maggots in the meat _expansion
DESCRIPTION
Dark Heresy RPG expansionTRANSCRIPT
Maggots in the Meat: Expanded Changes to the GM’s Kit scenario by Jeans_Stealer ([email protected]) (Along with a significant amount of help by Gregorius21778, Saldre and Darth Smeg from the Dark Heresy Fantasy Flight Games forums) October 2012 ‘Maggots in the Meat’ could be a fantastic Scenario. Problem is, it has some exceptionally, exceptionally hard aliens for bosses, so you need to start with Higher-level Characters anyway than the Level 1s that the book suggests. (Optional rules for lower-level characters are shown later.) My Characters have come into this Campaign at level 4, so all the changes are to match them accordingly. Hopefully, at Level 4 there is still a difficult and potentially lethal fight at the end of the campaign. Remember– if your players aren't at risk, they’re obviously not working for the Inquisition. CHANGES
The Acolytes receive a small imagifier/charm/necklace to represent their inquisitorial status as acting agents. The campaign missed out how their codes could be used by the Port Authority tower – In this campaign though, there are no ‘official’ boats, and ‘clandestine’ is the order of play!
The addition of modern-armed mercenaries to the Baroness Falatrish’s army, and slightly tougher
musketmen. (The Musketmen are not really toughened because A. They’re Feudal Conscripts and B. they are just a ‘distraction’ in the Campaign – the real threat is later.)
Smeed and Smoot actually having a good reason for dumping bodies and ‘working’ with the
Slaugth, as seen later. They receive no stat increases as protecting them is now the requirement for this part of the campaign.
The Prince of Olrankan may allow an audience with the Acolytes (if they swing their status around)
or the ‘Hill’ area is now open to explore. This opens more Avenues for talking characters.
The Slaugth can escape the Sky-Mill, and the Acolytes must hunt them down in the Swamps, where their space-vessel-come-escape-capsule crash landed.
Part 1: Emperor’s Island There’s no passenger boat to Olrankan. The blockade has stopped all ships. The Acolytes must find another way onto Olrankan. The suggested options are below: Mostly this is as per the Campaign, with opponents (Krass & his Cronies) made tougher (more wounds, more skills, more Talents – see the Enemies section) but with the added option of intimidating/scaring them into submission, instead of them just outright attacking. Increase the level of interaction if desired. The Mercy Ship The few local Imperium representatives (The Ecclesiarchy & the Munitorium) don’t wish to be involved in the ‘Local War’. On the other side, None of the feuding parties involved in this civil war want the IMPERIUM annoyed or involved, and so the local clergy will have demanded special rights and "untouchable status" in exchange for being neutral in the conflict. The PCs will either need social skills to convince the Priest to break his word of honour and thereby endanger his colleagues (+10 or +20, as the PCs do represent the Inquisition, after all) or they can try to sneak on-board the ship - This should be a routine (+20) affair (Silent Move and Concealment) but should have the difficulty increased if they first tried to negotiate a passage through conversation and failed. The Clergy ship will likely be searched when it reaches the blockade, so the players successfully disguising themselves is important to getting through. See how your players wish to play it, and roll along with it! The Inquisition Card If push comes to shove, the PC can always demand a free passage using their inquisition representation necklaces. But, this information would spread within a day and would give the Slaugth a fair warning that there are some well-armed players in Olrankan… The Mercenary Boatman An ex-military off-worlder with a fast hovercraft/airboat/seacraft lives on Emperors Island- Come up with a sufficient Name (using the Rulebook or otherwise.) He used to bring people over to Olrankan if they paid the

high price but now the old guy is not making any money (due to the blockade) and spends his remaining coin on cheap booze. The PCs might have already met him in a seedy bar as he sticks out for still wearing the almost complete military uniform of his former duty. The PCs could hire him as a Blockade-runner, taking them between the highly un-manoeuvrable Gunboats of the Baroness…but this will need a considerable cash investment, or some very strong roleplaying / convincing to appeal to his former youth and daring recklessness. ("Oh…I didn’t think that one of the greatest Sea-Dog Mercs in the Calixis Sector would be afraid of some primitives with black-powder weapons…") If there are several "off-world mercenary sharpshooters" placed throughout the Blockade, a "running long range firefight" (for 8-15 rounds) is possible as the fast Sea-craft breaks through between the larger ships. Musketmen and Mercs open fire; they attempt to board the Acolytes’ ship by jumping on it, or going for the craft in other ways. The PCs need to fire at them to dis-encourage such (or even pick them of with sniper fire of their own from a fast moving hovercraft/boat/ship.) Swamp Trek Of course the PC could hire someone with (or borrow/’borrow’) a fishing boat to take them to the swamps near the city and then try to sneak in on foot, clambering the wall or by swimming in via the Harbour. The Plumes guard the harbour and the Baroness’s forces are outside the walls, so they will have to sneak or fight past them (and face the appropriate consequences if necessary.) Aboard the Black Market Merchant Ship Successful Inquiry tests with many degrees of success will point the PCs to a local merchant buying up the luxury foodstuffs and wine/booze on Emperors island (no-one else is touching it… who needs champagne deep into a war?) This person then ships the items elsewhere, returning each day (or every other day) without holes from the Blockade. The merchant apparently knows the Captain of the Blockade fleet and gives him a share of black market gains, in exchange for being allowed through the Blockade to sell his Luxury food in Olrankan (it’s purchased by the palace and the Commanding office of the Plumes – some corruption obviously exists. This is also an alternate route into the palace.) The ‘Inspections’ by the Blockade fleet are less invasive than they would be on the Priest’s vessel, but there are more mercenaries and fewer basic musketmen. Also, the guns trained (by the fleet) on his ship are heavier… The Harbour guards know about the arrangement but keep it a secret to the wider body of armsmen and the populace of the city. This should provide enough different options. Part 2: The Wharf The Prince is trying the ‘play down’ the rumours of the attacks, now more and more prevalent amongst the population, as sneak-and-demoralise attacks by the Baroness. The Plumes, unless convinced otherwise or pressed, will not outwardly discuss the evidence they’ve seen. The Investigation still points towards the outer wall (and its distractions.) Part 3: The Hill Some players may think that they can get support by the Plumes. In this changed campaign this should be a possibility, but substantial evidence may be required… See how the players play this section, but leave options open. The Hill is a sealed wooden-buttress section where the walls are cleaner and tidier, there is still some bombardment damage but otherwise it’s protected by competent Plumes and contains nothing but Nobles (of this backwater, anyway.) The Prince is holding constant war meetings as the fight starts to shift against him. He cannot count on his few allies (The Baroness is slowly turning them one-by-one.) He cannot get the support he needs from Emperor’s Island due to the Blockade, even though he has considerably deep pockets from pre-war savings. Through a hard fight at the wall, The Prince may be informed of the Mercenaries within his town (likely saving the day and turning a vicious and brutal wave in a stylish and flamboyant way) and as a further distraction, a raid on the Blockade’s Powder-ships could be requested of the Players, or some other such

pompous demonstration and morale-booster for the citizens… and by which informing the Slaugth that the Acolytes are here. Players could sneak into his court looking for Intel (thinking the Prince involved) to hear a more detailed account of an interrupted attack on a Plume by the Slaugth’s Type 1 creation – a small pack of Red Jenkins – leaving him horribly mutilated and needing his limbs amputated. Keep the ideas open here – the Campaign should have left this avenue open. Another interesting option: The Slaugth infiltrators have been advising both sides of the war, using their Shroud-cloaks to make them look like soothsayers, intelligence gatherers, and war-experts/ancient veterans. One of them may appear in Prince Orcan’s court, flanked by a red Jenkin. (The diminutive creature is in hiding-robes too, carrying things & acting as bodyguard.) The Slaugth are using this tactic to prolong the war (and to keep themselves fed) and should a shrewd Acolyte encounter and reveal the Alien, the Slaugth 'advisor' will attempt to flee through kitchens, long-halls and sewers, leaving the Red Jenkin to Delay the Acolyte while it makes it’s escape (and therefore be ready for the acolytes at the Sky-mill.) Part 4: The Wall Nobody will take notice of small splashes of blood in a feudal Warzone… the walls are coming down, cannonballs are landing in the streets and troops are dying in droves. The ‘Recent attack’ site is removed from this campaign and replaced with the eyewitness accounts as described below. Random encounters This section doesn’t change from the GM kit. If the players encounter a patrol or a cannon-ball then play it as described, but if they’re conscripted, then there’s the opportunity for large hordes of the Baroness’s musketmen to be attacking the wall, as well as smaller hordes of plumes defending it. Expect Mercenaries to be amongst the Baroness’s army (to pose a second threat) but don’t draw the players in too long here. (See the Antagonist’s section for details of musketmen, captains and mercenaries.) If the Players successfully fend off a large attack, then they get bonuses to talking to all Plumes, and some extra doors may be opened for them to get answers. Asking about the attacks, depending on who is asked, should direct them to one of the sources below. The survivor Inquiry/charm within the wall-guarding Plumes or via some other means (talking to the Plume Captain about the attacks) reveals the story of ‘The Survivor’ – he’s housed up in a field hospital several lines back from the wall, and was attacked in the middle of the night by some of the Slaugth “pets” (The Type 1, or the “Red Jenkin” – see the enemies section.) Suddenly more Plumes showed up, opening fire on the half-seen thing. He lost an arm, suffered massive internal injuries, and is slowly succumbing to infection. The Acolytes can talk to him – convincing him that they’ll listen to his crazy story is enough for it to be told. He heard dragging noises whilst on wall patrol, investigated and came across a mutilated corpse of several civilians. He was about to raise the alarm when he was jumped from all directions by several small creatures. He managed to fend several off and scream for help before they overpowered him, and began pulling him to pieces. He didn’t see it fully, but he noted that the Red Jenkin had an ‘almost human-like face with whiskers’. The moonlight showed him half-glimpses of its bald, scaly-skinned rat-and-monkey-like form. He blacked out from the pain as it tore into him. He was rescued by other Plumes, who deny that they saw anything but fast-moving shadows as they let rip. A good success on the fellowship test here reveals that: “We were all blasting at shadows - some of us fled, but we grabbed him outta there, all the while pumping bullets into the shadows…I swear I hit one. Well… I think I did, ‘cos it…it sobbed? But… but the other shapes, they… they dragged it away…they took it with them!” This should lead to a discussion about the Corpse Farmers as they took custody of the only remaining civilian body the other plumes found (and the survivor’s legs – they were mauled so badly they had to be amputated) but no other bodies were found, even though the survivor saw more than one. He can’t explain it, and neither can the other plumes. The Homeless Witness If the Acolytes are unsuccessful with their inquiries around the wall or city, they are approached, in a dark Alley, by a Homeless man. He takes them to a quiet place down the back alleys, and offers to tell them what he saw in exchange for money/supplies/medical care/food/clothing (+10 to all tests.)

He saw an attack on a pregnant woman and her young son (slightly too young to be a Plume conscript) in the middle of the night by two small creatures, and he describes what carried them away… a short, stocky lummox-of-a-thing. (This is the Type 2: The ‘Brut-Ox’ – see Enemies section later.) Again, he didn’t see much, and had to stay perfectly still and silent so that they didn’t see him. The ‘Attackers’ headed off into the night (he may not have seen which way) and taking the bodies too (The Brut-Ox carried all of them.) He can show them the location of the attack – very little evidence remains here. (Tracking can be used here at (-20) as the tracks are old - the tracks head off towards the Fabricator’s district. Passing by one degree reveals that what the Homeless man said is true... foul ‘alien’ footprints.) The Homeless man also saw a ‘small flash’ in the night sky, several months ago or more. No one else saw it, just him. No-one else knows anything about it. (It was the Slaugth-ship coming under fire, before it crashed on Acreage in the Swamp near Olrankan – more on this later.) If the Acolytes ask the right questions, and ply him with the right resources, the homeless man can direct them to the Fabricator’s District (he has heard rumours from other homeless about things in the Fabricator’s district, matching the things he saw in description) or to the Corpse Farmers, as he’s seen them clearing up bodies and collecting them. Part 5: Smeed & Smoot: The Corpse Farmers In a city under constant siege, somebody needs to clear up and dispose of the bodies in the street. In Olrankan, this became a constant job, as if the were left to rot, plague and famine would set in; The Bodies cannot be dumped in the Harbour either, as the water would be poisoned. Smeed & Smoot are "regular body haulers" - people in the city whom collect the corpses and dispose of them for a pitiful fee. Smeed & Smoot are in trouble. Several weeks ago, their incinerator was working full capacity, they couldn’t get hold of the fuel, and the bodies were mounting – so they looked for a dumping ground. It Turns out that Smeed and Smoot haven't been disposing of bodies they way they should have for a while. They have been dumping the bodies in a pit by the Old Sky-Mill in the middle of the night, their warehouse full of wrapped-up dead. The Old Sky-Mill was perfect - near the outer wall facing the swamp, with few patrols, checks, or incidents to bother them. However while there on their third dumping mission, something spoke to them, in broken, squealing rasps out of the darkness. The voices came from many people, many people in pain and suffering in agony… The voices spoke of a bargain. The Corpse Farmers would dump their Bodies here. The Bodies would disappear. The Corpse Farmers would collect (from the pit-side) trinkets, thrones and equipment in “Payment” (The Farmers quickly realised that the things there were collecting were from bodies they didn’t bring, they were from others) and any rescinding of the deal would result in their death… and the death of everyone around them. Smeed and Smoot agreed in fear, and fled. They have seen eyes watching their warehouse / shack in the night, and sometimes even during the day. They dread even going near the incinerator, and so it remains cold – they now just dump the bodies in the pit by the Sky-Mill, and sometimes, when they look back as they go quickly, they see black shapes swoop from the upper levels of the Mill towards the ground (The Social test must be passed by several degrees to learn this…) They fear for their souls, they fear they’ve made a pact with the "Dark Ones" and that they will suffer in damnation – but they have seen the predator eyes watching them and their family, the sound of creaking roof-tiles and rustling trees and snapping branches making their nights sleepless. They are afraid, and will resist all questions from the Acolytes unless seriously convinced, and so it’s a (-20) to all interaction tests with them (but it’s obvious they’re terrified of something. Both have family living in the shack / building behind the warehouse, and the Slaugth constructs are constantly watching - Smeed & Smoot have become desperate people working under immense pressure, knowing that if they slip there family will end up as food to these…daemonic things.
The Slaugth are in a Win-Win situation. The Acolytes will arrive at their Shack/hovel/building to find a cold incinerator, a warehouse full of wrapped bodies, and two very nervous looking gentlemen… Smeed & Smoot are no tougher. Several Type 1 constructs (No. of Acolytes + several more) are watching the Warehouse constantly. Any breaking or convincing of Smeed and Smoot will result in the Xenos pets/constructs attacking during the questioning. They start with Smeed & Smoot’s Families – it is likely that several family members will not survive the attack. They also try to kill Smeed and Smoot, and the Acolytes must protect them at all costs, if they are to discover the dumping location… Part 5: The Sky-Mill There are several changes here:
1. The Number and type of Constructs used in the attack, and maybe the number of Slaugth. 2. The Acolytes will have had to do something significantly overt for the Slaugth to be ready. 3. The Slaugth can escape and will head into the Swamps on gliding wings from their Shroud cloaks. 4. The Destination for the Slaugth needs evidence planted, so that the Acolytes can follow them to the
crash-site... into the Swamps.
Constructs The Slaugth use both types, but there are twice as many Type 1(Red Jenkin) as there are Type 2 (Brut-Ox) overall there are 12 constructs, or three for every acolyte – see the Enemies section. They will attack the Acolytes on the stairs as described. There should only be two Slaugth overall, but add a third if they breeze through the first two infiltrators. (this is unlikely however.) Alerting the Slaugth Discussing their mission loudly over Comm-link before entering the Sky-Mill will give the Slaugth a small amount of warning, in which case the Slaugth will retreat to the Sky-Mill dome and reign fire down on the Acolytes. They are all Slaugth Infiltrators (See the Game Master’s Kit.) Slaugth Escape If the fight starts going badly, the Slaugth will attempt to escape – Their Shroud-cloaks can be used to “hold” their Gestalt Entity-form in a basic ‘parachute’. They will leap from the Sky-Mill blades, and attempt a glide for the swamp over the near city wall. They may land in front of or on-top of the wall (especially if they come under fire) and have to fight their way through. They can squeeze through a barricade/portcullis, or climb a wall-tower and leap over the wall, heading into the swamp – give the Acolytes a chance to give chase if possible. Slaugth destination in the Swamp If the Acolytes kill them all then they’ve done well, but it’s not quite over yet. If they don’t, they have to chase down the survivor(s) – but there is a crash site. Their escape pod is located in the swamp (see next section.) To locate it, the Slaugth each carry a small locator in the Slaugth's equipment that indicates the direction of the Slaugth ship (takes a (+20) toughness test to use, falling by 10 every round it's active. failure indicates gaining a level of fatigue.) They also marked a map on the inside of the Sky-Mill top-dome wall, showing it’s location against the Sky-Mill. Part 6: The Swamp The PCs (and several plumes if they convince the Prince/Plume Captain) have to hunt down the Remaining escaped Slaugth (if one/several escape) in the Swamps, as the final battle for Olrankan happens. The Slaugth made an emergency landing after being chased by an unknown ship and badly damaged, and cannot repair their vessel… but the War on Olrankan was a good place to sit tight, and wait for possible extraction… The Acolytes can hear the battle occurring in the background as they hunt through the Marshland, unsure of whether Prince Orcan will be in Charge when they return… Heading into the Swamps It’s still a Siege – The Acolytes will have to convince the Plumes and/or the Prince to let them leave and chase the Slaugth. This can be done in a Variety of ways (disguise, sneaking, charming, discussing, and offering to attack the Baroness…) but any movement at greater than walking speed through the swamps
requires a (+20) Agility check to avoid falling over. Any failure on this test by more than 5 degrees indicates that the player has fallen into quicksand, and unless another Acolytes pulls them out with a (+0) strength test, they will sink for a number of rounds equal to their Agility Bonus, after which they will begin to drown… If they use “white flags” and identify themselves as the Inquisition to the forces of the Baroness, they will leave them alone (as long as a Commanding Officer is there – Normal Musketmen might have heard of “Olrankan’s Mercs” and will try to kill them - if they made an impact at the wall, that is.) Some convincing role-play might even get them a unit of musketmen (depending on their success on a social skill/Fellowship test.) This increases the Bonus to the Agility test for quicker movement to (+30) in the Swamp as the Musketmen show the way to move through the swamp. If any of the Slaugth survived, they’ll come out of the low mist to attack the Acolytes (impairing vision down to 20-25 metres, and drifting across the battlefield to impair it further.) They Slaugth are trying to get their Comm-system in their ship to work, but if The Acolytes are winning, they will attempt to activate a self-destruct sequence… When the Slaugth are dead and their ship is captured or destroyed, the Campaign ends. It takes the Acolytes a week to get through the blockade and leave Olrankan behind as an Ordo Xenos sweeper-team is called in to clean up the mess… as Olrankan falls in the wake of their exit. The Baroness is now in control. An award of 100-200 extra exp should be available for this mission. Any seriously good rolling or anyone cheating the odds or death should earn a fate point. The acolytes could find the evidence in the ruin of the Sky-Mill of a wide-spreading conspiracy (as described in the GM Kit) or there could be evidence that the logicians shot down the Slaugth space-craft. Or perhaps This Slaugth was part of a Mother-ship colony somewhere in local space, or was on the way to a Rendezvous. An entire campaign can be effectively seeded from this mission.
Lower-Level Players: Matching the Scenario to rank 1 characters There is no doubt about it… the Slaugth are tough, and three of them, as well as all their pets, would mince a bunch of level ones like butter. So, in order to match this scenario to level ones (1’s): Musketmen and Krass/Cronies are as per the GM’s Kit. Officers just have different weapons. This way
they’re easier and are matched to their level. If they get conscripted, they might fight as a VERY small part of the overall battle or against a VERY
small horde (A rating of 10.) Plumes will be about to assist if required. Mercenaries… They can be rated as ‘scum’ from the antagonist’s section of the core rulebook to
differentiate them. All their weapons are modern/non-primitive but do not have mono or special ammo. Smeed & Smoot are NOT innocent. This is to balance the end scene. See below. The Slaugth creatures – there are far fewer, and Type 1’s lose dodge, lightning reflexes and Swift
Attack. There are two-three in Smeed & Smoot’s warehouse, and two or three overall in the Sky-mill, with only a SINGLE Type 2 per four acolytes. Smeed and Smoot are calm and collected in their fanaticism, and don’t have family in their shack behind the warehouse. They’re alone and have no family (died in the war, embittering them to it) and they’re convinced that the Corpse-King will deliver them into salvation (and somehow think it’s the emperor, as it is the Corpse-King from space…)
The single Slaugth is very, very likely to get away and not die. The faster they get to the sky-mill, the less likely his ship is to work and get him back into orbit. The Slaugth will attack briefly, but will otherwise flee into the swamp and away on his ship, leaving the crazed cultists and Xenos pets to hold up the Acolytes.
The Cult of the corpse-king It is and may be insinuated earlier in the campaign about an old cult that was wiped out years ago. The stories have passed down the line of succession, in the event that the Corpse-King may return… A Ship did indeed crash land, as per the scenario changes, but it is NOT badly damaged. In fact it needs very little to fly again, but on a Feudal world that’s hard to come by. The part of the swamp where the ship crashed is pretty treacherous but the Slaugth was undeterred, and with the locating of Smeed & Smoot dumping bodies near the mill, their ‘realisation’ of the ‘return of the Corpse-King’ was seen as the perfect cover by the single Slaugth infiltrator.
Smeed & Smoot have been ‘collecting’ corpses from the streets in the dead of night, after the Slaugth pets have had their ‘fun’, and in return, Smeed & Smoot have received protection, power and favours. The Slaugth has ‘marked’ cult members using a ‘Necro-kiss’ (an area of toxified/decayed flesh.) There may be members in the king’s court if it goes that way – I expect entertainers or noble’s entourage. Various Low-lives around the city as well, perhaps…even plumes. There are VERY few (The Slaugth is VERY picky) so this should not be an obvious tie-in (perhaps one in the kings’ court, and the odd citizen in the fabricator’s district.) The Cult, started ‘again’ by Smeed & Smoot, brings corpses for offerings to the Sky-mill, and ‘prays’ to the Slaugth, also giving ‘offerings’ of allowing themselves to be tortured (much to the Slaugth’s amusement, and he has accidentally killed many) or bringing tools for the Slaugth to repair his ship with. The Sky-Mill Corpse Cult Instead of just the Xenos Pets, the Skymill is also defended by a collection of feudal cultist brigands/Low-lives/Entourage to Nobles. Their weapons (although only melee and revolvers) are backed up by a diabolical fanatical frenzy to make them lethal (as well as several Xenos pets.) They believe that the death and decay is essential, inevitable, and that they will be rewarded by the Slaugth (The Corpse-King himself, playing on their idea of the Corpse-God of Terra/Terror.) See their stats at the end of the Villains’ Section below. The Acolytes might stumble into an empty Sky-Mill; they might follow some cultists in. They might interrupt a ceremony happening on the bottom floor. They might interrupt an ‘Offering’ of torture-puppet, bodies or just plain tools. It’s up to the GM and the players. The offerings happen at night, almost every night, by a variety of numbers. Once the shooting starts, some might flee, others attacking – expect 2-3 Type 1’s, a type 2, and 6 Corpse Fanatics (+2 per extra acolyte) spread all over the place. Perhaps even add a fanatic or two with slightly better stats to be up in the attic (‘converted’ plumes – use the enforcer stats) defending the Slaugth Directly (who makes take a pot-shot or two, but it ultimately trying to withdraw.) The Slaugth’s stats don’t change – only its mentality, as it WANTS to escape into orbit. The chase through the swamp is still possible (as is the requirement of avoiding patrols, but the symbol of the inquisition still works here.)
Villains Section Crazed Corpse-Cultist (OPTIONAL: FOR LOWER-RANKED PLAYERS) WS BS S T Ag Int Per WP Fel 30 25 32 32 30 30 33 30 27 Movement: 3/6/9/18 Wounds: 12 Size: Average Skills: Awareness (Per), Speak Language (Low Gothic) (Int), Swim (S) Climb (S), Common Lore (Creed) (Int), Concealment (Ag), Silent Move (Ag) Talents: Melee Weapon Training (Primitive), Pistol Training (SP, Primitive), Basic Training (Primitive) Armour: None (Robes/rags/workers’ uniforms) Possible Weapons: Axe or Sword (non-primitive), revolver, and/or musket (with non-primitive bayonet.) Gear: 18 bullets and/or 10 shot, Common/poor quality clothing, D5 Thrones. Krass & his Kronies WS BS S T Ag Int Per WP Fel 38 35 35 35 39 24 35 25 36 Movement: 3/6/9/18 Wounds: 14 Size: Average Skills: Awareness (Per), Intimidate (S) Climb +10 (S), Dodge (Ag), Speak Language (Low Gothic) (Int), Survival +10 (Int), Swim +10 (S), Shadowing +10, and Concealment +10. Talents: Melee Weapon Training (Primitive), Pistol Training (SP, Primitive), Basic Training (SP, Primitive), Disarm, Takedown, quickdraw, quickload, Furious Assault and Lightning Reflexes.

Armour: Leather Armour (all locations AP2 Prim except head) and a Flak vest for Krass. Possible Weapons: knife, Knuckleduster, Stub Auto. (Krass also has an Axe.) Gear: 2x Reloads, 1d5 thrones, Poor-quality Clothing. Falatrishian Captain / Lieutenant WS BS S T Ag Int Per WP Fel 40 36 38 38 39 30 40 38 40 Movement: 3/6/9/18 Wounds: 16 Size: Average Skills: Awareness (Per), Command (Fel), Intimidate (S) Climb (S), Common Lore (War) (Int), Dodge (Ag), Speak Language (Low Gothic) (Int), Survival +10 (Int), Swim (S), Tracking (Int) Talents: Melee Weapon Training (Primitive), Pistol Training (Primitive), Basic Training (Primitive), Disarm, quickload. Armour: Feudal Plate (Chest – AP5 Prim) Leather Armour (all other locations AP2 Prim) Possible Weapons: knife, Sword, Great Weapon (Polearm), Blackpowder pistols x3.
Gear: 12 blackpowder shot, Falatrishian army clothing (common quality.)
Falatrishian Mustketman WS BS S T Ag Int Per WP Fel 31 32 36 36 34 24 33 28 30 Movement: 3/6/9/18 Wounds: 16 Size: Average Skills: Awareness (Per), Intimidate(S) Climb(S), Common Lore (War) (Int), Speak Language (Low Gothic) (Int), Survival +10 (Int), Swim(S) Talents: Melee Weapon Training (Primitive), Pistol Training (Primitive), Basic Training (Primitive) quickload. Armour: Leather Hauberk (Chest AP2 Prim) Possible Weapons: knife, Blackpowder pistol, Blackpowder musket with Bayonet.
Gear: 12 blackpowder shot, Falatrishian army clothing (common quality.)
Mercenaries (see options below) WS BS S T Ag Int Per WP Fel 40 40 38 38 40 30 38 35 20 Movement: 4/8/12/24 Wounds: 15 Size: Average Skills: Awareness (Per), Intimidate (S) Climb (S), Common Lore (War) (Int), Speak Language (Low Gothic) (Int), Survival (Int), Swim (S) Climb (S), Common Lore (Creed) (Int), Concealment (Ag), Dodge (Ag), Silent Move (Ag), Command (Fel) Acrobatics (Ag) Talents: Melee Weapon Training (Primitive/Chain/Shock), Pistol Training (SP, Las), Basic Training (SP, Las), Rapid Reaction, Disarm, Takedown, (+others depending on Mercenary Choice) Armour: (Depends on Mercenary Choice) Possible Weapons: (Depends on Mercenary Choice. See below.) Gear: Common quality clothing, x2 reloads for every weapon, 2D10 Thrones.
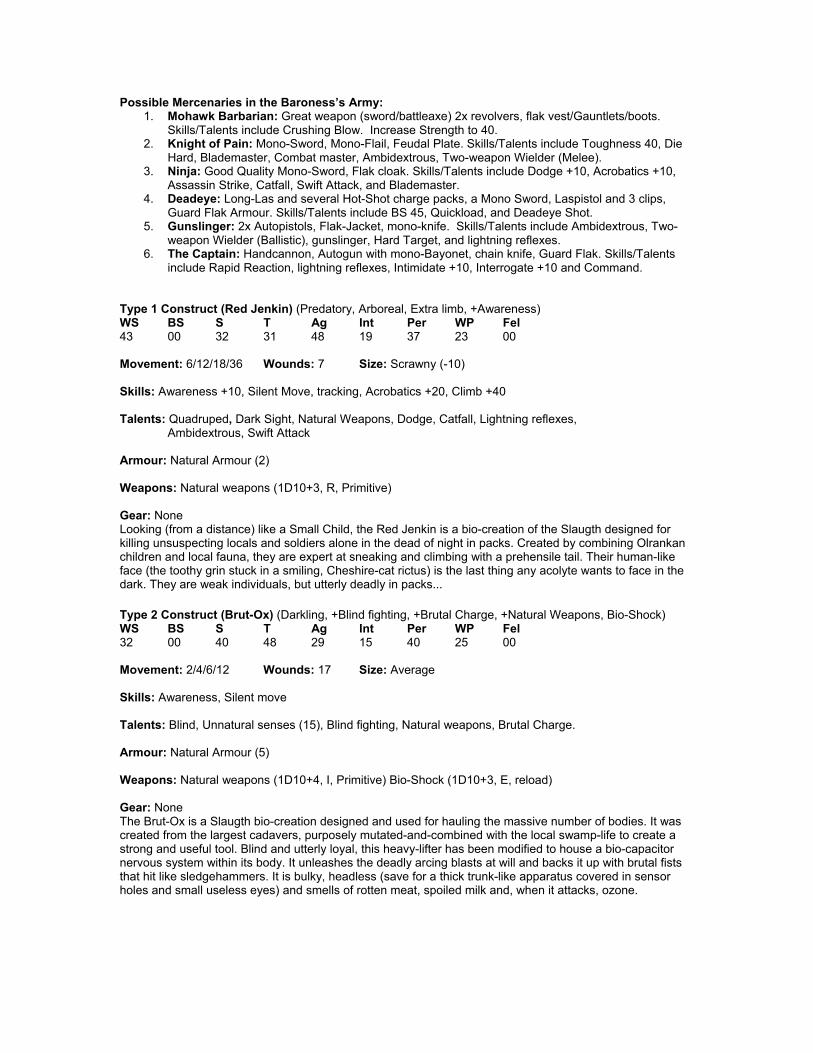
Possible Mercenaries in the Baroness’s Army: 1. Mohawk Barbarian: Great weapon (sword/battleaxe) 2x revolvers, flak vest/Gauntlets/boots.
Skills/Talents include Crushing Blow. Increase Strength to 40. 2. Knight of Pain: Mono-Sword, Mono-Flail, Feudal Plate. Skills/Talents include Toughness 40, Die
Hard, Blademaster, Combat master, Ambidextrous, Two-weapon Wielder (Melee). 3. Ninja: Good Quality Mono-Sword, Flak cloak. Skills/Talents include Dodge +10, Acrobatics +10,
Assassin Strike, Catfall, Swift Attack, and Blademaster. 4. Deadeye: Long-Las and several Hot-Shot charge packs, a Mono Sword, Laspistol and 3 clips,
Guard Flak Armour. Skills/Talents include BS 45, Quickload, and Deadeye Shot. 5. Gunslinger: 2x Autopistols, Flak-Jacket, mono-knife. Skills/Talents include Ambidextrous, Two-
weapon Wielder (Ballistic), gunslinger, Hard Target, and lightning reflexes. 6. The Captain: Handcannon, Autogun with mono-Bayonet, chain knife, Guard Flak. Skills/Talents
include Rapid Reaction, lightning reflexes, Intimidate +10, Interrogate +10 and Command. Type 1 Construct (Red Jenkin) (Predatory, Arboreal, Extra limb, +Awareness) WS BS S T Ag Int Per WP Fel 43 00 32 31 48 19 37 23 00 Movement: 6/12/18/36 Wounds: 7 Size: Scrawny (-10) Skills: Awareness +10, Silent Move, tracking, Acrobatics +20, Climb +40 Talents: Quadruped, Dark Sight, Natural Weapons, Dodge, Catfall, Lightning reflexes, Ambidextrous, Swift Attack Armour: Natural Armour (2) Weapons: Natural weapons (1D10+3, R, Primitive) Gear: None Looking (from a distance) like a Small Child, the Red Jenkin is a bio-creation of the Slaugth designed for killing unsuspecting locals and soldiers alone in the dead of night in packs. Created by combining Olrankan children and local fauna, they are expert at sneaking and climbing with a prehensile tail. Their human-like face (the toothy grin stuck in a smiling, Cheshire-cat rictus) is the last thing any acolyte wants to face in the dark. They are weak individuals, but utterly deadly in packs... Type 2 Construct (Brut-Ox) (Darkling, +Blind fighting, +Brutal Charge, +Natural Weapons, Bio-Shock) WS BS S T Ag Int Per WP Fel 32 00 40 48 29 15 40 25 00 Movement: 2/4/6/12 Wounds: 17 Size: Average Skills: Awareness, Silent move Talents: Blind, Unnatural senses (15), Blind fighting, Natural weapons, Brutal Charge. Armour: Natural Armour (5) Weapons: Natural weapons (1D10+4, I, Primitive) Bio-Shock (1D10+3, E, reload) Gear: None The Brut-Ox is a Slaugth bio-creation designed and used for hauling the massive number of bodies. It was created from the largest cadavers, purposely mutated-and-combined with the local swamp-life to create a strong and useful tool. Blind and utterly loyal, this heavy-lifter has been modified to house a bio-capacitor nervous system within its body. It unleashes the deadly arcing blasts at will and backs it up with brutal fists that hit like sledgehammers. It is bulky, headless (save for a thick trunk-like apparatus covered in sensor holes and small useless eyes) and smells of rotten meat, spoiled milk and, when it attacks, ozone.