mainboard management processor (mmp) command reference · introduction acano solution: mmp command...
TRANSCRIPT
Acano solution
Mainboard Management Processor (MMP) Command Reference
Acano
January 2014
76-1013-03-B

Contents
Acano solution: MMP Command Reference 76-1013-03-B Page 2
Contents
1 Introduction ....................................................................................................................... 3 1.1 Accessing the MMP ........................................................................................................... 3 1.2 Transferring files to and from the MMP .............................................................................. 3
1.2.1 Which files you see in the SFTP client ..................................................................... 4 1.3 What MMP Commands are Available? .............................................................................. 4
2 Network Commands .......................................................................................................... 5 2.1 Network Interface (iface) Commands ................................................................................ 5 2.2 Network Diagnostic Commands ........................................................................................ 5
2.2.1 IPv4 network diagnostic commands ......................................................................... 5 2.2.2 IPv6 network diagnostic commands ......................................................................... 5
2.3 IP Commands ................................................................................................................... 6 2.3.1 IPv4 commands ....................................................................................................... 6 2.3.2 IPv6 commands ....................................................................................................... 6
3 DNS Commands ............................................................................................................... 8
4 Provisioning with Certificates ............................................................................................. 9
5 Commands for Configuring the Acano Solution ............................................................... 11
6 MMP User Account Commands ...................................................................................... 13 6.1 Password Rules .............................................................................................................. 13
7 Application Configuration Commands.............................................................................. 15
7.1 Isode XMPP Server Commands ...................................................................................... 15 7.2 Web Bridge Commands .................................................................................................. 15 7.3 TURN Server Commands ................................................................................................ 16 7.4 Web Admin Interface Commands .................................................................................... 16
8 Miscellaneous Commands .............................................................................................. 17 8.1 Acano Server’s Serial Number ........................................................................................ 17 8.2 Message of the Day ........................................................................................................ 17 8.3 Pre-login Legal Warning Banner...................................................................................... 17 8.4 SNMP Commands........................................................................................................... 17
8.4.1 SNMP v1/2c commands ......................................................................................... 18 8.4.2 SNMP v3 commands ............................................................................................. 18 8.4.3 SNMP trap receiver configuration ........................................................................... 18
8.5 Downloading the System Logs ........................................................................................ 18 8.6 Backing up and Restoring MMP Configurations .............................................................. 18 8.7 Password Recovery/First Boot ........................................................................................ 19 8.8 Disk Space Usage ........................................................................................................... 20 8.9 Back and Restore System Configuration ......................................................................... 20 8.10 Upgrading the Acano solution ......................................................................................... 20

Introduction
Acano solution: MMP Command Reference 76-1013-03-B Page 3
1 Introduction There are two layers to the Acano solution (whether an Acano Server or virtualized deployment): a platform and an application. The platform is configured through the Mainboard Management Processor (MMP). The application runs on this managed platform with configuration interfaces of its own. These are sometimes referred to as “the media interfaces”.
The MMP is used for low level bootstrapping and configuration. It presents a command line interface. On the Acano Server the MMP can be accessed via the serial Console port or SSH on the Ethernet interface labeled Admin. In the virtualized deployment the MMP is accessed on virtual interface A.
The application level administration (call and media management) is done via the Web Admin Interface which can be configured to run on any one of the Ethernet interfaces.
Note: This document describes the MMP, and unless otherwise indicated, the information applies equally to Acano Server and virtualized deployments.
1.1 Accessing the MMP
On the Acano Server, the MMP can be accessed via SSH through the Admin Ethernet interface or the serial console. No other interfaces can be used. Accessing the MMP using Ethernet interfaces requires an SSH client. For Windows users puTTy is a popular choice. Access using the Console port does not require SSH; but both methods require the login credentials of an MMP admin user (see MMP User Account Commands). These are set up as part of the installation procedure; see the Acano Server Installation Guide.
In the virtualized deployment the MMP is accessed through the VSphere console tab (on virtual interface A) and requires the login credentials of an MMP admin user (see MMP User Account Commands). These are set up as part of the installation procedure; see the Acano Solution Virtualized Deployment Installation Guide.
1.2 Transferring files to and from the MMP
Files can be transferred to and from the MMP using the Secure File Transfer Protocol (SFTP). On Windows we recommend WinSCP (http://winscp.net/eng/index.php), although any client can be used. SFTP is used for transferring the following files:
Software upgrade images
Configuration snapshots
Security certificates
License files
System log files (as directed by Acano Support)
Crash diagnosis files (as directed by Acano Support)
Connect your SFTP client to the IP address of the MMP which can be found using the ipv4
mmp or ipv6 mmp command (as appropriate). Log in using the credentials of an MMP admin
user (see MMP User Account Commands).

Introduction
Acano solution: MMP Command Reference 76-1013-03-B Page 4
1.2.1 Which files you see in the SFTP client
After configuration you should see the following files listed when you access the MMP using SFTP (bear in mind that you may have different names for everything other than license.dat but the following are the example file names used in the installation and deployment guides):
Server.crt, webbridge.crt and xmpp.crt
license.dat (required name)
boot.json and live.json
server.key, webbridge.key and xmpp.key
cacert.pem, privkey.pem, server.pem and xmpp.pem
1.3 What MMP Commands are Available?
To see a list of commands that are available and their parameters type:
help
To see more details about one command type:
help <command name>
These commands are described in the following sections. All the commands are entered at the MMP command line interface prompt.
Some commands are followed by one or more examples in blue within the same table cell:
Command/Examples Description/Notes
iface <admin|a|b|c|d> <speed> <full|on|off>
iface admin 1000 full
iface admin autoneg <on|off>
Sets the network interface speed, duplex and auto-negotiation parameters
Sets the MMP properties to 1GE, full duplex
Enable/disables auto negotiation Note that the A, B, C and D interfaces are restricted to full duplex auto negotiation.

Network Commands
Acano solution: MMP Command Reference 76-1013-03-B Page 5
2 Network Commands
2.1 Network Interface (iface) Commands
2.2 Network Diagnostic Commands
These commands help with network diagnostics.
Note: In the virtualized deployment, there is no admin interface and therefore <mmp|admin> is not required in the following commands. For example in the Acano Server deployment use
ping <mmp|app> <target address|hostname> but in the virtualized deployment use ping <target address|hostname>
2.2.1 IPv4 network diagnostic commands
2.2.2 IPv6 network diagnostic commands
Command/Examples Description/Notes
iface mmp Displays the network interface configuration
iface <admin|a|b|c|d> <speed> <full|on|off>
iface admin 1000 full
iface admin autoneg <on>
Sets the network interface speed, duplex and auto-negotiation parameters
Sets the MMP properties to 1GE, full duplex
Enables auto negotiation Note that the A, B, C and D interfaces are restricted to full duplex auto negotiation.
Command/Examples Description/Notes
ping <mmp|app> <target address|hostname> Ping from the MMP or the application interfaces to the target IP address or hostname
traceroute <mmp|app> <target address|hostname> To traceroute from the MMP interface or application interfaces to the target IP address or hostname
Command/Examples Description/Notes
ping6 <mmp|app> <target address|hostname> Ping from the MMP or the application interfaces to the target IPv6 address or hostname
traceroute6 <mmp|app> <target address|hostname> To traceroute from the MMP interface or application interfaces to the target IPv6 address or hostname

Network Commands
Acano solution: MMP Command Reference 76-1013-03-B Page 6
2.3 IP Commands
2.3.1 IPv4 commands
Note: In the virtualized deployment, there is no admin interface and therefore admin is not a valid entry in the following commands; select from A, B, C or D.
2.3.2 IPv6 commands
The Acano solution supports multiple IPv6 addresses per interface.
Note: In the virtualized deployment, there is no admin interface and therefore admin is not a valid entry in the following commands; select from A, B, C or D.
Command/Examples Description/Notes
ipv4 <admin|a|b|c|d> Lists configured and observed network values
ipv4 < admin|a|b|c|d> dhcp Enables dhcp on the specified interface
ipv4 < admin|a|b|c|d> <enable|disable>
Enables/disables the specified interface Note: This command does not clear the configuration, only disables it.
ipv4 <admin|a|b|c|d> add <server IP address>/<Prefix Length> <Default Gateway>
ipv4 a add 10.1.2.3/16 10.1.1.1
ipv4 <admin|a|b|c|d> del < server IP address>
Configures the interface with an ipv4 address with specified prefix length and default gateway for egress packets. The example configures A with address 10.1.2.3 on subnet 10.1.0.0/16. If there is no more specific route, packets exiting via A will be sent via gateway 10.1.1.1.
Removes the IPv4 address on the specified interface
ipv4 <a|b|c|d> default Selects the interface of last resort for outbound connections. When connecting to remote hosts it is not always known from context which interface should be used. By comparison, responses to connections initiated by remote hosts will use the interface on which the connection was accepted. This is sometimes referred to as the strong IP model
ipv4 <admin|a|b|c|d> route add <address>/<prefix length>
ipv4 <admin|a|b|c|d> route del <address>/<prefix length>
ipv4 b route add 192.168.100.0/24
Adds a static route so you can route a specific subnet out of the specific interface. This is for quite specific routing scenarios whereby multiple interfaces are enabled, and you want to ensure that traffic for a specific subnet is routed out to the gateway of that particular interface
All traffic destined for 192.168.100.x will go out of interface b to interface b’s gateway
Command/Examples Description/Notes
Ipv6 <admin|a|b|c|d> Lists configured and observed network values

Network Commands
Acano solution: MMP Command Reference 76-1013-03-B Page 7
ipv6 <admin|a|b|c|d> add <address>
ipv6 a add 2001::2/64
Adds an IPv6 address on the specified interface
ipv6 <admin|a|b|c|d> del <address> Removes the IPv6 address
ipv6 <admin|a|b|c|d> enable Enables IPv6 for the specified interface
ipv6 <admin|a|b|c|d> disable Disables IPv6 for the specified interface

DNS Commands
Acano solution: MMP Command Reference 76-1013-03-B Page 8
3 DNS Commands
Note: In the virtualized deployment, there is no admin interface and therefore <mmp|admin> is not required in the following commands. For example in the Acano Server deployment use
dns <mmp|app> add forwardzone <domain-name> <server ip> but in the virtualized
deployment use dns add forwardzone <domain-name> <server ip>
Command/Examples Description/Notes
dns Displays the current DNS configuration details
dns <mmp|app> add forwardzone <domain-name> <server ip>
dns app add forwardzone 192.168.0.1
Configures a forward zone. A forward zone is a pair consisting of a domain name and at least one server address. If a name is below the given domain name in the DNS hierarchy, then the DNS resolver can query the given server. Multiple servers can be given for any particular domain name to provide load balancing and fail over. A common usage is to specify "." as the domain name i.e. the root of the DNS hierarchy, which matches every domain name.
Note: Application and MMP DNS needs to be set separately, but application DNS does not need to be set separately for A, B, C and D.
dns <mmp|app> del forwardzone <domain-name> <server ip> Deletes a specified forward zone
dns <mmp|app> add trustanchor <anchor>
dns mmp add trustanchor ". IN DS 19036 8 2 49AAC11D7B6F6446702E54A1607371607A1A4 1855200FD2CE1CDDE32F24E8FB5"
Adds a trust anchor for Domain Name System Security Extensions (DNSSEC). Trust anchors should be specified in DNS Resource Record form inside quotation marks –
see the example. See [1] for details.
dns <mmp|app> del trustanchor <zonename>
dns mmp del trustanchor
Removes a trust anchor
The zonename is the domain name in the Resource Record representing the anchor. The example removes the trust anchor installed in the example above
dns <mmp|app> lookup <a/aaaa/srv> <hostname>
dns mmp lookup srv _xmpp-client._tcp.google.com
Does name "lookups" of type A, AAAA or SRV from the perspective of either the MMP or the application.
The lookup "drills" through SRV results. That is, when an SRV record returns a domain name this is resolved by A and AAAA lookups.
Note: If the application modules are not operational (e.g. during booting or rebooting), then DNS lookups for "app" will return no results.
Provisioning with Certificates
Acano solution: MMP Command Reference 76-1013-03-B Page 9
4 Provisioning with Certificates Use the following PKI (Public Key Infrastructure) commands.
The key file should contain an RSA or DSA key encoded as either PEM or DER with the file name extension being .pem, .der or .key. The certificate file should be an x509 certificate encoded as PEM or DER with the file name extension being .crt, .cer, .pem, or .der
File names can include alphanumeric characters, hyphens and underscore characters followed by one of the extensions above. You can choose the per-service certificate and key file names; even using the same pair of files for every service.
The private key and certificate files should be uploaded via SFTP.
Command/Examples Description/Notes
pki Displays current PKI usage.
pki list Lists PKI files i.e. private keys, certificates and certificate signing requests (CSRs).
pki inspect <filename> Inspect a file and shows whether the file is a private key, a certificate, a CSR or unknown. In the case of certificates, various details are displayed e.g.
pki inspect self4.crt
File contains a PEM encoded certificate
Name: /O=Acano Ltd
Serial number: 0
Issuer: /O=Acano Ltd
Subject: /O=Acano Ltd
Start date: Sep 10 19:05:41 2013 GMT
Expiry: Sep 10 19:05:41 2014 GMT
Fingerprint:
446e401674403dc28ecff5f823e33269067c373
Both PEM and DER format files are handled.
pki match <key> <certificate> This command checks whether the specified key and a certificate on the system match. A private key and a certificate are two halves of one usable identity and must match if they are to be used for a service e.g. XMPP
pki unlock <key> Private keys are often provided with password-protection. To be used in the Acano solution, the key must be unlocked.
This command prompts for a password to unlock the target file. The locked name will be replaced by an unlocked key with the same name
pki csr <key/cert basename> <commonName> For users happy to trust that Acano meets requirements for generation of private key material, private keys and associated Certificate Signing Requests can be generated.
<key/cert basename> is a string identifying the new key and CSR (e.g. "new" results in "new.key" and "new.csr" files)
<commonName>" is the commonName (CN) which should be on the certificate. The commonName should be the DNS name for the system (for more information see http://info.ssl.com/Article.aspx?id=10048).
Provisioning with Certificates
Acano solution: MMP Command Reference 76-1013-03-B Page 10
The CSR file can be downloaded by SFTP and given to a certificate authority (CA) to be signed. On return it must be uploaded via SFTP. It can then be used as a certificate.
pki selfsigned <key/cert basename> For quick testing and debugging, self-signed certificates
(http://en.wikipedia.org/wiki/Self-signed_certificate) can be
generated.
<key/cert basename> identifies the key and certificate which will be generated e.g. "pki selfsigned new" creates new.key and new.crt (which is self-signed).

Commands for Configuring the Acano Solution
Acano solution: MMP Command Reference 76-1013-03-B Page 11
5 Commands for Configuring the Acano Solution
Command/Examples Description/Notes
health Displays temperatures, voltages and other health information about the Acano solution
Note: The health command is not available on a virtualized deployment.
uptime Displays the time since the Acano solution was last rebooted
hostname <hostname> Sets the hostname for the server.
Note: A reboot is required after issuing this command.
timezone <timezone>
timezone Europe/London
Sets the time zone for the Acano solution. The Acano solution uses the standard IANA time zone database.
See [2] for a list.
Note: A reboot is required after issuing this command.
ntp server add <hostname>
ntp status
ntp server list
ntp server del <hostname>ntp
Configures an NTP server
Checks the status of the NTP servers
Display a list of configured NTP servers
Removes an NTP server
date
date set <date> <time>
date set 2013-08-17 13:04
Displays the current system and local time
Sets the date and time. This command should only be necessary in virtualized deployments, and server deployments that do not use an NTP server.
The accepted formats for date and time are
ISO 8601 format (%Y-%m-%d) plus 24-hour time with hour separated by a space
%m/%d/%y plus 24 hour time
reboot Reboots the Acano solution
Note: Rebooting the Acano solution will disconnect any calls. The process takes some minutes to complete.
callbridge listen <a|b|c|d|none> callbridge listen a
callbridge restart
callbridge certs <key-file> <cert-file>
Configures an interface (chosen from A, B, C or D) for the Call Bridge to listen on.
callbridge listen none makes the Call Bridge stop listening;
however, it remains enabled.
Restarts the core media services. Note: Rebooting the Acano solution will disconnect any calls. The process takes some minutes to complete.
Defines the names of the key file name and certificate file name for the Acano solution. (Also see the section Provisioning with certificates.)
syslog syslog server add <hostname> [<port>] syslog enable syslog disable syslog server del <hostname>
List the current syslog configuration Sets up a syslog server The Acano solution can send its log files to a remote syslog server over TCP (not UDP)
The port defaults to 514
Also, see section 8.5 for details on downloading the system
Commands for Configuring the Acano Solution
Acano solution: MMP Command Reference 76-1013-03-B Page 12
logs (not to be confused with the syslog files).
version Displays the software release currently installed on the Acano solution
activation
activation <key code> This command is for the virtualized deployment only.
The Acano virtualized solution requires an activation key: without this activation key the Acano solution’s Call Bridge will only support a limited number of calls. To get the activation key, email the MAC address of your virtual server to [email protected]. Then enter the code they return.

MMP User Account Commands
Acano solution: MMP Command Reference 76-1013-03-B Page 13
6 MMP User Account Commands The levels of MMP user accounts are:
Admin: MMP administrator; permitted to do all tasks
Crypto: MMP cryptography operator; permitted to do crypto-related tasks
Audit: Can check audit logs
Note: Do not confuse user accounts set up with the commands in this section, with accounts which are set up using Active Directory and which let users log in on an Acano client and make calls.
Unless otherwise mentioned the following commands require you to be logged into an MMP account with admin rights.
6.1 Password Rules
There are a number of commands which enforce more secure password usage. All these all commands require admin level access.
Command/Examples Description/Notes
user add <username> <admin|crypto|audit> Creates a new MMP user Prompts for a password for the user which must be entered twice to ensure that the intended password is configured. On first login, the user will be asked to configure a new password.
user del <username> Removes a user from the system
user list Displays the list of users, their role, the expiry date of their password and whether or not they are logged in
user evict <username> Logs a user out from his or her session
passwd
user expire <username>
Changes your password. Any MMP user can issue this command: then follow the instructions
Forces a user to configure a new password on next login
Command/Examples Description/Notes
user rule max_history <number> Prevents password reuse by checking new passwords against that user’s previous number of passwords
user rule password_age <number> Enforces a maximum age for passwords in days
user rule min_password_age <number> Prevents the password history controls being circumvented, by setting a minimum interval before a password can be reset.
Note: This interval is overridden when an admin enters the "user expire <number>" command.
user rule min_length <number> Sets the minimum password length

MMP User Account Commands
Acano solution: MMP Command Reference 76-1013-03-B Page 14
user rule min_special <number> Sets the minimum number of "special" characters: !@#$%^&*()_+=?><,."\/
user rule min_uppercase <number> Sets the minimum uppercase letters in a password
user rule min_lowercase <number> Sets the minimum lowercase letters in a password
user rule longest_digit_run <number> Sets the maximum consecutive digits allowed in a password
user rule only_ascii <true|false> Restricts passwords to ASCII characters
User rule no_username <true|false> Prevents a password being set that contains the user name.
user rule no_palindrome true Prevents a password being set that is a palindrome
Application Configuration Commands
Acano solution: MMP Command Reference 76-1013-03-B Page 15
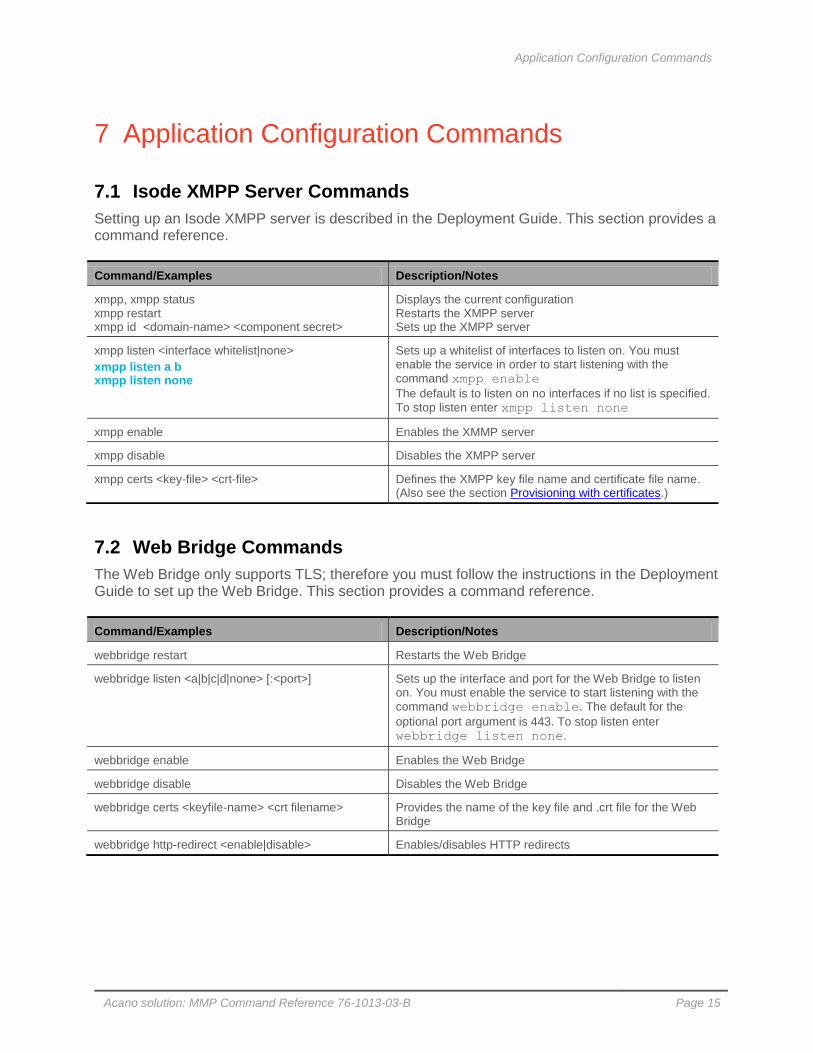
7 Application Configuration Commands
7.1 Isode XMPP Server Commands
Setting up an Isode XMPP server is described in the Deployment Guide. This section provides a command reference.
7.2 Web Bridge Commands
The Web Bridge only supports TLS; therefore you must follow the instructions in the Deployment Guide to set up the Web Bridge. This section provides a command reference.
Command/Examples Description/Notes
xmpp, xmpp status xmpp restart xmpp id <domain-name> <component secret>
Displays the current configuration Restarts the XMPP server Sets up the XMPP server
xmpp listen <interface whitelist|none>
xmpp listen a b xmpp listen none
Sets up a whitelist of interfaces to listen on. You must enable the service in order to start listening with the
command xmpp enable
The default is to listen on no interfaces if no list is specified.
To stop listen enter xmpp listen none
xmpp enable Enables the XMMP server
xmpp disable Disables the XMPP server
xmpp certs <key-file> <crt-file> Defines the XMPP key file name and certificate file name. (Also see the section Provisioning with certificates.)
Command/Examples Description/Notes
webbridge restart Restarts the Web Bridge
webbridge listen <a|b|c|d|none> [:<port>] Sets up the interface and port for the Web Bridge to listen on. You must enable the service to start listening with the
command webbridge enable. The default for the
optional port argument is 443. To stop listen enter
webbridge listen none.
webbridge enable Enables the Web Bridge
webbridge disable Disables the Web Bridge
webbridge certs <keyfile-name> <crt filename> Provides the name of the key file and .crt file for the Web Bridge
webbridge http-redirect <enable|disable> Enables/disables HTTP redirects

Application Configuration Commands
Acano solution: MMP Command Reference 76-1013-03-B Page 16
7.3 TURN Server Commands
Setting up a TURN server is described in the Deployment Guide. This section provides a command reference.
7.4 Web Admin Interface Commands
Command/Examples Description/Notes
turn restart Restarts the TURN server
turn listen <interface whitelist|none>
turn listen a b
Sets up a whitelist of interfaces to listen on. To start listening, you must enable the service with the command
turn enable. To stop listen enter turn listen
none.
turn enable Enables the TURN server
turn disable Disables the TURN server
turn credentials <username> <password> <realm>
turn credentials myusername mypassword mycompany.com
Sets the credentials for the TURN server
turn public-ip <public ip>
turn delete public-ip
Sets up a public IP address for the TURN server
Deletes the TURN server public IP address
Command/Examples Description/Notes
webadmin Displays the configuration
webadmin restart Restarts the Web Admin Interface
webadmin listen <admin|a|b|c|d> [<port>]
webadmin listen a webadmin listen a 443
Sets up the interface for the Web Admin Interface to listen on. To start listening, you must enable the service with the
command webadmin enable. To stop listening enter
webadmin listen none. The default is port 443.
Note: admin is not a valid parameter for this command in
the virtualized deployment.
webadmin enable Enables the Web Admin Interface
webadmin disable Disables the Web Admin Interface
webadmin certs <keyfile-name> <crt filename> Provides the name of the key file and .crt file for the Web Admin Interface
webadmin http-redirect <enable|disable> Enables/disables HTTP redirects for the Web Admin Interface
webadmin status Displays the Web Admin Interface status.
webadmin user <name> <password> Sets up a Web Admin Interface user account.

Miscellaneous Commands
Acano solution: MMP Command Reference 76-1013-03-B Page 17
8 Miscellaneous Commands
8.1 Acano Server’s Serial Number
8.2 Message of the Day
MMP users with admin rights can issue the commands in this section.
8.3 Pre-login Legal Warning Banner
If your organization requires a legal warning prior to login, MMP users with admin rights can use the following commands:
8.4 SNMP Commands
Note: This section does not apply to virtualized deployments.
The Acano solution supports both SNMP versions 1/2c and 3: the configuration is different for each. Be aware of the security implications of using SNMP version 1/2c: it does not support robust authentication and therefore anyone who knows the community string can query the server.
The MMP interface only provides a minimal amount of user configuration options. To handle more complex requirements, use the MMP interface to create an initial user and then manage the user database directly - for example with snmpusm from the Net-SNMP package.
Command/Examples Description/Notes
serial Displays the serial number of the Acano Server.
Note that this command does not apply to the virtualized deployment.
Command/Examples Description/Notes
motd Displays the current message of the day, if any
motd add "<message>" Displays a banner with <message> after login
motd del Removes the message of the day
Command/Examples Description/Notes
login_warning Displays the current login warning message, if any.
login_warning add "<message>" Displays a legal warning prior to login
login_warning del Deletes the legal warning
Miscellaneous Commands
Acano solution: MMP Command Reference 76-1013-03-B Page 18
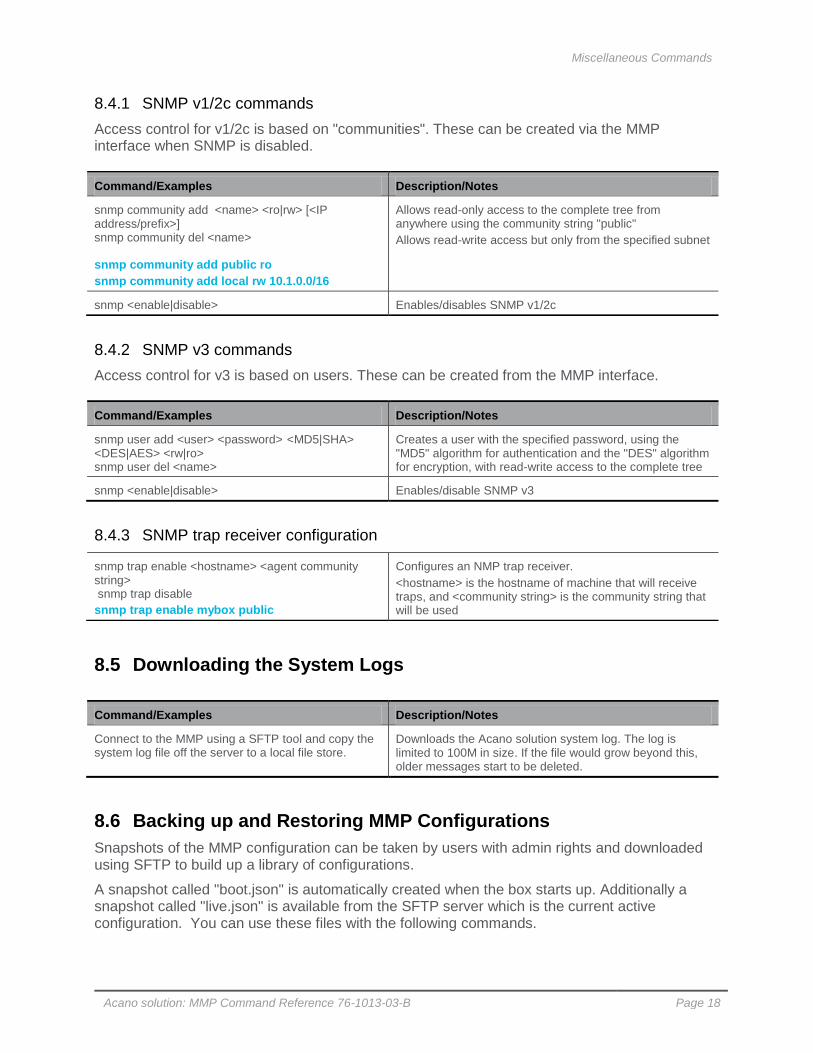
8.4.1 SNMP v1/2c commands
Access control for v1/2c is based on "communities". These can be created via the MMP interface when SNMP is disabled.
8.4.2 SNMP v3 commands
Access control for v3 is based on users. These can be created from the MMP interface.
8.4.3 SNMP trap receiver configuration
8.5 Downloading the System Logs
8.6 Backing up and Restoring MMP Configurations
Snapshots of the MMP configuration can be taken by users with admin rights and downloaded using SFTP to build up a library of configurations.
A snapshot called "boot.json" is automatically created when the box starts up. Additionally a snapshot called "live.json" is available from the SFTP server which is the current active configuration. You can use these files with the following commands.
Command/Examples Description/Notes
snmp community add <name> <ro|rw> [<IP address/prefix>] snmp community del <name> snmp community add public ro
snmp community add local rw 10.1.0.0/16
Allows read-only access to the complete tree from anywhere using the community string "public"
Allows read-write access but only from the specified subnet
snmp <enable|disable> Enables/disables SNMP v1/2c
Command/Examples Description/Notes
snmp user add <user> <password> <MD5|SHA> <DES|AES> <rw|ro> snmp user del <name>
Creates a user with the specified password, using the "MD5" algorithm for authentication and the "DES" algorithm for encryption, with read-write access to the complete tree
snmp <enable|disable> Enables/disable SNMP v3
snmp trap enable <hostname> <agent community string> snmp trap disable
snmp trap enable mybox public
Configures an NMP trap receiver.
<hostname> is the hostname of machine that will receive traps, and <community string> is the community string that will be used
Command/Examples Description/Notes
Connect to the MMP using a SFTP tool and copy the system log file off the server to a local file store.
Downloads the Acano solution system log. The log is limited to 100M in size. If the file would grow beyond this, older messages start to be deleted.
Miscellaneous Commands
Acano solution: MMP Command Reference 76-1013-03-B Page 19
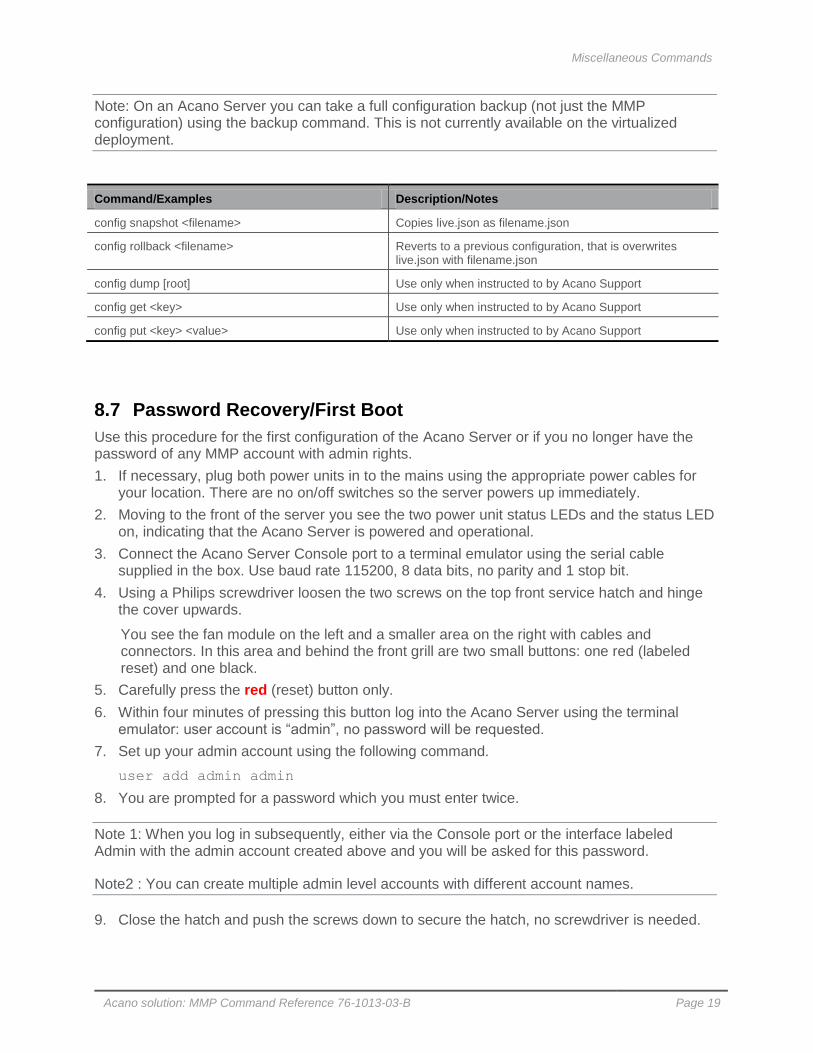
Note: On an Acano Server you can take a full configuration backup (not just the MMP configuration) using the backup command. This is not currently available on the virtualized deployment.
8.7 Password Recovery/First Boot
Use this procedure for the first configuration of the Acano Server or if you no longer have the password of any MMP account with admin rights.
1. If necessary, plug both power units in to the mains using the appropriate power cables for your location. There are no on/off switches so the server powers up immediately.
2. Moving to the front of the server you see the two power unit status LEDs and the status LED on, indicating that the Acano Server is powered and operational.
3. Connect the Acano Server Console port to a terminal emulator using the serial cable supplied in the box. Use baud rate 115200, 8 data bits, no parity and 1 stop bit.
4. Using a Philips screwdriver loosen the two screws on the top front service hatch and hinge the cover upwards.
You see the fan module on the left and a smaller area on the right with cables and connectors. In this area and behind the front grill are two small buttons: one red (labeled reset) and one black.
5. Carefully press the red (reset) button only.
6. Within four minutes of pressing this button log into the Acano Server using the terminal emulator: user account is “admin”, no password will be requested.
7. Set up your admin account using the following command.
user add admin admin
8. You are prompted for a password which you must enter twice.
Note 1: When you log in subsequently, either via the Console port or the interface labeled Admin with the admin account created above and you will be asked for this password.
Note2 : You can create multiple admin level accounts with different account names.
9. Close the hatch and push the screws down to secure the hatch, no screwdriver is needed.
Command/Examples Description/Notes
config snapshot <filename> Copies live.json as filename.json
config rollback <filename> Reverts to a previous configuration, that is overwrites live.json with filename.json
config dump [root] Use only when instructed to by Acano Support
config get <key> Use only when instructed to by Acano Support
config put <key> <value> Use only when instructed to by Acano Support

Miscellaneous Commands
Acano solution: MMP Command Reference 76-1013-03-B Page 20
8.8 Disk Space Usage
8.9 Back and Restore System Configuration
Note: This section does not apply to virtualized deployments.
8.10 Upgrading the Acano solution
Command/Examples Description/Notes
df Displays disk usage for both the MMP and MODULE 0 as the percentage usage per partition and the percentage inode usage.
Command/Examples Description/Notes
backup list Displays a list of any snapshot files on the server.
backup snapshot <name> Creates a full Acano Server system snapshot. A file <name>.bak is created for download over SFTP. We strongly recommend using this command before every software upgrade.
backup rollback <name> Restores the system for the backup <name> (uploads the file and rolls back the configuration. Note: This command overwrites the existing configuration and reboots the server. Therefore it should be used with caution.
Command/Examples Description/Notes
upgrade Upgrades the Acano solution. You must have uploaded the image file of the version that you want to upgrade to before issuing this command..

Acano solution: MMP Command Reference 76-1013-03-B Page 21
© 2014 Acano (UK) Ltd. All rights reserved. This document is provided for information purposes only and its contents are subject to change without notice. This document may not be reproduced or transmitted in any form or by any means, for any purpose other than the recipient’s personal use, without our prior written permission.
Acano and coSpace are trademarks of Acano. Other names may be trademarks of their respective owners.