mainstage user manual - american musical supply · mainstage is a new application designed to be...
TRANSCRIPT

MainStageUser Manual

K
Apple Inc.© 2007 Apple Inc. All rights reserved.
Under the copyright laws, this manual may not be copied, in whole or in part, without the written consent of Apple. Your rights to the software are governed by the accompanying software license agreement.
The Apple logo is a trademark of Apple Inc., registered in the U.S. and other countries. Use of the “keyboard” Apple logo (Option-Shift-K) for commercial purposes without the prior written consent of Apple may constitute trademark infringement and unfair competition in violation of federal and state laws.
Every effort has been made to ensure that the information in this manual is accurate. Apple Inc. is not responsible for printing or clerical errors.
Note:
Because Apple frequently releases new versions and updates to its system software, applications, and Internet sites, images shown in this manual may be slightly different from what you see on your screen.
Apple Inc.1 Infinite LoopCupertino, CA 95014-2084408-996-1010www.apple.com
Apple, AppleScript, FireWire, Logic, Mac, Mac OS, QuickTime, Apple, Apple Store, and Jam Pack are trademarks of Apple Inc., registered in the U.S. and other countries.
Finder, GarageBand, and MainStage are trademarks of Apple Inc.
Other company and product names mentioned herein are trademarks of their respective companies. Mention of third-party products is for informational purposes only and constitutes neither an endorsement nor a recommendation. Apple assumes no responsibility with regard to the performance or use of these products.

3
1
Contents
Chapter 1 7 An Introduction to MainStage7
What Is MainStage?
8
Using MainStage With MIDI Controllers
9
Using MainStage With Guitars and Other Instruments
9
Adding MainStage to Your Music Setup
11
Using MainStage in Live Performance
11
Resources for Learning About MainStage
12
MainStage Onscreen User Manual
12
Apple Websites
Chapter 2 15 Setting Up Your System15
Using MIDI Devices With MainStage
16
Using Audio Devices With MainStage
16
Using Effects Plug-ins With MainStage
Chapter 3 17 The MainStage Interface17
The MainStage Window
19
Layout Mode
20
Edit Mode
21
Perform Mode
22
Full Screen Mode
Chapter 4 23 Getting Started With MainStage23
Before You Begin
23
Choosing a Concert Template
25
Selecting and Playing Patches
26
Adding a Patch
27
Renaming a Patch
27
Adding a Channel Strip to a Patch
29
Changing a Channel Strip Setting
30
Learning Controller Assignments
31
Mapping Screen Controls to Parameters

4
Contents
33
Trying Out Full Screen and Perform Modes
34
Customizing the MainStage Window
Chapter 5 37 Working With Concerts37
Opening and Closing Concerts
38
Saving Concerts
39
How Saving Affects Parameter Values
39
Using Tempo in a MainStage Concert
41
Muting Audio Output
42
Silencing MIDI Notes
42
Working at the Concert Level
Chapter 6 47 Working in Edit Mode47
Working With Patches in Edit Mode
51
Working With Channel Strips in Edit Mode
60
Mapping Screen Controls
62
Working With Sets in Edit Mode
64
Working at the Set Level
65
Overriding Concert- and Set-Level Mappings
66
Sharing Patches and Sets Between Concerts
Chapter 7 67 Working in Layout Mode68
Changing the Grid Resolution
68
Modifying the Layout of a Concert
68
Working With Screen Controls
76
Assigning Hardware Controls to Screen Controls
78
Editing Screen Control Parameters
81
How MainStage Passes Through MIDI Messages
82
Exporting a Layout
82
Importing a Layout
Chapter 8 85 Performing Live With MainStage85
Before the Performance Starts
85
Using Full Screen Mode and Perform Mode
86
Selecting Patches in Performance
88
Using Screen Controls in Performance
88
Handling Tempo Changes in Performance
89
Performing With Guitars and Other Instruments
90
Using the Tuner
91
Tips for Complex Hardware Setups

Contents
5
Appendix A 93 Key Commands93
Concerts and Layouts
93
Patches and Sets (Edit Mode)
94
Editing
94
Actions
94
Parameter Mapping (Edit Mode)
94
Channel Strips (Edit Mode)
95
Screen Controls (Layout Mode)
95
Window and View
95
Help and Support
Appendix B 97 Setting MainStage Preferences97
General Preferences
98
Audio/MIDI Preferences
Index 99


1
7
1
An Introduction to MainStage
MainStage turns your computer into a powerful and customizable musical instrument, optimized for use in live performance.
The advent of fast, powerful portable computers has created new opportunities for musicians to use their computers in live performance. Now computer musicians can keep an entire library of sounds on their computers to use when they play live. What they need most is a way to access, organize, and manipulate those sounds that combines the advantages of computer-based music-making with the tactile control and ease of use of dedicated music hardware.
What Is MainStage?
MainStage is a new application designed to be used in live performance. MainStage turns your computer into a powerful multi-instrument and effects processor that you can use on stage. If you are a keyboard player, guitarist, vocalist, or other performing musician, you can use MainStage with your instruments, microphones, and other music gear when you perform live.
MainStage lets you use the professional-quality instruments and effects included in Logic Studio in your live performances. You can access and edit instruments and effects using the familiar Logic channel strip interface. If you play a USB or MIDI keyboard controller, you can play and control a wide variety of software instruments, including pianos and other keyboards, synthesizers, strings, horns, percussion, and others. If you play a guitar or another musical instrument, you can perform using many of the effects from Logic Studio, including guitar and bass amp simulation, reverb, compression, EQ, and more. Vocalists can also use effects with their voice, and acoustic instruments can use them with their instruments played through a microphone.

8 Chapter 1
An Introduction to MainStage
MainStage provides a simple, flexible interface for organizing and accessing your sounds in
concerts
. Concerts are MainStage “documents” that hold your sounds—a concert can store all the sounds you’ll use in an entire performance. In a MainStage concert, individual sounds are stored as
patches
, and each patch can contain one or more audio or software instrument channel strips. You can add channel strips, choose channel strip settings, add instruments and effects, and edit their parameters to customize your sounds. You can even mix audio and software instrument channel strips in a single patch.
Each concert also includes a visual interface, called a
layout
, that has controls you can use to modify your patches in live performance. Layouts contain
screen controls
, which can include keyboards, faders, knobs, buttons, pedals, drum pads, and other objects. You make connections between your MIDI devices and the concert by assigning hardware controls to the screen controls in the MainStage workspace. After you make controller assignments, you map the screen controls to channel strip and plug-in parameters, completing the connection so that you can easily access and manipulate the parameters you want for each patch in the concert. You can also map screen controls to select patches and to provide visual feedback about patches, parameter values, and other information in real time.
MainStage lets you quickly and easily make controller assignments and parameter mappings to speed your workflow. You can customize your layout to match the controls on your MIDI hardware, to optimize the use of available screen space, or in any other way that suits your needs.
Using MainStage With MIDI Controllers
If you play a USB or MIDI keyboard controller, you can play and control MainStage patches using your controller. You can assign faders, knobs, buttons, and other controls on the keyboard controller to screen controls in your concert, and then map those screen controls to parameters in your patches. You can choose exactly the parameters you want to have at your fingertips for each patch and access them from your controller as you perform.
You can use MainStage with keyboard controllers and other devices that send standard MIDI messages, including sustain and expression pedals and MIDI foot switches. You can also use MainStage with other controllers, such as MIDI guitars and wind controllers.

Chapter 1
An Introduction to MainStage
9
Using MainStage With Guitars and Other Instruments
If you play an electric guitar or other musical instrument, you can use MainStage as a powerful and configurable effects processor. After you connect your instrument to your computer using an audio interface, you select the audio input for your instrument in the audio channel strips in your patches, where you can add effects including amp simulation, EQ, compression, and reverb. You can control volume, effect blend, or expression with an expression pedal, and use a foot switch to select patches.
Vocalists and acoustic musicians can use MainStage in the same way, by connecting the audio input from a microphone to audio channel strips in their patches. You can use MainStage with Core Audio-compatible audio devices, such as audio interfaces, for input from instruments and microphones, and for audio output to speakers, monitors, a mixing board, or a public address (PA) system.
Adding MainStage to Your Music Setup
If you are a MIDI keyboardist, guitarist, or vocalist, or if you play another type of instrument, you can add MainStage to your rig setup following these steps:Â
Customize your sounds and effects setupsÂ
Organize the patches in your concertÂ
Customize your layoutÂ
Make connections between MainStage and your music hardware
To make setup easier, MainStage divides these tasks into two groups, with separate modes for each group of tasks. You customize and organize your patches in Edit mode, and customize your layout and make connections to your hardware in Layout mode. The advantage of this division is that it separates tasks you normally perform only once, such as setting up your layout (the Layout mode tasks) from those you are likely to repeat more often, such as editing your sounds (the Edit mode tasks).
Edit Mode: Working With Your Sounds
You edit and organize patches in
Edit mode
. In Edit mode, your patches are “live” so you can hear the results of your edits instantly. You can select and play patches, choose channel strip settings, and edit channel strip parameters. You can quickly define key ranges for channel strips to create keyboard layers and splits, scale expression and other parameters using transforms, and filter incoming MIDI messages.
MainStage includes a variety of concert templates designed for different musical instruments, styles, and uses. You can use a concert template as a ready-made “multi-instrument” or as a starting point for creating your own custom concert.

10 Chapter 1
An Introduction to MainStage
When you open a concert in Edit mode, the patches in the concert appear in the Patch List, where you can select them and start playing. You can edit patch parameters, add channel strips to existing patches or create new ones, and reorder patches to build your custom collection of sounds to use when you perform.
You can also organize patches in
sets
for added flexibility. Sets are “folders” that can store groups of patches you want to keep together, which can be useful in several ways. For example, you can store all your favorite lead synth patches in a set, or store multiple patches you intend to use in a single song, and quickly select the patches you want while performing.
Edit mode is where you map screen controls to channel strip parameters. You can map whichever parameters you want to modify for each patch to screen controls so they can be easily manipulated from your hardware when you perform live. You can also map screen controls to MainStage-specific actions, such as selecting the next patch you want to play.
Layout Mode: Making Connections With Your Gear
Each concert contains a layout, which visually represents your hardware controls onscreen. In
Layout mode
, you arrange screen controls in the MainStage workspace, and make connections between MainStage and your music hardware.
In Layout mode, you connect your MIDI devices to the screen controls in your MainStage concert by assigning hardware controls such as knobs, faders, pedals, and drum pads to corresponding screen controls. MainStage features a variety of screen controls, including keyboards, knobs, faders, switches, pitch bend and modulation wheels, foot pedals, and drum pads. Also included are screen controls to display text and images, and a patch selector that you can use to view and select patches while performing. You can move and resize screen controls in the workspace and customize the display of visual feedback for parameter values and other information.
You only need to make hardware controller assignments once for an entire concert, greatly reducing the amount of work required to connect your hardware with your computer.

Chapter 1
An Introduction to MainStage
11
Using MainStage in Live Performance
Once you have created and organized your sounds, customized your layout, and made your hardware assignments, you’re ready to play. When you perform live, you can use your computer as the final sound module and effects box in your rig. You can select a patch and start playing it instantly. MainStage switches seamlessly between patches and can sustain notes from the previous patch while you start playing the newly selected one. You can view feedback about your patches, including names, parameter values, and audio output levels, in real time. You can also adjust concert-wide effects using busses and control other concert-wide settings.
MainStage provides two modes for performing live: Full Screen mode and Perform mode. In Full Screen mode, the workspace fills your entire screen, optimizing available screen space for your onscreen layout. In Perform mode, the workspace fills the MainStage window but lets you retain access to the Finder and to other applications. You can use whichever mode you prefer.
You can use MainStage with multiple MIDI controllers, microphones, musical instruments, and other music equipment. For time-based effects such as reverb and delay, you can set a pre-defined tempo, use MIDI input for tempo changes, or tap the tempo as you perform.
Resources for Learning About MainStageThis manual describes the MainStage interface, commands, and menus, and gives step-by-step instructions for creating MainStage concerts and for accomplishing specific tasks. It also includes information on setting up your system. It is designed to provide the information you need to get up to speed quickly so you can take full advantage of the intuitive interface and powerful features of MainStage.
If you want to start by learning how to set up audio and MIDI hardware to use with MainStage, read Chapter 2, “Setting Up Your System,” on page 15. If you want to learn about the features and controls in the MainStage interface, read Chapter 3, “The MainStage Interface,” on page 17. If you want to jump right in and start using the application, skip ahead to Chapter 4, “Getting Started With MainStage,” on page 23. If you want to read about using MainStage in live performance, turn to Chapter 8, “Performing Live With MainStage,” on page 85.
In addition to this manual, MainStage provides other sources of support.

12 Chapter 1 An Introduction to MainStage
MainStage Onscreen User ManualThe MainStage onscreen user manual allows you to access information directly onscreen while you’re working in MainStage. To view this information, choose Help > MainStage User Manual. The MainStage onscreen user manual is a hyperlinked version of the MainStage User Manual, enhanced with features that make locating information quick and easy. The homepage provides quick access to various features, including the Late-Breaking
News and the Logic Studio Instruments and Effects manual. A comprehensive bookmark list allows you to quickly choose what you want to see
and takes you there as soon as you click the link.
In addition to these navigational tools, the MainStage onscreen user manual gives you other means to locate information quickly:Â All cross-references in the text are linked. You can click any cross-reference and jump
immediately to that location. Then, you can use the Preview Back button to return to where you were before you clicked the cross-reference.
 The table of contents and index are also linked. If you click an entry in either of these sections, you jump directly to that section of the user manual.
 You can also use the Find dialog to search the text for specific words or a phrase.
Apple WebsitesThere are a variety of Apple websites that you can visit to find additional information.
Logic Studio WebsiteFor general information and updates, as well as the latest news on Logic Studio, including MainStage, go to:Â http://www.apple.com/logicstudio
Apple Service and Support WebsiteFor software updates and answers to the most frequently asked questions for Apple products, go to:Â http://www.apple.com/support
You’ll also have access to product specifications, reference documentation, and Apple and third-party product technical articles.

Chapter 1 An Introduction to MainStage 13
Other Apple WebsitesStart at the Apple homepage to find the latest and greatest information about Apple products:Â http://www.apple.com
QuickTime is an industry-standard technology for handling video, sound, animation, graphics, text, music, and 360-degree virtual reality (VR) scenes. QuickTime provides a high level of performance, compatibility, and quality for delivering digital video. Go to the QuickTime website for information on the types of media supported, a tour of the QuickTime interface, specifications, and more:Â http://www.apple.com/quicktime
FireWire is one of the fastest peripheral standards ever developed, which makes it great for use with multimedia peripherals, such as video camcorders and the latest high-speed hard disk drives. Visit this website for information about FireWire technology and available third-party FireWire products:Â http://www.apple.com/firewire
For information about seminars, events, and third-party tools used in web publishing, design and print, music and audio, desktop movies, digital imaging, and the media arts, go to:Â http://www.apple.com/pro
For resources, stories, and information about projects developed by users in education using Apple software, go to:Â http://www.apple.com/education
Go to the Apple Store to buy software, hardware, and accessories direct from Apple and to find special promotions and deals that include third-party hardware and software products:Â http://www.apple.com/store


2
15
2 Setting Up Your System
You can use MainStage with a wide variety of MIDI controllers and Core Audio compliant audio devices.
Real-time generation and processing of digital audio requires intensive processing by your computer. If you plan to work on large or complex projects, using a computer with a faster processor and extra random-access memory (RAM) installed can facilitate your productivity. Additional RAM is useful particularly when using a large number of effects plug-ins and when playing sample-based software instruments. It is recommended that you do not run other processor- or RAM-intensive applications simultaneously with MainStage, particularly when performing live.
Using MIDI Devices With MainStageMainStage works with many USB and MIDI keyboard controllers and with other MIDI devices such as foot pedals and switches. To work with MainStage, MIDI devices must send standard MIDI control messages. MainStage receives standard MIDI messages, but does not send MIDI messages and cannot be used to control external MIDI devices. For more information about using MIDI devices, see the “Setting Up Your System” chapter in the Logic Pro 8 User Manual.
Using MIDI Devices That Send Special MIDI Message TypesCertain types of hardware controls such as knobs (rotary controls) and buttons are capable of sending several types of MIDI messages. When you assign these controls to MainStage screen controls using the Learn process, MainStage analyzes the incoming MIDI data to determine which type of message the hardware control is sending. In order for MainStage to learn these controls correctly, be sure to turn knobs through their full range of motion and to press buttons exactly three times during the Learn process.
Some MIDI controllers can send nonstandard or proprietary MIDI messages. MainStage cannot process or respond to nonstandard MIDI messages, to “registered” or “non-registered” parameter messages, or to system exclusive (SysEx) messages.

16 Chapter 2 Setting Up Your System
Some devices feature buttons that send program change messages. You can use these buttons to send program change messages to MainStage, but you cannot assign them to control other parameters using MainStage screen controls.
Choosing a Controller PresetSome keyboard controllers allow you to choose different presets or “scenes” that reconfigure the messages sent by the controls on the device. In most cases, you should choose a generic preset that sends standard MIDI messages rather than system exclusive messages or messages intended for a particular application. After you have assigned hardware controls to screen controls in MainStage, do not change the preset on the MIDI device, or your assignments might be lost.
In some cases, you can change the message type the controller sends by choosing a different preset or by reprogramming the device. Some devices may include software that you can use to reprogram knobs, buttons, and other controls. For information about reprogramming a MIDI device, see the documentation that came with the device.
Using Audio Devices With MainStageMainStage works with Core Audio-compliant audio devices, including FireWire, USB, and PCI audio interfaces. For more information about using audio devices, see the “Setting Up Your System” chapter in the Logic Pro 8 User Manual.
MainStage can require a large amount of available RAM, particularly when playing sample-based software instruments. It is recommended that you test your system and the concerts you plan to use before you perform using MainStage to make sure there is enough available memory to play and switch between patches without causing audio drop-outs or distortion. Unlike in Logic Pro 8, you can choose different audio input and output drivers in MainStage. For more information about choosing audio drivers, see “Setting MainStage Preferences” on page 97.
Using Effects Plug-ins With MainStageYou can use many of the Logic Studio effects plug-ins in MainStage channel strips. Some Logic Studio plug-ins, including surround plug-ins and those causing noticeable latency, are not available in MainStage. For more information about the included effects plug-ins, refer to the Logic Studio Instruments and Effects manual. You can also use Apple and third-party Audio Units effects in MainStage channel strips in the same way you use them in Logic Pro 8 channel strips.
Some Audio Units plug-ins can introduce latency. Using effects that introduce latency, such as compressors and limiters, can produce undesirable or unpredictable results during live performance.

3
17
3 The MainStage Interface
You do all your work in MainStage in a single window, the MainStage window.
The MainStage window is organized to make working with your patches and your layout easy as you edit your concerts. The workspace fills the center of the window, with inspectors and other editing areas on the left and right sides. When you are ready to perform, you can use one of two performance-oriented modes to maximize your onscreen layout for easy viewing on stage.
The MainStage WindowSome features of the MainStage interface are common to all modes, while others are only available in certain modes.
Activity Monitor
Inspector
Toolbar
Workspace with screen controls

18 Chapter 3 The MainStage Interface
The main features of the MainStage window include:Â Toolbar: Includes buttons for common commands and tools. You can customize the
Toolbar so that the commands you use most frequently are readily available. Activity Monitor: Shows your computer’s processor and memory usage, and shows
the input from your MIDI devices as you edit and perform. Workspace: The “canvas” where you customize your onscreen layout, assign hardware
controls to screen controls, and view your concerts. Screen controls: The onscreen objects that correspond to the controls on your
hardware devices. You can add and arrange screen controls in the workspace, assign hardware controls to screen controls, and then map them to parameters you want to control for each patch in your concert.
 Channel strips: Channel strips are where you build and customize your sounds. MainStage channel strips are similar to channel strips in Logic Pro 8, with Insert, Sends, and I/O menus as well as level meters, faders, pan knobs, and other controls.
 Inspectors: Inspectors appear on the left side of the MainStage window when you select items onscreen. Different inspectors are available in different modes. The inspectors allow you to edit parameters and attributes for patches, sets, screen controls, channel strips, and the concert and layout.
To make working easier, MainStage features four different modes, each suited to a different task. You audition, edit, and organize your sounds and map screen controls in Edit mode. You customize the visual arrangement of controls onscreen and make controller assignments in Layout mode. You use either Perform mode or Full Screen mode when you perform live.

Chapter 3 The MainStage Interface 19
Layout ModeLayout mode is where you customize your onscreen layout and make connections between your MIDI hardware and the screen controls in your concert. You drag screen controls into the workspace and arrange them onscreen to customize your layout, then make controller assignments between your MIDI hardware and the screen controls.
In the Layout Inspector, you can edit layout parameters to customize hardware assignments and modify the visual look of screen controls.
 Layout Inspector: View and edit parameters for screen controls in the workspace, including hardware assignment and appearance parameters.
 Panel Controls and Shelf Controls palettes: Drag screen controls from either palette into the workspace to add them to your onscreen layout. Panel controls appear surrounded by a flat panel in the workspace, while shelf controls appear on an adjustable three-dimensional shelf.
In Layout mode, unlike the other modes in MainStage, you can’t select or edit individual patches. You can play and hear the last selected patch as you work on your layout.
Layout Inspector
Panel Controls Palette Shelf Controls Palette

20 Chapter 3 The MainStage Interface
Edit ModeEdit mode is where you create, customize, and organize your sounds. You can add patches, add and edit channel strips, create keyboard layers and splits, and edit channel strip parameters. Edit mode is also where you select and map screen controls to channel strip parameters and actions, and edit patch, set, and concert-level parameters.
 Patch List: Shows the patches and sets in the concert. You can add patches and sets to the Patch List and rename, select, and reorder them. The Patch List includes an Action menu where you can create patches and sets, reset program change numbers, skip items, and import and export patches and sets to use in other concerts.
 Concert, Set, Patch, Channel Strip, and Screen Control Inspectors: View and edit parameters for the currently selected item. The name of the inspector changes to reflect the type of item selected.
 Channel Strip Settings browser (displayed when a channel strip is selected): Choose channel strip settings for the selected channel strip. You can search for settings by name, choose which settings are visible, and set the default channel strip setting for new channel strips.
 Parameter Mapping browser (displayed when a screen control is selected): Choose channel strip parameters or actions to map to the screen control currently selected in the workspace.
Patch List
Screen ControlInspector
(changes depending onthe selection)
Parameter MappingBrowser
Channel Strips area

Chapter 3 The MainStage Interface 21
 Channel Strips area: View and edit the channel strips in your patches or at the concert or set level. Channel strips appear in a vertical format similar to Logic Pro 8 channel strips, with many of the same controls. You can also add channel strips and save channel strip settings.
The remaining two modes, Perform mode and Full Screen mode, are both optimized for performing live. You can use either one when you perform.
Perform ModeIn Perform mode, the workspace fills the entire MainStage window. The Toolbar is visible so that you can switch modes using the Mode buttons, use the Panic or Master Mute buttons and the Tuner, and view CPU and memory levels and MIDI input in the Activity Monitor. The browsers and inspectors are hidden to maximize the size of the workspace, making screen controls larger and easier to read in onstage situations. You can still access the Finder and switch to other applications in Perform mode.

22 Chapter 3 The MainStage Interface
Full Screen ModeIn Full Screen mode, the workspace fills your entire computer display so that your screen controls are as large as possible for maximum readability. Full Screen mode optimizes your display for live performance when you want to use MainStage exclusively while you play.

4
23
4 Getting Started With MainStage
You can quickly start working in MainStage by choosing a concert template and trying out the patches in the concert. This chapter provides a guided “walkthrough” you can follow the first time you open MainStage.
Before You BeginBefore you start working in MainStage, you should connect the hardware equipment that you plan to use, such as your keyboard controller, audio interface, instruments, or microphones, to your computer. To use keyboard controllers and other MIDI devices with MainStage, the devices should be capable of sending standard MIDI messages. If you’re not sure whether this is the case for a particular device, consult the owner’s manual or the product website. For more information, see “Setting Up Your System” on page 15.
Choosing a Concert TemplateMainStage includes templates for different musical instruments, styles, and uses. You can choose a concert template in the Choose Template dialog, which appears the first time you open MainStage and each time you create a new concert.

24 Chapter 4 Getting Started With MainStage
To choose a concert template:1 Choose File > New Concert (or press Command-N).
The Choose Template dialog appears. On the left is the Collection list, with collections for different instrument types. On the right is the Template list, which shows the available templates for the selected collection.
2 Click a collection from the Collection list to see the templates in that collection.
3 Click a concert template from the Template list to create a new concert using that template.
A new concert created from the template opens in Edit mode. The workspace appears in the center of the MainStage window, showing the screen controls in the concert. To the left of the workspace is the Patch List, which shows the patches and sets in the concert. The channel strips for the selected patch appear in the Channel Strips area to the right of the workspace.
The first time you open a concert, the topmost patch is selected, so you can start playing immediately using a connected keyboard controller (if the patch has a software instrument channel strip) or using an instrument or microphone connected to your computer (if the patch has an audio channel strip). When you reopen a saved concert, the patch that was selected when you closed the concert is selected.
For more information about opening, editing, and saving concerts, see “Working With Concerts” on page 37.
Choose a collection fromthis column to see the
available templates.
Choose a template for a new concert from this column.

Chapter 4 Getting Started With MainStage 25
Selecting and Playing PatchesThe patches in the concert appear in the Patch List along the left side of the MainStage window. You can quickly try out patches to find the ones you want to use.
If you are using a MIDI controller, you can play patches that have a software instrument channel strip using your controller. If you are playing an electric guitar or another instrument or are using a microphone connected to an audio interface, you can play or sing using patches that have an audio channel strip. Before playing through an audio channel strip, first make sure that the channel strip is set to receive input on the channel (or stereo pair of channels) to which your instrument or microphone is connected.
To select a patch:1 In the Patch List, located to the left of the workspace, click the patch.
2 With the patch selected, you can start playing instantly.
You can also select patches in the Patch List using your computer keyboard.
To select a patch using your computer keyboard:m Press the Down Arrow key to select the next (lower) patch in the Patch List.
m Press the Up Arrow key to select the previous (higher) patch in the Patch List.
With the patch selected, try moving some controls on your MIDI controller and check to see if the screen controls in the workspace respond. Some screen controls, including the keyboard, modulation and pitch bend wheels, and sustain pedal screen controls, respond to appropriate MIDI messages without needing to be assigned or mapped.
You can continue selecting and playing patches in the concert to find sounds you want to perform with or to use as a starting point for creating your own custom patches. You can also add new patches and edit their channel strip settings to create your own unique sounds.
Click a patch in the Patch List to select it, and start playing.

26 Chapter 4 Getting Started With MainStage
Adding a PatchYou can add patches to a concert and organize them in the Patch List. The number of patches is limited only by the amount of available memory in your system. When you add a patch to a concert, you choose whether the patch is created with an audio or a software instrument channel strip.
To add a new patch:1 Click the Add Patch button (+), located in the upper-right corner of the Patch List.
The New Channel Strip dialog appears at the top of the window.
2 Select the type of channel strip for the patch.
If you want to play the patch using your keyboard controller, click the Software Instrument button. If you want the patch to receive audio input from an instrument or microphone, click the Audio button.
3 Choose the audio output for the channel strip from the Output pop-up menu.
4 For audio channel strips, choose mono or stereo format from the Format pop-up menu and choose the audio input from the Input pop-up menu.
Important: Audio channel strips can produce feedback, particularly if you are using a microphone for audio input. When you add an audio channel strip, the volume of the channel strip is set to silence by default. To quickly eliminate feedback later, you can click the Mute button on the channel strip or press Control-M to activate Master Mute.
5 Click Create.
A new patch appears in the Patch List, and the channel strip for the patch appears in the Channel Strips area.
6 For audio channel strips, gradually raise the volume fader until you hear sound on the channel.
Click the button for thetype of channel strip you
want the patch tocontain.

Chapter 4 Getting Started With MainStage 27
Renaming a PatchWhen you add a patch, by default it takes the name of the channel strip added with it. You can quickly rename patches to make it easier to identify and distinguish between them.
To rename a patch:1 Double-click the patch in the Patch List.
A field appears around the patch name, which is selected.
2 Type a new name in the patch name field.
For more information about editing and organizing patches, see “Working With Patches in Edit Mode” on page 47.
Adding a Channel Strip to a PatchYou can add channel strips to a patch to create layered sounds and keyboard splits. When you add a channel strip to a patch, you choose whether to add an audio or software instrument channel strip. You can mix both types in a single patch.
To add a channel strip to a patch:1 Make sure the patch is selected in the Patch List.
2 Click the Add Channel Strip button (+) in the upper-right corner of the Channel Strips area.
The New Channel Strip dialog appears. You choose settings in the Channel Strip dialog in the same way as when you add a patch.
3 In the New Channel Strip dialog, select the type of channel strip you want to create.
4 Choose the audio output for the channel strip from the Output pop-up menu.
Double-click the patch name, then type a new name.

28 Chapter 4 Getting Started With MainStage
5 For audio channel strips, choose mono or stereo format from the Format pop-up menu and choose the audio input from the Input pop-up menu.
6 Click Create.
A new channel strip appears in the Channel Strips area, highlighted in blue to indicate that it is selected. The Channel Strip Settings browser appears below the workspace, showing available channel strip settings for the channel strip.
7 For audio channel strips, gradually raise the volume fader until you hear sound on the channel.
Most channel strip controls function in MainStage in the same way that they do in Logic Pro 8. You can adjust channel strip output using the Volume fader, adjust pan position using the Pan knob, and mute or solo the channel strip using the Mute and Solo buttons. You can choose new channel strip settings, add and edit effects, add sends to busses, and change the output in the same way as in Logic Pro 8. For audio channel strips, you can switch between mono and stereo format using the Format button. For software instrument channel strips, you can choose a different instrument from the Input pop-up menu.

Chapter 4 Getting Started With MainStage 29
For general information about working with channel strips, see Chapter 10, “Working with Instruments and Effects” in the Logic Pro 8 User Manual. For more information about channel strips in MainStage, see “Working With Channel Strips in Edit Mode” on page 51.
Changing a Channel Strip SettingYou can quickly change the instrument, effects, and other parameters for a channel strip by selecting a new setting from the Channel Strip Settings browser. The browser shows available settings for the currently selected channel strip.
To select a new channel strip setting:1 In the Channel Strips area, select the channel strip you want to change.
The selected channel strip is highlighted, and available settings for the channel strip appear in the Channel Strip Settings browser. In the Channel Strip Settings browser, Logic Studio content appears as a series of numbered folders with different instrument categories. If you have GarageBand or have one or more Jam Pack collections installed on your computer, those settings appear below the Logic Studio settings.
2 Click a category from the column on the left, then click subcategories from the columns on the right until you see the settings you want.
You can also search for channel strip settings by name, reset the current channel strip, and perform other functions from the Channel Strip Settings browser. For more information about the Channel Strip Settings browser, see “Choosing Channel Strip Settings” on page 53.
Click a category in thiscolumn to see theavailable choices.
Click the channel stripsetting you want to use from
the columns to the right.

30 Chapter 4 Getting Started With MainStage
Learning Controller AssignmentsWhen you select a patch or a channel strip setting, some channel strip parameters respond to the controls on your MIDI device instantly. MainStage responds to notes played on a keyboard controller, modulation and pitch bend wheel messages, and sustain pedal messages without your having to configure any screen controls to receive these messages. For other controls such as faders, knobs, and buttons, you must assign these hardware controls to MainStage screen controls before you can use them in your concert.
In MainStage, you assign hardware controls to screen controls in the Layout Inspector using the Learn process, similar to learning controller assignments for a control surface in Logic Pro 8. Learning controller assignments is a quick and easy method for assigning hardware controls to screen controls.
Note: To be able to assign a hardware control to a screen control, the hardware control must send standard MIDI messages. For more information, see “Using MIDI Devices With MainStage” on page 15.
To learn controller assignments:1 In the Toolbar, click the Layout button.
MainStage switches to Layout mode.
2 In the workspace, select the screen control you want to learn.
The selected control appears highlighted in blue.
3 In the Layout Inspector, click the Learn button.
The Learn button glows red to indicate that the Learn process is active.
4 On your MIDI device, move the control you want to assign to the screen control. Move faders and knobs through their full range of motion, and press buttons exactly three times (not too quickly) to enable MainStage to correctly learn the MIDI message types sent by these controls.
Click the Learn button to start learning hardware assignments.

Chapter 4 Getting Started With MainStage 31
The values in the Hardware Assignment pop-up menus change to reflect the type of hardware control learned by the screen control. While the assignment is being learned, incoming MIDI messages appear in the Activity Monitor above the workspace.
After the assignment is learned, the screen control responds when you move the corresponding hardware control. This shows that the screen control is receiving MIDI input and is correctly assigned.
5 While the Learn process is active, you can learn additional controller assignments by selecting another screen control and moving the hardware control you want to assign to it. You can learn as many assignments as you wish while the Learn button remains red.
6 When you are finished assigning controls, click the Learn button again to turn off the Learn process.
For more information about making controller assignments, see “Assigning Hardware Controls to Screen Controls” on page 76.
Mapping Screen Controls to ParametersAfter you have learned controller assignments, you can move on to the next step, mapping screen controls to the parameters in your patches you will want to modify when you are performing. In contrast to learning controller assignments, you will likely want to map screen controls to parameters in each patch, so that you can easily access and modify the parameters you want for each patch when you are performing live. You can also map parameters at the concert level to control master volume, view master levels, or modify concert-wide effects.
You map screen controls to parameters in Edit mode. When you switch from Layout mode to Edit mode, screen controls in the workspace do not respond to movements of physical controls on your MIDI hardware until you map them to channel strip parameters. There are two ways to map screen controls to parameters: by visually selecting parameters on the channel strip or plug-in window, or by choosing parameters in the Parameter Mapping browser.
To map screen controls to channel strip and plug-in parameters:1 In the Toolbar, click the Edit button.
MainStage switches to Edit mode.
2 In the workspace, click the screen control you want to map.
The screen control is highlighted in blue. The Screen Control Inspector appears below the Patch List, showing the parameters for the selected screen control. The Parameter Mapping browser appears in place of the Channel Strip Settings browser, showing the channel strips and plug-ins available for mapping, as well as the Actions folder.

32 Chapter 4 Getting Started With MainStage
3 In the Screen Control Inspector, click the Map Parameter button.
The Map Parameter button lights red to indicate that mapping is active.
4 To map the screen control to a channel strip parameter, click the control for the parameter on the channel strip in the Channel Strips area.
5 To map the screen control to a plug-in parameter, double-click the plug-in in the Inserts section of the channel strip to open the plug-in window, then click the parameter in the plug-in window.
The screen control is mapped to the selected parameter. You can continue mapping additional screen controls by clicking them in the workspace and then clicking the corresponding parameters in a channel strip or plug-in window.
6 When you are finished, click the Map Parameter button again to turn off mapping.
To map screen controls using the Parameter Mapping browser:1 In the workspace, click the screen control you want to map.
The screen control is highlighted in blue. The Screen Control Inspector appears below the Patch List, and the Parameter Mapping browser appears in place of the Channel Strip Settings browser.
2 In the column on the left of the Parameter Mapping browser, select the channel strip with the parameter to which you want to map the screen control.
Parameters for the selected channel strip appear in the columns on the right. Additional folders for the instruments and effects in the channel strip may appear in these columns. Click a folder to see the parameters for that instrument or effect.
Click the screen controlyou want to map to a
parameter.
Click the parameter in a channel strip or plug-in window.

Chapter 4 Getting Started With MainStage 33
3 Select the parameter you want to map.
The screen control is mapped to the selected parameter. You can continue mapping additional screen controls by clicking them in the workspace and then choosing parameters in the Parameter Mapping browser. Using the Parameter Mapping browser, you can map parameters that are not visible in plug-in windows.
You can also map screen controls to MainStage-specific actions and to AppleScript scripts. For more information about mapping screen controls, see “Mapping Screen Controls” on page 60.
Note: If you change the channel strip setting for a channel strip to which you have mapped screen controls, you will lose any parameter mappings.
You can also edit velocity sensitivity for a channel strip, create controller transforms, and filter various MIDI messages. For information about editing channel strips, see “Editing Channel Strips in MainStage” on page 54.
Trying Out Full Screen and Perform ModesNow you can try playing your patches as you would in a performance. MainStage provides two modes, Full Screen mode and Perform mode, that optimize the display of the workspace for live performance.
To switch to Full Screen mode, do one of the following:m Choose View > Full Screen (or press Command-4).
m Click the Full Screen button.
To switch to Perform mode, do one of the following:m Choose View > Perform (or press Command-3).
m Click the Perform button.
You can try both of these modes, playing the patches you added or modified, and using the controls on your MIDI controller to modify the parameters you have mapped to screen controls.
Click the channel stripwith the parameter you
want to map.
Click the parameter inthe submenu.

34 Chapter 4 Getting Started With MainStage
Customizing the MainStage WindowYou can customize the MainStage window to suit your way of working. You can adjust the height of the Patch List, show or hide the Inspector and the Channel Strips area, and customize the buttons on the Toolbar.
Resizing the WorkspaceYou can adjust both the horizontal and vertical size of the workspace to give more room to the Patch List, the inspectors, and the browser.
To resize the workspace horizontally:1 Move the pointer to the space between the workspace and the browser.
The pointer becomes a resize pointer.
2 Drag up or down to resize the workspace.
To resize the workspace vertically:1 Move the pointer to the space between the workspace and the Channel Strips area.
The pointer becomes a resize pointer.
2 Drag left or right to resize the workspace.
Adjusting the Height of the Patch ListYou can adjust the height of the Patch List, to show more patches or to allow more room for the Inspector.
To adjust the height of the Patch List:1 Place the pointer between the Patch List and the Inspector.
The pointer becomes a resize pointer.
2 Drag the pointer up or down to adjust the height of the Patch List.
The height of the Inspector also adjusts to preserve the amount of space between the Patch List and the Inspector.
Hiding and Showing the InspectorYou can hide the Inspector, or show it if it is hidden.
To hide or show the Inspector, do one of the following:m Choose View > Inspectors (or press Command-5).
m In the Toolbar, click the Inspectors button.

Chapter 4 Getting Started With MainStage 35
Hiding and Showing the Channel Strips AreaYou can hide the Channel Strips area or show it if it is hidden. Hiding the Channel Strips area gives you more room for the workspace.
To hide or show the Channel Strips area, do one of the following:m Choose View > Channel Strips (or press Command-6).
m In the Toolbar, click the Channel Strips button.
Customizing the ToolbarThe Toolbar at the top of the MainStage window contains buttons for frequently used commands. You can customize the Toolbar, adding buttons for the functions you use most often and can return to the default set later.
The default set of Toolbar buttons includes buttons for selecting the different window modes, hiding the Inspector and the Channel Strips area, activating Master Mute, and other common commands. You can customize the Toolbar with additional buttons for other commands and adjust the position and spacing of items. You can also hide the Toolbar to maximize available screen space. You customize the Toolbar by dragging items from the Customize Toolbar dialog to the Toolbar.
To show the Customize dialog, do one of the following:m Choose View > Customize Toolbar.
m Control-click the Toolbar, then choose Customize Toolbar from the shortcut menu.
The Customize Toolbar dialog appears, and spaces between buttons in the Toolbar are outlined in gray.
To add a button to the Toolbar:m Drag a button from the Customize sheet to the Toolbar.
If you drag a button between two existing buttons, the buttons move to make room for the new button.
To move a button in the Toolbar:m If the Customize Toolbar dialog is visible, drag the button to move it.
m If the Customize Toolbar dialog is not visible, Command-drag the button to move it.
You can also rearrange the Toolbar using set-width spaces, flexible spaces, and separators.

36 Chapter 4 Getting Started With MainStage
To add space or a separator to the Toolbar:m Drag a space, flexible space, or separator from the Customize Toolbar dialog to the
Toolbar.
To return the Toolbar to the default set of buttons:m Drag the default button set, located at the bottom of the Customize Toolbar dialog, to
the Toolbar.
You can also change the Toolbar so that it shows only icons or only text by choosing Icon Only or Text Only from the shortcut menu.
To show only icons in the Toolbar, do one of the following:m Control-click the Toolbar, then choose Icon Only from the shortcut menu.
m In the Customize Toolbar dialog, choose Icon Only from the Show pop-up menu.
To show both icons and text in the Toolbar, do one of the following:m Control-click the Toolbar, then choose Icon & Text from the shortcut menu.
m In the Customize Toolbar dialog, choose Icon & Text from the Show pop-up menu.
To dismiss the Customize sheet:m When you are finishing customizing the Toolbar, click Done.
To hide the Toolbar:m Choose View > Hide Toolbar.
When the Toolbar is hidden, the menu item becomes Show Toolbar.

5
37
5 Working With Concerts
Concerts are the documents in which you create and organize the sounds you use in your performances and customize your onscreen layout.
A MainStage concert holds all the sounds you’ll use for an entire performance or a series of performances. In a concert, you add, edit, and organize patches, and switch between patches while you are performing. You can reorder patches in the Patch List and also organize them into sets.
Concerts also contain layouts, where you visually arrange screen controls in the workspace and make connections between MainStage and your hardware devices. You can add and arrange screen controls and assign hardware MIDI controls to screen controls, in Layout mode. For information about customizing your layout, see “Working in Layout Mode” on page 67.
You can also control the volume for an entire concert, add concert-wide effects, and make other changes at the concert level.
Opening and Closing ConcertsYou can create a new concert from a template, open an existing concert to continue working, and close and save concerts. You can add patches to a concert and organize them in the Patch List. The number of patches is limited only by the amount of available memory. You can add channel strips to an existing patch or to new ones you create, and can organize patches into sets. For information about patches and sets, see “Working in Edit Mode” on page 47.
The process of creating a new concert from a concert template is described in “Choosing a Concert Template” on page 23. You can open an existing concert to play the patches in the concert or continue editing them.
38 Chapter 5 Working With Concerts
To open an existing concert, do one of the following:m Choose File > Open Concert, select the concert you want to open, then click Open.
m In the Finder, double-click the concert.
m In the Finder, drag the concert over the MainStage icon in the Dock.
You can also reopen a recently open concert by choosing File > Open Recent Concert and then choosing a concert from the submenu.
By default, when you open a concert, it opens in Edit mode. You can change the default behavior in MainStage Preferences. For more information, see “Setting MainStage Preferences” on page 97.
The first time you open a concert, the first (top) patch is selected. When you reopen a concert, the patch that was selected when you last saved the concert is selected.
Note: You can have multiple concerts open at the same time and drag patches and sets between them. Having multiple concerts open uses more of your computer’s CPU and memory resources. In most situations, you should have only one concert open while performing.
To close a concert:m Choose File > Close Concert.
If you have edited the concert since the last time you saved it, you will be prompted to save your changes.
Saving ConcertsWhen you save a concert, all of the changes you made to the patches and sets in the concert, as well as the concert settings, are saved. To prevent losing your changes, be sure to save your work periodically.
To save a concert:1 Choose File > Save Concert.
2 The first time you save a concert, the Save dialog appears. Type a name for the concert, and browse to the location where you want to save it, then click Save.
You can also save a concert with a new name by choosing File > Save Concert As.

Chapter 5 Working With Concerts 39
How Saving Affects Parameter ValuesWhile a concert is open, any changes you make to channel strip or plug-in parameters are retained for as long as the concert is open. If you change parameter values in a patch, select another patch, and later select the first patch again, the parameter values will be as you left them when you selected the other patch. If you save the concert, the changed values are saved. If you close the concert without saving, the parameter values revert to their last saved state when you reopen the concert.
If you decide not to keep your latest changes, you can revert a concert to its previously saved state.
To revert a concert to its last saved state:m Choose File > Revert Concert.
All the changes you’ve made since the last time you saved the concert are lost when you revert the concert.
Using Tempo in a MainStage ConcertSome plug-ins available in MainStage, including delay and tremolo effects, synthesizer LFOs, and the metronome, can require a specific tempo. You can set the tempo for a concert, and change the tempo by selecting a patch or a set with its own tempo setting. You can also change the tempo in real time by tapping a new tempo, or have MainStage receive tempo changes from incoming MIDI messages.
When you open a MainStage concert, the tempo setting in the Concert Inspector is used until you change the tempo by selecting a patch or set with its own tempo setting, or by tapping a tempo. When you change the tempo, MainStage uses the new tempo until you change it again, or until you close the concert.
You can set the tempo for a concert in the Concert Inspector, which appears in the lower-left corner of the MainStage window when the concert icon is selected in the Patch List. By default, the tempo for new concerts is set to 120 beats per minute (bpm).
To set the tempo for a concert:1 In the Patch List, select the concert icon.
2 In the Concert Inspector, set the tempo using the Tempo value slider.
You can set the tempo in any of the following ways:
 Drag the numeric value up or down. Drag the numeric value left or right. Click the left or right arrow.

40 Chapter 5 Working With Concerts
 Select the value and type a new value.
3 Select the Tempo checkbox to activate the tempo.
You can use patches and sets to change the tempo when you select the patch or set while performing. For information about patch tempo settings, see “Using a Patch to Change the Tempo” on page 50. For information about set-level tempo settings, see “Using a Set to Change the Tempo” on page 63.
Tapping the TempoMainStage includes a “tap tempo” feature that allows you to set the tempo in real time while you perform. You can tap the tempo using the Tap Tempo button in the Toolbar (if it is visible) or using a key command.
To tap the tempo using the Tap Tempo button:m Click the Tap Tempo button in the Toolbar several times at the desired tempo.
For information about adding buttons to the Toolbar, see “Customizing the Toolbar” on page 35.
You can also tap the tempo using your computer keyboard.
To tap the tempo using a computer keyboard:m Press Control-T several times at the desired tempo.
Getting the Tempo From MIDI InputYou can also have MainStage receive tempo changes from incoming MIDI messages. When the “Get tempo from MIDI input” checkbox is selected, MainStage listens to incoming MIDI clock messages for tempo information. If it receives tempo information, the concert tempo changes to the new tempo value.
To get the tempo from incoming MIDI clock messages:m In the Concert Inspector, select the “Get tempo from MIDI input” checkbox.
If there is no MIDI clock information in the MIDI messages MainStage receives, MainStage uses the concert tempo setting and changes the tempo when you select a patch or a set with its own tempo setting, or tap a new tempo. If MainStage stops receiving MIDI clock messages, it continues to use the last received value for the tempo until you select a patch or set with its own tempo setting or tap a new tempo.
Set the tempo in the value slider. You can drag, click the arrows, or click and type a value.

Chapter 5 Working With Concerts 41
Muting Audio OutputSometimes when you are playing or editing sounds, you may want to quickly mute (silence) all audio output for the concert. MainStage includes a Master Mute button that silences the output from every patch in the concert.
To quickly mute all sound, do one of the following:m Press Control-M.
In the Toolbar, click the Master Mute button.
m If you have mapped the Master Mute function to a screen control, press or move the corresponding controller.
The Master Mute button changes to show that the output is muted (a red diagonal line covers the speaker icon). All output remains muted until you click the Master Mute button again.
To unmute all sound, do one of the following:m Press Control-M again.
m Click the Master Mute button again.
m If you have mapped the Master Mute function to a screen control, press or move the corresponding controller.
Master Mute is also a mappable parameter in the Parameter Mapping browser. You can map Master Mute to a button or other controller in your concerts, so that you can quickly mute all output when you are playing live in Perform or Full Screen mode.
In addition, you can mute audio output for a single channel strip by clicking its Mute (M) button.

42 Chapter 5 Working With Concerts
Silencing MIDI NotesMainStage also includes a Panic function, which works like the Panic function in Logic Pro 8. The Panic function immediately silences any hanging MIDI notes.
To silence all MIDI notes, do one of the following:m Press Control-P.
m If the Panic button is visible in the Toolbar, click it.
m If you have mapped the Panic function to a screen control, press or move the corresponding controller.
You can also add a Panic button to the Toolbar and use it to silence MIDI notes. For information about customizing the Toolbar, see “Customizing the Toolbar” on page 35.
Working at the Concert LevelYou can control the overall volume for a concert and make other changes at the concert level. You can use busses at the concert level to control concert-wide effects or to control the output of multiple channel strips assigned to the bus. You can also add channel strips at the concert level and have the concert-level channel strips available with every patch in the concert.
You can map screen controls to busses and to concert-level channel strips only at the concert level, not at the patch or set level.
To make changes at the concert level:m In Edit mode, select the icon for the concert in the Patch List.
Click the concert icon inthe Patch List to work at
the concert level.

Chapter 5 Working With Concerts 43
Controlling the Overall Volume of a ConcertA MainStage concert contains Output and Master channel strips that you can use to control the overall volume of the concert. The Master channel strip always controls the output volume of the entire concert. If the concert has multiple Output channel strips, each Output channel strip controls the volume level for a particular (mono or stereo) physical output. You can use the Output and Master channel strips to control the overall volume in the same way you control the overall volume of a Logic Pro 8 project.
To see all of the channel strips, you may need to resize the Channel Strips area.
To control the overall volume level of a concert:m Drag either the Output 1-2 volume fader or the Master volume fader.
You can map a screen control to a channel strip parameter or an action at the concert level. For example, you can map the Output 1-2 Volume fader to a fader screen control and use the hardware control assigned to that screen control to adjust the overall volume of the concert.
To map a screen control at the concert level:1 Make sure the concert icon is selected in the Patch List.
2 Click the screen control you want to map.
The Parameter Mapping browser appears below the workspace.
3 In the Parameter Mapping browser, click the parameter to which you want to map the screen control.
At the concert level, the Channel Strips area shows the Output and Master channel strips, busses, and any concert-level channel strips.

44 Chapter 5 Working With Concerts
In the example above, you would click the fader screen control, click Out 1-2 in the left column of the Parameter Mapping browser, and then click Volume in the second column of the browser.
Screen controls can also display visual feedback about parameter values, including volume level. For example, you can also map the Output 1-2 Volume fader to a level meter screen control and have the level meter display the overall volume level while you are performing live. In this case, you would map the level meter to Level in the second column of the browser, rather than to Volume.
When you map a screen control at the concert level, you cannot map the same screen control at the patch or set level unless you override the concert-level mapping. For information about overriding concert-level mappings, see “Overriding Concert- and Set-Level Mappings” on page 65.
Adding Concert-Wide EffectsYou can add concert-wide effects such as reverb and delay using sends and busses. When you choose a send from the Send slot on a channel strip, the corresponding bus appears at the concert level. You can insert effects on the bus and have those effects apply to every channel strip sending its signal to the bus.
To send a channel strip signal to a bus:1 In the Patch List, select the patch you want to use with a concert-wide effect.
The channel strips for the patch appear in the Channel Strips area.
2 On the channel strip, click one of the Send slots and choose a bus from the menu.
Choose a bus from one of the Sends slots.

Chapter 5 Working With Concerts 45
3 Drag the Send knob next to the slot to set the amount of the signal sent to the bus.
To add a concert-wide effect to a bus:1 In the Patch List, select the concert.
The busses in the concert appear in the Channel Strips area along with the concert-level channel strips.
2 On the bus, click one of the Insert slots and choose an effect from the menu.
After you add an effect to a bus, you can edit the effect as you would any channel strip effect, by double-clicking it to open the plug-in window, and then adjusting parameters in the plug-in window. You can add multiple effects to a bus, and adjust the level and pan of the bus using the controls on the bus.
You can also add concert-wide effects to a bus at the patch level if Show Signal Flow Channel Strips is active. For information about showing signal flow channel strips in the Channel Strips area, see “Showing Signal Flow Channel Strips” on page 55.
Using Busses to Control Channel Strip OutputYou can also send the output of multiple channel strips to a bus and then use the bus to control the volume level and pan position of the channel strips. Sending the output to a bus is also useful for adding EQ or compression to a group of patches.
To send the output of a channel strip to a bus:1 In the Patch List, select the patch you want to control using a bus.
2 In the channel strip, click the Output slot and choose a bus from the menu.
When you send channel strip output to a bus, the volume fader of the channel strip controls how much of the signal is sent to the bus.
To control the output of channel strips using a bus:1 In the Patch List, click the concert.
The concert is selected. The busses added to the concert appear in the Channel Strips area along with the concert-level channel strips.
2 Drag the Volume fader on the bus to adjust the volume level of the overall bus output.
3 Drag the Pan knob on the bus to adjust the pan position of the overall bus output.
When you control the output of multiple channel strips using a bus, their relative volume levels and pan positions are preserved, but the overall volume level and pan position are modified by the bus Volume fader and Pan knob.

46 Chapter 5 Working With Concerts
Adding Channel Strips at the Concert LevelYou can add a channel strip at the concert level and use the concert-level channel strip for a software instrument or audio input you want to use in every patch in the concert.
Important: When you add a channel strip at the concert level, it takes precedence over the channel strips in the patches and sets in the concert. For example, if you add a concert-level channel strip containing a software instrument, the software instrument takes precedence over all of the software instruments in all of the patches and sets in the concert, for the notes in its key range. This means that you will hear only the sound of the concert-level software instrument, and will not be able to play any software instruments in a patch or set that fall in the same key range.
To add a concert-level channel strip:1 In the Patch List, select the concert.
2 Click the Add Channel Strip (+) button at the top of the Channel Strips area.
3 In the New Channel Strip dialog, select the type of channel strip you want to create.
4 Choose the audio output for the channel strip from the Output pop-up menu.
5 For audio channel strips, choose mono or stereo format from the Format pop-up menu.
Important: Audio channel strips can produce feedback, particularly if you are using a microphone for audio input. When you add an audio channel strip, the volume of the channel strip is set to silence by default. To quickly eliminate feedback later, you can click the Mute button on the channel strip or press Control-M to activate Master Mute.
6 Click Create.
7 For software instrument channel strips, define the key range for the channel strip in the Channel Strip Inspector so that the concert-level channel strip does not overlap software instruments you plan to use in your patches and sets.
When you add a channel strip at the concert level, you can map screen controls to the channel strip only at the concert level, not for individual patches or sets.

6
47
6 Working in Edit Mode
In Edit mode, you create patches with your custom sounds, map screen controls, and work with patches and sets in the Patch List.
You can create your custom collection of patches in Edit mode, and organize them in the Patch List so that you can easily access them in performance.
Working With Patches in Edit ModePatches are the individual sounds you play using your keyboard controller (for MIDI keyboardists) and the effects setups you use with your instrument or microphone (for guitarists, vocalists, and other instrumentalists). MainStage patches can contain multiple channel strips, each with a different instrument or effects setup.
Some basic patch operations, including selecting and playing patches, adding new patches, and naming patches are described in “Getting Started With MainStage” on page 23.
Selecting Items in the Patch ListAll of the patches and sets in a concert appear in the Patch List, located to the left of the workspace. To select an item in the Patch List in Edit mode, you can click the item or use key commands.
Key command Selection
Up Arrow Previous item (patch or set)
Down Arrow Next item (patch or set)
Command–Up Arrow Previous patch
Command–Down Arrow Next patch
Command–Left Arrow Previous set (or the current set if a patch is currently selected)
Command–Right Arrow Next set

48 Chapter 6 Working in Edit Mode
Skipping Items in the Patch ListYou can skip patches or sets in the Patch List. When a patch or set is skipped, you can still select the item by clicking it, but when you use the arrow keys together with the Control key to select items in the Patch List, skipped items are passed over and the next non-skipped item is selected. Skipped items are also skipped when you use the patch selector in Full Screen or Perform mode.
To skip a patch or set:1 Select the patch or set in the Patch List.
2 Choose Skip from the Action menu for the Patch List.
The item appears as a thin line in the Patch List.
To set a skipped patch or set to no longer be skipped:1 Select the item (patch or set) in the Patch List.
2 Choose Don’t Skip from the Action menu for the Patch List.
The item returns to full size in the Patch List.
Patches and sets are skipped only when you use the arrow keys together with the Control key. Items set to be skipped are still selected when you use the arrow keys alone or when you click them.
Collapsing Sets in the Patch ListYou can collapse sets in the Patch List. When you collapse a set, you can select the set and use any channel strips or busses at the set level, but cannot select or play patches in the set while in Edit mode.
To collapse a set:1 In the Patch List, click the disclosure triangle for the set.
You can uncollapse the set by clicking its disclosure triangle again. Collapsing a set has no effect on whether you can select patches in the set in Full Screen or Perform mode.
Copying and Pasting PatchesYou can copy, paste, and duplicate patches in the Patch List using the standard Mac OS X key commands, or by Option-dragging. When you paste or duplicate a patch, it includes any mappings made to parameters in the original patch.
Reordering PatchesWhen you add a patch to a concert, the new patch appears below the currently selected patch in the Patch List. You can reorder patches in the Patch List.
To reorder patches in the Patch List:m Drag patches up or down in the Patch List until they appear in the order you want.

Chapter 6 Working in Edit Mode 49
Changing Program Change NumbersWhen you add a patch to a concert, the patch is given a MIDI program change number (the lowest available number between 0–127) until all available program change numbers are taken. You can use program change numbers to select patches when performing by assigning buttons on a MIDI device to send program change messages. You can change the program change number in the Patch Inspector.
To change the program change number for a patch:1 In the Patch List, select the patch.
When you select a patch, the Patch Inspector appears below the Patch List.
2 In the Patch Inspector, select the Program Change checkbox.
3 Using the value slider, set the program change number.
The MIDI standard allows program change numbers with values from 0–127. If all available program change numbers in a concert are already in use, any new patches added to the concert will be given program change number zero (0), but the number is active (the checkbox is not selected).
If two or more patches have the same program change number, and the numbers are active, the patch that appears first (highest) in the Patch List or patch selector is selected when you send the program change message with the corresponding value.
You can reset program change numbers for all patches in a concert. When you reset program change numbers, patches are assigned program change numbers based on their order in the Patch List, starting from the top.
To reset program change numbers for all patches in a concert:m Choose Reset Program Change Numbers from the Action menu for the Patch List (or
press Command-Shift-Option-R).
You can assign buttons and other controls to send program change messages, and use them to select patches in the concert. For information about assigning buttons, see “Assigning Buttons” on page 77.
Select the checkbox and set the program change number in the value slider.

50 Chapter 6 Working in Edit Mode
Using a Patch to Change the TempoYou can give a patch its own tempo setting so that when you select the patch, the tempo changes to the patch tempo setting. MainStage uses the new tempo until you select another patch or set with its own tempo setting, tap a new tempo, or until MainStage receives tempo information from incoming MIDI messages. For more information about using and changing tempo in MainStage, see “Using Tempo in a MainStage Concert” on page 39.
To change the tempo using a patch:1 In the Patch Inspector, set the patch tempo using the “Change Tempo to” value slider.
2 Select the “Change Tempo to” checkbox to activate the patch tempo when the patch is selected.
Changing Patch IconsEach patch has an icon that appears in the Patch List next to the patch name. By default, the patch icon shows the type of channel strip created when the patch was added. You can choose a new icon for a patch, and use icons to visually distinguish patches in the Patch List.
To change the icon for a patch:m In the Patch Inspector, choose an icon from the Icon pop-up menu.
Deleting PatchesYou can delete a patch if you decide you no longer want it in the concert.
To delete a patch:1 Select the patch in the Patch List.
2 Choose Edit > Delete (or press the Delete key).

Chapter 6 Working in Edit Mode 51
Working With Channel Strips in Edit ModeChannel strips are the building blocks of your patches. They contain the instruments and effects for the sounds you will use in performance. MainStage channel strips use the channel strip interface familiar from Logic Pro 8. MainStage channel strips have the following features in common with Logic Pro 8 channel strips:
In MainStage, you can use audio and software instrument channel strips in your patches (and also at the concert and set levels). You can use channel strips in MainStage just as you can in Logic Pro 8. You can adjust the volume level using the Volume fader, adjust the pan position using the Pan knob, and mute or solo the channel strip using the Mute and Solo buttons.
As in Logic Pro 8, you can add effects using the Insert slots, send the signal to a bus using the Sends slots, and choose a different output from the Output slot. For audio channel strips, you can change the format between mono and stereo using the Format button. For software instrument channel strips, you can change the instrument using the Input slot.
Because MainStage is designed for live performance rather than recording and arranging, there are a few differences between MainStage channel strips and Logic Pro 8 channel strips:Â MainStage channel strips include an Expression dial so that you can easily see the
current MIDI Expression being received by the channel strip.
Settings menu
Insert slots
Send slots
Pan knob
Volume fader and levelmeter
Mute and solo buttons
Icon
Name

52 Chapter 6 Working in Edit Mode
 MainStage channel strips do not have a Record Enable or Bounce button. MainStage audio channel strips do not have an input monitoring (i) button. You can
use the Mute button to silence the channel strip. In MainStage, you can use the Format button to select mono or stereo format.
MainStage does not support surround input or surround processing. MainStage channel strips do not have a Group pop-up menu. In MainStage, the selected channel strip is indicated by a blue rectangle. In MainStage, the name of the channel strip changes when you select a new channel
strip setting, unless you have renamed it. In MainStage, the channel strip number (at the bottom of the channel strip) reflects
its order in the patch, not the concert.
Additionally, some plug-ins available in Logic Pro 8, including surround plug-ins and plug-ins that are not optimized for real-time performance (because they introduce a high degree of latency) are not available in MainStage.
For more information about working with channel strips, see Chapter 10, “Working with Instruments and Effects” and Chapter 25, “Mixing” in the Logic Pro 8 User Manual. For complete information about the instruments and effects available in Logic Studio, see the Logic Studio Instruments and Effects manual.
The procedure for adding channel strips is described in “Adding a Channel Strip to a Patch” on page 27.
Selecting Channel StripsWhen you add a channel strip to a patch (or add a channel strip at the set or concert level), the channel strip is selected in the Channel Strips area, and available settings appear in the Channel Strip Settings browser. You can select a channel strip directly by clicking it in the Channel Strips area, and also select an adjacent channel strip by using key commands:
Key command Selection
Left Arrow The channel strip to the left
Right Arrow The channel strip to the right

Chapter 6 Working in Edit Mode 53
Choosing Channel Strip SettingsYou can quickly change the instrument, effects, and other parameters for a channel strip by choosing a new channel strip setting. You can choose a new channel strip setting in one of two ways: by using the Channel Strip Settings browser, or by using the Settings button at the top of the channel strip.
To choose a channel strip setting from the Channel Strip Settings browser:1 In the Channel Strips area, select the channel strip you want to change.
The selected channel strip is highlighted with a blue outline, and available settings for the channel strip appear in the Channel Strip Settings browser.
In the Channel Strip Settings browser, Logic Studio content appears in a series of numbered folders with different instrument categories. If you have GarageBand installed, or have one or more Jam Packs installed on your computer, those settings appear below the Logic Studio settings.
2 Click a category from the column on the left, then click subcategories from the columns on the right until you see the settings you want.
You can select a recent channel strip setting by clicking Recent in the column on the left, and then selecting a recent setting from the second column. As in Logic Pro 8, you can also choose a new channel strip setting from the Settings menu at the top of the channel strip.
To choose a channel strip setting from the Settings menu:m Click the Settings button at the top of the channel strip, then choose a new setting
from the menu that appears.
Note: When you choose new channel strip settings from the Settings menu, the selected channel strip setting does not appear selected in the Channel Strip Settings browser.
You can also search for channel strip settings by name.
To search for channel strip settings in the Channel Strip Settings browser:1 Choose Find from the Action menu in the upper-right corner of the Channel Strip
Settings browser.
2 In the dialog that appears, type the text you want to search for.
The channel strip with the text in its name appears selected in the browser.

54 Chapter 6 Working in Edit Mode
3 If more than one channel strip has the text as part of its name, choose Find Again from the Action menu to cycle through the channel strips with names containing the text.
4 To change the channel strip setting, click the name of the new setting in the Channel Strip Settings browser.
The Channel Strip Settings browser shows all channel strip settings available to Logic Studio applications, including settings that may not be useful in MainStage, such as surround and mastering settings. If you choose a channel strip setting containing plug-ins not usable in MainStage, the plug-ins appear with a bold diagonal line in the Channel Strips area.
Resetting a Channel StripYou can also reset a channel strip. Resetting a channel strip removes all instruments and effects, putting the channel strip in an “empty” state.
To reset a channel strip:1 In the Channel Strips area, select the channel strip.
2 In the Channel Strip Settings browser, click Reset.
After you have reset the channel strip, you can choose a new setting from the Channel Strip Settings browser or add instruments and effects directly on the channel strip.
Editing Channel Strips in MainStageYou can add instruments to software instrument channel strips and add effects to both audio and software instrument channel strips in the Channel Strips area. Adding instruments and effects to a channel strip is the same in MainStage as it is in Logic Pro 8.
Not all Logic Studio effects and instruments can be used with MainStage. In particular, effects that introduce a large amount of latency, or that are designed for surround panning, cannot be used with MainStage. If you choose a channel strip setting containing one of these effects, the unused effects are shown disabled (gray, with a diagonal line running through the effect name).
You edit channel strip parameters in the Channel Strip Inspector, which appears below the Patch List when the channel strip is selected in the Channel Strips area. You can rename a channel strip, give it a color, set a velocity range and velocity offset, create a controller transform, and filter MIDI control messages to the channel strip.

Chapter 6 Working in Edit Mode 55
Renaming a Channel StripWhen you add a channel strip to a patch, the channel strip has a default name. You can rename channel strips to distinguish your custom settings from the default ones.
To rename a channel strip:m In the Channel Strip Inspector, select the name in the Name field and type a new name.
Choosing the Channel Strip ColorEach channel strip has a color, which appears as a layer above the keyboard screen control in the workspace. You can change the color to visually distinguish channel strips as you perform.
To change the color for a channel strip:m In the Channel Strip Inspector, choose a color from the Color menu.
Changing the Channel Strip IconWhen you add a channel strip, the channel strip has a default icon, which appears above the Settings menu. You can change the icon to help visually distinguish channel strips with different instrument types or uses.
To change the icon for a channel strip:m In the Channel Strip Inspector, choose an icon from the Icon well.
Showing Signal Flow Channel StripsIn addition to the channel strips in a patch, you can view and edit signal flow channel strips in the Channel Strips area. Signal flow channel strips include the Output and Master channel strips for the concert and any busses that are receiving signal from a channel strip in the patch. You can also view signal flow channel strips at the set level.
You can also add concert-wide effects to a bus at the patch level by choosing Show Signal Flow Channel Strips from the Action menu for the Channel Strips area to show the busses receiving signal from channel strips in the patch, and then adding the effects to the bus.
To show signal flow channel strips:m Choose Show Signal Flow Channel Strips from the Action menu in the upper-right
corner of the Channel Strips area.
Type a new name in the field.
Choose an icon from the well.
Choose a color from themenu.

56 Chapter 6 Working in Edit Mode
Creating Keyboard Layers and SplitsIf you play a keyboard controller, you can easily create keyboard layers and splits in your MainStage patches. You create layers and splits by adding two or more channel strips to a patch and defining key ranges for each channel strip.
Defining a Key RangeThe key range defines the range of notes on the keyboard that trigger sound from a software instrument in a channel strip. You can define key ranges so that channel strips overlap (for layered sounds) or are separate (for splits).
To define a key range for a channel strip:1 In the Channel Strips area, select the channel strip.
2 In the Channel Strip Inspector, click the Learn button next to the Low Key value slider.
3 On your keyboard controller, press the key you want to set as the lowest key in the key range.
4 Click the Learn button again to turn off Learn mode for the Low Key.
5 Click the Learn button next to the High Key value slider.
6 On your keyboard controller, press the key you want to set as the highest key in the key range.
7 Click the Learn button again to turn off Learn mode for the High Key.
When you play the patch, you hear the channel strip when you play notes inside the key range. When you play notes outside the key range, no sound is generated from the channel strip.
Setting Floating Split PointsWhen a key range has a floating split point, the notes that define the boundaries of the key range ends change depending on the keys you play as you approach the boundary of the key range.
Set the high key andlow key using these
value sliders.
You can also click Learn and play the corresponding note on your music keyboard.

Chapter 6 Working in Edit Mode 57
Floating split points can be explained using an example. If you set the Low Key of a key range to C1, set a floating split point value of 3, then play notes immediately above C1 (for example, the notes F1-Eb1-D1), and continue playing downward past C1 (for example, the notes C1-Bb0-A0) the split point moves down to include those notes, up to the floating split point value (3 semitones). If, however, you start by playing notes immediately below the Low Key (for example, the notes G0-A0-B0) and continue playing upward past C1 (for example, the notes C1-D1-E1), the split point moves up to include those notes, up to the floating split point value. (In this example, C1 and D1 would be included, but not E1, which is four semitones above the Low Key.)
To set floating split points for a key range:1 Set a floating split point for the Low Key by entering a value in the Low Key Floating
Split value slider. You can type an integer value, click the arrows to increment or decrement the value, or drag the slider to set the number of notes used for the split.
2 Set a floating split point for the High Key by entering a value in the High Key Floating Split value slider. You can type an integer value, click the arrows to increment or decrement the value, or drag the slider to set the number of notes used for the split.
You can also create a keyboard split by adding a channel strip at the set level and adjusting the key range of the channel strips in the patches in the set. The channel strip at the set level takes precedence over any channel strips in patches in the set for the notes in its key range. For information about adding a channel strip at the set level, see “Working at the Set Level” on page 64.
Overriding Concert- and Set-Level Key RangesIf a software instrument channel strip exists at the concert level, the concert-level channel strip takes precedence over any patch-level software instrument channel strips within its key range. This means that when you play any notes in the key range of the concert-level channel strip on a keyboard controller, you hear only the concert-level channel strip, even when a patch is selected.
Similarly, if a software instrument channel strip exists at the set level, the same condition applies for all patches in the set. That is, the set-level channel strip takes precedence over any patch-level channel strips within its key range.
You can override concert- or set-level channel strips for a channel strip on an individual patch, so that the patch-level channel strip takes precedence over the concert-level or set-level channel strips.
To override concert- or set-level key ranges:1 In the Patch List, select the patch with the channel strip that you want to override the
concert- or set-level channel strip.
2 In the Channel Strips area, select the channel strip with the key range that you want to override the concert- or set-level key range.

58 Chapter 6 Working in Edit Mode
A message appears in the Channel Strip Inspector asking if you want to override the concert- or set-level key ranges. (The text indicates whether the key ranges are at the concert level, the set level, or both levels.)
3 Select the checkbox next to the message.
Setting the Velocity Range and OffsetBy default, the velocity of a channel strip extends from 1 to 127. You can limit the velocity range so that the channel strip only responds when the notes you play on your controller fall between the Min and Max values of the velocity range.
To set the velocity range for a channel strip:1 Set the minimum velocity that triggers the channel strip using the Velocity Min value
slider.
2 Set the maximum velocity that triggers the channel strip using the Velocity Max value slider.
A velocity offset means that when you play a note at a certain velocity, the channel strip responds as if the velocity is higher or lower, by the value of the offset. If you have a velocity offset for the channel strip, the velocity of keys you play on your controller is shifted by the amount of the offset value (up for positive offset values, down for negative ones).
To set a velocity offset for a channel strip, do one of the following:m Drag the Velocity Offset value slider
m Double-click the Velocity Offset value slider and type an offset value.
Creating Controller TransformsYou can graphically remap (or transform) the values for some MIDI control messages so that input values from your controller produce different output values for the channel strip. A common use of the transform is for expression scaling, where input MIDI expression values are mapped to different output values on a graphic curve. In MainStage, you can transform values for expression and also for modulation, MIDI volume, and breath control messages.
Click the checkbox tooverride key ranges of
channel strips at theconcert or set level.

Chapter 6 Working in Edit Mode 59
In addition, you can remap input values for any one of these four message types to output values for one of the other types. For example, you can remap MIDI volume values from your controller to send expression values to the channel strip, or remap input breath values to send modulation values. The Controller Transform feature provides a very flexible way of remapping both the values and the output destination for these MIDI control messages.
You choose the input and output message types and graphically create transform curves in the Controller Transform section of the Channel Strip Inspector. In the Controller Transform graphic editing area, the horizontal axis represents input values from your controller, and the vertical axis represents output values sent to the channel strip.
To set the input and output message types for a controller transform:1 In the Controller Transform section of the Channel Strip Inspector, choose the input
message type from the Input pop-up menu.
2 Choose the output message type from the Output pop-up menu.
To graphically edit the controller transform curve:1 Click a point on the diagonal controller transform curve where you want to change the
output value.
2 Drag the point vertically to change the output value.
3 Double-click a point if you want to delete it.
If a patch contains more than one channel strip, the controller transform curves for the other channel strips in the patch appear in the controller transform display behind the current curve. Each channel strip in the patch can have its own controller transform.
To reset the controller transform curve:m Control-click the graphic editing area, then choose Reset to Default from the shortcut
menu.
Click a point on the curveand drag to set its value.
Choose the input and output message types from these menus.

60 Chapter 6 Working in Edit Mode
Filtering MIDI MessagesYou can filter some MIDI messages for a channel strip in the Channel Strip Inspector. When you select one or more MIDI message types in the Filter section of the Channel Strip Inspector, the corresponding MIDI message types are filtered out of any incoming MIDI data and are not sent to the channel strip.
You can filter the following types of MIDI messages: Pitch Bend Modulation (control message 1) Aftertouch Sustain (control message 64) Expression (control message 11)
To filter incoming MIDI messages:m In the Filter section, select the checkbox for the type of MIDI messages you want to
filter.
If you have created a controller transform, you can filter the input message type, and the controller transform will still send its output message type. It is also possible to filter the output message type, but in this case the output of the controller transform will be filtered.
Deleting Channel StripsYou can delete a channel strip if you decide you no longer want it in a patch.
To delete a channel strip:1 Select the channel strip in the Channel Strips area.
2 Choose Edit > Delete (or press the Delete key).
Mapping Screen Controls After you have chosen the channel strip settings you want to play, you can map MainStage screen controls to channel strip parameters or map them to MainStage-specific actions or to AppleScript scripts. For information about assigning physical controls to screen controls in the workspace, see “Assigning Hardware Controls to Screen Controls” on page 76.
Mapping Screen Controls to Channel Strip and Plug-in ParametersYou can map screen controls to channel strip and plug-in parameters in one of two ways: mapping screen controls visually to parameters on the channel strip or in a plug-in window and using the Parameter Mapping browser. For a description of both methods of mapping screen controls to parameters, see “Mapping Screen Controls to Parameters” on page 31.

Chapter 6 Working in Edit Mode 61
Mapping Screen Controls to ActionsYou can also map screen controls to MainStage-specific actions and to AppleScript scripts. The Actions folder, which appears in the Parameter Mapping browser along with available parameters, contains actions for selecting patches and sets, showing the Tuner, activating tap tempo, Master Mute, or Panic, and others. The Actions folder also contains an AppleScript subfolder with useful scripts.
You can map button screen controls to actions for selecting different patches and use physical buttons on your MIDI device to select patches when you perform. You can also map buttons to actions for selecting different sets or selecting the concert. For information about assigning buttons, see “Assigning Buttons” on page 77.
To map a screen controls to an action:1 In the workspace, click the screen control you want to map.
The Screen Control Inspector appears below the Patch List, showing the settings for the selected screen control. The Actions folder is available in the Parameter Mapping browser.
2 In the column on the left of the Parameter Mapping browser, click the Actions folder.
The available actions appear in the second column of the browser.
3 Select the action you want to map.
Mapping Screen Controls to All Channel Strips in a PatchWhen you map a screen control to a channel strip parameter such as volume or pan, you can map it to control the same parameter in all the channel strips in the patch. This is particularly useful when you want to control the overall volume of a layered sound, even if the different layers are played across multiple keyboards.
To map a screen control to all channel strips in the patch:1 Map the screen control following the instructions in the preceding sections.
2 In the Screen Control Inspector, select the “Send to all Channel Strips” checkbox.
Click the Actions menu tosee available actions.
Click the action youwant to map from
the submenu.

62 Chapter 6 Working in Edit Mode
Removing Screen Control MappingsIf you want a screen control to be free of any mappings, you can remove its existing mapping. This can be useful with controls that pass through MIDI messages (for example, for pitch bend and modulation wheels, or expression pedals) when you do not want them to send MIDI messages for their pass-through control type. You do not need to remove the mapping for a screen control when you remap it.
To reset the mapping for a screen control:1 In the workspace, click the screen control you want to map.
2 In the column on the left of the Parameter Mapping browser, click None.
Working With Sets in Edit ModeSets are like “folders” that let you organize patches you want to keep together. Using sets, you can organize patches in any manner. For example, you can put all the patches you want to use in the first part of a performance together or keep all your lead synth patches together. Sets are flexible, so you can use them in whatever way suits your method of working.
Here are some different ways you can use sets: To group similar or related sounds into “banks” To keep multiple patches you’ll use in a single song together To share a set-level instrument between a group of songs
Creating SetsYou can create a new, empty set or create a set from a group of selected patches.
To create a new, empty set:m Choose New Set from the Action menu in the upper-right corner of the Patch List.
A new set appears in the Patch List.
To create a set from a group of patches:1 In the Patch List, select the patches you want to include in the new set.
2 Choose New Set From Selection from the Action menu at the upper-right corner of the Patch List.
The new set appears in the Patch List containing the selected patches. You can add new patches to the set or drag existing patches into the set.

Chapter 6 Working in Edit Mode 63
Renaming SetsWhen you create a set, it is given a default name. You can rename a set in the same way you rename a patch in the Patch List.
To rename a set:1 Double-click the set in the Patch List.
A text field appears around the set name, which is selected.
2 Type a new name in the set name field.
Using a Set to Change the TempoYou can give a set its own tempo setting so that when you select the set, the tempo changes to the set tempo setting. MainStage uses the new tempo until you select another patch or set with its own tempo setting, tap a new tempo, or until MainStage receives tempo information from incoming MIDI messages. For more information about using and changing tempo in MainStage, see “Using Tempo in a MainStage Concert” on page 39.
To change the tempo using a set:1 In the Patch List, select the set.
2 In the Set Inspector, set the set tempo using the “Change Tempo to” value slider.
3 Click the “Change Tempo to” checkbox to activate the set tempo when the set is selected.
Overriding Concert-Level Key Ranges for a SetIf a software instrument channel strip exists at the concert level, the concert-level channel strip takes precedence over any set-level software instrument channel strips within its key range. This means that when you play any notes in the key range of the concert-level channel strip on a keyboard controller, you hear only the concert-level channel strip, even when a patch is selected in a set with a set-level channel strip.
You can override the concert-level channel strip for a channel strip at the set level, so that the set-level channel strip takes precedence over the concert-level one.
To override concert- or set-level key ranges:1 In the Patch List, select the set with the channel strip that you want to override the
concert-level channel strip.
2 In the Channel Strips area, select the channel strip with the key range that you want to override the concert-level key range.
3 Select the “Override concert and set ranges” checkbox.

64 Chapter 6 Working in Edit Mode
Deleting SetsYou can delete a set if you decide you no longer want it in the concert.
To delete a set:1 Select the set in the Patch List.
2 Choose Edit > Delete (or press the Delete key).
When you delete a set, the patches in the set are also deleted. If you want to delete only the set “folder,” move the patches outside the set before you delete it.
Working at the Set LevelYou can add channel strips at the set level and play the set-level channel strips together with every patch in the set. This can be useful, for example, if you want to use the same bass instrument in a single song or group of songs. You can place the patches for all of the songs in a set, add a channel strip at the set level, and then add a bass instrument to the set-level channel strip. You can set the key range of the bass instrument to play only notes in the lower octaves, so that you can play it together with your patches.
Important: If you add a channel strip at the set level, it takes precedence over all of the channel strips in all of the patches in the set. For example, if you add a software instrument channel strip at the set level, the software instrument for the set takes precedence over all of the software instruments in all of the patches in the set that fall within the same key range as the set-wide software instrument.
To add a set-level channel strip:1 In the Patch List, select the set.
2 Click the Add Channel Strip (+) button at the top of the Channel Strips area.
3 In the New Channel Strip dialog, select the type of channel strip you want to create.
4 Choose the audio output for the channel strip from the Output pop-up menu.
5 For audio channel strips, choose mono or stereo format from the Format pop-up menu and choose the audio input from the Input pop-up menu.
Important: Audio channel strips can produce feedback, particularly if you are using a microphone for audio input. When you add an audio channel strip, the volume of the channel strip is set to silence by default. To quickly eliminate feedback later, you can click the Mute button on the channel strip or press Control-M to activate Master Mute.
6 Click Create.

Chapter 6 Working in Edit Mode 65
Overriding Concert- and Set-Level MappingsBy default, mappings you make at the concert level (to parameters and actions) take precedence over mappings to individual patches or sets in the concert. If you map a screen control to a parameter at the concert level (for example, to Master Volume), that screen control cannot be mapped to a parameter or action in a patch or set, unless you override the concert-level mapping.
Similarly, mappings you make at the set level take precedence over mappings for any patches in the set. If you map a screen control to a parameter at the set level (for example, to an effect on a set-level channel strip), that screen control cannot be mapped to a parameter or action in a patch in the set, unless you override the set-level mapping.
If you try to map a screen control that is mapped at the concert or set level, text appears in the Screen Control Inspector informing you that the screen control is mapped at another level, and the parameters in the Screen Control Inspector are dimmed. You can override the concert- and set-level mappings for an individual patch, and then map the screen control at the patch level.
To override concert-level mappings:m In the Screen Control Inspector, select the “Override Concert mapping” checkbox.
The parameters in the Screen Control Inspector become active.
To override set-level mappings and other parameters for a patch:m In the Screen Control Inspector, select the “Override Set mapping” checkbox.
The Parameter Mapping section becomes active, so that you can map the parameter.
Select the checkbox tooverride mappings at the
concert level.

66 Chapter 6 Working in Edit Mode
Sharing Patches and Sets Between ConcertsYou can export patches and sets from a concert and import them into another concert. When you import a set, all the patches in the set are imported.
To export a patch, do one of the following:m Drag the patch from the Patch List to the Finder.
The patch appears as a .patch file in the Finder.
m Select the patch, choose Export Patch from the Action menu in the Patch List, then click Save.
The patch is exported to the ~/Library/Application Support/Logic/MainStage Patches folder.
To export a set, do one of the following:m Drag the set from the Patch List to the Finder.
The set appears as a .patch file in the Finder.
m Select the set, choose Export Set from the Action menu in the Patch List, then click Save.
The set is exported to the MainStage Patches folder.
Note: You can also export an entire concert as a set by selecting the concert and choosing Export Set from the Action menu.
You can export multiple patches or sets. When you export multiple patches by dragging them to the Finder, each patch is exported as a .patch file. When you select multiple patches and export them using the Export Patch command, the patches are grouped into a single exported set. You can import patches or sets from the Finder to another open concert.
To import a patch or set, do one of the following:m In Edit mode, drag the patch or set from the Finder to the Patch List.
m Choose Import from the Action menu in the Patch List, select the patch or set you want to import, then click Import.
You can also have multiple concerts open at the same time and drag patches and sets from the Patch List of one concert to the Patch List of another concert. However, having multiple concerts open uses more of your computer’s CPU and memory resources. It is recommended that you open multiple concerts only to share patches and sets, and to close all concerts except the one you are working in when you finish sharing patches or sets between concerts. When you are performing live, only one concert should be open.

7
67
7 Working in Layout Mode
You visually arrange your onscreen layout and make connections between your music hardware and MainStage in Layout mode.
You can’t change the position of faders, knobs, and other controls on your instruments or other music hardware, but you can arrange the screen controls in your MainStage concert in any order you like by editing the layout. You can modify an existing layout or create one from a template, and you can export a layout and import it into another concert.
Each concert template included with MainStage includes a built-in layout, optimized for a type of musical instrument, genre, or purpose.
You modify the layout of a concert in Layout mode. You can add and organize screen controls to match your music hardware, optimize your display size, and make assignments between controls on your MIDI hardware and the screen controls in your concert.
To switch to Layout mode, do one of the following:m Choose View > Layout (or press Command-1).
m Click the Layout button in the Toolbar.
The MainStage window switches to Layout mode.
In Layout mode, the workspace features a grid to help you align and organize screen controls. Below the workspace, the Panel Controls and Shelf Controls palettes appear, with different types of screen controls you can add to your layout. The Layout Inspector appears to the left of the workspace, where you can make controller assignments and edit layout parameters.

68 Chapter 7 Working in Layout Mode
Changing the Grid ResolutionWhen you switch to Layout mode, MainStage determines the appropriate grid resolution for your display. In the Layout Inspector, the Grid Resolution pop-up menu shows the current grid resolution. In most cases you should use the default grid resolution unless you plan to perform using a different size of display than the one you use to create your concerts.
To change the grid resolution:m In the Layout Inspector, choose a different resolution from the Grid Resolution pop-up
menu.
Note: If you choose a grid resolution that causes any screen controls in the layout to move outside the visible area, an alert appears, warning you that some screen controls would not be visible at the selected resolution. The screen controls that would be affected by the change appear highlighted in the workspace.
Modifying the Layout of a ConcertYou can modify an existing layout by adding and arranging screen controls in the workspace, changing existing controller assignments or making new ones, and editing screen control parameters. The following sections describe how to add and arrange controls onscreen, make hardware assignments, change the appearance of screen controls, and edit layout parameters. You can also export a layout and import a layout into a different concert. For information about importing and exporting layouts, see “Exporting a Layout” on page 82.
Working With Screen ControlsScreen controls are objects in a MainStage concert that correspond to the physical controls on your music hardware. Screen controls can also display information about patches, parameters, and parameters values, or contain text or images.
In a MainStage concert, screen controls appear in the workspace. You can add screen controls to the workspace, move and resize screen controls, group and lock them to preserve your layout, and edit their appearance in different ways.
After you have arranged the screen controls for your concert in the workspace, you make connections between your MIDI hardware and the concert by assigning physical controls on your hardware to the screen controls in the concert. You only need to make hardware assignments once for a concert, as long as you are using the same music hardware.
After you make controller assignments, you can map screen controls to channel strip parameters in your patches, or to actions. You map parameters in Edit mode. For information about mapping parameters, see “Mapping Screen Controls” on page 60.

Chapter 7 Working in Layout Mode 69
Screen Control TypesThere are two types of screen controls you can use in a MainStage layout: panel controls and shelf controls. In Layout mode, each type has its own palette (the Panel Controls palette and the Shelf Controls palette) located below the workspace. You can add screen controls to the workspace by dragging them from one of the palettes to the workspace.
Panel ControlsWhen you add a panel control to the workspace, it appears surrounded by a flat, glossy panel. When you place panel controls close together, their panels merge into a single, larger panel. Panel controls include: Round and directional knobs Vertical and horizontal faders Button Drum pad Level meter (used to visually display volume level or another parameter) Parameter text (used to dynamically display parameter names and values) Selector (used to select patches while you are performing) Text (used to display song lyrics, performance notes, and other static information) Image
Shelf ControlsWhen you add a shelf control, it appears on a three-dimensional shelf. You can move the shelf, adjust the angle of the shelf, and place multiple controls on the same shelf. For example, if you have a keyboard screen control in your layout, you can add pitch bend wheel and modulation wheel screen controls to the same shelf as the keyboard screen control. Shelf controls include: Keyboard Modulation or pitch bend wheel Sustain pedal Foot pedal Foot switch

70 Chapter 7 Working in Layout Mode
Adding Screen ControlsIn Layout mode you can quickly add screen controls to your layout and arrange them in the workspace.
To add a screen control:m Drag the screen control from one of the control palettes to the workspace.
As you drag the screen control to the workspace, a white outline appears, showing where it will be added. You can use the grid to align the screen control with other items in the workspace.
You can drag screen controls into the workspace in any order. If you plan to perform with a keyboard controller, you might want to first drag a keyboard screen control into the workspace, position it near the center, and then drag screen controls for the faders, knobs, wheels, buttons, and other physical controls on the keyboard controller.
When you drag a screen control into the workspace, the control is selected, and the available hardware assignments and other parameters for the screen control appear in the Layout Inspector to the left of the workspace. Different types of screen controls have different parameters, which are described in “Editing Screen Control Parameters” on page 78.
Adding Mod/Pitch Wheel Screen ControlsWhen you add mod/pitch wheels to a layout, by default they are configured to receive the following MIDI message types: The first mod/pitch wheel is configured to receive modulation messages. The second mod/pitch wheel is configured to receive pitch bend messages. The third mod/pitch wheel is configured to receive aftertouch messages.
By default, modulation and pitch bend screen controls pass through the MIDI messages for their common use—that is, mod wheels pass through MIDI modulation messages, and pitch bend wheels pass through MIDI pitch bend messages. In most cases this is desirable, so that you can use for their standard functions without any additional setup. If you want to use these screen controls to control other parameters, choose “Don’t pass thru” from the MIDI thru pop-up menu in the Layout Inspector.
Adding Foot Pedal Screen ControlsWhen you add a foot pedal to a layout, by default the first foot pedal you add is configured to receive expression messages, and the second foot pedal you add is configured to receive volume messages.
By default, expression pedal screen controls pass through the MIDI messages for their common functions (expression or volume). If you want to use an expression pedal screen control to control another parameter, choose “Don’t pass thru” from the MIDI thru pop-up menu in the Layout Inspector.
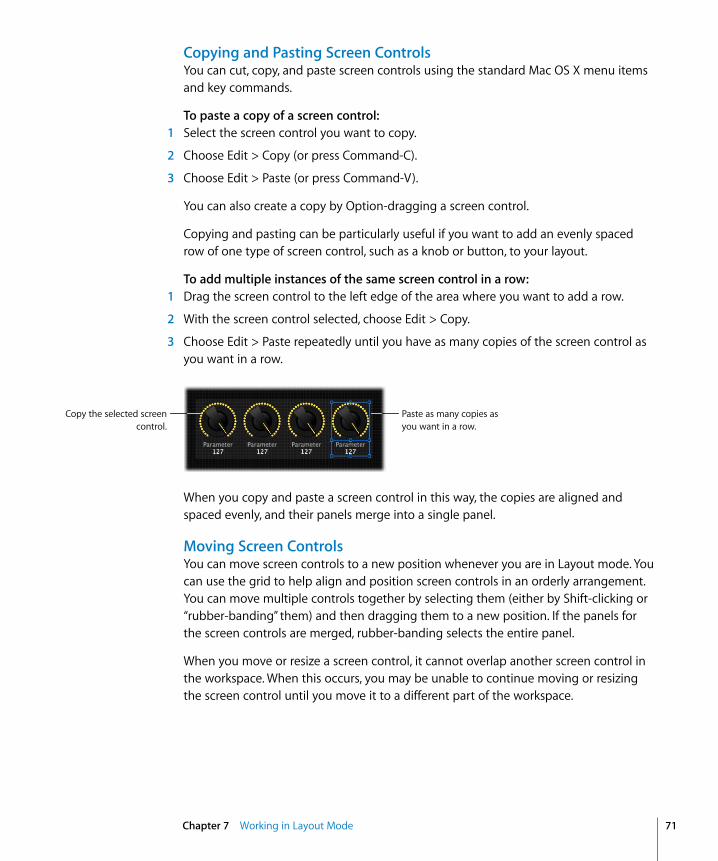
Chapter 7 Working in Layout Mode 71
Copying and Pasting Screen ControlsYou can cut, copy, and paste screen controls using the standard Mac OS X menu items and key commands.
To paste a copy of a screen control:1 Select the screen control you want to copy.
2 Choose Edit > Copy (or press Command-C).
3 Choose Edit > Paste (or press Command-V).
You can also create a copy by Option-dragging a screen control.
Copying and pasting can be particularly useful if you want to add an evenly spaced row of one type of screen control, such as a knob or button, to your layout.
To add multiple instances of the same screen control in a row:1 Drag the screen control to the left edge of the area where you want to add a row.
2 With the screen control selected, choose Edit > Copy.
3 Choose Edit > Paste repeatedly until you have as many copies of the screen control as you want in a row.
When you copy and paste a screen control in this way, the copies are aligned and spaced evenly, and their panels merge into a single panel.
Moving Screen ControlsYou can move screen controls to a new position whenever you are in Layout mode. You can use the grid to help align and position screen controls in an orderly arrangement. You can move multiple controls together by selecting them (either by Shift-clicking or “rubber-banding” them) and then dragging them to a new position. If the panels for the screen controls are merged, rubber-banding selects the entire panel.
When you move or resize a screen control, it cannot overlap another screen control in the workspace. When this occurs, you may be unable to continue moving or resizing the screen control until you move it to a different part of the workspace.
Paste as many copies as you want in a row.
Copy the selected screencontrol.

72 Chapter 7 Working in Layout Mode
Resizing Screen ControlsYou can resize screen controls to make them more easily visible, or to fit them into a smaller area. When you select a screen control, blue resize guides appear over it, which you can drag to resize the control.
To resize a screen control:1 Select the screen control in the workspace.
Blue resize guides appear over the screen control.
2 Drag the resize guides to resize the screen control.
For screen controls with a text display area, such as a knob or fader, you can resize the text display area independently from the control, or resize them together.
To resize the text display area of a screen control:1 Select the screen control in the workspace.
2 Drag the inner resize guide to increase the area of the text display.
3 Drag the outer resize guide to increase the overall size of the control.
Notice that when you resize the text display area, the rest of the screen control becomes smaller. You can first resize the overall control, and then resize the text display area using the inner resize guide.
Drag the outer resize guides to resize the screen control.
Drag the inner resize guide to resize the text area.

Chapter 7 Working in Layout Mode 73
Merging Screen ControlsWhen you place screen controls close together so that their edges are adjacent, the panels (for Panel controls) or the shelves (for Shelf controls) merge. The merged panel or shelf “grows” to encompass all of the adjacent screen controls.
Merging screen controls does not affect how they work, but helps organize them visually in the workspace. You can still move or resize a merged screen control by selecting the control and then dragging it to move it or dragging its resize guides to resize it. If you move or resize merged screen controls, the merged panel or shelf adjusts to encompass the moved or resized screen control, as long as it remains adjacent to the others.
When you select a merged screen control by rubber-banding, the merged panel or shelf and all the screen controls on it are selected, making it easy to move them together. You can select individual merged controls by Shift-clicking them.
Adjusting the Shelf for a Shelf ControlWhen you add a shelf control such as a keyboard to the workspace, it appears at a default angle, creating a three-dimensional appearance. You can adjust the angle of the shelf control so that it appears more or less three-dimensional. This can be useful, for example, if you want to see more of the keys on the keyboard, or minimize the amount of space it occupies onscreen.
To adjust the angle of the shelf for a shelf control:1 In the workspace, select the shelf control.
White alignment guides for the control’s shelf appear.
Their panels or shelves merge.
Move screen controls close together.
Alignment guides

74 Chapter 7 Working in Layout Mode
2 Drag the lower alignment guide (the one aligned with the front of the shelf control).
Drag the lower alignment guide down to make the angle steeper (as though you are looking down on the shelf control from above), or drag it up to make the angle less steep (as though you are looking at it from the front).
Moving the Shelf VerticallyYou can also move the shelf vertically to change its position in the workspace. When you move the shelf vertically, all screen controls on the shelf (for example, a modulation or pitch bend wheel and a keyboard) move with the shelf.
To move a shelf vertically:1 Select one of the screen controls on the shelf.
The alignment guides for the shelf appear.
2 Place the pointer over the upper alignment guide (the one aligned with the rear of the shelf control).
The pointer becomes a move pointer (a horizontal bar with up and down arrows).
3 Drag the upper alignment guide to move the shelf to a new position.
Drag the front (lower)alignment guide to
change the angleof the shelf.
Drag the rear (upper)guide to move the shelf
vertically.

Chapter 7 Working in Layout Mode 75
Grouping Screen ControlsYou can group screen controls together. When you group screen controls, moving or resizing one of the grouped controls moves or resizes the others by the same amount. Grouping screen controls has no effect on how they work in performance, but makes arranging them in the workspace easier.
To group screen controls:1 Select the screen controls you want to group together.
2 Choose Group from the workspace Action menu (or press Command-Option-G).
The screen controls are grouped. Moving one of the grouped controls moves the others, and resizing one of the grouped controls resizes the others.
Note: Because screen controls cannot overlap, in some cases the movement of grouped controls is constrained. When you move grouped controls, make sure there are no other controls in the way.
If you want to move one of the grouped controls separately, you can ungroup the controls.
To ungroup screen controls:1 Select the grouped controls.
2 Choose Ungroup from the workspace Action menu (or press Command-Shift-Option-G).
Group and Ungroup buttons are also available in the Toolbar if you customize the Toolbar. For information about customizing the Toolbar, see “Customizing the Toolbar” on page 35.
Locking Screen ControlsYou can lock screen controls to prevent them from being moved or resized accidentally.
To lock a screen control:1 Select the screen control (or controls) you want to group.
2 Choose Lock from the workspace Action menu (or press Command-L).
The screen control is locked. If you want to move or resize it later, you can unlock it.
To unlock a screen control:1 Select the locked screen control (or controls).
2 Choose Unlock from the workspace Action menu (or press Command-Shift-L).
Lock and Unlock buttons are also available on the Toolbar if you customize the Toolbar. For information about customizing the Toolbar, see “Customizing the Toolbar” on page 35.

76 Chapter 7 Working in Layout Mode
Deleting Screen ControlsIf you decide you no longer want a screen control in your layout, you can delete it from the workspace.
To delete a screen control:1 Select the screen control you want to delete.
2 Choose Edit > Delete (or press the Delete key).
When you delete a screen control, any assignments or mappings for the screen control are deleted as well.
Assigning Hardware Controls to Screen ControlsTo use MainStage with a MIDI controller, you assign hardware controls on the controller (such as faders, knobs, buttons, drum pads, and pedals) to screen controls in the workspace. After you assign a hardware control to a screen control, the screen control receives the MIDI messages from the hardware control. You only need to make controller assignments once for a concert as long as you use it with the same hardware.
You assign hardware controls to screen controls using the Learn process, which is similar to the process for learning controller assignments for a control surface in Logic Pro 8. The Learn process is described in “Learning Controller Assignments” on page 30.
When you assign a hardware control using the Learn button, MainStage determines the type of MIDI message the control sends when you move it, and the range of values the control is capable of sending. When you map the screen control to a channel strip parameter or an action, MainStage converts (or “maps”) the range of values sent by the hardware control to the optimal range of values usable by the parameter.
For example, many faders, knobs, and other MIDI controls send a range of numeric values between 0–127. You could map a hardware knob with this range of values to control the frequency parameter of an EQ effect, which has a range of usable values between 20 Hz–20 kHz. When you map the screen control for the knob to the EQ frequency parameter, MainStage converts the values sent by the hardware knob to be distributed between the minimum (20 Hz) and maximum (20 kHz) values for the parameter.

Chapter 7 Working in Layout Mode 77
Assigning KnobsMIDI controllers can have different types of knobs or rotary controllers. Knobs can be either absolute controllers, which send a fixed value determined by the knob’s position, or can be relative controllers, which increment or decrement the previous value regardless of their exact position. Knobs can either have a fixed range of movement, or be continuous (sometimes called endless rotary encoders).
When you assign a knob screen control using the Learn button, MainStage attempts to determine which type of knob or rotary control on your hardware is sending the MIDI message and sets the value in the Type pop-up menu in the Layout Inspector to the correct value. For absolute controllers, the correct value is Absolute; for relative controllers, the correct value can be either Relative (2’s complement) or Relative (Sign magnitude), depending on the type of relative controller.
When you assign a knob screen control, be sure the Type pop-up menu shows Absolute if the hardware controller is an absolute rotary controller, or shows one of the two Relative values if the hardware controller is a continuous rotary controller. Moving the knob through its full range of motion helps ensure that MainStage correctly determines the type of knob you are assigning.
Assigning ButtonsMIDI controllers can have different types of buttons. Some buttons send a single value each time you press them, while others alternate between two values when pressed. Other buttons can send separate values when they are pressed and released (this type of button is called a momentary or temporary button).
When you assign a button screen control using the Learn button, MainStage attempts to determine which type of button on your hardware is sending the MIDI message, and sets the value in the Type pop-up menu in the Layout Inspector to the correct value for that button type. To enable MainStage to determine the correct value, press the button exactly three times when you are learning it. Pressing the button three times helps ensure that MainStage determines if the button is a single value, alternating value, or momentary button.
You can change the function of a momentary button to match the function of a single value or alternating value button.

78 Chapter 7 Working in Layout Mode
To change the function of a momentary button:1 In Layout mode, be sure the button screen control is selected.
2 In the Layout Inspector, choose either Single Value or Alternating Value from the Type pop-up menu.
Choose Single Value if you want the button to function as a single value button, or choose Alternating Value if you want the button to function as an alternating value button. You cannot change the function of a single value or alternating value button to match the function of a momentary button.
Editing Screen Control ParametersWhen you select a screen control in Layout mode, the parameters for the screen control appear in the Layout Inspector where you can edit them. Some types of screen controls share the same common parameters, and others have different parameters. The parameters for each type are described in the following section.
To edit screen control parameters:1 In Layout mode, select the screen control. (When you drag a screen control to the
workspace, it is selected.)
2 In the Layout Inspector, edit the parameters for the selected screen control by choosing the menu item, typing text, clicking the button, or selecting the checkbox for the parameters you want to edit.
Keyboard ParametersYou can edit the following parameters for keyboard screen controls.
Hardware Assignment Device pop-up menu: Shows the name of the learned keyboard. The device name
may correspond to the name of the keyboard controller, or to a port on the controller, if it has multiple ports. You can choose another device, or choose All.
 Channel pop-up menu: Shows the MIDI channel on which MainStage receives input from the keyboard. You can choose another channel, or choose All.
 Velocity Sensitivity slider: Sets the velocity sensitivity for the keyboard. Less means that higher velocities are required to trigger the maximum value, while More means that lower velocities trigger the maximum value.
Settings Name field: Enter a name for the keyboard. The name appears in the Input pop-up
menu in the Channel Strip Inspector, where you can select the device the channel strip responds to.
 Number of Keys value slider: Enter the number of keys to display on the keyboard screen control.
 Lowest Key value slider: Enter the note name for the lowest key.

Chapter 7 Working in Layout Mode 79
 Lowest Key Learn button: Click the Learn button, then press the lowest key to have MainStage learn it.The Number of Keys and Low Key affect only the visual appearance of the screen control. They do not affect what notes are received from your keyboard controller.
Layer Display Display keyboard layers checkbox: When active, a layer is displayed above the
keyboard in the workspace for each software instrument channel strip in a patch. The layers show the name and color of the channel strip, and respond when you play the keyboard.
 Height value slider: Sets the height of the layer display that appears above the keyboard.
Common Screen Control ParametersYou can edit the following parameters for fader, knob, pedal, mod/pitch wheel, meter, and parameter text screen controls.
Hardware Assignment Device pop-up menu: Shows the name of the device containing the assigned control.
The device name may correspond to the name of the controller, or to a port on the controller, if it has multiple ports. You can choose another device, All, or Unassigned.
 Channel pop-up menu: Choose the MIDI channel on which MainStage receives input from the controller.
If you plan to use more than one keyboard when you perform, be sure that screen controls such as faders and knobs are assigned receive input from the correct controller using the Device and Channel pop-up menus. Type pop-up menu: Choose the type of control messages to which the control
responds. Number pop-up menu: Choose the MIDI control number that the control sends. For
common MIDI controls, such as volume, the control name appears in the menu along with the number.
 MIDI Thru pop-up menu: Choose whether the control automatically passes MIDI through, or does not pass MID through.
Appearance Color selector: Choose the color for the active part of the screen control, which
visually displays its current value in performance. (This parameter is not available for text or meter screen controls.)
 Control pop-up menu: Choose the type for the screen control. If you change the control to a different type, you may need to resize it in the workspace.

80 Chapter 7 Working in Layout Mode
Text Labels Display pop-up menu: Choose what information is displayed in the text display area
for the control, and how many lines are used to display it. Add Custom Text checkbox and field: Select the checkbox, then type custom text in
the field to display it on the top line of the control’s text display.
Drum Pad ParametersYou can edit the following parameters for drum pad screen controls.
Hardware Assignment Device pop-up menu: Shows the name of the device containing the drum pad. You
can choose another device, All, or Unassigned. Channel pop-up menu: Choose the MIDI channel on which MainStage receives input
from the controller. Note value slider: Set the MIDI note to which the drum pad responds.
Appearance Color selector: Choose the color for the active part of the screen control, so that you
can easily see when the drum pad is pressed. Control pop-up menu: Choose the type for the screen control. If you change the
control to a different type, you may need to resize it in the workspace.
Text Labels Display pop-up menu: Choose what information is displayed in the text display area,
and how many lines are used to display text. Add Custom Text checkbox and field: Select the checkbox, then type custom text in
the field to display it on the top line of the control’s text display.
Text ParametersYou can edit the following parameters for text screen controls. Font button: Click to show the Font menu from which you can select the font, style,
and size. Alignment buttons: Select whether the text is left, right, or center aligned, or justified. Text field: Enter the text you want to display onscreen. Show frame around text checkbox: When selected, a darker frame appears around the
text, showing the borders of the screen control.

Chapter 7 Working in Layout Mode 81
Image ParametersYou can edit the following parameters for image screen controls. Stretch to Fit checkbox: When selected, the image stretches to fill the area of the
Image screen control as completely as possible. Show frame around image checkbox: When selected, a darker frame appears around
the image, showing the borders of the screen control. Image well: Drag an image to into the well to display it using the Image screen control. Select button: Click to open an Open File dialog to browse and select an image.
Patch Selector ParametersYou can edit the following parameters for patch selector screen controls. View Patches and Sets button: When active, both patches and sets are shown in the
selector. Dual Column Display checkbox: When selected, sets are displayed in the left column
and patches are displayed in the right column. View Patches only button: When active, only patches are shown in the selector. Items to Display value slider: Set the number of items (lines) visible in the selector.
How MainStage Passes Through MIDI MessagesWhen MainStage receives incoming MIDI messages from your keyboard controller (or other MIDI device), they are “passed through” if no screen control in your current layout is assigned to receive that type of MIDI message (as set in the Number pop-up menu of the Layout Inspector for the screen controls).
If a screen control for that type of MIDI message exists, the data is not passed through if the MIDI Thru pop-up menu is set to “Do not pass through.” This is the default for most screen controls when you add them to a layout. The exceptions are screen controls assigned to the following MIDI message types: modulation, pitch bend, sustain, expression, and aftertouch. By default, when you add one of these screen controls, the MIDI pop-up menu is set to Automatic. The reason for these exceptions is so that when you add a screen control for a modulation wheel or a sustain pedal, for example, it “automatically” responds to the appropriate MIDI message type, without your having to configure it further. If you want to have the screen control respond to a different type of MIDI message, you can choose another MIDI message type from the Number pop-up menu in the Layout Inspector.
Incoming MIDI messages that are passed through are passed to any channel strips mapped to the same device sending those messages (that is, to the keyboard controller you are using to “play” those channel strips). If there is no matching device, the MIDI messages are sent to all channel strips.

82 Chapter 7 Working in Layout Mode
You can also filter incoming MIDI messages for individual channel strips. For information on filtering MIDI messages, see “Filtering MIDI Messages” on page 60.
Exporting a LayoutYou can export a layout so that you can save it independently from the concert, and import it into other concerts.
To export a layout:1 Choose File > Export Layout (or press Command-Shift-Control-S).
2 In the Save As dialog, type a name for the layout, and browse to a location where you want to save the layout (or use the default location).
3 Click Save.
Importing a LayoutYou can import an exported layout into another concert, and then adjust it to work with the mappings in the concert.
To import a layout into a concert:1 Choose File > Import Layout (or press Command-Control-O).
2 In the Open dialog, select the layout you want to import.
3 Click Open.
The layout for the concert changes to the imported layout.
When you import a layout into a concert, MainStage analyzes the layout and attempts to convert the assignments and mappings in the layout to work with the concert. It uses the following rules to convert imported assignments and mappings:Â Screen controls are assigned and mapped to screen controls of the same type if they
exist in the imported layout. Keyboard screen controls are assigned only to keyboard screen controls. If the arrangement of screen controls in the concert is similar to their arrangement in
the imported layout, screen controls are assigned and mapped to screen controls in the same positions in the workspace.
 If the arrangement of screen controls in the concert is different, MainStage tries to assign and map screen controls starting from the top-left corner of the workspace to the bottom-right corner.

Chapter 7 Working in Layout Mode 83
Because of the wide variety of possible layouts, not all assignments and mappings may be converted as you intended, depending on the differences between the layouts. After you import a layout into a concert, be sure to try the screen controls in the concert to see if they work as expected. After importing the layout, you may need to manually reassign some controls and then manually remap screen controls in your patches for the concert to work with the new layout. If the imported layout has fewer screen controls than the old layout, or has different types of screen controls, you will likely have to add new screen controls after importing and then assign physical controls to the screen controls to maintain the same level of functionality.


8
85
8 Performing Live With MainStage
Now that you’ve created and organized your sounds and set up your layout, it’s time to play! MainStage features two modes, Full Screen mode and Perform mode, optimized for live performance.
Before the Performance StartsHere are a few things to check before you start performing:Â Make sure your MIDI controllers, instruments, microphones, and other music
equipment is connected to your computer and is working. Select a patch with a software instrument channel strip and play your keyboard
controller. Watch the Activity Monitor to make sure MainStage is receiving MIDI input from the controller, and make sure you can hear the audio output.
 Make sure any instruments or microphones you plan to play through audio channel strips are connected to the correct audio inputs on your audio interface. Select a patch with an audio channel strip and play or sing to make sure you can hear audio output.
 For the best results, close any applications that you do not need while performing, particularly applications with high processor or RAM requirements.
Using Full Screen Mode and Perform ModeWhen you perform live, you can use either Full Screen mode or Perform mode, depending on which you prefer. Each mode offers some advantages for different performance situations.
Working in Full Screen ModeIn Full Screen mode, the MainStage workspace fills the entire screen, and screen controls appear at the maximum possible size for easy viewing. MainStage receives all keyboard input (so no other key commands, including Mac OS X key commands, are active). You can access the Master Mute and Panic functions and the Tuner using their key commands, or if you have mapped screen controls to these functions.

86 Chapter 8 Performing Live With MainStage
To switch to Full Screen mode, do one of the following:m Choose View > Full Screen (or press Command-4).
m Click the Full Screen button in the Toolbar.
To leave Full Screen mode, do one of the following:m Press the Escape (Esc) key.
m Click the circled “X” in the upper-left corner of the screen.
m Use the key command for one of the other modes (Command-1 through Command-3).
Working in Perform ModeIn Perform mode, the workspace fills the MainStage window, but the Toolbar is still visible so that you can access the Master Mute, Panic, Tuner, and other Toolbar buttons. You can resize the MainStage window and can also change the size of the workspace inside the window using the zoom slider. You can access the Finder and other open applications by clicking outside the MainStage window.
To switch to Perform mode, do one of the following:m Choose View > Perform (or press Command-3).
m Click the Perform button in the Toolbar.
By default, when you open MainStage, it opens in Edit mode. You can change the default behavior in the General pane of MainStage Preferences so that it opens in Perform or Full Screen mode. For more information, see “Setting MainStage Preferences” on page 97.
Selecting Patches in PerformanceIn Full Screen or Perform mode, you can view and select patches using the patch selector screen control in your layout. Patches and sets appear in the patch selector in the same order as in the Patch List in Edit mode. Skipped items do not appear in the patch selector and cannot be selected, but patches in collapsed sets do appear and can be selected. For information about skipping items, see “Skipping Items in the Patch List” on page 48.
When you select a patch, you can start playing it instantly. If you are sustaining notes from the previous patch, they will continue to be sustained until you release the notes or the sustain pedal. If the previous patch contains effects (such as a reverb or delay effect) with a release “tail,” the effect tail continues sounding for the amount of time set in the Silence Previous Patch pop-up menu in MainStage Preferences. For more information, see “Setting MainStage Preferences” on page 97.

Chapter 8 Performing Live With MainStage 87
When performing, keep in mind the difference between patch parameters and parameters controlled at the concert level. When you select a patch, its parameters are set to the values at which you last saved the patch. If you have previously played the patch since you opened the concert, they are set to the values at which you left them when you played the patch. Parameters at the concert level, however, remain at their current value when you select new patches. For example, if you select a patch with a channel strip set to a volume 0 dB, but the Master volume fader at the concert level is set to –96 dB, you will hear silence, not full volume. Similarly, parameters controlled at the set level remain at their current value when you select a different patch in the set.
Also keep in mind that when you select a patch, the screen controls for knobs, faders, and other controls in the workspace show the parameter values for the patch, which may be different than the positions of the physical controls on your controller. When you move the physical controls, the screen controls instantly update to show the current value.
Selecting Patches Using Key CommandsYou can select patches in the patch selector using the following key commands:
Selecting Patches Using ActionsIf you have mapped screen controls to actions for selecting patches, such as selecting the previous or next patch, you can select the patches using the physical controls assigned to those screen controls as you perform. You can also select sets or the concert using actions. Buttons are particularly useful for selecting patches, sets, or the concert using actions.
When selecting patches using actions, skipped patches are also skipped. For example, if you use a screen control mapped to select +10 patches, any skipped patches would not be counted in the +10.
Key command Selection
Up Arrow The previous patch
Down Arrow The next patch
Left Arrow The first patch in the previous set
Right Arrow The first patch in the next set

88 Chapter 8 Performing Live With MainStage
Selecting Patches Using Program Change MessagesIf your MIDI device has buttons or other controls that send program change messages, you can select patches in your concert by program change number. You can use program change messages to select patches, but not sets.
For information about how your MIDI device sends program change messages, consult the documentation that came with the device or the manufacturer’s website. For information about changing the program change number for a patch, see “Changing Program Change Numbers” on page 49.
Using Screen Controls in PerformanceIn performance, you use the controls on your MIDI hardware devices that are assigned to screen controls to manipulate the parameters mapped to those screen controls. When you select a new patch, the parameters you mapped for that patch are instantly available for editing.
When you move a physical control, the screen control instantly moves to reflect the current position of the physical control, and the parameter mapped to the screen control is instantly updated to the current value. MainStage screen controls do not “latch” to a specific value or move relative to the physical control, but reflect the current value.
Handling Tempo Changes in PerformanceWhen you open the concert you plan to use in your performance, MainStage uses the tempo for the concert you set in the Concert Inspector. If the “Get tempo from MIDI input” checkbox is selected, MainStage uses incoming MIDI tempo messages to set the tempo. For information about setting and changing the tempo in a concert, see “Using Tempo in a MainStage Concert” on page 39.
If you select a patch or set with its own tempo setting, the tempo changes to the new setting. You can also change the tempo in real time while you perform using the Tap Tempo feature, either by pressing Control-T repeatedly at the tempo you want to use, or by clicking the Tap Tempo button in the Toolbar repeatedly.

Chapter 8 Performing Live With MainStage 89
Performing With Guitars and Other InstrumentsYou can play electric guitars and other music instruments connected to your computer, using MainStage as a multi-effects processor. You choose the audio input to which the instrument is connected in the audio channel strips you want to use with the instrument. You can use guitar and bass amplification as well as other effects commonly used with guitars, or try using different effects for unique sound possibilities.
MainStage includes concert templates designed to be used with guitars. Some guitar-oriented templates include patches with pedal board-style screen controls that can be assigned to a foot switch, allowing you to bypass different effects in the channel strip. Some patches also allow you to switch between channel strips with different effects using an expression pedal.
When playing guitars and other low-impedance instruments, be sure they are connected to an audio input that matches the impedance of the instrument. Connecting a guitar to a standard line-level audio input may produce a lower volume level for the guitar’s output than intended.
You can also use MainStage with vocals, or any sound captured with a microphone, using an audio interface connected to your computer, and choosing the audio input channel in audio channel strips in your patches.

90 Chapter 8 Performing Live With MainStage
Using the TunerMainStage includes a Tuner that you can use to tune guitars and other instruments you play through an audio channel strip. The Tuner shows pitch on a circular scale with the note name and octave displayed in the center of the scale. When you play a single note on your instrument, the pitch is shown in relation to the correct pitch for the note displayed.
To tune an instrument using the tuner:1 Select the audio channel strip to which the instrument you want to tune is connected.
2 Click the Tuner icon in the Toolbar (or press Control-T).
The Tuner appears in the workspace.
3 Play a single note on your instrument, and watch the Tuner display.
As you play, the Tuner shows the note name of the closest note. If the note is not in tune, the note name and the Tuner glow red, and a vertical red bar appears, showing whether the note is sharp or flat.
The bar appears to the right of the note name if the note is sharp, and to the left if the note is flat. When the note is in tune, the note name and the tuner scale glow blue, and the vertical bar disappears.
Be sure to play only a single note at a time while tuning. The Tuner can’t tune to a chord or interval, or if you play different notes rapidly. For more information about the Tuner, refer to the Logic Studio Instruments and Effects manual.

Chapter 8 Performing Live With MainStage 91
Tips for Complex Hardware SetupsIt is highly recommended that you test your concert thoroughly using the same setup you plan to use in live performance prior to performing, at the performance location or venue if possible. This is especially important for more complex hardware setups.
Using Multiple Keyboard Controllers in PerformanceIf you plan to use multiple keyboard controllers when you perform, you can choose whether screen controls respond to MIDI messages from all controllers or only a specific controller, and whether channel strips receive input from all controllers or only a single controller.
In Layout mode, screen controls can be set to respond to MIDI input on all MIDI ports and channels or to only a specific device or channel. To have a screen control respond to MIDI input from all controllers, choose All from both the Device and Channel pop-up menus in the Layout Inspector. To have a screen control respond to only a specific controller, choose that controller from the Device pop-up menu, or to the same channel as the keyboard screen control.
In Edit mode, you set the device from which a channel strip receives MIDI input in the Key Range section of the Channel Strip Inspector. By default, channel strips receive input from the first controller in the layout. You can set a channel strip to receive input from another device in the Input pop-up menu.
Using a Different Hardware Setup in PerformanceIf you use MainStage with a complex hardware setup, for example with multiple MIDI controllers or MIDI interfaces, or with multiple audio inputs, you will achieve the best results when using exactly the same hardware setup you used when you created your concert.
If you plan to use MainStage with different controllers, interfaces, or other devices than the ones you used to create your concert, you need to relearn your hardware assignments using your performance hardware setup. To facilitate working in this situation, you can create two separate layouts, one for your studio setup and another for your performance setup, with corresponding screen controls in each layout. Before you perform, import the performance layout into your concert. The hardware assignments for your performance setup are imported with the layout, and your mappings are maintained.


93
A App
endi
x
A Key Commands
The following tables show the key commands for MainStage, grouped by function.
Concerts and Layouts
Patches and Sets (Edit Mode)
Key command Function
Command-N New Concert
Command-O Open Concert
Command-W Close Concert
Command-S Save Concert
Command-Shift-S Save Concert As
Command-Control-O Import Layout
Command-Shift-S Export Layout
Key command Function
Command-I Import Patches or Sets
Command-E Export Patch, Export Set, or Export As Set
Command–Left Arrow Select Previous Patch
Command–Right Arrow Select Next Patch
Command–Up Arrow Select Previous Set
Command–Down Arrow Select Next Set
Command-Shift-Option-S Create New Set from Selected Patches

94 Appendix A Key Commands
Editing
Actions
Parameter Mapping (Edit Mode)
Channel Strips (Edit Mode)
Key command Function
Command-Z Undo Last Command
Command-Shift-Z Redo Last Undone Command
Command-X Cut
Command-C Copy
Command-V Paste
Command-D Duplicate
Command-A Select All
Key command Function
Control-P Panic
Control-T Tap Tempo
Control-M Master Mute
Key command Function
Command-L Map the selected parameter (turn on mapping)
Command-F Find in Parameter Mapping browser
Command-G Find again
Key command Function
Command-Option-A Add audio channel strip
Command-Option-I Add software instrument channel strip

Appendix A Key Commands 95
Screen Controls (Layout Mode)
Window and View
Help and Support
Key command Function
Command-L Learn controller assignment (turn on the Learn process)
Command-Option-G Group
Command-Shift-Option-G Ungroup
Command-Shift-L Lock
Command-Shift-Option-L Unlock
Key command Function
Command-1 Layout mode
Command-2 Edit mode
Command-3 Perform mode
Command-4 Full Screen mode
Command-5 Show/Hide Inspectors
Command-6 Show/Hide Channel Strips area
Command-M Minimize
Command-, (comma) Open MainStage Preferences
Key command Function
Command-? (question mark) MainStage User Manual


97
B App
endi
x
B Setting MainStage Preferences
General PreferencesThese preferences let you set the tuning of software instruments, choose what happens when you open MainStage, choose different graphics performance settings, and set whether screen controls highlight when their parameter values change. Tuning slider: Sets the tuning for all software instruments in MainStage. Tuning is
centered around A440 Hz, in the range of ±100 cents. Startup Action pop-up menu: Choose the startup action when you open MainStage.
The choices are:Â Do Nothing: Opens the Choose Template dialog so that you can choose a concert
template to create a new concert. Open Most Recent Concert: Opens the last open concert in the same mode it was in
when you closed it. Open Most Recent Concert in Perform Mode/Full Screen Mode: Opens the last open
concert in the selected mode, either Perform or Full Screen mode. At Launch Open Concert in Perform Mode/Full Screen Mode: If you open MainStage
by double-clicking a concert in the Finder, the concert opens in the selected mode, either Perform or Full Screen mode.
 Graphics Performance pop-up menu: Choose a setting for better quality or better graphics performance, or choose Automatic to have MainStage select the appropriate setting for your computer. In most cases, Automatic should provide optimum results.
 Highlight objects when values change checkbox: When selected, screen controls in the workspace are highlighted briefly whenever their corresponding parameter values change.

98 Appendix B Setting MainStage Preferences
Audio/MIDI PreferencesThese preferences let you set the audio output and input drivers, set the size of the I/O buffer, set the audio sample rate, and choose which note is displayed as middle C.
Audio Audio Output pop-up menu: Choose the device you want to use to hear the audio
output from MainStage. Audio Input pop-up menu: Choose the device you want to use as the source for audio
input. I/O Buffer Size pop-up menu: Choose the size of the buffer for audio input and output
in samples. Smaller buffer sizes reduce the amount of latency, but also require more work from the CPU and may result in playback artifacts. You may want to try different settings to find the lowest setting that does not produce any artifacts.
 Sample Rate pop-up menu: Choose the sample rate for audio input. If you are using an audio interface or other audio device with MainStage, the Sample Rate value should be set to the sample rate of your audio device.
 Silence Previous Patch: Choose the amount of time sustained notes and effects tails continue to sound before falling to silence when you select a new patch.
MIDI  Display Middle C As pop-up menu: Choose whether middle C is displayed as C3 or C4. MIDI Status display: Displays the number of detected MIDI inputs.

99
Inde
xIndex
AAction menu
for Channel Strips area 55for Channel Strip Settings browser 53for Patch List 20, 48, 49Layout mode 75
actions, mapping screen controls to 61Actions folder 61Apple Store 13Apple websites 12–13
CChannel Strip Inspector 20channel strips 51
adding 27adding at concert level 46adding at set level 64changing color 55changing icon 55creating controller transform 58deleting 60differences from Logic 51filtering MIDI messages 60mapping screen controls to parameters 60renaming 55resetting 54setting velocity offset 58setting velocity range 58
Channel Strips areadescription 21showing 35
channel strip settingschoosing 29, 53editing 54editing parameters 54searching for 53
Channel Strip Settings browserchanging settings with 53overview 20
Concert Inspector 20concert level
adding channel strips 46
adding effects 44mapping screen controls 43overriding key ranges 57working on 42
concerts 8, 37closing 38controlling overall volume 43creating from template 23opening 37saving 38
concert template, choosing 23controller assignments 30, 76controller transform, creating 58Customize sheet 35, 36
EEdit mode 9, 20education users 13
FFireWire website 13Full Screen mode 22
switching to 33using 85
Ggrid resolution, changing 68guitars, using MainStage with 9, 89
Hhardware controls, assigning 76help, onscreen 12
Iicons, showing in Toolbar 36
Kkeyboard controllers, using 8keyboard splits
creating 56defining key range 56setting floating split points 56

100 Index
LLayout Inspector 19Layout mode
description 19switching to 67
layouts 8exporting 82importing 82
Logic Studio, learning about 13
MMainStage, onscreen help 12Master Mute 41microphones, using 9MIDI
filtering 60passing through messages 81
MIDI controllers, assigning controls 76
PPanic 42Parameter Mapping browser 20patches 8
adding 26changing icon 50changing program change number 49changing the tempo with 50deleting 50exporting 66importing 66naming 27overriding concert-level key ranges 57playing 25reordering 48selecting 25
Patch Inspector 20Patch List
overview 20reordering patches in 48
Perform mode 21switching to 33using 86
program change numberschanging 49selecting patches with 88
QQuickTime 13
SScreen Control Inspector 20screen controls 8, 18
adding 70adjusting shelf 73copying 71
deleting 76editing parameters 78grouping 75locking 75mapping to parameters 31, 60merging panels and shelves 73moving 71Panel 69pasting 71resizing 72Shelf 69types of 69working with 68
Set Inspector 20set level, working on 64sets
changing the tempo with 63creating 62deleting 64importing 66naming 63working with 62
signal flow channel strips 55specifications 13
Ttempo
changing in performance 88getting from MIDI input 40setting for a patch 50tapping 40using in a concert 39
Toolbarbuttons 35–36customizing 35–36
transforms, creating 58tuner, using 90
UUser Manual 12
Vvelocity offset 58velocity range 58
Wwebsites
Apple homepage 13Apple Service and Support 12Apple Store 13Apple websites 13FireWire 13QuickTime 13
workspace 18