make a desktop app with wordpress and … · page 1 make a desktop app with wordpress exeoutput for...
TRANSCRIPT

MAKE A DESKTOP APP
WITH WORDPRESS AND
EXEOUTPUT FOR PHP An ExeOutput for PHP tutorial

Page 1
Make a desktop app with WordPress
ExeOutput for PHP is a PHP to EXE compiler that can compile PHP websites
into stand-alone apps for Windows. With it, you can use WordPress to create
offline desktop apps that do not require any web server. This tutorial shows
you all the steps from the configuration of WordPress to the distribution of
your WordPress-based app.
Learn more about ExeOutput for PHP at http://www.exeoutput.com

Page 2
1. Prepare WordPress source directory
1.1 Download WordPress from wordpress.org
You can get the latest WordPress package at https://wordpress.org/download/
1.2 Create a folder where we will place all files (project, EXE, source files...). For
instance, "wordpress" in "Documents":

Page 3
1.3 Create another folder named "source" under the new "wordpress" folder:
1.4 Unpack the Zip archive to the "source" folder:

Page 4

Page 5
1.5 Go back to the initial "wordpress" folder and create a "Data" subfolder:
This "Data" subfolder will be used by the PHP application to store its files such as WordPress
themes, configuration files, temporary files and so on.
1.6 Navigate to "wordpress\source\wordpress" location and choose the "wp-
content" folder. Then right click and click Cut.

Page 6
1.7 Go back to the "wordpress\Data" folder you created previously, create a
"wordpress" folder, enter it and choose Paste to move the "wp-content" folder to
the new location:

Page 7
You should consider that all files in the "source" folder will be read-only when compiled with
ExeOutput for PHP. "wp-content" shouldn't be read-only, that's why we are moving it to the
"Data" folder.

Page 8
2. Start ExeOutput for PHP and install necessary add-ons by running
the Web Update utility
WordPress requires some additional packages such as MySQL. If you have already run the Web
Update utility of ExeOutput for PHP, you can skip the following steps.
2.1 Click "Check for Updates" or the corresponding icon
2.2 The "Web Update" utility is shown. Click "Check" (make sure you have an
active Internet connection)

Page 9
2.3 Make sure that "MySQL" and "Adminer" packages are selected and click Install
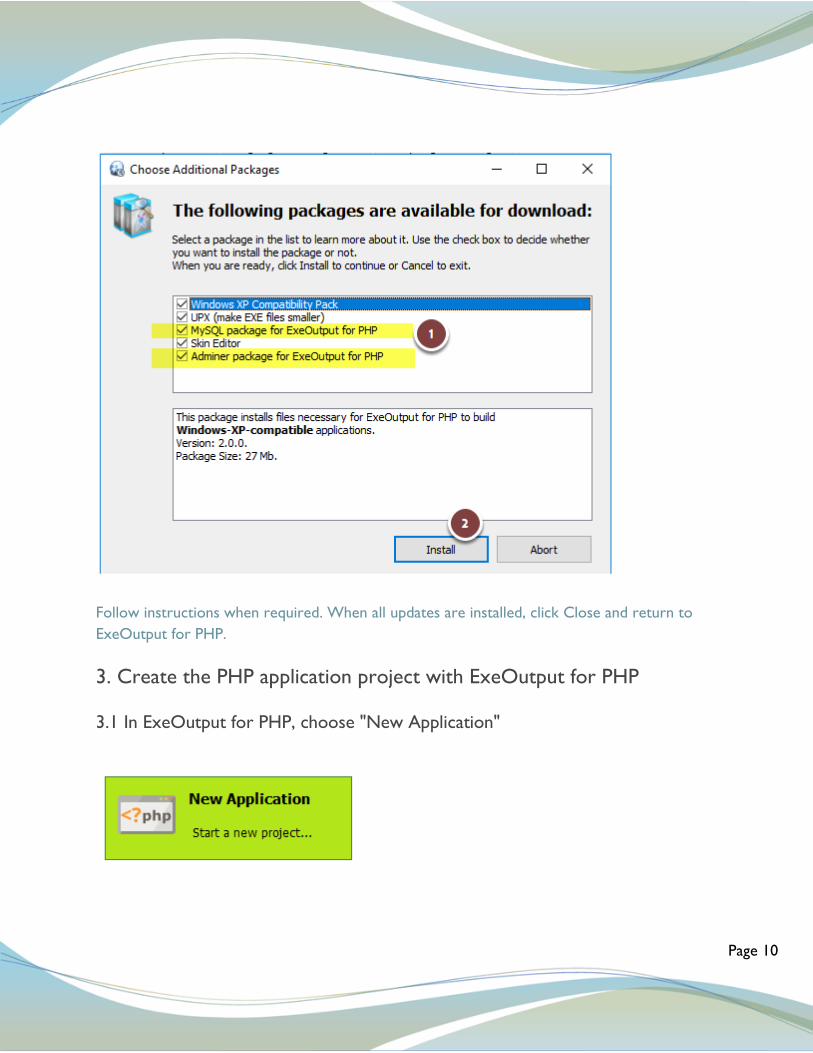
Page 10
Follow instructions when required. When all updates are installed, click Close and return to
ExeOutput for PHP.
3. Create the PHP application project with ExeOutput for PHP
3.1 In ExeOutput for PHP, choose "New Application"
Page 11
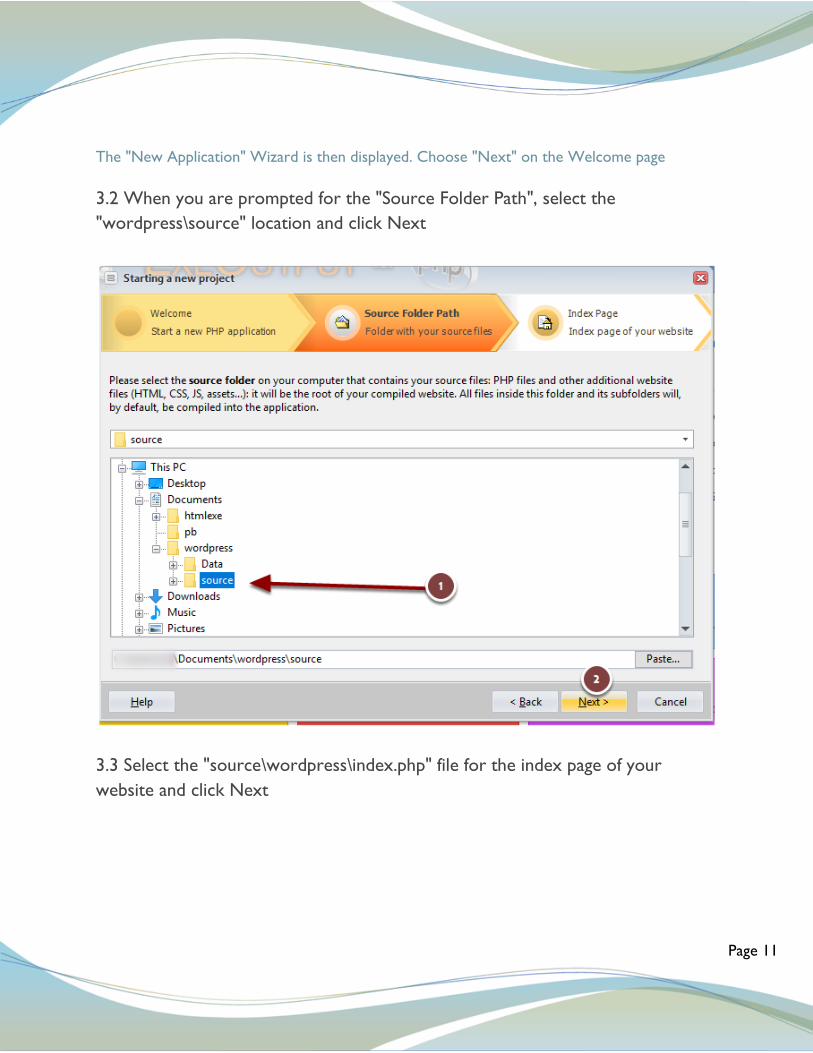
The "New Application" Wizard is then displayed. Choose "Next" on the Welcome page
3.2 When you are prompted for the "Source Folder Path", select the
"wordpress\source" location and click Next
3.3 Select the "source\wordpress\index.php" file for the index page of your
website and click Next

Page 12
3.4 Define what kind of GUI you want for your PHP application. ExeOutput for
PHP can include a ribbon for instance:

Page 13
If you want to support Windows XP, tick the corresponding option
3.5 You are prompted for the location of the output application executable file
which is used to launch the application on Windows. Click the Browse button and
be sure to select the "wordpress" root folder:

Page 14

Page 15
3.6 Choose a title for your new application:
3.7 Your application project is ready: first, save it as an EXOP file:

Page 16
The EXOP project file contains all settings of ExeOutput for PHP. Thus, you can easily load
your project later and find all of your settings again.

Page 17
4. Configure your PHP application
4.1 Choose the PHP version you want to use. For instance, the last supported is
PHP 7.1:
4.2 WordPress uses MySQL to store its data. We have to enable the
corresponding MySQL extension in PHP: choose "php_mysqli.dll", right click and
click "Compile to EXE"

Page 18
4.3 Repeat the same steps for the PHP mbstring extension:

Page 19
4.4 Then we have to prepare the MySQL server portable which will manage the
wordpress database. Click "MySQL Support" and "Copy MySQL server files to
destination folder"

Page 20
4.5 You are prompted for the root password and connection port. Enter the
values you want (or keep the default 3306 port).

Page 21
Be sure to write down these values because you will be asked for them again.
4.6 The MySQL server is started (do not close the console window) and, when it
is ready and listening, click OK.

Page 22

Page 23
4.7 For your information, MySQL files were created and placed in this folder:
4.8 Back to ExeOutput for PHP, we must create the database required for
WordPress. Start Adminer:

Page 24
Adminer is a database management tool. We can use it to manage databases of the portable
MySQL server.
4.9 To connect to the MySQL server, enter "root" and the root password you
defined previously. If you changed the connection port, enter it in server
"localhost:port". Click Login
Page 25
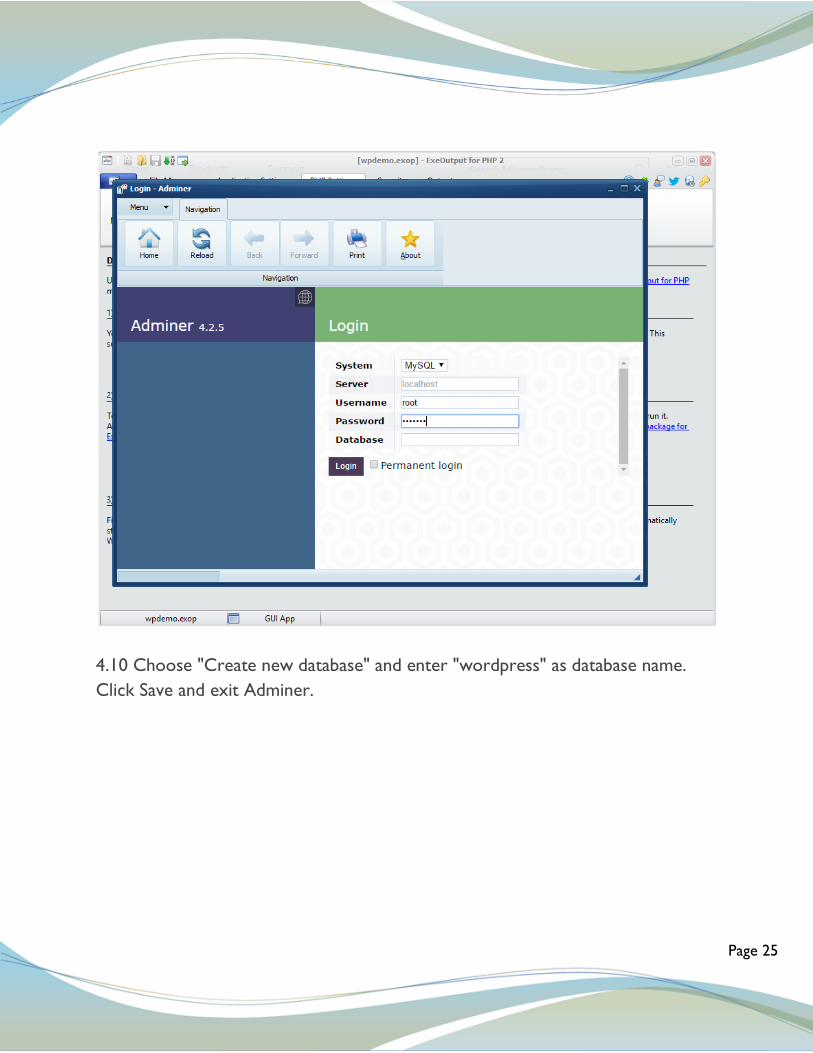
4.10 Choose "Create new database" and enter "wordpress" as database name.
Click Save and exit Adminer.

Page 26
Page 27
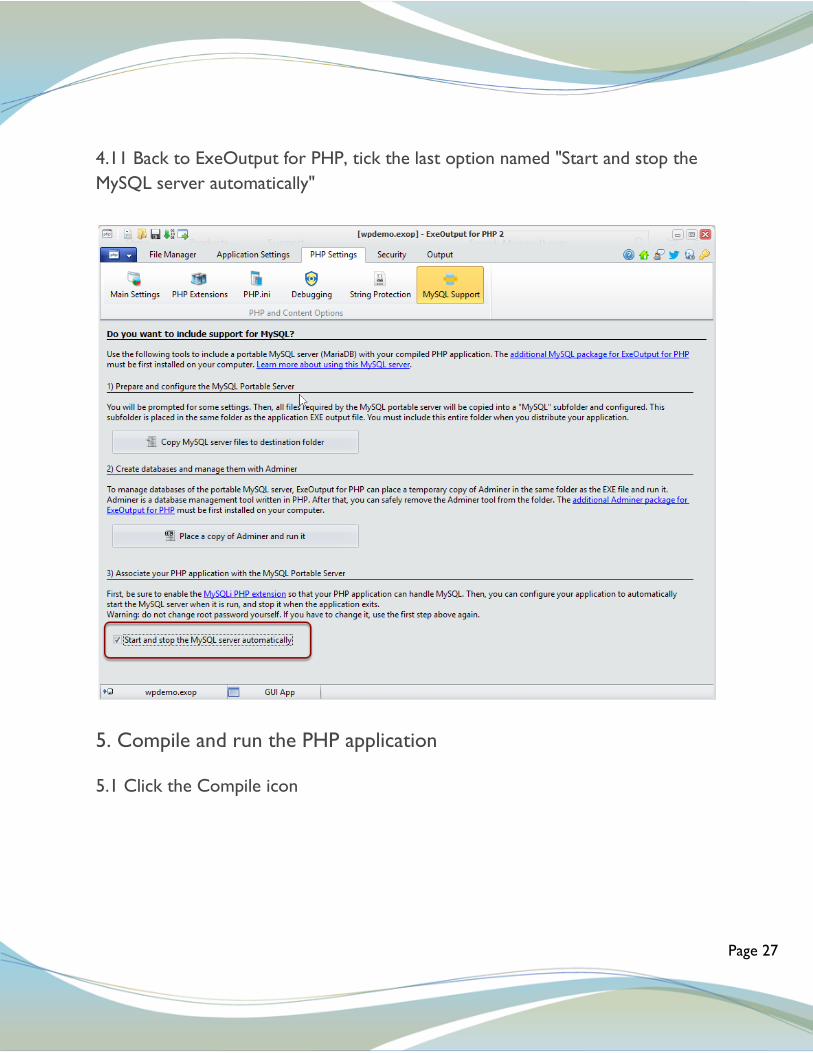
4.11 Back to ExeOutput for PHP, tick the last option named "Start and stop the
MySQL server automatically"
5. Compile and run the PHP application
5.1 Click the Compile icon

Page 28
5.2 The compilation is started and the progress bar is shown:

Page 29
5.3 Launch the new WordPress-based app by clicking the Run icon

Page 30
6. Configure your new Wordpress app
6.1 When the application is run for the first time, the WordPress setup is
displayed. As you can see, you have a Windows desktop application running
WordPress:

Page 31
Everything of the user interface (GUI) can be customized at will: you can modify the ribbon and
add new buttons, define your own menu items and even the skin of the window...
6.2 Enter "root" and the root password you defined above. We created the
"wordpress" database earlier. Click Submit

Page 32
6.3 Just ignore this database error and click Home

Page 33
6.4 Here comes the WordPress installation process after you select your language
again. Follow the steps as you would do for any normal WordPress installation.
Click Install WordPress after.

Page 34

Page 35
6.5 After installation, the WordPress login page is shown. Do not log in
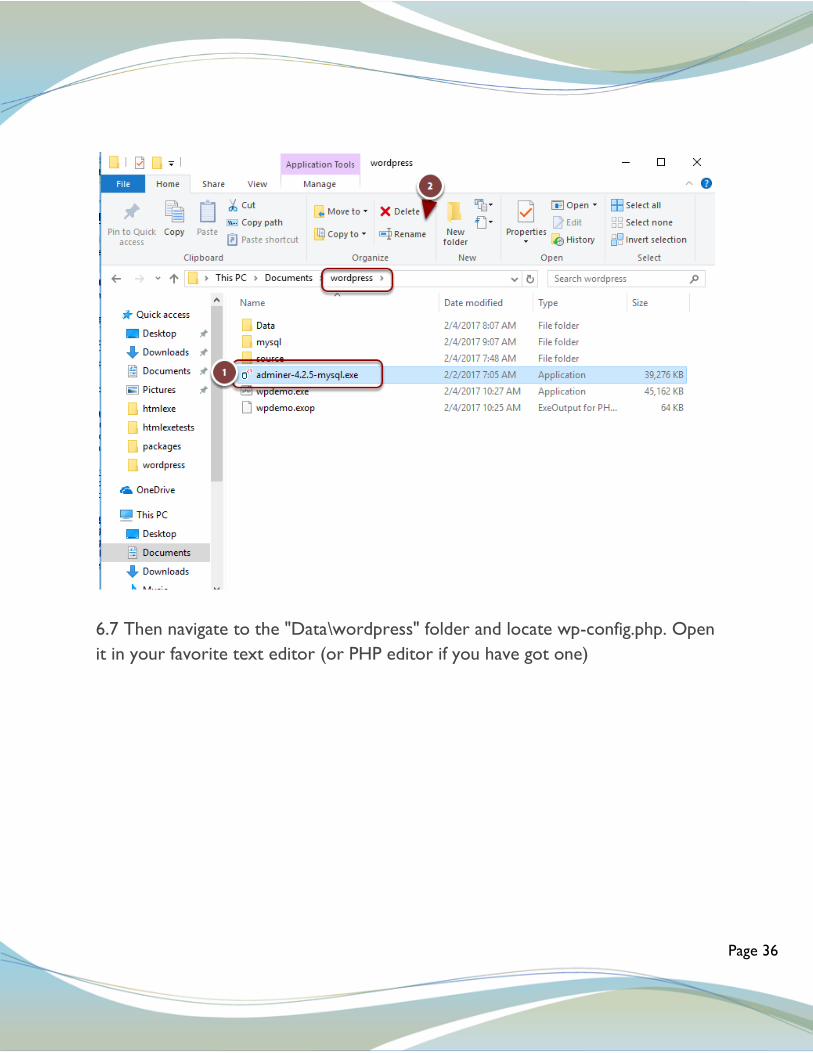
immediately and exit the app.
6.6 Go to the "wordpress" folder and remove the Adminer tool which is no more
necessary:
Page 36
6.7 Then navigate to the "Data\wordpress" folder and locate wp-config.php. Open
it in your favorite text editor (or PHP editor if you have got one)

Page 37
6.8 Go to the end of the file, juster after define('WP_DEBUG'...). And add this
text: define('DISABLE_WP_CRON', 'true');

Page 38
Then save your modifications.
6.9 Launch the Wordpress app again. For instance, in the "wordpress" folder,
double-click on wpdemo.exe which is the app's executable file.

Page 39
7. Administer WordPress
7.1 When you start the Wordpress app, the default website is now displayed.
Scroll down and you can log in:

Page 40

Page 41
7.2 Log in with your credentials previously defined
7.3 After some seconds, the WordPress Dashboard is displayed. You can now
work with WordPress as usual.

Page 42
Warning: do not install updates because the core files won't be really replaced. Download the
new wordpress.zip from wordpress.org and unpack all files to the "source" subfolder, as we did
previously.
8. Distribute your WordPress app
You can either compress all files into a Zip archive or an installer
8.1 For a Zip archive distribution, select the folders "Data", "mysql" and the
wpdemo.exe. Then zip them from Explorer:

Page 43
Then upload the Zip archive to your webserver, Dropbox or any file hosting service. Your end
users have just to unzip all of the files to a folder and launch wpdemo.exe to run the
WordPress app.
8.2 If you want to make an installer instead, you can use ExeOutput for PHP and
Paquet Builder, an Installer Builder Software. In ExeOutput for PHP, click Create
Setup:

Page 44
8.3 Then fill in all required fields and click Generate.

Page 45
Note: by default, the destination folder is set to c:\program files but we'll have to change that in
Paquet Builder, because we must have our application in a writeable directory, so that
WordPress can store its temporary files and MySQL its data.
8.4 Create a dedicated folder for your installer and save the project file (with
PBPX extension):

Page 46
Click Save and then OK. Paquet Builder is then launched.
8.5 File lists are automatically refreshed, just close this window.

Page 47
8.6 Change company information to yours and then click "Set main destination
folder":

Page 48
8.7 Change Default Destination Folder to %APPDATADIR%\My
Company\WordPress App - replace My Company by your name or brand

Page 49

Page 50
This will ensure files are always unpacked to a writeable directory and not a read-only one. You
could also use %MYDOCDIR% to unpack files to the user's Documents folder.
8.8 Uncheck "Request elevated rights" because we don't need such a permission
because we don't write to system folders. Then choose File Manager

Page 51
8.9 In File Manager, we must also include the "MySQL" folder that contains all of
the portable MySQL server's files. Click "Component Manage" then Add
Component; enter "MySql" for the Component Name and click OK.

Page 52
8.10 We tell Paquet Builder we want to add the entire folder "MySQL" to the
installer

Page 53
8.11 Finally we want to store paths relative to the "wordpress" folder (so that we
keep "mysql" in paths):
8.12 Files are automatically scanned and added to the installer. Close File Manager

Page 54
8.13 Choose Build Now and your installer is created.

Page 55
8.14 After compilation, the installer is ready. You can run it to see if it works fine
and then distribute the single EXE file.
Page 56
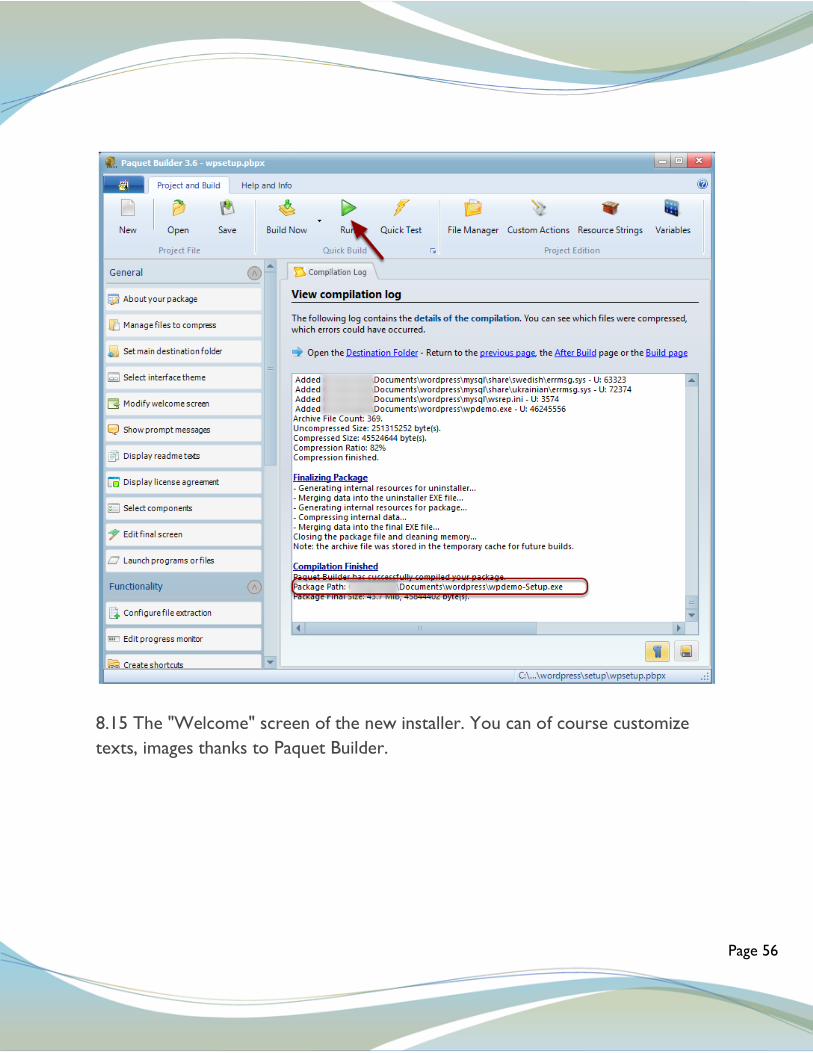
8.15 The "Welcome" screen of the new installer. You can of course customize
texts, images thanks to Paquet Builder.

Page 57
To distribute the installer, just share the EXE file: upload it to your web server, use dropbox or
any file sharing service. End users just launch the installer and they choose which directory all
files will be unpacked to.