making tables with microsoft word 2000 · making tables with microsoft word 2000 open any textbook,...
TRANSCRIPT

Making Tables With Microsoft Word 2000
Open any textbook, newspaper, or magazine and you will see many tables. A table is a grid of rows and columns that intersect to form cells. It is often easier to read or present information in a table than in a paragraph. Using Microsoft Word’s table feature, you can create a table, insert text or pictures into the table’s cells, and then format the table and the information in it. You will probably have to make many tables during your education and career.
Tables are organized into columns, rows, and cells. A cell is a rectangle formed by the intersection of a column and row. Columns, rows, and cells can have borders and fill colors.
Figure 1
My Program
Period Course Teacher Room
1
2
3
4
5
6
Row
Cell Fill Color
Border
Column
To move from cell to cell you can use keyboard shortcuts instead of using the mouse.
Table 1
Keyboard Shortcuts for Moving Between Cells To Move To Press
Next cell to right Tab or Right Arrow
Next cell to left Shift +Tab or left arrow
Next cell down Down arrow
Next cell up Up arrow
Inserting a Table There are two ways to create a table:
• You can insert a table from the Standard toolbar.
• You can click Table on the Menu bar select Insert and point to Table.
Tables Page 1

Exercise 1 Create A Simple Table
1. Start Microsoft Word.
2. Click the Show/Hide button so you can see spaces and paragraph marks.
3. Click the Maximize button to enlarge the window.
Saving a Document Document1 has not been saved with a name.
4. Press Ctrl+S.
5. The Save dialog box appears.
6. To the right of the Save in text box, click the drop-down arrow and select your period folder.
7. In the File name text box, a suggested file name should be highlighted.
8. Replace this filename by typing Tables 1 and 2, press Spacebar, type your initials, press Spacebar, and type your partner’s initials.
9. Click Save or press Enter.
Creating a Heading a New Way 10. Press Ctrl+R to right align the insertion
point.
11. Type your names and press Enter.
12. Click Insert on the Menu bar and select Date and Time .
13. The Date and Time dialog box opens.
14. Under Available formats, select a date you like.
15. Check the Update automatically box. This will change the date automatically in case you need to edit the exercise later.
16. Click OK.
17. Press Enter.
18. Type the word Period, press the Spacebar, and then type your period number.
19. Press Enter.
20. Type Tables 1 and 2.
21. Press Enter two times.
Tables Page 2

Adding a WordArt Title WordArt is a part of Microsoft Word that can improve the appearance of your work. Like ClipArt, WordArt is a graphic image—it is a picture of text, not regular text. The Spell and Grammar checker cannot find errors with your WordArt text, because it is a picture of text—not text. WordArt can be formatted the same way as pictures.
22. Press Ctrl+E to center your text.
23. Press Insert on the Menu bar, point to Picture, and select WordArt.
24. The WordArt Gallery opens.
25. Select the design in the fifth column and fourth row.
26. Click OK.
27. The Edit WordArt dialog box opens.
28. Type My Schedule.
29. Click OK.
30. The WordArt is inserted.
Like all pictures, the WordArt has resizing handles. The white color tells you that Text Wrapping is turned on. Since you do not want the text to wrap around the title you need to format the WordArt.
Formatting WordArt 31. Right-click the WordArt title and
select Format WordArt.
32. The Format WordArt dialog box opens.
33. Click the Layout tab.
34. Under Wrapping style, select In line with text.
35. Click OK.
36. The title is now locked in place.
37. Press Ctrl+End to move to the end of the document.
38. Press Enter twice.
39. Press Ctrl+L to left align the insertion point.
Tables Page 3

40. Look at Figure 2.
Figure 2
Insert a Table from the Standard Toolbar
41. Click the Insert Table button on the Standard toolbar.
42. Drag the mouse down and across until you have created a 7 x 4 table and release the mouse.
43. Each column is the same width and each row is the same height.
44. Also, notice that the table extends from the left to the right margin. Notice the markers on the ruler that indicate the column widths. The table is left aligned.
45. Type the labels exactly as they are below.
46. Complete the table with your particular information.
47. You will notice that if any information is too long for a cell, the text will automatically wrap to the next line.
Tables Page 4

Figure 3
Notice the WordArt has black resizing handles. The WordArt is locked in place like a piece of text.
Notice the 2 spaces after the WordArt
Notice the 2 spaces after the title
48. Press Ctrl+S to save your work.
49. Press Ctrl+End to go to the end of the document.
50. Press Enter two times.
Insert a Table from the Table Menu 51. Make sure the insertion point is left aligned.
52. Click Table from the Menu bar, point to Insert, and select Table.
53. The Insert Table dialog box opens.
Tables Page 5

54. Type 3 in the Number of columns text box.
55. Press Tab.
56. Type 7 in the Number of rows text box.
57. Press Tab.
58. Type 1.5 in the Column width text box.
59. Click OK.
Microsoft Word inserts a 7 x 3 table with 1.5-inch columns. The table is left aligned.
60. Type the labels exactly as they are in Figure 4.
61. Use your agenda book to fill in the start and end times for every period.
Figure 4
62. Press Ctrl+Home to move to the beginning of your document.
63. Press F7.
64. The Spell and Grammar checker will start.
65. Go through the document looking for spelling and grammar errors.
66. Press Ctrl+S to save when you are done.
Print Preview a Document
67. Press the Print Preview button on the Standard toolbar to check your document for a final time.
68. Make sure that you only have 1 page.
69. Look at Figure 5
Tables Page 6

Figure 5
70. Press the Close button when you are done.
Printing a Document 71. Press Ctrl+P.
72. The Print dialog box opens.
73. The Name of the printer should be Ireland.
74. Next to Number of copies, type 2 in the text box.
75. Click OK or press Enter.
76. Press Alt+F4 to close all open windows and to return to the Desktop.
Tables Page 7

Exercise 2 Formatting A Table
Tables 1 and 2 are very plain. In this exercise, you are going to learn to format a table in different ways to make the table more interesting to look at. Before you can format anything in any computer program, you must select it. There are several ways to select the contents of cells, rows, and columns. Once selected, you can delete, copy, move the contents, or change the format.
Table 2
Selecting Table Elements
To Select Mouse Table Menu
Cell Click left inside edge of cell or triple-click cell Table>Select Cell
Row Click to left of row or double-click left inside edge of a cell Table>Select Row
Column Click column’s top border Table>Select Column
Table Select all rows with the mouse Select all columns with the mouse Double-click the 4-headd arrow in the upper-left corner
Table>Select Table
77. Start Microsoft Word.
78. Click the Show/Hide button so you can see spaces and paragraph marks.
79. Click the Maximize button to enlarge the window.
Saving a Document Document1 has not been saved with a name.
80. Press Ctrl+S.
81. The Save dialog box appears.
82. To the right of the Save in text box, click the drop-down arrow and select your period folder.
83. In the File name text box, a suggested file name should be highlighted.
84. Replace this filename by typing Tables 3 and 4, press Spacebar, type your initials, press Spacebar, and type your partner’s initials.
85. Click Save or press Enter.
Tables Page 8

Creating a Heading a New Way 86. Press Ctrl+R to right align the insertion point.
87. Type your names and press Enter.
88. Click Insert on the Menu bar and select Date and Time .
89. The Date and Time dialog box opens.
90. Under Available formats, select a date you like.
91. Check the Update automatically box.
92. This will change the date automatically in case you need to edit the exercise later.
93. Click OK.
94. Press Enter.
95. Type the word Period, press the Spacebar, and then type your period number.
96. Press Enter.
97. Type Tables 3 and 4.
98. Press Enter two times.
Adding a WordArt Title 99. Press Ctrl+E to center your text.
100. Press Insert on the Menu bar, point to Picture, and select WordArt.
101. The WordArt Gallery opens.
102. Select the design in the fifth column and second row.
103. Click OK.
104. The Edit WordArt dialog box opens.
105. Type League Leaders.
106. Click OK.
107. The WordArt is inserted.
Like all pictures, the WordArt has resizing handles. The white color tells you that Text Wrapping is turned on. Since you do not want the text to wrap around the title you need to format the WordArt.
Formatting WordArt 108. Right-click the WordArt title and
select Format WordArt.
109. The Format WordArt dialog box opens.
Tables Page 9

110. Click the Layout tab.
111. Under Wrapping style, select In line with text.
112. Click OK.
113. The title is now locked in place.
114. Press Ctrl+End to move to the end of the document.
115. Press Enter twice.
116. Press Ctrl+L to left align the insertion point.
117. Look at Figure 6.
Figure 6
Insert a Table from the Standard Toolbar
118. Click the Insert Table button on the Standard toolbar.
119. Drag the mouse down and across until you have created a 7 x 6 table and release the mouse.
120. Each column is the same width and each row is the same height.
121. Also, notice that the table extends from the left to the right margin. The table is left aligned.
122. Type the labels and information exactly as in Figure 7.
123. You will notice that if any information is too long for a cell, the text will automatically wrap to the next line.
124. Look at Figure 7.
Tables Page 10

Figure 7
Don’t forget the periods after the team abbreviations.
Capitalize FG for Field Goals, FT for Free Throws, and LAL. for Los Angeles Lakers
125. Press Ctrl+S to save your work.
Open the Tables and Borders Toolbar 126. Right-click any toolbar at the top of the screen and select Tables and
Borders with the left mouse button.
Formatting the Title Row 127. Click in any cell in Row 1.
128. Click Table on the Menu bar, point to Select and select Row.
129. The entire row is highlighted.
130. Click Table on the Menu bar and select Merge Cells.
131. The cells in the row will be merged into one cell.
132. Press Ctrl+D. The Font dialog box opens.
133. Change the Font to Arial Black.
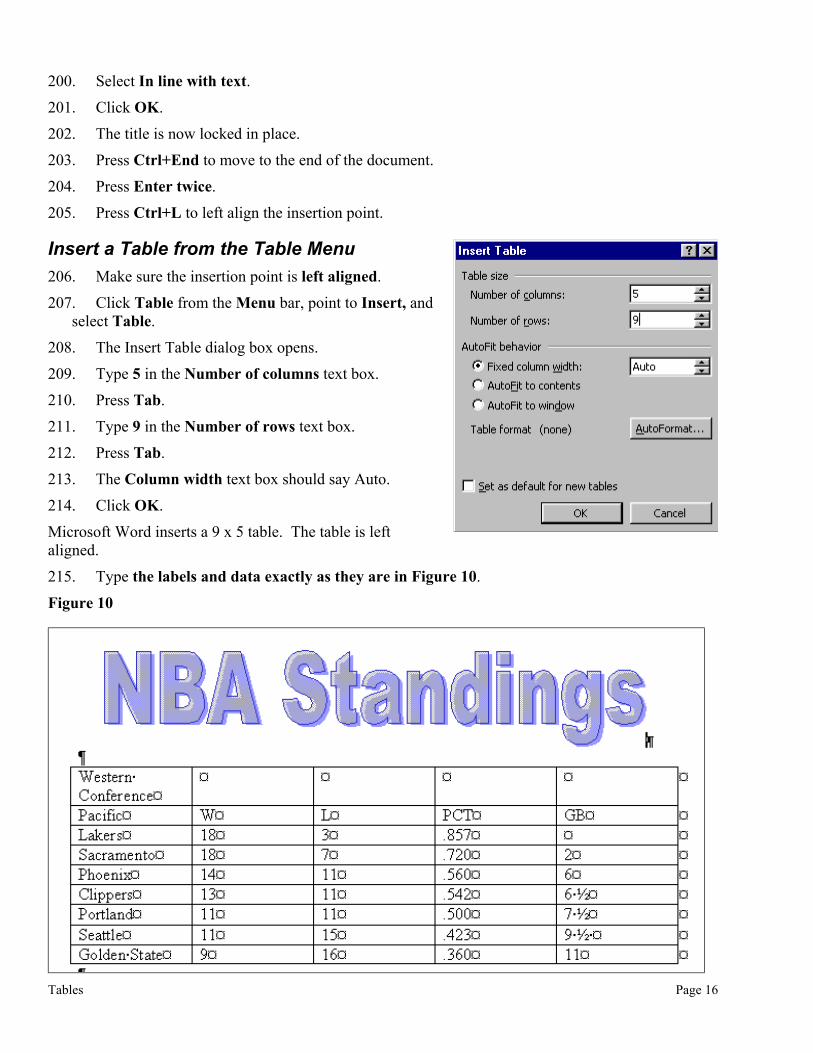
134. Change the Size to 24 points.
135. Change the Color to Red.
Tables Page 11

136. Click OK.
137. Click the Center text button on the Formatting toolbar.
138. Notice that the height of the row has gotten wider to fit the larger text. Word automattically enlarges the height of a row to fit larger text or more text.
139. On the Tables and Borders toolbar, click the drop-down arrow next to
the Shading Color button .
140. Select Gray-12.5%.
Formatting the Other Rows 141. Click in any cell in Row 2.
142. Click Table on the Menu bar, point to Select and select Row.
143. The entire row is highlighted.
144. Using the Formatting toolbar, change the text to Bold.
145. Using the Formatting toolbar, change the Font Size to 14 points.
146. Press Ctrl+E to center the text.
147. Click in any cell in Row 3.
148. Click Table on the Menu bar, point to Select and select Row.
149. The entire row is highlighted.
150. Click the Shading Color button on the Tables and Borders toolbar to make the row Gray 12.5%.
151. Click in any cell in Row 5.
152. Click Table on the Menu bar, point to Select and select Row. The entire row is highlighted.
153. Click the Shading Color button to make the row Gray 12.5%.
154. Click in any cell in Row 7.
155. Click Table on the Menu bar, point to Select and select Row.
156. The entire row is highlighted.
157. Click the Shading Color button to make the row Gray 12.5%.
The table now has alternating white and gray rows. This makes information easier to read.
158. Look at Figure 8.
Tables Page 12

Figure 8
Adding an Outside Border to the Table 159. Click in any cell in the table.
160. Click Table on the Menu bar, point to Select and select Table.
161. The entire table will be selected.
162. Click the drop-down arrow next to the Line Style button on the Tables and Borders toolbar.
163. Select the fourth style from the bottom.
164. Click the drop-down arrow next to the Line Weight button .
165. Select 3 pt.
166. Click the drop-down arrow next to the Border button .
167. Select the Outside Border button.
168. Look at Figure 8 to check the outside border.
Tables Page 13

Changing the Table Properties The Table Properties allows you to control how the table appears on the page. Here’s how to center the table and the information in the cells.
169. With the table still selected, click Table on the Menu bar and select Table Properties.
170. Click the Table tab.
171. Under Alignment, select Center.
172. Click the Cell tab.
173. Under Vertical Alignment, select Center.
174. Click OK.
Changing the Column Width (This is tricky!)
The table looks better, but column A is not wide enough for the words Player, Team to be on 1 line.
175. Move the mouse pointer over the border between the cell that say says Player, Team and the cell that says G.
176. The mouse changes from an I-beam to a double-headed arrow.
177. Click and drag the column to the right to make the first column wider.
178. Player, Team should now fit on 1 line.
Formatting the Numbers Numbers in a table are normally right aligned. However, I think it will look better centered.
179. Click in the cell that says 16.
180. Click and drag diagonally to the cell that says 26.2.
181. The numbers should all be selected.
182. Press Ctrl+E to center the numbers.
183. Press Ctrl+S to save your document.
184. Compare your work to Figure 9 on the next page.
Tables Page 14

Figure 9
Adding a Word Art Title 185. Press Ctrl+End to go to the end of the document.
186. Press Enter two times.
187. Press Ctrl+E to center your text.
188. Press Insert on the Menu bar, point to Picture, and select WordArt.
189. The WordArt Gallery opens.
190. Select the design in the third column and second row.
191. Click OK.
192. The Edit WordArt dialog box opens.
193. Type NBA Standings.
194. Change the Font Size to 48 pts.
195. Click OK.
196. The WordArt is inserted.
Like all pictures, the WordArt has resizing handles. The white color tells you that Text Wrapping is turned on. Since you do not want the text to wrap around the title you need to format the WordArt.
Formatting WordArt 197. Right-click the WordArt title and select Format WordArt.
198. The Format WordArt dialog box opens.
199. Click the Layout tab. Tables Page 15
200. Select In line with text.
201. Click OK.
202. The title is now locked in place.
203. Press Ctrl+End to move to the end of the document.
204. Press Enter twice.
205. Press Ctrl+L to left align the insertion point.
Insert a Table from the Table Menu 206. Make sure the insertion point is left aligned.
207. Click Table from the Menu bar, point to Insert, and select Table.
208. The Insert Table dialog box opens.
209. Type 5 in the Number of columns text box.
210. Press Tab.
211. Type 9 in the Number of rows text box.
212. Press Tab.
213. The Column width text box should say Auto.
214. Click OK.
Microsoft Word inserts a 9 x 5 table. The table is left aligned.
215. Type the labels and data exactly as they are in Figure 10.
Figure 10
Tables Page 16
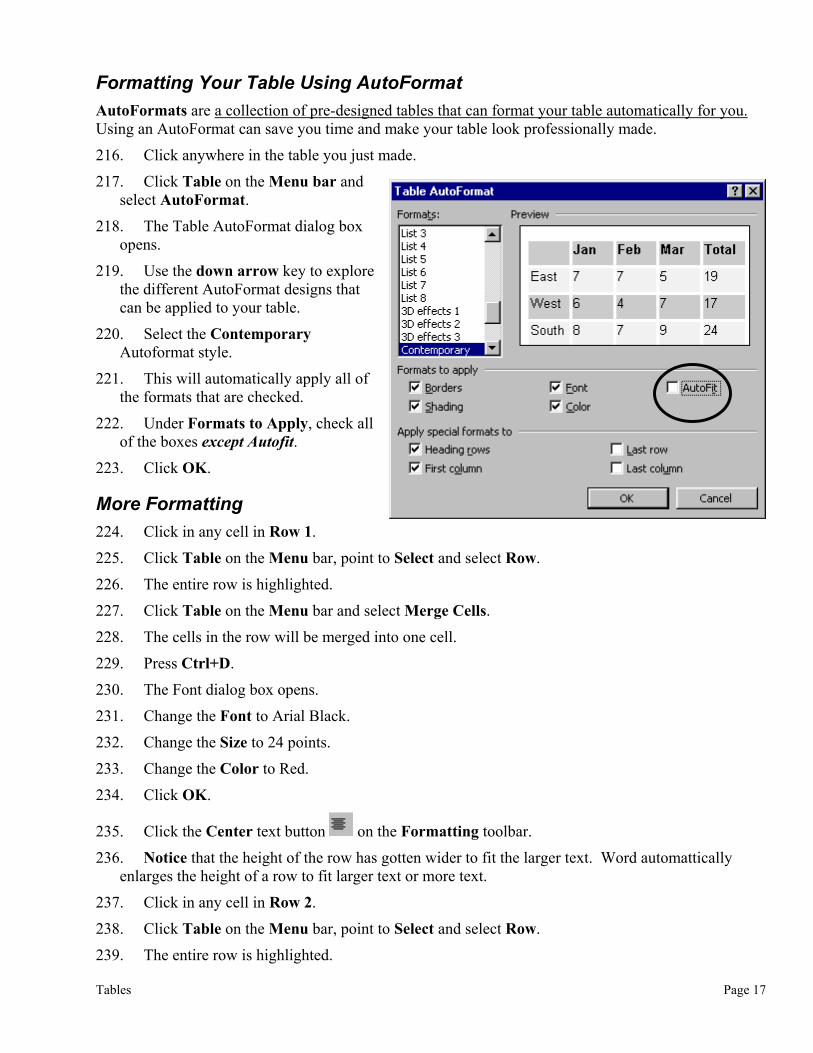
Formatting Your Table Using AutoFormat AutoFormats are a collection of pre-designed tables that can format your table automatically for you. Using an AutoFormat can save you time and make your table look professionally made.
216. Click anywhere in the table you just made.
217. Click Table on the Menu bar and select AutoFormat.
218. The Table AutoFormat dialog box opens.
219. Use the down arrow key to explore the different AutoFormat designs that can be applied to your table.
220. Select the Contemporary Autoformat style.
221. This will automatically apply all of the formats that are checked.
222. Under Formats to Apply, check all of the boxes except Autofit.
223. Click OK.
More Formatting 224. Click in any cell in Row 1.
225. Click Table on the Menu bar, point to Select and select Row.
226. The entire row is highlighted.
227. Click Table on the Menu bar and select Merge Cells.
228. The cells in the row will be merged into one cell.
229. Press Ctrl+D.
230. The Font dialog box opens.
231. Change the Font to Arial Black.
232. Change the Size to 24 points.
233. Change the Color to Red.
234. Click OK.
235. Click the Center text button on the Formatting toolbar.
236. Notice that the height of the row has gotten wider to fit the larger text. Word automattically enlarges the height of a row to fit larger text or more text.
237. Click in any cell in Row 2.
238. Click Table on the Menu bar, point to Select and select Row.
239. The entire row is highlighted.
Tables Page 17

240. Using the Formatting toolbar, change the text to Bold.
241. Using the Formatting toolbar, change the Font Size to 14 points.
242. Press Ctrl+E to center the text.
243. Look at Figure 11.
Formatting the Numbers Numbers in a table are normally right aligned. However, I think it will look better centered.
244. Click in the cell that says 18 in Row 3.
245. Click and drag diagonally to the cell that says 11 in Row 9.
246. The numbers should all be selected.
247. Press Ctrl+E to center the numbers.
Changing the Table Properties 248. With the table still selected, click
Table on the Menu bar and select Table Properties.
249. Click the Table tab.
250. Under Alignment, select Center to center the table on the page.
251. Click the Cell tab.
252. Under Vertical Alignment, select Center to center the text vertically.
253. Click OK.
254. Press Ctrl+Home to move to the beginning of your document.
255. Press F7 to Spell and Grammar check your document.
256. Review your work carefully.
257. Press Ctrl+S to save when you are done.
Print Preview a Document
258. Press the Print Preview button on the Standard toolbar to check your document for a final time.
Tables Page 18

259. Make sure that you only have 1 page.
260. Press the Close button when you are done.
261. Compare your work with Figure 11.
Figure 11
Printing a Document 262. Press Ctrl+P.
263. The Print dialog box opens.
264. The Name of the printer should be Ireland.
265. Next to Number of copies, type 2 in the text box.
266. Click OK or press Enter.
267. Press Alt+F4 to close all open windows and to return to the Desktop.
Exercise 3 Inserting New Columns And Rows
In addition to editing the contents of a table, you can add, delete, move, and copy cells, rows, and columns. You can modify a table by choosing the commands under Table on the Menu bar, right-clicking the table and choosing a command from the shortcut menu, or using the Tables and Borders toolbar.
Tables Page 19

Opening an Existing File 268. Start Microsoft Word.
269. Click File on the Menu bar and select Open.
270. The Open dialog box appears.
271. Click the drop-down arrow to the right of the Look in box.
272. Select your period folder.
273. Click Tables 1 and 2 select it.
274. Click the drop-down arrow next to the Views button and select Preview.
275. This will give you a quick look at the document before opening it.
276. Click the Open button .
277. Press the Show/Hide button so you can see spaces and paragraph marks.
Renaming a Document 278. Click File on the Menu bar and select Save As.
279. The Save As dialog box will appear.
280. Click the drop-down arrow to the right of the Save in text box and select your period folder.
281. Click in the File name text box, and change the filename to Table 5.
282. The filename should read Table 5 your initials and your partner’s initials.
283. Click Save or press Enter.
Open the Tables and Borders Toolbar If you don’t see the Tables and Borders toolbar, do this:
284. Right-click any toolbar at the top of the screen and select Tables and Borders with the left mouse button.
Changing the Page Orientation and Margins The table you will make needs more room on the paper.
285. Click File on the Menu bar and select Page Setup.
286. The Page Setup dialog box opens.
287. Click the Paper Size tab.
288. Under Orientation, select Landscape.
289. Click the Margins tab
290. Change the top, bottom, left and right margins to 0.5 inch.
Tables Page 20
291. Click OK.

Changing the Heading 292. Change the title in the heading to Table 5.
Deleting the Bottom Table and Paragraph Marks 293. Click next to the paragraph mark directly below the top table.
294. Click and drag down to the end of the document.
295. The bottom of the document is now selected.
296. Press the Delete key.
297. You should now see only the top table.
Inserting a Column in Table 5 To insert a new row or column, select the row where you want to insert new rows, or select the column where you want to insert new columns. Select the same number of rows or columns as the number of rows or columns you want to insert.
298. Click in any cell in Column D.
299. Click Table on the Menu bar, point to Insert, and select Columns to the Left.
300. A new column appears to the left of the column you selected.
301. Type Name of Text as a label for the new column.
302. Type the full names of your textbooks for each class.
303. Don’t forget that titles should be capitalized.
304. The textbook names are probably too long for the column width. Don’t worry about this now.
305. Click in any cell in Column E.
306. Click Table on the Menu bar, point to Insert, and select Columns to the Right.
307. A new column appears to the left of the column you selected.
308. Type Picture as a label for the new column.
309. Your table now has six columns.
310. Look at Figure 12.
Tables Page 21

Figure 12
Inserting a New Row 311. Click in any cell in Row 2 (This is Period 1.).
312. Click Table on the Menu bar, point to Insert, and select Rows below.
313. A new row appears below the row you selected.
314. Type the information in Figure 12 into your new row.
315. Type your teacher’s name and room number.
Adding Pictures to a Table To add a picture to a table, the wrapping must be turned off. The picture must be inline with text. Your teacher has selected some clipart to be inserted into the table.
316. Click in the picture cell for your science class.
317. Click Insert on the Menu bar, point to Picture, and select From File.
318. Click the drop-down arrow to the right of the Look in box and select Network Neighborhood.
319. Double-click Wright-ms1 (Zeus).
320. Double-click Students 200_.
321. Double-click Tables.
322. Click Science Picture to select it.
323. Click the Preview button to get a quick look at the picture before opening it.
324. Click the Insert button .
325. Double-click the picture.
326. The Format Picture dialog box opens.
Formatting the Picture 327. Click the Size tab.
328. Under Scale, double-click the number next to Height.
329. Type 25 and press the Tab key.
330. This will enter 25% next to Width.
331. Click OK.
Tables Page 22

Inserting More Pictures into Cells 332. Click in each of the picture cells and insert the correct picture into it.
333. Double-click each image and resize the picture to the following scale:
Table 3
Picture Scale
Math 15%
P.E. 30%
Record Room 15%
History 25%
Computer 25%
English 15%
334. Look at Figure 13
Figure 13: Be sure to type the full name of your textbooks.
Formatting Your Table 335. Double-click the WordArt title.
336. The Edit WordArt dialog box opens.
Tables Page 23

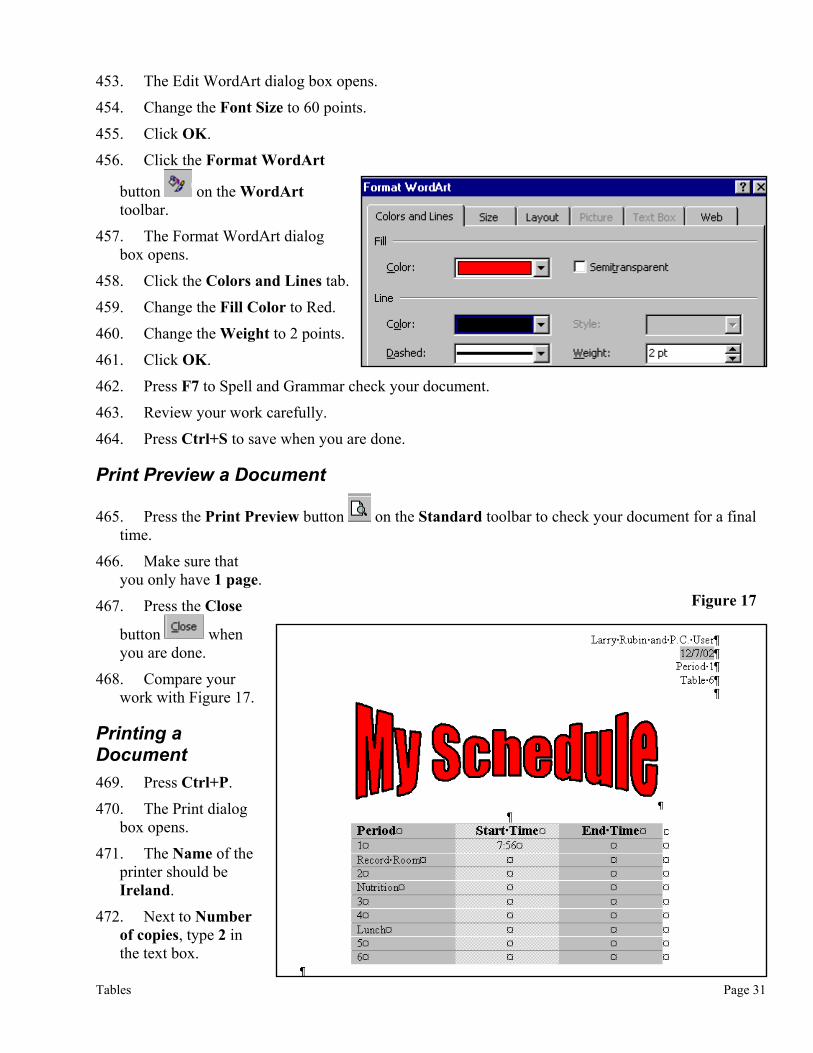
337. Change the Font Size to 24 points.
338. Click OK.
339. Click in Row 1.
340. Click Table on the Menu bar, point to Select, and select Row.
341. Using the Formatting toolbar, change the Font Size to 14 points.
342. Press Ctrl+B.
343. Using the Tables and Borders toolbar, click the drop-down arrow next to the Shading Color button.
344. Select Yellow.
345. Click in Column A.
346. Click Table on the Menu bar, point to Select, and select Column.
347. Using the Formatting toolbar, change the Font Size to 14 points.
348. Press Ctrl+B.
349. Using the Tables and Borders toolbar, click the drop-down arrow next to the Shading Color button.
350. Select Yellow.
351. Click in the cell that says Period.
352. Drag diagonally to the picture in the lower-right corner.
353. Press Ctrl+E.
354. Look at Figure 14.
Adding an Outside Border to the Table 355. Click in any cell in the table.
356. Click Table on the Menu bar, point to Select and select Table.
357. The entire table will be selected.
358. Click the drop-down arrow next to the Line Style button on the Tables and Borders toolbar.
359. Select the fourth style from the bottom.
360. Click the drop-down arrow next to the Line Weight button .
361. Select 3 pt.
362. Click the drop-down arrow next to the Border button .
Tables Page 24

363. Select the Outside Border button.
Changing the Table Properties 364. With the table still selected, click
Table on the Menu bar and select Table Properties.
365. Click the Table tab.
366. Under Alignment, select Center to center the table on the page.
367. Click the Cell tab.
368. Under Vertical Alignment, select Center to center the text vertically.
369. Click the Row tab.
370. Under Size, copy the settings in the picture to the right.
371. Click OK.
372. Press Ctrl+Home to move to the beginning of your document.
373. Press F7 to Spell and Grammar check your document.
374. Review your work carefully.
375. Press Ctrl+S to save when you are done.
Print Preview a Document
376. Press the Print Preview button on the Standard toolbar to check your document for a final time.
377. Make sure that you only have 1 page.
378. Press the Close button when you are done.
379. Compare your work with Figure 14
Tables Page 25
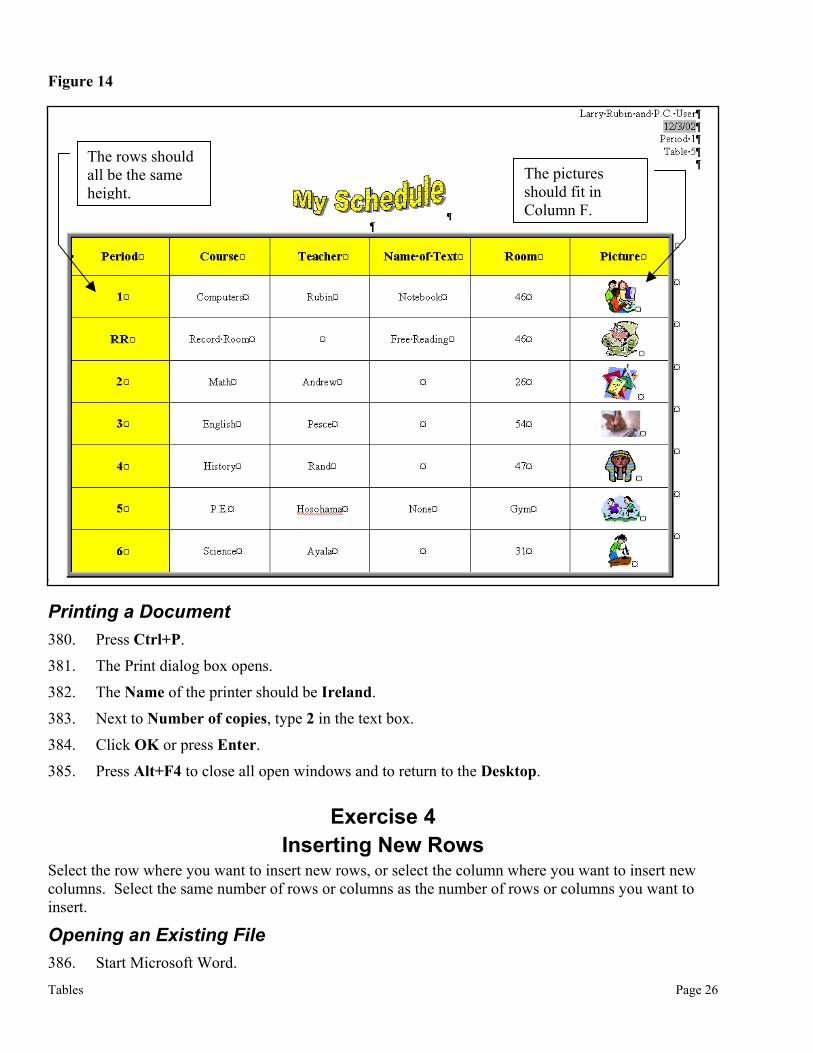
Figure 14
The pictures should fit in Column F.
The rows should all be the same height.
Printing a Document 380. Press Ctrl+P.
381. The Print dialog box opens.
382. The Name of the printer should be Ireland.
383. Next to Number of copies, type 2 in the text box.
384. Click OK or press Enter.
385. Press Alt+F4 to close all open windows and to return to the Desktop.
Exercise 4 Inserting New Rows
Select the row where you want to insert new rows, or select the column where you want to insert new columns. Select the same number of rows or columns as the number of rows or columns you want to insert.
Opening an Existing File 386. Start Microsoft Word.
Tables Page 26

387. Click File on the Menu bar and select Open.
388. The Open dialog box appears.
389. Click the drop-down arrow to the right of the Look in box.
390. Select your period folder.
391. Click Tables 1 and 2 select it.
392. Click the drop-down arrow next to the Views button and select Preview.
393. This will give you a quick look at the document before opening it.
394. Click the Open button .
395. Press the Show/Hide button so you can see spaces and paragraph marks.
Renaming a Document 396. Click File on the Menu bar and select Save As.
397. The Save As dialog box will appear.
398. Click the drop-down arrow to the right of the Save in text box and select your period folder.
399. Click in the text box next to File name, and change the filename to Table 6.
400. The filename should read Table 6 your initials and your partner’s initials.
401. Click Save or press Enter.
Open the Tables and Borders Toolbar If you don’t see the Tables and Borders toolbar, do this:
402. Right-click any toolbar at the top of the screen and select Tables and Borders with the left mouse button.
403. Click OK.
Changing the Heading 404. Change the title in the heading to Table 6.
Deleting the Top Table and Paragraph Marks 405. Click in the cell that says Period in the top table.
406. Click and drag down to the paragraph mark above the second table.
407. The top table and paragraph marks below it are now selected.
Tables Page 27

408. Press the Delete key.
Drag to the paragraph mark above the bottom table.
409. You should now see only the bottom table.
Inserting a New Row 410. Click in any cell in Row 2 (This is Period 1.).
411. Click Table on the Menu bar, point to Insert, and select Rows below.
412. A new row appears below the row you selected.
413. Type Record Room.
414. Add the start time and end time information into your new row.
415. Click in any cell in Row 5 (Period 3).
416. Click Table on the Menu bar, point to Insert, and select Rows Above.
417. A row is inserted for Nutrition.
418. Type Nutrition,
419. Add the start time and end time information into your new row.
420. Click in any cell in Row 7 (Period 4).
421. Click Table on the Menu bar, point to Insert, and select Rows Below.
422. A row is inserted for Lunch.
423. Type Lunch.
424. Add the start time and end time information into your new row.
Tables Page 28

425. Look at Figure 15.
Figure 15
Formatting the Table 426. Click the Table AutoFormat
button on the Tables and Borders toolbar.
427. Select 3D effects 3.
428. Copy the settings carefully in the picture to the right.
429. Click OK.
430. Click in Row 1.
431. Click Table on the Menu bar, point to Select, and select Row.
432. Using the Formatting toolbar, change the Font Size to 14 points.
433. Press Ctrl+B.
Formatting the Numbers Numbers in a table are normally right aligned. However, I think it will look better centered.
434. Click in the cell that says Start Time.
435. Click and drag diagonally to the cell that says the end time of period 6 (the lower right corner).
436. The numbers should all be selected.
Tables Page 29

437. Press Ctrl+E to center the numbers.
438. Look at Figure 16.
Figure 16
Changing the Table Properties 439. With the table still selected, click
Table on the Menu bar and select Table Properties.
440. Click the Table tab.
441. Under Alignment, select Center to center the table on the page.
442. Click the Cell tab.
443. Under Vertical Alignment, select Center to center the text vertically.
444. Click OK.
445. Press Ctrl+Home to move to the beginning of your document.
Formatting Your WordArt 446. Click your WordArt title once to select
it.
447. The WordArt toolbar should open.
448. Click the WordArt Gallery button
on the WordArt toolbar.
449. The WordArt Gallery dialog box opens.
450. Select the design in the fourth column and first row.
451. Click OK.
452. Double-click the WordArt title.
Tables Page 30
453. The Edit WordArt dialog box opens.
454. Change the Font Size to 60 points.
455. Click OK.
456. Click the Format WordArt
button on the WordArt toolbar.
457. The Format WordArt dialog box opens.
458. Click the Colors and Lines tab.
459. Change the Fill Color to Red.
460. Change the Weight to 2 points.
461. Click OK.
462. Press F7 to Spell and Grammar check your document.
463. Review your work carefully.
464. Press Ctrl+S to save when you are done.
Print Preview a Document
465. Press the Print Preview button on the Standard toolbar to check your document for a final time.
466. Make sure that you only have 1 page.
Figure 17467. Press the Close
button when you are done.
468. Compare your work with Figure 17.
Printing a Document 469. Press Ctrl+P.
470. The Print dialog box opens.
471. The Name of the printer should be Ireland.
472. Next to Number of copies, type 2 in the text box.
Tables Page 31

473. Click OK or press Enter.
474. Press Alt+F4 to close all open windows and to return to the Desktop.
Exercise 5 Making A Table Of Contents By Setting Tabs
If you are writing a long report or story with a number of sections, it is expected that you include a Table of Contents (TOC). There are a many ways to make a TOC in Microsoft Word, some simple, and some advanced. A TOC needs several straight columns of information. You are going to create two tables of contents, this time by setting tab stops instead of using the insert table command. Using a real table or tabs will line up information perfectly.
Instead of using a table, it is possible to line-up columns using the Tab key. Each time you press the Tab key, the insertion point moves 0.5 inch to the right. However, you can set the tab key to move any amount you wish. This is called setting tabs.
Once you set your tabs, it is often useful to use leader characters. Leader characters are dotted and dashed lines that lead your eye to the page number. You often see leader characters in table of contents, menus in restaurants, and price lists.
A TOC generally needs 3 columns, one for the chapter number, one for the title, and one for the page number. If you do not have chapters, use two columns.
Of course, you can make a table of contents without using a table or tabs at all. Before making a table of contents from scratch, look at several books to get creative design ideas from professional graphic designers. Let us make a TOC for the Internet chapter you did.
475. Start Microsoft Word.
476. You are now on Document1.
477. Click the Show/Hide button so you can see spaces and paragraph marks.
Saving a Document Document1 has not been saved with a name.
478. Press Ctrl+S.
479. The Save dialog box appears.
480. To the right of the Save in text box, click the drop-down arrow and select your period folder.
481. In the File name text box, a suggested file name should be highlighted.
482. Replace this filename by typing Table 7, press Spacebar, type your initials, press Spacebar, and type your partner’s initials.
483. Click Save or press Enter.
Creating a Heading a New Way 484. Press Ctrl+R to right align the insertion point.
Tables Page 32

485. Type your names and press Enter.
486. Click Insert on the Menu bar and select Date and Time .
487. The Date and Time dialog box opens.
488. Under Available formats, select a date you like.
489. Check the Update automatically box.
490. This will change the date automatically in case you need to edit the exercise later.
491. Click OK.
492. Press Enter.
493. Type the word Period, press the Spacebar, and then type your period number.
494. Press Enter.
495. Type Table 7.
496. Press Enter two times.
497. Press Ctrl+E to center the insertion point.
Creating a Flashy Title from the World Wide Web Your heading is must be flashy to get the attention of people. Here is an easy way to create a flashy title for your document.
Introducing Flaming Text
498. Using the Quick Launch toolbar on the Taskbar, start Internet Explorer .
499. In the Address bar text box type www.flamingtext.com.
500. When the Flaming Text home page is loaded, right-click a blank spot on the page.
501. Select Add to Favorites from the menu.
502. The Add Favorite dialog box opens.
503. Select your folder to open it.
504. Leave the name as FlamingText.com.
505. Click the OK button again to add the Web page to your Favorites folder.
Choosing a Heading 506. At the top of the page, click the hyperlink.
507. Scroll to the bottom of the page.
Tables Page 33

508. You will see the examples on the right.
509. Click the button.
510. Another page of examples opens.
511. Click the button.
512. Another page of examples opens.
513. Click the Old Stone example.
514. The Old Stone page opens. This page allows you to make changes.
Creating Text with Flaming Text
515. In the Text String box, type Table of Contents.
516. Change the Font Size to 60 points.
517. You can change the Font if you wish.
518. You can change the Age if you wish.
519. If you do change the Font, wait a second, and the sample will automatically change.
520. The Background Color is presently set to white. The color of the paper is white so do not change the color.
521. When you are ready, click the Create Logo button
.
522. A new Web page will appear.
523. Right-click the image and select Save Picture As.
524. Save in your period folder.
525. Name your Heading: TOC Title 1.jpg.
526. You must add the .jpg to make this work correctly.
527. Click Save.
Tables Page 34

Inserting a Picture 528. Click Insert on the Menu bar, point to Picture, and select From File.
529. The Insert Picture dialog box opens.
530. Click the drop-down arrow to the right of the Look in box and select your period folder.
531. Click TOC Title 1.jpg to select it.
532. Click the Preview button to get a quick look at the picture before opening it.
533. Click the Insert button .
534. Press Enter five times.
535. Press Ctrl+L to left align the insertion point.
536. Type Introduction.
537. Press the Enter key.
538. Type Welcome To Cyberspace: The Internet And The World Wide Web.
539. Press the Tab key.
540. Type 1.
541. Press Enter twice.
542. Type Exercise 1.
543. Press Enter.
544. Type Traveling Through Cyberspace On The World Wide Web.
545. Press Tab.
546. Type 5.
547. Press Enter twice.
548. Type Exercise 2.
549. Press Enter.
550. Type Copying, Pasting, And Saving Web Objects.
551. Press Tab.
552. Type 11.
553. Press Enter twice.
554. Type Exercise 3.
555. Press Enter.
556. Type Downloading And Installing.
557. Press Tab.
Tables Page 35

558. Type 19.
559. Press Enter twice.
560. Type Exercise 4.
561. Press Enter.
562. Type Downloading A Program From The Internet.
563. Press Tab.
564. Type 22.
565. Press Enter twice.
566. Type Exercise 5.
567. Press Enter.
568. Type Searching the Web.
569. Press Tab.
570. Type 25.
571. Press Enter twice.
572. Type Exercise 6.
573. Press Enter.
574. Type Rules For More Effective Searching.
575. Press Tab.
576. Type 32.
577. Press Enter twice.
578. Type Exercise 7.
579. Press Enter.
580. Type Using Search Engines To Find Pictures, Video, and Music.
581. Press Tab.
582. Type 38.
583. Press Enter twice.
584. Type Exercise 8.
585. Press Enter.
586. Type Searching The Web For An Aerospace Picture.
587. Press Tab.
588. Type 45.
589. Press Enter twice.
590. Type Group Project.
591. Press Enter. Tables Page 36

592. Type An Internet Scavenger Hunt.
593. Press Tab.
594. Type 1.
Figure 18: You are ready to make columns with Tabs.
Set Tab Stops with Leader Characters Each time you have pressed tab, the insertion point has moved 0.5 inch. In order to get the page numbers to line up in a column on the right side of the paper you could keep pressing tab many times, or you can quickly set up tab stops.
Tables Page 37

595. Move the insertion point to the left of the I in Introduction.
596. Drag down to after the end of the document.
597. The contents are now selected.
598. Click Format on the Menu bar and select Tabs.
599. The Tabs dialog box opens.
600. Under Tab stop position type a 6.
601. This means that when you press the tab key, the insertion point will move to the 6-inch mark on the horizontal ruler.
602. Under Alignment select Right.
603. Under Leader select style 2.
604. Click the Set button.
605. Click OK.
You have now commanded Word to move to the 6-inch position on the horizontal ruler whenever you press tab, to right align the tabbed information, and to put a dotted leader before the tabbed information.
Formatting Your TOC 606. Double-click the word Introduction to select it.
607. Using the Formatting toolbar, change the Font Size to 14 points.
608. Press Ctrl+B to make the text Bold.
609. Repeat the prior step to the words Exercises 1, 2, 3, 4, 5, 6, 7, 8, and Group Project.
610. Press Ctrl+Home to move to the beginning of your document.
611. Press F7 to Spell and Grammar check your document.
612. Review your work carefully.
613. Press Ctrl+S to save when you are done.
Print Preview a Document
614. Press the Print Preview button on the Standard toolbar to check your document for a final time.
615. Make sure that you only have 1 page.
616. Press the Close button when you are done.
617. Compare your work with Figure 19.
Tables Page 38

Figure 19
Printing a Document 618. Press Ctrl+P.
619. The Print dialog box opens.
620. The Name of the printer should be Ireland.
621. Next to Number of copies, type 2 in the text box.
622. Click OK or press Enter.
623. Press Alt+F4 to close all open windows and to return to the Desktop.
Tables Page 39

Exercise 6 Making A TOC Of This Chapter
624. Start Microsoft Word.
625. You are now on Document1.
626. Click the Show/Hide button so you can see spaces and paragraph marks.
627. Click the Maximize button to enlarge the window.
Saving a Document Document1 has not been saved with a name.
628. Press Ctrl+S.
629. The Save dialog box appears.
630. To the right of the Save in text box, click the drop-down arrow and select your period folder.
631. In the File name text box, a suggested file name should be highlighted.
632. Replace this filename by typing Table 8, press Spacebar, type your initials, press Spacebar, and type your partner’s initials.
633. Click Save or press Enter.
Creating a Heading a New Way 634. Press Ctrl+R to right align the insertion point.
635. Type your names and press Enter.
636. Click Insert on the Menu bar and select Date and Time .
637. The Date and Time dialog box opens.
638. Under Available formats, select a date you like.
639. Check the Update automatically box.
640. This will change the date automatically in case you need to edit the exercise later.
641. Click OK.
642. Press Enter.
643. Type the word Period, press the Spacebar, and then type your period number.
644. Press Enter.
645. Type Table 8.
646. Press Enter two times.
647. Press Ctrl+E to center the insertion point.
Tables Page 40

Creating a Flashy Title from the World Wide Web Your heading is must be flashy to get the attention of people. Here is an easy way to create a flashy title for your document.
Choosing a Heading 648. Click the Start button, point to Favorites, point to your favorite's folder, and select
FlamingText.com.
649. At the top of the page, click the hyperlink.
650. Under Headings, click the Example gallery hyperlink.
651. Browse through the examples.
652. Click any design you like.
653. In the Text String box, type Table of Contents.
654. Change the Font Size to 60 points.
655. Experiment with different settings.
656. You can change the:
• Font
• Color
• Transparency
• Border
• Background
• Anything else you like
657. When you are ready, click the Create Logo button .
658. A new Web page will appear.
659. Right-click the image and select Save Picture As.
660. Save in your period folder.
661. Name your Heading: TOC Title 2.jpg or TOC Title 2.gif depending on the picture type.
662. Note: You must add the .jpg or .gif extension to make this work correctly.
663. Click Save.
Inserting a Picture 664. Click Insert on the Menu bar, point to Picture, and select From File.
665. The Insert Picture dialog box opens.
666. Click the drop-down arrow to the right of the Look in box and select your period folder.
667. Click TOC Title 2.jpg to select it.
Tables Page 41

668. Click the Preview button to get a quick look at the picture before opening it.
669. Click the Insert button .
670. Press Enter five times.
671. Press Ctrl+L to left align the insertion point.
672. Type Introduction.
673. Press the Enter key.
674. Type Making Tables With Microsoft Word 2000.
675. Press the Tab key.
676. Type 1.
677. Press Enter twice.
678. Type Exercise 1.
679. Press the Enter key.
680. Type Creating A Simple Table.
681. Press the Tab key.
682. Type 2.
683. Press Enter twice.
684. Type Exercise 2.
685. Press Enter.
686. Type Formatting A Table.
687. Press Tab.
688. Type 8.
689. Press Enter twice.
690. Type Exercise 3.
691. Press Enter.
692. Type Inserting New Columns And Rows.
693. Press Tab.
694. Type 19.
695. Press Enter twice.
696. Type Exercise 4.
697. Press Enter.
698. Type Inserting New Rows.
699. Press Tab.
700. Type 26.
701. Press Enter twice. Tables Page 42

702. Type Exercise 5.
703. Press Enter.
704. Type Making A Table Of Contents By Setting Tabs.
705. Press Tab.
706. Type 32.
707. Press Enter twice.
708. Type Exercise 6.
709. Press Enter.
710. Type Making A TOC Of This Chapter.
711. Press Tab.
712. Type 40.
713. Press Enter twice.
714. Type Group Project.
715. Press Enter.
716. Type Design A Table Of The Nine Planets.
717. Press Tab.
718. Type 1.
Figure 20
Tables Page 43

Set Tab Stops with Leader Characters Each time you have pressed tab, the insertion point has moved 0.5 inch. In order to get the page numbers to line up in a column on the right side of the paper you could keep pressing tab many times, or you can quickly set up tab stops.
719. Move the insertion point to the left of the I in Introduction.
720. Drag down to the end of the document.
721. The contents are now selected.
722. Click Format on the Menu bar and select Tabs.
723. The Tabs dialog box opens.
724. Under Tab stop position type a 6.
725. This means that when you press the tab key, the insertion point will move to the 6-inch mark on the horizontal ruler.
726. Under Alignment select Right.
727. Under Leader select style 2.
728. Click the Set button.
729. Click OK.
You have now commanded Word to move to the 6-inch position on the horizontal ruler whenever you press tab, to right align the tabbed information, and to put a dotted leader before the tabbed information.
Formatting Your TOC 730. Select the word Introduction.
731. Using the Formatting toolbar, change the Font Size to 14 points.
732. Press Ctrl+B to make the text Bold.
733. Repeat the prior step to the words Exercises 1, 2, 3, 4, 5, 6, and Group Project.
734. Press Ctrl+Home to move to the beginning of your document.
735. Press F7 to Spell and Grammar check your document.
736. Review your work carefully.
737. Press Ctrl+S to save when you are done.
Print Preview a Document
738. Press the Print Preview button on the Standard toolbar to check your document for a final time.
739. Make sure that you only have 1 page.
Tables Page 44

740. Press the Close button when you are done.
741. Compare your work with Figure 21.
Figure 21
Printing a Document 742. Press Ctrl+P.
743. The Print dialog box opens.
744. The Name of the printer should be Ireland.
745. Next to Number of copies, type 2 in the text box.
746. Click OK or press Enter.
747. Press Alt+F4 to close all open windows and to return to the Desktop.
Tables Page 45