manage and automate windows file services … · this technical report provides insight into...
TRANSCRIPT

Technical Report
Manage and Automate a Windows File Services Environment with NetApp PowerShell Toolkit Best Practices Guide
Brahmanna Chowdary Kodavali and Shashanka SR, NetApp
February 2017 | TR-4577
Abstract
This technical report provides insight into automating the Windows File Services
environment by using the NetApp® PowerShell Toolkit. It discusses the provisioning,
modifying, monitoring, and cleaning of the CIFS environment, native auditing, the antivirus
environment, and the NetApp FPolicy® component. It also discusses how to manage day-to-
day CIFS tasks.

2 Manage and Automate a Windows File Services Environment with NetApp PowerShell Toolkit
© 2017 NetApp, Inc. All Rights Reserved. © 2016 NetApp, Inc. All rights reserved.
TABLE OF CONTENTS
1 Overview ................................................................................................................................................ 4
1.1 Purpose and Scope ........................................................................................................................................4
1.2 Intended Audience ..........................................................................................................................................4
2 PowerShell and NetApp PowerShell Toolkit ONTAP Module .......................................................... 4
2.1 Windows PowerShell Overview ......................................................................................................................4
2.2 NetApp PowerShell Toolkit Overview .............................................................................................................5
2.3 Getting Started ................................................................................................................................................6
2.4 Help System ....................................................................................................................................................7
2.5 PowerShell Pipeline ........................................................................................................................................7
3 Components of Windows File Services ............................................................................................. 9
4 Managing the CIFS Environment ...................................................................................................... 10
4.1 CIFS Server Prerequisites ............................................................................................................................ 10
4.2 Provisioning the CIFS Environment .............................................................................................................. 13
4.3 Modifying the CIFS Environment .................................................................................................................. 17
4.4 Monitoring the CIFS Environment ................................................................................................................. 23
4.5 Cleaning the CIFS Environment .................................................................................................................... 24
5 Managing Native Auditing ................................................................................................................. 27
6 Managing the Antivirus Environment ............................................................................................... 29
7 Managing FPolicy ............................................................................................................................... 35
8 Managing Day-to-Day Tasks .............................................................................................................. 38
References ................................................................................................................................................. 40
LIST OF TABLES
Table 1) Versions of PowerShell. ...................................................................................................................................5
Table 2) Cmdlets for CIFS server prerequisites. .......................................................................................................... 12
Table 3) Cmdlets for CIFS server provisioning. ............................................................................................................ 13
Table 4) Cmdlets for managing the CIFS server. ......................................................................................................... 17
Table 5) Cmdlets for monitoring the CIFS server. ........................................................................................................ 23
Table 6) Cmdlets for cleaning the CIFS server. ............................................................................................................ 24
Table 7) Cmdlets for managing native auditing. ........................................................................................................... 28
Table 8) Cmdlets for manging the antivirus environment. ............................................................................................ 31
Table 9) Cmdlets for managing FPolicy........................................................................................................................ 35

3 Manage and Automate a Windows File Services Environment with NetApp PowerShell Toolkit
© 2017 NetApp, Inc. All Rights Reserved. © 2016 NetApp, Inc. All rights reserved.
LIST OF FIGURES
Figure 1) PowerShell pipeline. ........................................................................................................................................8
Figure 2) PowerShell pipeline by value. .........................................................................................................................8
Figure 3) PowerShell pipeline by property name. ...........................................................................................................8
Figure 4) Components of Windows File Services. ........................................................................................................ 10
Figure 5) CIFS server prerequisites. ............................................................................................................................ 11
Figure 6) Provisioning the CIFS environment. .............................................................................................................. 13
Figure 7) Managing native auditing. ............................................................................................................................. 28
Figure 8) Managing the antivirus environment. ............................................................................................................ 30
Figure 9) Managing FPolicy. ......................................................................................................................................... 35

4 Manage and Automate a Windows File Services Environment with NetApp PowerShell Toolkit
© 2017 NetApp, Inc. All Rights Reserved. © 2016 NetApp, Inc. All rights reserved.
1 Overview
Microsoft is moving toward a more command-line-based interface to manage Windows servers. This
trend started with the Server Core option of Windows Server and is accelerating with the Windows Nano
Server. The CLI-first approach does not preclude a user from managing an environment through a GUI;
however, the GUI often lacks all the options, flexibility, and power that are offered in the CLI environment.
With this limitation in mind, NetApp PowerShell Toolkit (PSTK) was created. PSTK exposes all the
functions and features of the NetApp controllers by using the NetApp Manageability SDK open interface,
including those features that are not available in our GUI management systems. Windows File Services
can be automated and managed by using NetApp PSTK.
1.1 Purpose and Scope
This document provides a brief overview of automating a Windows File Services environment by using
the NetApp PowerShell Toolkit. It discusses the provisioning, modifying, monitoring, and cleaning of the
CIFS environment, native auditing, the antivirus environment, and the FPolicy component. It also
discusses how to manage day-to-day CIFS tasks.
1.2 Intended Audience
This document is intended for system and storage administrators who want to manage and automate the
Windows File Services environment with Windows PowerShell. Experts in PowerShell will find that all the
NetApp PSTK commands are self-documented, cross-referenced, and object-based. Therefore,
PowerShell experts will immediately be able to produce powerful and robust scripts. This document,
however, is for those administrators who are less familiar with PowerShell and its advantages when used
to manage an infrastructure.
It assumes that the reader:
Has a general knowledge about NetApp hardware and software solutions. For details, review the System Administration Guide for Cluster Administrators.
Has a general knowledge about the file-access protocols SMB and CIFS. For CIFS- and SMB-related information, review the Best Practices Guide for Windows File Services and the CIFS/SMB Configuration Express Guide.
Has a general knowledge about Windows PowerShell.
2 PowerShell and NetApp PowerShell Toolkit ONTAP Module
2.1 Windows PowerShell Overview
Windows PowerShell is a task automation and configuration management framework from Microsoft. It
consists of a command-line shell and a scripting language that are built on the .NET framework.
PowerShell enables administrators to perform administrative tasks and to automate tasks on both local
and remote Windows systems. Following are definitions of a few PowerShell components:
Cmdlet. A specialized .NET class that implements a particular operation.
Script. A plain text file with a .ps1 file extension that contains one or more PowerShell cmdlets.
Function. A named block of code that can be called once or multiple times anywhere from within a script.
Advanced function. A function written in script that performs operations similar to the way that cmdlets do.
Module. A package that contains Windows PowerShell commands such as cmdlets, providers, functions, workflows, variables, and aliases.
5 Manage and Automate a Windows File Services Environment with NetApp PowerShell Toolkit
© 2017 NetApp, Inc. All Rights Reserved. © 2016 NetApp, Inc. All rights reserved.
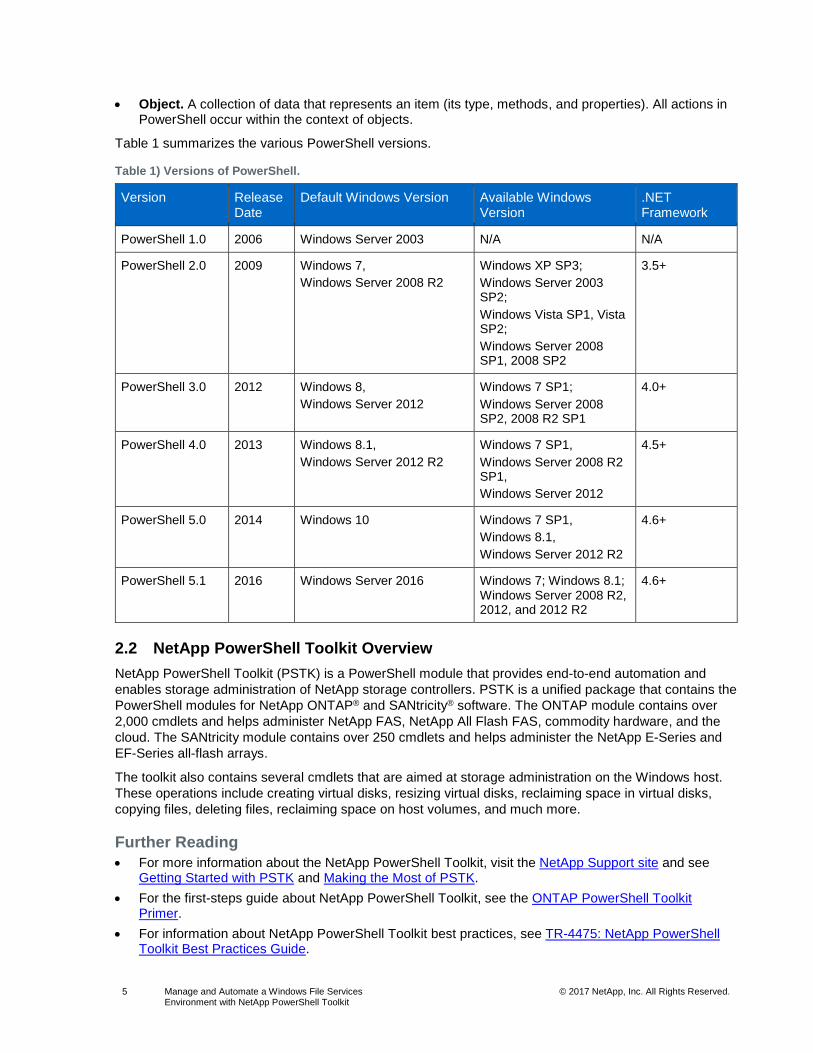
Object. A collection of data that represents an item (its type, methods, and properties). All actions in PowerShell occur within the context of objects.
Table 1 summarizes the various PowerShell versions.
Table 1) Versions of PowerShell.
Version Release Date
Default Windows Version Available Windows Version
.NET Framework
PowerShell 1.0 2006 Windows Server 2003 N/A N/A
PowerShell 2.0 2009 Windows 7,
Windows Server 2008 R2
Windows XP SP3;
Windows Server 2003 SP2;
Windows Vista SP1, Vista SP2;
Windows Server 2008 SP1, 2008 SP2
3.5+
PowerShell 3.0 2012 Windows 8,
Windows Server 2012
Windows 7 SP1;
Windows Server 2008 SP2, 2008 R2 SP1
4.0+
PowerShell 4.0 2013 Windows 8.1,
Windows Server 2012 R2
Windows 7 SP1,
Windows Server 2008 R2 SP1,
Windows Server 2012
4.5+
PowerShell 5.0 2014 Windows 10 Windows 7 SP1,
Windows 8.1,
Windows Server 2012 R2
4.6+
PowerShell 5.1 2016 Windows Server 2016 Windows 7; Windows 8.1; Windows Server 2008 R2, 2012, and 2012 R2
4.6+
2.2 NetApp PowerShell Toolkit Overview
NetApp PowerShell Toolkit (PSTK) is a PowerShell module that provides end-to-end automation and
enables storage administration of NetApp storage controllers. PSTK is a unified package that contains the
PowerShell modules for NetApp ONTAP® and SANtricity® software. The ONTAP module contains over
2,000 cmdlets and helps administer NetApp FAS, NetApp All Flash FAS, commodity hardware, and the
cloud. The SANtricity module contains over 250 cmdlets and helps administer the NetApp E-Series and
EF-Series all-flash arrays.
The toolkit also contains several cmdlets that are aimed at storage administration on the Windows host.
These operations include creating virtual disks, resizing virtual disks, reclaiming space in virtual disks,
copying files, deleting files, reclaiming space on host volumes, and much more.
Further Reading
For more information about the NetApp PowerShell Toolkit, visit the NetApp Support site and see Getting Started with PSTK and Making the Most of PSTK.
For the first-steps guide about NetApp PowerShell Toolkit, see the ONTAP PowerShell Toolkit Primer.
For information about NetApp PowerShell Toolkit best practices, see TR-4475: NetApp PowerShell Toolkit Best Practices Guide.

6 Manage and Automate a Windows File Services Environment with NetApp PowerShell Toolkit
© 2017 NetApp, Inc. All Rights Reserved. © 2016 NetApp, Inc. All rights reserved.
For support on NetApp PowerShell Toolkit, visit ONTAP Community Discussions and SANtricity Community Discussions.
System Requirements
Following are requirements for the NetApp PowerShell Toolkit:
Microsoft Windows 7 or later
Windows Server 2008 or later
Microsoft Windows PowerShell v3.0 or later
Microsoft .NET Framework v4.5.2 or later
NetApp ONTAP 7.3.x or later
2.3 Getting Started
1. Download the NetApp PowerShell Toolkit .msi installer from the NetApp Support site.
2. Install the NetApp PowerShell Toolkit (make sure that Data ONTAP PowerShell Toolkit is selected for installation under Advanced Setup).
3. Open the PowerShell Console and import the ONTAP module by running the following cmdlet:
# Import the ONTAP module
Import-Module -Name DataONTAP
# Change the execution policy to trust the scripts to be run
Set-ExecutionPolicy -ExecutionPolicy RemoteSigned
# Verify the execution policy
Get-ExecutionPolicy
# Connect to a NetApp Controller
Connect-NcController -Name <name or IP address of controller> -Credential (Get-Credential)
4. The following window prompts you to enter the credentials for the controller. Enter the credentials to connect the controller.

7 Manage and Automate a Windows File Services Environment with NetApp PowerShell Toolkit
© 2017 NetApp, Inc. All Rights Reserved. © 2016 NetApp, Inc. All rights reserved.
If you want to avoid the prompt for credentials, use credential object as follows:
# Controller info
$name = <name or IP address of controller>
$username = <user name of controller>
$password = <password for controller>
# Create controller credential object
$credpassword = ConvertTo-SecureString -AsPlainText -Force $password
$credential = new-object management.automation.pscredential $username, $credpassword
# Connect to a NetApp Controller
Connect-NcController -Name $name -Credential $credential
Note: The cmdlet Connect-NcController is to connect to an ONTAP controller (previously a NetApp clustered Data ONTAP® controller). To connect to a Data ONTAP operating in 7-Mode controller, use Connect-NaController. The prefix Nc is for an ONTAP controller, and the prefix Na is for a 7-Mode controller. All cmdlets follow this prefix rule.
2.4 Help System
The PowerShell Toolkit ONTAP module includes extensive, console-based help with elaborate
descriptions and examples. For help, use the following cmdlets:
# View the full HTML Help
Show-NcHelp
# view all the available PSTK cmdlets
Get-NcHelp
# view all the available PSTK cmdlets
Get-NcCommand
# view the available categories in PSTK
Get-NcHelp -CategoryList
# view all the cmdlets of a particular category
Get-NcCommand -Category <category>
# view help for a particular cmdlet
Get-Help <cmdlet_name>
# view full help for a particular cmdlet
Get-Help <cmdlet_name> -full
# view example for a particular cmdlet
Get-Help <cmdlet_name> -examples
# Pops up a window with the help information (PS v3.0+)
Get-Help <cmdlet_name> -ShowWindow
# get the members (properties and methods) of the objects returned by a cmdlet
<cmdlet_name> | Get-Member
2.5 PowerShell Pipeline
A pipeline is a series of commands that are connected by the pipeline operator |. Each pipeline operator
sends the results of the preceding command to the next command (Figure 1).

8 Manage and Automate a Windows File Services Environment with NetApp PowerShell Toolkit
© 2017 NetApp, Inc. All Rights Reserved. © 2016 NetApp, Inc. All rights reserved.
Figure 1) PowerShell pipeline.
In PowerShell, a cmdlet can receive objects from the pipeline in two ways:
By value. The output of a cmdlet must be the same type as the -InputObject parameter of the
other cmdlet, as shown in Figure 2.
Figure 2) PowerShell pipeline by value.
By property name. When the object has a property that matches the name of a parameter in the other cmdlet, as shown in Figure 3.
Figure 3) PowerShell pipeline by property name.
To determine the parameters that accept pipeline input, use Get-Help.

9 Manage and Automate a Windows File Services Environment with NetApp PowerShell Toolkit
© 2017 NetApp, Inc. All Rights Reserved. © 2016 NetApp, Inc. All rights reserved.
Examples
# Basic Pipeline example
Get-NcVol -Name <volume name> | Set-NcVol -Offline
# The objects returned from the Get-NcVol cmdlet include a ‘Name’ property
# The Set-NcVol cmdlet accepts pipeline input via the ‘Name’ property (ByPropertyName)
# Basic Filtering example (Filtering based on search criteria)
Get-NcVol | Where-Object { $_.State -eq ‘Offline’ } | Set-NcVol -Online
# Where-Object filters objects passed down the pipeline based on the search criteria you specify
# Basic Filtering example (Filtering based on property)
Get-NcVol | Select-Object -Property Name, TotalSize
# Select-Object allows you to filter the results based on property names, number of objects, or
other criteria
3 Components of Windows File Services
Figure 4 shows the components of Windows File Services. A CIFS server must be configured over a
NetApp ONTAP storage virtual machine (SVM) over which SMB shares are configured so that SMB
clients can access files. After the CIFS server has been set up, several management tasks can be
performed, such as:
Configuring CIFS options
Managing CIFS server security settings
Configuring SMB protocol and SMB signing
Managing CIFS oplocks
Configuring IPv6 CIFS access
Applying Group Policy Objects (GPOs) to CIFS servers
Managing domain controller connections
Managing CIFS server service

10 Manage and Automate a Windows File Services Environment with NetApp PowerShell Toolkit
© 2017 NetApp, Inc. All Rights Reserved. © 2016 NetApp, Inc. All rights reserved.
Managing the Home directory
Managing NetApp FPolicy policies
Managing antivirus (AV)
Managing native auditing
Figure 4) Components of Windows File Services.
4 Managing the CIFS Environment
This section provides information about CIFS server prerequisites and the cmdlets that are used for those
prerequisites, and it gives examples of the cmdlets.
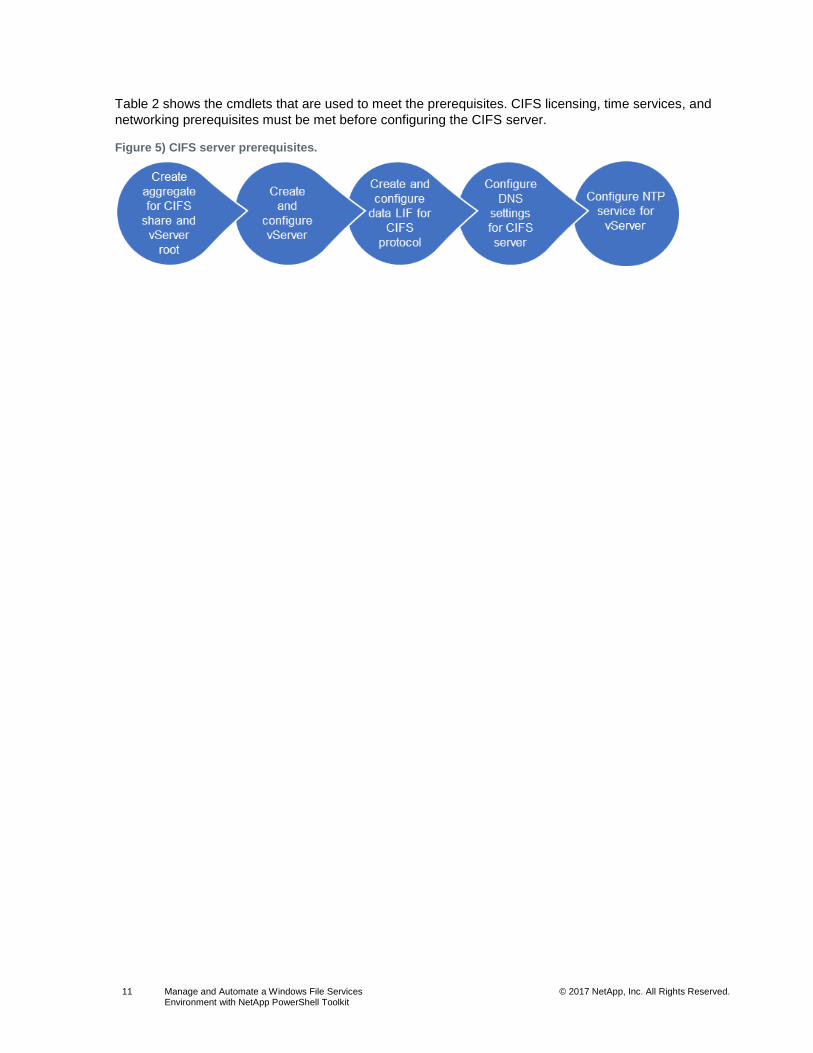
4.1 CIFS Server Prerequisites Figure 5 shows the prerequisites for deploying a CIFS server.
11 Manage and Automate a Windows File Services Environment with NetApp PowerShell Toolkit
© 2017 NetApp, Inc. All Rights Reserved. © 2016 NetApp, Inc. All rights reserved.
Table 2 shows the cmdlets that are used to meet the prerequisites. CIFS licensing, time services, and
networking prerequisites must be met before configuring the CIFS server.
Figure 5) CIFS server prerequisites.

12 Manage and Automate a Windows File Services Environment with NetApp PowerShell Toolkit
© 2017 NetApp, Inc. All Rights Reserved. © 2016 NetApp, Inc. All rights reserved.
Table 2) Cmdlets for CIFS server prerequisites.
Description Cmdlet
Create a new aggregate New-NcAggr
Create a new SVM (called Vserver in the CLI) New-NcVserver
Configure network settings: Create a new subnet New-NcNetSubnet
Configure network settings: Create a new LIF New-NcNetInterface
Configure DNS settings: Configure a DNS New-NcNetDns
Configure DNS settings: Enable DDNS Set-NcNetDdns
Configure the NTP service New-NcNtpServer
#------------------------------------------------------------------------------------
# User Inputs
# The below script uses example inputs. Please change it according to your needs
# Aggregate info
$aggr_name = "aggr_cifs"
$aggr_diskcount = 5
# VServer info
$vserver_name = "vserver_cifs"
$rootvolume_name = $vservername+"_root"
# Network info
$subnet_name = "cifs_subnet_231"
$lif1_name = "cifs_lif1"
# Domain info
$domain = "netapp.local"
# NTP info
$ntp_server_ip = "10.195.49.25"
#------------------------------------------------------------------------------------
# Get the nodes in the cluster
$cluster_nodes = (Get-NcNode).Node
# Get the data ports in cluster
$data_ports = Get-NcNetPort | where {$_.Role -eq 'data' -and $_.LinkStatus -eq 'up'}
#------------------------------------------------------------------------------------
# Create a new Aggregate
New-NcAggr -Name $aggr_name -Node $cluster_nodes[1] -DiskCount $aggr_diskcount
#------------------------------------------------------------------------------------
# Create a new VServer
New-NcVserver -Name $vserver_name -RootVolumeAggregate $aggr_name -RootVolume $rootvolume_name -
RootVolumeSecurityStyle NTFS
# Possible values for RootVolumeSecurityStyle: 'unix', 'ntfs', 'mixed'
#------------------------------------------------------------------------------------
# Network Configuration
# Create new subnet
New-NcNetSubnet -Name $subnet_name -BroadcastDomain Default -Subnet 10.238.231.0/22 -Ipspace
Default -Gateway 10.238.231.1 -IpRange 10.238.231.20-10.238.231.100 -ForceUpdateLifAssociations
# Above cmdlet uses example subnet, ip address, gateway and ip range
# Please change it according to your needs
# Create a new LIF
13 Manage and Automate a Windows File Services Environment with NetApp PowerShell Toolkit
© 2017 NetApp, Inc. All Rights Reserved. © 2016 NetApp, Inc. All rights reserved.
New-NcNetInterface -Name $lif1_name -Vserver $vserver_name -Role data -Node
$cluster_nodes[0] -Port $data_ports[0].Port -DataProtocols cifs -FirewallPolicy data -Subnet
$subnet_name
# Providing subnet will take IP address automatically
# To manually specify the IP, use -Address and -NetMask argument
# Possible values for FirewallPolicy: 'mgmt', 'data', cluster', 'intercluster'
#------------------------------------------------------------------------------------
# DNS Configuration
# Configure DNS settings for VServer
New-NcNetDns -Domains $domain -NameServers 10.238.231.199 -VserverContext $vserver_name
# Above cmdlet uses example NameServer IP Address
# Please change it according to your needs
# Enable DDNS for VServer
Set-NcNetDdns -VserverContext $vserver_name -DomainName $domain -Enable $true
#------------------------------------------------------------------------------------
# NTP Server Configuration
New-NcNtpServer -ServerName $ntp_server_ip -IsPreferred
#------------------------------------------------------------------------------------
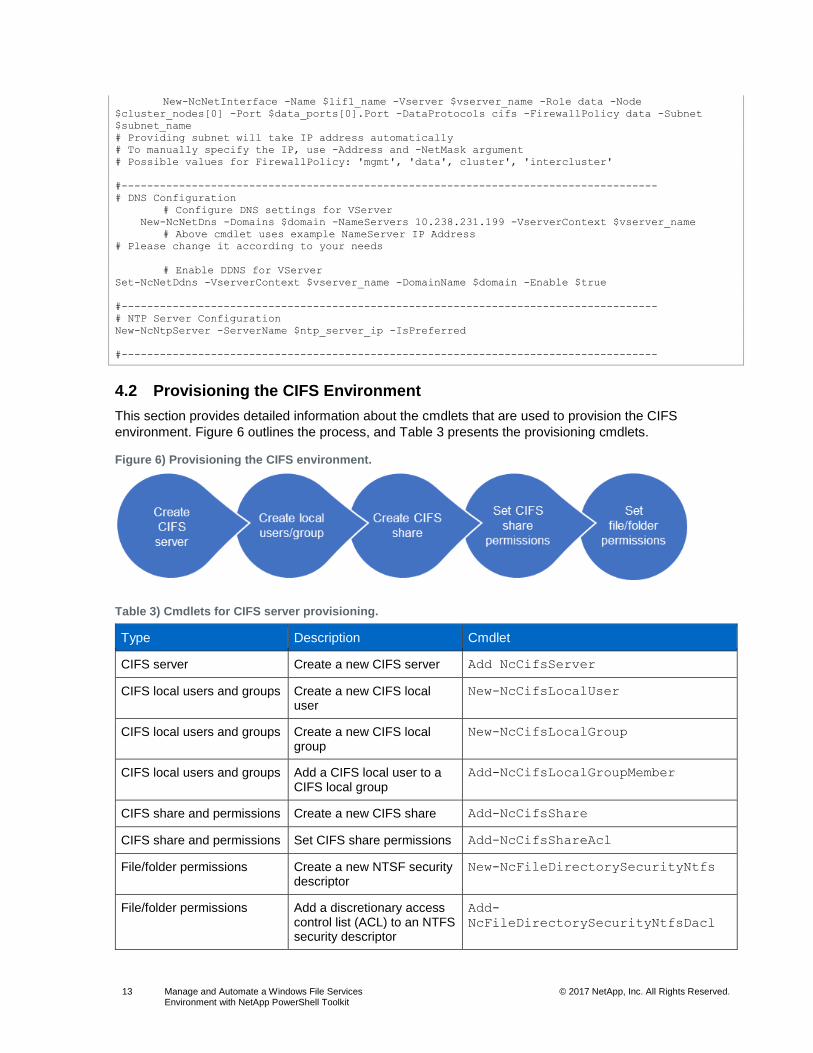
4.2 Provisioning the CIFS Environment
This section provides detailed information about the cmdlets that are used to provision the CIFS
environment. Figure 6 outlines the process, and Table 3 presents the provisioning cmdlets.
Figure 6) Provisioning the CIFS environment.
Table 3) Cmdlets for CIFS server provisioning.
Type Description Cmdlet
CIFS server Create a new CIFS server Add NcCifsServer
CIFS local users and groups Create a new CIFS local user
New-NcCifsLocalUser
CIFS local users and groups Create a new CIFS local group
New-NcCifsLocalGroup
CIFS local users and groups Add a CIFS local user to a CIFS local group
Add-NcCifsLocalGroupMember
CIFS share and permissions Create a new CIFS share Add-NcCifsShare
CIFS share and permissions Set CIFS share permissions Add-NcCifsShareAcl
File/folder permissions Create a new NTSF security descriptor
New-NcFileDirectorySecurityNtfs
File/folder permissions Add a discretionary access control list (ACL) to an NTFS security descriptor
Add-
NcFileDirectorySecurityNtfsDacl

14 Manage and Automate a Windows File Services Environment with NetApp PowerShell Toolkit
© 2017 NetApp, Inc. All Rights Reserved. © 2016 NetApp, Inc. All rights reserved.
Type Description Cmdlet
File/folder permissions Add a system/audit ACL to an NTFS security descriptor
Add-
NcFileDirectorySecurityNtfsSacl
File/folder permissions Create a new file-directory security policy
New-NcFileDirectorySecurityPolicy
File/folder permissions Attach a file-directory security policy task to a path
Add-
NcFileDirectorySecurityPolicyTask
Domain activities Add a trusted domain Add-NcCifsTrustedDomain
Domain activities Configure the preferred domain controllers
Add-
NcCifsPreferredDomainController
Home directory Add a CIFS home directory search path
Add-NcCifsHomeDirectorySearchPath
Shadow copy Add files to a shadow copy in a share
Add-NcCifsShadowCopyFile
#------------------------------------------------------------------------------------
# User Inputs
# The below script uses example inputs. Please change it according to your needs
# CIFS info
$cifsserver_name = "cifs_server"
$vol_name = "cifs_vol"
$qtree_name = "cifs_qtree"
$vol_share_name = "cifs_share_vol"
$qtree_share_name = "cifs_share_qtree"
# Domain info
$domain = "netapp.local"
$domain_username = "Administrator"
$domain_password = "password"
# VServer info
$vserver_name = "vserver_cifs"
# CIFS Local Users and Group info
$localgroup_name = "cifs_localgroup"
$localuser_name = "cifs_localuser"
$localuser_password = “password”
# File/Folder Permissions
$ntfs_sec_desc_id = "ntfssd"
$policy_name = "policy1"
# Home Directory info
$homedir_volume_name = "home_vol"
$homeshare_name = "home"
#------------------------------------------------------------------------------------
# Create a Secure String password for local user
$secure_localuser_password = ConvertTo-SecureString -AsPlainText -Force $localuser_password
#------------------------------------------------------------------------------------
# List all cmdlets available for CIFS
Get-NcHelp | where {$_.Category -eq 'cifs'}
#------------------------------------------------------------------------------------
# Create a new CIFS server
Add-NcCifsServer -Name $cifsserver_name -Domain $domain -OrganizationalUnit CN=Computers -
AdminUsername $domain_username -AdminPassword $domain_password -VserverContext $vserver_name

15 Manage and Automate a Windows File Services Environment with NetApp PowerShell Toolkit
© 2017 NetApp, Inc. All Rights Reserved. © 2016 NetApp, Inc. All rights reserved.
#------------------------------------------------------------------------------------
# CIFS Local Users and Groups
# Create a CIFS new Local User
New-NcCifsLocalUser -UserName $localuser_name -Password $secure_localuser_password -FullName
"$localuser_name $localuser_name" -Description "new cifs local user" -VserverContext
$vserver_name
# Above cmdlet uses example Name, FullName and Description
# Please change it according to your needs
# Create a new CIFS Local Group
New-NcCifsLocalGroup -Name $localgroup_name -Description "local group for cifs" -VserverContext
$vserver_name
# Above cmdlet uses example GroupName and Description
# Please change it according to your needs
# Add a CIFS Local user to CIFS local group
Add-NcCifsLocalGroupMember -Name $localgroup_name -Member $localuser_name -VserverContext
$vserver_name
#------------------------------------------------------------------------------------
# CIFS Share Configuration
# Create a new Volume to share
New-NcVol -Name $vol_name -Aggregate $aggr_name -size 10g -JunctionPath "/$vol_name" -
SecurityStyle "ntfs" -VserverContext $vserver_name
# Create a new Qtree to share
New-NcQtree -Volume $vol_name -Qtree $qtree_name -VserverContext $vserver_name -SecurityStyle
"ntfs"
# Share the volume
Add-NcCifsShare -Name $vol_share_name -Path "/$vol_name" -VserverContext $vserver_name -
ShareProperties "browsable"
# Share the qtree
Add-NcCifsShare -Name $qtree_share_name -Path "/$vol_name/$qtree_name" -VserverContext
$vserver_name -ShareProperties "browsable"
#------------------------------------------------------------------------------------
# CIFS Share Permissions
# Add permission for user or group for a CIFS Share
# Give full control access to the local group on volume share
Add-NcCifsShareAcl -Share $vol_share_name -UserOrGroup $localgroup_name -Permission
"full_control" -UserGroupType "windows" -VserverContext $vserver_name
# Give read access to the local user on qtree share
Add-NcCifsShareAcl -Share $qtree_share_name -UserOrGroup $localuser_name -Permission "read" -
UserGroupType "windows" -VserverContext $vserver_name
# Possible values for Permission: ‘no_access’, 'read', ‘change', 'full_control'
# Possible values for UserGroupType: ‘windows’, ‘unix_user’, ‘unix_group’
#------------------------------------------------------------------------------------
# File/Folder Permissions
# Create a new NTFS security descriptor
New-NcFileDirectorySecurityNtfs -SecurityDescriptor $ntfs_sec_desc_id -Owner $localuser_name -
Group $localgroup_name -VserverContext $vserver_name
# Add a discretionary access control entry to NTFS security descriptor
Add-NcFileDirectorySecurityNtfsDacl -SecurityDescriptor $ntfs_sec_desc_id -Account
$localuser_name -AccessType "allow" -Rights "full_control" -ApplyTo "files" -VserverContext
$vserver_name
# Add a system/audit access control entry to NTFS security descriptor
Add-NcFileDirectorySecurityNtfsSacl -SecurityDescriptor $ntfs_sec_desc_id -Account
$localuser_name -AccessType "success" -Rights "read_and_execute" -AdvancedRights “full_control” -
ApplyTo "sub_folders" -VserverContext $vserver_name
# Possible values for -AccessType: "deny", "allow"
# Possible values for -Rights: "no_access", "full_control", "modify", "read_and_execute", "read",
"write"
# Possible values for -AdvancedRights : "read_data", "write_data", "append_data", "read_ea",
"write_ea", "execute_file", "delete_child", "read_attr", "write_attr", "delete", "read_perm",
"write_perm", "write_owner", "full_control"

16 Manage and Automate a Windows File Services Environment with NetApp PowerShell Toolkit
© 2017 NetApp, Inc. All Rights Reserved. © 2016 NetApp, Inc. All rights reserved.
# Possible values for -ApplyTo: "this_folder", "sub_folders", "files"
# Create a new file directory security policy
New-NcFileDirectorySecurityPolicy -Name $policy_name -VserverContext $vserver_name
# Get the junction path of the file/folder
$query = Get-NcVol -Template
$query.Name = $vol_name
$query.JunctionPath
$volume_junctionpath = (Get-NcVol -Query $query | select JunctionPath).JunctionPath
$qtree_junctionpath = "$volume_junctionpath/$qtree_name"
# Add a file security policy task
Add-NcFileDirectorySecurityPolicyTask -Name $policy_name -Path $qtree_junctionpath -SecurityType
"ntfs" -NtfsSecurityDescriptor $ntfs_sec_desc_id -VserverContext $vserver_name
#------------------------------------------------------------------------------------
# Domain Activities
# Add to the list of trusted domains for name-mapping search
Add-NcCifsTrustedDomain -TrustedDomain $domain -VserverContext $vserver_name
# Add to a list of preferred domain controllers
Add-NcCifsPreferredDomainController -Domain $domain -DomainControllers 10.10.10.10 -
VserverContext $vserver_name
# Above cmdlet uses example DomainControllers IP Address
# Please change it according to your needs
#------------------------------------------------------------------------------------
# Home Directory
# Create a new volume for Home Directory
New-NcVol -Name $homedir_volume_name -Aggregate $aggr_name -size 10g -JunctionPath
"/$homedir_volume_name" -SecurityStyle "ntfs" -VserverContext $vserver_name
# Create a share for the volume
Add-NcCifsShare -Name $homeshare_name -Path "/$homedir_volume_name" -VserverContext $vserver_name
# Add that share as CIFS Home directory search path
Add-NcCifsHomeDirectorySearchPath -Path "/$homedir_volume_name" -VserverContext $vserver_name
# Add Home directory share
Add-NcCifsShare -Name %w -Path %w -VserverContext $vserver_name -ShareProperties "homedirectory"
# Get the VServer LIF
$vserver_lif = (Get-NcNetInterface -Name $lif1_name -VserverContext $vserver_name).Address
# Get all the AD Users by running a remote powershell command on the AD machine
$ad_userlist = Invoke-Command -ComputerName "ad.netapp.local" -ScriptBlock {(Get-ADGroupMember -
Identity CifsADgroup).name }
# Above cmdlet uses example ComputerName and example Identity
# Please change it according to your needs
# Please use FQDN of the AD machine for ComputerName
# Please provide a valid AD group for Identity
# Create folders for each user in the AD group
for($i=0; $i -lt $ad_userlist.Count; $i++)
{
$ad_user_dir = $ad_userlist[$i]
New-Item -Path "\\$vserver_lif\$homeshare_name\$ad_user_dir" -ItemType directory
}
#------------------------------------------------------------------------------------
# Shadow Copy
# Add files in a share
New-Item -Path "\\$vserver_lif\$qtree_share_name\file1.txt" -ItemType file
New-Item -Path "\\$vserver_lif\$qtree_share_name\file2.txt" -ItemType file
# Add a list of files to shadow copy in a particular share
Add-NcCifsShadowCopyFile -Id 101 -File "/$qtree_share_name/file1.txt" -VserverContext
$vserver_name
#------------------------------------------------------------------------------------

17 Manage and Automate a Windows File Services Environment with NetApp PowerShell Toolkit
© 2017 NetApp, Inc. All Rights Reserved. © 2016 NetApp, Inc. All rights reserved.
4.3 Modifying the CIFS Environment
Table 4 and the following example code provide detailed information about the cmdlets that are used to
modify and manage the CIFS server.
Table 4) Cmdlets for managing the CIFS server.
Type Description Cmdlet
CIFS server Start the CIFS server Start-NcCifsServer
CIFS server Stop the CIFS server Stop-NcCifsServer
CIFS server Modify the CIFS server Set-NcCifsServer
CIFS server Set CIFS security tunable parameters
Set-NcCifsSecurity
CIFS server Modify the CIFS specific tunable parameters
Set-NcCifsOption
CIFS local users and groups Modify a CIFS local user Set-NcCifsLocalUser
CIFS local users and groups Rename a CIFS local user Rename-NcCifsLocalUser
CIFS local users and groups Modify a CIFS local group Set-NcCifsLocalGroup
CIFS local users and groups Rename a CIFS local group Rename-NcCifsLocalGroup
CIFS share and permissions Modify a CIFS share Set-NcCifsShare
CIFS share and permissions Modify CIFS share permissions
Set-NcCifsShareAcl
CIFS sessions and files Retrieve the list of the established CIFS sessions
Get-NcCifsSession
CIFS sessions and files Retrieve the list of the opened CIFS files
Get-NcCifsSessionFile
CIFS sessions and files Close an open CIFS session Close-NcCifsSession
CIFS sessions and files Close an open CIFS file Close-NcCifsSessionFile
File/folder permissions Modify the NTFS security descriptor
Set-NcFileDirectorySecurityNtfs
File/folder permissions Modify a discretionary ACL of the NTFS security descriptor
Set-
NcFileDirectorySecurityNtfsDacl
File/folder permissions Modify a system/audit ACL of the NTFS security descriptor
Set-
NcFileDirectorySecurityNtfsSacl
File/folder permissions Modify a file security policy task
Set-
NcFileDirectorySecurityPolicyTask
File/folder permissions Apply the security settings of a policy
Set-NcFileDirectorySecurity

18 Manage and Automate a Windows File Services Environment with NetApp PowerShell Toolkit
© 2017 NetApp, Inc. All Rights Reserved. © 2016 NetApp, Inc. All rights reserved.
Type Description Cmdlet
Domain activities Enable the CIFS domain password schedule
Enable-
NcCifsDomainPasswordSchedule
Domain activities Modify the attributes of the CIFS domain password schedule object
Set-NcCifsDomainPasswordSchedule
Domain activities Modify the list of trusted domains
Set-NcCifsTrustedDomain
Domain activities Disable the CIFS domain password schedule
Disable-
NcCifsDomainPasswordSchedule
Home directory Modify the CIFS home directory search path
Set-NcCifsHomeDirectorySearchPath
Home directory Modify the CIFS home directory configurations
Set-NcCifsHomeDirectoryConfig
Shadow copy Save the NetApp Snapshot® copies of the shadow copy set
Save-NcCifsShadowCopySnapshot
Shadow copy Restore a shadow copy directory
Restore-NcCifsShadowCopyDirectory
#------------------------------------------------------------------------------------
# Start a CIFS server on the specified Vserver
Start-NcCifsServer -VserverContext $vserver_name
# Stop a CIFS server on the specified Vserver
Stop-NcCifsServer -VserverContext $vserver_name
# Set the configurations of a CIFS server
Set-NcCifsServer -CifsServer $cifsserver_name -Domain $domain -Ou CN=Computers -AdminUsername
$domain_username -AdminPassword $domain_password -VserverContext $vserver_name -
AdministrativeStatus "up" -ForceAccountOverwrite
# Possible values for AdministrativeStatus: 'up', 'down'
# ForceAccountOverwrite : if the domain is being modified,and a machine account with the same
name as the current Vserver's CIFS server name exists in the Active Directory, it will be
overwritten and reused
# Set CIFS security tunable parameters
Set-NcCifsSecurity -ClockSkew 5 -TicketAge 10 -RenewAge 7 -IsSigningRequired $true -
IsPasswordComplexityRequired $true -UseStartTlsForAdLdap $true -IsAesEncryptionEnabled $true -
LmCompatibilityLevel 'krb' -IsSmbEncryptionRequired $true -KerberosKdcTimeout 30s -VserverContext
$vserver_name
# -ClockSkew : The clock skew in minutes is the tolerance for accepting tickets with time stamps
that do not exactly match the host's system clock
# -TicketAge : This option determines the maximum amount of time in hours that a user's ticket
may be used for the purpose of Kerberos authentication
# -RenewAge : This option determines the maximum amount of time in days for which a ticket can
be renewed
# -IsSigningRequired : If true, signing is required for incoming CIFS traffic
# -IsPasswordComplexityRequired : If true, password complexity is required for local users
# -UseStartTlsForAdLdap : If true, use start-tls for AD LDAP connections. Default value : false
# -IsAesEncryptionEnabled : Determines whether AES-128 and AES-256 encryption mechanisms are
enabled for Kerberos-related CIFS communication.
# Default value : true
# -LmCompatibilityLevel : This option determines the LM compatibility level. Default value : 'LM,
NTLM, NTLMv2 and Kerberos'
# Possible Values :

19 Manage and Automate a Windows File Services Environment with NetApp PowerShell Toolkit
© 2017 NetApp, Inc. All Rights Reserved. © 2016 NetApp, Inc. All rights reserved.
# 'lm_ntlm_ntlmv2_krb' - Accepts LM, NTLM, NTLMv2 and Kerberos,
# 'ntlm_ntlmv2_krb' - Accepts NTLM, NTLMv2 and Kerberos,
# 'ntlmv2_krb' - Accepts NTLMv2 and Kerberos,
# 'krb' - Accepts Kerberos only
# -IsSmbEncryptionRequired : Determines whether SMB encryption is required for incoming CIFS
traffic. Default value : false
# -KerberosKdcTimeout : Timeout value for KDC connections. Example: 5m (5 minutes), 20s (20
seconds), 1h (1 hour) (Data ONTAP 8.4 and above)
# Create a new Unix group and user and add user to group
$unix_group = "unix_group"
$unix_user = "unix_user"
New-NcNameMappingUnixGroup -Name $unix_group -GroupId 21 -VserverContext $vserver_name
New-NcNameMappingUnixUser -Name $unix_user -UserId 1 -GroupId 21 -VserverContext $vserver_name
Add-NcNameMappingUnixGroupUser -Name $unix_group -UserName $unix_user -VserverContext
$vserver_name
# Modify the CIFS specific tunables that can be set on a Vserver
Set-NcCifsOption -DefaultUnixUser "root" -ReadGrantsExecute \"enabled\" -WinsServers $domain -
EnableSmb2 -MaxMpx 255 -ShadowcopyDirDepth 5 -IsSmb3Enabled $true -IsCopyOffloadEnabled $true -
DefaultUnixGroup $unix_group -IsShadowCopyEnabled $true -IsReferralEnabled $true -
IsLocalAuthEnabled $true -IsLocalUsersAndGroupsEnabled $true -
IsUseJunctionsAsReparsePointsEnabled $true -IsExportPolicyEnabled $true -
IsTrustedDomainEnumSearchEnabled $true -IsCopyOffloadDirectCopyEnabled $true -
FileSystemSectorSize '512' -IsUnixNtAclEnabled $true -ClientSessionTimeout 30s -IsDacEnabled
$true -AnonymousRestrictionLevel 'no_restriction' -IsReadOnlyDeleteEnabled $true -
IsFakeOpenEnabled $false -IsUnixExtensionsEnabled $true -IsSearchShortNamesEnabled $true -
IsAdvertiseDfsEnabled $false -IsAdvancedSparseFileSupportEnabled $true -MaxFileWriteZeroLength
512K -GuestUnixUser $unix_user -Smb1MaxBufferSize 256KB -MaxSameUserSessionsPerConnection 10 -
MaxSameTreeConnectPerSession 5 -MaxOpensSameFilePerTree 10 -MaxWatchesSetPerTree 5 -
IsAdminUsersMappedToRootEnabled $true -GrantUnixGroupPermsToOthers $true -
IsClientDupDetectionEnabled $true -IsClientVersionReportingEnabled $true -IsHideDotfilesEnabled
$true -IsLargeMtuEnabled $true -IsMultichannelEnabled $true -IsPathComponentCacheEnabled $true -
IsPathComponentCacheSymlinkEnabled $true -IsSmb31Enabled $true -MaxConnectionsPerSession 10 -
MaxLifsPerSession 10 -NbnsEnabledLifs $lif1_name -PathComponentCacheEntryExpTime 30 -
PathComponentCacheMaxEntries 3 -PathComponentCacheMaxSessionTokenSize 10 -
PathComponentCacheSymlinkExpTime 30 -WinNameForNullUser $localuser_name -IsNetbiosOverTcpEnabled
$true -VserverContext $vserver_name
# -DefaultUnixUser : This is the default UNIX user mapping that will be used if the identity of
a CIFS user connot be mapped using normal name mapping rules.
# -ReadGrantsExecute : On a file with UNIX Style security effective on it, if the file has read
permission on it, a CIFS user would be allowed to execute permissions if this option is enabled.
Possible values: \"enabled\", \"disabled\".
# -WinsServers : List of Windows Internet Name Service (WINS) IP addresses. The Vserver will send
NetBIOS name resolution requests to these addresses.
# -EnableSmb2 : Specify to enable Smb2 on this CIFS sserver.
# -DisableSmb2 : Specify to disable Smb2 on this CIFS sserver.
# -MaxMpx : This option controls maximum simultaneous operations the CIFS server reports it can
process per TCP connection. The default value for this option is 255.
# -ShadowcopyDirDepth : The maximum depth of directories to shadow copy.
# -IsSmb3Enabled : If true, the CIFS server negotiates the SMB3 version of the CIFS protocol.
# -IsCopyOffloadEnabled : If true, the CIFS server is capable of performing copy offload
operation.
# -DefaultUnixGroup : The default UNIX group used if the identity of a CIFS group cannot be
mapped using normal group mapping rules.
# -IsShadowCopyEnabled : If true, the CIFS server is capable of performing shadow copy
operations.
# -IsReferralEnabled : If true, the CIFS server refers clients to more optimal data access paths
(LIFs).
# -IsLocalAuthEnabled : If true, CIFS local users can authenticate.
# -IsLocalUsersAndGroupsEnabled : If true, the CIFS local users and groups feature is enabled on
the cluster.
# -IsUseJunctionsAsReparsePointsEnabled : If true, the CIFS server exposes junction points as
reparse points to Windows clients.
# -IsExportPolicyEnabled : If true, the CIFS server uses export policies to control client
access.
# -IsTrustedDomainEnumSearchEnabled : If true, the CIFS server is capable of performing
enumeration of trusted domains and search to map a UNIX user to a Windows user.

20 Manage and Automate a Windows File Services Environment with NetApp PowerShell Toolkit
© 2017 NetApp, Inc. All Rights Reserved. © 2016 NetApp, Inc. All rights reserved.
# -FileSystemSectorSize : Specifies the size of file system sector in bytes reported to SMB
Clients.
# Possible values:
# '512' - Reported file system sector size to SMB clients is 512 bytes,
# '4096' - Reported file system sector size to SMB clients is 4096 bytes
# -IsCopyOffloadDirectCopyEnabled : If true, the direct-copy copy offload mechanism is enabled.
The default value is true.
# -IsUnixNtAclEnabled : If true, NT ACLs can be set on a volume with UNIX security-style.
# -ClientSessionTimeout : The amount of idle time (in seconds) before a CIFS session is
disconnected.
# -IsDacEnabled : If true, the CIFS server supports Dynamic Access Control. The default value for
this parameter is false.
# -AnonymousRestrictionLevel : The level of access a non authenticated user get
# Possible values:
# 'no_restriction' - No access restriction for anonymous user
# 'no_enumeration' - Only enumeration is restricted
# 'no_access' - Access restricted for anonymous user.
# -IsReadOnlyDeleteEnabled : If true, a file can be deleted using UNIX delete semantics when the
DOS read-only bit is enabled.
# -IsFakeOpenEnabled : If true, the CIFS server supports fake open requests. The default value
for this parameter is true.
# -IsUnixExtensionsEnabled : If true, the CIFS server is capable of supporting UNIX Extensions.
The default value for this parameter is false.
# -IsSearchShortNamesEnabled : If true, the CIFS server supports searching short names. The
default value for this parameter is false.
# -IsAdvertiseDfsEnabled : If true, DFS referral of the CIFS protocol is advertised.
# -IsAdvancedSparseFileSupportEnabled : Specifies whether advanced sparse file capabilities, such
as Query Allocated Ranges and Set Zero Data, are enabled on the CIFS server.
# -MaxFileWriteZeroLength : Maximum length of data that the CIFS server can write zero with one
CIFS request. Value must be between 4K and 1G
# -GuestUnixUser : The specific unix user to which a guest user coming from any untrusted domain
can be mapped.
# -Smb1MaxBufferSize : Maximum buffer size used for SMB1 message that the server can receive
# -MaxSameUserSessionsPerConnection : Maximum simultaneous sessions by the same user per TCP
connection
# -MaxSameTreeConnectPerSession : Maximum simultaneous CIFS connections to the same share per
CIFS session.
# -MaxOpensSameFilePerTree : Maximum existing opens on the same file per CIFS Tree.
# -MaxWatchesSetPerTree : Maximum watches that can be set per CIFS Tree.
# -IsAdminUsersMappedToRootEnabled : Specifies that if name-mapping is not present for members of
BUILTIN\Administrators group then whether they can be mapped to Unix User 'root'.
# -GrantUnixGroupPermsToOthers : Specifies whether UNIX group permissions should be granted to
others when Windows clients access files on a UNIX security-style Volume/Qtree as well as mixed
security style Volume/Qtree, as long as the effective security style on the file is UNIX.
# -IsClientDupDetectionEnabled : Specifies whether the CIFS server should detect duplicate
sessions coming from the same SMB 1.0 client with VcNumber of zero (0).
# -IsClientVersionReportingEnabled : Specifies whether to report the client version through ASUP.
# -IsHideDotfilesEnabled : Specifies whether the CIFS server should hide files and directories
beginning with a dot '.' during directory enumeration.
# -IsLargeMtuEnabled : Specifies that the SMB 2.1 Large MTU feature is supported.
# -IsMultichannelEnabled : Specifies whether the CIFS server supports Multichannel or not.
# -IsPathComponentCacheEnabled : Specifies whether the CIFS path component cache is enabled for
SMB2 or not.
# -IsPathComponentCacheSymlinkEnabled : Specifies whether the CIFS symlink resolution for path
component cache is enabled for SMB2 or not.
# -IsSmb31Enabled : Specifies whether the CIFS server negotiates the SMB3.1 version of the CIFS
protocol.
# -MaxConnectionsPerSession : Maximum number of connections allowed per Multichannel session.
# -MaxLifsPerSession : Maximum number of network interfaces advertised per Multichannel session.
# -NbnsEnabledLifs : Specifies the list of LIFs on which NBNS broadcast can be sent.
# -PathComponentCacheEntryExpTime : This parameter controls the time in milliseconds when the
path component cache entry would be considered fresh.
# -PathComponentCacheMaxEntries : This parameter control the maximum number of cache entries in
one instance of path component cache.
# -PathComponentCacheMaxSessionTokenSize : This parameter specifies maximum session token size
for path component cache for SMB2.
# -PathComponentCacheSymlinkExpTime : This parameter controls the time in milliseconds when the
path component cache entry that is symlink would be considered fresh.
# -WinNameForNullUser : This parameter specifies a valid Windows user or group name that will be
added to the CIFS credentials for a NULL user Session.

21 Manage and Automate a Windows File Services Environment with NetApp PowerShell Toolkit
© 2017 NetApp, Inc. All Rights Reserved. © 2016 NetApp, Inc. All rights reserved.
# -IsNetbiosOverTcpEnabled : This optional parameter specifies whether the use of NetBIOS over
Tcp is enabled or not.
#------------------------------------------------------------------------------------
# CIFS Local Users and Groups
# Modify a CIFS local user
Set-NcCifsLocalUser -UserName $localuser_name -FullName $localuser_name -Description "new cifs
local user" -VserverContext $vserver_name
# Use -Disable to disable this local user
# Modify the CIFS Local user password
Set-NcCifsLocalUser -UserName $localuser_name -Password $localuser_password -VserverContext
$vserver_name
# Rename a CIFS local user
Rename-NcCifsLocalUser -UserName $localuser_name -NewUserName "new name" -VserverContext
$vserver_name
# Modify a CIFS local group
Set-NcCifsLocalGroup -Name $localgroup_name -Description "local cifs users' group" -
VserverContext $vserver_name
# Rename a CIFS local group
Rename-NcCifsLocalGroup -Name $localgroup_name -NewName $localgroup_name -VserverContext
$vserver_name
#------------------------------------------------------------------------------------
# CIFS Shares and Permissions
# Modify CIFS Shares
Set-NcCifsShare -Name $qtree_share_name -ShareProperties "browsable" -VserverContext
$vserver_name
# Modify CIFS Share Permissions
Set-NcCifsShareAcl -Share $qtree_share_name -UserOrGroup $localuser_name -Permission "write" -
VserverContext $vserver_name
#------------------------------------------------------------------------------------
# CIFS Sessions and Files
# Retrieve the list of the established CIFS sessions
Get-NcCifsSession
# Retrieve the list of the opened CIFS files
Get-NcCifsSessionFile
# Close an open CIFS session
Close-NcCifsSession -Node $cluster_nodes[0] -VserverContext $vserver_name -Confirm:$false
# Close an open CIFS file
Close-NcCifsSessionFile -Node $cluster_nodes[0] -VserverContext $vserver_name -Confirm:$false
#------------------------------------------------------------------------------------
# File/Folder Permissions
# Modify the NTFS security descriptor
Set-NcFileDirectorySecurityNtfs -SecurityDescriptor $ntfs_sec_desc_id -Owner $localuser_name -
Group $localgroup_name -ControlFlags 1
# Where -ControlFlags : The security descriptor control flags integer value
# The following are the bit fields of control flags
# 1... .... .... .... = Self Relative
# .0.. .... .... .... = RM Control Valid
# ..0. .... .... .... = SACL Protected
# ...0 .... .... .... = DACL Protected
# .... 0... .... .... = SACL Inherited
# .... .0.. .... .... = DACL Inherited
# .... ..0. .... .... = SACL Inherit Required
# .... ...0 .... .... = DACL Inherit Required
# .... .... ..0. .... = SACL Defaulted
# .... .... ...0 .... = SACL Present
# .... .... .... 0... = DACL Defaulted
# .... .... .... .1.. = DACL Present
# .... .... .... ..0. = Group Defaulted
# .... .... .... ...0 = Owner Defaulted

22 Manage and Automate a Windows File Services Environment with NetApp PowerShell Toolkit
© 2017 NetApp, Inc. All Rights Reserved. © 2016 NetApp, Inc. All rights reserved.
# At present only the following flags are honored. Others are ignored.
# ..0. .... .... .... = SACL Protected
# ...0 .... .... .... = DACL Protected
# .... .... ..0. .... = SACL Defaulted
# .... .... .... 0... = DACL Defaulted
# .... .... .... ..0. = Group Defaulted
# .... .... .... ...0 = Owner Defaulted
# Modify an discretionary access control entry of a file security descriptor
Set-NcFileDirectorySecurityNtfsDacl -SecurityDescriptor $ntfs_sec_desc_id -Account
$localuser_name -AccessType "allow" -Rights "full_control" -AdvancedRights "full_control" -
ApplyTo "this_folder" -VserverContext $vserver_name
# Modify an system/audit access control entry of a file security descriptor
Set-NcFileDirectorySecurityNtfsSacl -SecurityDescriptor $ntfs_sec_desc_id -Account
$localuser_name -AccessType "success" -Rights "read_and_execute" -AdvancedRights "full_control" -
ApplyTo "this_folder" -VserverContext $vserver_name
# Possible values for -AccessType : "deny", "allow"
# Possible values for -Rights : "no_access", "full_control", "modify",
"read_and_execute", "read", "write"
# Possible values for -AdvancedRights : "read_data", "write_data", "append_data", "read_ea",
"write_ea", "execute_file", "delete_child", "read_attr", "write_attr", "delete", "read_perm",
"write_perm", "write_owner", "full_control"
# Possible values for -ApplyTo : "this_folder", "sub_folders", "files"
# Get the junction path of the file/folder
$query = Get-NcVol -Template
$query.Name = $vol_name
$query.JunctionPath
$volume_junctionpath = (Get-NcVol -Query $query | select JunctionPath).JunctionPath
$qtree_junctionpath = "$volume_junctionpath/$qtree_name"
# Modify a file security policy task
Set-NcFileDirectorySecurityPolicyTask -Name $policy_name -Path $qtree_junctionpath -SecurityType
"ntfs" -NtfsMode "replace" -NtfsSecurityDescriptor $ntfs_sec_desc_id -Index 2 -VserverContext
$vserver_name
# Possible values for -SecurityType : "ntfs", "nfsv4"
# Possible values for -NtfsMode : "propagate", "ignore", "replace"
# -Index : the target index/position of this task in the policy. If a policy has already 5 tasks
and this is the 6th task you are adding and you want to add this task as 2nd task, you can
specifiy the index 2. By default the task gets added as last task. If the index number exceeds
the number of positions, it will go at the end
# Apply security settings of a policy
Set-NcFileDirectorySecurity -Name $policy_name -VserverContext $vserver_name
#------------------------------------------------------------------------------------
# Domain Activitites
# Enable the CIFS domain password schedule
Enable-NcCifsDomainPasswordSchedule -VserverContext $vserver_name
# Modify the attributes of CIFS domain password schedule object
Set-NcCifsDomainPasswordSchedule -WeeklyInterval 8 -RandomizedMinute 150 -DayOfWeek 1 -TimeOfDay
06:30:00 -VserverContext $vserver_name
# Where
# -WeeklyInterval : The number of weeks after which the scheduled domain account password
change must occur
# -RandomizedMinute : The minutes within which the scheduled domain account password start time
can be randomized beginning at TimeOfDay
# -DayOfWeek : The day of week when the scheduled domain account password change occurs
# -TimeOfDay : The time in HH:MM:SS format at which the scheduled domain account password
change starts
# Modify the list of trusted domains for name-mapping search
Set-NcCifsTrustedDomain -TrustedDomain $trusted_domain -VserverContext $vserver_name
# Disable the CIFS domain password schedule

23 Manage and Automate a Windows File Services Environment with NetApp PowerShell Toolkit
© 2017 NetApp, Inc. All Rights Reserved. © 2016 NetApp, Inc. All rights reserved.
Disable-NcCifsDomainPasswordSchedule -VserverContext $vserver_name
#------------------------------------------------------------------------------------
# Home Directory
# Set the position of a path in the list of paths that will be searched to find a CIFS user's
home directory
Set-NcCifsHomeDirectorySearchPath -Path "/$homedir_volume_name" -Position 1 -VserverContext
$vserver_name
# -Position : The target position this entry should be moved to, in the list of CIFS home
directory search paths
# Above cmdlet moves the CIFS home directory search path /$homedir_volume_name into the first
position
# Modify cifs home directory configurations
Set-NcCifsHomeDirectoryConfig -IsAdminAccessEnabled $true -IsPublicAccessEnabled $false -
VserverContext $vserver_name
# Possible values for -IsAdminAccessEnabled : "true", "false". If true, home directory access is
enabled to admin
# Possible values for -IsPublicAccessEnabled : "true", "false". If true, home directory access is
enabled to public
#------------------------------------------------------------------------------------
# Shadow Copy
# Request the storage system to keep the snapshots taken as part of the shadow copy set creation
Save-NcCifsShadowCopySnapshot -Id 101 -VserverContext $vserver_name
# Create source and destination directory
New-Item -Path "\\$vserver_lif\$qtree_share_name\src_dir" -ItemType directory
New-Item -Path "\\$vserver_lif\$qtree_share_name\dest_dir" -ItemType directory
# Request the storage system to restore a directory
Restore-NcCifsShadowCopyDirectory -Volume $vol_name -SourceDirectory '/$qtree_share_name/src_dir'
-DestinationDirectory '/$qtree_share_name/dest_dir' -DirectoryOnly
# -DirectoryOnly : When specified, only the directory and no content will be restored, otherwise
all content will be restored
#------------------------------------------------------------------------------------
4.4 Monitoring the CIFS Environment
Table 5 provides detailed information about the cmdlets that are used to monitor the CIFS server.
Table 5) Cmdlets for monitoring the CIFS server.
Type Description Cmdlet
CIFS server List all the CIFS servers Get-NcCifsServer
CIFS server List all the CIFS security tunable parameters
Get-NcCifsSecurity
CIFS server List the CIFS specific tunable parameters
Get-NcCifsOption
CIFS local users and groups List all the local users Get-NcCifsLocalUser
CIFS local users and groups List all the local groups Get-NcCifsLocalGroup
CIFS local users and groups List all the local users in a local group
Get-NcCifsLocalGroupMember
CIFS share and permissions List all the CIFS shares Get-NcCifsShare
File/folder permissions Get information about the NTFS security descriptor
Get-NcFileDirectorySecurityNtfs

24 Manage and Automate a Windows File Services Environment with NetApp PowerShell Toolkit
© 2017 NetApp, Inc. All Rights Reserved. © 2016 NetApp, Inc. All rights reserved.
Type Description Cmdlet
File/folder permissions Get information about discretionary access control entries
Get-
NcFileDirectorySecurityNtfsDacl
File/folder permissions Get information about system/audit access control entries
Get-
NcFileDirectorySecurityNtfsSacl
File/folder permissions Get security information about a file/folder
Get-NcFileDirectorySecurity
File/folder permissions Get information about policy tasks
Get-
NcFileDirectorySecurityPolicyTask
Domain activities Trigger the discovery of domain servers
Find-NcCifsDomainServer
Domain activities Retrieve the list of discovered trusted domains
Get-NcCifsDomainTrust
Domain activities List the CIFS domain password schedule objects
Get-NcCifsDomainPasswordSchedule
Domain activities List the preferred domain controllers that are associated with an active directory
Get-
NcCifsPreferredDomainController
Domain activities Trigger rediscovery of trusted domains
Invoke-
NcCifsDomainTrustsDiscovery
Domain activities List the trusted domains Get-NcCifsTrustedDomain
Home directory List the CIFS home directory search path
Get-NcCifsHomeDirectorySearchPath
Shadow copy List shadow copy EMS messages
Get-NcCifsShadowCopyEmsMessage
4.5 Cleaning the CIFS Environment
Table 6 and the following example code provide detailed information about the cmdlets that are used to
clean the CIFS server.
Table 6) Cmdlets for cleaning the CIFS server.
Type Description Cmdlet
Home directory Delete the home directory share
Remove-NcCifsShare
Home directory Delete the CIFS home directory search path
Remove-
NcCifsHomeDirectorySearchPath
Domain activities Remove a trusted domain Remove-NcCifsTrustedDomain
Domain activities Remove a preferred domain controller
Remove-
NcCifsPreferredDomainController

25 Manage and Automate a Windows File Services Environment with NetApp PowerShell Toolkit
© 2017 NetApp, Inc. All Rights Reserved. © 2016 NetApp, Inc. All rights reserved.
Type Description Cmdlet
File/folder permissions Delete an NTFS security descriptor
Remove-
NcFileDirectorySecurityNtfs
File/folder permissions Remove a discretionary access control entry from an NTFS security descriptor
Remove-
NcFileDirectorySecurityNtfsDacl
File/folder permissions Remove a system/audit access control entry from an NTFS security descriptor
Remove-
NcFileDirectorySecurityNtfsSacl
File/folder permissions Remove the security policy Remove-
NcFileDirectorySecurityPolicy
File/folder permissions Remove a task from the policy
Remove-
NcFileDirectorySecurityPolicyTask
File/folder permissions Remove the Storage Level Access Guard (SLAG) from the specified volume junction path
Remove-
NcFileDirectorySecuritySlag
CIFS share and permissions Remove permissions for the local user on a share
Remove-NcCifsShareAcl
CIFS share and permissions Remove permissions for the local group on a share
Remove-NcCifsShareAcl
CIFS share and permissions Delete a CIFS share Remove-NcCifsShare
CIFS local users and groups Remove a CIFS local user from a CIFS local group
Remove-NcCifsLocalGroupMember
CIFS local users and groups Remove a CIFS local user Remove-NcCifsLocalUser
CIFS local users and groups Remove a CIFS local group Remove-NcCifsLocalGroup
CIFS server Delete a CIFS server Remove-NcCifsServer
# Destroy Home Directory
# Get the VServer LIF
$vserver_lif = (Get-NcNetInterface -Name $lif1_name -VserverContext $vserver_name).Address
# Destroy all the folders created for each user in the AD Group
for($i=0; $i -lt $ad_userlist.Count; $i++)
{
$ad_user_dir = $ad_userlist[$i]
Remove-Item -Path "\\$vserver_lif\$homeshare_name\$ad_user_dir" -Force
}
# Destroy the Home directory share
Remove-NcCifsShare -Name %w -VserverContext $vserver_name -Confirm:$false
# Destroy the CIFS Home directory search path
Remove-NcCifsHomeDirectorySearchPath -Path "/$homedir_volume_name" -VserverContext
$vserver_name -Confirm:$false
# Destroy the CIFS share
Remove-NcCifsShare -Name $homeshare_name -VserverContext $vserver_name -Confirm:$false

26 Manage and Automate a Windows File Services Environment with NetApp PowerShell Toolkit
© 2017 NetApp, Inc. All Rights Reserved. © 2016 NetApp, Inc. All rights reserved.
# Destroy the Volume
# Unmount the volume
Dismount-NcVol -Name $homedir_volume_name -VserverContext $vserver_name -Force -
Confirm:$false
# Bring the Volume offline
Set-NcVol -Name $homedir_volume_name -Offline -VserverContext $vserver_name
# Destroy the Volume
Remove-NcVol -Name $homedir_volume_name -VserverContext $vserver_name -Confirm:$false
#------------------------------------------------------------------------------------
# Destroy domain related
# Remove domain related
$trusted_domain = "wfs.local"
# Remove from the list of trusted domains for name-mapping search
Remove-NcCifsTrustedDomain -TrustedDomain $trusted_domain -VserverContext $vserver_name
# Remove from a list of preferred domain controllers
Remove-NcCifsPreferredDomainController -Domain $trusted_domain -VserverContext $vserver_name
#------------------------------------------------------------------------------------
# Remove File/Folder permissions
$ntfs_sec_desc_id = "ntfssd"
$policy_name = "policy1"
$account = (Get-NcCifsLocalUser -UserName $localuser_name).UserName
# Delete a NTFS security descriptor
Remove-NcFileDirectorySecurityNtfs -SecurityDescriptor $ntfs_sec_desc_id -VserverContext
$vserver_name
# Remove a discretionary access control entry from NTFS security descriptor
Remove-NcFileDirectorySecurityNtfsDacl -SecurityDescriptor $ntfs_sec_desc_id -Account $account -
AccessType "allow" -VserverContext $vserver_name
# Remove a system/audit access control entry from NTFS security descriptor
Remove-NcFileDirectorySecurityNtfsSacl -SecurityDescriptor $ntfs_sec_desc_id -Account $account -
AccessType "success" -VserverContext $vserver_name
# Remove the security policy
Remove-NcFileDirectorySecurityPolicy -Name $policy_name -VserverContext $vserver_name
# Get the junction path of the file/folder
$query = Get-NcVol -Template
$query.Name = $vol_name
$query.JunctionPath
$volume_junctionpath = (Get-NcVol -Query $query | select JunctionPath).JunctionPath
$qtree_junctionpath = "$volume_junctionpath/$qtree_name"
# Remove a task from the policy of a vserver
Remove-NcFileDirectorySecurityPolicyTask -Name $policy_name -Path $qtree_junctionpath -
VserverContext $vserver_name
# Removes SLAG from the specified volume junction path
Remove-NcFileDirectorySecuritySlag -Path $qtree_junctionpath -VserverContext $vserver_name
#------------------------------------------------------------------------------------
# Remove CIFS Share permissions
# Remove permissions for the local user on qtree share
Remove-NcCifsShareAcl -Share $qtree_share_name -UserOrGroup $localuser_name -VserverContext
$vserver_name -Confirm:$false
# Remove permissions for the local group on volume share
Remove-NcCifsShareAcl -Share $vol_share_name -UserOrGroup $localgroup_name -VserverContext
$vserver_name -Confirm:$false
# Destroy CIFS Share
# Destroy the volume share
Remove-NcCifsShare -Name $qtree_share_name -VserverContext $vserver_name
# Destroy the qtree share
27 Manage and Automate a Windows File Services Environment with NetApp PowerShell Toolkit
© 2017 NetApp, Inc. All Rights Reserved. © 2016 NetApp, Inc. All rights reserved.
Remove-NcCifsShare -Name $vol_share_name -VserverContext $vserver_name
# Destroy Qtree and Volume
# Destroy Qtree
Remove-NcQtree -Volume $vol_name -Qtree qtree_name -VserverContext $vserver_name -Force -
Confirm:$false
# Destroy Volume
# Unmount the volume
Dismount-NcVol -Name $vol_name -VserverContext $vserver_name -Force -Confirm:$false
# Bring the Volume offline
Set-NcVol -Name $vol_name -Offline -VserverContext $vserver_name
# Destroy the Volume
Remove-NcVol -Name $vol_name -VserverContext $vserver_name -Confirm:$false
#------------------------------------------------------------------------------------
# Destroy CIFS Local Users and Groups
# Remove a CIFS Local user from CIFS local group
Remove-NcCifsLocalGroupMember -Name $localgroup_name -Member $localuser_name -VserverContext
$vserver_name
# Destroy CIFS Local User
Remove-NcCifsLocalUser -UserName $localuser_name -VserverContext $vserver_name
# Destroy CIFS Local Group
Remove-NcCifsLocalGroup -Name $localgroup_name -VserverContext $vserver_name
#------------------------------------------------------------------------------------
# Destroy CIFS Server
Remove-NcCifsServer -VserverContext $vserver_name -AdminUsername $domain_username -AdminPassword
$domain_password
#------------------------------------------------------------------------------------
# Destroy VServer
# Destroy LIF
Remove-NcNetInterface -Name $lif1_name -Vserver $vserver_name -Confirm:$false
# Destroy Subnet
Remove-NcNetSubnet -Name $subnet_name
# Bring the root volume offline
Set-NcVol -Name $rootvolume_name -Offline -VserverContext $vserver_name
# Destroy the root volume
Remove-NcVol -Name $rootvolume_name -VserverContext $vserver_name
# Destroy the VServer
Remove-NcVserver -Name $vserver_name
# Destroy aggregate
# Remove-NcAggr -Name $aggr_name -Confirm:$false
#------------------------------------------------------------------------------------
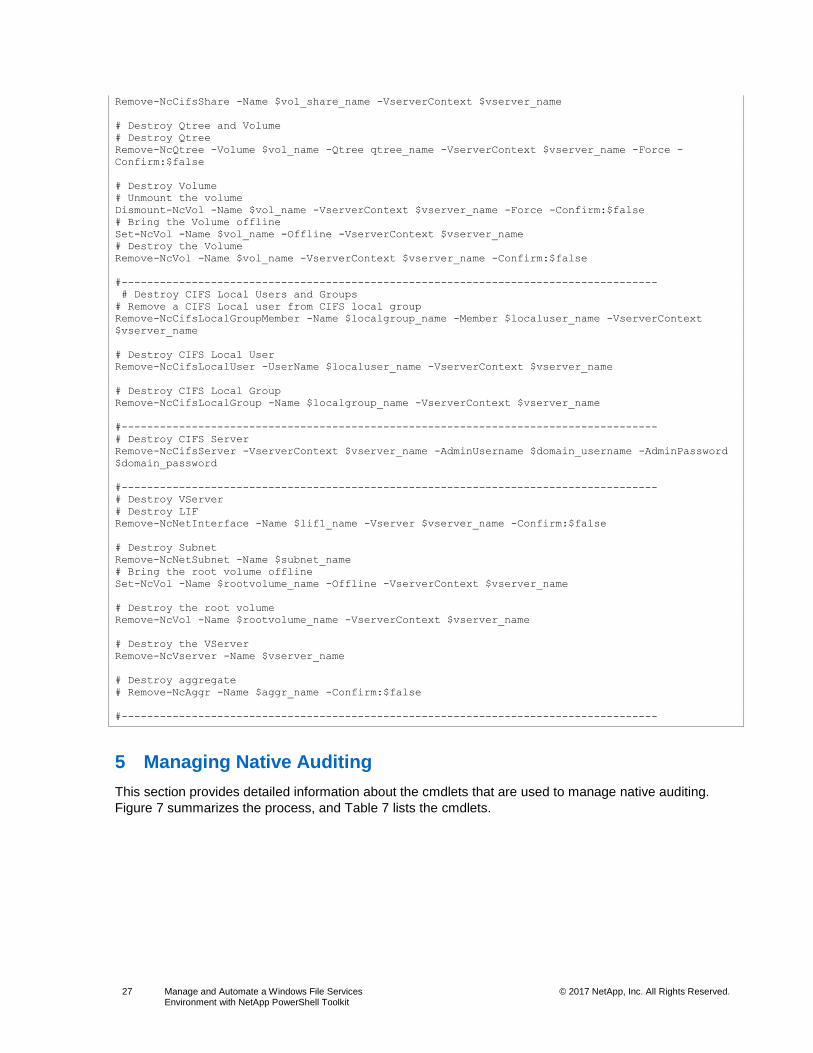
5 Managing Native Auditing
This section provides detailed information about the cmdlets that are used to manage native auditing.
Figure 7 summarizes the process, and Table 7 lists the cmdlets.

28 Manage and Automate a Windows File Services Environment with NetApp PowerShell Toolkit
© 2017 NetApp, Inc. All Rights Reserved. © 2016 NetApp, Inc. All rights reserved.
Figure 7) Managing native auditing.
Table 7) Cmdlets for managing native auditing.
Type Description Cmdlet
Provisioning native auditing Create an audit configuration New-NcFileserviceAudit
Modifying native auditing Enable auditing Enable-NcFileserviceAudit
Modifying native auditing Rotate the file service audit log Invoke-
NcFileserviceAuditLogRotate
Modifying native auditing Repair the audit infrastructure Repair-NcFileserviceAudit
Modifying native auditing Modify the audit configuration Set-NcFileserviceAudit
Modifying native auditing Disable auditing Disable-NcFileserviceAudit
Monitoring native auditing List audit configuration details Get-NcFileserviceAudit
Cleaning native auditing Remove the file service audit configuration
Remove-NcFileserviceAudit
# Provision Native Auditing
# Create a new Qtree to store Audit Log file
New-NcQtree -Volume $vol_name -Qtree "auditlog" -VserverContext $vserver_name -SecurityStyle
"ntfs"
# Get the junction path the Qtree created to store Audit Log file
$query = Get-NcVol -Template
$query.Name = $vol_name
$query.JunctionPath
$volume_junctionpath = (Get-NcVol -Query $query | select JunctionPath).JunctionPath
$auditlog_path = "$volume_junctionpath/auditlog"
# Create audit configuration for a Vserver
New-NcFileserviceAudit -Destination $auditlog_path -RotateLimit 20 -RotateSize 50MB -
VserverContext $vserver_name
#------------------------------------------------------------------------------------
# Modify Native Auditing
# Enable Auditing for Vserver
Enable-NcFileserviceAudit -VserverContext $vserver_name
# Rotate fileservice audit log
Invoke-NcFileserviceAuditLogRotate -VserverContext $vserver_name
# Repair the audit infrastructure
Repair-NcFileserviceAudit -VserverContext $vserver_name
# Get the junction path the Qtree created to store Audit Log file
$query = Get-NcVol -Template

29 Manage and Automate a Windows File Services Environment with NetApp PowerShell Toolkit
© 2017 NetApp, Inc. All Rights Reserved. © 2016 NetApp, Inc. All rights reserved.
$query.Name = $vol_name
$query.JunctionPath
$volume_junctionpath = (Get-NcVol -Query $query | select JunctionPath).JunctionPath
$auditlog_path = "$volume_junctionpath/auditlog"
# Modify audit configuration
Set-NcFileserviceAudit -Destination $auditlog_path -AuditEvents "cifs_logon_logoff" -
RotateLimit 20 -AuditGuarantee $true -RotateSize 50MB -Format "evtx" -VserverContext
$vserver_name
# Possible values for -AuditEvents:
# 'file_ops' - File Operation Events,
# 'cifs_logon_logoff' - CIFS Logon and Logoff Events,
# 'cap_staging' - Central Access Policy Staging Events
# If not specified, then default is 'file_ops,cifs_logon_logoff,cap_staging'
# Possible values for -AuditGuarantee : "true", "false". Default value is true
# Possible values for -Format:
# 'xml' - Data ONTAP-Specific XML Log Format,
# 'evtx' - Microsoft Windows EVTX Log Format
# If not specified, then default is 'evtx'
# -RotateSize : Default value is 100MB
# Disable Auditing for Vserver
Disable-NcFileserviceAudit -VserverContext $vserver_name
#------------------------------------------------------------------------------------
# Clean Native Auditing
# Remove the fileservice audit configuration
Remove-NcFileserviceAudit -VserverContext $vserver_name
# Remove the Qtree used to store Audit Log file
Remove-NcQtree -Volume $vol_name -Qtree "auditlog" -VserverContext $vserver_name -Force -
Confirm:$false
#------------------------------------------------------------------------------------
6 Managing the Antivirus Environment
This section provides detailed information about the cmdlets that are used to manage the antivirus environment. Figure 8 summarizes the process, and

30 Manage and Automate a Windows File Services Environment with NetApp PowerShell Toolkit
© 2017 NetApp, Inc. All Rights Reserved. © 2016 NetApp, Inc. All rights reserved.
Table 8 lists the cmdlets.
Figure 8) Managing the antivirus environment.

31 Manage and Automate a Windows File Services Environment with NetApp PowerShell Toolkit
© 2017 NetApp, Inc. All Rights Reserved. © 2016 NetApp, Inc. All rights reserved.
Table 8) Cmdlets for manging the antivirus environment.
Type Description Cmdlet
Provisioning the antivirus environment
Create a virus scanner pool New-NcVscanScannerPool
Provisioning the antivirus environment
Create a Vscan on-access policy New-
NcVscanOnAccessPolicy
Provisioning the antivirus environment
Create a new antivirus log entry New-NcAntivirusLogEntry
Provisioning the antivirus environment
Create an on-demand task New-NcVscanOnDemandTask
Modifying the antivirus environment
Enable the Vscan scanner Enable-NcVscan
Modifying the antivirus environment
Discard cached information about scanned files
Reset-NcVscan
Modifying the antivirus environment
Resolve the host names that are configured in the scanner pool
Resolve-NcVscanHostnames
Modifying the antivirus environment
Disable the Vscan scanner Disable-NcVscan
Modifying the antivirus environment
Enable a Vscan on-access policy Enable-
NcVscanOnAccessPolicy
Modifying the antivirus environment
Disable a Vscan on-access policy Disable-
NcVscanOnAccessPolicy
Modifying the antivirus environment
Modify a Vscan scanner pool Set-NcVscanScannerPool
Modifying the antivirus environment
Modify a Vscan on-access policy Set-
NcVscanOnAccessPolicy
Modifying the antivirus environment
Set the attributes of the antivirus engine
Set-NcAntivirusEngine
Modifying the antivirus environment
Modify the attributes of antivirus engine options
Set-
NcAntivirusEngineOption
Modifying the antivirus environment
Set quarantine information for the antivirus engine
Set-NcAntivirusRemedy
Modifying the antivirus environment
Set version information for the antivirus engine
Set-NcAntivirusVersion
Modifying the antivirus environment
Start an antivirus update job Start-NcAntivirusUpdate
Modifying the antivirus environment
Run an on-demand task Invoke-
NcVscanOnDemandTask
Modifying the antivirus environment
Modify an on-demand task Set-NcVscanOnDemandTask
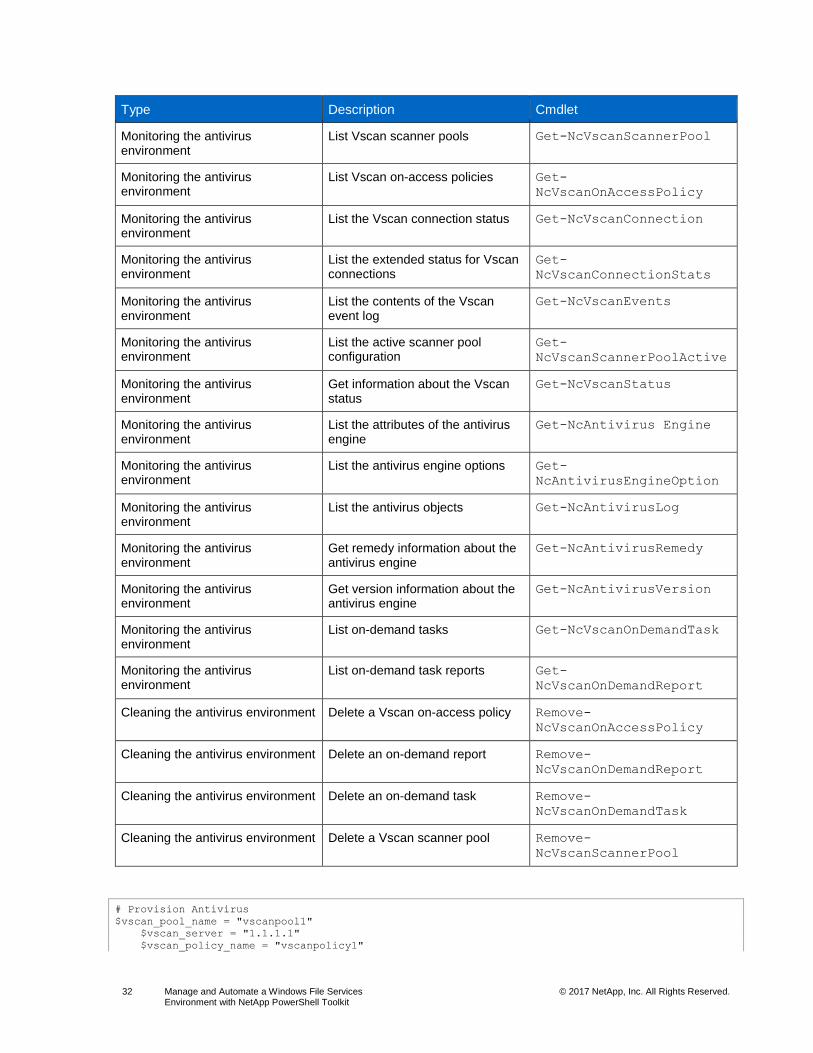
32 Manage and Automate a Windows File Services Environment with NetApp PowerShell Toolkit
© 2017 NetApp, Inc. All Rights Reserved. © 2016 NetApp, Inc. All rights reserved.
Type Description Cmdlet
Monitoring the antivirus environment
List Vscan scanner pools Get-NcVscanScannerPool
Monitoring the antivirus environment
List Vscan on-access policies Get-
NcVscanOnAccessPolicy
Monitoring the antivirus environment
List the Vscan connection status Get-NcVscanConnection
Monitoring the antivirus environment
List the extended status for Vscan connections
Get-
NcVscanConnectionStats
Monitoring the antivirus environment
List the contents of the Vscan event log
Get-NcVscanEvents
Monitoring the antivirus environment
List the active scanner pool configuration
Get-
NcVscanScannerPoolActive
Monitoring the antivirus environment
Get information about the Vscan status
Get-NcVscanStatus
Monitoring the antivirus environment
List the attributes of the antivirus engine
Get-NcAntivirus Engine
Monitoring the antivirus environment
List the antivirus engine options Get-
NcAntivirusEngineOption
Monitoring the antivirus environment
List the antivirus objects Get-NcAntivirusLog
Monitoring the antivirus environment
Get remedy information about the antivirus engine
Get-NcAntivirusRemedy
Monitoring the antivirus environment
Get version information about the antivirus engine
Get-NcAntivirusVersion
Monitoring the antivirus environment
List on-demand tasks Get-NcVscanOnDemandTask
Monitoring the antivirus environment
List on-demand task reports Get-
NcVscanOnDemandReport
Cleaning the antivirus environment Delete a Vscan on-access policy Remove-
NcVscanOnAccessPolicy
Cleaning the antivirus environment Delete an on-demand report Remove-
NcVscanOnDemandReport
Cleaning the antivirus environment Delete an on-demand task Remove-
NcVscanOnDemandTask
Cleaning the antivirus environment Delete a Vscan scanner pool Remove-
NcVscanScannerPool
# Provision Antivirus
$vscan_pool_name = "vscanpool1"
$vscan_server = "1.1.1.1"
$vscan_policy_name = "vscanpolicy1"

33 Manage and Automate a Windows File Services Environment with NetApp PowerShell Toolkit
© 2017 NetApp, Inc. All Rights Reserved. © 2016 NetApp, Inc. All rights reserved.
$task_name
$priv_user = (Get-NcCifsLocalUser -UserName $localuser_name).UserName
# Create a virus scanner pool
New-NcVscanScannerPool -Name $vscan_pool_name -VscanServer $vscan_server -PrivilegedUser
$priv_user -VserverContext $vserver_name
# Create a Vscan On-Access policy
New-NcVscanOnAccessPolicy -Name $vscan_policy_name -Protocol cifs -VserverContext
$vserver_name
# Create a new antivirus log entry
New-NcAntivirusLogEntry -VendorId 1 -VendorString "Test string”
#------------------------------------------------------------------------------------
# Modify Antivirus
$vscan_pool_name = "vscanpool1"
$vscan_policy_name = "vscanpolicy1"
# Enable the vscan scanner for the current Vserver
Enable-NcVscan -VserverContext $vserver_name
# Discard cached information of files that have been successfully scanned
Reset-NcVscan -VserverContext $vserver_name
# Resolve the hostnames configured in the scanner pool
Resolve-NcVscanHostnames -ScannerPool $vscan_pool_name -VserverContext $vserver_name
# Disable the vscan scanner for the current Vserver
Disable-NcVscan -VserverContext $vserver_name
# Enable the vscan On-Access policy
Enable-NcVscanOnAccessPolicy -Name $vscan_policy_name -VserverContext $vserver_name
# Disable the vscan On-Access policy
Disable-NcVscanOnAccessPolicy -Name $vscan_policy_name -VserverContext $vserver_name
# Modify a Vscan scanner pool
Set-NcVscanScannerPool -Name $vscan_pool_name -VscanServer $vscan_server -PrivilegedUser
$priv_user -RequestTimeout 50 -ScanQueueTimeout 30 -SessionSetupTimeout 20 -
SessionTeardownTimeout 20 -MaxSessionSetupRetries 3 -VserverContext $vserver_name
# -RequestTimeout : Total request-service time-limit in seconds. The default value is
30
# -ScanQueueTimeout : Scan-queue wait time-limit in seconds. The default is 20
# -SessionSetupTimeout : Total session setup time-limit in seconds. The default value is
10
# -SessionTeardownTimeout : Total session teardown time-limit in seconds. The default value
is 10
# -MaxSessionSetupRetries : Maximum number of consecutive session-setup attempts. The default
is 5
# Modify a Vscan On-Access policy
Set-NcVscanOnAccessPolicy -Name $vscan_policy_name -Filter 'scan_mandatory' -MaxFileSize 512
-ExcludePath '/ -ExcludeExtension 'vhd,vhdx,vmdk' -IncludeExtension 'txt' -
ScanFilesWithNoExtension -IsScanMandatory $true -VserverContext $vserver_name
# -Filter : Filters to apply. Possible values :
# 'scan_mandatory' - Enable mandatory scan,
# 'scan_ro_volume' - Enable scans for read-only volume,
# 'scan_execute_access' - Scan only files opened with execute-access (CIFS only)
# -MaxFileSize : Max file-size (in bytes) allowed for scanning
# This sets the attributes of the antivirus engine installed
Set-NcAntivirusEngine -Enable -LicenseKey "xxxx-xxxx-xxxx-xxxx" -Vendor "norton" -ProductInfo
"norton av 360" -LicenseType "full" -LicenseExpiration "09:12:2017" -Seats 2 -UpdateUrl
"https:/norton.com" -DesiredActivationCode "xxxx-xxxx-xxxx-xxxx" -CurrentActivationCode "xxxx-
xxxx-xxxx-xxxx"
# -Enable : If specified, the antivirus engine will be enabled
# -Disable : If specified, the antivirus engine will be disabled
# -LicenseType : Possible values : "full" - full license
# "eval" - evaluation license
# "none" - no license

34 Manage and Automate a Windows File Services Environment with NetApp PowerShell Toolkit
© 2017 NetApp, Inc. All Rights Reserved. © 2016 NetApp, Inc. All rights reserved.
# -Seats : Number of nodes that can run an instance of the antivirus software
# -UpdateUrl : HTTP/HTTPS url for downloading updates
# Modify the attributes of antivirus engine options
Set-NcAntivirusEngineOption -GroupArchiveUnpack $true -MaxRecursionDepth 5 -HeuristicAnalysis
$true -MacroAnalysis $true -ScanMime $true -MimeLinesToScan 5 -CacheSize 512k -ProxyHost
"http://proxy_server_name" -ProxyPort 2552 -ProxyLogin "admin" -ProxyPassword "netapp1!" -
DecompressedFileCountLimit 256 -DecompressedFileSizeLimit 512 -DecompressionLayersLimit 10 -
DecompressionSizeFactor 256 -IsSpywareEnabled $true
# -GroupArchiveUnpack : If true, scan archive file formats
# -MaxRecursionDepth : Max recursion depth into archives
# -HeuristicAnalysis : If true, heuristic virus search analysis
# -MacroAnalysis : If true, macro virus search analysis
# -ScanMime : If true, scan MIME-encoded files
# -MimeLinesToScan : Max lines to scan to identify MIME file
# -CacheSize : Max cache size for scanning files. Specify the cache size using
format: <number>[k|m|g|t]
# Set the quarantine information of the Anti-Virus engine installed
Set-NcAntivirusRemedy -Action "repair" -Option "add_extension" -Extension ".vir" -Repair
"quarantine" -Directory "/quarantine"
# -Action : Possible values: "none" - no action will be taken;
# "repair" - file will be reparied;
# "delete" - file will be deleted;
# "quarantine" - file will be quarantined
# -Option : Possible values: "move" - file will be moved
# "add_extension" - an extension will be added to the file
# -Repair : Possible values: "none" - no action will be taken
# "delete" - file will be deleted
# "quarantine" - file will be quarantined
# Set the version information of the antivirus engine installed
Set-NcAntivirusVersion -ClusterVersion "8.4" -ComponentUpdated "both" -Vsapi32BitVersion
"xxx-x" -Vsapi64BitVersion "xxx-x" -VirusPatternVersion "xxx-x" -SpywarePatternVersion "xxx-x"
# -ClusterVersion : The current cluster version of the engine
# -ComponentUpdated : The component that was updated
# Possible values : "engine" - only antivirus engine was updated
# "vde" - only virus definition files were updated
# "both" - both antivirus engine and virus definition files were
updated
# -Vsapi32BitVersion : The version of the 32-bit VSAPI engine
# -Vsapi64BitVersion : The version of the 64-bit VSAPI engine
# -VirusPatternVersion : The version of the virus pattern files
# -SpywarePatternVersion : The version of the spyware pattern files
# Start an antivirus update job
Start-NcAntivirusUpdate -Sync
# -Sync : If specified, an antivirus update job should be started immediately
#------------------------------------------------------------------------------------
# Clean Antivirus
$vscan_pool_name = "vscanpool1"
$vscan_policy_name = "vscanpolicy1"
# Delete a Vscan On-Access policy
Remove-NcVscanOnAccessPolicy -Name $vscan_policy_name -VserverContext $vserver_name
# Delete an On-Demand report
Remove-NcVscanOnDemandReport
# Delete an On-Demand Task
Remove-NcVscanOnDemandTask
# Delete a Vscan scanner pool
Remove-NcVscanScannerPool -Name $vscan_pool_name -VserverContext $vserver_name
#------------------------------------------------------------------------------------

35 Manage and Automate a Windows File Services Environment with NetApp PowerShell Toolkit
© 2017 NetApp, Inc. All Rights Reserved. © 2016 NetApp, Inc. All rights reserved.
7 Managing FPolicy
This section provides detailed information about the cmdlets that are used to manage the NetApp FPolicy
feature. Figure 9 shows an overview of the process, and Table 9 lists the cmdlets.
Figure 9) Managing FPolicy.
Table 9) Cmdlets for managing FPolicy.
Type Description Cmdlet
Provisioning FPolicy Create a new event for the CIFS protocol
New-NcFpolicyEvent
Provisioning FPolicy Create a new FPolicy policy external engine
New-NcFpolicyExternalEngine
Provisioning FPolicy Create a new FPolicy policy New-NcFpolicyPolicy
Provisioning FPolicy Create FPolicy scope options
New-NcFpolicyScope
Modifying FPolicy Enable a specific named policy
Enable-NcFpolicyPolicy
Modifying FPolicy Disable a specific named policy
Disable-NcFpolicyPolicy
Modifying FPolicy Make a connection to an FPolicy server
Connect-NcFpolicyServer
Modifying FPolicy Terminate a connection to an FPolicy server
Disconnect-NcFpolicyServer
Modifying FPolicy Set FPolicy event options Set-NcFpolicyEvent
Modifying FPolicy Modify an FPolicy external engine
Set-NcFpolicyExternalEngine
Modifying FPolicy Modify a policy Set-NcFpolicyPolicy
Modifying FPolicy Create an export policy New-NcExportPolicy
Modifying FPolicy Set FPolicy scope options Set-NcFpolicyScope
Monitoring FPolicy List FPolicy event options Get-NcFpolicyEvent
Monitoring FPolicy Get information about external engines
Get_NcFpolicyExternalEngine
Monitoring FPolicy Get information about policies
Get-NcFpolicyPolicy

36 Manage and Automate a Windows File Services Environment with NetApp PowerShell Toolkit
© 2017 NetApp, Inc. All Rights Reserved. © 2016 NetApp, Inc. All rights reserved.
Type Description Cmdlet
Monitoring FPolicy List FPolicy scope options Get-NcFpolicyScope
Monitoring FPolicy Get information about the passthrough read connection status
Get-
NcFpolicyPassthroughReadConnection
Monitoring FPolicy Get information about the FPolicy server status
Get-NcFpolicyServerStatus
Monitoring FPolicy Get information about the FPolicy policy status
Get-NcFpolicyStatus
Cleaning FPolicy Delete an FPolicy event Remove-NcFpolicyEvent
Cleaning FPolicy Delete an FPolicy external engine
Remove-NcFpolicyExternalEngine
Cleaning FPolicy Delete an FPolicy policy scope
Remove-NcFpolicyScope
Cleaning FPolicy Delete a policy Remove-NcFpolicyPolicy
# Provision Fpolicy
# Create a new event for the CIFS protocol
New-NcFpolicyEvent -Name $event_name -Protocol cifs -FileOperation create,delete,read,write -
VserverContext $vserver_name
# Create a new FPolicy policy external engine
New-NcFpolicyExternalEngine -Name $external_engine_name -PrimaryServer 1.1.1.1 -Port 2357 -
SslOption no_auth -VserverContext $vserver_name
# Create a new Fpolicy policy
New-NcFpolicyPolicy -Name $fpolicy_name -Event $event_name -EngineName $external_engine_name
-NonMandatory -VserverContext $vserver_name
# Create FPolicy scope options
New-NcFpolicyScope -PolicyName $fpolicy_name -VserverContext $vserver_name
#------------------------------------------------------------------------------------
# Modify Fpolicy
# Enable a specific named policy
Enable-NcFpolicyPolicy -Name $fpolicy_name -SequenceNumber 1 -VserverContext $vserver_name
# Disables a specific named policy
Disable-NcFpolicyPolicy -Name $fpolicy_name -VserverContext $vserver_name
# Make a connection to FPolicy server
Connect-NcFpolicyServer -PolicyName $fpolicy_name -FpolicyServer $fpolicy_server -Node
$cluster_nodes[0] -VserverContext $vserver_name
# Terminate connection to FPolicy server
Disconnect-NcFpolicyServer -PolicyName $fpolicy_name -FpolicyServer $fpolicy_server -Node
$cluster_nodes[0] -VserverContext $vserver_name
# Set FPolicy event options
Set-NcFpolicyEvent -Name $event_name -Protocol cifs -FileOperation create,delete,read,write -
Filter "first_read,first_write" -VolumeOperation $true -VserverContext $vserver_name
# Possible values for -Protocol : "cifs", "nfsv3", "nfsv4"
# Possible values for -FileOperation:
# "close" - File close operation
# "create" - File create operation
# "create_dir" - File create directory operation
# "delete" - File delete operation

37 Manage and Automate a Windows File Services Environment with NetApp PowerShell Toolkit
© 2017 NetApp, Inc. All Rights Reserved. © 2016 NetApp, Inc. All rights reserved.
# "delete_dir" - Directory delete operation
# "getattr" - Get attribute operation
# "link" - Link operation
# "lookup" - Lookup operation
# "open" - File open operation
# "read" - File read operation
# "write" - File write operation
# "rename" - File rename operation
# "rename_dir" - Directory rename operation
# "setattr" - Set attribute operation
# "symlink" - Symbolic link operation
# Possible values for -Filter:
# "monitor_ads" - Monitor alternate data stream
# "close_with_modification" - Filter close with modification
# "close_without_modification" - Filter close without modification
# "first_read" - Filter first read
# "first_write" - Filter first write
# "offline_bit" - Filter offline bit set
# "open_with_delete_intent" - Filter open with delete intent
# "open_with_write_intent" - Filter open with write intent
# "write_with_size_change" - Filter write with size change
# Possible values for -VolumeOperation : "true", "false". If true, the volume operation required
for the event
# Modify an FPolicy external engine
Set-NcFpolicyExternalEngine -Name $external_engine_name -PrimaryServer 1.1.1.1 -Port 2357 -
SecondaryServer 2.2.2.2 -SslOption "mutual_auth" -RequestCancelTimeout 30 -RequestAbortTimeout 30
-StatusRequestInterval 5 -MaxConnectionRetries 8 -MaxServerRequests 25 -ServerProgressTimeout 30
-KeepAliveInterval 20 -CertificateCommonName $domain -CertificateSerial
"B1:B8:88:48:64:B7:45:52:21:CC:35:37:9E:24:50:EE:AD:58:02:B5" -CertificateCa
"certs/www.example.com.cert.pem" -RecvBufferSize 512KB -SendBufferSize 512KB -SessionTimeout 20 -
EnableResiliency -ResiliencyMaxRetentionDuration 360 -ResiliencyDirectoryPath '/path' -
Synchronous -VserverContext $vserver_name
# -RequestCancelTimeout : Timeout in seconds for a screen request to be processed by an FPolicy
server. Default value : 20 seconds
# -RequestAbortTimeout : Timeout in seconds for a screen request to be aborted by storage
appliance. Default value : 40 seconds
# -StatusRequestInterval : Interval time in seconds for storage appliance to query status request
from FPolicy server. Default value : 10 seconds
# -MaxConnectionRetries : Number of times storage appliance will attempt to establish a broken
connection to FPolicy server. Default value : 5
# -MaxServerRequests : Maximum number of outstanding screen requests that will be queued for
an FPolicy Server. Default value : 50
# -ServerProgressTimeout : Timeout in seconds in which a throttled FPolicy server must complete
at least one screen request. If no request is processed within the timeout, connection to FPolicy
server is terminated. Default value : 60 seconds
# -KeepAliveInterval : Interval time in seconds for storage appliance to send keep-alive
message to FPolicy server. Default value : 10 seconds
# -RecvBufferSize : Receive buffer size of connected socket for FPolicy Server. Default
value : 256KB
# -SendBufferSize : Send buffer size of connected socket for FPolicy Server. Default value
: 256KB
# -SessionTimeout : Session Id purge timeout during FPolicy server reconnection. Default
value : 10 seconds
# -EnableResiliency : Specify to enable resiliency (Only Data ONTAP 8.4 and above)
# -ResiliencyMaxRetentionDuration : Maximum retention duration for which the notifications will
be stored. Default value : 180 seconds
# -Synchronous : If specified, the external engine type is synchronous. If the engine is
synchronous, reply is sent from FPolicy servers
# -Asynchronous : If specified, the external engine type is asynchronous. If the engine is
asynchronous, no reply is sent from FPolicy servers
# Modify a policy
Set-NcFpolicyPolicy -Name $fpolicy_name -Event $event_name -EngineName $external_engine_name
-Mandatory -AllowPrivilegedAccess true -PrivilegedUserName $localuser_name -
IsPassthroughReadEnabled $true -VserverContext $vserver_name
# Create export policies
$export_policy1 = "export_policy1"
$export_policy2 = "export_policy2"
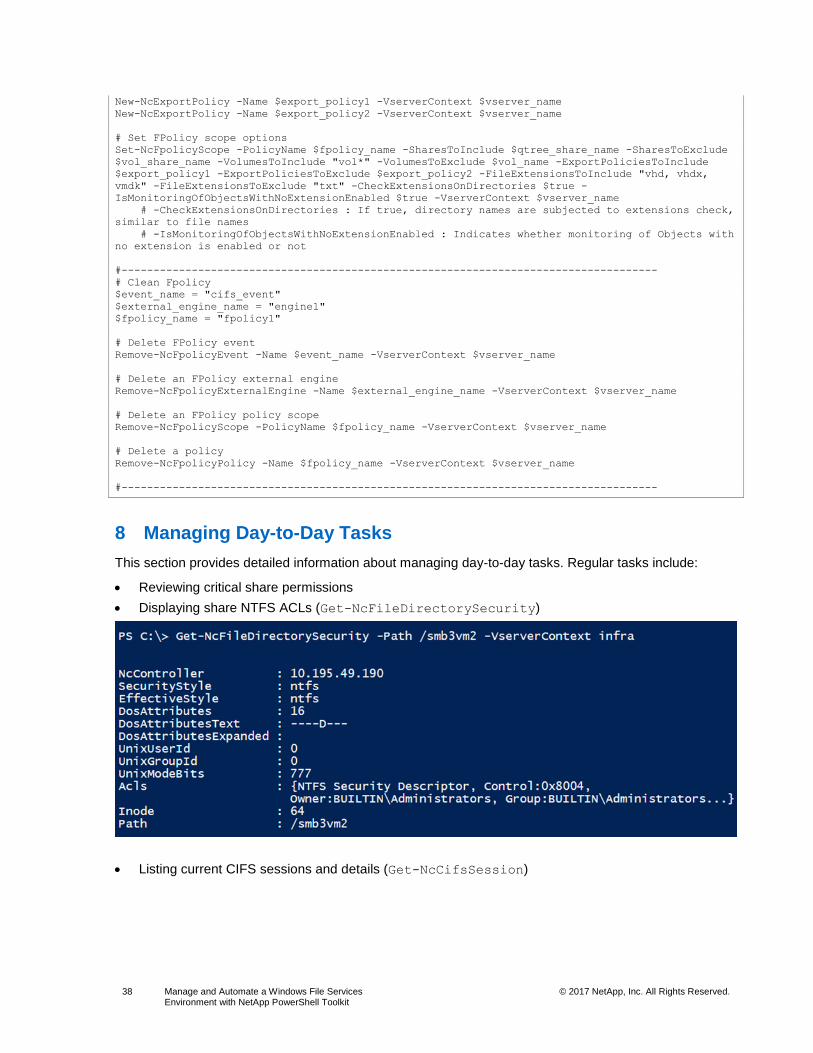
38 Manage and Automate a Windows File Services Environment with NetApp PowerShell Toolkit
© 2017 NetApp, Inc. All Rights Reserved. © 2016 NetApp, Inc. All rights reserved.
New-NcExportPolicy -Name $export_policy1 -VserverContext $vserver_name
New-NcExportPolicy -Name $export_policy2 -VserverContext $vserver_name
# Set FPolicy scope options
Set-NcFpolicyScope -PolicyName $fpolicy_name -SharesToInclude $qtree_share_name -SharesToExclude
$vol_share_name -VolumesToInclude "vol*" -VolumesToExclude $vol_name -ExportPoliciesToInclude
$export_policy1 -ExportPoliciesToExclude $export_policy2 -FileExtensionsToInclude "vhd, vhdx,
vmdk" -FileExtensionsToExclude "txt" -CheckExtensionsOnDirectories $true -
IsMonitoringOfObjectsWithNoExtensionEnabled $true -VserverContext $vserver_name
# -CheckExtensionsOnDirectories : If true, directory names are subjected to extensions check,
similar to file names
# -IsMonitoringOfObjectsWithNoExtensionEnabled : Indicates whether monitoring of Objects with
no extension is enabled or not
#------------------------------------------------------------------------------------
# Clean Fpolicy
$event_name = "cifs_event"
$external_engine_name = "engine1"
$fpolicy_name = "fpolicy1"
# Delete FPolicy event
Remove-NcFpolicyEvent -Name $event_name -VserverContext $vserver_name
# Delete an FPolicy external engine
Remove-NcFpolicyExternalEngine -Name $external_engine_name -VserverContext $vserver_name
# Delete an FPolicy policy scope
Remove-NcFpolicyScope -PolicyName $fpolicy_name -VserverContext $vserver_name
# Delete a policy
Remove-NcFpolicyPolicy -Name $fpolicy_name -VserverContext $vserver_name
#------------------------------------------------------------------------------------
8 Managing Day-to-Day Tasks
This section provides detailed information about managing day-to-day tasks. Regular tasks include:
Reviewing critical share permissions
Displaying share NTFS ACLs (Get-NcFileDirectorySecurity)
Listing current CIFS sessions and details (Get-NcCifsSession)

39 Manage and Automate a Windows File Services Environment with NetApp PowerShell Toolkit
© 2017 NetApp, Inc. All Rights Reserved. © 2016 NetApp, Inc. All rights reserved.
Determining which client opened the file (Get-NcCifsSession, Get-NcCifsSessionFile)
Displaying locks (Get-NcLock)
Invoking the CLI commands from NetApp PowerShell Toolkit (PSTK)
# CLI commands can be invoked from PSTK using cmdlet ‘Invoke-NcSSh’
# Basic example to invoke a CLI command for secd
$cmd_set_diag = "set diag -confirmations off"
for($i=0; $i -lt $cluster_nodes.Count; $i++)
{
$node = $cluster_nodes[$i]
$cmd_secd = "statistics secd show -node $node -vserver $vserver_name"
Invoke-NcSsh -Command $cmd_set_diag
Invoke-NcSsh -Command "$cmd_set_diag; $cmd_secd"
}
Retrieving the CIFS performance counters

40 Manage and Automate a Windows File Services Environment with NetApp PowerShell Toolkit
© 2017 NetApp, Inc. All Rights Reserved. © 2016 NetApp, Inc. All rights reserved.
# Retrieve CIFS performance objects
$perf_object = Get-NcPerfObject | where {$_.Name -cmatch 'cifs'}
# This will return the following perf objects : cifs, cifs:node, cifs:vserver, cifs_cap,
cifs_cap:constituent, cifs_shadowcopy, cifs_watch and nblade_cifs
# For each of the retrieved performance objects, get the perf counters
foreach($object in $perf_object)
{
# Get list of performance counters
$perf_counters = Get-NcPerfCounter -Name $object.Name
# Get list of performance object instances
$instance = Get-NcPerfInstance -Name $object.Name
$mod_perf_counters = @()
foreach($counter in $perf_counters)
{
$mod_counter = [pscustomobject]@{Name=$counter.Name;Unit=$counter.Unit}
$mod_perf_counters += $mod_counter
}
$arr = @()
for ($i=0; $i -lt $mod_perf_counters.Count; $i++)
{
$name = $mod_perf_counters[$i].Name
$unit = $mod_perf_counters[$i].Unit
# Get list of current counter values of instances of an object
$perf_data = Get-NcPerfData -Name $object.Name -Instance $instance.Name -Counter
$mod_perf_counters[$i].Name
$arritem = [pscustomobject]@{Name=$name;Unit=$unit;Value=$perf_data.Counters.Value}
$arr += $arritem
}
Write-Host "--------------------------------------------------------------------"
Write-Host " Perf Object : " $object.Name
Write-Host "--------------------------------------------------------------------"
$arr
Write-Host "--------------------------------------------------------------------"
}
References
The following references were used in this document.
System Administration Guide for Cluster Administrators https://library.netapp.com/ecmdocs/ECMP1636037/html/frameset.html
Best Practices Guide for Windows File Services http://www.netapp.com/us/media/tr-4191.pdf
CIFS/SMB Configuration Express Guide https://library.netapp.com/ecm/ecm_get_file/ECMP1547457
ONTAP File Access and Protocols Management Guide https://fieldportal.netapp.com/content/200567
Getting Started with PSTK http://community.netapp.com/t5/Virtualization-and-Cloud-Articles-and-Resources/Getting-Started-With-Data-ONTAP-PowerShell-Toolkit-pptx/ta-p/87123
Making the Most of PSTK http://community.netapp.com/t5/Virtualization-and-Cloud-Articles-and-Resources/Making-The-Most-Of-Data-ONTAP-PowerShell-Toolkit/ta-p/87234
ONTAP PowerShell Toolkit Primer http://www.netapp.com/us/media/tr-4161.pdf

41 Manage and Automate a Windows File Services Environment with NetApp PowerShell Toolkit
© 2017 NetApp, Inc. All Rights Reserved. © 2016 NetApp, Inc. All rights reserved.
TR-4475: NetApp PowerShell Toolkit Best Practices Guide https://fieldportal.netapp.com/content/316607

42 Manage and Automate a Windows File Services Environment with NetApp PowerShell Toolkit
© 2017 NetApp, Inc. All Rights Reserved. © 2016 NetApp, Inc. All rights reserved.
Refer to the Interoperability Matrix Tool (IMT) on the NetApp Support site to validate that the exact product and feature versions described in this document are supported for your specific environment. The NetApp IMT defines the product components and versions that can be used to construct configurations that are supported by NetApp. Specific results depend on each customer’s installation in accordance with published specifications.
Copyright Information
Copyright © 1994–2017 NetApp, Inc. All rights reserved. Printed in the U.S. No part of this document covered by copyright may be reproduced in any form or by any means—graphic, electronic, or mechanical, including photocopying, recording, taping, or storage in an electronic retrieval system—without prior written permission of the copyright owner.
Software derived from copyrighted NetApp material is subject to the following license and disclaimer:
THIS SOFTWARE IS PROVIDED BY NETAPP “AS IS” AND WITHOUT ANY EXPRESS OR IMPLIED WARRANTIES, INCLUDING, BUT NOT LIMITED TO, THE IMPLIED WARRANTIES OF MERCHANTABILITY AND FITNESS FOR A PARTICULAR PURPOSE, WHICH ARE HEREBY DISCLAIMED. IN NO EVENT SHALL NETAPP BE LIABLE FOR ANY DIRECT, INDIRECT, INCIDENTAL, SPECIAL, EXEMPLARY, OR CONSEQUENTIAL DAMAGES (INCLUDING, BUT NOT LIMITED TO, PROCUREMENT OF SUBSTITUTE GOODS OR SERVICES; LOSS OF USE, DATA, OR PROFITS; OR BUSINESS INTERRUPTION) HOWEVER CAUSED AND ON ANY THEORY OF LIABILITY, WHETHER IN CONTRACT, STRICT LIABILITY, OR TORT (INCLUDING NEGLIGENCE OR OTHERWISE) ARISING IN ANY WAY OUT OF THE USE OF THIS SOFTWARE, EVEN IF ADVISED OF THE POSSIBILITY OF SUCH DAMAGE.
NetApp reserves the right to change any products described herein at any time, and without notice. NetApp assumes no responsibility or liability arising from the use of products described herein, except as expressly agreed to in writing by NetApp. The use or purchase of this product does not convey a license under any patent rights, trademark rights, or any other intellectual property rights of NetApp.
The product described in this manual may be protected by one or more U.S. patents, foreign patents, or pending applications.
RESTRICTED RIGHTS LEGEND: Use, duplication, or disclosure by the government is subject to restrictions as set forth in subparagraph (c)(1)(ii) of the Rights in Technical Data and Computer Software clause at DFARS 252.277-7103 (October 1988) and FAR 52-227-19 (June 1987).
Trademark Information
NETAPP, the NETAPP logo, and the marks listed at http://www.netapp.com/TM are trademarks of NetApp, Inc. Other company and product names may be trademarks of their respective owners.