manageengine opmanager - sendquick integration …...manageengine opmanager - sendquick integration...
TRANSCRIPT
ManageEngine OpManager - sendQuick Integration Guide
Prepared by
TalariaX Pte Ltd
76 Playfair Road #08-01 LHK2 Building Singapore 367996
Tel : +65 6280 2881 Fax : +65 6280 6882 Email : [email protected]
www.TalariaX.com
Version Number Date Issued Update Information
V1.0 04.11.2019 First published version
Copyright©2019, TalariaX Pte Ltd 1

Table of Contents 1.0 Introduction 3
2.0 Send Email to sendQuick (SMTP Delivery) 3 2.1 Configure Email Filter in sendQuick 3 2.2 Configure SMTP Delivery on OpManager 7 2.3 Configure Email Based SMS Notification Profile 10
3.0 Send SMS Message via HTTP Method 15 3.1 Configure SMS Server in OpManager 15 3.2 Configure Notification Templates 18
Copyright©2019, TalariaX Pte Ltd 2

ManageEngine OpManager - sendQuick
Integration Guide
1.0 Introduction This document is a guide on how to integrate sendQuick with ManageEngine OpManager to send SMS alerts. In this guide, we will be using sendQuick Alert Plus for the integration. There are several ways to send alert messages from ManageEngine OpManager to sendQuick systems. You can use any of the following methods
● SMTP Delivery (email method) ● SMS Delivery (http method)
2.0 Send Email to sendQuick (SMTP Delivery) When any device is down or there is a need to send a notification alert, OpManager can trigger an email to sendQuick. sendQuick will then convert the email message to SMS. For this setup, sendQuick has a built-in SMTP that OpManager can use as the SMTP Mail Server.
2.1 Configure Email Filter in sendQuick sendQuick allows you to configure alerts to be sent to multiple phone numbers, groups or even combination of emails and sms. To explore this feature, navigate on the sendQuick dashboard to : Filter Rules > Email Filter
Copyright©2019, TalariaX Pte Ltd 3

Click on Add New Record. You can then create a new record to define the email address OpManager should send to. In our example, we will use [email protected] The user email can be anything meaningful that you choose but the domain name of the email address must correspond to your domain name of your sendQuick system. Fill in the Description, Mail To, Mail From (Optional) and for Match Mode, check on ANY . Once done, click Save.
Click on View for the record that you have created :
Copyright©2019, TalariaX Pte Ltd 4
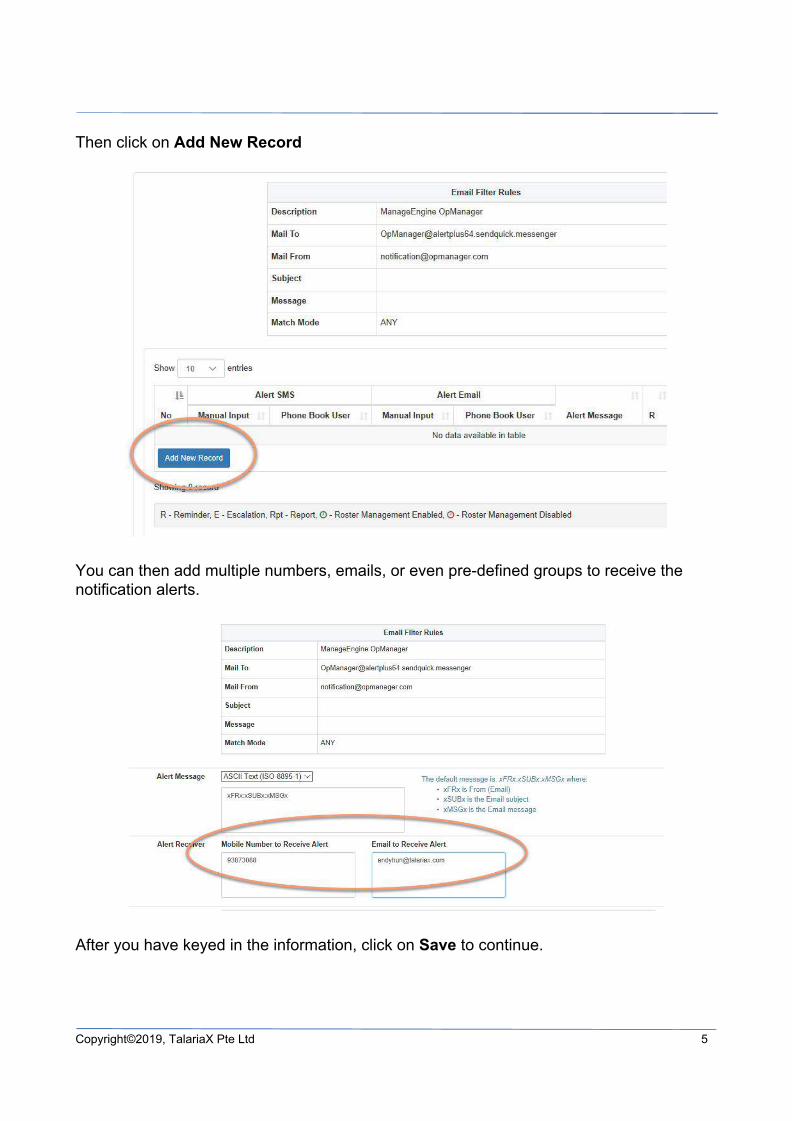
Then click on Add New Record
You can then add multiple numbers, emails, or even pre-defined groups to receive the notification alerts.
After you have keyed in the information, click on Save to continue.
Copyright©2019, TalariaX Pte Ltd 5

Quick tip - To check your host and domain name, you can find the value in the sendQuick dashboard under System Overview under Host and Domain. For e.g. our domain name is alertplus64.sendquick.messenger
Copyright©2019, TalariaX Pte Ltd 6
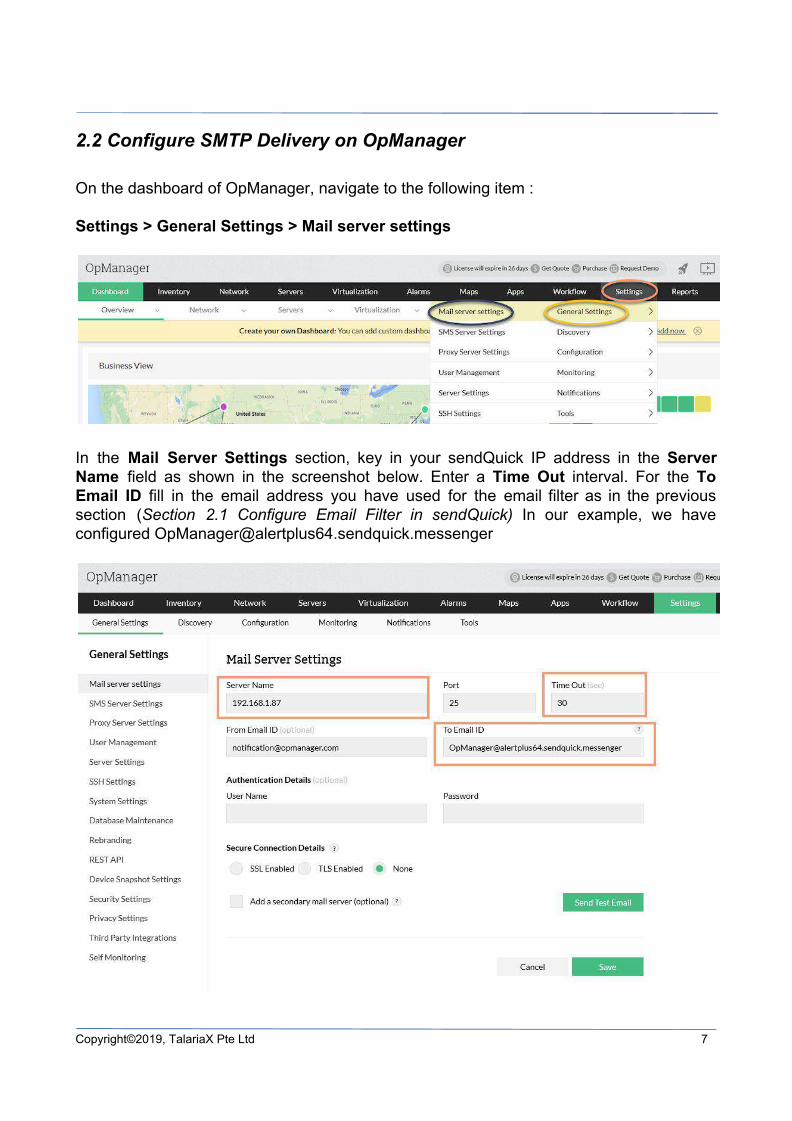
2.2 Configure SMTP Delivery on OpManager On the dashboard of OpManager, navigate to the following item : Settings > General Settings > Mail server settings
In the Mail Server Settings section, key in your sendQuick IP address in the Server Name field as shown in the screenshot below. Enter a Time Out interval. For the To Email ID fill in the email address you have used for the email filter as in the previous section (Section 2.1 Configure Email Filter in sendQuick) In our example, we have configured [email protected]
Copyright©2019, TalariaX Pte Ltd 7

By default, the Port is 25 . Leave the Authentication Details - User Name and Password fields blank. For Secure Connection Details, you can select any of the methods listed provided they are installed in both OpManager and sendQuick. If you are unsure if the protocols are installed on your servers, select “ None”
Quick tip - To check what you installed on sendQuick, navigate to the following item on the sendQuick dashboard : Security Setup > SSL Setup > SSL Protocol
After the configuration, click on the Send Test Email to test if the setup is correct.
Copyright©2019, TalariaX Pte Ltd 8

To confirm that sendQuick has subsequently received the email and sent out as SMS, go to sendQuick dashboard. Navigate to : Usage Logs > Message Logs Click on the Sent tab and SMS tab. If there is a corresponding entry in the logs, that means the SMS text was sent successfully.
Copyright©2019, TalariaX Pte Ltd 9

2.3 Configure Email Based SMS Notification Profile Next, configure the notification templates that can be used by notification triggers. In the ManageEngine OpManager dashboard, navigate to : Settings > Notifications > Add Profile
Select the Email based SMS Notification Profile. It’s important to use the same email address configured in Section 2.1 for the Mail Filter for the To Email Address field.
Configure the email Subject and Message with the relevant parameters that you want to appear in your alert messages. Click on Next.
Copyright©2019, TalariaX Pte Ltd 10
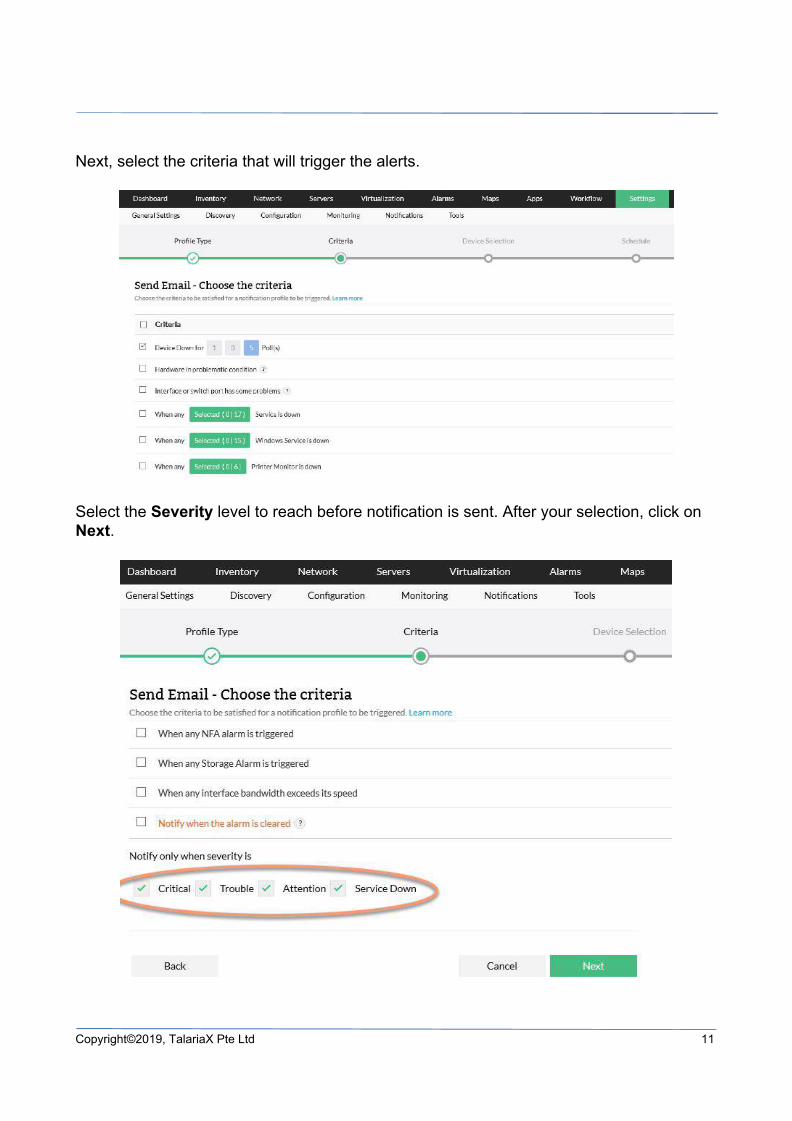
Next, select the criteria that will trigger the alerts.
Select the Severity level to reach before notification is sent. After your selection, click on Next.
Copyright©2019, TalariaX Pte Ltd 11

You should already have used OpManager earlier to discover devices in your network and have them in the Inventory. Select the Devices that are in the Inventory to attach this notification profile.
OpManager allows you to Schedule when the alert should be sent. Configure according to your requirements.
Copyright©2019, TalariaX Pte Ltd 12

Finally, you can give a profile name for this Notification Profile.
To test if the configuration is correctly setup, click on the Test Action button.
After the test is successful, you can Save this profile.
Copyright©2019, TalariaX Pte Ltd 13

To confirm that sendQuick has subsequently received the email and sent out as SMS, go to sendQuick dashboard. Navigate to : Usage Logs > Message Logs Click on the Sent tab and SMS tab. If there is a corresponding entry in the logs, that means the SMS text was sent successfully.
Copyright©2019, TalariaX Pte Ltd 14

3.0 Send SMS Message via HTTP Method Alternatively, sms notification alerts can also be sent via sendQuick from OpManager using the HTTP method. You do not need to do any configuration in sendQuick.
3.1 Configure SMS Server in OpManager On the dashboard of OpManager navigate to the following item : Settings > General Settings > SMS Server Settings
Copyright©2019, TalariaX Pte Ltd 15

Under the SMS Gateway tab, fill the HTTP URL field with the sendQuick http URL string as follows:
http://<sendQuickIP >/cmd/system/api/sendsms.cgi
Replace < sendQuickIP > with the IP address of your sendQuick system. For the field HTTP Parameters , fill the following
tar_num=$recipient&tar_msg=$message See the example :
After the configuration, you can do a test to see if it works. Click on Send Test SMS. Enter the Mobile number to receive the test SMS and click on Send .
Copyright©2019, TalariaX Pte Ltd 16

If the test is successful, a message will appear as follows under SMS Gateway API Response :
To confirm that sendQuick has subsequently sent out the SMS text, on the sendQuick dashboard, navigate to : Usage Logs > Message Logs Click on the Sent tab and SMS tab. If there is a corresponding entry in the logs, that means the SMS text was sent successfully.
Copyright©2019, TalariaX Pte Ltd 17

3.2 Configure Notification Templates Next, configure the notification templates that can be used by notification triggers. In the ManageEngine OpManager dashboard, navigate to : Settings > Notifications > Add Profile
Select the SMS Notification Profile . Fill in the Mobile number to receive SMS alerts.
Copyright©2019, TalariaX Pte Ltd 18

Next, select the criteria that will trigger the alerts. Select the Severity level to reach before notification is sent. After your selection, click on Next.
You should already have used OpManager earlier to discover devices in your network and have them in the Inventory. Select the Devices that are in the Inventory to attach this notification profile.
Copyright©2019, TalariaX Pte Ltd 19

OpManager allows you to Schedule when the alert should be sent. Configure according to your requirements.
Finally, you can give a profile name for this Notification Profile. To test if the configuration is correctly setup, click on the Test Action button.
Copyright©2019, TalariaX Pte Ltd 20
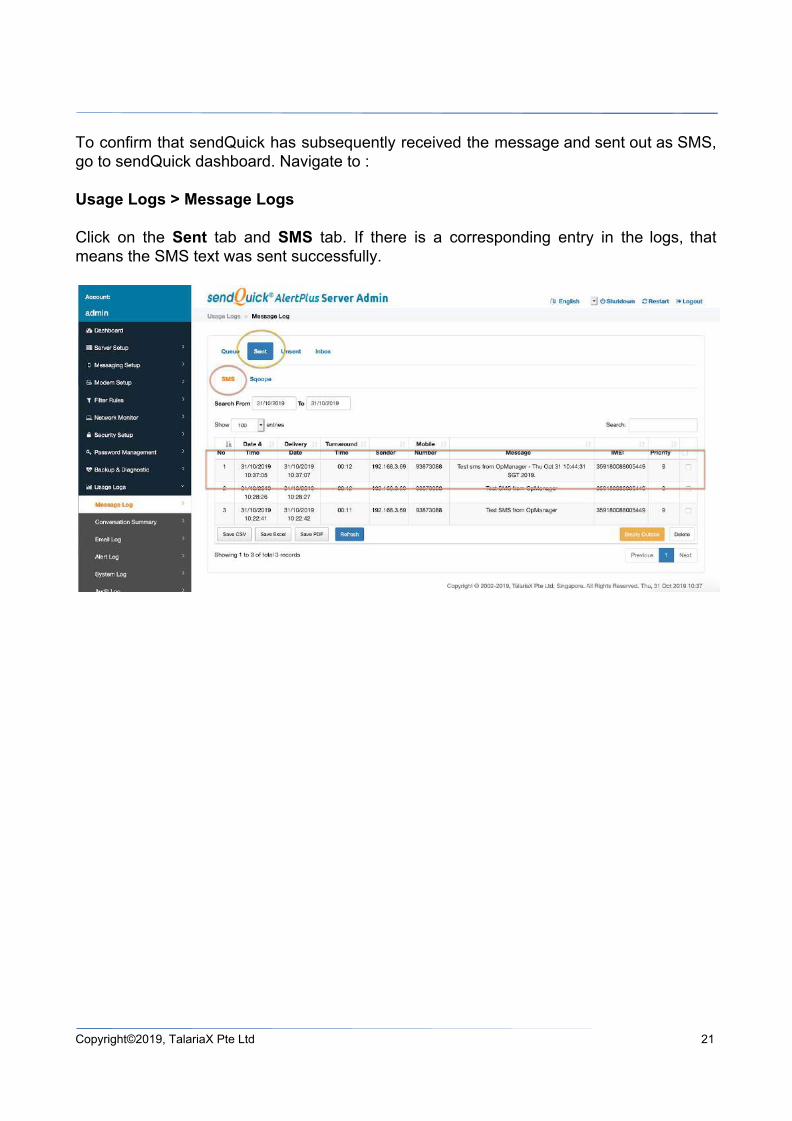
To confirm that sendQuick has subsequently received the message and sent out as SMS, go to sendQuick dashboard. Navigate to : Usage Logs > Message Logs Click on the Sent tab and SMS tab. If there is a corresponding entry in the logs, that means the SMS text was sent successfully.
Copyright©2019, TalariaX Pte Ltd 21