managing resource records - confluence
TRANSCRIPT
1. 2.
Managing Resource RecordsDNS resource records provide information about objects and hosts. DNS servers use these records to respond to queries for hosts and objects. The appliance supports IDNs for all DNS resource records. For information about IDNs, see . Note that the Support for Internationalized Domain Namesappliance does not decode the IDN of a resource record to punycode. In other words, a record that contains a domain name in punycode is displayed in punycode and a record that contains an IDN is displayed in its native characters.
You can manage the following types of DNS resource records:
A (IPv4 Address)—For information, see Managing A RecordsALIAS Records—For information, see Managing ALIAS RecordsNS (Name server)—For information, see Managing NS RecordsAAAA (IPv6 Address)—For information, see Managing AAAA RecordsPTR (Pointer)—For information, see Managing PTR RecordsMX (Mail exchanger)—For information, see Managing MX RecordsSRV (Service location)—For information, see Managing SRV RecordsTXT (Text)—For information, see Managing TXT RecordsTLSA (Transport Layer Security)—For information, see Managing TLSA RecordsCAA (Certification Authority Authorization)—For information, see Managing CAA RecordsCNAME (Canonical name)—For information, see Managing CNAME RecordsDNAME—For information, see Managing DNAME RecordsNAPTR—For information, see Managing NAPTR RecordsLBDN—For information, see Managing LBDN RecordsUnknown—For information, see Managing Unknown Records
Managing A RecordsAn A (address) record is a DNS resource record that maps a domain name to an IPv4 address. To define a specific name-to-address mapping, you can add an A record to a previously defined authoritative forward-mapping zone. If the zone is associated with one or more networks, the IP address must belong to one of the associated networks. For example, if the A record is in the corpxyz.com zone, which is associated with 10.1.0.0/16 network, then the IP addresses of the A record must belong to the 10.1.0.0/16 network. For information about associating zones and networks, see Associating Networks with
.Zones
The appliance also supports wildcard A records. For example, you can use a wildcard A record in the corpxyz.com domain to map queries for names such as www1.corpxyz.com, ftp.corpxyz.com, main.corpxyz.com, and so on to the IP address of a public-facing web server. Note that wildcard names only apply when the domain name being queried does not match any resource record.
NIOS allows superusers to add A records with a blank name. Limited-access users must have read/write permission to Adding a blank A/AAAA recordto add A records with a blank name. You can assign global permission for specific admin groups and roles to allow limited-access users to add blank A records. For more information, see . Administrative Permissions for Adding Blank A or AAAA Records
Adding A Records
From the tab, select the tab, expand the Toolbar and click -> -> .Data Management DNS Add Record Add A RecordIn the wizard, do the following:Add A Record
Name: If Grid Manager displays a zone name, enter the host name that you want to map to an IP address. The displayed zone name can either be the last selected zone or the zone from which you are adding the host record. If no zone name is displayed or if you want to specify a different zone, click . When there are multiple zones, Grid Manager displays the dialog box. Click Select Zone Zone Selectora zone name in the dialog box and then enter the host name. The name you enter is prefixed to the DNS zone name that is displayed, and the complete name becomes the FQDN (fully qualified domain name) of the host. For example, if the zone name displayed is corpxyz.com and you enter admin, then the FQDN becomes admin.corpxyz.com. Ensure that the domain name you enter complies with the host name restriction policy defined for the zone. To create a wildcard A record, enter an asterisk (*) in this field.DNS : This field displays the DNS view to which the DNS zone belongs.ViewShared : This field appears only when you are creating a shared record. Click . If you have Record Group Select Shared Record Grouponly one shared record group, the appliance displays the name of the shared record group here. If you have multiple shared record groups, select the shared record group in the dialog box. You can use filters or the function to Shared Record Group Selector Go tonarrow down the list.Host Name : Displays the host name policy of the zone.PolicyIn the section, click the Add icon and do one of the following:IP Addresses
Select to enter the IPv4 address to which you want the domain name to map. orAdd AddressSelect to retrieve the next available IP address in a network.Next Available IPv4If the A record is in zone that has associated networks, the dialog box lists the associated networks. If the Network Selectorzone has no network associations, the dialog box lists the available networks. When you select a network, Network SelectorGrid Manager retrieves the next available IP address in that network.
Comment: Optionally, enter additional information about the A record.
Note
If an A record with the domain name in its native characters is added to the Infoblox Grid through DDNS updates, the field displays the Namerecord name in UTF-8 encoded format. For example, an A record with the domain name .test.com added through DDNS updates displays \229\183\165\228\189\156\231\171\153.test.com in the field.Name

2.
3. 4.
1. 2.
3. 4.
5.
Create Select this option to automatically generate a PTR record that maps the specified IP address to the associated PTR record:host name. To create the PTR record, the reverse-mapping zone must be in the database.Disable: Select this checkbox to disable the record. Clear the checkbox to enable it.
Click to define extensible attributes. For information, see .Next Managing Extensible AttributesSave the configuration and click if it appears at the top of the screen.Restart
Modifying A Records
When you modify an A record, you can do the following:
In the tab, you can change the information you previously entered through the wizard, as described in .General Adding A RecordsThe tab displays discovered data, if any, for the record. For information, see .Discovered Data Viewing Discovered Data
You can also enter or edit information in the , , and tabs. For information on modifying and deleting resource TTL Extensible Attributes Permissionsrecords, see . Modifying, Disabling, and Deleting Host and Resource Records
Managing ALIAS RecordsAn ALIAS record is a virtual DNS record type created for a standard record type to ALIAS the root domain (apex zone) to another name. You can use an ALIAS record to host a website at a domain name without the "www" (or other) prefix when using the cloud services, such as Amazon Web Services, Azure VMs, GitHub pages, Heroku, and so on. For example: You can use an ALIAS record to point your domain foo.com to a host name like mail.foo.com. When you perform a DNS lookup on an ALIAS record, the authoritative DNS server dynamically resolves an ALIAS record for the matching ALIAS target. The response will contain the ALIASed record's, which can be A, AAAA, MX, NAPTR, PTR, SPF, SRV, or TXT values. You can ALIAS the same domain with multiple target types.
You can synchronize ALIAS records from your AWS to NIOS using Amazon Route 53. For information about AWS deployments, refer to the Installation Guide for vNIOS for AWS.
Following are some guidelines to remember when you use ALIAS records:
The ALIAS records are not supported on the DNS zones that are assigned to a Microsoft primary server. This means that you cannot assign a DNS zone containing an ALIAS record to a Microsoft primary server and you cannot add an ALIAS record to a DNS zone that is assigned to a Microsoft primary server.You cannot add an ALIAS record to a DNSSEC signed zone and you cannot sign a zone containing an ALIAS record. You cannot add an ALIAS record to a DNS zone if there is a secondary server that is using zone transfer as an update mechanism. Also, you cannot use zone transfer process to update zones containing ALIAS records in the Grid secondaries.You cannot update any ALIAS record using a DNS request. You can create and update ALIAS records only by using the NIOS UI or API.An ALIAS record can coexist with other types of records for the same owner name unless there is another configured record at the owner name whose type is an allowed target type for ALIAS. You cannot configure an ALIAS record whose target type is the same as the configured record type.You cannot use DDNS updates to add or delete an ALIAS record.
Adding ALIAS Records
To add an ALIAS record, perform the following steps:
From the tab, select the tab, expand the Toolbar and click -> -> .Data Management DNS Add Record ALIAS RecordIn the wizard, do the following:Add ALIAS Record
Name: The ALIAS record name. The displayed zone name can either be the last selected zone or the zone from which you are adding the ALIAS record. If no zone name is displayed or if you want to specify a different zone, click . When there are multiple Select Zonezones, Grid Manager displays the dialog box.Zone Selector If you do not specify the record name, then it resumes the name of the Zone
.ApexRecord Type: You can configure any record type - A, AAAA, MX, NAPTR, PTR, SPF, SRV, TXT. Target: Enter the domain name that is used to reply to any DNS request. Any FQDN. You can also type the domain name for the resource. Examples:
CloudFront distribution domain name: d111111abcdef8.cloudfront.netELB load balancer DNS name: example-1.us-east-1.elb.amazonaws.comS3 website endpoint: s3-website.us-east-2.amazonaws.comResource record set in this hosted zone: www.example.com
Comment: Enter additional information about the ALIAS record.Disable: Select this checkbox to disable the record. Clear the checkbox to enable it.
Click to define extensible attributes. For information, see .Next Managing Extensible AttributesSave the configuration or click to schedule this task. Click in the panel to immediately execute this task or click Next Now Schedule Change Later and specify a date, time, and time zone. For information about how to schedule a task, see .Scheduling TasksSave the configuration and click if it appears at the top of the screen.Restart
Note
Currently, the ALIAS target name cannot be another alias of a CNAME or DNAME chain. If the ALIAS target name does not have a resource record of the exact type as the ALIAS target type, NIOS returns a NODATA message.

1. 2.
3. 4.
5.
Modifying ALIAS Records
When you modify an ALIAS record, you can perform the following step:
In the tab, you can change the information you previously entered through the wizard.General
You can also enter or edit information in the , , and tabs. For information on modifying and deleting resource TTL Extensible Attributes Permissionsrecords, see . Modifying, Disabling, and Deleting Host and Resource Records
Managing NS RecordsAn NS record identifies an authoritative DNS server for a domain. Each authoritative DNS server must have an NS record. Grid Manager automatically creates NS records when you assign a Grid member as the primary server for a zone or when you assign an NS group to a zone. Grid Manager generates two NS records; an authoritative NS record for the current zone; and a delegation NS record for the parent zone for each name server available in the NS group. You cannot edit an automatically generated NS record. Note that when you delete a name server from an NS group, the NS record associated with the name server is deleted. For information about using NS Groups, see . You can manually create NS records for other zones. NS Importing Zone Datarecords associated with one or more IP addresses are used for related A record and PTR record generation. You can configure an NS record for anycast IP addresses on the appliance. For more information about anycast, see . About Anycast Addressing for DNS
Adding NS Records
To add an NS record, perform the following steps:
From the tab, select the tab, expand the Toolbar and click -> -> .Data Management DNS Add Record Add NS RecordIn the wizard, complete the following fields:Add NS Record
Zone: The displayed zone name can either be the last selected zone or the zone from which you are adding the NS record. If no zone name is displayed or if you want to specify a different zone, click . When there are multiple zones, Grid Manager displays Select Zonethe dialog box.Zone SelectorDNS View: Displays the DNS view to which the selected zone belongs.Hostname Policy: Displays the host name policy of the selected zone.Name Enter the host name that you want to configure as the name server for the zone. IDN is not supported in this field. You Server:can use the punycode representation of an IDN in this field.
Click Next to enter IP addresses for the name server.In the panel, click the Add icon and complete the following fields:Name Server Addresses
Address: Enter the IP address of the name server.Add This field displays Yes by default, enabling the automatic generation of a PTR record for the IP address. You can PTR Record:select to disable the generation of the PTR record.No
Click to define extensible attributes or save the configuration and click if it appears at the top of the screen.Next Restart
Modifying and Deleting NS Records
When you modify an NS record, you can change the following information:
In the tab, you can change the name server name.GeneralIn the tab, you can do the following:Addresses
Delete an address by selecting it and clicking the Delete icon.Add an address by clicking the Add icon, and then entering the IP address and completing the field.Add PTR Record
Managing AAAA RecordsAn AAAA (quad A address) record maps a domain name to an IPv6 address. To define a specific name-to-address mapping, add an AAAA record to a previously defined authoritative forward-mapping zone. If the zone is associated with one or more networks, the IP address must belong to one of the associated networks. For example, if the AAAA record is in the corpxyz.com zone, which is associated with the 1111:0001/32 network, then the IP addresses of the A record must belong to that network. For information about associating zones and networks, see . Associating Networks with Zones
NIOS allows superusers to add AAAA records with a blank name. Limited-access users must have read/write permission to Adding a blank A/AAAA reco to add AAAA records with a blank name. You can assign global permission for specific admin groups and roles to allow limited-access users to add rd
blank AAAA records. For more information, see . Administrative Permissions for Adding Blank A or AAAA Records
Note
If an AAAA record with the domain name in its native characters is added to the Infoblox Grid through DDNS updates, the field displays Namethe record name in UTF-8 encoded format. For example, an AAAA record with the domain name . added through DDNS updates test.comdisplays\229\183\165\228\189\156\231\171\ in the field.153.test.com Name

1. 2.
3. 4.
1. 2.
3.
Adding AAAA Records
To create an AAAA record, perform the following steps:
From the tab, select the tab, expand the Toolbar and click -> -> .Data Management DNS Add Record Add AAAA RecordIn the wizard, complete the following:Add AAAA Record
Name: If Grid Manager displays a zone name, enter the host name that you want to map to an IP address. The displayed zone name can either be the last selected zone or the zone from which you are adding the AAAA record. If no zone name is displayed or if you want to specify a different zone, click . When there are multiple zones, Grid Manager displays the dialog box. Click Select Zone Zone Selectora zone name in the dialog box, and then enter the host name. The name you enter is prefixed to the DNS zone name that is displayed, and the complete name becomes the FQDN (fully qualified domain name) of the host. For example, if the zone name displayed is corpxyz.com and you enter admin, then the FQDN becomes admin.corpxyz.com.DNS : Displays the DNS view to which the selected DNS zone belongs.ViewShared : This field appears only when you are creating a shared record. Click . If you have Record Group Select Shared Record Grouponly one shared record group, the appliance displays the name of the shared record group here. If you have multiple shared record groups, select the shared record group in the dialog box. You can use filters or the function to Shared Record Group Selector Go tonarrow down the list.Hostname : Displays the host name policy of the zone.PolicyIP Enter the IPv6 address to which you want the domain name to map. When you enter an IPv6 address, you can use double Address:colons to compress a contiguous sequence of zeros. You can also omit any leading zeros in a four-hexadecimal group. For example, the complete IPv6 address 2006:0000:0000:0123:4567:89ab:0000:cdef can be shortened to 2006::123:4567:89ab:0:cdef. Note that if there are multiple noncontiguous groups of zeros, the double colon can only be used for one group to avoid ambiguity. The NIOS appliance displays an IPv6 address in its shortened form, regardless of its form when it was entered.Comment: Optionally, enter additional information about this record.Create Select this option to automatically generate a PTR record that maps the specified IP address to the associated PTR record:host name. To create the PTR record, the reverse-mapping zone must be in the database.Disable: Clear the checkbox to enable the record. Select the checkbox to disable it.
Click to define extensible attributes. For information, see .Next Managing Extensible AttributesSave the configuration and click if it appears at the top of the screen.Restart
Modifying AAAA Records
When you modify an AAAA record, you can perform the following steps:
In the tab, you can change the information you previously entered through the wizard.GeneralIn the tab, you can view discovered data, if any, for the record. For information, see .Discovered Data Viewing Discovered Data
You can also enter or edit information in the , and tabs. For information on modifying and deleting resource TTL Extensible Attributes Permissionsrecords, see . Modifying, Disabling, and Deleting Host and Resource Records
Managing PTR RecordsIn a reverse-mapping zone, a PTR (pointer) record maps an IP address to a host name. Before adding a PTR record to a reverse-mapping zone, you must first create the zone. You can also add PTR records to forward-mapping zones to support zeroconf (zero configuration networking), such as wide-area Bonjour. For information about the Bonjour protocol, refer to . Though adding PTR records to forward-mapping zones http://www.apple.com/support/bonjoursupports some of the use cases in RFC 1101, it does not support the network name mapping use case described in the RFC. For more information, refer to .http://tools.ietf.org/html/rfc1101
Adding PTR Records
To add a PTR record, perform the following steps:
From the tab, select the tab, expand the Toolbar and click -> -> .Data Management DNS Add Record Add PTR RecordIn the wizard, do the following:Add PTR Record
Name or : From the drop-down list, select or . When you select , click to select a zone, IP Address Name IP Address Name Select Zoneand then enter a value for the PTR record. When you are adding a PTR record to a reverse-mapping zone, you can enter a value from 0 to 255 in the or field. Note that when you launch this wizard from the tab, you can only select a reverse-Name IP Address IPAMmapping zone. When you launch this from a reverse-mapping zone, the IP address field is populated with the prefix that corresponds to the selected zone. When you launch this from a forward-mapping zone, you can only specify the host name, not an IP address.When you select , enter the IPv4 or IPv6 address that you want to map to the domain name.IP AddressDNS : If you entered an IP address, you must select the DNS view of the PTR record. If you entered a name, this field displays the ViewDNS view of the selected zone.Domain : Enter the domain name to which you want the PTR record to point. For example, you can enter corpxyz.com.NameComment: Optionally, enter information about the PTR record.Disable: Select this checkbox to disable the record. Clear the checkbox to enable it.
Note
If a PTR record with the domain name in its native characters is added to the Infoblox Grid through DDNS updates, the and Name Domain Name fields display the record name in UTF-8 encoded format. For example, a PTR record with the domain name . added through DDNS test.comupdates displays \229\183\165\228\189\156\231\171\153.test.com in the and fields.Name Domain Name
3. 4.
Save the configuration or click to define extensible attributes. For information, se .Next e Managing Extensible AttributesClick if it appears at the top of the screen.Restart
To schedule this task, click the Schedule icon at the top of the wizard. In the panel, click , and then specify a date, time, and time Schedule Change Laterzone.
Modifying PTR Records
To modify a PTR record, perform the following steps:
In the tab, you can change the information you previously entered through the wizard. Note that you cannot change an IPv4 address to Generalan IPv6 address or move a PTR record from a forward-mapping zone to a reverse-mapping zone and vice versa. When you modify a PTR record that belongs to a forward-mapping zone, you can only modify the name since there is no IP address for such record. For information, see Adding
. PTR RecordsIn the tab, you can view discovered data, if any, for the record. For information, see .Discovered Data Viewing Discovered Data
You can also enter or edit information in the , and tabs. For information on modifying and deleting resource TTL Extensible Attributes, Permissionsrecords, see . Modifying, Disabling, and Deleting Host and Resource Records
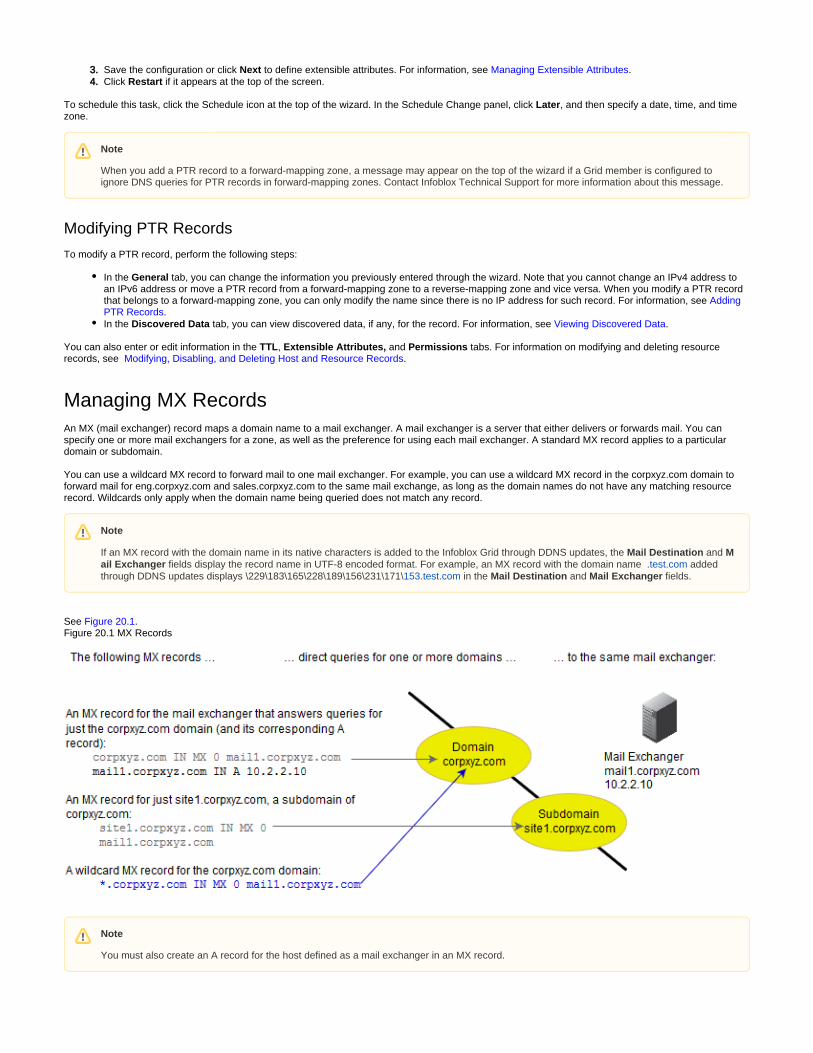
Managing MX RecordsAn MX (mail exchanger) record maps a domain name to a mail exchanger. A mail exchanger is a server that either delivers or forwards mail. You can specify one or more mail exchangers for a zone, as well as the preference for using each mail exchanger. A standard MX record applies to a particular domain or subdomain.
You can use a wildcard MX record to forward mail to one mail exchanger. For example, you can use a wildcard MX record in the corpxyz.com domain to forward mail for eng.corpxyz.com and sales.corpxyz.com to the same mail exchange, as long as the domain names do not have any matching resource record. Wildcards only apply when the domain name being queried does not match any record.
See . Figure 20.1 Figure 20.1 MX Records
Note
When you add a PTR record to a forward-mapping zone, a message may appear on the top of the wizard if a Grid member is configured to ignore DNS queries for PTR records in forward-mapping zones. Contact Infoblox Technical Support for more information about this message.
Note
If an MX record with the domain name in its native characters is added to the Infoblox Grid through DDNS updates, the and Mail Destination M fields display the record name in UTF-8 encoded format. For example, an MX record with the domain name . added ail Exchanger test.com
through DDNS updates displays \229\183\165\228\189\156\231\171\ in the and fields.153.test.com Mail Destination Mail Exchanger
Note
You must also create an A record for the host defined as a mail exchanger in an MX record.
1. 2.
3.
Adding MX Records
To add an MX record from the Tasks Dashboard, see . You can also add MX records from the tab -> tab by Add MX Record Data Management DNSclicking -> -> from the Toolbar.Add Record Add MX Record
Modifying and Deleting MX Records
When you modify an MX record, you can change the information you previously entered in the tab. You can also enter or edit information in the General TTL, and tabs. For information on modifying and deleting resource records, see Extensible Attributes, Permissions Modifying, Disabling, and Deleting Host a
. nd Resource Records
Managing SRV RecordsAn SRV (service location) record directs queries to hosts that provide specific services. For example, if you have an FTP server, then you might create an SRV record that specifies the host which provides the service. You can specify more than one SRV record for a host. For more information about SRV records, see .RFC2052,ADNSRRforspecifyingthelocationofservices(DNSSRV)
Adding SRV Records
From the tab, select the tab, expand the Toolbar and click -> -> .Data Management DNS Add Record Add SRV RecordIn the wizard, complete the following fields:Add SRV Record
Display input as: Select the format in which you want the SRV record to be displayed. When you select RFC 2782 format, the appliance follows the _ format as defined in RFC 2782. When you select Free format, enter the entire name in the Domain service._protocol.namefield.Service: Specify the service that the host provides. You can either select a service from the list or type in a service, if it is not on the list. For example, if you are creating a record for a host that provides FTP service, select _ftp. To distinguish the service name labels from the domain name, the service name is prefixed with an underscore. If the name of the service is defined at http://www.iana.org
, use that name. Otherwise, you can use a locally-defined /assignments/service-names-port-numbers/service-names-port-numbers.xmlname.Protocol: Specify the protocol that the host uses. You can either select a protocol from the list or type in a protocol, if it is not on the list. For example, if it uses TCP, select _tcp. To distinguish the protocol name labels from the domain name, the protocol name is prefixed with an underscore.Domain: If Grid Manager displays a zone name, enter the name here to define an SRV record for a host or subdomain. The displayed zone name can either be the last selected zone or the zone from which you are adding the SRV record. If no zone name is displayed or if you want to specify a different zone, click . When there are multiple zones, Grid Manager displays the Select Zone Zone Selectordialog box. Click a zone name in the dialog box, and then enter the name to define the SRV record. The NIOS appliance prefixes the name you enter to the domain name of the selected zone. For example, if you want to create an SRV record for a web server whose host name is www2.corpxyz.com and you define the SRV record in the corpxyz.com zone, enter www2 in this field. To define an SRV record for a domain whose name matches the selected zone, leave this field blank. The NIOS appliance automatically adds the domain name (the same as the zone name) to the SRV record. For example, if you want to create an SRV record for the corpxyz.com domain and you selected the corpxyz.com zone, leave this field blank.Preview: After you have entered all the information, this field displays the FQDN, which is the concatenation of the Service, Protocol, and Domain fields.Shared : This field appears only when you are creating a shared record. Click . If you have Record Group Select Shared Record Grouponly one shared record group, the appliance displays the name of the shared record group here. If you have multiple shared record groups, select the shared record group in the dialog box. You can use filters or the function to Shared Record Group Selector Go tonarrow down the list.Priority: Select or enter an integer from 0 to 65535. The priority determines the order in which a client attempts to contact the target host; the domain name host with the lowest number has the highest priority and is queried first. Target hosts with the same priority are attempted in the order defined in the field.WeightWeight: Select or enter an integer from 0 to 65535. The weight allows you to distribute the load between target hosts. The higher the number, the more that host handles the load (compared to other target hosts). Larger weights give a target host a proportionately higher probability of being selected.Port: Specify the appropriate port number for the service running on the target host. You can use standard or nonstandard port numbers, depending on the requirements of your network. You can select a port number from the list or enter an integer from 0 to 65535.Target: Enter the canonical domain name of the host (not an ALIAS); for example, www2.corpxyz.com.
Comment: Enter a descriptive comment for the record.Disable: Clear the checkbox to enable the record. Select the checkbox to disable it.
Note
If an SRV record with the domain name in its native characters is added to the Infoblox Grid through DDNS updates, the and Name SRV Targetfields display the domain name in UTF-8 encoded format. For example, an SRV record with the domain name .test.com added through DDNS updates displays \231\148\181\232\132\145.test.com in the and fields.Name SRV Target
Note
In addition, you need to define an A record mapping the canonical name of the host to its IP address.

3. 4.
Save the configuration or click to define extensible attributes. For information, see .Next Managing Extensible AttributesClick if it appears at the top of the screen.Restart
Modifying and Deleting SRV Records
To modify an SRV record, perform the following steps:
In the tab, the field displays the format in which the SRV record was configured. For RFC 2782 format, the appliance General Display input asmatches the }service. format and displays the corresponding information in the Service and Protocol fields. If the appliance cannot { protocol.namematch the service and protocol, it displays the entire name in the Domain field. For Free format, the entire name is displayed in the Domain field. For more information about the other fields, see . Adding SRV Records
You can also enter or edit information in the , and tabs. For information on modifying and deleting resource TTL Extensible Attributes, Permissionsrecords, see . Modifying, Disabling, and Deleting Host and Resource Records
Managing TXT RecordsA TXT (text record) record contains supplemental information for a host. For example, if you have a sales server that serves only North America, you can create a text record stating this fact. You can create more than one text record for a domain name.
Using TXT Records for SPF
SPF (Sender Policy Framework) is an anti-forgery mechanism designed to identify spam e-mail. SPF fights e-mail address forgery and makes it easier to identify spam, worms, and viruses. Domain owners identify sending mail servers in DNS. SMTP receivers verify the envelope sender address against this information, and can distinguish legitimate mail from spam before any message data is transmitted.
SPF makes it easy for a domain to say, "I only send mail from these machines. If any other machine claims that I'm sending mail from there, they're not valid." For example, when an AOL user sends mail to you, an email server that belongs to AOL connects to an email server that belongs to you. AOL uses SPF to publish the addresses of its email servers. When the message comes in, your email servers can tell if the server that sent the email belongs to AOL or not.
You can use TXT records to store SPF data that identifies what machines send mail from a domain. You can think of these specialized TXT records as reve that e-mail servers can use to verify if a machine is a legitimate sender of an e-mail.rse MX records
SPF Record Examples
corpxyz.com. IN TXT "v=spf1 mx –all" corpxyz.net. IN TXT "v=spf1 a:mail.corpxyz.com –all" corpxyz.net. IN TXT "v=spf1 include:corpxyz.com -all" corpxyz.net. IN TXT "v=spf1 mx -all exp=getlost.corpxyz.com" corpxyz.com. IN TXT "v=spf1 include:corp200.com -all"
Adding TXT Records
To add an TXT record from the Tasks Dashboard, see . You can also add TXT records from the tab -> tab by Add TXT Record Data Management DNSclicking -> -> from the Toolbar.Add Record Add TXT Record
Note
The appliance does not match the service and protocol names to exactly how they appear in the drop-down lists. It only checks whether the first two parts of the names start with an underscore. If the first two parts do not start with an underscore, the appliance assumes it is a free format. For example, is considered as RFC 2782 format even though _abc is not in the drop-down list, and _xyz is not in the _abc._xyz.name Service P
drop-down list. Grid Manger displays _abc in the field and _xyz in the field. On the other hand, " " is rotocol Service Protocol abc.xyz.nameconsidered as a free format because the first two parts do not start with underscores, and Grid Manager displays this in its entirety in the Domain field.
Note
If a TXT record with the domain name in its native characters is added to the Infoblox Grid through DDNS updates, the field displays the Namedomain name in UTF-8 encoded format. For example, a TXT record with the domain name . added through DDNS updates displays test.com\231\148\181\232\132\ in the field.145.test.com Name
Note
If an SPF record goes beyond the BIND limit of 255 characters, Infoblox recommends that you break up the record into two TXT records.

1. 2.
Modifying and Deleting TXT Records
When you modify a TXT record, you can change the information you previously entered in the tab. You can also enter or edit information in the General TTL, and tabs. For information on modifying and deleting resource records, see Extensible Attributes, Permissions Modifying, Disabling, and Deleting Host a
. nd Resource Records
Managing TLSA RecordsA TLSA record is used to associate a TLS (Transport Layer Security) server certificate or a public key with a domain name. For example, you can define whether a certificate or a public key must be associated with a domain name when you define a TLSA resource record through Grid Manager. When you define your own TLSA record, you do not have to depend on an external Certificate Authority to issue a digitally signed TLS certificate for your domain name. When a client queries the domain name, TLSA records are matched to authenticate associated TLS certificates.
Using TLSA Records for DANE
Infoblox supports DANE (DNS-based Authentication of Named Entities) protocol to secure information about domain names. DANE uses DNSSEC to sign certificates and keys that are used by the TLS and distributes secure information about the domain name using DNS. With DANE, you can make an authoritative binding between the domain name and a certificate or a public key, whichever is used by a host for the respective domain. You can define what kind of certificates or public keys must be associated with a domain name to prevent vulnerability attacks and to reduce or prevent the interaction of third-party Certification Authorities to issue PKIX certificates. For detailed information about the TLSA record format and certificate usage, refer to RFC 6698
The DNS-Based Authentication of Named Entities (DANE) Transport Layer Security (TLS) Protocol: TLSA.
Adding TLSA Records
In NIOS 8.5, you can add a TLSA record to a DNSSEC signed zone only. You cannot unsign a zone that contains a TLSA record. In NIOS 8.5.1 or later, you can add a TLSA record to a DNSSEC signed zone or an unsigned zone. To add a TLSA record:
From the tab, select the tab, expand the Toolbar and click -> -> .Data Management DNS Add Record TLSA RecordIn the wizard, complete the following fields:Add TLSA Record
Display : Select either or . Grid Manager selects by default. input as Strict format (_port._protocol.domain) Free format Strict formatIn this format, you can choose port and protocol values from the list. When you select , you cannot specify these values.Free formatPort: Select a value from the drop-down list to indicate the port on which the TLS-based service is active.The values in the drop-down list are:
21 (FTP)22 (SSH)23 (Telnet)25 (SMTP)80 (HTTP)88 (Kerberos)389 (LDAP)443 (HTTPS)464 (KPASSWD)3268 (GC)
Protocol: Select a value from the drop-down list to indicate the protocol that is used for secure communication. The values in the drop-down list are:
_msdcs_sites_tcp_udp
Name: Enter a name for the TLSA resource record. You can specify a name only when you select .Free formatSelect : Click to select a zone. In NIOS 8.5, you must select only a signed zone to associate with a TLSA resource record. In NIOS Zone8.5.1 or later, you can select a signed zone or an unsigned zone. For more information, see . Click to clear the Signing a Zone Clear Namethat you have entered.FQDN: This is displayed by default. You cannot modify the value. TLSA resource records are stored using the domain name that you select. When you select , is displayed as the FQDN. Example: abc.example.com. When you select Free format name.domain Strict form
, _ is displayed as the FQDN, where:at port._protocol.domain_ indicates the port on which the TLS-based service is active.port_ indicates the name of the transport protocol that you have selected.protocol
Consider an example where you are the owner of the domain www.example.com and you have set the to and Port 443(HTTPS) Protocolto which indicates that the HTTP server is running TLS on port 443. To request TLSA record for www.example.com, you must use tcp ,
Similarly, to request a TLSA resource record for an SMTP server running the STARTTLS protocol on __443._tcp. www.example.com.port 25 at mail.example.com, you must use _ .25._tcp.mail.example.comDNS : The DNS View associated with the selected DNS zone is displayed.ViewCertificate : Select a value from the drop-down list to indicate how the certificate or the public key associated with the domain Usagename is matched when the client queries for the domain name on the TLS server. The values in the drop-down list are: , PKIX-TA PKIX-
, , and .EE DANE-TA DANE-EE
Note
When you select and values are set to and _ , by default. You can change Strict format, Port Protocol 443 (HTTPS) tcpthese values. When you select , you cannot edit the mentioned values.Free format

1. 2.
With and , you need additional Trust Anchors to validate peer certificate chains. These Trust Anchors must PKIX-TA PKIX-EEbe mutually trusted by both the TLS server and the client. For more information, refer to RFC 6698 The DNS-Based Authenticati
on of Named Entities (DANE) Transport Layer Security (TLS) Protocol: TLSA.When you select and , the TLSA records that you define using Grid Manager are sufficient to verify the DANE-TA DANE-EEclient's certificate chain and additional Trust Anchors are not required to authenticate the public key or certificate data. For more information, refer to RFC 6698 The DNS-Based Authentication of Named Entities (DANE) Transport Layer Security (TLS) Protoc
ol: TLSA.Selector: Select a value from the drop-down list to indicate whether you are associating an entire certificate or only the public key with the domain. When you select a value, it indicates which part of the TLS certificate presented by the server is matched with the associated data. The values in the drop-down list are and . NIOS builds a hexadecimal format Full certificate Subject Public Key Infofor the entire certificate when you select . If you select , NIOS extracts the public key and builds Full certificate Subject Public Key Infoa hexadecimal format for it.Matched : Select a value from the drop-down list to indicate how a TLS certificate or the public key of the domain received from the Typeclient must be matched with the certificate or the key that you have specified for the respective domain in the TLS server. You can select to match the entire content or only the hash of the selector. The values in the drop-down list are: , , and No hash SHA 256 bit SHA 512 bi
If you select , the TLS server performs an exact match on the selected content. When you select either or t. No hash SHA 256 bit SHA 5 , only the hash of the selected content is matched by the TLS server.12 bit
Certificate : Enter the certificate data that must be matched for authentication. You can either paste the full certificate or the Datacorresponding public key when the is set to . Based on the values that you select for the and the Matched Type No hash Selector Match
, the server builds a hexadecimal format for the TLSA record. If you set the to or , you ed Type Matched Type SHA 256 bit SHA 512 bitmust specify only the hash of the full certificate or the public key.Get : Click this to upload the certificate or the public key to the server.From FileNote the following:
When you select , you must provide either the certificate or public key or hash of any of them. The value must be Strict formatbased on the and field values.Selector Matched TypeWhen you select you must upload the certificate in DER format. The server builds an appropriate hexadecimal Free format,format for the TLSA record based on the value.Selector
Comment: Optionally, enter a descriptive comment for the TLSA record.Disable: Clear the checkbox to enable the record. Select the checkbox to disable it.
You can also perform the following steps:
Use to search for TLSA records. For information, see Global Search . Global SearchUse to copy TLSA records between DNS zones. For information, see Copy Records Copying Zone Records.Define global permission for with read-only, read/write or deny access. You can also define object level permission for TLSA All TLSA recordsrecords. For information, see and . Defining Global Permissions Defining Object PermissionsImport and export records in CSV format. For information, see . Importing and Exporting Data using CSV ImportView audit log entries for the TLSA record. For information, see . Viewing the Audit Log
Modifying and Deleting TLSA Records
When you modify a TLSA record, you can change the information you previously entered in the tab. You can also enter or edit information in the General T, and tabs. For information on modifying and deleting resource records, see TL Extensible Attributes, Permissions Modifying, Disabling, and Deleting Host
. and Resource Records
Managing CAA RecordsA Certification Authority Authorization (CAA) DNS resource record enables domain owners to define the Certificate Authorities (CAs) that can issue certificates for a domain. When you define a CAA record, only the CAs listed in the records can issue certificates for the respective domain. With CAA, you can also define notification rules to manage requests for a certificate from a non-authorized CA. If you do not define a CAA resource record, any CA can issue a certificate for the domain. For detailed information about the CAA record format and certificate usage, refer to RFC 6844 DNS Certification
. You can add, edit, or delete a CAA resource record through Grid Manager or the Infoblox API. The Authority Authorization (CAA) Resource Recordfollowing are a few examples of CAA resource records:
example.com. CAA 0 issue “ssl.com; policy=ev”example.com. CAA 0 issuewild “;”example.com. CAA 0 iodef “mailto:[email protected]”example.com. CAA 0 iodef “certissues.example.com”
Adding CAA Records
To add a CAA record, perform the following steps:
From the tab, select the tab, expand the Toolbar and click -> -> .Data Management DNS Add Record CAA RecordIn the wizard, complete the following fields:Add CAA Record
Name: Enter a name for the CAA record. Click to select a zone. When there are multiple zones, Grid Manager displays the Select Zone dialog box. Click to clear the zone that you have entered.Zone Selector Clear
Note
When you enable threat protection on a member, you must configure either a pass rule or rate limiting rule for CAA DNS resource record types. This is specific to record types that use threat protection rule templates to allow incoming DNS queries for the respective CAA record. If you do not configure these rules, the threat protection service that is running on the member blocks the DNS queries of the CAA record.
2.
3. 4.
5.
DNS View: The DNS view associated with the selected DNS zone is displayed.Flag: Select a checkbox to set the flag value. When the flag is set to , it tells the CA that it must completely understand Bit 0 (Critical)the property tag to proceed. A CA does not issue certificates for any domain when the flag is set to and the property tag Bit 0 (Critical)is not understood. NIOS considers the flag value as zero, if you do not select any checkbox.
Note that the flags are unsigned integers between 0 and 255. Infoblox represents these integers in the form of bits. When you select the checkbox for , the flag value is set to binary 10000000, which is decimal 128. Example: CAA 128 xyz “Unknown”. Bit 0 (Critical)
Consider the following example with two CAA records:
CAA 0 issue “ca.example.net; policy=ev”CAA 128 xyz “Unknown”
In the above example, the property tag is flagged as unknown. The CA associated with example.net or any other issuer cannot issue xyza certificate unless the processing rules for the property tag are clearly understood by the CA.xyzType(Tag): Indicates the type of CAA record. The supported CAA record types are:
Issue: Select this to explicitly authorize a single CA to issue a certificate for the domain and subdomains of the specified domain.Issuewild: Select this to explicitly authorize a single CA to issue a wildcard certificate for the domain. It allows the domain holder or anyone acting under the authority of the domain holder to issue wildcard certificates for the domain.
Iodef: Select this to specify an email address or URL of the web service to report invalid certificate requests or issued certificates that violate your CAA policy.Infoblox allows you to enter a new CAA record type other than those displayed in the drop-down list. The maximum length allowed is 255 characters.
Certificate Authority: Indicates the CA that is authorized to issue a certificate for the domain. The maximum length for certificate authority is 8192 characters. You can also specify the email address or the URL to report CAA policy violation for the domain. This is valid for only. Infoblox recommends that you add either the or prefix to the domain name. Iodef http:// https:// You must explicitly add "mailto" when specifying the email address. For example, "mailto:admin@ ".example.comComment: Optionally, enter a descriptive comment for the CAA record.Disable: Clear the checkbox to enable the record. Select the checkbox to disable it.
Save the configuration or click to define extensible attributes. For information, see .Next Managing Extensible AttributesSave the configuration or click to schedule this task. Click in the panel to immediately execute this task or click Next Now Schedule Change Laterand specify a date, time, and time zone. For information about how to schedule a task, see .Scheduling TasksClick to complete the configuration.Save & Close
You can also perform the following steps:
Use to search for CAA records. For information, see Global Search . Global SearchUse to copy CAA records between DNS zones. For information, see Copy Records Copying Zone Records.Define global permission for with read-only, read/write or deny access. You can also define object level permission for CAA All CAA recordsrecords. For information, see and . Defining Global Permissions Defining Object PermissionsImport and export records in CSV format. For information, see .Importing and Exporting Data using CSV ImportView audit log entries for the CAA record. For information, see . Viewing the Audit LogUse Smart Folders to organize threat protection profiles by name, comment or object type. For information, see .Smart Folders You can view the status of the import process and a summary report in the Data Import Wizard Log. For large data sets, this option is an efficient approach. To download the Data Import Wizard, visit . www.infoblox.com/import/
Modifying and Deleting CAA Records
When you modify a CAA record, you can change the information you previously entered in the tab. You can also enter or edit information in the General TTL, and tabs. For information on modifying and deleting resource records, see Extensible Attributes, Permissions Modifying, Disabling, and Deleting Host
.and Resource Records
Managing CNAME Records
Note
You can select only as the flag value and the remaining checkboxes are reserved for future use. The Bit 0 (Critical)appliance displays a warning message when you select a checkbox other than .Bit 0 (Critical)
Note
Issue wild type takes precedence over Issue.
Note
Infoblox does not support shared CAA records and does not provide Windows 2016 MS Server support for CAA records.

A CNAME record maps an ALIAS to a canonical name. You can use CNAME records in both forward- and IPv4 reverse-mapping zones to serve two different purposes. (At this time, you cannot use CNAME records with IPv6 reverse-mapping zones.)
CNAME Records in Forward-Mapping Zones
In a forward-mapping zone, a CNAME record maps an ALIAS to a canonical (or official) name. CNAME records are often more convenient to use than canonical names because they can be shorter or more descriptive. For example, you can add a CNAME record that maps the ALIAS to the qa.engrcanonical name .qa.engr.corpxyz.com
To add a CNAME record to a forward-mapping zone from the Tasks Dashboard, see . You can also add CNAME records from the Add CNAME Record Data tab -> tab by clicking -> -> from the Toolbar.Management DNS Add Record Add CNAME Record
CNAME Records in IPv4 Reverse-Mapping Zones
You can add CNAME records to an IPv4 reverse-mapping zone to create ALIASes to addresses maintained by a different name server when the reverse-mapping zone on the server is a delegated child zone with fewer than 256 addresses. This technique allows you to delegate responsibility for a reverse-mapping zone with an address space of fewer than 256 addresses to another authoritative name server. See and Figure 20.2 RFC 2317, Classless IN-
.ADDR.ARPA delegation
Note
If a CNAME record with the domain name in its native characters is added to the Infoblox Grid through DDNS updates, the and ALIAS Canonic fields display the domain name in UTF-8 encoded format. For example, a CNAME record with the domain name . added al Name test.com
through DDNS updates displays \231\148\181\232\132\ in the and fields.145.test.com Canonical Name ALIAS
Note
A CNAME record does not have to be in the same zone as the canonical name to which it maps. In addition, a CNAME record cannot have the same name as any other record in that zone.

Figure 20.2 CNAME Records in a Reverse-Mapping Zone
You add CNAME records in the parent zone on your name server. The ALIASes defined in those CNAME records point to the addresses in PTR records in the child zone delegated to the other server.
When you define a reverse-mapping zone that has a netmask from /25 (255.255.255.128) to /31 (255.255.255.254), you must include an RFC 2317 prefix. This prefix can be anything, from the address range (examples: 0-127, 0/127) to descriptions (examples: first-network, customer1). On a NIOS appliance, creating such a reverse-mapping zone automatically generates all the necessary CNAME records. However, if you need to add them manually to a parent zone that has a child zone with fewer than 255 addresses.
Adding CNAME Records
To add a CNAME record to a forward-mapping or reverse-mapping zone from the Tasks Dashboard, see . You can also add CNAME Add CNAME Recordrecords from the tab -> tab by clicking -> -> from the Toolbar.Data Management DNS Add Record Add CNAME Record
Modifying and Deleting CNAME Records
When you modify a CNAME record, you can change the information you previously entered in the tab. You can also enter or edit information in Generalthe , and tabs. For information on modifying and deleting resource records, see TTL Extensible Attributes, Permissions Modifying, Disabling, and Deleting
. Host and Resource Records
Managing DNAME Records
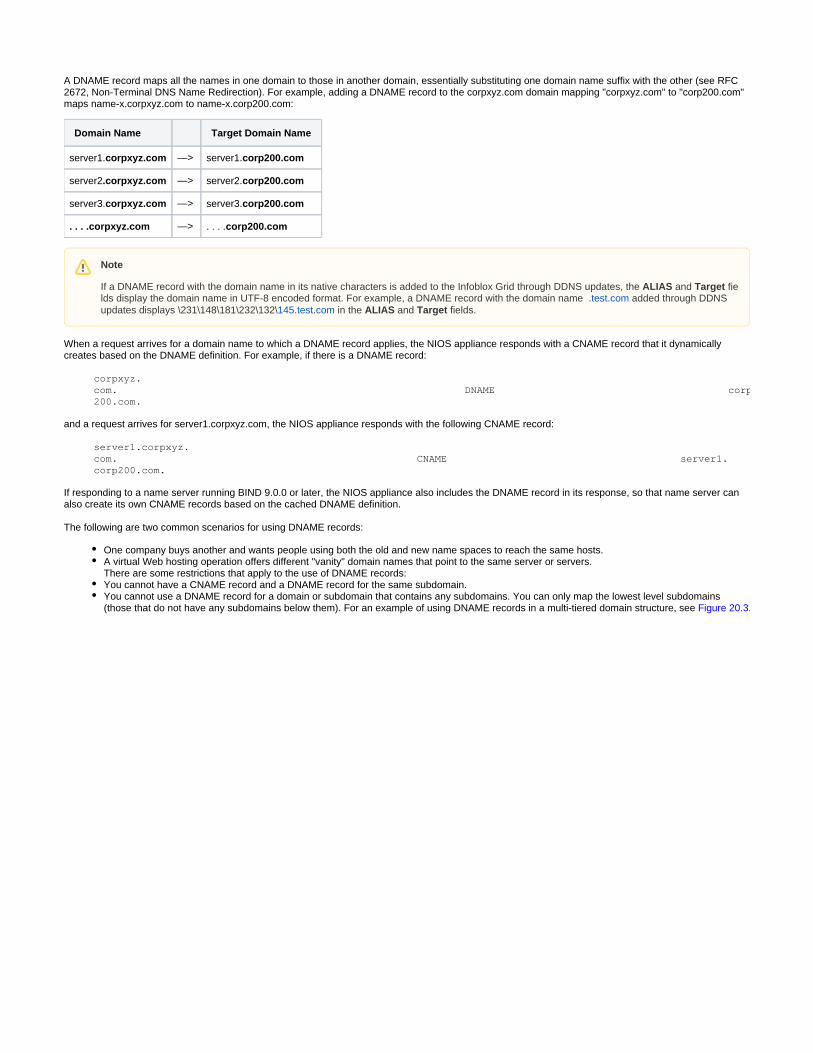
A DNAME record maps all the names in one domain to those in another domain, essentially substituting one domain name suffix with the other (see RFC 2672, ). For example, adding a DNAME record to the corpxyz.com domain mapping "corpxyz.com" to "corp200.com" Non-Terminal DNS Name Redirectionmaps .corpxyz.com to .corp200.com:name-x name-x
Domain Name Target Domain Name
server1.corpxyz.com —> server1.corp200.com
server2.corpxyz.com —> server2.corp200.com
server3.corpxyz.com —> server3.corp200.com
. . . .corpxyz.com —> . . . .corp200.com
When a request arrives for a domain name to which a DNAME record applies, the NIOS appliance responds with a CNAME record that it dynamically creates based on the DNAME definition. For example, if there is a DNAME record:
corpxyz.com. DNAME corp200.com.
and a request arrives for server1.corpxyz.com, the NIOS appliance responds with the following CNAME record:
server1.corpxyz.com. CNAME server1.corp200.com.
If responding to a name server running BIND 9.0.0 or later, the NIOS appliance also includes the DNAME record in its response, so that name server can also create its own CNAME records based on the cached DNAME definition.
The following are two common scenarios for using DNAME records:
One company buys another and wants people using both the old and new name spaces to reach the same hosts.A virtual Web hosting operation offers different "vanity" domain names that point to the same server or servers.There are some restrictions that apply to the use of DNAME records:You cannot have a CNAME record and a DNAME record for the same subdomain.You cannot use a DNAME record for a domain or subdomain that contains any subdomains. You can only map the lowest level subdomains (those that do not have any subdomains below them). For an example of using DNAME records in a multi-tiered domain structure, see . Figure 20.3
Note
If a DNAME record with the domain name in its native characters is added to the Infoblox Grid through DDNS updates, the and fieALIAS Targetlds display the domain name in UTF-8 encoded format. For example, a DNAME record with the domain name . added through DDNS test.comupdates displays \231\148\181\232\132\ in the and fields.145.test.com ALIAS Target

Figure 20.3 Adding DNAME Records for the Lowest Level Subdomains
In the case of a domain structure consisting of a single domain (no subdomains), adding a DNAME record redirects queries for every name in the domain to the target domain, as shown in . Figure 20.4
Figure 20.4 Adding a DNAME Record for a Single Domain
When using a DNAME record, you must copy the resource records for the source domain to the zone containing the target domain, so that the DNS server providing service for the target domain can respond to the redirected queries.
Copy from corpxyz.com
to corpxyz.corp200.com
www1 IN A 10.1.1.10 www1 IN A 10.1.1.10
www2 IN A 10.1.1.11 www2 IN A 10.1.1.11
ftp1 IN A 10.1.1.20 ftp1 IN A 10.1.1.20
mail1 IN A 10.1.1.30 mail1 IN A 10.1.1.30
1. 2.
3. 4.
5.
After copying these records to the zone containing the corpxyz.corp200.com domain, delete them from the zone containing the corpxyz.com domain.
If DNS service for the source and target domain names is on different name servers, you can import the zone data from the NIOS appliance hosting the source domain to the appliance hosting the target domain. For information about this procedure, see . Importing Zone Data
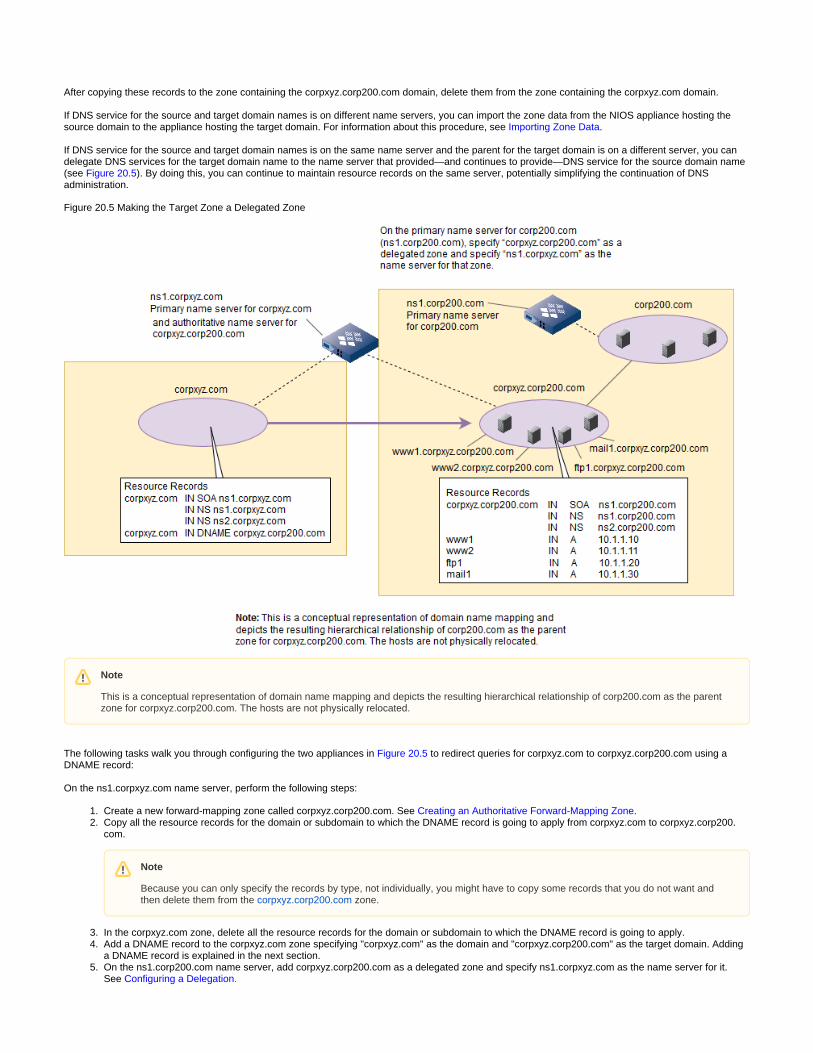
If DNS service for the source and target domain names is on the same name server and the parent for the target domain is on a different server, you can delegate DNS services for the target domain name to the name server that provided—and continues to provide—DNS service for the source domain name (see ). By doing this, you can continue to maintain resource records on the same server, potentially simplifying the continuation of DNS Figure 20.5administration.
Figure 20.5 Making the Target Zone a Delegated Zone
The following tasks walk you through configuring the two appliances in to redirect queries for corpxyz.com to corpxyz.corp200.com using a Figure 20.5DNAME record:
On the ns1.corpxyz.com name server, perform the following steps:
Create a new forward-mapping zone called corpxyz.corp200.com. See . Creating an Authoritative Forward-Mapping ZoneCopy all the resource records for the domain or subdomain to which the DNAME record is going to apply from corpxyz.com to corpxyz.corp200.com.
In the corpxyz.com zone, delete all the resource records for the domain or subdomain to which the DNAME record is going to apply.Add a DNAME record to the corpxyz.com zone specifying "corpxyz.com" as the domain and "corpxyz.corp200.com" as the target domain. Adding a DNAME record is explained in the next section.On the ns1.corp200.com name server, add corpxyz.corp200.com as a delegated zone and specify ns1.corpxyz.com as the name server for it. See . Configuring a Delegation
Note
This is a conceptual representation of domain name mapping and depicts the resulting hierarchical relationship of corp200.com as the parent zone for corpxyz.corp200.com. The hosts are not physically relocated.
Note
Because you can only specify the records by type, not individually, you might have to copy some records that you do not want and then delete them from the zone.corpxyz.corp200.com

1. 2.
3. 4.
DNAME Records for Forward-Mapping Zones
To add a DNAME record to a forward-mapping zone:
From the tab, select the tab, expand the Toolbar and click -> -> .Data Management DNS Add Record Add DNAME RecordIn the wizard, complete the following fields:Add DNAME Record
ALIAS: If Grid Manager displays a zone name, enter the name of a subdomain here. If you are adding a DNAME record for the entire zone, leave this field empty. This field is for adding a DNAME record for a subdomain within the selected zone. The displayed zone name can either be the last selected zone or the zone from which you are adding the CNAME record. If no zone name is displayed or if you want to specify a different zone, click . When there are multiple zones, Grid Manager displays the dialog Select Zone Zone Selectorbox. Click a zone name in the dialog box, and then enter the name of a subdomain.Target: Enter the domain name to which you want to map all the domain names specified in the ALIAS field.Comment: Enter identifying text for this record, such as a meaningful note or reminder.Disable: Clear the checkbox to enable the record. Select the checkbox to disable it.
Save the configuration or click to define extensible attributes. For information, see .Next Using Extensible AttributesClick if it appears at the top of the screen.Restart
DNAME Records for Reverse-Mapping Zones
You can use DNAME records to redirect reverse lookups from one reverse-mapping zone to another. You can use DNAME records for reverse-mapping zones to simplify the management of subzones for classless address spaces larger than a class C subnet (a subnet with a 24-bit netmask).
RFC 2672, , includes an example showing the delegation of a subzone for an address space with a 22-bit netmask Non-Terminal DNS Name Redirectioninside a zone for a larger space with a 16-bit netmask:
$ORIGIN 0.192.in-addr.arpa.
8/22 NS ns.slash-22-holder.example.
8 DNAME 8.8/22
9 DNAME 9.8/22
10 DNAME 10.8/22
11 DNAME 11.8/22
The reverse-mapping zone 0.192.in-addr.arpa. applies to the address space 192.0.0.0/16. Within this zone is a subzone and subdomain with the abbreviated name . (Its full name is .) This subdomain contains its own subdomains corresponding to the 1024 addresses in 8/22 8/22.0.192.in-addr.arpathe 192.0.8.0/22 subnet:
Subdomain 8/22 (8/22.0.192.in-addr.arpa)Subdomain 8.8/22 for addresses 192.0.8.0 – 192.0.8.255 (or 192.0.8.0/24)Subdomain 9.8/22 for addresses 192.0.9.0 – 192.0.9.255 (or 192.0.9.0/24)Subdomain 10.8/22 for addresses 192.0.10.0 – 192.0.10.255 (or 192.0.10.0/24)Subdomain 11.8/22 for addresses 192.0.11.0 – 192.0.11.255 (or 192.0.11.0/24)
The NS record delegates authority for the reverse-mapping subzone 8/22 to the DNS server ns.slash-22-holder.example.Finally, the DNAME records provide ALIASes mapping domain names that correspond to the 192.0.8.0/24, 192.0.9.0/24, 192.0.10.0/24, and 192.0.11.0/24 subnets to the respective subdomains 8.8/22, 9.8/22, 10.8/22, and 11.8/22 in the 8/22.0.192.in-addr.arpa subzone.
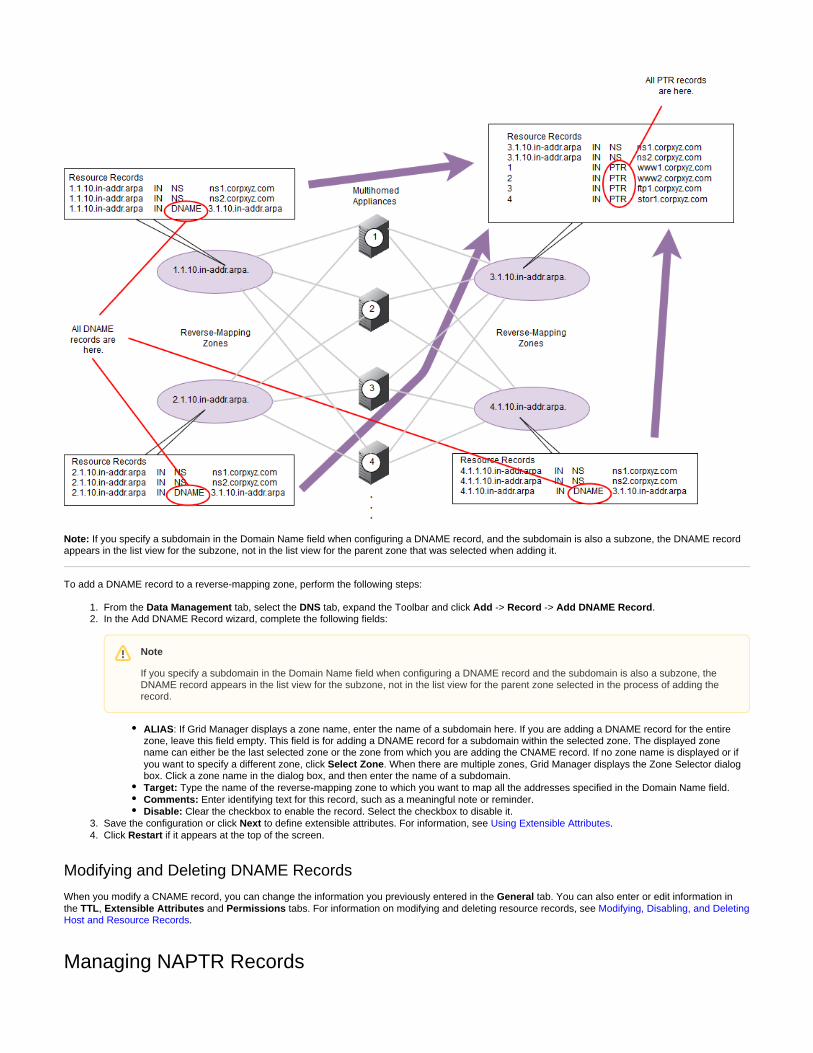
You might also use DNAME records if you have a number of multihomed appliances whose IP addresses must be mapped to a single set of domain names. An example of this is shown in . Figure 20.6
Figure 20.6 DNAME Records to Simplify DNS for Multihomed Appliances
Note
If you specify a subdomain in the Domain Name field when configuring a DNAME record and the subdomain is also a subzone, the DNAME record appears in the list view for the subzone, not in the list view for the parent zone selected in the process of adding the record.
Note
NIOS appliances support DNAME records in reverse-mapping zones that map addresses to target zones with a classless address space larger than a class C subnet. However, NIOS appliances do not support such target zones.
1. 2.
3. 4.
Note: If you specify a subdomain in the Domain Name field when configuring a DNAME record, and the subdomain is also a subzone, the DNAME record appears in the list view for the subzone, not in the list view for the parent zone that was selected when adding it.
To add a DNAME record to a reverse-mapping zone, perform the following steps:
From the tab, select the tab, expand the Toolbar and click -> -> .Data Management DNS Add Record Add DNAME RecordIn the wizard, complete the following fields:Add DNAME Record
ALIAS: If Grid Manager displays a zone name, enter the name of a subdomain here. If you are adding a DNAME record for the entire zone, leave this field empty. This field is for adding a DNAME record for a subdomain within the selected zone. The displayed zone name can either be the last selected zone or the zone from which you are adding the CNAME record. If no zone name is displayed or if you want to specify a different zone, click . When there are multiple zones, Grid Manager displays the dialog Select Zone Zone Selectorbox. Click a zone name in the dialog box, and then enter the name of a subdomain.Target: Type the name of the reverse-mapping zone to which you want to map all the addresses specified in the Domain Name field.Comments: Enter identifying text for this record, such as a meaningful note or reminder.Disable: Clear the checkbox to enable the record. Select the checkbox to disable it.
Save the configuration or click to define extensible attributes. For information, see .Next Using Extensible AttributesClick if it appears at the top of the screen.Restart
Modifying and Deleting DNAME Records
When you modify a CNAME record, you can change the information you previously entered in the tab. You can also enter or edit information in Generalthe , and tabs. For information on modifying and deleting resource records, see TTL Extensible Attributes Permissions Modifying, Disabling, and Deleting
. Host and Resource Records
Managing NAPTR Records
Note
If you specify a subdomain in the Domain Name field when configuring a DNAME record and the subdomain is also a subzone, the DNAME record appears in the list view for the subzone, not in the list view for the parent zone selected in the process of adding the record.
1. 2.
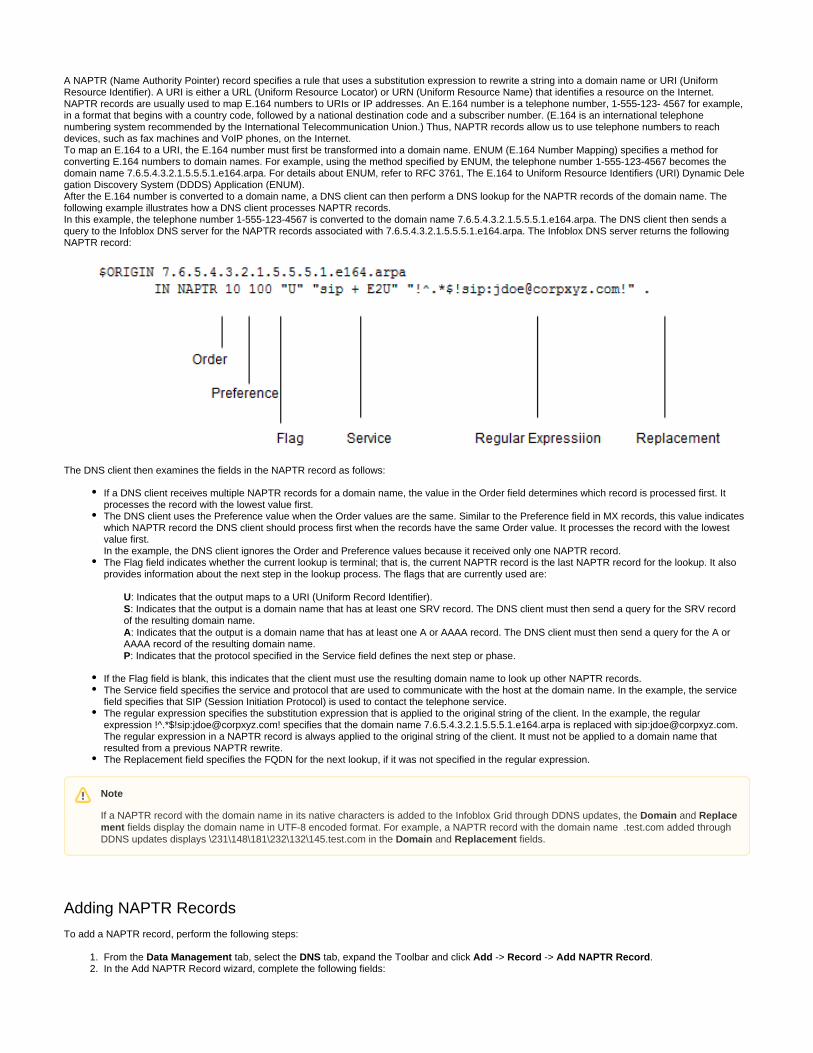
A NAPTR (Name Authority Pointer) record specifies a rule that uses a substitution expression to rewrite a string into a domain name or URI (Uniform Resource Identifier). A URI is either a URL (Uniform Resource Locator) or URN (Uniform Resource Name) that identifies a resource on the Internet.NAPTR records are usually used to map E.164 numbers to URIs or IP addresses. An E.164 number is a telephone number, 1-555-123- 4567 for example, in a format that begins with a country code, followed by a national destination code and a subscriber number. (E.164 is an international telephone numbering system recommended by the International Telecommunication Union.) Thus, NAPTR records allow us to use telephone numbers to reach devices, such as fax machines and VoIP phones, on the Internet.To map an E.164 to a URI, the E.164 number must first be transformed into a domain name. ENUM (E.164 Number Mapping) specifies a method for converting E.164 numbers to domain names. For example, using the method specified by ENUM, the telephone number 1-555-123-4567 becomes the domain name 7.6.5.4.3.2.1.5.5.5.1.e164.arpa. For details about ENUM, refer to RFC 3761, The E.164 to Uniform Resource Identifiers (URI) Dynamic Dele
.gation Discovery System (DDDS) Application (ENUM)After the E.164 number is converted to a domain name, a DNS client can then perform a DNS lookup for the NAPTR records of the domain name. The following example illustrates how a DNS client processes NAPTR records.In this example, the telephone number 1-555-123-4567 is converted to the domain name 7.6.5.4.3.2.1.5.5.5.1.e164.arpa. The DNS client then sends a query to the Infoblox DNS server for the NAPTR records associated with 7.6.5.4.3.2.1.5.5.5.1.e164.arpa. The Infoblox DNS server returns the following NAPTR record:
The DNS client then examines the fields in the NAPTR record as follows:
If a DNS client receives multiple NAPTR records for a domain name, the value in the Order field determines which record is processed first. It processes the record with the lowest value first.The DNS client uses the Preference value when the Order values are the same. Similar to the Preference field in MX records, this value indicates which NAPTR record the DNS client should process first when the records have the same Order value. It processes the record with the lowest value first.In the example, the DNS client ignores the Order and Preference values because it received only one NAPTR record.The Flag field indicates whether the current lookup is terminal; that is, the current NAPTR record is the last NAPTR record for the lookup. It also provides information about the next step in the lookup process. The flags that are currently used are:
U: Indicates that the output maps to a URI (Uniform Record Identifier).: Indicates that the output is a domain name that has at least one SRV record. The DNS client must then send a query for the SRV record S
of the resulting domain name.: Indicates that the output is a domain name that has at least one A or AAAA record. The DNS client must then send a query for the A or A
AAAA record of the resulting domain name.: Indicates that the protocol specified in the Service field defines the next step or phase.P
If the Flag field is blank, this indicates that the client must use the resulting domain name to look up other NAPTR records.The Service field specifies the service and protocol that are used to communicate with the host at the domain name. In the example, the service field specifies that SIP (Session Initiation Protocol) is used to contact the telephone service.The regular expression specifies the substitution expression that is applied to the original string of the client. In the example, the regular expression !^.*$!sip:[email protected]! specifies that the domain name 7.6.5.4.3.2.1.5.5.5.1.e164.arpa is replaced with sip:[email protected]. The regular expression in a NAPTR record is always applied to the original string of the client. It must not be applied to a domain name that resulted from a previous NAPTR rewrite.The Replacement field specifies the FQDN for the next lookup, if it was not specified in the regular expression.
Adding NAPTR Records
To add a NAPTR record, perform the following steps:
From the tab, select the tab, expand the Toolbar and click -> -> .Data Management DNS Add Record Add NAPTR RecordIn the wizard, complete the following fields:Add NAPTR Record
Note
If a NAPTR record with the domain name in its native characters is added to the Infoblox Grid through DDNS updates, the and Domain Replace fields display the domain name in UTF-8 encoded format. For example, a NAPTR record with the domain name .test.com added through ment
DDNS updates displays \231\148\181\232\132\145.test.com in the and fields.Domain Replacement
2.
3.
4.
1. 2.
3.
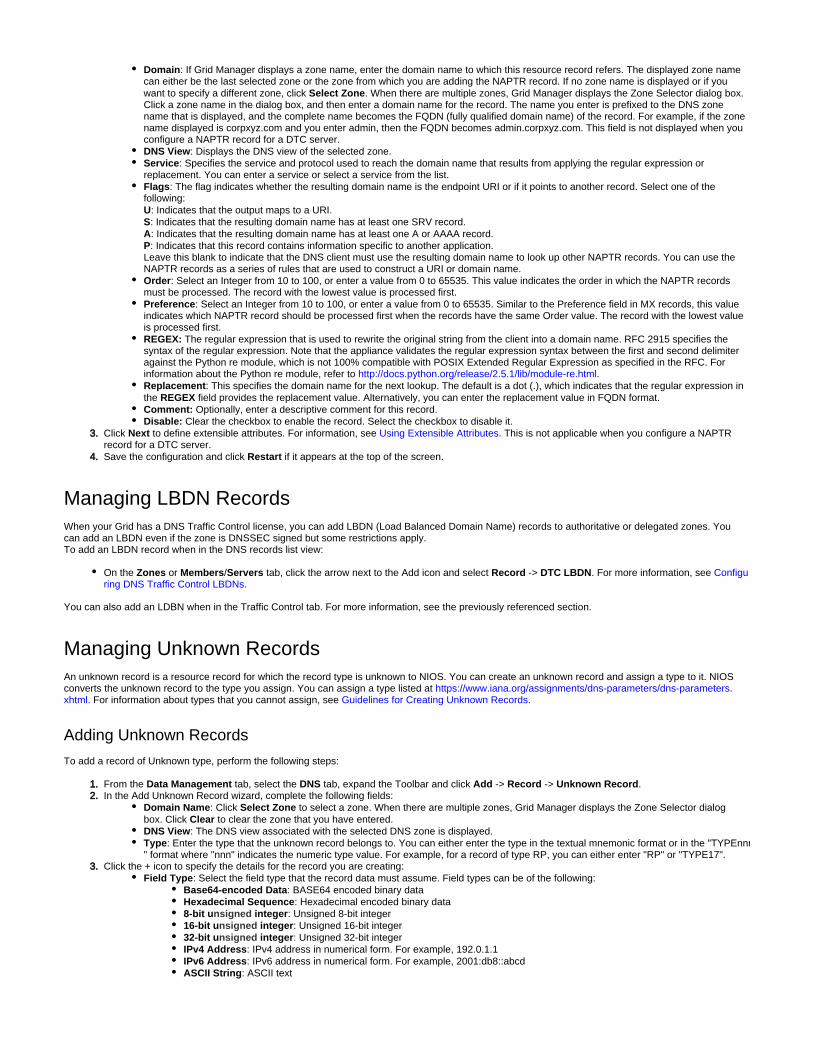
Domain: If Grid Manager displays a zone name, enter the domain name to which this resource record refers. The displayed zone name can either be the last selected zone or the zone from which you are adding the NAPTR record. If no zone name is displayed or if you want to specify a different zone, click . When there are multiple zones, Grid Manager displays the dialog box. Select Zone Zone SelectorClick a zone name in the dialog box, and then enter a domain name for the record. The name you enter is prefixed to the DNS zone name that is displayed, and the complete name becomes the FQDN (fully qualified domain name) of the record. For example, if the zone name displayed is corpxyz.com and you enter admin, then the FQDN becomes admin.corpxyz.com. This field is not displayed when you configure a NAPTR record for a DTC server.DNS View: Displays the DNS view of the selected zone.Service: Specifies the service and protocol used to reach the domain name that results from applying the regular expression or replacement. You can enter a service or select a service from the list.Flags: The flag indicates whether the resulting domain name is the endpoint URI or if it points to another record. Select one of the following:
: Indicates that the output maps to a URI.U: Indicates that the resulting domain name has at least one SRV record.S: Indicates that the resulting domain name has at least one A or AAAA record.A: Indicates that this record contains information specific to another application.P
Leave this blank to indicate that the DNS client must use the resulting domain name to look up other NAPTR records. You can use the NAPTR records as a series of rules that are used to construct a URI or domain name.Order: Select an Integer from 10 to 100, or enter a value from 0 to 65535. This value indicates the order in which the NAPTR records must be processed. The record with the lowest value is processed first.Preference: Select an Integer from 10 to 100, or enter a value from 0 to 65535. Similar to the Preference field in MX records, this value indicates which NAPTR record should be processed first when the records have the same Order value. The record with the lowest value is processed first.REGEX: The regular expression that is used to rewrite the original string from the client into a domain name. RFC 2915 specifies the syntax of the regular expression. Note that the appliance validates the regular expression syntax between the first and second delimiter against the Python re module, which is not 100% compatible with POSIX Extended Regular Expression as specified in the RFC. For information about the Python re module, refer to .http://docs.python.org/release/2.5.1/lib/module-re.htmlReplacement: This specifies the domain name for the next lookup. The default is a dot (.), which indicates that the regular expression in the field provides the replacement value. Alternatively, you can enter the replacement value in FQDN format.REGEXComment: Optionally, enter a descriptive comment for this record.Disable: Clear the checkbox to enable the record. Select the checkbox to disable it.
Click to define extensible attributes. For information, see . This is not applicable when you configure a NAPTR Next Using Extensible Attributesrecord for a DTC server.Save the configuration and click if it appears at the top of the screen.Restart
Managing LBDN RecordsWhen your Grid has a DNS Traffic Control license, you can add LBDN (Load Balanced Domain Name) records to authoritative or delegated zones. You can add an LBDN even if the zone is DNSSEC signed but some restrictions apply.To add an LBDN record when in the DNS records list view:
On the or / tab, click the arrow next to the Add icon and select -> . For more information, see Zones Members Servers Record DTC LBDN Configu. ring DNS Traffic Control LBDNs
You can also add an LDBN when in the Traffic Control tab. For more information, see the previously referenced section.
Managing Unknown RecordsAn unknown record is a resource record for which the record type is . You can create an unknown record and assign a type to it. NIOS unknown to NIOSconverts the unknown record to the type you assign. You can assign listed at a type https://www.iana.org/assignments/dns-parameters/dns-parameters.
. For information about types that you cannot assign, see .xhtml Guidelines for Creating Unknown Records
Adding Unknown Records
To add a record of type, perform the following steps:Unknown
From the tab, select the tab, expand the Toolbar and click -> -> .Data Management DNS Add Record Unknown RecordIn the wizard, complete the following fields:Add Unknown Record
Domain Name: Click to select a zone. When there are multiple zones, Grid Manager displays the dialog Select Zone Zone Selectorbox. Click to clear the zone that you have entered.ClearDNS View: The DNS view associated with the selected DNS zone is displayed.Type: Enter the type that the unknown record belongs to. You can either enter the type in the textual mnemonic format or in the "TYPEnnn" format where "nnn" indicates the numeric type value. For example, for a record of type RP, you can either enter "RP" or "TYPE17".
Click the + icon to specify the details for the record you are creating:Field Type: Select the field type that the record data must assume. Field types can be of the following:
Base64-encoded Data: BASE64 encoded binary dataHexadecimal Sequence: Hexadecimal encoded binary data8-bit u integernsigned : Unsigned 8-bit integer16-bit u integernsigned : Unsigned 16-bit integer32-bit u integernsigned : Unsigned 32-bit integer
: IPv4 Address IPv4 address in numerical form. For example, 192.0.1.1: IPv6 Address IPv6 address in numerical form. For example, 2001:db8::abcd
: ASCII textASCII String
3.
4. 5. 6. 7. 8.
1.
2.
3. 4. 5.
6.
7.
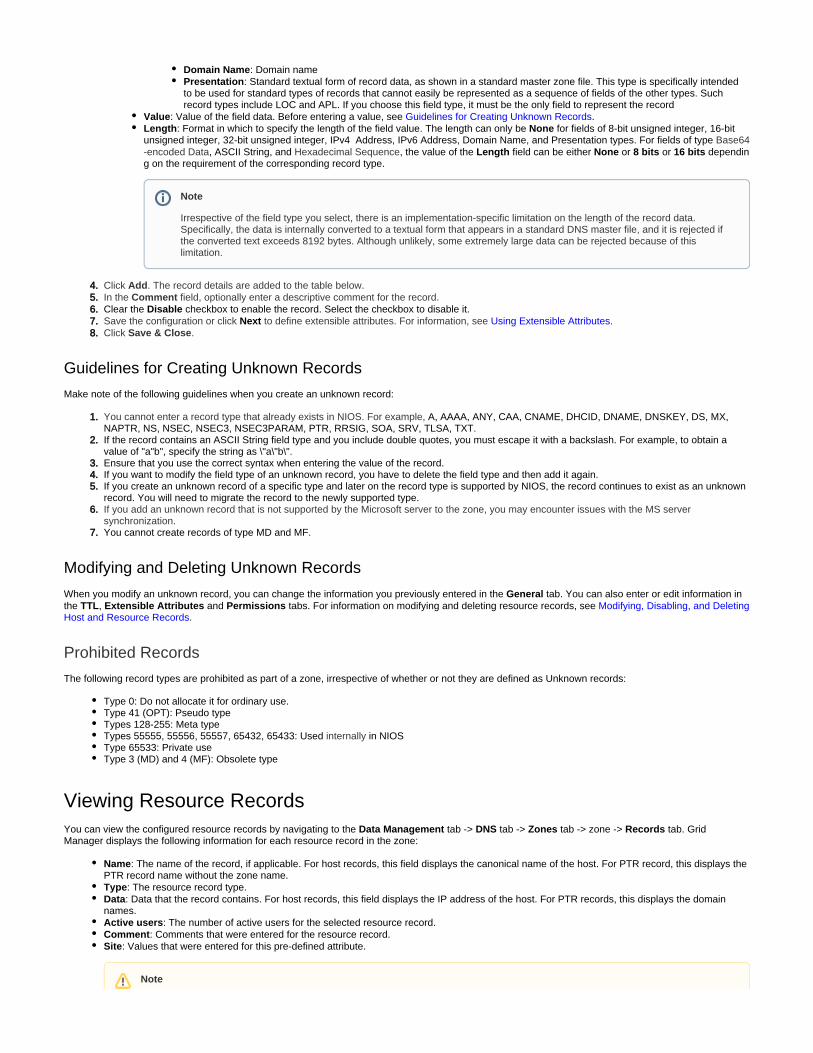
: Domain nameDomain Name: Presentation Standard textual form of record data, as shown in a standard master zone file. This type is specifically intended
to be used for standard types of records that cannot easily be as a sequence of fields of the other types. Such representedrecord types include LOC and APL. If you choose this field type, it must be the only field to represent the record
Value: Value of the . Before entering a value, see .field data Guidelines for Creating Unknown RecordsLength: Format in which to . of 8 , specify the length of the field value The length can only be None for fields -bit unsigned integer 16-bit
, IPv6 Address, Domain Name, and Presentation types. For fields of type unsigned integer, 32-bit unsigned integer, IPv4 Address Base64, ASCII String, and , the value of the field can be either or or dependin-encoded Data Hexadecimal Sequence Length None 8 bits 16 bits
g on the requirement of the corresponding record type.
Click . The record details are added to the table below.AddIn the field, optionally enter a descriptive comment for the record.CommentClear the checkbox to enable the record. Select the checkbox to disable it.DisableSave the configuration or click Next to define extensible attributes. For information, see Using Extensible Attributes.Click .Save & Close
Guidelines for Creating Unknown Records
Make note of the following guidelines when you create an unknown record:
You cannot enter a record type that already exists in NIOS. For example, A, AAAA, ANY, CAA, CNAME, DHCID, DNAME, DNSKEY, DS, MX, NAPTR, NS, NSEC, NSEC3, NSEC3PARAM, PTR, RRSIG, SOA, SRV, TLSA, TXT.If the record contains an ASCII String field type and you include double quotes, you must escape it with a backslash. For example, to obtain a value of "a"b", specify the string as \"a\"b\".Ensure that you use the correct syntax when entering the value of the record. If you want to modify the field type of an unknown record, you have to delete the field type and then add it again.If you create an unknown record of a specific type and later on the record type is supported by NIOS, the record continues to exist as an unknown record. You will need to migrate the record to the newly supported type.If you add an unknown record that is not supported by the Microsoft server to the zone, you may encounter issues with the MS server synchronization.You cannot create records of type MD and MF.
Modifying and Deleting Unknown Records
When you modify an unknown record, you can change the information you previously entered in the tab. You can also enter or edit information in Generalthe , and tabs. For information on modifying and deleting resource records, see TTL Extensible Attributes Permissions Modifying, Disabling, and Deleting
. Host and Resource Records
Prohibited Records
The following record types are prohibited as part of a zone, irrespective of whether or not they are defined as Unknown records:
Type 0: Do not allocate it for ordinary use.Type 41 (OPT): Pseudo type Types 128-255: Meta type Types 55555, 55556, 55557, 65432, 65433: Used in NIOSinternally Type 65533: Private useType 3 (MD) and 4 (MF): Obsolete type
Viewing Resource RecordsYou can view the configured resource records by navigating to the tab -> tab -> tab -> -> tab. Grid Data Management DNS Zones zone RecordsManager displays the following information for each resource record in the zone:
Name: The name of the record, if applicable. For host records, this field displays the canonical name of the host. For PTR record, this displays the PTR record name without the zone name.Type: The resource record type.Data: Data that the record contains. For host records, this field displays the IP address of the host. For PTR records, this displays the domain names.Active users: The number of active users for the selected resource record.Comment: Comments that were entered for the resource record.Site: Values that were entered for this pre-defined attribute.
Note
Irrespective of the field type you select, there is an implementation-specific limitation on the length of the record data. Specifically, the data is internally converted to a textual form that appears in a standard DNS master file, and it is rejected if the converted text exceeds 8192 bytes. Although unlikely, some extremely large data can be rejected because of this limitation.
Note

1. 2.
1.
2. 3.
4.
1.
You can also display the following columns:
MS Delegation Addresses: This column appears only if the primary server of the zone is a Microsoft server. It displays the IP addresses that are associated with an NS record.TTL: The TTL (time-to-live) value of the record.Address: The IPv4 or IPv6 address associated with the owner domain name in a reverse-mapping zone.Shared: Displays true for shared resource records. Otherwise, displays false.Shared Record Group: Displays the shared record group name of a shared record.Disabled: Indicates if the record is disabled.
You can perform the following steps:
Modify some of the data in the table. Double click a row and either modify the data in the field or select an item from a drop-down list. Click Saveto save the changes. Note that some fields are read only.Add new DNS records by clicking the arrow next to the Add icon and selecting , , , and then selecting the required Host Record Shared Recordrecord type. For more information, see . Managing Resource RecordsView the DNS Traffic Control structure for an LBDN.
Select the LBDN record and click the Open Visualization icon. For more information, see . Visualization for DNS Traffic Control ObjectsCreate a DTC server based on an existing A, AAAA, or host record by selecting a record in the table and clicking in the Create DTC ServerToolbar or in the record's Action menu. For more information, see . Configuring DNS Traffic Control ServersEdit the properties of a resource record.
Select the resource record, and then click the Edit icon.Delete a resource record.
Select the resource record, and then click the Delete icon.Export the list of resource records to a .csv file.
Click the Export icon.Print the list of resource records.
Click the Print icon.Use filters and the function to narrow down the list. With the autocomplete feature, you can just enter the first few characters of an object Gotoname in the field and select the object from the possible matches.GotoCreate a quick filter to save frequently used filter criteria:
In the filter section, click and define filter criteria for the quick filter.Show FilterClick and complete the configuration In the Save Quick Filter dialog box.SaveThe appliance adds the quick filter to the quick filter drop-down list in the panel. Note that global filters are prefixed with [G], local filters with [L], and system filters with [S].
Modifying, Disabling, and Deleting Host and Resource RecordsYou can modify, disable, or delete an existing host or DNS resource record. When physical repair or relocation of a network device occurs, you can disable a record instead of deleting it. When you disable a record, the NIOS appliance does not answer queries for it, nor does it include disabled records in zone transfers and zone imports. This avoids having to delete and then add the record again. When the changes to the physical device are complete, you can simply enable the host or resource record.To modify or disable a host or resource record, perform the following steps:
Use one of the following methods to retrieve the host or resource record:Perform a global search.Select it from a Smart Folder.From the tab, select the tab - > tab -> -> -> or .Data Management DNS Zones dns_view zone host_record resource_record
Select the record you want to modify and click the Modify icon.In the host or resource record editor, you can do the following:
In the tab, you can change most of the information, except for the read-only fields, such as the and General DNS View Host Name . You can select the checkbox to disable the record.Policy Disable
In the tab, you can modify the TTL setting. The NIOS appliance also allows you to specify TTL settings for each record. If you do not TTLspecify a TTL for a record, the appliance applies the default TTL value of the zone to each record. For information, see About Time To Live
.SettingsIn the tab, you can modify the attributes. For information, see .Extensible Attributes Using Extensible AttributesThe tab displays if you logged in as a superuser. For information, see Permissions About Administrative .Permissions
Save the configuration and click if it appears at the top of the screen.Restart
When you delete host and resource records, Grid Manager moves them to the Recycle Bin. You can use the Recycle Bin to store deleted DNS configuration objects and selectively restore objects to the active configuration at a later time. You can also permanently remove the objects from the Recycle Bin.
To delete host and resource record, perform the following steps:
The DNS record that is obscured by an LBDN record is indicated by a strikethrough, for example, an obscured A record appears as A Record in Grid Manager.
Note
You cannot delete automatically-generated records, such as NS records and SOA records.

1.
2. 3. 4.
Perform a global search to retrieve the record you want to delete. OrFrom the tab, select the tab, click the tab-> -> -> or .Data Management DNS Zones dns_view zone host_record resource_recordSelect the record and click the Delete icon.In the dialog box, select to delete or to cancel.Delete Confirmation Yes NoOptionally, if the option is selected and if you try to delete an A or AAAA record, the appliance Enable PTR record removal for A/AAAA recordsdisplays the dialog box to confirm whether you want to remove the corresponding PTR record that was Delete Confirmation (A or AAAA Record)automatically generated while creating the A or AAAA record. In the dialog box, select the Delete Confirmation Remove associated PTR resource
checkbox and click to delete the associated PTR record or click to cancel. For information about enabling this option, see record(s) Yes No Deleti. ng PTR Records associated with A or AAAA Records
OrYou can also schedule the deletion for a later time. Click and in the panel, enter a date, time, and time Schedule Deletion Schedule Changezone. For information, see . Scheduling Deletions