managing users in active directory domain services | p a g e managing users in active directory...
TRANSCRIPT
1 | P a g e
Managing Users in Active Directory Domain Services
To give you an overview of this presentation, the presenters, highlights only the following topics:
• Create and Administer User Accounts • Configure User Object Attributes • Automate User Account Creation
In Windows Server 2008 Active Directory, it available in three different objects that are used to represent individual users in the directory:
1. Two of these, the user object and the inetorgPerson object, are security principals that can be used to assign access to resources.
2. The third object, the contact object, which is not a security principal and is used primarily for e-mail.
A user object can have over 250 attributes created by the system and even more created by your organization. In this way, Windows Server 2008 Active Directory is very different than the more limited local security database found on member servers, Windows workstations, and some Linux computers. In local Security database, user object have a very few attributes, such as passwords and home directory. Because Active Directory can provide additional attributes for objects, Active Directory is useful as a directory service in addition to simplify being a database for storing authentication information. For example, Active Directory can become the primary location for most user information. The directory can become the place where all user information, such as telephone numbers, address, and organizational information is stored. When users learn how to search Active Directory, they will be able to find almost any information about other users that they are given permission to view.
User accounts stored in the directory are the fundamental component of identity. Because of their importance, knowledge of
user accounts and the tasks related to support them is critical to the success of server administrator.
Create and Administer User Accounts
What is User Account?
• A user account is an object that Enables authentication of a user with attributes, including a user logon name and password Is a security principal with a security identifier (SID) that can be assigned permissions to resources
• A user account can be stored In Active Directory®, where it enables logon to the domain and can be assigned permissions to
resources anywhere in the domain • Domain user accounts are administered with Active Directory snap-ins and commands
In the local security accounts manager (SAM) database of a member computer, where it enables logon to the local computer and can be assigned permissions to local resources
• Local user accounts are administered with the Local Users and Groups snap-in and the net local user command

2 | P a g e
Using the Windows interface
1. Open Active Directory Users and Computers. 2. In the console tree, right-click the folder in which you want to add a user account.
Where? Active Directory Users and Computers/fcc.com/AsiaUsers/Finance
3. Point to New, and then click User. 4. In First name, type the user's first name. 5. In Initials, type the user's initials. 6. In Last name, type the user's last name. 7. Modify Full name to add initials or reverse order of first and last names. 8. In User logon name, type the user logon name, click the UPN suffix in the drop-down list, and then click Next.
If the user will use a different name to log on to computers running Windows 95, Windows 98, or Windows NT, then you can change the user logon name as it appears in User logon name (pre-Windows 2000) to the different name.
9. In Password and Confirm password, type the user's password, and then select the appropriate password options. See the example given Figure 1.1. How to create a user in graphical interface.
Notes:
To perform this procedure, you must be a member of the
Account Operators group, Domain Admins group, or the Enterprise Admins group in Active Directory, or you must have been delegated the appropriate authority. As a security best practice, consider using Run as to perform this procedure. For more information, see Default local groups, Default groups, and Using Run as.
Figure 1. How to create a user in graphical interface

3 | P a g e
Using a command line
1. Open Command Prompt. • Type:
dsadd user "UserDN" –samid pre-Windows 2000 logon name –pwd { password | * } –mustchpwd yes
UserDN. Distinguished name of user to create -samid. Required for new account Pre-Windows 2000 logon name. The “downlevel” logon name that can be used in the logon format domain\username and that becomes %username% -pwd password. The desired initial password Asterisk (*) will prompt you to enter it at the command prompt, so that the plain text password is not entered with the command -mustchpwd { yes | no }. User must change password at next logon
For example: Just type: dsadd user “cn=asanglitan, ou=HR, ou=AsiaUsers, dc=fcc, dc=com” –samid asanglitan –pwd P@ssw0rd –mustchpwd yes. You will see the result of the operation succeed or not
By default, the result set is presented as the distinguished names (DNs) of each object, but you can use the –o
parameter with modifiers such as dn, rdn, upn, or samid to receive the results as DNs, relative DNs, user principal names (UPNs), or pre-Windows 2000 logon names (security accounts manager [SAM] IDs). Most of the DS commands take two modifiers after the command itself: the object type and the object’s DN. Import Users with CSVDE
Open Notepad:
1.Enter the following two lines. Each of the following bullets represents one line of text. Do not include the bullets in the Notepad document. 2. Save the file to drive E: newuser1.csv 3. Open a command prompt. 4. Type csvde -i -f newuser1.csv and press Enter.
Figure 2. Create a user using dsadd command
Figure 3.Import Users with CSVDE

4 | P a g e
The users are imported. If
you encounter any errors, examine the text file for typographical problems. Open the Active Directory Users And Computers snap-in and confirm that the users were created successfully. If you have had the Active Directory Users And Computers snap-in open during this exercise, you might have to refresh your view to see the newly created accounts. Examine the accounts to confirm that first name, last name, user principal name, and pre- Windows 2000 logon name are populated.
Note:
The -i parameter specifies import mode; without it, the default mode of CSVDE is export. The -f parameter identifies the file name to
import from or export to. The -k parameter is useful during import operations because it instructs CSVDE to ignore errors including Object Already Exists, Constraint Violation, and Attribute Or Value Already Exists. The import file itself is a comma-delimited text file (.csv or .txt) in which the first line defines the imported attributes by their Lightweight Directory Access Protocol (LDAP) attribute names. Each object follows, one per line, and must contain exactly the attributes listed on the first line.
This file newuser1.csv, when imported by the CSVDE command, will create a user object for Jhon Rico in the Finance OU. The user logon names, last name and first name, are configured by the file. You cannot use the CSVDE to import passwords, and without a password, the user account will be disabled initially. After you have reset the password, you can enable the object.
Importing Users with LDIFDE You can also use Ldifde.exe to import or export Active Directory objects, including users. The Lightweight Directory Access Protocol Data Interchange Format (LDIF) is a draft Internet standard for file format that can be used to perform batch operations against directories that conform to the LDAP standards. LDIF supports both import and export operations as well as batch operations that modify objects in the directory. The LDIFDE command implements these batch operations by using LDIF files. The LDIF file format consists of a block of lines that, together, constitute a single operation. Multiple operations in a single file are separated by a blank line. Each line comprising an operation consists of an attribute name followed by a colon and the value of the attribute. Let’s do it in your virtual machine! Open Notepad:
1.Enter the following lines. Each of the following bullets represents one line of text. Do not include the bullets in the Notepad document. 2. Save the file to drive E: judith.ldf
Figure 4. Users are imported

5 | P a g e
3. Open a command prompt. 4. Type ldifde -i -f Judith.ldf -k and press Enter.
The most common switches for LDIFDE command are: -i Turn on import mode. Without this parameter, LDIFDE exports information - f Filename . The file which to import -k ignore error and continue processing if Constraint Violation or Object Already Exist or errors.
Note: You should understand that both CSVDE and LDIFDE are able to import and export objects by using their respective file formats. Both commands are in the export mode by default and require the -i parameter to specify import mode. Only LDIFDE is capable of modifying existing objects or removing objects. Neither command enables you to import a user’s password. Only Dsadd supports specifying the password. If you import users with CSVDE or LDIFDE, the accounts will be disabled until you reset their passwords and enable the accounts
Figure 5. Importing users using LDIFDE
Figure 6. Users are imported

6 | P a g e
Rename User Account
In Active Directory Users and
Computers:
1.Right-click the user, and then click Rename. 2. Type the new common name (CN), and
press Enter.
3. Type the Full Name (which maps to cn
and name)
4. Type the First Name and Last Name.
5. Type the Display Name.
User Logon Name and User Logon Name
(Pre-Windows 2000).
• dsmod user UserDN [-upn UPN][-fn FirstName][-mi Initial][-ln LastName]
[-dn DisplayName][-email EmailAddress]
1. You cannot change the user logon names or CN with DSMod
• dsmove user UserDN -newname "New CN"
Account Attributes:
What is Attributes? Attributes means contain data that defines the information that is stored in an object or in another attribute. For example, a user account object has attributes that store user information, such as the user’s first name, last name, password, office number, and telephone number. Different types of objects have different attributes.
A printer object has attributes that store information that is related to printers, such as the printer model, the number of paper trays, the current location of the printer, and the port to which the printer is attached.
Some attributes contain information that relates to other attributes, such as syntax information or flags that label the attribute as optional or required. Syntax attributes define the format that is used to store data in other attributes.
Figure 7. Rename a User

7 | P a g e
An object definition is really an association of various attributes that are used to describe the characteristics of an object that stores specific pieces of data. The kind of data that the object stores determines which attributes are needed to define the object.
Large objects are made up of many smaller objects. In the user account object example, the user’s logon name attribute is a smaller object that contains a number of attributes of its own, including attributes that define the syntax of the logon name and that specify whether or not the logon name attribute is optional or required. The first name and last name attributes are also smaller objects that are defined in the schema. The object definition for the user account object lists the logon name attribute and the first name and last name attributes, as well as many other attributes, and it defines how these attributes relate to each other to store the data that represents a user account.
Defining objects and attributes this way gives the schema the ability to efficiently define many different types of objects. Many objects have some attributes in common. For example, many objects have a security descriptor to define who is allowed to access and make changes to the contents of the object. Rather than create a separate security descriptor definition for each object definition, the schema defines a single security descriptor object, and all other object definitions refer to the single security descriptor definition. This makes it possible for every object that needs a security descriptor to have one, while keeping only one definition for the security descriptor in the schema.
How to reset User’s Password
First, In Active Directory Users and Computers, right-click the user object and click Reset Password or
Or
Second , in Command Prompt:
Type: c:\>dsmod user “cn=asanglitan, ou=Finance, ou=AsiaUsers, dc=fcc, dc=com” –pwd P@ssw0rd –mustchpwd yes . <Hit Enter> you will see based on the result Figure 8. Reset User Password.
Best practices:
• Assign a temporary, unique, strong password to the user • Select User must change password at next logon • Communicate the password to the user in a secure manner
Figure 8. Reset User Password

8 | P a g e
Enable and Disable Users Account
Helpful questions before to enable and disable user account.
1. What business practices for disabling and enabling accounts are in place in your organization?
2. What are the security implications of someone having the right to disable or enable user accounts?
• Potential denial of service: an administrator accidentally or intentionally disabling accounts for users,
other admins, Web application pools, server products such as SQL, applications such as virus scanners,
or service accounts.
3. Under what circumstances would you disable a user account rather than delete it?
• If a user is on temporary leave, but will be returning, you would disable the account. Also, many
organizations have a policy of disabling user accounts when users leave the organization, and then
deleting the account at a later date.
First, In Active Directory Users and Computers, right-click the user object and click Disable
Or
Second , in Command Prompt:
Type: c:\>dsmod user “cn=asanglitan, ou=Finance, ou=AsiaUsers, dc=fcc, dc=com” –disabled yes . <Hit Enter> you will see based on the result Figure 8. Reset User Password , the user asanglitan was disabled.
Figure 9.How to Disable User Account

9 | P a g e
Delete User Account First In Active Directory Users and Computers, select the user and press Delete or right-click the user object and click Delete Or In command prompt,
Type: c:\>dsrm “cn=jhon rico , ou=Finance, ou=AsiaUsers, dc=fcc, dc=com” <Hit Enter> you will see based on the result Figure 9. The user are prompted to delete or not user jhon rico.
Note : • When you delete an account, you lose
The group memberships The security identifier (SID)
• Common practice Disable the account and move it to an OU for disabled objects After a period of time, delete the account
Figure 10.Delete User Account
10 | P a g e
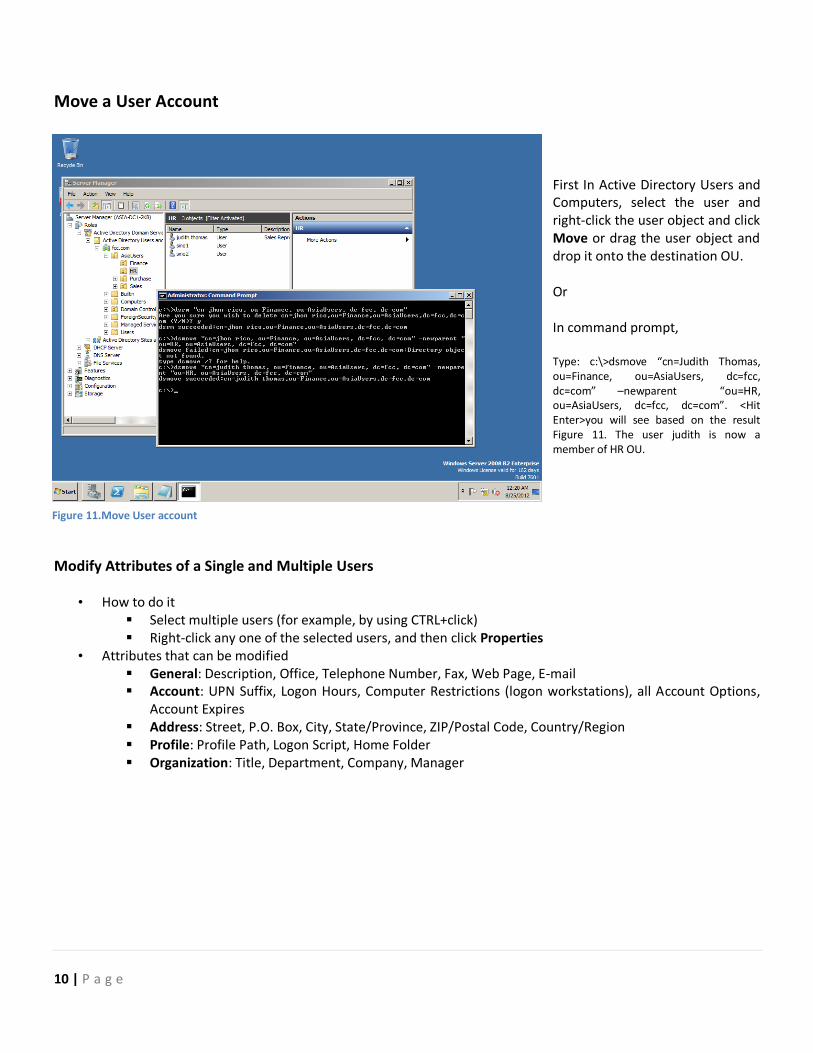
Move a User Account
First In Active Directory Users and Computers, select the user and right-click the user object and click Move or drag the user object and drop it onto the destination OU. Or In command prompt, Type: c:\>dsmove “cn=Judith Thomas, ou=Finance, ou=AsiaUsers, dc=fcc, dc=com” –newparent “ou=HR, ou=AsiaUsers, dc=fcc, dc=com”. <Hit Enter>you will see based on the result Figure 11. The user judith is now a member of HR OU.
Modify Attributes of a Single and Multiple Users
• How to do it Select multiple users (for example, by using CTRL+click) Right-click any one of the selected users, and then click Properties
• Attributes that can be modified General: Description, Office, Telephone Number, Fax, Web Page, E-mail Account: UPN Suffix, Logon Hours, Computer Restrictions (logon workstations), all Account Options,
Account Expires Address: Street, P.O. Box, City, State/Province, ZIP/Postal Code, Country/Region Profile: Profile Path, Logon Script, Home Folder Organization: Title, Department, Company, Manager
Figure 11.Move User account

11 | P a g e
Manage User Attributes with DSMod and DSGet
• DSMod modifies the attributes of object(s) dsmod user UserDN… [-parameter value …]
UserDN …. distinguishedName of the user(s) to modify Parameter. Attribute to modify. dsmod user /?
• Often does not map to the same name as LDAP (dsmod dept vs. LDAP department)
• DSGet gets (returns) the value of attributes of object(s) dsget user UserDN… [-parameter …]
dsget user /? • DSQuery can return objects based on search criteria
and pipe those objects to DSGet and DSMod dsquery user -desc "Marketing Task Force" | dsget user -email
The Attribute Editor provides visibility to useful attributes that do not appear on other tabs of a user’s Properties dialog box. It is available if Advanced Features are enabled. If you have not yet covered the Attribute Editor, spend time showing that the tab appears only when Advanced Features is enabled in the Active Directory Users and Computers View menu. These hidden attributes include some very useful ones, such as employeeID, employeeNumber, employeeType, division, assistant, and carLicense which is very helpful.
-------------------------------------------------------------End-------------------------------------------------------------------------------------
Figure 12.Attribute Editor Snap in