managing your opt in/opt out reg e offering · 2 managing your opt in/opt out reg e offering opt...
TRANSCRIPT

Revision date: June 28, 2019
For an updated copy of this booklet, check out the Reference Materials page of our website: https://www.cuanswers.com/resources/doc/cubase-reference/
CU*BASE® is a registered trademark of CU*Answers, Inc.
Managing Your Opt In/Opt Out Reg E Offering
Opt In/Opt Out Features in CU*BASE
INTRODUCTION
This booklet covers the screens used to configure your credit union’s Opt
In/Opt Out Reg E offering and the decisions your credit union needs to
make. It then covers the various methods you can use to capture your
members’ selections, including while opening a new membership, updating a
membership or through the Opt In/Opt Out Management screen.
CONTENTS
A CEO’S THINKING ON REGULATION E 3
APPROVED VS. NON-APPROVED, EXPECTED VS. UNEXPECTED 3 CONDITIONS THAT CAUSE NEGATIVE POSTING 4 THINGS FOR PROGRAM DESIGNERS TO CONSIDER 4 AN OPPORTUNITY FOR CREDIT UNIONS TO SHINE 5
CREDIT UNION CONFIGURATION SCENARIOS 6
WHAT CONFIGURATION DECISIONS DOES THE CREDIT UNION NEED TO MAKE?
6 CREDIT UNION A: POST AND AUTHORIZE, OPT IN ALL 7 CREDIT UNION B: POST ONLY AND REQUIRE A SELECTION 8 CREDIT UNION C: POST ONLY AND OPT ALL MEMBERS OUT 9
CONFIGURATION SCREENS 10
NSF AND OVERDRAFT CONFIGURATION SCREENS 10 PRE-CHECKING A SELECTION AT MEMBERSHIP OPEN 13

2 Managing Your Opt In/Opt Out Reg E Offering
OPT IN/OPT OUT AUTHORIZATIONS AND POSTING 15
AUTHORIZATION/POSTING FLOW 15
RECORDING MEMBERS’ OPT IN/OPT OUT PREFERENCES 17
OPENING A NEW MEMBERSHIP 17 MAKING A SELECTION DURING SUB ACCOUNT CREATION 19 OPT IN/OPT OUT MAINTENANCE SCREEN OVERVIEW 20 NOTE ON SUB ACCOUNT OPT OUT SELECTION 21 ACCESSING THE MAINTENANCE SCREEN THROUGH INQUIRY OR PHONE
OPERATOR 22 ACCESSING THE OPT IN/OPT OUT MAINTENANCE SCREEN THROUGH MEMBER
PERSONAL BANKER 23 CHANGING OR SELECTING A PREFERENCE THROUGH MEMBERSHIP UPDATE 24
MEMBER SELECTING PREFERENCE THROUGH “IT’S ME 247” 25
CONFIGURING MARKETING TEXT 25 MEMBER’S EXPERIENCE WHEN SELECTING ONLINE 27 INFORM YOUR MEMBERS HOW THEY CAN SELECT ONLINE 30
“OPT IN” SELECTED MEMBERSHIP DESIGNATIONS 31
SENDING OPT IN OR OPT OUT NOTICES TO MEMBERS 32
ADDING THE NOTICE EVENT TO A NOTICE 32 EDITING THE NOTICE EVENT TEXT 36 PRINTING THE NOTICE 40 PURGE RULES 41 REPRINTING A PREVIOUS BATCH OF NOTICES 41
WHAT DID MY MEMBERS SELECT? 42

Managing Your Opt In/Opt Out Reg E Offering 3
A CEO’S THINKING ON REGULATION E
Some Thoughts from Randy Karnes, CEO, on the Reg. E Opt In Process
June 9, 2010
These comments are a different kind of introduction to one of our topical reference booklets. They are very specific to the current industry conditions related to the new Reg. E Opt In provision, and address many of the short-term options credit unions are facing as the new reg. comes into effect.
This is the hardest regulation of 2010 for credit unions, as it is one that
requires salesmanship. You have to craft a service and then get a positive
confirmation that the member wants the service. The reason this is tough is that credit union camps are split in their motivations: the “consumer
protectionist” camp, the strict “rule compliance and interpretation” camp,
and the “reality of needing the income stream and avoiding negative savings
account losses” camp.
Lingering doubts about the service and the issues with holds and posting conditions make the application of the rule difficult for sales people to
commit to the sale. When members challenge the process, the sales person
has a hard time overcoming obstacles. The MSR and the consumer are
confused by the multiple scenarios for how a transaction was designated as
a Courtesy Pay or NSF transaction. This is compounded by having two
balances involved (current and available) and multiple reasons for the negative status (outlined below). Committing to the service is tough when
confusion abounds in so many cases. Therefore, your vision for the service
you are selling, the service for which members are opting in, must be
compelling.
Unfortunately, it will take some time for most credit unions and technical
networks (probably for good reason) to see how their peers, competition, and consumers crack the problem. What will fly with regulators? What will fly
with consumers as a mass audience? What will fly with the people who
count on these transaction postings? While it is easy to the CEO or CFO
(“the transaction posted to a negative balance, available or current...so it
deserves a fee!”), the sales and service aspects are not as easy in practice. It
will take commitment and vision for the service. It will require evolution as
the marketplace responds, and it will take experience to do it well.
APPROVED VS. NON-APPROVED, EXPECTED VS. UNEXPECTED
When you think about your overall NSF and Courtesy Pay income, you must
segment how you make income on ATM and Debit Card negative balance
postings. It’s a mixed bag: remember that all of these transactions are
force paid if they clear the initial approval process.
There are two ways to clear the approval process at the point of the
transaction (retailer or ATM machine):
1. First, the member’s transaction is verified and agreed to by the CU
(live communication), and
2. Second, the member’s transaction is just passed to the CU. In this case there was no direct communication or the item was

4 Managing Your Opt In/Opt Out Reg E Offering
posted against a static negative balance file (NBF) or positive balance file (PBF).
Either way the transaction now belongs to the credit union. Of course a
member just wants his transaction to be approved; he doesn’t know (or
probably care) which party approved it.
CONDITIONS THAT CAUSE NEGATIVE POSTING
So how do you get a negative posting on an ATM or debit card transaction?
1. The member’s current balance is positive prior to posting, but short
of the amount of an unexpected transaction (there was no verification
or NBF or PBF).
2. The member’s current balance is already negative prior to posting an unexpected transaction (no verification or NBF or PBF).
3. The member’s current balance is positive, but the available balance
is short due to other holds and not able to cover an unexpected
transaction (no verification or NBF or PBF).*
4. The member’s current balance is positive, but the available balance
is short due to other holds and now not able to cover the amount of an expected transaction (even though there was verification).*
5. The member’s current balance is negative and not able to cover the
amount of an expected transaction (even though there was
verification).**
*Shortages in available balance occur for various reasons even though the transaction was verified and the funds held. For example, other
postings might occur between the verification and the hold, such as ANR
limit postings, exceptions in hold processing, forced fees, unexpected
transactions, overrides, etc.
**A negative current balance can occur for various reasons even though
the transaction was verified and the funds held. For example, other postings might occur between the verification and the hold, such as ANR
limit postings, exceptions in hold processing, forced fees, unexpected
transactions, overrides, etc.
You have to remember that even if the member opted out of Debit/ATM
overdraft services, they may very well be part of your Check and ACH
Courtesy Pay program. Therefore, you are posting them into their negative limit for valid reasons, but when non-verified Debit or ATM activity shows
up, the member who Opted Out will not be charged the fee, according the
rule.
THINGS FOR PROGRAM DESIGNERS TO CONSIDER
Some questions for your overdraft service designer program and our
programming teams to consider:
• Can we analyze what percentage of Debit and ATM Card ANR fees and NSF are related to the 5 conditions above? This is a tough one, but we
imagine in the future we’ll be able to get a handle on it.

Managing Your Opt In/Opt Out Reg E Offering 5
• Should credit unions allow members to be part of a Checking and ACH
Courtesy Pay program and Opt Out of the Debit and ATM side? Debit
and ATM transactions will eat up limits and post more negative balance transactions this way without fee income. This would result in more
Checks and ACH items being declined because the limit is being used
elsewhere. This results in less income and more NSF on Checks and
ACH for some members. Should Courtesy Pay be an all-in or all-out
process? Does that make a more compelling argument to take the
service?
• Should CU*BASE estimate the non-verified transactions when the
amount fits a test (for example, if a transaction is under $25, assume it
was not verified), and then, if that item takes the account negative, post a
fee as if the transaction had not been approved.
• How long will it take for all of the networks to catch up with identifying
recurring debit card transactions and non-verified transactions for smart postings?
• Should CU*BASE waive fees in a matched hold/post condition for debit
card transactions? This would help to compensate for an imperfect hold
system.
• Should CU*BASE put in a tracking system for approved and non-
approved negative balance posting, and automate the suspension of service on ATM and Debit Cards (reports, hot card, etc.)?
• Should CU*BASE go even deeper, and give members the option on
whether negative balance limits are included in authorizations as well as
postings? “I opt in for your overdraft services, but please do not include the extra limit when authorizing transactions for my debit card. I want the posting protection only.”
AN OPPORTUNITY FOR CREDIT UNIONS TO SHINE
There is one wrinkle I like here, and one that may serve us all well. In
making Courtesy Pay a service that must be sold and verified by the
consumer, the regulator gives credit unions an opportunity to differentiate
themselves from the bad actors, openly for everyone to see. Let’s see what
the industry does with that.
Courtesy Pay is a good service. It spares members extra fees and saves money when applied fairly. It spares members reputation risk and
community standing by making the transaction conditions private between
their financial institution and themselves. It lowers the cost of servicing
negative accounts (return fees, collection fees, etc.). And finally, it creates
another service for credit unions to use to bond with the member: value exchanged and appreciated. Until this time, the service has not been as
transparent as it could be. This is an opportunity for credit unions to shine.
Let’s hope we can all turn lemons into lemonade – and we get some relief
from the rule designers as the flaws are brought into the light.

6 Managing Your Opt In/Opt Out Reg E Offering
CREDIT UNION CONFIGURATION
SCENARIOS
WHAT CONFIGURATION DECISIONS DOES THE CREDIT UNION NEED TO
MAKE?
Each credit union needs to define the configuration of their overdraft
protection services. Will the negative balance limit be used to for approval
for authorization and posting or simply for posting?
The settings that control how this works are part of Tool #558 NSF/OD
Transfer Configuration, as part of the Overdraft Protection Activation screen. The flags: "Use Negative Balance Limits for Authorizations" and "Use
Negative Balance Limits for Posting” control whether the member's negative
balance limit is added when determining the available balance amount.
Additionally, the credit union can select which Opt In/Opt Out selection will
be pre-checked when a new membership is opened. While the default is to not check either option, credit unions can pre-check either the In or Out
checkbox. A credit union might feel, for example, that most members will
want to Opt In and select this option. (Employees can always change this
selection when speaking directly with the member.)
Following are scenarios that three credit unions have selected with different
configuration and policies for overdraft protection. Credit Union A, B and C all have well defined Opt In/Opt Out Reg E policies, but each credit union
has defined their policy in a slightly different way. Based on their decisions,
each credit union has configured CU*BASE differently. Let’s look at their
decisions and their configurations. More complete discussion of the
configuration screens follows this narrative.

Managing Your Opt In/Opt Out Reg E Offering 7
CREDIT UNION A: POST AND AUTHORIZE, OPT IN ALL
Credit Union A feels that their overdraft funds are a service that members
should always have access to when using their ATM or Debit cards, for both
the authorization of purchases as well as for the purchase of items. The
credit union has fees for both NSF and Non-Return items to cover times
when the member brings the account negative. The credit union also wants all members to Opt In and feels that all its members will want this service.
Because of this, it always wants to begin with the Opt In box checked when
an employee opens a new membership. Following are the configuration
settings that this credit union would select (see full screens beginning on
page 10):
Posting and Authorization Configuration
Fee Configuration
Opt In/Out Default for Membership Open

8 Managing Your Opt In/Opt Out Reg E Offering
CREDIT UNION B: POST ONLY AND REQUIRE A SELECTION
Credit Union B wants its members to be able to access their overdraft funds
for Debit and ATM purchases, but does not want these funds to be
accessible for Debit card authorizations and when a member is asking for
money at an ATM. The credit union has fees for both NSF and Non-Return
items to cover times when the member brings the account negative. Credit Union B also want the Opt In/Opt Out selection to be a result of a
discussion between the member and its employee; it does not want to pre-
check any Opt In/Opt Out checkboxes when opening a new membership.
Following are the configuration settings that this credit union would select
(see full screens beginning on page 10):
Posting and Authorization Configuration
Fee Configuration
Opt In/Out Default for Membership Open

Managing Your Opt In/Opt Out Reg E Offering 9
CREDIT UNION C: POST ONLY AND OPT ALL MEMBERS OUT
Similar to Credit Union B, Credit Union C also wants its members to be able
to access their overdraft funds for Debit and ATM purchases, but does not
want these funds to be accessible for Debit card authorizations and when a
member is asking for money at an ATM. The credit union has fees for both
NSF and Non-Return items to cover times when the member brings the account negative. Unlike Credit Union B, however, Credit Union C feels that
most members will select to Opt Out and wants to pre-check this option
when opening a new membership. Following are the configuration settings
that this credit union would select (see full screens beginning on page 10):
Posting and Authorization Configuration
Fee Configuration
Opt In/Out Default for Membership Open

10 Managing Your Opt In/Opt Out Reg E Offering
CONFIGURATION SCREENS
NSF AND OVERDRAFT CONFIGURATION SCREENS
The NSF/OD Transfer Configuration allows the credit union to determine
when overdraft funds are used and also allows them to configure the fee
information.
The first option allows the credit union to define whether the negative
balance limit is used for authorizations and posting debit and ATM
transactions or just authorizations.
NSF/OD Transfer Configuration (Tool #558) > Overdraft protection and
activation
(Both Authorization and Posting)
The configuration in the screen above would be used by a credit union who
has decided to authorize and pay the transaction as an approved negative
balance transaction, and that they use the negative balance limit in the
Debit or ATM card authorization of the transaction, and approve the
transaction posting negative.
• NOTE: ACH items also automatically use Negative Balance Limits for
posting and authorization when they are posted via the ACH Exceptions screen using the Account Adjustment option.
If posting causes the account to go below the available balance, if it is still
within the negative balance limit, assess the Negative Balance fee with CU-
defined description; otherwise use the NSF fee and standard description
("NSF FEE").
• IMPORTANT NOTE FOR BATCH (PBF) PROCESSING: Remember that if your credit union uses batch ATM/Debit processing, that
authorizations are controlled by the custom PBF settings you have
set up with your batch provider. The Authorization Flag explained
above does NOT apply for batch processing.
Notice how the Posting flags for ATM and Debit Card
transactions are checked, as well as the Authorization
checkboxes.
This Origin 13 (ATM) Authorization check box
controls whether a member can take out the money as a
withdrawal.
This configuration determines whether the fee charged when a member’s
balance falls below available balance or current balance. It has no effect on
authorizations or postings.

Managing Your Opt In/Opt Out Reg E Offering 11
NSF/OD Transfer Configuration (Tool #558) > Overdraft protection and
activation
(Authorization Only)
The configuration above would be used by a credit union that has decided to use the courtesy pay limit to pay debit and ATM card transactions, but does
not use the limit as part of the authorization balance in approving
transaction prior to the posting.
If posting causes account to go below available balance, if it is still within the
negative balance limit, assess the ANR Fee with CU-defined description;
otherwise use the NSF fee and standard description ("NSF FEE").
• IMPORTANT NOTE FOR BATCH (PBF) PROCESSING: Remember that if your credit union uses batch ATM/Debit processing, that
authorizations are controlled by the custom PBF settings you have
set up with your batch provider. The Authorization Flag explained
above does NOT apply for batch processing.
Notice how the Posting flags for ATM and Debit
Card transactions are checked, but the Authorization
boxes are not.

12 Managing Your Opt In/Opt Out Reg E Offering
NSF/OD Transfer Configuration (Tool #558) > Overdraft protection & NSF
configuration
The second NSF/OD option configures the fee the member is charged and
the statement description, regardless of the previously shown screen’s
configuration.
These two sections of the screen
configure the NSF and Non-Return
Fee. The fee, associated G/L, and
transaction description are
configured here.

Managing Your Opt In/Opt Out Reg E Offering 13
PRE-CHECKING A SELECTION AT MEMBERSHIP OPEN
Your credit union may select to set the default setting for the Opt In/Opt
Out checkbox so that either the In or Out checkbox is pre-selected when an
employee opens a new membership. If no change is made to this
configuration, no box will be pre-checked. (See the image below for an
example when no checkbox is pre-checked.)
Use the Workflow Controls to
automatically check one of these two
checkboxes when opening a new
membership.
14 Managing Your Opt In/Opt Out Reg E Offering
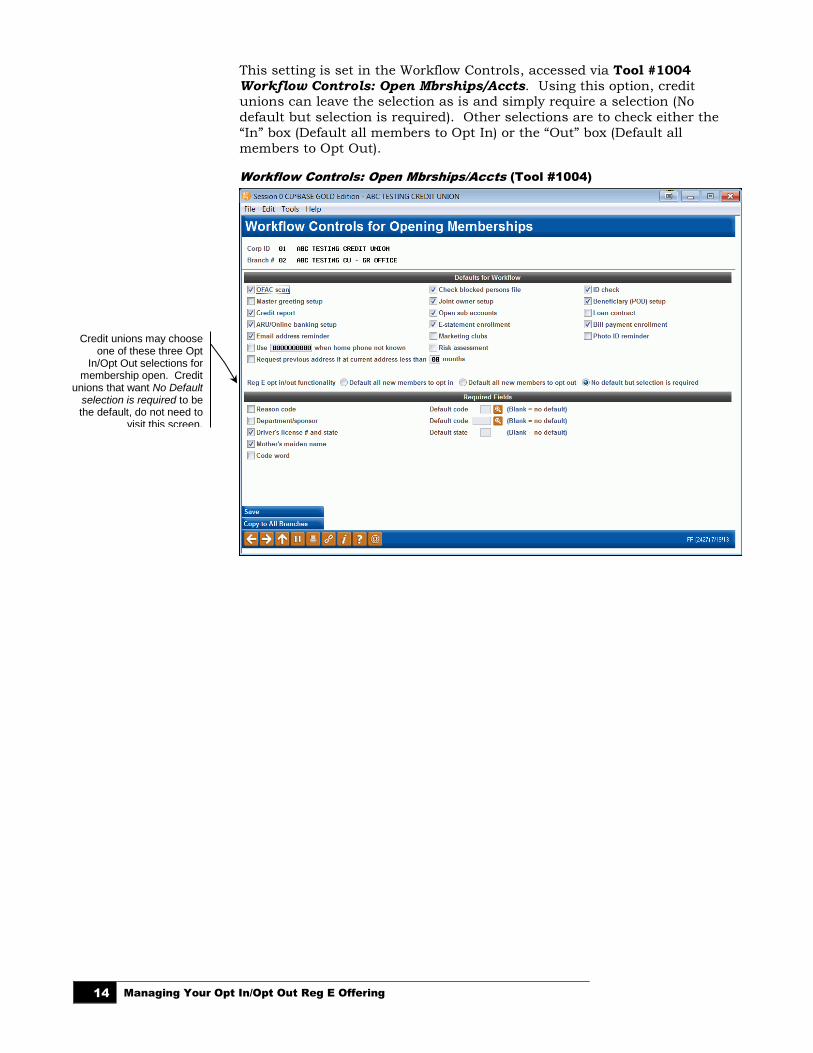
This setting is set in the Workflow Controls, accessed via Tool #1004
Workflow Controls: Open Mbrships/Accts. Using this option, credit unions can leave the selection as is and simply require a selection (No
default but selection is required). Other selections are to check either the
“In” box (Default all members to Opt In) or the “Out” box (Default all
members to Opt Out).
Workflow Controls: Open Mbrships/Accts (Tool #1004)
Credit unions may choose one of these three Opt
In/Opt Out selections for membership open. Credit
unions that want No Default selection is required to be the default, do not need to
visit this screen.

Managing Your Opt In/Opt Out Reg E Offering 15
OPT IN/OPT OUT AUTHORIZATIONS
AND POSTING
The Opt In/Opt posting programming currently applies to all ATM and debit
card transactions and follows a very clear set of rules set by CU*BASE.
Following is an explanation of the decision-making process:
• Note on recurring debit card transactions: As previously
communicated, we are currently in communication with our
ATM/Debit card vendors, and they are identifying their recurring Debit card transactions for our programming staff. Throughout the
months of July and August we will continue certifying this exception
with each vendor and will communicate our progress to all credit
unions.
AUTHORIZATION/POSTING FLOW
This table below covers when ANR (automated funds returns) and ODP
(overdraft protection) are used for authorizations and postings, and how Opt
In/Opt Out status affects this.
Overdraft Protection/ANR Activation Configuration (Tool #558 NSF/OD
Transfer Configuration)
Authorizations: 1. CU*BASE first determines whether to include ANR (automated funds
returns) and/or ODP (overdraft protection) for ATM and Debit
Authorizations by CU's configuration.
2. Non-Recurring Authorizations will never include the Negative Balance
Limit if the member is Opt Out; regardless of the CU's ANR/ODP
Activation configuration. 3. Recurring Authorizations will ignore the member's Opt In/Out status
and follow the CU's ANR/ODP Activation configuration.
4. For PIN transactions, the CU's configuration is used to determine if ANR
and/or ODP is allowed. If member is Opt Out, ANR and ODP will not be
used.

16 Managing Your Opt In/Opt Out Reg E Offering
5. If CU allows ODP but member is Opt Out, ODP will be used and the
ODP fee will be applied. ODP Fees are not included for Opt In/Out status.
Posting
1. CU*BASE first determines whether to include ANR and/or ODP for ATM
and Debit Postings by CU's configuration.
2. Recurring Transactions will always follow CU's ANR and ODP configuration and ignore member's Opt In/Out status. An ANR or NSF
fee is applied.
3. Non Recurring Transactions will always follow CU's ANR and ODP
Configuration and follow member's Opt In/Out Status. No fees are
applied if Opt Out
4. For PIN transactions, the CU's configuration is used to determine if ANR
and/or ODP is allowed. If member is Opt Out, ANR and ODP will not be
used.
Has your credit union decided that Reg E does not apply to how your credit union overdraft service works? A selection on the OPER menu (for Self Processors: OPER 10, 1) allows you to turn off the Reg E selection features in CU*BASE. This includes the Workflow Controls option and any Opt In/Opt Out checkboxes mentioned later in this booklet. These selectors will simply be removed from the screens. If you are interested in turning this option off for your credit union, contact a Client Service Representative.

Managing Your Opt In/Opt Out Reg E Offering 17
RECORDING MEMBERS’ OPT IN/OPT
OUT PREFERENCES
OPENING A NEW MEMBERSHIP
While opening a membership, your employees will see new Opt In/Opt Out
checkboxes, very prominently displayed at the bottom of the screen.
At this time, the member can have a conversation with the member about
his or her selection and check the appropriate checkbox. If a checkbox is
pre-flooded, the employee can change the selection at the member’s request.
Once a selection is made, the date of the selection and the Employee ID
making the selection are recorded.
• NOTE: An Opt In/Opt Out selection is required when opening a membership. Your employee must make a selection to advance to
the next screen.
Opening a Membership
• NOTE: As mentioned earlier in this document, your credit union can
select to have either the In or Out checkboxes pre-checked to assist your employee. (See Pre-Checking a Selection at Account Open on
page 13.)
One of these Opt In/Opt Out
checkboxes must be checked to
advance to the next screen.

18 Managing Your Opt In/Opt Out Reg E Offering
If an employee forgets to make a selection, helpful messaging will also
appear at the bottom of the screen.
No Selection Made on Membership Open
If the member selects to Opt In, the member is selecting to Opt in for all sub
accounts created for this membership.
• You can allow the member to Opt Out for selected sub accounts.
This process is done after the membership is opened. See page 21.
When no selection is made, helpful messaging will
appear at the bottom of the
screen.

Managing Your Opt In/Opt Out Reg E Offering 19
MAKING A SELECTION DURING SUB ACCOUNT CREATION
When opening a sub account, such as a savings or checking account, the
employee will have the opportunity to collect the member’s Opt In/Opt Out
preference. This selection is at the membership level.
Sub Account Open Selection Options
If an Opt In/Opt Out selection is not made after leaving this screen or the
member selects to Opt In, the Opt In/Opt Out Maintenance screen (covered
in the next section) will appear later in the account open process. This will
remind the employee to collect a selection or allow for members to Opt Out of
selected sub accounts.
This selection is a membership level
selection.

20 Managing Your Opt In/Opt Out Reg E Offering
OPT IN/OPT OUT MAINTENANCE SCREEN OVERVIEW
Your front line staff can record preferences on the Opt In/Opt Out
Maintenance screen, which can be accessed through Inquiry, Phone
Operator and Member Personal Banker. It also may be accessed while
opening a sub account.
The screens used to access to this the Maintenance screen are covered
following the explanation of this screen.
Opt In/Opt Out Maintenance Screen – Opt Out Selected
Using this Maintenance screen, an employee can record the member’s Opt
In/Opt Out selections. Membership level selection is made by checking the In or Out checkboxes at the top of the screen (more on sub account selection
in a moment). Messaging alerts the employee if an initial selection has not
been made. Once the box is checked, the employee can press Enter to
review the changes, but will need to use Save/Done (F10) to finalize the
change. This added control ensures that the correct selection is made.
Save/Done (F10) must be used to
record a change on this screen. Pressing
Enter will show a change only if the In
box is checked. (See following image.) This
adds additional controls that the
correct change is made.

Managing Your Opt In/Opt Out Reg E Offering 21
Opt In/Opt Out Maintenance Screen – Opt In Selected
If the member wishes to Opt In the employee checks Opt in and presses
Enter to view the above screen. (NOTE: The warning message that no
selection continues to appear because Save/Done (F10) has not been
selected to complete the update.) The employee must then use Save/Done
(F10) to complete the selection.
NOTE ON SUB ACCOUNT OPT OUT SELECTION
An Opt In selection on the Opt In/Opt Out Maintenance screen allows the
member to Opt Out of select sub accounts (see above screen). The employee
simply selects a Reg E Preference of Opt out for that select sub account. This
is intended to be used in rare cases where a member specifically asks to Opt In to your overdraft services, but wants to exclude a certain individual
account, such as a member who has an account that she uses for a small
home business flower shop, and doesn’t want that account to be handled the
same way as her personal accounts. (NOTE: The member must first “Opt In”
at the membership level in order to set this exception.)
The idea is to make it easy to sell the member on opting in for your overdraft services then only handle sub-account exceptions on an as-needed basis
for certain situations.
You can make changes to a member’s Opt In/Opt Out status through Tool
#20 Update Account Information. See page 24.
Once a member selects to Opt In, you can select to
Opt Out for individual sub
accounts here.

22 Managing Your Opt In/Opt Out Reg E Offering
ACCESSING THE MAINTENANCE SCREEN THROUGH INQUIRY OR PHONE
OPERATOR
Inquiry Screen (Same Access via Phone Operator)
From the Inquiry or Phone Operator screen select OTB/Cards (F17) to access
a screen listing the cards held by the member.
Member’s ATM and Debit Cards (accessed via “OTB/Cards” (F17))
Helpful messaging alerts you that
member has not made a selection.

Managing Your Opt In/Opt Out Reg E Offering 23
From Card Listing screen the employee then selects Reg E Settings (F13) to
access the Opt In/Opt Out Maintenance Screen (shown on page 20) where
the employee can record the member’s selection.
ACCESSING THE OPT IN/OPT OUT MAINTENANCE SCREEN THROUGH
MEMBER PERSONAL BANKER
Access the Opt In/Opt Out Maintenance Screen through a new Reg E Opt
In/Out Preference selection in Member Personal Banker. If the member has
not made a selection, the employee will be reminded to do so with a helpful
alert.
Member Personal Banker (Tool #14)
Alert Message
Pressing Enter from the Alert Screen will move you to the Member Personal
Banker Selection Screen.
Member Personal Banker (Tool #14)
Use Reg E opt in/out preference” to move to the Opt In/Opt Out Maintenance
Screen (shown on page 20) where you can then record the member’s
selection.
The employee receives an alert reminding him or her to record the
member’s Opt In/Opt Out
preference.

24 Managing Your Opt In/Opt Out Reg E Offering
CHANGING OR SELECTING A PREFERENCE THROUGH MEMBERSHIP
UPDATE
Membership Update is another route for “Opt In/Opt Out” selection. This
screen contains the same prominent “Opt In/Opt Out” checkboxes you see when you open a membership; however, when you access the membership
screen through Update, a selection is not required. (You might just be
changing a member’s email address and not have the member right in front
of you to ask for his or her preference.)
Update Membership Information (Tool #15)
Employees can also note exceptions at the sub-account level by using Reg E Exceptions (F13) from this screen. This takes them to the Opt In/Opt Out
Maintenance Screen (shown on page 20).
When no selection is made, messaging will appear in red.

Managing Your Opt In/Opt Out Reg E Offering 25
MEMBER SELECTING PREFERENCE
THROUGH “IT’S ME 247”
CONFIGURING MARKETING TEXT
If a credit union has activated the It’s Me 247 Opt In/Opt Out feature,
members can indicate their preference through Online Banking. A credit union can activate online selection by members by checking Allow member to change Reg E opt in/opt out choice in the Online/Mobile Web Banking screen
(shown below). Once this box is checked, members will see an Overdraft
Services page in the Preferences section in It’s Me 247. What the member
sees is shown in the next section of this booklet.
Online/Mobile/Text Banking VMS Config (Tool #569) > Online/Mobile Web
Banking
IMPORTANT: Before activation, enter text the member will see online.
Enter the text by clicking the “Member Instructions” button.
Check this box to allow members to
select their Opt In/Out choice online.
Click the Member Instructions button to
customize the text the member sees when making this
selection.

26 Managing Your Opt In/Opt Out Reg E Offering
Member Instructions
Enter the text that your members will view online when they select to either opt in or opt out of your program. (See the following section for examples of
what this looks like to a member.)
Sample text:
Courtesy pay coverage does not automatically cover one-time debit card
and ATM transactions and requires you to opt-in to the additional coverage as can be seen below. Once you agree to opt-in, the credit
union at its discretion will pay these transactions up to the maximum of
your courtesy pay limit based on your available (current) balance. You
will be charged $XX each time this service is provided and your account
is overdrawn; there are no limits to the number of times the credit union
may provide this service and charge your account. To opt-out of this feature in the future simply come back to this site or call a credit union
representative.
IMPORTANT NOTE: The text above is provided as a sample only. Refer to
your legal team for assistance with the exact wording to use for your credit
union’s offering.
IMPORTANT NOTE: No marketing information can be included in this area.
IMPORTANT NOTE: Refer to
http://www.ecfr.gov/graphics/pdfs/er27de11.000.pdf for more information
on what to enter in this screen.

Managing Your Opt In/Opt Out Reg E Offering 27
MEMBER’S EXPERIENCE WHEN SELECTING ONLINE
To select their Opt In/Opt Out selection, members must select Overdraft Services in the Info Center. If a member has not made a selection, neither
radial button will be chosen. This should help the member recognize that a
selection needs to be made.
• Overdraft Services will not appear if a credit union has not activated
this feature or if Online Banking is in Stand In.
Selecting to Opt Out via Online Banking
In the initial screen, the member will either be opted “In” or “Out.” This
member has selected “Opt In.”
Online Banking – “Opt In” Selected
Your configured credit union text will appear here. This is discussed in the previous section.
IMPORTANT NOTE: No marketing information can be
included in this area.

28 Managing Your Opt In/Opt Out Reg E Offering
This member can also select to “Opt Out” for certain suffixes. If the member
selects to Opt Out of select account(s) and checks the box, the member will view a list of accounts to specify exclusions. This list includes all savings
and checking accounts (from MEMBER1 and MEMBER2 with an Application
Type of “SH” or “SD”).
To complete the process of selecting to “Opt In,” the member must select the
Save Preferences button. A confirmation message will appear at the top of
the screen.
Your configured credit union text will appear here. This is discussed in the previous section.
IMPORTANT NOTE: No marketing information can be included in this area.
Your configured credit union text will appear here. This is discussed in the previous section.
IMPORTANT NOTE: No marketing information can be included in this area.

Managing Your Opt In/Opt Out Reg E Offering 29
If the member then selects to “Opt Out,” the member will be presented with a
confirmation window.
When the member select Yes, a confirmation message will appear at the top
of the screen.
Your configured credit union text will appear here. This is discussed in the previous section.
IMPORTANT NOTE: No marketing information can be included in this area.

30 Managing Your Opt In/Opt Out Reg E Offering
INFORM YOUR MEMBERS HOW THEY CAN SELECT ONLINE
Your members may not discover the It’s Me 247 option to Opt In or Opt Out
on their own and you may want to send them an email or online banking
message alerting them of this change. You may also want to give them a
little explanation of your credit union offering when activating this feature.
Here are some ways to get the word out to members.
• Use the Member Connect Software to send emails or online banking messages to your members who use online banking. This involves
creating a Query of these members and the Member Connect software
tools in CU*BASE. Refer to the “Marketing Campaigns with Member
Connect” booklet on the CU*BASE Reference Page for more details.
• Xtend is offering assistance with sending email and online banking
messages, or with making outbound calls to members. For more
information, email [email protected] or call 866-981-4XTD.
NOTE: Memberships of all membership designation may select to Opt Out
via It’s Me 247 once the credit union selects to activate the feature,
including organizational accounts. A credit union may select not to send
emails and online banking messages to these accounts and it is unlikely an
organization would stumble across this feature otherwise. If concerned, a credit union can monitor the AUDTMBRDT file. (See next section for a
description of what is included in this file.)

Managing Your Opt In/Opt Out Reg E Offering 31
“OPT IN” SELECTED MEMBERSHIP
DESIGNATIONS
Credit unions can choose to deactivate Reg E Opt In/Opt Out functionality
for memberships with specific Membership Designation codes. If the Exempt from Reg E. Opt In/Out Requirements box is checked in the Membership
Designation Configuration (Tool #523 Membership Designation
Configuration), all new memberships with this Designation (and accounts for that membership) will automatically be set to “Opt In.” Employees will
not even see the Opt In/Opt Out checkboxes at the bottom of the
screen. (Existing memberships will need to be manually maintained first
before changing an existing designation.)
Membership Designation Configuration (Tool #523)
Employees will also not be able to change any affected membership or
accounts to “Opt Out” since access points to change the status (via Phone
Operator, Membership Update, Inquiry and Phone Operator) will be either removed or blocked. (Reg E Settings (F13) from Inquiry, Phone Operator and
Membership Update will be removed and Member Personal Banker access
will not allow access). On affected accounts, messaging reading, “This
membership is exempt from Reg E Requirements.” will appear on the screen
to alert your employees of this status.
The exemption also blocks members’ ability to change their “Opt In/Opt Out” status online. Members with an exempted membership will not see
Overdraft Services under the “Info Center” of It’s Me 247.

32 Managing Your Opt In/Opt Out Reg E Offering
SENDING OPT IN OR OPT OUT
NOTICES TO MEMBERS
Credit unions can automatically generate member notices when a member
changes their Opt In/Opt Out status. When a change is made to a member’s
Opt In/Opt Out status (either to Opt In or Opt Out) a notice event will be triggered for that member. This event is generated either by a member
changing his or her status in It’s Me 247 or by a credit union employee
changing the status for the member in CU*BASE.
ADDING THE NOTICE EVENT TO A NOTICE
To send notices to members, add either one or both of the new Event Notice
Codes (ANRIN and ANROUT) to a new or existing notice through standard
Notice Configuration.
Configure Laser Notices (Tool #258) > Configure Notice Forms - Screen 1
This is the main notice configuration screen, the first of three used to design the layout and contents of printed Member Notice forms. From this initial
screen you can create, edit or delete a form, as well as set up the text and
account detail information that will appear for each notice event included on
the form.
• To edit an existing form, select the form and use Change (2). The screen
shown on page 33 will appear.
• To change the account details that are printed with each Event ID, or to modify the text associated with the events, use Define Event Details
(F10).

Managing Your Opt In/Opt Out Reg E Offering 33
• To create a new notice form, use Add (F6). The following window will
appear.
Enter a Form ID (numbers and letters, both uppercase and lowercase,
can be used) and use Enter to proceed to the screen shown on page 33.
CU*TIP: Event IDs cannot be associated with more than one form. Therefore, if you would like to create a new form that uses events that are currently on another form (such as the default form), first edit that form to delete the event code(s)—or delete the entire form if appropriate—before
creating a new form and attaching event codes to it.
• To delete an existing form, select the form and use Delete. One
confirmation message will appear; use Enter again to delete the entire
form. All events that have been associated with that form will now be
available to be connected to another form. (Use Define Event Details
(F10) to view a list of event codes with associated forms.)
The second screen is used to name the form and specify a title to print just
below the member name and address. Use the bottom half of the screen to enter any explanatory text or instructions to print either before or after the
events themselves. Start by entering any Introduction Text to appear before
the first event.
IMPORTANT: Two lines of text on this screen will combine to
form one complete line of text on the printed form. The spacing and bold fields denote the beginning of a printed line of text (see below for instructions on using these fields for spacing and bold highlight).

34 Managing Your Opt In/Opt Out Reg E Offering
Configure Notice Forms - Screen 2
HINT: On some printers, you may need to use a vertical bar ( | ) wherever you wish to see an exclamation point ( ! ) on the printed form. Use Print
Sample (F14) to verify the results on your printer.
Check the checkbox in front of “Include website address” to include the website address entered on the Chart of Accounts Maintenance screen on the notice.
Then, use Conclusion Text (F11) to toggle the screen and enter any
Conclusion Text to print at the bottom of the notice.

Managing Your Opt In/Opt Out Reg E Offering 35
Conclusion Text (Toggle – F11)
When done, use Enter to proceed to the third and final screen.
Configure Notice Forms - Screen 3
This third and final screen is used to define which of the Notice Events
should be printed as part of this form. To print the Opt In and Opt Out
Event ID on your Notice add ANRIN and/or ANROUT.
Use the Sequence column to enter a sequential number then enter the Event
ID (text is case-sensitive) into the Event column. Use Enter to confirm and
Event IDs are case-sensitive;
use Display Event IDs (F12) or click the blue
lookup button to see the exact
spelling.

36 Managing Your Opt In/Opt Out Reg E Offering
display a description of the event. Use Enter again when done to return to
the initial form configuration screen.
IMPORTANT: Event text and account details will only print on the form if that activity actually applies to the member when the notice is printed. For example, if your notice includes both ATM and Debit card events, and the member has an ATM NSF transaction, only that event will be shown on that member’s printed form. Another member may perform both an ATM and Debit Card NSF transaction on the same day, and would therefore see both events recorded on the same form.
When you select to print your notices following standard credit union
practices (Tool #653 Print Laser Member Notices), your member will receive either a printed notice or an e-Notice (if the member is signed up for
them). An Audit Tracker is generated whenever a Notice or an e-Notice is
sent.
EDITING THE NOTICE EVENT TEXT
Xtend has assisted with the text of these Event Notice Codes, but your credit
union can edit the text to fit your credit union requirements as needed.
To change the account details that are printed with each Event ID, or to
modify the text associated with the events, use Define Text and Account
Details for Notice Events (F10) from the first Notice Configuration screen
Configure Notice Events - Screen 1
This is the first of several screens used to change the account details that
are printed with each Event ID, and to control the text associated with the

Managing Your Opt In/Opt Out Reg E Offering 37
events. When a form is configured, you can choose to include as many of
these events as you wish.
To work with the text and account details associated with an event (such as
ANRIN or ANROUT), select the event and use Change to proceed to the
second screen.
Configure Notice Events – ANRIN - Screen 2
The second screen is used to define an event title and choose which account data should be included as part of the event to see how the configuration
shown above will appear on the printed form.
Place a checkmark in front of any item you wish to include for this event,
choose the column (Left or Right) where text should appear, then enter a
sequential line number to indicate the order in which the items should be
listed. If you do not wish to include a particular field on the form, simply
clear all of the fields for that item.
Press Enter to view the text that will appear on the notice, which can be
edited to meet the needs of the credit union. It is as follows:

38 Managing Your Opt In/Opt Out Reg E Offering
ANRIN Notice Event Text
This letter serves as confirmation of your consent to authorize the Credit Union to pay ATM and one-time debit card transactions when there are insufficient funds available to cover the transactions. This includes all accounts associated with your request. You have the right to revoke this consent at any time. Simply complete and return this form – stop by the credit union or mail it to the address listed above. We will discontinue payment of such overdrafts as soon as possible after receiving notice of your revocation. Any joint owner of the account may revoke the agreement.
_____ I revoke my earlier consent for the payment of overdrafts on ATM and
one-time debit card transactions on the account identified above.

Managing Your Opt In/Opt Out Reg E Offering 39
Configure Notice Events – ANOUT - Screen 2
Text for this notice event can also be changed but as a default is as follows:
ANROUT Notice Event Text
This letter serves as a confirmation that you have elected not to authorize the Credit Union to pay ATM and one-time debit card transactions when there are insufficient funds available to cover the transactions, which means your transactions could be declined in these situations.
Please contact us at any time you wish to reactivate this service.

40 Managing Your Opt In/Opt Out Reg E Offering
PRINTING THE NOTICE
Print Laser Member Notices (Tool #653)
This screen is used to print notice forms for events that have occurred since
the last time notices were printed. Notices are listed according to Form ID
and date generated. The Date Generated represents the day when the events
were compiled into the notice file.
NOTE: If it has been configured in Tool #523 Membership Designation Configuration, the DBA label will appear above the address instead of the member’s or organization’s name.
To print, specify a printer and paper drawer, then place a checkmark next to
each batch you wish to print and use Enter to begin printing.
IMPORTANT: Be sure to print ALL batches of the same form name at
the same time. This way, if the same event occurred for a member multiple
times during that period (such as several NSF checks over a weekend), all
will be printed on the same form.
For example, say you print notices on Thursday morning, then don’t print
them again until the following Monday afternoon. Member John Doe
changes his Opt In/Opt Out status on Friday, and changes again on Monday morning. On Monday afternoon, this screen will show separate batches of
notices for events that occurred on Thursday, Friday, Saturday, Sunday (if
applicable), and Monday morning. If all batches of the form were printed at
the same time, John’s notice form would include both of the events on the
same printed form.
This number represents the number of events that have been recorded in the
notice file. When the notices are printed, the system may be able to
combine events for a specific member onto a
single notice, resulting in a smaller number of actual
printed notices.

Managing Your Opt In/Opt Out Reg E Offering 41
PURGE RULES
To keep the notice file clean, notices will automatically be purged according
to the following rules:
• Notices that have not yet been printed will be deleted automatically after
10 calendar days from the Date Generated.
• Notices that have already been printed will be deleted automatically after
10 calendar days from the Date Last Printed recorded on the notice
batch. (Use Previously Printed (F11) to see these notices).
REPRINTING A PREVIOUS BATCH OF NOTICES
To reprint notices after they have already been printed, use Previously
Printed (F11) to view a list of batches printed previously. Printed notices are
listed according to Form ID and date printed. The Last Date Printed
represents the date on which the notices were last printed, and may
represent a batch of notices generated on several different days (such as when you print notices on Monday and they include events generated
Saturday and Monday).
If the configuration of the notices is altered in between printings, the reprint of the notices will marry with the new configuration and print notices with the updated configuration.
Notices can be reprinted as many times as needed until they are purged.
Use Previously Printed again to return to the list of notices waiting to be
printed.

42 Managing Your Opt In/Opt Out Reg E Offering
WHAT DID MY MEMBERS SELECT?
You may wish to review the number of members who have selected to Opt In
or Opt Out, or even to review the selection of an individual member at the
membership level or at the sub account level. You also may wish to review
which employee recorded this change or if the member made the change
within It’s Me 247.
To research this information, use Report Builder to query the file
AUDTMBRDT. This will allow you to review your members’ selections. This
file includes the membership of the member, sub account if selected, the
Employee ID who recorded the change, the date the change was made, and
which option (I for In and O for Out) the member selected.
• IMPORTANT NOTE: All members begin as “Opt Out.” No record is created (or written to the file) if the member selects an “Opt In/Opt
Out” status online because that is same as the original selection. If
the member selects to “Opt In” or changes back and forth, a record is
then written to the AUDTMBRDT file.
If you have any concerns regarding the selection of your members, first
review this file before sending any paperwork on to Client Services for review.