manga studio ex 5 cookbook - sample chapter
DESCRIPTION
Chapter No. 3 Getting a Handle on VectorsOver 90 hands-on recipes to help you create digital comics from page setup to exporting the final productFor more information: http://bit.ly/1WmfkDpTRANSCRIPT

Manga Studio Ex 5 Cookbook
Elizabeth Staley
Manga Studio Ex 5 Cookbook
What this book will do for you...
Create story fi les and custom pages for any Web or publishing project
Customize brushes for special ink effects, hatching and cross-hatching, and much more
Use the new Symmetry ruler and the new Line tools to create your illustrations faster and more effi ciently
Make and save custom screentones, and add them to your comic pages
Punch up your illustrations with color palettes and special effects
Add 3D models to create or accentuate your comic scenes
Finish a project by exporting it for the Web or for a printed collection
$ 44.99 US£ 28.99 UK
Prices do not include local sales tax or VAT where applicable
Inside the Cookbook... A straightforward and easy-to-follow format
A selection of the most important tasks and problems
Carefully organized instructions to solve problems effi ciently
Clear explanations of what you did
Solutions that can be applied to solve real-world problems
Visit www.PacktPub.com for books, eBooks,code, downloads, and PacktLib.
Quick answers to common problems
Manga Studio is a software application for the digital creation of comics and manga. Manga Studio EX 5 has all the features of Manga Studio 5, plus professional story creation tools and other special features that make it the ultimate illustration tool for serious comic, manga, and graphic artists.
This book teaches you all that you need to know to set up custom pages for your comic or Manga project. These recipes will take you all the way through to exporting your illustrations for print or to display on the Web. You will learn how to create custom brushes that you will use for inking, or for repetitive tasks such as drawing foliage or rubble. Next, you will move on to understanding Layer Modes and Layer Masks. Then, you'll learn how to fi nish up your illustrations with color, screentones, special effects, and 3D objects. Finally, you will be taught to export your hard work and share it with the world, either through the Web or in print.
Elizabeth StaleyM
anga Studio Ex 5 Cookbook
Over 90 hands-on recipes to help you create digital comics, from page setup to exporting the fi nal product
"CommunityExperienceDistilled"
Foreword by W.Byron Wilkins, Artist/Owner of TR1 Studios, Creator of "1977 the Comic" and Co-founder of the Webcomic Alliance
Free Sample

In this package, you will find: The author biography
A preview chapter from the book, Chapter 3 'Getting a Handle on Vectors'
A synopsis of the book’s content
More information on Manga Studio Ex 5 Cookbook

About the Author
Elizabeth Staley is a writer and artist currently living in western Pennsylvania, USA. When she isn't working on comics, she can be found watching crime shows and cartoons, reading comics and novels, or outdoors with her horse. She graduated with a bachelor's degree in media arts and animation in 2004. She has been working on her current web-published comic, Adrastus, since 2010.
She started using Manga Studio for her drawing in 2011 and hasn't looked back since. Elizabeth was involved in Smith Micro's beta test for Manga Studio 5 soon after she started using Manga Studio 4, and she has been talking about its benefi ts for artists ever since.
Mastering Manga Studio 5, Packt Publishing, was Elizabeth Staley's fi rst software book, released in 2013. After a warm reception from the Manga Studio artist community, she came back to write Manga Studio EX 5 Cookbook in 2015. In addition to these two titles, she has also self-published two comic collections and a novel.
PrefaceHello and welcome to the Manga Studio EX 5 Cookbook! This book is set up to give you "recipes" to complete tasks in Manga Studio EX 5—from creating pages, to using vector layers, to exporting your fi nished project. I hope that this book will become an invaluable resource in your library and that you'll look at it often when you can't remember the steps to do something in this amazing art software. I also hope that you'll use the techniques and tips presented in these pages to inspire you to create your own techniques and to streamline your workfl ow.
You may have purchased this book even though you don't have Manga Studio EX 5. Perhaps you have Manga Studio 5 and are looking to see if you should upgrade to the EX version? Thankfully, most of this book will apply to the Manga Studio 5 version of the software, but there are several exciting and time-saving features that are only available in the EX version.
If you have purchased my fi rst book, Mastering Manga Studio 5, Packt Publishing, these two books work very well together!
What this book coversChapter 1, Creating and Manipulating Pages and Page Templates, covers everything about making new pages (fi les) in Manga Studio EX 5. We will learn how to make custom paper sizes, make fi les with multiple pages (EX only), and make page and cover templates to save time in our drawing.
Chapter 2, Customizing Brushes, teaches us all about making new brushes in Manga Studio EX 5. This includes special effect brushes, such as broken glass, clothing ruffl es, and cracked rubble!
Chapter 3, Getting a Handle on Vectors, covers some of the vector tools in Manga Studio EX 5. We'll learn how to make vector layers, make marks with the brush and line tools, and edit those shapes by using the control points.
Chapter 4, Using the Layer Modes, have you ever wondered what the layer modes such as Multiply, Screen, and Darken do? This chapter will teach you all about these methods of combining layers.
Preface
Chapter 5, Making Selections and Layer Masks, includes the newest updates of Manga Studio EX 5 have included some new ways of making selections. Learn how to make layer masks, use the selection pen, and more in this chapter.
Chapter 6, Using New Rulers and Line Tools, covers the newer updates of Manga Studio EX 5, new rulers and new line tools. We'll learn how to use the Symmetry ruler, saturated lines, scattered lines, the Gloom tool, and more in this chapter.
Chapter 7, Adding and Creating Tones and Materials, shows that Manga Studio EX 5 comes with a large library of screentones and other materials, but we can also add our own! Learn how to apply existing materials to a drawing, then learn how to make your own screentones, fabric patterns, and more.
Chapter 8, Playing with Color Palettes, shows that there are many ways to store and choose colors for our drawing in Manga Studio EX 5. This chapter will teach us how to import an existing palette from another program, save color sets, create harmonious color schemes, and use the Color History palette.
Chapter 9, Creating Special Effects, covers color holds, shiny leather, lightning, and laser blasts! This chapter can get you started on some special effects to make your illustrations and comics pop!
Chapter 10, Using 3D Objects, reveals that Manga Studio EX 5 comes with many 3D elements that can be used in your work. Learn how to add 3D models to the page, move the objects and the 3D camera, customize models, and save custom 3D information as materials.
Chapter 11, Exporting the Finished Product, now that we have some comics made, it's time to take them and show them to the world- via print or the Web. This chapter will teach us about exporting pages, including how to reduce fi le size or change image dimensions without changing our original fi le.
109
3Getting a Handle
on Vectors
In this chapter, you will learn the following recipes:
Creating a vector layer
Making marks on a vector layer
Adjusting vector lines
Adding control points to the vector line
Deleting control points from the vector line
Scaling and rotating the vector line
IntroductionManga Studio has the capability to create both raster and vector graphics. What are the differences between these two?
Raster images are images based on pixels—dots of light and color information interpreted by the computer to create a picture. A raster is a grid of x and y coordinates of a display space. Raster images are used on the Internet and for most digital art. If we zoom too close into a raster image, we'll see the squares of color used to make up the picture.
With a raster image, we can lose quality if we try too much resizing. Say we create a postcard-size image, but then decide to have it made into a huge billboard, logo, or banner for behind a convention table. If the raster image doesn't have enough resolution, we could end up with a pixelated, low-quality print.
Getting a Handle on Vectors
110
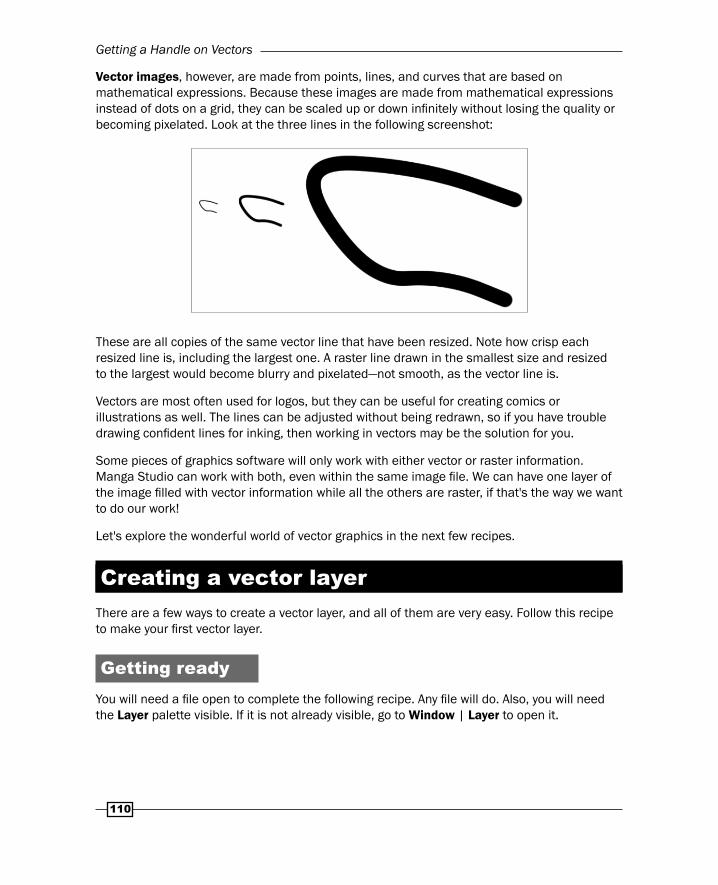
Vector images, however, are made from points, lines, and curves that are based on mathematical expressions. Because these images are made from mathematical expressions instead of dots on a grid, they can be scaled up or down infi nitely without losing the quality or becoming pixelated. Look at the three lines in the following screenshot:
These are all copies of the same vector line that have been resized. Note how crisp each resized line is, including the largest one. A raster line drawn in the smallest size and resized to the largest would become blurry and pixelated—not smooth, as the vector line is.
Vectors are most often used for logos, but they can be useful for creating comics or illustrations as well. The lines can be adjusted without being redrawn, so if you have trouble drawing confi dent lines for inking, then working in vectors may be the solution for you.
Some pieces of graphics software will only work with either vector or raster information. Manga Studio can work with both, even within the same image fi le. We can have one layer of the image fi lled with vector information while all the others are raster, if that's the way we want to do our work!
Let's explore the wonderful world of vector graphics in the next few recipes.
Creating a vector layerThere are a few ways to create a vector layer, and all of them are very easy. Follow this recipe to make your fi rst vector layer.
Getting readyYou will need a fi le open to complete the following recipe. Any fi le will do. Also, you will need the Layer palette visible. If it is not already visible, go to Window | Layer to open it.
Chapter 3
111
How to do it…This recipe will show you one method of creating a new vector layer:
1. Navigate to Layer | New Layer | Vector layer.
2. Enter a name for the layer in the New vector layer box.
3. Choose a color for Expression color (Monochrome, Gray, or Color) from the drop-down menu in the New vector layer dialog box.
4. If applicable, choose a Blending Mode from the drop-down menu in the New vector layer dialog box.
5. Click on OK to create the new layer.
There's more…You can also use the following method to create a new vector layer:
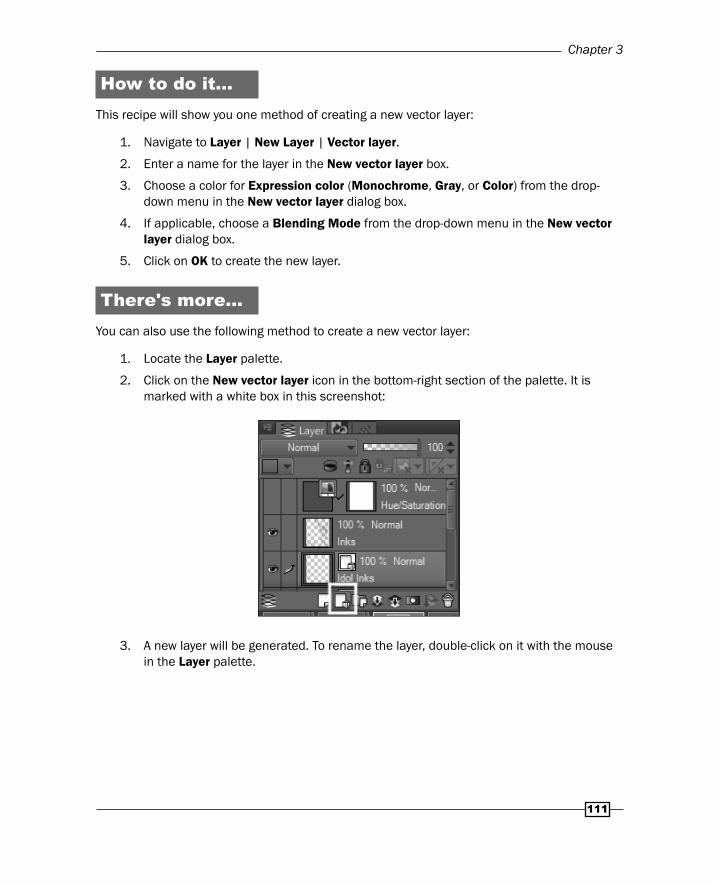
1. Locate the Layer palette.
2. Click on the New vector layer icon in the bottom-right section of the palette. It is marked with a white box in this screenshot:
3. A new layer will be generated. To rename the layer, double-click on it with the mouse in the Layer palette.
Getting a Handle on Vectors
112
Making marks on a vector layerNow that we have a layer to put our vectors on, it's time to draw on it! Just about any drawing tool can be used on a vector layer, but of course, each produces different results.
Getting readyAgain, you will need a fi le open to complete the following recipe. Any fi le will do. Also, you will need the Layer palette visible. If it is not already visible, go to Window | Layer to open it. Follow the instructions from the Creating a vector layer recipe to add a vector layer to the fi le, and make sure that it is the active (selected) layer.
How to do it…The following steps will walk us through drawing on a vector layer with an inking pen tool:
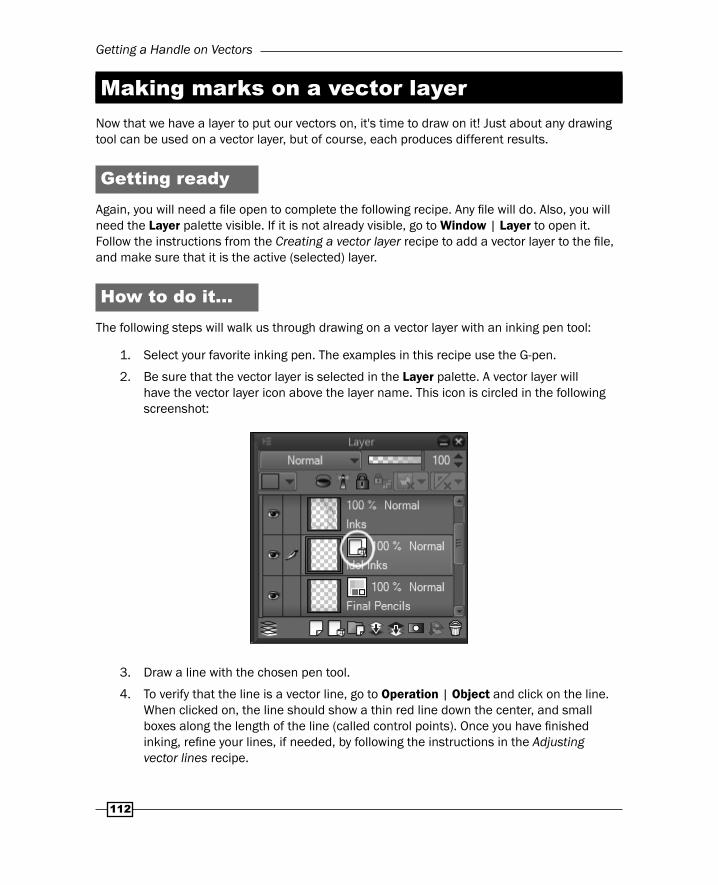
1. Select your favorite inking pen. The examples in this recipe use the G-pen.
2. Be sure that the vector layer is selected in the Layer palette. A vector layer will have the vector layer icon above the layer name. This icon is circled in the following screenshot:
3. Draw a line with the chosen pen tool.
4. To verify that the line is a vector line, go to Operation | Object and click on the line. When clicked on, the line should show a thin red line down the center, and small boxes along the length of the line (called control points). Once you have fi nished inking, refi ne your lines, if needed, by following the instructions in the Adjusting vector lines recipe.
Chapter 3
113
How it works…Manga Studio 5's vector layers will make any mark on them on a vector line. This allows us to get any kind of look that we want for our artwork. By using the pen tools, we can use line thicknesses to make our inking more dynamic. Alternatively, using the direct drawing tools, we can get sharp, crisp, and neat lines. No matter what we choose to make a mark with, we still get the fl exibility of a vector.
Need to connect two vector lines and turn them into one line? Click on the Correct line tool in the toolbox, and then select the Connect vector line subtool. Use this tool to select the intersection of the two vector lines and they will be connected automatically. This set of subtools also has other useful tools for making vector lines with brush tools!
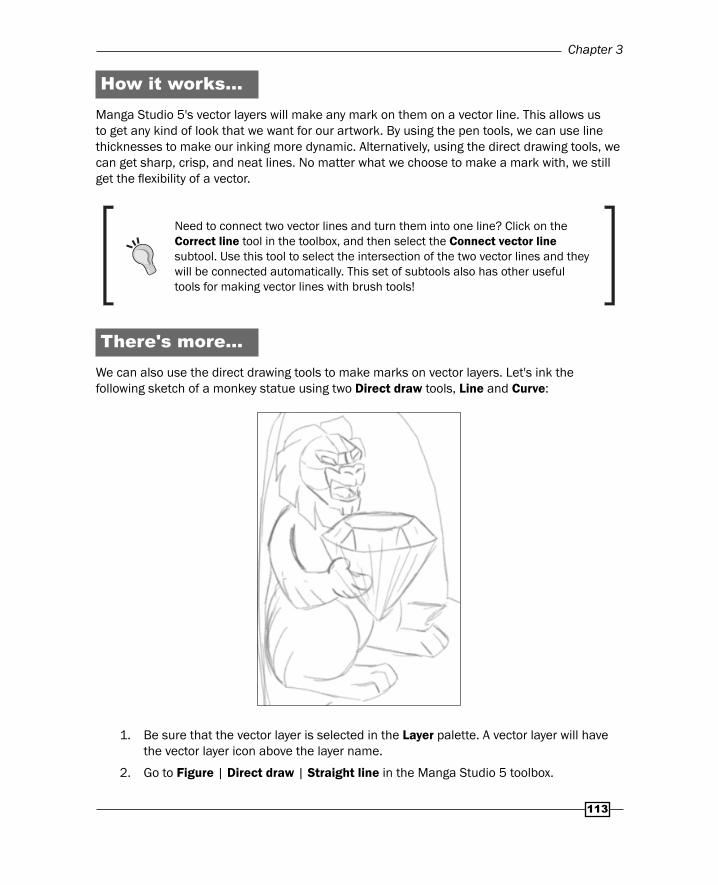
There's more…We can also use the direct drawing tools to make marks on vector layers. Let's ink the following sketch of a monkey statue using two Direct draw tools, Line and Curve:
1. Be sure that the vector layer is selected in the Layer palette. A vector layer will have the vector layer icon above the layer name.
2. Go to Figure | Direct draw | Straight line in the Manga Studio 5 toolbox.
Getting a Handle on Vectors
114
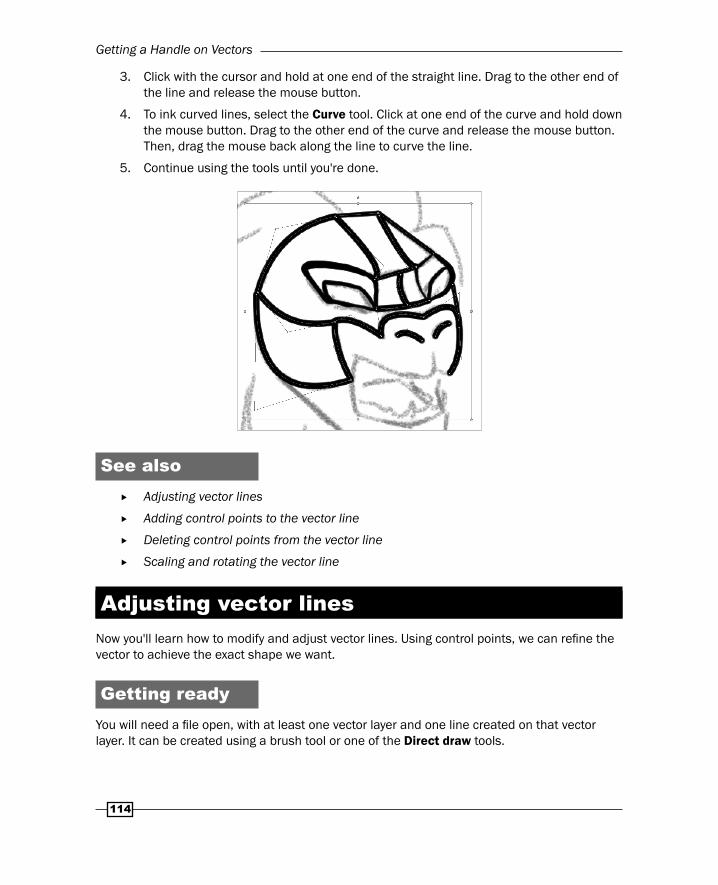
3. Click with the cursor and hold at one end of the straight line. Drag to the other end of the line and release the mouse button.
4. To ink curved lines, select the Curve tool. Click at one end of the curve and hold down the mouse button. Drag to the other end of the curve and release the mouse button. Then, drag the mouse back along the line to curve the line.
5. Continue using the tools until you're done.
See also Adjusting vector lines
Adding control points to the vector line
Deleting control points from the vector line
Scaling and rotating the vector line
Adjusting vector linesNow you'll learn how to modify and adjust vector lines. Using control points, we can refi ne the vector to achieve the exact shape we want.
Getting readyYou will need a fi le open, with at least one vector layer and one line created on that vector layer. It can be created using a brush tool or one of the Direct draw tools.

Chapter 3
115
How to do it…The following steps will walk us through adjusting lines made with vectors:
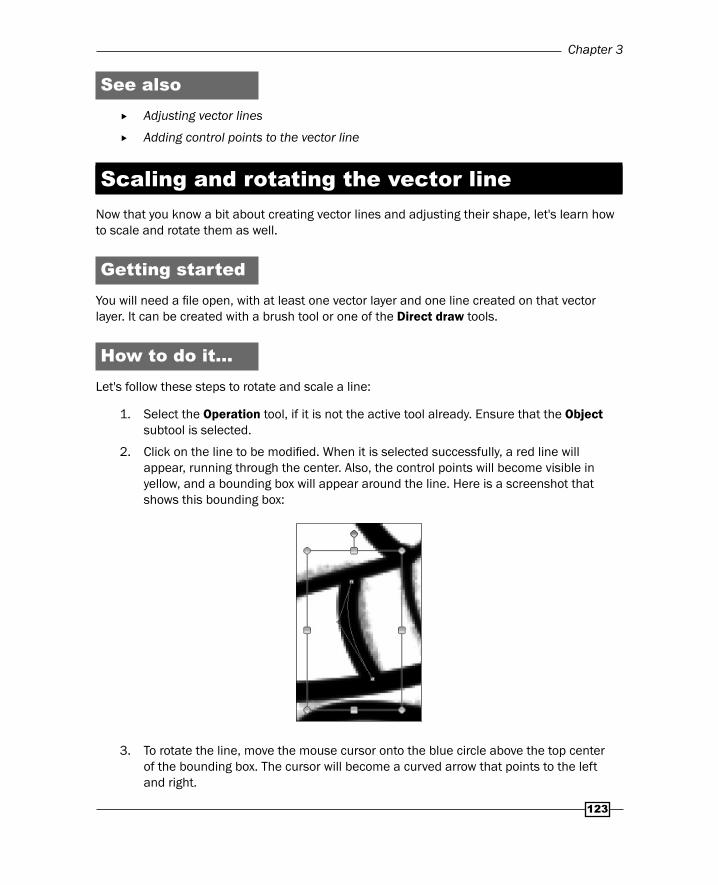
1. Select the Operation tool, circled in the following screenshot, and make sure that the Object subtool is selected. In the Tool property palette, make sure that the Operationoption is set to Control point and Scale/Rotate.
2. Click on the vector line that needs to be adjusted. You will see a red line down the center, yellow boxes at each control point, and a bounding box surrounding the line, as shown in this screenshot:
3. Determine what adjustment needs to be made. In this example, the top control point (the yellow box) needs to be moved to the left to match the sketch lines more closely. Click on the yellow control point to select it. The selected control point will turn red.
Getting a Handle on Vectors
116
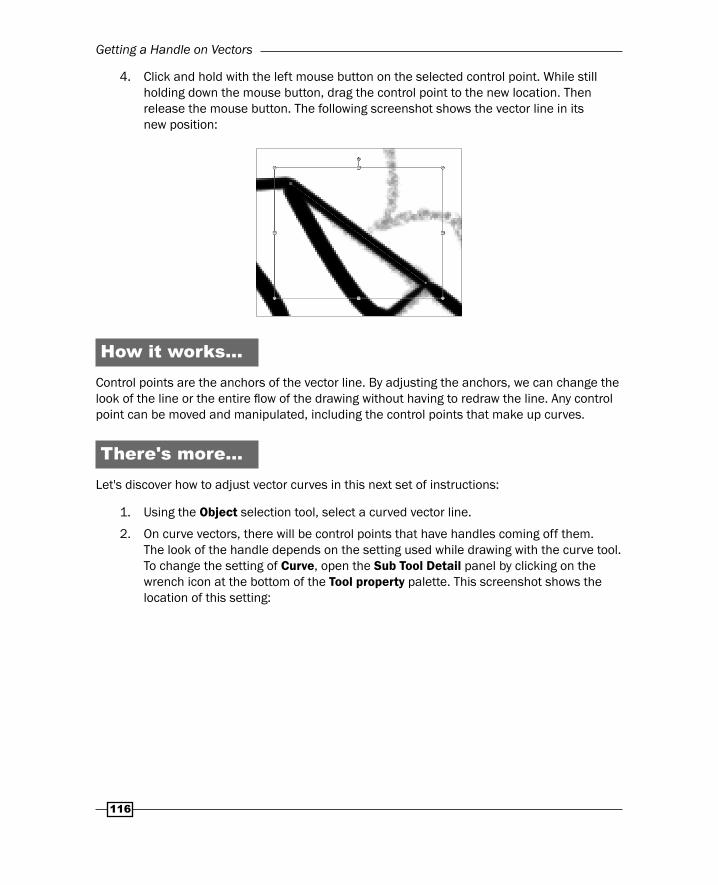
4. Click and hold with the left mouse button on the selected control point. While still holding down the mouse button, drag the control point to the new location. Then release the mouse button. The following screenshot shows the vector line in its new position:
How it works…Control points are the anchors of the vector line. By adjusting the anchors, we can change the look of the line or the entire fl ow of the drawing without having to redraw the line. Any control point can be moved and manipulated, including the control points that make up curves.
There's more…Let's discover how to adjust vector curves in this next set of instructions:
1. Using the Object selection tool, select a curved vector line.
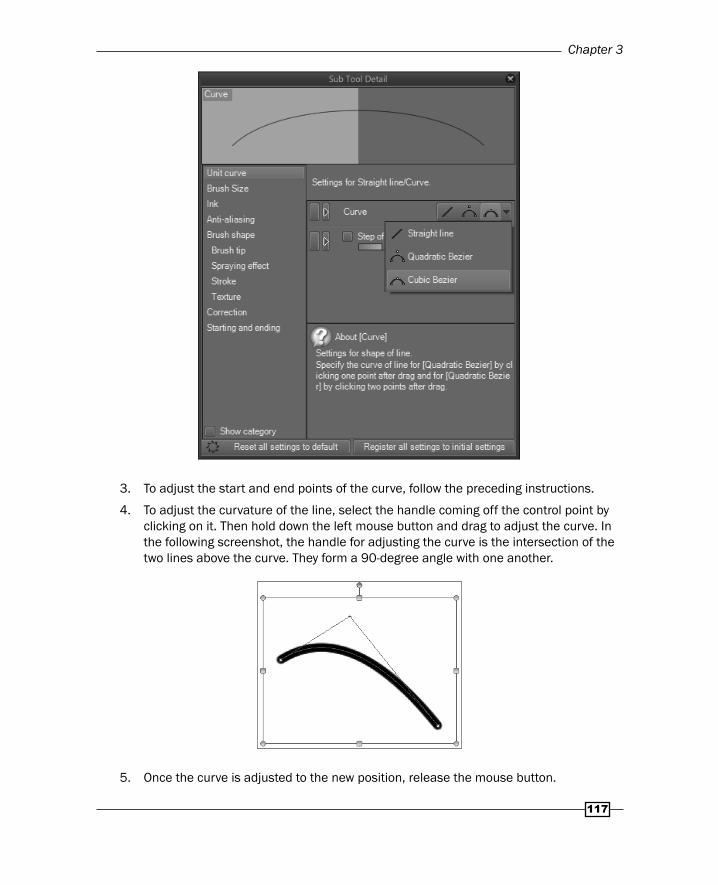
2. On curve vectors, there will be control points that have handles coming off them. The look of the handle depends on the setting used while drawing with the curve tool. To change the setting of Curve, open the Sub Tool Detail panel by clicking on the wrench icon at the bottom of the Tool property palette. This screenshot shows the location of this setting:
Chapter 3
117
3. To adjust the start and end points of the curve, follow the preceding instructions.
4. To adjust the curvature of the line, select the handle coming off the control point by clicking on it. Then hold down the left mouse button and drag to adjust the curve. In the following screenshot, the handle for adjusting the curve is the intersection of the two lines above the curve. They form a 90-degree angle with one another.
5. Once the curve is adjusted to the new position, release the mouse button.

Getting a Handle on Vectors
118
The type of preceding curve shown is called a Quadratic Bézier. The other option for curves in Manga Studio 5 is the Cubic Bézier.
A Quadratic Bézier is created by clicking and dragging a straight line. Then, after releasing the mouse button, we drag out in one direction or the other to create a single curve between the start and end of the line. Quadratic Bézier curves will create one curve no matter what the distance between the two anchor points of the line is.
A Cubic Bézier is created by dragging out a straight line between the start and end. After releasing the mouse button, one curve can be dragged out. After the mouse button is pressed again, a second curve can be added for further refi nement.
The line shown in the next screenshot is a Cubic Bézier. Note how it has two separate handles emanating from the control points, instead of just one as in the Quadratic Bézier. One handle goes toward the right, creating the start of the curve. The other handle goes toward the left, making the line slightly curve back again.
To adjust a Quadratic Bézier curve, select one of the two handles and drag it with the mouse as needed.
See also Adding control points to the vector line
Deleting control points from the vector line
Scaling and rotating the vector line
Chapter 3
119
Adding control points to the vector lineBy adding points to vectors, we can further refi ne our line.
Getting readyYou will need a fi le open, with at least one vector layer and one line created on that vector layer. It can be created with a brush tool or one of the Direct draw tools. In the following example, we will be using a line created with the Curve tool, set for a Cubic Bézier curve.
How to do it…The following steps will teach you how to add more control points to a vector:
1. Select the Operation tool, if it is not the active tool already. Ensure that the Object subtool is selected.
2. Click on the line that needs to be modifi ed.
3. On the PC, right-click with the mouse where the control point needs to be added. The following menu will appear.
4. Click on Add control point.
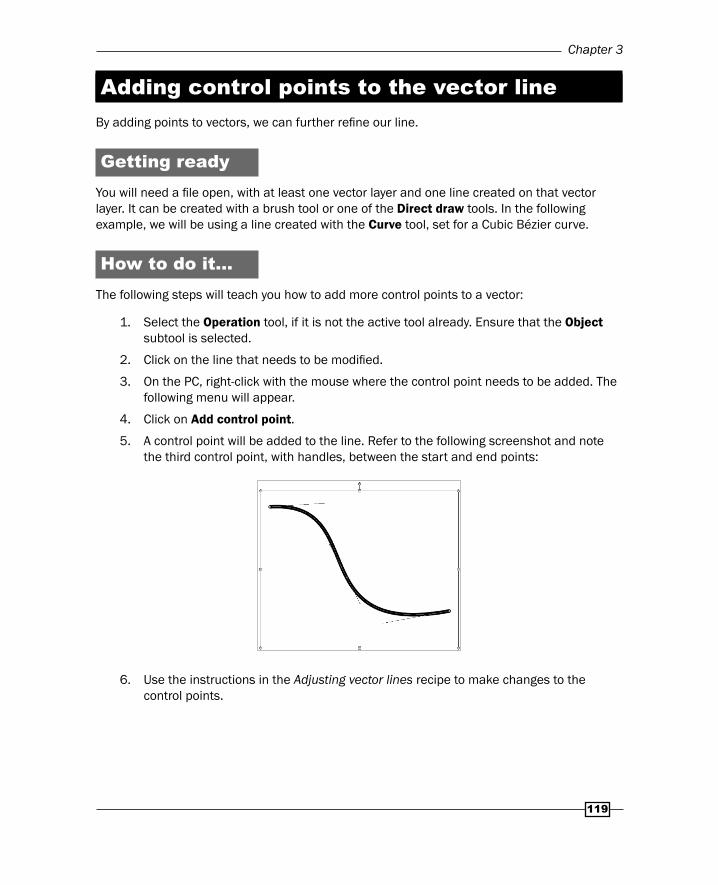
5. A control point will be added to the line. Refer to the following screenshot and note the third control point, with handles, between the start and end points:
6. Use the instructions in the Adjusting vector lines recipe to make changes to the control points.

Getting a Handle on Vectors
120
How it works…By adding more control points to the line, we have a lot more control over the shape of our vector. The line shown in this screenshot is the same Cubic Bézier line, but with the third control point in the middle, because of which we can make a completely different shape:
See also Deleting control points from the vector line
Deleting control points from the vector lineBesides adding points to a vector line, control points can also be deleted from it to further refi ne its look.
Getting readyAgain, you will need a fi le open, with at least one vector layer and one line created on that layer. It can be created with a brush tool or one of the Direct draw tools. In the following example, we will be using a line created with the G-pen tool.
How to do it…The following steps will teach you how to delete control points from a vector line:
1. Select the Operation tool, if it is not the active tool already. Ensure that the Object subtool is selected.
2. Click on the line that needs to be modifi ed. Then click on the control point to be removed to select it.
Chapter 3
121
3. On the PC, right-click on the selected control point.
4. Click on Delete control point(V).
5. The control point will be deleted.
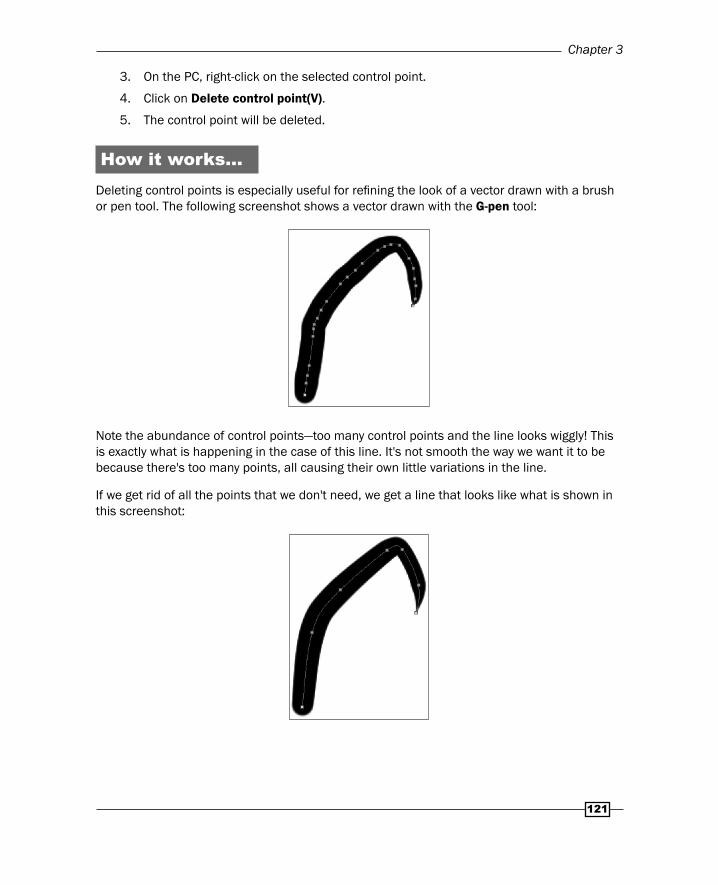
How it works...Deleting control points is especially useful for refi ning the look of a vector drawn with a brush or pen tool. The following screenshot shows a vector drawn with the G-pen tool:
Note the abundance of control points—too many control points and the line looks wiggly! This is exactly what is happening in the case of this line. It's not smooth the way we want it to be because there's too many points, all causing their own little variations in the line.
If we get rid of all the points that we don't need, we get a line that looks like what is shown in this screenshot:
Getting a Handle on Vectors
122
See how much smoother it is! The original line had 24 control points in it. The modifi ed line has just seven!
A less precise but faster way of simplifying the drawn vector line is by using the Simplify vector line subtool under the Correct line tool. Click and drag with this tool over the line you wish to simplify, and it will erase the control points along the selection automatically.
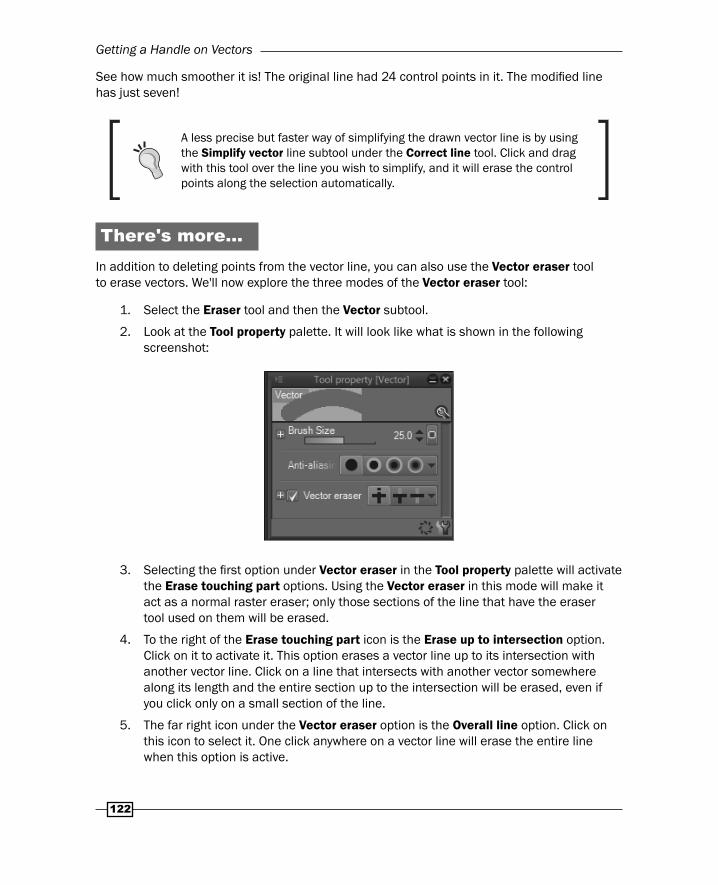
There's more…In addition to deleting points from the vector line, you can also use the Vector eraser tool to erase vectors. We'll now explore the three modes of the Vector eraser tool:
1. Select the Eraser tool and then the Vector subtool.
2. Look at the Tool property palette. It will look like what is shown in the following screenshot:
3. Selecting the fi rst option under Vector eraser in the Tool property palette will activate the Erase touching part options. Using the Vector eraser in this mode will make it act as a normal raster eraser; only those sections of the line that have the eraser tool used on them will be erased.
4. To the right of the Erase touching part icon is the Erase up to intersection option. Click on it to activate it. This option erases a vector line up to its intersection with another vector line. Click on a line that intersects with another vector somewhere along its length and the entire section up to the intersection will be erased, even if you click only on a small section of the line.
5. The far right icon under the Vector eraser option is the Overall line option. Click on this icon to select it. One click anywhere on a vector line will erase the entire line when this option is active.
Chapter 3
123
See also Adjusting vector lines
Adding control points to the vector line
Scaling and rotating the vector lineNow that you know a bit about creating vector lines and adjusting their shape, let's learn how to scale and rotate them as well.
Getting startedYou will need a fi le open, with at least one vector layer and one line created on that vector layer. It can be created with a brush tool or one of the Direct draw tools.
How to do it…Let's follow these steps to rotate and scale a line:
1. Select the Operation tool, if it is not the active tool already. Ensure that the Object subtool is selected.
2. Click on the line to be modifi ed. When it is selected successfully, a red line will appear, running through the center. Also, the control points will become visible in yellow, and a bounding box will appear around the line. Here is a screenshot that shows this bounding box:
3. To rotate the line, move the mouse cursor onto the blue circle above the top center of the bounding box. The cursor will become a curved arrow that points to the left and right.
Getting a Handle on Vectors
124
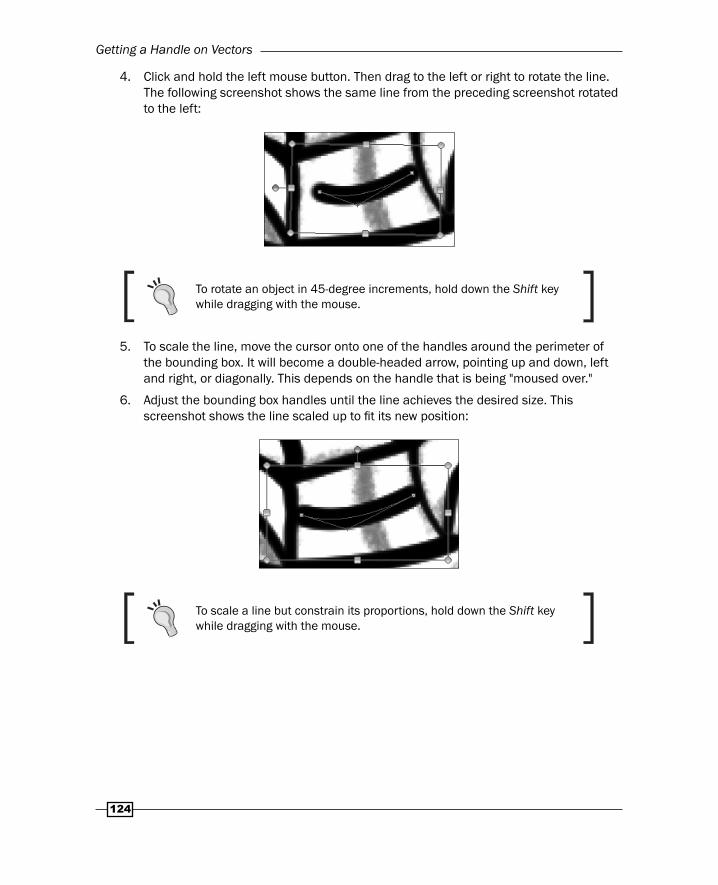
4. Click and hold the left mouse button. Then drag to the left or right to rotate the line. The following screenshot shows the same line from the preceding screenshot rotated to the left:
To rotate an object in 45-degree increments, hold down the Shift key while dragging with the mouse.
5. To scale the line, move the cursor onto one of the handles around the perimeter of the bounding box. It will become a double-headed arrow, pointing up and down, left and right, or diagonally. This depends on the handle that is being "moused over."
6. Adjust the bounding box handles until the line achieves the desired size. This screenshot shows the line scaled up to fi t its new position:
To scale a line but constrain its proportions, hold down the Shift key while dragging with the mouse.
Chapter 3
125
How it works…The bounding box is how we modify the entire line at once. Use the nine handles around the perimeter to scale or rotate the vector line. Just remember that the ninth handle—the one at the top of the bounding box, shown in a color different from the others—is the rotation handle, and the others are for scaling!
There's more...Follow these steps to scale or rotate more than one vector line at a time:
1. Select the Operation subtool, if it is not already selected.
2. Click to select a line.
3. Hold down Shift and continue selecting the lines to be altered.
4. Once all the desired lines have been selected, follow the preceding directions to scale or rotate them.
See also Adjusting vector lines

Where to buy this book You can buy Manga Studio Ex 5 Cookbook from the Packt Publishing website.
Alternatively, you can buy the book from Amazon, BN.com, Computer Manuals and most internet
book retailers.
Click here for ordering and shipping details.
www.PacktPub.com
Stay Connected:
Get more information Manga Studio Ex 5 Cookbook