manual for audiology clinical educators 2014 · analysing, integrating, and interpreting...
TRANSCRIPT

Manual for Audiology
Clinical Educators 2014
Department of Audiology and Speech Pathology
Melbourne School of Health Sciences
Faculty of Medicine, Dentistry and Health Sciences
The University of Melbourne

TABLE OF CONTENTS
General Information .................................................................................................... 1
Degree Overview: Master of Clinical Audiology ........................................................... 4
Subject Overview: Clinical Audiology A ...................................................................... 5
Subject Overview: Clinical Audiology B ...................................................................... 5
Clinical Protocols for Adult Patients ........................................................................... 8
Pre-appointment checklist ........................................................................................ 12
Assessment techniques ........................................................................................... 13
General points regarding adult clinics ...................................................................... 20
Goals for adult clinical testing .................................................................................. 23
Academic Hearing Aids protocols ............................................................................. 24
Subject Outline: Hearing Devices and Rehabilitation A ............................................. 26
Subject Outline: Hearing Devices and Rehabilitation B ............................................. 28
Goals for adult rehabilitation clinics ......................................................................... 30
Audiology Student Clinical Placement Assessment Form ......................................... 31
2

General Information
Thank you for agreeing to supervise our Master of Clinical Audiology students. This manual has been prepared to give you information about the curriculum, clinical procedures taught at the University of Melbourne and our expectations of competencies. This page also outlines some important guidelines concerning feedback and documentation. Please note that this manual, the student assessment forms and other useful documents are also available from our website at http://www.medoto.unimelb.edu.au/students/current_students Before the clinic Prior to each clinic, students are required to set goals specific to that clinic. The goals are student driven, and may arise from previous supervisor feedback or self reflection. The goals must be specific to the type of clinic and be achievable within the placement time. Examples may include goals such as improving PTA technique to avoid false positives, improving ear impression taking technique etc. The students have been asked to negotiate these goals with the clinic educator at the beginning of each placement. The educator may then be able to prioritise certain elements of the clinic in order to give the student a chance to achieve their goals especially in clinics where time is short. If the placement is longer than one day, a review period in relation to the goals is also encouraged. Student Feedback Please provide each student with constructive verbal feedback concerning their progress in clinics, preferably at the end of each day. Particular attention should be paid to the outcome of the goals set at the commencement of the placement. Student Assessment Please fill in a student assessment form for each student at the end of the clinic placement. We do not expect this process to take up a great deal of your time – summary information is sufficient. The information provided by you on these forms is not used as part of the formal assessment of students but it provides us with useful information concerning both the experience gained by the student during each placement and progress in developing clinical skills. These forms are also sent on to the students as a formal record of their experience and progress. There is a copy of the form at the end of this booklet and an electronic version is also available from our website at http://www.medoto.unimelb.edu.au/students/current_students Completed assessment forms can be sent to Angela Marshall either electronically at [email protected] or by mail to Angela Marshall, Department of Audiology and Speech Pathology, 550 Swanston Street, The University of Melbourne, 3010. Clinical Experience Sheets Each student will bring a clinical experience record sheet to the clinic, to be completed by the supervisor. The form has been designed to log the clinical experience hours according to the definition put forward to the ASA in July 2009 by a committee of representatives from all the Australian universities providing accredited audiology programs. This definition was modified slightly at a meeting by the same group in May 2010. Please note that observational hours are not recorded. However, the number of hours of direct adult and paediatric clinical assessment, indirect assessment and professional activities are recorded. The definition of these types of activities is below.
1

LOGGING CLINICAL EXPERIENCE HOURS FOR MASTER OF CLINICAL AUDIOLOGY STUDENTS
Student clinical experience is logged on the audiology clinical experience record sheet under three categories:
• Direct client/patient contact (subdivided into hours relating to experience with adult clients/patients and paediatric (<8 years developmental age) clients/patients
• Indirect client/patient contact • Professional activities
Clinical hour requirements In order to satisfy the national clinical hour requirements for clinical audiology qualifications in Australia, each student must complete at least 250 clinical experience hours. This total shall include:
at least 150 hours of direct client/patient contact, consisting of: o at least 100 hrs of direct adult client/patient contact, and o at least 30 hrs of direct paediatric (< 8 years developmental age) client/patient contact,
no more than 50 hours of professional activities As this is a national requirement, results for Clinical Audiology B and /or Paediatric Audiology B will be withheld until this requirement is met. In addition, audiology students at the University of Melbourne are required to attend all clinic placements for which they are scheduled. Students should note that satisfactory attendance at clinics is a hurdle requirement for Clinical Audiology A, Paediatric Audiology A, Clinical Audiology B and Paediatric Audiology B. A student must provide a medical certificate or a statutory declaration for any absence from a clinic. Failure to do so may result in failure of the clinical attendance hurdle requirement of the relevant subject. Direct client/patient contact Direct client/patient contact is defined as activities performed by the student, under supervision and in a clinical setting, that:
directly involve the client/patient, and directly contribute to the management and/or outcomes of that client/patient.
Examples include the student: taking a case history (this could also be taken from the client/patient’s care-giver or significant
other), preparing the client/patient and/or the audiological equipment for testing. For example,
instructing the client/patient on a test protocol, programming the client/patient’s NOAH file and hearing aid, or placing electrodes on the client/patient,
performing audiological assessments, interacting with the client/patient and/or the clinical educator in a manner that directly
contributes to the obtaining of reliable test results. For example, performing paediatric VRA/VROA distraction, performing alerting tasks during vestibular assessment, identifying evoked potential waveforms during acquisition, real-time troubleshooting of audiological equipment and/or procedures, etc,
analysing, integrating, and interpreting audiological test results, providing feedback on audiological test results (this could be provided to the client/patient’s
care-giver or significant other), providing audiological counselling (this could be provided to the client/patient’s care-giver or
significant other), and teaching the client/patient how to use a hearing aid/ALD etc (this could be provided to the
client/patient’s care-giver or significant other)
Indirect client/patient contact Indirect client/patient contact is defined as activities performed by the student, under supervision and in a clinical setting, that:
do not directly involve the client/patient, but directly contribute to the management and/or outcomes of that client/patient.
2
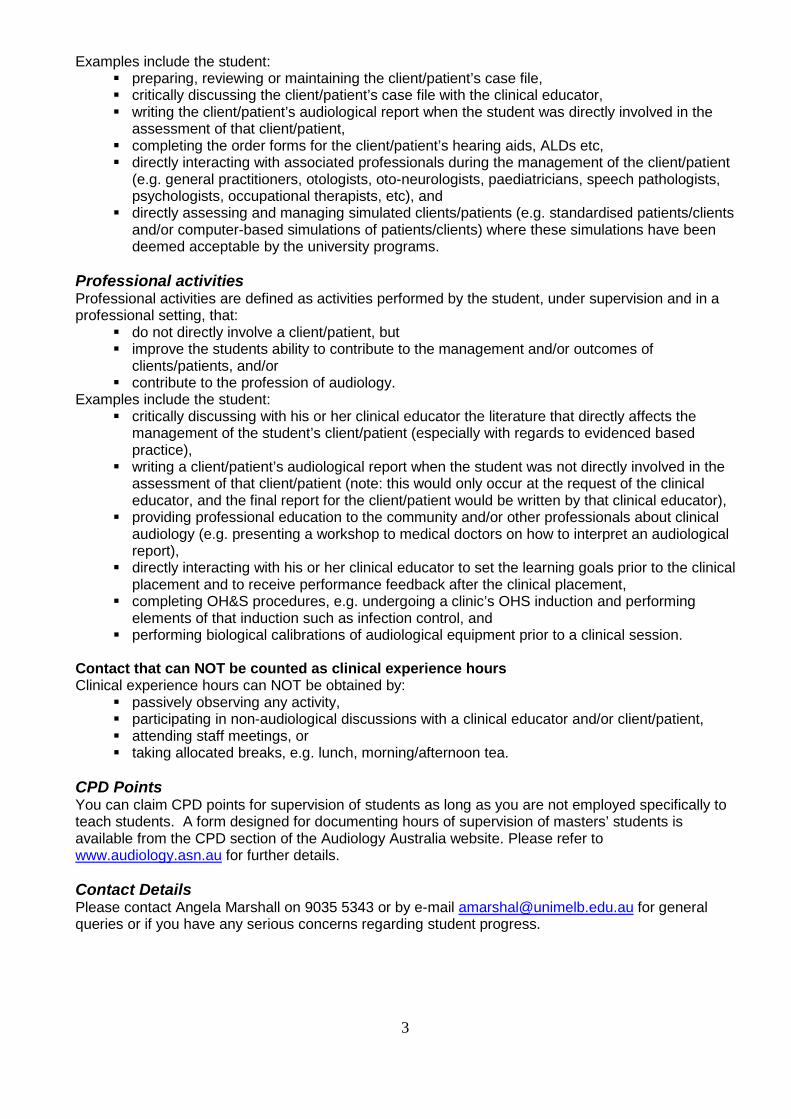
Examples include the student:
preparing, reviewing or maintaining the client/patient’s case file, critically discussing the client/patient’s case file with the clinical educator, writing the client/patient’s audiological report when the student was directly involved in the
assessment of that client/patient, completing the order forms for the client/patient’s hearing aids, ALDs etc, directly interacting with associated professionals during the management of the client/patient
(e.g. general practitioners, otologists, oto-neurologists, paediatricians, speech pathologists, psychologists, occupational therapists, etc), and
directly assessing and managing simulated clients/patients (e.g. standardised patients/clients and/or computer-based simulations of patients/clients) where these simulations have been deemed acceptable by the university programs.
Professional activities Professional activities are defined as activities performed by the student, under supervision and in a professional setting, that:
do not directly involve a client/patient, but improve the students ability to contribute to the management and/or outcomes of
clients/patients, and/or contribute to the profession of audiology.
Examples include the student: critically discussing with his or her clinical educator the literature that directly affects the
management of the student’s client/patient (especially with regards to evidenced based practice),
writing a client/patient’s audiological report when the student was not directly involved in the assessment of that client/patient (note: this would only occur at the request of the clinical educator, and the final report for the client/patient would be written by that clinical educator),
providing professional education to the community and/or other professionals about clinical audiology (e.g. presenting a workshop to medical doctors on how to interpret an audiological report),
directly interacting with his or her clinical educator to set the learning goals prior to the clinical placement and to receive performance feedback after the clinical placement,
completing OH&S procedures, e.g. undergoing a clinic’s OHS induction and performing elements of that induction such as infection control, and
performing biological calibrations of audiological equipment prior to a clinical session. Contact that can NOT be counted as clinical experience hours Clinical experience hours can NOT be obtained by:
passively observing any activity, participating in non-audiological discussions with a clinical educator and/or client/patient, attending staff meetings, or taking allocated breaks, e.g. lunch, morning/afternoon tea.
CPD Points You can claim CPD points for supervision of students as long as you are not employed specifically to teach students. A form designed for documenting hours of supervision of masters’ students is available from the CPD section of the Audiology Australia website. Please refer to www.audiology.asn.au for further details. Contact Details Please contact Angela Marshall on 9035 5343 or by e-mail [email protected] for general queries or if you have any serious concerns regarding student progress.
3
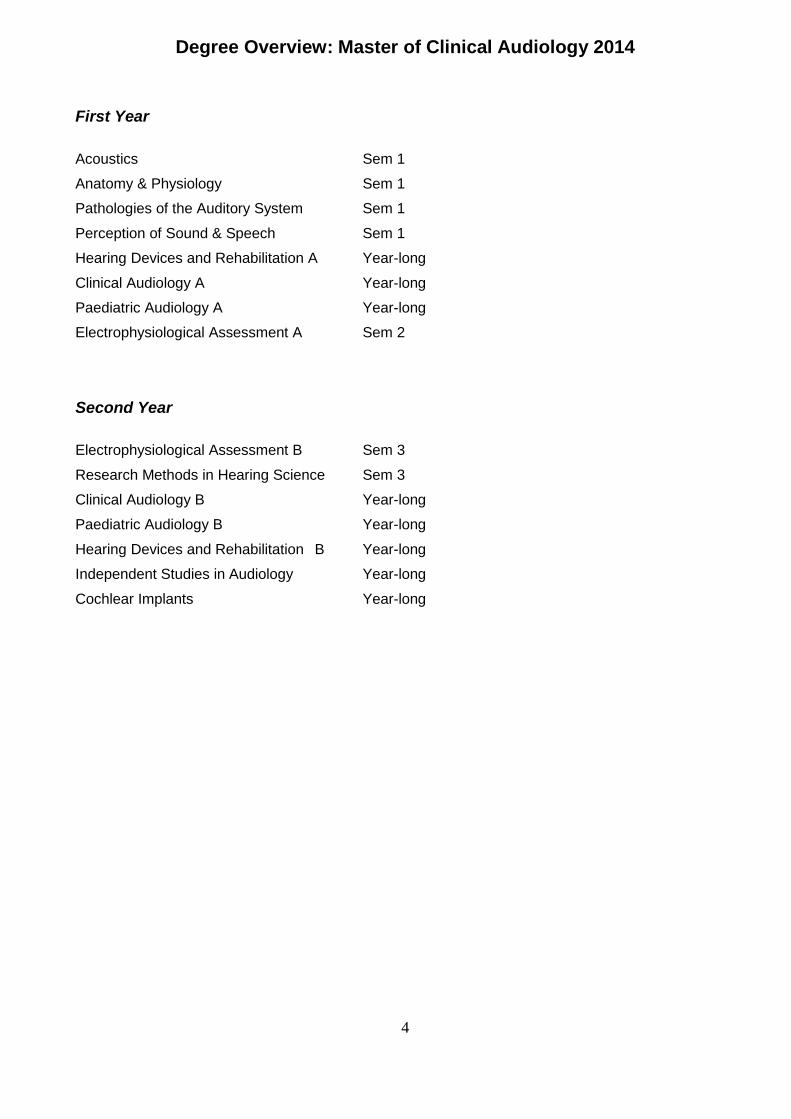
Degree Overview: Master of Clinical Audiology 2014
First Year Acoustics Sem 1 Anatomy & Physiology Sem 1 Pathologies of the Auditory System Sem 1 Perception of Sound & Speech Sem 1 Hearing Devices and Rehabilitation A Year-long Clinical Audiology A Year-long Paediatric Audiology A Year-long Electrophysiological Assessment A Sem 2
Second Year Electrophysiological Assessment B Sem 3 Research Methods in Hearing Science Sem 3
Clinical Audiology B Year-long
Paediatric Audiology B Year-long
Hearing Devices and Rehabilitation B Year-long
Independent Studies in Audiology Year-long
Cochlear Implants Year-long
4
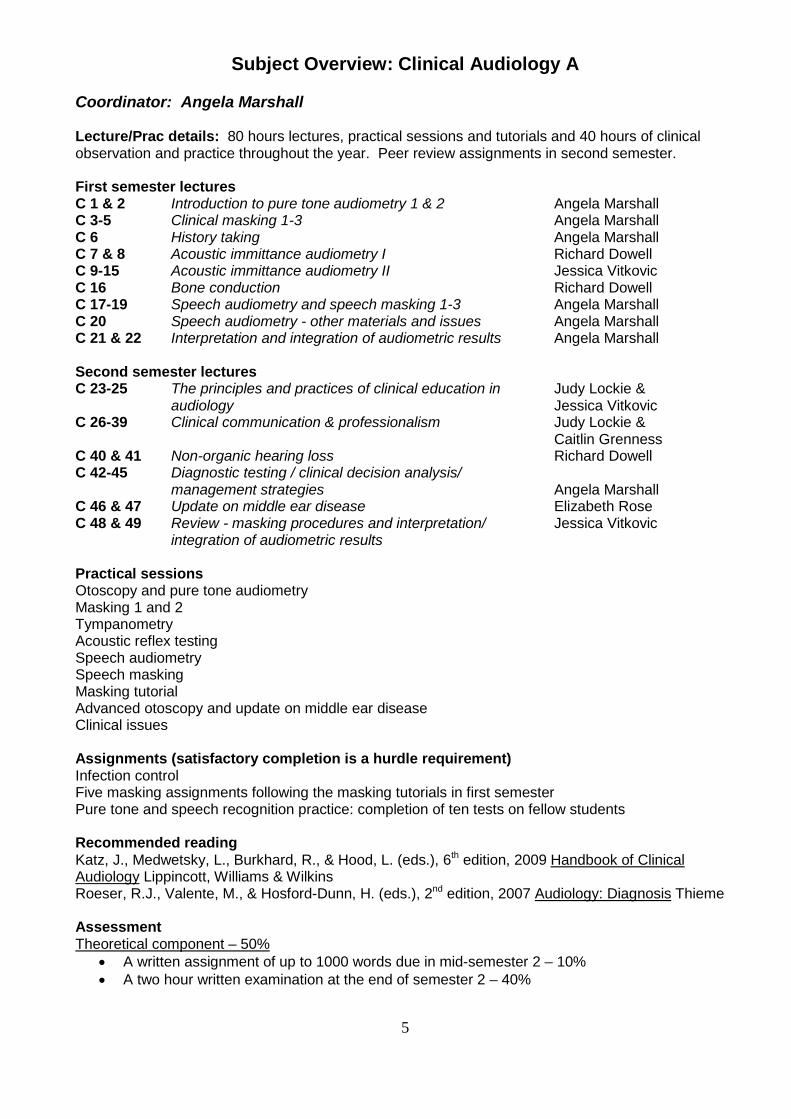
Subject Overview: Clinical Audiology A
Coordinator: Angela Marshall Lecture/Prac details: 80 hours lectures, practical sessions and tutorials and 40 hours of clinical observation and practice throughout the year. Peer review assignments in second semester. First semester lectures C 1 & 2 Introduction to pure tone audiometry 1 & 2 Angela Marshall C 3-5 Clinical masking 1-3 Angela Marshall C 6 History taking Angela Marshall C 7 & 8 Acoustic immittance audiometry I Richard Dowell C 9-15 Acoustic immittance audiometry II Jessica Vitkovic C 16 Bone conduction Richard Dowell C 17-19 Speech audiometry and speech masking 1-3 Angela Marshall C 20 Speech audiometry - other materials and issues Angela Marshall C 21 & 22 Interpretation and integration of audiometric results Angela Marshall Second semester lectures C 23-25 The principles and practices of clinical education in Judy Lockie & audiology Jessica Vitkovic C 26-39 Clinical communication & professionalism Judy Lockie & Caitlin Grenness C 40 & 41 Non-organic hearing loss Richard Dowell C 42-45 Diagnostic testing / clinical decision analysis/ management strategies Angela Marshall C 46 & 47 Update on middle ear disease Elizabeth Rose C 48 & 49 Review - masking procedures and interpretation/ Jessica Vitkovic
integration of audiometric results Practical sessions Otoscopy and pure tone audiometry Masking 1 and 2 Tympanometry Acoustic reflex testing Speech audiometry Speech masking Masking tutorial Advanced otoscopy and update on middle ear disease Clinical issues Assignments (satisfactory completion is a hurdle requirement) Infection control Five masking assignments following the masking tutorials in first semester Pure tone and speech recognition practice: completion of ten tests on fellow students Recommended reading Katz, J., Medwetsky, L., Burkhard, R., & Hood, L. (eds.), 6th edition, 2009 Handbook of Clinical Audiology Lippincott, Williams & Wilkins Roeser, R.J., Valente, M., & Hosford-Dunn, H. (eds.), 2nd edition, 2007 Audiology: Diagnosis Thieme Assessment Theoretical component – 50%
• A written assignment of up to 1000 words due in mid-semester 2 – 10% • A two hour written examination at the end of semester 2 – 40%
5

Clinical component – 50%, comprising: • A clinical skills assessment by OSCE at the end of semester 1 – 10% • A clinical skills assessment by OSCE at the end of semester 2 – 15% • A clinical examination at the end of semester 2 consisting of a simulated patient case followed
by an oral examination – 25% A pass for this examination is a hurdle requirement of the clinical component.
Students must pass the written examination and the clinical component in order to pass this subject.
Satisfactory attendance at and participation in the adult clinical placements throughout the year is a hurdle requirement.
6

Subject Overview: Clinical Audiology B Coordinator: Angela Marshall Lecture/Prac details: 47 hours lectures, problem based learning case discussions and practical work plus peer review assignments and supervised clinical work throughout the year First semester lectures Introduction to PBL sessions Jessica Vitkovic CB 1 & 2 Learning clinical reasoning Jessica Vitkovic & Judy Lockie CB 3 & 4 Advanced report writing Judy Lockie CB 5-10 Professionalism, ethics and clinical communication Judy Lockie CB 11 & 12 Audiology and indigenous Australians Matthew Grounds CB 13-18 Auditory processing Dani Tomlin CB 19-22 Audiological practice seminar Caitlin Grenness (coordinator) CB 23-28 Six hours of PBL case discussions Second semester lectures CB 29-33 Professionalism, ethics and clinical communication Judy Lockie CB 34 Introduction to public health/population health Rosemary McKenzie CB 35 & 36 Noise-induced hearing loss Paul O’Halloran CB 37-40 Industrial audiology and hearing protection Paul O’Halloran CB 41 Musicians’ earplugs Caitlin Grenness CB 42 Acoustic shock disorder Myriam Westcott CB 43-45 Three hours of PBL case discussions CB 46 & 47 Review of audiological integration/management Jessica Vitkovic Assessment Theoretical component – 60%
• Two written assignments due in mid- and late- semester 2 of equal weighting and not exceeding 1000 words each – 20%
• A two hour written examination at the end of semester 2 – 40% Clinical component – 40%, comprising:
• A clinical skills assessment by OSCE at the end of semester 1 – 10% • A clinical examination at the end of semester 1 consisting of a simulated complex patient case
followed by an oral examination – 20% • A clinical examination at the end of semester 2 consisting of the assessment of an adult
patient – 10% A pass for both clinical examinations is a hurdle requirement of the clinical component
Students must pass the written examination and the clinical component in order to pass this subject. Hurdle requirements:
• Satisfactory attendance at and participation in the problem based learning case discussions
• Satisfactory attendance at and participation in adult clinical placements throughout the year
Recommended reading Katz, J., Medwetsky, L., Burkhard, R., & Hood, L. (eds.), 6th edition, 2009 Handbook of Clinical Audiology Lippincott, Williams & Wilkins Roeser, R.J., Valente, M., & Hosford-Dunn, H. (eds.), 2nd edition, 2007 Audiology: Diagnosis Thieme
7

Clinical Protocols for Adult Patients The University of Melbourne Audiology Clinic
(January 2014) Overview The University of Melbourne Clinic offers a range of diagnostic assessment and rehabilitative services to patients from the age of seven years onward. The service accepts referrals from many sources including general medical practitioners, medical specialists (otologists, neurologists etc), speech pathologists and other audiology services. Self-referred patients are also seen. Mission Statement The mission of the University of Melbourne Clinic is to provide audiological investigation and to make appropriate recommendations using procedures that are based on a thorough investigation of current literature and practice and that are subject to quality assurance. Services Provided 1. General audiological assessment All patients referred to the clinic have the following assessments: A questionnaire/interview concerning history details that are relevant to hearing and balance Pure tone audiometry Speech recognition testing Acoustic immittance testing Speech recognition in noise testing If indicated, other assessments are carried out in order to determine the audiological status of the patient. If it is not possible to complete these assessments at the first appointment, they are scheduled for a later date. These assessments include:
• Auditory Brainstem Response (ABR) testing (see neuro-otologic assessment) • Otoacoustic emission (OAE) testing • Cortical Auditory Evoked Potential (CAEP) testing (also known as CERA testing) • Auditory perceptual disorder evaluation
A report containing a copy and summary of the results with recommendations for management is produced for each patient. 2. Neuro-otologic assessment
a. Self- or GP-referred patients Patients who have one or more of the following symptoms/findings are given an appointment for ABR testing:
• A sensorineural asymmetry of 30 dB or greater (e.g. 10 dB at three adjacent frequencies etc.) • Persistent unilateral or significantly asymmetric tinnitus • Normal basic test results but report of experiencing distortion of sound • Facial weakness or loss of feeling • Significantly poorer speech recognition scores than predicted from the audiogram (e.g. <80%
max score for normal hearing & mild losses, >20% asymmetry for symmetric losses etc.) • Positive acoustic reflex findings (e.g. unibox pattern or an unexpected sound effect) • Unusual, but not classically abnormal, acoustic reflex results (e.g. unexplained probe effect,
some unexplained elevated reflexes) If the patient is self-referred: ENT referral is recommended and the patient is advised that this can be organised either through his/her GP (private) or through the Eye and Ear Hospital (public). The patient is informed about the long waiting list at the hospital. If the patient opts to go privately: an interim report is sent to the GP recommending referral to an ear specialist once the ABR results are through.
8

If the patient opts to go to the hospital: a letter is sent to the Eye and Ear Hospital Outpatient Booking Unit requesting an appointment and including a report and a copy of the results. The following patient details must be included in the letter: full name, date of birth, address and business hours telephone number, reason for referral and relevant medical history to assist with patient triage. The Hospital then sends the patient an appointment. If the patient is referred by a GP an interim report is sent to the GP recommending referral to an ear specialist once the ABR results are through. Vestibular symptoms If patients have vestibular symptoms they can be given an appointment in the vestibular clinic.
b. Patients with the above symptoms/findings who have been referred by an ENT These patients are not booked in for an ABR test at this stage as the ENT might decide to refer straight for an MRI. A report is sent to the ENT explaining that the results raise the suspicion of an eighth nerve disorder and indicating that the patient can be referred back for an ABR test at the ENT’s discretion.
c. Action following ABR testing If the ABR results are abnormal: a report is sent to the GP indicating that the results are consistent with an eighth nerve disorder and recommending referral to an ear specialist If the ABR results are normal: a report is sent to the GP indicating that the results are normal and so show no evidence of an eighth nerve disorder. It should also be stated that as normal ABR results do not totally eliminate the possibility of eighth nerve disorders, referral to an ear specialist is recommended Otoacoustic emission (OAE) testing OAE testing is carried out when non-organic hearing loss is suspected Cortical Auditory Evoked Potential (CAEP) testing CAEP testing is carried out when nonorganic hearing loss is suspected 3. Auditory Processing Disorder (APD) evaluation When a patient reports hearing problems despite test results showing normal hearing, normal speech recognition in quiet and in noise, and normal immittance results the following protocol is followed: After obtaining the test results, discuss in more detail the specific hearing difficulties the client is reporting. Decide whether or not the reported problems are out of proportion to the hearing difficulties typically faced by people with normal hearing. APD evaluation is recommended in cases where significant difficulty hearing in noise is reported despite normal test results. 1. Reassure the client that his/her hearing is normal. Explain that everybody has difficulty
hearing in some situations. Changing workplace/house/etc can result in greater problems hearing than previously (e.g. now in open-plan office with more noise). Also, once people start to think they might have a hearing problem, they forget that people with normal hearing can have problems hearing in certain situations and instead attribute these problems as further evidence that they have a hearing problem.
Explain that some people do have problems with processing sounds/speech (even though they have normal hearing). There are further tests that can be carried out if required. This is also indicated if the LiSN-S High Cue results are outside normal limits. In our clinic the adult auditory processing assessment test battery includes auditory brainstem and cortical evoked potentials and distortion product otoacoustic emissions. Behavioural processing tests include tests of binaural integration and interaction and temporal resolution and sequencing. Also included are tests of auditory working memory, and sustained attention, if applicable.
9

2. Based on the degree of problem reported, either:
a) Say that in your opinion he/she does not need further testing at this stage. Reassure the client. This may be supported by normal speech in noise in results. Suggest the client can return for further testing in six months’ time if he/she feels the need.
b) Say that the problems do seem to warrant further testing and organise this (NB This
carries an out of pocket expense) 3. Make sure there is a note in the file documenting this discussion/decision. Note:
• Even very mild high frequency hearing loss can increase communication difficulties in noisy/difficult situations. This would mean that auditory processing tests would not normally be considered unless the hearing is normal. However the patient may be suitable for a software-based auditory training auditory training program and/or aural rehabilitation classes.
• If the client wishes to return in 6 months for further testing, he/she will be booked in for another
general hearing test at first. After the test, the client can be given an appointment for the auditory processing assessment test battery.
• If a processing disorder is diagnosed remediation options may include the supply of an FM
system or referral for a therapy session or software based auditory training.
ENT referral procedures ENT referral is recommended for self- or GP- referred patients with the following symptoms/results:
• Symptoms/results associated with retrocochlear pathology (see neuro-otologic assessment) • Conductive hearing loss &/or any evidence of middle ear complications e.g. cholesteatoma,
chronic discharge, persistent dry perforation, otalgia, persistent blocked feeling in ears • Any sensorineural hearing loss in patients under the age of 50 • Unexplained tinnitus • Pulsatile tinnitus
Making ENT appointments Self- referred patients who need to see an otologist can choose one of two options:
• They can see an otologist of their own choice privately – in this case a report is sent to their GP and the patient is advised to go to their doctor to get a referral to go to an otologist
• They can choose to go through the public system – in this case a letter is sent to the Eye and Ear Hospital Outpatient Booking Unit requesting an appointment and including a copy of the results. The following patient details must be included in the letter: full name, date of birth, address and business hours telephone number, reason for referral and relevant medical history to assist with patient triage. The Hospital then sends the patient an appointment.
GP-referred patients who need to see an otologist are advised to return to the referring GP and a report is sent to the GP recommending that the patient be referred to an otologist. History questionnaire/interview On arrival, each patient is asked to complete the following checklist. The audiologist discusses the responses with the patient prior to testing and writes notes on the reverse side of the sheet. The checklist and history notes are scanned into the patient file at the end of the clinic.
10

Pre-appointment checklist
11
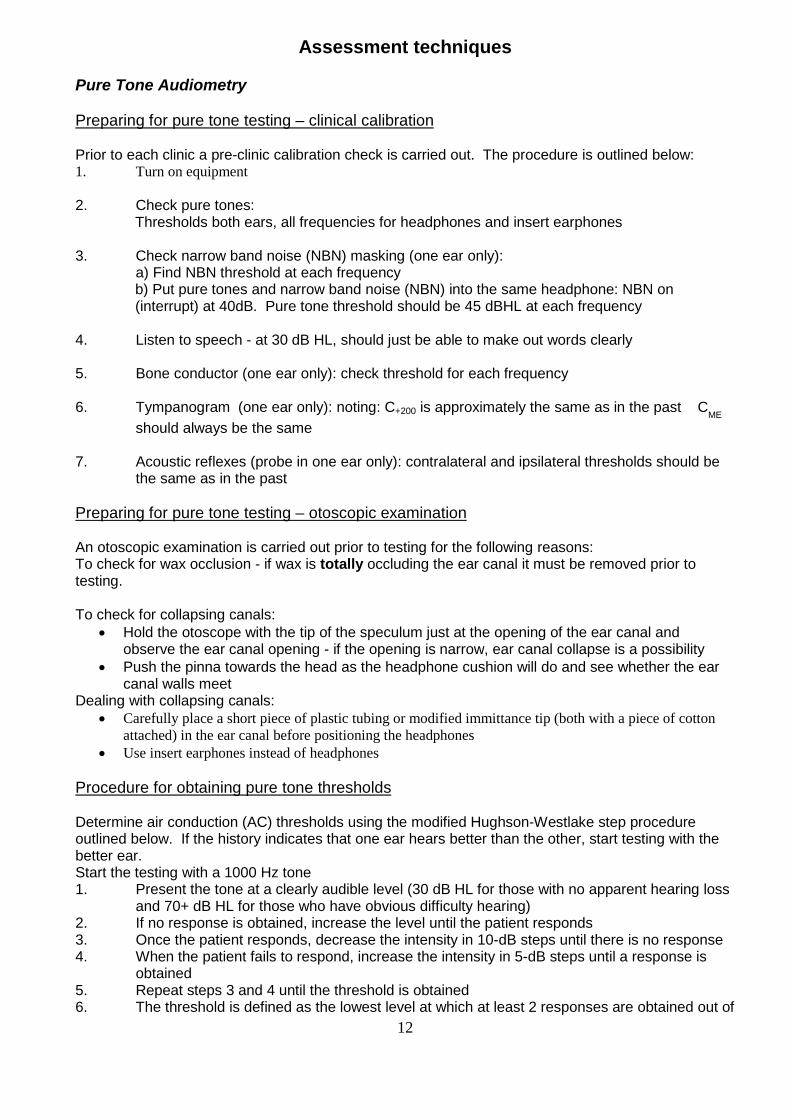
Assessment techniques Pure Tone Audiometry Preparing for pure tone testing – clinical calibration Prior to each clinic a pre-clinic calibration check is carried out. The procedure is outlined below: 1. Turn on equipment 2. Check pure tones:
Thresholds both ears, all frequencies for headphones and insert earphones 3. Check narrow band noise (NBN) masking (one ear only):
a) Find NBN threshold at each frequency b) Put pure tones and narrow band noise (NBN) into the same headphone: NBN on (interrupt) at 40dB. Pure tone threshold should be 45 dBHL at each frequency
4. Listen to speech - at 30 dB HL, should just be able to make out words clearly 5. Bone conductor (one ear only): check threshold for each frequency 6. Tympanogram (one ear only): noting: C+200 is approximately the same as in the past CME
should always be the same 7. Acoustic reflexes (probe in one ear only): contralateral and ipsilateral thresholds should be
the same as in the past Preparing for pure tone testing – otoscopic examination An otoscopic examination is carried out prior to testing for the following reasons: To check for wax occlusion - if wax is totally occluding the ear canal it must be removed prior to testing. To check for collapsing canals:
• Hold the otoscope with the tip of the speculum just at the opening of the ear canal and observe the ear canal opening - if the opening is narrow, ear canal collapse is a possibility
• Push the pinna towards the head as the headphone cushion will do and see whether the ear canal walls meet
Dealing with collapsing canals: • Carefully place a short piece of plastic tubing or modified immittance tip (both with a piece of cotton
attached) in the ear canal before positioning the headphones • Use insert earphones instead of headphones
Procedure for obtaining pure tone thresholds Determine air conduction (AC) thresholds using the modified Hughson-Westlake step procedure outlined below. If the history indicates that one ear hears better than the other, start testing with the better ear. Start the testing with a 1000 Hz tone 1. Present the tone at a clearly audible level (30 dB HL for those with no apparent hearing loss
and 70+ dB HL for those who have obvious difficulty hearing) 2. If no response is obtained, increase the level until the patient responds 3. Once the patient responds, decrease the intensity in 10-dB steps until there is no response 4. When the patient fails to respond, increase the intensity in 5-dB steps until a response is
obtained 5. Repeat steps 3 and 4 until the threshold is obtained 6. The threshold is defined as the lowest level at which at least 2 responses are obtained out of
12

3 ascending trials Test frequencies are 1000, 2000, 3000, 4000, 6000, 8000, 250 and 500 Hz. Testing at 3000 and 6000 Hertz may be omitted if not considered to be clinically useful in a particular case. Present the initial tone at each subsequent test frequency at a level judged to be about 20 dB louder than the patient’s estimated threshold at the test frequency. If there is a difference in threshold of 20 dB or more between 500 and 1000 Hz, test at 750 Hz If there is a difference in threshold of 20 dB or more between 1000 and 2000 Hz, test at 1500 Hz Determine bone conduction (BC) thresholds for each ear at frequencies from 500 to 4000 Hz where the AC threshold is 20 dB HL or greater. BC thresholds are routinely determined only at octave frequencies but may also be determined at intermediate frequencies if this is considered to be clinically useful in a particular case. Bone conduction is tested at 250Hz only it is considered that it might give some clinically useful information. This includes the following situations:
• when there is a conductive loss at one or more of the higher frequencies • when a probe effect is obtained on acoustic reflex testing • in order to determine whether the AC threshold at 250 Hz in the opposite ear needs masking • when the AC threshold at 250 Hz doesn’t seem to fit with the rest of the audiogram
Mask all AC thresholds when the difference between the threshold and the non-test ear BC threshold is equal to or greater than the minimum interaural attenuation value (headphones, e.g. TDH 39 = 40 dB; insert earphones, e.g. ERA 3A: 70 dB ≤ 1 kHz; 50 dB > 1 kHz). Mask all BC thresholds when the air-bone gap is 15 dB or greater. Masking: Hood’s technique or plateau seeking Obtain the unmasked pure tone threshold in the test ear Introduce NBN at threshold level to the non test ear (ask the patient when the masking noise is first heard) ** Check that the masking threshold is consistent with the non test pure tone threshold on the audiogram Wind up the masking level by 10 dB Present the tone again at the unmasked threshold level
• If the patient responds, increase the masking by 10 dB and present the tone at the same level as before
• If the patient does not respond, increase the tone in 5 dB steps until a response is obtained This is the new threshold. Continue the above procedure according to whether a response is obtained or not until there is a ‘plateau’ in the level of response over a 20 dB increase in masking. ** The NBN listening check only needs to be carried out for the first masked threshold and then each time there is a change of transducer. If the NBN threshold is consistent with the non test pure tone threshold on the audiogram for these checks, the masking can be presented at the non test threshold + 10 dB for all other test frequencies. Central masking The central masking effect should be included in the masked threshold for bone conduction thresholds, but not for air conduction thresholds. The occlusion effect The occlusion effect must be considered when obtaining masked bone conduction thresholds at 250, 500 and 1000 Hertz. There are two possible approaches to this: First approach (used when there is a chance that bone conduction masking won’t be required)
• Obtain all unmasked thresholds unoccluded (with no headphone on, or tubephone in, the opposite ear)
13
• Set up the transducer ready for masking, then turn the bone conduction dial down by the amount of the maximum occlusion effect at the test frequency (30 dB at 250 Hertz, 20 dB at 500 Hertz and 10 dB at 1000 Hertz)
• Increase the tone in 5 dB steps until a response is obtained, then continue with Hood’s technique
Second approach (used when it is certain that masking will be required) • Obtain all unmasked bone conduction thresholds occluded and mask as necessary.
Dealing with ‘5 for 10’ masking patterns This pattern occurs when there is a 5 dB shift in response for every 10 dB increase in masking over at least a 40 dB increase in masking. When this occurs, first repeat the masking procedure as the pattern may not occur again. If the pattern persists:
• Allow 5 dB for central masking and select a threshold value near the point where the pattern started
• Note the problem down on the audiogram • Check whether the audiogram and acoustic immittance results are consistent with this
Dealing with the skirt of the filter problem This can occur when putting masking into an ear that has a large difference in thresholds at adjacent frequencies e.g. a sloping high frequency loss. The patient reports hearing the narrow band noise at a softer level than predicted from the audiogram as he/she is responding to the component of the masking noise coming from the skirt of the filter that corresponds to a frequency where the patient has a better hearing threshold. If this occurs:
• Turn the masking dial up to 10 dB above the air conduction threshold at the test frequency in the non-test ear, and then continue with Hood’s technique.
Speech Recognition Testing – AB words Norms 50 per cent point at 0 dB HL 100 per cent point at 30 dB HL Maximum gradient: 4 per cent per dB Suitable for patents from about five years of age Clinic Protocol Obtain only a maximum score for each ear unless a full speech audiogram is considered to be clinically useful Full curves are required in cases where:
• There are inconsistent results e.g. non-organic hearing loss is suspected • It is requested by the referring doctor/specialist or agency
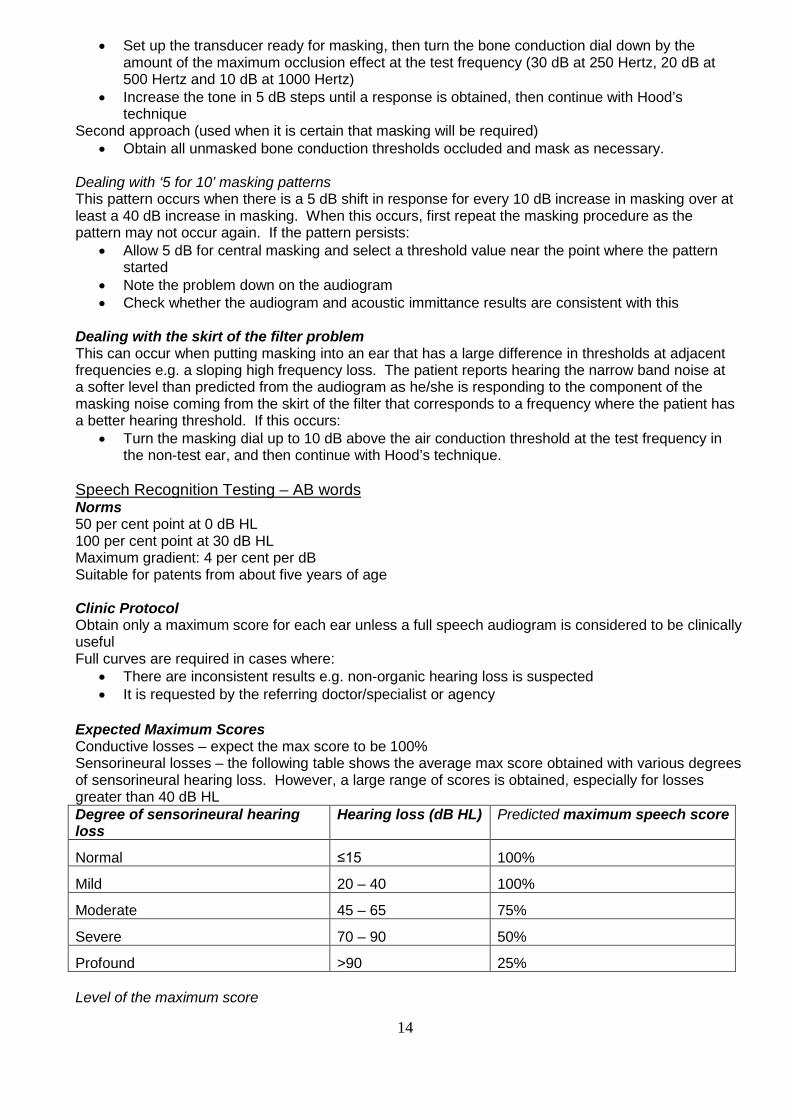
Expected Maximum Scores Conductive losses – expect the max score to be 100% Sensorineural losses – the following table shows the average max score obtained with various degrees of sensorineural hearing loss. However, a large range of scores is obtained, especially for losses greater than 40 dB HL Degree of sensorineural hearing loss
Hearing loss (dB HL) Predicted maximum speech score
Normal ≤15 100%
Mild 20 – 40 100%
Moderate 45 – 65 75%
Severe 70 – 90 50%
Profound >90 25% Level of the maximum score
14

For all configurations of loss, the level of max score in dB HL should be close to the average of the 1 & 2 kHz thresholds + 30. (The level of the max score on the normal curve is 30 dB HL) Instructions
• Ask the patient to repeat each word • Encourage the patient to guess • Encourage the patient to repeat what they hear, even parts of words or speech sounds
Scoring
• Each word (consisting of three phonemes) is worth 10 % • Score 3, 2, 1 or 0 according to the number of phonemes correctly repeated • To tally, the results are combined into 3's, each 3 being worth 10 % • At the end if a 2 or 1 is left over, 2 = 7 % and 1 = 3 % (e.g. 4 phonemes correct = 13%; 23
phonemes correct = 77%) Technique
• Present the first list at the level of the expected max score The limit for speech recognition testing is generally 90 dB HL, but in some instances we exceed this level e.g. if the loss has a conductive component or if there is a profound sensorineural hearing loss. Students are advised to check with the clinic supervisor before exceeding 90 dB HL
• If a lower score is obtained than expected, present another list at a higher intensity level, if possible
• If a full curve is required, decrease the intensity in whatever steps are necessary to ensure that at least 3 points are obtained:
one at the level of the expected maximum one between the level of the expected max and the half peak level (HPL) one at a level below the HPL
• Draw the curve of best fit Interpretation if a full curve is obtained Consistency check (for all types of loss): The HPL (in dB HL) should be within +/- 10 dB of the average of the 1 and 2 kHz thresholds. Speech Masking In order to save time in the clinic, speech masking is performed at all times during speech recognition testing. Calculate the amount of masking required: Derived from the traditional speech masking calculations the following rules apply: When using headphones: Masking level required = presentation level (dB HL) – 20dB + air bone gap in non test ear If the speech noise dial is not calibrated in dB HL, add the conversion factor from dial to dB HL for that particular machine When using insert earphones: Masking level required = presentation level (dB HL) – 40dB + air bone gap in non test ear If the speech noise dial is not calibrated in dB HL, add the conversion factor from dial to dB HL for that particular machine Quick check for overmasking (The Potter Method): If the sum of the air-bone gaps in the two ears is less than or equal to 50, you can use headphones for speech recognition testing/masking
15

If the sum of the air-bone gaps in the two ears is less than or equal to 90, you are not overmasking with insert earphones. Testing for Speech Rollover
• Turn the level of speech up by 40 dB, if possible given safety and comfort considerations, above the level at which the maximum was obtained
• Introduce masking noise as required • Subtract the minimum AB score from the maximum AB score (the minimum AB score is the
lowest score occurring after the maximum score) • The result is positive for VIIIth nerve site of lesion if the difference is greater than 20% • If the result is positive for VIIIth nerve site of lesion, refer to Neuro-otologic Protocol.
Speech Recognition in Noise Testing: LiSN-S In addition to the AB word testing, speech recognition in noise is assessed using the Phonak LiSN-S system. This is carried out regardless of age, hearing loss or difficulties reported in noise. It is not done routinely for NESB patients or in vestibular clinics where diagnostic testing is prioritised. The High Cue (DV 90) condition is used. A SRT is obtained following the standard program procedures. This assesses listening skills when both spatial and vocal cues are available. Where indicated (hearing thresholds outside normal limits) the patient’s audiogram is replicated using the prescribed gain amplifier (PGA). Results are expressed in dB and standard deviations relative to the mean. Action following the LiSN-S test Normal hearing
• No PGA. Normal results – no follow up required. Abnormal results – APD testing recommended.
Hearing loss (no hearing aids) • Normal without PGA – no further testing required • Abnormal without PGA – follow up with PGA (results used to guide a discussion concerning
hearing aid fitting) Hearing loss (with hearing aids)
• Normal with PGA (hearing aids helpful/counselling tool) • Abnormal with PGA (can be used as counselling tool/realistic expectations)
Reporting on LiSN-S “Results for the LiSN-S screening measure of speech reception in the presence of spatially separated background noise showed patient X has results within normal limits or showed patient X has significant difficulty”.
16

Acoustic Immittance Testing Contraindications Immittance testing should not be performed on an ear that is discharging, is painful, has a foreign body lodged in the external ear canal or has recently had surgery (in past 6 months). If there is any doubt or concern, obtain otological approval prior to performing the testing. Tympanometry Recording/classification of tympanograms Record the equivalent volume, peak compliance and peak pressure, and Jerger Type (A, B or C etc.) Tympanogram types: A: Normal peak compliance (0.3 to 1.6 cm3) and normal peak pressure (≥ -100 daPa) Variants: As (peak compliance < 0.3 cm3) Ad (peak compliance > 1.6 cm3) B: No peak. Only equivalent volume is recorded. Guideline for distinguishing between low volume and high volume type B: For adults, if equivalent volume is > 2.0 probably high volume. You usually need to consider other information e.g. history, otoscopic exam, equivalent volume of other ear (if intact tympanic membrane) in making this decision. C: Normal peak compliance (0.3 to 1.6 cm3) and negative peak pressure (<-100 daPa) Variants: Cs (peak compliance < 0.3 cm3) Cd (peak compliance > 1.6 cm3) Acoustic reflex testing Acoustic reflex testing is carried out in the following circumstances:
• When there is a significant conductive component (>15dB) in one or both ears except if there is a type B tympanogram
• When the audiological test results are inconsistent / unexpected including suspected nonorganic hearing loss.
Procedure • Adjust pressure to the peak pressure from the tympanogram. • Begin testing at 80 dB at 500Hz in the contralateral mode. Increase intensity in 5 dB steps until a
clear reflex is seen. Repeat presentation at the lowest level where there appears to be a reflex. If it is repeatable, accept that as the threshold. If not, ascend 5 dB and check at higher level(s): it is necessary to see a repeatable response at the level that is going to be noted as the reflex threshold. Repeat this procedure for 1000Hz and 2000Hz contralateral reflexes.
Further points to note; • Acoustic reflexes at 4000Hz are generally no longer tested, unless it is thought it may add useful
extra information to the case, (e.g. if nonorganic hearing loss is suspected, etc.) • If all reflexes are present at normal levels, the last set of ipsilateral reflexes does not need to be
tested • Consider adjusting the starting point for testing reflexes from 80, if the pattern of reflexes emerging
suggests that a different starting point may be more appropriate (e.g. if the reflex occurs at 75 for the first one, then use a lower starting point)
• Consider screening reflexes at 105 if you can confidently predict that the reflexes will be absent
17
Fluctuating resting compliance A practical problem in determining acoustic reflex thresholds can be fluctuating resting compliance. This can be caused by:
• Extraneous noise • Probe movement • When the middle ear compliance is high (particularly for type Ad tympanograms) very small
effects, such as the patient's breathing and pulse, can cause this problem. In this case, the pressure can be moved from the P(me) by up to +80 mm H2O and the reflexes will still be visible.
Reflex artefacts It is possible to see apparent changes in compliance in response to acoustic stimulation which are not genuine reflexes. These are much more common for ipsilateral reflexes than for contralateral as the reflex stimulus and the probe tone are presented to the same ear. Positive artefacts (deflection in same direction as for true reflex) If the filtering of these components of the sound (reflex stimulus tone and probe tone) is not adequate, a normal looking reflex may result (a decrease in compliance/increase in measured level of probe tone). This also can occur when patients grimace in response to the loud stimulus. This problem can be avoided by observing the patient carefully. In this situation, the artefact will be present for both ipsilateral and contralateral stimulation. Negative artefacts (deflection in opposite direction than for true reflex) Ipsilateral negative reflex artefacts are quite common and occur due to non-linear interactions of the stimulus and probe tones. This gives a decrease in measured level of probe tone, which is shown as an increase in compliance and so negative artefact. When a reversed “reflex” is seen, the level of the stimulus should be raised to see if a “true” reflex is seen at higher levels. In general, reversed reflexes in the ipsilateral condition should be considered as negative artefacts unless there is other information to suggest that the reflexes are reversed.
• If it is a true reversed reflex, it will also be reversed for the contralateral reflex with the probe in the same ear. Do you expect to see a reflex based on the person’s hearing level? E.g. For a profound hearing loss, if an ipsilateral reversed reflex is seen at 80dB, it is probably an artefact (or a nonorganic hearing loss!)
The latency of a “true” reflex is about 90 ms after the onset of the stimulus tone. It is sometimes possible to discriminate between artefacts and true reflexes by observing the latency of responses. Calibration of acoustic reflex levels Contralateral reflex threshold dial readings are calibrated in dB HL Ipsilateral reflex threshold dial readings may be calibrated either in dB HL in a 2cc coupler, or dB SPL in a 2 cc coupler. At our audiology clinic the dial readings for ipsilateral reflexes on all machines are calibrated in dB HL in a 2cc coupler.
18

Interpretation of acoustic reflex results The 95% confidence interval for normal acoustic reflex thresholds is 70 to 100 dB HL A reflex threshold at .5, 1 or 2 kHz at a level >100dB HL is considered to be elevated. We only test to 105dBHL, so a reflex is marked as absent if not present at 105. Acoustic reflex patterns Probe effect: reflex is absent or elevated with the probe in a particular ear Tone/sound effect: reflex is absent or elevated when reflex stimulus is presented to a particular ear Central pattern: one or both contralateral reflexes do not occur NOTE: This pattern is also seen with collapsing ear canals Interpretation of acoustic reflex results in patients with normal hearing or sensorineural hearing loss Acoustic reflex absence A tone effect at .5, 1 or 2 kHz is considered a +ve finding for VIIIth Nerve site of lesion in normally hearing patients or patients with sensorineural losses up to and including 50 dB HL If a reflex is absent where the loss is 55 dB HL or greater, this finding is considered inconclusive Reflex sensation level Reflex SL = contralateral reflex threshold in dB HL– pure tone threshold at the same frequency
• The lowest SL at which a reflex can be elicited is generally considered to be 15dB • If a reflex threshold is obtained at a SL <15dB, the validity of the audiogram should be
questioned • Reflex thresholds stay fairly stable as a cochlear loss progresses until the loss reaches
approximately 55 dB HL, and then they start to rise • It is therefore possible to have elevated reflexes with cochlear losses but the reflex SL is
generally reduced • If a reflex is present at a SL of 55 dB or less, the result is –ve for VIIIth N site of lesion (Jerger &
Jerger, 1983) Reflex threshold asymmetry
• Based on the contralateral reflex threshold differences between the two ears at .5, 1, and 2 kHz If there is a difference of >15dB at more than one frequency, this finding is considered +ve for VIIIth N pathology This test is only applicable to the results of patients with:
• Normal hearing • Bilateral symmetric sensorineural hearing losses • Asymmetric sensorineural losses where the loss does not exceed 50 dB
Interpretation of acoustic reflex results in patients with conductive hearing loss Probe in the affected ear A probe effect usually occurs with all types of middle ear pathology, including very slight disorders. (According to Jerger, an air-bone gap of 10 dB gives a probe effect in 80% of cases) Tone in the affected ear A tone effect can also occur with middle ear pathology, depending on the size of the air-bone gap. The reflex threshold will be elevated by the size of the air-bone gap, which may cause the reflex to be absent.
19
General Points Regarding Adult Clinics
(This handout is available to all students on the Learning Management System) Preparation You should ensure that you arrive in plenty of time to check all equipment so that you are
ready to start clinics on time. If you need more than 15 minutes we allow in the timetable, then you should arrive earlier.
You have your audiogram/tymps/reflexes from the prac at the beginning of the year, and should use this to check equipment.
If anything is not working, or you are unfamiliar with a piece of equipment, tell the supervisor before the clinic starts.
History Clinics held at the University of Melbourne Audiology Clinic will usually use a history
questionnaire. The patient will ideally have filled this out prior to you calling the patient in. Read this prior to bringing the patient into the room. Think about what areas and questions you may want to elaborate on.
Don’t sit behind the desk while taking the history. Try to have a logical flow to questions. Try to write down all relevant information. Listen to what the person says, so you don’t ask questions they have already answered.
Otoscopic Inspection Remember to always do it. Remember to check for collapsed canals, and to take appropriate action if you find them.
Headphone Placement Be very careful with headphone placement: ensure the diaphragm is right over the opening of
the ear canal. If you don’t do this, you may obtain incorrect thresholds. Don’t let the client adjust the headphones themselves; if they do, recheck that the headphones
are sitting properly. Once you have given the instructions and put the headphones on, ADJUST THE
TALKOVER. Start with the dial at a low level, and then talk to the client while adjusting the level to a comfortable point for them. You should then use the talkover for any instructions or encouragement or interaction, even if the client has normal hearing.
Pure Tone Audiometry/Masking Make sure the client cannot see you pressing the buttons on the audiometer. You can ask
them to face away from you if necessary. Test the better ear first for air conduction. Ensure starting points are high enough (for both air and bone conduction). For bone
conduction testing, consider air conduction thresholds in the better ear when deciding on appropriate starting points.
Try not to be rhythmical or to spend too long below threshold. If false positives occur, deal with these appropriately. Remember 1 kHz recheck on first ear (you don’t have to recheck 1 kHz threshold on second
ear). Give client some encouragement during threshold testing (but not while you are below
threshold). Once you have completed air conduction testing on the better ear, test the other ear. If there
are any gaps of 40dB or more between the two air conduction thresholds at a particular frequency, mask these.
Test poorer ear first for bone conduction. Look at air conduction thresholds and think about whether you will probably need to mask the bone conduction thresholds. If so, put the
20

headphone straight on to the non-test ear, then you won’t have to allow for the occlusion effect.
If you obtain bone conduction thresholds unoccluded and then have to mask, remember to allow for the occlusion effect.
If masking is needed (for air and bone conduction), try to mask as you go. Start the narrow band noise at 10-15 dB below the pure tone threshold, or lower for a steeply
sloping loss. If there is an inconsistency between the pure tone thresholds and narrow band noise
thresholds, you should follow this up. o If they hear the noise at a softer level than expected, could it be due to the skirt of the
filter? If so, start the masking at 10dB above the pure tone threshold. Alternatively, they may have exaggerated their pure tone thresholds and you should recheck the threshold.
o If they hear the noise at a louder level than expected, it may be because it is the first time they have done the task and if you do it again they will come in softer. For bone conduction thresholds, it may be that headphone placement is poor and so causing the higher threshold. Alternatively, you may have accepted a false positive during pure tone testing, and may need to re-check the threshold.
It is important not to be rhythmical during masking. Remember to turn masking off when it is no longer needed. Remember to check back to see if any further air conduction masking is needed after you
have completed your bone conduction masking. Speech Recognition Testing and Speech Masking When pure tone testing is finished, tell the client to have a break/relax while you get ready for
speech recognition testing. Remember to present speech masking. Use the Potter short cut to decide if you need to mask
via headphone or insert earphone. For the air-bone gaps in the calculations, use the average air-bone gap at 500, 1000, and 2000Hz (rounded up to the nearest 5dB).
Set up the audiometer remembering the dial conversions. If the audiometer has an auditory monitor, have it ready so you can listen to speech. Turn down the masking channel on the monitor, so you only listen to speech and not to the masking as well.
THEN, once you are ready to start, give the client the instructions and put the headphones on or insert earphones in.
Watch the client’s face to score accurately (you can ask them to turn and face you if they are still side on).
If obtaining a full speech recognition curve, when you get to the softer lists, let them know it will be more difficult and encourage them to guess.
If you don’t get the maximum score you expect with your first list, turn the level up to see if you do get the expected maximum at a higher intensity.
Remember to turn masking off when it is no longer needed. Tympanometry/Reflexes Recheck the size, shape and direction of ear canal to aid you in choosing the correct size tip
and in inserting it correctly. Give the client the instructions for tympanograms (AND reflexes, if testing of these is required)
before putting the headset on. If you don’t have a seal, try appropriate strategies to obtain one (reposition the tip, reposition
the headset, different tip, gel etc.). Remember to read the compliance and equivalent volume value on the screen correctly and
not write down the ‘gradient reading’ value. Remember to test reflexes with the pressure at the point of peak compliance, not necessarily
at 0daPa. If you are using the Auto setting this will do this automatically for you by performing a tymp when you press ‘run’, Otherwise you will need to adjust the pressure to the peak compliance manually if tymp machine is on “zero” setting. The exception to this is when fluctuating resting compliance makes it difficult to detect reflexes (often the case when there are Type Ad tympanograms). In this case you can manually adjust the pressure off the maximum compliance by up to 80 daPa.
21

For reflexes, remember you are looking for the reflex threshold, i.e. the lowest level at which you see the compliance change/deflect.
Follow the correct procedure, which is to ascend in 5dB steps till you see a clear reflex. Repeat presentation at the lowest level where there appears to be a reflex. If it is repeatable, accept that as the threshold. If not, ascend 5dB and check at higher level(s): it is necessary to see a repeatable response at the level that is going to be noted as the reflex threshold.
Think about what reflexes you expect to help you be more efficient and minimise the number of presentations you have to make. E.g. if the person has a “dead ear” you don’t expect any reflexes for the tone in that ear, so you could screen across at 105 dBHL.
Feedback Think about what the person’s main concern or reason for coming was, and try to address that
in your feedback What is the main message you want to get across in terms of telling them about the results,
and telling them what you suggest they do? Try to keep the language simple and give the information logically. Don’t show the audiogram to every client. For most people it is too complicated to understand
on one viewing.
22

Goals for adult clinical testing
Semester 1 Goals
Procedures/Testing To know basic test procedures and be able to carry these out independently
♦ Be ready to start clinic on time, having checked all equipment and tidied the room as required ♦ Be able to perform air conduction pure tone testing using appropriate threshold seeking technique,
know when and how to test bone conduction. ♦ Know when masking is required, and be able to use Hood’s technique to mask. ♦ Be able to predict speech curves, present speech material and score responses accurately. ♦ Know how to perform speech masking: ♦ Know whether headphones or insert earphones are required ♦ Be able to calculate the required level of masking and apply appropriate dial conversions. ♦ Be able to perform tympanometry and note down correct tympanogram type. ♦ Be able to apply correct technique for obtaining accurate reflex thresholds and obtain accurate
thresholds
Interaction with Client
♦ Be able to obtain a straightforward history, elaborating on relevant areas. ♦ Be able to explain to the client clearly and concisely the test procedure and the required response ♦ Be friendly, mature and have a professional approach to the client ♦ Be punctual and appropriately dressed.
Integration
♦ Be able to interpret the audiological results obtained in terms of type and site of disorder ♦ Be able to identify inconsistencies in audiometric findings Semester 2 Goals
Procedures/Testing To be able to obtain accurate test results on a range of adult cases, with only minimal help required for non-routine complex cases.
♦ Be ready to start clinic on time, having checked all equipment and tidied room as required. ♦ Be able to obtain accurate pure tone thresholds. This includes being able to structure presentations
to avoid false positives and take appropriate action when these occur, be aware of inconsistent and unexpected responses (including patients with suspected non-organic hearing loss) and deal with these appropriately.
♦ Be able to mask appropriately this includes; ♦ Allowing for the occlusion effect, skirt of the filter and central masking. ♦ Be aware of masking dilemmas and deal with these appropriately including using insert earphones
where necessary. ♦ Be able to obtain accurate speech recognition curves by presenting speech at appropriate levels,
with masking used appropriately. Be able to relate speech results to pure tone audiogram. ♦ Be able to obtain accurate tympanograms efficiently, using correct technique, including modifying the
technique for type Ad tympanograms; be able to obtain seals and use appropriate strategies when seal is difficult to obtain.
♦ Be able to obtain reflex thresholds accurately and efficiently; be able to deal with fluctuating resting compliance, be able to recognise biphasic and reversed reflexes and artefacts.
23
Interaction with Client ♦ Be able to take a comprehensive history elaborating on all relevant areas, using clear questions and
addressing clients concerns. Be able to adjust style, rephrase questions and follow up as necessary. ♦ Be able to explain the test procedure and required response to the client. Be able to adjust
instructions, rephrase, re-emphasise where necessary (younger children, non-English speaking background etc)
♦ Be able to explain results of testing to client in an appropriate manner, relate results to client’s presenting concern, make appropriate recommendations
♦ Be responsive to and considerate of the client; be assertive where required; maintain friendly and professional approach
♦ Behave in a mature manner at all times, demonstrate initiative (within constraints imposed by supervisor), be punctual and appropriately dressed.
Integration ♦ Be able to analyse and inter-relate all the test results ♦ Be able to recognise inconsistencies in test results and take appropriate action ♦ Be able to integrate the results and to understand the implication of the test results ♦ Be able to formulate appropriate management strategies ♦ Be able to write clear well-organised reports, which are submitted within a week.
Semester 3 and 4 Goals
Procedures/Testing Be able to work independently to obtain accurate results on all adult cases including non-routine complex cases.
Details as for Semester 2
Interaction with Client
♦ By this stage, the student should be carrying out the clinic in an independent professional manner in terms of history taking, instructions, client interaction and professional conduct. See details in Semester 2 information.
♦ Results of testing should be discussed clearly and accurately with client using appropriate terminology. This includes: ♦ being aware of client’s reactions and being able to modify own behaviour and structure of
feedback in response to this ♦ checking that client understands results and reasons for recommendations ♦ adequately answering client’s questions
Integration
♦ An extension of Semester 2 goals in terms of being able to integrate all results into conclusions regarding auditory pathology and being able to formulate appropriate management strategies
♦ Be able to communicate appropriate information (written reports) to various professionals, with wording and terminology appropriate for the recipient
24

ACADEMIC HEARING AIDS
PROCEDURES (updated January 2014)
Information for External Clinical Educators of the University of Melbourne Audiology Students
First Appointment ♦ Discussion about client’s hearing difficulties/communication needs; establish COSI goals
(ALD’s/Telstra vol control phone/other accessories are also discussed). ♦ Discussion about other factors relevant to the selection of amplification: including vision, manual
dexterity, pacemaker or other programmable implants fitted, mobile phone use ♦ Discussion about devices available: variety of styles including relevant pros and cons, relevant
features/options (such as directional microphone, telecoil, multi-memory) available including relevant pros and cons, discussion of whether monaural (which ear) or binaural including relevant pros and cons, and costs (written quote is given). Decision reached by client after discussion with Audiologist.
♦ Discussion of reasonable expectations of the amount of benefit to be gained from hearing aid/s. ♦ Payment details are discussed ♦ Impression/s (if required) are taken of the ear/s. (Students may take normal impressions if the
supervisor judges this to be appropriate, but deep impressions or involving mastoid cavity are to be done by supervisor). If a mastoid cavity requires packing prior to impression-taking, this should be done by a doctor, if appropriate.
Second Appointment
♦ REIG is performed routinely, (at 60dB SPL), using ISTS signal. Typically adaptive features of hearing aid can be left on for this. Insertion gain conducted at typically zero degree speaker azimuth. ♦ Family of curves for non-linear aids (at levels of 50, 60, 70 and 80dBSPL, for instance)
(optional). Evaluate compression formally/informally for different speech levels (optional). ♦ IG optimised re NAL-NL2 targets using 60 dB SPL ISTS input, typically. ♦ Further fine-tuning/adjustment based on subjective reports. ♦ Check tolerance to loud noisemakers, (e.g. loud speech, clapping, cup/spoon), with both aids
on if binaural fitting. Adjust MPO if required. ♦ Swept warble tone (80-90 dB SPL) for RESR (optional). Again, adjust MPO if required. ♦ For binaural fittings, check loudness balance. ♦ Measure effect of directional microphone by comparing insertion gain obtained for 0 and 180
degree speaker azimuths (optional). ♦ Instruct/counsel regarding hearing aid use, cleaning, batteries etc.
Third (and subsequent) Review Appointments
♦ Review progress/experience with the aid/s and adjust amplification/settings if necessary. Address any comfort/clarity/occlusion/management etc issues.
♦ Instruct regarding telecoil (consider subjective/objective assessment/adjustment of telecoil settings) if not already done.
♦ Measure IG of alternate programs if appropriate (optional). ♦ Consider ALD’s and wireless accessories if appropriate.
Final Appointment ♦ Assess outcome formally using COSI and IOI-HA. ♦ Speech recognition (optional): evaluate AB words in quiet e.g. at 65dBSPL, (aided). May choose
to test at softer levels, or in noise if appropriate. Alternatively, aided SPIN test (live voice, audiovisual versus audition only). Useful also for counselling.
♦ Recommend annual review of hearing thresholds and hearing aid function. ♦ Recommend aural rehabilitation programs, if not discussed previously.
25

Subject Overview: Hearing Devices and Rehabilitation A Course coordinator: Caitlin Grenness Lectures: This subject introduces the foundations of hearing aids and aural rehabilitation. Refer also to the handbook. No. Title Lecturer Hrs
SEMESTER ONE
1 & 2 Introduction to HDR subject CG 2
3 & 4 Introduction to aural rehabilitation AM 2
5 Aural rehabilitation programs AM 1
6 What it’s like to have a hearing loss AM/LW 1
7, 8, 9 Aural rehabilitation processes A AM 3
10 & 11 Introduction to hearing aids CG 2
12 & 13 Evaluation & training methods in aural rehabilitation AM 2
14,15,16,17,18,19 Pre-selection of hearing devices CG 6
20,21,22 Amplification 1 CG 3
23 Occlusion versus feedback: case studies CG 1
24 & 25 Ear moulds ST 2
26,27,28,29 Assistive listening devices series AM 4
30 & 31 Introduction to tinnitus AM 2
32 The Office of Hearing Services BA 1
SEMESTER TWO 33 Fitting Hearing Aids at Australian Hearing JN/MK 1
34,35,36,37,38,39 Hearing aid verification series CW 6
40 & 41 Digital hearing aids and signal processing HM 2
42,43,44,45 Post-fitting management (incl. outcome assessment)
CG 4
46 & 47 Amplification 2 CG 2
48 Telephone use with hearing aids CG 1
49,50,51 Medical aspects of ageing PH 3
52 & 53 Case studies CG 2
54 & 55 Bone conduction hearing aids AK 2
56,57,58 Audiology and vision impairment RO 3
59 & 60 Aural rehabilitation for elderly clients AM 2
61 & 62 Revision CG 2
26

Lecturers: Caitlin Grenness, University of Melbourne Angela Marshall, University of Melbourne Cathryn Williams, Academic Hearing Aids Samantha Tai, Academic Hearing Aids Alison King, Australian Hearing Hugh McDermott, Bionics Institute Rick Osborn, Audiologist in private practice Peter Hunter, Gerontologist John Nikolarakos, Australian Hearing Bridget Andritsos, Office of Hearing Services Pracs: #1 Ear impression taking #2 Problem solving with hearing aids 1 #3 Insertion gain #4 Coupler tests #5 Problem solving with hearing aids 2 References: The major reference for the amplification section of this subject (and for Hearing Devices and Rehabilitation B) is: • Dillon, H (2012) Hearing Aids. Several copies of this book are available in the library. The major references for the aural rehabilitation section of this subject are: • Montano and Spitzer (2009) Adult Audiologic Rehabilitation. Plural Publishing • Tye-Murray, N. (2009) Foundations of Aural Rehabilitation: children, adults and their family
members (3rd ed.) Delmar Further references will be suggested by lecturers in lecture handouts. Assessment:
• One hour written examination at the end of semester 1 (25%) • A case study due at the end of semester 2 (15%) • Clinical skills assessment by OSCE (objective structured clinical examination) at the
end of semester 2 (10%) • Two hour written exam at the end of semester 2 (50%)
Students must pass the written examination in order to pass the subject
27

Subject Overview: Hearing Devices and Rehabilitation B
Subject coordinator: Caitlin Grenness Lectures: This subject consists of a series of lectures, practical sessions and supervised clinical experience covering advanced concepts in amplification for hearing loss including signal processing hearing aids. Refer also to the handbook. No. Title Lecturer Hours
SEMESTER ONE
HB 1 & 2 Introduction to HDR B CG 2
HB 3 & 4 Assignment presentation from manufacturer CG 2
HB 5 & 6 Compression revision CG 2
HB 7 & 8 Advanced hearing aid verification CG 2
HB 9 & 10 Educational Amplification (FM systems) AK 2
HB 11 Telecoil measurement, adjustment and use CG 1
HB 12 & 13 Wireless communication and hearing aids CW 2
HB 14 - 17 Aural rehabilitation processes B CG 4
SEMESTER TWO
HB 18 - 24 Prescriptions series (Prac 3 to follow) CG 7
HB 29 Outcome assessment in hearing aid fittings CG 1
HB 30 & 31 Tinnitus and hyperacusis: clinical management AM 2
HB 32 & 33 Frequency lowering hearing aids HM 2
HB 34 - 37 Workshop on wireless devices CW & CG 4
HB 38 & 39 Revision CG 2
Lecturers: Caitlin Grenness, University of Melbourne Angela Marshall, University of Melbourne Cathryn Williams, Academic Hearing Aids Alison King, Australian Hearing Hugh McDermott, Bionics Institute
28
Prac sessions: #1: Problem solving with hearing aids 3 # 2: FM systems # 3: Advanced verification 1 # 4: Non-linear Prescriptions # 5: Advanced verification 2 Reading list: Dillon, Harvey (2012) Hearing Aids. Boomerang Press, Sydney. Assessment:
• A written assignment due in semester 1 (30%) • Clinical skills assessment by OSCE (objective structured clinical examination) at the
end of semester 1 (10%) • Two-hour written examination at the end of semester 2 (60%)
Students must pass the written examination in order to pass the subject Satisfactory attendance at and participation in the hearing devices clinical placements throughout the year is a hurdle requirement
29

Goals for adult rehabilitation clinics By End of 1st
Year By End of 2nd Year
First Appointment: Explanation of hearing aid fitting procedure Lead-in discussion of hearing problems Administer pre-fitting COSI Discuss appropriate expectations Guidance Complete “Other Considerations” part of form Consider ALDs Guidance Guidance Discussion/selection of hearing aid/s: Monaural/Binaural Style Features Accessories Guidance Selection of specific aid/s including cost N/A N/A Take ear impression/s (excluding deep/CIC) Decide on venting/earmould characteristics Give written quote N/A N/A Order hearing aid/s once selected and/or order ear moulds Guidance Guidance Second Appointment (Fitting): Create client file in NOAH, including audiogram (if required) Calibrate probe tube (REM) Pre-program aid/s using audiogram in NOAH Guidance Guidance Fit aids in ears (incl. cutting ear mould tubing if BTE) Perform insertion gain P1 @ 60 dB SPL, ISTS, Matching targets and using subjective comments) Perform insertion gain for other programs/other levels MPO checks (environmental sounds) RESR (80-90 dB SPL swept warble tone) Guidance Guidance Check balance between L and R (if bin.) Instruct in operation of the aid/s Guidance Guidance Counsel re initial use of the aid/s Guidance Explain cleaning/maintenance of the aid/s Guidance Payment organised N/A N/A Third and Subsequent Appointments (Reviews): Discuss client’s experiences Follow-up comments with careful questioning Guidance Formulate action/adjustment on the basis of this Guidance Carry out action/adjustment plan Guidance Guidance Review operation of aid/s, cleaning, etc Guidance Final Review Appointment: Discuss experiences (as above) Administer post-fitting COSI Administer IOI-HA Guidance Perform coupler test/s Explain use of battery tester and dri-aid kit Discuss future management (incl. ALDs) Guidance Administer aided speech test Guidance Guidance
Guidance: assistance may be required in some situations
30
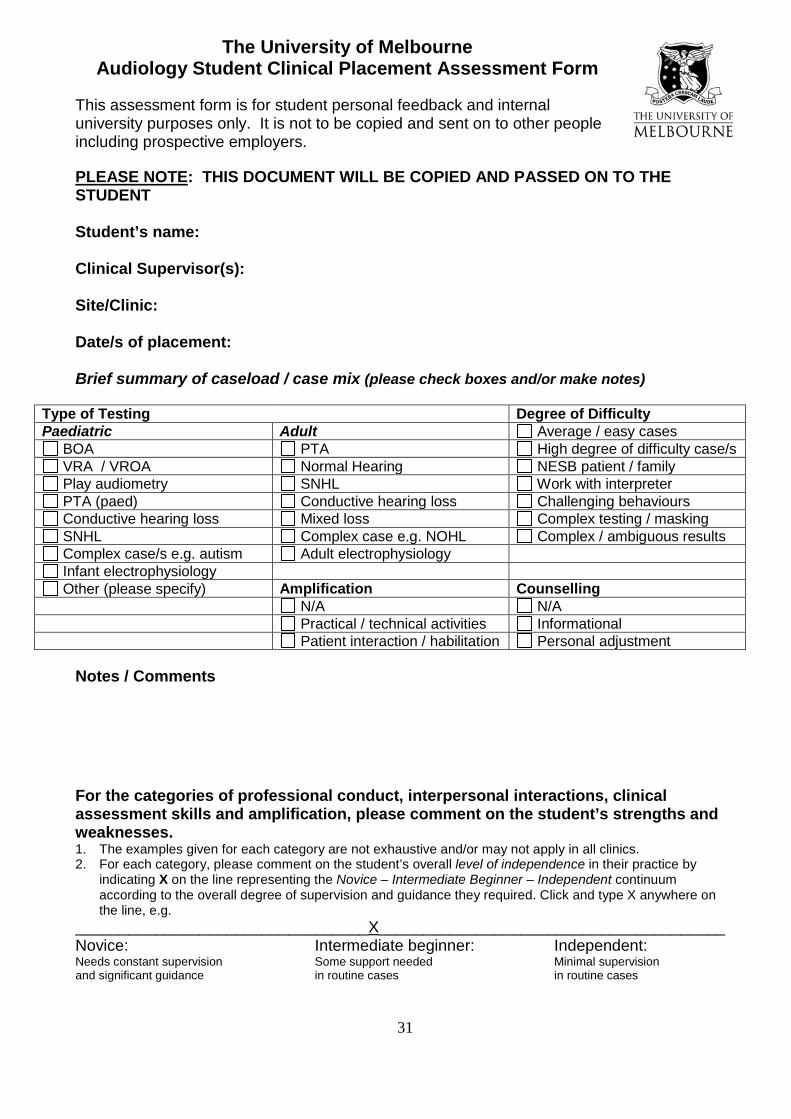
The University of Melbourne Audiology Student Clinical Placement Assessment Form
This assessment form is for student personal feedback and internal university purposes only. It is not to be copied and sent on to other people including prospective employers.
PLEASE NOTE: THIS DOCUMENT WILL BE COPIED AND PASSED ON TO THE STUDENT Student’s name: Clinical Supervisor(s): Site/Clinic: Date/s of placement:
Brief summary of caseload / case mix (please check boxes and/or make notes)
Type of Testing Degree of Difficulty Paediatric Adult Average / easy cases
BOA PTA High degree of difficulty case/s VRA / VROA Normal Hearing NESB patient / family Play audiometry SNHL Work with interpreter PTA (paed) Conductive hearing loss Challenging behaviours Conductive hearing loss Mixed loss Complex testing / masking SNHL Complex case e.g. NOHL Complex / ambiguous results Complex case/s e.g. autism Adult electrophysiology Infant electrophysiology Other (please specify) Amplification Counselling
N/A N/A Practical / technical activities Informational Patient interaction / habilitation Personal adjustment
Notes / Comments
For the categories of professional conduct, interpersonal interactions, clinical assessment skills and amplification, please comment on the student’s strengths and weaknesses. 1. The examples given for each category are not exhaustive and/or may not apply in all clinics. 2. For each category, please comment on the student’s overall level of independence in their practice by
indicating X on the line representing the Novice – Intermediate Beginner – Independent continuum according to the overall degree of supervision and guidance they required. Click and type X anywhere on the line, e.g.
_________________________________X_______________________________________Novice: Intermediate beginner: Independent: Needs constant supervision Some support needed Minimal supervision and significant guidance in routine cases in routine cases
31

1. If completing the form electronically please delete extra lines in each section as required. Double click on check boxes to open the field options window and select checked / not checked.
Professional conduct (Punctuality, courtesy, appropriate manner, interest, initiative, responsiveness to feedback, etc. Seeks supervision / assistance when appropriate) __________________________________________________________________________Novice: Intermediate beginner: Independent: Needs constant supervision Some support needed Minimal supervision and significant guidance in routine cases in routine cases Comments Interpersonal interactions (Patient-centredness, empathy, rapport. Appropriate clinical communication, effective interviewing style, use of language, voice level, non-verbal skills, etc.) ____________________________________________________________________________ Novice: Intermediate beginner: Independent: Needs constant supervision Some support needed Minimal supervision and significant guidance in routine cases in routine cases Comments
32

Clinical assessment skills (Pure tone testing, masking, speech recognition testing, speech masking, immittance testing, etc. Recognises and resolves test inconsistencies, interpretation, management planning, etc.) Novice: Intermediate beginner: Independent: Needs constant supervision Some support needed Minimal supervision and significant guidance in routine cases in routine cases Comments Amplification (Considerations in pre-selection, selection, use of prescriptive formula, impression-taking, real ear measurements, use of manufacturer’s software, trouble shooting, outcome assessment, assistive listening devices, counselling on care and maintenance). _________________________________________________________________________ Novice : Intermediate beginner: Independent: Needs constant supervision Some support needed Minimal supervision and significant guidance in routine cases in routine cases Comments ** Please email the completed form to [email protected] or mail to Angela Marshall, Department of Audiology and Speech Pathology, 550 Swanston Street, University of Melbourne, 3010. ** Please contact Angela on 9035 5343 if you have serious concerns about a student’s performance.
33