manual for code::blocks and simplecpp - iit bombaycs101/2014.2/project/manual...manual for...
TRANSCRIPT

Manual for Code::Blocks and Simplecpp
for CS101 course
Department of Computer Science and EngineeringIndian Institute of Technology - Bombay
Mumbai - 400076.
October 15, 2014

Contents
1 Introduction 11.1 Code::Blocks . . . . . . . . . . . . . . . . . . . . . . . . . . . . . . . . . . . . . . . . . . . 11.2 Simplecpp . . . . . . . . . . . . . . . . . . . . . . . . . . . . . . . . . . . . . . . . . . . . . 1
2 Code::Block IDE 1
3 Working with Code::Blocks and Simplecpp on Windows 63.1 Installation of Simplecpp with Code::Blocks . . . . . . . . . . . . . . . . . . . . . . . . . . 63.2 Writing a new C/C++ Program . . . . . . . . . . . . . . . . . . . . . . . . . . . . . . . . 12
3.2.1 Non-Graphic Project . . . . . . . . . . . . . . . . . . . . . . . . . . . . . . . . . . . 123.2.2 Graphic Project using graphics.h . . . . . . . . . . . . . . . . . . . . . . . . . . . . 203.2.3 Graphic Project using simplecpp . . . . . . . . . . . . . . . . . . . . . . . . . . . . 24
3.3 Building the Project . . . . . . . . . . . . . . . . . . . . . . . . . . . . . . . . . . . . . . . 313.4 Opening existing program/project . . . . . . . . . . . . . . . . . . . . . . . . . . . . . . . 32
4 Working with Code::Blocks and Simplecpp on Ubuntu 334.1 Installation of Code::Blocks . . . . . . . . . . . . . . . . . . . . . . . . . . . . . . . . . . . 334.2 Installation of packages for graphics.h header file . . . . . . . . . . . . . . . . . . . . . . . 344.3 Installation of Simplecpp . . . . . . . . . . . . . . . . . . . . . . . . . . . . . . . . . . . . . 344.4 Integrating Simplecpp with Code::Blocks IDE . . . . . . . . . . . . . . . . . . . . . . . . . 364.5 Writing a new c/c++ program . . . . . . . . . . . . . . . . . . . . . . . . . . . . . . . . . 394.6 Building the Project . . . . . . . . . . . . . . . . . . . . . . . . . . . . . . . . . . . . . . . 43
4.6.1 Non-Graphics Project . . . . . . . . . . . . . . . . . . . . . . . . . . . . . . . . . . 434.6.2 Graphics Project using graphics.h . . . . . . . . . . . . . . . . . . . . . . . . . . . 434.6.3 Graphics Project using simplecpp . . . . . . . . . . . . . . . . . . . . . . . . . . . . 48
4.7 Opening Existing Program/Project . . . . . . . . . . . . . . . . . . . . . . . . . . . . . . . 49
i

List of Figures
1 Code::Block IDE . . . . . . . . . . . . . . . . . . . . . . . . . . . . . . . . . . . . . . . . . 12 Menu Bar . . . . . . . . . . . . . . . . . . . . . . . . . . . . . . . . . . . . . . . . . . . . . 23 Main Toolbar . . . . . . . . . . . . . . . . . . . . . . . . . . . . . . . . . . . . . . . . . . . 24 Debugger Toolbar . . . . . . . . . . . . . . . . . . . . . . . . . . . . . . . . . . . . . . . . 35 Compiler Toolbar . . . . . . . . . . . . . . . . . . . . . . . . . . . . . . . . . . . . . . . . . 36 Manager . . . . . . . . . . . . . . . . . . . . . . . . . . . . . . . . . . . . . . . . . . . . . . 37 Editor, Start/Home Page . . . . . . . . . . . . . . . . . . . . . . . . . . . . . . . . . . . . 48 Shortcut to Create New Project or Open Existing Project . . . . . . . . . . . . . . . . . . 49 Shortcut to History of Projects Opened Using Code::Blocks . . . . . . . . . . . . . . . . . 510 Logs . . . . . . . . . . . . . . . . . . . . . . . . . . . . . . . . . . . . . . . . . . . . . . . . 511 Welcome to Code::Blocks Simplecpp Setup . . . . . . . . . . . . . . . . . . . . . . . . . . 612 Accepting License Agreement . . . . . . . . . . . . . . . . . . . . . . . . . . . . . . . . . . 613 License Inforamtion of Code::Blocks EP . . . . . . . . . . . . . . . . . . . . . . . . . . . . 714 Location of Installation . . . . . . . . . . . . . . . . . . . . . . . . . . . . . . . . . . . . . 715 Start Menu Folder . . . . . . . . . . . . . . . . . . . . . . . . . . . . . . . . . . . . . . . . 816 Application Shortcut Desktop Icon . . . . . . . . . . . . . . . . . . . . . . . . . . . . . . . 817 Installation Step . . . . . . . . . . . . . . . . . . . . . . . . . . . . . . . . . . . . . . . . . 918 Progress of Installation . . . . . . . . . . . . . . . . . . . . . . . . . . . . . . . . . . . . . . 919 Basic Information . . . . . . . . . . . . . . . . . . . . . . . . . . . . . . . . . . . . . . . . . 1020 Completing the Insallation . . . . . . . . . . . . . . . . . . . . . . . . . . . . . . . . . . . . 1021 Code::Block Simplecpp IDE . . . . . . . . . . . . . . . . . . . . . . . . . . . . . . . . . . . 1122 New form template . . . . . . . . . . . . . . . . . . . . . . . . . . . . . . . . . . . . . . . . 1223 New console application wizard . . . . . . . . . . . . . . . . . . . . . . . . . . . . . . . . . 1324 Selecting language for the project . . . . . . . . . . . . . . . . . . . . . . . . . . . . . . . . 1325 Providing title and folder for the project . . . . . . . . . . . . . . . . . . . . . . . . . . . . 1426 Selecting compiler for the project . . . . . . . . . . . . . . . . . . . . . . . . . . . . . . . . 1427 Project node with no files . . . . . . . . . . . . . . . . . . . . . . . . . . . . . . . . . . . . 1528 Adding file to the project . . . . . . . . . . . . . . . . . . . . . . . . . . . . . . . . . . . . 1529 Selecting type of file to be added in the project . . . . . . . . . . . . . . . . . . . . . . . . 1630 Select checkbox to skip this window next time . . . . . . . . . . . . . . . . . . . . . . . . . 1631 Select the language of the file added . . . . . . . . . . . . . . . . . . . . . . . . . . . . . . 1732 Details of file to be added . . . . . . . . . . . . . . . . . . . . . . . . . . . . . . . . . . . . 1733 Selecting the location and file name to be added . . . . . . . . . . . . . . . . . . . . . . . 1834 Finalize details of file to be added . . . . . . . . . . . . . . . . . . . . . . . . . . . . . . . 1835 Project node with ‘+’ sign indicating it can be expanded . . . . . . . . . . . . . . . . . . . 1936 Project node expanded . . . . . . . . . . . . . . . . . . . . . . . . . . . . . . . . . . . . . . 1937 Writing code in editor . . . . . . . . . . . . . . . . . . . . . . . . . . . . . . . . . . . . . . 1938 New form template . . . . . . . . . . . . . . . . . . . . . . . . . . . . . . . . . . . . . . . . 2039 New console application wizard . . . . . . . . . . . . . . . . . . . . . . . . . . . . . . . . . 2040 Selecting language for the project . . . . . . . . . . . . . . . . . . . . . . . . . . . . . . . . 2141 WinBGIm project . . . . . . . . . . . . . . . . . . . . . . . . . . . . . . . . . . . . . . . . 2142 Providing title and folder for the project . . . . . . . . . . . . . . . . . . . . . . . . . . . . 2243 Selecting compiler for the project . . . . . . . . . . . . . . . . . . . . . . . . . . . . . . . . 2244 Finalize details of file to be added (for line project) . . . . . . . . . . . . . . . . . . . . . . 2345 Project node with ‘+’ sign indicating it can be expanded . . . . . . . . . . . . . . . . . . . 2346 Writing program in editor (line project) . . . . . . . . . . . . . . . . . . . . . . . . . . . . 2447 New from template . . . . . . . . . . . . . . . . . . . . . . . . . . . . . . . . . . . . . . . . 2448 Simplecpp project . . . . . . . . . . . . . . . . . . . . . . . . . . . . . . . . . . . . . . . . 2549 Providing title and folder for the project . . . . . . . . . . . . . . . . . . . . . . . . . . . . 2550 Selecting compiler for the project . . . . . . . . . . . . . . . . . . . . . . . . . . . . . . . . 2651 Empty project node in Management window . . . . . . . . . . . . . . . . . . . . . . . . . 2652 Adding files to empty project node . . . . . . . . . . . . . . . . . . . . . . . . . . . . . . . 2753 Selecting c/c++ source for project . . . . . . . . . . . . . . . . . . . . . . . . . . . . . . . 27
ii

54 Selecting language for the file to be added . . . . . . . . . . . . . . . . . . . . . . . . . . . 2855 Giving location and name of the file to be added . . . . . . . . . . . . . . . . . . . . . . . 2856 Finalize details of file to be added . . . . . . . . . . . . . . . . . . . . . . . . . . . . . . . 2957 Project node with ‘+’ sign indicating it can be expanded . . . . . . . . . . . . . . . . . . . 2958 opening file in editor . . . . . . . . . . . . . . . . . . . . . . . . . . . . . . . . . . . . . . . 3059 coding . . . . . . . . . . . . . . . . . . . . . . . . . . . . . . . . . . . . . . . . . . . . . . . 3060 Output of hello world project . . . . . . . . . . . . . . . . . . . . . . . . . . . . . . . . . . 3161 Output of line project . . . . . . . . . . . . . . . . . . . . . . . . . . . . . . . . . . . . . . 3162 Output of 3poly project . . . . . . . . . . . . . . . . . . . . . . . . . . . . . . . . . . . . . 3163 Selecting Open under file in Menu Bar . . . . . . . . . . . . . . . . . . . . . . . . . . . . . 3264 Select file with .cbp extension to open an existing project . . . . . . . . . . . . . . . . . . 3265 Code::Block in Ubuntu Software Center . . . . . . . . . . . . . . . . . . . . . . . . . . . . 3366 Installing Code::Block using command line . . . . . . . . . . . . . . . . . . . . . . . . . . . 3367 Installing simplecpp . . . . . . . . . . . . . . . . . . . . . . . . . . . . . . . . . . . . . . . 3568 location of simplecpp/s++ . . . . . . . . . . . . . . . . . . . . . . . . . . . . . . . . . . . . 3569 Compiler and debugger settings . . . . . . . . . . . . . . . . . . . . . . . . . . . . . . . . . 3670 Copying the compiler . . . . . . . . . . . . . . . . . . . . . . . . . . . . . . . . . . . . . . . 3671 Change Toolchain Executable . . . . . . . . . . . . . . . . . . . . . . . . . . . . . . . . . . 3772 Changes to be made in Toolchain Executables . . . . . . . . . . . . . . . . . . . . . . . . . 3773 Simplecpp’s directory . . . . . . . . . . . . . . . . . . . . . . . . . . . . . . . . . . . . . . 3874 Additional Paths settings . . . . . . . . . . . . . . . . . . . . . . . . . . . . . . . . . . . . 3875 Starting a new project . . . . . . . . . . . . . . . . . . . . . . . . . . . . . . . . . . . . . . 3976 Selecting the language for project . . . . . . . . . . . . . . . . . . . . . . . . . . . . . . . . 3977 Title for Project . . . . . . . . . . . . . . . . . . . . . . . . . . . . . . . . . . . . . . . . . 4078 Selecting Compiler to Compile the Program . . . . . . . . . . . . . . . . . . . . . . . . . . 4079 Selecting simplecpp for projects including simplecpp . . . . . . . . . . . . . . . . . . . . . 4180 Project Node when Expanded . . . . . . . . . . . . . . . . . . . . . . . . . . . . . . . . . . 4181 Project Node when Expanded for helloworld.c (with code shown in editor) . . . . . . . . . 4282 Project node when expanded for line.c (with code shown in editor) . . . . . . . . . . . . . 4283 Project node when expanded for 3poly.cpp (with code shown in editor) . . . . . . . . . . . 4384 Output for helloworld.c . . . . . . . . . . . . . . . . . . . . . . . . . . . . . . . . . . . . . 4385 Project build options . . . . . . . . . . . . . . . . . . . . . . . . . . . . . . . . . . . . . . . 4486 Linker settings (Add Libraries) . . . . . . . . . . . . . . . . . . . . . . . . . . . . . . . . . 4487 Interface for adding libraries . . . . . . . . . . . . . . . . . . . . . . . . . . . . . . . . . . . 4588 Files/libraries to be added for graphic projects . . . . . . . . . . . . . . . . . . . . . . . . 4589 Relative or absolute path for files/libraries . . . . . . . . . . . . . . . . . . . . . . . . . . . 4690 libraries selected . . . . . . . . . . . . . . . . . . . . . . . . . . . . . . . . . . . . . . . . . 4691 Libraries added to project . . . . . . . . . . . . . . . . . . . . . . . . . . . . . . . . . . . . 4792 Output for line.c . . . . . . . . . . . . . . . . . . . . . . . . . . . . . . . . . . . . . . . . . 4793 Output for 3poly.cpp . . . . . . . . . . . . . . . . . . . . . . . . . . . . . . . . . . . . . . . 4894 Select file with .cbp extension to open an existing project . . . . . . . . . . . . . . . . . . 49
iii

1 Introduction
1.1 Code::Blocks
“Code::Blocks is a free C++ IDE built to meet the most demanding needs of its users.” [1]. Developed by‘The Code::Blocks Team’, Code::Block is a free, open-source [2] and cross-platform IDE, which supportsvarious free compilers. It is built around plugin framework, which allows functionality of Code::Block tobe extended by installing appropriate plugins. Plugins required for compiling and debugging are alreadyprovided by default. This manual is prepared after installing and testing Code::Block on Ubuntu 12.041
and Windows 7.2
1.2 Simplecpp
Simplecpp is a package used to write and execute turtle based non-graphic/graphic programs. Simplecppis a package developed by Prof. Abhiram Ranade at IIT Bombay and the book on ‘An Introductionto Programming through C++’ by Prof. Abhiram Ranade uses simplecpp to explain basic program-ming. For more information, please refer to the Chapter 1 of the book. Simplecpp is integrated withCode::Blocks and the simplecpp programs are tested with Code::Blocks on Windows 7 and Ubuntu 12.04.
2 Code::Block IDE
Code::Block IDE is shown in figure 1 (Ubuntu 12.04). The main parts of Code::Block along with figuresare discussed below
Figure 1: Code::Block IDE
1Ubuntu 12.04 with intel R©Core TMi3-2120 CPU @ 3.30GHzx4 processor 4 GB RAM and 32-bit architecture and 64bit architecture.
2Windows 7 with intel R©Core TMi3-2120 CPU @ 3.30GHzx4 processor 4 GB RAM and 32-bit architecture.
1

1. Menu bar:Menu bar is shown in figure 2. Menu bar can be toggled using F10. Few important link in menubar are described below (described from left to right):
Figure 2: Menu Bar
(a) File: File menu link contains options to create a new project, open an already existing project,save file, save project, save workspace and save everything. It also contains options for closinga single file, closing a project or closing entire workspace. Other options in File are to print,export and quit the Code::Block
(b) Edit: All the editing options required for editor are provided in Edit.
(c) View: This menu link contains link for various perspectives and toolbars along with manager,logs, script console, status bar, full screen.
(d) Project: Options related to the project is provided in this link which includes configuring buildoptions along with options for adding files, removing files and autoversioning of project.
(e) Build: Options for building the project, compiling a single file, running the project, buildingand running the project, rebuilding the project and cleaning the project is provided in build.Options for Building, rebuilding and cleaning the entire workspace is also provided along withoptions to select target (debug/release) and analysing error one by one.
(f) Debug: Various Debugging options are provided in this link.
(g) Plugins: Various plugins can be executed using this link. The link to manage the plugins isalso provided here.
(h) Settings: This contains link for various settings, setting related to Environment..., Editor...,Compiler and debugger..., Global Variables... and Scripting.... Script to be executed duringCode::Block start-up can also be edited here.
(i) Help: It contains information about Code::Block version, tips which can be toggled to bedisplayed at start-up and information about various plugins.
2. Main tool bar:Main tool bar is shown in figure 3. The buttons in Main toolbar are (from left to right):
Figure 3: Main Toolbar
(a) New File: For creating a new project.
(b) Open: For opening an already created project.
(c) Save : To save the file open in active editor (active editor means the editor tab in focus).
(d) Save all files: To save all the files for the current/selected project.
(e) Undo: To undo the executed action.
(f) Redo: To redo the undone action.
(g) Cut: To cut the selected/highlighted part in editor.
(h) Copy: To copy the selected/highlighted part in editor.
(i) Paste: To paste the cut/copy message in editor.
(j) Find: To find required text in the file in active editor.
2

(k) Replace: To replace required text in the file in active editor by some alternate text.
3. Debugger tool bar:Debugger tool bar is shown in figure 4. Debugger tool bar is used to debug the current/selectedproject. The buttons in debugger toolbar are (from left to right) Debug/Continue, Run to cursor,Next line,Next instruction, Step into, Step out, Stop debugger, Debugging Windows and Variousinfo. You will be able to understand the use of this buttons by rigorous practise of debuggingvarious projects.
Figure 4: Debugger Toolbar
4. Compiler tool bar:Compiler tool bar is shown in figure 5 and is used in building/compiling/running the current/se-lected project. The buttons in Compiler toolbar are (from left to right):
Figure 5: Compiler Toolbar
(a) Build: For building the current/selected project.
(b) Run: For running the current/selected project.
(c) Build and run: For building and running the current/selected project.
(d) Rebuild: For rebuilding the current/selected project.
(e) Abort: For aborting the build process for the current/selected project.
(f) Build target: For defining the type of build target for current/selected project, either debugor release.
5. Manager:Manager is shown in figure 6. It is labelled as Management. This window provides the list of allthe open projects and files for easy access to any required file of any project.
Figure 6: Manager
6. Editor:Editor is shown in figure 7. Here, all the coding work will take place. It is provided in tabbed
3
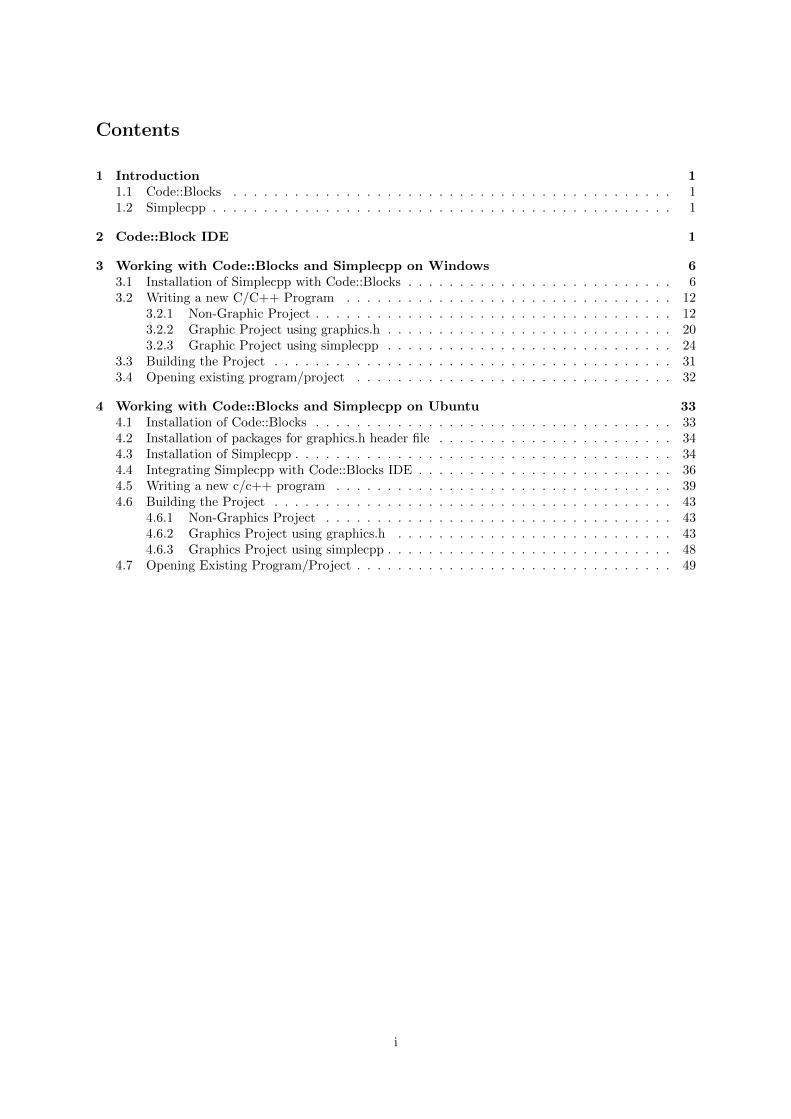
fashion to work with many files at once. When no project is open, the start page or home page isdisplayed in editor. The links given in start page is divided into two parts and explained below
Figure 7: Editor, Start/Home Page
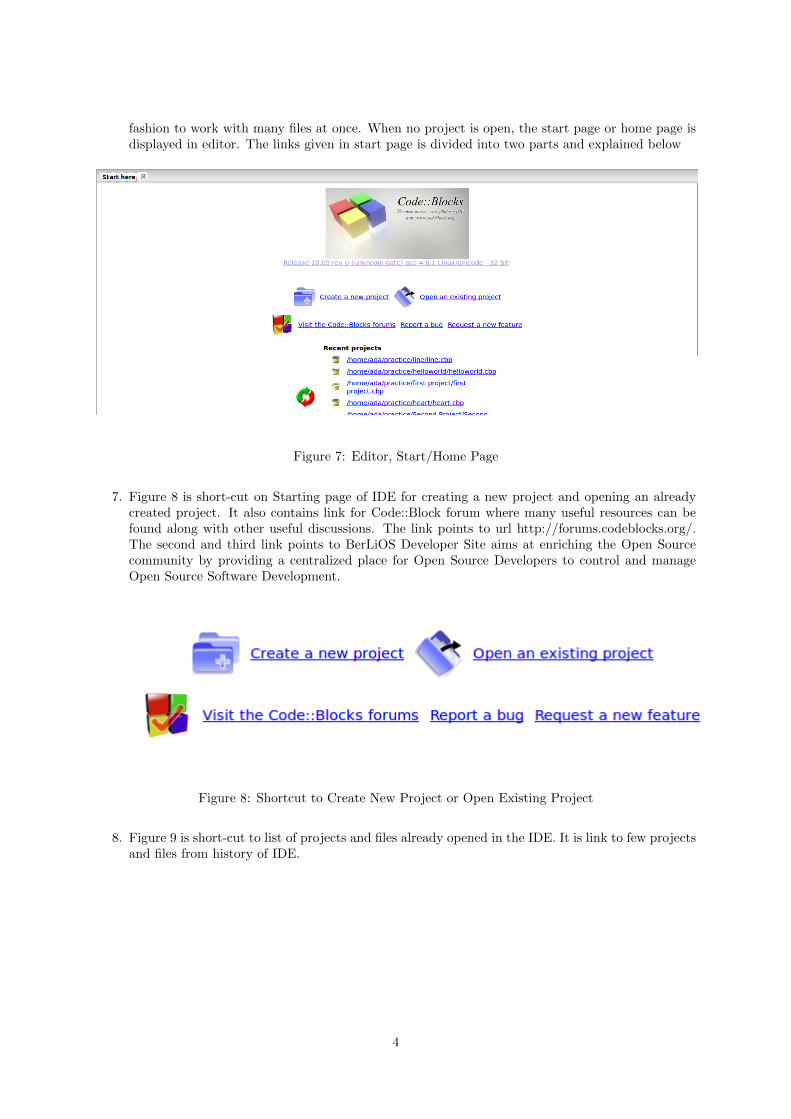
7. Figure 8 is short-cut on Starting page of IDE for creating a new project and opening an alreadycreated project. It also contains link for Code::Block forum where many useful resources can befound along with other useful discussions. The link points to url http://forums.codeblocks.org/.The second and third link points to BerLiOS Developer Site aims at enriching the Open Sourcecommunity by providing a centralized place for Open Source Developers to control and manageOpen Source Software Development.
Figure 8: Shortcut to Create New Project or Open Existing Project
8. Figure 9 is short-cut to list of projects and files already opened in the IDE. It is link to few projectsand files from history of IDE.
4

Figure 9: Shortcut to History of Projects Opened Using Code::Blocks
9. Logs:Log window is shown in figure 6. It is labelled as ‘Logs & others’. This window acts as log forvarious actions performed in IDE. All logs related to various activities can be checked at appropriatewindows.
Figure 10: Logs
5

3 Working with Code::Blocks and Simplecpp on Windows
In this section we discuss writing and building of three projects. First project (hello world.c) is a simpleprogram which displays hello world on output. The second project (line.c) uses graphics.h header fileand displays a line. The third project (3poly.cpp) uses simplecpp package and draws three polygons onoutput. The simplecpp package is integrated with Code::Blocks-EP IDE
3.1 Installation of Simplecpp with Code::Blocks
Download the .exe file from http://www.cse.iitb.ac.in/~cs101/Project/simplecpp/Windows/CB-Simplecpp-setup.
exe The installation steps are as given below.
1. A window as shown in Figure 11 will be displayed after double clicking on the .exe file. Click‘Next’.
Figure 11: Welcome to Code::Blocks Simplecpp Setup
2. A new window will be displayed as shown in Figure 12giving information on the license agreement.Select ‘I accept the agreement’. Click ‘Next’.
Figure 12: Accepting License Agreement
6
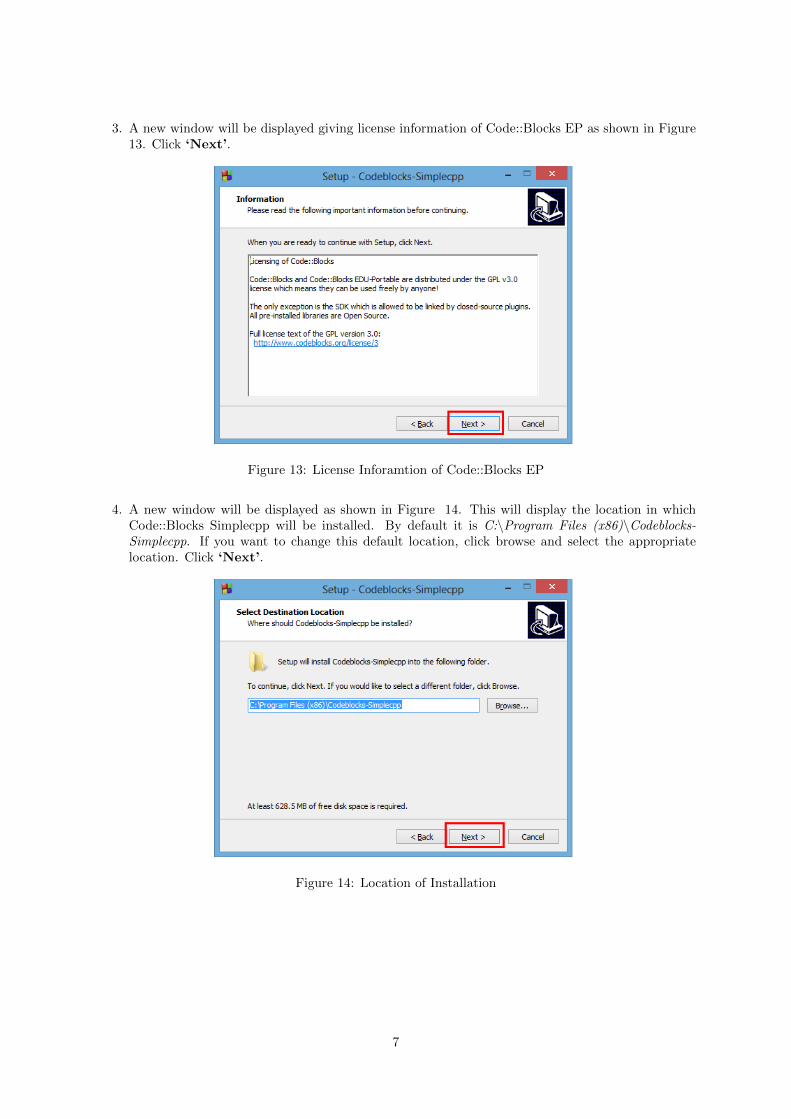
3. A new window will be displayed giving license information of Code::Blocks EP as shown in Figure13. Click ‘Next’.
Figure 13: License Inforamtion of Code::Blocks EP
4. A new window will be displayed as shown in Figure 14. This will display the location in whichCode::Blocks Simplecpp will be installed. By default it is C:\Program Files (x86)\Codeblocks-Simplecpp. If you want to change this default location, click browse and select the appropriatelocation. Click ‘Next’.
Figure 14: Location of Installation
7
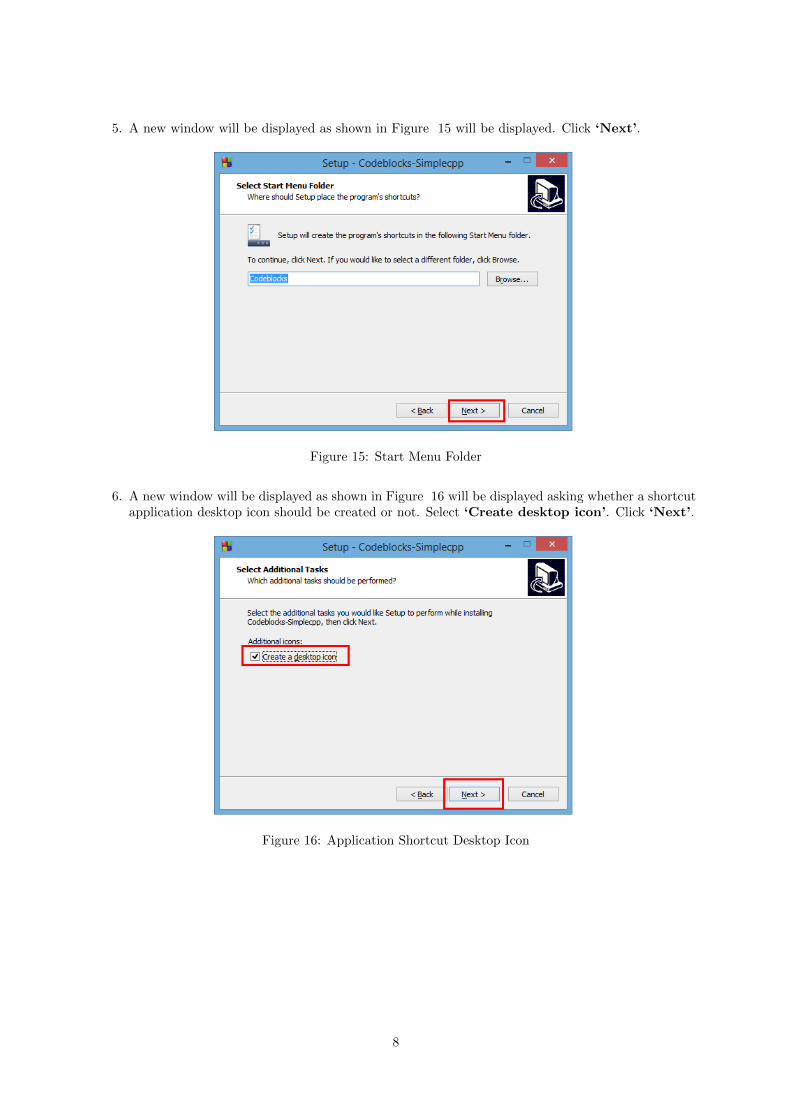
5. A new window will be displayed as shown in Figure 15 will be displayed. Click ‘Next’.
Figure 15: Start Menu Folder
6. A new window will be displayed as shown in Figure 16 will be displayed asking whether a shortcutapplication desktop icon should be created or not. Select ‘Create desktop icon’. Click ‘Next’.
Figure 16: Application Shortcut Desktop Icon
8

7. A new window will be displayed as shown in Figure 17 will be displayed. Click ‘Next’.
Figure 17: Installation Step
8. A new window will be displayed as shown in Figure 18 will be displayed. This window will showthe progress of the installation. Click ‘Next’.
Figure 18: Progress of Installation
9

9. A new window will be displayed as shown in Figure 19 will be displayed . Click ‘Next’.
Figure 19: Basic Information
10. A new window will be displayed as shown in Figure 20 will be displayed . Select ‘LaunchCodeblocks-Simplecpp. Click ‘Finish’.
Figure 20: Completing the Insallation
10
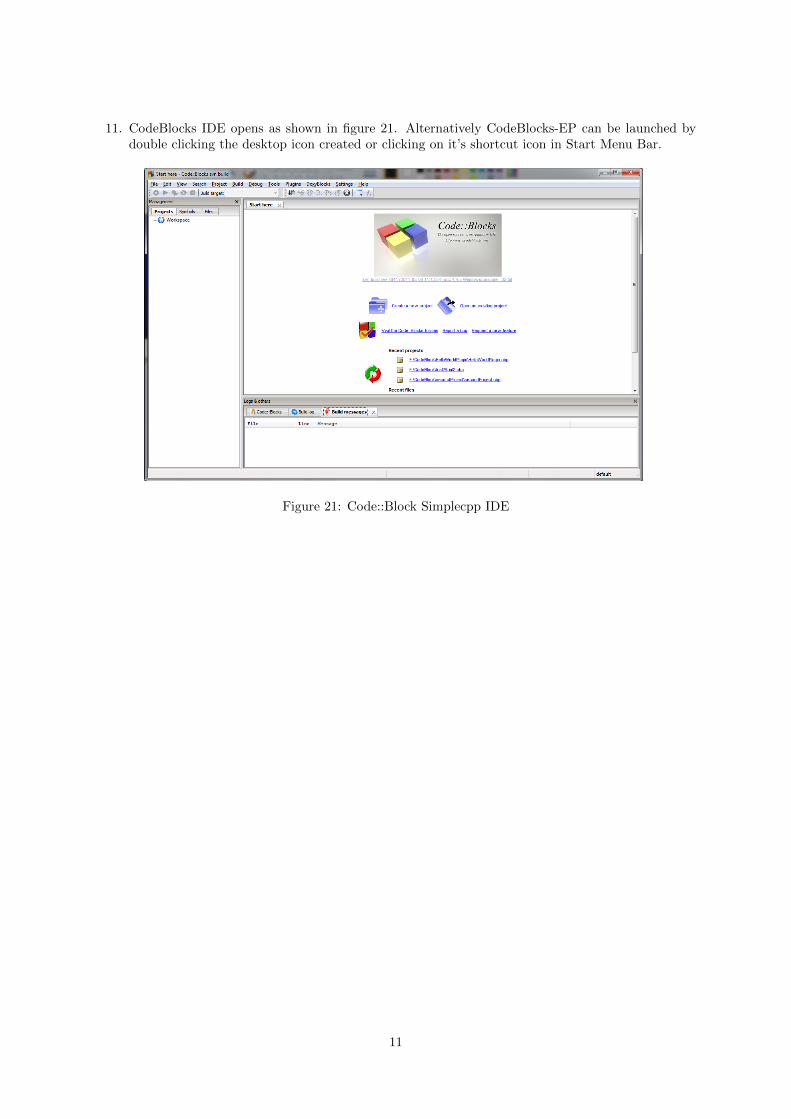
11. CodeBlocks IDE opens as shown in figure 21. Alternatively CodeBlocks-EP can be launched bydouble clicking the desktop icon created or clicking on it’s shortcut icon in Start Menu Bar.
Figure 21: Code::Block Simplecpp IDE
11
3.2 Writing a new C/C++ Program
This section is divided into writing non-graphic program, writing graphic program using graphics.hheader file and writing graphic program using simplecpp package.
3.2.1 Non-Graphic Project
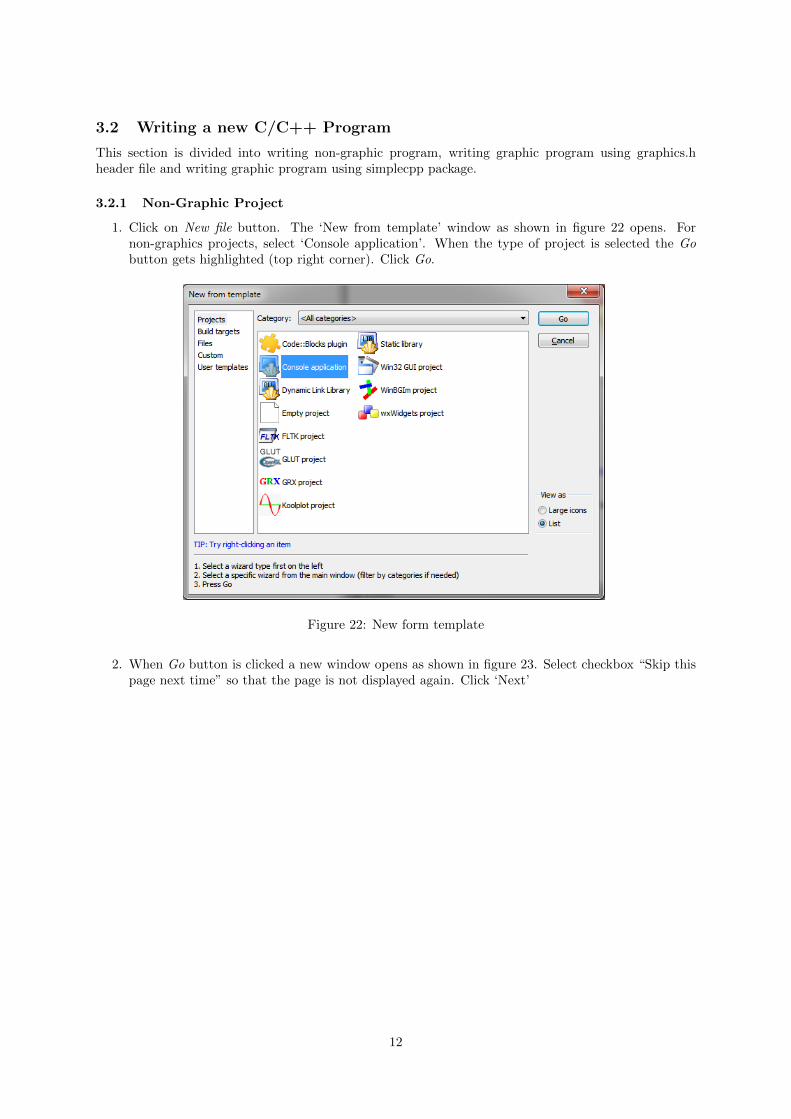
1. Click on New file button. The ‘New from template’ window as shown in figure 22 opens. Fornon-graphics projects, select ‘Console application’. When the type of project is selected the Gobutton gets highlighted (top right corner). Click Go.
Figure 22: New form template
2. When Go button is clicked a new window opens as shown in figure 23. Select checkbox “Skip thispage next time” so that the page is not displayed again. Click ‘Next’
12

Figure 23: New console application wizard
3. Next window enables user to select the language to be used for project as shown in Figure 24.Select C/C++. Here, ‘C’ is selected for helloworld project. Click ‘Next’.
Figure 24: Selecting language for the project
13
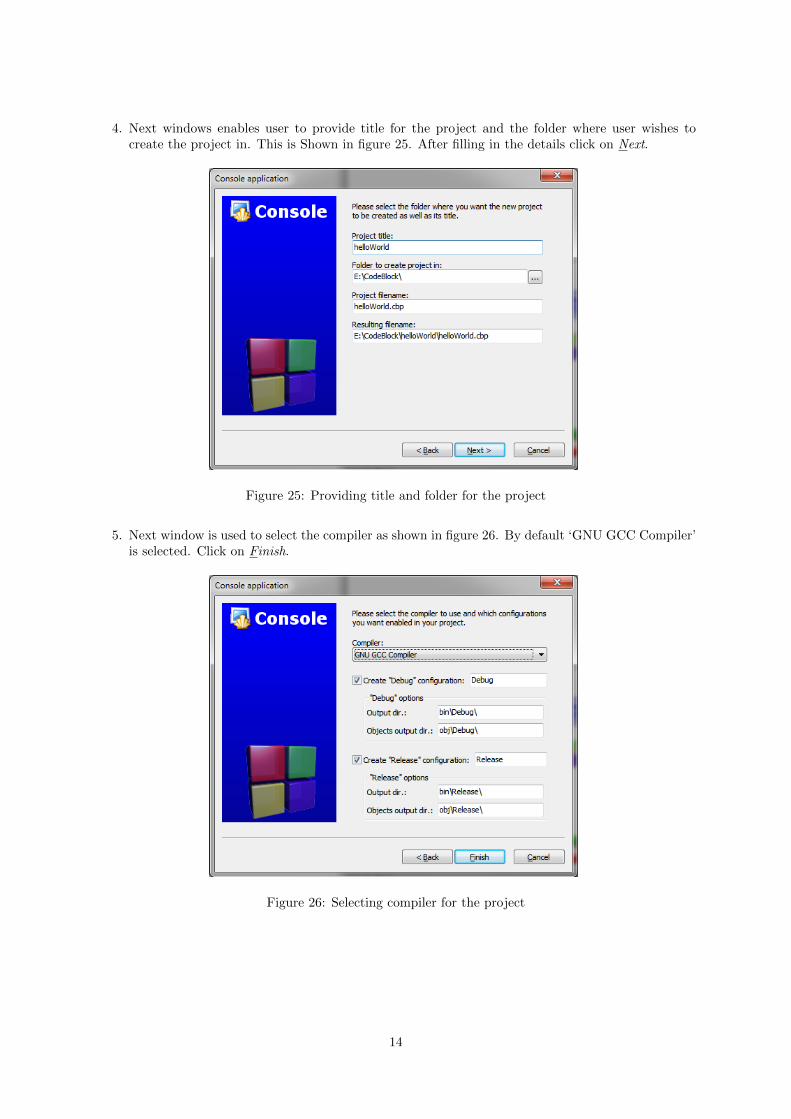
4. Next windows enables user to provide title for the project and the folder where user wishes tocreate the project in. This is Shown in figure 25. After filling in the details click on Next.
Figure 25: Providing title and folder for the project
5. Next window is used to select the compiler as shown in figure 26. By default ‘GNU GCC Compiler’is selected. Click on Finish.
Figure 26: Selecting compiler for the project
14
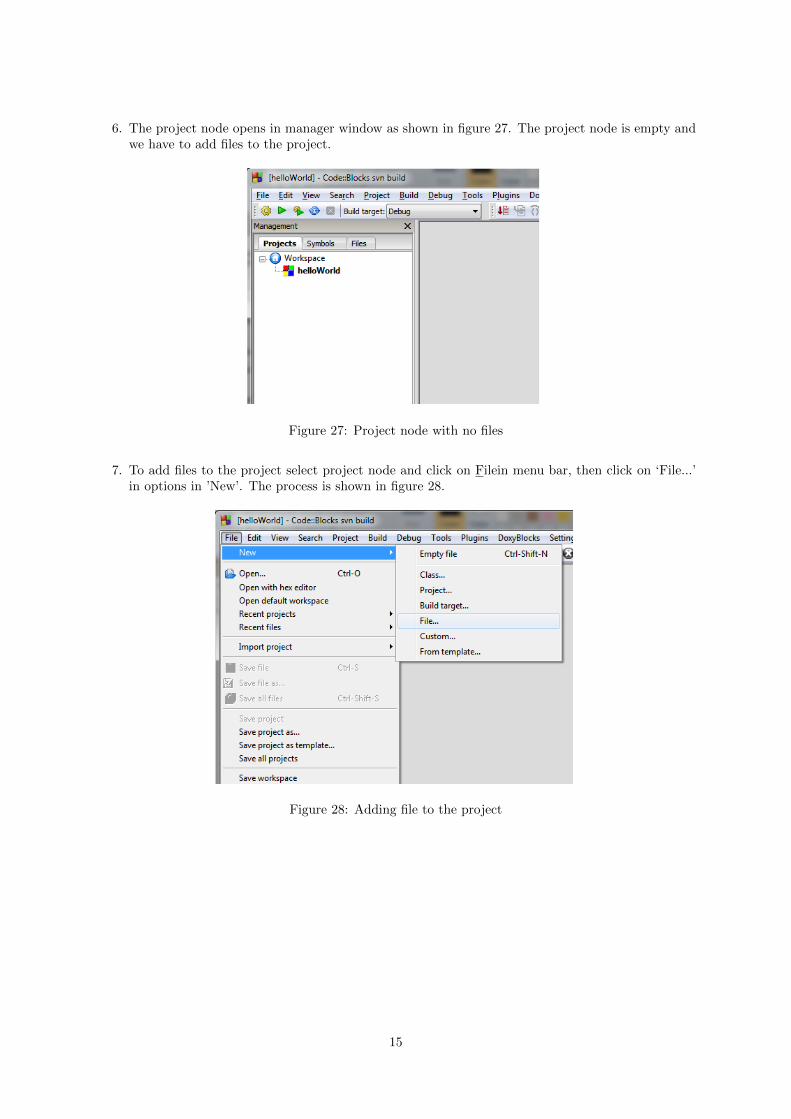
6. The project node opens in manager window as shown in figure 27. The project node is empty andwe have to add files to the project.
Figure 27: Project node with no files
7. To add files to the project select project node and click on Filein menu bar, then click on ‘File...’in options in ’New’. The process is shown in figure 28.
Figure 28: Adding file to the project
15

8. New from template opens as shown in figure 29. For our example select ‘C/C++ source’ and clickon Go.
Figure 29: Selecting type of file to be added in the project
9. A new window is displayed as shown in figure 30. Select the checkbox ‘Skip this page next time’so that it is not displayed again.
Figure 30: Select checkbox to skip this window next time
16

10. Select the preferred language as shown in figure 31. We have selected ‘C’ for our helloworld example.
Figure 31: Select the language of the file added
11. Figure 32 shows the window that opens to add the file. click on ‘...’ beside ‘Filename with fullpath’.
Figure 32: Details of file to be added
17
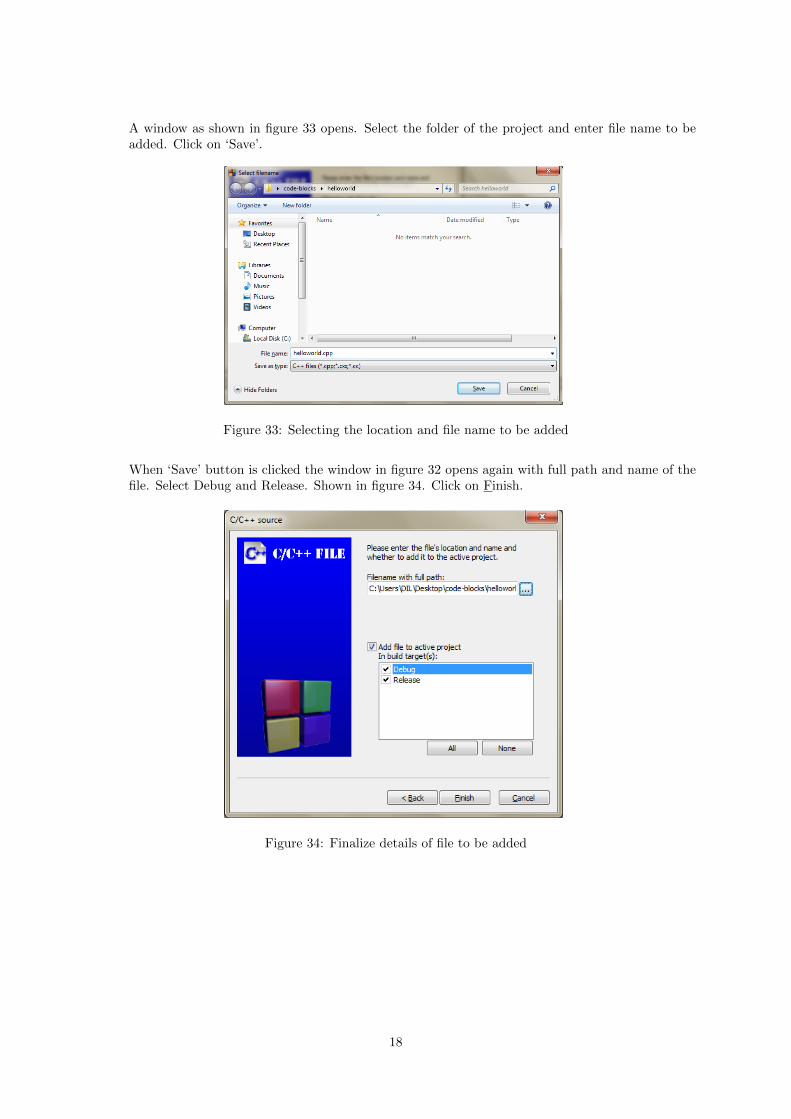
A window as shown in figure 33 opens. Select the folder of the project and enter file name to beadded. Click on ‘Save’.
Figure 33: Selecting the location and file name to be added
When ‘Save’ button is clicked the window in figure 32 opens again with full path and name of thefile. Select Debug and Release. Shown in figure 34. Click on Finish.
Figure 34: Finalize details of file to be added
18

12. Management window now shows project node which can be expanded. Click on project node anddouble click on ‘hello.c’ to open the file in editor shown in figure 35 and figure 36
Figure 35: Project node with ‘+’ sign indicating it can be expanded
Figure 36: Project node expanded
13. When the main.cpp file opens in editor, user can start coding. Code is shown in figure 37.
Figure 37: Writing code in editor
19

3.2.2 Graphic Project using graphics.h
1. Click on New file button. The ‘New form template’ window as shown in figure 22 opens. Forgraphics projects, select ‘WinBGIm project’. Go button gets highlighted (top right corner). Clickon Go.
Figure 38: New form template
2. When Go button is clicked a new window opens as shown in Figure 39. Select checkbox “Skip thispage next time” so every time new project is created this window should not come. Click on Next.If this step has been performed earlier, this window will not be displayed.
Figure 39: New console application wizard
3. Next window enables user to select the language to be used for project as shown in figure 40. For
20

the example hello world used in this manual select ‘C’ and click on Next.
Figure 40: Selecting language for the project
4. Next window asks the user to select type of project. The options are ‘Add Console’ and ‘Graphicsonly’ as shown in figure 41. Select ‘Graphics only’ and click on Next.
Figure 41: WinBGIm project
21

5. Next windows enables user to provide title for the project and the folder where user wishes tocreate the project. This is Shown in figure 42. After filling in the details click on Next.
Figure 42: Providing title and folder for the project
6. Next window is used to select the compiler as shown in figure 43. By default ‘GNU GCC Compiler’is selected. Click on Finish.
Figure 43: Selecting compiler for the project
22
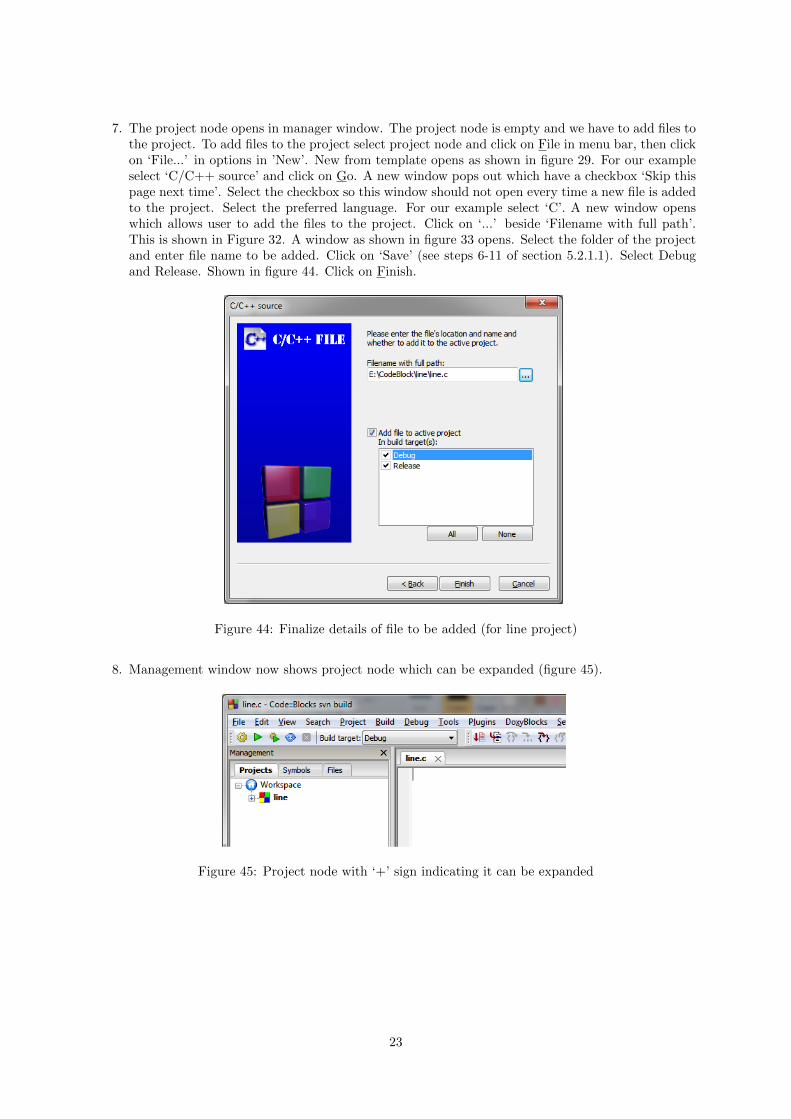
7. The project node opens in manager window. The project node is empty and we have to add files tothe project. To add files to the project select project node and click on File in menu bar, then clickon ‘File...’ in options in ’New’. New from template opens as shown in figure 29. For our exampleselect ‘C/C++ source’ and click on Go. A new window pops out which have a checkbox ‘Skip thispage next time’. Select the checkbox so this window should not open every time a new file is addedto the project. Select the preferred language. For our example select ‘C’. A new window openswhich allows user to add the files to the project. Click on ‘...’ beside ‘Filename with full path’.This is shown in Figure 32. A window as shown in figure 33 opens. Select the folder of the projectand enter file name to be added. Click on ‘Save’ (see steps 6-11 of section 5.2.1.1). Select Debugand Release. Shown in figure 44. Click on Finish.
Figure 44: Finalize details of file to be added (for line project)
8. Management window now shows project node which can be expanded (figure 45).
Figure 45: Project node with ‘+’ sign indicating it can be expanded
23

9. Click on project node and double click on ‘line.c’ to open the file in editor. When the line.c fileopens in editor, user can start coding. Code is shown in figure 46.
Figure 46: Writing program in editor (line project)
3.2.3 Graphic Project using simplecpp
1. Click on New file button. The ‘New form template’ window as shown in figure 22 opens. Forgraphics projects using simplecpp, select ‘Simplecpp project’. Go button gets highlighted (topright corner). Click on Go.
Figure 47: New from template
24

2. Next window asks the user to select type of project. The options are ‘Add Console’ and ‘Graphicsonly’ as shown in figure 48. Select ‘Graphics only’ and click on Next.
Figure 48: Simplecpp project
3. Next windows enables user to provide title for the project and the folder where user wishes tocreate the project. This is Shown in figure 49. After filling in the details click on Next.
Figure 49: Providing title and folder for the project
25

4. Next window is used to select the compiler as shown in figure 43. By default ‘GNU GCC Compiler’is selected. Click on Finish.
Figure 50: Selecting compiler for the project
5. The project node opens in manager window. The project node is empty as shown in figure 51. Wehave to add files to the project.
Figure 51: Empty project node in Management window
26

6. To add files to the project select project node and click on File in menu bar, then click on ‘File...’in options in ’New’. Shown in figure 52.
Figure 52: Adding files to empty project node
7. New from template opens as shown in figure 53. For our example select ‘C/C++ source’ and clickon Go.
Figure 53: Selecting c/c++ source for project
27

8. Select the preferred language. For our example select ‘C++’ (figure 54).
Figure 54: Selecting language for the file to be added
A new window opens which allows user to add the files to the project. Click on ‘...’ beside ‘Filenamewith full path’. This is shown in Figure 32. A window as shown in figure 55 opens. Select thefolder of the project and enter file name to be added. Click on ‘Save’.
Figure 55: Giving location and name of the file to be added
28
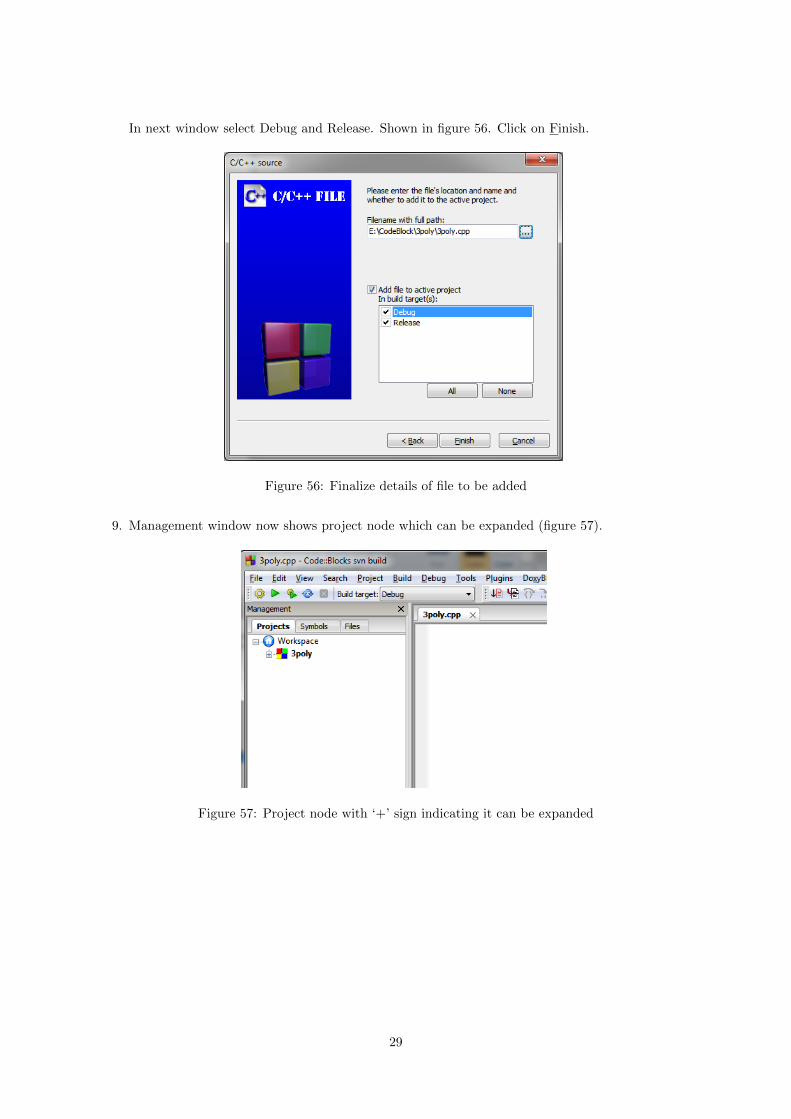
In next window select Debug and Release. Shown in figure 56. Click on Finish.
Figure 56: Finalize details of file to be added
9. Management window now shows project node which can be expanded (figure 57).
Figure 57: Project node with ‘+’ sign indicating it can be expanded
29
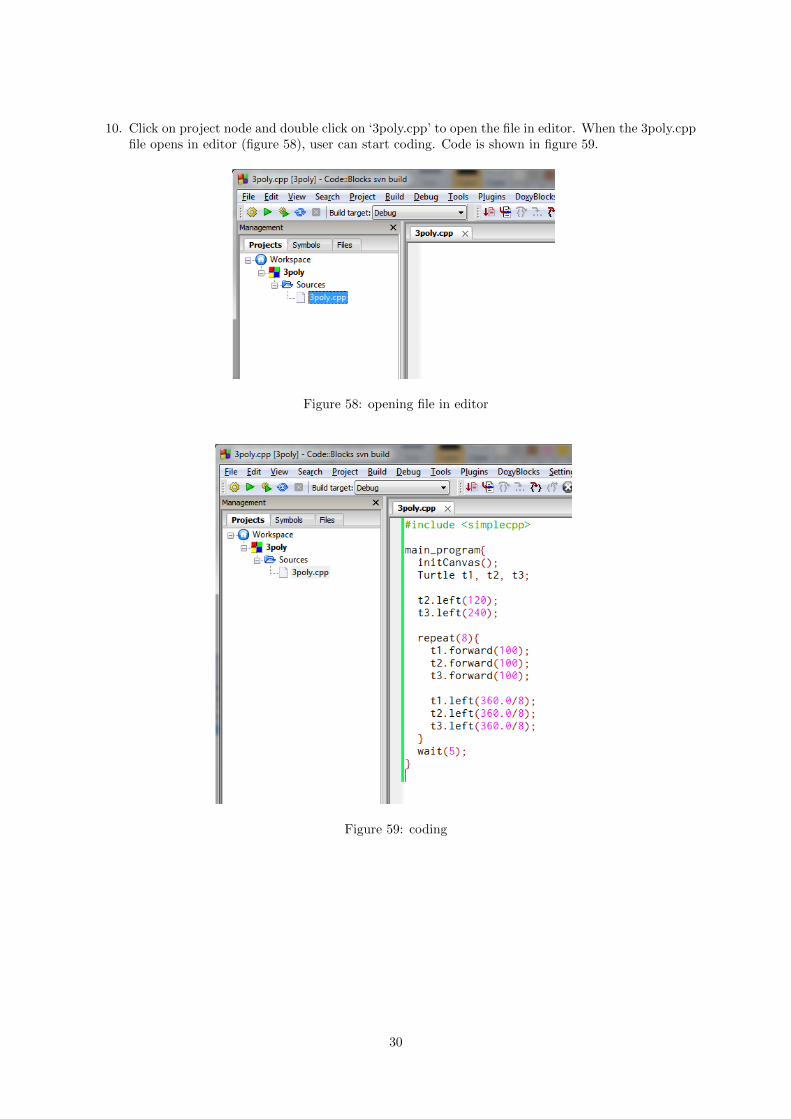
10. Click on project node and double click on ‘3poly.cpp’ to open the file in editor. When the 3poly.cppfile opens in editor (figure 58), user can start coding. Code is shown in figure 59.
Figure 58: opening file in editor
Figure 59: coding
30

3.3 Building the Project
The process to build the graphics and non-graphics project is same, just Click on ‘Build’ and then ‘Run’(or directly on ‘Build and run’). The output for the program used is shown in figure 60 for hello worldproject, figure 61 for line project and figure 62 for 3poly project.
Figure 60: Output of hello world project
Figure 61: Output of line project
Figure 62: Output of 3poly project
31

3.4 Opening existing program/project
Click on Open button 63. Browse to desired directory and open the file with .cbp extension as shown infigure 64.
Figure 63: Selecting Open under file in Menu Bar
Figure 64: Select file with .cbp extension to open an existing project
32

4 Working with Code::Blocks and Simplecpp on Ubuntu
In this section we discuss writing and building three projects. First project (hello world.c) is simpleprogram which displays hello world on output. The other project (line.c) uses graphics.h header file anddisplays a line. graphics.h is not supported by gcc, which is the default C/C++ compiler on Ubuntu.The third project (3poly.cpp) uses simplecpp package and draws three polygons on output. We have toinstall some packages, include few libgraph libraries during building the project with graphic.h headerfile.
4.1 Installation of Code::Blocks
Pre-requisite for installing Code::Block is ‘libwxgtk’ which is available in ubuntu software center. Thispackage will be already installed in your system3. It is also advised to install ‘build-essential’ packageand update repository list. In case the libwxgtk is not installed, it can be installed from command lineusing command given in listing 1 [3]. Code::Block is available in Ubuntu’s repository. It can be installedusing Ubuntu Software Center or it can also be installed using command line as given in listing 2.
1 $ sudo apt−get i n s t a l l l ibwxgtk2 .8−02 $ sudo apt−get i n s t a l l bui ld−e s s e n t i a l3 $ sudo apt−get update
Listing 1: Installing libwxgtk2.8-0 using command line
1 $ sudo apt−get i n s t a l l codeb locks
Listing 2: Installing Code::Blocks using command line
Figure 65: Code::Block in Ubuntu Software Center
Figure 66: Installing Code::Block using command line
3Check for the libwxgtk version available for your Ubuntu, minimum required version for Code::Block to run is 2.0,version available on Ubuntu 12.04 is 2.8
33

Figure 65 shows Code::Block along with it’s logo in Ubuntu Software Center, while figure 66 showsinstallation of Code::Block using command line. In figure 66 four underlined lines are:
line 1: Command to install the Code::Block.
line 2: Packages installed along with Code::Block.
line 3: Packages suggested along with Code::Block installation. libwxgtk2.84 package as mentioned aboveis already installed in your system. libwxgtk2.8-dev package is not required.
line 4: Final list of packages that will be installed in your system
When command line prompts for [Y/n] enter ‘y’ and press enter. When Code::Block is run for first time,It asks for default compiler. Select the appropriate compiler to proceed further. We have used ‘GNUGCC Compiler’.
4.2 Installation of packages for graphics.h header file
GCC compiler does not support graphics.h, conio.h, windows.h and few other header files that workson Turbo C or Borland C. graphics.h header files enables programmer to write simple c/c++ graphicsprograms. In Ubuntu, gcc is default c/c++ compiler, thus, we have to make some settings, for gcc tosupport graphics[4]. We will start with installing some packages from command line as given in listing 3
1 $ sudo apt−get i n s t a l l l i b s d l−image1 . 2 l i b s d l−image1 .2−dev gu i l e −1.8 gu i l e −1.8−devl i b s d l 1 . 2 debian l i b a r t −2.0−dev l i b a u d i o f i l e −dev l ibe sd0−dev l i b d i r e c t f b −devl i b d i r e c t f b −ext ra l i b f r e e t yp e 6−dev l ibxext−dev x11proto−xext−dev l i b f r e e t y p e 6l i baa1 l ibaa1−dev l i b s l ang2−dev l ibasound2 l ibasound2−dev
Listing 3: Installing required packages to support graphics.h
After the above mentioned packages are installed, download the libgraph package (download linkgiven in footnote5 ) and untar it in home directory. For this untarring tool must be installed on system.Open the command line and follow the instructions given in listing 4.
1 $ cd l ibgraph −1.0 .22 $ . / c on f i gu r e3 $ sudo make4 $ sudo make i n s t a l l5 $ sudo cp / usr / l o c a l / l i b / l ibg raph .∗ / usr / l i b
Listing 4: Installing libgraph package using command line
4.3 Installation of Simplecpp
Download the simplecpp’s tar package from http://www.cse.iitb.ac.in/~cs101/Project/simplecpp/
Ubuntu/simplecpp.tar. Untar the tar file and change to the simplecpp directory and run the command‘sh configure.sh’. Shown in figure 67.
1 $ cd DIRECTORY WHERE Simplecpp . tar IS DOWNLOADED2 $ tar −xvf Simplecpp . ta r3 $ cd simplecpp /4 $ sh con f i gu r e . sh
Listing 5: Installing simplecpp package using command line
4Details about above mentioned packages can be found at http://packages.ubuntu.com/precise/allpackages.5http://download.savannah.gnu.org/releases/libgraph/libgraph-1.0.2.tar.gz
34
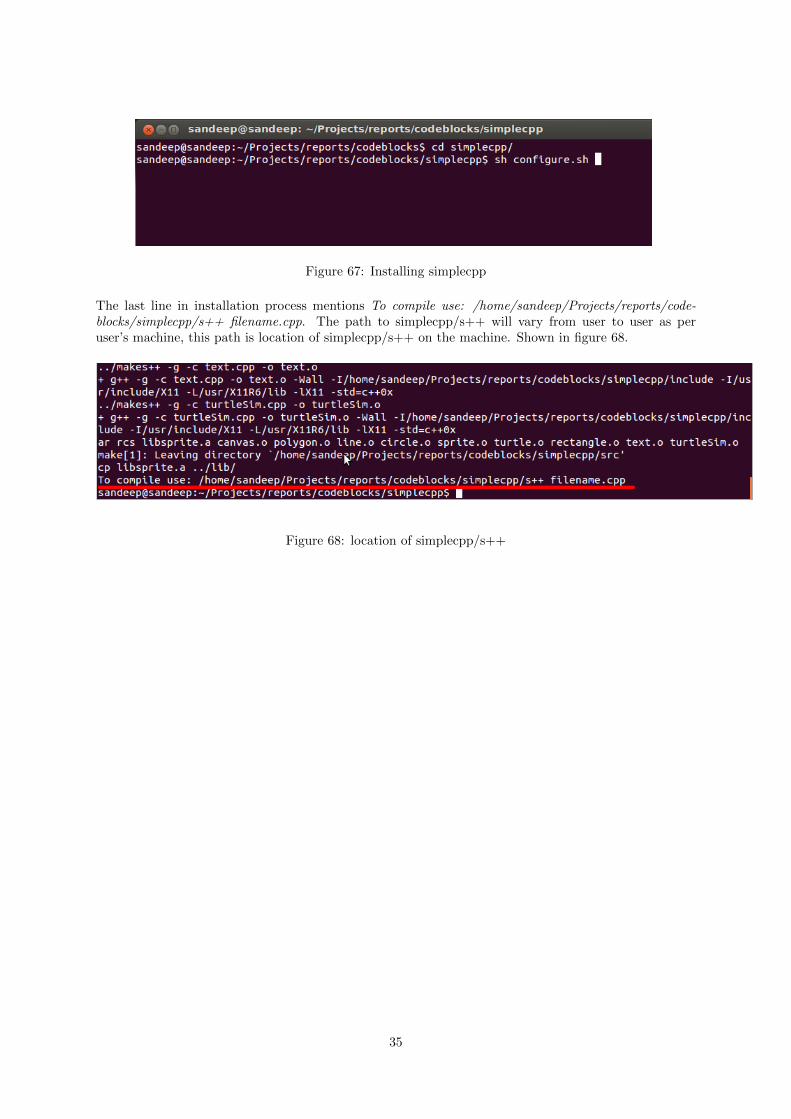
Figure 67: Installing simplecpp
The last line in installation process mentions To compile use: /home/sandeep/Projects/reports/code-blocks/simplecpp/s++ filename.cpp. The path to simplecpp/s++ will vary from user to user as peruser’s machine, this path is location of simplecpp/s++ on the machine. Shown in figure 68.
Figure 68: location of simplecpp/s++
35

4.4 Integrating Simplecpp with Code::Blocks IDE
To create a project using simplecpp package, we need to make some changes in the compiler and debuggersettings. The steps to make the required changes are as given below.
1. Open Code::Blocks and click on ‘Settings’ → ‘Complier and Debugger...’.
2. A window labelled Compiler and debugger settings will open as shown in Figure 69.
Figure 69: Compiler and debugger settings
3. By default the selected compiler is ‘GNU GCC Compiler’. Click ‘Copy’ highlighted with red boxin figure 69.
4. A window as shown in figure 70 will open. Write ‘simplecpp’ and click ‘Ok’.
Figure 70: Copying the compiler
36

5. A message stating ’change the appropriate setting in Toolchain executable’ is displayed, which isshown in figure 71.
Figure 71: Change Toolchain Executable
6. Click on ‘Toolchain executables’ tab highlighted with red box in figure 69.
7. Change the compiler path of Code::Blocks to that of simplecpp. The steps are given below.
8. Click all ‘...’ buttons highlighted with red box in figure 72) on by one. Change all the settings asshown in figure.
9. When ‘...’ is clicked, browse to the ‘/simplecpp’ directory as shown in figure 73. ‘s++’ and‘makes++’ are available in ‘/simplecpp/’ folder. ‘libsprite.a’ is available in ‘/simplecpp/lib/’ folder.
Figure 72: Changes to be made in Toolchain Executables
10. To summarize, the list of all the fields that need to be changed is given below
(a) Compiler’s installation directory: /simplecpp/
(b) C compiler: /simplecpp/s++/
(c) C++ compiler: /simplecpp/s++/
(d) Linker for Dynamic libs: /simplecpp/s++/
(e) Linker for static libs: /simplecpp/s++/libsprite.a
(f) Make program: /simplecpp/makes++/
37

Figure 73: Simplecpp’s directory
11. When all the required fields are changed, click on ‘Additional Paths’ shown in red block in figure 72.
12. In Additional Paths click ‘Add’ as shown in Figure 74. Browse to /simplecpp/ directory and clickon Ok. User will return on Compiler and debugger setting window. Click Ok again to exit settingsand return to editor.
Figure 74: Additional Paths settings
38

4.5 Writing a new c/c++ program
1. Click on New file button. The ‘New from template’ window opens as shown in figure 75. Selectthe type of project you want to program in. When the type of project is selected the Go buttongets highlighted (top right corner). Select ‘Console application’ and click on ‘Go’.
Figure 75: Starting a new project
2. When Go button is clicked, a new window opens as shown in figure 76. This window enables theuser to select the required language to proceed. Select the language and click on next.
Figure 76: Selecting the language for project
39

3. The subsequent windows enable the user to provide title for the project and the folder where userwishes to create the project in. This is shown in figure 77. After filling in the details click ‘Next’.
Figure 77: Title for Project
4. Next window is to select the compiler. By default ‘GNU GCC Compiler’ is selected. In this window,the user can change the compiler to be used as per the use and requirements.Non-graphic and Programs including graphics.h header file: Select ‘GNU GCC Compiler’(figure 78)Simplecpp programs: Select ‘Simplecpp’ (figure 79) . Click on Finish.
Figure 78: Selecting Compiler to Compile the Program
40

Figure 79: Selecting simplecpp for projects including simplecpp
5. Now, the project node opens in manager window as shown in figure 80. Project node can beexpanded to see the main.c file.
Figure 80: Project Node when Expanded
41

When main.c file is clicked, it opens in editor as shown in figure 81 for hello world project.
Figure 81: Project Node when Expanded for helloworld.c (with code shown in editor)
6. Code used for graphics program (line) is shown in figure 82.
Figure 82: Project node when expanded for line.c (with code shown in editor)
42

7. Code used for simplecpp program (3poly) is shown in figure 83. Every project involving simplecpphas to include simplecpp package as seen in first line of the code.
Figure 83: Project node when expanded for 3poly.cpp (with code shown in editor)
8. While using Code::Blocks for the first time, some extra windows will be displayed. In this manualonly the important windows are shown.
4.6 Building the Project
4.6.1 Non-Graphics Project
After the code is written, project needs to be built. Click on ‘build and run’ from compiler bar. Outputis as shown in figure 84.
Figure 84: Output for helloworld.c
4.6.2 Graphics Project using graphics.h
To build a program involving graphics.h, it is recommend to enable full logging in Code::Block. Fulllogging also helps in better debugging. Steps to enable full Full logging in Code::Block is given inappendix ??
43

Now the project using graphics.h (line) has to be linked with libraries copied in /usr/lib while installinglibgraph package. The steps to link the libraries and build the project is given below.
1. Right click on project node in Manager box and select build options... A new window ‘Project buildoptions’ as shown in figure 85 pops up. Option to change the compiler selected for the project isalso available in this window.
Figure 85: Project build options
2. In ‘Project build options’ window, click on linker settings tab. This tab is shown in figure 86.
Figure 86: Linker settings (Add Libraries)
44

3. In linker settings tab click on Add button under Link libraries box. When Add button is clicked asmall window titled Add library opens as shown in figure 87.
Figure 87: Interface for adding libraries
4. Click on dotted button to right of box. A new window opens as shown in figure 88.This window enables user to browse to appropriate folder and to select required library. Browse tothe /usr/lib directory. All the required library files are not visible.Select all files in dropdown placed at the bottom, to enable visibility of all types of files.Select all the libgraph .* files, except libgraph.la file. Files to be selected are shown in the figure 88.
Figure 88: Files/libraries to be added for graphic projects
45

5. Libraries shown in Ubuntu 12.04, 32-bit OS are libgraph.a, libgraph.so, libgraph.so.1, libgraph.so.1.0.2,libgraph.so.4 and libgraph.so.4.0.0. In Ubuntu 12.04, 64-bit OS libraries libgraph.so.4 and lib-graph.so.4.0.0 are not available. Select all the libgraph.* files except libgraph.la
6. After selecting all the required libraries click on Open. A new window labelled ‘Question’ will openasking ‘Keep this as relative path’ as shown in figure 89. Click on No.
Figure 89: Relative or absolute path for files/libraries
7. The libraries will be linked using absolute path as shown in figure 90. Click on ‘Ok’.
Figure 90: libraries selected
46

8. We are now re-directed to linker settings tab. The added libraries are shown. In Other linkeroptions window write ‘-lgraph’ . The final setup is shown in figure 91 with all the required 6libraries and ‘-lgraph’. Click on ‘Ok’ to get back to editor. Now we are ready to build the projectwith graphics.h header file
Figure 91: Libraries added to project
9. Now click the build and run button from compiler bar and output will be displayed as shown infigure 92.
Figure 92: Output for line.c
47
4.6.3 Graphics Project using simplecpp
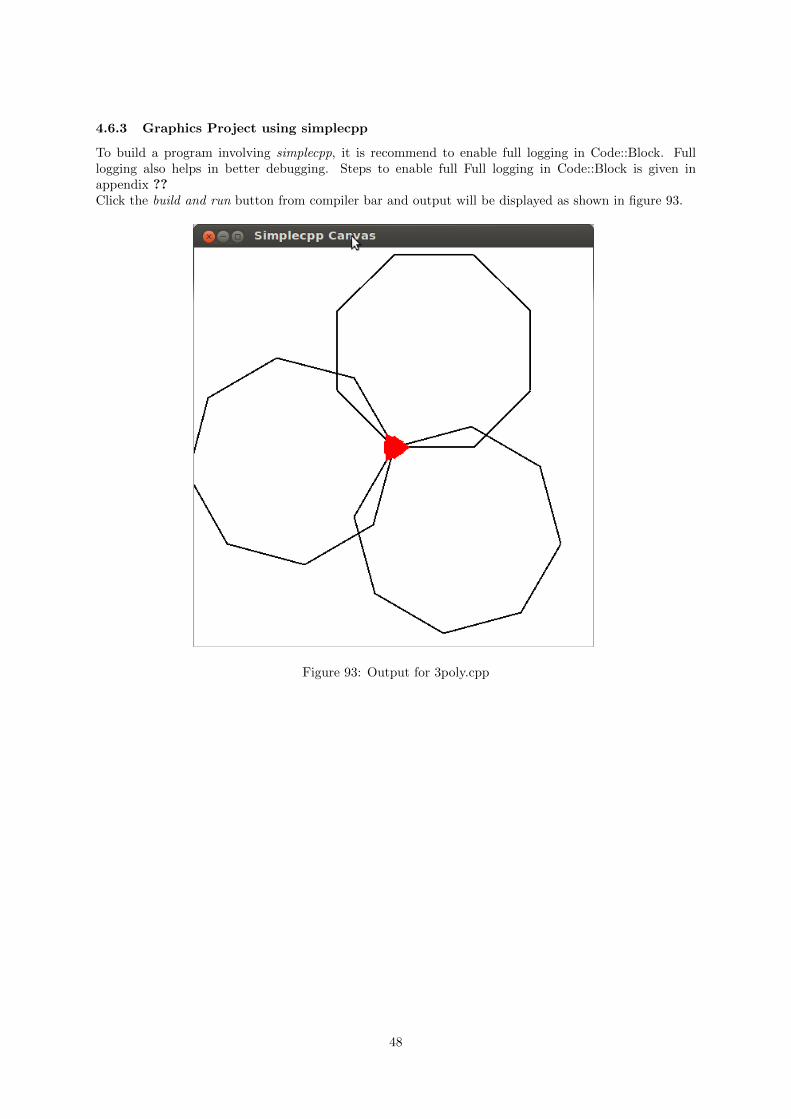
To build a program involving simplecpp, it is recommend to enable full logging in Code::Block. Fulllogging also helps in better debugging. Steps to enable full Full logging in Code::Block is given inappendix ??Click the build and run button from compiler bar and output will be displayed as shown in figure 93.
Figure 93: Output for 3poly.cpp
48

4.7 Opening Existing Program/Project
Click File and select ‘Open’. Browse to desired directory and select the file with .cbp extension as shownin figure 94 and click on Open.
Figure 94: Select file with .cbp extension to open an existing project
49

References
[1] The Code::Block Team. Code::block homepagehttp://www.codeblocks.org/.
[2] The Code::Block Team. Gpl v3.0 licensehttp://www.codeblocks.org/license.
[3] Installing code::block on ubuntuhttp://wiki.codeblocks.org/index.php?title=Installing_Code::Blocks_from_source_on_
Linux.
[4] Eternal thinker: How to use graphics.h in ubuntu?http://blog.eternal-thinker.com/2010/09/how-to-use-graphicsh-in-ubuntu.html.
50