manual oplus nl payment - gbedv gmbh & co....
TRANSCRIPT

Manual OPlus NL Payment
Prepared for
Customer and Partners
Project
OPplus
Prepared by
gbedv

manual_opp_NL_payment.docx
gbedv
Documentation
Manual OPplus NL Payment
2 of 17
Contents General Information ................................................................................................................................ 3
Manual Structure................................................................................................................................. 3
Description of Icons ............................................................................................................................. 3
OPplus Navigation Area ........................................................................................................................... 4
OPplus License Information module ....................................................................................................... 5
Setup Configuration ............................................................................................................................ 6
OPplus NL Payment module .................................................................................................................... 9
Required Orderer Bank Master Data ................................................................................................ 10
Bank Accounts (Orderer Bank) ...................................................................................................... 10
Required Customer Master Data ...................................................................................................... 11
Customer Bank Account Card ........................................................................................................ 11
Required Vendor Master Data .......................................................................................................... 12
Vendor Bank Account Card ........................................................................................................... 12
NL Payment Setup ............................................................................................................................. 13
General tab .................................................................................................................................... 13
File tab ........................................................................................................................................... 14
Payment Types .............................................................................................................................. 15
Payment Proposal Card ..................................................................................................................... 16
PMT NL tab .................................................................................................................................... 16

manual_opp_NL_payment.docx
gbedv
Documentation
Manual OPplus NL Payment
3 of 17
General Information
Manual Structure This manual describes the following modules of the certified vertical solution OPplus:
OPplus NL Payment
In the application menu, the functionalities of these modules are available via the “Payments” menu group. The manual describes the relevant fields and functions as well as procedures exemplifying the use of OPplus. For help about a specific field, click the field and press F1. Please note that OPplus modules may be purchased individually. Therefore, descriptions, menu items and illustrations of cross-module functionalities are not necessarily available to all users. The following modules of the certified vertical solution OPplus are described in separate manuals: OPplus Payments, OPplus G/L Open Entries, OPplus Ext. Lists and Reports, OPplus Analysis (Trial Balance & VAT).
Description of Icons
Information – Indicates sections which include important information to be considered by the user.
Reminder – Reminds the user of already mentioned information or processes which enable the user to achieve optimized results.
Tip – Indicates sections which assist the user to apply the functionality correctly.
Warning – Signifies information of high importance to be considered in order to avoid any errors.
manual_opp_NL_payment.docx
gbedv
Documentation
Manual OPplus NL Payment
4 of 17
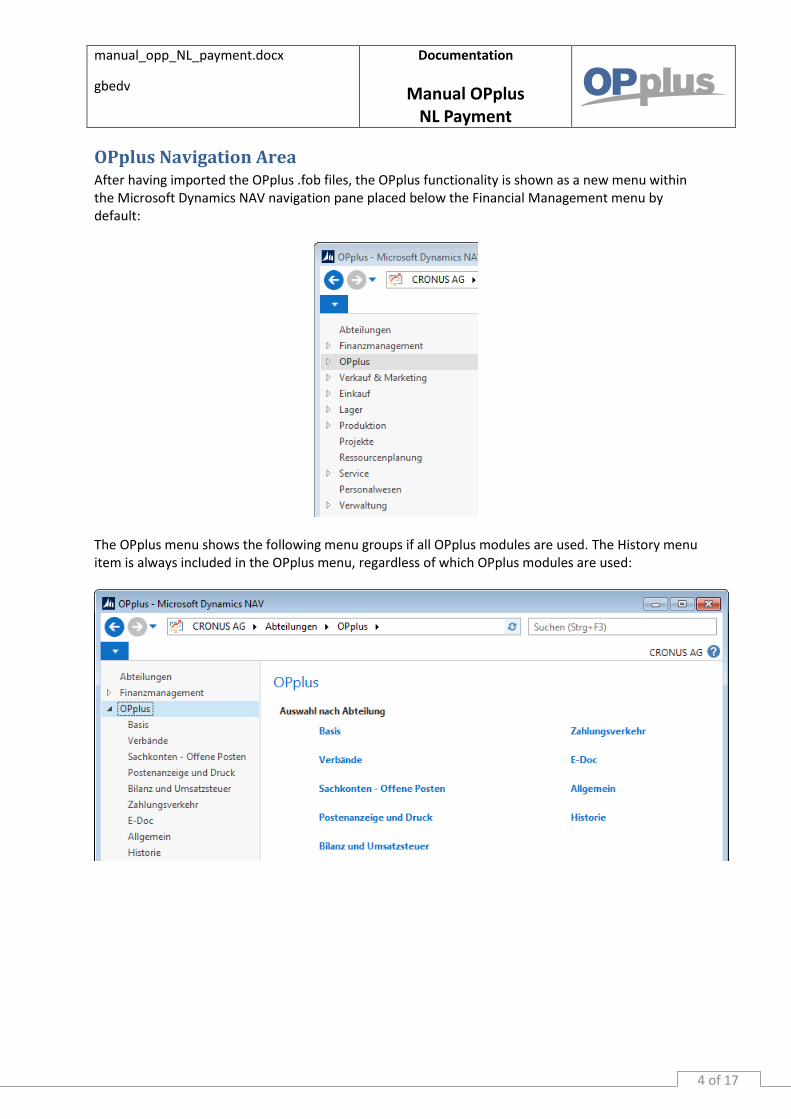
OPplus Navigation Area After having imported the OPplus .fob files, the OPplus functionality is shown as a new menu within the Microsoft Dynamics NAV navigation pane placed below the Financial Management menu by default:
The OPplus menu shows the following menu groups if all OPplus modules are used. The History menu item is always included in the OPplus menu, regardless of which OPplus modules are used:

manual_opp_NL_payment.docx
gbedv
Documentation
Manual OPplus NL Payment
5 of 17
OPplus License Information module This chapter describes the benefit of the OPplus License Information module which you will find in the navigation area of the General group. This module is always integrated and a prerequisite for using OPplus regardless which modules of OPplus you plan to use.
On the OPplus License Information page, you can see which modules are activated in the customer license. You may implement OPplus in a database without activating all modules in every company.

manual_opp_NL_payment.docx
gbedv
Documentation
Manual OPplus NL Payment
6 of 17
In order to activate a module it is necessary that a) the respective module is licensed and b) that the setup of the module has been started.
If you have licensed the Associations module, the “Setup done“ field will automatically contain a check mark. The system will not have a check mark for this field if any associations/linkages have been set up. Via this page you can now set up the user roles for all licensed modules.
Setup Configuration By using the “Export/Import Setups” function via the “OPplus License Information”, you can transfer OPplus setup tables from one database into another or from company A to company B.
The report is divided into two parts, providing three fields in the upper Options section.

manual_opp_NL_payment.docx
gbedv
Documentation
Manual OPplus NL Payment
7 of 17
Field Description Direction In this field, you can select whether to import or to export files.
Filename This field contains the name of the file you want to import and/or create.
Company
In this field, you can select one of the following 3 options:
All
o Export Select this option to export the data of all companies of the database into the text file.
o Import If you select this option, the data included in the text file will be imported into the companies of the database. If you have exported several companies into the file, the system will import the data of the first company contained in the file.
Current o Export
Select this option to export the data of the current company into the text file.
o Import Select this option to import the data of the text file into the selected company.
Company Related o Export
This option is not available for export. o Import
Select this option if you have previously exported all company data, and some companies are still missing in the database. The system will check if the corresponding company is included in the current database. If yes, the data of this company will be imported. If not, the company will be skipped.

manual_opp_NL_payment.docx
gbedv
Documentation
Manual OPplus NL Payment
8 of 17
In the lower part of the report, you will find a list of export/import data of respective modules:
When you open the report, the system checks which of the modules are included in the license. According to the license, the respective option fields are automatically enabled with a check mark. However, the user can change these settings manually. When you select the ”Import” option, the system will automatically import all modules included in the license. When you select the ”Export” option, the system will automatically export all modules which are included in the license and (at least) have one record in the corresponding table. Please note/make sure:
that the current customer license is activated in the server,
NO number series are created/edited during the import.
manual_opp_NL_payment.docx
gbedv
Documentation
Manual OPplus NL Payment
9 of 17
OPplus NL Payment module The NL Payment module of the certified vertical solution OPplus is used for the Dutch CLIEOP3 payment format to perform domestic credit transfers and direct debits. In the meantime, CLIEOP3 has been replaced by SEPA. The same applies for the BTL91 payment format formerly used for foreign transfers.
To ensure that the system creates the correct payment files when using the NL Payment module, you need to preset a number of fields in the master data. In the following sections, you will find a description of the fields and functions which are exclusively used for the NL Payment module. For the remaining basic functions, please refer to the OPplus Payments manual.

manual_opp_NL_payment.docx
gbedv
Documentation
Manual OPplus NL Payment
10 of 17
Required Orderer Bank Master Data
Bank Accounts (Orderer Bank)
The orderer bank account should be at a Dutch financial institution and have the corresponding country code, NL’. Similarly, a valid combination of bank code and account number and/or BIC/SWIFT code and IBAN should be specified.
In the NL Payment module, you will find the “PMT NL” tab containing the following specific fields:
Field Description Name Short description
SEPA Grouping This field is currently not used.
Name Code The following options are available:
1
2 You no longer need to specify this field since it has been replaced by SEPA.

manual_opp_NL_payment.docx
gbedv
Documentation
Manual OPplus NL Payment
11 of 17
Required Customer Master Data
Customer Bank Account Card
On the Customer Bank Account Card, you need specify the valid combination of bank code and
account number and/or BIC/SWIFT code and IBAN. Further specifications are not required.

manual_opp_NL_payment.docx
gbedv
Documentation
Manual OPplus NL Payment
12 of 17
Required Vendor Master Data
Vendor Bank Account Card
On the Vendor Bank Account Card, you need to specify the valid combination of bank code and
account number and/or BIC/SWIFT code and IBAN.

manual_opp_NL_payment.docx
gbedv
Documentation
Manual OPplus NL Payment
13 of 17
NL Payment Setup Before you can use the NL Payment module, you need to create the setup data by selecting Payments → Setup → NL Payment Setup Create Setup Data.
General tab
Field Description Name Short Description
Country Code When creating the setup files, this field is automatically filled with the Dutch ISO country code “NL”. This field cannot be modified.
Currency Code When creating the setup files, this field is automatically filled with the ISO country code for “EUR”. This field cannot be modified.
Homepage National Bank
In this field, you can specify the URL of the Dutch national bank. To open the homepage, simply click the globe icon.
CLIEOP3 Testing Mode
Place a check mark in this field if you want to mark the CLIEOP3 files with the test ID. This field does no longer require a value because it has been replaced by SEPA.
Last Sending Date This field shows the date on which the last CLIEOP3 file has been created. This field does no longer require a value because it has been replaced by SEPA.
Last Sequence No. Each time a CLIEOP3 file is created, the so-called sequence number is written into this field which is the last sending number. This field does no longer require a value because it has been replaced by SEPA.
Create Order Letter Place a check mark in this field if you want the system to create an order letter. An order letter is a file which includes the check sums of the CLIEOP3 file. This field does no longer require a value because it has been replaced by SEPA.

manual_opp_NL_payment.docx
gbedv
Documentation
Manual OPplus NL Payment
14 of 17
File tab
Field Description Name Short description
Linefeed (debug only)
Place a check mark in this field to enter a line break after each number set in order to increase readability of the payment file.
Decima Point (BTL91)
This field is currently not used.

manual_opp_NL_payment.docx
gbedv
Documentation
Manual OPplus NL Payment
15 of 17
Payment Types
After having created the setup data, the following additional payment types are available to perform transfers:
CLIEOP CLIEOP transfer (replaced by SEPA)
BTL91 Foreign transfer (BTL91) Following payment type is available for direct debits:
CLIEOP-DD CLIEOP direct debit (replaced by SEPA)

manual_opp_NL_payment.docx
gbedv
Documentation
Manual OPplus NL Payment
16 of 17
Payment Proposal Card
PMT NL tab

manual_opp_NL_payment.docx
gbedv
Documentation
Manual OPplus NL Payment
17 of 17
Field Description Name Short description
Payment Code The following three options are available:
Normal
Check
Base (not used)
Check Specify in this field (if the “Check” payment type is selected) to which address you want to send the payment:
Bank Orderer
Orderer
Beneficiary This field is only active if the payment code is set to “Check”
Instruction Code 1 - Instruction Code 4
Here you can specify up to four instruction codes for the recipient bank:
01 /PHONBEN/
02 /TELEXBEN/
03 /PHON/
04 /TELEX/
05 ADVISE BEN. BANK BY CABLE/ CABLE/SWIFT CHARGES FOR US
06 ADVISE BEN. BANK BY CABLE/ SWIFT WITHOUT CHARGES FOR US
07 /HOLD/
12 IF BEN. IS UNKNOWN OR HAS DECEASED PLEASE RETURN AMOUNT
13 THIS PAYMENT IS IRREVOCABLE
14 INTERCOMPANY TRANSFER
Urgent Place a check mark in this field to indicate that the payment is urgent.