manual to perform a qpcr with the abi 7500fastvorburch/files/protocol... · 2016-07-13 · select...
TRANSCRIPT

Manual to perform a qPCR with the ABI
7500Fast

2
Required material:
Product name REF Nummer / Order No. costs
MicroAmp® Fast Optical 96-Well Reaction Plate with Barcode 4360954 20 Stk. 183.00 Fr. (Lubio).
MicroAmp® Optical Adhesive Film 4360954 25 Stk. 149.00 Fr. (Lubio)
LightCycler® 480 SYBR Green I Master 1 04887352001 5ml ca. 200.00 Fr.
Nuclease-free water
Primer (4.5 µM) 2
One channel pipette (10, 100, 1000 µl) Tips from tick-list
8-channel pipette (10 µl) Tips from tick-list
Stepper + 0.2 ml tips Tips from tick-list
Centrifuge in G62 (with plate rotor)
1.5 ml tubes Tick-list
qPCR protocol See next page (pipetting template) – Settings for the protocol are in the following pages (Example of a pipetting template see last page)
1) buy via UTOX – 30% discount on Roche products 2) Stock conc. = 100µM ; 4,5µM is „working conc.“
Tips:
• Pipette neat and tidy (qPCR is very sensitive) • Dispense MasterMix with stepper • First pipette samples, than negative and positive control(s) –and at the end the standards • Pipette standards with the 8-channel pipette • If pipetting the same many times, it is worth distributing all the samples in a 96 well plate in
advance so you can use a multi-channel pipette • Stick the adhesive cover foil with Kleenex and not with your gloves or your bare fingers, foil has to
be clean! • Pipette the dilutions from A1 to H1 and in duplicate (e.g. in A1 pipette standard 107 and in H1
place standard 100. The duplicates should be pipetted next to A1 to H1 → A2 to H2. Replicates with the same dilution should be pipetted next to each other, i. e. A1 is duplicated in A2 and not in B1
qPCR Manual, Siegenthaler Jan, 04.07.2016
3
qPCR Manual, Siegenthaler Jan, 04.07.2016

4
Site of machine: LA-E76 ; right to the -80°C freezer
Person in charge: Smitha Pillai – BU-E09 (Utox) 5255
Stephan Fischer – BU-E09 (Utox) 5567
Book machine in advance with name, time and length of use (calendar is next to the notebook)
Start machine (the best is to start the machine 30 minutes before use to heat up)
If you use the cycler for the first time, you have to be introduced by one of the persons in charge!
qPCR Manual, Siegenthaler Jan, 04.07.2016

5
Start computer Username: ABIQPCR (should already be written in) Password: ABI7500@eaw Open software Software name is 7500 Software v2.3
Wenn Feld „Login“ aufgeht Guest als Username eintragen und OK drücken
Falls man nur Software benützt ohne einen Lauf zu machen, kommt eine Fehlermeldung das das Gerät nicht verbunden ist. Dann kann einfach Continue without connection gedrückt werden und die Software sollte dann starten
[If error message appears saying a calibration is required contact Smitha or Stephan]
This window should open
qPCR Manual, Siegenthaler Jan, 04.07.2016

6
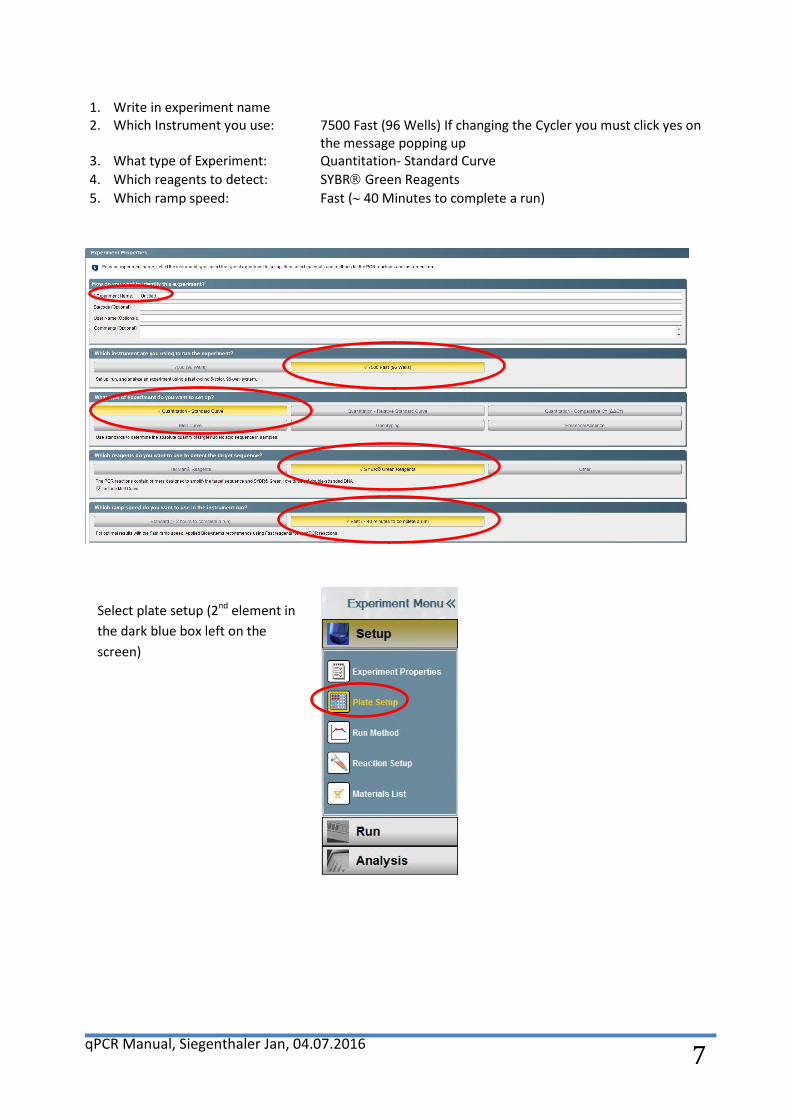
Start new Experiment Click on field New Experiment but not on the arrow
This window should open
qPCR Manual, Siegenthaler Jan, 04.07.2016
7
1. Write in experiment name 2. Which Instrument you use: 7500 Fast (96 Wells) If changing the Cycler you must click yes on
the message popping up 3. What type of Experiment: Quantitation- Standard Curve 4. Which reagents to detect: SYBR Green Reagents 5. Which ramp speed: Fast (∼ 40 Minutes to complete a run)
Select plate setup (2nd element in the dark blue box left on the screen)
qPCR Manual, Siegenthaler Jan, 04.07.2016
8
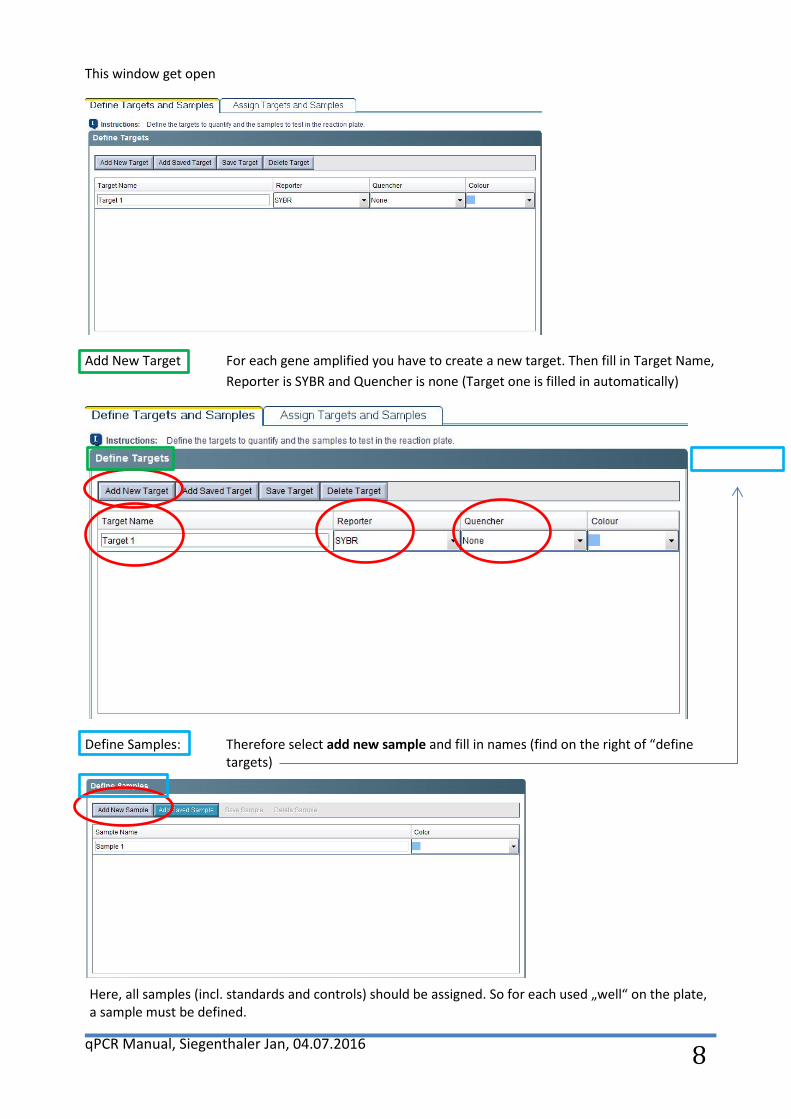
This window get open
Add New Target For each gene amplified you have to create a new target. Then fill in Target Name, Reporter is SYBR and Quencher is none (Target one is filled in automatically)
Define Samples: Therefore select add new sample and fill in names (find on the right of “define targets)
Here, all samples (incl. standards and controls) should be assigned. So for each used „well“ on the plate, a sample must be defined.
qPCR Manual, Siegenthaler Jan, 04.07.2016

9
Select Assign Targets and Samples: Each well must be assigned to the corresponding sample
First the standard curve must be define d Click Define and Set Up Standards
qPCR Manual, Siegenthaler Jan, 04.07.2016
10
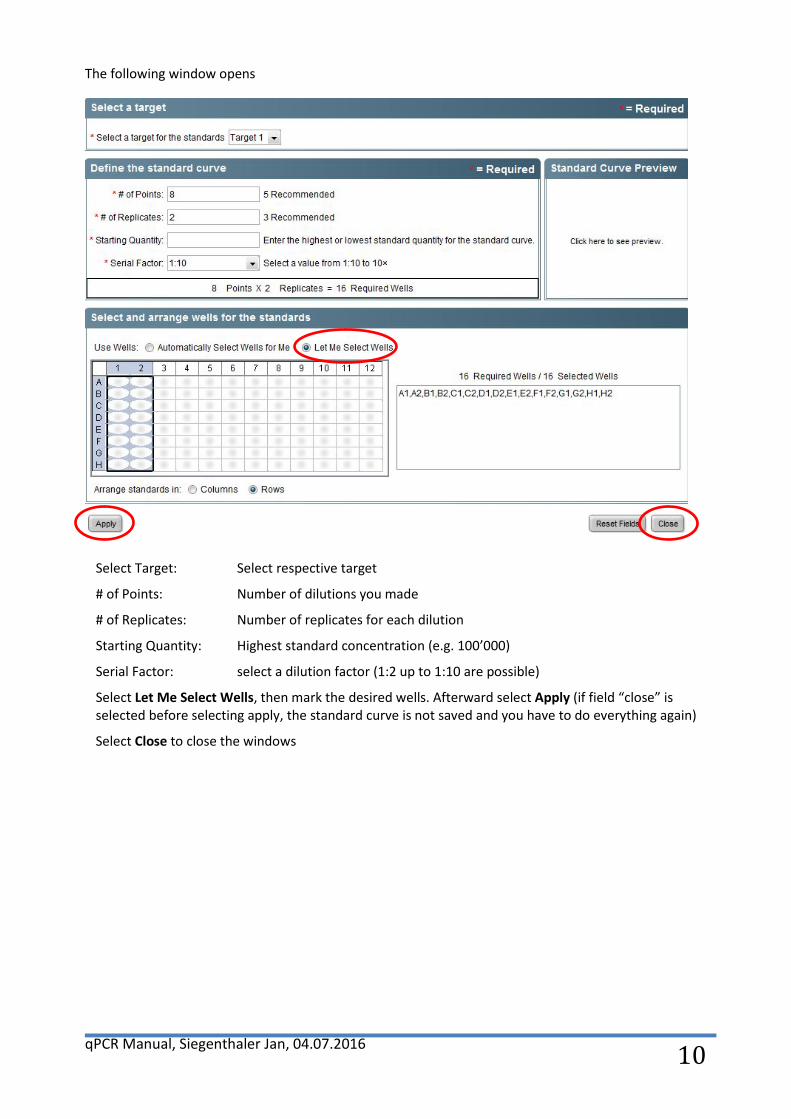
The following window opens
Select Target: Select respective target
# of Points: Number of dilutions you made
# of Replicates: Number of replicates for each dilution
Starting Quantity: Highest standard concentration (e.g. 100’000)
Serial Factor: select a dilution factor (1:2 up to 1:10 are possible)
Select Let Me Select Wells, then mark the desired wells. Afterward select Apply (if field “close” is selected before selecting apply, the standard curve is not saved and you have to do everything again)
Select Close to close the windows
qPCR Manual, Siegenthaler Jan, 04.07.2016
11
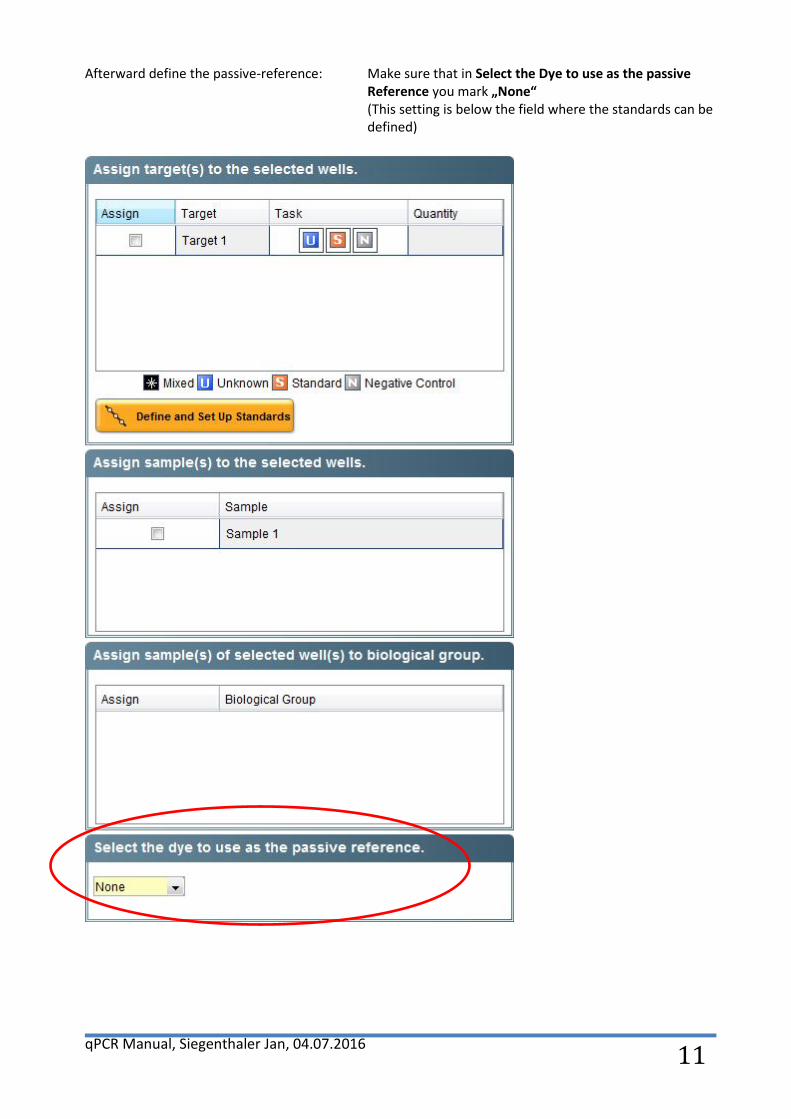
Afterward define the passive-reference: Make sure that in Select the Dye to use as the passive Reference you mark „None“ (This setting is below the field where the standards can be defined)
qPCR Manual, Siegenthaler Jan, 04.07.2016
12
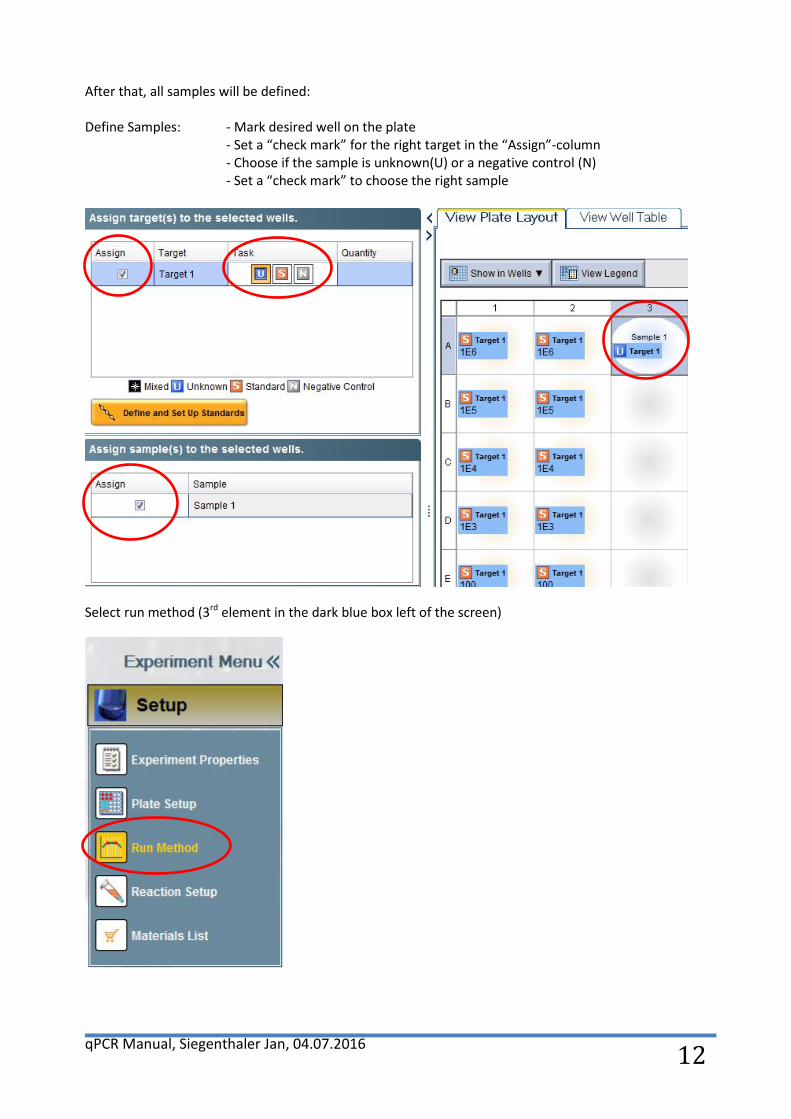
After that, all samples will be defined: Define Samples: - Mark desired well on the plate
- Set a “check mark” for the right target in the “Assign”-column - Choose if the sample is unknown(U) or a negative control (N)
- Set a “check mark” to choose the right sample
Select run method (3rd element in the dark blue box left of the screen)
qPCR Manual, Siegenthaler Jan, 04.07.2016

13
Fill in the right reaction volume
qPCR Manual, Siegenthaler Jan, 04.07.2016
14
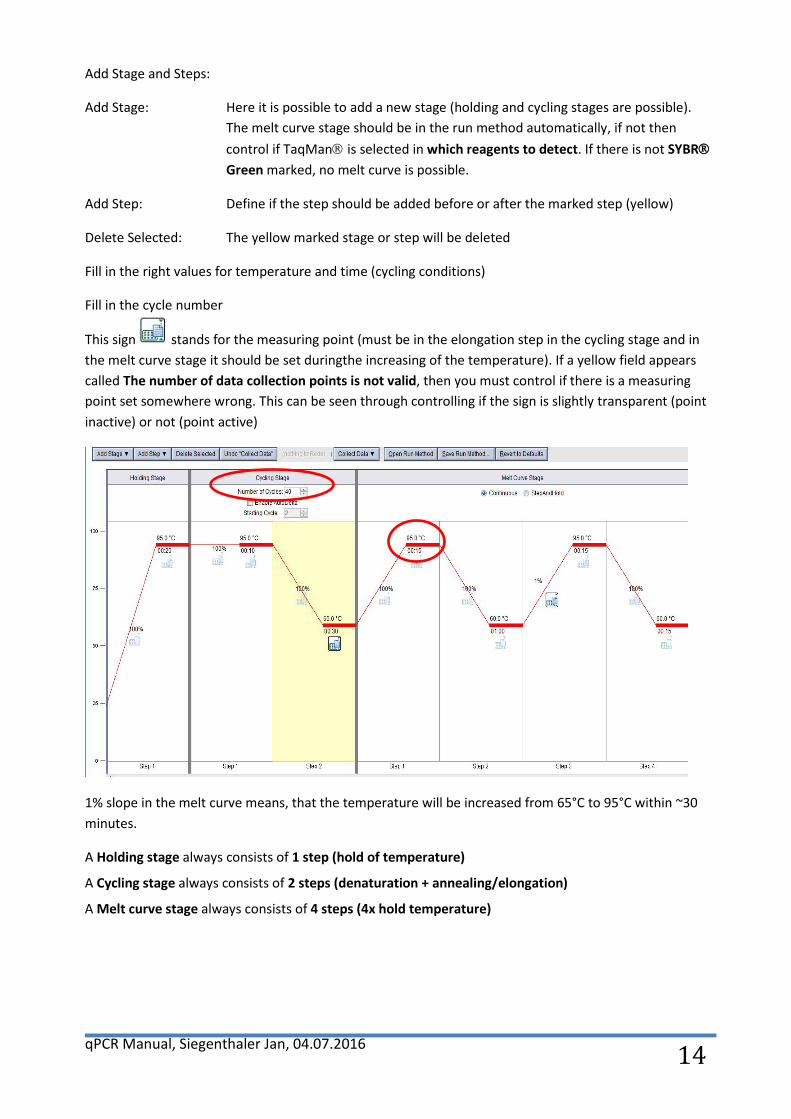
Add Stage and Steps:
Add Stage: Here it is possible to add a new stage (holding and cycling stages are possible). The melt curve stage should be in the run method automatically, if not then control if TaqMan is selected in which reagents to detect. If there is not SYBR Green marked, no melt curve is possible.
Add Step: Define if the step should be added before or after the marked step (yellow)
Delete Selected: The yellow marked stage or step will be deleted
Fill in the right values for temperature and time (cycling conditions)
Fill in the cycle number
This sign stands for the measuring point (must be in the elongation step in the cycling stage and in the melt curve stage it should be set duringthe increasing of the temperature). If a yellow field appears called The number of data collection points is not valid, then you must control if there is a measuring point set somewhere wrong. This can be seen through controlling if the sign is slightly transparent (point inactive) or not (point active)
1% slope in the melt curve means, that the temperature will be increased from 65°C to 95°C within ~30 minutes.
A Holding stage always consists of 1 step (hold of temperature)
A Cycling stage always consists of 2 steps (denaturation + annealing/elongation)
A Melt curve stage always consists of 4 steps (4x hold temperature)
qPCR Manual, Siegenthaler Jan, 04.07.2016

15
Put plate in ABI7500:
In the recess of the tray press firmly until it „clicks“ so that the tray comes out by itself
Put plate in ABI cycler
Well A1 must be on top left!
Then press the tray back (press firmly again) until it „clicks“ again
qPCR Manual, Siegenthaler Jan, 04.07.2016

16
When everything is correct, press
Important: Stay near the Cycler until the first or second cycle is finished. Sometimes an error message appears that the Cycler has a problem and does not start!
After the run’s finished:
To receive data press the green button ANALYSE (top right). After that it says on the button. This way you can check, if you have pressed “analyse” already in case you are not sure anymore.
Save run:
Press on the arrow next to the diskette symbol and then on save as to select the save location.
If repeating the same experiment more than once, it can be saved as template.
Never save your run as a template before you’ve selected “Save As”. If you do, your data will be lost!!!
qPCR Manual, Siegenthaler Jan, 04.07.2016

17
Export data:
Press on Export
This window should open
In 1. select which data you want to export (important: make sure you check “results”)
If you select more than one checkbox in 1. Then in 2. You can choose if all the data should be exported in one file or in separate files (samples setup, raw date, etc.).
In 3. choose a file name and a saving location (press browse).
Then press Start Export
After exporting all the data a window pops up asking whether you want to export more data or close the window. This window can be closed.
Now remove plate from cycler and throw away if not needed anymore!
At the end turn off the Cycler and the notebook.
qPCR Manual, Siegenthaler Jan, 04.07.2016

18
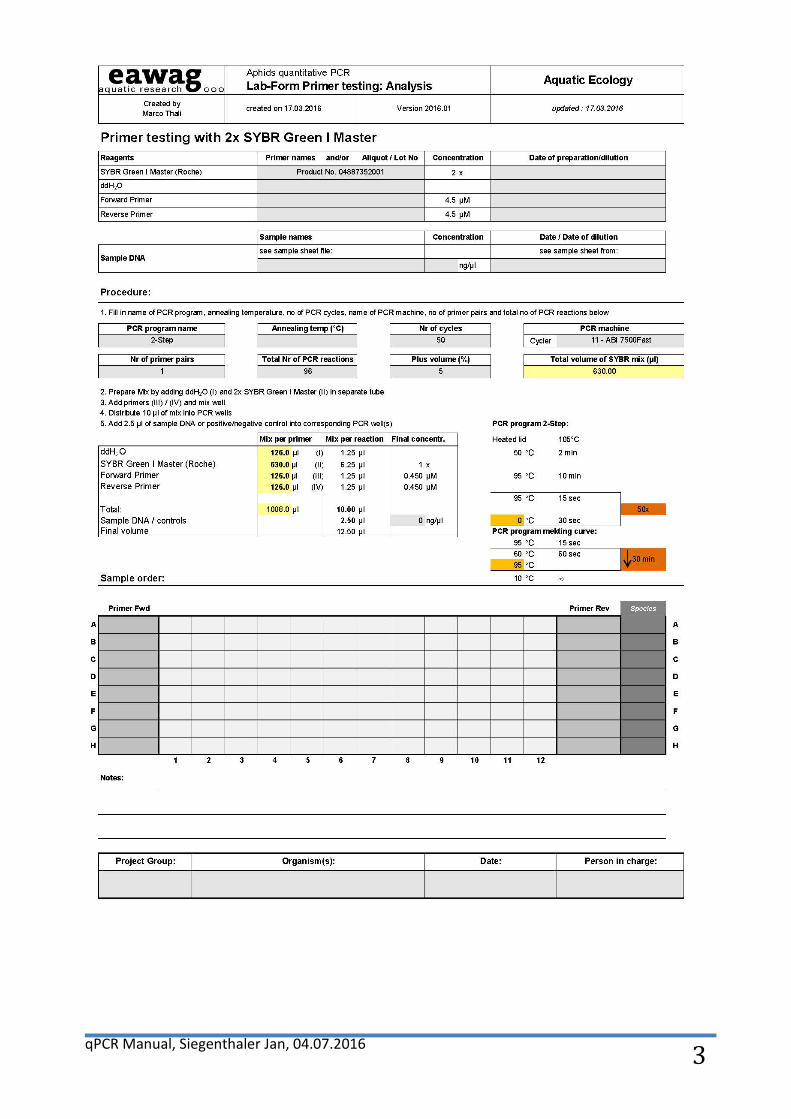
Example of a qPCR pipette template
qPCR Manual, Siegenthaler Jan, 04.07.2016