manual usuario riester oplaadbare laringoscoop
TRANSCRIPT
Rudolf Riester GmbH & Co. KGP. o. Box 35
Bruckstr.31
0-72417 JungingenGermany
Tel.: +49-7477-9270-0Fax: +49-7477-8180E-mail: [email protected]
Printed in Germany. Subject to alterations.
The Diagnostic Company
GebrauchsanweisungOperating Instructions
Mode d'emploiInstrucciones para el uso
Istruzioni per I'uso
ri -chorger®
(€
1. Important information - read prior to start-up
You have acquired a valuable RIESTER Ri-Charger charging base manulactured in compliance with Directive 93/42/EEC lor medical products andsubject to continuous stringent quality contro!.
Please read these Operating Instructions carelully prior to start-up and keepthem in a sale place.
Should you have any queries, please contact the Company or your RIESTERAgent who will be pleased to assist you. For addresses see last page ol theseOperating Instructions. The address ol your authorised RIESTER Agent will bEsupplied to you on request.
Please note that the RIESTER Ri-Charger charging base is only suitable lorcharging RIESTER instruments operated with RIESTER rechargeable batterie(Ri-Accus). Do not use lor any other equipment.
2. PurposeThe Ri-Charger charging base has been produced lor charging RIESTERhandles with RI ESTER rechargeable batteries (Ri-Accus).
3. Safety and electromagnetic compatibility
& Meaning ol symbol on casing.See operating instructions!
[gJ
Meaning ol symbol on rating plate on bottom ol unit:Protection class 11unit
•
Meaning ol symbol on rating plate on bottom ol unit:
1\ Application part type B
The unit complies with requirements lor electromagnetic compatibility. Pleasenote that instruments ol interfering lield strengths such as mobile telephones (radiological instruments, may affect its lunction.
Warning!
I . There may be a risk ol gases igniting when the instrument is used in the
presence ol Ilammabie drugs and air and/or oxygen or nitrous oxidemixtures!
• The instrument must only be opened by qualilied persons due to a possiblErisk ollethal electrocution.
4. Start-up and operation
The RIESTER Ri-Charger charging base is available as a 220 V or 110 Vmodel and suitable for charging of 2.5 V or 3.5 V handles.
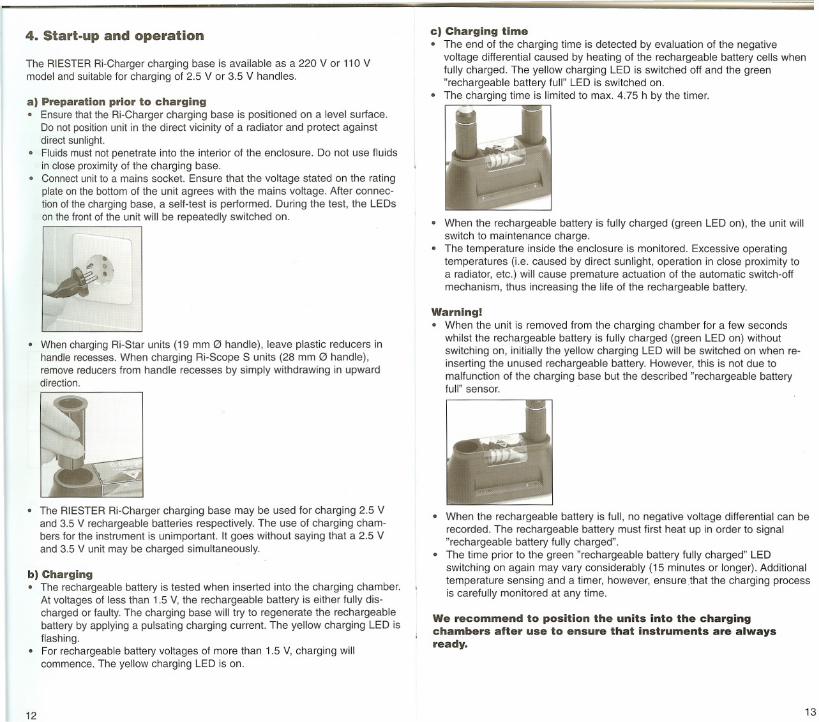
a) Preparation prior to charging• Ensure that the Ri-Charger charging base is positioned on a level surface.
Do not position unit in the direct vicinity of a radiator and proteet againstdirect sunlight.Fluids must not penetrate into the interior of the enclosure. Do not use fluidsin close proximity of the charging base.Conneet unit to a mains socket. Ensure that the voltage stated on the ratingplate on the bottom of the unit agrees with the mains voltage. Alter connection of the charging base, a self-test is performed. During the test, the LEDson the front of the unit will be repeatedly switched on.
• When charging Ri-Star units (19 mm 0 handle), leave plastic reducers inhandle recesses. Wh en charging Ri-Scope S units (28 mm 0 handle),remove reducers from handle recesses by simply withdrawing in upwarddirection.
• The RIESTER Ri-Charger charging base may be used for charging 2.5 Vand 3.5 V rechargeable batteries respectively. The use ot charging chambers for the instrument is unimportant. It goes without saying that a 2.5 Vand 3.5 V unit may be charged simultaneously.
b) Charging• The rechargeable battery is tested when inserted into the charging chamber.
At voltages of less than 1.5 V, the rechargeable battery is either fully discharged or faulty. The charging base will try to regenerate the rechargeablebattery by applying a pulsating charging current. The yellow charging LED istlashing.For rechargeable battery voltages of more than 1.5 V, charging willcommence. The yellow charging LED is on.
12
c) Charging time• The end of the charging time is detected by evaluation of the negative
voltage difterential caused by heating of the rechargeable battery cells whentully charged. The yellow charging LED is switched oft and the green"rechargeable battery tuil" LED is switched on.
• The charging time is limited to max. 4.75 h by the timer.
• When the rechargeable battery is tully charged (green LED on), the unit willswitch to maintenance charge.
• The temperature inside the enclosure is monitored. Excessive operatingtemperatures (i.e. caused by direct sunlight, operation in close proximity toa radiator, etc.) will cause premature actuation ot the automatic switch-oftmechanism, thus increasing the lite ot the rechargeable battery.
Warning!• Wh en the unit is removed trom the charging chamber tor a tew seconds
whilst the rechargeable battery is fully charged (green LED on) withoutswitching on, initially the yellow charging LED will be switched on when reinserting the unused rechargeable battery. However, this is not due tomalfunction of the charging base but the described "rechargeable batteryfull" sensor.
• When the rechargeable battery is full, no negative voltage difterential can berecorded. The rechargeable battery must first heat up in order to signal"rechargeable battery fully charged".
• The time prior to the green "rechargeable battery fully charged" LEDswitching on again may vary considerably (15 minutes or longer). Additionaltemperature sensing and a timer, however, ensure.that the charging processis caretully monitored at any time.
We recommend to position the units into the chargingchambers aft er use to ensure that instruments are alwaysready.
13
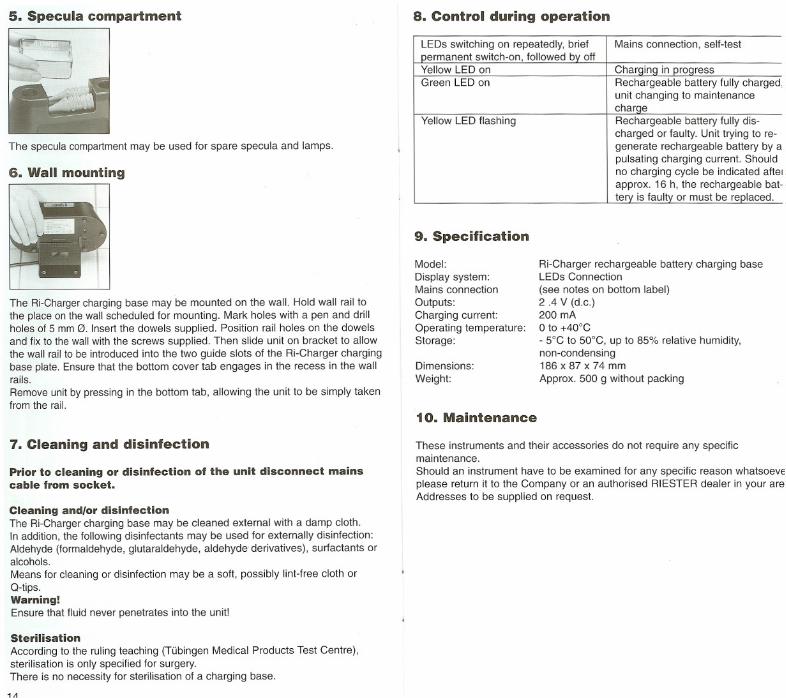
5. Specula compartment
The specula compartment may be used tor spare specula and lamps.
6. Wall mounting
8. Control during operation
LEDs switching on repeatedly, brietermanent switch-on, tollowed bv oft
Yellow LED onGreen LED on
Yellow LED tlashing
Mains connection, selt-test
Charging in progressRechargeable battery tully chargedunit changing to maintenance
chargeRechargeable battery tully discharged or taulty. Unit trying to regenerate rechargeable battery by apulsating charging current. Shouldno charging cycle be indicated aftelapprox. 16 h, the rechargeable batterv is taultv or must be reolaced.
9. Specification
The Ri-Charger charging base may be mounted on the wall. Hold wall rail tothe place on the wall scheduled tor mounting. Mark holes with a pen and drillholes ot 5 mm 0. Insert the dowels supplied. Position rail holes on the dowelsand tix to the wall with the screws supplied. Then slide unit on bracket to allowthe wall rail to be introduced into the two guide slots ot the Ri-Charger chargingbase plate. Ensure that the bottom cover tab engages in the rece ss in the wallrails.
Remove unit by pressing in the bottom tab, allowing the unit to be simply takentrom the rail.
Model:
Display system:Mains connection
Outputs:Charging current:Operating temperature:Storage:
Dimensions:
Weight:
10. Maintenance
Ri-Charger rechargeable battery charging baseLEDs Connection
(see notes on bottom label)2 .4 V (d.c.)200 mAo to +40°C
- 5°C to 50°C, up to 85% relative humidity,non-condensing186 x 87 x 74 mm
Approx. 500 9 without packing
7. Cleaning and disinfection
Prior to cleaning or disinfection of the unit disconneet mainsca bie from socket.
Cleaning and/or disinfectionThe Ri-Charger charging base may be cleaned extern al with a damp cloth.In addition, the tollowing disintectants may be used tor externally disintection:Aldehyde (tormaldehyde, glutaraldehyde, aldehyde derivatives), surfactants oralcohois.
Means tor cleaning or disintection may be a soft, possibly lint-tree cloth orQ-tips.Warning!Ensure that tluid never penetrates into the unit!
SterilisationAccording to the ruling teaching (Tübingen Medical Produets Test Centre),sterilisation is only specitied tor surgery.There is no necessity tor sterilisation ot a charging base.
1"
These instruments and their accessories do not require any speciticmaintenance.
Should an instrument have to be examined tor any specitic reason whatsoevEplease return it to the Company or an authorised RIESTER dealer in your areAddresses to be supplied on request.