mapzap™ user guidechronosnet4.com.s3.amazonaws.com/mapzap1.pdfchapter 1—welcome maps are fun to...
TRANSCRIPT
MapZap™
User Guide
Chronos Inc.
February 8, 2016
�1

© 2016 Chronos Inc. All rights reserved.
Under the copyright laws, this user guide may not be copied, in whole or in part, without the written consent of Chronos. Your rights to the software are governed by the accompanying software license agreement.
Every effort has been made to ensure that the information in this user guide is accurate. Chronos is not respon-sible for printing or clerical errors.
Chronos Inc.
www.chronosnet.com
MapZap, the MapZap logo, and the Chronos logo are trademarks of Chronos Inc.
Apple, Mac, Macintosh, Mac OS, iCloud, and Finder are trademarks of Apple Inc., registered in the U.S. and other countries.
All other trademarks, registered trademarks, service names, product and/or brand names are the sole property of their respective owners. Mention of third-party products is for informational purposes only and constitutes neither an endorsement nor a recommendation. Chronos assumes no responsibility with regard to the perfor-mance or use of these products.
�2
Chapter 1—Welcome
System Requirements 4
Installing MapZap — Chronos Version 4
Installing MapZap — Mac App Store Version 4
Uninstalling MapZap — Chronos Version 4
Uninstalling MapZap — Mac App Store Version 4
Learning to Use MapZap 5 Chapter 2—Using MapZap
Launching MapZap 6
The Main Window 6
Customizing The Map 7
Saving The Map To The Desktop 8
Adding Photos To The Map 8
Multiple Screens 9
�3
Chapter 1—Welcome
Maps are fun to look at and explore. Maps are also beautiful which is why people frame and hang them on their walls. Now, with MapZap, you can put a map directly on your desktop. Plus, you can add photos of friends and family to your map. Place the photos at your favorite hangout spots, where they live, or where you want to travel with them. MapZap brings your desktop to life with the places and people you enjoy.
System Requirements✦ Mac OS X v10.11 or later ✦ 50MB of available disk space
Installing MapZap — Chronos Version If you downloaded MapZap from the Chronos website, you should see a MapZap disk image on your desktop.
1) Open the MapZap disk image on your desktop.
2) Drag and drop the MapZap application icon onto your Applications folder or other folder of your choice.
Installing MapZap — Mac App Store Version If you purchased MapZap from the Mac App Store then OS X will automatically install the software on your computer in your Applications folder. If you deleted the application and wish to reinstall it from the Mac App Store, then follow the below steps.
1) Open the App Store application.
2) Click Purchases at the top of the App Store window. You’ll see a list of all the applications you’ve purchased on the Mac App Store.
3) Locate MapZap in the list of purchased applications and click Install.
Uninstalling MapZap — Chronos Version The below steps describe how to uninstall all of the components related to it.
1) Delete the MapZap application. The default location for applications is in the Applications folder, so check there first unless you installed it elsewhere.
Uninstalling MapZap — Mac App Store Version The below steps describe how to uninstall all of the components related to it.
1) Delete the MapZap application. The default location for applications is in the Applications folder, so check there first unless you installed it elsewhere.
�4

2) Delete the “com.chronos.MapZap” folder. This folder is where MapZap stores its settings. It is located at the following path where ~ denotes your HOME folder: ~/Library/Containers/com.chronos.MapZap.
Learning to Use MapZap To learn how to use MapZap, consult these resources:
User Guide
This guide describes MapZap’s features and shows how to use the program.
Onscreen Help
Help tags are available for many of the items in MapZap. To see the help tags, let the mouse pointer rest over an item for a couple of seconds.
Technical Support
Chronos provides various support options for MapZap. See http://www.chronosnet.com/Support/index.html for technical support options.
Web Resources
Go to http://www.chronosnet.com/Products/index.html to get the latest software and updates.
�5
Chapter 2—Using MapZap
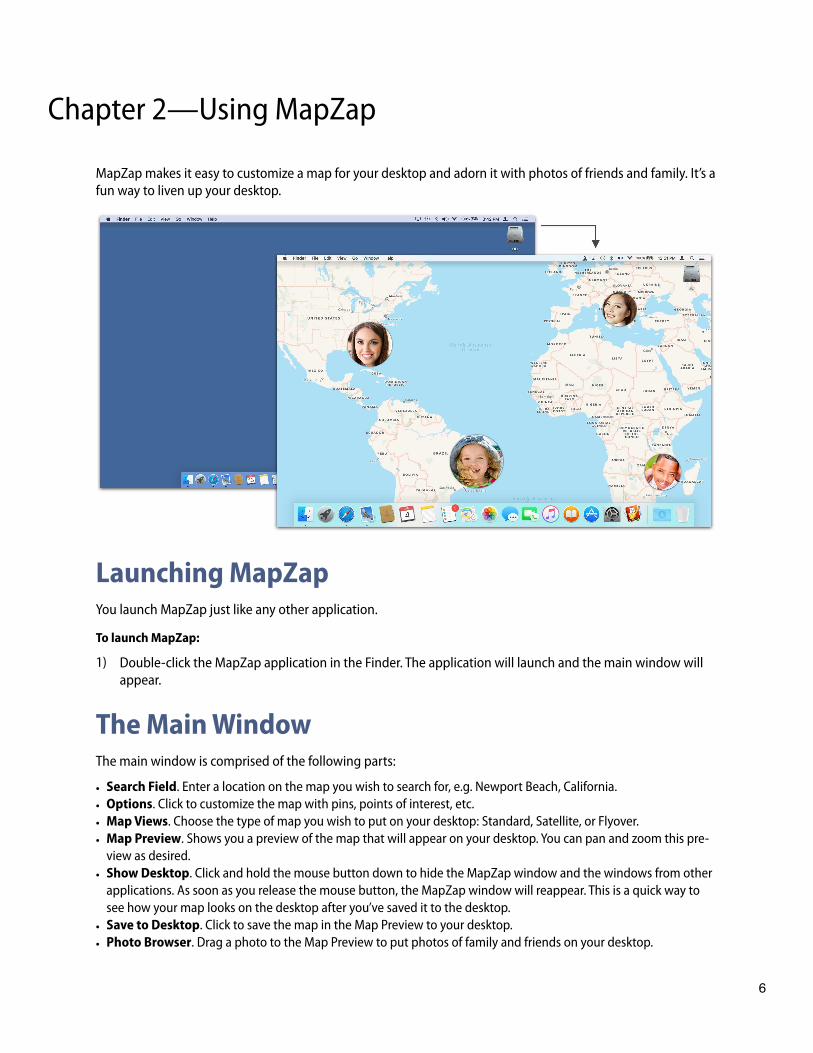
MapZap makes it easy to customize a map for your desktop and adorn it with photos of friends and family. It’s a fun way to liven up your desktop.
Launching MapZap You launch MapZap just like any other application.
To launch MapZap:
1) Double-click the MapZap application in the Finder. The application will launch and the main window will appear.
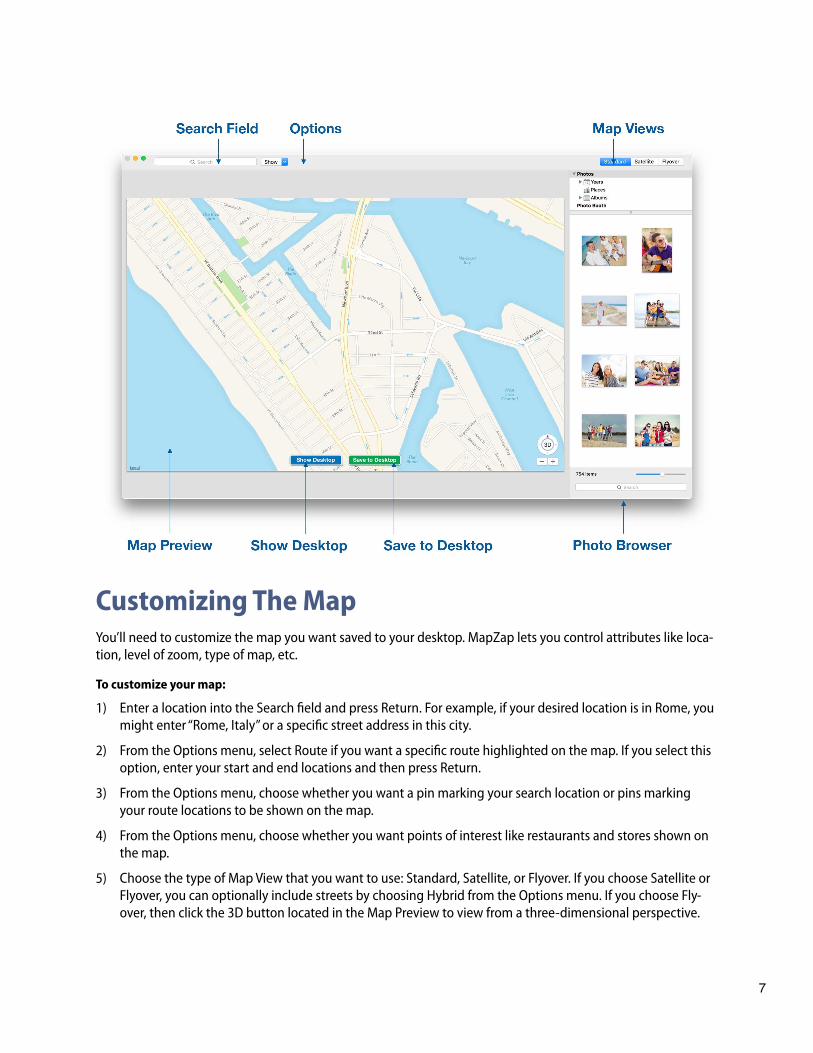
The Main Window The main window is comprised of the following parts:
• Search Field. Enter a location on the map you wish to search for, e.g. Newport Beach, California. • Options. Click to customize the map with pins, points of interest, etc. • Map Views. Choose the type of map you wish to put on your desktop: Standard, Satellite, or Flyover. • Map Preview. Shows you a preview of the map that will appear on your desktop. You can pan and zoom this pre-
view as desired. • Show Desktop. Click and hold the mouse button down to hide the MapZap window and the windows from other
applications. As soon as you release the mouse button, the MapZap window will reappear. This is a quick way to see how your map looks on the desktop after you’ve saved it to the desktop.
• Save to Desktop. Click to save the map in the Map Preview to your desktop. • Photo Browser. Drag a photo to the Map Preview to put photos of family and friends on your desktop.
�6
Customizing The Map You’ll need to customize the map you want saved to your desktop. MapZap lets you control attributes like loca-tion, level of zoom, type of map, etc.
To customize your map:
1) Enter a location into the Search field and press Return. For example, if your desired location is in Rome, you might enter “Rome, Italy” or a specific street address in this city.
2) From the Options menu, select Route if you want a specific route highlighted on the map. If you select this option, enter your start and end locations and then press Return.
3) From the Options menu, choose whether you want a pin marking your search location or pins marking your route locations to be shown on the map.
4) From the Options menu, choose whether you want points of interest like restaurants and stores shown on the map.
5) Choose the type of Map View that you want to use: Standard, Satellite, or Flyover. If you choose Satellite or Flyover, you can optionally include streets by choosing Hybrid from the Options menu. If you choose Fly-over, then click the 3D button located in the Map Preview to view from a three-dimensional perspective.
�7
6) Use the zoom and orientation controls in the map to zoom and rotate the map. You can also use mouse gestures to zoom and rotate the map.
7) Click and hold the mouse button down while moving the mouse to change the viewable portion of the map.
IMPORTANT NOTE: The Map Preview is a scaled down preview of the map that will be saved to your desktop. Because it is scaled down, it may not show all of the street names, points of interest, and topographical detail that will eventually appear in the full-size map saved to your desktop.
Saving The Map To The Desktop Once you have the map in the Map Preview customized the way you want it, the next step is to save it to your desktop.
To save the map to your desktop:
1) Click Save to Desktop to save a full-resolution version of the map to your Desktop.
IMPORTANT NOTE: Depending upon the speed of your internet connection, it can take from a fraction of a sec-ond to several seconds or more for the software to load and generate a full-resolution version of your map. As noted previously, the full-resolution map saved to your desktop will likely contain more detail than appears in the smaller Map Preview.
Adding Photos To The Map MapZap lets you add photos of friends and family to your map. Place the photos at your favorite hangout spots, where they live, or where you want to travel with them. MapZap brings your desktop to life with the places and people you enjoy.
To add a photo to your map:
1) Use the Photo Browser to locate the photo you want to put on your map.
2) Drag and drop the photo from the Photo Browser to the Map Preview.
3) Click and drag the photo to reposition it on the map.
4) Click and drag the resize handles on the corners and sides of the photo to resize the photo.
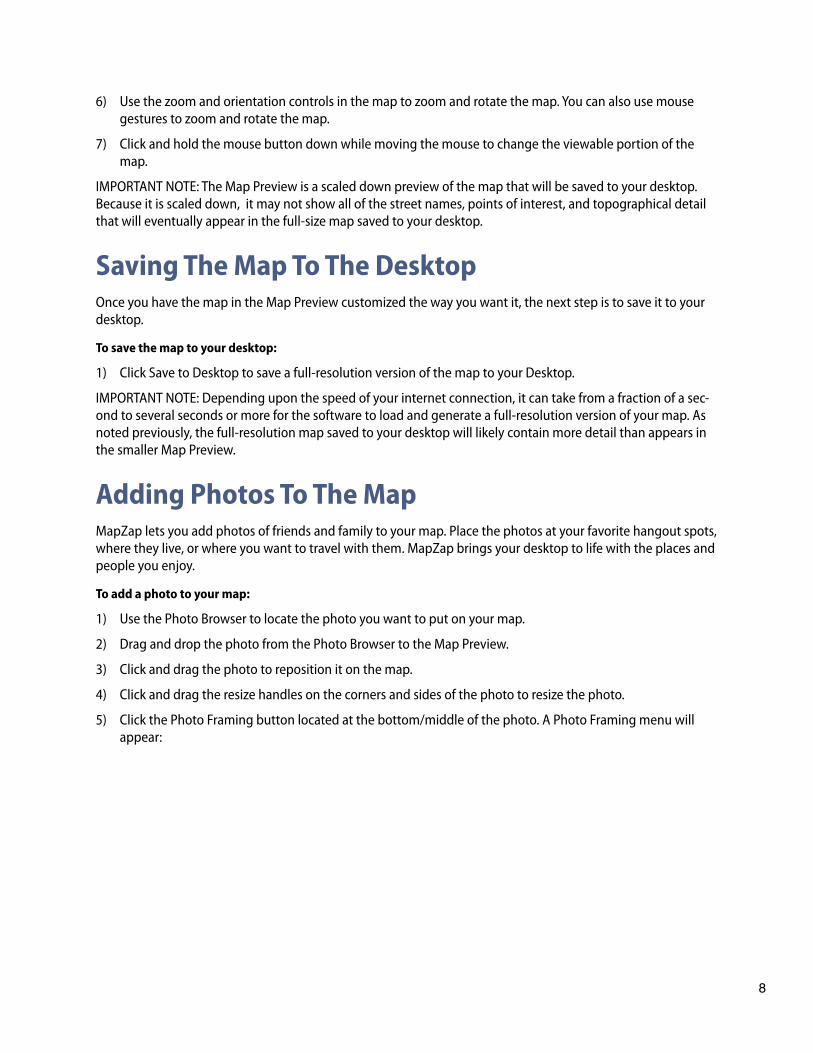
5) Click the Photo Framing button located at the bottom/middle of the photo. A Photo Framing menu will appear:
�8
6) From the Photo Framing menu, choose whether you want the photo to be framed in a rectangular, round-ed rectangular, or round shape.
7) From the Photo Framing menu, choose Border if you want a white border to appear around the photo.
8) From the Photo Framing menu, choose Crop if you wish to only use a portion of the photo. A rectangular, rounded rectangular, or round shape will appear on the photo. This photo represents the crop region. You can move and resize the crop region as desired by clicking and dragging. When you’ve finalized the crop region, simply click outside of the photo to perform the crop.
You can add as many photos to your map as you want. When you’re done adding photos, click Save to Desktop to save the map with the photos to your desktop.
Multiple Screens If you have multiple screens attached to your computer, MapZap lets you save a different map to each screen. Simply move the main MapZap window to the screen that you want to customize next and then customize a map and click Save to Desktop. The map will always be saved to the screen that contains the main MapZap window.
�9