mathematics materials for tomorrow's teachers
TRANSCRIPT
3/3/01 6/19/02 Section E: Geometry
E—1 M2T2
Statement of Purpose: The activities in this unit visit polygons from different perspectives. The first few activities focus on the definitions and properties of polygons. These activities incorporate a hands-on, investigative approach, which requires problem-solving to bring about a deeper understanding of the concepts of geometry. Visualizations skills, an important goal in late elementary school, help students explore and develop geometric concepts. The National Council of Teachers of Mathematics emphasizes that “Geometry enables us to describe, analyze, and understand our physical world, so there is little wonder that it holds a central place in mathematics or that it should be a focus throughout the school mathematics curriculum.” Navigating Through Geometry in Grades 3-5 (page 1)
STATE GOAL 9: Use geometric methods to analyze, categorize, and draw conclusions about points, lines, planes, and space.
Highlights
In this unit, we will begin by asking participants to explore properties of poly-gons. They will then use these properties to identify, compare, and analyze geometric relationships. The participants investigate and describe geometric properties and relation-ships and develop logical arguments to justify conclusions such as which shapes tessellate, how many lines of symmetry does a shape have, what is the relationship between prisms and pyramids? Concepts of symmetry, congru-ency, similarity, and angles are used to describe and analyze shapes found in practical applications.
Geometry
Connections to the Illinois Learning Standards. Standard 9.A-Demonstrate and apply geometric concepts involving points, lines, planes, and space. In this module participants build three-dimensional models of three-dimensional shapes.
Standard 9.B-Identify, describe, classify and compare relationships using points, lines, planes, and solids. In this module, participants explore the relationships of polygons and solids.
Standard 9.C-Construct convincing arguments and proofs to solve problems. The activities in this module give participants the opportunity to make predictions and construct arguments around the properties of polygons.
Mathematics Materials for Tomorrow’s Teachers
3/3/01 6/19/02 Section E: Geometry
E—2 M2T2: Late Elementary
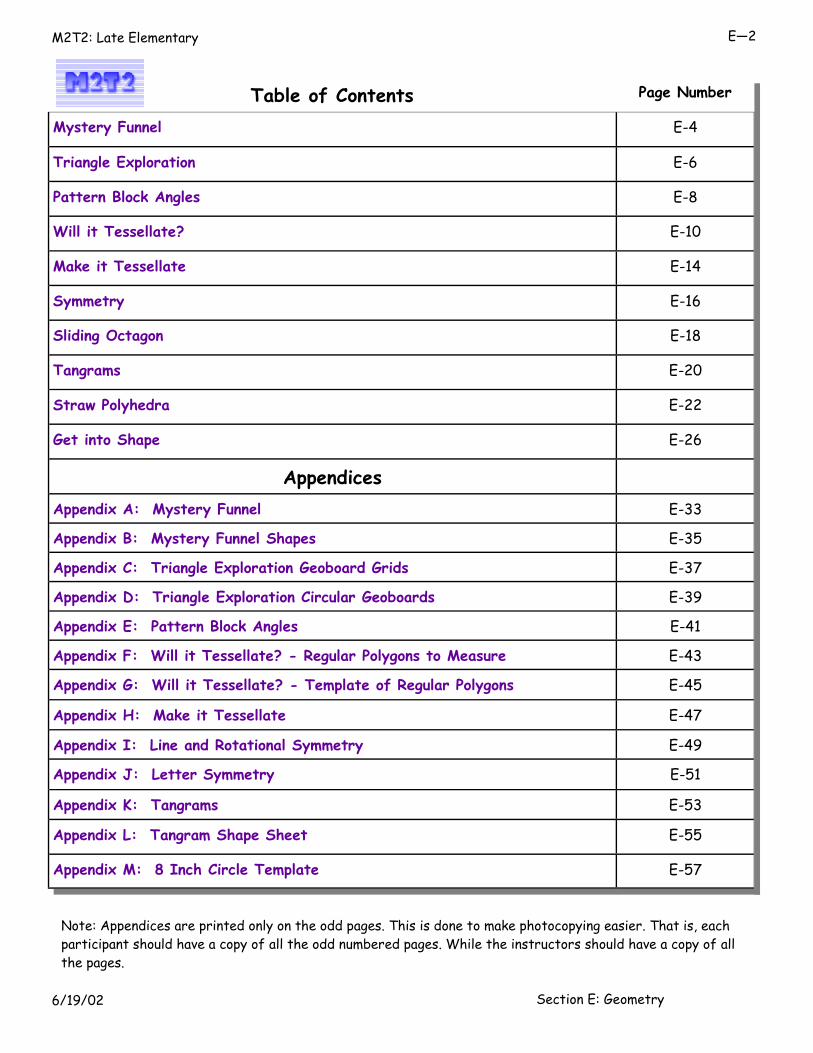
Table of Contents Page Number
Mystery Funnel E-4
Triangle Exploration E-6
Pattern Block Angles E-8
Will it Tessellate? E-10
Make it Tessellate E-14
Symmetry E-16
Sliding Octagon E-18
Tangrams E-20
Straw Polyhedra E-22
Get into Shape E-26
Appendices
Appendix A: Mystery Funnel E-33
Appendix B: Mystery Funnel Shapes E-35
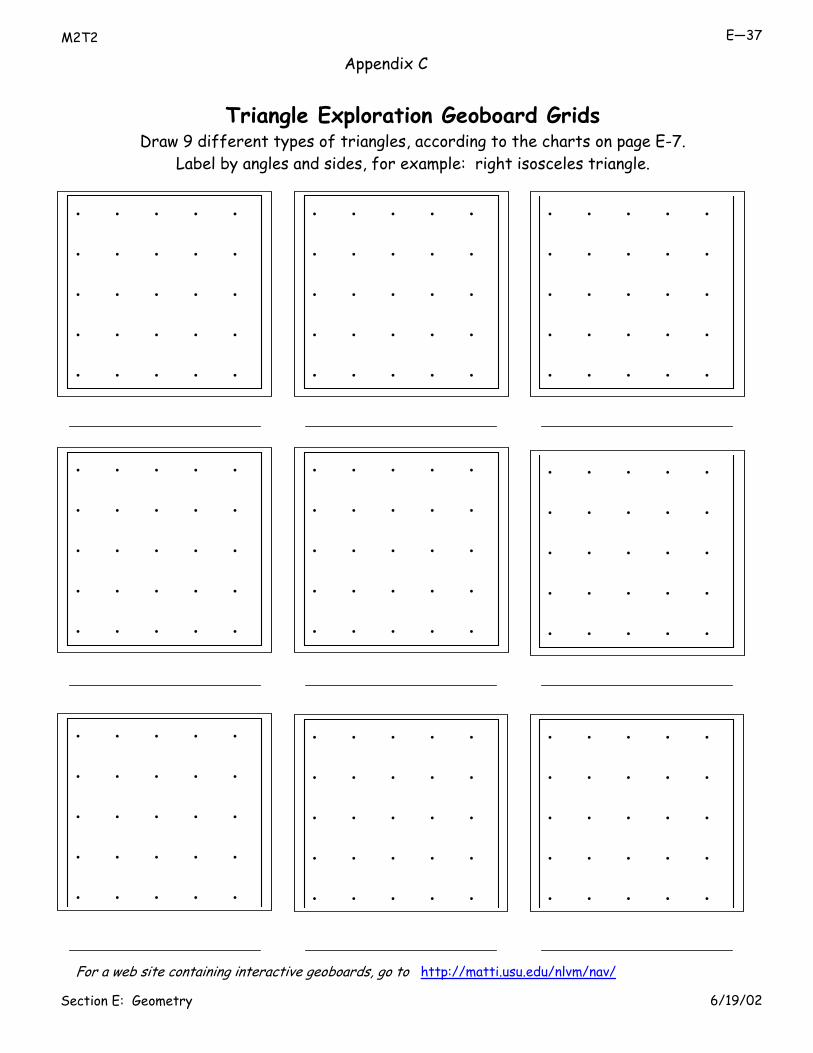
Appendix C: Triangle Exploration Geoboard Grids E-37
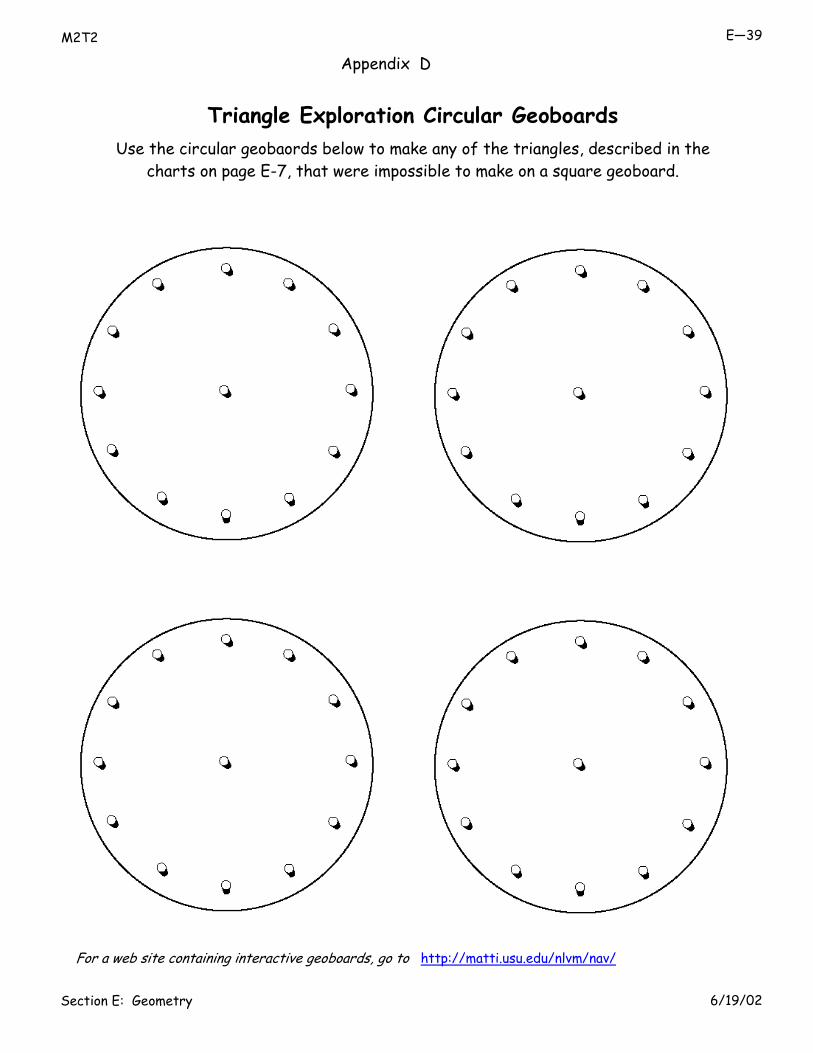
Appendix D: Triangle Exploration Circular Geoboards E-39
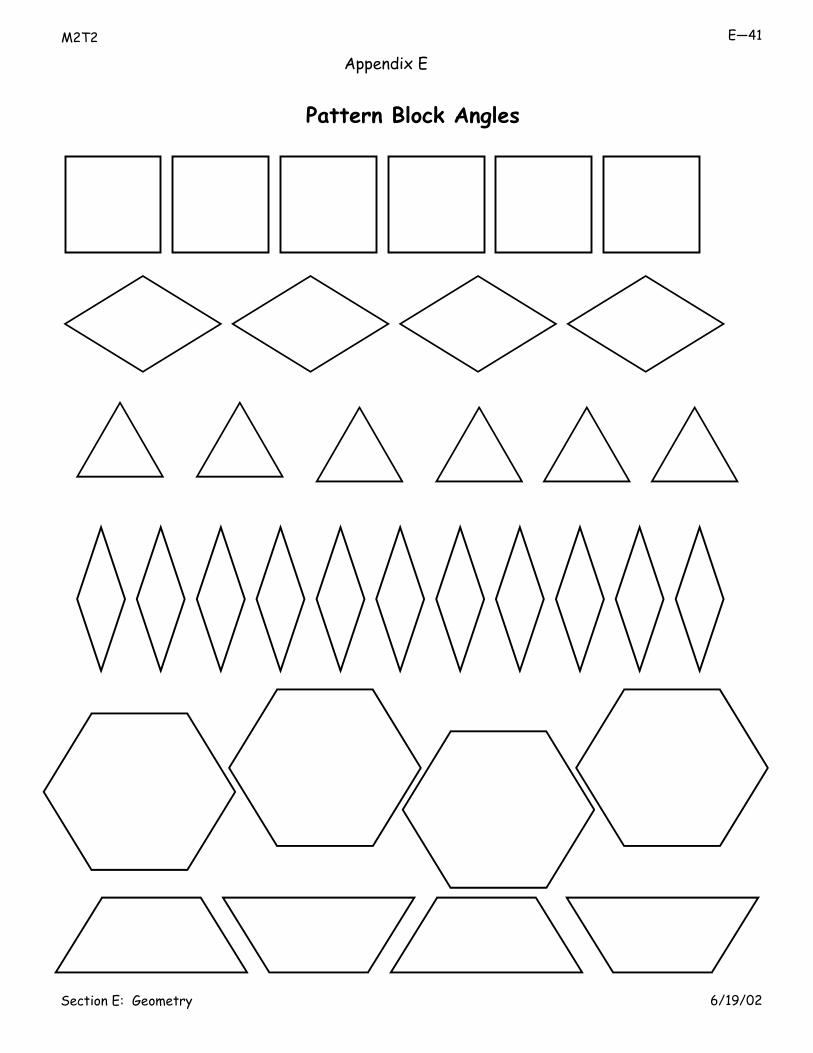
Appendix E: Pattern Block Angles E-41
Appendix F: Will it Tessellate? - Regular Polygons to Measure E-43
Appendix G: Will it Tessellate? - Template of Regular Polygons E-45
Appendix H: Make it Tessellate E-47
Appendix I: Line and Rotational Symmetry E-49
Appendix J: Letter Symmetry E-51
Appendix K: Tangrams E-53
Appendix L: Tangram Shape Sheet E-55
Appendix M: 8 Inch Circle Template E-57
Note: Appendices are printed only on the odd pages. This is done to make photocopying easier. That is, each participant should have a copy of all the odd numbered pages. While the instructors should have a copy of all the pages.
3/3/01 6/19/02 Section E: Geometry
E—3 M2T2
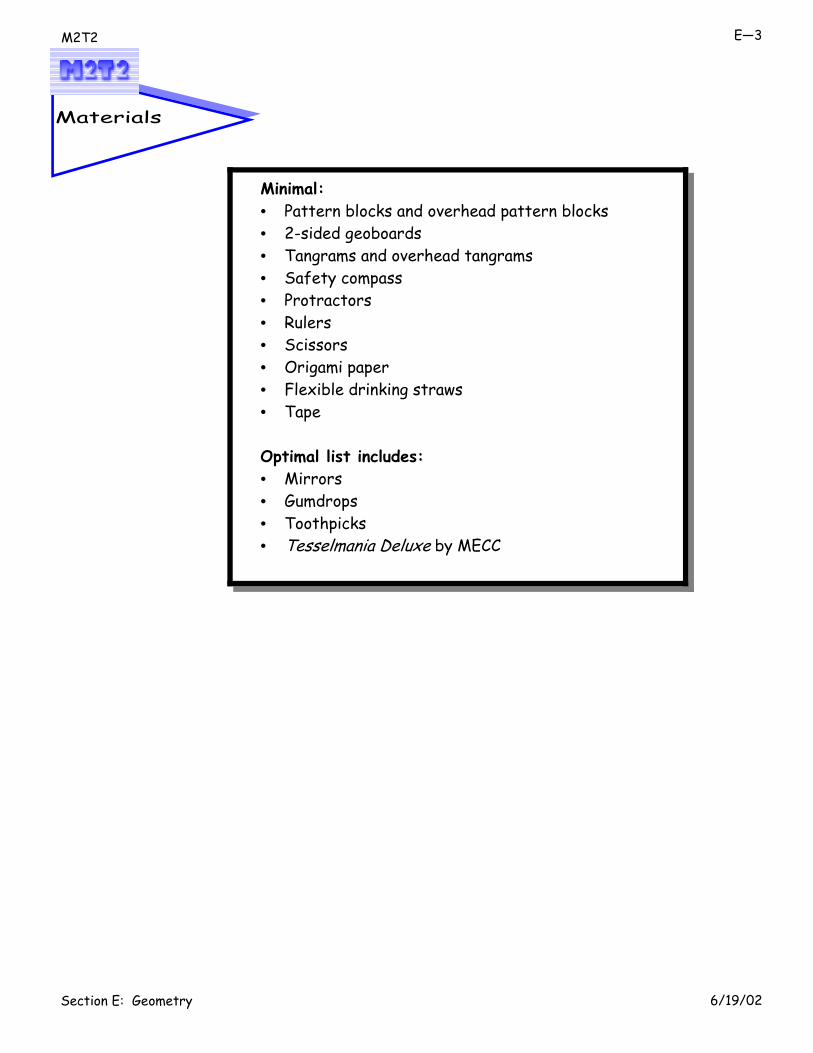
Minimal: • Pattern blocks and overhead pattern blocks • 2-sided geoboards • Tangrams and overhead tangrams • Safety compass • Protractors • Rulers • Scissors • Origami paper • Flexible drinking straws • Tape
Optimal list includes:
• Mirrors • Gumdrops • Toothpicks • Tesselmania Deluxe by MECC
Materials

3/3/01 6/19/02 Section E: Geometry
E—4 M2T2: Late Elementary
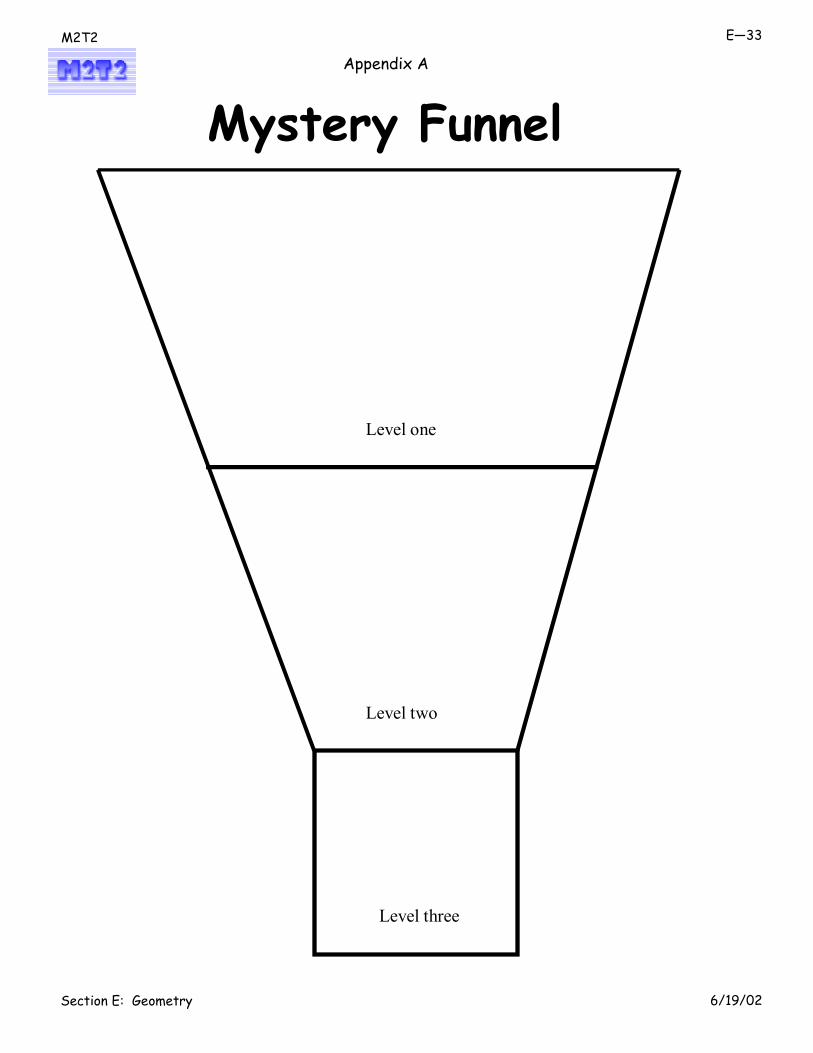
Level one
Level two
Level three
Activity Instructions Distribute the Mystery Funnel and Shapes worksheets to the participants (Appendix A and B). Participants will cut out each shape and place all of the shapes at the top of the Mystery Funnel. A clue will be read and participants will move shapes that have the property of that clue to level one. A second clue is then read. Using only the shapes from level one, move appropriate shapes to level two. This will continue until four clues are read. Participants will hold up the shapes that were sieved down the mystery funnel having all of the attributes of the four clues. (Applet included if possible of the Mystery Funnel and set of shapes.) Example…
1. Move down any shape that is a polygon. 2. Move down any shape that has a right angle. 3. Move down any shape that is a quadrilateral. 4. Move down any shape that is regular.
Participants should define the final shape/ shapes based on the attributes of the given clues.
Hints or notes:
Participants will discuss the characteristics of polygons and sort them in a variety of ways.
They will create definitions and justify them as they explore the differences among related polygons. See categories of two dimensional shapes: Navigating through Geometry 6-8 Literature connection:Shape Up by David Adler
Mystery Funnel
Instructor Page
Participants discuss why certain shapes, such as the circle, were not moved down. A circle is not a polygon, since it is not made of line segments. Have pairs of students develop with their own mystery clues and try them with the class. Extension: Create a set of mystery clues in which none of the shapes pass through to the bottom of the funnel.
1,2,3,4,5,6,7, 8,10,11,13,14
2,7,10,14
2,10,14
14
For example- ”A square is a regular quadrilateral with right angles.”

3/3/01 6/19/02 Section E: Geometry
E—5 M2T2
Use the Mystery Funnel and Mystery Funnel Shapes handouts from Appendix A & B (and/or the applet) to explore the properties of polygons.
· Cut out the shapes and place them at the top of the Mystery Funnel.
· Follow the clues to move the shapes to the correct levels.
· Identify, compare and analyze attributes of shapes and their properties as they are placed on the correct level.
· Define the shapes that have completely passed through the mystery funnel
based on the attributes from the given clues.
Now, create your own set of Mystery Funnel clues and share them with the class:
Clue one-
Clue two-
Clue three- Clue four-
Participant Page
Mystery Funnel

3/3/01 6/19/02 Section E: Geometry
E—6 M2T2: Late Elementary
Activity Instructions Distribute two-sided geoboards to participants with the instruction to construct a triangle. Participants should share the descriptions of the triangles formed in their groups of five or six, noting attributes that are the same and different. On the geoboard have participants make each triangle described:
Next, demonstrate an obtuse triangle such as the ones below. Why are these and other triangles difficult for some students to identify as triangles? Participants may share other examples of misconceptions of triangles observed in the classroom. Now have participants create triangles on the geoboard with the following attributes:
Why is it only possible to make the equilateral triangle on the circular side? Can participants name each triangle using both angle and side names, for example, a right scalene triangle.
Triangle Exploration
Instructor
Online Resources:
Notes: The triangle is the polygon with the least number of sides. Exploring the attrib-utes of triangles forms the basis of identifying and clas-sifying polygons with a greater number of sides. Two-sided geoboards must be used for this lesson – both grid pattern and circu-lar design will be used. If a circular geoboard is not available, use Appendix D or the web site listed. The equilateral triangle can not be made on the grid side, only the circular side. Definitions: Acute triangle – triangle with all acute angles. Obtuse triangle – triangle with one obtuse angle Right triangle – triangle with one right angle Scalene triangle – triangle with no congruent sides Isosceles triangle – triangle with two congruent sides Equilateral triangle – trian-gle with all sides congruent “Shape Up Fun with Trian-gles and Other Polygons” by David Adler introduces the language of triangles as well as other polygons.
Make a triangle with: Is it possible? If yes, what is it called? 1 right angle Yes - right triangle 2 right angles No 1 acute angle No 2 acute angles Yes - right triangle if 3rd angle is right or
obtuse triangle if 3rd angle is obtuse 3 acute angles Yes - acute triangle 1 obtuse angle Yes - obtuse triangle
Angle Chart
• To access virtual geoboards, go to http://matti.usu.edu/nlvm/nav/vlibrary.html
Make a triangle with: Is it possible? If yes, what is it called? No Congruent Sides Yes — scalene triangle
Two Congruent Sides Yes — isosceles triangle
All Sides Congruent Yes — equilateral triangle (Only on the circular side of the geoboard)
Side Chart
3/3/01 6/19/02 Section E: Geometry
E—7 M2T2
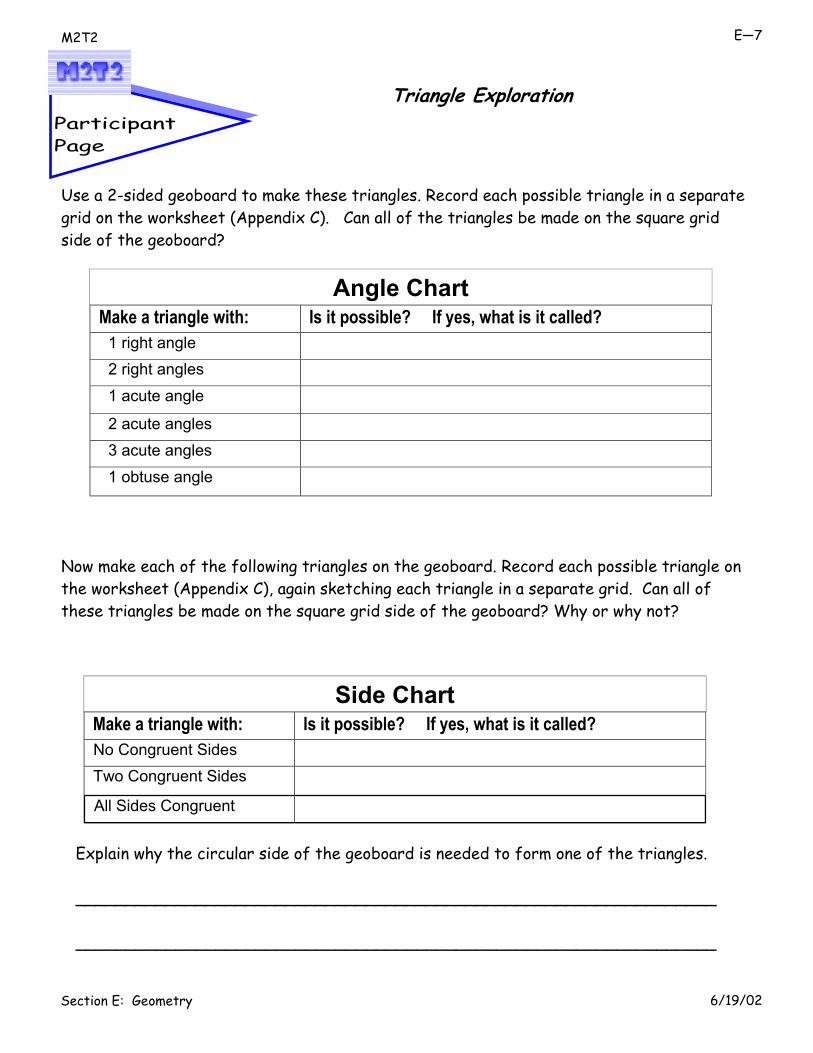
Participant Page
Triangle Exploration
Use a 2-sided geoboard to make these triangles. Record each possible triangle in a separate grid on the worksheet (Appendix C). Can all of the triangles be made on the square grid side of the geoboard?
Make a triangle with: Is it possible? If yes, what is it called? 1 right angle 2 right angles 1 acute angle 2 acute angles 3 acute angles 1 obtuse angle
Now make each of the following triangles on the geoboard. Record each possible triangle on the worksheet (Appendix C), again sketching each triangle in a separate grid. Can all of these triangles be made on the square grid side of the geoboard? Why or why not?
Explain why the circular side of the geoboard is needed to form one of the triangles. ________________________________________________________________ ________________________________________________________________
Angle Chart
Make a triangle with: Is it possible? If yes, what is it called? No Congruent Sides Two Congruent Sides All Sides Congruent
Side Chart

3/3/01 6/19/02 Section E: Geometry
E—8 M2T2: Late Elementary
Activity Instructions Before participants can work with tools such as protractors for measurement, it is important to be able to identify angles greater
and less than 90°. ⇒ In pairs or small groups, participants will manipulate pattern
block shapes to determine the number of degrees in each angle of the 6 standard pattern block pieces.
Hint:
To maintain the consistency of the results, standard pattern block pieces should be used for this activity. If not available, you can use pattern block templates, die-cut pieces or shapes cut from heavy card stock (see Appendix E). The web site below also provides a set of virtual pattern blocks.
Discussion of Math Content and Related Questions:
Pattern Block Angles
Instructor Page
⇒ Before working with the pattern blocks, pose the question, “What do we know about the angles of the shapes?”
Estimate the number of degrees in each angle. Which angles are right, acute, obtuse? ⇒ They will use prior knowledge of basic geometry, such as the
number of degrees in each angle of a square being equal to 90°. ⇒ A discussion of prior knowledge will also determine if the
participants identify the triangle as an equilateral triangle and that the number of degrees in each of its angles equals 60°.
Online Resources: • To access virtual pattern blocks, go to http://matti.usu.edu/nlvm/nav/vlibrary.html
90°
90°
90°
90°
60° 60°
30°
120°
120°
60° 60°
60°
60° 60°
120°
120° 120°
120°
120° 120°
120°
120°
30°
150° 150°
Solution processes may vary. However, the number of degrees should match the angle measures given.

3/3/01 6/19/02 Section E: Geometry
E—9 M2T2
Pattern Block Angles
Determine the measure of degrees in each interior angle of the six different pattern blocks.
· Use only the other pattern blocks to help measure the angles. · Use any prior knowledge such as the measure of the right angle of the square. · Use substitution to find different combinations of blocks to fit in the drawings of the
angles of each block. Example – how many triangles will fit into the angle of a hexagon? · Record the correct number of degrees at each angle for the six shapes.
Describe the process used to determine the number of degrees in each angle.
90°
90°
Participant Page

3/3/01 6/19/02 Section E: Geometry
E—10 M2T2: Late Elementary
Activity Instructions ⇒ Tell the participants they are presented with the task of
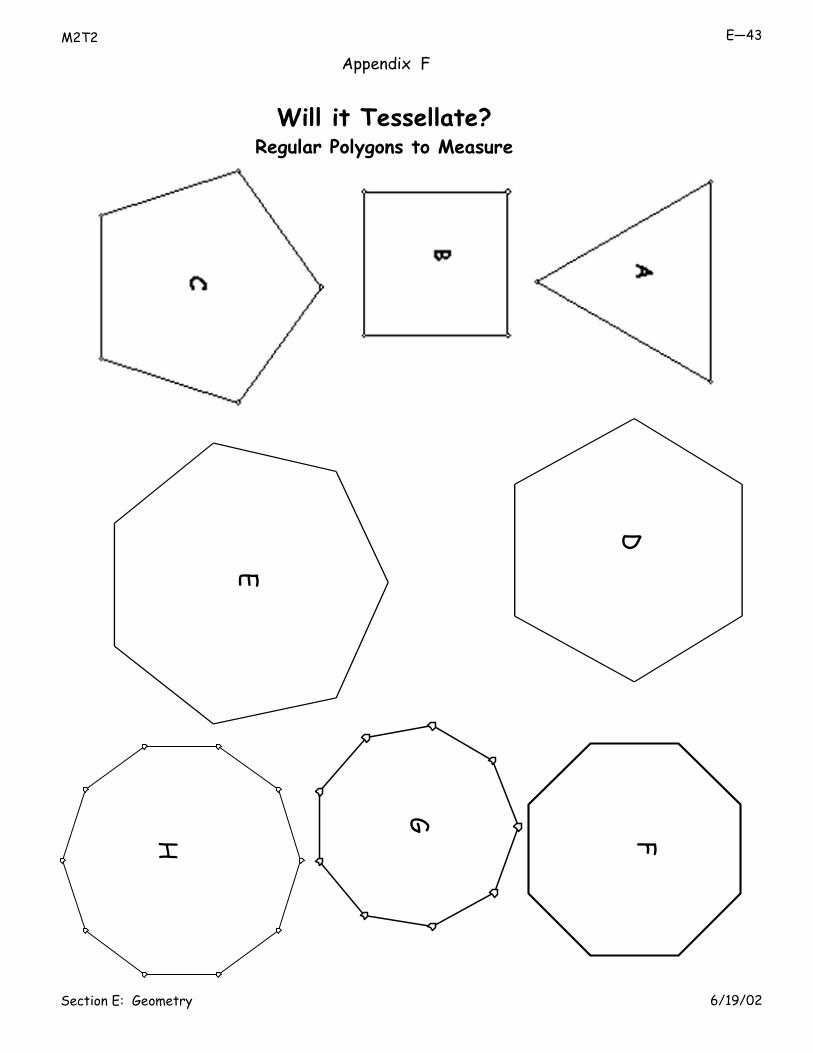
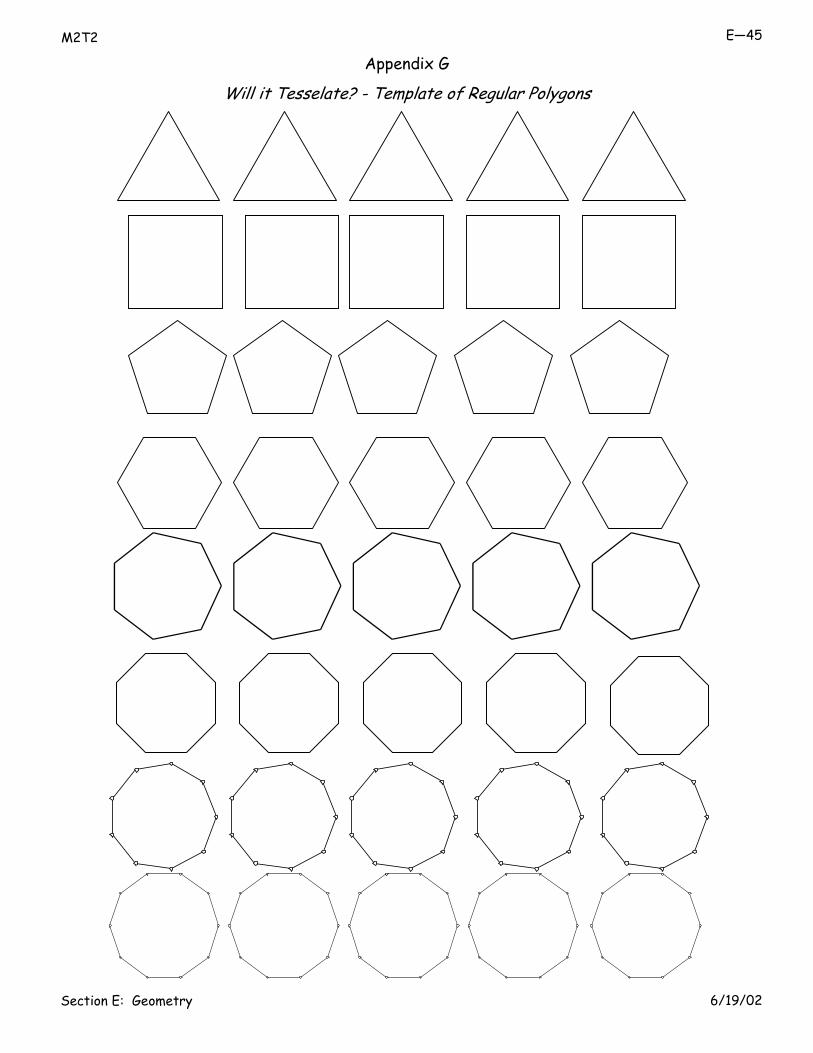
tiling a floor. They are only allowed to use one kind and one size of polygonal tile. These tiles must meet edge to edge and vertex to vertex, without any gaps or overlaps. Distribute the worksheet of regular polygons (Appendix F) to the participants. Have them predict, without actually trying, which regular polygons will tile the floor.
⇒ Next, have participants cut out the regular polygons from the
worksheet labeled Appendix G. With a partner have them try to arrange the triangles to determine whether they could cover the floor. Participants should repeat this process with the square, pentagon, hexagon, heptagon, octagon, nonagon, and decagon until they conclude which regular polygons will tessellate to cover the floor. Have the participants share arrangements that will complete the task of tiling the floor.
⇒ Next, distribute the Angles of Regular Polygons worksheet
(Page E-13) and protractors. Have the participants go back and measure the angles of each polygon on Appendix F. After the group discusses what they measure, give them the actual measurements. (see M2T2 Middle School Mathematics: Algebra, Patterns and Regular Polygons pages 8-9 for additional information) Discuss with the participants that since the regular polygons in a tessellation must fill the plane at each vertex, the interior angle must be an exact divisor of 360 degrees. That is why regular triangles (60° angles), squares (90° angles) and regular hexagons (120° angles) are the only regular polygons that will tessellate a plane.
Hints or notes:
Participants will predict, explore, and describe which regular polygons will tessellate and state the reason WHY!!! Tessellations are an everyday occurrence. They appear in art, geodesic domes, tiling, soap bubbles, kaleidoscopes, honeycombs, cell structures, quilts, and many more places. Literature connection-A Cloak for the Dreamer by Aileen Freymann & Kim Howard.
Will It Tessellate?
Instructor Page
Online Resources: To make virtual tessellations , go to http://matti.usu.edu/nlvm/nav/vlibrary.html
Extension — Make the 8 semiregular tessellations. Semiregular tessellations use two or more regular polygons (you need the dodecagon).

3/3/01 6/19/02 Section E: Geometry
E—11 M2T2
Definitions:
Tessellation— a covering of a surface (plane) with one or more shapes, in a pattern without gaps or holes and without overlaps. Regular polygon— a closed geometric figure with all sides the same length and all angles the same measure. Example: the square is a regular quadrilateral because all sides measure the same length and all the angles are equal. Regular tessellation—tilings of one type of regular polygon. Example: using all regular hexagons of the same size.
You are presented with the task of tiling a floor.
You are only allowed to use one kind and one size of regular polygonal tile. These tiles must meet edge to edge and
vertex to vertex, without any gaps or overlaps. We will be using the surface of your desk to represent the floor.
· What do you notice about all the regular polygons? · Predict which of the polygons you think can be used to tile the
floor. · Cut out the polygons from Appendix G and try to arrange them,
using all the same shape, to cover your desk. For example-can you cover your desk using only octagons?
· Record which polygons were able to complete the task. · Why do you think all polygons are not able to tile the floor? · Use the protractor to measure an angle of each polygon and
record your answer on page E-13 · Share your measurements with other participants and the
instructor. · Answer the question, “Is the exact angle measurement a factor
of 360 degrees?” Complete the worksheet (page E-13) and discuss your findings with your classmates.
Participant Page
Will It Tessellate?

3/3/01 6/19/02 Section E: Geometry
E—12 M2T2: Late Elementary
Will It Tessellate? (continued)
Instructor
Instructor’s answer key to “Angles of Regular Polygons” worksheet
# of Sides Name of My Actual Factor of & Angles Regular Measurement Angle 360 degrees Polygon Measurement (Yes or No) 3 triangle (answers 60 degrees yes 4 square will vary) 90 degrees yes 5 pentagon 108 degrees no 6 hexagon 120 degrees yes 7 heptagon 128 4/
7 degrees no 8 octagon 135 degrees no 9 nonagon 140 degrees no 10 decagon 144 degrees no Which regular polygons will tessellate? Only the triangle, square, and hexagon will tessellate What do they have in common? Their angles are all factors of 360. How many of each polygon does it take to fill the 360 degrees?
It takes 6 triangles 6 X 60 = 360
It takes 4 squares 4 X 90 = 360
It takes 3 hexagons 3 X 120 = 360

3/3/01 6/19/02 Section E: Geometry
E—13 M2T2
Participant Page
Will It Tessellate? (continued)
Angles of Regular Polygons
# of Sides Name of What Actual Factor of & Angles Regular I Angle 360 degrees Polygon Measured Measurement (Yes or No) 3 _________ __________ __________ __________ 4 _________ __________ __________ __________ 5 _________ __________ __________ __________ 6 _________ __________ __________ __________ 7 _________ __________ __________ __________ 8 _________ __________ __________ __________ 9 _________ __________ __________ __________ 10 _________ __________ __________ __________ Which regular polygons will tessellate? What do they have in common? How many of each polygon does it take to make 360 degrees?

3/3/01 6/19/02 Section E: Geometry
E—14 M2T2: Late Elementary
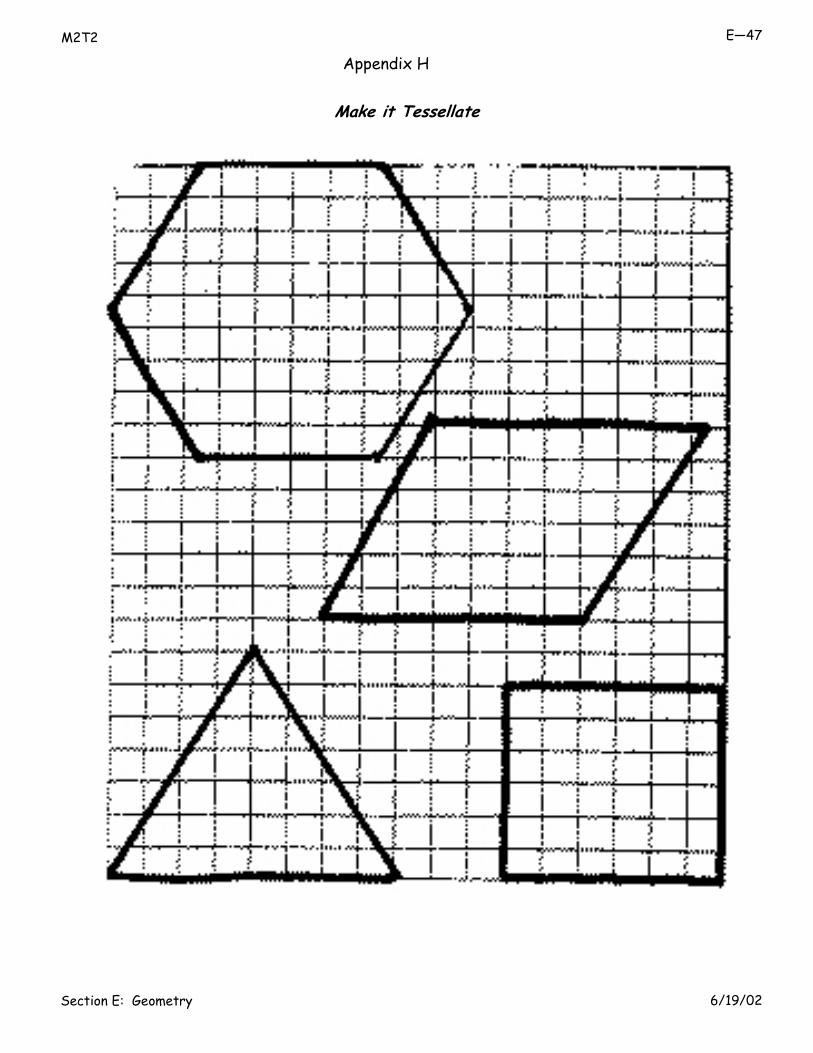
Context: The “Will it Tessellate?” activity taught us why triangles, quadrilaterals, and hexagons tessellate. This activity was designed around regular polygons. Please note all triangles (scalene, isosceles etc.) tessellate, as well as all quadrilaterals and all hexagons. For this activity we will only be using the square as our polygon tile and the translation as our transformation. When introducing tessellations, this is the simplest way to begin.
Activity Instructions ⇒ Tell the participants they will be drawing their own tessellation. The
tile they are creating is called an irregular tessellating figure. Performing a geometric transformation, such as, a translation, rotation, or reflection creates an irregular tessellating figure. By using the tile, the tessellation can be created.
1. Distribute the tessellation worksheet (Appendix H).
2. Participants will cut out the square. (Note, the polygons are drawn on
graph paper because this allows the students to easily match up the lines when they perform a geometric transformation)
3. Cut a section from the top of the square. Begin at
one corner and cut to the adjacent corner. (Never cut off or through a complete corner.)
4. Slide/translate the cutout piece to the bottom of
the square. (Make sure you do not flip or turn the piece. Also, match the lines of the graph paper up perfectly.)
5. Securely tape the cutout part in place along the
straight edge of the square.
6. Following the same rules, cut a section from one of the sides and slide/translate the cutout part to the opposite side. Then tape securely in place.
7. Your tile is complete and you are ready to
tessellate. {Follow instructions on the participant page…}
Notes: To create a beautiful and interesting tessellation, one must understand that tessellations are a true combination of art and mathematics. When studying tessellations, the work of the Dutch artist M. C. Escher may be of interest because of the fascinating pattern designs he created. Materials: worksheets, scissors, tape, construction paper, crayons or markers Literature connection: A Cloak for the Dreamer by Aileen Freymann & Kim Howard. Tip: It is best to model this activity using the overhead. Make a transparency of Appendix H.
Make It Tessellate
Instructor Page
Online Resources: Make tessellations on the computer by using the program TesselMania Deluxe by Mecc. Do a search of the word tessellation on the Internet; it’s amazing what you will find!
Extension –Have the participants experiment with different polygons and transformations. For example, use the triangle and perform the rotational transformation.
3/3/01 6/19/02 Section E: Geometry
E—15 M2T2
Definitions:
Geometric Transformations-when a figure is moved by translations, rotations, or reflections. Translation- when a figure slides to a new location without changing its orientation. Reflection-when a figure is flipped so that a mirror image is created Rotation- when a figure is turned about a fixed point.
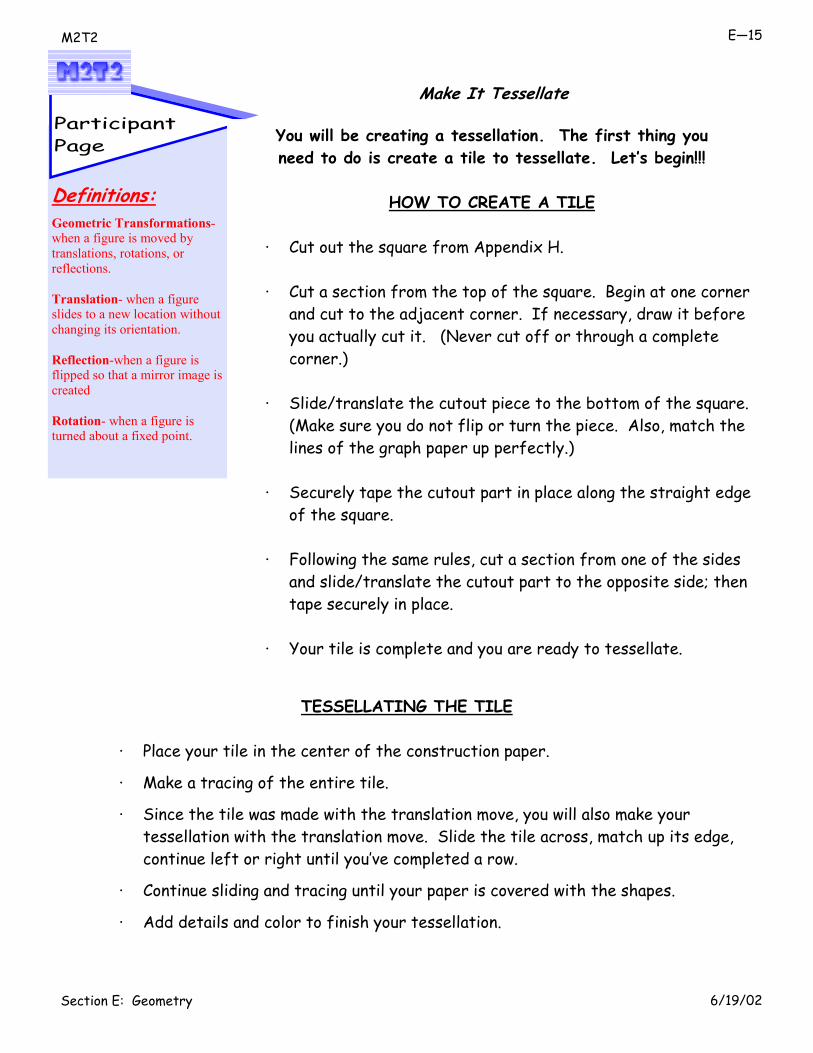
TESSELLATING THE TILE
· Place your tile in the center of the construction paper.
· Make a tracing of the entire tile.
· Since the tile was made with the translation move, you will also make your tessellation with the translation move. Slide the tile across, match up its edge, continue left or right until you’ve completed a row.
· Continue sliding and tracing until your paper is covered with the shapes.
· Add details and color to finish your tessellation.
Participant Page
Make It Tessellate
You will be creating a tessellation. The first thing you need to do is create a tile to tessellate. Let’s begin!!!
HOW TO CREATE A TILE
· Cut out the square from Appendix H.
· Cut a section from the top of the square. Begin at one corner
and cut to the adjacent corner. If necessary, draw it before you actually cut it. (Never cut off or through a complete corner.)
· Slide/translate the cutout piece to the bottom of the square.
(Make sure you do not flip or turn the piece. Also, match the lines of the graph paper up perfectly.)
· Securely tape the cutout part in place along the straight edge
of the square.
· Following the same rules, cut a section from one of the sides and slide/translate the cutout part to the opposite side; then tape securely in place.
· Your tile is complete and you are ready to tessellate.

3/3/01 6/19/02 Section E: Geometry
E—16 M2T2: Late Elementary
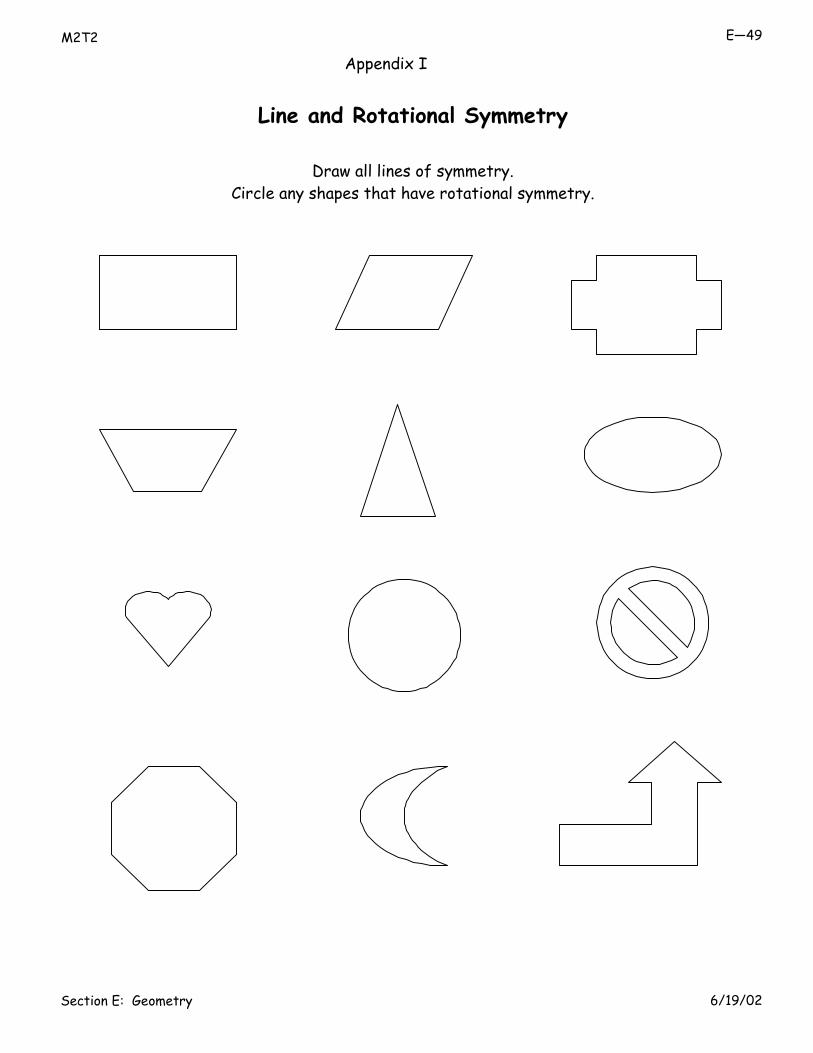
Activity Instructions
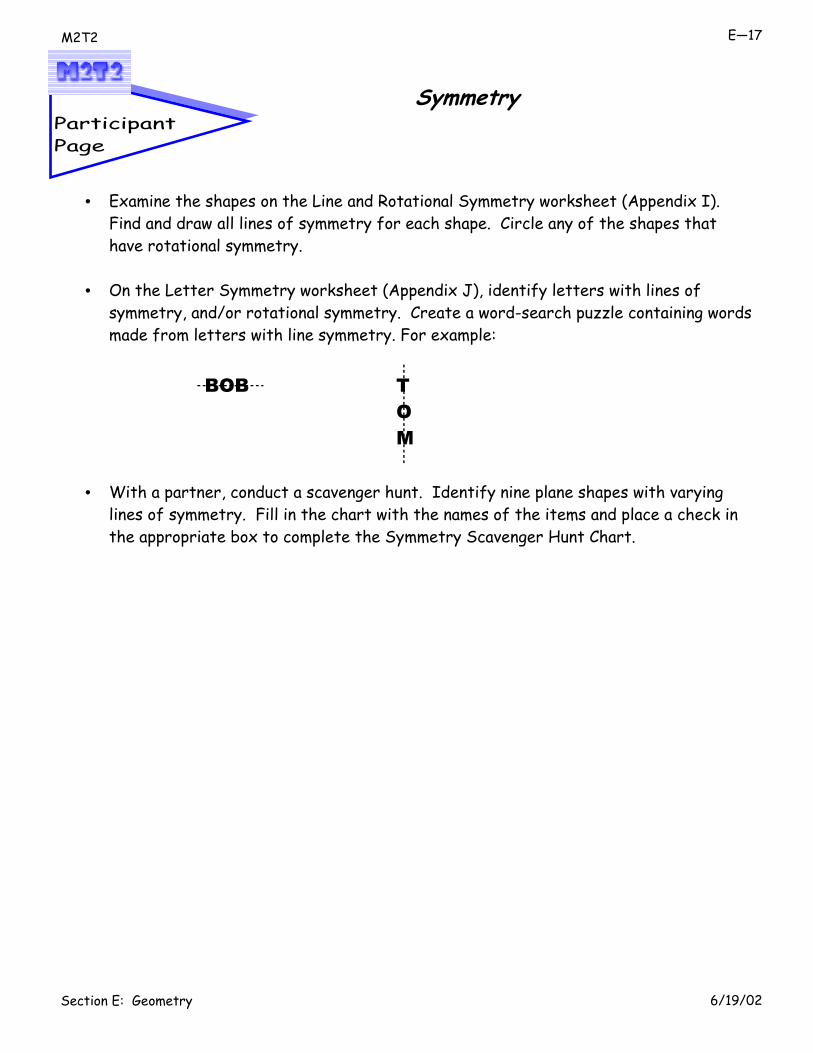
• Examine the shapes on the Line and Rotational Symmetry Worksheet (Appendix I). Find and draw all lines of symmetry for each shape. Circle any of the shapes that have rotational symmetry.
• On the Letters Worksheet (Appendix J), participants
identify letters with lines of symmetry, and/or rotational symmetry, then create a word-search puzzle containing words made from letters with line symmetry. For example:
BOB T
O M
• With a partner, participants will conduct a scavenger hunt, identifying nine plane shapes with varying lines of symmetry. Fill in the chart with the names of the items and place a check in the appropriate box on the chart to complete the Symmetry Scavenger Hunt Chart.
Hints or notes: Both reflective and rotational symmetry are found in nature, art, architecture, in the classroom, and all around us. Through a variety of activities, participants will identify lines of symmetry and shapes with rotational symmetry. Materials: Mirrors or Miras are optional for identifying lines of symmetry.
Symmetry
Instructor Page
3/3/01 6/19/02 Section E: Geometry
E—17 M2T2
• Examine the shapes on the Line and Rotational Symmetry worksheet (Appendix I).
Find and draw all lines of symmetry for each shape. Circle any of the shapes that have rotational symmetry.
• On the Letter Symmetry worksheet (Appendix J), identify letters with lines of
symmetry, and/or rotational symmetry. Create a word-search puzzle containing words made from letters with line symmetry. For example:
BOB T O M
• With a partner, conduct a scavenger hunt. Identify nine plane shapes with varying
lines of symmetry. Fill in the chart with the names of the items and place a check in the appropriate box to complete the Symmetry Scavenger Hunt Chart.
Participant Page
Symmetry

3/3/01 6/19/02 Section E: Geometry
E—18 M2T2: Late Elementary
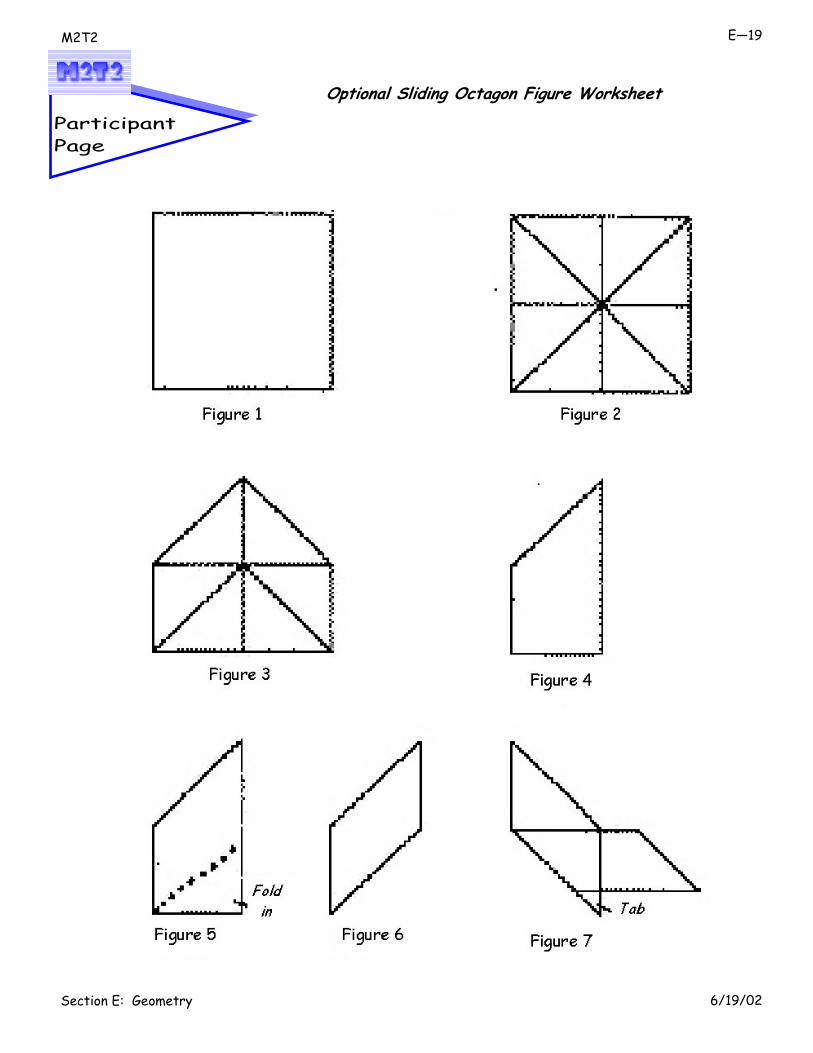
Activity Instructions Begin by passing out the origami paper. If you would like to make this a
listening activity, do not pass out The Sliding Octagon Figure worksheet. However, if you would like the participants to have a visual representation, when folding, use the Sliding Octagon Figure worksheet. Make a square out of a transparency and use the overhead to model the instructions. Participants should be able to complete the next seven pieces on their own.
1. What shape is this piece of paper? Square (See figure 1)
2. What do you call any four sided figure? Quadrilateral
3. Since this figure has all equal sides and angles, what do you call it? Regular
4. How many lines of symmetry does it have? Four
5. Fold along all lines of symmetry and then unfold. (See figure 2)
6. Fold the right and left corners down to the center point. This result will
leave you with what figure? Pentagon (See figure 3) 7. How many lines of symmetry does this new figure have? Fold on the line of symmetry. One (See figure 4)
8. Tuck in the lower right hand corner. Now what type of figure do you have? Parallelogram (See figures 5 & 6)
Make a total of eight pieces. Use two colors- four pieces of each one. Open a piece and slide another one inside. Tuck in the tabs and continue to do this until you have all eight connected. (See figure 7) Why do you think this is called the sliding octagon?
Hints or notes: “Understanding something intellectually and knowing the same thing tactilely are very different experiences.” Tomoko Fuse Origami means paper-folding. In true origami, hands and paper are the only tools allowed, no scissors, glue or tape are needed. The sliding octagon is called unit origami, because the final product is produced by assembling several, identical units which were created through paper folding. Materials—Origami paper Each participant will need eight pieces of origami paper, four each of two colors. Extension-Create other geometric figures and solids through origami. Resource-Unit Origami by Tokomo Fuse
Discussion of Math Content and Related Questions:
Sliding Octagon
Instructor Page
Again, the Sliding Octagon worksheet on Page E-19 is optional. Participants need to concentrate on straight folds and strong creases. The better the folds, the easier the sliding octagon will fit together. Questions may be answered orally as instructions are given.
3/3/01 6/19/02 Section E: Geometry
E—19 M2T2
Participant Page
Optional Sliding Octagon Figure Worksheet

3/3/01 6/19/02 Section E: Geometry
E—20 M2T2: Late Elementary
Activity Instructions Distribute the tangram worksheet to the participants (Appendix K ). Participants will cut out each shape. Discussion of Math Content and Related Questions:
1. Begin by asking the most specific name of each piece. 2. Have the participants tell you how many lines of symmetry
each tangram piece has. 3. Ask if any of the tangram pieces are congruent. Have them
explain how they know. 4. Ask if any of the tangram pieces are similar. Have them
explain how they know. 5. Using only certain pieces, participants will be asked to make
different polygons. 6. Let the area of the small square equal 1 square unit.
Participants will find the area of the other 6 pieces. Make different problems by changing the unit of area for the square.
Extension: Participants will take the seven pieces and make an object such as an animal or person. When they are finished, have them write a story about their tangram puzzle. Literature Connection: Read the book, Grandfather Tang’s Story by Ann Tompert or Three Pigs, One Wolf, and Seven Magic Shapes by Grace MacCrone.
Hints or notes: The tangram is an ancient puzzle that has been traced to China. Tradition says that the tangram shapes were first discovered when a man dropped a tile and it broke into seven pieces. Although tangrams can create infinite shapes, there are only 13 convex polygons you can make using all seven pieces. Tangrams allow students to compose and decompose shapes, as they use their logical reasoning skills to discover mathematical concepts and relationships. You may buy tangram puzzles, die cut them or use the Appendix __ to copy them.
Tangrams Puzzles that Enrich Geometric Vocabulary & Concepts Instructor
Page
Online Resources: • To access virtual tangrams, go to http://matti.usu.edu/nlvm/nav/vlibrary.html

3/3/01 6/19/02 Section E: Geometry
E—21 M2T2
Which pieces are CONGRUENT? How do you know? Which pieces are SIMILAR? How do you know? Construct the following polygons with tangrams: A) Use two small triangles and a square to make a rectangle. Trace it and label it A. B) Use two small triangles and a parallelogram to make a rectangle. Trace it and label it B. C) Use a medium triangle, two small triangles, and a parallelogram to make a rectangle.
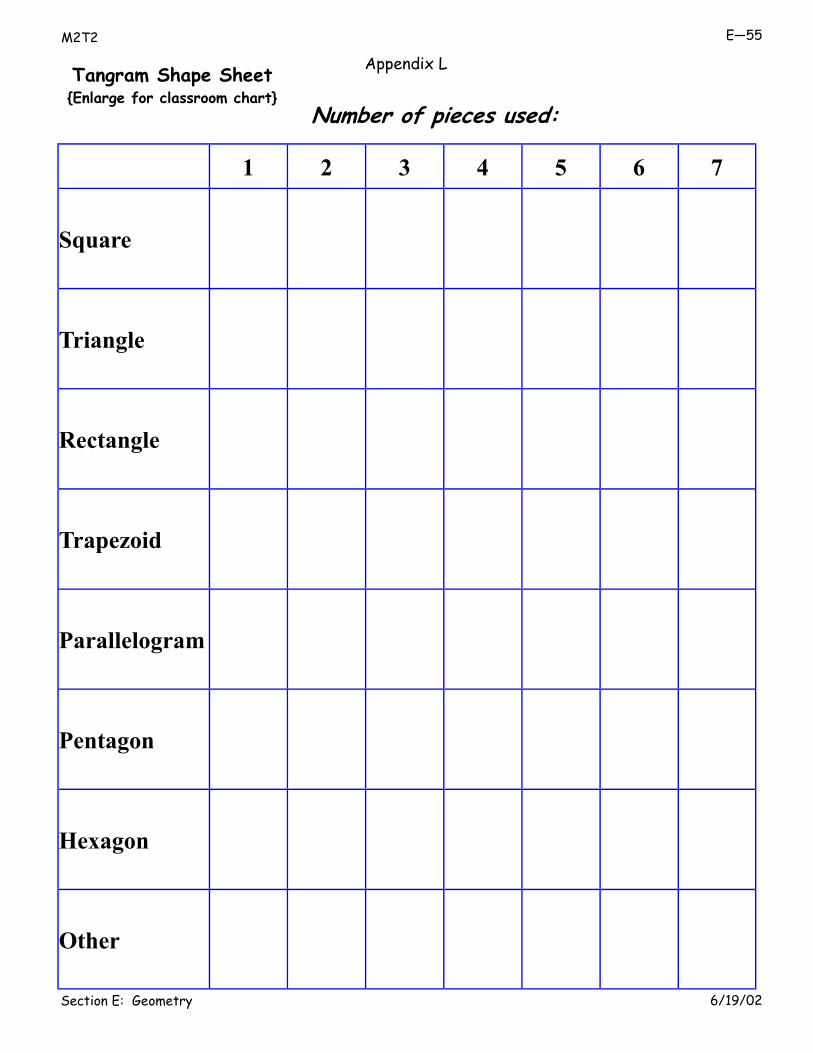
Trace it and label it C. Is rectangle A congruent to rectangle B? How do you know? Is rectangle C congruent to rectangle A? How do you know? If the small square has an area of one unit squared, what is the value of the area of the rest of the pieces? Piece 1 = _______ Piece 2= _____ Piece 3 = one unit squared Piece 4 = _____ Piece 5 = _______ Piece 6 = _____ Piece 7 = _______ Use the Tangram Shape Sheet (Appendix L) to make a record of shapes that can be made using 1,2,3,4,5,6,or 7 of the pieces. When you have solved a shape, trace around the outside and save that drawing. Attach the solution to a classroom chart.
Tangrams
Tangram Most Specific Name # of Lines
Piece 1
Piece 2
Piece 3
Piece 4
Piece 5
Piece 6
Piece 7
Begin by cutting out the 7 tangram pieces seen on Appendix K. Then, name each tangram piece with its most specific name and also describe how many lines of symmetry the figure has.
Participant Page

3/3/01 6/19/02 Section E: Geometry
E—22 M2T2: Late Elementary
Begin with a discussion of the difference between a pyramid and prism. ⇒ Review the facts that pyramids have a base that can be any polygon, and
that a pyramid is named according to the base. ( If the base is an octagon than it is an octagonal pyramid.) The sides of the pyramid are triangles whose sides have a common vertex (apex).
⇒ A prism has two congruent, parallel polygons for its top and bottom bases, and it is also named according to those bases. The lateral bases of the prisms are rectangular, not triangular like the pyramid. Also, review the terms faces, vertices, and edges.
Activity Instructions For this activity you will place the participants in the following groups:
1. triangular pyramid and prism 2. square pyramid and prism 3. rectangular pyramid and prism 4. pentagonal pyramid and prism
Note you will not be constructing a heptagonal or nonagonal pyramid and prism even though they are part of the chart. Students will construct the polygons which will be used as faces to make the polyhedra. Gently stretch the flexible segment of the straws, then bend to create the angles. Pinch the shorter end of the straw by pressing in to create a groove about an inch long. Insert this end into one of the longer ends of one of the other straws. (Remember that opposite sides connect; you will never connect two short ends together.) Repeat until all three straws are connected. The flexible end will bend and form the corners of the triangle. You would construct a square in the same manner using four straws, a pentagon by using five, etc. Model the triangular pyramid and prism since no group was assigned to make them. Ask the following questions:
· For the triangular pyramid, what is the base? A triangle · How many straws do you think we need to make a triangle? 3 · Do pyramids have triangles or rectangles as lateral faces? triangles · How many additional triangles do we need to attach to our triangular base to make a triangular pyramid? 3
Participants should help the instructor make the four triangles. When complete, the instructor should place the triangular base on the floor and place the additional triangles around the base, side to side. You will now have a two-dimensional net that can be folded into a three-dimensional pyramid. Hold the three triangles up and tape them at their common vertex. Holding the shapes together, tape along the bases about one inch from each vertex. Continue to do this until all triangles are attached.
Hints or notes:
“Students need to examine, build, compose, and decompose complex two- and three-dimensional objects” NCTM 2000, p.237 Geometric models play an important role in the mathematical development of students. They are very helpful in making connections, developing spatial-visualizations, seeing relationships, and enjoying mathematics. Materials — flexible drinking straws, scissors, tape Optional – Use toothpicks and gumdrops instead of straws and tape. Tip - To make a rectangle, instead of a square, straws may be cut to make different lengths. Extension - Dip the polyhedra into a bucket of bubble solution. Discuss the planes you see inside the polyhedra.
Discussion of Math Content and Related Questions:
Straw Polyhedra
Instructor Page
3/3/01 6/19/02 Section E: Geometry
E—23 M2T2
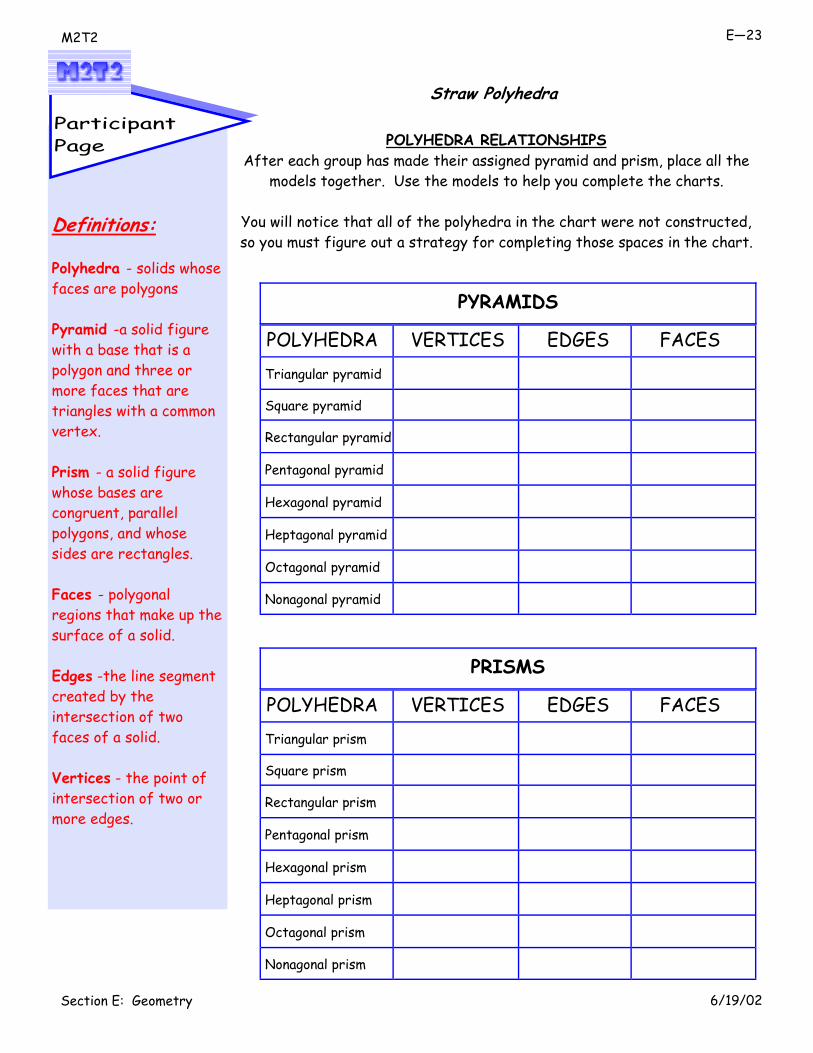
Definitions: Polyhedra - solids whose faces are polygons Pyramid -a solid figure with a base that is a polygon and three or more faces that are triangles with a common vertex. Prism - a solid figure whose bases are congruent, parallel polygons, and whose sides are rectangles. Faces - polygonal regions that make up the surface of a solid. Edges -the line segment created by the intersection of two faces of a solid. Vertices - the point of intersection of two or more edges.
POLYHEDRA RELATIONSHIPS After each group has made their assigned pyramid and prism, place all the
models together. Use the models to help you complete the charts.
You will notice that all of the polyhedra in the chart were not constructed, so you must figure out a strategy for completing those spaces in the chart.
Participant Page
Straw Polyhedra
POLYHEDRA VERTICES EDGES FACES Triangular pyramid
Square pyramid
Rectangular pyramid
Pentagonal pyramid
Hexagonal pyramid
Heptagonal pyramid
Octagonal pyramid
Nonagonal pyramid
PYRAMIDS
POLYHEDRA VERTICES EDGES FACES Triangular prism
Square prism
Rectangular prism
Pentagonal prism
Hexagonal prism
Heptagonal prism
Octagonal prism
Nonagonal prism
PRISMS
3/3/01 6/19/02 Section E: Geometry
E—24 M2T2: Late Elementary
Activity Instructions (continued)
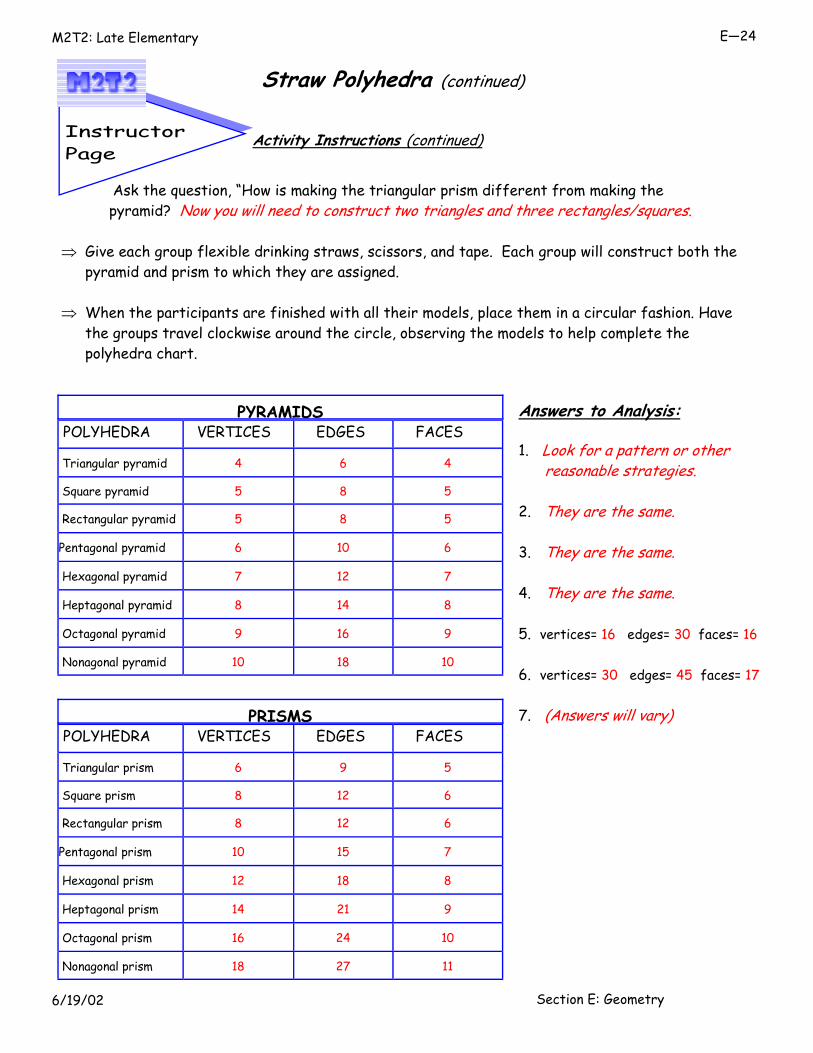
Ask the question, “How is making the triangular prism different from making the
pyramid? Now you will need to construct two triangles and three rectangles/squares. ⇒ Give each group flexible drinking straws, scissors, and tape. Each group will construct both the
pyramid and prism to which they are assigned. ⇒ When the participants are finished with all their models, place them in a circular fashion. Have
the groups travel clockwise around the circle, observing the models to help complete the polyhedra chart.
Instructor Page
Straw Polyhedra (continued)
POLYHEDRA VERTICES EDGES FACES
Triangular pyramid 4 6 4
Square pyramid 5 8 5
Rectangular pyramid 5 8 5
Pentagonal pyramid 6 10 6
Hexagonal pyramid 7 12 7
Heptagonal pyramid 8 14 8
Octagonal pyramid 9 16 9
Nonagonal pyramid 10 18 10
PYRAMIDS
POLYHEDRA VERTICES EDGES FACES
Triangular prism 6 9 5
Square prism 8 12 6
Rectangular prism 8 12 6
Pentagonal prism 10 15 7
Hexagonal prism 12 18 8
Heptagonal prism 14 21 9
Octagonal prism 16 24 10
Nonagonal prism 18 27 11
PRISMS
Answers to Analysis: 1. Look for a pattern or other reasonable strategies. 2. They are the same. 3. They are the same. 4. They are the same. 5. vertices= 16 edges= 30 faces= 16 6. vertices= 30 edges= 45 faces= 17 7. (Answers will vary)
3/3/01 6/19/02 Section E: Geometry
E—25 M2T2
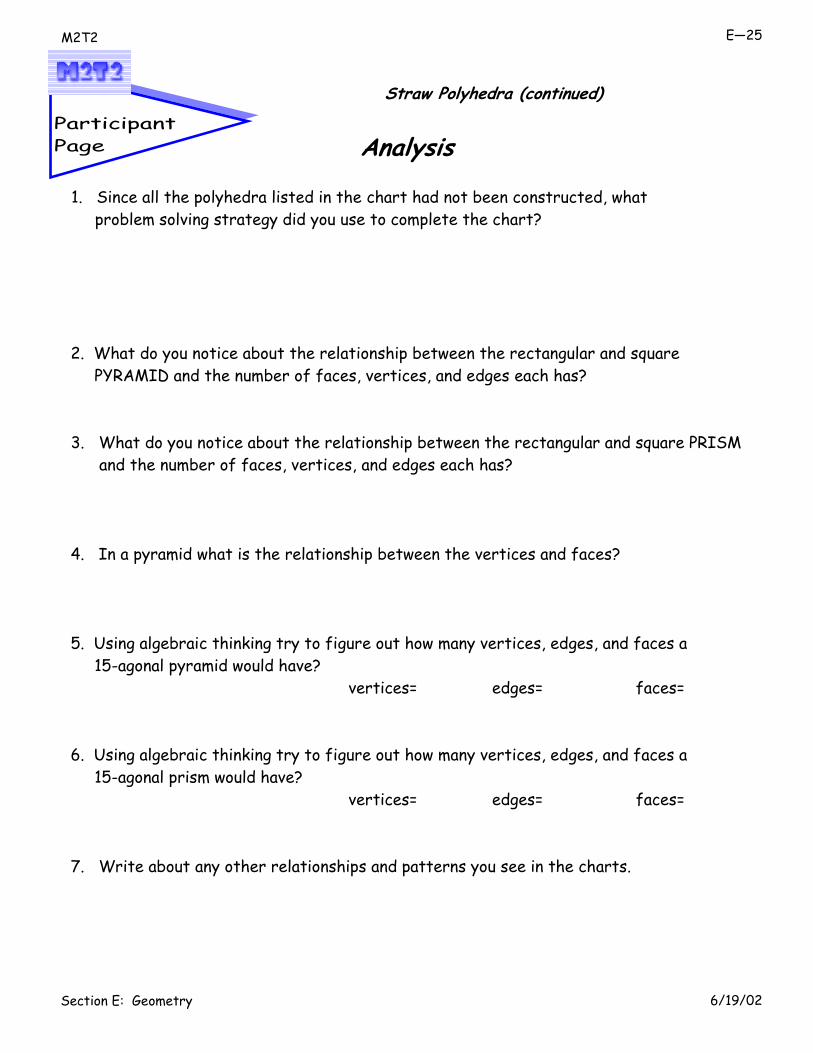
Analysis 1. Since all the polyhedra listed in the chart had not been constructed, what problem solving strategy did you use to complete the chart?
2. What do you notice about the relationship between the rectangular and square PYRAMID and the number of faces, vertices, and edges each has? 3. What do you notice about the relationship between the rectangular and square PRISM and the number of faces, vertices, and edges each has? 4. In a pyramid what is the relationship between the vertices and faces? 5. Using algebraic thinking try to figure out how many vertices, edges, and faces a 15-agonal pyramid would have? vertices= edges= faces= 6. Using algebraic thinking try to figure out how many vertices, edges, and faces a 15-agonal prism would have? vertices= edges= faces= 7. Write about any other relationships and patterns you see in the charts.
Participant Page
Straw Polyhedra (continued)

3/3/01 6/19/02 Section E: Geometry
E—26 M2T2: Late Elementary
Hints or notes: A circle will be folded into a variety of geometric shapes. This activity provides the opportunity to assess the concepts, vocabulary and knowledge of relationships between shapes. If participants use a compass to form the circle, the center will be clearly visible. If desired, use the circle provided on the next page (and in the appendix) to allow students to discover that the center can be found by folding two diagonals. As the paper constructions are formed, continue discussions to assess participants’ knowledge and understanding of the relationships. Vocabulary: diameter radius (radii) chord right triangle hypotenuse isosceles trapezoid rhombus similar congruent pyramid tetrahedron
Instructor Page
Get Into Shape
Activity Instructions
• Fold a circle with an eight-inch diameter in half and label each half semicircle. Can participants name the line segment formed by the fold? Label the segment diameter.
• Fold again making a second diameter. What line segments are formed by the two diameters? Label one radius. How does the size of the radius compare to the size of the diameter? The radius is half the diameter. What point is formed where the diameters intersect? Label the center.
• Fold the top of the circle down to the center. What is this line segment called? Label the chord.
• Make a second fold to the center so that the end of the new chord meets an end of the first chord. (This figure resembles a snowcone.) Make a third fold to the center so that the ends of the new chord meet the remaining ends of the previous two chords. What shape is formed? equilateral triangle (inscribed in a circle)
How many degrees are in each angle of the triangle? 60° Label the number of degrees at each angle.
• Fold to form the equilateral triangle, how do you know it is equilateral? Fold in half vertically. What type of triangle is formed? right scalene triangle. What is the longest side of the right triangle called? hypontenuse How many degrees are in each of the angles of the right triangle? 90° How do you know? The line of symmetry may also be identified.
diameter
radius
center
chord
hypotenuse
30°
90° 60°
3/3/01 6/19/02 Section E: Geometry
E—27 M2T2
Get Into Shape
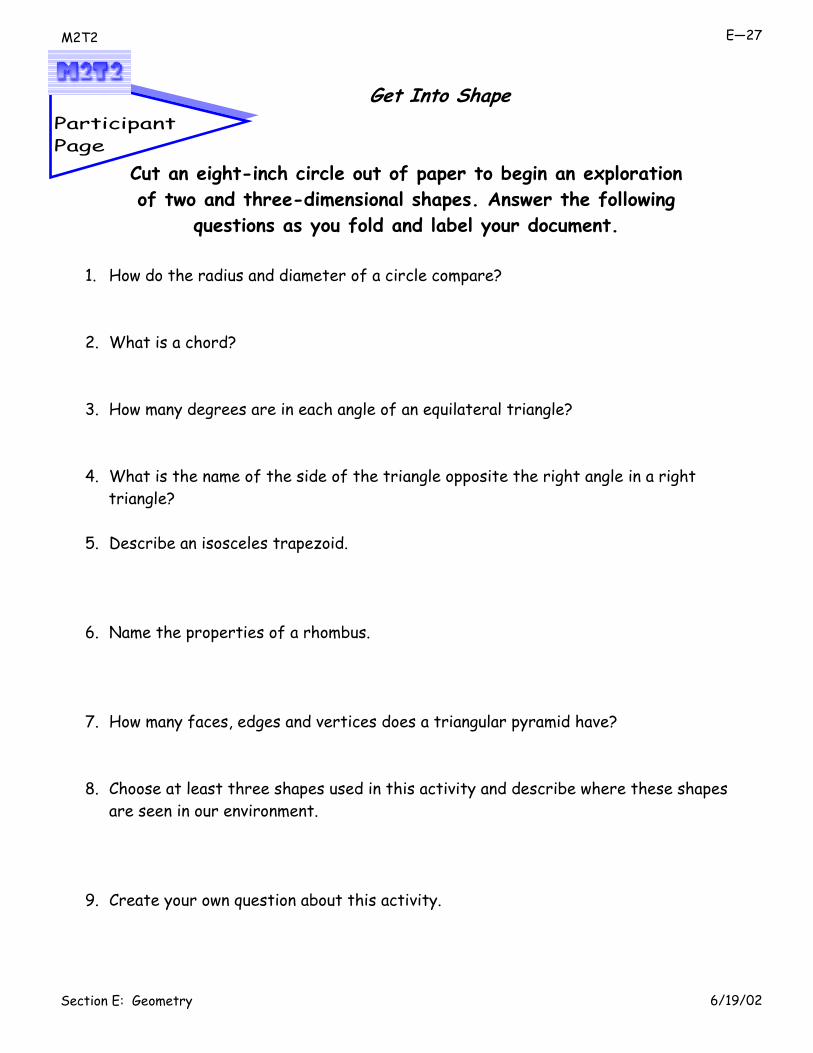
Cut an eight-inch circle out of paper to begin an exploration of two and three-dimensional shapes. Answer the following
questions as you fold and label your document.
1. How do the radius and diameter of a circle compare?
2. What is a chord?
3. How many degrees are in each angle of an equilateral triangle?
4. What is the name of the side of the triangle opposite the right angle in a right triangle? 5. Describe an isosceles trapezoid.
6. Name the properties of a rhombus.
7. How many faces, edges and vertices does a triangular pyramid have?
8. Choose at least three shapes used in this activity and describe where these shapes are seen in our environment.
9. Create your own question about this activity.
Participant Page

3/3/01 6/19/02 Section E: Geometry
E—28 M2T2: Late Elementary
Instructor Page
Get Into Shape (continued)
Activity Instructions (continued)
• Open to the large equilateral triangle then fold down to the midpoint of base of the triangle. What shape is formed? isosceles trapezoid Why is it called an isosceles trapezoid? One pair of parallel sides and one pair of congruent sides How many degrees are there in each angle of the trapezoid? How do you know? Label them on your shape.
• Now fold one of the 60˚ angles to the midpoint of the base of the trape-zoid. What is this new shape called? right trapezoid Why? Label the number of degrees in each angle.
• Next fold the remaining acute angle to form a right angle at the base. What is this new shape? rectangle
• Open back to the isosceles trapezoid. Fold one small equilateral triangle
over the center triangle. What shape is formed? rhombus What makes this shape a rhombus?
• Fold the other small equilateral triangle over the center triangle to form an equilateral triangle. How does this shape compare to the original equilateral triangle? similar How does it compare to the other small equilateral triangles? congruent
• Hold the shape in the palm of your hand and allow the triangles to open. Hold together to form a tetrahedron or triangular pyramid. How many faces does the figure have? four How many edges? six How many vertices? four
• Open the shape to the original equilateral triangle. Fold the top down to the center of the circle. What shape is formed? trapezoid
120° 120°
60° 60°
60°
90° 120°
90°

3/3/01 6/19/02 Section E: Geometry
E—29 M2T2
Participant Page
Get Into Shape (continued)
8 Inch Circle Template
3/3/01 6/19/02 Section E: Geometry
E—30 M2T2: Late Elementary
Instructor Page
Get Into Shape (continued)
Activity Instructions (continued)
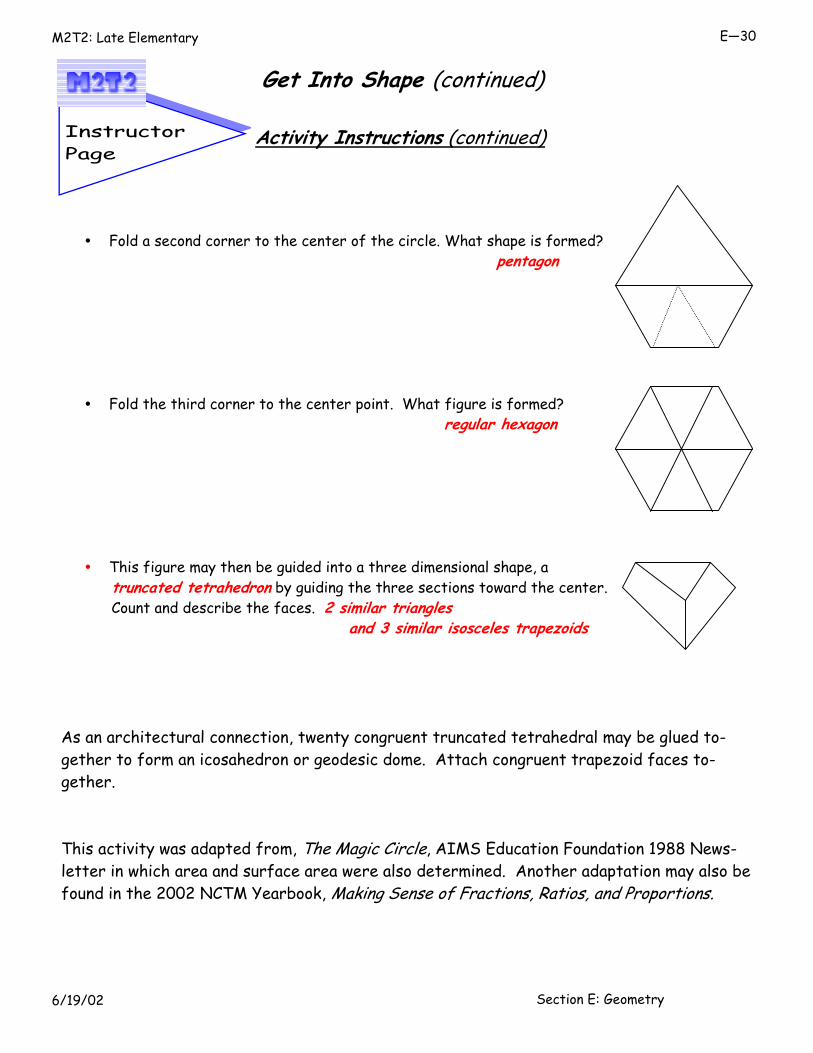
• Fold a second corner to the center of the circle. What shape is formed? pentagon
• Fold the third corner to the center point. What figure is formed? regular hexagon
• This figure may then be guided into a three dimensional shape, a truncated tetrahedron by guiding the three sections toward the center. Count and describe the faces. 2 similar triangles and 3 similar isosceles trapezoids
As an architectural connection, twenty congruent truncated tetrahedral may be glued to-gether to form an icosahedron or geodesic dome. Attach congruent trapezoid faces to-gether. This activity was adapted from, The Magic Circle, AIMS Education Foundation 1988 News-letter in which area and surface area were also determined. Another adaptation may also be found in the 2002 NCTM Yearbook, Making Sense of Fractions, Ratios, and Proportions.

3/3/01 6/19/02 Section E: Geometry
E—31 M2T2

3/3/01 6/19/02 Section E: Geometry
E—32 M2T2: Late Elementary
THIS PAGE INTENTIONALLY BLANK
3/3/01 6/19/02 Section E: Geometry
E—33 M2T2
Appendix A
Level one
Level two
Level three
Mystery Funnel

3/3/01 6/19/02 Section E: Geometry
E—34 M2T2: Late Elementary
THIS PAGE INTENTIONALLY BLANK

3/3/01 6/19/02 Section E: Geometry
E—35 M2T2
Appendix B
1 2 3
4 5
6
7 8
9
10
11
12 13
14

3/3/01 6/19/02 Section E: Geometry
E—36 M2T2: Late Elementary
THIS PAGE INTENTIONALLY BLANK
3/3/01 6/19/02 Section E: Geometry
E—37 M2T2
For a web site containing interactive geoboards, go to http://matti.usu.edu/nlvm/nav/
Appendix C
. . . . .
. . . . .
. . . . .
. . . . .
. . . . .
. . . . .
. . . . .
. . . . .
. . . . .
. . . . .
. . . . .
. . . . .
. . . . .
. . . . .
. . . . .
. . . . .
. . . . .
. . . . .
. . . . .
. . . . .
. . . . .
. . . . .
. . . . .
. . . . .
. . . . .
. . . . .
. . . . .
. . . . .
. . . . .
. . . . .
. . . . .
. . . . .
. . . . .
. . . . .
. . . . .
. . . . .
. . . . .
. . . . .
. . . . .
. . . . .
. . . . .
. . . . .
. . . . .
. . . . .
. . . . .
Triangle Exploration Geoboard Grids Draw 9 different types of triangles, according to the charts on page E-7.
Label by angles and sides, for example: right isosceles triangle.

3/3/01 6/19/02 Section E: Geometry
E—38 M2T2: Late Elementary
THIS PAGE INTENTIONALLY BLANK
3/3/01 6/19/02 Section E: Geometry
E—39 M2T2
Appendix D
Triangle Exploration Circular Geoboards
Use the circular geobaords below to make any of the triangles, described in the charts on page E-7, that were impossible to make on a square geoboard.
For a web site containing interactive geoboards, go to http://matti.usu.edu/nlvm/nav/

3/3/01 6/19/02 Section E: Geometry
E—40 M2T2: Late Elementary
THIS PAGE INTENTIONALLY BLANK
3/3/01 6/19/02 Section E: Geometry
E—41 M2T2
Appendix E
Pattern Block Angles

3/3/01 6/19/02 Section E: Geometry
E—42 M2T2: Late Elementary
THIS PAGE INTENTIONALLY BLANK
3/3/01 6/19/02 Section E: Geometry
E—43 M2T2
Appendix F
Will it Tessellate? Regular Polygons to Measure
F
G H
D
E

3/3/01 6/19/02 Section E: Geometry
E—44 M2T2: Late Elementary
THIS PAGE INTENTIONALLY BLANK
3/3/01 6/19/02 Section E: Geometry
E—45 M2T2
Appendix G
Will it Tesselate? - Template of Regular Polygons

3/3/01 6/19/02 Section E: Geometry
E—46 M2T2: Late Elementary
THIS PAGE INTENTIONALLY BLANK
3/3/01 6/19/02 Section E: Geometry
E—47 M2T2
Appendix H
Make it Tessellate

3/3/01 6/19/02 Section E: Geometry
E—48 M2T2: Late Elementary
THIS PAGE INTENTIONALLY BLANK
3/3/01 6/19/02 Section E: Geometry
E—49 M2T2
Appendix I
Line and Rotational Symmetry
Draw all lines of symmetry.
Circle any shapes that have rotational symmetry.

3/3/01 6/19/02 Section E: Geometry
E—50 M2T2: Late Elementary
THIS PAGE INTENTIONALLY BLANK
3/3/01 6/19/02 Section E: Geometry
E—51 M2T2
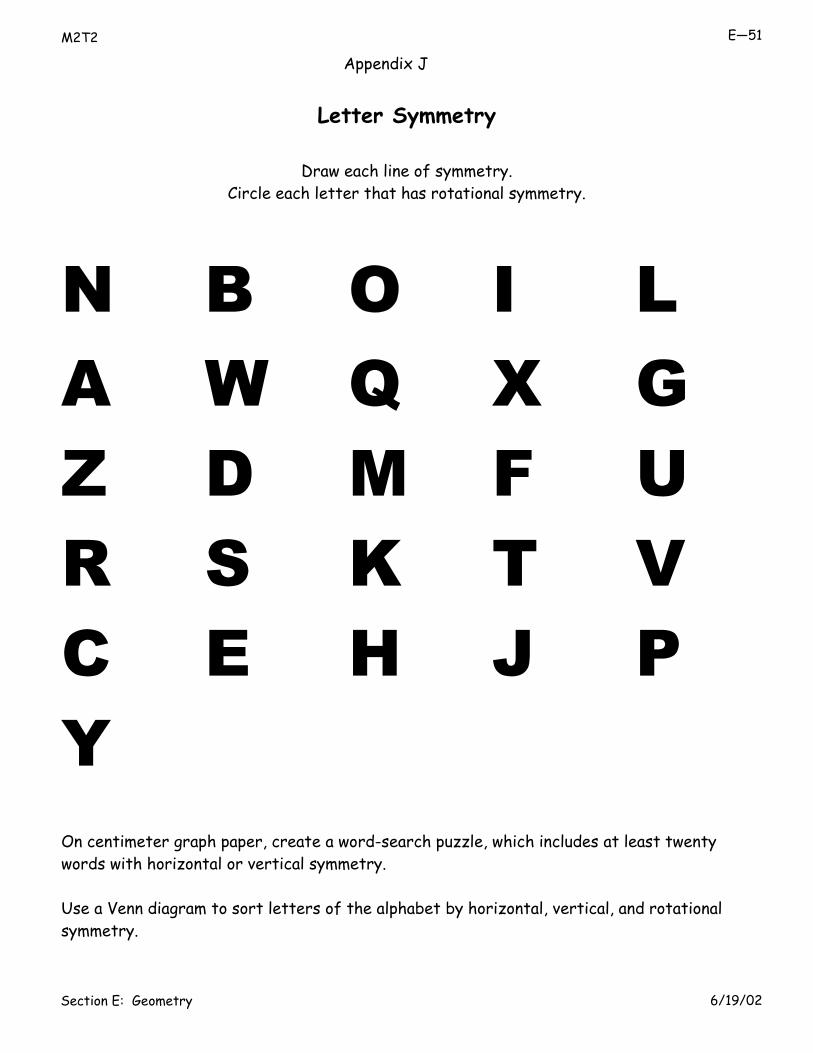
Appendix J
Letter Symmetry
Draw each line of symmetry.
Circle each letter that has rotational symmetry.
N B O I L A W Q X G Z D M F U R S K T V C E H J P Y On centimeter graph paper, create a word-search puzzle, which includes at least twenty words with horizontal or vertical symmetry. Use a Venn diagram to sort letters of the alphabet by horizontal, vertical, and rotational symmetry.

3/3/01 6/19/02 Section E: Geometry
E—52 M2T2: Late Elementary
THIS PAGE INTENTIONALLY BLANK
3/3/01 6/19/02 Section E: Geometry
E—53 M2T2
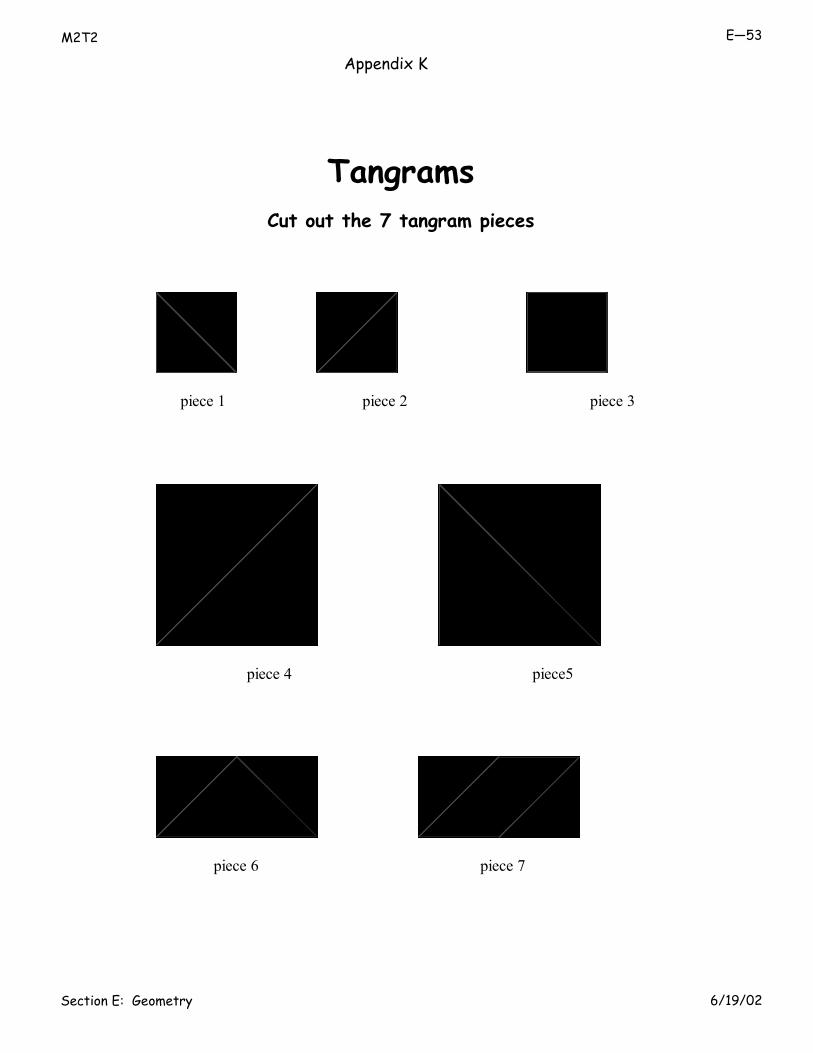
Appendix K
piece 1 piece 2 piece 3
piece 4 piece5
piece 6 piece 7
Tangrams
Cut out the 7 tangram pieces

3/3/01 6/19/02 Section E: Geometry
E—54 M2T2: Late Elementary
THIS PAGE INTENTIONALLY BLANK
3/3/01 6/19/02 Section E: Geometry
E—55 M2T2
Appendix L
1 2 3 4 5 6 7
Square
Triangle
Rectangle
Trapezoid
Parallelogram
Pentagon
Hexagon
Other
Tangram Shape Sheet {Enlarge for classroom chart}
Number of pieces used:

3/3/01 6/19/02 Section E: Geometry
E—56 M2T2: Late Elementary
THIS PAGE INTENTIONALLY BLANK

3/3/01 6/19/02 Section E: Geometry
E—57 M2T2
Appendix M
8 Inch Circle Template

3/3/01 6/19/02 Section E: Geometry
E—58 M2T2: Late Elementary
Geometry
Email questions and comments to [email protected]