matlab i: getting started - stat.utexas.edu · matlab i: getting started 2 the department of...
TRANSCRIPT

Matlab I: Getting Started
Updated: August 2012
Matlab I: Getting Started
2
The Department of Statistics and Data Sciences, The University of Texas at Austin
Table of Contents
Section 1: Introduction ............................................................................................ 3
About this Document .................................................................................................................. 3
Introduction to Matlab ................................................................................................................ 4
Section 2: An Overview of Matlab ......................................................................... 5
Getting Started ............................................................................................................................ 5
The Desktop Layout .................................................................................................................... 5
The Current Directory Window .................................................................................................. 6
The Workspace Window ............................................................................................................ 7
The Command History Window ................................................................................................. 7
The Command Window .............................................................................................................. 7
The Help Window ....................................................................................................................... 8
The Figure Window .................................................................................................................... 8
Section 3: Notation, Syntax, and Operations ........................................................ 9
Variable names ........................................................................................................................... 9
Numerical conventions ............................................................................................................... 9
Geometrical and directional conventions ................................................................................. 10
Operator and delimiter symbolics ............................................................................................. 10
Multiple operations ................................................................................................................... 12
Displaying content of multi-element variables ......................................................................... 14
Section 4: Importing and Exporting Information ..............................................16
Command Line Import .............................................................................................................. 16
The Import Wizard .................................................................................................................... 16
Import Functions ....................................................................................................................... 18
M-file Scripts ............................................................................................................................ 20
Export Functions ....................................................................................................................... 21
M-Books ................................................................................................................................... 24
Advanced Methods for Binary Information .............................................................................. 25
Matlab I: Getting Started
3
The Department of Statistics and Data Sciences, The University of Texas at Austin
Section 1: Introduction About this Document
This tutorial series introduces you to the MatlabR2008b suite of applications from MathWorks,
Inc. The R2008b release consists of version 7.7 of the primary Matlab application along with
some auxiliary modeling and simulation applications and specialized toolboxes. The suite as a
whole will be surveyed but the primary application, Matlab 7.7, will be the focus of the tutorial
sections designed for getting started. Instruction is aimed toward first-time users; however, those
who are already familiar with previous versions of Matlab can use this document to learn about
some of Matlab’s new features and graphical interface. The tutorial series is organized into four
parts containing a total of nine sections.
Part I includes the first four sections and serves to get the user acquainted with the Matlab
application. The first section provides a brief introduction to this tutorial series and to Matlab.
The second section gives an overview of the Matlab desktop layout and guides the reader
through each of the windows and their functions. Also covered in this section is the layout for
the built-in Matlab Help. The third section covers the basic methods of getting data into and
exporting data from Matlab, including the import wizard, command line I/O functions, and M-
books. The fourth section introduces the notation and syntax used by Matlab and contains
essential information for routine usage of the application.
Part II includes the fifth and sixth sections which serve to introduce the basic functionalities of
the Matlab application such that the user will be able to perform routine tasks. The fifth section
covers computational and numerical methods for doing various mathematical operations. The
sixth section goes through the basics of programming in the Matlab programming language and
the construction of M-files, which are callable scripts, macros, and functions that can be used
from the Matlab command line prompt or can be embedded within another such file.
Part III includes the seventh and eighth sections and covers aspects of manipulating and
visualizing properties of data sets, including experimental data that have no assumed functional
relationships a priori. The seventh section treats aspects of graphical display and data
visualization, particularly plots. An eighth section covers several ways in which Matlab can be
used in the analysis of experimental or collected data.
Part IV encompasses the ninth and final section which deals with optimization methods and with
modeling and simulation of dynamical systems. This last section includes an introduction to the
Simulink auxiliary application that is distributed with Matlab. Also, this section will introduce
the usage of Matlab Toolboxes, which are ensembles of related M-files developed for specific
types of applications.

Matlab I: Getting Started
4
The Department of Statistics and Data Sciences, The University of Texas at Austin
Throughout this document many concepts and techniques are illustrated using Matlab scripts and
other auxiliary files. All associated files can be downloaded from links on the same web page:
https://stat.utexas.edu/training/software-tutorials
Introduction to Matlab
In the 1960s and 1970s before the appearance of personal computers, complex and large scale
calculations were done on large mainframes using code primarily developed with FORTRAN.
As a number of related large subroutines were developed for specific computational purposes,
they were organized into public domain packages and distributed for free. Matlab was originally
created as a front end for one of these, the LINPACK package -- a group of routines for working
with matrices and linear algebra. The primary developer, Professor Cleve Moler at the
University of New Mexico, eventually founded MathWorks, Inc., to further develop and market
the product in a commercial setting. From the original Matlab, a high powered suite of
applications has evolved. The current generation release, the MatlabR2008b suite, features the
newest kernel, Matlab 7.7. It is largely backward compatible with recent Matlab versions, but
there may be some slight changes.

Matlab I: Getting Started
5
The Department of Statistics and Data Sciences, The University of Texas at Austin
Section 2: An Overview of Matlab
Getting Started
MathWorks, Inc. now is on a semiannual cycle for releasing updates of Matlab and its various
auxiliaries, so the version installed on the ITS servers may be changing periodically. The
procedure for launching Matlab is no different from one version to the next. However, the launch
method varies.
With UNIX, the environment PATH variable must include the directory containing the
Matlab installation. On the ITS UNIX system this directory is /usr/local/matlab and there
is a script that will automatically augment the PATH variable with necessary additions.
This script can be run from a shell prompt with the command
eval`/usr/local/etc/appuser`. Please note that backquotes should be used
rather than ordinary single quotes.
If the Matlab application is being run on a remote X terminal using a UNIX mainframe
application, then the DISPLAY variable has to be set to the local terminal and the local
terminal has to grant access to the UNIX mainframe. Both of these requirements can be
circumvented if the mainframe connection is through a secure shell (SSH) protocol.
Otherwise the commands
setenv DISPLAY myhost.mydomain:0.0
xhost +remotesystem.remotedomain
will need to be executed at the shell prompt. Matlab can then be started at a shell prompt
with the command matlab, or, in background with concurrent access to other processes
with the command matlab &.
The Windows distribution can be launched by double clicking on a Matlab icon or
shortcut. The default working path in this distribution consists of the Work subfolder of
the top level installation folder and the hierarchy within the Toolbox subfolder of the top
level installation folder. Access to files in other folders can be set by navigating with the
browser from the Set Path option of the File pull down menu.
The Desktop Layout
Once the path environment is set properly and the desktop appears on the monitor screen, using
Matlab will be practically the same for all operating system distributions. There are several
windows that can be used in arranging the desktop, but an initial configuration will appear upon
launching. If desired this can be modified by selecting an alternate choice from Desktop >
Desktop Layout on the top navigation bar. Once a preferred configuration is in place, initial or
otherwise, it can be saved with a specific name for use in future sessions using Desktop > Save

Matlab I: Getting Started
6
The Department of Statistics and Data Sciences, The University of Texas at Austin
Layout from the navigation bar. The name Default has been assigned to a three column
configuration, different from the initial two column configuration upon launch, which may cause
some confusion at first. This tutorial will use the initial two column layout for MatlabR2008b
package. The initial desktop for MatlabR2008b has a small Current Directory selection window
near the top, with an original location determined when the Matlab package is first installed. If
other folders have been added, then another current directory setting can be selected from among
those available. If a current directory not yet in the Matlab path is desired, that setting can be
specified from navigation after opening the small button with three periods just to the right of the
Current Directory field. The main area has the Command window on the right and an upper and
lower window on the left side. The upper left panel will show a Current Directory window which
shows its contents and which can be toggled with a Workspace window. The lower left panel
will show a Command History window. There are also undocked informational windows that
can be launched from Help > Product Help and Help > Demos, and there is an undocked
Figure window that is launched whenever a command involving graphical display is executed.
The Current Directory Window
The Current Directory window displays a current directory with a listing of its contents. There
is navigation capability for resetting the current directory to any directory among those set in the
path. This window is useful for finding the location of particular files and scripts so that they
can be edited, moved, renamed, deleted, etc. The default current directory for Windows
installations is a MATLAB folder within My Documents, which is automatically created upon
launch of Matlab if it does not already exist. By default its contents are displayed in the upper
left area of toggled windows when the application is first launched or when Desktop > Desktop
Layout > Default is selected from the navigation bar.

Matlab I: Getting Started
7
The Department of Statistics and Data Sciences, The University of Texas at Austin
The Workspace Window
The Workspace window provides an inventory of all the items in the workspace that are
currently defined, either by assignment or calculation, in the Command window or by
importation with a load or similar command from the Matlab command line prompt. These
items consist of the set of arrays (including 1x1 scalars) whose elements are variables or
constants and which have been constructed or loaded during the current Matlab session and have
remained stored in memory. Those which have been cleared and no longer are in memory will
not be included. The Workspace window shows the name of each variable and various attributes
such as array size. The particular attributes to be displayed can be selected from the Choose
Columns tab of the View pull down menu when the Workspace window is active. Values of a
variable or constant can be edited in an Array Editor, which is launched by double clicking the
variable’s icon in the Workspace window.
From the Workspace window, it is also possible to generate a graph of a multi-element vector or
matrix variable. To create a graph, choose a variable, click the graph button on the Workspace
window toolbar, and select the graph type from the pull down menu. The graph appears in a
figure window. The button itself changes to reflect the currently selected style of graph. In
addition, you can use the right-click in Windows (or the equivalent button or keystroke operation
for other operating systems) on the variable you want to graph. The type of graph desired can
then be chosen from the context menu. It is also possible to select multiple variables to graph
together. The values of a variable or values within a selected range of contiguous elements can
also be displayed in graphic form after opening in an Array Editor window, which will have a
graphing button with a pull down menu for type. The right-click procedure for graphical
viewing of an array variable can likewise be used after selecting elements in an Array Editor
window.
The Command History Window
The Command History window, at the lower left in the default desktop, contains a log of
commands that have been executed within the Command window. This is a convenient feature
for tracking when developing or debugging programs or to confirm that commands were
executed in a particular sequence during a multi-step calculation from the command line.
The Command Window
The Command window is where the command line prompt for interactive commands is located.
This is also the only window that appears if you execute the UNIX version of Matlab outside of

Matlab I: Getting Started
8
The Department of Statistics and Data Sciences, The University of Texas at Austin
an X environment, e.g., on a vt100 screen. Commands and scripts can be executed from a vt100
window, but graphics and desktop tools will not be available. The Matlab prompt on the
command window consists of two adjacent right angle brackets, i.e., >>. Results of command
operations will also be displayed in this window unless the command line is terminated by a
semi-colon, in which case the display of results is suppressed. If a command or script specified
on the command line is questionable or cannot be executed because of invalid syntax, undefined
variables, etc., a diagnostic message will be displayed in the Command window in red font.
The current value of any saved variable is also displayed in this window if its name is entered at
a prompt.
The Help Window
Separate from the main desktop layout is a Help desktop with its own layout. This utility can be
launched by selecting Help > Product Help from the Help pull down menu. This Help desktop
has a right side which contains links to help with functions, help with graphics, and tutorial type
documentation. The left side has various tabs that can be brought to the foreground for
navigating by table of contents, by indexed keywords, or by a search on a particular string.
The Figure Window
There is a Figure window that floats independently from the main desktop. If not already
present, it is launched when command execution results in graphical output. From the Edit
menu on the main Figure Window toolbar, there are selections for editing figure properties, axis
properties, and properties of objects within figures. On the Tools menu of the main Figure
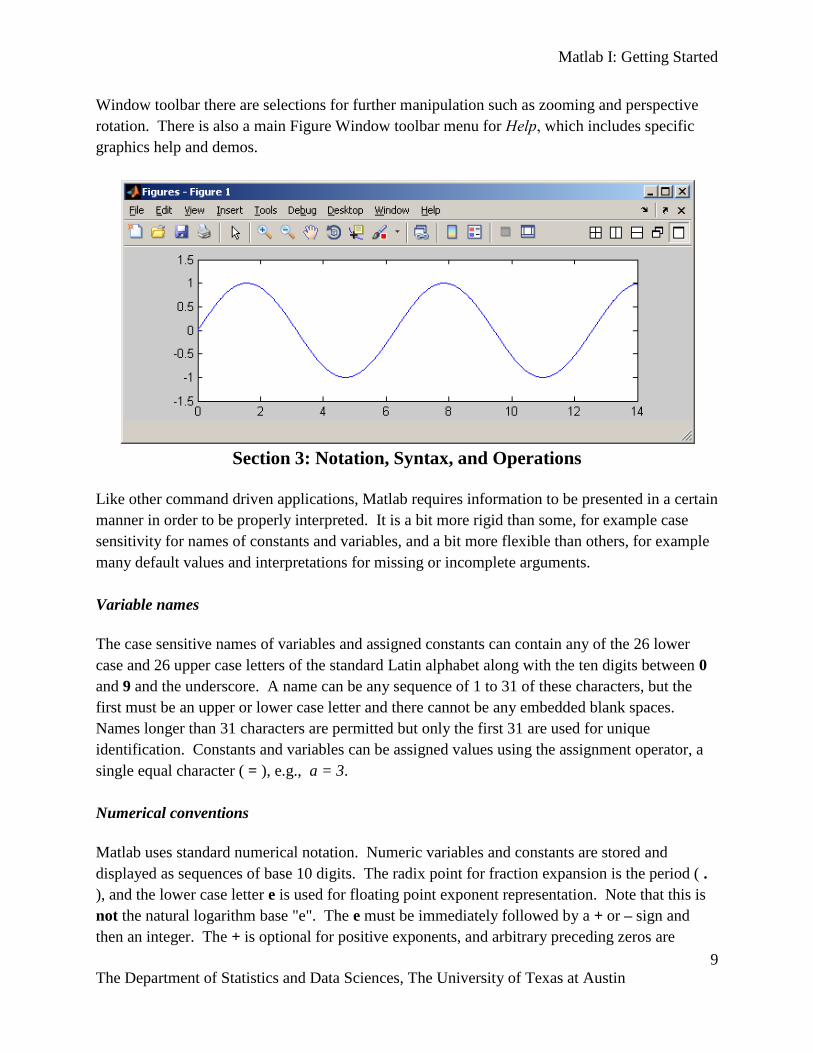
Matlab I: Getting Started
9
The Department of Statistics and Data Sciences, The University of Texas at Austin
Window toolbar there are selections for further manipulation such as zooming and perspective
rotation. There is also a main Figure Window toolbar menu for Help, which includes specific
graphics help and demos.
Section 3: Notation, Syntax, and Operations
Like other command driven applications, Matlab requires information to be presented in a certain
manner in order to be properly interpreted. It is a bit more rigid than some, for example case
sensitivity for names of constants and variables, and a bit more flexible than others, for example
many default values and interpretations for missing or incomplete arguments.
Variable names
The case sensitive names of variables and assigned constants can contain any of the 26 lower
case and 26 upper case letters of the standard Latin alphabet along with the ten digits between 0
and 9 and the underscore. A name can be any sequence of 1 to 31 of these characters, but the
first must be an upper or lower case letter and there cannot be any embedded blank spaces.
Names longer than 31 characters are permitted but only the first 31 are used for unique
identification. Constants and variables can be assigned values using the assignment operator, a
single equal character ( = ), e.g., a = 3.
Numerical conventions
Matlab uses standard numerical notation. Numeric variables and constants are stored and
displayed as sequences of base 10 digits. The radix point for fraction expansion is the period ( .
), and the lower case letter e is used for floating point exponent representation. Note that this is
not the natural logarithm base "e". The e must be immediately followed by a + or – sign and
then an integer. The + is optional for positive exponents, and arbitrary preceding zeros are
Matlab I: Getting Started
10
The Department of Statistics and Data Sciences, The University of Texas at Austin
permitted. For example, the integer 2000 can be represented as 2.0e+003, 2e3,
0002.000e0003, or even with a negative exponent as 20000e-1; and the fraction 2000
1 can be
represented as 0.0005, 5e-4, or 05.0000e-00004, or even with a positive exponent as
0.00005e001.
Matlab accommodates complex-valued numbers of two dimensional divisional algebra using the
symbols i and j as default notations for 1 . These two symbols are initially identical,
accommodating an historical notational difference between mathematical literature and
engineering literature. They both represent the upper intersection of the imaginary axis with a
circle of radius 1 centered at the origin of the complex plane, thus a single one of the two
possible square roots. Similarly they are not separate roots of -1 in the classical i j k notation of
higher dimensional divisional algebras such as Hamiltonian quaternions, and in fact k does not
have an initial built-in assigned value. Once i or j has been assigned some value the symbol
must be immediately preceded by a numerical value in order to signify an imaginary part. If not,
it will be interpreted as a separate entity. Thus:
(1 + 1i ) is a single complex number with magnitude 1 for both real and imaginary parts
(1 + 1*i) is a sum of the integer 1 and whatever value i happens to have at the time
Although i has an initial built-in value of 1 , it can be overwritten by assignment, and this is
frequently the case because that letter is commonly used to denote an index counter in loops.
Geometrical and directional conventions
Most of Matlab’s geometrical and directional conventions should be familiar. The principal
domain for multi-valued functions is symmetrically centered around zero, so that, for example,
the inverse sine function asin has the principal domain [-π/2, + π/2]. When a branch cut is
needed for analytic continuation in the complex plane, it extends from a point on the real axis to
negative infinity along that axis, as is typically done in complex analysis. Angles in the complex
plane or in polar coordinates are considered positive when measured in a counterclockwise
sense. Likewise the chirality of multidimensional coordinate systems is established by the
counterclockwise (right hand thumb) rule: if the fingers of the right hand are curled from the
positive nth axis toward the positive (n+1)th axis then the right thumb will point in the positive
direction of the orthogonal (n+2)th axis. Of course in terms of plotting and visualization,
dimensionality is limited to 3. For data analysis using matrix techniques, Matlab interprets
columns as variables with rows as observations or cases.
Operator and delimiter symbolics

Matlab I: Getting Started
11
The Department of Statistics and Data Sciences, The University of Texas at Austin
Basic Matlab notation essential for computation includes symbols that distinguish between
operations on elements within matrices and between matrices as a whole. The difference
between these all stem from the fundamental definition of matrix multiplication specifying that a
product matrix element is the inner product of the corresponding row vector of the left hand
component with the column vector of the right hand component, e.g.,
dc
baX and
hg
feY
h)*(df)*(cg)*(de)*(c
h)*(bf)*(ag)*(bc)*(a Y*X
The Matlab notation for binary operations on matrices, vectors, and their elements are as follows:
+ for matrix or element addition
- for matrix or element subtraction
.* for element multiplication
* for matrix multiplication
./ for element division
/ for right matrix division (right multiplication by an inverse)
\ for left matrix division (left multiplication by an inverse)
There is also Matlab notation for a few unary operations
.^ for raising an element to a power
^ for raising a matrix to a power
. ' for a simple row to column transpose (period and single vertical quote)
' for converting to complex conjugate transpose (single vertical quote)
Matlab also has specific notation and symbols for delimiters, separators, grouping, type
assignment, and so forth: Essential among these are:
[ ] for vector and matrix delimiter
( ) for grouping, vector and matrix element indices, function argument delimiter
: for index range separator
; for matrix row separator
blank space for matrix column element separator
, comma for matrix index separator, function argument separator
. period for radix expansion separator (American convention)
' ' single vertical quote for demarcation of character strings

Matlab I: Getting Started
12
The Department of Statistics and Data Sciences, The University of Texas at Austin
Note that a single vertical quote must be the ascii character code 34 symbol; other quote mark
variants with other ascii character codes cannot be substituted. The Matlab notation for Boolean
logicals uses the following symbols:
= = for logical equality
& for AND
| for inclusive OR,
~ for NOT
<= for less than or equal,
>= for greater than or equal
~= for not equal,
1 for true,
0 for false.
There is not a specific symbol notation for an exclusive OR, but there is a functional equivalent:
xor(p,q) is the same as the compound logical (p & ~q) | (~p & q).
Matlab also has special interpretation for certain symbols related to positioning within a line of
command instruction or code. Important and commonly used examples are:
Ignore Further Text: % anywhere in a line (uncompiled comment for rest of the line)
Suppress Display: ; at the end of the line
Continue on Next Line: … (three periods) at the end of a line
When working interactively at a keyboard, Matlab has a standard notation to indicate a status of
being ready for input
>> prompt for keyboard input in the command window
Also for interactive input from a keyboard, Matlab has a couple of standard notations to interrupt
functioning. These are:
^c simultaneous control key and lower case c to stop execution and return to prompt
^q simultaneous control key and lower case q to stop execution and exit Matlab
Multiple operations
Matlab accommodates multiple operations equivalent to macros in various other environments.
A set of commands to be performed sequentially as a batch can be specified in a Matlab m-file.
Matlab I: Getting Started
13
The Department of Statistics and Data Sciences, The University of Texas at Austin
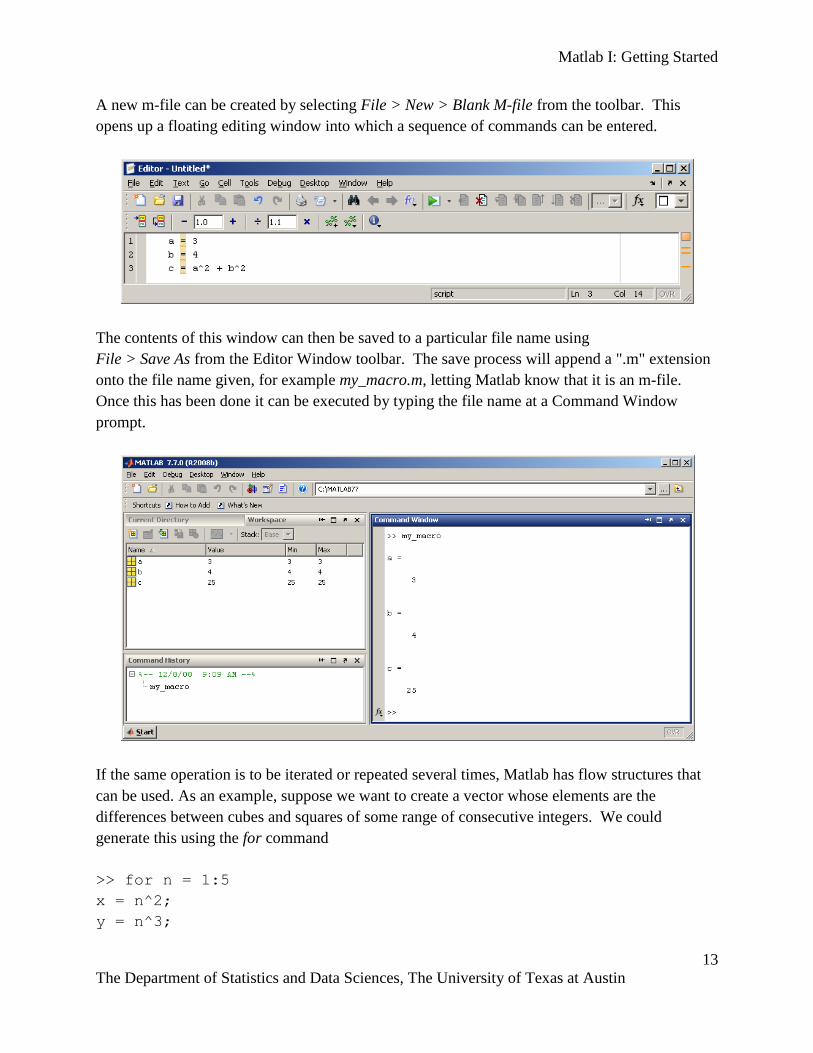
A new m-file can be created by selecting File > New > Blank M-file from the toolbar. This
opens up a floating editing window into which a sequence of commands can be entered.
The contents of this window can then be saved to a particular file name using
File > Save As from the Editor Window toolbar. The save process will append a ".m" extension
onto the file name given, for example my_macro.m, letting Matlab know that it is an m-file.
Once this has been done it can be executed by typing the file name at a Command Window
prompt.
If the same operation is to be iterated or repeated several times, Matlab has flow structures that
can be used. As an example, suppose we want to create a vector whose elements are the
differences between cubes and squares of some range of consecutive integers. We could
generate this using the for command
>> for n = 1:5
x = n^2;
y = n^3;
Matlab I: Getting Started
14
The Department of Statistics and Data Sciences, The University of Texas at Austin
z(n) = y - x;
end;
>> z
z =
0 4 18 48 100
Note that the for command requires an end statement so that Matlab will know when to go on to
the next index value. Other similar commands which can accommodate multiple repeated
operations, such as while, are discussed in section 5.
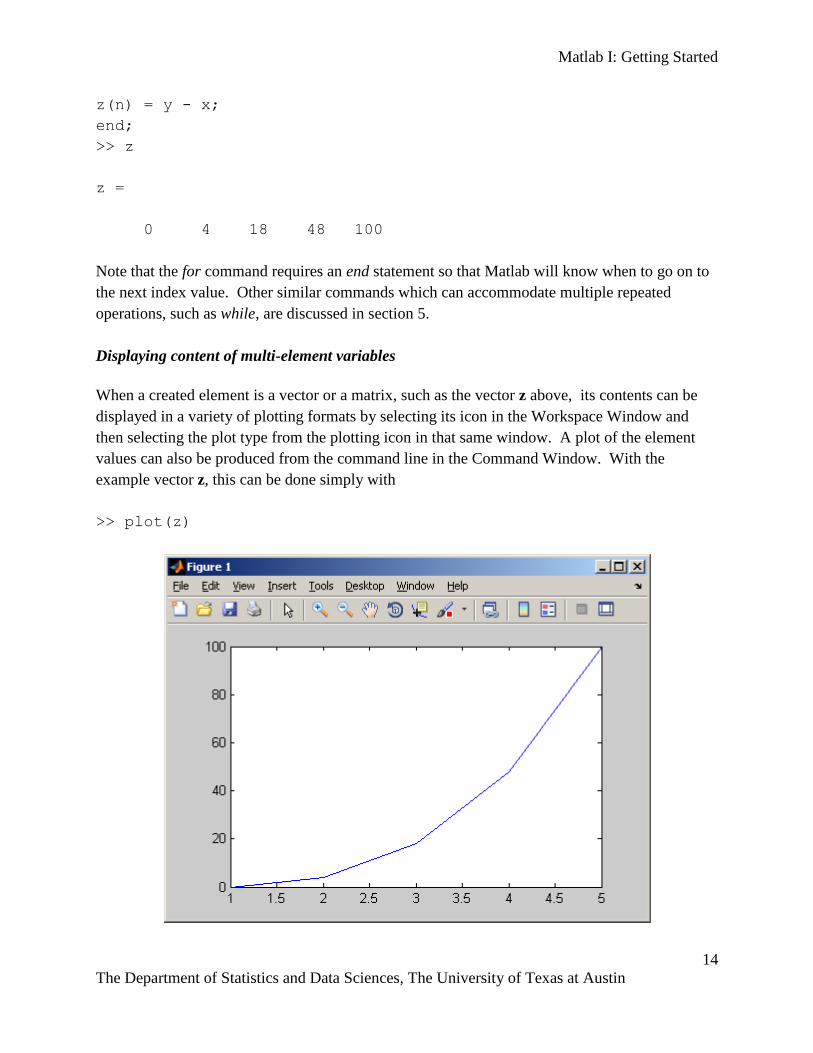
Displaying content of multi-element variables
When a created element is a vector or a matrix, such as the vector z above, its contents can be
displayed in a variety of plotting formats by selecting its icon in the Workspace Window and
then selecting the plot type from the plotting icon in that same window. A plot of the element
values can also be produced from the command line in the Command Window. With the
example vector z, this can be done simply with
>> plot(z)

Matlab I: Getting Started
15
The Department of Statistics and Data Sciences, The University of Texas at Austin
In Section 7 methods of customizing a display such as this will be presented.

Matlab I: Getting Started
16
The Department of Statistics and Data Sciences, The University of Texas at Austin
Section 4: Importing and Exporting Information
Information can be imported into and exported from the Matlab application by several different
methods. Some of the more common procedures are discussed below. Before proceeding with
this section, download Part_1_Getting_Started.zip and copy the following files to a location
where they can be accessed by the Matlab program.
planetsize.txt
planets1.txt
planets2.txt
planets3.txt
planetdata.doc
planets6.xls
planets7.jpg
and copy them into a location within the Matlab search path (for example, in the default work
folder or directory). If you cannot access these external documents, you can also find their
ASCII text contents within this document. Remember that the planetdata.doc, plantets6.xls, and
planets7.jpg files are binary and must be transferred in that mode
Command Line Import
The most elementary method for importing external information is piece by piece directly from
the command line by typing at the keyboard. For example:
>> earthradius = 6371;
will assign the numerical value 6371 to a variable earthradius. For extensive amounts of
information there are more efficient methods.
The Import Wizard
Matlab provides an import utility tool for convenient importation of data from external files.
This tool can be activated by selecting File > Import Data, or by executing the uiimport
command at a Matlab command line prompt. This utility can be used for importing both text and
numerical data contained within the same data file, but entries have to be in a matrix format with
specified column separators. From the file menu or from a command line execution of
uiimport with no specified file name you will be prompted to browse to the desired file
containing the data to be imported. This will launch the Import Wizard. When the name of a file
in the Matlab path follows the uiimport command, the content of that file is loaded into the
Import Wizard. As an example, consider a small file, planetsize.txt, containing a few planets’
names, radii, and masses with columns separated by tabs:

Matlab I: Getting Started
17
The Department of Statistics and Data Sciences, The University of Texas at Austin
Planet Radius Mass-kg*10^24
Earth 6371 5.97
Mars 3390 0.64
Venus 6052 4.87
This file can be imported directly with the command
>> uiimport planetsize.txt
or, with File > Import Data this file can be specified from a browse tool button. With either
method, the contents of the file will be displayed in a floating Import Wizard window. A
preview screen appears which lets you confirm the data importation, with separate tabs to
examine the numerical data and the text fields:
To continue, click on the Next > button and a new screen lets you selectively choose which
information from the file to import into the Matlab workspace. The process is completed by
clicking Finish.

Matlab I: Getting Started
18
The Department of Statistics and Data Sciences, The University of Texas at Austin
After clicking the Finish button there should be the variables data and textdata, depending on
which were selected, appearing in the Workspace window.
Import Functions
There are a variety of other ways to import structured data using the Command Window. Below
several of these functions are described in detail.
csvread
This function imports numeric data with comma-separated values (csv). For example, in the
planetary data above, suppose that we have an external file planets1.txt, containing the kilometer
radial distances and 1024 kg mass values for Earth, Mars and Venus:
6371, 5.97
3390, 0.64
6052, 4.87
The command
>> planets1 = csvread('planets1.txt')
would create a 3x2 matrix with the name planets1 whose content is the same as that shown on
the data tab generated previously by using the import wizard for the planetsize.txt file.
dlmread
This function is similar to csvread but more flexible, allowing the delimiter to be specified by
any character rather than restricting it to be a comma. For example, suppose that the file
planets2.txt had the format
6371; 5.97

Matlab I: Getting Started
19
The Department of Statistics and Data Sciences, The University of Texas at Austin
3390; 0.64
6052; 4.87
where values are separated by semi-colons. The command
>> planets2 = dlmread('planets2.txt', ';')
would create that same 3x2 matrix with the name planets2.
load
This is similar to csvread and dlmread but the separators can be blank spaces. For example, if
the file planets3.txt has the structure
6371 5.97
3390 0.64
6052 4.87
then the command
>> load planets3.txt
would create the same 3x2 matrix with the name planets3. Note that the target for the load
command is not enclosed in parentheses and does not need to be enclosed in single quotes.
fscanf
This is a lower level import function, equivalent to the C language function of the same name but
with the important difference that the result is vectorized. It requires extra manipulations of
opening and closing the file, but is more versatile in allowing text and numbers to be read in
together. For example, if we want to import the data from our file planetsize.txt we could use the
following sequence of commands to import the contents of the file in vectorized form
fid = fopen('planetsize.txt');
planetsize = fscanf(fid,'%c');
fclose(fid);
where the '%c' argument for fscanf is identical to the C language, i.e., parsing as character
strings. The variable planetsize is then actually an 80 element row vector of characters
(including blank spaces, tabs, and linefeeds) which have numerical ASCII character code values.
Characterized data values need to be converted to numbers before mathematical manipulations
will make sense. For example, we could convert the characters in the string representing the
earth radius, i.e., elements 39 – 42, to numerical form using the str2num Matlab function:
>> earthradius = str2num(planetsize(39:42))

Matlab I: Getting Started
20
The Department of Statistics and Data Sciences, The University of Texas at Austin
The variable earthradius will be in numerical form, ready for performing mathematical
operations, e.g.,
>> earthvolume = (4/3)*pi*((earthradius)^3)
textread
The textread function is similar to the primitive fscanf but will allow data variables to be
defined as part of the import process. As an example, again suppose that the file planetsize.txt
contains the information that we want to import into Matlab. We can specify the number of
header lines to skip before reaching the actual data (one such line in this example), and the
individual data formats for each column of data. The file contains the character string planet
names in the first column, the decimal integer planet radii in the second column and the floating
point planet masses in the third column. Thus, the command
>> [planets, radii, masses] = textread ...
('planetsize.txt','%s %d %f','headerlines',1)
where ‘%s’ signifies string, ‘%d’ signifies decimal, and ‘%f’ signifies floating point in the
format argument, will give the display
planets =
'Earth'
'Mars'
'Venus'
radii =
6371
3390
6052
masses =
5.9700
0.6400
4.8700
and add the column vector variables planets, radii, and masses to the workspace.
M-file Scripts
If data are already present within a text file containing only legitimate Matlab command syntax,
then that data can be imported by giving the file name an extension ".m" if not already present,
and then typing that file name (without the ".m" extension) in the Matlab command window. For
example, an external M-file planetradii.txt containing
earthradius = 6371
Matlab I: Getting Started
21
The Department of Statistics and Data Sciences, The University of Texas at Austin
marsradius = 3390
venusradius = 6052
can be re-named to planetradii.m and then used as a source to import these variables and their
values using the command
>> planetradii
Export Functions
diary
The simplest way to export data to an external file is to make use of the diary function. This is a
utility for logging a transcript of the Matlab command line input and screen output. The logging
process starts subsequent to the command
>> diary filename
where “filename” is a chosen text file name; and the logging process terminates with the
command
>> diary off
thus creating an external file that can be edited with a text editor to remove extraneous material.
For an example, let us create new variables using the data imported from the planetsize.txt file:
>> volumes = (4/3).*pi.*((radii).^3);
>> densities = (10^27).*masses./((10^15).*volumes);
>> planetinfo(:,1) = volumes;
>> planetinfo(:,2) = densities;
The variable planetinfo will then be a 3 x 2 matrix with column 1 containing planet volumes in
cubic kilometers and column 2 containing planet densities in grams per cubic centimeter. To
export this information to an external file planets4.txt we first activate the diary, set the display
format to exponential form, type in the name of the variable planetinfo, and turn off the diary:
>> diary planets4.txt
>> format short e
>> planetinfo
>> diary off
The external file planets4.txt then contains
format short e
planetinfo

Matlab I: Getting Started
22
The Department of Statistics and Data Sciences, The University of Texas at Austin
planetinfo =
1.0832e+012 5.5114e+000
1.6319e+011 3.9219e+000
9.2851e+011 5.2450e+000
diary off
This planets4.txt file can then be put into a text editor for deleting unwanted lines, adding
column headers, etc.
dlmwrite
The dlmwrite function allows you to write external data files in which the delimiter can be
specified. Let us assume that we have the variables from the textread example above loaded
into the workspace; that we have defined the vector variables volumes and densities as shown
above; and that we want to write out a new file planets5.txt with the new volume and density
data. We create a local array planets5 in the Command Window by typing in the desired data, a
column for each of the two vector variables
>> planets5(:,1) = volumes;
>> planets5(:,2) = densities;
The command
>> dlmwrite('planets5.txt',planets5, ';')
requests that the contents of the array planets5 be written to an external file planets5.txt using a
semicolon delimiter. Thus the new external file planets5.txt will contain
1083206916845.75;5.5114
163187806143.123;3.9219
928507395798.201;5.245
save
This utility is a primitive function that will save an array in an external file with columns
separated by blank space. With no arguments at all, the save command will store the current
values of all variables in a binary file matlab.mat from which they can be retrieved in a
subsequent Matlab session. Using the same array planets5 created above, the command
>> save planets5.txt planets5 –ascii -tabs
will produce an external file planets5.txt whose content is
1.0832069e+012 5.5114124e+000

Matlab I: Getting Started
23
The Department of Statistics and Data Sciences, The University of Texas at Austin
1.6318781e+011 3.9218617e+000
9.2850740e+011 5.2449771e+000
Without an extension such as “.txt” and the flag "-ascii", the default external file will be given a
default extension “.mat” and will be in binary format. Without the flag "-tabs" each row will be
a single character string variable and the separate display columns cannot be copied and pasted
to spreadsheet separate columns.
fprintf
This is another low level function that is equivalent to the C language function of the same name.
It is useful for exporting information that contains both text and data in a specified format, using
syntax similar to that of the C programming language. As an example, suppose we want to
export the newly computed planet volume and density values shown above into a file
planetinfo.txt that has the same layout as the imported file planetsize.txt. For this purpose we
need to create strings of 49 characters for each line in a new array, both the header line which
identifies the data in each column and the three subsequent data lines themselves. We will give
the new 4x49 array the arbitrary name outdata. The header for the column of planet names,
consisting of the first ten characters of each line, can be created by assignment
>> outdata(1,1:10) = 'Planet '
and the headers for the variable columns, spanning 38 subsequent characters, can be generated
by
>> outdata(1,11:50)='Volume (km^3) Density(g/cc) '
The subsequent data lines will have the planet names and variable values. For these, the numeric
values in the planetinfo variable need to be converted to text using the Matlab num2str utility.
For example
>> outdata(2,1:10) = 'Earth '
>> outdata(2,11:50) = num2str(planetinfo(1,:))
>> outdata(3,1:10) = 'Mars '
>> outdata(3,11:50) = num2str(planetinfo(2,:))
>> outdata(4,1:10) = 'Venus '
>> outdata(4,11:50) = num2str(planetinfo(3,:))
We also need to create an end of line character for each line in the 51st position. This is done
using the Matlab sprintf command, which functions as a printing command in the same way as
its namesake does in the C programming language
>> outdata(1:4,51) = sprintf('\n')
where ‘\n’ is the notation for the end-of-line character. As an output format we want the text
strings with a line feed in the display wherever there is an end-of-line character in the array. We

Matlab I: Getting Started
24
The Department of Statistics and Data Sciences, The University of Texas at Austin
can create a format variable, for example outformat, which specifies the display characteristics
by assigning it a string value with parsing instructions
>> outformat = '%s \n'
where ‘%s’ indicates a string and ‘\n’ indicates a linefeed at the end-of-line character. The new
file with the derived variable data can then be created with a sequence of two commands, the
first opening a new file with fopen and assigning it a numerical file ID and the second printing
the contents in the desired format with fprintf, both of which are analogous to their namesake
commands in the C programming language. In our example we created the output array by row
whereas fprintf assembles by column. Thus the array that we want exported is actually the
transpose of that which we created, i.e., outdata' (with the trailing single quote mark) rather than
outdata itself. In the Command Window we therefore execute the commands
>> fid = fopen('planetinfo.txt', 'w')
>> fprintf(fid,outformat,outdata')
>> fclose(fid)
where the "w" is the permission argument of fopen signifying permission to create and write to
the file. A new external text file, planetinfo.txt, will be created, containing the information in the
variable outdata that was created.
M-Books
The M-Book feature is used to transfer data between Matlab and Microsoft Word, a commonly
used word processing utility. As an example, suppose that we want to export some information
into a small Microsoft Word document with the name planetdata.doc.
We would first need to set up the proper configuration, which can be done with the command
>> notebook('–setup')
Subsequently the command
>> notebook planetdata.doc
opens up a Word document in a floating window into which you can copy and paste the desired
information from the Matlab command window, as well as composing any annotation. This also
adds a "Notebook" pulldown menu to the Word navigation toolbar, from which cell operations
can be performed. In the display below, the command lines that have been defined as Input
Cells from the Notebook pulldown menu get colored green, and can be evaluated with Notebook
> Evaluate Cell
Matlab I: Getting Started
25
The Department of Statistics and Data Sciences, The University of Texas at Austin
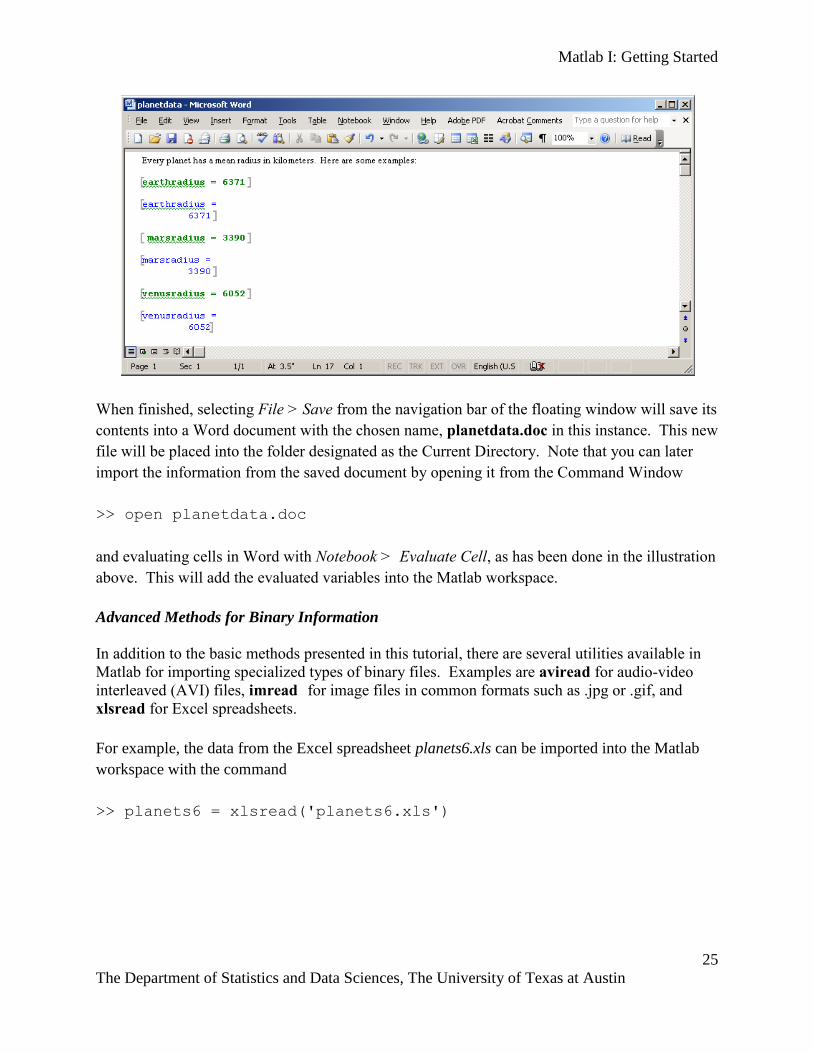
When finished, selecting File > Save from the navigation bar of the floating window will save its
contents into a Word document with the chosen name, planetdata.doc in this instance. This new
file will be placed into the folder designated as the Current Directory. Note that you can later
import the information from the saved document by opening it from the Command Window
>> open planetdata.doc
and evaluating cells in Word with Notebook > Evaluate Cell, as has been done in the illustration
above. This will add the evaluated variables into the Matlab workspace.
Advanced Methods for Binary Information
In addition to the basic methods presented in this tutorial, there are several utilities available in
Matlab for importing specialized types of binary files. Examples are aviread for audio-video
interleaved (AVI) files, imread for image files in common formats such as .jpg or .gif, and
xlsread for Excel spreadsheets.
For example, the data from the Excel spreadsheet planets6.xls can be imported into the Matlab
workspace with the command
>> planets6 = xlsread('planets6.xls')

Matlab I: Getting Started
26
The Department of Statistics and Data Sciences, The University of Texas at Austin
As another example, the data from the JPEG image file planets7.jpg can be imported with the
command
>> planets7 = imread('planets7.jpg')
The data that is imported is not the binary file itself, but rather a 3 dimensional matrix of pixel
intensity values where a third index specifies a primary color (red, green, blue). The imported
image itself can be viewed with the command
>> imshow(planets7)

Matlab I: Getting Started
27
The Department of Statistics and Data Sciences, The University of Texas at Austin