maximizer crm 2018 getting started...
TRANSCRIPT
Published By
Maximizer CRM 2018
Getting Started Guide
Maximizer CRM 2018 is specifically designed for small and medium-sized
businesses and corporate divisions of large companies. By integrating sales,
marketing, and customer service tools into one adaptable and affordable
solution, Maximizer CRM 2018 helps organizations realize their primary
customer management goal of having many profitable and satisfied
customers.
Throughout the customer life cycle, as prospects move from the marketing
department to the sales department, and as they are passed onto service
departments, Maximizer enables an organization to attract prospects, win
new customers, and increase repeat business.
2018
Maximizer CRM 2018 Getting Started Guide
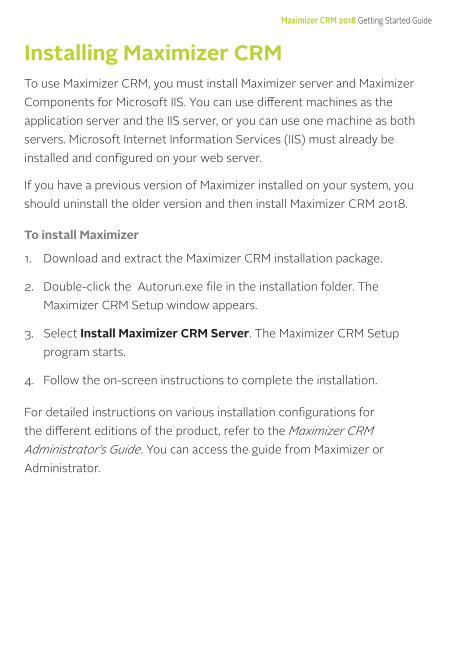
Installing Maximizer CRMTo use Maximizer CRM, you must install Maximizer server and Maximizer Components for Microsoft IIS. You can use different machines as the application server and the IIS server, or you can use one machine as both servers. Microsoft Internet Information Services (IIS) must already be installed and configured on your web server.
If you have a previous version of Maximizer installed on your system, you should uninstall the older version and then install Maximizer CRM 2018.
To install Maximizer
1. Download and extract the Maximizer CRM installation package.
2. Double-click the Autorun.exe file in the installation folder. The Maximizer CRM Setup window appears.
3. Select Install Maximizer CRM Server. The Maximizer CRM Setup program starts.
4. Follow the on-screen instructions to complete the installation.
For detailed instructions on various installation configurations for the different editions of the product, refer to the Maximizer CRM Administrator’s Guide. You can access the guide from Maximizer or Administrator.
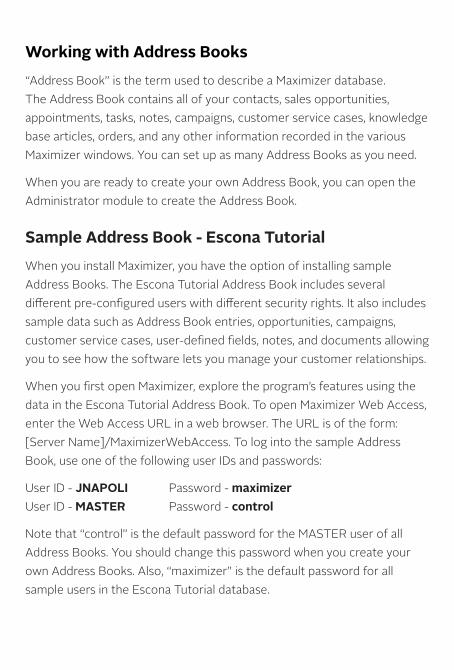
Working with Address Books“Address Book” is the term used to describe a Maximizer database. The Address Book contains all of your contacts, sales opportunities, appointments, tasks, notes, campaigns, customer service cases, knowledge base articles, orders, and any other information recorded in the various Maximizer windows. You can set up as many Address Books as you need.
When you are ready to create your own Address Book, you can open the Administrator module to create the Address Book.
Sample Address Book - Escona TutorialWhen you install Maximizer, you have the option of installing sample Address Books. The Escona Tutorial Address Book includes several different pre-configured users with different security rights. It also includes sample data such as Address Book entries, opportunities, campaigns, customer service cases, user-defined fields, notes, and documents allowing you to see how the software lets you manage your customer relationships.
When you first open Maximizer, explore the program’s features using the data in the Escona Tutorial Address Book. To open Maximizer Web Access, enter the Web Access URL in a web browser. The URL is of the form: [Server Name]/MaximizerWebAccess. To log into the sample Address Book, use one of the following user IDs and passwords:
User ID - JNAPOLI Password - maximizerUser ID - MASTER Password - control
Note that “control” is the default password for the MASTER user of all Address Books. You should change this password when you create your own Address Books. Also, “maximizer” is the default password for all sample users in the Escona Tutorial database.
Maximizer CRM 2018 Getting Started Guide
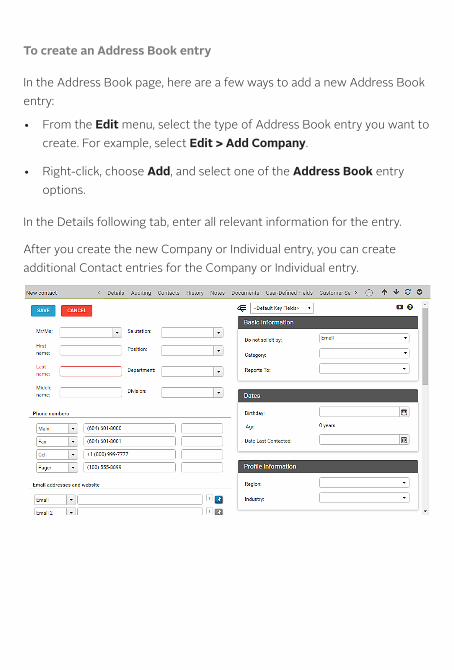
Maximizer CRM BasicsThe main component in Maximizer is the Address Book module, which lists the companies and organizations that you have recorded as Address Book entries.
There are other main modules that comprise all your sales, marketing, and customer service information. The main modules include the Address Book, Opportunities, Customer Service, and Campaigns pages. Following tabs, such as the Notes and User-Defined fields tabs, appear under the main page and contain information related to the selected entry in the main page. When you select a different entry in the page, the following tabs change to display information related to the selected entry.
Creating Companies, Individuals, and ContactsYou can create an Address Book entry as one of these three types:
• Company – Represents a group of people such as an organization, association, or business. A Company often has associated Contact entries.
• Individual – Represents a person who may not be associated with a company or organization. Like a Company entry, an Individual entry can have associated Contact entries.
• Contact – Represents people associated with a Company entry or, less frequently, an Individual entry.
To further organize your information, Address Book entries can be designated as sales leads, and then assigned to partners through the Partner field on the Details tab of the entry. Partners can access their assigned leads in Partner Access.
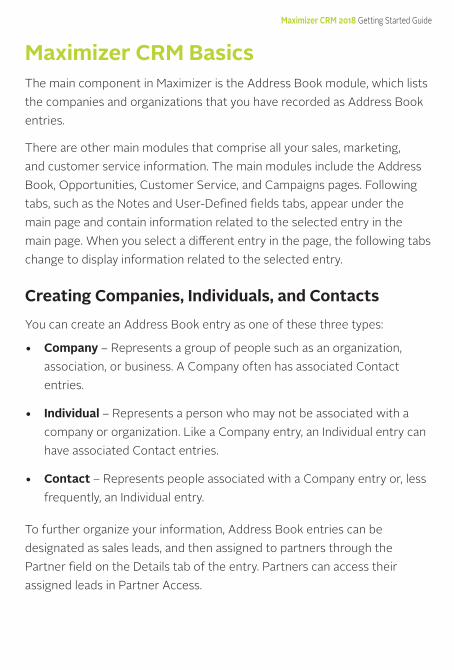
To create an Address Book entry
In the Address Book page, here are a few ways to add a new Address Book entry:
• From the Edit menu, select the type of Address Book entry you want to create. For example, select Edit > Add Company.
• Right-click, choose Add, and select one of the Address Book entry options.
In the Details following tab, enter all relevant information for the entry.
After you create the new Company or Individual entry, you can create additional Contact entries for the Company or Individual entry.
Maximizer CRM 2018 Getting Started Guide
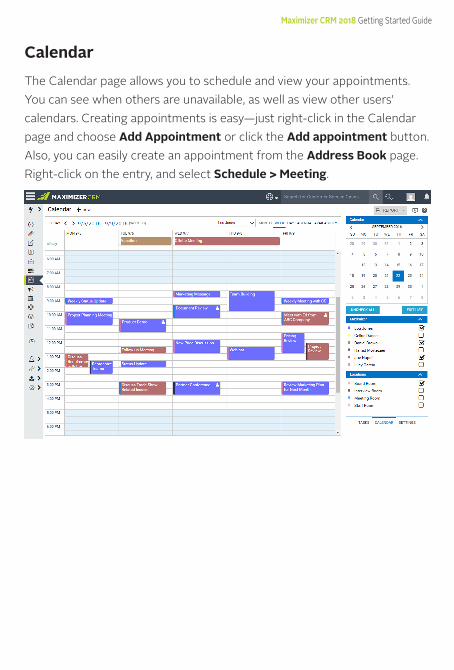
CalendarThe Calendar page allows you to schedule and view your appointments. You can see when others are unavailable, as well as view other users’ calendars. Creating appointments is easy—just right-click in the Calendar page and choose Add Appointment or click the Add appointment button. Also, you can easily create an appointment from the Address Book page. Right-click on the entry, and select Schedule > Meeting.
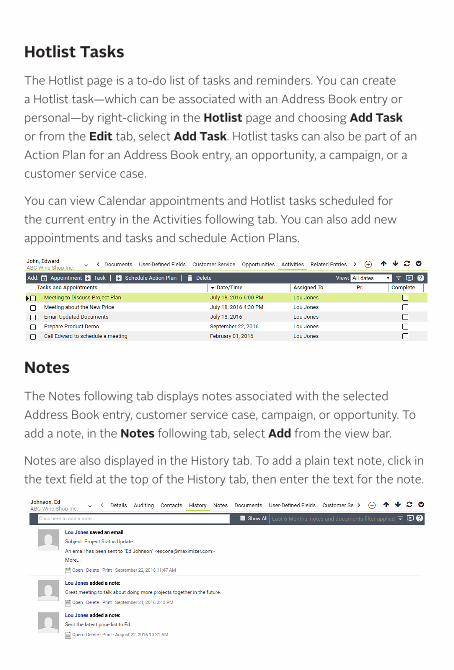
Hotlist TasksThe Hotlist page is a to-do list of tasks and reminders. You can create a Hotlist task—which can be associated with an Address Book entry or personal—by right-clicking in the Hotlist page and choosing Add Task or from the Edit tab, select Add Task. Hotlist tasks can also be part of an Action Plan for an Address Book entry, an opportunity, a campaign, or a customer service case.
You can view Calendar appointments and Hotlist tasks scheduled for the current entry in the Activities following tab. You can also add new appointments and tasks and schedule Action Plans.
NotesThe Notes following tab displays notes associated with the selected Address Book entry, customer service case, campaign, or opportunity. To add a note, in the Notes following tab, select Add from the view bar.
Notes are also displayed in the History tab. To add a plain text note, click in the text field at the top of the History tab, then enter the text for the note.
Maximizer CRM 2018 Getting Started Guide
User-Defined FieldsThe User-Defined Fields following tab displays custom fields you create and associate with the selected Address Book entry, opportunity, campaign, or customer service case. If you have the necessary security rights, you can create and modify user-defined fields. To set up user-defined fields, in the left navigation pane, select Administration > Set Up User-Defined Fields.
DocumentsThe Documents following tab displays the document entries associated with the selected Address Book entry, opportunity, campaign, or customer service case. You can insert documents like invoices, sales sheets, letters, and faxes created with other products like Microsoft® Excel. You can also add hyperlinks to documents stored outside of the Address Book.
To insert a file or hyperlink, in the Documents following tab, next to New in the view bar, click Document or Hyperlink. You can also view documents from the History tab.
Use Microsoft® Word Integration to create documents in Word using information from your Maximizer entries.
EmailUse Maximizer to send email to your Address Book entries and automatically save the email message as a note or document with the selected Address Book entries, opportunities, or customer service cases. To send an email, first select the entries. Then, from the Actions menu, select Write an Email. Compose the email message using merge fields to include personalized information from the entries in the message. When you’re finished, you can save the message as an email template to reuse later.
You can also use Microsoft® Outlook Integration to integrate your Maximizer Address Book with Outlook.
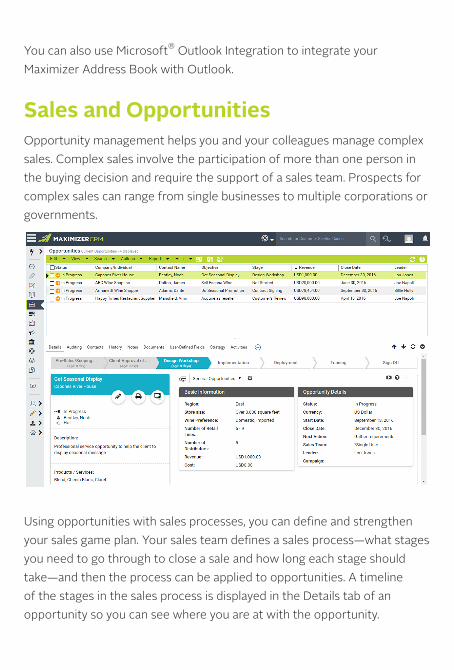
Sales and OpportunitiesOpportunity management helps you and your colleagues manage complex sales. Complex sales involve the participation of more than one person in the buying decision and require the support of a sales team. Prospects for complex sales can range from single businesses to multiple corporations or governments.
Using opportunities with sales processes, you can define and strengthen your sales game plan. Your sales team defines a sales process—what stages you need to go through to close a sale and how long each stage should take—and then the process can be applied to opportunities. A timeline of the stages in the sales process is displayed in the Details tab of an opportunity so you can see where you are at with the opportunity.

Maximizer CRM 2018 Getting Started Guide
Maximizer users can be selected to monitor all or specified opportunities. Opportunity monitors receive email notifications when opportunities are created, modified, or closed. To select users to monitor a specific opportunity, select the Monitoring button in an open opportunity.
To add an opportunity
1. Select the Address Book entry to which you want to add an opportunity. If you select a Contact, Maximizer adds the opportunity to the Company.
2. Right-click, and select Create an Opportunity. Or, from the Actions menu, select Create an Opportunity.
3. Enter the opportunity information in the Details tab.
4. Click Save to save the opportunity.
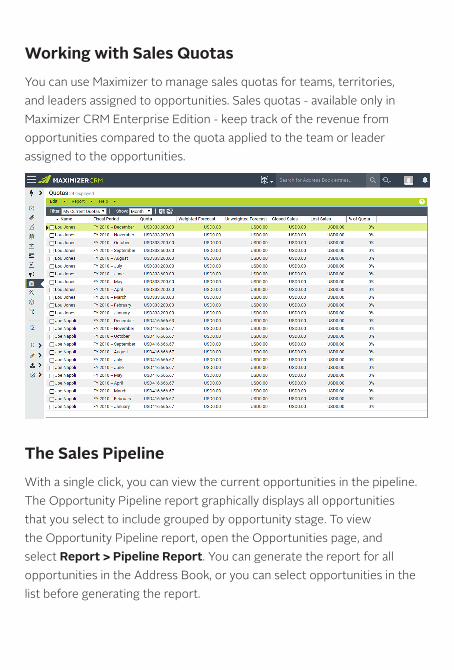
Working with Sales QuotasYou can use Maximizer to manage sales quotas for teams, territories, and leaders assigned to opportunities. Sales quotas - available only in Maximizer CRM Enterprise Edition - keep track of the revenue from opportunities compared to the quota applied to the team or leader assigned to the opportunities.
The Sales PipelineWith a single click, you can view the current opportunities in the pipeline. The Opportunity Pipeline report graphically displays all opportunities that you select to include grouped by opportunity stage. To view the Opportunity Pipeline report, open the Opportunities page, and select Report > Pipeline Report. You can generate the report for all opportunities in the Address Book, or you can select opportunities in the list before generating the report.
Maximizer CRM 2018 Getting Started Guide
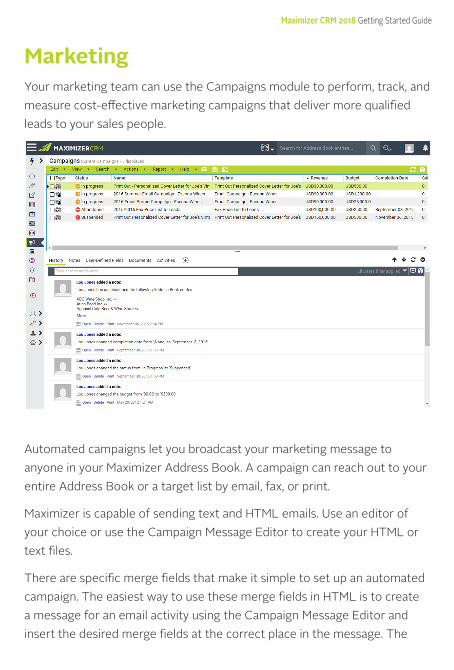
MarketingYour marketing team can use the Campaigns module to perform, track, and measure cost-effective marketing campaigns that deliver more qualified leads to your sales people.
Automated campaigns let you broadcast your marketing message to anyone in your Maximizer Address Book. A campaign can reach out to your entire Address Book or a target list by email, fax, or print.
Maximizer is capable of sending text and HTML emails. Use an editor of your choice or use the Campaign Message Editor to create your HTML or text files.
There are specific merge fields that make it simple to set up an automated campaign. The easiest way to use these merge fields in HTML is to create a message for an email activity using the Campaign Message Editor and insert the desired merge fields at the correct place in the message. The
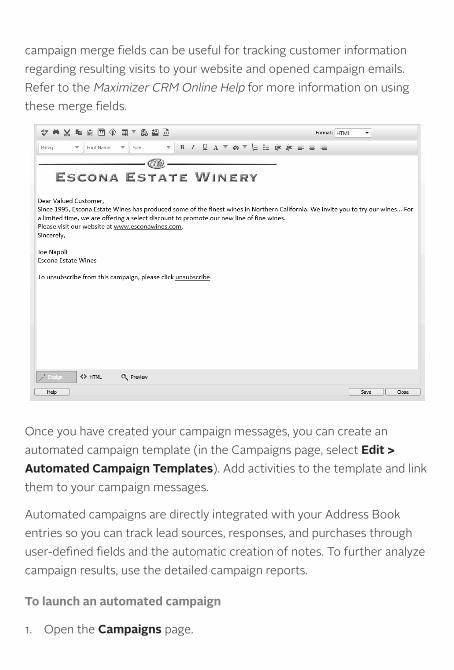
campaign merge fields can be useful for tracking customer information regarding resulting visits to your website and opened campaign emails. Refer to the Maximizer CRM Online Help for more information on using these merge fields.
Once you have created your campaign messages, you can create an automated campaign template (in the Campaigns page, select Edit > Automated Campaign Templates). Add activities to the template and link them to your campaign messages.
Automated campaigns are directly integrated with your Address Book entries so you can track lead sources, responses, and purchases through user-defined fields and the automatic creation of notes. To further analyze campaign results, use the detailed campaign reports.
To launch an automated campaign
1. Open the Campaigns page.
Maximizer CRM 2018 Getting Started Guide
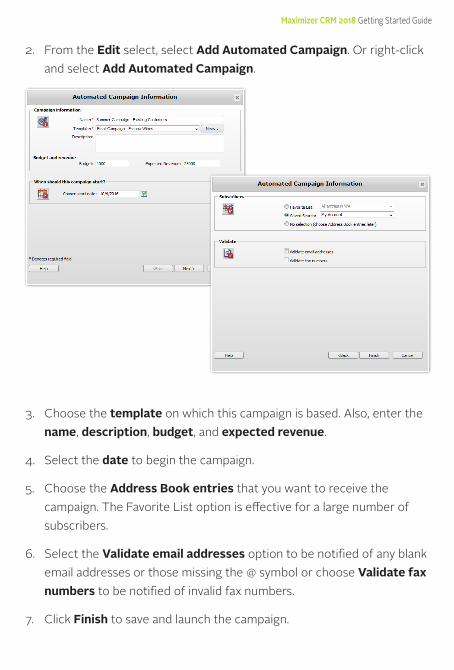
2. From the Edit select, select Add Automated Campaign. Or right-click and select Add Automated Campaign.
3. Choose the template on which this campaign is based. Also, enter the name, description, budget, and expected revenue.
4. Select the date to begin the campaign.
5. Choose the Address Book entries that you want to receive the campaign. The Favorite List option is effective for a large number of subscribers.
6. Select the Validate email addresses option to be notified of any blank email addresses or those missing the @ symbol or choose Validate fax numbers to be notified of invalid fax numbers.
7. Click Finish to save and launch the campaign.
Customer Service & SupportMaximizer enables customer service representatives to track and respond to service calls relating to matters such as billing inquiries, product cases, and frequently asked questions. When entering the details of a customer service case, enter information such as the assigned representative, follow-up deadline, status, priority, and a description of the issue. Once a case has been created, you can assign and escalate cases to the appropriate expert or manager in the company with the automatic creation of Hotlist tasks, appointments, and email reminders.
The Customer Service page supports and enhances your existing customer service business processes. All Address Book entry customer service communication can be recorded, categorized, and escalated appropriately to ensure issues are dealt with in a timely manner.
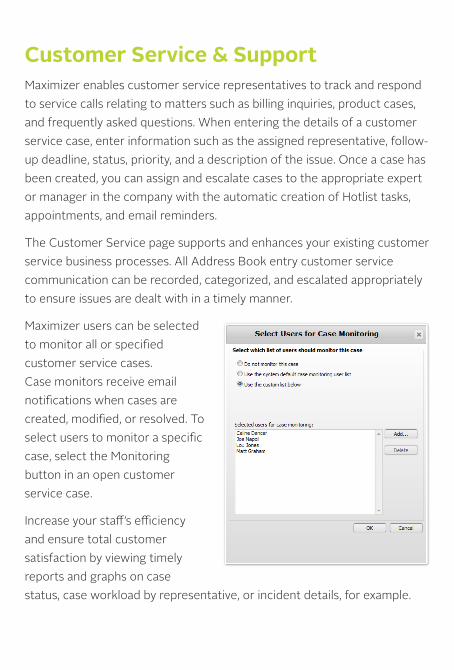
Maximizer users can be selected to monitor all or specified customer service cases. Case monitors receive email notifications when cases are created, modified, or resolved. To select users to monitor a specific case, select the Monitoring button in an open customer service case.
Increase your staff’s efficiency and ensure total customer satisfaction by viewing timely reports and graphs on case status, case workload by representative, or incident details, for example.
Maximizer CRM 2018 Getting Started Guide
Based on the follow-up deadline, a Hotlist task is automatically created for the assigned user when a case is created. The task is automatically modified when the follow-up deadline or assigned user is modified. And when the case is resolved, the task is marked as complete.
To create a customer service case
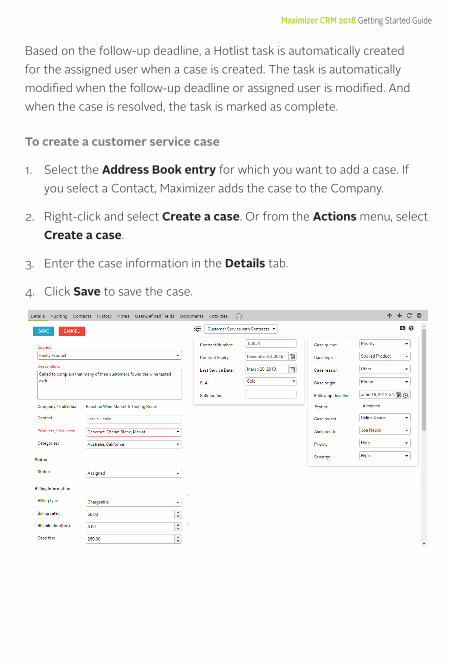
1. Select the Address Book entry for which you want to add a case. If you select a Contact, Maximizer adds the case to the Company.
2. Right-click and select Create a case. Or from the Actions menu, select Create a case.
3. Enter the case information in the Details tab.
4. Click Save to save the case.
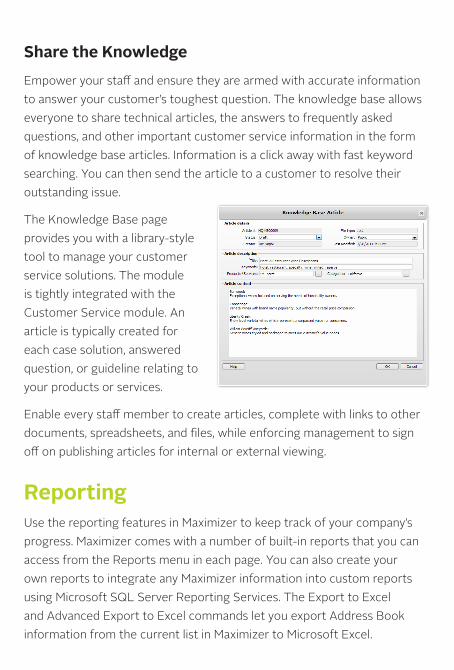
Share the Knowledge Empower your staff and ensure they are armed with accurate information to answer your customer’s toughest question. The knowledge base allows everyone to share technical articles, the answers to frequently asked questions, and other important customer service information in the form of knowledge base articles. Information is a click away with fast keyword searching. You can then send the article to a customer to resolve their outstanding issue.
The Knowledge Base page provides you with a library-style tool to manage your customer service solutions. The module is tightly integrated with the Customer Service module. An article is typically created for each case solution, answered question, or guideline relating to your products or services.
Enable every staff member to create articles, complete with links to other documents, spreadsheets, and files, while enforcing management to sign off on publishing articles for internal or external viewing.
ReportingUse the reporting features in Maximizer to keep track of your company’s progress. Maximizer comes with a number of built-in reports that you can access from the Reports menu in each page. You can also create your own reports to integrate any Maximizer information into custom reports using Microsoft SQL Server Reporting Services. The Export to Excel and Advanced Export to Excel commands let you export Address Book information from the current list in Maximizer to Microsoft Excel.
Maximizer CRM 2018 Getting Started Guide
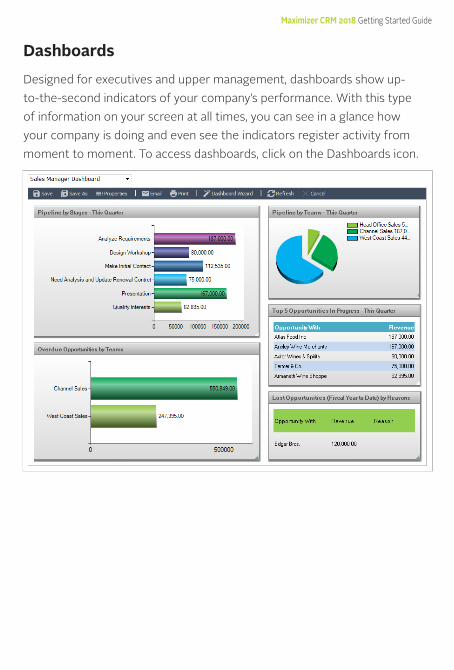
DashboardsDesigned for executives and upper management, dashboards show up-to-the-second indicators of your company’s performance. With this type of information on your screen at all times, you can see in a glance how your company is doing and even see the indicators register activity from moment to moment. To access dashboards, click on the Dashboards icon.
Access Options
Web AccessMaximizer Web Access is a secure, web-browser interface to a Maximizer Address Book. Users can access all of their Address Book data using a web browser—no need to install an application on each computer.
Mobile AccessMaximizer Mobile Access provides access to an Address Book through a wireless Internet-enabled device. You can access Address Book entries, opportunities, customer service cases, Hotlist tasks, appointments, user-defined fields, notes, the Company Library, and dashboards through Mobile Access. A list of supported browsers is available at: http://www.maximizer.com/support/
Partner AccessPartner Access creates a two-way flow of information between your organization and your business partners. Organizations with an extended sales force of resellers or dealers need a way to distribute and monitor sales opportunities to these partners.
You can access Partner Access in the Escona Tutorial sample Address Book using “Paul” as the user ID and “password” as the password.
Customer AccessCustomer Access offers customers a number of web-based services. Its functionality is very similar to Partner Access in that Customer Access can be customized to display information essential to your customers.
You can access Customer Access in the Escona Tutorial sample Address Book using “Mary” as the user ID and “password” as the password.
Maximizer CRM 2018 Getting Started Guide
Administrator ModuleThe Administrator module is typically used by a system administrator or other technically proficient staff to configure and manage the entire Maximizer application. The Administrator module is installed by default on the Maximizer server. You can also access the module over the Internet, using Maximizer Web Access Administrator.
Manage UsersYou use Administrator to manage users. Users are displayed in a list format with contact details and module access rights. From the Manage Users dialog box, you can set passwords, user preferences, and access rights. This is also where you can set up Windows Authentication for users.
Manage Security Groups, and TeamsYou use Administrator to manage security groups and teams. As with users, security groups and teams are displayed in a list format. The properties for security groups and teams can be easily accessed and modified from the Security Groups and Teams dialog box.
Web AccessWeb Access site URLs can be defined in Administrator. By default, these URLs are set up during the installation of the Maximizer Web components, but the values can be modified in the Web Access dialog box.
Importing and Upgrading DataYou can use Administrator to import Address Book entries from other sources, such as ACT!, GoldMine, or Outlook. You can also import Address Book entries and knowledge base articles in XML format or MXI (Maximizer XML Interface) format using the Advanced Import feature, which is available from the File > Import menu.
Administrator is also used to upgrade your Address Books from a previous version of Maximizer. You should always perform a backup before upgrading your data.
Document AdministrationYou can use the Document Administration functionality to reduce the size of your documents in an Address Book as part of regular maintenance.
Time Zone AlignmentThe Time Zone Alignment dialog box allows you to align users to time zones so that their appointments, Hotlist tasks, and opportunity activities reflect the time zone in which they were created.
Learn More About Maximizer CRM • Maximizer CRM Administrator’s Guide & User’s Guide The Maximizer
CRM manuals are available in Adobe® PDF format. You need to have the Adobe Acrobat Reader installed to be able to read the online guides. To download the reader free of charge, go to www.adobe.com and see the Acrobat products section of the website. You can find links to download the guides, under the Help > User’s Guide menu in Maximizer.
• Online Help - How-to help is available in both Maximizer and Administrator providing you with step-by-step instructions for all areas of the applications. In Maximizer Web Access, click on the question mark in the main windows and dialog boxes to access context-sensitive help.
Maximizer CRM 2018 Getting Started Guide
About Maximizer
Maximizer CRM is fueling the growth of businesses around the world. Our CRM solutions come fully loaded with the core Sales, Marketing and Service functionality companies need to optimize sales productivity, accelerate marketing and improve customer service. With flexible on-premise, our cloud and your cloud deployment options, tailored-to-fit flexibility, state-of-the art security infrastructure, industry-specific editions and anywhere/anytime mobile access, Maximizer is the affordable CRM solution of choice. From offices in North America, Europe, Middle East, Africa and AsiaPac, and a worldwide network of certified business partners, Maximizer has shipped over one million licenses to more than 120,000 customers worldwide.
Online Training - http://www.maximizer.com/crm-consulting-training/Knowledge Base - http://www.maximizer.com/knowledgebase/Online Demonstration - http://www.maximizer.com/resources/Supported Products - http://www.maximizer.com/support/
Notice of CopyrightPublished by Maximizer Software Inc. Copyright ©1988-2017All rights reserved.
Registered Trademarks and Proprietary NamesProduct names mentioned in this document may be trademarks or registered trademarks of Maximizer Software Inc. or other hardware, software, or service providers and are used herein for identification purposes only.
ApplicabilityThis document applies to Maximizer CRM 2018 Enterprise Editions.
AMERICAS ( HEAD OFFICE )
Maximizer Services Inc.Sales +1 800 804 6299Phone +1 604 601 8000Email [email protected] www.maximizer.com
EUROPE / MIDDLE EAST / AFRICA
Maximizer Software Ltd.Phone +44 (0) 1344 766 900Email [email protected] www.maximizer.com/uk
AUSTRALIA / NEW ZEALAND
Maximizer Software Solutions Pty. Ltd.Phone +61 (0) 2 9957 2011Email [email protected] Website www.maximizer.com/au
Copyright © 2017 Maximizer Services Inc., Maximizer Software Ltd., Maximizer Software Solutions Pty. Ltd. All rights reserved. Maximizer® CRM is a registered trademark of Maximizer Software Inc. Maximizer CRM, Maximizer CRM Live, Maximizer Contact Management, and other product names may be trademarks of their
respective holders. This is for information purposes only. MAXIMIZER SOFTWARE INC. MAKES NO WARRANTIES, EXPRESSED OR IMPLIED, IN THIS SUMMARY.
W W W. MA XIMIZER.COM