maxpower® 802.11n/g/b usb 2.0 adapter user manual · wireless configuration 11 troubleshooting/faq...
TRANSCRIPT
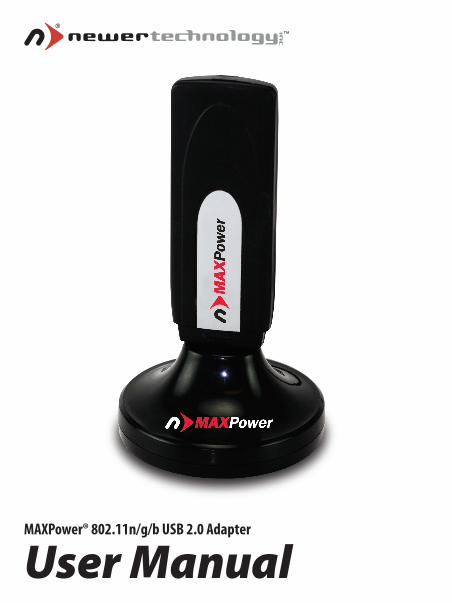
User ManualMAXPower® 802.11n/g/b USB 2.0 Adapter
2
Table of Contents
Before You Start 3 Network Information 3
Introduction 4
Package Contents 4
Installation for Macintosh 5
Software Installation 5
Wireless Configuration 7
Adding the Utility to Startup Items 9
Installation for Windows 10
Installation 10
Wireless Configuration 11
Troubleshooting/FAQ 15
Contacting Tech Support 17

3
Before You Start…For your convenience, this is a short checklist of information re-quired to set up your MAXPower 802.11n/g/b USB 2.0 Adapter.
You will also need this information prior to contacting Techni-cal Support. We recommend filling in the information into the spaces provided for easy reference. If you don’t know the infor-mation, you may need to consult your Router’s manual, your Internet Service Provider and/or your System Administrator.
Network Information
Router Mfg/Model:•
Router IP:• . . .
Router Username: •
Router Password:•
SSID:•
Channel: •
Authentication Type:•
Encryption Type:•
E• ncryption Key:
- or -
Password:
4
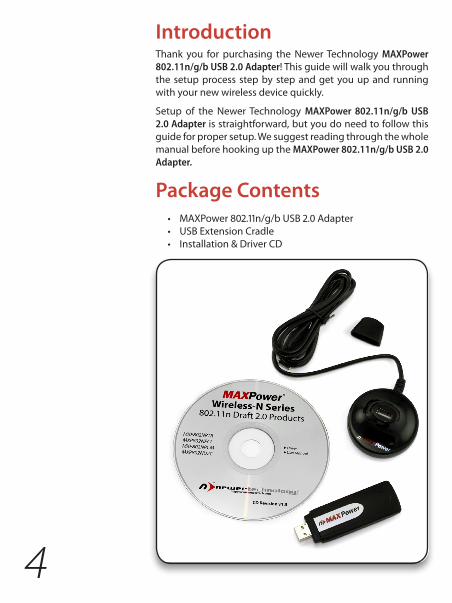
IntroductionThank you for purchasing the Newer Technology MAXPower 802.11n/g/b USB 2.0 Adapter! This guide will walk you through the setup process step by step and get you up and running with your new wireless device quickly.
Setup of the Newer Technology MAXPower 802.11n/g/b USB 2.0 Adapter is straightforward, but you do need to follow this guide for proper setup. We suggest reading through the whole manual before hooking up the MAXPower 802.11n/g/b USB 2.0 Adapter.
Package ContentsMAXPower 802.11n/g/b USB 2.0 Adapter•USB Extension Cradle•Installation & Driver CD•

5
Installation for Macintosh
Software InstallationYou can find the Mac OS X drivers either on the included 1. CD or download them from the following URL: http://www.newertech.com/downloads/maxpower_usb_n.dmg
After you put the CD in your computer and it loads, or you 2. double-click on the .dmg file you downloaded, the disk volume should appear. Open this to reveal folders with the different versions of the drivers.
Open the folder that corresponds to the Operating System 3. you are running. There will be two .pkg files – an installer and an uninstaller.
Double click on the installer .pkg file. The installer will 4. open.
Click “Continue”.5.

6
Click “Install”.6.
You will be prompted for your user name and password, 7. please enter it and hit “OK”. Note: You must have Administrative privileges to install this software on your Mac.
When Prompted, close any other open Applications, and 8. click “Continue Installation”.

7
Wait for the Installer to finish, then click the “Restart” 9. button. Your computer will restart. The Wireless Utility software may open at startup. Quit the application and proceed with the installation.
Even though the configuration utility
may open immediately after installation, you
must perform these steps as listed in order for your
Adapter to work properly.
Wireless Configuration
Before configuring: Insert the 1. MAXPower 802.11n/g/b USB 2.0 Adapter into an open USB 2.0 port. The Wireless Utility should open auto-matically. You can just ignore it for the time being.
Go to the “Apple” menu and select “System Preferences”.2.
Click on the “Network” preference pane icon.3.
The “Detected a new Network port” dialog should pop up. 4. Click “OK”.
Click “Apply” and close System Preferences.5.
Configuring for useWhen you inserted the 1. MAXPower 802.11n/g/b USB 2.0 Adapter into a USB 2.0 port, the Wireless Utility should have opened automatically. If it did not, or you quit the program, you can find it in your Applications folder.
8
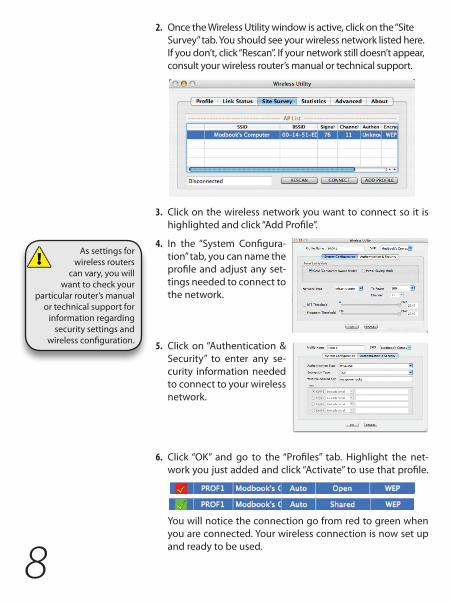
Click “OK” and go to the “Profiles” tab. Highlight the net-6. work you just added and click “Activate” to use that profile.
You will notice the connection go from red to green when you are connected. Your wireless connection is now set up and ready to be used.
Once the Wireless Utility window is active, click on the “Site 2. Survey” tab. You should see your wireless network listed here. If you don’t, click “Rescan”. If your network still doesn’t appear, consult your wireless router’s manual or technical support.
Click on the wireless network you want to connect so it is 3. highlighted and click “Add Profile”.
In the “System Configura-4. tion” tab, you can name the profile and adjust any set-tings needed to connect to the network.
As settings for wireless routers
can vary, you will want to check your
particular router’s manual or technical support for
information regarding security settings and
wireless configuration. Click on “Authentication & 5. Security” to enter any se-curity information needed to connect to your wireless network.

9
Adding the Utility to Startup ItemsIf the Wireless Utility does not automatically open upon inser-tion of the wireless adapter, you can set the Wireless Utility to open on startup by performing the following steps.
Go to the “Apple” menu and select “System Preferences”. 1.
Click on the “Accounts” Preference Pane.2.
Highlight the account you want to add the utility as a 3. startup item and click on the “Login Items” tab.
Click the “+” sign at the bottom.4.
Select the Wireless Utility in your Applications folder. 5.
Close the System Preferences window.6.

10
Installation for Windows
InstallationInsert the included Install CD. Navigate to the “Windows 1. Driver” folder and run the Installer.
Follow the instructions on the Installer Wizard, clicking 2. “Next” when each step is completed.
After completing the Installer Wizard, click “Finish” and 3. insert the MAXPower 802.11n/g/b USB 2.0 Adapter into an open USB 2.0 port. The software installation is now completed.
DO NOT connect the
MAXPower 802.11n/g/b USB 2.0 Adapter until you
are instructed to do so. Improper insertion may
result in unsuccessful installation of the device.
11
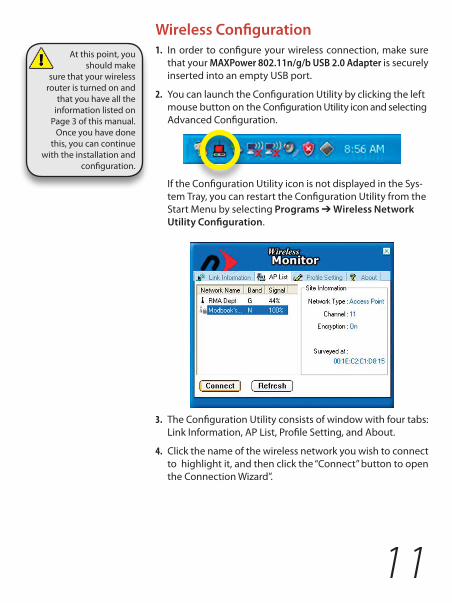
Wireless ConfigurationIn order to configure your wireless connection, make sure 1. that your MAXPower 802.11n/g/b USB 2.0 Adapter is securely inserted into an empty USB port.
You can launch the Configuration Utility by clicking the left 2. mouse button on the Configuration Utility icon and selecting Advanced Configuration.
If the Configuration Utility icon is not displayed in the Sys-tem Tray, you can restart the Configuration Utility from the Start Menu by selecting Programs ➔ Wireless Network Utility Configuration.
The Configuration Utility consists of window with four tabs: 3. Link Information, AP List, Profile Setting, and About.
Click the name of the wireless network you wish to connect 4. to highlight it, and then click the “Connect” button to open the Connection Wizard”.
At this point, you should make
sure that your wireless router is turned on and
that you have all the information listed on
Page 3 of this manual. Once you have done
this, you can continue with the installation and
configuration.

12
By default, the Profile Name is the name of the network you 5. are connecting to. If you wish to use a different name, you can change it now. Once the name is to your liking, click “Next”.
Select the “Network Type”, click on the drop-down arrow 6. and select the kind of network you’re using.
A “Peer-to-Peer” network is one that connects two “clients” (such as two computers) to one another directly, connecting to no other devices.
Under most circumstances, though, you will need to connect via an “Access Point”.
Leave the Transfer Rate set to “Automatic” unless your router requires you to choose a specific rate.
Once these options are set, click “Next”.
13
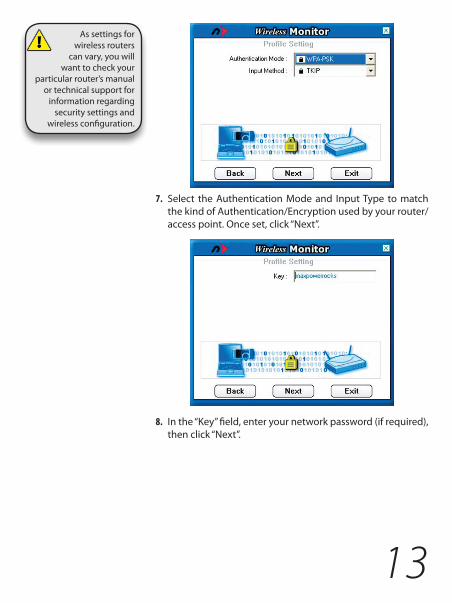
Select the Authentication Mode and Input Type to match 7. the kind of Authentication/Encryption used by your router/access point. Once set, click “Next”.
In the “Key” field, enter your network password (if required), 8. then click “Next”.
As settings for wireless routers
can vary, you will want to check your
particular router’s manual or technical support for
information regarding security settings and
wireless configuration.
14
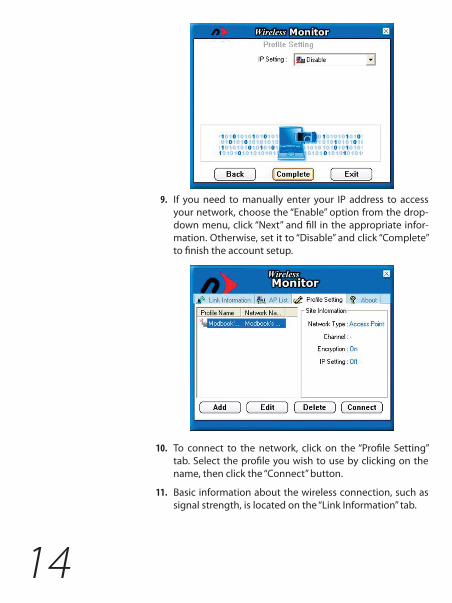
If you need to manually enter your IP address to access 9. your network, choose the “Enable” option from the drop-down menu, click “Next” and fill in the appropriate infor-mation. Otherwise, set it to “Disable” and click “Complete” to finish the account setup.
To connect to the network, click on the “Profile Setting” 10. tab. Select the profile you wish to use by clicking on the name, then click the “Connect” button.
Basic information about the wireless connection, such as 11. signal strength, is located on the “Link Information” tab.

15
Troubleshooting/FAQ
PROBLEM:
After a restart, the MAXPower 802.11n/g/b USB 2.0 Adapter is not seen.
SOLUTION:
Unplug and replug the MAXPower 802.11n/g/b USB 2.0 Adapter into a USB port, or do a complete shut down and then reboot instead of just restarting.
PROBLEM:
Network connection frequently drops.
SOLUTION:
Some wireless frequencies and channels are more common than others, resulting in interference. Try changing your wireless router’s channel (1-11) and/or frequency. Make sure these settings are matched in your wireless devices.
PROBLEM:
Can’t connect to wireless network with hidden SSID.
SOLUTION:
The MAXPower 802.11n/g/b USB 2.0 Adapter does work properly with SSID disabled. When you first startup , it will usually take 5-10 seconds for the MAXPower 802.11n/g/b USB 2.0 Adapter to automatically find and reconnect to the network that is using SSID disabled settings.
PROBLEM:
I don’t have a computer with USB 2.0, so I attached my MAX-Power 802.11n/g/b USB 2.0 Adapter to a USB 1.1 port and it seems to run slow.
SOLUTION:
The MAXPower 802.11n/g/b USB 2.0 Adapter will function via USB 1.1. However, the speeds will be severely limited by the slower bus speed.

16
PROBLEM:
The MAXPower 802.11n/g/b USB 2.0 Adapter won’t automati-cally connect to the Internet on my Mac.
SOLUTION:
In OS X 10.4.x or earlier:1. Go to the Network Preference Pane.2. Click on the “Show” drop-down menu and select “Net-
work Port Configurations”.3. In the list that shows, find the option for your USB inter-
face and drag it to the top of the list.4. Click “Apply” and close the Preferences window.
In OS X 10.5.x:1. Go to the Network Preference Pane.2. Click on the “Action” menu (it looks like a gear, as shown
below).
3. Select “Set Service Order…” from the menu that shows.4. Click “Apply” and close the Preferences window.5. Drag the PCI interface to the top of the list, then click
“OK”.6. Click “Apply” and close the Preferences window.
PROBLEM:
I tried attaching the MAXPower 802.11n/g/b USB 2.0 Adapter to a game console (PlayStation, XBox, Wii, etc.) that has a USB port, and I can’t get it to connect to my network.
SOLUTION:
The MAXPower 802.11n/g/b USB 2.0 Adapter requires a soft-ware driver, specific to Mac OS and Windows, to run. No driver software is available for any game console.
PROBLEM:
I am unable to configure the MAXPower 802.11n/g/b USB 2.0 Adapter using Apple’s built-in AirPort software.
SOLUTION:
This wireless adapter requires the use of the included software. It will not work using Apple’s native wireless software and drivers.
17
Contacting Tech SupportYou can register your MAXPower 802.11n/g/b USB 2.0 Adapter at NewerTech’s Web site:http://newertech.com/tech_support/ntwty.php
If you need support, there are three ways to contact Technical Support / Customer Service:
email•You can submit your email support request at: »http://helpcenter.newertech.com/
Phone•815-308-7001 - Option 2 »8am–8pm CST Monday–Friday »9am–4pm CST Saturday »
LiveChat•NewerTech’s distributor, OWC, offers live technical »assistance at: http://eshop.macsales.com/7am-10pm CST Monday–Friday »10am-4pm CST Saturday »12pm-4pm CST Sunday »
PROBLEM:
I need to save settings for multiple networks.
SOLUTION:
You can save multiple profiles for different networks by re-peating the same steps for the first connection you created. Once you have saved the profile, you can click on the Profile Manager and select the profile you wish to connect with.
PROBLEM:
My current router is set for 5GHz, and I am unable to connect.
SOLUTION:
The MAXPower 802.11n/g/b USB 2.0 Adapter only runs at 2.4GHz. In order to use this card with your wireless network, you will need to set your router (and all other devices on this network) to run at 2.4GHz.

18
CopyrightsCopyright © 2008 Newer Technology, Inc. All rights reserved. No part of this publication may be reproduced, stored in a re-trieval system, or transmitted in any form or by any means, electronic, mechanical, photocopying, recording or otherwise, without the prior written consent of Newer Technology.
ChangesThe material in this document is for information only and subject to change without notice. While reasonable efforts have been made in the preparation of this document to assure its accuracy, Newer Technology assumes no liability resulting from errors or omissions in this document, or from the use of the information contained herein. Newer Technology reserves the right to make changes or revisions in the product design or the product manual without reservation and without obligation to notify any person of such revisions and changes.
FCC Statement:
This equipment has been tested and found to comply with the limits for a Class B digital device, pursuant to Part 15 of the FCC Rules. These limits are designed to provide reasonable protection against harmful interference in a residential installation. This equipment generates, uses and can radiate radio frequency energy and, if not installed and used in accordance with the instructions, may cause harmful interference to radio communications. However, there is no guarantee that interference will not occur in a particular installation. If this equipment does cause harmful interference to radio or television reception, which can be determined by turning the equipment off and on, the user is encouraged to try and correct the interference by one or more of the following measures:
Reorient or relocate the receiving antenna.•
Increase the separation between the equipment and receiver.•
Connect the equipment into an outlet on a circuit different from that to which the receiver is connected.•
Consult the dealer or an experienced radio/TV technician for help.•
FCC Caution
FCC Caution: Any changes or modifications not expressly approved by the party responsible for compliance could void the user’s authority to operate this equipment.
This device complies with Part 15 of the FCC Rules. Operation is subject to the following two conditions: (1) This device may not cause harmful interference, and (2) this device must accept any interference received, including interference that may cause undesired operation.
IMPORTANT NOTE: FCC Radiation Exposure Statement:
This equipment complies with FCC radiation exposure limits set forth for an uncontrolled environment. This equipment should be installed and operated with minimum distance 20cm between the radiator & your body.
This transmitter must not be co-located or operating in conjunction with any other antenna or transmitter.
The availability of some specific channels and/or operational frequency bands are country dependent and are firmware programmed at the factory to match the intended destination. The firmware setting is not accessible by the end user.
The MXP802NPCM / MXP802GU2/ MXP802NU2C / MXP802NPCI / MXP802NRTR (FCC ID UNH - MXP802-NPCM, MXP802GU2, MXP802NU2C, MXP802NPCI, MXP802NRTR) is limited in CH1~CH11 for 2.5GHz by specified firmware controlled in U.S.A.
R&TTE Compliance Statement
Product Article Code: MXP802NPCM / MXP802GU2/ MXP802NU2C / MXP802NPCI / MXP802NRTR
Product Description: Wireless-N Notebook Adapter / Wireless-N USB Dongle / Wireless-N PCI Adapter / Wireless-N Broadband AP/Router
Product Manufacturer / Importer: Newer Technology, Inc.
This equipment complies with all the requirements of DIRECTIVE 1999/5/EC OF THE EUROPEAN PARLIAMENT AND THE COUNCIL of March 9, 1999 on radio equipment and telecommunication terminal Equipment and the mutual recognition of their conformity (R&TTE)
The R&TTE Directive repeals and replaces in the directive 98/13/EEC (Telecommunications Terminal Equipment and Satellite Earth Station Equipment) As of April 8, 2000.

19
Safety This equipment is designed with the utmost care for the safety of those who install and use it. However, special attention must be paid to the dangers of electric shock and static electricity when working with electrical equipment. All guidelines of this and of the computer manufacture must therefore be allowed at all times to ensure the safe use of the equipment.
EU Countries Intended for Use The ETSI version of this device is intended for home and office use in Austria, Belgium, Denmark, Finland, France, Germany, Greece, Ireland, Italy, Luxembourg, the Netherlands, Portugal, Spain, Sweden, and the United Kingdom.
The ETSI version of this device is also authorized for use in EFTA member states: Iceland, Liechtenstein, Norway, and Swit-zerland.
EU Countries prohibited for use None.
EU Countries where usage of the product as described below is limited to:France: The use of other channels than 10 through 13 is prohibited by law.
Health And Safety Precautions
Read this User’s Guide carefully, and follow the correct procedure when setting up the device.•
Do not open your wireless product or attempt to disassemble or modify it. Never insert any metallic object into the •device to avoid any risk of electrical shock, fire, short-circuiting or dangerous emissions. Your wireless product con-tains no user-serviceable parts. If it appears to be malfunctioning, have it inspected by a qualified Newer Technology Technical Support representative.
Never expose your device to rain, or use it near water, or in damp or wet conditions. Never place objects containing liq-•uids on the device, as they may spill into its openings. Doing so increases the risk of electrical shock, short-circuiting, fire or personal injury.
General Use Precautions:
Do not expose the wireless product to temperatures outside the range of 5° C to 40° C (41° F to 104° F). Doing so may •damage the device or disfigure its casing. Avoid placing your wireless product near a source of heat or exposing it to sunlight (even through a window). Inversely, placing your wireless product in an environment that is too cold or humid may damage the unit.
Always unplug the wireless product from the electrical outlet if there is a risk of lightning or if it will be unused for an •extended period of time. Otherwise, there is an increased risk of electrical shock, short-circuiting or fire.
Use only the power supply shipped with the device.•
Do not use the wireless product near other electrical appliances such as televisions, radios or speakers. Doing so may •cause interference which will adversely affect the operation of the other products.
Do not place the wireless product near sources of magnetic interference, such as computer displays, televisions or •speakers. Magnetic interference can affect the operation and stability of your wireless product.
Do not place heavy objects on top of the wireless product or use excessive force on it.•
Never use excessive force on your wireless product. If you detect a problem, consult the Troubleshooting section in •this manual.
Protect your wireless product from excessive exposure to dust during use or storage. Dust can build up inside the •device, increasing the risk of damage or malfunction.
Newer Technology recommends the use of normal glass cleaning products to keep the high lustre finish at it’s finest •with this product. Be sure to not get any moisture inside the holes and if you do, allow time to air dry before use.
Do not block the ventilation outlets on the rear of the wireless product. These help to keep your device cool during •operation. Blocking the ventilation outlets may cause damage to your device and cause an increased risk of short-circuiting or fire.

NWTMAN802NU2
©2008 Newer Technology, Inc. All Rights ReservedRevision 2, 12/08 - MCS