maxsimo quickref
TRANSCRIPT

8/6/2019 Maxsimo Quickref
http://slidepdf.com/reader/full/maxsimo-quickref 1/17
©Copyright IBM Corp. 2010. Page 1 of 17 Generic_ISM_7.2_Self Svc Quick Ref Guide_R1.2.doc
All rights reserved.
IBM Global ServicesSSO Integration, SMI
IBM Service Management
Self Service and Self Registration
Quick Reference Guide
Document Owner: ITD
Document Editor: Kathleen D’Adamo
Gokul Ramalingam
Revision Number: 1.2
Last Revised: December 02, 2010

8/6/2019 Maxsimo Quickref
http://slidepdf.com/reader/full/maxsimo-quickref 2/17
©Copyright IBM Corp. 2010. Page 2 of 17 Generic_ISM_7.2_Self Svc Quick Ref Guide_R1.2.doc
All rights reserved.
Document Abstract: The information in this document describes the functions of the IBM Service
Management tool. The information detailed is from the Self Service application for an end user. The
document is intended to be used by the end user to gain exposure to the tool environment.

8/6/2019 Maxsimo Quickref
http://slidepdf.com/reader/full/maxsimo-quickref 3/17
Generic_ISM_7.2_Self Svc Quick Ref Guide_R1.2.doc 12/8/2010
1 Table of Contents
1 Table of Contents ..................................................................................................................................3
2 Document Control.................................................................................................................................4 2.1 Summary of Changes ...........................................................................................................................4 2.2 Document Approvers .........................................................................Error! Bookmark not defined. 2.3 How to Find the Latest Version of this Document...............................................................................4 2.4 Document Distribution.........................................................................................................................4 2.5 Document Updates...............................................................................................................................4 3 Overview ................................................................................................................................................5 3.1 Purpose.................................................................................................................................................5 3.2 Scope....................................................................................................................................................5 3.3 Intended Audience ...............................................................................................................................5 3.4 General Definitions..............................................................................................................................5 4 Roles .......................................................................................................................................................5
5 Getting Started ......................................................................................................................................6 6 Navigating..............................................................................................................................................6 7 Start Centers..........................................................................................................................................8 8 Viewing Bulletins...................................................................................................................................8 9 Opening an Application........................................................................................................................9 10 Self Service...........................................................................................................................................9 10.1 Searching for Solutions......................................................................................................................9 10.1.1 Searching by Classification...........................................................................................................12 10.2 Service Requests ..............................................................................................................................13 10.2.1 Viewing a Service Request ...........................................................................................................13 10.2.2 Creating a Service Request ...........................................................................................................14 10.2.3 Updating a Service Request ..........................................................................................................15 10.3 Adding Attachments ........................................................................................................................16 11 Logging Off........................................................................................................................................17
Page 3 of 17

8/6/2019 Maxsimo Quickref
http://slidepdf.com/reader/full/maxsimo-quickref 4/17
Generic_ISM_7.2_Self Svc Quick Ref Guide_R1.2.doc 12/8/2010
2 Document Control
2.1 Summary of Changes
Revision Nbr Revision Date Author Nature of Change Approval
Date1.0 08 May 2009 K. D’Adamo Update for QS 4.0 08 May
2009
1.1 06 Nov 2009 K. D’Adamo Updated to match implemented
production environment
13 Nov 2009
1.2 02 Dec 2010 Gokul Ramalingam
K. D’Adamo
Updated for GCMS Phase 6 03 Dec 2010
2.2 Document Reviewers
Approver Title or Role
Sarah White Eagle ISM Architect / Technical Contact
Charles E Myers ISM Integration Architect
2.3 Document Approvers
Approver Title or Role
Grisselle Keller Document Owner
2.4 How to Find the Latest Version of this DocumentThe latest revision of this document can be obtained from
http://tucgsa.ibm.com/gsa/tucgsa/projects/i/itdmaximo/document.htm
2.5 Document Distribution
This document is distributed to document approvers. Printed copies are for reference only and are not
controlled. The user of this document is responsible for utilizing only the current revision.
2.6 Document Updates
If you have any suggestions to update or enhance this document, or if you find any errors, please send an
e-mail to ITDQS Central Application Support/Tampa/IBM.
Page 4 of 17

8/6/2019 Maxsimo Quickref
http://slidepdf.com/reader/full/maxsimo-quickref 5/17
Generic_ISM_7.2_Self Svc Quick Ref Guide_R1.2.doc 12/8/2010
3 Overview
3.1 Purpose
This document is intended to describe the functionality of the IBM Service Management (ISM) Self Service application and to serve as a quick reference guide to assist the reader with using the Self Service
interface.
3.2 Scope
The document covers all aspects related to the generic and standard functionality of the Self Service
application. Some information in the document may not pertain to your account. It is recommended that
you review any account-specific documentation for more information.
3.3 Intended Audience
The primary audience for this document includes Customer Self Help Users. The document explains end
user related activities for Self Service users.
3.4 General Definitions
The following terms are used in this document.
Term Definition
Application A part of the software that is used for specific functions. In ISM, the
individual modules such as Service Request or Incidents are also referred to
as applications.
Knowledgebase A database containing solutions and frequently asked question (FAQ)information.
Service Request The initial record requesting assistance
4 RolesThe information below describes the primary Self Service user role as it applies in ISM. The definition
provided below is ITUP / ITIL aligned.
User: The user receives services performed by an IT organization. When users need help, they contact
the User Contact Management, usually called a Service Desk. This help may be in the form of an incident
report, a service request, a request for change, or a request for information. The user is responsible for
providing the Service Desk with information about the requested service.
Page 5 of 17
8/6/2019 Maxsimo Quickref
http://slidepdf.com/reader/full/maxsimo-quickref 6/17
Generic_ISM_7.2_Self Svc Quick Ref Guide_R1.2.doc 12/8/2010
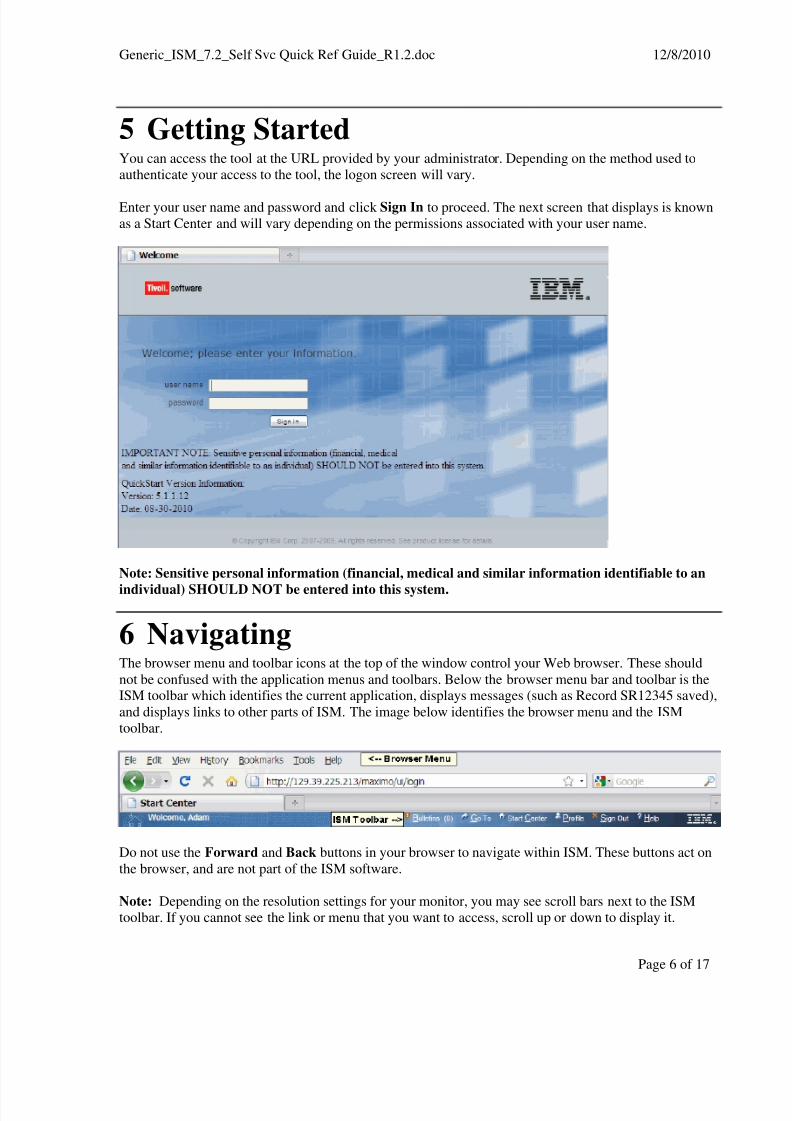
5 Getting StartedYou can access the tool at the URL provided by your administrator. Depending on the method used to
authenticate your access to the tool, the logon screen will vary.
Enter your user name and password and click Sign In to proceed. The next screen that displays is known
as a Start Center and will vary depending on the permissions associated with your user name.
Note: Sensitive personal information (financial, medical and similar information identifiable to an
individual) SHOULD NOT be entered into this system.
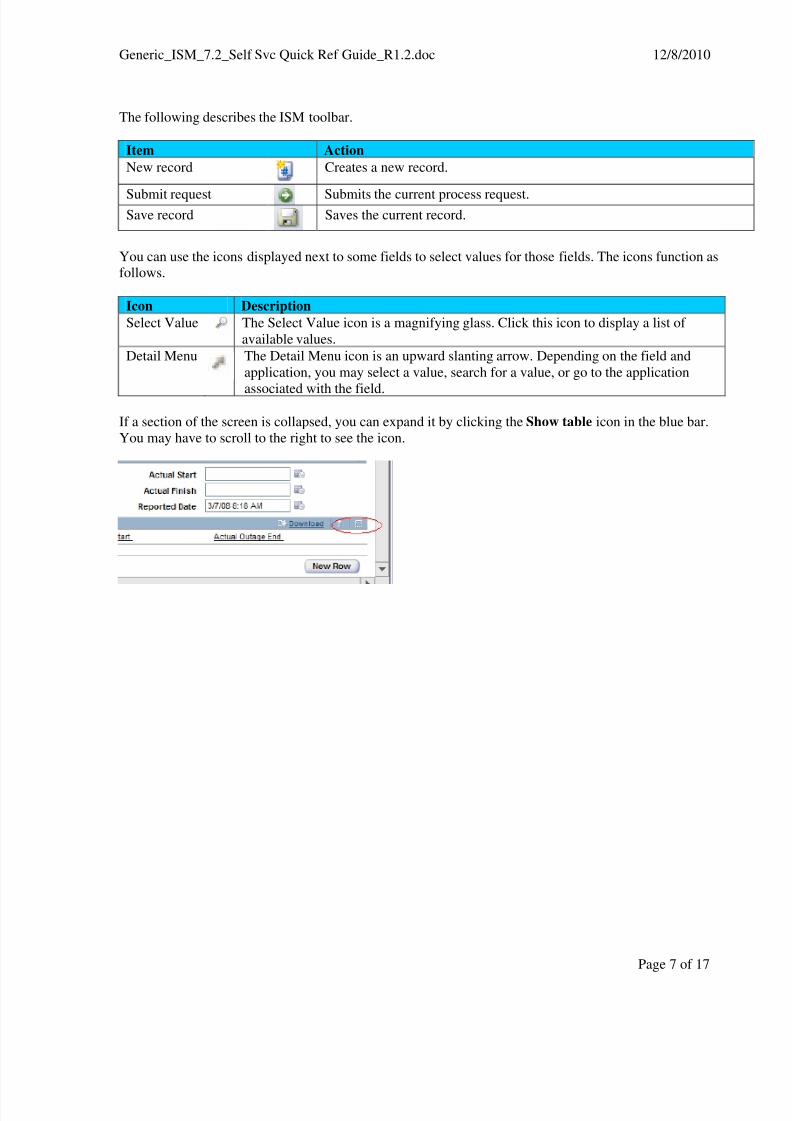
6 NavigatingThe browser menu and toolbar icons at the top of the window control your Web browser. These should
not be confused with the application menus and toolbars. Below the browser menu bar and toolbar is theISM toolbar which identifies the current application, displays messages (such as Record SR12345 saved),
and displays links to other parts of ISM. The image below identifies the browser menu and the ISM
toolbar.
Do not use the Forward and Back buttons in your browser to navigate within ISM. These buttons act on
the browser, and are not part of the ISM software.
Note: Depending on the resolution settings for your monitor, you may see scroll bars next to the ISM
toolbar. If you cannot see the link or menu that you want to access, scroll up or down to display it.
Page 6 of 17
8/6/2019 Maxsimo Quickref
http://slidepdf.com/reader/full/maxsimo-quickref 7/17
Generic_ISM_7.2_Self Svc Quick Ref Guide_R1.2.doc 12/8/2010
The following describes the ISM toolbar.
Item Action
New record Creates a new record.
Submit request Submits the current process request.Save record Saves the current record.
You can use the icons displayed next to some fields to select values for those fields. The icons function asfollows.
Icon Description
Select Value The Select Value icon is a magnifying glass. Click this icon to display a list of
available values.
Detail Menu The Detail Menu icon is an upward slanting arrow. Depending on the field and
application, you may select a value, search for a value, or go to the application
associated with the field.
If a section of the screen is collapsed, you can expand it by clicking the Show table icon in the blue bar.
You may have to scroll to the right to see the icon.
Page 7 of 17

8/6/2019 Maxsimo Quickref
http://slidepdf.com/reader/full/maxsimo-quickref 8/17
Generic_ISM_7.2_Self Svc Quick Ref Guide_R1.2.doc 12/8/2010
7 Start CentersWhen you log on, an initial welcome screen displays which is also known as a Start Center. A Start
Center contains links to actions, applications, data, records, and/or reports that are relevant to your user
name. Below is an example of a typical Start Center.
The information displayed on your Start Center allows you to review any new bulletins, jump to the
Solutions or Service Requests applications, create a service request, and view your open service requests.
A Start Center consists of two columns, one narrow and one wide. Each column can be configured to
display one or more portlets which display data and links that are available to you.
In the left (narrow) column are displayed links to the applications and actions that are most commonly
used which include, in this case, links for Search Solutions, View Service Requests, and Create Service
Request.
In the right (wide) column are displayed lists such as bulletin board messages and frequently asked
questions. These sections are also known as Result Sets. If more than ten entries display in any section,
click the left and right arrows to navigate through the list.
8 Viewing BulletinsUnread bulletin board messages display at the top of your Start Center. It is good practice to check thebulletin board for new messages before creating a service request in case there is information that is
relevant to the problem relevant to your request.
You can view bulletin board messages from any application by clicking the Bulletins link in the ISM
toolbar. This link will only display if there are active Bulletins. By default, only messages that you have
not viewed are displayed.
To display the contents of a new message, click the subject. The message opens to show the contents as
shown below. To close a message, click the message subject again.
Page 8 of 17

8/6/2019 Maxsimo Quickref
http://slidepdf.com/reader/full/maxsimo-quickref 9/17
Generic_ISM_7.2_Self Svc Quick Ref Guide_R1.2.doc 12/8/2010
If no messages are displayed, or you don’t see any messages about your current issue, you can search formessages by entering search criteria in the filter fields. For example, to see all messages about email
issues, type “email” in the Subject field and press Enter. You can also search by Post Date, Expiration
Date, and so on.
You can also view all messages in the system by clearing the filter fields and pressing Enter. However,
this is not recommended due to the large number of messages that may accumulate in any system over
time.
9 Opening an ApplicationThere are several ways to open an application through the Start Center:
• Service Desk Actions: To open an application, click the application link in the Self Service portlet,
such as click View Service Requests.
• Result Set portlets: To view bulletins and frequently asked questions, click an entry in a displayed list
on the right side of your Start Center.
• Go To: To open an application, click the Go To link in the navigation bar, then select the module
and application. For example, to open the Service Request application, select Go To > Self Service >
Service Requests.
10 Self ServiceThe Self Service application allows you to search for solutions, view current service requests, and create
service requests to submit to the Service Desk. Before you create a service request, you should search the
available solutions to see if one of them will help you.
10.1 Searching for Solutions
There are two ways to search for solutions prior to creating a service request:
• Select the Search Solutions link in the Service Desk Actions section of your start center.
• From the Go To menu, select Self Service > Service Requests > Search Solutions.
Page 9 of 17

8/6/2019 Maxsimo Quickref
http://slidepdf.com/reader/full/maxsimo-quickref 10/17
Generic_ISM_7.2_Self Svc Quick Ref Guide_R1.2.doc 12/8/2010
The Search Solutions application opens.
Enter search criteria as follows:
If you know the ID of the solution you want to view, you can type it in the Solution Id field.
To search for solutions about a particular topic, type a pertinent word or phrase in the Solution
Description field or the Keywords field.
To search for Frequently Asked Questions (FAQs), type FAQ in the Type field.
To search for solutions about a particular type of hardware, software, or network issue, click the
double arrow next to the Classification field and select Select Classification to choose the
appropriate classification. For detailed instructions, see Searching by Classification.
Then click Find. The solutions that match your search criteria display in the View Solutions table at the
bottom of the screen.
Page 10 of 17

8/6/2019 Maxsimo Quickref
http://slidepdf.com/reader/full/maxsimo-quickref 11/17
Generic_ISM_7.2_Self Svc Quick Ref Guide_R1.2.doc 12/8/2010
To view a solution, click the Solution number. Detailed information about the solution displays as shown
below.
Once you have reviewed the information, you can do any of the following:
In the User Comments section, rank the usefulness of the solution and enter comments, and then
click Save Comments/Ranking.
Use the links in the navigation bar to return to your Start Center or to go to another application.
Page 11 of 17

8/6/2019 Maxsimo Quickref
http://slidepdf.com/reader/full/maxsimo-quickref 12/17
Generic_ISM_7.2_Self Svc Quick Ref Guide_R1.2.doc 12/8/2010
10.1.1 Searching by Classification
To search by classification from the Search Solutions application, do the following:
1. Click the double arrow next to the Classification field and click Select Classification.
The Select Classification search dialog box displays, similar to the one shown below.
2. Click the plus sign next to a classification to expand the list. Continue to click the plus signs until
the desired classification displays. Once you can see the correct entry, click the blue box next to it
to select it.
The Classification and Class Description information are copied to the Search Solutions page.
3. Click the Find button. Solutions matching the search are displayed in the View Solutions table.
4. To view a particular solution, click the underlined Solution number. If you cannot find a solution
to the problem being experienced, you can submit a service request as described in Creating a
Service Request.
Page 12 of 17

8/6/2019 Maxsimo Quickref
http://slidepdf.com/reader/full/maxsimo-quickref 13/17
Generic_ISM_7.2_Self Svc Quick Ref Guide_R1.2.doc 12/8/2010
10.2 Service Requests
Each service request is assigned and ID number by the tool. When you create a service request, some
default information is included automatically such as the current date and time in a Date field and your
user name in the Requested By field. In most cases, the default data can be updated.
Note: You cannot delete a service request once it has been saved.
10.2.1 Viewing a Service Request
You can use the View Service Requests application to see the status and progress of your open service
requests previously submitted. You can also update your Service Request as described in Updating a
Service Request.
There are three ways to view a service request:
• Select the View Service Request link under Favorite Applications from the Start Center.
• From the Go To menu, select Self Service > Service Requests > View Service Requests.
• From the Service Request Submitted window, click View Details.
The Search for Service Requests window displays. Recent Service Requests display in the View ServiceRequests table.
To view the details of a particular request, click the request number in the Service Request id column.
If the service request you want to view is not visible, enter information as applicable in the search fields.
For example, to search by record status, click the magnifying glass next to the Status field, select one of
the options listed, and then click OK.
When you have filled in the values that you want to search by, click the Find button on the right side of
the screen. Any service requests that match your criteria display in the View Service Requests table.
Page 13 of 17

8/6/2019 Maxsimo Quickref
http://slidepdf.com/reader/full/maxsimo-quickref 14/17
Generic_ISM_7.2_Self Svc Quick Ref Guide_R1.2.doc 12/8/2010
10.2.2 Creating a Service Request
There are three ways to create a service request:
• From the Search Solutions screen.
• From the Create Service Request link on your Start Center.
• From the Go To menu, select Self Service > Service Requests > Create Service Request .
1. Open the Create Service Request application, using one of the methods listed above. An example
of the Create Service Request screen is shown below. All fields that are required by Maximo are
marked with a red asterisk. Your account may require additional fields for process purposes. All
mandatory fields must be completed before you can save the record.
Default information is populated in the Reported by, Phone, and Reported Date fields.
2. Verify that the Reported By and Phone fields are correct. If they are not, select a new value for
the Reported By field.
Note: You cannot modify the phone number for a particular person from this screen. You can
only select phone numbers already defined in the system.
3. In the E-mail field, type the reporting user’s e-mail address.
The Affected User field defaults to the person reporting the request. You can change this field if
you are submitting the request for another. For example, you might create a request for someone
who is currently traveling or an assistant could create a request for a VIP user.
Page 14 of 17

8/6/2019 Maxsimo Quickref
http://slidepdf.com/reader/full/maxsimo-quickref 15/17
Generic_ISM_7.2_Self Svc Quick Ref Guide_R1.2.doc 12/8/2010
4. To change the person listed in the Affected User field, click the magnifying glass next to the
field. The Select Value window displays as shown below.
You can search by any of the fields listed such as Person, Name, etc. Once the appropriate person
is found, click the name to populate the Affected User Field.
5. Enter a description of the service request in the Summary field. You can also type more
information in the Detail field.
6. To add an attachment to a service request, such as the text of an error message or a link to a Web
page, click either Attach File or Attach Web Address Link in the Attachments section. Thenfollow the instructions in Adding Attachments.
The other fields are all optional. It is recommended that you select a Classification to help the
Service Desk representative respond more quickly. You can also select a priority level in theReported Priority field.
7. When all the information has been entered, click the Submit button. A popup displays the record
number and the actions available to you.
8. To view the details of the record just created, click the View Details button. To return to the Start
Center, (initial screen), click the Return to Start Center button. To create another service
request, click the Create Another Service Request button.
10.2.3 Updating a Service Request
Once a service request has been submitted, it cannot be deleted. You can add information, such as
attachments or notes.
1. To update a service request, locate and display the request. For detailed instructions, see Viewing
a Service Request.
Page 15 of 17

8/6/2019 Maxsimo Quickref
http://slidepdf.com/reader/full/maxsimo-quickref 16/17
Generic_ISM_7.2_Self Svc Quick Ref Guide_R1.2.doc 12/8/2010
2. To add an attachment to a service request, such as the text of an error message or a link to a Web
page, open the service request and click either Attach File or Attach Web Address Link in the
Attachments section. Then follow the instructions in Adding Attachments.
3. To add notes to an existing record, click the Add Log Entry button located near the bottom right
side of the Log section. The Update Service Request Log window displays.
4. Enter a description of the update in the Summary and Details fields in the dialog box and click
OK. An example of the screen is shown below.
The update displays in the Log section of the record. The log can also contain information
provided by the Help Desk, and others as appropriate, on the progress of a service request.
10.3 Adding Attachments
You can add files or links to Web pages to provide additional information.
Note: Once you add an attachment and save the record, you cannot delete the attachment.
1. To add an attachment to a service request, such as the text of an error message or a link to a Web
page, open the service request and click either Attach File or Attach Web Address Link in the
Attachments section.
2. If you click Attach File, the following window displays. In the Display Name field, type a name
for the file up to 8 characters long. In the Description field, if desired, type a brief description of
the file’s purpose or what it contains. Click Browse to select the file and then click OK.
Note: By default, the attachment size is limited to 10 Mb.
Page 16 of 17

8/6/2019 Maxsimo Quickref
http://slidepdf.com/reader/full/maxsimo-quickref 17/17
Generic_ISM_7.2_Self Svc Quick Ref Guide_R1.2.doc 12/8/2010
Page 17 of 17
3. If you click Attach Web Address Link, the following window displays. In the Name field, type
a name for the link up to 8 characters long. In the Description field, if desired, type a brief
description of what the page contains. In the URL field, type or paste the URL of the destination,
and then click OK.
You are returned to Service request details screen. To view your attachments, click the paper clip icon at the top right corner of the screen.
11 Logging Off Closing the browser will not properly log out your ID and you may lose changes that were not yet saved
into the database. To successfully log out of the tool, click the Sign Out link in the ISM toolbar.
A confirming message is displayed.
Do either of the following:• To continue working with ISM, click Return.
• To exit ISM, close your browser window.
End of Document