mazda 6 owners manual 2006r en
TRANSCRIPT

Black plate (1,1)
Mazda6_8U66-EA-05F_Edition2 Page1Tuesday, July 26 2005 11:23 AM
Form No.8U66-EA-05F

Black plate (2,1)
Mazda6_8U66-EA-05F_Edition2 Page2Tuesday, July 26 2005 11:23 AM
Form No.8U66-EA-05F

Black plate (3,1)
Thank you for choosing a Mazda. We at Mazda design and build vehicles with completecustomer satisfaction in mind.
To help ensure enjoyable and trouble-free operation of your Mazda, read this manualcarefully and follow its recommendations.
An Authorized Mazda Dealer knows your vehicle best. So when maintenance or service isnecessary, that's the place to go.
Our nationwide network of Mazda professionals is dedicated to providing you with the bestpossible service.
We assure you that all of us at Mazda have an ongoing interest in your motoring pleasureand in your full satisfaction with your Mazda product.
Mazda North American Operations
Important Notes About This ManualKeep this manual in the glove box as a handy reference for the safe and enjoyable use of your Mazda. Should youresell the vehicle, leave this manual with it for the next owner.
All specifications and descriptions are accurate at the time of printing. Because improvement is a constant goal atMazda, we reserve the right to make changes in specifications at any time without notice and without obligation.
Event Data RecorderThis vehicle is equipped with an event data recorder. In the event of a crash, this device records data related tovehicle dynamics and safety systems for a short period of time. These data can help provide a betterunderstanding of the circumstances in which crashes and injuries occur and lead to the designing of safervehicles.
Air Conditioning and the EnvironmentYour Mazda's genuine air conditioner is filled with HFC134a (R134a), a refrigerant that has been found not todamage the earth's ozone layer. If the air conditioner does not operate properly, consult an Authorized MazdaDealer.
Please be aware that this manual applies to all models, equipment and options. As a result, you may findsome explanations for equipment not installed on your vehicle.
©2005 Mazda North American OperationsPrinted in U.S.A. (Print2)
AWord to Mazda Owners
Mazda6_8U66-EA-05F_Edition2 Page3Tuesday, July 26 2005 11:23 AM
Form No.8U66-EA-05F

Black plate (4,1)
We want to help you get the most drivingpleasure from your vehicle. Your owner'smanual, when read from cover to cover,can do that in many ways.
Illustrations complement the words of themanual to best explain how to enjoy yourMazda. By reading your manual, you canfind out about the features, importantsafety information, and driving undervarious road conditions.
The symbol below in this manual means“Do not do this” or “Do not let thishappen”.
Index: A good place to start is the Index,an alphabetical listing of all informationin your manual.
You'll find several WARNINGs,CAUTIONs, and NOTEs in the manual.
WARNINGAWARNING indicates a situation inwhich serious injury or death couldresult if the warning is ignored.
CAUTIONA CAUTION indicates a situation inwhich bodily injury or damage to yourvehicle, or both, could result if thecaution is ignored.
NOTE
A NOTE provides information andsometimes suggests how to make betteruse of your vehicle.
The symbol below, located on some partsof the vehicle, indicates that this manualcontains information related to the part.Please refer to the manual for a detailedexplanation.
How to Use This Manual
Mazda6_8U66-EA-05F_Edition2 Page4Tuesday, July 26 2005 11:23 AM
Form No.8U66-EA-05F

Black plate (5,1)
Mazda6_8U66-EA-05F_Edition2 Page5Tuesday, July 26 2005 11:23 AM
Form No.8U66-EA-05F
Table of Contents
Your Vehicle at a GlanceInterior, exterior views and part identification of your Mazda.
1
Essential Safety EquipmentUse of safety equipment, including seats, seat belt system, child-restraintsystems and SRS air bags.
2
Knowing Your MazdaExplanation of basic operations and controls; opening/closing and adjustmentof various parts.
3
Before Driving Your MazdaImportant information about driving your Mazda.
4
Driving Your MazdaExplanation of instruments and controls.
5
Interior ComfortUse of various features for drive comfort, including air-conditioning and audiosystem.
6
In Case of an EmergencyHelpful information on what to do in an emergency.
7
Maintenance and CareHow to keep your Mazda in top condition.
8
Customer Information and Reporting Safety DefectsImportant consumer information including warranties and add-on equipment.
9
SpecificationsTechnical information about your Mazda.
10
Index 11
Navigation System

Black plate (6,1)
Mazda6_8U66-EA-05F_Edition2 Page6Tuesday, July 26 2005 11:23 AM
Form No.8U66-EA-05F
Black plate (7,1)
1 Your Vehicle at a Glance
Interior, exterior views and part identification of your Mazda.
Dashboard and Interior Overview .............................................. 1-2
Exterior Overview ......................................................................... 1-4
1-1
Mazda6_8U66-EA-05F_Edition2 Page7Tuesday, July 26 2005 11:23 AM
Form No.8U66-EA-05F

Black plate (8,1)
The equipment and installation position varies by model.*Refer to Navigation System at the end of the manual.
Power window lock switch ................................................................................ page 3-27Power window switches .................................................................................... page 3-24Power door lock switch ..................................................................................... page 3-10
1-2
Your Vehicle at a Glance
Dashboard and Interior Overview
Mazda6_8U66-EA-05F_Edition2 Page8Tuesday, July 26 2005 11:23 AM
Form No.8U66-EA-05F

Black plate (9,1)
Headlight leveling switch .................................................................................. page 5-42Dashboard illumination ..................................................................................... page 5-28TCS-OFF switch ................................................................................................ page 5-22Lighting control/Turn signals ............................................................................ page 5-41Audio control switch ......................................................................................... page 6-43Instrument cluster .............................................................................................. page 5-25Air bags ............................................................................................................. page 2-45Wiper and washer lever ..................................................................................... page 5-43Cruise control switches ...................................................................................... page 5-18Information display ............................................................................................ page 6-50Hazard warning flasher switch .......................................................................... page 5-47Audio system ..................................................................................................... page 6-16Glove box .......................................................................................................... page 6-55Center console ................................................................................................... page 6-55Accessory socket ............................................................................................... page 6-57Cup holder ......................................................................................................... page 6-52Parking brake ....................................................................................................... page 5-5MT shift lever ...................................................................................................... page 5-9AT shift lever (Sport AT) ................................................................................... page 5-11Climate control system ........................................................................................ page 6-2Ignition switch ..................................................................................................... page 5-2Steering column release lever ............................................................................ page 3-41Remote fuel-filler lid release ............................................................................. page 3-31Trunk release button .......................................................................................... page 3-20Hood release handle .......................................................................................... page 3-32Storage pocket ................................................................................................... page 6-54Outside mirror switch ........................................................................................ page 3-41Interior light ....................................................................................................... page 6-47Sunvisor ............................................................................................................. page 6-47Map light ........................................................................................................... page 6-48Rearview mirror ................................................................................................. page 3-42Vanity mirror ...................................................................................................... page 6-47Front seats ............................................................................................................ page 2-2Seat belt ............................................................................................................. page 2-16Rear seat .............................................................................................................. page 2-9
Your Vehicle at a Glance
Dashboard and Interior Overview
1-3
Mazda6_8U66-EA-05F_Edition2 Page9Tuesday, July 26 2005 11:23 AM
Form No.8U66-EA-05F

Black plate (10,1)
The equipment and installation position varies by model.
Sedan/5-Door
1-4
Your Vehicle at a Glance
Exterior Overview
Mazda6_8U66-EA-05F_Edition2 Page10Tuesday, July 26 2005 11:23 AM
Form No.8U66-EA-05F

Black plate (11,1)
Trunk lid ............................................................................................................ page 3-20Hatch ................................................................................................................. page 3-12Antenna ............................................................................................................. page 6-16Rear window defroster ....................................................................................... page 5-45Power windows ................................................................................................. page 3-23Tires ................................................................................................................... page 8-38Light bulbs ......................................................................................................... page 8-43Hood .................................................................................................................. page 3-32Windshield wiper blades .................................................................................... page 8-32Moonroof ........................................................................................................... page 3-34Child safety locks .............................................................................................. page 3-11Fuel-filler lid ...................................................................................................... page 3-31Doors and keys .................................................................................................... page 3-9Outside mirror .................................................................................................... page 3-41
Your Vehicle at a Glance
Exterior Overview
1-5
Mazda6_8U66-EA-05F_Edition2 Page11Tuesday, July 26 2005 11:23 AM
Form No.8U66-EA-05F

Black plate (12,1)
The equipment and installation position varies by model.
Sport Wagon
1-6
Your Vehicle at a Glance
Exterior Overview
Mazda6_8U66-EA-05F_Edition2 Page12Tuesday, July 26 2005 11:23 AM
Form No.8U66-EA-05F

Black plate (13,1)
Liftgate .............................................................................................................. page 3-14Antenna ............................................................................................................. page 6-16Rear window defroster ....................................................................................... page 5-45Power windows ................................................................................................. page 3-23Tires ................................................................................................................... page 8-38Light bulbs ......................................................................................................... page 8-43Hood .................................................................................................................. page 3-32Windshield wiper blades .................................................................................... page 8-32Moonroof ........................................................................................................... page 3-34Child safety locks .............................................................................................. page 3-11Fuel-filler lid ...................................................................................................... page 3-31Doors and keys .................................................................................................... page 3-9Outside mirror .................................................................................................... page 3-41
Your Vehicle at a Glance
Exterior Overview
1-7
Mazda6_8U66-EA-05F_Edition2 Page13Tuesday, July 26 2005 11:23 AM
Form No.8U66-EA-05F

Black plate (14,1)
1-8
Mazda6_8U66-EA-05F_Edition2 Page14Tuesday, July 26 2005 11:23 AM
Form No.8U66-EA-05F

Black plate (15,1)
2 Essential Safety Equipment
Use of safety equipment, including seats, seat belt system, child-restraintsystems and SRS air bags.
Seats ............................................................................................... 2-2Front Seats (Manually Operated Seats) ..................................... 2-2Front Seats (Electrically Operated Seats) .................................. 2-5Rear Seat ................................................................................... 2-9
Seat Belt Systems ........................................................................ 2-16Seat Belt Precautions .............................................................. 2-16Seat Belt (Except Center-Rear Position) ................................. 2-19Front Seat Belt Pretensioner and Load Limiting Systems ....... 2-21Center-Rear Position Seat Belt ................................................ 2-23Seat Belt Extender ................................................................... 2-26Seat Belt Warning Light/Beep ................................................ 2-27
Child Restraint ............................................................................ 2-29Child Restraint Precautions ..................................................... 2-29Installing Child-Restraint Systems .......................................... 2-33LATCH Child-Restraint Systems ............................................ 2-40
SRS Air Bags ............................................................................... 2-45Supplemental Restraint Systems (SRS) Precautions ............... 2-45Supplemental Restraint System Components ......................... 2-50How the Air Bags Work .......................................................... 2-53
2-1
Mazda6_8U66-EA-05F_Edition2 Page15Tuesday, July 26 2005 11:23 AM
Form No.8U66-EA-05F

Black plate (16,1)
Front Seats (ManuallyOperated Seats)
WARNINGModification of the Front Seats:Modifying or replacing the front seatssuch as replacing the upholstery orloosening any bolts is dangerous. Thefront seats contain air bagcomponents essential to thesupplemental restraint system. Suchmodifications could damage thesupplemental restraint system andresult in serious injury. Consult anAuthorized Mazda Dealer if there isany need to remove or reinstall thefront seats.
Damaged Front Seats:Driving with damaged front seats isdangerous. A collision, even one notstrong enough to inflate the air bags,could damage the front seats whichcontain essential air bag components.If there was a subsequent collision, theair bag may not deploy which couldlead to injuries. Always have anAuthorized Mazda Dealer inspect thefront seats, front seat beltpretensioners and air bags after acollision.
WARNINGSecuring the Seats:Adjustable seats and seatbacks thatare not securely locked are dangerous.In a sudden stop or collision, the seator seatback could move, causinginjury. Make sure the adjustablecomponents of the seat are locked inplace by attempting to slide the seatforward and backward and rockingthe seatback.
qSeat Slide
WARNINGDriver's Seat Adjustment:Adjusting the driver's seat while thevehicle is moving is dangerous. Thedriver could lose control of the vehicleand have an accident. Adjust thedriver's seat only when the vehicle isstopped.
To move a seat forward or backward, raisethe lever and slide the seat to the desiredposition and release the lever.
2-2
Essential Safety Equipment
Seats
Mazda6_8U66-EA-05F_Edition2 Page16Tuesday, July 26 2005 11:23 AM
Form No.8U66-EA-05F

Black plate (17,1)
Make sure the lever returns to its originalposition and the seat is locked in place byattempting to push it forward andbackward.
qSeat Recline
WARNINGReclining:Sitting in a reclined position while thevehicle is moving is dangerousbecause you don't get the fullprotection from seat belts. Duringsudden braking or a collision, you canslide under the lap belt and sufferserious internal injuries. Formaximum protection, sit well back andupright.
Unlocked Seatback:The seatback plays an important rolein your protection in a vehicle.Leaving the seatback unlocked isdangerous as it can allow passengersto be ejected or thrown around andbaggage to strike occupants in asudden stop or collision, resulting insevere injury. After adjusting theseatback at any time, even when thereare no other passengers, rock theseatback to make sure it is locked inplace.
To change the seatback angle, leanforward slightly while raising the lever.Then lean back to the desired position andrelease the lever.
Make sure the lever returns to its originalposition and the seatback is locked inplace by attempting to push it forward andbackward.
CAUTIONWhen returning a rear-reclined seatbackto its upright position, make sure youhold onto the seatback with your otherhand while operating the lever. If theseatback is not supported, it will flipforward suddenly and could causeinjury.
Essential Safety Equipment
Seats
2-3
Mazda6_8U66-EA-05F_Edition2 Page17Tuesday, July 26 2005 11:23 AM
Form No.8U66-EA-05F

Black plate (18,1)
qHeight Adjustment (Driver's Seat)
By moving the seat lever up or down, theseat bottom height can be adjusted.
Down
Up
qHead Restraint
WARNINGHead Restraints Adjustment:Driving with the head restraintsadjusted too low or removed isdangerous. With no support behindyour head, your neck could beseriously injured in a collision. Alwaysdrive with the head restraints insertedwhen seats are being used and makesure they are properly adjusted.
Height adjustment
To raise a head restraint, pull it up to thedesired position.To lower the head restraint, press the stop-catch release, then push the head restraintdown.
Adjust the head restraint so that the top iseven with the top of the passenger's ears,never the passenger's neck.
qSeat Warmerí
The front seats are electrically heated. Theignition switch must be in the ONposition.
Press the switch to turn the seat warmeron or off. When the switch is in the ONposition, the indicator light will come on.
ON
OFF
2-4
Essential Safety Equipment
íSome models.
Seats
Mazda6_8U66-EA-05F_Edition2 Page18Tuesday, July 26 2005 11:23 AM
Form No.8U66-EA-05F

Black plate (19,1)
NOTE
The seat temperature is regulatedautomatically by a thermostat. Otherthan turning it on or off, it cannot beadjusted.
Front Seats (ElectricallyOperated Seats)
WARNINGModification of the Front Seats:Modifying or replacing the front seatssuch as replacing the upholstery orloosening any bolts is dangerous. Thefront seats contain air bagcomponents essential to thesupplemental restraint system. Suchmodifications could damage thesupplemental restraint system andresult in serious injury. Consult anAuthorized Mazda Dealer if there isany need to remove or reinstall thefront seats.
Damaged Front Seats:Driving with damaged front seats isdangerous. A collision, even one notstrong enough to inflate the air bags,could damage the front seats whichcontain essential air bag components.If there was a subsequent collision, theair bag may not deploy which couldlead to injuries. Always have anAuthorized Mazda Dealer inspect thefront seats, front seat beltpretensioners and air bags after acollision.
Essential Safety Equipment
Seats
2-5
Mazda6_8U66-EA-05F_Edition2 Page19Tuesday, July 26 2005 11:23 AM
Form No.8U66-EA-05F

Black plate (20,1)
CAUTIONl The seat-bottom power adjustment isoperated by motors. Avoid extendedoperation because excessive use candamage the motors.
l To prevent the battery from runningdown, avoid using the poweradjustment when the engine isstopped. The adjuster uses a largeamount of electrical power.
l Don't use the switch to make morethan one adjustment at a time.
qSeat Slide (Driver's Seat)
To slide the seat, move the slide lifterswitch on the outside of the seat to thefront or back and hold it. Release theswitch at the desired position.
qSeat Recline (Driver's Seat)
WARNINGReclining:Sitting in a reclined position while thevehicle is moving is dangerousbecause you don't get the fullprotection from seat belts. Duringsudden braking or a collision, you canslide under the lap belt and sufferserious internal injuries. Formaximum protection, sit well back andupright.
Reclining the Front Passenger SeatCan Turn Off the Front Passenger AirBags:If your vehicle is equipped with frontpassenger seat weight sensors, sittingin the front passenger seat improperlyout of position or with the seatbackreclined too far while the vehicle ismoving is dangerous as it can take offweight from the seat bottom and affectthe decision of the front passengersensing system. The front passengerwill not have the supplementaryprotection of the air bags andpretensioner, which could result inserious injury. Always sit uprightagainst your seatback, with your feeton the floor.
2-6
Essential Safety Equipment
Seats
Mazda6_8U66-EA-05F_Edition2 Page20Tuesday, July 26 2005 11:23 AM
Form No.8U66-EA-05F

Black plate (21,1)
Change the seatback angle by pressing thefront or rear side of the reclining switch.Release the switch at the desired position.
qHeight Adjustment (Driver's Seat)
Front height adjustment
To adjust the front height of the seat-bottom, raise or lower the front of theslide lifter switch on the left side of theseat.
Rear height adjustment
Raise or lower the back of the switch toadjust the rear height of the seat-bottom.
Height adjustment
Raise the seat-bottom by pulling up on thecenter of the switch. Release the switch atthe desired position.
Lower the seat-bottom by pressing downon the center of the switch. Release theswitch at the desired position.
Essential Safety Equipment
Seats
2-7
Mazda6_8U66-EA-05F_Edition2 Page21Tuesday, July 26 2005 11:23 AM
Form No.8U66-EA-05F

Black plate (22,1)
qLumbar Support Adjustment(Driver's Seat)
To adjust the lumbar support, pull thelever forward.
qHead Restraint
WARNINGHead Restraints Adjustment:Driving with the head restraintsadjusted too low or removed isdangerous. With no support behindyour head, your neck could beseriously injured in a collision. Alwaysdrive with the head restraints insertedwhen seats are being used and makesure they are properly adjusted.
To raise a head restraint, pull it up to thedesired position.To lower the head restraint, press the stop-catch release, then push the head restraintdown.
Adjust the head restraint so that the top iseven with the top of the passenger's ears,never the passenger's neck.
qSeat Warmerí
The front seats are electrically heated. Theignition switch must be in the ONposition.
Press the switch to turn the seat warmeron or off. When the switch is in the ONposition, the indicator light will come on.
ON
OFF
2-8
Essential Safety Equipment
íSome models.
Seats
Mazda6_8U66-EA-05F_Edition2 Page22Tuesday, July 26 2005 11:23 AM
Form No.8U66-EA-05F

Black plate (23,1)
NOTE
The seat temperature is regulatedautomatically by a thermostat. Otherthan turning it on or off, it cannot beadjusted.
Rear Seat
WARNINGStacking Cargo:Stacking luggage or other cargohigher than the seatbacks, and placingarticles on the rear package tray or onthe luggage compartment cover isdangerous. During sudden braking ora collision, objects can fly around andbecome projectiles that may hit andinjure passengers. Don't stack cargohigher than the seatbacks or placearticles on the rear package tray or onthe luggage compartment cover.
Not Securing Luggage and Cargo:Not securing cargo while driving isdangerous as it could move or becrushed during sudden braking or acollision and cause injury. Make sureluggage and cargo is secured beforedriving.
Securing Seats:Adjustable seats that are not securelylocked are dangerous. In a suddenstop or collision, the seat or seatbackcould move, causing injury. Make surethe adjustable components of the seatare locked in place.
Essential Safety Equipment
Seats
2-9
Mazda6_8U66-EA-05F_Edition2 Page23Tuesday, July 26 2005 11:23 AM
Form No.8U66-EA-05F

Black plate (24,1)
WARNINGUnlocked Seatback:The seatback plays an important rolein your protection in a vehicle.Leaving the seatback unlocked isdangerous as it can allow passengersto be ejected or thrown around andbaggage to strike occupants in asudden stop or collision, resulting insevere injury. After adjusting theseatback at any time, even when thereare no other passengers, rock theseatback to make sure it is locked inplace.
Passenger on the Folded Seatback:Driving with a passenger on the foldedseatback is dangerous. Allowing achild to sit up on the folded seatbackwhile the vehicle is moving isparticularly dangerous. In a suddenstop or even a minor collision, a childnot in a proper seat or child-restraintsystem and seat belt could be thrownforward, back or even out of thevehicle resulting in serious injuries ordeath. The child in the baggage areacould be thrown into other occupantsand cause serious injury. Never allowa passenger to sit or stand on thefolded seatback while the vehicle ismoving.
WARNINGChildren and the Folding Rear Seats:Playing with the folding rear seats isdangerous. Once the seats are backup, a child in the trunk would not beable to get out the way they hadentered. If you have small children,keep the seatbacks locked(sedan). Donot give the car keys to children anddo not allow them to play in thevehicle.
NOTE
When returning a rear seat to itsoriginal position, also replace the seatbelt to its normal position. Verify thatthe seat belt pulls out and retracts.
qSplit-Folding Rear Seatback (Sedan)
The seatbacks can be folded down toprovide more space in the trunk.
To fold the seatbacks
WARNINGOperating the Remote Handle LeversWhile a Rear-Facing Child-RestraintSystem is in the Rear Seat:Operating the remote handle leverswhile a rear-facing child-restraintsystem is in the rear seat is dangerous.It could cause injury to a child seatedin the child-restraint system when theseatback suddenly flips forward.Always remove the child-restraintsystem from the rear seat beforeoperating the remote handle levers forthe rear seat.
2-10
Essential Safety Equipment
Seats
Mazda6_8U66-EA-05F_Edition2 Page24Tuesday, July 26 2005 11:23 AM
Form No.8U66-EA-05F

Black plate (25,1)
WARNINGFolding Seatbacks with RemoteHandle Levers:Not checking the rear seat area forpersons before folding the seatbackswith the remote handle levers isdangerous. The rear seat area isdifficult to see from the rear of thevehicle. Operating the remote handlelevers without checking could causeinjury to a person when a seatbacksuddenly flips forward. Make surethere is nobody in the rear seat areabefore operating the remote handlelevers.
CAUTIONBe careful of the following when usingthe remote handle levers:
l On a downward slope, the seatbackcould flip forward faster than on aflat area.
l On an upward slope, the seatbackmay not fold down. When theseatbacks cannot be folded downwith levers, pull the rear seatbackforward from inside the vehicle.
1. Unfasten the lap portion of the center-rear seat belt (page 2-23).
CAUTIONAlways unfasten the lap portion of thebelt before folding left-rear seatback.Leaving the lap portion of the beltfastened could cause damage to the seatbelt, buckle and seatback.
2. After checking that the rear seats areclear, open the trunk and pull theremote handle levers on the left andright side of the trunk.
To return the seatbacks to the uprightposition
1. Lift the seatbacks upright.
2. Pull on the top of the seatbacks frominside the vehicle to make sure they arelocked.
3. Fasten the center-rear lap/shoulder beltand check that all seat belts are routedproperly for passenger use (page 2-23).
WARNINGSeat Belts Caught Under Seatbacks:A seat belt caught under a seatbackafter the seatback is returned to itsupright position is dangerous. In acollision or sudden stop, the seat beltcannot provide adequate protection.Always make sure the seat belts arefully pulled out from under theseatbacks.
Essential Safety Equipment
Seats
2-11
Mazda6_8U66-EA-05F_Edition2 Page25Tuesday, July 26 2005 11:23 AM
Form No.8U66-EA-05F

Black plate (26,1)
qEasy Fold Down Rear Seatbacksand Forward Slide Seat Bottomfor Added Luggage Space (5-Door/Sport Wagon)
The seatback can be folded down and theseat bottom slid forward to provide a flatsurface extending from the back of thefront seats to the rear of the vehicle forextra luggage space.
To fold down the rear seatbacks andslide forward seat bottoms
WARNINGOperating the Remote Handle LeversWhile a Rear-Facing Child-RestraintSystem is in the Rear Seat:Operating the remote handle leverswhile a rear-facing child-restraintsystem is in the rear seat is dangerous.It could cause injury to a child seatedin the child-restraint system when theseatback suddenly flips forward.Always remove the child-restraintsystem from the rear seat beforeoperating the remote handle levers forthe rear seat.
WARNINGFolding Seatbacks with RemoteHandle Levers:Not checking the rear seat area forpersons before folding the seatbackswith the remote handle levers isdangerous. The rear seat area isdifficult to see from the rear of thevehicle. Operating the remote handlelevers without checking could causeinjury to a person when a seatbacksuddenly flips forward. Make surethere is nobody in the rear seat areabefore operating the remote handlelevers.
When using the remote handle levers:
CAUTIONBe careful of the following when usingthe remote handle levers:
l On a downward slope, the seatbackcould flip forward faster than on aflat area.
l On an upward slope, the seatbackmay not fold down. When theseatbacks cannot be folded downwith levers, pull the rear seatbackforward from inside the vehicle.
1. Unfasten the lap portion of the center-rear seat belt (page 2-23).
2-12
Essential Safety Equipment
Seats
Mazda6_8U66-EA-05F_Edition2 Page26Tuesday, July 26 2005 11:23 AM
Form No.8U66-EA-05F

Black plate (27,1)
CAUTIONAlways unfasten the lap portion of thebelt before folding left-rear seatback.Leaving the lap portion of the beltfastened could cause damage to the seatbelt, buckle and seatback.
2. After checking that the rear seats areclear, open the liftgate compartmentand pull the remote handle levers onthe left and right side of the liftgatecompartment.
When using the rear seatback knobs:
CAUTIONWhen operating the rear seatback knob,make sure you support the seatbackwith your hand. If the seatback is notsupported with your hand, it will flipforward suddenly and could causeinjury to the finger that pushes the rearseatback knob down.
1. Unfasten the lap portion of the center-rear seat belt (page 2-23).
CAUTIONAlways unfasten the lap portion of thebelt before folding the rear-leftseatback. Leaving the lap portion of thebelt fastened could cause damage to theseat belt, buckle and seatback.
2. Support the seatback with your hand.
3. Push the rear seatback knob down.
To return the seatbacks to the uprightposition
1. Lift the seatbacks upright.
2. Pull on the top of the seatbacks frominside the vehicle to make sure they arelocked.
3. Fasten the center-rear lap/shoulder beltand check that all seat belts are routedproperly for passenger use (page 2-23).
Essential Safety Equipment
Seats
2-13
Mazda6_8U66-EA-05F_Edition2 Page27Tuesday, July 26 2005 11:23 AM
Form No.8U66-EA-05F

Black plate (28,1)
WARNINGSeat Belts Caught Under Seatbacks:A seat belt caught under a seatbackafter the seatback is returned to itsupright position is dangerous. In acollision or sudden stop, the seat beltcannot provide adequate protection.Always make sure the seat belts arefully pulled out from under theseatbacks.
Returning Rear Seatbacks to theUpright Position:A rear seatback not fully returned andlocked in the upright position isdangerous. Sudden stops ormaneuvering could cause a seatbackto flip forward suddenly resulting ininjury. If the red indicator is visible onthe back of the rear seatback knob, theseatback is not locked in the uprightposition. When returning the seatbackto the upright position, make surethere is no red indication.
Unlocked position
Locked position
qHead Restraint (5-Door/SportWagon)
WARNINGHead Restraints Adjustment:Driving with the head restraintsadjusted too low or removed isdangerous. With no support behindyour head, your neck could beseriously injured in a collision. Alwaysdrive with the head restraints insertedwhen seats are being used and makesure they are properly adjusted.
Height adjustment
To raise a head restraint, pull it up to thedesired position.To lower the head restraint, press the stop-catch release, then push the head restraintdown.
Adjust the head restraint so that the top iseven with the top of the passenger's ears,never the passenger's neck.
2-14
Essential Safety Equipment
Seats
Mazda6_8U66-EA-05F_Edition2 Page28Tuesday, July 26 2005 11:23 AM
Form No.8U66-EA-05F

Black plate (29,1)
qArmrest
The rear armrest in the center of the rearseatback can be used or placed upright(nooccupant in the center seat).
WARNINGPositioning the Shoulder Belt Over theArmrest:Positioning the shoulder portion of arear seat belt over the armrest isdangerous as it cannot provideadequate protection in a collision andcould result in serious injuries. Neverposition the shoulder portion of a rearseat belt over the armrest.
Essential Safety Equipment
Seats
2-15
Mazda6_8U66-EA-05F_Edition2 Page29Tuesday, July 26 2005 11:23 AM
Form No.8U66-EA-05F

Black plate (30,1)
Seat Belt PrecautionsSeat belts help to decrease the possibility of severe injury during accidents and suddenstops. Mazda recommends that the driver and all passengers always wear seat belts.
All of the seat belt retractors are designed to keep the lap/shoulder belts out of the waywhen not in use.
The driver's seat belt has no provisions for child-restraint systems and has only anemergency locking mode. The driver may wear it comfortably, and it will lock during acollision.
However, the front passenger's seat and all rear lap/shoulder belt retractors operate in twomodes: emergency locking mode, and for child-restraint systems, automatic locking mode.While we recommend you put all children in the rear seats, if you must use the frontpassenger seat for a child, slide the front passenger seat as far back as possible and makesure any child-restraint system is secured properly.
WARNINGNot Wearing Seat Belts:Not wearing a seat belt is extremely dangerous. During a collision, occupants notwearing seat belts could hit someone or things inside the vehicle or even be thrown outof the vehicle. They could be seriously injured or even killed. In the same collision,occupants wearing seat belts would be much safer. Always wear your seat belt andmake sure all occupants are properly restrained.
Seat Belt Damaged During an Accident:Using a damaged seat belt is dangerous. An accident could damage the belt webbingof the seat belt in use. A damaged seat belt cannot provide adequate protection in acollision. Front air bags and pretensioners work together, but whether a front seat wasoccupied or not, if any air bag deployed and whether a seat belt pretensioner deployedor not, all front seat belts and air bags must be inspected and replaced if necessary.Have an Authorized Mazda Dealer inspect all seat belt systems in use during anaccident before they are used again.
Twisted Seat Belts:Twisted seat belts are dangerous. In a collision, the full width of the belt isn't availableto absorb the impact. This puts more force on the bones beneath the belt, which couldcause serious injury or death. Don't wear twisted seat belts.
2-16
Essential Safety Equipment
Seat Belt Systems
Mazda6_8U66-EA-05F_Edition2 Page30Tuesday, July 26 2005 11:23 AM
Form No.8U66-EA-05F

Black plate (31,1)
WARNINGOne Belt, One Passenger:Using one seat belt for more than one person at a time is dangerous. A seat belt usedin this way can't spread the impact forces properly and the two passengers could becrushed together and seriously injured or even killed. Never use one belt for morethan one person at a time and always operate the vehicle with each occupant properlyrestrained.
CAUTIONBelt retraction may become difficult if the belts and rings are soiled, so try to keep themclean.
qPregnant Women and Persons with Serious Medical Conditions
Pregnant women should wear seat belts. Ask your doctor for specific recommendations.The lap belt should be worn SNUGLYAND AS LOWAS POSSIBLE OVER THE HIPS.The shoulder belt should be worn across your shoulder properly, but never across thestomach area.Persons with serious medical conditions also should wear seat belts. Check with yourdoctor for any special instructions regarding specific medical conditions.
Essential Safety Equipment
Seat Belt Systems
2-17
Mazda6_8U66-EA-05F_Edition2 Page31Tuesday, July 26 2005 11:23 AM
Form No.8U66-EA-05F

Black plate (32,1)
qEmergency Locking Mode
In the emergency locking mode, the belt remains comfortable on the occupant and theretractor will lock in position during a collision. When the seat belt is retracted, it willalways be in the emergency locking mode until it is switched to automatic locking mode bypulling it all the way out to its full length. If the belt feels tight and hinders comfortablemovement while the vehicle is stopped or in motion, it may be in the automatic lockingmode because the belt has been pulled too far out. To return to the belt more comfortableemergency locking mode, wait until the vehicle has stopped in a safe, level area, retract thebelt fully to convert it back to emergency locking mode and then extend it around youagain.
qAutomatic Locking Mode
Always use the automatic locking mode to keep the child-restraint system from shifting toan unsafe position in the event of an accident. To enable seat belt automatic locking mode,pull it all the way out and connect it as instructed on the child-restraint system. It willretract down to the child-restraint system and stay locked on it. See the section on childrestraint (page 2-29).
2-18
Essential Safety Equipment
Seat Belt Systems
Mazda6_8U66-EA-05F_Edition2 Page32Tuesday, July 26 2005 11:23 AM
Form No.8U66-EA-05F

Black plate (33,1)
Seat Belt (Except Center-Rear Position)
NOTE
When using the center-rear seat belt,refer to “Center-Rear Position SeatBelt” (page 2-23).
qFastening the Seat Belts
1. Grasp the tongue.
2. Slowly pull out the lap/shoulder belt.
Tongue
Belt
3. Insert the tongue into the buckle untilyou hear a click.
Buckle
Tongue
WARNINGPositioning the Shoulder Portion ofthe Seat Belt:Improper positioning of the shoulderportion of the seat belt is dangerous.Always make sure the shoulderportion of the seat belt is positionedacross your shoulder and near yourneck, but never under your arm, onyour neck, or on your upper arm.
4. Make sure the shoulder belt is snuglyfitted against your body.
Keep low on hip bone
Too high
Take up slack
WARNINGPositioning the Lap Portion of theSeat Belt:The lap portion of the seat belt worntoo high is dangerous. In a collision,this would concentrate the impactforce directly on the abdominal area,causing serious injury. Wear the lapportion of the belt snugly and as lowas possible.
Essential Safety Equipment
Seat Belt Systems
2-19
Mazda6_8U66-EA-05F_Edition2 Page33Tuesday, July 26 2005 11:23 AM
Form No.8U66-EA-05F

Black plate (34,1)
qUnfastening the Seat Belts
Depress the button on the buckle.
Button
NOTE
If a belt does not fully retract, inspect itfor kinks and twists. If it is still notretracting properly, have it inspected atan Authorized Mazda Dealer.
qShoulder Belt Adjuster
Adjust the height of the shoulder belt ifthe seat belt touches your neck, or if itcrosses your arm instead of your shoulder.To raise the shoulder belt adjuster, pushthe adjuster up. To lower the shoulder beltadjuster, pull the button and slide it down.Make sure the adjuster is locked.
WARNINGPositioning the Shoulder Portion ofthe Seat Belt:Improper positioning of the shoulderportion of the seat belt is dangerous.Always make sure the shoulderportion of the seat belt is positionedacross your shoulder and near yourneck, but never under your arm, onyour neck, or on your upper arm.
2-20
Essential Safety Equipment
Seat Belt Systems
Mazda6_8U66-EA-05F_Edition2 Page34Tuesday, July 26 2005 11:23 AM
Form No.8U66-EA-05F

Black plate (35,1)
Front Seat Belt Pretensionerand Load Limiting Systems
For optimum protection, the driver andfront passenger seat belts are equippedwith pretensioner and load limitingsystems.In moderate or greater frontal or near-frontal accidents, the front air bag andpretensioner systems deploysimultaneously. The pretensioners take upslack in the front seat belts as the air bagsare expanding. The seat belt pretensionersystem cannot provide adequateprotection in an accident if the seat belt isnot fastened properly. The load limitingsystem releases belt webbing in acontrolled manner to reduce belt force onthe occupant's chest.
WARNINGIncorrect Positioning of the Driverand Front Passenger Seat Belts:Incorrect positioning of the driver andpassenger seat belts is dangerous.Without proper positioning, thepretensioner and load limiting systemscannot provide adequate protection inan accident and this could result inserious injury. Wear seat belts only asrecommended in this owner's manual(page 2-19).
WARNINGExpended Seat Belt Pretensioners:One or both front air bags may deploy,and the corresponding pretensioner(s)will also deploy at the same time. Useof front seat belts with thepretensioner system expended isdangerous. Like the air bags, the seatbelt pretensioners will only functiononce. After they are expended, theywill not function again and must bereplaced immediately. If the seat beltpretensioners are not replaced, therisk of injury in a collision willincrease. Always have an AuthorizedMazda Dealer inspect the seat beltpretensioners and air bags after anycollision. Expended seat beltpretensioners and air bags must bereplaced after any collision whichcaused them to deploy. Additionally,the load limiter will only limit loads onthe chest once in a collision and isanother reason to have the front seatbelts inspected.
Modification or Testing of thePretensioner System:Modifying the components or wiringof the pretensioner system, includingthe use of electronic testing devices isdangerous. You could accidentallyactivate it or make it inoperable whichwould prevent it from activating in anaccident. The occupants or repairerscould be seriously injured. Nevermodify the components or wiring, oruse electronic testing devices on thepretensioner system.
Essential Safety Equipment
Seat Belt Systems
2-21
Mazda6_8U66-EA-05F_Edition2 Page35Tuesday, July 26 2005 11:23 AM
Form No.8U66-EA-05F

Black plate (36,1)
WARNINGPretensioner System Disposal:Improper disposal of the pretensionersystem or a vehicle with non-deactivated pretensioners isdangerous. Unless all safetyprocedures are followed, injury couldresult. Ask an Authorized MazdaDealer how to safely dispose of thepretensioner system or how to scrap apretensioner-equipped vehicle.
NOTE
l The pretensioner system will onlyactivate in a moderate or greaterfrontal or near-frontal collision. Itwill not activate in most rollovers,side or rear impacts.
l Some smoke (non-toxic gas) will bereleased when the air bags andpretensioners deploy. This does notindicate a fire. This gas normally hasno effect on occupants, however,those with sensitive skin mayexperience light skin irritation. Ifresidue from the deployment of theair bags or the front pretensionersystem gets on the skin or in theeyes, wash it off as soon as possible.
qAir Bag/Front Seat Belt PretensionerSystems Warning Light
If the air bag/front seat belt pretensionersystem is normal, the warning lightilluminates when the ignition switch isturned to the ON position or after theengine is cranked. After about 6 secondsit goes out.
A system malfunction is indicated whenthe warning light constantly flashes,constantly illuminates or doesn'tilluminate at all when the ignition switchis turned to the ON position. If any ofthese occur, consult an Authorized MazdaDealer as soon as possible. The systemmay not work in an accident.
WARNINGSelf-Servicing the Air Bag/Pretensioner Systems:Self-servicing or tampering with thesystems is dangerous. An air bag/pretensioner could accidentallyactivate or become disabled. Thiscould cause serious injuries. Nevertamper with the systems and alwayshave an Authorized Mazda Dealerperform all servicing and repairs.
2-22
Essential Safety Equipment
Seat Belt Systems
Mazda6_8U66-EA-05F_Edition2 Page36Tuesday, July 26 2005 11:23 AM
Form No.8U66-EA-05F

Black plate (37,1)
Center-Rear Position SeatBelt
Before using the center-rear lap/shoulderbelt make sure tongue (A) and anchorbuckle (B) are fastened.
(A)
(B)
qFastening the Seat Belt
1. Grasp the tongue (C).
2. Slowly pull out the lap/shoulder belt.
3. Insert the tongue (C) into the buckle(D) until you hear a click.
(C)
(D) (B)
(A)
WARNINGFastening the Center-Rear Seat Beltwith Only One Buckle:Fastening the center-rear seat beltwith only one buckle is dangerous. Ifonly one pair of seat belt tongue andbuckle, either tongue (A) and anchorbuckle (B) or tongue (C) and anchorbuckle (D), is fastened, the seat beltcannot provide full protection. In asudden stop or collision, the usercould slide under the belt and sufferserious injuries. Always make surethat both pairs of seat belt tongues andbuckles are fastened properly.
Positioning the Shoulder Portion ofthe Seat Belt:Improper positioning of the shoulderportion of the seat belt is dangerous.Always make sure the shoulderportion of the seat belt is positionedacross your shoulder and near yourneck, but never under your arm, onyour neck, or on your upper arm.
4. Make sure the shoulder belt is snuglyfitted against your body.
WARNINGPositioning the Lap Portion of theSeat Belt:The lap portion of the seat belt worntoo high is dangerous. In a collision,this would concentrate the impactforce directly on the abdominal area,causing serious injury. Wear the lapportion of the belt snugly and as lowas possible.
Essential Safety Equipment
Seat Belt Systems
2-23
Mazda6_8U66-EA-05F_Edition2 Page37Tuesday, July 26 2005 11:23 AM
Form No.8U66-EA-05F

Black plate (38,1)
qUnfastening the Seat Belt
Depress the button on the buckle.
Button
qUnfastening the Lap Portion ofthe Seat Belt
Insert a small object such as a key in theanchor buckle (B) slot.
(B)
(A)
CAUTIONAlways unfasten the lap portion of thebelt before folding the left-rearseatback. Leaving the lap portion of thebelt fastened could cause damage to theseat belt, buckle and seatback.
NOTE
To encourage rear seat passengers towear their seat belts, we suggest leavingthe center-rear lap position of the beltfastened at all times except whenfolding the rear seat forward.
qFastening the Lap Portion of theSeat Belt
Grasp tongue (A) and insert it into theanchor buckle (B) until you hear a click. Itis now secure for passenger use.
NOTE
After returning the left-rear seatback toits upright position, fasten the lapportion of the belt.
qStowing and pulling out theCenter-Rear Position Seat Belt
The center-rear position seat belt can bestowed using the following procedure.
CAUTIONWhen stowing the seat belt, make surethe belt is locked securely into therecess. If the seat belt is not lockedsecurely, it could fall down suddenlyand cause injury.
Sedan/5-Door
To stow the seat belt, retract the belt, puttongues (A) and (C) together and insertthem into the recess.
2-24
Essential Safety Equipment
Seat Belt Systems
Mazda6_8U66-EA-05F_Edition2 Page38Tuesday, July 26 2005 11:23 AM
Form No.8U66-EA-05F

Black plate (39,1)
Sedan (Behind head restraint on leftside)
5-Door (Left side of luggagecompartment)
To pull out the seat belt, slide tongueswith your finger, and slowly pull out theseat belt from the recess.
Sport Wagon
To stow the seat belt, retract the belt, puttongues (A) and (C) together and insertthem into the ceiling recess.
(A)
(C)
Ceiling recess
To pull out the seat belt, slide tongue (A)with your finger while moving itdownward, and slowly pull out the seatbelt from the ceiling recess.
Essential Safety Equipment
Seat Belt Systems
2-25
Mazda6_8U66-EA-05F_Edition2 Page39Tuesday, July 26 2005 11:23 AM
Form No.8U66-EA-05F
Black plate (40,1)
Seat Belt ExtenderIf your seat belt is not long enough, evenwhen fully extended, a seat belt extendermay be available to you at no charge fromyour Authorized Mazda Dealer.This extender will be only for you and forthe particular vehicle and seat. Even if itplugs into other seat belts, it may not holdin the critical moment of a crash.When ordering an extender, only orderone that provides the necessary additionallength to fasten the seat belt properly.Please contact your Authorized MazdaDealer for more information.
WARNINGUnnecessary Use of an Extender:Using a seat belt extender when notnecessary is dangerous. The seat beltwill be too long and not fit properly. Inan accident, the seat belt will notprovide adequate protection and youcould be seriously injured. Only usethe extender when it is required tofasten the seat belt properly.
Using an Improper Extender:Using a seat belt extender that is foranother person or a different vehicleor seat is dangerous. The seat belt willnot provide adequate protection andthe user could be seriously injured inan accident. Only use the extenderprovided for you and for the particularvehicle and seat. NEVER use theextender in a different vehicle or seat.
WARNINGUsing an Extender That is Too Long:Using an extender that is too long isdangerous. The seat belt will not fitproperly. In an accident, the seat beltwill not provide adequate protectionand you could be seriously injured.Don't use the extender or choose oneshorter in length if the distancebetween the extender's buckle and thecenter of the user's body is less than15cm (6 in).
NOTE
When not in use, remove the seat beltextender and store it in the vehicle. Ifthe seat belt extender is left connected,the seat belt extender might getdamaged as it will not retract with therest of the seat belt and can easily fallout of the door when not in use and bedamaged the seat belt warning light willnot illuminate and function properly.
2-26
Essential Safety Equipment
Seat Belt Systems
Mazda6_8U66-EA-05F_Edition2 Page40Tuesday, July 26 2005 11:23 AM
Form No.8U66-EA-05F

Black plate (41,1)
Seat Belt Warning Light/Beep
The seat belt warning light illuminatesand a beep sound will be heard if thedriver's seat belt is not fastened when theignition switch is turned to the ONposition.
Conditions of operation
Condition Result
The driver's seat belt is notfastened when the ignitionswitch is turned to the ONposition.
The warning lightflashes and a beepsound will be heardfor about 6 seconds.
The driver's seat belt isfastened while the warninglight and the beep sound areactivated.
The warning lightturns off and the beepsound stops.
The driver's seat belt isfastened before the ignitionswitch is turned to the ONposition.
The warning light willnot illuminate and thebeep sound will not beheard.
qBelt Minder
NOTE
The belt minder can be deactivated.Consult an Authorized Mazda Dealer todeactivate and restore the seat beltminder.
Driver's seat
The belt minder is a supplementalwarning to the seat belt warning function.If the driver's seat belt is not fastenedwhen the ignition switch is turned to theON position, the warning light/beepoperates to give you further remindersaccording to the chart below.
Condition
Vehicle speed
Between 0― 20km/h
(0 ― 12 mph)
20 km/h(12 mph) or
more
Seat belt
Indicator
Beep
: Fastened: Unfastened: Illuminated: Flashing: Beep
Once the beep sound is heard, it continuessounding even if the vehicle speed lowersto 20 km/h (12 mph) or less until theseatbelt is fastened or the beep soundperiod (90 seconds) has passed.
Essential Safety Equipment
Seat Belt Systems
2-27
Mazda6_8U66-EA-05F_Edition2 Page41Tuesday, July 26 2005 11:23 AM
Form No.8U66-EA-05F
Black plate (42,1)
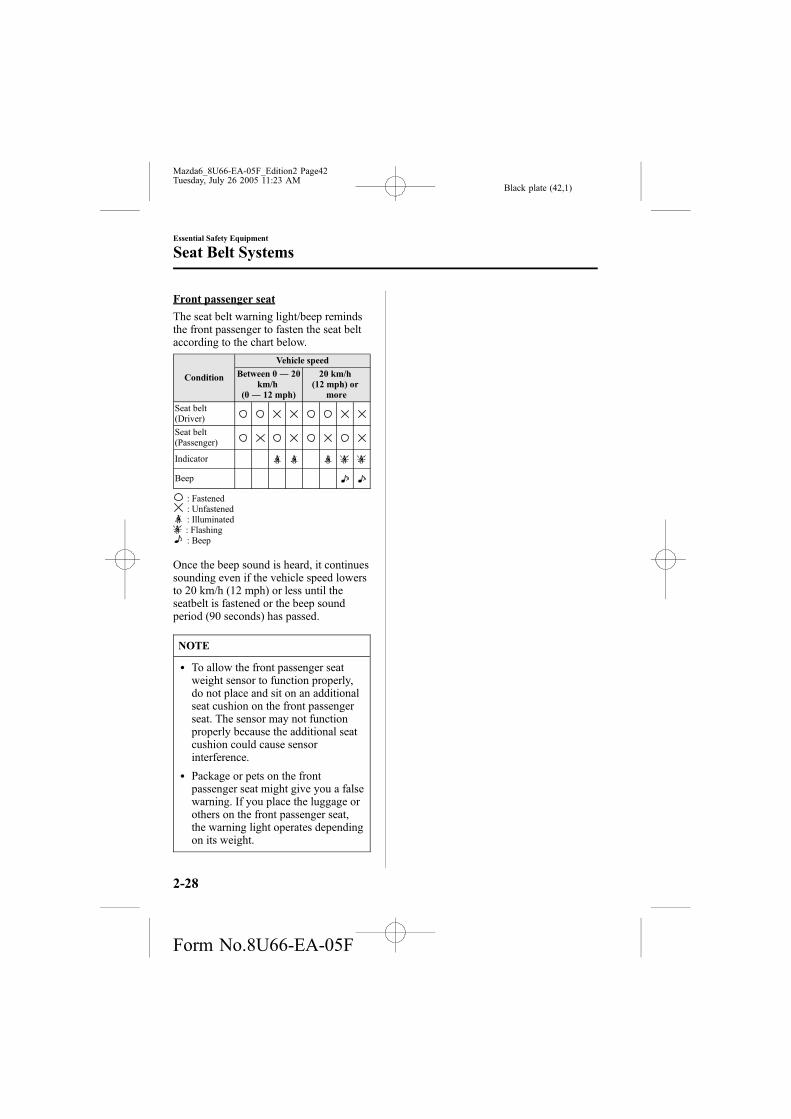
Front passenger seat
The seat belt warning light/beep remindsthe front passenger to fasten the seat beltaccording to the chart below.
Condition
Vehicle speed
Between 0― 20km/h
(0 ― 12 mph)
20 km/h(12 mph) or
more
Seat belt(Driver)
Seat belt(Passenger)
Indicator
Beep
: Fastened: Unfastened: Illuminated: Flashing: Beep
Once the beep sound is heard, it continuessounding even if the vehicle speed lowersto 20 km/h (12 mph) or less until theseatbelt is fastened or the beep soundperiod (90 seconds) has passed.
NOTE
l To allow the front passenger seatweight sensor to function properly,do not place and sit on an additionalseat cushion on the front passengerseat. The sensor may not functionproperly because the additional seatcushion could cause sensorinterference.
l Package or pets on the frontpassenger seat might give you a falsewarning. If you place the luggage orothers on the front passenger seat,the warning light operates dependingon its weight.
2-28
Essential Safety Equipment
Seat Belt Systems
Mazda6_8U66-EA-05F_Edition2 Page42Tuesday, July 26 2005 11:23 AM
Form No.8U66-EA-05F

Black plate (43,1)
Child Restraint PrecautionsMazda strongly urges the use of child-restraint systems for children small enough to usethem.
You are required by law to use a child-restraint system for children in the U.S. and Canada.Check your local and state or provincial laws for specific requirements regarding the safetyof children riding in your vehicle.
Whatever child-restraint system you consider, please pick the appropriate one for the ageand size of the child, obey the law and follow the instructions that come with the individualchild-restraint system.
A child who has outgrown child-restraint systems should sit in the rear and use seat belts,both lap and shoulder. If the shoulder belt crosses the neck or face, move the child closer tothe center of the vehicle in the outboard seats, and towards the buckle on the right if thechild is seated on the center seat.
Statistics confirm that the rear seat is the best place for all children up to 12 years of age,and more so with a supplemental restraint system (air bags).
A rear-facing child-restraint system should NEVER be used on the front seat with the airbag system activated. The front passenger's seat is also the least preferred seat for otherchild-restraint systems.
To reduce the chance of injuries caused by deployment of the front passenger air bag, thefront passenger seat weight sensors work as a part of the supplemental restraint system.This system deactivates the front passenger front and side air bags and also the frontpassenger seat belt pretensioner system when the total seated weight on the front passengerseat is less than approximately 30 kg (66 lb).
When an infant or small child sits on the front passenger seat, the system shuts off the frontpassenger front and side air bags and seat belt pretensioner system, so make sure the frontpassenger air bag deactivation indicator light illuminates.
Even if the front passenger air bag is shut off, Mazda strongly recommends that children beproperly restrained and child-restraint systems of all kinds are properly secured on the rearseats which are the best place for children.
For more details, refer to “Front passenger seat weight sensors (page 2-53)”.
Essential Safety Equipment
Child Restraint
2-29
Mazda6_8U66-EA-05F_Edition2 Page43Tuesday, July 26 2005 11:23 AM
Form No.8U66-EA-05F

Black plate (44,1)
WARNINGProper Size of Child-Restraint System:For effective protection in vehicle accidents and sudden stops, a child must beproperly restrained using a seat belt or child-restraint system depending on age andsize. If not, the child could be seriously injured or even killed in an accident.
Follow the Manufacturer's Instructions and Always Keep the Child-Restraint SystemBuckled Down:An unsecured child-restraint system is dangerous. In a sudden stop or a collision itcould move causing serious injury or death to the child or other occupants. Make sureany child-restraint system is properly secured in place according to the child-restraintsystem manufacturer's instructions. When not in use, remove it from the vehicle orfasten it with a seat belt, or latch it down to BOTH LATCH lower anchors for LATCHchild-restraint systems and the corresponding tether anchor.
Holding a Child While the Vehicle is Moving:Holding a child in your arms while the vehicle is moving is extremely dangerous. Nomatter how strong the person may be, he or she cannot hold onto a child in a suddenstop or collision and it could result in serious injury or death to the child or otheroccupants. Even in a moderate accident, the child may be exposed to air bag forcesthat could result in serious injury or death to the child, or the child may be slammedinto the adult, injuring the adult. Always secure a child in a proper child-restraintsystem.
Rear-Facing Child-Restraint System:Rear-facing child-restraint systems on the front seat are particularly dangerous.The child-restraint system can be hit by a deploying air bag and moved violentlybackward resulting in serious injury or death to the child. Even though you may feelassured that a front passenger air bag will not deploy based on the fact that the frontpassenger air bag deactivation indicator light illuminates, NEVER use a rear-facingchild-restraint system in the front seat with an air bag that could deploy even in amoderate collision.
2-30
Essential Safety Equipment
Child Restraint
Mazda6_8U66-EA-05F_Edition2 Page44Tuesday, July 26 2005 11:23 AM
Form No.8U66-EA-05F

Black plate (45,1)
WARNINGSeating Children in a Child-Restraint System on the Front Passenger Seat:If your vehicle is equipped with front passenger seat weight sensors, the vehicle is alsoequipped with an air bag deactivation indicator light (page 2-38). Even with the frontpassenger seat weight sensors, if you must use the front passenger seat for children,seating a child in a child-restraint system on the front passenger seat under thefollowing conditions increases the danger of the front passenger air bag deployingand could result in serious injury or death to the child.l The total seated weight of the child with the child-restraint system on the frontpassenger seat is approximately 30 kg (66 lb) or more with a child in the child-restraint system.
l Luggage or other items are placed on the seat with the child in the child-restraintsystem.
l A rear passenger or luggage push or pull down on the front passenger seatback.l A rear passenger puts their feet on the front seat rails.l Luggage or other items are placed on the seatback or hung on the head restraint.l The seat is washed.l Liquids are spilled on the seat.l The front passenger seat is moved backward, pushing into luggage or other itemsplaced behind it.
l The front passenger seatback contacts the rear seat.l Luggage or other items are placed between the front passenger seat and driver seat.l Any accessories which might increase the total seated weight on the front passengerseat are attached to the front passenger seat.
The designated positions with seat belts on the rear seats are the safest places forchildren. Always use seat belts and child restraints.
Children and Seating Position with Side and Curtain Air Bags:Allowing anyone to lean over or against the side window, the area of the frontpassenger seat, front and rear window pillars and the roof edge along both sides fromwhich the side and curtain air bags deploy, even if a child-restraint system is used, isdangerous. If the vehicle is equipped with side and curtain air bags, the impact ofinflation could cause serious injury or death to the child. Furthermore, leaning overor against the front door could block the side and curtain air bags and eliminate theadvantages of supplemental protection. With the front air bag and the additional sideair bag that comes out of the front seat, the rear seat is always a better location forchildren. Do not allow a child to lean over or against the side window, even if the childis seated in a child-restraint system.
Essential Safety Equipment
Child Restraint
2-31
Mazda6_8U66-EA-05F_Edition2 Page45Tuesday, July 26 2005 11:23 AM
Form No.8U66-EA-05F

Black plate (46,1)
WARNINGOne Belt, One Passenger:Using one seat belt for more than one person at a time is dangerous. A seat belt usedin this way can't spread the impact forces properly and the two passengers could becrushed together and seriously injured or even killed. Never use one belt for morethan one person at a time and always operate the vehicle with each occupant properlyrestrained.
Operating the Remote Handle Levers While a Rear-Facing Child-Restraint System isin the Rear Seat:Operating the remote handle levers while a rear-facing child-restraint system is in therear seat is dangerous. It could cause injury to a child seated in the child-restraintsystem when the seatback suddenly flips forward. Always remove the child-restraintsystem from the rear seat before operating the remote handle levers for the rear seat.
CAUTIONA seat belt or child-restraint system can become very hot in a closed vehicle duringwarm weather. To avoid burning yourself or a child, check them before you or your childtouches them.
NOTE
Your Mazda is equipped with LATCH lower anchors for attachment of speciallydesigned LATCH child-restraint systems in the rear seat. When using these anchors tosecure a child-restraint system, refer to “LATCH Child-Restraint Systems” (page 2-40).
2-32
Essential Safety Equipment
Child Restraint
Mazda6_8U66-EA-05F_Edition2 Page46Tuesday, July 26 2005 11:23 AM
Form No.8U66-EA-05F

Black plate (47,1)
Installing Child-RestraintSystems
Accident statistics reveal that a child issafer in the rear seat. The front passenger'sseat is clearly the worst choice for anychild under 12, and with rear-facing child-restraint systems it is clearly unsafe due toair bags.
Some child-restraint systems now comewith tethers and therefore must beinstalled on the seats that take tethers tobe effective. In your Mazda, tetheredchild-restraint systems can only beaccommodated in the three positions onthe rear seat.
Some child-restraint systems also employspecially designed LATCH attachments;refer to “LATCH Child-RestraintSystems” (page 2-40).
WARNINGTethered Child-Restraint SystemsWork Only on Tether-Equipped RearSeats:Installation of a tether equipped child-restraint system in the frontpassenger's seat defeats the safetydesign of the system and will result inan increased chance of serious injuryif the child-restraint system goesforward without benefit of beingtethered.Place tether equipped child-restraintsystems where there are tetheranchors.
qRear Outboard Seat Child-Restraint System Installation
Follow these instructions when using achild-restraint system, unless you areattaching a LATCH-equipped child-restraint system to the rear LATCH loweranchors. Refer to “LATCH Child-Restraint Systems” (page 2-40).
NOTE
Follow the child-restraint systemmanufacturer's instructions carefully. Ifyou are not sure whether you have aLATCH system or tether, check in thechild-restraint system manufacturer'sinstructions and follow themaccordingly. Depending on the type ofchild-restraint system, it may notemploy seat belts which are inautomatic locking mode.
1. Make sure the seatback is securelylatched by pushing it back until it isfully locked.
2. Secure the child-restraint system withthe lap portion of the lap/shoulder belt.See the manufacturer's instructions onthe child-restraint system for beltrouting instructions.
Essential Safety Equipment
Child Restraint
2-33
Mazda6_8U66-EA-05F_Edition2 Page47Tuesday, July 26 2005 11:23 AM
Form No.8U66-EA-05F
Black plate (48,1)
3. To get the retractor into the automaticlocking mode, pull the shoulder beltportion of the seat belt until the entirelength of the belt is out of the retractor.
4. Push the child-restraint system firmlyinto the vehicle seat. Be sure the beltretracts as snugly as possible. Clickingfrom the retractor will be heard duringretraction if the system is in theautomatic locking mode. If the beltdoes not lock the seat down tight,repeat this step.
NOTE
Inspect this function before each use ofthe child-restraint system. You shouldnot be able to pull the shoulder belt outof the retractor while the system is inthe automatic locking mode. When youremove the child-restraint system, besure the belt fully retracts to return thesystem to emergency locking modebefore occupants use the seat belts.
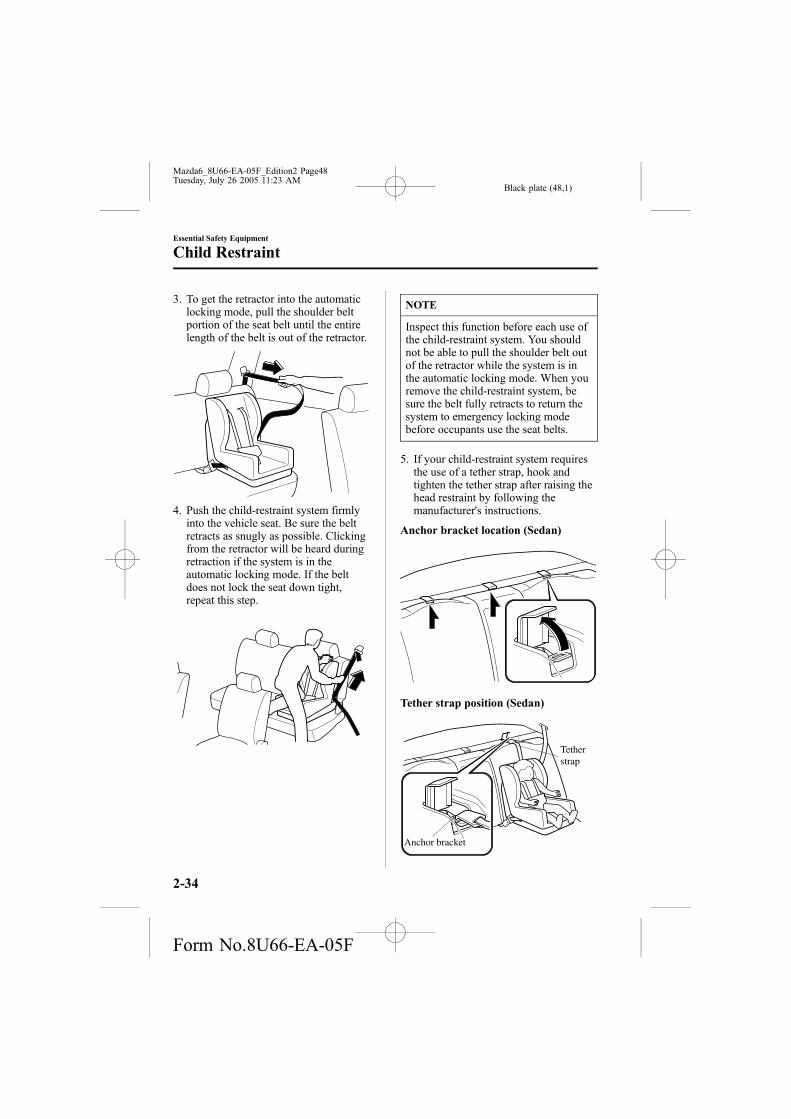
5. If your child-restraint system requiresthe use of a tether strap, hook andtighten the tether strap after raising thehead restraint by following themanufacturer's instructions.
Anchor bracket location (Sedan)
Tether strap position (Sedan)
Anchor bracket
Tether strap
2-34
Essential Safety Equipment
Child Restraint
Mazda6_8U66-EA-05F_Edition2 Page48Tuesday, July 26 2005 11:23 AM
Form No.8U66-EA-05F

Black plate (49,1)
Anchor bracket location (5-Door/SportWagon)
Tether strap position (5-Door/SportWagon)
Tether strap
Route between head restraint upright.
WARNINGChild-Restraint Tether Usage:Using the tether or tether anchor tosecure anything but a child-restraintsystem is dangerous. This couldweaken or damage the tether or tetheranchor and result in injury. Use thetether and tether anchor only for achild-restraint system.
Incorrect Attachment of the TetherStrap:Routing the tether strap on top of thehead restraint is dangerous. In acollision, the tether strap could slideoff the head restraint, and loosen thechild-restraint system. The child-restraint system could move whichmay result in death or injury to thechild. Always route the tether strapbetween the head restraint posts.
qCenter-Rear Seat Child-RestraintSystem Installation
1. Secure the child-restraint system withthe seat belt, according to themanufacturer's instructions.
2. Secure the tether strap according to thechild-restraint system manufacturer'sinstruction.
Essential Safety Equipment
Child Restraint
2-35
Mazda6_8U66-EA-05F_Edition2 Page49Tuesday, July 26 2005 11:23 AM
Form No.8U66-EA-05F

Black plate (50,1)
Tether strap position (Sedan)
Anchor bracket
Tether strap
Tether strap position (5-Door)
Tether strapAnchorbracket
Tether strap position (Sport Wagon)
Anchorbracket
Tether strap
WARNINGChild-Restraint Tether Usage:Child-restraint system anchorages aredesigned to withstand only those loadsimposed by correctly installed child-restraint systems.Under nocircumstances are they to be used foradult seat belts, harnesses, or forattaching other items or equipment tothe vehicle.
Incorrect Attachment of theTetherStrap for the Rear Center SeatPosition (5-Door):Routing the tether strap for the rearcenter seat position to one of the othertether anchor positions on theoutboard seatbacks is dangerous. In acollision, the tether strap could slideand loosen the child-restraint system.The child-restraint system could movewhich may result in death or injury tothe child. Always route the tether strapfor the rear center seat position to thecorrect tether anchor position asshown in the illustrations above.
2-36
Essential Safety Equipment
Child Restraint
Mazda6_8U66-EA-05F_Edition2 Page50Tuesday, July 26 2005 11:23 AM
Form No.8U66-EA-05F

Black plate (51,1)
qIf You Must Use the Front Seatfor Children
If you cannot put all children in the rearseat, at least put the smallest children inthe rear and be sure the largest child upfront uses the shoulder belt over theshoulder.NEVER put a rear-facing child-restraintsystem on the front passenger seat, evenwith a seat weight sensor equippedvehicle.This seat is also not set up for tetheredchild-restraint systems, put them in one ofthe rear seat positions set up with tetheranchors.Likewise the LATCH child-restraintsystem cannot be secured in the frontpassenger's seat and should be used in therear seat.Don't allow anyone to sleep against theside window if you have an optional sideand curtain air bag, it could cause seriousinjuries to an out of position occupant. Aschildren more often sleep in cars, it isbetter to put them in the rear seat. Ifinstalling the child-restraint system on thefront seat is unavoidable, follow theseinstructions when using a front-facingchild-restraint system in the frontpassenger's seat.
NOTE
l To check if your front seats have sideair bags:Every Mazda side air bag will have a“SRS AIRBAG”tag on the outboardshoulder of the front seats.
l To check if your vehicle has curtainair bags:Every Mazda curtain air bag willhave an “SRS AIRBAG” marking onthe front and rear window pillarsalong the roof edge.
WARNINGFront Passenger's Seat Position:As your vehicle has front air bags anddoubly so if your vehicle has side airbags, a front-facing child-restraintsystem should be put on the front seatonly when it is unavoidable.Always move the seat as far back aspossible, because the force of adeploying air bag could cause seriousinjury or death to the child.
Rear-Facing Child-Restraint System:Rear-facing child-restraint systems onthe front seat are particularlydangerous.The child-restraint system can be hitby a deploying air bag and movedviolently backward resulting in seriousinjury or death to the child. NEVERuse a rear-facing child-restraintsystem in the front seat with an air bagthat could deploy even in a moderatecollision.
Essential Safety Equipment
Child Restraint
2-37
Mazda6_8U66-EA-05F_Edition2 Page51Tuesday, July 26 2005 11:23 AM
Form No.8U66-EA-05F
Black plate (52,1)
WARNINGChildren and Seating Position withSide and Curtain Air Bags:Allowing anyone to lean over oragainst the side window, the area ofthe front passenger seat, front andrear window pillars and the roof edgealong both sides from which the sideand curtain air bags deploy, even if achild-restraint system is used, isdangerous. If the vehicle is equippedwith side and curtain air bags, theimpact of inflation could cause seriousinjury or death to the child.Furthermore, leaning over or againstthe front door could block the side andcurtain air bags and eliminate theadvantages of supplementalprotection. With the front air bag andthe additional side air bag that comesout of the front seat, the rear seat isalways a better location for children.Do not allow a child to lean over oragainst the side window, even if thechild is seated in a child-restraintsystem.
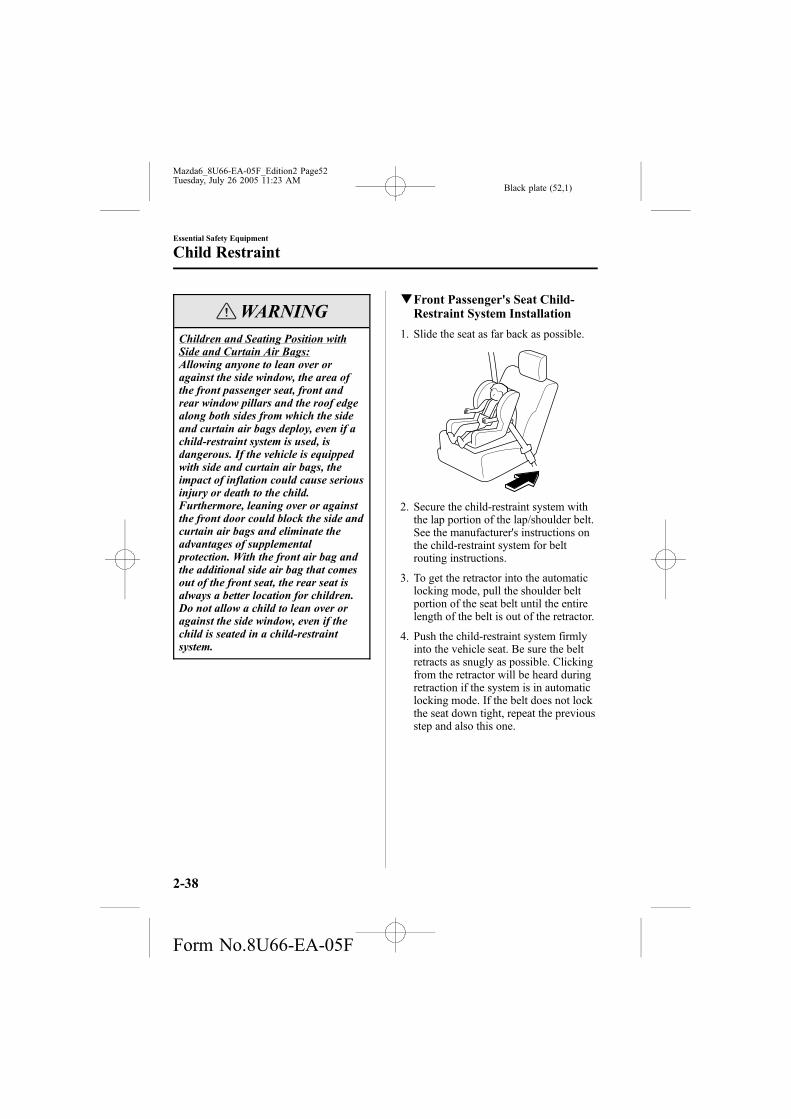
qFront Passenger's Seat Child-Restraint System Installation
1. Slide the seat as far back as possible.
2. Secure the child-restraint system withthe lap portion of the lap/shoulder belt.See the manufacturer's instructions onthe child-restraint system for beltrouting instructions.
3. To get the retractor into the automaticlocking mode, pull the shoulder beltportion of the seat belt until the entirelength of the belt is out of the retractor.
4. Push the child-restraint system firmlyinto the vehicle seat. Be sure the beltretracts as snugly as possible. Clickingfrom the retractor will be heard duringretraction if the system is in automaticlocking mode. If the belt does not lockthe seat down tight, repeat the previousstep and also this one.
2-38
Essential Safety Equipment
Child Restraint
Mazda6_8U66-EA-05F_Edition2 Page52Tuesday, July 26 2005 11:23 AM
Form No.8U66-EA-05F

Black plate (53,1)
NOTE
l Inspect this function before each useof the child-restraint system. Youshould not be able to pull theshoulder belt out of the retractorwhile the system is in the automaticlocking mode. When you remove thechild-restraint system, be sure thebelt fully retracts to return the systemto emergency locking mode beforeoccupants use the seat belts.
l Follow the child-restraint systemmanufacturer's instructions carefully.Depending on the type of child-restraint system, it may not employseat belts which are in automaticlocking mode.
5. Make sure the front passenger air bagdeactivation indicator light illuminatesafter installing a child-restraint systemon the front passenger seat.Refer to Front passenger air bagdeactivation indicator light on page2-53.
WARNINGSeating a Child in a Child-RestraintSystem on the Front Passenger SeatWith the Front Passenger Air BagDeactivation Indicator Light NotIlluminated:Seating a child in a child-restraintsystem installed on the front passengerseat with the front passenger air bagdeactivation indicator light notilluminated is dangerous. If thisindicator light does not illuminateeven when the total seated weight isless than approximately 30 kg (66 lb),this means that the front passengerfront and side air bags, and seat beltpretensioner are ready for deployment.If an accident were to deploy an airbag, a child sitting in the frontpassenger seat could be seriouslyinjured or killed. If the indicator lightdoes not illuminate after installing achild-restraint system on the frontpassenger seat, install the child-restraint system on the rear seat andconsult an Authorized Mazda Dealeras soon as possible. While it is alwaysbetter to install any child-restraintsystem on the rear seat, it is essentialto do so if the front passenger air bagdeactivation indicator light does notilluminate (page 2-53).
Essential Safety Equipment
Child Restraint
2-39
Mazda6_8U66-EA-05F_Edition2 Page53Tuesday, July 26 2005 11:23 AM
Form No.8U66-EA-05F

Black plate (54,1)
LATCH Child-Restraint SystemsYour Mazda is equipped with LATCH lower anchors for attachment of specially designedLATCH child-restraint systems in the rear seat that slide through the passenger seat when itis in the fully rearward position. Both anchors must be used, otherwise the seat will bouncearound and put the child in danger. Most LATCH child-restraint systems must also be usedin conjunction with a tether to be effective. If they have a tether you must use it to betterassure your child's safety.
WARNINGManufacturer's Instructions for Child-Restraint System:An unsecured child-restraint system is dangerous. In a sudden stop or a collision itcould move causing serious injury or death to the child or other occupants. Make surethe child-restraint system is properly secured in place according to the child-restraintsystem manufacturer's instructions.
Attaching Two Child-Restraint Systems to the Same LATCH Lower Anchor:Attaching two child-restraint systems to the same LATCH lower anchor is dangerous.In a collision, one anchor may not be strong enough to hold two child-restraint systemattachments and may break, causing serious injury or death. If you use the seatposition for another child-restraint system when an outboard LATCH position isoccupied, use the center seat belts instead, and the tether if tether-equipped.
Unsecured Child-Restraint System:An unsecured child-restraint system is dangerous. In a sudden stop or a collision itcould move causing serious injury or death to the child or other occupants. Follow thechild-restraint system manufacturer's instructions on belt routing to secure the seatjust as you would with a child in it so that nobody is tempted to put a child in animproperly secured seat later on. When not in use, remove it from the vehicle or fastenit with a seat belt, or latch it down to BOTH LATCH lower anchors for LATCH child-restraint systems.
LATCH Child-Restraint Systems:Not following the child-restraint system manufacturer's instructions when installingthe child-restraint system is dangerous. If seat belts or a foreign object prevent thechild-restraint system from being securely attached to the LATCH lower anchors andthe child-restraint system is installed improperly, the child-restraint system could movein a sudden stop or collision causing serious injury or death to the child or otheroccupants. When installing the child-restraint system, make sure there are no seatbelts or foreign objects near or around the LATCH lower anchors. Always follow thechild-restraint system manufacturer's instructions.
2-40
Essential Safety Equipment
Child Restraint
Mazda6_8U66-EA-05F_Edition2 Page54Tuesday, July 26 2005 11:23 AM
Form No.8U66-EA-05F

Black plate (55,1)
qLATCH Child-Restraint SystemInstallation Procedure (RearOutboard Seats)
1. Make sure the seatback is securelylatched by pushing it back until it isfully locked.
2. Expand the area between the seatbottom and the seatback slightly toverify the locations of the LATCHlower anchors.
NOTE
The markings above the LATCH loweranchors indicate the locations ofLATCH lower anchors for theattachment of a child-restraint system.
3. Secure the child-restraint system usingBOTH LATCH lower anchors,following the child-restraint systemmanufacturer's instruction.
4. If your child-restraint system cameequipped with a tether, that probablymeans it is very important to properlysecure the tether for child safety, pleasecarefully follow the child-restraintsystem manufacturer's instructionswhen installing tethers.
Anchor bracket location (Sedan)
Tether strap position (Sedan)
Tether strap
Anchor bracket
Anchor bracket location (5-Door/SportWagon)
Essential Safety Equipment
Child Restraint
2-41
Mazda6_8U66-EA-05F_Edition2 Page55Tuesday, July 26 2005 11:23 AM
Form No.8U66-EA-05F

Black plate (56,1)
Tether strap position (5-Door/SportWagon)
Tether strap
Route between head restraint upright.
WARNINGChild-Restraint Tether Usage:Using the tether or tether anchor tosecure anything but a child-restraintsystem is dangerous. This couldweaken or damage the tether or tetheranchor and result in injury. Use thetether and tether anchor only for achild-restraint system.
Incorrect Attachment of the TetherStrap:Routing the tether strap on top of thehead restraint is dangerous. In acollision, the tether strap could slideoff the head restraint, and loosen thechild-restraint system. The child-restraint system could move whichmay result in death or injury to thechild. Always route the tether strapbetween the head restraint posts.
qLATCH Child-Restraint SystemInstallation Procedure (RearCenter Seat)
The LATCH lower anchors at the centerof the rear seat are much further apart thanthe sets of LATCH lower anchors forchild-restraint system installation at otherseating positions. Child-restraint systemswith rigid LATCH attachments cannot beinstalled on the center seating position.Some LATCH equipped child-restraintsystems can be placed in the centerposition and will reach the nearestLATCH lower anchors which are 466 mm(18.35 in) apart. LATCH compatiblechild-restraint systems (with attachmentson belt webbing) can be used at thisseating position only if the child-restraintsystem manufacturer's instructions statethat the child-restraint system can beinstalled to LATCH lower anchors that are466 mm (18.35 in) apart. Do not attachtwo child-restraint systems to the sameLATCH lower anchor. If your child-restraint system has a tether, it must alsobe used for your child's optimum safety.
1. Make sure the seatback is securelylatched by pushing it back until it isfully locked.
2-42
Essential Safety Equipment
Child Restraint
Mazda6_8U66-EA-05F_Edition2 Page56Tuesday, July 26 2005 11:23 AM
Form No.8U66-EA-05F
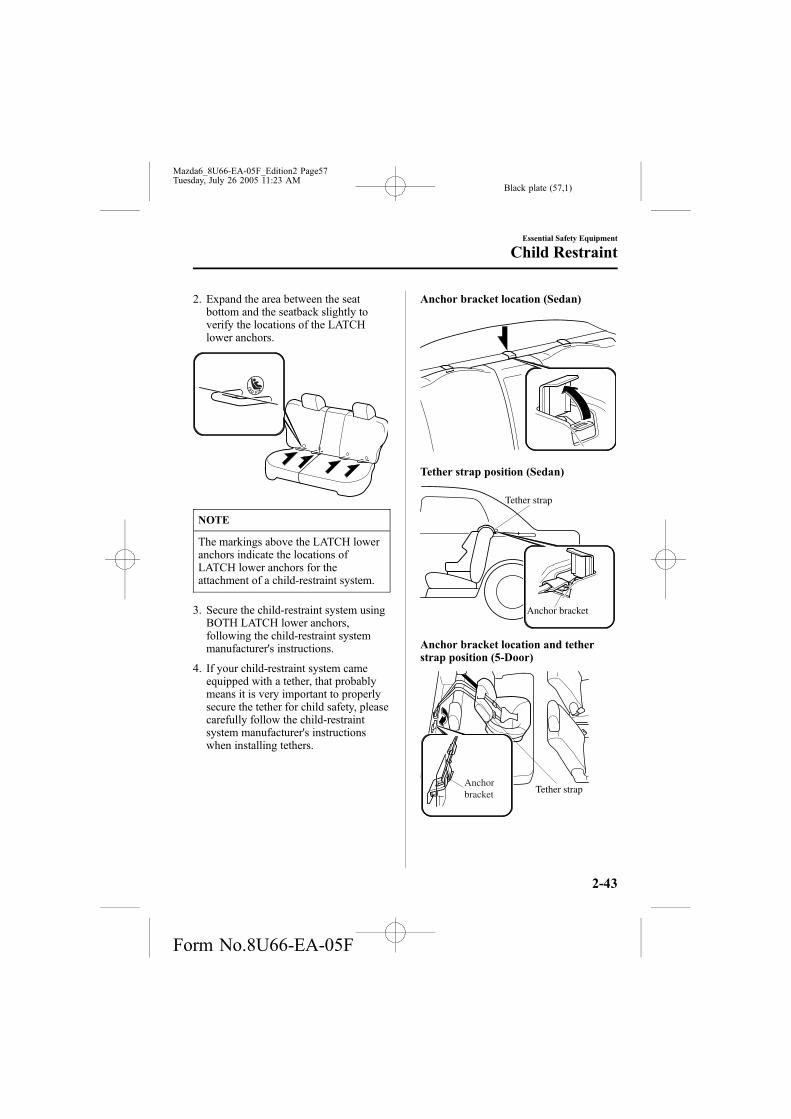
Black plate (57,1)
2. Expand the area between the seatbottom and the seatback slightly toverify the locations of the LATCHlower anchors.
NOTE
The markings above the LATCH loweranchors indicate the locations ofLATCH lower anchors for theattachment of a child-restraint system.
3. Secure the child-restraint system usingBOTH LATCH lower anchors,following the child-restraint systemmanufacturer's instructions.
4. If your child-restraint system cameequipped with a tether, that probablymeans it is very important to properlysecure the tether for child safety, pleasecarefully follow the child-restraintsystem manufacturer's instructionswhen installing tethers.
Anchor bracket location (Sedan)
Tether strap position (Sedan)
Tether strap
Anchor bracket
Anchor bracket location and tetherstrap position (5-Door)
Tether strapAnchorbracket
Essential Safety Equipment
Child Restraint
2-43
Mazda6_8U66-EA-05F_Edition2 Page57Tuesday, July 26 2005 11:23 AM
Form No.8U66-EA-05F

Black plate (58,1)
Anchor bracket location and tetherstrap position (Sport Wagon)
Anchorbracket
Tether strap
WARNINGChild-Restraint Tether Usage:Using the tether or tether anchor tosecure anything but a child-restraintsystem is dangerous. This couldweaken or damage the tether or tetheranchor and result in injury. Use thetether and tether anchor only for achild-restraint system.
2-44
Essential Safety Equipment
Child Restraint
Mazda6_8U66-EA-05F_Edition2 Page58Tuesday, July 26 2005 11:23 AM
Form No.8U66-EA-05F

Black plate (59,1)
Supplemental Restraint Systems (SRS) PrecautionsThe front and side supplemental restraint systems (SRS) include up to 6 air bags (verify“SRS AIRBAG” location indicator marks).They are located in:
l The steering wheel hub (driver air bag)
l The front passenger dashboard (front passenger air bag)
l The outboard sides of the front seatbacks (side air bags)í
l The front and rear window pillars, and the roof edge along both sides (curtain air bags)í
These systems operate independently depending on the type of accident encountered; ifyou have side and curtain air bags, the side and curtain air bags are not likely to deploy onboth sides in the same accident because a vehicle is not often hit from both sides. The sideand curtain air bags and the frontal air bag system will not normally deploy during thesame type of accident unless a combination of frontal and side impacts occur.
The air bag supplemental restraint systems are designed to provide supplemental protectiononly in the front seats in certain situations and the rear outside passenger positions only insame-side collisions, so seat belts are always important in the following ways:
Without seat belt usage, the air bags cannot provide adequate protection during an accident.Seat belt usage is necessary to:
l Keep the occupant from being thrown into an inflating air bag.
l Reduce the possibility of injuries during an accident that is not designed for air baginflation, such as roll-over or rear impact.
l Reduce the possibility of injuries in frontal or side collisions that are not severe enoughto activate the air bags.
l Reduce the possibility of being thrown from your vehicle.
l Reduce the possibility of injuries to lower body and legs during an accident because theair bags provide no protection to these parts of the body.
l Hold the driver in a position which allows better control of the vehicle.
Children should be protected by a child-restraint system as stipulated by law in every stateand province. In certain states and provinces, laws vary on the size a child must be to use achild-restraint system (page 2-29).Carefully consider which child-restraint system is necessary for your child and follow theinstallation directions in this Owner's Manual as well as the child-restraint systemmanufacturer's instructions.
Essential Safety Equipment
SRS Air Bags
2-45íSome models.
Mazda6_8U66-EA-05F_Edition2 Page59Tuesday, July 26 2005 11:23 AM
Form No.8U66-EA-05F
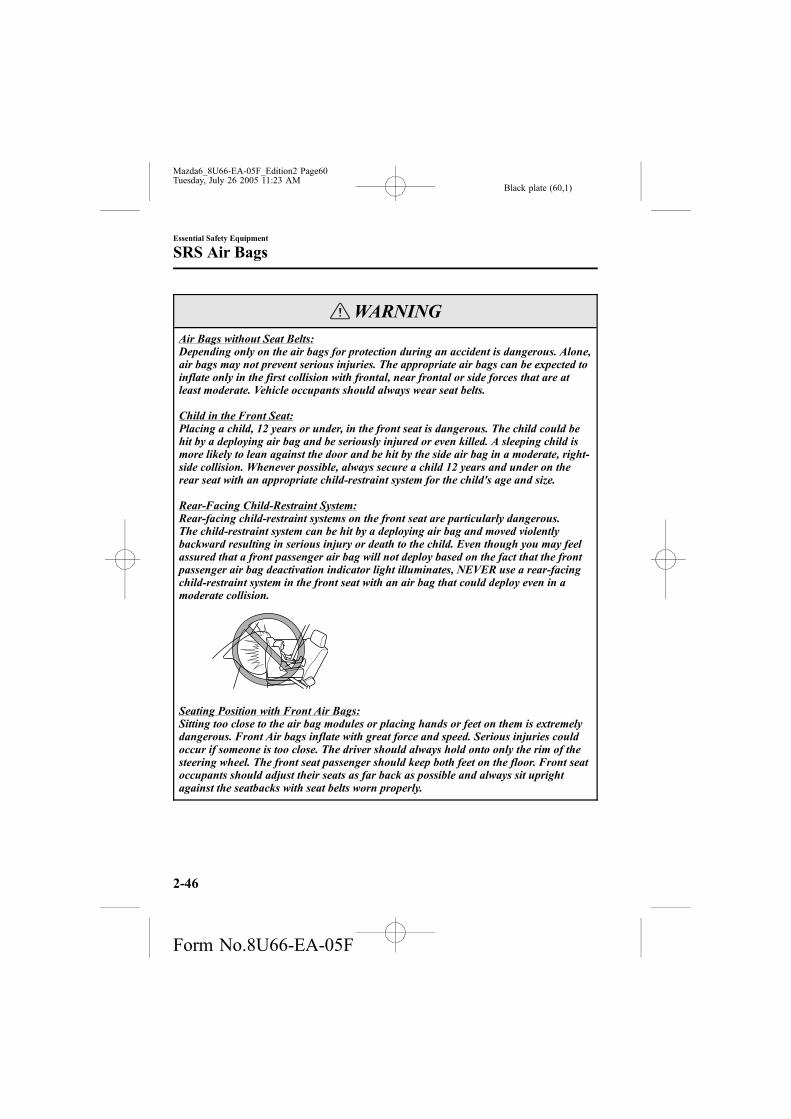
Black plate (60,1)
WARNINGAir Bags without Seat Belts:Depending only on the air bags for protection during an accident is dangerous. Alone,air bags may not prevent serious injuries. The appropriate air bags can be expected toinflate only in the first collision with frontal, near frontal or side forces that are atleast moderate. Vehicle occupants should always wear seat belts.
Child in the Front Seat:Placing a child, 12 years or under, in the front seat is dangerous. The child could behit by a deploying air bag and be seriously injured or even killed. A sleeping child ismore likely to lean against the door and be hit by the side air bag in a moderate, right-side collision. Whenever possible, always secure a child 12 years and under on therear seat with an appropriate child-restraint system for the child's age and size.
Rear-Facing Child-Restraint System:Rear-facing child-restraint systems on the front seat are particularly dangerous.The child-restraint system can be hit by a deploying air bag and moved violentlybackward resulting in serious injury or death to the child. Even though you may feelassured that a front passenger air bag will not deploy based on the fact that the frontpassenger air bag deactivation indicator light illuminates, NEVER use a rear-facingchild-restraint system in the front seat with an air bag that could deploy even in amoderate collision.
Seating Position with Front Air Bags:Sitting too close to the air bag modules or placing hands or feet on them is extremelydangerous. Front Air bags inflate with great force and speed. Serious injuries couldoccur if someone is too close. The driver should always hold onto only the rim of thesteering wheel. The front seat passenger should keep both feet on the floor. Front seatoccupants should adjust their seats as far back as possible and always sit uprightagainst the seatbacks with seat belts worn properly.
2-46
Essential Safety Equipment
SRS Air Bags
Mazda6_8U66-EA-05F_Edition2 Page60Tuesday, July 26 2005 11:23 AM
Form No.8U66-EA-05F

Black plate (61,1)
WARNINGSeating Position with Side and Curtain Air Bags:Sitting too close to the side air bag modules or placing hands on them is extremelydangerous. The side air bags inflate with great force and speed directly out of theoutboard side of the front seat and expand along the front door on the side the car ishit. Serious injury could occur if someone is sitting too close to the door or leaningagainst a window, or if rear seat occupants grab the sides of the front seatbacks.Furthermore, sleeping up against the door or hanging out the windows in the vehiclecould block the side and curtain air bags and eliminate the advantages ofsupplemental protection. Give the side and curtain air bags room to work by sitting inthe center of the seat while the vehicle is moving with seat belts worn properly.
Front Air Bag Modules Located in the Steering Wheel Hub and the Dashboard:Attaching an object to the front air bag modules or placing something in front of themis dangerous. In an accident, the object could interfere with front air bag inflation andinjure the occupants.Always keep the front air bag modules free of objects.
Side Air Bag Modules:Attaching things to the front seat in such a way as to cover the outboard side of theseat in any way is dangerous. In an accident the object could interfere with the side airbag, which inflates from the outboard side of the front seats, impeding the addedprotection of the side air bag system or redirecting the air bag in a way that isdangerous. Furthermore, the bag could be cut open spewing exhaust.Do not hang net bags, map pouches or backpacks with side straps on the front seats.Never use seat covers on the front seats. Always keep the side air bag modules in yourfront seats free to deploy in the event of a side collision.
Curtain Air Bag Modules:Attaching objects to the areas where the curtain air bag activates such as on thewindshield glass, side door glass, front and rear window pillars and along the roofedge and assist grips is dangerous. In an accident the object could interfere with thecurtain air bag, which inflates from the front and rear window pillars and along theroof edge, impeding the added protection of the curtain air bag system or redirectingthe air bag in a way that is dangerous. Furthermore, the bag could be cut openspewing exhaust.Do not place hangers or any other objects on the assist grips. When hanging clothes,hang them on the coat hook directly. Always keep the curtain air bag modules free todeploy in the event of a side collision.
Essential Safety Equipment
SRS Air Bags
2-47
Mazda6_8U66-EA-05F_Edition2 Page61Tuesday, July 26 2005 11:23 AM
Form No.8U66-EA-05F
Black plate (62,1)
WARNINGHot Air Bag Inflators:Hot air bag inflators are dangerous. Immediately after inflation, the inflators in thesteering wheel, dashboard, seatbacks, or the front and rear window pillars and alongthe roof edge are very hot. You could get burned. Don't touch the internal componentsof the air bag modules after the bags have inflated.
Installation of Front-End Equipment:Installation of front-end equipment, such as frontal protection bar (kangaroo bar, bullbar, push bar, etc.), snowplow, or winches, is dangerous. The air bag crash sensorsystem could be affected. This could cause air bags to inflate unexpectedly, or it couldprevent the air bags from inflating during an accident. Front occupants could beseriously injured. Never install any front-end equipment to your vehicle.
Suspension Adjustment:Adjusting the vehicle suspension is dangerous. If the vehicle's height or thesuspension is changed, the vehicle will be unable to accurately detect a collisionresulting in incorrect or unexpected air bag deployment and the possibility of seriousinjuries.
Modification of the Supplemental Restraint System:Modifying the components or wiring of the supplemental restraint system isdangerous. You could accidentally activate it or make it inoperable. Don't make anymodifications to the supplemental restraint system. This includes installing trim,badges, or anything else over the air bag modules. It also includes installing extraelectrical equipment on or near system components or wiring. An Authorized MazdaDealer can provide the special care needed in the removal and installation of frontseats. It is important to protect the side and curtain air bag wiring and connections toassure that the bags do not accidentally deploy and that the seats retain anundamaged air bag connection.
Damaged Side and Curtain Air Bag Wiring under the Seats:Placing luggage or other objects under the front seats is dangerous. The side andcurtain air bag wiring could be damaged, and in the event of a side collision, the sideand curtain air bags may not deploy, which could result in death or serious injury. Toprevent damage to the side and curtain air bag wiring, do not place luggage or otherobjects under the front seats.
2-48
Essential Safety Equipment
SRS Air Bags
Mazda6_8U66-EA-05F_Edition2 Page62Tuesday, July 26 2005 11:23 AM
Form No.8U66-EA-05F
Black plate (63,1)
NOTE
l When an air bag deploys, a loud inflation noise can be heard and some smoke will bereleased. Neither is likely to cause injury, however, the texture of the air bags maycause light skin injuries on body parts not covered with clothing through friction.
l Should you sell your Mazda, we urge you to tell the new owner of its air bag systemsand that familiarization with all instructions about them, from the Owner's Manual, isimportant.
Essential Safety Equipment
SRS Air Bags
2-49
Mazda6_8U66-EA-05F_Edition2 Page63Tuesday, July 26 2005 11:23 AM
Form No.8U66-EA-05F

Black plate (64,1)
Supplemental Restraint System ComponentsThe supplemental restraint systems (SRS) have two basic subsystems:
l The air bag system with inflators and air bags.
l The electrical system with crash sensors and diagnostic module.
The air bags are mounted in the following locations:
l The steering wheel hub
l The front passenger dashboard
l The outboard sides of the front seatbacksí
l The front and rear window pillars, and the roof edge along both sidesí
The air bags are out of sight until activated.
2-50
Essential Safety Equipment
íSome models.
SRS Air Bags
Mazda6_8U66-EA-05F_Edition2 Page64Tuesday, July 26 2005 11:23 AM
Form No.8U66-EA-05F
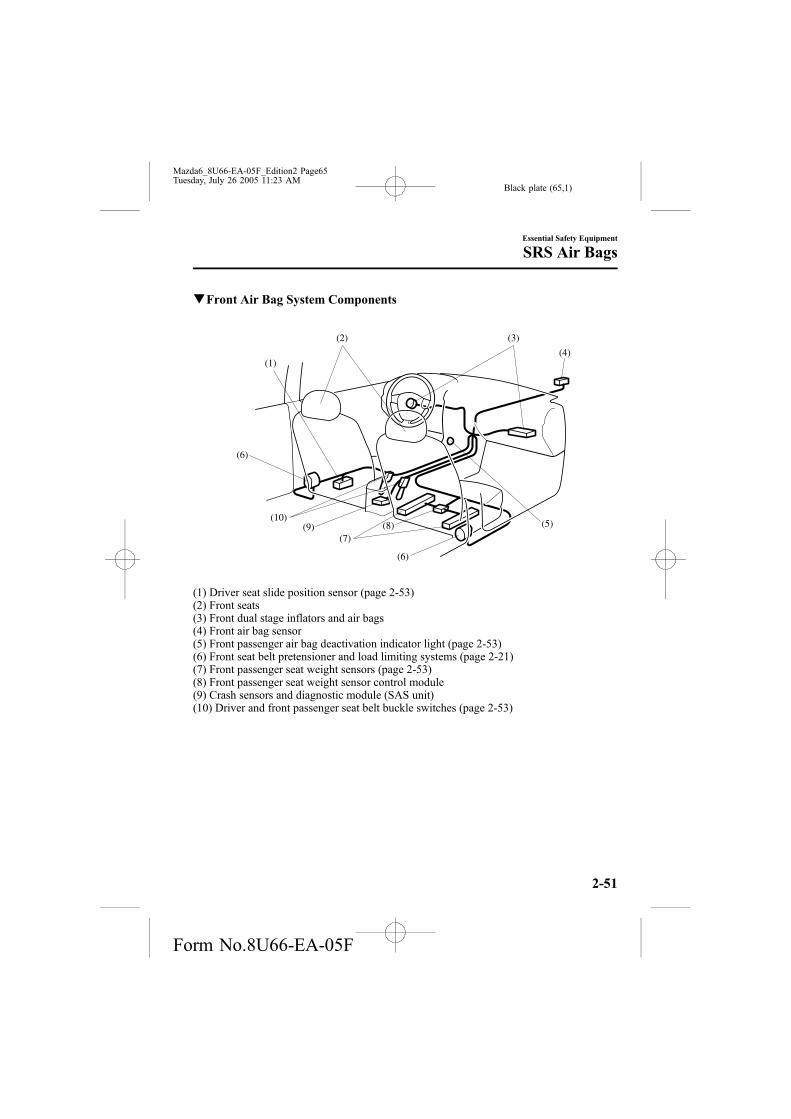
Black plate (65,1)
qFront Air Bag System Components
(1)
(6)
(10)
(7)
(6)
(9) (5)
(4)
(3)(2)
(8)
(1) Driver seat slide position sensor (page 2-53)(2) Front seats(3) Front dual stage inflators and air bags(4) Front air bag sensor(5) Front passenger air bag deactivation indicator light (page 2-53)(6) Front seat belt pretensioner and load limiting systems (page 2-21)(7) Front passenger seat weight sensors (page 2-53)(8) Front passenger seat weight sensor control module(9) Crash sensors and diagnostic module (SAS unit)(10) Driver and front passenger seat belt buckle switches (page 2-53)
Essential Safety Equipment
SRS Air Bags
2-51
Mazda6_8U66-EA-05F_Edition2 Page65Tuesday, July 26 2005 11:23 AM
Form No.8U66-EA-05F

Black plate (66,1)
qSide and Curtain Air Bag System Componentsí
Sedan/5-Door
Sport Wagon
(3)
(1) (1)
(4)
(2)
(4)(3)
(1) (1)(2)
(1) Side and curtain inflators and air bags(2) Front seats(3) Crash sensors and diagnostic module (SAS unit)(4) Side crash sensor
2-52
Essential Safety Equipment
íSome models.
SRS Air Bags
Mazda6_8U66-EA-05F_Edition2 Page66Tuesday, July 26 2005 11:23 AM
Form No.8U66-EA-05F

Black plate (67,1)
How the Air Bags Work
qHow the Front Air Bags Work
When air bag crash sensors detect a frontal impact of greater than moderate force, anelectrical current is sent to the inflators.Gases are produced to inflate the front air bags and after the inflation, the front air bagsquickly deflate.The front air bags will function only once. After that, the front air bags will not workagain and must be replaced.Only an Authorized Mazda Dealer can replace the system components.
The front, dual stage air bags control air bag inflation in two energy stages. During animpact of moderate severity the front air bags deploy with lesser energy, whereas duringmore severe impacts, they deploy with more energy. Deployment of the front air bags maydiffer between the driver and the front passenger depending on the driver seat position,front passenger weight and front seat belt usage, which allow for further controlling of thesystem.
The front air bags will deploy only in a frontal or frontal offset impact.
Driver seat slide position sensor
Your vehicle is equipped with a driver seat slide sensor as a part of the supplementalrestraint system. The sensor is located under the driver seat. The sensor determines whetherthe driver seat is fore or aft of a reference position and sends the seat position to the crashsensors and diagnostic module (SAS unit). The sensor is also designed to control thedeployment of the driver air bag depending on how close the driver seat is to the steeringwheel.
The air bag/front seat belt pretensioner system warning light flashes if the sensor has apossible malfunction (page 2-61).
Essential Safety Equipment
SRS Air Bags
2-53
Mazda6_8U66-EA-05F_Edition2 Page67Tuesday, July 26 2005 11:23 AM
Form No.8U66-EA-05F

Black plate (68,1)
Front passenger seat weight sensors
Your vehicle is also equipped with the front passenger air bag deactivation indicator light(page 2-38). These sensors are located under both of the front passenger seat rails. Thesesensors determine the total seated weight on the front passenger seat. The sensors are alsodesigned to prevent the front passenger front and side air bags and seat belt pretensionersystem from inflating if the total seated weight is less than approximately 30 kg (66 lb).
To reduce the chance of injuries caused by deployment of the front passenger air bag, thesystem deactivates the front passenger front and side air bags and also the seat beltpretensioner system when:
l There is no passenger in the front passenger seat. (The front passenger air bagdeactivation indicator light does not illuminate.)
l The total seated weight on the front passenger seat is less than approximately 30 kg (66lb). (The front passenger air bag deactivation indicator light illuminates.)
This system shuts off the front passenger front and side air bags and seat belt pretensionersystem, so make sure the front passenger air bag deactivation indicator light illuminatesaccording to the chart below.
The air bag/front seat belt pretensioner system warning light flashes and the frontpassenger air bag deactivation indicator light illuminates if the sensors have a possiblemalfunction. If this happens, the front passenger front and side air bags and seat beltpretensioner system will not deploy.
Front passenger air bag deactivation indicator light
This indicator light illuminates to remind you that the front passenger front and side airbags and seat belt pretensioner will not deploy during a collision.
If the front passenger weight sensors are normal, the indicator light illuminates when theignition switch is turned to the ON position. After about 6 seconds it goes out.
2-54
Essential Safety Equipment
SRS Air Bags
Mazda6_8U66-EA-05F_Edition2 Page68Tuesday, July 26 2005 11:23 AM
Form No.8U66-EA-05F
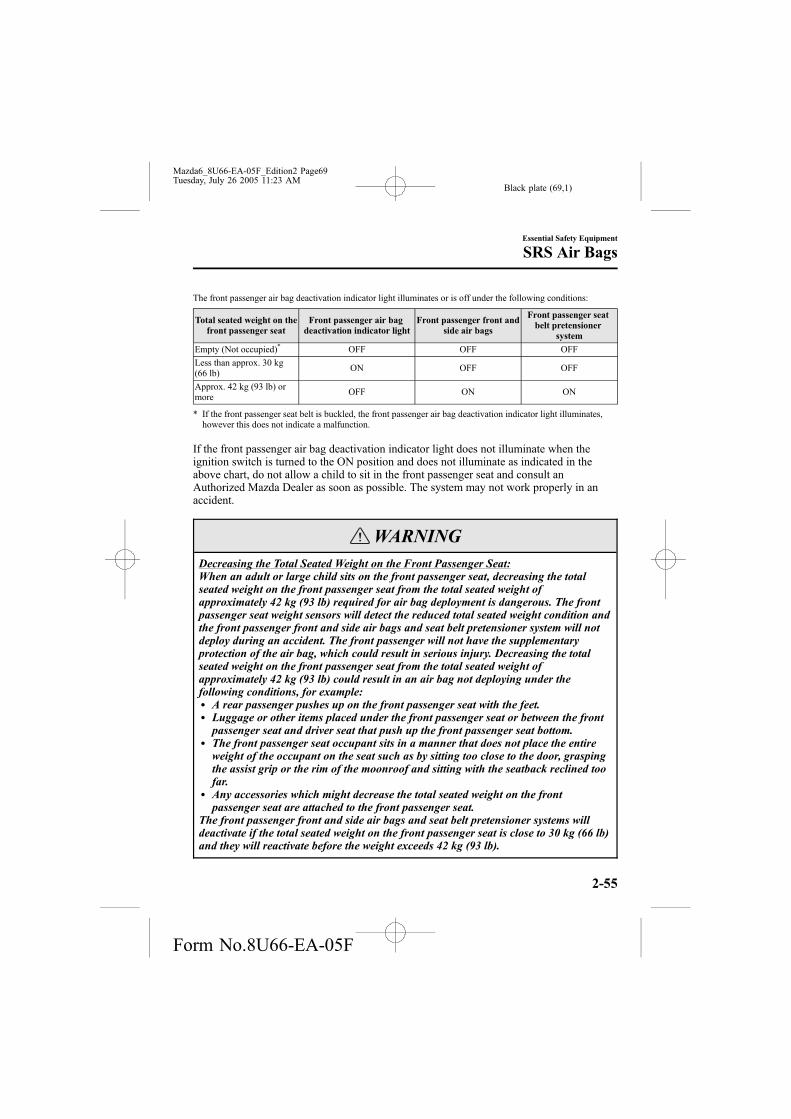
Black plate (69,1)
The front passenger air bag deactivation indicator light illuminates or is off under the following conditions:
Total seated weight on thefront passenger seat
Front passenger air bagdeactivation indicator light
Front passenger front andside air bags
Front passenger seatbelt pretensioner
system
Empty (Not occupied)* OFF OFF OFF
Less than approx. 30 kg(66 lb)
ON OFF OFF
Approx. 42 kg (93 lb) ormore
OFF ON ON
* If the front passenger seat belt is buckled, the front passenger air bag deactivation indicator light illuminates,however this does not indicate a malfunction.
If the front passenger air bag deactivation indicator light does not illuminate when theignition switch is turned to the ON position and does not illuminate as indicated in theabove chart, do not allow a child to sit in the front passenger seat and consult anAuthorized Mazda Dealer as soon as possible. The system may not work properly in anaccident.
WARNINGDecreasing the Total Seated Weight on the Front Passenger Seat:When an adult or large child sits on the front passenger seat, decreasing the totalseated weight on the front passenger seat from the total seated weight ofapproximately 42 kg (93 lb) required for air bag deployment is dangerous. The frontpassenger seat weight sensors will detect the reduced total seated weight condition andthe front passenger front and side air bags and seat belt pretensioner system will notdeploy during an accident. The front passenger will not have the supplementaryprotection of the air bag, which could result in serious injury. Decreasing the totalseated weight on the front passenger seat from the total seated weight ofapproximately 42 kg (93 lb) could result in an air bag not deploying under thefollowing conditions, for example:l A rear passenger pushes up on the front passenger seat with the feet.l Luggage or other items placed under the front passenger seat or between the frontpassenger seat and driver seat that push up the front passenger seat bottom.
l The front passenger seat occupant sits in a manner that does not place the entireweight of the occupant on the seat such as by sitting too close to the door, graspingthe assist grip or the rim of the moonroof and sitting with the seatback reclined toofar.
l Any accessories which might decrease the total seated weight on the frontpassenger seat are attached to the front passenger seat.
The front passenger front and side air bags and seat belt pretensioner systems willdeactivate if the total seated weight on the front passenger seat is close to 30 kg (66 lb)and they will reactivate before the weight exceeds 42 kg (93 lb).
Essential Safety Equipment
SRS Air Bags
2-55
Mazda6_8U66-EA-05F_Edition2 Page69Tuesday, July 26 2005 11:23 AM
Form No.8U66-EA-05F

Black plate (70,1)
WARNINGIncreasing the Total Seated Weight on the Front Passenger Seat:When an infant or small child sits on the front passenger seat, increasing the totalseated weight on the front passenger seat from the total seated weight ofapproximately 30 kg (66 lb) is dangerous. The front passenger seat weight sensors willdetect the increased total seated weight, which could result in the unexpecteddeployment of the front passenger front and side air bags and seat belt pretensionersystem in an accident and serious injury. Increasing the total seated weight on thefront passenger seat beyond the total seated weight of approximately 30 kg (66 lb)could result in the front passenger front and side air bags and seat belt pretensionersystem deployment in an accident under the following conditions, for example:l Luggage or other items are placed on the seat with the child in the child-restraintsystem.
l A rear passenger or luggage push or pull down on the front passenger seatback.l A rear passenger steps on the front passenger seat rails with the feet.l Luggage or other items are placed on the seatback or hung on the assist grip, headrestraint.
l The seat is washed.l Liquids are spilled on the seat.l The front passenger seat is moved backward, pushing into luggage or other itemsplaced behind it.
l The front passenger seatback contacts the rear seat.l Luggage or other items are placed between the front passenger seat and driver seat.l Any accessories which might increase the total seated weight on the front passengerseat are attached to the front passenger seat.
The front passenger front and side air bags and seat belt pretensioner systems willdeactivate if the total seated weight on the front passenger seat is close to 30 kg (66 lb)and they will reactivate before the weight exceeds 42 kg (93 lb).
2-56
Essential Safety Equipment
SRS Air Bags
Mazda6_8U66-EA-05F_Edition2 Page70Tuesday, July 26 2005 11:23 AM
Form No.8U66-EA-05F

Black plate (71,1)
CAUTIONl To assure proper deployment of the front air bag and to prevent damage to the sensorsin the front seat bottoms:
l Do not place sharp objects on the front seat bottoms or leave heavy luggage onthem.
l Do not spill any liquids on the front seats or under the front seats.
l To allow the sensors to function properly, always perform the following:
l Adjust the front seats as far back as possible and always sit upright against theseatbacks with seat belts worn properly.
l If you place your child on the front passenger seat, secure the child-restraint systemproperly and slide the front passenger seat as far back as possible (page 2-38).
NOTE
l The system requires about 10 seconds to alternate between turning the front passengerfront and side air bags and seat belt pretensioner system on or off.
l The front passenger air bag deactivation indicator light may illuminate repeatedly ifluggage or other items are put on the front passenger seat, or if the temperature of thevehicle's interior changes suddenly.
l The front passenger air bag deactivation indicator light may illuminate for 10 secondsif the total seated weight on the front passenger seat changes.
l If the front passenger air bag deactivation indicator light does not illuminate afterinstalling a child-restraint system on the front passenger seat, install the child-restraintsystem on the rear seat and consult an Authorized Mazda Dealer as soon as possible.
Driver and front passenger buckle switches
The buckle switches on the front seat belts detect whether or not the front seat belts aresecurely fastened and further control the deployment of the air bags.
Essential Safety Equipment
SRS Air Bags
2-57
Mazda6_8U66-EA-05F_Edition2 Page71Tuesday, July 26 2005 11:23 AM
Form No.8U66-EA-05F

Black plate (72,1)
qHow the Side and Curtain Air Bags Workí
When air bag crash sensors detect a side impact of greater than moderate force, anelectrical current is sent to the inflators.Gases are produced to inflate the side and curtain air bags and after the inflation, the sideand curtain air bags quickly deflate.The side and curtain air bags will function only once. After that, the side and curtain airbags will not work again and must be replaced. Only an Authorized Mazda Dealer canreplace the systems.
The side and curtain air bag will deploy only on the side the vehicle receives the force of the impact.
WARNINGDamaged Side and Curtain Air Bag Wiring under the Seats:Placing luggage or other objects under the front seats is dangerous. The side andcurtain air bag wiring could be damaged, and in the event of a side collision, the sideand curtain air bags may not deploy, which could result in death or serious injury. Toprevent damage to the side and curtain air bag wiring, do not place luggage or otherobjects under the front seats.
qAir Bag Activation/Deactivation
NOTE
If the front passenger seat weight sensors detect a total seated weight on the frontpassenger seat is less than approximately 42 kg (93 lb), the front passenger front and sideair bags and seat belt pretensioner may not inflate (page 2-53).
2-58
Essential Safety Equipment
íSome models.
SRS Air Bags
Mazda6_8U66-EA-05F_Edition2 Page72Tuesday, July 26 2005 11:23 AM
Form No.8U66-EA-05F

Black plate (73,1)
Front air bag activation
A greater than moderate impact will causethe front air bags to inflate in thefollowing cases:
l Hitting a solid wall straight on atgreater than about 22 km/h (14 mph).
l Hitting a curb, pavement edge or hardobject.
l Landing hard or the vehicle falling.
l Frontal impact within about a 30degree range from head-on to thevehicle.
l Driving into a big hole or hitting the farside of a hole.
Limitations to front air bag activation
Depending on the severity of impact, thefront air bags may not inflate in thefollowing cases:
l Impacts involving trees or poles causesevere cosmetic damage but may nothave enough stopping force to activatethe air bag.
l Frontal offset impact to the vehiclemay not provide the stopping forcenecessary for air bag deployment.
Essential Safety Equipment
SRS Air Bags
2-59
Mazda6_8U66-EA-05F_Edition2 Page73Tuesday, July 26 2005 11:23 AM
Form No.8U66-EA-05F

Black plate (74,1)
l Rear-ending or running under a truck'stail gate may not provide the stoppingforce necessary for air bag deployment.
Non-activation of front air bags
Front air bags will not normally inflate inthe following cases:
l Collision from the rear.
l Impact to the side, but it may deploythe side and curtain air bags.
l Vehicle roll-over, may deploy the sideand curtain air bags but not the front airbags.
Side and curtain air bag activationí
Greater than moderate impact to one sideof the vehicle (driver or passenger sideareas) will cause the side and curtain airbags on that side to inflate, but it will notnormally deploy the front air bags.
Limitations to side and curtain air bagactivationí
Depending on the severity of impact, theside and curtain air bags may not inflate inthe following cases:
l Frontal offset impact may not provideenough side impact to deploy the sideand curtain air bags.
l Side impacts involving trees or polescan cause severe cosmetic damage butmay not have enough impact force toactivate the side and curtain air bags.
2-60
Essential Safety Equipment
íSome models.
SRS Air Bags
Mazda6_8U66-EA-05F_Edition2 Page74Tuesday, July 26 2005 11:23 AM
Form No.8U66-EA-05F
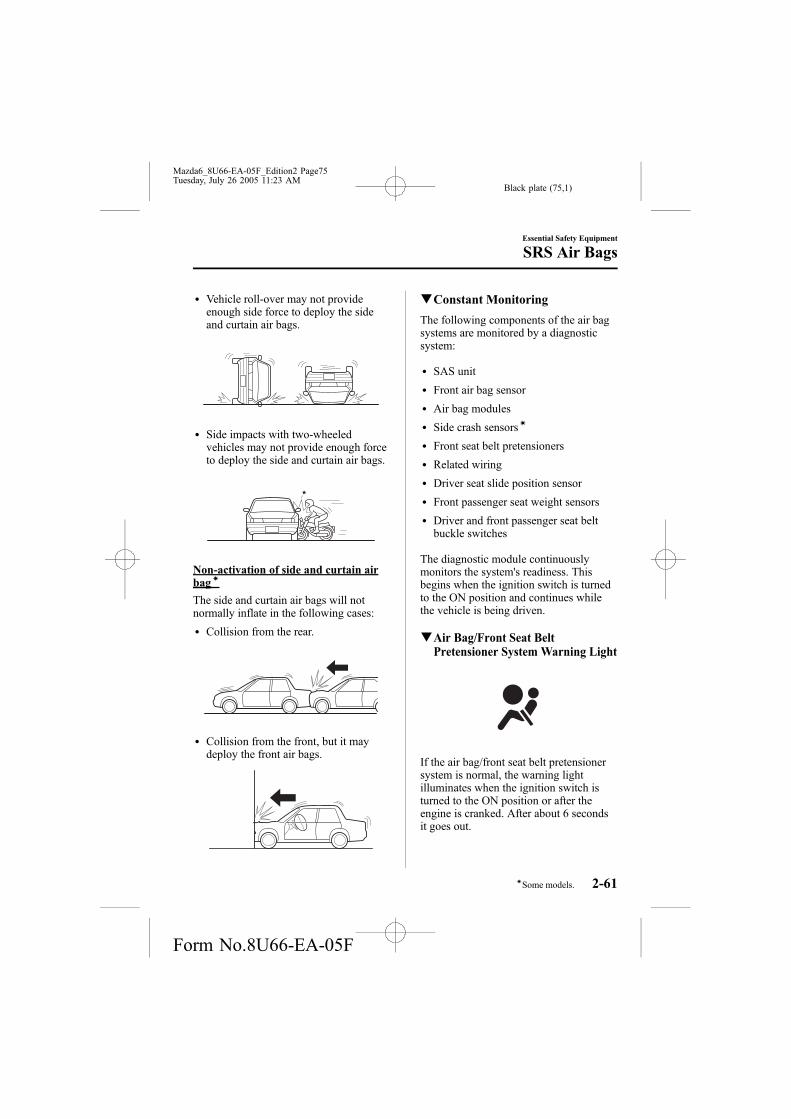
Black plate (75,1)
l Vehicle roll-over may not provideenough side force to deploy the sideand curtain air bags.
l Side impacts with two-wheeledvehicles may not provide enough forceto deploy the side and curtain air bags.
Non-activation of side and curtain airbagí
The side and curtain air bags will notnormally inflate in the following cases:
l Collision from the rear.
l Collision from the front, but it maydeploy the front air bags.
qConstant Monitoring
The following components of the air bagsystems are monitored by a diagnosticsystem:
l SAS unit
l Front air bag sensor
l Air bag modules
l Side crash sensorsí
l Front seat belt pretensioners
l Related wiring
l Driver seat slide position sensor
l Front passenger seat weight sensors
l Driver and front passenger seat beltbuckle switches
The diagnostic module continuouslymonitors the system's readiness. Thisbegins when the ignition switch is turnedto the ON position and continues whilethe vehicle is being driven.
qAir Bag/Front Seat BeltPretensioner System Warning Light
If the air bag/front seat belt pretensionersystem is normal, the warning lightilluminates when the ignition switch isturned to the ON position or after theengine is cranked. After about 6 secondsit goes out.
Essential Safety Equipment
SRS Air Bags
2-61íSome models.
Mazda6_8U66-EA-05F_Edition2 Page75Tuesday, July 26 2005 11:23 AM
Form No.8U66-EA-05F

Black plate (76,1)
A system malfunction is indicated whenthe warning light constantly flashes,constantly illuminates or doesn'tilluminate at all when the ignition switchis turned to the ON position. If any ofthese occur, consult an Authorized MazdaDealer as soon as possible. The systemmay not work in an accident.
WARNINGSelf-Servicing the Air Bag/Pretensioner Systems:Self-servicing or tampering with thesystems is dangerous. An air bag/pretensioner could accidentallyactivate or become disabled. Thiscould cause serious injuries. Nevertamper with the systems and alwayshave an Authorized Mazda Dealerperform all servicing and repairs.
qMaintenance
The air bag systems do not require regularmaintenance. But if any of the followingoccurs, take your vehicle to an AuthorizedMazda Dealer as soon as possible:
l The air bag system warning lightflashes.
l The air bag system warning lightremains illuminated.
l The air bag system warning light doesnot illuminate when the ignition switchis turned to the ON position.
l The air bags have deployed.
l Front passenger air bag deactivationindicator light does not illuminatewhen the ignition switch is turned tothe ON position or does not illuminateas indicated in the chart. For moredetails about this indicator light andthis chart, refer to “Front passengerseat weight sensors” (page 2-53).
WARNINGDamaged Air Bag/Seat BeltPretensioner System Components:Expended or damaged air bag or seatbelt pretensioner units must bereplaced after any collision whichcaused them to deploy or damagethem. Only a trained AuthorizedMazda Dealer can fully evaluate thesesystems to see that they will work inthe next accident. Driving with anexpended or damaged air bag orpretensioner units will provide youreduced protection in the next accidentand you could be injured or killed.
Removing Interior Parts:Removing any components such as thefront seats, front dashboard, thesteering wheel or parts on the frontand rear window pillars and along theroof edge, containing air bag parts orsensors is dangerous. These partscontain essential air bag components.The air bag could accidentally activateand cause serious injuries. Alwayshave an Authorized Mazda Dealerremove these parts.
2-62
Essential Safety Equipment
SRS Air Bags
Mazda6_8U66-EA-05F_Edition2 Page76Tuesday, July 26 2005 11:23 AM
Form No.8U66-EA-05F

Black plate (77,1)
WARNINGAir Bag Disposal:Improper disposal of an air bag or avehicle with live air bags in it can beextremely dangerous. Unless all safetyprocedures are followed, injury canresult. Ask an Authorized MazdaDealer how to safely dispose of an airbag or how to scrap an air bagequipped vehicle.
NOTE
If it becomes necessary to have thecomponents or wiring system for thesupplementary restraint systemmodified to accommodate a person withcertain medical conditions inaccordance with a certified physician,contact an Authorized Mazda Dealer,refer to “Customer Assistance (U.S.A.)”(page 9-2).
Essential Safety Equipment
SRS Air Bags
2-63
Mazda6_8U66-EA-05F_Edition2 Page77Tuesday, July 26 2005 11:23 AM
Form No.8U66-EA-05F

Black plate (78,1)
2-64
Mazda6_8U66-EA-05F_Edition2 Page78Tuesday, July 26 2005 11:23 AM
Form No.8U66-EA-05F

Black plate (79,1)
3 Knowing Your Mazda
Explanation of basic operations and controls; opening/closing and adjustmentof various parts.
Doors and Locks ........................................................................... 3-2Keys .......................................................................................... 3-2Keyless Entry System ............................................................... 3-3Door Locks ............................................................................... 3-9Hatch (5-Door) ........................................................................ 3-12Liftgate (Sport Wagon) ........................................................... 3-14Trunk Lid (Sedan) ................................................................... 3-20Inside Trunk Release Lever (Sedan) ....................................... 3-22Power Windows ...................................................................... 3-23Opening/Closing the Power Windows from Outside .............. 3-28Fuel-Filler Lid and Cap ........................................................... 3-31Hood ....................................................................................... 3-32Moonroofí ............................................................................. 3-33
Security System ........................................................................... 3-36Immobilizer System ................................................................ 3-36Theft-Deterrent Systemí ........................................................ 3-39
Steering Wheel and Mirrors ...................................................... 3-41Steering Wheel ........................................................................ 3-41Mirrors .................................................................................... 3-41
3-1íSome models.
Mazda6_8U66-EA-05F_Edition2 Page79Tuesday, July 26 2005 11:23 AM
Form No.8U66-EA-05F

Black plate (80,1)
Keys
WARNINGKeys and Children:Leaving children in a vehicle with thekey is dangerous. This could result insomeone being badly injured or evenkilled. These new kinds of keys arefascinating to children. They couldplay with power windows or othercontrols, or even make the vehiclemove. Don't leave the keys in yourvehicle with children and keep them ina place where your children will notfind or play with them.
NOTE
l Refer to Immobilizer System (page3-36) for information regarding keysand engine starting.
l (With theft-deterrent system)Refer to Theft-Deterrent System(page 3-39) for informationregarding keys and the prevention ofvehicle and vehicle contents theft.
The keys operate all locks.
Key code number plate
Retractabletype key
A code number is stamped on the plateattached to the key set; detach this plateand store it in a safe place (not in thevehicle) for use if you need to make areplacement key.
NOTE
Write down the code number and keepit in a separate safe and convenientplace, but not in the vehicle.If your key is lost, consult yourAuthorized Mazda Dealer and haveyour code number ready.
Key extend/retract method (Retractabletype key)
To extend the key, press the releasebutton.
3-2
Knowing Your Mazda
Doors and Locks
Mazda6_8U66-EA-05F_Edition2 Page80Tuesday, July 26 2005 11:23 AM
Form No.8U66-EA-05F

Black plate (81,1)
To retract the key, press the release buttonand rotate the key into the holder. Keyless Entry System
This system remotely locks and unlocksthe doors and the hatch/liftgate, and opensthe trunk lid, and opens the powerwindows.It can also help you signal for attention.Press the button slowly and carefully.
CAUTIONTo avoid damage to the transmitter, donot:
l Drop it.
l Get it wet.
l Disassemble it.
l Expose it to heat or sunlight.
Knowing Your Mazda
Doors and Locks
3-3
Mazda6_8U66-EA-05F_Edition2 Page81Tuesday, July 26 2005 11:23 AM
Form No.8U66-EA-05F
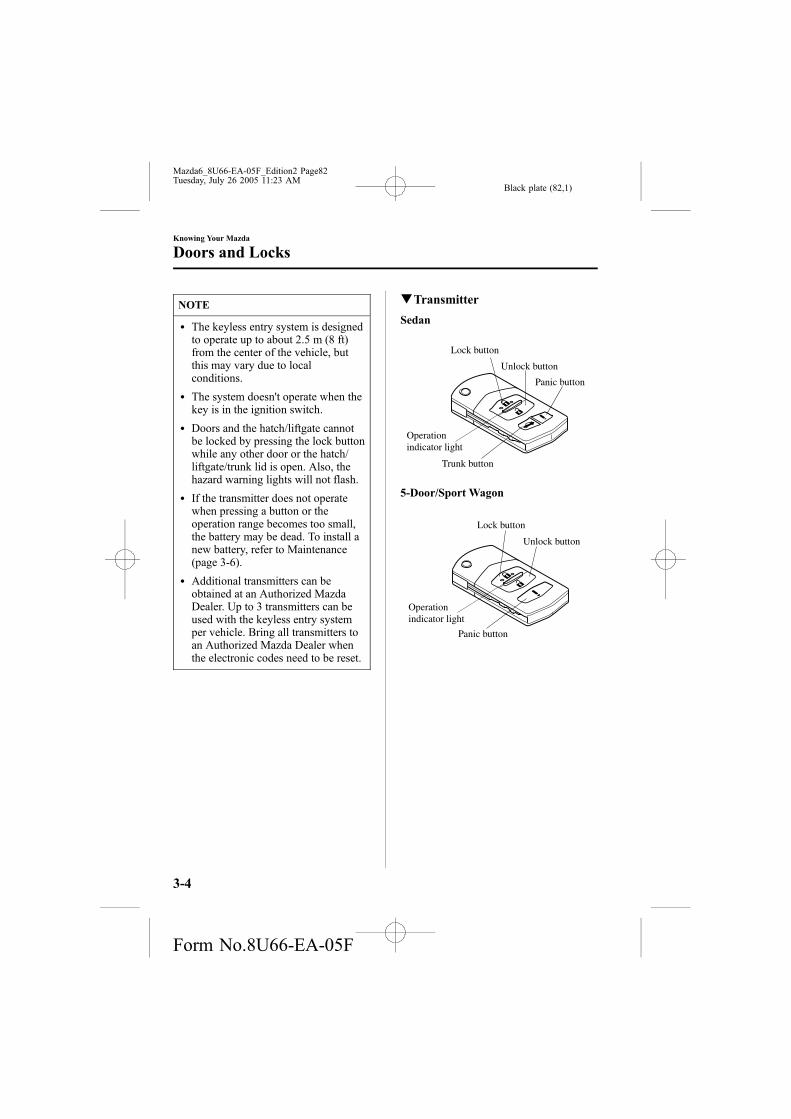
Black plate (82,1)
NOTE
l The keyless entry system is designedto operate up to about 2.5 m (8 ft)from the center of the vehicle, butthis may vary due to localconditions.
l The system doesn't operate when thekey is in the ignition switch.
l Doors and the hatch/liftgate cannotbe locked by pressing the lock buttonwhile any other door or the hatch/liftgate/trunk lid is open. Also, thehazard warning lights will not flash.
l If the transmitter does not operatewhen pressing a button or theoperation range becomes too small,the battery may be dead. To install anew battery, refer to Maintenance(page 3-6).
l Additional transmitters can beobtained at an Authorized MazdaDealer. Up to 3 transmitters can beused with the keyless entry systemper vehicle. Bring all transmitters toan Authorized Mazda Dealer whenthe electronic codes need to be reset.
qTransmitter
Sedan
Lock button
Unlock button
Trunk button
Panic button
Operationindicator light
5-Door/Sport Wagon
Lock button
Unlock button
Panic button
Operationindicator light
3-4
Knowing Your Mazda
Doors and Locks
Mazda6_8U66-EA-05F_Edition2 Page82Tuesday, July 26 2005 11:23 AM
Form No.8U66-EA-05F

Black plate (83,1)
NOTE
l (U.S.A.)This device complies with Part 15 ofthe FCC Rules. Operation is subjectto the following two conditions: (1)this device may not cause harmfulinterference, and (2) this device mustaccept any interference received,including interference that may causeundesired operation.
l (CANADA)This device complies with RSS-210of Industry CANADA. Operation issubject to the following twoconditions: (1) this device may notcause interference, and (2) thisdevice must accept any interference,including interference that may causeundesired operation of the device.
NOTE
The unlock button can be used to openthe power windows, refer to Opening/Closing Power Windows from Outside(page 3-28).
The operation indicator light flashes whenthe buttons are pressed.
Lock button
To lock the doors and the hatch/liftgate,press the lock button and the hazardwarning lights will flash once.
To confirm that all doors and the hatch/liftgate have been locked, press the lockbutton again within 5 seconds. If they areclosed and locked, the horn will sound.
NOTE
(Without theft-deterrent system)The hazard warning lights will flashonce to indicate that all doors and thehatch/liftgate are locked.(With theft-deterrent system)
l The hazard warning lights will notflash.
l The hazard warning lights only flashwhen the theft deterrent system isarmed, refer to the theft-deterrentsystem (page 3-39).
NOTE
l All doors and the hatch/liftgatecannot be locked when any door isopen and the key is in the ignitionswitch.
l Confirm that all doors and the hatch/liftgate are locked visually or audiblyby use of the double click.
Unlock button
To unlock the driver's door, press theunlock button and the hazard warninglights will flash twice.
To unlock all doors and the hatch/liftgate,press the unlock button again within 5seconds.
Knowing Your Mazda
Doors and Locks
3-5
Mazda6_8U66-EA-05F_Edition2 Page83Tuesday, July 26 2005 11:23 AM
Form No.8U66-EA-05F

Black plate (84,1)
NOTE
(Without theft-deterrent system)The hazard warning lights will flashtwice to indicate that all doors and thehatch/liftgate are unlocked.(With theft-deterrent system)
l The hazard warning lights will notflash.
l The hazard warning lights only flashwhen the theft deterrent system isturned off, refer to the theft-deterrentsystem (page 3-39).
NOTE
After unlocking with the transmitter, alldoors and the hatch/liftgate willautomatically lock if one of the doors orthe hatch/liftgate/trunk lid is not openedwithin about 30 seconds.
Trunk button
To open the trunk, press and hold thetrunk button until the trunk lid opens.
Panic button
If you witness from a distance someoneattempting to break into or damage yourvehicle, pressing the panic button willactivate the vehicle's alarm.
NOTE
The panic button will work whether anydoor is open or closed.
Turning on the alarm
Pressing the panic button for 1 second ormore will trigger the alarm for about 2minutes and 30 seconds, and thefollowing will occur:
l The horn sounds intermittently.
l The hazard warning lights flash.
Turning off the alarm
Press any button on the transmitter.
qTransmitter Maintenance
If the buttons on the transmitter areinoperable and the operation indicatorlight does not flash, the battery may bedead.Replace with a new battery before thetransmitter becomes unusable.
3-6
Knowing Your Mazda
Doors and Locks
Mazda6_8U66-EA-05F_Edition2 Page84Tuesday, July 26 2005 11:23 AM
Form No.8U66-EA-05F

Black plate (85,1)
CAUTIONl Install the battery with the positivepole ( ) facing down. Batteryleakage could occur if it is notinstalled correctly.
l When replacing the battery, becareful not to bend the electricalterminals or get oil on them. Also becareful not to get dirt in thetransmitter as it could be damaged.
l There is the danger of explosion ifthe battery is not correctly replaced.
l Replace only with the same typebattery (CR1620 or equivalent).
l Dispose of used batteries accordingto the following instructions.
l Insulate the plus and minusterminals of the battery usingcellophane or equivalent tape.
l Never disassemble.l Never throw the battery into fire
and/or water.l Never deform or crush.
Replacing the transmitter battery
1. Unfold the key (page 3-2).
2. Insert a screwdriver into the slot andpush the tab to remove the key fromthe transmitter.
Tab
3. Insert a screwdriver into the slot andgently pry open the transmitter.
4. Press the portion of the batteryindicated by A and remove the battery.
A
Knowing Your Mazda
Doors and Locks
3-7
Mazda6_8U66-EA-05F_Edition2 Page85Tuesday, July 26 2005 11:23 AM
Form No.8U66-EA-05F

Black plate (86,1)
NOTE
If it is difficult to remove the battery bypressing with a finger, use a screwdriverto press out the battery.
5. Put in the new battery (CR1620 orequivalent) with the positive pole ( )facing down.
6. Align the front and back covers andsnap the transmitter shut.
7. Install the key to the transmitter.
qService
If you have a problem with the keylessentry system, consult an AuthorizedMazda Dealer.
If your transmitter is lost or stolen, bringall remaining transmitters to anAuthorized Mazda Dealer as soon aspossible for a replacement and to makethe lost or stolen transmitter inoperative.
CAUTIONRadio equipment like this is governedby laws in the United States.Changes or modifications not expresslyapproved by the party responsible forcompliance could void the user'sauthority to operate the equipment.
3-8
Knowing Your Mazda
Doors and Locks
Mazda6_8U66-EA-05F_Edition2 Page86Tuesday, July 26 2005 11:23 AM
Form No.8U66-EA-05F

Black plate (87,1)
Door Locks
WARNINGUnattended Children and Pets:Leaving a child or an animalunattended in a parked vehicle isdangerous. In hot weather,temperatures inside a vehicle canbecome high enough to cause braindamage or even death. Always take allchildren and animals with you orleave a responsible person with them.
Keys and Children:Leaving children in a vehicle with thekey is dangerous. This could result insomeone being badly injured or evenkilled. They could play with powerwindows or other controls, or evenmake the vehicle move. Don't leave thekeys in your vehicle with children andkeep them in a place where yourchildren will not find or play withthem.
Unlocked Doors:Unlocked doors in a moving vehicleare dangerous. Passengers can fall outif a door is accidentally opened andcan more easily be thrown out in anaccident. So keep all doors lockedwhen driving.
WARNINGVehicles Left Unlocked:(Except sedan)Leaving your vehicle unlocked isdangerous as children could lockthemselves in a hot vehicle, whichcould result in death. Also, a vehicleleft unlocked becomes an easy targetfor thieves and intruders. Always closeall the windows, lock the doors andtake the key with you when leavingyour vehicle unattended.(Sedan)Leaving your vehicle unlocked isdangerous as children could lockthemselves in a hot vehicle, or becometrapped by climbing into the trunk,which could result in death. Also, avehicle left unlocked becomes an easytarget for thieves and intruders.Always close all the windows, lock thedoors and take the key with you whenleaving your vehicle unattended.
qLocking, Unlocking with Key
The driver's door can be locked/unlockedwith the key.Turn the key toward the front to unlock,toward the back to lock.
Lock
Unlock
Knowing Your Mazda
Doors and Locks
3-9
Mazda6_8U66-EA-05F_Edition2 Page87Tuesday, July 26 2005 11:23 AM
Form No.8U66-EA-05F

Black plate (88,1)
qLocking, Unlocking with Transmitter
The doors can be locked/unlocked byoperating the keyless entry systemtransmitter, refer to Keyless Entry System(page 3-3).
qLocking, Unlocking with Door-Lock Knob
To lock any door from the inside, push thedoor-lock knob.To unlock, pull it out.This does not operate the other doorlocks.
Lock
Unlock
To lock any door with the door-lock knobfrom the outside, push the door-lock knobto the lock position and close the door.This does not operate the other doorlocks.
Door-lock knob
NOTE
l Lockout prevention keeps you fromlocking the driver's door with the keyin the ignition switch.If you try to lock the driver's doorwhen the key is in the ignition switchand any door is open, the door lockimmediately unlocks.
l When locking the doors this way, becareful not to leave the key inside thevehicle.
qPower Door Locks
Vehicle lock-out prevention
The vehicle lock-out prevention featureprevents you from locking yourself out ofthe vehicle. With the key in the ignitionswitch, all doors and the hatch/liftgate willautomatically unlock if they are lockedusing the power door locks with any dooropen.
Locking, unlocking with key
All doors and the hatch/liftgate lockautomatically when the driver's door islocked with the key. All doors and thehatch/liftgate unlock when the driver'sdoor is unlocked and the key is held in theunlock position for one second or longer.
Lock
Unlock
3-10
Knowing Your Mazda
Doors and Locks
Mazda6_8U66-EA-05F_Edition2 Page88Tuesday, July 26 2005 11:23 AM
Form No.8U66-EA-05F

Black plate (89,1)
NOTE
Holding the key in the unlockedposition in the driver's door lock forabout a second unlocks all doors andthe hatch/liftgate. To unlock only thedriver's door, insert the key into thedriver's door lock and turn the keybriefly to the unlock position and thenimmediately return it to the centerposition.
Locking, unlocking with door-lockswitch
All doors and the hatch/liftgate lockautomatically when LOCK is pushed.They all unlock when the unmarked partof the door-lock switch is pushed.
Lock
Unlock
qRear Door Child Safety Locks
These locks are intended to help preventchildren from accidentally opening therear doors. Use them both whenever achild rides in the vehicle.
If you slide the child safety lock to thelock position before closing that door, thedoor cannot be opened from the inside.The door can be opened only by pullingthe outside handle.
Unlock
Lock
Knowing Your Mazda
Doors and Locks
3-11
Mazda6_8U66-EA-05F_Edition2 Page89Tuesday, July 26 2005 11:23 AM
Form No.8U66-EA-05F

Black plate (90,1)
Hatch (5-Door)
WARNINGOpen Hatch and Exhaust Gas:Exhaust gas in the cabin of a vehicleis dangerous. This gas contains CO(carbon monoxide), which is colorless,odorless, and highly poisonous. Ifinhaled, it can cause loss ofconsciousness and death. Becauseexhaust gas can get into the cabinthrough an open hatch, keep the hatchclosed when driving.
qLocking, Unlocking with Key
The hatch can be locked/unlocked byinserting the key into the driver's door keyslot, refer to Power Door Locks (page3-10).
qLocking, Unlocking with Transmitter
The hatch can be locked/unlocked byoperating the keyless entry systemtransmitter, refer to Keyless Entry System(page 3-3).
qLocking, Unlocking with Door-Lock Switch
The hatch can be locked/unlocked byoperating the door-lock switch, refer toPower Door Locks (page 3-10).
qOpening and Closing the Hatch
To open the hatch, pull up on the handle.
NOTE
If the vehicle battery is dead or there isa malfunction in the electrical systemand the hatch cannot be unlocked,perform the following manualprocedure as an emergency measure tounlock it:
1. Remove the cap on the interiorsurface of the hatch with a flatheadscrewdriver.
Cap
3-12
Knowing Your Mazda
Doors and Locks
Mazda6_8U66-EA-05F_Edition2 Page90Tuesday, July 26 2005 11:23 AM
Form No.8U66-EA-05F

Black plate (91,1)
NOTE
2. Turn the lever to the right to unlockthe hatch.
Lever
After performing this emergencymeasure, have the vehicle inspected atan Authorized Mazda Dealer as soon aspossible.
To close, use both hands to push the hatchdown until the lock snaps shut. Do notslam it. Pull up on the hatch to make sureit is secure.
qLuggage Strap
The luggage compartment can beaccessed by opening the hatch when thestraps are attached to the sides of thehatch.
Strap
qLuggage Compartment Cover
WARNINGPlacing Cargo on the Cover:Placing luggage or other cargo on topof the luggage compartment cover isdangerous. During sudden braking ora collision, the cargo could become aprojectile that could hit and injuresomeone. Don't place anything on topof the cover.
This cover can be removed for moreroom. To do this, just unfasten the straps;then lift and pull it out.
Knowing Your Mazda
Doors and Locks
3-13
Mazda6_8U66-EA-05F_Edition2 Page91Tuesday, July 26 2005 11:23 AM
Form No.8U66-EA-05F
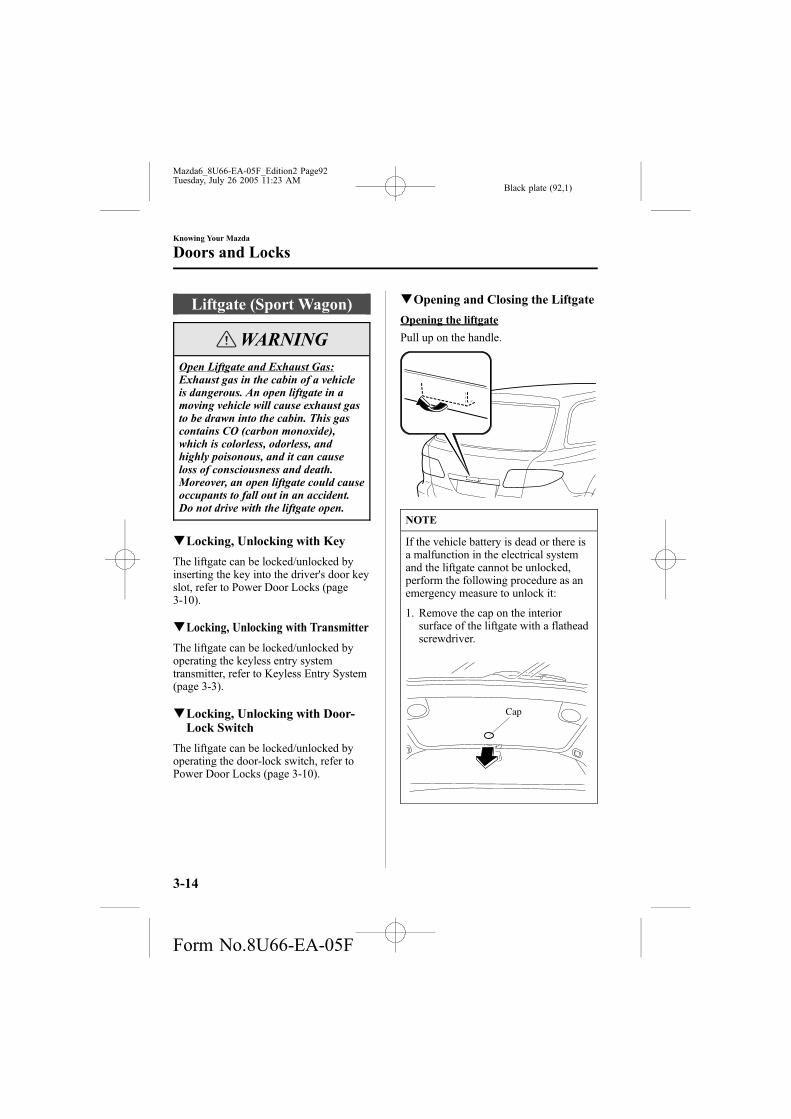
Black plate (92,1)
Liftgate (Sport Wagon)
WARNINGOpen Liftgate and Exhaust Gas:Exhaust gas in the cabin of a vehicleis dangerous. An open liftgate in amoving vehicle will cause exhaust gasto be drawn into the cabin. This gascontains CO (carbon monoxide),which is colorless, odorless, andhighly poisonous, and it can causeloss of consciousness and death.Moreover, an open liftgate could causeoccupants to fall out in an accident.Do not drive with the liftgate open.
qLocking, Unlocking with Key
The liftgate can be locked/unlocked byinserting the key into the driver's door keyslot, refer to Power Door Locks (page3-10).
qLocking, Unlocking with Transmitter
The liftgate can be locked/unlocked byoperating the keyless entry systemtransmitter, refer to Keyless Entry System(page 3-3).
qLocking, Unlocking with Door-Lock Switch
The liftgate can be locked/unlocked byoperating the door-lock switch, refer toPower Door Locks (page 3-10).
qOpening and Closing the Liftgate
Opening the liftgate
Pull up on the handle.
NOTE
If the vehicle battery is dead or there isa malfunction in the electrical systemand the liftgate cannot be unlocked,perform the following procedure as anemergency measure to unlock it:
1. Remove the cap on the interiorsurface of the liftgate with a flatheadscrewdriver.
Cap
3-14
Knowing Your Mazda
Doors and Locks
Mazda6_8U66-EA-05F_Edition2 Page92Tuesday, July 26 2005 11:23 AM
Form No.8U66-EA-05F

Black plate (93,1)
NOTE
2. Turn the lever to the right to unlockthe liftgate.
Lever
After performing this emergencymeasure, have the vehicle inspected atan Authorized Mazda Dealer as soon aspossible.
Closing the liftgate
Use both hands to push the liftgate downuntil the lock snaps shut. Do not slam it.Pull up on the liftgate to make sure it issecurely latched.
qLuggage Compartment Cover
Use the luggage compartment cover toconceal cargo or luggage.
WARNINGPlacing Cargo on the Cover:Placing luggage or other cargo on topof the luggage compartment cover isdangerous. During sudden braking ora collision, the cargo could become aprojectile that could hit and injuresomeone. Don't place anything on topof the cover.
CAUTIONMake sure the luggage compartmentcover is firmly secured. If it is notfirmly secured, it could unexpectedlydisengage resulting in injury.
Installing the cover
1. Set the left end of the retainer bar intothe notch on the left side of the luggagecompartment.
Retainer bar
Notch
2. Set the right side of the retainer baronto the retainer loop on the right sideof the luggage compartment.
Retainerloop
Knowing Your Mazda
Doors and Locks
3-15
Mazda6_8U66-EA-05F_Edition2 Page93Tuesday, July 26 2005 11:23 AM
Form No.8U66-EA-05F

Black plate (94,1)
3. Slowly pull out the cover towards youand insert the cover ends into the hookretainers at the rear of the vehicle.
Hookretainer
Removing the cover
1. Remove the cover ends from the hookretainers and slowly roll up the cover.
NOTE
To fully retract and protect the cover,guide the cover all the way into theretainer.
Tab
2. Press and hold the button on the rightside of the retainer bar and lift the bar.
Button
3. Remove the left end of the retainer barfrom the notch.
qLuggage Compartment Net
The luggage compartment net can be usedas a compartment separator or to keepanimals in the back.
CAUTIONMake sure the net is firmly secured. If itis not firmly secured, it couldunexpectedly disengage resulting ininjury.
3-16
Knowing Your Mazda
Doors and Locks
Mazda6_8U66-EA-05F_Edition2 Page94Tuesday, July 26 2005 11:23 AM
Form No.8U66-EA-05F
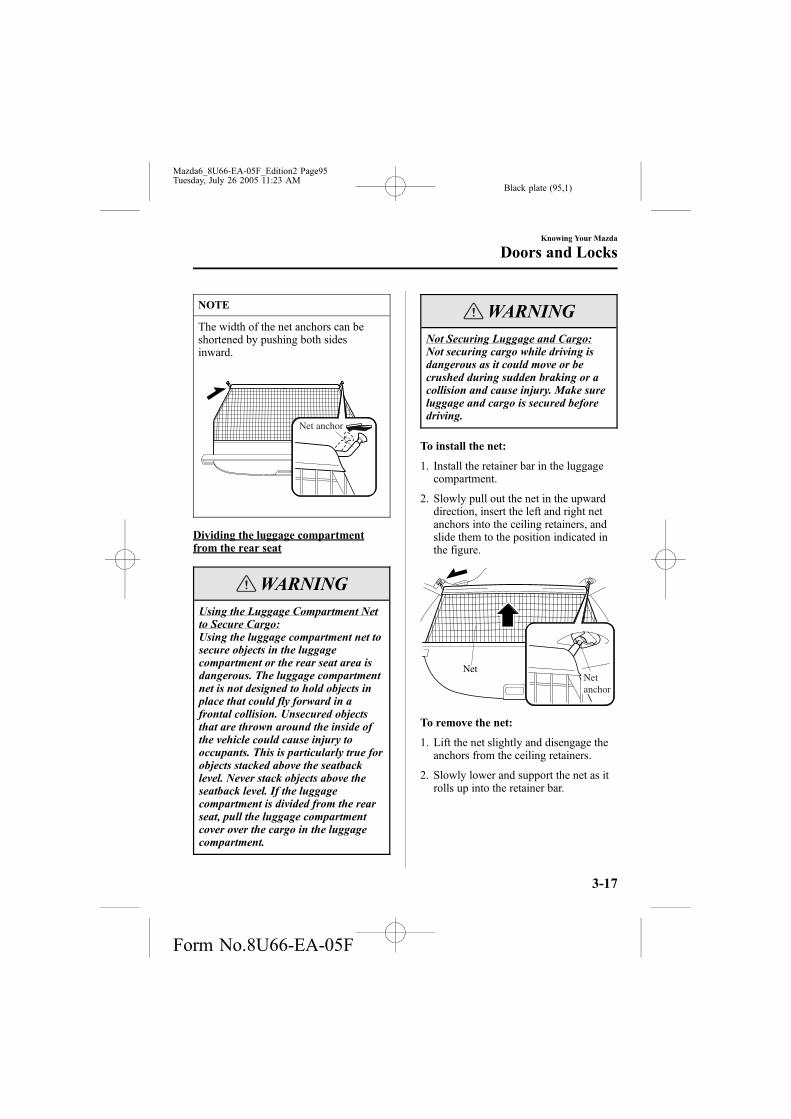
Black plate (95,1)
NOTE
The width of the net anchors can beshortened by pushing both sidesinward.
Net anchor
Dividing the luggage compartmentfrom the rear seat
WARNINGUsing the Luggage Compartment Netto Secure Cargo:Using the luggage compartment net tosecure objects in the luggagecompartment or the rear seat area isdangerous. The luggage compartmentnet is not designed to hold objects inplace that could fly forward in afrontal collision. Unsecured objectsthat are thrown around the inside ofthe vehicle could cause injury tooccupants. This is particularly true forobjects stacked above the seatbacklevel. Never stack objects above theseatback level. If the luggagecompartment is divided from the rearseat, pull the luggage compartmentcover over the cargo in the luggagecompartment.
WARNINGNot Securing Luggage and Cargo:Not securing cargo while driving isdangerous as it could move or becrushed during sudden braking or acollision and cause injury. Make sureluggage and cargo is secured beforedriving.
To install the net:
1. Install the retainer bar in the luggagecompartment.
2. Slowly pull out the net in the upwarddirection, insert the left and right netanchors into the ceiling retainers, andslide them to the position indicated inthe figure.
Netanchor
Net
To remove the net:
1. Lift the net slightly and disengage theanchors from the ceiling retainers.
2. Slowly lower and support the net as itrolls up into the retainer bar.
Knowing Your Mazda
Doors and Locks
3-17
Mazda6_8U66-EA-05F_Edition2 Page95Tuesday, July 26 2005 11:23 AM
Form No.8U66-EA-05F

Black plate (96,1)
CAUTIONWhen disengaging the net anchors, holdthe top of the net firmly in your hand. Ifyou lose control of the net, it willautomatically roll up in an uncontrolledmanner and could cause injury.
Dividing the luggage compartmentfrom the front seats
WARNINGUsing the Luggage Compartment Netto Secure Cargo:Using the luggage compartment net tosecure objects in the luggagecompartment or the rear seat area isdangerous. The luggage compartmentnet is not designed to hold objects inplace that could fly forward in afrontal collision. Unsecured objectsthat are thrown around the inside ofthe vehicle could cause injury tooccupants. This is particularly true forobjects stacked above the seatbacklevel. Never stack objects above theseatback level. If the luggagecompartment is divided from the rearseat, pull the luggage compartmentcover over the cargo in the luggagecompartment.
Not Securing Luggage and Cargo:Not securing cargo while driving isdangerous as it could move or becrushed during sudden braking or acollision and cause injury. Make sureluggage and cargo is secured beforedriving.
CAUTIONMoving the rear seatbacks with theretainer bar mounted could scratch theinterior of the vehicle. The retainer barmust be removed from the back of theseatbacks before raising the seatbacks.
To install the net:
1. Fold down the rear seatback (page2-12).
2. Remove the retainer bar from the rearseatback position.
3. Insert the retainer bar anchors into theleft side of each rear seatback retainer(back of the seatback).
Retainer bar
Rear seatRetainer
3-18
Knowing Your Mazda
Doors and Locks
Mazda6_8U66-EA-05F_Edition2 Page96Tuesday, July 26 2005 11:23 AM
Form No.8U66-EA-05F

Black plate (97,1)
4. Slide the retainer bar in the directionindicated in the figure, and engage theanchors into the seatback retainers.
Retainer bar
5. Slowly pull out the net in the upwarddirection, insert the left and right netanchors into the ceiling retainers, andslide them to the position indicated inthe figure.
Netanchor
Net
To remove the net:
1. Lift the net slightly and disengage thenet anchors from the ceiling retainers.
2. Slowly lower and support the net as itrolls up into the retainer bar.
3. Remove the retainer bar in the reverseorder of installation.
CAUTIONWhen disengaging the net anchors, holdthe top of the net firmly in your hand. Ifyou lose control of the net, it willautomatically roll up in an uncontrolledmanner and could cause injury.
Knowing Your Mazda
Doors and Locks
3-19
Mazda6_8U66-EA-05F_Edition2 Page97Tuesday, July 26 2005 11:23 AM
Form No.8U66-EA-05F

Black plate (98,1)
Trunk Lid (Sedan)
WARNINGOpen Trunk and Exhaust Gas:Exhaust gas in the cabin of a vehicleis dangerous. This gas contains CO(carbon monoxide), which is colorless,odorless, and highly poisonous. Ifinhaled, it can cause loss ofconsciousness and death. Becauseexhaust gas can get into the cabinthrough an open trunk, keep the trunkclosed when driving.
qOpening and Closing the Trunk Lid
WARNINGTrunk Access and Children:Leaving the trunk lid open or leavingchildren in the vehicle with the keys isdangerous. Children could open thetrunk lid and climb inside resulting inpossible injury or death from heatexposure. Close the trunk lid, lock therear seatbacks and do not allowchildren to play inside the vehicle.
Unattended Children and Pets:Leaving children or animalsunattended in a parked vehicle isdangerous. Babies left sleeping andkids who lock themselves in cars ortrunks can die very quickly from heatprostration. Don't leave your childrenor pets alone in a car at any time.Don't leave the car, the rear foldingseats or the trunk unlocked. Alwayskeep the car from being a temptingplace to play by locking rear seats,doors and the trunk, and keeping thekeys where children can not play withthem.
CAUTIONFor vehicles equipped with a rearspoiler, do not lift the trunk lid by thespoiler. Lifting up the trunk lid by therear spoiler could cause damage to therear spoiler and the trunk lid.
3-20
Knowing Your Mazda
Doors and Locks
Mazda6_8U66-EA-05F_Edition2 Page98Tuesday, July 26 2005 11:23 AM
Form No.8U66-EA-05F
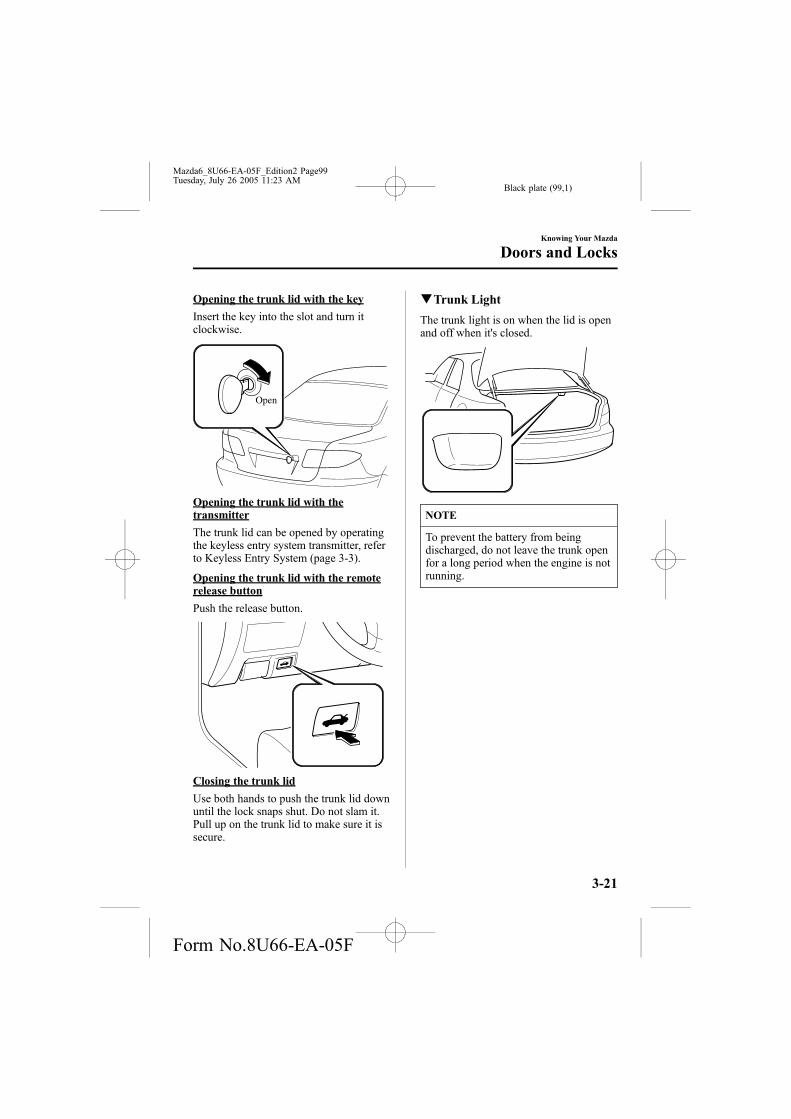
Black plate (99,1)
Opening the trunk lid with the key
Insert the key into the slot and turn itclockwise.
Open
Opening the trunk lid with thetransmitter
The trunk lid can be opened by operatingthe keyless entry system transmitter, referto Keyless Entry System (page 3-3).
Opening the trunk lid with the remoterelease button
Push the release button.
Closing the trunk lid
Use both hands to push the trunk lid downuntil the lock snaps shut. Do not slam it.Pull up on the trunk lid to make sure it issecure.
qTrunk Light
The trunk light is on when the lid is openand off when it's closed.
NOTE
To prevent the battery from beingdischarged, do not leave the trunk openfor a long period when the engine is notrunning.
Knowing Your Mazda
Doors and Locks
3-21
Mazda6_8U66-EA-05F_Edition2 Page99Tuesday, July 26 2005 11:23 AM
Form No.8U66-EA-05F

Black plate (100,1)
Inside Trunk ReleaseLever (Sedan)
Your vehicle is equipped with an insidetrunk release lever that provides a meansof escape for children and adults in theevent they become locked inside thetrunk.
No matter how careful adults might bewith keys and locking their cars, parentsshould be aware that children may betempted to play around vehicles and usethe trunk as a hiding place.
Adults are advised to familiarizethemselves with the operation andlocation of the inside trunk release leverso that all children can be told about it inan appropriate way, keeping in mind thatmost vehicles don't have such levers.
WARNINGTrunk Access and Children:Leaving the trunk lid open or leavingchildren in the vehicle with the keys isdangerous. Children could open thetrunk lid and climb inside resulting inpossible injury or death from heatexposure. Close the trunk lid, lock therear seatbacks and do not allowchildren to play inside the vehicle.
Unattended Children and Pets:Leaving children or animalsunattended in a parked vehicle isdangerous. Babies left sleeping andkids who lock themselves in cars ortrunks can die very quickly from heatprostration. Don't leave your childrenor pets alone in a car at any time.Don't leave the car, the rear foldingseats or the trunk unlocked. Alwayskeep the car from being a temptingplace to play by locking rear seats,doors and the trunk, and keeping thekeys where children can not play withthem.
3-22
Knowing Your Mazda
Doors and Locks
Mazda6_8U66-EA-05F_Edition2 Page100Tuesday, July 26 2005 11:23 AM
Form No.8U66-EA-05F

Black plate (101,1)
qOpening the Trunk Lid from theInside
Slide the inside trunk release lever in thedirection of the arrow. The lever is madeof material that will glow for hours in thedarkness of the trunk following a briefexposure to ambient light.
The inside trunk release lever is locatedon the inside of the trunk lid.
Power WindowsThe ignition switch must be in the ONposition for the power windows tooperate.
WARNINGClosing Power Windows:Closing power windows aredangerous. A person's hands, head, oreven neck could be caught by thewindow and result in serious injury oreven death.This warning applies especially tochildren. Make sure the opening isclear before closing a window.
Children and Power Windows:Leaving the power window switchesunlocked while children are in thevehicle is dangerous. Power windowswitches that are not locked with thepower window lock switch would allowchildren to operate power windowsunintentionally which could result inserious injury if a child's hands, heador neck becomes caught by thewindow. Always lock all passengerpower windows with the powerwindow lock switch on the driver'sside while children are in the vehicle,and never allow children to play withpower window switches.
CAUTIONTo prevent burning out the fuse anddamaging the power window system,don't open or close more than threewindows at once.
Knowing Your Mazda
Doors and Locks
3-23
Mazda6_8U66-EA-05F_Edition2 Page101Tuesday, July 26 2005 11:23 AM
Form No.8U66-EA-05F

Black plate (102,1)
qOperating the Front Power Windows
NOTE
l Each passenger power window canbe operated with each door switchwhen the power window lock switchon the driver's door is in theunlocked position (page 3-27).
l Each passenger power window canalso be operated by the powerwindow master control switches onthe driver's door.
Master control switchesLeft front window
Left rear window
Right front window
Right rear window
l The following functions can beperformed for the front powerwindows using the power windowmaster control switches on thedriver's door or front passenger'sdoor switch.
l Manual opening/closingl Auto-opening/closingl Two-step down function
Manual opening/closing
To open a power window to the desiredposition, lightly hold down the switch.To close the power window to the desiredposition, lightly pull up the switch.
Open
Close
Master control switches
Left front window
Right front window
Open
Close
Front passenger switch
Auto-opening/closing
To fully open a power windowautomatically, press the switch completelydown.To fully close the power windowautomatically, pull the switch completelyup.
To stop the power window partway, pullor press the switch in the oppositedirection and then release it.
3-24
Knowing Your Mazda
Doors and Locks
Mazda6_8U66-EA-05F_Edition2 Page102Tuesday, July 26 2005 11:23 AM
Form No.8U66-EA-05F

Black plate (103,1)
NOTE
If the battery had been disconnectedduring vehicle maintenance or for otherreasons, the power windows will notfully open and close automatically. Re-initialization of the automatic functionon the front passenger's power windowcannot be performed using the mastercontrol switches. Carry out thefollowing procedure on each doorswitch to resume operation:
1. Turn the ignition switch to the ONposition.
2. Press the switch and fully open thepower window.
3. Pull up the switch to fully close thepower window and continue holdingthe switch for about 2 seconds afterthe window fully closed.
After the system has been re-initialized,the front passenger's power window canbe fully opened or closed automaticallyusing the master control switches.
Two-step down function
With the power window completelyclosed, press the switch lightly and it willopen and stop about 3 cm (1 in) from thetop.If you continue to press and hold theswitch, the window will resume openingall the way.
NOTE
Pressing the power window switch oncewhen the window is fully closed willonly open it about 3 cm (1 in) to allowconvenient ventilation of the cabin.
Canceling the two-step down function
To cancel the two-step down function forthe front power windows, carry out thefollowing procedure using the mastercontrol switches.
1. Turn the ignition switch to the ONposition and complete the followingprocedure within 5 seconds:Press the power window switch 2 timesfirmly, then pull it 2 times firmly.
Right front window
Master control switches
Left front window
2. Turn the ignition switch to the LOCKposition.
3. With the ignition switch in the LOCKposition, and within 40 seconds, turnthe ignition switch to the ON positionand complete the following procedurewithin 5 seconds:Press the power window switch 2 timesfirmly, then pull 2 times firmly.
Knowing Your Mazda
Doors and Locks
3-25
Mazda6_8U66-EA-05F_Edition2 Page103Tuesday, July 26 2005 11:23 AM
Form No.8U66-EA-05F

Black plate (104,1)
NOTE
l The two-step down function cannotbe canceled if the procedure is notcompleted within the specified times,or the procedure is changed alongthe way. To redo the procedure, firstturn the ignition switch to the LOCKposition and proceed from thebeginning.
l If you are unable to cancel thefunction despite doing thecancellation procedure, consult anAuthorized Mazda Dealer.
Restoring the two-step down function
With the two-step down function in thecanceled state, repeat the previousprocedure for canceling the function oneach door switch and it will be restored.
NOTE
If you are unable to restore the functiondespite doing the restore procedure,consult an Authorized Mazda Dealer.
Jam-safe window
If a person's hands, head or an objectblocks the window during the manualclosing operation or the auto-closingoperation, the window will stop and openhalfway.
WARNINGBlocking the Power Window:Blocking the power window justbefore it reaches the fully closedposition or while fully holding up thepower window switch is dangerous.In this case, the jam-safe functioncannot prevent the window fromstopping. If fingers are caught, seriousinjuries could occur. Make surenothing blocks the window just beforeit reaches the fully closed position orwhile fully holding up the powerwindow switch.
NOTE
Depending on driving conditions, aclosing power window could stop andstart opening when the window feels ashock that is similar to somethingblocking it.In the event the jam-safe functionactivates and the power window cannotbe closed automatically using the auto-opening method, pull and hold theswitch fully and the window will close.
Engine-off power window operation
The power window can be operated about40 seconds after the ignition switch isturned from the ON position to the ACCor LOCK position with all doors closed. Ifeither front door is opened, the powerwindow will be inoperable.
3-26
Knowing Your Mazda
Doors and Locks
Mazda6_8U66-EA-05F_Edition2 Page104Tuesday, July 26 2005 11:23 AM
Form No.8U66-EA-05F

Black plate (105,1)
NOTE
l For engine-off operation of thepower window, the switch must beheld up firmly throughout windowclosure because the auto-closingfunction will be inoperable.
l The two-step down function isinoperable during engine-offoperation.
qOperating the Rear Power Windows
The power windows may be operatedwhen the power window lock switch onthe driver's door is in the unlockedposition.
A rear power windows may be opened orclosed using the power window mastercontrol switches on the driver's door.
Left rear window
Power window lock switch
Right rear window
To open the power window to the desiredposition, hold down the switch.To close the power window to the desiredposition, pull up the switch.
Close
Open
qPower Window Lock Switch
With the lock switch in the unlockedposition, all power windows on each doorcan be operated.
With the lock switch in the lockedposition, only the driver's side powerwindow can be operated.
Locked position
Unlocked position
Knowing Your Mazda
Doors and Locks
3-27
Mazda6_8U66-EA-05F_Edition2 Page105Tuesday, July 26 2005 11:23 AM
Form No.8U66-EA-05F

Black plate (106,1)
WARNINGUnintentional Window Operation:Unintentional power windowoperation is dangerous. A person'shands, head, or neck could be caughtby the window and result in seriousinjury. Unless a passenger needs tooperate a power window, keep thepower window lock switch in thelocked position.
NOTE
When the power window lock switch isin the locked position, the light on frontpassenger's power window switch turnsoff. The light may be difficult to seedepending on the surroundingbrightness.
Opening/Closing the PowerWindows from Outside
Front door windows can be opened orclosed from outside the vehicle after thedoors and the hatch/liftgate/trunk lid areclosed.
WARNINGClosing Power Windows:Closing power windows aredangerous. A person's hands, head, oreven neck could be caught by thewindow and result in serious injury oreven death.This warning applies especially tochildren. Make sure the opening isclear before closing a window.
NOTE
The power windows cannot be openedor closed from outside the vehicle underthe following condition:
l A door or the hatch/liftgate/trunk lidis opened.
l The key is inserted into the ignitionswitch.
3-28
Knowing Your Mazda
Doors and Locks
Mazda6_8U66-EA-05F_Edition2 Page106Tuesday, July 26 2005 11:23 AM
Form No.8U66-EA-05F

Black plate (107,1)
qAuto-Opening
Because nobody likes getting into a veryhot car, we have introduced a way to get ahead start on cooling it, even before youput your seat belts on and insert your keyin the ignition. If you see the vehicle is ina secure area, you can open the two frontwindows as you approach the vehicle toget the air moving before you even stepinto the hot vehicle.
WARNINGAuto-Opening Windows and Security:Do not let children play with yourkeys. If they open the window withoutyour knowing, the open windows arean even bigger invitation to a thiefthan leaving the doors unlocked. Usethe Auto-Window function only whenyou can see the vehicle and it is in asecure area.
The windows can be opened forventilating the cabin before getting in thevehicle.
With unlock button (with keyless entrysystem)
Press the unlock button on the transmitterand hold it. After the doors and the hatch/liftgate are unlocked, the windows fullyopen automatically.
Sedan
Lock button
Unlock button
Trunk button
Panic button
5-Door/Sport Wagon
Lock button
Unlock button
Panic button
To stop this operation, press the unlockbutton.
NOTE
The window opening operation also canbe stopped by pressing the lock button,panic button or trunk button. However,pressing these buttons will operate theirfunctions.
With key
1. Insert the key in the driver's door keycylinder.
Knowing Your Mazda
Doors and Locks
3-29
Mazda6_8U66-EA-05F_Edition2 Page107Tuesday, July 26 2005 11:23 AM
Form No.8U66-EA-05F

Black plate (108,1)
2. Turn the key toward the front and holdit. After the doors and the hatch/liftgateare unlocked, the windows fully openautomatically.
Open
To stop this operation, turn the key to thecenter position, then turn it toward thefront again.
NOTE
The window opening operation also canbe stopped by turning the key towardthe back. However, the doors and thehatch/liftgate will lock.
qClosing
The windows can be closed in case theyare left open after getting out of thevehicle.
With key
1. Insert the key in the driver's door keycylinder.
2. Turn the key toward the back and holdit. After the doors and the hatch/liftgateare locked, the windows close whilethe key is turned.
Close
3-30
Knowing Your Mazda
Doors and Locks
Mazda6_8U66-EA-05F_Edition2 Page108Tuesday, July 26 2005 11:23 AM
Form No.8U66-EA-05F

Black plate (109,1)
Fuel-Filler Lid and Cap
WARNINGFuel Spray:Fuel spray is dangerous. Fuel canburn skin and eyes and cause illness ifingested. Fuel spray is released whenthere is pressure in the fuel tank andthe fuel cap is removed too quickly.When removing the fuel cap, loosenthe cap slightly and wait for anyhissing to stop. Then remove it.
Fuel Vapor:Fuel vapor is dangerous. It could beignited by sparks or flames causingserious burns and injuries. Beforerefueling, stop the engine, and alwayskeep sparks and flames away from thefiller neck. Additionally, use of theincorrect fuel filler cap or not using afuel filler cap may result in fuel leak,which could result in serious burns ordeath in an accident.
CAUTIONAlways use only a genuine Mazda fuelcap or an approved equivalent,available at an Authorized MazdaDealer. The wrong cap can result in aserious malfunction of the fuel andemission control systems. It may alsocause the check engine light in theinstrument cluster to illuminate.
qFuel-Filler Lid
To open, pull up the remote fuel-filler lidrelease.
Remote fuel-filler lid release
qFuel-Filler Cap
To remove the filler cap, turn itcounterclockwise.
To close the filler cap, turn it clockwiseuntil it clicks.
Close
Open
Knowing Your Mazda
Doors and Locks
3-31
Mazda6_8U66-EA-05F_Edition2 Page109Tuesday, July 26 2005 11:23 AM
Form No.8U66-EA-05F

Black plate (110,1)
CAUTIONMake sure the fuel-filler cap istightened securely. The check enginelight may illuminate when the cap isn'ttightened securely. If the light remainson (even after you have tightened thecap securely, driven, and restarted theengine several times), it may indicate adifferent problem. Contact anAuthorized Mazda Dealer as soon aspossible.
Hood
WARNINGClosed and Securely Locked Hood:A hood that is not closed and securelylocked is dangerous as it could flyopen while the vehicle is moving andblock the driver's vision which couldresult in a serious accident. Alwayscheck that the hood is closed andsecurely locked.
qOpening the Hood
1. With the vehicle parked, pull therelease handle to unlock the hood.
3-32
Knowing Your Mazda
Doors and Locks
Mazda6_8U66-EA-05F_Edition2 Page110Tuesday, July 26 2005 11:24 AM
Form No.8U66-EA-05F

Black plate (111,1)
2. Slide the hood latch to the right and liftthe hood.
3. Grasp the support rod and secure it inthe stay hole indicated by the arrow tohold the hood open.
ClipSupport rod
qClosing the Hood
1. Check under the hood area to makecertain all filler caps are in place andall loose items (e.g. tools, oilcontainers, etc.) have been removed.
2. Insert the support rod in its clip whileholding up the hood. Verify that thesupport rod is secured in the clip beforeclosing the hood.
3. Close the hood so that it locks securely.
Moonroofí
The moonroof can be opened or closedelectrically only when the ignition switchis in the ON position.
Tilt switch
Slide switch
WARNINGExtending the Head or Arms Throughthe Moonroof:Extending the head, arms, or otherparts of the body through themoonroof is dangerous. The head orarms could hit something while thevehicle is moving. This could causeserious injury or death. Don't letpassengers stand up or extendanything through the open moonroofwhile the vehicle is moving.
Closing the Moonroof:A closing moonroof is dangerous. Thehands, head, or even neck of a person―especially a child― could be caughtin it as it closes, causing serious injuryor even death. Make sure the openingis clear before closing the moonroof.
Knowing Your Mazda
Doors and Locks
3-33íSome models.
Mazda6_8U66-EA-05F_Edition2 Page111Tuesday, July 26 2005 11:24 AM
Form No.8U66-EA-05F
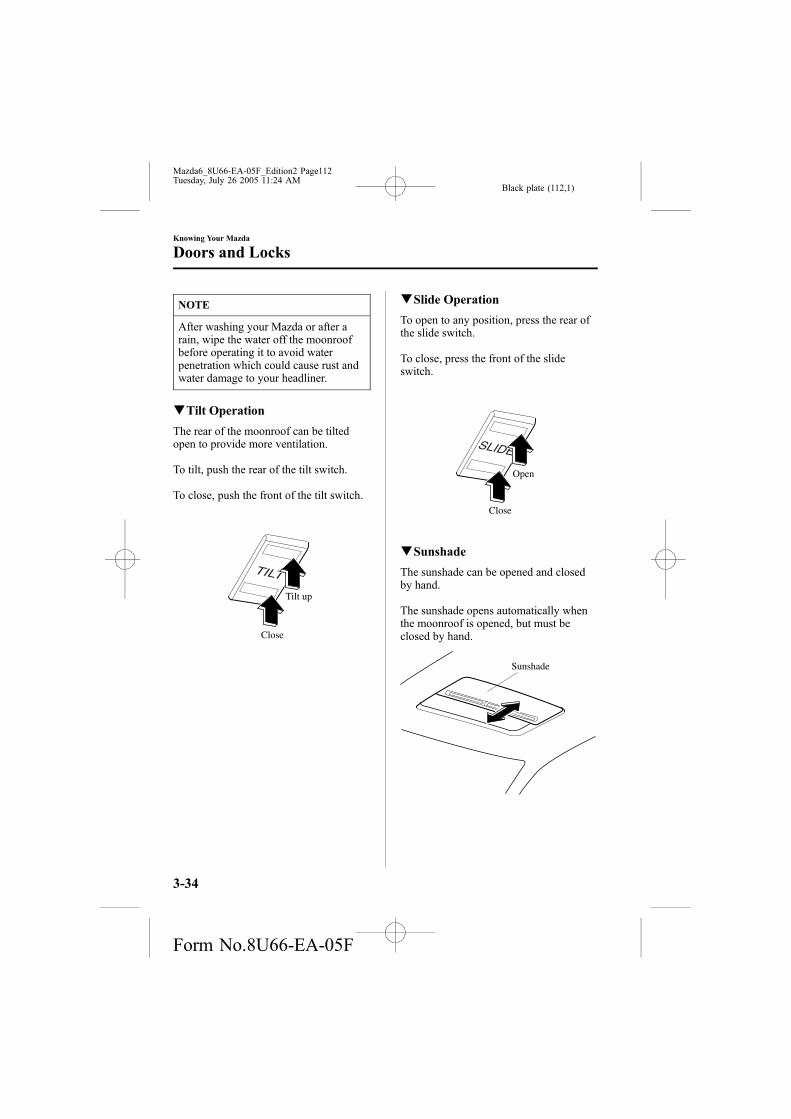
Black plate (112,1)
NOTE
After washing your Mazda or after arain, wipe the water off the moonroofbefore operating it to avoid waterpenetration which could cause rust andwater damage to your headliner.
qTilt Operation
The rear of the moonroof can be tiltedopen to provide more ventilation.
To tilt, push the rear of the tilt switch.
To close, push the front of the tilt switch.
Tilt up
Close
qSlide Operation
To open to any position, press the rear ofthe slide switch.
To close, press the front of the slideswitch.
Open
Close
qSunshade
The sunshade can be opened and closedby hand.
The sunshade opens automatically whenthe moonroof is opened, but must beclosed by hand.
Sunshade
3-34
Knowing Your Mazda
Doors and Locks
Mazda6_8U66-EA-05F_Edition2 Page112Tuesday, July 26 2005 11:24 AM
Form No.8U66-EA-05F

Black plate (113,1)
CAUTIONThe sunshade doesn't tilt. To avoiddamaging the sunshade, don't push upon it.
Knowing Your Mazda
Doors and Locks
3-35
Mazda6_8U66-EA-05F_Edition2 Page113Tuesday, July 26 2005 11:24 AM
Form No.8U66-EA-05F

Black plate (114,1)
Immobilizer SystemThe immobilizer system allows the engineto start only with a key the systemrecognizes.
If someone attempts to start the enginewith an unrecognized key, the engine willnot start, thereby helping to prevent thetheft of your vehicle.
CAUTIONl Radio equipment like this isgoverned by laws in the UnitedStates.Changes or modifications notexpressly approved by the partyresponsible for compliance couldvoid the user's authority to operatethe equipment.
l To avoid damage to the key, do not:
l Drop the key.l Get the key wet.l Expose the key to any kind of
magnetic field.l Expose the key to high
temperatures on places such as thedashboard or hood, under directsunlight.
CAUTIONWhen starting the engine do not allowthe following, as the engine may notstart due to the electronic signal fromthe ignition key not being transmittedcorrectly.
l A key ring rests on the key grip.
l Metal parts of other keys or metalobjects touch the key grip.
l Spare keys or keys for other vehiclesequipped with an immobilizersystem touch or come near the keygrip.
l Devices for electronic purchases, orsecurity passage touch or come nearthe key.
3-36
Knowing Your Mazda
Security System
Mazda6_8U66-EA-05F_Edition2 Page114Tuesday, July 26 2005 11:24 AM
Form No.8U66-EA-05F

Black plate (115,1)
NOTE
l (U.S.A.)This device complies with Part 15 ofthe FCC Rules. Operation is subjectto the following two conditions: (1)this device may not cause harmfulinterference, and (2) this device mustaccept any interference received,including interference that may causeundesired operation.
l (CANADA)This device complies with RSS-210of Industry CANADA. Operation issubject to the following twoconditions: (1) this device may notcause interference, and (2) thisdevice must accept any interference,including interference that may causeundesired operation of the device.
qOperation
Arming
The system is armed when the ignitionswitch is turned from the ON to the ACCposition.The security indicator light in theinstrument panel flashes every 2 secondsuntil the system is disarmed.
Disarming
The system is disarmed when the ignitionswitch is turned to the ON position withthe correct ignition key.The security indicator light illuminates forabout 3 seconds and goes out.
If the engine doesn't start with the correctignition key, and the security indicatorlight keeps illuminating or flashing, thesystem may have a malfunction. Consultan Authorized Mazda Dealer.
NOTE
l If the security indicator light comeson and stays on when the ignitionswitch is turned to the ON position,the engine will not start.
l Signals from a TVor radio station, orfrom a transceiver or a mobiletelephone, could interfere with yourimmobilizer system. If you are usingthe proper key and your engine failsto start, check the security indicatorlight. If it is flashing, remove theignition key and wait 2 seconds ormore, then reinsert it and try startingthe engine again. If it doesn't startafter 3 or more tries, contact anAuthorized Mazda Dealer.
l If the security indicator light flashescontinuously while you are driving,don't shut off the engine. Go to anAuthorized Mazda Dealer and haveit checked. If you shut off the enginewhile the light is flashing you won'tbe able to restart it.
Knowing Your Mazda
Security System
3-37
Mazda6_8U66-EA-05F_Edition2 Page115Tuesday, July 26 2005 11:24 AM
Form No.8U66-EA-05F

Black plate (116,1)
NOTE
l Since the electronic codes are resetwhen repairing the immobilizersystem, the keys are needed. Bringall the existing keys to an AuthorizedMazda Dealer.
qMaintenance
If you have a problem with theimmobilizer system or the key, consult anAuthorized Mazda Dealer.
NOTE
l The keys carry a unique electroniccode. For this reason, and to assureyour safety, obtaining replacementkey requires some waiting time.They are only available through anAuthorized Mazda Dealer.
l Always keep a spare key, in case oneis lost. If a key is lost, contact anAuthorized Mazda Dealer as soon aspossible.
l If you lose a key, an AuthorizedMazda Dealer will reset theelectronic codes of your remainingkeys and immobilizer system. Bringall the remaining keys to anAuthorized Mazda Dealer to reset.Starting the vehicle with a key thathas not been reset is not possible.
qModification and Add-OnEquipment
Mazda cannot guarantee the immobilizersystem's operation if the system has beenmodified or if any add-on equipment hasbeen installed to it.
CAUTIONTo avoid damage to your vehicle, donot modify the system or install anyadd-on equipment to the immobilizersystem or the vehicle.
3-38
Knowing Your Mazda
Security System
Mazda6_8U66-EA-05F_Edition2 Page116Tuesday, July 26 2005 11:24 AM
Form No.8U66-EA-05F

Black plate (117,1)
Theft-Deterrent Systemí
The optional theft-deterrent system isdesigned to prevent your vehicle or itscontents from being stolen when all doors,hood, and trunk lid/liftgate/hatch arelocked.
If forcible entry is attempted, the systemsounds the horn and flashes the hazardwarning lights.
NOTE
l The theft-deterrent system operateswith the key or the keyless entrysystem transmitter.
l The system will not function unlessit is properly armed. To properlysecure the vehicle, always make sureall windows are completely closedand all doors and the trunk lid/liftgate/hatch are locked beforeleaving the vehicle. Remember totake your key and transmitter.
qOperation
System triggering conditions
The horn sounds intermittently and thehazard warning lights flash for about 25seconds when the system is triggered byany one of the following:
l Forcing open a door, the hood or thetrunk lid/liftgate/hatch.
l Opening a door, the hood or the trunklid by operating an inside door-lockknob, the hood release handle or thetrunk lid release button.
If the system is triggered again, the lightsand horn will activate until a door isunlocked or the trunk lid is opened withthe key or with the transmitter.
qHow to Arm the System
1. Remove the key from the ignitionswitch.
2. Make sure the hood is closed. Closeand lock all doors and the hatch/liftgate/trunk lid from the outside usingthe key or press the lock button onyour keyless entry system transmitter.The hazard warning lights will flashonce to indicate that the system isarmed.
The following method will also arm thetheft-deterrent system:Close the hood and the hatch/liftgate/trunk lid . Press the area on the door-lock switch marked “LOCK” once.Close all doors.
NOTE
Locking the doors with the inside door-lock knob will not arm the system.
qTo Turn off an Armed System
An armed system can be turned off by anyone of the following methods:
l Unlock a door with the key.
l Press the unlock button on the keylessentry system transmitter.
l Insert the key into the ignition switchand turn it to the ON position.
The hazard warning lights will flash twiceto indicate that the system is turned off.
Knowing Your Mazda
Security System
3-39íSome models.
Mazda6_8U66-EA-05F_Edition2 Page117Tuesday, July 26 2005 11:24 AM
Form No.8U66-EA-05F
Black plate (118,1)
NOTE
The trunk lid can be opened with thekey or the transmitter even when thesystem is armed. The alarm will notcome on and the system will remainarmed.
qTo Stop an Alarm
A triggered alarm can be turned off byany one of the following methods:
l Unlock a door with the key.
l Open the trunk lid with the key.
l Press the unlock button or press andhold the trunk button on the keylessentry system transmitter.
NOTE
If you have any problem with the theft-deterrent system, consult an AuthorizedMazda Dealer.
qTheft-Deterrent Labels
A label indicating that your vehicle isequipped with a Theft-Deterrent System isin the glove box.
Mazda recommends that you affix it to thelower rear corner of a front door window.
3-40
Knowing Your Mazda
Security System
Mazda6_8U66-EA-05F_Edition2 Page118Tuesday, July 26 2005 11:24 AM
Form No.8U66-EA-05F

Black plate (119,1)
Steering Wheel
WARNINGAdjusting the Steering Wheel:Adjusting the steering wheel while thevehicle is moving is dangerous.Moving it can very easily cause thedriver to abruptly turn to the left orright. This can lead to loss of controlor an accident. Never adjust thesteering wheel while the vehicle ismoving.
qSteering Wheel Adjustment
To change the angle or length of thesteering wheel:
1. Stop the vehicle, pull down the lockrelease lever under the steeringcolumn.
Lock release lever
2. Tilt the steering wheel and/or adjust thesteering column length to the desiredpositions, push the lever up to lock thecolumn.
3. Push the wheel up and down to becertain it's locked before driving.
Mirrors
qOutside Mirrors
Check the mirror angles before driving.
WARNINGConvex Mirror:Changing lanes without taking intoaccount the actual distance of thevehicle in the convex mirror isdangerous. You could have a seriousaccident. What you see in the convexmirror is closer than it appears. Besure to look over your shoulder beforechanging lanes.
Power control mirror
The ignition switch must be in the ACCor ON position.
To adjust:
1. Press the left or right side of theselector switch to choose the left orright side mirror.
2. Depress the mirror switch in theappropriate direction.
Outside mirror
Selector switch
Mirror switch
Knowing Your Mazda
Steering Wheel and Mirrors
3-41
Mazda6_8U66-EA-05F_Edition2 Page119Tuesday, July 26 2005 11:24 AM
Form No.8U66-EA-05F

Black plate (120,1)
After adjusting the mirror, lock the controlby placing the selector switch in themiddle position.
Mirror defrosterí
To turn on the mirror defrosters, turn theignition switch to the ON position andpush the rear window defroster switch(page 5-45).
qRearview Mirror
WARNINGBlocked View:Cargo stacked higher than theseatbacks is dangerous. It can blockyour view in the rearview mirror,which might cause you to hit anothercar when changing lanes. Don't stackthings higher than the seatbacks.
Rearview mirror adjustment
Before driving, adjust the rearview mirrorto center on the scene through the rearwindow.Manual day/night mirror
Auto-dimming mirror
NOTE
For the manual day/night mirror,perform the adjustment with the day/night lever in the day position.
Reducing glare from headlights
Manual day/night mirror
Push the day/night lever forward for daydriving. Pull it back to reduce glare ofheadlights from cars at the rear.
Night
Day
Day/Night lever
Auto-dimming mirror
The auto-dimming mirror automaticallyreduces glare of headlights from cars atthe rear when the ignition switch is in theON position.
3-42
Knowing Your Mazda
íSome models.
Steering Wheel and Mirrors
Mazda6_8U66-EA-05F_Edition2 Page120Tuesday, July 26 2005 11:24 AM
Form No.8U66-EA-05F

Black plate (121,1)
Press the OFF button ( ) to cancel theautomatic dimming function. Theindicator light will go off.To reactivate the automatic dimmingfunction, press the ON button ( ). Theindicator light will illuminate.
Indicator light OFF button
ON button
NOTE
l Do not use glass cleaner or suspendobjects on or around the light sensor.Otherwise, light sensor sensitivitywill be affected and may not operatenormally.
Light sensor
Light sensor
l For information regarding the 3buttons ( , , ) on the auto-dimming mirror, refer to HomeLinkWireless Control System (page5-47).
Knowing Your Mazda
Steering Wheel and Mirrors
3-43
Mazda6_8U66-EA-05F_Edition2 Page121Tuesday, July 26 2005 11:24 AM
Form No.8U66-EA-05F

Black plate (122,1)
3-44
Mazda6_8U66-EA-05F_Edition2 Page122Tuesday, July 26 2005 11:24 AM
Form No.8U66-EA-05F

Black plate (123,1)
4 Before Driving Your Mazda
Important information about driving your Mazda.
Fuel and Engine Exhaust Precautions ........................................ 4-2Fuel Requirements .................................................................... 4-2Emission Control System .......................................................... 4-3Engine Exhaust (Carbon Monoxide) ......................................... 4-5
Before Starting the Engine ........................................................... 4-6Before Getting In ...................................................................... 4-6After Getting In ......................................................................... 4-6
Driving Tips ................................................................................... 4-7Break-In Period ......................................................................... 4-7Money-Saving Suggestions ...................................................... 4-7Hazardous Driving .................................................................... 4-8Rocking the Vehicle .................................................................. 4-9Winter Driving .......................................................................... 4-9Driving In Flooded Area ......................................................... 4-10Overloading ............................................................................. 4-11
Towing ......................................................................................... 4-12Trailer Towing ......................................................................... 4-12
4-1
Mazda6_8U66-EA-05F_Edition2 Page123Tuesday, July 26 2005 11:24 AM
Form No.8U66-EA-05F

Black plate (124,1)
Fuel RequirementsVehicles with catalytic converters or oxygen sensors must use ONLY UNLEADED FUEL,which will reduce exhaust emissions and keep spark plug fouling to a minimum.
Your Mazda will perform best with fuel listed in the table.
Fuel Octane Rating* (Anti-knock index)
Regular unleaded fuel 87 [ (R+M)/2 method] or above (91 RON or above)
* U.S. federal law requires that octane ratings be posted on gasoline station pumps.
Fuel with a rating lower than 87 octane (91 RON) could cause the emission control systemto lose effectiveness. It could also cause engine knocking and serious engine damage.
CAUTIONl USE ONLY UNLEADED FUEL.Leaded fuel is harmful to the catalytic converter or the oxygen sensor. The lead willaccumulate on the oxygen sensor and the catalyst inside the converter. This will resultin a malfunction of the emission control system, causing poor performance.
l Your vehicle can only use oxygenated fuels containing no more than 10% ethanol byvolume. Damage to your vehicle may occur when ethanol exceeds thisrecommendation, or if the gasoline contains any methanol. Stop using gasohol of anykind if your vehicle engine is performing poorly.
l Never add fuel system additives. Never add cleaning agents other than those specifiedby Mazda. Other cleaning agents and additives may damage the system. Consult anAuthorized Mazda Dealer.
Gasoline blended with oxygenates such as alcohol or ether compounds are generallyreferred to as oxygenated fuels. The common gasoline blend that can be used with yourvehicle is ethanol blended at no more than 10%. Gasoline containing alcohol, such asethanol or methanol, may be marketed under the name “Gasohol”.
Vehicle damage and drivability problems resulting from the use of the following may notbe covered by the Mazda warranty.
l Gasohol containing more than 10% ethanol.
l Gasoline or gasohol containing methanol.
l Leaded fuel or leaded gasohol.
4-2
Before Driving Your Mazda
Fuel and Engine Exhaust Precautions
Mazda6_8U66-EA-05F_Edition2 Page124Tuesday, July 26 2005 11:24 AM
Form No.8U66-EA-05F

Black plate (125,1)
Emission Control SystemYour vehicle is equipped with an emission control system (the catalytic converter is part ofthis system) that enables your vehicle to comply with existing exhaust emissionsrequirements.
WARNINGParking Over Flammable Objects:Parking over or near anything flammable, such as dry grass, is dangerous. Even withthe engine turned off, the exhaust system could ignite it because the exhaust systemgets very hot during normal use. A resulting fire could cause serious injury or death.Never park over or near anything flammable.
CAUTIONIgnoring the following precautions could cause lead to accumulate on the catalyst insidethe converter or cause the converter to get very hot. Either condition will damage theconverter and cause poor performance.
l USE ONLY UNLEADED FUEL.
l Don't drive your Mazda with any sign of engine malfunction.
l Don't coast with the ignition switch turned off.
l Don't descend steep grades in gear with the ignition switch turned off.
l Don't operate the engine at high idle for more than 5 minutes.
l Don't tamper with the emission control system. All inspections and adjustments mustbe made by a qualified technician.
l Don't push-start or pull-start your vehicle.
NOTE
Under U.S. federal law, any modification to the original-equipment emission controlsystem before the first sale and registration of a vehicle is subject to penalties. In somestates, such modification made on a used vehicle is also subject to penalties.
Before Driving Your Mazda
Fuel and Engine Exhaust Precautions
4-3
Mazda6_8U66-EA-05F_Edition2 Page125Tuesday, July 26 2005 11:24 AM
Form No.8U66-EA-05F

Black plate (126,1)
NOTE
After driving some distance and turning off the engine, the sound of a valve opening andclosing can be heard at the rear of the vehicle, however this does not indicate anabnormality. Your vehicle has a self-checking device and it operates after turning off theengine.
4-4
Before Driving Your Mazda
Fuel and Engine Exhaust Precautions
Mazda6_8U66-EA-05F_Edition2 Page126Tuesday, July 26 2005 11:24 AM
Form No.8U66-EA-05F

Black plate (127,1)
Engine Exhaust (Carbon Monoxide)
WARNINGCarbon Monoxide:Engine exhaust gas is dangerous. This gas contains carbon monoxide (CO), which iscolorless, odorless, and poisonous. When inhaled, it can cause loss of consciousnessand death. If you smell exhaust gas inside your vehicle, keep all windows fully openand contact an Authorized Mazda Dealer immediately.
Exhaust Gas in Enclosed Area:Running the engine inside an enclosed area, such as a garage, is dangerous. Exhaustgas, which contains poisonous carbon monoxide, could easily enter the cabin. Loss ofconsciousness or even death could occur. Don't run the engine when inside anenclosed area.
Idling with the Windows Closed:Exhaust gas is dangerous. When your vehicle is stopped with the windows closed andthe engine running for a long time even in an open area, exhaust gas, which containspoisonous carbon monoxide, could enter the cabin. Loss of consciousness or evendeath could occur. Open the windows or adjust the heating or cooling system to drawfresh air.
Snow Blocking the Exhaust Gas:Running the engine when a vehicle is stopped in deep snow is dangerous. The exhaustpipe could be blocked by the snow, allowing exhaust gas to enter the cabin. Becauseexhaust gas contains poisonous carbon monoxide, anyone in the cabin could beinjured or killed. Clear the snow from underneath and around your vehicle,particularly the tail pipe, before starting the engine.
Before Driving Your Mazda
Fuel and Engine Exhaust Precautions
4-5
Mazda6_8U66-EA-05F_Edition2 Page127Tuesday, July 26 2005 11:24 AM
Form No.8U66-EA-05F

Black plate (128,1)
Before Getting Inl Be sure the windows, outside mirrors,and outside lights are clean.
l Inspect inflation pressures andcondition of tires.
l Look under the vehicle for any sign ofa leak.
l If you plan to back up, make surenothing is in your way.
NOTE
Engine oil, engine coolant, brake/clutchfluid, washer fluid, and other fluidlevels should be inspected. SeeMaintenance, Section 8.
After Getting Inl Are all doors closed and locked?
l Is the seat adjusted properly?
l Are the inside and outside mirrorsadjusted?
l Is everyone's seat belt fastened?
l Check all gauges.
l Check all warning lights when theignition switch is turned to the ONposition.
l Release the parking brake and makesure the brake warning light goes off.
Always be thoroughly familiar with yourMazda.
4-6
Before Driving Your Mazda
Before Starting the Engine
Mazda6_8U66-EA-05F_Edition2 Page128Tuesday, July 26 2005 11:24 AM
Form No.8U66-EA-05F

Black plate (129,1)
Break-In PeriodNo special break-in is necessary, but a fewprecautions in the first 1,000 km (600miles) may add to the performance,economy, and life of your Mazda.
l Don't race the engine.
l Don't maintain one constant speed,either slow or fast, for a long period oftime.
l Don't drive constantly at full-throttle orhigh engine rpm for extended periodsof time.
l Avoid unnecessary hard stops.
l Avoid full-throttle starts.
Money-Saving SuggestionsHow you operate your Mazda determineshow far it will travel on a tank of fuel. Usethese suggestions to help save money onfuel and repairs.
l Avoid long warm-ups. Once the engineruns smoothly, begin driving.
l Avoid fast starts.
l Keep the engine tuned. Follow themaintenance schedule (page 8-3) andhave an Authorized Mazda Dealerperform inspections and servicing.
l Use the air conditioner only whennecessary.
l Slow down on rough roads.
l Keep the tires properly inflated.
l Don't carry unnecessary weight.
l Don't rest your foot on the brake pedalwhile driving.
l Keep the wheels in correct alignment.
l Keep windows closed at high speeds.
l Slow down when driving in crosswindsand headwinds.
WARNINGCoasting:Stopping the engine when going downa hill is dangerous. This causes theloss of power steering and powerbrake control, and may cause damageto the drivetrain. Any loss of steeringor braking control could cause anaccident. Never stop the engine whengoing down a hill.
Before Driving Your Mazda
Driving Tips
4-7
Mazda6_8U66-EA-05F_Edition2 Page129Tuesday, July 26 2005 11:24 AM
Form No.8U66-EA-05F

Black plate (130,1)
Hazardous Driving
WARNINGDownshifting on Slippery Surfaces:Downshifting into lower gear whiledriving on slippery surfaces isdangerous. The sudden change in tirespeed could cause the tires to skid.This could lead to loss of vehiclecontrol and an accident. If it isnecessary to downshift on slipperysurfaces, be very careful.
ABS:The ABS cannot compensate forunsafe and reckless driving, excessivespeed, tailgating (following anothervehicle too closely), driving on ice andsnow, and hydroplaning (reduced tirefriction and road contact because ofwater on the road surface). You canstill have an accident. So don't rely onABS as a substitute for safe driving.
When driving in water, mud, sand, orsimilar hazard:
l Be cautious and allow extra distancefor braking.
l Avoid sudden braking and quicksteering.
l If your vehicle is not equipped withABS, brake with the pedal by using alight up-down motion. Don't hold thepedal down constantly.If your vehicle is equipped with ABS,don't pump the brakes. Continue topress down on the brake pedal.
l If you get stuck, select a lower gear andaccelerate slowly. Don't spin the frontwheels.
l For more traction in starting onslippery surfaces, use sand, rock salt,chains, carpeting, or other nonslipmaterial under the front wheels.
4-8
Before Driving Your Mazda
Driving Tips
Mazda6_8U66-EA-05F_Edition2 Page130Tuesday, July 26 2005 11:24 AM
Form No.8U66-EA-05F

Black plate (131,1)
Rocking the Vehicle
WARNINGSpinning the Wheels:When the vehicle is stuck, spinningthe wheels at high speed is dangerous.The spinning tire could overheat andexplode. This could cause seriousinjuries. Don't spin the wheels at morethan 56 km/h (35 mph), and don'tallow anyone to stand behind a wheelwhen pushing the vehicle.
CAUTIONToo much rocking may cause engineoverheating, transaxle failure, and tiredamage.
If you must rock the vehicle to free it fromsnow, sand or mud, depress theaccelerator slightly and slowly move theshift lever from 1 (D) to R.
Winter Drivingl Carry emergency gear, windowscraper, flares, a small shovel, jumpercables, and a small bag of sand or salt.
Ask an Authorized Mazda Dealer toperform the following precautions:
l Have the proper ratio of antifreeze inthe radiator.
l Inspect the battery and its cables. Coldreduces battery capacity.
l Inspect the ignition system for damageand loose connections.
l Use washer fluid made withantifreeze―but don't use enginecoolant antifreeze for washer fluid(page 8-29).
l Don't use the parking brake in freezingweather as the parking brake mayfreeze. Instead, shift to P with anautomatic transaxle and to 1 or R witha manual transaxle. Block the rearwheels.
qSnow Tires
Use snow tires on all four wheels
Don't go faster than 120 km/h (75 mph)while driving with snow tires. Inflatesnow tires 30 kPa (0.3 kgf/cm2, 4.3 psi)more than recommended on the tirepressure label (driver's door frame), butnever more than the maximum cold-tirepressure shown on the tires.Your vehicle is originally equipped withall season radials designed to be used allyear around. In some extreme climatesyou may find it necessary to replace themwith snow tires during the winter monthsto further improve traction on snow andice covered roads.
Before Driving Your Mazda
Driving Tips
4-9
Mazda6_8U66-EA-05F_Edition2 Page131Tuesday, July 26 2005 11:24 AM
Form No.8U66-EA-05F

Black plate (132,1)
WARNINGMixing Tire Types:Using tires different in size or type isdangerous. Your vehicle's handlingcould be greatly affected and result inan accident. Use only the same sizeand type tires (snow, radial, or non-radial) on all four wheels.
CAUTIONCheck local regulations before usingstudded tires.
qTire Chains
This vehicle cannot be operated with tirechains because it could cause interferencewith the vehicle body and scratching.
Driving In Flooded Area
WARNINGDriving with Wet Brakes:Driving with wet brakes is dangerous.Increased stopping distance or thevehicle pulling to one side whenbraking could result in a seriousaccident. Light braking will indicatewhether the brakes have been affected.Dry the brakes by driving very slowlyand applying the brakes lightly untilbrake performance returns to normal.
CAUTIONMake sure water does not enter thevehicle interior or the engine area.Interior materials could get moldy, andmany electronic devices in the cabinand the engine could be damaged.
4-10
Before Driving Your Mazda
Driving Tips
Mazda6_8U66-EA-05F_Edition2 Page132Tuesday, July 26 2005 11:24 AM
Form No.8U66-EA-05F

Black plate (133,1)
Overloading
WARNINGVehicle Load Weight:The gross axle weight rating (GAWR)and the gross vehicle weight rating(GVWR) of your vehicle are on theMotor Vehicle Safety Standard Labelon the driver's door frame. Exceedingthese ratings can cause an accident orvehicle damage. You can estimate theweight of your load by weighing theitems (or people) before putting themin the vehicle. Be careful not tooverload your vehicle.
Before Driving Your Mazda
Driving Tips
4-11
Mazda6_8U66-EA-05F_Edition2 Page133Tuesday, July 26 2005 11:24 AM
Form No.8U66-EA-05F

Black plate (134,1)
Trailer TowingThe Mazda6 is not designed for towing.Never tow a trailer with your Mazda6.
4-12
Before Driving Your Mazda
Towing
Mazda6_8U66-EA-05F_Edition2 Page134Tuesday, July 26 2005 11:24 AM
Form No.8U66-EA-05F

Black plate (135,1)
5 Driving Your Mazda
Explanation of instruments and controls.
Starting and Driving ..................................................................... 5-2Ignition Switch .......................................................................... 5-2Starting the Engine .................................................................... 5-3Brake System ............................................................................ 5-4Manual Transaxle Operation ..................................................... 5-9Automatic Transaxle Controls ................................................. 5-11Power Steering ........................................................................ 5-18Cruise Control ......................................................................... 5-18Traction Control System (TCS)í ........................................... 5-22
Instrument Cluster and Indicators ............................................ 5-25Meters and Gauges .................................................................. 5-25
Warning/Indicator Lights and Beep Sounds ............................ 5-30Warning/Indicator Lights ........................................................ 5-30Beep Sounds ........................................................................... 5-40
Switches and Controls ................................................................ 5-41Lighting Control ..................................................................... 5-41Turn and Lane-Change Signals ............................................... 5-42Fog Lightsí ............................................................................ 5-43Windshield Wipers and Washer .............................................. 5-43Rear Window Wiper and Washerí ......................................... 5-45Rear Window Defroster ........................................................... 5-45Horn ........................................................................................ 5-46Hazard Warning Flasher .......................................................... 5-47HomeLink Wireless Control Systemí .................................... 5-47
5-1íSome models.
Mazda6_8U66-EA-05F_Edition2 Page135Tuesday, July 26 2005 11:24 AM
Form No.8U66-EA-05F

Black plate (136,1)
Ignition Switch
qIgnition Switch Positions
LOCK
The steering wheel locks to protectagainst theft. Only in this position can thekey be removed.
Manual transaxle
To turn the key from the ACC to theLOCK position, push the key in at theACC position, then turn it to the LOCKposition.
Push the key
Automatic transaxle
To turn the key from the ACC to theLOCK position, the shift lever must be inthe P position.
Shift lever engaged in P (park)
WARNINGRemoving the Key:It's dangerous to remove the key fromthe ignition switch while the vehicle ismoving. Removing the key allows thesteering wheel to lock. You will losesteering control and a serious accidentcould occur.Remove the key only when the vehicleis parked.
Not Setting the Parking Brake:Leaving the driver's seat withoutsetting the parking brake isdangerous. Unexpected vehiclemovement could occur if the parkingbrake is not set. This could cause anaccident. Before leaving the driver'sseat, always set the parking brake andmake sure the shift lever is in P withan automatic transaxle or in 1 or Rwith a manual transaxle.
5-2
Driving Your Mazda
Starting and Driving
Mazda6_8U66-EA-05F_Edition2 Page136Tuesday, July 26 2005 11:24 AM
Form No.8U66-EA-05F

Black plate (137,1)
NOTE
If turning the key is difficult, jiggle thesteering wheel from side to side.
ACC (Accessory)
The steering wheel unlocks and someelectrical accessories will operate.
ON
This is the normal running position afterthe engine is started. The warning lights(except brakes) should be inspectedbefore the engine is started (page 5-30).
NOTE
When the ignition switch is turned tothe ON position, the sound of the fuelpump motor operating near the fueltank can be heard. This does notindicate an abnormality.
START
The engine is started in this position. Itwill crank until you release the key; thenit returns to the ON position. The brakewarning light can be checked after theengine is started (page 5-30).
qIgnition Key Reminder
If the ignition switch is in the LOCK orACC position with the key inserted, acontinuous beep sound will be heardwhen the driver's door is opened.
Starting the Engine
NOTE
Engine-starting is controlled by thespark ignition system.This system meets all CanadianInterference-Causing EquipmentStandard requirements regulating theimpulse electrical field strength of radionoise.
1. Occupants should fasten their seatbelts.
2. Make sure the parking brake is on.
3. Depress the brake pedal.
4. (Manual transaxle)Depress the clutch pedal all the wayand shift into neutral.Keep the clutch pedal depressed whilecranking the engine.
(Automatic transaxle)Put the vehicle in park (P). If you mustrestart the engine while the vehicle ismoving, shift into neutral (N).
NOTE
(Manual transaxle)The starter will not operate if the clutchpedal is not depressed all the way.
(Automatic transaxle)The starter will not operate if the shiftlever is not in P or N.
5. Turn the ignition switch to the STARTposition and hold (up to 10 seconds ata time) until the engine starts.
Driving Your Mazda
Starting and Driving
5-3
Mazda6_8U66-EA-05F_Edition2 Page137Tuesday, July 26 2005 11:24 AM
Form No.8U66-EA-05F
Black plate (138,1)
CAUTIONDon't try the starter for more than 10seconds at a time. If the engine stalls orfails to start, wait 10 seconds beforetrying again. Otherwise, you maydamage the starter and drain the battery.
6. After starting the engine, let it idle forabout 10 seconds.
NOTE
l In extremely cold weather, below_18 °C (0 °F), or after the vehiclehas not been driven in several days,let the engine warm up withoutoperating the accelerator.
l Whether the engine is cold or warm,it should be started without use ofthe accelerator.
Brake System
qFoot Brake
Your Mazda has power-assisted brakesthat adjust automatically through normaluse.
Should power-assist fail, you can stop byapplying greater force than normal to thebrake pedal. But the distance required tostop will be greater than usual.
WARNINGCoasting with the Engine Off:Continuing to coast when the engineis stalled or turned off is dangerous.Braking will require more effort, andthe brake's power-assist could bedepleted if you pump the brake. Thiswill cause longer stopping distances oreven an accident. Don't continuecoasting when the engine is stalled orturned off, find a safe place to stop.
Riding the Brakes:Driving with your foot continuouslyon the brake pedal or steadily applyingthe brakes for long distances isdangerous. This causes overheatedbrakes, resulting in longer stoppingdistances or even total brake failure.This could cause loss of vehiclecontrol and a serious accident. Avoidcontinuous application of the brakes.Shift to a lower gear when going downsteep hills.
5-4
Driving Your Mazda
Starting and Driving
Mazda6_8U66-EA-05F_Edition2 Page138Tuesday, July 26 2005 11:24 AM
Form No.8U66-EA-05F
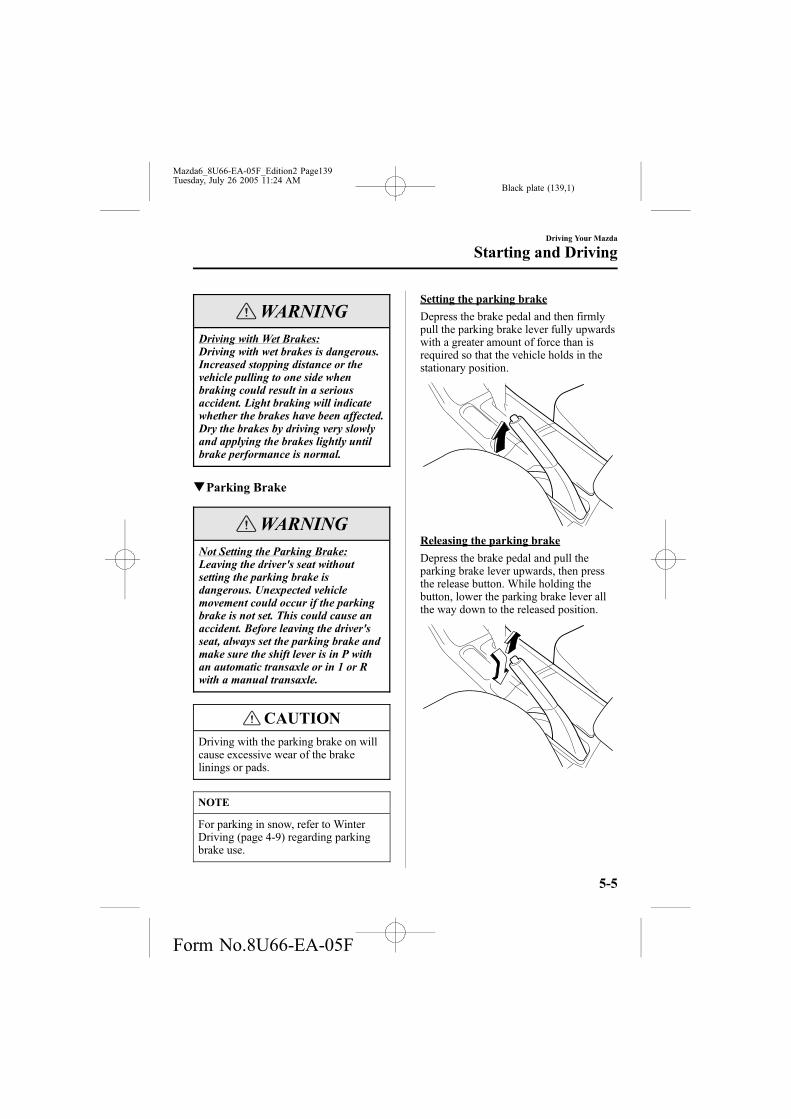
Black plate (139,1)
WARNINGDriving with Wet Brakes:Driving with wet brakes is dangerous.Increased stopping distance or thevehicle pulling to one side whenbraking could result in a seriousaccident. Light braking will indicatewhether the brakes have been affected.Dry the brakes by driving very slowlyand applying the brakes lightly untilbrake performance is normal.
qParking Brake
WARNINGNot Setting the Parking Brake:Leaving the driver's seat withoutsetting the parking brake isdangerous. Unexpected vehiclemovement could occur if the parkingbrake is not set. This could cause anaccident. Before leaving the driver'sseat, always set the parking brake andmake sure the shift lever is in P withan automatic transaxle or in 1 or Rwith a manual transaxle.
CAUTIONDriving with the parking brake on willcause excessive wear of the brakelinings or pads.
NOTE
For parking in snow, refer to WinterDriving (page 4-9) regarding parkingbrake use.
Setting the parking brake
Depress the brake pedal and then firmlypull the parking brake lever fully upwardswith a greater amount of force than isrequired so that the vehicle holds in thestationary position.
Releasing the parking brake
Depress the brake pedal and pull theparking brake lever upwards, then pressthe release button. While holding thebutton, lower the parking brake lever allthe way down to the released position.
Driving Your Mazda
Starting and Driving
5-5
Mazda6_8U66-EA-05F_Edition2 Page139Tuesday, July 26 2005 11:24 AM
Form No.8U66-EA-05F

Black plate (140,1)
qBrake System Warning Light
This warning has the following functions:
Parking brake warning
The light comes on when the parkingbrake is applied with the ignition switchin the START or ON position. It goes offwhen the parking brake is fully released.
Low brake fluid level warning
If the light stays on after the parking brakeis fully released, you may have a brakeproblem.
Drive to the side of the road and park offthe right-of-way.
You may notice that the pedal is harder topush or that it may go closer to the floor.In either case, it will take longer to stopthe vehicle.
1. With the engine stopped, check thebrake fluid level immediately and addfluid as required (page 8-24).
2. After adding fluid, check the lightagain.
If the warning light remains on, or if thebrakes do not operate properly, do notdrive the vehicle. Have it towed to anAuthorized Mazda Dealer.
Even if the light goes out have your brakesystem inspected as soon as possible byan Authorized Mazda Dealer.
NOTE
Having to add brake fluid is sometimesan indicator of leakage. Consult anAuthorized Mazda Dealer as soon aspossible even if the brake light is nolonger illuminated.
WARNINGBrake Warning Light:Driving with the brake system warninglight on is dangerous. It indicates thatyour brakes may not work at all orthat they could completely fail at anytime. If this light remains on, afterchecking that the parking brake isfully released, have the brakesinspected immediately. Don't drivewith this light on, have the vehicletowed to an Authorized Mazda Dealerto have the brakes inspected as soonas possible.
qAnti-Lock Brake System (ABS)í
The ABS control unit continuouslymonitors the speed of each wheel. If oneis about to lock up, the ABS responds byautomatically releasing and reapplyingthat wheel's brake.
The driver will feel a slight vibration inthe brake pedal and may hear a chatteringnoise from the brake system. This isnormal when the ABS operates. Don'tpump the brakes, continue to press downon the brake pedal.
5-6
Driving Your Mazda
íSome models.
Starting and Driving
Mazda6_8U66-EA-05F_Edition2 Page140Tuesday, July 26 2005 11:24 AM
Form No.8U66-EA-05F

Black plate (141,1)
WARNINGABS:The ABS cannot compensate forunsafe and reckless driving, excessivespeed, tailgating (following anothervehicle too closely), driving on ice andsnow, and hydroplaning (reduced tirefriction and road contact because ofwater on the road surface). You canstill have an accident. So don't rely onABS as a substitute for safe driving.
NOTE
Braking distances may be longer onloose surfaces (snow or gravel, forexample) which usually have a hardfoundation. A vehicle with a normalbraking system may require lessdistance to stop under these conditionsbecause the tires will build up a wedgeof surface layer when the wheels skid.
qABS Warning Lightí
The warning light stays on for a fewseconds when the ignition switch is turnedto the ON position.
If the ABS warning light stays on whileyou're driving, the ABS control unit hasdetected a system malfunction. If thisoccurs, your brakes will function normallyas if the vehicle had no ABS.Should this happen, consult an AuthorizedMazda Dealer as soon as possible.
NOTE
When the engine is jump-started tocharge the battery, uneven rpm occursand the ABS warning light comes on.This is due to a weak battery, not amalfunction.Recharge the battery.
qElectronic Brake ForceDistribution System Warningí
If the electronic brake force distributioncontrol unit determines that somecomponents are operating incorrectly, thecontrol unit may turn the brake systemwarning light and the ABS warning lighton at the same time. The problem is likelyto be an electronic brake force distributionsystem.
Driving Your Mazda
Starting and Driving
5-7íSome models.
Mazda6_8U66-EA-05F_Edition2 Page141Tuesday, July 26 2005 11:24 AM
Form No.8U66-EA-05F

Black plate (142,1)
WARNINGABS Warning Light and BrakeWarning Light on at the Same Time:Driving when the brake systemwarning light and ABS warning lightare on at the same time is dangerous.When both lights are on, the rearwheels could lock more quickly in anemergency stop than under normalcircumstances.Don't drive with both lights on, havethe vehicle towed to an AuthorizedMazda Dealer to have the brakesinspected as soon as possible.
qBrake Pad Wear Indicator
When the disc brake pads become worn,the built-in wear indicators contact thedisc plates. This causes a screeching noiseto warn that the pads should be replaced.
When you hear this noise, consult anAuthorized Mazda Dealer as soon aspossible.
WARNINGDriving with Worn Disc Pads:Driving with worn disc pads isdangerous. The brakes could fail andcause a serious accident. As soon asyou hear a screeching noise consultan Authorized Mazda Dealer.
5-8
Driving Your Mazda
Starting and Driving
Mazda6_8U66-EA-05F_Edition2 Page142Tuesday, July 26 2005 11:24 AM
Form No.8U66-EA-05F
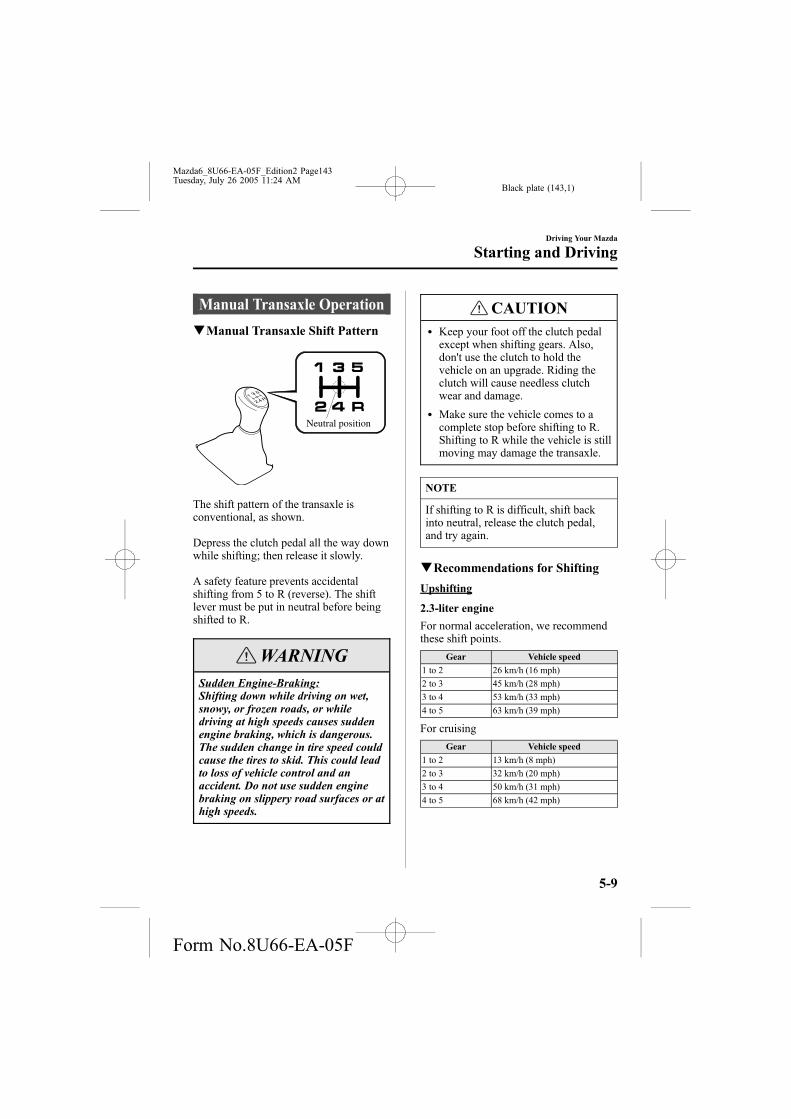
Black plate (143,1)
Manual Transaxle Operation
qManual Transaxle Shift Pattern
Neutral position
The shift pattern of the transaxle isconventional, as shown.
Depress the clutch pedal all the way downwhile shifting; then release it slowly.
A safety feature prevents accidentalshifting from 5 to R (reverse). The shiftlever must be put in neutral before beingshifted to R.
WARNINGSudden Engine-Braking:Shifting down while driving on wet,snowy, or frozen roads, or whiledriving at high speeds causes suddenengine braking, which is dangerous.The sudden change in tire speed couldcause the tires to skid. This could leadto loss of vehicle control and anaccident. Do not use sudden enginebraking on slippery road surfaces or athigh speeds.
CAUTIONl Keep your foot off the clutch pedalexcept when shifting gears. Also,don't use the clutch to hold thevehicle on an upgrade. Riding theclutch will cause needless clutchwear and damage.
l Make sure the vehicle comes to acomplete stop before shifting to R.Shifting to R while the vehicle is stillmoving may damage the transaxle.
NOTE
If shifting to R is difficult, shift backinto neutral, release the clutch pedal,and try again.
qRecommendations for Shifting
Upshifting
2.3-liter engine
For normal acceleration, we recommendthese shift points.
Gear Vehicle speed
1 to 2 26 km/h (16 mph)
2 to 3 45 km/h (28 mph)
3 to 4 53 km/h (33 mph)
4 to 5 63 km/h (39 mph)
For cruising
Gear Vehicle speed
1 to 2 13 km/h (8 mph)
2 to 3 32 km/h (20 mph)
3 to 4 50 km/h (31 mph)
4 to 5 68 km/h (42 mph)
Driving Your Mazda
Starting and Driving
5-9
Mazda6_8U66-EA-05F_Edition2 Page143Tuesday, July 26 2005 11:24 AM
Form No.8U66-EA-05F
Black plate (144,1)
3.0-liter engine
For normal acceleration, we recommendthese shift points.
Gear Vehicle speed
1 to 2 27 km/h (17 mph)
2 to 3 48 km/h (30 mph)
3 to 4 56 km/h (35 mph)
4 to 5 63 km/h (39 mph)
For cruising
Gear Vehicle speed
1 to 2 13 km/h (8 mph)
2 to 3 34 km/h (21 mph)
3 to 4 52 km/h (32 mph)
4 to 5 66 km/h (41 mph)
Downshifting
When you must slow down in heavytraffic or on a steep upgrade, downshiftbefore the engine starts to overwork. Thisreduces the chance of stalling and givesbetter acceleration when you need morespeed.On a steep downgrade, downshiftinghelps maintain safe speed and prolongsbrake life.
5-10
Driving Your Mazda
Starting and Driving
Mazda6_8U66-EA-05F_Edition2 Page144Tuesday, July 26 2005 11:24 AM
Form No.8U66-EA-05F

Black plate (145,1)
Automatic Transaxle Controls
Indicates that you must depress the brake pedal to shift (The ignition switch must be in the ACC or ON position).
Indicates the shift lever can be shifted freely into any position.
Various Lockouts:
qTransaxle Ranges
The shift lever must be in P or N tooperate the starter.
P (Park)
P locks the transaxle and prevents thefront wheels from rotating.
WARNINGHolding the Vehicle with P:Only setting the shift lever to the Pposition without using the parkingbrake to hold the vehicle is dangerous.If P fails to hold, the vehicle couldmove and cause an accident. To holdthe vehicle, set the shift lever to P ANDset the parking brake.
CAUTIONl Shifting into P, N or R while thevehicle is moving can damage yourtransaxle.
l Shifting into a driving gear orreverse when the engine is runningfaster than idle can damage thetransaxle.
R (Reverse)
In position R, the vehicle moves onlybackward. You must be at a complete stopbefore shifting to or from R, except underrare circumstances as explained inRocking the Vehicle (page 4-9).
Driving Your Mazda
Starting and Driving
5-11
Mazda6_8U66-EA-05F_Edition2 Page145Tuesday, July 26 2005 11:24 AM
Form No.8U66-EA-05F

Black plate (146,1)
N (Neutral)
In N, the wheels and transaxle are notlocked. The vehicle will roll freely evenon the slightest incline unless the parkingbrake or brakes are on.
WARNINGShifting from N or P:It's dangerous to shift from N or Pinto a driving gear when the engine isrunning faster than idle. If this isdone, the vehicle could move suddenly,causing an accident or serious injury.If the engine is running faster thanidle, don't shift from N or P into adriving gear.
Shifting into N while Driving:Shifting into N while driving isdangerous. Engine braking cannot beapplied when decelerating whichcould lead to an accident or seriousinjury. Do not shift into N whendriving the vehicle.
CAUTIONDo not shift into N when driving thevehicle. Doing so can cause transaxledamage.
D (Drive)
D is the normal driving position. From astop, the transaxle will automatically shiftthrough a 5-gear/6-gear* sequence.
* 3.0-liter engine model
M (Manual)
M is the manual shift mode position.Gears can be shifted up or down byoperating the shift lever.Refer to Manual Shift Mode (page 5-13).
qShift-Lock System
The shift-lock system prevents shiftingout of P unless the brake pedal isdepressed.
To shift from P:
1. Depress and hold the brake pedal.
2. Start the engine.
3. Move the shift lever.
NOTE
l When the ignition switch is in theLOCK position, the shift levercannot be shifted from P.
l To be sure the vehicle is in park, theignition key cannot be removedunless the shift lever is in P.
5-12
Driving Your Mazda
Starting and Driving
Mazda6_8U66-EA-05F_Edition2 Page146Tuesday, July 26 2005 11:24 AM
Form No.8U66-EA-05F

Black plate (147,1)
qManual Shift Mode
This mode gives you the feel of driving amanual transaxle vehicle by operating theshift lever and allows you to controlengine rpm and torque to the front wheelsmuch like a manual transaxle when morecontrol is desired.
To change to manual shift mode, shift thelever from D to M.
To return to automatic shift mode, shiftthe lever from M to D.
NOTE
l If you change to manual shift modewhen the vehicle is stopped, the gearwill shift to M1.
l If you shift up once when the vehicleis stopped and the gear is at M1, thegear will shift to M2. M2 is helpfulfor starting on slippery surfaces.
l (2.3-liter engine model)If you change to manual shift modewithout depressing the acceleratorpedal when driving in D range, 5thgear, the gear will shift to M4.(3.0-liter engine model)If you change to manual shift modewithout depressing the acceleratorpedal when driving in D range, thegear will shift to a lower gear (Ex;the gear changes from D range, 5thto M4).
Indicators
Shift position indicator
In manual shift mode, the “M” of the shiftposition indicator in the instrument panelilluminates.
Driving Your Mazda
Starting and Driving
5-13
Mazda6_8U66-EA-05F_Edition2 Page147Tuesday, July 26 2005 11:24 AM
Form No.8U66-EA-05F
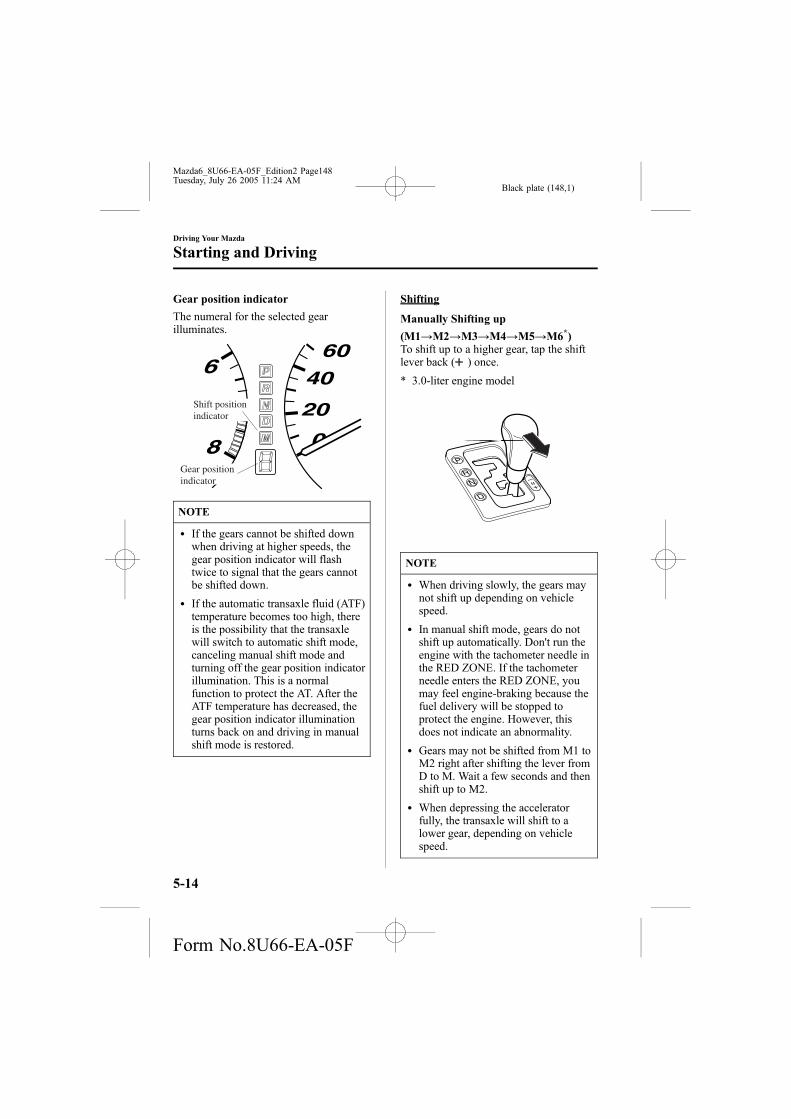
Black plate (148,1)
Gear position indicator
The numeral for the selected gearilluminates.
Shift position indicator
Gear position indicator
NOTE
l If the gears cannot be shifted downwhen driving at higher speeds, thegear position indicator will flashtwice to signal that the gears cannotbe shifted down.
l If the automatic transaxle fluid (ATF)temperature becomes too high, thereis the possibility that the transaxlewill switch to automatic shift mode,canceling manual shift mode andturning off the gear position indicatorillumination. This is a normalfunction to protect the AT. After theATF temperature has decreased, thegear position indicator illuminationturns back on and driving in manualshift mode is restored.
Shifting
Manually Shifting up
(M1→M2→M3→M4→M5→M6*)To shift up to a higher gear, tap the shiftlever back ( ) once.
* 3.0-liter engine model
NOTE
l When driving slowly, the gears maynot shift up depending on vehiclespeed.
l In manual shift mode, gears do notshift up automatically. Don't run theengine with the tachometer needle inthe RED ZONE. If the tachometerneedle enters the RED ZONE, youmay feel engine-braking because thefuel delivery will be stopped toprotect the engine. However, thisdoes not indicate an abnormality.
l Gears may not be shifted from M1 toM2 right after shifting the lever fromD to M. Wait a few seconds and thenshift up to M2.
l When depressing the acceleratorfully, the transaxle will shift to alower gear, depending on vehiclespeed.
5-14
Driving Your Mazda
Starting and Driving
Mazda6_8U66-EA-05F_Edition2 Page148Tuesday, July 26 2005 11:24 AM
Form No.8U66-EA-05F
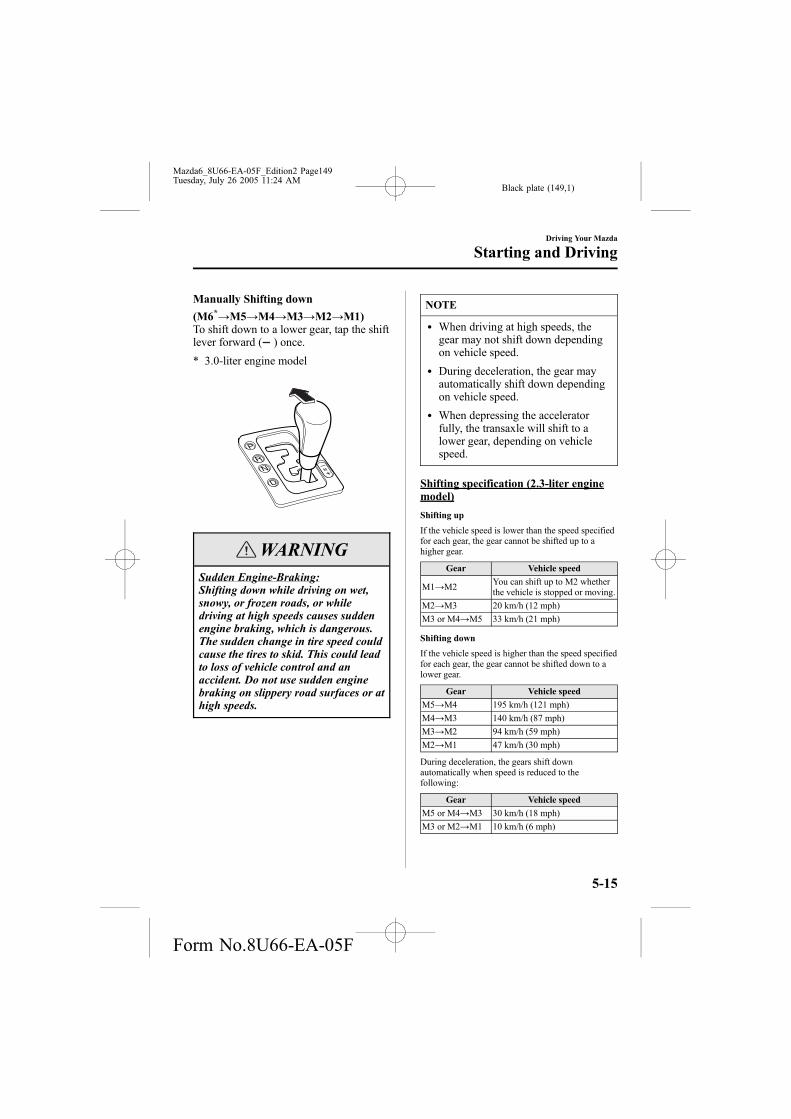
Black plate (149,1)
Manually Shifting down
(M6*→M5→M4→M3→M2→M1)To shift down to a lower gear, tap the shiftlever forward ( ) once.
* 3.0-liter engine model
WARNINGSudden Engine-Braking:Shifting down while driving on wet,snowy, or frozen roads, or whiledriving at high speeds causes suddenengine braking, which is dangerous.The sudden change in tire speed couldcause the tires to skid. This could leadto loss of vehicle control and anaccident. Do not use sudden enginebraking on slippery road surfaces or athigh speeds.
NOTE
l When driving at high speeds, thegear may not shift down dependingon vehicle speed.
l During deceleration, the gear mayautomatically shift down dependingon vehicle speed.
l When depressing the acceleratorfully, the transaxle will shift to alower gear, depending on vehiclespeed.
Shifting specification (2.3-liter enginemodel)
Shifting up
If the vehicle speed is lower than the speed specifiedfor each gear, the gear cannot be shifted up to ahigher gear.
Gear Vehicle speed
M1→M2You can shift up to M2 whetherthe vehicle is stopped or moving.
M2→M3 20 km/h (12 mph)
M3 or M4→M5 33 km/h (21 mph)
Shifting down
If the vehicle speed is higher than the speed specifiedfor each gear, the gear cannot be shifted down to alower gear.
Gear Vehicle speed
M5→M4 195 km/h (121 mph)
M4→M3 140 km/h (87 mph)
M3→M2 94 km/h (59 mph)
M2→M1 47 km/h (30 mph)
During deceleration, the gears shift downautomatically when speed is reduced to thefollowing:
Gear Vehicle speed
M5 or M4→M3 30 km/h (18 mph)
M3 or M2→M1 10 km/h (6 mph)
Driving Your Mazda
Starting and Driving
5-15
Mazda6_8U66-EA-05F_Edition2 Page149Tuesday, July 26 2005 11:24 AM
Form No.8U66-EA-05F

Black plate (150,1)
NOTE
If the vehicle is driven at a low speedfrom a standing start while in M2, thegear will not shift down to M1automatically until the shift lever istapped back ( ) or forward ( ).
If the vehicle is kicked down at the following speedsor lower, the gears shift down automatically:
Gear Vehicle speed
M5→M4 182 km/h (113 mph)
M4→M3 133 km/h (82 mph)
M3→M2 48 km/h (30 mph)
M2→M1 12 km/h (7 mph)
Shifting specification (3.0-liter enginemodel)
Shifting up
If the vehicle speed is lower than the speed specifiedfor each gear, the gear cannot be shifted up to ahigher gear.
Gear Vehicle speed
M1→M2You can shift up to M2 whetherthe vehicle is stopped or moving.
M2→M3 10 km/h (6 mph)
M3→M4 23 km/h (14 mph)
M4→M5 39 km/h (24 mph)
M5→M6 49 km/h (30 mph)
Shifting down
If the vehicle speed is higher than the speed specifiedfor each gear, the gear cannot be shifted down to alower gear.
Gear Vehicle speed
M5→M4 175 km/h (109 mph)
M4→M3 130 km/h (81 mph)
M3→M2 83 km/h (52 mph)
M2→M1 43 km/h (27 mph)
During deceleration, the gears shift downautomatically when speed is reduced to thefollowing:
Gear Vehicle speed
M6→M5
Between 50 and 212 km/h(31 and 131 mph), depending onhow much the accelerator pedalis released.
M5→M4
Between 38 and 161 km/h(23 and 100 mph), depending onhow much the accelerator pedalis released.
M4→M3
Between 23 and 70 km/h(14 and 44 mph), depending onhow much the accelerator pedalis released.
M3→M2
Between 10 and 46 km/h(6 and 28 mph), depending onhow much the accelerator pedalis released.
M2→M1 10 km/h (6 mph)
NOTE
If the vehicle is driven at a low speedfrom a standing start while in M2, thegear may not shift down to M1automatically.
If the vehicle is kicked down at the following speedsor lower, the gears shift down automatically:
Gear Vehicle speed
M6→M5 212 km/h (131 mph)
M6→M4 161 km/h (100 mph)
M5→M4 161 km/h (100 mph)
M5→M3 70 km/h (44 mph)
M4→M3 70 km/h (44 mph)
M4→M2 46 km/h (28 mph)
M3→M2 46 km/h (28 mph)
5-16
Driving Your Mazda
Starting and Driving
Mazda6_8U66-EA-05F_Edition2 Page150Tuesday, July 26 2005 11:24 AM
Form No.8U66-EA-05F

Black plate (151,1)
Recommendations for shifting
Upshifting
For normal acceleration and cruising, we recommendthese shift points.(2.3-liter engine model)
Gear Vehicle speed
M1 to M2 24 km/h (15 mph)
M2 to M3 40 km/h (25 mph)
M3 to M4 65 km/h (40 mph)
M4 to M5 73 km/h (45 mph)
(3.0-liter engine model)
Gear Vehicle speed
M1 to M2 24 km/h (15 mph)
M2 to M3 40 km/h (25 mph)
M3 to M4 65 km/h (40 mph)
M4 to M5 73 km/h (45 mph)
M5 to M6 80 km/h (50 mph)
Downshifting
When you must slow down in heavytraffic or on a steep upgrade, downshiftbefore the engine starts to overwork. Thisgives better acceleration when you needmore speed.
On a steep downgrade, downshiftinghelps maintain safe speed and prolongsbrake life.
qDriving Tips
Passing
For extra power when passing anothervehicle or climbing steep grades, depressthe accelerator fully. The transaxle willshift to a lower gear, depending on vehiclespeed.
Climbing steep grades from a stop
To climb a steep grade from a stoppedposition:
1. Depress the brake pedal.
2. Shift to D or M1, depending on theload weight and grade steepness.
3. Release the brake pedal whilegradually accelerating.
Descending steep grades
When descending a steep grade, shift tolower gears, depending on load weightand grade steepness. Descend slowly,using the brakes only occasionally toprevent them from overheating.
Driving Your Mazda
Starting and Driving
5-17
Mazda6_8U66-EA-05F_Edition2 Page151Tuesday, July 26 2005 11:24 AM
Form No.8U66-EA-05F

Black plate (152,1)
Power SteeringPower steering is only operable when theengine is running. If the engine is off or ifthe power steering system is inoperable,you can still steer, but it requires morephysical effort.
If the steering feels rigid during normaldriving, consult an Authorized MazdaDealer.
CAUTIONNever hold the steering wheel to theextreme left or right for more than 5seconds with the engine running.This could damage the power steeringsystem.
Cruise ControlWith cruise control, you can set andautomatically maintain any speed of morethan about 30 km/h (19 mph).
WARNINGCruise Control Use:Using cruise control in the followingconditions could cause you to losecontrol of the vehicle:l Hilly terrainl Steep inclinesl Heavy or unsteady trafficl Slippery or winding roadsl Similar restrictions that requireinconsistent speed
Don't use cruise control in thesesituations.
qCruise Main Indicator Light
This light comes on when the ON/OFFswitch is pressed and the cruise controlsystem is activated.
5-18
Driving Your Mazda
Starting and Driving
Mazda6_8U66-EA-05F_Edition2 Page152Tuesday, July 26 2005 11:24 AM
Form No.8U66-EA-05F

Black plate (153,1)
qCruise Set Indicator Light
This light comes on when a cruising speedis set.
qActivation/Deactivation
To activate the system, press the ON/OFFswitch.The cruise main indicator lightilluminates.
To deactivate the system, press the switchagain.The cruise main indicator light turns off.
WARNINGCruise Main Switch:Leaving the ON/OFF switch on whennot using the cruise control isdangerous as it may be switched onaccidentally. This could result in lossof vehicle control. Keep the ON/OFFswitch off when cruise control is not inuse.
qTo Set Speed
1. Activate the cruise control system bypressing the ON/OFF switch.
2. Accelerate to the desired speed, whichmust be more than 30 km/h (19 mph).
3. Press the SET/COAST button andrelease it at the speed you want.Release the accelerator at the sametime.
Don't continue to hold in the button. Untilyou release it, speed will continue to drop(unless you continue to accelerate) andyou'll miss the desired speed.
Driving Your Mazda
Starting and Driving
5-19
Mazda6_8U66-EA-05F_Edition2 Page153Tuesday, July 26 2005 11:24 AM
Form No.8U66-EA-05F
Black plate (154,1)
NOTE
l The SET function can't be activateduntil about 2 seconds after the ON/OFF switch has been engaged.
l On a steep grade, the vehicle maymomentarily slow down going up orspeed up while going down.
qTo Increase Cruising Speed
Follow either of these procedures.
l Press the RES/ACCEL button and holdit. Your vehicle will accelerate.Release the button at the speed youwant.
Your vehicle has a tap-up feature thatallows you to increase your current speedin increments of 1.6 km/h (1 mph) by amomentary tap of the RES/ACCELbutton. Multiple taps will increase yourvehicle speed 1.6 km/h (1 mph) for eachtap.
l Accelerate to the desired speed.Press the SET/COAST button andrelease it immediately.
NOTE
Accelerate if you want to speed uptemporarily when the cruise control ison. Greater speed will not interfere withit or change the set speed.Take your foot off the accelerator toreturn to the set speed.
5-20
Driving Your Mazda
Starting and Driving
Mazda6_8U66-EA-05F_Edition2 Page154Tuesday, July 26 2005 11:24 AM
Form No.8U66-EA-05F

Black plate (155,1)
qTo Decrease Cruising Speed
Press the SET/COAST button and hold it.The vehicle will gradually slow.Release the button at the speed you want.
Your vehicle has a tap-down feature thatallows you to decrease your current speedin decrements of 1.6 km/h (1 mph) by amomentary tap of the SET/COASTbutton. Multiple taps will decrease yourvehicle speed 1.6 km/h (1 mph) for eachtap.
qTo Resume Cruising Speed atMore Than 30 km/h (19 mph)
If some other method besides the ON/OFF switch was used to cancel cruisingspeed and the system is still activated, themost recent set speed will automaticallyresume when the RES/ACCEL button ispressed.If vehicle speed is below 30 km/h (19mph), increase the vehicle speed up to 30km/h (19 mph) and press the RES/ACCEL button.
qTo Cancel
To turn off the system, use one of thesemethods:
l Press the ON/OFF switch.
l Slightly depress the brake pedal.
l Depress the clutch pedal (Manualtransaxle only).
Driving Your Mazda
Starting and Driving
5-21
Mazda6_8U66-EA-05F_Edition2 Page155Tuesday, July 26 2005 11:24 AM
Form No.8U66-EA-05F

Black plate (156,1)
l Press the CANCEL button.
The system is off when the ignition is off.
NOTE
Cruise control will cancel at about 15km/h (9 mph) below the preset speed orbelow 30 km/h (19 mph).
Traction Control System(TCS)í
The Traction Control System (TCS)enhances traction and safety bycontrolling engine torque. When the TCSdetects driving wheel slippage, it lowersengine torque to prevent loss of traction.
This means that on a slick surface, theengine adjusts automatically to provideoptimum power to the drive wheelswithout causing them to spin and losetraction.
WARNINGTCS and Unsafe Driving:The traction control system (TCS)cannot compensate for unsafe andreckless driving, excessive speed,tailgating (following another vehicletoo closely), and hydroplaning(reduced tire friction and road contactbecause of water on the road surface).You can still have an accident. Sodon't rely on the traction controlsystem as a substitute for safe driving.
TCS and Snow and Ice:Driving without proper tractiondevices on snow and/or ice-coveredroads is dangerous. The tractioncontrol system (TCS) alone cannotprovide adequate traction and youcould still have an accident. Use snowtires and drive at reduced speeds whenroads are covered with ice and/orsnow.
5-22
Driving Your Mazda
íSome models.
Starting and Driving
Mazda6_8U66-EA-05F_Edition2 Page156Tuesday, July 26 2005 11:24 AM
Form No.8U66-EA-05F

Black plate (157,1)
qTCS Indicator Light
This indicator light stays on for a fewseconds when the ignition switch is turnedto the ON position. If the TCS isoperating, the indicator light flashes.
If the light stays on, the TCS may have amalfunction and it may not operatecorrectly. Take your vehicle to anAuthorized Mazda Dealer.
NOTE
l In addition to the indicator lightflashing, a slight lugging sound willcome from the engine. This indicatesthat the TCS is operating properly.
l On slippery surfaces, such as freshsnow, it will be impossible toachieve high rpm when the TCS ison.
qTCS OFF Indicator Light
This indicator light stays on for a fewseconds when the ignition switch is turnedto the ON position.It also comes on when the TCS OFFswitch is pressed and TCS is switched off.
If the light stays on when the TCS is notswitched off, take your vehicle to anAuthorized Mazda Dealer. The TCS mayhave a malfunction.
NOTE
After starting the engine when thecoolant temperature is extremely low,the TCS is automatically turned off. Atthis time, the TCS OFF indicator lightwill remain on, but this does notindicate an abnormality. After theengine has warmed, TCS will resumenormal operation and the indicator lightwill go out.
qTCS OFF Switch
Press the TCS OFF switch to turn off theTCS. The TCS OFF indicator light willilluminate.
Press the switch again to turn the TCSback on. The TCS OFF indicator lightwill go out.
Driving Your Mazda
Starting and Driving
5-23
Mazda6_8U66-EA-05F_Edition2 Page157Tuesday, July 26 2005 11:24 AM
Form No.8U66-EA-05F

Black plate (158,1)
NOTE
l When TCS is on and you attempt tofree the vehicle when it is stuck, ordrive it out of freshly fallen snow,the TCS will activate. Depressing theaccelerator will not increase enginepower and freeing the vehicle maybe difficult. When this happens, turnoff the TCS.
l If the TCS is off when the engine isturned off, it automatically activateswhen the ignition switch is turnedon.
l Leaving the TCS on will provide thebest traction.
5-24
Driving Your Mazda
Starting and Driving
Mazda6_8U66-EA-05F_Edition2 Page158Tuesday, July 26 2005 11:24 AM
Form No.8U66-EA-05F

Black plate (159,1)
Meters and Gauges(Black-out meter)When the ignition switch is in the ON position, the dashboard gauges illuminate.
Speedometer ...................................................................................................... page 5-26Odometer, Trip Meter and Trip Meter Selector .................................................. page 5-26Tachometer ........................................................................................................ page 5-27Engine Coolant Temperature Gauge .................................................................. page 5-27Fuel Gauge ........................................................................................................ page 5-28
Driving Your Mazda
Instrument Cluster and Indicators
5-25
Mazda6_8U66-EA-05F_Edition2 Page159Tuesday, July 26 2005 11:24 AM
Form No.8U66-EA-05F

Black plate (160,1)
qSpeedometer
The speedometer indicates the speed ofthe vehicle.
qOdometer, Trip Meter and TripMeter Selector
The display mode can be changedbetween trip meter A and trip meter B bypressing the selector while one of them isdisplayed. The selected mode will bedisplayed.
Trip meter
Odometer
Selector
Trip meter B
Press the selector
Press the selector
Trip meter A
Odometer
Odometer
NOTE
(Standard meter)The odometer and trip meter can bedisplayed as follows even when theignition switch is in the ACC or LOCKposition.The headlight switch must be in theor position to see the display.
l Displays for 10 minutes after theignition switch is turned to the ACCor LOCK position from the ONposition.
l Displays for 10 minutes after anydoor is opened.
Odometer
The odometer records the total distancethe vehicle has been driven.
Trip meter
The trip meter can record the totaldistance of two trips. One is recorded intrip meter A, and the other is recorded intrip meter B.
For instance, trip meter A can record thedistance from the point of origin, and tripmeter B can record the distance fromwhere the fuel tank is filled.
When trip meter A is selected, pressingthe selector again within one second willchange to trip meter B mode.
When trip meter A is selected, TRIPAwill be displayed. When trip meter B isselected, TRIP B will be displayed.
5-26
Driving Your Mazda
Instrument Cluster and Indicators
Mazda6_8U66-EA-05F_Edition2 Page160Tuesday, July 26 2005 11:24 AM
Form No.8U66-EA-05F

Black plate (161,1)
The trip meter records the total distancethe vehicle is driven until the meter isagain reset. Return it to “0.0” by holdingthe selector depressed for more than 1second. Use this meter to measure tripdistances and to compute fuelconsumption.
NOTE
l Only the trip meters record tenths ofkilometers (miles).
l The trip record will be erased when:
l The power supply is interrupted(blown fuse or the battery isdisconnected).
l The vehicle is driven over 999.9km (mile).
qTachometer
The tachometer shows engine speed inthousands of revolutions per minute(rpm).
Red zone
CAUTIONDon't run the engine with thetachometer needle in the RED ZONE.This may cause severe engine damage.
qEngine Coolant Temperature Gauge
The engine coolant temperature gaugeshows the temperature of the enginecoolant.
If the needle is near H, it indicatesoverheating.
CAUTIONDriving with an overheated engine cancause serious engine damage (page7-15).
Driving Your Mazda
Instrument Cluster and Indicators
5-27
Mazda6_8U66-EA-05F_Edition2 Page161Tuesday, July 26 2005 11:24 AM
Form No.8U66-EA-05F

Black plate (162,1)
qFuel Gauge
The fuel gauge shows approximately howmuch fuel is in the tank. We recommendkeeping the tank over 1/4 full. When thelow fuel warning light illuminates orwhen the needle is near E, refuel as soonas possible.
Low fuel warning light
NOTE
The direction of the arrow ( ) shownthat the fuel-filler lid is on the left sideof the vehicle.
qDashboard Illumination
Rotate the thumb wheel to adjust thebrightness of the instrument cluster andother illuminations in the dashboard.
NOTE
l The brightness of dashboardilluminations (except instrumentcluster) can be adjusted when theheadlight switch is in the orposition.
l (Black-out meter)The brightness of the instrumentcluster illumination can be adjustedwhen the headlight switch is in anyposition.
Dim
Bright
Canceling the illumination dimmer(Black-out meter and dashboardilluminations)
When the headlight switch is in the orposition, the illumination of the
instrument cluster and the informationdisplay dims.
5-28
Driving Your Mazda
Instrument Cluster and Indicators
Mazda6_8U66-EA-05F_Edition2 Page162Tuesday, July 26 2005 11:24 AM
Form No.8U66-EA-05F

Black plate (163,1)
When driving on snowy or foggy roads,or in other situations when the instrumentcluster or information display's visibilityis reduced due to glare from surroundingbrightness, cancel the illuminationdimmer and increase the illuminationintensity.
To cancel the illumination dimmer, rotatethe thumb wheel upward fully. You mayhear a click sound and the illuminationdimmer will be canceled.
NOTE
If the dashboard illumination switch iskept at the illumination dimmer cancelposition, the instrument cluster and theinformation display will not dim whenthe headlight switch is turned to theor position again.
Driving Your Mazda
Instrument Cluster and Indicators
5-29
Mazda6_8U66-EA-05F_Edition2 Page163Tuesday, July 26 2005 11:24 AM
Form No.8U66-EA-05F

Black plate (164,1)
Warning/Indicator Lights
Warning/Indicator lights will appear in any of the highlighted areas
Signal Warning/Indicator Lights Page
Brake System Warning Light 5-32
Charging System Warning Light 5-33
Engine Oil Pressure Warning Light 5-34
Check Engine Light 5-34
ABS Warning Light 5-32
Air Bag/Front Seat Belt Pretensioner System Warning Light 5-35
Low Fuel Warning Light 5-35
5-30
Driving Your Mazda
Warning/Indicator Lights and Beep Sounds
Mazda6_8U66-EA-05F_Edition2 Page164Tuesday, July 26 2005 11:24 AM
Form No.8U66-EA-05F

Black plate (165,1)
Signal Warning/Indicator Lights Page
Seat Belt Warning Light/Beep 5-35
Door-Ajar Warning Light 5-37
Low Washer Fluid Level Warning Light 5-37
Automatic Transaxle Warning Light 5-37
Security Indicator Light 5-37
Headlight High-Beam Indicator Light 5-38
Shift Position Indicator Light 5-38
TCS Indicator Light 5-38
TCS OFF Indicator Light 5-39
Cruise Main Indicator Light 5-39
Cruise Set Indicator Light 5-39
Light-On Indicator Light 5-39
Turn Signal/Hazard Warning Indicator Lights 5-39
Driving Your Mazda
Warning/Indicator Lights and Beep Sounds
5-31
Mazda6_8U66-EA-05F_Edition2 Page165Tuesday, July 26 2005 11:24 AM
Form No.8U66-EA-05F

Black plate (166,1)
qBrake System Warning Light
This warning has the following functions:
Parking brake warning
The light comes on when the parkingbrake is applied with the ignition switchin the START or ON position. It goes offwhen the parking brake is fully released.
Low brake fluid level warning
If the light stays on after the parking brakeis fully released, you may have a brakeproblem.
Drive to the side of the road and park offthe right-of-way.
You may notice that the pedal is harder topush or that it may go closer to the floor.In either case, it will take longer to stopthe vehicle.
1. With the engine stopped, check thebrake fluid level immediately and addfluid as required (page 8-24).
2. After adding fluid, check the lightagain.
If the warning light remains on, or if thebrakes do not operate properly, do notdrive the vehicle. Have it towed to anAuthorized Mazda Dealer.
Even if the light goes out have your brakesystem inspected as soon as possible byan Authorized Mazda Dealer.
NOTE
Having to add brake fluid is sometimesan indicator of leakage. Consult anAuthorized Mazda Dealer as soon aspossible even if the brake light is nolonger illuminated.
WARNINGBrake Warning Light:Driving with the brake system warninglight on is dangerous. It indicates thatyour brakes may not work at all orthat they could completely fail at anytime. If this light remains on, afterchecking that the parking brake isfully released, have the brakesinspected immediately. Don't drivewith this light on, have the vehicletowed to an Authorized Mazda Dealerto have the brakes inspected as soonas possible.
qABS Warning Light
The warning light stays on for a fewseconds when the ignition switch is turnedto the ON position.
5-32
Driving Your Mazda
Warning/Indicator Lights and Beep Sounds
Mazda6_8U66-EA-05F_Edition2 Page166Tuesday, July 26 2005 11:24 AM
Form No.8U66-EA-05F

Black plate (167,1)
If the ABS warning light stays on whileyou're driving, the ABS control unit hasdetected a system malfunction. If thisoccurs, your brakes will function normallyas if the vehicle had no ABS.Should this happen, consult an AuthorizedMazda Dealer as soon as possible.
NOTE
When the engine is jump-started tocharge the battery, uneven rpm occursand the ABS warning light comes on.This is due to a weak battery, not amalfunction.Recharge the battery.
qElectronic Brake ForceDistribution System Warning
If the electronic brake force distributioncontrol unit determines that somecomponents are operating incorrectly, thecontrol unit may turn the brake systemwarning light and the ABS warning lighton at the same time. The problem is likelyto be an electronic brake force distributionsystem.
WARNINGABS Warning Light and BrakeWarning Light on at the Same Time:Driving when the brake systemwarning light and ABS warning lightare on at the same time is dangerous.When both lights are on, the rearwheels could lock more quickly in anemergency stop than under normalcircumstances.Don't drive with both lights on, havethe vehicle towed to an AuthorizedMazda Dealer to have the brakesinspected as soon as possible.
qCharging System Warning Light
This warning light illuminates when theignition switch is turned to the ONposition and turns off when the engine isstarted.
If the warning light illuminates whiledriving, it indicates a malfunction of thealternator or of the charging system.Drive to the side of the road and park offthe right-of-way. Consult an AuthorizedMazda Dealer.
Driving Your Mazda
Warning/Indicator Lights and Beep Sounds
5-33
Mazda6_8U66-EA-05F_Edition2 Page167Tuesday, July 26 2005 11:24 AM
Form No.8U66-EA-05F

Black plate (168,1)
CAUTIONDon't continue driving when thecharging system warning light isilluminated because the engine couldstop unexpectedly.
qEngine Oil Pressure Warning Light
This warning light illuminates when theignition switch is turned to the ONposition and turns off when the engine isstarted.
This warning light indicates low engineoil pressure.
If the light illuminates while driving:
1. Drive to the side of the road and parkoff the right-of-way on level ground.
2. Turn off the engine and wait 5 minutesfor the oil to drain back into the oilpan.
3. Inspect the engine oil level (page 8-19).If it's low, add oil.
4. Check the warning light.
If the light remains illuminated even afteryou add oil, have your vehicle towed toan Authorized Mazda Dealer.
CAUTIONDon't run the engine if oil pressure islow. It could result in extensive enginedamage.
qCheck Engine Light
If this light comes on while driving, thevehicle may have a problem. It isimportant to note the driving conditionswhen the light came on and consult anAuthorized Mazda Dealer.
The check engine light may come on inthe following cases:
l The fuel tank level being very low orapproaching empty.
l The engine's electrical system has aproblem.
l The emission control system has aproblem.
l The fuel-filler cap is missing or nottightened securely.
If the check engine light remains on orflashes continuously, do not drive at highspeeds and consult an Authorized MazdaDealer as soon as possible.
5-34
Driving Your Mazda
Warning/Indicator Lights and Beep Sounds
Mazda6_8U66-EA-05F_Edition2 Page168Tuesday, July 26 2005 11:24 AM
Form No.8U66-EA-05F

Black plate (169,1)
qAir Bag/Front Seat BeltPretensioner System Warning Light
If the air bag/front seat belt pretensionersystem is normal, the warning lightilluminates when the ignition switch isturned to the ON position or after theengine is cranked. After about 6 secondsit goes out.
A system malfunction is indicated whenthe warning light constantly flashes,constantly illuminates or doesn'tilluminate at all when the ignition switchis turned to the ON position. If any ofthese occur, consult an Authorized MazdaDealer as soon as possible. The systemmay not work in an accident.
WARNINGSelf-Servicing the Air Bag/Pretensioner Systems:Self-servicing or tampering with thesystems is dangerous. An air bag/pretensioner could accidentallyactivate or become disabled. Thiscould cause serious injuries. Nevertamper with the systems and alwayshave an Authorized Mazda Dealerperform all servicing and repairs.
qLow Fuel Warning Light
Low fuel warning light
This warning light in the fuel gaugesignals that the fuel tank will soon beempty.Refuel as soon as possible.
qSeat Belt Warning Light/Beep
The seat belt warning light illuminatesand a beep sound will be heard if thedriver's seat belt is not fastened when theignition switch is turned to the ONposition.
Conditions of operation
Condition Result
The driver's seat belt is notfastened when the ignitionswitch is turned to the ONposition.
The warning lightflashes and a beepsound will be heardfor about 6 seconds.
The driver's seat belt isfastened while the warninglight and the beep sound areactivated.
The warning lightturns off and the beepsound stops.
The driver's seat belt isfastened before the ignitionswitch is turned to the ONposition.
The warning light willnot illuminate and thebeep sound will not beheard.
Driving Your Mazda
Warning/Indicator Lights and Beep Sounds
5-35
Mazda6_8U66-EA-05F_Edition2 Page169Tuesday, July 26 2005 11:24 AM
Form No.8U66-EA-05F

Black plate (170,1)
Belt minder
NOTE
The belt minder can be deactivated.Consult an Authorized Mazda Dealer todeactivate and restore the seat beltminder.
Driver's seat
The belt minder is a supplementalwarning to the seat belt warning function.If the driver's seat belt is not fastenedwhen the ignition switch is turned to theON position, the warning light/beepoperates to give you further remindersaccording to the chart below.
Condition
Vehicle speed
Between 0― 20km/h
(0 ― 12 mph)
20 km/h(12 mph) or
more
Seat belt
Indicator
Beep
: Fastened: Unfastened: Illuminated: Flashing: Beep
Once the beep sound is heard, it continuessounding even if the vehicle speed lowersto 20 km/h (12 mph) or less until theseatbelt is fastened or the beep soundperiod (90 seconds) has passed.
Front passenger seat
The seat belt warning light/beep remindsthe front passenger to fasten the seat beltaccording to the chart below.
Condition
Vehicle speed
Between 0― 20km/h
(0 ― 12 mph)
20 km/h(12 mph) or
more
Seat belt(Driver)
Seat belt(Passenger)
Indicator
Beep
: Fastened: Unfastened: Illuminated: Flashing: Beep
Once the beep sound is heard, it continuessounding even if the vehicle speed lowersto 20 km/h (12 mph) or less until theseatbelt is fastened or the beep soundperiod (90 seconds) has passed.
NOTE
l To allow the front passenger seatweight sensor to function properly,do not place and sit on an additionalseat cushion on the front passengerseat. The sensor may not functionproperly because the additional seatcushion could cause sensorinterference.
l Package or pets on the frontpassenger seat might give you a falsewarning. If you place the luggage orothers on the front passenger seat,the warning light operates dependingon its weight.
5-36
Driving Your Mazda
Warning/Indicator Lights and Beep Sounds
Mazda6_8U66-EA-05F_Edition2 Page170Tuesday, July 26 2005 11:24 AM
Form No.8U66-EA-05F

Black plate (171,1)
qDoor-Ajar Warning Light
This warning light comes on when anydoor isn't securely closed.
qLowWasher Fluid LevelWarning Lightí
This warning light indicates that littlewasher fluid remains. Add fluid (page8-29).
qAutomatic Transaxle Warning Light
This warning light stays on for a fewseconds when the ignition switch is turnedto the ON position.The light illuminates when the transaxlehas a problem.
CAUTIONIf the automatic transaxle warning lightilluminates, the transaxle has anelectrical problem. Continuing to driveyour Mazda in this condition couldcause damage to your transaxle.Consult an Authorized Mazda Dealer assoon as possible.
qSecurity Indicator Light
This indicator light starts flashing every 2seconds when the ignition switch is turnedfrom the ON to the ACC position and theimmobilizer system is armed.
The light stops flashing when the ignitionswitch is turned to the ON position withthe correct ignition key.At this time, the immobilizer system isdisarmed and the light illuminates forabout 3 seconds and then goes out.
If the engine doesn't start with the correctignition key, and the security indicatorlight keeps illuminating or flashing, thesystem may have a malfunction. Consultan Authorized Mazda Dealer.
Driving Your Mazda
Warning/Indicator Lights and Beep Sounds
5-37íSome models.
Mazda6_8U66-EA-05F_Edition2 Page171Tuesday, July 26 2005 11:24 AM
Form No.8U66-EA-05F
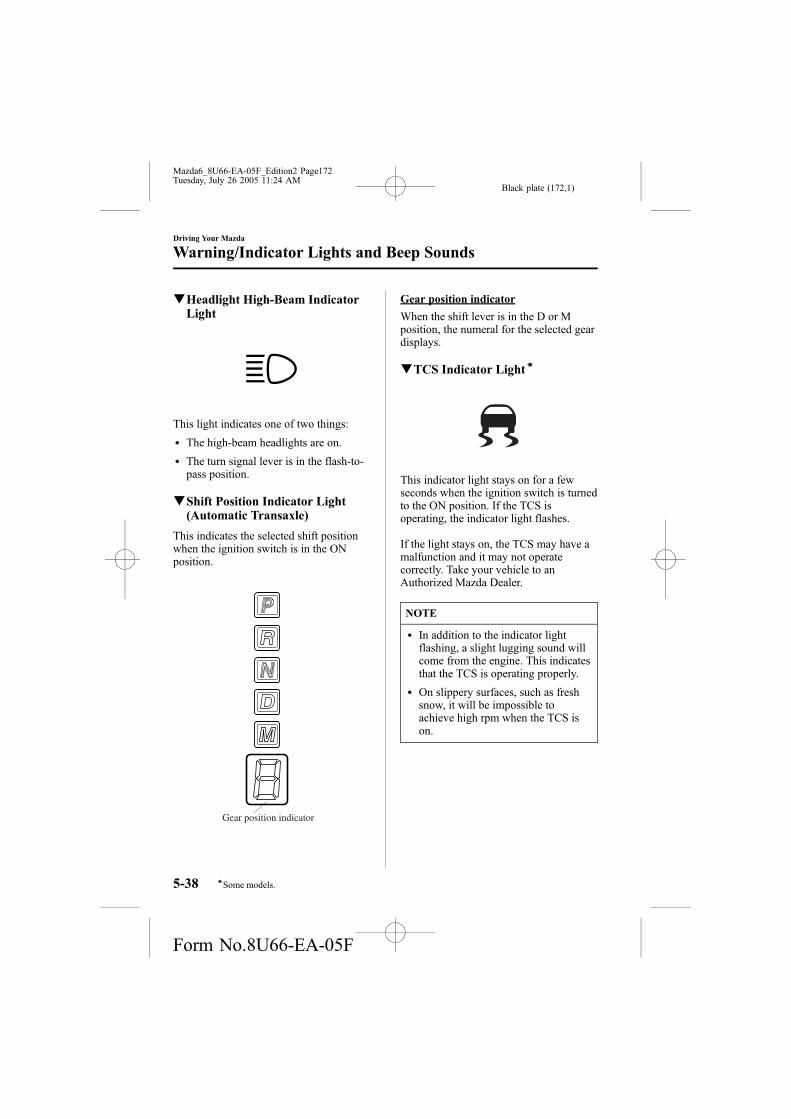
Black plate (172,1)
qHeadlight High-Beam IndicatorLight
This light indicates one of two things:
l The high-beam headlights are on.
l The turn signal lever is in the flash-to-pass position.
qShift Position Indicator Light(Automatic Transaxle)
This indicates the selected shift positionwhen the ignition switch is in the ONposition.
Gear position indicator
Gear position indicator
When the shift lever is in the D or Mposition, the numeral for the selected geardisplays.
qTCS Indicator Lightí
This indicator light stays on for a fewseconds when the ignition switch is turnedto the ON position. If the TCS isoperating, the indicator light flashes.
If the light stays on, the TCS may have amalfunction and it may not operatecorrectly. Take your vehicle to anAuthorized Mazda Dealer.
NOTE
l In addition to the indicator lightflashing, a slight lugging sound willcome from the engine. This indicatesthat the TCS is operating properly.
l On slippery surfaces, such as freshsnow, it will be impossible toachieve high rpm when the TCS ison.
5-38
Driving Your Mazda
íSome models.
Warning/Indicator Lights and Beep Sounds
Mazda6_8U66-EA-05F_Edition2 Page172Tuesday, July 26 2005 11:24 AM
Form No.8U66-EA-05F

Black plate (173,1)
qTCS OFF Indicator Lightí
This indicator light stays on for a fewseconds when the ignition switch is turnedto the ON position.It also comes on when the TCS OFFswitch is pressed and TCS is switched off.
If the light stays on when the TCS is notswitched off, take your vehicle to anAuthorized Mazda Dealer. The TCS mayhave a malfunction.
NOTE
After starting the engine when thecoolant temperature is extremely low,the TCS is automatically turned off. Atthis time, the TCS OFF indicator lightwill remain on, but this does notindicate an abnormality. After theengine has warmed, TCS will resumenormal operation and the indicator lightwill go out.
qCruise Main Indicator Light
This light comes on when the ON/OFFswitch is pressed and the cruise controlsystem is activated.
qCruise Set Indicator Light
This light comes on when a cruising speedis set.
qLight-On Indicator Light (Black-out meter)
This indicator light comes on when theexterior lights and dashboard illuminationare on.
qTurn-Signal/Hazard WarningIndicator Lights
When operating the turn signal lights, theleft or right turn signal indicator lightflashes to indicate which turn signal lightis operating (page 5-42).
When operating the hazard warninglights, both turn signal indicator lightsflash (page 5-47).
Driving Your Mazda
Warning/Indicator Lights and Beep Sounds
5-39íSome models.
Mazda6_8U66-EA-05F_Edition2 Page173Tuesday, July 26 2005 11:24 AM
Form No.8U66-EA-05F
Black plate (174,1)
NOTE
If an indicator light remains illuminated(does not flash) or if it flashesabnormally, one of the turn signal bulbsmay be burned out.
Beep Sounds
qSeat Belt Warning Beep
If the driver's seat belt is not fastenedwhen the ignition switch is turned to theON position, a beep sound will be heardfor about 6 seconds.If the driver's seat belt is not fastened andthe vehicle is driven at a speed faster thanabout 20 km/h (12 mph), a beep soundwill be heard again for about 90 seconds(the beep sound speeds up as timeelapses).Refer to Seat Belt Warning Light/Beep onpage 5-35.
qIgnition Key Reminder
If the ignition switch is in the LOCK orACC position with the key inserted, acontinuous beep sound will be heardwhen the driver's door is opened.
qLights-On Reminder
If lights are on and the key is removedfrom the ignition switch, a continuousbeep sound will be heard when thedriver's door is opened.
5-40
Driving Your Mazda
Warning/Indicator Lights and Beep Sounds
Mazda6_8U66-EA-05F_Edition2 Page174Tuesday, July 26 2005 11:24 AM
Form No.8U66-EA-05F

Black plate (175,1)
Lighting Control
qHeadlights
To turn on the lights, turn the headlightswitch on the end of the control lever.
Switch Position
Headlights Off Off On
TaillightsParking lightsLicense lightsDashboardillumination
Off On On
NOTE
l If the light switch is left on, the lightswill automatically switch off 30seconds after turning the ignitionswitch to the LOCK position orremoving the key.
The lights will automatically switchback on when the ignition switch isturned to the ACC or ON position.
l To prevent discharging the battery,don't leave the lights on while theengine is off unless safety requiresthem.
qLights-On Reminder
If lights are on and the key is removedfrom the ignition switch, a continuousbeep sound will be heard when thedriver's door is opened.
qHeadlight High-Low Beam
Push the lever forward for high beam.Pull back to original position for lowbeam.
High beam
Low beam
qFlashing the Headlights
To flash the headlights, pull the lever fullytoward you. The headlight switch doesnot need to be on, and the lever will returnto the normal position when released.
Driving Your Mazda
Switches and Controls
5-41
Mazda6_8U66-EA-05F_Edition2 Page175Tuesday, July 26 2005 11:24 AM
Form No.8U66-EA-05F

Black plate (176,1)
qHeadlight Levelingí
The number of riders and weight of cargoin the luggage compartment change theangle of the headlights.The headlight leveling switch adjusts thisangle.
Select the proper setting from the following chart.
Front seat Rearseat
LoadSwitchPositionDriver Passenger
× ― ― ― 0
× × ― ― 0
× × × ― 1
× × × × 2
× ― ― × 3
×: Yes―: No
qDaytime Running Lights (Canada)
In Canada, vehicles must be driven withthe headlights on during daytimeoperation.
For that reason, the daytime running lightsautomatically turn on when the ignitionswitch is turned to the ON position.
NOTE
The Daytime Running Lights turn offwhen the parking brake is applied.
Turn and Lane-ChangeSignals
qTurn Signal
Move the signal lever down (for a leftturn) or up (for a right turn) to the stopposition. The signal will self-cancel afterthe turn is completed.
If the indicator light continues to flashafter a turn, manually return the lever toits original position.
Right turn
Left turn
OFF
Right lane change
Left lane change
Green indicators on the dashboard showwhich signal is working.
Lane-change signals
Move the lever slightly toward thedirection of the change ―until theindicator flashes― and hold it there. Itwill return to the off position whenreleased.
NOTE
If an indicator light stays on withoutflashing or if it flashes abnormally, oneof the turn signal bulbs may be burnedout.
5-42
Driving Your Mazda
íSome models.
Switches and Controls
Mazda6_8U66-EA-05F_Edition2 Page176Tuesday, July 26 2005 11:25 AM
Form No.8U66-EA-05F

Black plate (177,1)
Fog Lightsí
Use this switch to turn on the fog lights.They help you to see as well as to be seen.
To turn the front fog lights on, rotate thefog light switch to the position.The headlight switch must be in theposition to turn on the front fog lights.
Fog light switch
To turn them off, rotate the fog lightswitch to the OFF position or turn theheadlight switch to the or OFFposition.
NOTE
The fog lights will turn off when theheadlights are set at high beam.
Windshield Wipers andWasher
The ignition switch must be in the ONposition.
WARNINGSubstitute Washer Fluid:Using radiator antifreeze as washerfluid is dangerous. If sprayed on thewindshield, it will dirty the windshield,affect your visibility, and could resultin an accident. Use only windshieldwasher fluid or plain water in thereservoir.
Frozen Washer Fluid:Using windshield washer fluid withoutanti-freeze protection in freezingtemperatures is dangerous. Thewasher fluid could freeze on thewindshield and block your vision. Youcould have an accident. Don't use thewasher without first warming thewindshield and never use plain tapwater.
Driving Your Mazda
Switches and Controls
5-43íSome models.
Mazda6_8U66-EA-05F_Edition2 Page177Tuesday, July 26 2005 11:25 AM
Form No.8U66-EA-05F
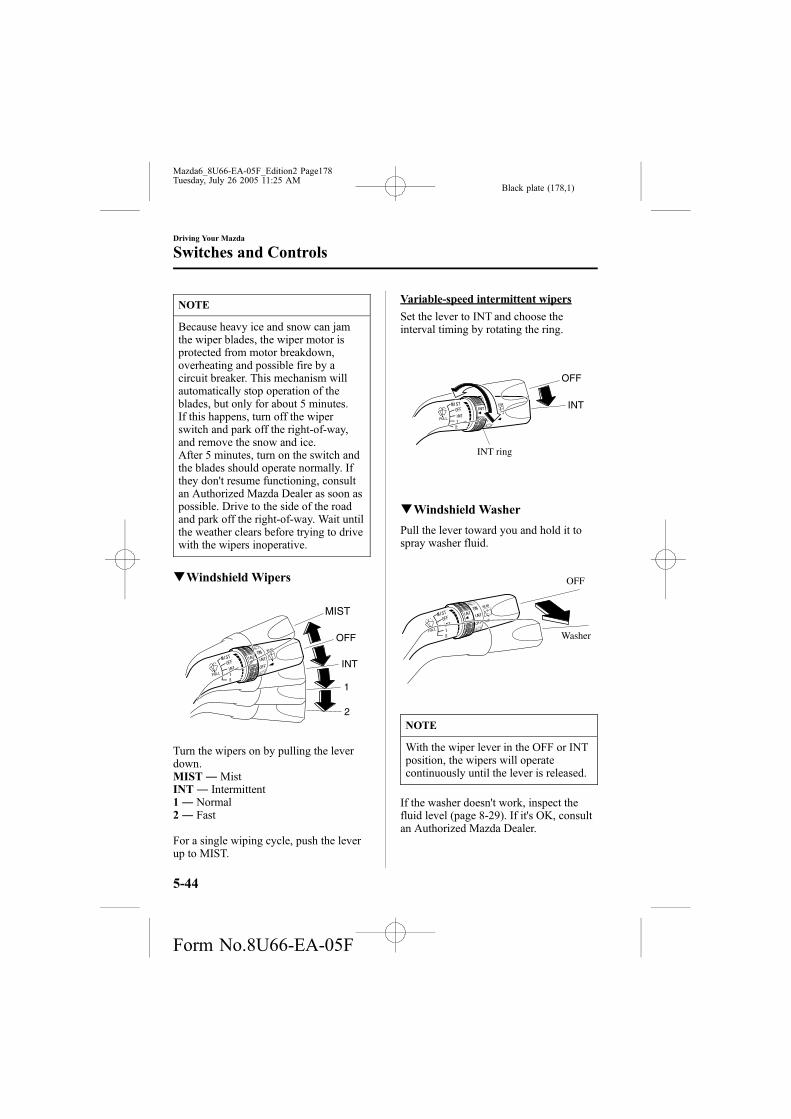
Black plate (178,1)
NOTE
Because heavy ice and snow can jamthe wiper blades, the wiper motor isprotected from motor breakdown,overheating and possible fire by acircuit breaker. This mechanism willautomatically stop operation of theblades, but only for about 5 minutes.If this happens, turn off the wiperswitch and park off the right-of-way,and remove the snow and ice.After 5 minutes, turn on the switch andthe blades should operate normally. Ifthey don't resume functioning, consultan Authorized Mazda Dealer as soon aspossible. Drive to the side of the roadand park off the right-of-way. Wait untilthe weather clears before trying to drivewith the wipers inoperative.
qWindshield Wipers
Turn the wipers on by pulling the leverdown.MIST ― MistINT ― Intermittent1 ― Normal2 ― Fast
For a single wiping cycle, push the leverup to MIST.
Variable-speed intermittent wipers
Set the lever to INT and choose theinterval timing by rotating the ring.
INT ring
qWindshield Washer
Pull the lever toward you and hold it tospray washer fluid.
OFF
Washer
NOTE
With the wiper lever in the OFF or INTposition, the wipers will operatecontinuously until the lever is released.
If the washer doesn't work, inspect thefluid level (page 8-29). If it's OK, consultan Authorized Mazda Dealer.
5-44
Driving Your Mazda
Switches and Controls
Mazda6_8U66-EA-05F_Edition2 Page178Tuesday, July 26 2005 11:25 AM
Form No.8U66-EA-05F
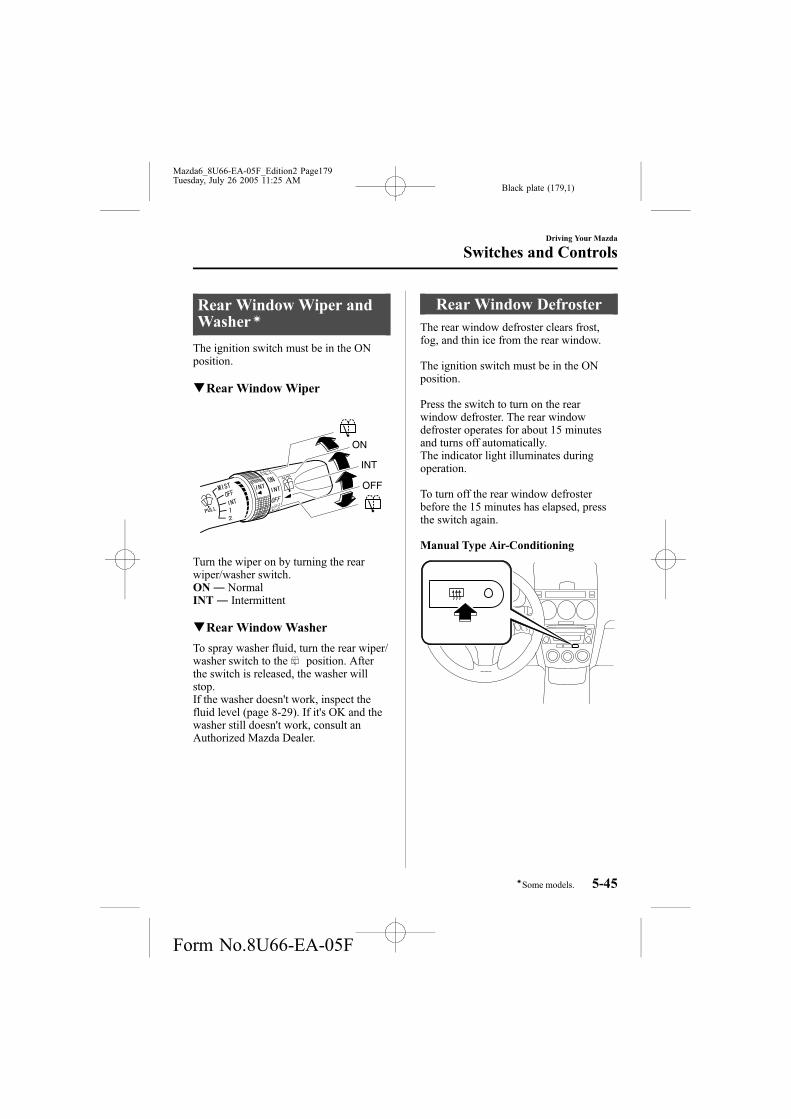
Black plate (179,1)
Rear Window Wiper andWasherí
The ignition switch must be in the ONposition.
qRear Window Wiper
Turn the wiper on by turning the rearwiper/washer switch.ON ― NormalINT ― Intermittent
qRear Window Washer
To spray washer fluid, turn the rear wiper/washer switch to the position. Afterthe switch is released, the washer willstop.If the washer doesn't work, inspect thefluid level (page 8-29). If it's OK and thewasher still doesn't work, consult anAuthorized Mazda Dealer.
Rear Window DefrosterThe rear window defroster clears frost,fog, and thin ice from the rear window.
The ignition switch must be in the ONposition.
Press the switch to turn on the rearwindow defroster. The rear windowdefroster operates for about 15 minutesand turns off automatically.The indicator light illuminates duringoperation.
To turn off the rear window defrosterbefore the 15 minutes has elapsed, pressthe switch again.
Manual Type Air-Conditioning
Driving Your Mazda
Switches and Controls
5-45íSome models.
Mazda6_8U66-EA-05F_Edition2 Page179Tuesday, July 26 2005 11:25 AM
Form No.8U66-EA-05F

Black plate (180,1)
Fully Automatic Type Air-Conditioning
CAUTIONDon't use sharp instruments or windowcleaners with abrasives to clean theinside of the rear window surface. Theymay damage the defroster grid insidethe window.
NOTE
This defroster is not designed formelting snow. If there is anaccumulation of snow on the rearwindow, remove it before using thedefroster.
HornTo sound the horn, press around themark on the steering wheel.
5-46
Driving Your Mazda
Switches and Controls
Mazda6_8U66-EA-05F_Edition2 Page180Tuesday, July 26 2005 11:25 AM
Form No.8U66-EA-05F

Black plate (181,1)
Hazard Warning FlasherThe hazard warning lights should alwaysbe used when you stop on or near aroadway.
The hazard warning lights warn otherdrivers that your vehicle is a traffic hazardand that they must take extreme cautionwhen near it.
Depress the hazard warning flasher and allfour turn signals will flash.
NOTE
l The turn signals don't work when thehazard warning lights are on.
l Check local regulations about the useof hazard warning lights while thevehicle is being towed. They mayforbid it.
HomeLink WirelessControl Systemí
NOTE
HomeLink and HomeLink house areregistered trademarks of JohnsonControls.
The HomeLink system replaces up to 3hand-held transmitters with a single built-in component in the auto-dimming mirror.Pressing the HomeLink button on theauto-dimming mirror activates garagedoors, gates and other devicessurrounding your home.
HomeLink button
Indicator light
Driving Your Mazda
Switches and Controls
5-47íSome models.
Mazda6_8U66-EA-05F_Edition2 Page181Tuesday, July 26 2005 11:25 AM
Form No.8U66-EA-05F
Black plate (182,1)
WARNINGSafety Stop and Reverse Feature:Using the HomeLink system with anygarage door opener that lacks thesafety stop and reverse feature asrequired by federal safety standards isdangerous. (This includes garagedoors manufactured before April 1,1982.)Using these garage door openers canincrease the risk of serious injury ordeath. For further information,contact HomeLink at 1-800-355-3515or www.homelink.com or yourAuthorized Mazda Dealer.
Safety While Programming orOperating HomeLink System:Programming or operating theHomeLink system without verifyingthe safety of areas surrounding garagedoors and gates is dangerous andcould result in an unexpected accidentand serious injury if someone were tobe hit. Always check the areassurrounding garage doors and gatesfor people or obstructions beforeprogramming or during operation ofthe HomeLink system.
CAUTIONHomeLink has been tested andcomplies with FCC and IndustryCanada rules. Changes or modificationsnot expressly approved by the partyresponsible for compliance could voidthe user's authority to operate thedevice.
NOTE
FCC ID: NZLOBIHL3CANADA: 4112A-OBIHL3This device complies with FCC rulespart 15. Operation is subject to thefollowing conditions:1- This device may not cause anyharmful interference and2- This device must accept anyinterference that may be receivedincluding interference that may causeundesired operation.
NOTE
The programming will not be erasedeven if the battery is disconnected.
qPre-programming the HomeLinkSystem
NOTE
It is recommended that a new battery beplaced in the hand-held transmitter ofthe device being programmed toHomeLink for quicker training andaccurate transmission of the radio-frequency signal.
l Verify that there is a remote controltransmitter available for the device youwould like to program.
l Disconnect the power to the device.
5-48
Driving Your Mazda
Switches and Controls
Mazda6_8U66-EA-05F_Edition2 Page182Tuesday, July 26 2005 11:25 AM
Form No.8U66-EA-05F

Black plate (183,1)
qProgramming the HomeLink System
CAUTIONWhen programming a garage dooropener or a gate, disconnect the powerto these devices before performingprogramming, as continuous operationof the devices could damage the motor.
The HomeLink system provides 3 buttonswhich can be individually selected andprogrammed using the transmitters forcurrent, on-market devices as follows:
1. Press and hold the two outerHomeLink buttons (buttons one andthree)― releasing only when theindicator light begins to flash (after 20seconds). Do not hold the buttons forlonger than 30 seconds and do notrepeat step 1 to program a second and/or third hand-held transmitter to theremaining two HomeLink buttons.
2. Position the end of your hand-heldtransmitter 2.5―7.5 cm (1―3 inches)away from the HomeLink button youwish to program while keeping theindicator light in view.
3. Simultaneously press and hold both thechosen HomeLink and hand-heldtransmitter buttons. Do not release thebuttons until step 4 has beencompleted.
NOTE
Some gate operators and garage dooropeners may require you to replace thisProgramming Step 3 with proceduresnoted in the “Gate Operator/CanadianProgramming” section.
4. After the HomeLink indicator lightchanges from a slow to a rapidlyblinking light, release both theHomeLink and hand-held transmitterbuttons.
NOTE
If the HomeLink indicator light doesnot change to a rapidly blinking light,contact HomeLink atwww.homelink.com or call 1-800-355-3515 for assistance.
5. Press and hold the just-trainedHomeLink button and observe theindicator light.
If the indicator light stays on constantly,programming is complete and yourdevice should activate when theHomeLink button is pressed and released.
NOTE
To program the remaining twoHomeLink buttons, begin with“Programming” ― step 2. Do notrepeat step 1.
If the indicator light blinks rapidly fortwo seconds and then turns to aconstant light, continue with“Programming” steps 6―8 to completethe programming of a rolling codeequipped device (most commonly agarage door opener).
6. At the garage door opener receiver(motor-head unit) in the garage, locatethe “learn” or “smart” button. This canusually be found where the hangingantenna wire is attached to the motor-head unit.
Driving Your Mazda
Switches and Controls
5-49
Mazda6_8U66-EA-05F_Edition2 Page183Tuesday, July 26 2005 11:25 AM
Form No.8U66-EA-05F
Black plate (184,1)
7. Firmly press and release the “learn” or“smart” button. (The name and color ofthe button may vary by manufacturer.)
NOTE
There are 30 seconds in which toinitiate step 8.
8. Return to the vehicle and firmly press,hold for two seconds and release theprogrammed HomeLink button. Repeatthe “press/hold/release” sequence asecond time, and, depending on thebrand of the garage door opener (orother rolling code equipped device),repeat this sequence a third time tocomplete the programming process.
HomeLink should now activate yourrolling code equipped device.
NOTE
To program the remaining twoHomeLink buttons, begin with“Programming” ― step 2. Do notrepeat step 1.
For questions or comments, please contactHomeLink at www.homelink.com or 1-800-355-3515.
qGate operator/CanadianProgramming
Canadian radio-frequency laws requiretransmitter signals to “time-out” (or quit)after several seconds of transmission ―which may not be long enough forHomeLink to pick up the signal duringprogramming. Similar to this Canadianlaw, some U.S. gate operators aredesigned to “time-out” in the samemanner.
If you live in Canada or you are havingdifficulties programming a gate operatorby using the “Programming” procedures(regardless of where you live), replace“Programming HomeLink” step 3 withthe following:
NOTE
If programming a garage door opener orgate operator, it is advised to unplug thedevice during the “cycling” process toprevent possible overheating.
Continue to press and hold the HomeLinkbutton while you press and release―every two seconds (“cycle”) your hand-held transmitter until the frequency signalhas successfully been accepted byHomeLink. (The indicator light will flashslowly and then rapidly.)Proceed with “Programming” step 4 tocomplete.
qOperating the HomeLink System
Press the programmed HomeLink buttonto operate a programmed device. Thecode will continue being transmitted for amaximum of 20 seconds.
5-50
Driving Your Mazda
Switches and Controls
Mazda6_8U66-EA-05F_Edition2 Page184Tuesday, July 26 2005 11:25 AM
Form No.8U66-EA-05F

Black plate (185,1)
qReprogramming the HomeLinksystem
To program a device to HomeLink using aHomeLink button previously trained,follow these steps:
1. Press and hold the desired HomeLinkbutton. DO NOT release the button.
2. The indicator light will begin to flashafter 20 seconds. Without releasing theHomeLink button, proceed with“Programming” - step 2.
qErasing Programmed HomeLinkButtons
To erase the existing programming fromall three operating channels, press andhold the two outside buttons ( , )on the auto-dimming mirror until theHomeLink indicator light begins to flashafter approximately 20 seconds.Verify that the programming has beenerased when you resell the vehicle.
Driving Your Mazda
Switches and Controls
5-51
Mazda6_8U66-EA-05F_Edition2 Page185Tuesday, July 26 2005 11:25 AM
Form No.8U66-EA-05F

Black plate (186,1)
5-52
Mazda6_8U66-EA-05F_Edition2 Page186Tuesday, July 26 2005 11:25 AM
Form No.8U66-EA-05F

Black plate (187,1)
6 Interior Comfort
Use of various features for drive comfort, including air-conditioning and audiosystem.
Climate Control System ............................................................... 6-2Operating Tips ........................................................................... 6-2Vent Operation .......................................................................... 6-3Types of the Climate Control System ....................................... 6-5Manual Type ............................................................................. 6-6Fully Automatic Type ............................................................. 6-11
Audio System ............................................................................... 6-16Antenna ................................................................................... 6-16Operating Tips for Audio System ........................................... 6-16Audio Set ................................................................................ 6-27Audio Control Switch Operation (Steering Wheel)í ............. 6-43Safety Certification ................................................................. 6-46
Interior Equipment ..................................................................... 6-47Sunvisors ................................................................................. 6-47Interior Lights ......................................................................... 6-47Information Display ................................................................ 6-50Cup Holder .............................................................................. 6-52Bottle Holder ........................................................................... 6-53Storage Compartments ............................................................ 6-54Accessory Sockets .................................................................. 6-57
6-1íSome models.
Mazda6_8U66-EA-05F_Edition2 Page187Tuesday, July 26 2005 11:25 AM
Form No.8U66-EA-05F

Black plate (188,1)
Operating Tips
qOperating the Climate ControlSystem
Operate the climate control system withthe engine running.
NOTE
To prevent the battery from beingdischarged, do not leave the fan controldial on for a long period of time withthe ignition switch in the ACC positionwhen the engine is not running.
qClearing the Air Inlet
Clear all obstructions like leaves, snowand ice from the hood and the air inlet inthe cowl grille to improve the systemefficiency.
qFoggy Windows
The windows may fog up easily in humidweather. Use the climate control system todefog the windows.
To help defog the windows, operate theair conditioner to dehumidify the air.
NOTE
The air conditioner may be used alongwith the heater to dehumidify the air.
qOutside/Recirculated Air Position
Use the outside air position in normalconditions. The recirculated air positionshould be used only when driving ondusty roads or for quick cooling of theinterior.
qParking in Direct Sunlight
If the vehicle has been parked in directsunlight during hot weather, open thewindows to let warm air escape, then runthe climate control system.
qNot Using for a Long Period
Run the air conditioner about 10 minutesat least once a month to keep internalparts lubricated.
qCheck the Refrigerant before theWeather Gets Hot
Have the air conditioner checked beforethe weather gets hot. Lack of refrigerantmay make the air conditioner lessefficient. Consult an Authorized MazdaDealer for refrigerant inspection.
The air conditioner is filled withHFC134a (R134a), a refrigerant that willnot damage the ozone layer.If the air conditioner is low on refrigerantor has a malfunction, consult anAuthorized Mazda Dealer.
qReplacement of the Cabin Air Filter
If your vehicle is equipped with an airfilter for the air conditioner, it is necessaryto change the filter periodically asindicated in scheduled maintenance (page8-3). Consult an Authorized MazdaDealer for replacement of the cabin airfilter.
6-2
Interior Comfort
Climate Control System
Mazda6_8U66-EA-05F_Edition2 Page188Tuesday, July 26 2005 11:25 AM
Form No.8U66-EA-05F

Black plate (189,1)
Vent Operation
qAdjusting the Vents
Directing airflow
1. Press the upper part of the air vent toopen it.
2. Rotate the air vent left and right toadjust the direction of airflow.
NOTE
When using the air conditioner, mistmay come out from the vents. This isnot a sign of trouble but a result ofhumid air being suddenly cooled.
Interior Comfort
Climate Control System
6-3
Mazda6_8U66-EA-05F_Edition2 Page189Tuesday, July 26 2005 11:25 AM
Form No.8U66-EA-05F

Black plate (190,1)
qSelecting the Airflow Mode
Defroster and Floor VentsDashboard Vents
Floor Vents
Defroster VentsDashboard and Floor Vents
6-4
Interior Comfort
Climate Control System
Mazda6_8U66-EA-05F_Edition2 Page190Tuesday, July 26 2005 11:25 AM
Form No.8U66-EA-05F

Black plate (191,1)
Types of the Climate Control SystemManual type and fully automatic type climate control systems are explained separately.Check your vehicle's climate control type and read the appropriate pages.Climate control information is displayed on the information display.Manual Type ............................................................................................................ page 6-6
Fully Automatic Type ............................................................................................. page 6-11
Interior Comfort
Climate Control System
6-5
Mazda6_8U66-EA-05F_Edition2 Page191Tuesday, July 26 2005 11:25 AM
Form No.8U66-EA-05F

Black plate (192,1)
Manual Type
A/C Switch
Air intake selector
Mode selector dialFan control dialTemperature control dial
qControl Switches
Temperature control dial
HotCold
This dial controls temperature. Turn itclockwise for hot and counterclockwisefor cold.
Fan control dial
This dial allows variable fan speeds.0―Fan off1―Low speed2―Medium low speed3―Medium high speed4―High speed
6-6
Interior Comfort
Climate Control System
Mazda6_8U66-EA-05F_Edition2 Page192Tuesday, July 26 2005 11:25 AM
Form No.8U66-EA-05F

Black plate (193,1)
Mode selector dial
Turn the mode selector dial to selectairflow mode (page 6-4).
A/C switch
Push the A/C switch to turn the airconditioner on. The indicator light on theswitch will illuminate when the fancontrol dial is set at position 1, 2, 3, or 4.
Push the switch once again to turn the airconditioner off.
NOTE
The air conditioner may not functionwhen the outside temperatureapproaches 0 °C (32 °F).
Air intake selector
This switch controls the source of airentering the vehicle.
Press the switch to alternate between theand positions. The indicator
light for the selected mode will illuminate.
It is recommended that under normalconditions the switch be kept in theoutside air position.
Outside air position ( )
Outside air is taken into the vehicle. Usethis position for normal ventilation andheating.
Recirculated air position ( )
Outside air is shut off. Air within thevehicle is recirculated.
This position can be used when driving ona dusty road or in similar conditions. Italso helps to provide quicker cooling ofthe interior.
Interior Comfort
Climate Control System
6-7
Mazda6_8U66-EA-05F_Edition2 Page193Tuesday, July 26 2005 11:25 AM
Form No.8U66-EA-05F

Black plate (194,1)
WARNINGThe Recirculated Air Position:Using the position in cold orrainy weather will cause the windowsto fog up. Your vision will behampered, which could lead to aserious accident. Do not use theposition in cold or rainy weather.
qHeating
1. Set the mode selector dial to theposition.
2. Set the air intake selector to theposition.
3. Set the temperature control dial to thehot position.
4. Set the fan control dial to the desiredspeed.
5. If dehumidified heating is desired, turnon the air conditioner.
NOTE
l If the windshield fogs up easily, setthe mode selector dial to theposition.
l If cooler air is desired at face level,set the mode selector dial at theposition and adjust the temperaturecontrol dial to maintain maximumcomfort.
l The air to the floor is warmer thanair to the face (except when thetemperature control dial is set at theextreme hot or cold position).
qCooling (With Air Conditioner)
1. Set the mode selector dial to theposition.
2. Set the temperature control dial to thecold position.
3. Set the fan control dial to the desiredspeed.
4. Turn on the air conditioner by pressingthe A/C switch.
5. Adjust the fan control dial andtemperature control dial to maintainmaximum comfort.
CAUTIONWhen using the air conditioner whiledriving up long hills or in heavy traffic,closely monitor the temperature gauge(page 5-27).The air conditioner may cause engineoverheating. If the gauge indicatesoverheating, turn the air conditioner off(page 7-15).
6-8
Interior Comfort
Climate Control System
Mazda6_8U66-EA-05F_Edition2 Page194Tuesday, July 26 2005 11:25 AM
Form No.8U66-EA-05F

Black plate (195,1)
NOTE
l When maximum cooling is desired,set the temperature control dial to theextreme cold position and set the airintake selector to the position,then set the fan control dial toposition 4.
l If warmer air is desired at floor level,set the mode selector dial at theposition and adjust the temperaturecontrol dial to maintain maximumcomfort.
l The air to the floor is warmer thanair to the face (except when thetemperature control dial is set at theextreme hot or cold position).
qVentilation
1. Set the mode selector dial to theposition.
2. Set the air intake selector to theposition.
3. Set the temperature control dial to thedesired position.
4. Set the fan control dial to the desiredspeed.
qWindshield Defrosting and Defogging
1. Set the mode selector dial to theposition.
2. Set the temperature control dial to thedesired position.
3. Set the fan control dial to the desiredspeed.
WARNINGFoggy Windshield:Using the position with thetemperature control set to the coldposition will cause the outside of thewindshield to fog up. Your vision willbe hampered, which could lead to aserious accident. Set the temperaturecontrol to the hot or warm positionwhen using the position.
NOTE
l For maximum defrosting, set thetemperature control dial to theextreme hot position and the fancontrol dial to position 4.
l If warm air is desired at the floor, setthe mode selector dial to theposition.
l In the , or position, the airconditioner is automatically turnedon (however, the indicator light doesnot illuminate) and the positionis automatically selected to defrostthe windshield.In the or position, the
position cannot be changed tothe position.
qDehumidifying (With AirConditioner)
Operate the air conditioner in cool or coldweather to help defog the windshield andside windows.
1. Set the mode selector dial to thedesired position.
Interior Comfort
Climate Control System
6-9
Mazda6_8U66-EA-05F_Edition2 Page195Tuesday, July 26 2005 11:25 AM
Form No.8U66-EA-05F
Black plate (196,1)
2. Set the air intake selector to theposition.
3. Set the temperature control dial to thedesired position.
4. Set the fan control dial to the desiredspeed.
5. Turn on the air conditioner by pressingthe A/C switch.
NOTE
One of the functions of the airconditioner is dehumidifying the airand, to use this function, thetemperature does not have to be set tocold. Therefore, set the temperaturecontrol dial to the desired position (hotor cold) and turn on the air conditionerwhen you want to dehumidify the cabinair.
6-10
Interior Comfort
Climate Control System
Mazda6_8U66-EA-05F_Edition2 Page196Tuesday, July 26 2005 11:25 AM
Form No.8U66-EA-05F

Black plate (197,1)
Fully Automatic Type
Air intake selector Temperature control dialFan control dial
Mode selector switchOFF switch Auto switch
A/C Switch
Windshield defroster switch
qControl Switches
AUTO switch
By pressing the AUTO switch thefollowing functions will be automaticallycontrolled in accordance with the settemperature:
l Airflow temperature
l Amount of airflow
l Selection of airflow mode
l Outside/Recirculated air selection
l Air conditioner operation
NOTE
AUTO switch indicator light
l When on, it indicates AUTOoperation, and the system willfunction automatically.
l When off, it indicates the operationof other switches such as the modeselector switch, fan control dial, A/Cswitch and windshield defrosterswitch. Other functions will continueto operate automatically.
Interior Comfort
Climate Control System
6-11
Mazda6_8U66-EA-05F_Edition2 Page197Tuesday, July 26 2005 11:25 AM
Form No.8U66-EA-05F

Black plate (198,1)
OFF switch
Pressing the OFF switch shuts off theclimate control system.
Temperature control dial
HotCold
This dial controls temperature.Turn itclockwise for hot and counterclockwisefor cold.
Fan control dial
FastSlow
The fan has seven speeds. The selectedspeed will be displayed.
Mode selector switch
The desired airflow mode can be selected(page 6-4).
NOTE
l With the airflow mode set toposition and the temperature controldial set at a medium temperature,heated air is directed to the feet and acomparably lower air temperaturewill flow through the central, left andright vents.
l To set the air vent to , press thewindshield defroster switch.
A/C switch
With the AUTO or fan control dial ON,press the A/C switch to select the airconditioning (cooling/dehumidifyingfunctions) on or off.
6-12
Interior Comfort
Climate Control System
Mazda6_8U66-EA-05F_Edition2 Page198Tuesday, July 26 2005 11:25 AM
Form No.8U66-EA-05F

Black plate (199,1)
NOTE
The air conditioner may not functionwhen the outside temperatureapproaches 0 °C (32 °F). (Indicatorremains on even when system is off.)
Air intake selector
Outside or recirculated air positions canbe selected. Press the switch to selectoutside/recirculated air positions.
Recirculated air position ( )
Use this position when going throughtunnels, driving in congested traffic (highengine exhaust areas) or when quickcooling is desired.
Outside air position ( )
Use this position for normal conditionsand defogging.
WARNINGThe Recirculated Air Position:Using the position in cold orrainy weather will cause the windowsto fog up. Your vision will behampered, which could lead to aserious accident. Do not use theposition in cold or rainy weather.
Windshield defroster switch
Press the switch to defrost the windshieldand front door windows.
qOperation of Automatic AirConditioning
1. Press the AUTO switch. Selection ofthe airflow mode, air intake selectorand amount of airflow will beautomatically controlled.
2. Use the temperature control dial toselect a desired temperature.
HotCold
To turn off the system, press the OFFswitch.
Interior Comfort
Climate Control System
6-13
Mazda6_8U66-EA-05F_Edition2 Page199Tuesday, July 26 2005 11:25 AM
Form No.8U66-EA-05F

Black plate (200,1)
NOTE
l For an optimal cabin temperature, setthe temperature close to “25.0 °C”(“77.0 °F”). Adjust to the desiredtemperature if necessary.
l Setting the temperature to maximumhigh or low will not provide thedesired temperature at a faster rate.
l When selecting heat, the system willrestrict airflow until it has warmed toprevent cold air from blowing out ofthe vents.
qWindshield Defrosting and Defogging
Press the windshield defroster switch.In this position, the position isautomatically selected, and the airconditioner automatically turned on(however, the indicator light does notilluminate). The air conditioner will directdehumidified air to the front windshieldand side windows (page 6-4). Airflowamount will be increased.
WARNINGFoggy Windshield:Using the position with thetemperature control set to the coldposition will cause the outside of thewindshield to fog up. Your vision willbe hampered, which could lead to aserious accident. Set the temperaturecontrol to hot or warm position whenusing the position.
NOTE
Use the temperature control dial toincrease the air flow temperature anddefog the windshield more quickly.
qSunlight/Temperature Sensor
The fully automatic air conditionerfunction measures inside and outsidetemperatures, and sunlight. It then setstemperatures inside the passengercompartment accordingly. Don't obstructthe sensor.
Sunlight sensor
6-14
Interior Comfort
Climate Control System
Mazda6_8U66-EA-05F_Edition2 Page200Tuesday, July 26 2005 11:25 AM
Form No.8U66-EA-05F

Black plate (201,1)
Interior temperature sensor
Interior Comfort
Climate Control System
6-15
Mazda6_8U66-EA-05F_Edition2 Page201Tuesday, July 26 2005 11:25 AM
Form No.8U66-EA-05F

Black plate (202,1)
Antenna
qDetachable Type
To remove the antenna, turn itcounterclockwise.To install the antenna, turn it clockwise.Make sure the antenna is securelyinstalled.
Install
Remove
CAUTIONTo prevent damage to the antenna,remove it before entering a car washfacility or passing beneath a lowoverhead clearance.
NOTE
When leaving your vehicle unattended,we recommend that you remove theantenna and store it inside the vehicle.
Operating Tips for AudioSystem
WARNINGDo Not Adjust Audio While Drivingthe Vehicle:Adjusting the audio while driving thevehicle is dangerous as it coulddistract your attention from the vehicleoperation which could lead to aserious accident. Always adjust theaudio while the vehicle is stopped.Even if the audio control switches areequipped on the steering wheel, learnto use the switches without lookingdown at them so that you can keepyour maximum attention on the roadwhile driving the vehicle.
CAUTIONFor the purposes of safe driving, adjustthe audio volume to a level that allowsyou to hear sounds outside of thevehicle.
NOTE
l Do not use the audio for long periodsof time while the engine is off.Otherwise the battery could go dead.
l If a digital cellular phone or CBradio is used in or near the vehicle, itcould cause noise to occur from theaudio system, however, this does notindicate that the system has beendamaged.
6-16
Interior Comfort
Audio System
Mazda6_8U66-EA-05F_Edition2 Page202Tuesday, July 26 2005 11:25 AM
Form No.8U66-EA-05F

Black plate (203,1)
qRadio Reception
AM characteristics
AM signals bend around such things asbuildings or mountains and bounce off theionosphere. Therefore, they can reachlonger distances than FM signals. Becauseof this, two stations may sometimes bepicked up on the same frequency at thesame time.
Station 2Station 1
Ionosphere
FM characteristics
An FM broadcast range is usually about40―50 km (25―30 miles) from thesource. Because of extra coding needed tobreak the sound into two channels, stereoFM has even less range than monaural(non-stereo) FM.
FM Station
40—50km(25—30 miles)
Signals from an FM transmitter are similarto beams of light because they do notbend around corners, but they do reflect.Unlike AM signals, FM signals cannottravel beyond the horizon. Therefore, FMstations cannot be received at the greatdistances possible with AM reception.
AM waveFM wave
FM wave
100—200 km (60—120 miles)
Ionosphere
Atmospheric conditions can also affectFM reception. High humidity will causepoor reception. However, cloudy daysmay provide better reception than cleardays.
Multipath noise
Since FM signals can be reflected byobstructions, it is possible to receive boththe direct signal and the reflected signal atthe same time. This causes a slight delayin reception and may be heard as a brokensound or a distortion. This problem mayalso be encountered when in closeproximity to the transmitter.
Reflected waveDirect
Interior Comfort
Audio System
6-17
Mazda6_8U66-EA-05F_Edition2 Page203Tuesday, July 26 2005 11:25 AM
Form No.8U66-EA-05F

Black plate (204,1)
Flutter/Skip noise
Signals from an FM transmitter move instraight lines and become weak in valleysbetween tall buildings, mountains, andother obstacles. When a vehicle passesthrough such an area, the receptionconditions may change suddenly, resultingin annoying noise.
Weak signal noise
In suburban areas, broadcast signalsbecome weak because of distance fromthe transmitter. Reception in such fringeareas is characterized by sound breakup.
Strong signal noise
This occurs very close to a transmittertower. The broadcast signals areextremely strong, so the result is noise andsound breakup at the radio receiver.
Station drift noise
When a vehicle reaches the area of twostrong stations broadcasting at similarfrequencies, the original station may betemporarily lost and the second stationpicked up. At this time there will be somenoise from this disturbance.
Station 2 88.3 MHz
Station 1 88.1 MHz
6-18
Interior Comfort
Audio System
Mazda6_8U66-EA-05F_Edition2 Page204Tuesday, July 26 2005 11:25 AM
Form No.8U66-EA-05F

Black plate (205,1)
qOperating Tips for Cassette TapePlayer
Cleaning the cassette tape player
The tape head, capstans, and pinch rollerswill gather oxide residue from cassettetapes. This can cause weak or waveringsounds and damage to the cassette tapesand player. Use a good quality head-cleaning tape or a liquid cleaner cassettetape to remove it.Should the unit not operate normally,consult an Authorized Mazda Dealer.Never attempt to repair it or insert ascrewdriver or anything else.
Handling the cassette tape player
The following precautions should beobserved.
l Do not spill any liquid on the audiosystem.
l Do not insert any objects, other thancassette tape, into the slot.
l If the cassette tape is loose, it mayproduce poor sound or performanceduring playback. Use a pencil orsomething similar to remove any slack.
l Only cassette tapes that play no longerthan 90 minutes should be used.Cassette tape exceeding 90 minutes arethin and may easily break.
l Do not leave a cassette tape in the tapeplayer slot when not in use. Remove itcompletely to permit the slot door toclose and to protect the mechanismfrom dust.
l Store cassette tapes away from extremeheat, magnetic fields, and directsunlight. Protect the exposed cassettetape from dirt and damage. Storecassette tapes in their original cases orother protective cases.
Interior Comfort
Audio System
6-19
Mazda6_8U66-EA-05F_Edition2 Page205Tuesday, July 26 2005 11:25 AM
Form No.8U66-EA-05F

Black plate (206,1)
qOperating Tips for CD Player/In-Dash CD Changer
Condensation phenomenon
Immediately after turning on the heaterwhen the vehicle is cold, the CD oroptical components (prism and lens) in theCD player/In-dash CD changer maybecome clouded with condensation. Atthis time, the CD will eject immediatelywhen placed in the unit. A clouded CDcan be corrected simply by wiping it witha soft cloth. Clouded optical componentswill clear naturally in about an hour. Waitfor normal operation to return beforeattempting to use the unit.
Handling the CD player/In-dash CDchanger
The following precautions should beobserved.
l Do not spill any liquid on the audiosystem.
l Do not insert any objects, other thanCDs, into the slot.
l The CD revolves at high speed withinthe unit. Defective (cracked or badlybent) CDs should never be used.
l Do not use non-conventional discssuch as heart-shaped, octagonal discs,etc. The CD player/In-dash CDchanger could be damaged.
l If the memory portion of the CD istransparent or translucent, do not usethe disc.
Transparent
6-20
Interior Comfort
Audio System
Mazda6_8U66-EA-05F_Edition2 Page206Tuesday, July 26 2005 11:25 AM
Form No.8U66-EA-05F

Black plate (207,1)
l A new CD may have rough edges onits inner and outer perimeters. If a discwith rough edges is used, propersetting will not be possible and the CDplayer/In-dash CD changer will notplay the CD. Remove the rough edgesin advance by using a ball-point pen orpencil as shown below. To remove therough edges, rub the side of the pen orpencil against the inner and outerperimeter of the CD.
l When driving over uneven surfaces,the sound may jump.
l The CD player/In-dash CD changer hasbeen designed to play CDs bearing theidentification logo as shown. No otherdiscs can be played.
CD Player
In-dash CD changer
l Be sure never to touch the signalsurface when handling the CDs. Pickup a CD by grasping the outer edge orthe edge of the hole and the outer edge.
l Do not stick paper or tape on the CD.Avoid scratching the reverse side (theside without a label).
l Dust, finger smudges, and dirt candecrease the amount of light reflectedfrom the signal surface, thus affectingsound quality. If the CD shouldbecome soiled, gently wipe it with asoft cloth from the center of the CD tothe edge.
l Do not use record sprays, antistaticagents, or household spray cleaners.Volatile chemicals such as benzine andthinner can also damage the surface ofthe CD and must not be used. Anythingthat can damage, warp, or fog plasticshould never be used to clean CDs.
Interior Comfort
Audio System
6-21
Mazda6_8U66-EA-05F_Edition2 Page207Tuesday, July 26 2005 11:25 AM
Form No.8U66-EA-05F

Black plate (208,1)
l CD TEXT textual information cannotbe displayed by audio units other thanthe In-dash CD changer (MP3 supporttype only). (Only playback is possible.)
l The following player can play MP3files recorded in CD-ROM, CD-R, andCD-RW.
· In-dash CD changer (MP3 filesupport type only)
l The CD player/In-dash CD changerejects the CD if the CD is insertedupside down. Also dirty and/ordefective CDs may be ejected.
l An 8 cm (3 in) CD cannot be played inthe CD player even if an 8 cm (3 in)CD adapter is used.The In-dash CD changer is speciallymade for 12 cm (5 in) CDs.An 8 cm (3 in) CD can be played in theIn-dash CD changer if an 8 cm (3 in)CD adapter is used.If an 8 cm (3 in) CD adapter is notused, the In-dash CD changer may bedamaged. Always use a CD adapter.
l Do not insert cleaning discs in the CDplayer/In-dash CD changer.
l Do not insert any disc with a peel-offor seal on it.
Handling the In-dash CD changer
l This unit may not be able to playcertain CD-R/CD-RWs made using acomputer or music CD recorder due todisc characteristics, scratches,smudges, dirt, etc., or due to dust orcondensation on the lens inside theunit.
l Storing CDs in the vehicle exposed todirect sunlight or high temperature maydamage the CD-R/CD-RWs, and makethem unplayable.
l CD-R/CD-RWexceeding 700 MBcannot be played.
l This unit may not be able to playcertain discs made using a computerdue to the application (writingsoftware) setting used. (For details,consult the store where the applicationwas purchased.)
l It is possible that certain text data, suchas titles, recorded on a CD-R/CD-RWmay not be displayed when musicaldata (CD-DA) is playing.
l The period from when a CD-RW isinserted to when it begins playing islonger than a normal CD or CD-R.
l Completely read the instruction manualand cautions for CD-R/CD-RWs.
qOperating tips for MP3
NOTE
Supply of this product only conveys alicense for private, non-commercial useand does not convey a license nor implyany right to use this product in anycommercial (i.e. revenue-generating)real time broadcasting (terrestrial,satellite, cable and/or any other media),broadcasting/streaming via the Internet,intranets and/or other networks or inother electronic content distributionsystems, such as pay-audio or audio-on-demand applications. An independentlicense for such use is required. Fordetails, please visit http://www.mp3licensing.com.
6-22
Interior Comfort
Audio System
Mazda6_8U66-EA-05F_Edition2 Page208Tuesday, July 26 2005 11:25 AM
Form No.8U66-EA-05F

Black plate (209,1)
l This unit can play MP3 files that havebeen recorded on CD-R/CD-RW/CD-ROMs. Discs that have been recordedusing the following formats can beplayed:
l ISO 9660 level 1l ISO 9660 level 2l Joliet extended formatl Romeo extended format
l This unit handles MP3 filesconforming to the MP3 formatcontaining both header frames and dataframes.
l This unit can play multi-sessionrecorded discs that have up to 99sessions.
l This unit can play MP3s with samplingfrequencies of 16/22.05/24/32/44.1/48kHz.
l This unit can play MP3 files that havebeen recorded in bit rates of 8 kbps to320 kbps. Nonetheless, to insureenjoyment of music with consistentsound quality, it is recommended to usediscs that have been recorded at a bitrate of 128 kbps or more.
l If a disc has both music data (CD-DA)and MP3 files, playback of the two filetypes differs depending on how thedisc was recorded.
l Packet written discs cannot be playedon this unit.
l This unit does not play CDs recordedusing MP3i (MP3 interactive), MP3PRO and RIFF MP3 formats.
About folders and files
l The order of hierarchy for MP3 filesand folders during playback or otherfunctions is from shallow to deep. Thearrangement and playing order of arecorded disc containing MP3 files isas follows:
l File numberA numerical file number is assignedto each file in a folder in the order ofhierarchy from shallow to deep.
l Folder numberA numerical folder number isassigned to each folder in the orderof hierarchy from shallow to deep.
05
06
0102
04
03
1
5
4
2
3
Level1 Level2 Level3 Level4
Folder No.
l The folder order is automaticallyassigned and this order cannot beoptionally set.
l Any folder without an MP3 file will beignored. (It will be skipped and thefolder number will not be displayed.)
Interior Comfort
Audio System
6-23
Mazda6_8U66-EA-05F_Edition2 Page209Tuesday, July 26 2005 11:25 AM
Form No.8U66-EA-05F

Black plate (210,1)
l MP3 files not conforming to the MP3format containing both header framesand data frames will be skipped andnot played.
l This unit will play MP3 files that haveup to eight levels. However, the morelevels a disc has, the longer it will taketo initially start playing. It isrecommended to record discs with twolevels or less.
l A single disc with up to 999 files canbe played and a single folder with up to255 files can be played.
l When naming an MP3 file, be sure toadd an MP3 file extension (.mp3) afterthe file name.
l The maximum number of charactersthat can be used for file names is asfollows. However, this unit will onlydisplay up to 30 characters, includingthe file extension (.mp3).
Maximum number ofcharacters in a file name(including a separator “.”and the three letters of the
file extension)
ISO9660 level 1 12*
ISO9660 level 2 31*
Joliet extendedformat
64
Romeo extendedformat
128
* English one-byte characters (capitalized only) andunderbar “_” are available.
CAUTIONThis unit can only play MP3 files thathave an MP3 file extension (.mp3)attached. Do not attach an MP3 fileextension to any other type file as itcould cause noise to be emitted or amalfunction in the unit.
About ID3 Tag display
l This unit can only display ID3 Tagalbum, track and artist names that havebeen input using Ver1.0/1.1/2.2/2.3formats. Any other data that may havebeen input cannot be displayed.
l This unit can only display English(including numerals) one-bytecharacters. Use only English (includingnumerals) one-byte characters wheninputting ID3 tags. Two-byte charactersand some special symbols cannot bedisplayed.
Specialized glossary
MP3
Abbreviation for “MPEG Audio Layer 3”.A technical standard for audiocompression as decided by an ISO(International Organization forStandardization) MPEG working group.Use of MP3 allows for audio data to becompressed to approximately a tenth ofthe source data size.
ISO 9660
An international standard for logicalformatting of CD-ROM files and folders.It is divided into three separate levelsbased on differences in file namingprocedures, data configuration and othercharacteristics.
6-24
Interior Comfort
Audio System
Mazda6_8U66-EA-05F_Edition2 Page210Tuesday, July 26 2005 11:25 AM
Form No.8U66-EA-05F

Black plate (211,1)
Multi-session
A session is the complete amount of datarecorded from the beginning to the end ofa single period of CD-ROM, CD-R/CD-RW data recording. Multi-session refers tothe existence of data from two or moresessions on a single disc.
Sampling
Refers to the process of encoding analogaudio data at regular intervals andconverting it to digital data. The samplingrate refers to the number of times asample is taken in one second and isexpressed in Hz units. Increasing thesampling rate improves the sound qualitybut also increases the data size.
Bit rate
Refers to the volume of data per second,expressed in bps (bits per second).Generally, the larger the number of thetransfer bit rate when compressing anMP3 file, the more information regardingmusical reproduction it carries, andtherefore the better the sound quality.
Packet writing
A general term for the method, similar tothat used for floppy discs or hard drives,of recording the required file in a singleincrement on a CD-R and similar.
ID3 Tag
ID3 tag is a method for storinginformation related to the music in anMP3 file. Information such as track, artistand album name can be stored. Thiscontent can be freely edited using ID3editing function software.
VBR
Abbreviation for Variable Bit Rate. WhileCBR (Constant Bit Rate) is generallyused, VBR varies the bit rate for audiocompression according to compressionconditions and this allows forcompression with preference given tosound quality.
Interior Comfort
Audio System
6-25
Mazda6_8U66-EA-05F_Edition2 Page211Tuesday, July 26 2005 11:25 AM
Form No.8U66-EA-05F

Black plate (212,1)
MEMO
6-26
Mazda6_8U66-EA-05F_Edition2 Page212Tuesday, July 26 2005 11:25 AM
Form No.8U66-EA-05F

Black plate (213,1)
Audio Set
Illustration is of a representative audio unit.
Cassette Tape Player
In-Dash CD Changer (Music CD Player)
In-Dash CD Changer (Music CD/MP3 CD Player)
CD Player
Power/Volume/Sound Controls .............................................................................. page 6-28Operating the Radio ............................................................................................... page 6-30Operating the Cassette Tape Player ........................................................................ page 6-32Operating the Compact Disc (CD) Player .............................................................. page 6-34Operating the In-Dash CD Changer ....................................................................... page 6-36Error Indications ..................................................................................................... page 6-42
Interior Comfort
Audio System
6-27
Mazda6_8U66-EA-05F_Edition2 Page213Tuesday, July 26 2005 11:25 AM
Form No.8U66-EA-05F

Black plate (214,1)
qPower/Volume/Sound Controls
Power/Volume dial Audio control dial
Power ON/OFF
Turn the ignition switch to the ACC orON position.
Press the power/volume dial to turn theaudio system on.Press the power/volume dial again to turnthe audio system off.
NOTE
To prevent the battery from beingdischarged, do not leave the audiosystem on for a long period of timewhen the engine is not running.
Volume adjustment
To adjust the volume, turn the power/volume dial.
Turn the power/volume dial to the right toincrease volume, to the left to decrease it.
Audio sound adjustment
1. Press the audio control dial to select thefunction. The selected function will beindicated.
*
*
* Depending on the mode selected, the indication changes.
6-28
Interior Comfort
Audio System
Mazda6_8U66-EA-05F_Edition2 Page214Tuesday, July 26 2005 11:25 AM
Form No.8U66-EA-05F
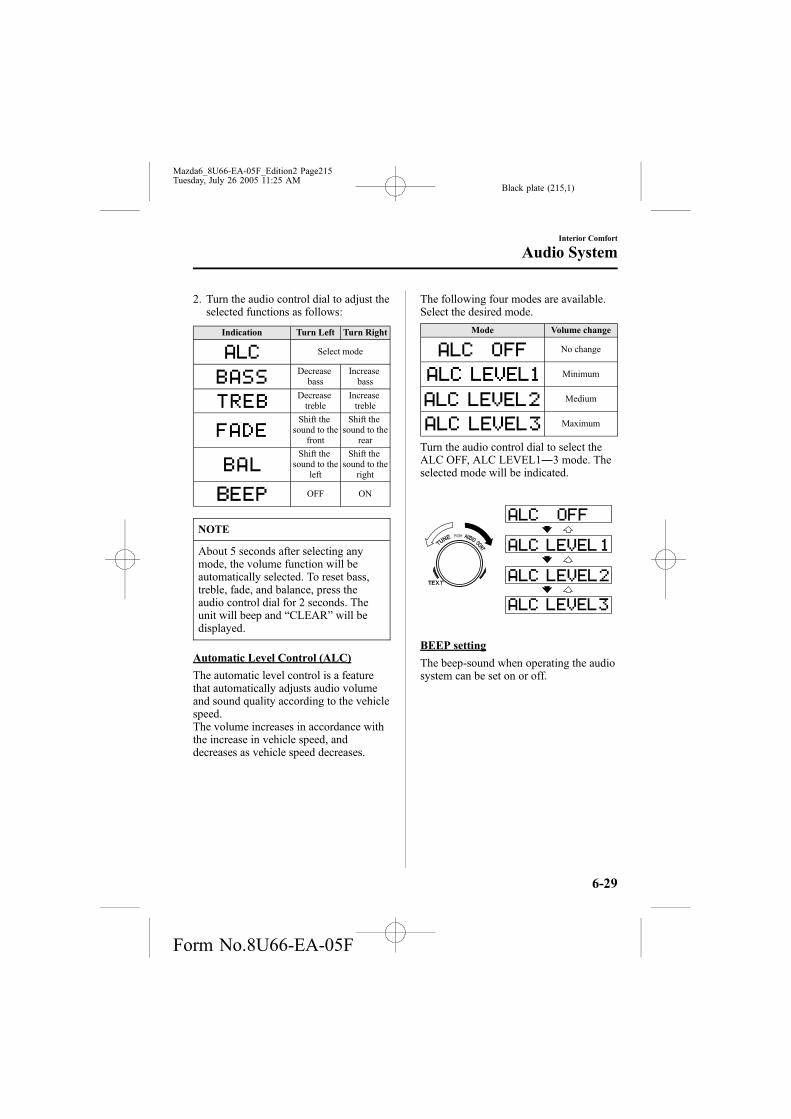
Black plate (215,1)
2. Turn the audio control dial to adjust theselected functions as follows:
Indication Turn Left Turn Right
Select mode
Decreasebass
Increasebass
Decreasetreble
Increasetreble
Shift thesound to the
front
Shift thesound to the
rear
Shift thesound to the
left
Shift thesound to the
right
OFF ON
NOTE
About 5 seconds after selecting anymode, the volume function will beautomatically selected. To reset bass,treble, fade, and balance, press theaudio control dial for 2 seconds. Theunit will beep and “CLEAR” will bedisplayed.
Automatic Level Control (ALC)
The automatic level control is a featurethat automatically adjusts audio volumeand sound quality according to the vehiclespeed.The volume increases in accordance withthe increase in vehicle speed, anddecreases as vehicle speed decreases.
The following four modes are available.Select the desired mode.
Mode Volume change
No change
Minimum
Medium
Maximum
Turn the audio control dial to select theALC OFF, ALC LEVEL1―3 mode. Theselected mode will be indicated.
BEEP setting
The beep-sound when operating the audiosystem can be set on or off.
Interior Comfort
Audio System
6-29
Mazda6_8U66-EA-05F_Edition2 Page215Tuesday, July 26 2005 11:25 AM
Form No.8U66-EA-05F

Black plate (216,1)
qOperating the Radio
Seek tuning button
Scan button
Channel preset buttons Manual tuning dial
Satellite button*
Band selector buttons
*For reception of optional SIRIUS digital satellite radio.Used on vehicles equipped with the separately sold SIRIUS digital satellite radio unit.For information on use, read the manual accompanying the SIRIUS unit.Subscription of SIRIUS digital satellite radio service is available in the U.S. (Except Alaska and Hawaii).
Auto memory button/Electric serial number button*
Radio ON
Press a band selector button ( , )to turn the radio on.
Band selection
Choose AM by pressing the AM button( ) and FM by pressing the FM1/2button ( ).
The selected mode will be indicated. IfFM stereo is being received, “ST” will bedisplayed.
NOTE
If the FM broadcast signal becomesweak, reception automatically changesfrom STEREO to MONO for reducednoise, and the “ST” indicator will goout.
Tuning
The radio has the following tuningmethods: Manual, Seek, Scan, Presetchannel, and Auto memory tuning. Theeasiest way to tune stations is to set themon preset channels.
NOTE
If the power supply is interrupted (fuseblows or the battery is disconnected),the preset channels will be canceled.
Manual tuning
Turning the manual tuning dial willchange the frequency higher or lower.
6-30
Interior Comfort
Audio System
Mazda6_8U66-EA-05F_Edition2 Page216Tuesday, July 26 2005 11:25 AM
Form No.8U66-EA-05F

Black plate (217,1)
Seek tuning
Pressing the seek tuning button ( , )will cause the tuner to seek a higher orlower frequency automatically.
NOTE
If you continue to press and hold thebutton, the frequency will continuechanging without stopping.
Scan tuning
Press the scan button ( ) toautomatically sample strong stations.Scanning stops at each station for about 5seconds. To hold a station, press the scanbutton ( ) again during this interval.
Preset channel tuning
The 6 preset channels can be used to store6 AM and 12 FM stations.
1. To set a channel first select AM, FM1,or FM2. Tune to the desired station.
2. Depress a channel preset button forabout 2 seconds until a beep sound isheard. The preset channel number andstation frequency will be displayed.The station is now held in the memory.
3. Repeat this operation for the otherstations and bands you want to store.To tune one in the memory, select AM,FM1, or FM2 and then press itschannel preset button. The stationfrequency and the channel number willbe displayed.
NOTE
If the power supply is interrupted (fuseblows or the battery is disconnected),the preset channels will be canceled.
Auto memory tuning
This is especially useful when driving inan area where the local stations are notknown. Additional AM/FM stations canbe stored without disturbing thepreviously set channels.
Press and hold the auto memory button( ) for about 2 seconds until a beepsound is heard; the system willautomatically scan and temporarily storeup to 6 stations with the strongestfrequencies in each selected band in thatarea.
After scanning is completed, the stationwith the strongest frequency will be tunedand its frequency displayed.Press and release the auto memory button( ) to recall stations from the auto-stored stations. One stored station will beselected each time; its frequency andchannel number will be displayed.
NOTE
If no stations can be tuned afterscanning operations, “A” will bedisplayed.
Interior Comfort
Audio System
6-31
Mazda6_8U66-EA-05F_Edition2 Page217Tuesday, July 26 2005 11:25 AM
Form No.8U66-EA-05F
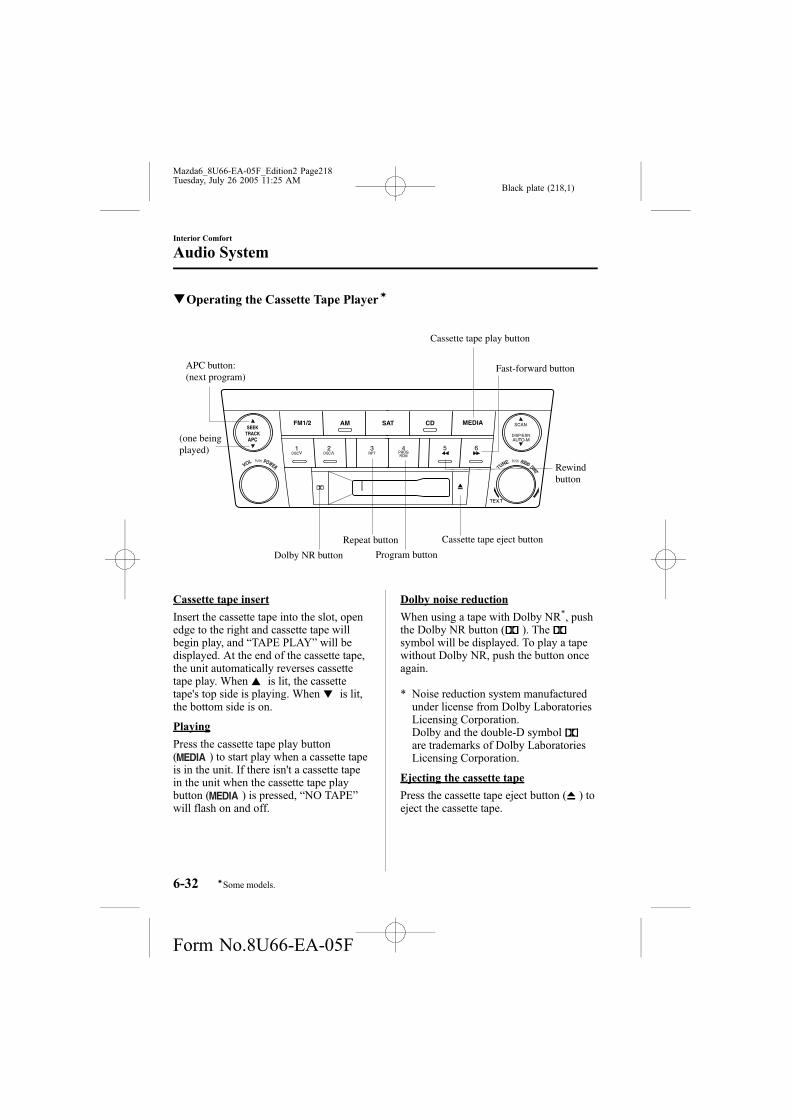
Black plate (218,1)
qOperating the Cassette Tape Playerí
(one being played)
APC button: (next program)
Rewind button
Repeat button
Dolby NR button Program button
Cassette tape eject button
Fast-forward button
Cassette tape play button
Cassette tape insert
Insert the cassette tape into the slot, openedge to the right and cassette tape willbegin play, and “TAPE PLAY” will bedisplayed. At the end of the cassette tape,the unit automatically reverses cassettetape play. When is lit, the cassettetape's top side is playing. When is lit,the bottom side is on.
Playing
Press the cassette tape play button( ) to start play when a cassette tapeis in the unit. If there isn't a cassette tapein the unit when the cassette tape playbutton ( ) is pressed, “NO TAPE”will flash on and off.
Dolby noise reduction
When using a tape with Dolby NR*, pushthe Dolby NR button ( ). Thesymbol will be displayed. To play a tapewithout Dolby NR, push the button onceagain.
* Noise reduction system manufacturedunder license from Dolby LaboratoriesLicensing Corporation.Dolby and the double-D symbolare trademarks of Dolby LaboratoriesLicensing Corporation.
Ejecting the cassette tape
Press the cassette tape eject button ( ) toeject the cassette tape.
6-32
Interior Comfort
íSome models.
Audio System
Mazda6_8U66-EA-05F_Edition2 Page218Tuesday, July 26 2005 11:25 AM
Form No.8U66-EA-05F

Black plate (219,1)
NOTE
The cassette tape can be ejected whenthe ignition switch is in the OFFposition.
Fast-forward/Rewind
Press the fast-forward button ( ) tofast-forward.Press the rewind button ( ) to rewind.To stop this operation and play thecassette tape, press the button again.
NOTE
When the cassette tape ends during fast-forward or rewind, it automaticallystops and starts playing.
Reversing
Press the program button ( ) tochange cassette tape-play direction.
NOTE
When the cassette tape ends, the unitautomatically reverses play.
Automatic program control (APC)
APC is used to find the beginning ofeither the next program or the one beingplayed.
Press the APC button ( ) to thebeginning of the next selection.Press the APC button ( ) to thebeginning of the one being played. Tostop this operation and play the cassettetape, press the button again.
NOTE
APC may not operate properly if:
l A tape was recorded at a low level.
l A tape has long, silent intervals.
l A tape is a live recording.
l A tape has very short intervals ofless than 3 seconds.
Repeat play
This operation makes it possible to listento a selection repeatedly.
Press the repeat button ( ) during play.The current selection playing will berepeated (“RPT” will be displayed).Press the repeat button ( ) once againto cancel repeat play.
NOTE
RPT may not operate properly if:
l A tape was recorded at a low level.
l A tape has long, silent intervals.
l A tape is a live recording.
l A tape has very short intervals ofless than 3 seconds.
Interior Comfort
Audio System
6-33
Mazda6_8U66-EA-05F_Edition2 Page219Tuesday, July 26 2005 11:25 AM
Form No.8U66-EA-05F

Black plate (220,1)
qOperating the Compact Disc (CD) Playerí
Scanbutton
Track down button
Track up button
Reverse button
Repeat button
Random button
Fast-forward button
CD play buttonCD slot CD eject buttonLoad button
Inserting the CD
Insert the CD into the slot, label-side up.The auto-loading mechanism will set theCD and begin play. There will be a shortlapse before play begins while the playerreads the digital signals on the CD.
Playing
Press the CD play button ( ) to startplay when a CD is in the unit.If there isn't a CD in the unit when the CDplay button ( ) is pressed, “NO DISC”will flash on and off.
NOTE
When the load button ( ) is pressed,the CD will load and play even if theCD eject button ( ) had beenpreviously pressed.
Ejecting the CD
Press the CD eject button ( ) to eject theCD.
Fast-forward/Reverse
Press and hold the fast-forward button( ) to advance through a track at highspeed.Press and hold the reverse button ( )to reverse through a track at high speed.
Track search
Press the track up button ( ) once toskip forward to the beginning of the nexttrack.Press the track down button ( ) once toskip back to the beginning of the currenttrack.
6-34
Interior Comfort
íSome models.
Audio System
Mazda6_8U66-EA-05F_Edition2 Page220Tuesday, July 26 2005 11:25 AM
Form No.8U66-EA-05F

Black plate (221,1)
Music scan
This feature helps to find a program byplaying about the first 10 seconds of eachtrack.
Press the scan button ( , ) duringplay to start scan play operation (the tracknumber will flash).Press the scan button ( , ) once againto cancel scan play.
NOTE
If the unit is left in scan, normal playwill resume where scan was selected.
Repeat play
This feature makes it possible to listen toa selection repeatedly.
Press the repeat button ( ) during play.The current selection will be repeated(“RPT” will be displayed).Press the repeat button ( ) once againto cancel repeat play.
Random play
This feature allows the CD player torandomly select the order of the songs.
Press the random button ( ) duringplay. The next selection will be randomlyselected (“RDM” will be displayed).Press the random button ( ) onceagain to cancel random play.
Interior Comfort
Audio System
6-35
Mazda6_8U66-EA-05F_Edition2 Page221Tuesday, July 26 2005 11:26 AM
Form No.8U66-EA-05F
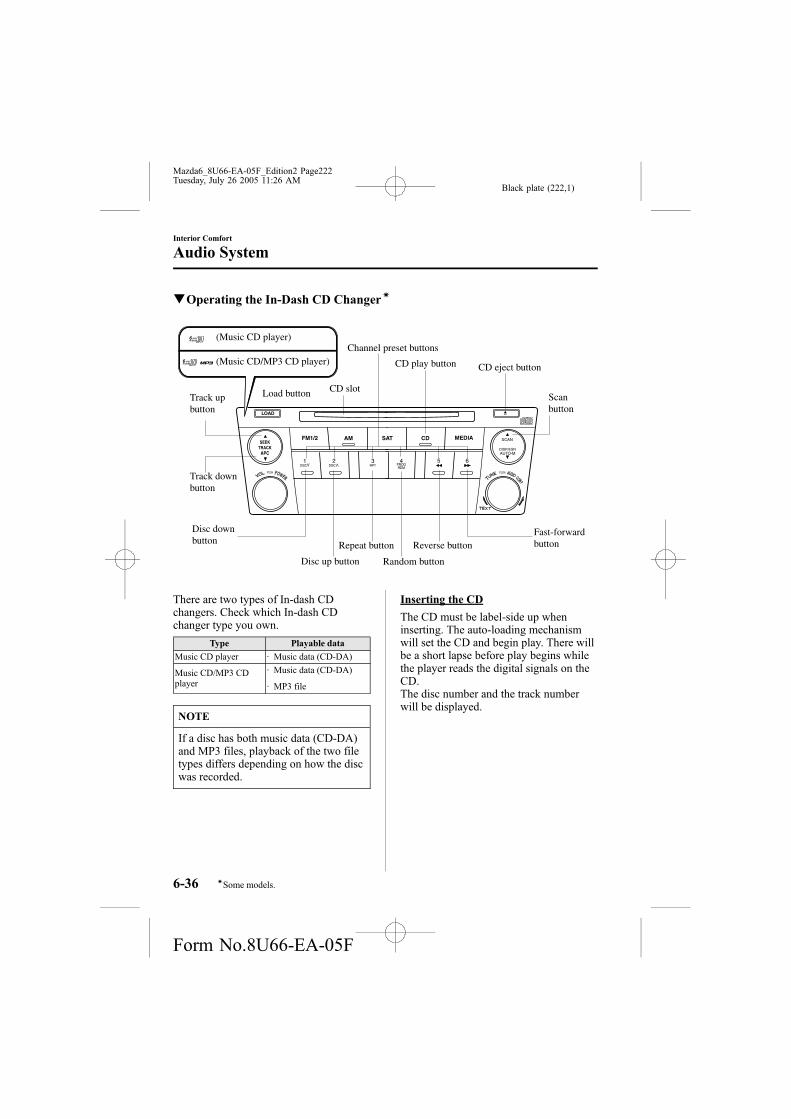
Black plate (222,1)
qOperating the In-Dash CD Changerí
Fast-forward button
Disc down button
Track down button
Track up button
Scanbutton
Channel preset buttons
CD eject button
CD slotLoad button
Reverse button
Disc up button Random button
Repeat button
CD play button
(Music CD player)
(Music CD/MP3 CD player)
There are two types of In-dash CDchangers. Check which In-dash CDchanger type you own.
Type Playable data
Music CD player · Music data (CD-DA)
Music CD/MP3 CDplayer
· Music data (CD-DA)
· MP3 file
NOTE
If a disc has both music data (CD-DA)and MP3 files, playback of the two filetypes differs depending on how the discwas recorded.
Inserting the CD
The CD must be label-side up wheninserting. The auto-loading mechanismwill set the CD and begin play. There willbe a short lapse before play begins whilethe player reads the digital signals on theCD.The disc number and the track numberwill be displayed.
6-36
Interior Comfort
íSome models.
Audio System
Mazda6_8U66-EA-05F_Edition2 Page222Tuesday, July 26 2005 11:26 AM
Form No.8U66-EA-05F
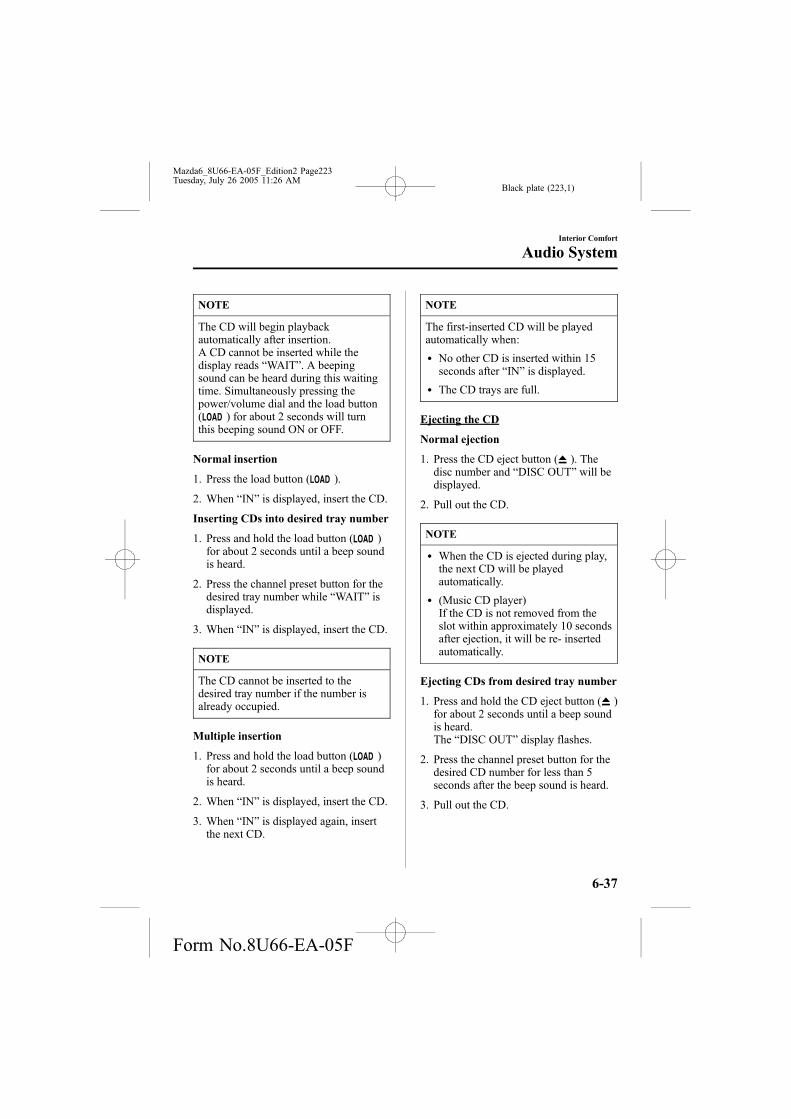
Black plate (223,1)
NOTE
The CD will begin playbackautomatically after insertion.A CD cannot be inserted while thedisplay reads “WAIT”. A beepingsound can be heard during this waitingtime. Simultaneously pressing thepower/volume dial and the load button( ) for about 2 seconds will turnthis beeping sound ON or OFF.
Normal insertion
1. Press the load button ( ).
2. When “IN” is displayed, insert the CD.
Inserting CDs into desired tray number
1. Press and hold the load button ( )for about 2 seconds until a beep soundis heard.
2. Press the channel preset button for thedesired tray number while “WAIT” isdisplayed.
3. When “IN” is displayed, insert the CD.
NOTE
The CD cannot be inserted to thedesired tray number if the number isalready occupied.
Multiple insertion
1. Press and hold the load button ( )for about 2 seconds until a beep soundis heard.
2. When “IN” is displayed, insert the CD.
3. When “IN” is displayed again, insertthe next CD.
NOTE
The first-inserted CD will be playedautomatically when:
l No other CD is inserted within 15seconds after “IN” is displayed.
l The CD trays are full.
Ejecting the CD
Normal ejection
1. Press the CD eject button ( ). Thedisc number and “DISC OUT” will bedisplayed.
2. Pull out the CD.
NOTE
l When the CD is ejected during play,the next CD will be playedautomatically.
l (Music CD player)If the CD is not removed from theslot within approximately 10 secondsafter ejection, it will be re- insertedautomatically.
Ejecting CDs from desired tray number
1. Press and hold the CD eject button ( )for about 2 seconds until a beep soundis heard.The “DISC OUT” display flashes.
2. Press the channel preset button for thedesired CD number for less than 5seconds after the beep sound is heard.
3. Pull out the CD.
Interior Comfort
Audio System
6-37
Mazda6_8U66-EA-05F_Edition2 Page223Tuesday, July 26 2005 11:26 AM
Form No.8U66-EA-05F

Black plate (224,1)
NOTE
(Music CD player)If the CD is not removed from the slotwithin approximately 10 seconds afterejection, it will be re- insertedautomatically.
Multiple ejection
1. Press and hold the CD eject button ( )for about 2 seconds until a beep soundis heard.The “DISC OUT” display flashes.
2. Press the CD eject button ( ) againfor less than 5 seconds after the beepsound is heard.
NOTE
If the button is not pressed and about 5seconds have elapsed while“DISC OUT” is flashing, CDs areautomatically ejected.
3. Pull out the CD, then the next CD willbe ejected.
NOTE
l CDs will be ejected starting with theone with the lowest number.
l All CDs in the tray will be ejectedcontinuously.
l CDs can be ejected when the ignitionswitch is off. Press and hold the CDeject button ( ) for about 2 secondsand all CDs will eject.
l (Music CD player)If the CD is not removed from theslot within approximately 10 secondsafter ejection, it will be re- insertedautomatically.
Playing
Press the CD play button ( ) to startplay when a CD is in the unit.If there isn't a CD in the unit when the CDplay button ( ) is pressed, “NO DISC”will flash on and off.
Fast-forward/Reverse
Press and hold the fast-forward button( ) to advance through a track at highspeed.Press and hold the reverse button ( )to reverse through a track at high speed.
Track search
Press the track up button ( ) once toskip forward to the beginning of the nexttrack.Press the track down button ( ) once toskip back to the beginning of the currenttrack.
Disc search
During music CD playback
To change the disc, press the DISC button( or ) during playback.
6-38
Interior Comfort
Audio System
Mazda6_8U66-EA-05F_Edition2 Page224Tuesday, July 26 2005 11:26 AM
Form No.8U66-EA-05F

Black plate (225,1)
During MP3 CD playback
To change the disc, press the DISC button( or ) for 1.5 seconds ormore during playback.
Folder search (during MP3 CDplayback)
To change to the previous folder, press thefolder down button ( ) for less than1.5 seconds, or press the folder up button( ) for less than 1.5 seconds toadvance to the next folder.
Music scan
This feature helps to find a program byplaying about the first 10 seconds of eachtrack.
Press the scan button ( , ) duringplay to start scan play operation (the tracknumber will flash).Press the scan button ( , ) once againto cancel scan play.
NOTE
If the unit is left in scan, normal playwill resume where scan was selected.
Repeat play
During music CD playback
1. Press the repeat button ( ) duringplayback to play the current trackrepeatedly. “RPT” is displayed.
2. Press the button again to cancel therepeat play.
During MP3 CD playback
(Track repeat)
1. Press the repeat button ( ) duringplayback to play the current trackrepeatedly. “RPT” is displayed.
2. To cancel the repeat play, press thebutton again after 3 seconds.
(Folder repeat)
1. Press the repeat button ( ) duringplayback, and then press the buttonagain within 3 seconds to play thetracks in the current folder repeatedly.“RPT” is displayed.
2. Press the button again to cancel therepeat play.
Random play
Tracks are randomly selected and played.
During music CD playback
1. Press the random button ( ) duringplayback to play the tracks in the CDrandomly. “RDM” is displayed.
2. Press the button again to cancel therandom play.
During MP3 CD playback
(Folder random)
1. Press the random button ( ) duringplayback to play the tracks in the folderrandomly. “RDM” is displayed.
2. To cancel the random play, press thebutton again after 3 seconds.
Interior Comfort
Audio System
6-39
Mazda6_8U66-EA-05F_Edition2 Page225Tuesday, July 26 2005 11:26 AM
Form No.8U66-EA-05F

Black plate (226,1)
(CD random)
1. Press the random button ( ) duringplayback, and then press the buttonagain within 3 seconds to play thetracks in the CD randomly. “RDM” isdisplayed.
2. Press the button again to cancel therandom play.
Switching the display(Music CD/MP3CD player)
Each time the display button ( ) ispressed during playback, the display willswitch in the following order.Music CD
File name display
Album name display
Artist name display
Track number/Elapsed time display
Disc tray number
MP3 CD
Disc tray number
Track name (ID3 Tag)
Folder name (ID3 Tag)
Album name (ID3 Tag)
Song name (ID3 Tag)
Artist name (ID3 Tag)
Disc number/File number/Elapsed time
Folder number/Track number
NOTE
(MP3 CD)
l “NO TITLE” will be displayed whenthe display is switched for a filewithout a file, track or other nameinput.
l This unit can only read English(including numerals) one-bytecharacters. If any other character isincluded, “NO TITLE” will bedisplayed. Depending on the CDwriting software used, proper displaymay not be possible.
6-40
Interior Comfort
Audio System
Mazda6_8U66-EA-05F_Edition2 Page226Tuesday, July 26 2005 11:26 AM
Form No.8U66-EA-05F

Black plate (227,1)
Display scroll(Music CD/MP3 CDplayer)
Only 12 characters can be displayed atone time. To display the rest of thecharacters of a long title, turn the displayfeed dial ( ) to the right. Hiddentitles can be scrolled into the display onecharacter at a time.
NOTE
The displayable number of characters islimited. If the number of characters,including the file extension (.mp3),exceeds 32 characters, it may not befully displayed.
Message display
If “CHECK CD” is displayed, it meansthat there is some CD malfunction. Checkfor damage, dirt, or smudges on the CD,and then properly reinsert. If the messageappears again, take the unit to anAuthorized Mazda Dealer for service.
Interior Comfort
Audio System
6-41
Mazda6_8U66-EA-05F_Edition2 Page227Tuesday, July 26 2005 11:26 AM
Form No.8U66-EA-05F

Black plate (228,1)
qError Indications
If you see an error indication on the display, find the cause in the chart. If you cannot clearthe error indication, take the vehicle to an Authorized Mazda Dealer.
Indication Cause Solution
CHECK CD
CD is inserted upside downInsert the CD properly. If the error indicationdoes not disappear, consult an Authorized MazdaDealer
CD is defectiveInsert another CD properly. If the error indicationdoes not disappear, consult an Authorized MazdaDealer
6-42
Interior Comfort
Audio System
Mazda6_8U66-EA-05F_Edition2 Page228Tuesday, July 26 2005 11:26 AM
Form No.8U66-EA-05F

Black plate (229,1)
Audio Control SwitchOperation (Steering Wheel)í
When the audio unit is turned on,operation of the audio unit from thesteering wheel is possible.
NOTE
Because the audio unit will be turnedoff under the following conditions, theswitches will be inoperable.
l When the ignition switch is turned tothe LOCK position.
l When the power button on the audiounit is pressed and the audio unit isturned off.
l When all CDs are ejected.
Without navigation system
With navigation systemUse the VOICE button for navigationsystem sound operation.For details, refer to“NAVIGATION SYSTEM”.
VOICE button
NOTE
l The VOICE button is operable withthe audio unit turned off.
l Mazda has installed this system toprevent distraction while driving thevehicle and using audio controls onthe dashboard.Always make safe driving your firstpriority.
Interior Comfort
Audio System
6-43íSome models.
Mazda6_8U66-EA-05F_Edition2 Page229Tuesday, July 26 2005 11:26 AM
Form No.8U66-EA-05F

Black plate (230,1)
qAdjusting the Volume
To increase the volume, press the volumebutton ( ).
To decrease the volume, press the volumebutton ( ).
qChanging the Source
Press the mode switch ( ) to changethe audio source (FM1 radio> FM2 radio>AM radio> CD player or CD changer>Cassette tape player> SIRIUS1>SIRIUS2> SIRIUS3> cyclical).
NOTE
Cassette tape, CD changer and SIRIUSdigital satellite radio modes cannot beselected in the following cases:
l A cassette deck, CD changer, orSIRIUS digital satellite radio unit isnot equipped on the audio system.
l A cassette tape, or CD has not beeninserted.
qSeek Switch
When listening to the radio
Press the seek switch ( , ), the radioswitches to the next/previous storedstation in the order that it was stored(1―6).
Press the seek switch ( , ) for about 2seconds until a beep sound is heard toseek all usable stations at a higher orlower frequency whether programmed ornot.
When playing a cassette tape
Press the seek switch ( ), release, and itwill advance to the next selection.Press the seek switch ( ), release, and itwill repeat the selection being played.
6-44
Interior Comfort
Audio System
Mazda6_8U66-EA-05F_Edition2 Page230Tuesday, July 26 2005 11:26 AM
Form No.8U66-EA-05F

Black plate (231,1)
When playing a CD
Press the seek switch ( ) to skip to thenext track.Press the seek switch ( ) to repeat thecurrent track.
qMute Switch
Press the mute switch ( ) once to muteaudio, press it again to resume audiooutput.
NOTE
If the ignition switch is turned to theLOCK position with the audio muted,the mute will be canceled.Therefore, when the engine is restarted,the audio is not muted. To mute theaudio again, press the mute switch ( ).
Interior Comfort
Audio System
6-45
Mazda6_8U66-EA-05F_Edition2 Page231Tuesday, July 26 2005 11:26 AM
Form No.8U66-EA-05F

Black plate (232,1)
Safety CertificationThis CD player is made and tested to meet exacting safety standards. It meets FCCrequirements and complies with safety performance standards of the U.S. Department ofHealth and Human Services.
CAUTIONl This CD player should not be adjusted or repaired by anyone except qualified servicepersonnel.If servicing is required, contact an Authorized Mazda Dealer.
l Use of controls or adjustments or performance of procedures other than thosespecified herein may result in hazardous laser exposure. Never operate the CD playerwith the top case of the unit removed.
l Changes or modifications not expressly approved by the party responsible forcompliance could void the user's authority to operate this equipment.
NOTE
For CD player section:This device complies with part 15 of the FCC Rules. Operation is subject to thefollowing two conditions: (1) This device may not cause harmful interference, and (2)this device must accept any interference received, including interference that may causeundesired operation.
NOTE
This equipment has been tested and found to comply with the limits for a Class B digitaldevice, pursuant to part 15 of the FCC Rules. These limits are designed to providereasonable protection against harmful interference in a residential installation. Thisequipment generates, uses, and can radiate radio frequency energy and, if not installedand used in accordance with the instructions, may cause harmful interference to radiocommunications. However, there is no guarantee that interference will not occur in aparticular installation.
6-46
Interior Comfort
Audio System
Mazda6_8U66-EA-05F_Edition2 Page232Tuesday, July 26 2005 11:26 AM
Form No.8U66-EA-05F

Black plate (233,1)
SunvisorsWhen you need a sunvisor, lower it foruse in front or swing it to the side.
Sunvisor
qVanity Mirrors
To use the vanity mirror, lower thesunvisor.The vanity mirror light will illuminatewhen you open the cover.
Interior Lights
qIlluminated Entry System
When the illuminated entry systemoperates, the overhead light (switch is inthe DOOR position) and the courtesylights turn on for:
l About 30 seconds after the driver'sdoor is unlocked and the ignition key isremoved.
l About 15 seconds after all doors areclosed.
l About 15 seconds after the key isremoved from the ignition with alldoors closed.
The light also turns off when:
l The ignition switch is turned to the ONposition and all doors are closed.
l The driver's door is locked.
NOTE
Battery saverIf any door is left opened, the light goesout after about 30 minutes to save thebattery.The light turns on again when theignition switch is turned to the ONposition, or when any door is openedafter all doors have been closed.
Interior Comfort
Interior Equipment
6-47
Mazda6_8U66-EA-05F_Edition2 Page233Tuesday, July 26 2005 11:26 AM
Form No.8U66-EA-05F
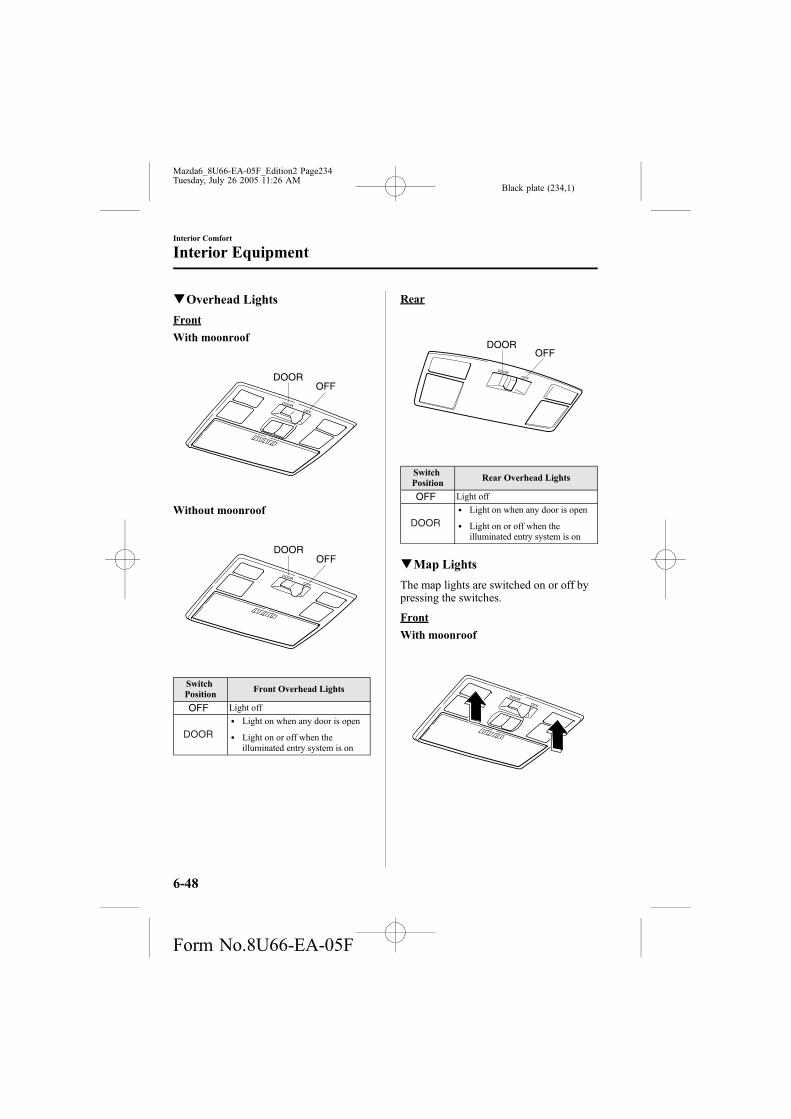
Black plate (234,1)
qOverhead Lights
Front
With moonroof
Without moonroof
SwitchPosition
Front Overhead Lights
Light offl Light on when any door is open
l Light on or off when theilluminated entry system is on
Rear
SwitchPosition
Rear Overhead Lights
Light offl Light on when any door is open
l Light on or off when theilluminated entry system is on
qMap Lights
The map lights are switched on or off bypressing the switches.
Front
With moonroof
6-48
Interior Comfort
Interior Equipment
Mazda6_8U66-EA-05F_Edition2 Page234Tuesday, July 26 2005 11:26 AM
Form No.8U66-EA-05F

Black plate (235,1)
Without moonroof
Rear
qLuggage Compartment Light
5-Door
SwitchPosition
Luggage Compartment Light
Light off
Light on when the hatch is open
Sport Wagon
SwitchPosition
Luggage Compartment Light
Light off
Light on when the liftgate is open
qCourtesy Lights
Turns on when any door is open or theilluminated entry system is on.
Courtesy light
Interior Comfort
Interior Equipment
6-49
Mazda6_8U66-EA-05F_Edition2 Page235Tuesday, July 26 2005 11:26 AM
Form No.8U66-EA-05F

Black plate (236,1)
Information Display
OPEN/CLOSE button (with navigation system)
AMB button (with outside temperature display )
TILT button (with navigation system)
CLOCK/CLK button SET button
qInformation Display Functions
The information display has the following functions:
l Clock
l Ambient Temperature Display (Outside Temperature Display)
l Climate Control Display
l Audio Display
6-50
Interior Comfort
Interior Equipment
Mazda6_8U66-EA-05F_Edition2 Page236Tuesday, July 26 2005 11:26 AM
Form No.8U66-EA-05F

Black plate (237,1)
qClock
When the ignition switch is in the ACC orON position, the time is displayed.
Time setting
1. Press the CLOCK button until a beepsounds, and “12Hr” and “24Hr” will bedisplayed.
2. Press the SET button to switch between“12Hr” and “24Hr” displays. Theselected display will flash.To select the desired clock setting,press the CLOCK button again whilethe preferred setting is flashing.
3. “Hr. ADJUST” will be displayed next,and the hour portion of the display willflash. Press the SET button to set thehour, then press the CLOCK button.
4. “Min. ADJUST” will be displayednext, and the minutes portion of thedisplay will flash. Press the SET buttonto set the minutes, then press theCLOCK button.
Time resetting
While the clock is displayed, press theSET button 1.5 seconds or more. Whenthe button is released, a beep will soundand the clock will be reset as follows:(Example)
12:01―12:29→12:0012:30―12:59→1:00
NOTE
When the SET button is released, theseconds are reset to “00”.
qAmbient Temperature Display
When the ignition switch is in the ONposition, press the AMB button to displaythe ambient temperature.
NOTE
l The displayed ambient temperaturemay vary from the actual ambienttemperature depending on thesurrounding area and vehicleconditions.
l Press the AMB button 2 seconds ormore to switch the display fromFahrenheit to Centigrade or viceversa.
l (With fully automatic climatecontrol system)Press the AMB button again toswitch the display from ambienttemperature to the temperature setfor the air conditioner.
Interior Comfort
Interior Equipment
6-51
Mazda6_8U66-EA-05F_Edition2 Page237Tuesday, July 26 2005 11:26 AM
Form No.8U66-EA-05F

Black plate (238,1)
qClimate Control Display
The climate control system status isdisplayed. To operate the climate controlsystem, refer to “Climate Control System”(page 6-2).
qAudio Display
The audio system status is displayed. Tooperate the audio system, refer to“Audio System” (page 6-16).
Cup Holder
WARNINGUsing Cup Holder:Using a cup holder to hold hot liquidswhile the vehicle is moving isdangerous. If the contents spill, youcould be scalded. Never use a cupholder to hold hot liquids while thevehicle is moving.
Don't Put Anything Other Than Cupsor Drink cans in Cup Holder:Putting objects other than cups ordrink cans in a cup holder isdangerous.During sudden braking ormaneuvering, occupants could be hitand injured, or objects could bethrown around the vehicle, causinginterference with the driver and thepossibility of an accident. Only use acup holder for cups or drink cans.
CAUTIONTo reduce the possibility of injury in anaccident or a sudden stop, keep cupholders closed when not in use.
6-52
Interior Comfort
Interior Equipment
Mazda6_8U66-EA-05F_Edition2 Page238Tuesday, July 26 2005 11:26 AM
Form No.8U66-EA-05F

Black plate (239,1)
qFront
To use the cup holder, open the centerconsole by pressing the lower center partof its cover.
qRear
The rear cup holder is on the rear centerarmrest.
Bottle HolderBottle holders are on the inside of thefront doors.
Bottle holder
CAUTIONDon't use the bottle holders forcontainers without caps. The contentsmay spill when the door is opened orclosed.
Interior Comfort
Interior Equipment
6-53
Mazda6_8U66-EA-05F_Edition2 Page239Tuesday, July 26 2005 11:26 AM
Form No.8U66-EA-05F

Black plate (240,1)
Storage Compartments
WARNINGOpen Storage Boxes:Driving with the storage boxes open isdangerous. To reduce the possibility ofinjury in an accident or a sudden stop,keep the storage boxes closed whendriving.
CAUTIONDon't leave lighters or eyeglasses in thestorage boxes while parked under thesun. A lighter could explode or theplastic material in eyeglasses coulddeform and crack from hightemperature.
qOverhead Console
This console box is designed to storeeyeglasses or other accessories.Push and release to open.
qStorage Pocket
To open, push the release catch down andpull the lid downward.
qCenter Box with Lid (WithoutNavigation System)
To use, pull the knob, and the lid opensautomatically.
Knob
6-54
Interior Comfort
Interior Equipment
Mazda6_8U66-EA-05F_Edition2 Page240Tuesday, July 26 2005 11:26 AM
Form No.8U66-EA-05F

Black plate (241,1)
qGlove Box
To open the glove box, pull the latchtoward you.Insert the key and turn it clockwise tolock, counterclockwise to unlock.
Unlock
Lock
qCenter Console
To open, pull the lower release catch.
Small items can be placed in the tray ofthe center console lid.To open it, pull the upper release catch.
qStorage Box (5-Door/Sport Wagon)
To open, turn the knobs and remove thecover.Luggage compartment, right side
Knob
Interior Comfort
Interior Equipment
6-55
Mazda6_8U66-EA-05F_Edition2 Page241Tuesday, July 26 2005 11:26 AM
Form No.8U66-EA-05F

Black plate (242,1)
Luggage compartment, left side
Knob
qCargo Securing Loops (5-Door/Sport Wagon)
WARNINGNot Securing Luggage and Cargo:Not securing cargo while driving isdangerous as it could move or becrushed during sudden braking or acollision and cause injury. Make sureluggage and cargo is secured beforedriving.
Use the loops in the luggage compartmentto secure cargo with a rope or net. Thetensile strength of the loops is 196 N (20kgf, 44 lbf). Do not apply excessive forceto the loops as it will damage them.
5-Door
Sport Wagon
6-56
Interior Comfort
Interior Equipment
Mazda6_8U66-EA-05F_Edition2 Page242Tuesday, July 26 2005 11:26 AM
Form No.8U66-EA-05F

Black plate (243,1)
qCargo Sub-Compartment (SportWagon)
To use the cargo sub-compartment,remove trunk board A and open trunkboard B.
Cargo sub-compartment
Trunk board A
Trunk board B
Accessory SocketsThe ignition switch must be in the ACCor ON position.Only use genuine Mazda accessories orthe equivalent requiring no greater than120 W (DC 12 V, 10 A).Front
Rear
Interior Comfort
Interior Equipment
6-57
Mazda6_8U66-EA-05F_Edition2 Page243Tuesday, July 26 2005 11:26 AM
Form No.8U66-EA-05F

Black plate (244,1)
CAUTIONTo prevent accessory socket damage orelectrical failure, pay attention to thefollowing:
l Don't use accessories that requiremore than 120 W (DC 12 V, 10 A).
l Don't use accessories that are notgenuine Mazda accessories or theequivalent.
l Close the cover when the accessorysocket is not in use.
l Correctly insert the plug into theaccessory socket.
NOTE
To prevent discharging the battery, don'tuse the socket for long periods with theengine off or idling.
6-58
Interior Comfort
Interior Equipment
Mazda6_8U66-EA-05F_Edition2 Page244Tuesday, July 26 2005 11:26 AM
Form No.8U66-EA-05F

Black plate (245,1)
7 In Case of an Emergency
Helpful information on what to do in an emergency.
Parking in an Emergency ............................................................. 7-2Parking in an Emergency .......................................................... 7-2
Flat Tire ......................................................................................... 7-3Spare Tire and Tool Storage ...................................................... 7-3Changing a Flat Tire ................................................................. 7-8
Overheating ................................................................................. 7-15Overheating ............................................................................. 7-15
Emergency Starting .................................................................... 7-17Starting a Flooded Engine ....................................................... 7-17Jump-Starting .......................................................................... 7-18Push-Starting ........................................................................... 7-20
Emergency Towing ..................................................................... 7-21Towing Description ................................................................. 7-21Recreational Towing ............................................................... 7-22
7-1
Mazda6_8U66-EA-05F_Edition2 Page245Tuesday, July 26 2005 11:26 AM
Form No.8U66-EA-05F

Black plate (246,1)
Parking in an EmergencyThe hazard warning lights should alwaysbe used when you stop on or near aroadway.
The hazard warning lights warn otherdrivers that your vehicle is a traffic hazardand that they must take extreme cautionwhen near it.
Depress the hazard warning flasher and allfour turn signals will flash.
NOTE
l The turn signals don't work when thehazard warning lights are on.
l Check local regulations about the useof hazard warning lights while thevehicle is being towed. They mayforbid it.
7-2
In Case of an Emergency
Parking in an Emergency
Mazda6_8U66-EA-05F_Edition2 Page246Tuesday, July 26 2005 11:26 AM
Form No.8U66-EA-05F

Black plate (247,1)
Spare Tire and Tool StorageSpare tire and tools are stored in the locations illustrated in the diagram.
Sedan/5-door
Spare tire
Tire hold-down bolt (Gold)
Sport Wagon
Spare tire
Jack
Lug wrench
Lug wrench
Jack
With sub-woofer
Tire hold-down bolt (Gold)
With sub-woofer
5-doorSedan
In Case of an Emergency
Flat Tire
7-3
Mazda6_8U66-EA-05F_Edition2 Page247Tuesday, July 26 2005 11:26 AM
Form No.8U66-EA-05F

Black plate (248,1)
qJack
To remove the jack
(Sedan)
1. Remove the jack container lid.
2. Turn the wing bolt counterclockwise.
(5-Door/Sport Wagon)
1. Turn the knob and remove the cover.
2. Remove the jack container lid.
3. Turn the wing bolt counterclockwise.
To secure the jack
Perform the removal procedure in reverse.
7-4
In Case of an Emergency
Flat Tire
Mazda6_8U66-EA-05F_Edition2 Page248Tuesday, July 26 2005 11:26 AM
Form No.8U66-EA-05F

Black plate (249,1)
qSpare Tire
Your Mazda has a temporary spare tire.The temporary spare is lighter and smallerthan a conventional tire, and is designedonly for emergency use and should beused only for VERY short periods.Temporary spares should NEVER be usedfor long drives or extended periods.
WARNINGDriving with a Temporary Spare Tireon Ice or Snow:Driving with a spare tire on the front(driving) wheels on ice or snow isdangerous. Handling will be affected.You could lose control of the vehicleand have an accident. Put the sparetire on the rear axle and move aregular tire to the front.
CAUTIONl When using the temporary spare tire,driving stability may decreasecompared to when using only theconventional tire. Drive carefully.
l To avoid damage to the temporaryspare or to the vehicle, observe thefollowing precautions:
l Don't exceed 80 km/h (50 mph).l Avoid driving over obstacles.
Also, don't drive through anautomatic car wash. This tire'sdiameter is smaller than aconventional tire, so the groundclearance is reduced about 35 mm(1.4 in).
l Do not use tire chains on any typeof tire, including the spare tire.
l Don't use your temporary spareon any other vehicle, it has beendesigned only for your Mazda.
l Use only one temporary spare tireon your vehicle at the same time.
To remove the spare tire
(Sedan)
1. Remove the trunk board.
In Case of an Emergency
Flat Tire
7-5
Mazda6_8U66-EA-05F_Edition2 Page249Tuesday, July 26 2005 11:26 AM
Form No.8U66-EA-05F

Black plate (250,1)
2. Turn the tire wing boltcounterclockwise.
(5-Door)
1. For vehicles equipped with a sub-woofer, uncouple the connector.
Connector
NOTE
Extra strength may be required touncouple the connector. Be sure tosqueeze the tab firmly.If uncoupling is very difficult, removethe wiring from the groove in the trunkboard. Then, pull the driver's side of thetrunk board up to remove the spare tire.
2. Remove the trunk board.
3. For vehicles equipped with a sub-woofer, loosen the wing bolt andremove the woofer and spare tire.
Lock washerWing bolt (Black)
Sub-woofer
For vehicles not equipped with a sub-woofer, loosen the hold-down bolt andremove the spare tire.
7-6
In Case of an Emergency
Flat Tire
Mazda6_8U66-EA-05F_Edition2 Page250Tuesday, July 26 2005 11:26 AM
Form No.8U66-EA-05F

Black plate (251,1)
(Sport Wagon)
1. Remove trunk board A and open trunkboard B.
Trunk board B
Trunk board A
2. For vehicles equipped with a cargosub-compartment, remove the cargosub-compartment.
3. For vehicles equipped with a sub-woofer, loosen the wing bolt andremove the woofer and spare tire.
Lock washerWing bolt (Black)
Sub-woofer
For vehicles not equipped with a sub-woofer, loosen the hold-down bolt andremove the spare tire.
NOTE
For vehicles equipped with a sub-woofer, put the sub-woofer on the leftside of the luggage compartment whenremoving the spare tire.
To secure the spare tire
Perform the removal procedure in reverse.
In Case of an Emergency
Flat Tire
7-7
Mazda6_8U66-EA-05F_Edition2 Page251Tuesday, July 26 2005 11:26 AM
Form No.8U66-EA-05F

Black plate (252,1)
Changing a Flat Tire
NOTE
If the following occurs while driving, itcould indicate a flat tire.
l Steering becomes difficult.
l The vehicle begins to vibrateexcessively.
l The vehicle pulls in one direction.
If you have a flat tire, drive slowly to alevel spot that is well off the road and outof the way of traffic to change the tire.Stopping in traffic or on the shoulder of abusy road is dangerous.
WARNINGJacking a Vehicle:Changing a tire is dangerous if notdone properly. The vehicle can slip offthe jack and seriously injure someone.Be sure to follow the directions forchanging a tire, and never get under avehicle that is supported only by ajack.
Passenger in Vehicle Supported by aJack:Allowing someone to remain in avehicle supported by a jack isdangerous. The occupant could causethe vehicle to fall resulting in seriousinjury. Never allow anyone inside avehicle supported by a jack.
NOTE
Make sure the jack is well lubricatedbefore using it.
1. Park on a level surface off the right-of-way and firmly set the parking brake.
2. Put a vehicle with an automatictransaxle in Park (P), a manualtransaxle in Reverse (R) or 1, and turnoff the engine.
3. Turn on the hazard warning flasher.
4. Have everyone get out of the vehicleand away from the vehicle and traffic.
5. Remove the jack, tool, and spare tire(page 7-3).
6. Block the wheel diagonally oppositethe flat tire. When blocking a wheel,place a tire block both in front andbehind the tire.
NOTE
When blocking a tire, use rocks orwood blocks of sufficient size to holdthe tire in place.
7-8
In Case of an Emergency
Flat Tire
Mazda6_8U66-EA-05F_Edition2 Page252Tuesday, July 26 2005 11:26 AM
Form No.8U66-EA-05F

Black plate (253,1)
qRemoving a Flat Tire
1. If your vehicle is equipped with awheel cover, pry off the wheel coverwith the beveled end of the lug wrench.
NOTE
Force the end of the lug wrench firmlybetween wheel and cover, or removalwill be difficult.
CAUTIONAlign the notch on the wheel coverwith the valve stem when installing it.
Notch
Tire valve
Damage could occur during installationif the wheel cover is not properlyaligned.
2. Loosen the lug nuts by turning themcounterclockwise one turn each, butdon't remove any lug nuts until the tirehas been raised off the ground.
3. Place the jack under the jackingposition closest to the tire beingchanged.
Jacking position
In Case of an Emergency
Flat Tire
7-9
Mazda6_8U66-EA-05F_Edition2 Page253Tuesday, July 26 2005 11:26 AM
Form No.8U66-EA-05F

Black plate (254,1)
WARNINGIncorrect Jacking Position:Attempting to jack the vehicle inpositions other than thoserecommended in this manual isdangerous. The vehicle could slip offthe jack and seriously injure or evenkill someone. Use only the front andrear jacking positions recommendedin this manual.
Improper Jack:Using a jack that isn't designed foryour Mazda is dangerous. The vehiclecould slip off the jack and seriouslyinjure someone. Use only the jackprovided with your Mazda.
Placing Objects Under the Jack:Jacking the vehicle with an objectunder the jack is dangerous. The jackcould slip and someone could beseriously injured by the jack or thefalling vehicle. Never place objectsunder the jack.
4. Insert the lug wrench into the jack.
5. Turn the lug wrench clockwise andraise the vehicle high enough so thatthe spare tire can be installed. Beforeremoving the lug nuts, make sure yourMazda is firmly in position and that itcannot slip or move.
6. Remove the lug nuts by turning themcounterclockwise; then remove thewheel.
7-10
In Case of an Emergency
Flat Tire
Mazda6_8U66-EA-05F_Edition2 Page254Tuesday, July 26 2005 11:26 AM
Form No.8U66-EA-05F

Black plate (255,1)
qLocking Lug Nutsí
If your vehicle has optional antitheftwheel lug nuts, one on each wheel willlock the tires and you must use a specialkey to unlock them. This key is attachedto the lug wrench and is stored with thespare tire. Register them with the lockmanufacturer by filling out the cardprovided in the glove box and mailing itin the accompanying envelope. If you losethis key, consult an Authorized MazdaDealer or use the lock manufacturer'sorder form, which is with the registrationcard.
Special keyAntitheft lug nut
To remove an antitheft lug nut
1. Obtain the key for the antitheft lug nut.
2. Place it on top of the nut, and be sureto hold the key square to it. If you holdthe key at an angle, you may damageboth key and nut. Don't use a powerimpact wrench.
3. Place the lug wrench on top of the keyand apply pressure. Turn the wrenchcounterclockwise.
To install the nut
1. Place the key on top of the nut.
2. Place the lug wrench on top of the key,apply pressure, and turn it clockwise.
qMounting the Spare Tire
1. Remove dirt and grime from themounting surfaces of the wheel andhub, including the hub bolts, with acloth.
WARNINGRemoving Dirt and Grime fromWheels, Hubs and Hub Bolts:When changing or replacing a tire,not removing dirt and grime from themounting surfaces of the wheel, huband hub bolts is dangerous. The lugnuts could loosen while driving andcause the tire to come off, resulting inan accident. Make sure the mountingsurfaces of the wheel, hub and lugnuts are clean before changing orreplacing tires.
2. Mount the spare tire.
In Case of an Emergency
Flat Tire
7-11íSome models.
Mazda6_8U66-EA-05F_Edition2 Page255Tuesday, July 26 2005 11:26 AM
Form No.8U66-EA-05F

Black plate (256,1)
3. Install the lug nuts with the bevelededge inward; tighten them by hand.
WARNINGDon't Apply Oil or Grease to LugNuts, Bolts:Applying oil or grease to lug nuts andbolts is dangerous. The lug nuts couldloosen while driving and cause the tireto come off, resulting in an accident.In addition, lug nuts and bolts couldbe damaged if tightened more thannecessary. Do not apply oil or greaseto lug nuts and bolts and do nottighten the lug nuts beyond therecommended tightening torque.
4. Turn the lug wrench counterclockwiseand lower the vehicle. Use the lugwrench to tighten the nuts in the ordershown.
If you're unsure of how tight the nutsshould be, have them inspected at anAuthorized Mazda Dealer.
Nut tightening torque
N·m (kgf·m, ft·lbf)88―118
(9―12, 65―87)
7-12
In Case of an Emergency
Flat Tire
Mazda6_8U66-EA-05F_Edition2 Page256Tuesday, July 26 2005 11:26 AM
Form No.8U66-EA-05F

Black plate (257,1)
WARNINGLoose Lug Nuts:Improperly or loosely tightened lugnuts are dangerous. The wheel couldwobble or come off. This could resultin loss of vehicle control and cause aserious accident. Always securely andcorrectly tighten the lug nuts.
Metric Studs and Lug Nuts:Because the wheel studs and lug nutson your Mazda have metric threads,using a non-metric nut is dangerous.On a metric stud, it would not securethe wheel and would damage the stud,which could cause the wheel to slip offand cause an accident. Be sure toreinstall the same nuts you removed orreplace them with metric nuts of thesame configuration.
5. Store the damaged tire, using the tirehold-down bolt to hold it in place.
Without sub-woofer
Tire hold-down boltTire clamp
With sub-woofer
Lock washerTire hold-down bolt (Gold)
Sub-woofer
6. Check the inflation pressure. Refer tothe specification charts on page 10-7.
7. Have the flat tire repaired or replacedas soon as possible.
WARNINGIncorrect Tire Air Pressure:Driving on tires with incorrect airpressure is dangerous. Tires withincorrect pressure could affecthandling and result in an accident.Don't drive with any tires that haveincorrect air pressure. When youcheck the regular tires' air pressure,check the spare tire, too.
NOTE
(5-Door with sub-woofer)When storing a damaged conventionaltire in the luggage compartment, thesub-woofer can be stored in its originalposition, however, the sub-wooferconnector on the trunk board cannot beconnected.
In Case of an Emergency
Flat Tire
7-13
Mazda6_8U66-EA-05F_Edition2 Page257Tuesday, July 26 2005 11:26 AM
Form No.8U66-EA-05F

Black plate (258,1)
NOTE
To prevent the jack and tool fromrattling, store them properly.
7-14
In Case of an Emergency
Flat Tire
Mazda6_8U66-EA-05F_Edition2 Page258Tuesday, July 26 2005 11:26 AM
Form No.8U66-EA-05F

Black plate (259,1)
OverheatingIf the temperature gauge indicatesoverheating, the vehicle loses power, oryou hear a loud knocking or pingingnoise, the engine is probably too hot.
WARNING
Cooling Fan and EngineInspection:Inspecting the engine with the ignitionswitch in the ON position isdangerous. The cooling fan could turnon unexpectedly even when the engineisn't running. You could be seriouslyinjured by the fan. Turn the ignitionswitch off and remove the key from theignition switch when you inspect theengine.
Cooling System Caps:When the engine and radiator are hot,scalding coolant and steam may shootout under pressure and cause seriousinjury. Don't remove either coolingsystem cap when the engine andradiator are hot.
Steam from Overheated Engine:Steam from an overheated engine isdangerous. The escaping steam couldseriously burn you. Open the hoodONLYafter steam is no longerescaping from the engine.
If the temperature gauge indicatesoverheating:
1. Drive safely to the side of the road andpark off the right-of-way.
2. Put a vehicle with an automatictransaxle in park (P), a manualtransaxle in neutral.Apply the parking brake.
3. Turn off the air conditioner.
4. Check whether coolant or steam isescaping from under the hood or fromthe engine compartment.
If steam is coming from the enginecompartment:Don't go near the front of the vehicle.Stop the engine.Wait until the steam dissipates, thenopen the hood and start the engine.
If neither coolant nor steam isescaping:Open the hood and idle the engine untilit cools.
CAUTIONIf the cooling fan does not operatewhile the engine is running, the enginetemperature will increase. Stop theengine and call an Authorized MazdaDealer.
5. Make sure the cooling fan is operating,then turn off the engine after thetemperature has decreased.
6. When cool, check the coolant level.If it's low, look for coolant leaks fromthe radiator and hoses.
In Case of an Emergency
Overheating
7-15
Mazda6_8U66-EA-05F_Edition2 Page259Tuesday, July 26 2005 11:26 AM
Form No.8U66-EA-05F

Black plate (260,1)
If you find a leak or other damage, or ifcoolant is still leaking:Stop the engine and call an AuthorizedMazda Dealer.
2.3-liter engineCooling system cap
Coolant reservoir
Coolingsystem cap
Coolant reservoir
3.0-liter engine
If you find no problems, the engine iscool, and no leaks are obvious:Carefully add coolant as required (page8-21).
CAUTIONIf the engine continues to overheat orfrequently overheats, have the coolingsystem inspected. The engine could beseriously damaged unless repairs aremade. Consult an Authorized MazdaDealer.
7-16
In Case of an Emergency
Overheating
Mazda6_8U66-EA-05F_Edition2 Page260Tuesday, July 26 2005 11:26 AM
Form No.8U66-EA-05F

Black plate (261,1)
Starting a Flooded EngineIf the engine fails to start, it may beflooded (excessive fuel in the engine).
Follow this procedure:
1. Depress the accelerator all the way andhold it there.
2. Turn the ignition switch to the STARTposition and hold it there―for up to 10seconds. If the engine starts, release thekey and accelerator immediatelybecause the engine will suddenly revup.
3. If the engine fails to start, crank itwithout depressing the accelerator―forup to 10 seconds.
In Case of an Emergency
Emergency Starting
7-17
Mazda6_8U66-EA-05F_Edition2 Page261Tuesday, July 26 2005 11:26 AM
Form No.8U66-EA-05F

Black plate (262,1)
Jump-StartingJump-starting is dangerous if done incorrectly. So follow the procedure carefully. If youfeel unsure about jump-starting, we strongly recommend that you have a competent servicetechnician do the work.
WARNINGEye Protection:Working without eye protection is dangerous. Battery fluid contains SULFURICACID which could cause blindness if splashed into your eyes. Also, hydrogen gasproduced during normal battery operation, could ignite and cause the battery toexplode. Always wear eye protection when working near the battery.
Spilled Battery Fluid:Spilled battery fluid is dangerous.Battery fluid contains SULFURIC ACID which could cause serious injuries if it getsin eyes, skin or clothing. If this happens, immediately flush your eyes with water for15 minutes or wash your skin thoroughly and get medical attention. Wear eyeprotection and protective gloves to prevent contact with battery fluid.
Children and Batteries:Allowing children to play near batteries is dangerous. Battery fluid could causeserious injuries if it gets in the eyes or on the skin. Always keep batteries out of thereach of children.
Keep Flames Away:Flames and sparks near open battery cells are dangerous. Hydrogen gas, producedduring normal battery operation, could ignite and cause the battery to explode. Anexploding battery can cause serious burns and injuries. Keep all flames includingcigarettes and sparks away from open battery cells. When working near a battery, donot allow metal tools to contact the positive ( ) or negative ( ) terminal of thebattery. Do not allow the positive ( ) terminal to contact the vehicle body.
Battery-Related Explosion:Flames and sparks near open battery cells are dangerous. Hydrogen gas, producedduring normal battery operation, could ignite and cause the battery to explode. Anexploding battery can cause serious burns and injuries. Keep all flames, includingcigarettes, and sparks away from open battery cells.
7-18
In Case of an Emergency
Emergency Starting
Mazda6_8U66-EA-05F_Edition2 Page262Tuesday, July 26 2005 11:26 AM
Form No.8U66-EA-05F

Black plate (263,1)
WARNINGLow Fluid Level or Frozen Battery:Jump-starting a frozen battery or one with a low fluid level is dangerous. It mayrupture or explode, causing serious injury.Don't jump-start a frozen battery or one with a low fluid level.
Connecting to Negative Terminal:Connecting the end of the second cable to the negative ( ) terminal of the dischargedbattery is dangerous.A spark could cause the gas around the battery to explode and injure someone.Connect the negative cable to a good ground point away from the battery.
Connecting Jumper Cable to Moving Parts:Connecting a jumper cable near or to moving parts (cooling fans, belts) is dangerous.The cable could get caught when the engine starts and cause serious injury. Neverconnect a jumper cable to or near any part that moves.
CAUTIONUse only a 12 V booster system. You can damage a 12 V starter, ignition system, andother electrical parts beyond repair with a 24 V power supply (two 12 V batteries inseries or a 24 V motor generator set).
1. Make sure the booster battery is 12 Vand that its negative terminal isgrounded.
2. If the booster battery is in anothervehicle, don't allow the vehicles totouch. Turn off the engine of thevehicle with the booster battery and allunnecessary electrical loads in bothvehicles.
3. Connect the jumper cables in the exactsequence as in the illustration.
l Connect one end of a cable to thepositive terminal on the dischargedbattery (1).
l Attach the other end to the positiveterminal on the booster battery (2).
l Connect one end of the other cableto the negative terminal of thebooster battery (3).
In Case of an Emergency
Emergency Starting
7-19
Mazda6_8U66-EA-05F_Edition2 Page263Tuesday, July 26 2005 11:26 AM
Form No.8U66-EA-05F
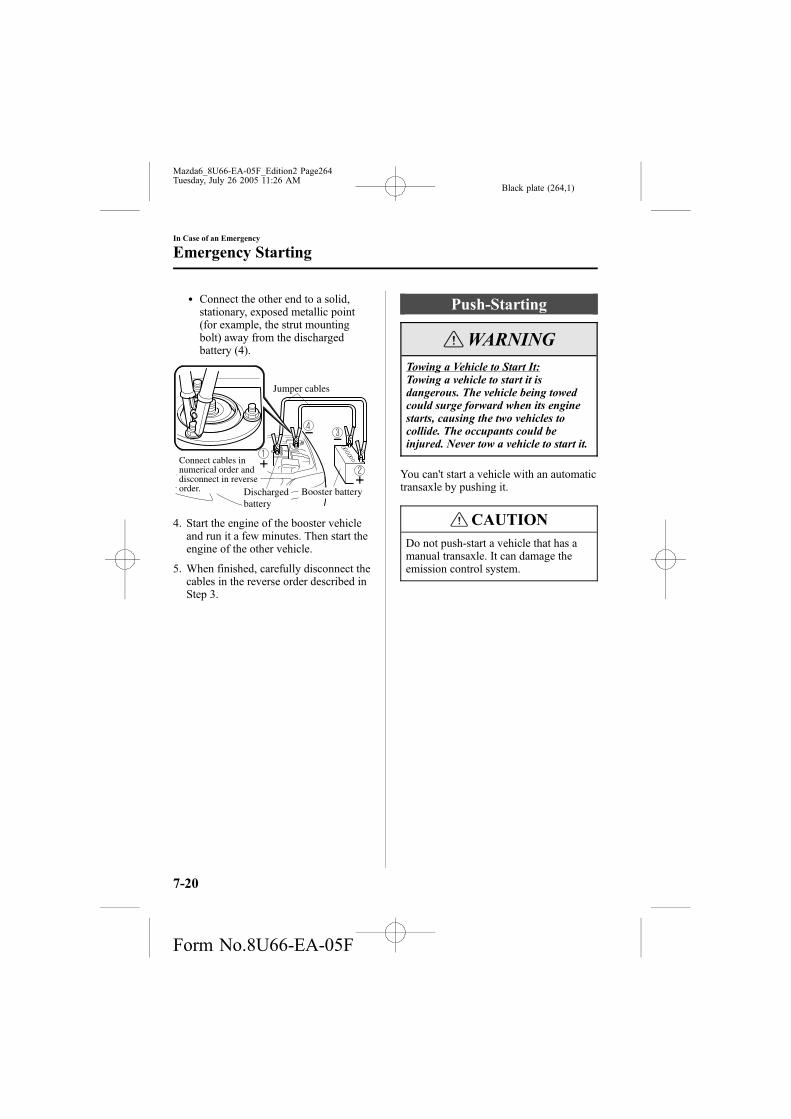
Black plate (264,1)
l Connect the other end to a solid,stationary, exposed metallic point(for example, the strut mountingbolt) away from the dischargedbattery (4).
Connect cables in numerical order and disconnect in reverse order. Discharged
battery
Jumper cables
Booster battery
4. Start the engine of the booster vehicleand run it a few minutes. Then start theengine of the other vehicle.
5. When finished, carefully disconnect thecables in the reverse order described inStep 3.
Push-Starting
WARNINGTowing a Vehicle to Start It:Towing a vehicle to start it isdangerous. The vehicle being towedcould surge forward when its enginestarts, causing the two vehicles tocollide. The occupants could beinjured. Never tow a vehicle to start it.
You can't start a vehicle with an automatictransaxle by pushing it.
CAUTIONDo not push-start a vehicle that has amanual transaxle. It can damage theemission control system.
7-20
In Case of an Emergency
Emergency Starting
Mazda6_8U66-EA-05F_Edition2 Page264Tuesday, July 26 2005 11:26 AM
Form No.8U66-EA-05F

Black plate (265,1)
Towing DescriptionWe recommend that towing be done onlyby an Authorized Mazda Dealer or acommercial tow-truck service.
Proper lifting and towing are necessary toprevent damage to the vehicle.Government and local laws must befollowed.
A towed vehicle usually should have itsfront wheels off the ground. If excessivedamage or other conditions prevent this,use wheel dollies.
Wheel dollies
When towing with the rear wheels on theground, release the parking brake.
CAUTIONDon't tow the vehicle pointed backwardwith driving wheels on the ground. Thismay cause internal damage to thetransaxle.
CAUTIONDon't tow with sling-type equipment.This could damage your vehicle. Usewheel-lift or flatbed equipment.
In Case of an Emergency
Emergency Towing
7-21
Mazda6_8U66-EA-05F_Edition2 Page265Tuesday, July 26 2005 11:26 AM
Form No.8U66-EA-05F

Black plate (266,1)
CAUTIONDo not use the hooks under the rearbumper for towing and tying down, asthey cannot hold the load and it willdamage the bumper.
Hooks
Recreational TowingAn example of “recreational towing” istowing your vehicle behind a motorhome.The transaxle is not designed for towingthis vehicle on all 4 wheels.When doing recreational towing refer to“Towing Description” (page 7-21) andcarefully follow the instructions.
7-22
In Case of an Emergency
Emergency Towing
Mazda6_8U66-EA-05F_Edition2 Page266Tuesday, July 26 2005 11:26 AM
Form No.8U66-EA-05F

Black plate (267,1)
8 Maintenance and Care
How to keep your Mazda in top condition.
Introduction .................................................................................. 8-2Introduction ............................................................................... 8-2
Scheduled Maintenance ................................................................ 8-3Scheduled Maintenance (USA, Canada, and Puerto Rico) ....... 8-3Scheduled Maintenance (Mexico) ............................................. 8-8
Owner Maintenance ................................................................... 8-15Owner Maintenance Schedule ................................................ 8-15Owner Maintenance Precautions ............................................. 8-16Engine Compartment Overview .............................................. 8-17Engine Oil ............................................................................... 8-18Engine Coolant ....................................................................... 8-21Brake/Clutch Fluid .................................................................. 8-24Power Steering Fluid ............................................................... 8-25Automatic Transaxle Fluid (ATF) ........................................... 8-26Washer Fluid ........................................................................... 8-29Body Lubrication .................................................................... 8-30Air Filter .................................................................................. 8-30Wiper Blades ........................................................................... 8-32Battery ..................................................................................... 8-37Tires ........................................................................................ 8-38Light Bulbs ............................................................................. 8-43Fuses ....................................................................................... 8-53
Appearance Care ........................................................................ 8-58How to Minimize Environmental Paint Damage .................... 8-58Exterior Care ........................................................................... 8-60Interior Care ............................................................................ 8-63
8-1
Mazda6_8U66-EA-05F_Edition2 Page267Tuesday, July 26 2005 11:26 AM
Form No.8U66-EA-05F

Black plate (268,1)
IntroductionBe extremely careful and prevent injury to yourself and others or damage to your vehiclewhen using this manual for inspection and maintenance.
If you're unsure about any procedure it describes, we strongly urge you to have a reliableand qualified service shop perform the work, preferably an Authorized Mazda Dealer.
Factory-trained Mazda technicians and genuine Mazda parts are best for your vehicle.Without this expertise and the parts that have been designed and made especially for yourMazda, inadequate, incomplete, and insufficient servicing may result in problems. Thiscould lead to vehicle damage or an accident and injuries.
For expert advice and quality service, consult an Authorized Mazda Dealer.
The owner should retain evidence that proper maintenance has been performed asprescribed.
Claims against the warranty resulting from lack of maintenance, as opposed to defectivematerials or authorized Mazda workmanship, will not be honored.
Any auto repair shop using parts equivalent to your Mazda's original equipment mayperform maintenance. But we recommend that it always be done by an AuthorizedMazda Dealer using genuine Mazda parts.
8-2
Maintenance and Care
Introduction
Mazda6_8U66-EA-05F_Edition2 Page268Tuesday, July 26 2005 11:26 AM
Form No.8U66-EA-05F

Black plate (269,1)
Scheduled Maintenance (USA, Canada, and Puerto Rico)Follow Schedule 1 if the vehicle is operated mainly where none of the following conditionsapply.If any do apply, follow Schedule 2 (Canada and Puerto Rico residents follow Schedule 2).
l Repeated short-distance driving
l Driving in dusty conditions
l Driving with extended use of brakes
l Driving in areas where salt or other corrosive materials are being used
l Driving on rough or muddy roads
l Extended periods of idling or low-speed operation
l Driving for long periods in cold temperatures or extremely humid climates
NOTE
After the prescribed period, continue to follow the described maintenance at therecommended intervals.
Maintenance and Care
Scheduled Maintenance
8-3
Mazda6_8U66-EA-05F_Edition2 Page269Tuesday, July 26 2005 11:26 AM
Form No.8U66-EA-05F
Black plate (270,1)
qSchedule 1
Maintenance Interval
Number of months or kilometers (miles), whichever comes first
Months 6 12 18 24 30 36 42 48
×1000 km 12 24 36 48 60 72 84 96
×1000 miles 7.5 15 22.5 30 37.5 45 52.5 60
ENGINE
Drive belts (tension)L3X engine I
AJVengine I I
Engine valve clearance (for L3X engine)Audible inspect every 120,000 km (75,000 miles), if noisy,
adjust
Engine oil R R R R R R R R
Engine oil filter R R R R R R R R
COOLING SYSTEM
Cooling system I I
Engine coolantFL22 type *1 Replace at first 192,000 km (120,000 miles) or 10 years; after
that, every 96,000 km (60,000 miles) or 5 years
OthersReplace at first 168,000 km (105,000 miles) or 5 years; after
that, every 48,000 km (30,000 miles) or 2 years
FUEL SYSTEM
Air filter R
Fuel lines and hoses *2 I I
Hoses and tubes for emission *2 I
IGNITION SYSTEM
Spark plugs Replace every 120,000 km (75,000 miles)
CHASSIS and BODY
Brake lines, hoses and connections I I
Disc brakes I I I I
Tire (Rotation) Rotate every 12,000 km (7,500 miles)
Steering operation and linkages I I
Front and rear suspension and ball joints I I
Driveshaft dust boots I I
Exhaust system and heat shields Inspect every 72,000 km (45,000 miles) or 5 years
All locks and hinges L L L L L L L L
8-4
Maintenance and Care
Scheduled Maintenance
Mazda6_8U66-EA-05F_Edition2 Page270Tuesday, July 26 2005 11:26 AM
Form No.8U66-EA-05F
Black plate (271,1)
Maintenance Interval
Number of months or kilometers (miles), whichever comes first
Months 6 12 18 24 30 36 42 48
×1000 km 12 24 36 48 60 72 84 96
×1000 miles 7.5 15 22.5 30 37.5 45 52.5 60
AIR CONDITIONER SYSTEM (if installed)
Cabin air filter Replace every 40,000 km (25,000 miles) or 2 years
Chart symbols:
I: Inspect and repair, clean, adjust, or replace if necessary.R: ReplaceL: Lubricate
Remarks:
*1 Use FL22 type coolant in vehicles with the inscription “FL22” on the radiator cap itself or the surroundingarea. Use FL22 when replacing the coolant.
*2 According to state/provincial and federal regulations, failure to perform maintenance on these items will notvoid your emissions warranties. However, Mazda recommends that all maintenance services be performed atthe recommended time or mileage/kilometer period to ensure long-term reliability.
Maintenance and Care
Scheduled Maintenance
8-5
Mazda6_8U66-EA-05F_Edition2 Page271Tuesday, July 26 2005 11:26 AM
Form No.8U66-EA-05F

Black plate (272,1)
qSchedule 2
Maintenance Interval
Number of months or kilometers (miles), whichever comes first
Months 4 8 12 16 20 24 28 32 36 40 44 48
×1000 km 8 16 24 32 40 48 56 64 72 80 88 96
×1000 miles 5 10 15 20 25 30 35 40 45 50 55 60
ENGINE
Drive belts (tension)L3X engine I
AJVengine I I
Engine valve clearance (for L3X engine)Audible inspect every 120,000 km (75,000 miles), if noisy,
adjust
Engine oilPuerto Rico Replace every 5,000 km (3,000 miles) or 3 months
Others R R R R R R R R R R R R
Engine oil filter R R R R R R R R R R R R
COOLING SYSTEM
Cooling system I I
Engine coolantFL22 type*1
Replace at first 192,000 km (120,000 miles) or 10 years; afterthat, every 96,000 km (60,000 miles) or 5 years
OthersReplace at first 168,000 km (105,000 miles) or 5 years; after
that, every 48,000 km (30,000 miles) or 2 years
Engine coolant level I I I I I I I I I I I I
FUEL SYSTEM
Air filterPuerto Rico R R
Others R
Fuel lines and hoses *2 I I
Hoses and tubes for emission *2 I
IGNITION SYSTEM
Spark plugsUSA Replace every 96,000 km (60,000 miles)
Others *3 Replace every 120,000 km (75,000 miles)
ELECTRICAL SYSTEM
Function of all lights I I I I I I I I I I I I
8-6
Maintenance and Care
Scheduled Maintenance
Mazda6_8U66-EA-05F_Edition2 Page272Tuesday, July 26 2005 11:26 AM
Form No.8U66-EA-05F

Black plate (273,1)
Maintenance Interval
Number of months or kilometers (miles), whichever comes first
Months 4 8 12 16 20 24 28 32 36 40 44 48
×1000 km 8 16 24 32 40 48 56 64 72 80 88 96
×1000 miles 5 10 15 20 25 30 35 40 45 50 55 60
CHASSIS and BODY
Brake lines, hoses and connections I I
Brake fluid level I I I I I I I I I I I I
Disc brakes I I I I
Tire (Rotation) Rotate every 8,000 km (5,000 miles)
Tire inflation pressure and tire wear I I I I I I I I I I I I
Steering operation and linkages I I
Power steering fluid level I I I I I I I I I I I I
Front and rear suspension and ball joints I I
Driveshaft dust boots I I
Exhaust system and heat shields Inspect every 72,000 km (45,000 miles) or 5 years
All locks and hinges L L L L L L L L L L L L
Washer fluid level I I I I I I I I I I I I
AIR CONDITIONER SYSTEM (if installed)
Cabin air filter Replace every 40,000 km (25,000 miles) or 2 years
Chart symbols:
I: Inspect and repair, clean, adjust, or replace if necessary.R: ReplaceL: Lubricate
Remarks:
*1 Use FL22 type coolant in vehicles with the inscription “FL22” on the radiator cap itself or the surroundingarea. Use FL22 when replacing the coolant.
*2 According to state/provincial and federal regulations, failure to perform maintenance on these items will notvoid your emissions warranties. However, Mazda recommends that all maintenance services be performed atthe recommended time or mileage/kilometer period to ensure long-term reliability.
*3 If the vehicle is operated under any of the following conditions, change the spark plugs every 96,000 km(60,000 miles) or shorter.
a) Repeated short-distance drivingb) Extended periods of idling or low-speed operationc) Driving for long periods in cold temperatures or extremely humid climates
Maintenance and Care
Scheduled Maintenance
8-7
Mazda6_8U66-EA-05F_Edition2 Page273Tuesday, July 26 2005 11:26 AM
Form No.8U66-EA-05F

Black plate (274,1)
Scheduled Maintenance (Mexico)Follow Schedule 1 if the vehicle is operated mainly where none of the following conditionsapply.If any do apply, follow Schedule 2.
l Repeated short-distance driving
l Driving in dusty conditions
l Driving with extended use of brakes
l Driving in areas where salt or other corrosive materials are being used
l Driving on rough or muddy roads
l Extended periods of idling or low-speed operation
l Driving for long periods in cold temperatures or extremely humid climates
l Towing a trailer
NOTE
After the prescribed period, continue to follow the described maintenance at therecommended intervals.
8-8
Maintenance and Care
Scheduled Maintenance
Mazda6_8U66-EA-05F_Edition2 Page274Tuesday, July 26 2005 11:26 AM
Form No.8U66-EA-05F

Black plate (275,1)
qSchedule 1
Maintenance Interval
Number of months or kilometers, whichever comes first
Months 6 12 18 24 30 36 42 48 54 60 66 72
×1000 km 10 20 30 40 50 60 70 80 90 100 110 120
ENGINE
Drive belts (tension) I I I
Engine valve clearance (for L3X engine) Audible inspect every 120,000 km, if noisy, adjust
Engine oil R R R R R R R R R R R R
Engine oil filter R R R R R R R R R R R R
COOLING SYSTEM
Cooling system I I I
Engine coolantFL22 type *1 Replace at first 190,000 km or 10 years; after that, every
60,000 km or 3 years
Others Replace every 40,000 km or 2 years
FUEL SYSTEM
Air filter R R R R R R
Fuel lines and hoses I *2 I *2 I
Hoses and tubes for emission I *2 I *2 I
Fuel filter R R R
IGNITION SYSTEM
Spark plugs Replace every 60,000 km
CHASSIS and BODY
Brake lines, hoses and connections I I I I I I
Brake fluid level I I I I I I I I I
Brake fluid R R R
Disc brakes I I I I I I I I I I I I
Tire (Rotation) Rotate every 10,000 km or 6 months
Tire inflation pressure and tire wear I I I I I I I I I I I I
Steering operation and linkages I I I I I I I I I I I I
Power steering fluid level I I I I I I I I I I I I
Front and rear suspension and ball joints I I I I I I I I I I I I
Driveshaft dust boots I I I I I I
Exhaust system and heat shields I I I I I I
All locks and hinges L L L L L L L L L L L L
Washer fluid level I I I I I I I I I I I I
Maintenance and Care
Scheduled Maintenance
8-9
Mazda6_8U66-EA-05F_Edition2 Page275Tuesday, July 26 2005 11:26 AM
Form No.8U66-EA-05F

Black plate (276,1)
Maintenance Interval
Number of months or kilometers, whichever comes first
Months 6 12 18 24 30 36 42 48 54 60 66 72
×1000 km 10 20 30 40 50 60 70 80 90 100 110 120
AIR CONDITIONER SYSTEM (if installed)
Cabin air filter R R R
Chart symbols:
I: Inspect and repair, clean, adjust, or replace if necessaryR: ReplaceL: Lubricate
Remarks:
*1 Use FL22 type coolant in vehicles with the inscription “FL22” on the radiator cap itself or the surroundingarea. Use FL22 when replacing the coolant.
*2 According to state/provincial and federal regulations, failure to perform maintenance on these items will notvoid your emissions warranties. However, Mazda recommends that all maintenance services be performed atthe recommended time or mileage/kilometer period to ensure long-term reliability.
8-10
Maintenance and Care
Scheduled Maintenance
Mazda6_8U66-EA-05F_Edition2 Page276Tuesday, July 26 2005 11:26 AM
Form No.8U66-EA-05F
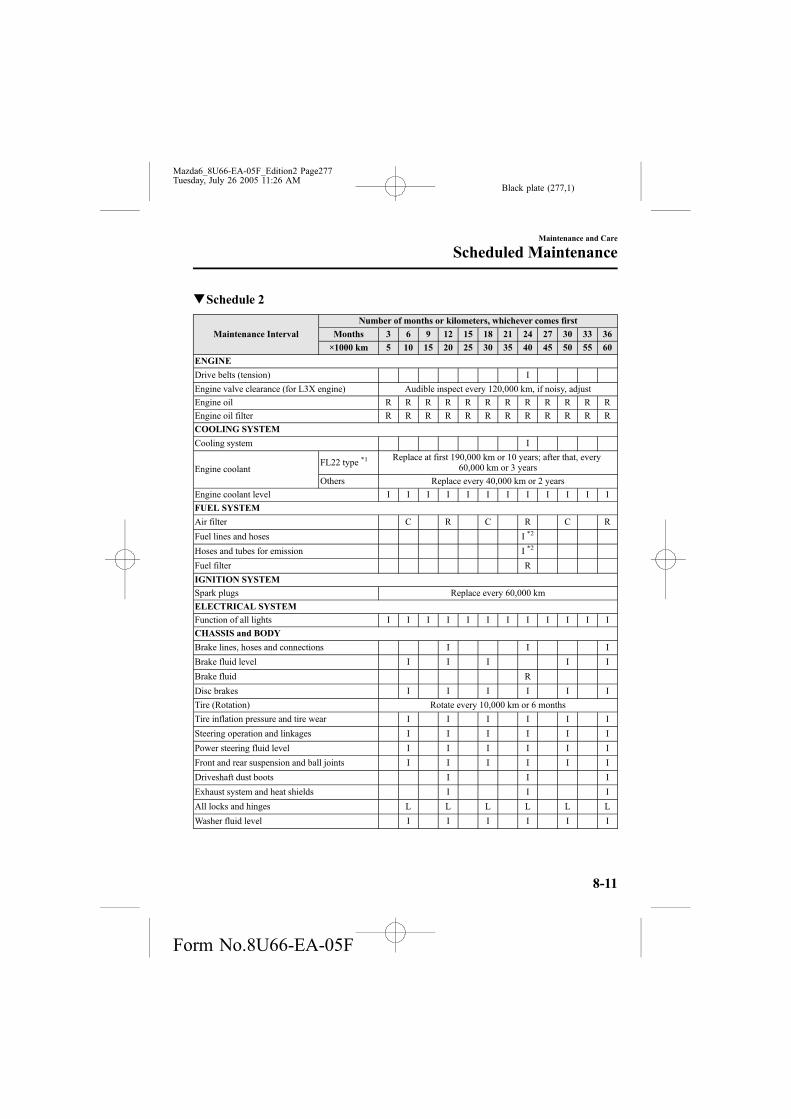
Black plate (277,1)
qSchedule 2
Maintenance Interval
Number of months or kilometers, whichever comes first
Months 3 6 9 12 15 18 21 24 27 30 33 36
×1000 km 5 10 15 20 25 30 35 40 45 50 55 60
ENGINE
Drive belts (tension) I
Engine valve clearance (for L3X engine) Audible inspect every 120,000 km, if noisy, adjust
Engine oil R R R R R R R R R R R R
Engine oil filter R R R R R R R R R R R R
COOLING SYSTEM
Cooling system I
Engine coolantFL22 type *1 Replace at first 190,000 km or 10 years; after that, every
60,000 km or 3 years
Others Replace every 40,000 km or 2 years
Engine coolant level I I I I I I I I I I I I
FUEL SYSTEM
Air filter C R C R C R
Fuel lines and hoses I *2
Hoses and tubes for emission I *2
Fuel filter R
IGNITION SYSTEM
Spark plugs Replace every 60,000 km
ELECTRICAL SYSTEM
Function of all lights I I I I I I I I I I I I
CHASSIS and BODY
Brake lines, hoses and connections I I I
Brake fluid level I I I I I
Brake fluid R
Disc brakes I I I I I I
Tire (Rotation) Rotate every 10,000 km or 6 months
Tire inflation pressure and tire wear I I I I I I
Steering operation and linkages I I I I I I
Power steering fluid level I I I I I I
Front and rear suspension and ball joints I I I I I I
Driveshaft dust boots I I I
Exhaust system and heat shields I I I
All locks and hinges L L L L L L
Washer fluid level I I I I I I
Maintenance and Care
Scheduled Maintenance
8-11
Mazda6_8U66-EA-05F_Edition2 Page277Tuesday, July 26 2005 11:26 AM
Form No.8U66-EA-05F

Black plate (278,1)
Maintenance Interval
Number of months or kilometers, whichever comes first
Months 3 6 9 12 15 18 21 24 27 30 33 36
×1000 km 5 10 15 20 25 30 35 40 45 50 55 60
AIR CONDITIONER SYSTEM (if installed)
Cabin air filter R R R
Chart symbols:
I: Inspect and repair, clean, adjust, or replace if necessaryR: ReplaceL: LubricateC: Clean
Remarks:
*1 Use FL22 type coolant in vehicles with the inscription “FL22” on the radiator cap itself or the surroundingarea. Use FL22 when replacing the coolant.
*2 According to state/provincial and federal regulations, failure to perform maintenance on these items will notvoid your emissions warranties. However, Mazda recommends that all maintenance services be performed atthe recommended time or mileage/kilometer period to ensure long-term reliability.
8-12
Maintenance and Care
Scheduled Maintenance
Mazda6_8U66-EA-05F_Edition2 Page278Tuesday, July 26 2005 11:26 AM
Form No.8U66-EA-05F

Black plate (279,1)
(Cont.)
Maintenance Interval
Number of months or kilometers, whichever comes first
Months 39 42 45 48 51 54 57 60 63 66 69 72
×1000 km 65 70 75 80 85 90 95 100 105 110 115 120
ENGINE
Drive belts (tension) I I
Engine valve clearance (for L3X engine) Audible inspect every 120,000 km, if noisy, adjust
Engine oil R R R R R R R R R R R R
Engine oil filter R R R R R R R R R R R R
COOLING SYSTEM
Cooling system I I
Engine coolantFL22 type *1 Replace at first 190,000 km or 10 years; after that, every
60,000 km or 3 years
Others Replace every 40,000 km or 2 years
Engine coolant level I I I I I I I I I I I I
FUEL SYSTEM
Air filter C R C R C R
Fuel lines and hoses I *2 I
Hoses and tubes for emission I *2 I
Fuel filter R R
IGNITION SYSTEM
Spark plugs Replace every 60,000 km
ELECTRICAL SYSTEM
Function of all lights I I I I I I I I I I I I
CHASSIS and BODY
Brake lines, hoses and connections I I I
Brake fluid level I I I I
Brake fluid R R
Disc brakes I I I I I I
Tire (Rotation) Rotate every 10,000 km or 6 months
Tire inflation pressure and tire wear I I I I I I
Steering operation and linkages I I I I I I
Power steering fluid level I I I I I I
Front and rear suspension and ball joints I I I I I I
Driveshaft dust boots I I I
Exhaust system and heat shields I I I
All locks and hinges L L L L L L
Washer fluid level I I I I I I
Maintenance and Care
Scheduled Maintenance
8-13
Mazda6_8U66-EA-05F_Edition2 Page279Tuesday, July 26 2005 11:26 AM
Form No.8U66-EA-05F

Black plate (280,1)
Maintenance Interval
Number of months or kilometers, whichever comes first
Months 39 42 45 48 51 54 57 60 63 66 69 72
×1000 km 65 70 75 80 85 90 95 100 105 110 115 120
AIR CONDITIONER SYSTEM (if installed)
Cabin air filter R R R
Chart symbols:
I: Inspect and repair, clean, adjust, or replace if necessaryR: ReplaceL: LubricateC: Clean
Remarks:
*1 Use FL22 type coolant in vehicles with the inscription “FL22” on the radiator cap itself or the surroundingarea. Use FL22 when replacing the coolant.
*2 According to state/provincial and federal regulations, failure to perform maintenance on these items will notvoid your emissions warranties. However, Mazda recommends that all maintenance services be performed atthe recommended time or mileage/kilometer period to ensure long-term reliability.
8-14
Maintenance and Care
Scheduled Maintenance
Mazda6_8U66-EA-05F_Edition2 Page280Tuesday, July 26 2005 11:26 AM
Form No.8U66-EA-05F
Black plate (281,1)
Owner Maintenance ScheduleThe owner or a qualified service technician should make these vehicle inspections at theindicated intervals to ensure safe and dependable operation.
Bring any problem to the attention of an Authorized Mazda Dealer or qualified servicetechnician as soon as possible.
qWhen Refueling
l Brake and clutch fluid level (page 8-24)
l Engine coolant level (page 8-21)
l Engine oil level (page 8-19)
l Washer fluid level (page 8-29)
qAt Least Monthly
Tire inflation pressures (page 8-39)
qAt Least Twice a Year (For Example, Every Spring and Fall)
l Automatic transaxle fluid level (page 8-26)
l Power steering fluid level (page 8-25)
You can do the following scheduled maintenance items if you have some mechanicalability and a few basic tools and if you closely follow the directions in this manual.
l Air filter (page 8-30)
l Engine coolant (page 8-21)
l Engine oil (page 8-19)
Maintenance and Care
Owner Maintenance
8-15
Mazda6_8U66-EA-05F_Edition2 Page281Tuesday, July 26 2005 11:26 AM
Form No.8U66-EA-05F

Black plate (282,1)
Owner Maintenance PrecautionsImproper or incomplete service may result in problems. This section gives instructions onlyfor items that are easy to perform.
As explained in the Introduction (page 8-2), several procedures can be done only by aqualified service technician with special tools.
Improper owner maintenance during the warranty period may affect warranty coverage.For details, read the separate Mazda Warranty statement provided with the vehicle. Ifyou're unsure about any servicing or maintenance procedure, have it done by anAuthorized Mazda Dealer.
There are strict environmental laws regarding the disposal of waste oil and fluids. Pleasedispose of your waste properly and with due regard to the environment.
We recommend that you entrust the oil and fluid changes of your vehicle to an AuthorizedMazda Dealer.
WARNINGMaintenance Procedures:Performing maintenance work on a vehicle is dangerous if not done properly. You canbe seriously injured while performing some maintenance procedures. If you lacksufficient knowledge and experience or the proper tools and equipment to do the work,have it done by a qualified technician.
Running the Engine:Working under the hood with the engine running is dangerous. It becomes even moredangerous when you wear jewelry or loose clothing.Either can become entangled in moving parts and result in injury.Therefore, if you must run the engine while working under the hood, make certainthat you remove all jewelry (especially rings, bracelets, watches, and necklaces) andall neckties, scarves, and similar loose clothing before getting near the engine orcooling fan which may turn on unexpectedly.
Electrical Fan and Engine Inspection:Inspecting the engine with the ignition switch in the ON position is dangerous. Thecooling fan could come on unexpectedly even when the engine isn't running. Youcould be seriously injured by the fan. Turn the ignition switch off and remove the keyfrom the ignition switch when you inspect the engine.
8-16
Maintenance and Care
Owner Maintenance
Mazda6_8U66-EA-05F_Edition2 Page282Tuesday, July 26 2005 11:26 AM
Form No.8U66-EA-05F

Black plate (283,1)
Engine Compartment Overview
Power steering fluid reservoir
Windshield washer fluid reservoir
Fuse block
Air filter
Brake/Clutch fluid reservoir
Engine coolant reservoir
Engine coolant reservoir
Automatic transaxle fluid-level dipstick (only for automatic transaxle)
Automatic transaxle fluid-level dipstick (only for automatic transaxle)
2.3-liter engine
3.0-liter engine
Battery
Engine oil dipstick
Windshield washer fluid reservoir
Power steering fluid reservoir
Cooling system cap
Engine oil-filler capBrake/Clutch fluid reservoir
Air filter
Fuse block
Battery
Engine oil-filler cap
Engine oil dipstick
Cooling system cap
Maintenance and Care
Owner Maintenance
8-17
Mazda6_8U66-EA-05F_Edition2 Page283Tuesday, July 26 2005 11:27 AM
Form No.8U66-EA-05F
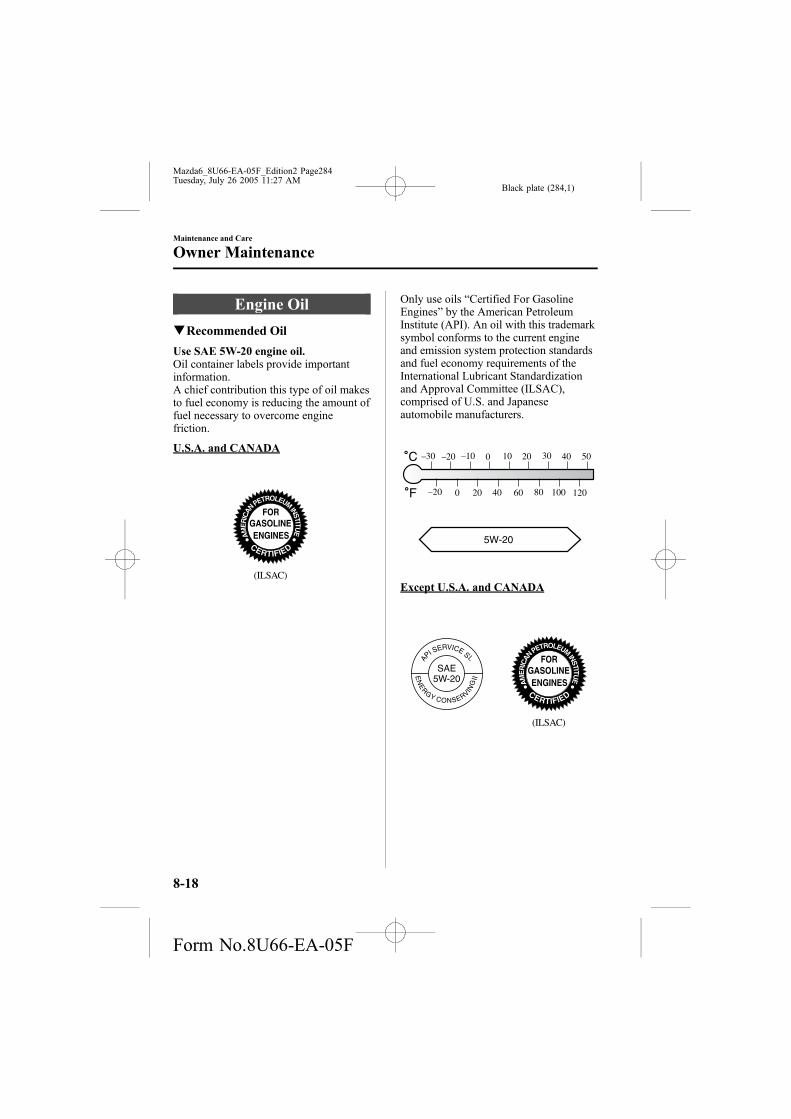
Black plate (284,1)
Engine Oil
qRecommended Oil
Use SAE 5W-20 engine oil.Oil container labels provide importantinformation.A chief contribution this type of oil makesto fuel economy is reducing the amount offuel necessary to overcome enginefriction.
U.S.A. and CANADA
(ILSAC)
Only use oils “Certified For GasolineEngines” by the American PetroleumInstitute (API). An oil with this trademarksymbol conforms to the current engineand emission system protection standardsand fuel economy requirements of theInternational Lubricant Standardizationand Approval Committee (ILSAC),comprised of U.S. and Japaneseautomobile manufacturers.
5W-20
120100806040200–20
50403020100–10–20–30
Except U.S.A. and CANADA
(ILSAC)
8-18
Maintenance and Care
Owner Maintenance
Mazda6_8U66-EA-05F_Edition2 Page284Tuesday, July 26 2005 11:27 AM
Form No.8U66-EA-05F

Black plate (285,1)
The quality designation SL, or ILSACmust be on the label.
5W-20
120100806040200–20
50403020100–10–20–30
qInspecting Engine Oil Level
1. Be sure the vehicle is on a levelsurface.
2. Warm up the engine to normaloperating temperature.
3. Turn it off and wait at least 5 minutesfor the oil to return to the oil pan.
4. Pull out the dipstick, wipe it clean, andreinsert it fully.
Full
Low
OK
2.3-liter engine
3.0-liter engine
FullOKLow
5. Pull it out again and examine the level.It's OK between Low and Full.But if it's near or below Low, addenough oil to bring the level to Full.
CAUTIONDon't add engine oil over Full. Thismay cause engine damage.
6. Make sure the O-ring on the dipstick ispositioned properly before reinsertingthe dipstick.
qChanging Engine Oil and Filter
Change engine oil and filter according toScheduled Maintenance (page 8-3).
Please act responsibly―protect theenvironment and take used oil to arecycling facility. Ask your dealer or aservice station for information.
Maintenance and Care
Owner Maintenance
8-19
Mazda6_8U66-EA-05F_Edition2 Page285Tuesday, July 26 2005 11:27 AM
Form No.8U66-EA-05F

Black plate (286,1)
WARNINGHandling Used Engine Oil:Continuous contact with used engineoil is dangerous. It could cause skincancer. Always wash with soap andwater immediately after changing oiland filter.
CAUTIONRemove any oil splatter from theexhaust manifold, the exhaust pipe andthe shield. Oil left on these areas willsmoke when the engine is running.
Changing engine oil
WARNINGChecking or Changing Engine Oil:Hot engine oil is dangerous. If theengine has been running, the engineoil becomes very hot. You could beseriously burned. Don't check orchange the engine oil when the engineis hot.
1. Warm up the engine for a few minutesand turn it off. Remove the oil-fillercap.
2. Remove the drain plug and drain theoil into a suitable container.
3. Replace the drain plug washer after theoil has thoroughly drained.
4. Reinstall the plug tightly.
5. Fill the engine with new oil to the Fullmark on the dipstick.
6. Securely reinstall the oil-filler cap.
2.3-liter engineLoosen
Tighten
Drain plug
Forward
Drain plug
Forward
Loosen
Tighten3.0-liter engine
7. Start the engine and inspect around thedrain plug for leaks.
8. Turn it off and wait 5 minutes for theoil to return to the oil pan.
Check the oil level and fill to the Fullmark if necessary.
2.3-liter engine
With oil filter replacement
Oil capacity (reference only)
L (US qt, Imp qt) 4.3 (4.5, 3.8)
Without oil filter replacement
Oil capacity (reference only)
L (US qt, Imp qt) 3.9 (4.1, 3.4)
8-20
Maintenance and Care
Owner Maintenance
Mazda6_8U66-EA-05F_Edition2 Page286Tuesday, July 26 2005 11:27 AM
Form No.8U66-EA-05F

Black plate (287,1)
3.0-liter engine
With oil filter replacement
Oil capacity (reference only)
L (US qt, Imp qt) 5.7 (6.0, 5.0)
Without oil filter replacement
Oil capacity (reference only)
L (US qt, Imp qt) 5.2 (5.5, 4.6)
NOTE
l The indicated engine oil capacitiesare for general reference purposesonly. When adding or changing oil,verify the engine oil level with theoil dipstick.
l Use only specified engine oil (page10-4).
Changing oil filter
Because you need a special tool toretighten the filter, an Authorized MazdaDealer should do the work.
Engine Coolant
qInspecting Coolant Level
WARNINGHot Engine:A hot engine is dangerous. If theengine has been running, parts of theengine compartment can become veryhot. You could be burned. Carefullyinspect the engine coolant in thecoolant reservoir, but do not open it.Do not use a match or live flame in theengine compartment. DO NOT ADDCOOLANT WHEN THE ENGINE ISHOT.
Cooling Fan and EngineInspection:Inspecting the engine with the ignitionswitch in the ON position isdangerous. The cooling fan could turnon unexpectedly even when the engineisn't running. You could be seriouslyinjured by the fan. Turn the ignitionswitch off and remove the key from theignition switch when you inspect theengine.
Cooling System Cap:When the engine and radiator are hot,scalding coolant and steam may shootout under pressure and cause seriousinjury. Don't remove the coolingsystem cap when the engine andradiator are hot.
Maintenance and Care
Owner Maintenance
8-21
Mazda6_8U66-EA-05F_Edition2 Page287Tuesday, July 26 2005 11:27 AM
Form No.8U66-EA-05F

Black plate (288,1)
Inspect the antifreeze protection andcoolant level in the coolant reservoir atleast once a year―at the beginning of thewinter season―and before travelingwhere temperatures may drop belowfreezing.
Inspect the condition and connections ofall cooling system and heater hoses.Replace any that are swollen ordeteriorated.
The coolant should be at full in theradiator and between the FULL or F andLOWor L marks on the coolant reservoirwhen the engine is cool.
2.3-liter engine
3.0-liter engine
If it's at or near LOWor L, add enoughcoolant to the coolant reservoir to providefreezing and corrosion protection and tobring the level to FULL or F.
CAUTIONRadiator coolant will damage paint.Rinse it off quickly if spilled.
If the coolant reservoir is empty or newcoolant is required frequently, consult anAuthorized Mazda Dealer.
qChanging Coolant
Change coolant according to ScheduledMaintenance (page 8-3).
CAUTIONl Use only soft (demineralized) waterin the coolant mixture. Water thatcontains minerals will cut down onthe coolant's effectiveness.
l Don't add only water. Always add aproper coolant mixture.
l The engine has aluminum parts andmust be protected by an ethylene-glycol-based coolant to preventcorrosion and freezing.
l DO NOT USE coolants ContainingAlcohol, methanol, Borate orSilicate.These coolants could damage thecooling system.
l DO NOT MIX alcohol or methanolwith the coolant. This could damagethe cooling system.
l Don't use a solution that containsmore than 60% antifreeze.This would reduce effectiveness.
8-22
Maintenance and Care
Owner Maintenance
Mazda6_8U66-EA-05F_Edition2 Page288Tuesday, July 26 2005 11:27 AM
Form No.8U66-EA-05F

Black plate (289,1)
NOTE
If the “FL22” mark is shown on or nearthe cooling system cap, use FL22 typeengine coolant. If engine coolant otherthan FL22 type is used, the enginecoolant must be replaced earlier thanthe specified replacement intervalindicated in the scheduled maintenance(page 8-3).
Except FL22 type
For mixture percentage:
Protection
Volume
Antifreezesolution
Deminera-lized water
Above _16°C (3°F) 35% 65%
Above _26°C (_15°F) 45% 55%
Above _40°C (_40°F) 55% 45%
FL22 type
FL22 type engine coolant concentration isfactory adjusted. Use the product as it iswithout diluting it.
To change coolant
WARNINGRemoving the Cooling System Cap:Removing the cooling system capwhile the engine is running or hot isdangerous. This might lead to coolingsystem and engine damage and couldresult in serious injury from escapinghot coolant or steam. Turn off theengine and wait until it's cool. Eventhen, be very careful when removingthe cap.Wrap a thick cloth around the cap andslowly turn it counterclockwise to thefirst stop (3.0-liter engine) or abouttwo and a half rotations (2.3-literengine).Step back while the pressure escapes.When you're sure all the pressure isgone, press down on the cap (3.0-literengine)― still using a cloth ― turnthe cap, and remove it.
1. Make sure the engine is not runningand it has cooled.
2. Remove the cooling system cap.
2.3-liter engineLoosen
Tighten
LoosenTighten
Maintenance and Care
Owner Maintenance
8-23
Mazda6_8U66-EA-05F_Edition2 Page289Tuesday, July 26 2005 11:27 AM
Form No.8U66-EA-05F

Black plate (290,1)
3.0-liter engine
Loosen
TightenTighten Loosen
3. Remove the radiator drain plug anddrain the coolant into a suitablecontainer. Properly dispose of the usedcoolant.
4. Flush out the system with runningwater.
5. Drain the system completely. Insert andtighten the plug. Add as muchethylene-glycol-based coolant mixtureand water as necessary to providefreezing and corrosion protection.
6. In extremely cold climates, add themixture percentage recommended inthe coolant mixture percentage table.
7. Run the engine at idle with the coolingsystem cap off. Slowly add additionalcoolant if necessary.
8. At this point, wait until the enginereaches normal operating temperature;then depress the accelerator two orthree times. Add more coolant, ifnecessary, until the system is full.
9. Install the cooling system cap. Inspectall connections for leaks. Inspect thelevel in the coolant reservoir one moretime and verify that the coolant level isbetween the F and L marks.
Brake/Clutch Fluid
qInspecting Brake/Clutch Fluid Level
The brakes and clutch draw fluid from thesame reservoir.Inspect the fluid level in the reservoirregularly. It should be kept at MAX.The level normally drops withaccumulated distance, a conditionassociated with wear of brake and clutchlinings. If it is excessively low, have thebrake/clutch system inspected by anAuthorized Mazda Dealer.
8-24
Maintenance and Care
Owner Maintenance
Mazda6_8U66-EA-05F_Edition2 Page290Tuesday, July 26 2005 11:27 AM
Form No.8U66-EA-05F

Black plate (291,1)
qAdding Brake/Clutch Fluid
WARNINGSpilled Brake Fluid:Spilled brake fluid is dangerous. If itgets in your eyes, they could beseriously injured. If this happens,immediately flush your eyes with waterand get medical attention. Brake fluidspilled on a hot engine could cause afire. Be careful not to spill brake fluidon yourself or on the engine.
Low Brake/Clutch Fluid Levels:Low brake/clutch fluid levels aredangerous. Low levels could signalbrake lining wear or a brake systemleak. Your brakes could fail and causean accident. If you find a low fluidlevel, have the brakes and clutchinspected.
If the fluid level is low, add fluid until itreaches MAX.Before adding fluid, thoroughly clean thearea around the cap.
CAUTIONl Brake and clutch fluid will damagepainted surfaces. If brake or clutchfluid does get on a painted surface,wipe it off immediately.
l Using nonspecified brake and clutchfluids (page 10-4) will damage thesystems. Mixing different fluids willalso damage them.If the brake/clutch system frequentlyrequires new fluid, consult anAuthorized Mazda Dealer.
Power Steering Fluid
qInspecting Power Steering FluidLevel
CAUTIONTo avoid damage to the power steeringpump, don't operate the vehicle for longperiods when the power steering fluidlevel is low.
NOTE
Use specified power steering fluid(page 10-4).
2.3-liter engine
Inspect the fluid level in the reservoir ateach engine oil change with the engine offand cold. Add fluid if necessary; it doesnot require periodic changing.
The level must be kept between MIN andMAX.
Visually examine the lines and hoses forleaks and damage.
Maintenance and Care
Owner Maintenance
8-25
Mazda6_8U66-EA-05F_Edition2 Page291Tuesday, July 26 2005 11:27 AM
Form No.8U66-EA-05F

Black plate (292,1)
If new fluid is required frequently, consultan Authorized Mazda Dealer.
3.0-liter engine
Inspect the fluid level at each engine oilchange. Add fluid if necessary; it does notrequire periodic changing.
LowOK
High
Loosen Tighten
The level must be kept between the H andL marks.
Visually examine the lines and hoses forleaks and damage.
1. Park on a level surface, well off theright-of-way, and set the parking brakefirmly.
2. Turn off the engine and allow it tocool.
3. Remove the filler cap and attacheddipstick.
4. Wipe them clean and put them back.
5. Remove again and inspect the level.
6. It must be between H and L. Add fluidif necessary.
Don't overfill.If new fluid is required frequently, consultan Authorized Mazda Dealer.
Automatic Transaxle Fluid(ATF)
qInspecting Automatic TransaxleFluid Level
The automatic transaxle fluid level shouldbe inspected regularly. Measure it asdescribed below.
2.3-liter engine
CAUTIONl Always check the automatictransaxle fluid level according to thefollowing procedure. If theprocedure is not done correctly, theautomatic transaxle fluid levelcannot be measured accuratelywhich could lead to automatictransaxle damage.
l A low fluid level can cause transaxleslippage. Overfilling can causefoaming, loss of fluid, and transaxlemalfunction.
l Use only the specified fluid. A non-specified fluid could result intransaxle malfunction and failure.
1. Park on a level surface and set theparking brake firmly.
2. Make sure there is no ATF leakagefrom the ATF hose or the housing.
3. Shift the shift lever to the park position(P), start the engine and warm it up.
8-26
Maintenance and Care
Owner Maintenance
Mazda6_8U66-EA-05F_Edition2 Page292Tuesday, July 26 2005 11:27 AM
Form No.8U66-EA-05F

Black plate (293,1)
CAUTIONDo not shift the shift lever while theengine is warming up. If the ATF levelis extremely low, the automatictransaxle could be damaged.
4. While the engine is still idling, pull outthe dipstick and wipe it clean, and thenput it back.
5. Check the ATF level. If there is no ATFadhering 5 mm from the end of thedipstick, add ATF.
CAUTIONIf there is no ATF adhering to thedipstick even after the engine has beenwarmed up, do not drive the vehicle.Otherwise, the automatic transaxlecould be damaged.
6. Shift the shift lever to each range andposition, and make sure there is noabnormality.
7. Drive the vehicle on city roads for 5km (3.1 mile) or more.
8. Park on a level surface and set theparking brake firmly.
9. Shift the shift lever to the park position(P), check the ATF level while theengine is idling, and make sure that theATF level is within the proper level. Ifthe ATF level is not within the properlevel, add ATF.The proper fluid level is marked on thedipstick as follows.
Low
Full
2.3-liter engine
3.0-liter engine
The volume of fluid changes with thetemperature. Fluid must be checked at idlewithout driving at normal operatingtemperature.
CAUTIONl Low fluid level causes transaxleslippage. Overfilling can causefoaming, loss of fluid, and transaxlemalfunction.
l Use specified fluid (page 10-4). Anonspecified fluid could result intransaxle malfunction and failure.
1. Park on a level surface and set theparking brake firmly.
2. Start the engine and depress the brakepedal.
Maintenance and Care
Owner Maintenance
8-27
Mazda6_8U66-EA-05F_Edition2 Page293Tuesday, July 26 2005 11:27 AM
Form No.8U66-EA-05F

Black plate (294,1)
3. Move the shift lever through all rangesand set it at P.
WARNINGSudden Vehicle Movement:Shifting the shift lever without firstdepressing the brake pedal isdangerous. The vehicle could movesuddenly and cause an accident.Make sure the brake pedal is appliedbefore shifting the shift lever.
4. With the engine still idling, pull out thedipstick, wipe it clean, and put it back.
5. Pull it out again.The proper fluid level is marked on thedipstick as follows.
AFull
BLow
3.0-liter engine
Fluid hot scale A
When the vehicle has been driven and thefluid is at normal operating temperature,about 65°C (150°F), the level must bebetween Full and Low.
Fluid cold scale B
When the engine has not been runningand the outside temperature is about 20°C(70°F), the fluid level should be close to,but not above, the bottom notch on thedipstick.
CAUTIONl Use the cold scale only as areference.
l If outside temperature is lower thanabout 20°C (70°F), start the engineand inspect the fluid level after theengine reaches operatingtemperature.
l If the vehicle has been driven for anextended period at high speeds or incity traffic in hot weather, inspect thelevel only after stopping the engineand allowing the fluid to cool for 30minutes.
Fully insert the dipstick. When addingfluid, inspect with the dipstick to makesure it doesn't pass full.
NOTE
Inspect the fluid on both sides of thedipstick in a well lit area for an accuratereading.
8-28
Maintenance and Care
Owner Maintenance
Mazda6_8U66-EA-05F_Edition2 Page294Tuesday, July 26 2005 11:27 AM
Form No.8U66-EA-05F

Black plate (295,1)
Washer Fluid
qInspecting Washer Fluid Level
WARNINGSubstitute Washer Fluid:Using radiator antifreeze as washerfluid is dangerous. If sprayed on thewindshield, it will dirty the windshield,affect your visibility, and could resultin an accident. Use only windshieldwasher fluid or plain water in thereservoir.
Using Washer Fluid Without Anti-freeze Protection in Cold Weather:Operating your vehicle intemperatures below 4 degrees C (40degrees F) using washer fluid withoutanti-freeze protection is dangerous asit could cause impaired windshieldvision and result in an accident. Incold weather, always use washer fluidwith anti-freeze protection.
NOTE
State or local regulations may restrictthe use of volatile organic compounds(VOCs), which are commonly used asanti-freeze agents in washer fluid. Awasher fluid with limited VOC contentshould be used only if it providesadequate freeze resistance for allregions and climates in which thevehicle will be operated.
Inspect fluid level in the washer fluidreservoir; add fluid if necessary.
Use plain water if washer fluid isunavailable.But use only washer fluid in cold weatherto prevent it from freezing.
Maintenance and Care
Owner Maintenance
8-29
Mazda6_8U66-EA-05F_Edition2 Page295Tuesday, July 26 2005 11:27 AM
Form No.8U66-EA-05F

Black plate (296,1)
Body LubricationAll moving points of the body, such asdoor and hood hinges and locks, shouldbe lubricated each time the engine oil ischanged. Use a nonfreezing lubricant onlocks during cold weather.
Make sure the hood's secondary latchkeeps the hood from opening when theprimary latch is released.
Air Filter
CAUTIONDon't drive without an air filter. Thiscould result in excessive engine wear.
This air filter may be cleaned withcompressed air and reused, or replaced,depending on its condition. Unless it isvery dirty, simply shake it to removeforeign particles. Each time you inspect it,wipe inside the air cleaner housing with adamp cloth.
qReplacing the Air Filter
NOTE
If the vehicle is operated in very dustyor sandy areas, replace the filter moreoften than recommended intervals.
1. Unfasten the clamps.
2.3-liter engine
8-30
Maintenance and Care
Owner Maintenance
Mazda6_8U66-EA-05F_Edition2 Page296Tuesday, July 26 2005 11:27 AM
Form No.8U66-EA-05F
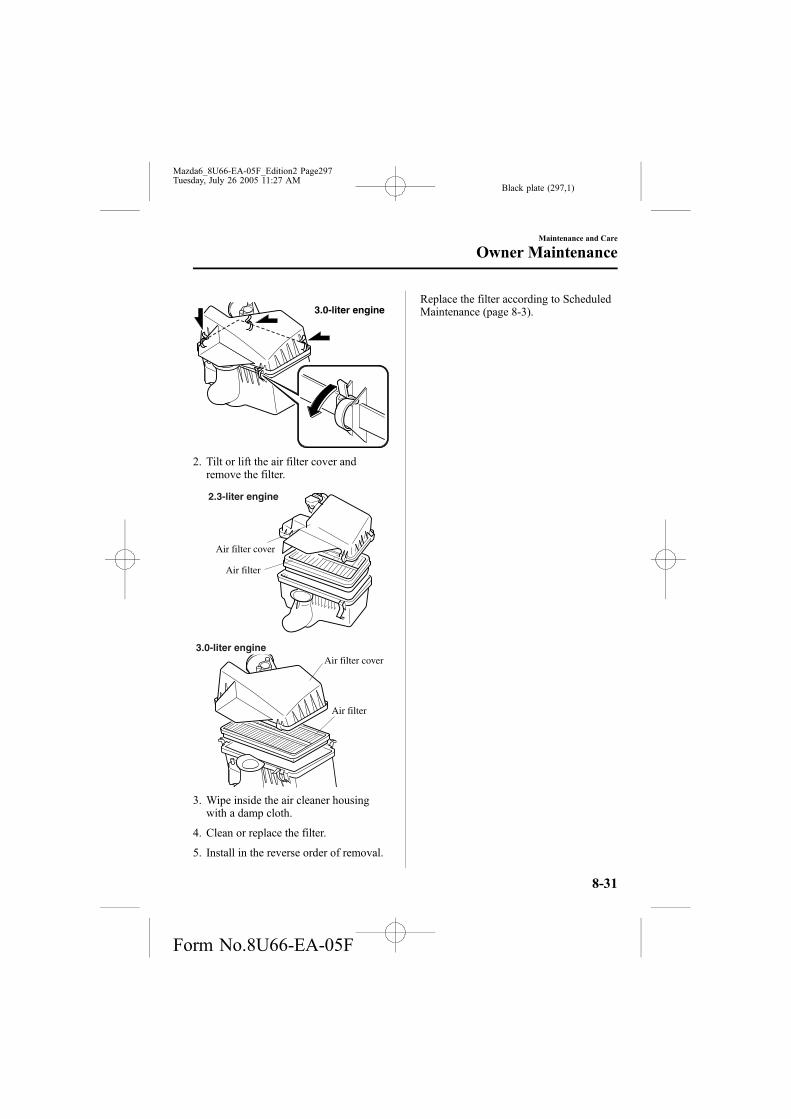
Black plate (297,1)
3.0-liter engine
2. Tilt or lift the air filter cover andremove the filter.
2.3-liter engine
Air filter cover
Air filter
3.0-liter engineAir filter cover
Air filter
3. Wipe inside the air cleaner housingwith a damp cloth.
4. Clean or replace the filter.
5. Install in the reverse order of removal.
Replace the filter according to ScheduledMaintenance (page 8-3).
Maintenance and Care
Owner Maintenance
8-31
Mazda6_8U66-EA-05F_Edition2 Page297Tuesday, July 26 2005 11:27 AM
Form No.8U66-EA-05F
Black plate (298,1)
Wiper Blades
CAUTIONl Hot waxes applied by automatic carwashers have been known to affectthe wiper's ability to clean windows.
l To prevent damage to the wiperblades, don't use gasoline, kerosene,paint thinner, or other solvents on ornear them.
Contamination of either the windshield orthe blades with foreign matter can reducewiper effectiveness. Common sources areinsects, tree sap, and hot wax treatmentsused by some commercial car washes.
If the blades are not wiping properly,clean the window and blades with a goodcleaner or mild detergent; then rinsethoroughly with clean water. Repeat ifnecessary.
qReplacing Windshield Wiper Blades
When the wipers no longer clean well, theblades are probably worn or cracked.Replace them.
CAUTIONTo prevent damage to the wiper armsand other components, don't try tosweep the wiper arm by hand.
NOTE
To prevent damage to the wiper armblades when raising both the driver andpassenger side wiper arms, raise thedriver side wiper arm first. Conversely,when setting down the wiper arms, setthe passenger side wiper arm downfirst.
1. Raise the wiper arm and turn the bladeassembly to expose the plastic lockingclip.Compress the clip and slide theassembly downward; then lift it off thearm.
Plastic locking clip
CAUTIONTo prevent damage to the windshield letthe wiper arm down easily, don't let itslap down on the windshield.
8-32
Maintenance and Care
Owner Maintenance
Mazda6_8U66-EA-05F_Edition2 Page298Tuesday, July 26 2005 11:27 AM
Form No.8U66-EA-05F

Black plate (299,1)
2. Hold the end of the rubber and pulluntil the tabs are free of the metalsupport.
Metal support
Tab
3. Remove the metal stiffeners from theblade rubber and install them in newblades.
CAUTIONl Don't bend or discard the stiffeners.You need to use them again.
l If the metal stiffeners are switched,the blade's wiping efficiency couldbe reduced.So don't use the driver's side metalstiffeners on the passenger's side, orvice versa.
l Be sure to reinstall the metalstiffeners in the new blade rubber sothat the curve is the same as it was inthe old blade rubber.
4. Carefully insert the new blade rubber.Then install the blade assembly in thereverse order of removal.
NOTE
Install the blade so that the tabs aretoward the bottom of the wiper arm.
Maintenance and Care
Owner Maintenance
8-33
Mazda6_8U66-EA-05F_Edition2 Page299Tuesday, July 26 2005 11:27 AM
Form No.8U66-EA-05F

Black plate (300,1)
qReplacing Rear Window WiperBlade (5-Door/Sport Wagon)
When the wiper no longer cleans well, theblade is probably worn or cracked.Replace it.
CAUTIONTo prevent damage to the wiper armand other components, don't move thewiper by hand.
(5-Door)
1. Raise the wiper arm and turn the bladeassembly to expose the plastic lockingclip.Compress the clip and slide theassembly downward; then lift it off thearm.
Plastic locking clip
CAUTIONTo prevent damage to the rear window,don't let the wiper arm fall on it.
2. Hold the end of the blade rubber andpull until the tabs are free of the metalsupport.
Metal support
Tab
3. Remove the metal stiffeners from theblade rubber and install them in newblades.
CAUTIONDon't bend or discard the stiffeners.You need to use them again.
8-34
Maintenance and Care
Owner Maintenance
Mazda6_8U66-EA-05F_Edition2 Page300Tuesday, July 26 2005 11:27 AM
Form No.8U66-EA-05F

Black plate (301,1)
4. Carefully insert the new blade rubber.Then install the blade assembly in thereverse order of removal.
(Sport Wagon)
1. Raise the wiper arm and rotate thewiper blade to the right until it unlocks,then remove the blade.
CAUTIONTo prevent damage to the rear window,don't let the wiper arm fall on it.
2. Pull down the blade rubber and slide itout of the blade holder.
3. Remove the metal stiffeners from theblade rubber and install them in newblades.
CAUTIONDon't bend or discard the stiffeners.You need to use them again.
Maintenance and Care
Owner Maintenance
8-35
Mazda6_8U66-EA-05F_Edition2 Page301Tuesday, July 26 2005 11:27 AM
Form No.8U66-EA-05F
Black plate (302,1)
4. Carefully insert the new blade rubber.Then install the blade assembly in thereverse order of removal.
8-36
Maintenance and Care
Owner Maintenance
Mazda6_8U66-EA-05F_Edition2 Page302Tuesday, July 26 2005 11:27 AM
Form No.8U66-EA-05F

Black plate (303,1)
Battery
WARNINGBattery-Related Lead Materials:Battery posts, terminals and related accessories contain lead and lead compounds,chemicals known to the State of California to cause cancer and reproductive harm.Wash hands after handling.
Eye Protection:Working without eye protection is dangerous. Battery fluid contains SULFURICACID which could cause blindness if splashed into your eyes. Also, hydrogen gasproduced during normal battery operation, could ignite and cause the battery toexplode. Always wear eye protection when working near the battery.
Spilled Battery Fluid:Spilled battery fluid is dangerous.Battery fluid contains SULFURIC ACID which could cause serious injuries if it getsin eyes, skin or clothing. If this happens, immediately flush your eyes with water for15 minutes or wash your skin thoroughly and get medical attention. Wear eyeprotection and protective gloves to prevent contact with battery fluid.
Children and Batteries:Allowing children to play near batteries is dangerous. Battery fluid could causeserious injuries if it gets in the eyes or on the skin. Always keep batteries out of thereach of children.
Keep Flames Away:Flames and sparks near open battery cells are dangerous. Hydrogen gas, producedduring normal battery operation, could ignite and cause the battery to explode. Anexploding battery can cause serious burns and injuries. Keep all flames includingcigarettes and sparks away from open battery cells. When working near a battery, donot allow metal tools to contact the positive ( ) or negative ( ) terminal of thebattery. Do not allow the positive ( ) terminal to contact the vehicle body.
Battery-Related Explosion:Flames and sparks near open battery cells are dangerous. Hydrogen gas, producedduring normal battery operation, could ignite and cause the battery to explode. Anexploding battery can cause serious burns and injuries. Keep all flames, includingcigarettes, and sparks away from open battery cells.
Maintenance and Care
Owner Maintenance
8-37
Mazda6_8U66-EA-05F_Edition2 Page303Tuesday, July 26 2005 11:27 AM
Form No.8U66-EA-05F

Black plate (304,1)
qBattery Maintenance
To get the best service from a battery:
l Keep it securely mounted.
l Keep the top clean and dry.
l Keep terminals and connections clean,tight, and coated with petroleum jellyor terminal grease.
l Rinse off spilled electrolyteimmediately with a solution of waterand baking soda.
l If the vehicle will not be used for anextended time, disconnect the batterycables and charge the battery every sixweeks.
TiresFor reasons of proper performance, safety,and better fuel economy, always maintainrecommended tire inflation pressures andstay within the recommended load limitsand weight distribution.
WARNINGUsing Different Tire Types:Driving your vehicle with differenttypes of tires is dangerous. It couldcause poor handling and poorbraking; leading to loss of control.Except for the limited use of thetemporary spare tire, use only thesame type tires (radial, bias-belted,bias-type) on all four wheels.
Using Wrong-Sized Tires:Using any other tire size than what isspecified for your Mazda (page 10-7)is dangerous. It could seriously affectride, handling, ground clearance, tireclearance, and speedometercalibration. This could cause you tohave an accident. Use only tires thatare the correct size specified for yourMazda.
8-38
Maintenance and Care
Owner Maintenance
Mazda6_8U66-EA-05F_Edition2 Page304Tuesday, July 26 2005 11:27 AM
Form No.8U66-EA-05F

Black plate (305,1)
qTire Inflation Pressure
WARNINGIncorrect Tire Inflation:Overinflation or underinflation of tiresis dangerous. Adverse handling orunexpected tire failure could result ina serious accident. Always inflate thetires to the correct pressure (page10-7).
Inspect all tire pressures monthly(including the spare) when the tires arecold. Maintain recommended pressuresfor the best ride, top handling, andminimum tire wear.
Refer to the specification charts (page10-7).
NOTE
l Always check tire pressure whentires are cold.
l Warm tires normally exceedrecommended pressures. Don'trelease air from warm tires to adjustthe pressure.
l Underinflation can cause reducedfuel economy, uneven andaccelerated tire wear, and poorsealing of the tire bead, which willdeform the wheel and causeseparation of tire from rim.
l Overinflation can produce a harshride, uneven and accelerated tirewear, and a greater possibility ofdamage from road hazards.Keep your tire pressure at the correctlevels. If one frequently needsinflating, have it inspected.
Maintenance and Care
Owner Maintenance
8-39
Mazda6_8U66-EA-05F_Edition2 Page305Tuesday, July 26 2005 11:27 AM
Form No.8U66-EA-05F

Black plate (306,1)
qTire Rotation
To equalize tread wear, rotate the tiresevery 12,000 km (7,500 miles)/8,000km*(5,000 miles) or sooner if irregularwear develops. During rotation, inspectthem for correct balance.
* Unique driving conditions for U.S.A.,Canada and Puerto Rico
Do not include (TEMPORARY USE ONLY) spare tire in rotation.
Forward
Also, inspect them for uneven wear anddamage. Abnormal wear is usually causedby one or a combination of the following:
l Incorrect tire pressure
l Improper wheel alignment
l Out-of-balance wheel
l Severe braking
After rotation, inflate all tire pressures tospecification (page 10-7) and inspect thelug nuts for tightness.
CAUTIONRotate unidirectional tires and radialtires that have an asymmetrical treadpattern or studs only from front to rear,not from side to side. Tire performancewill be weakened if rotated from side toside.
qReplacing a Tire
WARNINGWorn Tires:Driving with worn tires is dangerous.Reduced braking, steering, andtraction could result in an accident.Always use tires that are in goodcondition.
If a tire wears evenly, a wear indicatorwill appear as a solid band across thetread.Replace the tire when this happens.
New tread
Tread wear indicator
Worn tread
You should replace it before the band isacross the entire tread.
8-40
Maintenance and Care
Owner Maintenance
Mazda6_8U66-EA-05F_Edition2 Page306Tuesday, July 26 2005 11:27 AM
Form No.8U66-EA-05F

Black plate (307,1)
NOTE
Tires degrade over time, even whenthey are not being used on the road. It isrecommended that tires generally bereplaced when they are 6 years or older.Heat caused by hot climates or frequenthigh loading conditions can acceleratethe aging process. You should replacethe spare tire when you replace theother road tires due to the aging of thespare tire. Regarding the manufacturingweek and year is indicated with 4 digit.Refer to The tire labeling on page 9-21.
qTemporary Spare Tire
Inspect the temporary spare tire at leastmonthly to make sure it's properly inflatedand stored.
NOTE
The temporary spare tire conditiongradually deteriorates even if it has notbeen used.
The temporary spare tire is easier tohandle because of its construction. It islighter and smaller than a conventionaltire and should be used only for anemergency and only for a short distance.
Use the temporary only until theconventional tire is repaired, which shouldbe as soon as possible.
Maintain its pressure at 420 kPa (4.2kgf/cm2 or bar, 60 psi).
CAUTIONl Don't use your temporary spare tirerim with a snow tire or aconventional tire. Neither willproperly fit and could damage bothtire and rim.
l The temporary spare tire has a treadlife of less than 5,000 km (3,000miles). The tread life may be shorterdepending on driving conditions.
l The temporary spare tire is forlimited use, however, if the treadwear solid-band indicator appears,replace the tire with the same type oftemporary spare (page 8-40).
NOTE
Tires degrade over time, even whenthey are not being used on the road. It isrecommended that tires generally bereplaced when they are 6 years or older.Heat caused by hot climates or frequenthigh loading conditions can acceleratethe aging process. You should replacethe spare tire when you replace theother road tires due to the aging of thespare tire. Regarding the manufacturingweek and year is indicated with 4 digit.Refer to The tire labeling on page 9-21.
Maintenance and Care
Owner Maintenance
8-41
Mazda6_8U66-EA-05F_Edition2 Page307Tuesday, July 26 2005 11:27 AM
Form No.8U66-EA-05F

Black plate (308,1)
qReplacing a Wheel
WARNINGUsing a Wrong-Sized Wheel:Using a wrong-sized wheel isdangerous. Braking and handlingcould be affected, leading to loss ofcontrol and an accident. Always usewheels of the correct size on yourvehicle.
CAUTIONAwrong-sized wheel may adverselyaffect:
l Tire fit
l Wheel and bearing life
l Ground clearance
l Speedometer calibration
l Headlight aim
l Bumper height
When replacing a wheel, make sure thenew one is the same as the original factorywheel in diameter, rim width, and offset.
Proper tire balancing provides the bestriding comfort and helps reduce treadwear. Out-of-balance tires can causevibration and uneven wear, such ascupping and flat spots.
8-42
Maintenance and Care
Owner Maintenance
Mazda6_8U66-EA-05F_Edition2 Page308Tuesday, July 26 2005 11:27 AM
Form No.8U66-EA-05F

Black plate (309,1)
Light Bulbs
Luggage compartment light (Hatchback)
High-mount brake light (Sedan)
Headlights(High beam)
Headlights(Low beam)
Overhead light/ Map lights
Luggage compartment light
Sport Wagon
Taillights
Side-marker lights
License plate lights
Courtesy lights
Front turn signal lights
Parking lights
Reverse lights
Rear turn signal lights
Brake lights/Taillights
High-mount brake light
Fog lights
Sedan/5-Door
Taillights
Side-marker lights
License plate lights
Courtesy lights
Front turn signal lights
Parking lights
Reverse lights
Rear turn signal lights
Brake lights/Taillights
Trunk light
Fog lights
High-mount brake light (Hatchback)
Headlights(High beam)
(Low beam)Headlights
Map lightsOverhead light/
Maintenance and Care
Owner Maintenance
8-43
Mazda6_8U66-EA-05F_Edition2 Page309Tuesday, July 26 2005 11:27 AM
Form No.8U66-EA-05F

Black plate (310,1)
WARNINGXenon Fusion Bulb Replacement:Replacing the xenon fusion bulbsyourself is dangerous. Because thexenon fusion bulbs require highvoltage, you could receive an electricshock if the bulbs are handledincorrectly. Do not replace the xenonfusion bulbs yourself. Consult anAuthorized Mazda Dealer when thereplacement is necessary.
Handling Halogen Bulbs:When a halogen bulb breaks, it isdangerous. These bulbs containpressurized gas. If one is broken, itwill explode and serious injuries couldbe caused by the flying glass.If the glass portion is touched withbare hands, body oil could cause thebulb to overheat and explode when lit.Never touch the glass portion of thebulb with your bare hands and alwayswear eye protection when handling orworking around halogen bulbs.
Children and Halogen Bulbs:Playing with a halogen bulb isdangerous. Serious injuries could becaused by dropping a halogen bulb orbreaking it some other way.Always keep halogen bulbs out of thereach of children.
qReplacing Exterior Light Bulbs
Replacing the headlight, and parkinglight bulbs
Due to the complexity and difficulty ofthe procedure, the bulbs should bereplaced by an Authorized Mazda Dealer.
Fog lights
1. If you are changing the left fog lightbulb, start the engine, turn the steeringwheel all the way to the right, and turnoff the engine. If you are changing theright fog light bulb, turn the steeringwheel to the left.
2. Turn the screws counterclockwise andremove them.
3. Turn the center section of the plasticretainers counterclockwise and removethem, and partially peel back themudguard.
Removal
Installation
4. Turn the socket and bulb assemblycounterclockwise, and carefully pull itbackward.
8-44
Maintenance and Care
Owner Maintenance
Mazda6_8U66-EA-05F_Edition2 Page310Tuesday, July 26 2005 11:27 AM
Form No.8U66-EA-05F
Black plate (311,1)
5. Disconnect the socket and bulbassembly from the electrical connectorby pressing the tab on the connectorwith your finger and pulling it.
NOTE
l If the halogen bulb is accidentallytouched, it should be cleaned withrubbing alcohol before being used.
l To replace the bulb, contact anAuthorized Mazda Dealer.
l Use the protective cover and cartonfor the replacement bulb to disposeof the old bulb promptly and out ofthe reach of children.
6. Install the new socket and bulbassembly in the reverse order ofremoval.
Front turn signal lights
1. Turn the socket and bulb assemblycounterclockwise and remove it.
2. Remove the bulb by pushing it inslightly and turning itcounterclockwise.
3. Install the new bulb in the reverse orderof removal.
Side-marker lights
1. If you are changing the left side-makerlight, start the engine, turn the steeringwheel all the way to the right, and turnoff the engine. If you are changing theright side-maker light, turn the steeringwheel to the left.
2. Turn the screws counterclockwise andremove them.
Maintenance and Care
Owner Maintenance
8-45
Mazda6_8U66-EA-05F_Edition2 Page311Tuesday, July 26 2005 11:27 AM
Form No.8U66-EA-05F

Black plate (312,1)
3. Turn the center section of the plasticretainers counterclockwise and removethem, and partially peel back themudguard.
Removal
Installation
4. Turn the socket and bulb assemblycounterclockwise and remove it.
5. Disconnect the bulb from the socket.
Brake lights/Taillights, Rear turn signallights
(Sedan)
1. Pull the center section of the plasticretainer and remove the retainers andpartially open the trunk side trim.
Removal
Installation
2. Turn the socket and bulb assemblycounterclockwise and remove it.
3. Disconnect the bulb from the socket.
Brake lights/Taillights
8-46
Maintenance and Care
Owner Maintenance
Mazda6_8U66-EA-05F_Edition2 Page312Tuesday, July 26 2005 11:27 AM
Form No.8U66-EA-05F

Black plate (313,1)
Rear turn signal lights
4. Install the new bulb in the reverse orderof removal.
NOTE
To replace the bulb, contact anAuthorized Mazda Dealer.
(5-Door)
1. Turn the knob and remove the cover.
Left side Right side
2. Pull the strap and remove the cover.
3. Turn the socket and bulb assemblycounterclockwise and remove it.
4. Disconnect the bulb from the socket.
Brake lights/Taillights
Rear turn signal lights
Maintenance and Care
Owner Maintenance
8-47
Mazda6_8U66-EA-05F_Edition2 Page313Tuesday, July 26 2005 11:27 AM
Form No.8U66-EA-05F

Black plate (314,1)
5. Install the new bulb in the reverse orderof removal.
NOTE
To replace the bulb, contact anAuthorized Mazda Dealer.
(Sport Wagon)
1. Turn the knob and remove the cover.
Left side Right side
2. Pull the strap and remove the cover.
3. Turn the socket and bulb assemblycounterclockwise and remove it.
4. Disconnect the bulb from the socket.
Rear turn signal lightsBrake lights/Taillights
5. Install the new bulb in the reverse orderof removal.
NOTE
To replace the bulb, contact anAuthorized Mazda Dealer.
Reverse lights, Taillights
(Sedan)
1. Pull the center section of the plasticretainer and remove the retainers, thenremove the trunk rear trim.
Installation
Removal
2. Turn the socket and bulb assemblycounterclockwise and remove it.
8-48
Maintenance and Care
Owner Maintenance
Mazda6_8U66-EA-05F_Edition2 Page314Tuesday, July 26 2005 11:27 AM
Form No.8U66-EA-05F

Black plate (315,1)
3. Disconnect the bulb from the socket.
Reverse lightsTaillights
4. Install the new bulb in the reverse orderof removal.
(5-Door/Sport Wagon)
1. Remove the cover.
2. Turn the socket and bulb assemblycounterclockwise and remove it.
3. Disconnect the bulb from the socket.
Reverse lightsTaillights
4. Install the new bulb in the reverse orderof removal.
High-mount brake light
(Sedan)
1. Remove the high-mount brake lightcomponent.
2. Detach the electrical connector fromthe socket.
3. Turn the socket and bulb assemblycounterclockwise and remove it.
4. Disconnect the bulb from the socket.
5. Install the new bulb in the reverse orderof removal.
(5-Door)
1. Remove the cover.
2. Turn the socket and bulb assemblycounterclockwise and remove it.
3. Disconnect the bulb from the socket.
4. Install the new bulb in the reverse orderof removal.
Maintenance and Care
Owner Maintenance
8-49
Mazda6_8U66-EA-05F_Edition2 Page315Tuesday, July 26 2005 11:27 AM
Form No.8U66-EA-05F

Black plate (316,1)
(Sport Wagon)
1. Remove the liftgate upper trim andhigh-mount brake light component.
2. Turn the socket and bulb assemblycounterclockwise and remove it.
3. Disconnect the bulb from the socket.
4. Install the new bulb in the reverse orderof removal.
License plate lights
1. Wrap a flathead screwdriver with a softcloth to prevent damage to the lens andremove the lens by carefully prying onthe edge of the lens.
2. Disconnect the bulb by pulling it out.
3. Install the new bulb in the reverse orderof removal.
qReplacing Interior Light Bulbs
Overhead light/Map lights (Withoverhead console)
1. Remove the screws.
2. Wrap a flathead screwdriver with a softcloth to prevent damage to the trim andgently insert it in the overhead light asshown in the figure, and then removethe overhead light unit.
3. Turn the socket and bulb assemblycounterclockwise and remove it.
8-50
Maintenance and Care
Owner Maintenance
Mazda6_8U66-EA-05F_Edition2 Page316Tuesday, July 26 2005 11:27 AM
Form No.8U66-EA-05F
Black plate (317,1)
4. Disconnect the bulb from the socket.
5. Install the new bulb in the reverse orderof removal.
Overhead light/Map lights (Withoutoverhead console)
1. Wrap a flathead screwdriver with a softcloth to prevent damage to the trim andgently insert it in the overhead light asshown in the figure, and then removethe overhead light unit.
2. Turn the socket and bulb assemblycounterclockwise and remove it.
3. Disconnect the bulb from the socket.
4. Install the new bulb in the reverse orderof removal.
Courtesy lights, Vanity mirror lights,and Luggage compartment light
1. Wrap a small flathead screwdriver witha soft cloth to prevent damage to thelens and remove the lens by carefullyprying on the edge of the lens.
2. Disconnect the bulb by pulling it out.
Edge
Courtesy lights
Maintenance and Care
Owner Maintenance
8-51
Mazda6_8U66-EA-05F_Edition2 Page317Tuesday, July 26 2005 11:27 AM
Form No.8U66-EA-05F

Black plate (318,1)
Vanity mirror lights
Edge
(Type A)
Edge
Vanity mirror lights(Type B)
(5-Door)Luggage compartment light
Luggage compartment light(Sport Wagon)
Edge
3. Install the new bulb in the reverse orderof removal.
Trunk light (Sedan)
1. Press both sides of the lens cap toremove it.
2. Disconnect the bulb by pulling it out.
3. Install the new bulb in the reverse orderof removal.
8-52
Maintenance and Care
Owner Maintenance
Mazda6_8U66-EA-05F_Edition2 Page318Tuesday, July 26 2005 11:27 AM
Form No.8U66-EA-05F

Black plate (319,1)
FusesYour vehicle's electrical system isprotected by fuses.
If any lights, accessories, or controls don'twork, inspect the appropriate circuitprotector. If a fuse has blown, the insideelement will be melted.
If the same fuse blows again, avoid usingthat system and consult an AuthorizedMazda Dealer as soon as possible.
qFuse Replacement
Replacing the fuses on the driver's sidekick-panel
If the electrical system doesn't work, firstinspect fuses on the driver's side kick-panel.
1. Turn off the ignition switch and otherswitches.
2. Open the fuse panel cover by slidingthe cover straight back toward you.
CAUTIONPulling the cover off sideways maybreak the retaining tabs off.
3. Pull the fuse straight out with the fusepuller provided on the fuse blocklocated in the engine compartment.
4. Inspect it and replace if it's blown.
Normal Blown
5. Push in a new fuse of the sameamperage rating, and make sure it fitstightly. If it doesn't, have an AuthorizedMazda Dealer install it.If you have no spare fuses, borrow oneof the same rating from a circuit notessential to vehicle operation, such asthe AUDIO or CIGAR circuit.
WARNINGAlways replace a fuse with one of thesame rating. Otherwise you maydamage the electric system.
Maintenance and Care
Owner Maintenance
8-53
Mazda6_8U66-EA-05F_Edition2 Page319Tuesday, July 26 2005 11:27 AM
Form No.8U66-EA-05F

Black plate (320,1)
Replacing the fuses under the hood
If the headlights or other electricalcomponents don't work and the fuses inthe cabin are OK, inspect the fuse blockunder the hood. If a fuse is blown, it mustbe replaced. Follow these steps:
1. Turn off the ignition switch and allother switches.
2. Remove the fuse block cover.
3. If a fuse is blown, replace it with a newone of the same amperage rating.
Normal Blown
NOTE
To replace the MAIN fuse, contact anAuthorized Mazda Dealer (page 8-55).
8-54
Maintenance and Care
Owner Maintenance
Mazda6_8U66-EA-05F_Edition2 Page320Tuesday, July 26 2005 11:27 AM
Form No.8U66-EA-05F

Black plate (321,1)
qFuse Panel Description
Fuse block (Engine compartment)
DESCRIPTIONFUSE
RATINGPROTECTED COMPONENT
1 SPARE ― ―
2 SPARE ― ―
3 SPARE ― ―
4 M.DEF 7.5A Mirror defrosterí
5 ― ― ―
6 INJ 15A Injector
7 ENG BAR10A*1
Air flow sensor, EGR control valve15A*2
8―*1 ― ―
ENG BB*2 5A Cooling fan
9 HEAD LR 15A Headlight-low beam (Right)
10 HEAD LL 15A Headlight-low beam (Left)
11 HEAD HL 10A Headlight-high beam (Left)
12 HEAD HR 10A Headlight-high beam (Right)
13 ETC 7.5A Accelerator position sensor
14 HAZARD 10A Turn signal lights
15 STOP 20A Brake/Horn
Maintenance and Care
Owner Maintenance
8-55íSome models.
Mazda6_8U66-EA-05F_Edition2 Page321Tuesday, July 26 2005 11:27 AM
Form No.8U66-EA-05F

Black plate (322,1)
DESCRIPTIONFUSE
RATINGPROTECTED COMPONENT
16 TCM15A*1
TCM10A*2
17 ENG+B 7.5A PCM, TCM
18 FUEL PUMP 15A Fuel pump
19 IG KEY1 30A Engine control unit, Lighter
20 P.WIND 30A Power window
21 ― ― ―
22 DRL 20A DRL
23 ― ― ―
24 BLOWER 40A Blower motor
25 BTN 40A Overhead light, Power door lock
26 IG KEY2 40ARear wiper motorí, Heater control unit, Windshield wiper andwasher
27 DEFOG 40A Rear window defroster
28 ABS 60A ABSí
29AD FAN*1
30A Cooling fanFAN2*2
30FAN*1
30A Cooling fanFAN1*2
31 TAIL 10A Taillights, License plate lights, Parking lights
32 ILLUMI 10A Dashboard illumination
33 MAG 10A Magnet clutch
34 AUDIO 15A Audio system
35 P.SEAT 30A Power seatí
36 OPENER 7.5A Trunk opener motorí
37 ― ― ―
38―*1
― ―
IG1*2 15A CAT SSR
39 FOG 15A Fog lightsí
40 MAIN 120A For protection of all circuits
*1 2.3-liter engine*2 3.0-liter engine
8-56
Maintenance and Care
íSome models.
Owner Maintenance
Mazda6_8U66-EA-05F_Edition2 Page322Tuesday, July 26 2005 11:27 AM
Form No.8U66-EA-05F
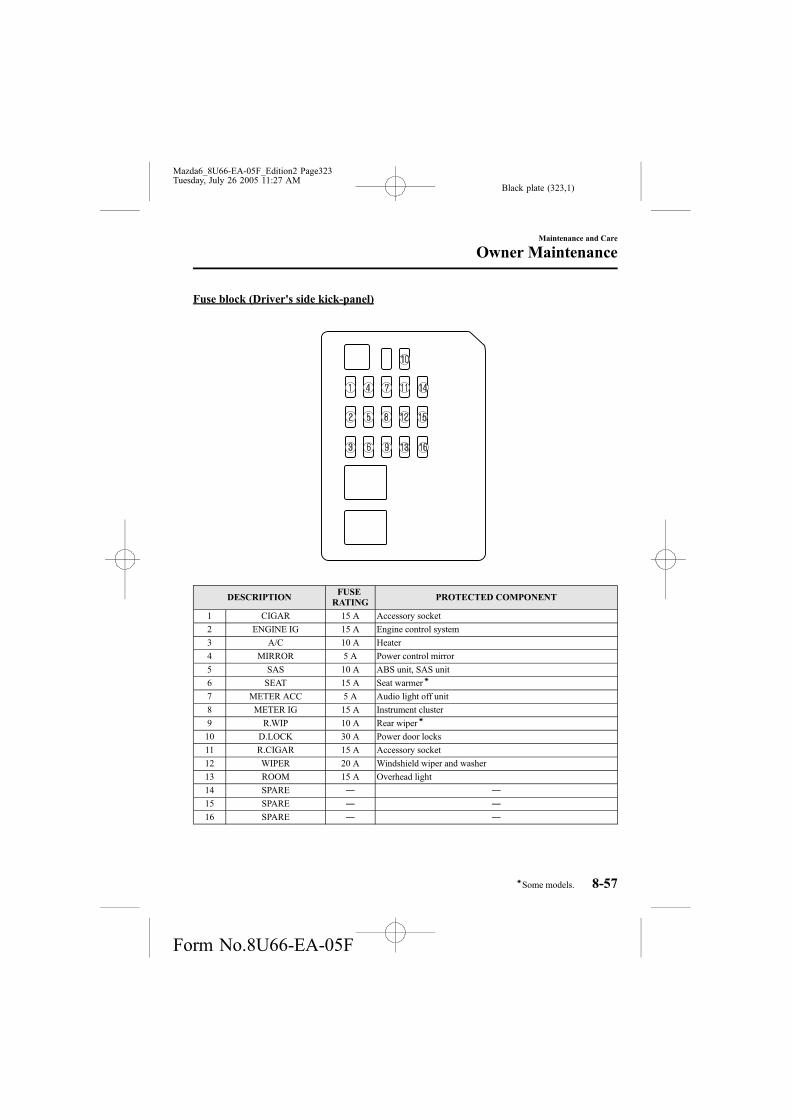
Black plate (323,1)
Fuse block (Driver's side kick-panel)
DESCRIPTIONFUSE
RATINGPROTECTED COMPONENT
1 CIGAR 15 A Accessory socket
2 ENGINE IG 15 A Engine control system
3 A/C 10 A Heater
4 MIRROR 5 A Power control mirror
5 SAS 10 A ABS unit, SAS unit
6 SEAT 15 A Seat warmerí
7 METER ACC 5 A Audio light off unit
8 METER IG 15 A Instrument cluster
9 R.WIP 10 A Rear wiperí
10 D.LOCK 30 A Power door locks
11 R.CIGAR 15 A Accessory socket
12 WIPER 20 A Windshield wiper and washer
13 ROOM 15 A Overhead light
14 SPARE ― ―
15 SPARE ― ―
16 SPARE ― ―
Maintenance and Care
Owner Maintenance
8-57íSome models.
Mazda6_8U66-EA-05F_Edition2 Page323Tuesday, July 26 2005 11:27 AM
Form No.8U66-EA-05F

Black plate (324,1)
How to MinimizeEnvironmental Paint Damage
The paintwork on your Mazda representsthe latest technical developments incomposition and methods of application.
Environmental hazards, however, canharm the paint's protective properties, ifproper care is not taken.
Here are some examples of possibledamage, with tips on how to preventthem.
qEtching Caused by Acid Rain orIndustrial Fallout
Occurrence
Industrial pollutants and vehicle emissionsdrift into the air and mix with rain or dewto form acids. These acids can settle on avehicle's finish. As the water evaporates,the acid becomes concentrated and candamage the finish.And the longer the acid remains on thesurface, the greater the chance is fordamage.
Prevention
It is necessary to wash and wax yourvehicle to preserve its finish according tothe instructions in this section. Thesesteps should be taken immediately afteryou suspect that acid rain has settled onyour vehicle's finish.
qDamage Caused by BirdDropping, Insects, or Tree Sap
Occurrence
Bird droppings contain acids. If thesearen't removed they can eat away the clearand color base coat of the vehicle'spaintwork.
When insects stick to the paint surfaceand decompose, corrosive compoundsform. These can erode the clear and colorbase coat of the vehicle's paintwork ifthey are not removed.
Tree sap will harden and adherepermanently to the paint finish. If youscratch the sap off while it is hard, somevehicle paint could come off with it.
Prevention
It is necessary to have your Mazdawashed and waxed to preserve its finishaccording to the instructions in thissection. This should be done as soon aspossible.
Bird droppings can be removed with asoft sponge and water. If you are travelingand these are not available, a moistenedtissue may also take care of the problem.The cleaned area should be waxedaccording to the instructions in thissection.Insects and tree sap are best removed witha soft sponge and water or a commerciallyavailable chemical cleaner.
Another method is to cover the affectedarea with dampened newspaper for one totwo hours. After removing the newspaper,rinse off the loosened debris with water.
8-58
Maintenance and Care
Appearance Care
Mazda6_8U66-EA-05F_Edition2 Page324Tuesday, July 26 2005 11:27 AM
Form No.8U66-EA-05F

Black plate (325,1)
qWater Marks
Occurrence
Rain, fog, dew, and even tap water cancontain harmful minerals such as salt andlime. If moisture containing theseminerals settles on the vehicle andevaporates, the minerals will concentrateand harden to form white rings. The ringscan damage your vehicle's finish.
Prevention
It is necessary to wash and wax yourvehicle to preserve its finish according tothe instructions in this section. Thesesteps should be taken immediately afteryou find water marks on your vehicle'sfinish.
qPaint Chipping
Occurrence
Paint chipping occurs when gravel thrownin the air by another vehicle's tires hitsyour vehicle.
How to avoid paint chipping
Keeping a safe distance between you andthe vehicle ahead reduces the chances ofhaving your paint chipped by flyinggravel.
NOTE
l The paint chipping zone varies withthe speed of the vehicle. Forexample, when traveling at 90 km/h(56 mph), the paint chipping zone is50 m (164 ft).
l In low temperatures a vehicle's finishhardens. This increases the chance ofpaint chipping.
l Chipped paint can lead to rustforming on your Mazda. Before thishappens, repair the damage by usingMazda touch-up paint according tothe instructions in this section.Failure to repair the affected areacould lead to serious rusting andexpensive repairs.
Maintenance and Care
Appearance Care
8-59
Mazda6_8U66-EA-05F_Edition2 Page325Tuesday, July 26 2005 11:27 AM
Form No.8U66-EA-05F

Black plate (326,1)
Exterior CareFollow all label and container directionswhen using a chemical cleaner or polish.Read all warnings and cautions.
qMaintaining the Finish
Washing
To help protect the finish from rust anddeterioration, wash your Mazdathoroughly and frequently, at least once amonth, with lukewarm or cold water.
If the vehicle is washed improperly, thepaint surface could be scratched. Here aresome examples of how scratching couldoccur.
Scratches occur on the paint surfacewhen:
l The vehicle is washed without firstrinsing off dirt and other foreignmatter.
l The vehicle is washed with a rough,dry, or dirty cloth.
l The vehicle is washed at a car washthat uses brushes that are dirty or toostiff.
l Cleansers or wax containing abrasivesare used.
NOTE
l Mazda is not responsible forscratches caused by automatic carwashes or improper washing.
l Scratches are more noticeable onvehicles with darker paint finishes.
To minimize scratches on the vehicle'spaint finish:
l Rinse off any dirt or other foreignmatter using lukewarm or cold waterbefore washing.
l Use plenty of lukewarm or cold waterand a soft cloth when washing thevehicle. Do not use a nylon cloth.
l Rub gently when washing or drying thevehicle.
l Take your vehicle only to a car washthat keeps its brushes well maintained.
l Don't use abrasive cleansers or waxthat contain abrasives.
CAUTIONl Don't use steel wool, abrasivecleaners, or strong detergentscontaining highly alkaline or causticagents on chrome-plated or anodizedaluminum parts. This may damagethe protective coating; also, cleanersand detergents may discolor ordeteriorate the paint.
l To prevent damaging the antenna,remove it before entering a car washfacility or passing beneath a lowoverhead clearance.
Pay special attention to removing salt,dirt, mud, and other foreign material fromthe underside of the fenders, and makesure the drain holes in the lower edges ofthe doors and rocker panels are clean.
8-60
Maintenance and Care
Appearance Care
Mazda6_8U66-EA-05F_Edition2 Page326Tuesday, July 26 2005 11:27 AM
Form No.8U66-EA-05F

Black plate (327,1)
Insects, tar, tree sap, bird droppings,industrial fallout, and similar deposits candamage the finish if not removedimmediately. When prompt washing withplain water is ineffective, use a mild soapmade for use on vehicles.
Thoroughly rinse off all soap withlukewarm or cold water. Don't allow soapto dry on the finish.
After washing the vehicle, dry it with aclean chamois to prevent water spots fromforming.
WARNINGDriving with Wet Brakes:Driving with wet brakes is dangerous.Increased stopping distance or thevehicle pulling to one side whenbraking could result in a seriousaccident. Light braking will indicatewhether the brakes have been affected.Dry the brakes by driving very slowlyand applying the brakes lightly untilbrake performance is normal.
Waxing
Your vehicle needs to be waxed whenwater no longer beads on the finish.Always wash and dry the vehicle beforewaxing it. In addition to the vehicle body,wax the metal trim to maintain its luster.
1. Use wax which contains no abrasives.Waxes containing abrasive will removepaint and could damage bright metalparts.
2. Use a good grade of natural wax formetallic, mica, and solid colors.
3. When waxing, coat evenly with thesponge supplied or a soft cloth.
4. Wipe off the wax with a soft cloth.
NOTE
A spot remover to remove oil, tar, andsimilar materials will usually also takeoff the wax. Rewax these areas even ifthe rest of the vehicle doesn't need it.
qRepairing Damage to the Finish
Deep scratches or chips on the finishshould be repaired promptly. Exposedmetal quickly rusts and can lead to majorrepairs.
CAUTIONIf your Mazda is damaged and needsmetal parts repaired or replaced, makesure the body shop applies anti-corrosion materials to all parts, bothrepaired and new. This will preventthem from rusting.
qBright-Metal Maintenance
l Use tar remover to remove road tar andinsects. Never do this with a knife orsimilar tool.
l To prevent corrosion on bright-metalsurfaces, apply wax or chromepreservative and rub it to a high luster.
l During cold weather or in coastal areas,cover bright-metal parts with a coatingof wax or preservative heavier thanusual. It would also help to coat themwith noncorrosive petroleum jelly orsome other protective compound.
Maintenance and Care
Appearance Care
8-61
Mazda6_8U66-EA-05F_Edition2 Page327Tuesday, July 26 2005 11:27 AM
Form No.8U66-EA-05F

Black plate (328,1)
CAUTIONDon't use steel wool, abrasive cleaners,or strong detergents containing highlyalkaline or caustic agents on chrome-plated or anodized aluminum parts.This may result in damage to theprotective coating and causediscoloration or paint deterioration.
qUnderbody Maintenance
Road chemicals and salt used for ice andsnow removal and solvents used for dustcontrol may collect on the underbody. Ifnot removed, they will speed up rustingand deterioration of such underbody partsas fuel lines, frame, floor pan, and exhaustsystem, even though these parts may becoated with anti-corrosive material.
Thoroughly flush the underbody andwheel housings with lukewarm or coldwater at the end of each winter. Try alsoto do this every month.
Pay special attention to these areasbecause they easily hide mud and dirt. Itwill do more harm than good to wetdown the road grime without removingit.
The lower edges of doors, rocker panels,and frame members have drain holes thatshould not be clogged. Water trappedthere will cause rusting.
WARNINGDriving with Wet Brakes:Driving with wet brakes is dangerous.Increased stopping distance or thevehicle pulling to one side whenbraking could result in a seriousaccident. Light braking will indicatewhether the brakes have been affected.Dry the brakes by driving very slowlyand applying the brakes lightly untilbrake performance is normal.
qAluminumWheel Maintenance
A protective coating is provided over thealuminum wheels. Special care is neededto protect this coating.
NOTE
l Don't use a wire brush or anyabrasive cleaner, polishingcompound, or solvent on aluminumwheels. They may damage thecoating.
l Only use a mild soap or neutraldetergent and always use a sponge orsoft cloth to clean the wheels.Rinse thoroughly with lukewarm orcold water. Also, be sure to clean thewheels after driving on dusty orsalted roads. This helps preventcorrosion.
l Avoid washing your vehicle in anautomatic car wash that uses high-speed or hard brushes.
l If your aluminum wheels lose luster,wax the wheels.
8-62
Maintenance and Care
Appearance Care
Mazda6_8U66-EA-05F_Edition2 Page328Tuesday, July 26 2005 11:27 AM
Form No.8U66-EA-05F

Black plate (329,1)
Interior Care
qDashboard Precautions
Prevent caustic solutions such as perfumeand cosmetic oils from contacting thedashboard. They'll damage and discolor it.If these solutions get on the dashboard,wipe them off immediately.
CAUTIONDo not use glazing agents.Glazing agents contain ingredientswhich may cause discoloration,wrinkling, cracks and peeling.
qCleaning the Upholstery andInterior Trim
Vinyl
Remove dust and loose dirt from vinylwith a whisk broom or vacuum cleaner.Clean vinyl with a leather-and-vinylcleaner.
Leatherí
Real leather isn't uniform and may havescars, scratches, and wrinkles. Clean itwith a leather cleaner or mild soap.
Wipe it with a damp soft cloth; then dryand buff it with a dry soft cloth.
Fabricí
Remove dust and loose dirt from fabricwith a whisk broom or vacuum cleaner.Clean it with a mild soap solution goodfor upholstery and carpets. Remove freshspots immediately with a fabric spotcleaner.
To keep the fabric looking clean andfresh, take care of it. Otherwise its colorwill be affected, it can be stained easily,and its fire-resistance may be reduced.
CAUTIONUse only recommended cleaners andprocedures. Others may affectappearance and fire-resistance.
qCleaning the Lap/Shoulder BeltWebbing
Clean the webbing with a mild soapsolution recommended for upholstery orcarpets. Follow instructions. Don't bleachor dye the webbing; this may weaken it.
After cleaning the belts, thoroughly drythe belt webbing and make sure there isno remaining moisture before retractingthem.
WARNINGDamaged Seat Belt:Using damaged seat belts isdangerous. In a collision, damagedbelts cannot provide adequateprotection. Have an Authorized MazdaDealer replace damaged beltsimmediately.
Maintenance and Care
Appearance Care
8-63íSome models.
Mazda6_8U66-EA-05F_Edition2 Page329Tuesday, July 26 2005 11:27 AM
Form No.8U66-EA-05F

Black plate (330,1)
qCleaning the Window Interiors
If the windows become covered with anoily, greasy, or waxy film, clean themwith glass cleaner. Follow the directionson the container.
CAUTIONDon't scrape or scratch the inside of therear window. You may damage the rearwindow defroster grid.
8-64
Maintenance and Care
Appearance Care
Mazda6_8U66-EA-05F_Edition2 Page330Tuesday, July 26 2005 11:27 AM
Form No.8U66-EA-05F

Black plate (331,1)
9 Customer Information and ReportingSafety Defects
Important consumer information including warranties and add-on equipment.
Customer Assistance ............................... 9-2Customer Assistance (U.S.A.) ............ 9-2Customer Assistance (Canada) ........... 9-4Customer Assistance (Puerto Rico) .... 9-7Customer Assistance (Mexico) ........... 9-8
Mazda Importer/Distributors ............... 9-10Importer/Distributor .......................... 9-10Distributor in Each Area ................... 9-10
Warranty ................................................ 9-12Warranties for Your Mazda ............... 9-12Outside the United States .................. 9-13Outside Canada ................................. 9-14Registering Your Vehicle in A ForeignCountry (Except United States andCanada) ............................................. 9-15Add-On Non-Genuine Parts andAccessories ....................................... 9-16
Cell Phones ............................................. 9-17Cell Phones Warning ......................... 9-17
Type Approval of Equipment ............... 9-18Type Approval of Equipment ............ 9-18
Uniform Tire Quality Grading System(UTQGS) ................................................ 9-19
Uniform Tire Quality Grading System(UTQGS) .......................................... 9-19
Tire Information (U.S.A.) ..................... 9-21Tire Labeling ..................................... 9-21Location of the Tire Label(Placard) ............................................ 9-27Tire Maintenance .............................. 9-30Vehicle Loading ................................ 9-33Steps for Determining the Correct LoadLimit: ................................................ 9-40
Reporting Safety Defects ....................... 9-41Reporting Safety Defects (U.S.A.) .... 9-41Reporting Safety Defects (Canada) ... 9-42
Service Publications .............................. 9-43Service Publications .......................... 9-43
9-1
Mazda6_8U66-EA-05F_Edition2 Page331Tuesday, July 26 2005 11:27 AM
Form No.8U66-EA-05F

Black plate (332,1)
Customer Assistance (U.S.A.)Your complete and permanent satisfaction is our business. We are here to serve you. AllAuthorized Mazda Dealers have the knowledge and the tools to keep your Mazda vehiclein top condition.If you have any questions or recommendations for improvement regarding the service ofyour Mazda vehicle or servicing by Mazda Dealer personnel, we recommend that you takethe following steps:
qSTEP 1: Contact Your Mazda Dealer
Discuss the matter with an Authorized Mazda Dealer. This is the quickest and best way toaddress the issue. If your concern has not been resolved by the CUSTOMER RELATIONS,SALES, SERVICE, or PARTS MANAGER, then please contact the GENERALMANAGER of the dealership or the OWNER.
qSTEP 2: Contact Mazda North American Operations
If for any reason you feel the need for further assistance after contacting your dealershipmanagement, you can reach Mazda North American Operations by one of the followingways.
Log on: at www.mazdaUSA.com
Answers to many questions, including how to locate or contact a local Mazda dealership inthe U.S., can be found here.
E-mail: click on “Contact Us” at the bottom of the page at www.mazdaUSA.com
By phone at:1 (800) 222-5500
By letter at:Attn: Customer AssistanceMazda North American Operations7755 Irvine Center DriveIrvine, CA 92618-2922P.O. Box 19734Irvine, CA 92623-9734
In order to serve you efficiently and effectively, please help us by providing the followinginformation:
1. Your name, address, and telephone number
2. Year and model of vehicle
9-2
Customer Information and Reporting Safety Defects
Customer Assistance
Mazda6_8U66-EA-05F_Edition2 Page332Tuesday, July 26 2005 11:27 AM
Form No.8U66-EA-05F

Black plate (333,1)
3. Vehicle Identification Number (17 digits, noted on your registration or title or located onthe upper driver's side corner of the dash)
4. Purchase date and current mileage
5. Your dealer's name and location
6. Your question(s)
If you live outside the U.S.A., please contact your nearest Mazda Distributor.
Customer Information and Reporting Safety Defects
Customer Assistance
9-3
Mazda6_8U66-EA-05F_Edition2 Page333Tuesday, July 26 2005 11:27 AM
Form No.8U66-EA-05F

Black plate (334,1)
Customer Assistance (Canada)
qSatisfaction Review Process
Your complete and permanent satisfaction is of primary concern to Mazda. All AuthorizedMazda Dealers have both the knowledge and tools to keep your Mazda in top condition. Inour experience, any questions, problems, or complaints regarding the operation of yourMazda or any other general service transactions are most effectively resolved by yourdealer. If the cause of your dissatisfaction cannot adequately be addressed by normaldealership procedures, we recommend that you take the following steps:
qSTEP 1: Contact the Mazda Dealer
Discuss the matter with a member of dealership management. If the Service Manager hasalready reviewed your concerns, contact the owner of the dealership or its GeneralManager.
qSTEP 2: Contact the Mazda Regional Office
If you feel that you still require assistance, ask the dealer Service Manager to arrange foryou to meet the local Mazda Service Representative. If more expedient, contact MazdaCanada Inc.Regional Office nearest you for such arrangements. Regional Office addressand phone numbers are shown (page 9-6).
qSTEP 3: Contact the Mazda Customer Relations Department
If still not substantially satisfied, contact the Customer Relations Department, MazdaCanada Inc., 55 Vogell Road, Richmond Hill, Ontario, L4B 3K5 Canada TEL:1 (800) 263-4680.Provide the Department with the following information:
1. Your name, address and telephone number
2. Year and model of vehicle
3. Vehicle Identification Number (VIN). Refer to the “Vehicle Identification Labels” pageof section 10 of this manual for the location of the VIN.
4. Purchase date
5. Present odometer reading
6. Your dealer's name and location
7. The nature of your problem and/or cause of dissatisfaction
The Department, in cooperation with the local Mazda Service Representative, will reviewthe case to determine if everything possible has been done to ensure your satisfaction.
9-4
Customer Information and Reporting Safety Defects
Customer Assistance
Mazda6_8U66-EA-05F_Edition2 Page334Tuesday, July 26 2005 11:27 AM
Form No.8U66-EA-05F
Black plate (335,1)
Please recognize that the resolution of service problems in most cases requires the use ofyour Mazda dealer's service facilities, personnel and equipment. We urge you to follow theabove three steps in sequence for most effective results.
qMediation/Arbitration Program
Occasionally a customer concern cannot be resolved through Mazda's CustomerSatisfaction Program. If after exhausting the procedures in this manual your concern is stillnot resolved, you have another option.
Mazda Canada Inc. participates in an arbitration program administered by theCanadian Motor Vehicle Arbitration Plan (CAMVAP). CAMVAP will advise you abouthow your concern may be reviewed and resolved by an independent third party throughbinding arbitration.
Your complete satisfaction is the goal of Mazda Canada Inc. and our dealers.Mazda's participation in CAMVAP makes a valuable contribution to our achieving thatgoal. There is no charge for using CAMVAP. CAMVAP results are fast, fair and final as theaward is binding on both you and Mazda Canada Inc.
qCanadian Motor Vehicle Arbitration Plan (CAMVAP)
If a specific item of concern arises, where a solution cannot be reached between an owner,Mazda, and/or one of it's dealers (that all parties cannot agree upon), the owner may wishto use the services offered by the Canadian Motor Vehicle Arbitration Plan (CAMVAP).
CAMVAP uses the services of Provincial Administrators to assist consumers in schedulingand preparing for their arbitration hearings. However, before you can proceed withCAMVAP you must follow your Mazda dispute resolution process as outlined previously.
Customer Information and Reporting Safety Defects
Customer Assistance
9-5
Mazda6_8U66-EA-05F_Edition2 Page335Tuesday, July 26 2005 11:27 AM
Form No.8U66-EA-05F
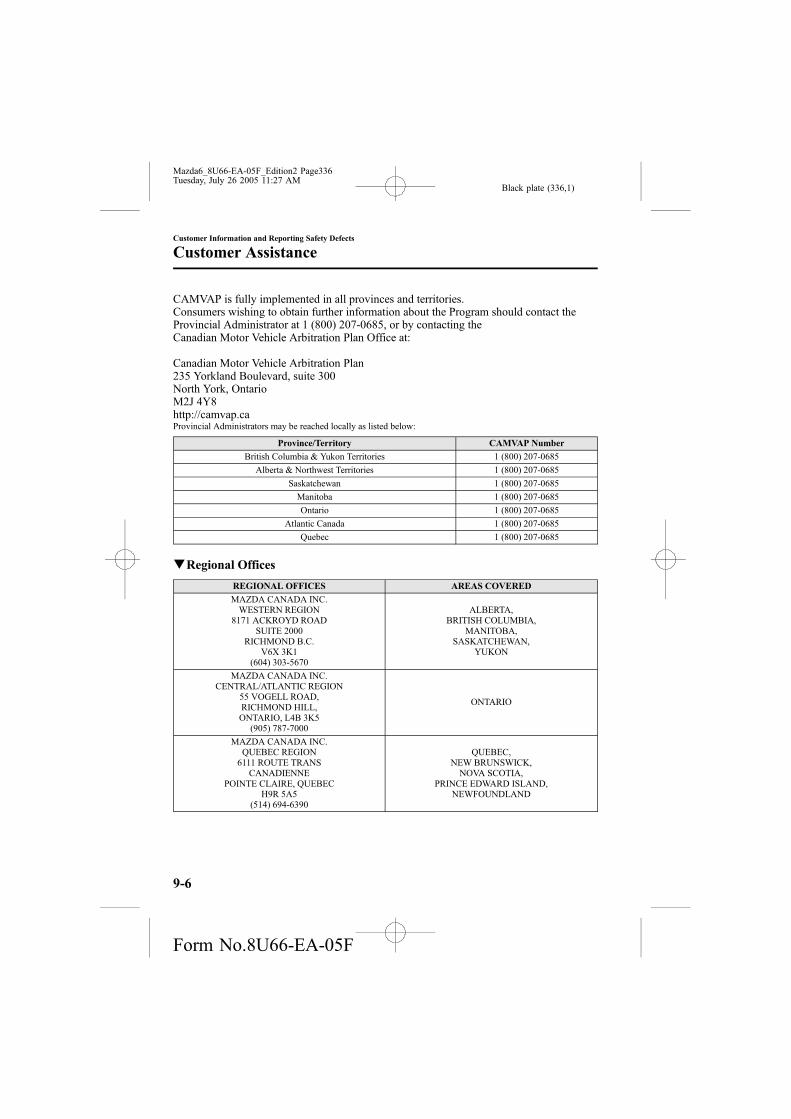
Black plate (336,1)
CAMVAP is fully implemented in all provinces and territories.Consumers wishing to obtain further information about the Program should contact theProvincial Administrator at 1 (800) 207-0685, or by contacting theCanadian Motor Vehicle Arbitration Plan Office at:
Canadian Motor Vehicle Arbitration Plan235 Yorkland Boulevard, suite 300North York, OntarioM2J 4Y8http://camvap.caProvincial Administrators may be reached locally as listed below:
Province/Territory CAMVAP Number
British Columbia & Yukon Territories 1 (800) 207-0685
Alberta & Northwest Territories 1 (800) 207-0685
Saskatchewan 1 (800) 207-0685
Manitoba 1 (800) 207-0685
Ontario 1 (800) 207-0685
Atlantic Canada 1 (800) 207-0685
Quebec 1 (800) 207-0685
qRegional Offices
REGIONAL OFFICES AREAS COVERED
MAZDA CANADA INC.WESTERN REGION
8171 ACKROYD ROADSUITE 2000
RICHMOND B.C.V6X 3K1
(604) 303-5670
ALBERTA,BRITISH COLUMBIA,
MANITOBA,SASKATCHEWAN,
YUKON
MAZDA CANADA INC.CENTRAL/ATLANTIC REGION
55 VOGELL ROAD,RICHMOND HILL,ONTARIO, L4B 3K5
(905) 787-7000
ONTARIO
MAZDA CANADA INC.QUEBEC REGION
6111 ROUTE TRANSCANADIENNE
POINTE CLAIRE, QUEBECH9R 5A5
(514) 694-6390
QUEBEC,NEW BRUNSWICK,NOVA SCOTIA,
PRINCE EDWARD ISLAND,NEWFOUNDLAND
9-6
Customer Information and Reporting Safety Defects
Customer Assistance
Mazda6_8U66-EA-05F_Edition2 Page336Tuesday, July 26 2005 11:27 AM
Form No.8U66-EA-05F
Black plate (337,1)
Customer Assistance (Puerto Rico)Your complete and permanent satisfaction is our business. That is why all AuthorizedMazda Dealers have the knowledge and the tools to keep your Mazda vehicle in topcondition.If you have any questions or recommendations for improvement regarding the service ofyour Mazda vehicle or servicing by Mazda Dealer personnel, we recommend that you takethe following steps:
qSTEP 1
Discuss the matter with an Authorized Mazda Dealer. This is the quickest and best way toaddress the issue. If your concern has not been resolved by the CUSTOMER RELATIONS,SALES, SERVICE, or PARTS MANAGER, then please contact the GENERALMANAGER of the dealership or the OWNER.
qSTEP 2
If, after following STEP 1, you feel the need for further assistance, please contact yourarea's Mazda representative (Indicated on the next page).
Please help us by providing the following information:
1. Your name, address, and telephone number
2. Year and model of vehicle
3. Vehicle Identification Number (17 digits, noted on your registration or title or located onthe upper driver's side corner of the dash)
4. Purchase date and current mileage
5. Your dealer's name and location
6. Your question(s)
Customer Information and Reporting Safety Defects
Customer Assistance
9-7
Mazda6_8U66-EA-05F_Edition2 Page337Tuesday, July 26 2005 11:27 AM
Form No.8U66-EA-05F

Black plate (338,1)
Customer Assistance (Mexico)Your complete and permanent satisfaction is our business. We are here to serve you. AllAuthorized Mazda Dealers have the knowledge and the tools to keep your Mazda vehiclein top condition.If you have any questions or recommendations for improvement regarding the service ofyour Mazda vehicle or servicing by Mazda Dealer personnel, we recommend that you takethe following steps:
qSTEP 1: Contact Your Mazda Dealer
Discuss the matter with an Authorized Mazda Dealer. This is the quickest and best way toaddress the issue.
l If your concern has not been resolved by the CUSTOMER RELATIONS, SALES,SERVICE, or PARTS MANAGER, then please contact the GENERAL MANAGER ofthe dealership or the OWNER.
l If it becomes necessary to have the components or wiring system for the supplementaryrestraint system modified to accommodate a person with certain medical conditions inaccordance with a certified physician, go to STEP2.
qSTEP 2: Contact Mazda Motor de Mexico
If for any reason you feel the need for further assistance after contacting your dealershipmanagement and it becomes necessary to have the components or wiring system for thesupplementary restraint system modified to accommodate a person with certain medicalconditions in accordance with a certified physician, you can reach Mazda Motor de Mexicoby one of the following ways.
Log on: at www.MazdaMexico.com.mx
Answers to many questions, including how to locate or contact a local Mazda dealership inMexico, can be found here.
E-mail: click on “Contactanos” at the top of the page at www.MazdaMexico.com.mx
By phone at:1 (866) 315 0220
9-8
Customer Information and Reporting Safety Defects
Customer Assistance
Mazda6_8U66-EA-05F_Edition2 Page338Tuesday, July 26 2005 11:27 AM
Form No.8U66-EA-05F
Black plate (339,1)
By letter at:Attn: Customer AssistanceMazda North American Operations7755 Irvine Center DriveIrvine, CA 92618-2922P.O. Box 19734Irvine, CA 92623-9734
In order to serve you efficiently and effectively, please help us by providing the followinginformation:
1. Your name, address, and telephone number
2. Year and model of vehicle
3. Vehicle Identification Number (17 digits, noted on your registration or title or located onthe upper driver's side corner of the dash)
4. Purchase date and current mileage
5. Your dealer's name and location
6. Your question(s)
Customer Information and Reporting Safety Defects
Customer Assistance
9-9
Mazda6_8U66-EA-05F_Edition2 Page339Tuesday, July 26 2005 11:27 AM
Form No.8U66-EA-05F

Black plate (340,1)
Importer/Distributor
qU.S.A.
Mazda North American Operations7755 Irvine Center DriveIrvine, CA 92618-2922 U.S.A.P.O. Box 19734Irvine, CA 92623-9734 U.S.A.TEL: 1 (800) 222-5500 (in U.S.A.)(949) 727-1990 (outside U.S.A.)
Distributor in Each Area
qCANADA
Mazda Canada Inc.55 Vogell Road, Richmond Hill,Ontario, L4B 3K5 CanadaTEL: 1 (800) 263-4680 (in Canada)(905) 787-7000 (outside Canada)
qPUERTO RICO/U.S. Virgin Island
Plaza Motors Corp. (Mazda de PuertoRico)P.O. Box 362722, San Juan, Puerto Rico00936-2722TEL: (787) 641-9300
qMEXICO
Mazda Motor de MexicoCircuito Guillermo Gonzalez CamarenaNo. 1500Col. Centro de Ciudad Santa Fe, 01210Mexico, D.F.TEL: 1 (866)315-0220
qGUAM
Triple J Motors157 South Marine Drive, Tamuning,GUAM 96911 USAP.O. Box 6066 Tamuning, Guam 96931TEL: (671) 649-6555
qSAIPAN
Pacific International Marianas, Inc.(d.b.a. Midway Motors)P.O. Box 887 Saipan, MP 96950TEL: (670) 234-7524
9-10
Customer Information and Reporting Safety Defects
Mazda Importer/Distributors
Mazda6_8U66-EA-05F_Edition2 Page340Tuesday, July 26 2005 11:27 AM
Form No.8U66-EA-05F

Black plate (341,1)
Triple J Saipan, Inc.(d.b.a. Triple J Motors)P.O. Box 500487 Saipan, MP 96950-0487TEL: (670) 234-7133/3051
qAMERICAN SAMOA
Polynesia Motors, Inc.P.O. Box 1120, Pago Pago, AmericanSamoa 96799TEL: (684) 699-9347
Customer Information and Reporting Safety Defects
Mazda Importer/Distributors
9-11
Mazda6_8U66-EA-05F_Edition2 Page341Tuesday, July 26 2005 11:27 AM
Form No.8U66-EA-05F

Black plate (342,1)
Warranties for Your Mazdal New Vehicle Limited Warranty
l Distributor Major Component Limited Warranty (Canada only)
l Safety Restraint System Limited Warranty
l Anti-perforation Limited Warranty
l Federal Emission Control Warranty (U.S.A. only)
l Emission Defect Warrantyl Emission Performance Warranty
l California Emission Control Warranty (U.S.A. only)
l Emission Control Warranty (Canada only)
l Replacement Parts and Accessories Limited Warranty
l Tire Warranty
NOTE
Detailed warranty information is provided with your Mazda.
9-12
Customer Information and Reporting Safety Defects
Warranty
Mazda6_8U66-EA-05F_Edition2 Page342Tuesday, July 26 2005 11:27 AM
Form No.8U66-EA-05F

Black plate (343,1)
Outside the United StatesGovernment regulations in the United States require that automobiles meet specificemission regulations and safety standards. Therefore, vehicles built for use in the UnitedStates may differ from those sold in other countries.
The differences may make it difficult or even impossible for your vehicle to receivesatisfactory servicing in other countries. We strongly recommend that you NOT take yourMazda outside the United States. However, in the event that you are moving to Canadapermanently, Mazda vehicles built for use in the United States could be eligible forexportation to Canada with specific vehicle modifications to comply with the CanadianMotor Vehicle Safety requirements (CMVSS).
NOTE
The above is applicable for a permanent import/export situation and not related totravelers on vacation.
You may have the following problems if you do take your vehicle outside of the UnitedStates:
l Recommended fuel may be unavailable. Any kind of leaded fuel or low-octane fuel willaffect vehicle performance and damage the emission controls and engine.
l Proper repair facilities, tools, testing equipment, and replacement parts may not beavailable.
Please refer to your Manufacturer's Warranty Booklet for more information.
Customer Information and Reporting Safety Defects
Warranty
9-13
Mazda6_8U66-EA-05F_Edition2 Page343Tuesday, July 26 2005 11:27 AM
Form No.8U66-EA-05F

Black plate (344,1)
Outside CanadaGovernment regulations in Canada require that automobiles meet specific emissionregulations and safety regulations. Therefore, vehicles built for use in Canada may differfrom those sold in other countries.
The differences may make it difficult or even impossible for your vehicle to receivesatisfactory servicing in other countries. We strongly recommend that you NOT take yourMazda outside Canada. However, in the event that you are moving to the United Statespermanently, Mazda vehicles built for use in Canada could be eligible for exportation to theUnited States with specific vehicle modifications to comply with the United States FederalMotor Vehicle Safety Standards (FMVSS).
NOTE
The above is applicable for a permanent import/export situation and not related totravelers on vacation.
You may have the following problems if you do take your vehicle outside of Canada:
l Recommended fuel may be unavailable. Any kind of leaded fuel or low-octane fuel willaffect vehicle performance and damage the emission controls and engine.
l Proper repair facilities, tools, testing equipment, and replacement parts may not beavailable.
Please refer to your Manufacturer's Warranty Booklet for more information.
9-14
Customer Information and Reporting Safety Defects
Warranty
Mazda6_8U66-EA-05F_Edition2 Page344Tuesday, July 26 2005 11:27 AM
Form No.8U66-EA-05F
Black plate (345,1)
Registering Your Vehicle in A Foreign Country (ExceptUnited States and Canada)
Government regulations in your country could require that automobiles meet specificemission and safety standards.Vehicles built for your country may differ from those built for other countries. In additionto registration problems, satisfactory service may be difficult or even impossible in anothercountry.
The fuel specified for your vehicle may be unavailable.
Parts, servicing techniques, and tools necessary to maintain and repair your vehicle may beunavailable.
There might not be an Authorized Mazda Dealer in the country you plan to take yourvehicle.
The Mazda warranty is valid only in certain countries.
Customer Information and Reporting Safety Defects
Warranty
9-15
Mazda6_8U66-EA-05F_Edition2 Page345Tuesday, July 26 2005 11:27 AM
Form No.8U66-EA-05F

Black plate (346,1)
Add-On Non-Genuine Parts and AccessoriesNon-genuine parts and accessories for Mazda vehicles can be found in stores.These may fit your vehicle, but they are not approved by Mazda for use with Mazdavehicles. When you install non-genuine parts or accessories, they could affect yourvehicle's performance or safety systems; the Mazda warranty doesn't cover this. Before youinstall any non-genuine parts or accessories, consult an Authorized Mazda Dealer.
WARNINGInstallation of Non-Genuine Parts or Accessories:Installation of non-genuine parts or accessories is dangerous. Improperly designedparts or accessories could seriously affect your vehicle's performance or safetysystems. This could cause you to have an accident or increase your chances of injuriesin an accident. Always consult an Authorized Mazda Dealer before you install non-genuine parts or accessories.
Add-On Electrical and Electronic Equipment:Incorrectly choosing or installing improper add-on equipment or choosing animproper installer is dangerous. Essential systems could be damaged, causing enginestalling, air-bag (SRS) activation, ABS inactivation, or a fire in the vehicle.Be very careful in choosing and installing add-on electrical equipment, such as mobiletelephones, two-way radios, stereo systems, and car alarm systems.
Mazda assumes no responsibility for death, injury, or expenses that may result from theinstallation of add-on non-genuine parts or accessories.
9-16
Customer Information and Reporting Safety Defects
Warranty
Mazda6_8U66-EA-05F_Edition2 Page346Tuesday, July 26 2005 11:27 AM
Form No.8U66-EA-05F

Black plate (347,1)
Cell Phones Warning
WARNINGUse of Cell Phones and Other Devices by Driver:Use of any electrical devices such as cell phones, computers, portable radios, vehiclenavigation or other devices by the driver while the vehicle is moving is dangerous.Dialing a number on a cell phone while driving also ties-up the driver's hands. Use ofthese devices will cause the driver to be distracted and could lead to a serious accident.If a passenger is unable to use the device, pull off the right-of-way to a safe areabefore use. If use of a cell phone is necessary despite this warning, use a hands-freesystem to at least leave the hands free to drive the vehicle. Never use a cell phone orother electrical devices while the vehicle is moving and, instead, concentrate on thefull-time job of driving.Please comply with the legal regulations concerning the use of communicationequipment in vehicles in your country.
Customer Information and Reporting Safety Defects
Cell Phones
9-17
Mazda6_8U66-EA-05F_Edition2 Page347Tuesday, July 26 2005 11:27 AM
Form No.8U66-EA-05F

Black plate (348,1)
Type Approval of Equipment
Immobilizer system
9-18
Customer Information and Reporting Safety Defects
Type Approval of Equipment
Mazda6_8U66-EA-05F_Edition2 Page348Tuesday, July 26 2005 11:27 AM
Form No.8U66-EA-05F

Black plate (349,1)
Uniform Tire Quality Grading System (UTQGS)This information relates to the tire grading system developed by the U.S. NationalHighway Traffic Safety Administration for grading tires by tread wear, traction, andtemperature performance.
qTread Wear
The tread wear grade is a comparative rating based on the wear rate of the tire when testedunder controlled conditions on a specified government test course.For example, a tire graded 150 would wear one-and-a-half times as well on the governmentcourse as a tire graded 100.
The relative performance of tires depends upon the actual conditions of their use, however,and may depart significantly from the norm because of variations in driving habits, servicepractices and differences in road characteristics and climate.
qTraction-AA, A, B, C
The traction grades, from highest to lowest, are AA, A, B, and C. These grades representthe tire's ability to stop on wet pavement as measured under controlled conditions onspecified government test surfaces of asphalt and concrete. A tire marked C may have poortraction performance.
WARNINGThe traction grade assigned to this tire is based on braking (straight ahead) tractiontests and does not include acceleration cornering (turning), hydroplaning, or peaktraction characteristics.
qTemperature-A, B, C
The temperature grades A (the highest), B, and C, represent the tire's resistance to thegeneration of heat and its ability to dissipate heat when tested under controlled conditionson a specified indoor laboratory test wheel.Sustained high temperature can cause the material of the tire to degenerate and reduce tirelife, and excessive temperatures can lead to sudden tire failure.
Grade C corresponds to a level of performance which all passenger vehicle tires must meetunder the Federal Motor Vehicle Safety Standard No. 109. Grades B and A representhigher levels of performance on the laboratory test wheel than the minimum required bylaw.
Customer Information and Reporting Safety Defects
Uniform Tire Quality Grading System (UTQGS)
9-19
Mazda6_8U66-EA-05F_Edition2 Page349Tuesday, July 26 2005 11:27 AM
Form No.8U66-EA-05F

Black plate (350,1)
WARNINGThe temperature grade for this tire is established for a tire that is properly inflated andnot overloaded. Excessive speed, underinflation, or excessive loading, eitherseparately or in combination, can cause heat buildup and possible tire failure.
These grades will be added to the sidewalls of passenger vehicle tires over the next severalyears according to a schedule established by the NHTSA and the tire manufacturers.
The grade of tires available as standard or optional equipment on Mazda vehicles may varywith respect to grade.
ALL PASSENGERVEHICLE TIRES MUST CONFORM TO THESE GRADES ANDTO ALL OTHER FEDERALTIRE-SAFETY REQUIREMENTS.
qUniform Tire Quality Grading
Quality grades can be found where applicable on the tire sidewall between tread shoulderand maximum section width.For example:Treadwear 200 Traction AATemperature A
TREADWEAR 200 TRACTION AA TEMPERATURE A
UTQGS MARK (example)
9-20
Customer Information and Reporting Safety Defects
Uniform Tire Quality Grading System (UTQGS)
Mazda6_8U66-EA-05F_Edition2 Page350Tuesday, July 26 2005 11:27 AM
Form No.8U66-EA-05F

Black plate (351,1)
Tire LabelingFederal law requires tire manufacturers to place standardized information on the sidewall ofall tires. This information identifies and describes the fundamental characteristics of the tireand also provides a tire identification number for safety standard certification and in case ofa recall.
qInformation on Passenger Vehicle Tires
Please refer to the diagram below.
1. TIN: U.S. DOT tire identification number
2. Passenger car tire
3. Nominal width of tire in millimeters
4. Ratio of height to width (aspect ratio)
5. Radial
6. Rim diameter code
7. Load index & speed symbol
8. Severe snow conditions
9. Tire ply composition and materials used
10. Max. load rating
Customer Information and Reporting Safety Defects
Tire Information (U.S.A.)
9-21
Mazda6_8U66-EA-05F_Edition2 Page351Tuesday, July 26 2005 11:27 AM
Form No.8U66-EA-05F

Black plate (352,1)
11. Tread wear, traction and temperature grades
12. Max. permissible inflation pressure
13. SAFETY WARNING
P215/65R15 95H is an example of a tire size and load index rating. Here is an explanationof the various components of that tire size and load index rating. Note that the tire size andload index rating may be different from the example.
P
Indicates a tire that may be installed on cars, SUVs, minivans and light trucks as designatedby the Tire and Rim Association (T&RA).
NOTE
If your tire size does not begin with a letter this may mean it is designated by eitherETRTO (European Tire and Rim Technical Organization) or JATMA (Japan TireManufacturing Association).
215
“215” is the nominal width of the tire in millimeters. This three-digit number gives thewidth in millimeters of the tire from sidewall edge to sidewall edge. In general, the largerthe number, the wider the tire.
65
“65” is the aspect ratio. This two-digit number indicates the tire's ratio of height to width.
R
“R” is the tire construction symbol. R indicates “Radial ply construction”.
15
“15” is the wheel rim diameter in inches.
95
“95” is the Load Index. This two-or three-digit number indicates how much weight eachtire can support.
9-22
Customer Information and Reporting Safety Defects
Tire Information (U.S.A.)
Mazda6_8U66-EA-05F_Edition2 Page352Tuesday, July 26 2005 11:27 AM
Form No.8U66-EA-05F

Black plate (353,1)
H
“H” is the speed rating. The speed rating denotes the maximum speed for which the use ofthe tire is rated.
Letter Rating Speed Rating
Q 99 mph
R 106 mph
S 112 mph
T 118 mph
U 124 mph
H 130 mph
V 149 mph
W 168* mph
Y 186* mph
* For tires with a maximum speed capability over 149 mph, tire manufacturers sometimes use the letters ZR. Fortires with a maximum speed capability over 186 mph, tire manufacturers always use the letters ZR.
M+S or M/S: Mud and Snow
AT: All Terrain.AS: All Season. The “M+S” or “M/S” indicates that the tire has some functional use inmud and snow.
U.S. DOT Tire Identification Number (TIN)
This begins with the letters “DOT” which indicates the tire meets all federal standards. Thenext two numbers or letters are the plant code where it was manufactured, and the last fournumbers represent the week and year the tire was manufactured. For example, the numbers457 means the 45st week of 1997. After 2000 the numbers go to four digits. For example,the number 2102 means the 21th week of 2002. The other numbers are marketing codesused at the manufacturer's discretion. This information is used to contact consumers if a tiredefect requires a recall.
Tire Ply Composition and Materials Used
The number of plies indicates the number of layers of rubber-coated fabric in the tire. Ingeneral, the greater the number of plies, the more weight a tire can support. Tiremanufacturers also must indicate the tire materials, which include steel, nylon, polyester,and other.
Maximum Load Rating
This number indicates the maximum load in kilograms and pounds that can be carried bythe tire.
Maximum Permissible Inflation Pressure
This number is the greatest amount of air pressure that should ever be put in the tire undernormal driving conditions.
Customer Information and Reporting Safety Defects
Tire Information (U.S.A.)
9-23
Mazda6_8U66-EA-05F_Edition2 Page353Tuesday, July 26 2005 11:27 AM
Form No.8U66-EA-05F
Black plate (354,1)
Tread Wear, Traction and Temperature Grades
Tread wear: The tread wear grade is a comparative rating based on the wear rate of the tirewhen tested under controlled conditions on a specified government test course. Forexample, a tire graded 150 would wear one and one-half (1 1/2) times as well on thegovernment course as a tire graded 100.Traction: The traction grades, from highest to lowest are AA, A, B, and C. The gradesrepresent the tire's ability to stop on wet pavement as measured under controlled conditionson specified government test surfaces of asphalt and concrete. A tire marked C may havepoor traction performance.Temperature: The temperature grades are A (the highest), B and C, representing the tire'sresistance to the generation of heat and its ability to dissipate heat when tested undercontrolled conditions on a specified indoor laboratory test wheel.
Snow Tires
In some heavy snow areas, local governments may require true snow tires, those with verydeeply cut tread. These tires should only be used in pairs or placed on all four wheels.Make sure you purchase snow tires that are the same size and construction type as the othertires on your vehicle.
SAFETYWARNING
The following safety warning appears on the tire's sidewall.SERIOUS INJURY MAY RESULT FROM:
l EXPLOSION OF TIRE/RIM ASSEMBLY DUE TO IMPROPER MOUNTING-MATCH TIRE DIAMETER TO RIM DIAMETER; NEVER EXCEED 40 psi (275 kPa)TO SEAT BEADS-ONLY SPECIALLY TRAINED PERSONS SHOULD MOUNTTIRES.
l TIRE FAILURE DUE TO UNDER-INFLATION/OVERLOADING/DAMAGE-FOLLOW OWNER'S MANUAL AND PLACARD IN VEHICLE-FREQUENTLYCHECK INFLATION PRESSURE AND INSPECT FOR DAMAGE.
9-24
Customer Information and Reporting Safety Defects
Tire Information (U.S.A.)
Mazda6_8U66-EA-05F_Edition2 Page354Tuesday, July 26 2005 11:27 AM
Form No.8U66-EA-05F

Black plate (355,1)
qInformation on Temporary Tires
Please refer to the diagram below.
1. Temporary tires
2. Nominal width of tire in millimeters
3. Ratio of height to width (aspect ratio)
4. Diagonal
5. Rim diameter code
T115/70D 16 is an example of a tire size and load index rating. Here is an explanation ofthe various components of that tire size and load index rating. Note that the tire size andload index rating may be different from the example.
T
Indicates a tire that may be installed on cars, SUVs, minivans and light trucks as designatedby the Tire and Rim Association (T&RA).
115
“115” is the nominal width of the tire in millimeters. This three-digit number gives thewidth in millimeters of the tire from sidewall edge to sidewall edge. In general, the largerthe number, the wider the tire.
70
“70” is the aspect ratio. This two-digit number indicates the tire's ratio of height to width.
Customer Information and Reporting Safety Defects
Tire Information (U.S.A.)
9-25
Mazda6_8U66-EA-05F_Edition2 Page355Tuesday, July 26 2005 11:27 AM
Form No.8U66-EA-05F

Black plate (356,1)
D
“D” is the tire construction symbol. D indicates “diagonal ply construction”.
16
“16” is the wheel rim diameter in inches.
9-26
Customer Information and Reporting Safety Defects
Tire Information (U.S.A.)
Mazda6_8U66-EA-05F_Edition2 Page356Tuesday, July 26 2005 11:27 AM
Form No.8U66-EA-05F

Black plate (357,1)
Location of the Tire Label (Placard)You will find the tire label containing tire inflation pressure by tire size and other importantinformation on the driver's side B-pillar or on the edge of the driver's door frame.
SAMPLE
qRecommended Tire Inflation Pressure
On the tire label you will find the recommended tire inflation pressure in both kPa and psifor the tires installed as original equipment on the vehicle. It is very important that theinflation pressure of the tires on your vehicle is maintained at the recommended pressure.You should check the tire pressure regularly to insure that the proper inflation pressure ismaintained.
Refer to Tires on page 10-7.
NOTE
Tire pressures listed on the vehicle placard or tire information label indicate therecommended cold tire inflation pressure, measured when the tires are cold, after thevehicle has been parked for at least 3 hours. As you drive, the temperature in the tirewarms up, increasing the tire pressure.
Customer Information and Reporting Safety Defects
Tire Information (U.S.A.)
9-27
Mazda6_8U66-EA-05F_Edition2 Page357Tuesday, July 26 2005 11:27 AM
Form No.8U66-EA-05F

Black plate (358,1)
WARNINGTire Under-Inflation:Driving your vehicle with under-inflated tires is dangerous.Under-inflation is the most common cause of failures in any kind of tire and mayresult in severe cracking, tread separation or “blowout”, with unexpected loss ofvehicle control and increased risk of injury. Under-inflation increases sidewall flexingand rolling resistance, resulting in heat buildup and internal damage to the tire. Itresults in unnecessary tire stress, irregular wear, loss of control and accidents. A tirecan lose up to half of its air pressure and not appear to be flat!It is impossible to determine whether or not tires are properly inflated just by lookingat them.Always check the tire inflation pressures on a regular basis according to therecommended tire inflation pressure on the tire label and in conjunction with theinformation in this owner's manual.
qChecking Tire Pressure
1. When you check the air pressure, make sure the tires are cold ―meaning they are nothot from driving even a mile.
2. Remove the cap from the valve on one tire.
3. Firmly press a tire gauge onto the valve.
4. Add air to achieve recommended air pressure.
5. If you overfill the tire, release air by pushing on the metal stem in the center of thevalve. Then recheck the pressure with your tire gauge.
6. Replace the valve cap.
7. Repeat with each tire, including the spare.
NOTE
Some spare tires require higher inflation pressure.
8. Visually inspect the tires to make sure there are no nails or other objects embedded thatcould poke a hole in the tire and cause an air leak.
9. Check the sidewalls to make sure there are no gouges, cuts, bulges, cracks or otherirregularities.
9-28
Customer Information and Reporting Safety Defects
Tire Information (U.S.A.)
Mazda6_8U66-EA-05F_Edition2 Page358Tuesday, July 26 2005 11:27 AM
Form No.8U66-EA-05F

Black plate (359,1)
NOTE
Warm tires normally exceed recommended pressures. Don't release air from warm tiresto adjust the pressure.Under-inflation can cause serious failures and accidents.Over-inflation can produce a harsh ride and the greater possibility of damage from roadhazards.
qGlossary of Terms
Tire Placard: A label indicating the OE tire sizes, recommended inflation pressure, andthe maximum weight the vehicle can carry.Tire Identification Number (TIN): A number on the sidewall of each tire providinginformation about the tire brand and manufacturing plant, tire size, and date ofmanufacture.Inflation Pressure: A measure of the amount of air in a tire.kPa: Kilopascal, the metric unit for air pressure.psi: Pounds per square inch, the English unit for air pressure.B-pillar: The structural member at the side of the vehicle behind the front door.Original Equipment (OE): Describes components originally equipped on the vehicle.Vehicle Load Limit: The maximum value of the combined weight of occupants and cargo.Bead Area of the Tire: Area of the tire next to the rim.Sidewall Area of the Tire: Area between the bead area and the tread.Tread Area of the Tire: Area on the perimeter of the tire that contacts the road when it'smounted on the vehicle.
Seating capacity means the total allowable number of vehicle occupants. Seating capacityis described on the tire label.
Production options weight is the combined weight of installed regular production optionsweighing over 2.3 kilograms in excess of the standard items which they replace, and notpreviously considered in the curb weight or accessory weight, including heavy duty brakes,ride levelers, roof rack, heavy duty battery, and special trim.
Rim is the metal support (wheel) for a tire or a tire and tube assembly upon which the tirebeads are seated.
Customer Information and Reporting Safety Defects
Tire Information (U.S.A.)
9-29
Mazda6_8U66-EA-05F_Edition2 Page359Tuesday, July 26 2005 11:27 AM
Form No.8U66-EA-05F
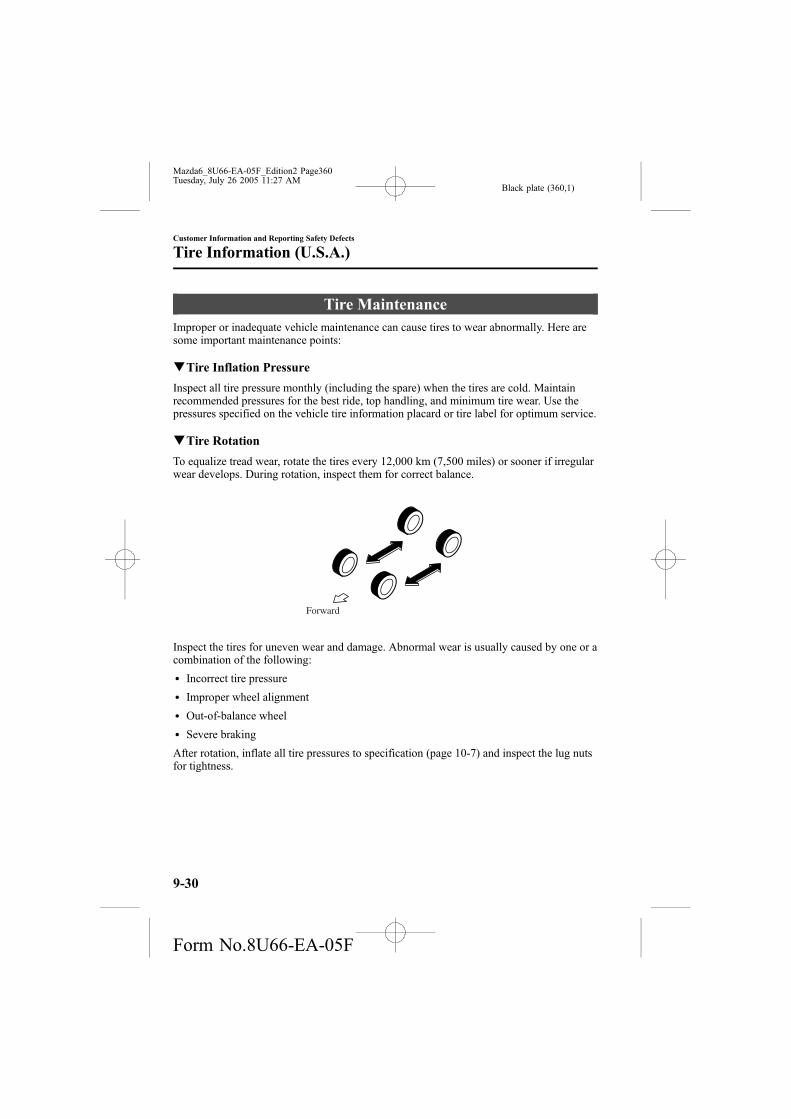
Black plate (360,1)
Tire MaintenanceImproper or inadequate vehicle maintenance can cause tires to wear abnormally. Here aresome important maintenance points:
qTire Inflation Pressure
Inspect all tire pressure monthly (including the spare) when the tires are cold. Maintainrecommended pressures for the best ride, top handling, and minimum tire wear. Use thepressures specified on the vehicle tire information placard or tire label for optimum service.
qTire Rotation
To equalize tread wear, rotate the tires every 12,000 km (7,500 miles) or sooner if irregularwear develops. During rotation, inspect them for correct balance.
Forward
Inspect the tires for uneven wear and damage. Abnormal wear is usually caused by one or acombination of the following:
l Incorrect tire pressure
l Improper wheel alignment
l Out-of-balance wheel
l Severe braking
After rotation, inflate all tire pressures to specification (page 10-7) and inspect the lug nutsfor tightness.
9-30
Customer Information and Reporting Safety Defects
Tire Information (U.S.A.)
Mazda6_8U66-EA-05F_Edition2 Page360Tuesday, July 26 2005 11:27 AM
Form No.8U66-EA-05F
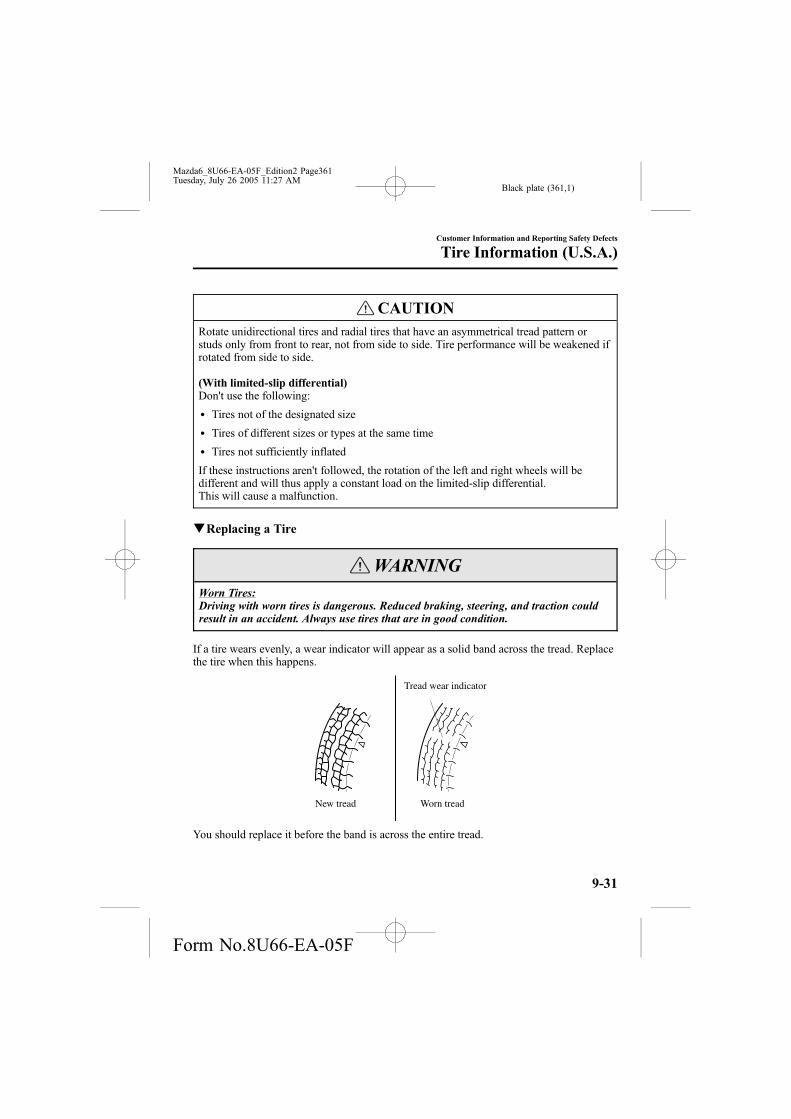
Black plate (361,1)
CAUTIONRotate unidirectional tires and radial tires that have an asymmetrical tread pattern orstuds only from front to rear, not from side to side. Tire performance will be weakened ifrotated from side to side.
(With limited-slip differential)Don't use the following:
l Tires not of the designated size
l Tires of different sizes or types at the same time
l Tires not sufficiently inflated
If these instructions aren't followed, the rotation of the left and right wheels will bedifferent and will thus apply a constant load on the limited-slip differential.This will cause a malfunction.
qReplacing a Tire
WARNINGWorn Tires:Driving with worn tires is dangerous. Reduced braking, steering, and traction couldresult in an accident. Always use tires that are in good condition.
If a tire wears evenly, a wear indicator will appear as a solid band across the tread. Replacethe tire when this happens.
New tread
Tread wear indicator
Worn tread
You should replace it before the band is across the entire tread.
Customer Information and Reporting Safety Defects
Tire Information (U.S.A.)
9-31
Mazda6_8U66-EA-05F_Edition2 Page361Tuesday, July 26 2005 11:27 AM
Form No.8U66-EA-05F

Black plate (362,1)
NOTE
Tires degrade over time, even when they are not being used on the road. It isrecommended that tires generally be replaced when they are 6 years or older. Heatcaused by hot climates or frequent high loading conditions can accelerate the agingprocess. You should replace the spare tire when you replace the other road tires due tothe aging of the spare tire. Regarding the manufacturing week and year is indicated with4 digit. Refer to The tire labeling on page 9-21.
qSafety Practices
The way you drive has a great deal to do with your tire mileage and safety. So cultivategood driving habits for your own benefit.
l Observe posted speed limits
l Avoid fast starts, stops and turns
l Avoid potholes and objects on the road
l Do no run over curbs or hit the tire against the curb when parking
CAUTIONIf you feel a sudden vibration or ride disturbance while driving or you suspect your tireor vehicle has been damaged, immediately reduce your speed. Drive with caution untilyou can safely pull off the road. Stop and inspect the tire for damage. If the tire is under-inflated or damaged, deflate it, remove the tire and rim and replace it with your sparetire. If you cannot detect a cause, have the vehicle towed to the nearest vehicle or tiredealer to have the vehicle inspected.
9-32
Customer Information and Reporting Safety Defects
Tire Information (U.S.A.)
Mazda6_8U66-EA-05F_Edition2 Page362Tuesday, July 26 2005 11:27 AM
Form No.8U66-EA-05F

Black plate (363,1)
Vehicle Loading
NOTE
This vehicle is not designed to tow a trailer.
This section will guide you in the proper loading of your vehicle and/or trailer, to keepyour loaded vehicle weight within its design rating capability, with or without a trailer.Properly loading your vehicle will provide maximum return of vehicle design performance.Before loading your vehicle, familiarize yourself with the following terms for determiningyour vehicle's weight ratings, with or without a trailer, from the vehicle's SafetyCertification Label and Tire and Load Information Label:
WARNINGOverloaded Vehicle:Overloading a vehicle is dangerous. The results of overloading can have seriousconsequences in terms of passenger safety. Too much weight on a vehicle's suspensionsystem can cause spring or shock absorber failure, brake failure, handling or steeringproblems, irregular tire wear, tire failure or other damage.Overloading makes a vehicle harder to drive and control. It also increases the distancerequired for stopping. In cases of serious overloading, brakes can fail completely,particularly on steep grades. The load a tire will carry safely is a combination of thesize of the tire, its load range, and corresponding inflation pressure.Never overload the vehicle and always observe the vehicle's weight ratings from thevehicle's Safety Certification and Tire and Load Information labels.
Base Curb Weight is the weight of the vehicle including a full tank of fuel and allstandard equipment. It does not include passengers, cargo, or optional equipment.
Customer Information and Reporting Safety Defects
Tire Information (U.S.A.)
9-33
Mazda6_8U66-EA-05F_Edition2 Page363Tuesday, July 26 2005 11:27 AM
Form No.8U66-EA-05F

Black plate (364,1)
Vehicle Curb Weight is the weight of your new vehicle when you picked it up from yourdealer plus any aftermarket equipment.
PAYLOAD
Payload is the combined weight of cargo and passengers that the vehicle is designed tocarry. The maximum payload for your vehicle can be found on the Tire and LoadInformation label on the driver's door frame or door pillar. Look for “THE COMBINEDWEIGHT OF OCCUPANTS AND CARGO SHOULD NEVER EXCEED XXX kg orXXX lbs” for your maximum payload. The payload listed on the tire label is the maximumpayload for the vehicle as built by the assembly plant. If any aftermarket or dealer installedequipment has been installed on the vehicle, the weight of the equipment must besubtracted from the payload listed on the tire label in order to be accurate.
9-34
Customer Information and Reporting Safety Defects
Tire Information (U.S.A.)
Mazda6_8U66-EA-05F_Edition2 Page364Tuesday, July 26 2005 11:27 AM
Form No.8U66-EA-05F

Black plate (365,1)
SAMPLE
CARGO
Cargo Weight includes all weight added to the Base Curb Weight, including cargo andoptional equipment. When towing, trailer tongue load or king pin weight is also part ofcargo weight.
The cargo weight limit decreases depending on the number of vehicle occupants. The cargoweight limit can be calculated by subtracting the total weight of the vehicle occupants fromthe “combined weight of occupants and cargo should never exceed” value on the tire label.
Customer Information and Reporting Safety Defects
Tire Information (U.S.A.)
9-35
Mazda6_8U66-EA-05F_Edition2 Page365Tuesday, July 26 2005 11:27 AM
Form No.8U66-EA-05F
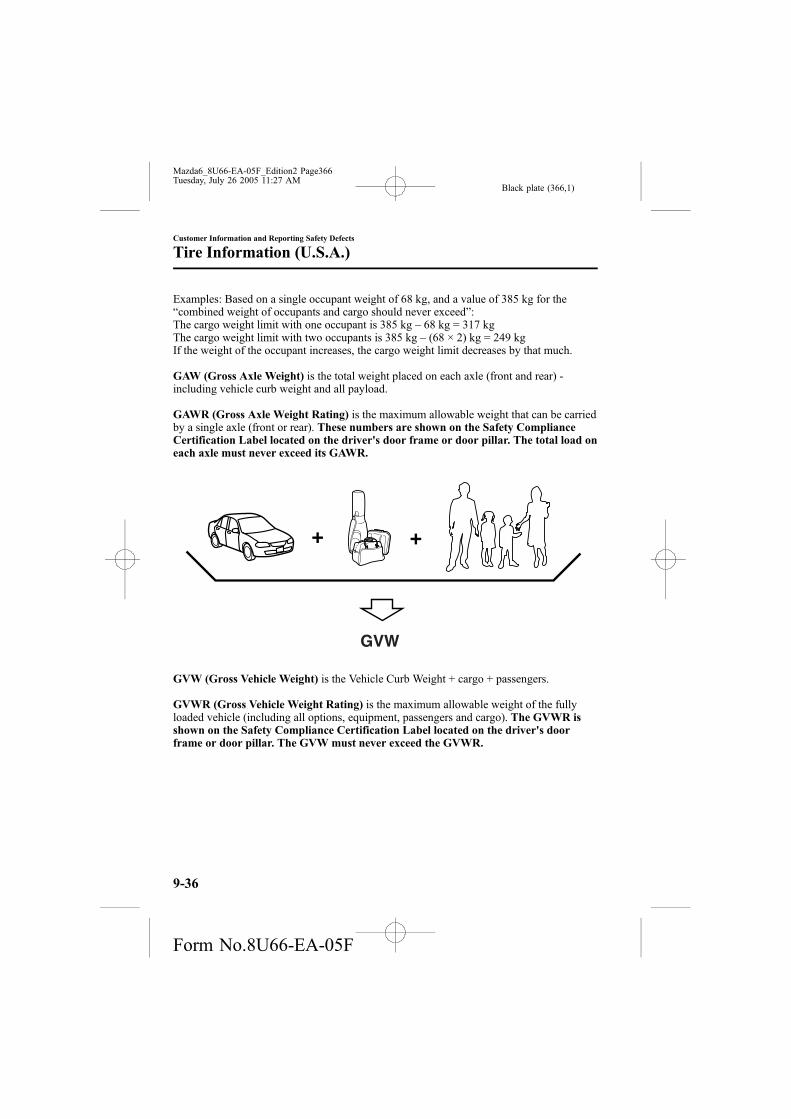
Black plate (366,1)
Examples: Based on a single occupant weight of 68 kg, and a value of 385 kg for the“combined weight of occupants and cargo should never exceed”:The cargo weight limit with one occupant is 385 kg _ 68 kg = 317 kgThe cargo weight limit with two occupants is 385 kg _ (68 × 2) kg = 249 kgIf the weight of the occupant increases, the cargo weight limit decreases by that much.
GAW (Gross Axle Weight) is the total weight placed on each axle (front and rear) -including vehicle curb weight and all payload.
GAWR (Gross Axle Weight Rating) is the maximum allowable weight that can be carriedby a single axle (front or rear). These numbers are shown on the Safety ComplianceCertification Label located on the driver's door frame or door pillar. The total load oneach axle must never exceed its GAWR.
GVW
GVW (Gross Vehicle Weight) is the Vehicle Curb Weight + cargo + passengers.
GVWR (Gross Vehicle Weight Rating) is the maximum allowable weight of the fullyloaded vehicle (including all options, equipment, passengers and cargo). The GVWR isshown on the Safety Compliance Certification Label located on the driver's doorframe or door pillar. The GVW must never exceed the GVWR.
9-36
Customer Information and Reporting Safety Defects
Tire Information (U.S.A.)
Mazda6_8U66-EA-05F_Edition2 Page366Tuesday, July 26 2005 11:27 AM
Form No.8U66-EA-05F

Black plate (367,1)
SAMPLE
WARNINGExceeding Axle Weight Rating Limits:Exceeding the Safety Certification Label axle weight rating limits is dangerous andcould result in death or serious injury as a result of substandard vehicle handling,performance, engine, transmission and/or structural damage, serious damage to thevehicle, or loss of control.Always keep the vehicle within the axle weight rating limits.
Customer Information and Reporting Safety Defects
Tire Information (U.S.A.)
9-37
Mazda6_8U66-EA-05F_Edition2 Page367Tuesday, July 26 2005 11:27 AM
Form No.8U66-EA-05F

Black plate (368,1)
GCW
GCW (Gross Combined Weight) is the weight of the loaded vehicle (GVW) plus theweight of the fully loaded trailer.
GCWR (Gross Combined Weight Rating) is the maximum allowable weight of thevehicle and the loaded trailer - including all cargo and passengers - that the vehicle canhandle without risking damage. (Important: The towing vehicle's braking system is ratedfor operation at GVWR, not at GCWR. Separate functional brakes should be used for safecontrol of towed vehicles and for trailers weighing more than 1,500 lbs). The GCW mustnever exceed the GCWR.
Maximum Loaded Trailer Weight is the highest possible weight of a fully loaded trailerthe vehicle can tow. It assumes a vehicle with only mandatory options, no cargo (internal orexternal), a tongue load of 10_15% (conventional trailer) or king pin weight of 15_25%(fifth-wheel trailer), and driver only (150 lbs). Consult your dealership (or the RVandTrailer Towing Guide provided by your dealership) for more detailed information.Tongue Load or Fifth-Wheel King Pin Weight refers to the amount of the weight that atrailer pushes down on a trailer hitch.
Examples: For a 5000 lb conventional trailer, multiply 5000 by 0.10 and 0.15 to obtain aproper tongue load range of 500 to 750 lbs. For an 11,500 lb fifth-wheel trailer, multiply by0.15 and 0.25 to obtain a proper king pin load range of 1,725 to 2,875 lbs.
9-38
Customer Information and Reporting Safety Defects
Tire Information (U.S.A.)
Mazda6_8U66-EA-05F_Edition2 Page368Tuesday, July 26 2005 11:27 AM
Form No.8U66-EA-05F
Black plate (369,1)
WARNINGExceeding GVWR or GAWR Specifications:Exceeding the GVWR or the GAWR specified on the certification label is dangerous.Exceeding any vehicle rating limitation could result in a serious accident, injury, ordamage to the vehicle.Do not use replacement tires with lower load carrying capacities than the originalsbecause they may lower the vehicle's GVWR and GAWR limitations. Replacementtires with a higher limit than the originals do not increase the GVWR and GAWRlimitations.Never exceed the GVWR or the GAWR specified on the certification label.
Customer Information and Reporting Safety Defects
Tire Information (U.S.A.)
9-39
Mazda6_8U66-EA-05F_Edition2 Page369Tuesday, July 26 2005 11:27 AM
Form No.8U66-EA-05F

Black plate (370,1)
Steps for Determining the Correct Load Limit:Steps for Determining Correct Load Limit:
(1) Locate the statement “The combined weight of occupants and cargo should neverexceed XXX kg or XXX lbs” on your vehicle's placard.
(2) Determine the combined weight of the driver and passengers that will be riding in yourvehicle.
(3) Subtract the combined weight of the driver and passengers from XXX kg or XXX lbs.
(4) The resulting figure equals the available amount of cargo and luggage load capacity.For example, if the “XXX” amount equals 1400 lbs. and there will be five 150 lbpassengers in your vehicle, the amount of available cargo and luggage load capacity is650 lbs. (1400_ 750 (5 × 150) = 650 lbs.)
(5) Determine the combined weight of luggage and cargo being loaded on the vehicle.That weight may not safely exceed the available cargo and luggage load capacitycalculated in Step 4.
(6) If your vehicle will be towing a trailer, the load from your trailer will be transferred toyour vehicle. Consult this manual to determine how this reduces the available cargoand luggage load capacity of your vehicle.
9-40
Customer Information and Reporting Safety Defects
Tire Information (U.S.A.)
Mazda6_8U66-EA-05F_Edition2 Page370Tuesday, July 26 2005 11:27 AM
Form No.8U66-EA-05F
Black plate (371,1)
Reporting Safety Defects (U.S.A.)
If you believe that your vehicle has a defect which could cause a crash or couldcause injury or death, you should immediately inform the National HighwayTraffic Safety Administration (NHTSA) in addition to notifying Mazda MotorCorporation (Your Mazda Importer/Distributor).
If NHTSA receives similar complaints, it may open an investigation, and if itfinds that a safety defect exists in a group of vehicles, it may order a recall andremedy campaign. However, NHTSA cannot become involved in individualproblems between you, your dealer, or Mazda Motor Corporation (Your MazdaImporter/Distributor).
To contact NHTSA, you may either call the Auto Safety Hotline toll-free at 1(800) 424-9393 (or 366-0123 in Washington, D.C. area) or write to: NHTSA,U.S. Department of Transportation. Washington, D.C. 20590. You can alsoobtain other information about motor vehicle safety from the Hotline.
NOTE
If you live in the U.S.A., all correspondence to Mazda Motor Corporation should beforwarded to:
Mazda North American Operations7755 Irvine Center DriveIrvine, California 92618-2922P.O. Box 19734Irvine, CA 92623-9734Customer Assistance Center or toll free at 1 (800) 222-5500
If you live outside of the U.S.A., please contact the nearest Mazda Distributor shown(page 9-10) in this booklet.
Customer Information and Reporting Safety Defects
Reporting Safety Defects
9-41
Mazda6_8U66-EA-05F_Edition2 Page371Tuesday, July 26 2005 11:27 AM
Form No.8U66-EA-05F

Black plate (372,1)
Reporting Safety Defects (Canada)Canadian customers who wish to report a safety-related defect to Transport Canada, DefectInvestigations and Recalls, may telephone the toll free hotline 1-800-333-0510, or contactTransport Canada by mail at: Transport Canada, ASFAD, Place de Ville Tower C, 330Sparks Street, Ottawa ON K1A 0N5.
For additional road safety information, please visit the Road Safety website at:http://www.tc.gc.ca/roadsafety/menu.htm
9-42
Customer Information and Reporting Safety Defects
Reporting Safety Defects
Mazda6_8U66-EA-05F_Edition2 Page372Tuesday, July 26 2005 11:27 AM
Form No.8U66-EA-05F

Black plate (373,1)
Service PublicationsFactory-authorized Mazda service publications are available for owners who wish to dosome of their own maintenance and repair.
When requesting any of our publications through an Authorized Mazda Dealer, refer to thechart below.
If they don't have what you need in stock, they can order it for you.
PUBLICATION ORDER NUMBER PUBLICATION DESCRIPTION
9999-95-063B-06 2006 WORKSHOP MANUAL (English)
9999-95-039G-06 2006 WIRING DIAGRAM (English)
9999-95-078C-06 (U.S.A. only) 2006 OWNER'S MANUAL
9999-EC-078C-06 (Canada only) 2006 OWNER'S MANUAL
9999-PR-078C-06 (Puerto Rico, Mexico only) 2006 OWNER'S MANUAL
qWORKSHOP MANUAL:
Covers recommended maintenance and repair procedures of the drive train, body andchassis.
qWIRING DIAGRAM:
Provides electrical schematics as well as component location for the entire electricalsystem.
qOWNER'S MANUAL:
This booklet contains information regarding the proper care and operation of your vehicle.This is not a technician's manual.
Customer Information and Reporting Safety Defects
Service Publications
9-43
Mazda6_8U66-EA-05F_Edition2 Page373Tuesday, July 26 2005 11:27 AM
Form No.8U66-EA-05F

Black plate (374,1)
9-44
Mazda6_8U66-EA-05F_Edition2 Page374Tuesday, July 26 2005 11:27 AM
Form No.8U66-EA-05F

Black plate (375,1)
10 Specifications
Technical information about your Mazda.
Identification Numbers ............................................................... 10-2Vehicle Information Labels ..................................................... 10-2
Specifications ............................................................................... 10-4Specifications .......................................................................... 10-4
10-1
Mazda6_8U66-EA-05F_Edition2 Page375Tuesday, July 26 2005 11:27 AM
Form No.8U66-EA-05F

Black plate (376,1)
Vehicle Information Labels
qVehicle Identification Number
The vehicle identification number legallyidentifies your vehicle. The number is ona plate attached to the left top side of thedashboard. This plate can easily be seenthrough the windshield.
qMotor Vehicle Safety Standard Label
qVehicle Emission ControlInformation Label
qTire Pressure Label
10-2
Identification Numbers
Mazda6_8U66-EA-05F_Edition2 Page376Tuesday, July 26 2005 11:27 AM
Form No.8U66-EA-05F

Black plate (377,1)
qEngine Number (3.0-liter engineonly)
Forward
Identification Numbers
10-3
Mazda6_8U66-EA-05F_Edition2 Page377Tuesday, July 26 2005 11:27 AM
Form No.8U66-EA-05F
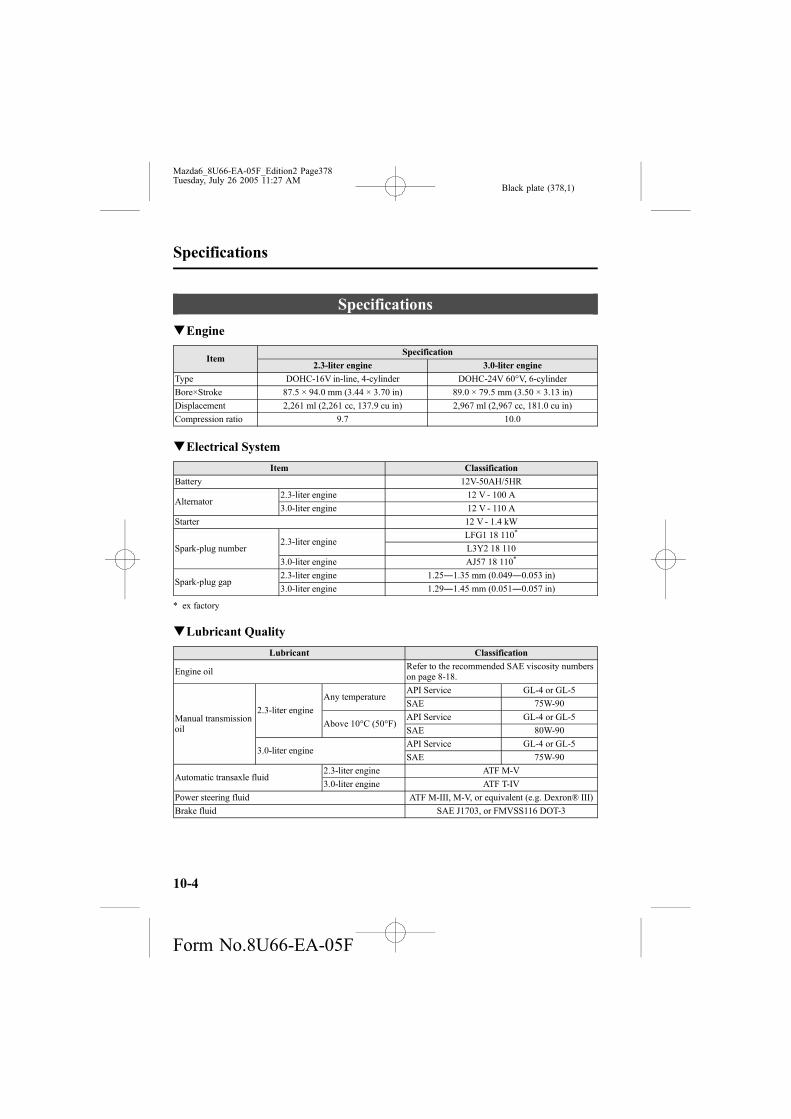
Black plate (378,1)
Specifications
qEngine
ItemSpecification
2.3-liter engine 3.0-liter engine
Type DOHC-16V in-line, 4-cylinder DOHC-24V 60°V, 6-cylinder
Bore×Stroke 87.5 × 94.0 mm (3.44 × 3.70 in) 89.0 × 79.5 mm (3.50 × 3.13 in)
Displacement 2,261 ml (2,261 cc, 137.9 cu in) 2,967 ml (2,967 cc, 181.0 cu in)
Compression ratio 9.7 10.0
qElectrical System
Item Classification
Battery 12V-50AH/5HR
Alternator2.3-liter engine 12 V - 100 A
3.0-liter engine 12 V - 110 A
Starter 12 V - 1.4 kW
Spark-plug number2.3-liter engine
LFG1 18 110*
L3Y2 18 110
3.0-liter engine AJ57 18 110*
Spark-plug gap2.3-liter engine 1.25―1.35 mm (0.049―0.053 in)
3.0-liter engine 1.29―1.45 mm (0.051―0.057 in)
* ex factory
qLubricant Quality
Lubricant Classification
Engine oilRefer to the recommended SAE viscosity numberson page 8-18.
Manual transmissionoil
2.3-liter engine
Any temperatureAPI Service GL-4 or GL-5
SAE 75W-90
Above 10°C (50°F)API Service GL-4 or GL-5
SAE 80W-90
3.0-liter engineAPI Service GL-4 or GL-5
SAE 75W-90
Automatic transaxle fluid2.3-liter engine ATF M-V
3.0-liter engine ATF T-IV
Power steering fluid ATF M-III, M-V, or equivalent (e.g. Dexron® III)
Brake fluid SAE J1703, or FMVSS116 DOT-3
10-4
Specifications
Mazda6_8U66-EA-05F_Edition2 Page378Tuesday, July 26 2005 11:27 AM
Form No.8U66-EA-05F

Black plate (379,1)
qCapacities
(Approximate Quantities)
ItemUnit
L US qt Imp qt
Engine oil
2.3-liter engine
With oil filterreplacement
4.3 4.5 3.8
Without oil filterreplacement
3.9 4.1 3.4
3.0-liter engine
With oil filterreplacement
5.7 6.0 5.0
Without oil filterreplacement
5.2 5.5 4.6
Coolant2.3-liter engine 7.0 7.4 6.2
3.0-liter engine 8.5 9.0 7.5
Manual transaxle oil2.3-liter engine 2.87 3.0 2.5
3.0-liter engine 2.3 2.4 2.0
Automatic transaxle fluid2.3-liter engine 8.04 8.5 7.3
3.0-liter engine 7.0 7.4 6.1
Fuel tank 68 18.0 (US gal)15.0
(Imp gal)
Check oil and fluid levels with dipsticks or reservoir gauges.
qDimensions
Item Specification
Overall length
Sedan 4,745 mm (186.8 in)
5-Door 4,745 mm*3(186.8 in), 4,765 mm*4(187.6 in)
Sport Wagon 4,770 mm*3(187.8 in), 4,785 mm*4(188.4 in)
Overall width 1,780 mm (70.1 in)
Overall heightSedan/5-Door 1,440 mm (56.7 in)
Sport Wagon 1,455 mm (57.3 in)
Track, front 1,540 mm*1(60.6 in), 1,530 mm*2(60.2 in)
Track, rear 1,540 mm*1(60.6 in), 1,530 mm*2(60.2 in)
Wheelbase 2,675 mm (105.3 in)
*1 16 inch wheel vehicle*2 17 inch wheel vehicle*3 Without license plate holder*4 With license plate holder
Specifications
10-5
Mazda6_8U66-EA-05F_Edition2 Page379Tuesday, July 26 2005 11:27 AM
Form No.8U66-EA-05F

Black plate (380,1)
qWeights
Specification Item Weight
2.3-liter engine
GVWR (Gross Vehicle Weight Rating) 1,940 kg (4,279 lbs)
GAWR (Gross Axle Weight Rating)Front 1,005 kg (2,216 lbs)
Rear 936 kg (2,064 lbs)
3.0-liter engine
GVWR (Gross Vehicle Weight Rating) 2,052 kg (4,526 lbs)
GAWR (Gross Axle Weight Rating)Front 1,084 kg (2,390 lbs)
Rear 968 kg (2,136 lbs)
qAir Conditioner
Gas complies with SAE J639 Maximum operating charge
HFC134a (R-134a) 0.5 kg (17.6 oz)
qLight Bulbs
Exterior light
Light bulbCategory
Wattage ECER SAE
Headlights
High beam 55 H1 ―
Low beamHalogen 55 H1 ―
Xenonfusion
35 D2S ―
Front turn signal lights 27 ― #2357A
Parking lights 5 W5W ―
Fog lightsí 55 H11 H11
Side-marker lights 5 W5W ―
High-mount brake lightSedan 18.4 W16W #921
5-Door/Sport Wagon 21 W21W #7440
Rear turn signal lightsSedan/5-Door 21 WY21W ―
Sport Wagon 21 W21W #7440
Brake lights/Taillights 21/5 W21/5W #7443
Taillights 5*1 W21/5W #7443
Reverse lights 18.4 W16W #921
License plate lights 5 W5W ―
*1 Use a 21/5W type bulb.
10-6 íSome models.
Specifications
Mazda6_8U66-EA-05F_Edition2 Page380Tuesday, July 26 2005 11:27 AM
Form No.8U66-EA-05F

Black plate (381,1)
Interior light
Light bulbCategory
Wattage ECE R
Trunk light (Sedan) 3 ―
Overhead light/Map lights 5 W5W
Courtesy lights 5 W5W
Vanity mirror lights*Type A 1.2 ―
Type B 3 ―
Luggage compartment light5-Door 5 ―
Sport Wagon 10 ―
* Vanity mirror lights
Type BType A
qTires
NOTE
The tires have been optimally matched with the chassis of your vehicle.When replacing tires, Mazda recommends that you replace tires of the same typeoriginally fitted to your vehicle. For details, contact an Authorized Mazda Dealer.
Check the tire pressure label for tire size and inflation pressure.Refer to Tire Inflation Pressure on page 8-39.
Standard tire
Tire sizeInflation pressure
Front Rear
P205/60R16 91V 220 kPa(2.2 kgf/cm2, 32 psi or lb/po2)
220 kPa(2.2 kgf/cm2, 32 psi or lb/po2)P215/50R17 93V
215/45R18 93W240 kPa
(2.4 kgf/cm2, 35 psi or lb/po2)240 kPa
(2.4 kgf/cm2, 35 psi or lb/po2)
Specifications
10-7
Mazda6_8U66-EA-05F_Edition2 Page381Tuesday, July 26 2005 11:27 AM
Form No.8U66-EA-05F

Black plate (382,1)
Temporary spare tire
Tire size Inflation pressure
T115/70D16 420 kPa (60 psi)
qFuses
Refer to the fuse rating on page 8-53.
10-8
Specifications
Mazda6_8U66-EA-05F_Edition2 Page382Tuesday, July 26 2005 11:27 AM
Form No.8U66-EA-05F

Black plate (383,1)
11 Index
11-1
Mazda6_8U66-EA-05F_Edition2 Page383Tuesday, July 26 2005 11:27 AM
Form No.8U66-EA-05F

Black plate (384,1)
A
Add-On Non-Genuine Parts andAccessories ....................................... 9-16Air Bag Systems ............................... 2-45Air Filter ............................................ 8-30Ambient Temperature Display .......... 6-51Antenna ............................................. 6-16Anti-Lock Brake System (ABS) ......... 5-6
Warning light ............................... 5-7Appearance Care ............................... 8-58Audio System ................................... 6-16
Audio control switch .................. 6-43Audio set .................................... 6-27Operating tips for audiosystem ........................................ 6-16Safety certification ..................... 6-46
Automatic TransaxleDriving tips ................................ 5-17Fluid ........................................... 8-26Manual shift mode ..................... 5-13Shift-lock system ....................... 5-12Transaxle ranges ......................... 5-11
B
BatteryEmergency starting .................... 7-17Maintenance ............................... 8-37Specifications ............................. 10-4
Beep soundsIgnition key reminder ................. 5-40Lights-on reminder ..................... 5-40Seat belt warning beep ............... 5-40
Before Starting the Engine .................. 4-6After getting in ............................. 4-6Before getting in .......................... 4-6
Body Lubrication .............................. 8-30Bottle Holder ..................................... 6-53
B
Brake/ClutchFluid ........................................... 8-24
BrakesAnti-lock brake system (ABS) ..... 5-6Foot brake .................................... 5-4Pad wear indicator ........................ 5-8Parking brake ............................... 5-5Warning light ............................... 5-6
Break-In Period ................................... 4-7Bulb Replacement ............................. 8-43
C
Capacities .......................................... 10-5Carbon Monoxide ............................... 4-5Cargo Securing Loops ...................... 6-56Cargo Sub-Compartment .................. 6-57Catalytic Converter ............................. 4-3Cell Phones ....................................... 9-17Center Box ........................................ 6-54Center Console .................................. 6-55Child Restraint
Installing child-restraintsystems ....................................... 2-33LATCH child-restraintsystems ....................................... 2-40
Child Safety Locks for Rear Doors ... 3-11Climate Control System ...................... 6-2
Gas specifications ...................... 10-6Clock ................................................. 6-51Courtesy Lights ................................. 6-49Cruise Control ................................... 5-18Cup Holder ........................................ 6-52Customer Assistance ........................... 9-2
D
Dashboard Illumination .................... 5-28
11-2
Index
Mazda6_8U66-EA-05F_Edition2 Page384Tuesday, July 26 2005 11:27 AM
Form No.8U66-EA-05F

Black plate (385,1)
D
Daytime Running Lights ................... 5-42Defroster
Rear window .............................. 5-45Dimensions ....................................... 10-5Door Locks ......................................... 3-9Driving In Flooded Area ................... 4-10Driving Tips ........................................ 4-7
Automatic transaxle ................... 5-17Break-in period ............................ 4-7Driving in flooded area .............. 4-10Hazardous driving ........................ 4-8Money-saving suggestions ........... 4-7Rocking the vehicle ...................... 4-9Winter driving .............................. 4-9
E
Emergency Starting ........................... 7-17Flooded engine ........................... 7-17Jump-starting .............................. 7-18Push-starting .............................. 7-20
Emergency Towing ........................... 7-21Emission Control System .................... 4-3Engine
Coolant ....................................... 8-21Exhaust gas .................................. 4-5Hood release .............................. 3-32Oil .............................................. 8-18Overheating ................................ 7-15Starting ......................................... 5-3
Engine Compartment Overview ........ 8-17Engine Coolant
Overheating ................................ 7-15Engine Coolant TemperatureGauge ................................................ 5-27Exhaust Gas ........................................ 4-5Exterior Care ..................................... 8-60
F
FlasherHazard warning .......................... 5-47Headlights .................................. 5-41
Flat Tire ............................................... 7-3Changing ...................................... 7-8Spare tire and tool storage ............ 7-3
FluidsClassification .............................. 10-4Owner maintenance ................... 8-15
Fog Lights ......................................... 5-43Foot Brake .......................................... 5-4Front Seats(Electrically Operated Seats) ............... 2-5Front Seats(Manually Operated Seats) ................. 2-2Fuel
Filler lid and cap ........................ 3-31Gauge ......................................... 5-28Requirements ............................... 4-2Tank capacity ............................. 10-5
Fuses ................................................. 8-53Panel description ........................ 8-55Replacement ............................... 8-53
G
Glove Box ......................................... 6-55
H
Hatch ................................................. 3-12Luggage compartment cover ...... 3-13Luggage strap ............................. 3-13
Hazard Warning Flasher .................... 5-47Hazardous Driving .............................. 4-8
Index
11-3
Mazda6_8U66-EA-05F_Edition2 Page385Tuesday, July 26 2005 11:27 AM
Form No.8U66-EA-05F
Black plate (386,1)
H
HeadlightsControl ....................................... 5-41Flashing ...................................... 5-41High-low beam .......................... 5-41Leveling ..................................... 5-42On reminder ............................... 5-41
HomeLink Wireless ControlSystem .............................................. 5-47Hood Release .................................... 3-32Horn .................................................. 5-46
I
IgnitionSwitch .......................................... 5-2
Illuminated Entry System ................. 6-47Immobilizer System .......................... 3-36Indicator Lights ................................. 5-30
Cruise Main ................................ 5-39Cruise set .................................... 5-39Headlight high-beam .................. 5-38Security ...................................... 5-37Shift position .............................. 5-38TCS ............................................ 5-38TCS OFF .................................... 5-39Turn-signal/hazard warning ....... 5-39
Information Display .......................... 6-50Ambient temperature display ..... 6-51Audio display ............................. 6-52Climate control display .............. 6-52Clock .......................................... 6-51Information display functions .... 6-50
Instrument Cluster ............................. 5-25Interior Care ...................................... 8-63Interior Lights ................................... 6-47
J
Jump-Starting .................................... 7-18
K
Keyless Entry System ......................... 3-3
L
Label Information ............................. 10-2Lane-Change Signals ........................ 5-42Trunk Release lever ........................... 3-22Liftgate .............................................. 3-14
Luggage compartment cover ...... 3-15Luggage compartment net .......... 3-16
Light BulbsReplacement ............................... 8-43Specifications ............................. 10-6
Lighting Control ............................... 5-41Lubricant Quality .............................. 10-4Luggage Compartment Light ............ 6-49
M
MaintenanceIntroduction .................................. 8-2Owner maintenanceprecautions ................................. 8-16Owner maintenance schedule ..... 8-15Scheduled ..................................... 8-3
Manual Transaxle Operation ............... 5-9Recommendations for shifting ..... 5-9
Map Lights ........................................ 6-48Mirrors
Outside mirrors .......................... 3-41Rearview mirror ......................... 3-42
Money-Saving Suggestions ................ 4-7Moonroof .......................................... 3-33
11-4
Index
Mazda6_8U66-EA-05F_Edition2 Page386Tuesday, July 26 2005 11:27 AM
Form No.8U66-EA-05F

Black plate (387,1)
O
Odometer and Trip Meter .................. 5-26Outside Mirrors ................................. 3-41Overhead Console ............................. 6-54Overhead Lights ................................ 6-48Overheating ....................................... 7-15Overloading ...................................... 4-11
P
Paint Damage .................................... 8-58Parking Brake ..................................... 5-5Parking in an Emergency .................... 7-2Power Door Locks ............................ 3-10Power Steering .................................. 5-18
Fluid ........................................... 8-25Power Windows ................................ 3-23Push-Starting ..................................... 7-20
R
Rear Door Child Safety Locks .......... 3-11Rear Seat ............................................. 2-9Rear Window Defroster .................... 5-45Rear Window Washer ....................... 5-45Rear Window Wiper .......................... 5-45Rearview Mirror ................................ 3-42Recreational Towing ......................... 7-22Registering Your Vehicle in A ForeignCountry ............................................. 9-15Rocking the Vehicle ............................ 4-9
S
Safety Defects, Reporting ................. 9-41
S
Seat Belt System3-point type(Except center-rear position) ...... 2-19Automatic locking ...................... 2-18Belt minder ................................. 2-27Center-rear position .................... 2-23Emergency locking .................... 2-18Extender ..................................... 2-26Pregnant women ........................ 2-17Pretensioner and load limiting .... 2-21Seat belt precautions .................. 2-16warning light/beep ..................... 2-27
SeatsFront seat(Electrically operated seats) ......... 2-5Front seat(Manually operated seats) ............ 2-2Rear seat ....................................... 2-9
Security SystemImmobilizer system .................... 3-36Theft-deterrent system ............... 3-39
Service Publications .......................... 9-43Spare Tire and Tool Storage ................ 7-3Specifications .................................... 10-4Speedometer ...................................... 5-26SRS Air Bags
How the Air Bags Work ............. 2-53Supplemental restraint systemsprecautions ................................. 2-45
Starting the Engine .............................. 5-3Steering Wheel .................................. 3-41
Horn ........................................... 5-46Storage Box ...................................... 6-55
Index
11-5
Mazda6_8U66-EA-05F_Edition2 Page387Tuesday, July 26 2005 11:27 AM
Form No.8U66-EA-05F

Black plate (388,1)
S
Storage Compartments ...................... 6-54Cargo securing loops .................. 6-56Cargo sub-compartment ............. 6-57Center box .................................. 6-54Center console ............................ 6-55Glove box ................................... 6-55Overhead console ....................... 6-54Storage box ................................ 6-55Storage pocket ............................ 6-54
Storage Pocket .................................. 6-54Sunshade ........................................... 3-34Sunvisors .......................................... 6-47
T
Tachometer ........................................ 5-27Temporary Spare Tire ....................... 8-41Theft-Deterrent System ..................... 3-39Tire Information ................................ 9-21Tires
Flat tire ......................................... 7-3Inflation pressure ........................ 8-39Replacement ............................... 8-40Rotation ...................................... 8-40Snow tires .................................... 4-9Spare tire and tool storage ............ 7-3Specifications ............................. 10-7Tire chains .................................. 4-10Uniform tire quality grading system(UTQGS) ................................... 9-19
Tool ..................................................... 7-3Towing
Description ................................. 7-21Emergency towing ..................... 7-21Recreational towing ................... 7-22
T
Traction Control System (TCS) ........ 5-22TCS indicator light ..................... 5-23TCS OFF indicator light ............ 5-23TCS OFF switch ........................ 5-23
Trip Meter ......................................... 5-26Trunk Lid .......................................... 3-20Trunk Light ....................................... 3-21Turn and Lane-Change Signals ......... 5-42
V
Vanity Mirrors ................................... 6-47Vehicle Information Labels ............... 10-2
W
Warning Lights ................................. 5-30ABS ............................................ 5-32Air bag system ........................... 5-35Automatic transaxle ................... 5-37Brake system .............................. 5-32Charging system ......................... 5-33Check engine .............................. 5-34Door-ajar .................................... 5-37Engine oil pressure ..................... 5-34Front seat belt pretensionersystem ........................................ 5-35Low fuel ..................................... 5-35Low washer fluid level ............... 5-37Seat belt ...................................... 5-35
Warranty ............................................ 9-12Washer Fluid ..................................... 8-29Weights ............................................. 10-6Wheel Replacement .......................... 8-42Windows
Power windows .......................... 3-23Windshield Washer ........................... 5-44
11-6
Index
Mazda6_8U66-EA-05F_Edition2 Page388Tuesday, July 26 2005 11:27 AM
Form No.8U66-EA-05F

Black plate (389,1)
W
Windshield Wipers ............................ 5-44Blades replacement .................... 8-32
Winter Driving .................................... 4-9
Index
11-7
Mazda6_8U66-EA-05F_Edition2 Page389Tuesday, July 26 2005 11:27 AM
Form No.8U66-EA-05F

Black plate (390,1)
11-8
Mazda6_8U66-EA-05F_Edition2 Page390Tuesday, July 26 2005 11:27 AM
Form No.8U66-EA-05F

NAVIGATION SYSTEM

2
Before U
se
Contents, Accessories, and LaserAccessoriesPlease contact an Authorized Mazda Dealer if you are missing any of the following accessories.
●Map Disc
CAUTION:THIS PRODUCT IS A CLASS I LASER PRODUCT.HOWEVER THIS PRODUCT USES A VISIBLE/INVISIBLE LASER BEAM WHICH COULD CAUSE HAZARDOUS RADIATION EXPOSURE IF DIRECTED.BE SURE TO OPERATE THIS PRODUCT CORRECTLY AS INSTRUCTED.USE OF CONTROLS OR ADJUSTMENTS OR PERFORMANCE OF PROCEDURES OTHER THAN THOSE SPECIFIED HEREIN MAY RESULT IN HAZARDOUS RADIATION EXPOSURE. DO NOT OPEN COVERS AND DO NOT REPAIR YOURSELF. REFER SERVICING TO QUALIFIED PERSONNEL.
Laser products:Wave length: 650 nmLaser power: No hazardous radiation is emitted with safety protection.
Prepa-ration
Imme-diateuse
Advanceduse
Ifnecessary
MAZDA6_Navi_EA.book Page 2 Tuesday, May 31, 2005 9:35 AM

3
ProductAccessories ...............................................................................................................2Laser Product ............................................................................................................2Contents ....................................................................................................................3Safety Information......................................................................................................4Introduction................................................................................................................6Names and Functions................................................................................................8
Before Use
Activation .................................................................................................................10Screen names and functions ...................................................................................12Screen change ........................................................................................................14
● Changing the Map Orientation/Scale ............................................ 15
Getting started
Destination Entry and Route Search........ 16● Change (Change Search Area) ● Address● Point of interest ● Emergency● Memory Point ● Home● Preset Destination ● Previous Destination● Intersection ● Freeway On/Off Ramp● Phone number ● Coordinates● Select from map
Use POI........................................................................................ 22Character Entry .................................................................... 23Direct Destination Input.............................................................. 24POI Icons on Maps / Delete Destination ............................. 25Route Options ...............................................................................................26
Routing
Address Book ..........................................................................................................32 Address Book
Voice Recognition.......................................................................... 38 Voice Recognition
Navigation Set Up....................................................................................................40 Navigation Set Up
Precautions/System Performance ...........................................................................48● Voice Guidance ● GPS● Map Matching ● Positioning Accuracy● Route Guide ● Route Search
Troubleshooting .......................................................................................................54● Verification First ● Error Messages
Maintenance ............................................................................................................55
As necessary
MAZDA6_Navi_EA.book Page 3 Tuesday, May 31, 2005 9:35 AM

4
Before U
se
Safety Information■ Read this owner’s manual for your Navigation System carefully before using the system.
They contain instructions about how to use the system in a safe and effective manner. Mazda assumes no responsibility for any problems resulting from failure to observe the instructions given in this manual.
■ This manual uses pictographs to show you how to use the product safely and to alert you to potential dangers resulting from improper connections and operation. The meanings of the pictographs are explained below. It is important that you fully understand the pictographs and explanations in order to use this manual and the system properly.
Warning
WarningThe presence of this Warning symbol in the text is intended to alert you to the importance of heeding the operation instructions. Failure to heed the instructions may result in severe injury or death.
■ Do not keep your eyes fixed on the monitor screen or operate the system while driving. Do not change the settings and destination locations while driving. Minimize the time spent on viewing the monitor screen and listening to the voice guidance while driving. Operating the system will distract the driver from looking ahead of the vehicle and can cause accidents. Always stop the vehicle in a safe location and use the parking brake before operating the system.
■ Always obey local traffic regulations. Your guided route may include roads that are not open to vehicles or are closed due to traffic regulations. Comply with the local traffic regulations and take another route.
■ Do not use the unit when it is out of order. If the unit is out of order (no image, no sound) or in an abnormal state (has foreign matter in it, is exposed to water, is smoking, or smells), then turn it off immediately and consult with an Expert repairer, we recommend an Authorized Mazda Repairer. Using the unit in an out-of-order condition may lead to accidents, fires, or electric shocks.
■ Use the proper power supply. This product is designed for operation with a negative grounded 12 V DC battery system.
■ Do not disassemble. Do not disassemble the product or attempt to repair it yourself. If the product needs to be repaired, take it to an Expert repairer, we recommend an Authorized Mazda Repairer.
Warnings
MAZDA6_Navi_EA.book Page 4 Tuesday, May 31, 2005 9:35 AM
5
Before U
se
Operation is subject to the following two conditions; (1) this device may not cause interference, and (2) this device must accept any interference, including interference that may cause undesired operation of the device.
Caution
CautionThe presence of this Caution symbol in the text is intended to alert you to the importance of heeding the operation instructions. Failure to heed the instructions may result in injury or material damage.
■ Do not use the product where it is exposed to water, moisture, or dust. Exposure to water, moisture, or dust may lead to smoke, fire, or other damage to the unit. Make especially sure that the unit does not get wet in car washes or on rainy days.
■ Keep the voice guidance volume at an appropriate level. Keep the volume level low enough to be aware of road and traffic conditions while driving.
■ Protect the Deck Mechanism. Do not insert any foreign objects into the slot of this unit.
■ This navigation system is designed use for exclusively in automobiles. This navigation system should only be installed in an automobile. Do not install it in a ship, aircraft, or any other vehicles except an automobile. Do not use it detached from the vehicle.
■ Do not insert or allow your hand or fingers to be caught in the unit. To prevent injury, do not get your hand or fingers caught in moving parts or in the disc slot. Especially watch out for infants.
Cautions
MAZDA6_Navi_EA.book Page 5 Tuesday, May 31, 2005 9:35 AM

6
Before U
se
Introduction
■ Extremely low or high temperatures may interfere with normal operationThe inside of the vehicle can become very hot or cold when it is parked for extended periods in direct sunlight or in cold places with the engine turned off. The navigation system may not operate normally under such circumstances. Turn off the navigation system until the inside of the vehicle has cooled down or warmed up. If the system does not operate thereafter, consult an Expert repairer, we recommend an Authorized Mazda Dealer.
This navigation system utilizes GPS* satellite signals, Speed sensor and Gyrosensor to track and display your vehicle’s current position, and to guide you from your starting point to your destination along a calculated route.* : GPS (Global Positioning System) is a position detecting system utilizing the signals from GPS satellites
deployed by the U.S. Defense Department.
Screens displayed in this manual may differ from those on the actual display.
Use This Product Safety
Navigation System
Screens
MAZDA6_Navi_EA.book Page 6 Tuesday, May 31, 2005 9:35 AM

7
Before U
se
MAZDA6_Navi_EA.book Page 7 Tuesday, May 31, 2005 9:35 AM

8
Before U
se
Names and Functions
●To remove the remote control from the cradle press
●When placing the remote control back in the cradle, press it until you hear it engage.
PUSH
Joystick●Selects items
by tilting it up, down, right, and left.●Scrolls map.
ZOOM keyChanges the map scale.( page 15)
RET keyReturns to the previous screen.
VOICE key●Initiates vocal guidance for route
maneuvers. ●Adjusts screen quality.
( page 13)
POS (Displays
ENTE●Execute●Display
MENUSelect a( pag
Infrared transmitter
ENTER
ZOOM
RET
VOICE
POS
ENTER
MENU
TALK Use for srecogniti
TALK
MAZDA6_Navi_EA.book Page 8 Tuesday, May 31, 2005 9:35 AM

9
Before U
se
u hear it engage.
NoteMatch the polarity of the batteries with the and marks in the battery case.
●Battery : Two AA batteries (R6PU)●Battery life : Approximately 5
months of normal use (when using manganese batteries at ambient temperatures)
●Battery replacement : Replace the batteries as soon as possible when the infrared receiver does not respond properly to remote control operations, or when the remote control does not work.
NoteMake sure that there is not any pressure applied to any of the remote control buttons when placing the remote control in the console box. Pressure on any of the buttons will drain the batteries.
Battery Inserting
➀ Open the battery compartment cover.
➁ Insert the new batteries.
➂ Close the battery compartment cover.
POS (Position) keyDisplays your current position.
ENTER key●Executes a selected item.●Displays pop up menu.
MENU keySelect a menu.( page 13)
nfrared transmitter
POS
ENTER
MENU
TALK SwitchUse for switching to voice recognition or canceling.
TALK
MAZDA6_Navi_EA.book Page 9 Tuesday, May 31, 2005 9:35 AM

10
Getting started
ActivationInsert the map disc into the unit to start the Mobile Navigation System.
Note●The map disc cannot be inserted or ejected while the ignition switch is in the OFF position.●Remember that the battery can run down if the ignition switch is kept in the ON or ACC
position for a long time while the engine not running.
■ Map Disc
● Refer to “Handling and Care of Map Discs” to know how to handle a map disc ( page 55).
1 Turn the ignition switch to the ON position and
press to open
the display.
Note
●This display angle can be adjusted by pressing .
When the is pressed, the display angle changes in stages.
●Press to close the display.
2 Remove the bracket.Note
The main unit is located under the front passenger seat.
3 Insert the map disc with the printed side facing up.
NoteCondensation may form on the optical lens or the map disc inside the unit when the temperature in the vehicle increases in a short time such as when heating the car on a cold day. This condensation may cause malfunctions. If so, unload the map disc and do not operate the unit for approximately 1 hour. Wipe the condensation off the map disc with a soft cloth.If the unit does not operate correctly after 1 hour, consult an Authorized Mazda Dealer.
Cautions
OPEN TILT
TILT
OPEN
screwBracket
[CAUTION] screen
MAZDA6_Navi_EA.book Page 10 Tuesday, May 31, 2005 9:35 AM
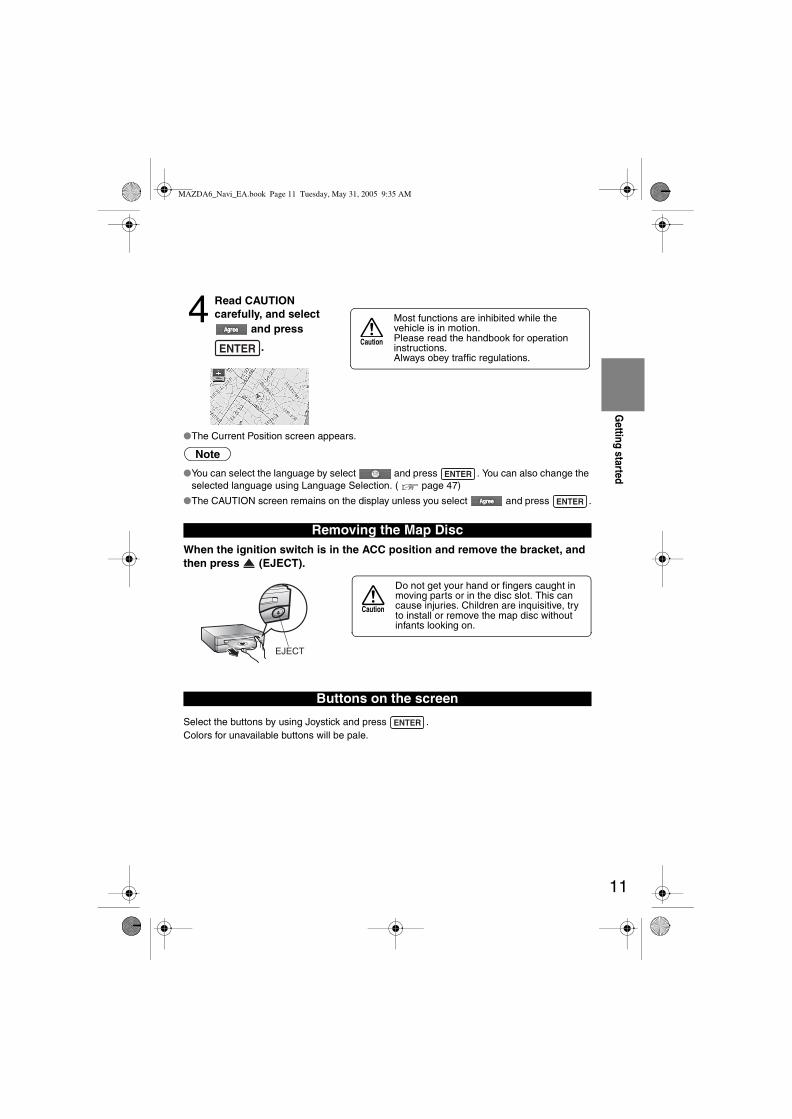
11
Getting started
●The Current Position screen appears.
Note
●You can select the language by select and press . You can also change the selected language using Language Selection. ( page 47)
●The CAUTION screen remains on the display unless you select and press .
When the ignition switch is in the ACC position and remove the bracket, and then press (EJECT).
Select the buttons by using Joystick and press .Colors for unavailable buttons will be pale.
4 Read CAUTION carefully, and select
and press
.
Removing the Map Disc
Buttons on the screen
ENTER
Most functions are inhibited while the vehicle is in motion.Please read the handbook for operation instructions.Always obey traffic regulations.
Caution
ENTER
ENTER
Do not get your hand or fingers caught in moving parts or in the disc slot. This can cause injuries. Children are inquisitive, try to install or remove the map disc without infants looking on.
Caution
ENTER
MAZDA6_Navi_EA.book Page 11 Tuesday, May 31, 2005 9:35 AM
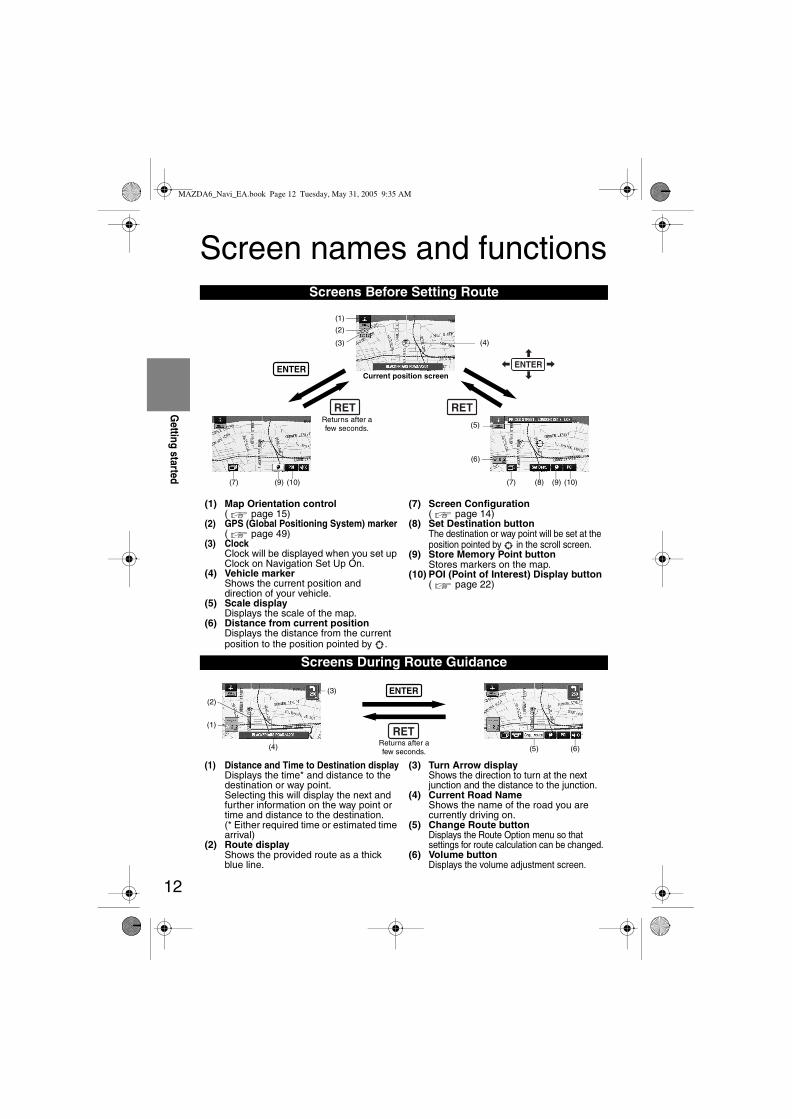
12
Getting started
Screen names and functionsScreens Before Setting Route
(1) Map Orientation control( page 15)
(2) GPS (Global Positioning System) marker( page 49)
(3) ClockClock will be displayed when you set up Clock on Navigation Set Up On.
(4) Vehicle markerShows the current position and direction of your vehicle.
(5) Scale displayDisplays the scale of the map.
(6) Distance from current positionDisplays the distance from the current position to the position pointed by .
(7) Screen Configuration( page 14)
(8) Set Destination buttonThe destination or way point will be set at the position pointed by in the scroll screen.
(9) Store Memory Point buttonStores markers on the map.
(10) POI (Point of Interest) Display button( page 22)
Screens During Route Guidance
(1) Distance and Time to Destination displayDisplays the time* and distance to the destination or way point.Selecting this will display the next and further information on the way point or time and distance to the destination.(* Either required time or estimated time arrival)
(2) Route displayShows the provided route as a thick blue line.
(3) Turn Arrow displayShows the direction to turn at the next junction and the distance to the junction.
(4) Current Road NameShows the name of the road you are currently driving on.
(5) Change Route buttonDisplays the Route Option menu so that settings for route calculation can be changed.
(6) Volume buttonDisplays the volume adjustment screen.
RET
(6)
(7) (8) (9) (10)
(5)
(4)(3)
ENTER
(1)
(2)
Returns after a few seconds.
ENTER
RET
Current position screen
(7) (9) (10)
ENTER
(5) (6)(4)
(3)
(1)
(2)
Returns after a few seconds.
RET
MAZDA6_Navi_EA.book Page 12 Tuesday, May 31, 2005 9:35 AM

13
Getting started
Menu appears when pressing .
Display Menu screen will be shown when you press (DISP) and hold.
NoteDisplay Menu screen will be disappeared when they have been unused during a few seconds.
■ Adjusting the screen quality
●Adjusts the screen brightness
Select “ADJ.”, press , and then select “BRIGHT”, press and the screen will be brighter when scrolling it to the right, or darker when scrolling it to the left.
●Adjusts the screen contrast
Select “ADJ.”, press , and then select “CONTRAST”, press and the screen will be lighter when scrolling it to the right, or deeper when scrolling it to the left.
Note• Adjust by scrolling the Joystick to the right and left.
• Restore the adjustment value to the default when selecting “RESET”, press .
■ Clearing the screen
Select “DISP OFF”, press and the screen will disappear.The screen will appear again when pressing any buttons.
■ Daytime screen/Night screenWhen the headlights are on, daytime mode can also be selected (if extra screen certain nighttime conditions). This selection can only be done when the headlights are on. Press
to switch between day and night modes.
• Alternatively, you can carry out the same operation by using .
Menu
Screen adjustments and settings
MENU
Destination Entry and Route Search ( page 16)Address Book ( page 32)Cancel Guidance ( page 25)Navigation Set Up ( page 40)Route Options ( page 26)
VOICE
ENTER ENTER
ENTER ENTER
ENTER
ENTER
ENTER
DIM
MAZDA6_Navi_EA.book Page 13 Tuesday, May 31, 2005 9:35 AM

14
Getting started
Screen changeCurrent position mapShows the current position of your vehicle on the scale selected.Route and flagsWhen the route has been set, the blue line represents the route and the following two flags appear on the map.
: Destination pointPress and Select ENTER
Map configuration
Single map One-screen display of map possible.
Dual map Dual screen display of map.
Turn List While using route guidance, the directions for the next junction where you have to turn are shown as Turn List.
Turn Arrow While using route guidance, the directions for the next junction where you have to turn are shown as Turn Arrow.
Enlarged Junction Diagram
Before a fork in the road, an enlarged diagram of the junction automatically appears in a second screen. This is to make route guidance even clearer.
During route guidance, an enlarged diagram of an approaching fork or junction appears. When you drive past the junction, the enlarged diagram disappears.
During route guidance, an enlarged diagram of the freeway automatically appears in a second screen as you approach a fork on the freeway. This is to make route guidance even clearer.
Freeway information
A simplified diagram of the freeway can be displayed.
MAZDA6_Navi_EA.book Page 14 Tuesday, May 31, 2005 9:35 AM

15
Getting started
■ Do not keep your eyes fixed on the monitor screen or operate the system while driving Do not change the settings and destination locations while driving. Minimize the time spent viewing the monitor screen and listening to the voice guidance while driving. Operating the system will distract the driver from looking ahead of the vehicle and may cause an accident. Always stop the vehicle in a safe location and use the parking brake before operating the system.
Map orientation
Map scale
Changing the Map Orientation/Scale
Warning
1 Press
2 Select , and
press
●North Up: Geographic north is up.
●Head Up: The direction you are heading is up.
ENTER
ENTER
1 ●The map can be displayed in
13 steps with scales from to .
●ZOOM OUT: Enlarges the map.
●ZOOM IN: Reduces the map. (more detail.)
ZOOM
Imperial display Metric display
128 mi (mile) 256 km
16 mi (mile) 32 km
2 mi (mile) 4 km
1/4 mi (mile) 500 m
1/32 mi (mile) 50 m
Positionbefore
change
<Scale bar>
ZOOM
MAZDA6_Navi_EA.book Page 15 Tuesday, May 31, 2005 9:35 AM

16
Routing
Destination Entry and Route Search●You can set the destination using various methods provided by the system.
Before Steps select
Change (Change Search Area)
Address
MENU ENTER
Open the [DESTINATION ENTRY] Menu
Select
Select the desired Sea : ID, OR, WA, : CA, NV : AZ, CO, MT, NM, UT, WY : IA, KS, MN, MO, ND, NE, : OK, TX : IL, IN, KY, MI, OH, WI
Open the [DESTINATION ENTRY] Menu
Select When narrowing down to house no.
Enter the house no.
Selec
When entering the street name directlySelect
Enter the street name and select
Selestreefrom
When narrowing down to city nameSelect
: Cancel the city selection.
: Displays 5 city name list nearest the current position.
Selecthe city namefrom the list
: Displays the city name input screen.
Enterthe city nameand selec
MAZDA6_Navi_EA.book Page 16 Tuesday, May 31, 2005 9:35 AM
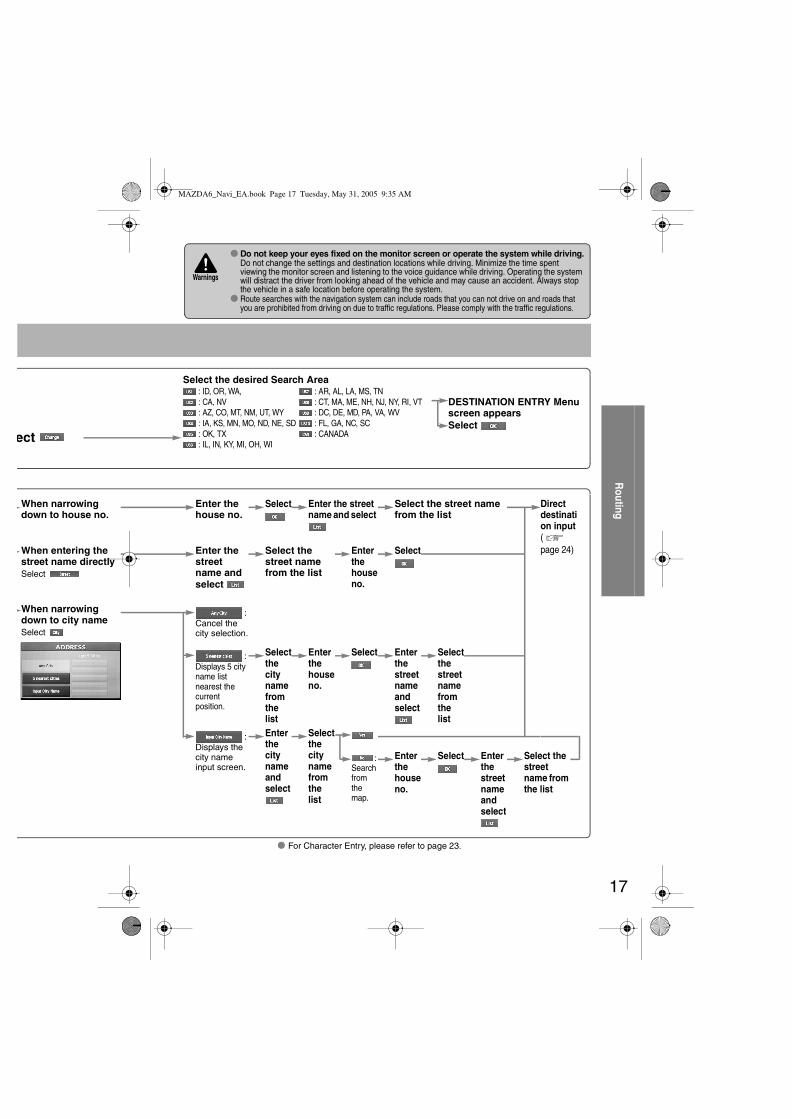
17
Routing
● For Character Entry, please refer to page 23.
● Do not keep your eyes fixed on the monitor screen or operate the system while driving.Do not change the settings and destination locations while driving. Minimize the time spent viewing the monitor screen and listening to the voice guidance while driving. Operating the system will distract the driver from looking ahead of the vehicle and may cause an accident. Always stop the vehicle in a safe location before operating the system.
● Route searches with the navigation system can include roads that you can not drive on and roads that you are prohibited from driving on due to traffic regulations. Please comply with the traffic regulations.
Warnings
ect
Select the desired Search Area : ID, OR, WA, : AR, AL, LA, MS, TN : CA, NV : CT, MA, ME, NH, NJ, NY, RI, VT : AZ, CO, MT, NM, UT, WY : DC, DE, MD, PA, VA, WV : IA, KS, MN, MO, ND, NE, SD : FL, GA, NC, SC : OK, TX : CANADA : IL, IN, KY, MI, OH, WI
DESTINATION ENTRY Menu screen appearsSelect
When narrowing down to house no.
Enter the house no.
Select Enter the street name and select
Select the street name from the list
Direct destination input( page 24)When entering the
street name directlySelect
Enter the street name and select
Select the street name from the list
Enter the house no.
Select
When narrowing down to city nameSelect
: Cancel the city selection.
: Displays 5 city name list nearest the current position.
Select the city name from the list
Enter the house no.
Select Enter the street name and select
Select the street name from the list
: Displays the city name input screen.
Enter the city name and select
Select the city name from the list
: Search from the map.
Enter the house no.
Select Enter the street name and select
Select the street name from the list
MAZDA6_Navi_EA.book Page 17 Tuesday, May 31, 2005 9:35 AM

18
Routing
Destination Entry and Route Search
Point of interest
Emergency
Open the [DESTINATION ENTRY] Menu
Select When entering the destination point directly
When narrowing down to category nameSelect
Select the category name from the list
When narrowing down to city nameSelect
: Cancel the city selection.
: Displays 5 city name list nearest the current position.
Selecthe cnamefrom list
: Displays the city name input screen.
Enterthe cnameand selec
Select
(When stopped)
When stopped
Displays the police station select screen.
Displays the hospital select screen.
When driving
Sets the destination to the nearest police station automatically.
Sets the destination to the nearest hospital automatically.
Selec
stationDistan
stationname.
MAZDA6_Navi_EA.book Page 18 Tuesday, May 31, 2005 9:35 AM
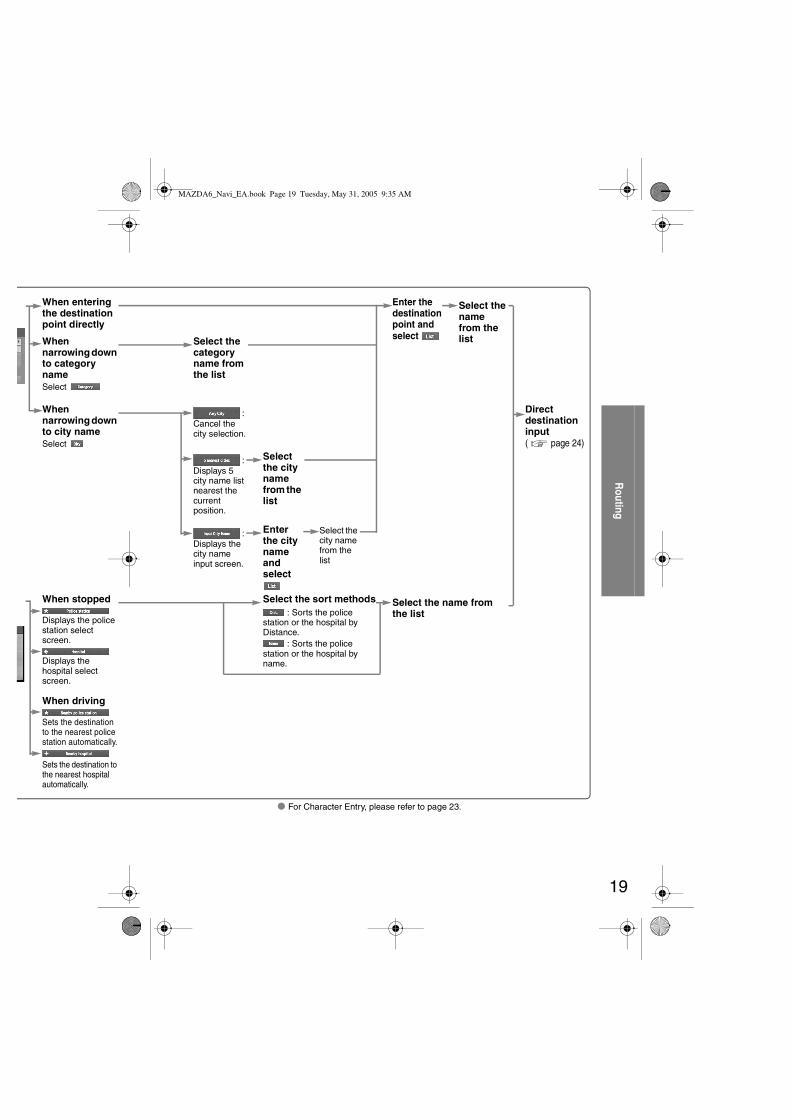
19
Routing
● For Character Entry, please refer to page 23.
When entering the destination point directly
Enter the destination point and select
Select the name from the listWhen
narrowing down to category nameSelect
Select the category name from the list
When narrowing down to city nameSelect
: Cancel the city selection.
Direct destination input( page 24)
: Displays 5 city name list nearest the current position.
Select the city name from the list
: Displays the city name input screen.
Enter the city name and select
Select the city name from the list
When stopped
Displays the police station select screen.
Displays the hospital select screen.
When driving
Sets the destination to the nearest police station automatically.
Sets the destination to the nearest hospital automatically.
Select the sort methods : Sorts the police
station or the hospital by Distance.
: Sorts the police station or the hospital by name.
Select the name from the list
MAZDA6_Navi_EA.book Page 19 Tuesday, May 31, 2005 9:35 AM
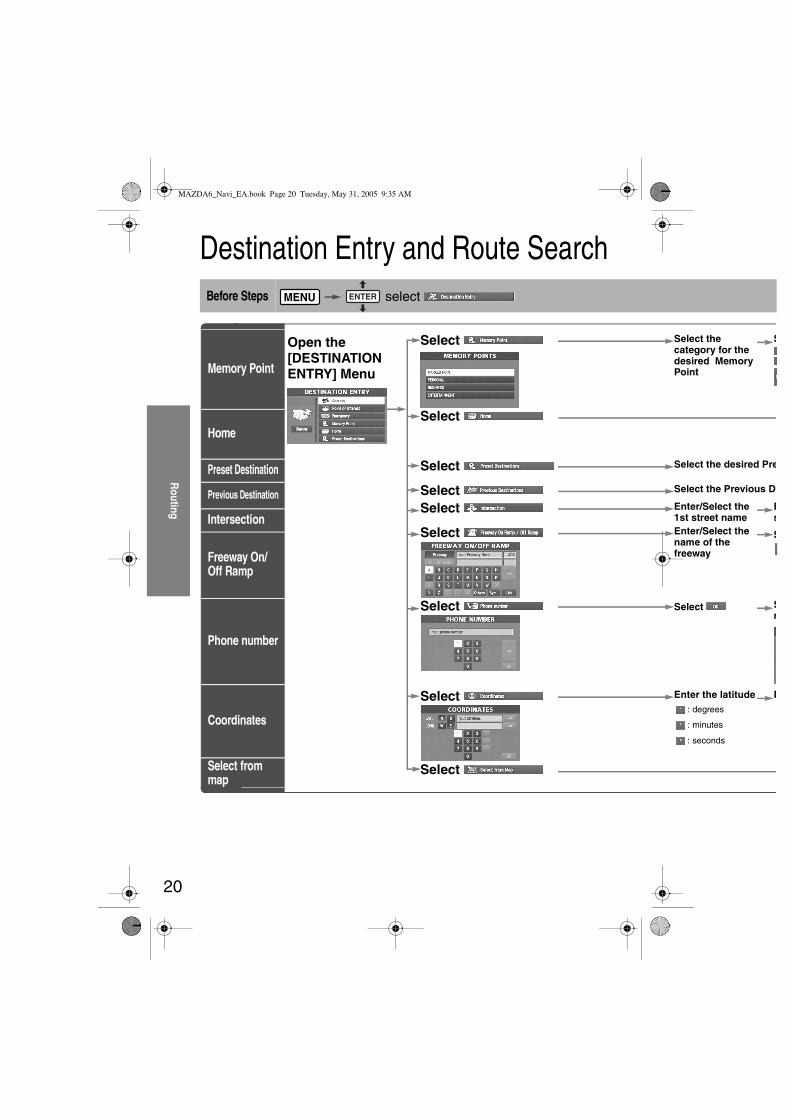
20
Routing
Destination Entry and Route SearchBefore Steps select
Memory Point
Home
Preset Destination
Previous Destination
Intersection
Freeway On/Off Ramp
Phone number
Coordinates
Select from map
MENU ENTER
Open the [DESTINATION ENTRY] Menu
Select Select the category for the desired Memory Point
S
Select
Select Select the desired Pre
Select Select the Previous De
Select Enter/Select the 1st street name
Es
Select
Enter/Select the name of the freeway
S
Select
Select Sn
Select
Enter the latitude: degrees
: minutes
: seconds
E
Select
MAZDA6_Navi_EA.book Page 20 Tuesday, May 31, 2005 9:35 AM
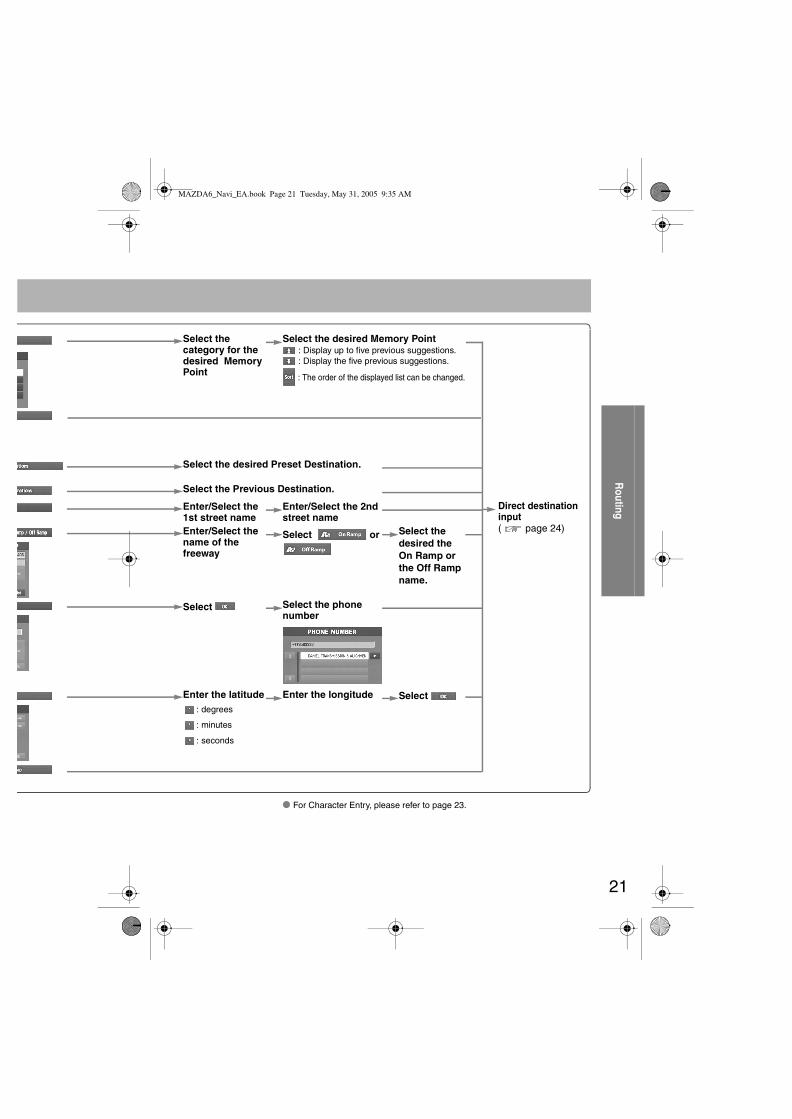
21
Routing
● For Character Entry, please refer to page 23.
Select the category for the desired Memory Point
Select the desired Memory Point : Display up to five previous suggestions. : Display the five previous suggestions.
: The order of the displayed list can be changed.
Direct destination input( page 24)
Select the desired Preset Destination.
Select the Previous Destination.
Enter/Select the 1st street name
Enter/Select the 2nd street name
Enter/Select the name of the freeway
Select or Select the desired the On Ramp or the Off Ramp name.
Select Select the phone number
Enter the latitude: degrees
: minutes
: seconds
Enter the longitude Select
MAZDA6_Navi_EA.book Page 21 Tuesday, May 31, 2005 9:35 AM

22
Routing
Use POI ●You can select one of the six categories on the menu or List Categories and then select the POI(s) to be displayed on the map.
Before Steps Select
Displaying POI(s) on a Map
Local Search
Deleting POI Markers
Before Steps Displaying POI(s) on a Map ( above)
Showing POI Data
ENTER ENTER
Open the [QUICK POI]
Select the categories to be displayed up to a maximum of five.●POI icon chart
( page 25)For categories other than the six displayed, select
and select them from the list shown.
Select the POI you want to find from the listed categories.After you make a selection, the point of interest you selected appears on the map.
: Search POI along the route during the guidance and show the list.
Display the POI. Select the desired POI by moving on top of the POI icon.The name of the selected POI appears.If no data is stored for the selected POI, the POI name is not displayed.
Select (Information)The POI(s) data is displayed.
: Stores the location of POI as a memory point.
MAZDA6_Navi_EA.book Page 22 Tuesday, May 31, 2005 9:35 AM

23
Routing
Character Entry
To enter the street name, city name, and other.
To enter the house phone number, and other.
Select the first several characters on the screen.
Select your target in the list.
●If a desired name is not in the list, go back to the step 1, and try fewer characters.
: Display up to five previous suggestions.
: Display the previous suggestions.
: Text flow (Right) : Text flow (Left)
: The order of the displayed list can be changed. (Displayed
list varies or may not be displayed depending on what was input.)
: Text can be input again.
( may not be displayed depending on what was
input. may be displayed
when is selected.)
: Move the cursor to the previous
position and delete a character.
: The list appears.
●Examples-Street: ANBERG Street: STRASSE DES 17. JUNIEnter by selecting characters: Enter by selecting characters:
Select Select
Select
Select
Names of which spelling starts with the entered character appear.
-Street: ACHATWEGEnter by selecting characters:
A N D E S 1 7
A C H A T
Select the characters on the screen.
Select
: Move the cursor to the previous position and delete a character.
MAZDA6_Navi_EA.book Page 23 Tuesday, May 31, 2005 9:35 AM

24
Routing
Direct Destination Input
Direct Destination Input
Selecting Route
1 Position the cursor on your destination on the map
Scroll the map and change the map scale if necessary.
2 Select
3 Select (Destination).Route calculation will be carried out and the entire route will be displayed on the map.Select (Way point) to set the address as a way point on your route ( page 32). You can set up to 5 way- points per trip.
4 Select .Route guidance begins using displayed route.
Note
●If your desired route cannot be found, (Change route) allows the route option settings to be changed. ( page 26)
●Selecting for five seconds or more will launch the Demo mode.
Operate after Step 3 of [Direct Destination Input]
4 Select .The calculation route can be selected from one of three types namely, Quick (the fastest route), Altern. (the standard route), or Short (the shortest route).
5 Select (Information).Details regarding the individual routes (i.e., required time total distance, roads used, etc.) Select either , , or , and then select
when you have decided on the route to be used.
ENTER
ENTER
ENTER
MAZDA6_Navi_EA.book Page 24 Tuesday, May 31, 2005 9:35 AM
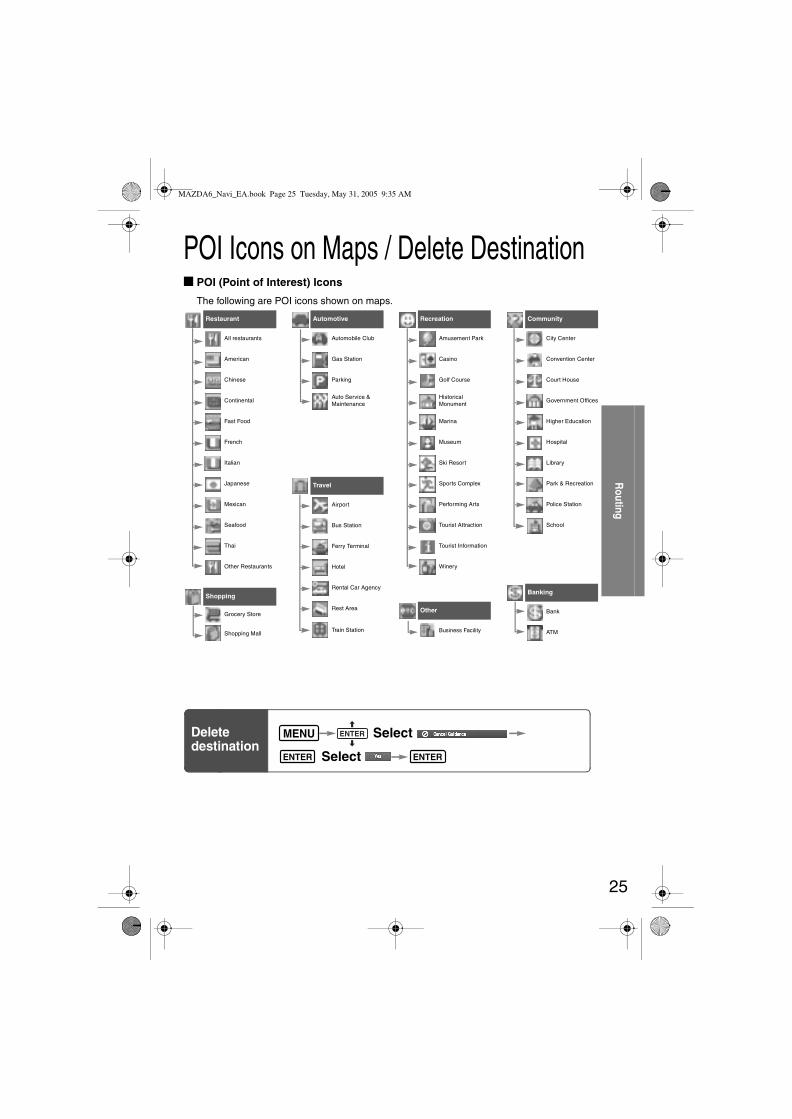
25
Routing
POI Icons on Maps / Delete Destination■ POI (Point of Interest) Icons
The following are POI icons shown on maps.
Restaurant
All restaurants
American
Chinese
Continental
Fast Food
French
Italian
Japanese
Mexican
Seafood
Thai
Other Restaurants
Shopping
Grocery Store
Shopping Mall
Automotive
Automobile Club
Gas Station
Parking
Auto Service & Maintenance
Travel
Airport
Bus Station
Ferry Terminal
Hotel
Rental Car Agency
Rest Area
Train Station
Recreation
Amusement Park
Casino
Golf Course
Historical Monument
Marina
Museum
Ski Resort
Sports Complex
Performing Arts
Tourist Attraction
Tourist Information
Winery
Other
Business Facility
Community
City Center
Convention Center
Court House
Government Offices
Higher Education
Hospital
Library
Park & Recreation
Police Station
School
Banking
Bank
ATM
Delete destination
Select
Select
MENU ENTER
ENTER ENTER
MAZDA6_Navi_EA.book Page 25 Tuesday, May 31, 2005 9:35 AM

26
Routing
Route Options ●During route guidance you can change the route options, stop or check the route.
Before Steps select
Search Condition
Route Preferences
MENU ENTER
Open the [ROUTE OPTIONS] Menu
Select
The routebe used.
The alter
The routewill be us
Select
Each timwill toggnon-usagroads or●
guidanc●The rout
specified
MAZDA6_Navi_EA.book Page 26 Tuesday, May 31, 2005 9:35 AM
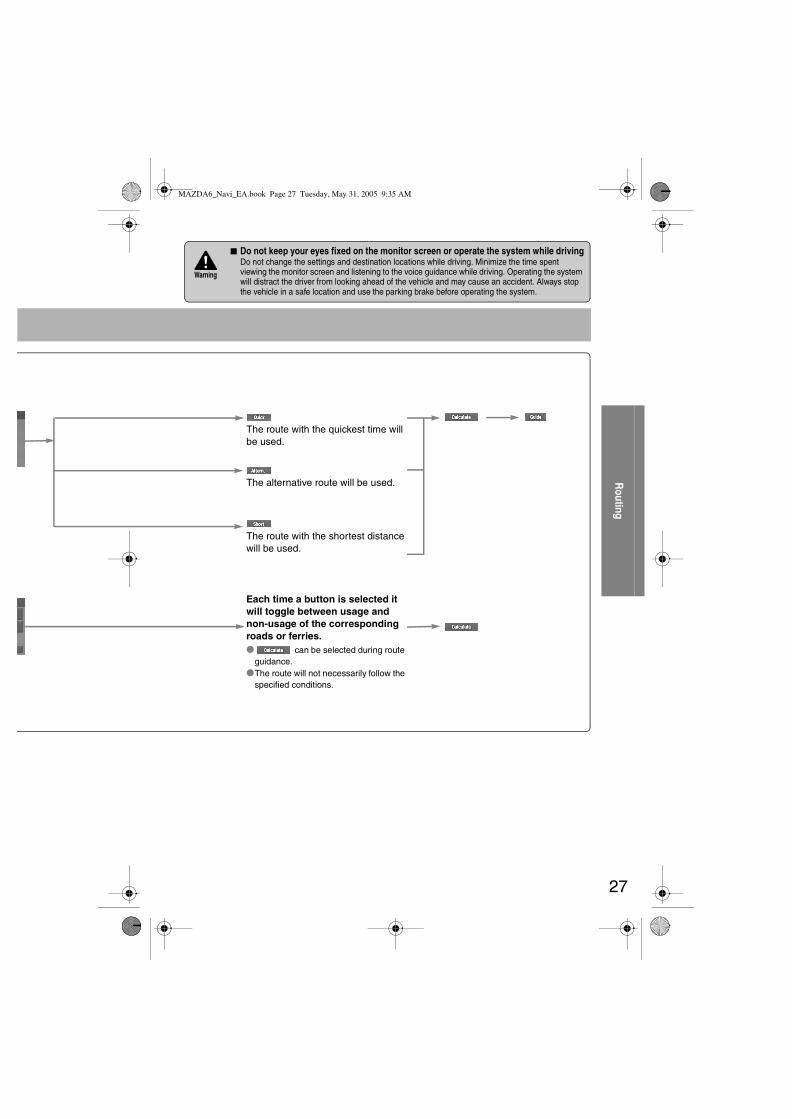
27
Routing
■ Do not keep your eyes fixed on the monitor screen or operate the system while drivingDo not change the settings and destination locations while driving. Minimize the time spent viewing the monitor screen and listening to the voice guidance while driving. Operating the system will distract the driver from looking ahead of the vehicle and may cause an accident. Always stop the vehicle in a safe location and use the parking brake before operating the system.
Warning
The route with the quickest time will be used.
The alternative route will be used.
The route with the shortest distance will be used.
Each time a button is selected it will toggle between usage and non-usage of the corresponding roads or ferries.● can be selected during route
guidance.●The route will not necessarily follow the
specified conditions.
MAZDA6_Navi_EA.book Page 27 Tuesday, May 31, 2005 9:35 AM

28
Routing
Route OptionsBefore Steps select
Addition of Way points
Modification of Destination or Way Point Positions
Modification of the Visiting Order
Deletion of Destination or Way PointsDeletion of Destination and All Way Points
MENU ENTER
Open the [ROUTE OPTIONS] Menu Select
Set the way point using your preferred method.
When a new destination is set by (Destination), it will
replace the current destination and route calculation will be carried out once again.
Select
Select (Change
Location).
Select the button forlocation to be modifShows the map for the destination/way points.
Select the buttons for the way points in the order that they should be visited.If you wish to cancel an
indication, select .Alternatively, you can cancel it by selecting the destination/way points that set the order.
When the sequencebeen completed, thevisiting order will beupdated automatica
Select the button corresponding to the destination or way point to be deleted.
: Cancel the dele
: Cancel the deletion
MAZDA6_Navi_EA.book Page 28 Tuesday, May 31, 2005 9:35 AM
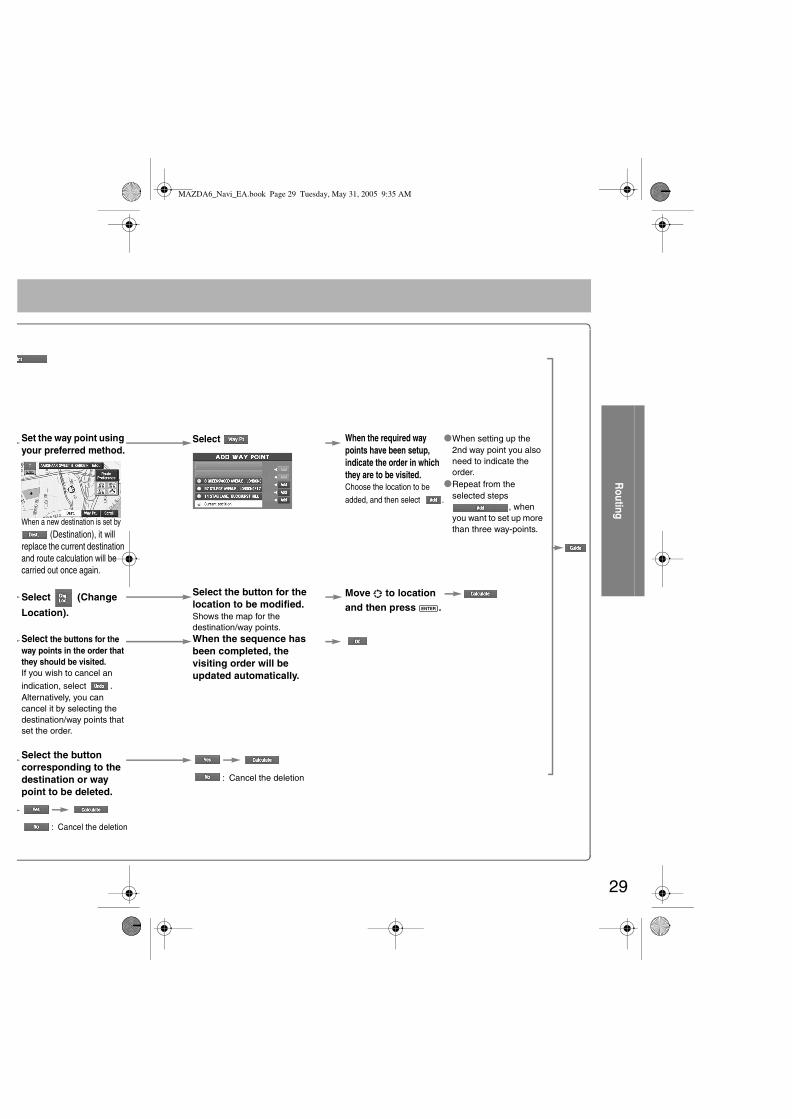
29
Routing
Set the way point using your preferred method.
When a new destination is set by (Destination), it will
replace the current destination and route calculation will be carried out once again.
Select When the required way points have been setup, indicate the order in which they are to be visited.Choose the location to be
added, and then select .
●When setting up the 2nd way point you also need to indicate the order.
●Repeat from the selected steps
, when you want to set up more than three way-points.
Select (Change
Location).
Select the button for the location to be modified.Shows the map for the destination/way points.
Move to location and then press .
Select the buttons for the way points in the order that they should be visited.If you wish to cancel an
indication, select .Alternatively, you can cancel it by selecting the destination/way points that set the order.
When the sequence has been completed, the visiting order will be updated automatically.
Select the button corresponding to the destination or way point to be deleted.
: Cancel the deletion
: Cancel the deletion
ENTER
MAZDA6_Navi_EA.book Page 29 Tuesday, May 31, 2005 9:35 AM
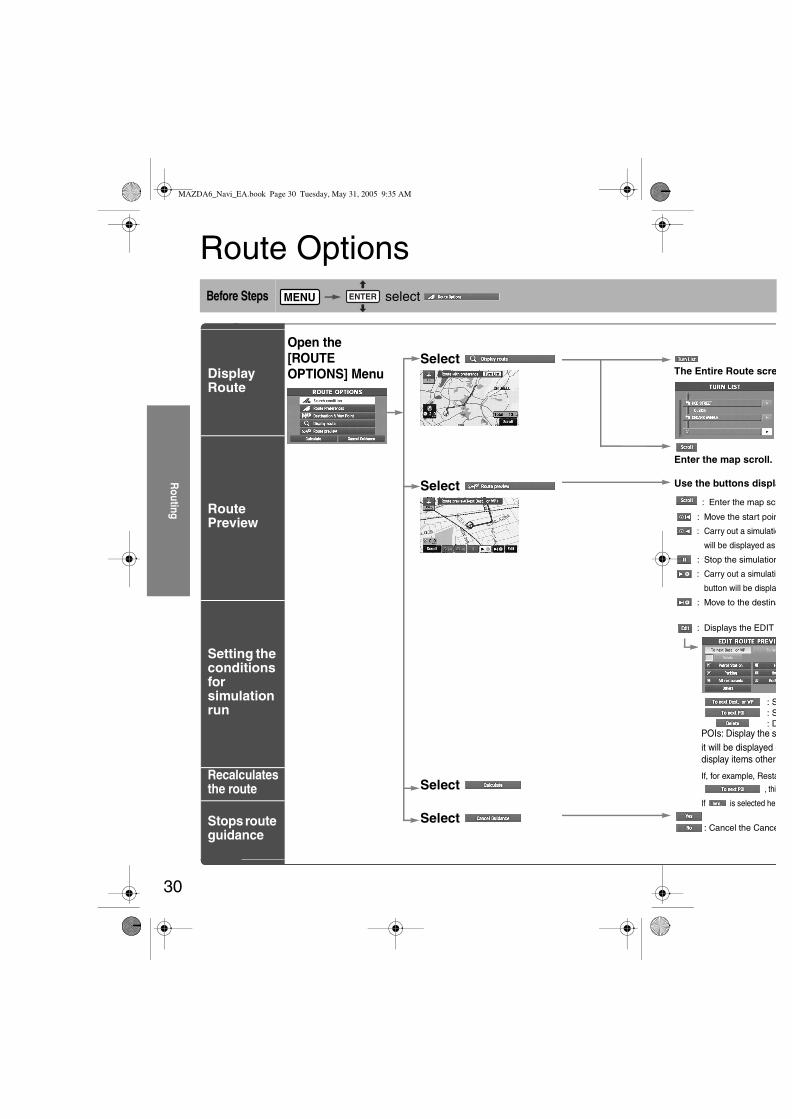
30
Routing
Route OptionsBefore Steps select
Display Route
Route Preview
Setting the conditions for simulation run
Recalculates the route
Stops route guidance
MENU ENTER
Open the [ROUTE OPTIONS] Menu
Select The Entire Route scre
Enter the map scroll.
Select Use the buttons displa
: Enter the map scr
: Move the start poin
: Carry out a simulatio
will be displayed as
: Stop the simulation
: Carry out a simulatio
button will be display
: Move to the destina
: Displays the EDIT
Select
: S : S : D
POIs: Display the sit will be displayed odisplay items other If, for example, Resta
, this
If is selected her
Select : Cancel the Cance
MAZDA6_Navi_EA.book Page 30 Tuesday, May 31, 2005 9:35 AM
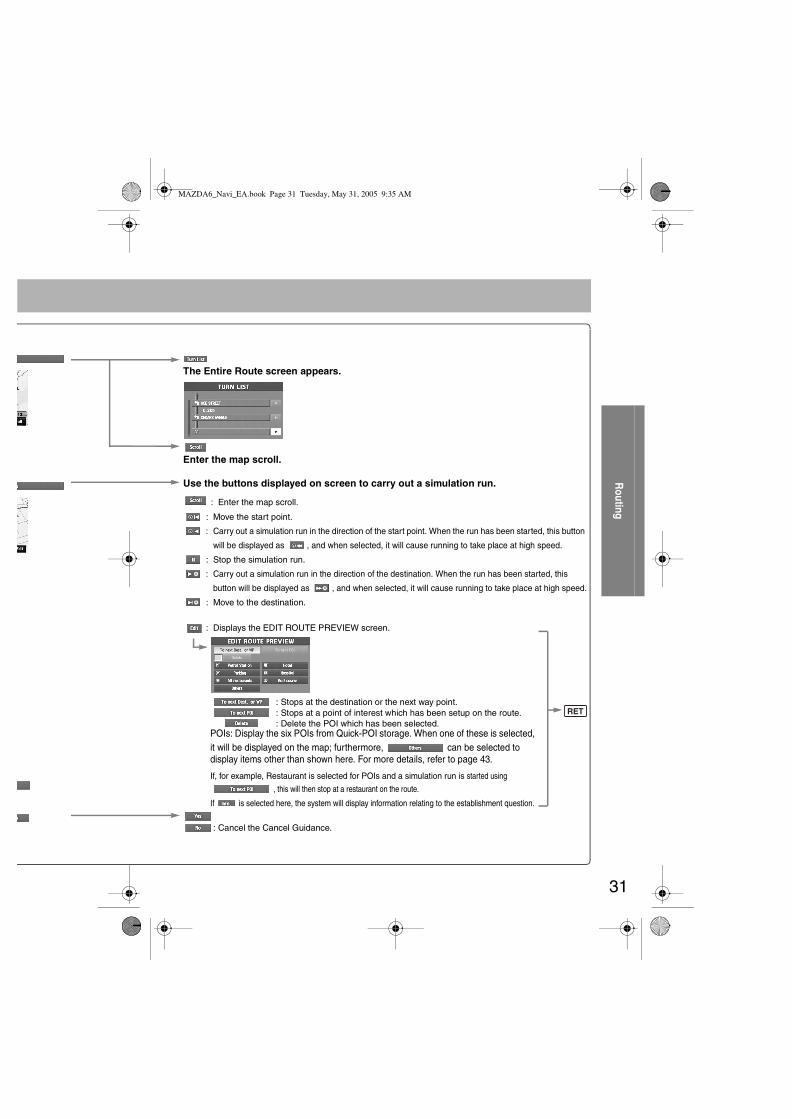
31
Routing
The Entire Route screen appears.
Enter the map scroll.
Use the buttons displayed on screen to carry out a simulation run.
: Enter the map scroll.
: Move the start point.
: Carry out a simulation run in the direction of the start point. When the run has been started, this button
will be displayed as , and when selected, it will cause running to take place at high speed.
: Stop the simulation run.
: Carry out a simulation run in the direction of the destination. When the run has been started, this
button will be displayed as , and when selected, it will cause running to take place at high speed.
: Move to the destination.
: Displays the EDIT ROUTE PREVIEW screen.
: Stops at the destination or the next way point. : Stops at a point of interest which has been setup on the route. : Delete the POI which has been selected.
POIs: Display the six POIs from Quick-POI storage. When one of these is selected, it will be displayed on the map; furthermore, can be selected to display items other than shown here. For more details, refer to page 43. If, for example, Restaurant is selected for POIs and a simulation run is started using
, this will then stop at a restaurant on the route.
If is selected here, the system will display information relating to the establishment question.
: Cancel the Cancel Guidance.
RET
MAZDA6_Navi_EA.book Page 31 Tuesday, May 31, 2005 9:35 AM

32
Ad
dress B
oo
k
Address Book ●You can, edit, or delete any destinations, way points, or marked point.
Before Steps select
Memory Point Storage
Memory Point Confirmation and Modification
Memory Point DeletionAll Memory Point Deletion
Category Name Modification
MENU ENTER
Open the [ADDRESS BOOK]
Select the category from the list.
Spp
Select
Sp
Spd
Changes the selected category name
E
MAZDA6_Navi_EA.book Page 32 Tuesday, May 31, 2005 9:35 AM

33
Ad
dress B
oo
k
Select the category from the list.
Set a memory point using your preferred method.Select a memory point to be modified
: Allows the display icon to be selected. Page 1 and 2 contain standard icons, whereas the With Sound page contains icons which also playback sounds.
: Allows the storage category to be changed. Select the button corresponding to the new category.
: Allows the name to be changed. When editing has been completed, select . Furthermore, select to display names on the map, or
if these names are not to be displayed.
: Allows memory points to be checked and modified on the map screen. After checking.
: Allows the telephone number to be modified. When editing has been completed, select .
Select a memory point to be deleted. : Cancel the deletion.
: Cancel the deletion.
Changes the selected category name
Erase letters using , enter the new letter, and then select .
MAZDA6_Navi_EA.book Page 33 Tuesday, May 31, 2005 9:35 AM

34
Ad
dress B
oo
k
Address BookBefore Steps select
Avoid Area Storage
Avoid Area Confirmation and Modification
Avoid Area Deletion
All Avoid Area Deletion
Category Name Modification
MENU ENTER
Open the [ADDRESS BOOK]
Sap
Select St
Sa
MAZDA6_Navi_EA.book Page 34 Tuesday, May 31, 2005 9:35 AM

35
Ad
dress B
oo
k
Select an avoid area using your preferred method.
: Reduces the size of the avoid area.
: Increases the size of the avoid area.
Select an avoid area to be modified.
Select an avoid area to be deleted.
:
: Allows the name to be changed. When editing has been completed, select
. Furthermore, select to display names on the
map, or if these names are not to be displayed.
: Allows avoid area to be checked and modified on the map screen. After checking.
: Cancel the deletion.
Cancel the deletion.
MAZDA6_Navi_EA.book Page 35 Tuesday, May 31, 2005 9:35 AM

36
Ad
dress B
oo
k
Address BookBefore Steps select
Destination & Way Points
z
Previous Destination Deletion
All Previous Destination Deletion
Preset Destination Storage
Preset Destination Confirmation and Modification
Preset Destination Deletion
All Preset Destination Deletion
Displays Icons at Memory Points
Starts Route calculation
MENU ENTER
Open the [ADDRESS BOOK]
Select
( page 28)
Select
Select
Select
Select
MAZDA6_Navi_EA.book Page 36 Tuesday, May 31, 2005 9:35 AM

37
Ad
dress B
oo
k
Select a destination to be deleted.
: The order of the displayed list can be changed.
: Cancel the deletion.
: Cancel the deletion.
Select a preset number. Set a preset number using your preferred method
Select a preset number. Select the button corresponding to the item to be modified
Select a preset number to be deleted.
: Cancel the deletion.
: Cancel the deletion.
MAZDA6_Navi_EA.book Page 37 Tuesday, May 31, 2005 9:35 AM

38
Voice R
ecog
nitio
n
Voice Recognition ●Voice control can be carried out by simply Pressing and using a voice command ( page 39) spoken into the microphone.
Voice Recognition Structure
● Microphone surfaceVoice entry recognition.
● (Steering Wheel)Use for switching to voice recognition or canceling.
Select the Language
Set up the language in advance.
1 Press
2 select
select select
3 Select your preferred language from the list
Note
To return to current position screen, press .
Basic Usage Pattern
1 Press (Steering Wheel)
2 Speak the desired voice command
Cancel Voice Recognition
1 Long press (Steering Wheel)(Press it more than 0.7 second.)
TALK
MICROPHONE
TALK
TALK Switch
MENU
ENTER
ENTER ENTER
POS
TALK
TALK
MAZDA6_Navi_EA.book Page 38 Tuesday, May 31, 2005 9:35 AM
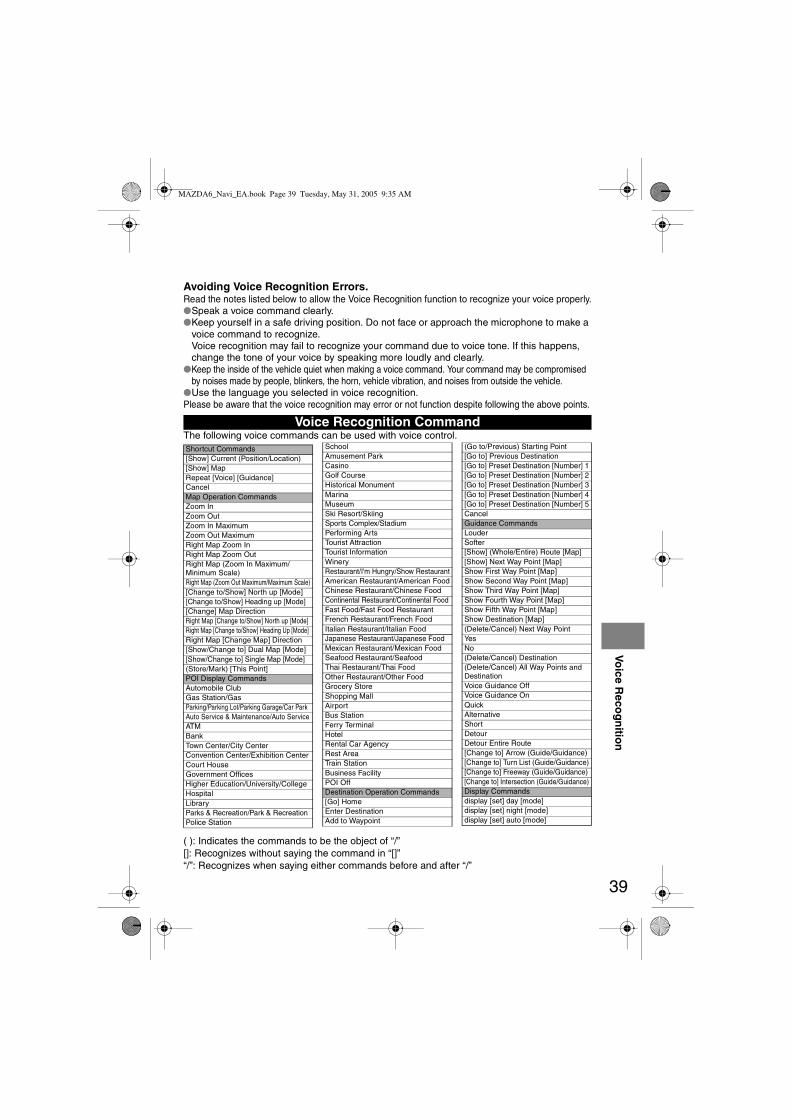
39
Voice R
ecog
nitio
n
Avoiding Voice Recognition Errors.Read the notes listed below to allow the Voice Recognition function to recognize your voice properly.●Speak a voice command clearly.●Keep yourself in a safe driving position. Do not face or approach the microphone to make a
voice command to recognize. Voice recognition may fail to recognize your command due to voice tone. If this happens, change the tone of your voice by speaking more loudly and clearly.
●Keep the inside of the vehicle quiet when making a voice command. Your command may be compromised by noises made by people, blinkers, the horn, vehicle vibration, and noises from outside the vehicle.
●Use the language you selected in voice recognition.Please be aware that the voice recognition may error or not function despite following the above points.
The following voice commands can be used with voice control.
( ): Indicates the commands to be the object of “/” []: Recognizes without saying the command in “[]”“/”: Recognizes when saying either commands before and after “/”
Voice Recognition Command
Shortcut Commands[Show] Current (Position/Location)[Show] MapRepeat [Voice] [Guidance]CancelMap Operation CommandsZoom InZoom OutZoom In MaximumZoom Out MaximumRight Map Zoom InRight Map Zoom OutRight Map (Zoom In Maximum/Minimum Scale)Right Map (Zoom Out Maximum/Maximum Scale)[Change to/Show] North up [Mode][Change to/Show] Heading up [Mode][Change] Map DirectionRight Map [Change to/Show] North up [Mode]Right Map [Change to/Show] Heading Up [Mode]Right Map [Change Map] Direction[Show/Change to] Dual Map [Mode][Show/Change to] Single Map [Mode](Store/Mark) [This Point]POI Display CommandsAutomobile ClubGas Station/GasParking/Parking Lot/Parking Garage/Car ParkAuto Service & Maintenance/Auto ServiceATMBankTown Center/City CenterConvention Center/Exhibition CenterCourt HouseGovernment OfficesHigher Education/University/CollegeHospitalLibraryParks & Recreation/Park & RecreationPolice Station
SchoolAmusement ParkCasinoGolf CourseHistorical MonumentMarinaMuseumSki Resort/SkiingSports Complex/StadiumPerforming ArtsTourist AttractionTourist InformationWineryRestaurant/I'm Hungry/Show RestaurantAmerican Restaurant/American FoodChinese Restaurant/Chinese FoodContinental Restaurant/Continental FoodFast Food/Fast Food RestaurantFrench Restaurant/French FoodItalian Restaurant/Italian FoodJapanese Restaurant/Japanese FoodMexican Restaurant/Mexican FoodSeafood Restaurant/SeafoodThai Restaurant/Thai FoodOther Restaurant/Other FoodGrocery StoreShopping MallAirportBus StationFerry TerminalHotelRental Car AgencyRest AreaTrain StationBusiness FacilityPOI OffDestination Operation Commands[Go] HomeEnter DestinationAdd to Waypoint
(Go to/Previous) Starting Point[Go to] Previous Destination[Go to] Preset Destination [Number] 1[Go to] Preset Destination [Number] 2[Go to] Preset Destination [Number] 3[Go to] Preset Destination [Number] 4[Go to] Preset Destination [Number] 5CancelGuidance CommandsLouderSofter[Show] (Whole/Entire) Route [Map][Show] Next Way Point [Map]Show First Way Point [Map]Show Second Way Point [Map]Show Third Way Point [Map]Show Fourth Way Point [Map]Show Fifth Way Point [Map]Show Destination [Map](Delete/Cancel) Next Way PointYesNo(Delete/Cancel) Destination(Delete/Cancel) All Way Points and DestinationVoice Guidance OffVoice Guidance OnQuickAlternativeShortDetourDetour Entire Route[Change to] Arrow (Guide/Guidance)[Change to] Turn List (Guide/Guidance)[Change to] Freeway (Guide/Guidance)[Change to] Intersection (Guide/Guidance)Display Commandsdisplay [set] day [mode]display [set] night [mode]display [set] auto [mode]
MAZDA6_Navi_EA.book Page 39 Tuesday, May 31, 2005 9:35 AM

40
Navig
ation
Set U
p
Navigation Set Up●You can alter the map display conditions, the route guidance conditions and show the
system information.
■ Stop your vehicle before the following operations. Do not change the settings and destination locations while driving. Minimize the time spent viewing the monitor screen and listening to the voice guidance while driving. Operating the system will distract the driver from looking ahead of the vehicle and may cause an accident. Always stop the vehicle in a safe location and put the parking brake on before operating the system.
Before Steps select
Warning
MENU ENTER ENTER
Open [NAVIGATION SET UP]
( page 41)
( page 43)
( page 47)
( page 47)
( page 44)
( page 46)
MAZDA6_Navi_EA.book Page 40 Tuesday, May 31, 2005 9:35 AM

41
Navig
ation
Set U
p
Navigation Set Up
Before Steps select
select
User Setting
MENU ENTER ENTER
ENTER ENTER
Open the [USER SETTINGS] screen
Select page
■ How to exit
■ MAP Color
Select a screen color from of options.
■ Map Mode
●Auto : The display will automatically switch between Day and Night illumination mode when the headlights are turned off and on respectively.
●Day : The display will be presented in Day illumination mode regardless of whether the headlights are on or off.
●Night : The display will be presented in Night illumination mode regardless of whether the headlights are on or off.
■ Distance
Select the distance unit from or .
■ Notify traffic restriction
The display of warnings during route guidance when passing through areas with traffic restrictions can be turned on or off
■ Arrival Time
The time which is displayed until the destination or a way point can be set as an estimated arrival time or the remaining time. Select to display the estimated arrival time, or to display the remaining time.
MAZDA6_Navi_EA.book Page 41 Tuesday, May 31, 2005 9:35 AM

42
Navig
ation
Set U
p
Navigation Set Up
Before Steps select
select
User Setting
MENU ENTER ENTER
ENTER ENTER
Open the [USER SETTINGS] screen
Select page
Select page
■ How to exit
■ Keyboard layout
The layout of input keys can be selected as or .
■ Guidance Screen
Select whether Enlarged Junction diagram screen is displayed automatically.
■ freeway information
Allows selection of whether guidance screen is to be displayed while driving on freeway.
■ Clock
Allows selection of whether clock is to be displeyed.
■ Beep
Allows selection of whether beep will sound.
MAZDA6_Navi_EA.book Page 42 Tuesday, May 31, 2005 9:35 AM

43
Navig
ation
Set U
p
Navigation Set UpThis function allows you set the categories on the area displayed when the (Point of interest) menu is selected on the map. Quick POI enables you store up to six different kinds category which you use most regularly.
1 select
2 select
Quick POI Selection
MENU ENTER ENTER
ENTER ENTER
Open the [QUICK POI SELECTION] screen
Select the button for Quick POI storage.
Note●Select the category to be changed
:This button allows you to restore the factory setting.
Select a category.Once selected, subcategories will be displayed.
:Subcategories from all of the individual categories will be displayed together.
Select the subcategories to be displayed on the map.
Repeat the above steps to add further POI markers displayed on the menu.
MAZDA6_Navi_EA.book Page 43 Tuesday, May 31, 2005 9:35 AM

44
Navig
ation
Set U
p
Navigation Set UpThis function allows you to correct any error in the position or direction of your vehicle display.
Before Steps select
Adjusting Current Position and Direction
select
Open the [Position calibration] screen
Move to the correct position and select .
Use or to adjust the direction in which you are heading, and select .
DistanceThis function automatically corrects any error in the display of the current position that might occur after tire replacement.
select
Distance is displayedYou will have to drive about 6 miles (10 km) before distance correction is complete.
Set ClockThe current time isa GPS satellite, tim
select
Open the [SET
Map VersionThe map and softwfunction.
select
Map and software
Calibration
MENU ENTER ENTER
ENTER ENTER
ENTER
ENTER ENTER
ENTER
ENTER
MAZDA6_Navi_EA.book Page 44 Tuesday, May 31, 2005 9:35 AM

45
Navig
ation
Set U
p
select
ect .
n which you are heading,
f the current position that
correction is complete.
Set ClockThe current time is set using this function. Since time notification is provided by a GPS satellite, time-zone adjustment can be carried out automatically.
select
Open the [SET CLOCK] screenSelect if you would prefer 24-hour display;
for 12-hour display.
Select to move the setting ahead by one hour, and similarly, select to move it back by one hour.How to exit .
Map VersionThe map and software version numbers can be confirmed by using this function.
select
Map and software versions are now displayed.
ENTER ENTER ENTER
ENTER
ENTER ENTER
ENTER ENTER
MAZDA6_Navi_EA.book Page 45 Tuesday, May 31, 2005 9:35 AM

46
Navig
ation
Set U
p
Navigation Set UpThis function replaces all the settings in the mobile navigation system with the initial default settings.
[Default List]
Restore System Defaults
Before Steps select
select
MENU ENTER ENTER
ENTER ENTER
Open the [SYSTEM DEFAULTS] screenSelect .
:Restores the average speed setting to the initial value upon factory setting.
If you execute Restore System Defaults, all of your Stored setting data will be deleted.
Item Initial conditionMenu namesFor maps (one screen and dual screen) North upMap display mode single-screen displayMap Display scale/Map scale for Dual-screen is not object of backup. Single-screen: 10,000 map (1/16 mi)
Dual-screen: 40,000 map (1/4 mi)Display guidance language EnglishQ-POI map display All OffQ-POI Selection A : Gas station
B : ATMC : ParkingD : Grocery storeE : All RestaurantF : Hotel
Search Area U9 (including Washington DC)Map Color 1Day/Night/Auto Setting AutoDistance Units (Miles/KM) (Global setting) MilesVolume Presets 4 (1 to 7)Right Screen Setting, POI OnTime display change (12h/24h) 24hKeyboard layout ABCArrival Time TimeNavigation Setup (Clock) OffNavigation Setup (Beep) OnVoice RecognitionSpeech recognition Language selection UK English (female)Map displayfreeway Information OffGuidance Screen ON
MAZDA6_Navi_EA.book Page 46 Tuesday, May 31, 2005 9:35 AM

47
Navig
ation
Set U
p
Navigation Set UpYou can change the languege of the menu and the voice guidance.
You can adjust the volume control for the voice guidance.
Before Steps select
select
Before Steps select
select
Language
MENU ENTER ENTER
ENTER ENTER
Open the [LANGUAGE] screen
Select your preferred language from the list.
: Select the language when using voice activate. ( page 38)
Volume Adjustment
MENU ENTER ENTER
ENTER ENTER
Open the [VOLUME] screen
Select the appropriate button to set the volume to between (minimum) and (maximum).
:Sound output will be muted.
MAZDA6_Navi_EA.book Page 47 Tuesday, May 31, 2005 9:35 AM

48
As necessary
Precautions/System Performance
Voice guidance has the following functions:
■ Intersection guidance●The system voice announces the distance to an upcoming turn and the turning direction.
This guidance function is automatic. Therefore, you do not have to set it, and it cannot be disabled.
●The system vocally announces the distance to an upcoming highway branching point or junction.
Voice Guidance
● The navigation system is just a support system for the driver. The driver should always pay attention to the traffic situation to safely make decisions. You may be unable at times to arrive at your destination due to out-of-date information on a map disc. You should be especially careful when selecting an urgent destination such as a hospital or a police station.
● Your route may sometimes include roads that are not open to vehicles or are closed due to traffic regulations. Please comply with the local traffic regulations.
● Do not change the settings and destination locations while driving. Minimize the time spent viewing the monitor screen and listening to the voice guidance while driving. Operating the system will distract the driver from looking ahead of the vehicle and may cause an accident. Always stop the vehicle in a safe location and use the parking brake before operating the system.
When two intersections are close together, the voice guidance may be late.
When two roundabouts are close together, the voice guidance for the second may be late.
Warnings
Second branching pointFirst branching point
150m
100m
Route
In 700m left turn.
Left turn ahead,then right turn.
Roundabout.Take the secondexit.
MAZDA6_Navi_EA.book Page 48 Tuesday, May 31, 2005 9:35 AM
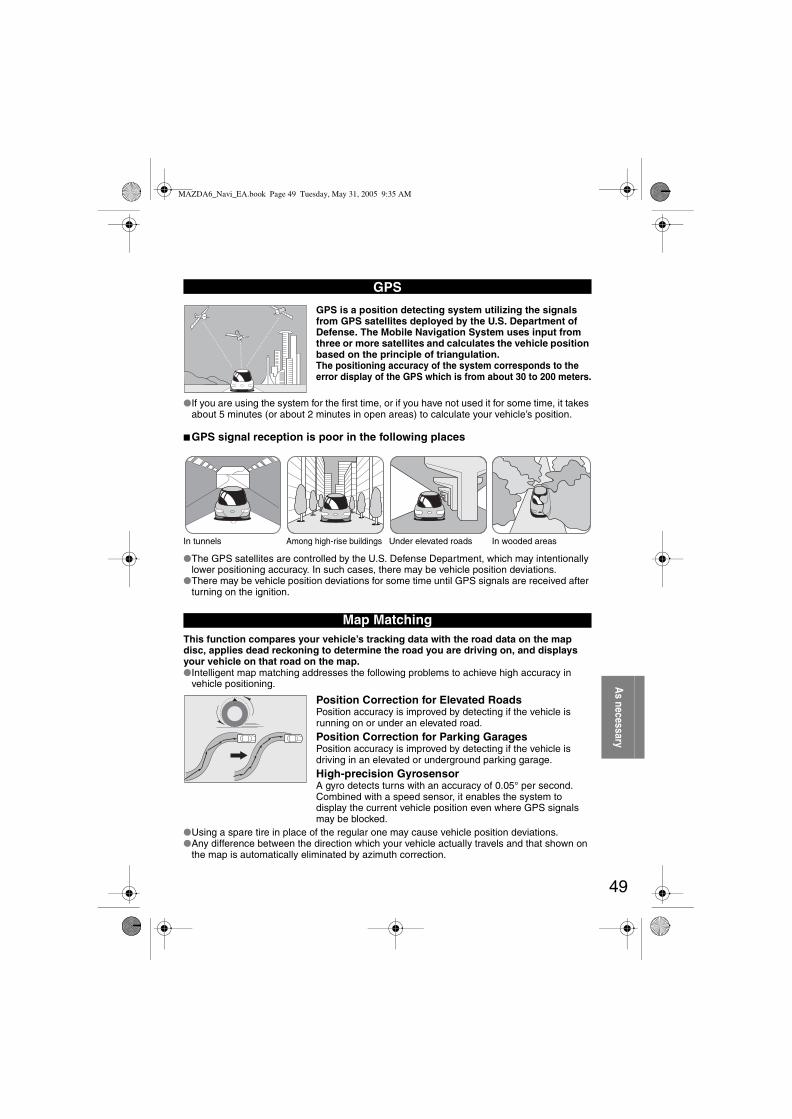
49
As necessary
GPS is a position detecting system utilizing the signals from GPS satellites deployed by the U.S. Department of Defense. The Mobile Navigation System uses input from three or more satellites and calculates the vehicle position based on the principle of triangulation. The positioning accuracy of the system corresponds to the error display of the GPS which is from about 30 to 200 meters.
●If you are using the system for the first time, or if you have not used it for some time, it takes about 5 minutes (or about 2 minutes in open areas) to calculate your vehicle’s position.
■ GPS signal reception is poor in the following places
●The GPS satellites are controlled by the U.S. Defense Department, which may intentionally lower positioning accuracy. In such cases, there may be vehicle position deviations.
●There may be vehicle position deviations for some time until GPS signals are received after turning on the ignition.
This function compares your vehicle’s tracking data with the road data on the map disc, applies dead reckoning to determine the road you are driving on, and displays your vehicle on that road on the map.●Intelligent map matching addresses the following problems to achieve high accuracy in
vehicle positioning.
Position Correction for Elevated RoadsPosition accuracy is improved by detecting if the vehicle is running on or under an elevated road.Position Correction for Parking GaragesPosition accuracy is improved by detecting if the vehicle is driving in an elevated or underground parking garage.High-precision GyrosensorA gyro detects turns with an accuracy of 0.05° per second. Combined with a speed sensor, it enables the system to display the current vehicle position even where GPS signals may be blocked.
●Using a spare tire in place of the regular one may cause vehicle position deviations.●Any difference between the direction which your vehicle actually travels and that shown on
the map is automatically eliminated by azimuth correction.
GPS
In tunnels Among high-rise buildings Under elevated roads In wooded areas
Map Matching
MAZDA6_Navi_EA.book Page 49 Tuesday, May 31, 2005 9:35 AM

50
As necessary
Precautions/System Performance
In the following situations, your vehicle position may not be displayed correctly on the map. But, as you keep driving, your vehicle position will be automatically corrected utilizing map matching and GPS data.
Although you may encounter the following problems in route guide, there is nothing wrong with the system.
Positioning Accuracy
Running on an elevated road
Making a turn after driving on a long straight road
Running on a steep mountain road
Running on a spiral road
Entering an intersection where a road branches off at a small angle
Running on gridiron layout of roads
Running on a slippery road with tire chains
Snaking on a wide road
When your vehicle is on a turntable with the ignition turned off
After getting off a ferryboat or vehicle train
Route Guide
For certain intersection shapes, the upcoming turn or the name of the intersection may not be announced.
For certain intersection shapes, you may be prompted to turn right or left When you should actually stay on the same road.
Voice guidance for the planned route may continue even after you have deviated from that route such as having turned too early.
Some points where the road divides on highways or toll roads may not be displayed or announced.
The Intersection Zoom Map may not always agree with the actual shape of the intersection.
The announced distance to an upcoming turn may differ slightly from reality.
STOPSTOP
CAR FERRY
Left turn ahead
In 300 m right turn
300m
0m
In 300 m right turn
MAZDA6_Navi_EA.book Page 50 Tuesday, May 31, 2005 9:35 AM

51
As necessary
Although you may encounter the following problems in a route search, there is nothing wrong with the system.
The navigation system is just a support system for the driver. The driver should always pay attention to the traffic situation to safely make decisions. You may be unable to arrive at your destination due to out-of-date information on a map disc. You should be especially careful when selecting an urgent destination such as a hospital or a police station.
Route Search
Warning
?
?
?
??
?? ?
It may also show roads that are out of use due to the opening of a new road or for other reasons.
The route shown only reaches a point near your destination if your destination has no direct access road or the road is too narrow. It may show a route
where you'll have to make a U-turn.
The guide map may show roads that are not passable due to closure in winter or for other reasons.
It may show a common road under or over an elevated road.
Destination
Road out of use
whichexit?
Destination
Destination
Destination
Depending upon the shape of roundabout (rotary), the guide map may show a wrong exit.
where the route remains unchanged after another search.
• There may be cases
• A congested route may be shown.
It may also show roads that only permit one-way traffic.
MAZDA6_Navi_EA.book Page 51 Tuesday, May 31, 2005 9:35 AM

52
As necessary
TroubleshootingNote
There may be some problems due to operational errors or mistakes. Please read this manual again and verify that there really is a problem before calling an Expert repairer, we recommend an Authorized Mazda Repairer to ask for repair services.
No picture●Check if a fuse has been blown.
Consult an Expert repairer, we recommend an Authorized Mazda Repairer.
●Check if the voltage level of the vehicle battery is low.Recharge the battery or change batteries.Display doesn’t
open or close
The vehicle position is not correct
●Check if the vehicle position changed when ACC was set to OFF.When, for example, • The vehicle was transported by a ferry boat.• The vehicle was rotated on a turn table in a parking lot.• The vehicle was transported by a tow track or other such
vehicle.Drive the vehicle for a while where you are receiving GPS signals.
Verification First
Symptom Check point
MAZDA6_Navi_EA.book Page 52 Tuesday, May 31, 2005 9:35 AM

53
As necessary
No GPS symbols are displayed
●GPS signals may not be received because of obstructions. After moving the vehicle away from obstructions, the GPS signals can be received.
The vehicle position is not displayed
●Check if the mode is set to the current position screen.
Press
No voice guidance
●Check if the volume control for the voice guidance has been turned off.
●Check if the vehicle is off the route.Repeat the route search while checking the route guide screen.
●Check if you are driving the vehicle in the wrong direction on the route.
Repeat the route search checking the direction of the destination.
Buttons in the remote control do not beep
●Check if [Beep] is set to [Off] ( page 42).
Symptom Check point
POS
MAZDA6_Navi_EA.book Page 53 Tuesday, May 31, 2005 9:35 AM

54
As necessary
Troubleshooting
Please insert a MAP DVD.
●The disc is not installed.Check if the disk is installed. If installed, check if the installed disk is correct.
MAP DVD-Read Error
●The disc is wet, dirty, scratched, or upside down, or the disc cannot be played with this unit or the incorrect disk is installed.
Eject the disc and check it.The disc installed is not a MAP DVD.
Error Messages
Error message Solution
MAZDA6_Navi_EA.book Page 54 Tuesday, May 31, 2005 9:35 AM

55
As necessary
Maintenance
■ Cleaning this productUse a dry, soft cloth to wipe it.
■ Cautions for cleaningNever use solvents such as benzene and thinners, they could mar the surface of the unit.
■ Map discIf you require the latest map disc, consult an Expert repairer, we recommend an Authorized Mazda Repairer.
■ How to hold the disc●Do not touch the underside of the disc.●Do not scratch the disc.●Do not bend the disc.●When not in use, keep the disc in the case.
■ Disc Cleaning●Use a dry, soft cloth to wipe from the center outward.
■ Do not leave discs in the following places:●Direct sunlight●Near car heaters●In dirty, dusty and damp areas●On seats and dashboards
Care of the Product
Handling and Care of Map Discs
Label side
<Right> <Wrong>
MAZDA6_Navi_EA.book Page 55 Tuesday, May 31, 2005 9:35 AM
MAZDA6_Navi_EA.book Page 56 Tuesday, May 31, 2005 9:35 AM