mb pro - mountbatten brailler – the braille and early...
TRANSCRIPT

MB Pro
The Second GenerationMountbatten Brailler
A Visual Guide
a visual guide

Developed by
Graham CookItinerant Teacher For The Visually Impaired
School District #59 (Peace River South)
for
Special Education Technology – British Columbia
S E T
B C
December 2001
This resource can be reproduced for non-commercial purposes,provided the credits are retained. This document is available on
SET-BC’s website, at www.setbc.org.

MB Pro: A Visual Guide
Table of Contents
Foreword ............................................................................................................................1
About SET-BC ...................................................................................................................2
The Mountbatten Brailler ...................................................................................................3
General Information ...........................................................................................................4
Noise Level ........................................................................................................................5
Turning Command Key On/Off..........................................................................................6
MB Pro Commands: Regular & Chorded..........................................................................7
MB Pro Ports & Parts.........................................................................................................8
MB Pro Keypad................................................................................................................10
Setting Up Equipment......................................................................................................11
Set Up For New Users.....................................................................................................12
Loading Paper Into The MB Pro
Manual feed...........................................................................................................14
Auto feed ...............................................................................................................16
Continuous feed ....................................................................................................17
Braille Cards Or Small Pieces Of Paper ..............................................................18
Ejecting Paper From The MB Pro ...................................................................................19
Mimic ................................................................................................................................20
Learn Mode & Advanced Mode.......................................................................................23
Setting Up Print Output: Back Translation – Braille to Print ...........................................25
Setting Up The Qwerty Keyboard: Forward Translation – Print to Braille
Grade 1 & 2 Braille................................................................................................28
Other Qwerty Commands .....................................................................................29
Recorded Speech............................................................................................................30

Activating Synthetic Speech............................................................................................31
Synthetic Speech Menu........................................................................................32
Helpful Tip For Beginner Braille Users .................................................................35
Memory ............................................................................................................................36
Batteries / Adaptor ...........................................................................................................37
Braille Writer Commands.................................................................................................38
Creating A New File / Deleting A File..............................................................................42
Directory Of Current Files & Embossing A Saved File ...................................................43
What About Our Perkins Brailler? ...................................................................................44
Editing ..............................................................................................................................45
Trouble Shooting..............................................................................................................46
MB Pro Cheat Sheets ......................................................................................................47
MB Pro: A Visual Guide
December 2001 Page 1
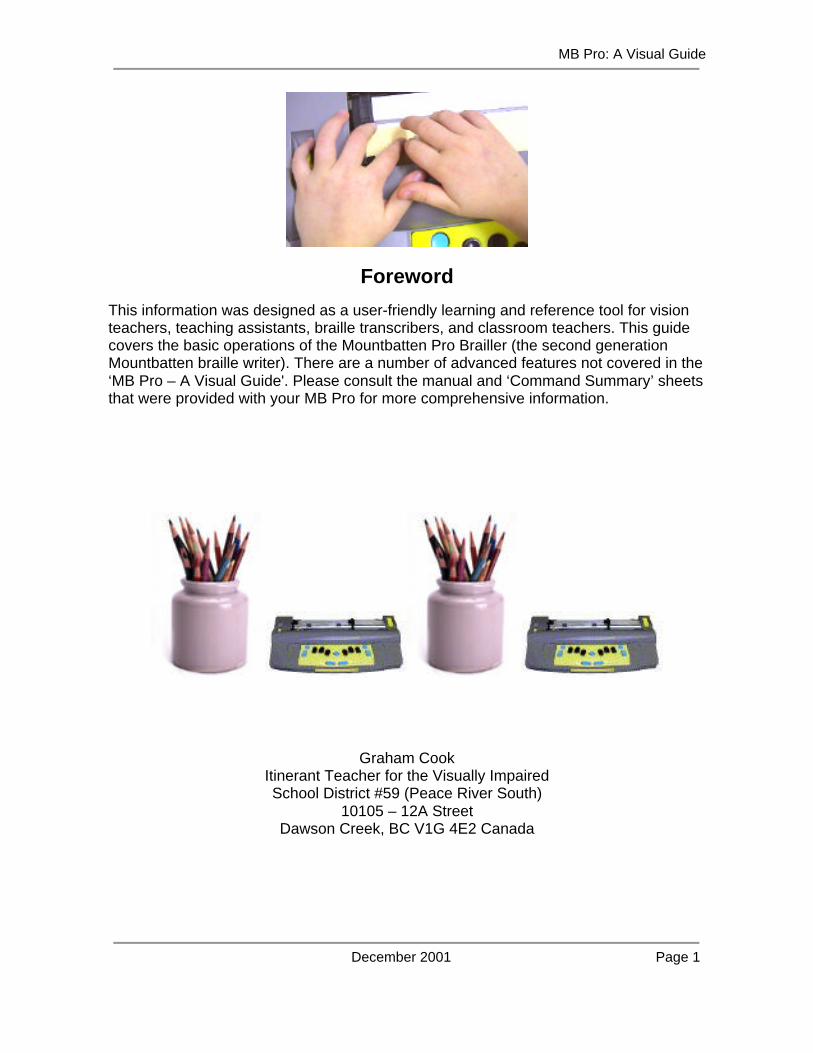
Foreword
This information was designed as a user-friendly learning and reference tool for visionteachers, teaching assistants, braille transcribers, and classroom teachers. This guidecovers the basic operations of the Mountbatten Pro Brailler (the second generationMountbatten braille writer). There are a number of advanced features not covered in the‘MB Pro – A Visual Guide'. Please consult the manual and ‘Command Summary’ sheetsthat were provided with your MB Pro for more comprehensive information.
Graham CookItinerant Teacher for the Visually ImpairedSchool District #59 (Peace River South)
10105 – 12A StreetDawson Creek, BC V1G 4E2 Canada

MB Pro: A Visual Guide
December 2001 Page 2
About SET-BC
Special Education Technology – British Columbia (SET-BC) is a provincial resourceprogram of the BC Ministry of Education. SET-BC assists BC school districts in meetingthe technology needs of student with:
• physical disabilities• visual impairments• autism
SET-BC’s mandate is:• to lend assistive technologies (reading, writing, and communication tools) where
required to ensure students’ access to educational programs, and• to assist school districts in providing the necessary training for students and
educators in the use of these technologies.
Each BC school district has a SET-BC District Partner who can provide information onhow services are provided for eligible students.
For more information and resources on assistive technology, check SET-BC’s websiteat www.setbc.org.
SET-BC Provincial Centre105 –1750 West 75th Avenue
Vancouver, British Columbia V6P 6G2Phone: 604-261-9450
Fax: 604-261-2256

MB Pro: A Visual Guide
December 2001 Page 3
The Mountbatten Brailler
Lord Mountbatten (1900-1979)
Lord Mountbatten was the great-grandsonof Queen Victoria and was born in 1900(Windsor, England). He was killed off thecoast of Ireland when a bomb, planted byIRA terrorists, blew up his fishing boat.
A large trust fund was established in hisname after his death. A portion of themoney raised went into developing a newbraille writer (the Mountbatten).
The Mountbatten was developed andmanufactured by Quantum Technology,an Australian company. Students willappreciate the friendly ‘Good Day!’ whenthe MB Pro is switched on.

MB Pro: A Visual Guide
December 2001 Page 4
General Information
The six black keys (used for creating the six dots in the braille cell) have been arrangedergonomically to fit fingers comfortably.
The blue keys are used as function keys.
The metal ‘paper holding bar’ can be removed. This prevents the ‘paper holding bar’from obscuring the braille being produced, however, the braille production is somewhatlouder.
Adjusting dot pressure for various types of paper:Decrease pressure: command + right functionIncrease pressure: command + left function
OR

MB Pro: A Visual Guide
December 2001 Page 5
There is a yellow volume control key at the front of the MB Pro that can adjust thespeech output.
The Mountbatten Pro takes almost any size or weight of paper:• regular photocopy paper• braille paper• thermoform plastic
With the following materials the best results are obtained using the multi strike feature(see pg 40).
• braille label• clear plastic• metal foil
Noise Level:
There are a number of low-tech ways to reduce the sound output from the ‘MB Pro’:
1. Put the ‘MB Pro’’ on two computer mouse pads.2. Turn down the braille pressure.3. Place the ‘MB Pro’’ in front of a solid object such as a book or facing a wall.

MB Pro: A Visual Guide
December 2001 Page 6
Turning Command Key On/Off
Deactivating the ‘command’ key is useful for novice Mountbatten users and duringclassroom demonstrations. Turning the command key off prevents users fromaccidentally entering commands, altering settings or getting stuck.
The ‘Command’ key is the round blue key in the centre of the MB Pro.
To deactivate press:left function + right function + new line + space(all keys together) = “command off”(repeat command to turn on)
Note: The last selected setting will be the new default after you turn the power off.

MB Pro: A Visual Guide
December 2001 Page 7
MB Pro Commands
There are two types of commands – regular and chorded.
MB Pro Commands (Regular):A command can be brailled or typed.
Important: All MB Pro commands start with the ‘command’ key and end with the ‘enter’key.
start (command) end (enter)
All Qwerty Keyboard commands start with the ‘esc’ key and finish with ‘end’ key.
start end
For example: Grade 2 braille translation using the qwerty keyboard.qwerty: (esc)FE(end)Repeat command to turn off!
MB Pro Commands (Chorded):A chorded command is a space bar and a specific letter pressed simultaneously.
c chord carriage return
i chord indent (indents 5 spaces)
f chord line feed (down 1 line)
r chord reverse line (up 1 line)
t chord tab (pre-set to move forwards 5 braille cells)
b chord back tab (pre-set to move backwards 5 braille cells)
p chord page eject (auto page removal)
z chord stops speech – while speaking
e chord end
h chord help
(caution – brailles help summary)

MB Pro: A Visual Guide
December 2001 Page 8
MB Pro Ports & Parts
paper bail
embossing margin adjuster head
paper grip lever paper advance paper (paper release) knob grip
rollers
power
on/off carrying handle
volume control Mimic cable

MB Pro: A Visual Guide
December 2001 Page 9
serial out parallel inprinter/computer from computer
headphonejack
parallel out to printer PC
keyboard
external braille keyboard port

MB Pro: A Visual Guide
December 2001 Page 10
MB Pro Keypad
left function or tab
6 braille dots
command
right function or
back tab
back space new line space bar enter key
Note:In older models of the Mountbatten, the ‘enter’ key was called the ‘margin release’.
Braille Cell Corresponding MB Pro Keys

MB Pro: A Visual Guide
December 2001 Page 11
Setting Up Equipment
printer
qwerty keyboard
headphones
power adaptor Mimic

MB Pro: A Visual Guide
December 2001 Page 12
Set-up for New Users
Setting up the MB Pro for beginning braille users:
• Be sure the learn mode is on (default setting).
• Set the MB Pro to braille every other line (the use of this setting will depend on yourstudent). We generally use the double spacing setting until grade 2, as regularspacing seems to hamper braille fluency in the early years. When the braille is incompact clumps it can be a tactual challenge.
Note:In the following command you may use a Nemeth number without a number sign, ornumber sign followed by a non Nemeth number.
(command)LS(space)2(enter)The MB Pro will say “ok”. When you select the new line key the embossing headmoves down two lines.
(command)LS(space)1(enter)Will return you to single line brailling.
• Be sure that word wrap is off (word wrap hyphenates words at the end of a line,which can be rather confusing for new users).
(command)WW(enter)The MB Pro will say “on” or “off”Note: Repeat the command to turn “off”
• Plug the Mimic into the right hand side of the MB Pro. Turn on (switch on rear leftside). The Mimic does not require any set-up (in 'learn made') and words are sentfrom the MB Pro when the student hits the spacebar after each word.
• Turn down the embossing pressure and use regular photocopy paper for classroomsituations. The noise level is drastically reduced and it will cause less disruption forthe teacher and peers.
command + left function (to decrease pressure)

MB Pro: A Visual Guide
December 2001 Page 13
• For individual braille instruction in a Resource Room or similar setting the studentcan use the regular 11x11 braille paper. It is important that the student is exposed tocrisp braille output on durable braille paper especially during the early years.
command + right function (to increase pressure)

MB Pro: A Visual Guide
December 2001 Page 14
Loading Paper into the MB Pro: Manual Feed
Note:For younger children who need immediate feedback of what they have just brailled,remove the paper bail (paper holding bar). The noise level will increase slightly but it isessential that students can clearly read the braille being created.
Before turning the MB Pro on:
1) Open the paper grip lever (paper release).
2) Insert paper under the embossing head and the paper grip rollers.
3) Push in the paper.
2
3
1
3

MB Pro: A Visual Guide
December 2001 Page 15
4) Align the top of the paper with the indented metallic groove.
5) Align the margin adjuster with the edge of the paper (only move the margin adjusterwhen the paper grip lever is up as you may damage the small rubber rollers).
6) Close paper grip lever.
7) Turn the MB Pro on.
6
45
Note:There is another way to load paper into the MB Pro. Paper can be inserted in the lowerback portion of the MB Pro and pushed inside to reappear under the embossing head.

MB Pro: A Visual Guide
December 2001 Page 16
Loading Paper into the MB Pro: Auto Feed
Note:The auto feed feature will work after a page eject new line + enter or when moving on toa second page of braille.
Tip 1: Keep the paper release key closed, otherwise the auto feed feature will notwork.
1) Align the paper under the embossing head and snug against the grip rollers.
Tip 2: It is important to start feeding the paper into the MB Pro as soon as the rollersstart moving, otherwise the braille embossing head will not correctly line up at thetop of the page.
2) Press right function + enter
3) Your paper will be automatically feed into the MB Pro.

MB Pro: A Visual Guide
December 2001 Page 17
Loading Paper into the MB Pro: Continuous Feed
Note:You can use continuous feed paper (fan fold computer paper) in the MB Pro. Thedefault for continuous feed is off, so you will need to send a command to turn it on. Youwill need to load the continuous feed paper into the lower back portion of the MB Pro toreappear under the embossing head.
Continuous Feed On/Off:MB Pro: (command)CP(space)ON/OFF(enter)qwerty: (esc)CP(space)ON/OFF(end)
Setting form length for continuous feed:MB Pro: (command)FL(space)924(enter)qwerty: (esc)FL(space)924(end)
Note:The standard braille page is 11 inches (every inch has a value of 84 so the full length ofa braille page is 924)

MB Pro: A Visual Guide
December 2001 Page 18
Loading Paper into the MB Pro:Brailling Cards or Small Pieces of Paper
The Mountbatten sometimes thinks that it is “out of paper” even though there is a smallcard in the brailler. If the paper is not large enough, the MB Pro paper sensors believe itto be empty.
You can fool the MB Pro by pressing:new line + space after loading smaller pieces of paper.
You may find that a portion of your card has been ejected from the MB Pro. Use:“reverse line” backspace + new line to get back to the top of your card to beginbrailling.

MB Pro: A Visual Guide
December 2001 Page 19
Ejecting Paper from the MB Pro
Automatically:
Press both new line + enter to automatically eject the paper from the MB Pro.
Manually:
Open the paper release lever and remove the paper.

MB Pro: A Visual Guide
December 2001 Page 20
Mimic
Note:Classroom teachers and parents will find the Mimic a very useful tool to help demystifybraille. Students’ work can be read in real time in the classroom as each word iscreated. For some braille using students, the Mimic may be perceived as a threatbecause it takes away the privacy of braille (classroom teachers are usually notproficient enough braille users to discover when students are brailling other things thanthe assigned work and students have been known to take advantage of this). The Mimicallows the classroom teacher to see the work being produced and to give promptfeedback to the student.
Power:
The Mimic runs on 4 AA batteries or with a 6 volt DC adaptor (Note: SET-BC does notprovide an adapter, but it needs relatively little power to operate so battery replacementwill not be that costly. This also makes the equipment more portable with one lessadaptor to plug in).
The off/on switch is located on the rear left of the Mimic. The Mimic will shut offautomatically after 15 minutes. Touch any key to reactivate. This feature works onlywhen the power switch has been left on.
Tip: When you unplug or switch off the Mimic display (in the 'learn mode'), theMB Pro will say, “Mimic off”. It does not however say “Mimic on” when plugged inor switched on. You or the student can scroll up and if you hear a soft beep, theMimic is on.
Note:In learn mode the Mimic works automatically when attached and will display every word(after pressing the space key).In advanced mode the Mimic needs to be activated.
MB Pro: (command)MIMIC(enter)qwerty: (esc)MIMIC(end)
Print words appear accurately on the Mimic display no matter if the student braillescontracted or uncontracted braille (or a combination of the two).
MB Pro: A Visual Guide
December 2001 Page 21
The Mimic can hold up to 30 pages of braille text.
Apparently the Mimic also works with the Braille Lite. The Mimic does not yet work withthe BrailleNote, but Quantum Technology and Pulse Data are currently working toachieve this.
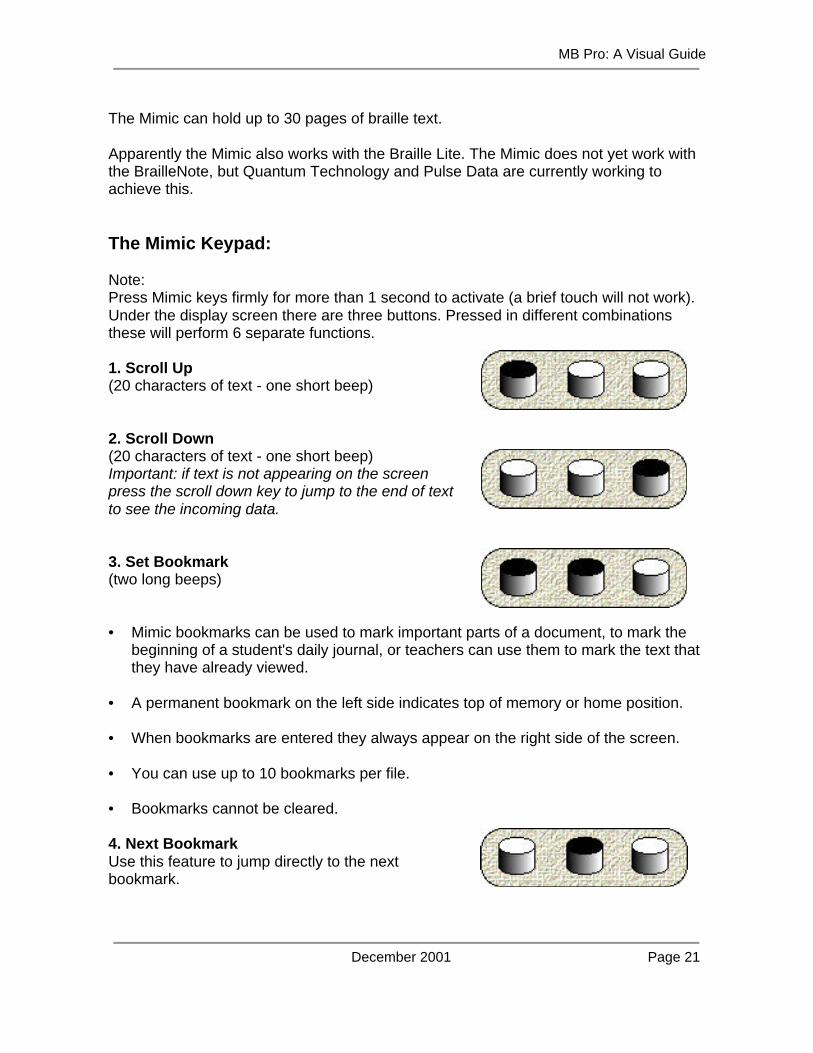
The Mimic Keypad:
Note:Press Mimic keys firmly for more than 1 second to activate (a brief touch will not work).Under the display screen there are three buttons. Pressed in different combinationsthese will perform 6 separate functions.
1. Scroll Up(20 characters of text - one short beep)
2. Scroll Down(20 characters of text - one short beep)Important: if text is not appearing on the screenpress the scroll down key to jump to the end of textto see the incoming data.
3. Set Bookmark(two long beeps)
• Mimic bookmarks can be used to mark important parts of a document, to mark thebeginning of a student's daily journal, or teachers can use them to mark the text thatthey have already viewed.
• A permanent bookmark on the left side indicates top of memory or home position.
• When bookmarks are entered they always appear on the right side of the screen.
• You can use up to 10 bookmarks per file.
• Bookmarks cannot be cleared.
4. Next BookmarkUse this feature to jump directly to the nextbookmark.

MB Pro: A Visual Guide
December 2001 Page 22
5. Clear MemoryThis will erase the text on the screen. Hold down for 2seconds – press again to confirm.
6. SendWill send text situated between bookmarks to anotherdevice e.g. a computer
Downloading to the Mimic:
Text can be downloaded from a computer directly into the Mimic and then into the MBPro for brailling (see Quantum’s ‘User Manual’ for details).

MB Pro: A Visual Guide
December 2001 Page 23
Learn Mode & Advanced Mode
Note:When you receive the MB Pro it will be in the learn mode.For advanced mode enter the following command:
ADV (command) ADV (enter)
MB Pro will say “on”
Repeat command to turn “off”(command) ADV (enter)
MB Pro will say “off”
Active in Learn Mode:
• This is a starting point for beginning braille users.
• Every key talks – this verbal orientation is very handy for new users (when thestudent raises and lowers the paper lever it even says “paper lever up” and “ok”respectively).
• The MB Pro is a braille writer only.
• The recorded speech (digitally recorded human voice) is easy to understand (alsoavailable in advanced mode).
• The command key can be deactivated. Press all of the following keys at the sametime:
new line + space + right function + left function
repeat
"command on" "command off"
• Mimic port is active (plug-in and turn on).

MB Pro: A Visual Guide
December 2001 Page 24
Active in Advanced Mode:
• braille translation
• PC keyboard (works in learn mode too)
• recorded or synthetic speech:o synthetic speech (computer voice)o pitch and rate can be adjustedo unlimited vocabularyo speech editor
• use of printers
• communication with other computers and notetakers

MB Pro: A Visual Guide
December 2001 Page 25
Setting Up Print Output:Back Translation - Braille to Print
The MB Pro will translate braille into print. This is a significant advantage in classroomenvironments as it provides print copies of the student’s work for review by sightedteachers.
Note: You can use a parallel or serial printer but it has to be a line printer (prints out lineby line). Page printers such as laser printers are not compatible with the MB Pro. CanonBubble Jet printers for example will work. Connect the printer as shown in ‘MB Pro’sPorts and Parts”.
Emptying Buffer:
The printer will wait to fill the ‘buffer’ which contains 80 characters before printing. Thebuffer can be emptied at any time by pressing MB Pro’s ‘new line’ key or qwerty’s ‘enter’key twice.
or ‘new line’ key (twice) ‘enter’ key (twice)
The following steps are for print output using a parallel printer (please see page 27Quantum’s ‘User Manual’ for setting up serial printers).
1. Plug the printer cable into the MB Pro.
2. Set your printer to ‘on-line’.

MB Pro: A Visual Guide
December 2001 Page 26
(braille)3. Turn on ‘back translation’ Brlto print.
bp MB Pro: (command)BP(enter)qwerty: (esc)BP(end)
Note: Repeat the same command to turn “off”.
4. Check to see if everything is working by pressing the new line key twice.
MB Pro: A Visual Guide
December 2001 Page 27
Other braille to print format commands:
1. Centering Print Output On (only on print copy):bce
MB Pro: (command)BCE(enter)qwerty: (esc)BCE(end)
Note: Repeat the same command to turn “off”.
2. All Capitals Print Output On (not in braille):bcl
MB Pro: (command)BCL(enter)qwerty: (esc)BCL(end)
Note: Repeat the same command to turn “off”.
3. New Line In Braille Is New line In Print: blit
MB Pro: (command)BLIT(enter)qwerty: (esc)BLIT(end)
Note: Repeat the same command to turn “off”.
4. Printer Line Spacing: bls
MB Pro: (command)BLS(space)[1 through 10](enter)qwerty: (esc)BLS(space)[1 through 10](end)
Note: (command)BLS(enter) returns you to the default setting
The printer line spacing is a good feature if you are using a printer where you cannotsee the results straight away because the paper is still inside the printer. Printer linespacing is also very helpful for younger students who don’t produce much braille ateach sitting; with increased line spacing the paper passes through the printer faster.
When the MB Pro is turned off the printer settings are erased and will need resetting. Aquick way to reset the printer setting is to turn the MB Pro off and restart.

MB Pro: A Visual Guide
December 2001 Page 28
Setting up the Qwerty Keyboard to MB Pro:Forward Translation - Print to Braille
The qwerty keyboard can be attached to the MB Pro. It is a wonderful tool for individualswho do not know how to braille (such as most classroom teachers, parents and sightedpeers). This is an ideal way for sighted people to leave notes for braille readers.
You must use a PC keyboard with the MB Pro.
Note: You can fix mistakes while typing on the qwerty by using the backspace.
Grade 1 braille (uncontracted):
Grade 1 braille does not require any setup (in either learn or advanced mode).1. plug the qwerty into the MB Pro2. turn on the MB Pro3. start typing
Grade 2 braille (contracted):
Information typed on the keyboard can also be converted to Grade 2 braille. Laminatethe following steps on a plastic sheet for the classroom teacher and sighted peers.1. be sure that you are in ‘advance mode’ for grade 2 braille output
qwerty: (esc)ADV(end) – “on or “off”2. turn on ‘forward translation’
qwerty: (esc)FE(end) – “on” or “off”3. start typing4. enter, enter to send or wait until the buffer is filled (see below)
The MB Pro will store what you are typing in short term memory (buffer) until you reachthe end of a braille line (40 braille cells) or print line (80 characters) and then it will beautomatically brailled/printed.

MB Pro: A Visual Guide
December 2001 Page 29
Note:
Forward translation (print to brl)
Back translation (brl to print)
All forward translation begins with an ‘f’ and all backward translation begins with a ‘b’.
Other qwerty commands:
1. Turning on forward translation (print to braille):qwerty: (esc)FE(end)
Note: repeat command to turn “off” and “on”
today2. Grade 1 Braille (uncontracted, e.g. today today):
Grade 1 braille output from qwerty keyboard:
qwerty: (esc)FGR(space)1(end)
Note: The keyboard text is only sent to the MB Pro when the buffer is full (orenter, enter) even though the output will be in grade 1 braille.
td3. Grade 2 Braille (contracted braille e.g. td today):
Back to Grade 2 braille output from qwerty keyboard:qwerty: (esc)FGR(space)2(end)
4. Each new line in print is a new line in braille:qwerty: (esc)FLIT(end)
Note: repeat command to turn "off' and "on"
5. Suppress empty lines between paragraphs and add two spaces to the beginning ofeach paragraph:
qwerty: (esc)FLIT(space)S(end)

MB Pro: A Visual Guide
December 2001 Page 30
Recorded Speech
There are various settings available for recorded speech.
Reminder:All commands start with the command key and end with enter.
(command)SPK(space)R(enter)Selects recorded speech (default)
This command will get you out of synthetic speech (in advanced mode).
(command)SPK(space)A(enter) - “speak all keys”Speaks all keyboard keys, functions and commands. This is the basis for the learnmode. As less speech is required one of the following options can be used.
(command)SPK(space)C(enter) - “commands only”Speaks errors & prompts only. No braille dot keys.
(command)SPK(space)D(enter) - “speak dot keys”Speaks only braille dot keys. No function keys.
(command)SPK(space)N(enter) - “no speech”No Speech – tones only mode
MB Pro: A Visual Guide
December 2001 Page 31
Activating Synthetic Speech
Note:Synthetic speech can only be activated in the advanced mode. If you try the followingcommand in the learn mode it will say “command error”.
Reminder:To turn on/off advanced mode:
(command)ADV(enter)
Activating synthetic speech:(command)SPK(space)S(enter)Selects synthetic speech
MB Pro: A Visual Guide
December 2001 Page 32
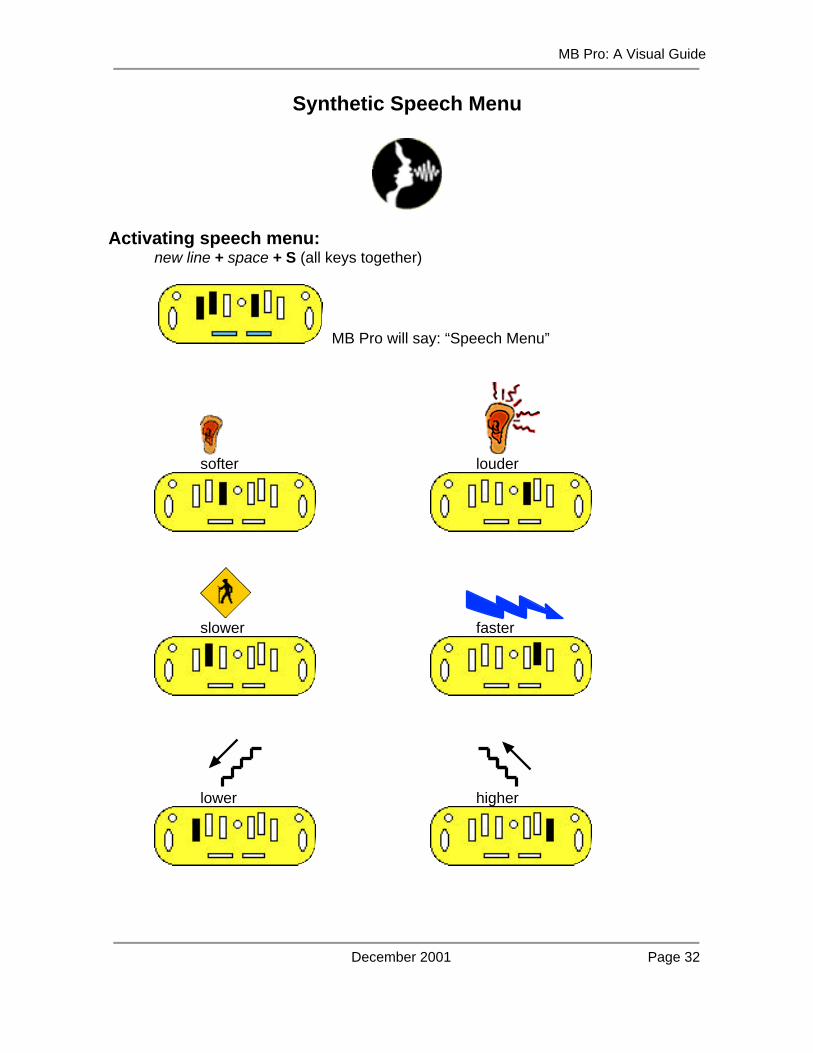
Synthetic Speech Menu
Activating speech menu:new line + space + S (all keys together)
MB Pro will say: “Speech Menu”
softer louder
slower faster
lower higher

MB Pro: A Visual Guide
December 2001 Page 33
P = Punctuation
Note: Repeat the letter ‘P’ to select the following:• “some”• “none”• “most”
E = Echo
Note: repeat the letter ‘E’ to select the following:• “echo letters”• “echo words”• “echo both”• “echo no”
N = Numbers
Note: repeat the letter ‘N’ to select the following:• “numbers spoken as words”• “numbers spoken as digits”
K = Speak Capital Letters
Note: repeat the letter ‘K’ to select the following:• “cap no”• “cap yes”
F = Foreign Characters
Note: repeat the letter ‘F’ to select the following:• “foreign letters no”• “foreign letters yes”
S = Spaces
Note: repeat the letter ‘S’ to select the following:• “speak spaces yes”• “speak spaces no”

MB Pro: A Visual Guide
December 2001 Page 34
C = CommandsThis is a useful feature for younger students who requireauditory feedback while brailling commands.
Note: repeat the letter ‘C’ to select the following:• “speak commands yes”• “speak commands no’
L = Speaking Mode
Note: repeat the letter ‘L’ to select the following:• “letters spoken as ASCII”• “letters spoken as dots” (i.e. # sign 3,4,5,6)• “letters spoken as translated”
(default setting i.e. 'ab' spoken as 'about')
Exit From Speech Menu
E + space (S) (together) = “Exit”

MB Pro: A Visual Guide
December 2001 Page 35
Helpful Tip for Beginner Braille Users:Speech Output without Braille
The sound of the embossing head can muffle the speech output and the student couldmiss the necessary auditory feedback. If you have very young braille users who arespecifically working on finger placement and the production of individual braille letters, itcan be helpful to have speech only without embossing.
Just press the command key and then start entering various braille letters (you caneven practice Nemeth numbers). Tactile feedback is crucial for new braille users and Iwould use this feature sparingly - this is just another little trick to assist the student.
Press command key: the MB Pro will think that you are entering a command so theembosser will not be working.
Press the enter key to return to regular brailling.
MB Pro: A Visual Guide
December 2001 Page 36
Memory
The MB Pro can hold up to 30 files (each file can have up to 200 pages).
Checking MB Pro’s available memory:
MB Pro: (command)FREE(enter)qwerty: (esc)FREE(end)
The MB Pro will tell you how many ‘bytes’ you have left.

MB Pro: A Visual Guide
December 2001 Page 37
Batteries/Adaptor
Battery status:
new line + space + B (together)
“battery o.k. charger connected or disconnected”
Note: If your Mountbatten stops brailling, check the battery status to see if the battery isflat.
Battery:
• The ‘MB Pro’ runs on a lead acid battery (like in your car). The battery cannot bedamaged by overcharging, so leave the ‘MB Pro’ plugged in whenever possible.
• The MB Pro automatically sleeps after 15 minutes if there is no data entry.• A fully charged battery will provide power for approximately 15 pages of Braille.• Don’t leave the MB Pro for a long time with a low battery, e.g. during the summer
holidays, otherwise it might be difficult to restart (again, just like your car).• Batteries will last approximately 5 years.• When the MB Pro is fully charged, it can be left unplugged for a long time.• The MB Pro also has a memory back-up battery that needs replacing every two
years.
Adaptor:
• Power adaptor – 12v DC 1 Amp.• Label your adaptor ‘MB Pro’ (in braille & print). ONLY use the adaptor provided with
your Mountbatten.• When you plug in the MB Pro adaptor, it will say “charging” and “not charging” when
unplugged.

MB Pro: A Visual Guide
December 2001 Page 38
Braille Writer Commands
Note: The following commands can be sent to the Mountbatten using the qwertykeyboard. Classroom teachers not proficient in braille can assist their student withcentering, etc.
Reminder: qwerty commands start with the esc key and finish with end key – the use ofspaces in the command is the same as with the Mountbatten.
Correction (back space delete):Press both the backspace + space
Overstrike:Deletes the last cell and replaces it with the braille correction.
+ the braille correction
Press the backspace and the braille correction at the same time (e.g. erase a letter ‘b’and replace it with the letter ‘s’).
Word wrap:No hyphenating words between lines.
MB Pro: (command)WW(enter) - “on” or “off”qwerty: (esc)WW(end)

MB Pro: A Visual Guide
December 2001 Page 39
Multi-strike:If you are using heavy paper, Braille Label or foil, use the multi-strike feature (BrailleLabel is very faint in the default setting). There are four settings from 1 (default) up to 4that relate to the number of hammer strikes hitting each dot.
MB Pro: (command)MS(space)4(enter) - highest settingMB Pro: (command)MS(space)1(enter) - back to default
qwerty: (esc)MS(space)4(end) - highest settingqwerty: (esc)MS(space)1(end) - back to default
Auto repeat on/off:When braille and qwerty keys are held down they will automatically repeat. This ishelpful when creating graphics.
MB Pro: (command)AR(enter) - “on” or “off”qwerty: (esc)AR(end)
Line spacing:1 = regular space, 2 = double space, 3 = triple spaceNote: use nemeth numbers without number sign
MB Pro: (command)LS(space)2(enter)qwerty: (esc)LS(space)2(end)
Back to factory defaults:MB Pro: (command)STD(enter)qwerty: (esc)STD(end)
Centering on/off:Automatically centers the braille.Note: Must be in cell 1 to center correctly.
MB Pro: (command)CE(enter) - “on” or “off”qwerty: (esc)CE(end)
The braille to be centered is held in the buffer until the new line key is pressed.

MB Pro: A Visual Guide
December 2001 Page 40
Write or save silently:Turns embosser off while brailling. Students can use this in the classroom to limit thenoise output.
MB Pro: (command)EM(enter) - “on” or “off”qwerty: (esc)EM(end)
Adjusting left margin:MB Pro: (command)LM(space)5 [# of cells] (enter)qwerty: (esc)LM(space)5 [# of cells] (end)
Adjusting right margins:MB Pro: (command)RM(space)10 [# of cells] (enter)qwerty: (esc)RM(space)10 [# of cells] (end)
Tip: Use Nemeth numbers without a number sign.
Set left margin to embossing head position:MB Pro: (command)LMH(enter)qwerty: (esc)LMH(end)
Set right margin to embossing head position:MB Pro: (command)RMH(enter)qwerty: (esc)RMH(end)
Remove right margins:Returns right margin to default setting.
MB Pro: (command)RM(enter)qwerty: (esc)RM(end)
Remove left margins:Returns left margin to default setting.
MB Pro: (command)LM(enter)qwerty: (esc)LM(end)

MB Pro: A Visual Guide
December 2001 Page 41
Setting tabs:Tabs can be custom set to the position of the embossing head. Tab setting can behelpful for laying out vertical Nemeth sums (the distance between ‘mad minute’ sumscan be custom set). Tabs can also be inserted to form columns.
MB Pro: (command)TSH(enter)qwerty: (esc)TSH(end)
Note: Multiple tabs can be set in a variety of positions depending on the needs of yourstudents.
Clearing tab settings:Clears all tab settings.
MB Pro: (command)TC(enter)qwerty: (esc)TC(end)

MB Pro: A Visual Guide
December 2001 Page 42
Creating a New File / Deleting a File
The following Commands works in both learn and advanced mode.
Note: Use Grade 1 braille when brailling commands. File names can have up to 16characters including numbers but no spaces.
Starting a new file:MB Pro: (command)BEGIN(space)’file name’(enter)qwerty: (esc)BEGIN(space)’file name’(end)
Ending a file:MB Pro: (command)END(enter)qwerty: (esc)END(end)
Deleting a file:Must be outside the file to delete.
MB Pro: (command)DEL(space)’file name’(enter)qwerty: (esc)DEL(space)’file name’(end)
Undeleting the last deleted file:Only works before turning the unit off.
MB Pro: (command)UNDEL(enter)qwerty: (esc)UNDEL(end)
Deleting all files in the memory:**CAUTION** Be careful with this one!
MB Pro: (command)DEL(space)ALL(enter)qwerty: (esc)DEL(space)ALL(end)

MB Pro: A Visual Guide
December 2001 Page 43
Directory of Current Files &Embossing a Saved File
Directory of current files:Brailles a directory and also provides the file sizes.
MB Pro: (command)DIR(enter)qwerty: (esc)DIR(end)
Remaining free memory space:MB Pro: (command)FREE(enter)qwerty: (esc)FREE(end)
Embossing a saved file:MB Pro: (command)PR(space)’file name’(enter)qwerty: (esc)PR(space)’file name’(end)
Emboss multiple copies:MB Pro: (command)MPR(space)’number of copies’ (space)’file name’(enter)qwerty: (esc)MPR(space)’number of copies’ (space) ’file name’ (end)
Emboss a specific page within a file:MB Pro: (command)PR(space)’file name’(space)page number(enter)qwerty: (esc)PR(space)’file name’(space)page number(end)
Emboss from page # to page # within a file:MB Pro: (command)PR(space)’file name’(space) starting pagenumber(space)ending page number (enter)
qwerty: (esc)PR(space)’file name’(space)starting pagenumber(space)ending page number(end)

MB Pro: A Visual Guide
December 2001 Page 44
What About Our Perkins Brailler?
The Mountbatten Brailler is a wonderful tool for beginning braille users. It is a large stepforwards from the Perkins Brailler.
It is, however, important that our students are still exposed to the Perkins Brailler, asmodern technology will sometimes fail (from a dead battery to getting damaged bydropping). The new technology is usually so expensive that a Perkins Brailler is the onlyaffordable option for backup equipment in school and for the students to use in theirhome environment (the MB Pro is portable but it's not very practical to take home on aregular basis).

MB Pro: A Visual Guide
December 2001 Page 45
Editing
To edit using the MB Pro, the student has to navigate throughout the file using a'speech editor'. This is very much like the Braille 'n Speak (there is no tactile braillefeedback).
I believe that when students are ready for serious editing they should start usingequipment such as the BrailleNote, utilizing the refreshable braille feature along withspeech output.
The MB Pro will continue to be a wonderful tool for a variety of uses such as Nemethmath. With the qwerty keyboard attached it will also remain a powerful tool forclassroom integration (sighted peers can create grade 2 braille).
MB Pro: A Visual Guide
December 2001 Page 46
Trouble Shooting
Refer to the ‘Troubleshooting Guide’ in the MB Pro User Manual (page 55) for helpfultrouble shooting tips.
Restore all default settings:MB Pro: (command)STD(enter)qwerty: (esc)STD(end)
Note:After restoring the default settings I find it helpful to do a SAVE before restarting the MBPro. We have had a situation where every MB Pro key said “error” when it was pressed.Even with the STD command we still had the same problem after restarting – the SAVEbefore shutting down made all the difference.
MB Pro: (command)SAVE(enter)qwerty: (esc)SAVE(end)
The MB Pro comes with a one-year warranty.
Tech support:
The Quantum Technology web site is www.quantech.com.au.
The Aroga Group provides technology support for students using MB Pros from SET-BC. Their website is www.aroga.com.• For technology support, contact Ryan or Steve.• For service requests, contact Rick.

MB Pro: A Visual Guide
December 2001 Page 47
MB Pro Cheat Sheets
Commands (MB Pro): (command key) to start (enter key) to finish
Commands (qwerty):ESC (to start) END (to finish)
Ejecting paper: Auto paper feed:
Advanced mode on/off:
MB Pro: (command)ADV(enter) qwerty: (esc)ADV(end) (MB Pro will say “advanced mode on”)
MB Pro: (command)ADV(enter) qwerty: (esc)ADV(end) (MB Pro will say “advanced mode off”)
Starting a new file:MB Pro: (command)BEGIN(space)‘File Name’(enter)qwerty: (esc)BEGIN(space)‘File Name’(end)

MB Pro: A Visual Guide
December 2001 Page 48
Ending a file:MB Pro: (command)END(enter)qwerty: (esc)END(end)
Brailling a saved file:MB Pro: (command)PR(space)‘file name’(enter)
qwerty: (esc)PR(space)‘file name’(end)
Deleting files: (you must go outside the file to delete):MB Pro: (command)DEL(enter)
qwerty: (esc)DEL(end)
qwerty grade 1 braille output:(plug in keyboard in ‘learn mode’ and it works automatically)
qwerty grade 2 braille output:(forward translation) (only works in ‘advanced mode’)
MB Pro: (command)FE(enter) qwerty: (esc)FE(end)
Ink printer setup: (back translation)(only works in ‘advanced mode’) MB Pro: (command)BP(enter) “on” or “off” qwerty: (esc) BP(end)
Printing or embossing a saved file:(set-up the ink printer first, see section: ‘Setting Up Print Output’
MB Pro: (command)PR(space)‘file name’(enter) qwerty: (esc)PR(space)‘file name’(end)

MB Pro: A Visual Guide
December 2001 Page 49
Synthetic speech on/off:(only works in ‘advanced mode’) MB Pro: (command)SPK(space)S(enter) qwerty: (esc)SPK(space)S(end)
Recorded speech on/off: (works in ‘learn mode' and 'advanced mode’)
MB Pro: (command)SPK(space)R(enter) qwerty: (esc)SPK(space)R(end)
Back to factory defaults:(a helpful command when things get messed up) MB Pro: (command)STD(enter) qwerty: (esc)STD(end) followed by
MB Pro: (command)SAVE(enter)qwerty: (esc)SAVE(end)