mbi a00 mbi a40 g b d e f r i t - whirlpool emeadocs.whirlpool.eu/_doc/4619-694-54111.pdf · 2 g b...
TRANSCRIPT

1
GB
DE
FR
IT
MBI A00 MBI A40
2
GB
INSTALLATION
PRIOR TO CONNECTING
ENSURE THAT THE APPLIANCE IS NOT DAMAGED. Check that the oven door closes fi rmly against the door support and that the internal door seal is not damaged. Empty the oven and clean the interior with a soft, damp cloth.
AFTER CONNECTING
THE EARTHING OF THIS APPLIANCE is compulso-ry. The manufacturer will accept no re-sponsibility for injury to persons, ani-mals or damage to objects arising from the non-observance of this requirement.
The manufacturers are not liable for any problems caused by the user’s failure to ob-serve these instructions.
DO NOT OPERATE THIS APPLIANCE if it has a damaged mains cord or plug, if it is not working properly, or if it has been dam-aged or dropped. Do not immerse the mains cord or plug in water. Keep the cord away from hot surfaces. Electrical shock, fi re or other hazards may result.
DO NOT REMOVE THE MICROWAVE INLET PROTECTION PLATES located on the side of the oven cavity wall. They prevent grease & food parti-cles from entering the mi-crowave inlet channels.
ENSURE the oven cavity is empty before mounting.
CHECK THAT THE VOLTAGE on the rating plate corresponds to the voltage in your home.
THE OVEN CAN BE OPERATED ONLY if the oven door is fi rmly closed.
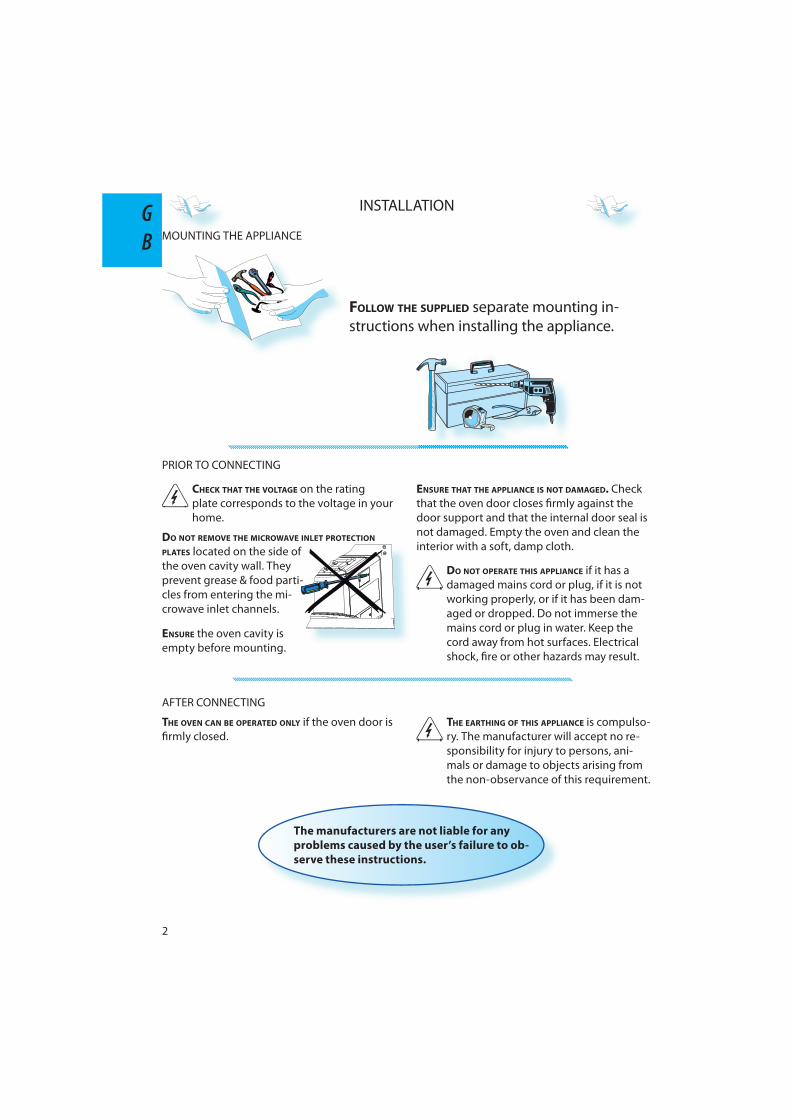
MOUNTING THE APPLIANCE
FOLLOW THE SUPPLIED separate mounting in-structions when installing the appliance.

3
GB
IMPORTANT SAFETY INSTRUCTIONS
DO NOT HEAT, OR USE FLAMMABLE MATERIALS in or near the oven. Fumes can create a fi re hazard or explosion.
DO NOT USE YOUR MICROWAVE oven for drying textiles, paper, spices, herbs, wood, fl ow-ers, fruit or other combustible materials. Fire could result.
DO NOT OVER-COOK FOOD. Fire could result.
DO NOT LEAVE THE OVEN UNATTENDED, espe-cially when using paper, plastic or oth-er combustible materials in the cook-ing process. Paper can char or burn and some plastics can melt if used when heating foods.
IF MATERIAL INSIDE / OUTSIDE THE OVEN SHOULD IGNITE OR SMOKE IS OBSERVED, keep oven door closed and turn the oven off . Dis-connect the power cord or shut off pow-er at the fuse or circuit breaker panel.
READ CAREFULLY AND KEEP FOR FUTURE REFERENCE
ONLY ALLOW CHILDREN to use the oven with adult supervision after adequate instruc-tions have been given so that the child is able to use the oven in a safe way and un-derstands the hazards of improper use. The appliance is not intended for use by young children or infi rm persons without supervision. Young children should be supervised to ensure that they do not play with the appliance.If your oven has a com-bination mode, children should only use the oven under adult supervision due to the high temperatures generated.
DO NOT USE YOUR MICROWAVE oven for heating anything in airtight sealed contain-ers. The pressure increas-es and may cause damage when opening or may explode.
EGGSDO NOT USE YOUR MICROWAVE oven for cook-ing or reheating whole eggs with or without shell since they may explode even after microwave heating has ended.
THE DOOR SEALS AND THE DOOR SEAL AREAS must be regularly inspected for damage. If these areas are damaged the appliance should not be operated until it has been repaired by a trained service technician.
DO NOT USE corrosive chemicals or va-pors in this appliance. This type of oven is specifi cally designed to heat or cook food. It is not designed for industrial or laboratory use.

4
GB GENERAL
THIS APPLIANCE IS DESIGNED FOR DOMESTIC USE ONLY!
THE APPLIANCE SHOULD NOT BE OPERATED without food in the oven when using microwaves. Operation in this manner is likely to damage the appliance.
IF YOU PRACTICE OPERATING the oven, put a glass of water inside. The water will absorb the mi-crowave energy and the oven will not be dam-aged.
REMOVE WIRE TWIST-TIES from paper or plastic bags before placing bag in the oven.
DEEPFRYINGDO NOT USE YOUR MICROWAVE oven for deep-frying, because the oil temperature cannot be controlled.
LIQUIDSE.G. BEVERAGES OR WATER. Overheating the liquid beyond boiling point can occur without evidence of bubbling. This could result in a sudden boil over of the hot liquid.To prevent this possibility the following steps should be taken:
1. Avoid using straight-sided containers with narrow necks.
2. Stir the liquid before placing the container in the oven and let the teaspoon remain in the container.
3. After heating, allow standing for a short time, stirring again before carefully re-moving the container from the oven.
CAREFULALWAYS REFER to a microwave cookbook for de-tails. Especially, if cooking or reheating food that contains alcohol.
AFTER HEATING BABY FOOD or liquids in a baby bottle or in a baby food jar, always stir and check the temperature before serving. This will ensure that the heat is evenly distributed and the risk of scalding or burns can be avoided.Ensure the Lid and the Teat is removed be-fore heating!
PRECAUTIONS
USE HOT PADS OR OVEN MITTS to prevent burns, when touching containers, oven parts, and pan after cooking.
DO NOT USE THE CAVITY for any storage purposes.

5
GB
ACCESSORIES
GENERAL
IF ACCESSORIES CONTAINING METAL comes in contact with the oven interior, while the oven is in op-eration, sparking can occur and the oven could be damaged.
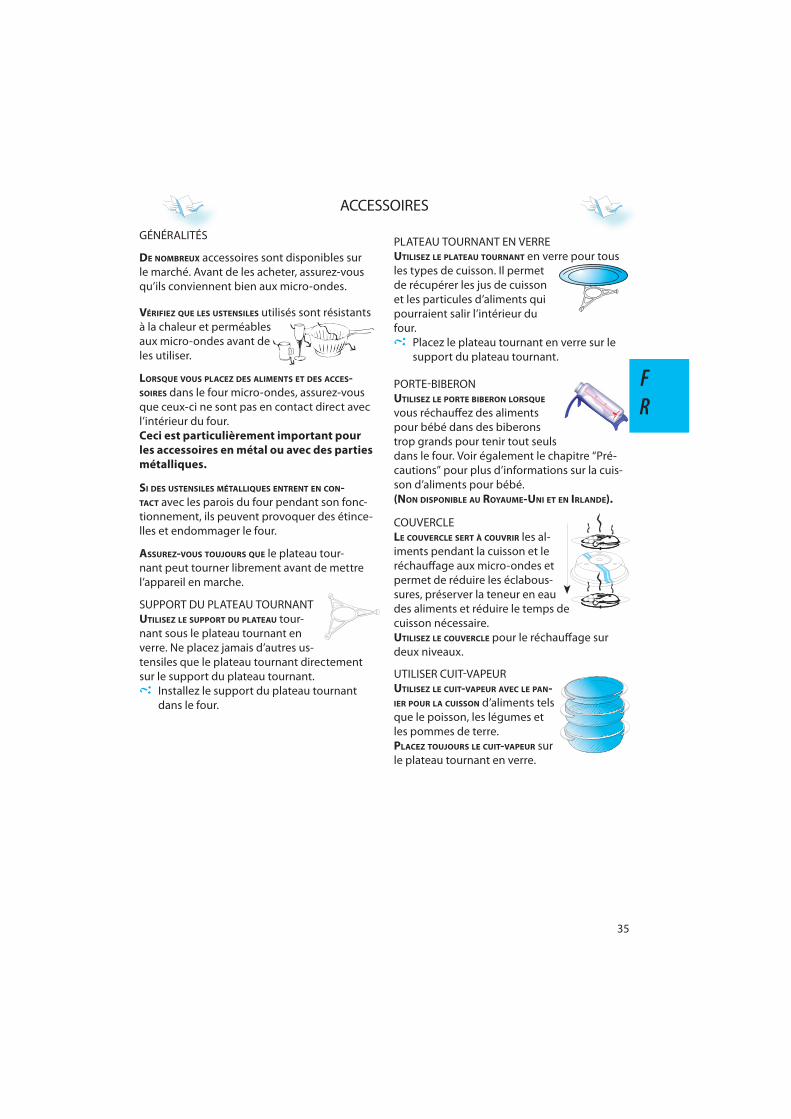
TURNTABLE SUPPORTUSE THE TURNTABLE SUPPORT under the Glass turntable. Never put any other utensils on the turntable support.
Fit the turntable support in the oven.
�
GLASS TURNTABLEUSE THE GLASS TURNTABLE with all cooking meth-ods. It collects the dripping juic-es and food particles that other-wise would stain and soil the in-terior of the oven.
Place the Glass turntable on the turntable support.
�ENSURE THAT THE UTENSILS YOU USE are oven proof and allow microwaves to pass through them before cooking.
WHEN YOU PUT FOOD AND ACCESSORIES in the micro-wave oven, ensure that they do not come in contact with the interior of the oven. This is especially important with accesso-ries made of metal or metal parts.
ALWAYS ENSURE that the turntable is able to turn freely before starting the oven.
THERE ARE a number of accessories available on the market. Before you buy, ensure they are suitable for microwave use.
COVERTHE COVER is used to cover food during cooking and reheating with microwaves only and helps to re-duce spattering, retain food mois-ture as well as reducing the time needed.USE THE COVER for two level reheat-ing.
BABY BOTTLE HOLDERUSE THE BABY BOTTLE HOLDER when heating baby food in bottles that are too tall to stand-alone in the oven. Please see also, the chapter ”Precau-tions”, for more information about heating baby food.(NOT AVAILABLE IN THE UK AND IRELAND).
STEAMERUSE THE STEAMER WITH THE STRAIN-ER in place for such foods as fi sh, vegetables and potatoes.ALWAYS PLACE the steamer on the Glass Turntable.

6
GB
TO PAUSE OR STOP COOKING
TO PAUSE COOKING The cooking can be paused to check, turn or stir the food by opening the door. The setting will be maintained for 10 minutes.
TO CONTINUE COOKING Close the door and press the Start but-ton ONCE. The cooking is resumed from where it was paused.Pressing the Start button TWICE will increase the time by 30 seconds.
IF YOU DON’T WANT TO CONTINUE COOKING Remove the food, close the door and press the STOP button
A BEEP WILL SIGNAL once a minute for 10 min-utes when the cooking is fi nished. Press the STOP button or open the door to cancel the signal.NOTE: The oven will only hold the settings for 60 seconds if the door is opened and then closed after the cooking is fi nished.
START PROTECTION / CHILD LOCK
THIS AUTOMATIC SAFETY FUNCTION IS ACTIVATED ONE MINUTE AFTER the oven has returned to “stand by mode“. (The oven is in “stand by” when the 24-hour clock is displayed or if the clock has not been set, when the display is blank).
THE DOOR MUST BE OPENED AND CLOSED e.g. putting food into it, before the safety lock is released. Else the display will show “door “.
COOLING DOWNWHEN A FUNCTION IS FINISHED, the oven carries out a cooling procedure. This is normal. After this procedure the oven switches off au-tomatically.
THE COOLING PROCEDURE can be interrupted with-out any harm to the oven.
door

7
GB
CLOCK
KEEP THE DOOR OPEN WHILE SETTING THE CLOCK. This gives you 5 minutes to complete the setting of the Clock. Otherwise, each step must be accomplished within 60 seconds.
q PRESS THE STOP BUTTON (3 seconds) until the left-hand digit (hour’s) flicker.
w PRESS THE +/- BUTTONS to set the hours.
e PRESS THE START BUTTON. (The two right hand digits (minutes) flicker).
r PRESS THE +/- BUTTONS to set the minutes.
t PRESS THE START BUTTON again.
THE CLOCK IS SET AND IN OPERATION.NOTE: When the appliance is fi rst plugged in or after a power failure, the display is blank. If the clock is not set, the display will remain blank until the cooking time is set.IF YOU WISH TO REMOVE THE CLOCK from the display once it has been set, simply press the Stop button again for 3 seconds and then press the Stop button once more.TO REINSTATE THE CLOCK, follow the above procedure.
KITCHEN TIMER
USE THIS FUNCTION when you need a kitchen timer to measure exact time for various purposes such as cooking eggs or letting the dough rise before baking etc.
q PRESS THE +/- BUTTONS to set the desired length of the timer.
w PRESS THE POWER BUTTON repeatedly to set the power to 0 W.
e PRESS THE START BUTTON. AN ACOUSTIC SIGNAL will be heard when the timer has fi nished to count down.
q etwr
w
q e

8
GB
MICROWAVES ONLY
POWER SUGGESTED USE:
750 WREHEATING OF BEVERAGES, water, clear soups, coff ee, tea or other food with a high water content. If the food contains egg or cream choose a lower power. COOKING OF fi sh, vegetables, meat etc.
500 WMORE CAREFUL COOKING e.g. high protein sauces, cheese and egg dishes and to fi nish cook-ing casseroles.
350 W SIMMERING STEWS, melting butter.
160 W DEFROSTING. Softening butter, cheeses. Softening Ice cream.
0 W WHEN USING the Timer only.
COOK & REHEAT WITH MICROWAVES
USE THIS FUNCTION for normal cooking and reheating, such as vegetables, fi sh, potatoes and meat.
q PRESS THE +/- BUTTONS to set the time.
w PRESS THE POWER BUTTON repeatedly to set the power.
e PRESS THE START BUTTON. ONCE THE COOKING PROCESS HAS BEEN STARTED: The time can easily be increased in 30-second steps by pressing the Start button. Each press in-creases the time with 30 seconds. You may also alter the time by pressing the +/- buttons to in-crease or decrease the time. PRESSING THE POWER BUTTON may also change the power level. The fi rst press will show you the cur-rent power level. Press the power button repeatedly to change power level.ALL SETTINGS CAN BE CHANGED during cooking if you so desire.
CHOOSING POWER LEVEL
w
q e

9
GB
MANUAL DEFROST
FOLLOW THE PROCEDURE for “How to cook & reheat with microwaves” and choose power level 160 W when defrosting manually.
CHECK AND INSPECT THE FOOD REGULARLY. Experi-ence will give you the times needed for vari-ous amounts.
TURN LARGE JOINTS halfway through the defrost-ing process.
FROZEN FOOD IN PLASTIC BAGS, plastic fi lms or card-board packages can be placed directly in the oven as long as the package has no metal parts (e.g. metal twist ties).
THE SHAPE OF THE PACKAGE alters the de-frosting time. Shallow packets defrost more quickly than a deep block.
SEPARATE PIECES as they begin to defrost. Individual slices defrost more easily.
SHIELD AREAS OF FOOD with small pieces of aluminum foil if they start to become warm (e.g. chicken legs and wing tips).
BOILED FOOD, STEWS AND MEAT SAUCES de-frost better if stirred during defrost-
ing time.WHEN DEFROSTING it is better to under-thaw the food slightly and allow the
process to fi nish during standing time.
STANDING TIME AFTER DEFROSTING ALWAYS IMPROVES the result since the temperature will then be evenly distribut-ed throughout the food.

10
GB
FOOD AMOUNT HINTS
MEAT 100G - 2KG Minced meat, cutlets, steaks or roasts.
POULTRY 100G - 2KG Chicken whole, pieces or fi llets.
FISH 100G - 1.5KG Whole, steaks or fi llets.
FOR FOOD NOT LISTED IN THIS TABLE and if the weight is lesser or greater than recommended weight, you should follow the procedure for “Cook and reheat with microwaves” and choose 160 W when defrosting.
JET DEFROST
USE THIS FUNCTION for defrosting Meat, Fish & Poultry ONLY.JET DEFROST SHOULD ONLY BE USED if the net weight is between 100 - 2Kg.
q PRESS THE JET DEFROST BUTTON.
w PRESS THE + / - BUTTONS to set the weight of the food.
e PRESS THE START BUTTON.
MIDWAY THROUGH THE DEFROSTING PROCESS the oven stops and prompts you to TURN FOOD.Open the door.Turn the food.Close the door and restart by pressing the Start button.
NOTE: The oven continues automatically after 2 min. if the food hasn’t been turned. The defrosting time will be longer in this case.
���
THIS FUNCTION NEEDS TO KNOW the net weight of the food. The oven will then auto-matically calculate the needed time to fi nish the procedure.
FROZEN FOODS: IF THE FOOD IS WARMER than deep-freeze temperature (-18°C), choose lower weight of the food.IF THE FOOD IS COLDER than deep-freeze temperature (-18°C), choose higher weight of the food.
w q e

11
GB
JET START
THIS FUNCTION IS USED FOR quick reheating of foods with a high water content such as; clear soups, coff ee or tea.PRESS TO AUTOMATICALLY START with full microwave power level and the cooking time set to 30 sec-onds. Each additional press increases the time with 30 seconds. You may also alter the time by pressing the +/- buttons to increase or decrease the time after the function has started.
MEMORY
THE MEMORY FUNCTION PROVIDES you with an easy way to quickly recall a preferred setting.THE PRINCIPLE OF THE MEMORY FUNCTION is to store whatever setting that is currently displayed.
q PRESS THE MEMO BUTTON.
w PRESS THE START BUTTON. HOW TO STORE A SETTING:
q SELECT any function and make the nesseccary settings
w MAKE the nesseccary settings
e PRESS AND KEEP THE MEMO BUTTON PRESSED for 3 seconds until an acoustic signal is heard. The set-ting is now stored. You may reprogram the memory as many times as you wish.
WHEN THE APPLIANCE is plugged in or after a power failure, your Memo function will have stored - 1 minutes and 750 W as default setting.
wq

12
GB
�
�
�
STEAM
USE THIS FUNCTION FOR such food as vegetables & fi sh.ALWAYS USE THE SUPPLIED STEAMER when using this function.
q PRESS THE STEAM BUTTON.
w CONTINUE TO REPEATEDLY PRESS THE STEAM BUTTON to set the food class.
e PRESS THE +/- BUTTONS to set the weight of the food.
r PRESS THE START BUTTON.
PLACE the food on the steam grid.
ADD 100 ml (1dl) water in the bottom part of the steamer.
COVER with the lid.
THE STEAMER IS designed to be used with microwaves only!NEVER USE IT WITH ANY OTHER FUNCTION AT ALL. USING THE STEAMER in any other function may cause damage. ALWAYS ENSURE that the turntable is able to turn freely before starting the oven.ALWAYS PLACE the steamer on the Glass Turntable.
wq e

13
GB
POTATOES / ROOT VETABLES (150g - 500g) USE EVEN SIZES.
Cut the vetgetables into even pieces.Allow to stand for 1 - 2 minutes, after cookingVEGETABLES (150g - 500g)
(Caulifl ower and Broccoli)
FROZEN VEGETABLES (150g - 500g)
ALLOW TO STAND for 1 - 2 minutes.
FISH FILETS (150g - 500g)DISTRIBUTE FILLETS EVENLY on the steamgrid. Interlace thin parts. Allow to stand for 1 - 2 minutes, after cooking.
COOKING VEGETABLESPLACE THE VEGETABLES into the strainer. Pour 100 ml water into the bottom part. Cover with the lid and set the time. SOFT VEGETABLES such as broccoli and leek require 2-3 minutes cooking time. HARDER VEGETABLES such as carrots and potatoes require 4-5 minutes cooking time.
STEAM
r
w
q
e

14
GB
MAINTENANCE & CLEANING
CLEANING IS THE ONLY MAINTENANCE normally re-quired. FAILURE TO MAINTAIN THE OVEN in a clean condition could lead to deterioration of the surface that could adversely aff ect the life of the appliance and possibly result in a hazardous situation.
DO NOT USE METAL SCOURING PADS, ABRASIVE CLEANSERS, steel-wool pads, grit-ty washcloths, etc. which can damage the control panel, and the interior and exterior oven surfac-es. Use a sponge with a mild detergent or a paper towel with spray glass cleaner. Apply spray glass cleaner to a paper towel.DO NOT SPRAY directly on the oven.
AT REGULAR INTERVALS, especially if spill overs have occurred, remove the turntable, the turntable support and wipe the base of the oven clean.
DISHWASHER SAFE:
TURNTABLE SUPPORT.
GLASS TURNTABLE.
THIS OVEN IS DESIGNED to operate with the turnta-ble in place.
DO NOT operate the microwave oven when the turntable has been removed for cleaning.
USE A MILD DETERGENT, water and a soft cloth to clean the interior surfaces, front and rear of the door and the door opening.
DO NOT ALLOW GREASE or food particles to build up around the door.
FOR STUBBORN STAINS, boil a cup of water in the oven for 2 or 3 minutes. Steam will soften the marks.
COVER
STEAMER
BABYBOTTLE HOLDER
ADDING SOME LEMON JUICE to a cup of water, plac-ing this on the turntable and boiling for a few minutes can eliminate odors inside the oven.
DO NOT USE STEAM CLEANING APPLIANCES when cleaning your microwave oven.

15
GB
TROUBLE SHOOTING GUIDE
IF THE OVEN DOES NOT WORK, do not make a service call until you have made the following checks:
The Turntable and turntable support is in place.The Plug is properly inserted in the wall socket.The Door is properly closed.Check your Fuses and ensure that there is power available.Check that the oven has ample ventilation.Wait for 10 minutes, then try to operate the oven once more.Open and then close the door before you try again.
THIS IS TO AVOID unnecessary calls for which you will be charged. When calling for Service, please give the serial number and type number of the oven (see Ser-vice label). Consult your warranty booklet for further advice.
�������
IF THE MAINS CORD NEEDS REPLACING it should be replaced by the original mains cord, which is avail-able via our service organi-zation. The mains cord may only be replaced by a trained service technician.
SERVICE ONLY TO BE CARRIED OUT BY A TRAINED SERVICE TECHNICIAN. It is hazardous for anyone oth-er than a trained person to carry out any service or repair oper-ation, which involves the re-moval of any cover, which gives pro-tection against exposure to microwave energy.DO NOT REMOVE ANY COVER.

16
GB
Test Amount Approx. time Power level Container
12.3.1 750 g 10 min 750 W Pyrex 3.227
12.3.2 475 g 5 ½ min 750 W Pyrex 3.827
12.3.3 900 g 14 min 750 W Pyrex 3.838
13.3 500 g 2 min 40 sec Jet Defrost
SUPPLY VOLTAGE 230 V/50 HZ
RATED POWER INPUT 1300 W
FUSE 10 A (UK 13 A)
MW OUTPUT POWER 750 W
OUTER DIMENSIONS (HXWXD) 348 X 595 X 320
INNER DIMENSIONS (HXWXD) 187 X 370 X 290
ENVIRONMENTAL HINTS
THE PACKING BOX may be fully recy-cled as confi rmed by the recy-cling symbol. Follow local dis-posal regulations. Keep po-tentially hazardous packag-ing (plastic bags, polysty-rene etc.) out of the reach of children.THIS APPLIANCE is marked according to the Euro-pean directive 2002/96/EC on Waste Electrical and Electronic Equipment (WEEE). By ensuring this product is disposed of correctly, you will help prevent potential negative consequences for the environment and human health, which could otherwise be caused by inappropriate waste handling of this product.
THE SYMBOL on the product, or on the docu-ments accompanying the product, indicates that this appliance may not be treat-ed as household waste. In-stead it shall be handed over to the applicable collection point for the recycling of electrical and electronic equipment. DISPOSAL must be carried out in accordance with lo-cal environmental regula-tions for waste disposal.FOR MORE DETAILED INFORMATION about treatment, recovery and recycling of this product, please contact your local city offi ce, your household waste disposal service or the shop where you purchased the product.BEFORE SCRAPPING, cut off the mains cord so that the appliance cannot be connected to the mains.
IN ACCORDANCE WITH IEC 60705.
THE INTERNATIONAL ELECTROTECHNICAL COMMISSION, SC. 59H, has developed a standard for comparative testing of heating performance of diff erent microwave ovens. We recommend the following for this oven:

17
DE
AUFSTELLUNG
VOR DEM ANSCHLIESSEN
DAS GERÄT DARF NICHT BESCHÄDIGT SEIN. Die Tür muss dicht mit dem Rahmen abschließen und die innenliegende Türdichtung darf nicht be-schädigt sein. Entfernen Sie alle Gegenstän-de aus dem Gerät und reinigen Sie die Innen-fl ächen mit einem weichen, feuchten Tuch.
NACH DEM ANSCHLIESSEN
DIE ERDUNG DIESES GERÄTES ist gesetzlich vorgeschrieben. Der Hersteller übernim-mt keinerlei Haftung für Personen- oder Sachschäden bzw. Verletzungen von Tie-ren, die aus einer Nichteinhaltung dieser Vorschrift resultieren.
Der Hersteller ist für Probleme, die sich aus der Nichtbeachtung dieser Anweisungen durch den Nutzer ergeben, nicht verant-wortlich.
NEHMEN SIE DAS GERÄT NICHT IN BETRIEB, wenn das Stromkabel oder der Steck-er beschädigt ist, das Gerät nicht ein-wandfrei funktioniert, heruntergefallen ist oder in irgendeiner Weise beschädigt wurde. Das Netzkabel oder den Stecker nicht in Wasser tauchen. Das Kabel von heißen Flächen fern halten. Sonst kön-nen Stromschlag, Brand oder sonstige Risiken die Folge sein.
ENTFERNEN SIE NICHT DIE PLATTEN ZUM SCHUTZ DER MIKROWELLENLUFTKANÄLE an der Seite des Garraums des Geräts. Sie verhindern, dass Fett und Speiseteilchen in die Mikrowellenluftkanäle gelangen.
VOR DER MONTAGE MUSS der Garraum des Geräts leer sein.
DIE SPANNUNG AUF DEM TYPENSCHILD muss der Netzspannung in Ihrem Haus ent-sprechen.
DAS GERÄT KANN NUR IN BETRIEB GENOMMEN WERDEN , wenn die Tür richtig (fest anliegend) geschlos-sen ist.
AUFSTELLUNG DES GERÄTS
BEFOLGEN SIE DIE MITGELIEFERTE separate Ein-bauanleitung zur Aufstellung des Geräts.

18
DE
WICHTIGE SICHERHEITSHINWEISE
ERHITZEN ODER VERWENDEN SIE KEINE BREN-NBAREN MATERIALIEN in dem Gerät selbst oder in seiner Nähe. Rauchentwicklung kann zu Brand oder Explosion führen.
VERWENDEN SIE DAS MIKROWELLENGERÄT NICHT zum Trocknen von Textilien, Papier, Gewürzen, Holz, Gemüse, Früchten oder anderen brennbaren Materialien. Es besteht Brandgefahr.
DIE SPEISEN NICHT LÄNGER ALS NÖTIG GAREN. Es besteht Brandgefahr.
LASSEN SIE DAS GERÄT NICHT UNBEAUFSICH-TIGT, insbesondere dann nicht, wenn beim Garen Papier, Kunststoff oder an-dere brennbare Materialien verwen-det werden. Papier kann verkohlen oder Feuer fangen. Einige Kunststoff e können schmelzen, wenn sie zusammen mit den Speisen erhitzt werden.
WENN MATERIAL INNERHALB ODER AUSSERHALB DES GARRAUMS ZU BRENNEN ANFÄNGT ODER SICH RAUCH BILDET, die Gerätetür geschlossen halten und das Gerät ausschalten. Den Netzstecker ziehen oder die Sicherung im Schaltkasten herausdrehen.
LESEN SIE DIE BEDIENUNGSANLEITUNG SORGFÄLTIG DURCH UND BEWAHREN SIE SIE ZUM SPÄTEREN NACHSCHLAGEN AUF.
KINDER DÜRFEN das Mikrowellengerät nur unter Aufsicht benutzen, und nur dann, wenn sie ausreichend eingewiesen wur-den und sich der Gefahren eines unsach-gemäßen Gebrauchs bewusst sind. Ohne Aufsicht darf das Gerät nicht von kleinen Kindern oder gebrechlichen Personen benutzt werden. Kleinere Kinder bei Verwendung des Mikrowellengerätes nicht unbeaufsichtigt lassen, damit diese nicht mit dem Gerät spielen.Wenn das Gerät einen Kombinationsmodus besitzt, dürfen Kinder das Gerät wegen der entstehenden ho-hen Temperaturen nur unter Aufsicht Erwachsener benutzen.
ERHITZEN SIE NIEMALS Speisen oder Flüssigkeiten in luftdicht verschlossenen Behältern in der Mikrowelle. Der Druck im Behälter nimmt zu. Das kann beim Öff nen des Behälters zu Verletzungen oder einer Explosion führen.
EIERBENUTZEN SIE DAS MIKROWELLENGERÄT nicht zum Garen oder Aufwärmen ganzer Eier mit oder ohne Schale, da diese auch nach Beenden des Gar- oder Aufwärmvorgangs ex-plodieren können.
BEI DER REINIGUNG MÜSSEN DIE TÜRDICHTUNG UND DEREN SITZ regelmäßig auf Beschädigungen überprüft werden. Bei einer Beschädigung das Gerät erst wieder in Betrieb nehm-en, nachdem es von einem qualifi zierten Kundendiensttechniker repariert wurde.
VERWENDEN SIE IN DIESEM GERÄT KEINE ätzen-den Chemikalien oder Dämpfe. Dieser Gerätetyp wurde speziell zum Aufwär-men oder Garen von Speisen entwick-elt. Er eignet sich nicht für industrielle Zwecke oder Laborzwecke.

19
DE
ALLGEMEINES
DAS GERÄT IST AUSSCHLIESSLICH FÜR DIE VERWENDUNG IM HAUSHALT BESTIMMT!
SCHALTEN SIE DAS MIKROWELLENGERÄT niemals ohne Speisen im Garraum ein. Andernfalls kann es zu Schäden am Gerät kommen.
WENN SIE SICH MIT DEM GERÄT vertraut machen wollen, stellen Sie ein Glas Wasser in den Gar-raum. Das Wasser absorbiert die Energie der Mikrowellen, sodass das Gerät nicht beschä-digt wird.
ENTFERNEN SIE ALLE METALLTEILE (Z. B. VERSCHLÜSSE) von Papier- oder Plastikbeuteln, bevor Sie diese in den Garraum legen.
FRITTIERENDAS MIKROWELLENGERÄT DARF NICHT zum Frittieren verwendet werden, da die Temperatur des Frittieröls nicht kontrol-liert werden kann.
FLÜSSIGKEITEN(ZUM BEISPIEL GETRÄNKE ODER WASSER.) Flüssig-keiten können über den Siede-punkt hinaus erhitzt werden, ohne dass es zu einer sichtbar-en Blasenbildung kommt. Die heiße Flüssigkeit kann plötzlich überkochen.Um dies zu vermeiden, ergreifen Sie folgende Vorsichtsmaßnahmen:
1. Verwenden Sie möglichst keine hohen, schmalen Gefäße mit engem Hals.
2. Rühren Sie die Flüssigkeit um, bevor Sie das Gefäß in den Garraum stellen, und lassen Sie einen Teelöff el im Gefäß.
3. Lassen Sie die Flüssigkeit nach dem Erhit-zen kurz stehen und rühren Sie sie vor der vorsichtigen Entnahme des Gefäßes aus dem Gerät nochmals um.
ACHTUNGGENAUERE INFORMATIONEN DAZU FINDEN SIE im Mi-krowellenkochbuch. Dies gilt besonders für das Garen oder Erhitzen von alkoholhaltigen Speisen.
BABYNAHRUNG IN GLÄSERN ODER GETRÄNKE IN BABYFLASCHEN müssen nach dem Erwärmen immer umgerührt und auf die rich-tige Temperatur überprüft werden. Dadurch wird eine gleichmäßige Wärmeverteilung sicher-gestellt und das Risiko eines Verbrühens oder Verbrennens vermieden.Den Deckel bzw. Sauger unbedingt vor dem Erwärmen abnehmen!
VORSICHTSMASSNAHMEN
VERWENDEN SIE IMMER TOPFLAPPEN ODER OFEN-HANDSCHUHE , wenn Sie nach dem Garen Behälter, Geräteteile und Schalen anfas-sen. Es besteht Verbrennungsgefahr.
VERWENDEN SIE DEN GARRAUM nicht als Ablage.

20
DE
ZUBEHÖR
ALLGEMEINES
WENN SOLCHE TEILE mit den Innenwänden des Garraums in Berührung kommen, während die Mikrowelle in Betrieb ist, können Funken ent-stehen und das Gerät beschädigen.
DREHTELLERAUFLAGEDIE DREHTELLERAUFLAGE muss sich immer unter dem Glasdrehteller befi nden. Keine anderen Gegen-stände auf die Drehtelleraufl age legen.
Setzen Sie die Drehtelleraufl age in das Gerät ein.
�
GLASDREHTELLERVERWENDEN SIE DEN GLASDREHTELLER bei allen Gerätefunktionen. Er fängt heruntertropfende Flüssigkeit und Speiseteilchen auf, sodass eine unnötige Verschmutzung des Innenraums vermieden wird.
Setzen Sie den Glasdrehteller auf die Drehtelleraufl age.
�VERWENDEN SIE NUR hitzebeständiges und mik-rowellengeeignetes Kochge-schirr.
SPEISEN UND ZUBEHÖRTEILE dürfen nicht beim Hin-einstellen in die Mikrowelle mit den Innenwän-den des Gerätes in Berührung kommen. Das gilt besonders dann, wenn die Zubehörteile aus Metall oder Metallteilen bestehen.
DER DREHTELLER MUSS SICH STETS ungehindert dre-hen können, bevor das Gerät eingeschaltet wird.
EINE REIHE von Zubehörteilen kann käufl ich er-worben werden. Prüfen Sie vor dem Kauf, ob das Zubehör für das Mikrowellengerät geeig-net ist.
ABDECKHAUBEDIE ABDECKHAUBE dient dazu, die Speisen beim Garen und Auf-wärmen in der Mikrowelle ab-zudecken. Sie vermindert Ver-schmutzungen des Garraums sowie das Austrocknen der Speisen und verkürzt die Gar-zeit.VERWENDEN SIE DIE ABDECKHAUBE auch beim Auf-
FLÄSCHCHENHALTERDEN FLÄSCHCHENHALTER ZUM Aufwär-men von Babynahrung in hohen Flaschen verwenden, die nicht al-lein in der Mikrowelle stehen bleiben. Im Kap-itel “Vorsichtsmaßnahmen” fi nden Sie weit-ere Informationen zum Erwärmen von Baby-nahrung.(IN GROSSBRITANNIEN UND IRLAND NICHT VERFÜGBAR).
wärmen auf zwei Ebenen.DÄMPFEINSATZVERWENDEN SIE DEN DÄMPFEINSATZ MIT SIEB für Nahrungsmittel wie Fisch, Gemüse und Kartoff eln.PLATZIEREN SIE DEN DÄMPFEINSATZ immer auf dem Glassdrehteller.

21
DE
UNTERBRECHUNG ODER ABBRUCH DES GARVORGANGS
GARVORGANG UNTERBRECHEN Der Garvorgang kann durch Öff nen der Gerätetür unterbro-chen werden, um die Speisen zu kontrollieren, zu wenden oder umzurüh-ren. Die Einstellungen werden 10 Minuten lang beibehalten.
GARVORGANG FORTSETZEN Schließen Sie die Tür und drücken Sie die Starttaste EINMAL. Der Garvorgang wird an der Stelle fortgesetzt, an der er unterbrochen wurde.Durch ZWEIMALIGES Drücken der Starttaste wird die Garzeit um weitere 30 Sekunden ver-längert.
GARVORGANG ABBRECHEN Nehmen Sie das Gericht heraus, schließen Sie die Gerätetür und drück-en Sie die Stopptaste.
EIN PIEPTON signalisiert, dass der Garvorgang beendet ist. Er ertönt nach Ablauf der Garzeit 10 Minuten lang ein-mal pro Minute. Drücken Sie zum Abschalten des Pieptons die Stopptaste oder öff nen Sie die Gerätetür.HINWEIS: Das Gerät behält die Einstellungen nur 60 Sekunden lang bei, wenn die Tür nach Ende des Garvorgangs geöff net und dann geschlos-sen wird.
STARTSCHUTZ/KINDERSICHERUNG
DIESE AUTOMATISCHE SICHERHEITSFUNKTION WIRD EINE MINUTE, nachdem das Gerät in den “Be-reitschaftsmodus” zurückgekehrt ist, aktiviert. (Das Gerät befi ndet sich im Bereitschaftsmodus, wenn die 24-Stunden-Uhr angezeigt wird oder wenn die Uhr nicht eingestellt und das Display dun-kel ist).
DIE SICHERHEITSVERRIEGELUNG WIRD ERST DANN FREIGEGEBEN, wenn die Tür geöff net und wieder geschlossen wird, z. B. wenn Speisen in die Mi-krowelle gestellt werden. Anderenfalls zeigt das Display die Meldung “DOOR” (Tür).
ABKÜHLENNACH BEENDEN EINER FUNKTION kühlt das Gerät selbsttätig ab. Das ist normal. Nach diesem Vorgang schaltet sich das Gerät automatisch ab.
DER ABKÜHLVORGANG kann ohne Schaden für das Gerät unterbrochen werden.
Door

22
DE
UHR
DIE GERÄTETÜR BEIM EINSTELLEN DER UHR GEÖFFNET LASSEN. Dadurch haben Sie 5 Minuten Zeit, um die Uhr einzustellen. Anderenfalls muss jeder Schritt innerhalb von 60 Sekunden ausgeführt werden.
q DRÜCKEN SIE DIE STOPPTASTE 3 SEKUNDEN LANG, bis die linke Ziffer (für die Stunden) blinkt.
w STELLEN SIE MIT DEN TASTEN +/- die Stunden ein.
e DRÜCKEN SIE AUF DIE STARTTASTE. Die beiden rechten Ziffern (Minutenanzeige) blinken.
r STELLEN SIE MIT DEN TASTEN +/- die Minuten ein.
t DIE START-TASTE erneut drücken.
DIE UHR IST NUN EINGESTELLT UND IN BETRIEB.HINWEIS: Wenn das Gerät zum ersten Mal an das Stromnetz angeschlossen oder nach einem Stro-mausfall eingeschaltet wird, bleibt das Display dunkel. Wenn die Uhr nicht eingestellt wird, bleibt das Display dunkel, bis die Garzeit eingestellt ist.WENN DIE UHR nach dem Einstellen auf dem Display ausgeblendet werden soll, drücken Sie die Zeittaste erneut für 3 Sekunden und anschließend die Taste STOP.UM DIE UHR NEU EINZUSTELLEN, gehen Sie wie vorstehend beschrieben vor.
ZEITSCHALTUHR
MIT DER ZEITSCHALTUHR KANN z. B. zum Kochen von Eiern oder Nudeln oder zum Gehenlassen von Teig usw. die genaue Zeit eingestellt werden.
q STELLEN SIE MIT DEN TASTEN +/- die gewünschte Zeit ein.
w DRÜCKEN SIE DIE TASTE “LEISTUNGSSTUFE” mehrmals, bis die Leistungsstufe 0 W gewählt ist.
e DRÜCKEN SIE AUF DIE STARTTASTE. NACH ABLAUF DER EINGESTELLTEN ZEIT ertönt ein Signalton.
q etwr
w
q e

23
DE
NUR MIKROWELLE
LEISTUNG VORGESCHLAGENE VERWENDUNG:
750 W
ZUM AUFWÄRMEN VON GETRÄNKEN, Wasser, klaren Suppen, Kaff ee, Tee oder anderen Nah-rungsmitteln mit hohem Wassergehalt Eine niedrigere Leistungsstufe wählen, falls die Speise Ei oder Sahne enthält. ZUM GAREN VON Fisch, Fleisch, Aufl auf usw.
500 WSCHONENDERE ZUBEREITUNG, z. B. bei Saucen mit hohem Eiweißgehalt, Käse und Eierspeisen, sowie zum Fertigkochen von Eintopfgerichten
350 W ZUM KÖCHELN VON EINTOPFGERICHTEN und zum Schmelzen von Butter
160 W ZUM AUFTAUEN Zum Anwärmen von Butter und Käse Zum Antauen von Speiseeis
0 W BEI AUSSCHLIESSLICHER VERWENDUNG der Zeitschaltuhr.
GAREN UND AUFWÄRMEN MIT DER MIKROWELLE
DIESE FUNKTION dient zur normalen Zubereitung und zum Aufwärmen von Speisen wie Gemüse, Fisch, Kartoff eln und Fleisch.
q STELLEN SIE MIT DEN TASTEN +/- die Zeit ein.
w DRÜCKEN SIE DIE TASTE “LEISTUNGSSTUFE” mehrmals, bis die gewünschte Leistungsstufe gewählt ist.
e DRÜCKEN SIE AUF DIE STARTTASTE. WÄHREND DES GARVORGANGS: Die Garzeit kann problemlos durch Drücken der Starttaste in 30-Sekunden-Schritten verlängert werden. Mit jedem Tastendruck wird die Garzeit um 30 Sekunden verlängert. Die Garzeit lässt sich auch durch durch Drücken der Tasten +/- verlängern oder verkürzen. MIT DER TASTE “LEISTUNGSSTUFE” kann auch die Leistungsstufe geändert werden. Bei der ersten Betä-tigung wird die aktuelle Leistungsstufe angezeigt. Drücken Sie die Taste “Leistungsstufe” meh-rmals, um eine andere Leistungsstufe zu wählen.ALLE EINSTELLUNGEN KÖNNEN BEI BEDARF während des Garvorgangs geändert werden.
WAHL DER LEISTUNGSSTUFE
w
q e

24
DE
MANUELLE AUFTAUFUNKTION
BEIM MANUELLEN AUFTAUEN gehen Sie entsprech-end dem Kapitel “Garen und Aufwärmen mit der Mikrowelle” vor und stellen Sie die Leis-tung auf 160 W ein.
DEN AUFTAUGRAD DER SPEISEN IN REGELMÄSSIGEN AB-STÄNDEN ÜBERPRÜFEN. Mit der Zeit zeigen Erfah-rungswerte, welche Einstellungen die unter-schiedlichen Mengen benötigen.
WENDEN SIE GROSSE SPEISESTÜCKE nach der halben Auftauzeit.
TIEFKÜHLKOST IN PLASTIKBEUTELN, Klarsichtfolie oder Kartons können Sie direkt mit der Ver-packung auftauen, solange diese Ver-packugnen keine Metallteile (z. B. Drahtverschlüsse) enthalten.
DIE AUFTAUZEIT WIRD AUCH durch die Ver-packungsform beeinfl usst. Speisen in dünneren Verpackungen tauen sch-neller auf als dicke Blöcke.
TRENNEN SIE DIE SPEISESTÜCKE, sobald sie antauen. Einzelne Scheiben tauen schneller auf.
DECKEN SIE BESTIMMTE SPEISEBE-REICHE (z. B. Hähnchenschen-kel oder -fl ügelchen) mit kleinen Stückchen Alufo-lie ab, sobald diese anfangen warm zu werden.
GEKOCHTES, GESCHMORTES UND FLEISCHSOSSEN tauen besser auf, wenn sie während des
Auftauprozesses umgerührt werden.DIE AUFTAUZEIT sollte lieber etwas ger-inger bemessen und der Auftauproz-
ess während der Stehzeit abgeschlossen werden.
MIT EINER STEHZEIT VON EINIGEN MINUTEN ERGIBT SICH IMMER EIN BESSERES Auftauergeb-nis, da sich die Temperatur gleichmäßiger in der Speise verteilen kann.

25
DE
SPEISEN MENGE HINWEISE
FLEISCH 100 G BIS 2 KG Hackfl eisch, Koteletts, Steaks oder Braten
GEFLÜGEL 100 G BIS 2 KGGanze Hähnchen, Hähnchenstücke oder Hähnchen-fi lets
FISCH 100G BIS 1,5 KG Ganze Fische, Steaks oder Filets
BEI NAHRUNGSMITTELN, DIE NICHT IN NACHSTEHENDER TABELLE ENTHALTEN SIND und die ein geringeres oder höheres Gewicht als empfohlen haben, verfahren Sie entsprechend dem Kapitel “Garen und Auf-wärmen mit der Mikrowelle” und wählen Sie zum Auftauen 160 W.
JET DEFROST
VERWENDEN SIE DIESE FUNKTION NUR zum Auftauen von Fleisch, Fisch und Gefl ügel.DIE JET DEFROST-FUNKTION IST NUR FÜR SPEISEN mit einem Nettogewicht von 100 g bis 2 kg vorgesehen.
q DRÜCKEN SIE DIE JET DEFROST-TASTE.
w GEBEN SIE MIT DEN TASTEN + / - das Gewicht der Speise ein.
e DRÜCKEN SIE AUF DIE STARTTASTE. NACH DER HÄLFTE DES AUFTAUVORGANGS hält das Gerät an und es erscheint die Meldung
TURN FOOD (Speisen wenden).Öff nen Sie die Tür.Wenden Sie die Speisen.Schließen Sie die Tür nehmen Sie das Gerät durch Drücken der Starttaste wieder in Betrieb.
HINWEIS: Das Gerät setzt sich automatisch nach 2 Minuten wieder in Gang, wenn die Speisen nicht gewendet wurden. Das Auftauen dauert in diesem Fall länger.
���
BEI DIESER FUNKTION MUSS das Gewicht der Speise bekannt sein. Das Gerät berechnet anschließend automatisch die für den Auftauvorgang benötigte Zeit.
TIEFGEKÜHLTE SPEISEN: WENN DIE SPEISEN WÄRMER als die Ti-efkühltemperatur (-18 °C) sind, ein niedrigeres Gewicht wählen.WENN DIE SPEISEN kälter als die Tiefküh-ltemperatur (-18 °C) sind, ein höheres Gewicht wählen.
w q e

26
DE
SCHNELLSTART
DIESE FUNKTION DIENT ZUM schnellen Aufwärmen von Speisen mit einem hohen Wassergehalt, z. B. klaren Suppen, Kaff ee oder Tee.DIE SCHNELLSTARTTASTE DRÜCKEN, um automatisch mit der vollen Mikrowellenleistung und ein-er Garzeit von 30 Sekunden zu beginnen. Mit jedem weiteren Tastendruck wird die Zeit um 30 Sekunden verlängert. Die Garzeit lässt sich auch durch Drücken der Tasten +/- verlängern bzw. verkürzen, wenn das Gerät bereits in Betrieb ist.
SPEICHER
MIT DER SPEICHER-FUNKTION KÖNNEN SIE einfach und schnell eine bevorzugte Einstellung aufrufen.MIT DIESER FUNKTION KÖNNEN SIE jede aktuell angezeigte Funktion und Einstellung speichern.
q DRÜCKEN SIE DIE SPEICHERTASTE.
w DRÜCKEN SIE DIE STARTTASTE. EINE EINSTELLUNG SPEICHERN:
q WÄHLEN SIE eine Funktion aus und nehmen Sie die erforderlichen Einstellungen vor .
w NEHMEN SIE die erforderlichen Einstellungen vor .
e DRÜCKEN SIE DIE SPEICHERTASTE und halten Sie sie 3 Sekunden lang gedrückt, bis ein Signalton ertönt. Die Einstellung ist nun gespeichert. Sie können den Speicher beliebig oft neu pro grammieren.
WENN DAS GERÄT zum ersten Mal an das Stromnetz angeschlossen oder nach einem Stromausfall eingeschaltet wird, enthält der Speicher die Einstellung 1 Minute und 750 W als Standardeinstel-lung.
wq

27
DE
�
�
�
DÄMPFEN
DIESE FUNKTION dient zur Zubereitung von Gemüse und Fisch.VERWENDEN SIE IMMER DEN MITGELIEFERTEN DÄMPFEINSATZ , wenn Sie diese Funktion verwenden.
q DRÜCKEN SIE DIE TASTE “DÄMPFEN”.
w DRÜCKEN SIE DIE TASTE “DÄMPFEN” MEHRMALS, um die Art der Speisen einzustellen.
e GEBEN SIE MIT DEN TASTEN + / - das Gewicht der Speise ein.
r DRÜCKEN SIE AUF DIE STARTTASTE.
LEGEN SIE die Speisen auf den Dämpfeinsatz.
GEBEN SIE 100 ml (1 dl) Wasser in den unteren Teil des Dämpfeinsatzes.
DECKEN Sie das Gargut ab.
DER DÄMPFEINSATZ DARF NUR bei Mikrowellenbetrieb verwendet werden!NIEMALS ZUSAMMEN MIT ANDEREN FUNKTIONEN VERWENDEN.
WIRD DER DÄMPFEINSATZ für andere Funktionen verwendet, kann er beschädigt werden. DER DREHTELLER MUSS SICH STETS ungehindert drehen können, bevor das Gerät eingeschaltet wird.PLATZIEREN SIE DEN DÄMPFEINSATZ immer auf dem Glassdrehteller.
wq e

28
DE
KARTOFFELN/WURZELGEMÜSE (150 bis 500 g)
GLEICHMÄSSIGE GRÖSSEN VERWENDEN. Schneiden Sie das Gemüse in gleichmäßig große Stücke. Lassen Sie den Behälter nach dem Garen 1 bis 2 Mi-nuten stehen.
GEMÜSE (150 bis 500 g) (Blumenkohl und Brokkoli)
TIEFGEFRORENES GEMÜSE (150 bis 500 g)
LASSEN SIE DEN BEHÄLTER nach dem Erwärmen 1 bis 2 Mi-nuten stehen.
FISCHFILETS (150g - 500g)VERTEILEN SIE DIE FILETS gleichmäßig auf dem Dämpfein-satz. Legen Sie dünne Teile übereinander. Lassen Sie den Behälter nach dem Garen 1 bis 2 Minuten stehen.
GAREN VON GEMÜSEGEBEN SIE DAS GEMÜSE in den Dämpfeinsatz. Gießen Sie 100 ml Wasser in den unteren Teil. Decken Sie das Gargut ab und stellen Sie die Zeit ein. WEICHES GEMÜSE wie Brokkoli und Porree benötigt eine Garzeit von 2 bis 3 Minuten. FESTERES GEMÜSE wie Möhren und Kartoff eln benötigt eine Garzeit von 4 bis 5 Minuten.
DÄMPFEN
r
w
q
e

29
DE
WARTUNG UND PFLEGE
DAS GERÄT MUSS IM NORMALFALL nur gereinigt werden. WIRD DAS GERÄT NICHT sauber gehalten, kann dies zur Abnutzung der Oberfl ächen führen. Dies wiederum verringert die Lebensdauer des Geräts und führt u. U. zu gefährlichen Situa-tionen.
VERWENDEN SIE KEINE TOPFREINIGER AUS METALL, SCHEUERMITTEL, Topfkratzer aus Stahlwolle und keine groben Reinigungstücher usw., da diese das Bedienfeld sow-ie die Innen- und Außenfl ächen des Gerätes beschädigen können. Benutzen Sie zum Reinigen einen Schwamm und ein mildes Reinigungsmittel oder ein Papiertuch und Glasreinigerspray. Sprühen Sie den Glasreiniger auf ein Papiertuch.SPRÜHEN SIE DEN REINIGER NIEMALS direkt in das Gerät.
REINIGEN SIE DAS GERÄT IN REGELMÄSSIGEN ABSTÄN-DEN, insbesondere wenn Speisen übergelaufen sind. Entfernen Sie dabei den Drehteller und die Drehtelleraufl age und reinigen Sie den Garraumboden.
SPÜLMASCHINENFESTES ZUBEHÖR:
DREHTELLERAUFLAGE.
GLASDREHTELLER.
VERWENDEN SIE DIE MIKROWELLENFUNKTION NUR mit eingesetztem Drehteller.
DIE MIKROWELLE ERST WIEDER IN BETRIEB NEHM-EN, wenn der Drehteller nach der Reini-gung wieder eingesetzt wurde.
VERWENDEN SIE NUR MILDE REINIGUNGSMITTEL, Was-ser und ein weiches Wischtuch zum Reinigen der Innenraumfl ächen sowie der Innen- und Außenseite der Gerätetür.
FETTSPRITZER oder Speisereste dürfen sich nicht an der Tür festsetzen.
BEI HARTNÄCKIGER VERSCHMUTZUNG EMPFIEHLT ES SICH, ein Glas Wasser 2 bis 3 Minuten lang im Gar-raum zu erhitzen. Durch den Dampf wird der Schmutz aufgeweicht.
ABDECKHAUBE
DAMPFEINSATZ
FLÄSCHCHENHALTER
UNANGENEHMER GERUCH IM GARRAUM LÄSST SICH BE-SEITIGEN, wenn ein Glas Wasser mit Zitronensaft auf den Drehteller gestellt wird und das Was-ser einige Minuten lang kocht.
VERWENDEN SIE ZUM REINIGEN der Mikrow-elle keine Dampfreiniger.

30
DE
FEHLERBEHEBUNG
FALLS DAS GERÄT NICHT EINWANDFREI FUNKTIONIERT, überprüfen Sie zunächst folgende Punkte, bevor Sie sich an den Kundendienst wenden:
Sind Drehtelleraufl age und Drehteller rich-tig eingesetzt?Steckt der Netzstecker richtig in der Steck-dose?Ist die Gerätetür richtig geschlossen?Sind die Sicherungen in Ordnung und ist Strom vorhanden?Wird das Gerät ausreichend belüftet?Versuchen Sie nach zehn Minuten erneut, das Gerät in Betrieb zu nehmen.Öff nen und schließen Sie vor einem erneu-ten Versuch die Tür.
AUF DIESE WEISE KÖNNEN überfl üssige Anfahrten des Kundendiensttechnikers vermieden werden, die für Sie mit Kosten verbunden sind. Wenn Sie den Kundendiensttechniker an-fordern, müssen Sie die Seriennummer und die Typenbezeichnung des Gerätes angeben (siehe Aufkleber). Weitere Hinweise fi nden Sie im Garantieheft.
�������
DAS NETZKABEL DARF NUR GEGEN EIN ORIGI-NALKABEL AUSGETAUSCHT WERDEN, das über unseren Kunden-dienst bezogen werden kann. Das Netzkabel darf nur von einem qualifi zierten Kundendiensttechniker aus-gewechselt werden.
REPARATUREN AM GERÄT DÜR-FEN NUR VON EINEM QUALIFI-ZIERTEN KUNDENDIENSTTECHNIKER VORGENOMMEN WERDEN. Laien bringen sich durch Reparaturversuche in Gefahr, bei denen die zum Schutz vor Mikrowellenstrahlung am Gerät ange-brachten Abdeckungen oder Gehäuseteile entfernt werden müssen.ENTFERNEN SIE KEINE GERÄTEABDECKUNGEN.

31
DE
Testen Menge Ungef. Dauer Leistungsstufe Behälter/Gefäß
12.3.1 750 g 10 min 750 W Glaskochgeschirr (Pyrex 3.227)
12.3.2 475 g 5 ½ min 750 W Glaskochgeschirr (Pyrex 3.827)
12.3.3 900 g 14 min 750 W Glaskochgeschirr (Pyrex 3.838)
13.3 500 g 2 min 40 s Schnellauftauen
NETZSPANNUNG 230 V/50 Hz
EINGANGSNENNLEISTUNG 1300 W
SICHERUNG 10 A (GB 13 A)
AUSGANGSLEISTUNG DER MIKROWELLE 750 W
AUSSENABMESSUNGEN (H X B X T) 348 x 595 x 320
INNENABMESSUNGEN (H X B X T) 187 x 370 x 290
TIPPS ZUM UMWELTSCHUTZ
DIE VERPACKUNG besteht aus 100 % recycelbarem Material und ist durch das Recycling-Symbol gekennzeichnet. Beachten Sie bei der Entsorgung die örtlichen Vorschriften. Ver-packungsmaterial, das eine potentielle Gefahr darstellt (Plastikbeutel, Sty-ropor usw.), außer Reichweite von Kindern aufbewahren.IN ÜBEREINSTIMMUNG MIT DEN ANFORDERUNGEN DER EUROPÄISCHEN RICHTLINIE 2002/96/EG ÜBER ELEK-TRO- UND ELEKTRONIK-ALTGERÄTE (WEEE) IST VOR-LIEGENDES GERÄT mit einer Kennzeichnung versehen. Durch die korrekte Entsorgung die-ses Geräts leisten Sie einen positiven Beitrag für den Schutz der Umwelt und die Gesund-heit des Menschen und verhindern negative Folgen, die im Falle einer unsachgemäßen Ent-sorgung entstehen können.
AUF DEM PRODUKT oder der beiliegenden Produktdokumentation ist ein Symbol abgebildet, das angibt, dass dieses Gerät nicht im Hausmüll entsorgt werden darf. Es muss im Recy-clinghof mit einer getrennten Sammlung für Elektro- und Elektronikgeräte entsorgt werden. DIE ENTSORGUNG des Gerätes muss in Übereinstimmung mit den geltenden lokalen Umweltschutzbestimmungen für die Müllent-sorgung erfolgen.BITTE WENDEN SIE SICH AN DIE ZUSTÄNDIGEN Be-hörden Ihrer Gemeindeverwaltung, an den lo-kalen Recyclinghof für Hausmüll oder an den Händler, bei dem Sie dieses Gerät erworben haben, um weitere Informationen über die Be-handlung, Verwertung und Wiederverwend-ung dieses Produkts zu erhalten.DAS GERÄT VOR DEM VERSCHROTTEN durch Absch-neiden des Netzkabels unbrauchbar machen.
GEMÄSS IEC 60705.DIE INTERNATIONALE ELEKTROTECHNISCHE KOMMISSION, SC. 59H, hat eine Richtlinie für Vergleichstests der Heizleistung verschiedener Mikrowellengeräte erarbeitet. Für dieses Gerät empfehlen wir Folgen-des:

32
FR
INSTALLATION
AVANT DE BRANCHER L’APPAREIL
ASSUREZ-VOUS QUE L’APPAREIL N’EST PAS ENDOMMA-GÉ. Vérifi ez que la porte ferme correctement et que l’encadrement intérieur de la porte n’est pas endommagé. Enlevez les accessoires du four et essuyez l’intérieur avec un chiff on doux humide.
APRÈS LE BRANCHEMENT DE L’APPAREILLA MISE À LA TERRE DE L’APPAREIL est obliga-toire. Le fabricant décline toute respon-sabilité en cas d’accidents causés à des personnes, des biens ou des animaux, suite au non-respect de cette obligation.
Le constructeur décline toute responsabil-ité si l’utilisateur ne respecte pas ces in-structions.
N’UTILISEZ EN AUCUN CAS CET APPAREIL SI LE COR-DON d’alimentation ou la prise de courant est endommagé, si l’appareil ne fonc-tionne pas correctement ou s’il a été en-dommagé ou est tombé. Ne plongez ja-mais le cordon d’alimentation ou la prise dans l’eau. Éloignez le cordon des sur-faces chaudes. Si l’appareil a été endom-magé, son utilisation peut s’avérer dan-gereuse.
NE DÉMONTEZ PAS LES PLAQUES DE PROTECTION CON-TRE LES MICRO-ONDES situées sur les fl ancs de la cavité du four. Elles empêchent à la graisse et aux particules alimentaires de pénétrer dans les canaux d’entrée des micro-ondes.
AVANT DE COMMENCER L’INSTALLATION, VÉRIFIEZ que la cavité du four est vide.
VÉRIFIEZ QUE LA TENSION indiquée sur la plaque signalétique correspond bien à celle de votre habitation.
LE FOUR NE PEUT ÊTRE UTILISÉ QUE SI la porte est cor-rectement fermée.
INSTALLATION DE L’APPAREIL
LORS DE L’INSTALLATION DE L’APPAREIL, RESPECTEZ les instructions fournies séparément.

33
FR
REMARQUES IMPORTANTES CONCERNANT LA SÉCURITÉ
VEILLEZ À NE PAS CHAUFFER OU UTILISER DE MA-TÉRIAUX infl ammables à l’intérieur ou à proximité du four. Les vapeurs dégagées peuvent provoquer un incendie ou une explosion.
N’UTILISEZ JAMAIS VOTRE four micro-ondes pour sécher des textiles, du papier, des épices, des herbes, du bois, des fl eurs, des fruits ou d’autres produits combusti-bles. Ils pourraient s’enfl ammer.
NE CUISEZ PAR LES ALIMENTS EXCESSIVEMENT. Ils pourraient s’enfl ammer.
NE LAISSEZ PAS LE FOUR SANS SURVEILLANCE, SURTOUT SI VOUS UTILISEZ DU PAPIER, du plas-tique ou d’autres matériaux combusti-bles pour la cuisson. Le papier peut car-boniser ou brûler et certains plastiques peuvent fondre lorsqu’ils sont utilisés pour réchauff er des aliments.
SI CE QUI SE TROUVE À L’INTÉRIEUR OU À L’EXTÉRIEUR DU FOUR PRENAIT FEU, ou que vous constatez de la fumée, n’ouvrez pas la porte, mais arrêtez le four et la ventilation. Débranchez le cordon d’alimentation ou coupez le courant au fusible ou au disjoncteur.
LISEZ ATTENTIVEMENT ET CONSERVEZ EN LIEU SÛR POUR TOUTE CONSULTATION ULTÉRIEURE
NE LAISSEZ LES ENFANTS utiliser le four sans surveillance d’un adulte que si des instruc-tions appropriées ont été données afi n que l’enfant puisse utiliser le four de façon sûre et comprenne les dangers d’un usage in-correct. L’appareil ne doit pas être utilisé par de jeunes enfants ou des personnes handicapées sans surveil-lance. Les enfants doi-vent être surveillés pour s’assurer qu’ils ne jouent pas avec l’appareil.Si le four peut fonctionner en mode com-biné, les enfants ne doivent l’utiliser que sous la surveillance d’un adulte à cause des hautes températures engendrées.
N’UTILISEZ PAS LE FOUR MICRO-ONDES pour chauff er des al-iments ou des liquides dans des récipients her-métiques. L’augmentation de la pression peut les endommager lors de l’ouverture, ou les faire exploser.
OEUFSN’UTILISEZ PAS VOTRE FOUR MICRO-ONDES pour cuire ou réchauff er des oeufs avec ou sans coquille, car ils peuvent exploser même si la cuisson est terminée.
CONTRÔLEZ RÉGULIÈREMENT L’ÉTAT DES JOINTS et de l’encadrement de la porte. Si ces zones étaient endommagées, n’utilisez plus l’appareil et faites-le contrôler par un tech-nicien spécialisé.
N’UTILISEZ PAS DE PRODUITS CHIMIQUES ou de vapeurs corrosifs dans cet appareil. Ce type de four a été spécialement conçu pour réchauff er ou cuire des aliments. Il n’est pas prévu pour un usage industriel ou de laboratoire.

34
FR
GÉNÉRALITÉS
N’UTILISEZ CET APPAREIL QUE POUR UN USAGE DOMES-TIQUE !
LE FOUR NE DOIT JAMAIS être utilisé à vide avec la fonction micro-ondes. Cela risquerait de l’endommager.
SI VOUS VOUS EXERCEZ À LE programmer, placez un verre d’eau à l’intérieur. L’eau absorbera l’énergie des micro-ondes et le four ne sera pas abîmé.
ENLEVEZ LES FERMETURES MÉTALLIQUES des sachets en papier ou en plastique avant de les placer dans le four.
FRITUREN’UTILISEZ PAS LE FOUR MICRO-ONDES pour frire, car il ne permet pas de contrôler la tem-pérature de l’huile.
LIQUIDESPAR EX. BOISSONS OU EAU. Dans un four à micro-ondes, les liquides peuvent bouillir sans produire de bulles. Dans ce cas, ils peuvent débor-der brusquement.Afi n d’éviter cet inconvénient, prenez les précautions suivantes :
1. Évitez d’utiliser des récipients à bord droit et col étroit.
2. Agitez le liquide avant de placer le récipi-ent dans le four et laisser la cuillère à café dans le récipient.
3. Après avoir chauff é, attendez un court in-stant et agitez de nouveau avant de sortir le récipient du four.
ATTENTIONREPORTEZ-VOUS SYSTÉMATIQUEMENT à un livre de recettes pour plus de détails sur la cuisson au four micro-ondes. En particulier si vous cui-sez ou réchauff ez des aliments contenant de l’alcool.
APRÈS AVOIR RÉCHAUFFÉ DES ALIMENTS POUR BÉBÉ (biberons, petits pots), remuez toujours et vé-rifi ez la température avant de servir. Vous assurez ainsi une bonne répartition de la chaleur et évitez les risques de brûlure ou d’ébouillantage.Enlevez la tétine ou le couvercle avant de réchauff er !
PRÉCAUTIONS
AFIN D’ÉVITER DE VOUS BRÛLER, UTILISEZ DES GANTS ISOLANTS ou des maniques pour toucher les récipients ou les parties du four après la cuisson.
N’UTILISEZ PAS LA CAVITÉ du four pour y ranger des objets.
35
FR
ACCESSOIRES
GÉNÉRALITÉS
SI DES USTENSILES MÉTALLIQUES ENTRENT EN CON-TACT avec les parois du four pendant son fonc-tionnement, ils peuvent provoquer des étince-lles et endommager le four.
SUPPORT DU PLATEAU TOURNANTUTILISEZ LE SUPPORT DU PLATEAU tour-nant sous le plateau tournant en verre. Ne placez jamais d’autres us-tensiles que le plateau tournant directement sur le support du plateau tournant.
Installez le support du plateau tournant dans le four.
�
PLATEAU TOURNANT EN VERREUTILISEZ LE PLATEAU TOURNANT en verre pour tous les types de cuisson. Il permet de récupérer les jus de cuisson et les particules d’aliments qui pourraient salir l’intérieur du four.
Placez le plateau tournant en verre sur le support du plateau tournant.
�VÉRIFIEZ QUE LES USTENSILES utilisés sont résistants à la chaleur et perméables aux micro-ondes avant de les utiliser.
LORSQUE VOUS PLACEZ DES ALIMENTS ET DES ACCES-SOIRES dans le four micro-ondes, assurez-vous que ceux-ci ne sont pas en contact direct avec l’intérieur du four. Ceci est particulièrement important pour les accessoires en métal ou avec des parties métalliques.
ASSUREZ-VOUS TOUJOURS QUE le plateau tour-nant peut tourner librement avant de mettre l’appareil en marche.
DE NOMBREUX accessoires sont disponibles sur le marché. Avant de les acheter, assurez-vous qu’ils conviennent bien aux micro-ondes.
COUVERCLELE COUVERCLE SERT À COUVRIR les al-iments pendant la cuisson et le réchauff age aux micro-ondes et permet de réduire les éclabous-sures, préserver la teneur en eau des aliments et réduire le temps de cuisson nécessaire.UTILISEZ LE COUVERCLE pour le réchauff age sur deux niveaux.
PORTEBIBERONUTILISEZ LE PORTE BIBERON LORSQUE vous réchauff ez des aliments pour bébé dans des biberons trop grands pour tenir tout seuls dans le four. Voir également le chapitre “Pré-cautions” pour plus d’informations sur la cuis-son d’aliments pour bébé.(NON DISPONIBLE AU ROYAUME-UNI ET EN IRLANDE).
UTILISER CUITVAPEURUTILISEZ LE CUIT-VAPEUR AVEC LE PAN-IER POUR LA CUISSON d’aliments tels que le poisson, les légumes et les pommes de terre.PLACEZ TOUJOURS LE CUIT-VAPEUR sur le plateau tournant en verre.

36
FR
INTERRUPTION OU ARRÊT DE LA CUISSON
POUR INTERROMPRE LA CUISSON Si vous souhaitez vérifi er, mélanger ou retourner les aliments, ouvrez la porte : la cuisson s’arrêtera automatiquement. Les ré-glages sont conservés pendant 10 minutes.
POUR POURSUIVRE LA CUISSON Fermez la porte et appuyez UNE FOIS sur la touche Start (Démarrage). La cuisson reprend là où elle a été in-terrompue.Si vous appuyez DEUX FOIS sur la touche Start (Démarrage), le temps de cuisson est augmen-té de 30 secondes.
SI VOUS NE SOUHAITEZ PAS CONTINUER LA CUI-SSON Sortez les aliments, fermez la porte et appuyez sur la touche Stop (Arrêt)
UN SIGNAL SONORE RETENTIT TOUTES LES MINUTES pen-dant 10 minutes en fi n de cuisson. Pour désactiver le signal, appuyez sur la touche Stop (Arrêt) ou ou-vrez la porte.REMARQUE : Les sélections ne restent affi chées que 60 secondes, si l’on ouvre et referme la porte à la fi n de la cuisson.
PROTECTION CONTRE UNE MISE EN MARCHE DU FOUR À VIDE / SÉCURITÉ ENFANTS
CETTE FONCTION DE SÉCURITÉ AUTOMATIQUE EST AC-TIVÉE UNE MINUTE après le retour du four en mode veille”. (Le four est en mode “veille” si l’heure est affi chée ou si l’horloge n’a pas été programmée lorsque l’écran est vide).
CELA SIGNIFIE QUE VOUS DEVEZ OUVRIR et refermer la porte, pour y introduire un plat, afi n d’annuler la sécurité enfants. Sinon l’affi cheur indique “door ”.
PHASE REFROIDISSEMENTLORSQUE LE FOUR A TERMINÉ DE FONCTIONNER, il exécute une procédure de refroidissement. Cela est normal. Après cette procédure, le four s’arrête automa-tiquement.
LA PROCÉDURE DE REFROIDISSEMENT peut être inter-rompue sans aucun dommage pour le four.
Door

37
FR
HORLOGE
MAINTENEZ LA PORTE OUVERTE PENDANT LE RÉGLAGE DE L’HORLOGE. Vous disposez ainsi de 5 minutes pour ef-fectuer cette opération. Sinon, chaque opération doit être eff ectuée en moins de 60 secondes.
q APPUYEZ SUR LA TOUCHE ARRÈT/STOP (3 secondes) jusqu’à ce que les chiffres de gauche, les heures, clignotent.
w APPUYEZ SUR LES TOUCHES +/- pour régler les heures.
e APPUYEZ SUR LA TOUCHE START. Les deux chiffres de droite (minutes) clignotent.
r APPUYEZ SUR LES TOUCHES +/- pour régler les minutes.
t APPUYEZ DE NOUVEAU SUR LA TOUCHE Départ/Start.
L’HORLOGE EST RÉGLÉE ET FONCTIONNE.REMARQUE : À la première utilisation ou après une panne de courant, l’écran est vide. Si l’horloge n’est pas réglée, l’écran reste vide jusqu’au réglage d’un temps de cuisson.SI VOUS SOUHAITEZ SUPPRIMER L’AFFICHAGE DE L’HEURE après le réglage de l’horloge, appuyez à nouveau sur la touche Horloge pendant 3 secondes, puis sur ARRÊT/STOP.POUR RÉAFFICHER L’HORLOGE suivez la procédure ci-dessus.
MINUTEUR
UTILISEZ CETTE FONCTION SI VOUS DEVEZ mesurer un temps avec précision, par exemple pour la cuisson des oeufs ou pour faire lever une pâte avant de la cuire, etc.
q APPUYEZ SUR LES TOUCHES +/- pour régler la durée désirée du minuteur.
w APPUYEZ PAR PRESSIONS SUCCESSIVES SUR LA TOUCHE PUISSANCE pour régler le niveau de puissance sur 0 W.
e APPUYEZ SUR LA TOUCHE START. UN SIGNAL SONORE VOUS AVERTIT LORSQUE le minuteur a terminé le compte à rebours.
q etwr
w
q e

38
FR
FONCTION MICROONDES UNIQUEMENT
ALIMENTATION UTILISATION CONSEILLÉE :
750 W
RÉCHAUFFAGE DE BOISSONS, EAU, potages, café, thé ou autres aliments à haute teneur en eau. Pour les plats préparés avec des oeufs ou de la crème, choisir une puissance in-férieure. CUISSON DE poisson, légumes, viandes, etc.
500 WCUISSON ATTENTIVE, PAR EX. DES PLATS préparés avec de la sauce, du fromage et des oeufs et fi n de cuisson des ragoûts.
350 W CUISSON LENTE DE RAGOÛTS, ramollissement de beurre.
160 WDÉCONGÉLATION. Ramollissement du beurre, des fromages. Ramollissement de la gla-ce.
0 W UNIQUEMENT LORSQUE vous utilisez le minuteur.
CUISSON ET RÉCHAUFFAGE AVEC LA FONCTION MICROONDES
UTILISEZ CETTE FONCTION POUR LA CUISSON normale ou le réchauff age rapide d’aliments tels que les lé-gumes, le poisson, les pommes de terre et la viande.
q APPUYEZ SUR LES TOUCHES +/- pour régler la durée de cuisson.
w APPUYEZ PAR PRESSIONS SUCCESSIVES SUR LA TOUCHE PUISSANCE pour régler le niveau de puissance.
e APPUYEZ SUR LA TOUCHE START. LORSQUE LA CUISSON A DÉMARRÉ : Le temps de cuisson peut être augmenté facilement par paliers de 30 secondes en appuyant sur la touche Start. Chaque nouvelle pression augmente le temps de cuisson de 30 secondes. Vous pouvez également modifi er le temps de cuisson en appuyant sur les touches +/- pour augmenter ou diminuer sa durée. LE NIVEAU DE PUISSANCE PEUT ÉGALEMENT ÊTRE MODIFIÉ au moyen de la touche Power (Puissance). La pre-mière pression vous indiquera le niveau de puissance actuel. Appuyez par pressions successives sur la touche Power (Puissance) pour modifi er le niveau de puissance.VOUS POUVEZ MODIFIER TOUS LES RÉGLAGES en cours de cuisson, si vous le souhaitez.
SÉLECTION DU NIVEAU DE PUISSANCE
w
q e

39
FR
DÉCONGÉLATION MANUELLE
POUR UNE DÉCONGÉLATION MANUELLE, procédez comme pour la “Cuisson et réchauff age aux mi-cro-ondes” et choisissez une une puissance de 160 W.
EXAMINEZ LES ALIMENTS RÉGULIÈREMENT POUR VÉRIFIER LEUR ÉTAT. La pratique vous enseignera combi-en de temps il faut pour décongeler ou ramol-lir diff érentes quantités.
RETOURNEZ LES GROS MORCEAUX vers le milieu du processus de décongélation.
LES ALIMENTS CONGELÉS, CONTENUS DANS DES SACHETS en plastique, de la pellicule plastique ou des emballages en carton, pourront être pla-cés directement dans le four, pourvu que l’emballage n’ait aucune partie en mé-tal (par exemple, des fermetures métal-liques).
LE TEMPS DE DÉCONGÉLATION dépend de la forme de l’emballage. Les paquets plats se dé-congèlent plus rapidement qu’un gros bloc.
SÉPAREZ LES MORCEAUX dès qu’ils commencent à se décongeler.
LES TRANCHES SÉPARÉES SE DÉCON-GÈLENT PLUS FACILEMENT.ENVELOPPEZ CERTAINES ZONES des aliments dans de petits morceaux de papier aluminium quand elles commencent à roussir (par exem-ple, les ailes et les cuisses de poulet).
LES ALIMENTS BOUILLIS, LES RAGOÛTS ET LES SAUCES DE VIANDE se décongèlent mieux
s’ils sont remués durant la décongé-lation.
LORSQUE VOUS DÉCONGELEZ, IL EST CONSEILLÉ de ne pas décongeler complètement les al-
iments et de laisser se terminer le processus durant le temps de repos.
QUELQUES MINUTES DE REPOS APRÈS la décongéla-tion améliorent toujours le résul-tat, permettant à la tempéra-ture d’être répartie unifor-mément dans les aliments.

40
FR
FOOD QUANTITÉ CONSEILS
VIANDE 100 G - 2 KG Viande hachée, côtelettes, biftecks ou rôtis.
VOLAILLES 100 G - 2 KG Poulet entier, fi lets ou morceaux.
POISSON 100 G - 1,5 KG Poissons entiers, darnes ou fi lets.
POUR LES ALIMENTS NON INDIQUÉS DANS LE TABLEAU ci-dessous ou si leur poids est inférieur ou supéri-eur au poids conseillé, procédez comme indiqué au paragraphe “Cuisson et réchauff age aux micro-ondes” et réglez la puissance sur 160 W pour la décongélation.
DÉCONGÉLATION RAPIDE
UTILISEZ CETTE FONCTION UNIQUEMENT pour la décongélation de la viande, du poisson et de la volaille.LA FONCTION DE DÉCONGÉLATION RAPIDE ne doit être utilisée que pour les aliments ayant un poids net compris entre 100 g - 2 kg.
q APPUYEZ SUR LA TOUCHE JET DEFROST.
w APPUYEZ SUR LES TOUCHES + / - pour spécifier le poids des aliments.
e APPUYEZ SUR LA TOUCHE START.
À LA MOITIÉ DU PROCESSUS DE DÉCONGÉLATION, le four s’arrête et vous invite à TURN FOOD (Tourner les aliments)
Ouvrez la porte.Retournez les aliments.Fermez la porte et redémarrez le four en appuyant sur la touche Start (Démarrage).
REMARQUE : four continue automatiquement après 2 minutes. si vous n’avez pas retourné les ali-ments. Dans ce cas, la durée de décongélation sera allongée.
���
LORS DE L’UTILISATION DE CETTE FONCTION, vous de-vez connaître le poids net des ali-ments. Le four calcule automatique-ment le temps nécessaire à la décon-gélation.
ALIMENTS SURGELÉS : POUR LES ALIMENTS PLUS CHAUDS que la température de surgélation (-18 °C), choisissez un poids d’aliment inférieur.POUR LES ALIMENTS PLUS FROIDS que la tem-pérature de surgélation (-18 °C), choi-sissez un poids supérieur.
w q e

41
FR
JET START DÉMARRAGE RAPIDE
UTILISEZ CETTE FONCTION POUR réchauff er rapidement des aliments à forte teneur en eau, tels que la soupe, le café ou le thé.APPUYEZ SUR DÉPART/JET START POUR FAIRE DÉMARRER automatiquement le four à puissance maximale pendant 30 secondes. Chaque nouvelle pression augmente le temps de 30 secondes. Vous pou-vez également modifi er le temps de cuisson en appuyant sur les touches +/- pour augmenter ou diminuer sa durée après le démarrage de la fonction.
MÉMOIRE
LA FONCTION MÉMOIRE FOURNIT un moyen pour rappeler rapidement et simplement les réglages pré-férés.LE PRINCIPE DE LA FONCTION MÉMOIRE EST DE stocker tous les réglages qui sont affi chés à un moment donné.
q APPUYEZ SUR LA TOUCHE MÉMO.
w APPUYEZ SUR LA TOUCHE START. ENREGISTREMENT D’UN RÉGLAGE :
q SÉLECTIONNEZ la fonction de votre choix et faites le réglage nécessaire
w FAITES le réglage nécessaire
e APPUYEZ ET MAINTENEZ ENFONCÉE LA TOUCHE MÉMO pendant 3 secondes, jusqu’à émission d’un bip sonore. Le réglage est désormais enregistré. Vous pouvez reprogrammer la mémoire autant de fois que vous le désirez.
LORSQUE LE FOUR est branché pour la première fois ou après une panne de courant, les réglages par défaut enregistrés par la fonction Mémo sont : 1 minute et 750 W.
wq

42
FR
�
��
VAPEUR/STEAM
UTILISEZ CETTE FONCTION POUR LA CUISSON d’aliments, tels que les légumes et le poisson.UTILISEZ TOUJOURS LE “MICRO PLUS VAPEUR” FOURNI lorsque vous utilisez cette fonction.
q APPUYEZ SUR LA TOUCHE VAPEUR/STEAM.
w APPUYEZ PAR PRESSIONS SUCCESSIVES SUR LA TOUCHE VAPEUR/STEAM pour indiquer la catégorie d’aliments.
e APPUYEZ SUR LES TOUCHES +/- pour spécifier le poids des aliments.
r APPUYEZ SUR LA TOUCHE START.
PLACEZ les aliments dans le panier vapeur.
AJOUTEZ 100 ml (1dl) d’eau au fond du panier.
COUVREZ avec le couvercle.
LE CUIT-VAPEUR EST conçu pour être utilisé avec les micro-ondes seulement.NE L’UTILISEZ JAMAIS POUR UNE AUTRE FONCTION. VOUS RISQUERIEZ de l’endommager. ASSUREZ-VOUS TOUJOURS QUE le plateau tournant peut tourner librement avant de mettre l’appareil en marche.PLACEZ TOUJOURS LE CUIT-VAPEUR sur le plateau tournant en verre.
wq e

43
FR
POMMES DE TERRE / LÉGUMES-RACINES (150 g - 500 g) COUPEZ EN MORCEAUX DE MÊME TAILLE.
Coupez les légumes en morceaux de même taille. Laissez reposer 1 - 2 minutes après la cuissonLÉGUMES (150 g - 500 g)
(Chou-fl eur et brocoli)
LÉGUMES-SURGELÉS (150 g - 500 g)
LAISSEZ REPOSER 1 à 2 minutes.
FILETS DE POISSONS (150 g - 500 g)
RÉPARTIR LES FILETS UNIFORMÉMENT dans le panier-vapeur. Superposer les tranches fi nes. Laissez reposer 1 - 2 min-utes après la cuisson
CUISSON DE LÉGUMESPLACEZ LES LÉGUMES dans le panier. Versez 100 ml d’eau sur le fond. Couvrez avec un couvercle et réglez le temps de cuisson. LES LÉGUMES TENDRES, TELS les brocolis et les poireaux, cuisent en 2-3 minutes. LES LÉGUMES DURS, TELS les carottes et les pommes de terre, emploient 4-5 minutes pour cuire.
VAPEUR/STEAM
r
w
q
e

44
FR
ENTRETIEN ET NETTOYAGE
L’ENTRETIEN DE CET APPAREIL se limite à son nettoy-age. SI LE FOUR N’EST PAS MAINTENU PROPRE, cela peut en-traîner la détérioration de la surface : la durée de vie de l’appareil pourra en être aff ectée et provoquer des situations de danger.
N’UTILISEZ PAS DE TAMPONS À RÉCURER EN MÉ-TAL, DE NETTOYANTS ABRASIFS, de tampons en laine de verre, de chiff ons rugueux, etc... car ils peuvent abîmer le bandeau de com-mandes, ainsi que les surfaces intérieures et extérieures du four. Utilisez une éponge avec un détergent doux ou une serviette en papier avec un nettoyant pour vitres. Vaporisez le produit sur la servi-ette en papier.NE LE VAPORISEZ PAS directe-ment sur le four.
À INTERVALLES RÉGULIERS, NOTAMMENT en cas de débordements, enlevez le plateau tournant, le support du plateau tournant et es-suyez la base du four.
NETTOYAGE AU LAVEVAISSELLE :
SUPPORT DU PLATEAU TOURNANT.
PLATEAU TOURNANT EN VERRE.
CE FOUR EST CONÇU POUR fonctionner avec le pla-teau tournant.
NE METTEZ pas le four en marche si le pla-teau tournant a été enlevé pour le net-toyage.
UTILISEZ UN DÉTERGENT DOUX, DE L’EAU et un chiff on doux pour nettoyer l’intérieur du four, les deux faces de la porte et l’encadrement de la porte.
VEILLEZ À CE QUE DE LA GRAISSE ou des parti-cules alimentaires ne s’accumulent aut-our de la porte.
POUR LES SALISSURES TENACES, FAITES bouillir une tasse d’eau dans le four pendant 2 ou 3 min-utes. La vapeur facilitera l’élimination des sal-
COUVERCLE
UTILISER CUIT-VAPEUR
PORTE-BIBERON
ÉLIMINEZ LES ODEURS ÉVENTUELLES en faisant bouillir une tasse d’eau avec deux rondelles de citron, placée sur le plateau tournant.
issures.N’UTILISEZ PAS D’APPAREIL DE NETTOYAGE À VA-PEUR pour nettoyer votre four micro-ondes.

45
FR
DIAGNOSTIC DES PANNES
SI LE FOUR NE FONCTIONNE pas, avant de contacter votre Revendeur, veuillez vérifi er si :
Le plateau tournant et support du plateau tournant sont en place.La prise de courant est bien branchée.La porte est correctement fermée.Les fusibles sont en bon état et la puis-sance de l’installation est adaptée.Vérifi ez que le four est bien ventilé.Attendez 10 minutes et essayez à nouveau.Ouvrez et refermez la porte avant d’essayer à nouveau.
CELA VOUS ÉVITERA peut-être des interventions inutiles qui vous seraient facturées. LORSQUE VOUS CONTACTEZ le Service Après-Vente, veuillez préciser le modèle et le numéro de sé-rie du four (voir étiquette Service). Consultez le livret de garantie pour de plus amples infor-mations à ce sujet.
�������
SI LE CORDON D’ALIMENTATION DOIT être rem-placé, utilisez un cordon d’origine disponible auprès du Service Après-Vente. Le câble d’alimentation doit être remplacé par un tech-nicien spécialisé du Service Après-Vente.
LE SERVICE APRÈS-VENTE NE DOIT ÊTRE EFFECTUÉ QUE PAR DES TECH-NICIENS SPÉCIALISÉS. Il est dan-gereux pour quiconque, autre qu’un technicien spéciali-sé, d’assurer le Service Après-Vente ou d’effectuer des opéra- tions impliquant le démontage des panneaux de protection contre l’exposition à l’énergie des micro-ondes.NE DÉMONTEZ AUCUN PANNEAU.

46
FR
Test Quantité Approx. Durée Niveau de puissance Récipient
12.3.1 750 g 10 mn 750 W Pyrex 3.227
12.3.2 475 g 5 mn et demie 750 W Pyrex 3.827
12.3.3 900 g 14 mn 750 W Pyrex 3.838
13.3 500 g 2 min 40 s Décongél. rapide
TENSION D’ALIMENTATION 230 V / 50 Hz
PUISSANCE NOMINALE 1300 W
FUSIBLE 10 A (UK 13 A)
PUISSANCE MO 750 W
DIMENSIONS EXTERNES (HXLXP) 348 x 595 x 320
DIMENSIONS INTERNES (HXLXP) 187 X 370 X 290
INFORMATIONS POUR LE RECYCLAGE
LES MATÉRIAUX D’EMBALLAGE SONT en-tièrement recyclables comme l’indique le symbole de recy-clage. Suivez les réglementa-tions locales en vigueur en matière d’élimination des déchets. Ne laissez pas les élé-ments d’emballage (sachets en plastique, élé-ments en polystyrène, etc.) à la portée des en-fants.CET APPAREIL PORTE LE SYMBOLE du recyclage con-formément à la Directive Européenne 2002/96/CE concernant les Déchets d’Équipements Électriques et Électroniques (DEEE ou WEEE). En procédant correctement à la mise au re-but de cet appareil, vous contribuerez à empêcher toute conséquence nuisible pour l’environnement et la santé de l’homme.
LE SYMBOLE PRÉSENT SUR l’appareil ou sur la documentation qui l’accompagne indique que ce produit ne peut en aucun cas être traité comme déchet ménager. Il doit par con-séquent être remis à un centre de collecte des déchets char-gé du recyclage des équi-pements électriques et électroniques. LA MISE AU REBUT doit être eff ectuée conformément aux réglementations locales en vigueur en matière de protection de l’environnement.POUR OBTENIR DE PLUS AMPLES DÉTAILS au sujet du traitement, de la récupération et du recyclage de cet appareil, veuillez vous adresser au bu-reau compétent de votre commune, à la socié-té de collecte des déchets ou directement à votre revendeur.AVANT DE VOUS SÉPARER de l’appareil, rendez-le in-utilisable en coupant le cordon d’alimentation, de manière à ne plus pouvoir raccorder l’appareil au réseau électrique.
SELON LA NORME CEI 60705.
LA COMMISSION ÉLECTROTECHNIQUE INTERNATIONALE, SC. 59H, a établi une norme relative à des essais de performance comparatifs eff ectués sur diff érents fours micro-ondes. № us recommandons ce qui suit pour ce four :

47
IT
INSTALLAZIONE
PRIMA DELLA CONNESSIONE
ASSICURARSI CHE L’APPARECCHIO NON SIA DANNEGGIA-TO. Verifi cate che la porta del forno si chiu-da perfettamente e che la guarnizione interna non sia danneggiata. Vuotate il forno e pulire l’interno con un panno morbido e umido.
DOPO IL COLLEGAMENTO
LA MESSA A TERRA DELL’APPARECCHIO È OBBLI-GATORIA a termini di legge. Il fabbrican-te declina qualsiasi responsabilità per eventuali danni a persone, animali o cose, derivanti dalla mancata osservanza di questa norma.
I produttori non sono responsabi-li per problemi causati dall’inosservanza dell’utente delle presenti istruzioni.
NON FAR FUNZIONARE L’APPARECCHIO con il cavo di alimentazione o la spina danneg-giati, se non funziona correttamente o se ha subito danni o è caduto. № n immer-gete il cavo di alimentazione o la spina in acqua. Tenete lontano il cavo di alimen-tazione da superfi ci calde. Potrebbero verifi carsi scosse elettriche, incendi o al-tri pericoli.
NON RIMUOVETE LE PIASTRE DI PROTEZIONE del forno a microonde che si trova-no lateralmente nella cavità del forno. Tali piastre evita-no che i grassi e i pezzet-ti di cibo entrino nelle feri-toie del forno.ASSICURARSI PRIMA dell’installazione che il forno sia vuoto.
CONTROLLARE CHE LA TENSIONE indicata sulla targhetta matricola corrisponda alla ten-sione della vostra abitazione.
IL FORNO FUNZIONA SOLO se la porta è stata chiusa correttamente.
MONTAGGIO DELL’APPARECCHIO
DURANTE L’INSTALLAZIONE, seguire le istruzioni per il montaggio fornite separatamente.

48
IT
IMPORTANTI PRECAUZIONI DI SICUREZZA
NON RISCALDATE O USATE MATERIALI infi amma-bili all’interno o vicino al forno. I vapo-ri potrebbero causare pericoli d’incendio o esplosioni.
NON USATE IL FORNO A MICROONDE per asci-ugare tessuti, carta, spezie, erbe, legno, fi ori, frutta o altro materiale combusti-bile. Si potrebbero causare incendi.
NON CUOCERE TROPPO GLI ALIMENTI. Potreb-bero verifi carsi incendi.
NON LASCIATE IL FORNO SENZA SORVEGLIANZA, specialmente quando si usa carta, plas-tica o altri materiali combustibili durante il processo di cottura. La carta si potreb-be carbonizzare o bruciare e alcuni tipi di plastica potrebbero sciogliersi con il calore.
SE IL MATERIALE ALL’INTERNO O ALL’ESTERNO DEL FORNO DOVESSE INCENDIARSI O SE SI NOTA FUMO, tenere chiusa la porta e spegne-re il forno. Staccare la spina dalla presa di corrente o disinserire l’alimentazione generale dell’abitazione.
LEGGERE ATTENTAMENTE E CONSERVARE PER ULTERIORI CONSULTAZIONI
PERMETTERE AI BAMBINI di utilizzare il forno senza la supervisione di un adulto soltan-to se adeguatamente istruiti, se in grado di utilizzare il forno in modo sicuro e di com-prendere i rischi connessi ad un utilizzo im-proprio. Questo apparecchio non deve essere utiliz-zato da bambini o da persone in-ferme senza la supervisione di un adulto. № n lasci-are giocare i bambini con questo apparecchio.Se il forno presenta una mo- dalità combinata di funzionamento, non consen-tire ai bambini di usarlo senza la supervi-sione di un adulto, a causa delle alte tem-perature generate.
NON USARE IL FORNO A MI-CROONDE per riscaldare ali-menti o liquidi in conteni-tori sigillati. L’aumento di pressione potrebbe causare danni all’apertura del contenitore, il quale potrebbe anche esplodere.
UOVANON USATE IL FORNO A MICROONDE per cucinare o riscaldare uova intere, con o sen-za guscio, poiché potrebbero esplodere anche dopo che il processo di riscaldamento a mi-croonde è terminato.
LE GUARNIZIONI DELLA PORTA E DELLE ZONE CIR-COSTANTI devono essere controllate periodi-camente. In caso di danni, non fate funzi-onare l’apparecchio fi nché non sia stato riparato da un tecnico qualifi cato.
NON USARE prodotti chimici cor-rosivi o prodotti vaporizzati su quest’apparecchio. Questo tipo di forno è stato progettato per riscaldare o cuo-cere alimenti. № n deve essere usato a scopo industriale o di laboratorio.

49
IT
SUGGERIMENTI GENERALI
QUESTO APPARECCHIO È DESTINATO ESCLUSIVAMENTE ALL’USO DOMESTICO!
CON LA FUNZIONE MICROONDE INSERITA, questo ap-parecchio non deve mai essere messo in funzi-one senza alimenti. Ne potrebbero derivare dan-ni all’apparecchio.
QUANDO SI FANNO PROVE DI PROGRAMMAZIONE, mettete all’interno un bicchiere di acqua. L’acqua assorbirà le microonde e il forno non si rovinerà.
TOGLIERE I LACCI DI CHIUSURA dai sacchet-ti di plastica o carta prima di metter-li in forno.
FRITTURA A BAGNO D’OLIONON USATE IL FORNO A MICROONDE per fritture a ba-gno d’olio, poiché è impossibile con-trollare la temperatura dell’olio.
LIQUIDIES. BEVANDE O ACQUA. Quando si riscaldano liq-uidi come bevande o acqua, questi si possono surriscaldare oltre il punto di ebollizione senza che appaiano bollicine. Ciò potrebbe determinare un traboccamento improvviso di liquido bollente.Per prevenire questa possibilità, operate come segue:
1. Evitare l’uso di contenitori con colli stretti.2. Mescolare il liquido prima di mettere il re-
cipiente nel forno e lasciarvi immerso un cucchiaino da tè.
3. Dopo il riscaldamento, prevedere un tem-po di riposo, mescolando ancora prima di togliere il recipiente dal forno.
ATTENZIONEPER MAGGIORI dettagli riferitevi sempre ad un li-bro di ricette per forno a microonde. special-mente se gli alimenti da cuocere o riscaldare contengono alcool.DOPO AVER RISCALDATO gli alimenti per bambini o liquidi nel biber-on, oppure in contenitori per omogeneizzati, agitare e con-trollare sempre la temperatura prima di servire. Questo favorirà la distribuzione omogenea del calore evitando il rischio di bruciature.Togliere il coperchio e la tettarella dal biber-on prima di riscaldarli!
PRECAUZIONI
PER EVITARE DI BRUCIARSI indossare sempre guanti da forno per manipolare conten-itori, toccare il forno e togliere le casse-ruole.
NON USATE LA CAVITÀ come dispensa.

50
IT
ACCESSORI
SUGGERIMENTI GENERALI
SE GLI ACCESSORI METALLICI VENGONO in contatto con le pareti interne mentre il forno è in fun-zione, si produrranno scintille ed il forno ne ri-sulterà danneggiato.
GUIDA PER PIATTO ROTANTESERVIRSI DEL SUPPORTO DEL PIATTO RO-TANTE sotto al piatto rotante in vetro. № n appoggiate altri utensili sopra la guida per piatto rotante.
Montate la guida per il piatto rotante nel forno.
�
PIATTO ROTANTE IN VETROUSATE IL PIATTO ROTANTE in vetro con tutti i meto-di di cottura. Il piatto rotante raccoglie i sughi di cottura e le particelle di cibo che altrimenti macchierebbero e sporchereb-bero l’interno del forno.
Posizionate il piatto rotante in vetro sopra la guida.
�ASSICURARSI CHE GLI UTENSILI USATI SIANO RESISTENTI AL CALORE DEL FORNO e trasparenti alle microonde.
QUANDO METTETE L’ALIMENTO E GLI ACCESSORI nel for-no a microonde, accertatevi che non tocchino le pareti interne del forno. Questa precauzione è particolarmente im-portante per gli accessori metallici o con componenti metallici.
ASSICURARSI SEMPRE che sempre che il piatto ro-tante sia in grado di ruotare liberamente prima di avviare il forno.
IN COMMERCIO sono disponibili diversi accessori. Prima di acquistarli, accertarsi che siano speci-fi ci per la cottura a microonde.
COPERCHIOUTILIZZARE l’apposito coperchio per coprire l’alimento durante la cot-tura ed il riscaldamento con solo le microonde. Il coperchio serve a ridurre gli schizzi, trattenere l’umidità degli alimenti ed abbrevi-are i tempi di cottura.UTILIZZATE IL COPERCHIO per il riscaldamento su due livelli.
PORTAPOPPATOIOUSARE IL PORTAPOPPATOIO per riscaldare alimenti per bambini in poppatoi troppo alti per essere posti in posizione eretta all’interno del forno. Fare anche riferimento al capitolo “Precauzi-oni” per ulteriori informazioni per il riscalda-mento di alimenti per bambini.(NON DISPONIBILE NEL REGNO UNITO E IN IRLANDA).
PENTOLA PER COTTURA A VAPOREUSATE LA PENTOLA PER LA COTTURA a vapore con l’apposita griglia per cuocere alimenti come pesce, verdure e patate.POSARE LA PENTOLA per la cottu-ra a vapore sul piatto rotante in vetro.

51
IT
SOSPENSIONE O INTERRUZIONE DELLA COTTURA
PER INTERROMPERE LA COTTURA Per controllare, mescolare o girare l’alimento, aprire la porta ed il processo di cot-tura si interromperà automaticamente. La fun-zione rimane impostata per 10 minuti.
PER RIPRENDERE LA COTTURA Chiudere la porta e premere il tasto di Avvio UNA SOLA VOLTA. Il processo di cottura riprende da dove era sta-to interrotto.Premendo il tasto di Avvio DUE VOLTE si deter-mina un incremento del tempo di cottura di 30 secondi.
PER NON CONTINUARE LA COTTURA Togliere l’alimento, chiudere la porta e premere il tasto di Arresto.
AL COMPLETAMENTO DEL PROCESSO DI COTTURA, il ci-calino del forno suona ogni minuto per 10 minuti. fi nché non viene premuto il tasto di Arresto o non viene ap-erta la porta per far cessare il seg-nale.NOTA: Se si apre e chiude la porta al termine del processo di cottura, le impostazioni rimango-no memorizzate per 60 secondi.
PROTEZIONE ANTIAVVIO / SICUREZZA BAMBINI
QUESTA FUNZIONE DI SICUREZZA SI ATTIVA AUTOMATI-CAMENTE UN MINUTO DOPO che il forno viene a trovarsi nella fase di attesa “stand-by”. (Il forno si trova in modalità “stand by” quando appare visualizza-to l’orologio a 24 ore oppure, se l’orologio non è stato impostato, quando il display è vuo-to).
LA PORTA DEL FORNO DEVE ESSERE APERTA e poi richiu-sa per esempio per inserire il cibo per sblocca-re il meccanismo di sicurezza. In caso diverso sul display apparirà la dicitura “door ”.
RAFFREDDAMENTOAL TERMINE DI UNA FUNZIONE, il forno inizia un ciclo di raff reddamento. Ciò è da ritenersi del tutto normale. Alla fi ne del ciclo di raff reddamento il forno si spegne automaticamente.
IL CICLO DI RAFFREDDAMENTO può essere interrotto senza provocare danni al forno.
door

52
IT
OROLOGIO
TENERE LA PORTA DEL FORNO APERTA QUANDO SI IMPOSTA L’OROLOGIO. Si hanno 5 minuti di tempo per com-pletare l’impostazione dell’orologio. Se la porta viene tenuta chiusa, è necessario completare og-nuna delle sequenze entro 60 secondi.
q PREMERE IL TASTO DI ARRESTO (3 secondi) finchè le cifre a sinistra indicanti le ore, non lampeggiano.
w PREMERE I TASTI +/- per impostare le ore.
e PREMETE IL TASTO DI AVVIO. (Le due cifre a destra (minuti) lampeggiano)
r PREMERE I TASTI +/- per impostare i minuti.
t PREMERE DI NUOVO IL TASTO START .L’OROLOGIO È IMPOSTATO ED È IN FUNZIONE.NOTA: Quando l’apparecchio viene collegato elettricamente per la prima volta o dopo un’interruzione di corrente, sul visualizzatore non compare nessuna indicazione. Se l’orologio non è impostato, il display resterà vuoto fi nché non verrà impostato un tempo di cottura.PER TOGLIERE LA FUNZIONE OROLOGIO dal visualizzatore dopo averla programmata, premere nuova-mente il tasto Arresto per 3 secondi e poi il tasto di Arresto.PER REINSERIRE LA FUNZIONE OROLOGIO, seguite la procedura sopra descritta.
TIMER
UTILIZZARE QUESTA FUNZIONE per indicare sul timer di cucina il tempo desiderato, ad esempio per cuo-cere uova, pasta o far lievitare la pasta prima di cuocerla e così via.
q PREMERE I TASTI +/- per impostare il tempo desiderato sul contatore del timer.
w PREMERE RIPETUTAMENTE IL TASTO DELLA POTENZA per impostare il livello di potenza su 0 W.
e PREMERE DI NUOVO IL TASTO START .ALLO SCADETE DEL TEMPO IMPOSTATO SUL TIMER, il forno a microonde emette un segnale acustico.
q etwr
w
q e

53
IT
SOLO MICROONDE
POTENZA USO SUGGERITO:
750 WRISCALDAMENTO DI BEVANDE, acqua, zuppe non dense, caff è, tè o altri alimenti ad alto conte-nuto di acqua. Se l’alimento contiene uova o panna, scegliere una potenza inferiore. COTTURA DI PESCE, carne, piatti gratinati, ecc.
500 WCOTTURA ACCURATA DI SALSE molto proteiche, piatti a base di uova e formaggio e per termi-nare la cottura di piatti in umido.
350 W FAR BOLLIRE LENTAMENTE STUFATI , e per sciogliere il burro.
160 W SCONGELAMENTO. Ammorbidire burro e formaggi. Ammorbidire gelati.
0 W SOLO CON L’USO del Timer.
COTTURA E RISCALDAMENTO CON LE MICROONDE
UTILIZZATE QUESTA FUNZIONE per normali operazioni di cottura e riscaldamento di verdure, pesce, pa-tate e carne.
q PREMERE I TASTI +/- per impostare le ore.
w PREMETE RIPETUTAMENTE IL TASTO DELLA POTENZA per impostare il livello di potenza su 0 W.
e PREMERE DI NUOVO IL TASTO START .UNA VOLTA CHE IL PROCESSO DI COTTURA È INIZIATO: Il tempo può essere facilmente incrementato di 30 secondi alla volta premendo il tasto d’avvio. Ogni successiva pressione determina un incremento del tempo di cottura di ulteriori 30 secondi. Si può anche aumentare o ridurre il tempo premendo i tasti. PREMENDO IL TASTO POWER (POTENZA), è possibile modifi care anche il livello di potenza impostato. Alla prima pressione verrà indicato l’attuale livello di potenza. Premere il tasto ripetutamente per modifi care il livello di potenza nel modo desiderato.TUTTE LE IMPOSTAZIONI POSSONO ESSERE MODIFICATE durante la cottura.
COME SCEGLIERE IL LIVELLO DI POTENZA
w
q e

54
IT
FUNZIONE DI SCONGELAMENTO MANUALE
SEGUIRE LA PROCEDURA descritta per la “Funzione di cottura e riscaldamento con le microonde” e per eff ettuare lo scongelamento manuale selezionare il livello di potenza 160 W 160 W.
CONTROLLARE COSTANTEMENTE L’ALIMENTO. Con l’esperienza si apprenderanno i giusti tempi per le varie quantità.
GIRARE I PEZZI PIÙ GROSSI A METÀ tempo nel corso del processo di scongelamento.
ALIMENTI CONGELATI CONFEZIONATI IN SACCHETTI DI PLASTICA, pellicola in plastica o scatole di car-tone possono essere messi in cottura di-rettamente purché la confezione non con-tenga parti metalliche (es. lacci di chi-usura in metallo).LA FORMA DEL CONTENITORE IN CUI È CONFEZI-ONATO l’alimento interagisce sui tempi di scongelamento. Confezioni di basso spes-sore scongelano più rapidamente rispetto a un blocco più compatto.
RICORDATE DI STACCARE L’UNA DALL’ALTRA LE PAR-TI dell’alimento quando cominciano a sconge-larsi.
LE FETTE SEPARATE UNA AD UNA SCON-GELANO PIÙ RAPIDAMENTE.SE DURANTE LO SCONGELAMENTO si nota che alcune parti di alimento iniziano a cuocere (es. cosce di pollo ed estremità delle ali), è bene coprirle con dei pezzetti di fo-glio di alluminio.
ALIMENTI LESSATI, STUFATI E RAGÙ DI CARNE SCONGELANO meglio se vengono mesco-
lati di tanto in tanto per l’intera dura-ta del processo.
PER UN PERFETTO RISULTATO DI SCONGELAMEN-TO, è sempre preferibile non scongelare com-
pletamente l’alimento e prevedere sempre un tempo di riposo adeguato.
ALCUNI MINUTI DI RIPOSO DOPO LO SCONGELAMENTO MIGLIORA-NO sempre il risultato in quanto la temperatura inter-na dell’alimento viene distribuita con maggio-re uniformità.

55
IT
ALIMENTO QUANTITÀ SUGGERIMENTI
CARNE 200 G - 1 KG Carne macinata, cotolette, bistecche o arrosti.
POLLAME 200 G - 1 KG Pollo intero, a pezzi o fi letti.
PESCE 200 G - 1 KG Bistecche o fi letti interi.
PER I CIBI NON ELENCATI NELLA TABELLA e se il peso è inferiore o superiore al peso consigliato, seguite la procedura descritta in “Cottura e riscaldamento con le microonde” e scegliete la potenza 160 W per lo scongelamento.
FUNZIONE JET DEFROST
USARE QUESTA FUNZIONE per scongelare SOLO carne, pesce e pollame.LA FUNZIONE JET DEFROST PUÒ ESSERE USATA SOLO se il peso netto è compreso fra 100 g- 3 kg.
q PREMERE DI NUOVO IL TASTO START .
w PREMERE I TASTI +/- per impostare il peso del cibo.
e PREMERE DI NUOVO IL TASTO START .A METÀ DEL PROCESSO DI SCONGELAMENTO il forno si arresta e invita a girare l’alimento
TURN FOOD.Aprire la porta.Girare l’alimento.Chiudere la porta e riavviare premendo il tasto Start.
NOTA: il forno riprenderà a funzionare automaticamente dopo un minuto se il cibo non viene gira-to. In q uesto caso, sarà richiesto un tempo di scongelamento maggiore.
���
PER QUESTA FUNZIONE È NECESSARIO indicare il peso netto del cibo. Il forno quindi cal-colerà automaticamente il tempo necessario per terminare la proce-dura.
CIBI SURGELATI: SE L’ALIMENTO È A TEMPERATURA PIÙ ALTA DI QUELLA DI SURGELAMENTO (-18°C), selezion-ate un peso inferiore dell’alimento.SE L’ALIMENTO È A TEMPERATURA PIÙ BASSA DI QUELLA DI SURGELAMENTO (-18°C), selezion-ate un peso superiore.
w q e

56
IT
FUNZIONE JET START
USARE QUESTA FUNZIONE per riscaldare rapidamente alimenti ad alto contenuto d’acqua come zuppe non dense, caff è o tè; brodo, caff è o tè.PREMERE START PER AVVIARE AUTOMATICAMENTET il forno a microonde alla massima potenza con il tem-po di cottura impostato a 30 secondi. Ogni successiva pressione determina un incremento del tempo di cottura di ulteriori 30 secondi. È possibile modifi care il tempo premendo i tasti +/-, risp-ettivamente per incrementarlo o diminuirlo, dopo l’avvio della funzione.
FUNZIONE MEMORIA
LA FUNZIONE MEMORIA CONSENTE DI richiamare rapidamente con la massima semplicità un’impostazione preferita.IL PRINCIPIO DELLA FUNZIONE MEMORIA è quello di memorizzare l’impostazione visualizzata al momen-to.
q PREMERE DI NUOVO IL TASTO START .
w PREMERE IL TASTO START. PER MEMORIZZARE UN’IMPOSTAZIONE:
q SELEZIONARE una funzione ed eseguire le impostazioni necessarie
w ESEGUIRE LE impostazioni necessarie
e PREMERE E MANTENERE PREMUTO IL TASTO MEMO per 3 secondi fino a che non si sente il segnale
acustico. A questo punto l’impostazione è stata memorizzata. È possibile riprogrammare le memorie il numero di volte desiderato.
QUANDO L’APPARECCHIO viene collegato alla presa di corrente o dopo un blackout elettrico, la funzi-one Memo avrà memorizzato - 1 minuto e 750 W come impostazione predefi nita.
wq

57
IT�
�
�
VAPORE
USARE QUESTA FUNZIONE PER verdure, pesce, riso e pasta.UTILIZZANDO QUESTA FUNZIONE, UTILIZZATE sempre la pentola per la cottura a vapore fornita.
q PREMERE DI NUOVO IL TASTO START .
w CONTINUARE A PREMERE RIPETUTAMENTE IL TASTO VAPORE per impostare la classe di alimento.
e PREMERE I TASTI +/- per impostare il peso del cibo.
r PREMERE DI NUOVO IL TASTO START .
COLLOCARE IL cibo sulla griglia del vapore.
AGGIUNGERE 100 ml (1dl) di acqua nella parte inferiore della pentola per cottura a vapore.
COPRIRE con il coperchio.
LA COTTURA A VAPORE DEVE ESSERE UTILIZZATA ESCLUSIVAMENTE CON LA FUNZIONE MICROONDE!NON USARE MAI LA PENTOLA PER COTTURA A VAPORE CON NESSUNA ALTRA FUNZIONE. in quanto potrebbe causare danni. ASSICURARSI sempre che il piatto rotante sia in grado di ruotare liberamente prima di avviare il forno.POSARE LA PENTOLA per la cottura a vapore sul piatto rotante in vetro.
wq e

58
IT
PATATE / ROOT VETABLES (100 g - 500 g) USARE FORMATI UNIFORMI.
Tagliare le verdure in pezzetti uniformi. Lasciare riposare 1 - 2 minuti dopo la cotturaVERDURE (150g - 500g)
(Cavolfi ori e broccoli)
VERDURE SURGELATE (100 g - 500 g)
LASCIARE RIPOSARE per 1 o 2 minuti.
PESCE A FILETTI (150g - 500g)DISTRIBUIRE UNIFORMEMENTE I FILETTI SULLA griglia. Interlace thin parts. Allow to stand for 1 - 2 minutes, after cook-ing.
COTTURA DI VERDURECOLLOCARE LE VERDURE nel cestello. Versare 100 ml di acqua nella parte inferiore. Coprire con il coperchio e impostare il tempo. LE VERDURE PIÙ TENERE, come broccoli e porri, cuociono in 2-3 minuti. VERDURE DALLA POLPA PIÙ CONSISTENTE, COME CAROTE E PATATE, CUOCIONO IN 4-5 MINUTI.
VAPORE
r
w
q
e

59
IT
MANUTENZIONE E PULIZIA
LA PULIZIA È LA SOLA MANUTENZIONE NORMALMENTE RICHIESTA. LA MANCATA ESECUZIONE DELLE OPERAZIONI DI PULIZIA periodiche può provocare deterioramenti del-la superfi cie che possono infl uenzare negati-vamente la durata dell’apparecchio e causare situazioni di pericolo.
NON UTILIZZARE PAGLIETTE METALLICHE,DETERGENTI AG-GRESSIVI, panni abrasivi, ecc. che possono dan-neggiare la mascheri-na, l’interno e l’esterno del forno. Usare una spugna con un detergente neutro o un panno carta con un prodotto spray per la pulizia dei vetri. Applicare il prodotto spray per la pulizia dei vetri su un pan-no carta.NON SPRUZZARE DIRETTAMENTE SUL FORNO.
AD INTERVALLI REGOLARI, special-mente se si sono verifi cati traboccamenti, rimuovere il piatto rotante e il supporto e pu-lite la base del forno.
LAVABILE IN LAVASTOVIGLIE:
GUIDA PER PIATTO ROTANTE.
PIATTO ROTANTE IN VETRO.
QUESTO FORNO È STATO PROGETTATO per funzionare con il piatto rotante alloggiato nella sua sede.
NON FAR FUNZIONARE il forno quando il pi-atto rotante è stato rimosso per essere pulito.
USARE UN DETERGENTE NEUTRO, acqua e un panno morbido per pulire le superfi ci interne e la par-te interna ed esterna e i giunti della porta.
NON LASCIARE che si formino depositi di grasso o di cibo attorno alla porta.
PER MACCHIE TENACI, far bollire una tazza colma d’acqua nel forno per 2 o 3 minuti. Il vapore ammorbidirà lo sporco.
COPERCHIO
PENTOLA PER COTTURA A VAPORE
PORTABIBERON
GLI ODORI ALL’INTERNO DEL FORNO possono essere eliminati mettendo nel forno una tazza colma d’acqua con succo di limone e facendo bollire per alcuni minuti.
NON UTILIZZARE APPARECCHI DI PULIZIA A VAPORE per pulire il forno a microonde.

60
IT
GUIDA RICERCA GUASTI
SE IL FORNO NON FUNZIONA, prima di chiamare il Servizio Assistenza, eff ettuare i seguenti con-trolli:
Il piatto rotante e l’apposita guida sono al-loggiati nella sede.La spina è inserita correttamente nella pre-sa di corrente.La porta chiude correttamente.Controllare i fusibili e accertarsi che non manchi la corrente.Controllare che il forno sia ventilato ade-guatamente.Aspettare una decina di minuti, poi tentare di riavviare il forno.Aprire e poi chiudere la porta prima di ten-tare nuovamente di avviare il forno.
QUESTO PER EVITARE chiamate inutili in Assistenza, che vi potrebbero essere addebitate. Quando si chiama l’Assistenza, indicate sem-pre il numero di matricola e il modello del for-no (vedere la targhetta Service). Per ulterio-ri informazioni, consultare il libretto della ga-ranzia.
�������
IL CAVO DI ALIMENTAZIONE DEVE ESSERE sostitu-ito solo con un cavo originale, disponibile tramite la nostra organizzazione del servizio assistenza. Il cavo di ali-mentazione deve essere sos-tituito solo da personale spe-cializzato.
IL SERVIZIO ASSISTENZA DEVE ES-SERE EFFETTUATO ESCLUSIVAMENTE DA TECNICI ADDESTRATI. È pericolo-so per chiunque non faccia parte del personale specializzato ef-fettuate operazioni di assisten-za o riparazione che comportino la rimozione di qualunque pannello di cop-ertura contro l’esposizione all’energia del-le microonde.NON RIMUOVERE ALCUN PANNELLO DI COPERTURA.

61
IT
Prova QuantitàTempo
approssimativo Livello di potenza Contenitore
12.3.1 750 g 10 min. 750 W Pyrex 3.227
12.3.2 475 g 5 min. e mezzo 750 W Pyrex 3.827
12.3.3 900 g 14 min. 750 W Pyrex 3.838
13.3 500 g 2 min. e 40 sec Jet defrost
TENSIONE DI ALIMENTAZIONE 230 V/50 Hz
POTENZA NOMINALE 1300 W
FUSIBILE 10 A (Regno Unito 13 A)
POTENZA DELLE MICROONDE 750 W
DIMENSIONI ESTERNE (HXLXP) 348 x 595 x 320
DIMENSIONI INTERNE (HXLXP) 187 x 370 x 290
CONSIGLI PER LA SALVAGUARDIA DELL’AMBIENTE
IL MATERIALE D’IMBALLO è riciclabile al 100% ed è contrassegnato dal simbolo del riciclaggio. Per lo smaltimento seguire le nor-mative locali. Il materia-le di imballaggio (sacchet-ti di plastica, parti in polisti-rolo, ecc.) deve essere tenuto fuori dalla por-tata dei bambini in quanto potenziale fonte di pericolo.QUESTO APPARECCHIO è contrassegnato in confor-mità alla Direttiva Europea 2002/96/EC, Waste Electrical and Electronic Equipment (WEEE). Assicurandosi che questo prodotto sia smaltito in modo corretto, l’utente contribuisce a pre-venire le potenziali conseguenze negative per l’ambiente e la salute.
IL SIMBOLO sul prodotto o sulla documentazi-one di accompagnamento indica che questo prodot-to non deve essere tratta-to come rifi uto domestico. ma deve essere consegnato pres-so l’idoneo punto di raccol-ta per il riciclaggio di appar-ecchiature elettriche ed elettroniche. DISFARSENE seguendo le nor-mative locali per lo smalti-mento dei rifi uti.PER ULTERIORI INFORMAZIONI sul trattamento, re-cupero e riciclaggio di questo prodotto, con-tattate l’idoneo uffi cio locale, il servizio di rac-colta dei rifi uti domestici o il negozio presso il quale il prodotto è stato acquistato.PRIMA DELLA ROTTAMAZIONE, rendetelo inservibile tagliando il cavo elettrico di alimentazione.
IN CONFORMITÀ ALLA NORMA IEC 60705.
LA COMMISSIONE ELETTROTECNICA INTERNAZIONALE, SC. 59H, ha messo a punto una prova di riscalda-mento standard per valutare le prestazioni di riscaldamento di tutti i forni a microonde. Per ques-to forno, raccomandiamo quanto segue:

62

63

64
Whi
rlpoo
l Sw
eden
AB
GB FR IT
4 6 1 9 - 6 9 4 - 5 4 1 1 1
DE