mcafee epolicy orchestrator cloud 5.6 · product guide mcafee epolicy orchestrator cloud 5.6.0. ......
TRANSCRIPT
Product Guide
McAfee ePolicy Orchestrator Cloud 5.6.0
COPYRIGHT
Copyright © 2015 McAfee, Inc., 2821 Mission College Boulevard, Santa Clara, CA 95054, 1.888.847.8766, www.intelsecurity.com
TRADEMARK ATTRIBUTIONSIntel and the Intel logo are registered trademarks of the Intel Corporation in the US and/or other countries. McAfee and the McAfee logo, McAfee ActiveProtection, McAfee DeepSAFE, ePolicy Orchestrator, McAfee ePO, McAfee EMM, McAfee Evader, Foundscore, Foundstone, Global Threat Intelligence,McAfee LiveSafe, Policy Lab, McAfee QuickClean, Safe Eyes, McAfee SECURE, McAfee Shredder, SiteAdvisor, McAfee Stinger, McAfee TechMaster, McAfeeTotal Protection, TrustedSource, VirusScan are registered trademarks or trademarks of McAfee, Inc. or its subsidiaries in the US and other countries.Other marks and brands may be claimed as the property of others.
LICENSE INFORMATION
License AgreementNOTICE TO ALL USERS: CAREFULLY READ THE APPROPRIATE LEGAL AGREEMENT CORRESPONDING TO THE LICENSE YOU PURCHASED, WHICH SETSFORTH THE GENERAL TERMS AND CONDITIONS FOR THE USE OF THE LICENSED SOFTWARE. IF YOU DO NOT KNOW WHICH TYPE OF LICENSE YOUHAVE ACQUIRED, PLEASE CONSULT THE SALES AND OTHER RELATED LICENSE GRANT OR PURCHASE ORDER DOCUMENTS THAT ACCOMPANY YOURSOFTWARE PACKAGING OR THAT YOU HAVE RECEIVED SEPARATELY AS PART OF THE PURCHASE (AS A BOOKLET, A FILE ON THE PRODUCT CD, OR AFILE AVAILABLE ON THE WEBSITE FROM WHICH YOU DOWNLOADED THE SOFTWARE PACKAGE). IF YOU DO NOT AGREE TO ALL OF THE TERMS SETFORTH IN THE AGREEMENT, DO NOT INSTALL THE SOFTWARE. IF APPLICABLE, YOU MAY RETURN THE PRODUCT TO MCAFEE OR THE PLACE OFPURCHASE FOR A FULL REFUND.
2 McAfee ePolicy Orchestrator Cloud 5.6.0 Product Guide

Contents
Preface 7About this guide . . . . . . . . . . . . . . . . . . . . . . . . . . . . . . . . . . 7
Audience . . . . . . . . . . . . . . . . . . . . . . . . . . . . . . . . . . 7Conventions . . . . . . . . . . . . . . . . . . . . . . . . . . . . . . . . . 7
Find product documentation . . . . . . . . . . . . . . . . . . . . . . . . . . . . . . 8
1 Managing security with McAfee ePO Cloud 9Benefits of McAfee ePO Cloud . . . . . . . . . . . . . . . . . . . . . . . . . . . . . 9Differences between McAfee ePO and McAfee ePO Cloud . . . . . . . . . . . . . . . . . . 9McAfee ePO Cloud components . . . . . . . . . . . . . . . . . . . . . . . . . . . . 10How the software works . . . . . . . . . . . . . . . . . . . . . . . . . . . . . . . 10Sign up for a free trial . . . . . . . . . . . . . . . . . . . . . . . . . . . . . . . . 11
2 Getting started with McAfee ePO Cloud 13Setting up McAfee ePO Cloud overview . . . . . . . . . . . . . . . . . . . . . . . . . 14Initial information requirements . . . . . . . . . . . . . . . . . . . . . . . . . . . . 15Activate your account . . . . . . . . . . . . . . . . . . . . . . . . . . . . . . . . 15Log on to McAfee ePO Cloud . . . . . . . . . . . . . . . . . . . . . . . . . . . . . 15Password management best practices . . . . . . . . . . . . . . . . . . . . . . . . . 16Reset a forgotten password . . . . . . . . . . . . . . . . . . . . . . . . . . . . . 16Create the installation URL . . . . . . . . . . . . . . . . . . . . . . . . . . . . . . 17
Use default products and policies . . . . . . . . . . . . . . . . . . . . . . . . 17Customize the installation URL . . . . . . . . . . . . . . . . . . . . . . . . . 17
Skip creating the installation URL . . . . . . . . . . . . . . . . . . . . . . . . . . . 18Send the installation URL to users . . . . . . . . . . . . . . . . . . . . . . . . . . . 19Confirm system management . . . . . . . . . . . . . . . . . . . . . . . . . . . . 20Uninstall product software from systems . . . . . . . . . . . . . . . . . . . . . . . . 21
3 The McAfee ePO Cloud console 23Navigating the interface . . . . . . . . . . . . . . . . . . . . . . . . . . . . . . . 23
Using the McAfee ePO Cloud navigation menu . . . . . . . . . . . . . . . . . . . 23Customizing the navigation pane . . . . . . . . . . . . . . . . . . . . . . . . 24Personal settings categories . . . . . . . . . . . . . . . . . . . . . . . . . . 24Server settings categories . . . . . . . . . . . . . . . . . . . . . . . . . . . 25
Working with lists and tables . . . . . . . . . . . . . . . . . . . . . . . . . . . . . 25Filter a list . . . . . . . . . . . . . . . . . . . . . . . . . . . . . . . . . 26Search for specific list items . . . . . . . . . . . . . . . . . . . . . . . . . . 26Click table row checkboxes . . . . . . . . . . . . . . . . . . . . . . . . . . . 27Select items in tree lists . . . . . . . . . . . . . . . . . . . . . . . . . . . . 27
Manage your account . . . . . . . . . . . . . . . . . . . . . . . . . . . . . . . . 27Edit your user profile and change your password . . . . . . . . . . . . . . . . . . 28View your subscription information . . . . . . . . . . . . . . . . . . . . . . . 28Contact support . . . . . . . . . . . . . . . . . . . . . . . . . . . . . . . 29
Provide feedback . . . . . . . . . . . . . . . . . . . . . . . . . . . . . . . . . . 29
McAfee ePolicy Orchestrator Cloud 5.6.0 Product Guide 3
4 The System Tree 31The System Tree structure . . . . . . . . . . . . . . . . . . . . . . . . . . . . . . 31
The My Organization group . . . . . . . . . . . . . . . . . . . . . . . . . . . 31The My Group subgroup . . . . . . . . . . . . . . . . . . . . . . . . . . . . 32The Lost and Found group . . . . . . . . . . . . . . . . . . . . . . . . . . . 32System Tree groups . . . . . . . . . . . . . . . . . . . . . . . . . . . . . . 32Inheritance . . . . . . . . . . . . . . . . . . . . . . . . . . . . . . . . . 33
Considerations when planning your System Tree . . . . . . . . . . . . . . . . . . . . . 34Environmental borders and their impact on system organization . . . . . . . . . . . . 34Subnets and IP address ranges . . . . . . . . . . . . . . . . . . . . . . . . . 34Operating systems and software . . . . . . . . . . . . . . . . . . . . . . . . 34Tags and systems with similar characteristics . . . . . . . . . . . . . . . . . . . 35
Criteria-based sorting . . . . . . . . . . . . . . . . . . . . . . . . . . . . . . . . 35IP address sorting criteria . . . . . . . . . . . . . . . . . . . . . . . . . . . 36Tag-based sorting criteria . . . . . . . . . . . . . . . . . . . . . . . . . . . 36Group order and sorting . . . . . . . . . . . . . . . . . . . . . . . . . . . . 36Catch-all groups . . . . . . . . . . . . . . . . . . . . . . . . . . . . . . . 36How a system is added to the System Tree when sorted . . . . . . . . . . . . . . . 37
Create and populate System Tree groups . . . . . . . . . . . . . . . . . . . . . . . . 38Create groups manually . . . . . . . . . . . . . . . . . . . . . . . . . . . . 38Add sorting criteria to groups . . . . . . . . . . . . . . . . . . . . . . . . . . 38Enable or disable System Tree sorting on systems . . . . . . . . . . . . . . . . . 39Sort systems manually . . . . . . . . . . . . . . . . . . . . . . . . . . . . 39
Move systems within the System Tree . . . . . . . . . . . . . . . . . . . . . . . . . 40Remove a system from the System Tree . . . . . . . . . . . . . . . . . . . . . . . . 40Manage Agent Deployment URLs . . . . . . . . . . . . . . . . . . . . . . . . . . . 41
5 Tags 43Create tags using the New Tag Builder . . . . . . . . . . . . . . . . . . . . . . . . . 43Manage tags . . . . . . . . . . . . . . . . . . . . . . . . . . . . . . . . . . . 44Create, delete, and modify tag subgroups . . . . . . . . . . . . . . . . . . . . . . . . 45Exclude systems from automatic tagging . . . . . . . . . . . . . . . . . . . . . . . . 45Apply tags to selected systems . . . . . . . . . . . . . . . . . . . . . . . . . . . . 46Clear tags from systems . . . . . . . . . . . . . . . . . . . . . . . . . . . . . . . 46Apply criteria-based tags to all matching systems . . . . . . . . . . . . . . . . . . . . . 47
6 Product deployment 49Benefits of product deployment projects . . . . . . . . . . . . . . . . . . . . . . . . 49The Product Deployment page . . . . . . . . . . . . . . . . . . . . . . . . . . . . 50Viewing Product Deployment audit logs . . . . . . . . . . . . . . . . . . . . . . . . . 51View product deployment . . . . . . . . . . . . . . . . . . . . . . . . . . . . . . 51Deploy products using a deployment project . . . . . . . . . . . . . . . . . . . . . . . 52Monitor and edit deployment projects . . . . . . . . . . . . . . . . . . . . . . . . . 53
7 Policy management 55About policies . . . . . . . . . . . . . . . . . . . . . . . . . . . . . . . . . . . 55
When policies are applied . . . . . . . . . . . . . . . . . . . . . . . . . . . 55How policies are applied . . . . . . . . . . . . . . . . . . . . . . . . . . . . 55Policy ownership . . . . . . . . . . . . . . . . . . . . . . . . . . . . . . . 56
Policy assignment rules . . . . . . . . . . . . . . . . . . . . . . . . . . . . . . . 56Policy assignment rule priority . . . . . . . . . . . . . . . . . . . . . . . . . 56System-based policy assignment . . . . . . . . . . . . . . . . . . . . . . . . 57
Create and manage policies . . . . . . . . . . . . . . . . . . . . . . . . . . . . . 57Create a policy from the Policy Catalog page . . . . . . . . . . . . . . . . . . . 57Manage an existing policy on the Policy Catalog page . . . . . . . . . . . . . . . . 58Enforce product policies . . . . . . . . . . . . . . . . . . . . . . . . . . . . 59
Contents
4 McAfee ePolicy Orchestrator Cloud 5.6.0 Product Guide
Manage policy history . . . . . . . . . . . . . . . . . . . . . . . . . . . . . 60Compare policies . . . . . . . . . . . . . . . . . . . . . . . . . . . . . . . 60
Create and manage policy assignment rules . . . . . . . . . . . . . . . . . . . . . . . 61Create policy assignment rules . . . . . . . . . . . . . . . . . . . . . . . . . 61Manage policy assignment rules . . . . . . . . . . . . . . . . . . . . . . . . . 62
Manually assign policies . . . . . . . . . . . . . . . . . . . . . . . . . . . . . . . 62Assign policies to managed systems . . . . . . . . . . . . . . . . . . . . . . . 62Copy and paste policy assignments . . . . . . . . . . . . . . . . . . . . . . . 64
View policy information . . . . . . . . . . . . . . . . . . . . . . . . . . . . . . . 66View groups and systems where a policy is assigned . . . . . . . . . . . . . . . . 66View policy settings . . . . . . . . . . . . . . . . . . . . . . . . . . . . . . 67View assignments where policy enforcement is disabled . . . . . . . . . . . . . . . 67View policies assigned to a group . . . . . . . . . . . . . . . . . . . . . . . . 67View policies assigned to a specific system . . . . . . . . . . . . . . . . . . . . 67View policy inheritance for a group . . . . . . . . . . . . . . . . . . . . . . . 68View and reset broken inheritance . . . . . . . . . . . . . . . . . . . . . . . . 68
8 Client tasks 69How the Client Task Catalog works . . . . . . . . . . . . . . . . . . . . . . . . . . . 69Update tasks . . . . . . . . . . . . . . . . . . . . . . . . . . . . . . . . . . . 69
View assigned client task . . . . . . . . . . . . . . . . . . . . . . . . . . . 70Update managed systems regularly with a scheduled update task . . . . . . . . . . . 71
Manage client tasks . . . . . . . . . . . . . . . . . . . . . . . . . . . . . . . . . 71Create client tasks . . . . . . . . . . . . . . . . . . . . . . . . . . . . . . 72Edit client tasks . . . . . . . . . . . . . . . . . . . . . . . . . . . . . . . 72Delete client tasks . . . . . . . . . . . . . . . . . . . . . . . . . . . . . . 73Compare client tasks . . . . . . . . . . . . . . . . . . . . . . . . . . . . . 73View client tasks assigned to a specific system . . . . . . . . . . . . . . . . . . . 73
9 Server tasks 75View server tasks . . . . . . . . . . . . . . . . . . . . . . . . . . . . . . . . . 75Server task status . . . . . . . . . . . . . . . . . . . . . . . . . . . . . . . . . 76Remove outdated server tasks from the Server Task Log . . . . . . . . . . . . . . . . . . 76Create a server task . . . . . . . . . . . . . . . . . . . . . . . . . . . . . . . . 76Remove outdated log items automatically . . . . . . . . . . . . . . . . . . . . . . . . 77Accepted Cron syntax when scheduling a server task . . . . . . . . . . . . . . . . . . . 78
10 Dashboards and monitors 79Using dashboards and monitors . . . . . . . . . . . . . . . . . . . . . . . . . . . . 79Specify the first-time dashboard . . . . . . . . . . . . . . . . . . . . . . . . . . . . 79
11 Managing system events 81The Threat Event Log . . . . . . . . . . . . . . . . . . . . . . . . . . . . . . . . 81Determine how events are forwarded . . . . . . . . . . . . . . . . . . . . . . . . . . 82
Determine which events are forwarded . . . . . . . . . . . . . . . . . . . . . . 83Determine which events are forwarded immediately . . . . . . . . . . . . . . . . . 83
12 Queries and reports 85About queries . . . . . . . . . . . . . . . . . . . . . . . . . . . . . . . . . . . 85Run a query . . . . . . . . . . . . . . . . . . . . . . . . . . . . . . . . . . . . 86Export query results to other formats . . . . . . . . . . . . . . . . . . . . . . . . . 86About reports . . . . . . . . . . . . . . . . . . . . . . . . . . . . . . . . . . . 87Run reports . . . . . . . . . . . . . . . . . . . . . . . . . . . . . . . . . . . . 87View report output . . . . . . . . . . . . . . . . . . . . . . . . . . . . . . . . . 87
Contents
McAfee ePolicy Orchestrator Cloud 5.6.0 Product Guide 5
Index 89
Contents
6 McAfee ePolicy Orchestrator Cloud 5.6.0 Product Guide
Preface
This guide provides the information you need to work with your McAfee product.
Contents About this guide Find product documentation
About this guideThis information describes the guide's target audience, the typographical conventions and icons usedin this guide, and how the guide is organized.
AudienceMcAfee documentation is carefully researched and written for the target audience.
The information in this guide is intended primarily for:
• Administrators — People who implement and enforce the company's security program.
ConventionsThis guide uses these typographical conventions and icons.
Book title, term,emphasis
Title of a book, chapter, or topic; a new term; emphasis.
Bold Text that is strongly emphasized.
User input, code,message
Commands and other text that the user types; a code sample; a displayedmessage.
Interface text Words from the product interface like options, menus, buttons, and dialogboxes.
Hypertext blue A link to a topic or to an external website.
Note: Additional information, like an alternate method of accessing anoption.
Tip: Suggestions and recommendations.
Important/Caution: Valuable advice to protect your computer system,software installation, network, business, or data.
Warning: Critical advice to prevent bodily harm when using a hardwareproduct.
McAfee ePolicy Orchestrator Cloud 5.6.0 Product Guide 7
Find product documentationOn the ServicePortal, you can find information about a released product, including productdocumentation, technical articles, and more.
Task1 Go to the ServicePortal at https://support.mcafee.com and click the Knowledge Center tab.
2 In the Knowledge Base pane under Content Source, click Product Documentation.
3 Select a product and version, then click Search to display a list of documents.
PrefaceFind product documentation
8 McAfee ePolicy Orchestrator Cloud 5.6.0 Product Guide
1 Managing security with McAfee ePOCloud
McAfee®
ePolicy Orchestrator®
Cloud (McAfee ePO™
Cloud) provides unified endpoint securitymanagement. It reduces incident response times, strengthens protection, and simplifies risk andsecurity management with automation features and end-to-end network visibility.
Contents Benefits of McAfee ePO Cloud Differences between McAfee ePO and McAfee ePO Cloud McAfee ePO Cloud components How the software works Sign up for a free trial
Benefits of McAfee ePO CloudMcAfee ePO Cloud is an extensible management platform for centralized policy management andenforcement of your security products and the systems where they are installed.
It also provides comprehensive reporting and product deployment, all through a single point ofcontrol.
Using McAfee ePO Cloud, you can manage security across endpoints, networks, and data while youidentify, manage, and respond to security issues and threats.
Differences between McAfee ePO and McAfee ePO CloudWe provide different platforms for managing the security of your network.
McAfee ePO is installed on a server in your network environment. It is intended for enterprises thatalready have an established infrastructure, including the necessary dedicated servers. It assumes thatyour organization can configure, maintain, and patch these servers. McAfee ePO features such asautomatic responses, Active Directory synchronization, and the Software Manager support in-housesecurity administration.
McAfee ePO Cloud is a cloud-based instance of McAfee ePO. With McAfee ePO Cloud, you don't need toconfigure and maintain the servers where your security management software runs. Softwaremanagement and other maintenance are taken care of by our engineers.
1
McAfee ePolicy Orchestrator Cloud 5.6.0 Product Guide 9
McAfee ePO Cloud componentsThese components make up McAfee ePO Cloud software.
• McAfee ePO Cloud — The center of your managed environment. McAfee ePO Cloud deliverssecurity policies and tasks, controls updates, and processes events for all managed systems.
• McAfee Agent — A vehicle of information and enforcement between McAfee ePO Cloud and eachmanaged system. The agent retrieves updates, implements tasks, enforces policies, and forwardsevents for each managed system. It uses a separate secure data channel to transfer data back tothe cloud hosted server.
• Master Repository — The central location for all McAfee updates and signatures, residing onMcAfee ePO Cloud. The Master Repository retrieves user-specified updates and signatures fromMcAfee.
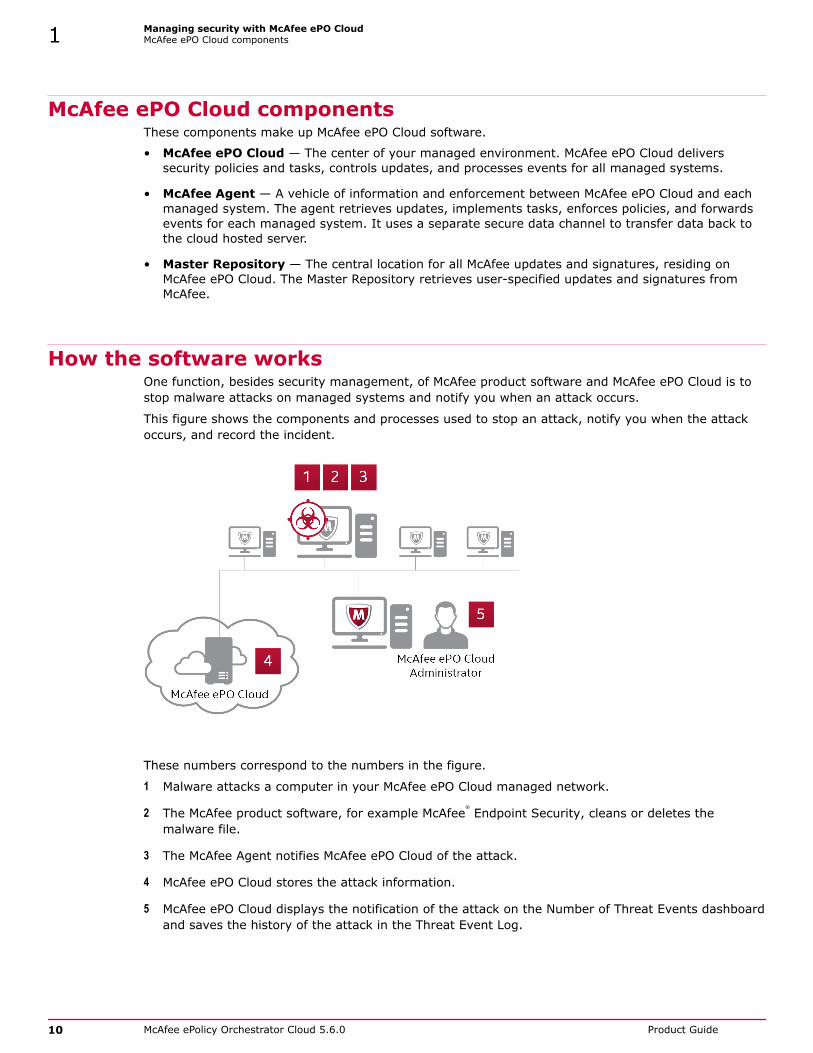
How the software worksOne function, besides security management, of McAfee product software and McAfee ePO Cloud is tostop malware attacks on managed systems and notify you when an attack occurs.
This figure shows the components and processes used to stop an attack, notify you when the attackoccurs, and record the incident.
These numbers correspond to the numbers in the figure.
1 Malware attacks a computer in your McAfee ePO Cloud managed network.
2 The McAfee product software, for example McAfee®
Endpoint Security, cleans or deletes themalware file.
3 The McAfee Agent notifies McAfee ePO Cloud of the attack.
4 McAfee ePO Cloud stores the attack information.
5 McAfee ePO Cloud displays the notification of the attack on the Number of Threat Events dashboardand saves the history of the attack in the Threat Event Log.
1 Managing security with McAfee ePO CloudMcAfee ePO Cloud components
10 McAfee ePolicy Orchestrator Cloud 5.6.0 Product Guide
Sign up for a free trialSign up for a 60-day free trial of McAfee ePO Cloud.
After signing up for a trial account, you have full access to the products available in McAfee ePO Cloudfor 60 days. This trial gives you an opportunity to evaluate McAfee ePO and its products in yourenvironment.
TaskFor details about product features, usage, and best practices, click ? or Help.
1 Navigate to https://manage.mcafee.com and click Sign Up Now.
2 Enter your company information, billing address, and a primary contact.
Once you submit your details, you receive an email with the instructions about activating your trialaccount.
Managing security with McAfee ePO CloudSign up for a free trial 1
McAfee ePolicy Orchestrator Cloud 5.6.0 Product Guide 11
1 Managing security with McAfee ePO CloudSign up for a free trial
12 McAfee ePolicy Orchestrator Cloud 5.6.0 Product Guide
2 Getting started with McAfee ePO Cloud
Complete these tasks to activate your account and deploy the McAfee Agent and product software tothe systems in your network.
After the McAfee Agents are installed on your systems they start the communication between thesemanaged systems and McAfee ePO Cloud.
Contents Setting up McAfee ePO Cloud overview Initial information requirements Activate your account Log on to McAfee ePO Cloud Password management best practices Reset a forgotten password Create the installation URL Skip creating the installation URL Send the installation URL to users Confirm system management Uninstall product software from systems
2
McAfee ePolicy Orchestrator Cloud 5.6.0 Product Guide 13
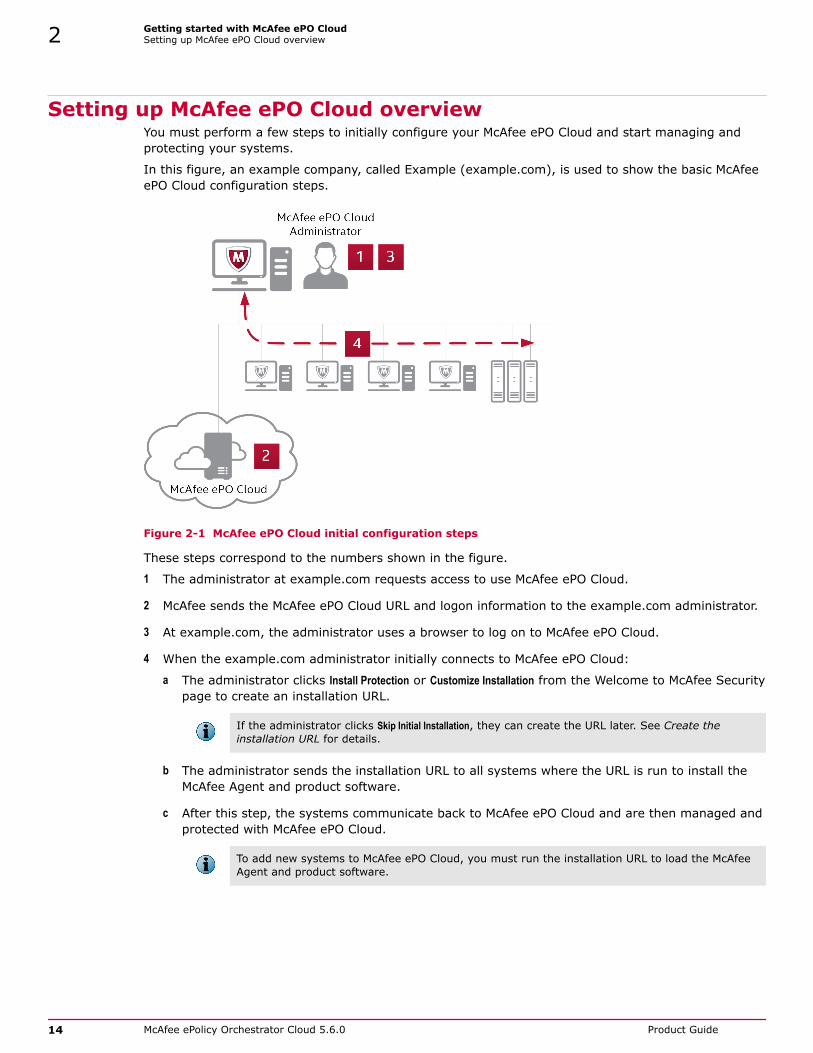
Setting up McAfee ePO Cloud overviewYou must perform a few steps to initially configure your McAfee ePO Cloud and start managing andprotecting your systems.
In this figure, an example company, called Example (example.com), is used to show the basic McAfeeePO Cloud configuration steps.
Figure 2-1 McAfee ePO Cloud initial configuration steps
These steps correspond to the numbers shown in the figure.
1 The administrator at example.com requests access to use McAfee ePO Cloud.
2 McAfee sends the McAfee ePO Cloud URL and logon information to the example.com administrator.
3 At example.com, the administrator uses a browser to log on to McAfee ePO Cloud.
4 When the example.com administrator initially connects to McAfee ePO Cloud:
a The administrator clicks Install Protection or Customize Installation from the Welcome to McAfee Securitypage to create an installation URL.
If the administrator clicks Skip Initial Installation, they can create the URL later. See Create theinstallation URL for details.
b The administrator sends the installation URL to all systems where the URL is run to install theMcAfee Agent and product software.
c After this step, the systems communicate back to McAfee ePO Cloud and are then managed andprotected with McAfee ePO Cloud.
To add new systems to McAfee ePO Cloud, you must run the installation URL to load the McAfeeAgent and product software.
2 Getting started with McAfee ePO CloudSetting up McAfee ePO Cloud overview
14 McAfee ePolicy Orchestrator Cloud 5.6.0 Product Guide
Initial information requirementsBefore you start your initial McAfee ePO Cloud configuration, you must have some specific information.
This information helps you quickly configure McAfee ePO Cloud and start protecting your systems:
• McAfee ePO Cloud Welcome email — It provides an activation code and instructions for logging onfor the first time.
• List of computers connected to your network — This information allows you to connect thosesystems to McAfee ePO Cloud by either:
• Sending an email to the computer users and have them run the installation URL.
• Remotely logging on to the computers as administrator to run the installation URL.
Activate your accountAfter you receive your Welcome email, activate your user account.
Before you beginYour Welcome email provides an activation code and instructions for logging on for the firsttime. Your activation code expires one week after you receive your email.
If you have already activated your account, you cannot activate it again. If you need a newactivation code, contact support.
TaskFor details about product features, usage, and best practices, click ? or Help.
1 From the Welcome email, click Activate/Click Here to Begin.
The Activate User page displays the activation code and your email address as the user name.
2 Choose a secure password, type it in the form, and re-enter it for verification. Use a password thatmeets your organization's guidelines or McAfee best practices.
3 Click Activate.
If you're activating a trial account, you can choose between McAfee ePO and McAfee ePO Cloud.
Your account is successfully activated and you can log on to McAfee ePO Cloud.
Log on to McAfee ePO CloudTo access McAfee ePO Cloud, enter your email address and password on the logon screen.
Before you beginYou must have the email address assigned to your account and your password.
Getting started with McAfee ePO CloudInitial information requirements 2
McAfee ePolicy Orchestrator Cloud 5.6.0 Product Guide 15
TaskFor details about product features, usage, and best practices, click ? or Help.
1 Navigate to the McAfee ePO Cloud Log On page:
https://manage.mcafee.com
2 Type your account email address and password, select a language, then click Log On.
The first time you log on, McAfee ePO Cloud displays the Getting Started page. Subsequent logonsdisplay the first favorite in the Menu ribbon.
Click Log Off to close your session and make it inaccessible to others.
Password management best practicesTo protect your systems and your data, choose passwords that conform to your organization'srequirements or McAfee best practices.
Passwords are an important aspect of computer security. Poorly chosen passwords can compromiseyour networks and systems. For better password security, we recommend these practices.
• Use a minimum of eight characters.
• Use a combination of uppercase and lowercase letters.
• Use at least one special character.
• Use at least one number.
• Don't use part of your email address in the password.
Reset a forgotten passwordIf you have forgotten your password, you can reset it.
Before you beginActivate your McAfee ePO Cloud user account.
TaskFor details about product features, usage, and best practices, click ? or Help.
1 Open the McAfee ePO Cloud Log On page.
If you are already using McAfee ePO Cloud, log off.
2 Click Forgot Password to open the Forgot Password Recovery page.
3 Type your email address in the Email field, then click Submit.
McAfee sends you an email that allows you to reset your password on McAfee ePO Cloud.
4 Open the email and click Reset Password to create a new password.
The Forgot Password Recovery page opens in your browser.
2 Getting started with McAfee ePO CloudPassword management best practices
16 McAfee ePolicy Orchestrator Cloud 5.6.0 Product Guide
5 Open the Forgot Password Recovery page: click the link in the verification email you received.
6 Type your email and the verification code
7 Choose a secure password, type it in the form, and re-enter it for verification. Use yourorganization's guidelines or McAfee best practices for choosing passwords.
8 Click Submit.
Your password is reset and you can log on to McAfee ePO Cloud.
Create the installation URLCreate the installation URL to distribute it to users in your network. Users navigate to the installationURL to install security products and the McAfee Agent on their systems.
Use default products and policiesThe easiest way to create the installation URL is to use the use the default products and policysettings.
TaskFor details about product features, usage, and best practices, click ? or Help.
1 Open the Getting Started page: select Menu | Software | Getting Started.
If it's your first time logging on, the Getting Started page appears automatically.
2 Click Install Protection.
3 Click an installation option.
• Install Protection on This Computer — Displays a web browser installer where you click Install and alldefault software products are installed on this computer.
• Install Protection on Other Computers — Displays the Install Protection on Other Computers dialog boxthat includes the installation URL.
See Send the installation URL to users to send the installation URL to all users whose systemsyou want to manage with McAfee ePO Cloud.
4 Make sure that the systems have installed the McAfee Agent, and that the systems havecommunicated with McAfee ePO Cloud, downloaded the product software, and are now managed.
For details, see Confirm system management.
Customize the installation URLYou can customize the products and policy settings used when creating the installation URL. Forexample, you can choose non-default policies for your Desktop Protection software.
Your license agreement determines which options appear on the Customize Software Installation page.
Getting started with McAfee ePO CloudCreate the installation URL 2
McAfee ePolicy Orchestrator Cloud 5.6.0 Product Guide 17
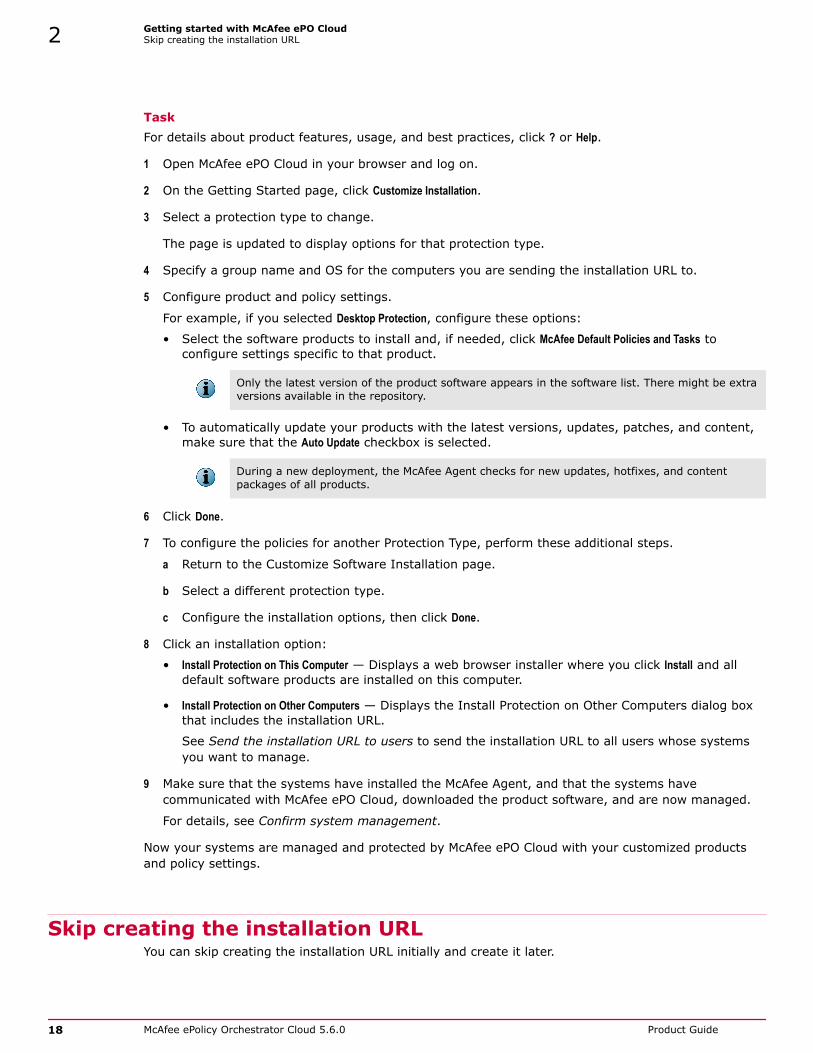
TaskFor details about product features, usage, and best practices, click ? or Help.
1 Open McAfee ePO Cloud in your browser and log on.
2 On the Getting Started page, click Customize Installation.
3 Select a protection type to change.
The page is updated to display options for that protection type.
4 Specify a group name and OS for the computers you are sending the installation URL to.
5 Configure product and policy settings.
For example, if you selected Desktop Protection, configure these options:
• Select the software products to install and, if needed, click McAfee Default Policies and Tasks toconfigure settings specific to that product.
Only the latest version of the product software appears in the software list. There might be extraversions available in the repository.
• To automatically update your products with the latest versions, updates, patches, and content,make sure that the Auto Update checkbox is selected.
During a new deployment, the McAfee Agent checks for new updates, hotfixes, and contentpackages of all products.
6 Click Done.
7 To configure the policies for another Protection Type, perform these additional steps.
a Return to the Customize Software Installation page.
b Select a different protection type.
c Configure the installation options, then click Done.
8 Click an installation option:
• Install Protection on This Computer — Displays a web browser installer where you click Install and alldefault software products are installed on this computer.
• Install Protection on Other Computers — Displays the Install Protection on Other Computers dialog boxthat includes the installation URL.
See Send the installation URL to users to send the installation URL to all users whose systemsyou want to manage.
9 Make sure that the systems have installed the McAfee Agent, and that the systems havecommunicated with McAfee ePO Cloud, downloaded the product software, and are now managed.
For details, see Confirm system management.
Now your systems are managed and protected by McAfee ePO Cloud with your customized productsand policy settings.
Skip creating the installation URLYou can skip creating the installation URL initially and create it later.
2 Getting started with McAfee ePO CloudSkip creating the installation URL
18 McAfee ePolicy Orchestrator Cloud 5.6.0 Product Guide
TaskFor details about product features, usage, and best practices, click ? or Help.
1 Open McAfee ePO Cloud in your browser and log on.
2 On the Getting Started page, click Skip Initial installation.
The Dashboards page appears with the Welcome to ePolicy Orchestrator and Getting Starteddashboards.
Now you can run the Welcome to ePolicy Orchestrator slideshow and become familiar with the userinterface.
When you are ready to create the installation URL, select Menu | Software | Getting Started.
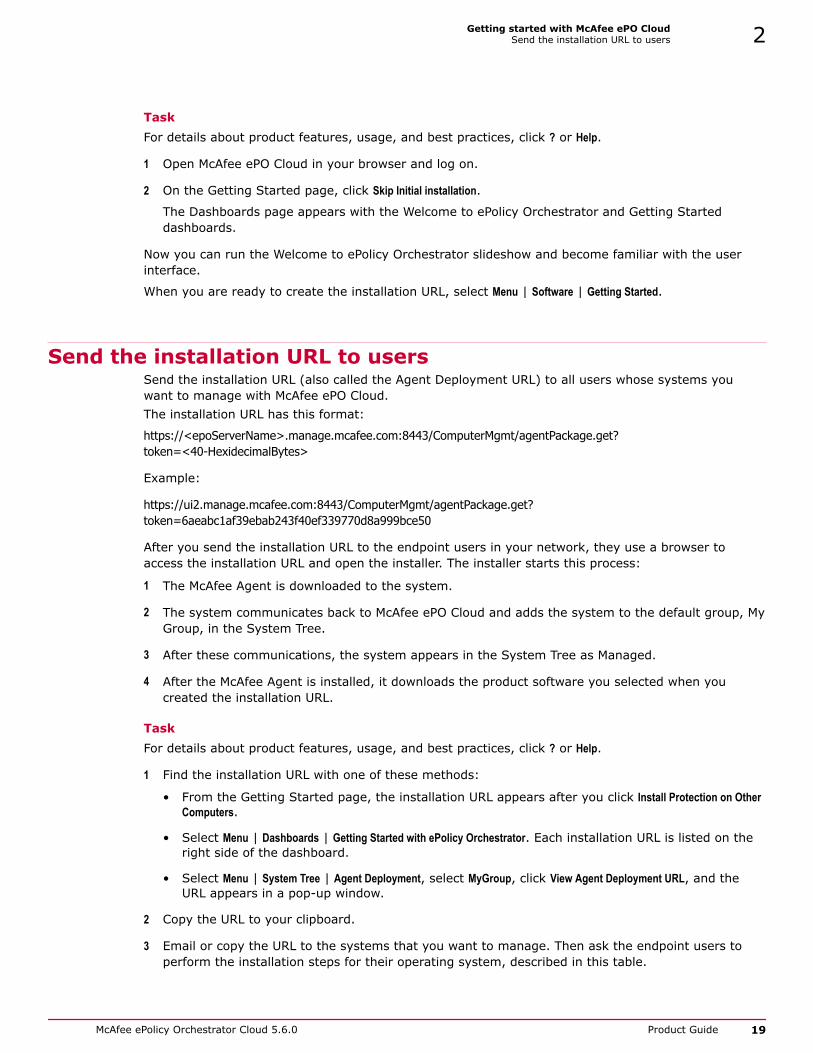
Send the installation URL to usersSend the installation URL (also called the Agent Deployment URL) to all users whose systems youwant to manage with McAfee ePO Cloud.The installation URL has this format:
https://<epoServerName>.manage.mcafee.com:8443/ComputerMgmt/agentPackage.get?token=<40-HexidecimalBytes>
Example:
https://ui2.manage.mcafee.com:8443/ComputerMgmt/agentPackage.get?token=6aeabc1af39ebab243f40ef339770d8a999bce50
After you send the installation URL to the endpoint users in your network, they use a browser toaccess the installation URL and open the installer. The installer starts this process:
1 The McAfee Agent is downloaded to the system.
2 The system communicates back to McAfee ePO Cloud and adds the system to the default group, MyGroup, in the System Tree.
3 After these communications, the system appears in the System Tree as Managed.
4 After the McAfee Agent is installed, it downloads the product software you selected when youcreated the installation URL.
TaskFor details about product features, usage, and best practices, click ? or Help.
1 Find the installation URL with one of these methods:
• From the Getting Started page, the installation URL appears after you click Install Protection on OtherComputers.
• Select Menu | Dashboards | Getting Started with ePolicy Orchestrator. Each installation URL is listed on theright side of the dashboard.
• Select Menu | System Tree | Agent Deployment, select MyGroup, click View Agent Deployment URL, and theURL appears in a pop-up window.
2 Copy the URL to your clipboard.
3 Email or copy the URL to the systems that you want to manage. Then ask the endpoint users toperform the installation steps for their operating system, described in this table.
Getting started with McAfee ePO CloudSend the installation URL to users 2
McAfee ePolicy Orchestrator Cloud 5.6.0 Product Guide 19
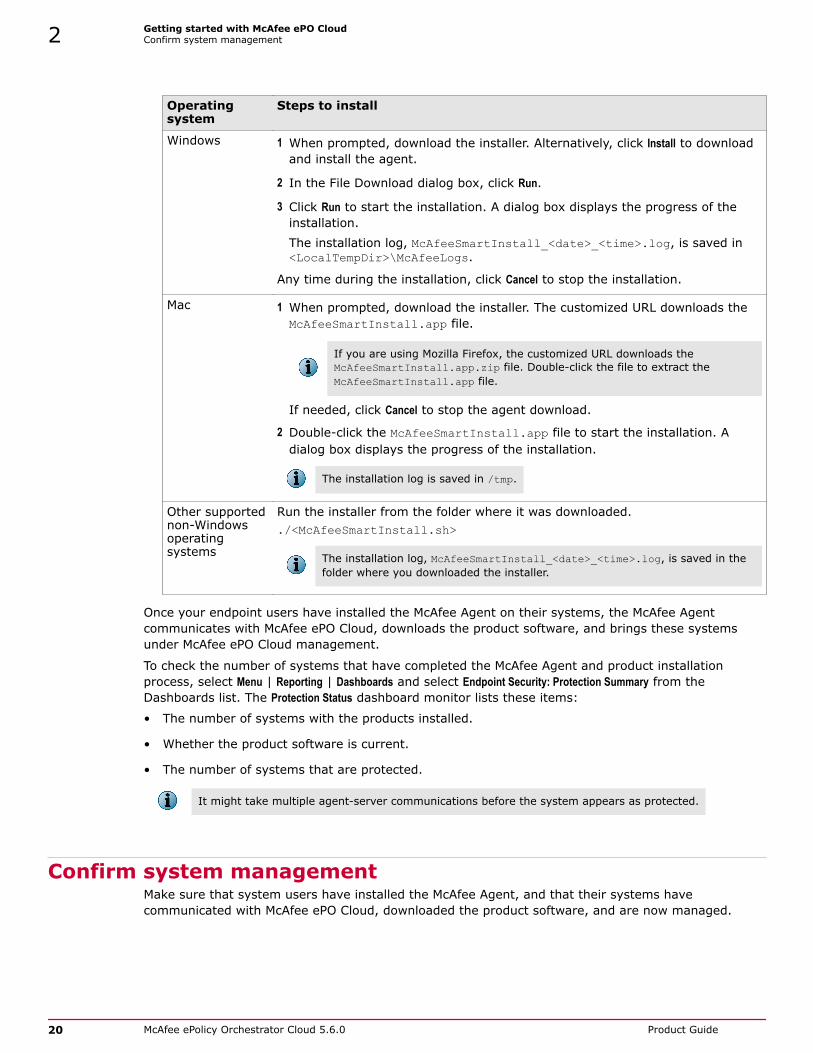
Operatingsystem
Steps to install
Windows 1 When prompted, download the installer. Alternatively, click Install to downloadand install the agent.
2 In the File Download dialog box, click Run.
3 Click Run to start the installation. A dialog box displays the progress of theinstallation.The installation log, McAfeeSmartInstall_<date>_<time>.log, is saved in<LocalTempDir>\McAfeeLogs.
Any time during the installation, click Cancel to stop the installation.
Mac 1 When prompted, download the installer. The customized URL downloads theMcAfeeSmartInstall.app file.
If you are using Mozilla Firefox, the customized URL downloads theMcAfeeSmartInstall.app.zip file. Double-click the file to extract theMcAfeeSmartInstall.app file.
If needed, click Cancel to stop the agent download.
2 Double-click the McAfeeSmartInstall.app file to start the installation. Adialog box displays the progress of the installation.
The installation log is saved in /tmp.
Other supportednon-Windowsoperatingsystems
Run the installer from the folder where it was downloaded../<McAfeeSmartInstall.sh>
The installation log, McAfeeSmartInstall_<date>_<time>.log, is saved in thefolder where you downloaded the installer.
Once your endpoint users have installed the McAfee Agent on their systems, the McAfee Agentcommunicates with McAfee ePO Cloud, downloads the product software, and brings these systemsunder McAfee ePO Cloud management.
To check the number of systems that have completed the McAfee Agent and product installationprocess, select Menu | Reporting | Dashboards and select Endpoint Security: Protection Summary from theDashboards list. The Protection Status dashboard monitor lists these items:
• The number of systems with the products installed.
• Whether the product software is current.
• The number of systems that are protected.
It might take multiple agent-server communications before the system appears as protected.
Confirm system management Make sure that system users have installed the McAfee Agent, and that their systems havecommunicated with McAfee ePO Cloud, downloaded the product software, and are now managed.
2 Getting started with McAfee ePO CloudConfirm system management
20 McAfee ePolicy Orchestrator Cloud 5.6.0 Product Guide
TaskFor details about product features, usage, and best practices, click ? or Help.
1 To confirm that the system users have installed the McAfee Agent, select one:
• Menu | Systems | Systems
• Menu | Systems | System Tree and click the Systems tab
2 Using the list of email addresses that you used to send the installation URL, confirm that Managedappears in the Managed State column next to each computer listed in the System Name column.
If all computers don't appear, you might need to remind your users to install the McAfee Agentusing the installation URL.
McAfee ePO Cloud is now managing these systems in your network.
Uninstall product software from systemsYou can uninstall all product software from managed systems in a group using the existing productdeployment task.
Before you beginYou must know the group name of the systems where the product software is installed touse the uninstall feature in Product Deployment.
If there are any systems you don't want to uninstall the product software from, move themto a different group before starting this process.
This product software uninstallation process uses the Product Deployment task created during yourinitial software installation. When the uninstallation task is complete, all systems in the System Treegroup specified at installation have all product software removed. You can use this process when youare done evaluating products.
You can't use this process to choose which products are installed or removed. To install a subset ofproducts on a group of systems, create a different product deployment task or installation URL to do so.
TaskFor details about product features, usage, and best practices, click ? or Help.
1 To open the Product Deployment page, select Menu | Software | Product Deployment.
2 In the product deployment list, select the deployment task that you used to initially create theinstallation URL. That task is the product deployment task used to uninstall the product softwarefrom that group of systems.
To find the correct task to use, look for the product deployment name with the group name or URLname appended to "Initial Deployment <GroupName>." For example, "Initial Deployment MyGroup."
3 With the product deployment task selected, in the Actions list, select Uninstall.
The uninstallation task starts with the status displayed in a progress bar.
The configured product software is removed from all systems in the selected System Tree group.When the uninstallation is finished, Uninstall Successful appears with the number of updatedsystems shown in parentheses.
Getting started with McAfee ePO CloudUninstall product software from systems 2
McAfee ePolicy Orchestrator Cloud 5.6.0 Product Guide 21
4 To delete the product deployment task, select it from the product deployment list and select Deletefrom the Actions list.
5 Delete the associated System Tree group.
a Open the System Tree: select Menu | Systems | System Tree.
b Click System Tree Actions | Delete Group.
c Select Remove McAfee Agent on next agent-server communication from all systems, then click OK.
The group is removed from the System Tree, and all associated systems are removed from McAfeeePO Cloud management. You can reuse the group name later.
After the products are uninstalled and the systems removed from McAfee ePO Cloud management, youcan create a product deployment task or installation URL. For example, you might configure a differentproduct deployment task to install a subset of products on the systems in the group.
2 Getting started with McAfee ePO CloudUninstall product software from systems
22 McAfee ePolicy Orchestrator Cloud 5.6.0 Product Guide
3 The McAfee ePO Cloud console
Log on to the console to configure McAfee ePO Cloud, and to manage and monitor your networksecurity.
Contents Navigating the interface Working with lists and tables Manage your account Provide feedback
Navigating the interfaceThe McAfee ePO Cloud interface uses menu-based navigation with a Favorites bar you can customizeto get where you want to go quickly.
Menu sections represent top-level features. As you add managed products to McAfee ePO Cloud, theMenu options increase.
Using the McAfee ePO Cloud navigation menuOpen the McAfee ePO Cloud menu to navigate the McAfee ePO Cloud interface.
The menu uses categories that include features and functionality of McAfee ePO Cloud. Each categorycontains a list of primary feature pages associated with a unique icon. Select a category in Menu toview and navigate to the primary pages that make up that feature.
3
McAfee ePolicy Orchestrator Cloud 5.6.0 Product Guide 23
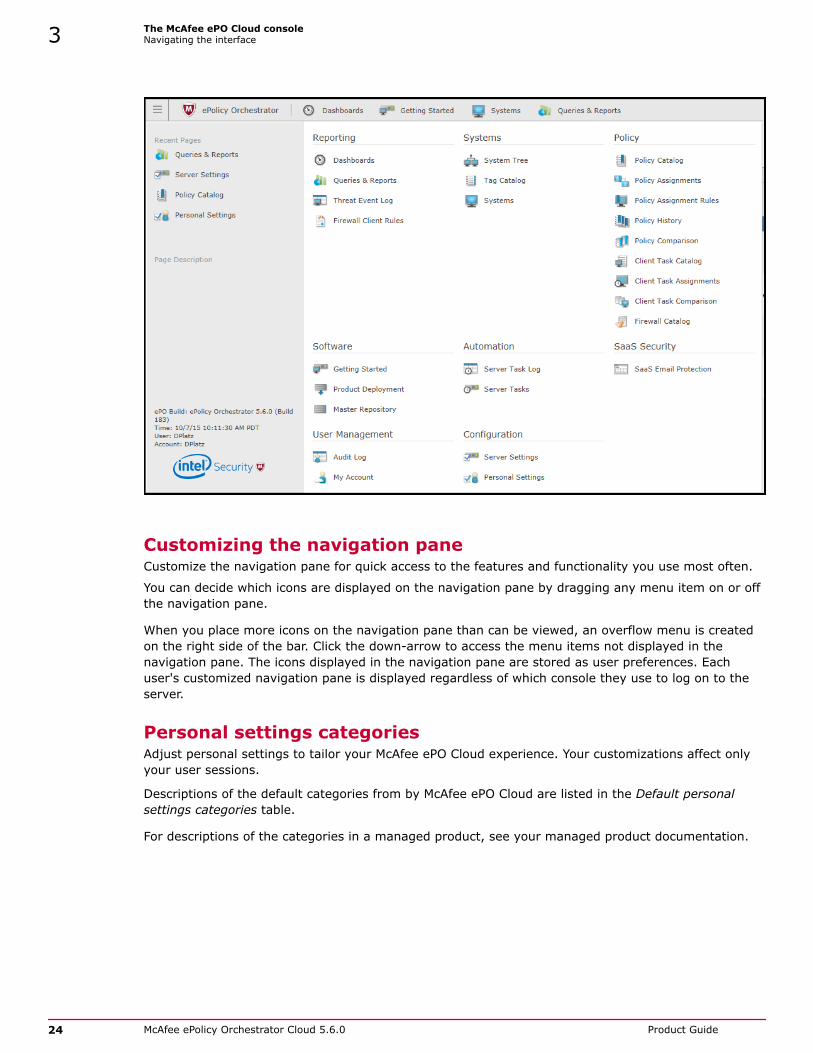
Customizing the navigation paneCustomize the navigation pane for quick access to the features and functionality you use most often.
You can decide which icons are displayed on the navigation pane by dragging any menu item on or offthe navigation pane.
When you place more icons on the navigation pane than can be viewed, an overflow menu is createdon the right side of the bar. Click the down-arrow to access the menu items not displayed in thenavigation pane. The icons displayed in the navigation pane are stored as user preferences. Eachuser's customized navigation pane is displayed regardless of which console they use to log on to theserver.
Personal settings categoriesAdjust personal settings to tailor your McAfee ePO Cloud experience. Your customizations affect onlyyour user sessions.
Descriptions of the default categories from by McAfee ePO Cloud are listed in the Default personalsettings categories table.
For descriptions of the categories in a managed product, see your managed product documentation.
3 The McAfee ePO Cloud consoleNavigating the interface
24 McAfee ePolicy Orchestrator Cloud 5.6.0 Product Guide
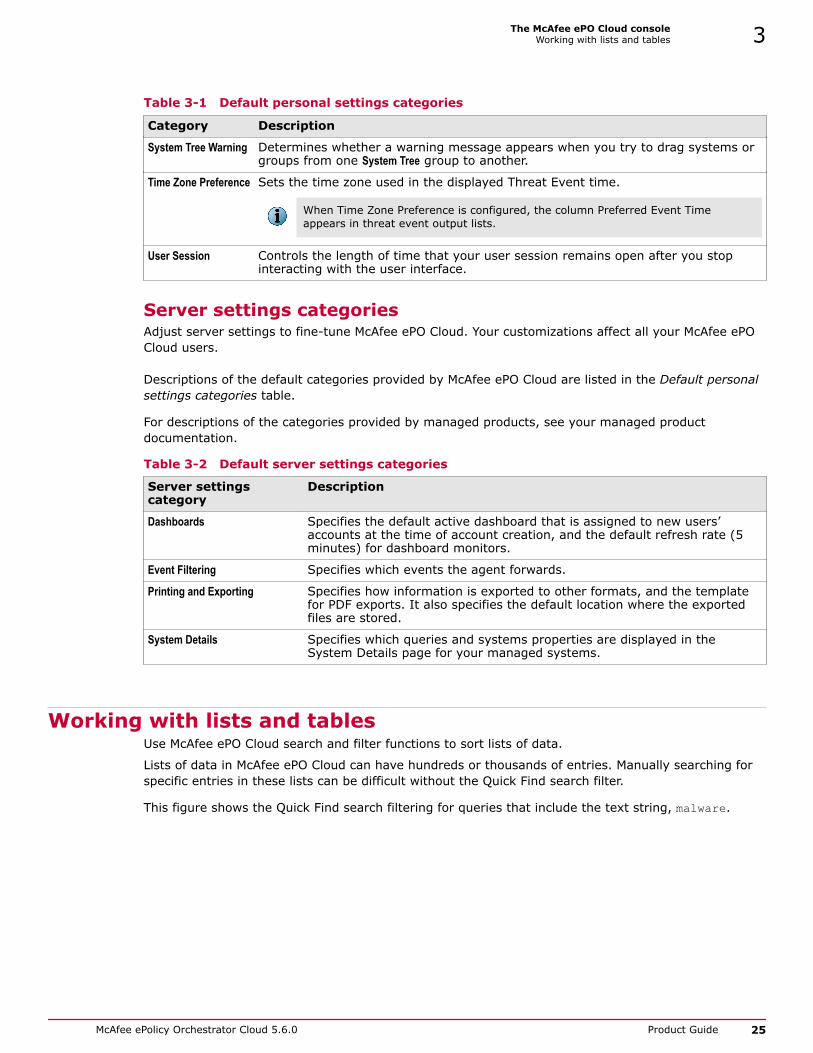
Table 3-1 Default personal settings categories
Category Description
System Tree Warning Determines whether a warning message appears when you try to drag systems orgroups from one System Tree group to another.
Time Zone Preference Sets the time zone used in the displayed Threat Event time.
When Time Zone Preference is configured, the column Preferred Event Timeappears in threat event output lists.
User Session Controls the length of time that your user session remains open after you stopinteracting with the user interface.
Server settings categoriesAdjust server settings to fine-tune McAfee ePO Cloud. Your customizations affect all your McAfee ePOCloud users.
Descriptions of the default categories provided by McAfee ePO Cloud are listed in the Default personalsettings categories table.
For descriptions of the categories provided by managed products, see your managed productdocumentation.
Table 3-2 Default server settings categories
Server settingscategory
Description
Dashboards Specifies the default active dashboard that is assigned to new users’accounts at the time of account creation, and the default refresh rate (5minutes) for dashboard monitors.
Event Filtering Specifies which events the agent forwards.
Printing and Exporting Specifies how information is exported to other formats, and the templatefor PDF exports. It also specifies the default location where the exportedfiles are stored.
System Details Specifies which queries and systems properties are displayed in theSystem Details page for your managed systems.
Working with lists and tablesUse McAfee ePO Cloud search and filter functions to sort lists of data.
Lists of data in McAfee ePO Cloud can have hundreds or thousands of entries. Manually searching forspecific entries in these lists can be difficult without the Quick Find search filter.
This figure shows the Quick Find search filtering for queries that include the text string, malware.
The McAfee ePO Cloud consoleWorking with lists and tables 3
McAfee ePolicy Orchestrator Cloud 5.6.0 Product Guide 25
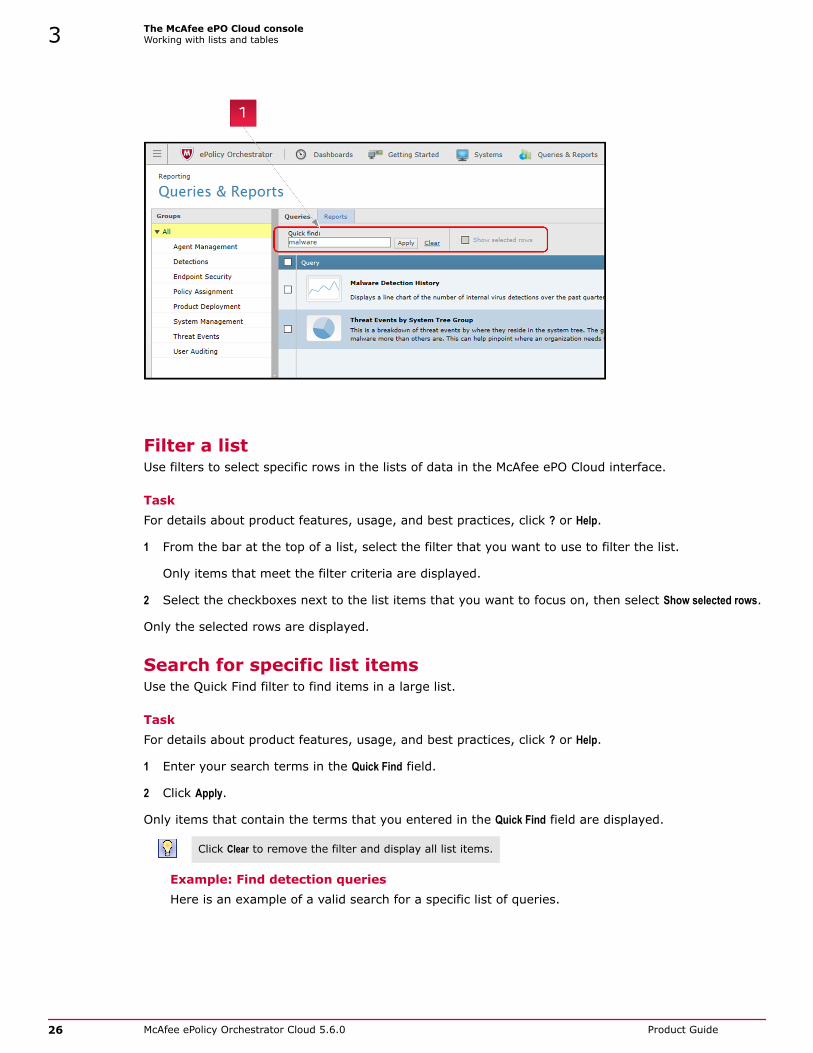
Filter a listUse filters to select specific rows in the lists of data in the McAfee ePO Cloud interface.
TaskFor details about product features, usage, and best practices, click ? or Help.
1 From the bar at the top of a list, select the filter that you want to use to filter the list.
Only items that meet the filter criteria are displayed.
2 Select the checkboxes next to the list items that you want to focus on, then select Show selected rows.
Only the selected rows are displayed.
Search for specific list itemsUse the Quick Find filter to find items in a large list.
TaskFor details about product features, usage, and best practices, click ? or Help.
1 Enter your search terms in the Quick Find field.
2 Click Apply.
Only items that contain the terms that you entered in the Quick Find field are displayed.
Click Clear to remove the filter and display all list items.
Example: Find detection queriesHere is an example of a valid search for a specific list of queries.
3 The McAfee ePO Cloud consoleWorking with lists and tables
26 McAfee ePolicy Orchestrator Cloud 5.6.0 Product Guide
1 Select Menu | Reporting | Queries & Reports, then click Query.
All queries that are available in McAfee ePO Cloud appear in the list.
2 Limit the list to specific queries, for example, "detection." In the Quick Find field, typedetection, then click Apply.
Some lists contain items translated for your location. When communicating with users in otherlocales, remember that query names can differ.
Click table row checkboxesThe McAfee ePO Cloud interface has special table row selection actions and shortcuts that allow you toselect table row checkboxes using click or Shift+click.
Some output pages in the McAfee ePO Cloud interface display a checkbox next to each list item in thetable. These checkboxes allow you to select rows individually, as groups, or select all rows in the table.
This table row selection action does not work in the Audit Log table.
This table lists the actions used to select table row checkboxes.
To select... Action Response
Individual rows Click checkbox for individual rows. Selects each individual row independently.
Group of rows Click one checkbox, then hold Shiftwhile you click the last checkbox in thegroup.
Selects all the rows between and includingthe first and last rows that you clicked.
All rows Click the top checkbox in tableheadings.
Selects every row in the table.
Select items in tree listsYou can press Ctrl+click to select consecutive or non-consecutive items in tree lists.
Hierarchical tree lists, for example System Tree (Subgroups) and Tag Group Tree lists, let you selectlist items:
• Individually — Click an item.
• As a consecutive group — Press Ctrl+click and select the items sequentially.
• As a non-consecutive group — Press Ctrl+click and select each item individually.
Manage your accountManage basic McAfee ePO Cloud account settings.
Tasks• Edit your user profile and change your password on page 28
The Profile page shows your user and logon information. You can view your profile andchange your email address, your password, or your account information.
• View your subscription information on page 28View your active McAfee product subscriptions, utilization, and order history.
• Contact support on page 29Contact support to get help with your McAfee ePO Cloud account.
The McAfee ePO Cloud consoleManage your account 3
McAfee ePolicy Orchestrator Cloud 5.6.0 Product Guide 27
Edit your user profile and change your passwordThe Profile page shows your user and logon information. You can view your profile and change youremail address, your password, or your account information.
TaskFor details about product features, usage, and best practices, click ? or Help.
1 Open the My Profile page.
a From the McAfee ePO Cloud console, select Menu | User Management | My Account.
The My Account page opens in a new window or tab.
b Click My Profile.
2 Click Edit Profile to change your profile, password, or the account you log on to.
Action Steps
Edit yourprofile
To change your profile, click Edit Profile.1 Change the profile as needed.
2 Click Submit.
The changes appear on the Profile page.
Change yourpassword
To change your password, click Edit Profile.1 Click Change Password.
2 Type your current password in the form. Choose a secure password, type it inthe form, and re-enter it for verification.
Use your organization's guidelines or McAfee best practices for changingpasswords.
3 Click Submit. A confirmation window opens.
4 Click Done to return to the Profile page.
Change theaccount youlog on to
If you have access to multiple accounts, you can change the account specified inyour user profile to log on to a different account.1 Click Edit Profile.
2 From the Default Sign In Account drop-down list, select the account that you want tolog on to.
3 Click Submit. A confirmation window appears.
The next time you log on, you are routed to McAfee ePO Cloud console for thespecified account.
3 Close the My Profile tab to return to the McAfee ePO Cloud console.
View your subscription informationView your active McAfee product subscriptions, utilization, and order history.
Before you beginActivate your McAfee ePO Cloud user account.
3 The McAfee ePO Cloud consoleManage your account
28 McAfee ePolicy Orchestrator Cloud 5.6.0 Product Guide
TaskFor details about product features, usage, and best practices, click ? or Help.
1 Open the Subscriptions page:
a From the McAfee ePO Cloud console, select Menu | User Management | My Account.
The My Account page opens in a new window or tab.
b Click Subscriptions.
On the Subscriptions page, you can see your Active Subscriptions, Utilization Summary, andOrder History.
2 Close the My Account window or tab to return to the McAfee ePO Cloud console.
Contact supportContact support to get help with your McAfee ePO Cloud account.
Before you beginActivate your McAfee ePO Cloud user account.
TaskFor details about product features, usage, and best practices, click ? or Help.
1 Open the Support page:
a From the McAfee ePO Cloud console, select Menu | User Management | My Account.
The My Account page opens in a new window.
b Click Support.
2 Use the information on the Support page to obtain help with your account.
3 Close the My Account page to return to the McAfee ePO Cloud console.
Provide feedbackSubmit information about your McAfee ePO Cloud experience including product concept submissions,feature requests, and comments.
Task1 From the McAfee ePO Cloud console, in the upper-right corner, click Feedback.
2 In the Provide Feedback window, enter your information.
3 Click Send.
Thank you for taking the time to send your feedback. Although we can't guarantee a response, weappreciate your suggestions.
The McAfee ePO Cloud consoleProvide feedback 3
McAfee ePolicy Orchestrator Cloud 5.6.0 Product Guide 29
3 The McAfee ePO Cloud consoleProvide feedback
30 McAfee ePolicy Orchestrator Cloud 5.6.0 Product Guide
4 The System Tree
The System Tree is a graphical representation of how your managed network is organized.
Use McAfee ePO Cloud software to automate and customize your systems' organization. The structureyou put in place affects how security policies are inherited and enforced throughout your environment.
You can organize your System Tree using these methods:
• Criteria-based sorting, using criteria applied to systems manually or automatically.
• Manual organization from the console (drag and drop).
Contents The System Tree structure Considerations when planning your System Tree Criteria-based sorting Create and populate System Tree groups Move systems within the System Tree Remove a system from the System Tree Manage Agent Deployment URLs
The System Tree structureThe System Tree is a hierarchical structure that organizes the systems in your network into groupsand subgroups.
The default System Tree structure includes these groups:
• My Organization — The root of your System Tree.
• My Group — The default group subgroup added from the Getting Started initial softwareinstallation.
This subgroup name might have been changed from the default during the initial softwareinstallation.
• Lost and Found — The catch-all subgroup for any systems that have not been or could not beadded to other groups in your System Tree.
The My Organization groupThe My Organization group, the root of your System Tree, contains all systems added to or detectedon your network (manually or automatically).
Until you create your own structure, all systems are added by default to My Group.
The My Group name might have been changed from the default during the initial software installation.
4
McAfee ePolicy Orchestrator Cloud 5.6.0 Product Guide 31
The My Organization group has these characteristics:
• It can't be deleted.
• It can't be renamed.
The My Group subgroupMy Group is a subgroup of the My Organization group and is added by default during the GettingStarted initial software installation.
The subgroup My Group name might have been changed from the default during the initial softwareinstallation.
When your network computers run the installation URL, they are assigned by default to the subgroupMy Group of the System Tree.
TaskFor details about product features, usage, and best practices, click ? or Help.
1 Select Menu | Systems | System Tree, in the System Tree.
2 Click Delete Group or Rename Group to change the My Group subgroup.
If you delete systems from the System Tree, make sure that you select the option Remove agent from allsystems. If the McAfee Agent is not removed, deleted systems reappear in the Lost and Foundgroup because the McAfee Agent continues to communicate to McAfee ePO Cloud. Also, unless youselect Remove agent installed products from all systems, the product software remains installed on thesystems deleted from the System Tree.
The Lost and Found groupThe Lost and Found group is a subgroup of the My Organization group.Depending on the methods that you specify when creating and maintaining the System Tree, theserver uses different characteristics to determine where to place systems. The Lost and Found groupstores systems whose locations can't be determined.
The Lost and Found group has these characteristics:
• It can't be deleted.
• It can't be renamed.
• Its sorting criteria can't be changed from being a catch-all group, although you can provide sortingcriteria for the subgroups that you create within it.
• It always appears last in the System Tree list and is not alphabetized among its peers.
• When a system is sorted into Lost and Found, it is placed in a subgroup named for the system’sdomain. If no such group exists, one is created.
If you delete systems from the System Tree, make sure that you select the option Remove McAfee Agent onnext agent-server communication from all systems. If the McAfee Agent is not removed, deleted systems reappearin the Lost and Found group because the McAfee Agent still communicates with McAfee ePO Cloud.
System Tree groupsSystem Tree groups represent a collection of systems. Deciding which systems to group depends onthe unique needs of your network and business.You can group systems based on:
4 The System TreeThe System Tree structure
32 McAfee ePolicy Orchestrator Cloud 5.6.0 Product Guide

• Machine-type (for example, laptops, servers, or desktops)
• Geography (for example, North America or Europe)
• Department boundaries (for example, Finance or Marketing)
• Any criteria that supports your needs
Groups can include both systems and other groups (subgroups).
Grouping systems with similar properties or requirements into these units allows you to managepolicies for systems in one place, rather than setting policies for each system individually.
InheritanceInheritance is an important property that simplifies policy and task administration. Because ofinheritance, child subgroups in the System Tree hierarchy inherit policies set at their parent groups.
For example:
• Policies set at the My Organization level of the System Tree are inherited by all groups below it.
• Group policies are inherited by subgroups or individual systems within that group.
This table is an example of a System Tree hierarchy.
System Tree Hierarchy
My Organization Top-level group
Los Angeles Child subgroup of My Organization
Desktop Child subgroup of Los Angeles
Laptop Child subgroup of Los Angeles
Server Child subgroup of Los Angeles
Windows Child subgroup of Server
SQL Child subgroup of Server
Linux Child subgroup of Server
San Francisco Child subgroup of My Organization
Desktop Child subgroup of San Francisco
Laptop Child subgroup of San Francisco
Server Child subgroup of San Francisco
Lost and Found Child subgroup of My Organization
In this example, all policies assigned to the Los Angeles | Server group are inherited by the Windows,SQL, and Linux child subgroups.
Inheritance is enabled by default for all groups and individual systems that you add to the SystemTree. Default inheritance allows you to set policies and schedule client tasks in fewer places.
To allow for customization, inheritance can be broken by applying a new policy at any location of theSystem Tree. You can lock policy assignments to preserve inheritance.
The System TreeThe System Tree structure 4
McAfee ePolicy Orchestrator Cloud 5.6.0 Product Guide 33
Considerations when planning your System TreeAn efficient and well-organized System Tree can simplify maintenance. Many administrative, network,and political realities of each environment can affect how your System Tree is structured.
Because every network is different and requires different policies, and possibly different management,McAfee recommends planning your System Tree before moving the systems from the default groupwhere they were created.
Regardless of the methods you choose to create and populate the System Tree, consider yourenvironment while planning the organization of your System Tree.
Environmental borders and their impact on system organizationHow you organize the systems for management depends on the borders that exist in your network.These borders influence the organization of the System Tree differently than the organization of yournetwork topology.
We recommend evaluating these borders in your network and organization, and whether they must beconsidered when defining the organization of your System Tree.
Political borders
Many large networks are divided by individuals or groups responsible for managing different portionsof the network. Sometimes these borders do not coincide with topological or geographic borders. Whoaccesses and manages the segments of the System Tree affects how you structure it.
Functional borders
Some networks are divided by the roles of those using the network; for example, Sales andEngineering. Even if the network is not divided by functional borders, you might need to organizesegments of the System Tree by functionality if different groups require different policies.
A business group might run specific software that requires special security policies. For example,arranging your email Exchange Servers into a group and setting specific exclusions for on-accessscanning.
Subnets and IP address rangesIn many cases, organizational units of a network use specific subnets or IP address ranges, so you cancreate a group for a geographic location and set IP address filters for it.
You can also use network location, such as IP address, as the primary grouping criterion, if yournetwork isn’t spread out geographically
If possible, consider using sorting criteria based on IP address information to automate System Treecreation and maintenance. Set IP address subnet masks or IP address range criteria for applicablegroups within the System Tree. These filters automatically populate locations with the appropriatesystems.
Operating systems and softwareConsider grouping systems with similar operating systems to manage products and policies moreeasily. If you have legacy systems, you can create a group for them and deploy and manage securityproducts on these systems separately. Also, by giving these systems a corresponding tag, you canautomatically sort them into a group.
4 The System TreeConsiderations when planning your System Tree
34 McAfee ePolicy Orchestrator Cloud 5.6.0 Product Guide
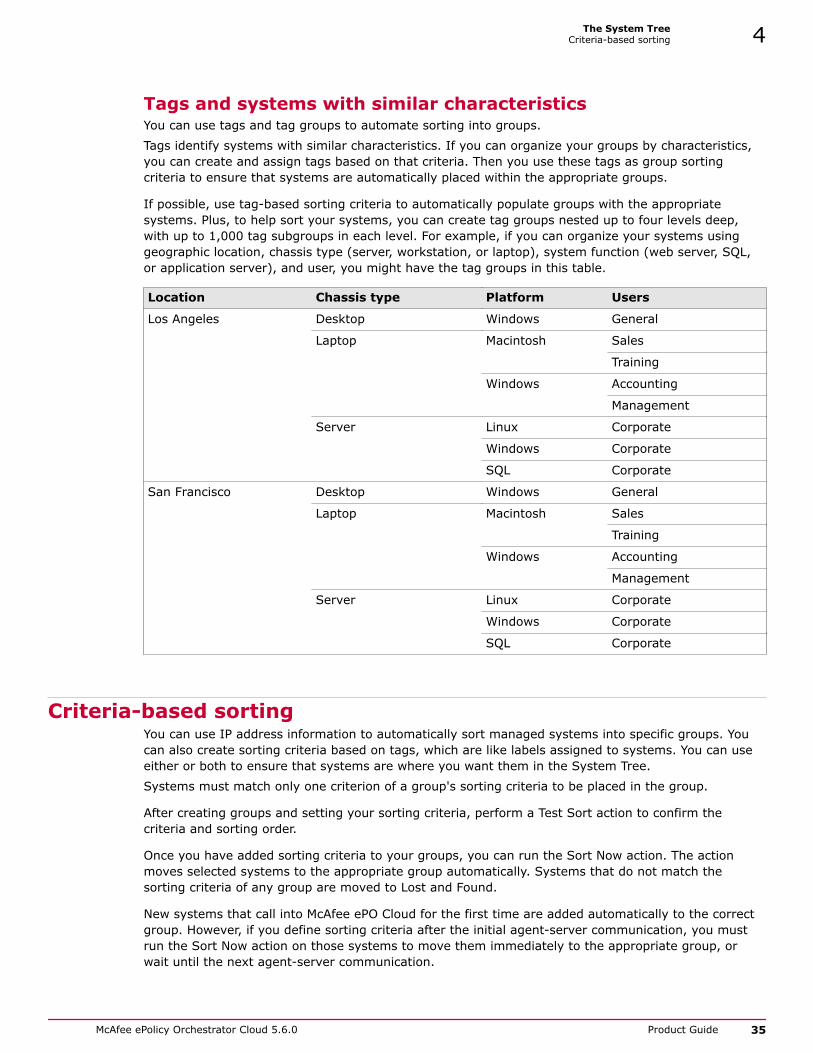
Tags and systems with similar characteristicsYou can use tags and tag groups to automate sorting into groups.
Tags identify systems with similar characteristics. If you can organize your groups by characteristics,you can create and assign tags based on that criteria. Then you use these tags as group sortingcriteria to ensure that systems are automatically placed within the appropriate groups.
If possible, use tag-based sorting criteria to automatically populate groups with the appropriatesystems. Plus, to help sort your systems, you can create tag groups nested up to four levels deep,with up to 1,000 tag subgroups in each level. For example, if you can organize your systems usinggeographic location, chassis type (server, workstation, or laptop), system function (web server, SQL,or application server), and user, you might have the tag groups in this table.
Location Chassis type Platform Users
Los Angeles Desktop Windows General
Laptop Macintosh Sales
Training
Windows Accounting
Management
Server Linux Corporate
Windows Corporate
SQL Corporate
San Francisco Desktop Windows General
Laptop Macintosh Sales
Training
Windows Accounting
Management
Server Linux Corporate
Windows Corporate
SQL Corporate
Criteria-based sortingYou can use IP address information to automatically sort managed systems into specific groups. Youcan also create sorting criteria based on tags, which are like labels assigned to systems. You can useeither or both to ensure that systems are where you want them in the System Tree.
Systems must match only one criterion of a group's sorting criteria to be placed in the group.
After creating groups and setting your sorting criteria, perform a Test Sort action to confirm thecriteria and sorting order.
Once you have added sorting criteria to your groups, you can run the Sort Now action. The actionmoves selected systems to the appropriate group automatically. Systems that do not match thesorting criteria of any group are moved to Lost and Found.
New systems that call into McAfee ePO Cloud for the first time are added automatically to the correctgroup. However, if you define sorting criteria after the initial agent-server communication, you mustrun the Sort Now action on those systems to move them immediately to the appropriate group, orwait until the next agent-server communication.
The System TreeCriteria-based sorting 4
McAfee ePolicy Orchestrator Cloud 5.6.0 Product Guide 35
Sorting status of systems
On any system or collection of systems, you can enable or disable System Tree sorting. If you dodisable System Tree sorting on a system, it is excluded from sorting actions, except when the TestSort action is performed. During a test sort, the sorting status of the system or collection is consideredand can be moved or sorted from the Test Sort page.
System Tree sorting settings on McAfee ePO Cloud
For sorting to take place, it must be enabled on McAfee ePO Cloud and on the systems. By default,once sorting is enabled, systems are sorted at the first agent-server communication (or next, ifapplying changes to existing systems) and are not sorted again.
Test sorting systems
Use this feature to view where systems are placed during a sort action. The Test Sort page displaysthe systems and the paths to the location where they are sorted. Although this page does not displaythe sorting status of systems, if you select systems on the page (even ones with sorting disabled),clicking Move Systems places those systems in the location identified.
IP address sorting criteriaIn many networks, subnets and IP address information reflect organizational distinctions, such asgeographical location or job function. If IP address organization coincides with your needs, considersetting IP address sorting criteria for groups.
In this version of McAfee ePO Cloud, this functionality has changed, and now allows for the setting ofIP address sorting criteria randomly throughout the tree. As long as the parent has no assignedcriteria, you no longer need to ensure that the sorting criteria of the child group’s IP address is asubset of the parent’s. Once configured, you can sort systems at agent-server communication, or onlywhen a sort action is manually initiated.
IP address sorting criteria must not overlap between different groups. Each IP address range or subnetmask in a group’s sorting criteria must cover a unique set of IP addresses. If criteria does overlap, thegroup where those systems end up depends on the order of the subgroups on the System Tree GroupDetails tab. You can check for IP address overlap using the Check IP Integrity action in the GroupDetails tab.
Tag-based sorting criteriaIn addition to using IP address information to sort systems into the appropriate group, you can definesorting criteria based on the tags assigned to systems.
Tag-based criteria can be used with IP address-based criteria for sorting.
Group order and sortingFor additional flexibility with System Tree management, configure the order of a group’s subgroups,and the order of their placement during sorting.
When multiple subgroups have matching criteria, changing this order can change where a system endsup in the System Tree. If you are using catch-all groups, they must be the last subgroup in the list.
Catch-all groupsCatch-all groups are groups whose sorting criteria is set to All others on the group's Sorting Criteriapage.
Only subgroups at the last position of the sort order can be catch-all groups. These groups receive allsystems that were sorted into the parent group, but were not sorted into any of the catch-all’s peers.
4 The System TreeCriteria-based sorting
36 McAfee ePolicy Orchestrator Cloud 5.6.0 Product Guide
How a system is added to the System Tree when sortedWhen the McAfee Agent communicates with the server for the first time, the server uses an algorithmto place the system in the System Tree. When it cannot find an appropriate location for a system, itputs the system in the Lost and Found group.
On each agent-server communication, the server attempts to locate the system in the System Tree byMcAfee Agent GUID. Only systems whose agents have already called into the server for the first timehave a McAfee Agent GUID in the database. If a matching system is found, it is left in its existinglocation.
If a matching system is not found, the server uses an algorithm to sort the systems into theappropriate groups. Systems can be sorted into any criteria-based group in the System Tree, as longas each parent group in the path does not have non-matching criteria. Parent groups of acriteria-based subgroup must have no criteria or matching criteria.
The sorting order assigned to each subgroup (defined in the Group Details tab) determines the order thatthe server considers subgroups for sorting.
1 The server searches for a system without a McAfee Agent GUID (the McAfee Agent has neverbefore called in) with a matching name in a group with the same name as the domain. If found, thesystem is placed in that group. This can happen when you have added systems to the System Tree.
2 If a matching system is still not found, the server searches for a group of the same name as thedomain where the system originates. If such a group is not found, one is created under the Lostand Found group, and the system is placed there.
3 Properties are updated for the system.
4 The server applies all criteria-based tags to the system if the server is configured to run sortingcriteria at each agent-server communication.
5 What happens next depends on whether System Tree sorting is enabled on both the server and thesystem.
• If System Tree sorting is disabled on either the server or the system, the system is left where itis.
• If System Tree sorting is enabled on the server and system, the system is moved based on thesorting criteria in the System Tree groups.
6 The server considers the sorting criteria of all top-level groups according to the sorting order on theMy Organization group’s Group Details tab. The system is placed in the first group with matchingcriteria or a catch-all group it considers.
• Once sorted into a group, each of its subgroups is considered for matching criteria according totheir sorting order on the Group Details tab.
• Sorting continues until there is no subgroup with matching criteria for the system, and is placedin the last group found with matching criteria.
7 If such a top-level group is not found, the subgroups of top-level groups (without sorting criteria)are considered according to their sorting.
8 If such a second-level criteria-based group is not found, the criteria-based third-level groups of thesecond-level unrestricted groups are considered.
Subgroups of groups with criteria that doesn't match are not considered. A group must havematching criteria or have no criteria for its subgroups to be considered for a system.
The System TreeCriteria-based sorting 4
McAfee ePolicy Orchestrator Cloud 5.6.0 Product Guide 37
9 This process continues down through the System Tree until a system is sorted into a group.
If the server setting for System Tree sorting is configured to sort only on the first agent-servercommunication, a flag is set on the system. The flag means that the system can never be sortedagain at agent-server communication unless the server setting is changed to enable sorting onevery agent-server communication.
10 If the server cannot sort the system into any group, it is placed in the Lost and Found group withina subgroup that is named after its domain.
Create and populate System Tree groupsCreate System Tree groups and populate the groups with systems.
You can populate groups by dragging selected systems to any group in the System Tree. Drag and dropto move groups and subgroups within the System Tree.
There is no single way to organize a System Tree, and because every network is different, yourSystem Tree organization can be as unique as your network layout. You can use more than onemethod of organization.
Tasks• Create groups manually on page 38
Create System Tree subgroups. Groups are automatically populated as the systems in yournetwork communicate with McAfee ePO Cloud.
• Add sorting criteria to groups on page 38Sorting criteria for System Tree groups can be based on IP address information or tags.
• Enable or disable System Tree sorting on systems on page 39The sorting status of a system determines whether it can be sorted into a criteria-basedgroup.
• Sort systems manually on page 39Sort selected systems into groups with criteria-based sorting enabled.
Create groups manuallyCreate System Tree subgroups. Groups are automatically populated as the systems in your networkcommunicate with McAfee ePO Cloud.
TaskFor details about product features, usage, and best practices, click ? or Help.
1 Open the New Subgroups dialog box.
a Select Menu | Systems | System Tree.
b Select a group, then click New Subgroup.
Create more than one subgroup at a time.
2 Type a name then click OK.
The new group appears in the System Tree.
Add sorting criteria to groupsSorting criteria for System Tree groups can be based on IP address information or tags.
4 The System TreeCreate and populate System Tree groups
38 McAfee ePolicy Orchestrator Cloud 5.6.0 Product Guide
TaskFor details about product features, usage, and best practices, click ? or Help.
1 Select Menu | Systems | System Tree, click the Group Details tab, then select the group in the System Tree.
2 Next to Sorting criteria click Edit. The Sorting Criteria page for the selected group appears.
3 Select Systems that match any of the criteria below, then the criteria selections appear.
Although you can configure multiple sorting criteria for the group, a system only has to match asingle criterion to be placed in this group.
4 Configure the criteria. Options include:
• IP addresses — Use this text box to define an IP address range or subnet mask as sorting criteria.Any system whose address falls within it is sorted into this group.
• Tags — Click Add Tags and perform these steps in the Add Tags dialog box.
1 Click the tag name, or names, to add and sort the systems in this parent group.
To select multiple tags, click Ctl + the tag names.
2 Click OK.
The tags selected appear in Tags on the Sorting Criteria page and next to Sorting Criteria on theGroup Details page.
5 Repeat as needed until sorting criteria is reconfigured for the group, then click Save.
See also IP address sorting criteria on page 36Tag-based sorting criteria on page 36
Enable or disable System Tree sorting on systemsThe sorting status of a system determines whether it can be sorted into a criteria-based group.
You can change the sorting status on systems in any table of systems (such as query results), andalso automatically on the results of a scheduled query.
TaskFor details about product features, usage, and best practices, click ? or Help.
1 Select Menu | Systems | System Tree | Systems, then select the systems you want.
2 Select Actions | Directory Management | Change Sorting Status, then select whether to enable or disableSystem Tree sorting on selected systems.
3 In the Change Sorting Status dialog box, select whether to disable or enable System Tree sortingon the selected system.
Depending on the setting for System Tree sorting, these systems are sorted on the nextagent-server communication. Otherwise, they can only be sorted with the Sort Now action.
Sort systems manuallySort selected systems into groups with criteria-based sorting enabled.
The System TreeCreate and populate System Tree groups 4
McAfee ePolicy Orchestrator Cloud 5.6.0 Product Guide 39
TaskFor details about product features, usage, and best practices, click ? or Help.
1 Select Menu | Systems | System Tree | Systems, then select the group that contains the systems.
2 Select the systems then click Actions | Directory Management | Sort Now. The Sort Now dialog boxappears.
If you want to preview the results of the sort before sorting, click Test Sort instead. (However, if youmove systems from within the Test Sort page, all selected systems are sorted, even if they haveSystem Tree sorting disabled.)
3 Click OK to sort the systems.
Move systems within the System TreeMove systems from one group to another in the System Tree. You can move systems from any pagethat displays a table of systems, including the results of a query.
In addition to the steps below, you can also drag and drop systems from the Systems table to anygroup in the System Tree.
Even in a perfectly organized System Tree that's regularly synchronized, you might need to movesystems manually between groups. For example, you might need to periodically move systems fromthe Lost and Found group.
TaskFor details about product features, usage, and best practices, click ? or Help.
1 Select Menu | Systems | System Tree | Systems, then browse to and select the systems.
2 Click Actions | Directory Management | Move Systems to open the Select New Group page.
3 Select whether to enable or disable System Tree sorting on the selected systems when they aremoved.
4 Select the group to place the systems in, then click OK.
If you move systems between groups, the moved systems inherit the policies assigned to their newgroup.
See also The Lost and Found group on page 32
Remove a system from the System TreeIf a system user leaves your company or gets a new computer, you can delete their managed systemusing the System Tree.
You also can delete systems from the System Tree by deleting the System Tree group that includes thesystems.
4 The System TreeMove systems within the System Tree
40 McAfee ePolicy Orchestrator Cloud 5.6.0 Product Guide
TaskFor details about product features, usage, and best practices, click ? or Help.
1 Select Menu | Systems | System Tree, click the Systems tab, and click the group with the systems youwant to remove.
2 In the System Name column, select the systems you want to remove and click Actions | DirectoryManagement | Delete.
3 Select Remove McAfee Agent on next agent-server communication from all systems.
4 Click OK.
The system is removed from the System Tree after the next agent-server communication.
Manage Agent Deployment URLsYou can create, delete, enable, disable, or view Agent Deployment URLs using the McAfee ePO Cloudserver.
TaskFor details about product features, usage, and best practices, click ? or Help.
1 Select Menu | Systems | System Tree, then click the Agent Deployment tab.
2 Click Actions, then select the required option.
Options Definition
Choose Columns Opens the Choose Columns page where you select the columns todisplay in the Agent Deployment page.
Create Agent Deployment URL Opens the Agent Deployment URL page where you to create a new URLfor Agent Deployment.
Delete Agent Deployment URL Deletes the selected Agent Deployment URL.
Enable/Disable Agent DeploymentURL
Controls whether the client system users can deploy the agentusing the URL.
Export Table Displays the Export page where you choose the way the table isexported.
View Agent Deployment URL Displays the Agent Deployment URL.
The System TreeManage Agent Deployment URLs 4
McAfee ePolicy Orchestrator Cloud 5.6.0 Product Guide 41
4 The System TreeManage Agent Deployment URLs
42 McAfee ePolicy Orchestrator Cloud 5.6.0 Product Guide
5 Tags
Use tags to identify and sort systems. Tags and tag groups allow you to select groups of systems andsimplify the creation of tasks and queries.
Contents Create tags using the New Tag Builder Manage tags Create, delete, and modify tag subgroups Exclude systems from automatic tagging Apply tags to selected systems Clear tags from systems Apply criteria-based tags to all matching systems
Create tags using the New Tag BuilderUse the New Tag Builder to create tags quickly.Tags can use criteria that is evaluated against every system:
• Automatically at agent-server communication.
• When the Run Tag Criteria action is taken.
• Manually on selected systems, regardless of criteria, with the Apply Tag action.
Tags without criteria can only be applied manually to selected systems.
TaskFor details about product features, usage, and best practices, click ? or Help.
1 Select Menu | Systems | Tag Catalog | New Tag.
2 On the Description page, enter a name and meaningful description, then click Next. The Criteria pageappears.
3 Select and configure the criteria, then click Next. The Evaluation page appears.
To apply the tag automatically, configure criteria for the tag.
5
McAfee ePolicy Orchestrator Cloud 5.6.0 Product Guide 43

4 Select whether systems are evaluated against the tag's criteria only when the Run Tag Criteria actionis taken, or also at each agent-server communication, then click Next. The Preview page appears.
These options are unavailable if criteria was not configured. When systems are evaluated against atag's criteria, the tag is applied to systems that match the criteria and have not been excluded fromthe tag.
5 Verify the information on this page, then click Save.
If the tag has criteria, this page displays the number of systems that receive this tag whenevaluated against its criteria.
The tag is added under the selected tag group in the Tag Tree on the Tag Catalog page.
Manage tagsOnce tags are created using the New Tag Builder, use the Actions list to edit, delete, and move thetags.
TaskFor details about product features, usage, and best practices, click ? or Help.
1 Select Menu | Systems | Tag Catalog.
2 From the Tags list, select a tag or multiple tags, click Actions, then select an action.
Action Steps
Edit a tag
The number ofaffectedsystems islisted at the topof the page.
From the Edit Tag Builder:1 On the Description page, type a name and meaningful description, then
click Next.
2 Select and configure the criteria, then click Next.
To apply the tag automatically, you must configure criteria for the tag.
3 Select whether systems are evaluated against the tag's criteria onlywhen the Run Tag Criteria action is taken, or also at each agent-servercommunication, then click Next.
These options are unavailable if criteria was not configured. Whensystems are evaluated against a tag's criteria, the tag is applied tosystems that match the criteria and are not excluded from the tag.
4 Verify the information on this page, then click Save.
If the tag has criteria, this page displays the number of systems thatreceive this tag when evaluated against its criteria.
The tag is updated on the Tag Catalog page under the selected tag group inthe Tag Tree.
Delete a tag Click Delete, then click OK to delete the tag.
5 TagsManage tags
44 McAfee ePolicy Orchestrator Cloud 5.6.0 Product Guide
Action Steps
Export a tag Click Export Table.
Move tags From the Move Tags dialog box, select the tag group where you wan thetags to appear, then click OK.
You can also drag and drop the tags into the tag groups in the Tag Tree.
Create, delete, and modify tag subgroupsTag subgroups allow you to nest tag groups up to four levels deep, with up to 1,000 tag subgroupsunder a single parent group. These tag groups allow you to use criteria-based sorting to automaticallyadd systems to the correct groups.
TaskFor details about product features, usage, and best practices, click ? or Help.
1 Select Menu | Systems | Tag Catalog.
2 From the Tag Catalog page, select one of these actions.
Action Steps
Create a tagsubgroup
1 In the Tag Tree, select the tag group (or parent tag group) where you want tocreate the tag subgroup.
My Tags is the default top-level tag group added during McAfee ePO Cloudinstallation.
2 Click New Subgroup to see the New Subgroup dialog box.
3 In the Name field, enter a descriptive name for the new tag subgroup.
4 Click OK to create the tag subgroup.
Rename a tagsubgroup
1 In the Tag Tree, select the tag subgroup that you want to rename.
2 Click Tag Tree Actions | Rename Group to open the Rename Subgroup dialog box.
3 In the Name field, enter the new name for the tag subgroup.
4 Click OK and the tag subgroup is renamed.
Delete a tagsubgroup
1 In the Tag Tree, select the tag subgroup that you want to delete.
2 Click Actions | Delete. An Action: Delete confirmation dialog box appears.
3 If you are sure you want to delete the tag subgroup, click OK and the tagsubgroup is removed.
Exclude systems from automatic taggingPrevent systems from having specific tags applied.
You can also use a query to collect systems, then exclude the tags from those systems from the queryresults.
TagsCreate, delete, and modify tag subgroups 5
McAfee ePolicy Orchestrator Cloud 5.6.0 Product Guide 45
TaskFor details about product features, usage, and best practices, click ? or Help.
1 Select Menu | Systems | System Tree | Systems, then select the group that contains the systems in theSystem Tree.
2 Select one or more systems in the Systems table, then click Actions | Tag | Exclude Tag.
3 In the Exclude Tag dialog box, select the tag group, select the tag to exclude, then click OK.
To limit the list to specific tags, type the tag name in the text box under Tags.
4 Verify that the systems have been excluded from the tag:
a Select Menu | Systems | Tag Catalog, then select the tag or tag group from the list of tags.
b Next to Systems with tag, click the link for the number of systems excluded from the criteria-basedtag application. The Systems Excluded from the Tag page appears.
c Verify that the systems are in the list.
Apply tags to selected systemsApply a tag manually to selected systems in the System Tree.
TaskFor details about product features, usage, and best practices, click ? or Help.
1 Select Menu | Systems | System Tree | Systems, then select the group that contains the systems youwant.
2 Select the systems, then click Actions | Tag | Apply Tag.
3 In the Apply Tag dialog box, select the tag group, select the tag to apply, then click OK.
To limit the list to specific tags, type the tag name in the text box under Tags.
4 Verify that the tags have been applied:
a Select Menu | Systems | Tag Catalog, then select a tag or tag group from the list of tags.
b Next to Systems with tag in the details pane, click the link for the number of systems taggedmanually. The Systems with Tag Applied Manually page appears.
c Verify that the systems are in the list.
Clear tags from systemsRemove tags from selected systems.
5 TagsApply tags to selected systems
46 McAfee ePolicy Orchestrator Cloud 5.6.0 Product Guide
TaskFor details about product features, usage, and best practices, click ? or Help.
1 Select Menu | Systems | System Tree | Systems, then select the group that contains the systems youwant.
2 Select the systems, then click Actions | Tag | Clear Tag.
3 In the Clear Tag dialog box, perform one of these steps, then click OK.
• Remove a specific tag — Select the tag group, then select the tag.
To limit the list to specific tags, type the tag name in the text box under Tags.
• Remove all tags — Select Clear All.
4 Verify that the tags have been removed:
a Select Menu | Systems | Tag Catalog, then select a tag or tag group in the list of tags.
b Next to Systems with tag in the details pane, click the link for the number of systems taggedmanually. The Systems with Tag Applied Manually page appears.
c Verify that the systems are not included in the list.
Apply criteria-based tags to all matching systemsApply a criteria-based tag to all non-excluded systems that match the specified criteria.
TaskFor details about product features, usage, and best practices, click ? or Help.
1 Select Menu | Systems | Tag Catalog, then select a tag or tag group from the Tags list.
2 Click Actions | Run Tag Criteria.
3 On the Action pane, select whether to reset manually tagged and excluded systems.
Resetting manually tagged and excluded systems removes the tag from systems that don't matchthe criteria, and applies the tag to systems that match criteria but were excluded from receiving thetag.
4 Click OK.
5 Verify that the systems have the tag applied:
a Select Menu | Systems | Tag Catalog, then select a tag or tag group in the list of tags.
b Next to Systems with tag in the details pane, click the link for the number of systems with thetag applied by criteria. The Systems with Tag Applied by Criteria page appears.
c Verify that the systems are in the list.
The tag is applied to all systems that match its criteria.
TagsApply criteria-based tags to all matching systems 5
McAfee ePolicy Orchestrator Cloud 5.6.0 Product Guide 47
5 TagsApply criteria-based tags to all matching systems
48 McAfee ePolicy Orchestrator Cloud 5.6.0 Product Guide
6 Product deployment
McAfee ePO Cloud simplifies the process of deploying security products to the managed systems inyour network by providing a user interface to configure and schedule deployments.
Contents Benefits of product deployment projects The Product Deployment page Viewing Product Deployment audit logs View product deployment Deploy products using a deployment project Monitor and edit deployment projects
Benefits of product deployment projectsProduct deployment projects simplify the process of deploying security products to your managedsystem by reducing the time and overhead to schedule and maintain deployments throughout yournetwork.
Product deployment projects allow you to:
• Run a deployment continuously — You can configure your deployment project so that when newsystems matching your criteria are added, products are deployed automatically.
• Stop a running deployment — If you must stop a deployment once it's started, you can. Thenyou can resume that deployment when you're ready.
• Uninstall a previously deployed product — If a deployment project has been completed, andyou want to uninstall the associated product from the systems assigned to your project, selectUninstall from the Action list.
6
McAfee ePolicy Orchestrator Cloud 5.6.0 Product Guide 49
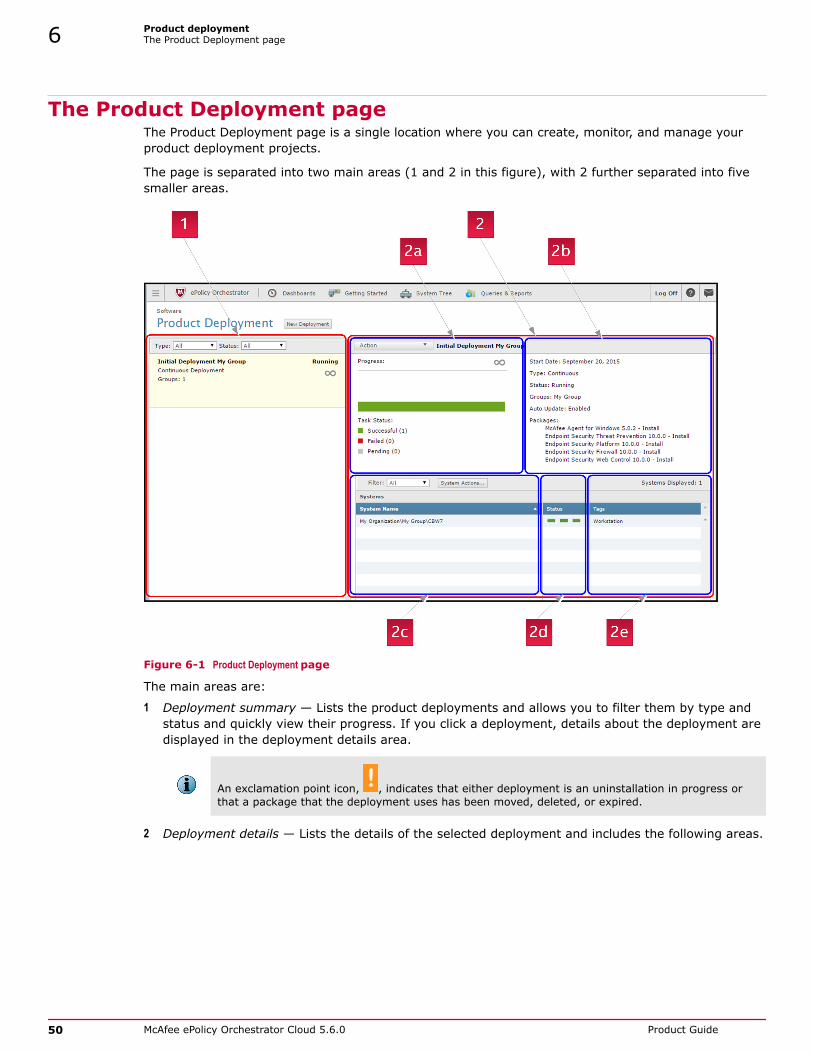
The Product Deployment pageThe Product Deployment page is a single location where you can create, monitor, and manage yourproduct deployment projects.
The page is separated into two main areas (1 and 2 in this figure), with 2 further separated into fivesmaller areas.
Figure 6-1 Product Deployment page
The main areas are:
1 Deployment summary — Lists the product deployments and allows you to filter them by type andstatus and quickly view their progress. If you click a deployment, details about the deployment aredisplayed in the deployment details area.
An exclamation point icon, , indicates that either deployment is an uninstallation in progress orthat a package that the deployment uses has been moved, deleted, or expired.
2 Deployment details — Lists the details of the selected deployment and includes the following areas.
6 Product deploymentThe Product Deployment page
50 McAfee ePolicy Orchestrator Cloud 5.6.0 Product Guide
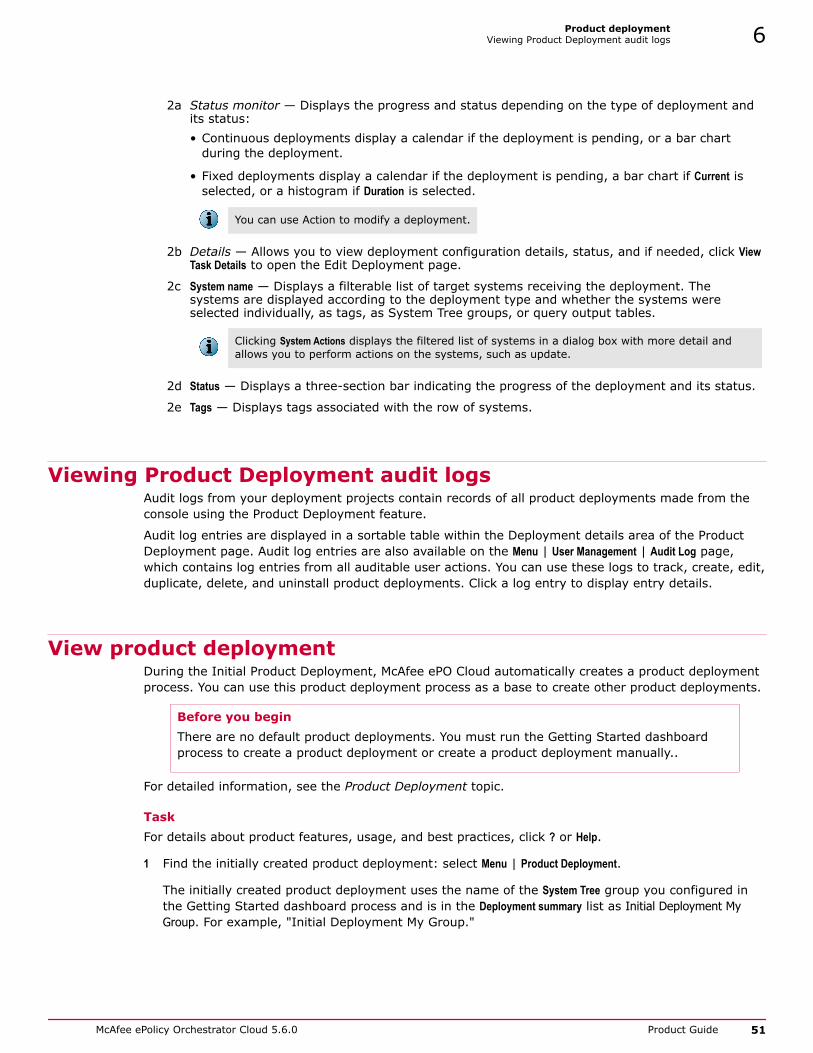
2a Status monitor — Displays the progress and status depending on the type of deployment andits status:• Continuous deployments display a calendar if the deployment is pending, or a bar chart
during the deployment.
• Fixed deployments display a calendar if the deployment is pending, a bar chart if Current isselected, or a histogram if Duration is selected.
You can use Action to modify a deployment.
2b Details — Allows you to view deployment configuration details, status, and if needed, click ViewTask Details to open the Edit Deployment page.
2c System name — Displays a filterable list of target systems receiving the deployment. Thesystems are displayed according to the deployment type and whether the systems wereselected individually, as tags, as System Tree groups, or query output tables.
Clicking System Actions displays the filtered list of systems in a dialog box with more detail andallows you to perform actions on the systems, such as update.
2d Status — Displays a three-section bar indicating the progress of the deployment and its status.
2e Tags — Displays tags associated with the row of systems.
Viewing Product Deployment audit logsAudit logs from your deployment projects contain records of all product deployments made from theconsole using the Product Deployment feature.
Audit log entries are displayed in a sortable table within the Deployment details area of the ProductDeployment page. Audit log entries are also available on the Menu | User Management | Audit Log page,which contains log entries from all auditable user actions. You can use these logs to track, create, edit,duplicate, delete, and uninstall product deployments. Click a log entry to display entry details.
View product deploymentDuring the Initial Product Deployment, McAfee ePO Cloud automatically creates a product deploymentprocess. You can use this product deployment process as a base to create other product deployments.
Before you beginThere are no default product deployments. You must run the Getting Started dashboardprocess to create a product deployment or create a product deployment manually..
For detailed information, see the Product Deployment topic.
TaskFor details about product features, usage, and best practices, click ? or Help.
1 Find the initially created product deployment: select Menu | Product Deployment.
The initially created product deployment uses the name of the System Tree group you configured inthe Getting Started dashboard process and is in the Deployment summary list as Initial Deployment MyGroup. For example, "Initial Deployment My Group."
Product deploymentViewing Product Deployment audit logs 6
McAfee ePolicy Orchestrator Cloud 5.6.0 Product Guide 51
2 To view the product deployment details, select the name of the product deployment assigned to theinitial product deployment URL you created. The page changes to display details of the productdeployment configuration.
Don't change this default product deployment. This deployment is running daily to update yourmanaged systems if any of the products, or the McAfee Agent, are updated.
Now you know the location and configuration of the initially created product deployment. You canduplicate this product deployment to, for example deploy the McAfee Agent to platforms usingdifferent operating systems.
You can also modify the initially created client task named, for example Initial Deployment My Group. Tofind the client task, select Menu | Client Task Catalog; it is listed in the Client task Types under ProductDeployment.
Deploy products using a deployment projectA deployment project allows you to easily select products to deploy to your target systems, andschedule the deployment.
TaskFor details about product features, usage, and best practices, click ? or Help.
1 Select Menu | Software | Product Deployment.
2 Select New Deployment to start a new project.
3 Type a name and description for this deployment. This name appears on the Product Deploymentpage after you save the deployment.
4 Choose the type of deployment:
• Continuous — Uses your System Tree groups or tags to configure the systems receiving thedeployment. This feature allows these systems to change over time as they are added orremoved from the groups or tags.
• Fixed — Uses a fixed (defined) set of systems to receive the deployment. System selection isdone using your System Tree or the output of Managed Systems Queries.
5 To automatically update your products, make sure that the Auto Update checkbox is selected.
If the checkbox is deselected, products are still updated with the latest patches, hotfixes, andcontent packages, but major and minor releases are ignored.
During a new deployment, the McAfee Agent checks for new updates, hotfixes, and contentpackages of all installed products on the client. See the McAfee Agent documentation for details.
6 To specify which software to deploy or uninstall, select a product from the Package list. Click + or - toadd or remove packages.
7 From the Actions list, select Install or Uninstall.
8 In the Command line text field, specify any command-line installation options. For information aboutcommand-line options, see the product documentation for the software you're deploying.
9 Under Select the systems, click Select Systems.
6 Product deploymentDeploy products using a deployment project
52 McAfee ePolicy Orchestrator Cloud 5.6.0 Product Guide
The System Selection dialog box is a filter that allows you to select groups in your System Treeusing these tabs:
• System Tree — Select System Tree groups or subgroups and their associated systems.
• Tags — Select tag groups or tag subgroups and their associated systems.
• Selected Systems — Displays the total selections you made in each tab, creating the target systemsfor your deployment.
For example, if your System Tree contains Group A, which includes both servers and workstations,you can target the entire group. You can also target only the servers or only the workstations (ifthey are tagged correctly), or a subset of either system type in Group A.
For a fixed deployment, the maximum number of systems that can receive the deployment is 500.
If needed, configure the following:
• Allow end users to postpone this deployment (Windows only)
• Maximum number of postponements allowed
• Option to postpone expires after
• Display this text
10 Under Select a start time select a schedule for your deployment:
• Run Immediately — Starts the deployment task during the next ASCI.
• Once or Daily — Opens the scheduler so you can configure the start date, time, andrandomization.
11 Click Save at the top of the page. The Product Deployment page opens with your new project addedto the list of deployments.
After you create a deployment project, a client task is automatically created with the deploymentsettings.
Monitor and edit deployment projectsUse the Product Deployment page to create, track, and change deployment projects.
TaskFor details about product features, usage, and best practices, click ? or Help.
1 Select Menu | Software | Product Deployment.
2 Filter the list of deployment projects using the following:
• Type — Filters the deployments that appear by All, Continuous, or Fixed.
• Status — Filters the deployments that appear by All, Finished, In Progress, Pending, Running, orStopped.
3 From the list on the left side of the page, click a deployment to display its details on the right sideof the page.
If a package in this deployment expires, the deployment is invalid. If you mouse-over thedeployment, you see this message: "Package(s) in this deployment have been moved, deleted, orexpired."
Product deploymentMonitor and edit deployment projects 6
McAfee ePolicy Orchestrator Cloud 5.6.0 Product Guide 53
4 Use the progress section of the details display to view:
• Calendar displaying the start date for pending continuous and fixed deployments.
• Histogram displaying systems and the time to completion for fixed deployments.
• Status bar displaying system deployment and uninstallation progress.
Under the status bar, Task Status lists Successful, Failed, and Pending for the number of targetsystems in parentheses.
5 Click Action and one of these actions to modify a deployment:
• Edit • Resume
• Delete • Stop
• Duplicate • Uninstall
• Mark Finished
6 In the details section, click View Task Details to view and modify the settings for the deployment.
7 In the Systems table, select an option in the Filter list to change which systems appear.
The options in the list depend on the status of the deployment.
• For the Uninstall action, the filters include All, Packages Removed, Pending, and Failed.
• For all other actions, the filters include All, Install Successful, Pending, and Failed.
8 In the Systems table you can:
• Check the status of each row of target systems in the Status column. A three-section status barindicates the progress of the deployment.
• Check the tags associated with the target systems in the Tags column.
• Click System Actions to perform system-specific actions on the systems you select.
6 Product deploymentMonitor and edit deployment projects
54 McAfee ePolicy Orchestrator Cloud 5.6.0 Product Guide
7 Policy management
Policies ensure that product features are configured correctly on managed systems.
Contents About policies Policy assignment rules Create and manage policies Create and manage policy assignment rules Manually assign policies View policy information
About policiesA policy is a collection of settings that you create and configure, then enforce.
Policies are organized by product, then by categories within each product. For example, the McAfeeAgent product includes categories for General, Repository, and Troubleshooting.
To see policies in a specific policy category, select Menu | Policy | Policy Catalog, then select a product andcategory from the drop-down lists.
Each category includes a default policy, McAfee Default. You can't delete, edit, export, or rename thispolicy, but you can copy it and edit the copy.
When policies are appliedPolicies are applied to systems according to the agent-server communication and policy enforcementintervals.
When you configure policy settings, the new settings are applied to specified managed systems at thenext agent-server communication. By default, the agent-server communication occurs every 60minutes. You can adjust this interval on the General tab of the McAfee Agent policy pages.
After policy settings are in effect on the managed system, the McAfee Agent continues to enforcepolicy settings according to the policy enforcement interval. By default, the policy enforcement occursevery 60 minutes. You can adjust this interval on the General tab as well.
How policies are appliedPolicies are applied to any system by one of two methods: inheritance or assignment.
You can assign any policy in the Policy Catalog to any group or system. Assignment allows you todefine policy settings once for a specific need, then apply the policy to multiple locations.
Inheritance determines whether the policy settings and client tasks for a group or system are takenfrom its parent. By default, inheritance is enabled throughout the System Tree.
7
McAfee ePolicy Orchestrator Cloud 5.6.0 Product Guide 55
Assignment locking
You can lock the assignment of a policy on any group or system. Assignment locking prevents otherusers from inadvertently replacing a policy. Assignment locking is inherited with the policy settings.
Assignment locking is valuable when you want to assign a certain policy at the top of the System Treeand make sure that no other users move it.
Assignment locking does not prevent the policy owner from changing policy settings. Therefore, if youintend to lock a policy assignment, make sure that you are the owner of the policy.
See also Assign a policy to a System Tree group on page 63Assign a policy to a managed system on page 63Assign a policy to systems in a System Tree group on page 64Copy policy assignments from a group on page 64Copy policy assignments from a system on page 65Paste policy assignments to a group on page 65Paste policy assignments to a specific system on page 65
Policy ownershipEach policy is assigned an owner — the user who created it. You must have the correct permissions toedit a policy you don't own.
If you want to use a policy owned by a different user, we recommend that you duplicate the policy,then use the duplicate. Duplicating policies prevents unexpected policy changes from affecting yournetwork. If you assign a policy that you don't own, and the owner modifies the policy, all systems thatwere assigned the policy receive the modifications.
You can specify multiple users as owners of a single policy.
Policy assignment rulesPolicy assignments rules reduce the overhead of managing numerous policies for systems that meetspecific criteria, while maintaining more generic policies across your System Tree.
This level of granularity in policy assignments limits the instances of broken inheritance in the SystemTree to accommodate the policy settings that particular systems require. You can create a policyassignment rule that is enforced for all servers on your network based on the tags you have applied,or all systems in a specific location in your System Tree.
Policy assignment rule priorityPolicy assignment rules can be prioritized to simplify maintenance of policy assignment management.When you set priority to a rule, it is enforced before other assignments with a lower priority.
In some cases, the outcome can be that some rule settings are overridden. For example, consider asystem that is included in two policy assignment rules, rules A and B. Rule A has priority level 1, andallows included systems unrestricted access to Internet content. Rule B has priority level 2, andheavily restricts the same system's access to Internet content. In this scenario, rule A is enforcedbecause it has higher priority. As a result, the system has unrestricted access to Internet content.
7 Policy managementPolicy assignment rules
56 McAfee ePolicy Orchestrator Cloud 5.6.0 Product Guide
System-based policy assignmentSystem-based assignments allow you to assign policies based on System Tree location or tags.
System-based policies are assigned based on selection criteria you define using the Policy AssignmentBuilder.
All policy assignment rules require that System Tree location is specified. Tag-based policiyassignments are useful when you want all systems of a particular type to have the same securitypolicy, regardless of their System Tree location.
Create and manage policiesMcAfee ePO Cloud provides a number tools to manage policies, including the Policy Catalog, PolicyHistory, and Policy Comparison.
Tasks• Create a policy from the Policy Catalog page on page 57
Custom policies created using the Policy Catalog are not assigned to any groups orsystems. You can create policies before or after a product is deployed.
• Manage an existing policy on the Policy Catalog page on page 58Edit, duplicate, rename, or delete a policy.
• Enforce product policies on page 59Policy enforcement is enabled by default, and is inherited in the System Tree, but you canmanually enable or disable enforcement on specified systems.
• Manage policy history on page 60When you change a policy from the Policy Catalog, a Policy History entry is created whereyou can describe the change for future reference. You can view and compare policy historyentries, or revert to a previous version of a policy.
• Compare policies on page 60Policy Comparison can help you identify differences between similar policies.
Create a policy from the Policy Catalog page Custom policies created using the Policy Catalog are not assigned to any groups or systems. You cancreate policies before or after a product is deployed.
TaskFor details about product features, usage, and best practices, click ? or Help.
1 Open the New Policy dialog box.
a Select Menu | Policy | Policy Catalog.
b Select the product and category from the drop-down lists.
All created policies for the selected category appear in the Details pane.
c Click New Policy.
2 Select the policy you want to duplicate from the Create a policy based on this existing policy drop-down list.
3 Type a name for the new policy and click OK.
The policy appears in the Policy Catalog.
Policy managementCreate and manage policies 7
McAfee ePolicy Orchestrator Cloud 5.6.0 Product Guide 57
4 Click the name of the new policy.
The Policy Settings Builder opens.
5 Edit the policy settings as needed.
6 Click Save.
Manage an existing policy on the Policy Catalog pageEdit, duplicate, rename, or delete a policy.
TaskFor details about product features, usage, and best practices, click ? or Help.
1 To select an existing policy, select Menu | Policy | Policy Catalog, then select the product and categoryfrom the drop-down lists.
All created policies for the selected category appear in the details pane.
2 Select one of these actions.
Action Steps
Edit policy settings
The number ofaffectedsystems is listedat the top of thepage.
1 Locate the policy, then click the policy name.
2 Edit the settings as needed, then click Save.
To record policy revisions, type a comment in the text field next toDuplicate, in the footer of the Policy Catalog page.
Duplicate a policy 1 Locate the policy, then click Duplicate in that policy’s row.The Duplicate Existing Policy dialog box appears.
2 Type the name of the new policy in the field, then click OK.The new policy appears on the Policy Catalog page.
3 Click the new policy in the list.
4 Edit the settings as needed, then click Save.
To record policy revisions, type a comment in the text field next toDuplicate, in the footer of the Policy Catalog page.
The new policy appears in the details pane.
Rename a policy 1 Locate the policy, then click Rename in a policy row.The Rename Policy dialog box appears.
2 Type a new name for the existing policy, then click OK.
The renamed policy appears in the details pane.
Delete a policy 1 Locate the policy, then click Delete in the policy row.
2 Click OK when prompted.
The deleted policy is removed from the details pane.
7 Policy managementCreate and manage policies
58 McAfee ePolicy Orchestrator Cloud 5.6.0 Product Guide
Enforce product policiesPolicy enforcement is enabled by default, and is inherited in the System Tree, but you can manuallyenable or disable enforcement on specified systems.You can manage policy enforcement from these locations:
• Assigned Policies tab of the System Tree — Choose whether to enforce policies for products orcomponents on the selected group.
• Policy Catalog page — View policy assignments and enforcement. You can also lock policyenforcement to prevent changes below the locked node.
If policy enforcement is turned off, systems in the specified group don't receive updated site lists duringan agent-server communication. As a result, managed systems in the group might not function asexpected.
Tasks• Enforce policies for a product in a System Tree group on page 59
Enable or disable policy enforcement in a group.
• Enforce policies for a product on a system on page 59Enable or disable policy enforcement on a managed system.
Enforce policies for a product in a System Tree groupEnable or disable policy enforcement in a group.
TaskFor details about product features, usage, and best practices, click ? or Help.
1 Select Menu | Systems | System Tree, click Assigned Policies tab, then select a group in the System Tree.
2 Select the product you want, then click the link next to Enforcement Status.
3 To change the enforcement status, select Break inheritance and assign the policy and settings below.
4 Next to Enforcement status, select Enforcing or Not enforcing accordingly.
5 Choose whether to lock policy inheritance.
Locking inheritance for policy enforcement prevents breaking enforcement for groups and systemsthat inherit this policy.
6 Click Save.
Enforce policies for a product on a systemEnable or disable policy enforcement on a managed system.
TaskFor details about product features, usage, and best practices, click ? or Help.
1 Select Menu | Systems | System Tree, click Systems tab, then select the group under System Tree where thesystem belongs.
The list of systems belonging to this group appears in the details pane.
2 Select a system, then click Actions | Modify Policies on a Single System.
The Policy Assignment page appears.
3 Select a Product, then click Enforcing next to Enforcement status.
The Enforcement page appears.
Policy managementCreate and manage policies 7
McAfee ePolicy Orchestrator Cloud 5.6.0 Product Guide 59
4 If you want to change the enforcement status you must first select Break inheritance and assign the policyand settings below.
5 Next to Enforcement status, select Enforcing or Not enforcing accordingly.
6 Click Save.
Manage policy historyWhen you change a policy from the Policy Catalog, a Policy History entry is created where you candescribe the change for future reference. You can view and compare policy history entries, or revert toa previous version of a policy.
Policy History entries appear in three places: Policy History, Server Task Log Details, and Audit LogDetails.
Only policies you create in the Policy Catalog have Policy History entries. Make sure that you leave acomment whenever you revise a policy. Consistent commenting creates a robust history of yourchanges.
To record policy revisions, type a comment in the text field next to Duplicate, in the footer of thePolicy Catalog page.
TaskFor details about product features, usage, and best practices, click ? or Help.
1 To view the Policy History, select Menu | Policy | Policy History .
No Policy History entries appear for McAfee Default policies. You might need to use the page filter,described in the next step, to select a created or duplicated McAfee Default policy.
2 Use the Product, Category, and Name filters to select Policy History entries.
3 To manage a policy or Policy History entry, click Actions, then select an action.
• Choose Columns — Opens a dialog box that allows you to select which columns to display.
• Compare Policy — Opens the Policy Comparison page where you can compare two selected policies.
The current version of a policy has the latest date. To compare the current revision of a policyand a previous policy revision, select the latest revision and a previous revision to compare.
• Export Table — Opens the Export page. Use the Export page to specify the format and the packageof Policy History entry files to export. You can save or email the exported file.
• Revert Policy — Reverts the policy to the selected policy version.
You can select only one target policy.
When you revert a policy, you are prompted to add a comment to the Policy History entry.
See also Manage an existing policy on the Policy Catalog page on page 58
Compare policiesPolicy Comparison can help you identify differences between similar policies.
Many of the values and variables included on the Policy Comparison page are specific to each product.For option definitions not included in the table, see the documentation for the product that providesthe policy you want to compare.
7 Policy managementCreate and manage policies
60 McAfee ePolicy Orchestrator Cloud 5.6.0 Product Guide
TaskFor details about product features, usage, and best practices, click ? or Help.
1 Select Menu | Policy Comparison, then select a product, category, and Show settings from the lists.
Change the Show setting from All Policy Settings to Policy Differences or Policy Matches to reduce the datadisplayed.
These settings populate the policies to compare in the Policy 1 and Policy 2 lists.
2 Select the policies to compare in the Compare policies row from the Policy 1 and Policy 2 column lists.
The top two rows of the table display the number of settings that are different and identical.
3 Click Print to open a printer friendly view of the comparison.
Create and manage policy assignment rulesConfigure policy assignment rules to simplify policy management.
Tasks
• Create policy assignment rules on page 61Creating policy assignment rules allows you to enforce policies for users or systems basedon configured rule criteria.
• Manage policy assignment rules on page 62Perform common management tasks when working with policy assignment rules.
Create policy assignment rulesCreating policy assignment rules allows you to enforce policies for users or systems based onconfigured rule criteria.
TaskFor details about product features, usage, and best practices, click ? or Help.
1 Open the Policy Assignment Builder.
a Select Menu | Policy | Policy Assignment Rules.
b Click New Assignment Rule.
2 Specify the details for this policy assignment rule, including:
• A unique name and description.
• The rule type. The rule type you specify determines which criteria is available on the SelectionCriteria page.
By default, the priority for new policy assignment rules is assigned sequentially based on thenumber of existing rules. After creating the rule, you can edit the priority by clicking Edit Priority onthe Policy Assignment Rules page.
3 Click Next.
4 Click Add Policy to select the policies that you want to enforce with this policy assignment rule.
5 Click Next.
Policy managementCreate and manage policy assignment rules 7
McAfee ePolicy Orchestrator Cloud 5.6.0 Product Guide 61
6 Specify the criteria you want to use in this rule. Your criteria selection determines which systemsare assigned this policy.
7 Review the summary and click Save.
Manage policy assignment rulesPerform common management tasks when working with policy assignment rules.
TaskFor details about product features, usage, and best practices, click ? or Help.
1 Select Menu | Policy | Policy Assignment Rules.
2 Select one of these actions:
Action Steps
Delete a policyassignment rule
Click Delete in the selected assignment row.
Edit a policyassignment rule
Click the selected assignment. The Policy Assignment Builder opens.Work through each page to modify this policy assignment rule.
Export policyassignment rules
Select Actions | Export. The Download Policy Assignment Rules page opens,where you can view or download the PolicyAssignmentRules.xml file.
Import policyassignment rules
Select Actions | Import. The Import Policy Assignment Rules dialog boxopens, from which you can browse to a previously downloadedPolicyAssignmentRules.xml file. You are prompted to choose whichrules included in the file to import. You can select which rules to importand, if any rules in the file have the same name as those already in yourPolicy Assignment Rules list, you can select which to retain.
Edit the priority of apolicy assignment rule
Select Actions | Edit Priority. The Edit Priority page opens, where you changethe priority of policy assignment rules using the drag and drop handle.
View the summary of apolicy assignment rule
Click > in the selected assignment row.
Manually assign policiesYou can assign or copy and paste policies to specific systems in the System Tree. These methods overridepolicy inheritance, so they're helpful for applying policies on systems that require special privileges orsettings.
Tasks
• Assign policies to managed systems on page 62Assign policies to a group or to specific systems in the System Tree. You can assign policiesbefore or after a product is deployed.
• Copy and paste policy assignments on page 64Copy and paste policy assignments to easily share multiple assignments between groupsand systems from different portions of the System Tree.
Assign policies to managed systemsAssign policies to a group or to specific systems in the System Tree. You can assign policies before orafter a product is deployed.We recommend assigning policies at the highest level possible so that the groups and subgroups belowinherit the policy.
7 Policy managementManually assign policies
62 McAfee ePolicy Orchestrator Cloud 5.6.0 Product Guide
Tasks• Assign a policy to a System Tree group on page 63
Assign a policy to a specific group of the System Tree.
• Assign a policy to a managed system on page 63Assign a policy to a specific managed system.
• Assign a policy to systems in a System Tree group on page 64Assign a policy to multiple managed systems within a group.
Assign a policy to a System Tree groupAssign a policy to a specific group of the System Tree.
TaskFor details about product features, usage, and best practices, click ? or Help.
1 Select Menu | Systems | System Tree, click Assigned Policies tab, then select a product.
Each assigned policy per category appears in the details pane.
2 Locate the policy category you want, then click Edit Assignment.
3 If the policy is inherited, next to Inherited from, select Break inheritance and assign the policy and settings below.
4 Select the policy from the Assigned policy drop-down list.
From this location, you can also edit the selected policy's settings, or create a policy.
5 Choose whether to lock policy inheritance.
Locking policy inheritance prevents any systems that inherit this policy from having another oneassigned in its place.
6 Click Save.
See also How policies are applied on page 55
Assign a policy to a managed systemAssign a policy to a specific managed system.
TaskFor details about product features, usage, and best practices, click ? or Help.
1 Select Menu | Systems | System Tree, click Systems tab, then select a group under System Tree.
All systems within this group (but not its subgroups) appear in the details pane.
2 Select a system, then click Actions | Agent | Modify Policies on a Single System.
The Policy Assignment page for that system appears.
3 Select a product.
The categories of selected product are listed with the system's assigned policy.
4 Locate the policy category you want, then click Edit Assignments.
5 If the policy is inherited, next to Inherited from, select Break inheritance and assign the policy and settings below.
Policy managementManually assign policies 7
McAfee ePolicy Orchestrator Cloud 5.6.0 Product Guide 63
6 Select the policy from the Assigned policy drop-down list.
From this location, you can also edit settings of the selected policy, or create a policy.
7 Choose whether to lock policy inheritance.
Locking policy inheritance prevents any systems that inherit this policy from having another oneassigned in its place.
8 Click Save.
See also How policies are applied on page 55
Assign a policy to systems in a System Tree groupAssign a policy to multiple managed systems within a group.
TaskFor details about product features, usage, and best practices, click ? or Help.
1 Select Menu | Systems | System Tree, click Systems tab, then select a group in the System Tree.
All systems in this group (but not its subgroups) appear in the details pane.
2 Select the systems you want, then click Actions | Agent | Set Policy & Inheritance.
The Assign Policy page appears.
3 Select the Product, Category, and Policy from the drop-down lists.
4 Select whether to Reset inheritance or Break inheritance, then click Save.
See also How policies are applied on page 55
Copy and paste policy assignmentsCopy and paste policy assignments to easily share multiple assignments between groups and systemsfrom different portions of the System Tree.
Tasks• Copy policy assignments from a group on page 64
You can use Copy Assignments to copy policy assignments from a group in the SystemTree.
• Copy policy assignments from a system on page 65You can use Copy Assignments to copy policy assignments from a specific system.
• Paste policy assignments to a group on page 65You can paste policy assignments to a group after you copy them from a group or system.
• Paste policy assignments to a specific system on page 65Paste policy assignments to a specific system after copy the policy assignments from agroup or system.
Copy policy assignments from a groupYou can use Copy Assignments to copy policy assignments from a group in the System Tree.
7 Policy managementManually assign policies
64 McAfee ePolicy Orchestrator Cloud 5.6.0 Product Guide
TaskFor details about product features, usage, and best practices, click ? or Help.
1 Select Menu | Systems | System Tree, click Assigned Policies tab, then select a group in the System Tree.
2 Click Actions | Copy Assignments.
3 Select the products or features where you want to copy policy assignments, then click OK.
Copy policy assignments from a systemYou can use Copy Assignments to copy policy assignments from a specific system.
TaskFor details about product features, usage, and best practices, click ? or Help.
1 Select Menu | Systems | System Tree, click Systems tab, then select a group in the System Tree.
The systems belonging to the selected group appear in the details pane.
2 Select a system, then click Actions | Agent | Modify Policies on a Single System.
3 Click Actions | Copy Assignments, select the products or features where you want to copy policyassignments, then click OK.
See also How policies are applied on page 55
Paste policy assignments to a groupYou can paste policy assignments to a group after you copy them from a group or system.
TaskFor details about product features, usage, and best practices, click ? or Help.
1 Select Menu | Systems | System Tree, click Assigned Policies tab, then select the group you want in theSystem Tree.
2 In the details pane, click Actions and select Paste Assignments.
If the group already has policies assigned for some categories, the Override Policy Assignmentspage appears.
When pasting policy assignments, the Enforce Policies and Tasks policy appears in the list. Thispolicy controls the enforcement status of other policies.
3 Select the policy categories you want to replace with the copied policies, then click OK.
See also How policies are applied on page 55
Paste policy assignments to a specific systemPaste policy assignments to a specific system after copy the policy assignments from a group orsystem.
Policy managementManually assign policies 7
McAfee ePolicy Orchestrator Cloud 5.6.0 Product Guide 65
TaskFor details about product features, usage, and best practices, click ? or Help.
1 Select Menu | Systems | System Tree, click Systems tab, then select a group in the System Tree.
All systems belonging to the selected group appear in the details pane.
2 Select the system where you want to paste policy assignments, then click Actions | Agent | ModifyPolicies on a Single System.
3 In the details pane, click Actions | Paste Assignment.
If the system already has policies assigned for some categories, the Override Policy Assignments pageappears.
When pasting policy assignments, the Enforce Policies and Tasks policy appears in the list. This policycontrols the enforcement status of other policies.
4 Confirm the replacement of assignments.
See also How policies are applied on page 55
View policy informationView detailed information about your policies, including policy owners, assignments, and inheritance.
Tasks• View groups and systems where a policy is assigned on page 66
The Policy Catalog page lists only the policy assignments not the group, or system thatinherits the policy.
• View policy settings on page 67View details for a policy assigned to a product category or system.
• View assignments where policy enforcement is disabled on page 67View assignments where policy enforcement, per policy category, is disabled.
• View policies assigned to a group on page 67View the policies assigned to a System Tree group, sorted by product.
• View policies assigned to a specific system on page 67View a list of all policies assigned to a system from one central location, the System Tree.
• View policy inheritance for a group on page 68View the policy inheritance of a specific group.
• View and reset broken inheritance on page 68Identify the groups and systems where policy inheritance is broken.
View groups and systems where a policy is assignedThe Policy Catalog page lists only the policy assignments not the group, or system that inherits thepolicy.
TaskFor details about product features, usage, and best practices, click ? or Help.
1 Select Menu | Policy | Policy Catalog, then select a product and category.
All created policies for the selected category appear in the details pane.
7 Policy managementView policy information
66 McAfee ePolicy Orchestrator Cloud 5.6.0 Product Guide
2 Under Assignments on the row of the policy, click the link that indicates the number of groups orsystems the policy is assigned to (for example, 6 assignments).
On the Assignments page, each group or system where the policy is assigned appears with its nodename and node type.
View policy settingsView details for a policy assigned to a product category or system.
TaskFor details about product features, usage, and best practices, click ? or Help.
1 Select Menu | Policy | Policy Catalog, then select a product and category.
All created policies for the selected category appear in the details pane.
2 Click next to a policy.
The policy pages and their settings appear.
You can also view this information when accessing the assigned policies of a specific group. Toaccess this information, select Menu | Systems | System Tree, click Assigned Policies tab, then click the linkfor the selected policy in the Policy column.
View assignments where policy enforcement is disabledView assignments where policy enforcement, per policy category, is disabled.
TaskFor details about product features, usage, and best practices, click ? or Help.
1 Select Menu | Policy | Policy Catalog, then select a product and category.
All created policies for the selected category appear in the details pane.
2 Click the link next to Product enforcement status, which indicates the number of assignments whereenforcement is disabled, if any.
The Enforcement for <policy name> page appears.
3 Click any item in the list to go to its Assigned Policies page.
View policies assigned to a groupView the policies assigned to a System Tree group, sorted by product.
TaskFor details about product features, usage, and best practices, click ? or Help.
1 Select Menu | Systems | System Tree, click Assigned Policies tab, then select a group in the System Tree.
All assigned policies, organized by product, appear in the details pane.
2 Click any policy to view its settings.
View policies assigned to a specific systemView a list of all policies assigned to a system from one central location, the System Tree.
Policy managementView policy information 7
McAfee ePolicy Orchestrator Cloud 5.6.0 Product Guide 67
TaskFor details about product features, usage, and best practices, click ? or Help.
1 Select Menu | Systems | System Tree, click the Systems tab, then select a group in the System Tree.
All systems belonging to the group appear in the details pane.
2 Click the name of a system to drill into the System Information page, then click the Applied Policiestab.
View policy inheritance for a groupView the policy inheritance of a specific group.
TaskFor details about product features, usage, and best practices, click ? or Help.
1 Select Menu | Systems | System Tree.
2 Click Assigned Policies tab.
All assigned policies, organized by product, appear in the details pane.
The policy row, under Inherit from, displays the name of the group from which the policy is inherited.
View and reset broken inheritanceIdentify the groups and systems where policy inheritance is broken.
TaskFor details about product features, usage, and best practices, click ? or Help.
1 Select Menu | Systems | System Tree, then click Assigned Policies tab.
All assigned policies, organized by product, appear in the details pane. The policy row, under BrokenInheritance, displays the number of groups and systems where this policy's inheritance is broken.
This number is the number of groups or systems where the policy inheritance is broken, not thenumber of systems that do not inherit the policy. For example, if only one group does not inherit thepolicy, 1 doesn't inherit appears, regardless of the number of systems within the group.
2 Click the link indicating the number of child groups or systems that have broken inheritance.
The View broken inheritance page displays a list of the names of these groups and systems.
3 To reset the inheritance of any of these, select the checkbox next to the name, then click Actionsand select Reset Inheritance.
7 Policy managementView policy information
68 McAfee ePolicy Orchestrator Cloud 5.6.0 Product Guide
8 Client tasks
Create and schedule client tasks to automate how you manage systems in your network.
Client tasks are commonly used for these activities.
• Product functionality
• Upgrades and updates
For information about which client tasks are available and what they can help you do, see thedocumentation for your managed products.
Contents How the Client Task Catalog works Update tasks Manage client tasks
How the Client Task Catalog worksUse the Client Task Catalog to create client task objects you can reuse to help manage systems in yournetwork.
The Client Tasks Catalog applies the concept of logical objects to McAfee ePO Cloud client tasks. Youcan create client task objects for various purposes without the need to assign them immediately. As aresult, you can treat these objects as reusable components when assigning and scheduling clienttasks.
Client tasks can be assigned at any level in the System Tree. Groups and systems lower in the treeinherit client tasks. As with policies and policy assignments, you can break the inheritance for anassigned client task.
Update tasksDetermine when agents on managed systems go for updates.
You can create and update client tasks to control when and how managed systems receive updatepackages.
8
McAfee ePolicy Orchestrator Cloud 5.6.0 Product Guide 69
Considerations when creating or updating client tasks
Consider the following when scheduling client update tasks:
• Create a daily update client task at the highest level of the System Tree, so that all systems inheritthe task. If your organization is large, you can use randomization intervals to mitigate thebandwidth impact. For networks with offices in different time zones, balance network load byrunning the task at the local system time of the managed system, rather than at the same time forall systems.
• Run update tasks for DAT and Engine files at least once a day. Managed systems might be loggedoff from the network and miss the scheduled task. Running the task frequently ensures that thesesystems receive the update.
• Maximize bandwidth efficiency and create several scheduled client update tasks that updateseparate components and run at different times. For example, you can create one task to updateonly DAT files, then create another to update both DAT and Engine files weekly or monthly (Enginepackages are released less frequently).
• Create and schedule more tasks to update products that do not use the McAfee Agent for Windows.
• Create a task to update your main workstation applications, to ensure that they all receive theupdate files. Schedule it to run daily or several times a day.
View assigned client taskDuring the Initial Product Deployment process, McAfee ePO Cloud automatically creates a productdeployment client task. You can use this assigned client task as a basis for creating other productdeployment client tasks.
Before you beginThere are no default product deployment client tasks. You must run the Initial ProductDeployment to create the initial product deployment client task.
TaskFor details about product features, usage, and best practices, click ? or Help.
1 To see the initial product deployment client task, select Menu | Client Task Catalog.
2 Find the initial product deployment client task: from the Client Task Types list, select McAfee Agent |Product Deployment.
The initially created product deployment client task uses the name of the System Tree group that youconfigured in the Agent Deployment URL as InitialDeployment_<groupName>. For example,"InitialDeployment_AllWindowsSystems." This task appears in the Name column of the McAfee Agent |Product Deployment table.
3 To open the client task and view its details, click the name of the task configured in the AgentDeployment URL.
4 To close the page, click Cancel.
Now you know the location and configuration of the default product deployment client task. You canduplicate this client task to, for example, deploy the McAfee Agent to platforms using differentoperating systems.
8 Client tasksUpdate tasks
70 McAfee ePolicy Orchestrator Cloud 5.6.0 Product Guide
Update managed systems regularly with a scheduled updatetaskCreate and configure update tasks. We recommend using a daily update client task to ensure systemsare current with the latest DAT and engine files.
TaskFor details about product features, usage, and best practices, click ? or Help.
1 Open the New Task dialog box.
a Select Menu | Policy | Client Task Catalog.
b Under Client Task Types, select a product, then click New Task.
2 Verify that Product Update is selected, then click OK.
3 Type a name for the task you are creating and add any notes.
4 Next to the Update in Progress dialog box, select if you want the users to be aware an update is inprocess, and if you want to allow them to postpone the process.
5 Select a package type, then click Save.
When configuring individual signatures and engines, if you select Engine and deselect DAT, when thenew engine is updated a new DAT is automatically updated to ensure complete protection.
6 Select Menu | Systems | System Tree, click the Systems tab, then select the system where you want todeploy the product update, then click Actions | Agent | Modify Tasks on a single system.
7 Click Actions | New Client Task Assignment.
8 On the Select Task page, make the following selections:
• Product — Select McAfee Agent.
• Task Type — Select Product Update.
Then select the task you created to deploy the product update.
9 Next to Tags, select the platforms where you are deploying the packages, then click Next:• Send this task to all computers.
• Send this task to only computers that have the following criteria — Click edit next to the criteria to configure,select the tag group, select the tags to use in the criteria, then click OK.
To limit the list to specific tags, type the tag name in the text box under Tags.
10 On the Schedule page, select whether the schedule is enabled, and specify the schedule details, thenclick Next.
11 Review the summary, then click Save.
The task is added to the list of client tasks for the groups and systems where it is applied. Agentsreceive the new update task information the next time they communicate with the server. If the taskis enabled, the update task runs at the next occurrence of the scheduled day and time.
Manage client tasksCreate and maintain client tasks.
Client tasksManage client tasks 8
McAfee ePolicy Orchestrator Cloud 5.6.0 Product Guide 71
Tasks• Create client tasks on page 72
Use client tasks to automatically perform product updates. The process is similar for allclient tasks.
• Edit client tasks on page 72You can edit any previously configured client task settings or schedule information.
• Delete client tasks on page 73You can delete any previously configured client tasks.
• Compare client tasks on page 73The Client Task Comparison tool determines which client task settings are different andwhich are the same.
• View client tasks assigned to a specific system on page 73View a list of all client tasks assigned to a system from one central location, the SystemTree.
Create client tasksUse client tasks to automatically perform product updates. The process is similar for all client tasks.
In some cases, you must create a new client task assignment to associate a client task to a SystemTree group.
TaskFor details about product features, usage, and best practices, click ? or Help.
1 Open the New Task dialog box.
a Select Menu | Policy | Client Task Catalog.
b Under Client Task Types, select a product, then click New Task.
2 Select a task type from the list, then click OK to open the Client Task Builder.
3 Enter a name for the task, add a description, then configure the settings specific to the task typeyou are creating.
The configuration options depend on the task type selected.
4 Review the task settings, then click Save.
The task is added to the list of client tasks for the selected client task type.
Edit client tasksYou can edit any previously configured client task settings or schedule information.
TaskFor details about product features, usage, and best practices, click ? or Help.
1 Select Menu | Policy | Client Task Catalog.
2 Select the Client Task Type from the navigation tree on the left.
The available client tasks appear in the window on the right.
8 Client tasksManage client tasks
72 McAfee ePolicy Orchestrator Cloud 5.6.0 Product Guide
3 Click the client task name to open the Client Task Catalog dialog box.
4 Edit the task settings as needed, then click Save.
The managed systems receive the changes you configured the next time the agents communicate withthe server.
Delete client tasksYou can delete any previously configured client tasks.
TaskFor details about product features, usage, and best practices, click ? or Help.
1 Select Menu | Policy | Client Task Catalog to open the Client Task Catalog dialog box.
2 Select the Client Task Type from the navigation tree on the left.
The available client tasks appear in the window on the right.
3 From the Actions column, click Delete next to the client task.
4 Click OK.
Compare client tasksThe Client Task Comparison tool determines which client task settings are different and which are thesame.
Many of the values and variables included on this page are specific to each product. For optiondefinitions not included in the table, see the documentation for the product that provides the clienttask that you want to compare.
TaskFor details about product features, usage, and best practices, click ? or Help.
1 Select Menu | Client Task Comparison, then select a product, client task type, and show settings from thelists.
These settings populate the client tasks to compare in the Client Task 1 and Client Task 2 lists.
2 Select the client tasks to compare in the Compare Client Tasks row from the Client Task 1 and the Client Task2 column lists.
The top two rows of the table display the number of settings that are different and identical. Toreduce the amount of data, change the Show setting from All Client Task Settings to Client Task Differences orClient Task Matches.
3 Click Print to open a printer-friendly view of this comparison.
View client tasks assigned to a specific systemView a list of all client tasks assigned to a system from one central location, the System Tree.
TaskFor details about product features, usage, and best practices, click ? or Help.
1 Select Menu | Systems | System Tree, click the Systems tab, then select a group in the System Tree.
All systems belonging to the group appear in the details pane.
Client tasksManage client tasks 8
McAfee ePolicy Orchestrator Cloud 5.6.0 Product Guide 73
2 Click the name of a system to drill into the System Information page, then click the Applied ClientTasks tab.
8 Client tasksManage client tasks
74 McAfee ePolicy Orchestrator Cloud 5.6.0 Product Guide
9 Server tasks
Server tasks are configurable actions that run on McAfee ePO Cloud at scheduled times or intervals.Leverage server tasks to automate repetitive tasks.
McAfee ePO Cloud includes preconfigured server tasks and actions. Most of the additional softwareproducts you manage with McAfee ePO Cloud also add preconfigured server tasks.
Contents View server tasks Server task status Remove outdated server tasks from the Server Task Log Create a server task Remove outdated log items automatically Accepted Cron syntax when scheduling a server task
View server tasksThe Server Task Log provides the status of your server tasks and displays any errors that might haveoccurred.
TaskFor details about product features, usage, and best practices, click ? or Help.
1 Open the Server Task Log: select Menu | Automation | Server Task Log.
2 Sort and filter the table to focus on relevant entries.
• To change which columns are displayed, click Choose Columns.
• To order table entries, click a column title.
• To hide unrelated entries, select a filter from the drop-down list.
3 To view additional details, click an entry.
See also Server task status on page 76
9
McAfee ePolicy Orchestrator Cloud 5.6.0 Product Guide 75
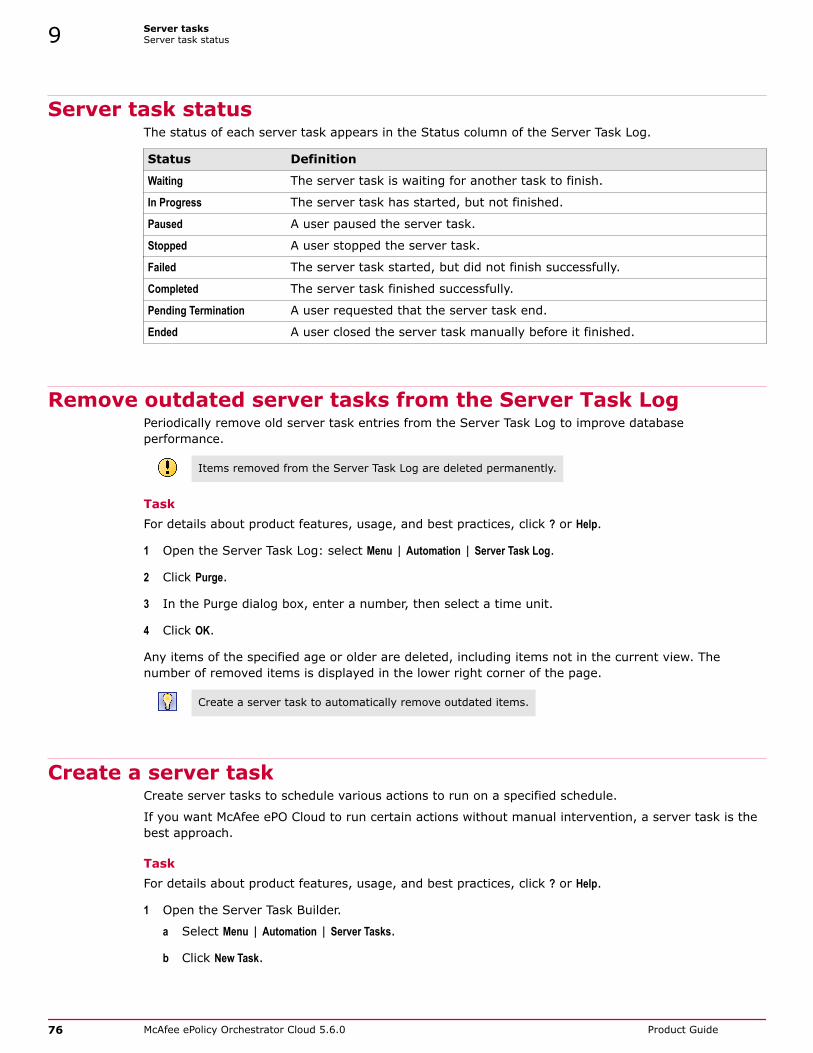
Server task statusThe status of each server task appears in the Status column of the Server Task Log.
Status Definition
Waiting The server task is waiting for another task to finish.
In Progress The server task has started, but not finished.
Paused A user paused the server task.
Stopped A user stopped the server task.
Failed The server task started, but did not finish successfully.
Completed The server task finished successfully.
Pending Termination A user requested that the server task end.
Ended A user closed the server task manually before it finished.
Remove outdated server tasks from the Server Task LogPeriodically remove old server task entries from the Server Task Log to improve databaseperformance.
Items removed from the Server Task Log are deleted permanently.
TaskFor details about product features, usage, and best practices, click ? or Help.
1 Open the Server Task Log: select Menu | Automation | Server Task Log.
2 Click Purge.
3 In the Purge dialog box, enter a number, then select a time unit.
4 Click OK.
Any items of the specified age or older are deleted, including items not in the current view. Thenumber of removed items is displayed in the lower right corner of the page.
Create a server task to automatically remove outdated items.
Create a server taskCreate server tasks to schedule various actions to run on a specified schedule.
If you want McAfee ePO Cloud to run certain actions without manual intervention, a server task is thebest approach.
TaskFor details about product features, usage, and best practices, click ? or Help.
1 Open the Server Task Builder.
a Select Menu | Automation | Server Tasks.
b Click New Task.
9 Server tasksServer task status
76 McAfee ePolicy Orchestrator Cloud 5.6.0 Product Guide
2 Give the task an appropriate name, and decide whether the task has a Schedule status, then clickNext.
If you want the task to run automatically, set Schedule status to Enabled.
3 Select and configure the action for the task, then click Next.
4 Choose the schedule type (the frequency), start date, end date, and schedule time to run the task,then click Next.
The schedule information is used only if you enable Schedule status.
5 Click Save to save the server task.
The new task appears in the Server Tasks list.
See also Accepted Cron syntax when scheduling a server task on page 78
Remove outdated log items automaticallyUse a server task to automatically remove old entries from a table or log, such as closed issues oroutdated user action entries.
Items removed from a log are deleted permanently.
TaskFor details about product features, usage, and best practices, click ? or Help.
1 Open the Server Task Builder.
a Select Menu | Automation | Server Tasks.
b Click New Task.
2 Type a name and description for the server task.
3 Enable or disable the schedule for the server task, then click Next.
The server task does not run until it is enabled.
4 From the drop-down list, select a purge action, such as Purge Server Task Log.
5 Next to Purge records older than, enter a number, then select a time unit, then click Next.
6 Schedule the server task, then click Next.
7 Review the details of the server task.
• To make changes, click Back.
• If everything is correct, click Save.
The new server task appears on the Server Tasks page. Outdated items are removed from thespecified table or log when the scheduled task runs.
See also Accepted Cron syntax when scheduling a server task on page 78
Server tasksRemove outdated log items automatically 9
McAfee ePolicy Orchestrator Cloud 5.6.0 Product Guide 77
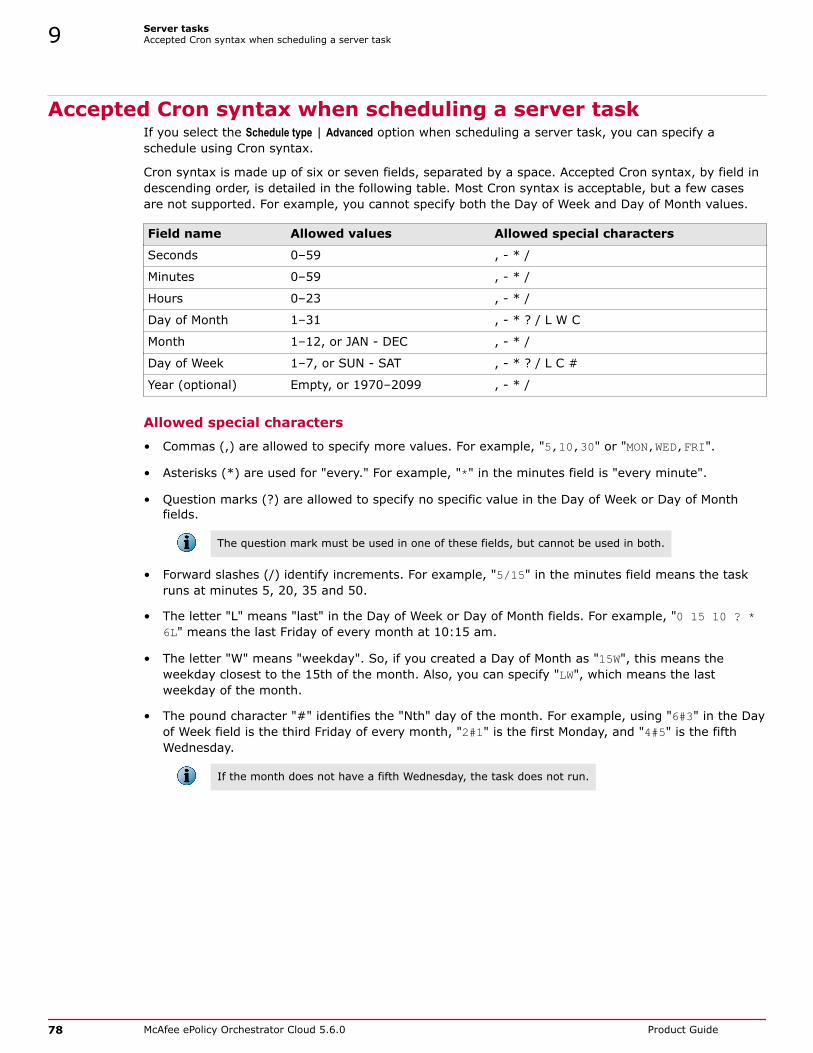
Accepted Cron syntax when scheduling a server taskIf you select the Schedule type | Advanced option when scheduling a server task, you can specify aschedule using Cron syntax.
Cron syntax is made up of six or seven fields, separated by a space. Accepted Cron syntax, by field indescending order, is detailed in the following table. Most Cron syntax is acceptable, but a few casesare not supported. For example, you cannot specify both the Day of Week and Day of Month values.
Field name Allowed values Allowed special characters
Seconds 0–59 , - * /
Minutes 0–59 , - * /
Hours 0–23 , - * /
Day of Month 1–31 , - * ? / L W C
Month 1–12, or JAN - DEC , - * /
Day of Week 1–7, or SUN - SAT , - * ? / L C #
Year (optional) Empty, or 1970–2099 , - * /
Allowed special characters
• Commas (,) are allowed to specify more values. For example, "5,10,30" or "MON,WED,FRI".
• Asterisks (*) are used for "every." For example, "*" in the minutes field is "every minute".
• Question marks (?) are allowed to specify no specific value in the Day of Week or Day of Monthfields.
The question mark must be used in one of these fields, but cannot be used in both.
• Forward slashes (/) identify increments. For example, "5/15" in the minutes field means the taskruns at minutes 5, 20, 35 and 50.
• The letter "L" means "last" in the Day of Week or Day of Month fields. For example, "0 15 10 ? *6L" means the last Friday of every month at 10:15 am.
• The letter "W" means "weekday". So, if you created a Day of Month as "15W", this means theweekday closest to the 15th of the month. Also, you can specify "LW", which means the lastweekday of the month.
• The pound character "#" identifies the "Nth" day of the month. For example, using "6#3" in the Dayof Week field is the third Friday of every month, "2#1" is the first Monday, and "4#5" is the fifthWednesday.
If the month does not have a fifth Wednesday, the task does not run.
9 Server tasksAccepted Cron syntax when scheduling a server task
78 McAfee ePolicy Orchestrator Cloud 5.6.0 Product Guide
10 Dashboards and monitors
Dashboards help you keep constant watch on your environment.
Dashboards are collections of monitors. Monitors condense information about your environment intoeasily understood graphs and charts. Usually, related monitors are grouped on a specific dashboard.For example, the Threat Events dashboard contains four monitors that display information aboutthreats to your network.
Contents Using dashboards and monitors Specify the first-time dashboard
Using dashboards and monitorsSelect the information you need for your network security.
The McAfee ePO Cloud console has a default dashboard that appears the first time you log on. Thenext time you log on, the Dashboards page displays the last dashboard you used.
You can switch dashboards by selecting a different dashboard from the drop-down menu.
Specify the first-time dashboardUse the Dashboards server setting to determine which dashboard appears after a user logs on for thefirst time.
TaskFor details about product features, usage, and best practices, click ? or Help.
1 Open the Edit Dashboards page.
a Select Menu | Configuration | Server Settings.
b From the Setting Categories list, select Dashboards.
c Click Edit.
2 Select a dashboard.
3 Click Save.
The first time a user logs on, the dashboard you specified appears. Subsequent logons return the userto the page they were on when they logged off.
10
McAfee ePolicy Orchestrator Cloud 5.6.0 Product Guide 79

10 Dashboards and monitorsSpecify the first-time dashboard
80 McAfee ePolicy Orchestrator Cloud 5.6.0 Product Guide
11 Managing system events
You can configure how often and what events are forwarded to the McAfee ePO Cloud.
The list of event types you have depends on the software products you are managing with the McAfeeePO Cloud.
Events are generated by the product software, such as Endpoint Security Threat Prevention , andpassed to the McAfee Agent. These events are uploaded either immediately or at the nextagent-server communication interval (ASCI) to the McAfee ePO cloud. Events then appear on theThreat Events dashboard or in queries and reports you generate.
Contents The Threat Event Log Determine how events are forwarded
The Threat Event LogUse the Threat Event Log to quickly view and sort through events in the database. You can purge thelog only by age.
You can choose which columns are displayed in the sortable table. You can choose from various eventdata to use as columns.
Depending on which products you are managing, you can also take certain actions on the events.Actions are available in the Actions menu at the bottom of the page.
Common event format
Most managed products now use a common event format. The fields of this format can be used ascolumns in the Threat Event Log. These fields include:
• Action Taken — Action that the product took in response to the threat.
• Agent GUID — Unique identifier of the agent that forwarded the event.
• DAT Version — DAT version on the system that sent the event.
• Detecting Product Host Name — Name of the system hosting the detecting product.
• Detecting Product ID — ID of the detecting product.
• Detecting Product IPv4 Address — IPv4 address of the system hosting the detecting product (ifapplicable).
• Detecting Product IPv6 Address — IPv6 address of the system hosting the detecting product (ifapplicable).
11
McAfee ePolicy Orchestrator Cloud 5.6.0 Product Guide 81
• Detecting Product MAC Address — MAC address of the system hosting the detecting product.
• Detecting Product Name — Name of the detecting managed product.
• Detecting Product Version — Version number of the detecting product.
• Engine Version — Version number of the detecting product’s engine (if applicable).
• Event Category — Category of the event. Possible categories depend on the product.
• Event Generated Time (UTC) — Time in Coordinated Universal Time that the event was detected.
• Event ID — Unique identifier of the event.
• Event Received Time (UTC) — Time in Coordinated Universal Time that McAfee ePO Cloud received theevent.
• File Path — File path of the system which sent the event.
• Host Name — Name of the system which sent the event.
• IPv4 Address — IPv4 address of the system which sent the event.
• IPv6 Address — IPv6 address of the system which sent the event.
• MAC Address — MAC address of the system which sent the event.
• Network Protocol — Threat target protocol for network-homed threat classes.
• Port Number — Threat target port for network-homed threat classes.
• Process Name — Target process name (if applicable).
• Server ID — Server ID that sent the event.
• Threat Name — Name of the threat.
• Threat Source Host Name — System name from which the threat originated.
• Threat Source IPv4 Address — IPv4 address of the system from which the threat originated.
• Threat Source IPv6 Address — IPv6 address of the system from which the threat originated.
• Threat Source MAC Address — MAC address of the system from which the threat originated.
• Threat Source URL — URL from which the threat originated.
• Threat Source User Name — User name from which the threat originated.
• Threat Type — Class of the threat.
• User Name — Threat source user name or email address.
Determine how events are forwardedDetermine when events are forwarded and which events are forwarded immediately.
The server receives event notifications from agents. You can configure McAfee Agent policies toforward events either immediately to the server or only at agent-server communication intervals.
11 Managing system eventsDetermine how events are forwarded
82 McAfee ePolicy Orchestrator Cloud 5.6.0 Product Guide
If you choose to send events immediately (as set by default), the McAfee Agent forwards all eventswhen they are received.
The default interval for processing event notifications is one minute. As a result, there might be a delaybefore events are processed.
If you choose not to have all events sent immediately, the McAfee Agent forwards immediately onlyevents that are designated by the issuing product as high priority. Other events are sent only at theagent-server communication.
Tasks• Determine which events are forwarded on page 83
Use the Server Settings page to determine which events are forwarded to the server.
• Determine which events are forwarded immediately on page 83Determine whether events are forwarded immediately or only during agent-servercommunication.
Determine which events are forwardedUse the Server Settings page to determine which events are forwarded to the server.
TaskFor details about product features, usage, and best practices, click ? or Help.
1 Select Menu | Configuration | Server Settings, select Event Filtering, then click Edit.
2 Select the events, then click Save.
These settings take effect for each managed system after its next agent-server communication.
Determine which events are forwarded immediatelyDetermine whether events are forwarded immediately or only during agent-server communication.
If the currently applied policy is not set for immediate uploading of events, either edit the currentlyapplied policy or create a McAfee Agent policy. This setting is configured on the Threat Event Logpage.
TaskFor details about product features, usage, and best practices, click ? or Help.
1 Select Menu | Policy | Policy Catalog, then select Product as McAfee Agent and Category as General.
2 Click an existing agent policy.
3 On the Events tab, select Enable priority event forwarding.
4 Select the event severity.
Events of the selected severity (and greater) are forwarded immediately to the server.
5 To regulate traffic, type an Interval between uploads (in minutes).
6 To regulate traffic size, type the Maximum number of events per upload.
7 Click Save.
Managing system eventsDetermine how events are forwarded 11
McAfee ePolicy Orchestrator Cloud 5.6.0 Product Guide 83
11 Managing system eventsDetermine how events are forwarded
84 McAfee ePolicy Orchestrator Cloud 5.6.0 Product Guide
12 Queries and reports
McAfee ePO Cloud comes with its own querying and reporting capabilities.
In addition to the querying and reporting systems, you can use these logs to gather information aboutactivities on your McAfee ePO Cloud server and your network:
• Audit Log
• Server Task Log
• Threat Event Log
Contents About queries Run a query Export query results to other formats About reports Run reports View report output
About queriesQueries enable you to poll McAfee ePO Cloud data. Information gathered by queries is returned in theform of charts and tables.
Query results are actionable
Query results displayed in tables (and drill-down tables) have actions available for selected items inthe table. Actions are available at the bottom of the results page.
Exported results
Query results can be exported to four different formats. Exported results are historical data and arenot refreshed like other monitors when used as dashboard monitors. Like query results andquery-based monitors displayed in the console, you can drill down into the HTML exports for moredetailed information.
Unlike query results in the console, data in exported reports is not actionable.
Reports are available in these formats:
• CSV — Use the data in a spreadsheet application (for example, Microsoft Excel).
• XML — Transform the data for scripts and other purposes.
12
McAfee ePolicy Orchestrator Cloud 5.6.0 Product Guide 85
• HTML — View the exported results as a webpage.
• PDF — Print the results.
Run a queryRun a query when you want specific informaiton about your network environment or McAfee ePOCloud.
TaskFor details about product features, usage, and best practices, click ? or Help.
1 Select Menu | Reporting | Queries & Reports, then select a query from the Queries list.
2 Click Actions | Run. When the query results appear, you can drill down into the report and act onitems as needed.
3 Click Close when finished.
Export query results to other formatsQuery results can be exported to these formats: HTML, PDF, CSV, and XML.
Exporting query results differs from creating a report. First, no additional information is added to theexport output as you do when you create a report; only the output data is added to the report.Second, more formats are supported. The exported query results can be used for further processingusing the supported machine-friendly formats such as XML and CSV. Reports are designed to behuman readable, and as such are only output as PDF files.
Unlike query results in the console, exported data is not actionable.
TaskFor details about product features, usage, and best practices, click ? or Help.
1 Select Menu | Reporting | Queries & Reports, select a query, then click Run.
2 After the query runs, click Options | Export Data.
The Export page appears.
3 Select what to export. For chart-based queries, select Chart data only or Chart data and drill-down tables.
4 Select whether the data files are exported individually or in a single archive (.zip) file.
5 Select the format of the exported file.
• CSV — Saves the data in a spreadsheet application (for example, Microsoft Excel).
• XML — Transforms the data for other purposes.
• HTML — Use this report format to view the exported results as a webpage.
• PDF — Print the results.
12 Queries and reportsRun a query
86 McAfee ePolicy Orchestrator Cloud 5.6.0 Product Guide
6 If exporting to a PDF file, configure the following:
• Select the Page size and Page orientation.
• (Optional) Include a cover page with this text and enter the needed text.
7 Specify the recipients and body text for the query email.
When typing multiple email addresses for recipients, you must separate entries with a comma orsemicolon.
8 Click Export.
The files are emailed as attachments to the recipients.
About reportsReports package query results into a PDF document, enabling offline analysis.
Generate reports to share information about your network environment, such as threat events andmalware activity, with security administrators and other stakeholders.
Run reportsReports must be run before examining their results.Reports can be run from these locations within McAfee ePO Cloud:
• The report listing
• Within a server task
These instructions assume that you are running reports from within the report listing.
TaskFor details about product features, usage, and best practices, click ? or Help.
1 Select Menu | Reporting | Queries & Reports, then select the Report tab.
2 Select a report from the report list, then click Actions | Run.
When the report is complete, the resulting PDF is sent to your browser. It is displayed ordownloaded according to your browser settings.
Some reports take a while to complete. It is possible to have more than one report runningsimultaneously, but you cannot initiate more than one report at a time through the interface. Whenthe report is complete, the software updates the Last Run Result column in the report list with a link tothe PDF containing those results.
View report outputView the last run version of every report.
Every time a report runs, the results are stored on the server and displayed in the report list.
Whenever a report runs, the prior results are erased and cannot be retrieved. If you are interested incomparing different runs of the same report, we recommended that you archive the output elsewhere.
Queries and reportsAbout reports 12
McAfee ePolicy Orchestrator Cloud 5.6.0 Product Guide 87
TaskFor details about product features, usage, and best practices, click ? or Help.
1 Select Menu | Reporting | Queries & Reports.
2 Select the Report tab
In the report list, you see a Last Run Result column. Each entry in this column is a link to retrieve thePDF that resulted from the last successful run of that report. Click a link from this column toretrieve a report.
A PDF opens within your browser, and your browser behaves as you have configured it for that filetype.
12 Queries and reportsView report output
88 McAfee ePolicy Orchestrator Cloud 5.6.0 Product Guide
Index
Aabout this guide 7actions
Apply Tag 46
Check IP Integrity 36
Run Tag Criteria 43
Sort Now 39
Test Sort 39
used with Product Deployment 52
activateusers 15
administratorschange password 28
edit profile 28
view profile 28
agentfirst call to server 37
GUID and System Tree location 37
McAfee Agent, McAfee ePO Cloud components 10
Apply Tag action 43
Audit Logused with Product Deployment 51
Bbest practices
duplicating policies before assigning 55
passwords 16
policy assignment locking 55
System Tree creation 38
borders, See System Tree organization
Ccatch-all groups 36
Check IP Integrity action 36
client tasksabout 69
comparing 73
creating 72
deleting 73
editing settings for 72
view 70
viewing assignment on a specific system 73
working with 71
compare client tasks 73
compare policies 60
componentsMcAfee ePO Cloud, about 10
confirm system management 20
contact support 29
conventions and icons used in this guide 7criteria-based tags
applying 47
sorting 38
Cron syntax used with server tasks 78
Ddashboards
first-time 79
introduction 79
McAfee 79
private 79
public 79
server settings 79
DAT file updatingconsiderations for creating tasks 69
daily task 71
scheduling a task 71
deploymentinstallation URL 19
view 51
view assigned client task 70
documentationaudience for this guide 7product-specific, finding 8typographical conventions and icons 7
domain synchronization 34
Eenforcement, See policy enforcement engine updating
scheduling a task 71
eventsforwarding and notifications 83
McAfee ePolicy Orchestrator Cloud 5.6.0 Product Guide 89
Ffeatures, McAfee ePO Cloud
components 10
how it works 10
filterslist 26
overview 25
used with Policy Assignment Rules 62
used with Product Deployment 53
Gglobal unique identifier (GUID) 37
groupscatch-all 36
configuring criteria for sorting 38
creating manually 38
criteria-based 37
defined 32
moving systems manually 40
My Group 32
operating systems and 34
pasting policy assignments to 65
policies, inheritance of 33
policy enforcement for a product 59
sorting, automated 35
using IP address to define 34
viewing policy assignment 67
Iinheritance
and policy settings 55
broken, resetting 68
defined 33
viewing for policies 68
installation URL 19
interfacefavorites bar 23
menu 23
Menu 23
navigation 23
IP addressas grouping criteria 34
range, as sorting criteria 38
sorting and checking overlap 36
sorting criteria 38
subnet mask, as sorting criteria 38
LLAN connections and geographical borders 34
language packages, See agent lists
filtering 26
searching 26
lists, working with 25
log on and log off 15
Lost and Found group 32
Mmaking comments and suggestions 29
managed systemspolicy management on 55
sorting, criteria-based 35
viewing policy assignment 67
Master RepositoryMcAfee ePO Cloud components 10
McAfee Agent 10
McAfee ePOdifferences from McAfee ePO Cloud 9
McAfee ePO Cloudabout 9differences from McAfee ePO 9how it works 10
McAfee recommendationsduplicate policies before assignment 55
evaluate borders for organization 34
System Tree planning 34
use IP addresses for sorting 34
use tag-based sorting criteria 35
McAfee ServicePortal, accessing 8Menu
navigating in the interface 24
menu-based navigation 23
monitors 79
My Group 32
My Organization group of System Tree 31
Nnavigation
Menu 23
menu-based 23
navigation pane 24
network bandwidth, See System Tree organization notifications
event forwarding 83
Ooperating systems
grouping 34
legacy systems (Windows 95, Windows 98) 34
Ppasswords
best practices 16
change 28
create 15
reset 16
Index
90 McAfee ePolicy Orchestrator Cloud 5.6.0 Product Guide

personal settings 24
categories 24
policiesabout 55
assigning and managing 62
broken inheritance, resetting 68
categories 55
comparing 60
controlling on Policy Catalog page 57
group inheritance, viewing 68
how they are applied to systems 55
importing and exporting 55
inheritance 55
manage policies using policy history entries 60
managing, on Policy Catalog page 58
ownership 56
settings, viewing 67
viewing 55, 66
working with Policy Catalog 57
policy assignmentcopying and pasting 64, 65
disabled enforcement, viewing 67
group, assigning to 63
locking 55
Policy Catalog 55
systems, assigning to 63, 64
viewing 66, 67
policy assignment rules 56
about 56
and multi-slot policies 56
creating 61
deleting and editing 62
editing priority 62
importing and exporting 62
priority 56
rule criteria 56
system-based 56
system-based policies 57
viewing summary 62
Policy Catalogmanage policies using policy history entries 60
page, viewing 55
working with 57
policy enforcementenabling and disabling 59
for a product 59
viewing assignments where disabled 67
when policies are enforced 55
policy management 55
using groups 32
working with client tasks 71
product deploymentabout monitoring and modifying 50
creating 52
methods 49
product deployment (continued)monitoring and modifying 53
projects 49
uninstalling software 21
view 51
view assigned client task 70
profilechange password 28
view and edit 28
providing feedback 29
Qqueries 85
actions on results 85
exporting to other formats 86
report formats 85
run existing 86
using results to exclude tags on systems 45
Quick Find 26
Rreports
about 87
actions 87
formats 85
running 87
viewing output 87
responsesevent forwarding 82
Run Tag Criteria action 43
Sscheduling
server tasks with Cron syntax 78
server settingsdashboards 79
event notifications 82
overview 25
Server Task Logremoving outdated tasks 76
Status column 76
viewing server tasks 75
server tasksabout 75
creating 76
removing outdated 76
removing outdated log items 77
scheduling with Cron syntax 78
status of 76
viewing 75
serverssettings and controlling behavior 25
ServicePortal, finding product documentation 8Sort Now action 35
Index
McAfee ePolicy Orchestrator Cloud 5.6.0 Product Guide 91

sorting criteriaconfiguring 38
for groups 38
groups, automated 35
IP address 36, 38
sorting systems into groups 35
tag 38
tag-based 35, 36
SQL servers, See databases subgroups
criteria-based 37
subnets, as grouping criteria 34
subscription, view information 28
synchronizationdefaults 37
System Tree 31
assigning policies to a group 63
creation, automated 34
criteria-based sorting 35
defined 32
deleting systems from 32
inheritance 33
Lost and Found group 32
My Group 32
My Organization level 31
organization 31
populating groups 38
removing systems 40
structure 31
System Tree organizationborders in your network 34
creating groups 38
moving systems to groups manually 40
network bandwidth 34
operating systems 34
planning considerations 34
selecting multiple items 27
System Tree sortingdefault settings 37
enabling 39
IP address 36
ordering subgroups 36
tag-based criteria 36
system-based policiesabout 57
criteria 57
systemsassigning policies to 63, 64
confirm system management 20
pasting policy assignments to 65
policy enforcement for a product 59
sorting into groups 39
viewing policy assignment 67
Ttable row, select checkboxes 27
tables, working with 25
Tag Builder wizard 43
Tag Catalog 43
tag-based sorting criteria 35, 36
tagsapplying 47
create, delete, and modify subgroups 45
creating with Tag Builder wizard 43
criteria-based 35
criteria-based sorting 38
edit, delete, export, and move 44
excluding systems from automatic tagging 45
group sorting criteria 35
manual application of 46
policy assignment based on 57
tags, subgroupscreate, delete, and modify 45
selecting multiple items 27
technical support, finding product information 8Test Sort action 35
Threat Event Log 81
time zone, personal 24
Uupdates
client tasks 69
considerations for creating tasks 69
scheduling an update task 71
user accountsactivate 15
change default 28
change password 28
contact support 29
create password 15
edit profile 28
log on 15
reset password 16
view profile 28
view subscription information 28
user, time zone 24
usersactivate 15
contact support 29
log on 15
reset password 16
view subscription information 28
VVPN connections and geographical borders 34
WWAN connections and geographical borders 34
Index
92 McAfee ePolicy Orchestrator Cloud 5.6.0 Product Guide

0-00