mclaren p11 - complete · mclaren p11 - complete.book page 28 friday, january 22, 2016 9:43 am....
TRANSCRIPT

OWNER’S HANDBOOK
SUPER SERIES
Mclaren P11 - Complete.book Page 2 Friday, January 22, 2016 9:43 AM

ASSISTANCE
ASSISTANCE
Retailer Network
McLaren Atlanta
McLaren Bergen Co
McLaren Beverly Hil
McLaren Calabasas
McLaren Chicago
McLaren Dallas
McLaren Greenwich
McLaren Houston
McLaren Long Islan
McLaren Mexico Cit
The Collection McLa
McLaren Newport B
McLaren Philadelph
McLaren Ra
McLaren Sa
McLaren Sa
McLaren Sc
btain assistance using the number(s) sistance, or the dealer is unable to istance, please call 855-4McLaren (855-
24 hours: +1 727 537 0626
24 hours: +1 416 877 2620
24 hours: +1 888 683 3757
24 hours: +1 610 886 3000
UK business hours: +44 148 326 1500
Mclaren P11 - Complete.book Page 2 Friday, January 22, 2016 9:43 AM
ncho Mirage 24 hours: +1 760 773 5100
(ext 401)
n Francisco 24 hours: +1 650 815 4472
ntiago 24 hours: +56 994 496 824
ottsdale 24 hours: +1 480 544 5592
24 hours: +1 770 394 4234
unty 24 hours: TBC
ls 24 hours: +1 818 585 9620
24 hours: +1 818 585 9620
24 hours: +1 773 547 3877
24 hours: +1 214 497 1082
24 hours: +1 203 537 9128
24 hours: +1 844 663 0534
d 24 hours: +1 516 478 4326
y 24 hours: +52 554 177 7507
ren (Miami) 24 hours: +1 305 442 9696
each 24 hours: +1 714 252 3284
ia 24 hours: +1 610 886 3000
If you have been unable to olisted for towing/roadside asprovide towing/roadside ass462-5273).
McLaren Tampa Bay
McLaren Toronto
McLaren Vancouver
McLaren Washington DC
McLaren Client Services

CONTENTS
BEFORE YOU DRIVE.............................................................................. 1.1
DRIVING CONTROLS ........................................................................... 2.1
INSTRUMENTS......................................................................................... 3.1
COMFORT AND CONVENIENCE.................................................. 4.1
MAINTAINING YOUR McLAREN................................................... 5.1
VEHICLE DATA AND GLOSSARY .............................................. 6.1
INDEX .................................................................................................................7.1
Mclaren P11 - Complete.book Page 1 Friday, January 22, 2016 9:43 AM

INTRODUCTION
2
INTRODUCTION
Introduction
Please read thyourself with before you drinformation fbenefit and e
This publicatifeatures availSeries. Certaifor display anto your vehicspecificationsfitment of Mc
NOTE: Tpublicatunique v
The documenare an integrayou pass themthe vehicle.
The informatsections, to ainformation y
ething should go wrong and how to age any possible problems which arise as ult. Information on fuses, lights and what
o if you experience a puncture.
icle Data and Glossaryr to this section when you need
rmation regarding the fluids and tities that are required for the various
ems on your McLaren, or when you need ow a specific piece of data relating to
McLaren or its performance.
Technical glossary contains a brief anation of some of the more complex ems fitted to your McLaren. Your McLaren iler will be able to assist should you need e information.
xtable of contents and the index will help find information quickly, when you need
Mclaren P11 - Complete.book Page 2 Friday, January 22, 2016 9:43 AM
is information to familiarize your McLaren and its features ive. This provides the necessary or you to get the optimum njoyment from your McLaren.
on describes all options and able for the McLaren Super n descriptions, including those d menu functions, may not apply le due to model variant, country , optional equipment or the Laren approved accessories.
he images shown in this ion may not exactly reflect your ehicle.
ts supplied with your McLaren l part of the vehicle. Ensure that onto the new owner if you sell
ion is divided into specific ssist in finding the particular ou require:
Before you driveDetails the settings you need to make in the cockpit to ensure you are fully prepared and have safe and easy access to all controls before driving.
Driving Controls This section contains detailed information regarding the equipment and driving controls fitted to your McLaren and how to use those controls to best effect during a journey.
InstrumentsThis section contains information on the instrument cluster, including information of how to view and change vehicle settings.
Comfort and ConvenienceContains information on those systems and features which make the cockpit a pleasant environment in which to spend time.
Maintaining your McLarenInformation on maintaining your McLaren is here. Also included is advice on using your McLaren in winter weather and if you choose to drive your vehicle abroad, what to do if
sommana resto d
VehRefeinfoquansystto knyour
The explsystRetamor
IndeThe you it.
INTR
3
Inform
McLarenmeet anMcLarenintroductechnic
© McLa
This pubtranslatwithoutAutomo
The equvary froand mavary frovehicle
This vehcars.mc
Printed
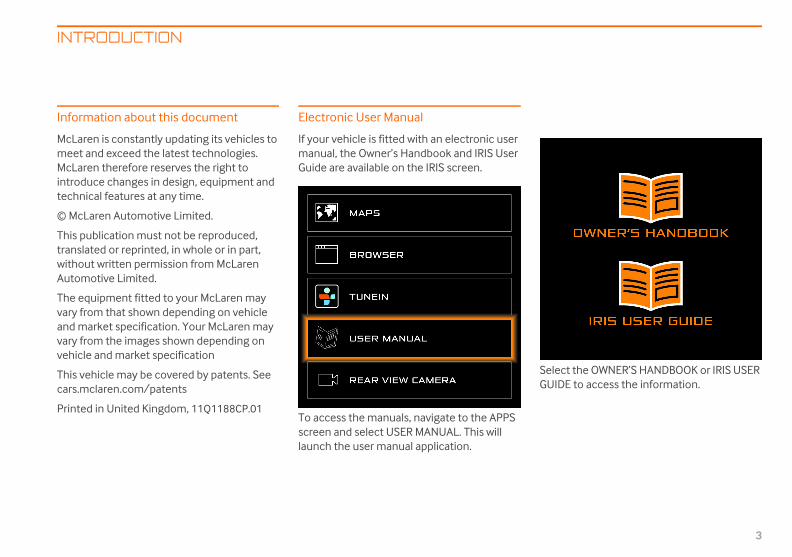
Select the OWNER’S HANDBOOK or IRIS USER GUIDE to access the information.
Mclaren P11 - Complete.book Page 3 Friday, January 22, 2016 9:43 AM
ODUCTION
ation about this document
is constantly updating its vehicles to d exceed the latest technologies. therefore reserves the right to e changes in design, equipment and
al features at any time.
ren Automotive Limited.
lication must not be reproduced, ed or reprinted, in whole or in part, written permission from McLaren tive Limited.
ipment fitted to your McLaren may m that shown depending on vehicle rket specification. Your McLaren may m the images shown depending on and market specification
icle may be covered by patents. See laren.com/patents
in United Kingdom, 11Q1188CP.01
Electronic User Manual
If your vehicle is fitted with an electronic user manual, the Owner’s Handbook and IRIS User Guide are available on the IRIS screen.
To access the manuals, navigate to the APPS screen and select USER MANUAL. This will launch the user manual application.
INTRODUCTION
4
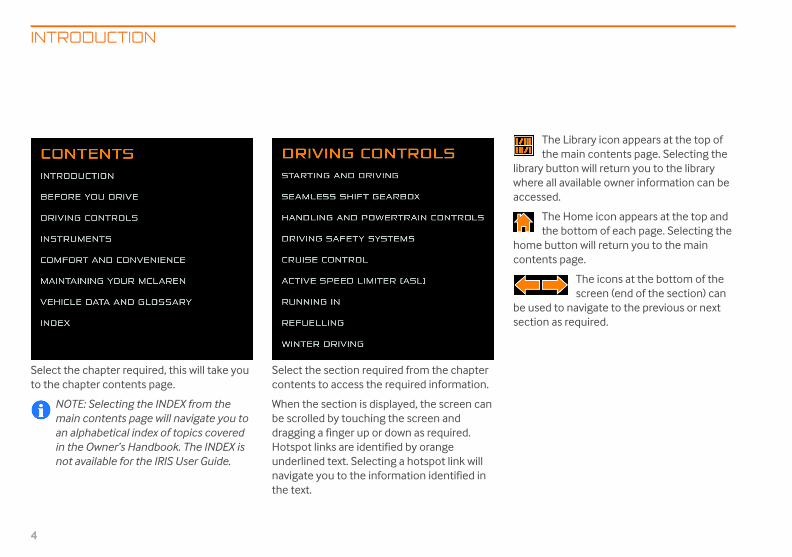
Select the chto the chapte
NOTE: Smain coan alphain the Onot avai
The Library icon appears at the top of the main contents page. Selecting the
ry button will return you to the library re all available owner information can be ssed.
The Home icon appears at the top and the bottom of each page. Selecting the
e button will return you to the main ents page.
The icons at the bottom of the screen (end of the section) can
sed to navigate to the previous or next ion as required.
Mclaren P11 - Complete.book Page 4 Friday, January 22, 2016 9:43 AM
apter required, this will take you r contents page.
electing the INDEX from the ntents page will navigate you to betical index of topics covered
wner’s Handbook. The INDEX is lable for the IRIS User Guide.
Select the section required from the chapter contents to access the required information.
When the section is displayed, the screen can be scrolled by touching the screen and dragging a finger up or down as required. Hotspot links are identified by orange underlined text. Selecting a hotspot link will navigate you to the information identified in the text.
librawheacce
homcont
be usect

INTR
5
Symbo
You willOwner’sintendemessagdisplaye
Mclaren P11 - Complete.book Page 5 Friday, January 22, 2016 9:43 AM
ODUCTION
ls
find the following symbols in this handbook. These symbols are d to give you an instant visual e on what type of information is being d.
Warnings
A warning draws your attention to activities that could cause injury or death.
Notes
Notes draw your attention to activities that contain possible risks to your McLaren, provide advice that you may find useful, or give additional information regarding a particular subject.
Environmental note
Environmental notes give you tips on minimizing the impact of you and your vehicle on the environment.
INTRODUCTION
6
Operating sa
WARNINfitted toeach otsystemother infaults coperatioand you
Additiomade tocarried its oper
nd clearanceWARNING: Damage to the front of the vehicle may occur when approaching steep inclines or declines.
e with care when:
approaching curbs
approaching steep inclines
departing steep declines
driving on rough roads
driving in areas where traffic calming measures have been deployed
driving in any other environment where sudden changed of road surface height or elevation are encountered such as car parks
Vehicle dimensions - except 675LT, 6.8.
Vehicle dimensions - 675LT, page 6.9.
Mclaren P11 - Complete.book Page 6 Friday, January 22, 2016 9:43 AM
fety
G: The electronic systems your McLaren interact with
her. Tampering with these s could cause malfunctions in terconnected systems. Such
ould seriously endanger the nal safety of your McLaren
r own safety.
nal work or modifications the vehicle, which have been
out incorrectly can also affect ating safety.
Vehicle useObserve the following when using your McLaren:
• the safety notes throughout this information
• road traffic laws and regulations
WARNING: There are various warning labels attached to your McLaren. These are intended to make you and others aware of various risks. Do not remove any warning labels from the vehicle.
If you remove these warning labels, you or others may not then be aware of dangers, which may result in an injury.
Grou
Driv
•••••
•
See page
See

INTR
7
Track dTo achiereliabilitfollowinattempt
• entem
• watem
• tireop
NOtheMcis i
NOthe
CoolingWe recovehicle temperbrakes aperformthe veh
Mclaren P11 - Complete.book Page 7 Friday, January 22, 2016 9:43 AM
ODUCTION
rivingve optimum performance and
y it is important to ensure the g preconditions are met before ing to drive your vehicle on a track:
gine oil is at normal operating perature
ter is at normal operating perature
s should not exceed the safe erating temperatures
TE: Before you use your vehicle on track, consult your McLaren Retailer. Laren recommend that your vehicle nspected before and after track use.
TE: Always drive within your limits and limits of the vehicle.
downmmend you take time to cool the during track driving due to the high atures that may be generated by the nd transmission which could affect ance. Time should be taken to drive
icle at a slower speed without using
hard braking or carrying out excessive gear changes, this uses the airflow to cool the vehicle.
We recommend that time is allowed for your vehicle to return to normal operating temperatures before leaving the track.
NOTE: When stopping the vehicle directly after performance driving we recommend that the ignition is not immediately switched off or the parking brake is applied. We recommend that the engine is left to idle prior to the ignition being switched off.
NOTE: Please refer to your Service & Warranty Guide for track and competition use implications.

Mclaren P11 - Complete.book Page 8 Friday, January 22, 2016 9:43 AM

1.1
OPENING AND CLOSINGGeneral................................................................................................................. 1.2Opening a door ................................................................................................. 1.5Locking a door .................................................................................................. 1.6Mislock ................................................................................................................. 1.7Individual settings ........................................................................................... 1.8Locking and unlocking from inside.......................................................... 1.8Opening a door from inside......................................................................... 1.9Closing a door................................................................................................. 1.10Automatic locking ........................................................................................ 1.10Engine cover................................................................................................... 1.11Luggage compartment .............................................................................. 1.14Retractable Roof - Spider models .......................................................... 1.16Backlight - Spider models.......................................................................... 1.19Tonneau Cover - Spider models ............................................................. 1.20
STOWING LUGGAGEStowage Luggage - Spider models........................................................ 1.23
ANTI-THEFT SYSTEMAlarm system.................................................................................................. 1.26Immobilizer ..................................................................................................... 1.26Tow-away protection .................................................................................. 1.27Interior motion sensor................................................................................ 1.28
SEATSSafety................................................................................................................. 1.29Manual seats - except 675LT ................................................................... 1.29Racing seats .................................................................................................... 1.30Electric seats................................................................................................... 1.31
STEERING WHEEL AND STEERING COLUMNManual steering wheel adjustment....................................................... 1.36Electric steering wheel adjustment ...................................................... 1.37Horn ................................................................................................................... 1.38
OCCUPANT SAFETYSeat belts ......................................................................................................... 1.39Supplementary Restraint System.......................................................... 1.41Child passengers........................................................................................... 1.47
MIRRORSSafety................................................................................................................. 1.50Interior mirror ................................................................................................ 1.50Exterior mirrors.............................................................................................. 1.50
LIGHTINGExterior lighting - except 675LT ............................................................. 1.52Exterior lighting - 675LT ............................................................................ 1.53Light switch..................................................................................................... 1.54Hi beam headlamps..................................................................................... 1.55Daytime running lamps.............................................................................. 1.56Rear fog lamp ................................................................................................. 1.56Turn signals..................................................................................................... 1.57Hazard warning lamps................................................................................ 1.57Parking lights.................................................................................................. 1.58
WASHERS AND WIPERWindscreen wiper ......................................................................................... 1.59
VEHICLE LIFTVehicle Lift Operation................................................................................. 1.61
BEFORE YOU DRIVE
Mclaren P11 - Complete.book Page 1 Friday, January 22, 2016 9:43 AM

BEFORE YOU DRIVEOPENING
1.2
OPENING AND CLOSING
General
The vehicle cby using the kpressing the fob.
The keyless ebe within 5 fesensors.
For your convengine is notirrespective oVehicle elect
Keyless entrKeyless entrydisarm the vedoor when th(1.5 meters) oneeds only tonon-metallic not need to b
fob entryr McLaren includes two remote control fobs. The key fob allows you to remotely and unlock the vehicle.
NOTE: To prevent theft, only use the key fob in the immediate vicinity of the vehicle.
key fob locks and unlocks the following:
the doors (including fuel filler flap)
the luggage compartment
Mclaren P11 - Complete.book Page 2 Friday, January 22, 2016 9:43 AM
AND CLOSING
an be unlocked or locked either eyless entry feature, or by
appropriate button on the key
ntry feature requires the key to et (1.5 meters) of the door
enience, provided that the running, the car can be locked f the electrical status, see
rical status, page 2.3.
y allows the driver to unlock and hicle by simply opening the e key fob is within 5 feet f the door sensors. The key fob be on the driver's person or in a container such as a bag. It does e exposed or handled.
Four sensors detect where the key fob is around the vehicle.
1. In vehicle sensor
2. Left-hand door sensor
3. Right-hand door sensor
4. Cup holder sensor
KeyYoukey lock
The
••

BEFOOPEN
1.3
To unlothe unloturn sigalarm sy
The unldependselectedUnlock,
Unlock Button
Outcome
Single Press
If BOTH is selected, a single press of the button unlocks both doors.
If DRIVER is selected, a single press of the button unlocks the driver’s door. A second press (after a pause) unlocks the passenger’s door.
Double Press
If BOTH is selected, a double press of the button unlocks both doors and unlatches the driver’s door.
If DRIVER is selected, a double press of the button will unlock and unlatch the driver’s door only.
Long Press
A long press of the button will unlock both doors and unlatch the passenger’s door.
Mclaren P11 - Complete.book Page 3 Friday, January 22, 2016 9:43 AM
RE YOU DRIVEING AND CLOSING
ck the vehicle, using the key fob, press ck button. The front, rear and side
nals flash twice and the anti-theft stem is deactivated.
ock button operation changes ing whether the DRIVER or BOTH is in the vehicle settings, see Door
page 3.14.
NOTE: If the vehicle is dirty or wet, is advisable to open the doors using the key fob.
A quick double press of the unlock button will unlatch the driver’s door. A long press and hold on the unlock button will unlatch the passenger’s door.
WARNING: The key fob allows the engine to be started and is also used to activate other features on the vehicle.
Take the key fob with you, every time you leave the vehicle.
NOTE: Do not expose the key fob to high levels of electromagnetic radiation. Doing so may cause it to function incorrectly. For example close proximity to laptops, tablets, personal media players, or cell phones.
BEFORE YOU DRIVEOPENING
1.4
Stowing theFor security, ifob stays on ycar. If, howevwithin the carview.
NOTE: Ifvehicle’ cluster, detected
NOTE: Dcenter cin the cubetweenimmediasystem wthe engi
Mclaren P11 - Complete.book Page 4 Friday, January 22, 2016 9:43 AM
AND CLOSING
key fobt is recommended that the key our person when you are in the
er, you wish to stow the key fob , ensure that it is not left in plain
the message ‘key not found in appears on the instrument reposition key fob until it is
.
o not stow the key fob in the onsole stowage compartment, p holders, in the stowage nets the seats, or on the shelf tely behind the seats as the ill not detect its presence and
ne will not start.
Discharged batteryIf you are unfortunate enough to experience a fully discharged battery, the vehicle can still be opened using the mechanical key, see Unlocking - discharged battery, page 5.25.

BEFOOPEN
1.5
Openin
1. Preun
WAtheopspaff
NOTE: When the door is opened, the window will lower slightly. It will raise to the closed position once the door is shut. If the window does not lower, for example, due to a discharged battery or freezing temperatures, take care when opening and closing the door. Do not force the door during opening or closing, as this could lead to the door seals or window becoming damaged.
NOTE: A sustained long press and hold on the unlock button will automatically lower the window on that side of the vehicle. The window will continue to lower until the unlock button is released or the windows are fully lowered.
NOTE: If the vehicle is unlocked using the key fob but the doors or luggage compartment are not opened, the vehicle will relock after 30 seconds.
Mclaren P11 - Complete.book Page 5 Friday, January 22, 2016 9:43 AM
RE YOU DRIVEING AND CLOSING
g a door
ss the button (1) firmly to unlock and latch the door.
RNING: Always stand to the rear of door before opening it, as the
ening action may cause injury. The eed that the door opens will be ected by ambient temperature.
NOTE: Because the door opens outwards and then upwards, ensure sufficient side and overhead clearance before opening a door.
See Vehicle dimensions - except 675LT, page 6.8.
See Vehicle dimensions - 675LT, page 6.9.
2. If keyless entry is used, the front, rear and side turn signals (market specific) will flash twice, and the anti-theft alarm system is deactivated.
3. The door latch will then release, allowing the door to be partially raised before it automatically swings outwards and upwards. The mirrors will unfold if folded.
NOTE: If the vehicle is dirty or wet, it is advisable to open the doors using the key fob.
A quick double press of the unlock button will unlatch the driver’s door. A long press and hold on the unlock button will unlatch the passenger’s door.

BEFORE YOU DRIVEOPENING
1.6
Locking a do
1. Close thpage 1.1
2. To lock tpress thside turnsequencalarm sy
NOTE: A sustained long touch and hold on the lock sensor will automatically raise the window. The window will continue to raise until the lock sensor is released or the window is fully closed.
The turn signals flash to indicate that the anti-theft alarm system is activated and the mirrors will fold.
NOTE: When the door is opened the door glass will lower slightly to avoid contact with other parts of the vehicle. When the door is closed the glass will rise to the closed position automatically. If for any reason the door glass does not rise it is likely that the system has sensed a “trap” event. This can be caused by debris in the glass channel or misalignment of the glass. Ensure there are no obvious signs of debris in the glass channel, and hold the lock button. The glass will rise providing the door is correctly closed and there are no obstructions preventing it rising. If the glass does not close, or the glass repeatedly fails to automatically raise, contact your McLaren Retailer.
Mclaren P11 - Complete.book Page 6 Friday, January 22, 2016 9:43 AM
AND CLOSING
or
e door. See Closing a door, 0
he vehicle using the key fob, e lock button. The front, rear and signals flash in a rapid, circular e around the car. The anti-theft stem is activated.
3. If using the keyless entry feature, touch the lock sensor (1) on the bodyside.
NOTE: Ensure the key is within a 5 feet (1.5 meters) range of the door sensors when using the keyless entry feature.
NOTE: The lock sensor will recognize a single touch.
4.

BEFOOPEN
1.7
Mislock
If eitherlid or thkey fob ‘mislocklock theon the kthe ‘misattempttonneauis not fu
Mclaren P11 - Complete.book Page 7 Friday, January 22, 2016 9:43 AM
RE YOU DRIVEING AND CLOSING
the doors, the luggage compartment e engine cover are left open, or the is still inside the vehicle, an audible ’ signal will sound when an attempt to vehicle is made when the lock button ey fob is pressed. On Spider models, lock’ signal will also sound when an is made to lock the vehicle if the cover is not fully closed or if the roof lly opened or fully closed.
NOTE: If the doors are open or the key fob is still inside the vehicle, a momentary sounding of the alarm horn will alert you. If the luggage compartment lid or engine cover is open, a long tone will alert you. The long tone will also indicate that the tonneau cover is open or the roof is not fully open or fully closed on Spider models.
Check that the doors, the luggage compartment lid, the engine cover and the tonneau cover (Spider only) are all closed and that the roof is fully open or fully closed (Spider only), then relock the vehicle.
NOTE: The car can be locked/alarmed with the luggage compartment open. A long tone is sounded to alert you of this condition, and differs to the short tone sounded for door open/key in car mislock. The luggage compartment will become alarmed as soon as the luggage compartment lid is closed. This will allow you to connect the battery charger to the charging point in the luggage compartment whilst leaving the rest of the vehicle locked.

BEFORE YOU DRIVEOPENING
1.8
Individual se
If you frequenyou can chanonly the driveDoor Lock, pa
If only the drito unlock, theunlocked by edoor internalbutton on thethe car from tcenter conso
Mclaren P11 - Complete.book Page 8 Friday, January 22, 2016 9:43 AM
AND CLOSING
ttings
tly travel without passengers, ge the locking system so that r's door is unlocked, see Auto ge 3.14.
ver's door has been configured passenger’s door can only be ither pulling the passenger’s
handle, pressing the unlock key fob again or by unlocking
he central locking button on the le.
Locking and unlocking from inside
1. Press the central locking button to lock the vehicle, the light in the button will illuminate to indicate that the vehicle is locked.
2. Press the central locking button again to unlock the vehicle and the light in the button will extinguish.
BEFOOPEN
1.9
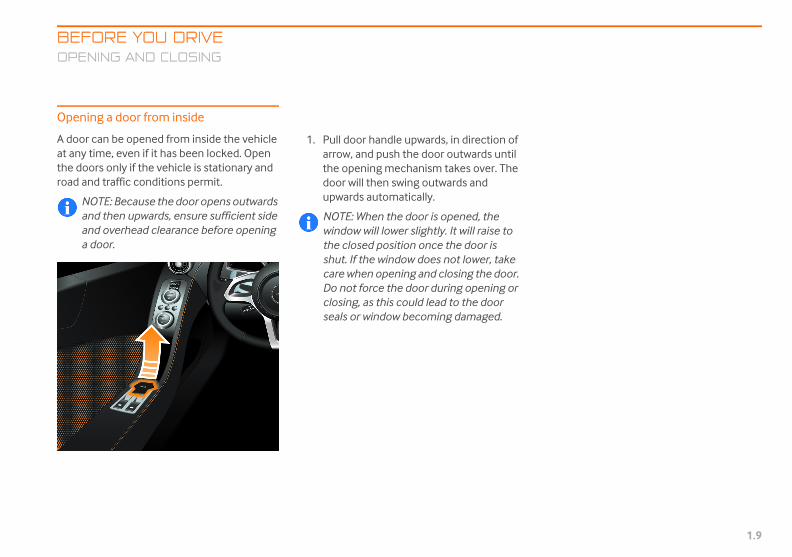
Openin
A door cat any tithe dooroad an
NOanana d
Mclaren P11 - Complete.book Page 9 Friday, January 22, 2016 9:43 AM
RE YOU DRIVEING AND CLOSING
g a door from inside
an be opened from inside the vehicle me, even if it has been locked. Open rs only if the vehicle is stationary and d traffic conditions permit.
TE: Because the door opens outwards d then upwards, ensure sufficient side d overhead clearance before opening oor.
1. Pull door handle upwards, in direction of arrow, and push the door outwards until the opening mechanism takes over. The door will then swing outwards and upwards automatically.
NOTE: When the door is opened, the window will lower slightly. It will raise to the closed position once the door is shut. If the window does not lower, take care when opening and closing the door. Do not force the door during opening or closing, as this could lead to the door seals or window becoming damaged.

BEFORE YOU DRIVEOPENING
1.10
Closing a do
1. Push/puensure t
WARNINobjectsclosing.for vehilatchescontinuwhen thThere ispreventor bodydoor aninjury a
If the windowto an anti-tra
• reopen a
• lock vehbodysid
omatic locking
doors and the luggage compartment lock matically after the vehicle has driven
y.
NOTE: The doors unlock automatically in an accident if the force of the impact exceeds a predetermined level.
automatic locking function is selectable e vehicle settings section of the ument cluster, see Auto Door Lock, 3.14. If automatic locking is ON, the
rior central locking button will illuminate the vehicle locks on drive away.
AND CLOSING
or
ll the door downwards and hat it latches securely.
G: Keep hands and other clear of the door edge when This is particularly important cles fitted with soft close as the door will automatically e to the fully closed position e first catch has engaged. no anti-trap feature ing the door closing if an item part is trapped between the d the door aperture, serious nd vehicle damage may occur.
does not close, this may be due p event. Try one of the following:
nd close door
icle using the lock sensor on the e
In the event of continuous anti-trap events, press the lock sensor (1) for a few seconds. The window will continue to rise until you remove your hand from the lock sensor. Only attempt this if the above methods do not resolve the problem.
NOTE: Do not force the door closed, the door seals or window could be damaged.
Aut
The autoawa
The in thinstrpageinteonce
BEFOOPEN
1.11
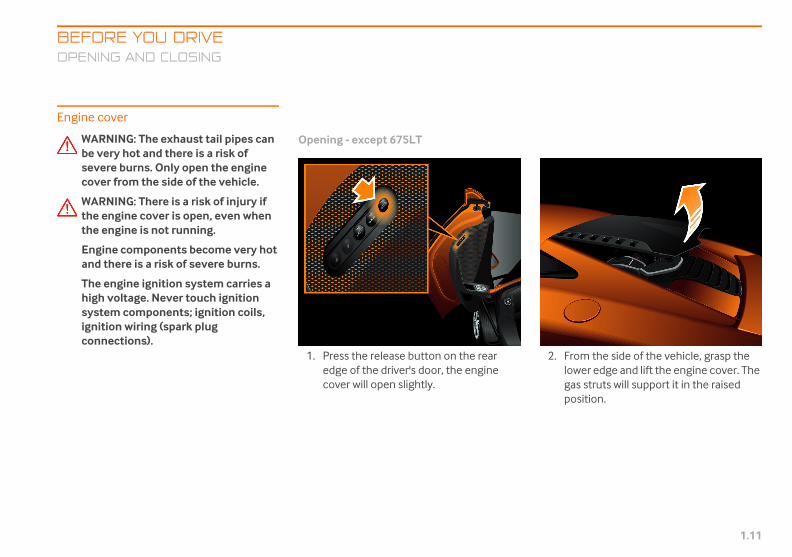
Engine
WAbeseco
WAthethe
Enan
Thhigsyignco
2. From the side of the vehicle, grasp the lower edge and lift the engine cover. The gas struts will support it in the raised position.
Mclaren P11 - Complete.book Page 11 Friday, January 22, 2016 9:43 AM
RE YOU DRIVEING AND CLOSING
cover
RNING: The exhaust tail pipes can very hot and there is a risk of vere burns. Only open the engine ver from the side of the vehicle.
RNING: There is a risk of injury if engine cover is open, even when engine is not running.
gine components become very hot d there is a risk of severe burns.
e engine ignition system carries a h voltage. Never touch ignition
stem components; ignition coils, ition wiring (spark plug
nnections).
Opening - except 675LT
1. Press the release button on the rear edge of the driver's door, the engine cover will open slightly.

BEFORE YOU DRIVEOPENING
1.12
Closing - excWARNINbe verysevere bcover fr
Pull the enginside of the velatches secur
Ensure engin
From the side of the vehicle, grasp the lower edge and lift the engine cover.
Mclaren P11 - Complete.book Page 12 Friday, January 22, 2016 9:43 AM
AND CLOSING
ept 675LTG: The exhaust tail pipes can
hot and there is a risk of urns. Only close the engine
om the side of the vehicle.
e cover down squarely from the hicle and ensure that the cover ely on both sides.
e cover is secure once closed.
Opening - 675LT - except Spider1. Remove the engine cover opening tool
from the tool kit. See Luggage compartment equipment - 675LT, page 5.10.
2. Insert the engine cover opening tool into each guide hole located underneath the lower corners of the engine cover.
Rotate 45° counter-clockwise for the left-hand side, clockwise for the right-hand side.
Unlatch both sides of the engine cover.
3.
BEFOOPEN
1.13
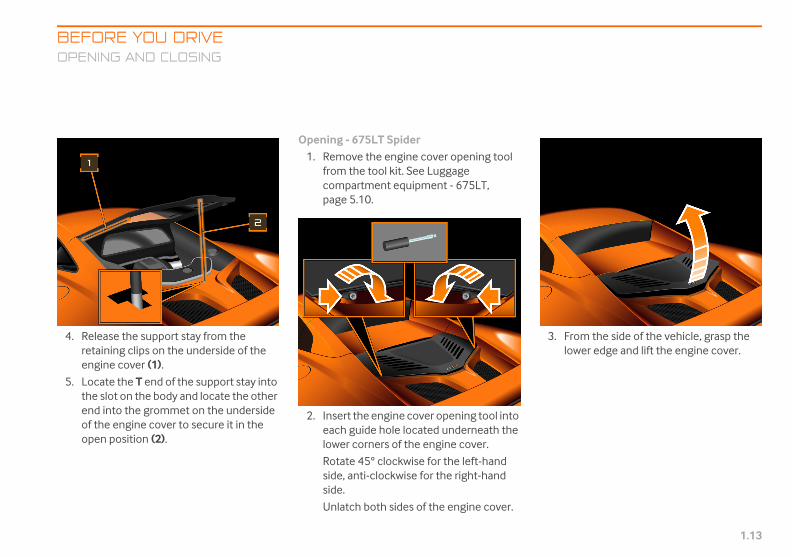
4. Rereten
5. Lotheenof op
3. From the side of the vehicle, grasp the lower edge and lift the engine cover.
Mclaren P11 - Complete.book Page 13 Friday, January 22, 2016 9:43 AM
RE YOU DRIVEING AND CLOSING
lease the support stay from the aining clips on the underside of the gine cover (1).
cate the T end of the support stay into slot on the body and locate the other
d into the grommet on the underside the engine cover to secure it in the en position (2).
Opening - 675LT Spider1. Remove the engine cover opening tool
from the tool kit. See Luggage compartment equipment - 675LT, page 5.10.
2. Insert the engine cover opening tool into each guide hole located underneath the lower corners of the engine cover.
Rotate 45° clockwise for the left-hand side, anti-clockwise for the right-hand side.
Unlatch both sides of the engine cover.
BEFORE YOU DRIVEOPENING
1.14
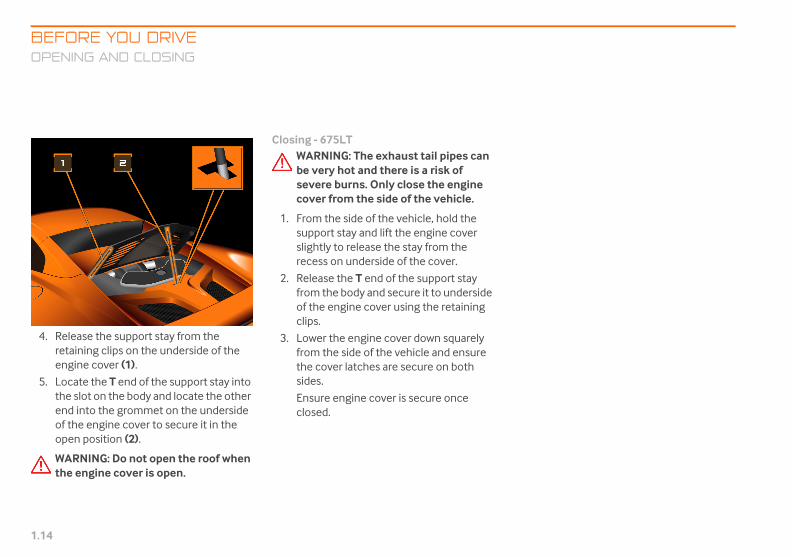
4. Release retainingengine c
5. Locate tthe slot end intoof the enopen po
WARNINthe eng
Mclaren P11 - Complete.book Page 14 Friday, January 22, 2016 9:43 AM
AND CLOSING
the support stay from the clips on the underside of the over (1).
he T end of the support stay into on the body and locate the other the grommet on the underside gine cover to secure it in the
sition (2).
G: Do not open the roof when ine cover is open.
Closing - 675LTWARNING: The exhaust tail pipes can be very hot and there is a risk of severe burns. Only close the engine cover from the side of the vehicle.
1. From the side of the vehicle, hold the support stay and lift the engine cover slightly to release the stay from the recess on underside of the cover.
2. Release the T end of the support stay from the body and secure it to underside of the engine cover using the retaining clips.
3. Lower the engine cover down squarely from the side of the vehicle and ensure the cover latches are secure on both sides.
Ensure engine cover is secure once closed.
BEFOOPEN
1.15
Luggag
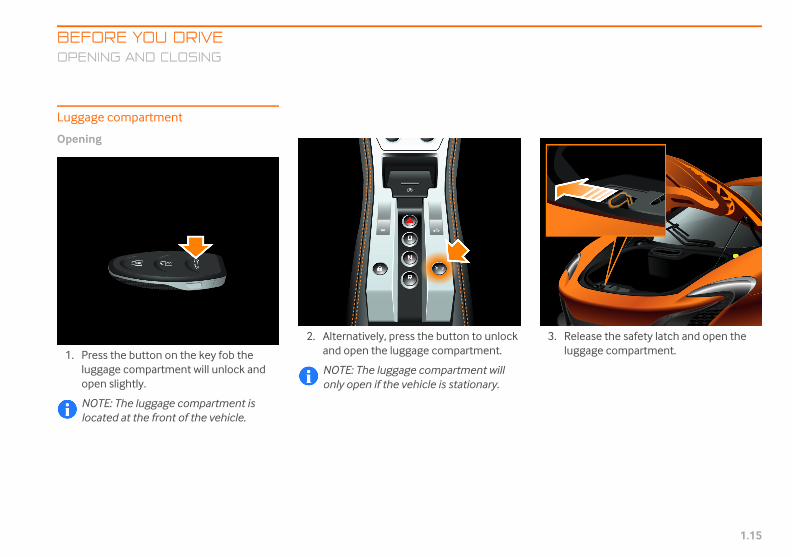
Openin
1. Prelugop
NOloc
3. Release the safety latch and open the luggage compartment.
Mclaren P11 - Complete.book Page 15 Friday, January 22, 2016 9:43 AM
RE YOU DRIVEING AND CLOSING
e compartment
g
ss the button on the key fob the gage compartment will unlock and
en slightly.
TE: The luggage compartment is ated at the front of the vehicle.
2. Alternatively, press the button to unlock and open the luggage compartment.
NOTE: The luggage compartment will only open if the vehicle is stationary.

BEFORE YOU DRIVEOPENING
1.16
ClosingWARNINtrappedcompar
1. Pull the firmly ansecurely
NOTE: Dluggagemay locthe car.
NOTE: Iflocked, isignals w
2. The luggalarmedcompart
NOTE: Twith theThis willwhile lealocked. Ayou of th
button is located at the front of the rnal luggage compartment area. The on is illuminated green when the car is ke and flashes when the vehicle is locked
ut down. This operation is completely pendent of ignition state. There are 2 es to the button:
If the vehicle is in motion when the button is pressed, the primary latch releases to allow air to enter the luggage compartment, but is prevented from opening by the secondary latch.
If the vehicle is stationary, both latches will release to allow the occupant to exit the luggage compartment.
Mclaren P11 - Complete.book Page 16 Friday, January 22, 2016 9:43 AM
AND CLOSING
G: Ensure that no one can be as you close the luggage tment.
luggage compartment lid down d ensure that it is latched .
o not leave the key fob in the compartment, as the vehicle k, and you may be locked out of
the vehicle had previously been t will still be locked and the turn ill flash as the lid closes.
age compartment will become as soon as the luggage ment lid is closed.
he car can be locked/alarmed luggage compartment open. allow you to charge the battery ving the rest of the vehicle long tone is sounded to alert is.
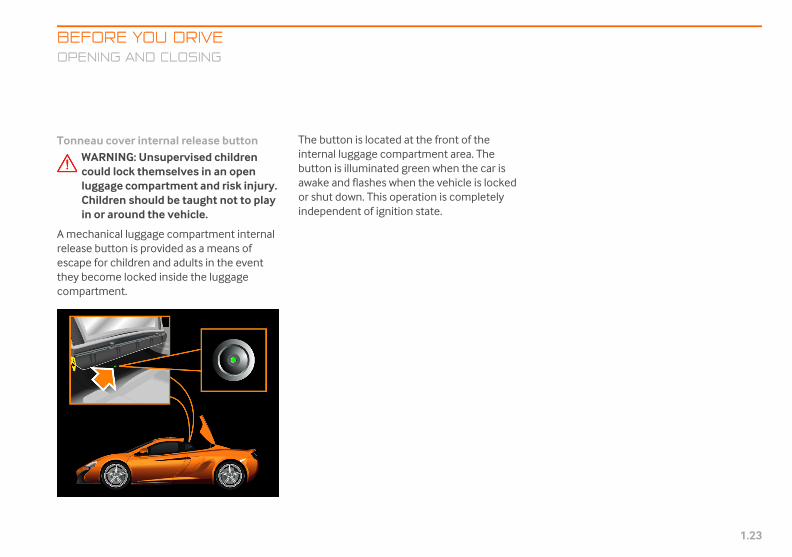
Luggage compartment internal release button
WARNING: Unsupervised children could lock themselves in an open luggage compartment and risk injury. Children should be taught not to play in or around the vehicle.
A mechanical luggage compartment internal release button is provided as a means of escape for children and adults in the event they become locked inside the luggage compartment.
The intebuttawaor shindemod
1.
2.

BEFOOPEN
1.17
Retract
The retrlightweiswiftly bbehind
The roocenter c
The roo25 mph
WAbeMabydurooda
WAthein anda
WAopintwathe
Roof Operating Temperature
NOTE: Roof operation is inhibited when operated below the minimum ambient operating temperature.
Minimum ambient operating temperature
14°F (-10°C)
Mclaren P11 - Complete.book Page 17 Friday, January 22, 2016 9:43 AM
RE YOU DRIVEING AND CLOSING
able Roof - Spider models
actable roof comprises of two ght panels which, when operated, fold eneath the tonneau panel located
the cockpit.
f is operated using the switch on the onsole.
f can be operated at speeds up to (40 kph).
RNING: Do not place any objects tween the moving parts of the roof. ke sure any occupants or
standers are clear of the roof ring operation. Operation of the f may cause personal injury or
mage to components.
RNING: Do not operate the roof if stowage bags are fitted and in use
the tonneau area. The roof system d/or the backlight glass could be maged.
RNING: To avoid damaging the erating mechanism and the vehicle erior, carefully remove surface ter, ice or snow before operating roof.
The roof must only be operated if the stowage bags are not in use and stored securely in the stowage mounts.
NOTE: Do not sit, stand or place any load on the backlight interior trim panel.
If you experience any problems with the roof, contact your Authorized McLaren Retailer immediately.
NOTE: If the vehicle is stopped with the roof open, it is possible to close the roof before the vehicle goes to sleep to leave it secure.

BEFORE YOU DRIVEOPENING
1.18
Opening the1. The veh
present.
NOTE: Ohalted w
2. Press anroof. If ywill stop
NOTE: When the roof starts to move, the tonneau cover will open and the backlight glass will drop slightly. The message ‘Roof Operation In Progress’ will appear on the left-hand instrument cluster.
Once the roof is fully open (stowed), the tonneau cover will close and the backlight glass will return to an aero position to reduce wind buffeting in the cockpit. The message ‘Roof Open’ will appear on the left-hand instrument cluster. An audible tone will confirm that the roof cycle is complete.
If the switch is held in the down position after the operation has completed, the windows and backlight will open fully.
If the vehicle speed rises above 25 mph (40 kph) while the roof is being operated, roof operation is paused. The message ‘Reduce Vehicle Speed, Release and Re-press Button For Roof Operation’ will appear on the left-hand instrument cluster.
Mclaren P11 - Complete.book Page 18 Friday, January 22, 2016 9:43 AM
AND CLOSING
rooficle must be awake with key
peration of the roof will be hilst the engine is cranking.
d hold the switch to operate the ou release the switch, the roof until you press the switch again.
NOTE: If the tonneau cover has been opened at any time while the roof is closed, the message ‘Confirm Tonneau Empty' will be displayed on the left-hand instrument cluster.
3. Check the tonneau area is empty and the stowage bags are correctly stowed. Press OK on the menu stalk, once you have confirmed this.
4. Press and hold the switch until the roof is fully open (stowed).
5.
6.
7.
BEFOOPEN
1.19
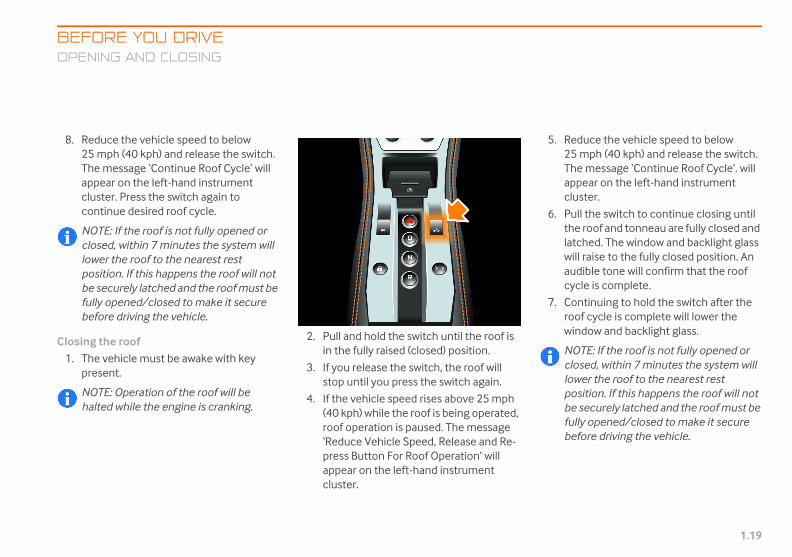
8. Re25Thapcluco
NOclolowpobefulbe
Closing1. Th
pre
NOha
5. Reduce the vehicle speed to below 25 mph (40 kph) and release the switch. The message ‘Continue Roof Cycle’. will appear on the left-hand instrument cluster.
6. Pull the switch to continue closing until the roof and tonneau are fully closed and latched. The window and backlight glass will raise to the fully closed position. An audible tone will confirm that the roof cycle is complete.
7. Continuing to hold the switch after the roof cycle is complete will lower the window and backlight glass.
NOTE: If the roof is not fully opened or closed, within 7 minutes the system will lower the roof to the nearest rest position. If this happens the roof will not be securely latched and the roof must be fully opened/closed to make it secure before driving the vehicle.
Mclaren P11 - Complete.book Page 19 Friday, January 22, 2016 9:43 AM
RE YOU DRIVEING AND CLOSING
duce the vehicle speed to below mph (40 kph) and release the switch. e message ‘Continue Roof Cycle’ will pear on the left-hand instrument ster. Press the switch again to
ntinue desired roof cycle.
TE: If the roof is not fully opened or sed, within 7 minutes the system will er the roof to the nearest rest
sition. If this happens the roof will not securely latched and the roof must be ly opened/closed to make it secure fore driving the vehicle.
the roofe vehicle must be awake with key sent.
TE: Operation of the roof will be lted while the engine is cranking.
2. Pull and hold the switch until the roof is in the fully raised (closed) position.
3. If you release the switch, the roof will stop until you press the switch again.
4. If the vehicle speed rises above 25 mph (40 kph) while the roof is being operated, roof operation is paused. The message ‘Reduce Vehicle Speed, Release and Re-press Button For Roof Operation’ will appear on the left-hand instrument cluster.

BEFORE YOU DRIVEOPENING
1.20
Backlight - S
WARNINbeing uensure providenot, opelead to
Lower the baobtain additioRaise the bacreduce wind b
NOTE: Itbacklighkey pres
The backlightconsole.
NOTE: Ifwith theAuthorizimmedia
Opening1. The veh
present.
Check the tonneau area is empty and the stowage bags are correctly stowed. Press OK on the menu stalk, once you have confirmed this.
Press and hold the backlight switch to lower the backlight to the desired position.
NOTE: Do not fully open the backlight when it is raining or snowing, as water could enter the cabin area and affect electrical components.
Mclaren P11 - Complete.book Page 20 Friday, January 22, 2016 9:43 AM
AND CLOSING
pider models
G: If the tonneau area is sed to stow luggage, please that the stowage bags d with the vehicle are used. If ration of the backlight could
damage to the backlight glass.
cklight, with the roof open, to nal air flow around the cockpit.
klight to an aero position to uffeting in the cockpit.
is only possible to operate the t if the vehicle is awake with the ent.
switch is located on the center
you experience any problems backlight, contact your ed McLaren Retailer tely.
icle must be awake with the key
2. Press and hold the switch to lower the backlight. If you release the switch, the backlight will stop until you press the switch again.
NOTE: If the tonneau cover has been opened while the roof is closed, the message ‘Confirm Tonneau Empty' will be displayed on the left-hand instrument cluster.
3.
4.

BEFOOPEN
1.21
Closing1. Th
pre
2. Puraiin t
NObabasle
NOTE: Access to the tonneau storage area can only be made using the tonneau open/close buttons on the driver’s door switch panel.
NOTE: The key must be within range of the driver’s door to enable tonneau control.
2. Press and hold the button on the rear edge of the driver's door until the tonneau cover is fully open.
NOTE: The tonneau cover cannot be opened if the roof is open.
Mclaren P11 - Complete.book Page 21 Friday, January 22, 2016 9:43 AM
RE YOU DRIVEING AND CLOSING
e vehicle must be awake with the key sent.
ll and hold the backlight switch to se the backlight until the backlight is he desired position.
TE: If the vehicle is stopped with the cklight open, you are able to close the cklight before the vehicle goes to ep to leave it secure.
Tonneau Cover - Spider models
The tonneau cover is the panel behind the cockpit. The tonneau cover can be opened and closed and allows access to the area below.
The retractable roof is stowed in the area underneath the tonneau cover when the roof has been lowered. The tonneau cover is then closed.
Opening1. The vehicle must be awake with key
present.
WARNING: Do not place any objects between the moving parts of the tonneau. Make sure any occupants or bystanders are clear of the tonneau during operation. Operation of the tonneau may cause personal injury or damage to components.
NOTE: Do not operate the tonneau cover whilst loading/unloading of the tonneau area is taking place. The vehicle will remain awake for a maximum of fifteen minutes while the tonneau is open.
BEFORE YOU DRIVEOPENING
1.22
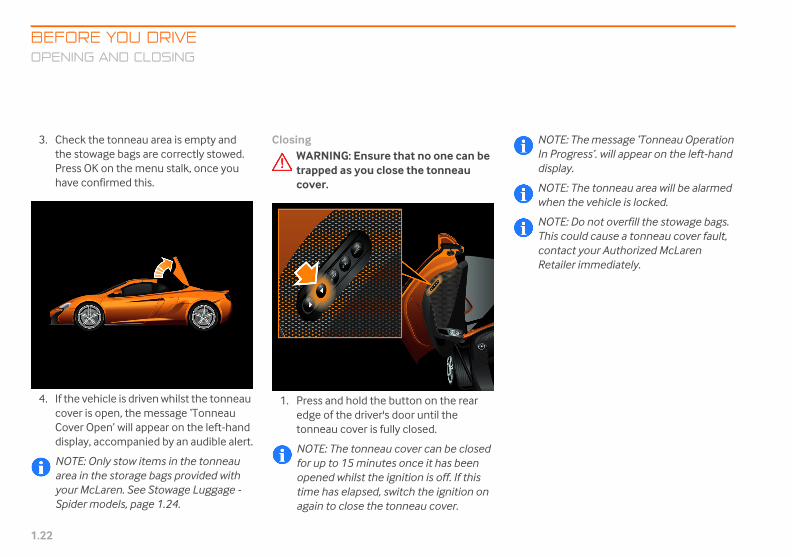
3. Check ththe stowPress OKhave con
4. If the vecover is Cover Odisplay,
NOTE: Oarea in tyour McSpider m
NOTE: The message ‘Tonneau Operation In Progress’. will appear on the left-hand display.
NOTE: The tonneau area will be alarmed when the vehicle is locked.
NOTE: Do not overfill the stowage bags. This could cause a tonneau cover fault, contact your Authorized McLaren Retailer immediately.
Mclaren P11 - Complete.book Page 22 Friday, January 22, 2016 9:43 AM
AND CLOSING
e tonneau area is empty and age bags are correctly stowed. on the menu stalk, once you firmed this.
hicle is driven whilst the tonneau open, the message ‘Tonneau pen’ will appear on the left-hand accompanied by an audible alert.
nly stow items in the tonneau he storage bags provided with Laren. See Stowage Luggage - odels, page 1.24.
ClosingWARNING: Ensure that no one can be trapped as you close the tonneau cover.
1. Press and hold the button on the rear edge of the driver's door until the tonneau cover is fully closed.
NOTE: The tonneau cover can be closed for up to 15 minutes once it has been opened whilst the ignition is off. If this time has elapsed, switch the ignition on again to close the tonneau cover.
BEFOOPEN
1.23
TonneaWAcolugChin
A mechrelease escape they becompar
Mclaren P11 - Complete.book Page 23 Friday, January 22, 2016 9:43 AM
RE YOU DRIVEING AND CLOSING
u cover internal release buttonRNING: Unsupervised children
uld lock themselves in an open gage compartment and risk injury. ildren should be taught not to play or around the vehicle.
anical luggage compartment internal button is provided as a means of for children and adults in the event come locked inside the luggage tment.
The button is located at the front of the internal luggage compartment area. The button is illuminated green when the car is awake and flashes when the vehicle is locked or shut down. This operation is completely independent of ignition state.

BEFORE YOU DRIVESTOWING
1.24
STOWING LUGGAGE
Stowage Lu
When the roothe tonneau small items. Ytwo stowage
WARNINthe tonndamagethe bac
The stowage tonneau area
Mclaren P11 - Complete.book Page 24 Friday, January 22, 2016 9:43 AM
LUGGAGE
ggage - Spider models
f is raised, the area underneath cover can be used for storing our McLaren is supplied with
bags for this purpose.
G: Do not place loose items in eau area. This could lead to
to the roof system and/or klight glass.
bags can be filled while in the or out of the vehicle.
NOTE: Only use the stowage bags provided. No other type of luggage bag can be used. The warning label on the interior of the tonneau cover confirms this.
NOTE: Ensure the contents do not exceed the recommended fill level identified by the red line on the rear of the bulkhead area. The warning label on the bulkhead confirms this.
NOTE: Do not overfill the stowage bags. The weight of each stowage bag and contents should not exceed 33 lbs (15 kg).
NOTE: Do not fill the stowage bags with any of the following:
• hazardous and/or volatile compounds or liquids
• heavy and/or sharp objects
• foods and/or liquids affected by heat
• fragile items or items which are easily breakable

BEFOSTOW
1.25
Installin1. Op
- S
2. Remo
3. Resto
4. Plaanton
NOTE: Ensure the stowage bags are securely fitted when in use and are attached to all the location points.
Mclaren P11 - Complete.book Page 25 Friday, January 22, 2016 9:43 AM
RE YOU DRIVEING LUGGAGE
g stowage bagsen the tonneau cover. Tonneau Cover pider models, page 1.21
move the stowage bags from the unts inside the tonneau cover.
lease the toggle and unroll the wage bags.
ce the items inside the stowage bags d/or place the stowage bags in the neau area.
5. Ensure the McLaren logos are facing towards the rear bulkhead and outboard of the vehicle.
6. Attach the carry handle (1) to the fixing area.
7. Attach the secondary loop (2) to the secondary fixing point.
NOTE: Zip the stowage bags fully closed when in use. This will prevent items from falling out and damaging the roof system and/or backlight glass.
BEFORE YOU DRIVESTOWING
1.26
Removing an
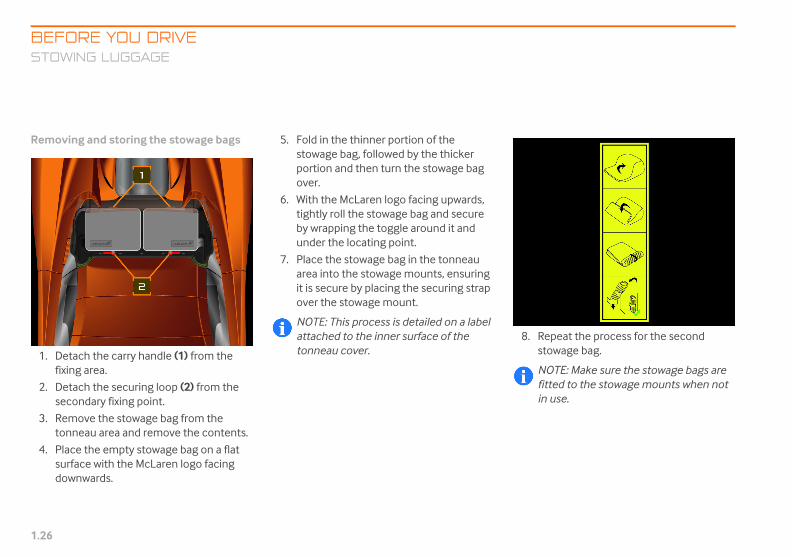
1. Detach tfixing ar
2. Detach tseconda
3. Removetonneau
4. Place thsurface downwa
Repeat the process for the second stowage bag.
NOTE: Make sure the stowage bags are fitted to the stowage mounts when not in use.
Mclaren P11 - Complete.book Page 26 Friday, January 22, 2016 9:43 AM
LUGGAGE
d storing the stowage bags
he carry handle (1) from the ea.
he securing loop (2) from the ry fixing point.
the stowage bag from the area and remove the contents.
e empty stowage bag on a flat with the McLaren logo facing rds.
5. Fold in the thinner portion of the stowage bag, followed by the thicker portion and then turn the stowage bag over.
6. With the McLaren logo facing upwards, tightly roll the stowage bag and secure by wrapping the toggle around it and under the locating point.
7. Place the stowage bag in the tonneau area into the stowage mounts, ensuring it is secure by placing the securing strap over the stowage mount.
NOTE: This process is detailed on a label attached to the inner surface of the tonneau cover.
8.

BEFOANTI-
1.27
ANTI-THEFT SYSTEM
Alarm s
A visualalarm syfollowin
• a d
• the
• the
• the
NOif ysile
The alarfollowin
• tow
• int
• ce
NOcointto
Disarming the alarm system1. Unlock the vehicle (using the keyless
system or the key fob), the alarm will disarm and the light in central locking button will stop flashing.
Mclaren P11 - Complete.book Page 27 Friday, January 22, 2016 9:43 AM
RE YOU DRIVETHEFT SYSTEM
ystem
and audible alarm is triggered if the stem is armed and any of the g are opened:
oor
engine cover
luggage compartment lid
tonneau cover (Spider only)
TE: The alarm remains triggered even ou close the open aperture. To nce the alarm, unlock the vehicle.
m system also incorporates the g features:
-away protection
erior motion sensor
nter console bin
TE: The center console stowage mpartment must be closed for the erior motion sensor or the Auto Alarm become armed.
Arming the alarm system1. Lock the vehicle (using the keyless
system or the key fob). The anti-theft alarm system will be armed after approximately 5 seconds.
2. The light in the central locking button will illuminate for approximately 60 seconds after locking the vehicle
BEFORE YOU DRIVEANTI-THE
1.28
Immobilizer
The immobilibeing started
The vehicle iswhen it sensepresent in the
Remobilizatiosensed inside
NOTE: Imthe engi
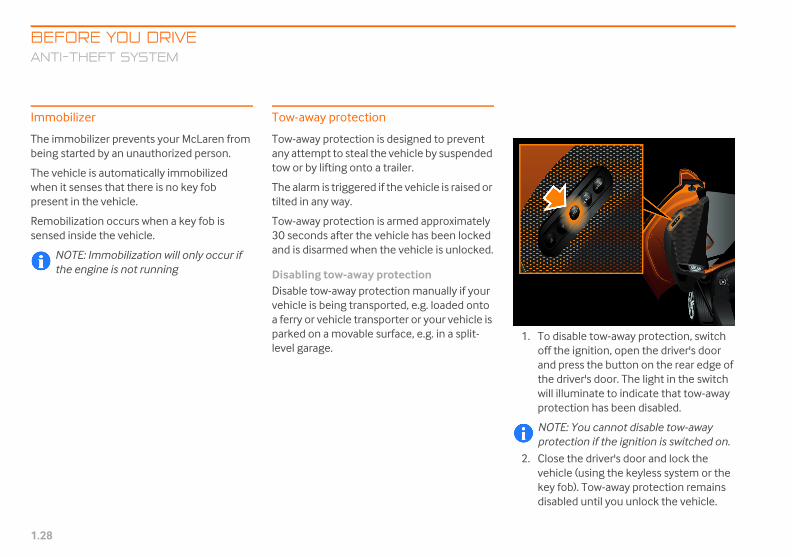
To disable tow-away protection, switch off the ignition, open the driver's door and press the button on the rear edge of the driver's door. The light in the switch will illuminate to indicate that tow-away protection has been disabled.
NOTE: You cannot disable tow-away protection if the ignition is switched on.
Close the driver's door and lock the vehicle (using the keyless system or the key fob). Tow-away protection remains disabled until you unlock the vehicle.
Mclaren P11 - Complete.book Page 28 Friday, January 22, 2016 9:43 AM
FT SYSTEM
zer prevents your McLaren from by an unauthorized person.
automatically immobilized s that there is no key fob vehicle.
n occurs when a key fob is the vehicle.
mobilization will only occur if ne is not running
Tow-away protection
Tow-away protection is designed to prevent any attempt to steal the vehicle by suspended tow or by lifting onto a trailer.
The alarm is triggered if the vehicle is raised or tilted in any way.
Tow-away protection is armed approximately 30 seconds after the vehicle has been locked and is disarmed when the vehicle is unlocked.
Disabling tow-away protectionDisable tow-away protection manually if your vehicle is being transported, e.g. loaded onto a ferry or vehicle transporter or your vehicle is parked on a movable surface, e.g. in a split-level garage.
1.
2.
BEFOANTI-
1.29
Interior
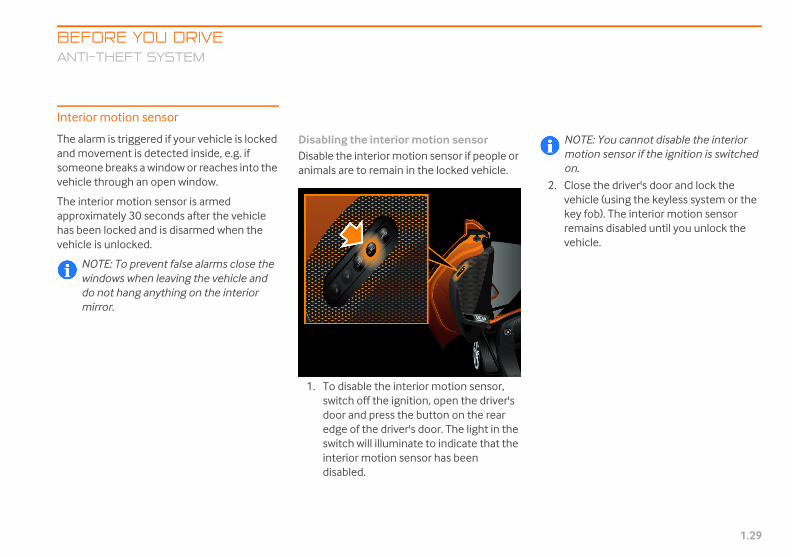
The alarand mosomeonvehicle
The inteapproximhas beevehicle
NOwindomi
NOTE: You cannot disable the interior motion sensor if the ignition is switched on.
2. Close the driver's door and lock the vehicle (using the keyless system or the key fob). The interior motion sensor remains disabled until you unlock the vehicle.
Mclaren P11 - Complete.book Page 29 Friday, January 22, 2016 9:43 AM
RE YOU DRIVETHEFT SYSTEM
motion sensor
m is triggered if your vehicle is locked vement is detected inside, e.g. if e breaks a window or reaches into the
through an open window.
rior motion sensor is armed ately 30 seconds after the vehicle
n locked and is disarmed when the is unlocked.
TE: To prevent false alarms close the dows when leaving the vehicle and
not hang anything on the interior rror.
Disabling the interior motion sensorDisable the interior motion sensor if people or animals are to remain in the locked vehicle.
1. To disable the interior motion sensor, switch off the ignition, open the driver's door and press the button on the rear edge of the driver's door. The light in the switch will illuminate to indicate that the interior motion sensor has been disabled.

BEFORE YOU DRIVESEATS
1.30
SEATS
Safety
WARNINwhen thmay notraffic ccontrolthe seacause a
WARNINeven wiDo not lthe vehseat is m
WARNINbecome
To reduevent ofollowin
• All vehiseat poto be woaway fropossibleseat muvehicle driver's
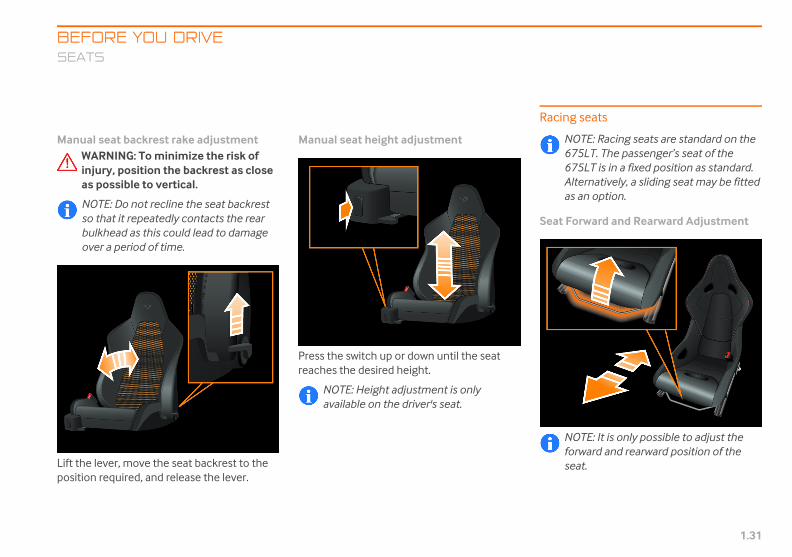
ual seats - except 675LT
ual seat forward and rearward stment
he lever, move the seat to the desired tion and release the lever to lock the seat.
WARNING: Ensure the seat is locked in position before driving.
NOTE: Ensure that there are no items of luggage in the footwell or behind, underneath or to the side of the seats. This may lead to the seats being damaged.
Mclaren P11 - Complete.book Page 30 Friday, January 22, 2016 9:43 AM
G: Adjust the driver's seat e vehicle is stationary. You
t be able to observe road and onditions and you could lose of the vehicle as a result of t moving. You could therefore n accident.
G: The seats can be moved thout a key fob in the vehicle. eave children unattended in icle, they could be injured if a
oved accidentally.
G: Ensure that no one can trapped as the seat moves.
ce the risk of injuries in the f an accident, observe the g:
cle occupants must select a sition that allows the seat belt
rn correctly, but is as far m the front air bags as . The position of the driver's st allow the driver to drive the safely. The distance from the seat to the pedals must be
such that the driver can fully depress the pedals. The distance between the driver's chest and the center of the air bag cover must be more than 10 inches (25 centimeters). The driver's arms should be slightly bent when holding the steering wheel.
• Vehicle occupants must always wear their seat belt correctly.
• Position the passenger’s seat as far back as is comfortable.WARNING: McLaren Automotive does not recommend the use child seats in this vehicle, but if you choose to do so, please follow the below guidelines:
• Children under 4 ft 5 in (1.35 meters) tall or younger than 12 years of age must be secured in a suitable child restraint.
• If you are using a child restraint on the passenger’s seat, move the seat as far back as possible.
Man
Manadju
Lift tposi
BEFOSEAT
1.31
ManualWAinjas
NOso buov
Lift the position
Racing seats
NOTE: Racing seats are standard on the 675LT. The passenger’s seat of the 675LT is in a fixed position as standard. Alternatively, a sliding seat may be fitted as an option.
Seat Forward and Rearward Adjustment
NOTE: It is only possible to adjust the forward and rearward position of the seat.
Mclaren P11 - Complete.book Page 31 Friday, January 22, 2016 9:43 AM
RE YOU DRIVES
seat backrest rake adjustmentRNING: To minimize the risk of
ury, position the backrest as close possible to vertical.
TE: Do not recline the seat backrest that it repeatedly contacts the rear lkhead as this could lead to damage er a period of time.
lever, move the seat backrest to the required, and release the lever.
Manual seat height adjustment
Press the switch up or down until the seat reaches the desired height.
NOTE: Height adjustment is only available on the driver's seat.

BEFORE YOU DRIVESEATS
1.32
To adjust theseat to the decomfortably rmove them t
WARNINin posit
NOTE: Eluggagethe seatbeing daadjustm
Seat Height For seat heighMcLaren Reta
WARNINshould McLare
ard and rearward adjustment
s the switch (1) up or down until the seat hes the desired position.
Mclaren P11 - Complete.book Page 32 Friday, January 22, 2016 9:43 AM
seat, lift the lever and slide the sired position, ensuring you can each all pedals and are able to
hrough their full travel.
G: Ensure the seat is locked ion before driving.
nsure that there are no items of in the footwell or adjacent to s as this may lead to the seats maged or not getting full ent.
Adjustmentt adjustment, contact your iler.
G: Seat height adjustment only be carried out by your n Retailer.
Electric seats
Electric seat adjustment
The seat adjustment switch is on the front face of the seat base and can be used when the vehicle is in any awake status, see Vehicle electrical status, page 2.3.
NOTE: Ensure there are no items of luggage in the footwell or behind, beneath or to the side of the seats, or the seats may be damaged.
Forw
Presreac
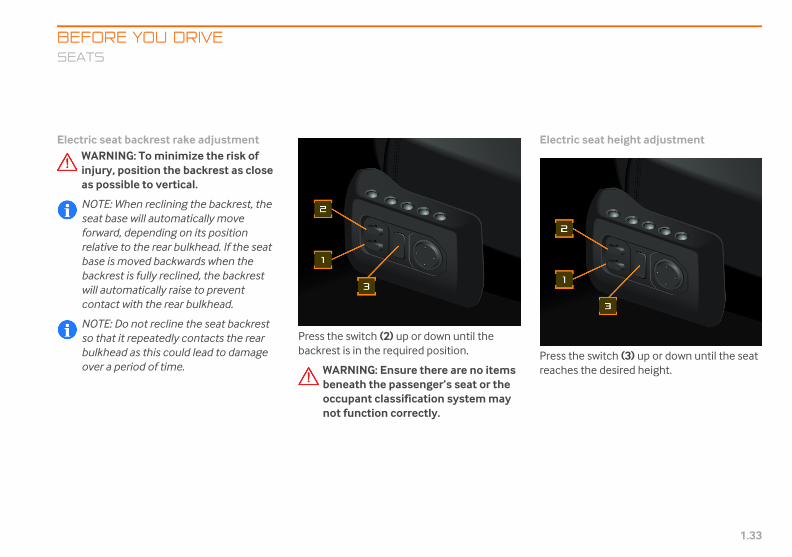
BEFOSEAT
1.33
ElectricWAinjas
NOseaforrelbabawilco
NOso buov
Electric seat height adjustment
Press the switch (3) up or down until the seat reaches the desired height.
Mclaren P11 - Complete.book Page 33 Friday, January 22, 2016 9:43 AM
RE YOU DRIVES
seat backrest rake adjustmentRNING: To minimize the risk of
ury, position the backrest as close possible to vertical.
TE: When reclining the backrest, the t base will automatically move
ward, depending on its position ative to the rear bulkhead. If the seat se is moved backwards when the ckrest is fully reclined, the backrest l automatically raise to prevent ntact with the rear bulkhead.
TE: Do not recline the seat backrest that it repeatedly contacts the rear lkhead as this could lead to damage er a period of time.
Press the switch (2) up or down until the backrest is in the required position.
WARNING: Ensure there are no items beneath the passenger’s seat or the occupant classification system may not function correctly.

BEFORE YOU DRIVESEATS
1.34
Electric seat
Press (1) to lothe lumbar su
Press (3) to inselected lum
alling a seat and mirror positionWARNING: Only recall a seat, mirror position and steering wheel position, when the vehicle is stationary. You may not be able to observe road and traffic conditions and you could lose control of the vehicle as a result of the seat moving. You could therefore cause an accident.
s the button (2) where the required ng is stored, and hold until the seat and ors have completed their adjustment.
Mclaren P11 - Complete.book Page 34 Friday, January 22, 2016 9:43 AM
lumbar adjustment
wer or (2) to raise the position of pport.
flate or (4) to deflate the bar support.
Storing a seat and mirror positionSpecific seat and exterior mirror positions can be stored for up to three drivers.
Set the seat, mirrors, and steering wheel to the desired positions; see Electric seats, page 1.32, Electric steering wheel adjustment, page 1.38 and Exterior mirrors, page 1.51.
Press and hold the memory set button (1) and then simultaneously press any of the memory position buttons (2) to store the setting.
Rec
Pressettimirr

BEFOSEAT
1.35
ComforWAbe
When coseat willpositiondriver's
This assthe featpage 3.1
Use thesteeringreturn tno seat readjust
Seat mAfter usthe drivusing thsteering
The funReturn SClear” is
NOTE: Cancel the comfort entry/entry function by starting the engine, or by pressing the seat switch pack while the seat is returning to position.
4. If the comfort entry/entry function is canceled, it will not be possible to return the seat to its previous position using this function. The message in the left-hand display will disappear and the control stalk will return to its normal use. The function will be available when comfort entry/exit is next used.
5. Once the seat has returned to its previous position, the message in the left-hand display will disappear and an audible alert will confirm that the seat return has been completed.
Mclaren P11 - Complete.book Page 35 Friday, January 22, 2016 9:43 AM
RE YOU DRIVES
t entry/exitRNING: Ensure that no one can
come trapped as the seat moves.
mfort entry/exit is active, the driver's move fully rearwards and to its lowest when the engine is off and the door is opened.
ists exit from the vehicle. To switch ure on or off, see Comfort Entry/Exit, 5.
seat, mirror and if fitted, electric wheel, memory recall feature to
he seat to your preferred position. If positions are stored in memory, the seat using the controls.
emory - Stalk returning comfort entry/exit, you can return er’s seat to its most recent position e control stalk on the left of the column.
ction will only be available when “To eat, Pull left Stalk or Press OK to
displayed on the left-hand display.
The vehicle must be awake with ignition off, the driver’s door closed, and comfort entry/exit ON.
1. Pull the control stalk towards you once to initiate the comfort entry function.
2. If at any point you wish to cancel the function, operate the control stalk or open the driver’s door. A message “Seat Returning, Operate Stalk or Open Door to Cancel” will appear in the left-hand display.
NOTE: This function will only return the seat to the position it was in prior to the comfort entry/exit function being used. It will not use any of the seat memory positions, unless the previous position was one of the stored seat memory positions.
3. If the seat is manually adjusted before the stalk is used, the function will be lost and will not be available until the next time comfort entry/exit function is used.
BEFORE YOU DRIVESEATS
1.36
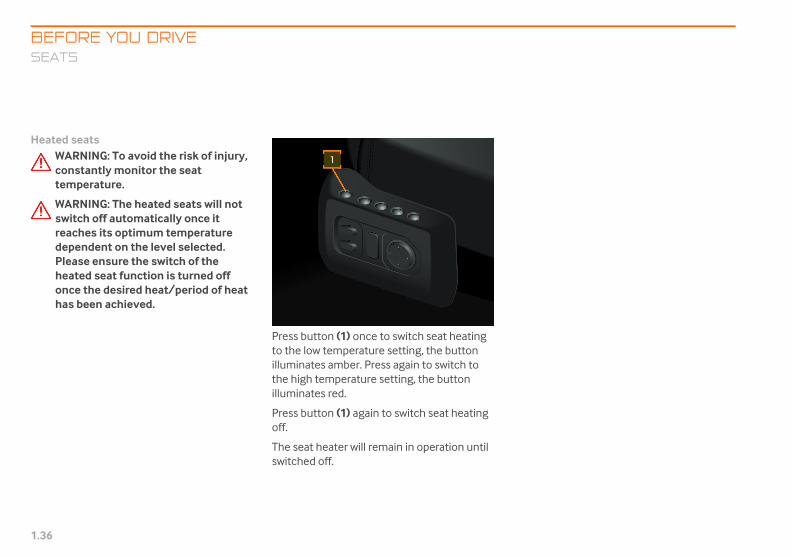
Heated seatWARNINconstantemper
WARNINswitch oreachesdependPlease eheated once thhas bee
Mclaren P11 - Complete.book Page 36 Friday, January 22, 2016 9:43 AM
sG: To avoid the risk of injury, tly monitor the seat
ature.
G: The heated seats will not ff automatically once it its optimum temperature ent on the level selected. nsure the switch of the
seat function is turned off e desired heat/period of heat n achieved.
Press button (1) once to switch seat heating to the low temperature setting, the button illuminates amber. Press again to switch to the high temperature setting, the button illuminates red.
Press button (1) again to switch seat heating off.
The seat heater will remain in operation until switched off.
BEFOSTEE
1.37
STEERING WHEEL AND STEERING
Manua
WAwhYoancoveac
The steeand rea
Push thposition
Mclaren P11 - Complete.book Page 37 Friday, January 22, 2016 9:43 AM
RE YOU DRIVERING WHEEL AND STEERING COLUMN
COLUMN
l steering wheel adjustment
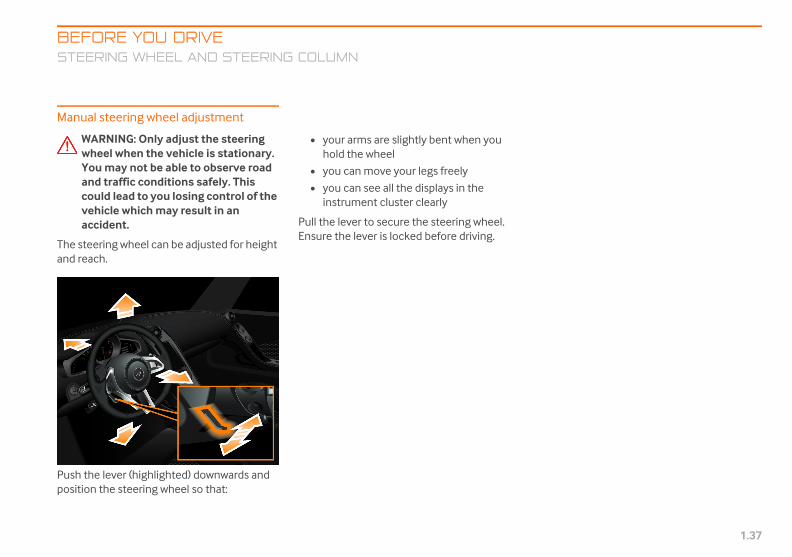
RNING: Only adjust the steering eel when the vehicle is stationary. u may not be able to observe road d traffic conditions safely. This uld lead to you losing control of the hicle which may result in an cident.
ring wheel can be adjusted for height ch.
e lever (highlighted) downwards and the steering wheel so that:
• your arms are slightly bent when you hold the wheel
• you can move your legs freely
• you can see all the displays in the instrument cluster clearly
Pull the lever to secure the steering wheel. Ensure the lever is locked before driving.

BEFORE YOU DRIVESTEERING
1.38
Electric stee
WARNINwheel wYou maand trafcould levehicle acciden
The steering for height andswitch when status, see Ve
The column cleft-hand side
NOTE: The column control switch will only adjust the steering wheel in one direction at a time.
g the column control switch, position the ring wheel so that:
your arms are slightly bent when you hold the wheel
you can move your legs freely
you can see all the displays in the instrument cluster clearly
omatic steering wheel adjustmentur vehicle is equipped with electric seats, lectric steering wheel position is stored
n the seat and mirror positions are stored. “Storing a seat and mirror position” on
34.
WARNING: Ensure that your hands are kept clear of the wheel and column as the steering wheel moves.
NOTE: Any automatic movement can be canceled with any input from the column control switch.
Mclaren P11 - Complete.book Page 38 Friday, January 22, 2016 9:43 AM
WHEEL AND STEERING COLUMN
ring wheel adjustment
G: Only adjust the steering hen the vehicle is stationary.
y not be able to observe road fic conditions safely. This ad to you losing control of the which may result in an t.
wheel position may be adjusted reach using the column control
the vehicle is in any awake hicle electrical status, page 2.3.
ontrol switch is located on the of the steering column.
1. Height: Raise
2. Height: Lower
3. Reach: Away
4. Reach: Towards
Moving the column control switch in directions 1 & 2 adjusts the steering wheel height, raising or lowering the wheel’s position.
Moving the column control switch in directions 3 & 4 adjusts the steering wheel reach, moving it closer or further away.
Usinstee
•
••
AutIf yothe ewheSee page
BEFOSTEE
1.39
ComforWhen costeeringforwardhighestthe driv
You cancolumncontrol column
WAareco
NOcanco
Mclaren P11 - Complete.book Page 39 Friday, January 22, 2016 9:43 AM
RE YOU DRIVERING WHEEL AND STEERING COLUMN
t entry/exitmfort entry/exit is active, the wheel and column will move fully
(away from the driver) and to its position when the engine is off and er's door is opened.
return the steering wheel and to its most recent position using the stalk on the left of the steering . See “Comfort entry/exit” on page 35.
RNING: Ensure that your hands kept clear of the wheel and
lumn as the steering wheel moves.
TE: Any automatic movement can be celed with any input from the
lumn control switch.
Horn
Press the center of the steering wheel to operate the horn.
NOTE: The horn can be operated when the ignition is switched off.
BEFORE YOU DRIVEOCCUPAN
1.40
OCCUPANT SAFETY
Seat belts
Seat belts andmost effectivoccupants frominimizes thimpacts and t
WARNINworn, wbeen enbuckle, functionthat all seat bel
Ensure
• is routeyour pejoints a
• fits clos• is not tw• is route
shoulde• lies flat
collar bshoulde
• fits clospulling
the shoulder belt between the breasts and to the side of the abdomen. Ensure the belt is not slack or twisted.
WARNING: The seat belt only provides its intended degree of protection if the seat backrest is positioned close to vertical, and the occupant is sitting upright.
WARNING: The seat belt cannot perform its function correctly if the seat belt or buckle becomes excessively dirty or damaged. Ensure the belt latch engages the buckle fully.
Check the seat belts regularly to ensure that they are not damaged, or routed over sharp edges and are not trapped. The belt could tear in an accident, causing injury to occupants.
Have seat belts checked if the belts have been damaged or subjected to a heavy load. Work on the seat belts should only be carried out by your McLaren Retailer.
Mclaren P11 - Complete.book Page 40 Friday, January 22, 2016 9:43 AM
T SAFETY
child restraint systems are the e means of restraining vehicle m impact forces, which, in turn,
e danger of injury from interior he effects of whiplash.
G: A seat belt which is not orn incorrectly, or has not gaged fully in the seat belt cannot perform its intended . To avoid injuries, ensure
vehicle occupants wear their t correctly at all times.
that the belt:
d as low as possible across lvic area, i.e. across your hip nd not across your abdomenelyisted
d across the middle of your r
across the mid point of the one between the neck and rely across your pelvis by
the shoulder belt upwards
Do not secure any objects with a seat belt if the seat belt is being used by a vehicle occupant.
Avoid wearing bulky clothing.
Do not route the belt across sharp edged or fragile objects especially if these are on or in your clothing The seat belt could be damaged and you could be injured.
Only one person should use each seat belt at any one time.
Never allow children to travel on the lap of another occupant.
Children under 4 ft 5 in (1.35 meters) tall or younger than 12 years of age must be secured in a suitable child restraint. Follow the manufacturer's instructions when installing child restraint systems.
WARNING: Pregnant women should wear a seat belt to ensure maximum safety of mother and unborn child. Position the lap belt across the hips, beneath the abdomen and position

BEFOOCCU
1.41
Wearin
1. Enan
2. Gratheacrbeacr
The belt tensioner will be triggered for each seat belt, provided the belt latch is engaged in the seat belt buckle, if a head-on or rear-end collision occurs and the vehicle decelerates or accelerates rapidly.
If the belt tensioners are triggered, a bang will be heard, a small amount of dust may be released and the Supplementary Restraint System warning light will illuminate.
WARNING: Once triggered (or if you are unsure if they have triggered) you MUST not drive the vehicle. Contact your nearest McLaren Retailer immediately.
Belt force limitersThe seat belts incorporate belt force limiters. Belt force limiters are tuned to the front air bags and gradually release the tension being applied to the belts during an impact, thus reducing the force exerted on occupants.
Mclaren P11 - Complete.book Page 41 Friday, January 22, 2016 9:43 AM
RE YOU DRIVEPANT SAFETY
g a seat belt
sure that you are seated comfortably d the controls are within easy reach.
sp the seat belt latch and pull across body, ensuring that the belt lies flat oss the mid point of the collar bone
tween the neck and shoulder, then oss the chest and pelvis.
3. With the belt correctly positioned insert the latch into the buckle and press until a click is heard to confirm engagement.
Check engagement by attempting to pull the latch from the buckle.
Seat belt tensionersThe seat belts incorporate belt tensioners. Belt tensioners apply tension to the seat belts in an accident, pulling them tight against the occupant.
WARNING: Do not insert the belt latch into the passenger’s seat belt buckle if the passenger’s seat is unoccupied. The belt tensioners could be triggered in an accident.
WARNING: Belt tensioners do not correct an incorrect seating position or incorrectly worn seat belts.
Belt tensioners do not pull occupants back towards the backrests.
BEFORE YOU DRIVEOCCUPAN
1.42
Seat belt waThe seainstrum
reminds vehiseat belts. Thextinguishes when the drivtheir seat bel
WARNING: Air bags are not a substitute for correctly worn seat belts, they enhance the level of occupant protection offered by seat belts.
WARNING: Correct operation of the air bags can only occur if the steering wheel, the passenger’s air bag cover, the knee air bag cover and the door trim are not covered.
Mclaren P11 - Complete.book Page 42 Friday, January 22, 2016 9:43 AM
T SAFETY
rning lightt belt warning light in the ent cluster and a warning tone
cle occupants to fasten their e seat belt warning light and the warning tone ceases er and passenger have fastened
t.
Supplementary Restraint System
Air bag system
Your McLaren is equipped with the following air bags:
• driver's front air bag in the steering wheel
• passenger’s front air bag in the dashboard
• driver’s and passenger’s knee air bags
• side head air bags in the doors
WARNING: Take note of all warning labels attached to the sun visors.

BEFOOCCU
1.43
WAinjob
• Enleathe
• Dodamo
• Doda
• Onouinjarewh
• Ocmuins
• Enobocof
Air bag system modificationIf it is necessary to modify the air bag system to accommodate a person with disabilities, please contact McLaren Automotive Inc at:
McLaren Automotive Inc.
750 3rd Avenue, Suite 2400
New York
NY 10017
Mclaren P11 - Complete.book Page 43 Friday, January 22, 2016 9:43 AM
RE YOU DRIVEPANT SAFETY
RNING: To reduce the risk of uries in the event of an accident, serve the following points:
sure that the driver's chest is at st 10 inches (25 centimeters) from air bag cover.
not lean forward over the shboard while the vehicle is in tion.
not rest your feet on the shboard.ly hold the steering wheel by the tside of the rim. You could be ured if the air bag deploys and you holding the inside of the steering eel.cupants, particularly children, st not lean on the doors from ide the vehicle.sure that there are no other jects between the vehicle cupants and the deployment area the air bags.
• Because of the high speed at which air bags deploy, there is a risk of injuries caused by an inflating air bag.
Air bag replacement
McLaren recommends that airbags are replaced every 15 years to prevent airbags from not firing due to component operating life.

BEFORE YOU DRIVEOCCUPAN
1.44
Front air bag
The driver's frthe steering wair bag (2) dedashboard.
The front air bdetermines thprotection fochest injuries
side head air bags (left-hand highlighted) ocated in the upper area of each door l, and are deployed if the system rmines they can offer additional ection for the head of the occupant on ide of the vehicle on which the impact rs.
NOTE: The passenger’s side head air bag is only deployed if the passenger’s seat is occupied.
Mclaren P11 - Complete.book Page 44 Friday, January 22, 2016 9:43 AM
T SAFETY
s
ont air bag (1) deploys in front of heel and the passenger’s front
ploys in front of and above the
ags are deployed if the system ey can offer additional
r occupants against head and .
NOTE: The passenger’s front air bag is only triggered if the PASSENGER AIR BAG OFF warning light on the overhead console is NOT illuminated, see Occupant classification system - front passenger’s seat, page 1.45.
Side head air bagsWARNING: To reduce the risk of injury to occupants if a side head air bag is triggered, ensure that:
• there are no other objects between the vehicle occupants and the deployment area of the air bags
• no accessories are attached to the doors
• no heavy or sharp objects are left in the pockets in clothing
• occupants, particularly children, must not lean on the doors from inside the vehicle
The are lpanedeteprotthe soccu

BEFOOCCU
1.45
Knee aiWAto tri
• thethede
• nothe
The knethe lowedeploye
The status of the air bags is indicated by the PASSENGER AIR BAG OFF warning light on the overhead console.
The PASSENGER AIR BAG OFF warning light illuminates when the ignition is switched on and extinguishes after 5 seconds.
The warning light will remain illuminated if the passenger’s seat is unoccupied or if a child seat is fitted.
NOTE: The PASSENGER AIR BAG OFF warning light is always illuminated unless the specific weight is exceeded.
Mclaren P11 - Complete.book Page 45 Friday, January 22, 2016 9:43 AM
RE YOU DRIVEPANT SAFETY
r bagsRNING: To reduce the risk of injury
occupants if a knee air bag is ggered, ensure that:
re are no other objects between vehicle occupants and the
ployment area of the air bags heavy or sharp objects are left in pockets in clothing
e air bags (highlighted) are located in r area of the dash board, and are
d if the system determines they can
offer additional protection for the knees and lower body of the occupant on the side of the vehicle on which the impact occurs.
NOTE: The passenger’s knee air bag is only deployed if the passenger’s seat is occupied.
Occupant classification system - front passenger’s seat The system can determine if the passenger’s seat is occupied using a capacitance mat fitted in the seat base, and by checking the seat belt buckle engagement on the passenger’s seat belt. The passenger’s front air bag will not be active unless a specific weight is exceeded. This allows child restraint systems to be used on the passenger’s seat.
BEFORE YOU DRIVEOCCUPAN
1.46
If the PASSENis illuminatednot active. Thtensioner on active even ifwarning light
WARNINOFF wawhen thpassengdeactivseriousair bag i
WARNINoccupafunctionobjectsapply adblanketequipmheater, seriousoccupaoperate
WARNING: Do not place sharp objects onto the passenger’s seat. These may damage the occupant classification system if they puncture the seat cushion.
WARNING: To ensure that the occupant classification system functions correctly, never place objects (e.g. a cushion) under the child restraint system. The entire base of the child restraint system must be in contact with the seat at all times. If a child restraint system is not fitted correctly it may not provide the intended degree of protection in the event of an accident and may cause injuries.
ag deploymente event of a collision the air bags are oyed by the Supplementary Restraints em to protect the vehicle occupants. The em can control the number of airbags oyed and partially or fully inflate the
Mclaren P11 - Complete.book Page 46 Friday, January 22, 2016 9:43 AM
T SAFETY
GER AIR BAG OFF warning light , the passenger’s front air bag is e side head air bag and the belt the passenger’s side remain the PASSENGER AIR BAG OFF is illuminated.
G: If the PASSENGER AIR BAG rning light is not illuminated e child seat is fitted, the er’s air bag is not
ated. The child could be ly injured if the passenger’s nflates.
G: To ensure that the nt classification system
s correctly, never place under the seat. Also never
ditional material such as a , cushion, or aftermarket ent such as a seat cover, or massager. These items can ly affect how well the nt classification system s. McLaren recommends that
aftermarket equipment such as covers, heaters, and massagers are NOT used.
WARNING: Any electronic devices that are either active or connected to the 12V accessory socket should not be placed on the passenger’s seat. They can affect how the occupant classification system operates.
WARNING: The occupant classification system may become affected if any form of liquid (inclusive of rain) is spilled onto the passenger’s seat. If the PASSENGER AIR BAG OFF warning light is not illuminated when the seat is unoccupied, do not install a child restraint or allow anyone to occupy the seat. Please contact your nearest McLaren Retailer at your earliest convenience.
Air bIn thdeplSystsystdepl

BEFOOCCU
1.47
airbags collisionprotecti
The systhe collioccupanphysicarelationare knonecessapressuroccupan
After andepressinflationused tovents inoccurreoccupan
An airbamovemthe loadfor a co
Supplementary Restraint System warning light
The Supplementary Restraint System performs a self-test at regular intervals
when the ignition is switched on and the engine is running.
The warning light in the instrument cluster illuminates when the ignition is switched on and extinguishes 5 seconds after the engine is started.
WARNING: Contact your McLaren retailer immediately should any of the following occur:
• the warning light does not illuminate when you switch on the ignition
• the light does not extinguish 5 seconds after the engine is running
• the light illuminates again, after the engine has started
Mclaren P11 - Complete.book Page 47 Friday, January 22, 2016 9:43 AM
RE YOU DRIVEPANT SAFETY
depending on the severity of the to provide the best possible on to the vehicle occupants.
tem uses sensors to rapidly evaluate sion severity, the number of vehicle ts, each occupants weight, their
l size and their seated position in to their airbags. Once all these factors wn the system will then deploy the ry airbags and regulate the inflation
e in the impact zone to ensure the ts safety.
accident the air bags begin to urise almost immediately after the process has taken place. The gas
inflate the airbags escapes through the airbag and this helps reduce the nce of major impact injuries to the ts.
g slows down and restricts the ent of the vehicle occupant reducing on the body, but is not a substitute
rrectly worn seat belt.
WARNING: If the air bags are deployed, a bang will be heard and a small amount of fine powder may be released. The noise will not damage your hearing and the powder does not constitute a health hazard nor does it imply that a fire has broken out. This powder could cause short term breathing difficulties for persons suffering from asthma or other respiratory conditions. To prevent breathing difficulties, leave the vehicle as soon as possible or open a window.
WARNING: After an air bag has been triggered, air bag parts are hot, do not touch them. Have the air bags replaced at your McLaren Retailer.
Out Of Position (OOP)The airbag system in your McLaren has been tested for the correct small child Out Of Position (OOP) operation. OOP can occur if a small child is incorrectly positioned in the passenger’s seat in the event of a collision in which the airbags are deployed.

BEFORE YOU DRIVEOCCUPAN
1.48
Safety featuIf you are unfin an accidento assist you
• the door
• the haza
• the inter
In some instaswitched off.
d restraint systemaren Automotive does not recommend se of child seats in this vehicle, but if you se to do so, please follow the below
elines:
re any child under 4 ft 5 in (1.35 meters) r younger than 12 years of age traveling e vehicle in an appropriate category aint according to their weight. Contact McLaren Retailer for advice.
se refer to current national and state laws pecific requirements.
egory Weight
egory 0 Up to 22 lbs (10 kg)
egory 0+s Up to 29 lbs (13 kg)
egory I 20 lbs to 40 lbs (9 to 18 kg)
egory II 33 lbs to 55 lbs (15 to 25 kg)
egory III 49 lbs to 79 lbs (22 to 36 kg)
Mclaren P11 - Complete.book Page 48 Friday, January 22, 2016 9:43 AM
T SAFETY
resortunate enough to be involved t the following events will occur and any recovery personnel:
s will unlock
rd warning lights will switch on
ior lighting will switch on
nces, the fuel system will also be
Child passengers
WARNING: Do not leave children unsupervised in the vehicle even if they are secured in a child restraint. Children could injure themselves on parts of the vehicle, open a door and be seriously or even fatally harmed by prolonged exposure to heat or cold.
If children open a door, they could cause injury to others in doing so or get out of the vehicle and possibly injure themselves or they could be injured by a passing vehicle.
Do not expose the child restraint system to direct sunlight. The metal parts of the child restraint system could burn the child.
Do not carry heavy or hard objects inside the vehicle unless they are secured.
An unsecured or incorrectly positioned load increases the risk of injury to the child during sharp braking, a sudden change of direction or an accident.
ChilMcLthe uchooguid
Secutall oin threstryour
Pleafor s
Cat
Cat
Cat
Cat
Cat
Cat

BEFOOCCU
1.49
WAfacpafroindOF
is fully rearwards and is positioned at the lowest height. A manual passenger’s seat does not have height adjustment.
WARNING: If the child restraint system has not been fitted correctly, the child cannot be restrained in an accident or sudden braking and could be injured. When fitting a child restraint system, observe the manufacturer's instructions on the correct use of the child restraint.
KISI child restraint functionYour McLaren is fitted with a KISI system which is an automatic locking seat belt on the passenger’s side designed to temporarily lock the seat belt to securely hold the child restraint in the passenger’s seat.
1. Extend the passenger’s seat belt fully. The KISI system only engages when the seat belt is fully extended.
NOTE: If the vehicle is parked on a hill the inertia lock may stop the seat belt extending. If this occurs, release the seat
Mclaren P11 - Complete.book Page 49 Friday, January 22, 2016 9:43 AM
RE YOU DRIVEPANT SAFETY
RNING: Never secure a rearward ing child restraint system on the
ssenger’s seat if the passenger’s nt air bag is active. The status is icated by the PASSENGER AIR BAG F indicator.
WARNING: If the PASSENGER AIR BAG OFF indicator does not illuminate, do not use a rearward facing child restraint system on the passenger seat. You may use a forward-facing child restraint system on the passenger’s seat. The warning label on the passenger’s side is there to remind you of this.
WARNING: If a forward facing child seat is fitted to the passenger’s seat, make sure that the passenger’s seat
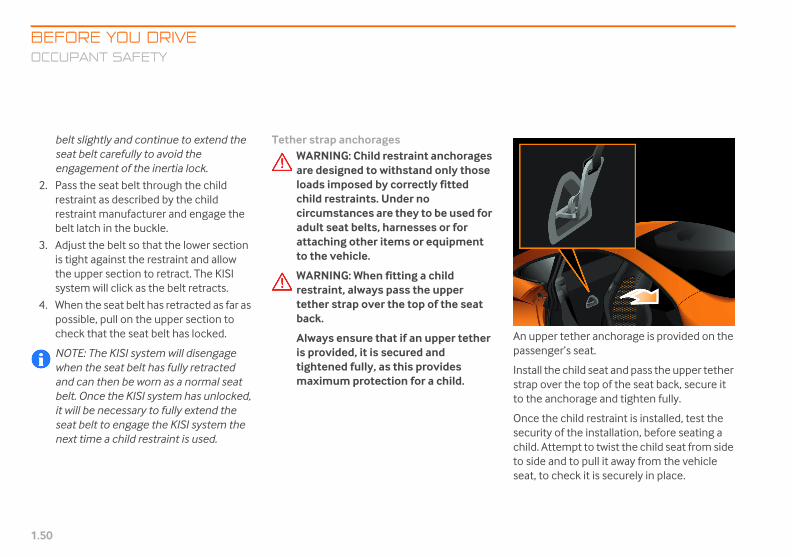
BEFORE YOU DRIVEOCCUPAN
1.50
belt slighseat beltengagem
2. Pass therestraintrestraintbelt latc
3. Adjust this tight athe uppesystem w
4. When thpossiblecheck th
NOTE: Twhen thand canbelt. Oncit will beseat beltnext tim
pper tether anchorage is provided on the enger’s seat.
ll the child seat and pass the upper tether over the top of the seat back, secure it e anchorage and tighten fully.
e the child restraint is installed, test the rity of the installation, before seating a . Attempt to twist the child seat from side
de and to pull it away from the vehicle , to check it is securely in place.
Mclaren P11 - Complete.book Page 50 Friday, January 22, 2016 9:43 AM
T SAFETY
tly and continue to extend the carefully to avoid the
ent of the inertia lock.
seat belt through the child as described by the child manufacturer and engage the h in the buckle.
e belt so that the lower section gainst the restraint and allow r section to retract. The KISI ill click as the belt retracts.
e seat belt has retracted as far as , pull on the upper section to at the seat belt has locked.
he KISI system will disengage e seat belt has fully retracted then be worn as a normal seat
e the KISI system has unlocked, necessary to fully extend the to engage the KISI system the e a child restraint is used.
Tether strap anchoragesWARNING: Child restraint anchorages are designed to withstand only those loads imposed by correctly fitted child restraints. Under no circumstances are they to be used for adult seat belts, harnesses or for attaching other items or equipment to the vehicle.
WARNING: When fitting a child restraint, always pass the upper tether strap over the top of the seat back.
Always ensure that if an upper tether is provided, it is secured and tightened fully, as this provides maximum protection for a child.
An upass
Instastrapto th
Oncsecuchildto siseat

BEFOMIRRO
1.51
MIRRORS
Safety
WAmiof
Exterior mirrors
WARNING: In some markets, the exterior mirrors have convex glass fitted. This type of mirror enlarges the field of vision, but reduces the size of the image. This means that objects are closer than they appear.
To avoid misjudging the distance to vehicles traveling behind and perhaps causing an accident, check the actual distance of the vehicle, before changing direction.
The exterior mirrors control is located on the dashboard between the steering wheel and the center console.
Mclaren P11 - Complete.book Page 51 Friday, January 22, 2016 9:43 AM
RE YOU DRIVERS
RNING: Before driving, adjust all rrors to give the best possible view road and traffic conditions.
Interior mirror
Adjust the interior mirror to get a good view of the road and traffic conditions.
Move the lever on the bottom of the mirror to avoid being dazzled by lights from vehicles behind.

BEFORE YOU DRIVEMIRRORS
1.52
Adjusting m1. Switch t
2. Rotate tadjust th(2) to ad
3. Move thto adjusposition
or dipping in reverseexterior mirrors can be set to dip when rse is engaged. This provides a view of the nd to the rear of the vehicle. See Reverse
or Dip, page 3.15.
ted mirrorsrior mirrors are heated when the rear ow heater is in operation, and the engine
nning. They are also heated when the ient temperature is below 41°F (5°C).
NOTE: Mirrors on the 675LT are only heated when the ambient temperature is below 41°F (5°C).
Mclaren P11 - Complete.book Page 52 Friday, January 22, 2016 9:43 AM
irrorshe ignition on.
he control to the left (1) to e left-hand mirror or to the right just the right-hand mirror.
e control up, down left and right t the mirror to the desired .
Exterior mirror fold1. Switch the ignition on.
2. Rotate the control to position (3) to fold the mirrors.
3. To unfold the mirrors rotate the control away from position (3).
NOTE: If the switch remains in position (3) the mirrors will be folded until the switch is moved.
Exterior mirror automatic foldThe exterior mirrors can be set so that they fold automatically when the vehicle is locked. Unfolding occurs as a door is opened, not when the vehicle is unlocked. See Auto Fold Mirrors, page 3.14.
MirrThe revegrouMirr
HeaExtewindis ruamb

BEFOLIGHT
1.53
LIGHTING
Exterio
1. He
2. He
3. Tulam
4. Sid
5. Sid
Mclaren P11 - Complete.book Page 53 Friday, January 22, 2016 9:43 AM
RE YOU DRIVEING
r lighting - except 675LT
adlamp hi beam
adlamp lo beam
rn signal/Daytime running p/Sidelamp
e turn signal
e Marker
1. Turn signal
2. Central high mounted stop lamp
3. License plate lamp
4. Tail lamp and stop lamp
5. Side marker
6. Reflector
7. Reverse lamp and rear fog lamp
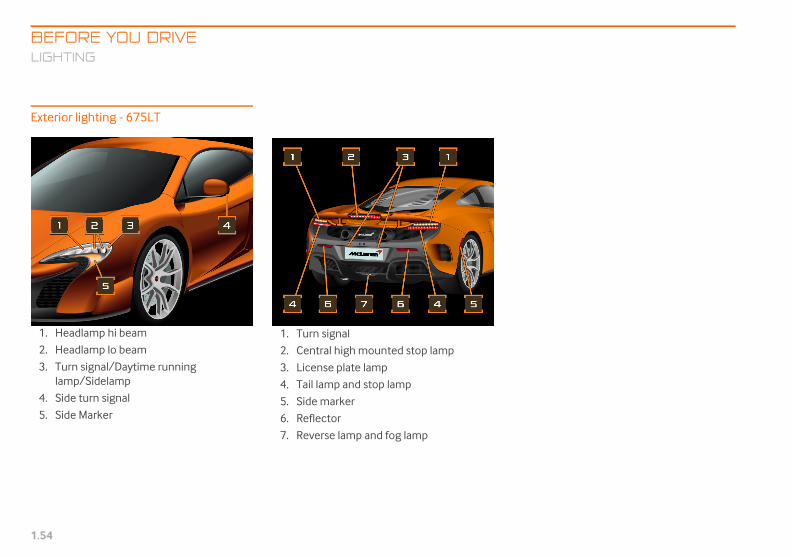
BEFORE YOU DRIVELIGHTING
1.54
Exterior ligh
1. Headlam
2. Headlam
3. Turn siglamp/Si
4. Side turn
5. Side Ma
Mclaren P11 - Complete.book Page 54 Friday, January 22, 2016 9:43 AM
ting - 675LT
p hi beam
p lo beam
nal/Daytime running delamp
signal
rker
1. Turn signal
2. Central high mounted stop lamp
3. License plate lamp
4. Tail lamp and stop lamp
5. Side marker
6. Reflector
7. Reverse lamp and fog lamp

BEFOLIGHT
1.55
Light sw
WAau
Auyolig
The lighsteeringthe follo
At positexceptio
irrespective of ambient light conditions. When the rear fog lamps are switched off, the lo beam headlamps will also switch off dependant on ambient light conditions.
Mclaren P11 - Complete.book Page 55 Friday, January 22, 2016 9:43 AM
RE YOU DRIVEING
itch
RNING: The lights do not switch on tomatically in foggy conditions.
tomatic light control is only an aid, u are responsible for the vehicle's hting at all times.
t switch is located between the wheel and the driver’s door and has wing positions.
ion (0), the lights are off with the n of daytime running lamps.
Rotate the control to position (A) for automatic light control.
Rotate the control to position (1) for sidelamps or position (2) for headlamps. The side lamp or headlamp warning light illuminates in the instrument cluster.
NOTE: A warning tone sounds if the driver's door is opened while the sidelamps or headlamps are switched on.
Automatic light controlThe sidelamps and lo beam headlamps are switched on automatically when ambient light falls below a predetermined level.
To switch on automatic light control, turn the light switch to position (A).
NOTE: If the vehicle detects rain whilst the light switch is set to position (A) the lo beam headlamps will switch on automatically, regardless of current external light levels.
NOTE: With the light switch in position (A) and the fog lights switched on, the lo beam headlamps will also switch on

BEFORE YOU DRIVELIGHTING
1.56
SidelampsThe sidelamplamps are a cDiodes (LEDsthe headlamplower intensitlamps, see Da
The sidelamplamps illuminturned to pos
The sidinstrum
Lo beam heaTo switch on switch to (2).
The heainstrum
NOTE: Oheadlighdriving oright-ha
dlamp flashthe stalk fully towards you.
hi beam headlamps operate for as long as talk is held.
The hi beam headlamps warning light illuminates in the instrument cluster.
Mclaren P11 - Complete.book Page 56 Friday, January 22, 2016 9:43 AM
s and the daytime running ombined series of Light Emitting ) located around the outside of . The sidelamps operate at a y than the daytime running ytime running lamps, page 1.57.
s, tail lamps and license plate ate when the light switch is ition (1).
elamps warning light in the ent cluster illuminates.
dlampsthe headlamps, turn the light
dlamps warning light in the ent cluster illuminates.
n your McLaren, the same t lo beam setting applies for n either the left-hand or
nd side of the road.
Hi beam headlamps
To switch to hi beams, push the stalk away from you.
The hi beam headlamps warning light illuminates in the instrument cluster.
Pull the stalk towards you, to revert to lo beams.
HeaPull
The the s

BEFOLIGHT
1.57
Daytim
Your Mclamps wthe igniswitcherunningEmittingof the lorunningthan the
NOTE: With the light switch in position (A) and the rear fog lights switched on, the lo beam headlamps will also switch on irrespective of ambient light conditions. When the rear fog lamps are switched off, the lo beam headlamps will also switch off dependant on ambient light conditions.
Mclaren P11 - Complete.book Page 57 Friday, January 22, 2016 9:43 AM
RE YOU DRIVEING
e running lamps
Laren is fitted with daytime running hich illuminate automatically when
tion is switched on even if all lights are d off. The sidelamps and the daytime lamps are a combined series of Light Diodes located around the outside beam headlamp. The daytime lamps operate at a higher intensity sidelamps.
Rear fog lamp
NOTE: The rear fog lamp only operates when lo beam headlamps are on.
Ensure that the lo beam headlamps are switched on or the light switch is in position (A).
Press the fog light button in the center of the light switch.
The warning light in the instrument cluster and the light in the switch both
illuminate.
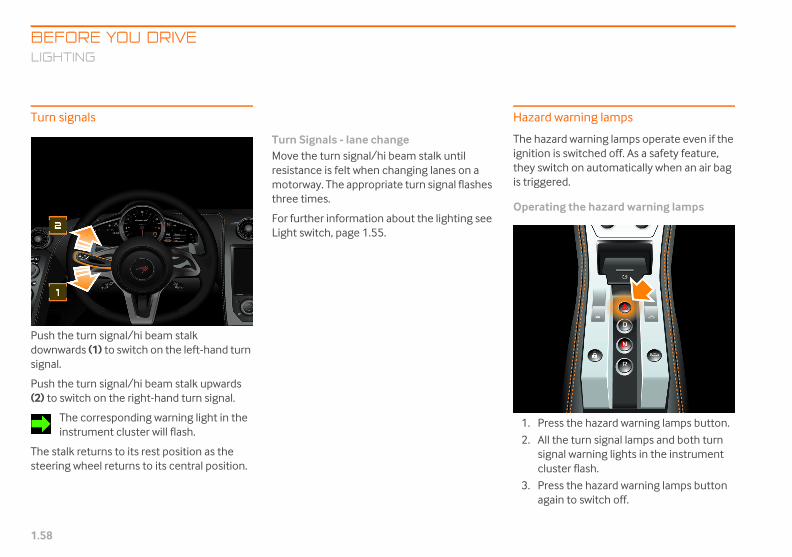
BEFORE YOU DRIVELIGHTING
1.58
Turn signals
Push the turndownwards (1signal.
Push the turn(2) to switch
The corinstrum
The stalk retusteering whe
ard warning lamps
hazard warning lamps operate even if the ion is switched off. As a safety feature, switch on automatically when an air bag ggered.
rating the hazard warning lamps
Press the hazard warning lamps button.
All the turn signal lamps and both turn signal warning lights in the instrument cluster flash.
Press the hazard warning lamps button again to switch off.
Mclaren P11 - Complete.book Page 58 Friday, January 22, 2016 9:43 AM
signal/hi beam stalk ) to switch on the left-hand turn
signal/hi beam stalk upwards on the right-hand turn signal.
responding warning light in the ent cluster will flash.
rns to its rest position as the el returns to its central position.
Turn Signals - lane changeMove the turn signal/hi beam stalk until resistance is felt when changing lanes on a motorway. The appropriate turn signal flashes three times.
For further information about the lighting see Light switch, page 1.55.
Haz
The ignittheyis tri
Ope
1.
2.
3.

BEFOLIGHT
1.59
NObetheto
Panic aThe panattract aflashing
The panpressinga period
The horbeen acturn sighorn cahazard wseconds
To switchazard w
2. To deactivate the parking lights, press the turn signal/hi beam stalk down for the left-hand side or push up for the right-hand side until resistance is felt. The selected parking lights will then be deactivated.
NOTE: This will allow parking lights on both sides to be active at same time, and also allows one side to be deactivated, whilst keeping the opposite side activated.
Mclaren P11 - Complete.book Page 59 Friday, January 22, 2016 9:43 AM
RE YOU DRIVEING
TE: If the hazard warning lamps have en switched on automatically, press hazard warning lamps button once
switch them off.
larmic alarm function is designed to ttention by sounding the horn and the turn signal lamps repeatedly.
ic alarm can be switched on by the hazard warning lamps button for of 3 seconds or more.
n will cease after the panic alarm has tive for a long period of time, but the nal lamps will continue to flash. The n be re-initiated by pressing the
arning lamps button for a period of 3 or more.
h the panic alarm off, press the arning lamps button briefly.
Parking lights
NOTE: The parking lights can only be activated when the ignition is switched off.
1. To activate the parking lights, press the turn signal/hi beam stalk down for the left-hand side or push up for the right-hand side until resistance is felt. The selected parking lights will illuminate once the vehicle has been locked.

BEFORE YOU DRIVEWASHERS
1.60
WASHERS AND WIPER
Windscreen
1. Windscr
2. Automa
3. Slow wip
4. Fast wip
NOTE: Sdry weatwiper swwiper bla
wipee the wiper stalk to position (3), to ate the wiper at slow speed.
rn the stalk to position (1) to switch off.
wipee the wiper stalk to position (4), to ate the wiper at fast speed.
rn the stalk to position (1) to switch off.
Mclaren P11 - Complete.book Page 60 Friday, January 22, 2016 9:43 AM
AND WIPER
wiper
een wiper off
tic wipe
e
e
witch off the windscreen wiper in her, dirt can cause inadvertent eeps which could damage the de or windscreen.
Operating the windscreen wiper1. Ensure the ignition is switched on.
2. Move the wiper stalk to the required position
NOTE: If the windscreen wiper is switched on and the vehicle comes to a halt, the windscreen wiper automatically switches to intermittent wipe, until the vehicle moves away.
Automatic wipeA rain sensor, located on the windscreen behind the rear view mirror, measures the quantity of water on the screen and operates the wiper at the most appropriate speed.
To select, move the windscreen wiper stalk to the automatic wipe position (2).
The wiper will wipe once. The wipe frequency then depends on how wet the windscreen is.
Only select the automatic wipe position in damp weather conditions or when it is raining.
To adjust the sensitivity of the rain sensor, see Wiper Sensitivity, page 3.16.
SlowMovoper
Retu
FastMovoper
Retu
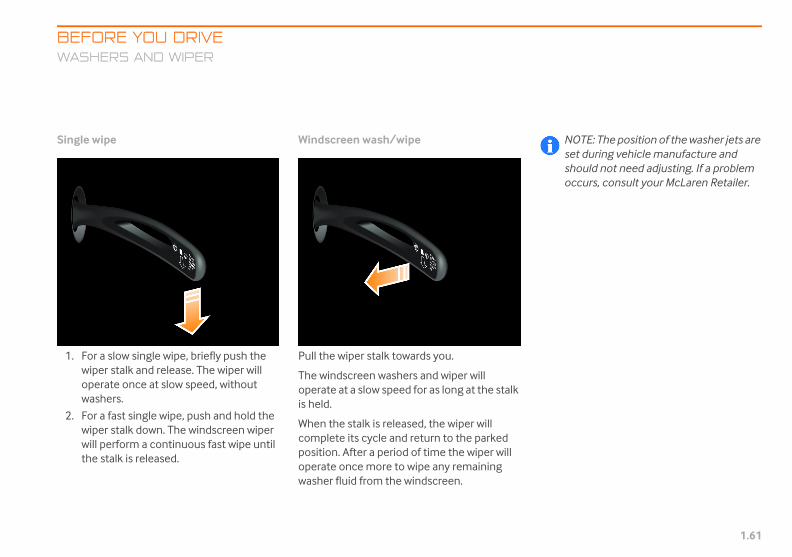
BEFOWASH
1.61
Single w
1. Fowipopwa
2. Fowipwilthe
NOTE: The position of the washer jets are set during vehicle manufacture and should not need adjusting. If a problem occurs, consult your McLaren Retailer.
Mclaren P11 - Complete.book Page 61 Friday, January 22, 2016 9:43 AM
RE YOU DRIVEERS AND WIPER
ipe
r a slow single wipe, briefly push the er stalk and release. The wiper will
erate once at slow speed, without shers.
r a fast single wipe, push and hold the er stalk down. The windscreen wiper
l perform a continuous fast wipe until stalk is released.
Windscreen wash/wipe
Pull the wiper stalk towards you.
The windscreen washers and wiper will operate at a slow speed for as long at the stalk is held.
When the stalk is released, the wiper will complete its cycle and return to the parked position. After a period of time the wiper will operate once more to wipe any remaining washer fluid from the windscreen.

BEFORE YOU DRIVEVEHICLE
1.62
VEHICLE LIFT
Vehicle Lift
Vehicle lift giv option to raise or lower the veh ent on the current vehicle ride h
Ride height c aised when traveling at speeds bel (50 kph). The vehicle will automatic t speeds above 37 mph (60 k
NOTE: If lift icon in the right-hand dis er, the system is not available ve the vehicle at high speed an your McLaren Retailer ossible.
The vehicle s an be left fully raised for extended t it may relax to a lower level ov
If the vehicle ised position for a long period, a et may occur when the engine is to return the vehicle to no ight.
If vehicle lift i n in motion, slight adjustments ing feel may be experienced, al and does not affect the ope e vehicle.
You obtain access to vehicle lift using the menu structure, see LEFT-HAND DISPLAY, page 3.3.
Accessing the menu
You can access the vehicle lift menu using the menu control stalk on the left of the steering column, whenever the engine is running.
NOTE: Vehicle handling modes are inhibited when vehicle lift is lowering or raising.
NOTE: Vehicle lift will be unavailable if launch mode is active.
Hold the menu control stalk up for one second to quickly access the menu. A confirmation tone will be heard.
Alternatively, access vehicle lift using the menu structure, see LEFT-HAND DISPLAY, page 3.3.
The left-hand display will exit after the timeout duration has been exceeded back to home screen if there is no activity on the menu. To set the timeout to home screen duration, see Home screen, page 3.6.
Mclaren P11 - Complete.book Page 62 Friday, January 22, 2016 9:43 AM
d contact as soon as p
uspension cperiods, buer time.
is left in a ra system res
next startedrmal ride he
s used wheto the steer this is norm
ration of th
LIFT
Operation
es you theicle dependeight.
an only be row 31 mphally lower a
ph).
the vehicleplay is amb. Do not dri

Mclaren P11 - Complete.book Page 63 Friday, January 22, 2016 9:43 AM

Mclaren P11 - Complete.book Page 64 Friday, January 22, 2016 9:43 AM

2.1
STARTVehicSwitcInstruSeamParkinBrakeStartiDrivinExhauParkinRear V
SEAMLOvervGear AccelManu
HANDLActiveActiveHandPoweWinteLauncSpinn
YSTEMS..................................................................................... 2.34stem .......................................................................... 2.34..................................................................................... 2.35..................................................................................... 2.35..................................................................................... 2.36..................................................................................... 2.36-fill .............................................................................. 2.36ontrol (ESC) ........................................................... 2.37
..................................................................................... 2.38
..................................................................................... 2.40
..................................................................................... 2.44ring System........................................................... 2.48
..................................................................................... 2.51.................................................................................... 2.51trol............................................................................ 2.52
eed ............................................................................. 2.53ed............................................................................... 2.53peed.......................................................................... 2.54
ITER (ASL)ed limit.................................................................... 2.55
..................................................................................... 2.56
..................................................................................... 2.56
..................................................................................... 2.57
DRIV
Mclaren P11 - Complete.book Page 1 Friday, January 22, 2016 9:43 AM
ING AND DRIVINGle electrical status ................................................................................ 2.3hing on the ignition ............................................................................. 2.4ments and warning lights ................................................................. 2.4less shift gearbox gear positions.................................................... 2.7g brake..................................................................................................... 2.9
pedal...................................................................................................... 2.11ng/stopping the engine.................................................................. 2.11g ............................................................................................................... 2.13st Temperature Monitoring.......................................................... 2.15g Sensors............................................................................................. 2.15iew Camera (RVC)............................................................................. 2.16
ESS SHIFT GEARBOXiew........................................................................................................... 2.19
positions ................................................................................................ 2.19erator pedal position........................................................................ 2.20al/Automatic mode.......................................................................... 2.20
ING AND POWERTRAIN CONTROLS dynamics control ............................................................................ 2.24 button.................................................................................................. 2.25
ling control ........................................................................................... 2.25rtrain control ....................................................................................... 2.27r mode - except 675LT.................................................................... 2.29h control .............................................................................................. 2.30ing wheel pull away - 675LT.......................................................... 2.32
DRIVING SAFETY SGeneral.........................Anti-lock Braking SyBrake assist system.Brake disc wiping .....Hill hold control........Brake-steer.................Electronic brake preElectronic Stability CESC - except 675LT.ESC - 675LT................Airbrake .......................Tire Pressure Monito
CRUISE CONTROLOverview .....................Using cruise controlCanceling cruise conIncreasing cruise spReducing cruise speResuming a stored s
ACTIVE SPEED LIMSetting an upper spe
RUNNING INRunning in ..................Normal/Road use....Track use.....................
ING CONTROLS
2.2
DRIVING CONTROLS
REFUELLINFilling withRecommen
WINTER DRWinter driv
Mclaren P11 - Complete.book Page 2 Friday, January 22, 2016 9:43 AM
G fuel ............................................................................................... 2.58
ded fuel ..................................................................................... 2.60
IVINGing ................................................................................................. 2.61
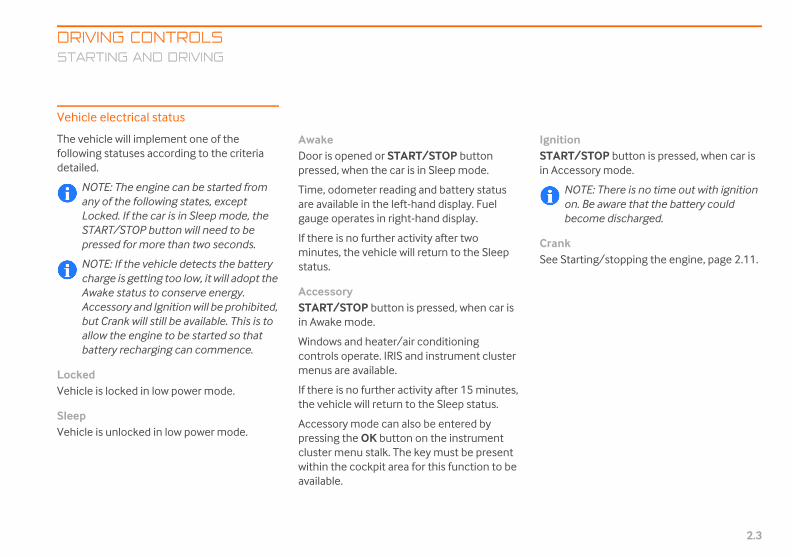
DRIVSTAR
2.3
STARTING AND DRIVING
Vehicle
The vehfollowindetailed
NOanLoSTpre
NOchAwAcbualloba
LockedVehicle
SleepVehicle
IgnitionSTART/STOP button is pressed, when car is in Accessory mode.
NOTE: There is no time out with ignition on. Be aware that the battery could become discharged.
CrankSee Starting/stopping the engine, page 2.11.
Mclaren P11 - Complete.book Page 3 Friday, January 22, 2016 9:43 AM
ING CONTROLSTING AND DRIVING
electrical status
icle will implement one of the g statuses according to the criteria .
TE: The engine can be started from y of the following states, except cked. If the car is in Sleep mode, the ART/STOP button will need to be ssed for more than two seconds.
TE: If the vehicle detects the battery arge is getting too low, it will adopt the ake status to conserve energy. cessory and Ignition will be prohibited, t Crank will still be available. This is to w the engine to be started so that
ttery recharging can commence.
is locked in low power mode.
is unlocked in low power mode.
AwakeDoor is opened or START/STOP button pressed, when the car is in Sleep mode.
Time, odometer reading and battery status are available in the left-hand display. Fuel gauge operates in right-hand display.
If there is no further activity after two minutes, the vehicle will return to the Sleep status.
AccessorySTART/STOP button is pressed, when car is in Awake mode.
Windows and heater/air conditioning controls operate. IRIS and instrument cluster menus are available.
If there is no further activity after 15 minutes, the vehicle will return to the Sleep status.
Accessory mode can also be entered by pressing the OK button on the instrument cluster menu stalk. The key must be present within the cockpit area for this function to be available.

DRIVING CONTROLSSTARTING
2.4
Switching o
1. Ensure tvehicle.
2. To switcstarting START/depress
NOTE: Ifpress th
ruments and warning lights
ing lights can be divided into different gories, according to the color that they inate.
RED, AMBER or YELLOW - indicates that a fault has been detected. A fault indicated by a RED light is more important than one displayed in AMBER or YELLOW.
BLUE or GREEN - indicates that a system or feature is switched on and operating.
Mclaren P11 - Complete.book Page 4 Friday, January 22, 2016 9:43 AM
AND DRIVING
n the ignition
hat the key fob is inside the
h on the ignition without the engine, press the STOP button, without
ing the brake pedal.
the vehicle is in Awake mode, e START/STOP button twice.
3. The ignition will switch on, the oil temperature, water temperature and fuel gauges will operate and several of the warning lights will illuminate as a self-test. The instrument cluster will fully illuminate.
Inst
Warncateillum
•
•

DRIVSTAR
2.5
Main in
1. Ta
2. SpUse the control stalk to navigate through the menus.
Mclaren P11 - Complete.book Page 5 Friday, January 22, 2016 9:43 AM
ING CONTROLSTING AND DRIVING
struments overview
chometer, page 3.2
eedometer, page 3.2
Left-hand display overview
The left-hand display provides vital information to the driver as well as the facility to personalize some vehicle settings.

DRIVING CONTROLSSTARTING
2.6
Warning ligh t-hand display overview
Oil temperature, page 3.34
Water temperature, page 3.35
Fuel level, page 3.35
Handling control, page 2.25
Powertrain control, page 2.27
Electrpage
Electrpage
Brake
Seat b
Mclaren P11 - Complete.book Page 6 Friday, January 22, 2016 9:43 AM
AND DRIVING
ts - left-hand side Righ
1.
2.
3.
4.
onic Stability Control (ESC), 2.37
onic Stability Control (ESC), 2.37
warning light, page 2.11
elt warning light, page 1.42
General warning - illuminates in conjunction with other warning lights
Rear fog lamp, page 1.57
Sidelamps, page 1.56
Lo beam headlamps, page 1.56
Hi beam headlamps, page 1.56
Turn signals, page 1.58
Gearbox mode indicator, page 3.25
Messages - Coupe and Spider, page 3.26

DRIVSTAR
2.7
Warnin
Seamless shift gearbox gear positions
The gearbox operates in either automatic or manual mode. Automatic mode is selected unless the driver chooses manual mode, see Manual/Automatic mode, page 2.20. If manual mode is active, gear changes are made using the gearshift paddles, see Gearshift paddles, page 2.22.
NOTE: The letter on each button will illuminate red to identify if the vehicle is in Drive, Neutral or Reverse.
Mclaren P11 - Complete.book Page 7 Friday, January 22, 2016 9:43 AM
ING CONTROLSTING AND DRIVING
g lights - right-hand side
Turn signals, page 1.58
Engine warning light, page 2.14
Supplementary Restraint System warning light, page 1.47
Anti-lock Braking System status light, page 2.35
Tire Pressure Monitoring System operation, page 2.48
Parking brake status, page 2.10
Parking brake fault, page 2.10
Gear position indicator
Gear Shift Indicator (GSI)
Not available in all markets, consult your McLaren Retailer.

DRIVING CONTROLSSTARTING
2.8
DriveAll seveGear ch
manual mode
With the exceselected and vehicle will bethrottle use mmaneuvers atraffic.
NeutralNo geabrakes
freely, e.g. forinformation oTowing for re
ReverseIn normgear wh
When carryinrequire rapid and back aga
rshift paddles
pshift, pull the right-hand paddle towards To downshift pull the left-hand paddle rds you. The current gear position ars in the gear position display, see Gear
tion indicator, page 3.33.
NOTE: The single-piece paddle and central pivot enables upshifts and downshifts to be made using either paddle.
Mclaren P11 - Complete.book Page 8 Friday, January 22, 2016 9:43 AM
AND DRIVING
n forward gears are available. anges will be automatic, unless has been selected.
ption of 675LT, when drive is the brakes are released, the gin to move slowly without any aking it useful for parking
nd for moving off in queuing
r is engaged. Releasing the will allow the vehicle to move pushing or towing. For more n use of neutral for towing, see covery, page 5.43.
al circumstances, select reverse en the vehicle is stationary.
g out parking maneuvers that changes from drive to reverse in, it is possible to engage
reverse or drive at speeds up to 6mph (10 kph) whilst traveling in the opposite direction.
NOTE: If reverse or drive is requested at speeds above 6 mph (10 kph), the transmission will engage neutral, as a self protection feature.
Neutral can be selected at any speed by pressing the ‘N’ button.
With the exception of 675LT, when reverse is selected and the brakes are released, the vehicle will begin to move slowly without any throttle use making it useful for parking maneuvers.
Gea
To uyou.towaappeposi

DRIVSTAR
2.9
Asbyfrobyfro
The geathe hanselectedaccelera
WAmoenau
WAadsli
NOauto pebe
To immgear whhold a dsufficien
Parking brake
WARNING: Do not place small items such as coins in the parking brake recess as this could inhibit the operation of the parking brake switch.
NOTE: When parking on steep downhill slopes, turn the front wheels towards the kerb. When parking on steep uphill slopes, turn the front wheels away from the kerb.
Mclaren P11 - Complete.book Page 9 Friday, January 22, 2016 9:43 AM
ING CONTROLSTING AND DRIVING
an alternative, upshifts can be made pushing the left-hand paddle away m you and downshifts can be made pushing the right-hand paddle away m you.
rshift paddles operate irrespective of dling and powertrain program , and there is no need to release the tor pedal to change gear.
RNING: For safety, in manual de only, the vehicle will monitor
gine speed and may perform an tomatic gear change if necessary.
RNING: Do not change down for ditional engine braking on a ppery surface.
TE: If operating the paddles in tomatic mode, the gearbox will revert automatic changes if an eight second riod elapses without a gear change ing made.
ediately shift to the lowest possible ilst the vehicle is moving, select and ownshift on the paddle while applying t brake pedal pressure. The vehicle
will then go down through all gears sequentially until the optimum gear is reached or you release the paddle.
When the vehicle speed is below 6 mph (10 kph) or the vehicle is stationary with a gear selected, select a downshift and hold the paddle to select neutral.
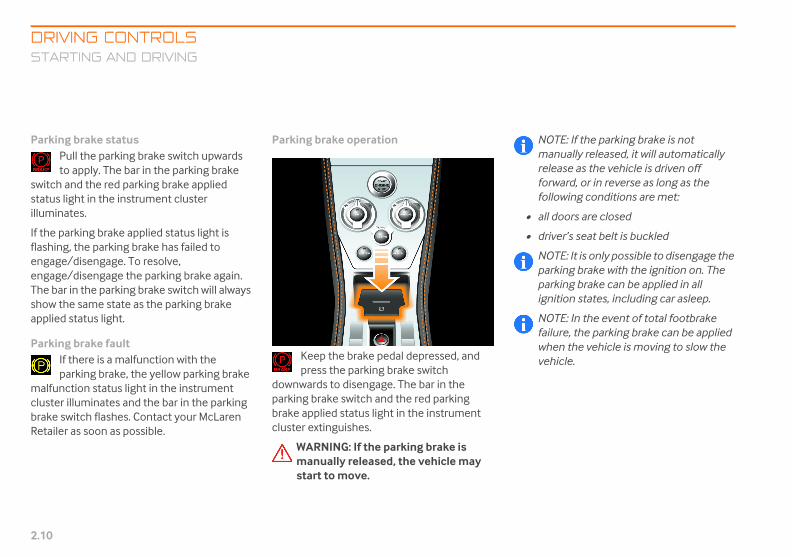
DRIVING CONTROLSSTARTING
2.10
Parking brakPull theto apply
switch and thstatus light inilluminates.
If the parkingflashing, the pengage/disenengage/disenThe bar in theshow the samapplied statu
Parking brakIf thereparking
malfunction scluster illumibrake switch Retailer as so
NOTE: If the parking brake is not manually released, it will automatically release as the vehicle is driven off forward, or in reverse as long as the following conditions are met:
all doors are closed
driver’s seat belt is buckled
NOTE: It is only possible to disengage the parking brake with the ignition on. The parking brake can be applied in all ignition states, including car asleep.
NOTE: In the event of total footbrake failure, the parking brake can be applied when the vehicle is moving to slow the vehicle.
Mclaren P11 - Complete.book Page 10 Friday, January 22, 2016 9:43 AM
AND DRIVING
e status parking brake switch upwards . The bar in the parking brake
e red parking brake applied the instrument cluster
brake applied status light is arking brake has failed to gage. To resolve, gage the parking brake again.
parking brake switch will always e state as the parking brake
s light.
e fault is a malfunction with the brake, the yellow parking brake tatus light in the instrument
nates and the bar in the parking flashes. Contact your McLaren on as possible.
Parking brake operation
Keep the brake pedal depressed, and press the parking brake switch
downwards to disengage. The bar in the parking brake switch and the red parking brake applied status light in the instrument cluster extinguishes.
WARNING: If the parking brake is manually released, the vehicle may start to move.
•
•

DRIVSTAR
2.11
Brake p
WAthemaan
If othebralea
WAserunwiprethe
WAthemathewe
WAillumosaMc
Starting/stopping the engine
WARNING: Never run the engine when the vehicle is in an enclosed space. Exhaust fumes contain poisonous carbon monoxide. Breathing exhaust fumes could lead to unconsciousness and death.
NOTE: Do not depress the accelerator pedal when starting the engine.
The engine can be either started using manual cranking (except 675LT) or timed cranking.
To change between the cranking functions of the START/STOP button, see Timed Crank, page 3.15.
Mclaren P11 - Complete.book Page 11 Friday, January 22, 2016 9:43 AM
ING CONTROLSTING AND DRIVING
edal
RNING: Do not keep any objects in driver's footwell. Ensure that floor ts or carpets are properly secured
d do not obstruct the pedals.
bjects become trapped between pedals, you would not be able to ke or accelerate, and this could d to an accident.
RNING: The braking system is rvo assisted when the engine is
ning. The brakes will still function th the engine off, but more
ssure will be required to operate m.
RNING: Do not rest your foot on brake pedal while traveling as this y overheat the brakes, reduce ir efficiency and cause excessive
ar.
RNING: If the brake warning light minates while the vehicle is in tion, stop the vehicle as soon as
fety permits and contact your Laren Retailer immediately.
Brake discs and padsWARNING: New brake pads require a period of bedding in. For the first 625 miles (1,000 km), avoid situations where heavy braking is required.
Brake disc and pad wear depends on the driving style and driving conditions.
Brake warning lightThe brake warning light will illuminate when the ignition is switched on as a
system test. If the brake warning light illuminates at any other time, a fault is indicated. Stop the vehicle as soon as safety permits and contact your McLaren Retailer immediately.
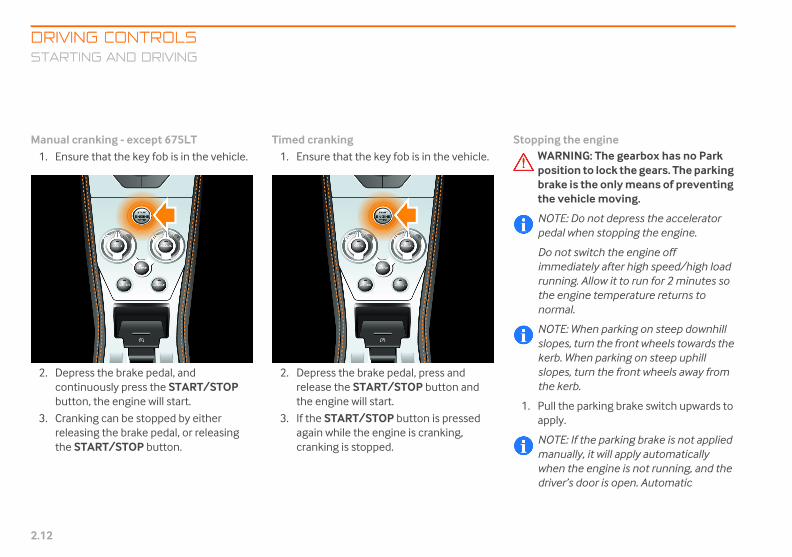
DRIVING CONTROLSSTARTING
2.12
Manual cran1. Ensure t
2. Depresscontinuobutton,
3. Crankingreleasinthe STA
ping the engineWARNING: The gearbox has no Park position to lock the gears. The parking brake is the only means of preventing the vehicle moving.
NOTE: Do not depress the accelerator pedal when stopping the engine.
Do not switch the engine off immediately after high speed/high load running. Allow it to run for 2 minutes so the engine temperature returns to normal.
NOTE: When parking on steep downhill slopes, turn the front wheels towards the kerb. When parking on steep uphill slopes, turn the front wheels away from the kerb.
Pull the parking brake switch upwards to apply.
NOTE: If the parking brake is not applied manually, it will apply automatically when the engine is not running, and the driver’s door is open. Automatic
Mclaren P11 - Complete.book Page 12 Friday, January 22, 2016 9:43 AM
AND DRIVING
king - except 675LThat the key fob is in the vehicle.
the brake pedal, and usly press the START/STOP
the engine will start.
can be stopped by either g the brake pedal, or releasing RT/STOP button.
Timed cranking1. Ensure that the key fob is in the vehicle.
2. Depress the brake pedal, press and release the START/STOP button and the engine will start.
3. If the START/STOP button is pressed again while the engine is cranking, cranking is stopped.
Stop
1.

DRIVSTAR
2.13
apthepo
2. Se
3. PreenAcstaact
Driving
Driving away
WARNING: Never turn the engine off while driving, there will be no assistance for the steering or the foot brake. You will need more effort to steer and brake and could lose control of the vehicle and cause an accident.
NOTE: Do not drive at high engine speeds until the engine has reached normal operating temperature.
NOTE: The doors will lock when the vehicle reaches a speed of approximately 9 mph (15 kph). Auto lock can be set in the instrument cluster, see Auto Door Lock, page 3.14.
ENVIRONMENTAL: When starting from cold, gear changes occur at higher engine speeds. The catalytic converter will reach its operating temperature quicker and reduce engine emissions.
1. With the engine running, press and hold the brake pedal.
Mclaren P11 - Complete.book Page 13 Friday, January 22, 2016 9:43 AM
ING CONTROLSTING AND DRIVING
plication can be overridden by holding parking brake switch in the down
sition whilst opening the driver’s door.
lect neutral.
ss the START/STOP button. The gine stops, the vehicle enters the cessory state, see Vehicle electrical tus, page 2.3. The immobilizer is ivated.
NOTE: If the START/STOP button is pressed for more than a second, the vehicle will enter the Awake state for a brief time before returning to Accessory state if no further inputs are made, see Vehicle electrical status, page 2.3.

DRIVING CONTROLSSTARTING
2.14
2. Select dupshift bpaddles.Gearshifposition
3. Keep therelease tstatus ligthe bar iextingui
WARNINmanualstart to
NOTE: Ifmanuallrelease aforward,followin
• all doors
• driver’s s
4. Carefully
When in manual mode, avoid high engine rpm by changing to a higher gear as soon as possible.
The Gear Shift Indicator (GSI) will illuminate when an upshift would
maintain optimum economy.
NOTE: Not available in all markets, consult your McLaren Retailer.
Avoid laboring or over-revving the engine.
Switch off the air conditioning when it is not needed.
Avoid journeys where frequent stop start driving is involved.
Ensure that your driving style suits the prevailing road and traffic conditions; allow time for smooth, progressive acceleration and braking.
Use a reputable fuel economy tracking website to track your mileage and fuel usage.
Mclaren P11 - Complete.book Page 14 Friday, January 22, 2016 9:43 AM
AND DRIVING
rive or reverse gear, or initiate an y operating the gearshift
For more information, see t paddles, page 2.22 and Gear s, page 2.19.
brake pedal depressed and he parking brake switch. The red ht in the instrument cluster and
n the parking brake switch sh.
G: If the parking brake is ly released, the vehicle may move.
the parking brake is not y released, it will automatically s the vehicle is driven off
or in reverse as long as the g conditions are met:
are closed
eat belt is buckled
depress the accelerator pedal.
Engine warning lightThis engine warning light illuminates when the ignition is on and extinguishes
as soon as the engine is started, provided no faults exist.
If the light illuminates while driving, an engine management fault has been detected and reduced engine performance may be experienced. Stop the vehicle as soon as safety permits and contact your McLaren Retailer immediately.
Limphome modeLimphome mode activates automatically when vehicle systems detect a fault which may cause further damage unless vehicle or system performance is restricted. Care should be taken while driving in this mode. Contact your McLaren Retailer immediately.
Economical drivingImproved fuel economy can be achieved by following this advice.
• Accelerate smoothly and gently from a standing start.
•
•
•
•
•
•

DRIVSTAR
2.15
Exhaus
The vehtemperconvertoverhea
If excesmeasurleft-han
The vehas this mmaneuvhigh enexhaustuntil the
If the exexcessivand Limperformvehicle
NOtembearecotemext
Parking Sensors
The parking sensors alert the driver to any obstructions while maneuvering at low speeds. The system comprises four ultrasonic sensors in the front bumper, four ultrasonic sensors in the rear bumper and two sounders. Each sounder has a different pitch to indicate whether the obstruction is at the front or the rear of the vehicle.
The front parking sensors are automatically switched on when the ignition is switched on. The rear parking sensors are switched on when reverse gear is selected. The light
Mclaren P11 - Complete.book Page 15 Friday, January 22, 2016 9:43 AM
ING CONTROLSTING AND DRIVING
t Temperature Monitoring
icle continuously monitors exhaust atures to protect the catalytic ers from damage caused by ting.
sive exhaust temperatures are ed, a warning will be displayed on the d side of the instrument cluster.
icle speed should be reduced as soon essage is observed. Refrain from
ers involving high engine speed and gine load (full throttle) to allow the s to cool. The message will remain temperature has reduced.
haust temperature remains at an e level, a second warning is displayed phome mode is activated. The engine ance will remain limited until the
is restarted.
TE: Catalytic converter over perature warnings are not likely to
observed during normal driving and the result of extreme operating
nditions. For example, high exhaust peratures can be caused by
ended track driving, maintaining high
engine speed for long durations, and sudden and repeated changes in throttle demand.
NOTE: High exhaust temperatures can cause damage to catalytic converters and should be avoided by practicing careful driving.
If the warnings persist, contact your McLaren Retailer.

DRIVING CONTROLSSTARTING
2.16
around the pilluminate redare active.
The center sea range of appcenter sensorange of appr
An intermitteobstruction ismoves closerfrequency of distance betwobstruction is1.5 feet (40 ccontinuous.
WARNINnot detechildrendangerowith caumirrorsbehind
r View Camera (RVC)
Rear View Camera (RVC) is mounted in enter of the rear grille. The live video
is displayed on the IRIS screen when the tion is active.
NOTE: If the video feed is blurred or unclear, carefully clean the lens with water and a soft cloth.
Mclaren P11 - Complete.book Page 16 Friday, January 22, 2016 9:43 AM
AND DRIVING
arking sensors button will to indicate that parking sensors
nsors on the front bumper have roximately 3 feet (1 meter). The
rs in the rear bumper have a oximately 5 feet (1.5 meters).
nt tone is heard when an within range. As the vehicle to an obstruction, the the tone increases. When the een the sensors and the less than approximately
entimeters), the tone becomes
G: The parking sensors may ct moving objects such as and animals, until they are usly close. Always maneuver tion and always use your
turn your head and look you.
NOTE: The parking sensors are for guidance only and are not intended to replace the driver's visual checks for obstructions when maneuvering. The parking sensors may not detect some obstructions, such as narrow posts or small obstructions close to the ground such as kerbs.
The rear parking sensors are automatically switched off when reverse gear is de-selected.
The parking sensors can be switched off manually by pressing the center of the button, the light around the button will extinguish.
When the system has been manually switched off, both the front and rear sensors will still switch on when reverse gear is selected and remain on until manually switched off again.
If a fault is detected, a long high-pitched tone will sound. If the sensors are obscured by dirt, ice or snow, clean them. If the problem persists, contact your McLaren Retailer.
Rea
The the cfeedfunc

DRIVSTAR
2.17
A colorefeed as objects
Each covehicle (25 centhe vehvehicle.
The red(40 cen
Following automatic activation, the RVC cannot be interrupted. Touching anywhere on the screen or pressing any of the physical IRIS buttons will have no effect.
The RVC can be manually activated by selecting REAR CAMERA from the IRIS SETTINGS menu.
Mclaren P11 - Complete.book Page 17 Friday, January 22, 2016 9:43 AM
ING CONTROLSTING AND DRIVING
d grid is overlaid onto the live video a guide to the proximity of visible to the rear bumper of the vehicle.
lored box starts at the rear of the and extends 10 inches timeters) beyond the widest point of icle and extends back, away from the
static box extends back 1.5 feet timeters) from the rear of the vehicle.
The green static box extends back 6.6 feet (2 meters) from the rear of the vehicle, with an additional line at 3.3 feet (1 meter).
The yellow dynamic box extends back 10 feet (3 meters) from the rear of the vehicle, with additional lines at 6.6 feet (2 meters) and 3.3 feet (1 meter). The yellow box will curve, in relation to steering angle, indicating the current path of the vehicle.
NOTE: The rear view camera is for guidance only and is not intended to replace the driver's visual checks for obstructions when maneuvering. The rear view camera may not show some obstructions in certain ambient light or weather conditions.
NOTE: The steering guide grid will not be displayed if a steering angle fault exists.
The RVC is automatically activated when reverse gear is selected and automatically deactivated 10 seconds after a forward gear is selected or immediately if the vehicle’s forward speed exceeds 6 mph (10 kph).

DRIVING CONTROLSSTARTING
2.18
Whenactiva
touching thealso be deactanywhere bephysical IRIS
NOTE: Tdeactivaactivate
Mclaren P11 - Complete.book Page 18 Friday, January 22, 2016 9:43 AM
AND DRIVING
the RVC has been manually ted, it can be deactivated by on-screen icon. The RVC will ivated if the screen is touched low the status bar or any of the buttons are pressed.
he RVC cannot be manually ted if it has been automatically d by selecting reverse gear.

DRIVSEAM
2.19
SEAMLESS SHIFT GEARBOX
Overvie
The geaSeamlein autom
AutomachoosesManual/
In automautomasuit youappropr
• Po
• Ac
• Ve
• Bra
NOwaspe
Avwhas
throttle use making it useful for parking maneuvers and for moving off in queuing traffic.
NeutralNo gear is engaged. Releasing the brakes will allow the vehicle to move
freely, e.g. for pushing or towing. For more information on use of neutral for towing, see Towing for recovery, page 5.43.
ReverseIn normal circumstances, select reverse gear when the vehicle is stationary.
When carrying out parking maneuvers that require rapid changes from drive to reverse and back again, it is possible to engage reverse or drive at speeds up to 6mph (10 kph) whilst traveling in the opposite direction.
NOTE: If reverse or drive is selected at speeds above 6 mph (10 kph), the transmission will engage neutral, as a self protection feature.
Neutral can be selected at any speed by pressing the ‘N’ button.
Mclaren P11 - Complete.book Page 19 Friday, January 22, 2016 9:43 AM
ING CONTROLSLESS SHIFT GEARBOX
w
rbox is a 7-speed, dual clutch ss Shift Gearbox that can be operated
atic or manual mode.
tic mode is selected unless the driver manual mode, see Automatic mode, page 2.20.
atic mode, the gearbox tically optimizes the shift points to r style of driving by selecting the most iate gear depending on:
wertrain control, page 2.27
celerator pedal position, page 2.20
hicle speed
king effort
TE: Allow the engine and gearbox to rm up before driving at high engine eds and high loads.
oid prolonged spinning of the rear eels when driving on slippery surfaces this could damage the drivetrain.
Gear positions
Press one of the gear position buttons.
NOTE: The letter on each button will illuminate red to identify if the vehicle is in Drive, Neutral or Reverse.
DriveAll seven forward gears are available. Gear changes will be automatic, unless
manual mode has been selected.
With the exception of 675LT, when drive is selected and the brakes are released, the vehicle will begin to move slowly without any
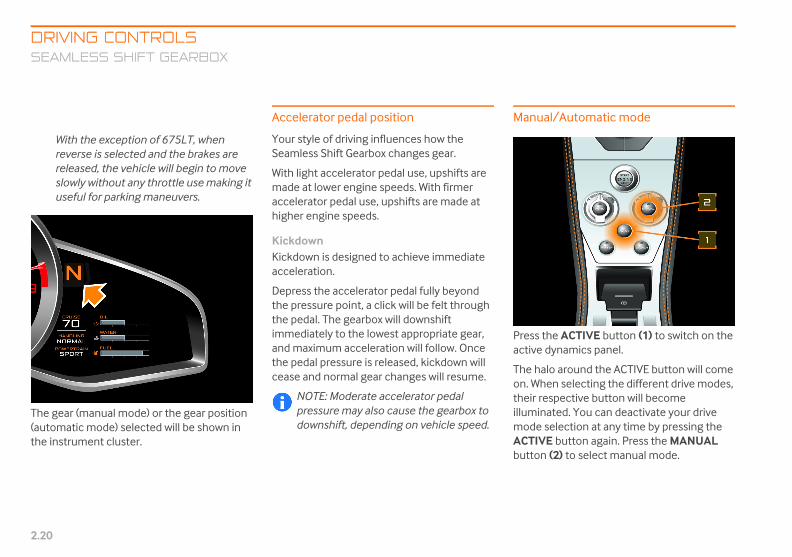
DRIVING CONTROLSSEAMLES
2.20
With thereverse releasedslowly wuseful fo
The gear (ma(automatic mthe instrume
ual/Automatic mode
s the ACTIVE button (1) to switch on the e dynamics panel.
halo around the ACTIVE button will come hen selecting the different drive modes,
r respective button will become inated. You can deactivate your drive e selection at any time by pressing the IVE button again. Press the MANUAL on (2) to select manual mode.
Mclaren P11 - Complete.book Page 20 Friday, January 22, 2016 9:43 AM
S SHIFT GEARBOX
exception of 675LT, when is selected and the brakes are , the vehicle will begin to move ithout any throttle use making it r parking maneuvers.
nual mode) or the gear position ode) selected will be shown in
nt cluster.
Accelerator pedal position
Your style of driving influences how the Seamless Shift Gearbox changes gear.
With light accelerator pedal use, upshifts are made at lower engine speeds. With firmer accelerator pedal use, upshifts are made at higher engine speeds.
KickdownKickdown is designed to achieve immediate acceleration.
Depress the accelerator pedal fully beyond the pressure point, a click will be felt through the pedal. The gearbox will downshift immediately to the lowest appropriate gear, and maximum acceleration will follow. Once the pedal pressure is released, kickdown will cease and normal gear changes will resume.
NOTE: Moderate accelerator pedal pressure may also cause the gearbox to downshift, depending on vehicle speed.
Man
Presactiv
The on. WtheiillummodACTbutt

DRIVSEAM
2.21
The geaforwardthe geapage 2.2
When in manual mode and driving more economically, the Gear Shift Indicator (GSI) will illuminate when an upshift would maintain optimum economy. The GSI will not illuminate if the requested acceleration or deceleration cannot be met with a higher gear. See Economical driving, page 2.14.
NOTE: Not available in all markets, consult your McLaren Retailer.
Press the MANUAL button again to revert to automatic mode.
Mclaren P11 - Complete.book Page 21 Friday, January 22, 2016 9:43 AM
ING CONTROLSLESS SHIFT GEARBOX
rbox mode indicator displays M. All gear changes are made by operating rshift paddles, see Gearshift paddles,
2.
When driving in manual mode, the gear position indicator will change from orange to red to indicate that an upshift is required to maintain optimum performance.
NOTE: The 675LT also has an audible shift indicator, which will sound to indicate that an upshift is required to maintain optimum performance.
For setting options see Performance Shift Cue (PSC) - 675LT, page 3.14.

DRIVING CONTROLSSEAMLES
2.22
The gearbox gear changesgearshift padadopt a tempwill remain accontinues to each within agearbox modGearbox mod
NOTE: The single-piece paddle and central pivot enables upshifts and downshifts to be made using either paddle.
As an alternative, upshifts can be made by pushing the left-hand paddle away from you and downshifts can be made by pushing the right-hand paddle away from you.
gearshift paddles operate irrespective of handling and powertrain program cted, and there is no need to release the lerator pedal to change gear.
WARNING: For safety, in manual mode only, the vehicle will monitor engine speed and may perform an automatic gear change if necessary.
WARNING: Do not change down for additional engine braking on a slippery surface.
NOTE: If operating the paddles in automatic mode, the gearbox will revert to automatic changes if an eight second period elapses without a gear change being made.
Mclaren P11 - Complete.book Page 22 Friday, January 22, 2016 9:43 AM
S SHIFT GEARBOX
mode indicator displays A. All occur automatically, but if a dle is operated the gearbox will orary manual mode. This mode tive for as long as the driver make manual gear changes, n eight second period. The e indicator displays A/M, see e indicator, page 3.25.
NOTE: As soon as an eight second period has elapsed without a manual gear change being made, the gearbox will revert to automatic mode.
Gearshift paddles
To upshift, pull the right-hand paddle towards you. To downshift pull the left-hand paddle towards you. The current gear position appears in the gear position display, see Gear position indicator, page 3.33.
The the seleacce

DRIVSEAM
2.23
To immgear whhold a dsufficienwill thensequenreached
When th(10 kphgear selpaddle t
Neutralpressing
Mclaren P11 - Complete.book Page 23 Friday, January 22, 2016 9:43 AM
ING CONTROLSLESS SHIFT GEARBOX
ediately shift to the lowest possible ilst the vehicle is moving, select and ownshift on the paddle while applying t brake pedal pressure. The vehicle go down through all gears
tially until the optimum gear is or you release the paddle.
e vehicle speed is below 6 mph ) or the vehicle is stationary with a ected, select a downshift and hold the o select neutral.
can be selected at any speed by the ‘N’ button.

DRIVING CONTROLSHANDLING
2.24
HANDLING AND POWERTRAIN CONTROLS
Active dyna
The handlingswitches, on the driver to cperformance
Active dynamThe active dyfollowing conthe engine ruon.
LT
AERO button, see Airbrake, page 2.44
Active button, page 2.25
Handling control, page 2.25
Electronic Stability Control (ESC), page 2.37
STOP/START button, see Vehicle electrical status, page 2.3
Powertrain control, page 2.27
Manual/Automatic mode, page 2.20
Launch control, page 2.30
Mclaren P11 - Complete.book Page 24 Friday, January 22, 2016 9:43 AM
AND POWERTRAIN CONTROLS
mics control
and powertrain control the active dynamics panel, allow
hange the handling and characteristics of the vehicle.
ics panelnamics panel contains the trols, and will only function with nning or the ignition switched
Except 675LT
1. Winter mode - except 675LT, page 2.29
2. Active button, page 2.25
3. Handling control, page 2.25
AERO button, see Airbrake, page 2.44
4. STOP/START button, see Vehicle electrical status, page 2.3
5. Powertrain control, page 2.27
Manual/Automatic mode, page 2.20
6. Launch control, page 2.30
675
1.
2.
3.
4.
5.
6.

DRIVHAND
2.25
Active
PressinghandlinACTIVEswitche
NOthepaanrempre
Handling control
The handling control switch affects the following vehicle characteristics:
• Roll stiffness
• Adaptive damping
• ESC settings
• Steering response
Selecting a setting
1. Press the ACTIVE button to switch on the active dynamics panel.
Mclaren P11 - Complete.book Page 25 Friday, January 22, 2016 9:43 AM
ING CONTROLSLING AND POWERTRAIN CONTROLS
button
the ACTIVE button activates the g and powertrain controls. The button and handling and powertrain s will illuminate.
TE: When the ignition is switched off, controls on the active dynamics
nel will also switch off. The handling d powertrain control settings will be
embered but it will be necessary to ss the ACTIVE button again to
operate the controls when the ignition is next switched on or the vehicle will revert to automatic gear changes.

DRIVING CONTROLSHANDLING
2.26
2. Rotate tone of th
mode selected will remain active, until selection is changed, or the ignition is ched off.
NOTE: If all the following conditions are not met when the selection is made, the mode will not be implemented until they are met:
engine running with no fault conditions existing
no vehicle dynamic or stability interventions activated, e.g. Electronic Stability Control;
vehicle speed below 114 mph (190 kph)
steering wheel in straight ahead position, and not being turned, if the car is moving
n the active dynamics panel is off, the dling display in the right-hand display will
Normal, see Handling and powertrain lay, page 3.33.
section13.fm Page 26 Monday, January 25, 2016 8:31 AM
AND POWERTRAIN CONTROLS
he handling control to select e following settings.
Settings The the swit
•
•
•
•
WheHanshowdisp
N Normal
Suspension at its softest setting, offers a compliant ride while maintaining good body control through corners.
S Sport
Suspension is stiffer, giving a firmer ride coupled with enhanced handling characteristics. Active aerodynamics (Airbrake) becomes available to further enhance vehicle handling.
T Track
The suspension is at its stiffest, giving almost race car handling and ride characteristics. Active aerodynamics (Airbrake) becomes available to further enhance vehicle handling.
The Electronic Stability Control warning light is permanently illuminated (except 675LT).

DRIVHAND
2.27
NOElein oElepa
ProactiThe Proadjustabintercontypical mhandlindampergrip, traride com
2. Rotate the powertrain control to select one of the following settings.
Mclaren P11 - Complete.book Page 27 Friday, January 22, 2016 9:43 AM
ING CONTROLSLING AND POWERTRAIN CONTROLS
TE: In Track handling mode, the ctronic Stability Control system is still peration. For further information, see
ctronic Stability Control (ESC), ge 2.37.
ve chassis controlactive chassis control system features le roll control using hydraulically nected dampers, in place of the echanical anti-roll bars. Each
g mode adjusts the settings of the s to offer high levels of roll control, ction and a unique combination of
fort and handling.
Powertrain control
Selecting a setting
1. Press the ACTIVE button to switch on the active dynamics panel.

DRIVING CONTROLSHANDLING
2.28
Settings
The differentabove are onselected.
nomy mode
n the vehicle is operating in any ertrain setting with automatic gear shifts cted, the transmission adapts to an
omical shift strategy during periods of le driving. This is determined by the cle speed, acceleration, braking and road ient.
N Normal
S Sport
T Track
Mclaren P11 - Complete.book Page 28 Friday, January 22, 2016 9:43 AM
AND POWERTRAIN CONTROLS
gear change strategies outlined ly relevant with automatic mode
The mode selected will remain active, until the selection is changed, or the ignition is switched off.
When the active dynamics panel is off, the Powertrain display in the right-hand display will show Normal, see Handling and powertrain display, page 3.33.
NOTE: The use of the Track setting on the public road is not recommended.The Track setting is strictly intended for high performance track/off road use only.
Eco
Whepowseleecongentvehigrad
Gear changes are configured to offer the optimum economy without sacrificing the vehicle's inherent performance.
Gear changes will occur at a higher engine speed and with a reduced shift duration and are further enhanced with cylinder cut. See Cylinder cut, page 6.15.
Gear change strategy is at its sharpest. Changes occur instantly, according to throttle response and are further enhanced with cylinder cut and inertia push. See Cylinder cut, page 6.15 and Inertia push, page 6.16.
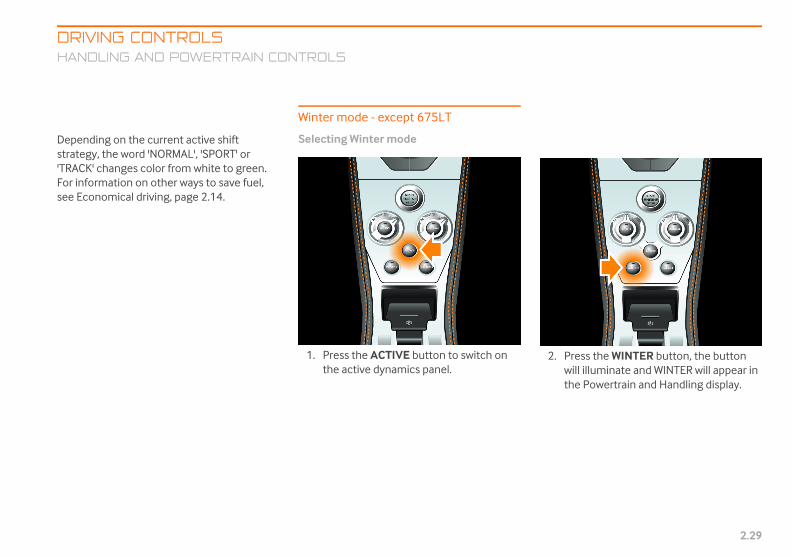
DRIVHAND
2.29
Dependstrategy'TRACK'For infosee Eco
2. Press the WINTER button, the button will illuminate and WINTER will appear in the Powertrain and Handling display.
Mclaren P11 - Complete.book Page 29 Friday, January 22, 2016 9:43 AM
ING CONTROLSLING AND POWERTRAIN CONTROLS
ing on the current active shift , the word 'NORMAL', 'SPORT' or
changes color from white to green. rmation on other ways to save fuel, nomical driving, page 2.14.
Winter mode - except 675LT
Selecting Winter mode
1. Press the ACTIVE button to switch on the active dynamics panel.

DRIVING CONTROLSHANDLING
2.30
3. Winter mand powthe roll sElectronchangedassistanconditiopoints afor the s
4. For morepage 2.6
5. To switcagain, alignition.
NOTE: If there is a fault or the launch procedure has not been followed correctly, a warning message Launch mode unavailable - see Owners Manual will be shown in the left-hand display. Repeat the launch procedure, ensuring that it is followed correctly. If the warning message remains, contact your McLaren Retailer.
NOTE: Launch mode is only available if the following conditions are met:
both doors are closed
the vehicle lift function is inactive
atmospheric pressure is sufficient for normal engine performance
winter mode not activated
engine coolant at normal operating temperature
Mclaren P11 - Complete.book Page 30 Friday, January 22, 2016 9:43 AM
AND POWERTRAIN CONTROLS
ode overrides both handling ertrain controls. In winter mode, tiffness, adaptive damping and ic Stability Control settings are to give the maximum
ce to the driver in slippery ns. The engine speed, gearshift nd shift speed are also optimized lippery conditions.
information, see Winter driving, 1.
h off, press the WINTER button ternatively switch off the
Launch control
Launch control is designed to offer the maximum acceleration from a standing start.
WARNING: Do not initiate launch control unless on a track. Before initiating launch control, ensure that all doors, luggage compartment and engine cover are closed, and the prevailing conditions are suitable for performing maximum acceleration maneuvers.
NOTE: Launch control can be operated in either automatic or manual mode and any handling or powertrain mode, but only when the active dynamics panel is activated.
NOTE: The launch sequence can be aborted at any point by carrying out any of the following actions:
• applying the parking brake
• pressing the ACTIVE button to switch off the vehicle dynamics panel
• or pressing the launch button to switch off launch control
•
•
•
•
•

DRIVHAND
2.31
Launch1. En
ah
2. Delef
3. Prethe
NOTE: To abort launch control release the brake pedal before pressing the accelerator pedal or wait for approximately 60 seconds until launch control is deactivated.
NOTE: The message 'Launch Mode Active - Boost Building' will be shown in the left-hand display. Once sufficient boost has been achieved, the message 'Launch Mode Active - Boost Ready' will be shown in the left-hand display.
6. Release the brake pedal with your left foot and the launch control system will perform a launch start to give maximum acceleration.
NOTE: To abort launch control release the accelerator pedal or wait for approximately 5-10 seconds until launch control is deactivated. If the launch is aborted, release the accelerator pedal and then press again to drive away.
7. Launch control will operate if procedure has been followed correctly until aborted.
Mclaren P11 - Complete.book Page 31 Friday, January 22, 2016 9:43 AM
ING CONTROLSLING AND POWERTRAIN CONTROLS
control processsure the steering wheel is in a straight ead position.
press the brake pedal firmly with your t foot and select first gear.
ss the ACTIVE button to switch on active dynamics panel.
4. Press the LAUNCH button.
NOTE: L will flash in the gearbox mode indicator, see Manual/Automatic mode, page 2.20 and 'Launch Mode Active - Awaiting Throttle' will be shown in the left-hand display.
5. With your left foot remaining on the brake pedal, press and hold the accelerator pedal down fully with your right foot, the engine speed will increase to 3,000 rpm.

DRIVING CONTROLSHANDLING
2.32
NOTE: Wvehicle wshifts, ancontinueabortedthe acceoperate
NOTE: Spinning wheel pull away is only available if the following conditions are met:
engine coolant at normal operating temperature
atmospheric pressure is sufficient for normal engine performance
vehicle is stationary and on level ground
Electronic Stability Control is switched off
See Electronic Stability Control (ESC), page 2.37
launch control is inactive
first gear is selected
parking brake is disengaged
steering wheel should be in a straight ahead position to ensure greater control during pull away
WARNING: If the steering wheel is not in a straight ahead position, extreme caution must be taken during pull away as there is an increased chance of spinning the vehicle.
Mclaren P11 - Complete.book Page 32 Friday, January 22, 2016 9:43 AM
AND POWERTRAIN CONTROLS
hilst in launch control, the ill carry out automatic gear d optimize traction. It will to do so until launch control is
. To abort launch control, release lerator pedal, apply the brake, or
one of the gearshift paddles.
Spinning wheel pull away - 675LT
For the driver who wishes to demonstrate maximum drama on pull away.
WARNING: Do not initiate spinning wheel pull away unless on a track. Before initiating spinning wheel pull away, ensure that all doors, luggage compartment and engine cover are closed, and the prevailing conditions are suitable for performing dramatic acceleration maneuvers.
WARNING: During spinning wheel pull away the Electronic Stability Control will be deactivated, resulting in loss of traction and spinning of the rear wheels.
NOTE: Spinning wheel pull away can be operated in either automatic or manual mode and any powertrain mode, but only Sport or Track chassis modes.
NOTE: Spinning wheel pull away can be aborted at any point by carrying out any of the following actions:
• applying the brakes
• releasing the accelerator pedal
•
•
•
•
•
•
•
•

DRIVHAND
2.33
Spinnin1. De
veh
2. Redekicaccrea
NOrelthe
NOin aouspiprotoo
If mwhenlev
Mclaren P11 - Complete.book Page 33 Friday, January 22, 2016 9:43 AM
ING CONTROLSLING AND POWERTRAIN CONTROLS
g wheel pull away processpress the brake pedal to hold the icle stationary.
lease the brake pedal and then rapidly press the accelerator pedal past the kdown position. The vehicle will elerate dramatically, spinning the r wheels.
TE: To abort spinning wheel pull away, ease the accelerator pedal or depress brake pedal.
TE: During spinning wheel pull away utomatic mode, the vehicle will carry
t automatic gear shifts, and continue nning the rear wheels until the cess is aborted or grip levels become high to allow for wheel spin.
anual gear shifts are made, the eels will continue to spin if optimum gine speed is maintained and grip els allow.

DRIVING CONTROLSDRIVING S
2.34
DRIVING SAFETY SYSTEMS
General
This section cfollowing safe
• Anti-loc
• Brake as
• Brake di
• Hill hold
• Brake-st
• Electron
• Electron
• Airbrake
WARNINincreasespeciaand icy distanc
The drivin this sthe laws
Always suit theand mafrom otthe road
i-lock Braking System
Anti-lock Braking System prevents the els from locking when you brake. This s the vehicle to be steered during
ing maneuvers.
Anti-lock Braking System works from a d of approximately 5 mph (8 kph)
ards, regardless of road surface itions. It works on slippery surfaces, even
n you brake gently.
WARNING: Do not depress the brake pedal repeatedly in quick succession (pumping). Depress the brake pedal firmly and evenly. Pumping the brake pedal reduces the braking effect.
e Anti-lock Braking System operates ng braking, the warning light flashes, and brake pedal pulses as this happens.
n the Anti-lock Braking System is ated, maintain the force on the brake l until the braking situation is over.
WARNING: Always adapt your driving style to suit the prevailing road and weather conditions and maintain sufficient distance from other road users and objects on the road.
Mclaren P11 - Complete.book Page 34 Friday, January 22, 2016 9:43 AM
AFETY SYSTEMS
ontains information about the ty systems:
k Braking System
sist system
sc wiping
eer
ic brake pre-fill
ic Stability Control
G: The risk of an accident es when driving quickly, lly when cornering, on wet roads. Always maintain a safe e to the vehicle in front.
ing safety systems described ection are unable to override of physics.
adapt your driving style to road and weather conditions intain a sufficient distance her road users and objects on
.
NOTE: In winter conditions, the maximum effect of the Anti-lock Braking System, brake assist system and Electronic Stability Control can only be achieved if you use winter tires, with snow chains or snow socks where they are necessary.
Ant
The wheallowbrak
The speeupwcondwhe
If thdurithe
Wheactivpeda

DRIVDRIVIN
2.35
Anti-locIf sy
Do not dMcLaren
WASysyCo
If tmawhtheab
Brake disc wiping
Brake disc wiping operates automatically when the windscreen wiper is switched on. It prevents moisture build up on the brake discs during periods of heavy rain, improving braking performance.
Mclaren P11 - Complete.book Page 35 Friday, January 22, 2016 9:43 AM
ING CONTROLSG SAFETY SYSTEMS
k Braking System status lightthere is a malfunction with the stem, the status light will illuminate. rive your vehicle, contact your Retailer as soon as possible.
RNING: If the Anti-lock Braking stem malfunctions, brake assist stem and Electronic Stability ntrol are also deactivated.
he Anti-lock Braking System lfunctions, the wheels could lock en you brake. This may increase stopping distance and impair your
ility to steer.
Brake assist system
Brake assist system operates in emergency braking situations. If you depress the brake pedal quickly, the brake assist system automatically increases the force applied to the brakes and thus shortens the stopping distance.
Continue to depress the brake pedal firmly until the emergency situation is over, the Anti-lock Braking System prevents the wheels from locking.
When you release the brake pedal, the brakes will work as normal. Brake assist system is deactivated.
WARNING: If the brake assist system malfunctions, the brakes will still operate. However, the braking force is not automatically boosted and this may increase the stopping distance.

DRIVING CONTROLSDRIVING S
2.36
Hill hold con
If the brake pvehicle on a happly the brapedal is relea
tronic brake pre-fill
e accelerator pedal is suddenly released, lectronic brake pre-fill function
ediately brings the brake pads into act with the discs, ensuring rapid braking.
Mclaren P11 - Complete.book Page 36 Friday, January 22, 2016 9:43 AM
AFETY SYSTEMS
trol
edal is applied to hold the ill, this function will continue to
kes for two seconds after the sed to assist a smooth start.
Brake-steer
Brake steer offers the benefits of a torque vectoring differential, but is integrated into the braking system reducing weight and providing excellent speed of response.
Torque vectoring gives the differential the ability to change the amount of power that is sent to each of the rear wheels to provide optimum stability and traction.
If the system detects that the car is starting to understeer through a corner, the inside rear brake is gently applied. This helps to increase the yaw rate of the car, making the car feel more resistant to understeer. The lateral ‘g’ force is also increased giving better handling characteristics.
If the driver uses too much throttle exiting a corner, the inside rear wheel increases speed, which without brake steer could cause the car to become unstable. In this situation, brake steer will again gently apply the brake on the inside rear wheel, thereby restoring traction and stability.
Elec
If ththe eimmcont

DRIVDRIVIN
2.37
Electro
Electronstabilitythe road
Electronwheel sskid andindividupower oaway onstabilize
Ein
on and o
NOwawhHa
WAcooffStastyco
WARNING: The traction control system cannot reduce the risk of an accident if you drive too fast. The traction control system is unable to override the laws of physics.
See: ESC - except 675LT, page 2.38.
See: ESC - 675LT, page 2.40.
Mclaren P11 - Complete.book Page 37 Friday, January 22, 2016 9:43 AM
ING CONTROLSG SAFETY SYSTEMS
nic Stability Control (ESC)
ic stability control monitors driving and traction between the tires and surface.
ic stability control detects when a tarts to spin or the vehicle starts to stabilizes the vehicle by braking al wheels, and/or limiting the engine utput. This also assists when pulling wet or slippery road surfaces and s the vehicle when braking.
lectronic stability control operation is dicated by the warning light blinking ff.
TE: The electronic stability control rning light is permanently illuminated en Track mode is selected on the ndling Control.
RNING: If the electronic stability ntrol warning light blinks on and , do not deactivate Electronic bility Control. Adapt your driving le to suit road and traffic
nditions.
Electronic stability control cannot reduce the risk of an accident if you drive too fast. Electronic stability control is unable to override the laws of physics.
NOTE: Electronic stability control only functions properly if wheels with the recommended specification tires are used.
Electronic stability control is activated automatically as soon as the engine is running.
Traction control systemThe traction control system is an integral part of Electronic Stability Control.
The traction control system reduces engine torque to prevent the wheels from spinning. If additional intervention is required to stop the wheels from spinning, the vehicle will apply the rear brakes individually. The traction control system brakes individual drive wheels to prevent them from spinning. This means that the vehicle can accelerate on slippery surfaces.

DRIVING CONTROLSDRIVING S
2.38
ESC - excep
Deactivating
WARNINControlvehicle your dritraffic c
WARNINElectrona track suitable
NOTE: WStabilityconditio
• the 'ESC
• the lightillumina
• Electronimprove
• the engiand the
• the anti-activate
To confirm the selection, press and hold the AERO and MANUAL buttons together for 5 seconds.
The Electronic Stability Control OFF warning light will illuminate and a confirmation message will appear in the left-hand display.
Mclaren P11 - Complete.book Page 38 Friday, January 22, 2016 9:43 AM
AFETY SYSTEMS
t 675LT
Electronic Stability Control
G: When Electronic Stability is deactivated, the risk of the skidding is increased. Adapt ving style to suit road and onditions.
G: Do not deactivate ic Stability Control unless on
and prevailing conditions are .
hen you deactivate Electronic Control, the following ns result:
OFF' warning light illuminates
on the ESC OFF button tes - 675LT
ic Stability Control no longer s driving stability
ne's torque is no longer limited drive wheels could spin
lock braking system remains d
Deactivation Procedure - except 675LT1. Ensure the vehicle is stationary, with the
engine running and the brake pedal depressed.
2. Track powertrain and handling modes should be selected, but the dynamics panel should not be switched on, see Handling control, page 2.25.
3. Press and hold the ACTIVE button on the active dynamics panel for 5 seconds, a warning message will be displayed in the left-hand display 'Confirm ESC Off'.
4.
5.

DRIVDRIVIN
2.39
ReactivWhen EreactivaOFF warextingu
NOauignag
Mclaren P11 - Complete.book Page 39 Friday, January 22, 2016 9:43 AM
ING CONTROLSG SAFETY SYSTEMS
ating Electronic Stability Controllectronic Stability Control is ted, the Electronic Stability Control ning light in the instrument cluster ishes.
TE: Electronic Stability Control is tomatically reactivated when the ition is next switched off and on
ain.
Reactivation Procedure - except 675LT
Perform any of the following to reactivate Electronic Stability Control:
• Press the ACTIVE button on the active dynamics panel.
• Change the setting on either the handling or powertrain control.
• Switch on cruise control.
• Switch the ignition off and then switch on again.

DRIVING CONTROLSDRIVING S
2.40
ESC - 675LT
Deactivating
WARNINControlvehicle your dritraffic c
WARNINElectrona track suitable
NOTE: WStabilityconditio
• the 'ESC
• the lightillumina
• Electronimprove
• the engiand the
• the anti-activate
rt dynamic modeSelect Sport handling mode.
The Electronic Stability Control is ON by default.
Press the ESC OFF button briefly to activate Sport Dynamic mode which allows more dynamic freedom over the default ESC ON mode.
ESC DYN will be displayed on the instrument cluster and the light on the ESC OFF button will illuminate.
k dynamic modeSelect Track handling mode.
The Electronic Stability Control is ON by default, but allows slightly increased wheel slip during acceleration over the default ESC ON condition in Normal and Sport handling modes.
Mclaren P11 - Complete.book Page 40 Friday, January 22, 2016 9:43 AM
AFETY SYSTEMS
Electronic Stability Control
G: When Electronic Stability is deactivated, the risk of the skidding is increased. Adapt ving style to suit road and onditions.
G: Do not deactivate ic Stability Control unless on
and prevailing conditions are .
hen you deactivate Electronic Control, the following ns result:
OFF' warning light illuminates
on the ESC OFF button tes - 675LT
ic Stability Control no longer s driving stability
ne's torque is no longer limited drive wheels could spin
lock braking system remains d
Dynamic ESC Modes - 675LTThe level of Electronic Stability Control can be adjusted to various dynamic modes to suit the driver’s requirements and is dependant on the handling mode currently active.
Electronic Stability Control dynamic modes can be selected at any vehicle speed.
Ensure Sport or Track handling mode is active, see Handling control, page 2.25.
Spo1.
2.
Trac1.
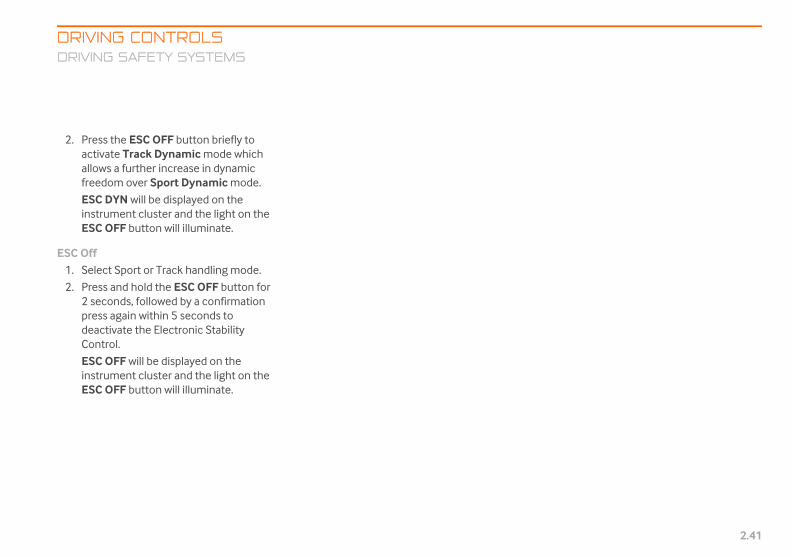
DRIVDRIVIN
2.41
2. Preactallofre
ESinsES
ESC Off1. Se
2. Pre2 spredeCo
ESinsES
Mclaren P11 - Complete.book Page 41 Friday, January 22, 2016 9:43 AM
ING CONTROLSG SAFETY SYSTEMS
ss the ESC OFF button briefly to ivate Track Dynamic mode which ws a further increase in dynamic
edom over Sport Dynamic mode.
C DYN will be displayed on the trument cluster and the light on the C OFF button will illuminate.
lect Sport or Track handling mode.
ss and hold the ESC OFF button for econds, followed by a confirmation ss again within 5 seconds to
activate the Electronic Stability ntrol.
C OFF will be displayed on the trument cluster and the light on the C OFF button will illuminate.
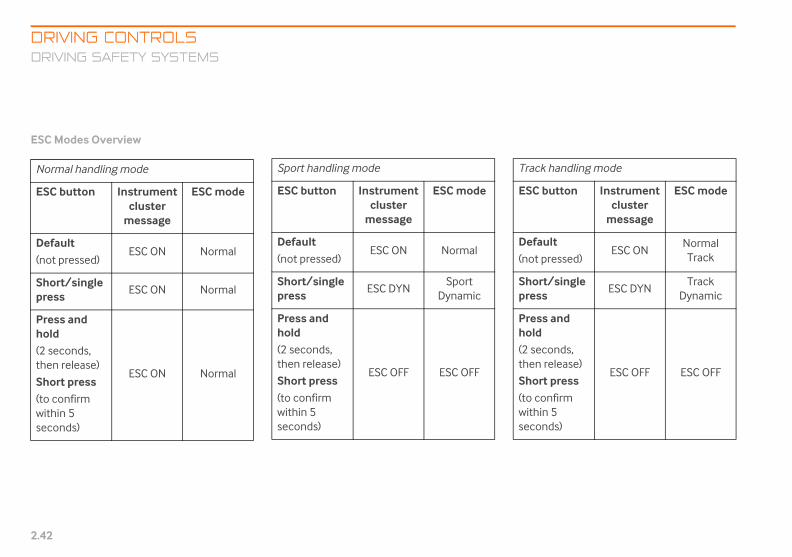
DRIVING CONTROLSDRIVING S
2.42
ESC Modes O
Normal hand
ESC button
Default(not pressed
Short/singpress
Press and hold(2 seconds, then release
Short press(to confirm within 5 seconds)
ck handling mode
C button Instrument cluster
message
ESC mode
faultt pressed)
ESC ONNormal Track
ort/single ss
ESC DYNTrack
Dynamic
ss and ldeconds, n release)
ort press confirm hin 5 onds)
ESC OFF ESC OFF
Mclaren P11 - Complete.book Page 42 Friday, January 22, 2016 9:43 AM
AFETY SYSTEMS
verview
ling mode
Instrument cluster
message
ESC mode
)ESC ON Normal
le ESC ON Normal
)ESC ON Normal
Sport handling mode
ESC button Instrument cluster
message
ESC mode
Default(not pressed)
ESC ON Normal
Short/single press
ESC DYNSport
Dynamic
Press and hold(2 seconds, then release)
Short press(to confirm within 5 seconds)
ESC OFF ESC OFF
Tra
ES
De(no
Shpre
Preho(2 sthe
Sh(towitsec

DRIVDRIVIN
2.43
ReactivWhen EreactivaOFF warextingu
NOauignag
Mclaren P11 - Complete.book Page 43 Friday, January 22, 2016 9:43 AM
ING CONTROLSG SAFETY SYSTEMS
ating Electronic Stability Controllectronic Stability Control is ted, the Electronic Stability Control ning light in the instrument cluster ishes.
TE: Electronic Stability Control is tomatically reactivated when the ition is next switched off and on
ain.
Reactivation Procedure - 675LT
Perform any of the following to reactivate Electronic Stability Control:
• Press the ESC OFF button, the light on the button will extinguish.
• Change the setting on the handling control to Normal.
• Switch on cruise control.
• Switch the ignition off and then switch on again.

DRIVING CONTROLSDRIVING S
2.44
Airbrake
WARNINfor ensupart of tduring A
The Airbrake McLaren anddescribed beinitiates after
NOTE: Tpressureengine r
NOTE: Tautomattemperaengine swarninginstrumAirbrakewill becotemperaengine s
WARNING: If the Airbrake fails the self-test, a message will appear in the left-hand display. Contact your McLaren Retailer.
NOTE: If the engine has been stopped with the Airbrake in the downforce position, the self-test procedure will be reversed, i.e. the Airbrake will lower fully then raise to the driver selected downforce position.
mal driving position mode is the default position with the active mics panel switched off and is used for al driving conditions.
nforce positionis position, the Airbrake is raised to ase rear downforce. This position
ances vehicle stability with increased dynamic drag. The Airbrake can be raised y vehicle speed.
Mclaren P11 - Complete.book Page 44 Friday, January 22, 2016 9:43 AM
AFETY SYSTEMS
G: The driver is responsible ring that no persons, or any heir body can be trapped irbrake movement.
is located at the rear of your has three operating positions, as low, and a self-test facility that every full ignition on/off cycle.
he Airbrake uses hydraulic and will only operate with the unning.
he Airbrake system is ically deactivated at tures below 24°F (-4°C) or at peeds below 500 rpm. A message will appear on the ent cluster if operation of the is selected. The Airbrake system me active when the ambient ture rises above 24°F (-4°C). or peed rises above 500 rpm.
1. Normal driving position
2. Downforce position
3. Rapid braking position
Self-testAfter each full ignition cycle, the first time the engine is started and at speeds above 9 mph (15 kph), the Airbrake self-tests, rising to the downforce position and then returning slowly to its initial position.
NorThisdynanorm
DowIn thincreenhaeroat an

DRIVDRIVIN
2.45
1. Prethe
675LT
2. Press the AERO button. The Airbrake rises and locks in the downforce position.
NOTE: The Airbrake may automatically lower to reduce aerodynamic drag in favor of straight line speed if the vehicle is traveling in a straight line at full throttle.
The Airbrake will not automatically lower when cornering or when launch control is active.
Mclaren P11 - Complete.book Page 45 Friday, January 22, 2016 9:43 AM
ING CONTROLSG SAFETY SYSTEMS
ss the ACTIVE button to switch on active dynamics panel.
Except 675LT

DRIVING CONTROLSDRIVING S
2.46
Lowering thIf the car is tr(15 kph), presAirbrake will lposition.
WARNINdownfoAirbrakobstrucleaves, Airbrakcorrectlensurintrapped
NOTE: Tspeed ocriteria:
• When cobe betw(120 kph
• When trvehicle s(15 kph)
• This is tobeing tra
id braking positionng hard braking at speeds above 60 mph ph), the Airbrake automatically rises to ully deployed position to provide imum braking assistance.
e the pressure on the brake pedal is sed, the Airbrake will return to its
ious position - either the driver’s selected nforce position or the normal driving tion.
NOTE: The Airbrake will lower just before the vehicle comes to a halt during hard braking.
Airbrake may actively deploy, even if the e pedal is not depressed, to maintain cle stability under the following itions:
When high longitudinal G forces are measured, for example. when the accelerator pedal is suddenly released.
When high vertical G forces are measured, for example. when traveling over the crest of a hill.
Mclaren P11 - Complete.book Page 46 Friday, January 22, 2016 9:43 AM
AFETY SYSTEMS
e Airbrake - vehicle movingaveling at speeds above 9 mph s the AERO button, and the ower to the normal driving
G: Before deactivating the rce position, check the e for any objects which may t movement, e.g. branches or and remove them or the e may no longer function y. The driver is responsible for g no person or object can be during Airbrake movement.
he Airbrake will only lower if the f the vehicle meets the following
rnering, the vehicle speed must een 9 mph (15 kph) and 75 mph ).
aveling in a straight line, the peed must be between 9 mph and 155 mph (250 kph).
reduce the risk of any object pped.
Lowering the Airbrake - vehicle stationaryIf the car is being parked and the Airbrake is still deployed, press and hold the AERO button for 5 seconds, and the Airbrake will start to lower. Keep the button pressed until the Airbrake is fully lowered, remaining alert to any potential obstructions.
WARNING: Before lowering, check the Airbrake for any objects which may obstruct movement, e.g. branches or leaves, and remove them or the Airbrake may no longer function correctly. The driver is responsible for ensuring no person or object can be trapped during Airbrake movement.
NOTE: If the AERO button is released before the Airbrake is fully retracted, it will return to the previously selected position.
RapDuri(95 kthe fmax
Oncreleaprevdowposi
The brakvehicond
•
•
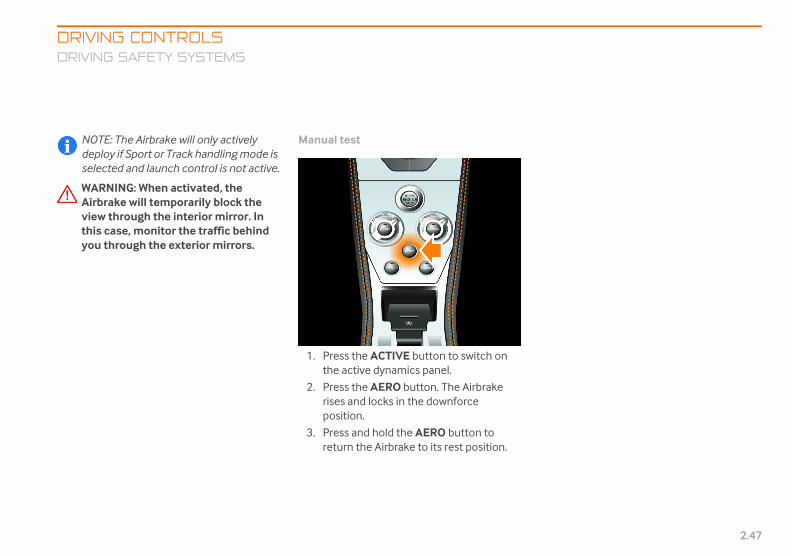
DRIVDRIVIN
2.47
NOdesel
WAAirviethiyo
Mclaren P11 - Complete.book Page 47 Friday, January 22, 2016 9:43 AM
ING CONTROLSG SAFETY SYSTEMS
TE: The Airbrake will only actively ploy if Sport or Track handling mode is ected and launch control is not active.
RNING: When activated, the brake will temporarily block the w through the interior mirror. In s case, monitor the traffic behind u through the exterior mirrors.
Manual test
1. Press the ACTIVE button to switch on the active dynamics panel.
2. Press the AERO button. The Airbrake rises and locks in the downforce position.
3. Press and hold the AERO button to return the Airbrake to its rest position.
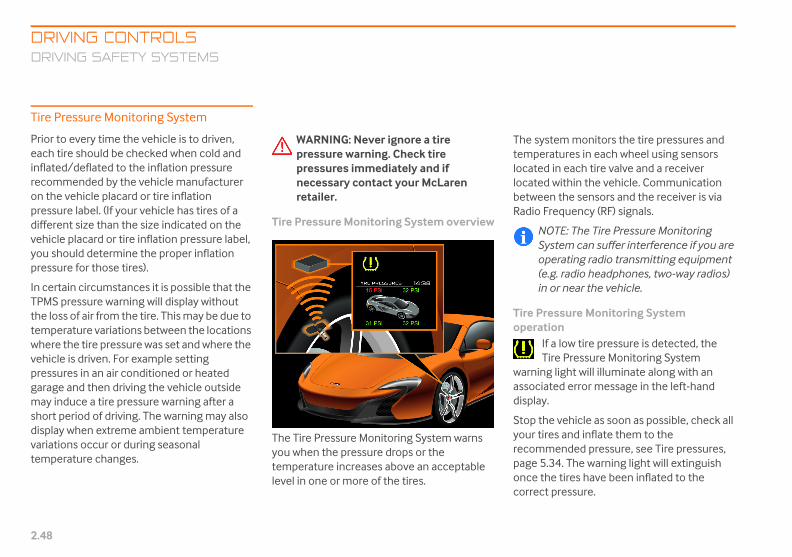
DRIVING CONTROLSDRIVING S
2.48
Tire Pressur
Prior to everyeach tire shoinflated/deflarecommendeon the vehiclpressure labedifferent sizevehicle placayou should depressure for t
In certain circTPMS pressurthe loss of airtemperature where the tirevehicle is drivpressures in agarage and thmay induce ashort period odisplay whenvariations occtemperature
system monitors the tire pressures and peratures in each wheel using sensors ted in each tire valve and a receiver ted within the vehicle. Communication een the sensors and the receiver is via
o Frequency (RF) signals.
NOTE: The Tire Pressure Monitoring System can suffer interference if you are operating radio transmitting equipment (e.g. radio headphones, two-way radios) in or near the vehicle.
Pressure Monitoring System ration
If a low tire pressure is detected, the Tire Pressure Monitoring System
ing light will illuminate along with an ciated error message in the left-hand lay.
the vehicle as soon as possible, check all tires and inflate them to the mmended pressure, see Tire pressures, 5.34. The warning light will extinguish the tires have been inflated to the
ect pressure.
Mclaren P11 - Complete.book Page 48 Friday, January 22, 2016 9:43 AM
AFETY SYSTEMS
e Monitoring System
time the vehicle is to driven, uld be checked when cold and ted to the inflation pressure d by the vehicle manufacturer
e placard or tire inflation l. (If your vehicle has tires of a than the size indicated on the rd or tire inflation pressure label,
termine the proper inflation hose tires).
umstances it is possible that the e warning will display without
from the tire. This may be due to variations between the locations pressure was set and where the en. For example setting n air conditioned or heated en driving the vehicle outside tire pressure warning after a f driving. The warning may also
extreme ambient temperature ur or during seasonal
changes.
WARNING: Never ignore a tire pressure warning. Check tire pressures immediately and if necessary contact your McLaren retailer.
Tire Pressure Monitoring System overview
The Tire Pressure Monitoring System warns you when the pressure drops or the temperature increases above an acceptable level in one or more of the tires.
The temlocalocabetwRadi
Tireope
warnassodisp
Stopyourrecopageoncecorr

DRIVDRIVIN
2.49
Driving causes ttire failuefficienthe veh
WAforthecoinftritir
Each tircold andpressurpressur
Navigatthe left-pressur
manually checking tire pressures or checking for wear and damage. The system only provides a low tire pressure warning and does not re-inflate the tires.
The Tire Pressure Monitoring System cannot alert you to damage to a tire. Regularly check the condition of your tires.
WARNING: If low pressure warnings occur frequently, have the tires checked at your McLaren Retailer. Driving on an under-inflated tire will causes the tire to overheat and can lead to tire failure.
ENVIRONMENTAL: Under-inflated tires reduce fuel efficiency and tire tread life, and may affect the vehicle’s handling and braking characteristics.
ENVIRONMENTAL: Check tire pressures at least every 7 days.
Mclaren P11 - Complete.book Page 49 Friday, January 22, 2016 9:43 AM
ING CONTROLSG SAFETY SYSTEMS
on a significantly under-inflated tire he tire to overheat and can lead to re. Under-inflation also reduces fuel
cy and tire tread life, and may affect icle’s handling and stopping ability.
RNING: TPMS is not a substitute proper tire maintenance, and it is driver’s responsibility to maintain
rrect tire pressure, even if under-lation has not reached the level to gger illumination of the TPMS low e pressure warning light.
e should be checked weekly when inflated/deflated to the inflation
e recommended on the tire inflation e label.
e through the 'Vehicle Info' screen in hand display to view the current tire es, see Vehicle info, page 3.17.
The display shows the pressures of each of the four tires. If the pressure figure appears in green, no action is required. If it appears as red text, inflate the associated tire to the correct pressure as soon as possible.
Inspect the tire(s) for any possible causes of reduced tire pressure.
WARNING: The tire pressures indicated in the left-hand display will be more accurate with a pressure gauge. The Tire Pressure Monitoring System is not a substitute for
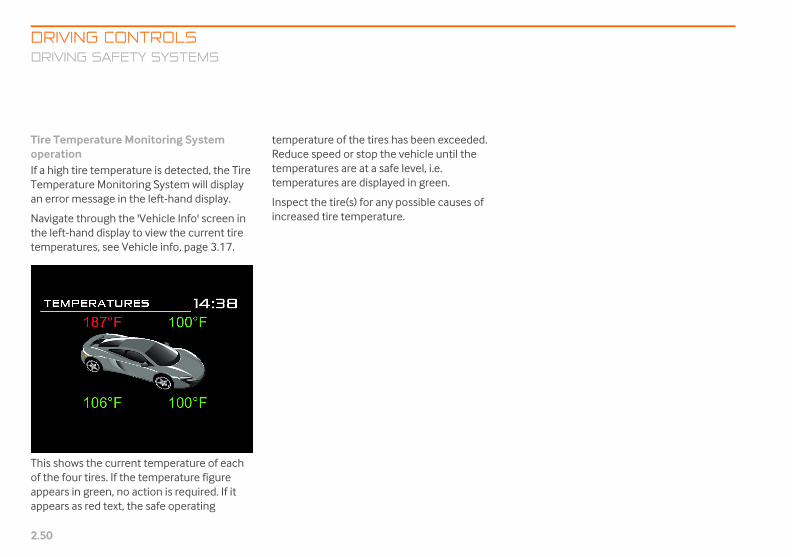
DRIVING CONTROLSDRIVING S
2.50
Tire TemperoperationIf a high tire tTemperaturean error mess
Navigate throthe left-handtemperatures
This shows thof the four tirappears in grappears as re
Mclaren P11 - Complete.book Page 50 Friday, January 22, 2016 9:43 AM
AFETY SYSTEMS
ature Monitoring System
emperature is detected, the Tire Monitoring System will display age in the left-hand display.
ugh the 'Vehicle Info' screen in display to view the current tire , see Vehicle info, page 3.17.
e current temperature of each es. If the temperature figure een, no action is required. If it d text, the safe operating
temperature of the tires has been exceeded. Reduce speed or stop the vehicle until the temperatures are at a safe level, i.e. temperatures are displayed in green.
Inspect the tire(s) for any possible causes of increased tire temperature.

DRIVCRUIS
2.51
CRUISE CONTROL
Overvie
WAroacrutracu
Neor po
Cruise cconstanpedal. Twhere afor long
Using cruise control
Accelerate to the desired speed and push the stalk up briefly, to activate cruise control. The set speed will appear in the right-hand display.
NOTE: Cruise control will only operate at speeds in excess of 20 mph (30 kph).
Speed can be increased at any time by pressing the accelerator pedal. Once the accelerator pedal is released the vehicle will return to the cruise speed.
Mclaren P11 - Complete.book Page 51 Friday, January 22, 2016 9:43 AM
ING CONTROLSE CONTROL
w
RNING: Pay particular attention to d and traffic conditions, when ise control is activated, and always vel at a speed which is safe for the rrent conditions.
ver use cruise control on winding slippery roads or when visibility is or, e.g. in fog, heavy rain or snow.
ontrol allows the driver to maintain a t speed without using the accelerator his is useful on motorway journeys constant speed can be maintained periods.
All cruise control functions are operated by the cruise control stalk, positioned on the right of the steering column.

DRIVING CONTROLSCRUISE C
2.52
WARNINcruise iscruise fReleasicircumsvehicle you exp
NOTE: Cruise control is canceled automatically if Electronic Stability Control detects wheel spin or vehicle skid or if Electronic Stability Control is switched off.
Mclaren P11 - Complete.book Page 52 Friday, January 22, 2016 9:43 AM
ONTROL
G: Always be aware that engaged and do not override
or extended periods. ng the accelerator in these tances could lead to the not decelerating at the rate ect.
Canceling cruise control
Briefly press the cruise control stalk away from you.
Cruise control is canceled. The indicator in the instrument cluster extinguishes but the last speed set remains stored.
NOTE: The last speed stored is cleared when you switch off the engine.
Cruise control is also canceled if the foot brake is pressed, if neutral is selected or if Active Speed Limiter is selected.
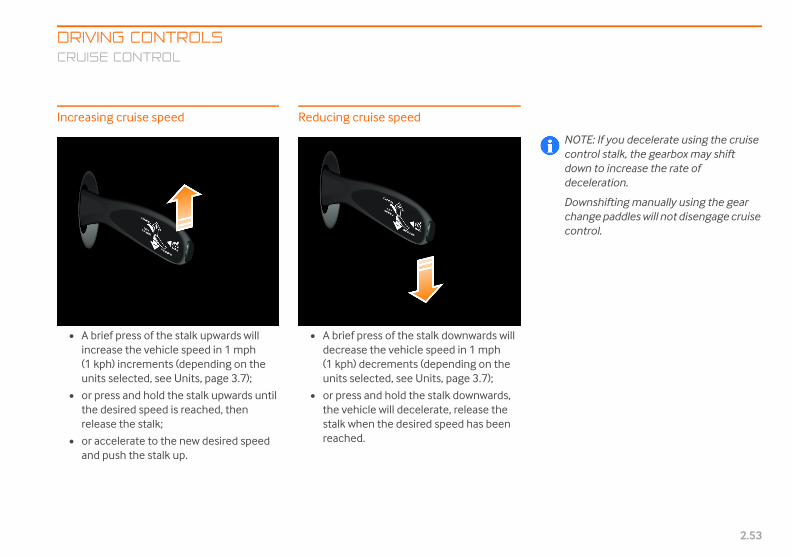
DRIVCRUIS
2.53
Increas
• A binc(1un
• or therel
• or an
NOTE: If you decelerate using the cruise control stalk, the gearbox may shift down to increase the rate of deceleration.
Downshifting manually using the gear change paddles will not disengage cruise control.
Mclaren P11 - Complete.book Page 53 Friday, January 22, 2016 9:43 AM
ING CONTROLSE CONTROL
ing cruise speed
rief press of the stalk upwards will rease the vehicle speed in 1 mph
kph) increments (depending on the its selected, see Units, page 3.7);
press and hold the stalk upwards until desired speed is reached, then
ease the stalk;
accelerate to the new desired speed d push the stalk up.
Reducing cruise speed
• A brief press of the stalk downwards will decrease the vehicle speed in 1 mph (1 kph) decrements (depending on the units selected, see Units, page 3.7);
• or press and hold the stalk downwards, the vehicle will decelerate, release the stalk when the desired speed has been reached.
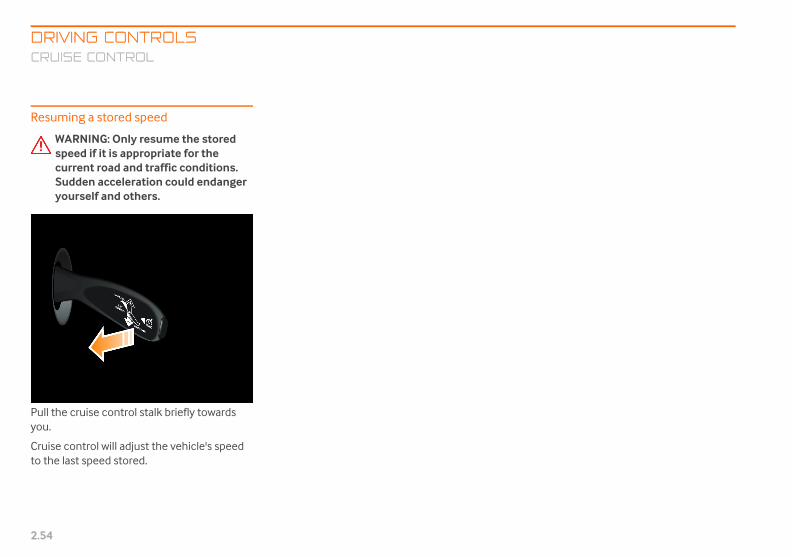
DRIVING CONTROLSCRUISE C
2.54
Resuming a
WARNINspeed ifcurrentSuddenyoursel
Pull the cruisyou.
Cruise controto the last spe
Mclaren P11 - Complete.book Page 54 Friday, January 22, 2016 9:43 AM
ONTROL
stored speed
G: Only resume the stored it is appropriate for the road and traffic conditions. acceleration could endanger f and others.
e control stalk briefly towards
l will adjust the vehicle's speed ed stored.
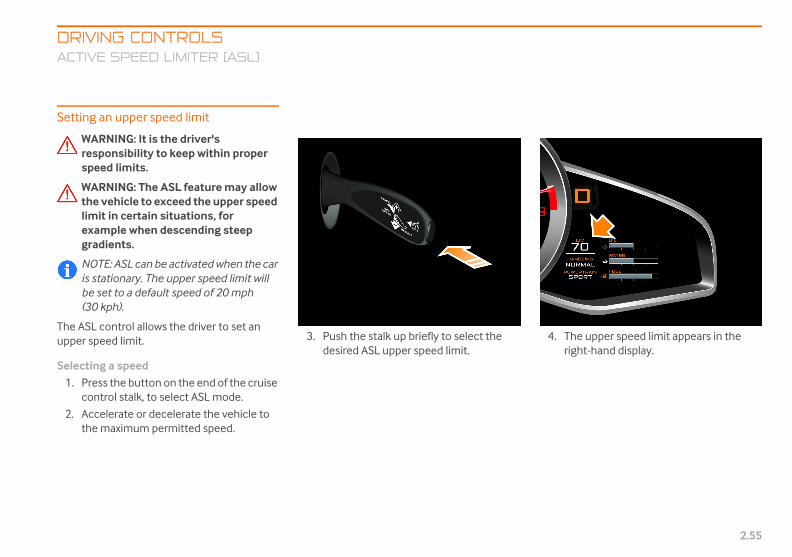
DRIV NTROLSACTIV D LIMITER (ASL)
2.55
ACTIVE SPEED LIMITER (ASL)
Setting speed limit
WA is the driver's res to keep within proper sp
WA e ASL feature may allow the exceed the upper speed lim n situations, for ex n descending steep gra
NO be activated when the car is s he upper speed limit will be ault speed of 20 mph (30
The ASL ows the driver to set an upper s
Selectin1. Pre on on the end of the cruise
co o select ASL mode.
2. Ac decelerate the vehicle to the permitted speed.
3. Push the stalk up briefly to select the desired ASL upper speed limit.
4. The upper speed limit appears in the right-hand display.
Mclaren P11 - Complete.book Page 55 Friday, January 22, 2016 9:43 AM
TE: ASL cantationary. T
set to a defkph).
control allpeed limit.
g a speedss the butt
ntrol stalk, t
celerate or maximum
ING COE SPEE
an upper
RNING: It ponsibility
eed limits.
RNING: Th vehicle toit in certai
ample whedients.

DRIVING CONTROLSRUNNING
2.56
RUNNING IN
Running in
Observe the fwhen the vehcomponents
Engine and gFor the first 6
• drive at
• do not dspeed lim(240 kph
• do not u
• avoid heat full th
• avoid dr2,000 rp
• avoid ruload for
• avoid us
• do not dbraking
• avoid sto2 minutrunning
• avoid idl10 minu
mal/Road use
Allow the engine to warm up before driving at high engine speeds and high loads. Limit engine speed to 5,000 rpm until the engine reaches full operating temperature.
Avoid stopping the engine within 2 minutes of high speed/high load running.
Avoid idling the engine for more than 10 minutes.
Mclaren P11 - Complete.book Page 56 Friday, January 22, 2016 9:43 AM
IN
ollowing running in instructions icle is new or if any of these have been replaced.
earbox25 miles (1,000 km):
varying road and engine speeds
rive faster than the maximum it of the road, or 150 mph
)
se your vehicle on a race track;
avy loads on the engine (driving rottle)
iving at engine speeds less than m
nning at constant speed and long periods
ing kickdown
ownshift for additional engine
pping the engine within es of high speed and high load
ing the engine for more than tes
After the 625 miles (1,000 km) running in period, you may gradually use the vehicle's full performance.
NOTE: Failure to observe the engine and gearbox operating limits during the running in period may lead to premature wear or damage.
NOTE: These running in instructions also apply for the first 625 miles (1,000 km) after the engine or transmission has been replaced.
ENVIRONMENTAL: This advice will assist in improving fuel economy and should be adopted as normal driving practice even after the running in period.
BrakesNew brakes require an initial bedding in period. Avoid heavy braking situations for the first 625 miles (1,000 km).
Nor
•
•
•

DRIVRUNN
2.57
Track u
NOdu
Before yconsultrecommbefore a
Mclaren P11 - Complete.book Page 57 Friday, January 22, 2016 9:43 AM
ING CONTROLSING IN
se
TE: Do not use the vehicle on a track ring the running in period.
ou use your vehicle on the track, your McLaren Retailer. McLaren
end that your vehicle is inspected nd after track use.

DRIVING CONTROLSREFUELL
2.58
REFUELLING
Filling with f
WARNINFire, nausing a when haengine
WARNINdamagefuel vapcontact
The fuel fillerleft-hand sideautomaticallyunlocked.
NOTE: Dflap opedamagemechan
NOTE: Tlocked if
Do not continue to fill the tank after the pump nozzle switches off.
Remove the nozzle.
Close the fuel filler flap, you will hear the latch engage.
Mclaren P11 - Complete.book Page 58 Friday, January 22, 2016 9:43 AM
ING
uel
G: Fuel is highly flammable. ked flames, smoking and cell phone are prohibited ndling fuels. Switch off the
before refuelling.
G: Fuel and fuel vapors can your health. Do not inhale ors or allow fuel to come into with skin or clothing.
flap is located at the rear on the . It is locked or unlocked when the vehicle is locked or
o not attempt to force the filler n if the car is locked. You may the flap and its locking ism.
he fuel filler flap will remain the engine is running.
Filling at the gas station1. Switch off the engine.
2. Press the rear edge of the fuel filler flap, the latch will release.
3. Open the flap.
NOTE: Your vehicle is not fitted with a fuel filler cap.
4. Insert the nozzle into the fuel filler and dispense fuel. For fuel recommendations, see Recommended fuel, page 2.60.
5.
6.
7.

DRIVREFU
2.59
Filling w
NOusesoupu
1. Sw
2. Prethe
3. Op
NOfue
WARNING: Take care to avoid spillages and overfilling. Ensure any spillages are cleaned immediately.
8. Remove the nozzle.
9. Remove the fuel funnel, clean thoroughly and store in the luggage compartment.
10. Close the fuel filler flap, you will hear the latch engage.
Mclaren P11 - Complete.book Page 59 Friday, January 22, 2016 9:43 AM
ING CONTROLSELLING
ith the fuel funnel
TE: The fuel funnel should only be d when filling the fuel tank from rces other than a gas station fuel
mp.
itch off the engine.
ss the rear edge of the fuel filler flap, latch will release.
en the flap.
TE: Your vehicle is not fitted with a l filler cap.
4. Collect the fuel funnel from the luggage compartment, see Fuel funnel, page 5.12.
5. Insert the fuel funnel fully into the filler neck.
6. Insert the nozzle into the fuel funnel and dispense fuel. For fuel recommendations, see Recommended fuel, page 2.60.
7. Do not overfill.

DRIVING CONTROLSREFUELL
2.60
Recommen
NOTE: Foctane rpumps. average(RON) anrating.
For maximum94 AKI rated f
In areas wheruse unleadedminimum oct
NOTE: Inof fuel bthe fillin
NOTE: Tdamagemeet thunleadeused.
Damageis not co
Do not udamage
Mclaren P11 - Complete.book Page 60 Friday, January 22, 2016 9:43 AM
ING
ded fuel
ederal law requires that gasoline atings can be posted on the The octane rating shown is an of Research Octane Number d Motor Octane Number (MON)
engine performance the use of uel is recommended.
e 94 AKI rated fuel is unavailable, premium grade gasoline with a ane rating specification.
formation relating to the quality eing dispensed is displayed on g pump.
he likelihood of engine wear or is increased if fuel does not e requirements of EN 228 for d gasoline or if fuel additives are
caused by use of incorrect fuel vered by the vehicle warranty.
se leaded fuel, doing so may the catalytic converter.
No use of methanol is allowed. In areas where 94 AKI rated fuel is unavailable, use unleaded premium grade gasoline with a minimum octane rating of 91 AKI. Fuel with an ethanol content up to E10 maximum is permitted.
NOTE: This vehicle is not suitable for use with fuels containing more than 10% Ethanol.
Do not use E85 fuels (85% Ethanol content). This vehicle is not fitted with the equipment necessary for the use of fuels containing more than 10% Ethanol. If E85 fuels are used, serious damage will occur to the engine and fuel system.
NOTE: If the fuel tank is accidentally filled with the incorrect type of fuel, do not start the engine, and seek qualified assistance.

DRIVWINTE
2.61
WINTER DRIVING
Winter
It is recoinspecteonset ofollowin
• chco
• adthe
• ch
• ch
Select Wactive dit necespage 2.2
Winter Normalshould b
Dynamirecomm
NOTE: A wheel change must be carried out at your McLaren Retailer. The vehicle could be damaged if it is jacked up incorrectly.
Consult your McLaren Retailer for advice and information regarding the maximum speed specified for the winter tires fitted. Restrict the maximum speed of the vehicle using the ASL system, see Setting an upper speed limit, page 2.55.
Mclaren P11 - Complete.book Page 61 Friday, January 22, 2016 9:43 AM
ING CONTROLSR DRIVING
driving
mmended that you have your vehicle d at your McLaren Retailer at the
f winter. This service includes the g:
ecking the antifreeze/anti-corrosion ncentration
ding concentrated cleaning agent to windscreen cleaning system
ecking the battery
anging the tires
inter mode (except 675LT) on the ynamics panel, when conditions make sary, see Winter mode - except 675LT, 9.
driving - 675LT powertrain and handling modes
e used for winter driving.
c ESC and ESC Off modes are not ended for winter driving.
Winter tiresUse winter tires below 45°F (7°C) and on snow or ice-covered roads. The maximum effect of the Anti-lock Braking System and Electronic Stability Control systems is only achieved with these tires.
Use winter tires of the same make and tread on all wheels to maintain safe handling characteristics. Change the tire type in 'Vehicle Settings' in the left-hand display, see Tire Type, page 3.17.
Winter tires are directional, not asymmetrical, and so must be fitted in accordance with the directional markings on the sides of the tires.
NOTE: Only winter tires specified by McLaren should be used.
WARNING: Replace winter tires with a tread depth of less than 4 mm immediately. They are not suitable for winter use because they do not provide sufficient grip, and could cause an accident.

DRIVING CONTROLSWINTER D
2.62
Snow chainsMcLaren recosnow chains wMcLaren vehsnow chains, mind:
• Only evewheels.
• Comply installat
NOTE: Iffront whcontact compondriven. Acould be
Do not exceespeed of 30 mchains as soodriving on sno
Mclaren P11 - Complete.book Page 62 Friday, January 22, 2016 9:43 AM
RIVING
- except 675LTmmends that you only use hich have been approved for
icles. If you are intending to fit bear the following points in
r fit snow chains to both rear
with the manufacturer's ion instructions.
snow chains are fitted on the eels, they may come into with the bodywork or axle ents while the vehicle is being s a result, the tire or the vehicle damaged.
d the maximum permissible ph (50 kph). Remove the snow
n as possible if you are no longer w-covered roads.
Snow socks - 675LTMcLaren recommends that you only use snow socks which have been approved for McLaren vehicles. If you are intending to fit snow socks, bear the following points in mind:
• Only ever fit snow socks to both rear wheels.
• Comply with the manufacturer's installation instructions.
Do not exceed the maximum permissible speed displayed on the snow sock packaging. Remove the snow socks as soon as possible if you are no longer driving on snow-covered roads.

Mclaren P11 - Complete.book Page 63 Friday, January 22, 2016 9:43 AM

Mclaren P11 - Complete.book Page 64 Friday, January 22, 2016 9:43 AM

3.1
OVERVIEWOverview.............................................................................................................. 3.2Tachometer ....................................................................................................... 3.2Speedometer .................................................................................................... 3.2
LEFT-HAND DISPLAYOverview.............................................................................................................. 3.3Home screen ..................................................................................................... 3.6Settings................................................................................................................ 3.7Vehicle info...................................................................................................... 3.17Language ......................................................................................................... 3.20Trip computer ................................................................................................ 3.21Vehicle lift ........................................................................................................ 3.22Time display .................................................................................................... 3.25Gearbox mode indicator ............................................................................ 3.25Messages - Coupe and Spider.................................................................. 3.26Messages - Spider Only .............................................................................. 3.30
RIGHT-HAND DISPLAYGear position indicator ............................................................................... 3.33Display window .............................................................................................. 3.33Handling and powertrain display............................................................ 3.33Oil temperature ............................................................................................. 3.34Water temperature....................................................................................... 3.35Fuel level........................................................................................................... 3.35
INSTRUMENTS
Mclaren P11 - Complete.book Page 1 Friday, January 22, 2016 9:43 AM

INSTRUMENTSOVERVIEW
3.2
OVERVIEW
Overview
The instrume vated when the ignition in sw ee Switching on the ignition, page
WARNIN sages will be displaye is a malfunction in the inst nd/or one of the displays
The veh dling charact y be affected. Contact aren Retailer immedi
Tachometer
The tachometer (1) is mounted centrally within the instrument cluster. The red band in the display indicates the engine's maximum RPM.
NOTE: Do not operate the engine at or near its maximum speed for a significant length of time. The fuel supply is cut off to protect the engine when the maximum RPM is reached.
Speedometer
The speedometer (2) is a digital display mounted within the tachometer.
NOTE: The speedometer changes from mph to kph when the units are changed from miles to kilometers, see Units, page 3.7
Mclaren P11 - Complete.book Page 2 Friday, January 22, 2016 9:43 AM
ately.
nts are actiitched on, s
2.4.
G: No mesd if there
ruments a.
icle's haneristics ma your McL

INSTLEFT-
3.3
LEFT-HAND DISPLAY
Overvie
The leftthe infodriver, ait is requthe dispignitionrelated when thwarningfault ha
The stotime whmessag
WAmecoroaca
WAmeacto
Mclaren P11 - Complete.book Page 3 Friday, January 22, 2016 9:43 AM
RUMENTSHAND DISPLAY
w
-hand display automatically presents rmation and warning messages to the s and when the computer determines ired. Serious faults are also stored in
lay and presented every time the is switched on. Additional engine warning messages will be displayed e engine is switched on. These s messages will be repeated until the
s been rectified.
red messages can be viewed at any en the ignition is on, see Error es, page 3.18.
RNING: Operating and browsing nus whilst the vehicle is in motion
uld make you unable to observe d and traffic conditions and could
use an accident.
RNING: Do not ignore warning ssages, failure to take appropriate
tion may result in injury or damage the vehicle.
In addition to presenting vital information to the driver, the left-hand display also provides the facility to personalize some vehicle settings and enables operation of the Trip features.
Navigation through the menu structure is achieved using the control stalk mounted on the left of the steering column.

INSTRUMENTSLEFT-HA
3.4
The following
Home scree
Settings, pag
computer, page 3.21
icle lift, page 3.22
Mclaren P11 - Complete.book Page 4 Friday, January 22, 2016 9:43 AM
ND DISPLAY
categories are available.
n, page 3.6
e 3.7
Vehicle info, page 3.17
Language, page 3.20
Trip
Veh
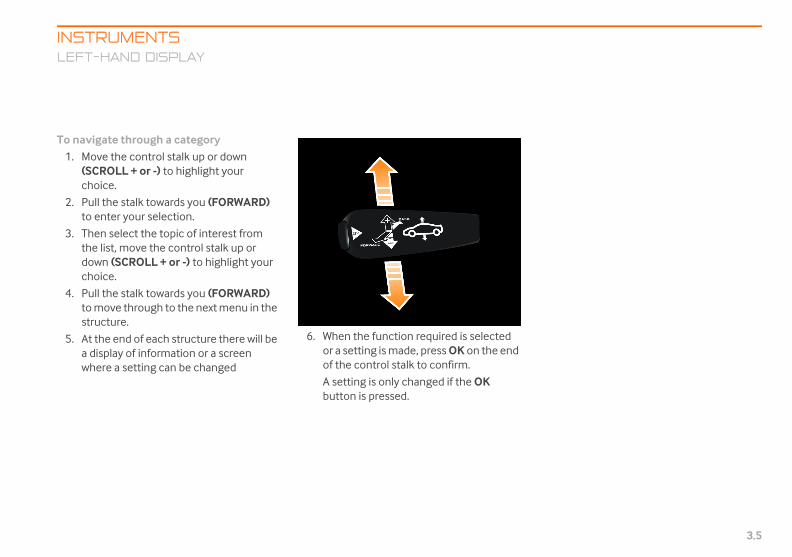
INSTLEFT-
3.5
To navi1. Mo
(SCch
2. Puto
3. Ththedoch
4. Puto str
5. At a dwh
Mclaren P11 - Complete.book Page 5 Friday, January 22, 2016 9:43 AM
RUMENTSHAND DISPLAY
gate through a categoryve the control stalk up or down ROLL + or -) to highlight your
oice.
ll the stalk towards you (FORWARD) enter your selection.
en select the topic of interest from list, move the control stalk up or
wn (SCROLL + or -) to highlight your oice.
ll the stalk towards you (FORWARD) move through to the next menu in the ucture.
the end of each structure there will be isplay of information or a screen ere a setting can be changed
6. When the function required is selected or a setting is made, press OK on the end of the control stalk to confirm.
A setting is only changed if the OK button is pressed.
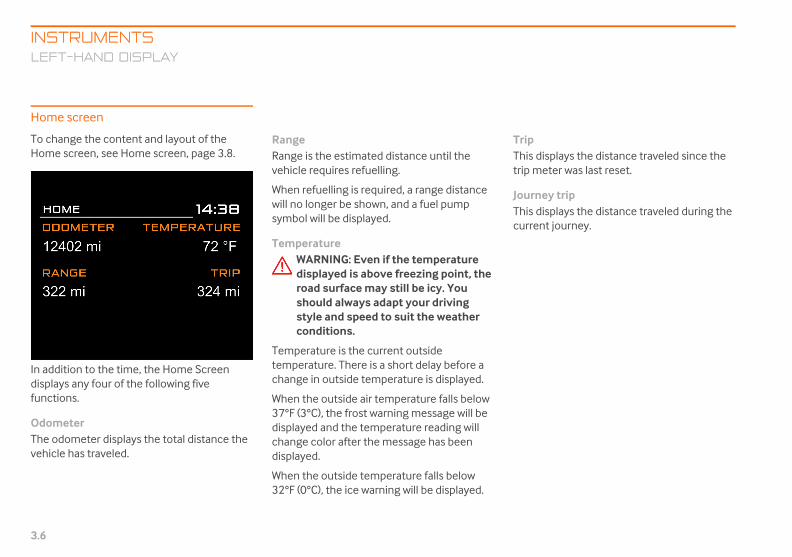
INSTRUMENTSLEFT-HA
3.6
Home scree
To change thHome screen
In addition todisplays any ffunctions.
OdometerThe odometevehicle has tr
displays the distance traveled since the meter was last reset.
ney trip displays the distance traveled during the ent journey.
Mclaren P11 - Complete.book Page 6 Friday, January 22, 2016 9:43 AM
ND DISPLAY
n
e content and layout of the , see Home screen, page 3.8.
the time, the Home Screen our of the following five
r displays the total distance the aveled.
RangeRange is the estimated distance until the vehicle requires refuelling.
When refuelling is required, a range distance will no longer be shown, and a fuel pump symbol will be displayed.
TemperatureWARNING: Even if the temperature displayed is above freezing point, the road surface may still be icy. You should always adapt your driving style and speed to suit the weather conditions.
Temperature is the current outside temperature. There is a short delay before a change in outside temperature is displayed.
When the outside air temperature falls below 37°F (3°C), the frost warning message will be displayed and the temperature reading will change color after the message has been displayed.
When the outside temperature falls below 32°F (0°C), the ice warning will be displayed.
TripThistrip
JourThiscurr
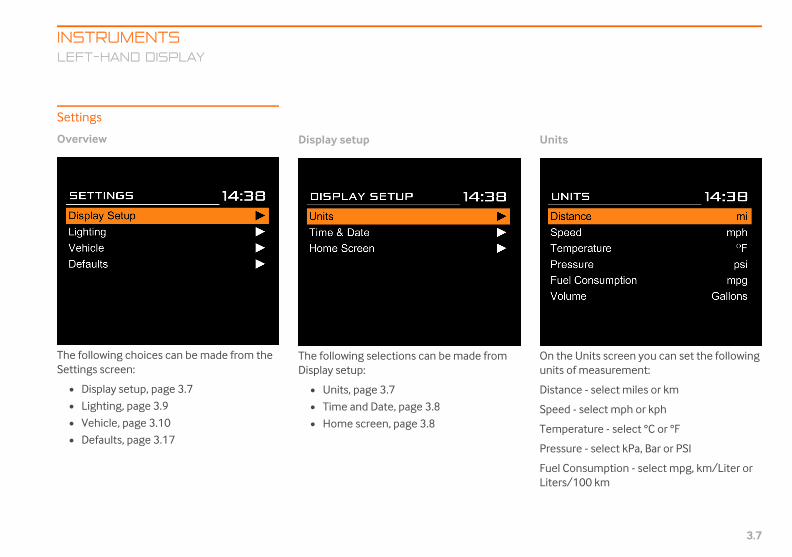
INSTLEFT-
3.7
Setting
Overvie
The folloSettings
• Dis
• Lig
• Ve
• De
Units
On the Units screen you can set the following units of measurement:
Distance - select miles or km
Speed - select mph or kph
Temperature - select °C or °F
Pressure - select kPa, Bar or PSI
Fuel Consumption - select mpg, km/Liter or Liters/100 km
Mclaren P11 - Complete.book Page 7 Friday, January 22, 2016 9:43 AM
RUMENTSHAND DISPLAY
s
w
wing choices can be made from the screen:
play setup, page 3.7
hting, page 3.9
hicle, page 3.10
faults, page 3.17
Display setup
The following selections can be made from Display setup:
• Units, page 3.7
• Time and Date, page 3.8
• Home screen, page 3.8

INSTRUMENTSLEFT-HA
3.8
Volume - seleliters
The setting focountry or repurchased. Thindividually a
Press the OKstalk to confir
NOTE: Tthe trip c
e screen
e are two choices available to you.
first is to set four of the following five s, on the screen, in the position of your ce:
Odometer
Range
Temperature
Trip since reset
Journey trip
Mclaren P11 - Complete.book Page 8 Friday, January 22, 2016 9:43 AM
ND DISPLAY
ct UK gallons, US gallons or
r your vehicle depends on the gion where the vehicle was
e units can be changed t any time.
button on the end of the control m your selections.
his feature also sets the units for omputer.
Time and Date
Set the Time before setting the Date.
The time and date are both set manually.
Press the OK button on the end of the control stalk to confirm your choice.
The time display can be set as 12 hour or 24 hour format, and the date display can be set as day followed by month or month followed by day.
Hom
Ther
The itemchoi
•••••

INSTLEFT-
3.9
The sectime ouChoose
Press thstalk to
External lighting
Two choices are available.
1. Set the duration that external lights remain on after the vehicle has been unlocked.
2. Set the duration that external lights remain on after the vehicle has been locked.
Press the OK button on the end of the control stalk to confirm your choice.
Mclaren P11 - Complete.book Page 9 Friday, January 22, 2016 9:43 AM
RUMENTSHAND DISPLAY
ond selection is the duration of the t for return to the Home screen. 5, 10, 30 or 60 seconds.
e OK button on the end of the control confirm your choice.
Lighting
Select External lighting, page 3.9, or Internal lighting, page 3.10.
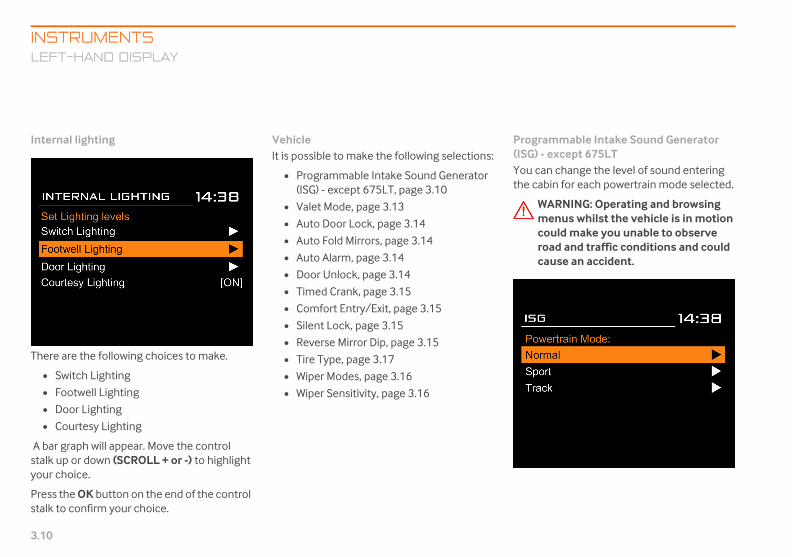
INSTRUMENTSLEFT-HA
3.10
Internal ligh
There are the
• Switch L
• Footwel
• Door Lig
• Courtes
A bar graph wstalk up or doyour choice.
Press the OKstalk to confi
rammable Intake Sound Generator ) - except 675LT can change the level of sound entering
abin for each powertrain mode selected.
WARNING: Operating and browsing menus whilst the vehicle is in motion could make you unable to observe road and traffic conditions and could cause an accident.
Mclaren P11 - Complete.book Page 10 Friday, January 22, 2016 9:43 AM
ND DISPLAY
ting
following choices to make.
ighting
l Lighting
hting
y Lighting
ill appear. Move the control wn (SCROLL + or -) to highlight
button on the end of the control rm your choice.
VehicleIt is possible to make the following selections:
• Programmable Intake Sound Generator (ISG) - except 675LT, page 3.10
• Valet Mode, page 3.13
• Auto Door Lock, page 3.14
• Auto Fold Mirrors, page 3.14
• Auto Alarm, page 3.14
• Door Unlock, page 3.14
• Timed Crank, page 3.15
• Comfort Entry/Exit, page 3.15
• Silent Lock, page 3.15
• Reverse Mirror Dip, page 3.15
• Tire Type, page 3.17
• Wiper Modes, page 3.16
• Wiper Sensitivity, page 3.16
Prog(ISGYouthe c
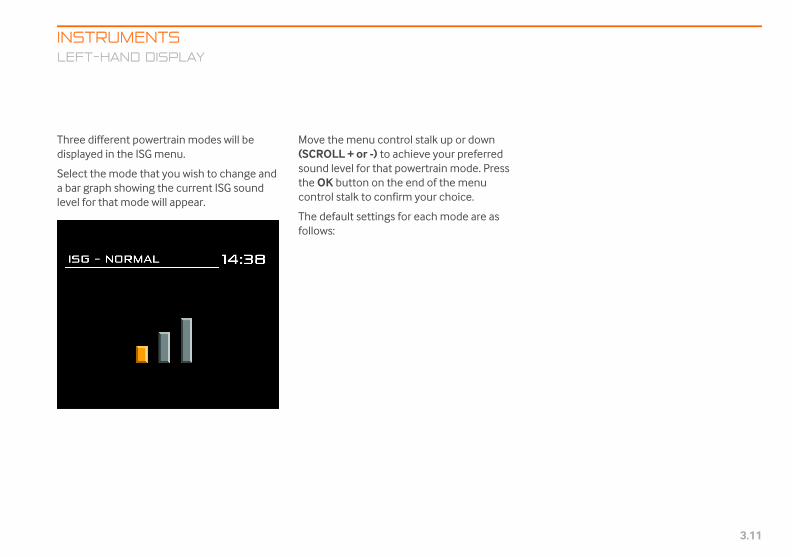
INSTLEFT-
3.11
Three ddisplaye
Select ta bar grlevel for
Mclaren P11 - Complete.book Page 11 Friday, January 22, 2016 9:43 AM
RUMENTSHAND DISPLAY
ifferent powertrain modes will be d in the ISG menu.
he mode that you wish to change and aph showing the current ISG sound that mode will appear.
Move the menu control stalk up or down (SCROLL + or -) to achieve your preferred sound level for that powertrain mode. Press the OK button on the end of the menu control stalk to confirm your choice.
The default settings for each mode are as follows:

INSTRUMENTSLEFT-HA
3.12
Track - 3 bars
NOTE: These are the default settings for each mode, but you can apply any level of sound to any powertrain mode.
Mclaren P11 - Complete.book Page 12 Friday, January 22, 2016 9:43 AM
ND DISPLAY
Normal - 1 bar Sport - 2 bars

INSTLEFT-
3.13
Valet M
To entedown undisplay,of the c
Repeat
The defshould copportu
When Disable Valet Mode is selected, the PIN must be entered again, before the mode is disabled.
Press the OK button on the end of the control stalk to confirm your choice.
NOTE: 675LT model vehicles are limited to a maximum speed of 35mph (55kph) when Valet Mode is activated.
Mclaren P11 - Complete.book Page 13 Friday, January 22, 2016 9:43 AM
RUMENTSHAND DISPLAY
ode
r the PIN, press the control stalk up or til the first digit appears in the
then press the OK button on the end ontrol stalk to confirm your choice.
the process to enter the full PIN.
ault PIN will be set to 0000. You hange this PIN at the earliest nity.
For a 5 second period after entering Valet Mode, the PIN can be changed. Select Change Valet PIN and enter a 4 digit PIN of your choice.
With Valet Mode on, the luggage compartment and engine cover both remain locked, and a confirmation message appears in the left-hand display.

INSTRUMENTSLEFT-HA
3.14
PerformancePSC is an audsound to indito maintain o
When 'OFF' isbe disabled.
When 'SPORTbe active in eor handling m
When 'TRACKbe active in Tmodes.
Press the OKstalk to confi
o Alarm Auto Alarm selected, the vehicle will matically lock and the alarm set if cked and left for 30 seconds with all
rs and covers left fully closed.
s the OK button on the end of the control to confirm your choice.
r Unlockn 'DRIVERS' is selected, only the driver's
r will unlock when the vehicle is unlocked either the key fob or door button.
n 'BOTH' is selected, both doors will ck when the vehicle is unlocked using
er the key fob or door button.
losures will lock with either 'DRIVERS' or H' selected.
s the OK button on the end of the control to confirm your choice.
Mclaren P11 - Complete.book Page 14 Friday, January 22, 2016 9:43 AM
ND DISPLAY
Shift Cue (PSC) - 675LTible shift indicator, which will cate that an upshift is required ptimum performance.
selected, the PSC function will
AND TRACK' is selected, PSC will ither Sport or Track powertrain odes.
ONLY' is selected, PSC will only rack powertrain or handling
button on the end of the control rm your choice.
Auto Door LockWhen you receive the vehicle, Auto door lock will be set to on.
The vehicle doors will automatically lock as the vehicle moves off.
Switch Auto Door Lock off, and the doors remain unlocked after moving off, unless, they are locked manually.
Press the OK button on the end of the control stalk to confirm your choice.
Auto Fold MirrorsWhen 'ON' is selected the exterior mirrors will fold as the vehicle is locked and unfold when the door is opened. If 'OFF' is selected, the mirrors will remain in their driving position.
Press the OK button on the end of the control stalk to confirm your choice.
AutWithautounlodoo
Presstalk
DooWhedoowith
Wheunloeith
All c'BOT
Presstalk
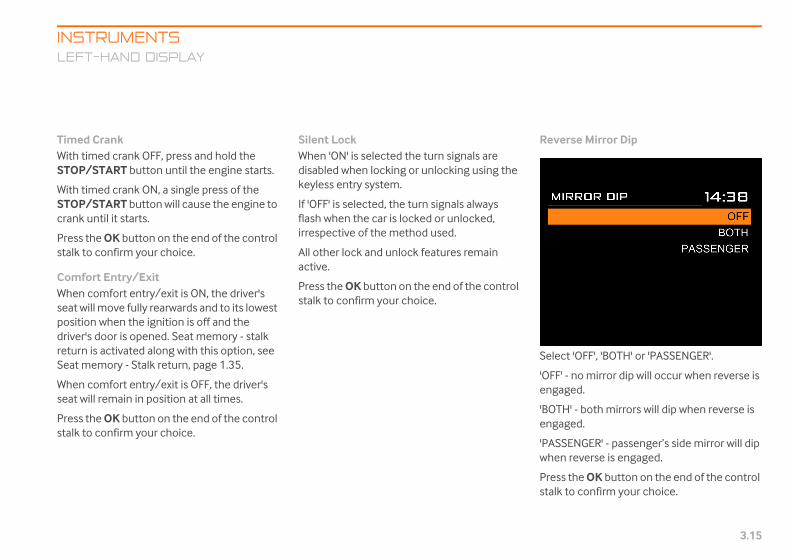
INSTLEFT-
3.15
Timed CWith timSTOP/S
With timSTOP/Scrank u
Press thstalk to
ComforWhen coseat willpositiondriver's return isSeat me
When coseat will
Press thstalk to
Reverse Mirror Dip
Select 'OFF', 'BOTH' or 'PASSENGER'.
'OFF' - no mirror dip will occur when reverse is engaged.
'BOTH' - both mirrors will dip when reverse is engaged.
'PASSENGER' - passenger’s side mirror will dip when reverse is engaged.
Press the OK button on the end of the control stalk to confirm your choice.
Mclaren P11 - Complete.book Page 15 Friday, January 22, 2016 9:43 AM
RUMENTSHAND DISPLAY
ranked crank OFF, press and hold the TART button until the engine starts.
ed crank ON, a single press of the TART button will cause the engine to
ntil it starts.
e OK button on the end of the control confirm your choice.
t Entry/Exitmfort entry/exit is ON, the driver's
move fully rearwards and to its lowest when the ignition is off and the door is opened. Seat memory - stalk activated along with this option, see mory - Stalk return, page 1.35.
mfort entry/exit is OFF, the driver's remain in position at all times.
e OK button on the end of the control confirm your choice.
Silent LockWhen 'ON' is selected the turn signals are disabled when locking or unlocking using the keyless entry system.
If 'OFF' is selected, the turn signals always flash when the car is locked or unlocked, irrespective of the method used.
All other lock and unlock features remain active.
Press the OK button on the end of the control stalk to confirm your choice.

INSTRUMENTSLEFT-HA
3.16
To set the amreverse is sele
1. Switch t
2. Select 'Bmirror d
3. Depress
4. Adjust mAdjustin
5. Take veh
The next timewill automaticthe previouslposition.
er Sensitivity
wiper sensitivity adjusts the amount of present on the windscreen required to ate the wiper with AUTOMATIC mode
cted. A bar graph will appear showing ent wiper sensitivity setting. A higher ber of bars results in a lower amount of r being required to activate this function.
e the control stalk up or down OLL + or -) to achieve your preferred
ng for the wiper operation.
Mclaren P11 - Complete.book Page 16 Friday, January 22, 2016 9:43 AM
ND DISPLAY
ount the mirrors will dip when cted:
he ignition on.
OTH' or 'PASSENGER' in the ip section of the cluster.
brake and select reverse gear.
irror(s) to desired position, see g mirrors, page 1.52.
icle out of reverse.
reverse is selected, the vehicle ally move the mirror/mirrors to
y set offset from the normal
Wiper ModesSelect either AUTOMATIC or TIMED.
With AUTOMATIC selected, wiper operation in the Auto position will be controlled by the rain sensor.
With TIMED selected, wiper operation in the Auto position will be an intermittent wipe.
Press the OK button on the end of the control stalk to confirm your choice.
Wip
The rain activselecurrnumwateMov(SCRsetti

INSTLEFT-
3.17
Press thstalk to
Tire Typ
The dispavailablvehicle.
Press thstalk to
Vehicle info
Overview
The following choices can be made from the Vehicle info screen.
• Service interval, page 3.18
• Error messages, page 3.18
• Tire pressure monitoring, page 3.18
• Tire temperature monitoring, page 3.19
• Oil status, page 3.19
• Battery status, page 3.19
• Vehicle identification, page 3.20
Mclaren P11 - Complete.book Page 17 Friday, January 22, 2016 9:43 AM
RUMENTSHAND DISPLAY
e OK button on the end of the control confirm your choice.
e
lay will show all the possible tire types e. Select the tires fitted to your
e OK button on the end of the control confirm your choice.
Defaults
Select Restore Default Settings then press the OK button on the end of the control stalk to confirm that you wish to reset to the default settings.
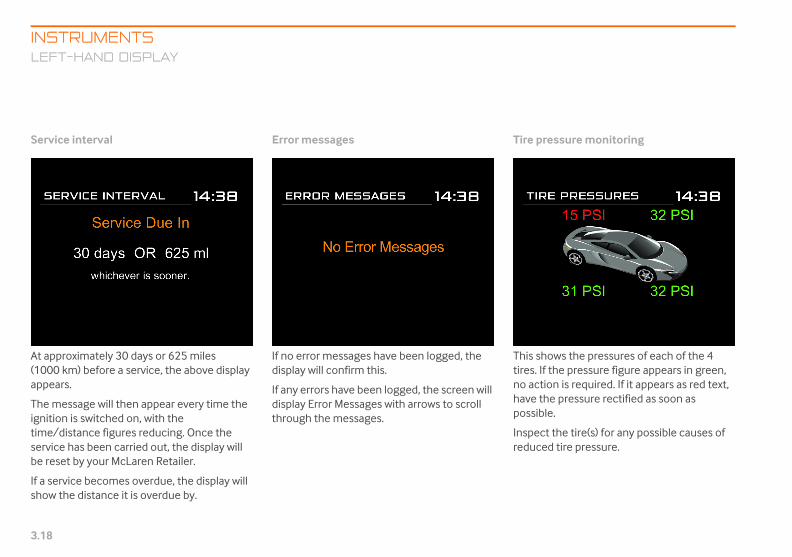
INSTRUMENTSLEFT-HA
3.18
Service inter
At approxima(1000 km) beappears.
The messageignition is switime/distancservice has bbe reset by yo
If a service beshow the dist
pressure monitoring
shows the pressures of each of the 4 . If the pressure figure appears in green, ction is required. If it appears as red text, the pressure rectified as soon as ible.
ect the tire(s) for any possible causes of ced tire pressure.
Mclaren P11 - Complete.book Page 18 Friday, January 22, 2016 9:43 AM
ND DISPLAY
val
tely 30 days or 625 miles fore a service, the above display
will then appear every time the tched on, with the e figures reducing. Once the een carried out, the display will
ur McLaren Retailer.
comes overdue, the display will ance it is overdue by.
Error messages
If no error messages have been logged, the display will confirm this.
If any errors have been logged, the screen will display Error Messages with arrows to scroll through the messages.
Tire
Thistiresno ahaveposs
Inspredu

INSTLEFT-
3.19
Tire tem
This shoof the 4appearsappearstemperReducetempertemper
Inspectincrease
Battery status
Displays a battery symbol showing the level of charge.
When battery charge is too low, a message 'Battery Fault' will also be displayed.
For more information, see Charging the battery, page 5.14
Mclaren P11 - Complete.book Page 19 Friday, January 22, 2016 9:43 AM
RUMENTSHAND DISPLAY
perature monitoring
ws the current temperature of each tires. If the temperature figure in green, no action is required. If it as red text, the safe operating
ature of the tires has been exceeded. speed or stop the vehicle until the atures are at a safe level, i.e. atures are displayed in green.
the tire(s) for any possible causes of d tire temperature.
Oil status
Displays a bar showing the level of oil, together with the oil temperature.
To check the engine oil level, see Checking the engine oil, page 5.2

INSTRUMENTSLEFT-HA
3.20
Vehicle iden
Displays the v
following choices are available:
English (UK)
English (US)
French
German
Italian
Spanish
Chinese
Japanese
Russian
Korean
Thai
s the OK button on the end of the control to confirm your choice.
anguage is not available on your vehicle, SUPPORTED will appear in the display. sult your McLaren Retailer for further tance.
Mclaren P11 - Complete.book Page 20 Friday, January 22, 2016 9:43 AM
ND DISPLAY
tification
ehicle identification number.
Language
Use this screen to set your preferred language.
The
•••••••••••
Presstalk
If a lNOTConassis

INSTLEFT-
3.21
Trip co
The trip
• Tri
• Jou
Journey trip
Displays distance, average fuel consumption and average speed for the current journey.
The hours displayed is the time that the engine has been running in the current journey.
The information will reset to zero when the engine is switched off.
Mclaren P11 - Complete.book Page 21 Friday, January 22, 2016 9:43 AM
RUMENTSHAND DISPLAY
mputer
can display the following Information.
p, page 3.21
rney trip, page 3.21
Trip
Displays distance, average fuel consumption and average speed since the last trip reset.
The hours displayed is the time that the engine has been running since the last trip reset.
Press the OK button on the end of the control stalk for 2 seconds to reset the information back to zero.

INSTRUMENTSLEFT-HA
3.22
Vehicle lift
You can accethe menu consteering colurunning.
NOTE: Vinhibitedraising.
NOTE: Vlaunch m
Hold the mensecond to quconfirmation
height can only be raised when traveling eeds below 31mph (50kph). The vehicle utomatically lower at speeds above ph (60kph).
NOTE: The vehicle suspension can be left fully raised for extended periods, but it may relax to a lower level over time.
e vehicle is left in a raised position for a period, a system reset may occur when ngine is next started to return the
cle to normal ride height.
hicle lift is used when in motion, slight stments to the steering feel may be rienced, this is normal and does not t the operation of the vehicle.
NOTE: Vehicle handling modes are inhibited when vehicle lift is lowering or raising.
NOTE: Vehicle lift will be unavailable if launch mode is active.
Mclaren P11 - Complete.book Page 22 Friday, January 22, 2016 9:43 AM
ND DISPLAY
ss the vehicle lift menu using trol stalk on the left of the
mn, whenever the engine is
ehicle handling modes are when vehicle lift is lowering or
ehicle lift will be unavailable if ode is active.
u control stalk up for one ickly access the menu. A tone will be heard.
Alternatively, access vehicle lift using the menu structure, see LEFT-HAND DISPLAY, page 3.3.
The left-hand display will exit after the timeout duration has been exceeded back to home screen if there is no activity on the menu. To set the timeout to home screen duration, see Home screen, page 3.8.
NOTE: If the vehicle lift icon in the right-hand display is amber, the system is not available. Do not drive the vehicle at high speed and contact your McLaren Retailer as soon as possible.
The Vehicle Lift menu displays the following Information:
• Vehicle Lift - Raise, page 3.23
• Vehicle Lift - Lower, page 3.24
A confirmation tone will be heard, when vehicle lift is selected.
Vehicle lift gives you the option to raise or lower the vehicle dependent on the current vehicle ride height.
Rideat spwill a37m
If thlongthe evehi
If veadjuexpeaffec

INSTLEFT-
3.23
Vehicle
NOherai
NOvehste
NOin tyo
To change from raise to lower, move the menu control stalk downwards. The vehicle will start to lower, and the information displayed on the instrument cluster will confirm the change.
When the vehicle is fully raised, an audible confirmation tone is heard. ‘Ride Height: Raised’ appears in the left-hand display and the vehicle lift icon is illuminated while the vehicle remains raised.
Mclaren P11 - Complete.book Page 23 Friday, January 22, 2016 9:43 AM
RUMENTSHAND DISPLAY
Lift - Raise
TE: When the vehicle is at normal ride ight, you will only have the option to se the vehicle.
TE: Vehicle lift will be delayed if the icle experiences any excessive
ering wheel input.
TE: Always check the vehicle lift icon he right-hand display before driving
ur vehicle.
To raise the vehicle, move the menu control stalk upwards.
The change in vehicle height is confirmed by an ascending audible tone. ‘Vehicle Raising’ appears in the left-hand display and the vehicle lift icon will flash in the right-hand display.
If the engine is stopped while the vehicle is raising, the system will stop and only continue to raise when the engine is restarted.
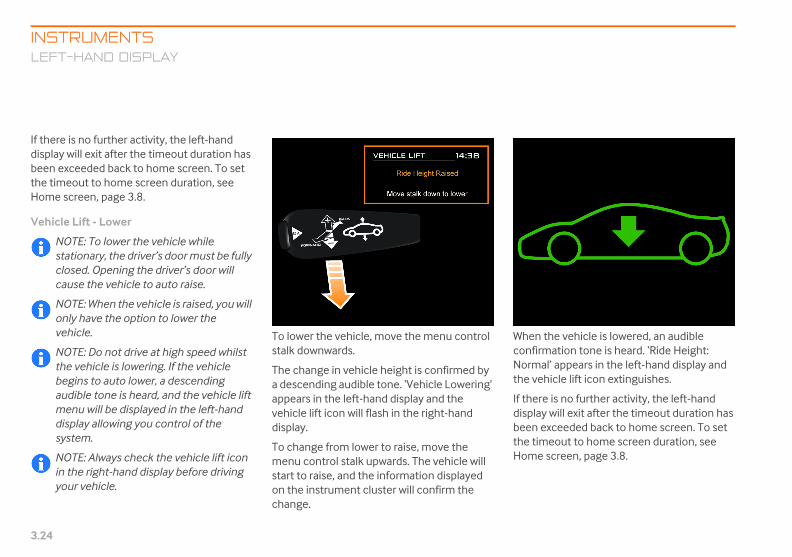
INSTRUMENTSLEFT-HA
3.24
If there is no display will exbeen exceedethe timeout tHome screen
Vehicle Lift -
NOTE: Tstationaclosed. Ocause th
NOTE: Wonly havvehicle.
NOTE: Dthe vehibegins taudible menu wdisplay asystem.
NOTE: Ain the rigyour veh
n the vehicle is lowered, an audible irmation tone is heard. ‘Ride Height:
al’ appears in the left-hand display and ehicle lift icon extinguishes.
ere is no further activity, the left-hand lay will exit after the timeout duration has
exceeded back to home screen. To set imeout to home screen duration, see e screen, page 3.8.
Mclaren P11 - Complete.book Page 24 Friday, January 22, 2016 9:43 AM
ND DISPLAY
further activity, the left-hand it after the timeout duration has d back to home screen. To set
o home screen duration, see , page 3.8.
Lower
o lower the vehicle while ry, the driver’s door must be fully
pening the driver’s door will e vehicle to auto raise.
hen the vehicle is raised, you will e the option to lower the
o not drive at high speed whilst cle is lowering. If the vehicle o auto lower, a descending tone is heard, and the vehicle lift ill be displayed in the left-hand llowing you control of the
lways check the vehicle lift icon ht-hand display before driving icle.
To lower the vehicle, move the menu control stalk downwards.
The change in vehicle height is confirmed by a descending audible tone. ‘Vehicle Lowering’ appears in the left-hand display and the vehicle lift icon will flash in the right-hand display.
To change from lower to raise, move the menu control stalk upwards. The vehicle will start to raise, and the information displayed on the instrument cluster will confirm the change.
WheconfNormthe v
If thdispbeenthe tHom

INSTLEFT-
3.25
Time d
The cloccorner o
NO12daDa
Mclaren P11 - Complete.book Page 25 Friday, January 22, 2016 9:43 AM
RUMENTSHAND DISPLAY
isplay
k appears in the top right-hand f the left-hand display.
TE: The time can be displayed in a hour or 24 hour format. The time and
te are set manually, see Time and te, page 3.8.
Gearbox mode indicator
The gearbox mode indicator shows the current mode selected:
• Automatic A• Manual M• Temporary manual A/M• Launch L
For more information, see Manual/Automatic mode, page 2.20.

INSTRUMENTSLEFT-HA
3.26
Messages - C
The left-hand what you should do when one of these messages is d
Message
ESC OFF
Invalid Oper
See Owners
ectly. See Electronic Stability Control
Airbrake Res
Low Vehicle
See Owners
ss the AERO button.
elow 9 mph (15 kph) or is stationary, l begin to lower. Hold the AERO button ully to the normal driving position
Clutch Over
See Owners
ns. This may be caused by excessive hill ills for extended periods. As a result, the
few minutes.
Launch Mod
See Owners
Launch control, page 2.30.
immobilizer
See Owners
Use Emerge
See Owners
, see Starting the vehicle, page 5.26.
Mclaren P11 - Complete.book Page 26 Friday, January 22, 2016 9:43 AM
ND DISPLAY
oupe and Spider
display may show messages that refer you to the Owner Manual. The table below indicatesisplayed.
Action
ation
Manual
The ESC deactivation procedure has not been followed corr(ESC), page 2.37.
tricted
Speed
Manual
• Raise the vehicle speed above 9 mph (15 kph) and pre
• or to lower the Airbrake while the vehicle is traveling bpress the AERO button for 5 seconds, the Airbrake wilfor a further 3 seconds until the Airbrake has lowered f
Temperature
Manual
The vehicle has been subject to extreme operating conditiostarts, repeated hard acceleration, driving slowly up steep hgearbox may limit engine torque.
Stop the vehicle and allow the engine to idle in neutral for a
e Unavailable
Manual
The conditions to enable a Launch have not been met, see
Failure
Manual
Contact your McLaren Retailer immediately.
ncy - Start Receptacle
Manual
The key fob is not functioning correctly. To start the engine

INSTLEFT-
3.27
Low br
See Ow
Low st
See Ow
id, page 5.7.
Check
See Ow
res, page 5.33.
Check
See Ow
res, page 5.33.
Check
See Ow
res, page 5.33.
Check
See Ow
res, page 5.33.
Pressu
Stop ve
ecting wheels and tires, page 5.33.
Pressu
Stop ve
ecting wheels and tires, page 5.33.
Pressu
Stop ve
ecting wheels and tires, page 5.33.
Messa
Mclaren P11 - Complete.book Page 27 Friday, January 22, 2016 9:43 AM
RUMENTSHAND DISPLAY
ake fluid level
ners Manual
Top up brake fluid, see Brake fluid, page 5.8.
eering fluid level
ners Manual
Top up the power steering fluid, see Power steering flu
pressure on front left tire
ners Manual
Inspect wheels and tires, see Inspecting wheels and ti
pressure on front right tire
ners Manual
Inspect wheels and tires, see Inspecting wheels and ti
pressure on rear left tire
ners Manual
Inspect wheels and tires, see Inspecting wheels and ti
pressure on rear right tire
ners Manual
Inspect wheels and tires, see Inspecting wheels and ti
re low on front left tire
hicle
Stop the vehicle and inspect wheels and tires, see Insp
re low on front right tire
hicle
Stop the vehicle and inspect wheels and tires, see Insp
re low on rear left tire
hicle
Stop the vehicle and inspect wheels and tires, see Insp
ge Action
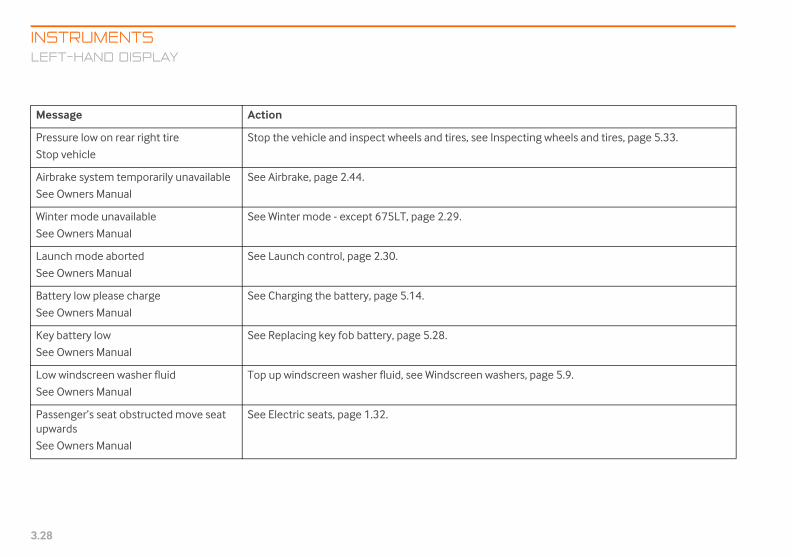
INSTRUMENTSLEFT-HA
3.28
Pressure low
Stop vehicle
g wheels and tires, page 5.33.
Airbrake sys
See Owners
Winter mode
See Owners
Launch mod
See Owners
Battery low p
See Owners
Key battery
See Owners
Low windscr
See Owners
age 5.9.
Passenger’supwards
See Owners
Message
Mclaren P11 - Complete.book Page 28 Friday, January 22, 2016 9:43 AM
ND DISPLAY
on rear right tire Stop the vehicle and inspect wheels and tires, see Inspectin
tem temporarily unavailable
Manual
See Airbrake, page 2.44.
unavailable
Manual
See Winter mode - except 675LT, page 2.29.
e aborted
Manual
See Launch control, page 2.30.
lease charge
Manual
See Charging the battery, page 5.14.
low
Manual
See Replacing key fob battery, page 5.28.
een washer fluid
Manual
Top up windscreen washer fluid, see Windscreen washers, p
seat obstructed move seat
Manual
See Electric seats, page 1.32.
Action

INSTLEFT-
3.29
ESC FaCenter
ectly. As a result, the engine torque will be me mode. Care should be taken while driving ted driving aids will not be fully functional. tability Control (ESC), page 2.37.
Vehiclevehicle
or. As a result in this mode, the engine torque driving in this condition. To reinstate full
ngine. If the problem persists, contact your
ClimatService
ly. Please contact your McLaren Retailer. See MATE CONTROL (TOUCHSCREEN CONTROLS)
Catalys imphome mode, page 2.14.
Messa
Mclaren P11 - Complete.book Page 29 Friday, January 22, 2016 9:43 AM
RUMENTSHAND DISPLAY
ilure - Go to McLaren Service The Electronic Stability Control is not functioning corrsignificantly limited and the vehicle will enter Limphoin this condition, the braking and traction control relaPlease contact your McLaren Retailer, see Electronic S
Limphome - Stop and restart the The vehicle has recovered from a previous system errwill be significantly limited. Care should be taken whileperformance please stop the vehicle and restart the eMcLaren Retailer. See Limphome mode, page 2.14.
e Control Fault - Go to McLaren Centre
The climate control system is not functioning correctCLIMATE CONTROL - EXCEPT 675LT, page 4.4 and CLI- 675LT, page 4.12.
t Temperature See Exhaust Temperature Monitoring, page 2.15 and L
ge Action
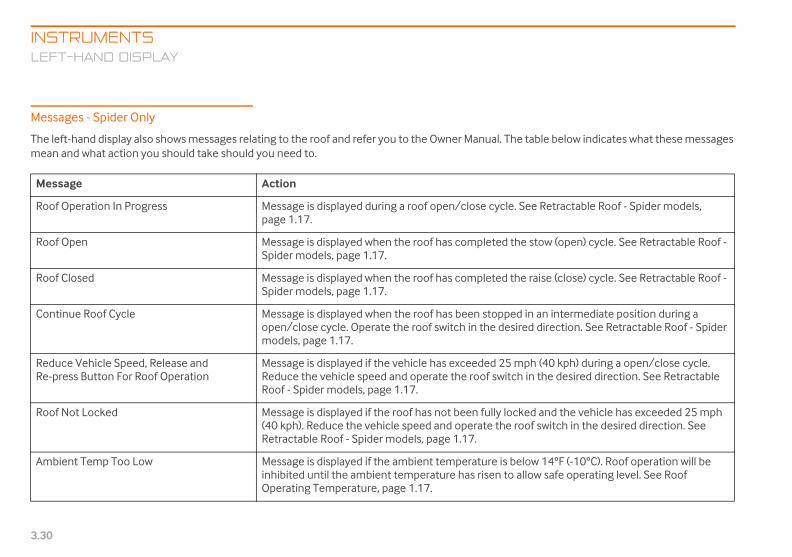
INSTRUMENTSLEFT-HA
3.30
Messages - S
The left-hand ble below indicates what these messages mean and wh
Message
Roof Operat Retractable Roof - Spider models,
Roof Open tow (open) cycle. See Retractable Roof -
Roof Closed aise (close) cycle. See Retractable Roof -
Continue Ro an intermediate position during a direction. See Retractable Roof - Spider
Reduce VehRe-press Bu
(40 kph) during a open/close cycle. the desired direction. See Retractable
Roof Not Lo and the vehicle has exceeded 25 mph switch in the desired direction. See
Ambient Tem 14°F (-10°C). Roof operation will be w safe operating level. See Roof
Mclaren P11 - Complete.book Page 30 Friday, January 22, 2016 9:43 AM
ND DISPLAY
pider Only
display also shows messages relating to the roof and refer you to the Owner Manual. The taat action you should take should you need to.
Action
ion In Progress Message is displayed during a roof open/close cycle. Seepage 1.17.
Message is displayed when the roof has completed the sSpider models, page 1.17.
Message is displayed when the roof has completed the rSpider models, page 1.17.
of Cycle Message is displayed when the roof has been stopped inopen/close cycle. Operate the roof switch in the desiredmodels, page 1.17.
icle Speed, Release and tton For Roof Operation
Message is displayed if the vehicle has exceeded 25 mphReduce the vehicle speed and operate the roof switch inRoof - Spider models, page 1.17.
cked Message is displayed if the roof has not been fully locked(40 kph). Reduce the vehicle speed and operate the roofRetractable Roof - Spider models, page 1.17.
p Too Low Message is displayed if the ambient temperature is belowinhibited until the ambient temperature has risen to alloOperating Temperature, page 1.17.

INSTLEFT-
3.31
Hydrau as become too hot. Roof operation will be afe operating level. Please contact your
Bad Su as become too low. Start the engine and allow in the desired direction. Please contact your
Roof S ed in an intermediate position during a ff. Operate the roof switch in the desired
Tonne lose cycle. See Tonneau Cover - Spider
Tonne eted the open cycle. See Tonneau Cover -
Tonne eted the close cycle. See Tonneau Cover -
Roof Fa ction. Roof operation will be inhibited. Please
Messa
Mclaren P11 - Complete.book Page 31 Friday, January 22, 2016 9:43 AM
RUMENTSHAND DISPLAY
lic System Over Temperature Message is displayed if the roof hydraulic system hinhibited until the hydraulic system cools to allow sMcLaren Retailer.
pply Voltage - Start Engine Message is displayed if the vehicle battery charge hthe battery to be charged. Operate the roof switch McLaren Retailer.
ystem Power Down - Roof Not Secure Message is displayed when the roof has been stoppopen/close cycle and the roof system has turned odirection. Please contact your McLaren Retailer.
au Operation In Progress Message is displayed during tonneau cover open/cmodels, page 1.21.
au Open Message is displayed when the tonneau has complSpider models, page 1.21.
au Closed Message is displayed when the tonneau has complSpider models, page 1.21.
ilure Message is displayed if there is a operational malfuncontact your McLaren Retailer.
ge Action
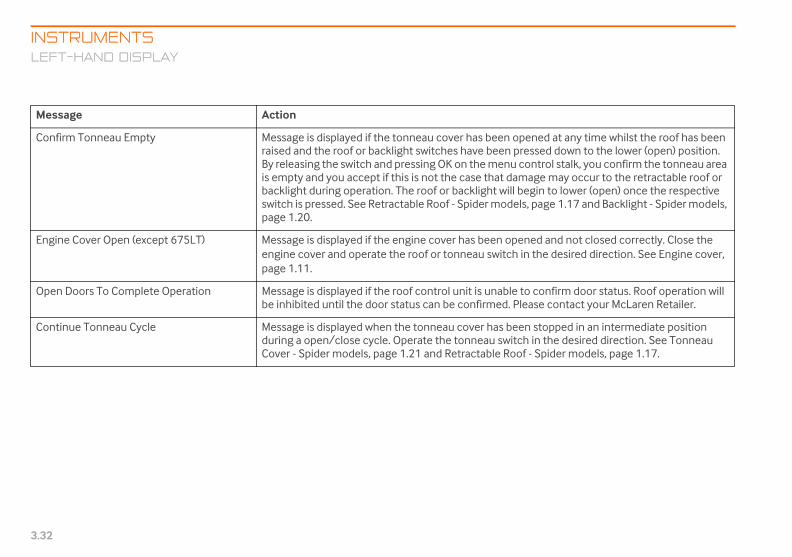
INSTRUMENTSLEFT-HA
3.32
Confirm Ton ed at any time whilst the roof has been sed down to the lower (open) position. trol stalk, you confirm the tonneau area
ge may occur to the retractable roof or in to lower (open) once the respective age 1.17 and Backlight - Spider models,
Engine Cove d and not closed correctly. Close the the desired direction. See Engine cover,
Open Doors confirm door status. Roof operation will se contact your McLaren Retailer.
Continue To stopped in an intermediate position n the desired direction. See Tonneau Spider models, page 1.17.
Message
Mclaren P11 - Complete.book Page 32 Friday, January 22, 2016 9:43 AM
ND DISPLAY
neau Empty Message is displayed if the tonneau cover has been openraised and the roof or backlight switches have been presBy releasing the switch and pressing OK on the menu conis empty and you accept if this is not the case that damabacklight during operation. The roof or backlight will begswitch is pressed. See Retractable Roof - Spider models, ppage 1.20.
r Open (except 675LT) Message is displayed if the engine cover has been openeengine cover and operate the roof or tonneau switch in page 1.11.
To Complete Operation Message is displayed if the roof control unit is unable to be inhibited until the door status can be confirmed. Plea
nneau Cycle Message is displayed when the tonneau cover has been during a open/close cycle. Operate the tonneau switch iCover - Spider models, page 1.21 and Retractable Roof -
Action

INSTRIGHT
3.33
RIGHT-HAND DISPLAY
Gear po
The geacurrentnumber
When dpositionred to inmaintai
Handling and powertrain display
Confirmation of the handling and powertrain mode selected (3) is displayed. For more information on the different settings that are available, see Active dynamics control, page 2.24.
NOTE: If the ACTIVE button has not been pressed (active dynamics panel is off), the Handling and Powertrain displays will both show Normal.
Mclaren P11 - Complete.book Page 33 Friday, January 22, 2016 9:43 AM
RUMENTS-HAND DISPLAY
sition indicator
r position indicator (1) shows the gear position selected; forward gear , neutral or reverse.
riving in manual mode, the gear indicator will change from orange to dicate that an upshift is required to
n optimum performance.
Display window
The display window (2) provides the driver with visual confirmation of cruise control speed and Electronic Stability Control status.

INSTRUMENTSRIGHT-HA
3.34
Additionparticulaselectioimplememet.
e gauge shows high temperature, NGE, slow down until the temperature s to normal. If the temperature continues
se and the bar turns RED, a warning sage will appear in the left-hand display.
the vehicle as soon as safety permits and act your McLaren Retailer immediately.
Mclaren P11 - Complete.book Page 34 Friday, January 22, 2016 9:43 AM
ND DISPLAY
ally, if all conditions for a r mode are not met when the
n is made, the mode will not be nted until the conditions are
Oil temperature
The oil temperature is displayed in the form of a colored bar graph (1) on the right-hand side of the instrument cluster.
When the engine is first started the bar will be BLUE. As the engine warms up the color will change to GRAY, indicating normal temperature.
High temperature is indicated if the bar turns ORANGE and excessive temperature is indicated by the bar turning RED.
If thORAdropto rimes
Stopcont

INSTRIGHT
3.35
Water t
The watform of hand sid
When thBLUE. Achangetemper
High temORANGindicate
Fuel level
The fuel level is displayed in the form of a colored bar graph (3) on the right-hand side of the instrument cluster. The bar will usually be GRAY. When the bar turns RED there is approximately 2.9 gallons of fuel remaining in the tank.
Mclaren P11 - Complete.book Page 35 Friday, January 22, 2016 9:43 AM
RUMENTS-HAND DISPLAY
emperature
er temperature is displayed in the a colored bar graph (2) on the right-e of the instrument cluster.
e engine is first started the bar will be s the engine warms up the color will to GRAY, indicating normal ature.
perature is indicated if the bar turns E and excessive temperature is d by the bar turning RED.
If the gauge shows high temperature, ORANGE, slow down until the temperature drops to normal. If the temperature continues to rise and the bar turns RED, a warning message will appear in the left-hand display.
Stop the vehicle as soon as safety permits and contact your McLaren Retailer.

Mclaren P11 - Complete.book Page 36 Friday, January 22, 2016 9:43 AM

Mclaren P11 - Complete.book Page 37 Friday, January 22, 2016 9:43 AM

Mclaren P11 - Complete.book Page 38 Friday, January 22, 2016 9:43 AM

4.1
WINDOWSSafety.................................................................................................................... 4.2Opening and closing....................................................................................... 4.2
CLIMATE CONTROL - EXCEPT 675LTOverview.............................................................................................................. 4.4Controls ............................................................................................................... 4.4AC button............................................................................................................ 4.5Modes of operation......................................................................................... 4.5Temperature control...................................................................................... 4.7Blower speed control ..................................................................................... 4.8Air distribution settings................................................................................. 4.9Demisting/Defrosting.................................................................................... 4.9Air Recirculation mode............................................................................... 4.10System Calibration ....................................................................................... 4.11Heated rear window..................................................................................... 4.11
CLIMATE CONTROL (TOUCHSCREEN CONTROLS) - 675LTOverview........................................................................................................... 4.12Controls ............................................................................................................ 4.12Modes of Operation ..................................................................................... 4.13AC (Screen) Button....................................................................................... 4.14Demisting/Defrosting................................................................................. 4.14Temperature Control .................................................................................. 4.15Air Recirculation Mode ............................................................................... 4.16Blower Speed Control ................................................................................. 4.16Air Distribution Settings............................................................................. 4.17System Calibration ....................................................................................... 4.18
LO-JACK STOLEN VEHICLE RECOVERY SYSTEMOverview .......................................................................................................... 4.19In the event of a theft ................................................................................. 4.19
INTERIOR FEATURESInterior lighting.............................................................................................. 4.20Entry lighting.................................................................................................. 4.20Exit lighting ..................................................................................................... 4.21Stowage net.................................................................................................... 4.21Sun visors......................................................................................................... 4.23Stowage compartment.............................................................................. 4.23Cup holders..................................................................................................... 4.24Owner documentation............................................................................... 4.24Accessory power sockets.......................................................................... 4.25Car cover .......................................................................................................... 4.26
COMFORT AND CONVENIENCE
Mclaren P11 - Complete.book Page 1 Friday, January 22, 2016 9:43 AM
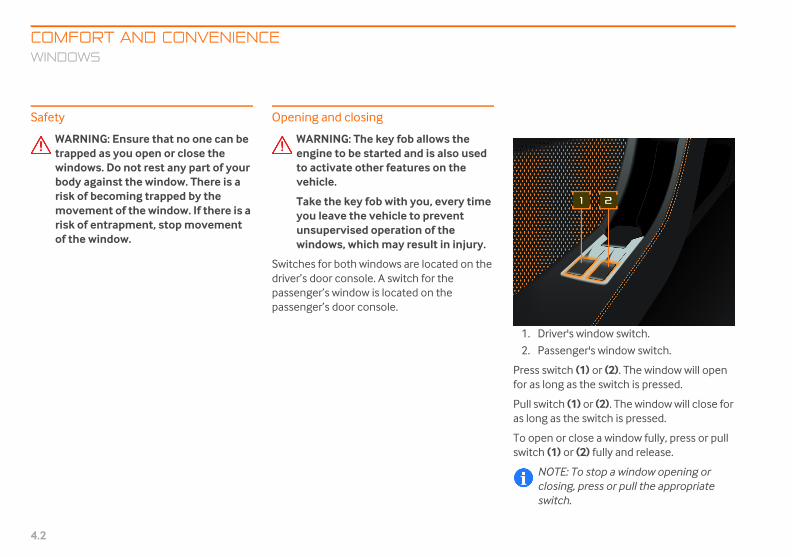
COMFORT AND CONVENIENCEWINDOWS
4.2
WINDOWS
Safety
WARNINtrappedwindowbody agrisk of bmovemrisk of eof the w
Driver's window switch.
Passenger's window switch.
s switch (1) or (2). The window will open s long as the switch is pressed.
switch (1) or (2). The window will close for ng as the switch is pressed.
pen or close a window fully, press or pull ch (1) or (2) fully and release.
NOTE: To stop a window opening or closing, press or pull the appropriate switch.
Mclaren P11 - Complete.book Page 2 Friday, January 22, 2016 9:43 AM
G: Ensure that no one can be as you open or close the s. Do not rest any part of your ainst the window. There is a ecoming trapped by the ent of the window. If there is a ntrapment, stop movement indow.
Opening and closing
WARNING: The key fob allows the engine to be started and is also used to activate other features on the vehicle.
Take the key fob with you, every time you leave the vehicle to prevent unsupervised operation of the windows, which may result in injury.
Switches for both windows are located on the driver’s door console. A switch for the passenger’s window is located on the passenger’s door console.
1.
2.
Presfor a
Pull as lo
To oswit
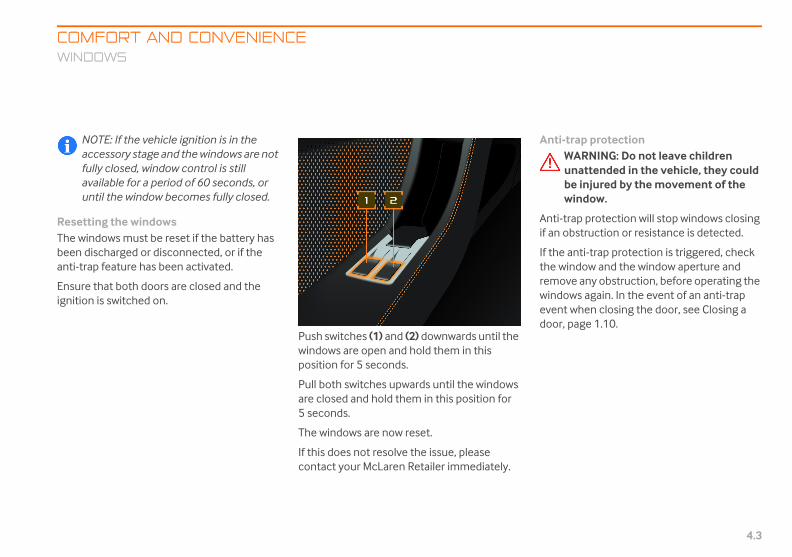
COMWIND
4.3
NOaccfulavaun
ResettiThe winbeen disanti-trap
Ensure ignition
Anti-trap protectionWARNING: Do not leave children unattended in the vehicle, they could be injured by the movement of the window.
Anti-trap protection will stop windows closing if an obstruction or resistance is detected.
If the anti-trap protection is triggered, check the window and the window aperture and remove any obstruction, before operating the windows again. In the event of an anti-trap event when closing the door, see Closing a door, page 1.10.
Mclaren P11 - Complete.book Page 3 Friday, January 22, 2016 9:43 AM
FORT AND CONVENIENCEOWS
TE: If the vehicle ignition is in the essory stage and the windows are not
ly closed, window control is still ilable for a period of 60 seconds, or
til the window becomes fully closed.
ng the windowsdows must be reset if the battery has charged or disconnected, or if the feature has been activated.
that both doors are closed and the is switched on.
Push switches (1) and (2) downwards until the windows are open and hold them in this position for 5 seconds.
Pull both switches upwards until the windows are closed and hold them in this position for 5 seconds.
The windows are now reset.
If this does not resolve the issue, please contact your McLaren Retailer immediately.

COMFORT AND CONVENIENCECLIMATE
4.4
CLIMATE CONTROL - EXCEPT 675LT
Overview
The system cmode or sett
The combinaof dust and p
WARNINsettingsIf the wlonger btraffic cacciden
NOTE: Toperateand windvehicle henvironmopening
NOTE: Tsensor iswheel anobstructperformsystem w
NOTE: Tclimate ignition
er's climate controls
Windscreen demist button
Air recirculation button
Temperature control
MONO button
Air conditioning (AC) button
AUTO button
Blower speed control
Air distribution buttons
Heated rear window button
Mclaren P11 - Complete.book Page 4 Friday, January 22, 2016 9:43 AM
CONTROL - EXCEPT 675LT
an be operated in automatic ings can be adjusted manually.
tion filter reduces the quantity ollutants entering the car.
G: Follow the recommended given for heating or cooling.
indows mist up, you may no e able to observe road and
onditions and could cause an t.
he climate control system s more effectively with the doors
ows closed. However, if the as been standing in a hot ent for a long time, ventilate by
the windows briefly.
he interior air temperature located between the steering d the center console. Do not airflow to this sensor or the ance of the climate control
ill be reduced.
he vehicle will retain the current control settings when the is switched off.
Controls
The climate control system is operated using controls located on the driver’s and passenger’s door consoles. When MONO is selected, the driver can adjust the blower speed, and the temperature on the passenger’s side of the vehicle.
Driv
1.
2.
3.
4.
5.
6.
7.
8.
9.
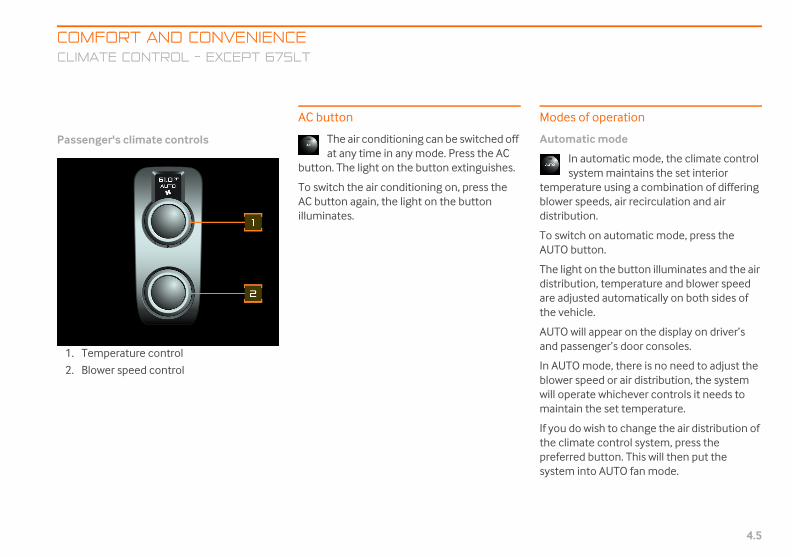
COMCLIMA
4.5
Passen
1. Te
2. Blo
Modes of operation
Automatic mode
In automatic mode, the climate control system maintains the set interior
temperature using a combination of differing blower speeds, air recirculation and air distribution.
To switch on automatic mode, press the AUTO button.
The light on the button illuminates and the air distribution, temperature and blower speed are adjusted automatically on both sides of the vehicle.
AUTO will appear on the display on driver’s and passenger’s door consoles.
In AUTO mode, there is no need to adjust the blower speed or air distribution, the system will operate whichever controls it needs to maintain the set temperature.
If you do wish to change the air distribution of the climate control system, press the preferred button. This will then put the system into AUTO fan mode.
Mclaren P11 - Complete.book Page 5 Friday, January 22, 2016 9:43 AM
FORT AND CONVENIENCETE CONTROL - EXCEPT 675LT
ger's climate controls
mperature control
wer speed control
AC button
The air conditioning can be switched off at any time in any mode. Press the AC
button. The light on the button extinguishes.
To switch the air conditioning on, press the AC button again, the light on the button illuminates.

COMFORT AND CONVENIENCECLIMATE
4.6
This is denoteAUTO in the dstill continuemaintain the additional moAUTO LO funspeeds to achcabin tempersound emittesystem whilst
To switch on button once will remain litdisplay to AU
To return to Asingle time.
AUTO LO canwith a double
If necessary, manually adjupage 4.6.
e passenger then adjusts any of the air perature settings on their climate control l, MONO mode will be deactivated. The O button light will then extinguish.
driver can exit MONO mode at any time single press of the MONO button. The
O button light will then extinguish.
Mclaren P11 - Complete.book Page 6 Friday, January 22, 2016 9:43 AM
CONTROL - EXCEPT 675LT
d by the fan symbol underneath isplay console. The system will
to control the blower speed to set temperature. There is an de known as AUTO LO. The
ction operates the fan at lower ieve and maintain the desired ature. This reduces the level of d from the climate control retaining auto functionality.
AUTO LO, press the AUTO when in AUTO mode. The LED and the text will change in the TO LO.
UTO, press the AUTO button a
be entered from manual mode press of the AUTO button.
the system settings can be sted, see Manual mode,
Manual modeTo adjust the air temperature manually, see Temperature control, page 4.7.
To adjust the blower speed manually, see Blower speed control, page 4.8.
When either the air temperature or blower speed is adjusted manually, the light on the AUTO button will extinguish and the blower speed will appear on the display on driver’s and passenger’s door consoles.
MONO mode buttonMONO mode allows the driver to transfer their air temperature settings
directly over to the passenger’s climate control panel.
Press the MONO button, the light on the button will illuminate and all air temperature settings will be transferred over to the passenger’s climate control panel. Any changes the driver makes on their climate control panel, will change automatically on the passenger’s climate control panel.
If thtempaneMON
The by aMON

COMCLIMA
4.7
Tempe
Rotate ttemperdecreas
Press thautoma
NOin 061temthe
Mclaren P11 - Complete.book Page 7 Friday, January 22, 2016 9:43 AM
FORT AND CONVENIENCETE CONTROL - EXCEPT 675LT
rature control
he control clockwise to increase the ature, or counter-clockwise to e.
e AUTO button to return to tic mode.
TE: The temperature can be adjusted .5°F (0.5°C) increments from
°F to 82°F (16°C to 28°C). Change the perature in small increments, until
desired setting is achieved.
To set the temperature to maximum, rotate the control clockwise until 'HI' is displayed. In AUTO mode, the climate control system adjusts the air temperature to the highest setting, the blower speed is set to maximum and air is directed to the footwells.
To set the temperature to minimum, rotate the control counter-clockwise until 'LO' is displayed. In AUTO mode, the climate control system sets the air temperature to the lowest setting, the blower speed is set to maximum and air is directed to the center air vents.
The temperature set will appear on the displays on the driver’s and passenger’s door consoles.
NOTE: With 'LO' selected, it is not possible to switch off the air conditioning or switch on demist mode.
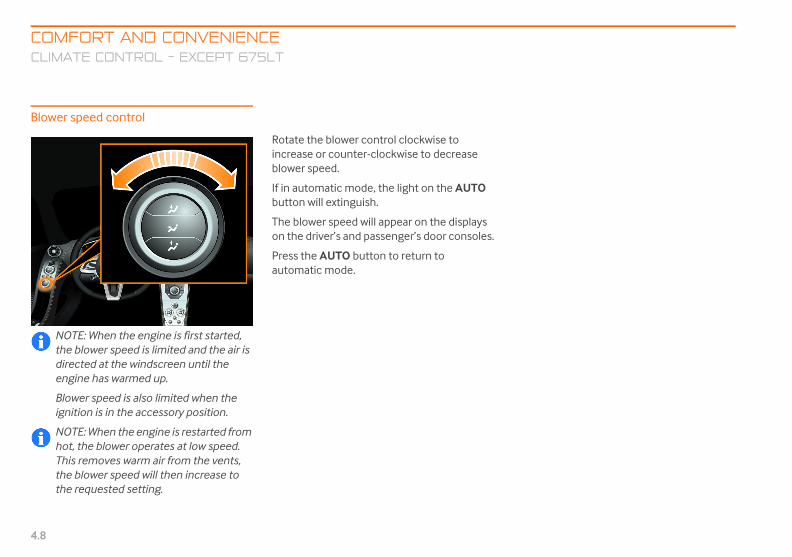
COMFORT AND CONVENIENCECLIMATE
4.8
Blower spee
NOTE: Wthe blowdirectedengine h
Blower signition
NOTE: Whot, the This remthe blowthe requ
Mclaren P11 - Complete.book Page 8 Friday, January 22, 2016 9:43 AM
CONTROL - EXCEPT 675LT
d control
hen the engine is first started, er speed is limited and the air is at the windscreen until the as warmed up.
peed is also limited when the is in the accessory position.
hen the engine is restarted from blower operates at low speed. oves warm air from the vents, er speed will then increase to ested setting.
Rotate the blower control clockwise to increase or counter-clockwise to decrease blower speed.
If in automatic mode, the light on the AUTO button will extinguish.
The blower speed will appear on the displays on the driver’s and passenger’s door consoles.
Press the AUTO button to return to automatic mode.
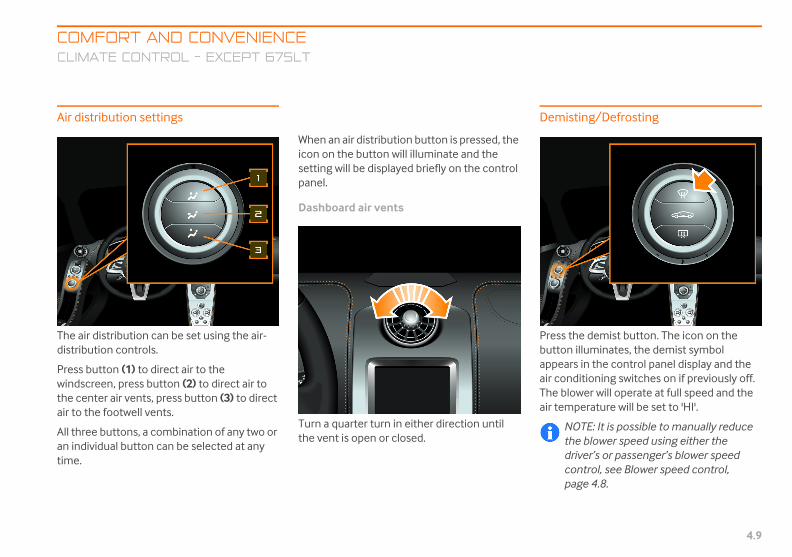
COMCLIMA
4.9
Air dist
The air ddistribu
Press buwindscrthe cenair to th
All threean indivtime.
Demisting/Defrosting
Press the demist button. The icon on the button illuminates, the demist symbol appears in the control panel display and the air conditioning switches on if previously off. The blower will operate at full speed and the air temperature will be set to 'HI'.
NOTE: It is possible to manually reduce the blower speed using either the driver’s or passenger’s blower speed control, see Blower speed control, page 4.8.
Mclaren P11 - Complete.book Page 9 Friday, January 22, 2016 9:43 AM
FORT AND CONVENIENCETE CONTROL - EXCEPT 675LT
ribution settings
istribution can be set using the air-tion controls.
tton (1) to direct air to the een, press button (2) to direct air to ter air vents, press button (3) to direct e footwell vents.
buttons, a combination of any two or idual button can be selected at any
When an air distribution button is pressed, the icon on the button will illuminate and the setting will be displayed briefly on the control panel.
Dashboard air vents
Turn a quarter turn in either direction until the vent is open or closed.
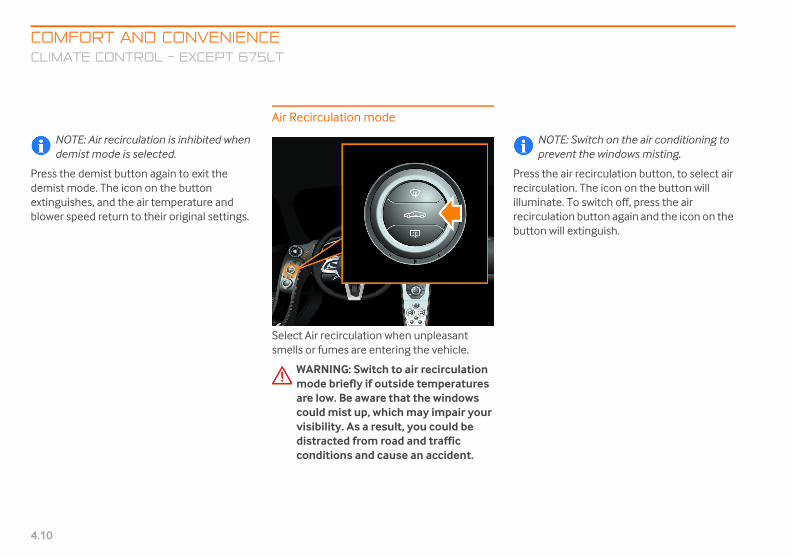
COMFORT AND CONVENIENCECLIMATE
4.10
NOTE: Ademist m
Press the demdemist modeextinguishes,blower speed
NOTE: Switch on the air conditioning to prevent the windows misting.
s the air recirculation button, to select air culation. The icon on the button will inate. To switch off, press the air culation button again and the icon on the on will extinguish.
Mclaren P11 - Complete.book Page 10 Friday, January 22, 2016 9:43 AM
CONTROL - EXCEPT 675LT
ir recirculation is inhibited when ode is selected.
ist button again to exit the . The icon on the button and the air temperature and return to their original settings.
Air Recirculation mode
Select Air recirculation when unpleasant smells or fumes are entering the vehicle.
WARNING: Switch to air recirculation mode briefly if outside temperatures are low. Be aware that the windows could mist up, which may impair your visibility. As a result, you could be distracted from road and traffic conditions and cause an accident.
Presrecirillumrecirbutt
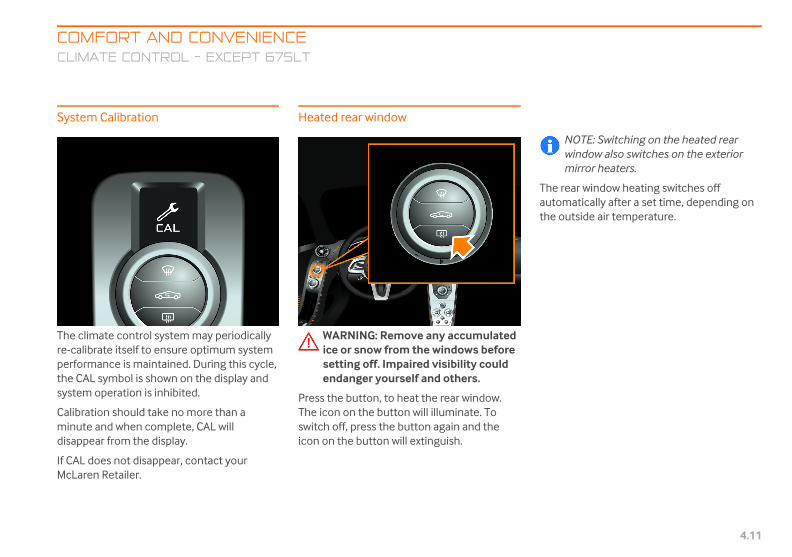
COMCLIMA
4.11
System
The climre-calibperformthe CALsystem
Calibratminute disappe
If CAL dMcLaren
NOTE: Switching on the heated rear window also switches on the exterior mirror heaters.
The rear window heating switches off automatically after a set time, depending on the outside air temperature.
Mclaren P11 - Complete.book Page 11 Friday, January 22, 2016 9:43 AM
FORT AND CONVENIENCETE CONTROL - EXCEPT 675LT
Calibration
ate control system may periodically rate itself to ensure optimum system ance is maintained. During this cycle, symbol is shown on the display and operation is inhibited.
ion should take no more than a and when complete, CAL will ar from the display.
oes not disappear, contact your Retailer.
Heated rear window
WARNING: Remove any accumulated ice or snow from the windows before setting off. Impaired visibility could endanger yourself and others.
Press the button, to heat the rear window. The icon on the button will illuminate. To switch off, press the button again and the icon on the button will extinguish.
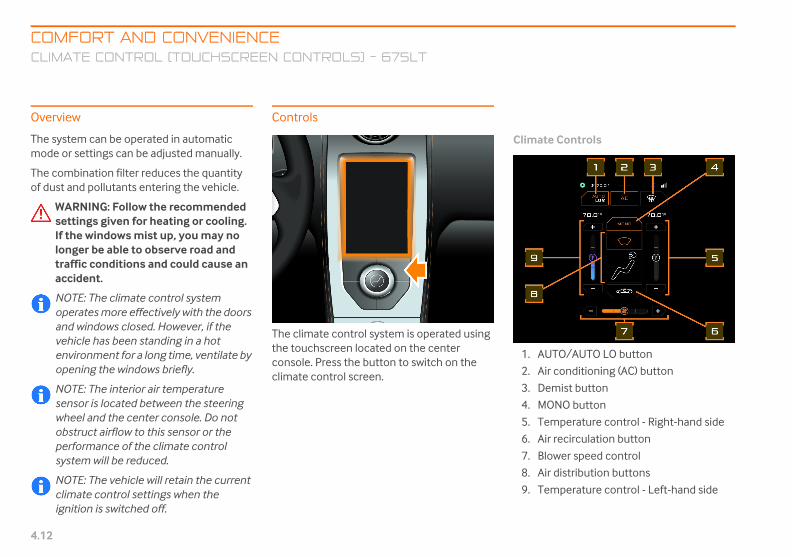
COMFORT AND CONVENIENCECLIMATE
4.12
CLIMATE CONTROL (TOUCHSCREEN CONTROLS) - 675LT
Overview
The system cmode or sett
The combinaof dust and p
WARNINsettingsIf the wlonger btraffic cacciden
NOTE: Toperateand windvehicle henvironmopening
NOTE: Tsensor iswheel anobstructperformsystem w
NOTE: Tclimate ignition
ate Controls
AUTO/AUTO LO button
Air conditioning (AC) button
Demist button
MONO button
Temperature control - Right-hand side
Air recirculation button
Blower speed control
Air distribution buttons
Temperature control - Left-hand side
Mclaren P11 - Complete.book Page 12 Friday, January 22, 2016 9:43 AM
CONTROL (TOUCHSCREEN CONTROLS) - 675LT
an be operated in automatic ings can be adjusted manually.
tion filter reduces the quantity ollutants entering the vehicle.
G: Follow the recommended given for heating or cooling.
indows mist up, you may no e able to observe road and
onditions and could cause an t.
he climate control system s more effectively with the doors
ows closed. However, if the as been standing in a hot ent for a long time, ventilate by
the windows briefly.
he interior air temperature located between the steering d the center console. Do not airflow to this sensor or the ance of the climate control
ill be reduced.
he vehicle will retain the current control settings when the is switched off.
Controls
The climate control system is operated using the touchscreen located on the center console. Press the button to switch on the climate control screen.
Clim
1.
2.
3.
4.
5.
6.
7.
8.
9.

COMCLIMA
4.13
Modes
Autom
In automsystem temperblower sdistribu
The conindicate
• Or
• Wh
• Gra
To switcAUTO b
The lighdistribuare adjuthe veh
In AUTOblower swill opemaintai
the AUTO LO mode will be activated again. Pressing the AUTO button a second time will select the AUTO mode.
If necessary, the system settings can be manually adjusted, see Manual Mode, page 4.13.
Manual ModeTo adjust the air temperature, see Temperature Control, page 4.15.
To adjust the blower speed manually, see Blower Speed Control, page 4.16.
MONO ModeMONO mode allows any changes the driver makes to their air temperature settings to be mirrored automatically to the passenger’s temperature setting.
Touching the on-screen MONO button will cause it to illuminate and automatically implement the driver’s air temperature settings to the passenger’s side.
Mclaren P11 - Complete.book Page 13 Friday, January 22, 2016 9:43 AM
FORT AND CONVENIENCETE CONTROL (TOUCHSCREEN CONTROLS) - 675LT
of Operation
atic Mode
atic mode, the climate control maintains the set interior ature using a combination of differing peeds, air recirculation and air
tion.
trol panel uses different colors to operational states:
ange indicates ON.
ite indicates OFF but available for use.
y indicates not available for use.
h on automatic mode, touch the utton.
t on the button illuminates and the air tion, temperature and blower speed sted automatically on both sides of icle.
mode, there is no need to adjust the peed or air distribution, the system
rate whichever controls it needs to n the set temperature.
If you do wish to change the air distribution of the climate control system, touch the preferred button. This will then put the system into AUTO fan mode.
This is denoted by the color of the blower speed slider. The bar is gray and the slider moves by itself when the blower is under automatic control. Here, the system is continuing to control the blower speed to maintain the set temperature. There is an additional mode known as AUTO LO. The AUTO LO function operates the fan at lower speeds to achieve and maintain the desired cabin temperature. This reduces the level of sound emitted from the climate control system whilst retaining auto functionality.
To switch on AUTO LO, press the AUTO button once when in AUTO mode. The AUTO LO symbol will change from white to orange.
To return to AUTO, press the AUTO button a single time.
If the blower speed is adjusted while AUTO LO is active the manual mode will be selected by default. If the AUTO button is then pressed

COMFORT AND CONVENIENCECLIMATE
4.14
The driver caby a single toMONO buttonextinguish.
isting/Defrosting
ch the demist button. The icon on the on illuminates and the air conditioning ches on if previously off. The blower will ate at full speed and the air temperature e set to 'HI'.
NOTE: It is possible to manually reduce the blower speed, see Blower Speed Control, page 4.16.
NOTE: Air recirculation is inhibited when demist mode is selected.
Mclaren P11 - Complete.book Page 14 Friday, January 22, 2016 9:43 AM
CONTROL (TOUCHSCREEN CONTROLS) - 675LT
n exit MONO mode at any time uch of the MONO button. The on the screen will then
AC (Screen) Button
The AC enhances cooling and dehumidifying of air. It is used by max-cooling and defrosting modes.
Use the AC screen button as an ON/OFF switch.
Dem
Toubuttswitoperwill b
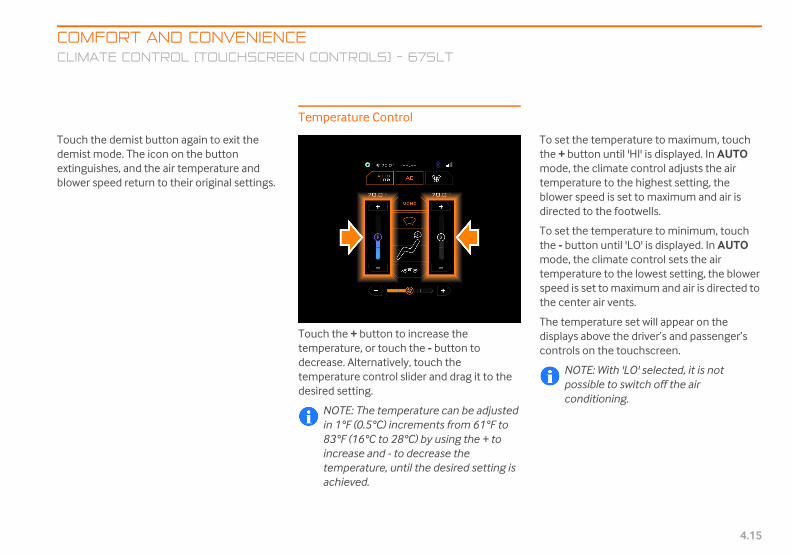
COMCLIMA
4.15
Touch tdemist mextingublower s
To set the temperature to maximum, touch the + button until 'HI' is displayed. In AUTO mode, the climate control adjusts the air temperature to the highest setting, the blower speed is set to maximum and air is directed to the footwells.
To set the temperature to minimum, touch the - button until 'LO' is displayed. In AUTO mode, the climate control sets the air temperature to the lowest setting, the blower speed is set to maximum and air is directed to the center air vents.
The temperature set will appear on the displays above the driver’s and passenger’s controls on the touchscreen.
NOTE: With 'LO' selected, it is not possible to switch off the air conditioning.
Mclaren P11 - Complete.book Page 15 Friday, January 22, 2016 9:43 AM
FORT AND CONVENIENCETE CONTROL (TOUCHSCREEN CONTROLS) - 675LT
he demist button again to exit the ode. The icon on the button
ishes, and the air temperature and peed return to their original settings.
Temperature Control
Touch the + button to increase the temperature, or touch the - button to decrease. Alternatively, touch the temperature control slider and drag it to the desired setting.
NOTE: The temperature can be adjusted in 1°F (0.5°C) increments from 61°F to 83°F (16°C to 28°C) by using the + to increase and - to decrease the temperature, until the desired setting is achieved.
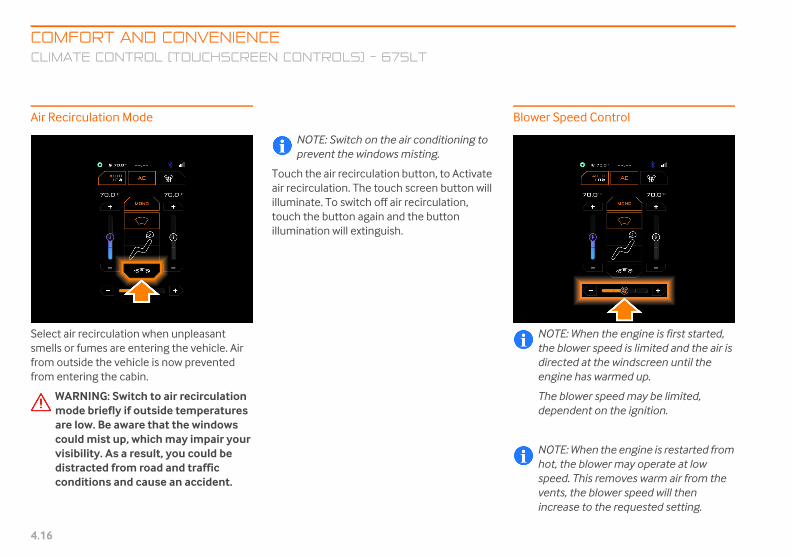
COMFORT AND CONVENIENCECLIMATE
4.16
Air Recircula
Select air recsmells or fumfrom outsidefrom entering
WARNINmode bare low.could mvisibilitdistractconditio
er Speed Control
NOTE: When the engine is first started, the blower speed is limited and the air is directed at the windscreen until the engine has warmed up.
The blower speed may be limited, dependent on the ignition.
NOTE: When the engine is restarted from hot, the blower may operate at low speed. This removes warm air from the vents, the blower speed will then increase to the requested setting.
Mclaren P11 - Complete.book Page 16 Friday, January 22, 2016 9:43 AM
CONTROL (TOUCHSCREEN CONTROLS) - 675LT
tion Mode
irculation when unpleasant es are entering the vehicle. Air
the vehicle is now prevented the cabin.
G: Switch to air recirculation riefly if outside temperatures Be aware that the windows ist up, which may impair your
y. As a result, you could be ed from road and traffic ns and cause an accident.
NOTE: Switch on the air conditioning to prevent the windows misting.
Touch the air recirculation button, to Activate air recirculation. The touch screen button will illuminate. To switch off air recirculation, touch the button again and the button illumination will extinguish.
Blow

COMCLIMA
4.17
Touch tspeed, oblower sicon and
If in autspeed wextingu
Press thautoma
Dashboard Air Vents
Turn a quarter turn in either direction until the vent is open or closed.
Mclaren P11 - Complete.book Page 17 Friday, January 22, 2016 9:43 AM
FORT AND CONVENIENCETE CONTROL (TOUCHSCREEN CONTROLS) - 675LT
he + button to increase the blower r touch the - button to decrease peed. Alternatively, touch the fan drag it to the desired setting.
omatic mode, adjusting the blower ill cause the AUTO button to
ish.
e AUTO button to return to tic mode.
Air Distribution Settings
The air distribution can be set using the air-distribution controls.
Press top screen area to direct air to the windscreen, press middle screen area to direct air to the center air vents, press bottom screen area to direct air to the footwell vents.
All three screen areas, a combination of any two or an individual area can be selected at any time.
When an air distribution screen area is pressed, the screen icon will illuminate.

COMFORT AND CONVENIENCECLIMATE
4.18
System Cali
The climate cre-calibrate itperformancethe “AC Calibdisplay and sy
Calibration shminute and wCalibrating” mdisplay.
If the “AC Caldisappear, co
Mclaren P11 - Complete.book Page 18 Friday, January 22, 2016 9:43 AM
CONTROL (TOUCHSCREEN CONTROLS) - 675LT
bration
ontrol system may periodically self to ensure optimum system is maintained. During this cycle, rating” message is shown on the stem operation is inhibited.
ould take no more than a hen complete the “AC essage will disappear from the
ibrating” message does not ntact your McLaren Retailer.

COM ND CONVENIENCELO-JA LEN VEHICLE RECOVERY SYSTEM
4.19
LO-JA LEN VEHICLE RECO YSTEMOvervie
This sec es an overview of the Lo-Jack Veh ery System. If you need further , contact your McLaren Retailer
The Lo- comprises a small, silent radio tra stalled in the vehicle to aid locating in the event of a theft.
Once in transmitter and the Vehicle n Number (VIN) are register National Crime Informa (NCIC) database, used by federal, cal law enforcement agencie ut the USA.
In the event of a theft
1. If you discover the vehicle has been stolen, report the theft to the local Police authority including the details of the VIN.
2. The theft is then recognized by the NCIC database which automatically triggers the activation of the Lo-Jack transmitter in the stolen vehicle.
3. Once the transmitter is activated, it will transmit a signal which can be detected by tracking units fitted to Police vehicles within a 2-3 mile radius.
4. When the Police secure the stolen vehicle, arrangements will have to be made with you for the vehicle to be collected. The Police may recover the vehicle to a secure compound for further investigation.
You may be liable for any recovery and storage charges.
Mclaren P11 - Complete.book Page 19 Friday, January 22, 2016 9:43 AM
Identificatioed with thetion Center state and los througho
FORT ACK STO
CK STOVERY Sw
tion providicle Recov
clarification.
Jack systemnsmitter in the vehicle
stalled, the

COMFORT AND CONVENIENCEINTERIOR
4.20
INTERIOR FEATURES
Interior ligh
1. Left-hantouch pa
2. Right-hatouch pa
3. Interior
For full interio(3) quickly.
NOTE: Eswitched
To switch off pad (3) again
y lighting
y lighting improves visibility and security n you approach the vehicle.
n the vehicle is unlocked, the headlamps tail lamps illuminate for a period of time ntil the ignition is switched on.
et the entry lighting duration, see External ing, page 3.9.
Mclaren P11 - Complete.book Page 20 Friday, January 22, 2016 9:43 AM
FEATURES
ting
d reading light on/off/gradual d
nd reading light on/off/gradual d
lighting on/off touch pad
r lighting, press the touch pad
nsure that the interior lighting is off when leaving the vehicle.
the interior lighting, press touch .
Reading lightsPress touch pads (1) or (2) to switch on the desired reading light.
For gradual reading illumination, press and hold touch pad (1) or (2) until desired lighting is achieved.
Press touch pads (1) or (2) again to switch off the respective reading light.
Courtesy lightingThe interior of your McLaren is lit in the following areas:
• the driver's and passenger's footwells, when you open a door
• the center console (illuminated by a light within the overhead light panel), if the ignition is on
• the interior door handles, if the ignition is on
The courtesy lighting extinguishes one minute after the doors have been closed or when the ignition is switched on.
The luggage compartment light illuminates when the luggage compartment is opened.
Entr
Entrwhe
Wheand or u
To slight

COMINTER
4.21
Exit ligh
Exit lighwhen yothe heatime.
To set thlighting
Exit lighpulling tmomenbe in an
Every adwhilst thincrease15 seco
Once thcomplelightingnot be ainstrumagain th
WARNING: Do not use the stowage net to transport any heavy, sharp-edged or breakable objects. Occupants could be injured by objects being thrown around during sharp braking, a sudden change of direction or an accident.
Passenger’s footwell stowage net
There is a stowage net in the passenger’s footwell for storing small items.
Mclaren P11 - Complete.book Page 21 Friday, January 22, 2016 9:43 AM
FORT AND CONVENIENCEIOR FEATURES
ting
ting improves visibility and security u leave the vehicle by illuminating
dlamps and tail lamps for a period of
e exit lighting duration, see External , page 3.9.
ting can also be activated manually by he turn signal stalk towards you tarily three times. The vehicle must awake state with the ignition off.
ditional pull on the turn signal stalk e exit lighting has been activated will the time increment by an additional
nds.
e vehicle has been exited, locked and ted its set operating time, the exit will extinguish and the function will vailable, unless it is switched on in the ent cluster or is manually activated rough the turn signal stalk.
Stowage net
Bulkhead stowage net
A stowage net is fitted on the bulkhead between the seats for storing small items.
NOTE: The maximum weight the stowage pocket can support is 2.2 lbs (1 kg).
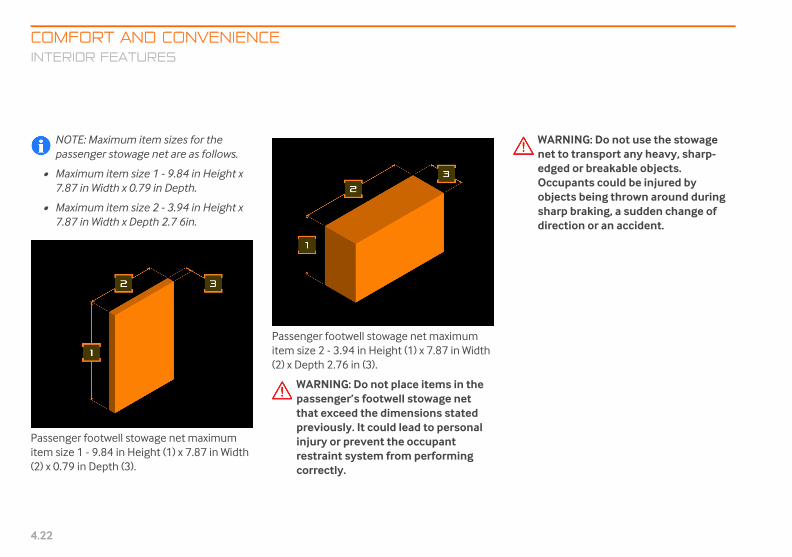
COMFORT AND CONVENIENCEINTERIOR
4.22
NOTE: Mpasseng
• Maximu7.87 in W
• Maximu7.87 in W
Passenger foitem size 1 - 9(2) x 0.79 in D
WARNING: Do not use the stowage net to transport any heavy, sharp-edged or breakable objects. Occupants could be injured by objects being thrown around during sharp braking, a sudden change of direction or an accident.
Mclaren P11 - Complete.book Page 22 Friday, January 22, 2016 9:43 AM
FEATURES
aximum item sizes for the er stowage net are as follows.
m item size 1 - 9.84 in Height x idth x 0.79 in Depth.
m item size 2 - 3.94 in Height x idth x Depth 2.7 6in.
otwell stowage net maximum .84 in Height (1) x 7.87 in Width epth (3).
Passenger footwell stowage net maximum item size 2 - 3.94 in Height (1) x 7.87 in Width (2) x Depth 2.76 in (3).
WARNING: Do not place items in the passenger’s footwell stowage net that exceed the dimensions stated previously. It could lead to personal injury or prevent the occupant restraint system from performing correctly.
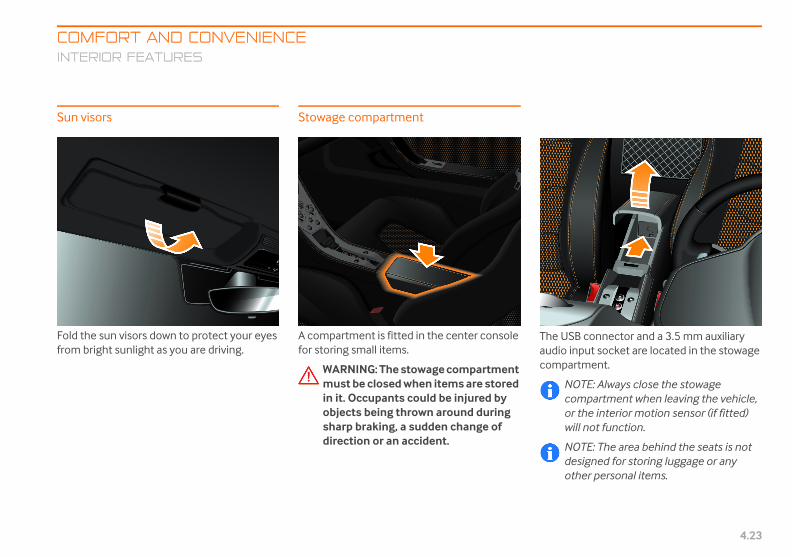
COMINTER
4.23
Sun vis
Fold thefrom br
The USB connector and a 3.5 mm auxiliary audio input socket are located in the stowage compartment.
NOTE: Always close the stowage compartment when leaving the vehicle, or the interior motion sensor (if fitted) will not function.
NOTE: The area behind the seats is not designed for storing luggage or any other personal items.
Mclaren P11 - Complete.book Page 23 Friday, January 22, 2016 9:43 AM
FORT AND CONVENIENCEIOR FEATURES
ors
sun visors down to protect your eyes ight sunlight as you are driving.
Stowage compartment
A compartment is fitted in the center console for storing small items.
WARNING: The stowage compartment must be closed when items are stored in it. Occupants could be injured by objects being thrown around during sharp braking, a sudden change of direction or an accident.

COMFORT AND CONVENIENCEINTERIOR
4.24
Stowage pocA pocket is fitseat for storin
er documentation
r McLaren is equipped with the following ments:
Service and Warranty booklet - provides information on what to do and who to contact in the event of problems.
IRIS user guide - provides information on how to operate all the functions of the IRIS system fitted to your McLaren.
e documents are stored in a slot under ashboard on the passenger's side.
Mclaren P11 - Complete.book Page 24 Friday, January 22, 2016 9:43 AM
FEATURES
ketted to the front edge of each g small items.
Cup holders
Utilize the two cup holders for safe convenient storage of closed drink containers when on a journey.
WARNING: Drinking while the car is moving could cause you to become distracted which could lead to an accident.
Own
Youdocu
•
•
Thesthe d

COMINTER
4.25
Access
Thlugthach
NOthefrosocenexc
Mclaren P11 - Complete.book Page 25 Friday, January 22, 2016 9:43 AM
FORT AND CONVENIENCEIOR FEATURES
ory power sockets
Luggage compartment socket
e accessory socket, located in the gage compartment, is the only one t can be used to connect the battery
arger.
TE: Do not leave any device (except battery charger), that draws power
m the vehicle, connected to the ket for extended periods without the
gine running. This may lead to essive battery drain.
Interior accessory 12V socket
The interior accessory 12V socket is located inside the passenger compartment, behind the center console.
NOTE: Do not connect the battery charger to the interior accessory socket.

COMFORT AND CONVENIENCEINTERIOR
4.26
Car cover
A car cover, scan be purch
McLaren recoif it is to be leweeks. Cleanensuring thatthe cover.
NOTE: Afitting thcould ca
Mclaren P11 - Complete.book Page 26 Friday, January 22, 2016 9:43 AM
FEATURES
uitable for use inside a garage, ased from your McLaren Retailer.
mmends that the car is covered ft in storage for periods over two the vehicle inside and out, it has fully dried, prior to fitting
llow the engine to cool before e cover or the hot exhaust pipes use damage to the cover.

Mclaren P11 - Complete.book Page 27 Friday, January 22, 2016 9:43 AM

Mclaren P11 - Complete.book Page 28 Friday, January 22, 2016 9:43 AM

5.1
FLUID TOPPING UPEngine oil............................................................................................................. 5.2Gearbox oil level ............................................................................................... 5.5Coolant................................................................................................................. 5.6Power steering fluid........................................................................................ 5.7Brake fluid ........................................................................................................... 5.8Windscreen washers....................................................................................... 5.9
EMERGENCY EQUIPMENTEmergency Equipment Safety ................................................................ 5.10Luggage compartment equipment - except 675LT....................... 5.10Luggage compartment equipment - 675LT ..................................... 5.10Warning triangle ............................................................................................ 5.11First Aid kit ....................................................................................................... 5.11Tire sealant ...................................................................................................... 5.12Towing eye ...................................................................................................... 5.12Fuel funnel....................................................................................................... 5.12Engine cover release tool - 675LT ......................................................... 5.13Fire extinguisher............................................................................................ 5.13
BATTERY CARE AND MAINTENANCEBattery safety ................................................................................................. 5.14Charging the battery ................................................................................... 5.14Boost starting from another vehicle ..................................................... 5.15
FUSESFuse replacement......................................................................................... 5.18Main fuse box.................................................................................................. 5.18Secondary fuse box...................................................................................... 5.21Battery fuse box............................................................................................. 5.22
LIGHTINGVehicle lights .................................................................................................. 5.24
MANUAL UNLOCKING AND OPENINGUnlocking - discharged battery .............................................................. 5.25Starting the vehicle...................................................................................... 5.26Door opening from inside - discharged battery............................... 5.27Opening luggage compartment - discharged battery .................. 5.28Replacing key fob battery ......................................................................... 5.28
WASHERS AND WIPERReplacing the wiper blade......................................................................... 5.31
WHEELS AND TIRESWheels and tires............................................................................................ 5.32Deflated tire .................................................................................................... 5.35P ZeroTM Trofeo R tires ............................................................................. 5.37
VEHICLE CAREWashing your McLaren............................................................................... 5.38Cleaning the interior ................................................................................... 5.40
RAISING THE VEHICLEVehicle lifting points.................................................................................... 5.41
McLAREN ASSISTANCEMcLaren Assistance..................................................................................... 5.42In the event of a breakdown .................................................................... 5.42Towing for recovery..................................................................................... 5.43
MAINTAINING YOUR McLAREN
Mclaren P11 - Complete.book Page 1 Friday, January 22, 2016 9:43 AM

MAINTAINING YOUR McLARENFLUID TO
5.2
FLUID TOPPING UP
Engine oil
The engine uoil for every 6on your stylemay be highenew or if you speeds.
You will only consumptiondriven for sevkilometers.
NOTE: Lthe engiby such vehicle wavailable
Checking thThe engine ochecked. No warnings are
The level is viewed in the Vehicle Info section in the left-hand display, see Vehicle info, page 3.17.
Start the engine and hold the engine speed at 2,000 rpm for 40 seconds. Allow the engine oil temperature to reach a temperature of 70°C (158°F).
NOTE: The throttle can be fully depressed as the engine speed will be electronically limited to 2,000 rpm.
When the timer has reached '0', the oil level will be shown on the display along with a description.
NOTE: The line on the display indicates the maximum oil level for 19 seconds after the oil level is read.
Mclaren P11 - Complete.book Page 2 Friday, January 22, 2016 9:43 AM
PPING UP
ses approximately 0.1 quarts of 25 miles (1,000 km), depending
of driving. The oil consumption r than this when the vehicle is frequently drive at high engine
be able to estimate the oil after the vehicle has been eral thousand miles or
ubricant additives could damage ne or gearbox. Damage caused additives is not covered by the
arranty. Further information is from your McLaren Retailer.
e engine oilil level must be manually automatic level checks or provided.
To check the engine oil level manually:
1. Ensure the following conditions are met:
• Vehicle stationary and positioned on a level surface.
• Neutral selected and the foot brake applied (use left foot).
NOTE: The foot brake must be applied for the entire duration of the oil level check.
2.
3.
4.

MAINFLUID
5.3
5. If ttopfol
NOcocoleafalreltheme
2. Unscrew the engine oil filler cap.
3. Top up with the correct quantity of Mobil 1 New Life 0W-40 engine oil, in 0.26 quart quantities. Approximately 0.79 quarts is required to raise the level from minimum to maximum. Refer to Top up quantity, page 5.5.
NOTE: Do not overfill. Top up in 0.26 quart quantities and then re-check before adding further oil.
Mclaren P11 - Complete.book Page 3 Friday, January 22, 2016 9:43 AM
TAINING YOUR McLAREN TOPPING UP
he engine oil is below the target level, up the oil in accordance to the
lowing procedure.
TE: Once the oil level check has been mpleted and returned a value, do not ntinue to test the system. This may d to aeration of the oil and return a
se value. To end the oil level check, ease the throttle pedal and return to Vehicle info menu by moving the nu stalk back.
Topping up the engine oilWARNING: There is a risk of injury if the engine cover is open, even when the engine is not running.
Engine components become very hot. Avoid contact, there is a risk of severe burns.
NOTE: The engine must be switched off before carrying out the oil top up process.
NOTE: McLaren only recommends the use of Mobil 1 New Life 0W-40 engine oil.
1. Open the engine cover, see Engine cover, page 1.11.

MAINTAINING YOUR McLARENFLUID TO
5.4
4. Check thlevel is c
NOTE: Ifoverfillehave anyMcLarencatalytic
5. Refit the
ENVIROtake carbe allowwaterwa
NOTE: Ecorrectland bowdetachesystem. should bthe car wengine c
Close the engine cover, see Engine cover, page 1.11.
Mclaren P11 - Complete.book Page 4 Friday, January 22, 2016 9:43 AM
PPING UP
e left-hand display to ensure orrect.
you have inadvertently d the engine with oil, you must excess removed at your Retailer. The engine or the converter could be damaged.
engine oil filler cap.
NMENTAL: When topping up, e not to spill any oil. Oil must not ed to escape into the soil or ys.
nsure oil filler cap is refitted y, with the markings on the cap l aligned. If not, it may become d and allow oil to escape the If closed correctly the handle e facing directly to the front of ith the recesses parallel to the ompartment side covers.
6.

MAINFLUID
5.5
Top up
Based ohand disas show
Gearbox oil level
If you experience oil loss or problems with gear shifts, have the gearbox checked by your McLaren Retailer.
NOTE: The clutch and gearbox oil has mileage related service intervals. This maintenance can only be carried out by your McLaren Retailer.
Mclaren P11 - Complete.book Page 5 Friday, January 22, 2016 9:43 AM
TAINING YOUR McLAREN TOPPING UP
quantity
n the oil status displayed on the left-play, add the required quantity of oil
n in the following table.
Oil temperatureIf the oil temperature is too high, a warning will be displayed in the left-hand display. Reduce the vehicle and engine speed until the warning message disappears.
Bars on display Quantity of oil required
1 bar - red - under filled 2.0 pt. (1.00 litre)
2 bars - yellow - min. 1.5 pt. (0.75 litre)
3 bars - green - OK 1.0 pt. (0.50 litre)
4 bars - green - OK 0.5 pt. (0.25 litre)
5 bars - green - OK 0.2 pt. (0.10 litre)
6 bars - green - target 0.0 pt. (0.00 litre)
7 bars - yellow - max. 0.0 pt. (0.00 litre)
8 bars - red - overfilled Contact your McLaren Retailer
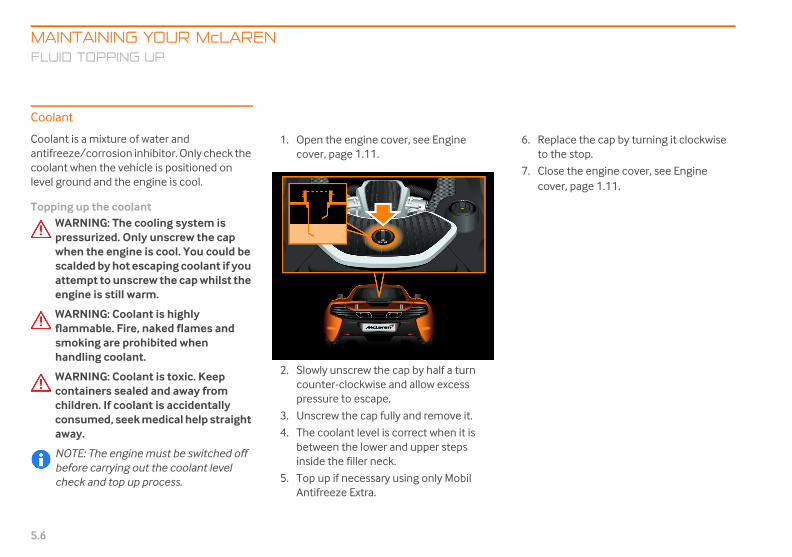
MAINTAINING YOUR McLARENFLUID TO
5.6
Coolant
Coolant is a mantifreeze/cocoolant whenlevel ground
Topping up tWARNINpressurwhen thscaldedattempengine
WARNINflammasmokinhandlin
WARNINcontainchildrenconsumaway.
NOTE: Tbefore ccheck an
Replace the cap by turning it clockwise to the stop.
Close the engine cover, see Engine cover, page 1.11.
Mclaren P11 - Complete.book Page 6 Friday, January 22, 2016 9:43 AM
PPING UP
ixture of water and rrosion inhibitor. Only check the the vehicle is positioned on
and the engine is cool.
he coolantG: The cooling system is
ized. Only unscrew the cap e engine is cool. You could be by hot escaping coolant if you t to unscrew the cap whilst the is still warm.
G: Coolant is highly ble. Fire, naked flames and g are prohibited when g coolant.
G: Coolant is toxic. Keep ers sealed and away from . If coolant is accidentally ed, seek medical help straight
he engine must be switched off arrying out the coolant level d top up process.
1. Open the engine cover, see Engine cover, page 1.11.
2. Slowly unscrew the cap by half a turn counter-clockwise and allow excess pressure to escape.
3. Unscrew the cap fully and remove it.
4. The coolant level is correct when it is between the lower and upper steps inside the filler neck.
5. Top up if necessary using only Mobil Antifreeze Extra.
6.
7.

MAINFLUID
5.7
Power
WAhiganha
WAtoxawache
Left-hand drive models
5. Measure the distance, inside the reservoir, down to the fluid level. Maximum fill level is 1.97 in (50 mm) and minimum fill level is 2.17 in (55 mm) from the top of the filler neck.
6. Top up if necessary using only Pentosin CHF202 power steering fluid, contact your McLaren Retailer.
7. Replace the cap by turning it to the stop.
8. Close the luggage compartment, see Luggage compartment, page 1.15.
Mclaren P11 - Complete.book Page 7 Friday, January 22, 2016 9:43 AM
TAINING YOUR McLAREN TOPPING UP
steering fluid
RNING: Power steering fluid is hly flammable. Fire, naked flames
d smoking are prohibited when ndling power steering fluid.
RNING: Power steering fluid is ic. Keep containers sealed and
ay from children. If fluid is cidentally consumed, seek medical lp straight away.
Right-hand drive models
Checking fluid level1. Switch the ignition on and start the
engine. Select normal handling mode, see Handling control, page 2.25.
2. Allow the engine to idle for 20 seconds before checking the fluid level.
3. Open the luggage compartment, see Luggage compartment, page 1.15.
4. Turn the cap counter-clockwise and remove it.

MAINTAINING YOUR McLARENFLUID TO
5.8
Brake fluid
WARNINflammasmokinhandlin
WARNINcontainchildrenconsumaway.
WARNINair tight
NOTE: Aharmfulspillageswith a mwater.
NOTE: Tbefore cand top
Checking flu1. Open th
Luggage
Left-hand drive models
The brake fluid is correct if the level just covers the base of the filter in the filler neck.
Top up if necessary using only new Pentosin DoT 5.1 brake fluid.
Replace the cap by turning it to the stop.
Close the luggage compartment, see Luggage compartment, page 1.15.
Mclaren P11 - Complete.book Page 8 Friday, January 22, 2016 9:43 AM
PPING UP
G: Brake fluid is highly ble. Fire, naked flames and g are prohibited when g brake fluid.
G: Brake fluid is toxic. Keep ers sealed and away from . If fluid is accidentally ed, seek medical help straight
G: Only use fluid from new, containers.
void spilling brake fluid, it is to painted surfaces. Any must be removed immediately ixture of car shampoo and
he engine must be switched off arrying out the brake fluid check up process.
id levele luggage compartment, see compartment, page 1.15.
Right-hand drive models
2. Unscrew the cap counter-clockwise and remove it.
3.
4.
5.
6.

MAINFLUID
5.9
Windsc
WAhiganha
WAcochcoaw
NOMo
NOall
The reselocated
The rese1 gallon
4. Close the luggage compartment, see Luggage compartment, page 1.15.
Mclaren P11 - Complete.book Page 9 Friday, January 22, 2016 9:43 AM
TAINING YOUR McLAREN TOPPING UP
reen washers
RNING: Some washer fluids are hly flammable. Fire, naked flames
d smoking are prohibited when ndling washer fluid.
RNING: Washer fluid is toxic. Keep ntainers sealed and away from ildren. If fluid is accidentally nsumed, seek medical help straight ay.
TE: McLaren recommends the use of bil Screenwash concentrate.
TE: Add washer fluid to the reservoir year round.
rvoir for the windscreen washers is in the luggage compartment.
rvoir has a capacity of approximately .
Checking fluid level1. Open the luggage compartment, see
Luggage compartment, page 1.15.
2. Mix a solution of Mobil Screenwash concentrate and water in a container before adding to the reservoir. Concentration of the washer solution should be mixed to suit the outside temperatures.
3. Open the reservoir cap, top up the reservoir with washer fluid and close the cap.
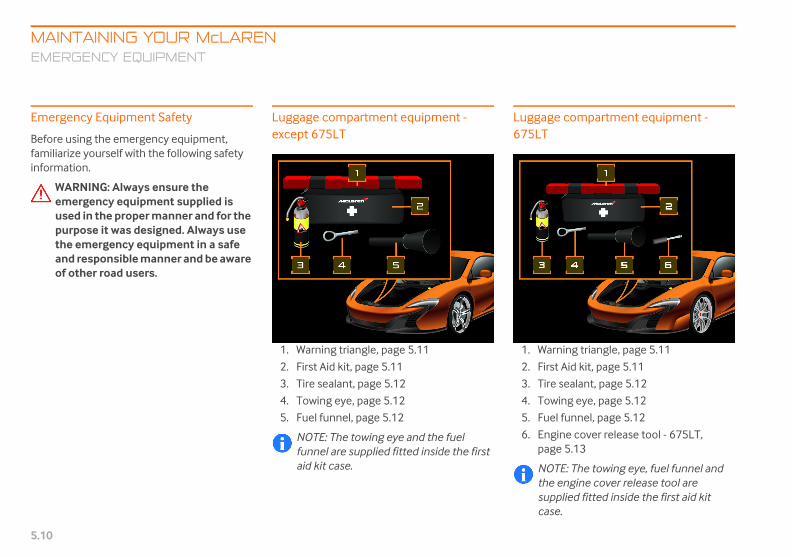
MAINTAINING YOUR McLARENEMERGEN
5.10
EMERGENCY EQUIPMENT
Emergency
Before using familiarize yoinformation.
WARNINemergeused in purposethe emeand resof other
gage compartment equipment - LT
Warning triangle, page 5.11
First Aid kit, page 5.11
Tire sealant, page 5.12
Towing eye, page 5.12
Fuel funnel, page 5.12
Engine cover release tool - 675LT, page 5.13
NOTE: The towing eye, fuel funnel and the engine cover release tool are supplied fitted inside the first aid kit case.
Mclaren P11 - Complete.book Page 10 Friday, January 22, 2016 9:43 AM
CY EQUIPMENT
Equipment Safety
the emergency equipment, urself with the following safety
G: Always ensure the ncy equipment supplied is the proper manner and for the it was designed. Always use rgency equipment in a safe
ponsible manner and be aware road users.
Luggage compartment equipment - except 675LT
1. Warning triangle, page 5.11
2. First Aid kit, page 5.11
3. Tire sealant, page 5.12
4. Towing eye, page 5.12
5. Fuel funnel, page 5.12
NOTE: The towing eye and the fuel funnel are supplied fitted inside the first aid kit case.
Lug675
1.
2.
3.
4.
5.
6.
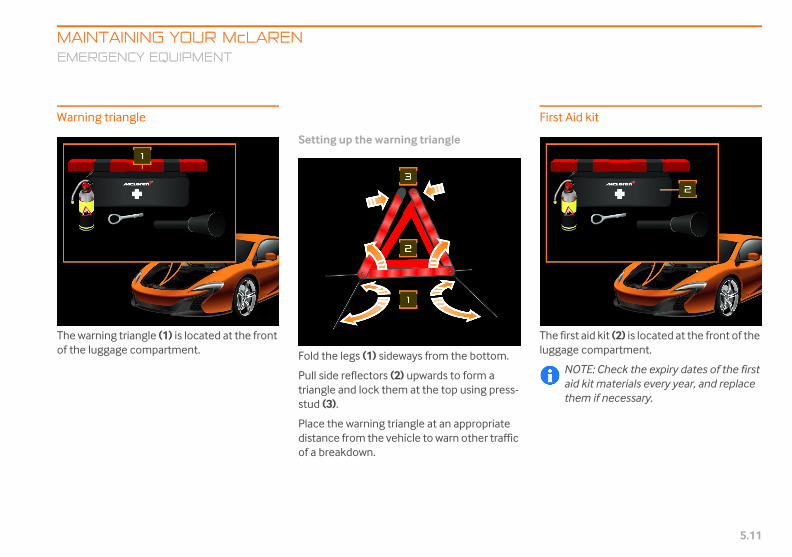
MAINEMER
5.11
Warnin
The warof the lu
First Aid kit
The first aid kit (2) is located at the front of the luggage compartment.
NOTE: Check the expiry dates of the first aid kit materials every year, and replace them if necessary.
Mclaren P11 - Complete.book Page 11 Friday, January 22, 2016 9:43 AM
TAINING YOUR McLARENGENCY EQUIPMENT
g triangle
ning triangle (1) is located at the front ggage compartment.
Setting up the warning triangle
Fold the legs (1) sideways from the bottom.
Pull side reflectors (2) upwards to form a triangle and lock them at the top using press-stud (3).
Place the warning triangle at an appropriate distance from the vehicle to warn other traffic of a breakdown.

MAINTAINING YOUR McLARENEMERGEN
5.12
Tire sealant
The tire sealathe luggage c
For instructiosealant, see D
NOTE: Csealant enecessa
l funnel
fuel funnel (5) is located inside the first it case at the front of the luggage partment.
NOTE: Only use the fuel funnel when filling the vehicle with fuel from sources other than a fuel pump at a gas station.
Do not use the fuel funnel when topping up coolant, engine oil or any other fluids in the vehicle.
Mclaren P11 - Complete.book Page 12 Friday, January 22, 2016 9:43 AM
CY EQUIPMENT
nt (3) is located at the front of ompartment.
ns on how to use the tire eflated tire, page 5.35.
heck the expiry date of the tire very year, and replace if
ry.
Towing eye
The towing eye (4) is located inside the first aid kit case at the front of the luggage compartment.
NOTE: Your McLaren is equipped with a front towing eye mounting only. It is not possible to tow other vehicles.
For information on installing the towing eye, see Towing eye and mounting, page 5.43.
Fue
The aid kcom

MAINEMER
5.13
Engine
The enginside thluggage
Mclaren P11 - Complete.book Page 13 Friday, January 22, 2016 9:43 AM
TAINING YOUR McLARENGENCY EQUIPMENT
cover release tool - 675LT
ine cover release tool (6) is located e first aid kit case at the front of the compartment.
Fire extinguisher
The fire extinguisher is located at the front of the luggage compartment.
Release the retaining strap and remove the fire extinguisher.
To operate, follow the manufacturer’s instructions on the side of the fire extinguisher.
NOTE: The fire extinguisher must be checked every year or it may fail in an emergency. Once the extinguisher is used it will have to be replaced.
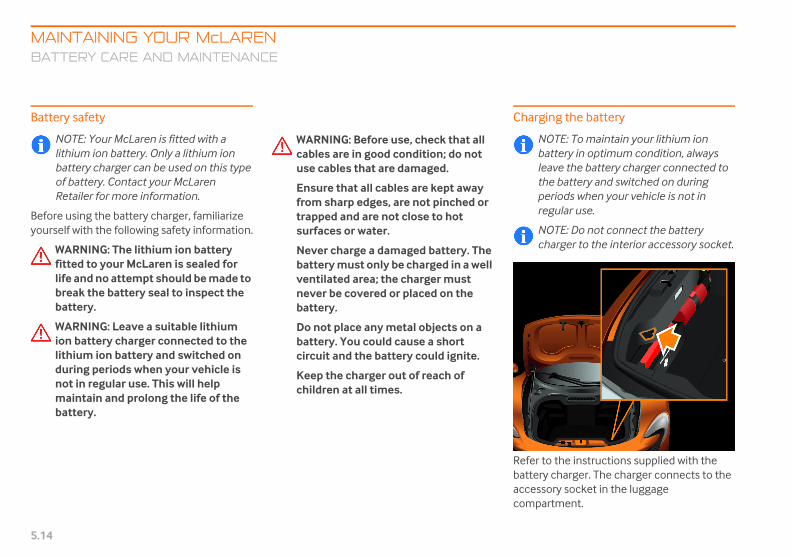
MAINTAINING YOUR McLARENBATTERY
5.14
BATTERY CARE AND MAINTENANCE
Battery safe
NOTE: Ylithium ibattery cof batteRetailer
Before using yourself with
WARNINfitted tolife andbreak thbattery
WARNINion battlithiumduring pnot in remaintaibattery
rging the battery
NOTE: To maintain your lithium ion battery in optimum condition, always leave the battery charger connected to the battery and switched on during periods when your vehicle is not in regular use.
NOTE: Do not connect the battery charger to the interior accessory socket.
r to the instructions supplied with the ery charger. The charger connects to the ssory socket in the luggage partment.
Mclaren P11 - Complete.book Page 14 Friday, January 22, 2016 9:43 AM
CARE AND MAINTENANCE
ty
our McLaren is fitted with a on battery. Only a lithium ion harger can be used on this type
ry. Contact your McLaren for more information.
the battery charger, familiarize the following safety information.
G: The lithium ion battery your McLaren is sealed for
no attempt should be made to e battery seal to inspect the
.
G: Leave a suitable lithium ery charger connected to the
ion battery and switched on eriods when your vehicle is gular use. This will help
n and prolong the life of the .
WARNING: Before use, check that all cables are in good condition; do not use cables that are damaged.
Ensure that all cables are kept away from sharp edges, are not pinched or trapped and are not close to hot surfaces or water.
Never charge a damaged battery. The battery must only be charged in a well ventilated area; the charger must never be covered or placed on the battery.
Do not place any metal objects on a battery. You could cause a short circuit and the battery could ignite.
Keep the charger out of reach of children at all times.
Cha
Refebattaccecom
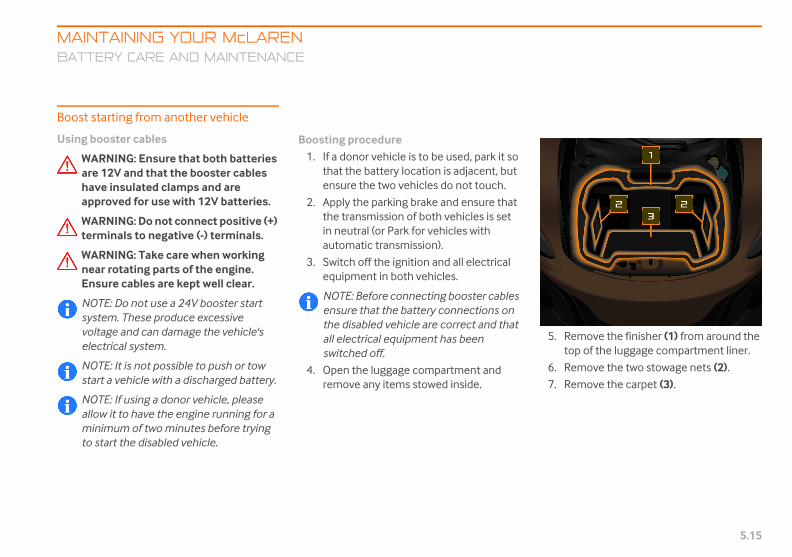
MAINBATT
5.15
Boost s
Using b
WAarehaap
WAter
WAneEn
NOsysvoele
NOsta
NOallomito
5. Remove the finisher (1) from around the top of the luggage compartment liner.
6. Remove the two stowage nets (2).
7. Remove the carpet (3).
Mclaren P11 - Complete.book Page 15 Friday, January 22, 2016 9:43 AM
TAINING YOUR McLARENERY CARE AND MAINTENANCE
tarting from another vehicle
ooster cables
RNING: Ensure that both batteries 12V and that the booster cables
ve insulated clamps and are proved for use with 12V batteries.
RNING: Do not connect positive (+) minals to negative (-) terminals.
RNING: Take care when working ar rotating parts of the engine. sure cables are kept well clear.
TE: Do not use a 24V booster start tem. These produce excessive
ltage and can damage the vehicle's ctrical system.
TE: It is not possible to push or tow rt a vehicle with a discharged battery.
TE: If using a donor vehicle, please w it to have the engine running for a
nimum of two minutes before trying start the disabled vehicle.
Boosting procedure1. If a donor vehicle is to be used, park it so
that the battery location is adjacent, but ensure the two vehicles do not touch.
2. Apply the parking brake and ensure that the transmission of both vehicles is set in neutral (or Park for vehicles with automatic transmission).
3. Switch off the ignition and all electrical equipment in both vehicles.
NOTE: Before connecting booster cables ensure that the battery connections on the disabled vehicle are correct and that all electrical equipment has been switched off.
4. Open the luggage compartment and remove any items stowed inside.

MAINTAINING YOUR McLARENBATTERY
5.16
8. Removeside andliner.
9. Removetop edgeliner.
10. Remove
Check that the cables are clear of any moving components and that all four connections are secure.
WARNING: Ensure that each connection is securely made and that there is no risk of the clips accidentally slipping or being pulled from the connection points/battery terminal - this could cause sparking, which could lead to fire or explosion.Start the engine of the donor vehicle and allow it to run for two minutes.
The electrical system on the disabled vehicle should now be ready for the engine to be started.
Start the engine of the disabled vehicle.
Allow both vehicles to idle for two minutes.
Switch off the donor vehicle.
NOTE: Do not switch on any electrical circuits on the previously disabled vehicle until after the booster cables have been removed.
Mclaren P11 - Complete.book Page 16 Friday, January 22, 2016 9:43 AM
CARE AND MAINTENANCE
the 7 screws (4) securing the the base luggage compartment
the 10 screws (5) securing the of the luggage compartment
the luggage compartment liner.
11. Connect one end of the positive (+) booster cable to the positive (+) terminal on the donor vehicle's battery.
12. Connect the other end of the positive (+) booster cable to the positive (+) terminal on the disabled vehicle's battery (A).
13. Connect one end of negative (-) booster cable to the negative (-) terminal on the donor vehicle's battery.
14. Connect the other end of the negative (-) booster cable to the negative (-) terminal on the disabled vehicle's battery (B).
15.
16.
17.
18.
19.
20.

MAINBATT
5.17
NOhaneRedocoim
Mclaren P11 - Complete.book Page 17 Friday, January 22, 2016 9:43 AM
TAINING YOUR McLARENERY CARE AND MAINTENANCE
TE: If battery is fully discharged, or s been disconnected, it may be cessary to reset the windows, see setting the windows, page 4.3. If this es not resolve the issue, please ntact your McLaren Retailer mediately.
Disconnecting the cablesWARNING: To avoid serious injury, use caution when removing the booster cables as the engine on the previously disabled vehicle will be running. You will be working close to components carrying high voltage, or may be hot.
1. Disconnect the booster cables in the reverse order to that used for connection.
2. Refit the luggage compartment liner and secure with the 17 screws.
3. Fit the stowage nets, the carpet and the top finisher.
4. Stow the contents removed from the luggage compartment.
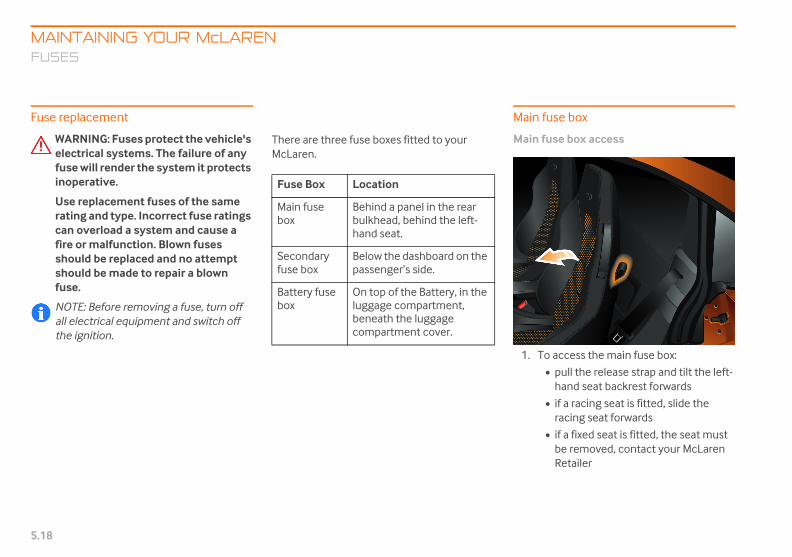
MAINTAINING YOUR McLARENFUSES
5.18
FUSES
Fuse replace
WARNINelectricfuse wilinopera
Use reprating acan ovefire or mshould should fuse.
NOTE: Ball electrthe ignit
n fuse box
n fuse box access
To access the main fuse box:
• pull the release strap and tilt the left-hand seat backrest forwards
• if a racing seat is fitted, slide the racing seat forwards
• if a fixed seat is fitted, the seat must be removed, contact your McLaren Retailer
Mclaren P11 - Complete.book Page 18 Friday, January 22, 2016 9:43 AM
ment
G: Fuses protect the vehicle's al systems. The failure of any l render the system it protects tive.
lacement fuses of the same nd type. Incorrect fuse ratings rload a system and cause a alfunction. Blown fuses
be replaced and no attempt be made to repair a blown
efore removing a fuse, turn off ical equipment and switch off ion.
There are three fuse boxes fitted to your McLaren.
Mai
Mai
1.
Fuse Box Location
Main fuse box
Behind a panel in the rear bulkhead, behind the left-hand seat.
Secondary fuse box
Below the dashboard on the passenger’s side.
Battery fuse box
On top of the Battery, in the luggage compartment, beneath the luggage compartment cover.
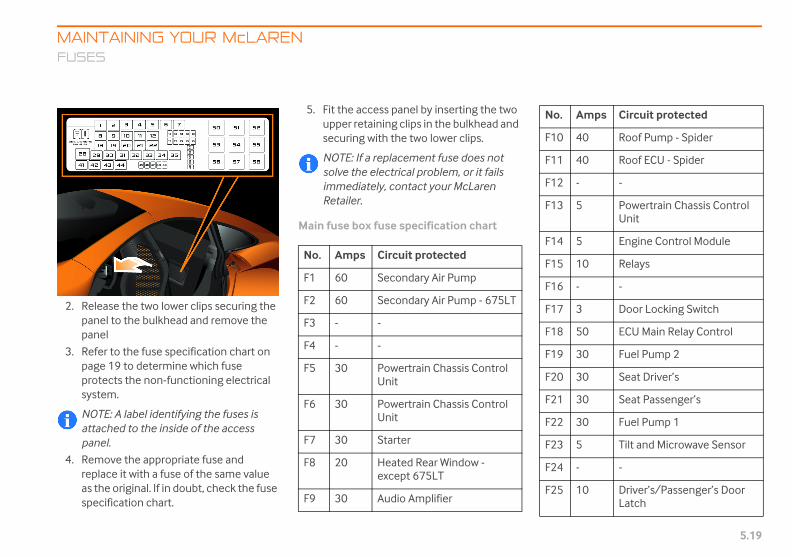
MAINFUSE
5.19
2. Repapa
3. Repaprosys
NOattpa
4. Rerepas spe
F10 40 Roof Pump - Spider
F11 40 Roof ECU - Spider
F12 - -
F13 5 Powertrain Chassis Control Unit
F14 5 Engine Control Module
F15 10 Relays
F16 - -
F17 3 Door Locking Switch
F18 50 ECU Main Relay Control
F19 30 Fuel Pump 2
F20 30 Seat Driver’s
F21 30 Seat Passenger’s
F22 30 Fuel Pump 1
F23 5 Tilt and Microwave Sensor
F24 - -
F25 10 Driver’s/Passenger’s Door Latch
No. Amps Circuit protected
Mclaren P11 - Complete.book Page 19 Friday, January 22, 2016 9:43 AM
TAINING YOUR McLARENS
lease the two lower clips securing the nel to the bulkhead and remove the nel
fer to the fuse specification chart on ge 19 to determine which fuse tects the non-functioning electrical tem.
TE: A label identifying the fuses is ached to the inside of the access nel.
move the appropriate fuse and lace it with a fuse of the same value
the original. If in doubt, check the fuse cification chart.
5. Fit the access panel by inserting the two upper retaining clips in the bulkhead and securing with the two lower clips.
NOTE: If a replacement fuse does not solve the electrical problem, or it fails immediately, contact your McLaren Retailer.
Main fuse box fuse specification chart
No. Amps Circuit protected
F1 60 Secondary Air Pump
F2 60 Secondary Air Pump - 675LT
F3 - -
F4 - -
F5 30 Powertrain Chassis Control Unit
F6 30 Powertrain Chassis Control Unit
F7 30 Starter
F8 20 Heated Rear Window - except 675LT
F9 30 Audio Amplifier

MAINTAINING YOUR McLARENFUSES
5.20
F26 10
F27 5
F28 -
F29 20
F30 -
F31 50
F32 50
F33 30
F34 30
F35 -
F36 20
F37 15
F38 15
F39 15
No. Amps
- Powertrain Chassis Control Unit
- Starter
- Secondary Air Pump
- Cooling Fans
- ECU Main relay Control
. Amps Circuit protected
Mclaren P11 - Complete.book Page 20 Friday, January 22, 2016 9:43 AM
ICPC
Electronic Park Brake
-
Vacuum Pump
-
Cooling Fan Left-Hand
Cooling Fan Right-Hand
Electronic Park Brake Motor Left-Hand
Electronic Park Brake Motor Right-Hand
-
Battery Main Relay
Emission Control Systems
Fuel Injection and Ignition - Left-Hand Bank
Fuel Injection and Ignition - Right-Hand Bank
Circuit protected
F40 10 Engine Ancillaries
R41 - -
R42 - Vacuum Pump relay
R43 - Vacuum Pump relay
R44 - Heated Rear Window - except 675LT
F45 10 Electrical Thermostats, Camshaft Actuators
F46 - -
F47 - -
F48 - -
F49 - -
R50 - Fuel Pump 1
R51 - -
R52 - Fuel Pump 2
R53 - Powertrain Chassis Control Unit
No. Amps Circuit protected
R54
R55
R56
R57
R58
No

MAINFUSE
5.21
Second
Second
1. Acgabesid
2. Re
3. Re
NOpathe
Secondary fuse box fuse specification chart
No. Amps Circuit protected
F1 20 Driver's door
F2 20 Passenger's door
F3 25 Lights
F4 20 Lights
F5 35 Body
F6 35 Body
F7 35 Alarm
F8 5 Electronic Stability Control
F9 10 OBD2 Diagnostics
F10 10 Air conditioning
F11 3 Alarm Control Unit
F12 3 Tracker
F13 7.5 Alarm
F14 10 Instrument cluster
Mclaren P11 - Complete.book Page 21 Friday, January 22, 2016 9:43 AM
TAINING YOUR McLARENS
ary fuse box
ary fuse box access
cess to the secondary fuse box is ined by lowering the closing panel low the dashboard on the passenger’s e.
move the two front screws (1).
move the side fixing clip (2).
TE: If you wish to lower the closing nel fully, also remove the two clips at rear (3).
4. Lower the closing panel, sufficiently to gain access to the fuse box.
NOTE: Do not lower the closing panel further than necessary as it could be damaged.
5. Remove the appropriate fuse and replace it with a fuse of the same value as the original. If in doubt, check the fuse specification chart.
6. Raise the closing panel into position, fit the clip and fit and tighten the two front screws.

MAINTAINING YOUR McLARENFUSES
5.22
Battery fuse
Battery fuse
1. Open thremove
2. Removetop of th
3. Remove
4. Remove
Press the 2 catches on the right-hand side of the cover and remove the cover from the fuse box.
Mclaren P11 - Complete.book Page 22 Friday, January 22, 2016 9:43 AM
box
box access
e luggage compartment lid and any items stowed inside.
the finisher (1) from around the e luggage compartment liner.
the two stowage nets (2).
the carpet (3).
5. Remove the 7 screws (4) securing the side and the base luggage compartment liner.
6. Remove the 10 screws (5) securing the top edge of the luggage compartment liner.
7. Remove the luggage compartment liner.
8.

MAINFUSE
5.23
9. Rerepas spe
10. Enwitha
11. Resec
12. Fit
13. Stolug
Mclaren P11 - Complete.book Page 23 Friday, January 22, 2016 9:43 AM
TAINING YOUR McLARENS
move the appropriate fuse and lace it with a fuse of the same value
the original. If in doubt, check the fuse cification chart.
gage the left-hand side of the cover h the fuse box, and push the right-nd side down to fully engage the clips.
fit the luggage compartment liner and ure with the 17 screws.
stowage nets, carpet, and top finisher.
w the contents removed from the gage compartment.
Battery fuse box fuse specification chart
No. Amps Circuit protected
1 - -
2 - -
3 30 Air Conditioning - Motor - Control Module
4 50 Secondary Fuse Box Supply
5 20 Electronic Stability Control valves
6 40 Electronic Stability Control motor
7 20 Auxiliary Power Socket - Luggage Compartment
8 40 Secondary Fuse Box Supply
9 100 Electro Hydraulic Power Assisted Steering
10 200 Main Fuse Box Supply
11 - -
MAINTAINING YOUR McLARENLIGHTING
5.24
LIGHTING
Vehicle ligh
Lighting is an aspect of vehicle safety. You m re ensure that all lights are wor imes.
All the extern your McLaren use the latest Lig Diode technology.
Unlike traditio t bulbs, these lights have a long li ower consumption while providin amount of illumination.
HeadlampsYour McLaren th Light Emitting Diodes headl e provide greater visibility on b i beams, especially during advers nd driving conditions.
NOTE: D pt to change Light Emitting rself, as you could damage lighting systems. Have fau ctified by your McLaren
Mclaren P11 - Complete.book Page 24 Friday, January 22, 2016 9:43 AM
is fitted wiamps. Thesoth lo and he weather a
o not attem Diodes you the vehiclelty lights re Retailer.
ts
important ust therefoking at all t
al lights on ht Emitting
nal filamenfe and low pg the same

MAINMANU
5.25
MANUAL UNLOCKING AND OPEN
Unlock
If you arbecausehas beckey.
NOstalowcanalathe
2. The mechanical lock is located below the door on the sill panel, underneath a removable panel.
3. Remove the panel by placing your fingers in the recess and pulling outwards.
NOTE: The panel is not tethered to the vehicle and can be removed completely. Ensure that the panel is stored safely and cannot be damaged when the mechanical key is used.
Mclaren P11 - Complete.book Page 25 Friday, January 22, 2016 9:43 AM
TAINING YOUR McLARENAL UNLOCKING AND OPENING
ING
ing - discharged battery
e unable to lock or unlock the vehicle the vehicle battery or key fob battery
ome discharged, use the mechanical
TE: In the event of an extremely low te of battery charge, the windows will er slightly so that the left-hand door be opened with the manual key. The
rm system will be disarmed to prevent alarm sounding.
Unlocking and opening procedure
1. Press release catch and remove the mechanical key from the key fob.
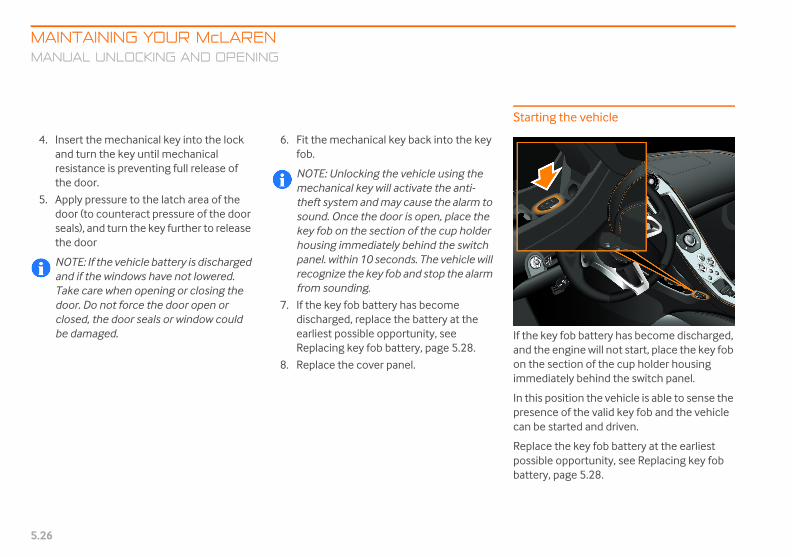
MAINTAINING YOUR McLARENMANUAL
5.26
4. Insert thand turnresistanthe door
5. Apply prdoor (toseals), anthe door
NOTE: Ifand if thTake cardoor. Doclosed, tbe dama
ting the vehicle
e key fob battery has become discharged, the engine will not start, place the key fob he section of the cup holder housing ediately behind the switch panel.
is position the vehicle is able to sense the ence of the valid key fob and the vehicle be started and driven.
lace the key fob battery at the earliest ible opportunity, see Replacing key fob
ery, page 5.28.
Mclaren P11 - Complete.book Page 26 Friday, January 22, 2016 9:43 AM
UNLOCKING AND OPENING
e mechanical key into the lock the key until mechanical
ce is preventing full release of .
essure to the latch area of the counteract pressure of the door
d turn the key further to release
the vehicle battery is discharged e windows have not lowered. e when opening or closing the not force the door open or he door seals or window could ged.
6. Fit the mechanical key back into the key fob.
NOTE: Unlocking the vehicle using the mechanical key will activate the anti-theft system and may cause the alarm to sound. Once the door is open, place the key fob on the section of the cup holder housing immediately behind the switch panel. within 10 seconds. The vehicle will recognize the key fob and stop the alarm from sounding.
7. If the key fob battery has become discharged, replace the battery at the earliest possible opportunity, see Replacing key fob battery, page 5.28.
8. Replace the cover panel.
Star
If thand on timm
In thprescan
Reppossbatt

MAINMANU
5.27
Door obattery
To releamanualthe stra
The doodoor to automa
To refit its holde
NOba
Mclaren P11 - Complete.book Page 27 Friday, January 22, 2016 9:43 AM
TAINING YOUR McLARENAL UNLOCKING AND OPENING
pening from inside - discharged
se a door from inside, release the door release strap retainer and pull p.
r latch will then release, allowing the be partially raised before it tically swings outwards and upwards.
the release strap, feed the strap into r and snap the retainers into place.
TE: Only use this strap when the ttery has become discharged.
NOTE: Please ensure that both of the retainers on the manual door release strap are fitted correctly, and in the correct positions on the B-Pillar after use.
NOTE: Please ensure that the manual door release strap is fully retracted before fitting the retainers to their B-Pillar locations.
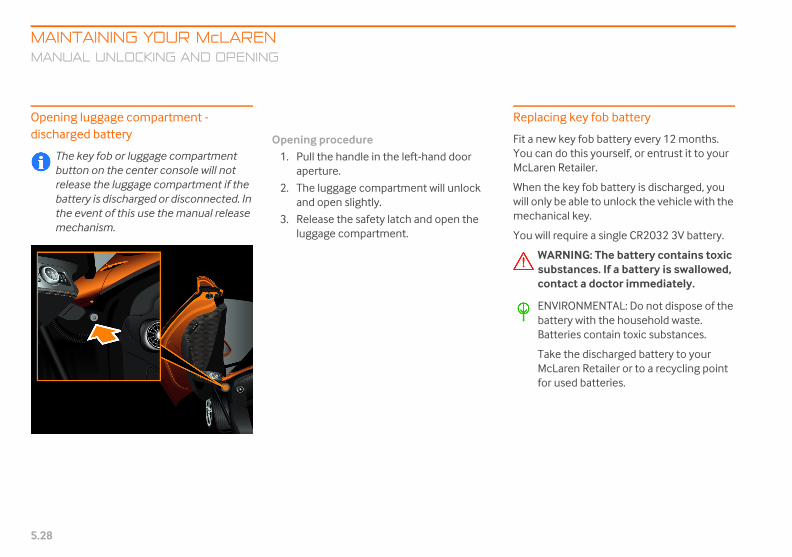
MAINTAINING YOUR McLARENMANUAL
5.28
Opening lugdischarged
The keybutton orelease tbattery ithe evenmechan
lacing key fob battery
new key fob battery every 12 months. can do this yourself, or entrust it to your aren Retailer.
n the key fob battery is discharged, you nly be able to unlock the vehicle with the
hanical key.
will require a single CR2032 3V battery.
WARNING: The battery contains toxic substances. If a battery is swallowed, contact a doctor immediately.
ENVIRONMENTAL: Do not dispose of the battery with the household waste. Batteries contain toxic substances.
Take the discharged battery to your McLaren Retailer or to a recycling point for used batteries.
Mclaren P11 - Complete.book Page 28 Friday, January 22, 2016 9:43 AM
UNLOCKING AND OPENING
gage compartment - battery
fob or luggage compartment n the center console will not he luggage compartment if the s discharged or disconnected. In t of this use the manual release
ism.
Opening procedure1. Pull the handle in the left-hand door
aperture.
2. The luggage compartment will unlock and open slightly.
3. Release the safety latch and open the luggage compartment.
Rep
Fit aYouMcL
Whewill omec
You

MAINMANU
5.29
1. Preme
3. Remove the back cover from the key fob and remove the battery holder.
Mclaren P11 - Complete.book Page 29 Friday, January 22, 2016 9:43 AM
TAINING YOUR McLARENAL UNLOCKING AND OPENING
ss the release catch and remove the chanical key from the key fob.
2. Slide the button pad away from the key fob.
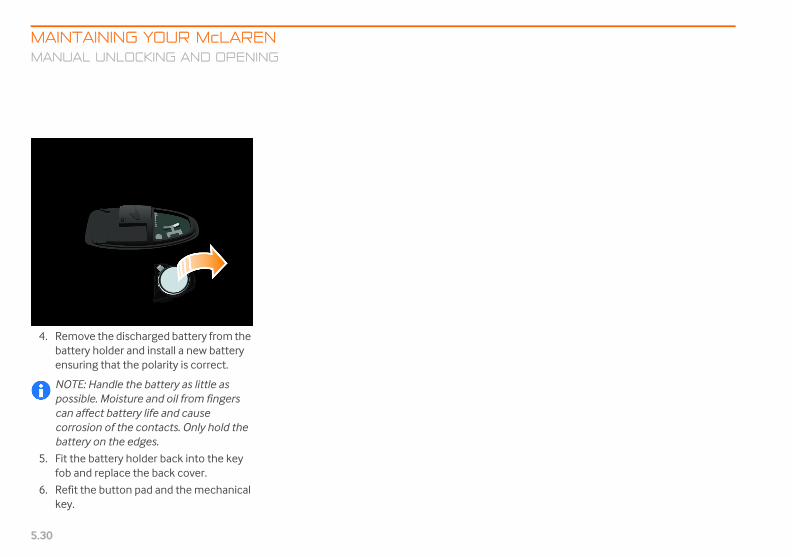
MAINTAINING YOUR McLARENMANUAL
5.30
4. Removebattery hensuring
NOTE: Hpossiblecan affecorrosiobattery o
5. Fit the bfob and
6. Refit thekey.
Mclaren P11 - Complete.book Page 30 Friday, January 22, 2016 9:43 AM
UNLOCKING AND OPENING
the discharged battery from the older and install a new battery that the polarity is correct.
andle the battery as little as . Moisture and oil from fingers ct battery life and cause n of the contacts. Only hold the n the edges.
attery holder back into the key replace the back cover.
button pad and the mechanical
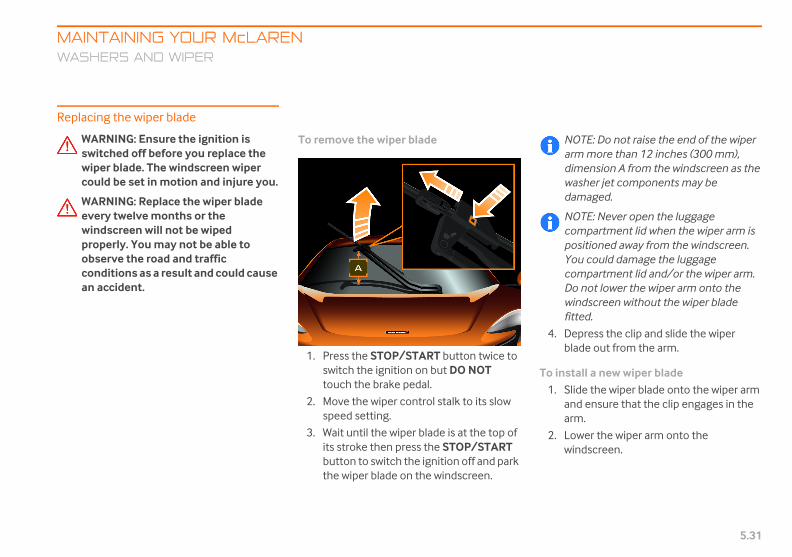
MAIN G YOUR McLARENWASH D WIPER
5.31
WASHERS AND WIPER
Replac er blade
WA sure the ignition is sw before you replace the wi he windscreen wiper co n motion and injure you.
WA place the wiper blade ev months or the wi ill not be wiped pro may not be able to ob oad and traffic co a result and could cause an
To remove the wiper blade
1. Press the STOP/START button twice to switch the ignition on but DO NOT touch the brake pedal.
2. Move the wiper control stalk to its slow speed setting.
3. Wait until the wiper blade is at the top of its stroke then press the STOP/START button to switch the ignition off and park the wiper blade on the windscreen.
NOTE: Do not raise the end of the wiper arm more than 12 inches (300 mm), dimension A from the windscreen as the washer jet components may be damaged.
NOTE: Never open the luggage compartment lid when the wiper arm is positioned away from the windscreen. You could damage the luggage compartment lid and/or the wiper arm. Do not lower the wiper arm onto the windscreen without the wiper blade fitted.
4. Depress the clip and slide the wiper blade out from the arm.
To install a new wiper blade1. Slide the wiper blade onto the wiper arm
and ensure that the clip engages in the arm.
2. Lower the wiper arm onto the windscreen.
Mclaren P11 - Complete.book Page 31 Friday, January 22, 2016 9:43 AM
serve the rnditions as accident.
TAININERS AN
ing the wip
RNING: Enitched off
per blade. Tuld be set i
RNING: Reery twelvendscreen w
perly. You

MAINTAINING YOUR McLARENWHEELS
5.32
WHEELS AND TIRES
Wheels and
WARNINin axle pfitted asthe drivbe adve
Consulthave hainformabeddingstyle.
• With necornerin
• Only hasame ty
• Never upunctur
• Only hafitted.
• Tires deeffects temperenvironrecommevery si
and axle components. This could result in damage to the tires or the vehicle.
NOTE: Retreaded tires must not be used. Do not fit used tires if you have no information about their previous usage.
NOTE: Modification to the brake system and wheels is not permitted, nor is the use of spacer plates or brake dust shields. Any such modifications will invalidate the vehicle warranty on the area modified.
NOTE: A wheel change must be carried out at your McLaren Retailer. The vehicle could be damaged if it is jacked up incorrectly.
NOTE: Store tires in a cool, dry place, preferably in the dark. Protect the tires from oil, grease and petrol.
Mclaren P11 - Complete.book Page 32 Friday, January 22, 2016 9:43 AM
AND TIRES
tires
G: Have worn tires replaced airs and ensure the tires are specified. With worn tires,
ing stability of the vehicle will rsely affected.
your McLaren Retailer if you d new tires fitted for tion on the appropriate in time based on your driving
w tires, avoid high speed g and excess speed.
ve wheels and tires of the pe and make fitted.se a tire which has been ed and then repaired.ve tires of the correct size
grade over time due to the of ultraviolet light, extreme atures, high loads, and mental conditions. It is ended that tires are replaced
x years, or sooner if required.
McLaren recommends that you only use Pirelli summer or winter tires, See Wheel and tire sizes, page 6.12.
These tires provide the best possible performance in conjunction with the safety systems on your vehicle and have been specifically approved by McLaren.
McLaren cannot accept any responsibility for damage that may result from use of other tires and wheels. Further information about wheels and tires can be obtained from your McLaren Retailer.
WARNING: Using tires other than those which have been recommended by McLaren, may contact the body work and adversely affect the handling. This may cause loss of vehicle control. Noise levels and fuel consumption may also be adversely affected. In addition, when driving with a load or when using snow traction devices, they could cause contact between the bodywork

MAINWHEE
5.33
Tire ma
1. Wid
2. Tirwid
3. Ind
4. Indin i
5. Thletindan(30
Regularly check the tire tread depth and the condition of the tread across the whole width of the tire. Turn the front wheels to full lock in order to inspect the inner tread.
When the tread is worn to 1.6 mm, the wear indicators appear on the surface of the tread pattern, producing a continuous band of rubber across the width of the tire. Tires must be replaced as soon as the wear indicator becomes visible, or sooner if legislation dictates replacement at a greater tread depth.
Mclaren P11 - Complete.book Page 33 Friday, January 22, 2016 9:43 AM
TAINING YOUR McLARENLS AND TIRES
rkings
th of tire in millimeters
e profile given as percentage of tire th.
icates that the tire is radial ply.
icates the diameter of the wheel rim nches.
e numbers denote load index and the ter indicates the speed rating. 91 icates a weight of 1,350 lbs (615 kg)
d Y indicates speeds over 186 mph 0 kph).
6. Displays the maximum load which can be carried by the tire
7. Wear rate indicator. The higher the figure the longer a tire will last.
8. The alpha character denotes resistance to heat. An 'A' rated tire offers most heat resistance.
9. Information about the manufacture of the tire. Contains place and date of manufacture.
TiresWARNING: Only tires recommended by McLaren are to be fitted to the vehicle.
WARNING: The tires must be mounted according to the labeling on the tire wall.
Inspecting wheels and tiresAt least every 14 days, check the tires for cuts, punctures, tears, bumps, deformation and cracks. Check wheels for severe corrosion. Damaged wheels could cause a loss of tire pressure.
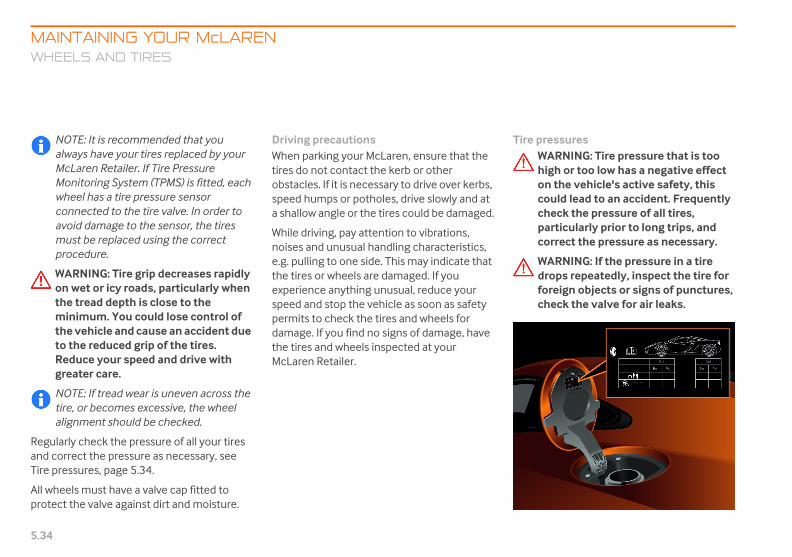
MAINTAINING YOUR McLARENWHEELS
5.34
NOTE: Italways hMcLarenMonitorwheel haconnectavoid damust beprocedu
WARNINon wet othe treaminimuthe vehto the reReducegreater
NOTE: Iftire, or balignme
Regularly cheand correct tTire pressure
All wheels muprotect the v
pressuresWARNING: Tire pressure that is too high or too low has a negative effect on the vehicle's active safety, this could lead to an accident. Frequently check the pressure of all tires, particularly prior to long trips, and correct the pressure as necessary.
WARNING: If the pressure in a tire drops repeatedly, inspect the tire for foreign objects or signs of punctures, check the valve for air leaks.
Mclaren P11 - Complete.book Page 34 Friday, January 22, 2016 9:43 AM
AND TIRES
is recommended that you ave your tires replaced by your Retailer. If Tire Pressure
ing System (TPMS) is fitted, each s a tire pressure sensor
ed to the tire valve. In order to mage to the sensor, the tires replaced using the correct re.
G: Tire grip decreases rapidly r icy roads, particularly when
d depth is close to the m. You could lose control of icle and cause an accident due
duced grip of the tires. your speed and drive with care.
tread wear is uneven across the ecomes excessive, the wheel nt should be checked.
ck the pressure of all your tires he pressure as necessary, see s, page 5.34.
st have a valve cap fitted to alve against dirt and moisture.
Driving precautionsWhen parking your McLaren, ensure that the tires do not contact the kerb or other obstacles. If it is necessary to drive over kerbs, speed humps or potholes, drive slowly and at a shallow angle or the tires could be damaged.
While driving, pay attention to vibrations, noises and unusual handling characteristics, e.g. pulling to one side. This may indicate that the tires or wheels are damaged. If you experience anything unusual, reduce your speed and stop the vehicle as soon as safety permits to check the tires and wheels for damage. If you find no signs of damage, have the tires and wheels inspected at your McLaren Retailer.
Tire

MAINWHEE
5.35
For the conditioThey arethe fuel
If the vethe tire necessa
NOlab
NOareop
Incnovehim
Check tit is necare warmair out orecomm
Driving too low
Deflated tire
Your McLaren is equipped with a can of tire sealant, which is located in the luggage compartment.
In the event of a puncture, follow the steps below to ensure your safety and the safety of other vehicle occupants and other road users.
Repairing a puncture1. Stop the vehicle as far away as possible
from traffic and on a firm and level surface.
2. If on a public highway, switch on the hazard warning lamps, see Hazard warning lamps, page 1.58.
3. Passengers should exit the vehicle safely and remain well away from the vehicle, the road and any traffic.
4. Apply the parking brake and select neutral.
5. Place the warning triangle at an appropriate distance from the vehicle to warn other traffic of a breakdown, see Warning triangle, page 5.11.
Mclaren P11 - Complete.book Page 35 Friday, January 22, 2016 9:43 AM
TAINING YOUR McLARENLS AND TIRES
tire pressures for various operating ns, see Tire pressures, page 6.12. also printed on a label attached to
filler flap.
hicle is to be driven at high speeds, pressure must be checked, and if ry adjusted.
TE: In some markets, the tire pressure el is attached to the driver's sill panel.
TE: Tire pressures given for low loads minimum values which offer
timum ride comfort.
reased pressures for higher loads will t adversely affect the running of the
icle, but ride comfort will be paired.
he pressures when the tires are cold. If essary to check the tires when they
, pressures will be higher. Do not let f warm tires to match the ended cold tire pressures.
with tire pressure that is too high or can:
• create a risk of tire failure with resultant accidents, causing injury or death
• shorten the life of the tires
• cause increased tire damage
• have a negative effect on handling characteristics (e.g. by causing aquaplaning)
ENVIRONMENTAL: Check tire pressures at least every 14 days.
Interchanging wheelsWARNING: Only approved wheels with winter tires can be fitted to your McLaren as alternatives.

MAINTAINING YOUR McLARENWHEELS
5.36
Using the tir
You can use tpunctures, patread. The tiretemperatures
WARNINto seal p
• there argreater
• the rim
WARNING: Keep the tire sealant out of reach of children. If tire sealant is swallowed, immediately rinse the mouth thoroughly and drink a large amount of water. Do not induce vomiting. Contact a doctor immediately. Do not inhale tire sealant fumes.
NOTE: After using tire sealant, the tire valve, incorporating the Tire Pressure Monitoring System sensor, will have to be replaced.
Mclaren P11 - Complete.book Page 36 Friday, January 22, 2016 9:43 AM
AND TIRES
e sealant
he tire sealant to seal small rticularly those in the tire's sealant can be used at ambient down to -4°F (-20°C).
G: The tire sealant is unable unctures if:
e cuts or punctures in the tire than 4 mms are damaged
• you have driven at very low tire pressures or with deflated tires
Contact your McLaren Retailer immediately.
Remove the tire sealant from the luggage compartment and follow the instructions on the container.
NOTE: If possible, locate the cause of the puncture and position the wheel so the puncture is at the lowest point to enable the sealant to be more effective.
Have the punctured tire replaced as soon as possible.
WARNING: Have punctured tires replaced. McLaren do not recommend that punctured tires are repaired.
WARNING: If the tire sealant comes into contact with your eyes or skin, immediately rinse thoroughly with clean water, change out of clothing which has been in contact with the tire sealant. If an allergic reaction occurs, contact a doctor immediately.

MAINWHEE
5.37
P ZeroT
Pirelli offor use o
NOsta
NOfittSys
The drivwith theupper rarisks.
NOdeproberegdoha
The matires aretread paother tir
Mclaren P11 - Complete.book Page 37 Friday, January 22, 2016 9:43 AM
TAINING YOUR McLARENLS AND TIRES
M Trofeo R tires
fer P ZeroTM Trofeo R tires approved n your McLaren.
TE: P ZeroTM Trofeo R tires are ndard on the 675LT.
TE: P ZeroTM Trofeo R tires must be ed with the Tire Pressure Monitoring tem (TPMS).
er’s skill level must be commensurate vehicle performance levels in the nge limits due to increased safety
TE: Due to ultra high performance sign and the particular manufacturing cess of these tires, they must always
replaced in axle sets (Front and rear) ardless of wear or mileage. Failure to
so may have a negative affect on the ndling characteristics of the vehicle.
in features of the P ZeroTM Trofeo R a reduced tread depth and a special ttern and carcass compared with es.
WARNING: Risk of accident from worn tires. P ZeroTM Trofeo R tires have a smaller tread depth, and thus can reach their wear limit sooner. It is important to check tire wear frequently to avoid risk of serious personal injury or death from worn tires.
WARNING: Risk of accident through loss of road surface contact, control over the vehicle and braking ability, leading to serious personal injury or death. The reduced tire tread depth means that there is an increased risk of aquaplaning on wet roads. When driving on wet or mud-covered roads reduce speed significantly.
NOTE: Notify anyone using your car of these characteristics and possible effects.

MAINTAINING YOUR McLARENVEHICLE
5.38
VEHICLE CARE
Washing you
ENVIROproducthazardotake prespilling aquantitie
sponge, use generous quantities of water paying particular attention to areas where dirt can accumulate. Use one wash mitt for the top of the vehicle (roof, luggage compartment lid and areas above the wheel arch line) and a separate mitt for areas below the wheel arch line.
NOTE: Do not clean the wheels with these wash mitts.
NOTE: Do not allow the shampoo to dry, it will leave streaks on the paint work.
Tar spots and stubborn grease marks can be removed using white spirit or denatured alcohol. After cleaning, immediately wash the area with soapy water to remove all traces of spirit or alcohol.
Once the vehicle is clean, work from the top of the vehicle down and rinse the vehicle thoroughly using a hose pipe held at a shallow angle, avoiding direct spray on engine cover vents.
Dry the vehicle using a chamois leather or drying towel.
Mclaren P11 - Complete.book Page 38 Friday, January 22, 2016 9:43 AM
CARE
r McLaren
NMENTAL: Some cleaning s contain chemicals that are us to the environment. Always cautions to prevent fluids from nd never use excessive s.
Hand washing your McLarenPrior to hand washing, lock the vehicle and place the key out of range (at least 9.8 feet (3 meters) or greater distance) to ensure that the doors do not open.
NOTE: Do not wash the vehicle in direct sunlight or if it is hot to the touch, this may cause water marks and streaks.
Do not wash the engine with hose pipe or pressure washer.
Do not use household detergents, these products will discolor painted surfaces and remove protective wax finishes.
1. Pre-rinse the body thoroughly with a hose pipe held at a shallow angle to loosen any dirt and wet the paintwork ready for washing, avoiding direct spray on engine cover vents.
2. Prepare a bucket of warm water and a good quality car shampoo. Refer to the shampoo manufacturer's instructions for dilution ratios.
3. Working from the top of the vehicle down, wash the vehicle, ideally using a lambswool wash mitt rather than a
4.
5.
6.

MAINVEHIC
5.39
NOenvehopexc
Washin
NOnoing
Wash thquality cwash mApply poassist in
NOwhpa
NOclerim
NOaftbe
Underbody cleaningSalt used on roads to control snow and ice during the winter can collect on the vehicle's underbody, if this is not removed, corrosion can occur. During the winter months, regularly hose the underbody with water paying particular attention to the wheel arches and areas where dirt can accumulate.
PolishingOccasionally polish the paint work using a good quality polish, following up with a protective wax.
NOTE: Do not use cutting compound, color restoration products or polishes containing a harsh abrasive. These can scratch the surface and permanently damage the paint work.
Paint damage and rectificationRegularly inspect the paint work for damage. Any stone chips or deep scratches should be repaired as soon as possible. Contact your McLaren Retailer for advice.
Mclaren P11 - Complete.book Page 39 Friday, January 22, 2016 9:43 AM
TAINING YOUR McLARENLE CARE
TE: In case of signs of water in the gine bay, it is advised to drive the
icle and warm the engine to erating temperature to dry off any essive water from the engine.
g the wheels
TE: Wash the wheels frequently, do t allow brake dust to become rained in the wheel rim finish.
e wheels using warm water, a good ar shampoo and a wheel brush or
itt that is used only on the wheels. lish to non-satin finished wheels to
keeping them clean.
TE: Never apply polish to satin finish eels, this will result in localized glossy
tches on the surface of the wheel.
TE: Do not use acid based wheel aners as these can damage the wheel finish leading to corrosion.
TE: Ensure the brakes are fully dried er the wheels have been cleaned fore the vehicle is stored.
Wiper blades and rubber sealsClean wiper blades and rubber seals using warm water and a good quality car shampoo only. Do not use petroleum or alcohol-based cleaners.
Windscreen, windows and mirrorsRegularly clean all windows inside and out using a window cleaning solution. An automotive glass cleaner is recommended. After washing the vehicle with car shampoo containing wax, clean the outside of the windscreen with glass cleaner. Do not use abrasive cleaning compounds as mirror glass is particularly susceptible to damage.
Polycarbonate rear window - 675LTRegularly clean the polycarbonate rear window using water and a pH neutral detergent only.
Satin carbon fiberBefore cleaning satin carbon fiber, always test the cleaning solution on a concealed area. Use only detergent with water and a lint free cloth. Do not use abrasive cleaning products or polish.

MAINTAINING YOUR McLARENVEHICLE
5.40
Cleaning the
NOTE: Yto recominterior
Carpet and fBefore cleanicleaning soluwith diluted ucloth.
LeatherBefore cleanicleaning soluwith warm waa proprietary clean, lint-frecleaning prod
Do not polishdashboard. Pand may intewith diluted uwith a damp c
ruments and display screensn the instrument cluster using a damp . Do not use abrasive cleaning products
olish.
Mclaren P11 - Complete.book Page 40 Friday, January 22, 2016 9:43 AM
CARE
interior
our McLaren Retailer will be able mend products for cleaning the
of your vehicle.
abricsng upholstery, always test the tion on a concealed area. Clean pholstery cleaner and a clean
ng leather, always test the tion on a concealed area. Clean ter and a non-detergent soap or leather cleaner. Dry with a dry, e cloth. Do not use abrasive ucts or polish.
the upper surfaces of the olished surfaces are reflective rfere with the driver's view. Clean pholstery cleaner, then wipe loth.
Carbon fiberBefore cleaning visible carbon fiber, always test the cleaning solution on a concealed area. Clean with a propriety matt dashboard cleaner. Contact your McLaren Retailer for more information. Do not use abrasive cleaning products or polish.
Alcantara®Dust the material with care. Moisten a soft cloth or a sponge with water, wring it thoroughly and run it over the whole Alcantara® material. Make sure not to wet it excessively; rinse the cloth or sponge and repeat as necessary.
Leave the material to dry overnight.
Once the material has dried, in order to restore the material, brush it delicately with a soft bristle brush.
Seat beltsExtend the belts and clean with warm soapy water only. Do not use any type of detergent or chemical cleaning product. Allow the belts to dry naturally while extended, preferably away from direct sunlight.
InstCleaclothor p

MAIN G YOUR McLARENRAISIN VEHICLE
5.41
RAISING THE VEHICLE
Vehicle nts
Refer to tion, and labels on the vehicle, lifting locations.
Make th ion available to any third parties w assisting in the recovery of your
NO the vehicle at any other po age the vehicle.
NO ck with a flat lifting pla rubber pad to protect the ch urface damage. Do not lift un panel.
WARNING: Ensure the vehicle is correctly positioned on a jack or vehicle lift before raising the vehicle to a workable height. Always engage vehicle lift safety locks or use suitable stands to ensure your safety before working under the vehicle.
Mclaren P11 - Complete.book Page 41 Friday, January 22, 2016 9:43 AM
the illustra for correct
is informatho may be
McLaren.
TE: Lifting ints will dam
TE: Use a jatform and aassis from sder a body
TAINING THE
lifting poi

MAINTAINING YOUR McLARENMcLAREN
5.42
McLAREN ASSISTANCE
McLaren As
If your McLarattempt to massistance.
Refer to yourdocumentatiinformation y
Mclaren P11 - Complete.book Page 42 Friday, January 22, 2016 9:43 AM
ASSISTANCE
sistance
en is immobilized, do not ake your own arrangements for
Service and Warranty on, this contains all the ou need.
In the event of a breakdown
In the event of a problem with your vehicle, contact your McLaren Retailer. If your McLaren Retailer is unavailable, contact the Roadside Assistance Operator who is available 24 hours a day, 7 days a week.
NOTE: The contact details of your Roadside Assistance Operator can be found in your Service and Warranty booklet.
The McLaren Retailer or Roadside Assistance Operator will verify your identity and that of your vehicle, as well as determining your exact location.
They will then discuss the problem with you and, with your agreement, determine the best solution.

MAINMcLA
5.43
Towing
Your Mceye mo
NOcoeyevehrec
Do
TowingThe towluggage
1. Remo
3. Remove the towing eye, stow it in the luggage compartment and refit the cover to the towing eye mounting as soon as the vehicle has been recovered.
Mclaren P11 - Complete.book Page 43 Friday, January 22, 2016 9:43 AM
TAINING YOUR McLARENREN ASSISTANCE
for recovery
Laren is equipped with a front towing unting only.
TE: Do not tow the vehicle, doing so uld damage the gearbox. The towing
must only be used to winch the icle onto a trailer or transporter for overy purposes.
not use a rigid bar to tow the vehicle.
eye and mountinging eye is located at the front of the compartment.
move the cover from the towing eye unting in the front bumper. 2. Screw the towing eye clockwise into the
mounting hole, ensuring that it is screwed in to the full extent of the thread.
NOTE: To avoid damage to the towing eye and the vehicle, it is important to ensure that the towing eye is in full contact with the mating surface of the front structure.
NOTE: A winch cable/strap must be secured to the towing eye only or the vehicle could be damaged.

Mclaren P11 - Complete.book Page 44 Friday, January 22, 2016 9:43 AM

Mclaren P11 - Complete.book Page 45 Friday, January 22, 2016 9:43 AM

Mclaren P11 - Complete.book Page 46 Friday, January 22, 2016 9:43 AM
6.1
GENUINE McLAREN PARTS AND ACCESSORIESOverview.............................................................................................................. 6.2
VEHICLE IDENTIFICATIONVehicle identification number.................................................................... 6.3
DATAOverview.............................................................................................................. 6.4Vehicle operating temperatures ............................................................... 6.4Engine .................................................................................................................. 6.5Maximum speeds in each gear................................................................... 6.7Gear ratios........................................................................................................... 6.7Vehicle dimensions - except 675LT......................................................... 6.8Vehicle dimensions - 675LT........................................................................ 6.9Vehicle weights.............................................................................................. 6.10Wheel and tire sizes ..................................................................................... 6.12Turning circle.................................................................................................. 6.12Tire pressures................................................................................................. 6.12
SERVICE PRODUCTS, FLUIDS AND CAPACITIESService products ........................................................................................... 6.13Engine oil specification .............................................................................. 6.13Fuel ..................................................................................................................... 6.13Coolant.............................................................................................................. 6.14Power steering fluid..................................................................................... 6.14Brake fluid ........................................................................................................ 6.14
TECHNICAL GLOSSARYTechnical glossary ........................................................................................ 6.15
VEHICLE DATA AND GLOSSARY
Mclaren P11 - Complete.book Page 1 Friday, January 22, 2016 9:43 AM
VEHICLE DATA AND GLOSSARYGENUINE N PARTS AND ACCESSORIES
6.2
GENUINE McLAREN PARTS AND ACCESSORIES
Overview
McLaren reco at you only use genuine McL ement parts and accessories. T on-genuine parts could have a l effect on the vehicle's ope afety. McLaren tests replacement ccessories, for reliability, saf ability. McLaren accepts no re for the use of non-genuine parts hicles, even if they have been ind y approved.
In many coun cement parts and accessories a ially approved for installation if ly with legal requirements e McLaren replacement ccessories meet these require
Genuine McL nd accessories can be obtained f cLaren Retailer where the pa rofessionally fitted.
Ensure that any accessories are suitable for your McLaren. Accessories which constitute a modification to the vehicle could invalidate the vehicle's warranty. This applies if they:
• change the vehicle type approved in the warranty
• could endanger road users
• adversely affect the vehicle's emissions and noise levels
Always quote the vehicle identification number, you will find this on the vehicle identification plate, and in the bottom left-hand corner of the windscreen.
Mclaren P11 - Complete.book Page 2 Friday, January 22, 2016 9:43 AM
tries, replare only officthey comp. All genuinparts and aments.
aren parts arom your Mrts will be p
McLARE
mmends tharen replache use of n
detrimentaration and sparts and aety and suitsponsibility on their veependentl

VEHI TA AND GLOSSARYVEHIC TIFICATION
6.3
VEHICLE IDENTIFICATION
Vehicle tion number
The veh cation number can be found o m left-hand corner of the windscr
The num so be found engraved on the bod e right-hand seat, stamped on a pla se of the driver's side B-post a in the Vehicle Info section in the le play, see Vehicle identific 3.20.
VIN plate
The vehicle identification number plate also contains the following:
• maximum permitted laden weight
• maximum permitted laden weight including trailer
• maximum permitted front axle laden weight
• maximum permitted rear axle laden weight
Mclaren P11 - Complete.book Page 3 Friday, January 22, 2016 9:43 AM
icle identifin the bottoeen.
ber can aly behind thte at the band viewed ft-hand disation, page
CLE DALE IDEN
identifica
VEHICLE DATA AND GLOSSARYDATA
6.4
DATA
Overview
This section ctechnical datthe vehicle's may thereforequipment. Yinformation f
Mclaren P11 - Complete.book Page 4 Friday, January 22, 2016 9:43 AM
ontains all the necessary a for your vehicle and applies to standard equipment. The data e differ for vehicles with optional ou can obtain further rom your McLaren Retailer.
Vehicle operating temperatures
NOTE: If the vehicle is used outside the minimum and maximum ambient temperatures, performance degradation may be experienced. McLaren disclaims any liability of the stated engine power not being achieved if the vehicle is being used outside of the stated temperature ranges or being used at altitude.
Minimum ambient operating temperature
-4°F (-20°C)
Maximum ambient operating temperature
+122°F (+50°C)

VEHIDATA
6.5
Engine
Engine
Rated @rpm
Rated @rpm
Rated @rpm
Rated @rpm
Numbe
Displac
Mclaren P11 - Complete.book Page 5 Friday, January 22, 2016 9:43 AM
CLE DATA AND GLOSSARY
- 650S
output (kW) 478 @ 7,250
output (PS) 650 @ 7,250
torque (Nm) 678 @ 6,000 [95% 3000-7000]
torque (lb-ft) 500 @ 6,000 [95% 3000-7000]
r of cylinders 8
ement cm3 3,799
Engine - 650S
Maximum engine speed (rpm)
8,500
Power to weight ratio (PS/tonne)
500 - Coupe
485 - Spider
Acceleration (0 to 100 kph) (s)
3.2 P ZeroTM tires
(3.0 P ZeroTM Corsa tires)
Acceleration (0 to 60 mph) (s)
3.1 P ZeroTM tires
(2.9 P ZeroTM Corsa tires)

VEHICLE DATA AND GLOSSARYDATA
6.6
icle emission label
vehicle emission label can be found anently affixed to the underside of the
ne cover.
label contains:
engine displacement;
a statement of compliance with the appropriate model year US EA regulations;
the exhaust emissions standard.
Engine - 67
Rated outpu@rpm
Rated outpu@rpm
Rated torqu@rpm
Rated torqu@rpm
Number of c
Displacemen
Mclaren P11 - Complete.book Page 6 Friday, January 22, 2016 9:43 AM
Veh
The permengi
The
••
•
5LT
t (kW) 496 @ 7,100
t (PS) 675 @ 7,100
e (Nm) 700 @ 5,500-6,500
e (lb-ft) 516 @ 5,500-6,500
ylinders 8
t cm3 3,799
Engine - 675LT
Maximum engine speed (rpm)
8,500
Power to weight ratio (PS/tonne)
549
Acceleration (0 to 100 kph) (s)
2.9 P ZeroTM Trofeo R tires
Acceleration (0 to 60 mph) (s)
2.8 P ZeroTM Trofeo R tires

VEHIDATA
6.7
Maximu Gear ratios
Excep
1st gea
2nd ge
3rd ge
4th ge
5th ge
6th ge
7th ge
1st gear 3.981:1
2nd gear 2.613:1
3rd gear 1.905:1
4th gear 1.479:1
5th gear 1.161:1
6th gear 0.906:1
7th gear 0.686:1
Final drive 3.308:1
Mclaren P11 - Complete.book Page 7 Friday, January 22, 2016 9:43 AM
CLE DATA AND GLOSSARY
m speeds in each gear
t 675LT
r (mph (kph)) 50 (80)
ar (mph (kph)) 77 (124)
ar (mph (kph)) 106 (170)
ar (mph (kph)) 137 (220)
ar (mph (kph)) 175 (282)
ar (mph (kph)) 208 (335) - Coupe
205 (331) - Spider
ar (mph (kph)) 193 (312) - Coupe
192 (309) - Spider
675LT
1st gear (mph (kph)) 50 (80)
2nd gear (mph (kph)) 77 (124)
3rd gear (mph (kph)) 106 (170)
4th gear (mph (kph)) 137 (220)
5th gear (mph (kph)) 175 (282)
6th gear (mph (kph)) 205 (330) - Coupe
203 (326) - Spider
7th gear (mph (kph)) 193 (312) - Coupe
192 (309) - Spider

VEHICLE DATA AND GLOSSARYDATA
6.8
Vehicle dim
NOTE: All dimensions are approximate.
A Vehicle
B Wheelba
C Rear ove
D Front overhan
E Ground clearanc
Vehicle width (doors open at widest point)
10 ft 2 in (3,087 mm)
Vehicle height (doors open)
6 ft 3 in (1,892 mm)
Mclaren P11 - Complete.book Page 8 Friday, January 22, 2016 9:43 AM
ensions - except 675LT
length 14 ft 10 in (4,512 mm)
se 8 ft 9 in (2,670 mm)
rhang 2 ft 7 in (786 mm)
g3 ft 6 in (1,056 mm)
e5 in (120 mm)
F Vehicle width (doors closed, including mirrors)
6 ft 11 in (2,093 mm)
G Vehicle height (doors closed)
4 ft (1,199 mm) - Coupe4 ft (1,203 mm) - Spider
J
K
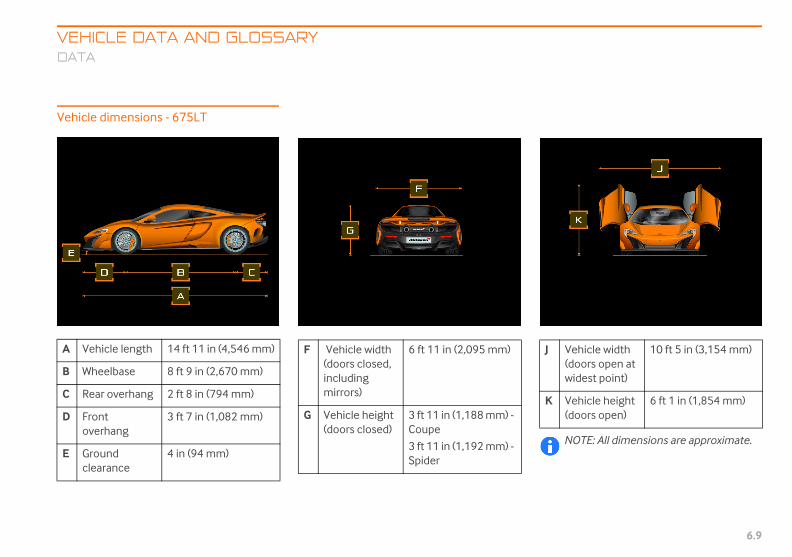
VEHIDATA
6.9
Vehicle
NOTE: All dimensions are approximate.
A Ve
B Wh
C Re
D Froov
E Grcle
J Vehicle width (doors open at widest point)
10 ft 5 in (3,154 mm)
K Vehicle height (doors open)
6 ft 1 in (1,854 mm)
Mclaren P11 - Complete.book Page 9 Friday, January 22, 2016 9:43 AM
CLE DATA AND GLOSSARY
dimensions - 675LT
hicle length 14 ft 11 in (4,546 mm)
eelbase 8 ft 9 in (2,670 mm)
ar overhang 2 ft 8 in (794 mm)
nt erhang
3 ft 7 in (1,082 mm)
ound arance
4 in (94 mm)
F Vehicle width (doors closed, including mirrors)
6 ft 11 in (2,095 mm)
G Vehicle height (doors closed)
3 ft 11 in (1,188 mm) - Coupe
3 ft 11 in (1,192 mm) - Spider
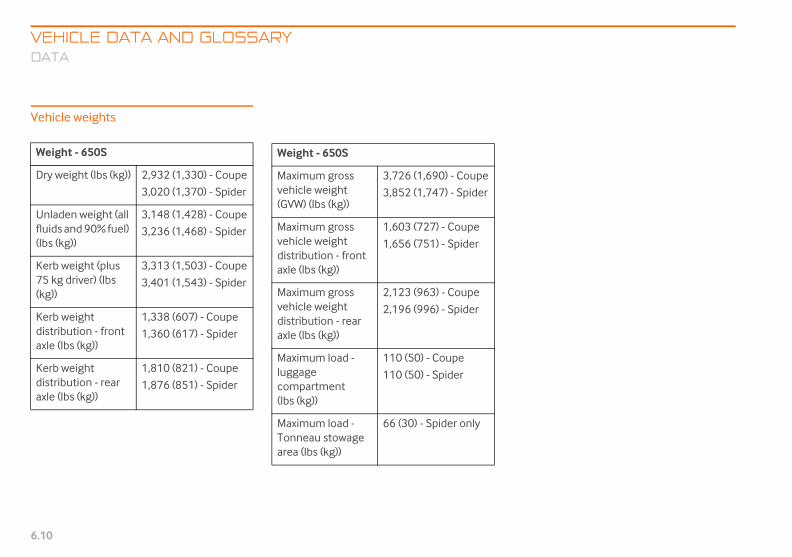
VEHICLE DATA AND GLOSSARYDATA
6.10
Vehicle weig
Weight - 65
Dry weight (
Unladen wefluids and 90(lbs (kg))
Kerb weight75 kg driver(kg))
Kerb weightdistribution axle (lbs (kg)
Kerb weightdistribution axle (lbs (kg)
Mclaren P11 - Complete.book Page 10 Friday, January 22, 2016 9:43 AM
hts
0S
lbs (kg)) 2,932 (1,330) - Coupe
3,020 (1,370) - Spider
ight (all % fuel)
3,148 (1,428) - Coupe
3,236 (1,468) - Spider
(plus ) (lbs
3,313 (1,503) - Coupe
3,401 (1,543) - Spider
- front )
1,338 (607) - Coupe
1,360 (617) - Spider
- rear )
1,810 (821) - Coupe
1,876 (851) - Spider
Weight - 650S
Maximum gross vehicle weight (GVW) (lbs (kg))
3,726 (1,690) - Coupe
3,852 (1,747) - Spider
Maximum gross vehicle weight distribution - front axle (lbs (kg))
1,603 (727) - Coupe
1,656 (751) - Spider
Maximum gross vehicle weight distribution - rear axle (lbs (kg))
2,123 (963) - Coupe
2,196 (996) - Spider
Maximum load - luggage compartment (lbs (kg))
110 (50) - Coupe
110 (50) - Spider
Maximum load - Tonneau stowage area (lbs (kg))
66 (30) - Spider only

VEHIDATA
6.11
Weigh
Dry we
Unladefluids a(lbs (kg
Kerb w75 kg d(lbs (kg
Kerb wdistribuaxle (lb
Kerb wdistribuaxle (lb
Mclaren P11 - Complete.book Page 11 Friday, January 22, 2016 9:43 AM
CLE DATA AND GLOSSARY
t - 675LT
ight (lbs (kg)) 2,711 (1,230) - Coupe
2,800 (1,270) - Spider
n weight (all nd 90% fuel) ))
2,928 (1,328) - Coupe
3,016 (1,368) - Spider
eight (plus river) ))
3,093 (1,403) - Coupe
3,181 (1,443) - Spider
eight tion - front
s (kg))
1,237 (561) - Coupe
1,263 (573) - Spider
eight tion - rear
s (kg))
1,691 (767) - Coupe
1,753 (795) - Spider
Weight - 675LT
Maximum gross vehicle weight (GVW) (lbs (kg))
3,519 (1,596) - Coupe
3,607 (1,636) - Spider
Maximum gross vehicle weight distribution - front axle (lbs (kg))
1,638 (743) - Coupe
1,665 (755) - Spider
Maximum gross vehicle weight distribution - rear axle (lbs (kg))
1,881 (853) - Coupe
1,942 (881)- Spider
Maximum load - luggage compartment (lbs (kg))
110 (50) - Coupe
110 (50) - Spider
Maximum load - Tonneau stowage area (lbs (kg))
66 (30) - Spider only

VEHICLE DATA AND GLOSSARYDATA
6.12
Wheel and t
Wheel sizes
Summer tire
pressures
tire pressures are given below and can be found on a label on the underside of fuel filler flap.
Front wheel
Rear wheels
Front tires
- Pirelli P Zer
- Pirelli P Zerexcept 675L
- Pirelli P Zer
Rear tires
- Pirelli P Zer
- Pirelli P Zerexcept 675L
- Pirelli P Zer
ding dition
Front wheels
Rear wheels
Bar Psi Bar Psi
rmal use 2.0 29 2.2 32
eds over 165 h (270 kph)
2.6 38 2.8 41
Mclaren P11 - Complete.book Page 12 Friday, January 22, 2016 9:43 AM
ire sizes
s
Winter tires
Turning circle
Except 675LT
675LT
Tire
The alsothe
s 8.5J x 19
11J x 20
oTM MC1 235/35 R19
oTM Corsa MC1 - T
235/35 R19
oTM Trofeo R 235/35 R19
oTM MC1 305/30 R20
oTM Corsa MC1 - T
305/30 R20
oTM Trofeo R 305/30 R20
Front tires
- Pirelli SottoZeroTM 3 235/35 R19
Rear tires
- Pirelli SottoZeroTM 3 305/30 R20
Turning circle kerb-to-kerb
41 ft (12.3 meters)
Turning circle kerb-to-kerb
47 ft (14.2 meters)
Loacon
No
Spemp

VEHISERV
6.13
SERVICE PRODUCTS, FLUIDS AND
Service
Service and brayou onlfor McLnon-appby the li
WAanproregenenprowiCose
ENprores
Fuel
WARNING: Fuel is highly flammable. Fire, naked flames and smoking are therefore prohibited when handling fuels.
Switch off the engine before refuelling.
WARNING: Do not allow fuel to come into contact with skin or clothing.
Allowing fuels to come into direct contact with your skin or inhaling fuel vapors is damaging to your health.
For more information about fuel, see Recommended fuel, page 2.60.
Fuel tank
Total capacity 19 gal. (72 litres)
Capacity remaining when low level lamp illuminates
2.9 gal. (11 litres)
Mclaren P11 - Complete.book Page 13 Friday, January 22, 2016 9:43 AM
CLE DATA AND GLOSSARYICE PRODUCTS, FLUIDS AND CAPACITIES
CAPACITIES
products
products are fuel, engine oil, coolant ke fluid. McLaren recommends that y use products tested and approved aren. Damage resulting from using roved service products is not covered
ability for material defects.
RNING: When handling, storing d disposing of any service ducts, please observe the relevant ulations. Failure to do so could
danger people and the vironment. Do not allow service ducts to come into direct contact
th your eyes or open wounds. ntact a doctor immediately if any rvice product is swallowed.
VIRONMENTAL: Dispose of service ducts in an environmentally ponsible manner.
Engine oil specification
NOTE: McLaren recommends only Mobil 1 New Life 0W-40 engine oil.
You may obtain further information from your McLaren Retailer.
NOTE: Do not use any lubricant additives. These could lead to increased wear and damage to the mechanical assemblies. Damage caused by additives, which are not approved, is not covered by the McLaren warranty.
Engine oil capacity 8.0 litres

VEHICLE DATA AND GLOSSARYSERVICE
6.14
Coolant
The coolant iand corrosionfollowing fun
• antifree
• increasesystem
• offers an
NOTE: Uclimatesused, thsufficienand the reduced
er steering fluid
use Pentosin CHF202 power steering .
e fluid
use Pentosin DoT 5.1 Brake fluid.
r a period of time, the brake fluid absorbs sture from the air, this reduces its boiling t.
WARNING: If the boiling point of the brake fluid is reduced too much, vapor pockets may form in the brake system when the brakes are applied hard (e.g. when driving downhill or track driving) impairing the braking efficiency. Therefore, have the brake fluid replaced at the recommended service intervals.
Cooling syst
Antifreeze/cinhibitor
Antifreeze qprotection t
Mclaren P11 - Complete.book Page 14 Friday, January 22, 2016 9:43 AM
PRODUCTS, FLUIDS AND CAPACITIES
s a mixture of water, antifreeze inhibitor. It performs the
ctions in the cooling system:
ze protection
d efficiency of the cooling
ti-corrosion protection
se Mobil Extra Antifreeze in all , all year round. If coolant is not e cooling system will not be tly protected from corrosion cooling system efficiency will be .
NOTE: To prevent damage to the engine, only top up with a pre-mixed coolant that provides the desired level of antifreeze protection.
If antifreeze/corrosion inhibitor is present in the correct concentration, the boiling point of the coolant will be around 266°F (130°C). The antifreeze and corrosion inhibitor concentration in the cooling system should be approximately 50% ±5%. This will protect the cooling system against freezing in temperatures of -40°F (-40°C).
The antifreeze and corrosion inhibitor concentration in the cooling system should not exceed 55%, which provides antifreeze protection down to -49°F (-45°C), as a higher concentration will not dissipate heat so effectively.
If the vehicle is losing coolant, do not drive your vehicle and contact your McLaren Retailer.
Pow
Onlyfluid
Brak
Only
Ovemoipoin
em capacity 6.9 gal. (26.0 litres)
orrosion Mobil Extra Antifreeze
uantity for o -4°F (-20°C)
3.4 gal. (13.0 litres)

VEHITECH
6.15
TECHNICAL GLOSSARY
Techni
Active
A systemhandlinthe veh
AirbrakThe Airbthe vehperform
Anti-locThe Antwheels allows tbraking
AutomA card wthe vehthe vehauthoriz
Brake aBrake asbrakingpedal qu
If the driver uses too much throttle exiting a corner, the inside rear wheel increases speed, which without brake steer could cause the car to become unstable. In this situation, brake steer will again gently apply the brake on the inside rear wheel, thereby restoring traction and stability.
Cylinder cutWhen calling for an upshift at moderate engine speeds under hard acceleration within Sport powertrain mode, the number of firing engine cylinders are cut to rapidly decrease the engine torque and engine speed allowing faster upshifts to be achieved. This will make the upshift more audibly noticeable than a normal upshift. This also occurs in Track powertrain mode, but at high engine speeds it is replaced by inertia push. See Inertia push, page 6.16.
Electronic brake pre-fillIf the accelerator pedal is suddenly released, the electronic brake pre-fill function immediately brings the brake pads into contact with the discs, making for more rapid braking.
Mclaren P11 - Complete.book Page 15 Friday, January 22, 2016 9:43 AM
CLE DATA AND GLOSSARYNICAL GLOSSARY
cal glossary
dynamics control
that allows the driver to change the g and performance characteristics of icle.
erake is a movable wing that enhances
icle's driving stability and braking ance by increasing rear downforce.
k Braking System i-lock Braking System prevents the from locking when you brake. This he vehicle to be steered during maneuvers.
atic Driver Recognition cards hich must be on the person entering
icle or the Tracker system signals that icle is being moved without ation.
ssist system sist system operates in emergency
situations. If you depress the brake ickly, Brake assist system
automatically increases the force being applied to the brakes and thus shortens the stopping distance.
Brake disc wipingBrake disc wiping operates when the windscreen wiper is switched on. It prevents moisture build up on the brake discs during periods of heavy rain, by applying the brakes momentarily, so that the pads touch the discs.
Brake steerBrake steer offers the benefits of a torque vectoring differential, but is integrated into the braking system reducing weight and providing excellent speed of response.
If the system detects that the car is starting to understeer through a corner, the inside rear brake is gently applied. This helps to increase the yaw rate of the car, making the car feel more resistant to understeer. The lateral ‘g’ force is also increased giving better handling characteristics.

VEHICLE DATA AND GLOSSARYTECHNICA
6.16
Electronic SESC monitorsbetween the
Global PositBy means of tsatellite signageographicalsignals are coused both to vehicle and fo
Handling conThe handlingfollowing veh
• Roll stiff
• Adaptive
• ESC sett
Hill hold conHill hold contstarts. The brathe brakes un
nch control ch control is designed to give the
imum acceleration performance from a ding start.
ing sensorsparking sensor system comprises four sonic sensors in the front bumper, four sonic sensors in the rear bumper and two ders. When the parking sensors detect
bstructions while maneuvering, the ders provide an audible warning.
ormance Shift Cue (PSC) - 675LT is an audible shift indicator, which will d to indicate that an upshift is required aintain optimum performance.
r View CameraRear View Camera (RVC) is mounted in enter of the rear grille. The live video
is displayed on the IRIS screen when the tion is active.
Mclaren P11 - Complete.book Page 16 Friday, January 22, 2016 9:43 AM
L GLOSSARY
tability Control driving stability and traction tires and the road surface.
ioning Systemhe appropriate receivers, ls supply information on the
position of the vehicle. These mpared with a digital map and determine the position of the r its route guidance.
trol control switch affects the icle characteristics:
ness
damping
ings
trolrol prevents roll-back on hill ke system automatically applies til the accelerator is pressed.
Inertia pushWithin Track powertrain mode when calling for an upshift at high engine speeds under hard acceleration, inertia push put simply delivers greater acceleration. Under normal driving conditions, outside of inertia push when maximum performance is not called for, the engine and transmission speeds are aligned for a smooth seamless upshift. However, with inertia push, the clutch holding the next gear is engaged with greater force and the engine speed is not allowed to decrease fully, therefore utilizing the inertia of its internal rotating masses. This in turn provides a torque impulse as the gear is engaged aiding acceleration and maximizing performance.
Keyless EntryKeyless Entry allows the driver to unlock the vehicle and disarm the alarm by simply opening the door when the key is within 5 feet (1.5 meters) of the door sensors.
LauLaunmaxstan
ParkThe ultraultrasounan osoun
PerfPSCsounto m
ReaThe the cfeedfunc

VEHITECH
6.17
SeamleThe seaclutch gautomachangecoupledfrom theaccelera
SuppleSystemare autoprovide
Tire PreTire Prechecks four tiretemper
VehicleThe veh17 digitabout yoit was bu
Mclaren P11 - Complete.book Page 17 Friday, January 22, 2016 9:43 AM
CLE DATA AND GLOSSARYNICAL GLOSSARY
ss Shift Gearboxmless shift gearbox is a 7 speed, dual earbox. Gear changes can be fully tic or driver controlled. The gear s are almost instantaneous. It is this with uninterrupted torque delivery engine which provides the relentless tion.
mentary Restraint System comprises a number of air bags which matically deployed in an accident to
additional occupant protection.
ssure Monitoring Systemssure Monitoring System constantly the pressure and temperature in all s. It warns if the pressure drops or the
ature rises in one or more of the tires.
Identification Numbericle identification number is a unique number which provides information
ur vehicle, as well as when and where ilt.
Typical vehicle identification number = SBM11AAA5AW000001

Mclaren P11 - Complete.book Page 18 Friday, January 22, 2016 9:43 AM

Mclaren P11 - Complete.book Page 19 Friday, January 22, 2016 9:43 AM

Mclaren P11 - Complete.book Page 20 Friday, January 22, 2016 9:43 AM
INDE
7.1
AccelerAccessoActive d
activehandllauncpowewinte
Active ssettin
Air bagschild deplofront knee occupOut Oreplacside hsyste
Air condair disair recair veautomblowe
Airbrake ................................................................. 2.44manual test ..................................................... 2.47
Alarm ...................................................................... 1.27arming ............................................................... 1.27disarming ......................................................... 1.27panic .................................................................. 1.59
Anti-lock Braking System ............................... 2.34Anti-trap protection - windows .......................4.3Automatic light control .................................. 1.55Automatic locking ............................................ 1.10Automatic mode - air conditioning . 4.5, 4.13Automatic mode - transmission ................. 2.20Automatic wipe .................................................. 1.60
B
Backlight ............................................................... 1.20closing ............................................................... 1.21opening ............................................................ 1.20operation ......................................................... 1.20
Battery fuse box ................................................. 5.22fuses .................................................................. 5.22
Battery replacement - key fob ..................... 5.28Battery safety ...................................................... 5.14Belts - seat ............................................................ 1.40Blower speed - air conditioning ......... 4.8, 4.16Boost starting ..................................................... 5.15Brake assist system .......................................... 2.35
INDEX
Mclaren P11 - Complete.book Page 1 Friday, January 22, 2016 9:43 AM
X
A
ator pedal position ............................ 2.20ries ............................................................6.2ynamics panel .................................... 2.24 button .................................................. 2.25ing control ........................................... 2.25h control ............................................... 2.30rtrain control ....................................... 2.27r mode ................................................... 2.29peed limiter ......................................... 2.55g an upper speed limit .................... 2.55 .................................................................. 1.42passengers ........................................... 1.48yment .................................................... 1.46air bags .................................................. 1.44air bags .................................................. 1.45ant classification system .............. 1.45f Position (OOP) testing ................. 1.47ement of air bags ............................. 1.43ead air bags ......................................... 1.44
m modification ................................... 1.43itioning ....................................................4.4tribution ..................................................4.9irculation mode ................................ 4.10
nts ...............................................................4.9atic mode ..............................................4.5
r speed .....................................................4.8
calibration ....................................................... 4.11controls ...............................................................4.4demisting ............................................................4.9driver’s air conditioning controls ..............4.4manual mode ....................................................4.6MONO mode .....................................................4.6passenger’s air conditioning controls .....4.5switching on/off ..............................................4.5temperature ......................................................4.7
Air conditioning (touchscreen controls) . 4.12air conditioning controls ........................... 4.12air distribution ............................................... 4.17air recirculation mode ................................ 4.16air vents ............................................................ 4.17automatic mode ........................................... 4.13blower speed .................................................. 4.16calibration ....................................................... 4.18controls ............................................................ 4.12demisting ......................................................... 4.14manual mode ................................................. 4.13MONO mode .................................................. 4.13switching on/off ........................................... 4.14temperature ................................................... 4.15
Air distribution - air conditioning ...... 4.9, 4.17Air recirculation mode - air conditioning ...................................4.10, 4.16Air vents ...................................................... 4.9, 4.17

INDEX
7.2
Brake disc wipBrake fluid ...
topping upBrake pedal .Brakes
Anti-lock BAnti-lock Blight ...........bedding-inbrake assisbrake disc brake steerelectronic foot ............hill hold coparking .....warning lig
Brake-steer .Breakdown ..Bulb replacemBulkhead sto
Calibration - aCamera .........
rear view ..
r - engine ...........................1.11, 1.12, 1.13osing .................................................. 1.12, 1.14ening ...................................1.11, 1.12, 1.13
se control .....................................................2.51ncelling ........................................................2.52creasing speed .........................................2.53
creasing speed ...........................................2.53suming speed ............................................2.54tting ...............................................................2.51
holder ............................................................4.24
D
............................................................................6.4 display .........................................................3.25ime running lamps ..................................1.57osting - air conditioning ............... 4.9, 4.14isting - air conditioning ............... 4.9, 4.14
loyment - air bags .....................................1.46ensions ...................................................6.8, 6.9harged battery ..............................................1.4harged key fob battery ...........................5.28arting the engine ......................................5.26lay messagesupe and Spider .........................................3.26ider only ......................................................3.30
lay screen cleaning ..................................5.40r mirror heating .........................................1.52
Mclaren P11 - Complete.book Page 2 Friday, January 22, 2016 9:43 AM
ing ............................................... 2.35......................................................... 6.14 ..........................................................5.8......................................................... 2.11
raking System .......................... 2.34raking System warning ......................................................... 2.35 ....................................................... 2.56t system ..................................... 2.35wiping .......................................... 2.35 ...................................................... 2.36
brake pre-fill .............................. 2.36......................................................... 2.11ntrol ............................................. 2.36............................................................2.9ht ................................................... 2.11......................................................... 2.36......................................................... 5.42
ent .............................................. 5.24wage net ..................................... 4.21
C
ir conditioning ........... 4.11, 4.18......................................................... 2.16......................................................... 2.16
Capacities ............................................................. 6.13cooling system .............................................. 6.14engine oil ......................................................... 6.13fuel tank ........................................................... 6.13
Car cover ............................................................... 4.26Catalyst .................................................................. 2.15
high temperature ......................................... 2.15Catalytic converter ........................................... 2.15Changing wheels ............................................... 5.35Checking engine oil ............................................5.2Child passengers ............................................... 1.48Child restraint system ..................................... 1.48
KISI child seat function .............................. 1.49tether straps ................................................... 1.50
Cleaning ................................................................ 5.38exterior ............................................................. 5.38instruments and display screens ........... 5.40interior .............................................................. 5.40wheels ............................................................... 5.39
Clock ....................................................................... 3.25Closing the backlight ....................................... 1.21Closing the engine cover .................. 1.12, 1.14Closing the luggage compartment ............ 1.16Closing the roof ................................................. 1.19Closing the windows ...........................................4.2Coolant .................................................................. 6.14
topping up ..........................................................5.6Copyright .................................................................... 3
Coveclop
Cruicadeinrese
Cup
DataDateDaytDefrDemDepDimDiscDisc
stDisp
CoSp
DispDoo

INDE
7.3
Doors ..automclosinlockinlockinmanuopenopenbatteopen
Drink hoDriver’sDriving Driving Driving Driving Dynami
EconomElectric
backrforwaheighlumb
ElectricElectric
Equipment ........................................................... 5.10luggage compartment ............................... 5.10
Exhaust .................................................................. 2.15temperature monitoring ........................... 2.15
Exit lighting .......................................................... 4.21Exterior lighting .....................................1.53, 1.54Exterior mirrors .................................................. 1.51
heating ............................................................. 1.52memory ............................................................ 1.34mirror automatic fold ................................. 1.52mirror fold ....................................................... 1.52reverse dip ....................................................... 1.52
Extinguisher ........................................................ 5.13Eye - towing ......................................................... 5.12
F
Features12V Socket ...................................................... 4.25stowage compartment .............................. 4.23stowage net .................................................... 4.21sun visors ......................................................... 4.23
Filling with fuel ................................................... 2.58Fire extinguisher ................................................ 5.13First aid kit ............................................................ 5.11Fluid - brake ......................................................... 6.14
topping up ..........................................................5.8
Mclaren P11 - Complete.book Page 3 Friday, January 22, 2016 9:43 AM
X
.......................................................................1.2atic locking ........................................ 1.10
g from outside ................................... 1.10g .................................................................1.6g and unlocking from inside ...........1.8al opening from inside ................... 5.27
ing from inside .......................................1.9ing from inside - discharged ry .............................................................. 5.27ing from outside ....................................1.5lder ......................................................... 4.24
air conditioning controls ..................4.4away ........................................................ 2.13in winter ................................................. 2.61precautions .......................................... 5.34safety systems .................................... 2.34c ESC modes ....................................... 2.40
E
ical driving ........................................... 2.14 seats ....................................................... 1.32est rake adjustment ......................... 1.33rd and rearward adjustment ......... 1.32t adjustment ....................................... 1.33
ar adjustment ...................................... 1.34 seats and mirror memory .............. 1.34al status ....................................................2.3
Electronic brake pre-fill .................................. 2.36Electronic Stability Control ........................... 2.37
deactivating ........................................2.38, 2.40dynamic modes ............................................ 2.40reactivating .........................................2.39, 2.43
Emergency fuel filling funnel ....................... 5.12Engine .................................................................... 2.11
immobilizer ..................................................... 1.28power output ....................................................6.5running in ........................................................ 2.56starting ............................................................. 2.11stopping ........................................................... 2.12technical data ...................................................6.5warning light .................................................. 2.14
Engine cover .............................. 1.11, 1.12, 1.13closing ..................................................1.12, 1.14opening ................................... 1.11, 1.12, 1.13release tool ..................................................... 5.13
Engine oil .................................................................5.2capacity ............................................................ 6.13checking .............................................................5.2level warnings ...................................................5.2specification ................................................... 6.13temperature warnings ..................................5.5topping up ..........................................................5.3usage ....................................................................5.2
Entry lighting ...................................................... 4.20

INDEX
7.4
Fluid - power topping up
Foot brake ...Force limitersFront air bagsFuel ................
funnel .......level displaquality ......safety ........tank ...........
Funnel - fuel Fuse box
main ..........secondary
Fuses .............battery fusmain fuse breplacemesecondary
Gear positionGear positionGear ratios ...Gear Shift Ind
obilizer .........................................................1.28ar speeds .......................................................6.7
easing vehicle ground clearance ........1.62easing vehicle ride height ......................1.62idual unlock settings .................................1.8
ecting tires ..................................................5.33ecting wheels .............................................5.33lling luggage bags ...................................1.24lling stowage bags ..................................1.25uments ............................................................3.2
eaning ............................................................5.40ock ..................................................................3.25splay messages - Coupe and Spider ..3.26splay messages - Spider only ...............3.30splay window ..............................................3.33el level display ............................................3.35ar position indicator ...............................3.33arbox mode indicator ............................3.25ndling and powertrain display ............3.33me screen .....................................................3.6
ft-hand display ..............................................3.3l temperature display ..............................3.34erview ..............................................................3.2ht-hand display ........................................3.33ttings ................................................................3.7eedometer .....................................................3.2chometer ........................................................3.2ip computer .................................................3.21
Mclaren P11 - Complete.book Page 4 Friday, January 22, 2016 9:43 AM
steering ...................................... 6.14 ..........................................................5.7......................................................... 2.11 - seat belts ............................... 1.41 ...................................................... 1.44......................................................... 2.58......................................................... 5.12y ..................................................... 3.35......................................................... 2.60......................................................... 6.13......................................................... 6.13........................................................ 5.12
......................................................... 5.18........................................................ 5.21
......................................................... 5.18e box ............................................ 5.22ox ................................................. 5.18
nt ................................................... 5.18fuse box ...................................... 5.21
G
indicator ................................... 3.33s ........................................................2.7............................................................6.7icator .......................................... 2.14
Gearbox ................................................................. 2.19gear positions ................................................ 2.19gearshift paddles .......................................... 2.22kickdown .......................................................... 2.20modes ............................................................... 2.20oil topping up ....................................................5.5
Gearbox mode indicator ................................. 3.25Genuine McLaren parts and accessories ....6.2Glossary - technical .......................................... 6.15Ground clearance .................................................... 6
H
Handling control ................................................ 2.25Hazard warning lamps ..................................... 1.58Headlamps ........................................................... 1.56
flasher ............................................................... 1.56hi beam ............................................................. 1.56
Heated rear window ......................................... 4.11Heated seats ....................................................... 1.36Hi beam ................................................................. 1.56Hill hold control ................................................. 2.36Horn ........................................................................ 1.39
I
Identification number - vehicle ......................6.3Ignition - switching on ........................................2.4
ImmIn geIncrIncrIndivInspInspInstaInstaInstr
clcldididifugegehaholeoiovrigsesptatr

INDE
7.5
vehicvehicwater
InterchaInterior Interior
courtInterior Interior Introdu
Jacking JourneyJump st
Key fobentrystowi
Key fobKeylessKickdowKit - firsKit - tireKnee air
sidelamps ........................................................ 1.56switch ................................................................ 1.55turn signals ..................................................... 1.58
Limphome ........................................................... 2.14Lo beam headlamps ........................................ 1.56Locking .....................................................................1.6
automatic ........................................................ 1.10from inside .........................................................1.8mislock ................................................................1.7
Lo-Jack vehicle tracking system ................. 4.19Luggage compartment .................................. 1.15
closing ............................................................... 1.16manual opening ............................................ 5.28opening - discharged battery .................. 5.28unlocking and opening .............................. 1.15
Luggage compartment equipment .......... 5.10Luggage compartment internal release button ........................................1.16, 1.23
M
Main fuse box ...................................................... 5.18fuses .................................................................. 5.18
Main instruments overview ..............................2.5Manual mode - air conditioning ........ 4.6, 4.13Manual mode - transmission ........................ 2.20Manual seat backrest adjustment .............. 1.31
Mclaren P11 - Complete.book Page 5 Friday, January 22, 2016 9:43 AM
X
le info ..................................................... 3.17le lift ........................................................ 3.22 temperature display ....................... 3.35nging wheels ..................................... 5.35
accessory power socket ................ 4.25lighting .................................................. 4.20esy lighting .......................................... 4.20mirror ..................................................... 1.51motion sensor .................................... 1.29ction ...............................................................2
J
the vehicle ........................................... 5.41 trip .......................................................... 3.21arting ...................................................... 5.15
K
.....................................................................1.2 .....................................................................1.2ng ................................................................1.4 battery replacement ....................... 5.28 entry ..........................................................1.2n .............................................................. 2.20
t aid .......................................................... 5.11 repair ..................................................... 5.35 bags ...................................................... 1.45
L
Lamps - side ........................................................ 1.56Launch control ................................................... 2.30Left-hand display ..................................................3.3
clock .................................................................. 3.25home screen .....................................................3.6messages - Coupe and Spider ................. 3.26messages - Spider only .............................. 3.30overview ..............................................................2.5settings ................................................................3.7trip computer ................................................. 3.21vehicle info ..................................................... 3.17vehicle lift ........................................................ 3.22
Lifting points - vehicle ..................................... 5.41Light switch ......................................................... 1.55Lighting ................................................................. 1.53
automatic control ........................................ 1.55courtesy lighting ........................................... 4.20day time running lamps ............................. 1.57exterior .................................................1.53, 1.54hazard warning .............................................. 1.58headlamp flash .............................................. 1.56hi beam ............................................................. 1.56interior .............................................................. 4.20lo beam ............................................................. 1.56parking lights ................................................. 1.59rear fog lamp .................................................. 1.57

INDEX
7.6
Manual seatsbackrest raforward anheight adju
Manual test -Manual unlocMcLaren AssiMcLaren partMirror .............
automatic exterior ....exterior miheating .....interior .....memory ...reverse dip
Mislock ..........MONO modeMotion senso
Odometer ....Oil - engine ..
capacity ...checking .level ...........level warni
ormance Shift Cue ...................................3.14er output .........................................................6.5gine ..................................................................6.5
er steering fluid .........................................6.14pping up ..........................................................5.7ertrain control ............................................2.27autions - driving ........................................5.34sures - tire ....................................... 5.34, 6.12ucts - service .............................................6.13
cture repair kit ............................................5.35
R
ng seats ........................................................1.31justment ......................................................1.31 sensor ..........................................................1.60s - gear ............................................................6.7ing lights .....................................................4.20
fog lamp ......................................................1.57 spoiler ..........................................................2.44 View Camera .............................................2.16 window heating .......................................4.11rculation mode conditioning .................................. 4.10, 4.16mmended fuel quality ..........................2.60very of your vehicle ................................5.43elling .............................................................2.58oving and storing stowage bags ........1.26
Mclaren P11 - Complete.book Page 6 Friday, January 22, 2016 9:43 AM
....................................................... 1.30ke adjustment ......................... 1.31d rearward adjustment ......... 1.30stment ....................................... 1.31
Airbrake ..................................... 2.47king .............................................. 5.25stance ......................................... 5.42s and accessories ......................6.2......................................................... 1.51exterior mirror fold ................ 1.52......................................................... 1.51rror fold ....................................... 1.52......................................................... 1.52......................................................... 1.51......................................................... 1.34 ....................................................... 1.52............................................................1.7 - air conditioning ......... 4.6, 4.13r - interior .................................. 1.29
O
............................................................3.6
............................................................5.2
......................................................... 6.13
............................................................5.2
............................................................5.2ngs ...................................................5.2
specification ................................................... 6.13temperature display .................................... 3.34temperature warnings ...................................5.5top up ...................................................................5.3
Oil - gearbox ...........................................................5.5Opening a door .....................................................1.5
from inside .........................................................1.9from outside ......................................................1.5
Opening and closing the tonneau cover . 1.21Opening and closing the vents .......... 4.9, 4.17Opening the backlight .................................... 1.20Opening the engine cover ....1.11, 1.12, 1.13Opening the roof ............................................... 1.18Opening the windows ........................................4.2Operating temperatures - vehicle .................6.4Outside temperature display ...........................3.6Owner documentation ................................... 4.24
P
Panic alarm .......................................................... 1.59Parking brake .........................................................2.9Parking lights ...................................................... 1.59Parking sensors .................................................. 2.15Parts ...........................................................................6.2Passenger’s air conditioning controls .........4.5Passenger’s footwell stowage net .............. 4.21Passengers - child ............................................. 1.48
PerfPow
enPow
toPowPrecPresProdPun
Raciad
RainRatioReadRearRearRearRearReci- air RecoRecoRefuRem

INDE
7.7
Replacinbulbsfuse key fowiper
Restrainchild KISI csuppltethe
Retractasafe o
Rev couRight-ha
displafuel legear phandloil temovervwater
Roof ....closinopen
Running
electric backrest rake adjustment ........ 1.33electric forward and rearward adjustment ...................................................... 1.32electric height adjustment ....................... 1.33electric seat adjustment ........................... 1.32electric seat and mirror memory ........... 1.34electric seat lumbar adjustment ............ 1.34heated seats ................................................... 1.36manual adjustment ..................................... 1.30manual backrest rake adjustment ........ 1.31manual forward and rearward adjustment ...................................................... 1.30manual height adjustment ....................... 1.31racing seat adjustment .............................. 1.31safety ................................................................. 1.30
Secondary fuse box .......................................... 5.21fuses .................................................................. 5.21
Sensor .................................................................... 1.29interior motion .............................................. 1.29
Sensors .................................................................. 2.15parking .............................................................. 2.15
Service and Warranty ....................................... 4.24Service products ............................................... 6.13Setting up warning triangle .......................... 5.11Settings - individual unlock ..............................1.8Side head air bags ............................................. 1.44Sidelamps ............................................................. 1.56Slipping wheel pull away ................................ 2.32
Mclaren P11 - Complete.book Page 7 Friday, January 22, 2016 9:43 AM
X
g .................................................................. 5.24.................................................................... 5.18b battery .............................................. 5.28
blade ...................................................... 5.31t system ............................................... 1.42................................................................... 1.48
hild seat function .............................. 1.49ementary .............................................. 1.42r straps ................................................... 1.50ble roof ................................................. 1.17perating temperatures .................. 1.17nter ............................................................3.2nd display ............................................ 3.33y window .............................................. 3.33vel ........................................................... 3.35osition indicator ............................... 3.33
ing and powertrain display ............ 3.33perature ............................................. 3.34
iew ..............................................................2.6 temperature ...................................... 3.35.................................................................... 1.17g .............................................................. 1.19
ing ............................................................ 1.18 in ............................................................ 2.56
S
Safety ..................................................................... 1.40air bag system modification .................... 1.43air bags ............................................................. 1.42air bags Out Of Position (OOP) ................ 1.47battery .............................................................. 5.14fuel ..................................................................... 6.13mirrors .............................................................. 1.51replacement of air bags ............................. 1.43seat belts ......................................................... 1.40seats .................................................................. 1.30
Sealant - tire ........................................................ 5.12Seamless Shift Gearbox .................................. 2.19
gear positions ................................................ 2.19gearshift paddles .......................................... 2.22kickdown ......................................................... 2.20mode ................................................................. 2.20
Seat belt warning light .................................... 1.42Seat belts .............................................................. 1.40
force limiters .................................................. 1.41safety ................................................................. 1.40tensioners ....................................................... 1.41wearing ............................................................. 1.41
Seats ....................................................................... 1.30backrest - electric ........................................ 1.33backrest - manual ........................................ 1.31electric adjustment ..................................... 1.32
INDEX
7.8
Snow chains Snow socks .SpecificationSpeedometeSpeeds - in geSpoiler ...........START/STOPStarting and d
foot brake gear positiogearshift pinstrumentmain instruparking brastarting theswitching owarning lig
Starting the edischarged
Steering coluSteering whe
electrical ahorn ...........manual adj
Stopping theStowage bag
installing ..removing a
alant ...............................................................5.12mmer ............................................................6.12mperature monitoring ...........................2.50ofeo R ............................................................5.37inter ................................................................6.12neau cover ...................................................1.21
ening and closing ....................................1.21ping up ..............................................................5.2ake fluid ...........................................................5.8olant .................................................................5.6gine oil ............................................................5.3arbox oil ..........................................................5.5wer steering fluid ........................................5.7
indscreen washers .......................................5.9-away protection .......................................1.28ing ...................................................................5.43e ......................................................................5.12k driving .............................................................. 7k use ..............................................................2.57king system ................................................4.19tion control system .................................2.37gle - warning .............................................5.11
..........................................................................3.21 signals .........................................................1.58ing circle ......................................................6.12
Mclaren P11 - Complete.book Page 8 Friday, January 22, 2016 9:43 AM
........................................................ 2.62......................................................... 2.62 - engine oil ............................... 6.13r .........................................................3.2ar ....................................................6.7
......................................................... 2.44 button ...........................................2.4riving .............................................2.3........................................................ 2.11ns ...................................................2.7
addles .............................................2.8s and warning lights .................2.4ments ............................................2.5ke ....................................................2.9 engine ...................................... 2.11n the ignition .............................2.4
hts ...................................................2.6ngine .......................................... 2.11 key fob battery ....................... 5.26mn ................................................ 1.37el ................................................... 1.37djustment .................................. 1.38......................................................... 1.39ustment ..................................... 1.37 engine ........................................ 2.12s ..................................................... 1.24......................................................... 1.25nd storing ................................. 1.26
Stowage compartment/audio interface . 4.23Stowage luggage ............................................... 1.24Stowage net ........................................................ 4.21Stowing the key fob ............................................1.4Summer tires ...................................................... 6.12Sun visors ............................................................. 4.23Supplementary Restraint System .............. 1.42Switch - lighting ................................................. 1.55Switching air conditioning on/off .... 4.5, 4.14Switching on the ignition ..................................2.4Symbols ....................................................................... 5
T
Tachometer ............................................................3.2Technical data .......................................................6.4
engine ..................................................................6.5Technical glossary ............................................ 6.15Temperature - air conditioning ......... 4.7, 4.15Temperature display ...........................................3.6Tensioners - seat belt ...................................... 1.41Tires ........................................................................ 5.33
inspecting ........................................................ 5.33markings .......................................................... 5.33monitoring system ...................................... 2.48pressure monitoring ................................... 2.48pressures ............................................ 5.34, 6.12repair kit ........................................................... 5.35
sesuteTrw
Tonop
Topbrcoengepow
TowTow
eyTracTracTracTracTrianTripTurnTurn

INDE
7.9
UnlockiUnlockiment ...UnlockiUpper s
settin
Vehicle Vehicle Vehicle Vehicle
operaopera
Vehicle Vehicle Vehicle Vehicle
dischVehicle Vehicle Vehicle Vehicle Vents ..Volume
Wheels ................................................................... 5.32inspecting ........................................................ 5.33interchanging ................................................ 5.35
Wheels and tires ................................................ 5.32Window demisting - air conditioning ..................................... 4.9, 4.14Windows ...................................................................4.2
anti-trap protection ........................................4.3opening and closing .......................................4.2
Windscreen washers ...........................................5.9Windscreen wiper .............................................. 1.60
rain sensor ....................................................... 1.60single wipe ...................................................... 1.61wash/wipe ....................................................... 1.61
Winter driving ..................................................... 2.61Winter mode ....................................................... 2.29Winter tires ........................................................... 6.12Wiper blade replacement ............................... 5.31
Mclaren P11 - Complete.book Page 9 Friday, January 22, 2016 9:43 AM
X
U
ng - discharged battery ................... 5.25ng and opening the luggage compart-.................................................................... 1.15ng from inside ........................................1.8peed limit .............................................. 2.55g ............................................................... 2.55
V
dimensions ................................... 6.8, 6.9electrical status ....................................2.3identification number ........................6.3lift ............................................................ 1.62tion ......................................................... 1.62tion and instrument display ......... 3.22lifting points ........................................ 5.41operating temperatures ...................6.4speeds ......................................................6.7starting .................................................. 2.11arged key fob battery ...................... 5.26tracking ................................................. 4.19use .......................................................... 2.56washing ................................................. 5.38weights .................................................. 6.10.......................................................... 4.9, 4.17tric alarm .............................................. 1.29
W
Warning - engine oil level ..................................5.2Warning - engine oil temperature .................5.5Warning light
Anti-lock Braking System .......................... 2.35brakes ............................................................... 2.11engine ............................................................... 2.14seat belt ............................................................ 1.42Supplementary Restraint System .......... 1.47
Warning lightsleft-hand side ....................................................2.6right-hand side .................................................2.7
Warning triangle ................................................ 5.11Washers ....................................................................5.9
windscreen ........................................................5.9Washing ................................................................. 5.38
exterior ............................................................. 5.38wheels ............................................................... 5.39
Water temperature display ............................ 3.35Wearing seat belts ............................................ 1.41Weights ................................................................. 6.10Wheel - steering ................................................. 1.37
electrical adjustment .................................. 1.38manual adjustment ..................................... 1.37
Wheel sizes .......................................................... 6.12

Mclaren P11 - Complete.book Page 10 Friday, January 22, 2016 9:43 AM

Mclaren P11 - Complete.book Page 2 Friday, January 22, 2016 9:43 AM

Mclaren P11 - Complete.book Page 3 Friday, January 22, 2016 9:43 AM
CARS.McLAREN.COM