mcsa guide to networking with windows server … guide to networking with windows server 2016, exam...
TRANSCRIPT

MCSA Guide to Networking with
Windows Server 2016, Exam 70-741
First Edition
Chapter 4
Implementing DHCP
© 2018 Cengage. All Rights Reserved. May not be copied, scanned, or duplicated, in whole or in part, except for use as permitted in a license distributed with a certain product or service or otherwise on a password-protected website
for classroom use.

Objectives
4.1 Describe the DHCP protocol and process
4.2 Install and configure a DHCP server
4.3 Configure a DHCP server
4.4 Implement DHCPv6
4.5 Configure DHCP high availability
© 2018 Cengage. May not be copied, scanned, or duplicated, in whole or in part, except for use as permitted in a license distributed with a certain product or service or otherwise on a password-protected website for classroom use.

An Overview of Dynamic Host
Configuration Protocol
• Dynamic Host Configuration Protocol (DHCP) is a
component of the TCP/IP protocol suite
– Used to assign an IP address to a host automatically
from a defined pool of addresses
• IP addresses assigned via DHCP are usually leased, not
permanently assigned
• To prevent a disruption in communication, the client attempts
to renew the lease when the lease interval is 50% expired
• DHCP is based on broadcast packets
© 2018 Cengage. May not be copied, scanned, or duplicated, in whole or in part, except for use as permitted in a license distributed with a certain product or service or otherwise on a password-protected website for classroom use.

The DHCP Address Assignment Process (1 of 2)
• The request for an IP address between a DHCP client and a
DHCP server is a 4-packet sequence:
1. DHCPDISCOVER - client transmits a broadcast packet via
UDP source port 68 and UDP destination port 67 to the
network
2. DHCPOFFER - DHCP server received the
DHCPDISCOVER packet and responds with an offer
3. DHCPREQUEST - client responds by requesting the
offered address
4. DHCPACK - the server acknowledges the transaction and
sends IP parameters to the client
© 2018 Cengage. May not be copied, scanned, or duplicated, in whole or in part, except for use as permitted in a license distributed with a certain product or service or otherwise on a password-protected website for classroom use.

The DHCP Address Assignment Process (2 of 2)
© 2018 Cengage. May not be copied, scanned, or duplicated, in whole or in part, except for use as permitted in a license distributed with a certain product or service or otherwise on a password-protected website for classroom use.

DHCP Address Renewal (1 of 2)
• A client uses unicast packets rather than broadcast packets in
the lease renewal process
– The client already knows the address of the server
• A successful renewal is a 2-packet sequence:
1. DHCPREQUEST - when the lease is 50% expired, the
client sends a unicast packet to request a renewal
▪ If server doesn’t respond, client will try 3 more times
2. DHCPPACK - if server can honor the renewal request, will
send a unicast packet granting and acknowledging the
renewal request
© 2018 Cengage. May not be copied, scanned, or duplicated, in whole or in part, except for use as permitted in a license distributed with a certain product or service or otherwise on a password-protected website for classroom use.

DHCP Address Renewal (2 of 2)
• The renewal request may fail in these situations:
– The server responds but can’t honor the renewal
▪ The requested address may have been deleted or
deactivated from the scope
– The server doesn’t respond
1. The client keeps its current address until 87.5% of the
lease interval has expired and sends out a
DHCPREQUEST broadcast packet
2. Two possible results from the DHCPREQUEST
– A DHCP server responds
– No DHCP server responds and client starts the
process all over again
© 2018 Cengage. May not be copied, scanned, or duplicated, in whole or in part, except for use as permitted in a license distributed with a certain product or service or otherwise on a password-protected website for classroom use.

DHCP Messages
Message
Number
Message name Description
1 DHCPDISCOVER Sent by a client to discover an available DHCP
server and request a new IP address.
2 DHCPOFFER Sent by the server in response to a
DHCPDISCOVER with an offer of an IP
address.
3 DHCPREQUEST Sent by a client to request a lease on an
offered IP address in response to a
DHCPOFFER or to renew an existing lease.
4 DHCPDECLINE Sent by a client in response to a DHCPOFFER
to decline an offered IP address.
5 DHCPACK Sent by the server to acknowledge a
DHCPREQUEST or DHCPINFORM.
6 DHCPNAK Sent by the server in response to a
DHCPREQUEST.
7 DHCPRELEASE Sent by a client to release a leased address.
8 DHCPINFORM Sent by a client to request additional
configuration.
© 2018 Cengage. May not be copied, scanned, or duplicated, in whole or in part, except for use as permitted in a license distributed with a certain product or service or otherwise on a password-protected website for classroom use.

Installing and Configuring a DHCP
Server (1 of 2)
• DHCP Server role can be installed by using the Add Roles and
Features Wizard via Server Manager or the following
PowerShell cmdlet:
– Install -WindowsFeature DHCP -
IncludeManagementTools
• After installing, the DHCP console is available on the Tools
menu in Server Manager
• In a Windows domain, the DHCP server must be authorized,
and a scope must be created before the server can provide
DHCP services
© 2018 Cengage. May not be copied, scanned, or duplicated, in whole or in part, except for use as permitted in a license distributed with a certain product or service or otherwise on a password-protected website for classroom use.

Installing and Configuring a DHCP
Server (2 of 2)
© 2018 Cengage. May not be copied, scanned, or duplicated, in whole or in part, except for use as permitted in a license distributed with a certain product or service or otherwise on a password-protected website for classroom use.

DHCP Server Authorization
• DHCP clients have no way of determining whether a DHCP
server is valid
• Reason for authorization:
– A rogue DHCP server could be installed on a network and
incorrect IP address settings could be configured on client
computers
• DHCP server authorization requires Enterprise Administrator
credentials
• To authorize with PowerShell, type:
– Add -DhcpServerInDC
© 2018 Cengage. May not be copied, scanned, or duplicated, in whole or in part, except for use as permitted in a license distributed with a certain product or service or otherwise on a password-protected website for classroom use.

DHCP Scopes (1 of 2)
• DHCP scope - a pool of IP addresses and other IP
configuration parameters that a DHCP server uses to lease
addresses to DHCP clients
• A scope consists of the following required parameters:
– Scope name
– Start and end IP addresses
– Prefix length or subnet mask
– Lease duration - specifies how long a DHCP client can
keep an address
© 2018 Cengage. May not be copied, scanned, or duplicated, in whole or in part, except for use as permitted in a license distributed with a certain product or service or otherwise on a password-protected website for classroom use.

DHCP Scopes (2 of 2)
© 2018 Cengage. May not be copied, scanned, or duplicated, in whole or in part, except for use as permitted in a license distributed with a certain product or service or otherwise on a password-protected website for classroom use.

Exclusion Ranges
• Addresses can be excluded in two ways:
– De facto exclusion - you set the start and end IP
addresses in the scope so that several addresses in the
subnet fall outside the scope’s range
– Create an exclusion range - consists of one or more
addresses in the scope that the DHCP server doesn’t least
to clients
▪ They can be created when the scope is created with the
New Scope Wizard or afterward by right-clicking the
Address Pool node under the scope and clicking New
Exclusion Range
© 2018 Cengage. May not be copied, scanned, or duplicated, in whole or in part, except for use as permitted in a license distributed with a certain product or service or otherwise on a password-protected website for classroom use.

Reservations
• Reservation - an IP address associated with the MAC address
of a DHCP client to ensure that when the client requests an IP
address, it always gets the same one
• The IP address in the reservation must fall within the same
subnet and use the same subnet mask as the scope
• You can force a client to release a reserved address and get a
different address by typing:
– ipconfig /release and then ipconfig /renew
© 2018 Cengage. May not be copied, scanned, or duplicated, in whole or in part, except for use as permitted in a license distributed with a certain product or service or otherwise on a password-protected website for classroom use.

Multiple Subnets, Multiple
Scopes (1 of 2)
• A DHCP scope can service a single subnet
– DHCP is based on broadcasts, which can’t traverse routers
• Three methods for handling a network with multiple subnets:
– Configure a DHCP server in each subnet
– Configure a single DHCP server with network interfaces
connected to each subnet and scopes defined for each
subnet
– Configure DHCP relay agents on subnets that don’t have a
DHCP server
© 2018 Cengage. May not be copied, scanned, or duplicated, in whole or in part, except for use as permitted in a license distributed with a certain product or service or otherwise on a password-protected website for classroom use.

Multiple Subnets, Multiple
Scopes (2 of 2)
© 2018 Cengage. May not be copied, scanned, or duplicated, in whole or in part, except for use as permitted in a license distributed with a certain product or service or otherwise on a password-protected website for classroom use.

Configuring Superscopes and
Multicast Scopes (1 of 3)
• Superscope - a special type of scope consisting of one or more
member scopes that allows a DHCP server to service multiple
IPv4 subnets on a single physical network
– Directs the DHCP server to draw addresses from both
scopes
• Useful if the number of computers on a physical network
exceeds the size of the original subnet
• Each scope that’s part of a superscope is referred to as a
“member scope”
© 2018 Cengage. May not be copied, scanned, or duplicated, in whole or in part, except for use as permitted in a license distributed with a certain product or service or otherwise on a password-protected website for classroom use.

Configuring Superscopes and
Multicast Scopes (2 of 3)
© 2018 Cengage. May not be copied, scanned, or duplicated, in whole or in part, except for use as permitted in a license distributed with a certain product or service or otherwise on a password-protected website for classroom use.

Configuring Superscopes and
Multicast Scopes (3 of 3)
• Create superscopes in the DHCP console by right-clicking the
IPv4 node
• Click New Superscope and follow the New Superscope Wizard
• You can also create a superscope with the following
PowerShell cmdlet:
– Add-DhcpServerv4SuperScope -SuperscopeName
“NewSuperScope” -ScopeID 10.12.0.0,10.1.0.0
© 2018 Cengage. May not be copied, scanned, or duplicated, in whole or in part, except for use as permitted in a license distributed with a certain product or service or otherwise on a password-protected website for classroom use.
Configuring Multicast Scopes
• An IPv4 multicast packet is addressed to a group of hosts
listening on a particular multicast IP address
• Multicast scope - allows assigning multicast addresses
dynamically to multicast servers and clients with the Multicast
Address Dynamic Client Allocation Protocol (MADCAP)
• Two common ranges of multicast addresses:
– Administrative scopes
– Global scopes
• Configure multicast scopes in the DHCP console or with
PowerShell cmdlets
© 2018 Cengage. May not be copied, scanned, or duplicated, in whole or in part, except for use as permitted in a license distributed with a certain product or service or otherwise on a password-protected website for classroom use.

DHCP Options
• DHCP options can be assigned at the following levels:
– Server options - affect all scopes but can be overridden
by a scope, policy, or reservation option
– Scope options - affect clients that get a lease from the
scope in which the option is configured
– Policy options - allow an administrator to assign IP
address options to clients based on client properties
– Reservation options - based on a computer’s MAC
address
▪ Take precedence over any conflicting options set at any
other level
© 2018 Cengage. May not be copied, scanned, or duplicated, in whole or in part, except for use as permitted in a license distributed with a certain product or service or otherwise on a password-protected website for classroom use.

Common DHCP Options
• DHCP options are specified in the format NNNOptionName
– NNN represents a three-digit number that identifies the
option in the DHCP packet
• Common options:
– 003 Router
– 006 DNS Servers
– 015 DNS Domain Name
– 044 WINS/NBNS Servers
– 046 WINS/NBT node type
© 2018 Cengage. May not be copied, scanned, or duplicated, in whole or in part, except for use as permitted in a license distributed with a certain product or service or otherwise on a password-protected website for classroom use.
Configuring Options (1 of 2)
• Server options are configured by clicking the IPv4 or IPv6
node in the DHCP console
– Right-click Server Options, click Configure Options
• The Server options dialog box has two tabs:
– General - has a list of available options in the upper
pane
– Advanced - has the same list of options as well as a list
box to choose the Vendor Class
▪ A field in the DHCP packet that is used to identify a
device model or an OS version
© 2018 Cengage. May not be copied, scanned, or duplicated, in whole or in part, except for use as permitted in a license distributed with a certain product or service or otherwise on a password-protected website for classroom use.

Configuring Options (2 of 2)
© 2018 Cengage. May not be copied, scanned, or duplicated, in whole or in part, except for use as permitted in a license distributed with a certain product or service or otherwise on a password-protected website for classroom use.

DHCP Server Configuration (1 of 2)
• When performing DHCP server configuration tasks, right-click the server
node and you can choose from the following tasks:
– Add/Remove Binding
– Backup
– Restore
– All Tasks
– Delete
– Refresh
– Properties
© 2018 Cengage. May not be copied, scanned, or duplicated, in whole or in part, except for use as permitted in a license distributed with a certain product or service or otherwise on a password-protected website for classroom use.

DHCP Server Configuration (2 of 2)
• Right-click the IPv4 node and you can choose from the following
options:
– Display Statistics
– New Scope
– New Superscope
– New Multicast Scope
– Configure Failover and Replicate Failover Scopes
– Define User Classes and Define Vendor Classes
– Reconcile All Scopes
– Set Predefined Options
– Properties
© 2018 Cengage. May not be copied, scanned, or duplicated, in whole or in part, except for use as permitted in a license distributed with a certain product or service or otherwise on a password-protected website for classroom use.

Configuring IPv4 Server
Properties (1 of 3)
• The IPv4 Properties dialog box has six tabs:
– General - specify statistics and logging parameters
– DNS - configure how DHCP interacts with a DNS server
for making updates on behalf of DHCP clients
– Network Access Protection (NAP) - enable or disable
NAP on all scopes
– Filters - configure MAC address filters to allow or deny
DHCP services to computers
– Failover - configure and view failover status
– Advanced - offers many advanced options
© 2018 Cengage. May not be copied, scanned, or duplicated, in whole or in part, except for use as permitted in a license distributed with a certain product or service or otherwise on a password-protected website for classroom use.

Configuring IPv4 Server
Properties (2 of 3)
© 2018 Cengage. May not be copied, scanned, or duplicated, in whole or in part, except for use as permitted in a license distributed with a certain product or service or otherwise on a password-protected website for classroom use.

Configuring IPv4 Server
Properties (3 of 3)
© 2018 Cengage. May not be copied, scanned, or duplicated, in whole or in part, except for use as permitted in a license distributed with a certain product or service or otherwise on a password-protected website for classroom use.

DHCP Name Protection (1 of 2)
• Name squatting - A DNS problem that occurs when a non-
Windows computer registers its name with a DNS server, but the
name has already been registered by a Windows computer
• DHCP name protection - prevents name squatting by non-
Windows computers by using a DHCP resource record called
Dynamic Host Configuration Identifier (DHCID)
• To configure name protection, right-click the scope or server node
in the DHCP console and click Properties
– Click the DNS tab
– Click the Configure button in the Name Protection section
– Click the Enable Name Protection check box to enable or
disable name protection
© 2018 Cengage. May not be copied, scanned, or duplicated, in whole or in part, except for use as permitted in a license distributed with a certain product or service or otherwise on a password-protected website for classroom use.

DHCP Name Protection (2 of 2)
© 2018 Cengage. May not be copied, scanned, or duplicated, in whole or in part, except for use as permitted in a license distributed with a certain product or service or otherwise on a password-protected website for classroom use.
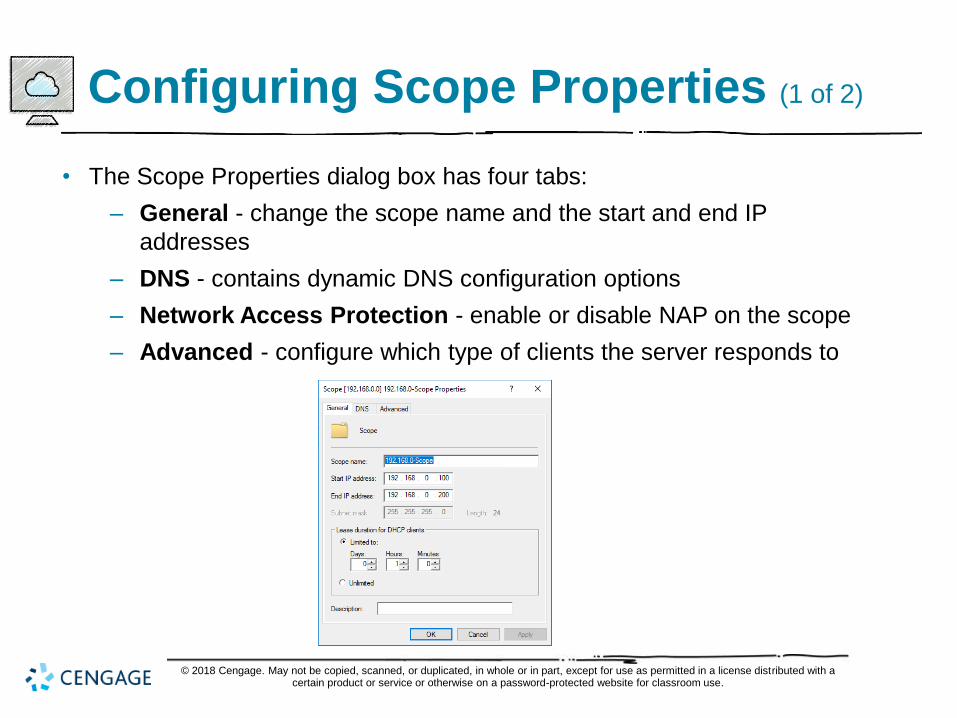
Configuring Scope Properties (1 of 2)
• The Scope Properties dialog box has four tabs:
– General - change the scope name and the start and end IP
addresses
– DNS - contains dynamic DNS configuration options
– Network Access Protection - enable or disable NAP on the scope
– Advanced - configure which type of clients the server responds to
© 2018 Cengage. May not be copied, scanned, or duplicated, in whole or in part, except for use as permitted in a license distributed with a certain product or service or otherwise on a password-protected website for classroom use.

Configuring Scope Properties (2 of 2)
© 2018 Cengage. May not be copied, scanned, or duplicated, in whole or in part, except for use as permitted in a license distributed with a certain product or service or otherwise on a password-protected website for classroom use.

Configuring Filters
• DHCP filters - allow administrators to restrict which computers
on a network are leased IP addresses
• Filters use MAC addresses as the filtering criteria
• Filters are configured under the IPv4 node and are not
available for IPv6 DHCP
• If you create an allow filter, only a device with a MAC address
in the filter can lease an IP address from the DHCP server
• If you create a deny filter, all devices except those with a MAC
address in the filter can lease an address
© 2018 Cengage. May not be copied, scanned, or duplicated, in whole or in part, except for use as permitted in a license distributed with a certain product or service or otherwise on a password-protected website for classroom use.

Configuring Policies (1 of 2)
• DHCP policies - give administrators more fine-tuned control
over address lease options
– Contain conditions that specify one or more clients that IP
address settings should be delivered to
• Policy conditions can be created with any combination of the
following:
– Vendor Class
– User Class
– MAC address
– Client identifier
– Fully qualified domain name
– Relay agent information© 2018 Cengage. May not be copied, scanned, or duplicated, in whole or in part, except for use as permitted in a license distributed with a
certain product or service or otherwise on a password-protected website for classroom use.
Configuring Policies (2 of 2)
• Policies can be configured at the server level or the scope level
• Scope-level policies take precedence over server-level policies if both
are configured and there’s a conflict
• Server-level policies are limited to assigning DHCP options and lease
duration to clients matching the policy conditions
• To create a policy, right-click the Policies node under the IPv4 node or
the scope and click New Policy to start the DHCP Policy Configuration
Wizard, then follow these steps:
1. Give the policy a name and description
2. Create one or more conditions that identify devices
3. Configure settings for the policy
4. Configure additional settings in the policy’s Properties dialog box
© 2018 Cengage. May not be copied, scanned, or duplicated, in whole or in part, except for use as permitted in a license distributed with a certain product or service or otherwise on a password-protected website for classroom use.

Configuring DHCP for PXE Boot (1 of 2)
• If using WDS to install Windows OSs on computers
– You might need to configure DHCP to respond to Preboot
Execution Environment (PXE) network interfaces
– PXE is a network environment built into many network
interface cards (NICs) that allows a computer to boot from
an image stored on a network server
• Common setups that require special DHCP configuration:
– The DHCP server is on a different server or a different
subnet from the WDS server
– DHCP is installed on the same server as WDS, but it’s
not a Microsoft DHCP server, or the Microsoft DHCP
server is installed after WDS was installed
© 2018 Cengage. May not be copied, scanned, or duplicated, in whole or in part, except for use as permitted in a license distributed with a certain product or service or otherwise on a password-protected website for classroom use.

Configuring DHCP for PXE Boot (2 of 2)
© 2018 Cengage. May not be copied, scanned, or duplicated, in whole or in part, except for use as permitted in a license distributed with a certain product or service or otherwise on a password-protected website for classroom use.

DHCP Relay Agents (1 of 3)
• DHCP relay agent - a device that listens for broadcast
DHCPDISCOVER and DHCPREQUEST messages and forwards
them to a DHCP server on another subnet
• You can configure a DHCP relay agent on a subnet that doesn’t
have a DHCP server
– You can still manage DHCP addresses from a central server
without having to configure the DHCP server with network
interfaces in each subnet
© 2018 Cengage. May not be copied, scanned, or duplicated, in whole or in part, except for use as permitted in a license distributed with a certain product or service or otherwise on a password-protected website for classroom use.

DHCP Relay Agents (2 of 3)
© 2018 Cengage. May not be copied, scanned, or duplicated, in whole or in part, except for use as permitted in a license distributed with a certain product or service or otherwise on a password-protected website for classroom use.

DHCP Relay Agents (3 of 3)
• DHCP relay process:
1. A client on the same subnet as the relay agent sends a DHCPDISCOVER broadcast
2. The relay agent forwards the message to the DHCP server’s IP address as a unicast
3. The DHCP server receives the message. Since the relay agent’s address is in the
message, the server draws an address from scope matching the relay agent’s address
4. The DHCP server sends a unicast DHCPOFFER to the subnet the message was
received from
5. The relay agent forwards the DHCPOFFER as a broadcast to the subnet it was
received from
6. The DHCP client broadcasts a DHCPREQUEST
7. The relay agent forwards it to the DHCP server
8. The server replies with a DHCPACK to the relay agent
9. The relay agent forwards the DHCPACK to the client
10. Renewal requests are unicast packets, so the client can communicate directly with the server
© 2018 Cengage. May not be copied, scanned, or duplicated, in whole or in part, except for use as permitted in a license distributed with a certain product or service or otherwise on a password-protected website for classroom use.

Installing a DHCP Relay Agent (1 of 2)
• The DHCP relay agent function is configured as part of the Routing role service under the
Remote Access server role
• To make a Windows Server 2016 server a DHCP relay agent, follow these steps:
1. Install the Remote Access server role and include the Routing role service
2. In the Routing and Remote Access console, right-click the server node and click
Configure and Enable Routing and Remote Access
3. Click Custom configuration in the Routing and Remote Access Server Setup
Wizard
4. Click the LAN routing check box, click Next and then Finish and click Start service
when prompted
5. In the Routing and Remote Access console, expand the IPv4 node and right-click
General node and click New Routing Protocol
6. In the Routing and Remote Access console, right-click DHCP Relay Agent and click
New Interface
© 2018 Cengage. May not be copied, scanned, or duplicated, in whole or in part, except for use as permitted in a license distributed with a certain product or service or otherwise on a password-protected website for classroom use.

Installing a DHCP Relay Agent (2 of 2)
• To make a Windows Server 2016 server a DHCP relay agent, follow these steps
(continued):
7. In the DHCP Relay Properties dialog box, accept the default settings and click OK
8. In the Routing and Remote Access console, right-click the DHCP Relay Agent and
click Properties
▪ Type the address of the DHCP server the relay agent should forward DHCP
messages to and click Add, click OK
© 2018 Cengage. May not be copied, scanned, or duplicated, in whole or in part, except for use as permitted in a license distributed with a certain product or service or otherwise on a password-protected website for classroom use.

Server Migration, Export, and
Import (1 of 2)
• To migrate a DHCP server from Server1 to Server2, follow these steps:
1. On Server1, create a folder named C:\Export or similar and
change the directory to that folder. Export the DHCP server
configuration and database using one of the following methods:
▪ Use the following PowerShell cmdlet:
Export-DhcpServer -File Dhcp.xml -Leases
▪ Use the following Command Prompt command:
netsh dhcp server export Dhcp.txt all
2. On Server1, copy the exported file to Server2.
3. Unauthorize the DHCP server, stop the DHCP service, or
uninstall the DHCP Server role on Server1.
4. On Server2, install the DHCP server role and authorize it, if necessary
© 2018 Cengage. May not be copied, scanned, or duplicated, in whole or in part, except for use as permitted in a license distributed with a certain product or service or otherwise on a password-protected website for classroom use.

Server Migration, Export, and
Import (2 of 2)
• To migrate a DHCP server from Server1 to Server2, follow
these steps (continued):
5. On Server2, import the exported file using one of the
following methods:
▪ Use the following PowerShell cmdlet:
Import-DhcpServer -File C:\Dhcp.xml -Leases -BackupPath C:\dhcpback
▪ Use the following Command Prompt command:
netsh dhcp server import C:\Dhcp.txt all
6. On Server2, verify that the scope and existing leases
were imported and that the DHCP service isrunning.
© 2018 Cengage. May not be copied, scanned, or duplicated, in whole or in part, except for use as permitted in a license distributed with a certain product or service or otherwise on a password-protected website for classroom use.

Troubleshooting DHCP
• DHCP is a generally reliable protocol, but things can and do go wrong
from time to time:
– A client is not receiving a DHCP address
– A client is receiving an incorrect DHCP address
– IP address conflicts are occurring
– The DHCP server service is not starting
– No addresses are being leased
• DHCP Troubleshooting Tools
– Reviewing DHCP server statistics and reconciling scopes
– Third-party protocol analyzer (such as Wireshark)
– The built-in DHCP audit logging feature
▪ Enabled by default
© 2018 Cengage. May not be copied, scanned, or duplicated, in whole or in part, except for use as permitted in a license distributed with a certain product or service or otherwise on a password-protected website for classroom use.
Implementing DHCPv6
• DHCPv6 enables you to:
– Manage IPv6 address assignment better
– See which addresses are being used on the network
– Control IPv6 address options
© 2018 Cengage. May not be copied, scanned, or duplicated, in whole or in part, except for use as permitted in a license distributed with a certain product or service or otherwise on a password-protected website for classroom use.

IPv6 Address Structure
• Uses 128 bits, instead of IPv4’s 32 bits, for an address
• IPv6 addresses are written as eight 16-bit hexadecimal numbers
separated by colons:
– Fe80:0:0:0:18ff:0024:8e5a:60
– Things to note about IPv6 addresses:
▪ One or more consecutive 0 values can be written as a
double colon, but only one double colon can exist in an
IPv6 address
▪ Leading 0s are optional
▪ Hexadecimal numbers are easier to convert to binary
© 2018 Cengage. May not be copied, scanned, or duplicated, in whole or in part, except for use as permitted in a license distributed with a certain product or service or otherwise on a password-protected website for classroom use.

The IPv6 Interface ID
• The interface ID of an IPv6 is typically the last 64 bits of an IPv6
address
• Can be assigned to a host in these ways:
– Using the 48-bit MAC address - first two zeros in a MAC
address are replaced with 02
▪ This autoconfigured 64-bit host ID is referred to as an
Extended Unique Identifier (EUI)-64 interface ID
– A randomly generated permanent interface identifier
– A temporary interface identifier
© 2018 Cengage. May not be copied, scanned, or duplicated, in whole or in part, except for use as permitted in a license distributed with a certain product or service or otherwise on a password-protected website for classroom use.
IPv6 Autoconfiguration
• IPv6 autoconfiguration occurs by two methods:
– Stateless autoconfiguration - the node listens for router
advertisement messages from a local router
– Stateful autoconfiguration - the node uses an
autoconfiguration protocol, such as DHCPv6, to obtain its
IPv6 address and other configuration information
© 2018 Cengage. May not be copied, scanned, or duplicated, in whole or in part, except for use as permitted in a license distributed with a certain product or service or otherwise on a password-protected website for classroom use.

How Autoconfiguration Works on
Windows Hosts
• The Windows autoconfiguration steps:
1. At initialization, a link-local address is determined
2. The link-local address is verified as unique by using duplicate
address detection
3. If the address is verified as unique, the address is assigned to
the interface
4. The host transmits a router solicitation message
5. If no router advertisement messages are received in response to
the solicitation message, the host attempts to use DHCPv6 to get
an address
6. If router advertisement message is received, the prefix in the
router advertisement is used along with the interface ID to configure the IPv6 address on the interface
© 2018 Cengage. May not be copied, scanned, or duplicated, in whole or in part, except for use as permitted in a license distributed with a certain product or service or otherwise on a password-protected website for classroom use.

Configuring DHCPv6 Scopes (1 of 2)
• Configure DHCPv6 scopes in the DHCP console or with the
Add-DhcpServerv6Scope PowerShell cmdlet
• To configure a DHCPv6 scope you need to provide the following
information:
– Scope name
– Prefix
– Preference
– Exclusions
– Scope lease
© 2018 Cengage. May not be copied, scanned, or duplicated, in whole or in part, except for use as permitted in a license distributed with a certain product or service or otherwise on a password-protected website for classroom use.

Configuring DHCPv6 Scopes (2 of 2)
© 2018 Cengage. May not be copied, scanned, or duplicated, in whole or in part, except for use as permitted in a license distributed with a certain product or service or otherwise on a password-protected website for classroom use.

DHCPv6 Operation
• DHCPv6 uses a DHCP Unique Identifier (DUID) to lease an
address
– A hexadecimal number, usually derived from the network
interface’s MAC address
• After a DHCPv6 scope is created and activated
– The DHCPv6 server can assign IPv6 addresses
• Dynamic assignment of IPv6 addresses is similar to the process
for IPv4 addresses
– DHCPv6 client listens on port 546 and the server listens on
port 547
© 2018 Cengage. May not be copied, scanned, or duplicated, in whole or in part, except for use as permitted in a license distributed with a certain product or service or otherwise on a password-protected website for classroom use.

DHCPv6 Options
• You configure DHCPv6 options just as you do for standard
DHCPv4
• There’s no option in DHCPv6 to assign a default gateway
(router)
– This task is handled by router advertisements sent by routers
on the network
• You can configure options at the server level, the scope level,
and the reservation level
– There are no policies or filters for DHCPv6
© 2018 Cengage. May not be copied, scanned, or duplicated, in whole or in part, except for use as permitted in a license distributed with a certain product or service or otherwise on a password-protected website for classroom use.

DHCP High Availability
• Microsoft offers the following ways to achieve high availability for
DHCP:
– Split scopes
– DHCP failover
– DHCP server cluster
– Hot standby
• Most recommended methods for high availability and fault
tolerance:
– Split scopes and DHCP failover
© 2018 Cengage. May not be copied, scanned, or duplicated, in whole or in part, except for use as permitted in a license distributed with a certain product or service or otherwise on a password-protected website for classroom use.

DHCP Split Scopes (1 of 2)
• Split scope - a fault-tolerant DHCP configuration in which two DHCP
servers share the same scope information
– Allows both servers to offer services to clients
• Create a split scope by using the wizard as follows:
1. Install the DHCP Server role on two servers
2. Create a scope on the first server and activate it
▪ The wizard configures the scope on the second server
3. Run the wizard on the first server
4. The wizard creates the scope on the secondary server and
creates the necessary exclusion range
▪ According to the split percentage on both servers
5. Create reservations on both servers
© 2018 Cengage. May not be copied, scanned, or duplicated, in whole or in part, except for use as permitted in a license distributed with a certain product or service or otherwise on a password-protected website for classroom use.

DHCP Split Scopes (2 of 2)
© 2018 Cengage. May not be copied, scanned, or duplicated, in whole or in part, except for use as permitted in a license distributed with a certain product or service or otherwise on a password-protected website for classroom use.

DHCP Failover
• DHCP failover - allows two DHCP servers to share the pool of
addresses in a scope
– Lease information is replicated between servers
– If one server goes down, the other server maintains lease
information
– Only available in IPv4 scopes
• Two modes for DHCP failover:
– Load-balancing mode (default mode)
– Hot standby mode
© 2018 Cengage. May not be copied, scanned, or duplicated, in whole or in part, except for use as permitted in a license distributed with a certain product or service or otherwise on a password-protected website for classroom use.
Configuring Load-Balancing
Modes (1 of 2)
• Configure DHCP failover in the DHCP console
– Right-click the IPv4 node or the target scope
– Click Configure Failover
– The Configure Failover Wizard will guide you through the process
• If you configure failover from the IPv4 node, all scopes are listed and
selected by default
• You will choose the partner server
– Must be an authorized server that already has the DHCP Server
service configured
• You will name the failover relationship and choose whether the failover
configuration will be load balancing or hot standby
© 2018 Cengage. May not be copied, scanned, or duplicated, in whole or in part, except for use as permitted in a license distributed with a certain product or service or otherwise on a password-protected website for classroom use.

Configuring Load-Balancing
Modes (2 of 2)
© 2018 Cengage. May not be copied, scanned, or duplicated, in whole or in part, except for use as permitted in a license distributed with a certain product or service or otherwise on a password-protected website for classroom use.

Configuring Hot Standby Mode
• The process for configuring hot standby mode is almost identical to configuring
load balancing mode, with the following exceptions:
– Select “Hot standby” option for failover mode
– Instead of choosing load balancing percentage, specify whether the
failover partner is the active server or the standby server, assign a
percentage
© 2018 Cengage. May not be copied, scanned, or duplicated, in whole or in part, except for use as permitted in a license distributed with a certain product or service or otherwise on a password-protected website for classroom use.

Editing or Deleting a Failover
Configuration
• If you need to edit or delete a failover configuration, right-click the IPv4 node
and click Properties
© 2018 Cengage. May not be copied, scanned, or duplicated, in whole or in part, except for use as permitted in a license distributed with a certain product or service or otherwise on a password-protected website for classroom use.

Chapter Summary (1 of 3)
• Dynamic Host Configuration Protocol (DHCP) is a component of the TCP/IP
protocol suite that is used to assign an IP address to a host automatically from
a defined pool of addresses
• The process of a DHCP client requesting an IP address and a DHCP server
fulfilling the request is a four-packet sequence of broadcasts
• The DHCP service is installed as a server role named DHCP Server
• A DHCP scope is a pool of IP addresses and other IP configuration parameters
that a DHCP server uses to lease addresses to DHCP clients
• A split scope is a fault-tolerant DHCP configuration in which two DHCP servers
share the same scope information
• Almost every network requires a DNS server’s IP address for name resolution
and a default gateway to communicate with other subnets and the Internet
© 2018 Cengage. May not be copied, scanned, or duplicated, in whole or in part, except for use as permitted in a license distributed with a certain product or service or otherwise on a password-protected website for classroom use.

Chapter Summary (2 of 3)
• You can perform several DHCP server configuration tasks in the DHCP console
• The IPv4 server properties include statistics and logging parameters, dynamic
DNS configuration, NAP configuration, filters, conflict detection, and
configuration of DNS registration credentials
• DHCP filters allow administrators to restrict which computers on a network are
leased an IP address based on the client MAC address
• DHCP policies give you more fine-tuned control of address lease options than
you have with server, scope, and reservation options
• If you’re using Windows Deployment Services to install Windows OSs on
computers, you might need to configure DHCP to respond to Preboot Execution
Environment network interfaces
• A DHCP relay agent is a device that listens for broadcast DHCPDISCOVER
and DHCPREQUEST messages and forwards them to a DHCP server on
another subnet
© 2018 Cengage. May not be copied, scanned, or duplicated, in whole or in part, except for use as permitted in a license distributed with a certain product or service or otherwise on a password-protected website for classroom use.
Chapter Summary (3 of 3)
• Windows Server 2016 allows you to migrate the DHCP server role to
another server
• DHCP is a fairly reliable protocol, but at times, you may encounter basic
problems
• The DHCP audit logging feature, which is enabled by default, provides
a logging file that shows information about when addresses were
leased, renewed, and released as well as information about DNS
updates attempted by the DHCP server
• Ways to achieve high availability: split scopes, DHCP failover, DHCP
server clusters, and hot standby
• DHCP failover allows two DHCP servers to share the pool of addresses
in a scope
© 2018 Cengage. May not be copied, scanned, or duplicated, in whole or in part, except for use as permitted in a license distributed with a certain product or service or otherwise on a password-protected website for classroom use.