mdm 7.1 data manager reference guide - sap help … sp17...sap netweaver master data management...
TRANSCRIPT

SAP SE Dietmar-Hopp-Allee 16 69190 Walldorf Germany +49 1805 34 34 34 fax +49 1805 34 34 20
SAP NetWeaver
Master Data Management (MDM)
MDM Data Manager
Reference Guide
Release: MDM 7.1 SP17
December 2016
ii MDM Data Manager Reference Guide
© 2016 SAP SE or an SAP affiliate company. All rights reserved. No part of this publication may be reproduced or transmitted in any form or for any purpose without the express permission of SAP SE. The information contained herein may be changed without prior notice. Some software products marketed by SAP SE and its distributors contain proprietary software components of other software vendors. Adobe, the Adobe logo, Acrobat, PostScript, and Reader are trademarks or registered trademarks of Adobe Systems Incorporated in the United States and other countries. Apple, App Store, FaceTime, iBooks, iPad, iPhone, iPhoto, iPod, iTunes, Multi-Touch, Objective-C, Retina, Safari, Siri, and Xcode are trademarks or registered trademarks of Apple Inc. Bluetooth is a registered trademark of Bluetooth SIG Inc. Citrix, ICA, Program Neighborhood, MetaFrame now XenApp, WinFrame, VideoFrame, and MultiWin are trademarks or registered trademarks of Citrix Systems Inc. Computop is a registered trademark of Computop Wirtschaftsinformatik GmbH. Edgar Online is a registered trademark of EDGAR Online Inc., an R.R. Donnelley & Sons Company. Facebook, the Facebook and F logo, FB, Face, Poke, Wall, and 32665 are trademarks of Facebook. Google App Engine, Google Apps, Google Checkout, Google Data API, Google Maps, Google Mobile Ads, Google Mobile Updater, Google Mobile, Google Store, Google Sync, Google Updater, Google Voice, Google Mail, Gmail, YouTube, Dalvik, and Android are trademarks or registered trademarks of Google Inc. HP is a registered trademark of the Hewlett-Packard Development Company L.P. HTML, XML, XHTML, and W3C are trademarks, registered trademarks, or claimed as generic terms by the Massachusetts Institute of Technology (MIT), European Research Consortium for Informatics and Mathematics (ERCIM), or Keio University. IBM, DB2, DB2 Universal Database, System i, System i5, System p, System p5, System x, System z, System z10, z10, z/VM, z/OS, OS/390, zEnterprise, PowerVM, Power Architecture, Power Systems, POWER7, POWER6+, POWER6, POWER, PowerHA, pureScale, PowerPC, BladeCenter, System Storage, Storwize, XIV, GPFS, HACMP, RETAIN, DB2 Connect, RACF, Redbooks, OS/2, AIX, Intelligent Miner, WebSphere, Tivoli, Informix, and Smarter Planet are trademarks or registered trademarks of IBM Corporation. Microsoft, Windows, Excel, Outlook, PowerPoint, Silverlight, and Visual Studio are registered trademarks of Microsoft Corporation. INTERMEC is a registered trademark of Intermec Technologies Corporation. IOS is a registered trademark of Cisco Systems Inc. The Klout name and logos are trademarks of Klout Inc. Linux is the registered trademark of Linus Torvalds in the United States and other countries. Motorola is a registered trademark of Motorola Trademark Holdings LLC. Mozilla and Firefox and their logos are registered trademarks of the Mozilla Foundation. Novell and SUSE Linux Enterprise Server are registered trademarks of Novell Inc. OpenText is a registered trademark of OpenText Corporation. Oracle and Java are registered trademarks of Oracle and its affiliates. QR Code is a registered trademark of Denso Wave Incorporated. RIM, BlackBerry, BBM, BlackBerry Curve, BlackBerry Bold, BlackBerry Pearl, BlackBerry Torch, BlackBerry Storm, BlackBerry Storm2, BlackBerry PlayBook, and BlackBerry AppWorld are trademarks or registered trademarks of Research in Motion Limited. SAVO is a registered trademark of The Savo Group Ltd. The Skype name is a trademark of Skype or related entities. Twitter and Tweet are trademarks or registered trademarks of Twitter. UNIX, X/Open, OSF/1, and Motif are registered trademarks of the Open Group. Wi-Fi is a registered trademark of Wi-Fi Alliance. SAP, R/3, ABAP, BAPI, SAP NetWeaver, Duet, PartnerEdge, ByDesign, SAP BusinessObjects Explorer, StreamWork, SAP HANA, the Business Objects logo, BusinessObjects, Crystal Reports, Crystal Decisions, Web Intelligence, Xcelsius, Sybase, Adaptive Server, Adaptive Server Enterprise, iAnywhere, Sybase 365, SQL Anywhere, Crossgate, B2B 360° and B2B 360° Services, m@gic EDDY, Ariba, the Ariba logo, Quadrem, b-process, Ariba Discovery, SuccessFactors, Execution is the Difference, BizX Mobile Touchbase, It's time to love work again, SuccessFactors Jam and BadAss SaaS, and other SAP products and services mentioned herein as well as their respective logos are trademarks or registered trademarks of SAP AG in Germany or an SAP affiliate company. All other product and service names mentioned are the trademarks of their respective companies. Data contained in this document serves informational purposes only. National product specifications may vary. These materials are subject to change without notice. These materials are provided by SAP SE and its affiliated companies ("SAP Group") for informational purposes only, without representation or warranty of any kind, and SAP Group shall not be liable for errors or omissions with respect to the materials. The only warranties for SAP Group products and services are those that are set forth in the express warranty statements accompanying such products and services, if any. Nothing herein should be construed as constituting an additional warranty.
SAP SE Neurottstrasse 16 69190 Walldorf Germany +49 6227 74 74 74 fax +49 6227 75 75 75
MDM Data Manager Reference Guide iii
Contents
Part 1: Starting Data Manager .................................................. 1
Starting and Connecting to a Repository ........................................... 3 Starting Data Manager ................................................................... 3 Setting Up Unencrypted Repository Connections .......................... 3 Setting Up Secure Repository Connections ................................... 4
MDM Data Manager Main Window .................................................... 5 MDM Modes ....................................................................................... 6
The Current Table .......................................................................... 7 MDM Repository Structure ................................................................. 9
Data Types ................................................................................... 12 Dimensions and Units .................................................................. 14 Taxonomies ................................................................................. 15 Attributes ...................................................................................... 16
Checking Spelling ............................................................................ 18
Part 2: Record Mode ................................................................ 21
Working in Record Mode.................................................................. 22 Record Mode at a Glance ............................................................ 23
Status Bar ............................................................................................ 23 Special Columns of the Records Pane......................................... 24
Searching for Records ..................................................................... 25 Drilldown Search vs. Free-Form Search ...................................... 25
Drilldown Search ................................................................................. 25 Free-Form Search ............................................................................... 25
Drilldown Searches ...................................................................... 27 Flat and Hierarchy Lookup Search Tabs .............................................. 28 Taxonomy Lookup Search Tabs .......................................................... 29 Nested Lookups and Multi-Level Search-within-a-Search .................... 30 Qualified Lookup Search Tabs ............................................................. 32 Tuple Search Tabs .............................................................................. 33 Performing a Drilldown Search ............................................................ 34 OR Searches, AND Searches, and Multi-Valued Fields ....................... 36 OR Searches, AND Searches, and Hierarchy Lookup Fields ............... 37
Hiding and Unhiding Search Tabs ............................................... 39 Free-Form Searches .................................................................... 40
Literal Search ...................................................................................... 41 Measurement Search .......................................................................... 41 Expression Search .............................................................................. 42 Free-Form Search Operators ............................................................... 43
Keyword Search ........................................................................... 46 Multi-Word Keyword Searches ............................................................. 46 Single-Field Keyword Searches ........................................................... 47 Keyword Search Operators .................................................................. 47
Keyword Stemming ...................................................................... 48 How Stemming Works ......................................................................... 49 Multi-Word Stemming .......................................................................... 49

iv MDM Data Manager Reference Guide
Compound Word Splitting .................................................................... 49 Punctuation .......................................................................................... 50
Performing a Free-Form Search ................................................... 51 Combining Free-Form Search with Drilldown Search ........................... 51
Saving and Restoring Named Searches ....................................... 52 Saving and Restoring Local Searches .......................................... 53
Record Operations ........................................................................... 55 Limits and Slicing for Multi- Record Operations ............................ 57 Adding Records ............................................................................ 57 Deleting Records .......................................................................... 57 Duplicating Records ..................................................................... 58 Saving and Restoring Records ..................................................... 59 Protecting Records ....................................................................... 59 Comparing Records ...................................................................... 60
Comparing Multiple Records ................................................................ 61 Comparing Checked-Out Records with their Originals .......................... 62
Merging Records .......................................................................... 62 The Merge Records Dialog .................................................................. 63 Color Coding of Data Values ................................................................ 64 Record Merge Operations .................................................................... 64 Performing the Merge .......................................................................... 66 Merging Subsets of Values from Multi-Valued Fields ............................ 67 Merging Tuple Records within a Tuple Field ......................................... 67 Auto-Populating the Merged Record .................................................... 68 Record Merge and Checkout ................................................................ 68
Viewing a Record’s Hierarchical Relationships ............................. 69 Seeing Records Linked To a Main Table Record.................................. 69 Seeing Records Linked From Main Table Records ............................... 70 Seeing a Visual Depiction of a Record’s Hierarchy ............................... 70
Editing Record Details ...................................................................... 72 Keyboard Shortcuts For Record Editing ....................................... 73 Identifying Required Fields ........................................................... 73 Viewing and Editing Multiple Records .......................................... 74
Maximum Record and Value Limits ...................................................... 75 Editing Text and Numeric Fields ................................................... 76 Editing Measurement Fields and Attributes .................................. 76 Editing Lookup Fields ................................................................... 77
Selecting Lookup Field Values from a Pick List .................................... 77 Searching for Lookup Field Values ....................................................... 78
Changing the Category of a Main Table Record ........................... 80 Editing Qualified Lookup Fields .................................................... 81
The Qualified Lookup Field Cell ........................................................... 81 The Select Qualified Lookup Record Dialog ......................................... 82
Editing Tuple Fields ...................................................................... 86 Filtering Tuple Records According to Search Criteria ........................... 86 Managing the Tuple Records in a Tuple Field ...................................... 86 Editing Tuple Field Values for Multiple Main Table Records ................. 88
Editing Log Lookup Fields ............................................................ 90 Updating Values of Calculated Fields ........................................... 91 Editing Text Attributes .................................................................. 91

MDM Data Manager Reference Guide v
Modifying a Text Attribute Value List ............................................ 93 Working with Lookup Tables ............................................................ 95
Editing Flat Lookup Tables ........................................................... 95 Editing Hierarchy Lookup Tables ................................................. 96 Editing Taxonomy Lookup Tables ................................................ 97 Editing Qualified Lookup Tables .................................................. 97
Working with Objects ....................................................................... 99 Object Tables at a Glance ............................................................ 99
Binary Objects Table ......................................................................... 100 Copy Blocks Table ............................................................................. 101 Images Table ..................................................................................... 101 PDFs Table ....................................................................................... 103 Sounds Table .................................................................................... 103 Text Blocks Table .............................................................................. 104 Text HTMLs Table ............................................................................. 104 Videos Table ..................................................................................... 105
Object Fields at a Glance ........................................................... 106 The Object Lookup Field at A Glance ........................................ 106 The Object Selector Dialog at a Glance ..................................... 107
Available Objects Pane ...................................................................... 108 Selected Objects Pane ...................................................................... 108 Toggle View Toolbar Buttons ............................................................. 108 Slider ................................................................................................. 109 Resizer .............................................................................................. 109 Object Detail Tab ............................................................................... 109 Data Groups Tab ............................................................................... 109 Usage Tab ......................................................................................... 110 Filters Tab ......................................................................................... 111 Add Button ......................................................................................... 111 Selecting and Deselecting Data Groups ............................................ 111 Selecting and Deselecting Objects..................................................... 113
Object Operations .......................................................................... 114 Adding and Deleting Objects ...................................................... 117
Adding Objects .................................................................................. 117 Deleting Objects ................................................................................ 119
Linking Objects to Object Lookup Fields .................................... 120 Adding and Linking New Objects ....................................................... 120 Copying and Pasting Links ................................................................ 121 Removing Links ................................................................................. 121
Reimporting and Replacing Objects ........................................... 122 Generating Object Thumbnails .................................................. 124 Viewing Object Details ............................................................... 124 Editing Object Details ................................................................. 125
Editing Objects in Data Manager ....................................................... 125 Editing Objects Using External Applications ....................................... 126
Editing the Data Groups Hierarchy ............................................ 126 Merging Objects ......................................................................... 127 Editing Object Layers ................................................................. 128 Image-Specific Operations ......................................................... 129
Viewing Images and Image Variants .................................................. 129 Adding User-Generated Image Variants ............................................ 130

vi MDM Data Manager Reference Guide
Adding System-Generated Variants ................................................... 130 Deleting Image Variants ..................................................................... 130 Searching by Image Variant ............................................................... 130 Saving Images to Disk........................................................................ 131 Setting Image Print Size ..................................................................... 132
Cropping and Rotating Images ................................................... 133 Resizing the Image View .................................................................... 137 Rotating and Mirroring Images ........................................................... 137 Cropping Images ................................................................................ 138
Text Block-Specific Operations ................................................... 141 Splitting Text Blocks ........................................................................... 141
Text HTML-Specific Operations .................................................. 142 Editing a Text HTML Object ............................................................... 142 Copying the HTML Code of a Text HTML Object................................ 144
Copy Block-Specific Operations ................................................. 144 Editing a Copy Block .......................................................................... 144 Expanding a Copy Block .................................................................... 145 Copying a Copy Block ........................................................................ 146
PDF–Specific Operations ........................................................... 146 Viewing PDFs .................................................................................... 146
Binary Object/Sound/Video-Specific Operations ........................ 147 Saving Objects to Disk ....................................................................... 147
Editing Relationships ...................................................................... 148 Modifying Masks ............................................................................. 153
Editing the Masks Table ............................................................. 153 Context Menu Mask Commands ................................................ 154 Modify Mask Command .............................................................. 155
Checking Out Records ................................................................... 158 Check In/Out Operations ............................................................ 159 [Checked Out] Column ............................................................... 160 Managing Checkouts .................................................................. 160 Checkout and Stamp Fields ........................................................ 164 Checkout and Staging ................................................................ 164 Checkout and Transaction Management .................................... 165 Checkout and Import .................................................................. 165
MDM Expressions .......................................................................... 166 Expression Editor ....................................................................... 167
Editing Expressions ............................................................................ 168 Copying and Pasting Expressions ...................................................... 169 Accessing the Virtual Extended Record .............................................. 170
Branch Expressions .................................................................... 173 Expression Operators ................................................................. 174 Expression Functions ................................................................. 174
System Time ...................................................................................... 175 Absolute Value ................................................................................... 175 Modulo ............................................................................................... 175 Negate ............................................................................................... 175 Square Root ....................................................................................... 176 If Then ............................................................................................... 176 If Then Else ........................................................................................ 176

MDM Data Manager Reference Guide vii
Is Null ................................................................................................ 177 Is Not Null .......................................................................................... 177 Has Any Values ................................................................................. 177 Has All Values ................................................................................... 178 Multi-Valued Lookup .......................................................................... 178 Has Any Chars .................................................................................. 178 Has All Chars .................................................................................... 179 Length ............................................................................................... 179 Left .................................................................................................... 179 Right .................................................................................................. 179 Mid .................................................................................................... 180 Find ................................................................................................... 180 Trim All .............................................................................................. 180 Trim Left ............................................................................................ 180 Trim Right .......................................................................................... 181 Upper ................................................................................................ 181 Lower ................................................................................................ 181 Is Upper ............................................................................................. 181 Is Lower ............................................................................................. 181 Concatenate ...................................................................................... 182 Count ................................................................................................. 182 Maximum ........................................................................................... 182 Minimum ............................................................................................ 182 Average ............................................................................................. 183 Sum ................................................................................................... 183 Language .......................................................................................... 183 Branch ............................................................................................... 184 REQUIRED_FIELDS ......................................................................... 184
Validating Records ......................................................................... 185 Validation Operations ................................................................. 185 Validations Tab .......................................................................... 187 Validation Properties .................................................................. 188 Managing and Editing Validations .............................................. 188
Editing Validation Expressions ........................................................... 190 Adding Branch Validations ................................................................. 191 Validation Groups .............................................................................. 192 Editing the Validation Groups Hierarchy............................................. 193
Validation Execution .................................................................. 194 Manual vs. Automatic Execution ........................................................ 194 Validation Result Dialogs ................................................................... 194 Multilingual Validations ...................................................................... 195 Validation Result Columns ................................................................. 195 Manually Executing Validations ......................................................... 196
A Note About Validations and Data Integrity .............................. 196 Validations and Multi-Valued Lookup Fields .............................. 196 Validations and Tuples ............................................................... 197
Validating Tuple Records ................................................................... 197 Validating Tuple Fields ...................................................................... 197
Validation Example: ISBN Numbers and Check Digits .............. 198 Assignments .................................................................................. 204
Assignment Operations .............................................................. 204 Assignments Tab ....................................................................... 205 Assignment Properties ............................................................... 205
viii MDM Data Manager Reference Guide
Managing and Editing Assignments ........................................... 206 Editing Assignment Expressions ........................................................ 208 Adding Branch Assignments .............................................................. 209
Assignment Execution ................................................................ 210 Assignment Result Column ................................................................ 210 Executing Assignments ...................................................................... 210
MDM Workflows ............................................................................. 211 The MDM Workflow Engine ........................................................ 212
Defining and Executing Workflows ..................................................... 213 Workflow Owner ................................................................................. 213 Workflow Administrator ...................................................................... 214 Workflow Launcher ............................................................................ 215 Sending to the Next Step ................................................................... 215 Splitting Jobs...................................................................................... 215 Microsoft Visio Design-Time ............................................................... 215 Notifications ....................................................................................... 216 Record Filtering .................................................................................. 217 Record Check Out .............................................................................. 218 User vs. Role Assignments ................................................................ 218 Execution Type .................................................................................. 218 Push vs. Pull ...................................................................................... 219 Manual vs. Automatic Steps ............................................................... 220 Validations and Approvals .................................................................. 221 Task Completion Commands ............................................................. 221 Operation Slicing and Split Jobs ......................................................... 223
Workflows Table ......................................................................... 223 Managing and Editing Workflow Records ................................... 225 Microsoft Visio Plug-in at a Glance ............................................. 226
Configuring the Microsoft Visio Plug-in ............................................... 227 Workflow Drawing Validation ...................................................... 228 Workflow Steps ........................................................................... 230
Approve Step ..................................................................................... 231 Assign Step ........................................................................................ 232 Branch Step ....................................................................................... 232 Connect Step ..................................................................................... 233 EC Service Step ................................................................................. 233 Group Step ........................................................................................ 234 Match Step ......................................................................................... 234 Merge Step ........................................................................................ 236 Notify Step ......................................................................................... 236 Process Step...................................................................................... 237 Start Step ........................................................................................... 238 Stop Step ........................................................................................... 238 Syndicate Step ................................................................................... 239 Validate Step...................................................................................... 239 Wait Step ........................................................................................... 240
Defining and Editing Workflows .................................................. 241 Workflows Tab ............................................................................ 243
Status Pane ....................................................................................... 243 Tasks Pane ........................................................................................ 244
Inbound Task Queue State Transitions ...................................... 245 Managing Workflow Jobs............................................................ 246
MDM Data Manager Reference Guide ix
Executing Workflow Jobs ........................................................... 248 A Note About Workflows and Process Execution ....................... 254
Part 3: Hierarchy Mode .......................................................... 257
Working with Hierarchy Tables ...................................................... 259 Hierarchy Mode at a Glance ...................................................... 260
Hierarchy Pane .................................................................................. 261 Records Pane .................................................................................... 261 Record Detail Tab .............................................................................. 261 Language Detail Tab ......................................................................... 262 Status Bar .......................................................................................... 262
Non-Unique Node Names .......................................................... 263 Inner Node Assignments and Internal Leaf Nodes ..................... 264 Finding Tree Nodes ................................................................... 265
Hierarchy Tree Operations ............................................................. 266 Adding a Node ........................................................................... 267 Renaming a Node ...................................................................... 268 Deleting a Node ......................................................................... 269 Changing the Case of Node Names .......................................... 270 Sorting Nodes ............................................................................ 270 Moving a Node with Drag-and-Drop ........................................... 271 Merging Nodes with Drag-and-Drop .......................................... 274 Cutting and Pasting Nodes ........................................................ 275 Hiding and Unhiding Nodes ....................................................... 277 Creating Aliases ......................................................................... 279 Creating an Internal Leaf Node .................................................. 281
Part 4: Taxonomy Mode ........................................................ 283
Working with Taxonomy Tables ..................................................... 285 Taxonomy Mode at a Glance ..................................................... 286
Taxonomy Pane ................................................................................ 287 Attributes Pane .................................................................................. 287 Attribute Detail Tab ............................................................................ 287 Attribute Language Detail Tab ........................................................... 288 Attribute Usage Tab ........................................................................... 288 Taxonomy Detail Tab ......................................................................... 289 Taxonomy Language Detail Tab ........................................................ 289 Status Bar .......................................................................................... 290
Attributes vs. Fields .................................................................... 291 The Attributes Grid ..................................................................... 291 Attribute Types ........................................................................... 292 Attribute Priorities ....................................................................... 293 Linked and Inherited Attributes .................................................. 294 Finding Categories and Attributes .............................................. 295 Structuring the Taxonomy .......................................................... 297 Printing the Taxonomy ............................................................... 297
Taxonomy Tree Operations ........................................................... 301 Adding a Category ..................................................................... 302

x MDM Data Manager Reference Guide
Renaming a Category ................................................................. 303 Deleting a Category .................................................................... 304 Changing the Case of Category Names ..................................... 305 Sorting Categories ...................................................................... 305 Moving a Category with Drag-and-Drop ..................................... 306 Merging Categories with Drag-and-Drop .................................... 308 Cutting and Pasting Categories .................................................. 310 Creating Category Aliases .......................................................... 311 Creating an Internal Leaf Node Category ................................... 314 Partitioning a Category ............................................................... 315 Consolidating Categories............................................................ 316 Using Matching Sets ................................................................... 318
Attribute Properties ......................................................................... 324 Common Properties .................................................................... 324
Attribute Name ................................................................................... 325 Attribute Alias ..................................................................................... 325 Attribute Definition .............................................................................. 325 Attribute Image ................................................................................... 325 Multi-Valued Option ............................................................................ 325
Text Attribute Properties ............................................................. 326 Attribute Text Values .......................................................................... 326 Text Value Image ............................................................................... 328 Text Value Text .................................................................................. 328
Numeric Attribute Properties ....................................................... 329 Attribute Ratings ................................................................................ 329 Dimension and Default Unit ................................................................ 330 Decimal Places and Show Fractions .................................................. 332
Coupled Numeric Attribute Properties ........................................ 333 Coupled Name and Delimiter ............................................................. 333 Primary and Coupled Dimension Options ........................................... 333
Link-Specific Property ................................................................. 334 Attribute Priority ................................................................................. 334
Unit and Dimension Finder ......................................................... 335 Attribute Operations ........................................................................ 336
Saving and Restoring Attributes ................................................. 336 Adding and Modifying Attributes ................................................. 337 Deleting Attributes ...................................................................... 340 Linking and Unlinking Attributes ................................................. 341 Viewing Attribute Usage ............................................................. 342 Changing Attribute Priority .......................................................... 343 Promoting and Demoting Attributes ............................................ 345 Merging Attributes ...................................................................... 346
Merging Text Attributes ...................................................................... 349 Merging Numeric Attributes ................................................................ 350 Merging Coupled Numeric Attributes .................................................. 351
Splitting Attributes ....................................................................... 352 Reassigning Attribute Ratings .................................................... 354 Converting Attribute Types ......................................................... 356
Text to Numeric .................................................................................. 356
MDM Data Manager Reference Guide xi
Text to Coupled Numeric ................................................................... 358 Numeric or Coupled Numeric to Text ................................................. 359 Numeric to Coupled Numeric ............................................................. 359 Coupled Numeric to Numeric ............................................................. 360
Sort Text Values ........................................................................ 361 Decimal Places and Show Fractions .......................................... 362
Part 5: Product Relationships .............................................. 365
Working with Product Relationships ............................................... 367 Category-Level Relationships ........................................................ 368 Product-Level Relationships .......................................................... 369
Sibling vs. Parent/Child Relationships ....................................... 370 Single- vs. Multi-Table Relationships ......................................... 371 Single- vs. Multi-Level Relationships ......................................... 372 Hybrid Relationships .................................................................. 372 Relationship Qualifiers ............................................................... 373 Editing Related Records ............................................................ 373
The Relationships Pop-Up Window.................................................... 374 The Anchor Record............................................................................ 375 The Relationships Tabs ..................................................................... 376 Relationship Naming Conventions ..................................................... 379 Adding Related Records .................................................................... 380 Removing Related Records ............................................................... 380 Splitting Related Sibling Records ....................................................... 381 Reordering Related Records ............................................................. 381 Changing the Anchor Record ............................................................. 382 Importing and Exporting Relationship Links ....................................... 383 Copying Related Records .................................................................. 387
Product-Centric versus Relationship-Centric View ..................... 387 Product-Centric View ......................................................................... 387 Relationship-Centric View .................................................................. 387
Part 6: Qualified Tables ......................................................... 389
Working with Qualified Tables ........................................................ 391 Multiple Prices and Cross-Reference Part Numbers .................. 391 Product Applications and Application-Based Search ................. 395
Qualified Table Overview ............................................................... 399 Qualified Table Terminology ...................................................... 399 Qualifiers .................................................................................... 400 Qualified Lookup Cells ............................................................... 400 Qualified Lookup Search Tabs ................................................... 401
Part 7: Matching Mode .......................................................... 403
Matching Overview ........................................................................ 405 Working in Matching Mode............................................................. 406
Matching Highlights .................................................................... 407 Matching is Record-Centric ........................................................ 407 Interactive Matching ................................................................... 407

xii MDM Data Manager Reference Guide
Automated Matching ................................................................... 407 Defining and Executing Matching Strategies .............................. 408
Matching Strategy Definition ........................................................... 409 Transformations .......................................................................... 409
Transformation Operations ................................................................. 409 Transformations Tab .......................................................................... 410 Transformation Properties .................................................................. 411 Substitutions ...................................................................................... 411 Managing and Editing Transformations .............................................. 412
Matching Rules ........................................................................... 414 Matching Rule Operations .................................................................. 415 Rules Tab .......................................................................................... 415 Matching Rule Properties ................................................................... 416 Matching Functions and Matching Scores .......................................... 417 Managing and Editing Matching Rules ............................................... 418
Matching Strategies .................................................................... 418 Matching Strategy Operations ............................................................ 418 Strategies Tab .................................................................................... 418 Matching Strategy Properties ............................................................. 419 Threshold Scores ............................................................................... 420 Improving Match Speed with Required Fields ..................................... 420 Managing and Editing Matching Strategies ........................................ 421
Matching Strategy Execution .......................................................... 422 Matching Result Columns ........................................................... 423 Executing the Matching Strategy ................................................ 424 Improving Match Speed .............................................................. 425 Merging Records ........................................................................ 427 Relating Records (Match and Relate) ......................................... 428
Part 8: Family Mode ............................................................... 431
Product Families ............................................................................. 432 Working with the Families Table ..................................................... 433
Family Mode at a Glance ............................................................ 435 Family Hierarchy Pane ....................................................................... 436 Families Pane .................................................................................... 436 Partitioning Tab .................................................................................. 437 Family Detail Tab ............................................................................... 438 Status Bar .......................................................................................... 438
The Family Hierarchy ................................................................. 439 Family Data ................................................................................ 440 Partitions..................................................................................... 440
Value Combinations ........................................................................... 442 Inheritance in Family Mode ................................................................ 443 Multiple Partitions ............................................................................... 444 Nested and Combined Partitions ........................................................ 445 Arbitrary Partitions .............................................................................. 447
Family Hierarchy Operations .......................................................... 449 Partitioning by a Single Field or Attribute .................................... 450 Partitioning by Multiple Fields and/or Attributes .......................... 451

MDM Data Manager Reference Guide xiii
Combining Partitions .................................................................. 453 Splitting a Partition ..................................................................... 453 Removing Partitions ................................................................... 454 Reordering Partitions ................................................................. 455 Restoring Inheritance ................................................................. 455 Setting the Record Mode Search ............................................... 456 Synchronizing Family Children ................................................... 457 Linking Family Data ................................................................... 458
Part 9: Exporting Records .................................................... 459
Exporting Table Records................................................................ 461 Qualifier and Qualified Lookup Field Export ............................... 469 Attribute Export .......................................................................... 470 Exporting the Records................................................................ 471 Export Naming Conventions ...................................................... 473 Export Column Name Syntax ..................................................... 476 Excel 2002 Configuration ........................................................... 477 Access 97 vs. Access 2000 ....................................................... 477
Exporting Attributes ........................................................................ 479
Part 10: Importing Records ................................................... 481
Importing Records from Excel ........................................................ 483 Performing the Import ................................................................ 485 Importing Image/PDF Links ........................................................ 490
Data Manager Import vs. MDM Import Manager ............................ 491
Part 11: Configuration Options ............................................ 493
Configuration Options .................................................................... 495
Part 12: Multilingual Support ................................................ 501
Introduction .................................................................................... 503 Multi-Byte Unicode Implementation ........................................... 504 Multi-Layered Data Model .......................................................... 504 Language-Centric Views ............................................................ 504 Multilingual Repository Metadata ............................................... 505 Multilingual Repository Data ...................................................... 505 Multilingual Publishing................................................................ 505 Multilingual GUI Software ........................................................... 506 Repository Languages and Language Names ........................... 506 Multilingual Data and Metadata Elements .................................. 506
Multilingual Basics ......................................................................... 507 Language Layers ....................................................................... 507 Language Inheritance ................................................................ 508
Multilingual Operations .................................................................. 511 Connecting to MDM Data Manager ............................................ 512

xiv MDM Data Manager Reference Guide
Current Language Data Editing (Record Detail Tab) .................. 512 Multilingual Data Editing (Language Detail Tab) ......................... 513 Show Inherited Language Values Option ................................... 514 Importing Multilingual Objects ..................................................... 515
Creating New Object Records ............................................................ 515 Populating Existing Object Records ................................................... 515
Merging Multilingual Objects ....................................................... 516 Searching for Missing Multilingual Data ...................................... 516 Multilingual Expressions ............................................................. 518 Multilingual Export and Import .................................................... 518
Record Mode Export .......................................................................... 519 Record Mode Import .......................................................................... 520 Taxonomy Mode Export ..................................................................... 522 Taxonomy Mode Import ..................................................................... 524
Part 13: Remote Systems and MDM .................................... 527
Introduction ..................................................................................... 529 What is a Remote System? ........................................................ 529 Key Mapping ............................................................................... 529 [Remote System] and [Remote Key] Fields ................................ 530
Remote System Operations............................................................ 531 Viewing and Editing Key Mappings ............................................ 531
Table Record Key Mappings .............................................................. 531 Attribute Definition Key Mappings....................................................... 531 Text Attribute Text Value Key Mappings ............................................. 532
Identifying Key Mappings............................................................ 533 Removing Key Mappings ............................................................ 533 Key Mapping Export and Import ................................................. 534
Record Mode Export .......................................................................... 534 Record Mode Import .......................................................................... 535

1
PART 1: STARTING DATA MANAGER
This section describes how to start MDM Data Manager and connect it to a repository.
For more information about installing and working with MDM, see the MDM documentation on the SAP Help Portal at http://help.sap.com/nwmdm71.


MDM Data Manager Reference Guide 3
Starting and Connecting to a Repository
A repository must be running on a Master Data Server in order for Data Manager to connect to it.
STARTING DATA MANAGER
To start Data Manager and connect to a repository:
1. Double-click the MDM Data Manager icon.
2. In the Connect to MDM Repository dialog, select the desired MDM repository, the language layer to work in, and enter your user name and password.
3. Click OK to connect Data Manager to the repository.
NOTE ►► If an MDM repository does not appear in the list, you must
add it by clicking “…” (browse) to set up the connection (see the following sections for more information).
NOTE ►► If a repository’s TCP/IP port number changes, you must re-add the repository as the old entry will load whatever repository is loaded on the old TCP/IP port.
MULTILINGUAL ►► More information about language layers and multilingual repositories is provided in “Part 14: Multilingual Support.”
SETTING UP UNENCRYPTED REPOSITORY CONNECTIONS
To set up an unencrypted connection to an MDM repository:
1. In the Connect to MDM Repository dialog, click “…” (browse).
2. In the Choose Repository dialog, select the Master Data Server on which the repository is running.
If the Master Data Server has not been previously connected to by
Data Manager, type the name or IP address of its host, or click “…” (browse) to select it from a list.
NOTE ►► If the Master Data Server is configured to listen on non-"MDM default" ports, you must type in the port number after the Master
Data Server name, using the format ServerName:PortNumber (for
example, ServerXYZ:54321). Otherwise, Data Manager will be
unable to connect to the Master Data Server.
3. Select the repository (you may have to click the “refresh” button next to the Repository field to load the repository names).
4. Click OK to add the repository to the Connect to MDM Repository list.

4 MDM Data Manager Reference Guide
SETTING UP SECURE REPOSITORY CONNECTIONS
Secure connections are only possible for repositories on SSL-enabled Master Data Servers (see “Network and Communication Security” in the MDM 7.1 Security Guide for more information).
To set up a secure connection to an MDM repository:
1. In the Connect to MDM Repository dialog, click “…” (browse).
2. In the Choose Repository dialog:
a. Select the SSL-enabled Master Data Server
b. Click Secure Connection
c. Enter the paths to the client Key File and SSL Library
3. Click the “refresh” button next to the Repository field and choose the repository you want to connect securely to.
4. Click OK to add the repository to the Connect to MDM Repository list.
5. In the Connect to Repository dialog, a lock icon indicates that communications with the selected repository will be established on a secure connection.
Figure 1. The lock icon on the Connect to MDM Repository dialog

MDM Data Manager Reference Guide 5
MDM Data Manager Main Window
The MDM Data Manager main window is similar for every mode. The main window includes three primary panes (and perhaps several subpanes), which may be resized by dragging the splitters that separate them (Figure 2). The panes may appear somewhat different in the different MDM modes, so you should also refer to the main window illustrations and descriptions in the parts of this guide that cover each mode (Record mode, Hierarchy mode, and so on).
Figure 2. Three-pane MDM Data Manager main window
TIP ►► To cycle among the panes in the main window, press F6.
TIP ►► To resize panes, place the mouse pointer over a splitter until the pointer changes to a vertical or horizontal pipe with arrows, then click and hold down the mouse button while you drag the splitter in the direction of the arrows.
NOTE ►► Fields, dialog boxes, and context menus in MDM Data Manager for which you have read-only access are disabled by default and appear grayed out. You can turn off this feature via MDM Console by changing the value of the Repository Property parameter, Disable Read-Only fields in Data Manager.
Record list area
Record-editing area
Menubar and toolbar
Status line
Drag splitters to resize panes

6 MDM Data Manager Reference Guide
MDM Modes
MDM Data Manager operates in five modes. Each mode is designed for manipulating specific types of tables and repository information, as follows:
Record mode. Allows you to search, view and edit the records of
any table in the MDM repository. This is the mode you will use most often, primarily to view and edit records in the main table, but also to view and edit records in any of the subtables.
Hierarchy mode. Allows you to view and edit the hierarchy tables in
the MDM repository, including regular hierarchy tables, taxonomy tables, and the Masks table. Though you can also view and edit the records of a hierarchy table in Record mode, Hierarchy mode specifically allows you to edit the parent/child relationships and the sibling ordering of the hierarchy.
Taxonomy mode. Allows you to view and edit the taxonomy tables
in the MDM repository. You will use this mode to create and maintain the category hierarchy used in the repository, and to manage the attributes associated with each category and subcategory. Though you can also view and edit taxonomy tables in both Record mode (for searching) and Hierarchy mode (for editing the other fields of information associated with each category), Taxonomy mode is unique in that instead of focusing on the records of the taxonomy table, it allows you to create and manage the pool of attributes
associated with the taxonomy table, and to assign attributes to categories on a category-by-category basis.
Matching mode. Allows you to identify and eliminate duplicate
records within an MDM repository. When you view the main table in Matching mode, MDM allows you to perform “matching-and-merging” on and against any or all of its records, using various user-defined criteria to decide whether or not records are potential duplicates.
Family mode. Allows you to view and edit the Families table, which
layers a hierarchy of families upon the taxonomy hierarchy to further break down each category into smaller groups of main table records. Use this mode to partition the categories of the taxonomy hierarchy by the values of other fields and/or attributes, and then to associate family data (such as an image, a paragraph, and bullets) once with each family of main table records rather than each individual record.

MDM Data Manager Reference Guide 7
THE CURRENT TABLE
In each mode, MDM Data Manager operates on the current table. The current table is displayed in the drop-down list control at the far left of the toolbar (Figure 3).
Figure 3. Current table shown at left of toolbar
When you open the drop-down list, the table list includes all the tables in an MDM repository, ordered first by table type and then alphabetically within table type (Figure 4). The main table, then the set of subtables and the Masks table, then the set of object tables, then the special tables, are each separated by gray lines in the table list.
Figure 4. Drop-down table list open for table selection
Recall that not all tables can be viewed and edited in each mode. When you open the table list, those tables that cannot be selected in the current mode are unavailable. Further, a mode itself is unavailable if the MDM repository contains no tables of the appropriate type (e.g. you cannot enter Taxonomy mode if there are no taxonomy tables).

8 MDM Data Manager Reference Guide
NOTE ►► When you first start MDM Data Manager, it places you in Record mode and makes the main table the current table. When you change to each of the other modes for the first time, it automatically selects a table of the proper type, and then remembers the current table selection for each mode as you change the current table in each mode and move back and forth between modes.
Detailed instructions for using the features of each mode are provided in later parts of this guide.
MDM Data Manager Reference Guide 9
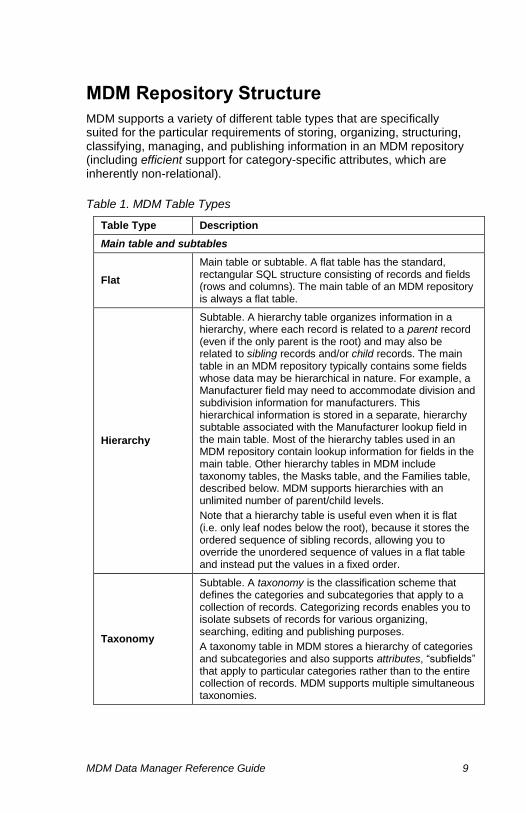
MDM Repository Structure
MDM supports a variety of different table types that are specifically suited for the particular requirements of storing, organizing, structuring, classifying, managing, and publishing information in an MDM repository (including efficient support for category-specific attributes, which are inherently non-relational).
Table 1. MDM Table Types
Table Type Description
Main table and subtables
Flat
Main table or subtable. A flat table has the standard, rectangular SQL structure consisting of records and fields (rows and columns). The main table of an MDM repository is always a flat table.
Hierarchy
Subtable. A hierarchy table organizes information in a hierarchy, where each record is related to a parent record (even if the only parent is the root) and may also be related to sibling records and/or child records. The main table in an MDM repository typically contains some fields whose data may be hierarchical in nature. For example, a Manufacturer field may need to accommodate division and subdivision information for manufacturers. This hierarchical information is stored in a separate, hierarchy subtable associated with the Manufacturer lookup field in the main table. Most of the hierarchy tables used in an MDM repository contain lookup information for fields in the main table. Other hierarchy tables in MDM include taxonomy tables, the Masks table, and the Families table, described below. MDM supports hierarchies with an unlimited number of parent/child levels.
Note that a hierarchy table is useful even when it is flat (i.e. only leaf nodes below the root), because it stores the ordered sequence of sibling records, allowing you to override the unordered sequence of values in a flat table and instead put the values in a fixed order.
Taxonomy
Subtable. A taxonomy is the classification scheme that defines the categories and subcategories that apply to a collection of records. Categorizing records enables you to isolate subsets of records for various organizing, searching, editing and publishing purposes.
A taxonomy table in MDM stores a hierarchy of categories and subcategories and also supports attributes, “subfields” that apply to particular categories rather than to the entire collection of records. MDM supports multiple simultaneous taxonomies.
10 MDM Data Manager Reference Guide
Table Type Description
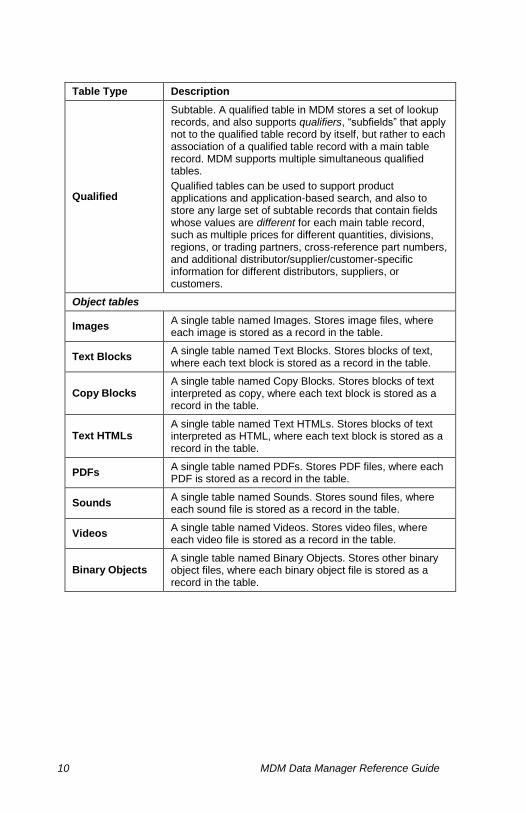
Qualified
Subtable. A qualified table in MDM stores a set of lookup records, and also supports qualifiers, “subfields” that apply not to the qualified table record by itself, but rather to each association of a qualified table record with a main table record. MDM supports multiple simultaneous qualified tables.
Qualified tables can be used to support product applications and application-based search, and also to store any large set of subtable records that contain fields whose values are different for each main table record, such as multiple prices for different quantities, divisions, regions, or trading partners, cross-reference part numbers, and additional distributor/supplier/customer-specific information for different distributors, suppliers, or customers.
Object tables
Images A single table named Images. Stores image files, where each image is stored as a record in the table.
Text Blocks A single table named Text Blocks. Stores blocks of text, where each text block is stored as a record in the table.
Copy Blocks A single table named Copy Blocks. Stores blocks of text interpreted as copy, where each text block is stored as a record in the table.
Text HTMLs A single table named Text HTMLs. Stores blocks of text interpreted as HTML, where each text block is stored as a record in the table.
PDFs A single table named PDFs. Stores PDF files, where each PDF is stored as a record in the table.
Sounds A single table named Sounds. Stores sound files, where each sound file is stored as a record in the table.
Videos A single table named Videos. Stores video files, where each video file is stored as a record in the table.
Binary Objects A single table named Binary Objects. Stores other binary object files, where each binary object file is stored as a record in the table.

MDM Data Manager Reference Guide 11
Table Type Description
Special tables
Masks
A single hierarchy table named Masks. In concept, a mask acts like a stencil, in that it blocks (“masks”) all main table records from view except the defined subset of records that are included in the mask, to allow the subset to be viewed and manipulated as a whole. A mask is a static snapshot of the set of records that are included in the mask (as opposed to a view or a named search, where the results set is determined dynamically every time the search is run). Each record in the Masks table is the name of a subset of main table records. MDM supports an unlimited hierarchy of masks.
Named Searches
A single flat table named Named Searches. A named search is a static snapshot of the search selections that were in effect when the named search was saved (as opposed to a mask, which is a snapshot of the subset of records), where the results set itself is determined dynamically when it is selected. Each record in the Named Searches table returns a subset of a main table’s records. MDM supports 400 named searches per repository.
Families
A single hierarchy table named Families. Used to further partition main table records in each category into smaller groups based upon the values of other fields and/or attributes. You can associate family data (a paragraph, an image, bullets) once with a family of products rather than with each individual product, and also define the table layout of the field and/or attribute data (field order; stack, vertical, and horizontal pivots; and other display options). This table is available only in Family mode.
Image Variants1
A single table named Image Variants. Used to define the structure and format of each of the variants for each image. Each variant is a modified version derived from an original image; the original image is never modified. This table is managed in MDM Console and is not visible in MDM Data Manager.
Relationships1
A single table named Relationships. Used to define each of the different record-level relationships. Each relationship can be either bidirectional (sibling) or unidirectional (parent-child). This table is managed in MDM Console and is not visible in MDM Data Manager, although the relationships between records can themselves be created and edited in Record mode.
Workflows
A single table named Workflows. Stores the workflows of an MDM repository, where each workflow is stored as a record in the table. Workflows are created and edited in MDM Data Manager.

12 MDM Data Manager Reference Guide
Table Type Description
Data Groups
A single hierarchy table named Data Groups. Stores the hierarchy of data groups used to break the entire set of objects in the MDM repository into manageable subgroups.
Validation Groups
A single hierarchy table named Validation Groups. Stores the hierarchy of validation groups used to organize multiple validations for subsequent execution as a group.
DATA TYPES
An MDM repository supports a variety of compound and structured data types that, like the set of MDM table types, are specifically suited for managing information in a master data repository.
NOTE ►► In the tables below, a bullet (•) in the column labeled “MV” means that the data type can be defined as multi-valued, so that a single field or attribute can be used to store multiple values.
DATA INTEGRITY ►► Multi-valued fields and attributes make the structure of an MDM repository dramatically simpler, more compact, and more searchable, by allowing you to store all the values corresponding to a particular data element in the same place. The alternative requires creating multiple fields or attributes, in some cases up to a maximum of one field or attribute for each possible value.
Table 2. Field Data Types (Standard SQL)
Data Type MV
SQL Server
Oracle DB2 MaxDB HANA ASE
Text
Text field (<= 500 chars).
Nvarchar Nvarchar2
Varchar
Varchar Nvarchar
Nvarchar
Text Large
Text field (> 500 chars)
Text CLOB CLOB Long Unicode
CLOB Text
Integer
4-byte integer field
Int Number Int Fixed (10)
Int Int
Real1
4-byte real field
Real Number Float Float (16)
REAL REAL

MDM Data Manager Reference Guide 13
Data Type MV
SQL Server
Oracle DB2 MaxDB HANA ASE
TimeStamp
DateTime field
DateTime
Date Timestamp
Timestamp
Timestamp
DateTime
Boolean
Two-valued field
Bit Number Smallint
Fixed (1) TINYINT TINYINT
1 MDM supports real numbers containing up to 7 significant digits.
Table 3. Field Data Types (MDM Extended)
Data Type MV Description
Text Normalized Text field with “special” (non-alphanumeric) characters removed for searching/sorting (always displays original).
Name Text field with internal structure for storing parts of a name (prefix, first, middle, last, suffix).
Log Text Large field with internal structure for managing multiple timestamped blocks of text within a single field.
AutoID Integer field that MDM automatically increments.
Currency
Real8 field displayed with a currency symbol.
Note: The maximum field length is 15 characters. MDM will not save numbers that are longer, irrespective of the
maximum number of decimal places set for the Currency field in the MDM Console.
GM Time TimeStamp field that is adjusted to a particular time zone.
Measurement ● Real field with an associated unit of measure.
Literal Date TimeStamp field that ignores the time part.
Literal Time TimeStamp field that ignores the date part.
Create Stamp TimeStamp field that MDM automatically sets with the date and time of record creation.
Time Stamp TimeStamp field that MDM automatically updates with the date and time of modification when any of the fields being tracked are updated.
User Stamp Text field that MDM automatically updates with the name of the user who makes the change when any of the fields being tracked are updated.
Mask ● Virtual field that stores an enumeration of main table records. It is never displayed but is used for searching.
Lookup [Flat] ● Field whose value(s) are a lookup into a flat table.
Lookup [Hierarchy] ● Field whose value(s) are a lookup into a hierarchy table.
Lookup [Taxonomy] Field whose single value is a lookup into a taxonomy table.
Lookup [Qualified] ● Field whose values are a lookup into a qualified table.

14 MDM Data Manager Reference Guide
Data Type MV Description
Lookup [Image] ● Field whose value(s) lookup into the Images table.
Lookup [Text Block] ● Field whose value(s) lookup into the Text Blocks table.
Lookup [Copy Block] ● Field whose value(s) lookup into the Copy Blocks table.
Lookup [Text HTML] ● Field whose value(s) lookup into the Text HTMLs table.
Lookup [PDF] ● Field whose value(s) lookup into the PDFs table.
Lookup [Sound] ● Field whose value(s) lookup into the Sounds table.
Lookup [Video] ● Field whose value(s) lookup into the Videos table.
Lookup [Binary Object]
● Field whose value(s) lookup into the Binary Objects table.
Table 4. Attribute Data Types
Attribute Data Type MV Corresponding MDM Field Type
Text ● Lookup [Flat]
Numeric ● Measurement
Coupled Numeric ● n/a
NOTE ►► A Text Normalized field stores the actual text value, but uses the normalized value for sorting and searching. The normalized value is an upper-case version of the original with non-alphanumeric characters removed (includes a-z, A-Z, and 0-9 from original value).
DATA INTEGRITY ►► See “Decimals, Fractions, and Floating Point Precision” in the MDM Console Reference Guide for more information about how MDM Data Manager handles fractions and floating point numbers in field and attribute values.
DIMENSIONS AND UNITS
As noted in the tables above, MDM has a compound data type for storing physical measurements that combines a numeric value with a unit of measure. It allows you to associate a physical dimension with a
measurement field or numeric attribute, and then to assign to every numeric value a unit of measure chosen from the list of units applicable to that dimension.
MDM currently has built-in support for over 70 different physical dimensions and over 750 different units of measure. In addition, MDM is able to convert between different units, for proper comparison and sorting of numeric values with different units within a list, impossible with most other systems that often store numeric values and units of measure as a single text string or in two distinct fields.

MDM Data Manager Reference Guide 15
DATA INTEGRITY ►► Physical dimensions make it easy to enforce data integrity, since units of measure must be selected from a predefined list of units rather than typed in by the user as a text string.
DATA INTEGRITY ►► Measurement fields and numeric attributes are 4-byte real fields with the exception of the dimensions Time and Frequency, which require the additional precision of 8-byte real fields.
TAXONOMIES
A taxonomy is a general term for classification scheme. The purpose of a taxonomy is to group like things together into categories, usually based on a set of common, category-specific characteristics, or attributes.
In the context of master data management, a taxonomy is what makes it possible to quickly locate a few specific records – or categories – in a database of thousands, tens of thousands, or even millions of records.
A taxonomy is usually hierarchical, meaning that some categories are subcategories of other categories. (In the MDM system, taxonomy tables are always hierarchical.) Most people are familiar, for example, with at least part of the hierarchical taxonomy used to classify animals, such as vertebrates mammals primates chimpanzees, and so on. Another example that you might experience in your daily life is groceries beverages carbonated decaffeinated. Each level of the hierarchy gets narrower in terms of what it includes.
MDM uses a hierarchical taxonomy of categories to structure master data in an MDM repository. A hierarchical taxonomy is typically represented as a “tree”.
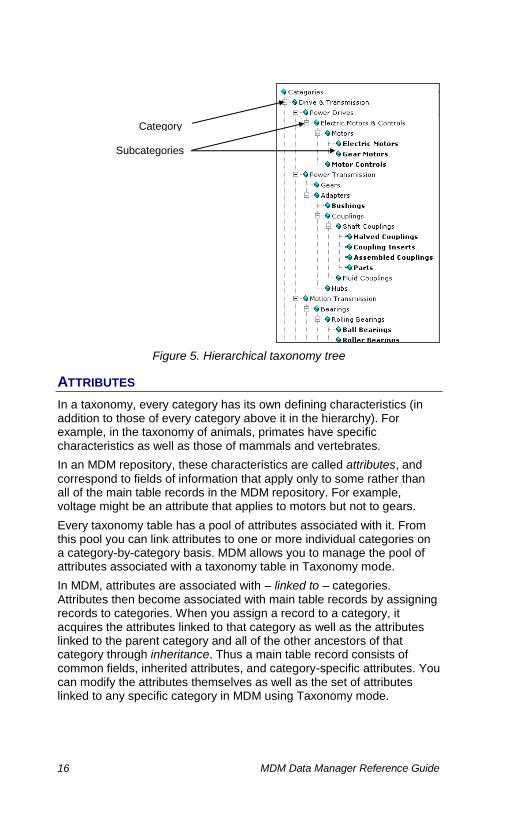
16 MDM Data Manager Reference Guide
Figure 5. Hierarchical taxonomy tree
ATTRIBUTES
In a taxonomy, every category has its own defining characteristics (in addition to those of every category above it in the hierarchy). For example, in the taxonomy of animals, primates have specific characteristics as well as those of mammals and vertebrates.
In an MDM repository, these characteristics are called attributes, and
correspond to fields of information that apply only to some rather than all of the main table records in the MDM repository. For example, voltage might be an attribute that applies to motors but not to gears.
Every taxonomy table has a pool of attributes associated with it. From this pool you can link attributes to one or more individual categories on a category-by-category basis. MDM allows you to manage the pool of attributes associated with a taxonomy table in Taxonomy mode.
In MDM, attributes are associated with – linked to – categories. Attributes then become associated with main table records by assigning records to categories. When you assign a record to a category, it acquires the attributes linked to that category as well as the attributes linked to the parent category and all of the other ancestors of that category through inheritance. Thus a main table record consists of common fields, inherited attributes, and category-specific attributes. You can modify the attributes themselves as well as the set of attributes linked to any specific category in MDM using Taxonomy mode.
Category
Subcategories
MDM Data Manager Reference Guide 17
NOTE ►► In MDM, an attribute is like a field, but one that applies only to a subset of the records in the main table. By contrast, a field is part of every record in the main table. If a particular attribute can be applied to every main table record, then it should be set up as a field in the main table. For example, every record in an MDM repository of products probably has an item number; therefore “Item Number” should be defined in the database as a field, and not as an attribute.
Attributes are displayed in lists in priority rather than alphabetical order, and can also be hidden entirely based on their priority.
Attributes and attribute priorities are described in more detail under “Attribute Types” on page 292, “Attribute Priorities” on page 293, and “Changing Attribute Priority” on page 343.
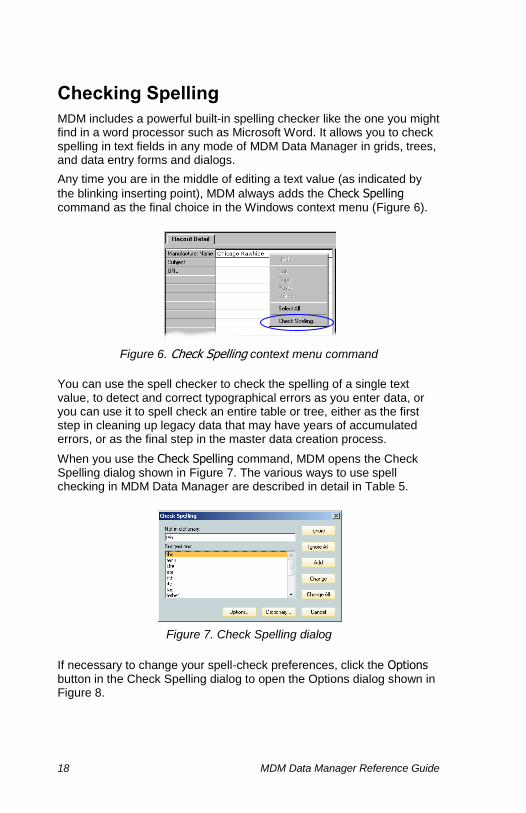
18 MDM Data Manager Reference Guide
Checking Spelling
MDM includes a powerful built-in spelling checker like the one you might find in a word processor such as Microsoft Word. It allows you to check spelling in text fields in any mode of MDM Data Manager in grids, trees, and data entry forms and dialogs.
Any time you are in the middle of editing a text value (as indicated by
the blinking inserting point), MDM always adds the Check Spelling command as the final choice in the Windows context menu (Figure 6).
Figure 6. Check Spelling context menu command
You can use the spell checker to check the spelling of a single text value, to detect and correct typographical errors as you enter data, or you can use it to spell check an entire table or tree, either as the first step in cleaning up legacy data that may have years of accumulated errors, or as the final step in the master data creation process.
When you use the Check Spelling command, MDM opens the Check Spelling dialog shown in Figure 7. The various ways to use spell checking in MDM Data Manager are described in detail in Table 5.
Figure 7. Check Spelling dialog
If necessary to change your spell-check preferences, click the Options button in the Check Spelling dialog to open the Options dialog shown in Figure 8.

MDM Data Manager Reference Guide 19
Figure 8. Check Spelling Options dialog
NOTE ►► Currently, MDM only supports spell-checking in English.
To spell check the value of a single text field, text block field, tree node name, or attribute property:
1. If necessary, double-click to begin editing the field or property, or press
F2 to begin editing the tree node.
2. Right-click and choose Check Spelling from the context menu, or
choose Edit > Check Spelling from the main menu to open the Check Spelling dialog (Figure 7 above).
To spell check all of the text fields of a single record:
1. Click on the record in the Record Detail tab and choose Edit > Check
Spelling from the main menu.
2. MDM spell checks each text field in sequence.
To spell check a copy block or text HTML block:
1. Double-click on the object cell to open the block editor.
2. Click the spell check button ( ) on the block editor’s toolbar to start the spell check.
To spell check all of the records or tree nodes of the current table, or all of the attributes of the current taxonomy table:
1. Click on the first item you want to check in the applicable pane
(Hierarchy, Taxonomy, Records, Attributes), and choose Edit > Check
Spelling from the main menu.
2. MDM spell checks each record, tree node, or attribute in sequence, and within each record or attribute, spell checks each field or property.

20 MDM Data Manager Reference Guide
Table 5. Spell Checking in MDM Data Manager
To Check… Do This… MDM Spell Checks…
Records
All of the records of the current table
In the Records pane on the first record you want to check, and choose Edit >
Check Spelling from the main menu.
From the selected record forward, record by record, field by field, word by word.
A particular record
Click in the Record Detail tab on one of
the fields, and choose Check Spelling from the main menu.
All of the editable text fields of the selected record, field by field, word by word.
A particular text field
Begin editing the text field in the Record
Detail tab, right-click and choose Check
Spelling from the context menu or the main menu.
All of the words of the text field being edited.
A portion of a text field
During editing, highlight a portion of the field value, right-click and choose Check Spelling from the context menu.
All of the highlighted words.
Trees
All of the nodes of an editable tree
Click in the tree pane on the first node
you want to check, and choose Check
Spelling from the main menu.
From the selected node forward, node by node, word by word.
A particular node
Press F2 to begin editing the node,
right-click and choose Check Spelling from the context menu or the main menu
All of the words of the node being edited.
A portion of a node
During editing, highlight a portion of the node name, right-click and choose
Check Spelling from the context menu.
All of the highlighted words.
Attributes
All of the attributes of a taxonomy table
Click in the Attributes pane on the first attribute you want to check, and
choose Edit > Check Spelling from the main menu.
From the selected attribute forward, attribute by attribute, property by property, word by word.
A particular attribute property
Begin editing the property in the Attribute Detail tab, right-click and
choose Check Spelling from the context menu.
All of the words of the attribute property being edited.
A portion of an attribute property
During editing, highlight a portion of the property value, right-click and
choose Check Spelling from the context menu.
All of the highlighted words.
Text Blocks, Text HTML Blocks, Copy Blocks
A text block Begin editing, right-click and choose
Check Spelling from the context menu.
All of the words of the block.
A portion of a text block
During editing, highlight a portion of the block, right-click and choose
Check Spelling from the context menu.
All of the highlighted words.
A text HTML block or copy block
During editing, click the spell check button on the editor toolbar.
All of the words of the block.

21
PART 2: RECORD MODE
This part covers the basics of record searching and editing and presents step-by-step procedures for the functions in Record mode.

22 MDM Data Manager Reference Guide
Working in Record Mode
Record mode is used to manage the records of any table in the MDM repository, including the main table, regular subtables, and object subtables.
When you first start MDM Data Manager, it places you in Record Mode with the connected repository’s main table selected as the current table. You can change tables at any time by selecting a different table from the current table drop-down list.
To switch to Record mode:
Click the Record Mode toolbar button (shown at left), or press Ctrl+1,
or choose View > Record Mode from the main menu.
To specify the current table:
Click on the drop-down table list (Figure 128) or press F4, and select the table whose records you want to search, view, or edit.
Alternatively, choose View > Table from the main menu and choose from the cascading menu of tables.
Figure 9. Drop-down table list in Record Mode
TIP ►► If you want to simply review the records in a table and wish to avoid any accidental changes, you can put MDM Data Manager into
read-only mode by clicking on the Read-Only toolbar button (shown at
left), or by choosing View > Read-Only from the main menu.

MDM Data Manager Reference Guide 23
RECORD MODE AT A GLANCE
The main window of Record mode consists of the items shown in the numbered callouts of Figure 10, listed below.
Figure 10. Record mode main window
1. Search Parameters pane
2. Records pane
3. Tabs pane
4. Status bar
Status Bar
The Status bar (Figure 11) displays the following mode-specific information for the current table (from left to right):
“n selected” (when zero or two or more records are selected)
“x of y records found” (where ‘y’ is the total number of records, and ‘x’ is the number of records displayed in the Records pane based on the current search selections)
“Record Mode”
Figure 11. Record mode status bar
3
2 1
4
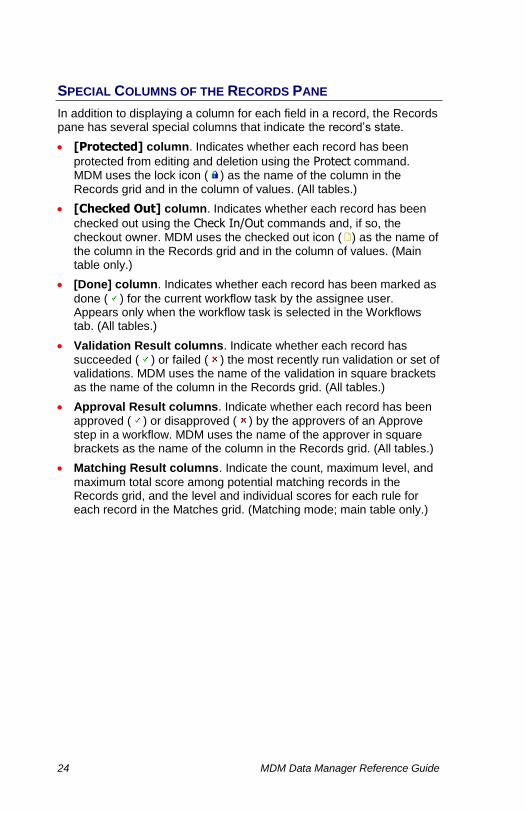
24 MDM Data Manager Reference Guide
SPECIAL COLUMNS OF THE RECORDS PANE
In addition to displaying a column for each field in a record, the Records pane has several special columns that indicate the record’s state.
[Protected] column. Indicates whether each record has been
protected from editing and deletion using the Protect command. MDM uses the lock icon ( ) as the name of the column in the Records grid and in the column of values. (All tables.)
[Checked Out] column. Indicates whether each record has been
checked out using the Check In/Out commands and, if so, the checkout owner. MDM uses the checked out icon ( ) as the name of the column in the Records grid and in the column of values. (Main table only.)
[Done] column. Indicates whether each record has been marked as
done ( ) for the current workflow task by the assignee user. Appears only when the workflow task is selected in the Workflows tab. (All tables.)
Validation Result columns. Indicate whether each record has
succeeded ( ) or failed ( ) the most recently run validation or set of validations. MDM uses the name of the validation in square brackets as the name of the column in the Records grid. (All tables.)
Approval Result columns. Indicate whether each record has been
approved ( ) or disapproved ( ) by the approvers of an Approve step in a workflow. MDM uses the name of the approver in square brackets as the name of the column in the Records grid. (All tables.)
Matching Result columns. Indicate the count, maximum level, and
maximum total score among potential matching records in the Records grid, and the level and individual scores for each rule for each record in the Matches grid. (Matching mode; main table only.)

MDM Data Manager Reference Guide 25
Searching for Records
When you want to locate a particular record or set of related records in the database, you perform a search. This allows you to view and manipulate a subset of records that match your search selections.
NOTE ►► You must be in Record mode to perform a search.
DRILLDOWN SEARCH VS. FREE-FORM SEARCH
There are two types of search in MDM Data Manager, as described in the following sections and as illustrated in Figure 12.
Drilldown Search
With drilldown search, you can make selections from each search tab, where each tab corresponds to a lookup field in the table (such as Manufacturer or Category). You can also make selections for each of the attributes linked to the selected category, and each of the qualifiers of a qualified table record. You can make selections in any order, to constrain the search results and converge on one or more products, and you can also remove search selections in any order to expand the set of search results and find similar products.
At each step along the way, the system narrows down the choice of values for each search dimension to show only those that are valid given the current result set based on the previous search selections. This is known as limiting and guarantees that you can never go down a
dead-end path. For example, if you select “Chain Saws” in the Category tab, and then open the Manufacturer tab, only the manufacturers of chain saws will be listed. (The specific names of tables and search tabs may be different in your particular repository). The result is an extremely flexible and powerful search capability, delivered through an exceptionally smooth and intuitive process.
DATA INTEGRITY ►► Limiting makes it easy to detect errors in your master data, when values that should not be part of the search results show up in the limited list of existing field or attribute values.
Free-Form Search
With free-form search, you can perform searches on any field that does not lookup its values from a subtable. Free-form search also allows you to do “fuzzy” searches with a variety of search operators; however, the down side of this approach is that you can also end up with no matching records, which cannot happen with drilldown search.
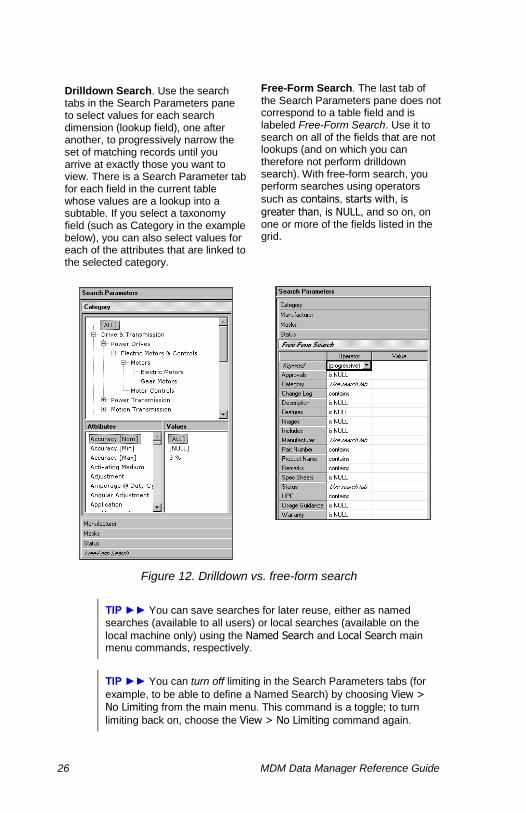
26 MDM Data Manager Reference Guide
Drilldown Search. Use the search tabs in the Search Parameters pane to select values for each search dimension (lookup field), one after another, to progressively narrow the set of matching records until you arrive at exactly those you want to view. There is a Search Parameter tab for each field in the current table whose values are a lookup into a subtable. If you select a taxonomy field (such as Category in the example below), you can also select values for each of the attributes that are linked to the selected category.
Free-Form Search. The last tab of the Search Parameters pane does not correspond to a table field and is labeled Free-Form Search. Use it to search on all of the fields that are not lookups (and on which you can therefore not perform drilldown search). With free-form search, you perform searches using operators
such as contains, starts with, is greater than, is NULL, and so on, on one or more of the fields listed in the grid.
Figure 12. Drilldown vs. free-form search
TIP ►► You can save searches for later reuse, either as named searches (available to all users) or local searches (available on the
local machine only) using the Named Search and Local Search main menu commands, respectively.
TIP ►► You can turn off limiting in the Search Parameters tabs (for
example, to be able to define a Named Search) by choosing View > No Limiting from the main menu. This command is a toggle; to turn
limiting back on, choose the View > No Limiting command again.
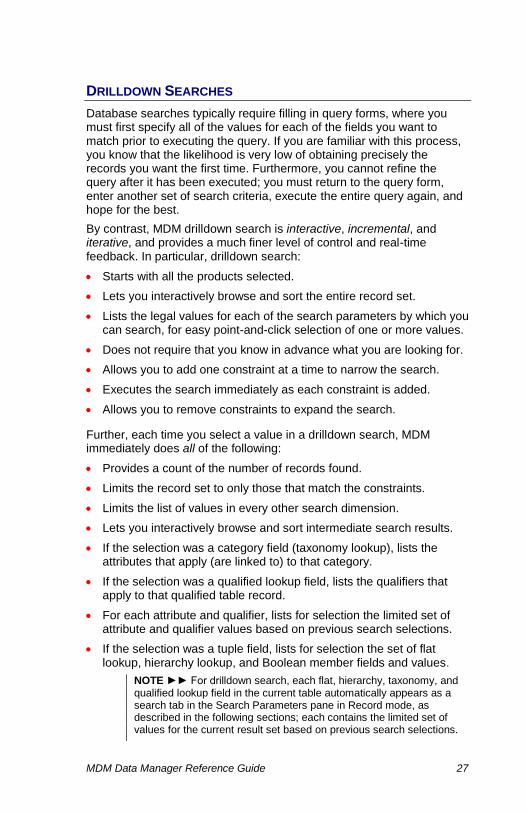
MDM Data Manager Reference Guide 27
DRILLDOWN SEARCHES
Database searches typically require filling in query forms, where you must first specify all of the values for each of the fields you want to match prior to executing the query. If you are familiar with this process, you know that the likelihood is very low of obtaining precisely the records you want the first time. Furthermore, you cannot refine the query after it has been executed; you must return to the query form, enter another set of search criteria, execute the entire query again, and hope for the best.
By contrast, MDM drilldown search is interactive, incremental, and iterative, and provides a much finer level of control and real-time feedback. In particular, drilldown search:
Starts with all the products selected.
Lets you interactively browse and sort the entire record set.
Lists the legal values for each of the search parameters by which you can search, for easy point-and-click selection of one or more values.
Does not require that you know in advance what you are looking for.
Allows you to add one constraint at a time to narrow the search.
Executes the search immediately as each constraint is added.
Allows you to remove constraints to expand the search.
Further, each time you select a value in a drilldown search, MDM immediately does all of the following:
Provides a count of the number of records found.
Limits the record set to only those that match the constraints.
Limits the list of values in every other search dimension.
Lets you interactively browse and sort intermediate search results.
If the selection was a category field (taxonomy lookup), lists the attributes that apply (are linked to) to that category.
If the selection was a qualified lookup field, lists the qualifiers that apply to that qualified table record.
For each attribute and qualifier, lists for selection the limited set of attribute and qualifier values based on previous search selections.
If the selection was a tuple field, lists for selection the set of flat lookup, hierarchy lookup, and Boolean member fields and values.
NOTE ►► For drilldown search, each flat, hierarchy, taxonomy, and qualified lookup field in the current table automatically appears as a search tab in the Search Parameters pane in Record mode, as described in the following sections; each contains the limited set of values for the current result set based on previous search selections.
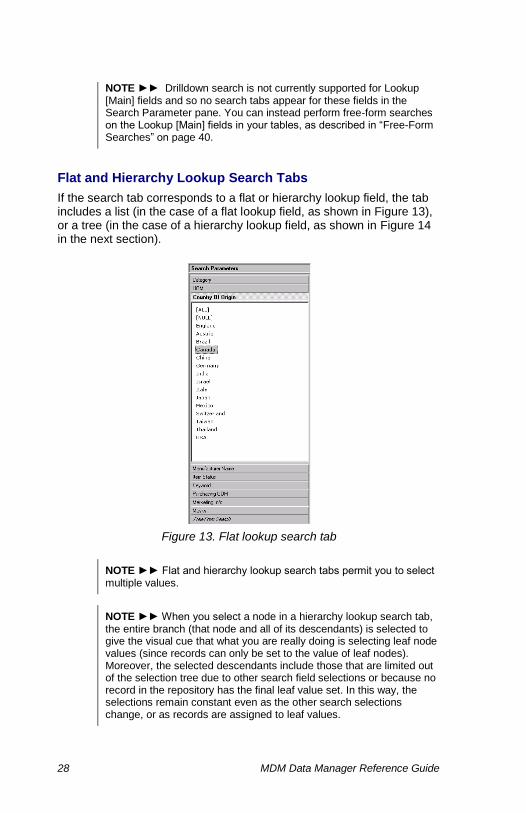
28 MDM Data Manager Reference Guide
NOTE ►► Drilldown search is not currently supported for Lookup [Main] fields and so no search tabs appear for these fields in the Search Parameter pane. You can instead perform free-form searches on the Lookup [Main] fields in your tables, as described in “Free-Form Searches” on page 40.
Flat and Hierarchy Lookup Search Tabs
If the search tab corresponds to a flat or hierarchy lookup field, the tab includes a list (in the case of a flat lookup field, as shown in Figure 13), or a tree (in the case of a hierarchy lookup field, as shown in Figure 14 in the next section).
Figure 13. Flat lookup search tab
NOTE ►► Flat and hierarchy lookup search tabs permit you to select multiple values.
NOTE ►► When you select a node in a hierarchy lookup search tab, the entire branch (that node and all of its descendants) is selected to give the visual cue that what you are really doing is selecting leaf node values (since records can only be set to the value of leaf nodes). Moreover, the selected descendants include those that are limited out of the selection tree due to other search field selections or because no record in the repository has the final leaf value set. In this way, the selections remain constant even as the other search selections change, or as records are assigned to leaf values.
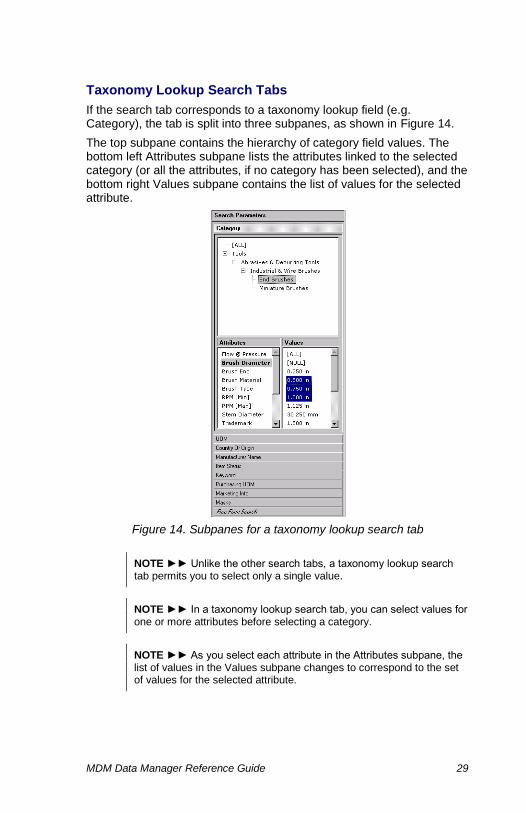
MDM Data Manager Reference Guide 29
Taxonomy Lookup Search Tabs
If the search tab corresponds to a taxonomy lookup field (e.g. Category), the tab is split into three subpanes, as shown in Figure 14.
The top subpane contains the hierarchy of category field values. The bottom left Attributes subpane lists the attributes linked to the selected category (or all the attributes, if no category has been selected), and the bottom right Values subpane contains the list of values for the selected attribute.
Figure 14. Subpanes for a taxonomy lookup search tab
NOTE ►► Unlike the other search tabs, a taxonomy lookup search tab permits you to select only a single value.
NOTE ►► In a taxonomy lookup search tab, you can select values for one or more attributes before selecting a category.
NOTE ►► As you select each attribute in the Attributes subpane, the list of values in the Values subpane changes to correspond to the set of values for the selected attribute.

30 MDM Data Manager Reference Guide
NOTE ►► The Attributes subpane lists attributes in priority order rather than alphabetical order, and hides those whose priority is below the threshold priority (see “Configuration Options” on page 495 for more information about the Attributes options).
NOTE ►► To distinguish different ratings for a numeric attribute, the Attributes subpane appends the rating abbreviation in square brackets
(e.g. Width [Max]) to the attribute name. However, MDM does not
append [Nom] when Nominal is the only rating for the attribute.
Nested Lookups and Multi-Level Search-within-a-Search
Lookup fields can appear not only in the main table but also within any of the lookup tables themselves, such as when the Manufacturer field in the main table is a lookup into the Manufacturers table of legal manufacturer names, and the State field in the Manufacturers table is in turn a lookup into the States table of legal two-letter state abbreviations.
In MDM Data Manager, each lookup field in a lookup table appears not only as a search tab when the current table is the lookup table, but also within the search tab for the main table lookup field when the current table is the main table, for multi-level “search-within-a-search.”
NOTE ►► A single nested lookup field allows the main table lookup field to support search-within-a-search. Multiple nested lookup fields not only support search-within-a-search, they also allow the lookup table to act as a valid table that defines specific value combinations among the values of each of the multiple nested lookup fields.
NOTE ►► Like all MDM drilldown searches, multi-level search-within-a-search is omnidirectional; that is, you can make nested lookup field value selections in any order and intermingle them with selections made from other search dimensions.
If the search tab corresponds to a lookup field into a table that contains one or more nested lookup fields, the tab is split into three subpanes, as shown in Figure 15.
The top left Lookups subpane lists the lookup fields of the lookup table itself, and the top right Values subpane contains the list of values for the selected nested lookup field. Finally, the bottom subpane contains the list of lookup table values (narrowed down based on the selections of values for the lookup fields of the lookup table).
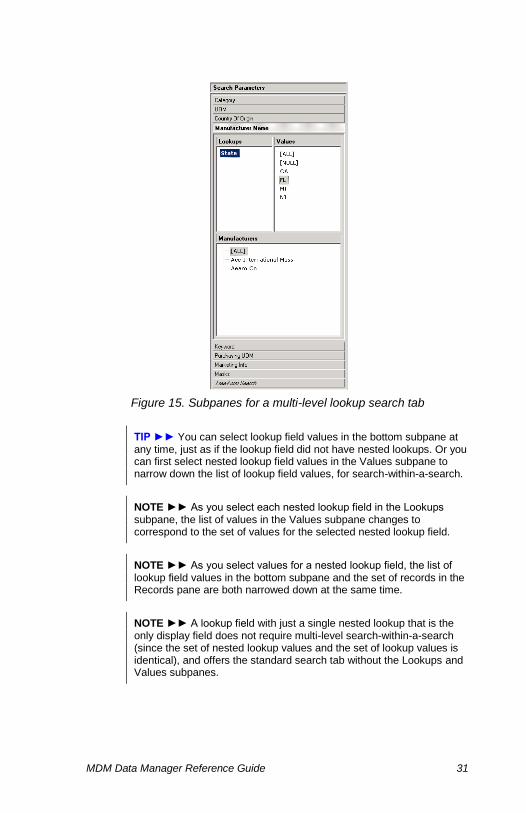
MDM Data Manager Reference Guide 31
Figure 15. Subpanes for a multi-level lookup search tab
TIP ►► You can select lookup field values in the bottom subpane at any time, just as if the lookup field did not have nested lookups. Or you can first select nested lookup field values in the Values subpane to narrow down the list of lookup field values, for search-within-a-search.
NOTE ►► As you select each nested lookup field in the Lookups subpane, the list of values in the Values subpane changes to correspond to the set of values for the selected nested lookup field.
NOTE ►► As you select values for a nested lookup field, the list of lookup field values in the bottom subpane and the set of records in the Records pane are both narrowed down at the same time.
NOTE ►► A lookup field with just a single nested lookup that is the only display field does not require multi-level search-within-a-search (since the set of nested lookup values and the set of lookup values is identical), and offers the standard search tab without the Lookups and Values subpanes.

32 MDM Data Manager Reference Guide
Qualified Lookup Search Tabs
If the search tab corresponds to a qualified lookup field, the tab is split into as many as five subpanes, as shown in Figure 16.
If the qualified table itself contains lookup fields, as described in the previous section, the top left Lookups subpane lists these nested lookup fields and the top right Values subpane contains the list of values for the selected nested lookup field (although these two subpanes are hidden if the qualified table does not contain any lookup fields). The middle subpane contains the list of qualified table records (narrowed down based on the selections of values for the lookup fields of the qualified table). Finally, the bottom left Qualifiers subpane lists the lookup qualifiers, and the bottom right Values subpane contains the list of values for the selected qualifier.
Figure 16. Subpanes for a qualified lookup search tab
NOTE ►► In a qualified lookup search tab, you can select values only for cached lookup qualifiers before selecting a qualified table record; for non-cached lookup qualifiers, you must explicitly select a qualified table record before the qualifier even appears in the Qualifiers subpane.
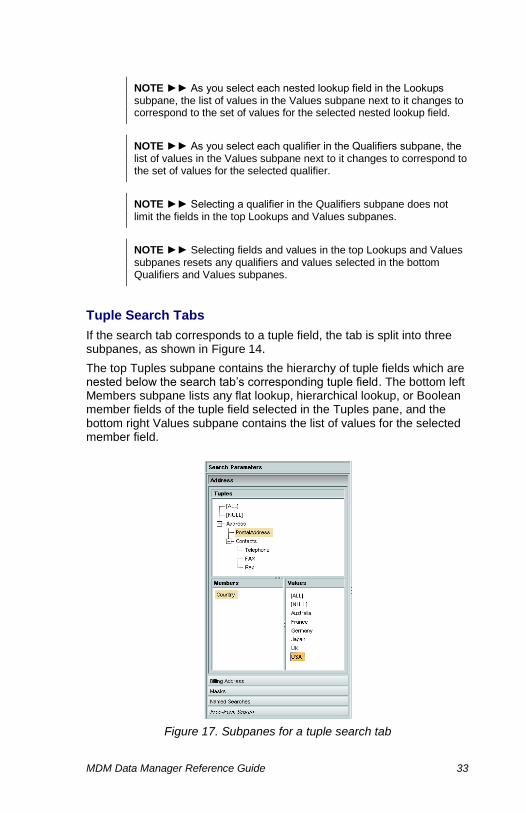
MDM Data Manager Reference Guide 33
NOTE ►► As you select each nested lookup field in the Lookups subpane, the list of values in the Values subpane next to it changes to correspond to the set of values for the selected nested lookup field.
NOTE ►► As you select each qualifier in the Qualifiers subpane, the list of values in the Values subpane next to it changes to correspond to the set of values for the selected qualifier.
NOTE ►► Selecting a qualifier in the Qualifiers subpane does not limit the fields in the top Lookups and Values subpanes.
NOTE ►► Selecting fields and values in the top Lookups and Values subpanes resets any qualifiers and values selected in the bottom Qualifiers and Values subpanes.
Tuple Search Tabs
If the search tab corresponds to a tuple field, the tab is split into three subpanes, as shown in Figure 14.
The top Tuples subpane contains the hierarchy of tuple fields which are nested below the search tab’s corresponding tuple field. The bottom left Members subpane lists any flat lookup, hierarchical lookup, or Boolean member fields of the tuple field selected in the Tuples pane, and the bottom right Values subpane contains the list of values for the selected member field.
Figure 17. Subpanes for a tuple search tab

34 MDM Data Manager Reference Guide
NOTE ►► In order to preserve the structure of a tuple hierarchy that contains nested lookup or Boolean member fields, the search tab may display tuple fields which have no flat lookup, hierarchy lookup, or Boolean member fields of their own. Selecting these tuples results in no values appearing in the Members and Values panes.
NOTE ►► If a tuple field on the current table contains no immediate or nested flat lookup, hierarchy lookup, or Boolean member fields, no search tab is added for that tuple field.
Performing a Drilldown Search
To be able to perform a drilldown search, the current table must be a table with lookup fields (usually the main table).
Drilldown searches use the search tabs in the Search Parameters pane on the left side of the Records mode main window (Figure 10). Each lookup field has its own search tab for drilldown search; that is, each search tab corresponds to a field in the table that is a lookup into a subtable. For example, a Manufacturer tab corresponds to the field of the same name that is a lookup into the Manufacturers table; similarly the Category tab corresponds to the Category field that is a lookup into the Categories table.
TIP ►► To navigate up and down the Search Parameter tabs using
the keyboard, press Ctrl+Tab or Shift+Ctrl+Tab.
To initialize (“reset”) the search criteria:
If you have not already cleared a previous search, you need to reset the search to clear the search selections and start with all of the
records in the selected table. Click the Reset Search toolbar button
(shown at left), choose Search > Reset Search, or press
Shift+Ctrl+Delete.
To perform a drilldown search:
1. Select the first search tab you want to use. MDM displays a list or hierarchy containing the set of valid values for the selected field. The
set of values includes [ALL] as its first choice (“Match records that contain any of the existing values for the field”), and may also include
[NULL] as its second choice (“Match records where no value has been entered for the field”).
TIP ►► To see all of the currently active search criteria at any time, click on the Search Selections tab next to the Record Detail tab.
2. Select the value or values you want to match.

MDM Data Manager Reference Guide 35
TIP ►► To find records that are missing a value for the selected field
or attribute, choose [NULL] from the list of values.
NOTE ►► As you select each value, MDM immediately narrows down the records displayed in the Records pane and updates the number of matching records found displayed on the status bar.
NOTE ►► As you select each value, MDM also narrows down the values displayed in every list or hierarchy in every other search tab (with the exception of the Named Searches tab, which is not limited and whose selections can lead you down a dead-end path of zero results).
NOTE ►► Nested lookup field names in the Lookups subpane, attribute names in the Attributes subpane, and Qualifier names in the Qualifiers subpane, that have values selected for them are highlighted in bold (see “Configuration Options” on page 495 for more information about the Display options).
NOTE ►► Multiple selections within a search dimension expand the search results. Each of the search selections are ORed together so that a record matches if it matches any of the values you select. However, if a field or attribute is multi-valued, you can change it so that the multiple search selections are instead ANDed together (see “OR Searches, AND Searches, and Multi-Valued Fields” in the next section).
DATA INTEGRITY ►► [NULL] searches make it easy to detect missing master data, when records that should not have NULL values show up in the search results.
3. Select other Search Parameter tabs and values as desired to further narrow the record set, until the Records list contains exactly the records you want to view or edit.
NOTE ►► Selections across multiple search dimensions narrow the search results. Each of the dimensions are ANDed together so that a record matches if it matches selections in all of the search dimensions (see “OR Searches, AND Searches, and Multi-Valued Fields” in the next section).
To remove a constraint and widen the search:
Select the applicable Search Parameter tab for the field or attribute
and select the [ALL] choice.
TIP ►► You can also right-click on a search tab and choose from the context menu to reset some or all of the selections for that search tab.

36 MDM Data Manager Reference Guide
OR Searches, AND Searches, and Multi-Valued Fields
When you select multiple values within and across search dimensions, they are combined as follows:
ORing. Multiple selections within a search dimension expand the
search results. Each of the search selections are ORed together so that a record matches if it matches any of the values you select.
ANDing. Selections across search dimensions narrow the search
results. Each of the dimensions are ANDed together so that a record matches if it matches selections in all of the search dimensions.
ORing multiple selections within a search dimension makes sense for a single-valued field, which cannot possibly match more than a single value for each record. If you were to instead AND multiple selections so that each record must match all of the values you select, you would always get no search results.
By contrast, a multi-valued field can store multiple values within a single record, so that ANDing multiple values can sometimes be more appropriate than ORing them. For example, if you select values Green and Red for the multi-valued attribute Color, you may want to match records that have: (1) either Green or Red (OR search); or (2) both Green and Red (AND search).
For multi-valued fields and attributes, MDM allows you to change the way multiple selections are combined from OR to AND.
To set a multi-valued field to AND multiple selections:
1. Make the multi-valued field the current search tab, or select the multi-valued attribute in the taxonomy search tab.
2. Right-click on the current search tab or the selected attribute and
choose AND Multi-Valued Search from the context menu, or choose
Search > AND Multi-Valued Search from the main menu.
3. MDM places a check next to the command in the menu, displays the
AND icon ( ) next to the field or attribute name as shown in Figure 18, and ANDs multiple search selections for the field or attribute.
Figure 18. AND multi-valued search tab

MDM Data Manager Reference Guide 37
NOTE ►► As you select each value, MDM narrows down the values displayed in every list or hierarchy not only in every other search tab but also in the current search tab. For this reason, Shift and drag selection is not available with multi-valued AND search.
NOTE ►► When ANDing multi-valued attributes, the AND icon ( ) appears inside the attribute pane next to the name of the attribute with the ANDed values.
NOTE ►► ANDing qualifier values is not supported.
TIP ►► The command is a toggle. To change back to OR from AND,
choose the AND Multi-Valued Search command again.
OR Searches, AND Searches, and Hierarchy Lookup Fields
Searching within a multi-valued hierarchy lookup search tab has special behavior and special meaning, especially as it relates to AND searches.
With an OR search, when you select a parent node in the hierarchy, the search results of each child are ORed together. MDM illustrates this by automatically selecting all of its children as if each of the children were individually selected, as shown in Figure 19.
Figure 19. Parent selection in hierarchy lookup search tab
If you then unselect one of the children (using Ctrl+Click to unselect the node), the other children remain selected and are ORed together, but MDM automatically unselects the parent, as shown in Figure 20.

38 MDM Data Manager Reference Guide
Figure 20. Child unselection unselects parent
NOTE ►► A taxonomy lookup search tab only permits single selection. Automatic selection/unselection of parents/children applies only for hierarchy lookup search tabs that permit multiple selection.
With an AND search, when you select a parent node in the hierarchy, the search results of each child are ORed together, to be ANDed together with other search selections. Because multiple selections are ANDed together, MDM does not automatically select all of its children.
In fact, when you select any node in the hierarchy, MDM automatically
unselects all of its ancestors and all of its descendants.
The search logic and selection/unselection behavior for OR and AND searches in a hierarchy lookup search tab is summarized in Table 6.
Table 6. OR and AND Searches in a Hierarchy Lookup Search Tab
Search Description
OR
Selecting an internal node causes all of its descendants to be selected and their results ORed together, to be ORed with other selections.
Selecting an internal node is the same as selecting each descendent separately, which can be used as a shortcut to select all but a few children, by first selecting the parent and then unselecting some children.
Unselecting any node causes all of its ancestors to be unselected as well. (If the parent node were to remain selected, it should produce the same results as if all of its descendants were selected, but one of the descendents was just unselected.)
AND
Selecting an internal node causes the results of all of its descendants to be ORed together as a single selection, to be ANDed with other selections.
Selecting an internal node is different than selecting each descendant separately, which ANDs the results of all selected descendants.
Selecting any node causes all of its ancestors and descendants to be unselected. (Because multiple selections are ANDed together, if an ancestor and descendant were to both remain selected, it would be the same as just having the descendant selected, so it would be confusing to leave them both selected.)
Unselecting a node just unselects that node.

MDM Data Manager Reference Guide 39
HIDING AND UNHIDING SEARCH TABS
To hide a search tab, right-click on it and choose Hide from the context menu. The search tab disappears from the Search Parameters pane.
To unhide a search tab, right-click on the search tab just beneath where
you want to insert the search tab, and choose Unhide from the context menu. Then select the search tab you want to unhide from the cascading menu of hidden search tab names, as shown in Figure 21. The unhidden search tab will be inserted above the search tab on which
you right-clicked to open the context menu.
Figure 21. Unhiding a search tab using the grid context menu
NOTE ►► Because the unhidden search tab is inserted above the displayed search tab on which you right-click, you cannot unhide a search tab to be the last search tab in the grid.
When the Search Parameters pane has the focus, you can also hide
and unhide search tabs by choosing View > Search Tabs from the main menu to open the Select Displayed Search Tabs dialog, as shown in Figure 22. Highlight the search tabs you want to hide in the Search
Tabs to Display list and click Remove, or highlight the search tabs you
want to unhide in the Available Search Tabs list and click Add. You can also drag-and-drop search tabs in the Search Tabs to Display list to reorder them in the Search Parameters pane. Finally, to display all the
search tabs and restore the default search tab order, click Default. Click
OK when you are done to close the Select Displayed Search Tabs dialog.

40 MDM Data Manager Reference Guide
Figure 22. Hiding search tabs using the View > Search Tabs command
FREE-FORM SEARCHES
If you need to search by a main table lookup field, a field that is not a lookup, or if you are not able to find what you want in the main table using drilldown search (or if there simply are no drilldown search tabs for the current table), you may need to resort to a free-form search.
A free-form search allows you to use operators such as contains, starts with, is less than or equal to, and so on, to find matching records (Figure 23). Also, free-form search does not restrict you to selecting one or more precise values from the list of existing values; you can enter any complete or partial value you wish for a field.
Figure 23. Free-Form Search tab
NOTE ►► Unlike drilldown search, free-form search can lead you down a dead-end path, since you are permitted to enter values that may not exist rather than being forced by MDM to choose only from a list of existing values.
You also can drag-and-drop search tabs in the Search Tabs to Display list to reorder them in the Search Parameters pane.
To display all the search tabs and restore the default search
tab order, click Default.

MDM Data Manager Reference Guide 41
The Free-Form Search tab contains a grid with three columns:
The first column is the row header and lists all the fields in the table, and for each qualified lookup field, all of its cached qualifiers.
The second column contains a drop-down list of operators for each field. The set of available operators depends on the field type.
The third column contains the values you specify.
NOTE ►► The first free-form search entry, Keyword, is not a field; (see “Keyword Search” on page 46 for more information).
NOTE ►► The second free-form search entry, Expression, is not a field (see “Expression Search” on page 42 for more information).
NOTE ►► Qualifiers that are cached – including non-lookup qualifiers – appear just after the corresponding qualified lookup field. They are indented and enclosed in square brackets ([]).
NOTE ►► Fields that are lookups into subtables support both free-form search and drilldown search (see “Combining Free-Form Search with Drilldown Search” on page 51 for more information); fields that are lookups into main tables support free-form search only.
NOTE ►► Free-form searches on lookup fields match against the looked-into table’s display field values.
Literal Search
Searching against any particular field in the table using free-form search performs a literal search, matching records only if that field matches precisely the literal string of characters that you type (including embedded spaces). The operator determines the kind of match that is required for the literal string.
Measurement Search
MDM features an innovative enhancement to free-form keyword text search called measurement search.
Measurement search automatically converts typed text values that represent measurements – those that consist of a numeric value and a unit – between different physical units, so you can find equivalent measurement values even when the value you type has a different unit from how it is stored in the repository.
So, for example, the measurement value "30 inches" stored in the repository can be found as any of: 30", 30 inches, 30 in, 2 1/2 feet, 2-1/2', 2.5 ft, 2 feet 6 inches, 76.2 centimeters, 762 mm, or 0.762 meter.

42 MDM Data Manager Reference Guide
NOTE ►► When performing a measurement search, MDM first converts the values in the record data to the searched-for dimension and then rounds the resulting values to the number of decimal places specified for the measurement field in MDM Console. The resulting values are what gets matched against the search criteria. (This conversion does not alter the actual values stored in the repository.)
NOTE ►► Measurement search leverages MDM’s built-in support for over 70 physical dimensions and over 750 different units of measure.
DATA INTEGRITY ►► Measurement fields and numeric attributes are 4-byte real fields with the exception of the dimensions Time and Frequency, which require the additional precision of 8-byte real fields.
Expression Search
Notice that the second row of the free-form search grid does not correspond to a field in the table either. Instead it is labeled Expression
and supports a special kind of free-form search. With Expression search, you can enter an arbitrary expression that performs a complex set of tests, including various arithmetic, string, and logical operators, and performed on multiple fields and attributes at the same time rather than just a single field. When you perform an Expression search, MDM Data Manager evaluates the expression on each record and returns the set of records for which the expression is either TRUE or FALSE, depending upon the selected operator.
NOTE ►► An expression that returns a NULL result evaluates to: (1)
TRUE for validations (validation SUCCESS); and (2) FALSE for search
(included in the search results for the is FALSE operator).
NOTE ►► When you double-click on the Value cell, MDM opens the Validation Expression dialog shown in Figure 24.
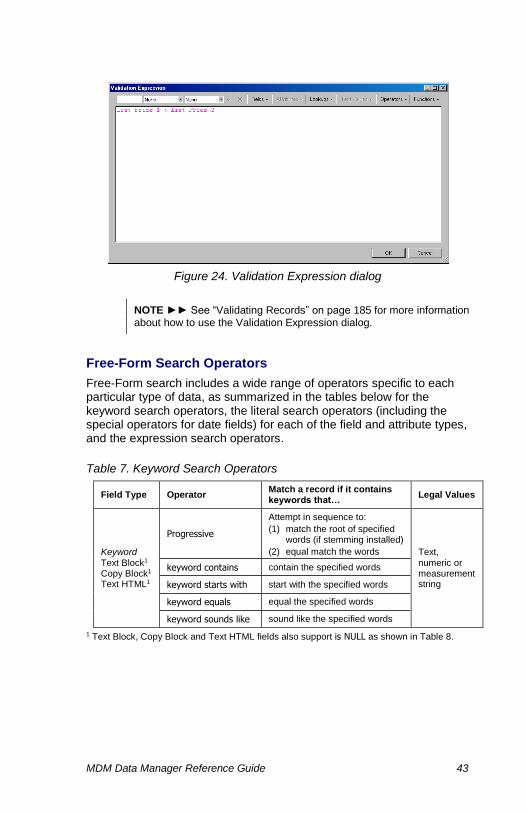
MDM Data Manager Reference Guide 43
Figure 24. Validation Expression dialog
NOTE ►► See “Validating Records” on page 185 for more information about how to use the Validation Expression dialog.
Free-Form Search Operators
Free-Form search includes a wide range of operators specific to each particular type of data, as summarized in the tables below for the keyword search operators, the literal search operators (including the special operators for date fields) for each of the field and attribute types, and the expression search operators.
Table 7. Keyword Search Operators
Field Type Operator Match a record if it contains keywords that…
Legal Values
Keyword
Text Block1 Copy Block1 Text HTML1
Progressive
Attempt in sequence to:
(1) match the root of specified words (if stemming installed)
(2) equal match the words Text, numeric or measurement string
keyword contains contain the specified words
keyword starts with start with the specified words
keyword equals equal the specified words
keyword sounds like sound like the specified words
1 Text Block, Copy Block and Text HTML fields also support is NULL as shown in Table 8.
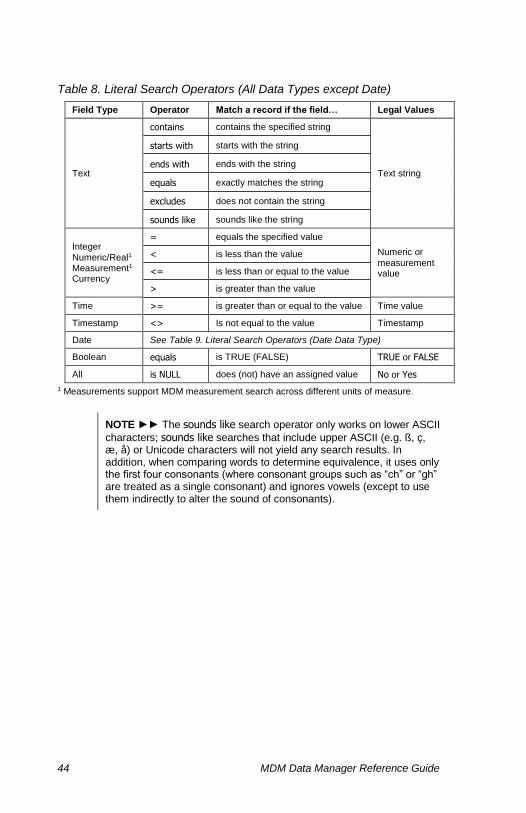
44 MDM Data Manager Reference Guide
Table 8. Literal Search Operators (All Data Types except Date)
Field Type Operator Match a record if the field… Legal Values
Text
contains contains the specified string
Text string
starts with starts with the string
ends with ends with the string
equals exactly matches the string
excludes does not contain the string
sounds like sounds like the string
Integer Numeric/Real1 Measurement1 Currency
= equals the specified value
Numeric or
measurement value
< is less than the value
<= is less than or equal to the value
> is greater than the value
Time >= is greater than or equal to the value Time value
Timestamp <> Is not equal to the value Timestamp
Date See Table 9. Literal Search Operators (Date Data Type)
Boolean equals is TRUE (FALSE) TRUE or FALSE
All is NULL does (not) have an assigned value No or Yes
1 Measurements support MDM measurement search across different units of measure.
NOTE ►► The sounds like search operator only works on lower ASCII
characters; sounds like searches that include upper ASCII (e.g. ß, ç, æ, å) or Unicode characters will not yield any search results. In addition, when comparing words to determine equivalence, it uses only the first four consonants (where consonant groups such as “ch” or “gh” are treated as a single consonant) and ignores vowels (except to use them indirectly to alter the sound of consonants).

MDM Data Manager Reference Guide 45
Table 9. Literal Search Operators (Date Data Type)
Field Type
Operator Match a record if the field… Legal Values
Date
ABS= equals the specified date value
Date value (mm/dd/yyyy)
ABS< is less than the value
ABS<= is less than or equal to the value
ABS> is greater than the value
ABS>= is greater than or equal to the value
ABS<> is not equal to the value
range is within the specified date range (between)
Current Month Next Month
Prior Month Current Year
Next Year Prior Year Custom +
date value pair (mm/dd/yyyy) (mm/dd/yyyy)
REL= = the specified date relative to today Today Tomorrow Yesterday
Current Month Next Month
Prior Month Current Year
Next Year Prior Year Custom +
integer value +
date unit (days,
months, years)
REL< < the specified date relative to today
REL<= <= the specified date relative to today
REL> > the specified date relative to today
REL>= >= the specified date relative to today
REL<> <> the specified date relative to today
is NULL does (not) have an assigned value No or Yes
NOTE ►► Each type of date operator accepts a different type of compound value for the operand: (1) the absolute comparison operators take a single explicit mm/dd/yyyy date value; (2) the range
operator takes a period from the drop-down list, or Custom and a pair of mm/dd/yyyy date values); (3) the relative comparison operators take
a period from the drop-down list, or Custom and an integer value (positive or negative) and date unit from the drop-down list to specify a point in time relative to today.

46 MDM Data Manager Reference Guide
Table 10. Expression Search Operators
Field Type Operator Match a record if the expression evaluates to…
Legal Values
Expression is TRUE TRUE
n/a is FALSE FALSE
DATA INTEGRITY ►► Being able to search for NULL values – in both drilldown and free-form search – makes it easy to search for missing data values.
KEYWORD SEARCH
The first row of the free-form search grid is labeled Keyword and supports a special kind of free-form search. When you perform a keyword search, MDM searches simultaneously across all of the keyword-enabled fields on the current table. It then matches a record if it can match the typed search terms within any of the record’s keyword-enabled fields.
For example, the keyword search entry “television” would return the following records:
recordID Product1 Description1
113 43” Television Widescreen; plasma
114 Television Stand Wood
115 3’ HDMI cable Television must have HDMI jack
1 Keyword-enabled field
Figure 25. Records found by keyword search
NOTE ►► Whether or not a field is keyword-enabled is determined by
the setting of the field’s Keyword property in MDM Console (see “To Keyword or Not To Keyword” in the MDM Console Reference Guide for more information).
NOTE ►► Keyword searches are not case-sensitive.
Multi-Word Keyword Searches
MDM supports multi-word keyword searching. It performs an “OR” or “AND” search depending on how you enter the search words.
Search terms separated by a semi-colon (;) are treated as OR searches where MDM matches a record if it contains any of the search words in its keyword-enabled fields.
For example, the keyword search entry “washer; dryer” would return all of the records shown in Figure 26.

MDM Data Manager Reference Guide 47
recordID Product1 Description1
112 Electric Dryer Washer sold separately
113 Washer and Dryer Side-by-side
114 Washer Top-loading
115 Dryer Front-loading
116 Laundrymatic 2000 Compact washer and dryer set
1 Keyword-enabled field
Figure 26. Records found by OR keyword search
As Figure 26 shows, the OR search returns records 114 and 115 are even though they do not contain all of the search words.
Search terms NOT separated by a semi-colon (;) are treated as AND searches. To match, a record must contain all of the search words anywhere in their keyword-enabled fields. Search words do not have to appear next to each other, or even in the same field, to match.
For example, the keyword search entry “washer dryer” would return the records shown in Figure 27.
recordID Product1 Description1
112 Electric Dryer Washer sold separately
113 Washer and Dryer Side-by-side
116 Laundrymatic 2000 Compact washer and dryer set
1 Keyword-enabled field
Figure 27. Records found by AND keyword search
As Figure 27 shows, the AND search does not return records 114 and 115 because they do not contain all of the search words.
Single-Field Keyword Searches
When you enter search terms in the Keyword row on the Free-Form Search grid, MDM searches all keyword-enabled fields on the current table. However, you can limit MDM to search only within specific, keyword-enabled text block, copy block, or text HTML fields by entering your search terms within the field’s own row in the free-form search grid.
Keyword Search Operators
Keyword search supports the set of operators shown in Table 7 on page 43. Each operator has some advantages and disadvantages.
Specifically: (1) progressive search has a compound effect when stemming is installed, finding variants of the search word in addition to
the search word itself; (2) contains search finds substrings but is
relatively slow; and (3) sounds like search is more forgiving about spelling errors but often returns many extraneous results.

48 MDM Data Manager Reference Guide
Sometimes, however, you may want to apply a different operator to each of the words you specify for the keyword search. For example, you
may want to perform a contains search on one word, an equals search
on another word, a stemmed search on another word, and finally, a
sounds like search on another word.
To achieve this type of hybrid search, the progressive search operator now allows you to tag each word with a wildcard for special handling.
The wildcards supported by the progressive search operator and their meaning are summarized in Table 11.
Table 11. Wildcards Supported by the Progressive Search Operator
Wildcard Position Syntax Search Behavior
n/a n/a word Stem then equal (default)
* Prefix *word [or *word*] Contains only
* Postfix word* Starts with only
= Prefix =word Equal only
+ Prefix +word Stem then equal then sounds like
NOTE ►► Be sure to put space between each of the search words.
KEYWORD STEMMING
When searching for keywords using the Progressive operator, MDM uses the Inxight stemming engine (if installed) to extract the stem (or base form) of the entered search words. Base forms are simply the form of the keyword found in the dictionary. With keyword stemming, MDM finds records containing the search words you entered, plus records containing any variants of your search words, saving you the hassle of performing multiple searches or simply not finding all of the records you were looking for.
For example, the words “grinding”, “grinds”, and “ground” are all variants of the verb grind. However, without keyword stemming, any search for the keyword “grind” might not find records containing “grinding” and “grinds” in their keyword fields (depending on the search operator) and would definitely miss records containing “ground”.
NOTE ►►Stemming is not available for non-whitespace languages such as Japanese, Thai, and Chinese languages.
NOTE ►► If the Inxight engine is not installed and defined in the mds.ini file, MDM uses the ngrams algorithm for stemming, which is not as broad, but is faster than the Inxight engine.
MDM Data Manager Reference Guide 49
How Stemming Works
Keyword stemming works by taking the search terms you entered and finding their base forms. Once a search term’s base form is found, MDM searches for all of its variants in your records’ keyword-enabled fields.
MDM does not match keywords which are a different part of speech than the search term you enter. For example, a keyword search for the noun “walker” will not match a record with the verb “walk” or its variants.
Table 12 describes the stemming behavior for different parts of speech.
Table 12. Variants Found For Different Parts of Speech
Part Variants Found Example (Stem > matching words)
Verb Person (first, second, third person)
Number (singular or plural)
Tense (past, present, future)
Be > am; are; is; was; been; being
Noun Number (singular or plural) Goose > goose; geese
Pronoun Number (singular or plural) That > that; those
Adjective Comparatives and superlatives Big > big; bigger; best
Adverb None Quickly > quickly
Unknown None ABC > ABC; abc
Sometimes, a search word can stem to multiple parts of speech. For example, the search term “ground” can have two base forms: the verb grind (as in, “Who ground the coffee beans?”) and the noun ground (as
in, “Be careful, the ground is wet.”). Because it is impossible for MDM to know which base form the user intended to search for, MDM will search for the variants of each of the base forms found for each of the search words entered.
Finally, If MDM is unable to determine the base form of a search term, it only searches for the term as it was originally entered.
Multi-Word Stemming
If more than one keyword search term is entered, MDM stems each word individually. If the search is an OR search, than any record containing any variant of any keyword search term is considered a match.
If the search is an AND search, than a record must contain any variant of each keyword search term to be considered a match.
See “Multi-Word Keyword Searches” on page 46 for more information about OR and AND keyword searches.
Compound Word Splitting
Compound words like “bookcase” and “football” (or “holzschraube” in German) are formed by combining two or more words. For some

50 MDM Data Manager Reference Guide
languages, MDM splits compounds into their component words, stems them into their base form, and then searches for variants of each component word in addition to variants of the compound word itself.
For example, if the German word “holzschraube” (meaning woodscrew) is entered as a keyword search term, MDM searches for variants of the words “holz” (wood), “schraube” (screw), and “holzschraube” and then matches any record containing any variant of any of these words.
Compound word splitting is performed for the following languages: Dutch, Finnish, German, and Swedish.
For all other languages, including English, MDM stems only the compound word itself, not its components.
For example, if the English word “bookcase” is entered as a keyword search term, MDM searches only for variants of the word “bookcase” (e.g. “bookcases”).
NOTE ►► The language used for keyword stemming is the language selected in the Connect to MDM Repository dialog.
Punctuation
Punctuation in search terms introduces ambiguity and should be avoided if possible. When it is not possible, such as when typing in a contraction (such as “can’t” or “won’t” in English) or an elision (such as “l’abri” in French), the word is typically split into its components, as shown in Table 13.
Table 13. Stemming Contractions and Elisions
Punctuation Mark Example Resulting Search Words
Apostrophe Can’t Can
‘t
Apostrophe l’abri l’
abri
NOTE ►► MDM has reserved some punctuation marks for use as wildcards, multi-word delimiters, and for performing hybrid searches (see “Keyword Search Operators’ on page 47 for more information).
MDM Data Manager Reference Guide 51
PERFORMING A FREE-FORM SEARCH
You can perform a free-form search on any table.
To start a free-form search:
1. Select the table you want to search. Free-Form Search always appears as the last search tab in the Search Parameters pane.
2. In the Free-Form Search tab, for the first field where you want to specify a search criterion, select an Operator from the drop-down list.
3. Type a Value and press Enter, or tab away from the field to run the search. MDM displays the number of matching records on the status bar.
4. Repeat steps 2 and 3 for additional search criteria. Remember, you can get to a point where there are no matching records. If this occurs, reset some of the search selections, or reset the entire search to start
from all the records by clicking on the Reset Search toolbar button, or
choosing Search > Reset Search from the main menu.
TIP ►► When you perform a free-form search on a text field using the
starts with operator, MDM Data Manager performs an incremental search. With incremental search, each successive character you type narrows down the search results immediately as you type it, without
waiting for you to press Enter. By contrast, all other data types and
operators require that you press Enter before MDM performs the search.
NOTE ►► Excludes search works by including results that have any values not in the exclude set. This means that if you have multiple values set for a field of a record, and you perform a search to exclude one of these values, you will still get that record because it contains the other value which is not in the excluded set.
NOTE ►► When you add a free-form search criteria for a field, MDM Data Manager automatically: (1) makes the field visible in the Records grid; and (2) sorts by that column, if it is sortable.
Combining Free-Form Search with Drilldown Search
You can always combine free-form search criteria with drilldown search selections. When the two are combined, the selections in each drilldown search tab are limited by the results of the free-form search.
With a lookup field, you can perform either a free-form search in the
Free-Form Search tab or a drilldown search in the corresponding search tab. Setting one clears the other, meaning you cannot use both types of searches for the same field at the same time.
52 MDM Data Manager Reference Guide
This either/or behavior on lookup fields provides a useful mechanism for “pre-limiting” the selections in a drilldown search tab. For example, to find all the “brush” categories, you could first perform a free-form “contains” search for "brush" for the Category field. This would limit the selections in the Category search tab to just those categories containing the word "brush" (e.g. End Brushes, Cap Brushes, and so on). Then, you could go into Category search tab and select the category you want from the limited hierarchy of categories.
NOTE ►► Unless you knew the first word in each category, you could not have used typeahead seek to locate the categories.
NOTE ►► To avoid dead-end searches, free-form search on a lookup field clears any pick list selections for the same lookup field.
Combining free-form search with drilldown search therefore enhances the use of the drilldown search tabs, in effect, providing a "search-within-a-search" even without nested lookup fields.
SAVING AND RESTORING NAMED SEARCHES
Data Manager includes the ability to save the search selections made on a main table to a record on the MDM repository’s Named Searches table. These named searches are available to any user connecting to the repository, unlike local searches which are saved to the file system of the machine on which a user is running Data Manager.
Before you can save search selections to a named search, you must first create a corresponding record on the Named Searches table and identify the main table for which the Named Search is to be available. The Named searches table supports a maximum of 400 records (400 named searches). Each time you save to a specific named search record, you overwrite its previously stored search selections.
Restoring a named search applies its associated search selections to the current record set and returns whatever set of records match this search criteria. Until you save search selections to a named search record, selecting the named search returns all records. However, once you save search selections to a named search, it is possible that restoring this named search can return zero records.
NOTE ►► A user’s ability to create a named search is controlled by
the Named Searches table privilege in MDM Console.
NOTE ►► You can add named searches as criteria for MDM Console’s record constraint feature.
NOTE ►► Named searches apply to top-level records only.

MDM Data Manager Reference Guide 53
To save the current search selections as a named search:
1. Choose Search > Save as Named Search from the main menu.
2. Select the named search to which you want to save the current search selections from the cascading menu of named searches.
NOTE ►► A user’s ability to save to a named search is controlled by
the Save Named Search role privilege in MDM Console.
To restore search selections from a named search:
1. Choose Search > Restore Named Search from the main menu.
2. Select the named search from which you want to restore search selections from the cascading menu of named searches.
3. MDM clears the current search selections and restores the search selections of the named search.
NOTE ►► Restoring a named search, which replaces the current search selections with those of the named search, is different than selecting a named search in the Named Searches search tab, which adds the named search as a current search selection.
SAVING AND RESTORING LOCAL SEARCHES
MDM Data Manager includes the ability to save all of the current search selections to a local search in the file system and then restore them at a later time.
NOTE ►► Each local search is visible in the cascading menu of local searches only to users on the workstation on which the local search was created.
To save the current search selections as a local search:
1. Choose Search > Save as Local Search from the main menu to open the Save as Local Search dialog shown in Figure 28.
Figure 28. Save as Local Search dialog
2. Type a name for the local search.
3. Click OK to close the Save as Local Search dialog and save the current search selections to the file system.
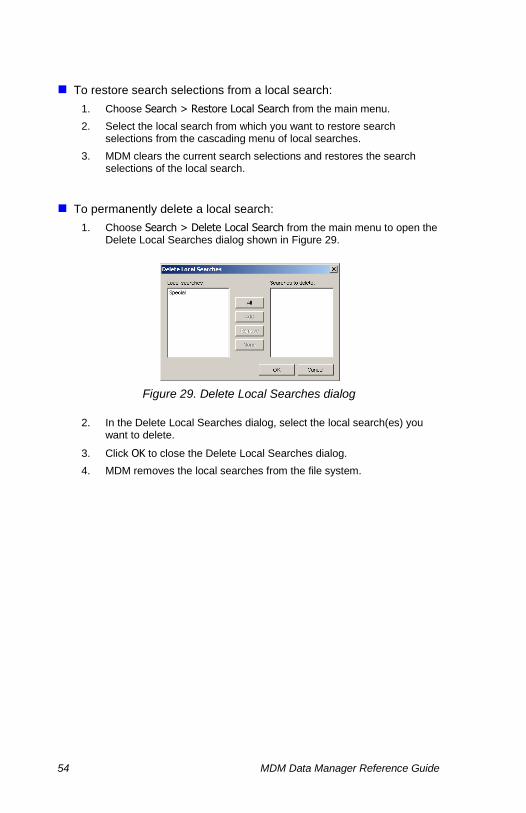
54 MDM Data Manager Reference Guide
To restore search selections from a local search:
1. Choose Search > Restore Local Search from the main menu.
2. Select the local search from which you want to restore search selections from the cascading menu of local searches.
3. MDM clears the current search selections and restores the search selections of the local search.
To permanently delete a local search:
1. Choose Search > Delete Local Search from the main menu to open the Delete Local Searches dialog shown in Figure 29.
Figure 29. Delete Local Searches dialog
2. In the Delete Local Searches dialog, select the local search(es) you want to delete.
3. Click OK to close the Delete Local Searches dialog.
4. MDM removes the local searches from the file system.
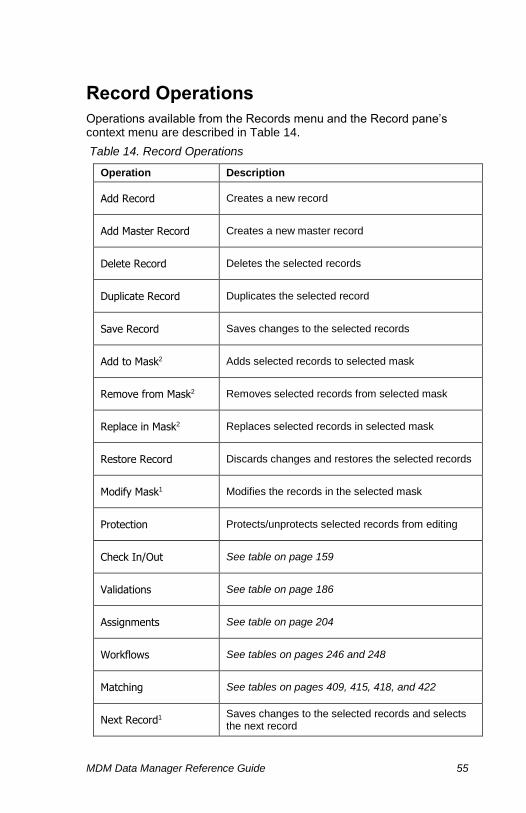
MDM Data Manager Reference Guide 55
Record Operations
Operations available from the Records menu and the Record pane’s context menu are described in Table 14.
Table 14. Record Operations
Operation Description
Add Record Creates a new record
Add Master Record Creates a new master record
Delete Record Deletes the selected records
Duplicate Record Duplicates the selected record
Save Record Saves changes to the selected records
Add to Mask2 Adds selected records to selected mask
Remove from Mask2 Removes selected records from selected mask
Replace in Mask2 Replaces selected records in selected mask
Restore Record Discards changes and restores the selected records
Modify Mask1 Modifies the records in the selected mask
Protection Protects/unprotects selected records from editing
Check In/Out See table on page 159
Validations See table on page 186
Assignments See table on page 204
Workflows See tables on pages 246 and 248
Matching See tables on pages 409, 415, 418, and 422
Next Record1 Saves changes to the selected records and selects the next record

56 MDM Data Manager Reference Guide
Operation Description
Previous Record1 Saves changes to the selected records and selects the previous record
Compare Records Displays a detail grid comparing the selected records
Compare with Original Displays comparison between the selected checked out record and the original record(s)
Merge Records Merges the selected records into a single record
Merge Objects2 Merges the selected object into a single object
Reimport2 Reimports the selected objects from their original location3
Replace2 Replaces the selected object with a new object3
Generate Thumbnail2 Generates the thumbnails for the selected objects3
Save Original to Disk2 Saves the original of the selected object to disk3
Set Print Size2 Sets the print size for the selected images3
Split Text Block2 Splits the selected text blocks by the specified3 delimiter
Edit Key Mappings Edits the key mappings for the selected record
Modify Text Value List1 Modifies the text value list of the current text attribute
Recalculate2 Refreshes calculated field(s) on the selected records
1 Operation appears in Records menu only. 2 Operation appears in context menu only. 3 Operation enabled on object tables only.
NOTE ►► See “Editing Record Details” on page 72 for information about editing record fields and attributes.
NOTE ►► See “Working with Objects” on page 99 for information about editing object lookup tables and fields.
DATA INTEGRITY ►► You can use role-based privileges to decide whether users must first check out records before adding, modifying, merging, or deleting them.
MDM Data Manager Reference Guide 57
LIMITS AND SLICING FOR MULTI- RECORD OPERATIONS
Most record operations can be performed on multiple records at a time by multi-selecting the records in the Records pane. The maximum number of records a user can edit, delete, check in, check out, roll back, recalculate, or merge in a single operation from the Records pane is
limited by the Maximum Record Modify Limit repository property in MDM Console.
Some operations also have the ability to be sliced, which breaks up the large set of records selected by the user into smaller groups, called slices, for processing. If slicing is enabled for an operation, it is possible for some records to succeed and others to fail. (If a single record in a record slice fails, all of the records in that slice are considered to fail—but other slices still have the opportunity to succeed. If slicing is not enabled, one failed record causes the entire operation to fail.) In cases where some record slices fail and others succeed, Data Manager gives users the opportunity to view the failed records and either save them to a mask or copy them to the Windows clipboard for later correction.
NOTE ►► See "What is Slicing?" in the MDM Console Guide for more information about slicing record operations.
ADDING RECORDS
You can add individual records directly into a repository by using the
Add Records operation.
On most tables, new records are added as the last record in the grid. On hierarchy tables, MDM adds the new record as the last child of the
root node. Pressing F5 refreshes the Records grid and moves the new record into its proper sort order.
To add a new record to the current table:
1. Right-click in the Records pane and choose Add from the context
menu, or click the Add Record toolbar button (shown at left), or press
Ins, or choose Records > Add Record from the main menu.
2. MDM adds a new empty record to the repository and places you into the Record Details pane for editing.
NOTE ►► Master records are for use with SAP for Retail. See the MDM 5.5 IT Scenario Process Guide for more information about adding master records.
DELETING RECORDS
You can permanently delete records from a repository by using the
Delete Records operation.
CAUTION ►► Once a record is deleted, it cannot be recovered.

58 MDM Data Manager Reference Guide
To permanently delete one or more records from the current table:
1. In the Records pane, select the record(s) you want to delete.
2. Right-click on one of the records and choose Delete from the context
menu, or click the Delete Record toolbar button (shown at left), or press
Del, or choose Records > Delete Record from the main menu.
3. MDM prompts you to confirm that you really want to delete the records.
Click OK to remove the records from the table.
DUPLICATING RECORDS
If you want to add a record that is similar to an existing record, instead
of using the Add Record command, you might save time by duplicating the similar record and editing the duplicate.
The Duplicate Record command duplicates the field and attribute data of a selected record as well as its sibling, parent, and child relationship links.
On most tables, duplicate records are added as the last record in the grid. On hierarchy tables, MDM adds the duplicate record as a sibling of
and just after the original record. Pressing F5 refreshes the Records grid and moves the duplicate record into its proper sort order.
To add a duplicate of a record to the current table:
1. In the Records pane, select the single record you want to duplicate.
2. Right-click on the record and choose Duplicate from the context menu,
or choose Records > Duplicate Record from the main menu.
3. MDM adds the duplicate record as the last record in the grid and places you into the Record Detail tab for editing.
4. Save the duplicated record or press Esc to discard it.
NOTE ►► You cannot duplicate object or Workflow table records.
NOTE ►► Write-once and unique field values are duplicated. You have the opportunity to change the values of Write-once fields on a duplicated record immediately after the duplication, before it is saved.
NOTE ►► MDM prepends the text, “Copy of”, to the primary display field values of duplicate records, according to the Repository
Properties setting, Prepend “Copy of” on duplicate record. (For more information on this setting, see “Modifying Repository Properties” in the MDM Console Reference Guide.)

MDM Data Manager Reference Guide 59
SAVING AND RESTORING RECORDS
When you first click inside a cell in the Record Detail grid, MDM displays a pencil icon next to the selected record(s) in the Records pane (Figure 30) as an indicator of which records are being edited.
Once you actually make changes to the selected records, MDM enables
the Save Record and Restore Record commands. Saving a record saves the record changes to the repository. Restoring a record discards all unsaved changes and returns the record to its last saved state.
CAUTION►► Once a record is saved it cannot be restored to its previous state.
Figure 30. Pencil icon next to a record in the Records grid
To save changes to the record(s) you are editing:
Right-click on the Record Detail tab and choose Save Record from the context menu, or
Choose Records > Save Record from the main menu, or
Press Shift+Enter, or
Move the focus away from the Record Detail tab.
To discard unsaved changes and restore the record(s) to their prior state:
Right-click on the Record Detail tab and choose Restore Record from the context menu, or
Choose Records > Restore Record from the main menu, or
Press Esc.
PROTECTING RECORDS
If you have finished editing a record, and want to make sure that it is not inadvertently modified or deleted, either by you or by someone else, you can write-protect it.
MDM highlights protected records in read-only gray in both the Records pane and the Record Detail pane, to indicate that they cannot be edited
Pencil icon
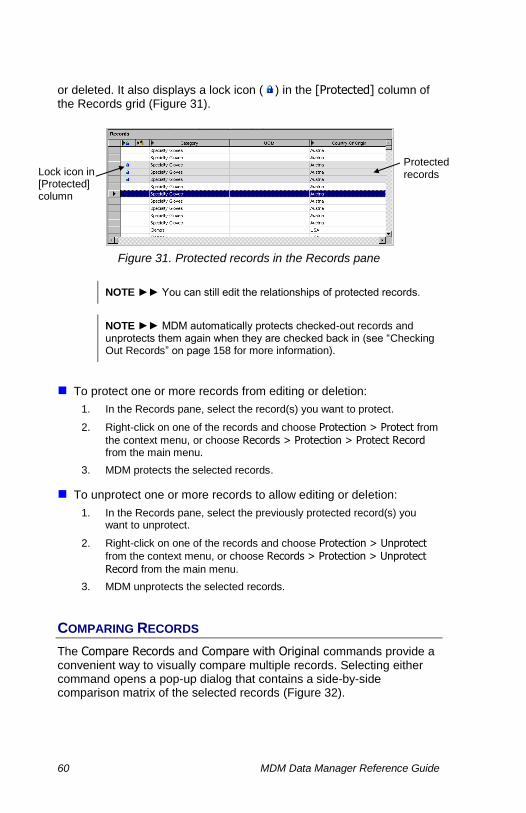
60 MDM Data Manager Reference Guide
or deleted. It also displays a lock icon ( ) in the [Protected] column of the Records grid (Figure 31).
Figure 31. Protected records in the Records pane
NOTE ►► You can still edit the relationships of protected records.
NOTE ►► MDM automatically protects checked-out records and unprotects them again when they are checked back in (see “Checking Out Records” on page 158 for more information).
To protect one or more records from editing or deletion:
1. In the Records pane, select the record(s) you want to protect.
2. Right-click on one of the records and choose Protection > Protect from
the context menu, or choose Records > Protection > Protect Record from the main menu.
3. MDM protects the selected records.
To unprotect one or more records to allow editing or deletion:
1. In the Records pane, select the previously protected record(s) you want to unprotect.
2. Right-click on one of the records and choose Protection > Unprotect from the context menu, or choose Records > Protection > Unprotect
Record from the main menu.
3. MDM unprotects the selected records.
COMPARING RECORDS
The Compare Records and Compare with Original commands provide a convenient way to visually compare multiple records. Selecting either command opens a pop-up dialog that contains a side-by-side comparison matrix of the selected records (Figure 32).
Protected records Lock icon in
[Protected] column
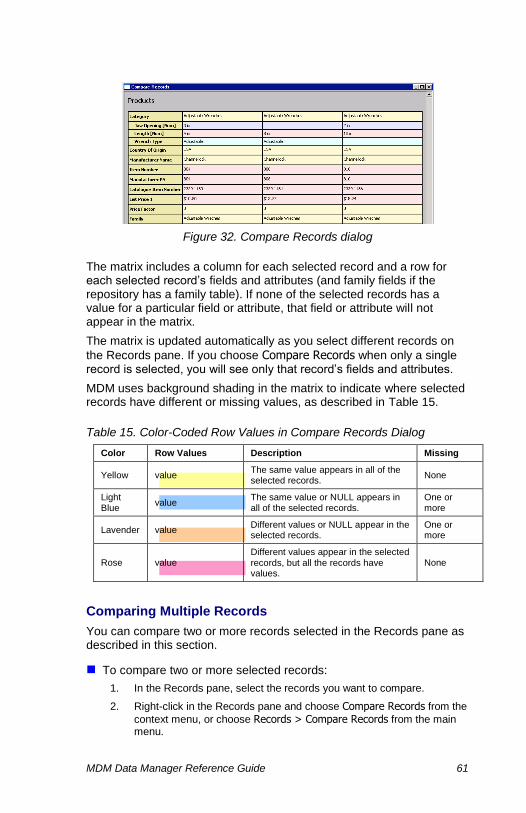
MDM Data Manager Reference Guide 61
Figure 32. Compare Records dialog
The matrix includes a column for each selected record and a row for each selected record’s fields and attributes (and family fields if the repository has a family table). If none of the selected records has a value for a particular field or attribute, that field or attribute will not appear in the matrix.
The matrix is updated automatically as you select different records on
the Records pane. If you choose Compare Records when only a single record is selected, you will see only that record’s fields and attributes.
MDM uses background shading in the matrix to indicate where selected records have different or missing values, as described in Table 15.
Table 15. Color-Coded Row Values in Compare Records Dialog
Color Row Values Description Missing
Yellow value The same value appears in all of the selected records.
None
Light Blue
value The same value or NULL appears in all of the selected records.
One or more
Lavender value Different values or NULL appear in the selected records.
One or more
Rose value Different values appear in the selected records, but all the records have values.
None
Comparing Multiple Records
You can compare two or more records selected in the Records pane as described in this section.
To compare two or more selected records:
1. In the Records pane, select the records you want to compare.
2. Right-click in the Records pane and choose Compare Records from the
context menu, or choose Records > Compare Records from the main menu.

62 MDM Data Manager Reference Guide
3. MDM opens the Compare Records dialog.
4. Click the close button in the upper right corner of the dialog when you are done viewing the comparison.
Comparing Checked-Out Records with their Originals
The Compare with Original command allows you to quickly compare a single checked-out record with its original version in the repository. It opens the same pop-up dialog as shown in Figure 32 above, but instead of comparing different records the comparison is between the checked-out record and its original(s).
NOTE ►► If the checked out record is the result of having previously merged multiple checked out records, then the checked out record is compared against all of the pre-merge originals.
The Compare with Original command is disabled for records that were checked out new.
To compare a checked out record with its original record(s):
1. In the Records pane, select the checked out record you want to compare to its original(s).
2. Right-click in the Records pane and choose Compare with Original from the context menu, or choose Records > Compare with Original from the main menu.
3. MDM opens the Compare Records dialog.
4. Click the close button in the upper right corner of the dialog when you are done.
MERGING RECORDS
Merging records is necessary when you have multiple records that contain the same information, but no single record that provides a complete and up-to-date version of that information.
Moreover, the challenge is not only to specify the correct field and attribute values within a single record and then eliminate the duplicates, but also to detect all lookup field values and parent/child product relationships that reference any of the merged records and to reassign them to the single merged result record.
When you use the Merge Records command, MDM opens the Merge Records dialog. The dialog contains a grid with: (1) a column for the merged result record; (2) a column for each selected record; and (3) a row for each of the fields and attributes of the selected records. You can then merge the records and the underlying values as described in the following sections.

MDM Data Manager Reference Guide 63
NOTE ►► You can use the Merge Records command only to merge main table or object table records in Record mode. To merge hierarchy and taxonomy lookup table records, use drag-and-drop or the Cut and Paste as Merge commands in Hierarchy and Taxonomy modes (see “Merging Nodes with Drag-and-Drop” on page 274 and “Merging Categories with Drag-and-Drop” on page 308 for more information). To merge the tuple records contained in a tuple field, use the Merge command in the Edit Tuple Records dialog.
The Merge Records Dialog
The Merge Records dialog contains a grid with: (1) a column for the merged result record; (2) a column for each selected “source” record; and (3) a row for each of the fields and attributes of the selected records, as shown in Figure 33.
Figure 33. Merge Records dialog
NOTE ►► In the grid, the column for the merged result record is
named [Merged Record], while the column for each selected source
record is named with the value of the record’s display field (or [NULL] if the display field is empty).
NOTE ►► The set of attributes includes the combined set of attributes for all the categories represented by the selected records. When you set the category value in the merged result record, MDM highlights the names of the attributes that are not linked to that category in blue. Then, when you close the Merge Records dialog, MDM automatically links to that category any attributes in blue for which you set values in the merged record.

64 MDM Data Manager Reference Guide
Color Coding of Data Values
Like multi-record selection in the Records pane, source record values in the Merge Records dialog grid are color-coded to indicate whether they are the same as, different than, or missing in the other source records, as further described in Table 16.
Table 16. Color-Coded Row Values in Merge Records Dialog
Color Row Values Description Missing
None No value appears in any of the selected records.
All
Black Value The same value appears in all of the selected records.
None
Blue Value The same value or NULL appears in all of the selected records.
One or more
Magenta value1 Different values or NULL appear in the selected records.
One or more
Red value1 Different values appear in the selected records, but all the records have values.
None
NOTE ►► Notwithstanding the color coding above, for each row whose value is set, the value is displayed in black bold in: (1) the
[Merged Record] column; and (2) each of the original record column(s) that supplied the value, highlighting the source of each merged value.
Record Merge Operations
The Merge Records dialog does not allow you to type values into the cells of the grid for the merged result record. Rather, it provides a set of record merge operations for quickly – and accurately – setting the values for the merged record without typing.
The record merge operations you can perform within the Merge Records dialog include:
Copying all values from a source record to the merged record
Copying only non-NULL source values to the merged record
Copying source values only to NULL values in the merged record
Copying a single source value to the merged record
Appending a source value to a multi-value in the merged record
Concatenating a source value to a text value in the merged record
Pasting a source value to a different field in the merged record
Selecting which multi-values to use in the merged record

MDM Data Manager Reference Guide 65
Merging multiple values into a single value in the merged record
TIP ►► You can double-click on a source column grid cell to quickly set the field value of the merged record for the selected field (overwriting the previously set value, if any).
Operations applying to individual field or attribute values are summarized in Table 17, and operations applying to an entire record are summarized in Table 18.
Table 17. Record Merge Operations (Grid Cell Context Menu)
Operation Description
[Merged Record] grid cells
Paste1 Sets the cell value using the copied source value.
Paste as Append1,2 Appends the copied source value to the set of previously set cell values.
Paste as Concatenate3 Concatenates the copied source value to the previously set cell value.
Select Values…2 Sets the cell value using your choice of previously set cell values.
Merge Values…4 Sets the cell value using a merged set of previously set cell values.
Clear Clears the previously set cell value(s).
Source record grid cells
Set Sets the merged record value using the source value.
Append2 Appends the source value(s) to the set of previously set merged record values.
Concatenate3 Concatenates the source value to the previously set merged record value.
Copy Copies the source value.
Set Values…2 Sets the merged record value using your choice of source values.
Append Values…2 Appends your choice of source values to the set of previously set merged record values.
1 Can only paste to fields sharing the same data type as the copied value 2 Multi-valued fields only 3 Text fields only 4 Tuple fields only

66 MDM Data Manager Reference Guide
Table 18. Record Merge Operations (Column Title Context Menu)
Operation Description
[Merged Record] column
Set All (Equal) Sets all merged record values using only values which are equal across all source records.
Set All (Equal or NULL) Sets all merged record values only values which are equal or NULL across all source records.
Clear All Clears all previously set values of the merged record.
Source record columns
Set All Sets all merged record values using the values of the source record (both NULL and non-NULL).
Set with Non-NULLs Only Sets all values of the merged record using only the non-NULL values of the source record.
Set NULLs Only Sets only the NULL values of the merged record using the values of the source record.
Performing the Merge
You can merge multiple records into a single record, including the reassignment of all lookup field values and parent/child relationships that reference any of the merged records, as described in this section.
To merge multiple records into a single record:
1. In the Records pane, select all of the records you want to merge.
2. Right-click on one of the records and choose Merge Records from the
context menu, or choose Records > Merge Records from the main menu to open the Merge Records dialog shown in Figure 33.
3. Set the values in the merged result record as follows:
Double-click on a source column grid cell to quickly set the field value of the selected field.
Use the column title context menu to quickly set all the field values of the merged record.
Use the grid cell context menu to set the field value of the selected field, or to copy and paste values between fields.
4. When you are done setting values, press OK to close the Merge Records dialog and merge the selected records.
If any automatic validations apply to the merged record, Data Manager runs those validations before saving the record.
NOTE ►► Data Manager automatically updates all related lookup field links and parent/child relationships as a result of the merge.
MDM Data Manager Reference Guide 67
Merging Subsets of Values from Multi-Valued Fields
Sometimes, you may want to merge only a subset of values from a
multi-valued field. The Set Values, Append Values, and Select Values commands each open a Merge Values dialog, from which you can choose the values to use in the merged record. The specific dialog that opens varies according to the type of data contained in the multi-valued field.
NOTE ►► You do not need to manually update the links shown in the Usage tab of an object lookup field’s Merge Values dialog, as Data Manager does this for you as part of the merge operation.
Merging Tuple Records within a Tuple Field
Merging tuple records within a tuple field is necessary when the tuple field contains multiple tuple records with the same information, but no single tuple record that provides a complete and up-to-date version of that information.
NOTE ►► You can also merge tuple records from within the Edit Tuple Records dialog.
To merge tuple records from the Merge Records dialog:
1. Right-click on a tuple field in the [Merged Record] column and choose Merge Values from the pop-up context menu to open the Merge Tuple Records dialog.
2. In Tuple Records pane of the Merge Tuple Records dialog, select two or more tuple records to merge.
3. Click the Merge button to open a new Merge Records dialog.
4. Perform the merge and click OK when finished to return to the Merge Tuple Records dialog.
5. When finished merging tuple records, click OK to update the tuple field with the new, merged tuple records.
NOTE ►► As it does when merging table records, Data Manager automatically updates all related lookup field links and parent/child relationships as a result of merging tuple records.

68 MDM Data Manager Reference Guide
Auto-Populating the Merged Record
To help streamline the merging of multiple records that may have many fields, qualifiers, and attributes, MDM can automatically set the values
of the [Merged Record] column in the Merge Records dialog with values from the selected records, so that you do not have to set them manually.
Which [Merged Record] values get populated automatically is
determined by the setting of the Auto-Populate in Merge Records Dialog configuration option:
None. MDM does not populate any values; every one of them must
be set manually.
All Values Equal. MDM auto-populates values for fields in which all
source recorde share the same value.
All Values Equal or NULL. MDM auto-populates values for fields in
which all source records have the same or NULL values.
NOTE ►► The last two configuration settings correspond to the
manual record merge operations Set All (Equal) and Set All (Equal or
ULL), which are available from the [Merged Record] column.
Regardless of the setting, you must manually populate rows in which different values exist for the selected source records.
Record Merge and Checkout
If you try to merge a combination of checked-in and checked-out records, the following message appears:
"The selected records cannot be merged since there is a mixture of checked out and non-checked out records."
You can choose from the following options:
Don't check out the records If you try to proceed with the merge after choosing this option, you will receive an error stating that records in different checkout statuses cannot be merged.
Check out exclusively The non-checked out records are checked out exclusively and you can proceed with the merge operation.
Check out non-exclusively The non-checked out records are checked out non-exclusively and you can proceed with the merge operation.
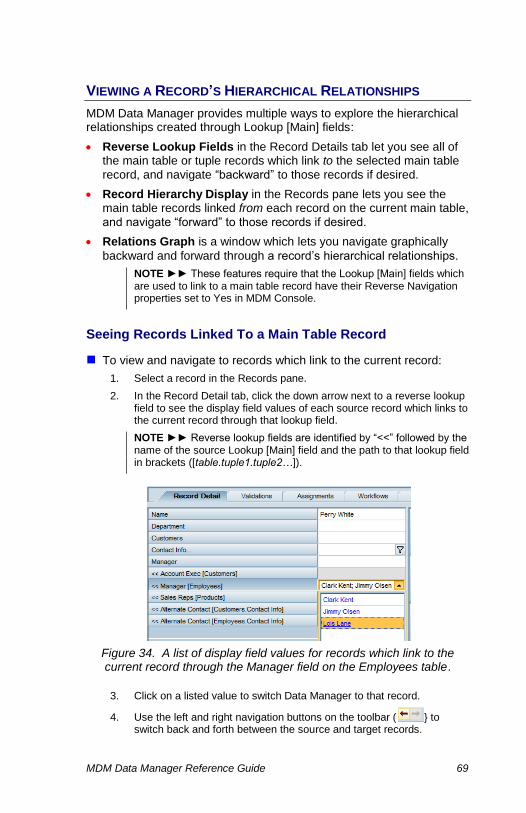
MDM Data Manager Reference Guide 69
VIEWING A RECORD’S HIERARCHICAL RELATIONSHIPS
MDM Data Manager provides multiple ways to explore the hierarchical relationships created through Lookup [Main] fields:
Reverse Lookup Fields in the Record Details tab let you see all of the main table or tuple records which link to the selected main table
record, and navigate “backward” to those records if desired.
Record Hierarchy Display in the Records pane lets you see the main table records linked from each record on the current main table,
and navigate “forward” to those records if desired.
Relations Graph is a window which lets you navigate graphically
backward and forward through a record’s hierarchical relationships.
NOTE ►► These features require that the Lookup [Main] fields which are used to link to a main table record have their Reverse Navigation properties set to Yes in MDM Console.
Seeing Records Linked To a Main Table Record
To view and navigate to records which link to the current record:
1. Select a record in the Records pane.
2. In the Record Detail tab, click the down arrow next to a reverse lookup field to see the display field values of each source record which links to the current record through that lookup field.
NOTE ►► Reverse lookup fields are identified by “<<” followed by the name of the source Lookup [Main] field and the path to that lookup field in brackets ([table.tuple1.tuple2…]).
Figure 34. A list of display field values for records which link to the current record through the Manager field on the Employees table.
3. Click on a listed value to switch Data Manager to that record.
4. Use the left and right navigation buttons on the toolbar ( } to switch back and forth between the source and target records.

70 MDM Data Manager Reference Guide
Seeing Records Linked From Main Table Records
To view and navigate to records linked from a main table:
1. Select the desired main table as the current table.
2. Click the + icon in the upper-right corner of the Records pane and choose one of the table’s Lookup [Main] fields to base the hierarchy display upon.
Figure 35. The list of Lookup [Main] fields in the current table
NOTE ►► Available choices include all Lookup [Main] fields on the current table, plus any Lookup [Main] fields located in the table’s tuple fields.
3. Expand a current table record to see the target records linked to the
current record through the chosen lookup field. If the target records are located on a different table than the current table, Data Manager adds new header columns to the hierarchy display.
4. Double-click on a target record to switch Data Manager to that record.
5. Use the left and right navigation buttons on the toolbar ( ) to switch back and forth between the source and target records.
6. To turn off the hierarchy display, repeat step 1 and choose [None].
Seeing a Visual Depiction of a Record’s Hierarchy
To navigate graphically through a record’s hierarchy:
1. Select the desired main table as the current table.
2. Select a record and click the Relations Graph icon ( ) on the Data
Manager toolbar.
3. Navigate through the Relations Graph using the following toolbar and/or context-menu options:

MDM Data Manager Reference Guide 71
Table 19. Relations Graph Options
Option Description
Back Switch back to the original record
Forward Switch to the previous record
Hide/Show Details Hide or show the Details pane
Anchor View Do not change the Selected Record when a new record is selected in the Records pane
Go to Main Record Open this record in the Records pane and set it as the Selected Record in the Relations graph
Go to Tuple Record
Open this record in the Tuple Editor and set it as the Selected Record in the Relations graph
The Relations Graph can display one hierarchy level in either direction from the selected record. Records to the left of the Selected Record link to the selected record and are grouped under the Lookup [Main] field of
the source table/tuple. Records to the right of the Selected Record are linked from the selected record and are grouped under the Lookup [Main] field of the target table.
A triangle( ◄ or ►) next to a record indicates that the record hierarchy extends further in that direction. Double-clicking on that record sets it as the new Selected Record and exposes its related records.

72 MDM Data Manager Reference Guide
Editing Record Details
As you make search selections, the set of matching records appears automatically in the Records pane. Selecting a record in the Records pane displays the record’s data in the Record Detail tab, where you can edit record information (Figure 37).
Figure 37. Steps for editing records
The following sections describe how to edit the various field and attribute types available with MDM.
NOTE ►► Once you edit a record, the record must be saved before the changes are applied in the repository (see “Saving and Restoring Records” on page 59 for more information).
NOTE ►► See “Working with Objects” on page 99 for information about editing object lookup tables and fields.
DATA INTEGRITY ►► You can use role-based privileges to decide whether users must check out records before editing them.
2 Select record(s) from the search results list here
1 Make search
selections here
3 Edit the selected record(s) here

MDM Data Manager Reference Guide 73
KEYBOARD SHORTCUTS FOR RECORD EDITING
Since it is common to edit a series of adjacent records in the Records pane, and even to edit the same fields in each record, MDM Data Manager provides several time-saving keystroke combinations that speed up editing under these circumstances, as listed in Table 20.
Table 20. Keyboard Shortcuts for Record Editing
Keystroke Command Description
Shift+Ctrl+Up Previous Record Saves the current record and moves to the previous record while remaining on the same cell in the Record Detail tab.
Shift+Ctrl+Down Next Record Saves the current record and moves to the next record while remaining on the same cell in the Record Detail tab.
Ctrl+' “Ditto” Enters the value entered into the same field in the previously edited record.
F2 Edit Enters the field for editing, or opens the drop-down control for selection.
Shift+Enter Save Record Saves the changes made to the current record or group of records.
Esc Restore Record Discards changes and restores the previous field values. This must be done before changes have been saved.
NOTE ►► Each of the commands above works only when the focus is on a cell in the Record Detail tab.
IDENTIFYING REQUIRED FIELDS
You can configure Data Manager to mark required fields with an
asterisk in the Record Detail pane (see Identify Required Fields with an Asterisk in “Configuration Options” on page 495 for more information). This feature applies to the local Data Manager only.
See “Required Fields” in the MDM Console Reference Guide for information about how to enable a field as a required field.
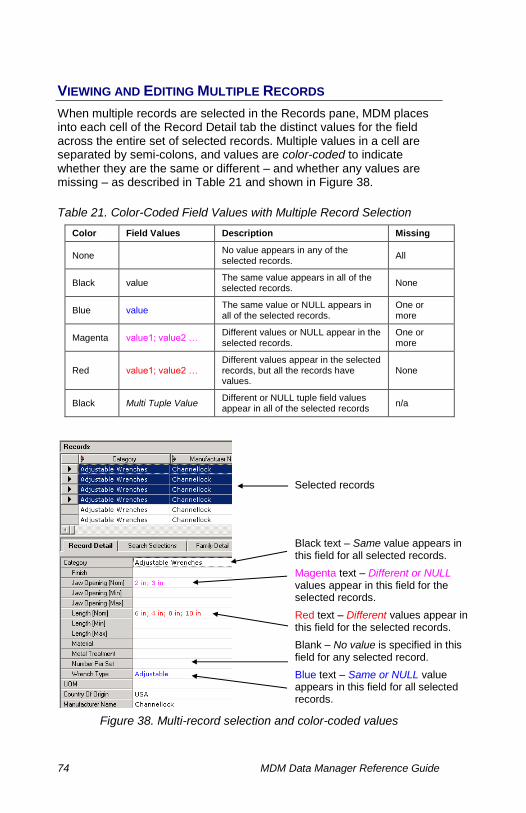
74 MDM Data Manager Reference Guide
VIEWING AND EDITING MULTIPLE RECORDS
When multiple records are selected in the Records pane, MDM places into each cell of the Record Detail tab the distinct values for the field across the entire set of selected records. Multiple values in a cell are separated by semi-colons, and values are color-coded to indicate whether they are the same or different – and whether any values are missing – as described in Table 21 and shown in Figure 38.
Table 21. Color-Coded Field Values with Multiple Record Selection
Color Field Values Description Missing
None No value appears in any of the selected records.
All
Black value The same value appears in all of the selected records.
None
Blue value The same value or NULL appears in all of the selected records.
One or more
Magenta value1; value2 … Different values or NULL appear in the selected records.
One or more
Red value1; value2 … Different values appear in the selected records, but all the records have values.
None
Black Multi Tuple Value Different or NULL tuple field values appear in all of the selected records
n/a
Figure 38. Multi-record selection and color-coded values
Black text – Same value appears in this field for all selected records.
Magenta text – Different or NULL values appear in this field for the selected records.
Red text – Different values appear in this field for the selected records.
Blank – No value is specified in this field for any selected record.
Blue text – Same or NULL value appears in this field for all selected records.
.
Selected records
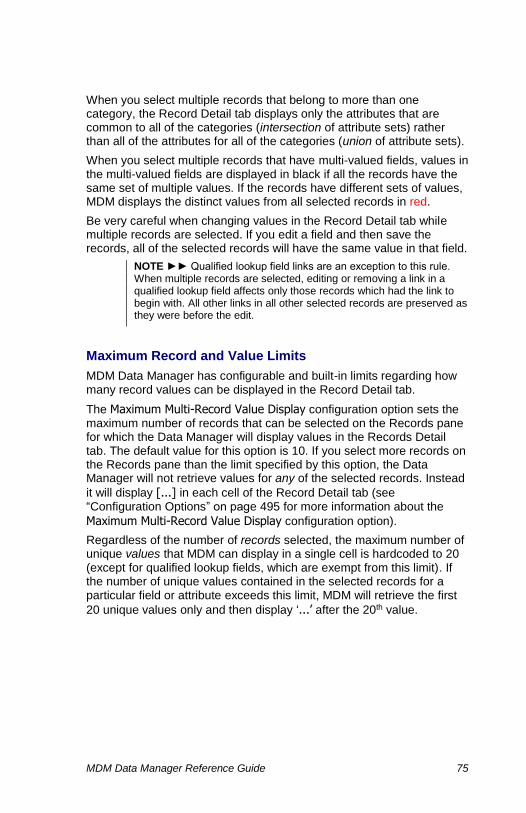
MDM Data Manager Reference Guide 75
When you select multiple records that belong to more than one category, the Record Detail tab displays only the attributes that are common to all of the categories (intersection of attribute sets) rather than all of the attributes for all of the categories (union of attribute sets).
When you select multiple records that have multi-valued fields, values in the multi-valued fields are displayed in black if all the records have the same set of multiple values. If the records have different sets of values, MDM displays the distinct values from all selected records in red.
Be very careful when changing values in the Record Detail tab while multiple records are selected. If you edit a field and then save the records, all of the selected records will have the same value in that field.
NOTE ►► Qualified lookup field links are an exception to this rule. When multiple records are selected, editing or removing a link in a qualified lookup field affects only those records which had the link to begin with. All other links in all other selected records are preserved as they were before the edit.
Maximum Record and Value Limits
MDM Data Manager has configurable and built-in limits regarding how many record values can be displayed in the Record Detail tab.
The Maximum Multi-Record Value Display configuration option sets the maximum number of records that can be selected on the Records pane for which the Data Manager will display values in the Records Detail tab. The default value for this option is 10. If you select more records on the Records pane than the limit specified by this option, the Data Manager will not retrieve values for any of the selected records. Instead
it will display [...] in each cell of the Record Detail tab (see “Configuration Options” on page 495 for more information about the
Maximum Multi-Record Value Display configuration option).
Regardless of the number of records selected, the maximum number of unique values that MDM can display in a single cell is hardcoded to 20 (except for qualified lookup fields, which are exempt from this limit). If the number of unique values contained in the selected records for a particular field or attribute exceeds this limit, MDM will retrieve the first
20 unique values only and then display ‘...’ after the 20th value.
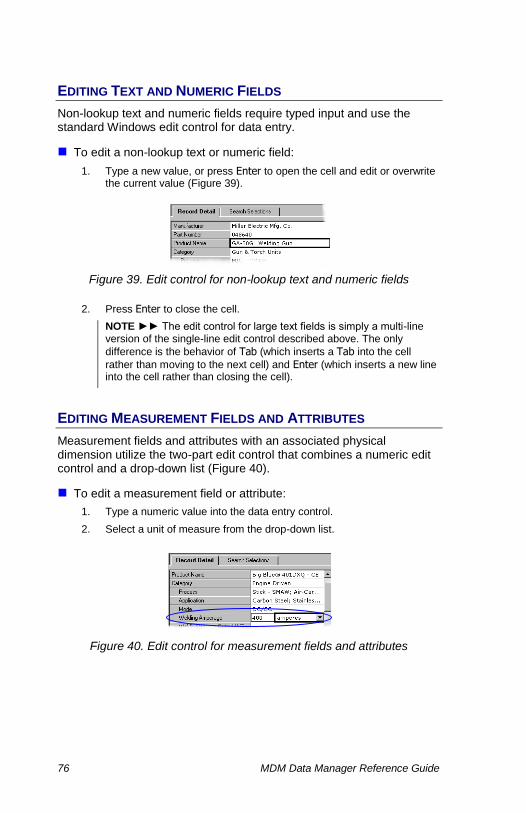
76 MDM Data Manager Reference Guide
EDITING TEXT AND NUMERIC FIELDS
Non-lookup text and numeric fields require typed input and use the standard Windows edit control for data entry.
To edit a non-lookup text or numeric field:
1. Type a new value, or press Enter to open the cell and edit or overwrite the current value (Figure 39).
Figure 39. Edit control for non-lookup text and numeric fields
2. Press Enter to close the cell.
NOTE ►► The edit control for large text fields is simply a multi-line version of the single-line edit control described above. The only
difference is the behavior of Tab (which inserts a Tab into the cell
rather than moving to the next cell) and Enter (which inserts a new line into the cell rather than closing the cell).
EDITING MEASUREMENT FIELDS AND ATTRIBUTES
Measurement fields and attributes with an associated physical dimension utilize the two-part edit control that combines a numeric edit control and a drop-down list (Figure 40).
To edit a measurement field or attribute:
1. Type a numeric value into the data entry control.
2. Select a unit of measure from the drop-down list.
Figure 40. Edit control for measurement fields and attributes

MDM Data Manager Reference Guide 77
EDITING LOOKUP FIELDS
The values of a lookup field are limited to the records available in the field’s lookup table. To edit the value of a lookup field, you must either select a new value from the lookup field’s drop-down pick list, or search for the new value using the field’s drop-down search control.
NOTE ►► Whether you select or search for a lookup field’s values is
determined by the lookup table type and/or the lookup field’s Value Selection property in MDM Console. Lookups into main tables always require searches.
Selecting Lookup Field Values from a Pick List
Pick lists vary in appearance based on the lookup table type (hierarchy and taxonomy lookup fields display values in a tree, for example) and whether the field is single- or multi-valued.
To edit a single-valued lookup field using a pick list:
1. Double-click in the applicable field or click on the down triangle to open the drop-down pick list.
2. Select a new value from the drop-down list.
3. Press Enter or click on the up triangle to close the drop-down control.
To edit a multi-valued lookup field using a pick list:
1. Double-click in the applicable field or click on the down triangle to open the drop-down pick lists.
2. Select or deselect items from the drop-down pick list, as follows:
To add Available list item(s) to the Selected list, highlight them and click the Add button.
To remove items from the Selected list, highlight them and click the Remove button.
To add all of the items to the Selected list, click All.
To remove all of the items from the Selected list, click None.
NOTE ►► For hierarchy lookup fields, Data Manager displays internal nodes in gray, unselected values in black, and selected values in bold.
3. Press Enter or click on the up triangle to close the drop-down pick list.

78 MDM Data Manager Reference Guide
Searching for Lookup Field Values
Because lookup tables may contain hundreds of thousands of records (or more), Data Manager provides a drop-down search function to help you select lookup field values which match the criteria you provide.
To edit a single-valued lookup field using Lookup Search:
1. Double-click in the applicable field or click on the down triangle to open the drop-down Lookup Search control. The control contains a row for each display field in the lookup table.
2. In the Lookup Search control, enter or select display field values to narrow down the available values. Data Manager displays the number of matching lookup table records at the top of the control.
Figure 41. The drop-down Lookup Search
TIP ►► You can use the wildcard ‘*’ to perform starts-with searches (“ABC*”), ends-with searches (“*XYZ”), and contains searches (“*JKL*”) on text fields in the mini-search control.
3. If your search returns multiple records, click the Pick Record… button to select the desired lookup field value from a list of matching lookup table records in the Select Lookup Record dialog.
Figure 42. The Select Lookup Record dialog
NOTE ►► If the number of matching records exceeds 50, Data Manager displays a warning before opening the Select Lookup Record
dialog. This threshold can be customized in the Select Lookup Record Threshold configuration option (See “Configuration Options” on page 495 for more information).
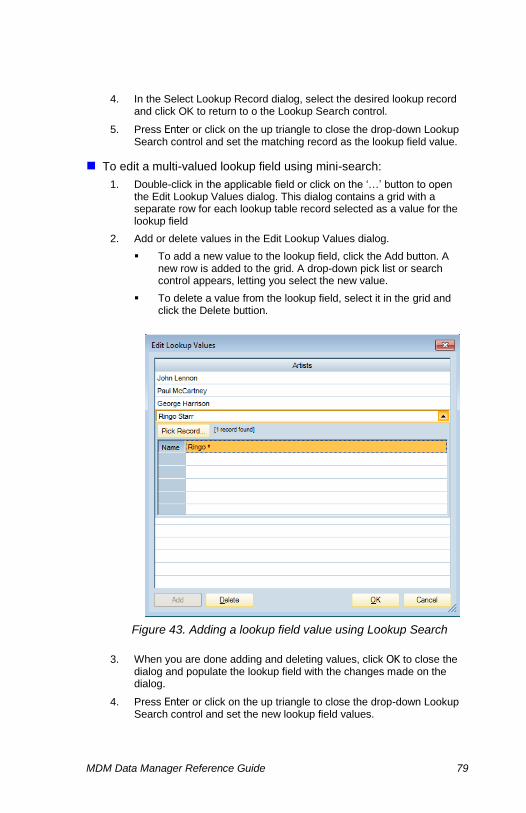
MDM Data Manager Reference Guide 79
4. In the Select Lookup Record dialog, select the desired lookup record and click OK to return to o the Lookup Search control.
5. Press Enter or click on the up triangle to close the drop-down Lookup Search control and set the matching record as the lookup field value.
To edit a multi-valued lookup field using mini-search:
1. Double-click in the applicable field or click on the ‘…’ button to open the Edit Lookup Values dialog. This dialog contains a grid with a separate row for each lookup table record selected as a value for the lookup field
2. Add or delete values in the Edit Lookup Values dialog.
To add a new value to the lookup field, click the Add button. A new row is added to the grid. A drop-down pick list or search control appears, letting you select the new value.
To delete a value from the lookup field, select it in the grid and click the Delete buttion.
Figure 43. Adding a lookup field value using Lookup Search
3. When you are done adding and deleting values, click OK to close the dialog and populate the lookup field with the changes made on the dialog.
4. Press Enter or click on the up triangle to close the drop-down Lookup Search control and set the new lookup field values.

80 MDM Data Manager Reference Guide
CHANGING THE CATEGORY OF A MAIN TABLE RECORD
When you assign a category value for a main table record, MDM lists the set of attributes linked to that category beneath the category field in the Record Detail tab, so that you can specify values for each of these category-specific attributes.
If you later change the category associated with the main table record, the set of linked attributes may be different than before. If the only attributes listed in the Record Detail tab were those attributes linked to the new category, you might lose data values that had been specified for attributes linked to the old category but not to the new category.
To address this challenge, MDM lists both sets of linked attributes when you change the category associated with a main table record, and highlights the names of the attributes linked to the previous category but not linked the new category in blue, as shown in Figure 44.
Figure 44. Changing the category associated with a main table record
Listing both sets of attributes allows you to remove unwanted attribute values or add missing values. Simply delete the values for any unlinked attributes in blue that you do not want to be automatically linked to the new category.
When you save the record with the new category, MDM automatically
links to the new category any attributes in blue for which values are set, so that no values associated with the record will be lost.

MDM Data Manager Reference Guide 81
EDITING QUALIFIED LOOKUP FIELDS
Each record in a repository’s main table may be assigned to one or more qualified table records. Qualified lookup fields, which appear on the right side of the Record Details tab, show which qualified table records are currently linked with the selected main table record(s).
You can perform the following functions on qualified lookup fields:
Add (link) qualified table records to the selected main table record.
Remove (unlink) qualified table records from the selected record.
View qualified table record details (including qualifiers).
Add new records to the qualified table.
Edit qualifier values on a linked qualified table record.
NOTE ►► When multiple main table records are selected, MDM Data Manager consolidates identical qualified table records in the qualified lookup field cell and the Select Qualified Lookup Record dialog (to
change this behavior, see the Consolidate identical qualified lookups configuration option in "Configuration Options" on page 495.)
The Qualified Lookup Field Cell
Each linked qualified table record is displayed on its own row inside the qualified lookup field’s cell. By holding the mouse over a record in the qualified lookup cell, you can quickly view the details of that qualified table record. MDM displays the details in a tooltip that contains the values for each of the linked qualified table record’s fields and qualifiers, as shown in Figure 45.
Figure 45. Qualified lookup field tooltip
You can also view and edit qualified record details by right-clicking on
the record in the qualified lookup cell and selecting View/Edit Detail… from the context menu. This opens the Qualified Lookup Detail dialog (Figure 47).
Tooltip

82 MDM Data Manager Reference Guide
Figure 46. Qualified Lookup Detail dialog
The Qualified Lookup Detail dialog displays the field and qualifier values of the selected qualified table record. For easy identification, qualifier names are enclosed in square brackets ([ ]).
From the Qualified Lookup Detail dialog, you can also edit the qualifier values of the selected qualified table record.
To edit the qualifiers of a linked qualified table record:
1. From the Record Detail tab, right-click on a qualified table record in a
qualified lookup field cell and choose View/Edit Detail… from the context menu.
2. From within the Qualified Lookup Detail dialog, click the Edit button to enable the edit controls, and edit the qualified table record qualifier values.
Figure 47. Qualified Lookup Detail dialog
The Select Qualified Lookup Record Dialog
To add or remove qualified records linked to the main table record, double-click inside the qualified lookup field’s cell to open the Select Qualified Lookup Records dialog (Figure 48).

MDM Data Manager Reference Guide 83
Figure 48. Select Qualified Lookup Records dialog
The Select Qualified Lookup Records dialog contains a Search Parameters pane, an Available lookup records list, a Selected lookup records list, and two tabs: Lookup Detail and Search Selections.
Use the Search Parameters pane to narrow down the list of qualified table records appearing the Available lookup records list. For convenience, all of the search selections you make on the Search Parameters pane are shown on the Search Selections tab.
The Available lookup records list contains all of the records on the qualified lookup table which match your search selections. When you select a record in the Available lookup records list, the Lookup Detail tab displays the record’s field values (both display and non-display) in read-only gray, but its qualifiers are not displayed.
The Selected lookup records list contains all of the qualified table records which have been added to the main table record(s) you are editing. When you select a record in the Selected lookup records list, the Lookup Detail tab displays both the field and the qualifier values for the record, with the field values appearing in read-only gray and the qualifier names appear in square brackets ([ ]).
In addition to adding and removing existing qualified table records, you can also create new qualified table records from the Select Qualified Lookup Records dialog. New qualified table records are added to the Available lookup records list and must be added to the Selected lookup records list before their qualifier values can be edited.
84 MDM Data Manager Reference Guide
To narrow down the set of qualified table records in the Available Lookup Records pane:
1. In the qualified lookup selector dialog, add one or more search selections in the Search Parameter tabs for each lookup field of the qualified table.
2. MDM narrows down the list of available qualified table records.
TIP ►► To clear the search selections for all of the lookup fields,
right-click on any of the search tabs and choose Reset Search from the context menu. To clear them for just a single field, either: (1) select
[ALL] in the search tab for that field, or (2) right-click on the search tab
for that field and choose Reset Parameter from the context menu.
To link existing qualified table records to the main table record:
1. In the Select Qualified Lookup Records dialog, highlight a record in the
Available lookup records list and click the Add button.
2. The record appears in the Selected lookup records list.
3. Click OK to save the change and close the Select Qualified Lookup Records dialog.
TIP ►► You can also double-click on a qualified table record (or drag-and-drop it) to add it to the Selected lookup records list.
NOTE ►► All qualified lookup fields are multi-valued, so you are always permitted to select multiple qualified table records.
NOTE ►► Unlike other object selectors, the qualified lookup selector dialog does not remove qualified table records from the Available lookup records list when you add them to the Selected lookup records list so that you can add each qualified table record more than once, if necessary, with a different set of qualifier values.
To unlink qualified table records from the main table record:
1. In the Select Qualified Lookup Records dialog, highlight a record in the
Selected lookup records list and click the Remove button.
2. The record disappears from the Selected lookup records list.
3. Click OK to save the change and close the Select Qualified Lookup Records dialog.
TIP ►► You can also double-click on a qualified table record (or drag-and-drop it) to remove it from the Selected lookup records list.
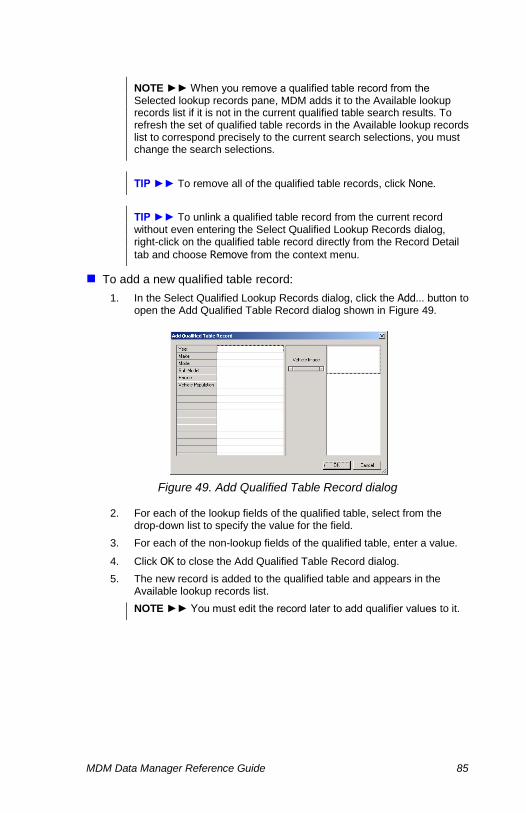
MDM Data Manager Reference Guide 85
NOTE ►► When you remove a qualified table record from the Selected lookup records pane, MDM adds it to the Available lookup records list if it is not in the current qualified table search results. To refresh the set of qualified table records in the Available lookup records list to correspond precisely to the current search selections, you must change the search selections.
TIP ►► To remove all of the qualified table records, click None.
TIP ►► To unlink a qualified table record from the current record without even entering the Select Qualified Lookup Records dialog, right-click on the qualified table record directly from the Record Detail
tab and choose Remove from the context menu.
To add a new qualified table record:
1. In the Select Qualified Lookup Records dialog, click the Add… button to open the Add Qualified Table Record dialog shown in Figure 49.
Figure 49. Add Qualified Table Record dialog
2. For each of the lookup fields of the qualified table, select from the drop-down list to specify the value for the field.
3. For each of the non-lookup fields of the qualified table, enter a value.
4. Click OK to close the Add Qualified Table Record dialog.
5. The new record is added to the qualified table and appears in the Available lookup records list.
NOTE ►► You must edit the record later to add qualifier values to it.

86 MDM Data Manager Reference Guide
EDITING TUPLE FIELDS
In the Record Detail tab, a tuple field cell displays the number of tuple records contained in that tuple field and the display field values of its first five tuple records.
For example, in Figure 50, the PostalAddress tuple field cell shows that the PostalAddress tuple field contains one (1) tuple record, which has the display field values “100 Main Street”, “Los Angeles”, and “CA”.
Figure 50. Tuple field cells
NOTE ►► Data Manager uses a dash (-) to separate the number of tuple records from the tuple records themselves; a comma (,) to separate the display field values within each tuple record; and a semi-colon (;) to separate each tuple record displayed.
Filtering Tuple Records According to Search Criteria
You can use a tuple field cell’s Filter button ( ) to limit the set of tuple records displayed in the tuple field cell and Edit Tuple Records dialog. When filtering is enabled, only tuple records matching the search criteria selected for the tuple field in the Search Parameters pane will be counted and displayed.
Managing the Tuple Records in a Tuple Field
To view or modify the set of tuple records contained in a record’s tuple field, click the ‘…’ button at the far right of the tuple field’s cell to open the Edit Tuple Records dialog. You can also open the Edit Tuple Records dialog by double-clicking inside a tuple field’s cell.
The Edit Tuple Records dialog is based upon the Data Manager’s Record Mode. You can select records from the Tuple Hierarchy to display in the Tuple Records grid, and the record details appear in the Tuple Details tab. If a tuple has multilingual fields, a Language Detail tab is added.
NOTE ►► The Tuple Hierarchy tree includes a node for each record contained in the tuple field. If a tuple has tuple member fields, the member tuple fields and records are nested below their parent records.

MDM Data Manager Reference Guide 87
Figure 51. Edit Tuple Records dialog
To view/edit tuple record details:
1. Select a tuple record in the Tuple Hierarchy pane. The selected record and its siblings appear in the Tuple Records grid.
2. Edit the record’s field values in the Tuple Detail tab (and Language Detail tab, if the tuple has multilingual fields.)
When you edit a tuple field’s records, every affected record and tuple field is changed to blue in the Tuple Hierarchy tree.
3. Press Shift+Enter to save the changes to the dialog or press Esc to cancel them.
4. When you are ready to save changes to the repository, click OK to close the dialog and then save the main table record in the Records pane.
NOTE ►► Tuple record fields which have values that are populated by MDM (such as calculated and time stamp fields) are updated only after the main table record is saved..
NOTE ►► You can view and edit more than one of a tuple field’s records simultaneously by selecting them in the Tuple Records pane (see “Viewing and Editing Multiple Records” on page 74 for more information.)

88 MDM Data Manager Reference Guide
To add a new tuple record:
1. In the Tuple Hierarchy pane, select the tuple field you want to add a record to.
2. Click the Add button, or right-click in the Tuple Records grid and choose Add from the pop-up context menu.
3. Data Manager adds a new empty record to the Tuple Records grid and places you in the Tuple Detail tab for editing.
To delete a tuple record:
1. In the Tuple Records grid, select the tuple record(s) you want to delete.
2. Click the Delete button, or right-click on a selected record and choose Delete from the pop-up context menu.
To duplicate a tuple record:
1. In the Tuple Records grid, select the tuple record you want to duplicate.
2. Click the Duplicate button, or right-click on a selected record and choose Duplicate from the pop-up context menu.
3. Data Manager adds the duplicate record as the last record in the Tuple Records grid and places you in the Tuple Detail tab for editing.
To merge tuple records:
1. In the Tuple Records grid, select the tuple records you want to merge.
2. Click the Merge button, or right-click on a selected record and choose Merge from the pop-up context menu.
3. Perform the merge, as described in “Merging Records” on page 62.
Editing Tuple Field Values for Multiple Main Table Records
There may be times when you need to update the same information in the same tuple fields for multiple main table records. For example, if a supplier’s address changes and that address information is contained in the same tuple field across multiple Product table records, it would be easier to change the address values in all of the affected Product table records at once, instead of having to repeat the task in the same tuple field for each product record.
When editing tuple field values for multiple main table records, the Edit Tuple Records dialog helps you keep track of which tuple records belong to which main table records by adding the display field values of the source main table records as nodes in the Tuple Hierarchy tree, and as the values of the [Source Record] column in the Tuple Subrecord grid, as shown in Figure 52.

MDM Data Manager Reference Guide 89
Figure 52. Editing the Tuple Records of Multiple Main Table Records
To view/edit tuple record details for more than one main table record:
1. Select the main table records in the Records pane
2. In the Record Detail tab, double-click on the relevant tuple field cell to view all of the tuple records for that field from all of the selected main table records.
3. You can now view, edit, and delete tuple records as described in “Managing the Tuple Records in a Tuple Field” on page 86, with the exception that any new tuple subrecords added in the dialog will be added to all of the source main table records.

90 MDM Data Manager Reference Guide
EDITING LOG LOOKUP FIELDS
MDM Data Manager provides a convenient way to enter timestamped comments or notes about records.
To add a new log entry:
1. Right-click on the text area of the log cell and choose Add from the context menu to open the Add Log Entry dialog shown in Figure 53. Note that the dialog already contains a timestamp in its title.
Figure 53. Add Log Entry dialog
2. Type in the log entry text.
3. Click OK when you are done to close the Add Log Entry dialog.
4. MDM adds a new line item in the log cell for the new log entry, with the timestamp at the start of the line (Figure 54).
Figure 54. Log entries
NOTE ►► Pressing Enter will not exit the dialog; rather it will insert a new line into the text of the log entry.
To modify a log entry:
1. Double-click on the entry you want to edit, or right-click on it and
choose Modify from the context menu shown in Figure 55 below to open the Modify Log Entry dialog (similar to the Add Log Entry dialog shown in Figure 53).
2. Type the desired changes to the log entry text.
3. Click OK when you are done to close the Modify Log Entry dialog.
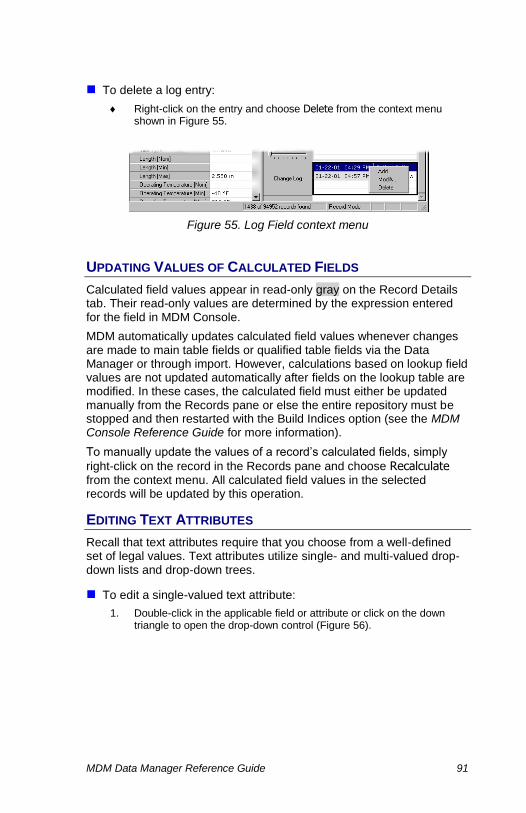
MDM Data Manager Reference Guide 91
To delete a log entry:
Right-click on the entry and choose Delete from the context menu shown in Figure 55.
Figure 55. Log Field context menu
UPDATING VALUES OF CALCULATED FIELDS
Calculated field values appear in read-only gray on the Record Details tab. Their read-only values are determined by the expression entered for the field in MDM Console.
MDM automatically updates calculated field values whenever changes are made to main table fields or qualified table fields via the Data Manager or through import. However, calculations based on lookup field values are not updated automatically after fields on the lookup table are modified. In these cases, the calculated field must either be updated manually from the Records pane or else the entire repository must be stopped and then restarted with the Build Indices option (see the MDM Console Reference Guide for more information).
To manually update the values of a record’s calculated fields, simply
right-click on the record in the Records pane and choose Recalculate from the context menu. All calculated field values in the selected records will be updated by this operation.
EDITING TEXT ATTRIBUTES
Recall that text attributes require that you choose from a well-defined set of legal values. Text attributes utilize single- and multi-valued drop-down lists and drop-down trees.
To edit a single-valued text attribute:
1. Double-click in the applicable field or attribute or click on the down triangle to open the drop-down control (Figure 56).

92 MDM Data Manager Reference Guide
Figure 56. Edit control for single-valued text attribute
2. Select a single item from the drop-down list.
3. Press Enter or click on the up triangle to close the drop-down control.
To add or remove items for a multi-valued text attribute:
1. Double-click in the applicable field or attribute or click on the down triangle to open the drop-down control (Figure 57).
Figure 57. Edit control for multi-valued text attribute
2. Select or deselect items from the drop-down list, as follows:
To add Available list item(s) to the Selected list, highlight them
and click the Add button.
To remove items from the Selected list, highlight them and click
the Remove button.
To add all of the items to the Selected list, click All.
To remove all of the items from the Selected list, click None.
3. Press Enter or click on the up triangle to close the drop-down control.

MDM Data Manager Reference Guide 93
MODIFYING A TEXT ATTRIBUTE VALUE LIST
You can modify the list of attribute text values directly from within
Record mode when the attribute cell context menu’s Modify Text Value List command is enabled (Figure 58). (See “Configuration Options” on page 495 for more information about the Display options.)
Figure 58. Record Detail tab context menu (Modify Text Value List)
To modify the text value list for a text attribute:
1. In the Record Detail tab, right-click on the applicable attribute cell, and
choose Modify Text Value List from the context menu to open the Modify Text Attribute Value List dialog (Figure 59).
Figure 59. Modify Text Attribute Value List dialog
2. In the Modify Text Attribute Value List dialog, do any of the following:
To add a new text value, right-click in the text value list and
choose Add from the context menu, or click the Add button, or
press Ins. MDM adds a new text value named “New Value” and
highlights it for editing. Type the new value, and press Enter.
To modify an existing text value, select it in the text value list, and
then right-click on the value and choose Modify from the context
menu, or click the Modify button, or press F2. MDM highlights the
text value for editing. Type the new text value and press Enter.
To permanently delete one or more existing text values, select them in the text value list, then right-click on one of the values and
Text value list

94 MDM Data Manager Reference Guide
choose Delete from the context menu, or click on the Delete
button, or press Del. MDM deletes the value(s) without confirmation.
3. Click OK to close the Modify Text Attribute Value List dialog.
NOTE ►► The Modify Text Attribute Value List dialog is almost identical to the Attribute Detail tab, except that only the text value list
and the Add and Modify buttons are available. If you want to change the other properties of an attribute, go into Taxonomy mode and edit the attribute directly, as described on page 337.
DATA INTEGRITY ►► To prevent data loss, MDM will not allow you to delete an attribute text value if it is assigned to the attribute in one or
more records. If you choose Delete in this situation, MDM displays an
error dialog when you click OK to close the Modify Text Attribute Value List dialog.
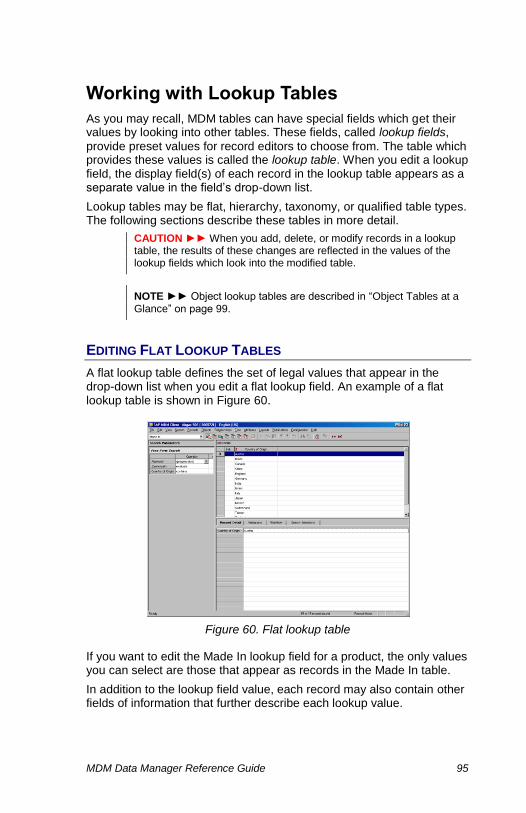
MDM Data Manager Reference Guide 95
Working with Lookup Tables
As you may recall, MDM tables can have special fields which get their values by looking into other tables. These fields, called lookup fields,
provide preset values for record editors to choose from. The table which provides these values is called the lookup table. When you edit a lookup field, the display field(s) of each record in the lookup table appears as a separate value in the field’s drop-down list.
Lookup tables may be flat, hierarchy, taxonomy, or qualified table types. The following sections describe these tables in more detail.
CAUTION ►► When you add, delete, or modify records in a lookup table, the results of these changes are reflected in the values of the lookup fields which look into the modified table.
NOTE ►► Object lookup tables are described in “Object Tables at a Glance” on page 99.
EDITING FLAT LOOKUP TABLES
A flat lookup table defines the set of legal values that appear in the drop-down list when you edit a flat lookup field. An example of a flat lookup table is shown in Figure 60.
Figure 60. Flat lookup table
If you want to edit the Made In lookup field for a product, the only values you can select are those that appear as records in the Made In table.
In addition to the lookup field value, each record may also contain other fields of information that further describe each lookup value.

96 MDM Data Manager Reference Guide
EDITING HIERARCHY LOOKUP TABLES
A hierarchy lookup table defines the hierarchy of legal values that appear in the drop-down list when you edit a hierarchy lookup field. An example of a hierarchy table displayed in Record mode is shown in Figure 61.
Figure 61. Hierarchy lookup table in Record mode
In addition to the lookup field value, each record may also contain other fields of information that further describe each lookup value (such as the Supplier Code, Discount Percentage, and Logo fields in the Record Detail tab in the figure above).
TIP ►► Although you can view, add, edit and delete the records of a hierarchy table in Record mode, you should usually edit a hierarchy table in Hierarchy mode so that you can view and edit the hierarchical relationships in addition to the other fields of each record.
TIP ►► To merge hierarchy lookup table records, use drag-and-drop
or the Cut and Paste as Merge commands in Hierarchy mode. (See “Merging Nodes with Drag-and-Drop” on page 274 for more information about merging hierarchy table lookup records).

MDM Data Manager Reference Guide 97
EDITING TAXONOMY LOOKUP TABLES
Taxonomy lookup tables contain the categories and the pool of attributes for a particular MDM repository. An example of a taxonomy table displayed in Record mode is shown in Figure 62.
Figure 62. Taxonomy lookup table in Record mode
In addition to the lookup field value, each record may also contain other fields of information that further describe each lookup value (such as the Category Icon field in the Record Detail tab in the figure above).
TIP ►► Although you can view, add, edit and delete the categories of a taxonomy table in Record mode, you should usually edit a taxonomy table in Taxonomy mode (so that you can view and edit the taxonomy hierarchy, the pool of attributes, and the links to each of the categories), or in Hierarchy mode (so that you can view and edit the taxonomy hierarchy in addition to the other fields of each category).
TIP ►► To merge taxonomy lookup table records, use drag-and-drop
or the Cut and Paste as Merge commands in Taxonomy mode. (See “Merging Categories with Drag-and-Drop” on page 308 for more information about merging taxonomy table lookup records).
EDITING QUALIFIED LOOKUP TABLES
A qualified lookup table defines the set of qualified table records that appear in the qualified lookup selector dialog when you edit a qualified
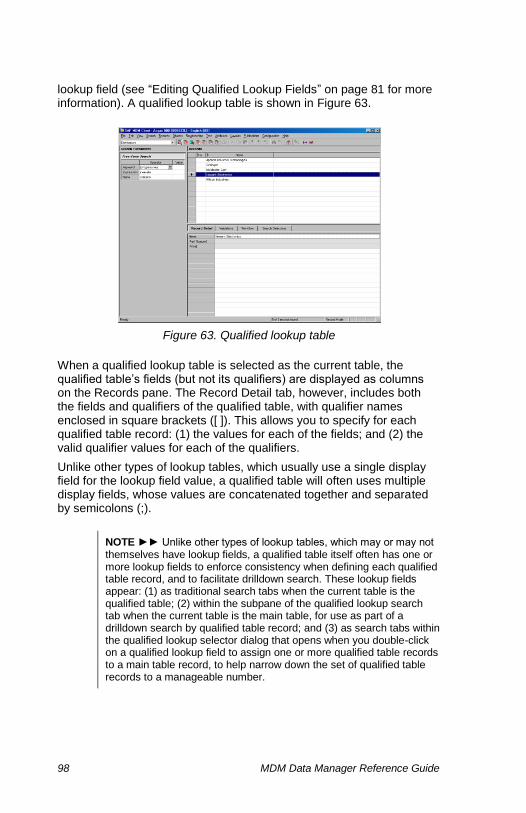
98 MDM Data Manager Reference Guide
lookup field (see “Editing Qualified Lookup Fields” on page 81 for more information). A qualified lookup table is shown in Figure 63.
Figure 63. Qualified lookup table
When a qualified lookup table is selected as the current table, the qualified table’s fields (but not its qualifiers) are displayed as columns on the Records pane. The Record Detail tab, however, includes both the fields and qualifiers of the qualified table, with qualifier names enclosed in square brackets ([ ]). This allows you to specify for each qualified table record: (1) the values for each of the fields; and (2) the valid qualifier values for each of the qualifiers.
Unlike other types of lookup tables, which usually use a single display field for the lookup field value, a qualified table will often uses multiple display fields, whose values are concatenated together and separated by semicolons (;).
NOTE ►► Unlike other types of lookup tables, which may or may not themselves have lookup fields, a qualified table itself often has one or more lookup fields to enforce consistency when defining each qualified table record, and to facilitate drilldown search. These lookup fields appear: (1) as traditional search tabs when the current table is the qualified table; (2) within the subpane of the qualified lookup search tab when the current table is the main table, for use as part of a drilldown search by qualified table record; and (3) as search tabs within the qualified lookup selector dialog that opens when you double-click on a qualified lookup field to assign one or more qualified table records to a main table record, to help narrow down the set of qualified table records to a manageable number.

MDM Data Manager Reference Guide 99
Working with Objects
Objects such as images, text blocks, and PDFs cannot be stored directly in a main or subtable field in an MDM repository. Instead, each object is defined or imported into the repository once and then linked to a main or subtable field as a lookup into the object table of that type.
From within the Data Manager, you can access objects in several ways:
Object tables
Object fields
Object lookup fields
The object selector dialog
The use and appearance of each way are described in the following sections.
OBJECT TABLES AT A GLANCE
Object lookup tables (Figure 64) are MDM subtables which contain objects such as images, text blocks, and PDFs. Each record in an object table corresponds to a single object. These objects can then be linked to main table and subtable records via lookup fields.
Figure 64. An object table in MDM Data Manager
100 MDM Data Manager Reference Guide
You can add, delete, search, and edit records in an object table like any other MDM table. However, object tables have several distinct differences from other tables:
Commands. In addition to the main menu Records commands for
manipulating the records of a table, additional Objects menu commands are also available.
Fields. The set of fields of each object record in an object lookup
table is fixed, and most of them are read-only.
Record Detail tab. The Record Detail tab places the object field (which is not a lookup when the current table is the object table) on
the left rather than the right side of the splitter, and places the other object table fields on the right.
NOTE ►► See “Object Operations” on page 114 for more information about object-specific commands.
The fields for each object lookup table are described in the following sections.
Binary Objects Table
The Binary Objects table is designed to hold binary files (such as executables), where each record in the table corresponds to a single binary file.
The fields of each record of the Binary Objects table are listed in Table 22. The fields in the table that are shaded are read-only.
Table 22. Binary Objects Table Fields
Field Description
Binary Object Thumbnail of the binary object.
Name Name of the binary object. Default value is Original Name.
Code Code name of the binary object.
Data Group* Data Group to which the binary object has been assigned.
Description Text description of the binary object.
Original Name Filename of the original binary object.
Source* Source location of the original binary object.
Original in Repository*
Whether or not the binary object is stored in the repository:
True – object stored in the repository.
False – object available in original location only.
Data Size The size of the binary object.
* Search tab in the Search Parameters pane.

MDM Data Manager Reference Guide 101
Copy Blocks Table
The Copy Blocks table is designed to hold large blocks of formatted text, where each record in the table corresponds to a single copy block.
Unlike text block objects, which are rendered as plain text, copy blocks enable you to use different styles within a text block as well as reference fields and attributes.
NOTE ►► You can only link copy block objects to fields in the Families table.
The fields of each record of the Copy Blocks table are listed in Table 23. The fields in the table that are shaded are read-only.
Table 23. Copy Blocks Table Fields
Field Description
Copy Block Contents of the copy block.
Code Code name of the copy block.
Data Group* Data Group to which the copy block has been assigned
Description Text description of the copy block.
Data Size The size of the copy block.
* Search tab in the Search Parameters pane.
Images Table
The Images table is designed to hold image files, where each record in the table corresponds to a single image.
The fields of each record of the Images table are listed in Table 24. The fields in the table that are shaded are read-only.
Table 24. Images Table Fields
Field Description
Image Thumbnail of the image.
Name Name of the image. Default value is Original Name.
Code Code name of the image.
Data Group* Data Group to which the image has been assigned.
Description Text description of the image.
Print Size Width and height of the sized image for publications.
Original Name Filename of the original image.
Source* Source location of the original image.
102 MDM Data Manager Reference Guide
Field Description
Original in Repository*
Whether or not the image is stored in the repository:
True – image stored in the repository.
False – image available in original location only.
Width Width in pixels of the original image.
Height Height in pixels of the original image.
Format* The image file format (JPEG, TIFF, GIF, AI and so on).
Rotation*
Rotation of the image, if any:
None
90° CW
90° CCW
180°
Mirrored
90° CW Mirrored
90° CCW Mirrored
180° Mirrored
Cropping*
Whether or not the image has been cropped:
Not Cropped – image has not been cropped.
Cropped – image has been cropped.
CRC of Original Data integrity check.
Has Thumbnail* Whether or not the thumbnail has been generated.
Is Vector* Whether or not the image is a vector.
Has Clipping Path* Whether or not the image has a clipping path.
EPS and PSD file formats only.
Data Size The size of the image.
Variant Name*
A column for each variant, indicating overall state:
System vs. User
Done vs. Outdated vs. Nonexistent Needed vs. Not Needed
* Search tab in the Search Parameters pane.
NOTE ►► When the image publication size has not been changed
from or has been reset to its default values using the Image Print Size
dialog, MDM displays [Def] next to the dimensions in the Print Size field of the Record Detail tab.
TIP ►► The variant name column contains three pieces of information: (1) whether the variant is system or user generated; (2) whether or not the variant is needed for this image; and (3) the variant status. You can change how this column sorts by clicking on the title
bar and choosing Sort By from the context menu and then choosing
either Creator, Needed, or Status from the cascading menu.
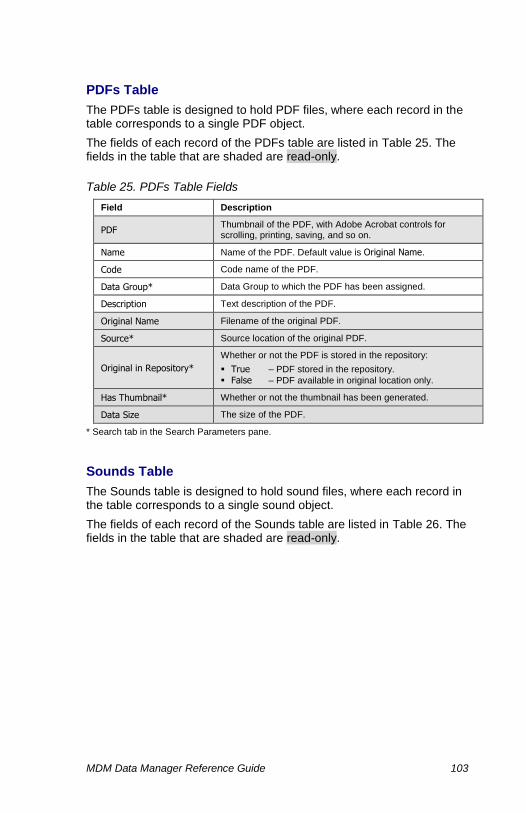
MDM Data Manager Reference Guide 103
PDFs Table
The PDFs table is designed to hold PDF files, where each record in the table corresponds to a single PDF object.
The fields of each record of the PDFs table are listed in Table 25. The fields in the table that are shaded are read-only.
Table 25. PDFs Table Fields
Field Description
PDF Thumbnail of the PDF, with Adobe Acrobat controls for scrolling, printing, saving, and so on.
Name Name of the PDF. Default value is Original Name.
Code Code name of the PDF.
Data Group* Data Group to which the PDF has been assigned.
Description Text description of the PDF.
Original Name Filename of the original PDF.
Source* Source location of the original PDF.
Original in Repository*
Whether or not the PDF is stored in the repository:
True – PDF stored in the repository.
False – PDF available in original location only.
Has Thumbnail* Whether or not the thumbnail has been generated.
Data Size The size of the PDF.
* Search tab in the Search Parameters pane.
Sounds Table
The Sounds table is designed to hold sound files, where each record in the table corresponds to a single sound object.
The fields of each record of the Sounds table are listed in Table 26. The fields in the table that are shaded are read-only.

104 MDM Data Manager Reference Guide
Table 26. Sounds Table Fields
Field Description
Sound Thumbnail of the sound.
Name Name of the sound. Default value is Original Name.
Code Code name of the sound.
Data Group* Data Group to which the sound has been assigned.
Description Text description of the sound.
Original Name Filename of the original sound object.
Source* Source location of the original sound object.
Original in Repository*
Whether or not the sound object is stored in the repository:
True – object stored in the repository.
False – object available in original location only.
Data Size The size of the sound object.
* Search tab in the Search Parameters pane.
Text Blocks Table
The Text Blocks table is designed to hold large blocks of plain text, where each record in the table corresponds to a single text block.
The fields of each record of the Text Blocks table are listed in Table 27. The fields in the table that are shaded are read-only.
Table 27. Text Blocks Table Fields
Field Description
Text Block The contents of the text block.
Code Code name of the text block.
Data Group* Displays the Data Group to which the text block has been assigned
Description Text description of the text block.
Data Size The size of the text block.
* Search tab in the Search Parameters pane.
Text HTMLs Table
The Text HTMLs table is designed to hold large blocks of HTML, where each record in the table corresponds to a single HTML object.
The fields of each record of the Text HTMLs table are listed in Table 28. The fields in the table that are shaded are read-only.

MDM Data Manager Reference Guide 105
Table 28. Text HTMLs Table Fields
Field Description
Text HTML The contents of the text HTML object.
Code Code name of the text HTML.
Data Group* Displays the Data Group to which the text HTML object has been assigned
Description Text description of the text HTML object.
Data Size The size of the text HTML object.
* Search tab in the Search Parameters pane.
Videos Table
The Videos table is designed to hold video files, where each record in the table corresponds to a single video object.
The fields of each record of the Videos table are listed in Table 29. The fields in the table that are shaded are read-only.
Table 29. Video Table Fields
Field Description
Video Thumbnail of the video.
Name Name of the video. Default value is Original Name.
Code Code name of the video.
Data Group* Data Group to which the video has been assigned.
Description Text description of the video.
Original Name Filename of the original video.
Source* Source location of the original video.
Original in Repository*
Whether or not the video is stored in the repository:
True – Video stored in the repository.
False – Video available in original location only.
Data Size The size of the video file.
* Search tab in the Search Parameters pane.
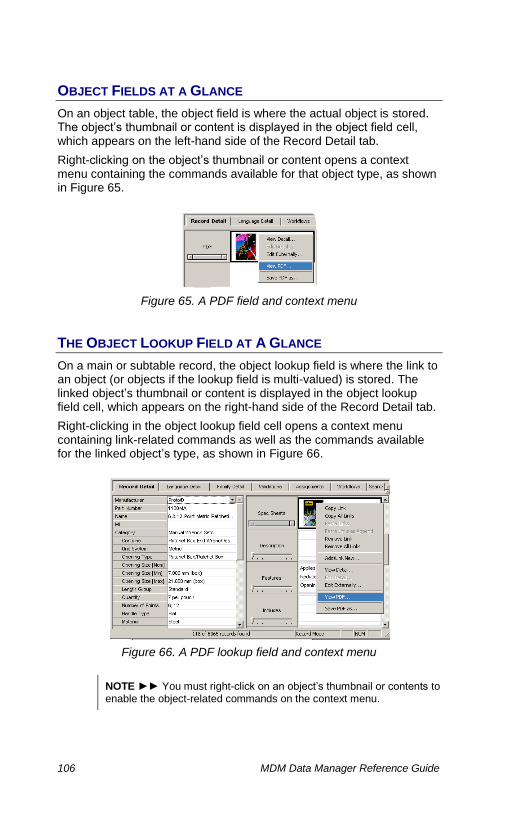
106 MDM Data Manager Reference Guide
OBJECT FIELDS AT A GLANCE
On an object table, the object field is where the actual object is stored. The object’s thumbnail or content is displayed in the object field cell, which appears on the left-hand side of the Record Detail tab.
Right-clicking on the object’s thumbnail or content opens a context menu containing the commands available for that object type, as shown in Figure 65.
Figure 65. A PDF field and context menu
THE OBJECT LOOKUP FIELD AT A GLANCE
On a main or subtable record, the object lookup field is where the link to an object (or objects if the lookup field is multi-valued) is stored. The linked object’s thumbnail or content is displayed in the object lookup field cell, which appears on the right-hand side of the Record Detail tab.
Right-clicking in the object lookup field cell opens a context menu containing link-related commands as well as the commands available for the linked object’s type, as shown in Figure 66.
Figure 66. A PDF lookup field and context menu
NOTE ►► You must right-click on an object’s thumbnail or contents to enable the object-related commands on the context menu.

MDM Data Manager Reference Guide 107
THE OBJECT SELECTOR DIALOG AT A GLANCE
The object selector dialog is used to select the objects to link to an object lookup field in a main or subtable record. The dialog is similar for every type of object lookup field. It includes three panes, which may be resized by dragging the 4-headed arrow that separates them.
To open the object selector dialog:
In the Record Detail tab, double-click on an object lookup field to open the object selector dialog (Figure 67).
Figure 67. Object selector dialog
The object selector dialog consists of the panes and tabs shown in the numbered callouts of Figure 67, listed below and described in the following sections:
1. Available Objects pane
2. Selected Objects pane
3. Toggle View toolbar buttons
4. Slider
5. Resizer
6. Object Detail tab
7. Data Groups tab
8. Usage tab
9. Filters tab
10. Add button
1 2 3
4
5
6
10
8 9 7
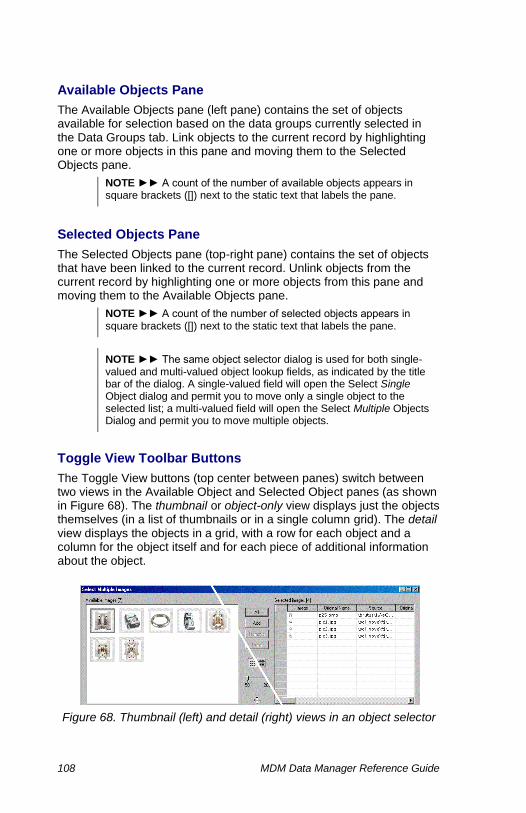
108 MDM Data Manager Reference Guide
Available Objects Pane
The Available Objects pane (left pane) contains the set of objects available for selection based on the data groups currently selected in the Data Groups tab. Link objects to the current record by highlighting one or more objects in this pane and moving them to the Selected Objects pane.
NOTE ►► A count of the number of available objects appears in square brackets ([]) next to the static text that labels the pane.
Selected Objects Pane
The Selected Objects pane (top-right pane) contains the set of objects that have been linked to the current record. Unlink objects from the current record by highlighting one or more objects from this pane and moving them to the Available Objects pane.
NOTE ►► A count of the number of selected objects appears in square brackets ([]) next to the static text that labels the pane.
NOTE ►► The same object selector dialog is used for both single-valued and multi-valued object lookup fields, as indicated by the title bar of the dialog. A single-valued field will open the Select Single Object dialog and permit you to move only a single object to the selected list; a multi-valued field will open the Select Multiple Objects Dialog and permit you to move multiple objects.
Toggle View Toolbar Buttons
The Toggle View buttons (top center between panes) switch between two views in the Available Object and Selected Object panes (as shown in Figure 68). The thumbnail or object-only view displays just the objects themselves (in a list of thumbnails or in a single column grid). The detail view displays the objects in a grid, with a row for each object and a column for the object itself and for each piece of additional information about the object.
Figure 68. Thumbnail (left) and detail (right) views in an object selector
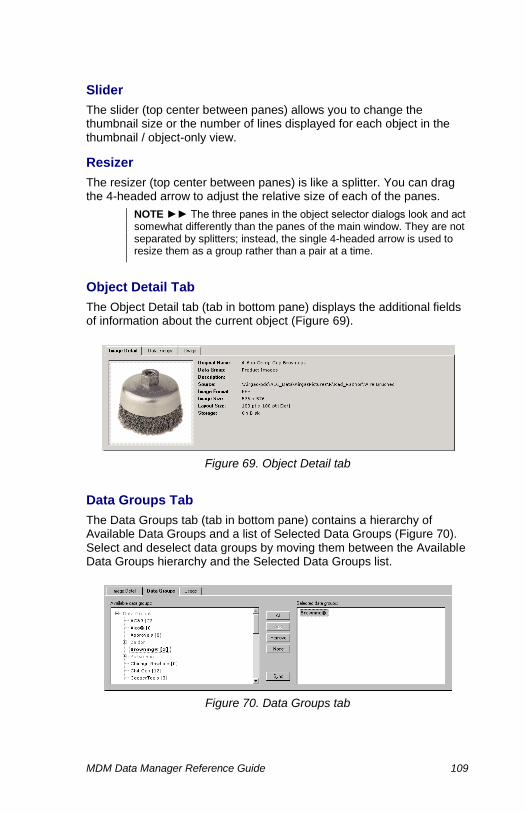
MDM Data Manager Reference Guide 109
Slider
The slider (top center between panes) allows you to change the thumbnail size or the number of lines displayed for each object in the thumbnail / object-only view.
Resizer
The resizer (top center between panes) is like a splitter. You can drag the 4-headed arrow to adjust the relative size of each of the panes.
NOTE ►► The three panes in the object selector dialogs look and act somewhat differently than the panes of the main window. They are not separated by splitters; instead, the single 4-headed arrow is used to resize them as a group rather than a pair at a time.
Object Detail Tab
The Object Detail tab (tab in bottom pane) displays the additional fields of information about the current object (Figure 69).
Figure 69. Object Detail tab
Data Groups Tab
The Data Groups tab (tab in bottom pane) contains a hierarchy of Available Data Groups and a list of Selected Data Groups (Figure 70). Select and deselect data groups by moving them between the Available Data Groups hierarchy and the Selected Data Groups list.
Figure 70. Data Groups tab

110 MDM Data Manager Reference Guide
Usage Tab
The Usage tab (tab in bottom pane) contains two subpanes (Figure 71). The Tables subpane on the left contains the list of tables and fields to which the current object is linked; the Links subpane on the right lists the corresponding set of records for each table and field. Use the Usage tab to browse the records to which an object is linked, and also to delete links to records without having to search for each record directly.
Figure 71. Usage tab
DATA INTEGRITY ►► The Usage tab makes it easy to detect errors in your master data, when records that should not apply to an object show up in the list of linked records.
NOTE ►► The left subpane is titled “Tables [n links]” (where ‘n’ is the total number of links to the selected object). Within the subpane, each table/field combination to which the object is linked appears in the list as “tablename [fieldname] [n]” (where ‘n’ is the number of links of the object to that particular table/field combination). Finally, the group of table/field combinations that are inaccessible appear as a single entry at the end of the list as “Inaccessible [n]”.
NOTE ►► The right subpane is titled “Links to ‘object’ from ‘tablename [fieldname] [x unreadable]” (where ‘n’ is the number of records to which the object is linked for that table/field combination and ‘x’ is the number of records, if any, that are linked but do not appear in the Links subpane because they are unreadable).
NOTE ►► The Usage tab does not display objects linked to tuple records.
Fields to which object is linked
Records in which object is linked to selected field on left

MDM Data Manager Reference Guide 111
Filters Tab
The Filters tab (4th tab of bottom pane; Text Blocks table only) allows you to specify a string to narrow down the set of text blocks in the Available Text Blocks pane using one of the free-form search operators for keyword search (Figure 72).
Figure 72. Filters tab (Text Blocks table only)
Add Button
The Add button (bottom left of selector dialog) allows you to add new objects to the repository directly from within the object selector dialog
rather than having to go to the object table itself. Click on the Add button to open the applicable Add Objects dialog.
Selecting and Deselecting Data Groups
Recall that the data groups hierarchy is the classification scheme that is used to organize objects into data groups, just as the taxonomy hierarchy is used to organize and break the entire collection of records into categories.
Similarly, just as selecting a category value in the search tab in Record mode determines the set of records that are available for browsing and editing, selecting data groups in the Data Groups tab determines the set of objects in the Available Objects pane that are available for selection; specifically, only those objects that belong to the data groups currently listed in the Selected Data Groups pane appear in the Available Objects pane (Figure 73).
NOTE ►► Whereas you can only select a single category at a time in the search tab in Record mode, the Data Groups tab allows you to select multiple data groups.

112 MDM Data Manager Reference Guide
Figure 73. Select data groups to add objects to Available Objects pane
NOTE ►► There are two sets of selection buttons in the object selector dialog: those in the top section of the dialog that select objects and move them between the Available and Selected Objects panes; and those in the bottom half of the dialog that select data groups and move them between the Available and Selected Data Groups panes within the Data Groups tab.
Like the drop-down control for multiple-item list selection, the Data Groups tab contains two sets of items: the hierarchy of Available Data Groups on the left, and the list of Selected Data Groups on the right.
NOTE ►► In available/selected lists, every item added to the selected list is removed from the available list. By contrast, a selected data group is not removed from the Available Data Groups hierarchy; instead, it is both added to the Selected Data Groups list and highlighted in bold in the Available Data Groups hierarchy.
There are several different ways to move a data group between the Available Data Groups hierarchy and the Selected Data Groups list to select (or deselect) the data group (and change the corresponding set of objects available for selection in the Available Objects pane):
Highlight the data group and click the Add (or Remove) button; or
Click All (or None) to select (or deselect) all of the data groups;
Double-click on the data group.
NOTE ►► You can only highlight leaf-node data groups in the Available Data Groups hierarchy and they cannot already be in the Selected Data Groups list.
Selecting data groups adds items to the Available Objects pane

MDM Data Manager Reference Guide 113
NOTE ►► When you add or remove a data group, the objects in the data group are immediately added to or removed from the Available Objects pane.
Selecting and Deselecting Objects
Like the drop-down control for multiple-item list selection, the object selector dialogs contains two panes for selection: Available Objects on the left and Selected Objects on the right, with the objects in each pane displayed in either a list or a grid depending upon the type of object and the view setting (Figure 73 above).
NOTE ►► Adding an object to Selected Objects pane links it to the current record and removing an object from the Selected Objects pane unlinks it from the current record.
There are several different ways to move an object between the Available Objects pane and the Selected Objects pane to select (or deselect) the object:
Highlight the object and click the Add (or Remove) button;
Click All (or None) to select (or deselect) all of the objects;
Double-click on the object; or
Drag-and-drop the object from one pane to the other.
To reorder the objects in either pane, highlight one or more objects (adjacent or non-adjacent), and then drag-and-drop them as a group anywhere in the pane.
NOTE ►► When you remove an object from the Selected Objects pane, it is added to the Available Objects pane even if it is not in one of the Selected Data Groups. To refresh the set of objects in the Available Objects pane to correspond precisely to the set of Selected
Data Groups, click the Sync button.

114 MDM Data Manager Reference Guide
Object Operations
MDM Data Manager provides multiple ways to manage objects in a repository (see “Working with Objects” beginning on page 99 for more information). It also provides object- and context-specific operations to help you manage your repository objects efficiently.
A list of object-related operations, which objects they apply to, and from where they are available is shown on Table 30.
Table 30. Object Operations
Operation Description Ob
jec
t M
en
u
Ob
jec
t C
ell
Ob
jec
t L
oo
ku
p C
ell
Ob
jec
t S
ele
cto
r D
ialo
g
All Objects
Copy Link Copies the link selected on the lookup field.
Copy All Links Copies all links on the selected lookup field.
Paste Link Replaces existing links on the selected record with the copied link.
Paste Links as Append
Appends the copied link to the list of existing links on the selected record.
Remove Link Removes the link selected on the lookup field.
Remove All Links Removes all links on the selected lookup field.
Add/Link New Adds new record to the object table and links it to the selected record.
Reimport Reimports the selected objects from their original location.
Replace Replaces the selected object with a new object.
Generate Thumbnail
Generates thumbnails for the selected objects.
View Detail Views the selected object and its detail
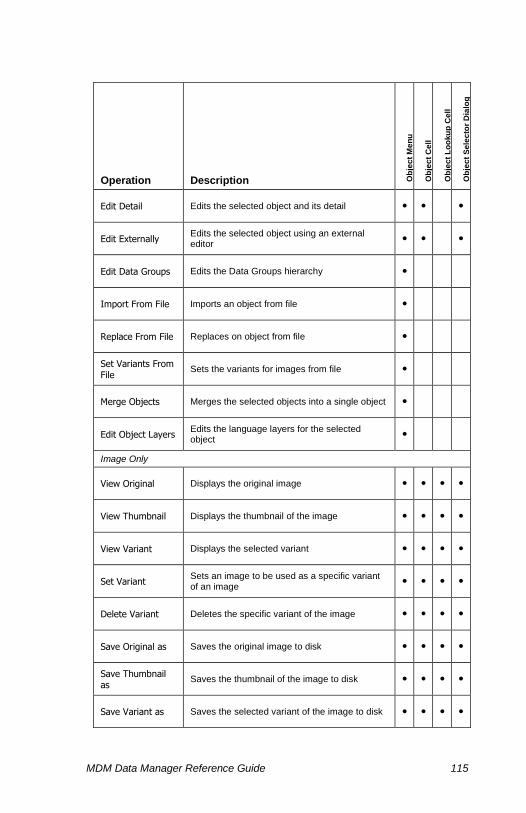
MDM Data Manager Reference Guide 115
Operation Description Ob
jec
t M
en
u
Ob
jec
t C
ell
Ob
jec
t L
oo
ku
p C
ell
Ob
jec
t S
ele
cto
r D
ialo
g
Edit Detail Edits the selected object and its detail
Edit Externally Edits the selected object using an external editor
Edit Data Groups Edits the Data Groups hierarchy
Import From File Imports an object from file
Replace From File Replaces on object from file
Set Variants From File
Sets the variants for images from file
Merge Objects Merges the selected objects into a single object
Edit Object Layers Edits the language layers for the selected object
Image Only
View Original Displays the original image
View Thumbnail Displays the thumbnail of the image
View Variant Displays the selected variant
Set Variant Sets an image to be used as a specific variant of an image
Delete Variant Deletes the specific variant of the image
Save Original as Saves the original image to disk
Save Thumbnail as
Saves the thumbnail of the image to disk
Save Variant as Saves the selected variant of the image to disk

116 MDM Data Manager Reference Guide
Operation Description Ob
jec
t M
en
u
Ob
jec
t C
ell
Ob
jec
t L
oo
ku
p C
ell
Ob
jec
t S
ele
cto
r D
ialo
g
Copy Original Copies the original image to the clipboard
Copy Thumbnail Copies the thumbnail of the image to the clipboard
Copy Variant Copies the selected variant of the image to the clipboard
Set Print Size Sets the print size for the selected images
Text Block Only
Copy Text Block Copies the text block.
Split Text Block
Splits the text block by the specified delimiter:
|
\
Return
Text HTML Only
Copy HTML Copies the HTML text block
Copy Block Only
Copy Unexpanded Copy
Copies the unexpanded version of the copy block
PDF Only
View PDF Displays the PDF in an Acrobat browser
Binary Object/Sound/Video Only
Save Object as Saves the object to disk
These and other object operations are described in the following sections.

MDM Data Manager Reference Guide 117
ADDING AND DELETING OBJECTS
You can add and delete objects from the repository as described in the following sections.
Adding Objects
Any time you add an object to an MDM repository, the object is added as a new record on the corresponding object table (new images are added to the Images table, and so on).
MDM Data Manager provides three ways to add new objects:
Adding new records directly on an object table
Clicking the Add… button on the object selector dialog
Choosing Add/Link from the object lookup field context menu.
Adding a new object record directly on an object table makes the new object instantly available as a lookup field value for lookup fields that look into that object table.
Clicking the Add… button on the object selector dialog adds the object record to the repository and also lets you select it as a value for the lookup field from which you opened the dialog.
Choosing Add/Link from an object lookup field context menu adds the object to the object table and automatically links it to the lookup field.
When you choose any of these methods, MDM Data Manager opens an Add Objects dialog like the one shown in Figure 74.
Figure 74. Add Objects dialog example
Adding objects to the repository usually means importing external files. In the case of text block, text HTML, and copy block objects, you have the option of entering text directly into the Add Objects dialog.
NOTE ►► In the Add Objects and other object-related dialogs, the Data Manager replaces the word “Object” in the title bar with the relevant object type.

118 MDM Data Manager Reference Guide
To add one or more new objects to an object table:
1. Issue an Add Record command from an object table, or open the object
selector dialog from an object lookup field and click Add…, or right-click
on an object lookup field and choose Add/Link to open the Add Object dialog shown in Figure 74 above.
2. Select the desired data group from the Data Group drop-down list.
TIP ►► You can use the Edit button to add new data groups (see “Editing the Data Groups Hierarchy” on page 126 for more information).
3. Select the language layer into which you want to import the image.
4. To add one or more individual object files, click Add to open the Windows file Open dialog shown in Figure 75.
Figure 75. Windows file Open dialog
5. Navigate to the desired folder, select the object file(s) you want to add
to the object table, and click Open. The file name is added to the Files area of the Add Object dialog.
NOTE ►► The Windows file Open dialog limits the number of files you are able to select to 1,000-2,000 files, depending on the length of the file names selected.
TIP ►► You can add all object files from a specific folder by clicking
Folder instead of Add on the Windows file Open dialog. Browse to the desired folder in the Choose Directory dialog and click OK, as shown in Figure 76.
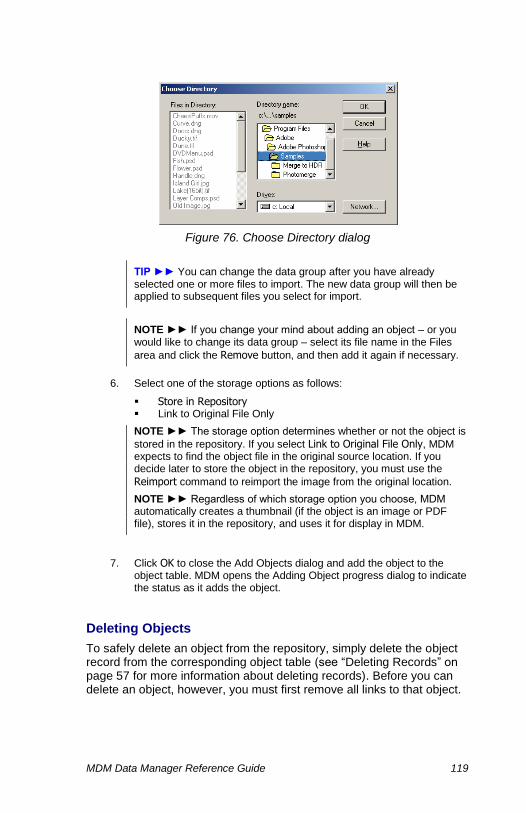
MDM Data Manager Reference Guide 119
Figure 76. Choose Directory dialog
TIP ►► You can change the data group after you have already selected one or more files to import. The new data group will then be applied to subsequent files you select for import.
NOTE ►► If you change your mind about adding an object – or you would like to change its data group – select its file name in the Files
area and click the Remove button, and then add it again if necessary.
6. Select one of the storage options as follows:
Store in Repository Link to Original File Only
NOTE ►► The storage option determines whether or not the object is
stored in the repository. If you select Link to Original File Only, MDM expects to find the object file in the original source location. If you decide later to store the object in the repository, you must use the
Reimport command to reimport the image from the original location.
NOTE ►► Regardless of which storage option you choose, MDM automatically creates a thumbnail (if the object is an image or PDF file), stores it in the repository, and uses it for display in MDM.
7. Click OK to close the Add Objects dialog and add the object to the object table. MDM opens the Adding Object progress dialog to indicate the status as it adds the object.
Deleting Objects
To safely delete an object from the repository, simply delete the object record from the corresponding object table (see “Deleting Records” on page 57 for more information about deleting records). Before you can delete an object, however, you must first remove all links to that object.
120 MDM Data Manager Reference Guide
LINKING OBJECTS TO OBJECT LOOKUP FIELDS
Recall that object lookup fields do not store actual objects, but links to object records stored in object lookup tables.
To link an object to an object lookup field:
1. In the Records pane, select the record(s) containing the lookup fields you want to link to an object.
2. In the Record Detail pane, double-click in the object lookup field’s cell to open the object selector dialog.
3. In the object selector dialog, click on the Data Groups tab and select the data group(s) containing the object(s) you want to link to the lookup field.
4. In the Available objects pane, select the object(s) you want to link and add them to the Selected objects pane.
5. Click OK to close the object selector dialog and link the selected object(s).
6. The Data Manager displays the linked object(s) in the lookup field.
NOTE ►► See “The Object Selector Dialog at a Glance” on page 107 for more information about the object selector dialog.
Adding and Linking New Objects
Objects must be added to an object table before they can be linked to an object lookup field. If you want to link an object lookup field to an
object that isn’t already in the MDM repository, the Add/Link New command combines these operations for your convenience.
To add a new object to the repository and simultaneously link it to a lookup field:
1. In the Records pane, select the record(s) containing the lookup fields you want to link to an object.
2. In the Record Detail pane, right-click in the object lookup field’s cell
and choose Add/Link New from the context menu to open the Add Object dialog (Figure 74).
3. Follow the instructions in “Adding Objects” on page 117 to add the new object.
4. Click OK to close the Add Objects dialog and link the added object to the lookup field.
5. The Data Manager displays the new, linked object in the lookup field.
MDM Data Manager Reference Guide 121
Copying and Pasting Links
If an object lookup field is already linked to an object in a lookup table, the linked object is displayed in the object lookup field’s cell. To quickly add the same linked object to another object lookup field (in the same record or a different record), you can copy the link from the original lookup field cell and paste it into the cell of the other object lookup field.
To copy object links from one lookup field to another:
1. In the Records pane, select the record(s) containing the lookup fields with the links you want to copy.
2. In the Record Detail pane, right-click on the linked object in the lookup field and choose Copy Link from the context menu.
TIP ►► If the object lookup field is also a multi-valued field, choosing
Copy All Links instead copies all of the links in the lookup field.
3. In the Records pane, select the record(s) containing the lookup fields on which you want to paste the copied link(s).
4. In the Record Detail pane, right-click in the object lookup field’s cell
and choose Paste Links from the context menu.
TIP ►► When pasting links into a multi-valued object lookup field, you
can use the Paste Links as Append command to preserve the lookup field’s existing set of links and add the pasted links to the set.
5. The Data Manager displays the pasted links in the cell of the lookup field.
CAUTION ►► When pasting a link into a non-mutli-valued lookup field, the pasted link replaces any existing link in the lookup field.
Removing Links
If you want to delete an existing link from an object lookup field, simply
right-click on the linked object and choose Remove Link from the
context menu.
TIP ►► If the object lookup field is also a multi-valued field, you can
remove all linked objects from the field by choosing Remove All Links instead.
122 MDM Data Manager Reference Guide
REIMPORTING AND REPLACING OBJECTS
Sometimes, you may want to reimport an object into an object record while preserving all of the existing links to the object record across the different lookup fields of the repository. To accomplish this, use the
Reimport operation to reimport objects from their original file locations.
If the object file you want to reimport has moved to a different file location – or if you want to replace the object with an entirely different object, while still preserving all of the links to the original object record across the different lookup fields of the repository – you can use the
Replace operation instead.
NOTE ►► To reimport or replace an object using the same data group and language layer as the original file, you can use the “Import from File” and “Replace from File” commands, which skips the Reimport/Replace Object dialog.
NOTE ►► Text Block, Text HTML, and Copy Block objects cannot be reimported or replaced.
To reimport objects from their original source locations:
1. In the Records pane, open the relevant object table and select the record(s) you want to reimport.
2. Right-click on one of the records and choose Reimport from the
context menu, or choose Objects > Reimport from the main menu to open the Reimport Object dialog (similar to the Add Objects dialog shown in Figure 74 above).
3. MDM places “Use original data group(s)” into the Data Group drop-down list, and places the selected object filename(s) into the Files area.
TIP ►► You can use the Data Group drop-down list to select a new data group to be applied to all of the reimported objects.
4. Click OK to close the Reimport Object dialog and reimport the objects from their original locations. MDM opens the Reimporting Objects progress dialog to indicate the status as it reimports each object.
To replace an existing object in an object record:
1. In the Records pane, open the relevant object table and select the record that contains the object you want to replace.
2. Right-click on the record and choose Replace from the context menu,
or choose Objects > Replace from the main menu to open the Replace Object dialog (similar to the Add Object dialog shown in Figure 74).
3. In the Files area of the Replace Object dialog, select the file of the
original object and click Remove to remove it from the list.
MDM Data Manager Reference Guide 123
4. Follow from step 2 of the Add Objects section to add the replacement object to the Files area.
5. MDM prompts you to confirm that you really want to replace the object.
Click OK to replace the existing object with the new object.
6. MDM opens the Replacing Object progress dialog to indicate the status as it replaces the object.
To use the Import From File command to add new objects:
1. Choose Objects > Import from File from the main menu.
2. In the Open dialog, select the text file listing the objects to import.
The text file must use the following format, with one line per object:
DataGroup Language Path
For example:
Images English [US] C:\Images\pic.jpg
NOTE ►► MDM expects the file to be tab-delimited, but you can
change the expected delimiter using the Import/Export > Text file field
delimiter option in the Configuration Options dialog.
3. Click OK to import the new objects.
To use the Replace From File command to replace existing objects:
1. Choose Objects > Replace from File from the main menu.
2. In the Open dialog, select the text file listing the code, data group, and language of the objects to be replaced and the path to the replacement objects.
The text file must use the following format, with one line per object:
Code DataGroup Language Path
For example:
Pic_jpg Images English [US] C:\New\pic.jpg
NOTE ►► MDM expects the file to be tab-delimited, but you can
change the expected delimiter using the Import/Export > Text file field
delimiter option in the Configuration Options dialog.
3. Click OK to replace the objects.
124 MDM Data Manager Reference Guide
GENERATING OBJECT THUMBNAILS
Sometimes, it may be necessary to manually generate the thumbnail of an image or PDF object. For example, MDM will not have generated the thumbnail if an image or PDF was imported into the repository through the MDM APIs, if Adobe Acrobat wasn’t installed when a PDF was first imported, or if the image file format wasn’t recognized when an image was first imported.
TIP ►► You can quickly locate all of the objects whose thumbnail needs to be generated by sorting on the Image or PDF column in the Records pane (when the Images or PDFs table is the current table) and selecting records with the “No Thumbnail” icon shown at left.
To manually generate the thumbnail for one or more objects:
1. In the Records pane, select the record(s) whose thumbnails you want to generate.
2. Right-click on one of the records and choose Generate Thumbnail from
the context menu, or choose Objects > Generate Thumbnail from the main menu.
3. MDM opens the Generating Thumbnails progress dialog to indicate the status as it generates the thumbnail for each of the images.
VIEWING OBJECT DETAILS
The Object Detail dialog displays information about a selected object, such as its data group, original name, and source file location.
An example of an Object Detail dialog is shown in Figure 77.
Figure 77. Image Detail dialog
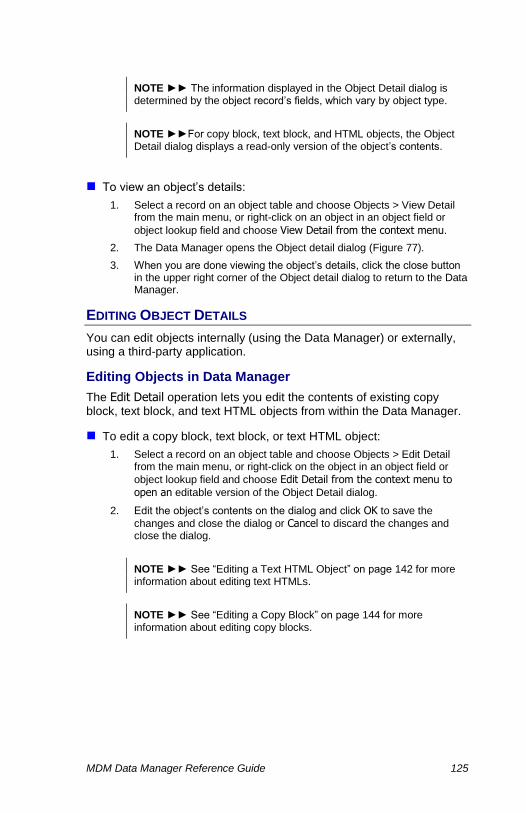
MDM Data Manager Reference Guide 125
NOTE ►► The information displayed in the Object Detail dialog is determined by the object record’s fields, which vary by object type.
NOTE ►►For copy block, text block, and HTML objects, the Object Detail dialog displays a read-only version of the object’s contents.
To view an object’s details:
1. Select a record on an object table and choose Objects > View Detail from the main menu, or right-click on an object in an object field or
object lookup field and choose View Detail from the context menu.
2. The Data Manager opens the Object detail dialog (Figure 77).
3. When you are done viewing the object’s details, click the close button in the upper right corner of the Object detail dialog to return to the Data Manager.
EDITING OBJECT DETAILS
You can edit objects internally (using the Data Manager) or externally, using a third-party application.
Editing Objects in Data Manager
The Edit Detail operation lets you edit the contents of existing copy block, text block, and text HTML objects from within the Data Manager.
To edit a copy block, text block, or text HTML object:
1. Select a record on an object table and choose Objects > Edit Detail from the main menu, or right-click on the object in an object field or
object lookup field and choose Edit Detail from the context menu to open an editable version of the Object Detail dialog.
2. Edit the object’s contents on the dialog and click OK to save the
changes and close the dialog or Cancel to discard the changes and close the dialog.
NOTE ►► See “Editing a Text HTML Object” on page 142 for more information about editing text HTMLs.
NOTE ►► See “Editing a Copy Block” on page 144 for more information about editing copy blocks.

126 MDM Data Manager Reference Guide
Editing Objects Using External Applications
You can edit any existing object with your favorite third-party editing application as described in this section.
To externally edit an existing object:
1. Select a record on an object table and choose Objects > Edit External from the main menu, or right-click on the object in an object field or
object lookup field and choose Edit External from the context menu.
2. MDM opens the original object for editing within the Windows application currently associated with the original format of the select object.
3. Edit the object and then save and exit the application.
4. MDM detects the update and prompts you to confirm that you want to update the original object in the repository.
EDITING THE DATA GROUPS HIERARCHY
You can modify the Data Groups hierarchy directly from within the Add
Objects dialog by clicking the Edit button to open the Edit Data Groups dialog and then using the context menu to add siblings and children, and to delete and rename existing nodes (Figure 78).
Figure 78. Edit Data Groups dialog
TIP ►► You can also edit the Data Groups hierarchy by choosing
Objects > Edit Data Groups from the main menu.
NOTE ►► See “Selecting and Deselecting Data Groups” on page 111 for more information about the Data Groups hierarchy.
Right-click context menu to edit the Data Groups hierarchy
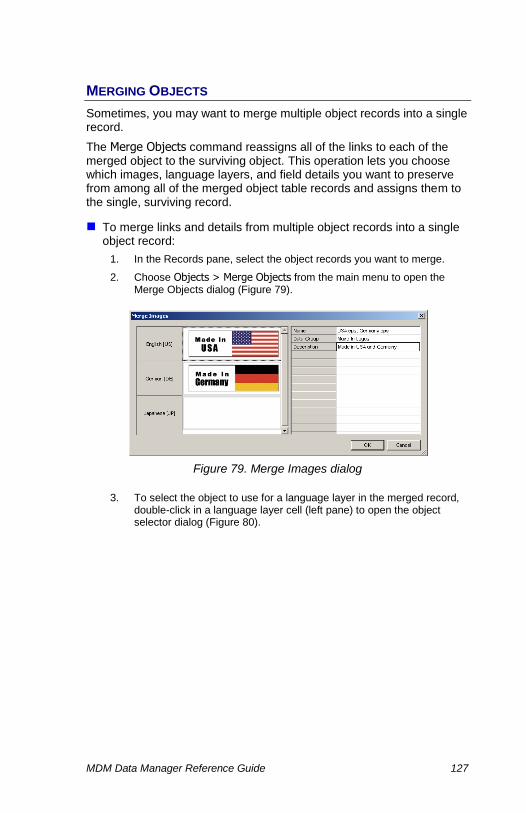
MDM Data Manager Reference Guide 127
MERGING OBJECTS
Sometimes, you may want to merge multiple object records into a single record.
The Merge Objects command reassigns all of the links to each of the merged object to the surviving object. This operation lets you choose which images, language layers, and field details you want to preserve from among all of the merged object table records and assigns them to the single, surviving record.
To merge links and details from multiple object records into a single object record:
1. In the Records pane, select the object records you want to merge.
2. Choose Objects > Merge Objects from the main menu to open the Merge Objects dialog (Figure 79).
Figure 79. Merge Images dialog
3. To select the object to use for a language layer in the merged record, double-click in a language layer cell (left pane) to open the object selector dialog (Figure 80).
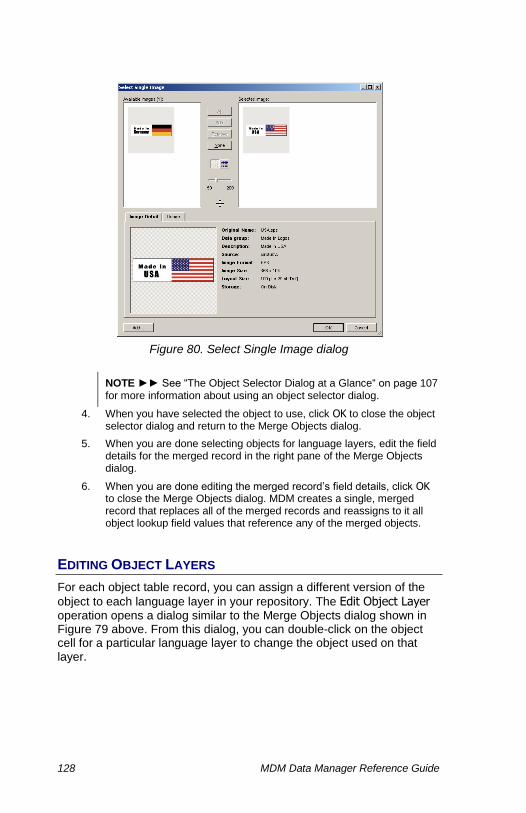
128 MDM Data Manager Reference Guide
Figure 80. Select Single Image dialog
NOTE ►► See “The Object Selector Dialog at a Glance“ on page 107 for more information about using an object selector dialog.
4. When you have selected the object to use, click OK to close the object selector dialog and return to the Merge Objects dialog.
5. When you are done selecting objects for language layers, edit the field details for the merged record in the right pane of the Merge Objects dialog.
6. When you are done editing the merged record’s field details, click OK to close the Merge Objects dialog. MDM creates a single, merged record that replaces all of the merged records and reassigns to it all object lookup field values that reference any of the merged objects.
EDITING OBJECT LAYERS
For each object table record, you can assign a different version of the
object to each language layer in your repository. The Edit Object Layer operation opens a dialog similar to the Merge Objects dialog shown in Figure 79 above. From this dialog, you can double-click on the object cell for a particular language layer to change the object used on that layer.
MDM Data Manager Reference Guide 129
IMAGE-SPECIFIC OPERATIONS
When an Images table record or image object lookup field is selected, operations specific to images are enabled on the Operations menu and object lookup field context menu.
These image-specific operations are summarized in Table 30 on page 114 and described in the sections below.
Viewing Images and Image Variants
You can view an original image, its thumbnail, or any of its variants
within a pop-up window using any of the image View commands.
With respect to the variants of an image, a particular variant can be in any of twelve possible states, based on three conditions: (1) it may be system or user generated; (2) it may or may not be needed; and (3) it may be nonexistent; outdated; or done. The states appear in square brackets ([]) next to the variant name in the cascading menu when you
choose the View > Variant command, as summarized in Table 31.
NOTE ►► The Original and Thumbnail variants always are always needed and done (i.e. up-to-date).
NOTE ►► To view the Original or a variant, an application on the local machine must be capable of opening that type of image file.
Table 31. Image Variant States
System States User States
Done; Needed; System Done; Needed; User
Done; Not Needed; System Done; Not Needed; User
Outdated; Needed; System Outdated; Needed; User
Outdated; Not Needed; System Outdated; Not Needed; User
Nonexistent; Needed; System Nonexistent; Needed; User
Nonexistent; Not Needed; System Nonexistent; Not Needed; User
To view a variant of an image in a pop-up window:
1. In the Record Detail tab, right-click on the image thumbnail and choose
from the context menu, or choose Objects > Image from the main menu and choose from the cascading menu, as follows:
View Original – view the Original variant View Thumbnail – view the Thumbnail variant View Variant – view the selected variant

130 MDM Data Manager Reference Guide
2. If you choose View Variant, MDM displays a cascading menu of variants from which to choose, with the status of each variant appearing next to the variant name in square brackets ([]) and the choices for those variants that do not exist disabled in gray.
3. MDM opens a pop-up window to view the selected image variant.
4. When you are done, click the pop-up window’s close button.
Adding User-Generated Image Variants
You can add a user-generated variant as described in this section.
To add a user-generated variant from an external image file:
1. In the Record Detail tab, right-click on the image thumbnail and choose
Set Variant from the context menu, and then choose the variant from the cascading menu of variant names.
2. MDM opens the Windows file Open dialog.
3. Navigate to the desired folder, select the image file you want to use for
the user-generated variant, and click Open.
4. MDM imports the file as the selected variant for the current image record(s).
Adding System-Generated Variants
System-generated variants are created using MDM Image Manager (see help.sap.com/nwmdm71 > Image Manager Reference for more
information).
Deleting Image Variants
You can delete an image variant as described in this section.
To delete a system- or user-generated variant:
1. In the Record Detail tab, right-click on the image thumbnail and choose
Delete Variant from the context menu, and then choose the variant from the cascading menu of variant names.
2. MDM deletes the selected variant for the current image record(s).
Searching by Image Variant
The search tabs for the Images object table allow you to search not only by data group, image source location, image format, and what rotation and cropping transformations have been applied to the image, but also by the state of each variant.
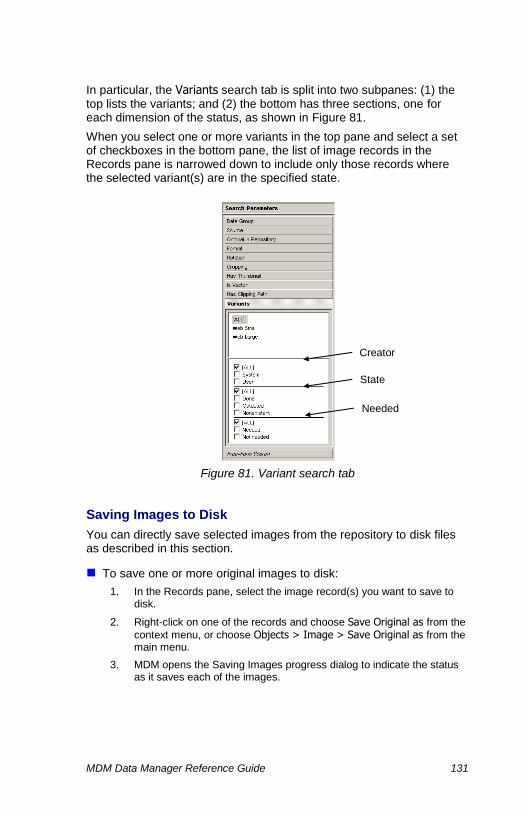
MDM Data Manager Reference Guide 131
In particular, the Variants search tab is split into two subpanes: (1) the top lists the variants; and (2) the bottom has three sections, one for each dimension of the status, as shown in Figure 81.
When you select one or more variants in the top pane and select a set of checkboxes in the bottom pane, the list of image records in the Records pane is narrowed down to include only those records where the selected variant(s) are in the specified state.
Figure 81. Variant search tab
Saving Images to Disk
You can directly save selected images from the repository to disk files as described in this section.
To save one or more original images to disk:
1. In the Records pane, select the image record(s) you want to save to disk.
2. Right-click on one of the records and choose Save Original as from the
context menu, or choose Objects > Image > Save Original as from the main menu.
3. MDM opens the Saving Images progress dialog to indicate the status as it saves each of the images.
Creator
State
Needed

132 MDM Data Manager Reference Guide
Setting Image Print Size
When you publish an image to a printed publication, it is placed onto the paper using the image print size you specify for the image, as described in this section.
To set the image print size of one or more images (for publications):
1. In the Records pane, select the image record(s) whose print size you want to set.
2. Double-click on the Print Size cell in the Record Detail pane, or choose
Objects > Image > Set Print Size from the main menu to open the Image Print Size dialog shown in Figure 82.
Figure 82. Image Print Size dialog
3. Select the unit from the drop-down list:
Q points didots millimeters picas ciceros inches
4. Type a numeric value for the print width or height of the image, or use the slider and the image preview to visually size the image.
NOTE ►► The maximum print size you can specify for an image is based on: (1) the number of pixels in the image divided by (2) the Default Image DPI repository property.
5. Click OK to close the Image Print Size dialog.
TIP ►► Click the Default button to restore the image to its default size based on the global repository properties.
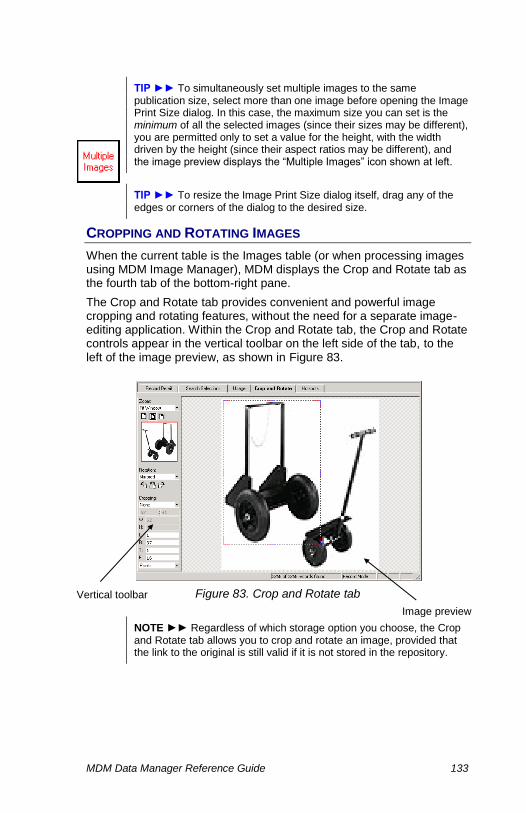
MDM Data Manager Reference Guide 133
TIP ►► To simultaneously set multiple images to the same publication size, select more than one image before opening the Image Print Size dialog. In this case, the maximum size you can set is the minimum of all the selected images (since their sizes may be different), you are permitted only to set a value for the height, with the width driven by the height (since their aspect ratios may be different), and the image preview displays the “Multiple Images” icon shown at left.
TIP ►► To resize the Image Print Size dialog itself, drag any of the edges or corners of the dialog to the desired size.
CROPPING AND ROTATING IMAGES
When the current table is the Images table (or when processing images using MDM Image Manager), MDM displays the Crop and Rotate tab as the fourth tab of the bottom-right pane.
The Crop and Rotate tab provides convenient and powerful image cropping and rotating features, without the need for a separate image-editing application. Within the Crop and Rotate tab, the Crop and Rotate controls appear in the vertical toolbar on the left side of the tab, to the left of the image preview, as shown in Figure 83.
Figure 83. Crop and Rotate tab
NOTE ►► Regardless of which storage option you choose, the Crop and Rotate tab allows you to crop and rotate an image, provided that the link to the original is still valid if it is not stored in the repository.
Image preview
Vertical toolbar

134 MDM Data Manager Reference Guide
Figure 84. Crop and Rotate vertical toolbar
The Crop and Rotate vertical toolbar controls, shown in Figure 84, make available all of the commands for viewing, rotating, mirroring, and cropping images, and enable you to perform the following operations:
View an image at its actual size, fit to window, or fit to window width.
Magnify the image preview up to 10 times actual size (10:1).
Reduce the image preview down to 1/10 actual size (1:10).
Rotate the image in either direction in 90° or 180° increments.
Create a mirror-image of the current image.
Use pixels or percent as measurements units.
Select any rectangular image region for cropping, either using visual crosshairs, or by entering numeric values for pixels or percentages.
Maintain a specified aspect ratio during cropping.
Equally crop top and bottom, left and right, or all four sides.
Zoom menu
Zoom buttons
Rotation menu
Rotation buttons
Cropping Constraints menu
Aspect Ratio cropping values
Width and Height values
Left, Right, Top, Bottom values
Unit menu

MDM Data Manager Reference Guide 135
Table 32 describes each of the controls in the Crop and Rotate tab.
Table 32. Crop and Rotate Controls
Control Option Button Description
Zoom (drop-down)
Actual Size
Displays image at actual size.
Fit Window
Displays the entire image within the image preview area, preserving its aspect ratio.
Fit Width
Displays the image with maximum width within the image preview area.
10:1 1:10 Displays the image according to the specified “zoom in” and “zoom out” ratio.
Rotation (drop-down)
None Restores the image to its original orientation, with no rotation or mirroring.
90° CW
Rotates the image 90° clockwise from its original orientation; toolbar button rotates from its current orientation.
90° CCW
Rotates the image 90° counterclockwise from its original orientation; toolbar button rotates from its current orientation.
180° Rotates the image 180° from its original orientation.
Mirrored
Flips the image horizontally from its original orientation; toolbar button flips from the current mirror state.
90° CW Mirrored
Rotates the image 90° clockwise and flips it from its original orientation.
90° CCW Mirrored
Rotates the image 90° counterclockwise and flips it from its original orientation.
180° Mirrored
Rotates the image 180° clockwise and flips it from its original orientation.
Cropping Constraint (drop-down)
None Does not apply any cropping constraints.
Aspect Ratio Constrains the crop to the specified aspect ratio.
Size Constrains the crop to the specified size.
L=R Constrains the crop to trim left and right equally.
T=B Constrains the crop to trim top and bottom equally.
L=R; T=B Constrains the crop to trim left and right equally and top and bottom equally.
L=R=T=B Constrains the crop to trim left, right, top, and bottom equally.
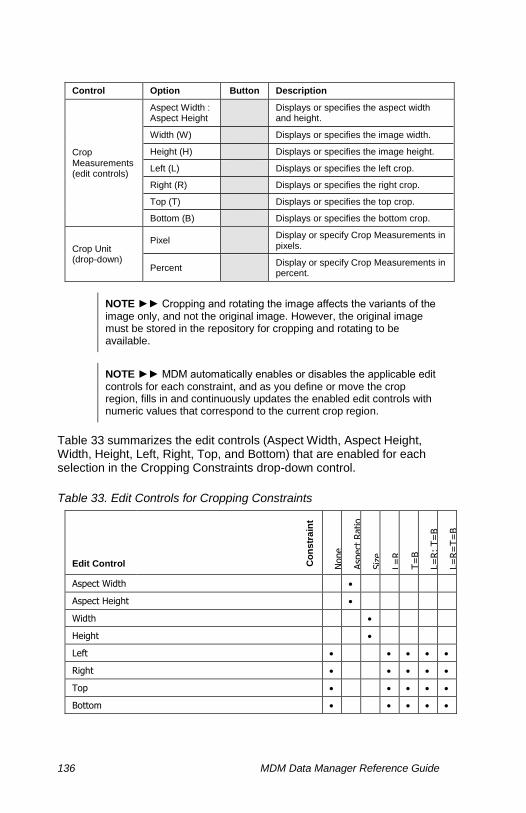
136 MDM Data Manager Reference Guide
Control Option Button Description
Crop Measurements (edit controls)
Aspect Width : Aspect Height
Displays or specifies the aspect width and height.
Width (W) Displays or specifies the image width.
Height (H) Displays or specifies the image height.
Left (L) Displays or specifies the left crop.
Right (R) Displays or specifies the right crop.
Top (T) Displays or specifies the top crop.
Bottom (B) Displays or specifies the bottom crop.
Crop Unit (drop-down)
Pixel Display or specify Crop Measurements in pixels.
Percent Display or specify Crop Measurements in percent.
NOTE ►► Cropping and rotating the image affects the variants of the image only, and not the original image. However, the original image must be stored in the repository for cropping and rotating to be available.
NOTE ►► MDM automatically enables or disables the applicable edit controls for each constraint, and as you define or move the crop region, fills in and continuously updates the enabled edit controls with numeric values that correspond to the current crop region.
Table 33 summarizes the edit controls (Aspect Width, Aspect Height, Width, Height, Left, Right, Top, and Bottom) that are enabled for each selection in the Cropping Constraints drop-down control.
Table 33. Edit Controls for Cropping Constraints
Edit Control Co
nstr
ain
t
None
Asp
ect
Ratio
Siz
e
L=
R
T=
B
L=
R;
T=
B
L=
R=
T=
B
Aspect Width
Aspect Height
Width
Height
Left
Right
Top
Bottom

MDM Data Manager Reference Guide 137
NOTE ►► A dot () means the edit control is enabled.
Resizing the Image View
You can display an image in the image preview area of the Crop and Rotate tab in any of the following sizes:
Actual Size. Displays the image at actual size.
Fit to Window. Displays the entire image within the image preview
area, preserving its aspect ratio. If you resize the Record Detail pane or the Data Manager window, the image preview is resized accordingly.
Fit Width to Window. Displays the image with maximum width
within the image preview area, preserving its aspect ratio. If you resize the Record Detail pane, the image preview is resized accordingly.
Zoom Ratio. Displays the image according to the specified zoom
ratio, which can range from a 1:10 reduction to a 10:1 enlargement.
To resize the image preview:
1. If necessary, select the Images table from the drop-down list of tables to make it the current table.
2. Click on the Crop and Rotate tab (if it is not already selected).
3. In the Records pane, select the image whose preview you want to resize.
4. Select the desired zoom from the Zoom drop-down list, or click any of the zoom toolbar buttons.
Rotating and Mirroring Images
You can rotate an image in 90° increments clockwise or counter-clockwise. You can also mirror the image by flipping it horizontally.
NOTE ►► The choices in the Rotation drop-down list display or select a rotation relative to the original image rotation. By contrast, the Rotation buttons change the rotation relative to the current image rotation.
To rotate and/or mirror an image:
1. In the Records pane, select the image you want to rotate and/or mirror.
2. Select the proper rotation from the Rotation drop-down list, or use the Rotation toolbar buttons.
3. Press Shift+Enter to save the new rotation. MDM immediately updates the thumbnail in the Records pane.

138 MDM Data Manager Reference Guide
Cropping Images
MDM Data Manager’s powerful image-cropping tools make using a separate image-editing application virtually unnecessary. You can use the mouse to select, move, and resize the crop region of an image, or enter pixel or percent measurements directly into the crop edit controls (as shown in Figure 83 and summarized in Table 32).
MDM Data Manager behaves as follows as you move the mouse cursor over the image preview in the Crop and Rotate tab:
Cursor type. The mouse cursor assumes different shapes according
to the different cropping operations that can be started from the current mouse position, as described in Table 33.
Cursor position. The status bar is continuously updated with the
current coordinates of the mouse cursor according to the format “(x, y)” (where ‘x’ is the horizontal distance in pixels from the left border and ‘y’ is the vertical distance in pixels from the top border).
Crop region. As you hold down the mouse button to define a crop
region or to resize or move an existing crop region, the status bar is continuously updated with the coordinates and size of the current crop region according to the format “(x1, y1) -> (x2, y2) = (m x n) [r]” (where ‘(x1, y1)’ and ‘(x2, y2)’ are the top-left and bottom-right coordinates of the crop region respectively; ‘(m x n)’ is the width and height of the crop region in pixels; and ‘r’ is the aspect ratio of the crop region in decimal), as shown in Figure 85.
Figure 85. Status bar with crop region information
NOTE ►► When no crop region has been defined, MDM automatically selects the entire image in the image preview.
TIP ►► You cannot define a new crop region if a crop region has already been defined and the cursor is within that region. To start a new crop, first reset the existing crop region by either: (1) clicking outside the current crop region; or (2) right-clicking within the region.

MDM Data Manager Reference Guide 139
Table 34. Cropping Cursors of the Crop and Rotate Tab
Cursor Description
Crosshairs. Indicates that you can start a crop by holding down the mouse and dragging to define the crop region.
Appears when the mouse is outside the current crop region or when the crop region is the entire image.
Two-headed diagonal arrows. Indicates that you can resize the current crop region by dragging the corresponding corner.
Appears when the mouse is over one of the four corners of the crop region.
Two-headed horizontal/vertical arrows. Indicates that you can resize the current crop region by dragging the corresponding edge.
Appears when the mouse is over the center of the left or right edge (horizontal arrow) or the top or bottom edge (vertical arrow) of the crop region.
Four-headed arrow. Indicates that you can move (drag-and-drop) the current crop region without resizing it.
Appears when the mouse is inside the current crop region and the crop region is not the entire image.
To crop an image using the mouse (with no cropping constraints):
1. In the Records pane, select the image you want to crop.
2. Select None from the Cropping Constraint drop-down list.
3. Move the mouse cursor over the image preview until the cursor changes to the crosshairs and is located at one of the four corners of the desired crop.
4. Click and hold down the mouse button while you drag the crosshairs until the desired crop region has been selected.
5. Release the mouse.
TIP ►► You can reset the crop region either by: (1) clicking outside the current crop region; or (2) right-clicking within the region.
TIP ►► You can adjust the size of the crop region by moving the mouse cursor over a corner or the center of an edge to be moved until the cursor switches to one of the two-headed arrows, clicking and holding down the mouse button, and dragging the corner or edge to the desired position.
TIP ►► You can adjust the position of the crop region by moving the mouse cursor over the crop region until the cursor switches to the four-headed arrow, clicking and holding down the mouse button, and dragging the crop region to the desired position without resizing it.
6. Press Shift+Enter to save the new crop region. MDM immediately updates the thumbnail in the Records pane.

140 MDM Data Manager Reference Guide
To crop an image by aspect ratio:
1. Select Aspect Ratio from the Cropping Constraint drop-down list to
enable the Aspect Width and Aspect Height edit controls.
2. If necessary, set the Unit to Pixel or Percent, as appropriate.
3. Enter the desired width:height ratio into the edit controls, and tab away to refresh the crop region outline with the specified aspect ratio.
4. As you move or resize the crop region using the mouse, MDM enforces the specified aspect ratio.
5. Press Shift+Enter to save the new crop region. MDM immediately updates the thumbnail in the Records pane.
To crop an image by size:
1. Select Size from the Cropping Constraint drop-down control to enable
the Width (W) and Height (H) edit controls.If necessary, set the Unit to
Pixel or Percent, as appropriate.
2. Enter the desired width and height into the edit controls, and tab away to refresh the crop region outline with the specified size.You can move (but not resize) the crop region using the mouse.
3. Press Shift+Enter to save the new crop region. MDM immediately updates the thumbnail in the Records pane.
To crop an image by Left/Right/Top/Bottom measurements:
1. Select an equality from the Cropping Constraint drop-down control to
enable the Left (L), Right (R), Top (T), and Bottom (B) edit controls.
2. If necessary, set the Unit to Pixel or Percent, as appropriate.
3. As you move or resize the crop region using the mouse, MDM enforces the equality constraint.
4. Press Shift+Enter to save the new crop region. MDM immediately updates the thumbnail in the Records pane.
To move the current crop region without resizing it:
1. Move the mouse cursor over the crop region until the cursor switches to the four-headed arrow.
2. Click and hold down the mouse button.
3. Drag the crop region to the desired position without resizing it.
4. Press Shift+Enter to save the new crop region. MDM immediately updates the thumbnail in the Records pane.

MDM Data Manager Reference Guide 141
TEXT BLOCK-SPECIFIC OPERATIONS
When a Text Blocks table record or text block object lookup field is selected, operations specific to text blocks are enabled on the Operations menu and object lookup field context menu.
These text block-specific operations are summarized in Table 30 on page 114 and described in the sections below.
Splitting Text Blocks
Sometimes, you may want to split a text block into multiple text block records based on a particular delimiter that appears in the text block, while duplicating all of the links to the original text block to each of the new text blocks.
When you use the Split Text Block command to split a text block by a delimiter, MDM does the following:
The text block is scanned for each occurrence of the delimiter.
Two or more Returns in a row (even when separated by white space) are removed and the text block split into two at that point.
For delimiters other than Return, two delimiters in a row includes the delimiter in the resulting text block instead of splitting at that point.
After splitting, all resulting text blocks are trimmed of leading and trailing white space.
The original text block is deleted after the split, unless referenced by a single-valued field, in which case the original text block is retained.
Multi-valued text block lookup fields are relinked to each split text block; single-valued fields are not affected by the split.
To split each of one or more text blocks into multiple text block records:
1. In the Records pane, select all of the text blocks you want to split.
2. Right-click on one of the records and choose Split Text Block from the
context menu, or choose Objects > Split Text Block from the main menu.
3. Choose the delimiter by which you want to split each text block from the cascading menu:
| \ Return
4. MDM splits the selected text block records and duplicates all text block lookup field values that reference any of the split text blocks.

142 MDM Data Manager Reference Guide
TEXT HTML-SPECIFIC OPERATIONS
When a Text HTMLs table record or text HTML object lookup field is selected, operations specific to text HTMLs are enabled on the Operations menu and object lookup field context menu.
These text HTML-specific operations are summarized in Table 30 on page 114 and described in the sections below.
Editing a Text HTML Object
You can edit text HTMLs using a built-in WYSIWYG HTML text editor.
The Text HTML Detail dialog has four tabs:
Normal. Displays and allows you to edit the formatted HTML.
HTML. Displays and allows you to edit the raw HTML.
Preview. Displays the Text HTML precisely as it will be rendered.
Publication Preview. Displays the Text HTML as it will publish.
NOTE ►► The Normal and Preview tabs display the Text HTML slightly differently (such as a different border for tables and slightly different paragraph wrapping); the Preview tab also includes the ability to test out links, which are disabled in the other tabs.
NOTE ►► Numerous HTML tags are not supported for print publication using MDM Publisher. These tags are stripped out in the Publication Preview tab, which displays the HTML as it will display within the preview panes of MDM Publisher and in printed publications.
To open the Text HTML Detail dialog:
Double-click on a Text HTML lookup field cell or right-click on the cell
and choose Edit Detail from the context menu.
NOTE ►► The Format Painter toolbar button is a toggle. When you click on it, MDM copies the format of the text that is selected (or at the point of the cursor if there is no selection). When you then drag-select new text with the mouse, that format is applied to the newly selected text. The format consists of the font name, font size, font color, highlight color, and the state of the bold, italic, and underline.
NOTE ►► Additional context menu commands not available on the
toolbar include: Find (Ctrl+F); Open in Browser (Ctrl+N); and Print (Ctrl+P).

MDM Data Manager Reference Guide 143
To edit an existing text HTML in the Data Manager:
1. In the Records pane, select the record you want to edit.
2. In the Record Detail tab, double-click on the Text HTML cell, or press
Enter to open the Text HTML Detail dialog. (Language-specific editing is available from the Language Detail tab.)
Figure 86. Text HTML Detail dialog for WYSIWYG text HTML editing
3. Make sure the Normal tab is the active tab, and click the Edit button
(shown as Save in the figure above) to enable editing.
4. Edit the text HTML by typing text and using the toolbar controls to add rich formatting.
5. When you are done editing, click the Save button to save the text
HTML record, and then click OK to close the dialog.
NOTE ►► MDM saves the changes automatically if you click OK
without first clicking the Save button.
TIP ►► If you want to abandon the changes you have made, click
Cancel without clicking the Save button.

144 MDM Data Manager Reference Guide
Copying the HTML Code of a Text HTML Object
Sometimes, you may want to copy the HTML of an existing text HTML object and use it for another text HTML object. Other times, you may want to edit the HTML in an external editor.
Using the Copy HTML command, you can copy the HTML code of a text HTML object and paste it into the HTML tab of another text HTML object or in an external HTML editor.
To copy the HTML code of an existing text HTML block:
1. In the Records pane, select the record containing the text HTML you want to copy.
2. MDM displays the text in the Text HTML Block field of the Record Detail tab.
3. Right-click on the text and choose Copy HTML from the context menu,
or choose Objects > Text HMTL > Copy HTML from the main menu.
4. MDM copies the HTML code of the selected text HTML block. You can the paste the copied HTML code in the HTML tab of another text HTML or in an external HTML editor.
COPY BLOCK-SPECIFIC OPERATIONS
When a Copy Blocks table record or copy block object lookup field is selected, operations specific to copy blocks are enabled on the Operations menu and object lookup field context menu.
These copy block-specific operations are summarized in Table 30 on page 114 and described in the sections below.
Editing a Copy Block
You can edit copy blocks using a built-in WYSIWYG copy block editor as described in this section.
The View Text Block Detail dialog has three tabs:
Normal. Displays and allows you to edit the formatted copy.
CBML. Displays and allows you to edit the raw CBML.
Expanded. Displays the copy block in its finalized form, including
any field or attribute values from its linked record set.
To open the Text HTM Detail dialog:
Double-click on the Text HTML lookup field cell or right-click on the cell
and choose Edit Detail from the context menu.

MDM Data Manager Reference Guide 145
To edit an existing copy block:
1. In the Records pane, select the copy block record you want to edit.
2. In the Record Detail pane, double-click on the Copy Block cell, or
press Enter to open the Text Block Detail dialog.
3. Make sure the Normal tab is the active tab and edit the copy block by typing text and using the toolbar controls to manage styles and fonts as well as add references to fields and variables. (Language-specific editing is available from the Language Detail tab.)
4. When you are done editing, click the Save button to save copy block
record, and then click OK to close the dialog.
Expanding a Copy Block
In the Copy Blocks table, the copy block field displays the copy block exactly as it appears in the Normal tab of the View Text Block Detail dialog.
Once you start linking copy blocks to family table records, you can expand the copy block to see the results of any functions, operators, or conditional statements included in the copy block. The expanded results apply to the selected record only.
NOTE ►► Because the functions, operators, and conditional statements included in a copy block get their values from the records to which the copy block is linked, you can view or expanded copy blocks only from the copy block lookup field of a selected family table record. Viewing expanded copy blocks from the Copy Blocks table includes only the formatted text of the copy block.
To view the expanded copy of a copy block:
1. Switch the Data Manager to Family Mode.
2. In the Family Hierarchy pane, select the family containing the copy block you want to see expanded.
3. MDM displays the unexpanded copy block in the copy box lookup field of the Record Detail tab, as shown Figure 88
Figure 87. Unexpanded version of a copy block

146 MDM Data Manager Reference Guide
4. Check the Expanded box below the name of the copy box lookup field to view the expanded copy, as shown Figure 88
Figure 88. Expanded version of a copy block
Copying a Copy Block
You can copy the unexpanded contents of a copy block object as described below.
NOTE ►► The ability to copy the expanded contents of a copy block
object is not supported and the Copy Expanded Copy menu option will be removed in a future version of Data Manager.
To copy the unexpanded copy of a copy block:
1. In the Records pane, select the record containing the copy block you want to copy.
2. MDM displays the copy in the Copy Block field of the Record Detail tab.
3. Right-click on the text and choose Copy Unexpanded Copy from the
context menu, or choose Objects > Copy Block > Copy Unexpanded
Copy from the main menu.
4. MDM copies the selected copy block contents to the clipboard.
PDF–SPECIFIC OPERATIONS
When a PDFs table record or PDF object lookup field is selected, operations specific to PDF files are enabled on the Operations menu and object lookup field context menu.
Viewing PDFs
If desired, you can view a PDF within a full-size window.
To view a PDF in a pop-up window:
In the Record Detail tab, right-click on the PDF thumbnail and choose
View PDF from the context menu, or choose Objects > PDF > View
PDF from the main menu to open a window containing the PDF.
NOTE ►► Adobe Reader or Adobe Acrobat must be installed on the computer running the Data Manager in order to view PDF files.
MDM Data Manager Reference Guide 147
BINARY OBJECT/SOUND/VIDEO-SPECIFIC OPERATIONS
When a Binary Objects, Sounds, or Videos table record or object lookup field is selected, operations specific to these objects are enabled on the Operations menu and object lookup field context menu.
These object-specific operations are summarized in Table 30 on page 114 and described in the sections below
Saving Objects to Disk
You can directly save selected binary object, sound, or video objects from the repository to disk files as described in this section.
To save one or more original objects to disk:
1. In the Records pane, select the object record(s) you want to save.
2. Right-click on one of the records and choose Save Object as from the
context menu, or choose Objects > Object > Save Object as from the main menu.
3. MDM opens the Saving Images progress dialog to indicate the status as it saves each of the images.

148 MDM Data Manager Reference Guide
Editing Relationships
MDM Data Manager includes a pop-up window for reviewing, adding (linking), and removing (unlinking) related records for each product-level relationship. You access the window from the Relationships field, which appears on the right side of the Record Detail tab (Figure 10).
NOTE ►► Each product-level relationship is like a multi-valued lookup field, in that it stores the links to one or more records.
NOTE ►► You can open the Relationships pop-up window only if a single record is selected in the Records grid.
NOTE ►► When zero records are selected or more than one record is selected in the Records grid, the Relationships field is disabled and highlighted in read-only gray.
TIP ►► For each product-level relationship, the Relationships field in the Record Detail tab displays a count for the number of related records. To view the actual related records, open the Relationships pop-up window and move from tab to tab.
To open the resizable Relationships pop-up window:
In the Record Detail tab, double-click on the Relationships field to open the pop-up window shown in Figure 89.
Figure 89. Relationships pop-up window
TIP ►► The relationship on which you double-click in the Relationships field determines the active Relationship tab when you first open the Relationships pop-up window.
Anchor record

MDM Data Manager Reference Guide 149
NOTE ►► The pop-up window remains open on top until you close it, and is hidden when you go into a mode other than Record mode.
NOTE ►► The pop-up window is product-centric rather than relationship-centric, in that it shows all the related records for each relationship for the anchor record (see “The Anchor Record” on page 375 for more information).
NOTE ►► See “Product-Level Relationships” on page 369 for more detailed information about product-level relationships.
From the Relationships pop-up window, you have access to the following functions:
View related records for each product-level relationship.
Add (link) related records to the anchor record.
Remove (unlink) related records from the anchor record.
Split related sibling records into a new sibling group.
Reorder the child records of a parent/child relationship.
Change the anchor record.
Import relationship links from a text file.
Export relationship links to a text file.
To add one or more related records to a relationship:
1. If necessary, click on the tab for the relationship to which you want to add related records to make it the active tab.
2. Make sure the current table is the table that contains the records you want to add.
3. In the Records pane, select the records that you want to relate to the anchor record, either as: (1) siblings of a sibling anchor; (2) children of a parent anchor; or (3) parents of a child anchor.
4. Choose Relationships > Add to Relationship from the main menu, or drag-and-drop the records into the applicable sibling grid or non-anchor parent/child grid.
5. MDM adds the related records.
NOTE ►► When you add new records to a child grid that has a
Position: (1) the Add to Relationship menu command adds them as the last related records; and (2) drag-and-drop adds them into the position at which you drop them.

150 MDM Data Manager Reference Guide
TIP ►► Required and Quantity, if they are defined for the relationship, are assigned default values when you first add the related records (Required=No and Quantity=1). To change the default values, you can: (1) click on the Required checkbox to toggle whether or not the record is required; and (2) click on the Quantity cell and type a new value.
TIP ►► You can also drag-and-drop records from the Records pane directly into the anchor parent/child grid if a single record is selected in the non-anchor grid.
To remove one or more related records from a relationship:
1. If necessary, click on the tab for the relationship from which you want to remove related records to make it the active tab.
2. In the applicable grid, select the records you want to remove.
3. Right-click on one of the records and choose Remove from Relationship from the context menu, or press Del, or choose
Relationships > Remove from Relationship from the main menu.
4. MDM removes the related records.
NOTE ►► The Relationships > Remove from Relationship main menu command deletes the selected records in the grid that has the focus.
To split one or more related records into a new sibling group:
1. If necessary, click on the tab for the sibling relationship whose related records you want to split to make it the active tab.
2. In the Sibling grid, select the records you want to split into a new sibling group.
3. Right-click on one of the records and choose Split from Relationship
from the context menu, or choose Relationships > Split from Relationship from the main menu.
4. MDM splits the related records into a new sibling group and removes them from the grid, unless the anchor is one of the selected records, in which case, the unselected records are removed from the group.
To reorder the set of related records in a relationship:
1. If necessary, click on the tab for the relationship whose related records you want to reorder to make it the active tab.
2. In the Child grid, select the records you want to reorder.
3. Drag-and-drop the records into their new position within the grid.
4. MDM moves the selected records to the new position.
NOTE ►► When the child grid has a Position column, the rest of the columns are non-sortable so that drag-and-drop makes sense.

MDM Data Manager Reference Guide 151
To change the anchor record to another related record in the active relationship tab:
Double-click on the related record. MDM moves the anchor icon to the new anchor record.
NOTE ►► If the new anchor is in the non-anchor grid of a parent/child relationship tab, MDM also automatically switches the active tab to the tab for the other half of the parent/child relationship.
TIP ►► To navigate the levels of a multi-level parent/child relationship defined within a table: (1) double-click on a related record in the non-anchor grid to make it the new anchor; (2) manually switch the active tab back to the tab for the original half of the parent/child relationship; and (3) repeat. To navigate up to parents and grandparents, start with the Parent tab as the active tab. To navigate down to children and grandchildren, start with the Child tab as the active tab.
NOTE ►► Changing the anchor record preserves as much context as possible in the relationship tab grid or grids: (1) if the active tab is a sibling tab, both the active tab and the set of related records in the Sibling grid remain the same; (2) if the active tab is a parent/child tab and the new anchor is in the non-anchor grid, the active tab changes to the tab for the other half of the relationship, but the set of related records in both grids remain the same; and (3) if the active tab is a parent/child tab and the new anchor is in the anchor grid, the active tab and the set of related records in the anchor grid remain the same, and only the set of related records in the non-anchor grid changes (to correspond to the new anchor).
To change the anchor record to a record in the Records grid:
Double-click on the record in the Records grid. MDM attempts to make the selected record the new anchor in the anchor grid of the active tab.
NOTE ►► For a parent/child relationship tab, if the current table is the table of the non-anchor grid but not of the anchor grid, MDM switches the active tab to the tab for the other half of the relationship and makes the selected record the new anchor in that grid.
NOTE ►► If the current table does not participate in the relationship of the active tab at all, double-clicking on the record in the Records grid has no effect and the anchor record remains unchanged.
TIP ►► To view the related records of each successive record in the Records grid, double-click on each record in the Records grid in sequence to change the anchor to that record in the active tab.

152 MDM Data Manager Reference Guide
To import a set of links for the related records of a relationship:
1. Choose Relationships > Import from File from the main menu, and then select from the cascading menu of relationships the relationship into which you want to import relationship links.
2. MDM opens the Windows file Open dialog for you to select a file. Navigate to the appropriate folder, select the text file that contains the
set of relationship links, and click Open.
3. MDM imports the relationship links and displays a progress dialog to indicate the current status of the import.
NOTE ►► MDM appends the imported relationship links to the set of existing links for each record by: (1) adding new links; and (2) updating existing links with the specified qualifier values. For an update, an unspecified qualifier value is ignored and does not overwrite the existing value with NULL (i.e. the setting of the NULL Values Overwrite Existing Values configuration option is ignored).
NOTE ►► Only the following field types are supported for relationship imports: Text, Text Normalized, Integer, Auto ID, Lookup [Flat], Lookup [Hierarchy], Lookup [Qualified Flat] (multi-valued), Lookup (Taxonomy), and Taxonomy (category).
To export a set of links for the related records of a relationship:
1. Choose Relationships > Export to File from the main menu, and then select from the cascading menu of relationships the relationship for which you want to export relationship links.
2. MDM opens the Windows file Open dialog for you to name the export file. Navigate to the appropriate folder, select or type a file name, and
click Save.
3. MDM exports the relationship links and displays a progress dialog to indicate the current status of the export.

MDM Data Manager Reference Guide 153
Modifying Masks
Product masks allow you to partition a single main table into as many customized, virtual subset repositories as you like.
The main uses of masks are to edit an arbitrary subset of records as a group, and to publish custom “subset catalogs.”
NOTE ►► The Masks table must already have been created for the repository (using MDM Console), and the individual mask(s) already defined before you can add records to, remove records from, or replace records in a mask.
NOTE ►► Each mask can apply to a single main table, and you cannot change the table association once it has been defined.
TIP ►► To add a new mask or delete an existing mask from the
hierarchy of masks, you can use the Modify Mask command described in the next section, or you can go into Hierarchy mode and edit the Masks table directly.
EDITING THE MASKS TABLE
The Masks table is a special hierarchy table that defines the hierarchy of masks. An example of a Masks table displayed in Record mode is shown in Figure 90.
The hierarchy corresponds to the tree that appears in the drop-down
tree control when you choose Records > Modify Mask from the main menu, and each record in the hierarchy corresponds to a mask that
appears in the cascading hierarchy of menus when you choose Add to
Mask or Remove from Mask from the Records pane context menu.
Figure 90. Masks table in Record mode

154 MDM Data Manager Reference Guide
In addition to the mask name, each mask record may also contain other fields of information that further describe the mask, including the main table to which the mask applies.
TIP ►► Although you can view and edit the records of the Masks table in Record mode, you should usually edit the Masks table in Hierarchy mode, so that you can edit the mask hierarchy in addition to the other fields of each mask record.
CONTEXT MENU MASK COMMANDS
You can add, remove, and replace records from a mask as described in the following sections.
NOTE ►► Mask commands can only be applied to masks associated with the current main table.
To add one or more records to a mask:
1. In the Records pane, select the record(s) you want to add to the mask.
2. Right-click on one of the records and choose Add to Mask from the context menu, as shown in Figure 91.
Figure 91. Adding records to a mask
3. Choose from the cascading hierarchy of menus the mask to which you want to add the records.
To remove one or more records from a mask:
1. In the Records pane, select the record(s) you want to remove.
2. Right-click on one of the records and choose Remove from Mask from the context menu.
3. Choose from the cascading hierarchy of menus the name of the mask from which you want to remove the records.

MDM Data Manager Reference Guide 155
To replace the records in a mask with one or more records:
1. In the Records pane, select the record(s) you want to add to the mask.
2. Right-click on one of the records and choose Replace in Mask from the context menu.
3. Choose from the cascading hierarchy of menus the name of the mask whose records you want to replace.
MODIFY MASK COMMAND
The Modify Mask command provides another way to add or remove records from one or more masks. This method is required if you want to: (1) modify a mask with a list of records identified in a file; (2) modify multiple masks at the same time; or (3) create a new mask.
The file must be a plain text (ASCII) file with one entry per line. The first line is the field name, followed by lines containing values for that field (each value on a new line). For example, a text file containing the following four lines could be used to add or remove three products with the specified SKU numbers:
SKU
45008
46009
46880
When you use the Modify Mask command to modify the records in a mask, MDM opens the Modify Mask dialog, and then updates the masks based on the option settings you specify (Table 35).
Table 35. Modify Mask Options
Option Radio Button Description
Mask Select the masks from the drop-down tree.
Operation
Add Add records to the selected mask.
Remove Remove records from the selected mask.
Replace With Replace the records in the selected mask.
Source
Search Results Modify the mask with the search results.
Selected Records Modify the mask with the selected records.
Records from File Modify the mask with records from a file.
To use the Modify Mask command to add records to a mask or remove records from a mask:
1. If you are going to add (or remove) a group of records from the Records pane to (or from) a mask, select the records before choosing
the Modify Mask command.

156 MDM Data Manager Reference Guide
2. Choose Records > Modify Mask from the main menu to open the Modify Mask dialog shown in Figure 92.
Figure 92. Modify Mask dialog
3. Select one or more masks from the tree of available masks.
4. Select the desired Operation to add, remove, or replace records:
Add Remove Replace With
5. Select the desired Source of the records to add, remove, or replace:
Search Results Selected Records Records from File
6. Click OK to close the Modify Mask dialog.
7. If you are modifying the mask from a list of records in a text file, the Windows file Open dialog appears for you to choose the file.
To use the Modify Mask command to add a new mask, or delete or rename an existing mask:
1. Choose Records > Modify Mask from the main menu to open the Modify Mask dialog shown in Figure 92 above.
2. Right-click on the existing mask you want to delete or rename, or after or below which you want to add a sibling or child.
3. MDM displays the context menu shown in Figure 93.
Resizable Dialog
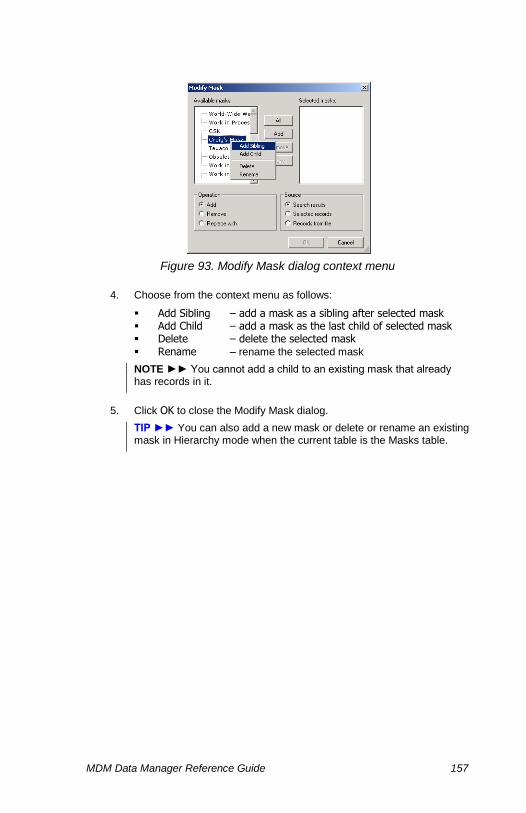
MDM Data Manager Reference Guide 157
Figure 93. Modify Mask dialog context menu
4. Choose from the context menu as follows:
Add Sibling – add a mask as a sibling after selected mask Add Child – add a mask as the last child of selected mask Delete – delete the selected mask Rename – rename the selected mask
NOTE ►► You cannot add a child to an existing mask that already has records in it.
5. Click OK to close the Modify Mask dialog.
TIP ►► You can also add a new mask or delete or rename an existing mask in Hierarchy mode when the current table is the Masks table.

158 MDM Data Manager Reference Guide
Checking Out Records
Sometimes you may want to allow one or more users to edit a copy of a record over an extended period of time as part of a collaborative process without changing the original until you are ready to commit the changes, and only then make them visible to users all at once. MDM allows you to do this with a versioning mechanism known as check out.
When you use the Check Out commands to check out an existing main table record, MDM does the following:
MDM creates a private duplicate copy of the record for editing, and simultaneously protects the original from editing or deletion.
The user who checks out the record owns the checkout; authorized users can specify which other users can join the checkout.
The owner and users who join see the duplicate instead of the original everywhere, and any of them can edit the duplicate.
While the record is checked out, the duplicate is hidden from all other users, who continue to see the original.
MDM displays a checked out icon ( ) and the username of the
checkout owner in the [Checked Out] column of the Records grid and highlights the original in read-only gray.
When an authorized user performs a Check In, MDM replaces the original with the edited duplicate, which becomes visible to all users.
NOTE ►► You can use the Check Out New commands to check out a new rather than an existing record, which creates a private new record with no visible original.
NOTE ►► Checking out an existing or new record can be: (1)
Exclusive, which grants join permissions to no other roles or users (by
default, no other users can join the checkout); and (2) Nonexclusive,
which grants join permissions to the Everyone role (by default, all users can join the checkout).
NOTE ►► Instead of checking in a record, an owner can use the Roll
Back command to delete the duplicate and cancel changes.
NOTE ►► You can use the All Versions command to display both versions (originals and duplicates) of all checked out records. This is the only way for other users to join the checkout of new records.
DATA INTEGRITY ►► You can use role-based privileges to decide whether owners and/or non-owners are permitted to check in, roll back, or modify join permissions of checked out records; and also whether users are allowed to add, modify, merge, or delete original records.

MDM Data Manager Reference Guide 159
CHECK IN/OUT OPERATIONS
The check in and check out operations are summarized in Table 36.
Table 36. Check In/Out Operations
Operation Description
Check Out Exclusive
Checks out the selected records exclusively.
Check Out Nonexclusive
Checks out the selected records nonexclusively.
Check Out New Record Exclusive
Checks out a new record exclusively.
Check Out New Record Nonexclusive
Checks out a new record nonexclusively.
Join Checkout Joins the selected checked out records.
Unjoin Checkout Unjoins the selected checked out records.
Check In Checks in the selected records to commit changes.
Roll Back Rolls back the selected records to discard changes.
Modify Join Permissions
Specifies which roles and users can join the selected checked out records.
All Versions Displays all versions of all checked out records.
NOTE ►► Check outs can be done in Record mode on the records of the main table only.
NOTE ►► Some restrictions apply if you attempt to merge checked out records: (1) you can merge records only if none of them are checked out, or all of them are the checked out versions of checked out records; (2) you cannot merge the original versions of checked out records, nor the checked out version of a record with an unchecked out record or the original of a checked out record; and (3) when a single surviving checked out record is checked in, the originals are then replaced with the single checked out record.

160 MDM Data Manager Reference Guide
[CHECKED OUT] COLUMN
The Records pane for the main table includes a sortable column named
[Checked Out] that indicates whether each record has been checked
out using the Check In/Out commands, the owner of a checked out record, and for duplicate versions, whether the user is: (1) the owner of the checkout; (2) a member of the checkout; or (3) a non-member of the checkout. MDM uses the checked out icon ( ) as the name of the column in the Records grid.
The icons that indicate the status of each checked record, along with the tooltip that appears when you move the mouse pointer over the record in the column, are summarized in Table 37.
Table 37. Checked Out Record States
Icon Tooltip Description
Original Original version of checked out record.
Member User is member of duplicate checked out record.
Non-Member User is non-member of duplicate checked out record.
MANAGING CHECKOUTS
The commands for checking out records are described in this section.
To check out one or more existing records:
1. In the Records pane, select the record(s) you want to check out.
2. Right-click on one of the records and choose Check In/Out from the
context menu, or choose Records > Check In/Out from the main menu, and in either case, choose from the cascading menu:
Check Out Exclusive Check Out Nonexclusive
3. MDM checks out the selected records by creating duplicates of the originals, as shown in Figure 94.

MDM Data Manager Reference Guide 161
Figure 94. Checked out records in the Records pane
NOTE ►► The figure above shows the checked out records for the user who performs the checkout. Other users see the original records in read-only gray.
To check out a new record:
1. In the Records pane, right-click and choose Check In/Out from the
context menu, or choose Records > Check In/Out from the main menu, and in either case, choose from the cascading menu:
Check Out New Record Exclusive Check Out New Record Nonexclusive
2. MDM checks out a new record by creating a new record and placing you into the Record Detail tab for editing.
To join the checkout of records checked out by another user:
1. In the Records pane, select the checked out record(s) you want to join.
2. Right-click on one of the records and choose Check In/Out > Join Checkout from the context menu, or choose Records > Check In/Out >
Join Checkout from the main menu.
3. MDM joins the checkout for the selected records by hiding the originals and making the duplicates visible and available for editing.
NOTE ►► The owner of the checkout must have checked out the
records Nonexclusive or granted you permission to join the checkout.
Checked out icon in [Checked Out] column
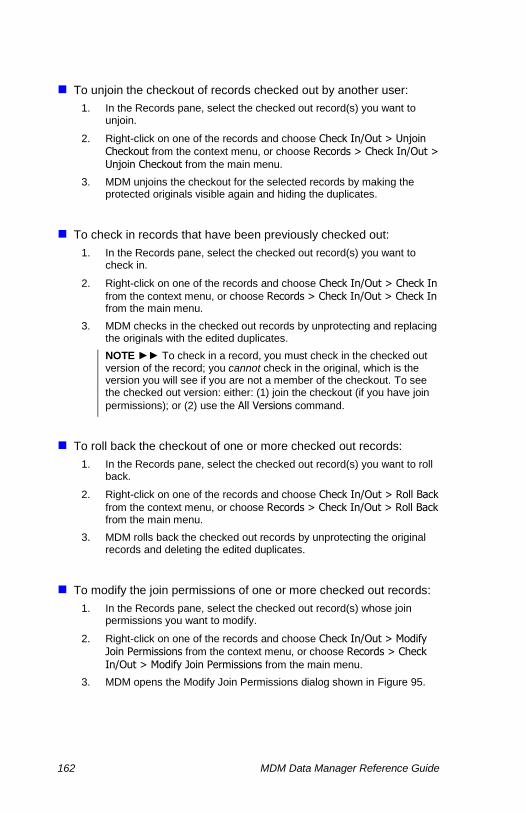
162 MDM Data Manager Reference Guide
To unjoin the checkout of records checked out by another user:
1. In the Records pane, select the checked out record(s) you want to unjoin.
2. Right-click on one of the records and choose Check In/Out > Unjoin Checkout from the context menu, or choose Records > Check In/Out > Unjoin Checkout from the main menu.
3. MDM unjoins the checkout for the selected records by making the protected originals visible again and hiding the duplicates.
To check in records that have been previously checked out:
1. In the Records pane, select the checked out record(s) you want to check in.
2. Right-click on one of the records and choose Check In/Out > Check In
from the context menu, or choose Records > Check In/Out > Check In from the main menu.
3. MDM checks in the checked out records by unprotecting and replacing the originals with the edited duplicates.
NOTE ►► To check in a record, you must check in the checked out version of the record; you cannot check in the original, which is the version you will see if you are not a member of the checkout. To see the checked out version: either: (1) join the checkout (if you have join
permissions); or (2) use the All Versions command.
To roll back the checkout of one or more checked out records:
1. In the Records pane, select the checked out record(s) you want to roll back.
2. Right-click on one of the records and choose Check In/Out > Roll Back
from the context menu, or choose Records > Check In/Out > Roll Back from the main menu.
3. MDM rolls back the checked out records by unprotecting the original records and deleting the edited duplicates.
To modify the join permissions of one or more checked out records:
1. In the Records pane, select the checked out record(s) whose join permissions you want to modify.
2. Right-click on one of the records and choose Check In/Out > Modify Join Permissions from the context menu, or choose Records > Check
In/Out > Modify Join Permissions from the main menu.
3. MDM opens the Modify Join Permissions dialog shown in Figure 95.
MDM Data Manager Reference Guide 163
Figure 95. Modify Join Permissions dialog
4. Add or remove users and/or roles who have permission to join the checkout by moving them between the Available and Selected lists.
5. Click OK to close the dialog and change the join permissions.
To view both originals and duplicates of all checked out records:
In the Records pane, right-click and choose Check In/Out > All Versions from the context menu, or choose Records > Check In/Out >
All Versions from the main menu.
NOTE ►► All Versions is a toggle. A check mark next to the All
Versions menu item indicates that it is turned on. To turn it off, choose
the All Versions command again.
NOTE ►► All Versions allows you to use the Compare Records command to compare the checked out version of a record with its
original. You can also use the Compare with Original command to compare the checked out record with its original directly (see “Comparing Records” on page 60 for more information).
NOTE ►► All Versions allows you to view the original of records for which you are a member of the checkout and the checked out version of records for which you are not a member of the checkout group.

164 MDM Data Manager Reference Guide
CHECKOUT AND STAMP FIELDS
Recall that record checkout is a versioning mechanism that allows users to edit a copy of a record over an extended period of time as part of a collaborative process without changing the original until you commit the changes, and only then makes them visible to users all at once.
With respect to the user and time of last change recorded in MDM’s Time Stamp and User Stamp fields, the guiding principle is that checkout is a hiding mechanism.
In other words, making changes to a checked out record and checking it back in has the same effect as if the record were never checked out and the changes were instead made to the original record every step of the way (and where the check in itself is not considered a modification for the purposes of triggering stamp fields). This preserves all the information about who made the changes and when.
NOTE ►► If stamp fields instead viewed checkout as a staging mechanism, checking out a record, making changes, and then checking it back in would be as if the record were edited and saved as of when and by the user who performs the check in.
CHECKOUT AND STAGING
Many master data management systems establish an actual staging environment outside the repository for processing raw inbound data before allowing it into the master data store. Such processing includes transforming and restructuring the data, correcting data quality issues, and checking new records against existing records for duplicates. In effect, staging requires a complete data management system outside the master data management system.
By contrast, MDM checkouts can be used to create a “virtual” staging environment that addresses these processing challenges within the repository rather than outside of it. Specifically, raw data is imported directly into the repository in a checked-out state, with subsequent processing orchestrated by workflow to perform validation, enrichment, and matching, after which changes may be approved and automatically checked in, or rejected and rolled back.
The virtual staging approach offered by checkouts is superior to an explicit staging environment outside the repository, protecting approved records from not-yet-validated incoming data and insulating end users from intermediate changes, while simultaneously offering internal users not only all of MDM’s powerful data management features for working on in-process records, but also complete high-performance searchability of those records regardless of their stage in the process.
MDM Data Manager Reference Guide 165
CHECKOUT AND TRANSACTION MANAGEMENT
Traditional business applications make heavy use of DBMS transaction
management – including the COMMIT and ROLLBACK statements – to ensure that a series of changes can be made safely and atomically. While MDM is not a traditional transactional system and does not support transaction management directly, it does support features that allow you to simulate the effect of a transaction.
Specifically, the analog to transactions in MDM is a checkout. By performing a checkout at the start of a transaction, changes can be made before committing them together as part of a checkin, or rolling them back atomically, all of which can be orchestrated within a workflow. Using this approach, multiple changes can be made within MDM or safely coordinated with changes outside the repository.
NOTE ►► Checkouts are not a full implementation of transaction management. For example, not all operations can be rolled back (e.g. deletes), and MDM has no support two-phase commit, which is required for multiple system coordination.
CHECKOUT AND IMPORT
Records checked out as part of an import operation are checked out nonexclusively (see “Check In/Out Operations” on page 159 for more
information about Checkout Nonexclusive).

166 MDM Data Manager Reference Guide
MDM Expressions
MDM expressions are Excel-like formulas that are evaluated by MDM and return a distinct value for each record.
Expressions can reference fields, attributes, and qualifiers; access lookup values, lookup records, and nested lookup records; navigate hierarchy, parent/child, and sibling relationships to access related records; reference the original data values of a checked out record; perform arithmetic, string, and logical operations; call built-in functions; and even reference other previously defined expressions.
Using MDM expressions, you can define complex formulas based on the data values of the record, and then evaluate those formulas against a group of one or more records, all without using a query language.
You can also define category-specific expressions as branches of a single expression, and MDM automatically executes the applicable expression based on the value of the category for each record.
Expressions appear within MDM in a variety of contexts, and in each case, their results are interpreted accordingly, as follows:
Validations. Validation expressions are defined and executed in
MDM Data Manager; the expression result is the Boolean success or failure of the validation for each record.
Assignments. Assignment expressions are defined and executed in
MDM Data Manager; the expression result is assigned to the value of the specified user-editable field for each record.
Calculated fields. Calculation expressions are defined in MDM
Console; the expression result is the read-only calculated field value based on other fields or attributes for each record.
NOTE ►► Calculated fields are described in the MDM Console Reference Guide.
For each record, MDM evaluates the expression based on the data values of the referenced fields, attributes, and qualifiers of that record, and the data values of any referenced records related to that record.
NOTE ►► An expression treats a referenced qualifier as a multi-valued field across the set of qualified links (although a calculated qualifier is evaluated individually for each qualified link).
NOTE ►► An expression treats related records as a multi-value across the set of related records.

MDM Data Manager Reference Guide 167
EXPRESSION EDITOR
The expression associated with a validation, an assignment, or a calculated field is defined and edited the MDM Expression Editor, shown in Figure 96.
Figure 96. Validation Expression dialog
An expression consists of field names, attribute names, qualifier names, lookup values, attribute text values, operators, and functions.
DATA INTEGRITY ►► Expressions are token-based, so that you do not have to type field, attribute, qualifier, operator, or function names, and can instead select them from drop-down lists, reducing the potential for typing error.
NOTE ►► If you manually type field, attribute, qualifiers, operators, and function names, MDM automatically tokenizes the text you have
just typed when you press Space, and highlights these tokens in blue or magenta.
NOTE ►► You must use the toolbar buttons to enter lookup values, text attribute values, and measurement values (consisting of a number and a unit of measure).
NOTE ►► When typing literal dates into the expression dialog, use
the formats “YYYY-MM-DD[Th-mm-ss[.uuu]]” (quotation marks
included) or YYYY\MM\DD.
NOTE ►► Expressions now support limited measurement arithmetic: (1) addition within the same convertible dimension (MDM uses the unit of the left-hand operator); and (2) multiplication of a scalar with a
measurement (e.g. Length *2 < 50 ft).
NOTE ►► Tokens for: (1) the values of lookup fields and text attributes appear as “name [value]”; and (2) virtual fields names (such
as [Record], [Depth], [Parent], [Child]) appear in square brackets ([]).
168 MDM Data Manager Reference Guide
Table 38 describes the toolbar buttons of the expression dialog for entering tokens into the expression.
Table 38. Expression Dialog Toolbar Buttons
Control / Button Tooltip Description
Number Type the number for a measurement value.
Dimension Chose from the drop-down list of dimensions.
Unit Choose from the drop-down list of units.
Enter
Enter the measurement value into the expression.
Cancel Clear the measurement value.
Fields
Choose from the drop-down list of fields, and for each lookup, from the cascading menu of fields.
Attributes Choose from the drop-down list of attributes.
Relationships
Choose from the drop-down list of relationships, and then from the cascading menu of fields.
Lookups
Choose from the drop-down list of lookups, and then from the pop-up dialog of lookup values.
Text Values
Choose from the drop-down list of text attributes, and then from the pop-up dialog of text values.
Operators Choose from the drop-down list of operators.
Functions Choose from the drop-down list of functions.
Editing Expressions
You can define and edit the expression associated with a validation, an assignment, or a calculated field as described in this section.
To edit an expression:
1. Double-click on the expression cell.
2. In the Expression Editor, enter the expression using the keyboard and the toolbar buttons to enter values, measurements, field names, attribute names, qualifier names, lookup values, attribute text values, operators, and functions.
3. Click OK to close the expression dialog.
4. To save the expression, press Shift+Enter.
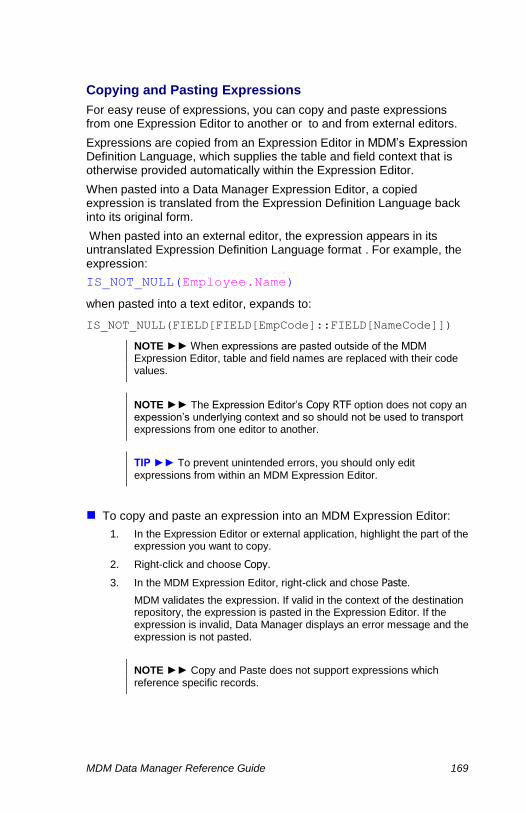
MDM Data Manager Reference Guide 169
Copying and Pasting Expressions
For easy reuse of expressions, you can copy and paste expressions from one Expression Editor to another or to and from external editors.
Expressions are copied from an Expression Editor in MDM’s Expression Definition Language, which supplies the table and field context that is otherwise provided automatically within the Expression Editor.
When pasted into a Data Manager Expression Editor, a copied expression is translated from the Expression Definition Language back into its original form.
When pasted into an external editor, the expression appears in its untranslated Expression Definition Language format . For example, the expression:
IS_NOT_NULL(Employee.Name)
when pasted into a text editor, expands to:
IS_NOT_NULL(FIELD[FIELD[EmpCode]::FIELD[NameCode]])
NOTE ►► When expressions are pasted outside of the MDM Expression Editor, table and field names are replaced with their code values.
NOTE ►► The Expression Editor’s Copy RTF option does not copy an expession’s underlying context and so should not be used to transport expressions from one editor to another.
TIP ►► To prevent unintended errors, you should only edit expressions from within an MDM Expression Editor.
To copy and paste an expression into an MDM Expression Editor:
1. In the Expression Editor or external application, highlight the part of the expression you want to copy.
2. Right-click and choose Copy.
3. In the MDM Expression Editor, right-click and chose Paste.
MDM validates the expression. If valid in the context of the destination repository, the expression is pasted in the Expression Editor. If the expression is invalid, Data Manager displays an error message and the expression is not pasted.
NOTE ►► Copy and Paste does not support expressions which reference specific records.
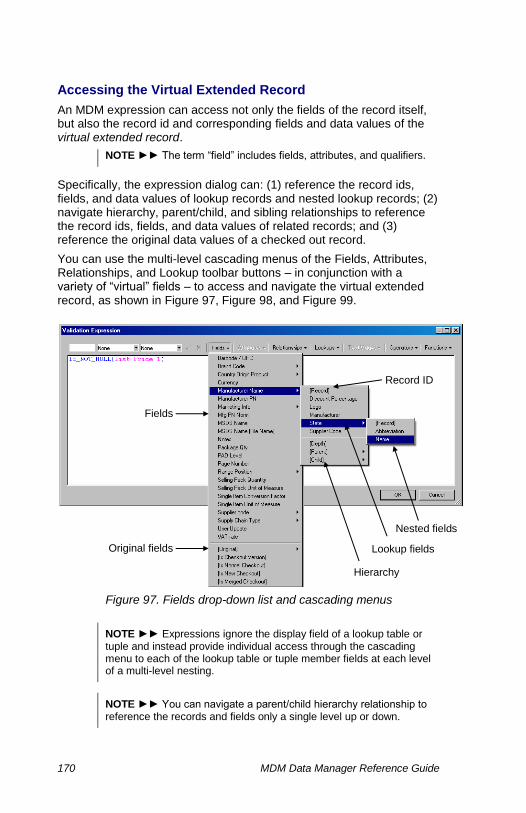
170 MDM Data Manager Reference Guide
Accessing the Virtual Extended Record
An MDM expression can access not only the fields of the record itself, but also the record id and corresponding fields and data values of the virtual extended record.
NOTE ►► The term “field” includes fields, attributes, and qualifiers.
Specifically, the expression dialog can: (1) reference the record ids, fields, and data values of lookup records and nested lookup records; (2) navigate hierarchy, parent/child, and sibling relationships to reference the record ids, fields, and data values of related records; and (3) reference the original data values of a checked out record.
You can use the multi-level cascading menus of the Fields, Attributes, Relationships, and Lookup toolbar buttons – in conjunction with a variety of “virtual” fields – to access and navigate the virtual extended record, as shown in Figure 97, Figure 98, and Figure 99.
Figure 97. Fields drop-down list and cascading menus
NOTE ►► Expressions ignore the display field of a lookup table or tuple and instead provide individual access through the cascading menu to each of the lookup table or tuple member fields at each level of a multi-level nesting.
NOTE ►► You can navigate a parent/child hierarchy relationship to reference the records and fields only a single level up or down.
Fields
Original fields
Nested fields
Lookup fields
Record ID
Hierarchy

MDM Data Manager Reference Guide 171
Figure 98. Relationships drop-down list and cascading menus
NOTE ►► For a same-table relationship, the drop-down list cascades to the same set of fields as the Fields toolbar button and to any other relationships; each relationship can participate at most once in a navigation once either side is included.
Figure 99. Lookups drop-down list
NOTE ►► The drop-down list cascades to: (1) the list of lookup fields of the current table, for access to their lookup values; and (2) the entire list of lookup tables, for access to lookup values that are nested beneath the current table through its lookup fields.
NOTE ►► Tokens for the values of lookup fields and text attributes are displayed as “name [value]”.
Using the drop-down lists and multi-level cascading menus of the expression dialog toolbar buttons to access the virtual extended record is summarized in Table 39.
Lookup fields
Lookup tables
Relationships

172 MDM Data Manager Reference Guide
Table 39. Accessing the Virtual Extended Record
Element Name Description
Record field A field of the record itself.
attribute An attribute of the record itself.
Lookup
lookup field ► Cascades to the fields of the lookup record.
[Record] The ID(s) of lookup records in the field value
field A field of the lookup record.
qualifier A qualifier field of the lookup record.
field ► Cascades to the fields of nested lookup record.
Tuple
tuple field ► Cascades to the tuple’s member fields.
[Record] The ID(s) of tuple records in the tuple field value
field A member field of the tuple.
field ► Cascades to the fields of nested tuple records.
Checkout
[Original] ► Cascades to the fields of the original record(s).
[Is Checkout Version] Checked out version of record? (T/F)
[Is Normal Checkout] Checkout of existing record? (T/F)
[Is New Checkout] Checkout of new record? (T/F)
[Is Merged Checkout] Checkout of merged records? (T/F)
Hierarchy
[Depth] Levels deep in the hierarchy.
[Parent] ► Cascades to the fields of the parent record.
[Child] ► Cascades to the fields of the child record(s).
Relationship
parent ► Cascades to the fields of the related record(s).
child ► Cascades to the fields of the related record(s).
sibling ► Cascades to the fields of the sibling record(s).
Lookup Value lookup field Pop-up dialog for a lookup field of the record.
lookup table Pop-up dialog for another lookup table.
NOTE ►► If an expression involves a qualified lookup field, the qualifiers for that field must be cached.
NOTE ►► Qualifiers appear as fields of the qualified lookup table through the cascading menu of the qualified lookup field.
NOTE ►► The [Record] virtual field contains only record IDs and can be used to verify the presence and quantity of records in the selected context. It does not contain the values of fields inside each record.
NOTE ►► The list of fields and attributes that appear in the Fields drop-down list also appear in the cascading menu when you navigate a hierarchy, parent/child, or sibling relationship to the same table.

MDM Data Manager Reference Guide 173
BRANCH EXPRESSIONS
Most likely, each category will have its own category-specific expression corresponding to the different attributes associated with each category.
One approach would be to define a different expression for each category, and then run the expression for the category based on the category value of the records on which you run the expression.
This approach has two shortcomings: (1) you can only run expressions on one category of records at a time; and (2) you have to run the expression for each category separately, one at a time.
Fortunately, MDM offers a shortcut that eliminates both of these problems. A branch expression is the category-specific expression that
applies to a particular category value. Each branch expression is defined with respect to a single parent expression.
Collectively, the set of branch expressions corresponding to the set of leaf-node categories allows you to run a single parent expression on a group of records from multiple categories and have it automatically invoke the applicable category-specific expression for each record.
To add a branch expression:
1. In the expressions pane, select the parent expression for which you want to add a branch.
2. Right-click on the parent expression and choose Add Branch from the
context menu, or choose Records from the main menu and choose Add
Branch from the applicable expression submenu.
3. MDM adds a new expression named “parent expression [NULL]” to the list of expressions, and highlights it for editing.
4. In the Branch property, select the category value for the branch from the drop-down list of categories.
5. Define the expression for the branch expression. All the other properties are disabled and read-only.
6. To save the branch expression, right-click on the properties pane and
choose Save Expression from the context menu, or press Shift+Enter.
7. MDM names the new branch “parent expression [category]” and if it is
not already part of it, adds the function Branch(Category) to the parent.
TIP ►► To run all of the branches of a parent expression, simply run the parent expression.
DATA INTEGRITY ►► Expression branches eliminate complicated expressions that test the category value and then branch accordingly, since the branch automatically runs the applicable category-specific expression based on the value of the category for each record.

174 MDM Data Manager Reference Guide
EXPRESSION OPERATORS
Table 40. Expression Operators
Operator Description
+ Adds two numeric fields or values
- Subtracts two numeric fields or values
* Multiplies two numeric fields or values
/ Divides two numeric fields or values
& Concatenates two string fields or values
() Separates expressions or operations
“ ” Surrounds a text string of characters
= Checks that two fields or values are equal
<> Checks that two fields or values are not equal
> Checks that a field or value is strictly greater than another
< Checks that a field or value is strictly less than another
>= Checks that a field or value is greater than or equal to another
<= Checks that a field or value is less than or equal to another
AND Combines two Boolean fields or values with the logical AND operator
OR Combines two Boolean fields or values with the logical OR operator
NOT Returns the opposite logical value of a Boolean field or value
TRUE Returns the logical value TRUE (used mainly in calculated fields)
FALSE Returns the logical value FALSE (used mainly in calculated fields)
EXPRESSION FUNCTIONS
The expression functions are described in the following subsections.
NOTE ►► Function arguments have the following meaning:
(1) v1, v2, … vn are value parameters
(2) i1, i2, …, in are integer parameters
(3) n1, n2, …, nn are numeric parameters
(4) s1, s2, … , sn are string parameters
(5) m1 is a multi-valued parameter (fields and attributes only)
NOTE ►► NULL-value handling is as follows:
(1) for validations, NULL is treated as a non-failure.
(2) for assignments, NULL is treated as NULL.
(3) for searches, NULL is treated as a non-match.

MDM Data Manager Reference Guide 175
NOTE ►► String functions are grapheme-based to be consistent with MDM search functions.
System Time
Description Returns floating point current time in UMT. The value is days since 1600-01-01T00:00:00.000
Syntax SYSTIME(n1)
n1: offset from current time in days.
Example
SYSTIME(0) Current time UTC
SYSTIME(NEGATE(7)) A week ago (last week)
SYSTIME(1/24) One hour from now
Note A parsing bug prevents you from entering negative numbers directly.
Absolute Value
Description Returns absolute value.
Syntax ABS(n1)
n1: numeric value
Example ABS(Width-Length) < 10 Is Width within 10 of Length?
Modulo
Description Returns the remainder of one integer divided by another
Syntax
MOD(i1, i2)
i1: integer dividend
i2: integer divisor
Example MOD(10, 7) 3
MOD(7, 0) NULL
Negate
Description Returns the arithmetic negative.
Syntax NEGATE(n1)
n1: numeric value
Example NEGATE(5) 5
NEGATE(0-8) 8

176 MDM Data Manager Reference Guide
Square Root
Description Returns the square root.
Syntax SQRT(n1)
n1: numeric value
Example SQRT(9) 3
SQRT(NEGATE(9)) NULL
If Then
Description Conditional return.
Syntax
IF(n1, v2)
n1: numeric (Boolean value)
v2: return value if n1 is non-zero
Example IF(Verified, Price) If Verified is TRUE (or non zero) Price otherwise NULL
Note Do not compare a Boolean field to its TRUE value, just use it as the value. In other words: IF(field, v2) rather than IF(field=TRUE, v2).
If Then Else
Description Conditional return.
Syntax
IF(n1, v2, v3)
n1: numeric (Boolean value)
v2: return value if n1 is non-zero
v3: return value if n1 is zero
Example IF(IS_NULL(Desc), “???”, Desc) If Desc is NULL “???” otherwise Desc
Note Do not compare a Boolean field to its TRUE value, just use it as the value. In other words: IF(field, v2, v3) rather than IF(field=TRUE, v2, v3).

MDM Data Manager Reference Guide 177
Is Null
Description Returns TRUE if all values are NULL.
Syntax
IS_NULL(v1 [, v]*)
v1: a value
v: optional additional values
Example
IS_NULL(Owner) Owner is NULL TRUE otherwise FALSE
IS_NULL(Name, ID) Both Name and ID are NULL TRUE otherwise FALSE
Note
When testing a qualified field’s qualifier values, returns TRUE if there are no qualified links or if any qualified link has a NULL qualifier value.
To test the inverse of IS_NULL(), use NOT(IS_NULL()).
Is Not Null
Description Returns TRUE if all values are not NULL.
Syntax
IS_NOT_NULL(v1[, v]*)
v1: a value
v: optional additional values
Example
IS_NOT_NULL(Owner) Owner is NULL FALSE otherwise TRUE
IS_NOT_NULL(Name, ID) Name or ID is NULL FALSE otherwise TRUE
Note
IS_NOT_NULL(First_Name, Last_Name, Phone) is logically equivalent
to but more efficient than IS_NOT_NULL(First_Name) AND IS_NOT_NULL(Last_Name) AND IS_NOT_NULL(Phone)
When testing a qualified field’s qualifier values, returns FALSE if there are no qualified links and TRUE if any qualified link has a non-NULL qualifier value.
To test the inverse of IS_NOT_NULL(), use NOT(IS_NOT_NULL()).
Has Any Values
Description Returns TRUE if any match found.
Syntax
HAS_ANY_VALUES(v1, v2[, v]*)
v1: target value
v2+: patterns or lookup values
Example
Given Color is a multi-valued lookup into the Colors table with values {[Red], [Green], Blue]} and [Red] is a record in the Colors table:
HAS_ANY_VALUES(Color, [Red]) TRUE
HAS_ANY_VALUES(Color, [White]) FALSE
HAS_ANY_VALUES([Red], Color) TRUE
HAS_ANY_VALUES( [White], Color) FALSE
Note If target and pattern are the same lookup types then the Ids are used otherwise it uses the string-based FIND for a positive match.
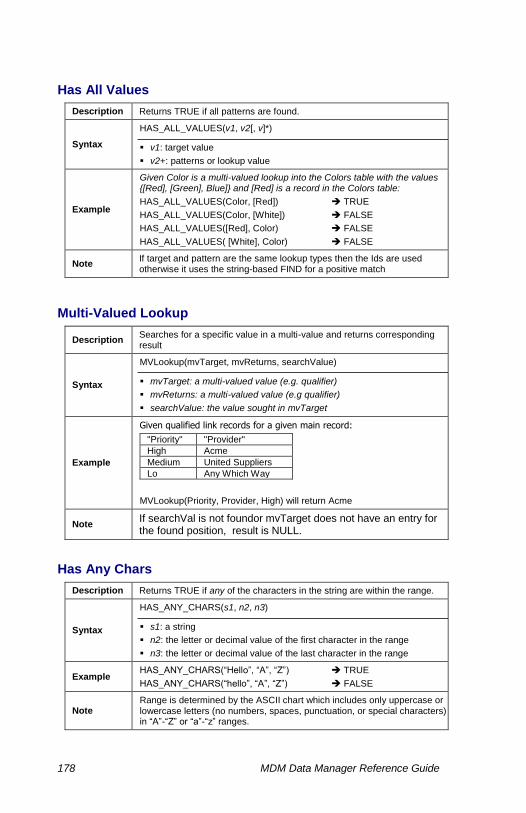
178 MDM Data Manager Reference Guide
Has All Values
Description Returns TRUE if all patterns are found.
Syntax
HAS_ALL_VALUES(v1, v2[, v]*)
v1: target value
v2+: patterns or lookup value
Example
Given Color is a multi-valued lookup into the Colors table with the values {[Red], [Green], Blue]} and [Red] is a record in the Colors table:
HAS_ALL_VALUES(Color, [Red]) TRUE
HAS_ALL_VALUES(Color, [White]) FALSE
HAS_ALL_VALUES([Red], Color) FALSE
HAS_ALL_VALUES( [White], Color) FALSE
Note If target and pattern are the same lookup types then the Ids are used otherwise it uses the string-based FIND for a positive match
Multi-Valued Lookup
Description Searches for a specific value in a multi-value and returns corresponding result
Syntax
MVLookup(mvTarget, mvReturns, searchValue)
mvTarget: a multi-valued value (e.g. qualifier)
mvReturns: a multi-valued value (e.g qualifier)
searchValue: the value sought in mvTarget
Example
Given qualified link records for a given main record:
"Priority" "Provider"
High Acme
Medium United Suppliers
Lo Any Which Way
MVLookup(Priority, Provider, High) will return Acme
Note If searchVal is not foundor mvTarget does not have an entry for the found position, result is NULL.
Has Any Chars
Description Returns TRUE if any of the characters in the string are within the range.
Syntax
HAS_ANY_CHARS(s1, n2, n3)
s1: a string
n2: the letter or decimal value of the first character in the range
n3: the letter or decimal value of the last character in the range
Example HAS_ANY_CHARS(“Hello”, “A”, “Z”) TRUE
HAS_ANY_CHARS(“hello”, “A”, “Z”) FALSE
Note Range is determined by the ASCII chart which includes only uppercase or lowercase letters (no numbers, spaces, punctuation, or special characters) in “A”-“Z” or “a”-“z” ranges.

MDM Data Manager Reference Guide 179
Has All Chars
Description Returns TRUE if all of the characters in the string are within the range.
Syntax
HAS_ALL_CHARS(s1, n2, n3)
s1: a string
n2: the letter or decimal value of the first character in the range
n3: the letter or decimal value of the last character in the range
Example
HAS_ALL_CHARS(“Hello”, “a”, “z”) FALSE
HAS_ALL_CHARS(“HELLO WORLD”, “A”, “Z”) FALSE
HAS_ALL_CHARS(“HELLOWORLD”, “A”, “Z”) TRUE
Note Range is determined by the ASCII chart which includes only uppercase or lowercase letters (no numbers, spaces, punctuation, or special characters) in “A”-“Z” or “a”-“z” ranges.
Length
Description Returns the number of characters in a string.
Syntax LEN(s1)
s1: string value
Example LEN(“Hello World”) 11
LEN(“Mañana”) 6
Left
Description Return the specified number of character from the start of the string.
Syntax
LEFT(s1, n2)
s1: the string value
n2: the number of graphemes
Example LEFT(“Mañana”, 3) “Mañ”
LEFT(“Mañana”, 30) “Mañana”
Right
Description Returns the specified number of characters from the end of the string.
Syntax
RIGHT(s1, n2)
s1: the string.
n1: number of characters
Example RIGHT(“Mañana”, 4) “ñana”
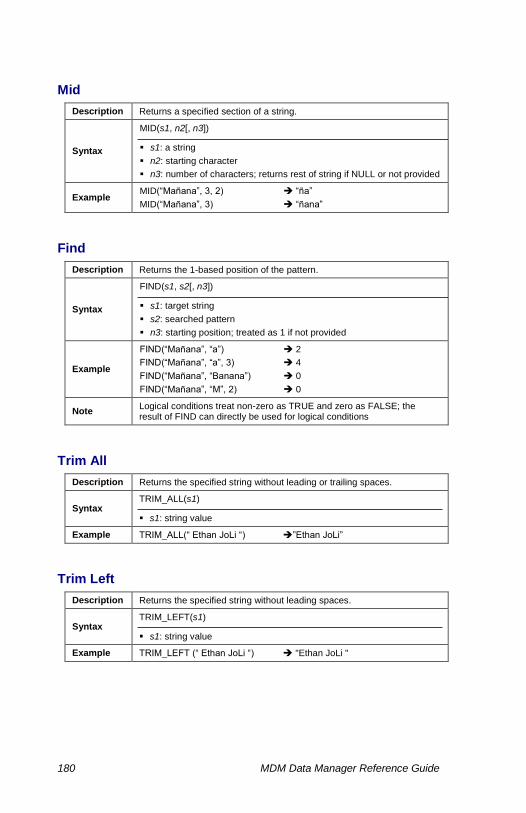
180 MDM Data Manager Reference Guide
Mid
Description Returns a specified section of a string.
Syntax
MID(s1, n2[, n3])
s1: a string
n2: starting character
n3: number of characters; returns rest of string if NULL or not provided
Example MID(“Mañana”, 3, 2) “ña”
MID(“Mañana”, 3) “ñana”
Find
Description Returns the 1-based position of the pattern.
Syntax
FIND(s1, s2[, n3])
s1: target string
s2: searched pattern
n3: starting position; treated as 1 if not provided
Example
FIND(“Mañana”, “a”) 2
FIND(“Mañana”, “a”, 3) 4
FIND(“Mañana”, “Banana”) 0
FIND(“Mañana”, “M”, 2) 0
Note Logical conditions treat non-zero as TRUE and zero as FALSE; the result of FIND can directly be used for logical conditions
Trim All
Description Returns the specified string without leading or trailing spaces.
Syntax TRIM_ALL(s1)
s1: string value
Example TRIM_ALL(“ Ethan JoLi “) ”Ethan JoLi”
Trim Left
Description Returns the specified string without leading spaces.
Syntax TRIM_LEFT(s1)
s1: string value
Example TRIM_LEFT (“ Ethan JoLi “) "Ethan JoLi "
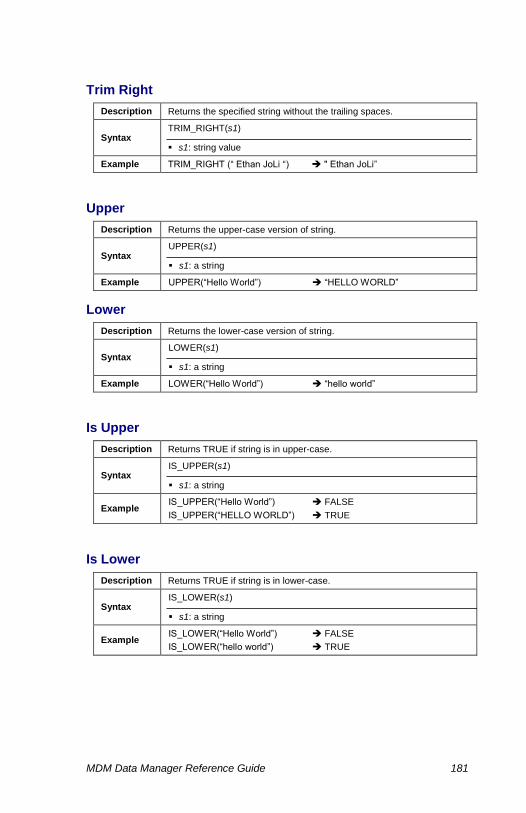
MDM Data Manager Reference Guide 181
Trim Right
Description Returns the specified string without the trailing spaces.
Syntax TRIM_RIGHT(s1)
s1: string value
Example TRIM_RIGHT (“ Ethan JoLi “) " Ethan JoLi”
Upper
Description Returns the upper-case version of string.
Syntax UPPER(s1)
s1: a string
Example UPPER(“Hello World”) “HELLO WORLD”
Lower
Description Returns the lower-case version of string.
Syntax LOWER(s1)
s1: a string
Example LOWER(“Hello World”) “hello world”
Is Upper
Description Returns TRUE if string is in upper-case.
Syntax IS_UPPER(s1)
s1: a string
Example IS_UPPER(“Hello World”) FALSE
IS_UPPER(“HELLO WORLD”) TRUE
Is Lower
Description Returns TRUE if string is in lower-case.
Syntax IS_LOWER(s1)
s1: a string
Example IS_LOWER(“Hello World”) FALSE
IS_LOWER(“hello world”) TRUE
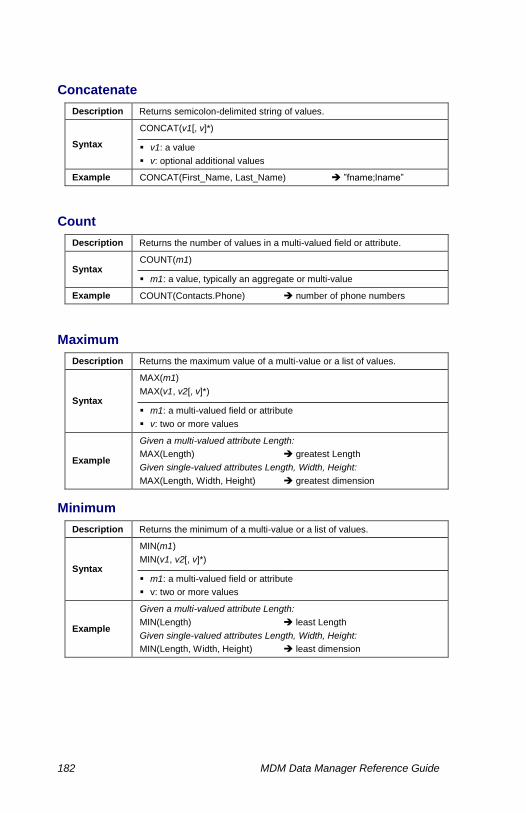
182 MDM Data Manager Reference Guide
Concatenate
Description Returns semicolon-delimited string of values.
Syntax
CONCAT(v1[, v]*)
v1: a value
v: optional additional values
Example CONCAT(First_Name, Last_Name) ”fname;lname”
Count
Description Returns the number of values in a multi-valued field or attribute.
Syntax COUNT(m1)
m1: a value, typically an aggregate or multi-value
Example COUNT(Contacts.Phone) number of phone numbers
Maximum
Description Returns the maximum value of a multi-value or a list of values.
Syntax
MAX(m1)
MAX(v1, v2[, v]*)
m1: a multi-valued field or attribute
v: two or more values
Example
Given a multi-valued attribute Length:
MAX(Length) greatest Length
Given single-valued attributes Length, Width, Height:
MAX(Length, Width, Height) greatest dimension
Minimum
Description Returns the minimum of a multi-value or a list of values.
Syntax
MIN(m1)
MIN(v1, v2[, v]*)
m1: a multi-valued field or attribute
v: two or more values
Example
Given a multi-valued attribute Length:
MIN(Length) least Length
Given single-valued attributes Length, Width, Height:
MIN(Length, Width, Height) least dimension
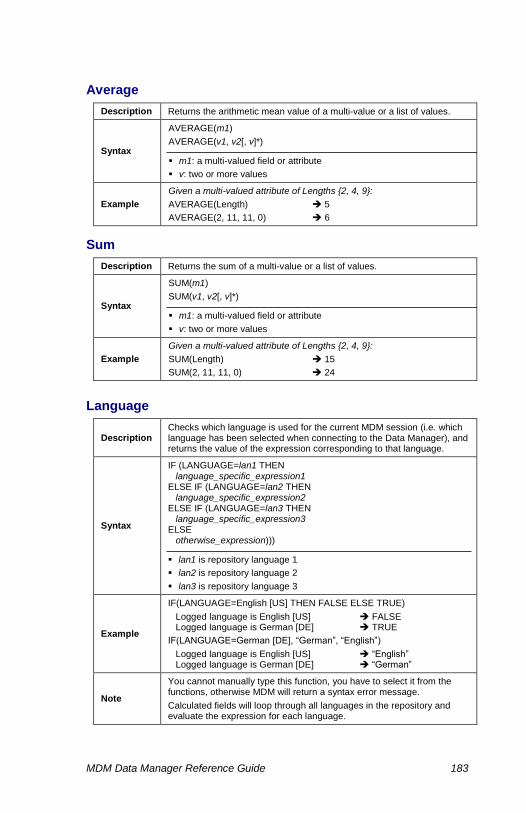
MDM Data Manager Reference Guide 183
Average
Description Returns the arithmetic mean value of a multi-value or a list of values.
Syntax
AVERAGE(m1)
AVERAGE(v1, v2[, v]*)
m1: a multi-valued field or attribute
v: two or more values
Example
Given a multi-valued attribute of Lengths {2, 4, 9}:
AVERAGE(Length) 5
AVERAGE(2, 11, 11, 0) 6
Sum
Description Returns the sum of a multi-value or a list of values.
Syntax
SUM(m1)
SUM(v1, v2[, v]*)
m1: a multi-valued field or attribute
v: two or more values
Example
Given a multi-valued attribute of Lengths {2, 4, 9}:
SUM(Length) 15
SUM(2, 11, 11, 0) 24
Language
Description Checks which language is used for the current MDM session (i.e. which language has been selected when connecting to the Data Manager), and returns the value of the expression corresponding to that language.
Syntax
IF (LANGUAGE=lan1 THEN language_specific_expression1 ELSE IF (LANGUAGE=lan2 THEN language_specific_expression2 ELSE IF (LANGUAGE=lan3 THEN language_specific_expression3 ELSE otherwise_expression)))
lan1 is repository language 1
lan2 is repository language 2
lan3 is repository language 3
Example
IF(LANGUAGE=English [US] THEN FALSE ELSE TRUE)
Logged language is English [US] FALSE Logged language is German [DE] TRUE
IF(LANGUAGE=German [DE], “German”, “English”)
Logged language is English [US] “English” Logged language is German [DE] “German”
Note
You cannot manually type this function, you have to select it from the functions, otherwise MDM will return a syntax error message.
Calculated fields will loop through all languages in the repository and evaluate the expression for each language.

184 MDM Data Manager Reference Guide
Branch
Description Calls the specialized taxonomy lookup field value-based function.
Syntax BRANCH(taxonomy field)
taxonomy field: a taxonomy lookup field
Example Given a taxonomy field named Category:
BRANCH(Category) branches on record-specific category value
Note You cannot manually type this function, you have to select it from the functions, otherwise MDM will return a syntax error message.
REQUIRED_FIELDS
Description Verifies all fields with Required property=Yes have non-NULL values.
Syntax REQUIRED_FIELDS
Example REQUIRED_FIELDS
Note Use this function in validation expressions to check whether required fields have values. You must manually type this function.

MDM Data Manager Reference Guide 185
Validating Records
MDM validations are MDM expressions that return a Boolean success or failure result.
Using MDM validations, you can define complex tests for all types of conditions, and then run those tests against a group of one or more records, all without using a query language.
You can also assign each validation to one or more validation groups. Each validation group is a set of validations that can be conveniently executed as a group with a single selection rather than forcing you to run each individual validation separately.
Validation expressions can be used to perform all sorts of tests that implement sophisticated business logic that goes far beyond simple data integrity checks, including:
Making sure required fields and other fields that are required when another field has a particular value all have a non-NULL value.
Making sure non-lookup fields that do not have pick lists to enforce data integrity have a legal value (e.g. Price > 0).
Comparing the values of different fields to make sure the relative values are legal (e.g. Price > Cost).
VALIDATION OPERATIONS
The following sections describe the various operations you can perform on validations in Record mode, including:
Adding a validation
Renaming a validation
Deleting a validation
Duplicating a validation
Editing a validation expression
Creating a branch validation
Placing a validation into one or more validation groups
Editing the validation groups hierarchy
Sorting validations
Executing a validation
Executing a validation group
The validation operations are summarized in Table 41.

186 MDM Data Manager Reference Guide
Table 41. Validation Operations
Operation Description
Add Validation Creates a new validation.
Rename Validation Renames the selected validation.
Delete Validation Deletes the selected validation.
Duplicate Validation Duplicates the selected validation.
Edit Validation Modifies the validation expression.
Add Branch Creates a new branch validation.
Edit Validation Groups Edits the hierarchy of validation groups.
Sort Validations Sorts the list of validations in ascending or descending order.
Execute Validation Runs the selected individual validation.
Execute Validation Group
Runs the selected group of validations.
NOTE ►► Validations are defined and run in Record mode; they can be created for records of any table, including main tables, lookup tables, and non-lookup subtables.
NOTE ►► You can also use the Detail View command to display a detailed property grid.
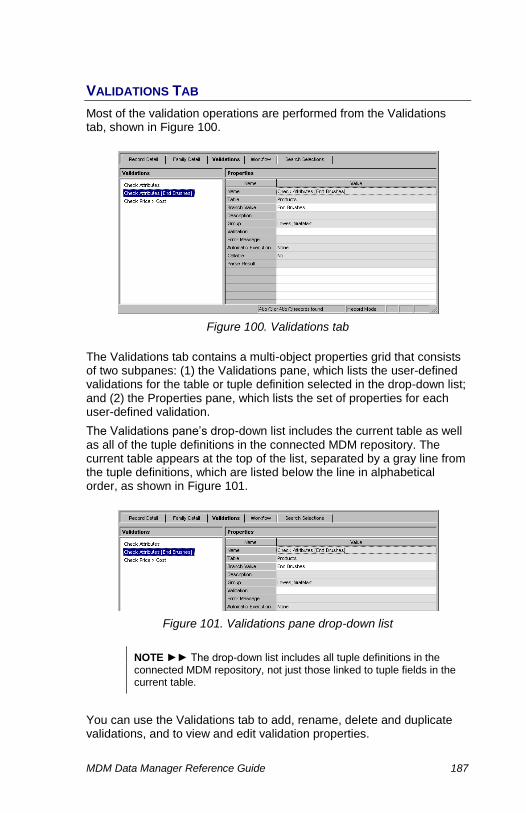
MDM Data Manager Reference Guide 187
VALIDATIONS TAB
Most of the validation operations are performed from the Validations tab, shown in Figure 100.
Figure 100. Validations tab
The Validations tab contains a multi-object properties grid that consists of two subpanes: (1) the Validations pane, which lists the user-defined validations for the table or tuple definition selected in the drop-down list; and (2) the Properties pane, which lists the set of properties for each user-defined validation.
The Validations pane’s drop-down list includes the current table as well as all of the tuple definitions in the connected MDM repository. The current table appears at the top of the list, separated by a gray line from the tuple definitions, which are listed below the line in alphabetical order, as shown in Figure 101.
Figure 101. Validations pane drop-down list
NOTE ►► The drop-down list includes all tuple definitions in the connected MDM repository, not just those linked to tuple fields in the current table.
You can use the Validations tab to add, rename, delete and duplicate validations, and to view and edit validation properties.

188 MDM Data Manager Reference Guide
VALIDATION PROPERTIES
The validation properties control the behavior of each validation, and are described in Table 42.
Table 42. Validation Properties
Property Description
Name* The validation name.
Code The unique validation code.
Description* The validation description.
Table The table on which the validation operates.
Branch Value The taxonomy lookup field value on which a branch branches.
Group The validation groups to which the validation belongs.
Validation The validation expression itself.
Error Message* The error message to display when the validation fails.
Automatic Execution
Whether or not to run the validation automatically each time you save a record, and if so, whether it is advisory (warning) or enforced (error):
None Warning Error
Callable Whether or not the expression should appear in the drop-down list of functions so that is callable by other
validations (Yes/No)?
* Multilingual field
MANAGING AND EDITING VALIDATIONS
MDM allows you to create and manage any number of validations in Record mode, for any table or tuple definition. You can add, modify, rename, delete, and duplicate validations as described in this section.
To add a new validation to the list of validations:
1. Set the current table to the table on which you want the new validation to appear.
2. If necessary, click on the Validations tab to make it the active tab.
3. Make sure the current table is selected in the Validation pane’s drop-down list, or, if you want to add a validation for a tuple definition, select the tuple definition from the drop-down list.
4. Right-click in the Validations pane and choose Add Validation from the
context menu, or choose Records > Validations > Add Validation from the main menu.

MDM Data Manager Reference Guide 189
5. MDM adds a new validation named “New Expression” to the list of validations, and highlights it for editing (Figure 102).
Figure 102. Adding a validation
6. Type the name you want for the validation and press Enter.
7. Specify the other properties of the validation.
8. Press Shift+Enter to save the new validation.
NOTE ►► The new validation appears only in lists for the table or tuple definition selected in the Validations pane drop-down list.
TIP ►► To change the new validation name after you press Enter,
press F2 to edit and type it again.
TIP ►► There is no explicit command to modify a validation. To edit the properties of a validation, select it in the Validations pane of the Validations tab, move the focus into the Properties pane, edit its
properties directly, and press Shift+Enter to save the changes.
To rename a validation:
1. If necessary, click on the Validations tab to make it the active tab.
2. In the Validations pane, select the validation you want to rename.
3. Right-click on the validation and choose Rename Validation from the
context menu, or press F2, or choose Records > Validations > Rename
Validation from the main menu.
4. MDM highlights the name of the validation for editing (Figure 103).

190 MDM Data Manager Reference Guide
Figure 103. Renaming a validation
5. Type the new name you want for the validation and press Enter.
To permanently delete a validation from the list of validations:
1. If necessary, click on the Validations tab to make it the active tab.
2. In the Validations pane, select the validation you want to delete.
3. Right-click on the validation and choose Delete Validation from the
context menu, or press Del, or choose Records > Validations > Delete
Validation from the main menu.
4. MDM prompts you to confirm that you really want to delete the
validation. Click OK to remove the validation from the list of validations.
To duplicate a validation:
1. If necessary, click on the Validations tab to make it the active tab.
2. In the Validations pane, select the validation you want to duplicate.
3. Right-click on the validation and choose Duplicate Validation from the
context menu, or choose Records > Validations > Duplicate Validation from the main menu.
4. MDM adds the duplicate validation to the list of validations and highlights the name of the validation for editing.
5. Type the name you want for the duplicate validation and press Enter.
Editing Validation Expressions
You can define and edit the validation expression associated with a validation as described in this section.
To edit a validation expression:
1. If necessary, click on the Validations tab to make it the active tab.
2. In the Validations pane, select the validation whose validation expression you want to edit.

MDM Data Manager Reference Guide 191
3. In the Properties pane, double-click on the Validation cell to open the Validation Expression dialog, as shown in Figure 104.
Figure 104. Validation Expression dialog
TIP ►► To open the Validation Expression dialog, you can also click
the “…” (browse) button on the far right of the Validation cell.
4. Enter the validation expression using the keyboard and the toolbar buttons to enter values, measurements, field names, attribute names, qualifier names, lookup values, attribute text values, operators, and functions.
5. Click OK to close the Validation Expression dialog.
6. To save the validation, right-click on the Properties pane and choose
Save Validation from the context menu, or press Shift+Enter.
TIP ►► Try to avoid defining overly complex validations. Instead, each validation should perform just a single test, so it can be debugged quickly and reused in a variety of contexts. Then use validation groups to combine individual validations into sets that can be run at the same time. (See “Validation Groups” on page 192 for more information.)
Adding Branch Validations
You can add a branch validation as described in this section.
To add a branch validation:
1. If necessary, click on the Validations tab to make it the active tab.
2. In the Validations pane, select the parent validation for which you want to add a branch.
3. Right-click on the parent validation and choose Add Branch from the
context menu, or choose Records > Validations > Add Branch from the main menu.

192 MDM Data Manager Reference Guide
4. MDM adds a new validation named “parent validation [NULL]” to the list of validations, and highlights it for editing.
5. In the Branch property, select the category value for the branch from the drop-down list of categories.
6. Define the Validation expression for the branch validation. All the other properties are disabled and read-only.
7. To save the branch validation, right-click on the Properties pane and
choose Save Validation from the context menu, or press Shift+Enter.
8. MDM names the new branch “parent validation [category]” and if it is
not already part of it, adds the function Branch(Category) to the parent.
TIP ►► To run all of the branches of a parent validation, simply run the parent validation.
DATA INTEGRITY ►► Validation branches eliminate complicated expressions that test the category value and then branch accordingly, since the branch automatically runs the applicable category-specific validation based on the value of the category for each record.
Validation Groups
Sometimes you may want to run a group of validations against one or more records at the same time. For example, Trading Partner X may have a total of 125 validations while Trading Partner Y has a total of 143 validations, many of them in common with Trading Partner X.
MDM supports this by allowing you to assign each validation to one or more validation groups. A validation group is a set of validations that you can run at the same time just by invoking the name of the group rather than the name of the individual validation.
When you run a validation group against a set of records, it is as if you have run each individual validation in the group, and you get an individual success or failure result for each validation for each record.
To add a validation to one or more validation groups:
1. If necessary, click on the Validations tab to make it the active tab.
2. In the Validations pane, select the validation you want to add to the group(s).
3. In the Properties pane, double-click on the Group cell.
4. MDM opens a dual-list drop-down hierarchy control for multiple-item selection, as shown in Figure 105.

MDM Data Manager Reference Guide 193
Figure 105. Validation group selection
5. Move one or more leaf-node groups between the Available Groups list and the Selected Groups list.
6. Press Enter or click on the up triangle to close the drop-down control.
7. To save the validation, right-click on the Properties pane and choose
Save Validation from the context menu, or press Shift+Enter.
DATA INTEGRITY ►► Validation groups allow you to organize large sets of related validations, eliminating the likelihood of forgetting to run any of the individual validations in the group.
Editing the Validation Groups Hierarchy
Validation groups are organized into a hierarchy. The Validation Groups hierarchy is similar to the Data Groups hierarchy in that it does not show up in the drop-down list of tables and cannot be edited directly.
Instead, you can modify the Validation Groups hierarchy by choosing
Records > Validations > Edit Validation Groups from the main menu to open the Edit Validation Groups Hierarchy dialog, and then using the context menu as in any editable tree to add siblings and children, and to delete and rename existing nodes (Figure 106).
Figure 106. Edit Validation Groups dialog
Right-click context menu to edit the Validation Groups hierarchy

194 MDM Data Manager Reference Guide
VALIDATION EXECUTION
The following sections describe how to run validations and how to interpret the validation results.
Manual vs. Automatic Execution
A validation can be invoked in two different ways:
Manual. You can manually run any validation or validation group
against the selected records in the Records pane at any time.
Automatic. You can define any validation so that MDM runs it
automatically every time you edit and attempt to save a record.
NOTE ►► The Automatic execution behavior is slightly different for tuple record validations. When a main table record is saved, tuple record validations are not automatically executed unless an instance of that tuple has been modified inside the main table record. Tuple field validations, on the other hand, are always automatically executed when a main table record is saved, regardless of whether the tuple field value has been modified or not. See “Validations and Tuples” on page 197 for more information about tuple records and tuple fields.
Automatic execution allows you to classify failures in two categories:
Warning. MDM notifies the user of the failed validation but allows the
record to be saved anyway .
Error. MDM notifies the user of the failed validation and also
prevents them from saving the record.
NOTE ►► Validation errors are downgraded to warnings by default on checked out records, but if left unfixed are reported as errors upon check in. See “Checking Out Records” on page 158 for more information about checking out records.
NOTE ►► When saving or checking-in multiple records, if any of the records fails an error validation, none of the selected records will be saved/checked-in. (If record slicing is enabled, then if any of the records in a slice fails an error validation, none of the records in that slice will be saved/checked in.
Validation Result Dialogs
When you run validations manually, or when MDM runs warning validations automatically, MDM displays a warning dialog listing each validation that failed against any of the selected or modified records.
When MDM runs error validations automatically, MDM displays an error dialog listing each validation that failed against any of the modified records.
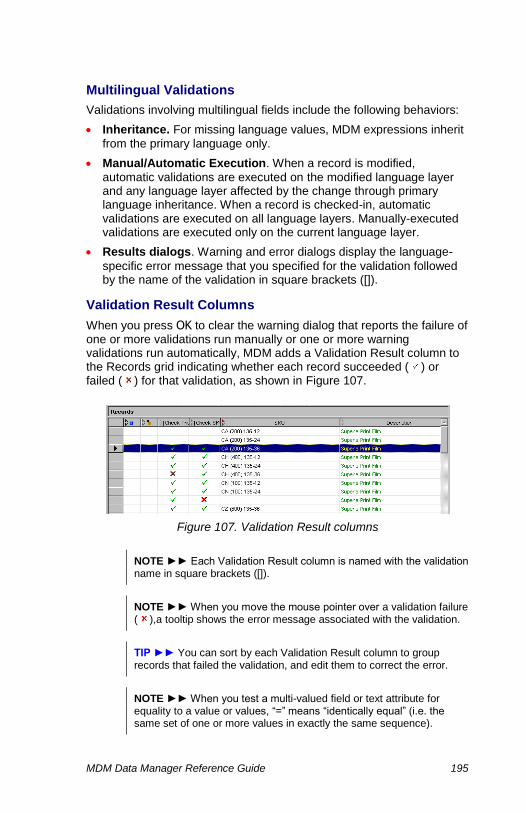
MDM Data Manager Reference Guide 195
Multilingual Validations
Validations involving multilingual fields include the following behaviors:
Inheritance. For missing language values, MDM expressions inherit
from the primary language only.
Manual/Automatic Execution. When a record is modified,
automatic validations are executed on the modified language layer and any language layer affected by the change through primary language inheritance. When a record is checked-in, automatic validations are executed on all language layers. Manually-executed validations are executed only on the current language layer.
Results dialogs. Warning and error dialogs display the language-
specific error message that you specified for the validation followed by the name of the validation in square brackets ([]).
Validation Result Columns
When you press OK to clear the warning dialog that reports the failure of one or more validations run manually or one or more warning validations run automatically, MDM adds a Validation Result column to the Records grid indicating whether each record succeeded ( ) or failed ( ) for that validation, as shown in Figure 107.
Figure 107. Validation Result columns
NOTE ►► Each Validation Result column is named with the validation name in square brackets ([]).
NOTE ►► When you move the mouse pointer over a validation failure ( ),a tooltip shows the error message associated with the validation.
TIP ►► You can sort by each Validation Result column to group records that failed the validation, and edit them to correct the error.
NOTE ►► When you test a multi-valued field or text attribute for equality to a value or values, “=” means “identically equal” (i.e. the same set of one or more values in exactly the same sequence).

196 MDM Data Manager Reference Guide
NOTE ►► NULL interpretation differs between validations and
search. Specifically, an expression that returns a NULL result evaluates
to: (1) TRUE for validations (validation SUCCESS); and (2) FALSE for
search (included in the search results for the is FALSE operator).
Manually Executing Validations
To manually run an individual validation or validation group against one or more selected records:
1. In the Records pane, select the one or more records to validate.
2. Right-click on one of the records and choose Validations from the
context menu, or choose Records > Validations from the main menu, and in either case, choose from the cascading menu:
Execute Execute Group
3. Choose from the cascading menu of individual or group validation names.
4. MDM runs the validations and displays a message dialog indicating success or failure. Click OK to close the dialog.
5. MDM adds a Validation Result column for each validation.
A NOTE ABOUT VALIDATIONS AND DATA INTEGRITY
Compared to a transactional system, where data integrity tends to be absolute and all data must be entered perfectly before the record is saved, MDM is a data management system with records that evolve and are enriched over their lifecycle. Moreover, since data in MDM isn’t linked to a single process, business application, or downstream system, there may be different validations and business rules that are applicable in different circumstances. As a result, MDM data entry and validations tend to be fairly flexible and forgiving rather than overbearing, to avoid encouraging a user to put junk values into fields that cannot be empty.
VALIDATIONS AND MULTI-VALUED LOOKUP FIELDS
The value of a multi-valued lookup field may consist of one or more lookup record values. Similarly, the value of a multi-valued text attribute may consist of one or more attribute text values.
When you define a validation expression, you can test the value of a multi-valued field or text attribute for equality to a constant value by: (1) choosing the “=” operator from the drop-down list of operators; and (2) choosing one or more constant values from the pop-up dialog of legal lookup values or attribute text values.
NOTE ►► When you test a multi-valued field or text attribute for equality to a value or values, “=” means “identically equal” (i.e. the same set of one or more values in exactly the same sequence).

MDM Data Manager Reference Guide 197
VALIDATIONS AND TUPLES
You can use validations to test tuple records and tuple fields, as described in this section.
Validating Tuple Records
You can manually validate tuple records just as you validate table records. Only, instead of creating validations for a specific repository table, you create them for a specific tuple. And because tuples are available to all main tables in a repository, a tuple’s validations can be run on any table which references that tuple.
For example, your Customers and Suppliers main tables may each have tuple fields which reference the Address tuple. If you want to test whether your address records have postal code values, it doesn’t matter whether the address is for a customer or supplier. So, rather than creating a different “Check For Postal Code” validation for every Address tuple field on each table, you can instead create a single validation for the Address tuple itself. MDM then makes this validation available to both tables. Further, this validation tests every instance of the Address tuple on the table from which it is executed, regardless of whether the referencing tuple field is single-valued ore multi-valued, or whether it is nested in a hierarchy of tuple fields.
For example, if you have a Contacts tuple that contains a multi-valued Address tuple field, the “Check for Postal Code” validation automatically runs against all address records contained in all instances of the Contacts tuple on the table records you select to test.
NOTE ►► Although tuples can contain tuple fields as member fields, how much of a nested tuple field’s values you can test from a validation on the parent tuple depends on whether the nested tuple field is single-valued or multi-valued. This behavior is explained in the next section.
Validating Tuple Fields
Sometimes, you may not want to run a validation on all instances of a tuple, just those in a specific tuple field. Or you may want to compare the value of one tuple instance to the value of a field outside that tuple
instance.
For example, if your Customers table has two tuple fields (“Customer Name” and “Sales Agent Name”) which reference the same Name tuple, you may want to run a different set of validations for the Customer Name tuple field than you do for the Sales Agent Name tuple field. Because tuple validations are run against all instances of a tuple, and you want to test specific instances only, you must create these validations on the Customers table and not the Name tuple.
198 MDM Data Manager Reference Guide
Likewise, you may want to verify that any record that contains a Customer Name value also has a Sales Agent Name value, and vice-versa. Even though a validation to test this could apply to both tuple instances, it would require knowledge of field values which exist outside of each tuple instance. Therefore, you must again create the validation on the parent record, not the Name tuple.
When creating validations involving tuple fields, whether the parent record is a table record or a tuple record is irrelevant.
NOTE ►► Like all validations, Data Manager reports the results of tuple validations for selected current table records in a Validation Result column on the Records pane. If a tuple validation fails, Data Manager is unable to report which tuple record caused the failure.
Validations involving multi-valued tuple fields require MDM to make a separate copy of the parent record for each combination of tuple records across each instance of each multi-valued tuple field in both the parent and nested tuple records. The exponential increase in records this can cause, along with the time required to complete each iteration of each validation on each resulting record, may affect MDM performance.
Recall, however, that you can also test tuple records in multi-valued tuple fields through validations on the referenced tuple, as described previously with the “Check For Postal Code” Address tuple validation
VALIDATION EXAMPLE: ISBN NUMBERS AND CHECK DIGITS
This section describes a comprehensive validation example for validating ISBN numbers, which is extensible to other validations that involve check digits.
By way of background, books are published with a 10-digit universal reference number known as an ISBN (International Standard Book Number). When creating new objects in a repository and entering long strings of digits manually, it is easy to transpose digits or make other data entry errors. Since the ISBN is used to order books, the number must be correct to avoid errors in the ordering process.
Recall that MDM validations allow you to perform one or more tests on data using Excel-like formulas to determine whether the data is valid or correct. While the tests can include mathematical, logical, and other
functions, the results are always Boolean (i.e. either TRUE or FALSE), signifying either a success or failure in passing the test.
Creating a validation for a business process involves breaking the process down into a series of questions or steps, each of which can be
answered either TRUE or FALSE. Examples of simple tests include: (1) is
a field value NULL; and (2) for a given SKU, is the value of the Price field greater than the value of the Cost field?
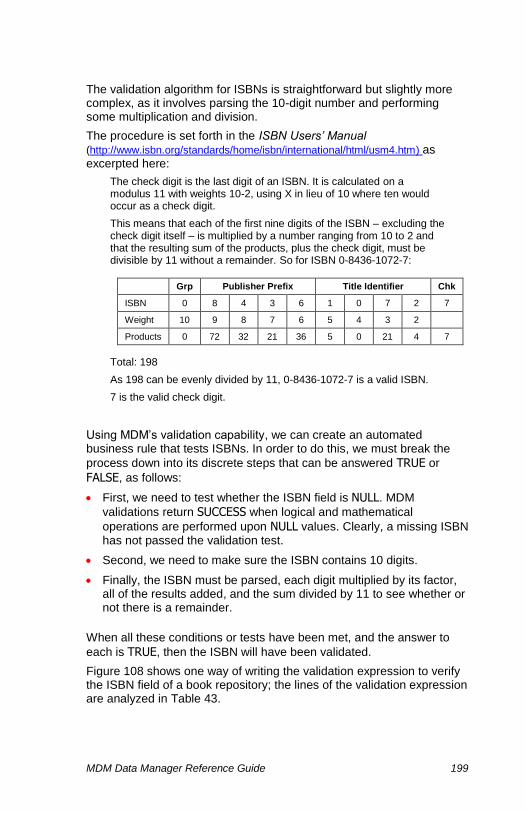
MDM Data Manager Reference Guide 199
The validation algorithm for ISBNs is straightforward but slightly more complex, as it involves parsing the 10-digit number and performing some multiplication and division.
The procedure is set forth in the ISBN Users’ Manual (http://www.isbn.org/standards/home/isbn/international/html/usm4.htm) as excerpted here:
The check digit is the last digit of an ISBN. It is calculated on a modulus 11 with weights 10-2, using X in lieu of 10 where ten would occur as a check digit.
This means that each of the first nine digits of the ISBN – excluding the check digit itself – is multiplied by a number ranging from 10 to 2 and that the resulting sum of the products, plus the check digit, must be divisible by 11 without a remainder. So for ISBN 0-8436-1072-7:
Grp Publisher Prefix Title Identifier Chk
ISBN 0 8 4 3 6 1 0 7 2 7
Weight 10 9 8 7 6 5 4 3 2
Products 0 72 32 21 36 5 0 21 4 7
Total: 198
As 198 can be evenly divided by 11, 0-8436-1072-7 is a valid ISBN.
7 is the valid check digit.
Using MDM’s validation capability, we can create an automated business rule that tests ISBNs. In order to do this, we must break the
process down into its discrete steps that can be answered TRUE or
FALSE, as follows:
First, we need to test whether the ISBN field is NULL. MDM
validations return SUCCESS when logical and mathematical
operations are performed upon NULL values. Clearly, a missing ISBN has not passed the validation test.
Second, we need to make sure the ISBN contains 10 digits.
Finally, the ISBN must be parsed, each digit multiplied by its factor, all of the results added, and the sum divided by 11 to see whether or not there is a remainder.
When all these conditions or tests have been met, and the answer to
each is TRUE, then the ISBN will have been validated.
Figure 108 shows one way of writing the validation expression to verify the ISBN field of a book repository; the lines of the validation expression are analyzed in Table 43.
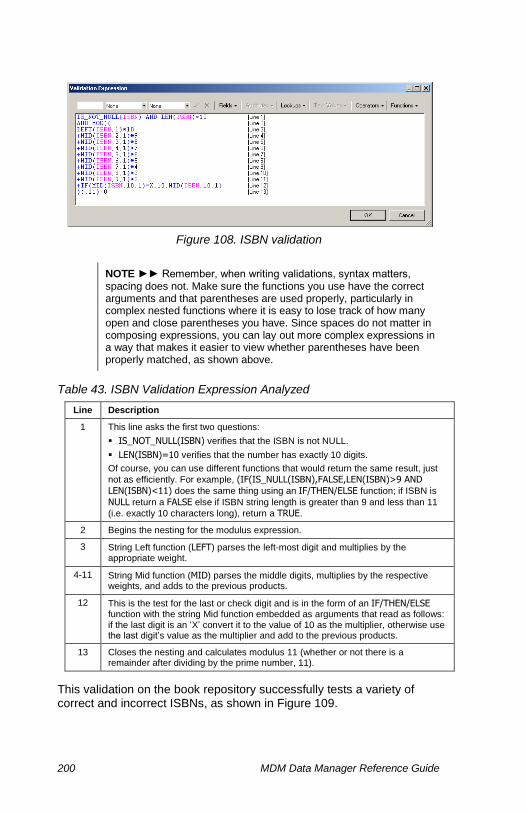
200 MDM Data Manager Reference Guide
Figure 108. ISBN validation
NOTE ►► Remember, when writing validations, syntax matters, spacing does not. Make sure the functions you use have the correct arguments and that parentheses are used properly, particularly in complex nested functions where it is easy to lose track of how many open and close parentheses you have. Since spaces do not matter in composing expressions, you can lay out more complex expressions in a way that makes it easier to view whether parentheses have been properly matched, as shown above.
Table 43. ISBN Validation Expression Analyzed
Line Description
1 This line asks the first two questions:
IS_NOT_NULL(ISBN) verifies that the ISBN is not NULL.
LEN(ISBN)=10 verifies that the number has exactly 10 digits.
Of course, you can use different functions that would return the same result, just
not as efficiently. For example, (IF(IS_NULL(ISBN),FALSE,LEN(ISBN)>9 AND
LEN(ISBN)<11) does the same thing using an IF/THEN/ELSE function; if ISBN is
NULL return a FALSE else if ISBN string length is greater than 9 and less than 11
(i.e. exactly 10 characters long), return a TRUE.
2 Begins the nesting for the modulus expression.
3 String Left function (LEFT) parses the left-most digit and multiplies by the appropriate weight.
4-11 String Mid function (MID) parses the middle digits, multiplies by the respective weights, and adds to the previous products.
12 This is the test for the last or check digit and is in the form of an IF/THEN/ELSE function with the string Mid function embedded as arguments that read as follows: if the last digit is an ‘X’ convert it to the value of 10 as the multiplier, otherwise use the last digit’s value as the multiplier and add to the previous products.
13 Closes the nesting and calculates modulus 11 (whether or not there is a remainder after dividing by the prime number, 11).
This validation on the book repository successfully tests a variety of correct and incorrect ISBNs, as shown in Figure 109.
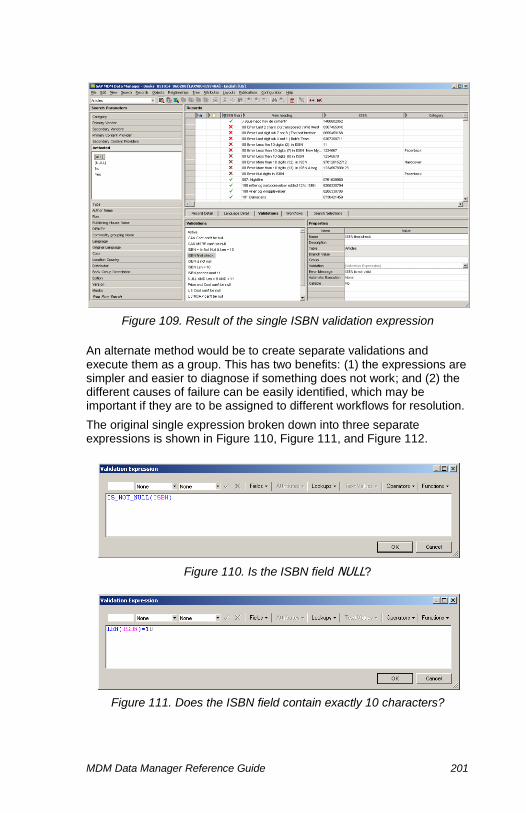
MDM Data Manager Reference Guide 201
Figure 109. Result of the single ISBN validation expression
An alternate method would be to create separate validations and execute them as a group. This has two benefits: (1) the expressions are simpler and easier to diagnose if something does not work; and (2) the different causes of failure can be easily identified, which may be important if they are to be assigned to different workflows for resolution.
The original single expression broken down into three separate expressions is shown in Figure 110, Figure 111, and Figure 112.
Figure 110. Is the ISBN field NULL?
Figure 111. Does the ISBN field contain exactly 10 characters?
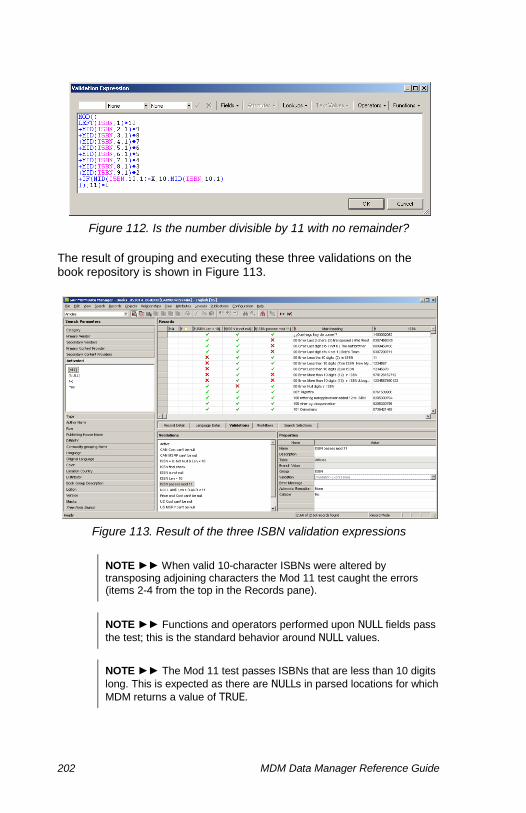
202 MDM Data Manager Reference Guide
Figure 112. Is the number divisible by 11 with no remainder?
The result of grouping and executing these three validations on the book repository is shown in Figure 113.
Figure 113. Result of the three ISBN validation expressions
NOTE ►► When valid 10-character ISBNs were altered by transposing adjoining characters the Mod 11 test caught the errors (items 2-4 from the top in the Records pane).
NOTE ►► Functions and operators performed upon NULL fields pass
the test; this is the standard behavior around NULL values.
NOTE ►► The Mod 11 test passes ISBNs that are less than 10 digits
long. This is expected as there are NULLs in parsed locations for which
MDM returns a value of TRUE.

MDM Data Manager Reference Guide 203
Validations offer a very powerful and flexible capability to test main table field and lookup data. Customers can create automated checks for data integrity that are configured to meet their unique requirements. And since the scripting is easy (no programming required), changes or new validations can be written as circumstances change, without the burden of involving significant IT resources. Validations can also be combined with workflows to further automate quality assurance on data. This provides customers with significant time savings and further assures the integrity of their valuable data assets.
The same validation methodology, with appropriate modifications, can be used to verify UPC, EAN, and other check digit calculations.

204 MDM Data Manager Reference Guide
Assignments
Like validations, MDM assignments are MDM expressions, except that instead of returning a Boolean success or failure result, they can return a data value of any type; and instead of displaying the expression result for each record in a column in the Records pane, they can assign it to the value of the specified user-editable field.
ASSIGNMENT OPERATIONS
Assignment operations are summarized in Table 44.
Table 44. Assignment Operations
Operation Description
Add Assignment Creates a new assignment.
Rename Assignment Renames the selected assignment.
Delete Assignment Deletes the selected assignment.
Duplicate Assignment Duplicates the selected assignment.
Edit Assignment Modifies the assignment expression.
Add Branch Creates a new branch assignment expression.
Sort Assignments Sorts the list of assignments in ascending or descending order.
Execute Assignment Runs the selected individual assignment.

MDM Data Manager Reference Guide 205
ASSIGNMENTS TAB
Most of the assignment operations are performed from the Assignments tab, shown in Figure 114.
Figure 114. Assignments tab
The Assignments tab contains a multi-object properties grid that consists of two subpanes: (1) the Assignments pane, which lists the user-defined assignments; and (2) the Properties pane, which lists the set of properties for each user-defined assignment.
You can use the Assignments tab to add, rename, delete and duplicate assignments, and to view and edit assignment properties.
ASSIGNMENT PROPERTIES
The assignment properties control the behavior of each assignment, and are described in Table 45.
Table 45. Assignment Properties
Property Description
Name* The assignment name.
Code The unique assignment code.
Description* The assignment description.
Table The table on which the assignment operates.
Branch Value The taxonomy lookup field value on which a branch branches.
Assignment The assignment expression itself.
Table Field The field to which to assign the expression result.
* Multilingual field.

206 MDM Data Manager Reference Guide
MANAGING AND EDITING ASSIGNMENTS
MDM allows you to create and manage any number of assignments in Record mode, for any table. You can add, modify, rename, delete, and duplicate assignments as described in this section.
To add a new assignment to the list of assignments:
1. If necessary, click on the Assignments tab to make it the active tab.
2. Right-click in the Assignments pane and choose Add Assignment from
the context menu, or choose Records > Assignments > Add
Assignment from the main menu.
3. MDM adds a new assignment named “New Expression” to the list of assignments, and highlights it for editing (Figure 115).
Figure 115. Adding an assignment
4. Type the name you want for the assignment and press Enter.
5. Specify the other properties of the assignment.
6. Press Shift+Enter to save the new assignment.
TIP ►► To change the new assignment name after you press Enter,
press F2 to edit and type it again.
TIP ►► There is no explicit command to modify an assignment. To edit the properties of an assignment, select it in the Assignments pane of the Assignments tab, move the focus into the Properties pane, edit
its properties directly, and press Shift+Enter to save the changes.
To rename an assignment:
1. If necessary, click on the Assignments tab to make it the active tab.
2. In the Assignments pane, select the assignment you want to rename.
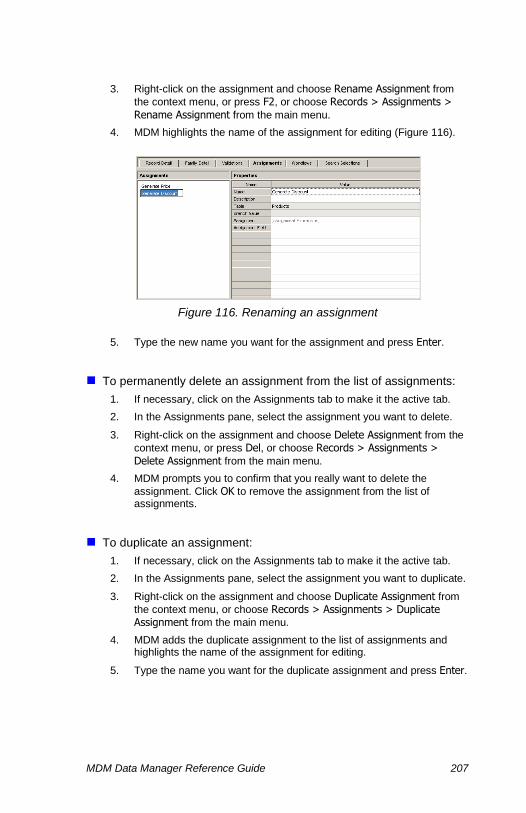
MDM Data Manager Reference Guide 207
3. Right-click on the assignment and choose Rename Assignment from
the context menu, or press F2, or choose Records > Assignments >
Rename Assignment from the main menu.
4. MDM highlights the name of the assignment for editing (Figure 116).
Figure 116. Renaming an assignment
5. Type the new name you want for the assignment and press Enter.
To permanently delete an assignment from the list of assignments:
1. If necessary, click on the Assignments tab to make it the active tab.
2. In the Assignments pane, select the assignment you want to delete.
3. Right-click on the assignment and choose Delete Assignment from the
context menu, or press Del, or choose Records > Assignments >
Delete Assignment from the main menu.
4. MDM prompts you to confirm that you really want to delete the
assignment. Click OK to remove the assignment from the list of assignments.
To duplicate an assignment:
1. If necessary, click on the Assignments tab to make it the active tab.
2. In the Assignments pane, select the assignment you want to duplicate.
3. Right-click on the assignment and choose Duplicate Assignment from
the context menu, or choose Records > Assignments > Duplicate Assignment from the main menu.
4. MDM adds the duplicate assignment to the list of assignments and highlights the name of the assignment for editing.
5. Type the name you want for the duplicate assignment and press Enter.
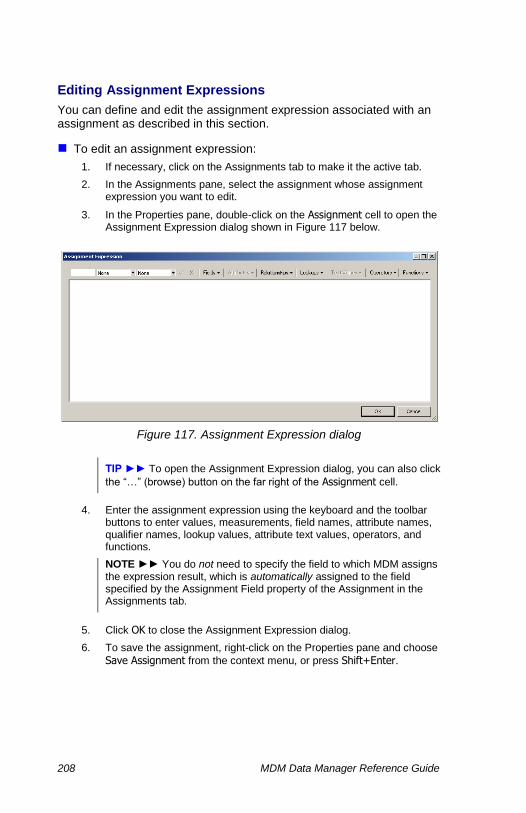
208 MDM Data Manager Reference Guide
Editing Assignment Expressions
You can define and edit the assignment expression associated with an assignment as described in this section.
To edit an assignment expression:
1. If necessary, click on the Assignments tab to make it the active tab.
2. In the Assignments pane, select the assignment whose assignment expression you want to edit.
3. In the Properties pane, double-click on the Assignment cell to open the Assignment Expression dialog shown in Figure 117 below.
Figure 117. Assignment Expression dialog
TIP ►► To open the Assignment Expression dialog, you can also click
the “…” (browse) button on the far right of the Assignment cell.
4. Enter the assignment expression using the keyboard and the toolbar buttons to enter values, measurements, field names, attribute names, qualifier names, lookup values, attribute text values, operators, and functions.
NOTE ►► You do not need to specify the field to which MDM assigns the expression result, which is automatically assigned to the field specified by the Assignment Field property of the Assignment in the Assignments tab.
5. Click OK to close the Assignment Expression dialog.
6. To save the assignment, right-click on the Properties pane and choose
Save Assignment from the context menu, or press Shift+Enter.

MDM Data Manager Reference Guide 209
Adding Branch Assignments
You can add a branch assignment as described in this section.
To add a branch assignment:
1. If necessary, click on the Assignments tab to make it the active tab.
2. In the Assignments pane, select the parent assignment for which you want to add a branch.
3. Right-click on the parent assignment and choose Add Branch from the
context menu, or choose Records > Assignments > Add Branch from the main menu.
4. MDM adds a new assignment named “parent assignment [NULL]” to the list of assignments, and highlights it for editing.
5. In the Branch property, select the category value for the branch from the drop-down list of categories.
6. Define the Assignment expression for the branch assignment. All the other properties are disabled and read-only.
7. To save the branch assignment, right-click on the Properties pane and
choose Save Assignment from the context menu, or press Shift+Enter.
8. MDM names the new branch “parent assignment [category]” and if it is
not already part of it, adds the function Branch(Category) to the parent.
TIP ►► To run all of the branches of a parent assignment, simply run the parent assignment.
DATA INTEGRITY ►► Assignment branches eliminate complicated expressions that test the category value and then branch accordingly, since the branch automatically runs the applicable category-specific assignment based on the value of the category for each record.
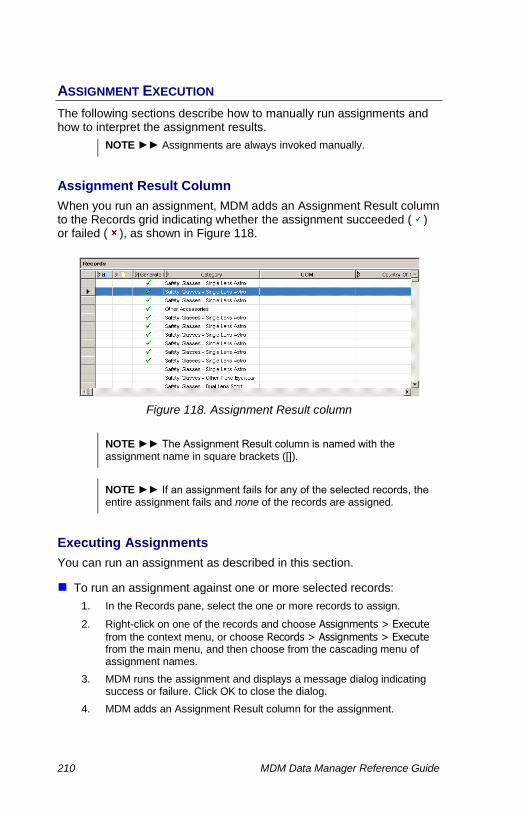
210 MDM Data Manager Reference Guide
ASSIGNMENT EXECUTION
The following sections describe how to manually run assignments and how to interpret the assignment results.
NOTE ►► Assignments are always invoked manually.
Assignment Result Column
When you run an assignment, MDM adds an Assignment Result column to the Records grid indicating whether the assignment succeeded ( ) or failed ( ), as shown in Figure 118.
Figure 118. Assignment Result column
NOTE ►► The Assignment Result column is named with the assignment name in square brackets ([]).
NOTE ►► If an assignment fails for any of the selected records, the entire assignment fails and none of the records are assigned.
Executing Assignments
You can run an assignment as described in this section.
To run an assignment against one or more selected records:
1. In the Records pane, select the one or more records to assign.
2. Right-click on one of the records and choose Assignments > Execute
from the context menu, or choose Records > Assignments > Execute from the main menu, and then choose from the cascading menu of assignment names.
3. MDM runs the assignment and displays a message dialog indicating success or failure. Click OK to close the dialog.
4. MDM adds an Assignment Result column for the assignment.

MDM Data Manager Reference Guide 211
MDM Workflows
MDM offers multiple layers of data management capabilities for maintaining data integrity, enforcing business logic, and automating business processes, as follows:
Data integrity. At the core layer, MDM offers flexible schema
management and an abstract object model that enforces data integrity with a variety of innovative features, including pick lists, enumerated text attributes, measurement data types, and so on.
Validations. Layered upon data integrity, MDM validations are
Excel-like expressions that allow you to enforce rules and business logic by defining tests for a variety of conditions, and then to execute a validation or validation group against one or more records.
Workflows. At the outer layer, MDM workflows consist of a
sequence of steps that allow you to orchestrate a series of operations that include user tasks, validations, and approvals, automating business processes at the data management level.
These three concentric layers of data management around a core of MDM data are illustrated in Figure 119.
Figure 119. The three layers of MDM data management
The MDM data management workflow described in this section complements and layers upon both the data integrity features of MDM and MDM validations, already described in previous sections.
NOTE ►► Workflow also dovetails with the MDM check out mechanism, allowing a workflow to proceed to completion on a private, hidden copy of the records of the job.
MDM Data
Validations
Workflows
Data Integrity
212 MDM Data Manager Reference Guide
THE MDM WORKFLOW ENGINE
Each MDM workflow consists of a sequence of steps and allows you to orchestrate a series of data management operations that include user tasks, validations, and approvals against one or more records.
The MDM workflow engine features a number of innovations that make designing, modifying, and executing workflows quick and easy for even the most non-technical MDM user:
Microsoft Visio design-time environment. The flow diagram
representing a workflow is designed using a Microsoft Visio plug-in, making workflow definition directly accessible even to end users.
Task-oriented execution-time environment. Workflows move from
step to step, showing up as tasks in each user’s inbound task queue within MDM Data Manager, ready for processing by the user.
Multi-record jobs. Each workflow is invoked as a job that can
consist of multiple records that move through the steps of a workflow as a group while simultaneously maintaining record-level granularity.
Record filtering. Selecting each workflow task limits the records in
the Records pane to just those records in the job, making it easy to identify and focus in on the particular records that require processing.
User- vs. role-based execution. A step can be assigned explicitly to
one or more users, or it can be assigned to one or more roles, which are expanded into the applicable users during workflow execution.
Group steps. A set of steps can be organized into a single group,
which eliminates much of the complexity of typical flow diagrams, since a group step has just a single input and a single output.
Any vs. all execution. Any or all of the steps in a group can be
executed; similarly, a single step can be performed by any or all of its assigned users.
Sequential vs. concurrent execution. The steps in a group can
execute sequentially or concurrently; similarly, a single step can be performed sequentially or concurrently by its assigned users.
Push vs. pull model. Receiving users can pull each task as it
appears in their task queue, or sending users can push it to a particular user.
Validations. Workflows can invoke validations that must succeed for
every record in the job, or the job is kicked back to the previous step with Validation Result columns for each validation and every record.
Approvals. Workflows can also require user approvals (either a
single approval or the unanimous approval of all approvers), with Approval Result columns for each approver and every record.

MDM Data Manager Reference Guide 213
Defining and Executing Workflows
The MDM workflow engine supports a data management workflow (as contrasted to a business process workflow) with data-level rather than
process-level granularity.
Each workflow is defined as consisting of a series of steps. Each step can be a user operation, a validation, or an approval. A sequence of one or more steps in a group or in a branch of a workflow is a thread.
You can add one or more records to a previously defined workflow and then launch the workflow as a job. Each job consists of the group of records that move through each step in the workflow as a series of tasks. Tasks appear in each user’s inbound task queue for processing.
The process of defining and executing workflows consists of two design-time phases and two runtime phases, as follows:
1. Creating a workflow record. Each workflow record is stored in the
Workflows table. You create a workflow by making the Workflows table the current table and adding a new record, which includes the workflow object that is a Microsoft Visio file stored in the repository.
2. Defining the workflow. When you double-click on the workflow
object, MDM launches Microsoft Visio for editing the flow diagram that represents the workflow, using a custom MDM workflow stencil that contains each of the MDM workflow step types and connectors.
3. Creating a job. A workflow job is created by making any user table
the current table and adding one or more records to an unlaunched job, which is an instance of a workflow that can then be launched manually or automatically based on various criteria.
4. Executing the job. Once the job has been launched, it moves
automatically from step-to-step and from user-to-user, showing up in the inbound task queue in each user’s Workflows tab for disposition and processing.
Workflow Owner
Every workflow has a single owner. Unique owner rights include:
Ability to manage all workflow jobs irrespective of who they are assigned to
Ability to edit checked-out workflow job records at any point in the workflow job process
Various steps of the workflow can be assigned only to the owner.
The owner is always set as the user for operations that are performed in MDS as part of the workflow for example, checkin, checkout, modify records, and so on.
214 MDM Data Manager Reference Guide
The owner is registered as the checkout user of the record/s associated with the workflow when checkout is done as part of the start step definition.
Emails from the workflow office are sent only from the owner's email address.
NOTE ►► The special user [Owner] often appears in drop-down lists of users within workflow step properties and refers to the workflow
owner. In addition, the special user [Anyone] sometimes appears in the drop-down lists and refers to any assignee user.
Workflow Administrator
A workflow can have more than one administrator.
A workflow administrator has the same rights as a workflow owner to perform administration operations, for example:
Delete workflow
Assume command
Assign command
However, the workflow administrator's rights differ from the workflow owner's, as follows:
Emails from the workflow office are sent only from the owner's email address.
The owner is registered as the checkout user of the record/s associated with the workflow when checkout is done as part of the start step definition.
The owner is always set as the user for operations that are performed in MDS as part of the workflow, for example, check in, check out, modify records, and so on.
Only the owner can edit workflow job records data at any point in the workflow process.
A user has workflow administrator privileges by meeting one of the following criteria:
The user is listed in the Administrator Users property of the workflow.
The user is included in a role assigned to the Administrator Role property of the workflow.
NOTE ►► The total number of characters used in all user names for Administrator Users and for Administrator Roles properties should not exceed 2000 characters (this maximum is non-configurable).
MDM Data Manager Reference Guide 215
Workflow Launcher
Every workflow also has a launcher. This is the user who launches the job. The workflow launcher has no special privileges, but can be selected to be the workflow owner, to perform the task, or to receive email notification.
NOTE ►► The special user [Launcher] often appears in drop-down lists of users within workflow step properties and refers to the workflow
launcher. In addition, the special user [Anyone] sometimes appears in the drop-down lists and refers to any assignee user.
Sending to the Next Step
Sometimes, you may not care who sends a job from one process step to the next; in these cases, the last assignee to finish processing the current step is the one who gets to send it to the next one.
Alternatively, when each process step has been completed, you may wish control of the job to pass back to the workflow owner, who can decide whether to push it to a particular assignee or allow it to be pulled by any of the assignees of the next step.
Whether any user or just the owner can send to the next step is based upon the setting of the Send Next Step property of the Start step.
Splitting Jobs
Sometimes, you may want some of the records in a job to proceed even though you have not finished processing all of them. To achieve this, you can split some of the records into a new job and send one of them on its way while you continue processing the records of the new job.
Whether any assignee or just the owner or the launcher can split a job is based upon the setting of the Split Job property of the Start step or the Approve step.
Microsoft Visio Design-Time
Why Microsoft Visio?
Microsoft Visio is a familiar desktop application that is part of the popular Microsoft Office Suite, readily available, and easy-to-use. This makes MDM workflow definition directly accessible even to end users, who do not need to install or learn more complex process-modeling applications.
The Visio plug-in includes a straightforward MDM workflow stencil of roughly a dozen shapes that embodies all of the workflow design-time functionality, and features the familiar three-pane structure typical of the Win32 MDM applications.

216 MDM Data Manager Reference Guide
Notifications
MDM workflow can send email notifications when a step has exceeded its allotted time or number of iterations. The notification from the owner of the workflow is sent to all assignees who have received but not yet completed the step, along with a “cc” to the specified users.
A sample email notification is shown in Figure 120.
NOTE ►► The iteration failed notification mail is sent when the next approve iteration begins.
The workflow step is overdue because it has exceeded its iteration
threshold:
Assignees: Joe Smith
Job: 10001
Records: 3
Start time: 06/27/2005 13:23:19
Due time: 06/28/2005 13:23:19
Workflow: Enrichment Workflow
Step: Approve
Description: Approve changes to new record
Figure 120. Workflow notification email
You must add a Mail Server entry in the mds.ini for every repository that
uses workflow (e.g. “Mail Server=mail.domain.com”). The timeout for mail server responses is 1 second. If MDM does not receive a response from the mail server within the timeout period, it aborts the email task and will not attempt to resend the email. You can adjust the length of
the timeout period in the mds.ini file’s Mail SMTP Timeout parameter.
Also, MDM verifies the first “sender” and “recipient’ email addresses for an email notification. If either or these are not valid, MDM aborts the email task and logs the error in the Workflows log.
The Subject and Body properties of a user-defined Notification step can include variables for job-specific information, as listed in Table 46.
Table 46. Notification Variables
Variable Description
%RepositoryName% The repository name.
%TableName% The table name.
%JobId% The job id.
%JobName% The job name.
%StepId% The step id.
%StepName% The step name.
MDM Data Manager Reference Guide 217
Variable Description
%Records%
The record id and display fields of the job records.
If the notify step includes values for the property To (field values), the information displayed for records is based on the selected value of the property, Email Notification (Single email per record, or Single email per email address).
%Code=Name% Retrieves the contents of the specified field name, which are displayed in the email body or email title.
NOTE ►► Because it may include multiple lines, the %Records% variable should not be added to a notification email’s Subject property.
NOTE ►► MDM separates a record’s display fields with a “|” delimiter when populating the %Records% variable.
NOTE ►► When populating the %Records% variable, MDM only looks up one level when a job record’s display field is a lookup field. If the display field of the lookup table is itself a lookup field, MDM substitutes the job record’s display field value with the RecID of the “first” lookup table record.
NOTE ►► When using %Code=Name%, MDM expands the value of the field, as in the Data Manager view. Note the following:
If the display field of lookup to flat also contains Lookup flat, the last lookup field is displayed as a numerical value and not as a string.
In lookup to hierarchy fields, only the first parameter is displayed.
Currency symbols are not displayed.
For a single-valued measurement, the symbol is not displayed.
Multi-valued measurement values are not displayed.
Record Filtering
When you select a task in the Tasks pane of the Workflows tab, MDM automatically limits the set of records in the Records pane to just those records in the corresponding job. This makes it easy to identify and focus in on the records that require processing.

218 MDM Data Manager Reference Guide
Record Check Out
Recall that you can manually check out and check in records using Data
Manager’s Check Out and Check In commands.
You can also have MDM automatically: (1) check out all the records of a workflow job when the job is launched; and then, when the job has completed, either (2) check in all of the records; or (3) cascade the checkout to the workflow job that is launched by the workflow.
Checking out records as part of a workflow allows it to proceed to completion on a private, hidden copy of the records of the job, and behaves according to the following general guidelines:
The workflow owner becomes the owner of the checked out records.
As the workflow moves from step to step, each user who receives a step joins the checkout and is not unjoined for the duration of the job.
Cascaded jobs do not have to have the same owner.
A record that is already in a workflow job (launched or unlaunched) cannot be manually checked out.
If a record has been manually checked out, only the checked out version of the record can be added to a workflow – not the original.
The records in an unlaunched workflow job must either be all checked in or all checked out, not a mixture of both.
A record can only be in one workflow job at a time.
No one (not even the workflow owner) can manually check in the
records in a workflow job (e.g. using the Data Manager Check In or
Roll Back commands).
User vs. Role Assignments
MDM workflow steps can be assigned either to one or more users or to one or more roles, as follows:
Users. User-based assignments allow you to explicitly specify which
user or users should be responsible for performing the step.
Roles. Role-based assignments allow you to specify roles rather
than users, with the actual users determined by MDM at runtime.
NOTE ►► Role-based assignments avoid having to explicitly identify users at design time, so that the actual users can change over time.
Execution Type
Recall that multiple users or roles can be assigned to a single step. MDM allows you to specify the Execution Type property for each step

MDM Data Manager Reference Guide 219
as it relates to: (1) whether either any single assignee or all of them must perform the step; and (2) if all of them, sequential or parallel execution among the multiple assignees of the step.
Similarly, multiple steps can be organized into a single group, and MDM allows you to specify the Execution Type property for the group as it relates to: (1) whether either any single step or all of them must be performed; and (2) if all of them, sequential or parallel execution among the multiple steps of the group.
The options for the Execution Type property of a step (for the assignees of a step) and of a group (for the steps of a group) are summarized in Table 47.
Table 47. Execution Type Options
Option Description
All Concurrent All assignees must perform the step. Each assignee can do so at the same time.
All Sequential Random All assignees must perform the step. Each assignee can do so one at a time in any order.
All Sequential Ordered1 All assignees must perform the step. Each assignee can do so one at a time in the order listed in the step.
Any Single Any single assignee can perform the step. The step can be pushed to or pulled by any assignee.
1 Available only for the Execution Type property of a step, not a group, because for a group you could simply eliminate the group if the steps are to be executed in sequential order.
NOTE ►► Behavior within a role is Any Single, where the user who accepts an available task can cover multiple roles, “pulls it away” from the users in each role to which it belongs, and is not included in the list of users for that role when the user sends it to the next role.
Push vs. Pull
MDM workflows support both a push and a pull model as a job moves from user to user within a step and from step to step within a workflow. In particular, both within a step and between steps, receiving users can pull each task as it appears in their task queue, or sending users can push it to a particular user. Whether the job is pushed or pulled affects the status in the task queue of the receiving user or users, as follows:
Push. The task appears in the inbound task queue as Received.
Pull. The task appears in the inbound task queue as Available.

220 MDM Data Manager Reference Guide
NOTE ►► A task that appears in a user’s inbound task queue as Available becomes Received after the user Accepts the task.
Based on the Execution Type setting of the current or receiving step: (1) the push occurs automatically; or (2) the push/pull is manual and up to the sending user, as summarized in Table 48.
Table 48. Push and Pull Based on Execution Type
Execution Type Automatic Push Manual Push/Pull
All Concurrent
All Sequential Random
All Sequential Ordered
Any Single
NOTE ►► [ANY] appears as the first choice in the cascading menus
of users, roles, and/or steps of the Next User and Next Step commands, as applicable, when manual push/pull is permitted and there are multiple values. See “Task Completion Commands” on page 221 for more information about the cascading menus.
Manual vs. Automatic Steps
MDM workflow supports two kinds of steps:
Manual. A manual step requires user action before the task is manually sent to the next user in the step or the next step in the workflow.
Automatic. An automatic step does not require user action; MDM
performs the task and automatically sends the workflow to the next step.
NOTE ►► Automatic steps include Assign, Notify, Validate, and Syndicate, and Merge and Connect (which are not functional).
NOTE ►► Even though they are invisible, automatic steps (such as a Validate step) may generate errors that prevent the job from moving to the selected next step.

MDM Data Manager Reference Guide 221
Validations and Approvals
An MDM workflow can run a validation or validation group against the records of a job. If any of the records fails any of the validations, the job is kicked back to the previous step, with a Validation Result column for each validation indicating the success ( ) or failure ( ) for each record.
NOTE ►► See “Validation Result Columns” on page 195 for more information about Validation Result columns.
Similarly, an MDM workflow can require the approval of one or more users for the records of a job. If any of the records is disapproved by any of the approvers, the job is kicked back to the previous step, with an Approval Result column for each approver indicating whether each record was approved ( ) or disapproved ( ), as shown in Figure 32.
Figure 121. Approval Result columns
NOTE ►► MDM adds an Approval Result column to the Records grid for each approver who has completed the task. Each Approval Result column is named with the approver user name in square brackets ([]).
Task Completion Commands
When you are done performing the action required by a task, you can indicate your completion using four different MDM workflow commands, only one of which will be enabled by MDM at any given time based upon the particular circumstances of the workflow.
For some of the commands, MDM also displays a single- or multi-level cascading menu that includes: (1) groups; (2) steps; (3) roles; and/or (4) users. In particular, which levels and elements are included in the cascading menu depends upon whether or not you are the last user to
perform a step and/or the Execution Type of the current or next step.
The Next Step command with cascading menus is illustrated in Figure 122; the task completion commands are summarized in Table 49.

222 MDM Data Manager Reference Guide
Figure 122. Next Step command
Table 49. Task Completion Commands and Cascading Menus
Command When Enabled Example Cascading Menu with All Levels
Done
Within a step when you are not the final user of the current step and:
Execution Type=
All Concurrent
Execution Type=
Any Single
Between steps when you are the final user of the current step and:
Send Next Step=
[Owner]
None
Next User
Within a step when you are not the final user of the current step and:
Execution Type=
All Sequential Random
Execution Type=
All Sequential Ordered
Next User >
[ANY]
——— role 1
> [ANY]
——— user 1 user 2 : user n role 2 : role n
Next Step
Between steps when you
are the final user of the current step and:
Send Next Step=
[Anyone]
Next Step >
group
>
step 1
> [ANY]
——— role 1 > [ANY] ——— user 1 user 2 : user n role 2 : role n

MDM Data Manager Reference Guide 223
step 2
> [ANY]
——— user 1 user 2 : user n : step n
> …
Previous Step
Between steps when you are the final user of an Approve step
Previous Step > group > previous step(s) > user(s)
NOTE ►► [ANY] appears as the first choice in the cascading menus
of the Next User and Next Step commands only when there are multiple remaining users, roles, or steps, as applicable.
NOTE ►► Choosing the [ANY] user creates a manual pull; choosing one of the named users creates a manual push.
Operation Slicing and Split Jobs
When a workflow job performs a Check In,Check Out, or Assignment operation and slicing has been enabled for that operation, it is possible for some record slices in that job to succeed and others to fail. In such cases, the workflow job is automatically split into two jobs: one job holds the successful records and the other job holds the failed records.
The job with the successful records advances to the next step in the workflow. The job with the failed records is put in an error state and remains at the failed step. Viewing its history displays the error that caused the records to fail. After correcting the error(s), right-click on the
job and choose Perform to re-run the operation.
NOTE ►► See "What is Slicing?" in the MDM Console Guide for more information about slicing.
WORKFLOWS TABLE
The Workflows table is a special table with a predefined set of fields. You can add, modify, and delete workflow records just like the records of a normal table. Each record in the Workflows table corresponds to a single workflow.
The fields of each record of the Workflows special table are listed in Table 50. The fields in the table that are shaded are read-only.
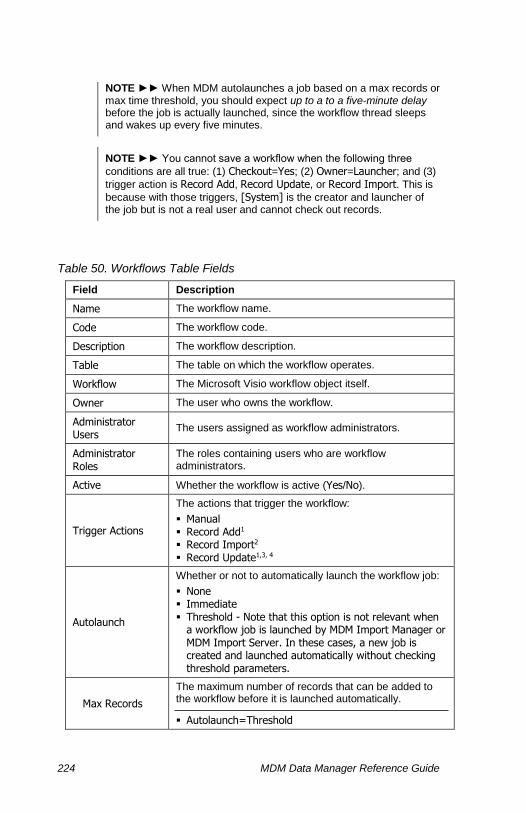
224 MDM Data Manager Reference Guide
NOTE ►► When MDM autolaunches a job based on a max records or max time threshold, you should expect up to a to a five-minute delay before the job is actually launched, since the workflow thread sleeps and wakes up every five minutes.
NOTE ►► You cannot save a workflow when the following three
conditions are all true: (1) Checkout=Yes; (2) Owner=Launcher; and (3)
trigger action is Record Add, Record Update, or Record Import. This is
because with those triggers, [System] is the creator and launcher of the job but is not a real user and cannot check out records.
Table 50. Workflows Table Fields
Field Description
Name The workflow name.
Code The workflow code.
Description The workflow description.
Table The table on which the workflow operates.
Workflow The Microsoft Visio workflow object itself.
Owner The user who owns the workflow.
Administrator Users
The users assigned as workflow administrators.
Administrator Roles
The roles containing users who are workflow administrators.
Active Whether the workflow is active (Yes/No).
Trigger Actions
The actions that trigger the workflow:
Manual Record Add1 Record Import2 Record Update1,3, 4
Autolaunch
Whether or not to automatically launch the workflow job:
None Immediate Threshold - Note that this option is not relevant when
a workflow job is launched by MDM Import Manager or MDM Import Server. In these cases, a new job is created and launched automatically without checking threshold parameters.
Max Records
The maximum number of records that can be added to the workflow before it is launched automatically.
Autolaunch=Threshold

MDM Data Manager Reference Guide 225
Field Description
0 means do not autolaunch based on record count
Max Time
The maximum amount of time that the workflow can remain unlaunched before it is launched automatically.
Autolaunch=Threshold
0 means do not autolaunch based on unlaunched time
Action on Complete
Whether or not to archive or delete the workflow job after it is completed:
None Archive Delete
Created By The user who created the workflow.
Created The local date and time the workflow was created.
Modified By The user who last modified the workflow.
Modified The local date and time the workflow was last modified.
1 Only one workflow is triggered by this action 2 Workflow checkout occurs before record update (update applied to checked out record) 3 Workflow checkout occurs after record update (update applied to original record) 4 Modifying records already in a workflow job will not trigger an additional workflow job.
NOTE ►► The Owner of a job: (1) sees in its task queue every instance of every step that is available to or received by every other user; (2) is the only user who can (a) delete a job that is not yet complete or (b) take over performing a step; and (3) depending upon the settings of the Start step, may be the only user who is permitted to (a) send the job from one process step to the next or (b) split a job.
NOTE ►► For Autolaunch=Threshold, the workflow thread wakes up every five minutes and launches the job if: (1) the number of records in
the unlaunched job is greater than Max Records; and/or (2) the time
since the unlaunched job was created is greater than Max Time.
MANAGING AND EDITING WORKFLOW RECORDS
MDM allows you to create and manage any number of workflow records, whose workflows can be associated with any MDM user table. You can add, modify, rename, and delete workflow records as described in this section.
NOTE ►► You must be in Record mode and the Workflows table must be the current table to perform these operations.

226 MDM Data Manager Reference Guide
To add a new workflow record to the Workflows table:
1. Right-click in the Records pane and choose Add from the context
menu, or click the Add Record toolbar button (shown at left), or press
Ins, or choose Records > Add Record from the main menu.
2. MDM adds a new workflow named “New Workflow” as the last record in the grid and places you into the Record Detail tab for editing.
TIP ►► There is no explicit command to modify a workflow record. To edit the fields of a workflow, select it in the Records pane, move the focus into the Record Detail pane, and edit them directly.
To rename a workflow:
1. In the Records pane, select the workflow you want to rename.
2. In the Record Detail pane, double-click on the Name field to edit the
name, and press Shift+Enter to save the changes.
To automatically archive or delete completed workflow jobs:
1. In the Records pane, select the workflow you want to rename.
2. In the Record Detail pane, choose Archive or Delete in the Action on
Complete field, and press Shift+Enter to save the changes.
To manually delete one or more workflows:
1. In the Records pane, select the workflows you want to delete.
2. Right-click on one of the workflow records and choose Delete from the
context menu, or click the Delete Record toolbar button (shown at left),
or press Del, or choose Records > Delete Record from the main menu.
3. MDM prompts you to confirm that you really want to delete the
workflows. Click OK to remove the workflow records from the Workflows table.
MICROSOFT VISIO PLUG-IN AT A GLANCE
Recall that the flow diagram representing a workflow is designed using a Microsoft Visio plug-in that is loaded automatically when you edit the Workflow field of a workflow record.
Specifically, when you double-click on the Workflow field, MDM launches Microsoft Visio for editing the flow diagram representing the workflow, using a custom MDM workflow stencil that contains each of the MDM workflow objects, as shown in Figure 123.
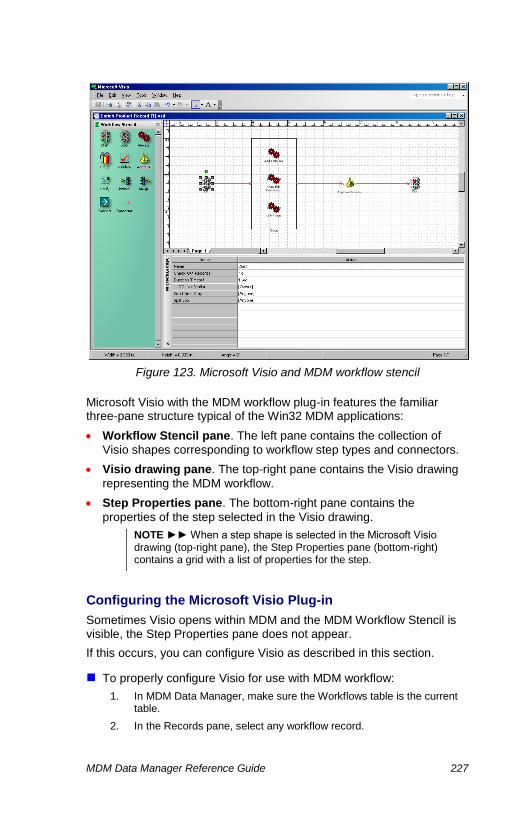
MDM Data Manager Reference Guide 227
Figure 123. Microsoft Visio and MDM workflow stencil
Microsoft Visio with the MDM workflow plug-in features the familiar three-pane structure typical of the Win32 MDM applications:
Workflow Stencil pane. The left pane contains the collection of
Visio shapes corresponding to workflow step types and connectors.
Visio drawing pane. The top-right pane contains the Visio drawing
representing the MDM workflow.
Step Properties pane. The bottom-right pane contains the
properties of the step selected in the Visio drawing.
NOTE ►► When a step shape is selected in the Microsoft Visio drawing (top-right pane), the Step Properties pane (bottom-right) contains a grid with a list of properties for the step.
Configuring the Microsoft Visio Plug-in
Sometimes Visio opens within MDM and the MDM Workflow Stencil is visible, the Step Properties pane does not appear.
If this occurs, you can configure Visio as described in this section.
To properly configure Visio for use with MDM workflow:
1. In MDM Data Manager, make sure the Workflows table is the current table.
2. In the Records pane, select any workflow record.
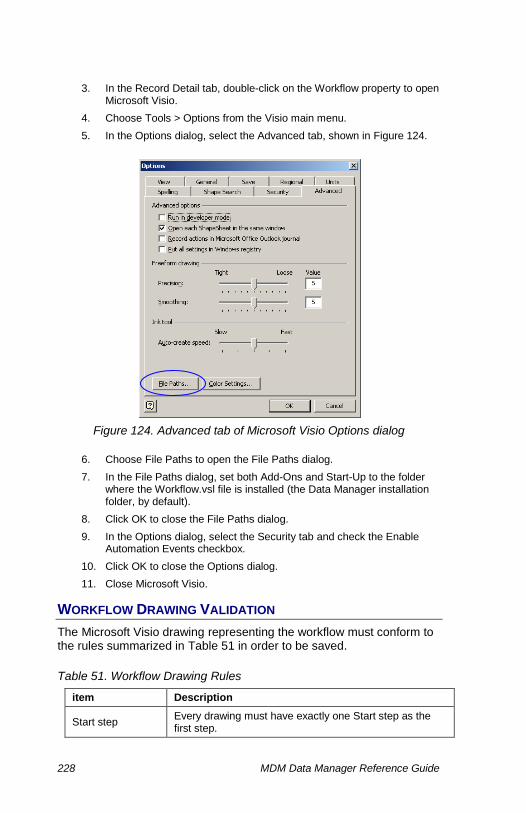
228 MDM Data Manager Reference Guide
3. In the Record Detail tab, double-click on the Workflow property to open Microsoft Visio.
4. Choose Tools > Options from the Visio main menu.
5. In the Options dialog, select the Advanced tab, shown in Figure 124.
Figure 124. Advanced tab of Microsoft Visio Options dialog
6. Choose File Paths to open the File Paths dialog.
7. In the File Paths dialog, set both Add-Ons and Start-Up to the folder where the Workflow.vsl file is installed (the Data Manager installation folder, by default).
8. Click OK to close the File Paths dialog.
9. In the Options dialog, select the Security tab and check the Enable Automation Events checkbox.
10. Click OK to close the Options dialog.
11. Close Microsoft Visio.
WORKFLOW DRAWING VALIDATION
The Microsoft Visio drawing representing the workflow must conform to the rules summarized in Table 51 in order to be saved.
Table 51. Workflow Drawing Rules
item Description
Start step Every drawing must have exactly one Start step as the first step.

MDM Data Manager Reference Guide 229
item Description
Stop step Every drawing must have at least one Stop step as the last step.
Step name Every step must have a unique name within each drawing.
Step inputs / outputs
Every step must have exactly the number of inputs and outputs defined for that type of step.
Step connections Every step must be connected to another step (except steps inside a Group step).
Step overlap A step cannot overlap another step (except within a Group step).
Group step Group steps can be nested.
Drawing pages A workflow drawing can consist of multiple pages (using a Connect step to connect the threads between pages).
Workflow stencil Only shapes from the Workflow Stencil can be used in a workflow drawing (no other shapes from other stencils are permitted).
Loops All loops must include at least one manual step.

230 MDM Data Manager Reference Guide
WORKFLOW STEPS
Each workflow consists of a user-defined sequence workflow steps. The different types of workflow steps and connectors are summarized in Table 52 and described in the following sections.
Table 52. Workflow Step Types
Step
Name Description
Approve Requires approval by one or more users.
Assign Performs an assignment against the job records.
Branch Breaks a single job into multiple subjobs and threads.
Connect Connects from one step to another in the workflow.
Connector Not a step type, but used to connect two steps.
EC Service An enrichment controller (EC) service step.
Group Groups steps for single, sequential, or concurrent execution.
Match Runs the matching strategy against the job records.
Merge Merges multiple threads into a single thread.
Notify Sends notification emails to the relevant users or email addresses.
Process A process step that assigns a task to one or more users or roles.
Start The first step of a workflow.
Stop The final step of a workflow.
Syndicate Syndicates the job records.
Validate Performs a validation or validation group against the job records.
Wait Pauses a job until the time specified in a selected field.
NOTE ►► MDM workflow emphasizes self-regulating logic rather than command-and-control, and features a relatively small number of step types for conceptual and design simplicity. At the same time, these simple self-contained steps can be combined to build sophisticated workflows that are flexible, configurable, and self-evident.
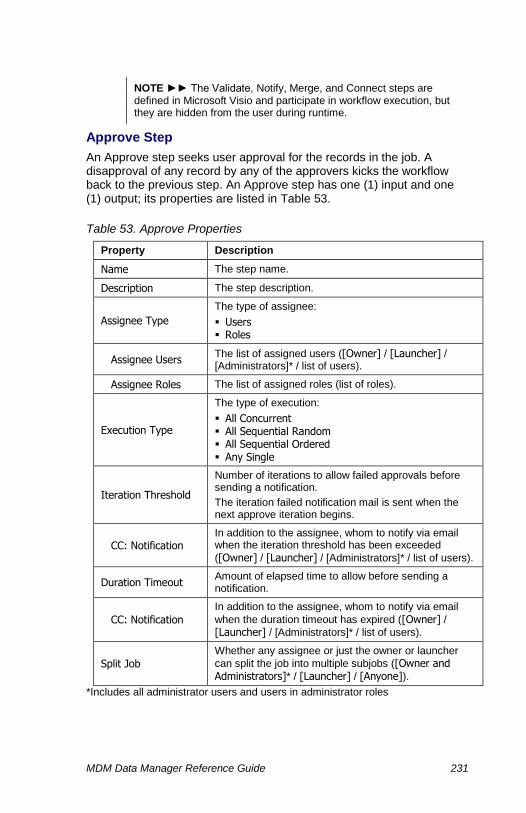
MDM Data Manager Reference Guide 231
NOTE ►► The Validate, Notify, Merge, and Connect steps are defined in Microsoft Visio and participate in workflow execution, but they are hidden from the user during runtime.
Approve Step
An Approve step seeks user approval for the records in the job. A disapproval of any record by any of the approvers kicks the workflow back to the previous step. An Approve step has one (1) input and one (1) output; its properties are listed in Table 53.
Table 53. Approve Properties
Property Description
Name The step name.
Description The step description.
Assignee Type
The type of assignee:
Users Roles
Assignee Users The list of assigned users ([Owner] / [Launcher] / [Administrators]* / list of users).
Assignee Roles The list of assigned roles (list of roles).
Execution Type
The type of execution:
All Concurrent All Sequential Random All Sequential Ordered Any Single
Iteration Threshold
Number of iterations to allow failed approvals before sending a notification.
The iteration failed notification mail is sent when the next approve iteration begins.
CC: Notification In addition to the assignee, whom to notify via email when the iteration threshold has been exceeded
([Owner] / [Launcher] / [Administrators]* / list of users).
Duration Timeout Amount of elapsed time to allow before sending a notification.
CC: Notification
In addition to the assignee, whom to notify via email
when the duration timeout has expired ([Owner] / [Launcher] / [Administrators]* / list of users).
Split Job
Whether any assignee or just the owner or launcher
can split the job into multiple subjobs ([Owner and Administrators]* / [Launcher] / [Anyone]).
*Includes all administrator users and users in administrator roles
232 MDM Data Manager Reference Guide
NOTE ►► If any of the records is disapproved by any of the approvers, the job is kicked back to the previous step, with an Approval Result column for each approver indicating whether each record was approved ( ) or disapproved ( ).
NOTE ►► When the job is kicked back, it returns to the previous step or group (if the previous step was also an Approve step, it returns to the manual step preceding the Approve steps) and when the Execution
Type is Any Single, retraces the same user or step that was executed before.
NOTE ►► The Split Job setting of the Approve step overrides that of the Start step.
Assign Step
An Assign step runs an assignment against the records in the job. An assignment failure of any record causes the entire step to fail and appear as a task to the owner of the workflow. An Assign step has one (1) input and one (1) output; its properties are listed in Table 54.
Table 54. Assign Properties
Property Description
Name The step name.
Description The step description.
Assignment The single assignment to run against the job.
NOTE ►► An assignment failure for any record causes the step to fail and the task to have an Error status. You can then either: (1) fix the error and then re-execute the step by right-clicking on the Assign task and choosing Perform, or (2) move to the next step without fixing the error. In either case, to advance the job to the next step you must right-
click on the Assign task and choose Next Step.
Branch Step
A Branch step breaks a single job into multiple concurrent subjobs, each of which follows the applicable thread in parallel and contains the subset of records that passed the validation associated with that branch. A Branch step has one (1) input and multiple outputs.
Table 55. Branch Properties
Property Description
Name The step name.

MDM Data Manager Reference Guide 233
Property Description
Description The step description.
Validations The validations or validation groups to run against the job.
Validation 1 … The branch step for records that succeed validation 1.
Validation n The branch step for records that succeed validation n.
[Default] The branch step for records that fail all of the validations.
NOTE ►► Each validation you specify for the Validations property appears as a subproperty of the Validations property. The drop-down list of possible branches for each validation subproperty includes the set of steps connected to the output of the Branch step.
NOTE ►► Each record appears in one subjob only: the subjob of the first validation it passes, or the [Default] subjob if it fails all validations.
NOTE ►► Even if you subsequently use a Merge step to recombine the multiple parallel threads created by the Branch step, the Merge does not recombine the multiple subjobs created by the Branch into a single job. Use a Group step instead if you want the parallel threads to be recombined into a single job.
Connect Step
A Connect step is effectively a connector, and is convenient when two steps that need to be connected are either not adjacent or on different pages of the Microsoft Visio diagram. A Connect step has one (1) input and zero (0) outputs; its properties are listed in Table 67.
Table 56. Connect Properties
Property Description
Name The step name.
Description The step description.
Target Step The step to connect to (list of steps with available inputs).
EC Service Step
An EC Service step is used to integrate the data cleansing functions of the MDM Enrichment Controller into an MDM Workflow. An EC Notify step has one (1) input and one (1) output; its properties are listed below.
Table 57. EC Notify Properties
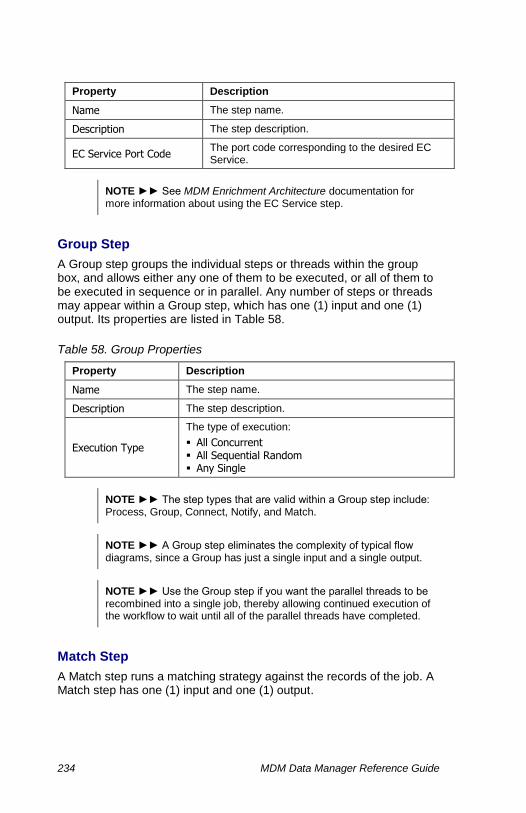
234 MDM Data Manager Reference Guide
Property Description
Name The step name.
Description The step description.
EC Service Port Code The port code corresponding to the desired EC Service.
NOTE ►► See MDM Enrichment Architecture documentation for more information about using the EC Service step.
Group Step
A Group step groups the individual steps or threads within the group box, and allows either any one of them to be executed, or all of them to be executed in sequence or in parallel. Any number of steps or threads may appear within a Group step, which has one (1) input and one (1) output. Its properties are listed in Table 58.
Table 58. Group Properties
Property Description
Name The step name.
Description The step description.
Execution Type
The type of execution:
All Concurrent All Sequential Random Any Single
NOTE ►► The step types that are valid within a Group step include: Process, Group, Connect, Notify, and Match.
NOTE ►► A Group step eliminates the complexity of typical flow diagrams, since a Group has just a single input and a single output.
NOTE ►► Use the Group step if you want the parallel threads to be recombined into a single job, thereby allowing continued execution of the workflow to wait until all of the parallel threads have completed.
Match Step
A Match step runs a matching strategy against the records of the job. A Match step has one (1) input and one (1) output.
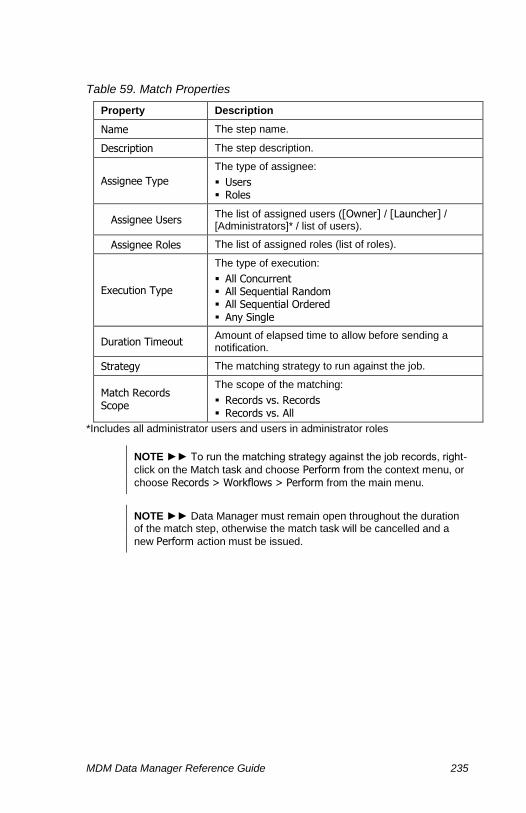
MDM Data Manager Reference Guide 235
Table 59. Match Properties
Property Description
Name The step name.
Description The step description.
Assignee Type
The type of assignee:
Users Roles
Assignee Users The list of assigned users ([Owner] / [Launcher] / [Administrators]* / list of users).
Assignee Roles The list of assigned roles (list of roles).
Execution Type
The type of execution:
All Concurrent All Sequential Random All Sequential Ordered Any Single
Duration Timeout Amount of elapsed time to allow before sending a notification.
Strategy The matching strategy to run against the job.
Match Records Scope
The scope of the matching:
Records vs. Records Records vs. All
*Includes all administrator users and users in administrator roles
NOTE ►► To run the matching strategy against the job records, right-
click on the Match task and choose Perform from the context menu, or
choose Records > Workflows > Perform from the main menu.
NOTE ►► Data Manager must remain open throughout the duration of the match step, otherwise the match task will be cancelled and a
new Perform action must be issued.

236 MDM Data Manager Reference Guide
Merge Step
A Merge step recombines some or all of the multiple parallel threads created by a Branch step into a single thread. A Merge step has multiple inputs and one (1) output; its properties are listed in Table 60.
Table 60. Merge Properties
Property Description
Name The step name.
Description The step description.
NOTE ►► The Merge does not recombine the multiple subjobs created by a Branch into a single job. Its primary use is to allow the sharing and reuse of the single output thread by each of the multiple input threads. Use a Group step instead if you want the parallel threads to be recombined into a single job.
Notify Step
A Notify step sends an email to one or more users and has one (1) input and one (1) output; its properties are listed in Table 61.
Table 61. Notify Properties
Property Description
Name The step name.
Description The step description.
To To whom the email should be sent ([Owner] / [Launcher] / [Administrators] */ list of users).
To (field values)
The text field in the current table that contains one or more email addresses to be used by the notify step.
Use the delimiter ";" to separate between email addresses.
To retrieve information, for example, from a lookup field, you can define the text field as calculated and set the name of the lookup field in the formula.

MDM Data Manager Reference Guide 237
Property Description
Email Notification
This option defines how to send notification emails for more than one record.
The option is enabled only when a field is selected for
the To (field values) property.
Single email per record – For each record, MDS sends one email to all the email addresses in the selected field in the corresponding record and to the defined users in the To property.
MDS sends one email to each email address with the relevant set of workflow records. The Notify step takes the email addresses from the To property (users) and the values from the field set in the property To (field values) for all workflow records.
Subject The subject of the email (truncated at 75 characters).
Body The body of the email.
*Includes all administrator users and users in administrator roles
NOTE ►► The Subject and Body text can include variables that contain job-specific information (see “Notifications” on page 216 for more information).
Process Step
A Process step indicates any user action. A workflow must have at least one Process step (but can have any number more). Each process step has one (1) input and one (1) output.
Table 62. Process Properties
Property Description
Name The step name.
Description The step description.
Assignee Type
The type of assignee:
Users Roles
Assignee Users The list of assigned users ([Owner] / [Launcher] / [Administrators]* / list of users).
Assignee Roles The list of assigned roles (list of roles).
Execution Type
The type of execution:
All Concurrent All Sequential Random All Sequential Ordered Any Single

238 MDM Data Manager Reference Guide
Property Description
Duration Timeout Amount of elapsed time to allow before sending a notification.
CC: Notification In addition to the assignee, whom to notify via email when the duration timeout has expired ([Owner] /
[Launcher] / [Administrators]* / list of users).
*Includes all administrator users and users in administrator roles
Start Step
The Start step indicates the beginning of the workflow. Every workflow must have one Start step, which has zero (0) inputs and one (1) output.
Table 63. Start Properties
Property Description
Name The step name.
Check Out Records Whether to check out the records at beginning of job
(Yes/No).
Duration Timeout The length of time allocated to the job.
CC: Notification
In addition to the assignee, whom to notify via email
when the workflow timeout expires ([Owner] / [Launcher] / [Administrators]* / list of users).
Send Next Step
Whether just the owner or the final assignee can send
to the next step when a step is complete ([Owner and Administrators]* / [Launcher] / [Anyone]).
Split Job
Whether any assignee or just the owner or launcher
can split the job into multiple subjobs ([Owner and Administrators]* / [Launcher] / [Anyone]).
*Includes all administrator users and users in administrator roles
NOTE ►► When a workflow receives checked out records from a
cascaded job it disregards its own Check Out Records property.
Stop Step
A Stop step indicates the end of the workflow. Every workflow must have at least one Stop step, which has one (1) input and zero (0) outputs. Its properties are listed in Table 64.
Table 64. Stop Properties
Property Description
Name The step name.
Launch The next workflow to launch.

MDM Data Manager Reference Guide 239
Property Description
Record Checkout
Action to take if the records of the job are checked out:
Check In – check in if checked out, else no action
Roll Back – roll back if checked out, else no action
Cascade – keep checked out for
Launch workflow
Syndicate Step
A Syndicate step syndicates the records of the job to one or more outbound ports. The Syndicate step works on a synchronous basis, meaning the workflow will not progress until the syndication task is completed. A Syndicate step has one (1) input and one (1) output; its properties are listed in Table 65.
Table 65. Syndicate Properties
Property Description
Name The step name.
Description The step description.
Ports The ports to which to syndicate the records of the job.
NOTE ►► The ports property is a dual-list drop-down hierarchy control for multiple-item selection that contains an internal node for each remote system and leaf nodes for each port.
NOTE ►► By right-clicking on a Syndicate step and selecting
Perform, the job owner can manually start (or restart) the syndication task, which may be necessary if the syndication failed previously.
Validate Step
A Validate step runs a validation or validation group against the records in the job. A validation failure of any record in any of the validations kicks the workflow back to the previous step. A Validation step has one (1) input and one (1) output; its properties are listed in Table 66.
Table 66. Validate Properties
Property Description
Name The step name.
Description The step description.

240 MDM Data Manager Reference Guide
Property Description
Validation The single validation or validation group to run against the job.
Split Failed Records
Whether to automatically split the failed records into a subjob and send just those failed records back to the previous step while allowing the successful records to proceed:
No Every Iteration Iteration Threshold
Iteration Timeout Number of iterations to allow failed validations before sending a notification.
CC: Notification In addition to the assignee, whom to notify via email when the iteration threshold has been exceeded
([Owner] / [Launcher] / [Administrators]* / list of users).
*Includes all administrator users and users in administrator roles
NOTE ►► If any of the records fails any of the validations, the job is kicked back to the previous step, with a Validation Result column for each validation indicating the success ( ) or failure ( ) for each record.
NOTE ►► When the job is kicked back, it returns to the previous step
or group, and when the Execution Type is Any Single, retraces the same user or step that was executed before.
Wait Step
A Wait step is useful for jobs which must wait until a specific date and time before moving forward to the next workflow step. It uses record values within a selected GM Time or Literal Date field as the "wait until" time (if the field contains different values for different records, the records are split up into separate subjobs for each value). A Wait step has one (1) input and one (1) output; its properties are listed in Table 67.

MDM Data Manager Reference Guide 241
Table 67. Wait Properties
Property Description
Name The step name.
Description The step description.
Assignee Type
Whether this step is assigned to MDM users or MDM roles:
Users Roles
Assignee Users The user(s) selected to maintain the step (if Assignee Type is Users).
Assignee Roles The role(s) selected to maintain the step (if Assignee Type is
Roles).
Wait Type
Whether the step should wait for the date and time specified in a GM Time field or a Literal Date field:
GM Time Field Literal Time Field
GM Time Field The GM Time field that contains the wait-until time (if Wait Type is GM Time Field).
Literal Date Field
The Literal Time field that contains the wait-until time (if Wait Type is Literal Time Field).
DEFINING AND EDITING WORKFLOWS
Recall that each workflow is stored as a record of the Workflows table, and that the actual workflow object is a Microsoft Visio file that is stored in the MDM repository and accessed through the Workflow field of each workflow record.
You can define and edit the workflow object within Microsoft Visio by launching Microsoft Visio and then editing the contents of the Workflow field as described in this section.
NOTE ►► Microsoft Visio is launched automatically by MDM when you edit the Workflow field.
To launch Microsoft Visio for editing a workflow object:
1. Make sure the Workflows table is the current table.
2. In the Records pane, select the workflow record whose workflow object you want to edit.
3. In the Record Detail tab, double-click on the Workflow field to launch Microsoft Visio using the MDM workflow stencil and open the workflow object for editing, as shown in Figure 125.
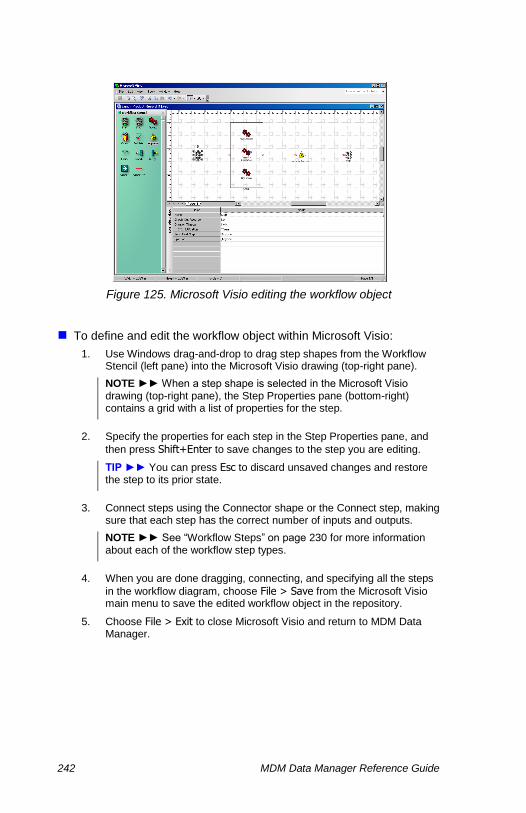
242 MDM Data Manager Reference Guide
Figure 125. Microsoft Visio editing the workflow object
To define and edit the workflow object within Microsoft Visio:
1. Use Windows drag-and-drop to drag step shapes from the Workflow Stencil (left pane) into the Microsoft Visio drawing (top-right pane).
NOTE ►► When a step shape is selected in the Microsoft Visio drawing (top-right pane), the Step Properties pane (bottom-right) contains a grid with a list of properties for the step.
2. Specify the properties for each step in the Step Properties pane, and
then press Shift+Enter to save changes to the step you are editing.
TIP ►► You can press Esc to discard unsaved changes and restore the step to its prior state.
3. Connect steps using the Connector shape or the Connect step, making sure that each step has the correct number of inputs and outputs.
NOTE ►► See “Workflow Steps” on page 230 for more information about each of the workflow step types.
4. When you are done dragging, connecting, and specifying all the steps
in the workflow diagram, choose File > Save from the Microsoft Visio main menu to save the edited workflow object in the repository.
5. Choose File > Exit to close Microsoft Visio and return to MDM Data Manager.

MDM Data Manager Reference Guide 243
WORKFLOWS TAB
Most of the workflow runtime operations are performed from the Workflows tab, shown in Figure 126.
Figure 126. Workflows tab
The Workflows tab consists of two subpanes: (1) the Status pane, which contains the list of task statuses; and (2) the Tasks pane, which contains a grid that lists the tasks for the currently selected queue.
You can use the Workflows tab to view and process workflow tasks, as described in the following section.
Status Pane
Each status contains those tasks in a particular state of processing.
When you select a queue other than [ALL] in the Status pane, MDM automatically limits the tasks in the Tasks pane to just the applicable tasks.
The statuses and corresponding task lists are summarized in Table 68.
Table 68. Task Statuses
Status Description
[ALL] All of the tasks and unlaunched, completed, and deleted jobs.
Unlaunched Unlaunched jobs.
Available Tasks that are available.
Received Tasks that have been received.
Send Next Tasks that revert to the workflow owner for sending to the next step.
Cascaded Completed jobs that have passed their checked out records to other jobs.
Completed Jobs that have been completed.
244 MDM Data Manager Reference Guide
Status Description
Error Tasks that have pending errors (Assign step only) or have been corrupted.
Archived Completed jobs that have been archived
Tasks Pane
When you select a task in the Tasks pane of the Workflows tab, MDM automatically limits the set of records in the Records pane to just those records in the corresponding job. This makes it easy to identify and focus in on the records that require processing.
The properties of each task are summarized in Table 69.
Table 69. Task Properties
Property Description
[New] Whether the task has just arrived ( ).
[Priority]
The task priority:
Lowest ( ) Low ( )
Normal High ( ) Highest ( )
Workflow The workflow name.
Step The step name.
Status
The job or step status:
Unlaunched Launched1
Available Accepted1
Received Send Next Sent1
The step status:
Done Deleted1 Split1 Assigned1
Cascaded Completed Error2
1 Transient state following the applicable user action 2 Assignment fails for any record (Assign step) or job corrupted
User
The user’s name and all other users: (1) who have also Received but not yet completed that task; or (2) to whom the task is also Available, with the other user
names displayed in square brackets (e.g. user [user2; user3]).
Recs The number of records in the job.
Job ID The id of the job.
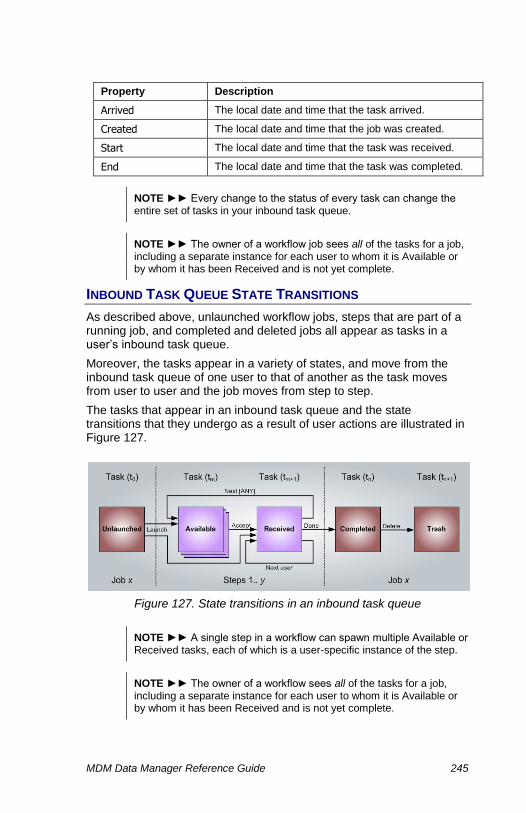
MDM Data Manager Reference Guide 245
Property Description
Arrived The local date and time that the task arrived.
Created The local date and time that the job was created.
Start The local date and time that the task was received.
End The local date and time that the task was completed.
NOTE ►► Every change to the status of every task can change the entire set of tasks in your inbound task queue.
NOTE ►► The owner of a workflow job sees all of the tasks for a job, including a separate instance for each user to whom it is Available or by whom it has been Received and is not yet complete.
INBOUND TASK QUEUE STATE TRANSITIONS
As described above, unlaunched workflow jobs, steps that are part of a running job, and completed and deleted jobs all appear as tasks in a user’s inbound task queue.
Moreover, the tasks appear in a variety of states, and move from the inbound task queue of one user to that of another as the task moves from user to user and the job moves from step to step.
The tasks that appear in an inbound task queue and the state transitions that they undergo as a result of user actions are illustrated in Figure 127.
Figure 127. State transitions in an inbound task queue
NOTE ►► A single step in a workflow can spawn multiple Available or Received tasks, each of which is a user-specific instance of the step.
NOTE ►► The owner of a workflow sees all of the tasks for a job, including a separate instance for each user to whom it is Available or by whom it has been Received and is not yet complete.

246 MDM Data Manager Reference Guide
NOTE ►► A job that checks out records and cascades to another workflow job that that also checks out the records: (1) will appear in the
task queue with Status=Cascaded until the cascaded job(s) complete; and (2) cannot be deleted until its records are checked back in or rolled back by the cascaded jobs.
NOTE ►► In the figure above, the upper paths to Available correspond to a pull, and the lower paths directly to Received correspond to a push. Recall that whether the push occurs automatically or whether the push/pull is manual and up to the sending user depends upon the Execution Type setting of the current or receiving step. See “Push vs. Pull” on page 219 for more information.
MANAGING WORKFLOW JOBS
The workflow job management operations are summarized in Table 70.
Table 70. Workflow Job Management Operations
Operation Description
Add to Job Adds the selected records to the selected job.
Remove from Job Removes the selected records from the selected job.
Launch Launches the selected job.
Delete Deletes the selected job.
Archive Archive the completed workflow job
To add one or more records to a workflow job:
1. In the Records pane, select the record(s) you want to add to a workflow job.
2. Right-click on one of the records and choose Workflows > Add to Job.
3. Select a job from the cascading menu of new and unlaunched workflow jobs.
4. MDM adds the records to the unlaunched job.
TIP ►► There is no explicit command to create a new workflow job. Instead, a new workflow job is created automatically when you add records to a workflow job that does not yet exist.

MDM Data Manager Reference Guide 247
NOTE ►► The cascading menu includes all of the active workflows (for creating and adding records to a new unlaunched job) and all of the unlaunched jobs (for adding records to an existing unlaunched job).
NOTE ►► You cannot add records to a job that has been launched.
To remove one or more records from an unlaunched workflow job:
1. In the Tasks pane of the Workflows tab, select the task corresponding to the unlaunched job from which you want to remove records.
NOTE ►► When you select a task in the Tasks pane of the Workflows tab, MDM automatically limits the set of records in the Records pane to just those records in the corresponding job.
TIP ►► The Status column in the Tasks pane of the Workflows tab displays Unlaunched for an unlaunched job.
2. In the Records pane, select the record(s) you want to remove from the workflow job.
3. Right-click on one of the records and choose Workflows > Remove from Job from the context menu, or choose Records > Workflows > Remove from Job from the main menu.
4. MDM removes the records from the unlaunched job.
NOTE ►► You cannot remove records from a job that has already been launched.
To launch an unlaunched workflow job:
1. In the Tasks pane of the Workflows tab, select the task corresponding to the unlaunched job you want to launch.
TIP ►► The Status column in the Tasks pane of the Workflows tab displays Unlaunched for an unlaunched job.
2. Right-click on the task and choose Workflows > Launch from the context menu, or choose Records > Workflows > Launch from the main menu.
3. MDM launches the job and updates the Tasks pane of the Workflows tab accordingly.
NOTE ►► Job launch fails if any records have been subsequently checked out after having been added to the unlaunched job.
To delete a workflow job:
1. In the Tasks pane of the Workflows tab, select the task corresponding to the job you want to delete.
2. Right-click on the task and choose Workflows > Delete from the context menu, or choose Records > Workflows > Delete from the main menu.

248 MDM Data Manager Reference Guide
3. MDM prompts you to confirm that you want to delete the job. Click OK to delete the job.
If the records of the job were checked out, MDM prompts you to choose whether to check in or roll back the checked out records.
4. MDM deletes the job and updates the Tasks pane of the Workflows tab accordingly.
NOTE ►► MDM deletes all of the tasks for the corresponding job.
NOTE ►► You can delete a job only if you are the owner of the corresponding workflow.
NOTE ►► You can delete either a launched or unlaunched job.
NOTE ►► You cannot delete a job with the status Cascaded if its records are still checked out.
To archive a completed workflow job:
1. In the Tasks pane of the Workflows tab, right-click the task corresponding to the completed job you want to archive and choose
Archive from the context menu.
2. MDM moves the job from the Completed folder to the Archived folder.
To view the history of a completed workflow job:
In the Tasks pane of the Workflows tab, right-click the task
corresponding to the archived job and choose View History from the context menu.
To delete an archived workflow job:
In the Tasks pane of the Workflows tab, right-click the task corresponding to the archived job you want to delete and choose
Delete from the context menu.
EXECUTING WORKFLOW JOBS
The workflow job execution operations are summarized in Table 71.
Table 71. Workflow Job Execution Operations
Operation Description
Mark as Done Marks the selected records as done for the selected task.
Unmark as Done Unmarks the selected records as done for the selected task.
Mark as Approved Marks the selected records as approved for the selected task.
MDM Data Manager Reference Guide 249
Operation Description
Mark as Disapproved Marks the selected records as disapproved for the selected task.
Unmark Unmarks the selected records for the selected task.
Split into Job Splits the selected records from the selected job into a new job.
Accept Accepts the available task.
Assume Assumes control of the selected task.
Assign Assigns the selected task to the selected user.
Perform Manually performs the selected task.
Done Marks the selected task as done.
Next User Sends the selected task to the next user.
Next Step Sends the selected task to the next step.
Previous Step Sends the selected job back to the previous step.
Set Priority Sets the priority of the selected task.
Show History Shows the history of the selected task.
NOTE ►► You must first select the applicable task in the Tasks pane of the Workflows tab to perform these operations.
To mark one or more records in a job as done for a task:
1. In the Tasks pane of the Workflows tab, select the applicable task.
2. In the Records pane, select the record(s) you want to mark as done.
3. Right-click on one of the records and choose Workflows > Mark as Done from the context menu, or choose Records > Workflows > Mark as Done from the main menu.
4. MDM marks the records as done by placing a checkmark ( ) in the [Done] column of the Records grid for those records.
250 MDM Data Manager Reference Guide
NOTE ►► Marking records as done is simply a private bookkeeping aid to help you keep track of which records you have processed while you are performing the activity required by the task.
NOTE ►► Records are marked as done on a per-task basis.
To unmark one or more records in a job as done for a task:
1. In the Tasks pane of the Workflows tab, select the applicable task.
2. In the Records pane, select the record(s) you want to unmark as done.
3. Right-click on one of the records and choose Workflows > Unmark as Done from the context menu, or choose Records > Workflows > Unmark as Done from the main menu.
4. MDM unmarks the records as done by removing the checkmark ( ) in the [Done] column of the Records grid for those records.
To mark one or more records in a job as approved:
1. In the Tasks pane of the Workflows tab, select the Approve task.
2. In the Records pane, select the record(s) you want to mark as approved.
3. Right-click on one of the records and choose Workflows > Mark as Approved from the context menu, or choose Records > Workflows > Mark as Approved from the main menu.
4. MDM marks the records as approved by placing a checkmark ( ) in the Approval Result column for your user name in the Records grid for those records.
NOTE ►► Marking records as approved is visible to other approvers after you complete the task; if any records are disapproved and the job is subsequently kicked back to the previous step, it is also visible to users of the previous step.
NOTE ►► For each approver who has completed the task, MDM adds an Approval Result column to the Records grid indicating whether each record has been approved ( ) or disapproved ( ) by that approver. Each Approval Result column is named with the approver user name in square brackets ([]).
To mark/unmark one or more records in a job as disapproved:
1. In the Tasks pane of the Workflows tab, select the Approve task.
2. In the Records pane, select the record(s) you want to mark as disapproved.
3. Right-click on one of the records and choose Workflows > Mark as Disapproved from the context menu, or choose Records > Workflows > Mark as Disapproved from the main menu.
MDM Data Manager Reference Guide 251
4. MDM marks the records as disapproved ( ) in the Approval Result column for your user name in the Records grid for those records.
To unmark one or more records in a job as approved or disapproved:
1. In the Tasks pane of the Workflows tab, select the Approve task.
2. In the Records pane, select the record(s) you want to unmark as approved or disapproved.
3. Right-click on one of the records and choose Workflows > Unmark from the context menu, or choose Records > Workflows > Unmark from the main menu.
4. MDM unmarks the records as approved or disapproved, clearing the Approval Result column for your user name in the Records grid for those records.
To split the records of a job into a subjob:
1. In the Tasks pane of the Workflows tab, select the applicable task.
2. In the Records pane, select the record(s) you want to split into a new job.
3. Right-click on one of the records and choose Workflows > Split into Job from the context menu, or choose Records > Workflows > Split into Job from the main menu.
4. MDM splits the records into a new job.
NOTE ►► Whether any user or just the owner can split into a new job is based upon the setting of the Split Job property of the Start step.
To accept a task that is Available:
1. In the Tasks pane of the Workflows tab, select the Available task.
2. Right-click on the task and choose Accept from the context menu, or
choose Records > Workflows > Accept from the main menu.
3. MDM accepts the task and updates the Tasks pane.
NOTE ►► When you accept a task that is Available, its status changes from Available to Received and it is removed from the inbound task queue of all of the other users to whom it was Available.
To assume a task that is Available to or Received by another user::
1. In the Tasks pane of the Workflows tab, select the task that is Available to or Received by another user.
2. Right-click on the task and choose Accept from the context menu, or
choose Records > Workflows > Accept from the main menu.
3. MDM accepts the task and updates the Tasks pane.
NOTE ►► You can assume a task from another user only if you are the owner of the corresponding workflow.

252 MDM Data Manager Reference Guide
NOTE ►► When you assume a task that is Received by another user, it is simply removed from that user’s inbound task queue and placed into yours. By contrast, when you assume a task that is Available to another user, it is also removed from the inbound task queue of all of the other users to whom it was previously Available.
To assign a task that has been Received to another user:
1. In the Tasks pane of the Workflows tab, select the Received task.
2. Right-click on the task and choose Assign from the context menu, or choose Records > Workflows > Assign from the main menu, and select the user from the cascading menu of assignees.
3. MDM assigns the task and updates the Tasks pane of the Workflows tab accordingly.
NOTE ►► You can assign the task to any of the assignee users of the
step as long as the Execution Type of the step is not All Concurrent.
To manually perform an Assign, Match, or Syndicate step:
1. In the Tasks pane of the Workflows tab, select a task which is in an Assign, Match, or Syndicate step.
2. Right-click on the task and choose Perform from the context menu, or choose Records > Workflows > Perform from the main menu.
3. MDM performs the assignment, match, or syndication and updates the Tasks pane of the Workflows tab accordingly.
NOTE ►► The Perform command is enabled only for: (1) a Match step that has been Received; (2) an Assign step that has failed and is in the Error status; or (3) any Syndicate step.
To mark a completed task as done:
1. In the Tasks pane of the Workflows tab, select the Received task.
2. Right-click on the task and choose Mark as Done from the context
menu, or choose Records > Workflows > Mark as Done.
3. MDM marks the task as done and updates the Tasks pane of the Workflows tab accordingly.
NOTE ►► See “Task Completion Commands” on page 221 for more
information about when the Done command is enabled.
To send a completed task to the next user or role:
1. In the Tasks pane of the Workflows tab, select the Received task that you want to send to the next user.
2. Right-click on the task and choose Next User from the context menu, or choose Records > Workflows > Next User from the main menu, and select the user and/or role from the cascading menu.
3. MDM sends the task to the next user and updates the Tasks panes of the Workflows tab accordingly for all of the affected users.
MDM Data Manager Reference Guide 253
NOTE ►► Choosing the [ANY] user or role creates a manual pull; choosing one of the named users creates a manual push.
NOTE ►► See “Task Completion Commands” on page 221 for more
information about when the Next User command is enabled.
To send a completed task to the next step:
1. In the Tasks pane of the Workflows tab, select the Received task that you want to send to the next step.
2. Right-click on the task and choose Next Step from the context menu, or choose Records > Workflows > Next Step from the main menu, and select the user and/or role and/or step from the cascading menu.
3. MDM sends the task to the next step and updates the Tasks panes of the Workflows tab accordingly for all of the affected users.
NOTE ►► Whether any user or just the owner can send a task to the next step is based upon the setting of the Send Next Step property of the Start step.
NOTE ►► If only the owner can send to the next step, the final user of the current step simply marks the task as Done and the task appears in the owner’s inbound task queue with status Send Next.
NOTE ►► See “Task Completion Commands” on page 221 for more
information about when the Next Step command is enabled.
To send a task back to the previous step:
1. In the Tasks pane of the Workflows tab, select the Approve task that you want to send back to the previous step.
2. Right-click on the task and choose Previous Step.
3. MDM sends the task to the previous step and updates the Tasks panes of the Workflows tab accordingly for all of the affected users.
NOTE ►► See “Task Completion Commands” on page 221 for more
information about when the Previous Step command is enabled.
To set the priority of the selected job:
1. In the Tasks pane of the Workflows tab, select the task corresponding to the job whose priority you want to set.
2. Right-click on the task and choose Set Priority from the context menu, or choose Records > Workflows > Set Priority from the main menu, and in either case, choose a priority level from the cascading menu.
3. MDM sets the priority of the job.
254 MDM Data Manager Reference Guide
To view the history of the selected job:
1. In the Tasks pane of the Workflows tab, select the task corresponding to the job whose history you want to view.
2. Right-click on the task and choose Show History to open the History dialog.
3. Click OK when you are done viewing the history of the job.
NOTE ►► By viewing the history of a cascaded job you can see the IDs of the jobs receiving its checked out records.
NOTE ►► By viewing the history of a split job you can see the ID of the job which originated the split.
NOTE ►► The History dialog displays all dates and times in GMT.
A NOTE ABOUT WORKFLOWS AND PROCESS EXECUTION
Recall that MDM workflows can be triggered by various events, such as adding, updating, or importing a record. However, such event-driven process execution has its limitations, and is effective only in very simple circumstances, when such events all trigger the same simple process.
Unfortunately, in most scenarios, the process flow depends very much on the type of update or the business intent of the change. For example, changing a product description may simply require approval from a copy editor, but changing the price may require the record to be approved and then distributed to a downstream system.
In the example, two very different processes must be chosen as a result of a single type of event. Moreover, as the number of variations increases, building these decisions into a single workflow that is triggered by a change event will likely result in excessively complex and difficult to manage process logic.
An alternative to the event-driven approach is patterned after SAP’s transaction model, where the user chooses the process to follow (i.e. the particular transaction) before making any changes to the data. This ensures that the correct downstream steps take place without any ambiguity for the user or complex decision logic within the process.
Within MDM, the transactional approach can be modeled by displaying a list of available workflows from which the user must choose before any modifications to the records take place. So for the example, the user would choose from the “Update Descriptive Information” workflow or the “Modify Price Structure” workflow before making the change.
This transactional approach is not only an effective substitute for event-driven execution but also a superior model, resulting in two very

MDM Data Manager Reference Guide 255
different processes managed by two distinct workflows and making clear to the user what will happen as a result of each action.

257
PART 3: HIERARCHY MODE
This part presents step-by-step procedures for the functions in Hierarchy mode.


MDM Data Manager Reference Guide 259
Working with Hierarchy Tables
Hierarchy mode is used to manage the records of a hierarchy table. When you view a hierarchy table in Hierarchy mode, MDM uses a tree to display the hierarchical relationships among the records, and a grid to display all of the fields of information for each record.
In Hierarchy mode, you can edit all of the fields of information for each record in the table, which you can do in Record mode. More importantly, though, you can also edit the hierarchical parent/child/sibling relationships among the records, which you cannot do in Record mode.
You will use Hierarchy mode primarily to: (1) create the hierarchy of parents and children; and (2) manipulate the order of the sibling records (even if there are no child levels in the hierarchy below the root). For example, the most frequently used lookup values from a hierarchy table can be placed at the top of the tree for easier access.
To switch to Hierarchy mode:
Click the Hierarchy Mode toolbar button (shown at left), or press Ctrl+2,
or choose View > Hierarchy Mode from the main menu.
NOTE ►► Hierarchy mode is unavailable if the repository contains no hierarchy tables.
To specify the current table:
Click on the drop-down table list (Figure 128) or press F4, and select the hierarchy table whose records you want to edit.
Alternatively, choose View > Table from the main menu and choose from the cascading menu of tables.
Figure 128. Drop-down table list in Hierarchy mode
NOTE ►► Only hierarchy tables are available in Hierarchy mode.

260 MDM Data Manager Reference Guide
NOTE ►► When you start MDM Data Manager and change to Hierarchy mode for the first time, it automatically selects a hierarchy table to be the current table. It then remembers the current table selection for each mode as you change the current table in each mode and move back and forth between modes.
HIERARCHY MODE AT A GLANCE
Figure 129. Hierarchy mode main window
TIP ►► If you want to simply review the records in a hierarchy and wish to avoid any accidental changes, you can put MDM Data
Manager into read-only mode by clicking on the Read-Only toolbar
button (shown at left), or by choosing View > Read-Only from the main menu.
The main window of Hierarchy mode consists of the panes and tabs shown in the numbered callouts of Figure 129, listed below and described in the following sections:
1. Hierarchy pane
2. Records pane
3. Record Detail tab
4. Language Detail tab
5. Status bar
1
2
3
5
4

MDM Data Manager Reference Guide 261
Hierarchy Pane
The Hierarchy pane (left pane) contains a tree representing the hierarchy of records in the current hierarchy table. Use the tree to create, manage and edit the hierarchy.
TIP ►► You can edit a hierarchy table in either Record mode or Hierarchy mode. Both modes allow you to edit all of the fields of each record. Hierarchy mode does not allow you to search for records like Record mode, but does allow you to edit the parent/child/sibling relationships among the records.
Records Pane
The Records pane (top-right pane) contains a list view of the current table’s records in a row/column grid, with a row for each record and a column for each of the fields. Use the Records pane to interactively browse all of the records of the current hierarchy table, sort by any of the sortable columns in ascending or descending order, and select one or more records for editing or deletion.
NOTE ►► The Hierarchy pane and the Records pane track one another; that is, when you select one or more records in the hierarchy tree, MDM automatically selects the corresponding records in the Records pane, and vice versa.
Record Detail Tab
The Record Detail tab (tab in bottom-right pane) contains a two-column grid. The first column is the row header and lists the fields of each record; the second column lists the corresponding field values (Figure 130). Use the Record Detail tab to view and edit the fields of each of the one or more records selected in the Records pane.
Figure 130. Record Detail tab

262 MDM Data Manager Reference Guide
Language Detail Tab
The Language Detail tab (tab in bottom-right pane; multilingual repository only) contains a multi-column grid with a column of data for each repository language. The first column is the row header and lists the multilingual fields and objects of the hierarchy table; the subsequent columns display the values for the corresponding language. Use the Language Detail tab to view and edit the multilingual data for the selected records in the Records pane.
Figure 131. Language Detail tab (multilingual repository only)
MULTILINGUAL ►► More information about languages and multilingual repositories is provided in “Part 14: Multilingual Support.”
Status Bar
The Status bar (Figure 132) displays the following mode-specific information for the current table (from left to right):
“n selected” (when zero or two or more records are selected)
“x records” (where ‘x’ is the total number of records)
“Hierarchy Mode”
Figure 132. Hierarchy mode status bar
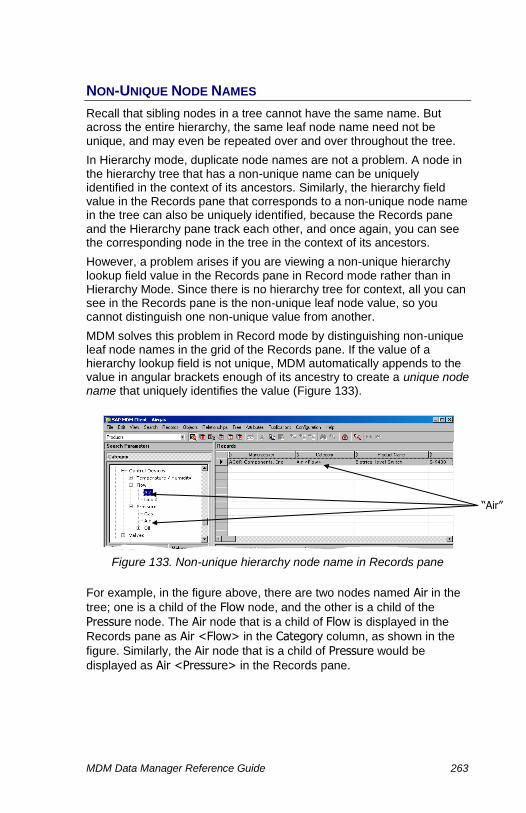
MDM Data Manager Reference Guide 263
NON-UNIQUE NODE NAMES
Recall that sibling nodes in a tree cannot have the same name. But across the entire hierarchy, the same leaf node name need not be unique, and may even be repeated over and over throughout the tree.
In Hierarchy mode, duplicate node names are not a problem. A node in the hierarchy tree that has a non-unique name can be uniquely identified in the context of its ancestors. Similarly, the hierarchy field value in the Records pane that corresponds to a non-unique node name in the tree can also be uniquely identified, because the Records pane and the Hierarchy pane track each other, and once again, you can see the corresponding node in the tree in the context of its ancestors.
However, a problem arises if you are viewing a non-unique hierarchy lookup field value in the Records pane in Record mode rather than in Hierarchy Mode. Since there is no hierarchy tree for context, all you can see in the Records pane is the non-unique leaf node value, so you cannot distinguish one non-unique value from another.
MDM solves this problem in Record mode by distinguishing non-unique leaf node names in the grid of the Records pane. If the value of a hierarchy lookup field is not unique, MDM automatically appends to the value in angular brackets enough of its ancestry to create a unique node name that uniquely identifies the value (Figure 133).
Figure 133. Non-unique hierarchy node name in Records pane
For example, in the figure above, there are two nodes named Air in the
tree; one is a child of the Flow node, and the other is a child of the
Pressure node. The Air node that is a child of Flow is displayed in the
Records pane as Air <Flow> in the Category column, as shown in the
figure. Similarly, the Air node that is a child of Pressure would be
displayed as Air <Pressure> in the Records pane.
“Air”
264 MDM Data Manager Reference Guide
Note that the value of the field hasn’t changed, only the way it is displayed in the Record mode Records pane. In this way, when you select a record or sort by the column that contains the hierarchy lookup field, you can easily distinguish between different instances of the same non-unique value and see where in the hierarchy they originated.
NOTE ►► MDM also uses unique node names as one of the
Hierarchy Field Format options in the record export.
NOTE ►► MDM does not indicate unique node names in the Record Detail grid because, if necessary, you can open the drop-down tree control to see the tree node that corresponds to a hierarchy lookup field value.
INNER NODE ASSIGNMENTS AND INTERNAL LEAF NODES
Recall that for proper organization of the records within an MDM repository, a hierarchy lookup field can normally be assigned only to the value of a leaf node in the hierarchy.
Sometimes, however, remote systems may have records with inner node assignments, in which the lookup field is assigned to the value of an internal (i.e. non-leaf) node. Moreover, you may wish to preserve these inner node assignments during inbound processing of records and/or to create inner nodes and assign records to them during data editing, for subsequent syndication of records having inner node assignments back to the remote system.
MDM supports inner node assignments indirectly – while preserving the rule that a hierarchy lookup field be assigned only to a leaf node in the hierarchy – using an internal leaf node, a special type of leaf node that
represents the internal parent node immediately above it.
You can then make inner node assignments to the parent by assigning records to the internal leaf – which acts as a proxy for the parent for assignment purposes – just as you would assign records to any other leaf node (see “Creating an Internal Leaf Node” on page 281 for information on how to create an internal leaf node).
TIP ►► You can search for records having an inner node assignment by selecting the internal leaf node in the hierarchy of lookup table values in the Search Parameters tab.
NOTE ►► Internal leaf nodes dovetail with the Partition and
Consolidate Children commands in Taxonomy mode, which interpret records having a NULL-valued partitioning attribute as having inner node assignments corresponding to an internal leaf node, and vice versa. (See “Partitioning a Category” on page 315 and “Consolidating Categories” on page 316 for more information).
MDM Data Manager Reference Guide 265
FINDING TREE NODES
The Find command is available in most modes. In Hierarchy mode, it opens the Find dialog and enables you to find text strings in the hierarchy tree. The dialog offers different options depending on which
mode you are in. This section describes how to use Find in Hierarchy mode; the Hierarchy mode options are summarized in Table 72.
Table 72. Hierarchy Mode Find Options
Option Checkbox Description
Find What Type the text string you want to match.
Search In You can only search in the tree.
Find Options
Match Case
Require… Do not require…
that the case match that of the text you type.
Whole Words Only
Require… Do not require…
that the text you type match whole words.
Exact Require… Do not require…
that the text match the entire value.
Search Backwards
Search up… Search down…
for the text string.
To open the Find dialog:
Click the Find toolbar button (shown at left), or press Ctrl+F, or choose
Edit > Find from the main menu to open the Find dialog.
To find a specific text string in the hierarchy tree:
1. In the Find dialog’s Find What text box, type the text you want to match.
2. Select or clear the Find Options checkboxes described in Table 72.
3. Click Find Next. MDM selects and highlights the first node in the hierarchy tree that matches your text, and since the Hierarchy and Records panes track one another, also selects the corresponding record in the Records pane.
4. To find the next (or previous) matching node, click Find Next in the
Find dialog, click the Find Next toolbar button (shown at left), or press
F3, or choose Edit > Find Next from the main menu.
NOTE ►► To search for records as opposed to tree nodes in a hierarchy table, switch to Record mode and search using Free-Form Search. (See “Free-Form Searches” on page 40 for more information).

266 MDM Data Manager Reference Guide
Hierarchy Tree Operations
The following sections describe how to modify the hierarchy tree using the MDM tree operations. For each operation, you will also find a list of constraints describing the conditions necessary for completing the operation. These operations for manipulating a hierarchy tree apply to any editable tree in MDM Data Manager, and are summarized in Table 73.
DATA INTEGRITY ►► MDM Data Manager prevents you from performing tree operations that would result in a loss of data integrity.
Table 73. Hierarchy Tree Operations
Operation Description
Add Sibling Node
Adds a new node to the tree as a sibling after the selected node.
Add Child Node
Adds a new node to the tree as the last child of the selected node.
Rename Node Renames the selected node.
Delete Node Removes the selected node from the tree.
Change Case Changes the name of the selected nodes to the selected case (upper, lower, sentence, title, toggle).
Sort Children Sorts the children of the selected node in ascending or descending order.
Sort Entire Branch Sorts all of the descendants of the selected node in ascending or descending order.
Move Node Moves a node between locations in the tree.
Merge Nodes Merges one node into another.
Hide Children Hides the display of hierarchical detail of the tree.
Create Alias Creates a duplicate node so that a node can exist in multiple locations in the tree.
Create Internal Leaf Node
Creates an internal leaf node for the selected tree item.
NOTE ►► Sibling nodes in a tree cannot have the same name.

MDM Data Manager Reference Guide 267
ADDING A NODE
To add a new sibling or child node to the hierarchy tree:
1. In the hierarchy tree, select the node either: (1) after which you want the new node to appear as a sibling; or (2) under which you want the new node to appear as a child.
2. Right-click on the node and choose from the context menu, or choose
Tree from the main menu and choose from the main menu, as follows:
Add Sibling Add Child
3. In the Record Detail pane, enter information for the new node.
4. Press Shift+Enter or right-click and choose Save Record to save the details of the new node.
5. MDM adds the new node either: (1) as a sibling of and just after the selected node in the hierarchy tree; or (2) as the last child of the selected node in the hierarchy tree.
NOTE ►► MDM does not add the new node to the tree until you have saved its details in the Record Detail pane.
Table 74. Add Sibling and Add Child Constraints
Operation Constraints
Add Sibling
Must be in Hierarchy or Taxonomy mode
Tree must have focus
Exactly one node must be selected
Root node cannot have siblings
Sibling nodes cannot have the same name
Add Child
Must be in Hierarchy or Taxonomy mode
Tree must have focus
Exactly one node must be selected
Node cannot be an alias
Node cannot have an alias
Node cannot have a matching set
Node value cannot currently be assigned to a lookup field
Sibling nodes cannot have the same name
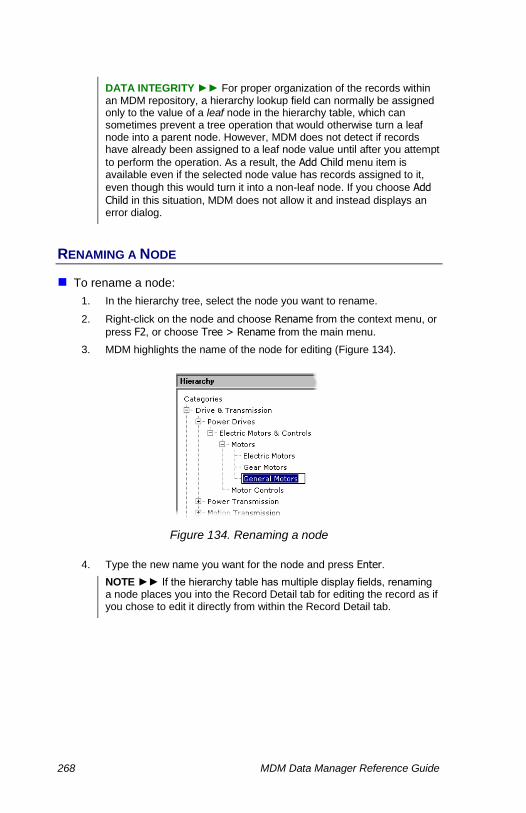
268 MDM Data Manager Reference Guide
DATA INTEGRITY ►► For proper organization of the records within an MDM repository, a hierarchy lookup field can normally be assigned only to the value of a leaf node in the hierarchy table, which can sometimes prevent a tree operation that would otherwise turn a leaf node into a parent node. However, MDM does not detect if records have already been assigned to a leaf node value until after you attempt
to perform the operation. As a result, the Add Child menu item is available even if the selected node value has records assigned to it,
even though this would turn it into a non-leaf node. If you choose Add Child in this situation, MDM does not allow it and instead displays an error dialog.
RENAMING A NODE
To rename a node:
1. In the hierarchy tree, select the node you want to rename.
2. Right-click on the node and choose Rename from the context menu, or
press F2, or choose Tree > Rename from the main menu.
3. MDM highlights the name of the node for editing (Figure 134).
Figure 134. Renaming a node
4. Type the new name you want for the node and press Enter.
NOTE ►► If the hierarchy table has multiple display fields, renaming a node places you into the Record Detail tab for editing the record as if you chose to edit it directly from within the Record Detail tab.
MDM Data Manager Reference Guide 269
Table 75. Rename Node Constraints
Operation Constraints
Rename Node
Must be in Hierarchy or Taxonomy mode
Must be in Hierarchy mode if the table has multiple display fields
Tree must have focus
Exactly one node must be selected
Root node cannot be renamed
Sibling nodes cannot have the same name
DELETING A NODE
To permanently delete one node from the tree:
1. In the hierarchy tree, select the leaf node you want to delete.
2. Right-click on the node and choose Delete from the context menu, or
click the Delete Tree Item toolbar button (shown at left), or press Del, or choose Tree > Delete from the main menu.
3. MDM prompts you to confirm that you really want to delete the node.
Click OK to remove the node from the hierarchy tree.
TIP ►► To bypass the delete confirmation dialog, press Shift when
you perform the Delete command.
Table 76. Delete Node Constraints
Operation Constraints
Delete Node
Must be in Hierarchy or Taxonomy mode
Tree must have focus
Exactly one node must be selected
Root node cannot be deleted
Node cannot have children
Node value cannot currently be assigned to a lookup field
DATA INTEGRITY ►► To prevent data loss, MDM will not allow you to delete a node if one or more records have a lookup field assigned to its value. However, MDM does not detect this condition until after you attempt to perform the operation. As a result, the Delete menu item is available even if the value of the selected node is in use. If you choose
Delete in this situation, MDM does not permit the delete and instead displays the error dialog shown in Figure 135.
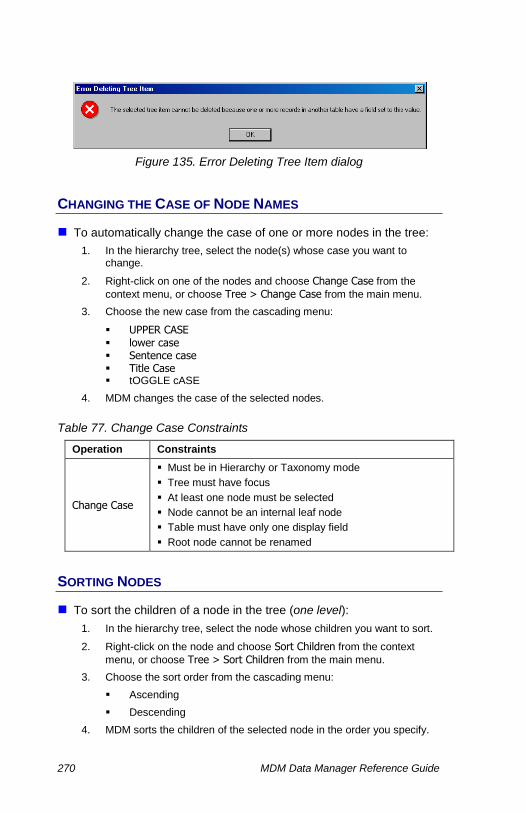
270 MDM Data Manager Reference Guide
Figure 135. Error Deleting Tree Item dialog
CHANGING THE CASE OF NODE NAMES
To automatically change the case of one or more nodes in the tree:
1. In the hierarchy tree, select the node(s) whose case you want to change.
2. Right-click on one of the nodes and choose Change Case from the
context menu, or choose Tree > Change Case from the main menu.
3. Choose the new case from the cascading menu:
UPPER CASE lower case Sentence case Title Case tOGGLE cASE
4. MDM changes the case of the selected nodes.
Table 77. Change Case Constraints
Operation Constraints
Change Case
Must be in Hierarchy or Taxonomy mode
Tree must have focus
At least one node must be selected
Node cannot be an internal leaf node
Table must have only one display field
Root node cannot be renamed
SORTING NODES
To sort the children of a node in the tree (one level):
1. In the hierarchy tree, select the node whose children you want to sort.
2. Right-click on the node and choose Sort Children from the context
menu, or choose Tree > Sort Children from the main menu.
3. Choose the sort order from the cascading menu:
Ascending
Descending
4. MDM sorts the children of the selected node in the order you specify.
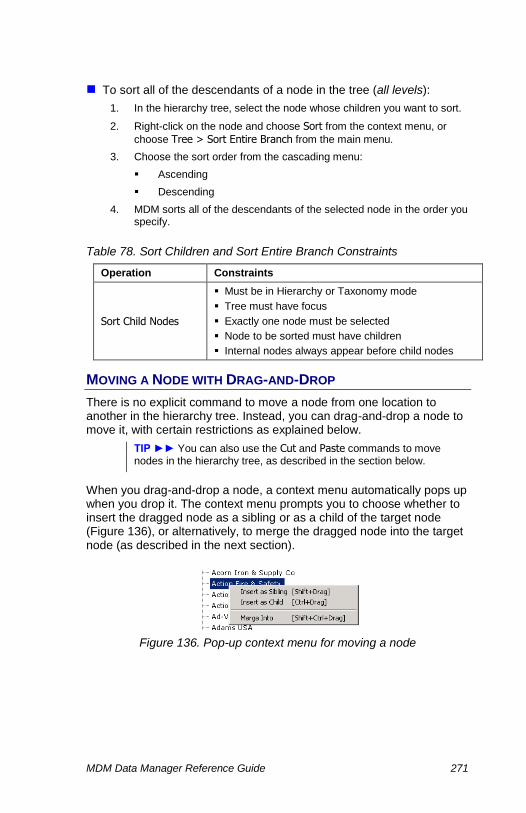
MDM Data Manager Reference Guide 271
To sort all of the descendants of a node in the tree (all levels):
1. In the hierarchy tree, select the node whose children you want to sort.
2. Right-click on the node and choose Sort from the context menu, or
choose Tree > Sort Entire Branch from the main menu.
3. Choose the sort order from the cascading menu:
Ascending
Descending
4. MDM sorts all of the descendants of the selected node in the order you specify.
Table 78. Sort Children and Sort Entire Branch Constraints
Operation Constraints
Sort Child Nodes
Must be in Hierarchy or Taxonomy mode
Tree must have focus
Exactly one node must be selected
Node to be sorted must have children
Internal nodes always appear before child nodes
MOVING A NODE WITH DRAG-AND-DROP
There is no explicit command to move a node from one location to another in the hierarchy tree. Instead, you can drag-and-drop a node to move it, with certain restrictions as explained below.
TIP ►► You can also use the Cut and Paste commands to move nodes in the hierarchy tree, as described in the section below.
When you drag-and-drop a node, a context menu automatically pops up when you drop it. The context menu prompts you to choose whether to insert the dragged node as a sibling or as a child of the target node (Figure 136), or alternatively, to merge the dragged node into the target node (as described in the next section).
Figure 136. Pop-up context menu for moving a node
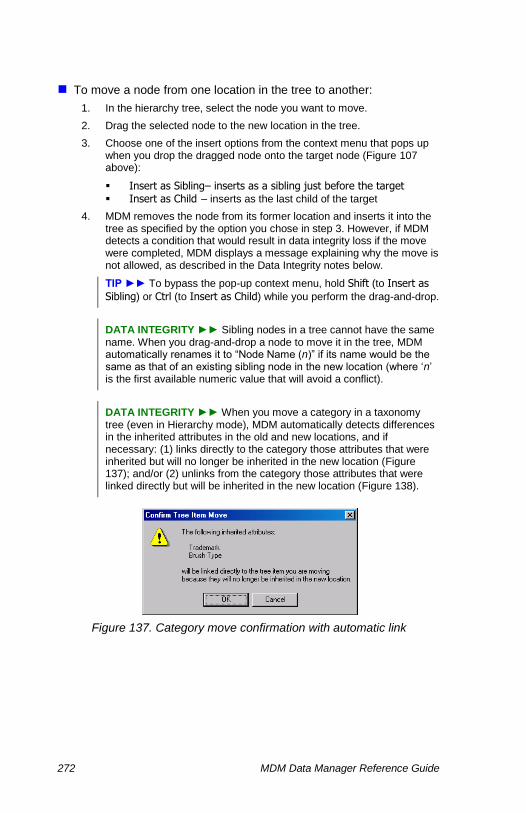
272 MDM Data Manager Reference Guide
To move a node from one location in the tree to another:
1. In the hierarchy tree, select the node you want to move.
2. Drag the selected node to the new location in the tree.
3. Choose one of the insert options from the context menu that pops up when you drop the dragged node onto the target node (Figure 107 above):
Insert as Sibling– inserts as a sibling just before the target Insert as Child – inserts as the last child of the target
4. MDM removes the node from its former location and inserts it into the tree as specified by the option you chose in step 3. However, if MDM detects a condition that would result in data integrity loss if the move were completed, MDM displays a message explaining why the move is not allowed, as described in the Data Integrity notes below.
TIP ►► To bypass the pop-up context menu, hold Shift (to Insert as
Sibling) or Ctrl (to Insert as Child) while you perform the drag-and-drop.
DATA INTEGRITY ►► Sibling nodes in a tree cannot have the same name. When you drag-and-drop a node to move it in the tree, MDM automatically renames it to “Node Name (n)” if its name would be the same as that of an existing sibling node in the new location (where ‘n’ is the first available numeric value that will avoid a conflict).
DATA INTEGRITY ►► When you move a category in a taxonomy tree (even in Hierarchy mode), MDM automatically detects differences in the inherited attributes in the old and new locations, and if necessary: (1) links directly to the category those attributes that were inherited but will no longer be inherited in the new location (Figure 137); and/or (2) unlinks from the category those attributes that were linked directly but will be inherited in the new location (Figure 138).
Figure 137. Category move confirmation with automatic link
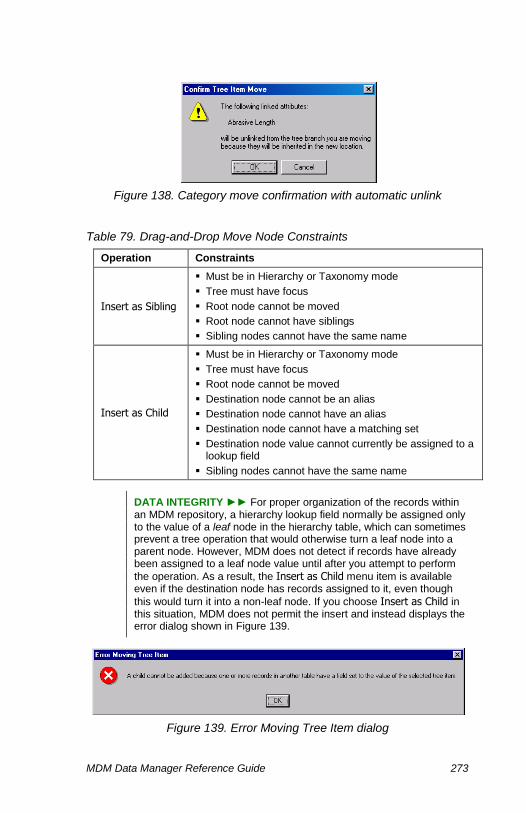
MDM Data Manager Reference Guide 273
Figure 138. Category move confirmation with automatic unlink
Table 79. Drag-and-Drop Move Node Constraints
Operation Constraints
Insert as Sibling
Must be in Hierarchy or Taxonomy mode
Tree must have focus
Root node cannot be moved
Root node cannot have siblings
Sibling nodes cannot have the same name
Insert as Child
Must be in Hierarchy or Taxonomy mode
Tree must have focus
Root node cannot be moved
Destination node cannot be an alias
Destination node cannot have an alias
Destination node cannot have a matching set
Destination node value cannot currently be assigned to a lookup field
Sibling nodes cannot have the same name
DATA INTEGRITY ►► For proper organization of the records within an MDM repository, a hierarchy lookup field normally be assigned only to the value of a leaf node in the hierarchy table, which can sometimes prevent a tree operation that would otherwise turn a leaf node into a parent node. However, MDM does not detect if records have already been assigned to a leaf node value until after you attempt to perform
the operation. As a result, the Insert as Child menu item is available even if the destination node has records assigned to it, even though
this would turn it into a non-leaf node. If you choose Insert as Child in this situation, MDM does not permit the insert and instead displays the error dialog shown in Figure 139.
Figure 139. Error Moving Tree Item dialog
274 MDM Data Manager Reference Guide
MERGING NODES WITH DRAG-AND-DROP
If two nodes in the hierarchy tree really represent the same value, you can merge one node into the other. This may be necessary if data was imported from two sources that used different names for the same node, or you decide that you no longer want to make a distinction between two existing node values.
Just as with moving nodes, there is no explicit command to merge two nodes in the hierarchy tree. Rather, the pop-up context menu that pops
up when you drag-and-drop a node includes a Merge Into choice (Figure 136) that allows you to merge the dragged node into the node onto which you drop – and in the process reassign main table hierarchy lookup field values that were assigned to the dragged node.
NOTE ►► The challenge of merging two nodes is to detect the lookup field values that have been assigned to the value of either node and to reassign them to the value of the single merged node, which MDM does automatically as part of the merge.
TIP ►► You can also use the Cut and Paste as Merge commands to merge two nodes in the hierarchy tree, as described in the section below.
Merging nodes occurs at the record level rather than the field level, and does not merge the underlying values of the fields within the two records. Specifically, it preserves the field values of the surviving node and discards those of the non-surviving node.
TIP ►► If necessary, you can first merge the underlying field values within the records prior to the merge by selecting each of the multiple records in the Records pane and reconciling the values in each of the fields. (See “Viewing and Editing Multiple Records” on page 74 for more information about how to view and edit multiple records.)
To merge one node into another:
1. In the hierarchy tree, select the node you want to merge (the one that will disappear from the hierarchy tree).
2. Drag the selected node onto the destination node (the surviving node that will remain in the hierarchy tree).
3. Choose Merge Into from the context menu that pops up when you perform the drop.
TIP ►► To bypass the pop-up context menu, hold both Shift and Ctrl while you perform the drag-and-drop.
4. MDM merges the two nodes and all of the lookup field values that were previously assigned to either one of them.
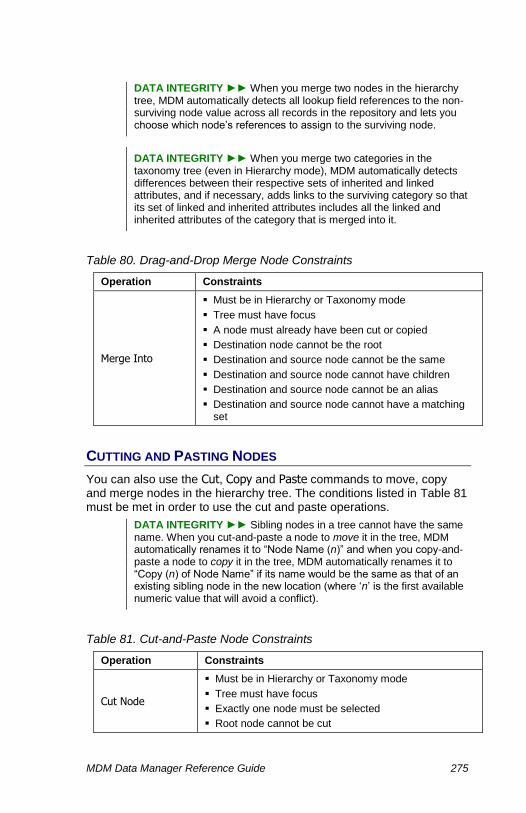
MDM Data Manager Reference Guide 275
DATA INTEGRITY ►► When you merge two nodes in the hierarchy tree, MDM automatically detects all lookup field references to the non-surviving node value across all records in the repository and lets you choose which node’s references to assign to the surviving node.
DATA INTEGRITY ►► When you merge two categories in the taxonomy tree (even in Hierarchy mode), MDM automatically detects differences between their respective sets of inherited and linked attributes, and if necessary, adds links to the surviving category so that its set of linked and inherited attributes includes all the linked and inherited attributes of the category that is merged into it.
Table 80. Drag-and-Drop Merge Node Constraints
Operation Constraints
Merge Into
Must be in Hierarchy or Taxonomy mode
Tree must have focus
A node must already have been cut or copied
Destination node cannot be the root
Destination and source node cannot be the same
Destination and source node cannot have children
Destination and source node cannot be an alias
Destination and source node cannot have a matching set
CUTTING AND PASTING NODES
You can also use the Cut, Copy and Paste commands to move, copy and merge nodes in the hierarchy tree. The conditions listed in Table 81 must be met in order to use the cut and paste operations.
DATA INTEGRITY ►► Sibling nodes in a tree cannot have the same name. When you cut-and-paste a node to move it in the tree, MDM automatically renames it to “Node Name (n)” and when you copy-and-paste a node to copy it in the tree, MDM automatically renames it to “Copy (n) of Node Name” if its name would be the same as that of an existing sibling node in the new location (where ‘n’ is the first available numeric value that will avoid a conflict).
Table 81. Cut-and-Paste Node Constraints
Operation Constraints
Cut Node
Must be in Hierarchy or Taxonomy mode
Tree must have focus
Exactly one node must be selected
Root node cannot be cut
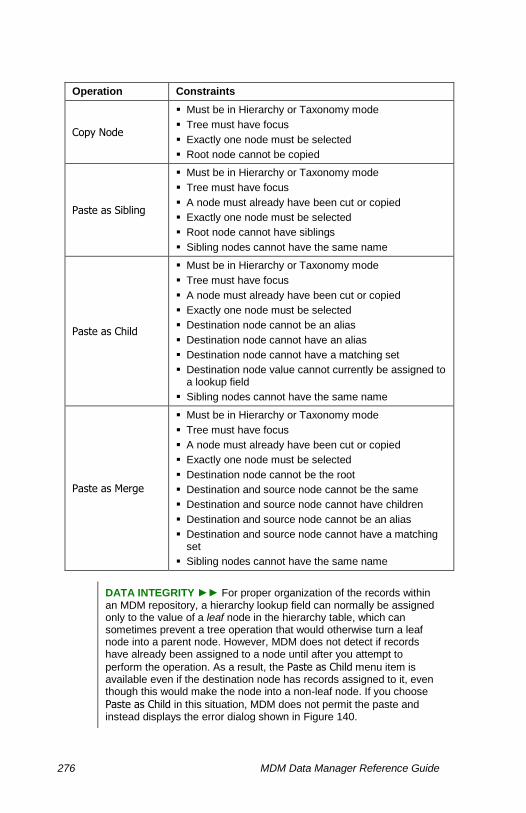
276 MDM Data Manager Reference Guide
Operation Constraints
Copy Node
Must be in Hierarchy or Taxonomy mode
Tree must have focus
Exactly one node must be selected
Root node cannot be copied
Paste as Sibling
Must be in Hierarchy or Taxonomy mode
Tree must have focus
A node must already have been cut or copied
Exactly one node must be selected
Root node cannot have siblings
Sibling nodes cannot have the same name
Paste as Child
Must be in Hierarchy or Taxonomy mode
Tree must have focus
A node must already have been cut or copied
Exactly one node must be selected
Destination node cannot be an alias
Destination node cannot have an alias
Destination node cannot have a matching set
Destination node value cannot currently be assigned to a lookup field
Sibling nodes cannot have the same name
Paste as Merge
Must be in Hierarchy or Taxonomy mode
Tree must have focus
A node must already have been cut or copied
Exactly one node must be selected
Destination node cannot be the root
Destination and source node cannot be the same
Destination and source node cannot have children
Destination and source node cannot be an alias
Destination and source node cannot have a matching set
Sibling nodes cannot have the same name
DATA INTEGRITY ►► For proper organization of the records within an MDM repository, a hierarchy lookup field can normally be assigned only to the value of a leaf node in the hierarchy table, which can sometimes prevent a tree operation that would otherwise turn a leaf node into a parent node. However, MDM does not detect if records have already been assigned to a node until after you attempt to
perform the operation. As a result, the Paste as Child menu item is available even if the destination node has records assigned to it, even though this would make the node into a non-leaf node. If you choose
Paste as Child in this situation, MDM does not permit the paste and instead displays the error dialog shown in Figure 140.

MDM Data Manager Reference Guide 277
Figure 140. Error Adding Child dialog
HIDING AND UNHIDING NODES
MDM Data Manager's Hide Children command provides a method for hiding hierarchical detail from end users of the repository while retaining the detail information for the MDM Data Manager operator.
For example, you may have products that are made by two divisions of one company. Even though you store the division information in the repository, you may want to “hide” this detailed information and instead identify the products as being from the same (parent) company.
The effect of Hide Children is to make all products assigned to the children of a given parent node appear to be members of that parent node for searching purposes; hidden child nodes do not appear at all in the Search Parameters tab in Record mode (Figure 141).
Figure 141. Hierarchy lookup search tab before and after Hide Children
When you hide the children of a node, the affected child nodes are highlighted in gray in the hierarchy tree (Figure 142).

278 MDM Data Manager Reference Guide
Figure 142. Child nodes dimmed in tree after Hide Children enabled
TIP ►► You can turn off the gray display of tree nodes that have been hidden (see “Configuration Options” on page 495 for more information about the Trees options).
When a search is performed using the parent of hidden children, products associated with the child nodes appear in the Records pane as being associated with the parent node directly. However, the Record Detail pane will identify the “hidden” child node in square brackets (Figure 143).
Figure 143. Hidden child information displayed in Record Detail
To hide the children of a node:
1. In the hierarchy tree, select the node whose children you want to hide.
2. Right-click on the node and choose Hide Children from the context
menu, or choose Tree > Hide Children from the main menu.
3. MDM highlights all of the descendants of the selected node in gray to indicate that they have been hidden.
NOTE ►► Hide Children is a toggle. A check mark next to the Hide
Children menu item indicates that it is turned on.
To unhide child nodes that had previously been hidden:
1. In the hierarchy tree, select the node whose children have previously been hidden.
Hidden child information is shown in the applicable field of the Record Detail tab.

MDM Data Manager Reference Guide 279
2. Right-click on the node and choose Hide Children from the context
menu, or choose Tree > Hide Children from the main menu.
3. MDM once again displays all of the descendants of the selected node in black to indicate that they are no longer hidden, and removes the check mark from the menu item.
Table 82. Hide Children Constraints
Operation Constraints
Hide Children
Must be in Hierarchy or Taxonomy mode
Table cannot support families
Tree must have focus
Exactly one node must be selected
Root node cannot have hidden children
Node cannot be an alias
Node cannot have an alias
CREATING ALIASES
Sometimes, you may want a group of products to appear in more than one location in the hierarchy tree, so that they can be found in various ways using drilldown search. A node alias provides just this ability, and allows products assigned to a single node to appear in two or more locations in the tree. For example, in a repository of gifts, you may have a hierarchy that lists all of the holidays, and you may want “Christmas” to be found in the tree under the node “Christian” (if navigating by religion) and the node “December” (if navigating by month).
When you use the Create Alias command to create an alias of a node, MDM creates a duplicate of the original node that can be renamed and moved to any other location in the tree. Aliases in the tree are highlighted in italics (Figure 144).
Figure 144. Creating an alias node
MDM provides commands not only to create aliases but also to find an alias from the original node and to find the original from the alias.
280 MDM Data Manager Reference Guide
TIP ►► You can turn off the italic display of tree nodes that are aliases (see “Configuration Options” on page 495 for more information about the Trees options).
TIP ►► You can delete a node alias exactly as you delete any other node.
NOTE ►► Two aliases of the same node or aliases of two different nodes can have the same name if they are not siblings.
NOTE ►► When you delete an original node that has aliases from the hierarchy tree, MDM notifies you that its aliases will also be deleted and requests confirmation to proceed.
To create an alias:
1. In the hierarchy tree, select the leaf node for which you want to create an alias.
2. Right-click on the node and choose Create Alias from the context
menu, or choose Tree > Create Alias from the main menu.
3. MDM adds a new node named “node [Alias]” as a sibling of and just after the original node (Figure 144 above).
4. Press F2 to edit the name of the alias.
5. MDM highlights the name of the alias for editing.
6. Type the name you want for the alias and press Enter.
7. Drag-and-drop the alias to move it to the target location in the tree.
To find an alias for a node:
1. In the hierarchy tree, select the leaf node whose aliases you want to locate.
2. Right-click on the node and choose Find Alias from the context menu,
or choose Tree > Find Alias from the main menu.
3. Select the desired alias from the cascading menu of aliases of the selected node.
4. MDM immediately changes the selected node in the hierarchy tree to the chosen alias.
To find the original node from an alias:
1. In the hierarchy tree, select the alias whose original node you want to locate.
2. Right-click on the alias and choose Find Original from the context
menu, or choose Tree > Find Original from the main menu.

MDM Data Manager Reference Guide 281
3. MDM immediately changes the selected node in the hierarchy tree to the original node.
Table 83. Hierarchy Alias Constraints
Operation Constraints
Create Alias
Must be in Hierarchy or Taxonomy mode
Aliases not allowed on masks table
Tree must have focus
Exactly one node must be selected
Root node cannot have an alias
Node cannot have children
Node cannot be an alias
Find Original
Must be in Hierarchy or Taxonomy mode
Tree must have focus
Exactly one node must be selected
Root node cannot be an alias
Node must be an alias
Find Alias
Must be in Hierarchy or Taxonomy mode
Tree must have focus
Root node cannot have an alias
Node must have at least one alias
CREATING AN INTERNAL LEAF NODE
Sometimes, you may want to assign one or more products to an inner node in the hierarchy tree. An internal leaf node provides this ability, acting as a proxy for its internal parent by allowing products assigned to it to be interpreted as having been assigned to the parent (see “Inner Node Assignments and Internal Leaf Nodes” on page 264 for more information on inner node assignments and internal leaf nodes).
When you use the Create Internal Leaf command to create an internal leaf for a parent node, MDM creates a duplicate of the parent node as its first child (Figure 145).
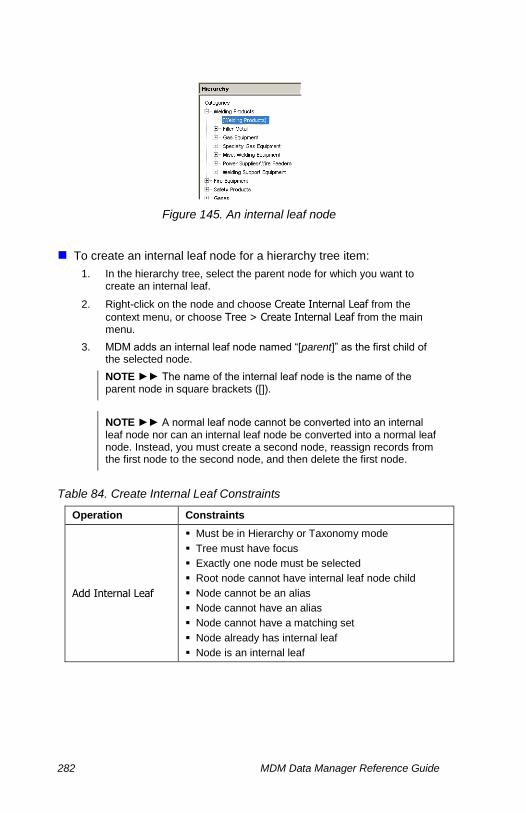
282 MDM Data Manager Reference Guide
Figure 145. An internal leaf node
To create an internal leaf node for a hierarchy tree item:
1. In the hierarchy tree, select the parent node for which you want to create an internal leaf.
2. Right-click on the node and choose Create Internal Leaf from the
context menu, or choose Tree > Create Internal Leaf from the main menu.
3. MDM adds an internal leaf node named “[parent]” as the first child of the selected node.
NOTE ►► The name of the internal leaf node is the name of the parent node in square brackets ([]).
NOTE ►► A normal leaf node cannot be converted into an internal leaf node nor can an internal leaf node be converted into a normal leaf node. Instead, you must create a second node, reassign records from the first node to the second node, and then delete the first node.
Table 84. Create Internal Leaf Constraints
Operation Constraints
Add Internal Leaf
Must be in Hierarchy or Taxonomy mode
Tree must have focus
Exactly one node must be selected
Root node cannot have internal leaf node child
Node cannot be an alias
Node cannot have an alias
Node cannot have a matching set
Node already has internal leaf
Node is an internal leaf

283
PART 4: TAXONOMY MODE
This part presents step-by-step procedures for the functions in Taxonomy mode.

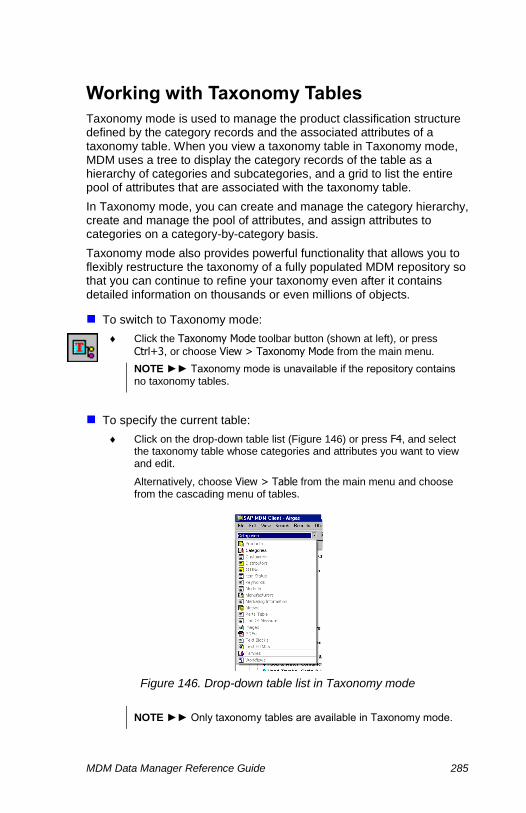
MDM Data Manager Reference Guide 285
Working with Taxonomy Tables
Taxonomy mode is used to manage the product classification structure defined by the category records and the associated attributes of a taxonomy table. When you view a taxonomy table in Taxonomy mode, MDM uses a tree to display the category records of the table as a hierarchy of categories and subcategories, and a grid to list the entire pool of attributes that are associated with the taxonomy table.
In Taxonomy mode, you can create and manage the category hierarchy, create and manage the pool of attributes, and assign attributes to categories on a category-by-category basis.
Taxonomy mode also provides powerful functionality that allows you to flexibly restructure the taxonomy of a fully populated MDM repository so that you can continue to refine your taxonomy even after it contains detailed information on thousands or even millions of objects.
To switch to Taxonomy mode:
Click the Taxonomy Mode toolbar button (shown at left), or press
Ctrl+3, or choose View > Taxonomy Mode from the main menu.
NOTE ►► Taxonomy mode is unavailable if the repository contains no taxonomy tables.
To specify the current table:
Click on the drop-down table list (Figure 146) or press F4, and select the taxonomy table whose categories and attributes you want to view and edit.
Alternatively, choose View > Table from the main menu and choose from the cascading menu of tables.
Figure 146. Drop-down table list in Taxonomy mode
NOTE ►► Only taxonomy tables are available in Taxonomy mode.
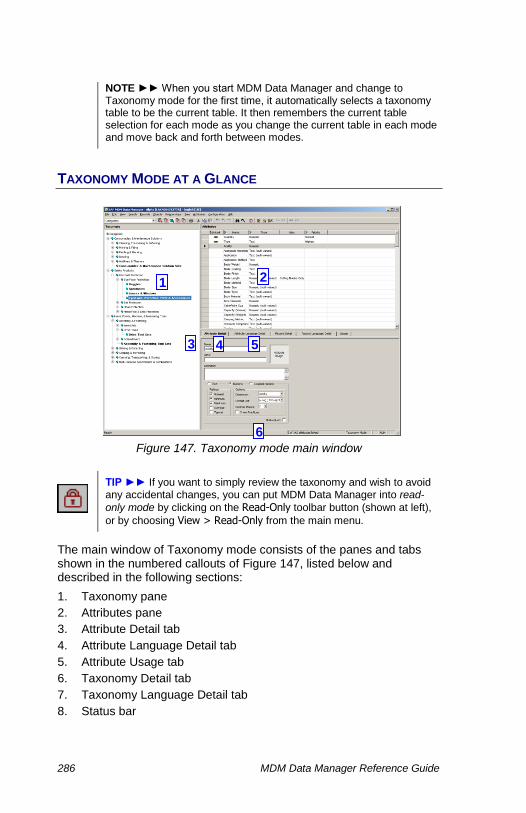
286 MDM Data Manager Reference Guide
NOTE ►► When you start MDM Data Manager and change to Taxonomy mode for the first time, it automatically selects a taxonomy table to be the current table. It then remembers the current table selection for each mode as you change the current table in each mode and move back and forth between modes.
TAXONOMY MODE AT A GLANCE
Figure 147. Taxonomy mode main window
TIP ►► If you want to simply review the taxonomy and wish to avoid any accidental changes, you can put MDM Data Manager into read-
only mode by clicking on the Read-Only toolbar button (shown at left),
or by choosing View > Read-Only from the main menu.
The main window of Taxonomy mode consists of the panes and tabs shown in the numbered callouts of Figure 147, listed below and described in the following sections:
1. Taxonomy pane
2. Attributes pane
3. Attribute Detail tab
4. Attribute Language Detail tab
5. Attribute Usage tab
6. Taxonomy Detail tab
7. Taxonomy Language Detail tab
8. Status bar
3
2 1
4
6
5

MDM Data Manager Reference Guide 287
Taxonomy Pane
The Taxonomy pane (left pane) contains a tree representing the hierarchy of categories and subcategories for the current taxonomy table. Use the tree in the Taxonomy pane to create, manage and edit the taxonomy hierarchy.
Attributes Pane
The Attributes pane (top-right pane) contains a list view of attributes in a row/column grid, with a row for each attribute and a column for each of the settings and values that define an attribute. Use the Attributes pane to interactively browse the pool of attributes associated with the current taxonomy table, link and unlink attributes to and from categories in the taxonomy tree, and select one or more attributes for editing, deletion, or other attribute-specific operations.
NOTE ►► You can set the Attributes pane to display only those attributes that are linked to the selected branch in the taxonomy tree by
choosing Attributes > Linked Attributes Only from the main menu.
Attribute Detail Tab
The Attribute Detail tab (tab in bottom-right pane) contains the properties that define the current attribute (Figure 148). Use the Attribute Detail tab to view and edit the attribute definition of the current attribute in the Attributes pane.
Figure 148. Attribute Detail tab
NOTE ►► Only a single attribute corresponding to the current row in the Attributes pane is displayed in the Attribute Detail tab, even if multiple rows are selected.

288 MDM Data Manager Reference Guide
Attribute Language Detail Tab
The Attribute Language Detail tab (tab in bottom-right pane; multilingual repository only) contains a multi-column grid with a column of data for each repository language. The first column is the row header and lists the multilingual properties of each attribute; subsequent columns display the values for the corresponding language. Use the Attribute Language Detail tab to view and edit the multilingual data for the selected attribute in the Attributes pane.
Figure 149. Attribute Language Detail tab (multilingual repository only)
Attribute Usage Tab
The Usage tab (tab in bottom-right pane) contains a miniature version of the taxonomy tree showing only those categories to which the current attribute is linked (Figure 150). Use the Usage tab to view the categories to which an attribute is linked, and also to quickly jump to and select any of those categories without having to navigate the taxonomy tree directly.
Figure 150. Attribute Usage tab

MDM Data Manager Reference Guide 289
DATA INTEGRITY ►► The Usage tab makes it easy to detect errors in your taxonomy, when attributes that should not be linked to a category show up in the hierarchy of category links.
Taxonomy Detail Tab
The Taxonomy Detail tab (tab in bottom-right pane) contains a two-column grid. The first column is the row header and lists the fields of the taxonomy table; the second column lists the corresponding field values (Figure 151). Use the Taxonomy Detail tab to view and edit the fields of the node selected in the taxonomy tree.
Figure 151. Record Detail tab
Taxonomy Language Detail Tab
The Taxonomy Language Detail tab (tab in bottom-right pane; multilingual repository only) contains a multi-column grid with a column of data for each repository language (Figure 152). The first column is the row header and lists the multilingual fields and objects of the taxonomy table; the subsequent columns display the values for the corresponding language. Use this Taxonomy Language Detail tab to view and edit the multilingual data for the node selected in the taxonomy tree.

290 MDM Data Manager Reference Guide
Figure 152. Language Detail tab (multilingual repository only)
MULTILINGUAL ►► More information about languages and multilingual repositories is provided in “Part 14: Multilingual Support.”
Status Bar
The Status bar (Figure 153) displays the following mode-specific information for the current taxonomy table (from left to right):
“n selected” (when zero or two or more attributes are selected)
“x of y attributes linked” (where ‘y’ is the total number of attributes in the table, and ‘x’ is the number of attributes linked to the selected
category in the taxonomy tree)
“Taxonomy Mode”
Figure 153. Taxonomy mode status bar

MDM Data Manager Reference Guide 291
ATTRIBUTES VS. FIELDS
In MDM, an attribute is like a field, but one that applies only to a subset of the records in a table. By contrast, a field is part of every record in a
table. If a particular attribute can be applied to every product in a repository, then it should be set up as a field in the main table. For example, every product in a repository probably has an item number; therefore “Item Number” should be defined in the database as a field, and not as an attribute.
THE ATTRIBUTES GRID
The Attributes pane contains a grid that includes a column for each of the properties that define an attribute, as shown in Table 85.
Table 85. Columns of the Attributes Grid
Column Description
Linked Link icon indicates if the attribute is linked to the selected category, or if inherited, how many levels up at which it is linked.
Name The attribute name.
Type
The attribute type:
Text Numeric Coupled Numeric
and whether it is multi-valued (e.g. Text (multi-valued)).
Alias The attribute alias.
Priority
If it is linked to the selected category, the attribute priority:
Highest High Normal Low Lowest
If Custom Priorities are enabled, the numeric value (from 1–100)
in square brackets (e.g. High [23]).
Definition* The long description of the attribute.
Values* For a text attribute, the set of text values.
Ratings*
For a numeric attribute, the specified ratings:
Nominal Minimum Maximum Average Typical
Dimension* For a numeric attribute, the physical dimension, and if specified,
the default unit in square brackets (e.g. Length [inches]).

292 MDM Data Manager Reference Guide
Column Description
Decimal* For a numeric attribute, the number of decimal places to display, and whether to display fractions.
* Hidden by default; unhide to display.
ATTRIBUTE TYPES
An MDM attribute can be a text attribute, a numeric attribute, or a coupled numeric attribute:
Text attributes are those whose possible values are easily expressed
as a list of predefined (usually text-valued) choices. “Color” is an example of a text attribute, as is “Head Type” for screws. The list of text values defined for a text attribute constitutes the set of legal values for that attribute.
NOTE ►► A text attribute is like a “mini” lookup table with the set of valid choices defined by the list of attribute text values rather than the records of a lookup table.
DATA INTEGRITY ►► The set of legal values associated with text attributes enforces data integrity and also makes the MDM repository much more searchable, since a consistent set of values is used across the entire MDM repository.
Numeric attributes are those whose values come from a potentially
continuous range of numeric values (with or without an associated physical dimension and unit of measure). “Socket Size” is an example of an attribute that typically should be treated as numeric.
NOTE ►► In theory you could make a list of all possible values for socket size across the entire set of products and make “Socket Size” a text attribute. However, you gain certain advantages by treating it as a numeric attribute, including proper numeric sorting and the ability to convert between units (such as between inches and millimeters). Also, numeric attributes allow you to associate a physical dimension with the attribute, and then to assign to every numeric value a unit of measure chosen from the list of units applicable to that dimension.
NOTE ►► To allow you to organize related numeric information within a single named attribute, a numeric attribute can have up to five
ratings: Nominal, Minimum, Maximum, Average, and Typical.
Coupled numeric attributes are numeric attributes where two
numeric values are required to describe the attribute, such as “horsepower @ rpm.”
NOTE ►► A coupled numeric attribute appears as “name delimiter coupledname” (where “delimiter” is the user-defined, attribute-specific delimiter string for the attribute).

MDM Data Manager Reference Guide 293
NOTE ►► Coupled attributes are always multi-valued.
An attribute of any type may be multi-valued, to accommodate products where one attribute may require two or more values to specify an item. For example, a software product might require a multi-valued text attribute to contain a list of the supported operating systems – such as Windows, Solaris, Unix; or Windows 95, Windows 98, Windows NT, and so on.
As another example, two-ended wrenches might require two numeric values for the “Size” attribute (a measurement for each end) to precisely describe the product and differentiate it from others. Again, having a single attribute makes it easier to search for the item.
DATA INTEGRITY ►► Multi-valued attributes make the structure of an MDM repository dramatically simpler, more compact, and more searchable, by allowing you to store all the values corresponding to a particular data element in the same place. The alternative is having to create multiple attributes, in some cases up to a maximum of one attribute for each possible value.
ATTRIBUTE PRIORITIES
MDM allows you to assign priorities to attributes, to define the order in which they should appear in lists, and even whether or not they should be displayed at all. This is an important feature that allows you to override the default alphabetical listing and put the attributes of most interest to you – and users of the repository – at the top of a list. For example, when you select a particular category in Record mode, the attributes for the category show up in priority order (attributes with the same priority level are listed alphabetically), and those that are below the threshold priority do not appear at all (see “Configuration Options” on page 495 for more information about the Attributes options).
DATA INTEGRITY ►► When you publish an MDM repository to the Web using the MDM APIs, the attribute priority is again used to determine the order in which attributes should appear in lists, or if they should even be displayed at all. Attribute priorities are thus not only for the convenience of MDM Data Manager users, but also critically important for a well-structured and usable Web catalog.
NOTE ►► Unlike the other properties of an attribute, which apply across all the categories to which the attribute is linked, priority can be set on a category-by-category (link-by-link) basis. In other words, the same attribute may have different priorities for different categories, to reflect the different importance it might have for each category.

294 MDM Data Manager Reference Guide
LINKED AND INHERITED ATTRIBUTES
When you view a taxonomy table in Taxonomy mode, MDM displays the category hierarchy as a tree in the Taxonomy pane, and the pool of attributes associated with the taxonomy table in the Attributes pane.
In MDM, attributes are associated with – linked to – categories.
Categories in the tree that have attributes directly linked to them are highlighted in bold. Similarly, attributes that are linked to the selected
category in the tree are displayed in the Attributes pane with a “linked” icon in the Linked column of the grid (Figure 154).
Figure 154. Attributes linked to selected node
TIP ►► You can turn off the bold display of tree nodes that have linked attributes (see “Configuration Options” on page 495 for more information about the Display options).
Attributes can also be inherited. If the linked icon is gray and has a superscript number next to it, this indicates that the attribute is not linked directly to the selected category but rather to one of its ancestors in the tree; the number indicates the level of inheritance. For example, “1” means that the attribute is inherited from one level up; that is, it is linked to the parent of the selected category. A “2” superscript means that the attribute is inherited from two levels up, and so on.
TIP ►► If you sort the Attributes pane by the Linked column, the attributes will always be listed with the linked and inherited attributes at the top of the list; in effect, they will always float to the top as you move from category to category in the taxonomy tree.
TIP ►► To set the Attributes pane to display only those attributes that are linked to or inherited by the selected node in the taxonomy tree,
choose Attributes > Linked Attributes Only from the main menu. This command is a toggle; to restore the display of all attributes to the grid,
choose the Linked Attributes Only command again.
NOTE ►► You can only set the priority of an attribute at the level to which it is linked. If an attribute is inherited, you must adjust the priority at the higher level to which it is linked directly.
Attributes linked to the current category have a Linked icon in the Linked column of the Attributes list.

MDM Data Manager Reference Guide 295
FINDING CATEGORIES AND ATTRIBUTES
The Find command is available in most modes. In Taxonomy mode, it opens the Find dialog and enables you to find text strings in the taxonomy tree or in the columns of the Attributes pane. The dialog offers different options depending on which mode you are in. This
section describes how to use Find in Taxonomy mode; the Taxonomy mode options are summarized in Table 86.
Table 86. Taxonomy Mode Find Options
Option Checkbox Description
Find What Type the text string you want to match.
Search In
Select where you want to search:
Tree Attributes
Find Options
Match Case
Require… Do not require…
that the case match that of the text you type.
Whole Words Only
Require… Do not require…
that the text you type match whole words.
Exact Require… Do not require…
that the text match the entire value.
Search Backwards
Search up… Search down…
for the text string.
Search In = Attributes
Attribute Search
Name Search… Do not search in Name.
Alias Search… Do not search in Alias.
Definition Search… Do not search in Definition.
Text Values Search… Do not search the text values.
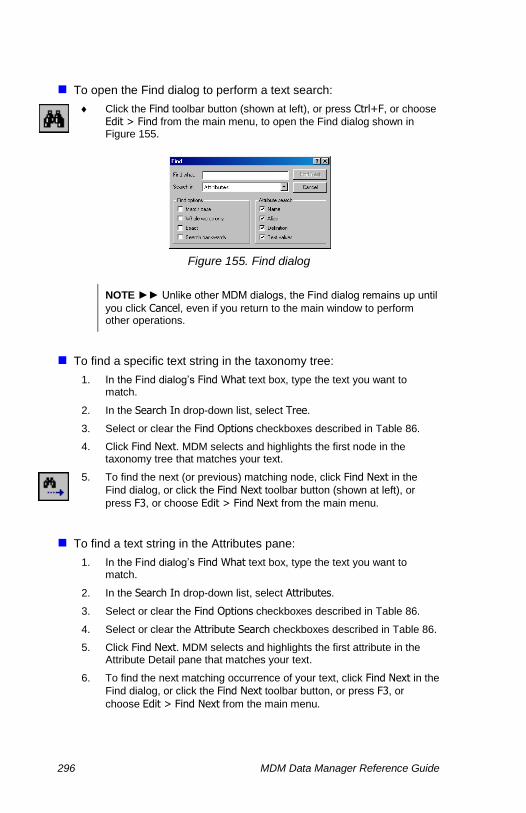
296 MDM Data Manager Reference Guide
To open the Find dialog to perform a text search:
Click the Find toolbar button (shown at left), or press Ctrl+F, or choose
Edit > Find from the main menu, to open the Find dialog shown in Figure 155.
Figure 155. Find dialog
NOTE ►► Unlike other MDM dialogs, the Find dialog remains up until
you click Cancel, even if you return to the main window to perform other operations.
To find a specific text string in the taxonomy tree:
1. In the Find dialog’s Find What text box, type the text you want to match.
2. In the Search In drop-down list, select Tree.
3. Select or clear the Find Options checkboxes described in Table 86.
4. Click Find Next. MDM selects and highlights the first node in the taxonomy tree that matches your text.
5. To find the next (or previous) matching node, click Find Next in the
Find dialog, or click the Find Next toolbar button (shown at left), or
press F3, or choose Edit > Find Next from the main menu.
To find a text string in the Attributes pane:
1. In the Find dialog’s Find What text box, type the text you want to match.
2. In the Search In drop-down list, select Attributes.
3. Select or clear the Find Options checkboxes described in Table 86.
4. Select or clear the Attribute Search checkboxes described in Table 86.
5. Click Find Next. MDM selects and highlights the first attribute in the Attribute Detail pane that matches your text.
6. To find the next matching occurrence of your text, click Find Next in the
Find dialog, or click the Find Next toolbar button, or press F3, or
choose Edit > Find Next from the main menu.
MDM Data Manager Reference Guide 297
STRUCTURING THE TAXONOMY
Repositories often start with legacy data that must be imported from multiple external sources. This data usually includes a variety of distinct formats and schemas, incompatible categorizations, and structural deficiencies that reflect shortcomings of the source application.
For optimal use within the MDM system, the raw data is normalized, cleansed, and restructured within MDM itself after the initial import. This is done using the collection of features in Taxonomy mode described in the following chapters, features that simplify an otherwise complex and amorphous process by breaking it down into a sequence of simple, discrete steps. They not only permit but actually encourage unlimited editing and restructuring of the initial category hierarchy, as well as other schema and data manipulation, on a fully populated MDM repository.
These same functions may also be used for updating and maintaining the repository as new product categories come and go, or as their associated attributes need to be fine-tuned. The MDM system excels at making these critical and usually complex tasks easy to accomplish.
PRINTING THE TAXONOMY
Taxonomy mode allows you to create a complex taxonomy that contains a substantial amount of data and metadata about the structure of your repository, including the taxonomy tree itself, linked attributes, matching sets, and other detailed information. You can use MDM to print this information in a graphical format for distribution to and review by product experts and suppliers of content, or simply for documenting the taxonomy.
NOTE ►► MDM places a copyright notice that you specify in the footer of each page of printed output (see “Configuration Options” on page 495 for more information about the Import/Export options).
When you use the File > Print > Tree command to print the taxonomy, MDM opens the Print Tree dialog, and then prints the taxonomy tree and other taxonomy information based on the option settings you specify.
NOTE ►► You must be in Taxonomy mode to use the File > Print >
Tree command.

298 MDM Data Manager Reference Guide
Table 87. Print Tree Options
Option Radio Button Description
Print What
Entire Tree
Prints the entire tree.
Selected Branch Only
Prints just the selected branch.
Selected Item Only
Prints just the selected tree item.
Tree Detail
Tree Only
Prints just the taxonomy tree with the name of each category (Figure 157).
Tree and Attributes
Prints the taxonomy tree, including the linked attributes for each category (Figure 158).
Tree, Attributes, and Details
Prints the taxonomy tree and the linked attributes, including the properties for each attribute (Figure 159).
Expand Before Printing
Expands all internal nodes to show children and all descendants prior to printing.
To print some or all of the taxonomy tree along with the linked attributes and other taxonomy information:
1. In Taxonomy mode, click the Print Tree toolbar button (shown at left),
or press Ctrl+P, or choose File > Print from the main menu and choose
Tree from the cascading menu to open the Print Tree dialog shown in Figure 156.
Figure 156. Print Tree dialog

MDM Data Manager Reference Guide 299
2. Select a printer or other output device.
3. Specify the desired dialog settings, as described in Table 87.
4. If necessary, click the Preview button to open the preview window (Figure 157, Figure 158, and Figure 159).
TIP ►► You can “zoom in” on the contents of the preview window by clicking the mouse anywhere inside the window. Repeated clicks cycle through all of the zoom levels.
5. Click Print to print the taxonomy tree and associated information.
Figure 157. Print Tree preview: Tree Only option
Zoom and navigation menu
Click the mouse anywhere inside the Print Preview window to cycle through all of the zoom levels.
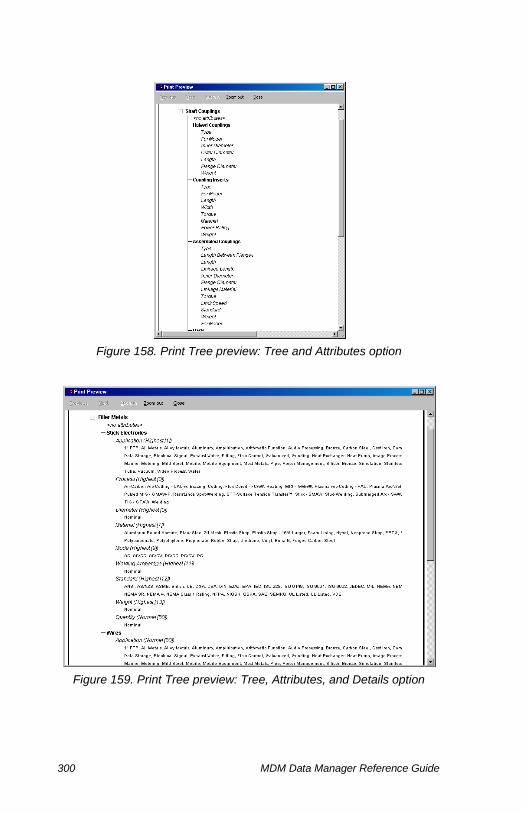
300 MDM Data Manager Reference Guide
Figure 158. Print Tree preview: Tree and Attributes option
Figure 159. Print Tree preview: Tree, Attributes, and Details option
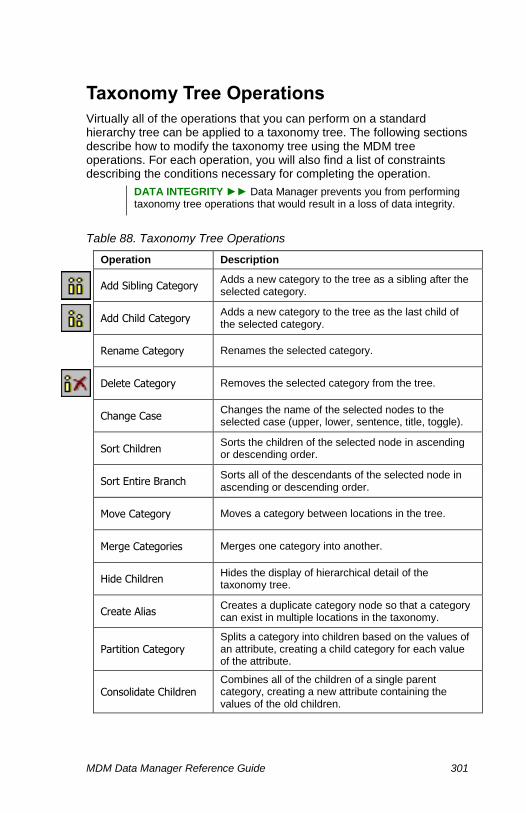
MDM Data Manager Reference Guide 301
Taxonomy Tree Operations
Virtually all of the operations that you can perform on a standard hierarchy tree can be applied to a taxonomy tree. The following sections describe how to modify the taxonomy tree using the MDM tree operations. For each operation, you will also find a list of constraints describing the conditions necessary for completing the operation.
DATA INTEGRITY ►► Data Manager prevents you from performing taxonomy tree operations that would result in a loss of data integrity.
Table 88. Taxonomy Tree Operations
Operation Description
Add Sibling Category
Adds a new category to the tree as a sibling after the selected category.
Add Child Category
Adds a new category to the tree as the last child of the selected category.
Rename Category Renames the selected category.
Delete Category Removes the selected category from the tree.
Change Case Changes the name of the selected nodes to the selected case (upper, lower, sentence, title, toggle).
Sort Children Sorts the children of the selected node in ascending or descending order.
Sort Entire Branch Sorts all of the descendants of the selected node in ascending or descending order.
Move Category Moves a category between locations in the tree.
Merge Categories Merges one category into another.
Hide Children Hides the display of hierarchical detail of the taxonomy tree.
Create Alias Creates a duplicate category node so that a category can exist in multiple locations in the taxonomy.
Partition Category Splits a category into children based on the values of an attribute, creating a child category for each value of the attribute.
Consolidate Children Combines all of the children of a single parent category, creating a new attribute containing the values of the old children.
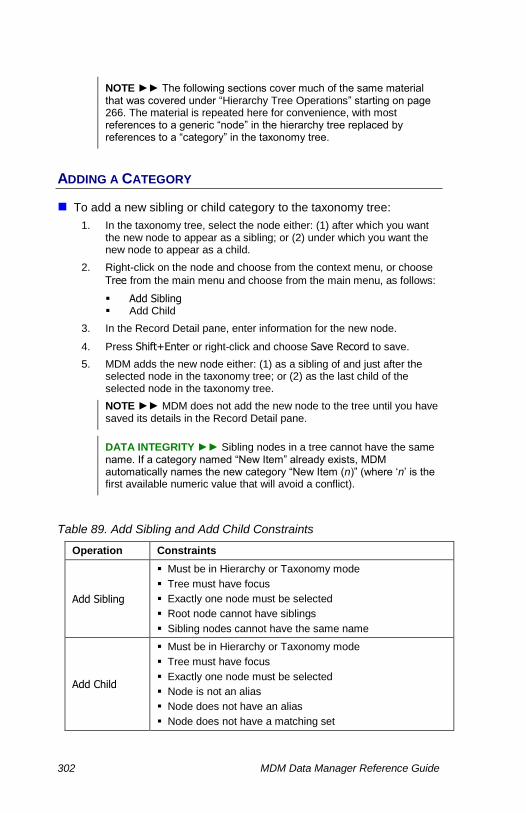
302 MDM Data Manager Reference Guide
NOTE ►► The following sections cover much of the same material that was covered under “Hierarchy Tree Operations” starting on page 266. The material is repeated here for convenience, with most references to a generic “node” in the hierarchy tree replaced by references to a “category” in the taxonomy tree.
ADDING A CATEGORY
To add a new sibling or child category to the taxonomy tree:
1. In the taxonomy tree, select the node either: (1) after which you want the new node to appear as a sibling; or (2) under which you want the new node to appear as a child.
2. Right-click on the node and choose from the context menu, or choose
Tree from the main menu and choose from the main menu, as follows:
Add Sibling Add Child
3. In the Record Detail pane, enter information for the new node.
4. Press Shift+Enter or right-click and choose Save Record to save.
5. MDM adds the new node either: (1) as a sibling of and just after the selected node in the taxonomy tree; or (2) as the last child of the selected node in the taxonomy tree.
NOTE ►► MDM does not add the new node to the tree until you have saved its details in the Record Detail pane.
DATA INTEGRITY ►► Sibling nodes in a tree cannot have the same name. If a category named “New Item” already exists, MDM automatically names the new category “New Item (n)” (where ‘n’ is the first available numeric value that will avoid a conflict).
Table 89. Add Sibling and Add Child Constraints
Operation Constraints
Add Sibling
Must be in Hierarchy or Taxonomy mode
Tree must have focus
Exactly one node must be selected
Root node cannot have siblings
Sibling nodes cannot have the same name
Add Child
Must be in Hierarchy or Taxonomy mode
Tree must have focus
Exactly one node must be selected
Node is not an alias
Node does not have an alias
Node does not have a matching set

MDM Data Manager Reference Guide 303
Operation Constraints
Node value cannot currently be assigned to a lookup field
Sibling nodes cannot have the same name
DATA INTEGRITY ►► For proper organization of the records within an MDM repository, a taxonomy lookup field can normally be assigned only to the value of a leaf-node category in the taxonomy table, which can sometimes prevent a tree operation that would otherwise turn a leaf node into a parent node. However, MDM does not detect if records have already been assigned to a category until after you attempt to
perform the operation. As a result, the Add Child menu item is available even if the selected category has records assigned to it, even though
this would turn it into a non-leaf node. If you choose Add Child in this situation, MDM does not permit the add and instead displays the error dialog shown in Figure 160.
Figure 160. Error Adding Child dialog
RENAMING A CATEGORY
To rename a category in the taxonomy tree:
1. In the taxonomy tree, select the category you want to rename.
2. Right-click on the category and choose Rename from the context
menu, or press F2, or choose Tree > Rename from the main menu.
3. MDM highlights the name of the category for editing (Figure 161).
Figure 161. Renaming a category
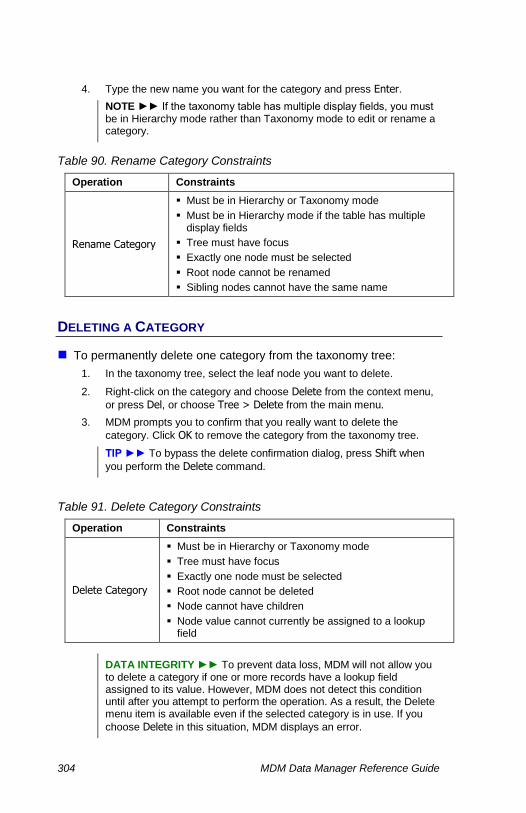
304 MDM Data Manager Reference Guide
4. Type the new name you want for the category and press Enter.
NOTE ►► If the taxonomy table has multiple display fields, you must be in Hierarchy mode rather than Taxonomy mode to edit or rename a category.
Table 90. Rename Category Constraints
Operation Constraints
Rename Category
Must be in Hierarchy or Taxonomy mode
Must be in Hierarchy mode if the table has multiple display fields
Tree must have focus
Exactly one node must be selected
Root node cannot be renamed
Sibling nodes cannot have the same name
DELETING A CATEGORY
To permanently delete one category from the taxonomy tree:
1. In the taxonomy tree, select the leaf node you want to delete.
2. Right-click on the category and choose Delete from the context menu,
or press Del, or choose Tree > Delete from the main menu.
3. MDM prompts you to confirm that you really want to delete the
category. Click OK to remove the category from the taxonomy tree.
TIP ►► To bypass the delete confirmation dialog, press Shift when
you perform the Delete command.
Table 91. Delete Category Constraints
Operation Constraints
Delete Category
Must be in Hierarchy or Taxonomy mode
Tree must have focus
Exactly one node must be selected
Root node cannot be deleted
Node cannot have children
Node value cannot currently be assigned to a lookup field
DATA INTEGRITY ►► To prevent data loss, MDM will not allow you to delete a category if one or more records have a lookup field assigned to its value. However, MDM does not detect this condition until after you attempt to perform the operation. As a result, the Delete menu item is available even if the selected category is in use. If you
choose Delete in this situation, MDM displays an error.
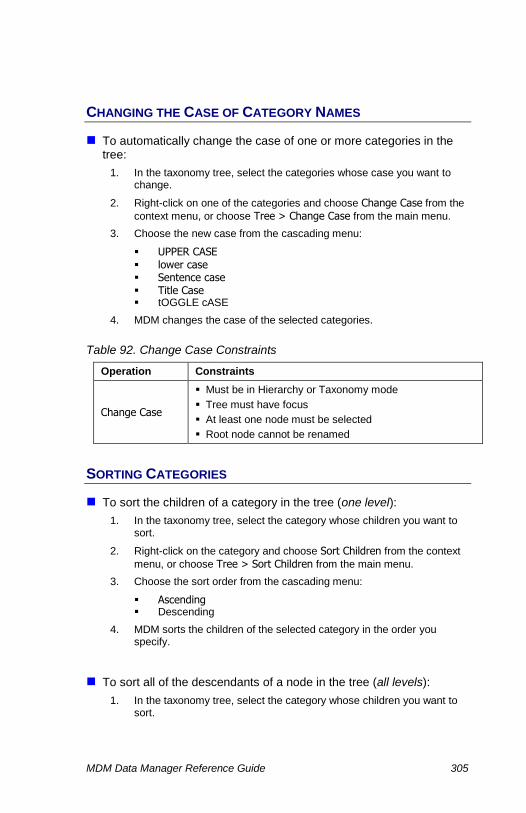
MDM Data Manager Reference Guide 305
CHANGING THE CASE OF CATEGORY NAMES
To automatically change the case of one or more categories in the tree:
1. In the taxonomy tree, select the categories whose case you want to change.
2. Right-click on one of the categories and choose Change Case from the
context menu, or choose Tree > Change Case from the main menu.
3. Choose the new case from the cascading menu:
UPPER CASE lower case Sentence case Title Case tOGGLE cASE
4. MDM changes the case of the selected categories.
Table 92. Change Case Constraints
Operation Constraints
Change Case
Must be in Hierarchy or Taxonomy mode
Tree must have focus
At least one node must be selected
Root node cannot be renamed
SORTING CATEGORIES
To sort the children of a category in the tree (one level):
1. In the taxonomy tree, select the category whose children you want to sort.
2. Right-click on the category and choose Sort Children from the context
menu, or choose Tree > Sort Children from the main menu.
3. Choose the sort order from the cascading menu:
Ascending Descending
4. MDM sorts the children of the selected category in the order you specify.
To sort all of the descendants of a node in the tree (all levels):
1. In the taxonomy tree, select the category whose children you want to sort.
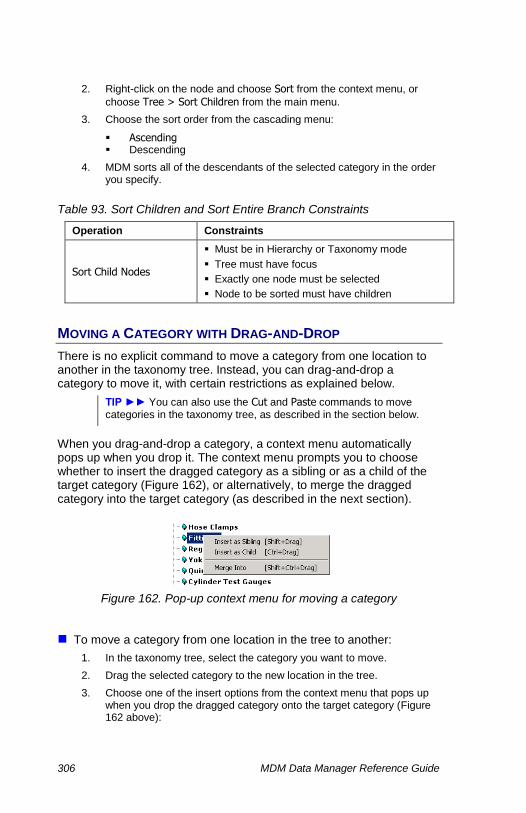
306 MDM Data Manager Reference Guide
2. Right-click on the node and choose Sort from the context menu, or
choose Tree > Sort Children from the main menu.
3. Choose the sort order from the cascading menu:
Ascending Descending
4. MDM sorts all of the descendants of the selected category in the order you specify.
Table 93. Sort Children and Sort Entire Branch Constraints
Operation Constraints
Sort Child Nodes
Must be in Hierarchy or Taxonomy mode
Tree must have focus
Exactly one node must be selected
Node to be sorted must have children
MOVING A CATEGORY WITH DRAG-AND-DROP
There is no explicit command to move a category from one location to another in the taxonomy tree. Instead, you can drag-and-drop a category to move it, with certain restrictions as explained below.
TIP ►► You can also use the Cut and Paste commands to move categories in the taxonomy tree, as described in the section below.
When you drag-and-drop a category, a context menu automatically pops up when you drop it. The context menu prompts you to choose whether to insert the dragged category as a sibling or as a child of the target category (Figure 162), or alternatively, to merge the dragged category into the target category (as described in the next section).
Figure 162. Pop-up context menu for moving a category
To move a category from one location in the tree to another:
1. In the taxonomy tree, select the category you want to move.
2. Drag the selected category to the new location in the tree.
3. Choose one of the insert options from the context menu that pops up when you drop the dragged category onto the target category (Figure 162 above):

MDM Data Manager Reference Guide 307
Insert as Sibling – inserts as a sibling just before the target
Insert as Child – inserts as the last child of the target
4. MDM removes the node from its former location and inserts it into the tree as specified by the option you chose in step 3. However, if MDM detects a condition that would result in data integrity loss if the move were completed, MDM displays a message explaining why the move is not allowed, as described in the Data Integrity notes below.
TIP ►► To bypass the pop-up context menu, hold Shift (to Insert as
Sibling) or Ctrl (to Insert as Child) while you perform the drag-and-drop.
DATA INTEGRITY ►► Sibling nodes in a tree cannot have the same name. When you drag-and-drop a node to move it in the tree, MDM automatically renames it to “Node Name (n)” if its name would be the same as that of an existing sibling node in the new location (where ‘n’ is the first available numeric value that will avoid a conflict).
DATA INTEGRITY ►► When you move a category in the taxonomy tree, MDM automatically detects differences in the inherited attributes in the old and new locations, and if necessary: (1) links directly to the category those attributes that were inherited but will no longer be inherited in the new location (Figure 163); and/or (2) unlinks from the category those attributes that were linked directly but will be inherited in the new location (Figure 164).
Figure 163. Category move confirmation with automatic link
Figure 164. Category move confirmation with automatic unlink

308 MDM Data Manager Reference Guide
Table 94. Drag-and-Drop Move Category Constraints
Operation Constraints
Insert as Sibling
Must be in Hierarchy or Taxonomy mode
Tree must have focus
Root node cannot be moved
Root node cannot have siblings
Sibling nodes cannot have the same name
Insert as Child
Must be in Hierarchy or Taxonomy mode
Tree must have focus
Root node cannot be moved
Destination node cannot be an alias
Destination node cannot have an alias
Destination node cannot have a matching set
Destination node value cannot currently be assigned to a lookup field
Sibling nodes cannot have the same name
DATA INTEGRITY ►► For proper organization of the records within an MDM repository, a taxonomy lookup field can normally be assigned only to the value of a leaf-node category in the taxonomy table, which can sometimes prevent a tree operation that would otherwise turn a leaf node into a parent node. However, MDM does not detect if records have already been assigned to a leaf-node category until after you
attempt to perform the operation. As a result, the Insert as Child menu item is available even if the destination category has records assigned to it, even though this would turn it into a non-leaf node. If you choose
Insert as Child in this situation, MDM does not permit the insert and instead displays an error.
MERGING CATEGORIES WITH DRAG-AND-DROP
If two categories in the taxonomy tree represent essentially the same category of products, you can merge one category into the other. This may be necessary if data was imported from two sources that used different names for the same category, or you decide that you no longer want to make a distinction between the products in two categories.
Just as with moving categories, there is no explicit command to merge two categories in the taxonomy tree. Rather, the pop-up context menu
that pops up when you drag-and-drop a category includes a Merge Into choice (Figure 162) that allows you to merge the dragged category into the category onto which you drop – and in the process reassign main table category field values that were assigned to the dragged category.

MDM Data Manager Reference Guide 309
NOTE ►► The challenge of merging two categories is to detect the category field values that have been assigned to either category and to reassign them to the single merged category, which MDM does automatically as part of the merge.
TIP ►► You can also use the Cut and Paste as Merge commands to merge two categories in the taxonomy tree.
Merging categories occurs at the record level rather than the field level, and does not merge the underlying values of the fields within the two category records. Specifically, it preserves the field values of the surviving category and discards those of the non-surviving category
TIP ►► If necessary, you can first merge the underlying field values within the records prior to the merge by selecting each of the multiple records in the Records pane (in Record or Hierarchy mode) and reconciling the values in each of the fields. (see "Viewing and Editing Multiple Records” on page 74 for more information about how to view and edit multiple records.)
To merge one category into another:
1. In the taxonomy tree, select the category you want to merge (the one that will disappear from the taxonomy tree).
2. Drag the selected category onto the destination category (the surviving category that will remain in the taxonomy tree).
3. Choose Merge Objects from the context menu that pops up when you perform the drop.
TIP ►► To bypass the pop-up context menu, hold both Shift and Ctrl while you perform the drag-and-drop.
4. MDM merges the two categories and all of the category lookup field values that were previously assigned to either one of them.
DATA INTEGRITY ►► When you merge two categories in the taxonomy tree, MDM automatically detects all lookup field references to the non-surviving category across all records in the repository.
DATA INTEGRITY ►► When you merge two categories in the taxonomy tree, MDM automatically detects differences between their respective sets of inherited and linked attributes, and if necessary, adds links to the surviving category so that its set of linked and inherited attributes includes all the linked and inherited attributes of the category that is merged into it.

310 MDM Data Manager Reference Guide
Table 95. Drag-and-Drop Merge Category Constraints
Operation Constraints
Merge Into
Must be in Hierarchy or Taxonomy mode
Tree must have focus
A node must already have been cut or copied
Destination node cannot be the root
Destination and source node cannot be the same
Destination and source node cannot have children
Destination and source node cannot be an alias
Destination and source node cannot have a matching set
CUTTING AND PASTING CATEGORIES
You can also use the Cut, Copy and Paste commands to move, copy and merge categories in the taxonomy tree. The conditions listed in Table 96 must be met in order to use the cut and paste operations.
NOTE ►► When you use the Cut and Copy commands, MDM places
a blinking highlight around the nodes that have been cut or copied.
DATA INTEGRITY ►► Sibling nodes in a tree cannot have the same name. When you cut-and-paste a node to move it in the tree, MDM automatically renames it to “Node Name (n)” and when you copy-and-paste a node to copy it in the tree, MDM automatically renames it to “Copy (n) of Node Name” if its name would be the same as that of an existing sibling node in the new location (where ‘n’ is the first available numeric value that will avoid a conflict).
Table 96. Cut-and-Paste Category Constraints
Operation Constraints
Cut Category
Must be in Hierarchy or Taxonomy mode
Tree must have focus
Exactly one node must be selected
Root node cannot be cut
Copy Category
Must be in Hierarchy or Taxonomy mode
Tree must have focus
Exactly one node must be selected
Root node cannot be copied

MDM Data Manager Reference Guide 311
Operation Constraints
Paste as Sibling
Must be in Hierarchy or Taxonomy mode
Tree must have focus
A node must already have been cut or copied
Exactly one node must be selected
Root node cannot have siblings
Sibling nodes cannot have the same name
Paste as Child
Must be in Hierarchy or Taxonomy mode
Tree must have focus
A node must already have been cut or copied
Exactly one node must be selected
Destination node cannot be an alias
Destination node cannot have an alias
Destination node cannot have a matching set
Destination node value cannot currently be assigned to a lookup field
Sibling nodes cannot have the same name
Paste as Merge
Must be in Hierarchy or Taxonomy mode
Tree must have focus
A node must already have been cut or copied
Exactly one node must be selected
Destination node cannot be the root
Destination and source node cannot be the same
Destination and source node cannot have children
Destination and source node cannot be an alias
Destination and source node cannot have a matching set
DATA INTEGRITY ►► For proper organization of the records within an MDM repository, a taxonomy lookup field can normally be assigned only to the value of a leaf-node category in the taxonomy table, which can sometimes prevent a tree operation that would otherwise turn a leaf node into a parent node. However, MDM does not detect if records have already been assigned to a category until after you attempt to
perform the operation. As a result, the Paste as Child menu item is available even if the destination category has records assigned to it, even though this would make the node into a non-leaf node. If you
choose Paste as Child in this situation, MDM does not permit the paste and instead displays an error.
CREATING CATEGORY ALIASES
Sometimes, you may want a group of products to appear in more than one location in the taxonomy tree, so that they can be found in various ways using drilldown search. A category alias provides just this ability,
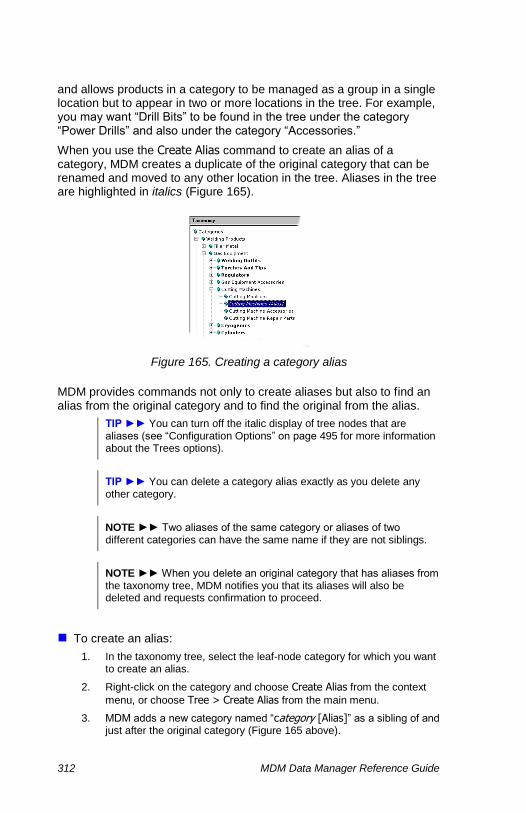
312 MDM Data Manager Reference Guide
and allows products in a category to be managed as a group in a single location but to appear in two or more locations in the tree. For example, you may want “Drill Bits” to be found in the tree under the category “Power Drills” and also under the category “Accessories.”
When you use the Create Alias command to create an alias of a category, MDM creates a duplicate of the original category that can be renamed and moved to any other location in the tree. Aliases in the tree are highlighted in italics (Figure 165).
Figure 165. Creating a category alias
MDM provides commands not only to create aliases but also to find an alias from the original category and to find the original from the alias.
TIP ►► You can turn off the italic display of tree nodes that are aliases (see “Configuration Options” on page 495 for more information about the Trees options).
TIP ►► You can delete a category alias exactly as you delete any other category.
NOTE ►► Two aliases of the same category or aliases of two different categories can have the same name if they are not siblings.
NOTE ►► When you delete an original category that has aliases from the taxonomy tree, MDM notifies you that its aliases will also be deleted and requests confirmation to proceed.
To create an alias:
1. In the taxonomy tree, select the leaf-node category for which you want to create an alias.
2. Right-click on the category and choose Create Alias from the context
menu, or choose Tree > Create Alias from the main menu.
3. MDM adds a new category named “category [Alias]” as a sibling of and just after the original category (Figure 165 above).
MDM Data Manager Reference Guide 313
4. Press F2 to edit the name of the alias.
5. MDM highlights the name of the alias for editing.
6. Type the name you want for the alias and press Enter.
7. Drag-and-drop the alias to move it to the target location in the tree.
To find an alias for a category:
1. In the taxonomy tree, select the leaf-node category whose aliases you want to locate.
2. Right-click on the category and choose Find Alias from the context
menu, or choose Tree > Find Alias from the main menu.
3. Select the desired alias from the cascading menu of aliases of the selected category.
4. MDM immediately changes the selected category in the taxonomy tree to the chosen alias.
To find the original category from an alias:
1. In the taxonomy tree, select the alias whose original category you want to locate.
2. Right-click on the alias and choose Find Original from the context
menu, or choose Tree > Find Original from the main menu.
3. MDM immediately changes the selected category in the taxonomy tree to the original category.
NOTE ►► When the selected category in the taxonomy tree is an alias, the linked icons for the attributes that are linked to the original category are highlighted in gray, just like inherited attributes, and cannot be linked to or unlinked from the alias.
Table 97. Category Alias Constraints
Operation Constraints
Create Alias
Must be in Hierarchy or Taxonomy mode
Aliases not allowed on masks table
Tree must have focus
Exactly one node must be selected
Root node cannot have an alias
Node cannot have children
Node cannot be an alias
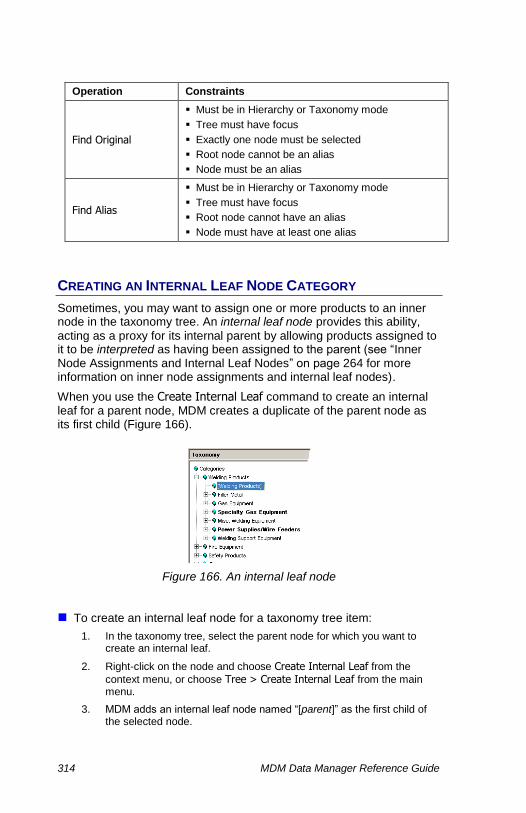
314 MDM Data Manager Reference Guide
Operation Constraints
Find Original
Must be in Hierarchy or Taxonomy mode
Tree must have focus
Exactly one node must be selected
Root node cannot be an alias
Node must be an alias
Find Alias
Must be in Hierarchy or Taxonomy mode
Tree must have focus
Root node cannot have an alias
Node must have at least one alias
CREATING AN INTERNAL LEAF NODE CATEGORY
Sometimes, you may want to assign one or more products to an inner node in the taxonomy tree. An internal leaf node provides this ability,
acting as a proxy for its internal parent by allowing products assigned to it to be interpreted as having been assigned to the parent (see “Inner Node Assignments and Internal Leaf Nodes” on page 264 for more information on inner node assignments and internal leaf nodes).
When you use the Create Internal Leaf command to create an internal leaf for a parent node, MDM creates a duplicate of the parent node as its first child (Figure 166).
Figure 166. An internal leaf node
To create an internal leaf node for a taxonomy tree item:
1. In the taxonomy tree, select the parent node for which you want to create an internal leaf.
2. Right-click on the node and choose Create Internal Leaf from the
context menu, or choose Tree > Create Internal Leaf from the main menu.
3. MDM adds an internal leaf node named “[parent]” as the first child of the selected node.

MDM Data Manager Reference Guide 315
NOTE ►► The name of the internal leaf node is the name of the parent node in square brackets ([]).
NOTE ►► You cannot edit the node name nor any of the fields of the internal leaf, which are auto-populated with the values of the parent when the internal leaf record is first created. This means that if the name of the parent changes, the internal leaf will continue to display the old parent name in square brackets.
NOTE ►► A normal leaf node cannot be converted into an internal leaf node nor can an internal leaf node be converted into a normal leaf node. Instead, you must create a second node, reassign records from the first node to the second node, and then delete the first node.
Table 98. Create Internal Leaf Constraints
Operation Constraints
Add Internal Leaf
Must be in Hierarchy or Taxonomy mode
Tree must have focus
Exactly one node must be selected
Root node cannot have internal leaf node child
Node cannot be an alias
Node cannot have an alias
Node cannot have a matching set
Node already has internal leaf
Node is an internal leaf
PARTITIONING A CATEGORY
If the taxonomy hierarchy does not have enough detail so that too many main table records are assigned to a particular leaf-node category, you can partition it into multiple child categories according to the values of a specified single-valued text attribute.
When you use the Partition command to partition a leaf-node category, MDM does the following:
Creates a child category for each value of the selected text attribute (Figure 167).
Reassigns each record that was previously assigned to the original category to one of the new children based on its value for the partitioning attribute.

316 MDM Data Manager Reference Guide
Figure 167. Taxonomy tree before and after Partition
NOTE ►► If any product assigned to the original leaf-node category has no value for the partitioning attribute, the system creates an internal leaf node category and assigns the product to it.
To partition a category:
1. In the taxonomy tree, select the leaf-node category you want to partition.
2. Right-click on the category and choose Partition from the context
menu, or choose Tree > Partition from the main menu.
3. Select the attribute on which to partition the selected category from the cascading menu of single-valued text attributes that are linked directly to the selected category.
4. MDM adds one child node for each value of the selected attribute.
Table 99. Partition Category Constraints
Operation Constraints
Partition Category
Must be in Taxonomy mode
Tree must have focus
Root node cannot be partitioned
Node cannot have children
Node cannot have a matching set
Node must have at least one linked single-valued text attribute with at least one domain value
CONSOLIDATING CATEGORIES
If the taxonomy hierarchy has too much detail so that there are too many child categories of a particular parent category, each with a small number of records, you can consolidate child categories into a single parent category.

MDM Data Manager Reference Guide 317
Consolidating categories is the flip side of partitioning. In partitioning, new child categories are created for each value of a specified attribute. In consolidating, child categories are eliminated and their names become the text values of a new text attribute.
When you use the Consolidate Children command to consolidate the children of a parent category, MDM does the following (Figure 168):
Removes the child categories from the tree.
Creates a new attribute called “Children of parent” and links it to the
parent category.
Reassigns each record that was previously assigned to each of the children to the parent.
Assigns as the value of the new attribute the name of the child category to which the record was originally assigned.
Figure 168. Taxonomy tree before and after Consolidate Children
NOTE ►► Any products assigned to the internal leaf node child of the parent category are assigned a NULL value for the new attribute
created as a result of the Consolidate Children command.
To consolidate the children of a category:
1. In the taxonomy tree, select the parent category whose children you want to consolidate.
2. Right-click on the category and choose Consolidate Children from the
context menu, or choose Tree > Consolidate Children from the main menu.
3. MDM removes the child categories from the tree, and creates and links a new attribute to the parent category.
Table 100. Consolidate Categories Constraints
Operation Constraints
Consolidate Children
Must be Taxonomy mode
Tree must have focus
Root node cannot be consolidated
Node must have at least two children
Children of the node cannot have children

318 MDM Data Manager Reference Guide
Operation Constraints
Children of the node cannot be an alias
Children of the node cannot have a matching set
All children of the node must have the same set of attributes
USING MATCHING SETS
Product relationships are useful for merchandising and for defining structural compatibility between different products or sets of products. MDM offers two mechanisms for representing product relationships, which can be defined at the category level (for efficiency) and at the individual product level (for precision), as follows:
Category-level. You can define a relationship between two product
categories. For example, you can define the categories Washers and Dryers as being related. This approach is efficient not only to define but also to maintain because new products that are added to either category automatically participate in the relationship, but it does not provide very granular control over the members of the relationship.
Product-level. You can also define a relationship between two or
more individual products. For example, you can define a particular washer/dryer combination as being related, because they are designed to stack one on top of another. This approach is very precise, but also has additional overhead because each relationship must be individually defined, and new products that are added to the repository must be added manually as members of the relationship.
NOTE ►► See “Product-Level Relationships” on page 369 for more information about product-level relationships.
The matching sets facility of MDM allows you to define category-level relationships. A matching set is a pair of related categories, where some or all of the products in each category are related to one another. You can define a matching set as either bidirectional (for a sibling-type relationship) or unidirectional (for a parent/child-type relationship).
In addition, layered on top of the category-level efficiency, matching sets allow you to restrict the matching products within each category to precise subsets based on physical characteristics and structural
compatibility of the products.
For example, you can define the Nuts and Screws categories as a matching set, and then further require that matching nuts and screws have the same Thread Size and Material, as shown in Figure 169.
Screws: Nuts:
SKU Name Thread Material SKU Name Thread Material
S-101 Screw 4-40 Brass N-341 Nut 4-40 Brass
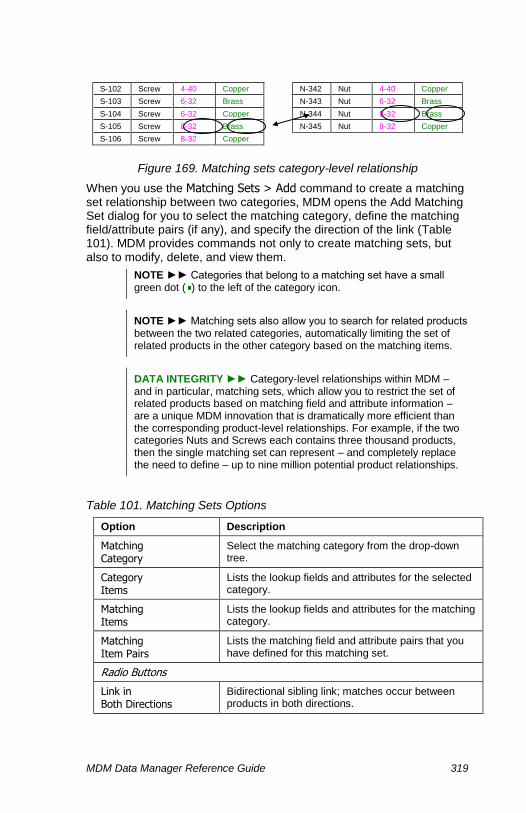
MDM Data Manager Reference Guide 319
S-102 Screw 4-40 Copper N-342 Nut 4-40 Copper
S-103 Screw 6-32 Brass N-343 Nut 6-32 Brass
S-104 Screw 6-32 Copper N-344 Nut 8-32 Brass
S-105 Screw 8-32 Brass N-345 Nut 8-32 Copper
S-106 Screw 8-32 Copper
Figure 169. Matching sets category-level relationship
When you use the Matching Sets > Add command to create a matching set relationship between two categories, MDM opens the Add Matching Set dialog for you to select the matching category, define the matching field/attribute pairs (if any), and specify the direction of the link (Table 101). MDM provides commands not only to create matching sets, but also to modify, delete, and view them.
NOTE ►► Categories that belong to a matching set have a small green dot ( ) to the left of the category icon.
NOTE ►► Matching sets also allow you to search for related products between the two related categories, automatically limiting the set of related products in the other category based on the matching items.
DATA INTEGRITY ►► Category-level relationships within MDM – and in particular, matching sets, which allow you to restrict the set of related products based on matching field and attribute information – are a unique MDM innovation that is dramatically more efficient than the corresponding product-level relationships. For example, if the two categories Nuts and Screws each contains three thousand products, then the single matching set can represent – and completely replace the need to define – up to nine million potential product relationships.
Table 101. Matching Sets Options
Option Description
Matching Category
Select the matching category from the drop-down tree.
Category Items
Lists the lookup fields and attributes for the selected category.
Matching Items
Lists the lookup fields and attributes for the matching category.
Matching Item Pairs
Lists the matching field and attribute pairs that you have defined for this matching set.
Radio Buttons
Link in Both Directions
Bidirectional sibling link; matches occur between products in both directions.

320 MDM Data Manager Reference Guide
Option Description
Link to Matching Category
Unidirectional parent/child link (selected category is the parent); matches occur from products in this category.
Link from Matching Category
Unidirectional parent/child link (selected category is the child); matches occur to products in this category.
NOTE ►► A category can participate in more than one matching set.
NOTE ►► Field and attribute matching is subject to the following constraints: (1) matching attributes must be of the same type (text and text, numeric and numeric, coupled and coupled); (2) for lookup fields and text attributes, only the same field or attribute can be matched together; and (3) for numeric and coupled attributes, different attributes with the same dimension(s) can be matched together.
NOTE ►► Matching sets can be bidirectional or unidirectional. A bidirectional matching set is bidirectional for both categories. A unidirectional matching set that is defined to a matching category will show up as from for the matching category, and vice versa. In other
words, if you specify a Link to Matching Category link for the matching set, it shows up in the matching set dialog for the other category as a
Link from Matching Category link.
To add a new matching set for a category:
1. In the taxonomy tree, select the leaf-node category for which you want to create a matching set.
2. Right-click on the category and choose Matching Sets from the context
menu, or choose Tree > Matching Sets from the main menu.
3. Choose Add from the cascading menu to open the Add Matching Set dialog shown in Figure 170.

MDM Data Manager Reference Guide 321
Figure 170. Add Matching Set dialog
4. MDM populates the Category Items list with the lookup fields and attributes for the selected category.
5. Select the desired Matching Category from the drop-down list.
6. MDM now populates the Matching Category Items list with the lookup fields and attributes for the matching category.
7. If necessary, add or remove matching field/attribute pairs, as follows:
To add a matching pair, highlight a field or attribute in the
Category Attributes list, highlight the matching field or attribute in
the Matching Category Items list, and click Match. MDM adds the
matching pair to the Matching Item Pairs list.
To remove a matching pair, highlight it in the Matching Item Pairs
list, and click Unmatch. MDM removes the matching pair from the
Matching Item Pairs list.
6. Select the applicable radio button to specify the relationship type:
Link in Both Directions Link to Matching Category Only Link from Matching Category Only
7. Click OK when you are done to close the Add Matching Set dialog.
8. MDM adds the new matching set without confirmation, and displays a small green dot ( ) to the left of both the selected category and the matching category.
To modify an existing matching set for a category:
1. In the taxonomy tree, select the leaf-node category whose matching set you want to modify.
2. Right-click on the category and choose Matching Sets from the context
menu, or choose Tree > Matching Sets from the main menu.
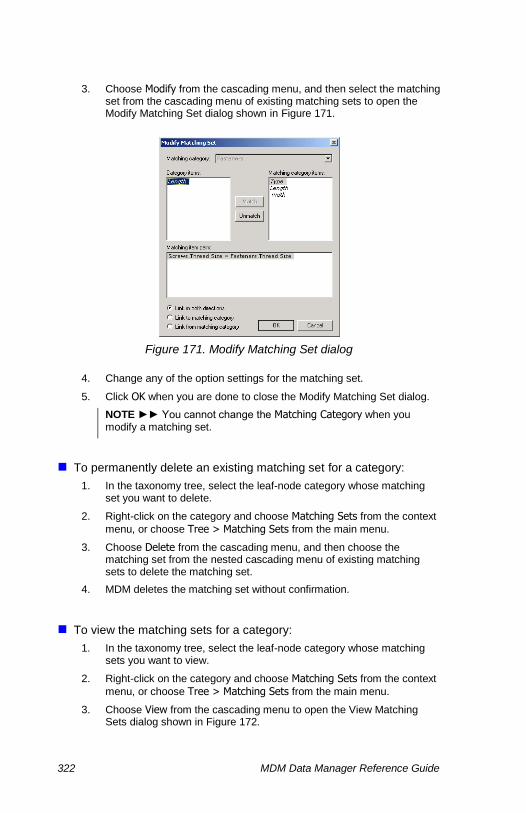
322 MDM Data Manager Reference Guide
3. Choose Modify from the cascading menu, and then select the matching set from the cascading menu of existing matching sets to open the Modify Matching Set dialog shown in Figure 171.
Figure 171. Modify Matching Set dialog
4. Change any of the option settings for the matching set.
5. Click OK when you are done to close the Modify Matching Set dialog.
NOTE ►► You cannot change the Matching Category when you modify a matching set.
To permanently delete an existing matching set for a category:
1. In the taxonomy tree, select the leaf-node category whose matching set you want to delete.
2. Right-click on the category and choose Matching Sets from the context
menu, or choose Tree > Matching Sets from the main menu.
3. Choose Delete from the cascading menu, and then choose the matching set from the nested cascading menu of existing matching sets to delete the matching set.
4. MDM deletes the matching set without confirmation.
To view the matching sets for a category:
1. In the taxonomy tree, select the leaf-node category whose matching sets you want to view.
2. Right-click on the category and choose Matching Sets from the context
menu, or choose Tree > Matching Sets from the main menu.
3. Choose View from the cascading menu to open the View Matching Sets dialog shown in Figure 172.

MDM Data Manager Reference Guide 323
Figure 172. View Matching Sets dialog
4. Click OK when you are done to close the View Matching Sets dialog.
Table 102. Matching Sets Constraints
Operation Constraints
Matching Set > Add
Must be in Taxonomy mode
Tree must have focus
Root node cannot have a matching set
Node cannot have children
Node cannot be an alias
Matching Set > Modify
Must be in Taxonomy mode
Tree must have focus
Root node cannot have a matching set
Node must have at least one matching set
Matching Set > Delete
Must be in Taxonomy mode
Tree must have focus
Root node cannot have a matching set
Node must have at least one matching set
Matching Set > View
Must be in Taxonomy mode
Tree must have focus
Root node cannot have a matching set
Node must have at least one matching set
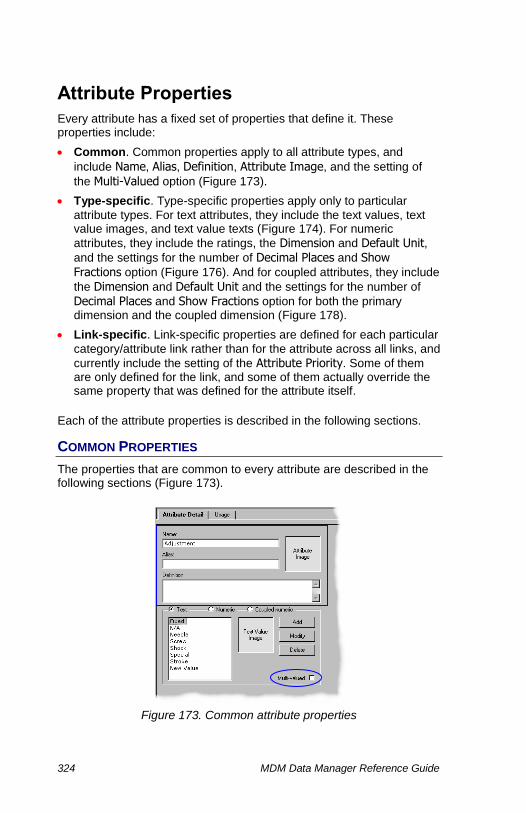
324 MDM Data Manager Reference Guide
Attribute Properties
Every attribute has a fixed set of properties that define it. These properties include:
Common. Common properties apply to all attribute types, and
include Name, Alias, Definition, Attribute Image, and the setting of
the Multi-Valued option (Figure 173).
Type-specific. Type-specific properties apply only to particular
attribute types. For text attributes, they include the text values, text value images, and text value texts (Figure 174). For numeric
attributes, they include the ratings, the Dimension and Default Unit, and the settings for the number of Decimal Places and Show
Fractions option (Figure 176). And for coupled attributes, they include
the Dimension and Default Unit and the settings for the number of
Decimal Places and Show Fractions option for both the primary dimension and the coupled dimension (Figure 178).
Link-specific. Link-specific properties are defined for each particular
category/attribute link rather than for the attribute across all links, and
currently include the setting of the Attribute Priority. Some of them are only defined for the link, and some of them actually override the same property that was defined for the attribute itself.
Each of the attribute properties is described in the following sections.
COMMON PROPERTIES
The properties that are common to every attribute are described in the following sections (Figure 173).
Figure 173. Common attribute properties

MDM Data Manager Reference Guide 325
Attribute Name
Every attribute must have a unique name. The Name property of the Attribute Detail tab is a standard Windows edit control for data entry.
Attribute Alias
Use the Alias property to assign alternate names to the attribute, which
can be found using the Find command or using keyword search on the
Web. The Alias property of the Attribute Detail tab is a standard Windows edit control for data entry.
Attribute Definition
Use the Definition property to provide a detailed description of the attribute, which is available when you publish the repository to paper or
to the Web, and can also be useful for searching with the Find
command. The Definition property of the Attribute Detail tab is a standard multi-line Windows edit control for data entry.
Attribute Image
Use the Attribute Image property to associate an illustrative image with the attribute, which is available when you publish the repository to paper
or the Web. The Attribute Image property is an MDM image lookup field; double-click on it to open the Select Single Image dialog and assign an image.
NOTE ►► The steps for adding and removing an Attribute Image are essentially identical to those for product images except that you can only select a single image.
Multi-Valued Option
Any MDM attribute can be defined as being multi-valued, so that it can
be used to store multiple values. The Multi-Valued option is a standard Windows checkbox; click on it to toggle the setting on and off.
DATA INTEGRITY ►► Multi-valued attributes make the structure of an MDM repository dramatically simpler, more compact, and more searchable, by allowing you to store all the values corresponding to a particular data element in the same place. The alternative is having to create multiple attributes, in some cases up to a maximum of one attribute for each possible value.

326 MDM Data Manager Reference Guide
TEXT ATTRIBUTE PROPERTIES
The type-specific properties for text attributes are described in the following sections (Figure 174).
Figure 174. Text attribute properties
Attribute Text Values
The definition of a text attribute includes a list of text values. This list constitutes the set of legal values for that attribute; these are the only values from which you can choose and which you can assign to the attribute during data entry.
NOTE ►► A text attribute is like a “mini” lookup table with the set of valid choices defined by the list of attribute text values rather than the records of a lookup table.
NOTE ►► The maximum length of a text value is 128 characters.
DATA INTEGRITY ►► The set of legal values associated with text attributes enforces data integrity and also makes the MDM repository much more searchable, since a consistent set of values is used across the entire MDM repository.
NOTE ►► In addition to the Attribute Image property, the Text Value Image property allows you to associate an illustrative image with each text value. Select a text value and double-click on the Text Value Image property to open the Select Single Image dialog and assign an image.

MDM Data Manager Reference Guide 327
NOTE ►► To complement the Text Value Image property, the Text Value Text property allows you to associate a descriptive text string
with each text value. Right-click on a text value and choose View/Edit
Text from the context menu to open the Edit Text Value Text dialog.
To add a new text value for a text attribute:
1. Right-click in the text value list and choose Add from the context menu,
or click the Add button, or press Ins.
2. MDM adds a new text value named “New Value” and highlights it for editing (Figure 175).
Figure 175. Adding a new text value
3. Type the text value, and press Enter.
TIP ►► To change the new text value after you press Enter, press F2 to edit and type it again.
DATA INTEGRITY ►► Two text values cannot have the same name. If a text value named “New Value” already exists, MDM automatically names the new text value “New Value (n)” (where ‘n’ is the first available numeric value that will avoid a conflict).
To modify an existing text value for a text attribute:
1. In the text value list, select the text value you want to modify.
2. Right-click on the selected text value and choose Rename from the
context menu, or click the Modify button, or press F2.
3. MDM highlights the text value for editing.
4. Type the text value and press Enter.
To permanently delete one or more text values for a text attribute:
1. In the text value list, select the text value(s) you want to delete.

328 MDM Data Manager Reference Guide
2. Right-click on one of the text values and choose Delete from the
context menu, or click on the Delete button, or press Del.
3. MDM deletes the value(s) without confirmation.
To sort the list of text values for a text attribute:
1. Right-click in the text value list and choose Sort from the context menu,
or choose Attributes > Sort Text Values from the main menu.
2. Choose the sort order from the cascading menu:
Ascending Descending
3. MDM sorts the text values in the order you specify.
TIP ►► Instead of sorting in ascending or descending order, you can also manually order the text values for an attribute using drag-and-drop, just as you can manually order the siblings in a hierarchy. This allows you to precisely control the order in which they appear in drop-down lists in MDM Data Manager and when you publish the repository to paper or to the Web.
DATA INTEGRITY ►► MDM Data Manager brings up a confirmation dialog before actually performing the sort, to make sure you do not inadvertently override the manual sort order of the text values.
Text Value Image
Each text value of a text attribute can have its own image assigned to it.
Use the Text Value Image property to associate an illustrative image with the attribute text value, which is available when you publish the
repository to paper or the Web. The Text Value Image property is an MDM image lookup field; double-click on it to open the Select Single Image dialog and assign an image.
Text Value Text
In addition to the Text Value Image, each text value of a text attribute
can also have its own text string assigned to it. Use the Text Value Text property to associate a descriptive text string with the attribute text
value. The Text Value Text property is an MDM large text field.
TIP ►► To add or edit the Text Value Text for a text value, right-click
on the text value and choose View/Edit Text from the context menu to open the Edit Text Value Text dialog.
TIP ►► To delete the Text Value Text for one or more text values,
select the text values, right-click on one of them, and choose Delete
Text from the context menu.

MDM Data Manager Reference Guide 329
NOTE ►► MDM indicates that a Text Value Text text string has been linked to a text value by highlighting the text value in bold.
NOTE ►► When you hold the mouse over the text value, MDM
displays a tooltip that contains the Text Value Text.
NUMERIC ATTRIBUTE PROPERTIES
The type-specific properties for numeric attributes are described in the following sections (Figure 176).
Figure 176. Numeric attribute properties
Attribute Ratings
To allow you to organize related numeric values within a single named attribute, a numeric attribute can be defined as having up to five ratings,
each of which shares the single, common attribute definition. Each rating is a standard Windows checkbox; click on it to toggle each rating on and off. The five ratings are listed in Table 103; the default is
Nominal.
Table 103. Numeric Attribute Ratings
Rating Suffix Description
Nominal [Nom] The most commonly applicable default rating when just a single measurement is associated with the attribute.
Minimum [Min] The corresponding attribute value is a minimum.
Maximum [Max] The corresponding attribute value is a maximum.

330 MDM Data Manager Reference Guide
Rating Suffix Description
Average [Avg] The corresponding attribute value is an average.
Typical [Typ] The corresponding attribute value is a typical value.
NOTE ►► You must specify at least one rating for a numeric attribute.
NOTE ►► To distinguish the different ratings for a numeric attribute in attribute lists, MDM appends to the attribute name the rating
abbreviation in square brackets (e.g. Width [Max]). However, MDM
does not append the [Nom] suffix when Nominal is the only rating specified for the attribute.
Dimension and Default Unit
A numeric attribute can be defined as having an associated physical dimension, so that each numeric value you enter also includes a unit of measure chosen from the list of units applicable to that dimension.
NOTE ►► MDM currently has built-in support for over 70 different physical dimensions and over 750 different units of measure. In addition, MDM is able to convert between different units, for proper sorting of numeric values with different units within a list.
The Dimension and Default Unit properties are drop-down lists. To specify the Dimension for a numeric attribute, select from the drop-down
list of physical dimensions (Figure 177). To specify the Default Unit, if any, to be used by MDM for new data values, select from the drop-down list of units of measure corresponding to the selected dimension. The
default value for both Dimension and Default Unit is None.

MDM Data Manager Reference Guide 331
Figure 177. Numeric attribute dimensions
DATA INTEGRITY ►► Physical dimensions and units of measure make it easy to enforce data integrity, since units of measure must be selected from a predefined list of units rather than typed in by the user as a text string.
NOTE ►► You must specify a unit of measure for each numeric value if a physical dimension is defined for the attribute.
NOTE ►► Just as with a numeric attribute, the physical dimension is optional for either or both coupled dimensions of a coupled numeric attribute.
NOTE ►► When you change the physical dimension for a numeric
attribute that already has data values assigned to it from None or from another dimension, MDM does not allow you to select None as the
Default Unit and makes special use of the unit you specify to automatically repopulate the unit part of each existing attribute value.
To set the Default Unit to None, first save the attribute with a Default Unit, then change the Default Unit to None and save it again.

332 MDM Data Manager Reference Guide
Decimal Places and Show Fractions
You can specify two display options for a numeric (or coupled numeric) attribute: the number of decimal places to use to display numeric
values, and whether or not to display the first seven fractional powers of two (i.e. 1/2, 1/4, 1/8, 1/16, 1/32, 1/64, 1/128) as fractions.
The Decimal Places property is a drop-down list. To specify the Decimal Places for a numeric attribute, select from the drop-down list of values
between 0 and 6. The Show Fractions option is a standard Windows checkbox; click on it to toggle the setting on and off.
TIP ►► You can also use the menu commands as an alternative the Attribute Detail tab to specify these display options. (See “Decimal Places and Show Fractions” on page 362 for more information.)
NOTE ►► The Show Fractions option only applies to units of measure that are traditionally displayed with fractional values (e.g. inches) and is ignored for units that are not typically displayed with fractional values (e.g. millimeters).
NOTE ►► The Show Fractions option displays as fractions the fractional powers of two from 1/2 to 1/128 for absolute values between 0 and 999,999 (including all numerator values, such as 3/4, 5/16, and 27/64). The exceptions are for the units: (1) Horsepower in the dimension Power (Apparent) and (2) Cups, Pints, and Quarts in the dimension Volume, which for absolute values between 0 and 100 also display the “odd” fractions 1/3, 2/3, 1/5, 3/5, 4/5, 1/6, and 5/6, and approximately 130 fractions of the form “1/x” where ‘x’ ranges from 7 to 100 in increments of 1 (e.g. 1/7, 1/15, and 1/78); from 100 to 1000 in increments of 50 (e.g. 1/150, 1/250, and 1/500); and from 1000 to 2000 in increments of 100 (e.g. 1/1100, 1/1200, and 1/1300).
NOTE ►► A coupled numeric attribute allows you to specify settings
for the number of Decimal Places and the Show Fractions option independently for each of the coupled dimensions.

MDM Data Manager Reference Guide 333
COUPLED NUMERIC ATTRIBUTE PROPERTIES
The type-specific properties for coupled numeric attributes are described in the following sections (Figure 178).
Figure 178. Coupled numeric attribute properties
Coupled Name and Delimiter
Unlike text and numeric attributes, a coupled numeric attribute has not just one but two names: the standard attribute name that is the name for the first primary dimension, and the coupled name that is the name for the second coupled dimension. In addition, you can specify a custom delimiter string (such as “ @ “) that is used to separate the two names of the coupled attribute and also to separate each pair of numeric values.
The Coupled Name and Delim properties of the Attribute Detail tab are standard Windows edit controls for data entry.
NOTE ►► MDM displays the two names for a coupled attribute as “name delimiter coupledname” (where “delimiter” is the delimiter string for the attribute).
NOTE ►► The delimiter string can be different for each coupled numeric attribute.
Primary and Coupled Dimension Options
Just like a numeric attribute, a coupled numeric attribute has options for
Dimension, Default Unit, Decimal Places, and Show Fractions. However, since a coupled attribute has two dimensions, it has two sets of settings for each of these options.

334 MDM Data Manager Reference Guide
LINK-SPECIFIC PROPERTY
The link-specific property that applies to each category/attribute link is described in the next section.
Attribute Priority
An attribute’s priority affects where it is displayed in a list of attributes that are linked to a given category. The higher the priority, the higher in the list the attribute appears. Priority values can be selected from the predefined list shown below, or by specifying any number from 1 (the highest priority) to 100 (the lowest priority), as listed in Table 104.
Table 104. Attribute Priorities, Numeric Equivalents, and Ranges
Priority Name Numeric Equivalent Numeric Range
Highest 10 1 – 20
High 30 21 – 40
Normal 50 41 – 60
Low 70 61 – 80
Lowest 90 81 – 100
NOTE ►► Unlike the other properties of an attribute, which apply across all the categories to which the attribute is linked, priority can be set on a category-by-category (link-by-link) basis. In other words, the same attribute may have different priorities for different categories, to reflect the different importance it might have for each category.
TIP ►► You cannot set attribute priority in the Attribute Detail tab. To set the priority of one or more attributes, select the attribute(s) in the
Attributes pane, right-click on one of them, and choose Priority from
the context menu, or choose Attributes > Priority from the main menu, and then in either case, choose from the cascading menu of priorities. (See “Changing Attribute Priority” on page 343 for more information.)
NOTE ►► MDM automatically assigns a priority of Normal [50] when you first link the attribute.
NOTE ►► You cannot set the priority of an attribute if the current category is an alias, or if the attribute is inherited rather than linked directly to the current category.
NOTE ►► You cannot specify numeric priorities (nor are they displayed in the Attributes pane) unless Allow Custom Priorities has been enabled (see “Configuration Options” on page 495 for more information about the Allow Custom Priorities option).

MDM Data Manager Reference Guide 335
UNIT AND DIMENSION FINDER
MDM provides built-in support for over 70 different physical dimensions and over 750 different units of measure, so that it may be a bit tedious to find the proper dimension that contains a particular unit.
To address this challenge, MDM offers a “unit and dimension finder” that allows you to type in a string and locate all the units that contain it. Just as with free-form search, the finder supports a “contains” search, a “starts with” search, and an “equals” search.
NOTE ►► The finder also searches against MDM’s built-in dictionary of over 2000 synonyms and abbreviations for the units, so that the list is always comprehensive regardless of what you type.
To find the units and dimension that match a typed string:
1. Choose Attributes > Unit and Dimension Finder from the main menu to open the Unit and Dimension Finder dialog shown in Figure 179.
Figure 179. Unit and Dimension Finder dialog
2. In the dialog’s Find What text box, type the text you want to match.
3. In the Operator drop-down control, choose the type of match you want:
Contains Starts With Equals
4. Click Find. MDM populates the grid with all the units that match.
5. Sort by either Dimension or Unit and scroll the grid to find the units and dimensions you are looking for.
6. Click Cancel when you are done to close the dialog.
336 MDM Data Manager Reference Guide
Attribute Operations
Selecting an attribute in the Attributes pane displays the attribute’s definition in the Attribute Detail tab, so that you can edit its properties. Similarly, selecting a category in the taxonomy tree displays the corresponding linked attributes in the Attributes pane so that you can link and unlink attributes.
Table 105. Attribute Operations
Operation Description
Add Attribute Adds an attribute to the pool of attributes.
Delete Attribute Removes an attribute from the pool of attributes.
Link Attribute Adds an attribute link to an existing category.
Unlink Attribute Removes an attribute link from an existing category.
Promote Attribute Relinks an attribute to the parent category for inheritance by the children.
Demote Attribute Relinks an attribute from the parent category to each of the children.
Merge Attributes Combines two attributes into one, including all references.
Split Attribute Splits a single attribute into many, including all references,
Reassign Ratings
Reassigns the underlying numeric data values to
different ratings (Nominal, Minimum, Maximum,
Average, Typical).
Convert Attribute Changes an attribute between types, automatically converting all of the underlying text or numeric data values.
SAVING AND RESTORING ATTRIBUTES
When an attribute has been edited but the changes have not yet been saved, a pencil icon appears next to the attribute (Figure 180). You can either save the changes or restore the attribute to its original state as described in this section.

MDM Data Manager Reference Guide 337
To save changes to the attribute you are editing:
Right-click on the Attribute Detail tab (not in a property) and choose
Save Attribute from the context menu (Figure 180), or choose
Attributes > Save Attribute from the main menu, or press Shift+Enter.
To discard unsaved changes and restore the attribute to its prior state:
Right-click on the Attribute Detail tab (not in a property) and choose
Restore Attribute from the context menu (Figure 180), or choose
Attributes > Restore Attribute from the main menu, or press Esc.
Figure 180. Attribute Detail tab context menu
CAUTION ►► If you select another attribute or click on the edited attribute in the grid, changes are saved automatically and you will no
longer be able to use the Restore Attribute command to undo them.
ADDING AND MODIFYING ATTRIBUTES
You can add attributes to the pool of attributes and modify the properties of a single existing attribute at a time as described in this section. Since the different attribute types have different properties that define them, the steps for adding and modifying an attribute differ slightly depending on the type.
NOTE ►► When you create a new attribute, you only define the type of information you intend you store in it, but you do not actually create the “bucket” in which to store the information until you link it to one or more categories. By contrast, when you create a new field, you define the type of information you intend to store in it and create the bucket at the same time.

338 MDM Data Manager Reference Guide
To add a new attribute to the pool of available attributes:
1. Right-click in the Attributes pane and choose Add from the context
menu, or click the Add Attribute toolbar button (shown at left), or press
Ins, or choose Attributes > Add Attribute from the main menu.
2. MDM adds an attribute named “New Attribute” as the last attribute in the grid, and places you into the Attribute Detail tab to specify the properties of the new attribute.
3. In the Name edit control, type the name you want for the new attribute.
4. In the Alias edit control, type one or more aliases for the attribute (used
by the Find command).
5. In the Description edit control, type a long description for the attribute.
6. Select the applicable radio button to specify the attribute type:
Text Numeric Coupled Numeric
7. Specify the additional properties for the particular attribute type.
8. Click the Multi-valued checkbox to define the attribute as multi-valued, if applicable.
9. To save the attribute, right-click on the Attribute Detail tab and choose
Save Attribute from the context menu, or choose Attributes > Save
Attribute from the main menu, or press Shift+Enter.
TIP ►► There is no explicit command to modify an attribute. To modify an attribute, select it in the Attributes pane, move the focus into the Attribute Detail tab, and edit it directly.
TIP ►► To copy one or more attributes (but not their links), select
them in the Attributes pane, right-click on one of them, choose Copy
from the context menu, then right-click again and choose Paste.
TIP ►► You can press F5 to refresh the Attributes grid and move the new, modified, or copied attribute into its proper sort order.
TIP ►► To change the type of an attribute that already has data
values assigned to it, use one of the Convert Type commands. (See “Converting Attribute Types” on page 356 for more information.)
Table 106. Add and Modify Attribute Constraints
Operation Constraints
Add Attribute Must be in Taxonomy mode
Attributes pane must have focus
Modify Attribute Must be in Taxonomy mode
Attribute Detail tab must have focus

MDM Data Manager Reference Guide 339
DATA INTEGRITY ►► Two attributes cannot have the same name. If an attribute named “New Attribute” already exists, MDM automatically names the new attribute “New Attribute (n)” (where ‘n’ is the first available numeric value that will avoid a conflict).
DATA INTEGRITY ►► To prevent data loss, MDM will not allow you to change the properties of an existing attribute if such a change would result in lost data. For example: (1) you cannot delete a text value for a text attribute if it is assigned to the attribute in one or more records; (2) you cannot uncheck one of the ratings for a numeric attribute if that rating has values assigned to it in one or more records; and (3) you cannot uncheck the multi-valued checkbox if the attribute has multiple values assigned to it in one or more records. If you attempt to make any such change that would result in lost data, MDM displays an error dialog when you attempt to save the attribute.
DATA INTEGRITY ►► When you change the physical dimension for a numeric attribute that already has data values assigned to it, MDM either: (1) eliminates the unit of measure from existing values if you are
changing the dimension to None (Figure 181); or (2) uses the Default Unit to automatically repopulate the unit part of each existing value if
you are changing the dimension from None or from another dimension
(Figure 182). (This is a special use of the Default Unit, which normally
applies only to new data values, and is why you must specify a Default
Unit when you change the dimension in this case).
Figure 181. Attribute save eliminating unit of measure
Figure 182. Attribute save assigning unit of measure

340 MDM Data Manager Reference Guide
DELETING ATTRIBUTES
If you no longer expect to use an attribute to store information for any category, you can delete it from the pool of attributes.
To permanently delete one or more attributes from the pool of available attributes:
1. In the Attributes pane, select the attribute(s) you want to delete.
2. Right-click on one of the attributes and choose Delete from the context
menu, or click the Delete Attribute toolbar button (shown at left), or
press Del, or choose Attributes > Delete Attribute from the main menu.
3. MDM prompts you to confirm that you really want to delete the attributes, and inform you if any of the attributes you intend to delete
have links. Click OK to remove the attributes from the pool of attributes.
TIP ►► To bypass the delete confirmation dialog: (1) if none of the
attributes you want to delete has links, hold Shift while you perform the
Delete command; or (2) if one or more of the attributes you want to
delete have links, hold Shift+Ctrl+Alt while you perform the Delete command.
Table 107. Delete Attribute Constraints
Operation Constraints
Delete Attribute
Must be in Taxonomy mode
Attributes pane must have focus
At least one attribute must be selected
No selected attributes can have data assigned to them
DATA INTEGRITY ►► To prevent data loss, MDM will not allow you to delete a linked attribute if values are assigned to it in one or more records. However, MDM does not detect this condition until after you
attempt to perform the operation. As a result, the Delete menu item is available even if the selected attribute has data assigned to it. If you
choose Delete in this situation, MDM does not permit the delete and instead displays the error dialog shown in Figure 183.
Figure 183. Error Deleting Attribute(s) dialog

MDM Data Manager Reference Guide 341
LINKING AND UNLINKING ATTRIBUTES
Recall that when you create an attribute, you only define the type of information you intend you store in it, but you do not actually create the “bucket” in which to store the information until you link it to one or more categories.
You can link multiple attributes to a single category, and you can link each attribute to multiple categories. You can also link an attribute to the parent of a category, if you want all of the children of that category to inherit the attribute.
NOTE ►► An attribute is not associated with any records of the main table until you: (1) link it to a category; and (2) assign that category to a main table record.
To link one or more attributes to a category:
1. In the taxonomy tree, select the category to which you want to link the attributes.
2. In the Attributes pane, select the attribute(s) you want to link to the selected category.
3. Right-click on one of the attributes and choose Link from the context
menu, or click the Link Attribute toolbar button (shown at left), or press
Ctrl+L, or choose Attributes > Link from the main menu.
4. MDM links the selected attributes to the selected category, and displays the linked icon in the Linked column of the Attributes pane (Figure 184).
Figure 184. Linked attributes with Linked icon
TIP ►► You can also drag-and-drop one or more attributes from the Attributes pane onto any category in the taxonomy tree to link it directly to that category.
To unlink one or more attributes from a category:
1. In the Taxonomy tree, select the category from which you want to unlink the attributes.
2. In the Attributes pane, select the attribute(s) you want to unlink from the selected category.
Attributes linked to the current category have a Linked icon in the Linked column of the Attributes list.

342 MDM Data Manager Reference Guide
3. Right-click on one of the attributes and choose Unlink from the context
menu, or click the Unlink Attribute toolbar button (shown at left), or
press Ctrl+U, or choose Attributes > Unlink from the main menu.
4. MDM unlinks the selected attributes from the selected category.
Table 108. Link and Unlink Attribute Constraints
Operation Constraints
Link Attribute
Must be in Taxonomy mode
Attributes pane must have focus
At least one attribute must be selected
Root node cannot have linked attributes
Node cannot be an alias
One or more of the selected attributes are already linked to or inherited by the selected node
Unlink Attribute
Must be in Taxonomy mode
Attributes pane must have focus
At least one attribute must be selected
Root node cannot have attributes to unlink
Node cannot be an alias
All of the selected attributes must be linked to the selected node
No selected attributes can have data assigned to them
DATA INTEGRITY ►► To prevent data loss, MDM will not allow you to unlink a linked attribute if values are assigned to it in one or more records. However, MDM does not detect this condition until after you
attempt to perform the operation. As a result, the Unlink menu item is available even if the selected attribute has data assigned to it. If you
choose Unlink in this situation, MDM does not permit the unlink and instead displays the error dialog shown in Figure 185.
Figure 185. Error Unlinking Attribute(s) dialog
VIEWING ATTRIBUTE USAGE
To see which categories have a particular attribute linked to them (“attribute usage”):
1. In the Attributes pane, select the attribute whose usage you want to see.

MDM Data Manager Reference Guide 343
2. Click on the Usage tab (to the right of the Attribute Detail tab).
3. The Usage tab contains a partial version of the category tree that includes: (1) all of its nodes expanded; (2) just enough tree structure to display those nodes to which the attribute is linked in black; (3) all other nodes highlighted in gray (Figure 186).
Figure 186. Attribute Usage tab
TIP ►► When you move the mouse pointer over a node to which the attribute is linked, MDM highlights the name of the node in bold. If you click on a bold node name, MDM will immediately change the selected category to that node in the taxonomy tree.
DATA INTEGRITY ►► The Usage tab makes it easy to detect errors in your taxonomy, when attributes that should not be linked to a category show up in the hierarchy of category links.
CHANGING ATTRIBUTE PRIORITY
Recall that unlike the other properties of an attribute, which apply across all the categories to which the attribute is linked, priority can be set on a category-by-category (link-by-link) basis. In other words, the same attribute may have different priorities for different categories, to reflect the different importance it might have for each category.
To set the priority of one or more linked attributes to a named priority:
1. In the Attributes pane, select the linked attribute(s) whose priority you want to set.
2. Right-click on one of the attributes and choose Priority from the context
menu, or choose Attributes > Priority from the main menu.
3. Choose one of the named priorities from the cascading menu:
Highest High Normal Low Lowest
4. MDM changes the priority of the selected attributes.
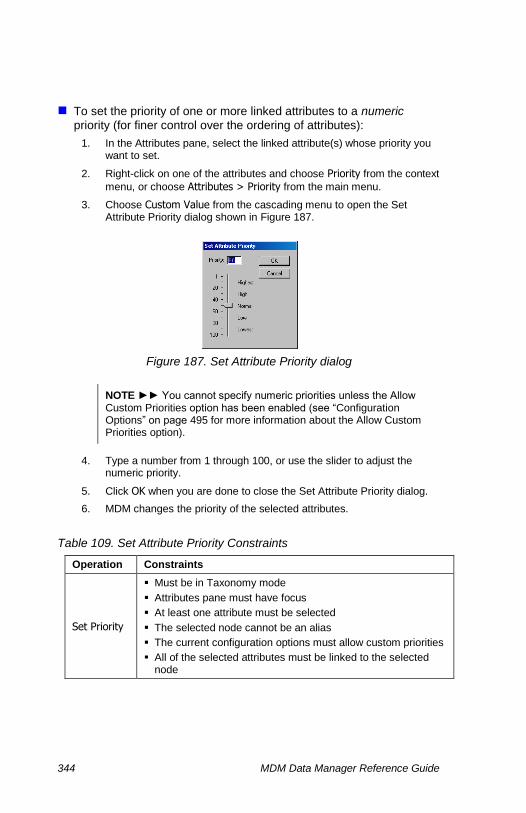
344 MDM Data Manager Reference Guide
To set the priority of one or more linked attributes to a numeric
priority (for finer control over the ordering of attributes):
1. In the Attributes pane, select the linked attribute(s) whose priority you want to set.
2. Right-click on one of the attributes and choose Priority from the context
menu, or choose Attributes > Priority from the main menu.
3. Choose Custom Value from the cascading menu to open the Set Attribute Priority dialog shown in Figure 187.
Figure 187. Set Attribute Priority dialog
NOTE ►► You cannot specify numeric priorities unless the Allow Custom Priorities option has been enabled (see “Configuration Options” on page 495 for more information about the Allow Custom Priorities option).
4. Type a number from 1 through 100, or use the slider to adjust the numeric priority.
5. Click OK when you are done to close the Set Attribute Priority dialog.
6. MDM changes the priority of the selected attributes.
Table 109. Set Attribute Priority Constraints
Operation Constraints
Set Priority
Must be in Taxonomy mode
Attributes pane must have focus
At least one attribute must be selected
The selected node cannot be an alias
The current configuration options must allow custom priorities
All of the selected attributes must be linked to the selected node

MDM Data Manager Reference Guide 345
PROMOTING AND DEMOTING ATTRIBUTES
As the repository taxonomy develops, it may become useful to promote or demote some attributes.
When you use the Promote command to promote a linked attribute,
MDM links the attribute to the parent, removes the direct link from the child, and replaces it with indirect links to all of the children through inheritance.
When you use the Demote command to demote a linked attribute, MDM
unlinks the attribute from the parent and links it directly to each of the children. In both cases, MDM preserves all of the underlying data values assigned to the attribute.
NOTE ►► If you promote to a parent an attribute that had been linked to just some of the children, it would then be indirectly linked through inheritance to all of the children. If you then demote the same attribute, it would then be directly linked to all of the children. If you want to revert to the initial state – where the attribute is linked to just some of the children – you must manually unlink it from the other children.
To promote one or more linked attributes:
1. In the taxonomy tree, select the category to which the attribute you want to promote is linked.
2. In the Attributes pane, select the linked attribute(s) you want to promote.
3. Right-click on one of the attributes and choose Promote from the
context menu, or choose Attributes > Promote from the main menu.
4. MDM links the selected attributes to the parent category, unlinks them from the selected category, and also unlinks them from any other descendants of the parent category.
NOTE ►► After the promote, the attribute is inherited not only by the selected category (as indicated by a “1” superscript next to the Linked icon in the Linked column of the Attributes list) but also all of the other descendants of the parent category.
To demote one or more linked attributes:
1. In the taxonomy tree, select the category to which the attribute you want to demote is linked.
2. In the Attributes pane, select the linked attribute(s) you want to promote.
3. Right-click on one of the attributes and choose Demote from the
context menu, or choose Attributes > Demote from the main menu.
4. MDM unlinks the selected attributes from the selected category and links each one directly to each of the children of the selected category.
346 MDM Data Manager Reference Guide
Table 110. Promote and Demote Attribute Constraints
Operation Constraints
Promote Attribute
Must be in Taxonomy mode
Attributes pane must have focus
At least one attribute must be selected
The selected node cannot be the root
The selected node cannot be an alias
All the selected attributes must be linked to the selected node
Demote Attribute
Must be in Taxonomy mode
Attributes pane must have focus
At least one attribute must be selected
The selected node cannot be the root
The selected node cannot be an alias
The selected node must have children
All the selected attributes must be linked to the selected node
MERGING ATTRIBUTES
Sometimes redundant attributes may get added to the repository. This may occur when importing a file that uses a different name for an existing attribute, or when different people create a new attribute for products without first checking to see if an equivalent attribute already exists. In these cases, the solution is to merge the redundant attributes.
When you use the Merge command to merge two attributes into a single attribute, MDM opens the Merge Attributes dialog similar to the Attribute Detail tab for the particular attribute type, and populates it with values for you to edit.
When you merge a text attribute, each attribute is likely to have a different set of text values, and MDM populates the merge dialog with the combined set of text values from each of them. You can modify text values, delete unused values, and even merge pairs of corresponding values, as necessary, to create a single synthesized set of text values for the merged attribute.
MDM then merges the attribute based on the values and option settings you specify (Table 111, and as shown in Figures Figure 189, Figure 190, and Figure 191), as follows:
Creates the resultant attribute to replace the original attributes.
Allows you to modify, delete, and arbitrarily combine text values for a text attribute merge.

MDM Data Manager Reference Guide 347
Links the resultant attribute to each of the categories that had either of the original attributes linked.
Assigns the appropriate value(s) to the resultant attribute in each record that had data values set for either original attribute.
Removes the two original attributes from the pool of attributes.
Merging attributes is a powerful operation that merges not only the attributes and their corresponding links, but also all of the underlying sets of data values and even the data values themselves that are assigned to each of the attributes.
DATA INTEGRITY ►► If each attribute has a different Attribute Image (or a different Text Value Image for a common text value), MDM
displays .Multiple Images. in the image property in place of either
image. You must double-click on the property to open the Select Single Image dialog and deselect one of the images to resolve the conflict
before you are permitted to hit OK.
DATA INTEGRITY ►► If both original attributes have a link to the same category so that individual main table records have a value set for each attribute, and you define the resultant attribute as single-valued, both original values cannot be stored in the resultant attribute. If this occurs, MDM cannot perform the merge without loss of data.
Instead, it creates a mask called “Merge Attributes Conflict [attr1, attr2]” identifying the offending records, and displays the error dialog shown in Figure 188.
Figure 188. Error Merging Attributes message
Table 111. Initial Merged Values in the Merge Attributes Dialog
Property Initial Merged Value
Name Merged Attr1 and Attr2
Alias Alias1 Alias2
Definition Definition1 Definition2
Attribute Image
Single displayed image if only one image or same image from both
Image frame color-coded based on source or conflict
Attr1 Image1

348 MDM Data Manager Reference Guide
Property Initial Merged Value
Attr2 Image2
Common to both Image
Two different images .Multiple Images.
Multi-Valued
Checkbox set if Multi-Valued set for either or both attributes
Color-coded based on source
Disabled if in use by either or both attributes (cannot be unchecked)
Priority Preserves Priority of each of the original links
Chooses higher priority when linked to the same category
Text attributes only
Text Value List
List contains combined set of text value(s)
Text values can be modified, deleted, and merged
Color-coded based on source
Bold if in use by either or both attributes (cannot be deleted)
Source Unused In Use
Attr1 text value1 text value1
Attr2 text value2 text value2
Common to both text value text value
Numeric attributes only
Ratings
Checkbox for each rating set if set for either or both attributes
Color-coded based on source
Disabled if in use by either or both attributes (cannot be unchecked)
Numeric and coupled numeric attributes only
Dimension Dimension (common for original attributes and cannot be
changed)
Default Unit Unit1
Decimal Places
Decimal1
Show Fractions
Checkbox set if Show Fractions set for either or both attributes
Color-coded based on source
Legend
Source Unused In Use
Attr1
Attr2
Common to both

MDM Data Manager Reference Guide 349
Merging Text Attributes
To merge two text attributes into a single attribute:
1. In the Attributes pane, select the two text attributes you want to merge.
2. Right-click on one of the attributes and choose Merge from the context
menu, or choose Attributes > Merge from the main menu to open the Merge Text Attributes dialog shown in Figure 189.
Figure 189. Merge Text Attributes dialog
3. MDM populates the dialog with the values and option settings from each of the two selected text attributes.
4. Edit the Name, Definition, and Alias properties for the merged attribute.
5. Select an image and/or eliminate conflicts for the Attribute Image property.
6. Edit, delete, and merge individual text values as necessary to create a single synthesized set of text values for the merged attribute. Note the color-coding and the bold highlighting that MDM uses to indicate the source of each text value and whether or not it is in use.
7. If it is not disabled, specify the setting for the Multi-Valued option.
8. Click OK when you are done to close the Merge Text Attributes dialog.
9. MDM merges the two selected attributes and all links to them, and if necessary, also modifies, deletes, and merges the underlying text values.
NOTE ►► The Merge Text Attributes dialog is almost identical to the
Attribute Detail tab for text attributes, except for the absence of the Add
button, and the presence of the Merge button (unique to this dialog) that allows you to merge pairs of text values.

350 MDM Data Manager Reference Guide
Merging Numeric Attributes
To merge two numeric attributes with the same dimension into a single attribute:
1. In the Attributes pane, select the two numeric attributes you want to merge.
2. Right-click on one of the attributes and choose Merge from the context
menu, or choose Attributes > Merge from the main menu to open the Merge Numeric Attributes dialog shown in Figure 190.
Figure 190. Merge Numeric Attributes dialog
3. MDM populates the dialog with the values and option settings from each of the two selected text attributes.
4. Edit the Name, Definition, and Alias properties for the merged attribute.
5. Select an image and/or eliminate conflicts for the Attribute Image property.
6. For those that are not disabled, specify settings for each of the ratings.
7. Specify the settings for the Default Unit, the number of Decimal Places,
and the Show Fractions option.
8. If it is not disabled, specify the setting for the Multi-valued option.
9. Click OK when you are done to close the Merge Numeric Attributes dialog.
10. MDM merges the two selected attributes and all links to them.
NOTE ►► The Merge Numeric Attributes dialog is identical to the
Attribute Detail tab for numeric attributes, except that the Dimension property cannot be edited.
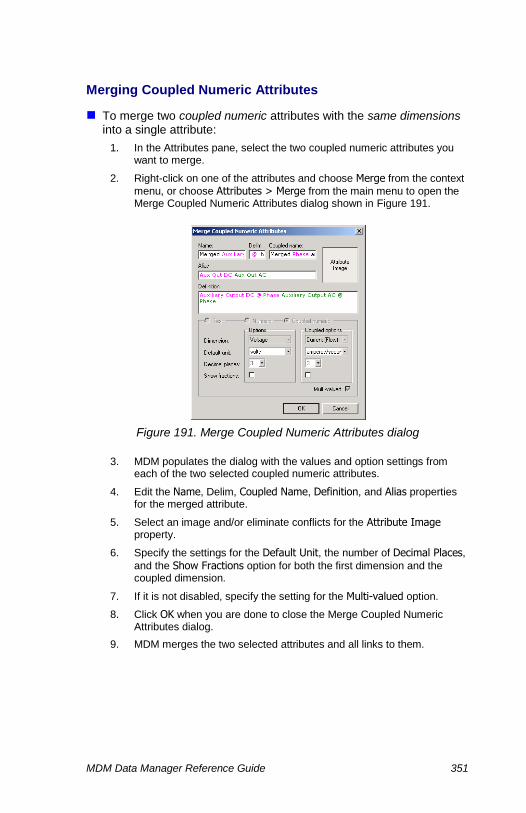
MDM Data Manager Reference Guide 351
Merging Coupled Numeric Attributes
To merge two coupled numeric attributes with the same dimensions into a single attribute:
1. In the Attributes pane, select the two coupled numeric attributes you want to merge.
2. Right-click on one of the attributes and choose Merge from the context
menu, or choose Attributes > Merge from the main menu to open the Merge Coupled Numeric Attributes dialog shown in Figure 191.
Figure 191. Merge Coupled Numeric Attributes dialog
3. MDM populates the dialog with the values and option settings from each of the two selected coupled numeric attributes.
4. Edit the Name, Delim, Coupled Name, Definition, and Alias properties for the merged attribute.
5. Select an image and/or eliminate conflicts for the Attribute Image property.
6. Specify the settings for the Default Unit, the number of Decimal Places,
and the Show Fractions option for both the first dimension and the coupled dimension.
7. If it is not disabled, specify the setting for the Multi-valued option.
8. Click OK when you are done to close the Merge Coupled Numeric Attributes dialog.
9. MDM merges the two selected attributes and all links to them.
352 MDM Data Manager Reference Guide
Table 112. Merge Attributes Constraints
Operation Constraints
Merge Attributes
Must be in Taxonomy mode
Attributes pane must have focus
Exactly two attributes must be selected
Neither of the selected attributes can be in a matching set
The selected attributes must have the same type, and if numeric or coupled, must have the same measurement type(s)
SPLITTING ATTRIBUTES
Just as you may need to merge two attributes, a single attribute may need to be broken into two or more attributes to meet the requirements of your master data, if for example, a single attribute is too generally defined across multiple links, or if a single attribute with multiple ratings would be better structured as different multiple attributes each with a single rating. In these cases, the solution is to split the attribute.
When you use the Split command to split an attribute into multiple attributes, MDM opens the Split Attribute dialog, and then splits the attribute based on the option settings you specify (Table 113), as follows:
Creates one or more new attributes.
Unlinks the original attribute from each category for which one or more new attributes was created.
Links each new attribute to the corresponding single category that had the original attribute linked.
Assigns the appropriate value(s) to the new attribute in each main table record that had data values set for the original attribute.
Removes the original attribute from the pool of attributes if you split by all links.
Splitting attributes is deceptively simple, but with just a few different options that let you split by all links or just the link to the selected category, and for numeric attributes let you split by ratings, you are able to split a single attribute into many in a variety of different ways.
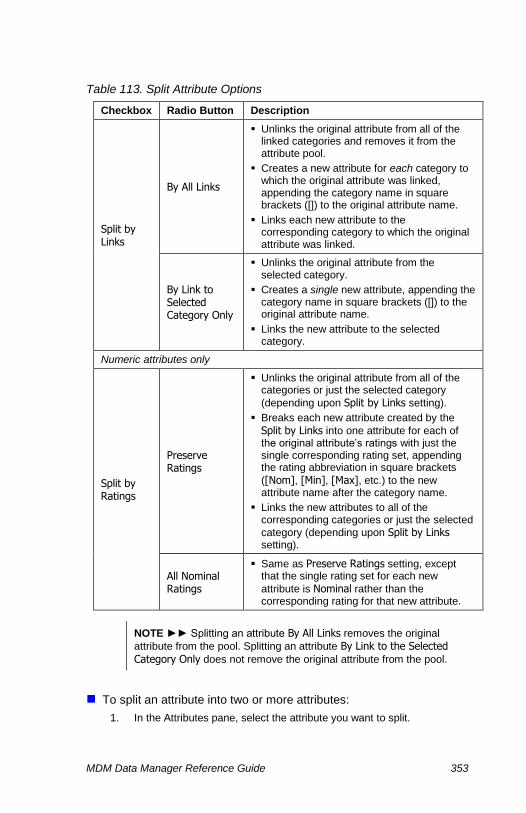
MDM Data Manager Reference Guide 353
Table 113. Split Attribute Options
Checkbox Radio Button Description
Split by Links
By All Links
Unlinks the original attribute from all of the linked categories and removes it from the attribute pool.
Creates a new attribute for each category to which the original attribute was linked, appending the category name in square brackets ([]) to the original attribute name.
Links each new attribute to the corresponding category to which the original attribute was linked.
By Link to Selected Category Only
Unlinks the original attribute from the selected category.
Creates a single new attribute, appending the category name in square brackets ([]) to the original attribute name.
Links the new attribute to the selected category.
Numeric attributes only
Split by Ratings
Preserve Ratings
Unlinks the original attribute from all of the categories or just the selected category
(depending upon Split by Links setting).
Breaks each new attribute created by the
Split by Links into one attribute for each of the original attribute’s ratings with just the single corresponding rating set, appending the rating abbreviation in square brackets
([Nom], [Min], [Max], etc.) to the new attribute name after the category name.
Links the new attributes to all of the corresponding categories or just the selected
category (depending upon Split by Links setting).
All Nominal Ratings
Same as Preserve Ratings setting, except that the single rating set for each new
attribute is Nominal rather than the corresponding rating for that new attribute.
NOTE ►► Splitting an attribute By All Links removes the original
attribute from the pool. Splitting an attribute By Link to the Selected
Category Only does not remove the original attribute from the pool.
To split an attribute into two or more attributes:
1. In the Attributes pane, select the attribute you want to split.

354 MDM Data Manager Reference Guide
2. Right-click on the attribute and choose Split from the context menu, or
choose Attributes > Split from the main menu to open the Split Attribute dialog shown in Figure 192.
Figure 192. Split Attribute dialog
3. Specify the desired dialog settings, as described in Table 113.
4. Click OK when you are done to close the Split Attribute dialog.
5. MDM splits the selected attribute.
Table 114. Split Attribute Constraints
Operation Constraints
Split Attribute
Must be in Taxonomy mode
Attributes pane must have focus
Exactly one attribute must be selected
The selected attribute cannot be in a matching set
The selected attribute cannot be in a family partition
The selected text or coupled attribute must have links, or the selected numeric attribute must have either links or multiple ratings
REASSIGNING ATTRIBUTE RATINGS
Recall that ratings allow you to organize related numeric values within a single named attribute, and that ratings are defined by selecting the
applicable Ratings check boxes in the Attribute Detail tab. (See “Attribute Ratings” on page 329 for more information about ratings).
Sometimes you may need to change the ratings of a numeric attribute, but if you have already assigned numeric values to the existing ratings, you cannot simply check and uncheck different ratings checkboxes, because that would not change the rating assigned to each set of existing numeric values. In these cases, the solution is to reassign ratings for the attribute.
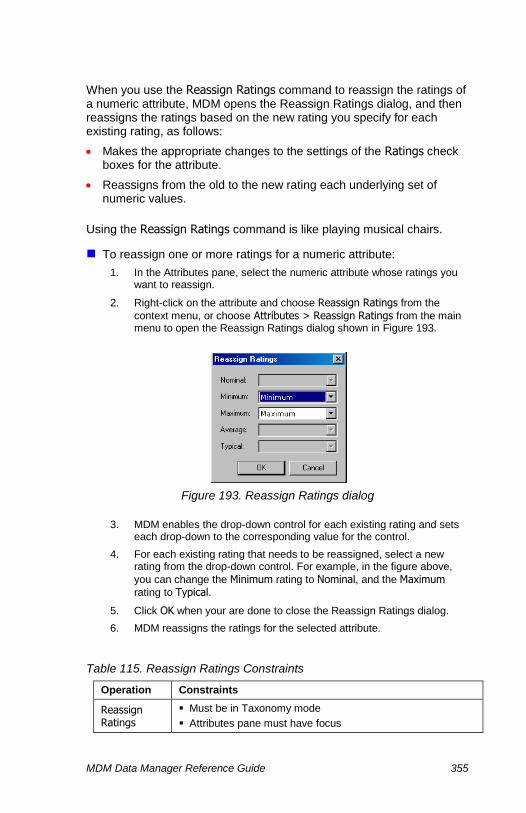
MDM Data Manager Reference Guide 355
When you use the Reassign Ratings command to reassign the ratings of a numeric attribute, MDM opens the Reassign Ratings dialog, and then reassigns the ratings based on the new rating you specify for each existing rating, as follows:
Makes the appropriate changes to the settings of the Ratings check boxes for the attribute.
Reassigns from the old to the new rating each underlying set of numeric values.
Using the Reassign Ratings command is like playing musical chairs.
To reassign one or more ratings for a numeric attribute:
1. In the Attributes pane, select the numeric attribute whose ratings you want to reassign.
2. Right-click on the attribute and choose Reassign Ratings from the
context menu, or choose Attributes > Reassign Ratings from the main menu to open the Reassign Ratings dialog shown in Figure 193.
Figure 193. Reassign Ratings dialog
3. MDM enables the drop-down control for each existing rating and sets each drop-down to the corresponding value for the control.
4. For each existing rating that needs to be reassigned, select a new rating from the drop-down control. For example, in the figure above,
you can change the Minimum rating to Nominal, and the Maximum
rating to Typical.
5. Click OK when your are done to close the Reassign Ratings dialog.
6. MDM reassigns the ratings for the selected attribute.
Table 115. Reassign Ratings Constraints
Operation Constraints
Reassign Ratings
Must be in Taxonomy mode
Attributes pane must have focus
356 MDM Data Manager Reference Guide
Operation Constraints
Exactly one attribute must be selected
The selected attribute must be numeric (but not coupled numeric)
DATA INTEGRITY ►► If you want to eliminate a rating to which numeric values have already been assigned, you cannot simply uncheck the rating in the Attribute Detail tab because this would result in data loss. To eliminate the rating, you must first delete the data values that have been assigned to the rating.
CONVERTING ATTRIBUTE TYPES
Sometimes, data is imported or added where the attribute type is incorrect and needs to be changed, for example, from text to numeric, or from numeric to coupled numeric.
MDM allows you to convert an attribute between types using the
Convert Type command, as described in the following sections.
Text to Numeric
When you convert from text to numeric, MDM opens a dialog that includes the ratings and options controls of the Attribute Detail tab and a two-column grid. The first column lists the entire set of text values for the attribute; the second column lists the corresponding numeric values and units of measure.
MDM then assists you in converting the values, as follows:
Sets the rating for the converted attribute to Nominal, the Dimension
and Default Unit to None, Decimal Places to 0, and Show Fractions off.
Populates the first column with text strings of all of the distinct text values for the text attribute across the entire repository.
Populates the second column with as many converted numeric values as it can discern in the corresponding text strings.
When you specify a Dimension, updates the second column with as many converted unit of measure values as it can discern in the corresponding text strings.
When you specify a Default Unit, updates the second column with units of measure for all remaining values that do not yet have a unit of measure.
Allows you to specify a setting for the Decimal Places option.
When you set the Show Fractions option, updates the second column to display the numeric values as fractions, where possible.

MDM Data Manager Reference Guide 357
Allows you to manually enter numeric values and/or units of measure that it cannot discern, or override values that it has populated automatically.
Finally, MDM converts the attribute from text to numeric based on the values you specify.
NOTE ►► You must enter a numeric value (and unit of measure, if you have specified a dimension) for every text value in the list before
MDM permits you to press OK. Otherwise, MDM would not have enough information to convert the attribute.
To change an attribute’s type from text to numeric:
1. In the Attributes pane, select the text attribute whose type you want to convert to numeric.
2. Right-click on the attribute and choose Convert Type from the context
menu, or choose Attributes > Convert Type from the main menu.
3. Choose To Numeric from the cascading menu of conversions to open the Convert Attribute Type from Text to Numeric dialog shown in Figure 194.
Figure 194. Convert Attribute Type from Text to Numeric dialog
4. MDM populates the first column of the grid with text strings of all of the distinct text values for the text attribute across the entire repository and the second column with the converted numeric values.
5. Choose the single Rating for the converted attribute.
6. Specify the Dimension for the converted attribute.
7. Specify the settings for the number of Decimal Places and the Show
Fractions option of the converted attribute.
8. Enter or override the numeric value and/or unit of measure for each text value.

358 MDM Data Manager Reference Guide
9. Click OK when you are done to close the dialog.
10. MDM converts the selected attribute.
Text to Coupled Numeric
Converting from text to coupled is very similar to converting from text to numeric as described under “Text to Numeric” above, except that the
converted attribute requires a Coupled Name, and the grid includes a third column for the converted numeric values and associated units of measure of the coupled dimension.
NOTE ►► MDM uses the ‘@’ as the separator when it attempts to parse and convert each text string into two measurement values.
To change an attribute’s type from text to coupled numeric:
1. In the Attributes pane, select the text attribute whose type you want to convert to coupled.
2. Right-click on the attribute and choose Convert Type from the context
menu, or choose Attributes > Convert Type from the main menu.
3. Choose To Coupled from the cascading menu of conversions to open the dialog shown in Figure 195.
Figure 195. Convert Attribute Type from Text to Coupled dialog
4. MDM populates the first column of the grid with text strings of all of the distinct text values for the text attribute across the entire repository and the second and third columns with the converted numeric values.
5. Enter a Coupled Name for the converted attribute.
6. Specify two Dimensions for the converted attribute.
7. Specify the settings for the number of Decimal Places and the Show
Fractions option for both dimensions of the converted attribute.
8. Enter or override the pair of numeric values and units of measure for each text value.
MDM Data Manager Reference Guide 359
9. Click OK when you are done to close the dialog.
10. MDM converts the selected attribute.
Numeric or Coupled Numeric to Text
When you convert from numeric or coupled numeric to text, MDM can convert every numeric value or value pair into a text string automatically and the conversion proceeds without user intervention.
To change an attribute’s type from either numeric or coupled numeric to text:
1. In the Attributes pane, select the numeric or coupled numeric attribute whose type you want to convert to text.
2. Right-click on the attribute and choose Convert Type from the context
menu, or choose Attributes > Convert Type from the main menu.
3. Choose To Text from the cascading menu of conversions.
4. MDM prompts you to confirm that you really want to convert the
attribute. Click OK to convert the attribute type to text.
5. MDM creates a text value list that includes a text value for each distinct numeric value (or value pair) that existed for the numeric (or coupled numeric) attribute across the entire repository, generated by converting each numeric value (or value pair) into a text string.
NOTE ►► Each generated text value reflects the settings for the
number of Decimal Places and the Show Fractions option. If the numeric or coupled numeric attribute had physical dimension(s), each generated text value includes both a numeric component and a unit of measure. If the attribute was coupled, the text value includes the delimiter string.
Numeric to Coupled Numeric
When you convert from numeric to coupled numeric, MDM opens a dialog that requires you to supply the coupled information, and just a single coupled numeric value.
To change an attribute’s type from numeric to coupled numeric:
1. In the Attributes pane, select the numeric attribute whose type you want to convert to coupled numeric.
2. Right-click on the attribute and choose Convert Type from the context
menu, or choose Attributes > Convert Type from the main menu.
3. Choose To Coupled from the cascading menu of conversions to open the dialog shown in Figure 196.
360 MDM Data Manager Reference Guide
Figure 196. Convert Numeric to Coupled dialog
4. Enter a Coupled Name for the converted attribute.
5. Specify the coupled Dimension for the converted attribute.
6. Specify the settings for the number of Decimal Places and the Show
Fractions option for the coupled dimension of the converted attribute.
7. Enter a single numeric value and unit of measure for all of the coupled values of the converted attribute.
8. Click OK when you are done to close the dialog.
9. MDM converts the selected attribute.
Coupled Numeric to Numeric
When you convert from coupled numeric to numeric, MDM truncates the coupled numeric value from every value pair for the coupled numeric attribute across the entire repository.
CAUTION ►► If you convert an attribute from coupled numeric to numeric, MDM tosses away the coupled data. Proceed with care. This operation cannot be undone.
To change an attribute’s type from coupled numeric to numeric:
1. In the Attributes pane, select the coupled numeric attribute whose type you want to convert to numeric.
2. Right-click on the attribute and choose Convert Type from the context
menu, or choose Attributes > Convert Type from the main menu.
3. Choose To Numeric from the cascading menu of conversions.
4. MDM prompts you to confirm that you really want to convert the attribute, and warn you that the numeric values associated with the
coupled dimension will be discarded (Figure 197). Click OK to convert the attribute type to numeric.
5. MDM converts the selected attribute.
MDM Data Manager Reference Guide 361
Figure 197. Convert Coupled to Numeric warning
Table 116. Convert Attribute Type Constraints
Operation Constraints
Convert to Text
Must be in Taxonomy mode
Attributes pane must have focus
Exactly one attribute must be selected
The selected attribute cannot be in a matching set
The selected attribute must be numeric or coupled, and if numeric, cannot have multiple ratings
Convert to Numeric
Must be in Taxonomy mode
Attributes pane must have focus
Exactly one attribute must be selected
The selected attribute cannot be in a matching set
The selected attribute must be text or coupled
Convert to Coupled
Must be in Taxonomy mode
Attributes pane must have focus
Exactly one attribute must be selected
The selected attribute cannot be in a matching set
The selected attribute must be text or numeric, and if numeric, cannot have multiple ratings
SORT TEXT VALUES
You can use menu commands as a shortcut to sort the text values of a text attribute in ascending or descending order.
To sort the list of text values for a text attribute:
1. In the Attributes pane, select the text attribute whose values you want to sort.
2. Right-click on the attribute, and choose Sort Text Values from the
context menu, or choose Attributes > Sort Text Values from the main menu.
3. Choose the sort order from the cascading menu:
Ascending Descending
4. MDM sorts the text values in the order you specify.
362 MDM Data Manager Reference Guide
TIP ►► You can also Sort Text Values using the context menu in the text value list of the Attribute Detail tab.
DATA INTEGRITY ►► MDM Data Manager brings up a confirmation dialog before actually performing the sort, to make sure you do not inadvertently override the manual sort order of the text values.
Table 117. Sort Text Values Constraints
Operation Constraints
Sort Text Values
Must be in Taxonomy mode
Attributes pane must have focus
Exactly one attribute must be selected
The selected attribute must be text
DECIMAL PLACES AND SHOW FRACTIONS
You can use menu commands as a shortcut to specify the display options for numeric attributes.
To set the number of decimal places for one or more numeric attributes:
1. In the Attributes pane, select the attribute(s) whose Decimal Places setting you want to change.
2. Right-click on one of the attributes, and choose Decimal Places from
the context menu, or choose Attributes > Decimal Places from the main menu.
3. Choose from the cascading menu of numeric values.
4. MDM sets the number of decimal places for the selected attributes.
TIP ►► You can also set the Decimal Places option for a single attribute at a time in the Attribute Detail tab.
NOTE ►► You cannot use the Decimal Places menu command with coupled numeric attributes because they have two numeric dimensions.
To set the display of fractions for one or more numeric attributes:
1. In the Attributes pane, select the attribute(s) whose Show Fractions setting you want to change.
2. Right-click on one of the attributes, and choose Show Fractions from
the context menu, or choose Attributes > Show Fractions from the main menu.
3. MDM sets the Show Fractions option for the selected attributes.
MDM Data Manager Reference Guide 363
TIP ►► You can also set the Show Fractions option for a single attribute at a time in the Attribute Detail tab.
NOTE ►► Show Fractions is a toggle. A check mark next to the Show Fractions menu item indicates that it is turned on. To turn it off, choose
the Show Fractions command again.
NOTE ►► You cannot use the Show Fractions menu command with coupled numeric attributes because they have two numeric dimensions.
NOTE ►► The Show Fractions option only applies to units of measure that are traditionally displayed with fractional values (e.g. inches) and is ignored for units that are not typically displayed with fractional values (e.g. millimeters).
Table 118. Decimal Places and Show Fractions Constraints
Operation Constraints
Decimal Places
Must be in Taxonomy mode
Attributes pane must have focus
At least one attribute must be selected
All of the selected attributes must be numeric
Show Fractions
Must be in Taxonomy mode
Attributes pane must have focus
At least one attribute must be selected
All of the selected attributes must be numeric


365
PART 5: PRODUCT RELATIONSHIPS
This part describes product relationships within MDM, which can be defined both at the category level and at the individual product level.
Product relationships are useful for merchandising, for representing structural relationships between products and non-products, and for representing other relationships between records in the repository.

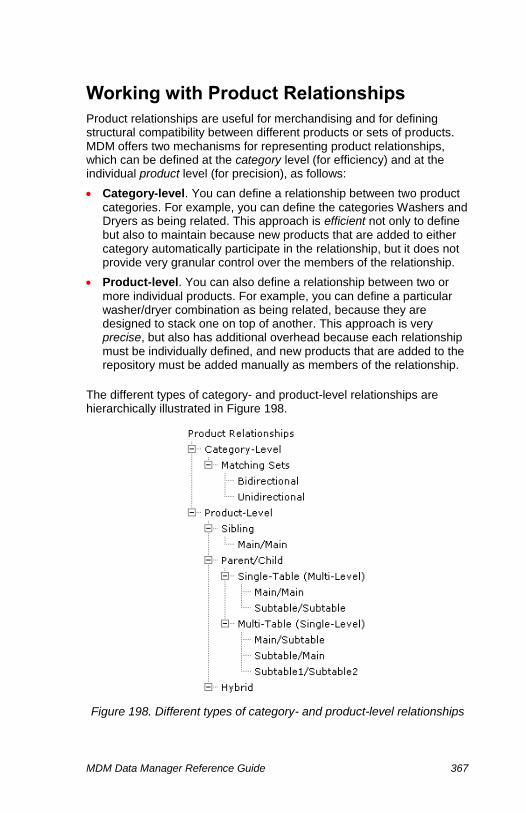
MDM Data Manager Reference Guide 367
Working with Product Relationships
Product relationships are useful for merchandising and for defining structural compatibility between different products or sets of products. MDM offers two mechanisms for representing product relationships, which can be defined at the category level (for efficiency) and at the individual product level (for precision), as follows:
Category-level. You can define a relationship between two product
categories. For example, you can define the categories Washers and Dryers as being related. This approach is efficient not only to define but also to maintain because new products that are added to either category automatically participate in the relationship, but it does not provide very granular control over the members of the relationship.
Product-level. You can also define a relationship between two or
more individual products. For example, you can define a particular washer/dryer combination as being related, because they are designed to stack one on top of another. This approach is very precise, but also has additional overhead because each relationship must be individually defined, and new products that are added to the repository must be added manually as members of the relationship.
The different types of category- and product-level relationships are hierarchically illustrated in Figure 198.
Figure 198. Different types of category- and product-level relationships
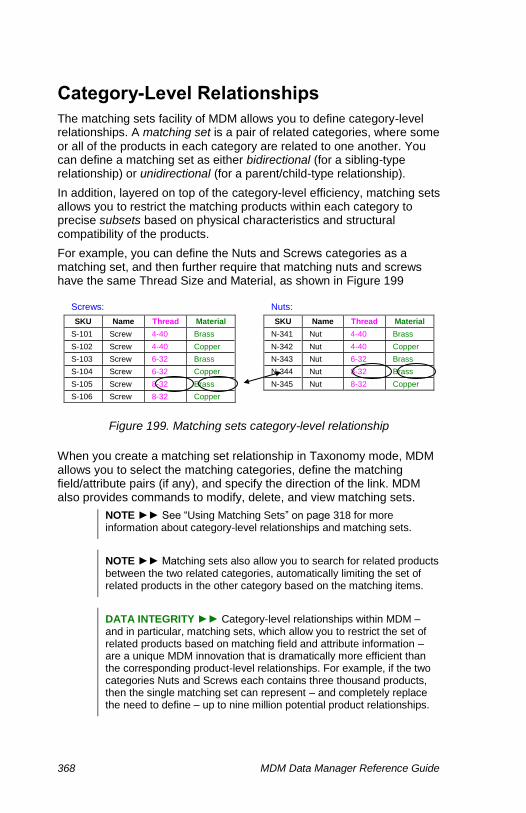
368 MDM Data Manager Reference Guide
Category-Level Relationships
The matching sets facility of MDM allows you to define category-level relationships. A matching set is a pair of related categories, where some
or all of the products in each category are related to one another. You can define a matching set as either bidirectional (for a sibling-type relationship) or unidirectional (for a parent/child-type relationship).
In addition, layered on top of the category-level efficiency, matching sets allows you to restrict the matching products within each category to precise subsets based on physical characteristics and structural compatibility of the products.
For example, you can define the Nuts and Screws categories as a matching set, and then further require that matching nuts and screws have the same Thread Size and Material, as shown in Figure 199
Screws: Nuts:
SKU Name Thread Material SKU Name Thread Material
S-101 Screw 4-40 Brass N-341 Nut 4-40 Brass
S-102 Screw 4-40 Copper N-342 Nut 4-40 Copper
S-103 Screw 6-32 Brass N-343 Nut 6-32 Brass
S-104 Screw 6-32 Copper N-344 Nut 8-32 Brass
S-105 Screw 8-32 Brass N-345 Nut 8-32 Copper
S-106 Screw 8-32 Copper
Figure 199. Matching sets category-level relationship
When you create a matching set relationship in Taxonomy mode, MDM allows you to select the matching categories, define the matching field/attribute pairs (if any), and specify the direction of the link. MDM also provides commands to modify, delete, and view matching sets.
NOTE ►► See “Using Matching Sets” on page 318 for more information about category-level relationships and matching sets.
NOTE ►► Matching sets also allow you to search for related products between the two related categories, automatically limiting the set of related products in the other category based on the matching items.
DATA INTEGRITY ►► Category-level relationships within MDM – and in particular, matching sets, which allow you to restrict the set of related products based on matching field and attribute information – are a unique MDM innovation that is dramatically more efficient than the corresponding product-level relationships. For example, if the two categories Nuts and Screws each contains three thousand products, then the single matching set can represent – and completely replace the need to define – up to nine million potential product relationships.
MDM Data Manager Reference Guide 369
Product-Level Relationships
Each type of product-level relationship corresponds to a real-world relationship between main table records and/or non-main table records, as summarized in Table 119 and described in the following sections.
Table 119. Product-Level Relationship Types
Type Table(s) Examples
Sibling Main Cross-sells (related products)
Interchange products (all equivalent)
Parent/Child
Main/Main
Assemblies and components (“SKU of SKUS”)
Up-sells
Accessories
Consumables
Replacements
Supercessions
Interchange products (one preferred)
Main/Subtable Kits and parts (“SKU of non-SKUs”)
Cross-reference part numbers
Subtable/Main Bundles (“non-SKU of SKUs”)
Interchange product groups
Subtable/Subtable Parts and subparts (“kits of kits”)
Bill of materials
Subtable1/Subtable2 Interchange part number groups
NOTE ►► The tables of a parent/child relationship can be of type Main, Flat, Hierarchy, or Qualified (but not of type Taxonomy).
NOTE ►► If a relationship embodies both sibling and parent/child data, and/or the parent/child data relates records both within the main table and between the main table and one or more subtables, you can create multiple independent product relationships to store the data and then combine them at the presentation layer into a hybrid relationship.
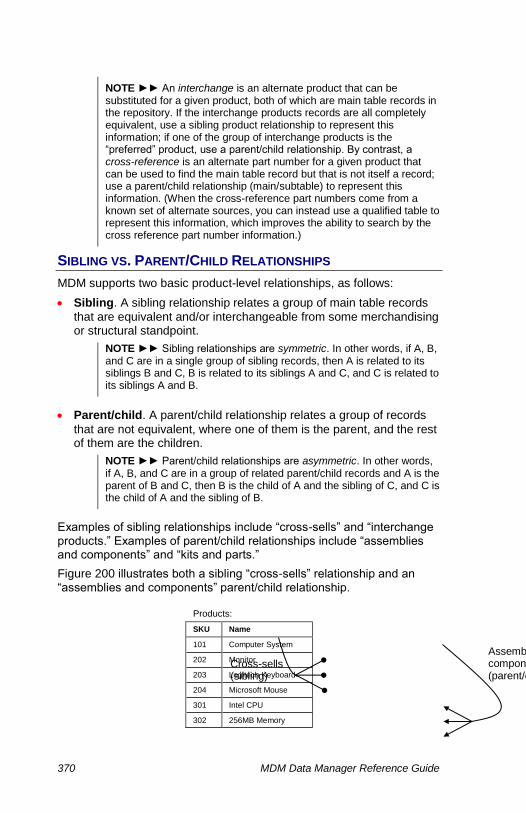
370 MDM Data Manager Reference Guide
NOTE ►► An interchange is an alternate product that can be substituted for a given product, both of which are main table records in the repository. If the interchange products records are all completely equivalent, use a sibling product relationship to represent this information; if one of the group of interchange products is the “preferred” product, use a parent/child relationship. By contrast, a cross-reference is an alternate part number for a given product that can be used to find the main table record but that is not itself a record; use a parent/child relationship (main/subtable) to represent this information. (When the cross-reference part numbers come from a known set of alternate sources, you can instead use a qualified table to represent this information, which improves the ability to search by the cross reference part number information.)
SIBLING VS. PARENT/CHILD RELATIONSHIPS
MDM supports two basic product-level relationships, as follows:
Sibling. A sibling relationship relates a group of main table records
that are equivalent and/or interchangeable from some merchandising or structural standpoint.
NOTE ►► Sibling relationships are symmetric. In other words, if A, B, and C are in a single group of sibling records, then A is related to its siblings B and C, B is related to its siblings A and C, and C is related to its siblings A and B.
Parent/child. A parent/child relationship relates a group of records
that are not equivalent, where one of them is the parent, and the rest of them are the children.
NOTE ►► Parent/child relationships are asymmetric. In other words, if A, B, and C are in a group of related parent/child records and A is the parent of B and C, then B is the child of A and the sibling of C, and C is the child of A and the sibling of B.
Examples of sibling relationships include “cross-sells” and “interchange products.” Examples of parent/child relationships include “assemblies and components” and “kits and parts.”
Figure 200 illustrates both a sibling “cross-sells” relationship and an “assemblies and components” parent/child relationship.
Products:
SKU Name
101 Computer System
202 Monitor
203 Logitech Keyboard
204 Microsoft Mouse
301 Intel CPU
302 256MB Memory
Assembly and components (parent/child)
Cross-sells (sibling)
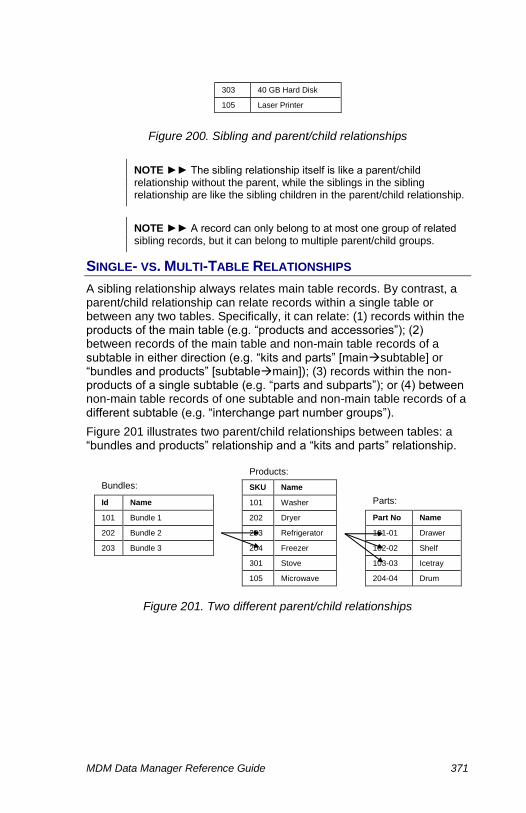
MDM Data Manager Reference Guide 371
303 40 GB Hard Disk
105 Laser Printer
Figure 200. Sibling and parent/child relationships
NOTE ►► The sibling relationship itself is like a parent/child relationship without the parent, while the siblings in the sibling relationship are like the sibling children in the parent/child relationship.
NOTE ►► A record can only belong to at most one group of related sibling records, but it can belong to multiple parent/child groups.
SINGLE- VS. MULTI-TABLE RELATIONSHIPS
A sibling relationship always relates main table records. By contrast, a parent/child relationship can relate records within a single table or between any two tables. Specifically, it can relate: (1) records within the products of the main table (e.g. “products and accessories”); (2) between records of the main table and non-main table records of a subtable in either direction (e.g. “kits and parts” [mainsubtable] or “bundles and products” [subtablemain]); (3) records within the non-products of a single subtable (e.g. “parts and subparts”); or (4) between non-main table records of one subtable and non-main table records of a different subtable (e.g. “interchange part number groups”).
Figure 201 illustrates two parent/child relationships between tables: a “bundles and products” relationship and a “kits and parts” relationship.
Products:
Bundles: SKU Name
Id Name 101 Washer Parts:
101 Bundle 1 202 Dryer Part No Name
202 Bundle 2 203 Refrigerator 101-01 Drawer
203 Bundle 3 204 Freezer 102-02 Shelf
301 Stove 103-03 Icetray
105 Microwave 204-04 Drum
Figure 201. Two different parent/child relationships

372 MDM Data Manager Reference Guide
NOTE ►► From a relationship-centric standpoint, a parent/child relationship represents a single relationship among a set of related records. By contrast, from a product-centric standpoint, a parent/child relationship within a single table (e.g. main/main or subtable/subtable) in effect represents two distinct relationships for each record: (1) the “parent” relationship of the parent/child relationship in which the record is the parent (looking “down” at its children); and (2) the “child” relationship of the parent/child relationship in which the record is one of the children (looking “up” at its parent).
SINGLE- VS. MULTI-LEVEL RELATIONSHIPS
A parent/child relationship that relates records between two different tables (e.g. main/subtable, subtable/main, or subtable1/subtable2) is automatically a single-level relationship, in that you can traverse at most once from a parent in one table to its children in the other table.
By contrast, a parent/child relationship within a single table (e.g. main/main or subtable/subtable) can be multi-level, in that you can recursively traverse from a parent to its children, from a child to its children, and so on.
For example, for an “assembly and components” parent/child relationship within the main table of records, a parent assembly record can be related to child component records, while a component that is itself an assembly becomes a parent that can be further related to child subcomponent records. Similarly, for a “parts and subparts” parent/child relationship within a subtable of parts records, a parent part record can be related to child subpart records, and then further related to subparts of the subparts.
HYBRID RELATIONSHIPS
The sibling and parent/child relationship types described above are the full set of product-level relationships explicitly supported by MDM.
However, if a relationship embodies both sibling and parent/child data, and/or the parent/child data relates records both within the main table and between the main table and one or more subtables, you can create multiple independent product relationships to store the data, and then combine them at the presentation layer into a hybrid relationship.
In this way, individual relationships act as building blocks that can be combined into complex hybrid relationships to represent many different multi-dimensional relationships between main table records and/or non-main table records, and that can be navigated in a variety of ways.
For example, an “interchange” sibling relationship can be combined with a “cross-reference” parent/child relationship (main/subtable) to represent all of the different SKUs and part numbers that can be used to identify and locate a particular product or group of products.

MDM Data Manager Reference Guide 373
NOTE ►► Alternatively, if the same set of cross-reference part numbers applies to all products in the interchange set, then you can eliminate the need to maintain cross-reference part numbers individually for each product by replacing the sibling and parent/child relationships above with two parent/child relationships from a subtable of interchange groups (really, a “super-table”) to: (1) the main table (the “interchange product groups” relationship); and (2) the part number subtable (the “interchange part number groups” relationship).
RELATIONSHIP QUALIFIERS
A product-level relationship allows you to store any of three additional pieces of information about each related sibling or child record:
Position. The record’s position in the sequence (parent/child only).
Required. Whether or not the record is required (Yes/No).
Quantity. The quantity of the record (defaults to 1).
EDITING RELATED RECORDS
The product-level relationships for each table are defined in MDM Console, but you specify the related records for each product relationship in MDM Data Manager, as described in the following sections.
Table 120. Product Relationship Operations
Operation Description
Add to Relationship
Adds the selected records to the relationship.
Remove from Relationship
Removes the selected records from the relationship.
Split from Relationship
Splits the selected records into a new sibling group.
Import from File Imports record relationships from a text file.
Export to File Exports record relationships to a text file.
NOTE ►► You must be in Record mode and the current table must participate in one or more product-level relationships to perform any of the product relationship operations.
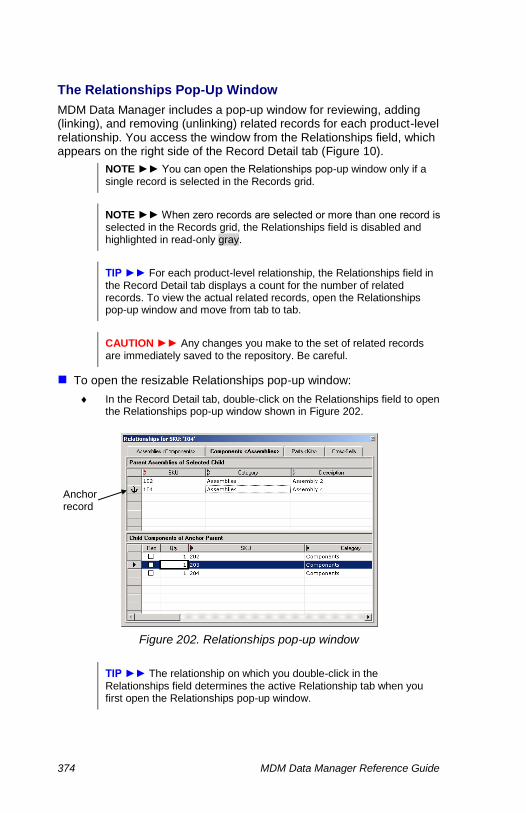
374 MDM Data Manager Reference Guide
The Relationships Pop-Up Window
MDM Data Manager includes a pop-up window for reviewing, adding (linking), and removing (unlinking) related records for each product-level relationship. You access the window from the Relationships field, which appears on the right side of the Record Detail tab (Figure 10).
NOTE ►► You can open the Relationships pop-up window only if a single record is selected in the Records grid.
NOTE ►► When zero records are selected or more than one record is selected in the Records grid, the Relationships field is disabled and highlighted in read-only gray.
TIP ►► For each product-level relationship, the Relationships field in the Record Detail tab displays a count for the number of related records. To view the actual related records, open the Relationships pop-up window and move from tab to tab.
CAUTION ►► Any changes you make to the set of related records are immediately saved to the repository. Be careful.
To open the resizable Relationships pop-up window:
In the Record Detail tab, double-click on the Relationships field to open the Relationships pop-up window shown in Figure 202.
Figure 202. Relationships pop-up window
TIP ►► The relationship on which you double-click in the Relationships field determines the active Relationship tab when you first open the Relationships pop-up window.
Anchor record
MDM Data Manager Reference Guide 375
NOTE ►► The pop-up window remains open on top until you close it, and is hidden when you go into a mode other than Record mode.
NOTE ►► The pop-up window is product-centric rather than relationship-centric, in that it shows all the related records for each relationship for the anchor record (see “The Anchor Record” below).
The Anchor Record
When you open the Relationships pop-up window, the single selected record in the Records grid when you first open the window becomes the anchor record. This is the single record for which the Relationships pop-up window shows – and allows you to edit – related records even after you change the selected record in the Records grid.
NOTE ►► The anchor record is identified in the grid within the tab for each relationship with an anchor icon in the row header (shown at left).
NOTE ►► The anchor record is also identified in the title bar of the Relationships pop-up window, which indicates the name and value of the display field (e.g. the SKU) of the anchor record.
Having a record remain anchored in the Relationships pop-up window allows you to navigate the records in the repository so that you can relate additional records to the anchor record for each product-level relationship. You do this by: (1) changing the selected records in the Records grid (if necessary by changing the search selections and the corresponding search results and even the current table itself); and then (2) adding the new related records.
The anchor record can also be used to navigate the related records themselves for each product-level relationship, from sibling to sibling, parent to child, and child to parent. For example, for an “assembly and components” relationship within the main table of products, you can use the anchor to navigate from an assembly parent record to its component child records. If a component is itself an assembly, you can then change the anchor to further navigate from the component record (which is now the parent) to its sub-component child records.
Finally, you can change the anchor record to an entirely unrelated record by double-clicking on a record in the Records grid outside the Relationships pop-up window to make it the new anchor record.
See “Adding Related Records” on page 380 for more information about how to add new related records. See “Changing the Anchor Record” on page 382 for more information about how to change the anchor record and also how to navigate the levels of a parent/child relationship.

376 MDM Data Manager Reference Guide
The Relationships Tabs
The Relationships pop-up window contains a relationship tab for each product-level relationship defined for the current table. Each tab corresponds to one of the relationships listed in the Relationships field in the Record Detail tab and contains either a single grid (for a sibling relationship) or two grids, one on top of another (for a parent/child relationship). The grids contain related records, as follows:
Sibling relationship tab. The grid contains the anchor record and
the set of related siblings of the anchor record.
Parent/child relationship tab. The grid that does not contain the
anchor record contains the set of related parents or children of the anchor record. The grid that contains the anchor record contains, in addition to the anchor, the set of related parents or children of the single selected record in the other grid.
NOTE ►► If a parent/child relationship is defined within the records of the current table rather than between the current table and another table, two tabs appear for the parent/child relationship: the Parent tab for the parent relationship and the Child tab for the child relationship.
The grids allow you to view, edit and navigate the related records for the corresponding product-level relationship, as summarized in Table 121.
Table 121. Relationship Tab for Each Relationship Type
Tab Type Description and Behavior of Tab
Sibling Relationship
(Figure 203)
One Sibling grid for the sibling relationship.
Sibling grid is titled “Siblings of Anchor Record” and contains the anchor record and each of its siblings.
If they are defined for the relationship, the Sibling grid also contains columns for the applicable relationship qualifiers (Required and Quantity).
You can add or remove sibling records from the Sibling grid.
If the anchor record has no siblings, it does not appear in the Sibling grid.
Parent of Parent/Child Relationship
(Figure 204)
Two grids for the parent/child relationship: (1) the Parent grid; and (2) the Child grid.
Anchor record appears in the Child grid (looking up at its parents).
Parent grid is titled “Parents of Anchor Child” and contains the parents of the anchor record in the Child grid.
Child grid is titled “Children of Selected Parent” and contains, in addition to the anchor record, the other children of the single selected record in the Parent grid.
If they are defined for the relationship, the Child grid also contains columns for the applicable relationship qualifiers (Position, Required, and Quantity).

MDM Data Manager Reference Guide 377
You can add or remove related records in either the Parent grid or the Child grid, and if Position is defined for the relationship, you can reorder the children as well.
Selecting any single record in the Parent grid changes the set of “other” records displayed in the Child grid.
Selecting no records or multiple records in the Parent grid hides all of the records other than the anchor in the Child grid and shades the grid in gray.
Selecting any one or more records in the Child grid has no effect on the set of records displayed in the Parent grid.
Double-clicking on any record in the Parent grid: (1) changes the anchor to the record; and (2) switches the active Relationship tab to that of the Child relationship.
Double-clicking on a record other than the anchor in the Child grid changes the anchor to the record (double-clicking on the anchor has no effect).
Child of Parent/Child Relationship
(Figure 205)
Two grids for the parent/child relationship: (1) the Parent grid; and (2) the Child grid.
Anchor record appears in the Parent grid (looking down at its children).
Parent grid is titled “Parents of Selected Child” and contains, in addition to the anchor record, the other parents of the single selected record in the Child grid.
Child grid is titled “Children of Anchor Parent” and contains the children of the anchor record in the Parent grid.
You can add or remove related records in either the Parent grid or the Child grid, and if Position is defined for the relationship, you can reorder the children as well.
Selecting any one or more records in the Parent grid has no effect on the set of records displayed in the Child grid.
Selecting any single record in the Child grid changes the set of “other” records displayed in the Parent grid.
Selecting no records or multiple records in the Child grid hides all of the records other than the anchor in the Parent grid and shades the grid in gray.
Double-clicking on a record other than the anchor in the Parent grid changes the anchor to the record (double-clicking on the anchor has no effect).
Double-clicking on any record in the Child grid: (1) changes the anchor to the record; and (2) switches the active Relationship tab to that of the Parent relationship.
NOTE ►► A sibling or child grid with a Required or Quantity column is “cell select” to allow you to edit the values for Required and Quantity.

378 MDM Data Manager Reference Guide
Figure 203. Sibling tab for a sibling relationship
Figure 204. Parent tab for a parent/child relationship
Figure 205. Child tab for a parent/child relationship
Anchor on bottom in Child grid
Anchor on top in Parent grid

MDM Data Manager Reference Guide 379
Relationship Naming Conventions
Relationships appear in a variety of contexts, including MDM Console, MDM Import Manager, and MDM Data Manager. Within MDM Data Manager, they appear in the Record Detail tab, in the Relationships
pop-up window, in the cascading choices of the Relationships menu
commands, and in the File > Export commands. Finally, relationships appear in the import and export files themselves.
The relationship naming conventions are slightly different for each context, as summarized in Table 122.
Table 122. Relationship Name Syntax in Various Contexts
Context Sibling Relationship Parent/Child Relationship
MDM Console
Relationships Table rel name parent name / child name
MDM Import Manager
Destination Tables Drop-Down List of Relationships
n/a parent name / child name
Destination Fields Grid List of Fields
n/a
field name <parent name> field name <child name> Quantity Required
MDM Data Manager
Record Detail Tab Relationships Cell
rel name
parent name <child name> child name <parent name>
Relationships Pop-Up Window Tab Names
rel name
parent name <child name> child name <parent name>
Relationships > Import from File / Export to File
Cascading Menu List of Relationships
rel name parent name / child name
Relationships > Import from File / Export to File
Import/Export File Field Names
display field name <rel name>
display field name <parent name> display field name <child name> Quantity Required
380 MDM Data Manager Reference Guide
File > Export
Export Dialog List of Fields
rel name
parent name <child name> child name <parent name>
File > Export
Export File Field Names rel name [Rel]
parent name <child name> [Rel] child name <parent name> [Rel]
Adding Related Records
You can add new related records to a product-level relationship as described in this section.
To add one or more related records to a relationship:
1. If necessary, click on the tab for the relationship to which you want to add related records to make it the active tab.
2. Make sure the current table is the table that contains the records you want to add.
3. In the Records pane, select the records that you want to relate to the anchor record, either as: (1) siblings of a sibling anchor; (2) children of a parent anchor; or (3) parents of a child anchor.
4. Choose Relationships > Add to Relationship from the main menu, or drag-and-drop the records into the applicable sibling grid or non-anchor parent/child grid.
5. MDM adds the related records.
NOTE ►► When you add new records to a child grid that has a
Position: (1) the Add to Relationship menu command adds them as the last related records; and (2) drag-and-drop adds them into the position at which you drop them.
TIP ►► Required and Quantity, if they are defined for the relationship, are assigned default values when you first add the related records (Required=No and Quantity=1). To change the default values, you can: (1) click on the Required checkbox to toggle whether or not the record is required; and (2) click on the Quantity cell and type a new value.
TIP ►► You can also drag-and-drop records from the Records pane directly into the anchor parent/child grid if a single record is selected in the non-anchor grid.
Removing Related Records
You can remove related records from a product-level relationship as described in this section.

MDM Data Manager Reference Guide 381
To remove one or more related records from a relationship:
1. If necessary, click on the tab for the relationship from which you want to remove related records to make it the active tab.
2. In the applicable grid, select the records you want to remove.
3. Right-click on one of the records and choose Remove from Relationship from the context menu, choose Relationships > Remove from Relationship from the main menu, or press Del.
4. MDM removes the related records.
NOTE ►► The Relationships > Remove from Relationship main menu command deletes the selected records in the grid that has the focus.
NOTE ►► Removing the anchor record removes the other related records rather than the anchor itself, as follows: (1) in a sibling grid, it breaks the link between the anchor and its related sibling records, which are removed from the grid (these siblings are still related to each other, but you cannot see them anymore); and (2) in a parent/child grid, it breaks the link between the anchor and the selected parent or child record in the non-anchor grid, which is removed from the grid.
Splitting Related Sibling Records
You can split one or more related records in a sibling relationship into a new sibling group as described in this section.
To split one or more related records into a new sibling group:
1. If necessary, click on the tab for the sibling relationship whose related records you want to split to make it the active tab.
2. In the Sibling grid, select the records you want to split into a new sibling group.
3. Right-click on one of the records and choose Split from Relationship
from the context menu, or choose Relationships > Split from
Relationship from the main menu.
4. MDM splits the related records into a new sibling group and removes them from the grid, unless the anchor is one of the selected records, in which case, the unselected records are removed from the group.
Reordering Related Records
If a parent/child product relationship has been defined in MDM Console as having a Position among its children, you can reorder the related records as described in this section.
To reorder the set of related records in a relationship:
1. If necessary, click on the tab for the relationship whose related records you want to reorder to make it the active tab.

382 MDM Data Manager Reference Guide
2. In the Child grid, select the records you want to reorder.
3. Drag-and-drop the records into their new position within the grid.
4. MDM moves the selected records to the new position.
NOTE ►► When the child grid has a Position column, the rest of the columns are non-sortable so that drag-and-drop makes sense.
Changing the Anchor Record
You can change the anchor record without closing the Relationships pop-up window as described in this section, a convenience not only for viewing and editing related records, but also for navigating the levels of a multi-level parent/child relationship.
To change the anchor record to another related record in the active relationship tab:
Double-click on the related record. MDM moves the anchor icon to the new anchor record.
NOTE ►► If the new anchor is in the non-anchor grid of a parent/child relationship tab, MDM also automatically switches the active tab to the tab for the other half of the parent/child relationship.
TIP ►► To navigate the levels of a multi-level parent/child relationship defined within a table: (1) double-click on a related record in the non-anchor grid to make it the new anchor; (2) manually switch the active tab back to the tab for the original half of the parent/child relationship; and (3) repeat. To navigate up to parents and grandparents, start with the Parent tab as the active tab. To navigate down to children and grandchildren, start with the Child tab as the active tab.
NOTE ►► Changing the anchor record preserves as much context as possible in the relationship tab grid or grids: (1) if the active tab is a sibling tab, both the active tab and the set of related records in the Sibling grid remain the same; (2) if the active tab is a parent/child tab and the new anchor is in the non-anchor grid, the active tab changes to the tab for the other half of the relationship, but the set of related records in both grids remain the same; and (3) if the active tab is a parent/child tab and the new anchor is in the anchor grid, the active tab and the set of related records in the anchor grid remain the same, and only the set of related records in the non-anchor grid changes (to correspond to the new anchor).
To change the anchor record to a record in the Records grid:
Double-click on the record in the Records grid. MDM attempts to make the record the new anchor in the anchor grid of the active tab.

MDM Data Manager Reference Guide 383
NOTE ►► For a parent/child relationship tab, if the current table is the table of the non-anchor grid but not of the anchor grid, MDM switches the active tab to the tab for the other half of the relationship and makes the selected record the new anchor in that grid.
NOTE ►► If the current table does not participate in the relationship of the active tab at all, double-clicking on the record in the Records grid has no effect and the anchor record remains unchanged.
TIP ►► To view the related records of each successive record in the Records grid, double-click on each record in the Records grid in sequence to change the anchor to that record in the active tab.
Importing and Exporting Relationship Links
MDM supports a variety of different mechanisms to import and export product relationship links, as summarized in Table 123.
Table 123. Mechanisms to Import and Export Relationship Links
Mechanism Supported File Formats Import Export
Text Excel Access Sibling P/C Sibling P/C
MDM Import Manager
MDM Data Manager
File > Export *
Relationships > Import
Relationships > Export
* Product-centric rather than relationship-centric.
NOTE ►► You can use MDM Import Manager to import parent/child relationships (but not sibling relationships) from a variety of non-text file formats. Use of MDM Import Manager to import relationship links is described in the MDM Import Manager Reference Guide.
NOTE ►► The File > Import from Excel command in MDM Data Manager is not used for importing product relationships.
NOTE ►► You can use the File > Export commands in MDM Data Manager to perform a product-centric export that treats each relationship as a multi-valued field (see “Exporting Table Records” on page 461 for more information).

384 MDM Data Manager Reference Guide
NOTE ►► Relationship-centric import and export of parent/child
relationship links using MDM Import Manager and the Relationships commands in MDM Data Manager read or create multiple parent/child pairs for each parent/child relationship, with one parent/child pair for each link placed on each line or row of the file, as shown in Figure 206.
SKU <Kits> Part No <Parts> Quantity Required
135-A 1234 3 0
135-A 5678 2 1
135-A 9012 1 1
Figure 206. File format of parent/child relationship pairs
You can use the Relationships > Import from File and Relationships > Export to File commands to import and export product relationships within MDM Data Manager as described in this section.
The text file formats for importing and exporting product relationships
using the Relationships commands are described in Table 124.
Table 124. File Formats for Importing and Exporting Relationship Links
Relationship Import/Export File Format
Sibling
First line lists the main table display or unique field names in the order their values appear on subsequent lines, where each display field name is followed by the relationship name in angular brackets (<>).
First line also lists the Required and Quantity relationship qualifier names (if they are defined for the relationship and they were selected for export).
Each subsequent line defines an entire group of related sibling records, listing the field and qualifier values that identify each sibling record in the order defined on the first line, and repeating the sequence for each record in the group of related sibling records.
Parent/Child
First line lists the display or unique field names of the parent table and the display or unique field names of the child table (both sides of the relationship even if it is a single-table relationship) in the order their values appear on subsequent lines, where each display field name is followed by the relationship name in angular brackets (<>).
First line also lists the Required and Quantity relationship qualifier names (if they are defined for the relationship and they were selected for export).
Each subsequent line defines a single pair of related parent/child records, listing the field and qualifier values that identify a single parent record and a single child record in the order defined on the first line.

MDM Data Manager Reference Guide 385
Qualifiers
The Required and Quantity fields are optional; if they appear, not all siblings or parent/child pairs need to have a value specified in the data file.
If the relationship link being imported does not exist in the repository and no value is specified for a qualifier, the
default qualifier values are Required=No and Quantity=1 (MDM does not permit relationship qualifiers to have NULL values).
If the relationship link being imported already exists in the repository, the existing value for a qualifier is: (1) overwritten if a value is specified in the data file; and (2) unchanged if no value is specified for the qualifier in the data file.
NOTE ►► The Import from File and Export to File commands read and write plain ASCII text files.
NOTE ►► The Field Delimiter character (e.g. Tab) is used to delimit each display field and qualifier value for each related record, where a lookup display field that itself consists of multiple display fields will appear as a single value combination delimited by a comma (,) (see “Configuration Options” on page 495 for more information).
TIP ►► The relationship import and export file formats are identical, which allows you to export the relationship links, edit the file, and then reimport them back into MDM.
To import a set of links for the related records of a relationship:
1. Choose Relationships > Import from File from the main menu, and then select from the cascading menu of relationships the relationship into which you want to import relationship links.
2. MDM opens the Windows file Open dialog for you to select a file. Navigate to the appropriate folder, select the text file that contains the
set of relationship links, and click Open.
3. MDM imports the relationship links and displays a progress dialog to indicate the current status of the import.
NOTE ►► The import of relationship links is a combination append and update in that: (1) new links are added to the set of existing links; and (2) qualifier values of existing links are updated if there is a value specified in the import file (otherwise they are left unchanged).
To export a set of links for the related records of a relationship:
1. Choose Relationships > Export to File from the main menu, and then select from the cascading menu of relationships the relationship for which you want to export relationship links.

386 MDM Data Manager Reference Guide
2. MDM opens the Relationship Export Options dialog shown in Figure 207.
Figure 207. Relationship Export Options dialog
3. Select which fields MDM will export to uniquely identify the records of each relationship link:
Display Fields Unique Fields
NOTE ►► For a sibling relationship, you can specify one choice of field(s). For a parent/child relationship, you can specify two choices, one for the parent relationship and one for the child relationship (even if they are the same table).
NOTE ►► The Display Fields edit control is always read-only and contains: (1) all the display fields for a non-hierarchy table; or (2) just the primary display field for a hierarchy table. The text in the edit control is gray when the Display Fields radio button is not selected and black when the radio button is selected.
NOTE ►► The Unique Fields drop-down control: (1) contains the set of unique fields and unique field combinations for a non-hierarchy table; or (2) is disabled for a hierarchy table, since the primary display field is guaranteed to be unique.
4. Select whether or not to export each relationship qualifier.
5. Click OK to close the Relationship Export Options dialog.
6. MDM opens the Windows file Open dialog for you to name the export file. Navigate to the appropriate folder, select or type a file name, and
click Save.
7. MDM exports the relationship links and displays a progress dialog to indicate the current status of the export.

MDM Data Manager Reference Guide 387
Copying Related Records
You can copy the set of related records for a single product relationship from one record to another as described in this section.
To copy the set of related records from one record to another:
1. In the Records grid, select the record whose related records you want to copy.
2. Without opening the Relationships pop-up window, select the Relationships field in the Record Detail tab, and then make sure to select the relationship whose related records you want to copy.
3. Press Ctrl+C, or choose Edit > Copy from the main menu.
4. In the Records grid, select the record onto which you want to copy the related records, and make sure the Relationships field is still selected in the Record Detail tab.
5. Press Ctrl+V, or choose Edit > Paste from the main menu.
NOTE ►► The Copy/Paste always copies the related records into the same relationship from which you copied, replacing any previous links.
TIP ►► To quickly delete the related records for a product relationship without going into the Relationships pop-up window, you can copy and paste from a record that has no related records for that relationship.
PRODUCT-CENTRIC VERSUS RELATIONSHIP-CENTRIC VIEW
MDM treats relationships and relationship links in two different ways, depending upon the context, as described in the following sections.
Product-Centric View
In the product-centric view, MDM treats the relationships from the standpoint of the related records themselves, treating each sibling relationship and each half of a parent/child relationship as a multi-valued field within each record.
For each record, the multi-valued field that corresponds to each relationship identifies the links to all of the related sibling, parent, or child records.
Examples of the product-centric view are the Record Detail tab, the Relationships pop-up window, and the Export to Text/Excel/Access file format.
Relationship-Centric View
In the relationship-centric view, MDM treats the relationships from the standpoint of the links between groups or pairs of related records:
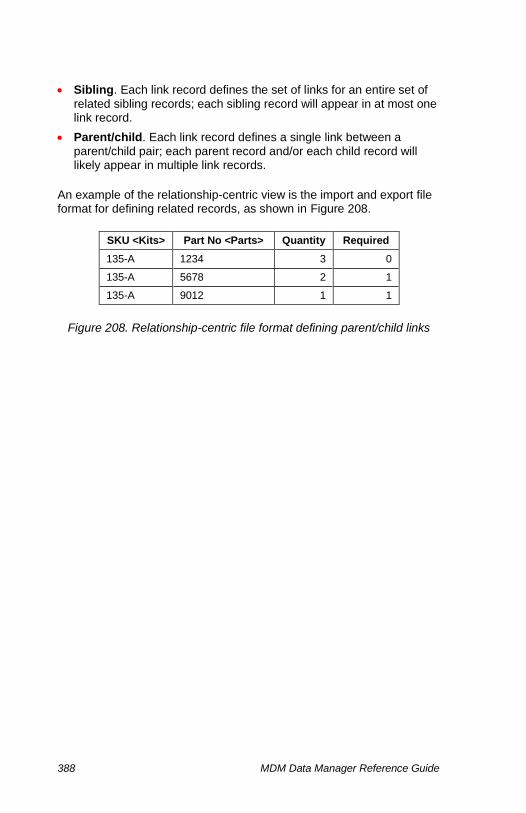
388 MDM Data Manager Reference Guide
Sibling. Each link record defines the set of links for an entire set of
related sibling records; each sibling record will appear in at most one link record.
Parent/child. Each link record defines a single link between a
parent/child pair; each parent record and/or each child record will likely appear in multiple link records.
An example of the relationship-centric view is the import and export file format for defining related records, as shown in Figure 208.
SKU <Kits> Part No <Parts> Quantity Required
135-A 1234 3 0
135-A 5678 2 1
135-A 9012 1 1
Figure 208. Relationship-centric file format defining parent/child links
389
PART 6: QUALIFIED TABLES
This part explains qualified tables within an MDM repository, and how to use them to efficiently store sparse data such as multiple pricing and cross-reference part numbers, valid tables that enforce value combinations, other distributor-, supplier-, and customer-specific information, and product applications for application based search.


MDM Data Manager Reference Guide 391
Working with Qualified Tables
A qualified table is a special kind of lookup table that is extremely versatile. It can be used to efficiently store complex relationships between a main table record and one or more lookup table records that contain various types of additional information.
A qualified table stores a set of lookup records, and also supports qualifiers, database “subfields” that apply not to the qualified table
record by itself, but rather to each association of a qualified table record with a main table record.
Qualified tables offer self-configuring, out-of-the-box support for:
Multiple prices (including quantity price breaks)
Cross-reference part numbers
Other distributor-, supplier-, and customer-specific information
Product applications for application-based search
Each of the different uses of a qualified table is described in the following sections.
MULTIPLE PRICES AND CROSS-REFERENCE PART NUMBERS
A normal flat or hierarchy lookup table is effective for a single multi-valued lookup field when: (1) the lookup table contains a relatively small number of records compared to the main table; and (2) the lookup table records themselves are standard for every main table record and represent a predefined and relatively fixed set of lookup values, such as a lookup into a list of legal manufacturer names.
However, a qualified table is necessary when the number of lookup table records would otherwise be very large, because each main table record is related not just to the predefined lookup values of the lookup table records but also to one or more additional fields of information that are different for every main table record (such as quantity price breaks, multiple prices for different divisions, regions, or trading partners, or cross-reference part numbers for different distributors or contract customers). In these cases, the fields whose values are different for each main table record should be defined as qualifier fields of the qualified table; the qualified table will then contain an actual record for each of the predefined lookup values or value combinations (such as distributor, contract customer, division, region, or trading partner).
NOTE ►► A qualified table used for multiple prices, cross-reference part numbers, or other distributor-specific information usually contains few, if any, lookup fields and multiple qualifiers.

392 MDM Data Manager Reference Guide
NOTE ►► Qualified table records also provide a way to store additional distributor/supplier/customer-specific information for each of multiple distributors/suppliers/customers for each main table record.
NOTE ►► In practice, the use of qualifiers and a qualified table instead of normal fields and a subtable keeps the number of actual records in the qualified table very small, but since every link between a main table record and an instance of a qualified table record contains additional information, the number of qualified link table records necessary to store the additional information is very large, often larger than the number of records in the main table itself.
When used for multiple prices or cross reference part numbers, qualified tables and qualifiers allow you to store a massive amount of potentially sparse data, by eliminating n fields from the main table and replacing them with a single qualified lookup field into a qualified table that has n corresponding records and one or more qualifiers. For example, n price fields, one for each distributor or quantity price break (or worse, each distributor / quantity price break combination) can be replaced with n qualified table records, one for each distributor / quantity price combination, and a qualifier for the price.
Consider first the main table of product records shown in Figure 209 that contains sparse quantity pricing data for each product.
SKU Name 1-9 1-24 1-49 10-24 25-49 50-99
113 Widget $3.51 $3.48 $3.44 $3.40
114 Wrench $8.75 $8.30 $7.99
115 Bearing $5.12 $4.80
Figure 209. Sparse pricing data using normal fields
Using a qualifier to store the quantity pricing data, the qualified table would have a single field Quantity and a single qualifier Price, and would contain the quantity records shown in Figure 210.
Pricing:
Quantity [Price]
1-9
1-24
1-49
10-24
25-49
50-99
Figure 210. Qualified table with valid quantity records

MDM Data Manager Reference Guide 393
A qualified lookup field in the main table would replace all of the quantity price fields, and the pricing data would be stored as qualifier values associated with main table / qualified table links, as shown in Figure 211.
SKU Name Lookup [Pricing]
113 Widget 1-9; $3.51
10-24; $3.48
25-49; $.344
50-99; $3.40
114 Wrench 1-24; $8.75
25-49; $8.30
50-99; $7.99
115 Bearing 1-49; $5.12
50-99; $4.80
Figure 211. Sparse fields replaced by qualified lookup field
NOTE ►► A main table / qualified table link is created only for those product/quantity combinations for which a price value actually exists.
Now consider the main table of product records shown in Figure 212 that contains one or more cross-reference part numbers for each product.
SKU Name Grainger McMaster Applied Newark
213 Gear G-408 A4Y-227
215 Sprocket 45-680 MA-215 A4Y-285
Figure 212. Cross-reference part numbers using normal fields
Using a qualifier to store the cross-reference part number data, the qualified table would have a single field Distributor and a single qualifier Part No, and would contain the distributor records shown in Figure 213.
Part Numbers:
Distributor [Part No]
Grainger
McMaster
Applied
Newark
Figure 213. Qualified table with valid distributor records

394 MDM Data Manager Reference Guide
A qualified lookup field in the main table would replace all of the distributor cross-reference part number fields, and the part number data would be stored as qualifier values associated with main table / qualified table links, as shown in Figure 214.
SKU Name Lookup [Part Numbers]
213 Gear Grainger; G-408
Newark; A4Y-227
215 Sprocket McMaster; 45-680
Applied; MA-215
Newark; A4Y-285
Figure 214. Part number fields replaced by qualified lookup field
Finally, consider the main table of product records shown in Figure 215 that contains distributor-specific quantity pricing data for each product.
SKU Name Grainger/
1 Grainger
/10 Applied/1 Applied/25
213 Gear $3.51 $3.28 $3.49 $2.99
215 Sprocket $5.01 $4.80 $5.04 $4.81
Figure 215. Distributor-specific quantity pricing data using normal fields
Using a qualifier to store the distributor-specific pricing data, the qualified table would now have fields Distributor and Quantity and the qualifier Price, and would contain the records shown in Figure 216.
Pricing:
Distributor Quantity [Price]
Grainger 1
Grainger 10
Applied 1
Applied 25
Figure 216. Qualified table with valid distributor/quantity records
A qualified lookup field in the main table would replace all of the price fields, and the pricing data would be stored as qualifier values associated with main table / qualified table links, as shown in Figure 217.

MDM Data Manager Reference Guide 395
SKU Name Lookup [Pricing]
213 Gear Grainger; 1; $3.51
Grainger; 10; $3.28
Applied; 1; $3.49
Applied; 25; $2.99
215 Sprocket Grainger; 1; $5.01
Grainger; 10; $4.80
Applied; 1; $5.04
Applied; 25; $4.81
Figure 217. Pricing fields replaced by qualified lookup fields
NOTE ►► Each qualified table field that becomes a qualifier reduces the level of validation by reducing the number of qualifier table records and associated set of valid value combinations. For example, in the example above, Price is the only qualifier, so only Distributor/Quantity combinations that exist among the four records of the qualified table are valid. By contrast, if Quantity were also a qualifier, the qualified table would have just two records – one for each Distributor – and the price for any quantity for a valid Distributor would be valid.
These examples illustrate just a flavor of the power of qualifiers and qualified tables. As you can see, the use of qualifiers offers a great deal of flexibility when it comes to restructuring data for more efficient storage and searching within a repository.
NOTE ►► When used to store entire records of distributor-, supplier-, or customer-specific information, qualified tables and qualifiers complement and extend the virtual subset repository capability offered by product masks, allowing the virtual repository associated with each mask to become a custom virtual catalog that contains additional custom information for each main table record.
PRODUCT APPLICATIONS AND APPLICATION-BASED SEARCH
A product application is a particular use of a product. Applications are
especially important in certain industries where application-driven product selection is the traditional way to locate products.
With qualified lookup tables, the MDM system features a new data model for product applications that replaces the traditional application-
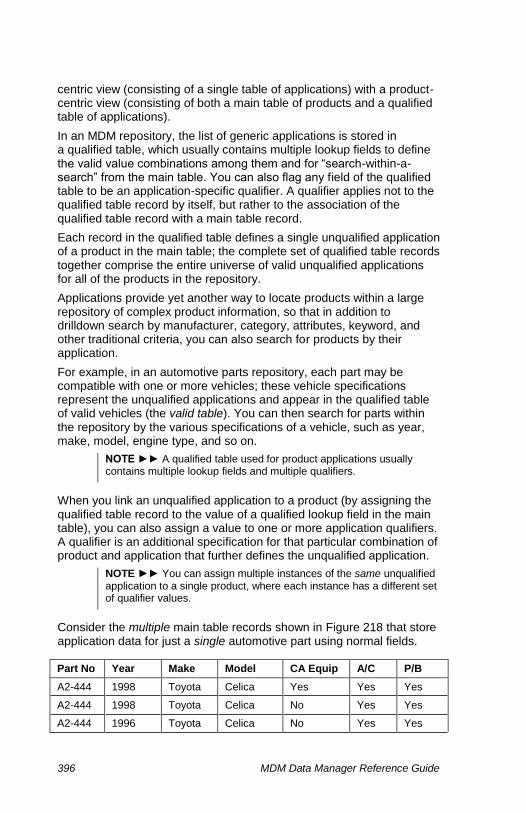
396 MDM Data Manager Reference Guide
centric view (consisting of a single table of applications) with a product-centric view (consisting of both a main table of products and a qualified table of applications).
In an MDM repository, the list of generic applications is stored in a qualified table, which usually contains multiple lookup fields to define the valid value combinations among them and for “search-within-a-search” from the main table. You can also flag any field of the qualified table to be an application-specific qualifier. A qualifier applies not to the qualified table record by itself, but rather to the association of the qualified table record with a main table record.
Each record in the qualified table defines a single unqualified application of a product in the main table; the complete set of qualified table records together comprise the entire universe of valid unqualified applications for all of the products in the repository.
Applications provide yet another way to locate products within a large repository of complex product information, so that in addition to drilldown search by manufacturer, category, attributes, keyword, and other traditional criteria, you can also search for products by their application.
For example, in an automotive parts repository, each part may be compatible with one or more vehicles; these vehicle specifications represent the unqualified applications and appear in the qualified table of valid vehicles (the valid table). You can then search for parts within the repository by the various specifications of a vehicle, such as year, make, model, engine type, and so on.
NOTE ►► A qualified table used for product applications usually contains multiple lookup fields and multiple qualifiers.
When you link an unqualified application to a product (by assigning the qualified table record to the value of a qualified lookup field in the main table), you can also assign a value to one or more application qualifiers. A qualifier is an additional specification for that particular combination of product and application that further defines the unqualified application.
NOTE ►► You can assign multiple instances of the same unqualified application to a single product, where each instance has a different set of qualifier values.
Consider the multiple main table records shown in Figure 218 that store application data for just a single automotive part using normal fields.
Part No Year Make Model CA Equip A/C P/B
A2-444 1998 Toyota Celica Yes Yes Yes
A2-444 1998 Toyota Celica No Yes Yes
A2-444 1996 Toyota Celica No Yes Yes

MDM Data Manager Reference Guide 397
Part No Year Make Model CA Equip A/C P/B
A2-444 1998 Ford Mustang No Yes Yes
A2-444 1997 Ford Mustang No No No
Figure 218. Automotive part and application data using normal fields
Using qualifiers to store the additional application specifications, the qualified table would have fields Year, Make, and Model, and the qualifiers CA Equip, A/C, and P/B, and for the applications above, would contain the records shown in Figure 219.
Vehicles:
Year Make Model [CA Equip] [A/C]
[P/B]
1998 Toyota Celica
1996 Toyota Celica
1998 Ford Mustang
1997 Ford Mustang
Figure 219. Qualified table with valid vehicle records
A qualified lookup field in the main table would replace all of the vehicle specification fields, and the application specifications would be stored as qualifier values associated with main table / qualified table links, resulting in the single main table record shown in Figure 220.
Part No Lookup [Vehicles]
A2-444 1998; Toyota; Celica; Yes; Yes; Yes
1998; Toyota; Celica; No; Yes; Yes
1996; Toyota; Celica; No; Yes; Yes
1998; Ford; Mustang; No; Yes; Yes
1997; Ford; Mustang; No; No; No
Figure 220. Vehicle specification fields replaced by qualified lookup field
DATA INTEGRITY ►► Using qualifiers to distinguish between different uses of the same unqualified application: (1) eliminates the need to enumerate every distinct value combination of fields and qualifiers taken together; (2) in so doing, dramatically reduces the number of distinct records in the qualified table, making it more useful as a valid table of legal lookup values; and (3) avoids a tremendous amount of data duplication, especially when rich content (such as images, text blocks, and PDFs) is added to each qualified table record.

398 MDM Data Manager Reference Guide
DATA INTEGRITY ►► This innovative data model has the following advantages: (1) it completely eliminates all duplication of both product data and application data typical of previous systems; (2) it efficiently enforces validation against the table of qualified table records; (3) it dramatically reduces memory and storage requirements; and (4) it is radically more efficient for maintenance and searching. For example, an automotive parts catalog that historically contained over twenty million application records is represented within an MDM repository with just over one million part records and forty thousand vehicle specification records.

MDM Data Manager Reference Guide 399
Qualified Table Overview
All qualified tables are flat, and you view and edit the records of a qualified table exclusively in Record mode. Qualified lookup fields are always multi-valued, use a specialized cell in the Record Detail tab, and use the qualified lookup selector dialog for data entry and editing.
QUALIFIED TABLE TERMINOLOGY
Terms like qualifier, qualified lookup field, and fully qualified lookup value are used with qualified tables. Check the definitions in Table 125 if you are uncertain about the meanings of these terms, each of which is further explained and referenced in the following sections.
Table 125. Qualified Table Terminology
Term Definition
Qualified Table An MDM flat table type that supports qualifiers.
Qualified Table Field One of the fields of the qualified table that applies to each record of the table.
Qualifier One of the link-specific fields of the qualified table; qualified values exist only for main table / qualified table links.
Qualified Table Record An actual record of the qualified table; includes field values but not qualifier values.
Qualified Lookup Field A field in the main table that is a lookup into the records of the qualified table.
Fully Qualified Lookup Value
The fully-qualified value of the lookup field, consisting of values for both the display fields of the qualified table and its link-specific qualifiers.
Qualified Lookup Record
The qualified table record corresponding to the qualified lookup value; multiple instances of each qualified table record can be linked to each main table record.
Qualified Lookup Search Tab
The drilldown search tab in Record mode corresponding to the qualified lookup field.
Qualified Lookup Cell
The specialized Record Detail tab cell in Record mode that displays the values of the qualified lookup field.
Qualified Lookup Selector Dialog
The selector dialog that opens when you double-click on a qualified lookup cell to edit the values of a qualified lookup field.

400 MDM Data Manager Reference Guide
QUALIFIERS
Just as a taxonomy table has attributes, additional fields of information for the category that you assign to a product, a qualified table has qualifiers, additional fields of information for each qualified table record that you assign to a product. But unlike a taxonomy table, which allows you to assign attributes to categories on a category-by category basis, a qualified table uses the same set of qualifiers for all qualified table records.
NOTE ►► Depending upon the context, a particular qualifier can be thought of as an extension to: (1) the main table record (e.g. prices); (2) the qualified table record (e.g. vehicle specifications); or (3) the link itself between the main and qualified table record (e.g. jobs).
NOTE ►► Qualified table fields and qualifiers are interchangeable, but with an effect on the number of qualified table records and on search efficiency and performance. Specifically, each field increases the number of qualified table records, which slows down the system but makes the qualified lookup field itself more searchable.
NOTE ►► Assigning attributes to categories on a category-by-category basis in a taxonomy table is a good idea because the number of category records is relatively small and the number of attributes is relatively large. By contrast, assigning qualifiers to qualified table records on a record-by-record basis in a qualified table would be cumbersome because the number of qualified table records is relatively large and the number of qualifiers is relatively small.
QUALIFIED LOOKUP CELLS
Taxonomy lookup fields are always single-valued, so each main table record always has just one set of attribute values based on the single category assigned to it, and these values can be neatly displayed vertically as subfields of the category in the Record Detail tab.
By contrast, qualified lookup fields are multi-valued, so each product can have multiple sets of qualifier values, each associated with one of the qualified table records assigned to it. Consequently, a qualified lookup field requires a specialized cell in the Record Detail tab to display the qualified lookup values, as shown in Figure 221.
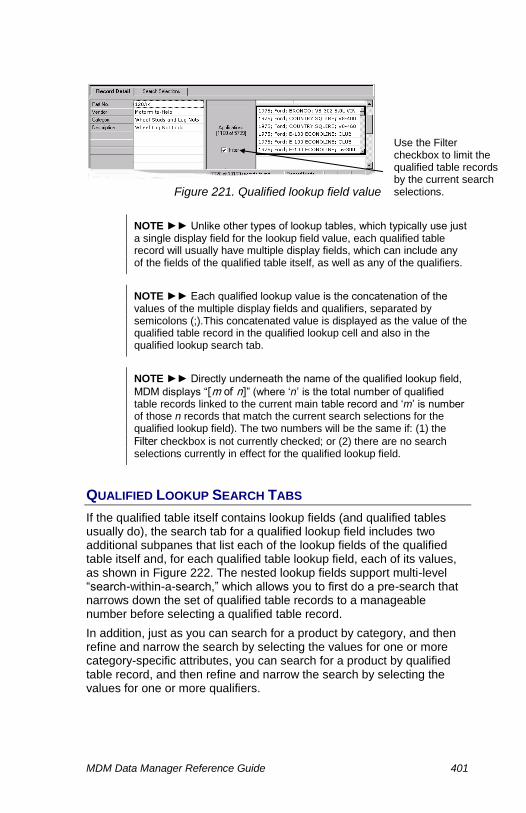
MDM Data Manager Reference Guide 401
Figure 221. Qualified lookup field value
NOTE ►► Unlike other types of lookup tables, which typically use just a single display field for the lookup field value, each qualified table record will usually have multiple display fields, which can include any of the fields of the qualified table itself, as well as any of the qualifiers.
NOTE ►► Each qualified lookup value is the concatenation of the values of the multiple display fields and qualifiers, separated by semicolons (;).This concatenated value is displayed as the value of the qualified table record in the qualified lookup cell and also in the qualified lookup search tab.
NOTE ►► Directly underneath the name of the qualified lookup field,
MDM displays “[m of n]” (where ‘n’ is the total number of qualified table records linked to the current main table record and ‘m’ is number of those n records that match the current search selections for the qualified lookup field). The two numbers will be the same if: (1) the
Filter checkbox is not currently checked; or (2) there are no search selections currently in effect for the qualified lookup field.
QUALIFIED LOOKUP SEARCH TABS
If the qualified table itself contains lookup fields (and qualified tables usually do), the search tab for a qualified lookup field includes two additional subpanes that list each of the lookup fields of the qualified table itself and, for each qualified table lookup field, each of its values, as shown in Figure 222. The nested lookup fields support multi-level “search-within-a-search,” which allows you to first do a pre-search that narrows down the set of qualified table records to a manageable number before selecting a qualified table record.
In addition, just as you can search for a product by category, and then refine and narrow the search by selecting the values for one or more category-specific attributes, you can search for a product by qualified table record, and then refine and narrow the search by selecting the values for one or more qualifiers.
Use the Filter checkbox to limit the qualified table records by the current search selections.
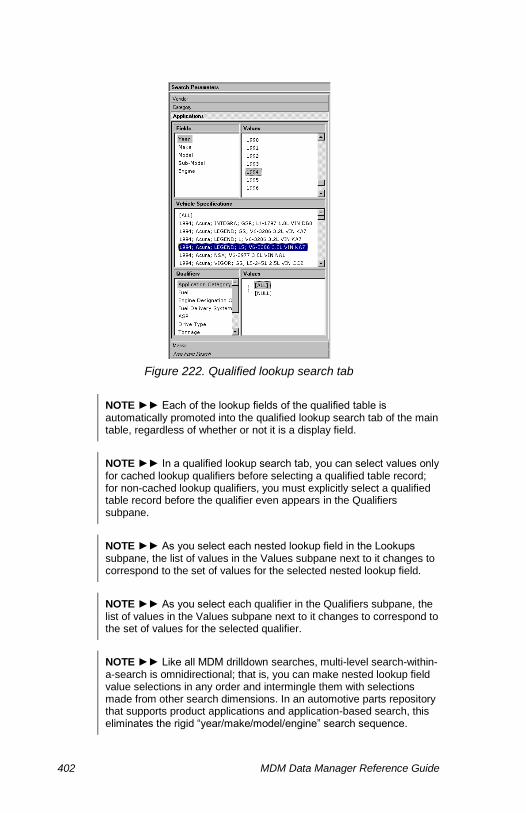
402 MDM Data Manager Reference Guide
Figure 222. Qualified lookup search tab
NOTE ►► Each of the lookup fields of the qualified table is automatically promoted into the qualified lookup search tab of the main table, regardless of whether or not it is a display field.
NOTE ►► In a qualified lookup search tab, you can select values only for cached lookup qualifiers before selecting a qualified table record; for non-cached lookup qualifiers, you must explicitly select a qualified table record before the qualifier even appears in the Qualifiers subpane.
NOTE ►► As you select each nested lookup field in the Lookups subpane, the list of values in the Values subpane next to it changes to correspond to the set of values for the selected nested lookup field.
NOTE ►► As you select each qualifier in the Qualifiers subpane, the list of values in the Values subpane next to it changes to correspond to the set of values for the selected qualifier.
NOTE ►► Like all MDM drilldown searches, multi-level search-within-a-search is omnidirectional; that is, you can make nested lookup field value selections in any order and intermingle them with selections made from other search dimensions. In an automotive parts repository that supports product applications and application-based search, this eliminates the rigid “year/make/model/engine” search sequence.

403
PART 7: MATCHING MODE
Matching mode supports deduplication of records within an MDM repository. This part explains how to use Matching mode to identify and merge potential matches.


MDM Data Manager Reference Guide 405
Matching Overview
MDM matching functionality addresses the consolidation of records within an MDM repository. The purpose of matching is to locate identicals (the same object in different systems) and duplicates (the same object in the same system).
NOTE ►► MDM matching functionality currently locates duplicates within the system but not identicals outside the system; it couples with MDM merging functionality to comprise the matching and merging support for deduplication of records within an MDM repository.
Historically, matching was viewed as part of the deduplication scenario, itself part of the inbound cleansing process. By contrast, the current MDM implementation has matching follow the inbound cleansing process. In other words, matching (record-level operation) within MDM Data Manager occurs subsequent to normalization (data-value-level operation) within MDM Import Manager, leveraging the MDM paradigm of layering higher-level scenarios upon core, component functions rather than building them monolithically from scratch.
A point of contrast: record matching within MDM Import Manager, while similar, has matching capabilities based on exact field matches, which
serves several purposes: (1) determining whether a record is a Create
or an Update; and (2) preventing duplicates from getting into the repository in the first place. By contrast, MDM Data Manager matching functionality supports interactive and automated strategy-based matching that allow identification of duplicates already in the repository.
NOTE ►► Matching mode now supports matching for Asian languages on the Windows 32 and Windows 64 platforms (the Inxight stemmer is only available for these platforms).

406 MDM Data Manager Reference Guide
Working in Matching Mode
Matching mode supports deduplication, and is used to identify and eliminate duplicate records within an MDM repository. When you view the main table in Matching mode, MDM allows you to perform “matching-and-merging” on and against any or all of its records, using various user-defined criteria to decide whether or not records are potential duplicates.
Matching mode looks a lot like Record mode, and in Matching mode, you can even search for and browse the records of the table. But you cannot edit them. Instead, Matching mode allows you define and execute matching strategies that identify potential duplicates for the records in the table, and then for each record, to merge any or all of the potential duplicates based on the likelihood of an actual match.
The process of matching and merging records typically involves: (1) defining the matching strategies, including the various transformations, matching rules, and scoring thresholds that comprise each strategy; (2) performing a search, to narrow down the set of records to just the ones you want to work on; (3) executing a matching strategy on any or all of the search results against any or all of the records in the repository; and (4) merging any or all of the potential duplicates into each record.
To switch to Matching mode:
Click the Matching Mode toolbar button (shown at left), or press Ctrl+4,
or choose View > Matching Mode from the main menu.
NOTE ►► Only the main table is available in Matching mode, and MDM automatically selects it when you change to Matching mode, as shown in Figure 223.
Figure 223. Current table in Matching mode
MDM Data Manager Reference Guide 407
MATCHING HIGHLIGHTS
MDM matching features the following:
Transformations (including substitution lists)
Matching functions (including both exact and fuzzy operators)
Matching rules (including scores for success, failure, and undefined)
Strategies (consisting of one or more rules)
Thresholds (for a record to be considered a low or a high match)
Matching groups (based on which records meet the thresholds)
Manual merge (merge records in the matching groups)
Workflow integration (apply a matching strategy to records in a job)
MATCHING IS RECORD-CENTRIC
MDM matching is record-centric. This means is that each record has its own matching group of zero or more potential matches, matching groups may overlap, and matching is not transitive (i.e. record B is a potential match for record A, and record C is a potential match for record B does not mean that record C is a potential match for record A).
When an MDM matching strategy is applied to a set of records, the strategy is applied to each selected record, and for each record, the potential matches are placed into the matching group for that record.
By contrast, a group-centric approach to matching applies a strategy and creates one or more non-overlapping groups of potential matches, and every record in a group is a potential match for every other.
A matching strategy can be applied to and against the selected records, the search results, or all the records of the repository.
INTERACTIVE MATCHING
Interactive matching in Matching mode is like searching (albeit based on complex “fuzzy” criteria that allow you to find potential matches that are not exact): fully interactive, ad hoc, and without any form of persistence.
You can use the applicable command to execute a matching strategy on any set of selected records against the set itself, against the current search results, or against the entire set of records in the repository.
AUTOMATED MATCHING
Automated matching occurs as part of workflow, using a Match step that applies a matching strategy to the records in the workflow job, either against the records in the job or against the entire set of records in the repository. Matching results are persistent during the execution of the workflow.
408 MDM Data Manager Reference Guide
DEFINING AND EXECUTING MATCHING STRATEGIES
Each matching strategy is defined as consisting of transformations, matching rules, and scoring thresholds, and then subsequently executed against one or more records.
The process of defining and executing matching strategies consists of three design-time phases and two runtime phases, as follows:
1. Defining the transformations. For each field, a transformation
applies multiple normalizing and cleansing operations to each field value on a record-by-record basis.
2. Defining the matching rules. For each field or field combination, a
matching rule applies a matching function to either the original or the previously transformed field value(s), and returns a score.
3. Defining a matching strategy. Each strategy applies one or more
rules during the matching process, and use a pair of high and low scoring thresholds to decide which records are potential matches.
4. Executing the strategy. You can execute a strategy against one
or more source records, and MDM applies the matching rules and the scoring thresholds on a record-pair-by-record-pair basis.
NOTE ►► A rule that references qualifiers is evaluated individually for each qualified link combination, and the score for a record pair is the best score across the entire set qualified link combinations.
5. Merging potential matches. For each source record, you can use
the total matching score for each record pair to decide which of the potential matching records to merge with each source record.
The different phases of defining and executing matching strategies are described in the following sections.

MDM Data Manager Reference Guide 409
Matching Strategy Definition
A matching strategy is comprised of one or more matching rules. Each matching rule can reference one or more fields. The fields that a rule references can be either actual or transformed fields.
TRANSFORMATIONS
Transformations allow you to create one or more transformed fields as part of the matching process. A transformed field is a virtual field whose values are based on normalizing and cleansing the values of an actual field. The transformed field can then be referenced when defining matching rules.
Transformations allow you to eliminate differences in data values that might prevent MDM from recognizing two otherwise matching values.
DATA INTEGRITY ►► Virtual transformed fields allow you perform matching against normalized and cleansed data values without changing the underlying repository data and without duplicating data.
Transformation Operations
The following sections describe the various transformation operations in Matching mode, including:
Editing transformation properties.
Editing the set of substitutions for a transformation.
Adding a transformation.
Renaming a transformation.
Deleting a transformation.
Duplicating a transformation.
The transformation operations are summarized in Table 126.
Table 126. Transformation Operations
Operation Description
Edit Transformation Modifies the properties of the selected transformation.
Edit Substitutions Modifies the set of substitutions of the selected transformation.
Add Transformation Creates a new transformation.

410 MDM Data Manager Reference Guide
Operation Description
Rename Transformation Renames the selected transformation.
Delete Transformation Deletes the selected transformations.
Duplicate Transformation Duplicates the selected transformation.
During the matching operation the repository is read-locked, which might block other operations until the matching process is completed. To enable other operations to continue, you can perform slicing on the transformation operation, which is the most resource-intensive phase in the matching process. You can set the following transformation slicing parameters in the mds.ini file:
Matching
Transformation Phase
Slice Size
Number. The number of records in each slice of the transformation operation in the matching process. Default is 1200.
Matching
Transformation Phase
Slice Wait Time MS
Number. The time between each transformation slice operation. It is recommended to set this to 100 ms if there are locking issues.
Default is 0, which means no slicing.
Transformations Tab
The transformation definition operations are performed from the Transformations tab, shown in Figure 224.
Figure 224. Transformations tab
The Transformations tab (tab in bottom-right pane) contains a multi-object properties grid that consists of three subpanes: (1) the

MDM Data Manager Reference Guide 411
Transformations pane, which lists the set of transformations; (2) the Properties pane, which lists the set of properties for each transformation, including the field to which the transformation is applied; and (3) the Substitutions pane, which lists the substitutions that comprise the transformation.
You can use the Transformations tab to add, rename, delete and duplicate transformations, to view and edit transformation properties, and to specify the set of substitutions for each transformation.
Transformation Properties
The transformation properties (including the list of substitutions that comprise the transformation) control the normalizing and cleansing specifications of each transformation, and are described in Table 127.
Table 127. Transformation Properties
Property Description
Properties Pane
Name The transformation name.
Field The field to be transformed.
Language The applicable language layer for a multilingual text field.
Preview The transformed value for the selected record (read-only).
Substitutions Pane
Token Whether to apply substitution to tokens only (space-delimited).
From The value to be replaced.
To The replacement value.
NOTE ►► The drop-down list of fields includes text fields and qualifiers (where qualifiers appear as qualifiedtable.qualifier).
Substitutions
Each transformation is essentially a list of substitutions. A substitution specifies the replacement of a “from” string with a “to” string, applied either anywhere in the data value or only to distinct tokens.
Substitutions are a powerful and versatile and yet also straightforward mechanism for normalizing and cleansing data, and directly support:
Character substitution. Replace accented “foreign” characters with
the corresponding character combinations (e.g. ‘ä’ “ae”).

412 MDM Data Manager Reference Guide
Character elimination. Remove punctuation and other special
characters that have no matching significance (e.g. ‘.’, ‘,’, ‘;’, ‘:’).
Token substitution. Replace entire words or abbreviations with a
complete representation (e.g. “GM” “General Motors”).
Token elimination. Eliminate noise words that may be inconsistent
in the data (e.g. “Corp.”, “Inc.”, “LLC”).
Synonym identification. Collapse tokens that are equivalent, such
as variations on a name (e.g. “Rob”, “Bob”, “Bobbie” “Robert”)
Managing and Editing Transformations
MDM allows you to create and manage any number of transformations in Matching mode. You can add, modify, rename, delete, and duplicate transformations as described in this section.
To add a new transformation to the list of transformations:
1. If necessary, click on the Transformations tab to make it the active tab.
2. Right-click in the Transformations pane and choose Add Transformation from the context menu, or choose Records > Matching
> Transformations > Add Item from the main menu.
3. MDM adds a new transformation named “New Transformation” to the list of transformations, and highlights it for editing.
4. Type the name you want for the transformation and press Enter.
TIP ►► To change the new transformation name after you press
Enter, press F2 to edit and type it again.
TIP ►► There is no explicit command to modify a transformation. To edit the properties of a transformation, select it in the Transformations pane of the Transformations tab, move the focus into the Properties
pane, edit its properties directly, and press Shift+Enter to save the changes.
To edit the list of substitutions that comprise a transformation:
1. If necessary, click on the Transformations tab to make it the active tab.
2. In the Transformations pane, select the single transformation for which you want to edit the list of substitutions (Figure 225).

MDM Data Manager Reference Guide 413
Figure 225. Editing the list of substitutions
3. Add, delete, and reorder substitutions as follows:
To add a substitution, check or do not check the Token checkbox in the first empty row, type the string to be replaced in the From cell, press Tab, type the replacement string in the To cell, and press Tab to move to the next empty row.
To delete a substitution, move the thick bordered highlight to the
row containing the substitution you want to delete and press Del.
To reorder the substitutions, press Ctrl+Up and Ctrl+Down to move the selected rows up and down, or drag-and-drop them to the new position.
4. Press Shift+Enter to save the changes
TIP ►► To remove a From value, leave the To value empty.
NOTE ►► Token substitution uses Space as a delimiter, which means the token for substitution should be surrounded by blanks.
NOTE ►► The From value is not case-sensitive (i.e. “Corp” will replace “Corp”, “corp”, and “CORP”).
To rename a transformation:
1. If necessary, click on the Transformations tab to make it the active tab.
2. In the Transformations pane, select the single transformation you want to rename.
3. Right-click on the transformation and choose Rename Transformation
from the context menu, or press F2, or choose Records > Matching >
Transformations > Rename Item from the main menu.
4. MDM highlights the name of the transformation for editing.
5. Type the new name you want for the transformation and press Enter.
414 MDM Data Manager Reference Guide
To permanently delete one or more transformations from the list of transformations:
1. If necessary, click on the Transformations tab to make it the active tab.
2. In the Transformations pane, select the transformation(s) you want to delete.
3. Right-click on one of the transformations and choose Delete Transformation from the context menu, or press Del, or choose
Records > Matching > Transformations > Delete Item from the main menu.
4. MDM prompts you to confirm that you really want to delete the
transformations. Click OK to remove the transformations from the list of transformations.
To duplicate a transformation:
1. If necessary, click on the Transformations tab to make it the active tab.
2. In the Transformations pane, select the single transformation you want to duplicate.
3. Right-click on the transformation and choose Duplicate Transformation
from the context menu, or choose Records > Matching >
Transformations > Duplicate Item from the main menu.
4. MDM adds the duplicate transformation to the list of transformations and highlights the name of the transformation for editing.
5. Type the name you want for the duplicate transformation and press
Enter.
TIP ►► You can define a generic transformation first and use it as a template for other transformations.
TIP ►► Since each transformation is defined on a single field, you can duplicate an existing transformation for use on multiple fields.
MATCHING RULES
A matching rule defines the matching function to be applied to a field or field combination, and assigns a score based on whether the matching function succeeds, fails, or is undefined because of NULL values. Each rule can then be included in one or more matching strategies.
Matching rules are the building blocks of a matching strategy, where each rule represents an individual criterion for comparing records and contributes to the overall score of the strategy.
NOTE ►► A rule that references qualifiers is evaluated individually for each qualified link combination, and the score for a record pair is the best score across the entire set qualified link combinations.
MDM Data Manager Reference Guide 415
Matching Rule Operations
The following sections describe the various matching rule operations in Matching mode, including:
Editing matching rule properties.
Adding a matching rule.
Renaming a matching rule.
Deleting a matching rule.
Duplicating a matching rule.
The matching rule operations are summarized in Table 128.
Table 128. Matching Rule Operations
Operation Description
Edit Matching Rule Modifies the properties of the selected matching rule.
Add Matching Rule Creates a new matching rule.
Rename Matching Rule Renames the selected matching rule.
Delete Matching Rule Deletes the selected matching rules.
Duplicate Matching Rule Duplicates the selected matching rule.
Rules Tab
The matching rule definition operations are performed from the Rules tab, shown in Figure 226.
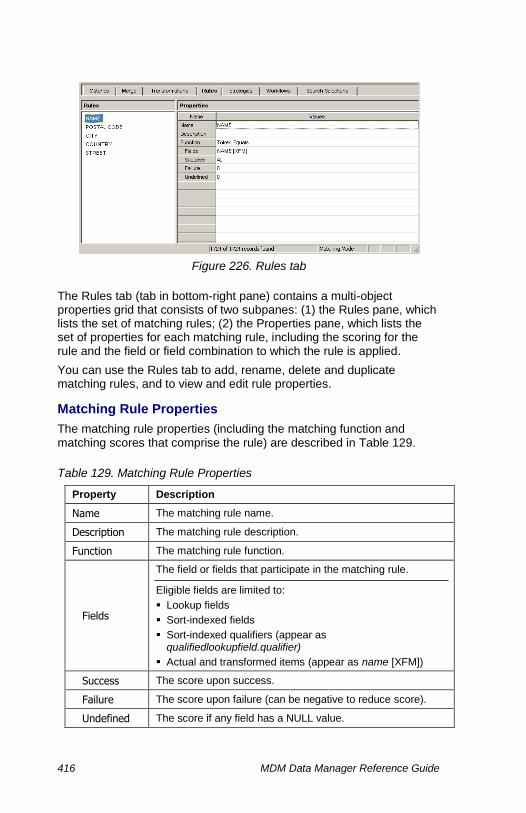
416 MDM Data Manager Reference Guide
Figure 226. Rules tab
The Rules tab (tab in bottom-right pane) contains a multi-object properties grid that consists of two subpanes: (1) the Rules pane, which lists the set of matching rules; (2) the Properties pane, which lists the set of properties for each matching rule, including the scoring for the rule and the field or field combination to which the rule is applied.
You can use the Rules tab to add, rename, delete and duplicate matching rules, and to view and edit rule properties.
Matching Rule Properties
The matching rule properties (including the matching function and matching scores that comprise the rule) are described in Table 129.
Table 129. Matching Rule Properties
Property Description
Name The matching rule name.
Description The matching rule description.
Function The matching rule function.
Fields
The field or fields that participate in the matching rule.
Eligible fields are limited to:
Lookup fields
Sort-indexed fields
Sort-indexed qualifiers (appear as qualifiedlookupfield.qualifier)
Actual and transformed items (appear as name [XFM])
Success The score upon success.
Failure The score upon failure (can be negative to reduce score).
Undefined The score if any field has a NULL value.

MDM Data Manager Reference Guide 417
MULTILINGUAL ►► The drop-down list of fields includes each language layer version of a multilingual text field, allowing you to define different rules for different language layers.
TIP ►► When you specify multiple fields, the multiple field values are concatenated into a single value for comparison purposes, overcoming discrepancies around which fields were used to store which values (e.g. Fname+Lname or Address1+Address2). If you do not want matching across fields, put each field in a different rule.
Matching Functions and Matching Scores
Each matching rule is essentially a numeric scoring mechanism that uses the specified matching function to compare field values across record pairs during matching execution, and then return a score for the three possible outcomes of the function:
Success. The matching function succeeded for the field values.
Failure. The matching function failed for the field values
Undefined. At least one of the fields values has a NULL value.
NOTE ►► When the match is not exact, fuzzy matching functions can also return Partial Success scores that are a fraction of the Success score based on the extent of the fuzzy match.
The current set of matching functions is listed in Table 130.
Table 130. Matching Functions
Function Description
Equals1
String comparison
Uses sort index
Exact match on the complete value of the entire field
Returns Success, Failure or Undefined score
Token Equals1, 2
Token comparison (word order not important)
Uses keyword index
Returns Success, Partial Success3, Failure or Undefined score
1 Equals is faster than Token Equals, which must perform more steps 2 Score = Success * Number of Unique Matching Tokens / Total Number of Unique Tokens
NOTE ►► All fields used for Equals searches must be sort-indexed,
and all fields used for Token Equals operations must be keyword-indexed (see “Field Properties” in the MDM Console Reference Guide).
418 MDM Data Manager Reference Guide
Managing and Editing Matching Rules
MDM allows you to create and manage any number of matching rules in Matching mode. You can add, modify, rename, delete, and duplicate matching rules by right-clicking in the Rules pane and choosing the relevant action from the context menu.
MATCHING STRATEGIES
A matching strategy is comprised of one or more matching rules, a pair of numeric thresholds, and, optionally, one or more partition fields to improve matching speed. Each strategy can then be executed against a set of one or more records against the set, the search results, or all of the records in the repository.
Matching strategies identify potential matches for each record based on the matching scores of the individual rules that comprise the strategy and the thresholds that determine which records are potential matches for each record.
Matching Strategy Operations
The matching strategy operations are summarized in Table 131.
Table 131. Matching Strategy Operations
Operation Description
Edit Matching Strategy Modifies the properties of the selected matching strategy.
Add Matching Strategy Creates a new matching strategy.
Rename Matching Strategy Renames the selected matching strategy.
Delete Matching Strategy Deletes the selected matching strategies.
Duplicate Matching Strategy Duplicates the selected matching strategy.
Strategies Tab
The matching strategy definition operations are performed from the Strategies tab, shown in Figure 227.

MDM Data Manager Reference Guide 419
Figure 227. Strategies tab
The Strategies tab (tab in bottom-right pane) contains a multi-object properties grid that consists of four subpanes: (1) the Strategies pane, which lists the set of matching strategies; (2) the Properties pane, which
lists the set of properties for each strategy, including the High and Low threshold scores; (3) the Scoring Rules pane, which lists the set of scoring rules for you to select those that should be included in each strategy; and (4) the Required Fields pane, which lists the repository table fields whose values you want to partition the match by.
You can use the Strategies tab to add, rename, delete and duplicate matching strategies, to view and edit strategy properties, and to decide which matching rules to include for each strategy.
Matching Strategy Properties
The matching strategy properties (including the threshold scores and the list of matching rules that comprise the strategy) are described in Table 132.
Table 132. Matching Strategy Properties
Property Description
Properties Pane
Name The matching strategy name.
Max Score Maximum total score based on the included rules (read-only)
Min Score Minimum total score based on the included rules (read-only)
High Threshold The threshold for high-likelihood potential matches.
Low Threshold The minimum threshold for potential matches.
Scoring Rules Pane
Include Whether or not to include the matching rule.
420 MDM Data Manager Reference Guide
Property Description
Rule The name of the matching rule.
Required Fields Pane
Include Whether or not to only match against records which share the same value for the selected field.
NOTE ►► All matching rules defined in the Rules tab appear in the
Scoring Rules pane; selecting Include adds a rule to the strategy.
NOTE ►► The read-only Min Score and Max Score properties are calculated automatically by MDM based on the Success scores of every matching rule included in the strategy, and allow you to set the
values for Low Threshold and High Threshold properties to classify the results.
Threshold Scores
A matching strategy executes each of the rules that comprise the strategy during matching execution and calculates a total score for each record based on the score of each of the individual rules, and then uses the threshold scores to determine which records are potential matches for the current record and in which match class they belong:
High. Records whose total score is greater than or equal to the High
Threshold score are included in the list of potential matches in the
Matches tab and placed in the High match class.
Low. Records whose total score is greater than or equal to the Low
Threshold score are included in the list of potential matches in the
Matches tab and placed in the Low match class.
Improving Match Speed with Required Fields
You can greatly improve the speed with which MDM executes a matching strategy by pre-selecting one or more fields whose values are expected to always be correct and which clearly differentiate potentially matching records. For example, the values in the "State" field of an address table indicates that a record for 123 Main St, California does not match a record for 123 Main St, New York, even though the other parts of the address are identical.
Rather than waste time comparing records from each state against records from all other states, you can instead identify the "State" field as a required field for the matching strategy. This limits the scope of the
match to just those records who share the same "State" field value, greatly reducing the overall number of comparisons required to complete the matching process. For an address table containing 10,000

MDM Data Manager Reference Guide 421
records but only 200 records per state, this means each record is only compared against 199 other records instead of 9,999.
NOTE ►► Text fields must be sort-indexed in order to appear in the Required fields list.
NOTE ►► When more than one required field is included in a matching strategy, records are compared against other records sharing the same distinct combination of values across the required fields.
Managing and Editing Matching Strategies
MDM allows you to create and manage any number of matching strategies in Matching mode. You can add, modify, rename, delete, and duplicate matching rules by right-clicking in the Strategies pane and choosing the relevant action from the context menu.
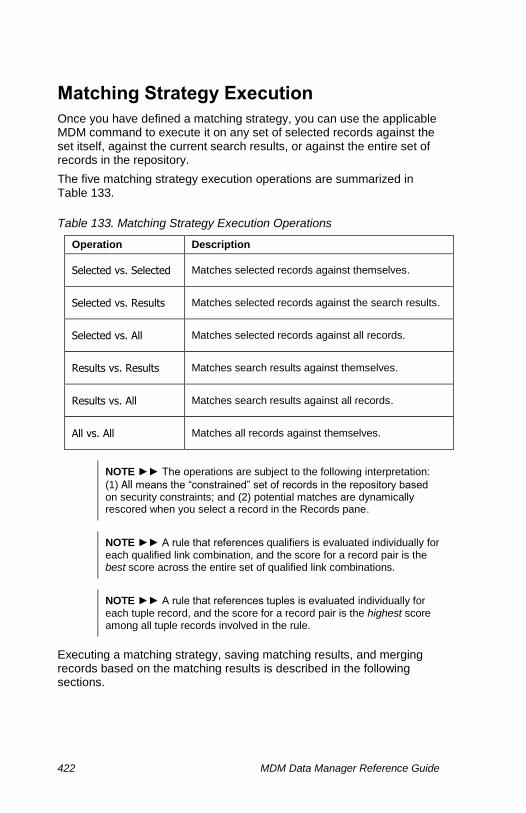
422 MDM Data Manager Reference Guide
Matching Strategy Execution
Once you have defined a matching strategy, you can use the applicable MDM command to execute it on any set of selected records against the set itself, against the current search results, or against the entire set of records in the repository.
The five matching strategy execution operations are summarized in Table 133.
Table 133. Matching Strategy Execution Operations
Operation Description
Selected vs. Selected Matches selected records against themselves.
Selected vs. Results Matches selected records against the search results.
Selected vs. All Matches selected records against all records.
Results vs. Results Matches search results against themselves.
Results vs. All Matches search results against all records.
All vs. All Matches all records against themselves.
NOTE ►► The operations are subject to the following interpretation:
(1) All means the “constrained” set of records in the repository based on security constraints; and (2) potential matches are dynamically rescored when you select a record in the Records pane.
NOTE ►► A rule that references qualifiers is evaluated individually for each qualified link combination, and the score for a record pair is the best score across the entire set of qualified link combinations.
NOTE ►► A rule that references tuples is evaluated individually for each tuple record, and the score for a record pair is the highest score among all tuple records involved in the rule.
Executing a matching strategy, saving matching results, and merging records based on the matching results is described in the following sections.

MDM Data Manager Reference Guide 423
MATCHING RESULT COLUMNS
In addition to columns for the actual fields of the record, the Records grid and the Matches grid each contain several Matching Result columns that indicate the result of executing a matching strategy, as illustrated in Figure 228 and summarized in Table 134.
Figure 228. Matching Result columns in Records grid
Table 134. Matching Result Columns
Name Description
Records Grid
[Count] Number of potential matches for the record.
[Class] Highest match class (High or Low) among the potential matches.
[Score] Highest matching score among the potential matches.
Matches Grid
[Include] Whether to include this record in the merge.
[Class] The match class (High or Low) of this record.
[Score] The total score of this record.
[rule 1] … [rule n] The individual score of this record for each matching rule.
TIP ►► You can use the sortable Matching Result columns to sort the
records in the Records pane as follows: (1) sort by [Count] to see the overall results of the matching strategy, and to see which records have the most potential matches (where too many matches may indicate
that the strategy itself is not discriminating enough); (2) sort by [Class] to group by match class; and (3) sort by [Score] to handle in descending order records with the highest likelihood potential matches that may require merging.
NOTE ►► Unlike other sortable columns, clicking on the [Count], [Class], or [Score] columns sorts records in descending order first, so that records with higher values are displayed at the top of the Records pane.

424 MDM Data Manager Reference Guide
TRACING MATCHING PERFORMANCE
You can view messages that are output by the MDS log file. Use the information provided by the log file to optimize the matching operation. You can manage the level of messages that are output by the MDS log file by setting the tracing level.
The Info level produces messages for high level operations for example:
Transformation operation start/end.
Requirements operation start/end.
RunningTokenScore operation start/end (calculation of the first pass of token scores).
Entire matching operation start/end including the all the threads.
RunningBooleanScoreFirstPass operation start/end (calculation of the first pass of regular scores).
The Debug level produces additional information about internal operations.
Before you execute the matching strategy, set the tracing level in the MDM Console.
In the Trace Filter Settings dialog box, set the tracing level to Info or Debug under Component Settings for the following:
Background_Thread > MatchingExecute
CatMgr2Server > StartMatchingTask
CatMgr2Server > StartMatchingTaskInternal
CatMgr2Server > StartMatchingTaskNoLockInternal
For more information, see the section Filtering Logging of MDS-Related Trace Messages in Part 7: MDS Administration in the MDM Console Reference Guide.
NOTE ►► To better understand and follow the log output while the
matching operation is in process, in the mds.ini file, set Max Threads
per Operation=1.
EXECUTING THE MATCHING STRATEGY
You can execute a matching strategy as described in this section.
To execute a matching strategy:
1. If necessary, select multiple records in the Records pane.

MDM Data Manager Reference Guide 425
2. Right-click on one of the records and choose Matching from the
context menu, or choose Records > Matching > Execute from the main menu (Figure 229):
Figure 229. Matching strategy execution
3. Choose the applicable matching operation from the cascading menu:
Selected vs. Selected Selected vs. Results Selected vs. All Results vs. Results Results vs. All All vs. All
NOTE ►► You must select more than one record to be able to
execute the Selected vs. Selected command.
4. Choose the applicable strategy from the cascading menu of strategies (if more than one matching strategy is defined in the Strategies tab).
5. MDM executes the matching strategy on the applicable records and populates the Matching Result columns and the Matches tab for them.
IMPROVING MATCH SPEED
If matching speed becomes an issue, MDM provides the following options for reducing overall match times:
426 MDM Data Manager Reference Guide
Required fields. Identifying required fields in a matching strategy
can greatly reduce the overall number of comparisons necessary to complete the matching process (see "Improving Match Speed with Required Fields" on page 420 for more information).
Multi-threaded processing. Enabling multi-threaded matching lets
MDM perform concurrent matching for each source record left to match, up to the number of threads allowed for an operation. The Enable Multithreaded Matching and Max Threads Per
Operation options are configured in the MDS configuration file,
described in the MDM Console Reference Guide.
MANAGING MATCHING RESULTS
Matching results are not automatically saved. After you execute the matching strategy on a set of records, you can save the matching results in the repository as a named item. If for any reason the connection to the repository is lost before you complete merging records, you do not need to execute the matching strategy again. You can load the saved results and continue your work.
NOTE ►► Saved matching results are a static snapshot at the time they were saved and do not reflect record modifications after that time.
To save a set of matching results after executing a matching strategy:
1. From the main menu, choose Records > Matching > Matching Results
> Save.
2. In the Matching Results Name field, you can modify the default name that appears.
3. Click OK to save.
To load a set of saved matching results:
1. From the main menu, choose Records > Matching > Matching Results
> Load.
2. In the Saved Matching Results list, select the set of results that you want to load.
3. Click OK.
NOTE ►► Matching results are saved per user. You cannot load matching results that were saved by another user.
To delete a set of saved matching results:
1. From the main menu, choose Records > Matching > Matching Results
> Delete.

MDM Data Manager Reference Guide 427
2. In the Delete Matching Results dialog box, select the sets of results in the Available list that you want to delete and move them to the Selected list.
3. Click OK.
MERGING RECORDS
After you execute the matching strategy on a set of records, you can use the Matches tab to decide which potential matches you want to include in the Merge tab, and then use the Merge tab to merge the records as described in this section.
To merge a record with some or all of its potential matches:
1. Select a record with potential matches in the Records grid.
2. In the Matches tab, check the Include checkbox for those potential matches you want to merge with the selected record (Figure 230).
Figure 230. Matches tab
NOTE ►► The selected record in the Records grid does not appear in the Matches grid and always appears automatically in the Merge tab.
TIP ►► You can include multiple records at once by selecting them in the Matches grid, right-clicking on one of them, and then choosing
Include from the context menu, or choosing Records > Matching > Include from the main menu. You can also uninclude multiple records at once by selecting them in the Matches grid, right-clicking on one of
them, and then choosing Uninclude from the context menu, or
choosing Records > Matching > Uninclude from the main menu.
3. In the Merge tab, set the values in the merged record (Figure 231).
Double-click on a source column grid cell to quickly set the field value of the selected field.
Use the column title context menu to quickly set all the field values of the merged record.
Use the grid cell context menu to set the field value of the selected field, or to copy and paste values between fields.

428 MDM Data Manager Reference Guide
Figure 231. Merge tab
NOTE ►► The selected record in the Records grid appears in the Merge tab with its display field value in the title bar flanked by arrows (► value ◄).
NOTE ►► See “Merging Records” on page 62 for more information about the merge record operations.
4. When you are done setting values, right-click anywhere in the Merge
tab and choose Merge Records from the context menu to merge the selected record with its potential matches.
RELATING RECORDS (MATCH AND RELATE)
Sometimes, you do not want to actually merge potential matching records with the selected record in the Records grid, since merging collapses multiple records into a single record, permanently eliminating records from the system. Instead, you may want to simply relate potential matching records to the selected record.
Specifically, after you execute the matching strategy on a set of records, you can preserve all of the existing records by using the Matches tab to relate rather than merge potential matches, as described in this section.

MDM Data Manager Reference Guide 429
To relate a record to some or all of its potential matches:
1. Select a record with potential matches in the Records grid.
2. In the Matches tab, select those potential matches you want to relate to the selected record (Figure 232).
Figure 232. Relating records in the Matches tab
3. Right-click on one of the records and choose Relate from the context
menu, or choose Records > Matching > Relate from the main menu, and then select a relationship from the cascading menu of relationships.
NOTE ►► The list of cascading menu of relationship includes: (1) sibling relationships for the main table; and (2) parent/child relationships where both the parent and child tables are the main table.
4. MDM relates the selected record in the Records grid to the selected records in the Matches grid using the selected relationship.
NOTE ►► For a parent/child relationship, the selected records in the Matches grid correspond to the half of the relationship selected in the cascading menu, and the selected record in the Records grid corresponds to the other half of the relationship shown in angular brackets (<>).

431
PART 8: FAMILY MODE
This part explains product families and the Families table, and presents step-by-step procedures for the functions in Family mode.
Family mode prepares master data for publishing both to the Web and to paper. It is the first step in preparing master data for paper publication.

432 MDM Data Manager Reference Guide
Product Families
When you publish the contents of a repository, main table product records often need to be organized into a more granular structure than that provided by the categories of the taxonomy. This increased granularity often involves not only grouping records based on the product category, but also further subgrouping them based on attribute values as well as other criteria (such as the manufacturer). Product families provide a way of organizing and identifying these groupings.
A product family is a group of main table product records that are related by one or more common fields and/or attributes having the same value, and that may also have additional fields of family data, such as an image, a logo, a paragraph of descriptive text, bullets of specifications, and so on.
Product families enable master data to be efficiently published not only to paper, but also to non-paper media such as the Web in a manner that preserves the presentation and organization seen in printed catalogs, with the added benefit of fast, efficient product search.
Most master data management systems require that product families (of which there may be thousands) be manually created. Further, they require that products records be manually added to the families, and also that they be manually moved to a different family if changes in the product record result in its no longer belonging to its original family.
NOTE ►► In other systems, a product family may be referred to as a presentation, a unit, an ad, or a module.
By contrast, the MDM system uses an innovative approach to structuring, storing, and maintaining product family information that overcomes the shortcomings of other master data management systems. It embodies patent-pending technology that intelligently automates the creation and management of product families, while at the same time preserving family integrity across changes to the family structure, changes to product records (including adding and deleting records), and even changes to the repository taxonomy itself.
DATA INTEGRITY ►► Layering the Family Hierarchy on top of the taxonomy hierarchy leverages all of the planning and work that went into developing the taxonomy in the first place.
As you refine the Family Hierarchy, MDM does not create families corresponding to all possible combinations of category and field/attribute values. Instead, it creates families only for actual value
combinations that occur in the main table product records, dramatically reducing the number of families to precisely those containing records (and certainly no more than the number of main table product records), thereby resulting in a much more compact Family Hierarchy.

MDM Data Manager Reference Guide 433
Working with the Families Table
Family mode is used to create and manage product family records in the Families table. The Families table contains a hierarchy of product families that is layered upon the hierarchy of another table (typically that of the taxonomy table). When you view the Families table in Family mode, MDM uses a tree to display the Family Hierarchy, and a grid to list the families and other fields of information for each family.
The Family Hierarchy, in conjunction with partitions, allows you to break down each category into smaller groups of like products. A partition is the division of a group of records into one or more subgroups based on the values of the field and/or attribute by which you partition.
Family mode is one of the most time-saving aspects of the MDM system. With a single command, you can often create the entire collection of necessary product families. In addition, since the Families table is typically layered upon the catalog’s taxonomy table, you leverage all of the planning and work that went into developing the taxonomy in the first place. Finally, as you break down categories into smaller subgroups comprising the families, MDM intelligently creates only those product families that actually contain product records.
In Family mode, you can add partitions (either at the root node or on a node-by-node basis) to refine the Family Hierarchy and the set of product families, and then associate family data – such as an image, a paragraph, and bullets – once with each family of products rather than with each individual product.
NOTE ►► Each family in the Families table corresponds to a single leaf-node record in the Family Hierarchy. In addition to storing family data for the family in each of the fields you specify for the Families table, each leaf-node family record automatically contains the set of like main table product records that are members of the family.
NOTE ►► The Families table must already have been created for the repository (using MDM Console) before you can enter Family mode and perform the operations described in this part of the reference guide.
NOTE ►► The fields of the Families table that store the family data are defined in MDM Console and are limited to object lookup fields (i.e. images, text blocks, and PDFs). For each family, you can select which objects to associate with it using the object selector dialogs and the object linking procedures (see “The Object Selector Dialog at a Glance” on page 107 for more information about the object selector dialog).

434 MDM Data Manager Reference Guide
DATA INTEGRITY ►► When you partition a node in the Family Hierarchy, MDM automatically: (1) partitions the leaf node or each leaf node beneath it that inherits the partition into multiple child families based on the values of the field or attribute that actually appear in main table product records corresponding to the value of that leaf node; (2) reassigns each product record that was previously assigned to the original family to one of the new child family nodes based on its value for the partitioning field or attribute; and (3) continuously maintains the Family Hierarchy, the set of families, and the family memberships across the addition and deletion of product records, changes to field and attribute values in the product records, and changes to the taxonomy itself.
Using Family mode to create the Family Hierarchy and assign family data to each family (and then using MDM Publisher to define the layout for each family) allows you to structure master data for publishing to the Web in a way that matches the quality standards established by paper catalogs.
NOTE ►► Family mode prepares master data for publishing both to the Web and to paper. It is the first step in preparing master data for paper publication.
NOTE ►► Product families are merely convenient for improving the clarity and layout of Web catalogs, but they are absolutely essential for publishing paper catalogs, where the product family is the basic layout element.
To switch to Family mode:
Click the Family Mode toolbar button (shown at left), or press Ctrl+5, or
choose View > Family Mode from the main menu.
NOTE ►► Family mode is unavailable if the repository does not contain a Families tables, which is created using MDM Console.
NOTE ►► Only the Families table is available in Family mode, and MDM automatically selects it when you change to Family mode, as shown in Figure 233.
Figure 233. Current table in Family mode

MDM Data Manager Reference Guide 435
FAMILY MODE AT A GLANCE
Figure 234. Family mode main window
TIP ►► If you want to simply review the Family Hierarchy and wish to avoid any accidental changes, you can put MDM Data Manager into
read-only mode by clicking on the Read-Only toolbar button (shown at
left), or by choosing View > Read-Only from the main menu.
The main window of Family mode consists of the panes and tabs shown in the numbered callouts of Figure 234, listed below and described in the following sections:
1. Family Hierarchy pane
2. Families pane
2. Partitioning tab
3. Family Detail tab
4. Status bar
3
2
1
4
5
436 MDM Data Manager Reference Guide
Family Hierarchy Pane
The Family Hierarchy pane (left pane) contains the tree representing the hierarchy of families for the Families table. Use the tree in the Family Hierarchy pane to partition any node of the Family Hierarchy (including the root).
TIP ►► The Families table is based on a taxonomy table (i.e. Categories) and corresponds to the taxonomy lookup field (i.e. Category) assigned to the Family Field of the Families table in MDM Console.
NOTE ►► When the Families table is based on the taxonomy table, the Family Hierarchy is based upon the taxonomy hierarchy, and the set of families initially corresponds to the set of leaf-node categories.
NOTE ►► Nodes that are the result of partitioning have a purple icon ( ) to the left of the node name. Nodes that have been directly partitioned (as opposed to having been partitioned through inheritance) have a small purple dot ( ) to the left of the node icon.
NOTE ►► Node names are displayed in the tree as follows:
(1) A node that cannot have linked family data (i.e. an internal node or a leaf-node family that does not contain main table product records) is highlighted in gray.
(2) A node that can have linked family data (i.e. a leaf-node family that contains main table product records) is displayed normally.
(3) A node that does have linked family data is highlighted in bold.
NOTE ►► When you partition, MDM never creates families that do not contain main table product records. Therefore, the only leaf-node families that will ever not contain product records are those that correspond to empty leaf-node categories of the original taxonomy and are automatically part of the initial Family Hierarchy.
Families Pane
The Families pane (top-right pane) contains a list view of the families in the Families table in a row/column grid, with a row for each leaf-node family, and columns for the family name and the Family Field (i.e. Category, if the Family Hierarchy is based on the Categories taxonomy hierarchy). Use the Families pane to interactively browse all of the records of the Families table, sort by any of the sortable columns in ascending or descending order, and select one or more leaf-node families for adding or removing family data.
MDM Data Manager Reference Guide 437
NOTE ►► The Family Hierarchy pane and the Families pane track one another; that is, when you select a leaf-node record in the Family Hierarchy, MDM automatically selects the corresponding family record in the Families pane, and vice versa. However, since the Families pane contains only leaf-node family records, MDM does not select a family record in the Families pane when you select an internal node in the Family Hierarchy pane.
Partitioning Tab
The Partitioning tab (tab in bottom-right pane) lists the lookup fields and text attributes that are available to partition either the selected node in the Family Hierarchy or the selected record in the Families pane (Figure 235). Available attributes include only those that are either linked to the selected node in the hierarchy or inherited from the parent node. Use the Partitioning tab to create the partitions that refine the Family Hierarchy and the set of product families.
Figure 235. Partitioning tab
NOTE ►► Only lookup fields and text attributes can be used to partition Family Hierarchy nodes.
NOTE ►► Only the single family corresponding to the current row in the Families pane is displayed in the Partitioning tab, even if multiple rows are selected.
NOTE ►► The list of items in the Partitioning tab includes the lookup fields followed by those text attributes that are linked to or inherited by the selected node. Field names are displayed in normal type and attribute names are highlighted in italics.
NOTE ►► The Partitioning tab lists attributes in priority order rather than alphabetical order, and hides those whose priority is below the threshold priority (see “Configuration Options” on page 495 for more information about the Attributes options).
NOTE ►► The Inherit checkbox is not checked for a node that has been directly partitioned (as opposed to having been partitioned
through inheritance). To restore inheritance, recheck the Inherit checkbox (see “Restoring Inheritance” on page 455).

438 MDM Data Manager Reference Guide
Family Detail Tab
The Family Detail tab (tab in bottom-right pane) displays the fields of the Families table that are used to store family data for the family (Figure 236). Double-click a field to open the corresponding object selector dialog and link a particular object (or objects) to the selected family.
Figure 236. Family Detail tab
NOTE ►► All of the families corresponding to the selected rows in the Families pane are displayed in the Family Detail tab for adding or removing family data for multiple families as a group.
NOTE ►► When an internal node is selected in the Family Hierarchy pane, no family record is selected in the Families pane, and the Family Detail tab is displayed in read-only gray, since you can only link objects to leaf-node family records.
NOTE ►► The fields of the Families table must already have been created (using MDM Console) before you can associate family data with each family.
DATA INTEGRITY ►► The Family Detail fields eliminate redundant information by allowing you to link a single object record once at the family level rather than to each individual record in the family.
Status Bar
The Status bar (Figure 238) displays the following mode-specific information for the Families table (from left to right):
“m records” (where ‘m’ is the number of records in the family when a single leaf-node family is selected)
“x families” (where ‘x’ is the total number of leaf-node families)
“Family Mode”

MDM Data Manager Reference Guide 439
Figure 238. Family mode status bar
THE FAMILY HIERARCHY
When you first create the Families table, you must specify the hierarchical table whose hierarchy forms the basis of the Family Hierarchy. This is the starting point from which to refine the Family Hierarchy and make finer-grained family definitions according to how you want to present product families in your repository.
Before any nodes have been partitioned (as described in the next section), the Family Hierarchy is identical to the hierarchy of the table selected as the basis for the Families table, as shown in Figure 239.
Figure 239. Initial Family Hierarchy before partitioning
TIP ►► The Families table is based on a taxonomy table (i.e. Categories) and corresponds to the taxonomy lookup field (i.e. Category) assigned to the Family Field of the Families table in MDM Console.
NOTE ►► The Family Hierarchy is based upon the taxonomy hierarchy, and the set of families initially corresponds to the set of leaf-node categories.
Just as each leaf-node category contains the group of main table product records assigned to that category, each leaf-node family

440 MDM Data Manager Reference Guide
contains the main table product records that share a common set of values for the category (or the hierarchy field whose table is used as the basis of the Families table) and each of the fields and/or attributes by which you partition.
FAMILY DATA
A family is used to store the family data associated with each of the records in the family. If the Family Hierarchy does not contain enough detail to allow family data to be properly associated with sufficiently small groups of records, you must break each family and the group of records within the family into multiple child families.
You use a partition to break a family into multiple families based on the values of the field or attribute by which you partition, so that different family data can then be associated with each of the multiple child families (see the next section for more information about partitions).
In addition, the rationale for choosing the fields and/or attributes by which to partition should take into account how your customers buy your products, or rather, how they shop for your products. That is, for a given product category, what qualities guide their searches through the catalog: Manufacturer? Material? The answers to such questions will identify the fields and/or attributes you should use to partition the nodes of the Family Hierarchy.
PARTITIONS
Recall from Taxonomy mode that the Partition command can be used to split a single leaf-node category into multiple child categories according to the values of a specified single-valued text attribute. When you partition a category, MDM creates a child category for each value of the selected text attribute, and reassigns each product record that was previously assigned to the original category to one of the new children based on its value for the partitioning attribute.
Just as partitioning a category in Taxonomy mode splits the group of records in the category into multiple child categories, partitioning a family in Family mode splits the group of records in the family into multiple child families. However, there are a number of differences between partitioning in Family mode and partitioning in Taxonomy mode, as summarized in Table 135.
Table 135. Partitions in Taxonomy Mode vs. Family Mode
Taxonomy Mode Family Mode
Can partition only by single-valued text attributes.
Can partition by any text attribute and also by any lookup field.
MDM Data Manager Reference Guide 441
Taxonomy Mode Family Mode
Can partition only leaf nodes. Can partition the root node, internal nodes, leaf nodes, and even family nodes that exist only as a result of partitions above them in the Family Hierarchy.
No concept of inheritance of partitions.
The partition of any internal node is inherited by each node beneath it in the Family Hierarchy that is not itself directly partitioned, and is applied to each leaf node that inherits it as if the leaf node were partitioned directly.
A partition adds detail to the taxonomy hierarchy by permanently altering its structure.
A partition adds detail to the Family Hierarchy by adding to the list of partitions for the node, so that you can undo its effects by removing the partition from the list.
When you partition a leaf-node family in the Family Hierarchy, MDM automatically does the following:
Creates a child family node for each value of the field or attribute by which you partition that actually exists in main table product records corresponding to the value of the partitioned leaf node (or value combination if the node is already the result of a partition), as shown in Figure 240.
Reassigns each product record that was previously assigned to the original family to one of the new child family nodes based on its value for the partitioning field or attribute.
Continuously maintains the Family Hierarchy, the set of families, and the family memberships across the addition and deletion of product records, changes to field and attribute values in the product records, and changes to the taxonomy itself.
Figure 240. Node in Family Hierarchy before and after partitioning
442 MDM Data Manager Reference Guide
NOTE ►► Nodes that are the result of partitioning have a purple icon ( ) to the left of the node name. Nodes that have been directly partitioned (as opposed to having been partitioned through inheritance) have a small purple dot ( ) to the left of the node icon.
DATA INTEGRITY ►► MDM maintains the integrity of the Family Hierarchy as follows:
(1) When you add a main table product record for which a family does not already exist, or when you change the value of a field or attribute so that the record belongs to a family that does not already exist, MDM automatically creates the family.
(2) When you delete a main table product record that is the only member of an existing family, or when you change the value of a field or attribute for a record that was the only member of an existing family so that it is no longer a member of the family, MDM automatically deletes the family.
(3) When you change the taxonomy hierarchy, or add or remove linked attributes, MDM automatically synchronizes the Family Hierarchy so that it continues to correspond to the taxonomy.
A partition can be applied to: (1) the root, for inheritance by each node beneath it in the Family Hierarchy that is not partitioned directly; or (2) any other internal or leaf node, overriding the inheritance, if any, from a partitioned node above it in the Family Hierarchy (see the next section for more information about inheritance).
NOTE ►► When you partition an internal node, MDM applies the partition to each leaf-node family beneath it that inherits the partition as if it were directly partitioned.
Value Combinations
When you add a partition, MDM creates a set of value combinations corresponding to the node value and all of the corresponding values of the field or attribute by which you partition. Not coincidentally, each family that MDM creates as a result of the partition corresponds to one of these value combinations.
However, MDM does not create families corresponding to all possible value combinations. Rather, it creates families only for actual value combinations that occur in the main table product records, dramatically reducing the number of families to precisely those containing product records (and certainly no more than the number of main table products), thereby resulting in a much more compact Family Hierarchy.
NOTE ►► Partitioning a single leaf-node value results in a single set of value combinations. Partitioning an internal node results in a set of value combinations for each leaf-node value beneath it that inherits the partition. Partitioning the root results in a set of value combinations for each leaf-node value that inherits the partition.

MDM Data Manager Reference Guide 443
NOTE ►► Since MDM never creates families that do not contain main table product records when you partition, the only leaf-node families that will ever not contain product records are those that correspond to empty leaf-node categories of the original taxonomy.
DATA INTEGRITY ►► If the entire set of possible values and value combinations were used when creating families, the Family Hierarchy would be unnecessarily large. Consider a repository with 200 categories, 500 manufacturers, and 10,000 products. If Category were to be partitioned by Manufacturer, the set of possible value combinations would result in 100,000 families (even though the main table contains only 10,000 product records). Most of these families would in fact contain no records, since for a particular category, only a small subset of manufacturers offers products (and conversely, each manufacturer offers just a small number of categories of products).
Inheritance in Family Mode
By default, when you partition an internal node (i.e. a node that has at least one child node), each of the child nodes inherits the parent’s
partitions, each of its child nodes inherits the inherited partitions, and so on, until the partitions are inherited by and applied to a leaf node.
NOTE ►► When a node is inheriting partitioning: (1) the Partition By list in the Partitioning tab contains the partition items that are inherited;
and (2) the Inherit checkbox is checked in the Partitioning tab to indicate that the items shown in the Partition By list are inherited.
Inheritance of partitions makes refining the Family Hierarchy for the repository extremely efficient. Recall that the initial Family Hierarchy is automatically determined by the choice of the Family Field when the Families table is created (and is usually based upon the taxonomy table). When you partition at the root, the partition is inherited by each of the children, so that by partitioning the root node, you can add a level of partitioning – for example, by Manufacturer – to the entire Family Hierarchy. Thus, with a single command, every family in the Family Hierarchy can be automatically partitioned by Manufacturer, and one or more child family nodes created for every manufacturer wherever there are actual product records that can be placed into the family.
When you directly partition any internal node or a leaf node, the inheritance of partitions from nodes above it in the Family Hierarchy is broken, and the node is partitioned only by the fields and/or attributes specified directly for that node.
In effect, directly partitioning the node breaks the chain of inheritance from nodes above it in the Family Hierarchy, and the partitions for the node override any inherited partitions.
444 MDM Data Manager Reference Guide
In this way, inheritance can be overridden for any node by directly partitioning it in the Family Hierarchy. Moreover, any child of the directly partitioned node then inherits the partitions of the node unless the partitioning information of the child node is itself directly partitioned.
NOTE ►► Nodes that have been directly partitioned (as opposed to having been partitioned through inheritance) have a small purple dot () to the left of the node icon in the Family Hierarchy tree.
NOTE ►► In addition to the purple dot, the Inherit checkbox is not checked in the Partitioning tab for nodes that have been directly
partitioned. To restore inheritance, recheck the Inherit checkbox (see “Restoring Inheritance” on page 455).
TIP ►► Not only is the Family Hierarchy usually based upon the taxonomy hierarchy, the root node of the Family Hierarchy is often partitioned by the Manufacturer field. This corresponds to the practice in most repositories of organizing products by category, and then by manufacturer within each category.
NOTE ►► Directly partitioning an internal node, all of whose children are also directly partitioned, will not result in any nodes being added to the Family Hierarchy, since partitioning is only applied to leaf nodes and the chain of inheritance is broken by each of its children.
Multiple Partitions
The result of a partition is that additional child nodes are added to the Family Hierarchy (provided, of course, that main table product records belong to the leaf-node family whose node is partitioned).
When you partition a node by more than one field or attribute, each partition is applied sequentially. In other words, the first partition is applied to the leaf node or to each leaf node beneath it that inherits the partition to create additional child family nodes, the second partition is then applied to the newly created leaf nodes beneath it that inherit the partition to create additional child family nodes, and so on, as shown in Figure 241, Figure 242, and Figure 243.

MDM Data Manager Reference Guide 445
Figure 241. Multiple partitions before first partition
Figure 242. Multiple partitions after first partition
Figure 243. Multiple partitions after second partition (nested partitions)
Nested and Combined Partitions
By default, multiple partitions for a particular node in the Family Hierarchy are nested (i.e. applied sequentially) as described in the previous section. Nested partitions add multiple levels of hierarchy, with a level of child family nodes created for the set of values in each of the nested partitions.
Partitions can also be combined (i.e. applied as a group). Combined
partitions add a single level of hierarchy, with child family nodes created for each of the merged value combinations of the combined partitions.

446 MDM Data Manager Reference Guide
NOTE ►► Each value combination corresponds to actual main table records containing that particular combination of values for the fields and/or attributes.
A nested partition displays each value of each value combination as a distinct node in the Family Hierarchy, with the values of the category field represented as sibling nodes at the top level in the hierarchy, the values of the first partitioning field or attribute represented as sibling nodes at a second level in the hierarchy as children of the first set of sibling nodes, and so on for each field or attribute participating in the partition, as shown in Figure 243 above.
NOTE ►► Reordering nested partitions changes the hierarchy structure created by the multiple partitions but results in the same set of leaf-node families.
By contrast, a combined partition displays each value combination consisting of the individual values of the category field and each of the fields or attributes participating in the combined partition as a single merged value in a single node in a hierarchy, with the entire set of value combinations represented as sibling nodes at a single level in the hierarchy, as shown in Figure 244.
Figure 244. Combined partitions
Not coincidentally, the value combination represented by each bottom-level leaf node in a nested partition corresponds to the value combination represented by each sibling node in a combined partition, and also to precisely the same subset of records.
NOTE ►► Combining partitions results in fewer internal nodes but exactly the same set of leaf nodes being added to the Family Hierarchy, so that the Family Hierarchy has less depth and fewer levels than if the partitions were not combined.
Nested and combined partitions would thus appear to be equivalent and interchangeable, and in some ways, they are. However, there are subtle differences between nested and combined partitions, as illustrated above and further described below:

MDM Data Manager Reference Guide 447
Node values. Even though the bottom-level leaf nodes of a nested
partition correspond to the top-level siblings of a combined partition, and both correspond to the same value combinations and subset of records, the node values themselves are very different. In a nested partition, the value of the bottom-level leaf node is the value of the last partition field, whereas in a combined partition, the value of the top-level sibling node is the merged value of all the partition fields.
Hierarchy. A nested partition creates the entire hierarchy
represented by the value combinations of the partition, along with all associated internal nodes, while a combined partition flattens the hierarchy and does not create any internal nodes.
Number of nodes for each field value. A nested partition creates a single node for each value of the first partitioned field, with a child for
each value of the first field or attribute by which you partition, “grandchild” nodes for each value of the second partition, and so on for each partition, whereas a combined partition creates multiple nodes for each value of the first partitioned field, with a child for each value combination of each of the partitions, making it more difficult with a combined partition to further partition a value of the partition.
Arbitrary Partitions
Recall that when you publish the contents of a repository, records often need to be organized into a more granular structure than that provided by the categories of the taxonomy. This increased granularity often involves not only grouping records based on the product category, but also further subgrouping them – through partitioning – based on attribute values as well as other criteria (such as the manufacturer).
Since partitioning allows you to break the group of records in a family into subgroups based on the values of a field or attribute, partitioning is data-driven and structural, and the subgroupings must typically occur along well-defined divisions of products based on actual product data.
Sometimes, however, you may want to break the records into subgroups based on arbitrary criteria that do not directly correspond to the product data itself. MDM supports this level of flexibility using the notion of a “phantom” text attribute, as described in this section.
First, in Taxonomy mode: (1) create a text attribute with a set of dummy values (e.g. A, B, and C); (2) link the phantom attribute to the category whose group of records you want to arbitrarily break into subgroups; (3) assign a very low Priority to the attribute so that it does not appear anywhere because it is below the various threshold priorities; and (4) assign a value to the phantom attribute for each product in the category based on how you want to break the records into subgroups. Finally, in Family mode: (5) partition the category by the phantom attribute as described in the following sections.
448 MDM Data Manager Reference Guide
The result is a Family Hierarchy where each family contains precisely the subgroup of records that you desire.
TIP ►► You can share the same phantom attribute among all the categories that need to be arbitrarily broken into subgroups. Moreover, you can link the phantom attribute to an internal node in the taxonomy, for inheritance by all the child categories beneath it, and then partition the applicable leaf-node families in the Family Hierarchy by the phantom attribute, or even partition an internal node in the Family Hierarchy. Finally, depending upon how many such categories exist in the taxonomy, you can even use a phantom field rather than attribute, and partition the entire Family Hierarchy at the root by the phantom field; only those categories containing product records having a value set for the phantom field will be affected by the partition.

MDM Data Manager Reference Guide 449
Family Hierarchy Operations
The following sections describe the various operations you can perform on the Family Hierarchy in Family mode, including:
Partitioning a node by a single field or attribute.
Partitioning a node by multiple fields and/or attributes at once.
Combining separate partitions.
Splitting partitions that were previously combined.
Removing partitions.
Reordering partitions.
Restoring inheritance of partitioning information.
The Family Hierarchy operations are summarized in Table 136.
Table 136. Family Hierarchy Operations
Operation Description
Add Partition Adds the selected items to the list of partitions for the selected tree node.
Combine Partitions Combines the selected partition items for the selected tree node.
Split Partitions Splits the previously combined partition items for the selected tree node.
Remove Partition Removes the selected partition items from the list of partitions for the selected tree node.
Reorder Partitions Reorders the selected partition items for the selected tree node.
Inherit Partitions Eliminates custom partitions for the selected tree node and restores inheritance of partitions.
Synchronize Family Children
Synchronizes the family tree to correspond to the current contents of the repository.
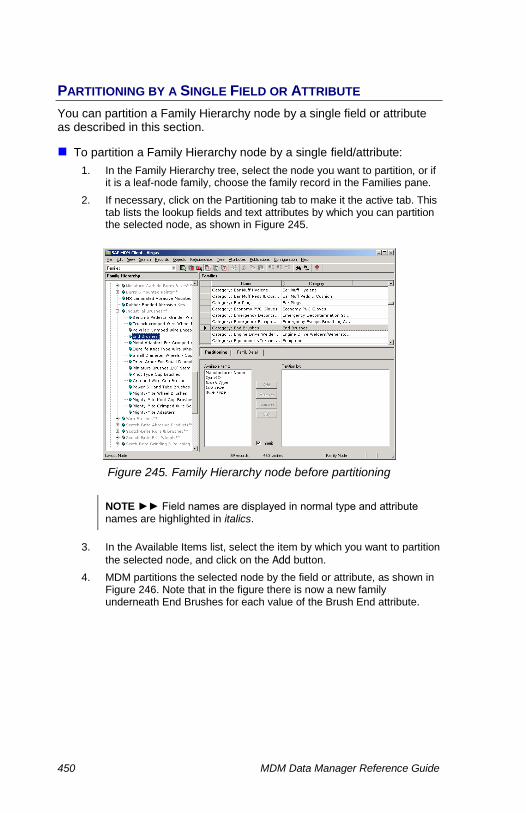
450 MDM Data Manager Reference Guide
PARTITIONING BY A SINGLE FIELD OR ATTRIBUTE
You can partition a Family Hierarchy node by a single field or attribute as described in this section.
To partition a Family Hierarchy node by a single field/attribute:
1. In the Family Hierarchy tree, select the node you want to partition, or if it is a leaf-node family, choose the family record in the Families pane.
2. If necessary, click on the Partitioning tab to make it the active tab. This tab lists the lookup fields and text attributes by which you can partition the selected node, as shown in Figure 245.
Figure 245. Family Hierarchy node before partitioning
NOTE ►► Field names are displayed in normal type and attribute names are highlighted in italics.
3. In the Available Items list, select the item by which you want to partition
the selected node, and click on the Add button.
4. MDM partitions the selected node by the field or attribute, as shown in Figure 246. Note that in the figure there is now a new family underneath End Brushes for each value of the Brush End attribute.

MDM Data Manager Reference Guide 451
Figure 246. Family hierarchy node after partitioning on a single attribute
NOTE ►► You can repeat this procedure to successively partition any family node by other fields or attributes.
NOTE ►► When you directly partition a node, MDM: (1) displays a small purple dot ( ) to the left of the node icon in the Family Hierarchy
tree; and (2) unchecks the Inherit checkbox in the Partitioning tab. To
restore inheritance, recheck the Inherit checkbox (see “Restoring Inheritance” on page 455).
TIP ►► Family nodes are nested in the Family Hierarchy in the same order as the fields/attributes shown in the Partition By list on the Partitioning tab. You can change the nesting of the family nodes by simply dragging-and-dropping the list items to rearrange them into the desired order.
PARTITIONING BY MULTIPLE FIELDS AND/OR ATTRIBUTES
You can partition a Family Hierarchy node by a combination of multiple fields and/or attributes as described in this section.
To partition a Family Hierarchy node by multiple fields and/or attributes:
1. In the Family Hierarchy tree, select the node you want to partition, or if it is a leaf-node family, choose the family record in the Families pane.
2. If necessary, click on the Partitioning tab to make it the active tab. This tab lists the lookup fields and text attributes by which you can partition the selected node, as shown in Figure 245 above.
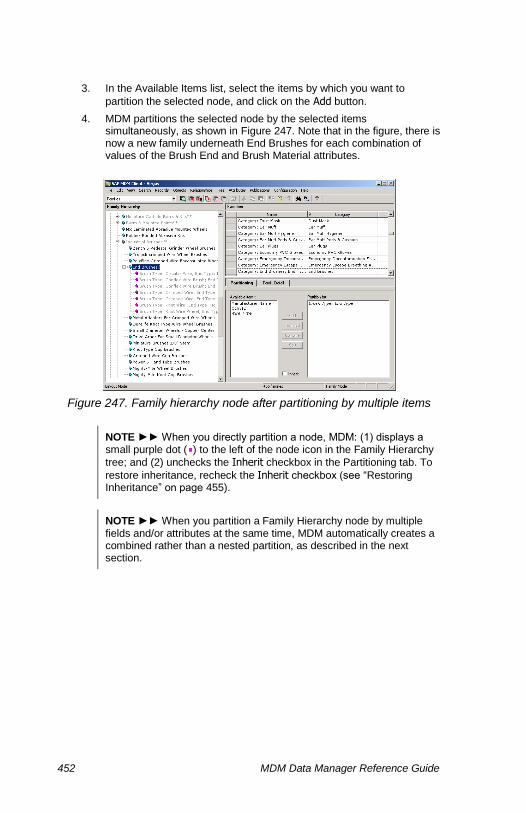
452 MDM Data Manager Reference Guide
3. In the Available Items list, select the items by which you want to
partition the selected node, and click on the Add button.
4. MDM partitions the selected node by the selected items simultaneously, as shown in Figure 247. Note that in the figure, there is now a new family underneath End Brushes for each combination of values of the Brush End and Brush Material attributes.
Figure 247. Family hierarchy node after partitioning by multiple items
NOTE ►► When you directly partition a node, MDM: (1) displays a small purple dot ( ) to the left of the node icon in the Family Hierarchy
tree; and (2) unchecks the Inherit checkbox in the Partitioning tab. To
restore inheritance, recheck the Inherit checkbox (see “Restoring Inheritance” on page 455).
NOTE ►► When you partition a Family Hierarchy node by multiple fields and/or attributes at the same time, MDM automatically creates a combined rather than a nested partition, as described in the next section.
MDM Data Manager Reference Guide 453
COMBINING PARTITIONS
You can combine two or more partitions that were previously added separately as described in this section.
To combine two or more partitions for a Family Hierarchy node:
1. In the Family Hierarchy tree, select the node whose partitions you want to combine, or if it is a leaf-node family, choose the family record in the Families pane.
2. If necessary, click on the Partitioning tab to make it the active tab.
3. In the Partition By list, select the two or more partition items you want to combine into a single partition.
4. Click on the Combine button, or right-click on one of the items and
choose Combine Partitions from the context menu.
5. MDM combines the selected partition items.
NOTE ►► See “Splitting a Partition” on page 453 for more information about how to split combined partitions.
NOTE ►► Combining partitions for a node that is currently inheriting partitions from an ancestor in the Family Hierarchy directly partitions the selected node and breaks the inheritance for that node, so that it no longer inherits partition changes made to its ancestor.
NOTE ►► When you directly partition a node, MDM: (1) displays a small purple dot ( ) to the left of the node icon in the Family Hierarchy
tree; and (2) unchecks the Inherit checkbox in the Partitioning tab. To
restore inheritance, recheck the Inherit checkbox (see “Restoring Inheritance” on page 455).
SPLITTING A PARTITION
You can split a partition that was previously combined as described in this section.
To split a partition for a Family Hierarchy node:
1. In the Family Hierarchy tree, select the node whose combined partition you want to split, or if it is a leaf-node family, choose the family record in the Families pane.
2. If necessary, click on the Partitioning tab to make it the active tab.
3. In the Partition By list, select the combined partition item you want to split into its individual component partitions.
4. Click on the Split button, or right-click on one of the items and choose
Split Partitions from the context menu.
5. MDM splits the selected partition items.
454 MDM Data Manager Reference Guide
NOTE ►► See “Combining Partitions” on page 453 for more information about how to combine partitions.
NOTE ►► Splitting a partition for a node that is currently inheriting partitions from an ancestor in the Family Hierarchy directly partitions the selected node and breaks the inheritance for that node, so that it no longer inherits partition changes made to its ancestor.
NOTE ►► When you directly partition a node, MDM: (1) displays a small purple dot ( ) to the left of the node icon in the Family Hierarchy
tree; and (2) unchecks the Inherit checkbox in the Partitioning tab. To
restore inheritance, recheck the Inherit checkbox (see “Restoring Inheritance” on page 455).
REMOVING PARTITIONS
Removing partitions in the Family Hierarchy is a matter of simply selecting the fields and/or attributes by which a node was partitioned, and removing them from the list of partitions for the node, as described in this section.
To remove one or more partitions from a Family Hierarchy node:
1. In the Family Hierarchy tree, select the node from which you want to remove the partitions, or if it is a leaf-node family, choose the family record in the Families pane.
2. If necessary, click on the Partitioning tab to make it the active tab.
3. In the Partition By list, select the one or more partition items you want
to remove, and click on the Remove button.
4. MDM removes the partition item(s) from the selected node, and restructures the Family Hierarchy to eliminate any family nodes that had been created as a result of the partition(s).
NOTE ►► Removing a partition for a node that is currently inheriting partitions from an ancestor in the Family Hierarchy directly partitions the selected node and breaks the inheritance for that node, so that it no longer inherits partition changes made to its ancestor.
NOTE ►► When you directly partition a node, MDM: (1) displays a small purple dot ( ) to the left of the node icon in the Family Hierarchy
tree; and (2) unchecks the Inherit checkbox in the Partitioning tab. To
restore inheritance, recheck the Inherit checkbox (see “Restoring Inheritance” on page 455).
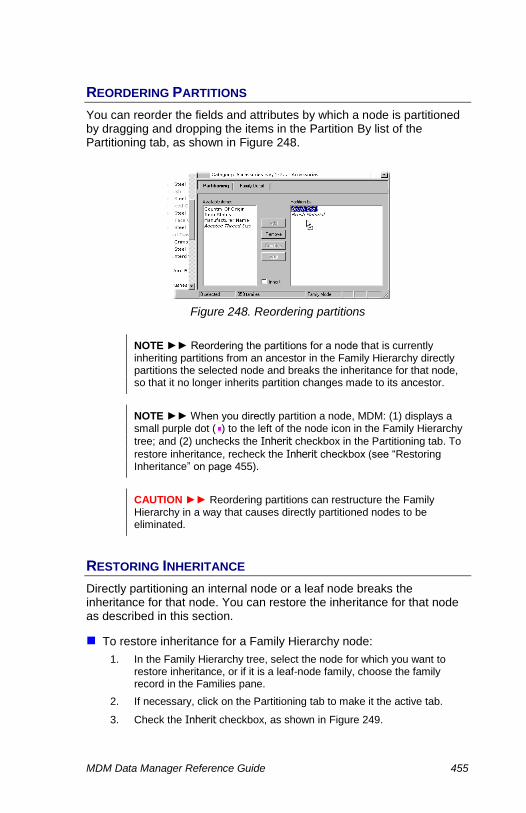
MDM Data Manager Reference Guide 455
REORDERING PARTITIONS
You can reorder the fields and attributes by which a node is partitioned by dragging and dropping the items in the Partition By list of the Partitioning tab, as shown in Figure 248.
Figure 248. Reordering partitions
NOTE ►► Reordering the partitions for a node that is currently inheriting partitions from an ancestor in the Family Hierarchy directly partitions the selected node and breaks the inheritance for that node, so that it no longer inherits partition changes made to its ancestor.
NOTE ►► When you directly partition a node, MDM: (1) displays a small purple dot ( ) to the left of the node icon in the Family Hierarchy
tree; and (2) unchecks the Inherit checkbox in the Partitioning tab. To
restore inheritance, recheck the Inherit checkbox (see “Restoring Inheritance” on page 455).
CAUTION ►► Reordering partitions can restructure the Family Hierarchy in a way that causes directly partitioned nodes to be eliminated.
RESTORING INHERITANCE
Directly partitioning an internal node or a leaf node breaks the inheritance for that node. You can restore the inheritance for that node as described in this section.
To restore inheritance for a Family Hierarchy node:
1. In the Family Hierarchy tree, select the node for which you want to restore inheritance, or if it is a leaf-node family, choose the family record in the Families pane.
2. If necessary, click on the Partitioning tab to make it the active tab.
3. Check the Inherit checkbox, as shown in Figure 249.

456 MDM Data Manager Reference Guide
4. MDM restores the inheritance to the selected node.
Figure 249. Restoring inheritance
NOTE ►► Restoring the inheritance for a directly partitioned Family Hierarchy node replaces the partition items for the node with the inherited partitions from its ancestor in the Family Hierarchy.
SETTING THE RECORD MODE SEARCH
Recall that each leaf-node family contains the main table product records that share a common set of values for the field whose table is used as the basis of the Families table (usually the category field) and each of the fields and/or attributes by which you partition.
You can use the Set Record Mode Search command to set the search selections in Record mode to correspond to the selected leaf-node family, so that you can conveniently identify the product records associated with the family.
To set the record mode search selections:
1. In the Family Hierarchy tree, select any leaf-node family for which you want to set the Record mode search selections.
2. Right-click on the selected node and choose Set Record Mode Search
from the context menu, or choose Tree > Set Record Mode Search from the main menu.
3. MDM sets the Record mode search selections so that the search results in Record mode will be the products in the selected family
TIP ►► Since each internal node in the Family Hierarchy is also defined by the value of one or more fields and attributes used to define
the Families table, you can also use the Set Record Mode Search command on an internal node to locate the product records associated with all of the leaf-node families that are children of the selected internal node.
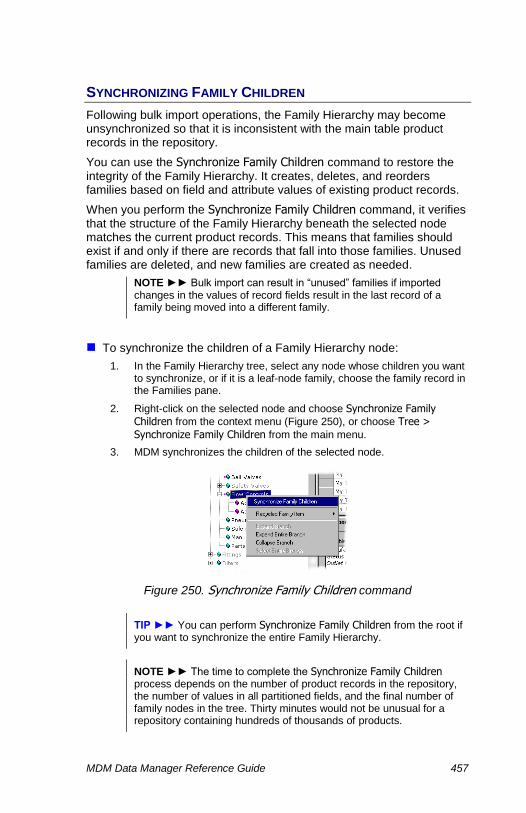
MDM Data Manager Reference Guide 457
SYNCHRONIZING FAMILY CHILDREN
Following bulk import operations, the Family Hierarchy may become unsynchronized so that it is inconsistent with the main table product records in the repository.
You can use the Synchronize Family Children command to restore the integrity of the Family Hierarchy. It creates, deletes, and reorders families based on field and attribute values of existing product records.
When you perform the Synchronize Family Children command, it verifies that the structure of the Family Hierarchy beneath the selected node matches the current product records. This means that families should exist if and only if there are records that fall into those families. Unused families are deleted, and new families are created as needed.
NOTE ►► Bulk import can result in “unused” families if imported changes in the values of record fields result in the last record of a family being moved into a different family.
To synchronize the children of a Family Hierarchy node:
1. In the Family Hierarchy tree, select any node whose children you want to synchronize, or if it is a leaf-node family, choose the family record in the Families pane.
2. Right-click on the selected node and choose Synchronize Family Children from the context menu (Figure 250), or choose Tree >
Synchronize Family Children from the main menu.
3. MDM synchronizes the children of the selected node.
Figure 250. Synchronize Family Children command
TIP ►► You can perform Synchronize Family Children from the root if you want to synchronize the entire Family Hierarchy.
NOTE ►► The time to complete the Synchronize Family Children process depends on the number of product records in the repository, the number of values in all partitioned fields, and the final number of family nodes in the tree. Thirty minutes would not be unusual for a repository containing hundreds of thousands of products.

458 MDM Data Manager Reference Guide
LINKING FAMILY DATA
You can associate family data with any leaf-node family record in the Family Hierarchy by linking one or more objects to each of its fields. The types of family data that can be linked to the fields are determined by the fields defined for the Families table (using MDM Console).
NOTE ►► Families and family data have the following restrictions: (1) family data can be linked only to leaf-node family records; (2) only object lookup fields can be defined as Family table fields; and (3) only objects can be linked as family data.
The object lookup fields in the Families table are always multi-valued. These fields appear in the Family Detail tab in Family mode (Figure 236) and are lookup fields into the corresponding object tables.
The following types of objects can be linked to families:
Images
Text blocks
Copy blocks
HTML text blocks
PDFs
To associate family data with a family record:
1. In the Family Hierarchy tree, select the leaf-node family to which you want to assign family data, or choose the family record in the Families pane.
2. In the Family Detail tab, double-click on the desired field to open the appropriate object selector dialog.
3. Select the desired object(s) and click OK to close the object selector dialog so that the selected objects appear in the Family Detail tab.
NOTE ►► The procedure for linking objects to an object lookup field is described in “Working with Objects” on page 99.
DATA INTEGRITY ►► By linking objects to a family, they are automatically and indirectly linked to all the existing records in the family and to all new records that MDM adds to the family.

459
PART 9: EXPORTING RECORDS
This part describes how to export a list of records from any of the tables of an MDM repository, or a list of attributes from a taxonomy table.
The Data Manager subsystem for exporting records is an extremely flexible ad hoc capability that should not be used outside of its intended scope as a lightweight utility.
For more complex tasks, please use MDM Syndicator.


MDM Data Manager Reference Guide 461
Exporting Table Records
Sometimes you may need to export some or all of the records of an MDM repository, for example, so that you can distribute subsets of your master data for review and/or editing by different audiences who are not users of the MDM system.
The Export command in Record mode allows you to output table records into several different, industry-standard file formats, as summarized in Table 137.
Table 137. Export File Formats
Export To…
Filename Extension
Major Split
Minor Split
Description
Text .txt Directories Files
Creates one or more Windows directories, and within each directory, one or more text files.
Excel .xls Worksheets Sheets
Creates one or more Excel worksheet files, and within each worksheet, one or more sheets.
Access .mdb Databases Tables
Creates one or more Access database files, and within each database, one or more tables.
You can use the Export command to create output files containing any or all of the records of the main table or any subtable of an MDM repository. Each record can contain any or all of the field, relationship, qualifier and attribute values, and tuple member fields. The export can also include the corresponding images and/or PDFs that are linked to the exported records (Table 138).
Table 138. Exporting Records
Item Description
Records
Export all of the records of the search results, just the subset selected in the Records pane, or when the current table is a lookup subtable, just the records that are currently being used as the value of a lookup field.
If the current table is a lookup subtable, each record corresponds to a legal lookup value for the corresponding lookup field.
If the current table is a taxonomy subtable, you can also export the links associated with each category record and an

462 MDM Data Manager Reference Guide
Item Description
additional sheet containing the text value list for each linked text attribute.
If the current table is an object subtable, each record corresponds to one of the objects that can be linked to a corresponding object lookup field.
Fields… Individually select the fields, product, relationships, qualifiers, and/or attributes to be exported, and their order in the output file.
Images / PDFs
When you export an image or PDF lookup field, MDM can also write into one or more Windows directories an individual file for each image or PDF that is linked to the object field.
When you use the Export command to export records from the current table, MDM opens the applicable Export dialog, and populates it with the fields and attributes of the current table.
First, each of the tabs is populated and enabled based on the Fields Tab and Other Tabs options you specify, as summarized in Table 139.
Table 139. Fields Tab and Other Tabs Group Options
Option Description and Constraints
Fields Tab
Lookup Details
Adds to the list of available fields all of the object lookup table fields for each of the object lookup fields of the current table.
At least one lookup field must exist in the current table
For tuples, only applies to the table from which the data is exported.
Remote System Details
Adds to the list of available fields two additional fields named [Remote System] and [Remote Key].
Used to export key mappings
For tuples, only applies to the table from which the data is exported.
Other Tabs
Relationships
Enables the Relationships tab for selection and export of relationships.
At least one product relationship must exist for the current table
Qualifiers
Enables the Qualifiers tab for selection and export of qualifiers (main table export).
At least one qualified lookup field must exist in the current table
MDM Data Manager Reference Guide 463
Option Description and Constraints
Attributes
Enables the Attributes tab for selection and export of attributes (main table export) or includes the links associated with each category record, and creates an additional sheet listing text attributes and their text values (taxonomy table export).
At least one taxonomy lookup field must exist in the current table
In the Taxonomy table, this checkbox is disabled when choosing at least one tuple member field.
Images/PDFs
Enables the Image Variants tab for selection of image variants, and writes to disk each image/PDF linked to each exported image/PDF lookup field.
At least one image or PDF lookup field must exist in the current table
TIP ►► To export images and/or PDFs in addition to table records, be
sure to check the Include Images/PDFs option and export the corresponding image and/or PDF field.
NOTE ►► With the exception of images and PDFs, MDM does not support the export of objects (e.g. sound, video, binary object) and such object fields do not appear in the list of available fields.
NOTE ►► When exporting tuples, these options apply only to the table that is exported.
MDM then creates output files and image/PDF directories based on the selections you make in each of the tabs (summarized in Table 140) and the export options you specify (summarized in Table 141).

464 MDM Data Manager Reference Guide
Table 140. Export Dialog Tabs
Tab Description and Constraints
Fields
Lists all of the fields of the current table, for you to select and reorder those to include in the export file.
Initial default selection includes those fields currently displayed in the Records pane in the order displayed; subsequent exports remember the selections and ordering you specify for each table type.
If Fields Tab > Lookup Details is checked, includes for each object lookup field all of the object lookup table fields, by appending the name of the lookup table field in square
brackets to the lookup field name (e.g. Product Image [Width]).
If Fields Tab > Remote System Details is checked, includes
two additional fields named [Remote System] and [Remote Key].
When you export the [Remote System] and [Remote Key] fields, MDM always expands each record into multiple
rows, with one row per [Remote System] / [Remote Key] value pair
Relationships
Lists all of the relationships of the current table, for you to select and reorder those to include in the export file.
The value of the relationship field for each record is the one or more values of the display field(s) of each linked record; for the purposes of export, the relationship field is treated as a multi-valued field.
A product relationship must exist for the current table
Other Tabs > Relationships must be checked
Qualifiers
Lists all of the qualifiers that correspond to the qualified lookup fields, for you to select those to include in the export file.
Initial default selection includes all the listed qualifiers.
If there are multiple qualified lookup fields, includes the qualifiers for each one, by appending the field name in angular brackets to the name of each qualifier (e.g.
Qualifier <qualified field>).
A qualified lookup field must exist in the current table
Other Tabs > Qualifiers must be checked
All qualified field values are exported as text values, regardless of their data type in the MDM repository.

MDM Data Manager Reference Guide 465
Tab Description and Constraints
Attributes
Lists all of the attributes that correspond to the categories in the records of the search results, for you to select those to include in the export file.
Initial default selection includes all the listed attributes; the default order and the actual export order for the different split options and category selections are summarized in Table 143.
If there are multiple taxonomy lookup fields, includes the attributes for each one, by appending the field name in angular brackets to the name of each attribute (e.g.
Attribute <taxonomy field>).
A taxonomy lookup field must exist in the current table
Other Tabs > Attributes must be checked
Images/PDFs
Lists all of the image variants, for you to select those to be written to files on the disk for each image linked to the selected image fields.
Creates an export directory for each image variant you export, by appending the variant name to the name of the image field, separated by an underscore (e.g.
ProductImage_variant).
Names each image file by appending the unique internal ID to the name of the image in the repository.
An image or PDF lookup field must exist in the current table
Other Tabs > Images/PDF Files must be checked
Languages
Lists all of the language layers for the repository.
Expands each multilingual field into multiple columns, one column per language, appending the language name in
angular brackets to the name of the field (e.g. Field <language [lo]>).
The repository must be multilingual
Other Tabs > Languages must be checked
Usage
Lists all the lookup fields that reference the current subtable (where each lookup field has the format
“table.field”).
Each field you select becomes a column named “Usage [table.field]” that contains the number of records that each subtable record is assigned to that field.
List includes an item named [All] that lists the total for all lookup fields.
The current table must be a subtable
Other Tabs > Usage must be checked
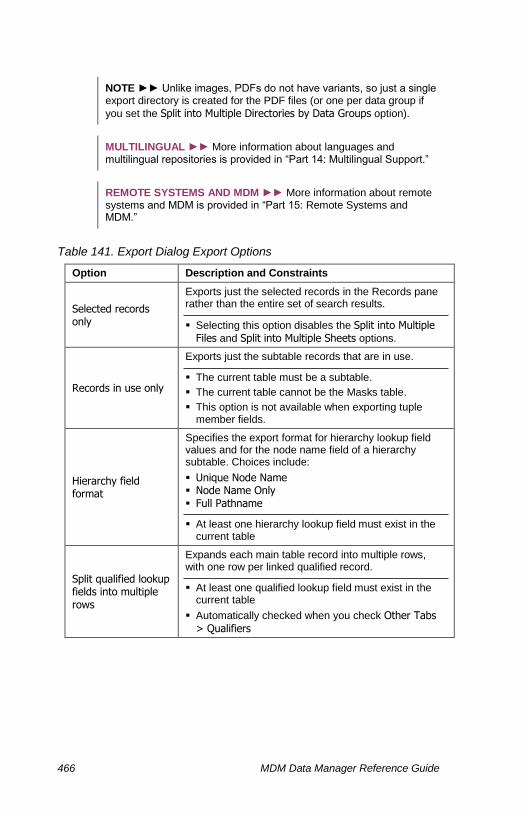
466 MDM Data Manager Reference Guide
NOTE ►► Unlike images, PDFs do not have variants, so just a single export directory is created for the PDF files (or one per data group if
you set the Split into Multiple Directories by Data Groups option).
MULTILINGUAL ►► More information about languages and multilingual repositories is provided in “Part 14: Multilingual Support.”
REMOTE SYSTEMS AND MDM ►► More information about remote systems and MDM is provided in “Part 15: Remote Systems and MDM.”
Table 141. Export Dialog Export Options
Option Description and Constraints
Selected records only
Exports just the selected records in the Records pane rather than the entire set of search results.
Selecting this option disables the Split into Multiple Files and Split into Multiple Sheets options.
Records in use only
Exports just the subtable records that are in use.
The current table must be a subtable.
The current table cannot be the Masks table.
This option is not available when exporting tuple member fields.
Hierarchy field format
Specifies the export format for hierarchy lookup field values and for the node name field of a hierarchy subtable. Choices include:
Unique Node Name Node Name Only Full Pathname
At least one hierarchy lookup field must exist in the current table
Split qualified lookup fields into multiple rows
Expands each main table record into multiple rows, with one row per linked qualified record.
At least one qualified lookup field must exist in the current table
Automatically checked when you check Other Tabs
> Qualifiers
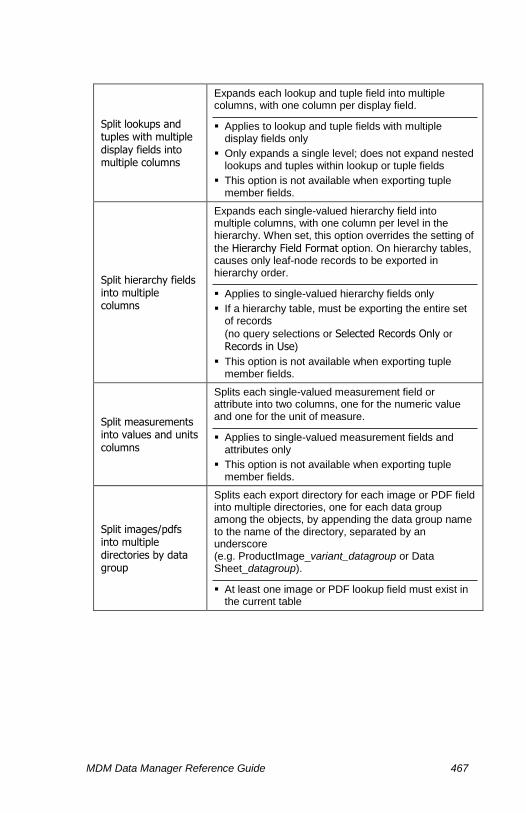
MDM Data Manager Reference Guide 467
Split lookups and tuples with multiple display fields into multiple columns
Expands each lookup and tuple field into multiple columns, with one column per display field.
Applies to lookup and tuple fields with multiple display fields only
Only expands a single level; does not expand nested lookups and tuples within lookup or tuple fields
This option is not available when exporting tuple member fields.
Split hierarchy fields into multiple columns
Expands each single-valued hierarchy field into multiple columns, with one column per level in the hierarchy. When set, this option overrides the setting of
the Hierarchy Field Format option. On hierarchy tables, causes only leaf-node records to be exported in hierarchy order.
Applies to single-valued hierarchy fields only
If a hierarchy table, must be exporting the entire set of records
(no query selections or Selected Records Only or
Records in Use)
This option is not available when exporting tuple member fields.
Split measurements into values and units columns
Splits each single-valued measurement field or attribute into two columns, one for the numeric value and one for the unit of measure.
Applies to single-valued measurement fields and attributes only
This option is not available when exporting tuple member fields.
Split images/pdfs into multiple directories by data group
Splits each export directory for each image or PDF field into multiple directories, one for each data group among the objects, by appending the data group name to the name of the directory, separated by an underscore (e.g. ProductImage_variant_datagroup or Data Sheet_datagroup).
At least one image or PDF lookup field must exist in the current table

468 MDM Data Manager Reference Guide
Split into multiple files by
Check this box and select a lookup field from the list of non-taxonomy lookup fields to create multiple files, one per value of the lookup field; each file contains the records for that value and is named by appending that value to the name you specify for the output file.
At least one non-taxonomy field must exist in the current table
Cannot split into multiple files based on a taxonomy field
Selected field must be sort-indexed
This option is not available when exporting tuple member fields.
Split into multiple sheets by
Check this box and select a lookup field from the list of lookup fields to create multiple sheets, one per value of the lookup field; each sheet contains the records for that value and is named with that value.
At least one lookup field must exist in the current table
Selected field must be sort-indexed
This option is not available when exporting tuple member fields.
Launch Excel after export
Launches Excel after completing the export; automatically opens each of the exported files for editing within the application.
TIP ►► To create rectangular tables that include attribute information,
set the Split into Multiple Files option or the Split into Multiple Sheets option and split by the taxonomy field. MDM creates a rectangular table for each category value, with each file or sheet containing only those attributes for that category value, in priority order.
NOTE ►► If there are multiple taxonomy tables, the list of lookup
tables in the Split into Multiple Files option or the Split into Multiple Sheets option includes an additional choice named “[All Taxonomy Fields]” that creates a separate file or sheet for each value combination of the different taxonomy fields.
NOTE ►► There is no Split [Remote Key] Fields into Multiple Rows option; MDM always expands each main table record into multiple
rows, with one row per [Remote System] / [Remote Key] value pair.
NOTE ►► MDM names the files and sheets (directories and files; databases and tables) as described under “Export Naming Conventions” on page 473.
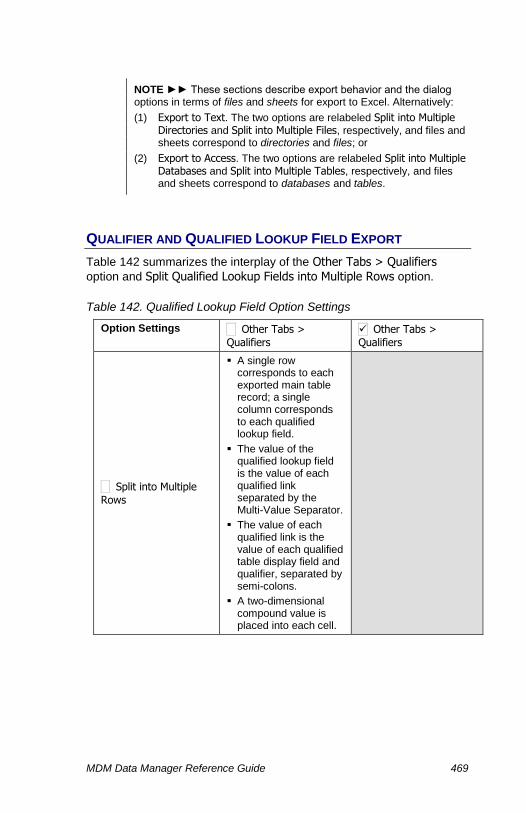
MDM Data Manager Reference Guide 469
NOTE ►► These sections describe export behavior and the dialog options in terms of files and sheets for export to Excel. Alternatively:
(1) Export to Text. The two options are relabeled Split into Multiple Directories and Split into Multiple Files, respectively, and files and sheets correspond to directories and files; or
(2) Export to Access. The two options are relabeled Split into Multiple Databases and Split into Multiple Tables, respectively, and files and sheets correspond to databases and tables.
QUALIFIER AND QUALIFIED LOOKUP FIELD EXPORT
Table 142 summarizes the interplay of the Other Tabs > Qualifiers
option and Split Qualified Lookup Fields into Multiple Rows option.
Table 142. Qualified Lookup Field Option Settings
Option Settings Other Tabs >
Qualifiers
Other Tabs >
Qualifiers
Split into Multiple
Rows
A single row corresponds to each exported main table record; a single column corresponds to each qualified lookup field.
The value of the qualified lookup field is the value of each qualified link separated by the Multi-Value Separator.
The value of each qualified link is the value of each qualified table display field and qualifier, separated by semi-colons.
A two-dimensional compound value is placed into each cell.
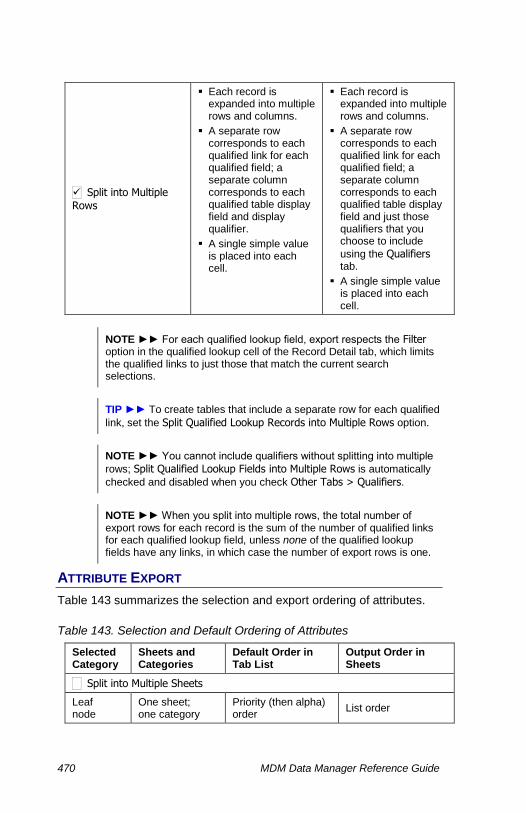
470 MDM Data Manager Reference Guide
Split into Multiple
Rows
Each record is expanded into multiple rows and columns.
A separate row corresponds to each qualified link for each qualified field; a separate column corresponds to each qualified table display field and display qualifier.
A single simple value is placed into each cell.
Each record is expanded into multiple rows and columns.
A separate row corresponds to each qualified link for each qualified field; a separate column corresponds to each qualified table display field and just those qualifiers that you choose to include
using the Qualifiers tab.
A single simple value is placed into each cell.
NOTE ►► For each qualified lookup field, export respects the Filter option in the qualified lookup cell of the Record Detail tab, which limits the qualified links to just those that match the current search selections.
TIP ►► To create tables that include a separate row for each qualified
link, set the Split Qualified Lookup Records into Multiple Rows option.
NOTE ►► You cannot include qualifiers without splitting into multiple
rows; Split Qualified Lookup Fields into Multiple Rows is automatically
checked and disabled when you check Other Tabs > Qualifiers.
NOTE ►► When you split into multiple rows, the total number of export rows for each record is the sum of the number of qualified links for each qualified lookup field, unless none of the qualified lookup fields have any links, in which case the number of export rows is one.
ATTRIBUTE EXPORT
Table 143 summarizes the selection and export ordering of attributes.
Table 143. Selection and Default Ordering of Attributes
Selected Category
Sheets and Categories
Default Order in Tab List
Output Order in Sheets
Split into Multiple Sheets
Leaf node
One sheet; one category
Priority (then alpha) order
List order

MDM Data Manager Reference Guide 471
Internal node
One sheet; one or more categories
Alpha order (within taxonomy table order)
List order
Split into Multiple Sheets
Any node
Multiple sheets; one or more categories; one per sheet
Alpha order (within taxonomy table order)
Priority (then alpha) order
[list order ignored]
NOTE ►► The Attributes tab in the Export dialog hides those attributes whose priority is below the threshold priority (see “Configuration Options” on page 495 for more information about the Attributes options).
EXPORTING THE RECORDS
When you export records from the current table, MDM creates output files containing some or all of the specified records in the current query results set, as follows:
Export to Text. MDM creates one or more directories, each containing one or more .txt files.
Export to Excel. MDM creates one or more .xls worksheet files, each consisting of one or more sheets.
Export to Access. MDM creates one or more.mdb database files, each consisting of one or more tables.
Exporting records from the current table is described in this section.
To export the records of the current table:
1. In Record mode, select File > Export from the main menu and choose from the cascading menu as follows:
To Text To Excel To Access
2. MDM opens the applicable Export dialog, as shown in Figure 251.
NOTE ►► If the current table contains tuples, the tuple member fields are shown in the Available Fields list. The tuples are in the format [Tuple name].[Tuple member field name].
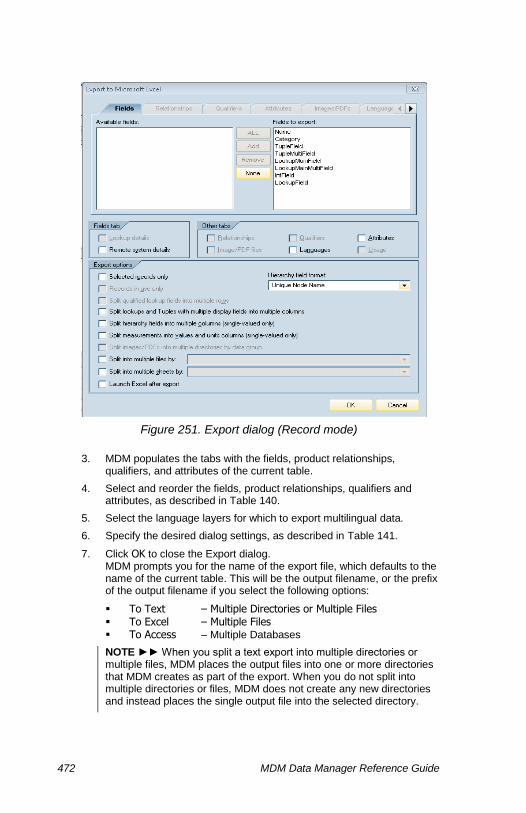
472 MDM Data Manager Reference Guide
Figure 251. Export dialog (Record mode)
3. MDM populates the tabs with the fields, product relationships, qualifiers, and attributes of the current table.
4. Select and reorder the fields, product relationships, qualifiers and attributes, as described in Table 140.
5. Select the language layers for which to export multilingual data.
6. Specify the desired dialog settings, as described in Table 141.
7. Click OK to close the Export dialog. MDM prompts you for the name of the export file, which defaults to the name of the current table. This will be the output filename, or the prefix of the output filename if you select the following options:
To Text – Multiple Directories or Multiple Files To Excel – Multiple Files To Access – Multiple Databases
NOTE ►► When you split a text export into multiple directories or multiple files, MDM places the output files into one or more directories that MDM creates as part of the export. When you do not split into multiple directories or files, MDM does not create any new directories and instead places the single output file into the selected directory.

MDM Data Manager Reference Guide 473
8. Type the name you want for the file(s) and click OK. MDM exports the selected records, and displays a progress dialog to indicate the current status of the export.
NOTE ►► When you export to Text and choose to view the text file after the export, MDM automatically launches the Windows application currently associated with files of type .txt (e.g. Notepad or Wordpad).
NOTE ►► When you export to Excel, MDM sets the formatting for numeric data to the number of decimal places that corresponds to the
Decimal Places setting in MDM Console (for fields) or in Taxonomy mode (for attributes). However, when a measurement is exported with the unit in the same cell as the value, the cell is of type Text and the value has the same number of decimal places as it is shown in MDM.
NOTE ►► When you export to Excel, MDM automatically inserts a space ( ) before a leading equals signs (=) in text fields, since Excel would otherwise expect a formula following the equals sign.
NOTE ►► When you export to Excel, MDM places a copyright notice that you specify in the footer of each sheet of printed output. (see “Configuration Options” on page 495 for more information about the Import/Export options).
EXPORT NAMING CONVENTIONS
A single export can generate many files and sheets (databases and tables). MDM generates the file and sheet names for you automatically based on the single output filename you specify and the split options you select, as summarized in Table 144.
Table 144. Record Export File and Sheet Naming
File and Sheet Split Option Filename(s) Sheet Name(s)
Split into Multiple Files
Split into Multiple Sheets table.xls table
Split into Multiple Files
Split into Multiple Sheets
table value 1.xls … table value n.xls table NULL.xls
value 1 … value n NULL
Split into Multiple Files
Split into Multiple Sheets table.xls
value 1 … value n NULL
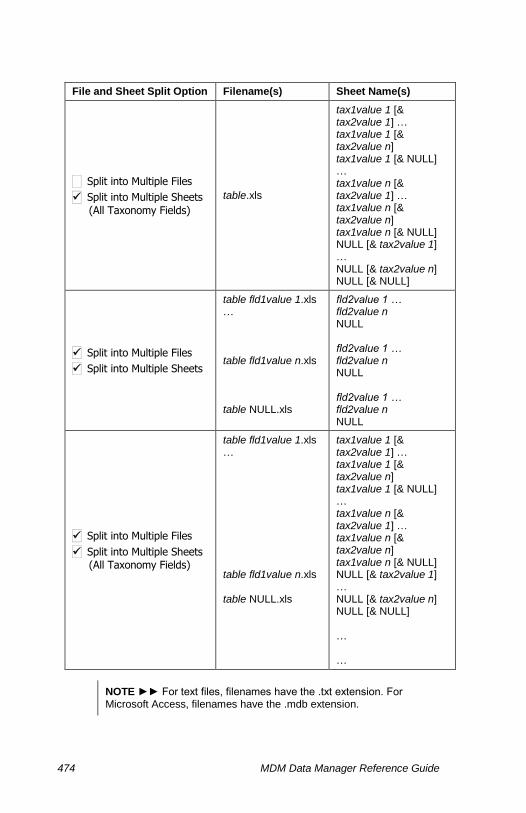
474 MDM Data Manager Reference Guide
File and Sheet Split Option Filename(s) Sheet Name(s)
Split into Multiple Files
Split into Multiple Sheets
(All Taxonomy Fields)
table.xls
tax1value 1 [& tax2value 1] … tax1value 1 [& tax2value n] tax1value 1 [& NULL] … tax1value n [& tax2value 1] … tax1value n [& tax2value n] tax1value n [& NULL] NULL [& tax2value 1] … NULL [& tax2value n] NULL [& NULL]
Split into Multiple Files
Split into Multiple Sheets
table fld1value 1.xls … table fld1value n.xls table NULL.xls
fld2value 1 … fld2value n NULL fld2value 1 … fld2value n NULL fld2value 1 … fld2value n NULL
Split into Multiple Files
Split into Multiple Sheets
(All Taxonomy Fields)
table fld1value 1.xls … table fld1value n.xls table NULL.xls
tax1value 1 [& tax2value 1] … tax1value 1 [& tax2value n] tax1value 1 [& NULL] … tax1value n [& tax2value 1] … tax1value n [& tax2value n] tax1value n [& NULL] NULL [& tax2value 1] … NULL [& tax2value n] NULL [& NULL] … …
NOTE ►► For text files, filenames have the .txt extension. For Microsoft Access, filenames have the .mdb extension.
MDM Data Manager Reference Guide 475
NOTE ►► If two file or sheet names (database, table, or column names) are the same, MDM appends a unique character to make the name distinct.
Table 145. Record Export Constraints
Operation Constraints
Export to Text Must be in Record mode
Export to Excel Must be in Record mode
Microsoft Excel must be installed on your system
Export to Access
Must be in Record mode
Microsoft Access Jet driver must be installed on your system
Table 146. Record Export Limitations
App Limitations
Microsoft Windows
Legal characters in filenames. Windows does not permit certain characters in export filenames; MDM either substitutes legal characters for these illegal characters or deletes them (see Table 147).
64-character pathname limit. Windows limits filenames to 64 characters; MDM truncates filenames (including the path and appended field value) that exceed this limit.
Microsoft Excel
Legal characters in sheet names. Excel does not permit certain characters in sheet names; MDM either substitutes legal characters for these illegal characters or deletes them (see Table 147).
31-character sheet name limit. Excel limits sheet names to 31 characters; MDM truncates sheet names that exceed this limit.
Microsoft Access
Legal characters in table/column names. Access does not permit certain characters in table and column names; MDM either substitutes legal characters for these illegal characters or deletes them (see Table 147).
64-character table / column name limit. Access limits table and column names to 64 characters; MDM truncates table and column names that exceed this limit.
NOTE ►► Unlike Excel and Access, Text files do not make use of cells; exporting text blocks to Text when they contain newlines or tabs will therefore disrupt the delimiting pattern for fields and records.
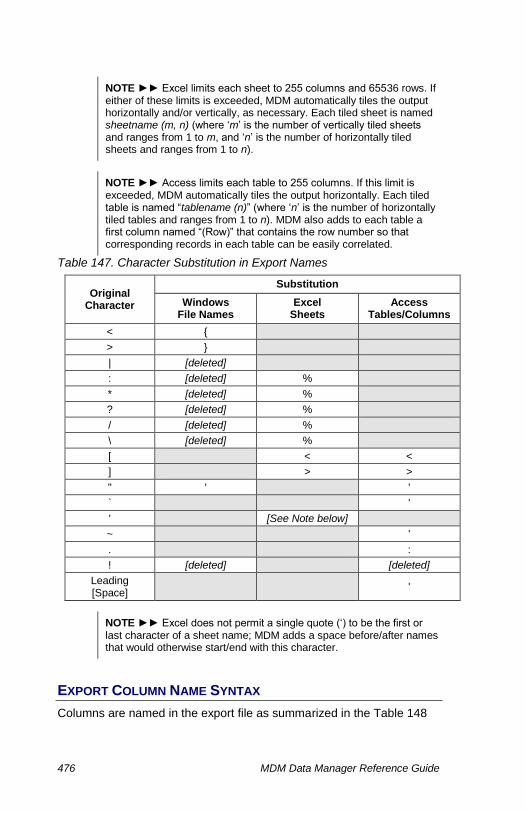
476 MDM Data Manager Reference Guide
NOTE ►► Excel limits each sheet to 255 columns and 65536 rows. If either of these limits is exceeded, MDM automatically tiles the output horizontally and/or vertically, as necessary. Each tiled sheet is named sheetname (m, n) (where ‘m’ is the number of vertically tiled sheets and ranges from 1 to m, and ‘n’ is the number of horizontally tiled sheets and ranges from 1 to n).
NOTE ►► Access limits each table to 255 columns. If this limit is exceeded, MDM automatically tiles the output horizontally. Each tiled table is named “tablename (n)” (where ‘n’ is the number of horizontally tiled tables and ranges from 1 to n). MDM also adds to each table a first column named “(Row)” that contains the row number so that corresponding records in each table can be easily correlated.
Table 147. Character Substitution in Export Names
Original Character
Substitution
Windows File Names
Excel Sheets
Access Tables/Columns
< {
> }
| [deleted]
: [deleted] %
* [deleted] %
? [deleted] %
/ [deleted] %
\ [deleted] %
[ < <
] > >
" ' '
` '
' [See Note below]
~ '
. :
! [deleted] [deleted]
Leading [Space]
'
NOTE ►► Excel does not permit a single quote (‘) to be the first or last character of a sheet name; MDM adds a space before/after names that would otherwise start/end with this character.
EXPORT COLUMN NAME SYNTAX
Columns are named in the export file as summarized in the Table 148
MDM Data Manager Reference Guide 477
Table 148. Export Column Name Syntax
Field or Attribute Type Column Name Syntax
Field FieldName
Attribute AttributeName
FieldAndAttributeName <taxonomy field>
Numeric Attribute AttributeName [rating] (rating is Nom, Max, Min,
Avg, Typ)
Split Measurement Value Name Name Unit
Split Lookup Display Fields (n columns)
FieldName [DisplayFieldName1] FieldName [DisplayFieldName2] … FieldName [DisplayFieldName3]
Split Hierarchy Field (n columns)
FieldName [1] FieldName [2] … FieldName [n]
EXCEL 2002 CONFIGURATION
By default, Microsoft Excel 2002 does not permit the execution of Visual Basic macros, which MDM uses to properly create the export file. To change the setting, perform the following procedure prior to attempting an export to Excel.
To configure Microsoft Excel 2002 to permit MDM export to Excel:
1. Open Microsoft Excel 2002.
2. From the Excel Main menu, select Tools > Macro > Security.
3. In the Security dialog, click the Trusted Sources tab.
4. Click to enable the Trust Access to Visual Basic Project check box.
5. Close the dialog.
ACCESS 97 VS. ACCESS 2000
Access export uses the Jet drivers to create .mdb files – based on the setting of the Access Export Options configuration option – as follows:
To generate Access 97 .mdb files, you need the Jet 3.5 driver. This driver is not part of the Access 97 distribution from Microsoft, and must be retrieved from the MDM FTP site.
To generate Access 2000 .mdb files, you need the Jet 4.0 driver. This driver is part of the Access 2000 distribution from Microsoft and is automatically installed when you install Access 2000; or if you do not have Access 2000, it can be retrieved from the MDM FTP site.

478 MDM Data Manager Reference Guide
To retrieve the drivers from the MDM FTP site, download the MDAC 2.0
service pack MDAC_TYPE.EXE and run it to install the appropriate OLE DB .dll files. The file includes both the Jet 3.5 and the Jet 4.0 drivers, and both are installed when you run the installation program.
NOTE ►► Even with the drivers, you still need either Access 97 or Access 2000 to view Access 97 files, and you still need Access 2000 to view Access 2000 files. Access 97 cannot read Access 2000 files.
MDM Data Manager Reference Guide 479
Exporting Attributes
Sometimes you may need to export the properties of the attributes of a
taxonomy table. The Export command in Taxonomy mode allows you to output this information into a single Excel worksheet.
TIP ►► Use the Export command in Record mode to export the
attribute values associated with each product record. Use the Export command in Taxonomy mode to export the attribute properties associated with each attribute.
When you use the Export command to export attribute properties for the current taxonomy table, MDM opens the Attribute Export dialog, and then creates a single output file based on the option settings you specify (Table 149).
Table 149. Attribute Export Options
Radio Button Description
Attributes to Export
Specifies which attributes to export. Choices include:
All Available Attributes. Exports all the attributes of the current taxonomy table.
Attributes Linked to Selected Tree Item. Exports the attributes linked to the selected category.
Unused Attributes. Exports the attributes not linked to any category.
Include Languages Specifies whether or not to include multiple language layers.
Split Attribute Text Values into Multiple Rows
Expands each text attribute into multiple rows, with one row per text value.
Launch Excel After Export Launches Excel after completing the export; automatically opens each of the exported files for editing within the application.
MULTILINGUAL ►► More information about languages and multilingual repositories is provided in “Part 14: Multilingual Support.”
To export the attributes of the current taxonomy table:
1. In Taxonomy mode, select File > Export from the main menu to open the Attribute Export dialog shown in Figure 252.
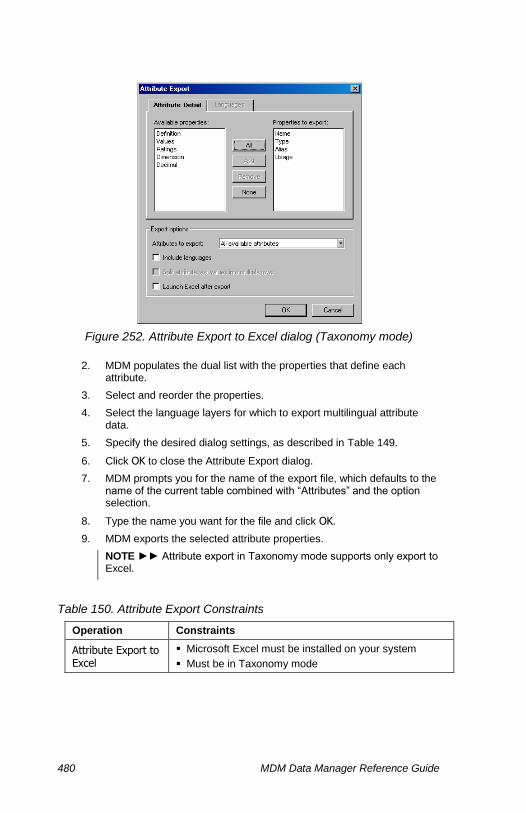
480 MDM Data Manager Reference Guide
Figure 252. Attribute Export to Excel dialog (Taxonomy mode)
2. MDM populates the dual list with the properties that define each attribute.
3. Select and reorder the properties.
4. Select the language layers for which to export multilingual attribute data.
5. Specify the desired dialog settings, as described in Table 149.
6. Click OK to close the Attribute Export dialog.
7. MDM prompts you for the name of the export file, which defaults to the name of the current table combined with “Attributes” and the option selection.
8. Type the name you want for the file and click OK.
9. MDM exports the selected attribute properties.
NOTE ►► Attribute export in Taxonomy mode supports only export to Excel.
Table 150. Attribute Export Constraints
Operation Constraints
Attribute Export to Excel
Microsoft Excel must be installed on your system
Must be in Taxonomy mode
481
PART 10: IMPORTING RECORDS
This part describes how to import a list of records into the main table from one or more Excel files.
The Data Manager subsystem for importing records is an extremely flexible ad hoc capability that should not be used outside of its intended scope ; its primary purpose is to re-import records previously exported using the Data Manager export subsystem.
For more complex tasks, please use MDM Import Manager.

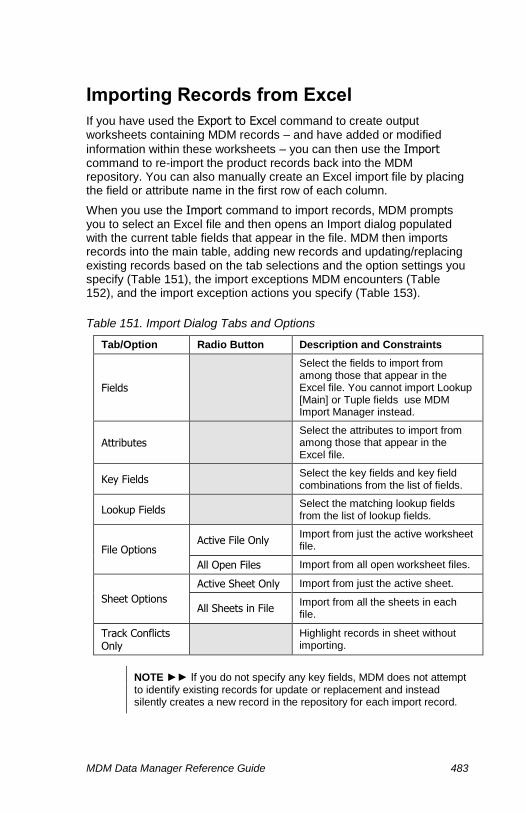
MDM Data Manager Reference Guide 483
Importing Records from Excel
If you have used the Export to Excel command to create output worksheets containing MDM records – and have added or modified
information within these worksheets – you can then use the Import command to re-import the product records back into the MDM repository. You can also manually create an Excel import file by placing the field or attribute name in the first row of each column.
When you use the Import command to import records, MDM prompts you to select an Excel file and then opens an Import dialog populated with the current table fields that appear in the file. MDM then imports records into the main table, adding new records and updating/replacing existing records based on the tab selections and the option settings you specify (Table 151), the import exceptions MDM encounters (Table 152), and the import exception actions you specify (Table 153).
Table 151. Import Dialog Tabs and Options
Tab/Option Radio Button Description and Constraints
Fields
Select the fields to import from among those that appear in the Excel file. You cannot import Lookup [Main] or Tuple fields use MDM Import Manager instead.
Attributes Select the attributes to import from among those that appear in the Excel file.
Key Fields Select the key fields and key field combinations from the list of fields.
Lookup Fields Select the matching lookup fields from the list of lookup fields.
File Options Active File Only
Import from just the active worksheet file.
All Open Files Import from all open worksheet files.
Sheet Options
Active Sheet Only Import from just the active sheet.
All Sheets in File Import from all the sheets in each file.
Track Conflicts Only
Highlight records in sheet without importing.
NOTE ►► If you do not specify any key fields, MDM does not attempt to identify existing records for update or replacement and instead silently creates a new record in the repository for each import record.
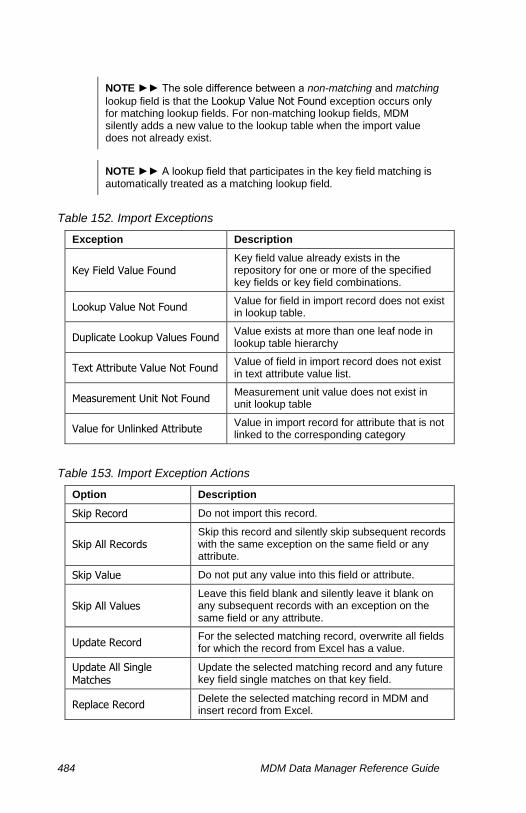
484 MDM Data Manager Reference Guide
NOTE ►► The sole difference between a non-matching and matching
lookup field is that the Lookup Value Not Found exception occurs only for matching lookup fields. For non-matching lookup fields, MDM silently adds a new value to the lookup table when the import value does not already exist.
NOTE ►► A lookup field that participates in the key field matching is automatically treated as a matching lookup field.
Table 152. Import Exceptions
Exception Description
Key Field Value Found Key field value already exists in the repository for one or more of the specified key fields or key field combinations.
Lookup Value Not Found Value for field in import record does not exist in lookup table.
Duplicate Lookup Values Found Value exists at more than one leaf node in lookup table hierarchy
Text Attribute Value Not Found Value of field in import record does not exist in text attribute value list.
Measurement Unit Not Found Measurement unit value does not exist in unit lookup table
Value for Unlinked Attribute Value in import record for attribute that is not linked to the corresponding category
Table 153. Import Exception Actions
Option Description
Skip Record Do not import this record.
Skip All Records Skip this record and silently skip subsequent records with the same exception on the same field or any attribute.
Skip Value Do not put any value into this field or attribute.
Skip All Values Leave this field blank and silently leave it blank on any subsequent records with an exception on the same field or any attribute.
Update Record For the selected matching record, overwrite all fields for which the record from Excel has a value.
Update All Single Matches
Update the selected matching record and any future key field single matches on that key field.
Replace Record Delete the selected matching record in MDM and insert record from Excel.
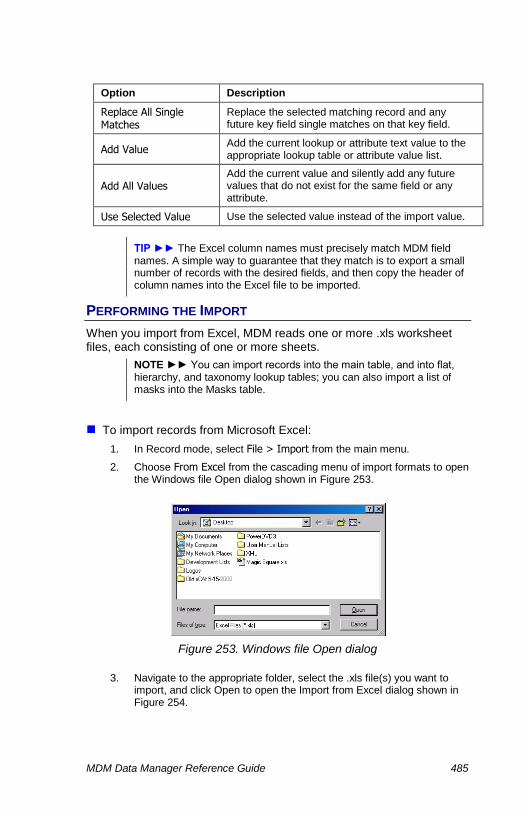
MDM Data Manager Reference Guide 485
Option Description
Replace All Single Matches
Replace the selected matching record and any future key field single matches on that key field.
Add Value Add the current lookup or attribute text value to the appropriate lookup table or attribute value list.
Add All Values Add the current value and silently add any future values that do not exist for the same field or any attribute.
Use Selected Value Use the selected value instead of the import value.
TIP ►► The Excel column names must precisely match MDM field names. A simple way to guarantee that they match is to export a small number of records with the desired fields, and then copy the header of column names into the Excel file to be imported.
PERFORMING THE IMPORT
When you import from Excel, MDM reads one or more .xls worksheet files, each consisting of one or more sheets.
NOTE ►► You can import records into the main table, and into flat, hierarchy, and taxonomy lookup tables; you can also import a list of masks into the Masks table.
To import records from Microsoft Excel:
1. In Record mode, select File > Import from the main menu.
2. Choose From Excel from the cascading menu of import formats to open the Windows file Open dialog shown in Figure 253.
Figure 253. Windows file Open dialog
3. Navigate to the appropriate folder, select the .xls file(s) you want to import, and click Open to open the Import from Excel dialog shown in Figure 254.

486 MDM Data Manager Reference Guide
Figure 254. Import from Excel dialog
4. MDM populates the list of Available Fields in the Fields tab with the fields of the main table that appear in the sheets of the Excel files. Select the fields that MDM should import into the main table.
NOTE ►► When the import file contains a column name that does not exist in the repository, MDM displays a warning dialog if the column contains data values; otherwise the column is silently ignored.
NOTE ►► When you import to a Data Group Field in Text Blocks, Copy Blocks, and Text HTML tables, you can select only existing Data Group IDs.
NOTE ►► When you import Text Blocks, Copy Blocks, and Text HTML, the exported field names must match the Table name in the language to which you are importing. For example, the field for text blocks to be imported to French <(><<)>FR> must be named Blocs Texte. To obtain the field names in the appropriate language, enter MDM Data Manager in the desired data language and export without selecting all other languages.
NOTE ►► The list of Available Fields includes qualifiers if they appear in the sheets of the Excel files. The import file should have one row per qualified link, field values duplicated in each row, and all of the link rows for a particular record contiguous. When there are existing links
for an existing record, MDM prompts you to either: (1) Replace the
entire set of links; or (2) Append to the set of links.
NOTE ►► The list of Available Fields includes [Remote System] and
[Remote Key] if they appear in the sheets of the Excel files. The import
file should have one row per [Remote System] / [Remote Key] value pair, field values duplicated in each row, and all of the rows for a
particular record contiguous. When there are existing [Remote System] / [Remote Key] value pairs for an existing record, MDM prompts you to
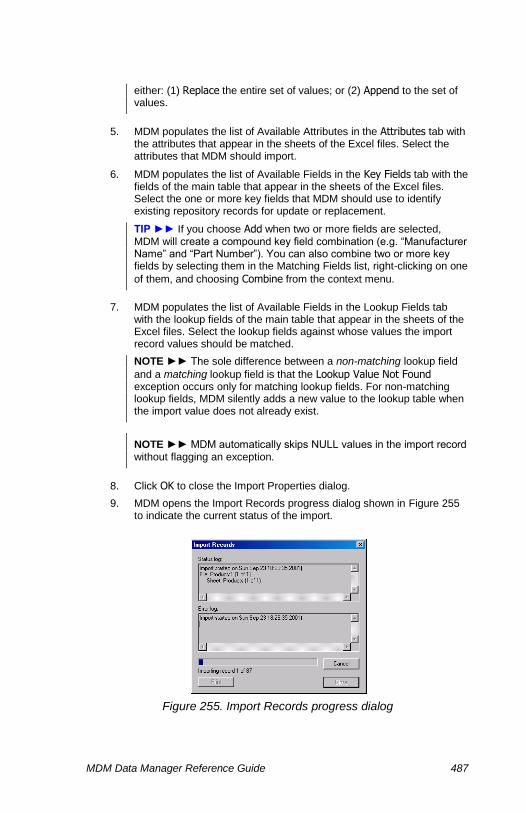
MDM Data Manager Reference Guide 487
either: (1) Replace the entire set of values; or (2) Append to the set of values.
5. MDM populates the list of Available Attributes in the Attributes tab with the attributes that appear in the sheets of the Excel files. Select the attributes that MDM should import.
6. MDM populates the list of Available Fields in the Key Fields tab with the fields of the main table that appear in the sheets of the Excel files. Select the one or more key fields that MDM should use to identify existing repository records for update or replacement.
TIP ►► If you choose Add when two or more fields are selected, MDM will create a compound key field combination (e.g. “Manufacturer Name” and “Part Number”). You can also combine two or more key fields by selecting them in the Matching Fields list, right-clicking on one
of them, and choosing Combine from the context menu.
7. MDM populates the list of Available Fields in the Lookup Fields tab with the lookup fields of the main table that appear in the sheets of the Excel files. Select the lookup fields against whose values the import record values should be matched.
NOTE ►► The sole difference between a non-matching lookup field
and a matching lookup field is that the Lookup Value Not Found exception occurs only for matching lookup fields. For non-matching lookup fields, MDM silently adds a new value to the lookup table when the import value does not already exist.
NOTE ►► MDM automatically skips NULL values in the import record without flagging an exception.
8. Click OK to close the Import Properties dialog.
9. MDM opens the Import Records progress dialog shown in Figure 255 to indicate the current status of the import.
Figure 255. Import Records progress dialog

488 MDM Data Manager Reference Guide
10. MDM flags exceptions that it encounters with the dialog shown in Figure 256.
Figure 256. Resolve Import Exception dialog
11. When the import is complete, you can use the Print button on the Import Records progress dialog to print out either the status log or the error log.
NOTE ►► MDM can either ignore NULL values in import records or uses them to overwrite existing values in matching records based on the NULL Values Overwrite Existing Values configuration option (see “Configuration Options” on page 495 for more information).
Table 154. Available Import Exception Actions
Exception Acti
on
Skip
Reco
rd
Skip
All
Reco
rds
Skip
Valu
e
Skip
All
Valu
es
Update
Reco
rd
Update
All
Sin
gle
Matc
hes
Repla
ce R
eco
rd
Repla
ce A
ll Sin
gle
Matc
hes
Update
Reco
rd
Add V
alu
e
Add A
ll Valu
es
Use
Sele
cted V
alu
e
Key Field Value Found ● ● ● ● ● ● ●
Lookup Value Not Found ● ● ● ● ● ● ●
Duplicate Lookup Values Found ● ● ● ● ●
Text Attribute Value Not Found ● ● ● ● ● ● ●
Measurement Unit Not Found ● ● ● ● ●
Value for Unlinked Attribute ● ● ● ●

MDM Data Manager Reference Guide 489
NOTE ►► The sole difference between a non-matching lookup field
and a matching lookup field is that the Lookup Value Not Found exception occurs only for matching lookup fields. For non-matching lookup fields, MDM silently adds a new value to the lookup table when the import value does not already exist.
NOTE ►► The Duplicate Lookup Values Found exception occurs only with hierarchy lookup tables that have duplicate leaf node values. You can distinguish between duplicate leaf node values in the import record using the Unique Node Name syntax described on page 263.
NOTE ►► The Multi-Value Separator used on import is the same as the Multi-Value Separator specified for export (see “Configuration Options” on page 495 for more information about the Import/Export options).
NOTE ►► MDM uses the period (.) to separate node names in a hierarchy. When the import file contains data values for a hierarchy field that contain a period, the period must either: (1) be followed by a space or a comma; or (2) be the last character of the last node name. Otherwise, MDM will confuse the period as a node separator.
NOTE ►► MDM can import new hierarchy lookup values.
NOTE ►► MDM can import attribute values even when the import file does not contain a category field, but only for those import records that already exist in the catalog. For new records, MDM adds the record
and fields but triggers a Value for Unlinked Attribute exception for the attribute values because no category is specified.
Table 155. Excel Column Name Syntax
Field or Attribute Type Column Name Syntax
Field FieldName
Attribute AttributeName
FieldAndAttributeName <taxonomy field>
Numeric Attribute AttributeName [rating] (rating is Nom, Max, Min,
Avg, Typ)
Split Measurement Value Name Name Unit
Split Lookup Display Fields (n columns)
FieldName [DisplayFieldName1] FieldName [DisplayFieldName2] … FieldName [DisplayFieldName3]
Split Hierarchy Field (n columns)
FieldName [1] FieldName [2] … FieldName [n]

490 MDM Data Manager Reference Guide
NOTE ►► When the import file contains a column name that could correspond to either a field or an attribute (since an MDM field and attribute may have the same name), MDM treats the first left-to-right instance of the column name as the field and the second instance (if it exists) as the attribute. If only one instance of the name exists in the import file and you want it to be treated as the attribute, the column must be named “attribute <taxonomy field>” where “taxonomy field” is the name of the taxonomy field to which the attribute belongs.
IMPORTING IMAGE/PDF LINKS
You can use the Import from Excel command to import links to images and PDFs that already exist in the repository. You do this by including a column in the Excel spreadsheet that contains the Original Name of the image/PDF you want to link to each record (where multiple image/PDF names can be delimited using the Multi-Value Separator).
If the link being imported cannot be resolved to a unique image or PDF, the import on the corresponding record fails.
NOTE ►► You cannot use the Import from Excel command to import links to other types of objects, nor to import the objects themselves.
NOTE ►► Object fields in the Excel import file other than image and PDF fields will not appear in the import dialog.
NOTE ►► To reduce but not totally eliminate the potential for ambiguity, you can also specify the data group corresponding to all the images/PDFs for each record in an optional second column named “fieldname [Data Group]”.

MDM Data Manager Reference Guide 491
Data Manager Import vs. MDM Import Manager
This section lists the major differences between the import capabilities of MDM Data Manager and those of MDM Import Manager.
In brief, the high-level differences are:
MDM Data Manager Import. Used primarily to reimport data
previously exported from MDM using MDM Data Manager export, or data that precisely matches the repository’s field structure and lookup values.
MDM Import Manager. Used for importing foreign data whose
structure is different from the target repository and whose data must be transformed and cleansed as part of the import process.
Specific differences are listed in Table 156.
Table 156. MDM Data Manager Import vs. MDM Import Manager
Description MDM Data Manager Import
MDM Import Manager
Supported Table Types
Flat Yes Yes
Hierarchy Yes Yes
Taxonomy Partial Yes
Qualified Yes Yes
Images Yes Yes
Text Blocks Yes Yes
Copy Blocks Yes Yes
Text HTMLs Yes Yes
PDFs Yes Yes
External files No Yes
Relationships Yes (w/ specific import format)
Yes
Feature / Function
Source file formats Excel Only Virtually any flat or relational electronic source file format (e.g. Access, Excel, SQL, XML)
Non-Main table imports Yes Yes
Select fields for import Yes Yes
Key field combinations Yes Yes
Multiple key fields No Yes

492 MDM Data Manager Reference Guide
Description MDM Data Manager Import
MDM Import Manager
Field mapping No (source and destination field names must match)
Yes (can map each source field to any destination field)
Import to lookup fields Yes Yes
Import to Multi-Lingual Field in Text Blocks, Copy Blocks, and Text HTML Tables
Partial. See the corresponding note in Performing the Import on page 485.
Yes
Create new attributes No Yes
Import text attribute values Yes Yes
Conflict handling During import Prior to import
Unlinked attribute handling Cannot import data into unlinked attributes
Can link attributes to the mapped category
UOM handling Can assign only one relevant UOM to all imported records
Can assign UOMs to imported records on a per value basis or a single UOM to all records
Combine information from multiple tables
No Yes (without needing to flatten source data in an external application prior to import)
Pivoting / reverse pivoting No Yes
Split a multi-value field to expand hierarchy
No Yes
Split a multi-value field into multiple fields
No Yes
Split a multi-valued field into multiple data values
No Yes
Combine fields to create value combinations
No Yes
Combine fields to create hierarchies
No Yes
Combine fields to create multi-valued fields
No Yes
Value conversion No Yes
Apply formulas to values No Yes
Data type conversion No Yes
Save/reuse mappings No Yes
Batch processing No Yes

493
PART 11: CONFIGURATION OPTIONS
This part describes the configuration options that allow you to customize the look and the behavior of MDM Data Manager.

MDM Data Manager Reference Guide 495
Configuration Options
Several configuration options affect the look and behavior of MDM Data Manager itself. Most users rarely alter the default configuration options, however, the variety of available options can sometimes come in handy.
You can use the Options command to open the Configuration Options dialog and change the option settings for MDM Data Manager. The dialog contains a grid that enables you to specify values for each MDM Data Manager option.
The options you can specify for MDM Data Manager are listed in Table 157.
Table 157. Configuration Options
Option Description
View
Allow you to display or hide certain screen elements – toolbar, status bar, and pane titles. You may want to hide screen elements to gain more screen area for data.
Toolbar Whether or not to display the toolbar.
Status bar Whether or not to display the status bar.
Pane titles
Whether or not to display the window pane titles:
Record mode (Search Parameters, Records) Hierarchy mode (Hierarchy, Records) Taxonomy mode (Taxonomy, Attributes) Matching mode (Search Parameters, Records)
Display
Control whether or not certain elements appear on the screen. Additional Display options let you determine how certain screen elements are displayed.
Thumbnails rather than objects in Records pane
Whether to display thumbnails or filenames for image and PDF lookup fields in the Records pane in Record mode. Filename display requires less transfer time on slow connections.
Nested lookup fields for which values are selected in bold
Whether to display in bold or normal nested lookup field names for which value(s) are selected in the Lookups subpane in Record mode.
Attribute names for which values are selected in bold
Whether to display in bold or normal attribute names for which value(s) are selected in the Attributes subpane in Record mode.
Qualifier names for which values are selected in bold
Whether to display in bold or normal qualifier names for which value(s) are selected in the Qualifiers subpane in Record mode.

496 MDM Data Manager Reference Guide
Option Description
Context tooltips
Whether or not to display context tooltips when you place the cursor over a disabled context (right-click) menu item, the tooltip explains the reason the item is disabled.
Show inherited language values in Language Detail tab
Whether or not to display inherited language values in the Language Detail tab.
Retrieve notifications delay in seconds
The length of time to wait after a record change notification is generated by MDS before Data Manager retrieves it. This delay can improve Data Manager performance as it allows Data Manager to retrieve notification in batches rather than one-by-one.
Indicate required fields with an asterisk
If a value is required for a field, Data Manager can add an asterisk before or after the field’s name in the Record Detail pane:
No (default)
Before
After
Note: To use this feature, the Required field property must be set to Yes in the MDM Console.
Formats
Determine the punctuation symbols that are used for numeric and currency formats. This allows MDM Data Manager to conform to various international standards for formatting numbers and currency.
Numeric decimal symbol
Decimal point symbol in numeric fields:
period comma
Numeric 1000s separator
Separator character for 000s in numeric fields:
comma period none space
Currency decimal symbol
Decimal point symbol in currency fields:
comma period
Currency 1000s separator
Separator character for 000s in currency fields:
comma period none space
Use Currency Symbol Whether or not to display the currency symbol in currency fields. The currency symbol for the field is specified in MDM Console.
MDM Data Manager Reference Guide 497
Option Description
Display time stamp fields in local time
Whether to display time stamp field values in local time (the time zone of the machine running Data Manager) or GMT. This setting does not change the actual timestamp values, which are stored in GMT.
Records Affect the behavior of records and record operations
Qualified lookup field does not suppress record auto-selection
Whether or not to suppress auto-selection of records after changing sort order or search results in the Records pane when the current table contains a qualified lookup field. Suppressing record selection improves performance when each record has many values for the qualified lookup field.
Maximum multi-record value display in Record Detail pane
Sets the maximum number of records for which multiple values will be displayed in a field of the Record Detail tab. High numbers can result in a long delay when you select all records.
Auto-populate in Merge Records dialog
Which rows of the [Merged Record] to auto-populate with values in the Merge Records dialog:
None All Values Equal All Values Equal or NULL
Web Pane URL for selected records
The URL to use as the target of the embedded
browser in the Web tab (None / selected URL).
Consolidate identical qualified lookups
Whether to consolidate identical qualified lookup records in the qualified lookup cell when multiple
main table records are selected. Selecting No may improve performance when large numbers of records are selected.
Trees Affect the visual appearance of tree nodes – bold, italic, gray – under certain conditions.
Display tree nodes that are hidden in gray
Whether to display in gray or normal tree nodes that are hidden. Gray highlights hidden nodes, which are otherwise indistinguishable from non-hidden nodes in hierarchy / taxonomy trees.
Display tree nodes that are aliases in italics
Whether to display in italics or normal tree nodes that are aliases. Italic display highlights alias nodes, which are otherwise indistinguishable from non-alias nodes in hierarchy / taxonomy trees.
Display taxonomy nodes that have linked attributes in bold
Whether to display in bold or normal categories that have linked attributes. Bold makes it easy to scan the taxonomy tree and see which categories have linked attributes.
498 MDM Data Manager Reference Guide
Option Description
Display icons in taxonomy and Family Hierarchies
Whether or not to display the colored icons that appear to the left of category names in the taxonomy tree ( ) and family names in the family hierarchy ( ).
Display family nodes that cannot have linked information in gray
Whether to display in gray or normal family nodes that cannot have linked information. Gray makes it easy to see which family nodes do not qualify for family information.
Display family nodes that have linked information in bold
Whether to display in bold or normal leaf family nodes that do have linked information. Bold makes it easy to scan the family tree and see which families have linked information
Attributes
Allow you to suppress the display of low-priority attributes in a taxonomy lookup search tab, in families and layouts, and in record exports (the default threshold is 100, the lowest priority level, so by default all attributes are always displayed, regardless of priority). In addition, you can enable or disable the editing of attribute text values in Record mode, and the ability to specify custom numeric priorities in Taxonomy mode.
Allow edit of attribute text values in Record mode
Whether or not to allow the editing of text values in Record mode for text attributes. Setting this option
enables the Records > Modify Text Attribute Value List command.
Allow custom priorities
Whether or not to allow the setting of custom numeric attribute priority values. Setting this option
enables the Attributes > Priority > Custom Value menu command.
Hide attributes in Search Parameters tab below priority…
Sets the priority below which attributes will not be displayed in a Search Parameters Attributes subpane in Record mode.
Hide attributes in families below priority…
Sets the priority below which attributes will not be displayed for partitions in Family mode.
Suppress attributes in record export below priority…
Sets the priority below which attributes will not be displayed in the Attributes tab in the Export dialogs in Record mode.
Default delimiter for coupled numeric attributes
Specifies the default delimiter string for new coupled numeric attributes.
Web Pane URL for Selected Attributes
The URL to use as the target of the embedded
browser in the Web tab (None / selected URL).
Import/Export Allow you to specify various parameters for import and export files.

MDM Data Manager Reference Guide 499
Option Description
Multi-value delimiter
Separator character for multi-valued fields (import and export):
return comma (,) semi-colon (;) pipe (alt + 0166) pipe (keyboard ‘|’)
Text file field delimiter
Separator character for columns of data (record export, relationship import, relationship export):
tab comma (,) semi-colon (;) pipe (alt + 0166) pipe (keyboard ‘|’)
Text string qualifier
Qualifier character for text fields:
none single-quote (') double-quote (")
Copyright text Specifies the copyright text to appear in the footer of exports and printed reports.
NULL values overwrite existing values on import
Whether or not to overwrite existing values with NULL values on import.
Export numeric data into text fields (Access only)
Whether a Text or Numeric field is created in Access to hold numeric data.
Include bi-directional reading order tags on export
Whether or not exports include tags that force display field values with mixed reading orders (left-to-right and right-to-left) to appear in the correct order.
Layouts Allow you to specify various parameters for publication layouts
Default units
The default layout unit of measure:
Q point didot mm pica cicero inch
Default image bounding box width
Default value is 100.
Default image bounding box height
Default value is 100.

500 MDM Data Manager Reference Guide
Option Description
Default image bounding box units
Unit of measure for default image bounding box values
Default image DPI The default value is 150.
To open the Configuration Options dialog that allows you to view and edit options settings:
1. Choose Configuration > Options from the main menu.
2. MDM opens the Configuration Options dialog.
TIP ►► Click the “+” icon to expand any node in the tree.
3. Click in the Value column for the option setting you want to change.
4. If the Value cell is a drop-down list, select the desired option. If the Value cell is an edit field, double-click inside the field and replace the existing value with a new value.
5. Click OK to save any new values and close the dialog.

501
PART 12: MULTILINGUAL SUPPORT
This part of the reference guide contains a general overview of multilingual support within the MDM system and a specific description of the multilingual features within MDM Data Manager. Multilingual support allows you to store multiple languages of information side-by-side within a single MDM repository.


MDM Data Manager Reference Guide 503
Introduction
MDM multilingual support fully addresses all of the requirements for multiple languages side-by-side within a single MDM repository.
It starts with an end-to-end Unicode implementation that supports both Western and Eastern languages, reflects a data model with multiple language layers that avoids data duplication while ensuring data integrity, and features an innovative user interface that offers flexibility and efficiency during the entry, editing, browsing, and publishing of multilingual data.
Moreover, MDM multilingual support not only accommodates multiple languages, but also all the myriad other dimensions of regionalization:
Multiple languages. Each MDM repository can store regional
information for one or more languages, including country-specific versions of the same language (e.g. English [US] and English [UK]).
Multiple regions. You can also create named regions for multiple
instance layers of the same language, for parallel support of regional dialects, expressions, and slang.
Multiple cultures. Even non-text data often has regional
requirements, such as when an image contains a human subject whose ethnicity must accommodate the target audience.
Multiple regulations. Some requirements have nothing to do with
language or culture, but rather with regulatory requirements, such as the restriction in France on showing a photo of a hypodermic needle.
Thus regardless of the specific requirement, MDM multilingual support makes it possible to efficiently store all of the dimensions of audience-specific information within a single MDM repository.
Specific aspects of MDM multilingual support are described in the following sections. They include:
Multi-byte Unicode implementation
Unlimited number of languages and locales
Support for character sets and sort order
Multi-layered data model
Single instance of each record
Language-centric view with multilingual data entry
Side-by-side multilingual comparison
Inheritance scheme for missing data
Multilingual repository metadata
Multilingual repository data
Multilingual publishing through APIs and portlets
Multilingual GUI software

504 MDM Data Manager Reference Guide
MULTI-BYTE UNICODE IMPLEMENTATION
Multilingual support adheres to and is implemented using the latest Unicode 4.0 standard, which provides full multi-byte encoding, supports the equivalent of code pages and double-byte languages within a single unified architecture, and continues all the way through and to the underlying DBMS with which MDM interfaces.
An individual MDM repository can be defined as storing data for an effectively unlimited number of languages, chosen from a list of languages and locales recognized by the system (e.g. English [US] and English [UK]), including both western European and Eastern languages.
Each language selection defines not only the language name, but also the underlying character set applicable to that language, the ability to properly display and perform data entry within the foreign character set, and other language-specific details (such as sort order).
NOTE ►► Language selection does not trigger language-specific stemming, decimal or thousands separator, or spell-check dictionary.
MULTI-LAYERED DATA MODEL
Once a repository has been defined as multilingual, MDM implements a “multi-layered” data model to store the multilingual information. Specifically, for each multilingual field, the single instance of each record contains a distinct data bucket for each language, and values can be entered for any or all of the defined languages at any time.
And because each individual record embodies all of the multilingual information for the record, a lookup value (such as a category) or an object (such as a text block) must be linked to and associated with a master data record just once for all languages rather than once for each language, avoiding unnecessary effort and potential for error.
LANGUAGE-CENTRIC VIEWS
Each user of the MDM system sees a “language-centric” view of the repository data and metadata. For example, one user can be entering and editing data in French while a second user is searching and browsing the repository in Japanese.
At the same time, within the language-centric view, a multilingual Language Detail tab within MDM Data Manager provides for multilingual data entry and a side-by-side comparison of the multilingual data.
Finally, an innovative inheritance scheme displays and color-codes data from other language layers for missing data in the current language, with an inheritance ordering for each language during data entry, editing, and browsing, and an inheritance threshold for published catalogs.

MDM Data Manager Reference Guide 505
MULTILINGUAL REPOSITORY METADATA
Within the multi-layered data model, not only the data but also all of the MDM repository metadata can be stored in multiple languages, for a consistent user experience in each language.
Language-specific metadata includes:
Table names
Field names
Category names
Attribute names
Attribute text values
NOTE ►► The MDM repository name itself is non-lingual.
MULTILINGUAL REPOSITORY DATA
Within a multilingual MDM repository, data can be stored in multiple languages for the applicable data types, as follows:
Numeric fields. Naturally, numeric fields do not require a distinct
value for each language and are always non-lingual. Meanwhile, MDM measurements are also non-lingual because they leverage MDM’s built-in library of dimensions and units.
Text fields. A text field can be flagged as non-lingual, so that a
single value is stored and used for all languages (such as for a part number field), or as multilingual, so that you can store a distinct value for each language (such as for a product name field).
Object fields. Images, Text Blocks, Copy Blocks, Text HTMLs, and
PDFs are automatically multilingual. While the need for multilingual text blocks and PDFs is obvious, perhaps not as obvious is the need for multilingual images, which may feature text that must appear in multiple languages, or a human subject of varying ethnicities.
NOTE ►► Boolean fields are non-lingual. However, the underlying True and False text values, like many lookup table display fields, are automatically multilingual.
MULTILINGUAL PUBLISHING
The MDM APIs and the library of MDM portlets/iViews both support multilingual Web publishing by providing language-specific access to multilingual repository data, for completely flexible presentation layers in a multilingual environment.

506 MDM Data Manager Reference Guide
MULTILINGUAL GUI SOFTWARE
Finally, the MDM Win32 tools themselves are multilingual and can be made available with all GUI elements translated into a target language using the MDM Set UI Lang tool.
NOTE ►► See the MDM Console Reference Guide for more information about how to set the MDM user interface language.
REPOSITORY LANGUAGES AND LANGUAGE NAMES
MDM currently supports nearly 100 languages that are built into the system. Each language consists of: (1) a generic language name; and (2) a two-letter country code enclosed in square brackets ([]).
MULTILINGUAL DATA AND METADATA ELEMENTS
Table 158. Multilingual Metadata and Data
Element Multilingual Non-Lingual
Repository metadata Table name
Field name
Repository name
Repository data Optionally multilingual
Text
Text Large
Always multilingual
Boolean1
Images
Text Blocks
Copy Blocks
Text HTMLs
PDFs
All other data types
Taxonomy metadata Name
Alias
Definition
Image
Text Value
Text Value Image
Text Value Description
All other properties
1 Boolean fields are non-lingual, but the underlying True and False values are multilingual.
NOTE ►► Multilingual fields can contain a value for each of the repository languages, while non-lingual fields contain only a single value that is not associated with any language.
MDM Data Manager Reference Guide 507
Multilingual Basics
Basic multilingual concepts are explained in the following sections.
LANGUAGE LAYERS
When you define an MDM repository as multilingual, MDM stores the multilingual data and metadata in multiple language layers, one for each language. A single language repository has a single layer; a multiple language repository has multiple layers.
The best way to understand language layers is to start by considering a typical unstructured approach to storing multiple languages for a field by creating multiple instances of the same field, as shown in Figure 257.
Part Number
Product Color (Eng) Color (Fre) Color (Ger)
113 T-Shirt Red Rouge Rot
114 T-Shirt Green Vert Grün
115 T-Shirt Blue Bleu Blau
Figure 257. A typical table with three Color fields for three languages
The table above contains three Color fields side-by-side, one for each language (English, French, and German), and can be successfully used to store the multilingual color data within the table.
Unfortunately, the system would know nothing of the relationship among the fields, so it cannot offer the user a language-centric view of the data, and the user has no way of knowing that the fields are related (except that the field names above have been tagged with the corresponding language). Finally, all the field names themselves exist only in English.
Now consider the MDM approach that uses multiple language layers to represent the multiple languages, as shown in Figure 258.
Figure 258. An MDM table with three language layers
Multiple layers efficiently organize and structure both multilingual data and metadata, with a single Color field above containing multiple data
German
French
English

508 MDM Data Manager Reference Guide
buckets rather than multiple Color fields that are completely unrelated, and multiple language-specific field names for all of the fields.
LANGUAGE INHERITANCE
To support convenient user access to multilingual data, MDM Data Manager provide a language-centric view of data within a multilingual repository, meaning that data is presented from the point of view of a particular language layer at a time. This single language is called the current language, and you select it when you first connect to a
multilingual repository.
NOTE ►► The language-centric view determines not only which language of data is displayed, but also which language of metadata is displayed, including table names, field names, and attribute names.
Now consider a multilingual field that is missing data in the current language. In a single-language repository, the value is shown as empty or NULL. However, MDM uses an innovative inheritance scheme to display – and color-code – data from other language layers for data values that are missing in the current language.
The actual value shown depends on the language inheritance defined for the current language. The language inheritance identifies the priority sequence of language layers from which to find a non-NULL value to display when the current language layer is NULL.
NOTE ►► Language inheritance is a type of layer transparency that allows individual data values to “show through” from other language layers when the current layer is missing data.
Language inheritance is set for each language, and is defined by the administrator as the ordering of all the other languages of the repository, split into: (1) primary inheritance (for languages whose values are close enough to the current language to be acceptable for publishing); and (2) secondary inheritance (for languages whose values are too different from the current language to be acceptable for publishing, but are perhaps useful during data entry and/or translation).
Thus, for MDM Data Manager, there is the current language and two levels of inheritance, color-coded as follows:
Black. The value is from the current language.
Green. The value is from a primary inherited language.
Red. The value is from a secondary inherited language.

MDM Data Manager Reference Guide 509
NOTE ►► MDM Data Manager displays: (1) actual values from the current language; (2) primary inherited values; and (3) secondary inherited values. By contrast, a published catalog (e.g. an electronic Web catalog or a printed catalog) is likely to display only: (4) actual values; and (5) primary inherited values; but (6) hide secondary inherited values, which are displayed in MDM Data Manager only for context during data entry and/or to assist in translation.
Consider a repository with three language layers: (1) English [US]; (2) English [UK]; and (3) German [DE]. Both English values are typically the same, so you can set the value for one version of English and allow the other to inherit it. However, you do not want the English languages to inherit German or vice versa. In this case, inheritance for each language would be as shown in Table 159.
Table 159. Language Inheritance Example for Three Languages
Language Primary Inheritance Secondary Inheritance
English [US] English [UK] German [DE]
English [UK] English [US] German [DE]
German [DE] <none> English [US]; English [UK]
Given the above inheritance, a record with the Size field set to “Small” for English [US] and to NULL for both English [UK] and German [DE] would display and color-code the value from each language-centric view as shown in Table 160.
Table 160. Language-Centric Display Example for Three Languages
Language Actual Value Inherits From Display Value
English [US] Small <actual value> Small
English [UK] NULL English [US] Small
German [DE] NULL English [US] Small
The terminology and behavior around inheritance in MDM Data Manager is summarized in Table 161.
Table 161. Inheritance in MDM Data Manager
Inheritance Item MDM Data Manager
Language ordering Language-specific
Actual values Current language
Levels of inheritance Two (primary and secondary)
Type of inherited values Metadata and data
Color coding Black / Green / Red

510 MDM Data Manager Reference Guide
An example of inheritance in MDM Data Manager is shown in Figure 260 below.
NOTE ►► MDM Data Manager displays the current language in the title bar after the MDM repository name. If the language has not been renamed, the language displays as “language [co]” (where “language” is the language name and “co” is the country name).
MDM Data Manager Reference Guide 511
Multilingual Operations
The following sections describe MDM Data Manager operations for connecting to and managing data within a multilingual MDM repository. There are no explicit commands for any of these operations. Rather, the multilingual data is processed using various extensions to the existing tabs, dialogs, and controls, as summarized in Table 162.
Table 162. Multilingual Data Manager Operations
Operation Description
Language field / Connect to MDM repository dialog
Connects to a multilingual MDM repository.
Data grid / Record Detail tab
Views and edits actual and inherited data.
Multilingual data grid / Language Detail tab
Views and edits multilingual data side-by-side.
Show Inherited Values option / Configuration Options dialog
Specifies whether to display inherited values in the Language Detail tab.
Language field / Add Object dialogs
Imports objects into new multilingual object records.
Object lookup field context menu / Language Detail tab
Imports objects into existing multilingual object records.
Merge Records data grid / Merge Records dialog
Merges multilingual object records.
Language Layer operator / Free-Form Search tab
Searches for missing multilingual data.
Languages checkbox and tab / Record mode Export dialog
Exports multilingual record data.
Record mode Import dialog Imports multilingual record data.
Languages checkbox and tab / Taxonomy mode Export dialog
Exports multilingual attribute data.
Taxonomy mode Import dialog Imports multilingual attribute data.
NOTE ►► The following sections describe only the multilingual aspects of MDM Data Manager operations listed in the table above. For a complete description of the operations themselves, see the applicable section in this guide.

512 MDM Data Manager Reference Guide
CONNECTING TO MDM DATA MANAGER
When you first connect to a multilingual MDM repository using MDM Data Manager, you must select the current language for that MDM Data Manager session.
You can use the Language field in the Connect to MDM Repository dialog to select the current language from the drop-down list of repository languages, as shown in Figure 259.
Figure 259. Language field in Connect to MDM Repository dialog
CURRENT LANGUAGE DATA EDITING (RECORD DETAIL TAB)
Recall that MDM Data Manager displays multilingual data that is inherited from language layers other than the current language layer in green and red, as shown in Figure 260.
Figure 260. Multilingual color coding in MDM Data Manager
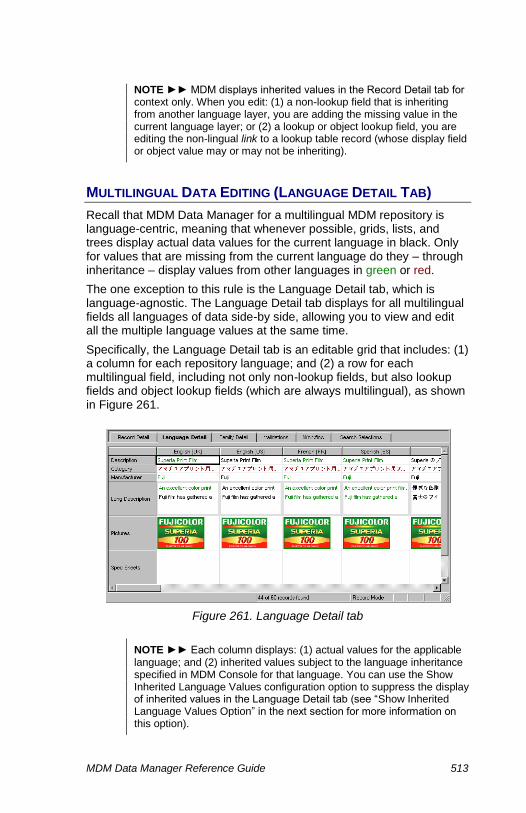
MDM Data Manager Reference Guide 513
NOTE ►► MDM displays inherited values in the Record Detail tab for context only. When you edit: (1) a non-lookup field that is inheriting from another language layer, you are adding the missing value in the current language layer; or (2) a lookup or object lookup field, you are editing the non-lingual link to a lookup table record (whose display field or object value may or may not be inheriting).
MULTILINGUAL DATA EDITING (LANGUAGE DETAIL TAB)
Recall that MDM Data Manager for a multilingual MDM repository is language-centric, meaning that whenever possible, grids, lists, and trees display actual data values for the current language in black. Only for values that are missing from the current language do they – through inheritance – display values from other languages in green or red.
The one exception to this rule is the Language Detail tab, which is language-agnostic. The Language Detail tab displays for all multilingual fields all languages of data side-by side, allowing you to view and edit all the multiple language values at the same time.
Specifically, the Language Detail tab is an editable grid that includes: (1) a column for each repository language; and (2) a row for each multilingual field, including not only non-lookup fields, but also lookup fields and object lookup fields (which are always multilingual), as shown in Figure 261.
Figure 261. Language Detail tab
NOTE ►► Each column displays: (1) actual values for the applicable language; and (2) inherited values subject to the language inheritance specified in MDM Console for that language. You can use the Show Inherited Language Values configuration option to suppress the display of inherited values in the Language Detail tab (see “Show Inherited Language Values Option” in the next section for more information on this option).

514 MDM Data Manager Reference Guide
NOTE ►► When you edit a value for a non-lookup field, you are editing the applicable language value for that field. By contrast, when you edit a value for a lookup field, you are editing the applicable language value for the display field of the already linked lookup table record. This allows you to set the display field values for each language without having to go to the lookup subtable.
NOTE ►► When you edit an inherited value for a non-lookup field or lookup display field, MDM first copies the inherited value into the
current layer, so that pressing Enter twice saves the inherited value in the current layer.
NOTE ►► When you use the Record Detail tab to edit a value for a lookup or object lookup field, you are specifying a link to a lookup table record. By contrast, when you use the Language Detail tab, you are editing the applicable language value for the underlying display field of the already linked lookup table record.
NOTE ►► The Language Detail tab displays [NULL] for a lookup field that has no linked value.
NOTE ►► Keyword searching only matches actual values in the current language layer or inherited values from any primary inherited language layer.
You can edit multiple languages in the Language Detail tab as follows:
Non-lookup value. Edit any non-lookup value directly by entering
the edit control.
Lookup field value. Edit the display field value of any linked lookup
table record directly by entering the edit control.
Object field value. Use the right-click context menu to edit an object
lookup field and add new objects to the repository.
NOTE ►► See “Populating Existing Object Records” on page 515 for more information on adding objects to different language layers.
SHOW INHERITED LANGUAGE VALUES OPTION
Recall from the previous section that the Language Detail tab displays all the languages side-by-side, and for each language, displays language-specific inherited values for missing data.
If you do not wish to see inherited data values, you can suppress the display of inherited values in the Language Detail tab by setting the Show Inherited Language Values configuration option to False (see “Configuration Options” on page 495 for more information).
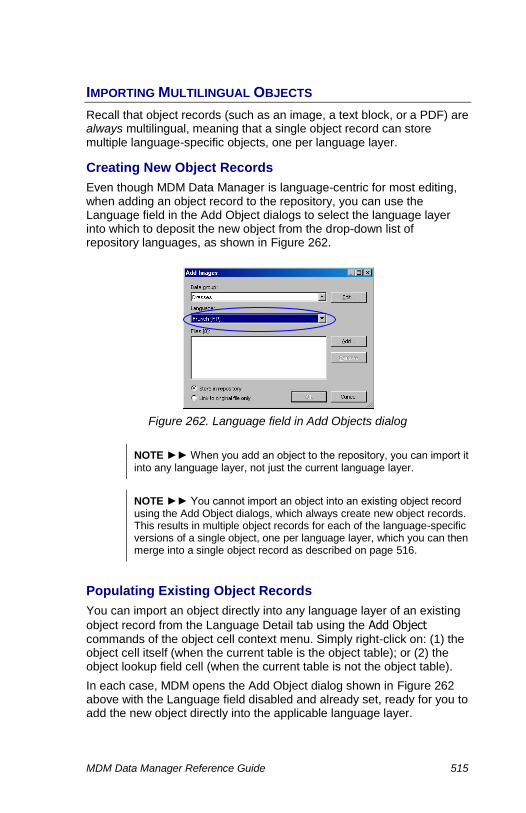
MDM Data Manager Reference Guide 515
IMPORTING MULTILINGUAL OBJECTS
Recall that object records (such as an image, a text block, or a PDF) are always multilingual, meaning that a single object record can store multiple language-specific objects, one per language layer.
Creating New Object Records
Even though MDM Data Manager is language-centric for most editing, when adding an object record to the repository, you can use the Language field in the Add Object dialogs to select the language layer into which to deposit the new object from the drop-down list of repository languages, as shown in Figure 262.
Figure 262. Language field in Add Objects dialog
NOTE ►► When you add an object to the repository, you can import it into any language layer, not just the current language layer.
NOTE ►► You cannot import an object into an existing object record using the Add Object dialogs, which always create new object records. This results in multiple object records for each of the language-specific versions of a single object, one per language layer, which you can then merge into a single object record as described on page 516.
Populating Existing Object Records
You can import an object directly into any language layer of an existing
object record from the Language Detail tab using the Add Object commands of the object cell context menu. Simply right-click on: (1) the object cell itself (when the current table is the object table); or (2) the object lookup field cell (when the current table is not the object table).
In each case, MDM opens the Add Object dialog shown in Figure 262 above with the Language field disabled and already set, ready for you to add the new object directly into the applicable language layer.

516 MDM Data Manager Reference Guide
MERGING MULTILINGUAL OBJECTS
As described in the previous section, you can use the Language Detail tab to import a new object into any language layer of an existing object.
However, when you use the Add Object dialogs, you may encounter either or both of the following language-layer challenges:
Multiple object records. You can use the dialogs to import a new
object into any language layer, but you cannot import an object into an existing object record, resulting in multiple object records for each of the language-specific versions of a single object.
Wrong language layer. Sometimes you may not only have the
multiple language-specific versions of an object in multiple object records, you may also have imported one or more of the objects into the wrong language layer.
Both of these challenges can be addressed using the Merge Records dialog when the current table is the object table, which allows you to: (1) merge multiple object records into a single object record; and (2) move objects between language layers when copying and pasting from the
source records to the [Merged Record].
NOTE ►► See “Merging Records” on page 62 for more information on how to merge records.
SEARCHING FOR MISSING MULTILINGUAL DATA
In a single-language repository, you can easily search for missing data
using the is NULL operator, which checks whether: (1) a non-lookup field does or does not have a value; or (2) a lookup field does or does not have a link to a subtable record.
Within a multilingual repository, the meaning of is NULL is basically the same for lookup fields, while for non-lookup fields, the meaning is simply extended to consider all of the language layers, not just the current layer, as summarized in Table 163.
Table 163. The is NULL Operator with Multiple Language Layers
is NULL True if…
Non-Lookup Field Lookup Field
No a value in any layer link
Yes all layers NULL no link

MDM Data Manager Reference Guide 517
In practice, however, with a multilingual repository and language inheritance, the is NULL operator may not always be granular enough, because you may want to distinguish between the various cases of missing data, including data missing entirely from all layers, missing from the current layer but inherited from some other layer, and so on.
The eight cases of missing data are summarized in Table 164.
Table 164. Cases of Missing Data with Language Inheritance
Case Current Layer Primary Inherited Secondary Inherited
1
2 •
3 •
4 • •
5 •
6 • •
7 • •
8 • • •
* In the table above, a bullet (•) means there is a value in the corresponding language layer.
To deal with these different cases of missing data with language
inheritance, MDM introduces the multilingual language layer operator that allows you to search for missing data with increased granularity, as summarized in Table 165.
Table 165. The language Layer Operator with Multiple Language Layers
language layer
True if…
Non-Lookup / Lookup Field Multi-Valued Lookup Field
0 1 2 3 4 5 6 7 <across the set of all links>
has value no missing values
is missing value any missing value
inherits primary any inherits primary
inherits secondary any inherits secondary
inherits any any inherits any
does not inherit no inherited values
NOTE ►► See Table 164 for a description of each of the eight cases for non-lookup and single-valued lookup fields.
NOTE ►► The language layer operator is available in MDM Data Manager in the Free-Form Search tab.
518 MDM Data Manager Reference Guide
NOTE ►► For lookup fields, the language layer operator is a test only of values that have a link, and in particular, on the display field value of the linked record.
NOTE ►► For multi-valued lookup fields, the language layer tests are performed on the entire set of linked values.
NOTE ►► Unlike the is NULL operator, which checks for missing data
in all layers, the has value operand of the language layer operator is used to check for missing data in the current language layer only.
NOTE ►► You cannot search for a linked lookup value that is NULL
because is NULL checks the link rather than the value of the link. To
check for a NULL display value, go to the subtable and perform an is
NULL search on the display field.
MULTILINGUAL EXPRESSIONS
You can quickly create language-specific Validation expressions in the
Expression editor by using the Languages operator, which inserts a pre-built language template into the expression.
NOTE ►► Use the Languages operator only for testing values stored in non-lookup Text fields, since the value of a lookup field or a text attribute is a link and not a multilingual value.
NOTE ►► MDM expressions used in validations, assignments, and calculated fields inherit from the primary inherited language only.
MULTILINGUAL EXPORT AND IMPORT
Recall that a multilingual MDM repository stores the information for multiple languages in multiple “stacked” layers, one for each language.
When you use the Export commands to export multilingual data, the stacked information is “flattened,” so that the multiple languages appear side-by-side as multiple columns for each multilingual field in the export file, each tagged with the name of the language.
Similarly, when you use the Import commands to import multilingual data, the multiple import file columns for each multilingual field are placed in the correct language layers as part of the import.
Record mode export and import can be used as a translation tool that allows you to export multilingual data, populate the missing values in the other languages, and then reimport the translated information back into the MDM repository.
MDM Data Manager Reference Guide 519
Record Mode Export
The Record mode File > Export commands bring up the Export dialog shown in Figure 263. You can use the Languages tab to export multiple languages of data for multilingual fields as described in this section; the guidelines for doing so are summarized in Table 166.
Table 166. Multilingual Export (Record Mode)
Current Table Field Type Notes
Main table Flat subtables Hierarchy subtables
Text
Text Large
Can export multiple languages using Languages checkbox and tab.
Lookup [normal]
Lookup [Text Block]
Lookup [Copy Block]
Lookup [Text HTML]
Use ML export at subtable level.
Lookup [Image]
Lookup [PDF]
Lookup [Sound]
Lookup [Video]
Lookup [Binary Object]
Cannot export all language layers at the same time.
Attribute text value Use Taxonomy mode export.
Images Text Blocks Copy Blocks Text HTMLs PDFs
Text Block field
Copy Block field
Text HTML field
Can export multiple languages using Languages checkbox and tab.
Image field
PDF field
Object properties
Cannot export all language layers at the same time.
NOTE ►► Strictly speaking, a lookup field is not itself multilingual; rather, the underlying lookup table display field or object is multilingual. To export the multiple language values for the lookup, make the current table the lookup or object table and export from there.
To export multilingual data in Record mode:
Use the Languages checkbox to enable the Languages tab, with which to select the languages to export, as shown in Figure 263.

520 MDM Data Manager Reference Guide
Figure 263. Languages tab and checkbox in Export dialog
NOTE ►► You cannot remove the current language from the Languages to Export list.
NOTE ►► MDM expands each multilingual field into multiple columns in the export file, one for each selected language (where each column name has the format “name <language [co]>”).
Record Mode Import
The Record mode File > Import command brings up the Import dialog shown in Figure 254. You can import multiple languages of data for multilingual fields as described in this section; the guidelines for doing so are summarized in Table 167.
MDM Data Manager Reference Guide 521
Table 167. Multilingual Import (Record Mode)
Current Table Field Type Notes
Main table Flat subtables
Text
Text Large
Can import multiple language layers.
Lookup [normal]
Lookup [Text Block]
Lookup [Copy Block]
Lookup [Text HTML]
Use ML import at subtable level.
Lookup [Image]
Lookup [PDF]
Lookup [Sound]
Lookup [Video]
Lookup [Binary Object]
Cannot import all language layers at the same time.
Attribute text value Use Taxonomy mode import.
Images Text Blocks Copy Blocks Text HTMLs PDFs
Text Block field
Copy Block field
Text HTML field
Can import multiple language layers into existing object table records only.
Image field
PDF field
Cannot import all language layers at the same time.
Object properties Cannot import property values.
NOTE ►► Record mode import does not explicitly reference language layers. Rather: (1) the multiple import file columns for each multilingual field (recognized using the multilingual field name syntax) appear in the list of Available Fields for matching to the different language layers of the multilingual field in the repository; and (2) only the current language column for each multilingual field appears in the list of Key Fields for record matching purposes.
TIP ►► To use export and import as a translation tool using a multilingual field as the key field for matching records: (1) the import and export should both be done in the same language; (2) all the values for the multilingual field that you intend to use as the key for reimport must be completely populated for that language for all records prior to the export. You cannot match on a value that was empty in the current language and then filled in after the export (nor can you match on a value that is populated in another language but empty in the current language).
TIP ►► You can use the Records > Add command when the current table is an object table to import new object records (images, text blocks, and PDFs) one language layer at a time.
522 MDM Data Manager Reference Guide
To import multilingual data in Record mode:
Include the multiple import file columns for each multilingual field in the Fields to Import list, as shown in Figure 254.
Figure 264. Import dialog
NOTE ►► The import file must have multiple columns for each multilingual field, one for each language layer (where each column name has the format “name <language [co]>”).
TIP ►► You should first use Record mode export to generate a template for use when translating and importing multilingual data.
Taxonomy Mode Export
The Taxonomy mode File > Export command brings up the Export dialog shown in Figure 265. You can use the Languages tab to export multiple languages for the multilingual attribute properties as described in this section; the guidelines for doing so are summarized in Table 168.

MDM Data Manager Reference Guide 523
Table 168. Multilingual Export (Taxonomy Mode)
Attribute Type Multilingual Property
Notes
All attribute types
Name
Alias
Definition
Can export multiple languages of attribute data using Include Languages checkbox and Languages tab.
Text attributes
Text Values
Text Value Description
Text Value Image
Numeric attributes
none
Coupled numeric Coupled Name
To export multilingual attribute properties in Taxonomy mode:
Use the Include Languages checkbox to enable the Languages tab, with which to select the languages to export, as shown in Figure 265.
Figure 265. Languages tab and checkbox in Export dialog
NOTE ►► You cannot remove the current language from the Languages to Export list.
NOTE ►► MDM expands each multilingual attribute property into multiple columns in the export file, one for each selected language (where each column name has the format “name <language [co]>”).
524 MDM Data Manager Reference Guide
NOTE ►► When you reimport a file of attribute information, MDM does not prompt you to specify a key field for matching import records to existing attributes. Instead MDM automatically uses: (1) the Name field for the current language layer to match attributes; and (2) the Name / Text Value field combination for the current language layer to match attribute text values. MDM highlights the Name and Text Value columns for the current language layer in red in the export file to indicate that the values must not be changed, and any row for which the column is empty cannot be reimported.
NOTE ►► When you reimport a file of attribute information, MDM ignores some of the columns (e.g. Type). MDM highlights these columns in gray in the export file to indicate that the values will be ignored when the file is reimported.
Taxonomy Mode Import
The Taxonomy mode File > Import command immediately processes the import file one row at a time without the need for an options dialog.
You can use the Import command to import multiple languages for the multilingual attribute properties as described in this section; the guidelines for doing so are summarized in Table 169.
Table 169. Taxonomy Mode Import
Attribute Type Multilingual Property Notes
All attribute types
Name
Alias
Definition Can import multiple languages of attribute data into existing attributes only based on: (1) the Name field (all attribute types); and (2) the Name and Text Value fields (text attribute text values).
Text attributes
Text Values
Text Value Description
Text Value Image
Numeric attributes
none
Coupled numeric Coupled Name
NOTE ►► Taxonomy mode import does not explicitly reference language layers. Rather, the import recognizes the multiple import file columns for each multilingual attribute property using the multilingual field name syntax.
NOTE ►► MDM does not prompt you to specify a key field for matching import records to existing attributes. Instead MDM automatically uses: (1) the Name field for the current language layer to match attributes; and (2) the Name / Text Value field combination for the current language layer to match attribute text values.
MDM Data Manager Reference Guide 525
TIP ►► To use export and import as a translation tool: (1) the import and export should both be done in the same language; (2) all the values for the Name and Text Value field must be completely populated for that language for all attributes prior to the export. You cannot match on a Name or Text Value that was empty in the current language and then filled in after the export (nor can you match on a value that is populated in another language but empty in the current language).
NOTE ►► The import file must have multiple columns for each multilingual attribute property, one for each language layer (where each column name has the format “name <language [co]>”).
TIP ►► You should first use Taxonomy mode export to generate a template for translating and importing multilingual attribute data.

527
PART 13: REMOTE SYSTEMS AND MDM
This part of the reference guide contains a general overview of remote systems and MDM, and a specific description of the related features within MDM Data Manager, including remote systems, key mapping, and ports, which allow MDM to synchronize data between itself and other systems.

MDM Data Manager Reference Guide 529
Introduction
MDM has special features that enable it to synchronize data between itself and other systems, as described in the following sections.
WHAT IS A REMOTE SYSTEM?
Any logical system that can supply data to or receive data from MDM is known as a remote system.
MDM can import data from remote systems and create/update master data objects using that data. Master data objects include main table records, subtable records / lookup values, and text attribute text values.
When data is changed in a remote system, the changes can be imported into MDM. Using previously created structural and key mappings, in conjunction with dynamically reconfigurable transformations and mappings, the data is applied to the master data objects. All changes to master data objects are tracked.
At any time, master data objects can then be distributed to all known remote systems through a process known as syndication. This involves determining which master data objects need to be distributed and converting them into a form that the remote system can understand.
NOTE ►► The remote system concept supports a number of features related to distribution by bundling all sorts of useful information related to a particular outside system, including key mapping, import maps, syndication maps, and various timestamps.
KEY MAPPING
A remote system’s objects are mapped to master data objects within MDM using key mapping. A key mapping maintains the relationship between the remote system’s identifier (or key) for an object and the corresponding master data object in MDM.
A key in MDM is a remote system-specific and object-type-specific unique identifier. Different remote systems can have their own separate collection of keys. Within a remote system, each type or collection of objects can have its own separate collection of keys as well. Key mappings are subject to the requirement that two different objects of the same type from the same remote system cannot have the same key.
Remote system objects of a particular type can map only to MDM objects of a particular type. A key can map to only one MDM object. However, an MDM object may map to multiple keys from the same remote system. When an MDM object maps to multiple keys, one of the keys is marked as the default key. The default key is the one that is used when syndicating a reference to the mapped MDM object.
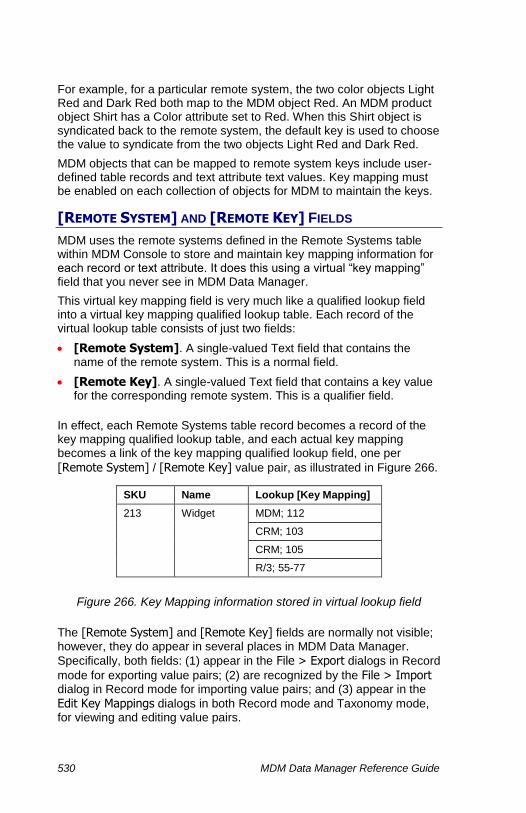
530 MDM Data Manager Reference Guide
For example, for a particular remote system, the two color objects Light Red and Dark Red both map to the MDM object Red. An MDM product object Shirt has a Color attribute set to Red. When this Shirt object is syndicated back to the remote system, the default key is used to choose the value to syndicate from the two objects Light Red and Dark Red.
MDM objects that can be mapped to remote system keys include user-defined table records and text attribute text values. Key mapping must be enabled on each collection of objects for MDM to maintain the keys.
[REMOTE SYSTEM] AND [REMOTE KEY] FIELDS
MDM uses the remote systems defined in the Remote Systems table within MDM Console to store and maintain key mapping information for each record or text attribute. It does this using a virtual “key mapping” field that you never see in MDM Data Manager.
This virtual key mapping field is very much like a qualified lookup field into a virtual key mapping qualified lookup table. Each record of the virtual lookup table consists of just two fields:
[Remote System]. A single-valued Text field that contains the name of the remote system. This is a normal field.
[Remote Key]. A single-valued Text field that contains a key value for the corresponding remote system. This is a qualifier field.
In effect, each Remote Systems table record becomes a record of the key mapping qualified lookup table, and each actual key mapping becomes a link of the key mapping qualified lookup field, one per
[Remote System] / [Remote Key] value pair, as illustrated in Figure 266.
SKU Name Lookup [Key Mapping]
213 Widget MDM; 112
CRM; 103
CRM; 105
R/3; 55-77
Figure 266. Key Mapping information stored in virtual lookup field
The [Remote System] and [Remote Key] fields are normally not visible; however, they do appear in several places in MDM Data Manager.
Specifically, both fields: (1) appear in the File > Export dialogs in Record
mode for exporting value pairs; (2) are recognized by the File > Import dialog in Record mode for importing value pairs; and (3) appear in the
Edit Key Mappings dialogs in both Record mode and Taxonomy mode, for viewing and editing value pairs.

MDM Data Manager Reference Guide 531
Remote System Operations
The following sections describe MDM Data Manager operations for managing the remote systems and key mapping of an MDM repository.
VIEWING AND EDITING KEY MAPPINGS
MDM Data Manager can be used to view and manually edit key mappings for records and text attribute text values.
Table Record Key Mappings
A record’s remote key details are visible on the right-hand side of the Record Detail tab.
NOTE ►► Remote key details are only available if key mapping is enabled for the table in MDM Console.
To view and/or edit the key mappings for a table record:
1. In Record mode, double-click on a record’s Remote Key cell in the Record Details tab, or right-click on the record and choose Record Key Mappings .
2. MDM opens the Edit Record Key Mappings dialog.
3. View and/or edit the key mapping records for each remote system.
TIP ►► You can use the Add and Delete buttons to add new key mappings and remove existing ones.
4. Click OK to close the dialog.
NOTE ►► The Edit Record Key Mappings command permits you to view and edit the key mappings of just a single record at a time.
NOTE ►► You cannot edit the key mappings of the original version of a checked out record.
NOTE ►► Since key mappings must be unique, you cannot add a key mapping value pair that has already been assigned to another record.
Attribute Definition Key Mappings
You view and manually edit key mappings for attribute names.
NOTE ►► The command is enabled only if the Attribute Definition Key Mapping property is enabled on the taxonomy table in MDM Console.

532 MDM Data Manager Reference Guide
To view and/or edit the key mappings for an attribute name:
1. In the Attributes pane in Taxonomy mode, select the attribute whose key mappings you want to view and/or edit.
2. Right-click on the record and choose Edit Key Mappings.
3. In the Edit Key Mappings dialog, view or edit key mapping records for each remote system.
TIP ►► You can use the Add and Delete buttons to add new key mappings and remove existing ones.
4. Click OK to close the dialog.
Text Attribute Text Value Key Mappings
You can view and edit key mappings for a text attribute text value
NOTE ►► The command is enabled only if key mapping is enabled for the text attribute.
To enable/disable key mapping of a text attribute’s text values:
1. In the Attributes pane in Taxonomy mode, select the text attribute.
2. In the Values pane, right-click on text value and choose Key Mapping to toggle key mapping on and off.
CAUTION ►► Turning off text value key mapping disables key mapping for all of the text values in the pane and deletes any key mappings defined for those values. Turning key mapping back on again later will not restore the key mappings and will require them to be created again.
To view and/or edit the key mappings for a text attribute text value:
3. In the Attributes pane in Taxonomy mode, select the text attribute whose key mappings you want to view and/or edit.
4. In the Values pane, right-click on the value and choose Edit Key Mappings.
5. In the Edit Key Mappings dialog, view or edit key mapping records for each remote system.
TIP ►► You can use the Add and Delete buttons to add new key mappings and remove existing ones.
6. Click OK to close the dialog.

MDM Data Manager Reference Guide 533
IDENTIFYING KEY MAPPINGS
When the Key Mappings option is enabled for a table in the MDM Console, you can search records by Remote Key parameter or by Remote System. This search capability enables you to identify all valid and invalid remote keys.
For general information about searching records in Data Manager, see Searching for Records on page 25.
To search by Remote System:
1. In the Search Parameters pane, open the Remote Systems search tab.
2. Select the required remote system. The search results are displayed in the Records pane and show all records that are linked to the remote system.
NOTE ►► The remote systems shown in the Remote Systems search tab are defined in the console. You may see remote systems that are not linked to any record in the current table. A search on an unlinked remote system will not return any results.
To search by Remote Key name:
1. In the Search Parameters pane, open the Free-Form search tab.
2. In the first column, select Remote Key.
3. In the second column, select the operator, Starts With or equals.
4. In the third column enter the search string. The search is case sensitive.
The search results display the records containing remote keys that match the search criteria.
REMOVING KEY MAPPINGS
You can perform a bulk removal of key mappings across systems, for example, to remove invalid key mappings.
TIP ►►To perform bulk removal of invalid key mappings, first search records by remote key value to identify invalid keys and then delete them.
To delete multiple key mappings:
1. Do one of the following to display the Delete Key Mappings dialog box:
In Record mode, right-click and select Delete Key Mappings. In the menu bar, select Edit > Delete Key Mappings.

534 MDM Data Manager Reference Guide
NOTE ►► The remote keys that are displayed in the Delete Key Mappings dialog box are for all systems and the displayed results are not affected by any search according to remote system, If you performed a search on remote key values in the Free Form search tab, you will see only the key mappings that were returned by the search. To display all key mappings for the selected records, clear the Filter by remote key checkbox in the dialog box.
2. In the Delete Key Mappings dialog box, select the key mappings to
delete. You can delete key mappings for multiple records.
3. Click OK to delete the key mappings and close the dialog box.
KEY MAPPING EXPORT AND IMPORT
Recall that for each table record, MDM stores key mapping information consisting of one or more remote systems, and for each remote system, one or more key mapping values, and that this information is stored in
the [Remote System] and [Remote Key] fields.
You can export and import the key mapping information of the [Remote System] and [Remote Key] fields using the Record mode Export and
Import commands, as described in the following sections.
NOTE ►► You currently cannot export and import key mapping information for text attribute text values.
Record Mode Export
To export key mapping information in Record mode:
1. From Record Mode, choose File > Export from the menu bar.
2. In the Fields tab of the Export dialog, select the [Remote System] and
[Remote Key] fields in the Remote System Details checkbox to include them in the list of Available fields, then select them for export.

MDM Data Manager Reference Guide 535
Figure 267. Remote System Details checkbox in Export dialog
NOTE ►► MDM expands each main table record into multiple rows,
with one row per [Remote System] / [Remote Key] value pair.
Record Mode Import
The Record mode File > Import command brings up the Import dialog. You can import key mapping information as described in this section.
To import key mapping information in Record mode:
1. From Record Mode, choose File > Import from the menu bar.
2. In the Import dialog, include the [Remote System] and [Remote Key] import file columns in the Fields to Import list and click OK.