mdx balsamiq manualv5 - wikispaces · tamara!alsheikh!-!2011! [email protected]!...
TRANSCRIPT

� Tamara Alsheikh -‐ 2011 t.al-‐[email protected] IDC/Middlesex University
1
Balsamiq manual Overview Balsamiq Mockups is a program that is produced by Balsamiq Studios (founded 2008). It is a relatively new program that allow users to create wireframes that feels like hand drawing a digital form. Balsamiq makes it easier for designers, product managers, developers and clients to create, edit, modify and move around components to reach the best design before developing the actual code. Although it is new, it is one of the most widely used programs for creating wireframes in the industry of HCI design.
Balsamiq Main window
1-‐ Quick Add tool: This is the fastest and easiest way to add UI controls.
Enter the name of the control that you would like to add and click on the desired name to insert it to the mockup canvas.
2-‐ UI Library: a tool to view all UI controls (UIC). To insert a UIC, select and drag it to the UI mockup or double click the UIC.
2-‐ UI Library
4-‐ Mockups Viewer
1-‐ Quick Add tool
3-‐ Mockup Canvas
Image 1

� Tamara Alsheikh -‐ 2011 t.al-‐[email protected] IDC/Middlesex University
2
3-‐ Mockup canvas: This is the main area where mockups will be created. You can add, edit, align, group …etc your UICs using all available space.
4-‐ Mockups viewer: This is a tool bar that shows all open mockups. The active mockup that is currently being edited in the mockup canvas is shown in blue. If you hover the mouse over the black part of the viewer, a
plus sign shows which you can click to add a new mockup.
Using UI controls (UIC)
The Property Inspector The property inspector is a group of control that appears automatically beside any UIC that you insert to the Mockup canvas. It includes a set of standard operations such as edit, group, align, layering, size. It also includes special controls that appear only for a specific group of UICs. If you hover the mouse over any control inside the inspector, it should show its name and keyboard shortcut (if any) in yellow.
Adding UIC You can insert a new UIC using 1-‐ UI Library described above. 2-‐ Quick add tool 3-‐ Copy and paste an existent UIC on the canvas by clicking on “Copy”
command in the property inspector or hold down ALT (OPTION key on Mac) and drag the selection.
Layering Layering is a way of changing the order that UICs appear in relation to each other on the canvas i.e. which is on top, which is below etc. You can use any of the following commands for ordering from the property inspector: Send to Back: Position the selected UIC at the very last layer of the canvas. Send backward: send the selected UIC only one layer backward. Bring to Front: Make the selected UIC in the first layer Bring Forward: Bring the selected UIC only one layer forward
Property Inspector
Image 2
Layer 1
Layer 2
Layer 3
Image 3
� Tamara Alsheikh -‐ 2011 t.al-‐[email protected] IDC/Middlesex University
3
Remark: remember that you can always hover over a control in the property panel to know its name and keyboard shortcut.
Selecting There are three ways to select multiple UICs.
1-‐ Hold the shift key and click the controls you would like to select. 2-‐ Click on an empty place on the canvas then draw a rectangle around the
UICs you would like to select. 3-‐ Click Ctrl+a (Cmd+a on Mac) to select all UICs in the canvas.
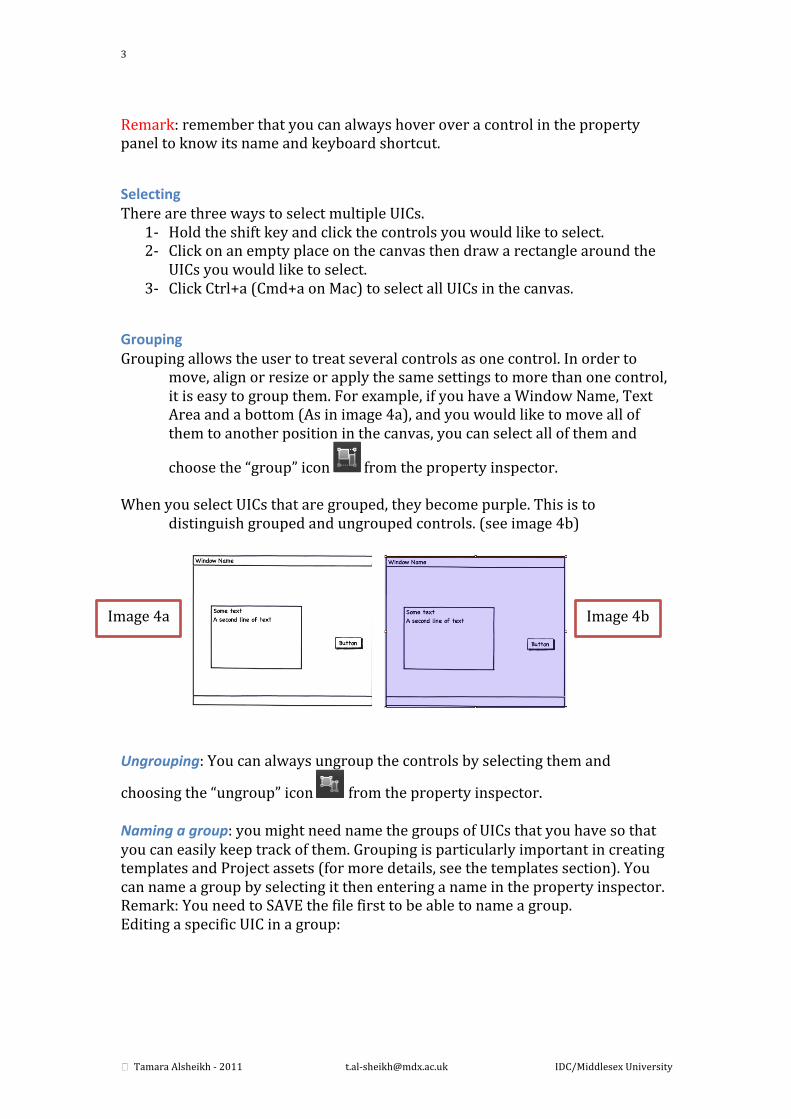
Grouping Grouping allows the user to treat several controls as one control. In order to
move, align or resize or apply the same settings to more than one control, it is easy to group them. For example, if you have a Window Name, Text Area and a bottom (As in image 4a), and you would like to move all of them to another position in the canvas, you can select all of them and
choose the “group” icon from the property inspector. When you select UICs that are grouped, they become purple. This is to
distinguish grouped and ungrouped controls. (see image 4b) Ungrouping: You can always ungroup the controls by selecting them and
choosing the “ungroup” icon from the property inspector. Naming a group: you might need name the groups of UICs that you have so that you can easily keep track of them. Grouping is particularly important in creating templates and Project assets (for more details, see the templates section). You can name a group by selecting it then entering a name in the property inspector. Remark: You need to SAVE the file first to be able to name a group. Editing a specific UIC in a group:
Image 4a Image 4b

� Tamara Alsheikh -‐ 2011 t.al-‐[email protected] IDC/Middlesex University
4
Editing a group To edit a specific UIC, double click the grouped UICs or select + Enter. The sign
appears on the top left corner of the canvas indicating that you are in the edit mode of the group. To exit the editing mode, click on the home icon of the sign.
Locking You can lock a UIC or a group of UICs to prevent it from accidental movement or editing. Locked UICs cannot be selected, moved nor edited. In some complex wireframes, it is recommended to lock UICs that you are done with to avoid accidental movement/editing.
Unlocking To unlock a UIC, right click on it and choose “Unlock [name of the control]” or “unlock group” if you are unlocking a grouped UICs
Icons Balsamiq has built in icons that you can put on some UICs e.g. arrows, media, mobile etc.
UICs that support Icons The following UICs support icons (i.e you could edit its shape to look like a built in icon)
• Icon • Icon and Text Label • Button • Menu Bar • ComboBox
Add an Icon You can add an icon by writing its name in the “icon search” in the property inspector or the icon library that can be displayed by clicking the little arrow on
the right. The icon library allows you to browse all categories of available icons as in Image 5.
Image 5

� Tamara Alsheikh -‐ 2011 t.al-‐[email protected] IDC/Middlesex University
5
Exercise 1 1-‐ Insert a window to the canvas, a button and a text area. 2-‐ Name the button “Home” and let the home icon show to the left of the
text. 3-‐ Write in the text area the following “Hello World, this is my first mockup”
and format it to be italic, size 16. a. Hint: resize the text area so that all text becomes visible if needed.
4-‐ Align the text area and button to the left for a more organized look. 5-‐ Lock the window so that it cannot be moved, edited and selected. 6-‐ Group the text box and button and move them to the top left corner of the
window. 7-‐ At the end, your mockup should look like below
Working with projects There is no built in feature in Balsamiq to manage multiple mockups in projects. However, there are “best practices” in the Balsamiq community to
create/manage projects to make full use of available functions.
Files Balsamiq saves a mockup using its default file extension “.bmml”. Also, a single project might have several images and other files that are used as resources for the project. For easily storing and managing a project, always start by creating a folder in your system to save all mockups that you are going to create. Inside this folder create a folder called “Assets” and another folder called “Resources”. Main folder: Save “.bmml” (i.e Mockups) in this folder. Resources Folder: In this folder, it is suggested to save all files that you might need in a project, for example a photoshop source file of a banner that you designed, a pdf file of one of your mockups …etc
Image 6

� Tamara Alsheikh -‐ 2011 t.al-‐[email protected] IDC/Middlesex University
6
Assets Folder: Save all images and external resources (if any) in this folder. If you save your images into this folder, Balsamiq will automatically show all the names of the saved images for you when you try to insert an image to the canvas (from the Property Inspector). (see image 8) Also, if you import an image to the Canvas (again via the Property Inspector), you have the option to automatically save the image into the assets folder. (see image 7)
Naming Convention The recommended way to name files is to use meaningful names in which words start with capital letters and have no spaces. For example, if you want to have a wireframe that shows registration of a website, call the wireframe RegistrationForm.bmml. Sticking to one naming convention makes it easier to find files, manage them and share them amongst a team.
Linking Sometimes, you might need to make your mockup more interactive. You might want a mutli-‐page mockup that you or users can interactively navigate through – this can be valuable for demonstrations and user-‐evaluations. For example, for a website you might design a homepage where registered users can log in. You might also have another page were new users can sign up. Linking could allow the user to see the sign-‐up page by clicking a “register now” link on the homepage (See Image 9). Remark: you have to save the mockup first to be able to link any UIC to another mockup. How to link
Image 7 Image 8
Image 9

� Tamara Alsheikh -‐ 2011 t.al-‐[email protected] IDC/Middlesex University
7
Linkable controls Most UICs support linking. In order to link a UIC to another mockup, go to the “Link” option in the property panel. If you click on the little arrow to the right, Balsamiq will show you all available mockups that you have in your project (see “Working with Projects” section for more information). Simply select the mockup that you would like your UIC to link to. To indicate that you have successfully linked the UIC to another mockup, a little red arrow should show on the upper right corner of your UIC as shown in this
image ( ) Exercise 2
1-‐ Use the mockup that you created in the last mockup 2-‐ Create and save a mockup called MyHomePage 3-‐ Insert a text area and write “This is my home page” 4-‐ Insert a link and name it “Click to view MyMap” 5-‐ Create a new mockup, name it as MyMap then save it. 6-‐ Insert a Browser window and a map. 7-‐ Make the link in the MyHomePage mockup link to MyMap mockup. 8-‐ Do not delete this mockup, you will need it in the next exercise.
Non-‐Linkable Controls Sometimes you might need to link some UICs that do not support linking or make a small part of a specific UIC link to another mockup. For example, you would like to make a line chart link to an illustration page once clicked (in other words, define a “Hot area” in a line chart). You need to do the following:
1-‐ Insert a canvas control and place it over the area that you want to turn into a link (i.e. the line chart).
2-‐ Format the canvas control so that it becomes transparent by changing the capacity bar and removing borders by changing the Border Style (so that that Line chart in the back becomes visible).
3-‐ Link the canvas to the desired mockup (in our example, LineChartInfo mockup).
4-‐ Group the canvas and the Line chart together. (See Image 10)
1-‐ Insert Canvas Control + Line Chart on the back
2-‐ Format the Canvas
3-‐ Link the Canvas
4-‐ Group the Canvas and Chart
Image 10

� Tamara Alsheikh -‐ 2011 t.al-‐[email protected] IDC/Middlesex University
8
Exercise 3 Since maps does not support linking, lets try to make the map linkable by inserting a canvas control.
1-‐ Use the same mockups that you created in the last exercise. (i.e MyHomePage and MyMap).
2-‐ Insert a canvas control and carefully edit, place it above the map. 3-‐ Make the canvas link to the MyHomePage mockup so that when a user
click on the map, the MyHomePage mockup is activated.
Symbols A symbol is a set of grouped UICs that can be reused. For example, if you have created a form that you think you will use in another mockup, you can convert it into a symbol. All symbols will be shown under “Project Assets” in the UI library. How to create symbols:
1-‐ Select all the UICs that you would like to convert to a symbol.
2-‐ Group the selected UICs. 3-‐ Name the group by writing the name
in the property inspector 4-‐ Press “convert to symbol”. 5-‐ The group will become green to
indicate that it has been converted to a symbol.
6-‐ You can view and reuse the symbol that you created (just like any normal UIC) under “project assets” tab in the UI library.
Reminder: you will not be able to see Project assets if your mockup is not saved. Remember to always save your mockup to get full functionality of the program activated.
Remark: Balsamiq will save your symbols as groups of UICs in a file called symbols.bmml in the assets folder of the project. For more information, refer to working with projects section. Editing Symbols There are two modes for editing symbols:
1-‐ Editing the source: by editing the source of the symbol, your changes will change all instances of this symbol across the project. For example, in the “MyForm” symbol above that we created, if you are in the “source editing” mode and change the text from “Last name” to “Family name”, your changes will apply to all mockups in the project that contain this form.
a. You can edit the source of a symbol by selecting the symbol then choosing “Edit source” as shown in Image 11 above.
3-‐ Enter name of group here
5-‐ The green color to show that It has been converted to a symbol Image 11

� Tamara Alsheikh -‐ 2011 t.al-‐[email protected] IDC/Middlesex University
9
2-‐ Editing an instance of the symbol: sometimes you might need to edit the “MyForm” symbol in one page only (Balsamiq calls this “overriding properties of the instance”).
a. You can edit an instance of a symbol by double clicking on the instance. A green label should show in the top of the canvas stating that you are currently editing an instance of a symbol (
). When you are done, click on the home symbol to continue working on your mockup.
Remark: Balsamiq applies a concept called “Local wins” when it comes to editing. (i.e if you have changed a property of an instance of a symbol, it will override any property changes that you might do on the symbol itself). For example, if in Mockup1, you changed the first row to “forename”, then you edited the source of the symbol and made it “FirstName”, the first row will always show as “forename” regardless the changes that you will make to the symbol. Uses of Symbols: Repetitive controls: create a symbol of a group of UICs if you will frequently need to use it in different mockups in the project. Templates: In some cases, you might need to have some controls always appearing across all mockups. For example, if you are creating a website, you might need the menu, header and footer of the website to appear in all mockups. Exercise 4
1-‐ Create a new mockup called MyGoogle 2-‐ Insert a browser window, a tabs bar and resize it to fit all screen and a
text field in the bottom of the page. 3-‐ Edit the tabs to the following names: Home, News, Maps, Shopping. 4-‐ Write “This is the footer, all rights reserved” in the text field. 5-‐ Group all controls. 6-‐ Convert them into a symbol and call it MyHomeSymbol. 7-‐ Create another mockup called “MyShopping”. 8-‐ Insert MyHomeSymbol fron the UI library.
Account Assets The disadvantage of Project assets is that the symbols that you create can only be seen and used by one project. This is rather limiting, as often you might want to use a symbol across various projects. (i.e create a symbol that could be permanently added to your UI library). In order to permanently use a symbol and add it to the UI library, create a mockup and insert various UICs and group them. Save this mockup under Documents>>Balsamiq Mockups>> assets. Now, all groups in that mockup will show as UICs under the Project Assets tab in the UI Library.

� Tamara Alsheikh -‐ 2011 t.al-‐[email protected] IDC/Middlesex University
10
Remark: All project and account symbols can be treated as any other built in UIC when you would like to insert, group, lock, align ..etc.
Importing new UICs Suppose that you found some interesting symbols that you want to add to your library. To insert them, save the .bmml files under Documents>>Balsamiq Mockups>>assets. If this path does not exist, create it yourself. Note that the name of the folder has to be called “Balsamiq Mockups”. Any mockup that you save to this path will show in the UI library under “Account Assets” Exercise 5 1-‐ Download the following symbol from this link http://tinyurl.com/6l9vnr3 (mockup downloaded from mockupstogo.net by Oskar Austegard) 2-‐ Save “iPadLandscape.bmml” file into your Documents>>Balsamiq Mockups>>assets. 3-‐ Go to Account assets in the UI library and experiement with the new iPad symbols that were added.
Importing and Exporting Mockups Now that you are able to create mockups for various purposes, it is essential to discuss how to save and share your mockups with stakeholders and group members. There are three ways to save your mockups, each have advantages and disadvantages.
1-‐ Image (.PNG): This method exports the current mockup to an image that you could share with group members and stakeholders. However, all links between mockups will be lost.
2-‐ Pdf: This method creates a fully linked Pdf file that shows all mockups on different pages. It is recommended for user testing (see user testing and presentations section)
File Format Can be edited once imported?
Supports linking?
Can be viewed without installing Balsamiq Mockups
Possible data loss? (i.e need source files accompanying the mockup)
Image (.PNG) No No Yes No Pdf No Yes Yes No To Clipboard (XML Code)
Yes Yes -‐-‐ Yes
Compressed file
Yes Yes No Yes
Table 1

� Tamara Alsheikh -‐ 2011 t.al-‐[email protected] IDC/Middlesex University
11
Remark: Note that you cannot edit the mockup once imported using the above methods. However, all project symbols and templates will be viewable without the need to send along any other source files. For example, if you have inserted a logo on a website mockup, you do not need to send the logo .JPEG source file along your imported mockup
3-‐ To Clipboard (XML Code): All balsamiq mockups can be represented by
simple XML code. You could export your mockup as XML code that you could easily paste into an email or share it with your group.
a. To import XML code into balsamiq, simply do the following: i. Click File>>Import XML code. ii. A text box will appear asking you to paste the XML code
that you have. iii. Paste the XML code that you have and click import. iv. Your mockup should appear on the Canvas showing all links
and symbols.
User Testing and Presentations
Presentations/Full Screen Mode: This mode is used for user-‐testing and presenting your mockups to clients/group members.
You can start the Full screen mode by clicking on the small rectangle on the top right corner of Balsamiq, go to View>>Full Screen Presentation or press Cmd + F (Ctrl + F for windows users).
Balsamiq Online Community Useful links:
1-‐ http://balsamiq.com/support : Here you can find the official Balsamiq documentation, tutorials, videos and much more.
2-‐ http://mockupstogo.net/ : A website for designers to upload and share their mockups and symbols to be used by others.

� Tamara Alsheikh -‐ 2011 t.al-‐[email protected] IDC/Middlesex University
12
Complete Exercises (Estimated time: 45minutes – 1 hour) Each mockup should have at least one link that links to another page with the same layout but which shows some changes that have taken place . Students to work in groups of 2-‐3 to create a mockup of one of the following pages: Exercises


