mecanum wheel tutorial - andymarkfiles.andymark.com/pdfs/mecanumwheeltutorial.pdf · mecanum wheel...
TRANSCRIPT

1
Mecanum Wheel Tutorial
Parts: - Assembled Drive Base
- 4" Mecanum Wheel set (4 wheels) (am-2626)
- Hardware Kit 2: Sprocket Mount to Plastic Omni Wheels (am-0190)
- One - 250 Sprocket Spacer (am-0207)
- Six - Individual #10-32 x 1.75" long Socket Head Cap Screw, steel, zinc plated (am-1166)
- Six - Individual #10-32 Nylock Nut (am-1212)
- 10mm Key Hub (am-0985a)
- 1/8x1/8x0400 Machine Key, steel (am-1018)
- Retainer Clip, 8mm id (am-0033)
- PG27 Planetary Gearbox with RS775 Motor (am-0915)
- 4 - M4-0.7 x 10mm SHCS (am-1269)
- 5/32 Allen Wrench
- 3/8 Wrench
Note: This tutorial uses the 4” mecanum wheels and PG27 Planetary Gearbox with RS775 Motor, but the same concept can be applied to most wheels and motors. This code can be used to drive the mecanum wheels
2
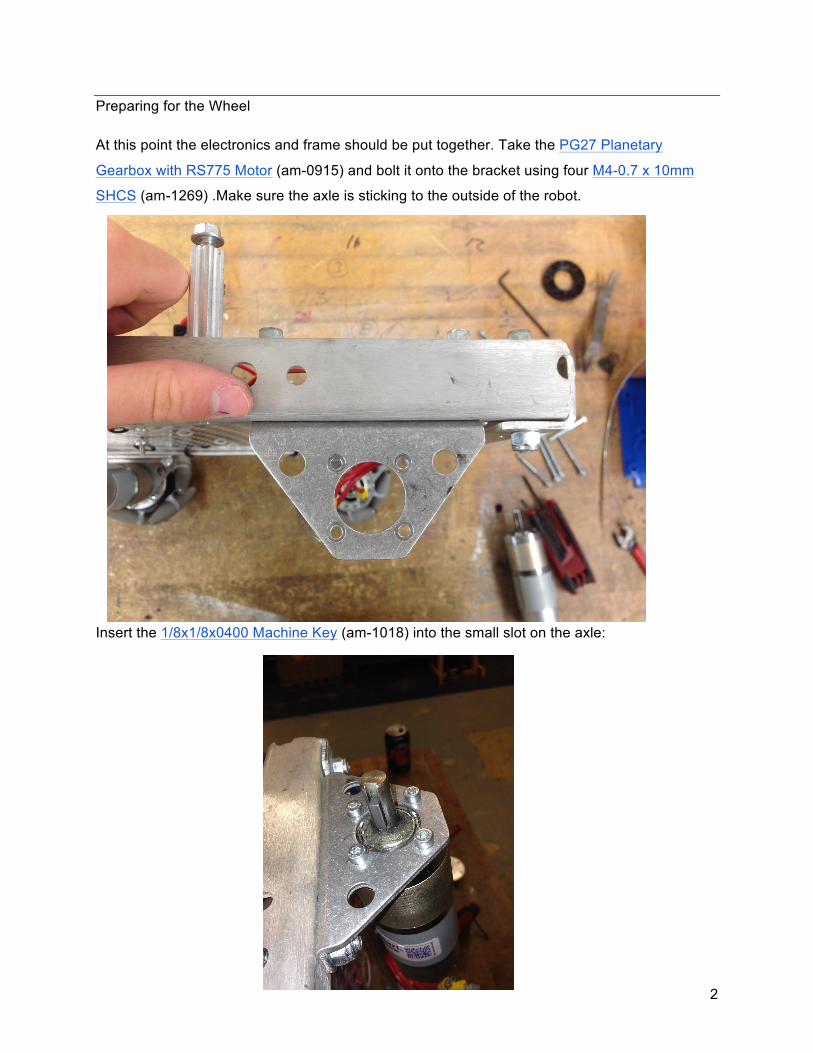
Preparing for the Wheel At this point the electronics and frame should be put together. Take the PG27 Planetary
Gearbox with RS775 Motor (am-0915) and bolt it onto the bracket using four M4-0.7 x 10mm
SHCS (am-1269) .Make sure the axle is sticking to the outside of the robot.
Insert the 1/8x1/8x0400 Machine Key (am-1018) into the small slot on the axle:

3
Place the 10mm Key Hub (am-0985a) over the axle and key:
Place the Retainer Clip, 8mm id (am-0033) over the exposed area of the shaft. This might be
difficult to place on. One way to accomplish this is by placing the clip on the end of a socket,
placing that over the end of the shaft, and hammering the socket. It should only take one well
placed hit to clip it on.
Note: Attaching the motors the right way is important. If done wrong the program may not work. Using the cables from the speed controller:
● Plug the red wire into the connector that is closest to the small red dot on the motor. ● The black wire plugs into the other connector. ● Make sure all of the motors are hooked up this way. Do not reverse one side. ●
4
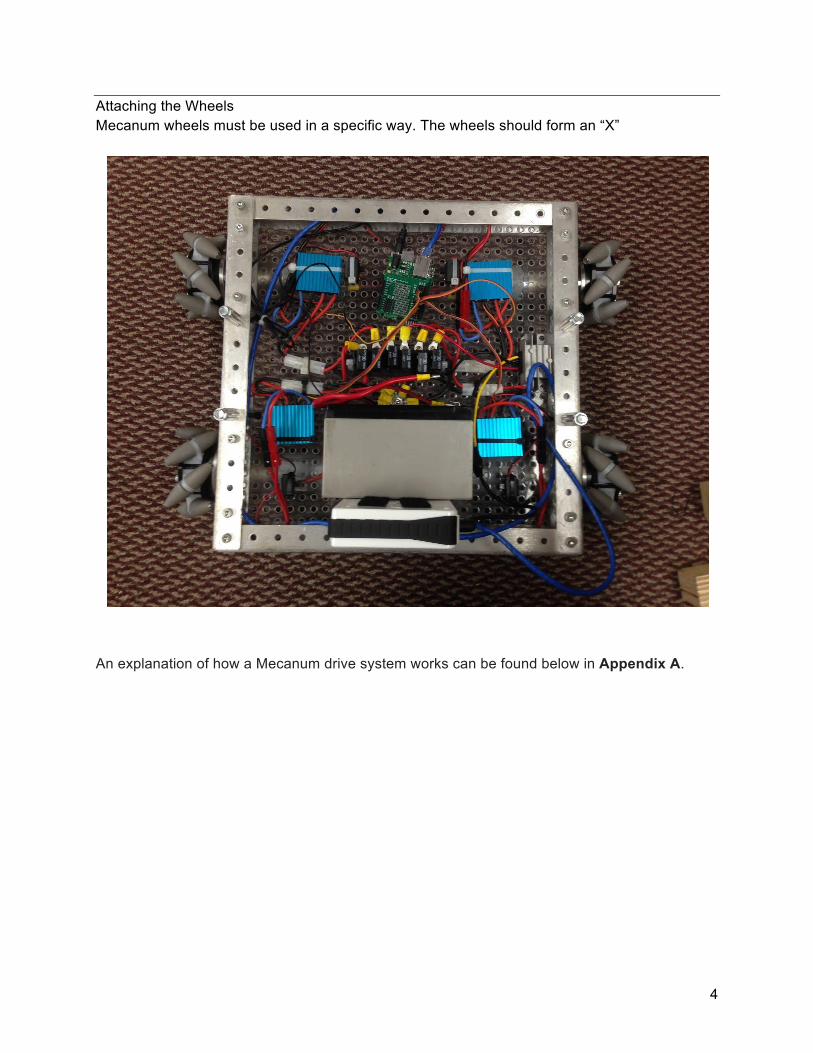
Attaching the Wheels Mecanum wheels must be used in a specific way. The wheels should form an “X”
An explanation of how a Mecanum drive system works can be found below in Appendix A.

5
Proceed to place the 250 Sprocket Spacer (am-0207) and 4" Mecanum Wheel (am-2626) onto the key hub with bolts attached:
Then, attach the #10-32 Nylock Nuts (am-1212) and tighten using the Allen Wrench and wrench
With the mecanum wheels you and now use this code.
6
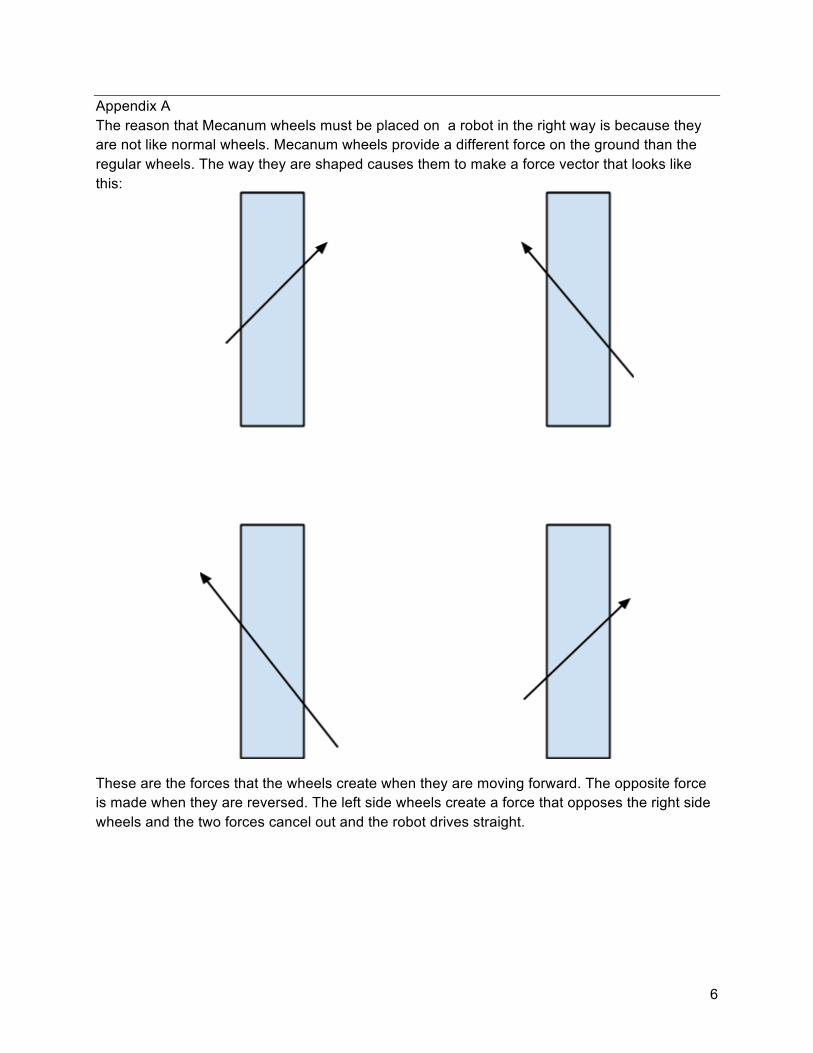
Appendix A The reason that Mecanum wheels must be placed on a robot in the right way is because they are not like normal wheels. Mecanum wheels provide a different force on the ground than the regular wheels. The way they are shaped causes them to make a force vector that looks like this: These are the forces that the wheels create when they are moving forward. The opposite force is made when they are reversed. The left side wheels create a force that opposes the right side wheels and the two forces cancel out and the robot drives straight.

7
Strafing The way we achieve strafing with mecanum wheels is by having all of the arrows face to the left. So, for this we would have to reverse the left-front wheel and the right-rear wheel. If you have something heavy on the robot that is only on one side and not in the center, e.g. the power source, the robot may not strafe very well because of the uneven weight distribution.

8
Appendix B: Mecanum Code //CODE /*-‐-‐-‐-‐-‐-‐-‐-‐-‐-‐-‐-‐-‐-‐-‐-‐-‐-‐-‐-‐-‐-‐-‐-‐-‐-‐-‐-‐-‐-‐-‐-‐-‐-‐-‐-‐-‐-‐-‐-‐-‐-‐-‐-‐-‐-‐-‐-‐-‐-‐-‐-‐-‐-‐-‐-‐-‐-‐-‐-‐-‐-‐ | This code is for the Arduino Ethernet and follows with the | | "Arduino Tutorial -‐ Mecanum Drive" provided by AndyMark. | | It may be useful to download the "Tank Drive" program from | | AndyMark as it contains useful explanations inside. | | | | Email: [email protected] | -‐-‐-‐-‐-‐-‐-‐-‐-‐-‐-‐-‐-‐-‐-‐-‐-‐-‐-‐-‐-‐-‐-‐-‐-‐-‐-‐-‐-‐-‐-‐-‐-‐-‐-‐-‐-‐-‐-‐-‐-‐-‐-‐-‐-‐-‐-‐-‐-‐-‐-‐-‐-‐-‐-‐-‐-‐-‐-‐-‐-‐-‐-‐-‐ Needed Parts: -‐ TBD -‐-‐-‐-‐-‐-‐-‐-‐-‐-‐-‐-‐-‐-‐-‐-‐-‐-‐-‐-‐-‐-‐-‐-‐-‐-‐-‐-‐-‐-‐-‐-‐-‐-‐-‐-‐-‐-‐-‐-‐-‐-‐-‐-‐-‐-‐-‐-‐-‐-‐-‐-‐-‐-‐-‐-‐-‐-‐-‐-‐-‐-‐-‐*/ #include <SPI.h> #include <Ethernet.h> #include <Servo.h> #include <EEPROM.h> #include <RobotOpen.h> #define FORWARD 255 #define REVERSE 0 #define NEUTRAL 127 #define FORWARD_MS 2000 #define REVERSE_MS 1000 #define NEUTRAL_MS 1500 //Declaring which joystick we are using ROJoystick usb1(1); //Declaring that we have two Servos Servo leftRear; Servo leftFront; Servo rightRear; Servo rightFront; //Delay time for calibration int d = 250; //FOR DEBUG int front_left = 0; int rear_left = 0; int front_right = 0; int rear_right = 0;

9
//IP Address of the Arduino IPAddress ip ( , , , ); //<=== Set IP Address!! void setup(){ //Identify which digital pins the servos are using rightRear.attach(5); rightFront.attach(6); leftRear.attach(3); leftFront.attach(9); //This function makes sure the speed controller and the Arduino understand each other. calibrate(); //Communicates with the RobotOpen Driver Station RobotOpen.setIP(ip); //Begins the RobotOpen tasks RobotOpen.begin(&enabled, &disabled, &timedtasks); } void enabled() { //Matching the motors to fit with the analog sticks. int drive = (FORWARD -‐ usb1.leftY()) -‐ NEUTRAL; int strafe = usb1.leftX() -‐ NEUTRAL; int rotate = usb1.rightX() -‐ NEUTRAL; front_left = drive + strafe + rotate + 126; rear_left = drive -‐ strafe + rotate + 126; front_right = drive -‐ strafe -‐ rotate + 126; rear_right = drive + strafe -‐ rotate + 126; //Localize to motor leftFront.writeMicroseconds(bias_ms(maximum(front_left))); leftRear.writeMicroseconds(bias_ms(maximum(rear_left))); rightFront.writeMicroseconds(bias_ms(maximum(FORWARD-‐front_right))); rightRear.writeMicroseconds(bias_ms(maximum(FORWARD-‐rear_right))); } void disabled() { // safety code leftRear.writeMicroseconds(NEUTRAL_MS); leftFront.writeMicroseconds(NEUTRAL_MS);

10
rightRear.writeMicroseconds(NEUTRAL_MS); rightFront.writeMicroseconds(NEUTRAL_MS); } void timedtasks() { //Publishing the values of the analog sticks to the RobotOpenDS RODashboard.publish("usb1.leftY()", usb1.leftY()); RODashboard.publish("usb1.leftX()", usb1.leftX()); RODashboard.publish("usb1.rightY()", usb1.rightY()); RODashboard.publish("usb1.rightX()", usb1.rightX()); RODashboard.publish("front_left", front_left); RODashboard.publish("rear_left", rear_left); RODashboard.publish("front_right", front_right); RODashboard.publish("rear_right", rear_right); RODashboard.publish("Uptime Seconds", ROStatus.uptimeSeconds()); } void calibrate() { //Calibrating the Controllers. See Appendix A in the Arduino Tutorial for more info leftRear.writeMicroseconds(NEUTRAL_MS); leftFront.writeMicroseconds(NEUTRAL_MS); rightRear.writeMicroseconds(NEUTRAL_MS); rightFront.writeMicroseconds(NEUTRAL_MS); delay(d); leftRear.writeMicroseconds(FORWARD_MS); leftFront.writeMicroseconds(FORWARD_MS); rightRear.writeMicroseconds(FORWARD_MS); rightFront.writeMicroseconds(FORWARD_MS); delay(d); leftRear.writeMicroseconds(REVERSE_MS); leftFront.writeMicroseconds(REVERSE_MS); rightRear.writeMicroseconds(REVERSE_MS); rightFront.writeMicroseconds(REVERSE_MS); delay(d); leftRear.writeMicroseconds(NEUTRAL_MS); leftFront.writeMicroseconds(NEUTRAL_MS); rightRear.writeMicroseconds(NEUTRAL_MS); rightFront.writeMicroseconds(NEUTRAL_MS); } //We declare that we have a function that is going to take an integer int bias_ms (int motor){ //The motors move around 15% slower when in reverse. float reverseBias = .85; //If the motor is moving forward we want to slow it down by 15%

11
if(motor>NEUTRAL){ //Maps a new scale that will match the speed of the motors running in reverse return map(motor, REVERSE , FORWARD, (FORWARD_MS*(1.0-‐reverseBias)+1000), (FORWARD_MS*reverseBias)); }else { //Maps a new scale that will match the speed of the motors running in reverse return map(motor, REVERSE, FORWARD, REVERSE_MS, FORWARD_MS); } } //this function makes sure the speed never goes above full forward or below full reverse. int maximum (int motor) { if (motor > FORWARD) { return motor = FORWARD; }else if (motor < REVERSE){ return motor = REVERSE; }else { return motor; } } void loop() { //Continually communicates with the Robot Open Driver Station RobotOpen.syncDS(); }