media-nav evolution - renault-multimedia.com · gb.4 general description (1/3) introduction your...
TRANSCRIPT

MEDIA-NAV EVOLUTION
DRIVER’S HANDBOOK
ENAULT S A S O I T AR TIONS IM LI I E AU A ITAL DE UAI E ALLOOULOGNE ILLAN OURT c ANTERRE L

A passion for performance
ELF, partner of
RENAULT recommends ELFPartners in cutting-edge automotive technology, Elf and Renault combine their expertise on both the racetrack and the city streets. This enduring partnership gives drivers a range of lubricants perfectly suited to Renault cars. Lasting protection and optimum performance for your engine – guaranteed. Whether changing the oil or simply topping up, to find the approved ELF lubricant best suited to your vehicle, ask your Renault dealer for a recommendation or consult your vehi-cle maintenance handbook.
www.lubricants.elf.com
A brand from
1
English ..................................................................
................................................................... ةيبرعلا
GB
ARA

GB.1
User precautions . . . . . . . . . . . . . . . . . . . . . . . . . . . . . . . . . . . . . . . . . . . . . . . . . . . . . . . . . . . . . . . . GB.3general information . . . . . . . . . . . . . . . . . . . . . . . . . . . . . . . . . . . . . . . . . . . . . . . . . . . . . . . . . . . . . . GB.4
General description . . . . . . . . . . . . . . . . . . . . . . . . . . . . . . . . . . . . . . . . . . . . . . . . . . . . . . . GB.4Introduction to the controls . . . . . . . . . . . . . . . . . . . . . . . . . . . . . . . . . . . . . . . . . . . . . . . . . . GB.7Switch on/off . . . . . . . . . . . . . . . . . . . . . . . . . . . . . . . . . . . . . . . . . . . . . . . . . . . . . . . . . . . . . GB.11Operate and use . . . . . . . . . . . . . . . . . . . . . . . . . . . . . . . . . . . . . . . . . . . . . . . . . . . . . . . . . . GB.12Volume . . . . . . . . . . . . . . . . . . . . . . . . . . . . . . . . . . . . . . . . . . . . . . . . . . . . . . . . . . . . . . . . . GB.14
Radio/AUX . . . . . . . . . . . . . . . . . . . . . . . . . . . . . . . . . . . . . . . . . . . . . . . . . . . . . . . . . . . . . . . . . . . . . GB.15Listen to the radio . . . . . . . . . . . . . . . . . . . . . . . . . . . . . . . . . . . . . . . . . . . . . . . . . . . . . . . . . GB.15Auxiliary audio sources . . . . . . . . . . . . . . . . . . . . . . . . . . . . . . . . . . . . . . . . . . . . . . . . . . . . GB.19Services . . . . . . . . . . . . . . . . . . . . . . . . . . . . . . . . . . . . . . . . . . . . . . . . . . . . . . . . . . . . . . . . GB.22Audio setting . . . . . . . . . . . . . . . . . . . . . . . . . . . . . . . . . . . . . . . . . . . . . . . . . . . . . . . . . . . . . GB.24
Navigation . . . . . . . . . . . . . . . . . . . . . . . . . . . . . . . . . . . . . . . . . . . . . . . . . . . . . . . . . . . . . . . . . . . . . GB.26The navigation system . . . . . . . . . . . . . . . . . . . . . . . . . . . . . . . . . . . . . . . . . . . . . . . . . . . . . GB.26Reading a map . . . . . . . . . . . . . . . . . . . . . . . . . . . . . . . . . . . . . . . . . . . . . . . . . . . . . . . . . . . GB.27Enter a destination . . . . . . . . . . . . . . . . . . . . . . . . . . . . . . . . . . . . . . . . . . . . . . . . . . . . . . . . GB.30Guidance . . . . . . . . . . . . . . . . . . . . . . . . . . . . . . . . . . . . . . . . . . . . . . . . . . . . . . . . . . . . . . . GB.36map settings . . . . . . . . . . . . . . . . . . . . . . . . . . . . . . . . . . . . . . . . . . . . . . . . . . . . . . . . . . . . . GB.42Managing the favourites . . . . . . . . . . . . . . . . . . . . . . . . . . . . . . . . . . . . . . . . . . . . . . . . . . . . GB.43Navigation settings . . . . . . . . . . . . . . . . . . . . . . . . . . . . . . . . . . . . . . . . . . . . . . . . . . . . . . . . GB.45
Eco² driving . . . . . . . . . . . . . . . . . . . . . . . . . . . . . . . . . . . . . . . . . . . . . . . . . . . . . . . . . . . . . . . . . . . . GB.49Bluetooth® device . . . . . . . . . . . . . . . . . . . . . . . . . . . . . . . . . . . . . . . . . . . . . . . . . . . . . . . . . . . . . . . GB.50
Pairing/unpairing Bluetooth® devices . . . . . . . . . . . . . . . . . . . . . . . . . . . . . . . . . . . . . . . . . GB.50Connecting/disconnecting Bluetooth® devices . . . . . . . . . . . . . . . . . . . . . . . . . . . . . . . . . . GB.53Using voice recognition . . . . . . . . . . . . . . . . . . . . . . . . . . . . . . . . . . . . . . . . . . . . . . . . . . . . GB.55Phonebook . . . . . . . . . . . . . . . . . . . . . . . . . . . . . . . . . . . . . . . . . . . . . . . . . . . . . . . . . . . . . . GB.58Making, receiving a call . . . . . . . . . . . . . . . . . . . . . . . . . . . . . . . . . . . . . . . . . . . . . . . . . . . . GB.59
Remote engine start-up . . . . . . . . . . . . . . . . . . . . . . . . . . . . . . . . . . . . . . . . . . . . . . . . . . . . . . . . . . . GB.62Reversing camera . . . . . . . . . . . . . . . . . . . . . . . . . . . . . . . . . . . . . . . . . . . . . . . . . . . . . . . . . . . . . . . GB.65
GB.2
System settings . . . . . . . . . . . . . . . . . . . . . . . . . . . . . . . . . . . . . . . . . . . . . . . . . . . . . . . . . . . . . . . . . GB.66Updating the system . . . . . . . . . . . . . . . . . . . . . . . . . . . . . . . . . . . . . . . . . . . . . . . . . . . . . . . . . . . . . GB.69Operating faults . . . . . . . . . . . . . . . . . . . . . . . . . . . . . . . . . . . . . . . . . . . . . . . . . . . . . . . . . . . . . . . . . GB.73
GB.3
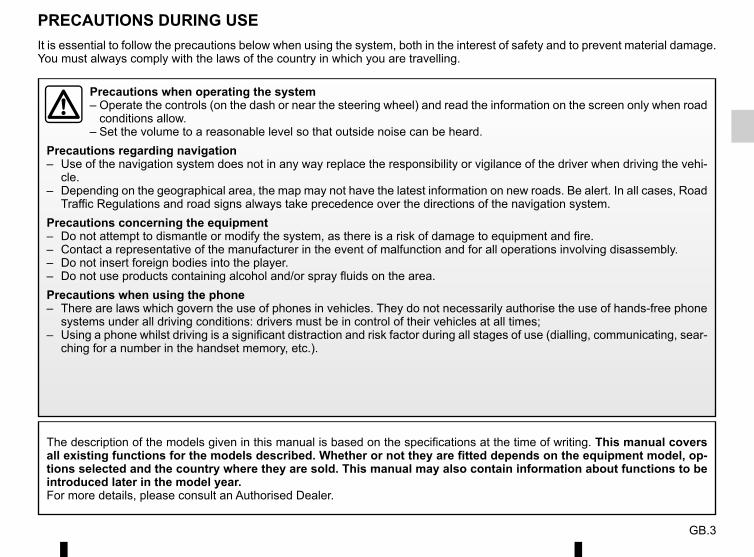
PRECAUTIONS DURING USE
The description of the models given in this manual is based on the specifications at the time of writing. This manual covers all existing functions for the models described. Whether or not they are fitted depends on the equipment model, op-tions selected and the country where they are sold. This manual may also contain information about functions to be introduced later in the model year.For more details, please consult an Authorised Dealer.
Precautions when operating the system– Operate the controls (on the dash or near the steering wheel) and read the information on the screen only when road
conditions allow.– Set the volume to a reasonable level so that outside noise can be heard.
Precautions regarding navigation– Use of the navigation system does not in any way replace the responsibility or vigilance of the driver when driving the vehi-
cle.– Depending on the geographical area, the map may not have the latest information on new roads. Be alert. In all cases, Road
Traffic Regulations and road signs always take precedence over the directions of the navigation system.Precautions concerning the equipment– Do not attempt to dismantle or modify the system, as there is a risk of damage to equipment and fire.– Contact a representative of the manufacturer in the event of malfunction and for all operations involving disassembly.– Do not insert foreign bodies into the player.– Do not use products containing alcohol and/or spray fluids on the area.Precautions when using the phone– There are laws which govern the use of phones in vehicles. They do not necessarily authorise the use of hands-free phone
systems under all driving conditions: drivers must be in control of their vehicles at all times;– Using a phone whilst driving is a significant distraction and risk factor during all stages of use (dialling, communicating, sear-
ching for a number in the handset memory, etc.).
It is essential to follow the precautions below when using the system, both in the interest of safety and to prevent material damage. You must always comply with the laws of the country in which you are travelling.

GB.4
GENERAL DESCRIPTION (1/3)
IntroductionYour vehicle’s multimedia system per-forms the following functions:– RDS radio;– DAB radio;– management of auxiliary audio
sources;– Internet favourites managing with the
Aha® application;– Hands-free phone;– voice recognition;– navigation assistance;– road traffic information (TMC);– information on areas for particular
care;– parking distance control (reversing
camera);– remote engine start-up program-
ming;– information on your driving style and
driving advice in order to optimise your fuel consumption.
Radio functionsThe multimedia system can be used to listen to FM (frequency modulation), DAB (digital audio) and AM(amplitude modulation) radio.The DAB system provides better sound reproduction and access to text infor-mation stored on the radio (Intellitext) by scrolling through the text to display:– news updates;– sports results, etc.The RDS system makes it possible to display the name of some stations or messages sent by FM stations to be displayed:– general traffic information (TA);– emergency message(s).
Function Aha®The Aha® application grants access to your favourites (podcasts, webradio, etc).Note: to use all the functions of the Aha® application on your multimedia system, you will need to download the application onto your smartphone, acti-vate location tracking on your telephone and connect it to the audio system.
Auxiliary audio functionYou can listen to your personal stereo directly through your vehicle’s speak-ers. There are several ways of connect-ing your personal stereo, depending on the type of device you have:– 3.5 mm Jack socket;– USB audio;– Bluetooth® connection.For more information on the list of com-patible devices, please contact an au-thorised dealer or visit the manufactur-er’s website if available.
GB.5
GENERAL DESCRIPTION (2/3)
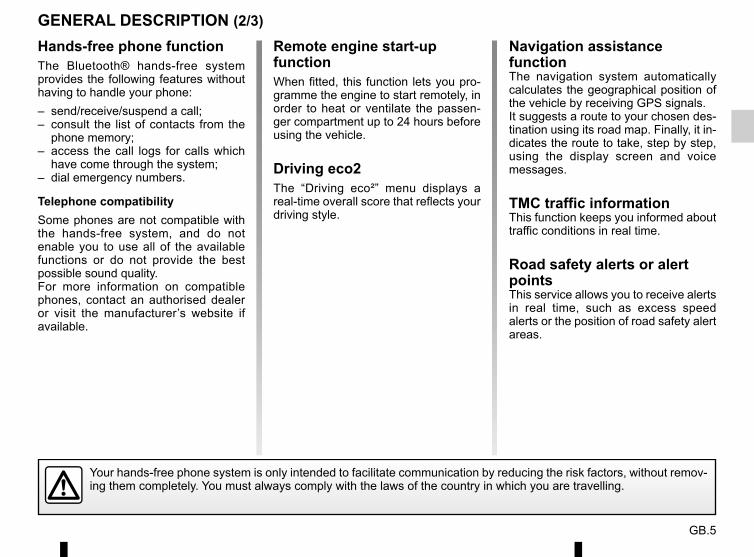
Hands-free phone functionThe Bluetooth® hands-free system provides the following features without having to handle your phone:– send/receive/suspend a call;– consult the list of contacts from the
phone memory;– access the call logs for calls which
have come through the system;– dial emergency numbers.
Telephone compatibilitySome phones are not compatible with the hands-free system, and do not enable you to use all of the available functions or do not provide the best possible sound quality.For more information on compatible phones, contact an authorised dealer or visit the manufacturer’s website if available.
Navigation assistance functionThe navigation system automatically calculates the geographical position of the vehicle by receiving GPS signals.It suggests a route to your chosen des-tination using its road map. Finally, it in-dicates the route to take, step by step, using the display screen and voice messages.
TMC traffic informationThis function keeps you informed about traffic conditions in real time.
Road safety alerts or alert pointsThis service allows you to receive alerts in real time, such as excess speed alerts or the position of road safety alert areas.
Remote engine start-up functionWhen fitted, this function lets you pro-gramme the engine to start remotely, in order to heat or ventilate the passen-ger compartment up to 24 hours before using the vehicle.
Driving eco2The “Driving eco²” menu displays a real-time overall score that reflects your driving style.
Your hands-free phone system is only intended to facilitate communication by reducing the risk factors, without remov-ing them completely. You must always comply with the laws of the country in which you are travelling.
GB.6
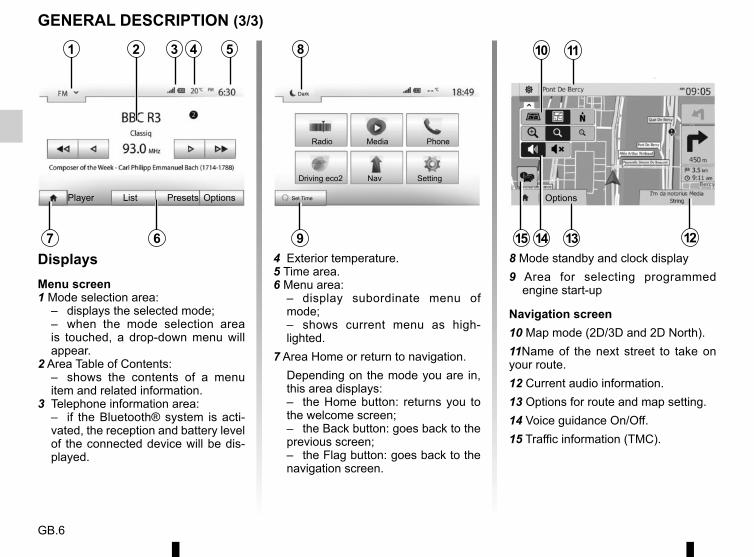
DisplaysMenu screen1 Mode selection area: – displays the selected mode; – when the mode selection area
is touched, a drop-down menu will appear.
2 Area Table of Contents: – shows the contents of a menu
item and related information.3 Telephone information area: – if the Bluetooth® system is acti-
vated, the reception and battery level of the connected device will be dis-played.
4 Exterior temperature.5 Time area.6 Menu area: – display subordinate menu of
mode; – shows current menu as high-
lighted.7 Area Home or return to navigation. Depending on the mode you are in,
this area displays: – the Home button: returns you to
the welcome screen; – the Back button: goes back to the
previous screen; – the Flag button: goes back to the
navigation screen.
8 Mode standby and clock display9 Area for selecting programmed
engine start-up
Navigation screen10 Map mode (2D/3D and 2D North).11Name of the next street to take on your route.12 Current audio information.13 Options for route and map setting.14 Voice guidance On/Off.15 Traffic information (TMC).
6
10 11
1213
GENERAL DESCRIPTION (3/3)
7
321
14
Player List Options Options
4 5 8
Radio Media Phone
Driving eco2 Nav Setting
Dark
9
Set TimePresets
15
GB.7
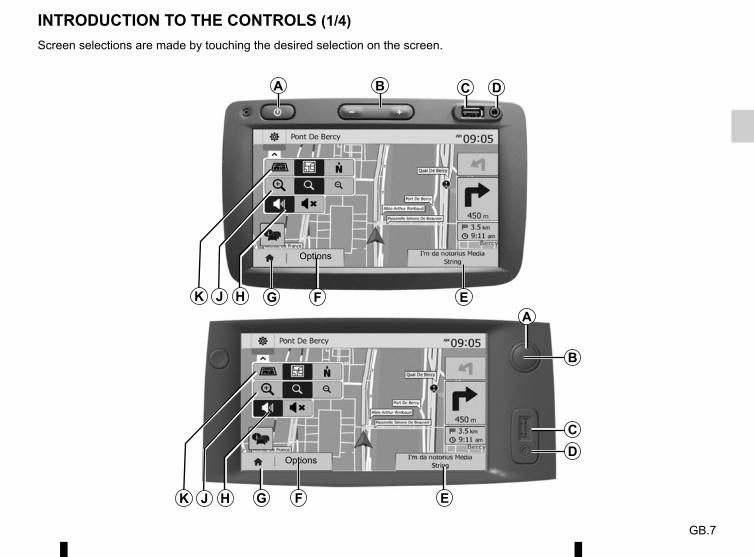
Screen selections are made by touching the desired selection on the screen.
INTRODUCTION TO THE CONTROLS (1/4)
B C DA
G F EHK
B
CD
G F E
A
Options
J
Options
HK J
GB.8
QR
L M
U
M
T
S
R
VT
U
M
S
R
T
W X
QR
L M
INTRODUCTION TO THE CONTROLS (2/4)
S T
NNN
P P P
P
N N
P
M
R
GB.9
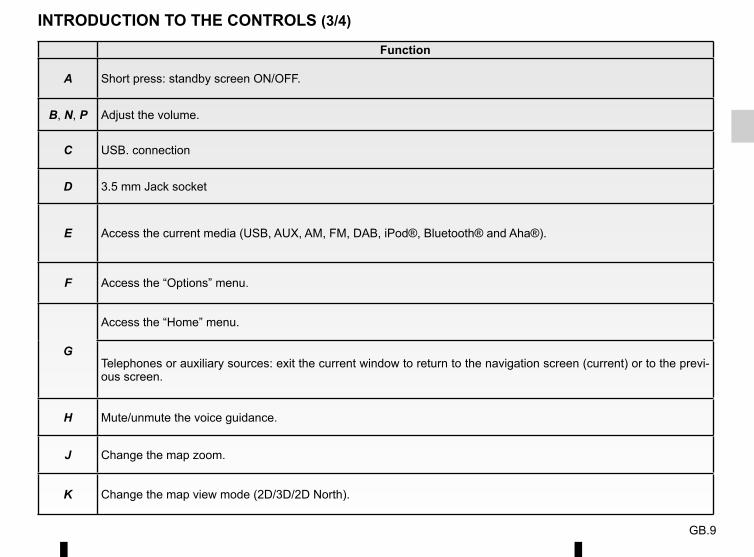
Function
A Short press: standby screen ON/OFF.
B, N, P Adjust the volume.
C USB. connection
D 3.5 mm Jack socket
E Access the current media (USB, AUX, AM, FM, DAB, iPod®, Bluetooth® and Aha®).
F Access the “Options” menu.
G
Access the “Home” menu.
Telephones or auxiliary sources: exit the current window to return to the navigation screen (current) or to the previ-ous screen.
H Mute/unmute the voice guidance.
J Change the map zoom.
K Change the map view mode (2D/3D/2D North).
INTRODUCTION TO THE CONTROLS (3/4)
GB.10
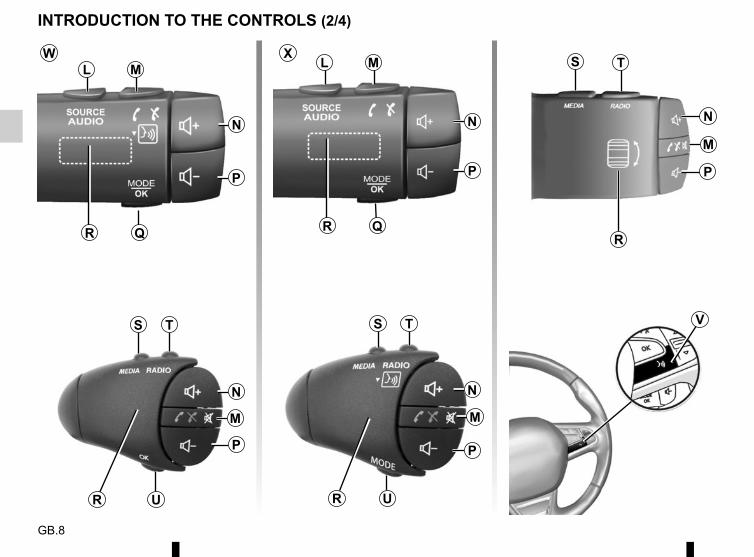
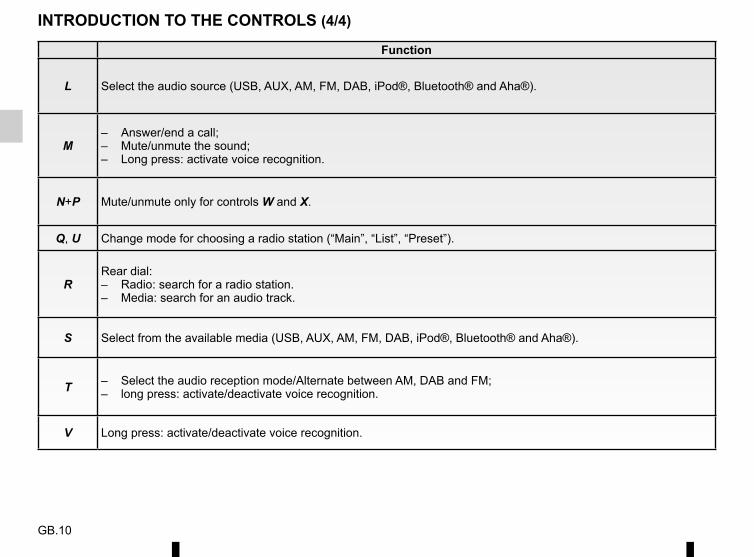
Function
L Select the audio source (USB, AUX, AM, FM, DAB, iPod®, Bluetooth® and Aha®).
M– Answer/end a call;– Mute/unmute the sound;– Long press: activate voice recognition.
N+P Mute/unmute only for controls W and X.
Q, U Change mode for choosing a radio station (“Main”, “List”, “Preset”).
RRear dial:– Radio: search for a radio station.– Media: search for an audio track.
S Select from the available media (USB, AUX, AM, FM, DAB, iPod®, Bluetooth® and Aha®).
T – Select the audio reception mode/Alternate between AM, DAB and FM;– long press: activate/deactivate voice recognition.
V Long press: activate/deactivate voice recognition.
INTRODUCTION TO THE CONTROLS (4/4)
GB.11
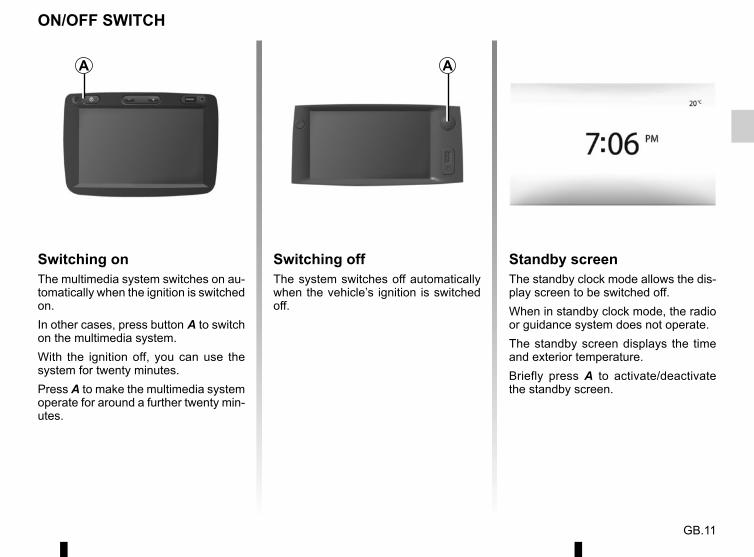
ON/OFF SWITCH
Switching onThe multimedia system switches on au-tomatically when the ignition is switched on.In other cases, press button A to switch on the multimedia system.With the ignition off, you can use the system for twenty minutes.Press A to make the multimedia system operate for around a further twenty min-utes.
Standby screenThe standby clock mode allows the dis-play screen to be switched off.When in standby clock mode, the radio or guidance system does not operate.The standby screen displays the time and exterior temperature.Briefly press A to activate/deactivate the standby screen.
AA
Switching offThe system switches off automatically when the vehicle’s ignition is switched off.
GB.12
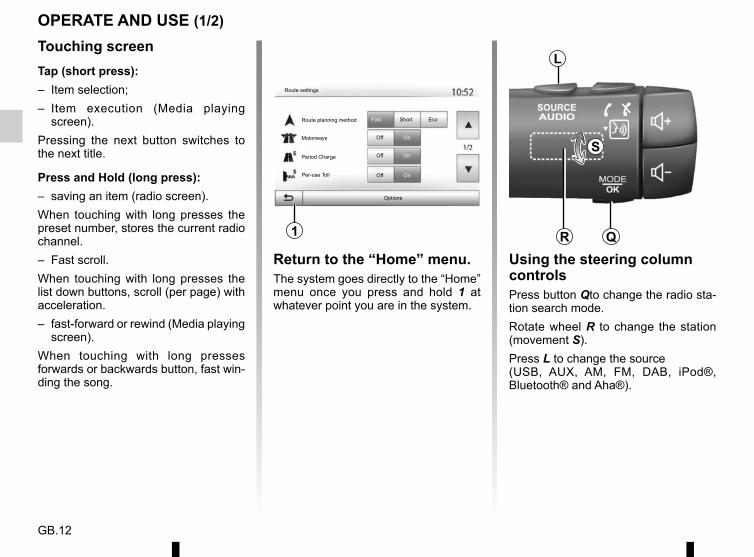
OPERATE AND USE (1/2)
Using the steering column controlsPress button Qto change the radio sta-tion search mode.Rotate wheel R to change the station (movement S).Press L to change the source(USB, AUX, AM, FM, DAB, iPod®, Bluetooth® and Aha®).
QR
S
LTouching screenTap (short press):– Item selection;– Item execution (Media playing
screen).Pressing the next button switches to the next title.
Press and Hold (long press):– saving an item (radio screen).When touching with long presses the preset number, stores the current radio channel.– Fast scroll.When touching with long presses the list down buttons, scroll (per page) with acceleration.– fast-forward or rewind (Media playing
screen).When touching with long presses forwards or backwards button, fast win-ding the song.
Return to the “Home” menu.The system goes directly to the “Home” menu once you press and hold 1 at whatever point you are in the system.
1
Options
Off
Off
Off
On
On
On
Fast Short EcoRoute planning method
Motorways
Per-use Toll
Period Charge
Route settings
GB.13
OPERATE AND USE (2/2)
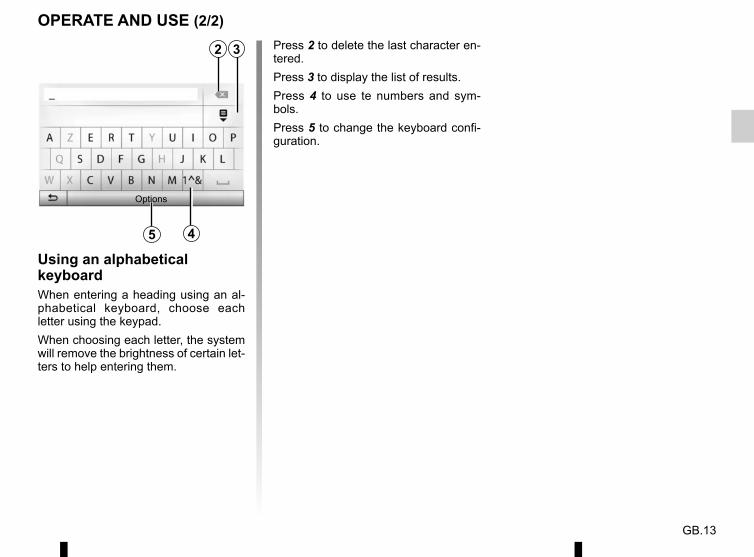
Using an alphabetical keyboardWhen entering a heading using an al-phabetical keyboard, choose each letter using the keypad.When choosing each letter, the system will remove the brightness of certain let-ters to help entering them.
Press 2 to delete the last character en-tered.Press 3 to display the list of results.Press 4 to use te numbers and sym-bols.Press 5 to change the keyboard confi-guration.
2
45
Options
3
GB.14
VolumeAdjust the sound level when listening to the different sources, messages, ring-tones and phone communications:– by turning or pressing B;– or on N/P.To adjust this function, please refer to the information on “Audio preferences” in the section on “Audio settings”.The radio source being listened to is in-terrupted when “TA” traffic information, news bulletins or a warning message is received.
MuteBriefly press M or simultaneously N and P on the steering column control. The “MUTE” icon is displayed at the top of the screen to indicate that the sound is switched off.Press M again briefly or simulta-neously N and P to continue listening to the current source.This function is deactivated automati-cally when the volume control is used or when a news or road traffic bulletin is broadcast.
Volume adjustment according to speedWhen this function is activated, the audio and navigation volume will vary according to the vehicle speed.To activate and adjust this function, please refer to the information on “Speed dependent volume control” of the section on “Audio settings”.
VOLUME
Set the volume to a reason-able level so that outside noise can be heard.
GB.15
LISTENING TO THE RADIO (1/4)
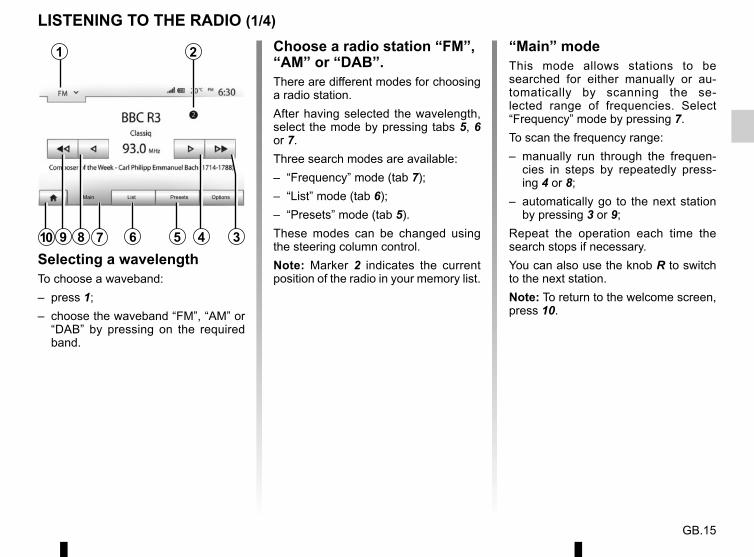
Selecting a wavelengthTo choose a waveband:– press 1;– choose the waveband “FM”, “AM” or
“DAB” by pressing on the required band.
1
Main List Presets Options
69 8 4 35
2
7
“Main” modeThis mode allows stations to be searched for either manually or au-tomatically by scanning the se-lected range of frequencies. Select “Frequency” mode by pressing 7.To scan the frequency range:– manually run through the frequen-
cies in steps by repeatedly press-ing 4 or 8;
– automatically go to the next station by pressing 3 or 9;
Repeat the operation each time the search stops if necessary.You can also use the knob R to switch to the next station.Note: To return to the welcome screen, press 10.
Choose a radio station “FM”, “AM” or “DAB”.There are different modes for choosing a radio station.After having selected the wavelength, select the mode by pressing tabs 5, 6 or 7.Three search modes are available:– “Frequency” mode (tab 7);– “List” mode (tab 6);– “Presets” mode (tab 5).These modes can be changed using the steering column control.Note: Marker 2 indicates the current position of the radio in your memory list.
10
GB.16
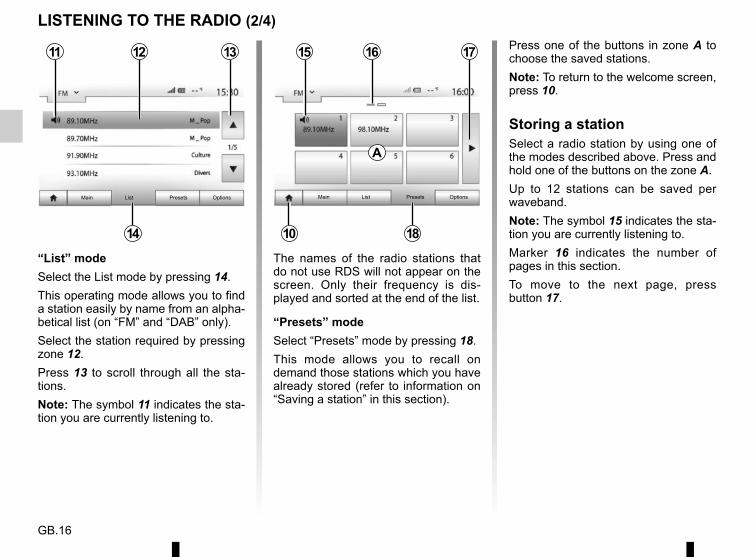
LISTENING TO THE RADIO (2/4)Press one of the buttons in zone A to choose the saved stations.Note: To return to the welcome screen, press 10.
Storing a stationSelect a radio station by using one of the modes described above. Press and hold one of the buttons on the zone A.Up to 12 stations can be saved per waveband.Note: The symbol 15 indicates the sta-tion you are currently listening to.Marker 16 indicates the number of pages in this section.To move to the next page, press button 17.
A
Main List Presets Options
15
The names of the radio stations that do not use RDS will not appear on the screen. Only their frequency is dis-played and sorted at the end of the list.
“Presets” modeSelect “Presets” mode by pressing 18.This mode allows you to recall on demand those stations which you have already stored (refer to information on “Saving a station” in this section).
“List” modeSelect the List mode by pressing 14.This operating mode allows you to find a station easily by name from an alpha-betical list (on “FM” and “DAB” only).Select the station required by pressing zone 12.Press 13 to scroll through all the sta-tions.Note: The symbol 11 indicates the sta-tion you are currently listening to.
12 1311
Main List Presets Options
14 1810
16 17
GB.17
LISTENING TO THE RADIO (3/4)
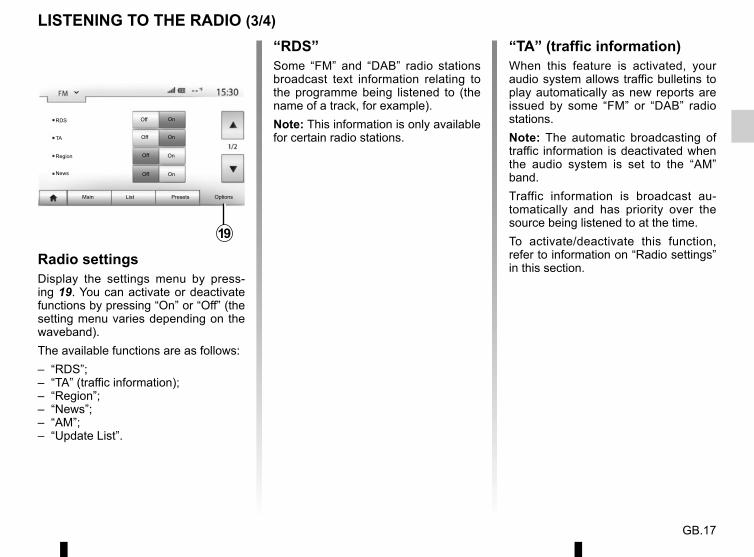
“RDS”Some “FM” and “DAB” radio stations broadcast text information relating to the programme being listened to (the name of a track, for example).Note: This information is only available for certain radio stations.
19
“TA” (traffic information)When this feature is activated, your audio system allows traffic bulletins to play automatically as new reports are issued by some “FM” or “DAB” radio stations.Note: The automatic broadcasting of traffic information is deactivated when the audio system is set to the “AM” band.Traffic information is broadcast au-tomatically and has priority over the source being listened to at the time.To activate/deactivate this function, refer to information on “Radio settings” in this section.
Main List Presets Options
RDS
TA
Region
News
Off
Off
Off
Off
On
On
On
On
Radio settingsDisplay the settings menu by press-ing 19. You can activate or deactivate functions by pressing “On” or “Off” (the setting menu varies depending on the waveband).The available functions are as follows:– “RDS”;– “TA” (traffic information);– “Region”;– “News”;– “AM”;– “Update List”.
GB.18
LISTENING TO THE RADIO (4/4)
“News”When this function is activated, it is possible to automatically listen to news as it is broadcast by certain “FM” or “DAB” radio stations.If you then select the other sources, when a broadcast of the selected pro-gramme type is made, it will interrupt the other sources.To activate/deactivate this function, refer to information on “Radio settings” in this section.
“AF”The frequency of an “FM” radio station may change depending on the geo-graphical area.In order to keep listening to the same radio station when changing region, activate the “AF” function so that your audio system can automatically retune the frequency.Note: This is only available for certain radio stations.Note: “AF” is only available if the “RDS” function is activated.Poor reception can sometimes cause erratic and annoying changes in fre-quency. In this case you should deac-tivate this function.To activate/deactivate this function, please refer to information on “Radio settings” in this section.
“AM”You can activate or deactivate the “AM” band. To activate/deactivate this func-tion, refer to information on “Radio set-tings” in this section.
“Update List”To update the list of stations and obtain the most recent ones, press “Start”.Note: Preferably update the “DAB” list as soon as your system is switched on.
GB.19
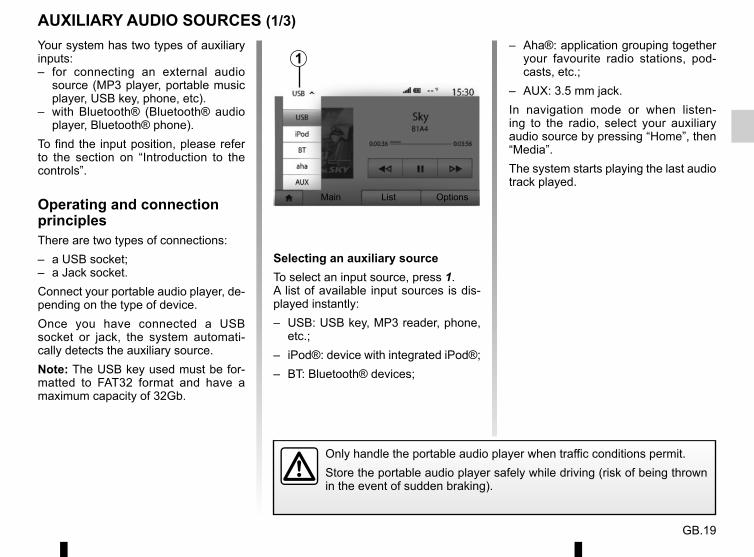
AUXILIARY AUDIO SOURCES (1/3)Your system has two types of auxiliary inputs:– for connecting an external audio
source (MP3 player, portable music player, USB key, phone, etc).
– with Bluetooth® (Bluetooth® audio player, Bluetooth® phone).
To find the input position, please refer to the section on “Introduction to the controls”.
Operating and connection principlesThere are two types of connections:– a USB socket;– a Jack socket.Connect your portable audio player, de-pending on the type of device.Once you have connected a USB socket or jack, the system automati-cally detects the auxiliary source.Note: The USB key used must be for-matted to FAT32 format and have a maximum capacity of 32Gb.
Selecting an auxiliary sourceTo select an input source, press 1. A list of available input sources is dis-played instantly:– USB: USB key, MP3 reader, phone,
etc.;– iPod®: device with integrated iPod®;– BT: Bluetooth® devices;
– Aha®: application grouping together your favourite radio stations, pod-casts, etc.;
– AUX: 3.5 mm jack.In navigation mode or when listen-ing to the radio, select your auxiliary audio source by pressing “Home”, then “Media”.The system starts playing the last audio track played.
Only handle the portable audio player when traffic conditions permit.Store the portable audio player safely while driving (risk of being thrown in the event of sudden braking).
Main List Options
1
GB.20
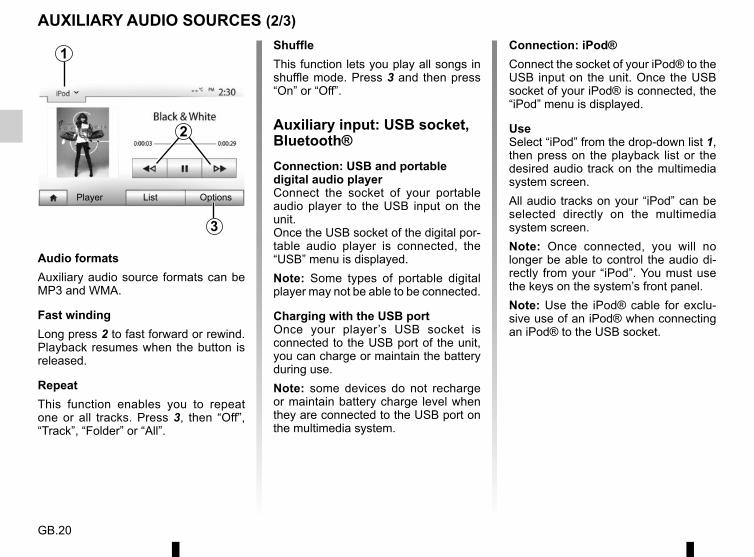
AUXILIARY AUDIO SOURCES (2/3)ShuffleThis function lets you play all songs in shuffle mode. Press 3 and then press “On” or “Off”.
Auxiliary input: USB socket, Bluetooth®Connection: USB and portable digital audio playerConnect the socket of your portable audio player to the USB input on the unit.Once the USB socket of the digital por-table audio player is connected, the “USB” menu is displayed.Note: Some types of portable digital player may not be able to be connected.
Charging with the USB portOnce your player’s USB socket is connected to the USB port of the unit, you can charge or maintain the battery during use.Note: some devices do not recharge or maintain battery charge level when they are connected to the USB port on the multimedia system.
Connection: iPod®Connect the socket of your iPod® to the USB input on the unit. Once the USB socket of your iPod® is connected, the “iPod” menu is displayed.
UseSelect “iPod” from the drop-down list 1, then press on the playback list or the desired audio track on the multimedia system screen.All audio tracks on your “iPod” can be selected directly on the multimedia system screen.Note: Once connected, you will no longer be able to control the audio di-rectly from your “iPod”. You must use the keys on the system’s front panel.Note: Use the iPod® cable for exclu-sive use of an iPod® when connecting an iPod® to the USB socket.
Audio formatsAuxiliary audio source formats can be MP3 and WMA.
Fast windingLong press 2 to fast forward or rewind. Playback resumes when the button is released.
RepeatThis function enables you to repeat one or all tracks. Press 3, then “Off”, “Track”, “Folder” or “All”.
1
3
Player List Options
2
GB.21
Connection: Bluetooth®Refer to the section on “Connecting/disconnecting Bluetooth® devices”.Once the Bluetooth® is connected, the “BT” menu is displayed.
UseSelect “BT” from the drop-down list 4, then press on the playback list or the desired audio track on the multimedia system screen.All the audio tracks on your Bluetooth® device can be selected directly from the multimedia system screen.Note: Once connected, you can no longer directly control your portable dig-ital audio player. You must use the keys on the system’s front panel.
Connection: Aha®For further information, please refer to the “Services” section.Once the Aha® application is con-nected, you can select “Aha” from the drop-down menu 4.
AUXILIARY AUDIO SOURCES (3/3)
Auxiliary input: jackConnectionConnect the jack of your portable audio player to the jack input.
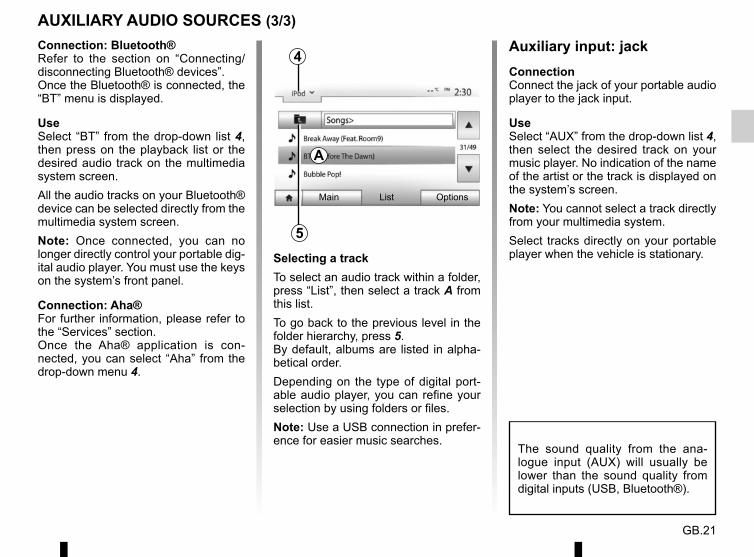
UseSelect “AUX” from the drop-down list 4, then select the desired track on your music player. No indication of the name of the artist or the track is displayed on the system’s screen.Note: You cannot select a track directly from your multimedia system.Select tracks directly on your portable player when the vehicle is stationary.Selecting a track
To select an audio track within a folder, press “List”, then select a track A from this list.To go back to the previous level in the folder hierarchy, press 5.By default, albums are listed in alpha-betical order.Depending on the type of digital port-able audio player, you can refine your selection by using folders or files.Note: Use a USB connection in prefer-ence for easier music searches.
4
Main List Options
The sound quality from the ana-logue input (AUX) will usually be lower than the sound quality from digital inputs (USB, Bluetooth®).
A
5
GB.22
SERVICES (1/2)
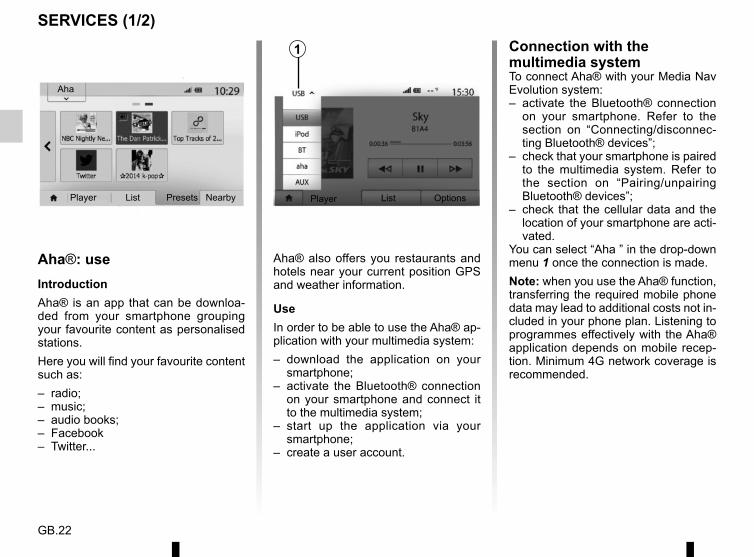
Aha®: useIntroductionAha® is an app that can be downloa-ded from your smartphone grouping your favourite content as personalised stations.Here you will find your favourite content such as:– radio;– music;– audio books;– Facebook– Twitter...
Aha® also offers you restaurants and hotels near your current position GPS and weather information.
UseIn order to be able to use the Aha® ap-plication with your multimedia system:– download the application on your
smartphone;– activate the Bluetooth® connection
on your smartphone and connect it to the multimedia system;
– start up the application via your smartphone;
– create a user account.
1
Player List OptionsPlayer List Presets Nearby
Aha
Connection with the multimedia systemTo connect Aha® with your Media Nav Evolution system:– activate the Bluetooth® connection
on your smartphone. Refer to the section on “Connecting/disconnec-ting Bluetooth® devices”;
– check that your smartphone is paired to the multimedia system. Refer to the section on “Pairing/unpairing Bluetooth® devices”;
– check that the cellular data and the location of your smartphone are acti-vated.
You can select “Aha ” in the drop-down menu 1 once the connection is made.Note: when you use the Aha® function, transferring the required mobile phone data may lead to additional costs not in-cluded in your phone plan. Listening to programmes effectively with the Aha® application depends on mobile recep-tion. Minimum 4G network coverage is recommended.
GB.23
SERVICES (2/2)
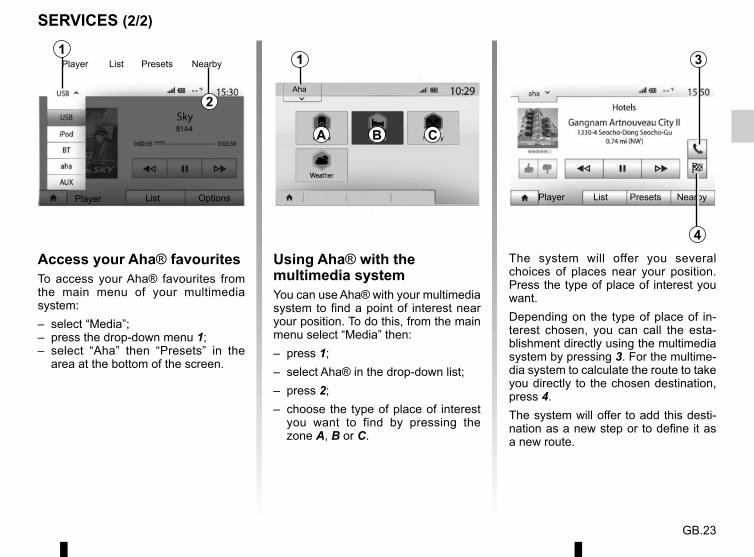
Using Aha® with the multimedia systemYou can use Aha® with your multimedia system to find a point of interest near your position. To do this, from the main menu select “Media” then:– press 1;– select Aha® in the drop-down list;– press 2;– choose the type of place of interest
you want to find by pressing the zone A, B or C.
Aha
1
A B C
The system will offer you several choices of places near your position. Press the type of place of interest you want.Depending on the type of place of in-terest chosen, you can call the esta-blishment directly using the multimedia system by pressing 3. For the multime-dia system to calculate the route to take you directly to the chosen destination, press 4. The system will offer to add this desti-nation as a new step or to define it as a new route.
Player List Presets Nearby
2
Player List Presets Nearby
3
4
Access your Aha® favouritesTo access your Aha® favourites from the main menu of your multimedia system:– select “Media”;– press the drop-down menu 1;– select “Aha” then “Presets” in the
area at the bottom of the screen.
1
Player List Options

GB.24
AUDIO SETTINGS (1/2)
Display the settings menu by pressing “Home” > “Setting”. Press 2 to access the audio settings.You can leave the settings menu and return to the welcome page by press-ing 3.
Volume adjustment according to speed (“Vol/Speed”)When the speed of your vehicle is more than (40 km/h) 25 mph, the volume level outputs higher than original volume level.Adjust the volume/speed ratio by press-ing one of the buttons in zone 1.You can deactivate this function by pressing “Off”.
1
3 2
Audio Display SystemBluetooth
Loudness
Sound
Off
Off
On
Audio Settings
Vol/Speed
BAL/FAD
“Loudness”Press “On” or “Off” to activate/deacti-vate the loudness function, which ac-centuates the bass and treble.
GB.25
AUDIO SETTINGS (2/2)
4
7 6 5
BAL/FAD
OK
Bass +3
Mid +0
Treble -2
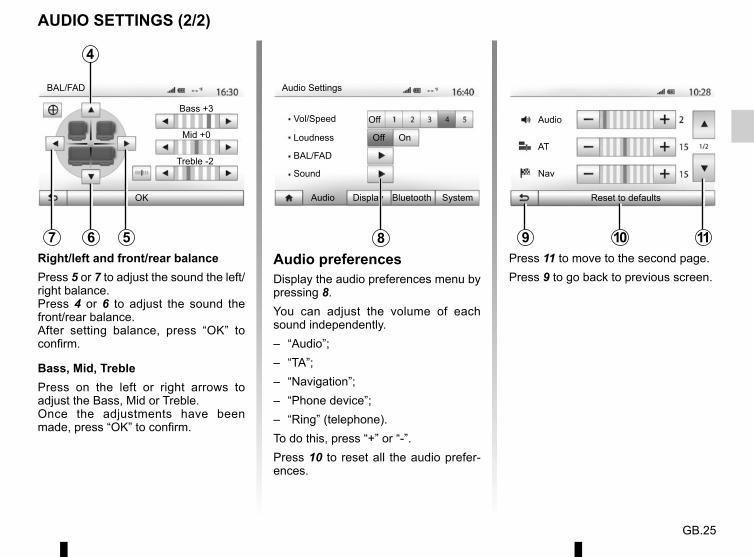
Right/left and front/rear balancePress 5 or 7 to adjust the sound the left/right balance.Press 4 or 6 to adjust the sound the front/rear balance.After setting balance, press “OK” to confirm.
Bass, Mid, TreblePress on the left or right arrows to adjust the Bass, Mid or Treble.Once the adjustments have been made, press “OK” to confirm.
Audio preferencesDisplay the audio preferences menu by pressing 8.You can adjust the volume of each sound independently.– “Audio”;– “TA”;– “Navigation”;– “Phone device”;– “Ring” (telephone).To do this, press “+” or “-”.Press 10 to reset all the audio prefer-ences.
Press 11 to move to the second page.Press 9 to go back to previous screen.
Audio Display SystemBluetooth
Loudness
Sound
Off
Off
On
Audio Settings
Vol/Speed
BAL/FAD
8 9 1110
Audio
AT
Nav
Reset to defaults
GB.26
THE NAVIGATION SYSTEMThe navigation systemThe navigation system calculates your position and guides you by using data:– of the GPS receiver;– from the digital map.
GPS receiverThe navigation system uses GPS (Global Positioning System) and GLONASS satellites orbiting the Earth. The GPS receiver receives signals transmitted from several satellites. The system can then locate the position of the vehicle.Note: After moving a long distance without driving (ferry, rail freight), the system may take several minutes to adjust before retuning to normal opera-tion.Updates (especially of maps) are pu-blished regularly. In some cases, it is possible that roads alter and that the mapping is not yet up to date.
Note: we recommend installing Naviextras Toolbox software on your computer and updating your system re-gularly.
The digital mapThe digital map contains the road maps and town maps that the system re-quires.
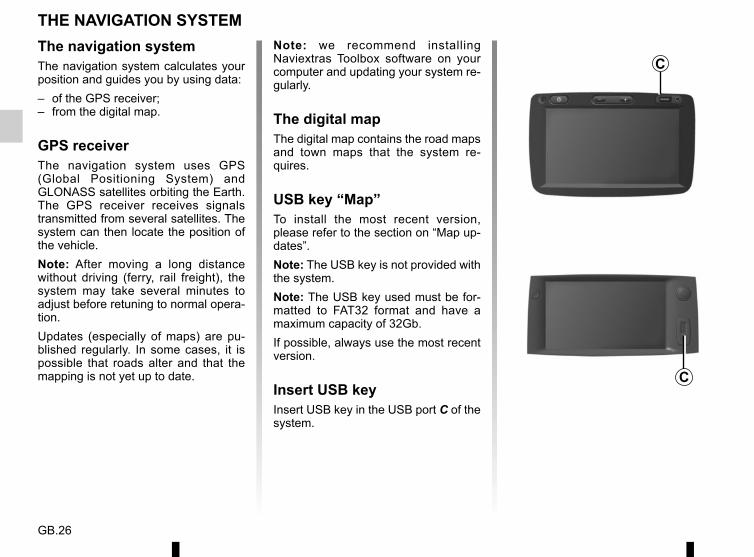
USB key “Map”To install the most recent version, please refer to the section on “Map up-dates”.Note: The USB key is not provided with the system.Note: The USB key used must be for-matted to FAT32 format and have a maximum capacity of 32Gb.If possible, always use the most recent version.
Insert USB keyInsert USB key in the USB port C of the system.
C
C

GB.27
READ A MAP (1/3)
Displaying the mapTo display the map around the current vehicle position, press “Home” > “Map”.Touch the map screen.To move around the navigation map, drag the desired direction on the screen. Press 1 to return to your cur-rent position.Press 3 to zoom in or out.
Map key4 Navigation display options.5 Access different display modes:– 3D mode;– 2D mode;– 2D North mode (the top of the map
always faces north).6 Name of the next major road or road
sign information.7 Route calculated by the navigation
system.8 Distance to and direction of next
change of direction.
9 Estimated time of arrival.10 Media currently playing.11 Distance remaining to the destina-
tion.12 Location of the vehicle on the navi-
gation map.13 Mute/unmute the voice guidance.14 Traffic information. Press this area to
find out about the different incidents present on your route.
Position GPSThis function makes it possible to find out the geographical location of the se-lected position (Address/latitude/longi-tude). Touch desired position on the screen. Press “Options” and then press “News” to find out the exact location of the se-lected position.
Map iconsThe navigation system uses symbols 2 to display points of interest (POI). Refer to the information on “Displaying points of interest” in the section on “Map set-tings”.
6 8
9111214
42 7
10
3
3
1 5
Options OK Options
13
GB.28
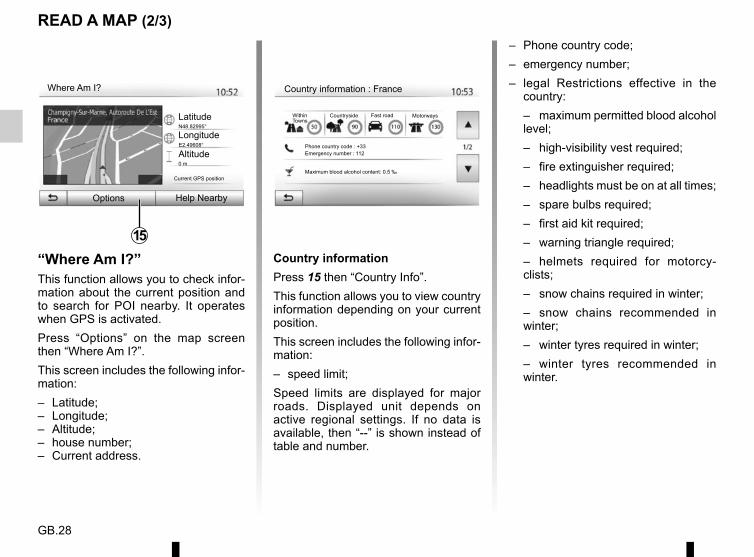
“Where Am I?”This function allows you to check infor-mation about the current position and to search for POI nearby. It operates when GPS is activated.Press “Options” on the map screen then “Where Am I?”.This screen includes the following infor-mation:– Latitude;– Longitude;– Altitude; – house number;– Current address.
READ A MAP (2/3)
Country informationPress 15 then “Country Info”.This function allows you to view country information depending on your current position.This screen includes the following infor-mation:– speed limit;Speed limits are displayed for major roads. Displayed unit depends on active regional settings. If no data is available, then “--” is shown instead of table and number.
15
– Phone country code;– emergency number;– legal Restrictions effective in the
country:– maximum permitted blood alcohol level;– high-visibility vest required;– fire extinguisher required;– headlights must be on at all times;– spare bulbs required;– first aid kit required;– warning triangle required;– helmets required for motorcy-clists;– snow chains required in winter;– snow chains recommended in winter;– winter tyres required in winter;– winter tyres recommended in winter.
Options Help Nearby
Where Am I?
Latitude
Longitude
Altitude
Country information : France
Maximum blood alcohol content: 0.5 ‰
Within Towns
Countryside Fast road Motorways
Phone country code : +33Emergency number : 112
Current GPS position
0 m
E2.49608°
N48.82995°

GB.29
« Help Nearby »This function allows you to search for assistance near your current position.Press 16 to open a new screen for the quick search.
READ A MAP (3/3)
Information on this screen:– car repair services;– medical and emergency services;– police stations;– petrol stations.To search a destination from this screen, please refer to the section on “Entering a destination” and the infor-mation on “Selecting Points of Interest (POI)”.
Help Nearby
Car repairAround here
Around here
Around here
Around here
Police
Health
Service station
16
Options Help Nearby
Where Am I?
Latitude
Longitude
Altitude
Current GPS position
0 m
E2.49608°
N48.82995°
GB.30
ENTERING A DESTINATION (1/6)
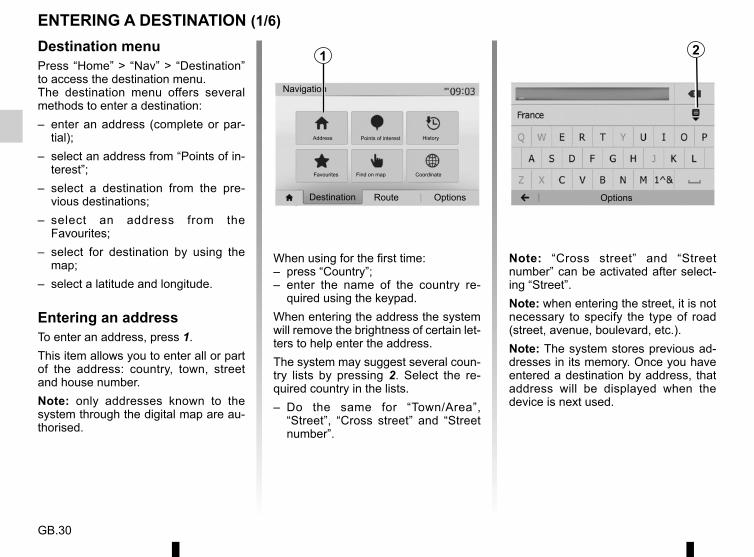
Destination menuPress “Home” > “Nav” > “Destination” to access the destination menu.The destination menu offers several methods to enter a destination:– enter an address (complete or par-
tial);– select an address from “Points of in-
terest”;– select a destination from the pre-
vious destinations;– select an address from the
Favourites;– select for destination by using the
map;– select a latitude and longitude.
Entering an addressTo enter an address, press 1.This item allows you to enter all or part of the address: country, town, street and house number.Note: only addresses known to the system through the digital map are au-thorised.
When using for the first time:– press “Country”;– enter the name of the country re-
quired using the keypad.When entering the address the system will remove the brightness of certain let-ters to help enter the address.The system may suggest several coun-try lists by pressing 2. Select the re-quired country in the lists.– Do the same for “Town/Area”,
“Street”, “Cross street” and “Street number”.
Note: “Cross street” and “Street number” can be activated after select-ing “Street”.Note: when entering the street, it is not necessary to specify the type of road (street, avenue, boulevard, etc.).Note: The system stores previous ad-dresses in its memory. Once you have entered a destination by address, that address will be displayed when the device is next used.
2
Options
Navigation
Address HistoryPoints of interest
CoordinateFind on map
Destination Route Options
Favourites
1
GB.31
ENTERING A DESTINATION (2/6)
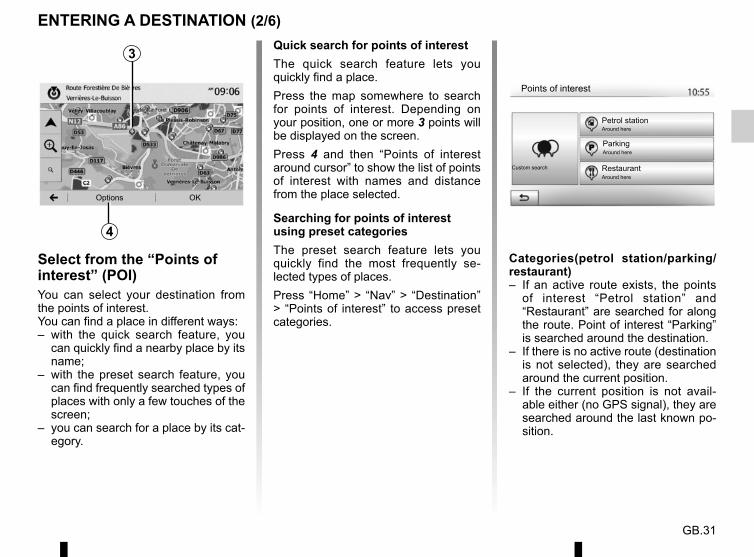
3 Quick search for points of interestThe quick search feature lets you quickly find a place.Press the map somewhere to search for points of interest. Depending on your position, one or more 3 points will be displayed on the screen. Press 4 and then “Points of interest around cursor” to show the list of points of interest with names and distance from the place selected.
Searching for points of interest using preset categoriesThe preset search feature lets you quickly find the most frequently se-lected types of places.Press “Home” > “Nav” > “Destination” > “Points of interest” to access preset categories.
Select from the “Points of interest” (POI)You can select your destination from the points of interest.You can find a place in different ways:– with the quick search feature, you
can quickly find a nearby place by its name;
– with the preset search feature, you can find frequently searched types of places with only a few touches of the screen;
– you can search for a place by its cat-egory.
Categories(petrol station/parking/restaurant)– If an active route exists, the points
of interest “Petrol station” and “Restaurant” are searched for along the route. Point of interest “Parking” is searched around the destination.
– If there is no active route (destination is not selected), they are searched around the current position.
– If the current position is not avail-able either (no GPS signal), they are searched around the last known po-sition.
Options OK
Points of interest
Custom search
Petrol station
Parking
Restaurant
Around here
Around here
Around here
4
GB.32
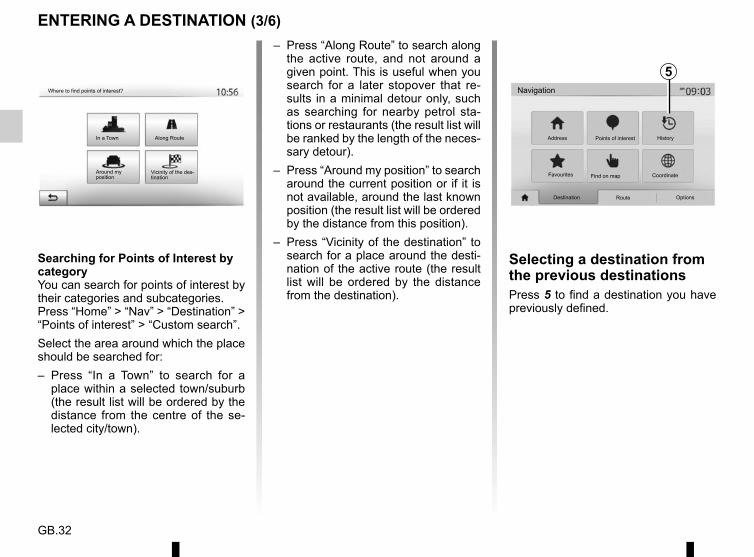
ENTERING A DESTINATION (3/6)
Searching for Points of Interest by categoryYou can search for points of interest by their categories and subcategories.Press “Home” > “Nav” > “Destination” > “Points of interest” > “Custom search”. Select the area around which the place should be searched for:– Press “In a Town” to search for a
place within a selected town/suburb (the result list will be ordered by the distance from the centre of the se-lected city/town).
Where to find points of interest?
In a Town
Around my position
Vicinity of the des-tination
Along Route
– Press “Along Route” to search along the active route, and not around a given point. This is useful when you search for a later stopover that re-sults in a minimal detour only, such as searching for nearby petrol sta-tions or restaurants (the result list will be ranked by the length of the neces-sary detour).
– Press “Around my position” to search around the current position or if it is not available, around the last known position (the result list will be ordered by the distance from this position).
– Press “Vicinity of the destination” to search for a place around the desti-nation of the active route (the result list will be ordered by the distance from the destination).
Selecting a destination from the previous destinationsPress 5 to find a destination you have previously defined.
5Navigation
Address HistoryPoints of interest
CoordinateFind on map
Destination Route
Favourites
Options
GB.33
ENTERING A DESTINATION (4/6)
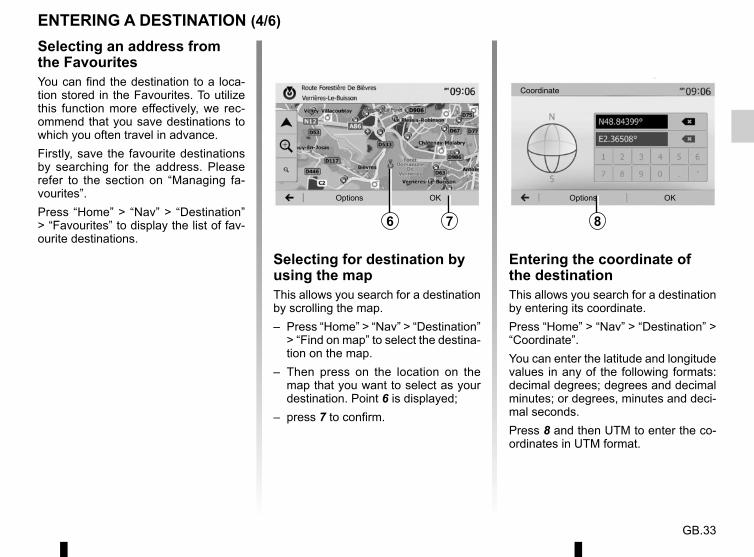
Selecting an address from the FavouritesYou can find the destination to a loca-tion stored in the Favourites. To utilize this function more effectively, we rec-ommend that you save destinations to which you often travel in advance.Firstly, save the favourite destinations by searching for the address. Please refer to the section on “Managing fa-vourites”.Press “Home” > “Nav” > “Destination” > “Favourites” to display the list of fav-ourite destinations.
6 7
Selecting for destination by using the mapThis allows you search for a destination by scrolling the map.– Press “Home” > “Nav” > “Destination”
> “Find on map” to select the destina-tion on the map.
– Then press on the location on the map that you want to select as your destination. Point 6 is displayed;
– press 7 to confirm.
Entering the coordinate of the destinationThis allows you search for a destination by entering its coordinate.Press “Home” > “Nav” > “Destination” > “Coordinate”.You can enter the latitude and longitude values in any of the following formats: decimal degrees; degrees and decimal minutes; or degrees, minutes and deci-mal seconds.Press 8 and then UTM to enter the co-ordinates in UTM format.
8
Options OK Options OK
Coordinate
GB.34
ENTERING A DESTINATION (5/6)
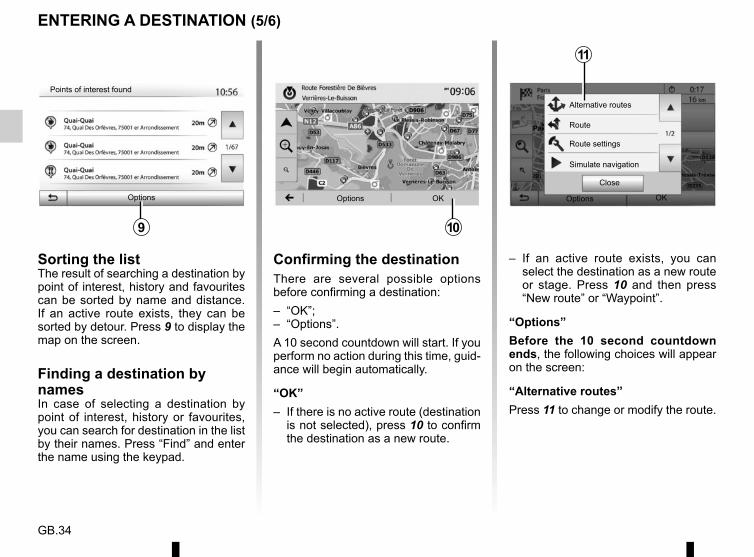
Confirming the destinationThere are several possible options before confirming a destination:– “OK”;– “Options”.A 10 second countdown will start. If you perform no action during this time, guid-ance will begin automatically.
“OK”– If there is no active route (destination
is not selected), press 10 to confirm the destination as a new route.
Sorting the listThe result of searching a destination by point of interest, history and favourites can be sorted by name and distance. If an active route exists, they can be sorted by detour. Press 9 to display the map on the screen.
Finding a destination by namesIn case of selecting a destination by point of interest, history or favourites, you can search for destination in the list by their names. Press “Find” and enter the name using the keypad.
10
Options Options OK
Route
Close
Points of interest found
Alternative routes
Simulate navigation
Route settings
– If an active route exists, you can select the destination as a new route or stage. Press 10 and then press “New route” or “Waypoint”.
“Options”Before the 10 second countdown ends, the following choices will appear on the screen:
“Alternative routes”Press 11 to change or modify the route.
9
Options OK
11
GB.35
ENTERING A DESTINATION (6/6)
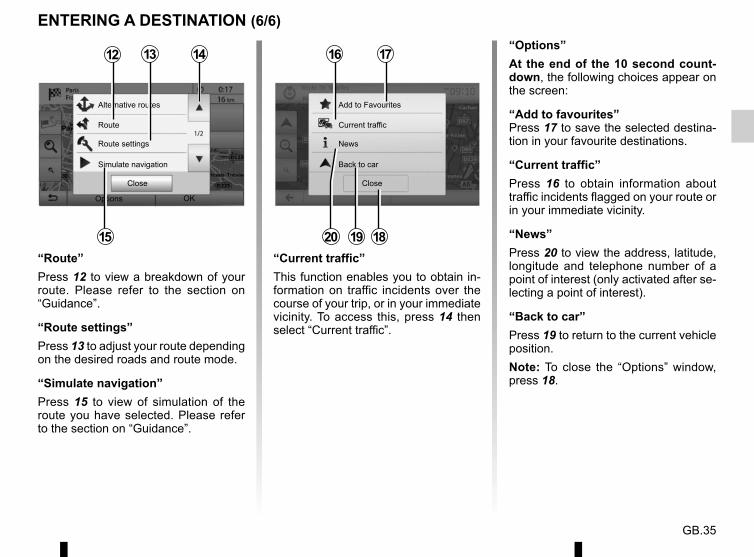
“Current traffic”This function enables you to obtain in-formation on traffic incidents over the course of your trip, or in your immediate vicinity. To access this, press 14 then select “Current traffic”.
17
19
16“Options”At the end of the 10 second count-down, the following choices appear on the screen:
“Add to favourites”Press 17 to save the selected destina-tion in your favourite destinations.
“Current traffic”Press 16 to obtain information about traffic incidents flagged on your route or in your immediate vicinity.
“News”Press 20 to view the address, latitude, longitude and telephone number of a point of interest (only activated after se-lecting a point of interest).
“Back to car”Press 19 to return to the current vehicle position.Note: To close the “Options” window, press 18.
Current traffic
Close
Add to Favourites
Back to car
News
20“Route”Press 12 to view a breakdown of your route. Please refer to the section on “Guidance”.
“Route settings”Press 13 to adjust your route depending on the desired roads and route mode.
“Simulate navigation”Press 15 to view of simulation of the route you have selected. Please refer to the section on “Guidance”.
Route
Close
Alternative routes
Simulate navigation
Route settings
Options OK
12 13
15 18
14
GB.36
GUIDANCE (1/6)
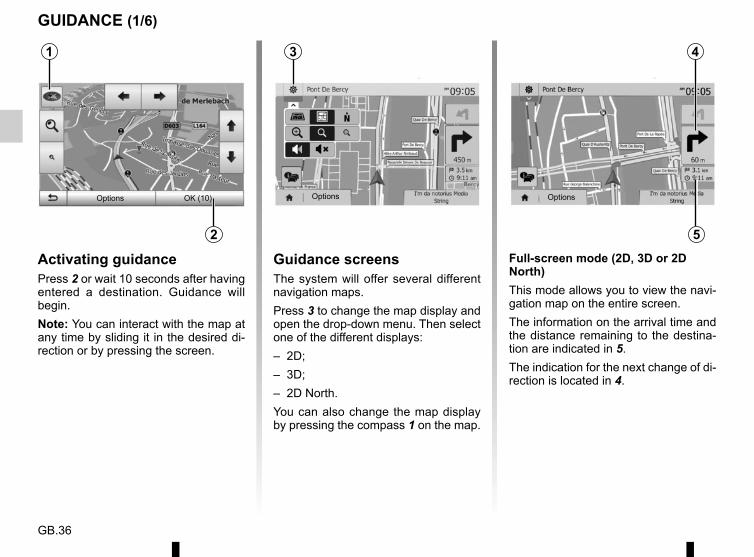
Activating guidancePress 2 or wait 10 seconds after having entered a destination. Guidance will begin.Note: You can interact with the map at any time by sliding it in the desired di-rection or by pressing the screen.
Guidance screensThe system will offer several different navigation maps.Press 3 to change the map display and open the drop-down menu. Then select one of the different displays:– 2D;– 3D;– 2D North.You can also change the map display by pressing the compass 1 on the map.
Full-screen mode (2D, 3D or 2D North)This mode allows you to view the navi-gation map on the entire screen.The information on the arrival time and the distance remaining to the destina-tion are indicated in 5.The indication for the next change of di-rection is located in 4.
Options
2
3
Options
4
5
Options OK (10)
1
GB.37
GUIDANCE (2/6)
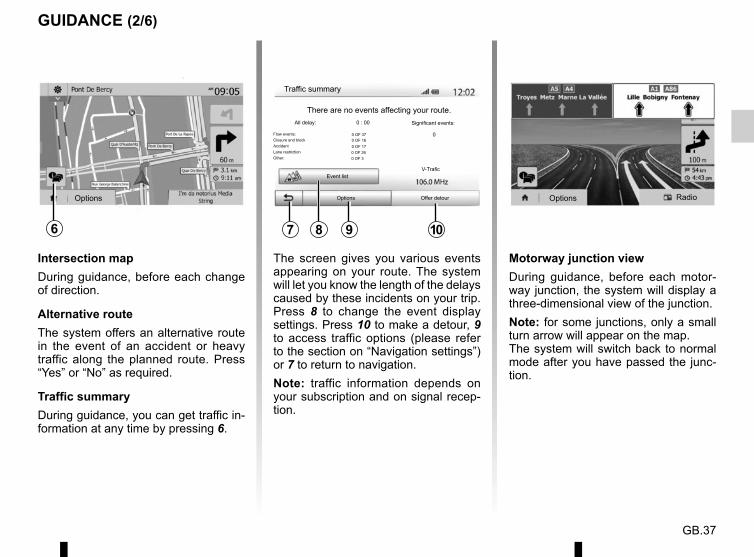
Intersection mapDuring guidance, before each change of direction.
Alternative routeThe system offers an alternative route in the event of an accident or heavy traffic along the planned route. Press “Yes” or “No” as required.
Traffic summaryDuring guidance, you can get traffic in-formation at any time by pressing 6.
Motorway junction viewDuring guidance, before each motor-way junction, the system will display a three-dimensional view of the junction.Note: for some junctions, only a small turn arrow will appear on the map.The system will switch back to normal mode after you have passed the junc-tion.
Options Radio
The screen gives you various events appearing on your route. The system will let you know the length of the delays caused by these incidents on your trip. Press 8 to change the event display settings. Press 10 to make a detour, 9 to access traffic options (please refer to the section on “Navigation settings”) or 7 to return to navigation.Note: traffic information depends on your subscription and on signal recep-tion.
7 9 1086
Options
Traffic summary
There are no events affecting your route.Significant events:
0
All delay: 0 : 00
Flow events:Closure and blockAccidentLane restrictionOther:
0 OF 370 OF 160 OF 170 OF 260 OF 3
Event listV-Trafic
Options Offer detour
GB.38
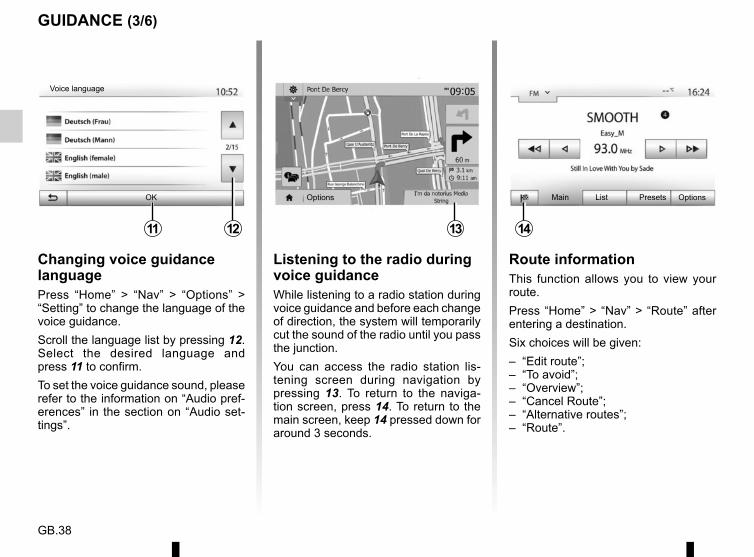
Changing voice guidance languagePress “Home” > “Nav” > “Options” > “Setting” to change the language of the voice guidance.Scroll the language list by pressing 12. Select the desired language and press 11 to confirm.To set the voice guidance sound, please refer to the information on “Audio pref-erences” in the section on “Audio set-tings”.
1211
Voice language
OK
Listening to the radio during voice guidanceWhile listening to a radio station during voice guidance and before each change of direction, the system will temporarily cut the sound of the radio until you pass the junction.You can access the radio station lis-tening screen during navigation by pressing 13. To return to the naviga-tion screen, press 14. To return to the main screen, keep 14 pressed down for around 3 seconds.
GUIDANCE (3/6)
Main List PresetsOptions
1413
Route informationThis function allows you to view your route.Press “Home” > “Nav” > “Route” after entering a destination.Six choices will be given:– “Edit route”;– “To avoid”;– “Overview”;– “Cancel Route”;– “Alternative routes”;– “Route”.
Options
GB.39
GUIDANCE (4/6)
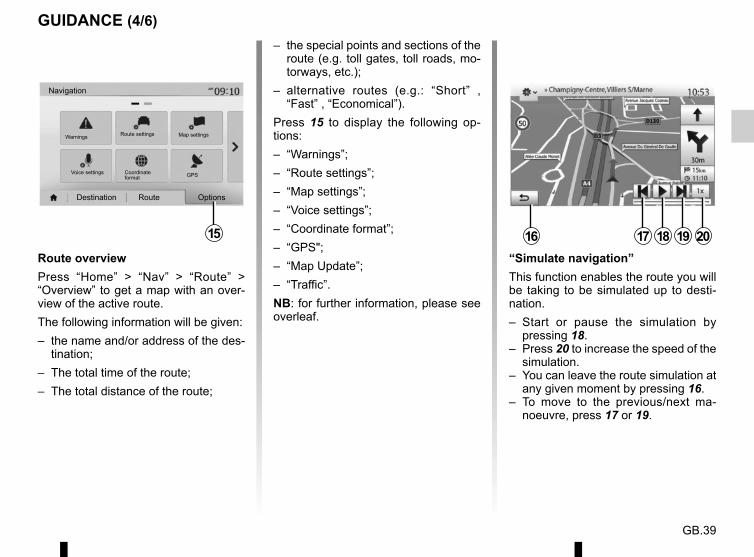
“Simulate navigation”This function enables the route you will be taking to be simulated up to desti-nation.– Start or pause the simulation by
pressing 18.– Press 20 to increase the speed of the
simulation.– You can leave the route simulation at
any given moment by pressing 16.– To move to the previous/next ma-
noeuvre, press 17 or 19.
1716 18 19 2015
RouteDestination
Warnings Route settings Map settings
GPSCoordinate format
Voice settings
Navigation
Options
– the special points and sections of the route (e.g. toll gates, toll roads, mo-torways, etc.);
– alternative routes (e.g.: “Short” , “Fast” , “Economical”).
Press 15 to display the following op-tions:– “Warnings”;– “Route settings”;– “Map settings”;– “Voice settings”;– “Coordinate format”;– “GPS";– “Map Update”;– “Traffic”.NB: for further information, please see overleaf.
Route overviewPress “Home” > “Nav” > “Route” > “Overview” to get a map with an over-view of the active route.The following information will be given:– the name and/or address of the des-
tination;– The total time of the route;– The total distance of the route;
GB.40
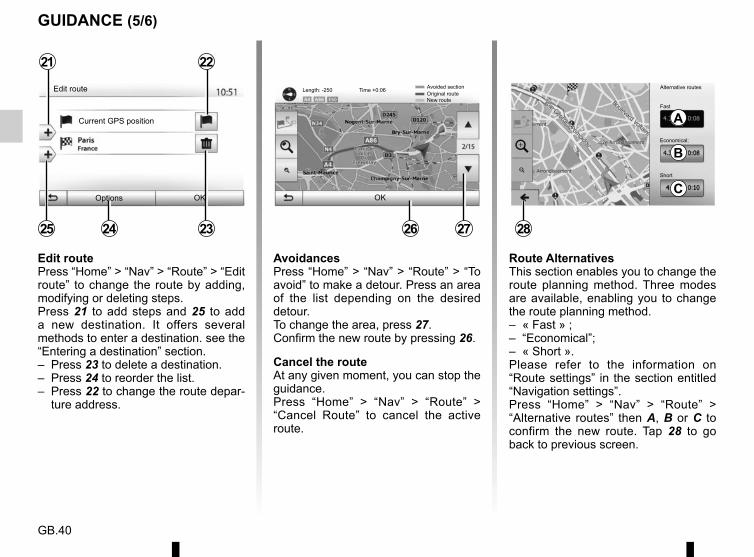
Edit routePress “Home” > “Nav” > “Route” > “Edit route” to change the route by adding, modifying or deleting steps.Press 21 to add steps and 25 to add a new destination. It offers several methods to enter a destination. see the “Entering a destination” section.– Press 23 to delete a destination.– Press 24 to reorder the list.– Press 22 to change the route depar-
ture address.
25 24
21
Options OK
23
Edit route
Current GPS position
22
GUIDANCE (5/6)
Route AlternativesThis section enables you to change the route planning method. Three modes are available, enabling you to change the route planning method.– « Fast » ;– “Economical”;– « Short ».Please refer to the information on “Route settings” in the section entitled “Navigation settings”.Press “Home” > “Nav” > “Route” > “Alternative routes” then A, B or C to confirm the new route. Tap 28 to go back to previous screen.
AvoidancesPress “Home” > “Nav” > “Route” > “To avoid” to make a detour. Press an area of the list depending on the desired detour.To change the area, press 27.Confirm the new route by pressing 26.
Cancel the routeAt any given moment, you can stop the guidance.Press “Home” > “Nav” > “Route” > “Cancel Route” to cancel the active route.
2726 28
OK
Alternative routes
Fast
Economical;
Short
Avoided sectionOriginal routeNew route
Length: -250 Time +0:06
A
B
C
GB.41
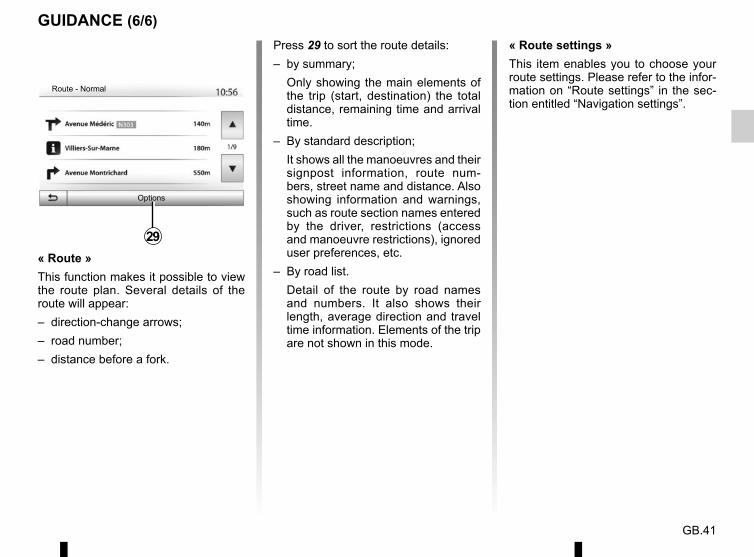
Press 29 to sort the route details:– by summary;
Only showing the main elements of the trip (start, destination) the total distance, remaining time and arrival time.
– By standard description;It shows all the manoeuvres and their signpost information, route num-bers, street name and distance. Also showing information and warnings, such as route section names entered by the driver, restrictions (access and manoeuvre restrictions), ignored user preferences, etc.
– By road list.Detail of the route by road names and numbers. It also shows their length, average direction and travel time information. Elements of the trip are not shown in this mode.
Options
Route - Normal
« Route »This function makes it possible to view the route plan. Several details of the route will appear:– direction-change arrows;– road number;– distance before a fork.
« Route settings »This item enables you to choose your route settings. Please refer to the infor-mation on “Route settings” in the sec-tion entitled “Navigation settings”.
29
GUIDANCE (6/6)
GB.42
MAP SETTINGS
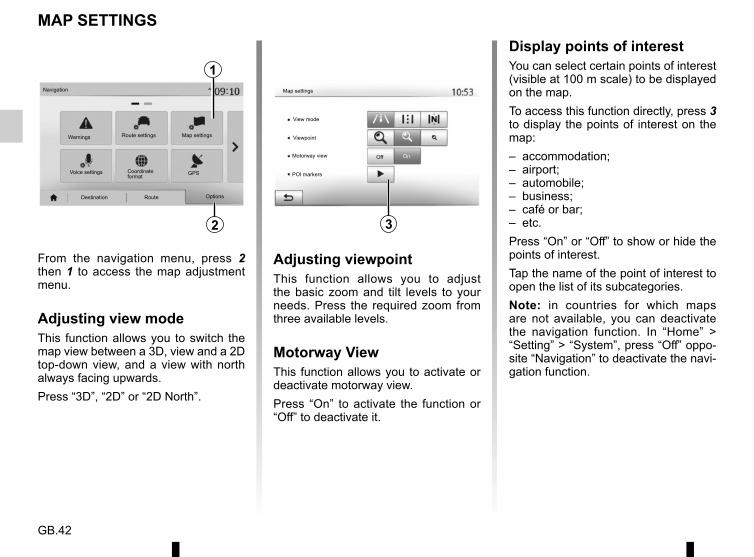
From the navigation menu, press 2 then 1 to access the map adjustment menu.
Adjusting view modeThis function allows you to switch the map view between a 3D, view and a 2D top-down view, and a view with north always facing upwards.Press “3D”, “2D” or “2D North”.
Adjusting viewpointThis function allows you to adjust the basic zoom and tilt levels to your needs. Press the required zoom from three available levels.
Motorway ViewThis function allows you to activate or deactivate motorway view.Press “On” to activate the function or “Off” to deactivate it.
Display points of interestYou can select certain points of interest (visible at 100 m scale) to be displayed on the map.To access this function directly, press 3 to display the points of interest on the map:– accommodation;– airport;– automobile;– business;– café or bar;– etc.Press “On” or “Off” to show or hide the points of interest.Tap the name of the point of interest to open the list of its subcategories.Note: in countries for which maps are not available, you can deactivate the navigation function. In “Home” > “Setting” > “System”, press “Off” oppo-site “Navigation” to deactivate the navi-gation function.
32
1
Off On
Map settings
Viewpoint
Motorway view
POI markers
Navigation
Warnings Map settings
Voice settings Coordinate format GPS
Destination Route Options
View mode
Route settings
GB.43
MANAGING THE FAVOURITES (1/2)
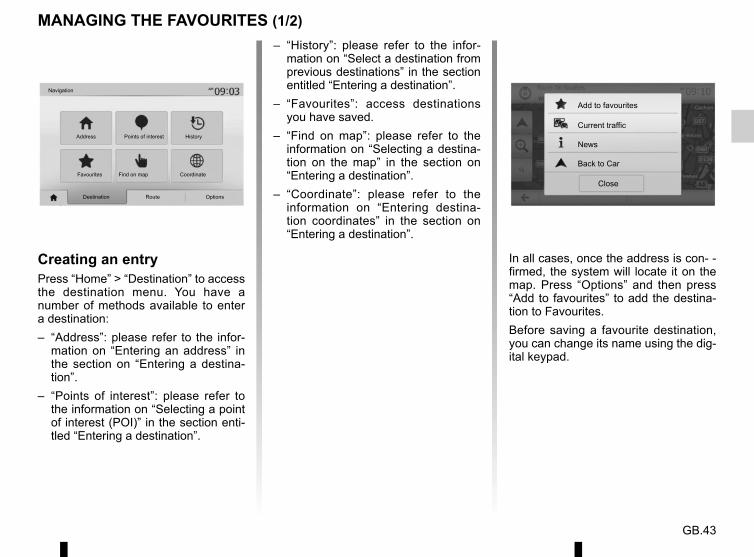
Creating an entryPress “Home” > “Destination” to access the destination menu. You have a number of methods available to enter a destination:– “Address”: please refer to the infor-
mation on “Entering an address” in the section on “Entering a destina-tion”.
– “Points of interest”: please refer to the information on “Selecting a point of interest (POI)” in the section enti-tled “Entering a destination”.
– “History”: please refer to the infor-mation on “Select a destination from previous destinations” in the section entitled “Entering a destination”.
– “Favourites”: access destinations you have saved.
– “Find on map”: please refer to the information on “Selecting a destina-tion on the map” in the section on “Entering a destination”.
– “Coordinate”: please refer to the information on “Entering destina-tion coordinates” in the section on “Entering a destination”.
In all cases, once the address is con- -firmed, the system will locate it on the map. Press “Options” and then press “Add to favourites” to add the destina-tion to Favourites.Before saving a favourite destination, you can change its name using the dig-ital keypad.
Current traffic
Close
Add to favourites
News
Navigation
Address Points of interest History
Favourites Find on map Coordinate
Destination Route Options
Back to Car
GB.44
MANAGING THE FAVOURITES (2/2)
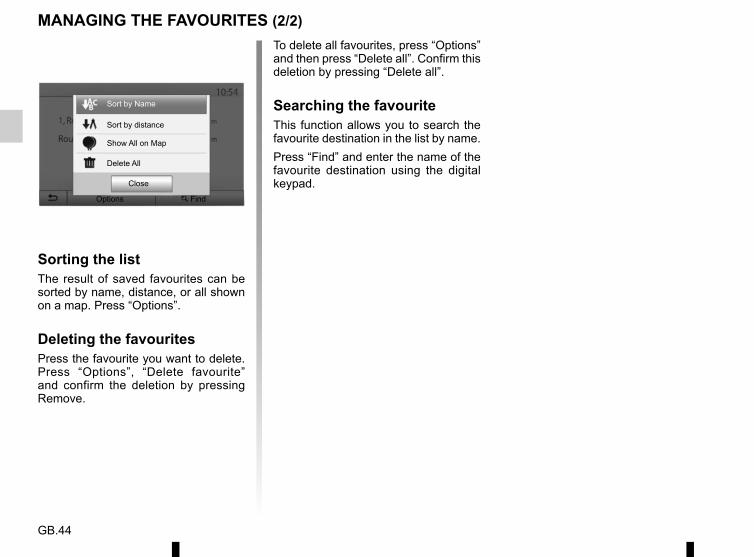
Sorting the listThe result of saved favourites can be sorted by name, distance, or all shown on a map. Press “Options”.
Deleting the favouritesPress the favourite you want to delete. Press “Options”, “Delete favourite” and confirm the deletion by pressing Remove.
To delete all favourites, press “Options” and then press “Delete all”. Confirm this deletion by pressing “Delete all”.
Searching the favouriteThis function allows you to search the favourite destination in the list by name.Press “Find” and enter the name of the favourite destination using the digital keypad.Close
Options Find
Delete All
Show All on Map
Sort by distance
Sort by Name
GB.45
NAVIGATION SETTINGS (1/4)
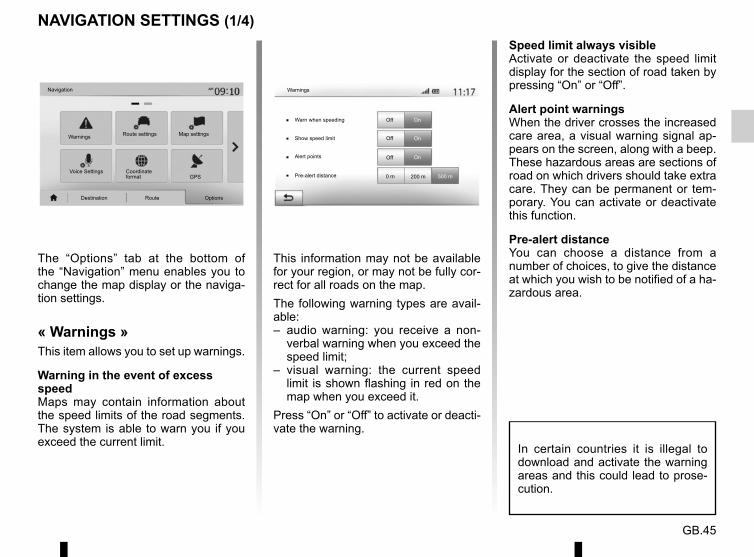
The “Options” tab at the bottom of the “Navigation” menu enables you to change the map display or the naviga-tion settings.
« Warnings »This item allows you to set up warnings.
Warning in the event of excess speedMaps may contain information about the speed limits of the road segments. The system is able to warn you if you exceed the current limit.
This information may not be available for your region, or may not be fully cor-rect for all roads on the map.The following warning types are avail-able:– audio warning: you receive a non-
verbal warning when you exceed the speed limit;
– visual warning: the current speed limit is shown flashing in red on the map when you exceed it.
Press “On” or “Off” to activate or deacti-vate the warning.
Speed limit always visibleActivate or deactivate the speed limit display for the section of road taken by pressing “On” or “Off”.
Alert point warningsWhen the driver crosses the increased care area, a visual warning signal ap-pears on the screen, along with a beep. These hazardous areas are sections of road on which drivers should take extra care. They can be permanent or tem-porary. You can activate or deactivate this function.
Pre-alert distanceYou can choose a distance from a number of choices, to give the distance at which you wish to be notified of a ha-zardous area.
Off
Off
Off
On
On
On
Warn when speeding
Show speed limit
Alert points
WarningsNavigation
Warnings Route settings Map settings
Voice Settings Coordinate format GPS
Destination Route Options
Pre-alert distance 0 m 200 m 500 m
In certain countries it is illegal to download and activate the warning areas and this could lead to prose-cution.
GB.46
NAVIGATION SETTINGS (2/4)
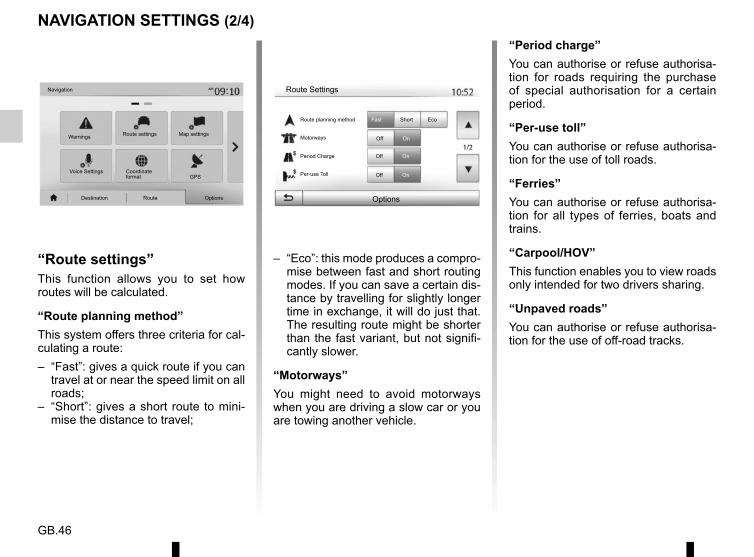
– “Eco”: this mode produces a compro-mise between fast and short routing modes. If you can save a certain dis-tance by travelling for slightly longer time in exchange, it will do just that. The resulting route might be shorter than the fast variant, but not signifi-cantly slower.
“Motorways”You might need to avoid motorways when you are driving a slow car or you are towing another vehicle.
“Route settings”This function allows you to set how routes will be calculated.
“Route planning method”This system offers three criteria for cal-culating a route:– “Fast”: gives a quick route if you can
travel at or near the speed limit on all roads;
– “Short”: gives a short route to mini-mise the distance to travel;
“Period charge”You can authorise or refuse authorisa-tion for roads requiring the purchase of special authorisation for a certain period.
“Per-use toll”You can authorise or refuse authorisa-tion for the use of toll roads.
“Ferries”You can authorise or refuse authorisa-tion for all types of ferries, boats and trains.
“Carpool/HOV”This function enables you to view roads only intended for two drivers sharing.
“Unpaved roads”You can authorise or refuse authorisa-tion for the use of off-road tracks.
Off
Off
On
On
Fast Short EcoRoute planning method
Motorways
Per-use Toll
Period Charge
Route SettingsNavigation
Warnings Route settings Map settings
Voice Settings Coordinate format GPS
Destination Route Options
OnOff
Options
GB.47
NAVIGATION SETTINGS (3/4)
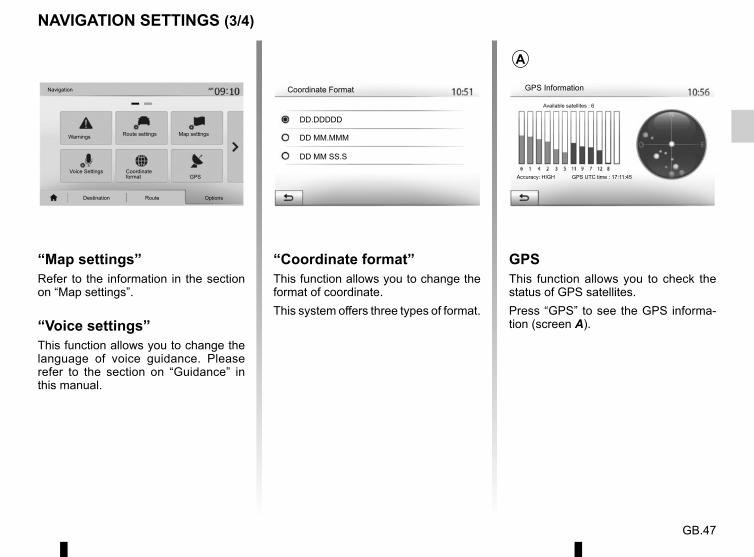
“Coordinate format”This function allows you to change the format of coordinate.This system offers three types of format.
“Map settings”Refer to the information in the section on “Map settings”.
“Voice settings”This function allows you to change the language of voice guidance. Please refer to the section on “Guidance” in this manual.
GPSThis function allows you to check the status of GPS satellites.Press “GPS” to see the GPS informa-tion (screen A).
Coordinate Format GPS Information
Available satellites : 6
Accuracy: HIGH GPS UTC time : 17:11:45
A
Navigation
Warnings Route settings Map settings
Voice Settings Coordinate format GPS
Destination Route Options
DD.DDDDD
DD MM.MMM
DD MM SS.S
GB.48
NAVIGATION SETTINGS (4/4)
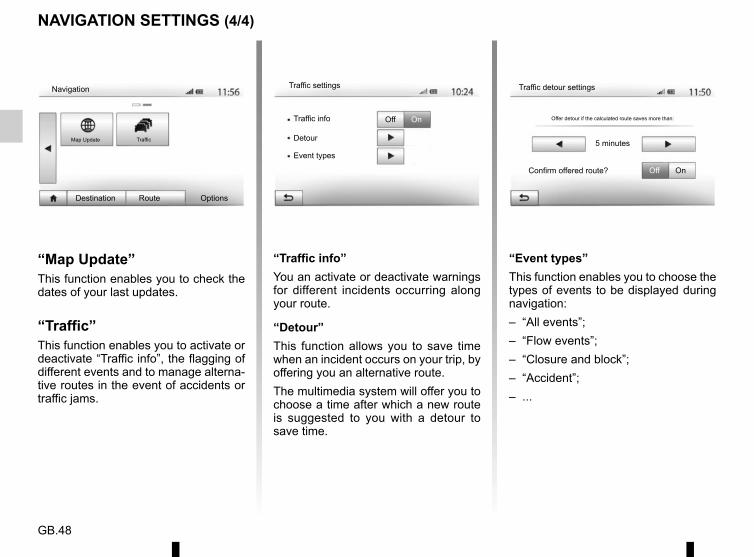
“Map Update”This function enables you to check the dates of your last updates.
“Traffic”This function enables you to activate or deactivate “Traffic info”, the flagging of different events and to manage alterna-tive routes in the event of accidents or traffic jams.
“Traffic info”You an activate or deactivate warnings for different incidents occurring along your route.
“Detour”This function allows you to save time when an incident occurs on your trip, by offering you an alternative route.The multimedia system will offer you to choose a time after which a new route is suggested to you with a detour to save time.
Traffic settings
Traffic info
Detour
Event types
Off On
“Event types”This function enables you to choose the types of events to be displayed during navigation:– “All events”;– “Flow events”;– “Closure and block”;– “Accident”;– ...
Navigation
Map Update Traffic
Destination Route Options
Traffic detour settings
5 minutes
Offer detour if the calculated route saves more than:
Confirm offered route? Off On
GB.49
DRIVING ECO²
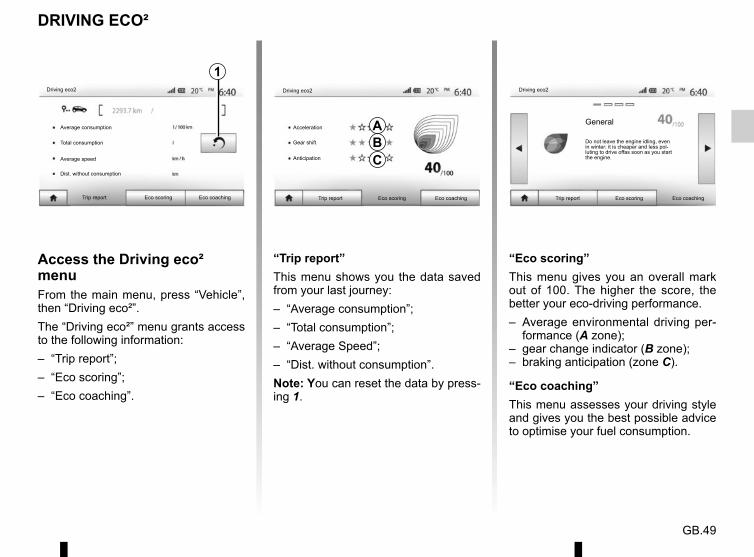
“Eco scoring”This menu gives you an overall mark out of 100. The higher the score, the better your eco-driving performance.– Average environmental driving per-
formance (A zone);– gear change indicator (B zone);– braking anticipation (zone C).
“Eco coaching”This menu assesses your driving style and gives you the best possible advice to optimise your fuel consumption.
“Trip report”This menu shows you the data saved from your last journey:– “Average consumption”;– “Total consumption”;– “Average Speed”;– “Dist. without consumption”.Note: You can reset the data by press-ing 1.
Access the Driving eco² menuFrom the main menu, press “Vehicle”, then “Driving eco²”.The “Driving eco²” menu grants access to the following information:– “Trip report”;– “Eco scoring”;– “Eco coaching”.
Acceleration
Driving eco2
Eco coaching
A
CBGear shift
Anticipation
Eco scoringTrip report
Driving eco2
Average consumption
Total consumption
Average speed
Dist. without consumption
Eco coachingEco scoringTrip report Eco coachingEco scoringTrip report
General
Do not leave the engine idling, even in winter: it is cheaper and less pol-luting to drive offas soon as you start the engine.
1Driving eco2
GB.50
Pairing another phone Bluetooth®To use your hands-free phone system, you must pair your Bluetooth® mobile to your vehicle before using it for the first time.Pairing will enable the system to rec-ognise and store a Bluetooth® phone. You can pair up to five phones, but only one can be connected at a time to the hands-free system.Pairing is carried out directly via the multimedia system or via your phone.The system and your phone must be switched on and make sure that the Bluetooth® on your mobile is activated, visible and identifiable to other devices (please refer to the instructions for your phone for further information).
PAIRING, UNPAIRING BLUETOOTH® DEVICES (1/3)
Audio Display Bluetooth System
Bluetooth Settings
View Bluetooth device list
Search for Bluetooth device
External device authorization
Change Password
Depending on the brand and model of your phone, the hands-free func-tions may be partially or fully incom-patible with your vehicle system.
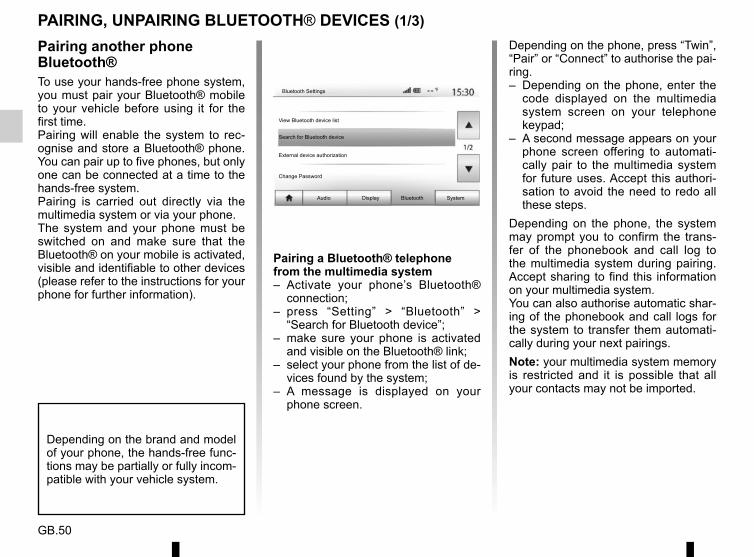
Pairing a Bluetooth® telephone from the multimedia system– Activate your phone’s Bluetooth®
connection;– press “Setting” > “Bluetooth” >
“Search for Bluetooth device”;– make sure your phone is activated
and visible on the Bluetooth® link;– select your phone from the list of de-
vices found by the system;– A message is displayed on your
phone screen.
Depending on the phone, press “Twin”, “Pair” or “Connect” to authorise the pai-ring.– Depending on the phone, enter the
code displayed on the multimedia system screen on your telephone keypad;
– A second message appears on your phone screen offering to automati-cally pair to the multimedia system for future uses. Accept this authori-sation to avoid the need to redo all these steps.
Depending on the phone, the system may prompt you to confirm the trans-fer of the phonebook and call log to the multimedia system during pairing. Accept sharing to find this information on your multimedia system.You can also authorise automatic shar-ing of the phonebook and call logs for the system to transfer them automati-cally during your next pairings.Note: your multimedia system memory is restricted and it is possible that all your contacts may not be imported.
GB.51
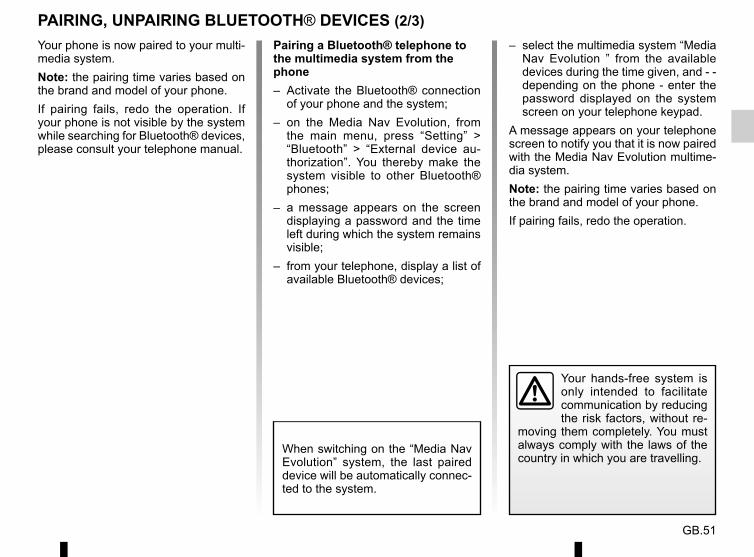
– select the multimedia system “Media Nav Evolution ” from the available devices during the time given, and - -depending on the phone - enter the password displayed on the system screen on your telephone keypad.
A message appears on your telephone screen to notify you that it is now paired with the Media Nav Evolution multime-dia system.Note: the pairing time varies based on the brand and model of your phone.If pairing fails, redo the operation.
PAIRING, UNPAIRING BLUETOOTH® DEVICES (2/3)Pairing a Bluetooth® telephone to the multimedia system from the phone– Activate the Bluetooth® connection
of your phone and the system;– on the Media Nav Evolution, from
the main menu, press “Setting” > “Bluetooth” > “External device au-thorization”. You thereby make the system visible to other Bluetooth® phones;
– a message appears on the screen displaying a password and the time left during which the system remains visible;
– from your telephone, display a list of available Bluetooth® devices;
When switching on the “Media Nav Evolution” system, the last paired device will be automatically connec-ted to the system.
Your hands-free system is only intended to facilitate communication by reducing the risk factors, without re-
moving them completely. You must always comply with the laws of the country in which you are travelling.
Your phone is now paired to your multi-media system.Note: the pairing time varies based on the brand and model of your phone.If pairing fails, redo the operation. If your phone is not visible by the system while searching for Bluetooth® devices, please consult your telephone manual.

GB.52
Unpairing a Bluetooth® phone from the Media Nav Evolution systemUnpairing erases a phone from the hands-free system memory.From the main menu, press “Setting” > “Bluetooth”, then “View Bluetooth device list”. Press the “recycle bin” icon 2 opposite the name of the phone you wish to delete from the list. Confirm your choice by pressing “OK”.
Unpairing all Bluetooth® phones from the Media Nav Evolution systemYou can also delete all phones pre-viously paired from the hands-free system memory. From the main menu, press “Setting” > “Bluetooth” > “View Bluetooth device list” then “Options” and “Delete all”. Confirm the deletion of all paired phones by pressing “OK”.
Audio Display Bluetooth System
Bluetooth Settings
View Bluetooth device list
Search for Bluetooth device
External device authorization
Change passkey
Bluetooth Devices
Info 2_3Gr
Seungyeon_VU2
Seungyeon_3
2
“Change passkey”You can customise the four-digit pass-word for the system authorising the pairing of Bluetooth® phones.From the main menu, press “Setting” > “Bluetooth” > “Change passkey”.
Options
“Smartphone”This function available on the second page of the “Bluetooth” menu enables you to access assistance with acti-vating and operating voice controls (please refer to the section on “Using voice controls”).
PAIRING, UNPAIRING BLUETOOTH® DEVICES (3/3)
GB.53
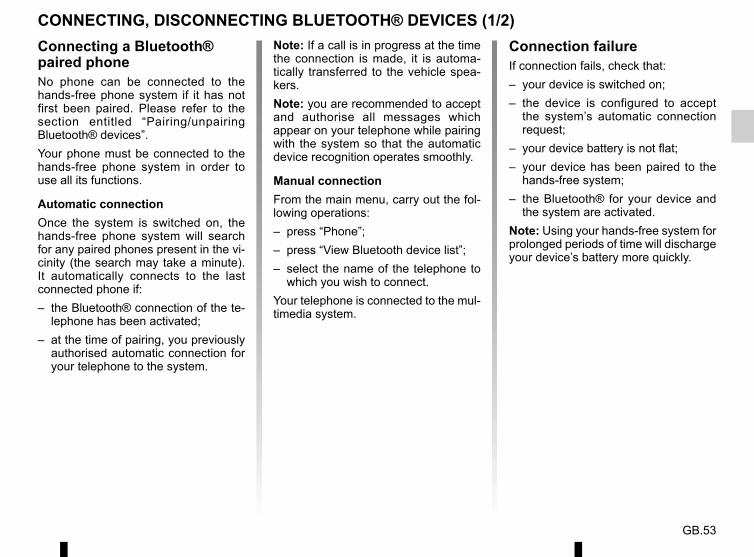
CONNECTING, DISCONNECTING BLUETOOTH® DEVICES (1/2)Note: If a call is in progress at the time the connection is made, it is automa-tically transferred to the vehicle spea-kers.Note: you are recommended to accept and authorise all messages which appear on your telephone while pairing with the system so that the automatic device recognition operates smoothly.
Manual connectionFrom the main menu, carry out the fol-lowing operations:– press “Phone”;– press “View Bluetooth device list”;– select the name of the telephone to
which you wish to connect.Your telephone is connected to the mul-timedia system.
Connection failureIf connection fails, check that:– your device is switched on;– the device is configured to accept
the system’s automatic connection request;
– your device battery is not flat;– your device has been paired to the
hands-free system;– the Bluetooth® for your device and
the system are activated.Note: Using your hands-free system for prolonged periods of time will discharge your device’s battery more quickly.
Connecting a Bluetooth® paired phoneNo phone can be connected to the hands-free phone system if it has not first been paired. Please refer to the section entitled “Pairing/unpairing Bluetooth® devices”.Your phone must be connected to the hands-free phone system in order to use all its functions.
Automatic connectionOnce the system is switched on, the hands-free phone system will search for any paired phones present in the vi-cinity (the search may take a minute). It automatically connects to the last connected phone if:– the Bluetooth® connection of the te-
lephone has been activated;– at the time of pairing, you previously
authorised automatic connection for your telephone to the system.
GB.54
CONNECTING, DISCONNECTING BLUETOOTH® DEVICES (2/2)
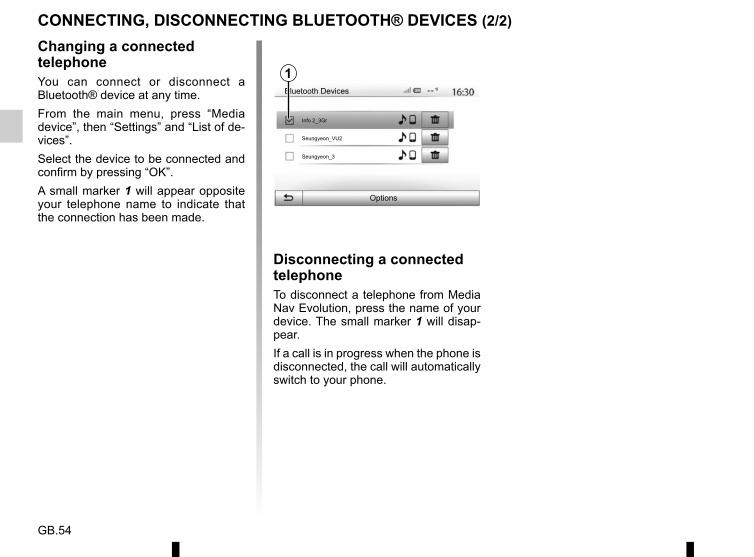
Disconnecting a connected telephoneTo disconnect a telephone from Media Nav Evolution, press the name of your device. The small marker 1 will disap-pear.If a call is in progress when the phone is disconnected, the call will automatically switch to your phone.
Info 2_3Gr
Seungyeon_VU2
Seungyeon_3
Changing a connected telephoneYou can connect or disconnect a Bluetooth® device at any time.From the main menu, press “Media device”, then “Settings” and “List of de-vices”.Select the device to be connected and confirm by pressing “OK”.A small marker 1 will appear opposite your telephone name to indicate that the connection has been made.
Options
Bluetooth Devices
1
GB.55
USING VOICE RECOGNITION (1/3)
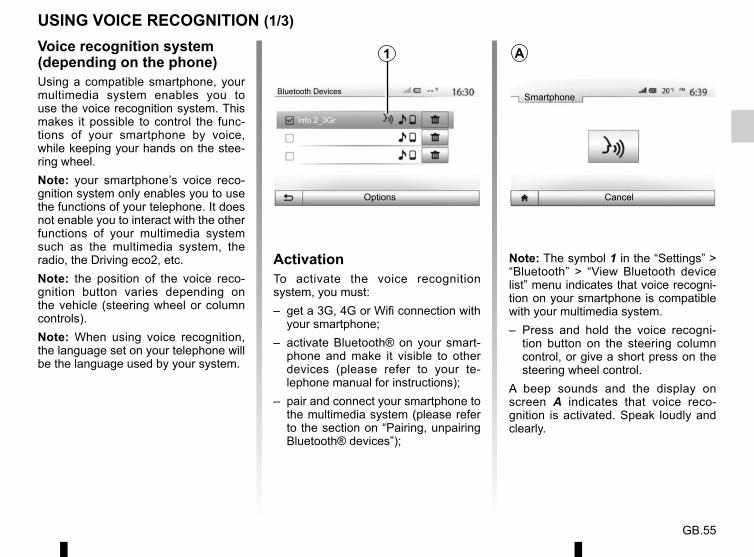
Voice recognition system (depending on the phone)Using a compatible smartphone, your multimedia system enables you to use the voice recognition system. This makes it possible to control the func-tions of your smartphone by voice, while keeping your hands on the stee-ring wheel.Note: your smartphone’s voice reco-gnition system only enables you to use the functions of your telephone. It does not enable you to interact with the other functions of your multimedia system such as the multimedia system, the radio, the Driving eco2, etc.Note: the position of the voice reco-gnition button varies depending on the vehicle (steering wheel or column controls).Note: When using voice recognition, the language set on your telephone will be the language used by your system.
Note: The symbol 1 in the “Settings” > “Bluetooth” > “View Bluetooth device list” menu indicates that voice recogni-tion on your smartphone is compatible with your multimedia system.– Press and hold the voice recogni-
tion button on the steering column control, or give a short press on the steering wheel control.
A beep sounds and the display on screen A indicates that voice reco-gnition is activated. Speak loudly and clearly.
1
Options
Bluetooth Devices
Info 2_3Gr
ActivationTo activate the voice recognition system, you must:– get a 3G, 4G or Wifi connection with
your smartphone;– activate Bluetooth® on your smart-
phone and make it visible to other devices (please refer to your te-lephone manual for instructions);
– pair and connect your smartphone to the multimedia system (please refer to the section on “Pairing, unpairing Bluetooth® devices”);
Smartphone
Cancel
A

GB.56
USING VOICE RECOGNITION (2/3)
DeactivationGive a long press on the voice recogni-tion button on screen B, on the steering wheel button or the steering column button.Note: if you try to use the voice reco-gnition system using the button on the steering wheel or steering column of your vehicle with a smartphone cur-rently paired and where the latter does not have this function, a message will be displayed on the multimedia system screen to notify you.
Cancel
3
Smartphone
UseOnce activated, to use voice recogni-tion, give a short press on the steering wheel button or steering column button of your vehicle, or a short press on button 3 on the Media-Nav touchs-creen. You can go back to the main menu by pressing 2 at any time.Note: When using voice recognition, the “Media” and “Radio” functions will not be available or accessible through the main menu of your multimedia system.
2
To return to screen B, press 4 in the main menu of your multimedia system.
B
SmartphoneMediaRadio
Driving eco 2 Nav Setting
Set Time
Dark
4
Voice Recognition not supported on this Bluetooth device
Dark
OK
Smartphone
GB.57
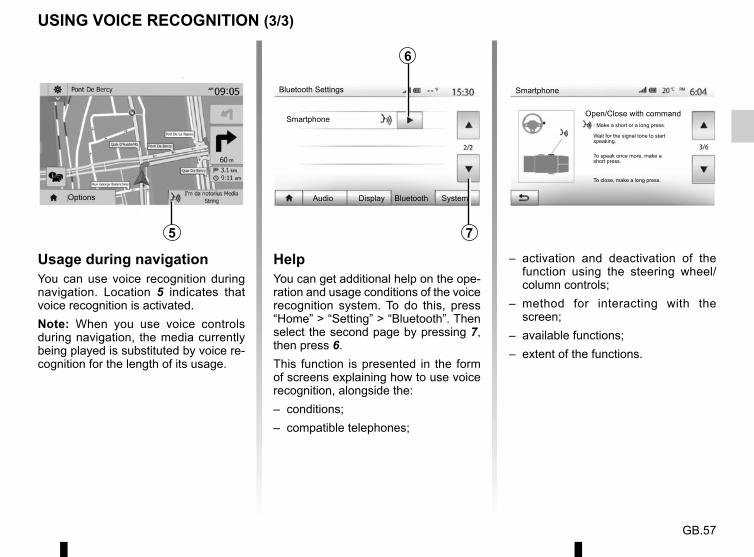
HelpYou can get additional help on the ope-ration and usage conditions of the voice recognition system. To do this, press “Home” > “Setting” > “Bluetooth”. Then select the second page by pressing 7, then press 6. This function is presented in the form of screens explaining how to use voice recognition, alongside the:– conditions;– compatible telephones;
6
Usage during navigationYou can use voice recognition during navigation. Location 5 indicates that voice recognition is activated. Note: When you use voice controls during navigation, the media currently being played is substituted by voice re-cognition for the length of its usage.
5
USING VOICE RECOGNITION (3/3)
Options
Smartphone
Bluetooth Settings
Audio Display Bluetooth System
7
Smartphone
Open/Close with command: Make a short or a long press.
Wait for the signal tone to start speaking.
To speak once more, make a short press.
To close, make a long press.
– activation and deactivation of the function using the steering wheel/column controls;
– method for interacting with the screen;
– available functions;– extent of the functions.
GB.58
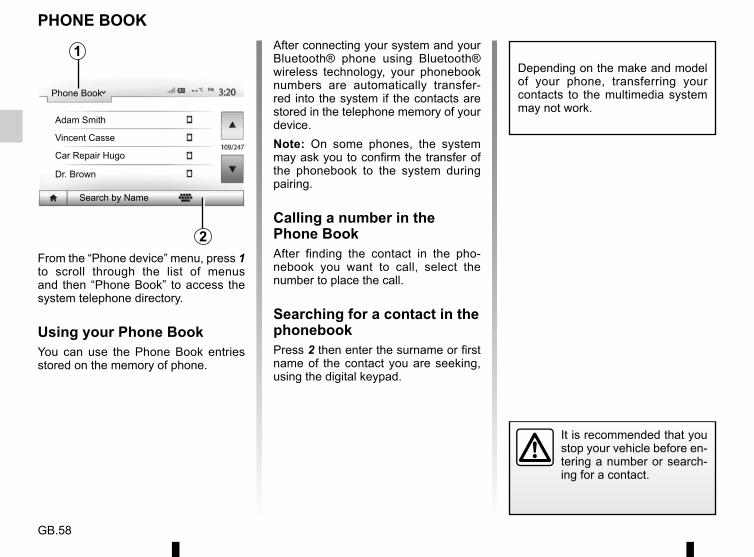
From the “Phone device” menu, press 1 to scroll through the list of menus and then “Phone Book” to access the system telephone directory.
Using your Phone BookYou can use the Phone Book entries stored on the memory of phone.
It is recommended that you stop your vehicle before en-tering a number or search-ing for a contact.
PHONE BOOKAfter connecting your system and your Bluetooth® phone using Bluetooth® wireless technology, your phonebook numbers are automatically transfer-red into the system if the contacts are stored in the telephone memory of your device.Note: On some phones, the system may ask you to confirm the transfer of the phonebook to the system during pairing.
Calling a number in the Phone BookAfter finding the contact in the pho-nebook you want to call, select the number to place the call.
Searching for a contact in the phonebookPress 2 then enter the surname or first name of the contact you are seeking, using the digital keypad.
1
2
Phone Book
Search by Name
Adam Smith
Vincent Casse
Car Repair Hugo
Dr. Brown
Depending on the make and model of your phone, transferring your contacts to the multimedia system may not work.

GB.59
Making a call from the phonebookWith the telephone connected, from the “Phone device” menu, select “Phone Book” from drop-down menu “1”.Select the contact (or the suitable number of the contact has more than one). The call is made automatically by pressing the contact’s number.Note: you can make a call from the multimedia system using the voice re-cognition from your smartphone. Refer to the Section entitled “Using voice re-cognition”.
Press 1 to scroll the list and then press “Calling Lists”.Press 6 to access to the list of All Calls.Press 5 to access the list of Outgoing Calls.Press 4 to access the list of Incoming Calls.Press 3 to access the list of Missed Calls.Note: The marker 2 indicates the number of missed calls.For each list, the contacts are listed from the most recent to the oldest. Select a contact to make the call.
MAKING, RECEIVING A CALL (1/3)
1
6 5 4 3
Calling Lists
All
Dialling a number from the call historyYou can use the call list stored on the phone memory to make a call.After connecting your unit and Bluetooth® phone via Bluetooth® wi-reless technology, the numbers in your phone's “All Calls”, “Outgoing Calls”, “Incoming Calls”, and “Missed Calls” lists are transferred automatically into the call list on your multimedia system.
2
Close
Adam Smith
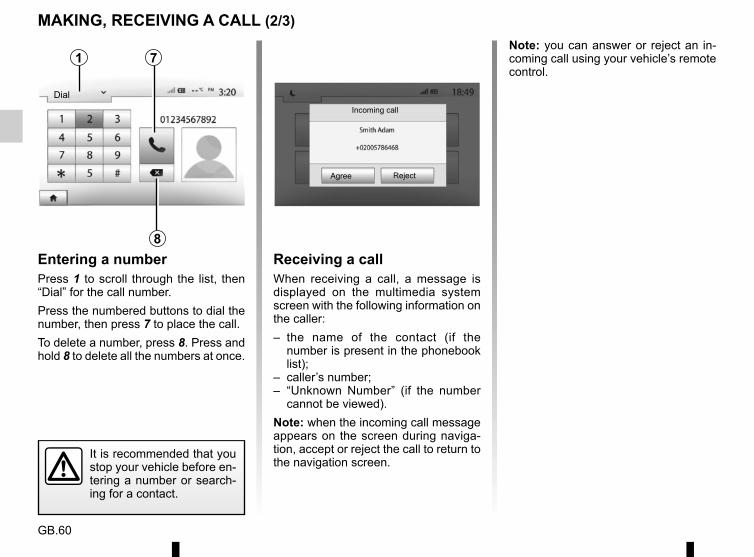
GB.60
MAKING, RECEIVING A CALL (2/3)
8
Dial
7
Entering a numberPress 1 to scroll through the list, then “Dial” for the call number.Press the numbered buttons to dial the number, then press 7 to place the call.To delete a number, press 8. Press and hold 8 to delete all the numbers at once.
It is recommended that you stop your vehicle before en-tering a number or search-ing for a contact.
1
Incoming call
Agree Reject
Receiving a callWhen receiving a call, a message is displayed on the multimedia system screen with the following information on the caller:– the name of the contact (if the
number is present in the phonebook list);
– caller’s number;– “Unknown Number” (if the number
cannot be viewed).Note: when the incoming call message appears on the screen during naviga-tion, accept or reject the call to return to the navigation screen.
Note: you can answer or reject an in-coming call using your vehicle’s remote control.
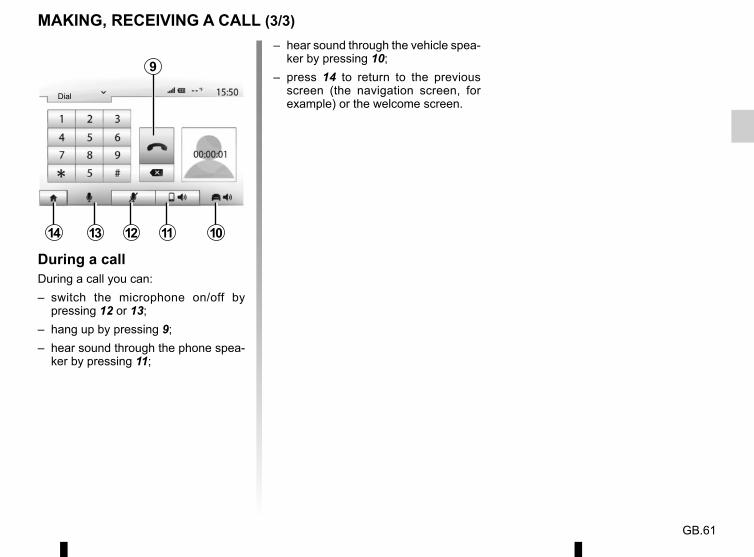
GB.61
13 12 11 10
Dial
9
14
MAKING, RECEIVING A CALL (3/3)
During a callDuring a call you can:– switch the microphone on/off by
pressing 12 or 13;– hang up by pressing 9;– hear sound through the phone spea-
ker by pressing 11;
– hear sound through the vehicle spea-ker by pressing 10;
– press 14 to return to the previous screen (the navigation screen, for example) or the welcome screen.
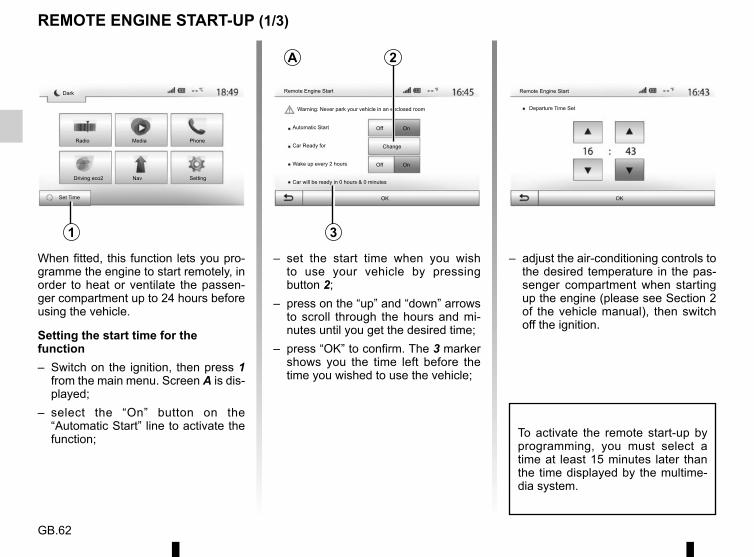
GB.62
– adjust the air-conditioning controls to the desired temperature in the pas-senger compartment when starting up the engine (please see Section 2 of the vehicle manual), then switch off the ignition.
REMOTE ENGINE START-UP (1/3)
Remote Engine Start
Warning: Never park your vehicle in an enclosed room
Automatic Start
Car Ready for
Wake up every 2 hours
Car will be ready in 0 hours & 0 minutes
Off On
Off On
Change
OKSet Time
Dark
Radio Media Phone
SettingNavDriving eco2
1
2A
3
Departure Time Set
Remote Engine Start
OK
When fitted, this function lets you pro-gramme the engine to start remotely, in order to heat or ventilate the passen-ger compartment up to 24 hours before using the vehicle.
Setting the start time for the function– Switch on the ignition, then press 1
from the main menu. Screen A is dis-played;
– select the “On” button on the “Automatic Start” line to activate the function;
– set the start time when you wish to use your vehicle by pressing button 2;
– press on the “up” and “down” arrows to scroll through the hours and mi-nutes until you get the desired time;
– press “OK” to confirm. The 3 marker shows you the time left before the time you wished to use the vehicle;
To activate the remote start-up by programming, you must select a time at least 15 minutes later than the time displayed by the multime-dia system.

GB.63
11:05 AM
REMOTE ENGINE START-UP (2/3)
The remote engine start-up operates if:– the lever is in neutral for vehicles
with a manual or sequential gearbox;– the lever is in position P for vehicles
with an automatic gearbox;– the ignition is switched off;– all the opening elements (bonnet,
doors, boot) are closed and locked when you leave the vehicle.
“Wake up every 2 hours”This function enables your vehicle to start automatically every two hours if the exterior temperature is below -5 °C. To activate this function, the ventilation system must be off. When this func-tion is activated, the ventilation system does not operate.In very cold conditions, the vehicle will start automatically and will stay on for approximately ten minutes before switching off.
Remote Engine Start
Warning: Never park your vehicle in an enclosed room
Automatic Start
Car Ready for
Wake up every 2 hours
Car will be ready in 0 hours & 0 minutes
Off On
Off On
Change
OK
If the exterior temperature does not drop below -5°C, the vehicle will not restart automatically and will go on standby for two hours before analysing the exterior temperature. The engine will restart if the exterior temperature is below -5°C.Approximately fifteen minutes before the programmed time, the engine starts and remains on for about ten minutes.Press “On” to activate this function or “Off” to deactivate it.Note: When you have activated and set the time at which you want to use your vehicle and leave, marker 4 will remind you of the vehicle departure time that you set previously.
Dark
Radio Media Phone
SettingNavDriving eco2
4

GB.64
Do not park the vehicle or run the engine in locations where combustible sub-stances or materials such
as grass or leaves can come into contact with the hot exhaust system.
REMOTE ENGINE START-UP (3/3)
In extreme conditions, the remote start-up by programming may not work.
Special feature on vehicles equipped with the “Wake up every 2 hours” function.It is imperative that the vehicle is driven for at least 10 minutes be-tween each use of the function. Risk of engine oil wear.
Driver’s responsibility when parking or stopping the vehicleNever leave an animal,
child or adult who is not self-suffi-cient alone on your vehicle, even for a short time. They may put them-selves or others at risk, for example by starting the engine, switching on equipment such as the electric win-dows or by locking the doors etc. Also, in hot and/or sunny weather, please remember that the tempera-ture inside the passenger compart-ment increases very quickly.RISK OF DEATH OR SERIOUS INJURY.
Do not use the engine remote start-up function or its programming when:– the vehicle is in a garage
or in a confined space.Risk of poisoning or suffoca-tion by exhaust gas emissions.
– the vehicle is covered with a pro-tective cover.Fire hazard.
– the bonnet is open or before it opens.Risk of burns or serious injury.
Depending on the country, the use of the remote starting func-tion or its programming can be prohibited by the legislation and/or the regulations in force.Before using this function, check the legislation and/or the regula-tions for the country in force.
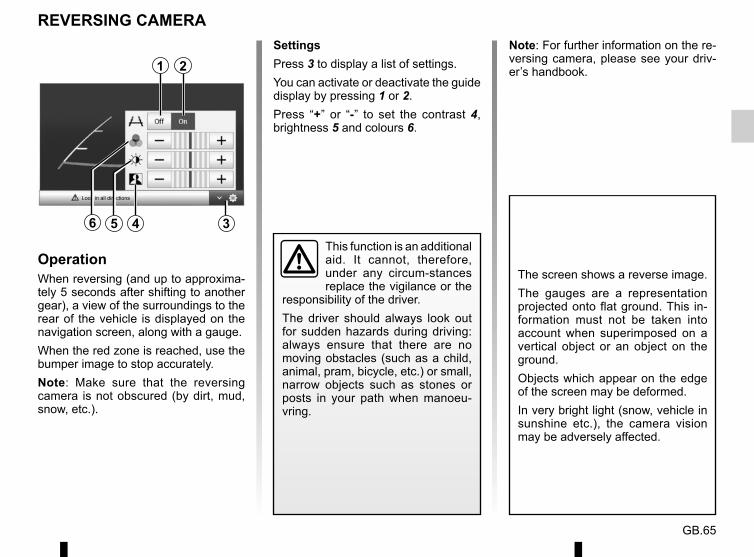
GB.65
Note: For further information on the re-versing camera, please see your driv-er’s handbook.
OperationWhen reversing (and up to approxima-tely 5 seconds after shifting to another gear), a view of the surroundings to the rear of the vehicle is displayed on the navigation screen, along with a gauge.When the red zone is reached, use the bumper image to stop accurately.Note: Make sure that the reversing camera is not obscured (by dirt, mud, snow, etc.).
SettingsPress 3 to display a list of settings.You can activate or deactivate the guide display by pressing 1 or 2.Press “+” or “-” to set the contrast 4, brightness 5 and colours 6.
REVERSING CAMERA
1 2
This function is an additional aid. It cannot, therefore, under any circum-stances replace the vigilance or the
responsibility of the driver.The driver should always look out for sudden hazards during driving: always ensure that there are no moving obstacles (such as a child, animal, pram, bicycle, etc.) or small, narrow objects such as stones or posts in your path when manoeu-vring.
The screen shows a reverse image.The gauges are a representation projected onto flat ground. This in-formation must not be taken into account when superimposed on a vertical object or an object on the ground.Objects which appear on the edge of the screen may be deformed.In very bright light (snow, vehicle in sunshine etc.), the camera vision may be adversely affected.
Look in all directions
56 4 3
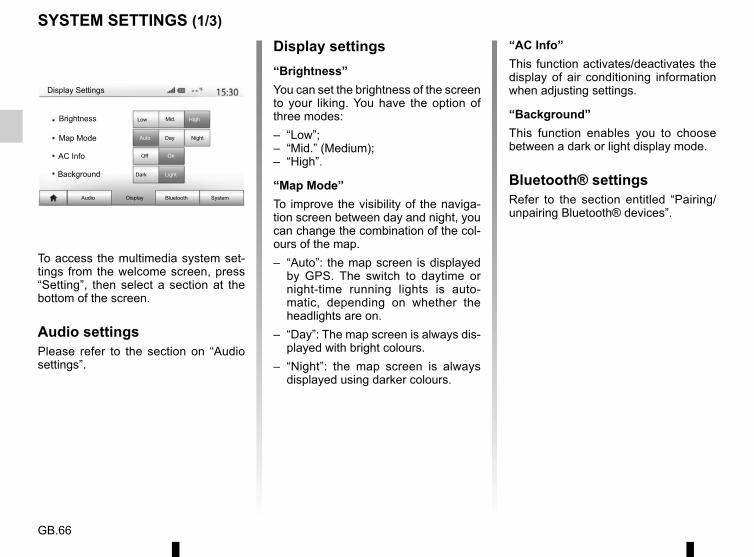
GB.66
SYSTEM SETTINGS (1/3)
To access the multimedia system set-tings from the welcome screen, press “Setting”, then select a section at the bottom of the screen.
Audio settingsPlease refer to the section on “Audio settings”.
Display settings“Brightness”You can set the brightness of the screen to your liking. You have the option of three modes:– “Low”;– “Mid.” (Medium);– “High”.
“Map Mode”To improve the visibility of the naviga-tion screen between day and night, you can change the combination of the col-ours of the map.– “Auto”: the map screen is displayed
by GPS. The switch to daytime or night-time running lights is auto-matic, depending on whether the headlights are on.
– “Day”: The map screen is always dis-played with bright colours.
– “Night”: the map screen is always displayed using darker colours.
“AC Info”This function activates/deactivates the display of air conditioning information when adjusting settings.
“Background”This function enables you to choose between a dark or light display mode.
Bluetooth® settingsRefer to the section entitled “Pairing/unpairing Bluetooth® devices”.
Display Settings
Brightness
Map Mode
Audio Display Bluetooth System
Low Mid. High
Auto Day Night
AC Info Off On
Background Dark Light
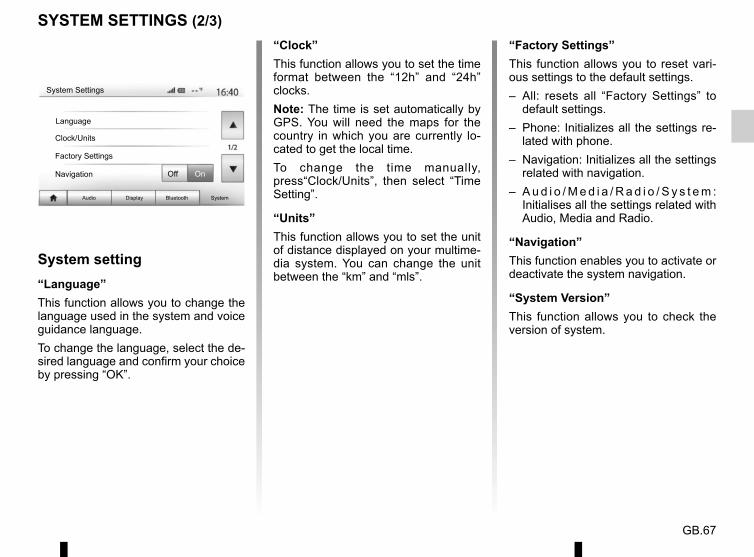
GB.67
SYSTEM SETTINGS (2/3)
Audio Display Bluetooth System
System Settings
Language
Clock/Units
Factory Settings
Navigation Off On
“Clock”This function allows you to set the time format between the “12h” and “24h” clocks.Note: The time is set automatically by GPS. You will need the maps for the country in which you are currently lo-cated to get the local time.To change the time manually, press“Clock/Units”, then select “Time Setting”.
“Units”This function allows you to set the unit of distance displayed on your multime-dia system. You can change the unit between the “km” and “mls”.
System setting“Language”This function allows you to change the language used in the system and voice guidance language.To change the language, select the de-sired language and confirm your choice by pressing “OK”.
“Factory Settings”This function allows you to reset vari-ous settings to the default settings.– All: resets all “Factory Settings” to
default settings.– Phone: Initializes all the settings re-
lated with phone.– Navigation: Initializes all the settings
related with navigation.– A u d i o / M e d i a / R a d i o / S y s t e m :
Initialises all the settings related with Audio, Media and Radio.
“Navigation”This function enables you to activate or deactivate the system navigation.
“System Version”This function allows you to check the version of system.
GB.68
SYSTEM SETTINGS (3/3)
Security codeYour audio system is protected by a se-curity code (supplied by the Approved Dealer). This is used to electronically lock the audio system when the power is cut (battery disconnected, system disconnected, fuse blown etc.).To operate the audio system, you must enter the secret four-digit code.Make a note of the code and keep it in a safe place. Contact one of the manu-facturer’s agents if you lose it.
Entering the codeThe message “CODE” followed by four empty spaces and a numerical keypad are displayed.Enter the corresponding code using the digital keypad, then press “OK” to con-firm.
Entering the code incorrectlyIf the code is entered incorrectly, the message “Incorrect PIN The system is locked” is displayed.Wait one minute and then re-enter the code.Each time the code is entered incor-rectly, the time required before the code can be re-entered is doubled.
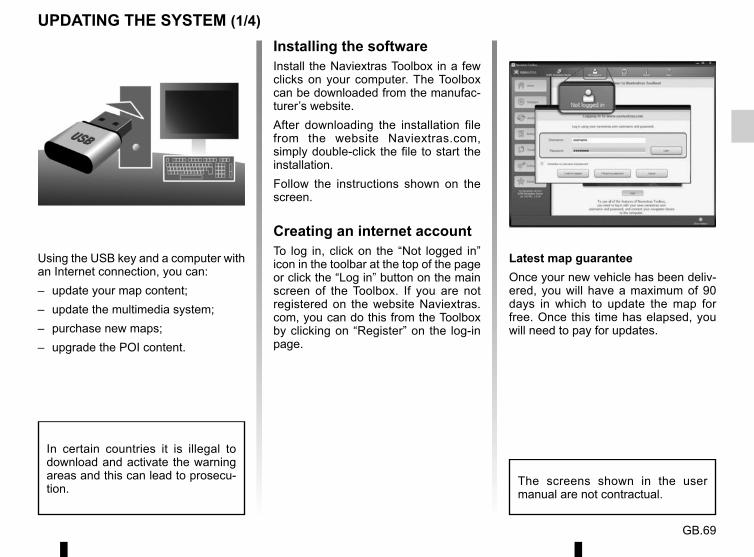
GB.69
UPDATING THE SYSTEM (1/4)
Using the USB key and a computer with an Internet connection, you can:– update your map content;– update the multimedia system;– purchase new maps;– upgrade the POI content.
Installing the softwareInstall the Naviextras Toolbox in a few clicks on your computer. The Toolbox can be downloaded from the manufac-turer’s website.After downloading the installation file from the website Naviextras.com, simply double-click the file to start the installation.Follow the instructions shown on the screen.
Creating an internet accountTo log in, click on the “Not logged in” icon in the toolbar at the top of the page or click the “Log in” button on the main screen of the Toolbox. If you are not registered on the website Naviextras.com, you can do this from the Toolbox by clicking on “Register” on the log-in page.
The screens shown in the user manual are not contractual.
In certain countries it is illegal to download and activate the warning areas and this can lead to prosecu-tion.
Latest map guaranteeOnce your new vehicle has been deliv-ered, you will have a maximum of 90 days in which to update the map for free. Once this time has elapsed, you will need to pay for updates.
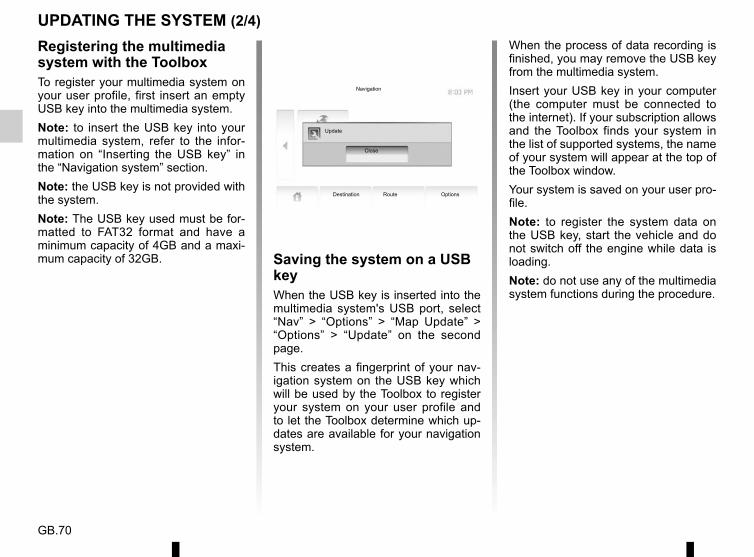
GB.70
UPDATING THE SYSTEM (2/4)When the process of data recording is finished, you may remove the USB key from the multimedia system.Insert your USB key in your computer (the computer must be connected to the internet). If your subscription allows and the Toolbox finds your system in the list of supported systems, the name of your system will appear at the top of the Toolbox window.Your system is saved on your user pro-file.Note: to register the system data on the USB key, start the vehicle and do not switch off the engine while data is loading.Note: do not use any of the multimedia system functions during the procedure.
Saving the system on a USB keyWhen the USB key is inserted into the multimedia system's USB port, select “Nav” > “Options” > “Map Update” > “Options” > “Update” on the second page.This creates a fingerprint of your nav-igation system on the USB key which will be used by the Toolbox to register your system on your user profile and to let the Toolbox determine which up-dates are available for your navigation system.
Update
Close
Navigation
Destination Route Options
Registering the multimedia system with the ToolboxTo register your multimedia system on your user profile, first insert an empty USB key into the multimedia system.Note: to insert the USB key into your multimedia system, refer to the infor-mation on “Inserting the USB key” in the “Navigation system” section.Note: the USB key is not provided with the system.Note: The USB key used must be for-matted to FAT32 format and have a minimum capacity of 4GB and a maxi-mum capacity of 32GB.
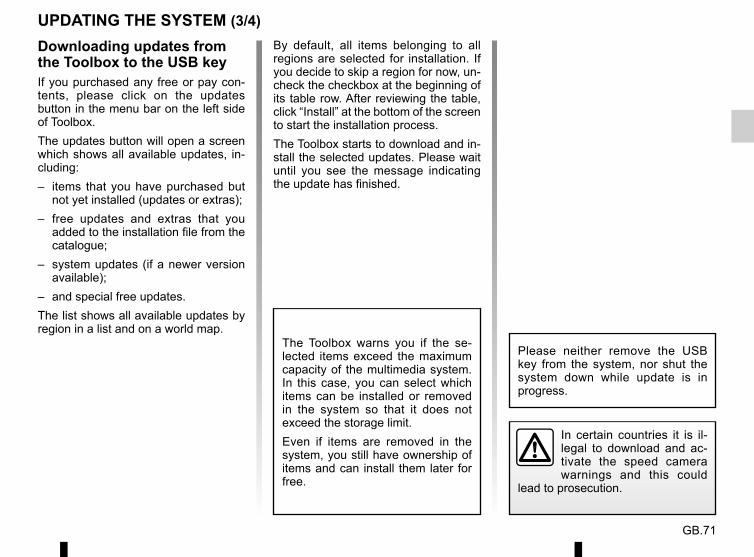
GB.71
By default, all items belonging to all regions are selected for installation. If you decide to skip a region for now, un-check the checkbox at the beginning of its table row. After reviewing the table, click “Install” at the bottom of the screen to start the installation process.The Toolbox starts to download and in-stall the selected updates. Please wait until you see the message indicating the update has finished.
Downloading updates from the Toolbox to the USB keyIf you purchased any free or pay con-tents, please click on the updates button in the menu bar on the left side of Toolbox. The updates button will open a screen which shows all available updates, in-cluding:– items that you have purchased but
not yet installed (updates or extras); – free updates and extras that you
added to the installation file from the catalogue;
– system updates (if a newer version available);
– and special free updates. The list shows all available updates by region in a list and on a world map.
UPDATING THE SYSTEM (3/4)
In certain countries it is il-legal to download and ac-tivate the speed camera warnings and this could
lead to prosecution.
Please neither remove the USB key from the system, nor shut the system down while update is in progress.
The Toolbox warns you if the se-lected items exceed the maximum capacity of the multimedia system. In this case, you can select which items can be installed or removed in the system so that it does not exceed the storage limit.Even if items are removed in the system, you still have ownership of items and can install them later for free.

GB.72
– The screen A is displayed automati-cally once the USB key is connected;
– press 2 to run the update;– previous 1 to go back to the previous
screen.When you press the button 2, the update procedure is launched. Do not use any of the system functions during the update procedure.
Updating the system and mapWhen the process of downloading is completed, the USB key can be re-moved from the computer. Insert the USB key into the USB port of the vehi-cle's multimedia system.Note: to update maps, start the vehicle and do not switch off the engine while data is loading.When the multimedia system is turned on, it automatically identifies the avail-able updates on the USB key, and offers to update the system or map from the updates found on the USB key. Do not switch off your multimedia system while the update is being installed.Note: downloading and installing a system update is only possible if there is a newer version available.
UPDATING THE SYSTEM (4/4)
A
1 2
Update Info
Current Software Info
Old version.
New Software Info
New version.
Update
When the update is completed, the multimedia system restarts with all new and up-to-date functionality.
LicenceTo obtain the GPL, LGPL, MPL and other open source licence source codes in this product, please visit the http://opensource.lge.com website.As well as the source code all the terms of the licence, warranty exclusions and copyright details are available for download.LG Electronics will also provide you with Open Source code on a CD-ROM against payment of distribution costs (such as media, shipping and han-dling costs) on request by post to [email protected] offer is valid for three years as of the date on which you purchased the product.
If the update is accidentally inter-rupted, restart the process from the beginning.
The multimedia system might restart automatically during the update process. Please wait for the radio screen to be displayed.
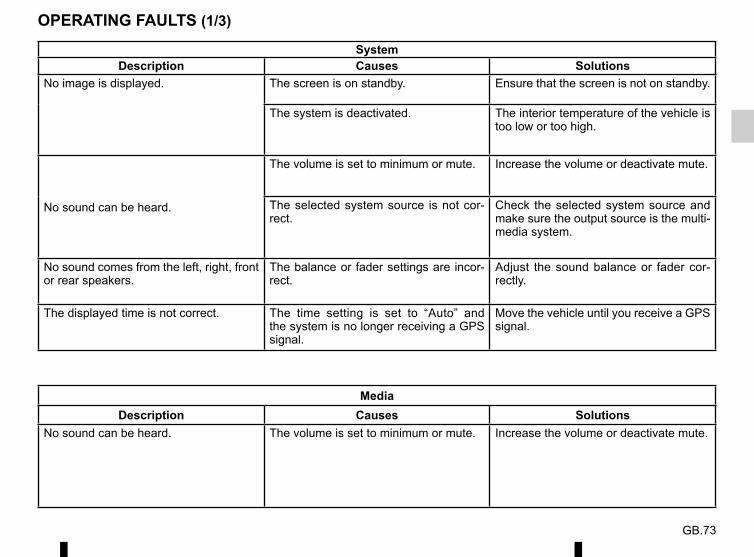
GB.73
OPERATING FAULTS (1/3)
SystemDescription Causes Solutions
No image is displayed. The screen is on standby. Ensure that the screen is not on standby.
The system is deactivated. The interior temperature of the vehicle is too low or too high.
No sound can be heard.
The volume is set to minimum or mute. Increase the volume or deactivate mute.
The selected system source is not cor-rect.
Check the selected system source and make sure the output source is the multi-media system.
No sound comes from the left, right, front or rear speakers.
The balance or fader settings are incor-rect.
Adjust the sound balance or fader cor-rectly.
The displayed time is not correct. The time setting is set to “Auto” and the system is no longer receiving a GPS signal.
Move the vehicle until you receive a GPS signal.
MediaDescription Causes Solutions
No sound can be heard. The volume is set to minimum or mute. Increase the volume or deactivate mute.
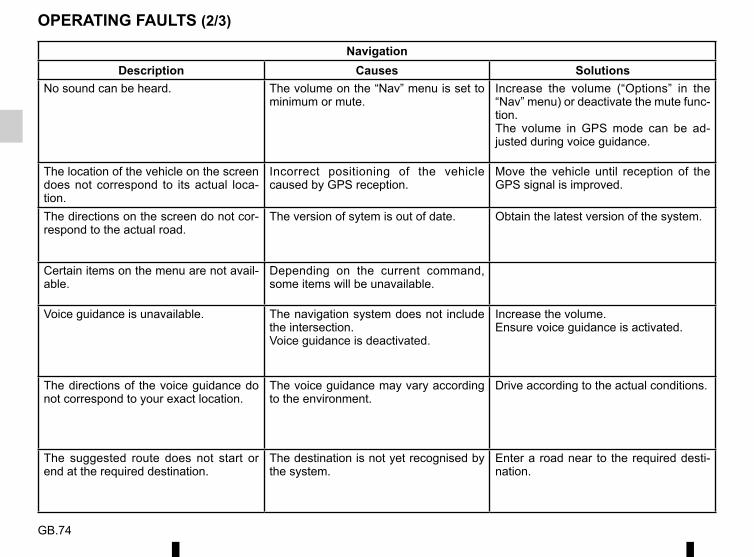
GB.74
OPERATING FAULTS (2/3)
NavigationDescription Causes Solutions
No sound can be heard. The volume on the “Nav” menu is set to minimum or mute.
Increase the volume (“Options” in the “Nav” menu) or deactivate the mute func-tion.The volume in GPS mode can be ad-justed during voice guidance.
The location of the vehicle on the screen does not correspond to its actual loca-tion.
Incorrect positioning of the vehicle caused by GPS reception.
Move the vehicle until reception of the GPS signal is improved.
The directions on the screen do not cor-respond to the actual road.
The version of sytem is out of date. Obtain the latest version of the system.
Certain items on the menu are not avail-able.
Depending on the current command, some items will be unavailable.
Voice guidance is unavailable. The navigation system does not include the intersection.Voice guidance is deactivated.
Increase the volume.Ensure voice guidance is activated.
The directions of the voice guidance do not correspond to your exact location.
The voice guidance may vary according to the environment.
Drive according to the actual conditions.
The suggested route does not start or end at the required destination.
The destination is not yet recognised by the system.
Enter a road near to the required desti-nation.
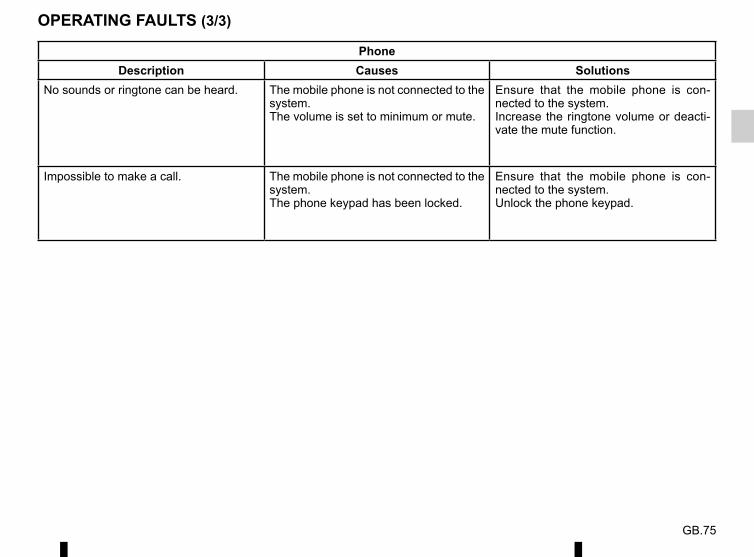
GB.75
PhoneDescription Causes Solutions
No sounds or ringtone can be heard. The mobile phone is not connected to the system.The volume is set to minimum or mute.
Ensure that the mobile phone is con-nected to the system.Increase the ringtone volume or deacti-vate the mute function.
Impossible to make a call. The mobile phone is not connected to the system.The phone keypad has been locked.
Ensure that the mobile phone is con-nected to the system.Unlock the phone keypad.
OPERATING FAULTS (3/3)
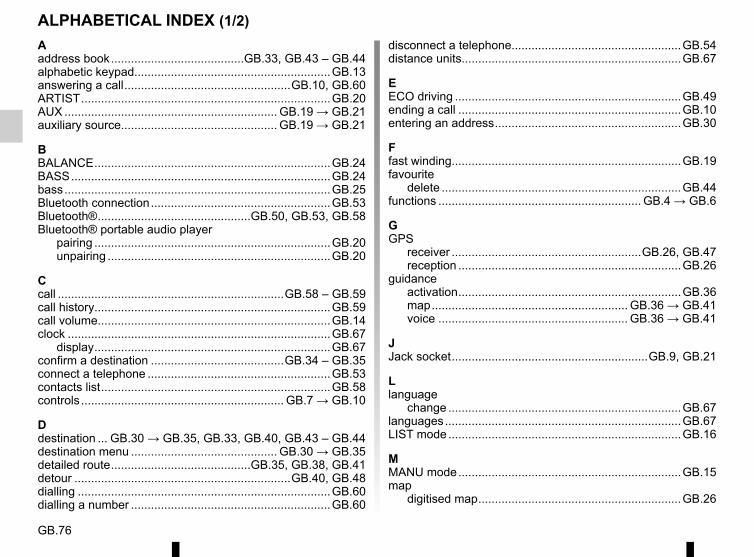
GB.76
ALPHABETICAL INDEX (1/2)Aaddress book ........................................GB.33, GB.43 – GB.44alphabetic keypad...........................................................GB.13answering a call ..................................................GB.10, GB.60ARTIST ...........................................................................GB.20AUX ................................................................ GB.19 → GB.21auxiliary source............................................... GB.19 → GB.21
BBALANCE .......................................................................GB.24BASS ..............................................................................GB.24bass ................................................................................GB.25Bluetooth connection ......................................................GB.53Bluetooth® ..............................................GB.50, GB.53, GB.58Bluetooth® portable audio player
pairing .......................................................................GB.20unpairing ...................................................................GB.20
Ccall ....................................................................GB.58 – GB.59call history.......................................................................GB.59call volume......................................................................GB.14clock ...............................................................................GB.67
display .......................................................................GB.67confirm a destination ........................................GB.34 – GB.35connect a telephone .......................................................GB.53contacts list .....................................................................GB.58controls ............................................................. GB.7 → GB.10
Ddestination ... GB.30 → GB.35, GB.33, GB.40, GB.43 – GB.44destination menu ............................................ GB.30 → GB.35detailed route ..........................................GB.35, GB.38, GB.41detour .................................................................GB.40, GB.48dialling ............................................................................GB.60dialling a number ............................................................GB.60
disconnect a telephone...................................................GB.54distance units..................................................................GB.67
EECO driving ....................................................................GB.49ending a call ...................................................................GB.10entering an address ........................................................GB.30
Ffast winding.....................................................................GB.19favourite
delete ........................................................................GB.44functions ............................................................. GB.4 → GB.6
GGPS
receiver .........................................................GB.26, GB.47reception ...................................................................GB.26
guidanceactivation ...................................................................GB.36map ........................................................... GB.36 → GB.41voice ......................................................... GB.36 → GB.41
JJack socket ...........................................................GB.9, GB.21
Llanguage
change ......................................................................GB.67languages .......................................................................GB.67LIST mode ......................................................................GB.16
MMANU mode ...................................................................GB.15map
digitised map .............................................................GB.26
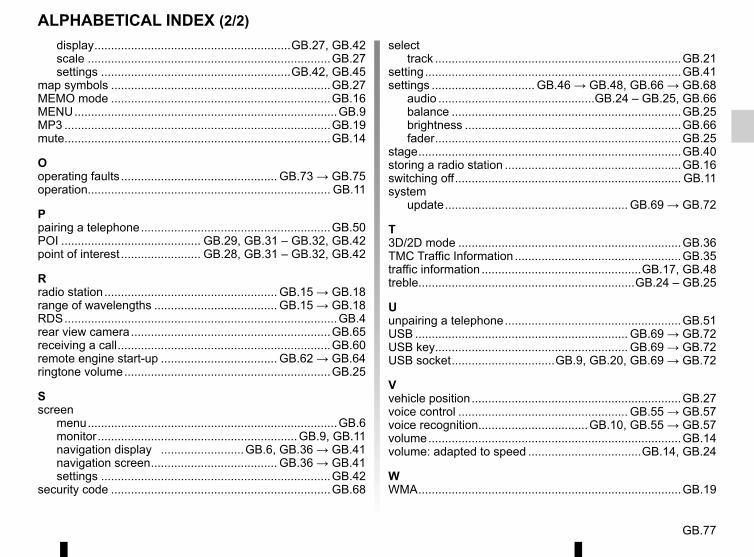
GB.77
ALPHABETICAL INDEX (2/2)display ...........................................................GB.27, GB.42scale .........................................................................GB.27settings .........................................................GB.42, GB.45
map symbols ..................................................................GB.27MEMO mode ..................................................................GB.16MENU ...............................................................................GB.9MP3 ................................................................................GB.19mute................................................................................GB.14
Ooperating faults ............................................... GB.73 → GB.75operation......................................................................... GB.11
Ppairing a telephone .........................................................GB.50POI .......................................... GB.29, GB.31 – GB.32, GB.42point of interest ........................ GB.28, GB.31 – GB.32, GB.42
Rradio station .................................................... GB.15 → GB.18range of wavelengths ..................................... GB.15 → GB.18RDS ..................................................................................GB.4rear view camera ............................................................GB.65receiving a call ................................................................GB.60remote engine start-up ................................... GB.62 → GB.64ringtone volume ..............................................................GB.25
Sscreen
menu ...........................................................................GB.6monitor ............................................................GB.9, GB.11navigation display .........................GB.6, GB.36 → GB.41navigation screen ...................................... GB.36 → GB.41settings .....................................................................GB.42
security code ..................................................................GB.68
selecttrack ..........................................................................GB.21
setting .............................................................................GB.41settings ............................... GB.46 → GB.48, GB.66 → GB.68
audio ...............................................GB.24 – GB.25, GB.66balance .....................................................................GB.25brightness .................................................................GB.66fader ..........................................................................GB.25
stage ...............................................................................GB.40storing a radio station .....................................................GB.16switching off .................................................................... GB.11system
update ....................................................... GB.69 → GB.72
T3D/2D mode ...................................................................GB.36TMC Traffic Information ..................................................GB.35traffic information ................................................GB.17, GB.48treble.................................................................GB.24 – GB.25
Uunpairing a telephone .....................................................GB.51USB ................................................................ GB.69 → GB.72USB key.......................................................... GB.69 → GB.72USB socket ...............................GB.9, GB.20, GB.69 → GB.72
Vvehicle position ...............................................................GB.27voice control ................................................... GB.55 → GB.57voice recognition.................................GB.10, GB.55 → GB.57volume ............................................................................GB.14volume: adapted to speed ..................................GB.14, GB.24
WWMA ...............................................................................GB.19


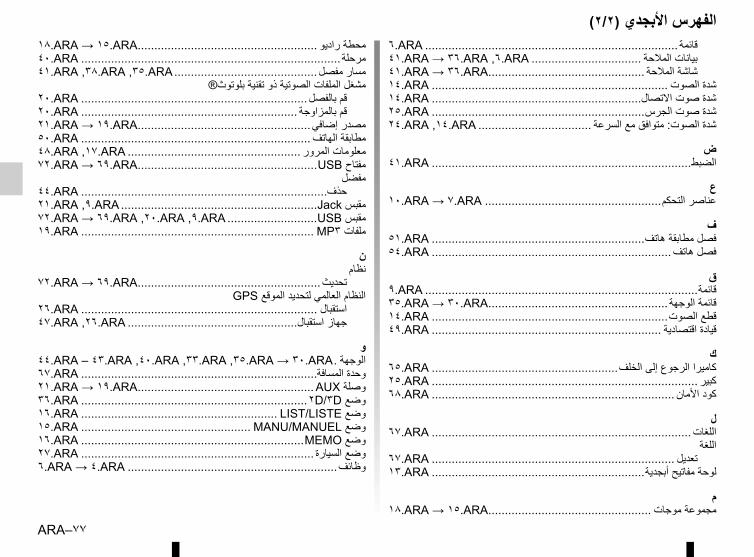
ARA–٧٧
الفهرس األبجدي (٢/٢)٦.ARA ............................................................................ قائمة٤١.ARA → ٣٦.ARA ,٦.ARA ................................. بيانات المالحة٤١.ARA → ٣٦.ARA ............................................... شاشة المالحة١٤.ARA ....................................................................... شدة الصوت١٤.ARA ...............................................................شدة صوت االتصال٢٥.ARA ................................................................شدة صوت الجرس٢٤.ARA ,١٤.ARA .................................. شدة الصوت: متوافق مع السرعة
ض٤١.ARA ..............................................................................الضبط
ع١٠.ARA → ٧.ARA .....................................................عناصر التحكم
ف٥١.ARA ................................................................فصل مطابقة هاتف٥٤.ARA ........................................................................فصل هاتف
ق٩.ARA ..................................................................................قائمة٣٥.ARA → ٣٠.ARA ...................................................... قائمة الوجهة١٤.ARA .......................................................................قطع الصوت٤٩.ARA ..................................................................... قيادة اقتصادية
ك٦٥.ARA ........................................................كاميرا الرجوع إلى الخلف٢٥.ARA ................................................................................ كبير٦٨.ARA .........................................................................كود األمان
ل٦٧.ARA ..............................................................................اللغات
اللغة٦٧.ARA ......................................................................... تعديل١٣.ARA ................................................................لوحة مفاتيح أبجدية
م١٨.ARA → ١٥.ARA ................................................. مجموعة موجات
١٨.ARA → ١٥.ARA ...................................................... محطة راديو٤٠.ARA ..............................................................................مرحلة٤١.ARA ,٣٨.ARA ,٣٥.ARA ...........................................مسار مفصل
مشغل الملفات الصوتية ذو تقنية بلوتوث®٢٠.ARA ....................................................................قم بالفصل٢٠.ARA ................................................................. قم بالمزاوجة٢١.ARA → ١٩.ARA ....................................................مصدر إضافي٥٠.ARA .....................................................................مطابقة الهاتف٤٨.ARA ,١٧.ARA .................................................... معلومات المرور٧٢.ARA → ٦٩.ARA ......................................................USB مفتاح
مفضل٤٤.ARA ..........................................................................حذف٢١.ARA ,٩.ARA ...........................................................Jack مقبس٧٢.ARA → ٦٩.ARA ,٢٠.ARA ,٩.ARA ...........................USB مقبس١٩.ARA ...................................................................... MPملفات ٣
ننظام
٧٢.ARA → ٦٩.ARA .......................................................تحديثGPS النظام العالمي لتحديد الموقع
٢٦.ARA ....................................................................... استقبال٤٧.ARA ,٢٦.ARA ...................................................جهاز استقبال
و٤٤.ARA – ٤٣.ARA ,٤٠.ARA ,٣٣.ARA ,٣٥.ARA → ٣٠.ARA . الوجهة٦٧.ARA .......................................................................وحدة المسافة٢١.ARA → ١٩.ARA ..................................................... AUX وصلة٣٦.ARA ....................................................................٢D/٣D وضع١٦.ARA ........................................................... LIST/LISTE وضع١٥.ARA ................................................... MANU/MANUEL وضع١٦.ARA ...................................................................MEMO وضع٢٧.ARA ...................................................................... وضع السيارة٦.ARA → ٤.ARA ...............................................................وظائف
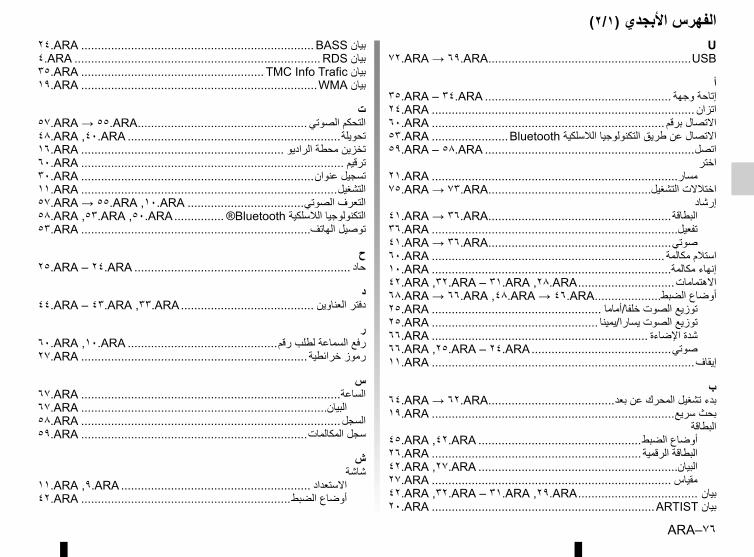
ARA–٧٦
الفهرس األبجدي (٢/١)U
٧٢.ARA → ٦٩.ARA .............................................................USB
أ٣٥.ARA – ٣٤.ARA ........................................................ إتاحة وجهة٢٤.ARA ...............................................................................اتزان٦٠.ARA ...................................................................... االتصال برقم٥٣.ARA .......................Bluetooth االتصال عن طريق التكنولوجيا الالسلكية٥٩.ARA – ٥٨.ARA ...............................................................اتصل
اختر٢١.ARA ..........................................................................مسار٧٥.ARA → ٧٣.ARA .................................................اختالالت التشغيل
إرشاد٤١.ARA → ٣٦.ARA .......................................................البطاقة٣٦.ARA ..........................................................................تفعيل٤١.ARA → ٣٦.ARA .......................................................صوتي٦٠.ARA ...................................................................... استالم مكالمة١٠.ARA ........................................................................إنهاء مكالمة٤٢.ARA ,٣٢.ARA – ٣١.ARA ,٢٨.ARA .............................االهتمامات٦٨.ARA → ٦٦.ARA ,٤٨.ARA → ٤٦.ARA ....................أوضاع الضبط٢٥.ARA ................................................... توزيع الصوت خلفا/أماما٢٥.ARA .................................................. توزيع الصوت يسارا/يمينا٦٦.ARA ................................................................. شدة اإلضاءة٦٦.ARA ,٢٥.ARA – ٢٤.ARA ..........................................صوتي١١.ARA ...............................................................................إيقاف
ب٦٤.ARA → ٦٢.ARA ......................................بدء تشغيل المحرك عن بعد١٩.ARA .........................................................................بحث سريع
البطاقة٤٥.ARA ,٤٢.ARA .................................................أوضاع الضبط٢٦.ARA ............................................................... البطاقة الرقمية٤٢.ARA ,٢٧.ARA ............................................................البيان٢٧.ARA ........................................................................ مقياس٤٢.ARA ,٣٢.ARA – ٣١.ARA ,٢٩.ARA .................................... بيان٢٠.ARA ...................................................................ARTIST بيان
٢٤.ARA ...................................................................... BASS بيان٤.ARA .......................................................................... RDS بيان٣٥.ARA ....................................................... TMC Info Trafic بيان١٩.ARA .......................................................................WMA بيان
ت٥٧.ARA → ٥٥.ARA ...................................................التحكم الصوتي٤٨.ARA ,٤٠.ARA ................................................................تحويلة١٦.ARA ............................................................. تخزين محطة الراديو٦٠.ARA ............................................................................... ترقيم٣٠.ARA ......................................................................تسجيل عنوان١١.ARA .............................................................................التشغيل٥٧.ARA → ٥٥.ARA ,١٠.ARA ...................................التعرف الصوتي٥٨.ARA ,٥٣.ARA ,٥٠.ARA ............... ®Bluetooth التكنولوجيا الالسلكية٥٣.ARA .....................................................................توصيل الهاتف
ح٢٥.ARA – ٢٤.ARA ................................................................. حاد
د٤٤.ARA – ٤٣.ARA ,٣٣.ARA ........................................ دفتر العناوين
ر٦٠.ARA ,١٠.ARA .............................................رفع السماعة لطلب رقم٢٧.ARA .................................................................... رموز خرائطية
س٦٧.ARA ..............................................................................الساعة٦٧.ARA ..........................................................................البيان٥٨.ARA ..............................................................................السجل٥٩.ARA ....................................................................سجل المكالمات
ششاشة
١١.ARA ,٩.ARA ......................................................... االستعداد٤٢.ARA ...............................................................أوضاع الضبط
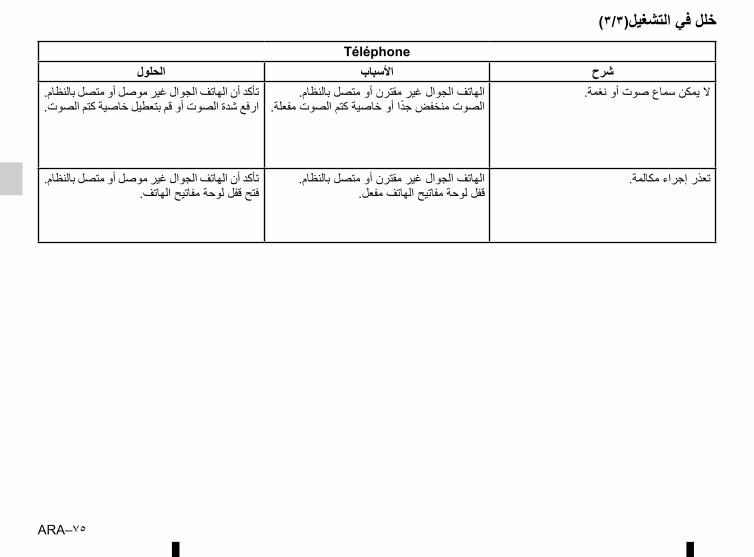
ARA–٧٥
Téléphoneالحلولاألسبابشرح
الهاتف الجوال غير مقترن أو متصل بالنظام.ال يمكن سماع صوت أو نغمة.الصوت منخفض جدا أو خاصية كتم الصوت مفعلة.
تأكد أن الهاتف الجوال غير موصل أو متصل بالنظام.
ارفع شدة الصوت أو قم بتعطيل خاصية كتم الصوت.
الهاتف الجوال غير مقترن أو متصل بالنظام.تعذر إجراء مكالمة.قفل لوحة مفاتيح الهاتف مفعل.
تأكد أن الهاتف الجوال غير موصل أو متصل بالنظام.فتح قفل لوحة مفاتيح الهاتف.
خلل في التشغيل(٣/٣)
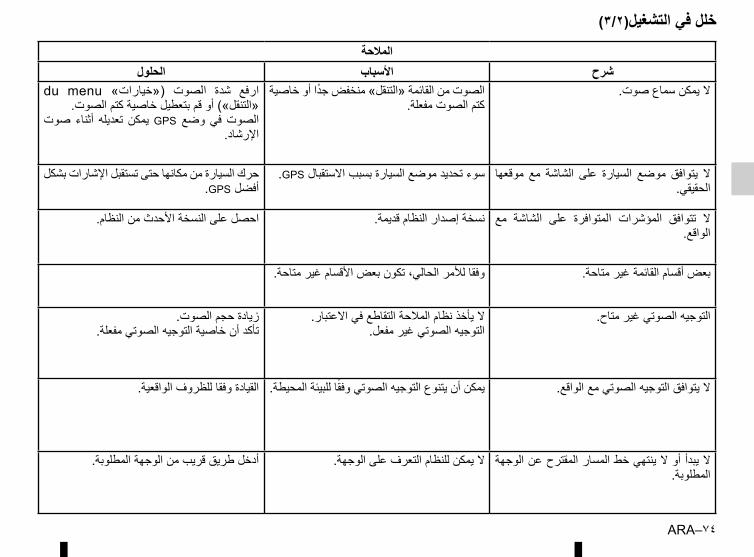
ARA–٧٤
خلل في التشغيل(٣/٢)المالحة
الحلولاألسبابشرحالصوت من القائمة «التنقل» منخفض جدا أو خاصية ال يمكن سماع صوت.
كتم الصوت مفعلة. du menu («خيارات» الصوت شدة ارفع
«التنقل») أو قم بتعطيل خاصية كتم الصوت.صوت أثناء تعديله يمكن GPS وضع في الصوت
اإلرشاد.
موقعها مع الشاشة على السيارة موضع يتوافق ال الحقيقي.
.GPS حرك السيارة من مكانها حتى تستقبل اإلشارات بشكل سوء تحديد موضع السيارة بسبب االستقبال.GPS أفضل
مع الشاشة على المتوافرة المؤشرات تتوافق ال الواقع.
احصل على النسخة األحدث من النظام.نسخة إصدار النظام قديمة.
وفقا لألمر الحالي، تكون بعض األقسام غير متاحة.بعض أقسام القائمة غير متاحة.
ال يأخذ نظام المالحة التقاطع في االعتبار.التوجيه الصوتي غير متاح.التوجيه الصوتي غير مفعل.
زيادة حجم الصوت.تأكد أن خاصية التوجيه الصوتي مفعلة.
القيادة وفقا للظروف الواقعية.يمكن أن يتنوع التوجيه الصوتي وفقا للبيئة المحيطة.ال يتوافق التوجيه الصوتي مع الواقع.
ال يبدأ أو ال ينتهي خط المسار المقترح عن الوجهة المطلوبة.
أدخل طريق قريب من الوجهة المطلوبة.ال يمكن للنظام التعرف على الوجهة.
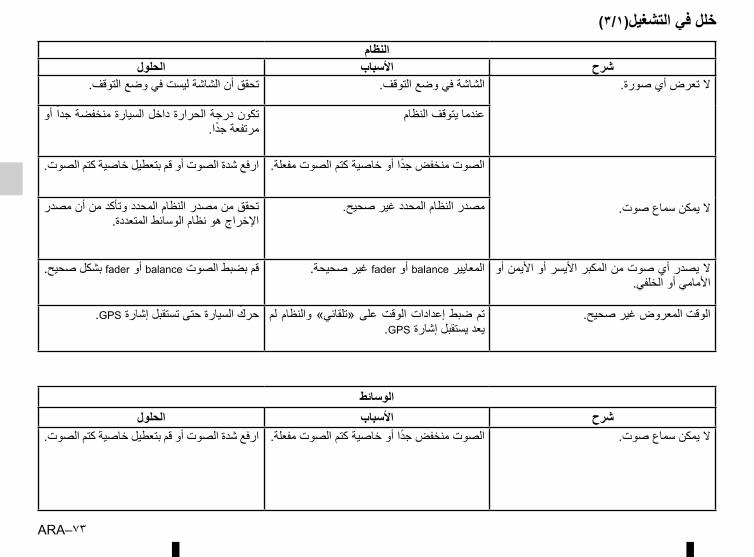
ARA–٧٣
خلل في التشغيل(٣/١)النظام
الحلولاألسبابشرحتحقق أن الشاشة ليست في وضع التوقف.الشاشة في وضع التوقف.ال تعرض أي صورة.
تكون درجة الحرارة داخل السيارة منخفضة جدا أو عندما يتوقف النظاممرتفعة جدا.
ال يمكن سماع صوت.
ارفع شدة الصوت أو قم بتعطيل خاصية كتم الصوت.الصوت منخفض جدا أو خاصية كتم الصوت مفعلة.
تحقق من مصدر النظام المحدد وتأكد من أن مصدر مصدر النظام المحدد غير صحيح.اإلخراج هو نظام الوسائط المتعددة.
ال يصدر أي صوت من المكبر األيسر أو األيمن أو األمامي أو الخلفي.
قم بضبط الصوت balance أو fader بشكل صحيح.المعايير balance أو fader غير صحيحة.
لم الوقت المعروض غير صحيح. والنظام على «تلقائي» الوقت إعدادات ضبط تم .GPS يعد يستقبل إشارة
.GPS حرك السيارة حتى تستقبل إشارة
الوسائطالحلولاألسبابشرح
ارفع شدة الصوت أو قم بتعطيل خاصية كتم الصوت.الصوت منخفض جدا أو خاصية كتم الصوت مفعلة.ال يمكن سماع صوت.

ARA–٧٢
ذاكرة توصيل بمجرد تلقائيا A الشاشة تظهر –USB؛
اضغط على 2 لبدء التحديث. –– اضغط على 1 للعودة إلى الشاشة السابقة.
إجراءات تشغيل يتم الزر 2، على الضغط عند تحديث عملية أثناء عمليات بأي تقم ال التحديث.
نظامك.
تحديث النظام والخرائط USB عند اكتمال عملية التنزيل، يمكن إزالة مفتاح USB منفذ في USB مفتاح أدخل الكمبيوتر. من
الخاص بنظام الوسائط المتعددة للسيارة.وال السيارة بإدارة قم الخرائط، لتحديث مالحظة:
تقم بإيقاف تشغيل المحرك أثناء تحميل البيانات.عند تشغيل نظام الوسائط المتعددة، فإنه يقوم تلقائيا بتحديد التحديثات المتاحة في مفتاح USB ويعرض طلب تحديث النظام أو الخريطة من التحديثات التي بإيقاف تقم ال .USB مفتاح على عليها العثور تم تشغيل نظام الوسائط المتعددة أثناء تثبيت التحديث.مالحظة: يكون تنزيل وتثبيت تحديثات النظام ممكن
فقط إذا كان هناك إصدار جديد متاح.
تحديث النظام (٤/٤)
A
1 2
معلومات حول التحديث
معلومات حالية حول البرنامج
اإلصدار القديم.
معلومات حديثة حول البرنامج
اإلصدار الجديد.
تحديث
عند اكتمال التحديث، تتم إعادة تشغيل نظام الوسائط المتعددة بجميع الوظائف الجديدة وبأخر تحديث.
الترخيص ،GPL، LGPL األكواد مصادر على للحصول المصدر مفتوحة األخرى والتراخيص MPLhttp:// الواردة في هذا المنتج، يرجى زيارة الموقع
.opensource.lge.comشروط كافة األكواد، مصادر إلى باإلضافة الضمان موانع عليها، المنصوص الترخيص متاحة تكون والنشر التأليف حقوق وإشعارات
للتحميل.أيضا بتزويدك تقوم LG Electronicsوسوف مقابل CD-ROM على المصدر مفتوحة باألكواد دفع الرسوم التي تغطي تكاليف التوزيع (مثل تكلفة الوسائط، الشحن والمناولة) بناء على طلب بالبريد
[email protected] إلىمن ابتداء سنوات ثالث لمدة متاح العرض هذا
تاريخ شراء المنتج.
التحديث، لعملية الإلرادي االنقطاع حال في أعد الخطوات منذ البداية. قد تتم إعادة تشغيل نظام الوسائط المتعددة أثناء عملية التحديث. انتظر حتى تظهر شاشة الراديو.
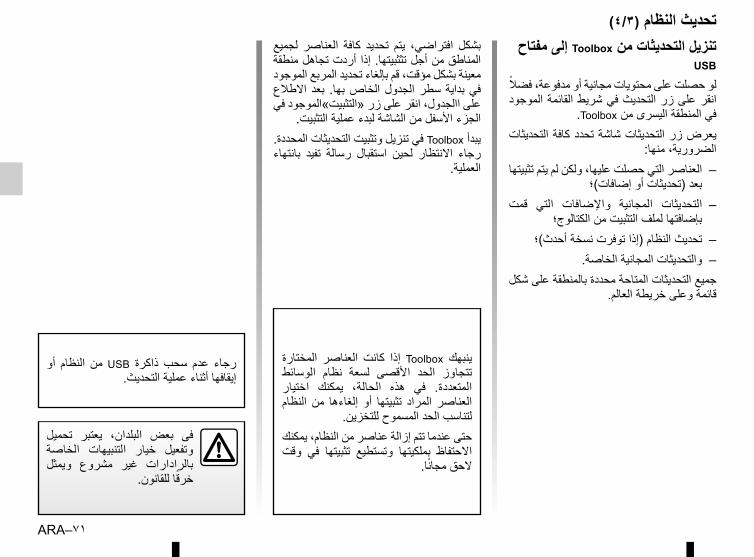
ARA–٧١
لجميع العناصر كافة تحديد يتم افتراضي، بشكل المناطق من أجل تثثبيتها. إذا أردت تجاهل منطقة معينة بشكل مؤقت، قم بإلغاء تحديد المربع الموجود االطالع بعد بها. الخاص الجدول سطر بداية في على االجدول، انقر على زر «التثبيت»الموجود في
الجزء األسفل من الشاشة لبدء عملية التثبيت.يبدأ Toolbox في تنزيل وتثبيت التحديثات المحددة. بانتهاء تفيد رسالة استقبال لحين االنتظار رجاء
العملية.
تنزيل التحديثات من Toolbox إلى مفتاح USB
لو حصلت على محتويات مجانية أو مدفوعة، فضال انقر على زر التحديث في شريط القائمة الموجود
.Toolbox في المنطقة اليسرى منيعرض زر التحديثات شاشة تحدد كافة التحديثات
الضرورية، منها:العناصر التي حصلت عليها، ولكن لم يتم تثبيتها –
بعد (تحديثات أو إضافات)؛ قمت التي واإلضافات المجانية التحديثات –
بإضافتها لملف التثبيت من الكتالوج؛تحديث النظام (إذا توفرت نسخة أحدث)؛ –
والتحديثات المجانية الخاصة. –جميع التحديثات المتاحة محددة بالمنطقة على شكل
قائمة وعلى خريطة العالم.
تحديث النظام (٤/٣)
تحميل يعتبر البلدان، بعض فى الخاصة التنبيهات خيار وتفعيل ويمثل مشروع غير بالرادارات
خرقا للقانون.
أو النظام من USB ذاكرة سحب عدم رجاء إيقافها أثناء عملية التحديث.
المختارة العناصر كانت إذا Toolbox ينبهك الوسائط نظام لسعة األقصى الحد تتجاوز اختيار يمكنك الحالة، هذه في المتعددة. النظام من إلغاءها أو تثبيتها المراد العناصر
لتناسب الحد المسموح للتخزين.حتى عندما تتم إزالة عناصر من النظام، يمكنك وقت في تثبيتها وتستطيع بملكيتها االحتفاظ
الحق مجانا.
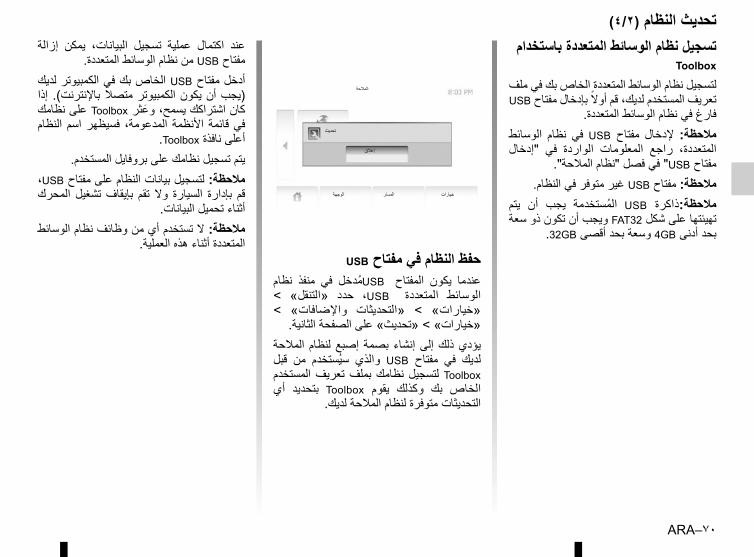
ARA–٧٠
تحديث النظام (٤/٢)إزالة يمكن البيانات، تسجيل عملية اكتمال عند
مفتاح USB من نظام الوسائط المتعددة.أدخل مفتاح USB الخاص بك في الكمبيوتر لديك إذا باإلنترنت). متصال الكمبيوتر يكون أن (يجب كان اشتراكك يسمح، وعثر Toolbox على نظامك النظام اسم فسيظهر المدعومة، األنظمة قائمة في
.Toolbox أعلى نافذةيتم تسجيل نظامك على بروفايل المستخدم.
،USB مالحظة: لتسجيل بيانات النظام على مفتاحالمحرك تشغيل بإيقاف تقم وال السيارة بإدارة قم
أثناء تحميل البيانات.مالحظة: ال تستخدم أي من وظائف نظام الوسائط
المتعددة أثناء هذه العملية.USB حفظ النظام في مفتاح
نظام منفذ في المفتاح USBمدخل يكون عندما < «التنقل» حدد ،USB المتعددة الوسائط < واإلضافات» «التحديثات < «خيارات»
«خيارات» > «تحديث» على الصفحة الثانية.المالحة لنظام إصبع بصمة إنشاء إلى ذلك يؤدي قبل من سيستخدم والذي USB مفتاح في لديك المستخدم تعريف بملف نظامك لتسجيل Toolboxأي بتحديد Toolbox يقوم وكذلك بك الخاص
التحديثات متوفرة لنظام المالحة لديك.
تحديث
إغالق
المالحة
الوجهة المسار خيارات
تسجيل نظام الوسائط المتعددة باستخدام Toolbox
لتسجيل نظام الوسائط المتعددة الخاص بك في ملف USB تعريف المستخدم لديك، قم أوال بإدخال مفتاح
فارغ في نظام الوسائط المتعددة.الوسائط نظام في USB مفتاح إلدخال مالحظة: "إدخال في الواردة المعلومات راجع المتعددة،
مفتاح USB" في فصل "نظام المالحة".مالحظة: مفتاح USB غير متوفر في النظام.
يتم أن يجب المستخدمة USB مالحظة:ذاكرة تهيئتها على شكل FAT32 ويجب أن تكون ذو سعة
.32GB 4 وسعة بحد أقصىGB بحد أدنى
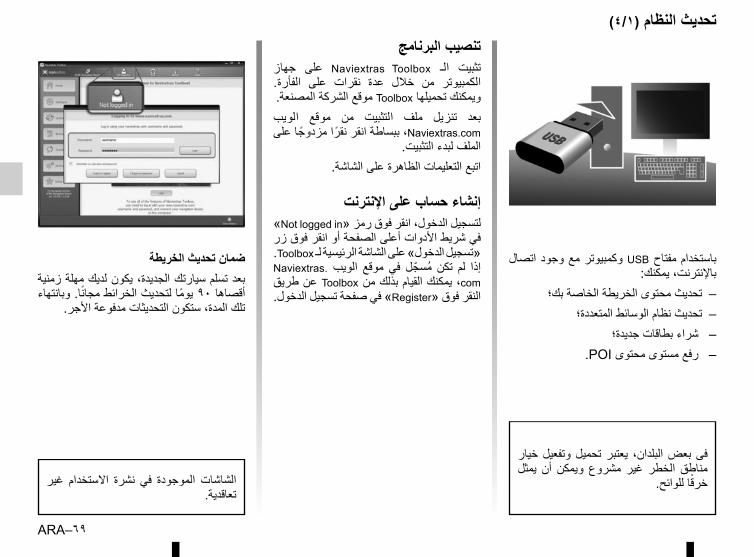
ARA–٦٩
تحديث النظام (٤/١)
باستخدام مفتاح USB وكمبيوتر مع وجود اتصال باإلنترنت، يمكنك:
تحديث محتوى الخريطة الخاصة بك؛ –تحديث نظام الوسائط المتعددة؛ –
– شراء بطاقات جديدة؛.POI رفع مستوى محتوى –
تنصيب البرنامججهاز على Naviextras Toolbox الـ تثبيت الفأرة. على نقرات عدة خالل من الكمبيوتر ويمكنك تحميلها Toolbox موقع الشركة المصنعة.
الويب موقع من التثبيت ملف تنزيل بعد Naviextras.com، ببساطة انقر نقرا مزدوجا على
الملف لبدء التثبيت.اتبع التعليمات الظاهرة على الشاشة.
إنشاء حساب على اإلنترنت «Not logged in» لتسجيل الدخول، انقر فوق رمزفي شريط األدوات أعلى الصفحة أو انقر فوق زر .Toolbox تسجيل الدخول» على الشاشة الرئيسية لـ»Naviextras. الويب موقع في مسجل تكن لم إذا com، يمكنك القيام بذلك من Toolbox عن طريق النقر فوق «Register» في صفحة تسجيل الدخول.
غير االستخدام نشرة في الموجودة الشاشات تعاقدية.
خيار وتفعيل تحميل يعتبر البلدان، بعض فى يمثل أن ويمكن مشروع غير الخطر مناطق
خرقا للوائح.
ضمان تحديث الخريطةبعد تسلم سيارتك الجديدة، يكون لديك مهلة زمنية أقصاها ٩٠ يوما لتحديث الخرائط مجانا. وبانتهاء
تلك المدة، ستكون التحديثات مدفوعة األجر.
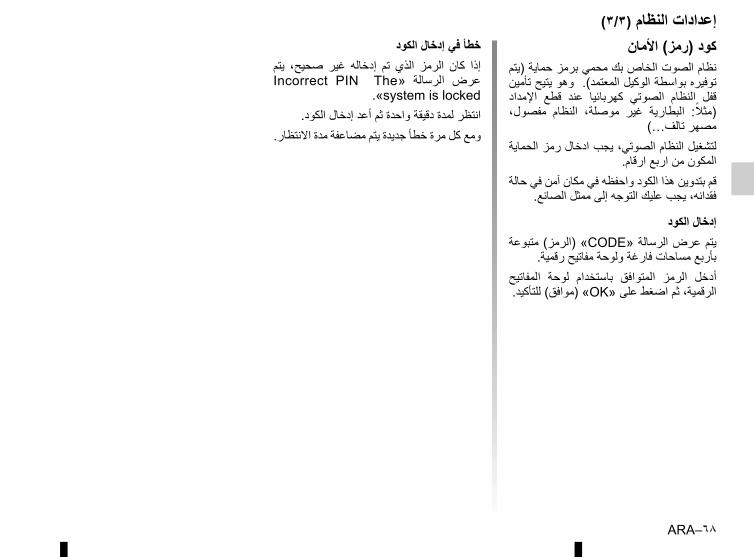
ARA–٦٨
إعدادات النظام (٣/٣)كود (رمز) األمان
نظام الصوت الخاص بك محمي برمز حماية (يتم توفيره بواسطة الوكيل المعتمد). وهو يتيح تأمين اإلمداد قطع عند كهربائيا الصوتي النظام قفل مفصول، النظام موصلة، غير البطارية (مثال:
مصهر تالف…)لتشغيل النظام الصوتي، يجب ادخال رمز الحماية
المكون من اربع ارقام.قم بتدوين هذا الكود واحفظه في مكان آمن في حالة
فقدانه، يجب عليك التوجه إلى ممثل الصانع.
إدخال الكوديتم عرض الرسالة «CODE» (الرمز) متبوعة
بأربع مساحات فارغة ولوحة مفاتيح رقمية.المفاتيح لوحة باستخدام المتوافق الرمز أدخل الرقمية، ثم اضغط على «OK» (موافق) للتأكيد.
خطأ في إدخال الكوديتم صحيح، غير إدخاله تم الذي الرمز كان إذا Incorrect PIN The» الرسالة عرض
.«system is lockedانتظر لمدة دقيقة واحدة ثم أعد إدخال الكود.
ومع كل مرة خطأ جديدة يتم مضاعفة مدة االنتظار.

ARA–٦٧
إعدادات النظام (٣/٢)
الصوت الشاشة Bluetooth النظام
ضوابط النظام
اللغة
الساعة/الوحدات
ضوابط شركة التصنيع
التنقل إيقاف تشغيل
«الساعة»تمكنك هذه الخاصية من االختيار بين نسق الساعة
.«٢٤h»١٢» وh»مالحظة: يتم ضبط الساعة بطريقة آلية من خالل تكون أن الضروري من الحالة، هذه في .GPSعلى للحصول بها المتواجد البلد خرائط لديك
التوقيت المحلي.«الساعة/ على اضغط يدويا، الساعة لضبط
الوحدات»، ثم اختر «ضبط الوقت».
«الوحدات»المسافة وحدة ضبط الخاصية هذه لك تتيح يمكنك المتعددة. الوسائط نظام على المعروضة
االختيار بين «كم» و«ميل». ضبط النظام«اللغة»
في المستخدمة اللغة تغيير الخاصية هذه لك تتيح النظام ولغة التوجيه الصوتي.
بتأكيد وقم المرغوبة اللغة اختر اللغة، لتغيير اختيارك بالضغط على «موافق».
«ضوابط شركة التصنيع»اإلعدادات تثبيت إعادة من الخاصية هذه تمكنك
المختلفة إلى الوضع االفتراضي.جميع «ضوابط ضبط إعادة على يعمل الكل: –
شركة التصنيع» إلى اإلعدادات االفتراضية.الهاتف: إعادة تعيين اإلعدادات المتعلقة بالهاتف –المتعلقة اإلعدادات تعيين إعادة المالحة: –
بالمالحة.تعيين إعادة صوت/وسائط/راديو/نظام: –اإلعدادات المتعلقة بالصوت، الوسائط والراديو.
«التنقل»تسمح هذه الوظيفة بتمكينك من تنشيط نظام المالحة
أو تعطيله.
«إصدار النظام»تتيح لك هذه الخاصية التعرف على نسخة إصدار
النظام.
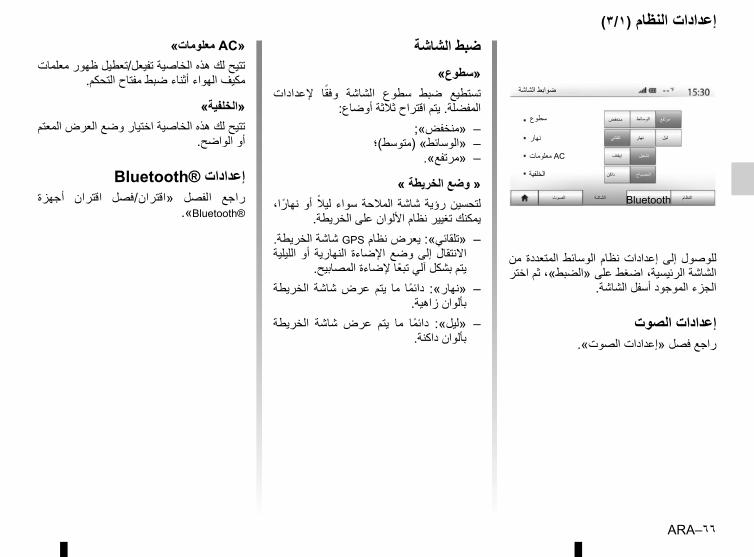
ARA–٦٦
إعدادات النظام (٣/١)
من المتعددة الوسائط نظام إعدادات إلى للوصول الشاشة الرئيسية، اضغط على «الضبط»، ثم اختر
الجزء الموجود أسفل الشاشة.
إعدادات الصوتراجع فصل «إعدادات الصوت».
ضبط الشاشة«سطوع»
إلعدادات وفقا الشاشة سطوع ضبط تستطيع المفضلة. يتم اقتراح ثالثة أوضاع:
«منخفض»; –«الوسائط» (متوسط)؛ –
«مرتفع». –
« وضع الخريطة »نهارا، أو ليال سواء المالحة شاشة رؤية لتحسين
يمكنك تغيير نظام األلوان على الخريطة.«تلقائي»: يعرض نظام GPS شاشة الخريطة. –الليلية أو النهارية اإلضاءة وضع إلى االنتقال
يتم بشكل آلي تبعا إلضاءة المصابيح.الخريطة شاشة عرض يتم ما دائما «نهار»: –
بألوان زاهية.الخريطة شاشة عرض يتم ما دائما «ليل»: –
بألوان داكنة.
«AC معلومات»تتيح لك هذه الخاصية تفيعل/تعطيل ظهور معلمات
مكيف الهواء أثناء ضبط مفتاح التحكم.
«الخلفية»تتيح لك هذه الخاصية اختيار وضع العرض المعتم
أو الواضح.
Bluetooth® إعداداتأجهزة اقتران «اقتران/فصل الفصل راجع
.«Bluetooth®
ضوابط الشاشة
سطوع
نهار
الصوت الشاشة Bluetooth النظام
منخفض الوسائط مرتفع
تلقائي نهار ليل
AC معلومات إيقاف تشغيل
الخلفية داكن المصباح

ARA–٦٥
كاميرا حول المعلومات من لمزيد ملحوظة: الرجوع للخلف، راجع دليل استخدام سيارتك.
التشغيلثوان خمس (ولمدة الخلفية للتعشيقة االنتقال عند على يظهر أخرى)، لتعشيقة االنتقال بعد تقريبا شاشة المالحة منظر للمكان الموجود خلف السيارة
ويصاحب العرض القالب.استعن الحمراء، المنطقة إلى الوصول يتم عندما
بالمصدم لتقف بشكل دقيق.غير للخلف الرجوع كاميرا أن تأكد ملحوظة:
محجوبة (اتساخات، وحل، جليد، إلخ).
إعداداتاضغط على 3 الستعراض قائمة االعدادات.
يمكنك تفعيل أو إبطال تفعيل عرض القالب بالضغط على 1 أو على 2.
التباين 4 لضبط «-» أو «+» على اضغط واإلضاءة 5 واأللوان 6.
كاميرا الرجوع إلى الخلف
أنواع من نوع الخاصية هذه تعد بأي يمكنها فال التكميلية. المساعدة حال من األحوال أن تحل محل يقظة
السائق ومسؤوليته.على السائق أن يظل منتبها لألحداث المفاجئة عدم من دائما تأكد القيادة أثناء تقع قد التي (مثال المناورة أثناء متحركة عوائق وجود أو دراجة...) أطفال، عربة حيوان، طفل، عائق صغير جدا أو رفيع جدا (حجر متوسط
الحجم، وتد رفيع جدا...).
تقدم الشاشة صورة معكوسة.العياران هما تمثيل مسقط على أرض مسطحة، اإلسقاط يتم عندما المعلومة هذه تجاهل ويتم
على شيء رأسي أو موضوع على األرض.األشياء التي تظهر على حافة الشاشة يمكن أن
تظهر مشوهة.الجليد، (بسبب الشديدة اإلضاءة حالة في السيارة في مواجهة الشمس...) يمكن أن تظهر
صورة الكاميرا مشوشة.
1 2
56 4 3
انظر في كل االتجاهات
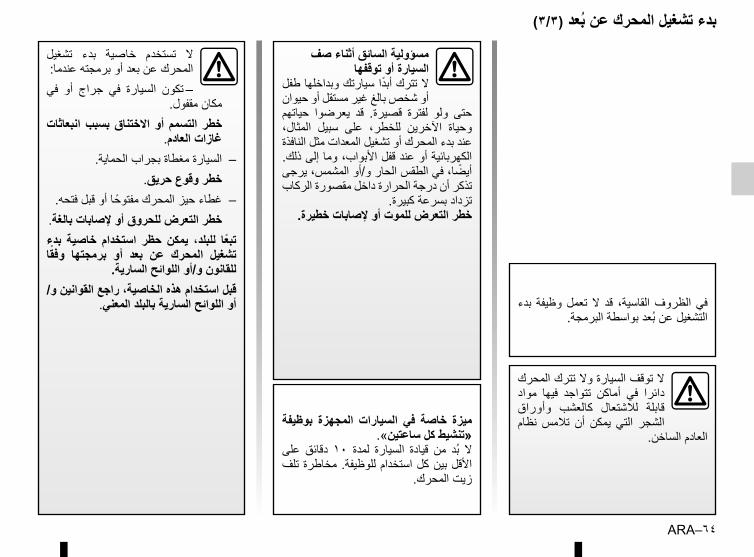
ARA–٦٤
ال توقف السيارة وال تترك المحرك مواد فيها تتواجد أماكن في دائرا وأوراق كالعشب لالشتعال قابلة نظام تالمس أن يمكن التي الشجر
العادم الساخن.
بدء تشغيل المحرك عن بعد (٣/٣)
بدء وظيفة تعمل ال قد القاسية، الظروف في التشغيل عن بعد بواسطة البرمجة.
بوظيفة المجهزة السيارات في خاصة ميزة «تنشيط كل ساعتين».
على دقائق ١٠ لمدة السيارة قيادة من بد ال األقل بين كل استخدام للوظيفة. مخاطرة تلف
زيت المحرك.
مسؤولية السائق أثناء صف السيارة أو توقفها
ال تترك أبدا سيارتك وبداخلها طفل أو شخص بالغ غير مستقل أو حيوان حياتهم يعرضوا قد قصيرة. لفترة ولو حتى المثال، سبيل على للخطر، اآلخرين وحياة عند بدء المحرك أو تشغيل المعدات مثل النافذة الكهربائية أو عند قفل األبواب، وما إلى ذلك. أيضا، في الطقس الحار و/أو المشمس، يرجى تذكر أن درجة الحرارة داخل مقصورة الركاب
تزداد بسرعة كبيرة.خطر التعرض للموت أو إلصابات خطيرة.
تشغيل بدء خاصية تستخدم ال المحرك عن بعد أو برمجته عندما:
في أو جراج في السيارة تكون –مكان مقفول.
انبعاثات بسبب االختناق أو التسمم خطر غازات العادم.
السيارة مغطاة بجراب الحماية. –خطر وقوع حريق.
غطاء حيز المحرك مفتوحا أو قبل فتحه. –خطر التعرض للحروق أو إلصابات بالغة.
بدء خاصية استخدام حظر يمكن للبلد، تبعا وفقا برمجتها أو بعد عن المحرك تشغيل
للقانون و/أو اللوائح السارية.قبل استخدام هذه الخاصية، راجع القوانين و/
أو اللوائح السارية بالبلد المعني.

ARA–٦٣
بدء تشغيل المحرك عن بعد (٢/٣)
يعمل بدء تشغيل المحرك عن بعد إذا:(النقطة المحايد الوضع على التعشيق ذراع –الحركة ناقل ذات للسيارات بالنسبة الميتة)
اليدوي أو األوتوماتيكي؛ذراع التعشيق في الوضع P بالنسبة للسيارات –
ذات ناقل الحركة األوتوماتيكي.اإلشعال مطفأ؛ –
حيز األبواب، األمامي، (الغطاء المنافذ كافة –األمتعة) محكمي الغلق عندما تغادر السيارة.
«تنشيط كل ساعتين»تتيح هذه الخاصية لسيارتك أن تبدأ بصورة تلقائية كل ساعتين إذا كانت الحرارة الخارجية أقل من ٥ درجة مئوية. لتنشيط هذه الوظيفة، يجب أن يكون ال الوظيفة، هذه تنشيط عند متوقفا. التهوية نظام
يعمل نظام التهوية.في حالة البرد القارس، سوف تبدأ السيارة بصورة عشر حوالي خالل مضاءة تظل وسوف تلقائية
دقائق ثم ستنطفئ.
بدء تشغيل المحرك عن بعد
تحذير : ال تركن السيارة في غرفة مقفلة
بدء تشغيل تلقائي
السيارة جاهزة
تنشيط كل ساعتين
ستكون السيارة جاهزة في غضون ٠ ساعات و٠ دقائق
إيقاف تشغيل
إيقاف تشغيل
تغيير
موافق
إذا كانت درجة الحرارة الخارجية ال تنزل عن ٥ درجة مئوية، لن تبدأ السيارة بصورة تلقائية وسوف توضع في وضع االستعداد في غضون ساعتين ثم سوف تقوم بتحليل درجة الحرارة الخارجية. سوف يعيد المحرك البدء إذا كانت درجة الحرارة أقل من
٥ درجة مئوية.يبدأ المحرك ويظل قيد التشغيل لمدة حوالي عشر دقائق، قبل الوقت الذي تم برمجته عليه بما يقرب
من خمس عشرة دقيقة.على أو الخاصية لتنشيط «تشغيل» على اضغط
«إيقاف» اللغاء التفعيل.مالحظة: إذا قمت بتنشيط أو تعريف الساعة التي ترغب في استخدام سيارتك فيها وترحل، العالمة 4 قمت التي السيارة رحيل بساعة تذكرك سوف
بتسجيلها من قبل.
11:05 AM
داكن
الراديو الوسائط الهاتف
Driving eco٢التنقلالضبط
4
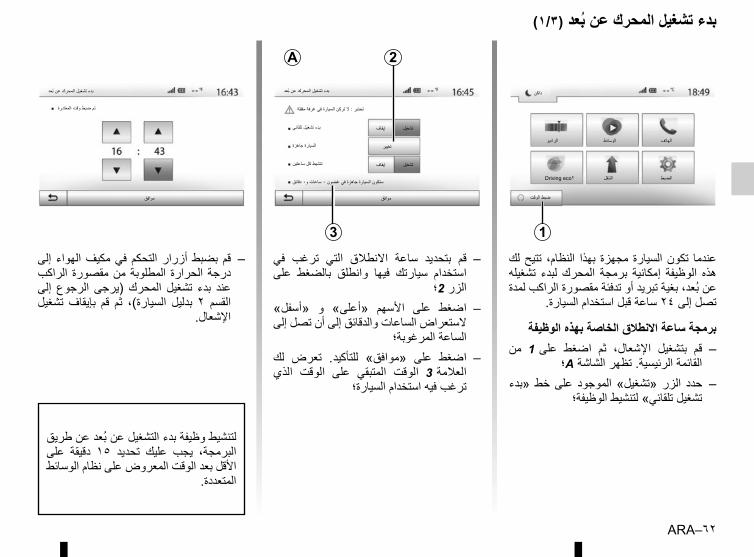
ARA–٦٢
إلى الهواء مكيف في التحكم أزرار بضبط قم –الراكب مقصورة من المطلوبة الحرارة درجة إلى الرجوع (يرجى المحرك تشغيل بدء عند تشغيل بإيقاف قم ثم السيارة)، بدليل ٢ القسم
اإلشعال.
بدء تشغيل المحرك عن بعد (١/٣)
ضبط الوقت
داكن
الراديو الوسائط الهاتف
Driving eco٢التنقلالضبط
1
بدء تشغيل المحرك عن بعد
تحذير : ال تركن السيارة في غرفة مقفلة
بدء تشغيل تلقائي
السيارة جاهزة
تنشيط كل ساعتين
ستكون السيارة جاهزة في غضون ٠ ساعات و٠ دقائق
إيقاف تشغيل
إيقاف تشغيل
تغيير
موافق
2A
3
تم ضبط وقت المغادرة
بدء تشغيل المحرك عن بعد
موافق
لك تتيح النظام، بهذا مجهزة السيارة تكون عندما تشغيله لبدء المحرك برمجة إمكانية الوظيفة هذه عن بعد، بغية تبريد أو تدفئة مقصورة الراكب لمدة
تصل إلى ٢٤ ساعة قبل استخدام السيارة.
برمجة ساعة االنطالق الخاصة بهذه الوظيفةمن على 1 اضغط ثم اإلشعال، بتشغيل قم –
القائمة الرئيسية. تظهر الشاشة A؛خط «بدء على الموجود الزر «تشغيل» حدد –
تشغيل تلقائي» لتنشيط الوظيفة؛
في ترغب التي االنطالق ساعة بتحديد قم –على بالضغط وانطلق فيها سيارتك استخدام
الزر 2؛«أسفل» و «أعلى» األسهم على اضغط –الستعراض الساعات والدقائق إلى أن تصل إلى
الساعة المرغوبة؛لك تعرض للتأكيد. «موافق» على اضغط –الذي الوقت على المتبقي الوقت العالمة 3
ترغب فيه استخدام السيارة؛
لتنشيط وظيفة بدء التشغيل عن بعد عن طريق على دقيقة ١٥ تحديد عليك يجب البرمجة، األقل بعد الوقت المعروض على نظام الوسائط
المتعددة.
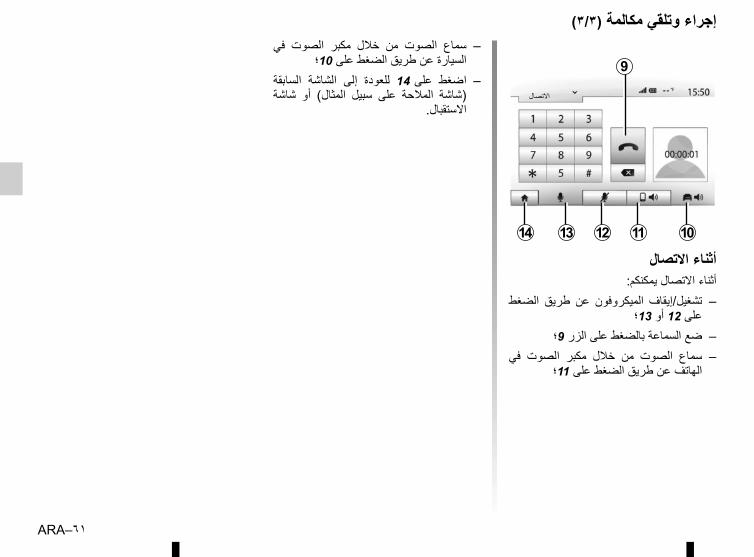
ARA–٦١
13 12 11 10
االتصال
9
14
إجراء وتلقي مكالمة (٣/٣)
أثناء االتصالأثناء االتصال يمكنكم:
الضغط طريق عن الميكروفون تشغيل/إيقاف –على 12 أو 13؛
ضع السماعة بالضغط على الزر 9؛ –في الصوت مكبر خالل من الصوت سماع –
الهاتف عن طريق الضغط على 11؛
في الصوت مكبر خالل من الصوت سماع –السيارة عن طريق الضغط على 10؛
السابقة الشاشة إلى للعودة على 14 اضغط –شاشة أو المثال) سبيل على المالحة (شاشة
االستقبال.

ARA–٦٠
إجراء وتلقي مكالمة (٣/٢)
كتابة رقمعلى ثم القائمة الستعراض على 1 اضغط
«االتصال» لرقم االتصال.اضغط على األرقام لكتابة الرقم المطلوب، ثم «7»
إلجراء المكالمة.طويلة ضغطة تسمح على 8. اضغط رقم، لمسح
على 8 بمسح جميع األرقام مرة واحدة.
يوصي بإيقاف السيارة لكتابة رقم أو للبحث عن اسم في هاتفك.
8
االتصال
71
مكالمة واردة
أوافق رفض
تلقي مكالمةعند استقبال مكالمة، تظهر رسالة على نظام شاشة نظام الوسائط المتعددة بالمعلومات التالية عن الرقم
المتصل:دليل في الرقم تسجيل حال (في المتصل اسم –
هاتفك)؛رقم المتصل؛ –
«رقم غير معروف» (إذا تعذرت رؤية الرقم). –مالحظة: عندما تظهر رسالة المكالمة الواردة على المكالمة ارفض أو اقبل المالحة، أثناء الشاشة
للعودة إلى شاشة المالحة.
واردة مكالمة رفض أو قبول يمكنك مالحظة: باستخدام جهاز التحكم عن بعد الخاص بالسيارة.
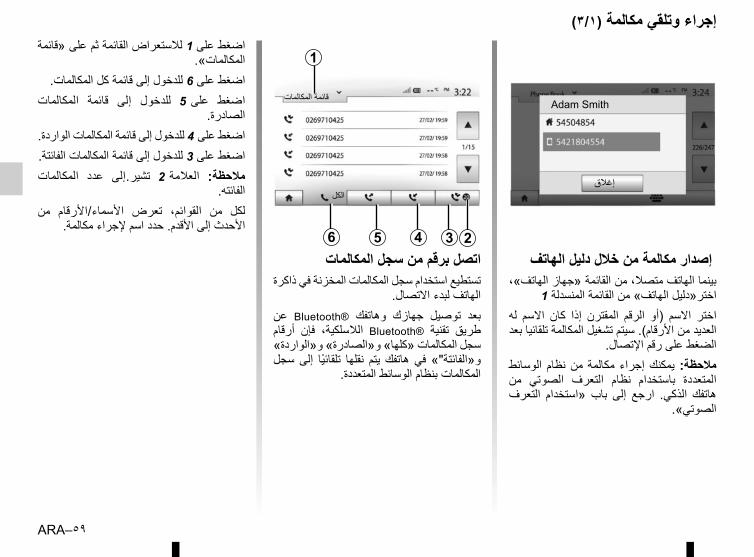
ARA–٥٩
إصدار مكالمة من خالل دليل الهاتفبينما الهاتف متصال، من القائمة «جهاز الهاتف»،
اختر«دليل الهاتف» من القائمة المنسدلة 1له االسم كان إذا المقترن الرقم (أو االسم اختر العديد من األرقام). سيتم تشغيل المكالمة تلقائيا بعد
الضغط على رقم اإلتصال.الوسائط نظام من مكالمة إجراء يمكنك مالحظة: من الصوتي التعرف نظام باستخدام المتعددة التعرف «استخدام باب إلى ارجع الذكي. هاتفك
الصوتي».
اضغط على 1 لالستعراض القائمة ثم على «قائمة المكالمات».
اضغط على 6 للدخول إلى قائمة كل المكالمات.المكالمات قائمة إلى للدخول على 5 اضغط
الصادرة.اضغط على 4 للدخول إلى قائمة المكالمات الواردة.اضغط على 3 للدخول إلى قائمة المكالمات الفائتة.
المكالمات عدد تشير.إلى العالمة 2 مالحظة: الفائته.
من األسماء/األرقام تعرض القوائم، من لكل األحدث إلى األقدم. حدد اسم إلجراء مكالمة.
إجراء وتلقي مكالمة (٣/١)
اتصل برقم من سجل المكالماتتستطيع استخدام سجل المكالمات المخزنة في ذاكرة
الهاتف لبدء االتصال.عن Bluetooth® وهاتفك جهازك توصيل بعد أرقام فإن الالسلكية، Bluetooth® تقنية طريق سجل المكالمات «كلها» و«الصادرة» و«الواردة» سجل إلى تلقائيا نقلها يتم هاتفك في و«الفائتة"»
المكالمات بنظام الوسائط المتعددة.
1
6 5 4 3
قائمة المكالمات
الكل
2
إغالق
Adam Smith
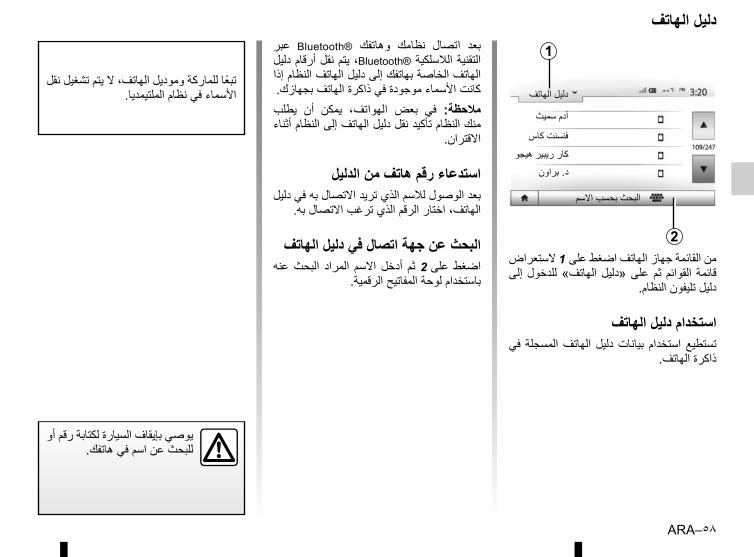
ARA–٥٨
من القائمة جهاز الهاتف اضغط على 1 الستعراض إلى للدخول الهاتف» على «دليل ثم القوائم قائمة
دليل تليفون النظام.
استخدام دليل الهاتففي المسجلة الهاتف دليل بيانات استخدام تستطيع
ذاكرة الهاتف.
يوصي بإيقاف السيارة لكتابة رقم أو للبحث عن اسم في هاتفك.
دليل الهاتفعبر Bluetooth® وهاتفك نظامك اتصال بعد التقنية الالسلكية ®Bluetooth، يتم نقل أرقام دليل الهاتف الخاصة بهاتفك إلى دليل الهاتف النظام إذا كانت األسماء موجودة في ذاكرة الهاتف بجهازك.
يطلب أن يمكن الهواتف، بعض في مالحظة: منك النظام تأكيد نقل دليل الهاتف إلى النظام أثناء
االقتران.
استدعاء رقم هاتف من الدليلبعد الوصول لالسم الذي تريد االتصال به في دليل
الهاتف، اختار الرقم الذي ترغب االتصال به.
البحث عن جهة اتصال في دليل الهاتفعنه البحث المراد االسم أدخل ثم على 2 اضغط
باستخدام لوحة المفاتيح الرقمية.
1
2
دليل الهاتف
البحث بحسب االسم
آدم سميث
فنسنت كاس
كار ريبير هيجو
د. براون
تبعا للماركة وموديل الهاتف، ال يتم تشغيل نقل األسماء في نظام الملتيمديا.
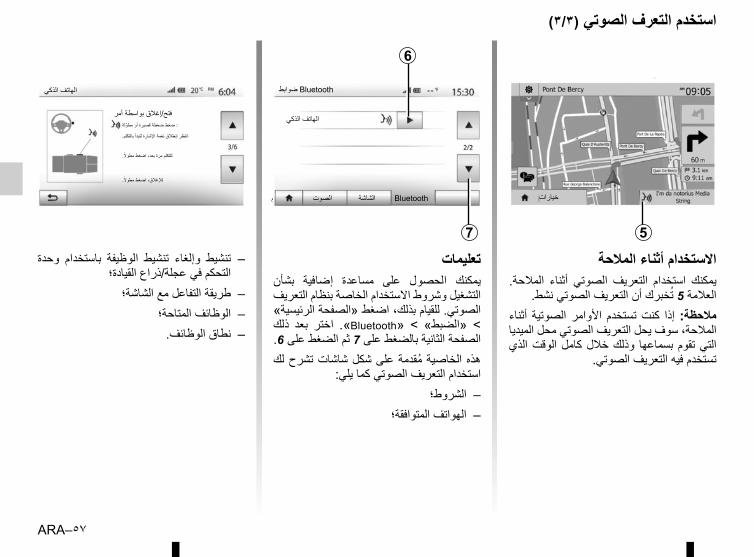
ARA–٥٧
تعليماتبشأن إضافية مساعدة على الحصول يمكنك التشغيل وشروط االستخدام الخاصة بنظام التعريف الصوتي. للقيام بذلك، اضغط «الصفحة الرئيسية» ذلك بعد اختر .«Bluetooth» < «الضبط» <الصفحة الثانية بالضغط على 7 ثم الضغط على 6. هذه الخاصية مقدمة على شكل شاشات تشرح لك
استخدام التعريف الصوتي كما يلي:الشروط؛ –
الهواتف المتوافقة؛ –
االستخدام أثناء المالحةالمالحة. أثناء الصوتي التعريف استخدام يمكنك
العالمة 5 تخبرك أن التعريف الصوتي نشط. أثناء الصوتية األوامر تستخدم كنت إذا مالحظة: المالحة، سوف يحل التعريف الصوتي محل الميديا الذي الوقت كامل خالل وذلك بسماعها تقوم التي
تستخدم فيه التعريف الصوتي.
استخدم التعرف الصوتي (٣/٣)
5
النظامخيارات
6
الهاتف الذكي
Bluetooth ضوابط
الصوت الشاشة Bluetooth
7
الهاتف الذكي
فتح/إغالق بواسطة أمر: ضغط ضغطة قصيرة أو مطولة
انتظر إنطالق نغمة اإلشارة لتبدأ بالتكلم.
للتكلم مرة بعد، اضغط مطوال.
لإلغالق، اضغط مطوال.
وحدة باستخدام الوظيفة تنشيط وإلغاء تنشيط –التحكم في عجلة/ذراع القيادة؛طريقة التفاعل مع الشاشة؛ –
الوظائف المتاحة؛ –نطاق الوظائف. –
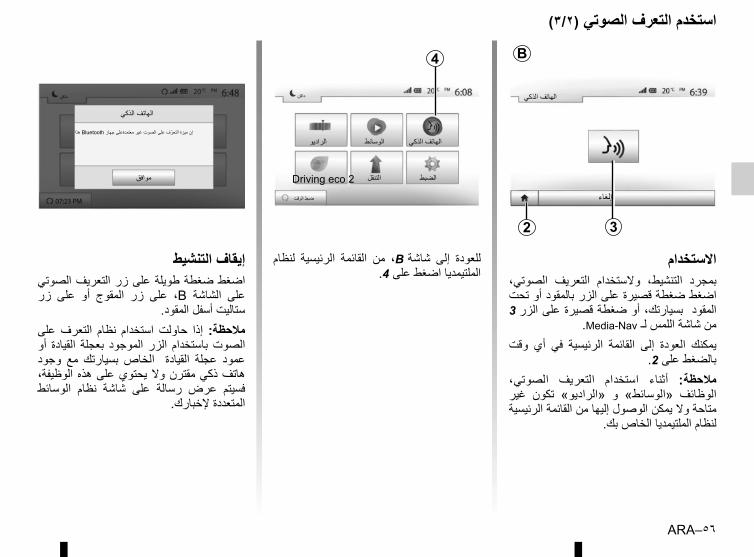
ARA–٥٦
استخدم التعرف الصوتي (٣/٢)
إيقاف التنشيطاضغط ضغطة طويلة على زر التعريف الصوتي زر على أو المقوج زر على ،B الشاشة على
ستاليت أسفل المقود.على التعرف نظام استخدام حاولت إذا مالحظة: أو القيادة بعجلة الموجود الزر باستخدام الصوت وجود مع بسيارتك الخاص القيادة عجلة عمود الوظيفة، هذه على يحتوي وال مقترن ذكي هاتف الوسائط نظام شاشة على رسالة عرض فسيتم
المتعددة إلخبارك.
االستخدامالصوتي، التعريف والستخدام التنشيط، بمجرد اضغط ضغطة قصيرة على الزر بالمقود أو تحت المقود بسيارتك، أو ضغطة قصيرة على الزر 3
.Media-Nav من شاشة اللمس لـوقت أي في الرئيسية القائمة إلى العودة يمكنك
بالضغط على 2.الصوتي، التعريف استخدام أثناء مالحظة: غير تكون «الراديو» و «الوسائط» الوظائف متاحة وال يمكن الوصول إليها من القائمة الرئيسية
لنظام الملتيمديا الخاص بك.
لنظام الرئيسية القائمة من ،B شاشة إلى للعودة الملتيمديا اضغط على 4.
إلغاء
3
الهاتف الذكي
2
B
الراديوالوسائطالهاتف الذكي
Driving eco 2 التنقل الضبط
ضبط الوقت
داكن
4
إن ميزة التعرف على الصوت غير معتمدةعلى جهاز Bluetooth هذا
داكن
موافق
الهاتف الذكي
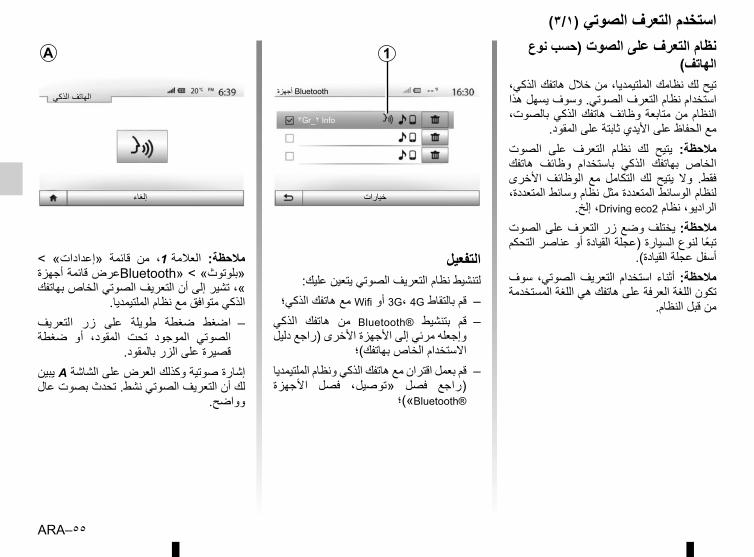
ARA–٥٥
استخدم التعرف الصوتي (٣/١)نظام التعرف على الصوت (حسب نوع
الهاتف)تيح لك نظامك الملتيمديا، من خالل هاتفك الذكي، استخدام نظام التعرف الصوتي. وسوف يسهل هذا بالصوت، الذكي هاتفك وظائف متابعة من النظام
مع الحفاظ على األيدي ثابتة على المقود.الصوت على التعرف نظام لك يتيح مالحظة: هاتفك وظائف باستخدام الذكي بهاتفك الخاص األخرى الوظائف مع التكامل لك يتيح وال فقط. لنظام الوسائط المتعددة مثل نظام وسائط المتعددة،
الراديو، نظام Driving eco2، إلخ.مالحظة: يختلف وضع زر التعرف على الصوت تبعا لنوع السيارة (عجلة القيادة أو عناصر التحكم
أسفل عجلة القيادة).سوف الصوتي، التعريف استخدام أثناء مالحظة: تكون اللغة العرفة على هاتفك هي اللغة المستخدمة
من قبل النظام.
< «إعدادات» قائمة من العالمة 1، مالحظة: «بلوتوث» > «Bluetoothعرض قائمة أجهزة »، تشير إلى أن التعريف الصوتي الخاص بهاتفك
الذكي متوافق مع نظام الملتيمديا.التعريف زر على طويلة ضغطة اضغط –ضغطة أو المقود، تحت الموجود الصوتي
قصيرة على الزر بالمقود.إشارة صوتية وكذلك العرض على الشاشة A يبين لك أن التعريف الصوتي نشط. تحدث بصوت عال
وواضح.
1
خيارات
Bluetooth أجهزة
٣Gr_٢ Info
التفعيللتنشيط نظام التعريف الصوتي يتعين عليك:
قم بالتقاط 3G، 4G أو Wifi مع هاتفك الذكي؛ –الذكي هاتفك من Bluetooth® بتنشيط قم –وإجعله مرئي إلى األجهزة األخرى (راجع دليل
االستخدام الخاص بهاتفك)؛قم بعمل اقتران مع هاتفك الذكي ونظام الملتيمديا –األجهزة فصل «توصيل، فصل (راجع
®Bluetooth»)؛
الهاتف الذكي
إلغاء
A

ARA–٥٤
(٢/٢) BLUETOOTH® توصيل، فصل أجهزة
فصل هاتف متصللفصل هاتف من Media Nav Evolution، اضغط
على اسم جهازك. تختفي العالمة الصغيرة 1.إذا كنت متصال في مرحلة لحظة فصل هاتفك، يتم
نقل االتصال تلقائيا على هاتفك.
تغيير الهاتف المتصل بهيمكنك االتصال/فصل االتصال ألي جهاز في أي
.Bluetooth® وقت«جهاز على اضغط الرئيسية، القائمة خالل من «قائمة وعلى «اإلعدادات» على ثم الوسائط»،
األجهزة».على بالضغط توصيله المراد الجهاز على اضغط
«موافق».تظهر عالمة صغيرة 1 أمام اسم هاتفك لتخبرك بأن
االتصال قد تم.
Info 2_3Gr
Seungyeon_VU2
Seungyeon_3
خيارات
Bluetooth أجهزة
1
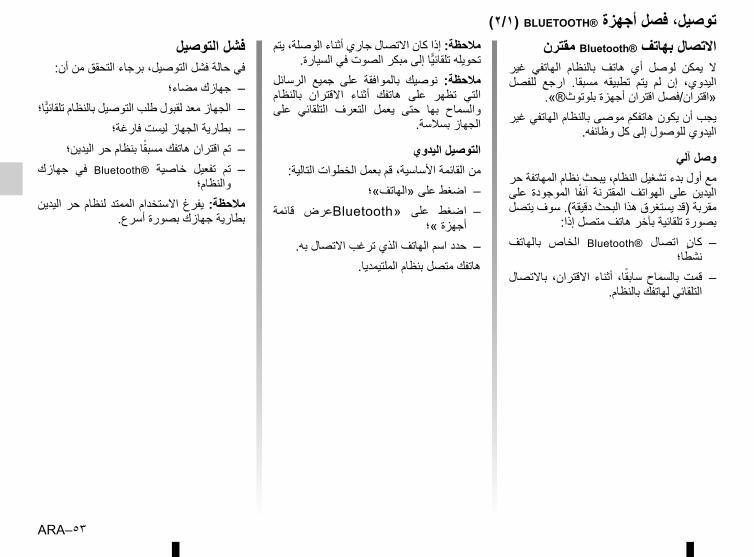
ARA–٥٣
(٢/١) BLUETOOTH® توصيل، فصل أجهزةمالحظة: إذا كان االتصال جاري أثناء الوصلة، يتم
تحويله تلقائيا إلى مبكر الصوت في السيارة.الرسائل جميع على بالموافقة نوصيك مالحظة: بالنظام االقتران أثناء هاتفك على تظهر التي على التلقائي التعرف يعمل حتى بها والسماح
الجهاز بسالسة.
التوصيل اليدويمن القائمة األساسية، قم بعمل الخطوات التالية:
اضغط على «الهاتف»؛ –قائمة «Bluetoothعرض على اضغط –
أجهزة »؛حدد اسم الهاتف الذي ترغب االتصال به. –
هاتفك متصل بنظام الملتيمديا.
فشل التوصيلفي حالة فشل التوصيل، برجاء التحقق من أن:
جهازك مضاء؛ –الجهاز معد لقبول طلب التوصيل بالنظام تلقائيا؛ –
بطارية الجهاز ليست فارغة؛ –تم اقتران هاتفك مسبقا بنظام حر اليدين؛ –
جهازك في Bluetooth® خاصية تفعيل تم –والنظام؛
اليدين حر لنظام الممتد االستخدام يفرغ مالحظة: بطارية جهازك بصورة أسرع.
االتصال بهاتف ®Bluetooth مقترنغير الهاتفي بالنظام هاتف أي لوصل يمكن ال للفصل ارجع مسبقا. تطبيقه يتم لم إن اليدوي،
«اقتران/فصل اقتران أجهزة بلوتوث®».يجب أن يكون هاتفكم موصى بالنظام الهاتفي غير
اليدوي للوصول إلى كل وظائفه.
وصل آليمع أول بدء تشغيل النظام، يبحث نظام المهاتفة حر على الموجودة آنفا المقترنة الهواتف على اليدين مقربة (قد يستغرق هذا البحث دقيقة). سوف يتصل
بصورة تلقائية بآخر هاتف متصل إذا:بالهاتف الخاص Bluetooth® اتصال كان –
نشطا؛باالتصال االقتران، أثناء سابقا، بالسماح قمت –
التلقائي لهاتفك بالنظام.
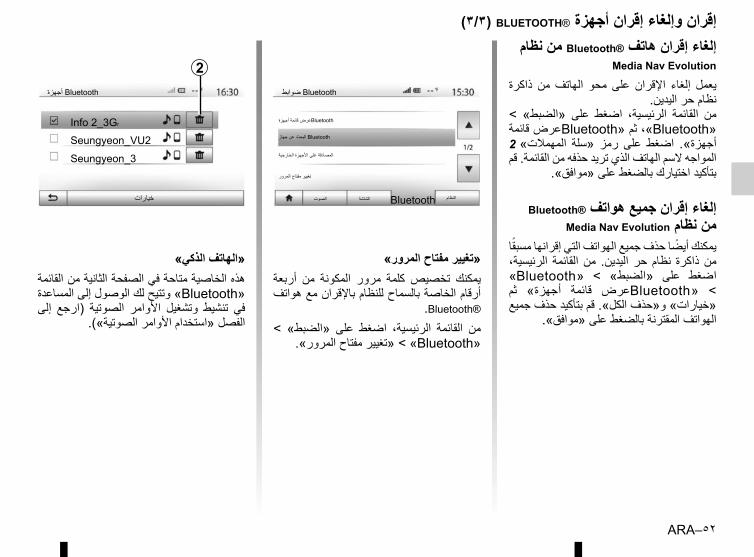
ARA–٥٢
إلغاء إقران هاتف ®Bluetooth من نظام Media Nav Evolution
ذاكرة من الهاتف محو على اإلقران إلغاء يعمل نظام حر اليدين.
< «الضبط» على اضغط الرئيسية، القائمة من «Bluetooth»، ثم «Bluetoothعرض قائمة المهمالت» 2 «سلة رمز على اضغط أجهزة». المواجه السم الهاتف الذي تريد حذفه من القائمة. قم
بتأكيد اختيارك بالضغط على «موافق».
Bluetooth® إلغاء إقران جميع هواتفMedia Nav Evolution من نظام
يمكنك أيضا حذف جميع الهواتف التي إقرانها مسبقا الرئيسية، القائمة من اليدين. حر نظام ذاكرة من «Bluetooth» < «الضبط» على اضغط ثم أجهزة» قائمة «Bluetoothعرض <«خيارات» و«حذف الكل». قم بتأكيد حذف جميع
الهواتف المقترنة بالضغط على «موافق».
الصوت الشاشة Bluetooth النظام
Bluetooth ضوابط
Bluetoothعرض قائمة أجهزة
Bluetooth البحث عن جهاز
المصادقة على األجهزة الخارجية
تغيير مفتاح المرور
«تغيير مفتاح المرور»أربعة من المكونة مرور كلمة تخصيص يمكنك أرقام الخاصة بالسماح للنظام باإلقران مع هواتف
.Bluetooth®
< «الضبط» على اضغط الرئيسية، القائمة من «Bluetooth» > «تغيير مفتاح المرور».
Bluetooth أجهزة
Info 2_3Gr
Seungyeon_VU2
Seungyeon_3
2
خيارات
«الهاتف الذكي»هذه الخاصية متاحة في الصفحة الثانية من القائمة «Bluetooth» وتتيح لك الوصول إلى المساعدة إلى (ارجع الصوتية األوامر وتشغيل تنشيط في
الفصل «استخدام األوامر الصوتية»).
(٣/٣) BLUETOOTH® إقران وإلغاء إقران أجهزة
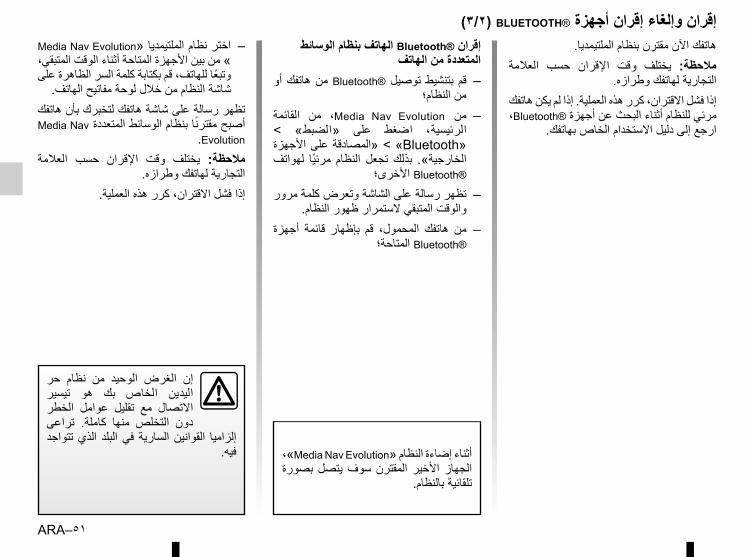
ARA–٥١
Media Nav Evolution» اختر نظام الملتيمديا –» من بين األجهزة المتاحة أثناء الوقت المتبقي، وتبعا للهاتف، قم بكتابة كلمة السر الظاهرة على
شاشة النظام من خالل لوحة مفاتيح الهاتف.تظهر رسالة على شاشة هاتفك لتخبرك بأن هاتفك Media Nav أصبح مقترنا بنظام الوسائط المتعددة
.Evolution
العالمة حسب اإلقران وقت يختلف مالحظة: التجارية لهاتفك وطرازه.
إذا فشل االقتران، كرر هذه العملية.
(٣/٢) BLUETOOTH® إقران وإلغاء إقران أجهزةإقران ®Bluetooth الهاتف بنظام الوسائط
المتعددة من الهاتفأو هاتفك من Bluetooth® توصيل بتنشيط قم –
من النظام؛القائمة من ،Media Nav Evolution من – < «الضبط» على اضغط الرئيسية، «Bluetooth» > «المصادقة على األجهزة لهواتف مرئيا النظام تجعل بذلك الخارجية».
®Bluetooth األخرى؛
تظهر رسالة على الشاشة وتعرض كلمة مرور –والوقت المتبقي الستمرار ظهور النظام.
أجهزة قائمة بإظهار قم المحمول، هاتفك من –®Bluetooth المتاحة؛
،«Media Nav Evolution» أثناء إضاءة النظامبصورة يتصل سوف المقترن األخير الجهاز
تلقائية بالنظام.
حر نظام من الوحيد الغرض إن تيسير هو بك الخاص اليدين الخطر عوامل تقليل مع االتصال تراعى كاملة. منها التخلص دون تتواجد الذي البلد في السارية القوانين إلزاميا
فيه.
هاتفك اآلن مقترن بنظام الملتيمديا.العالمة حسب اإلقران وقت يختلف مالحظة:
التجارية لهاتفك وطرازه.إذا فشل االقتران، كرر هذه العملية. إذا لم يكن هاتفك ،Bluetooth® مرئي للنظام أثناء البحث عن أجهزة
ارجع إلى دليل االستخدام الخاص بهاتفك.
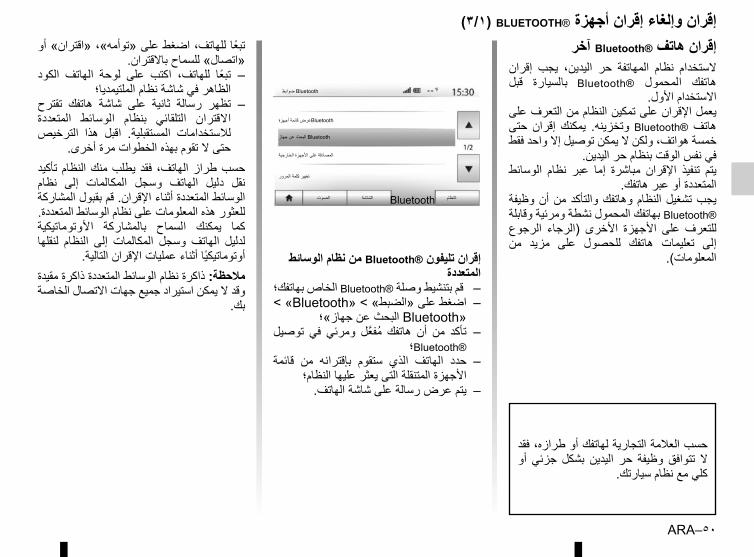
ARA–٥٠
إقران هاتف ®Bluetooth آخرإقران يجب اليدين، حر المهاتفة نظام الستخدام قبل بالسيارة Bluetooth® المحمول هاتفك
االستخدام األول.يعمل اإلقران على تمكين النظام من التعرف على حتى إقران يمكنك وتخزينه. Bluetooth® هاتف خمسة هواتف، ولكن ال يمكن توصيل إال واحد فقط
في نفس الوقت بنظام حر اليدين.الوسائط نظام عبر إما مباشرة اإلقران تنفيذ يتم
المتعددة أو عبر هاتفك.وظيفة أن من والتأكد وهاتفك النظام تشغيل يجب ®Bluetooth بهاتفك المحمول نشطة ومرئية وقابلة الرجوع (الرجاء األخرى األجهزة على للتعرف من مزيد على للحصول هاتفك تعليمات إلى
المعلومات).
(٣/١) BLUETOOTH® إقران وإلغاء إقران أجهزة
الصوت الشاشة Bluetooth النظام
Bluetooth ضوابط
Bluetoothعرض قائمة أجهزة
Bluetooth البحث عن جهاز
المصادقة على األجهزة الخارجية
تغيير كلمة المرور
حسب العالمة التجارية لهاتفك أو طرازه، فقد أو جزئي بشكل اليدين حر وظيفة تتوافق ال
كلي مع نظام سيارتك.
إقران تليفون ®Bluetooth من نظام الوسائط المتعددة
– قم بتنشيط وصلة ®Bluetooth الخاص بهاتفك؛ < «Bluetooth» < «اضغط على «الضبط –
«Bluetooth البحث عن جهاز»؛توصيل في ومرئي مفعل هاتفك أن من تأكد –
®Bluetooth؛قائمة من بإقترانه ستقوم الذي الهاتف حدد –
األجهزة المتنقلة التى يعثر عليها النظام؛يتم عرض رسالة على شاشة الهاتف. –
تبعا للهاتف، اضغط على «توأمه»، «اقتران» أو «اتصال» للسماح باالقتران.
الكود الهاتف لوحة على اكتب للهاتف، تبعا –الظاهر في شاشة نظام الملتيمديا؛
تقترح هاتفك شاشة على ثانية رسالة تظهر –المتعددة الوسائط بنظام التلقائي االقتران الترخيص هذا اقبل المستقبلية. لالستخدامات
حتى ال تقوم بهذه الخطوات مرة أخرى.تأكيد النظام منك يطلب فقد الهاتف، طراز حسب نظام إلى المكالمات وسجل الهاتف دليل نقل الوسائط المتعددة أثناء اإلقران. قم بقبول المشاركة للعثور هذه المعلومات على نظام الوسائط المتعددة.
األوتوماتيكية بالمشاركة السماح يمكنك كما لنقلها النظام إلى المكالمات وسجل الهاتف لدليل
أوتوماتيكيا أثناء عمليات اإلقران التالية.مالحظة: ذاكرة نظام الوسائط المتعددة ذاكرة مقيدة وقد ال يمكن استيراد جميع جهات االتصال الخاصة
بك.
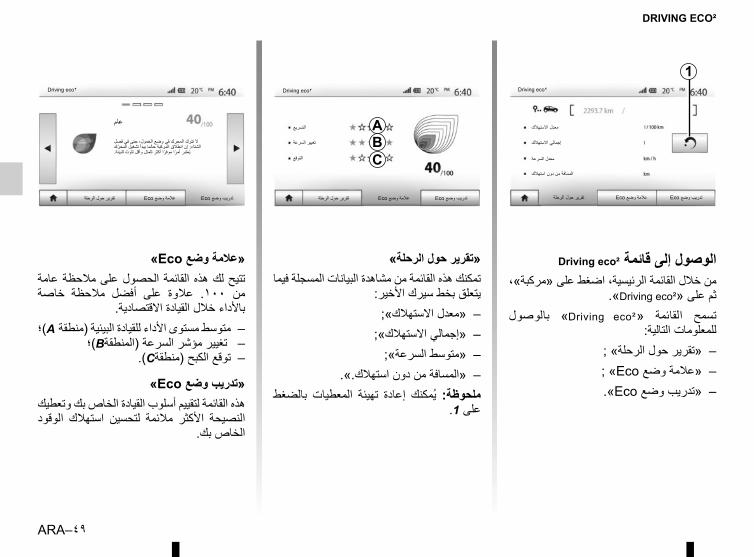
ARA–٤٩
DRIVING ECO²
«Eco عالمة وضع»تتيح لك هذه القائمة الحصول على مالحظة عامة خاصة مالحظة أفضل على عالوة .١٠٠ من
باألداء خالل القيادة االقتصادية.متوسط مستوى األداء للقيادة البيئية (منطقة A)؛ –
– تغيير مؤشر السرعة (المنطقةB)؛.(Cمنطقة) توقع الكبح –
«Eco تدريب وضع»هذه القائمة لتقييم أسلوب القيادة الخاص بك وتعطيك الوقود استهالك لتحسين مالئمة األكثر النصيحة
الخاص بك.
«تقرير حول الرحلة»تمكنك هذه القائمة من مشاهدة البيانات المسجلة فيما
يتعلق بخط سيرك األخير:«معدل االستهالك»; –
«إجمالي االستهالك»; –«متوسط السرعة»; –
«المسافة من دون استهالك.». –بالضغط المعطيات تهيئة إعادة يمكنك ملحوظة:
على 1.
Driving eco² الوصول إلى قائمةمن خالل القائمة الرئيسية، اضغط على «مركبة»،
.«Driving eco²» ثم علىبالوصول «Driving eco²» القائمة تسمح
للمعلومات التالية:«تقرير حول الرحلة» ; –; «Eco عالمة وضع» –.«Eco تدريب وضع» –
التسريع
Driving eco٢
Eco تدريب وضع
A
CBتغيير السرعة
التوقع
Eco تقرير حول الرحلةعالمة وضع
Driving eco٢
معدل االستهالك
إجمالي االستهالك
معدل السرعة
المسافة من دون استهالك
Eco تدريب وضعEco تقرير حول الرحلةعالمة وضع
1
Eco تدريب وضعEco تقرير حول الرحلةعالمة وضع
عام
ال تترك المحرك في وضع الخمول، حتى في فصل الشتاء: إن انطالق المركبة حالما يبدأ تشغيل المحرك يعتبر أمرا موفرا أكثر للمال وأقل تلوث للبيئة.
Driving eco٢
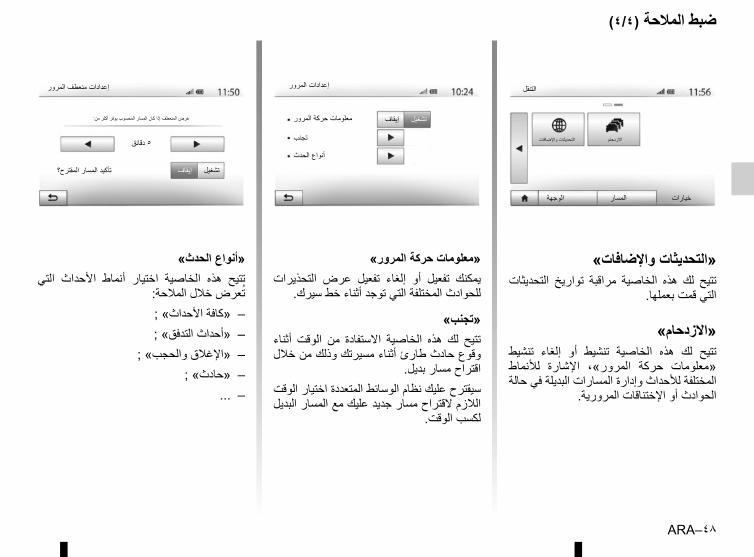
ARA–٤٨
ضبط المالحة (٤/٤)
«التحديثات واإلضافات»التحديثات تواريخ مراقبة الخاصية هذه لك تتيح
التي قمت بعملها.
«االزدحام»تنشيط إلغاء أو تنشيط الخاصية هذه لك تتيح لألنماط اإلشارة المرور»، حركة «معلومات المختلفة لألحداث وإدارة المسارات البديلة في حالة
الحوادث أو اإلختناقات المرورية.
«معلومات حركة المرور»التحذيرات عرض تفعيل إلغاء أو تفعيل يمكنك
للحوادث المختلفة التي توجد أثناء خط سيرك.
«تجنب»أثناء الوقت من االستفادة الخاصية هذه لك تتيح وقوع حادث طارئ أثناء مسيرتك وذلك من خالل
اقتراح مسار بديل.سيقترح عليك نظام الوسائط المتعددة اختيار الوقت الالزم القتراح مسار جديد عليك مع المسار البديل
لكسب الوقت.
إعدادات المرور
معلومات حركة المرور
تجنب
أنواع الحدث
إيقاف تشغيل
«أنواع الحدث»التي األحداث أنماط اختيار الخاصية هذه تتيح
تعرض خالل المالحة:«كافة األحداث» ; –«أحداث التدفق» ; –
«اإلغالق والحجب» ; –«حادث» ; –
... –
التنقل
التحديثات واإلضافات االزدحام
الوجهة المسار خيارات
إعدادات منعطف المرور
٥ دقائق
عرض المنعطف إذا كان المسار المحسوب يوفر أكثر من:
تأكيد المسار المقترح؟ إيقاف تشغيل
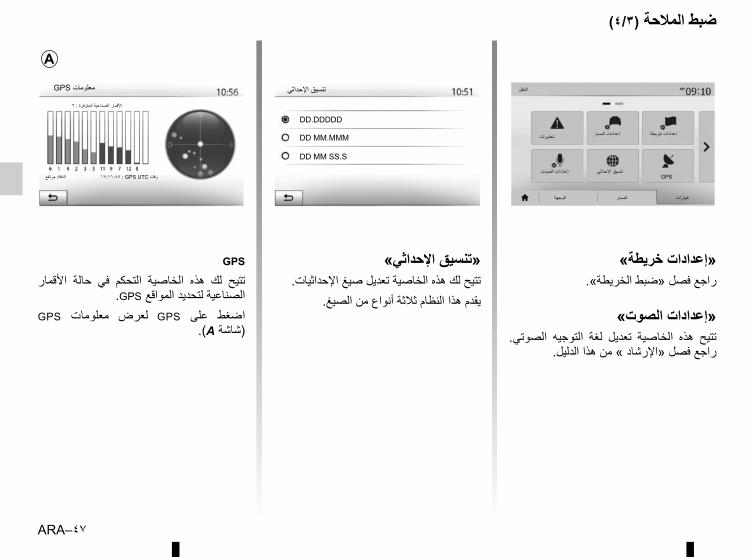
ARA–٤٧
ضبط المالحة (٤/٣)
«تنسيق اإلحداثي»تتيح لك هذه الخاصية تعديل صيغ اإلحداثيات.
يقدم هذا النظام ثالثة أنواع من الصيغ.
«إعدادات خريطة»راجع فصل «ضبط الخريطة».
«إعدادات الصوت»الصوتي. التوجيه لغة تعديل الخاصية هذه تتيح
راجع فصل «اإلرشاد » من هذا الدليل.
GPS
األقمار حالة في التحكم الخاصية هذه لك تتيح .GPS الصناعية لتحديد المواقع
GPS معلومات لعرض GPS على اضغط .(A شاشة)
GPS معلومات
األقمار الصناعية المتوفرة : ٦
الدقة: مرتفع ١٧:١١:٤٥ : GPS UTC وقت
A
التنقل
تحذيرات إعدادات المسار إعدادات خريطة
إعدادات الصوت تنسيق اإلحداثيGPS
الوجهة المسار خيارات
تنسيق اإلحداثي
DD.DDDDD
DD MM.MMM
DD MM SS.S
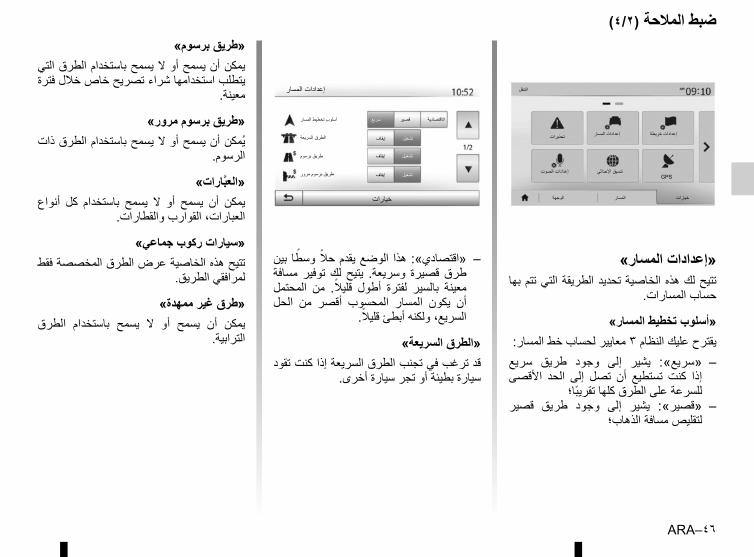
ARA–٤٦
ضبط المالحة (٤/٢)
«اقتصادي»: هذا الوضع يقدم حال وسطا بين –مسافة توفير لك يتيح وسريعة. قصيرة طرق المحتمل من قليال. أطول لفترة بالسير معينة الحل من أقصر المحسوب المسار يكون أن
السريع، ولكنه أبطئ قليال.
«الطرق السريعة»قد ترغب في تجنب الطرق السريعة إذا كنت تقود
سيارة بطيئة أو تجر سيارة أخرى.
«إعدادات المسار»تتيح لك هذه الخاصية تحديد الطريقة التي تتم بها
حساب المسارات.
«أسلوب تخطيط المسار»يقترح عليك النظام ٣ معايير لحساب خط المسار:
سريع طريق وجود إلى يشير «سريع»: –األقصى الحد إلى تصل أن تستطيع كنت إذا
للسرعة على الطرق كلها تقريبا؛قصير طريق وجود إلى يشير «قصير»: –
لتقليص مسافة الذهاب؛
«طريق برسوم»يمكن أن يسمح أو ال يسمح باستخدام الطرق التي يتطلب استخدامها شراء تصريح خاص خالل فترة
معينة.
«طريق برسوم مرور»يمكن أن يسمح أو ال يسمح باستخدام الطرق ذات
الرسوم.
«العبارات»أنواع كل باستخدام يسمح ال أو يسمح أن يمكن
العبارات، القوارب والقطارات.
«سيارات ركوب جماعي»تتيح هذه الخاصية عرض الطرق المخصصة فقط
لمرافقي الطريق.
«طرق غير ممهدة»الطرق باستخدام يسمح ال أو يسمح أن يمكن
الترابية.
التنقل
تحذيرات إعدادات المسار إعدادات خريطة
إعدادات الصوت تنسيق اإلحداثيGPS
الوجهة المسار خيارات
إيقاف
إيقاف
تشغيل
تشغيل
سريع قصير أسلوب تخطيط المساراالقتصادية
الطرق السريعة
طريق برسوم مرور
طريق برسوم
إعدادات المسار
إيقافتشغيل
خيارات

ARA–٤٥
ضبط المالحة (٤/١)
التبويب «خيارات» أسفل قائمة «التنقل» يتيح لك تغيير عرض الخريطة أو إعدادات المالحة.
«تحذيرات»يمكنك هذا القسم من ضبط التحذيرات.
تحذير في حالة تجاوز السرعةحدود حول معلومات على الخرائط تحتوي قد أن للنظام يمكن الطرق. لقطاعات السرعات
يحذرك عند تجاوز الحد الحالي.
قد أو المعلومات هذه تتوافر ال قد للمنطقة، تبعا ال تكون صحيحة تماما بالنسبة لكافة الطرق على
الخريطة.أنواع التنبيه التالية متوفرة:
تحذير صوتي: عندما تتجاوز السرعة المحددة –المسمحو بها تتلقى تحذيرا غير لفظي؛
للسرعة األقصى الحد يظهر بصري: تحذير –عند الخريطة على باألحمر ويضيء الحالية
تجاوزه.اضغط على «تشغيل» أو «إيقاف» لتفعيل/تعطيل
التحذير.
حدود السرعة مرئية دائماتفعيل أو إلغاء تفعيل عرض تحديد سرعة الطريق
المتبع بالضغط على «تشغيل» أو «إيقاف».
تحذيرات من نقطة الخطرعندما يعبر السائق منطقة يقظة حادة، تظهر إشارة تحذير مرئية على الشاشة يصاحبها إشارة صوتية. مناطق الخطر هذه تتماثل مع أجزاء الطريق والتي عليها يجب على السائق أن يتوخى الحذر الشديد. ربما تكون دائمة أو مؤقتة. يمكنك تنشيط أو إلغاء
تنشيط هذه الخاصية.
مسافة ما قبل التحذيرالخيارات من العديد بين من مسافة اختيار يمكنك
التي تود أن تحذرك من منطقة الخطر الحاد.
التنقل
تحذيرات إعدادات المسار إعدادات خريطة
إعدادات الصوت تنسيق اإلحداثي GPS
الوجهة المسار خيارات
إيقاف
إيقاف
إيقاف
تشغيل
تشغيل
تشغيل
تحذير عند السرعة
إظهار حد السرعة
نقاط التنبيه
تحذيرات
مسافة ما قبل التنبيه m ٠ m ٢٠٠ m ٥٠٠
خيار وتفعيل تحميل يعتبر البلدان، بعض فى يمثل أن ويمكن مشروع الخطرغير مناطق
خرقا للقانون.
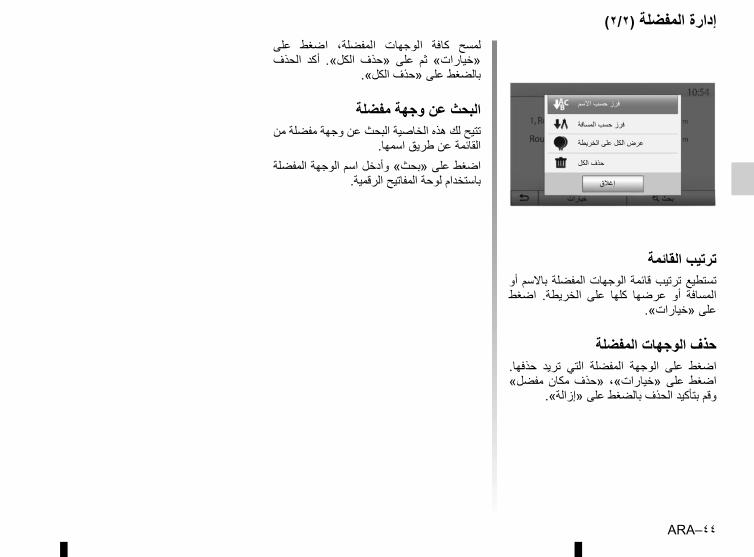
ARA–٤٤
إدارة المفضلة (٢/٢)
ترتيب القائمةتستطيع ترتيب قائمة الوجهات المفضلة باالسم أو اضغط الخريطة. على كلها عرضها أو المسافة
على «خيارات».
حذف الوجهات المفضلةحذفها. تريد التي المفضلة الوجهة على اضغط مفضل» مكان على «خيارات»، «حذف اضغط
وقم بتأكيد الحذف بالضغط على «إزالة».
على اضغط المفضلة، الوجهات كافة لمسح الحذف أكد الكل». «حذف على ثم «خيارات»
بالضغط على «حذف الكل».
البحث عن وجهة مفضلةتتيح لك هذه الخاصية البحث عن وجهة مفضلة من
القائمة عن طريق اسمها.اضغط على «بحث» وأدخل اسم الوجهة المفضلة
باستخدام لوحة المفاتيح الرقمية. إغالق
خيارات بحث
حذف الكل
عرض الكل على الخريطة
فرز حسب المسافة
فرز حسب االسم
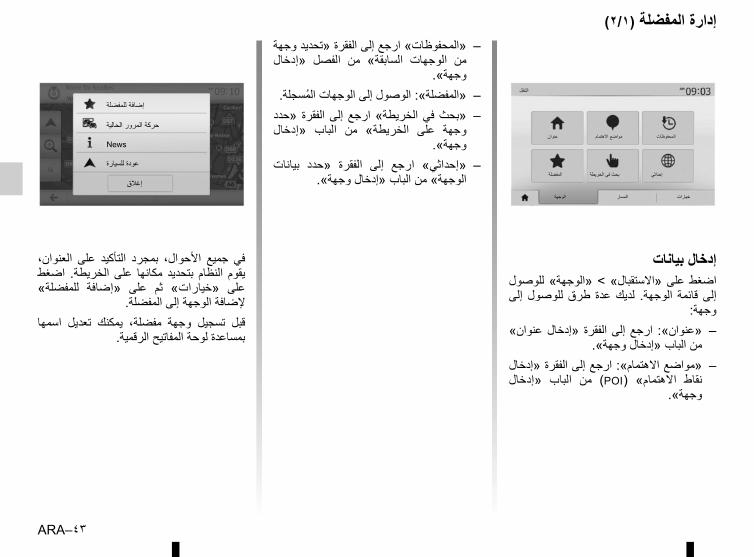
ARA–٤٣
إدارة المفضلة (٢/١)
إدخال بياناتللوصول على «االستقبال» > «الوجهة» اضغط إلى للوصول طرق عدة لديك الوجهة. قائمة إلى
وجهة:عنوان» الفقرة «إدخال إلى ارجع «عنوان»: –
من الباب «إدخال وجهة».«مواضع االهتمام»: ارجع إلى الفقرة «إدخال –«إدخال الباب من (POI) االهتمام» نقاط
وجهة».
«المحفوظات» ارجع إلى الفقرة «تحديد وجهة –«إدخال الفصل من السابقة» الوجهات من
وجهة».«المفضلة»: الوصول إلى الوجهات المسجلة. –
الفقرة «حدد إلى ارجع الخريطة» في «بحث –«إدخال الباب من الخريطة» على وجهة
وجهة».بيانات «حدد الفقرة إلى ارجع «إحداثي» –
الوجهة» من الباب «إدخال وجهة».
العنوان، على التأكيد بمجرد األحوال، جميع في اضغط الخريطة. على مكانها بتحديد النظام يقوم للمفضلة» «إضافة على ثم «خيارات» على
إلضافة الوجهة إلى المفضلة.اسمها تعديل يمكنك مفضلة، وجهة تسجيل قبل
بمساعدة لوحة المفاتيح الرقمية.
التنقل
عنوان مواضع االهتمام المحفوظات
المفضلة بحث في الخريطة إحداثي
الوجهة المسار خيارات
حركة المرور الحالية
إغالق
إضافة للمفضلة
News
عودة للسيارة
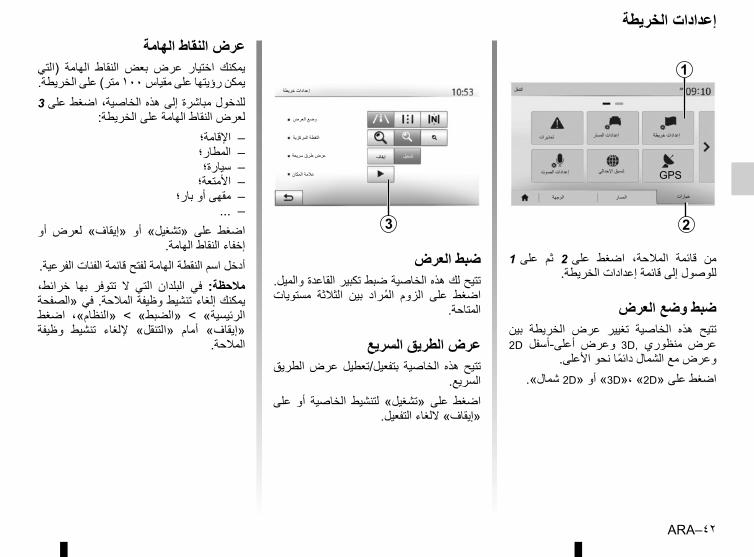
ARA–٤٢
إعدادات الخريطة
على 1 ثم على 2 اضغط المالحة، قائمة من للوصول إلى قائمة إعدادات الخريطة.
ضبط وضع العرضبين الخريطة عرض تغيير الخاصية هذه تتيح 2D أعلى-أسفل وعرض 3D, منظوري عرض
وعرض مع الشمال دائما نحو األعلى.اضغط على «3D»، «2D» أو «2D شمال».
ضبط العرضتتيح لك هذه الخاصية ضبط تكبير القاعدة والميل. مستويات الثالثة بين المراد الزوم على اضغط
المتاحة.
عرض الطريق السريعالطريق عرض بتفعيل/تعطيل الخاصية هذه تتيح
السريع.على أو الخاصية لتنشيط «تشغيل» على اضغط
«إيقاف» اللغاء التفعيل.
عرض النقاط الهامة(التي الهامة النقاط بعض عرض اختيار يمكنك يمكن رؤيتها على مقياس ١٠٠ متر) على الخريطة.للدخول مباشرة إلى هذه الخاصية، اضغط على 3
لعرض النقاط الهامة على الخريطة:اإلقامة؛ –المطار؛ –سيارة؛ –األمتعة؛ –
مقهى أو بار؛ –... –
أو لعرض «إيقاف» أو «تشغيل» على اضغط إخفاء النقاط الهامة.
أدخل اسم النقطة الهامة لفتح قائمة الفئات الفرعية.خرائط، بها تتوفر ال التي البلدان في مالحظة: يمكنك إلغاء تنشيط وظيفة المالحة. في «الصفحة اضغط «النظام»، < «الضبط» < الرئيسية» وظيفة تنشيط إللغاء «التنقل» أمام «إيقاف»
المالحة.
3
إيقاف تشغيل
إعدادات خريطة
النقطة المركزية
عرض طرق سريعة
عالمة المكان
وضع العرض
2
1التنقل
تحذيرات إعدادات خريطة
إعدادات الصوت تنسيق اإلحداثي GPS
الوجهة المسار خيارات
إعدادات المسار
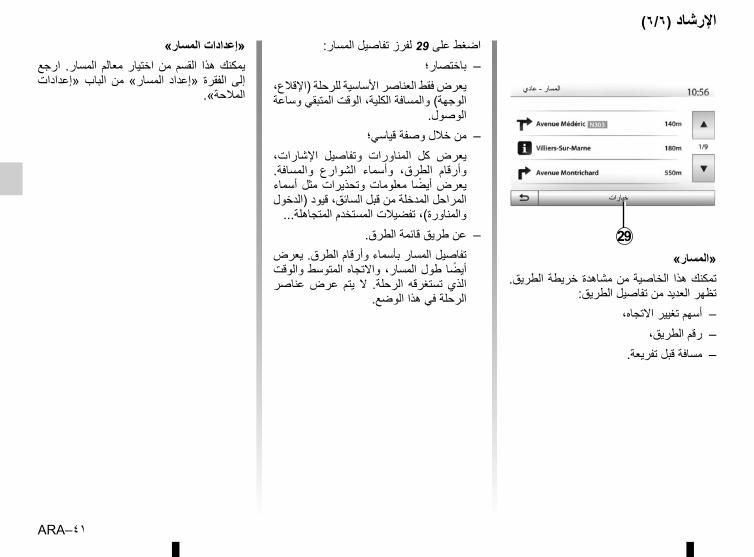
ARA–٤١
اضغط على 29 لفرز تفاصيل المسار:باختصار؛ –
يعرض فقط العناصر األساسية للرحلة (اإلقالع، الوجهة) والمسافة الكلية، الوقت المتبقي وساعة
الوصول.من خالل وصفة قياسي؛ –
اإلشارات، وتفاصيل المناورات كل يعرض والمسافة. الشوارع وأسماء الطرق، وأرقام أسماء مثل وتحذيرات معلومات أيضا يعرض المراحل المدخلة من قبل السائق، قيود (الدخول
والمناورة)، تفضيالت المستخدم المتجاهلة...عن طريق قائمة الطرق. –
تفاصيل المسار بأسماء وأرقام الطرق. يعرض أيضا طول المسار، واالتجاه المتوسط والوقت عناصر عرض يتم ال الرحلة. تستغرقه الذي
الرحلة في هذا الوضع.
«المسار»تمكنك هذا الخاصية من مشاهدة خريطة الطريق.
تظهر العديد من تفاصيل الطريق:أسهم تغيير االتجاه، –
رقم الطريق، –مسافة قبل تفريعة. –
«إعدادات المسار»ارجع المسار. معالم اختيار من القسم هذا يمكنك الباب «إعدادات من المسار» الفقرة «إعداد إلى
المالحة».
خيارات
المسار - عادي
29
اإلرشاد (٦/٦)

ARA–٤٠
المراحل والوجهة < «التنقل» < الرئيسية» «الصفحة اضغط «المسار» > «تعديل المسار» لتغيير المسار عن
طريق إضافة أو تعديل أو حذف خطوات.اضغط على 21 إلضافة مراحل سير ثم على 25 لتحديد مختلفة طرق يوجد جديدة. وجهة إلضافة
وجهة: راجع الفصل «إدخال وجهة».اضغط على 23 لحذف وجهة. –
اضغط على 24 إلعادة ترتيب القائمة. –اضغط على 22 لتعديل عنوان انطالق المسيرة. –
25 24
21
خيارات موافق
23
تعديل المسار
موضع GPS الحالي
22
اإلرشاد (٦/٥)
مسارات بديلةيتيح لك هذا الباب تعديل طريقة التخطيط للمسار. طريقة تعديل لك تسمح متاحة طرق ثالث هناك
تخطيط المسار:«سريع» ; –
«اقتصادي»؛ –«قصير». –
الباب من المسار» «إعداد الفقرة إلى ارجع «إعدادات المالحة».
< «التنقل» < الرئيسية» «الصفحة اضغط C أو B أو A المسار» > «طرق المسارات» ثم»إلى للعودة على 28 اضغط الجديد. المسار لتأكيد
الشاشة السابقة.
مسارات بديلة < «التنقل» < الرئيسية» «الصفحة اضغط بديل. مسار إلنشاء تجنبها» «يتم < «المسار» البديل للمسار وفقا القائمة من منطقة على اضغط
المراد.لتغيير منطقة، اضغط على 27.
قم بتأكيد المسار الجديد بالضغط على 26.
إلغاء المساريمكنك في أي وقت إيقاف التوجيه الحالي.
< «التنقل» < الرئيسية» «الصفحة اضغط المسار إللغاء المسار» «حذف < «المسار»
النشط.
2726
موافق
قسم تم تفاديهالمسار األصليمسار جديد
الطول: -٢٥٠ الوقت +٠:٠٦
28
طرق المسارات
سريع
اقتصادي
قصير
A
B
C
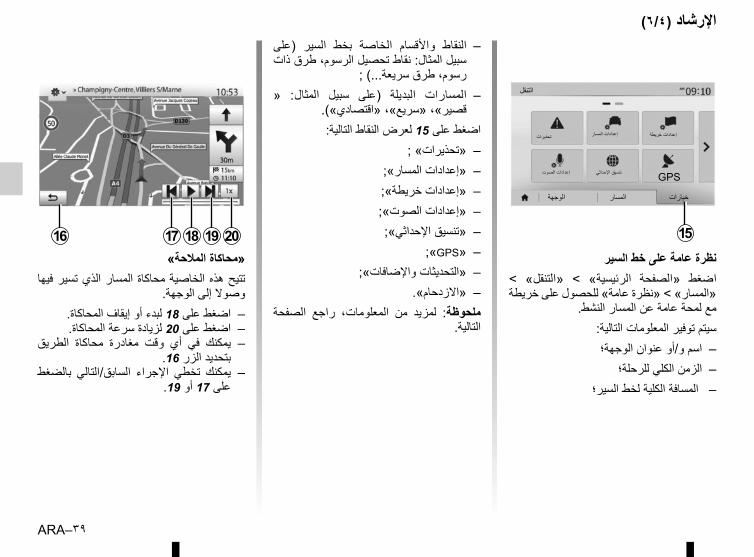
ARA–٣٩
اإلرشاد (٦/٤)
«محاكاة المالحة»تتيح هذه الخاصية محاكاة المسار الذي تسير فيها
وصوال إلى الوجهة.اضغط على 18 لبدء أو إيقاف المحاكاة. –اضغط على 20 لزيادة سرعة المحاكاة. –
الطريق محاكاة مغادرة وقت أي في يمكنك –بتحديد الزر 16.
بالضغط السابق/التالي اإلجراء تخطي يمكنك –على 17 أو 19.
1716 18 19 20 15
الوجهةالمسار
تحذيرات إعدادات المسار إعدادات خريطة
GPSإعدادات الصوتتنسيق اإلحداثي
التنقل
خيارات
(على السير بخط الخاصة واألقسام النقاط –سبيل المثال: نقاط تحصيل الرسوم، طرق ذات
رسوم، طرق سريعة...) ; » المثال: سبيل (على البديلة المسارات –
قصير»، «سريع»، «اقتصادي»).اضغط على 15 لعرض النقاط التالية:
«تحذيرات» ; –«إعدادات المسار»; –«إعدادات خريطة»; –«إعدادات الصوت»; –«تنسيق اإلحداثي»; –
;«GPS» –«التحديثات واإلضافات»; –
«االزدحام». –الصفحة راجع المعلومات، من لمزيد ملحوظة:
التالية.
نظرة عامة على خط السير < «التنقل» < الرئيسية» «الصفحة اضغط «المسار» > «نظرة عامة» للحصول على خريطة
مع لمحة عامة عن المسار النشط.سيتم توفير المعلومات التالية:اسم و/أو عنوان الوجهة؛ –
الزمن الكلي للرحلة؛ –– المسافة الكلية لخط السير؛
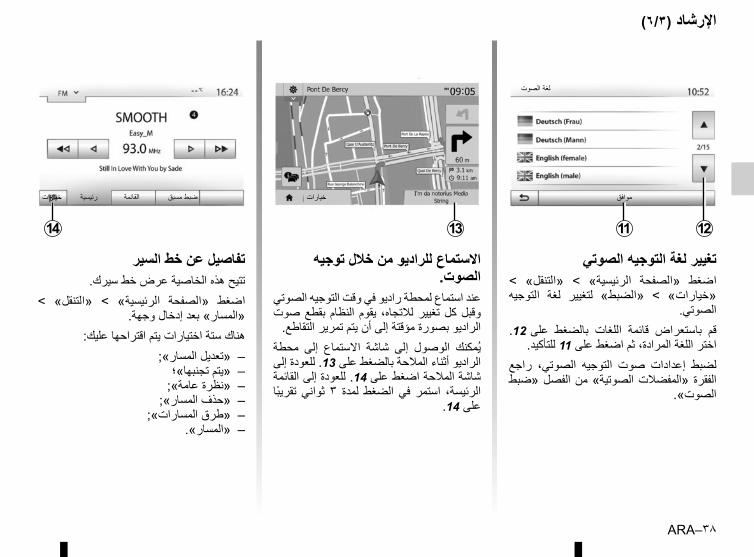
ARA–٣٨
تغيير لغة التوجيه الصوتي < «التنقل» < الرئيسية» «الصفحة اضغط التوجيه لغة لتغيير «الضبط» < «خيارات»
الصوتي.على 12. بالضغط اللغات قائمة باستعراض قم
اختر اللغة المرادة، ثم اضغط على 11 للتأكيد.راجع الصوتي، التوجيه صوت إعدادات لضبط الصوتية» من الفصل «ضبط الفقرة «المفضالت
الصوت».
1211
لغة الصوت
موافق
االستماع للراديو من خالل توجيه الصوت.
عند استماع لمحطة راديو في وقت التوجيه الصوتي صوت بقطع النظام يقوم لالتجاه، تغيير كل وقبل
الراديو بصورة مؤقتة إلى أن يتم تمرير التقاطع.محطة إلى االستماع شاشة إلى الوصول يمكنك الراديو أثناء المالحة بالضغط على 13. للعودة إلى شاشة المالحة اضغط على 14. للعودة إلى القائمة تقريبا ثواني ٣ لمدة الضغط في استمر الرئيسة،
على 14.
اإلرشاد (٦/٣)
رئيسية القائمة ضبط مسبق
14
خيارات
13
تفاصيل عن خط السيرتتيح هذه الخاصية عرض خط سيرك.
< «التنقل» < الرئيسية» «الصفحة اضغط «المسار» بعد إدخال وجهة.
هناك ستة اختيارات يتم اقتراحها عليك:«تعديل المسار»; –«يتم تجنبها»؛ –
«نظرة عامة»; –«حذف المسار»; –
«طرق المسارات»; –«المسار». –
خيارات
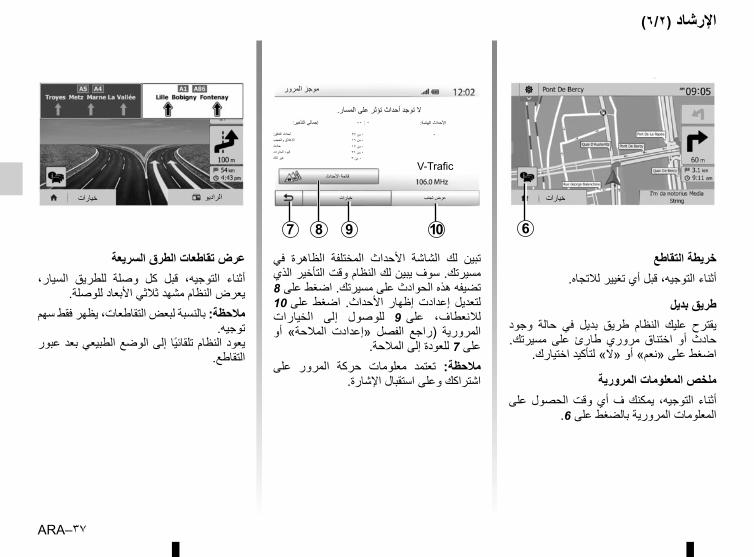
ARA–٣٧
اإلرشاد (٦/٢)
خريطة التقاطعأثناء التوجيه، قبل أي تغيير لالتجاه.
طريق بديلوجود حالة في بديل طريق النظام عليك يقترح مسيرتك. على طارئ مروري اختناق أو حادث
اضغط على «نعم» أو «ال» لتأكيد اختيارك.
ملخص المعلومات المروريةعلى الحصول وقت أي ف يمكنك التوجيه، أثناء
المعلومات المرورية بالضغط على 6.
عرض تقاطعات الطرق السريعةالسيار، للطريق وصلة كل قبل التوجيه، أثناء
يعرض النظام مشهد ثالثي األبعاد للوصلة.مالحظة: بالنسبة لبعض التقاطعات، يظهر فقط سهم
توجيه.يعود النظام تلقائيا إلى الوضع الطبيعي بعد عبور
التقاطع.
خيارات الراديو
في الظاهرة المختلفة األحداث الشاشة لك تبين مسيرتك. سوف يبين لك النظام وقت التأخير الذي تضيفه هذه الحوادث على مسيرتك. اضغط على 8 على 10 اضغط األحداث. إظهار إعدادت لتعديل الخيارات إلى للوصول على 9 لالنعطاف، أو المالحة» «إعدادت الفصل (راجع المرورية
على 7 للعودة إلى المالحة.على المرور حركة معلومات تعتمد مالحظة:
اشتراكك وعلى استقبال اإلشارة.
6
خيارات
7 9 108
موجز المرور
ال توجد أحداث تؤثر على المسار.األحداث الهامة:
٠
إجمالي التأخير: ٠ : ٠٠
أحداث التدفق:اإلغالق والحجبحادثقيود الحاراتغير ذلك
٠ من ٣٧٠ من ١٦٠ من ١٧٠ من ٢٦٠ من ٣
قائمة األحداثV-Trafic
خيارات عرض تجنب
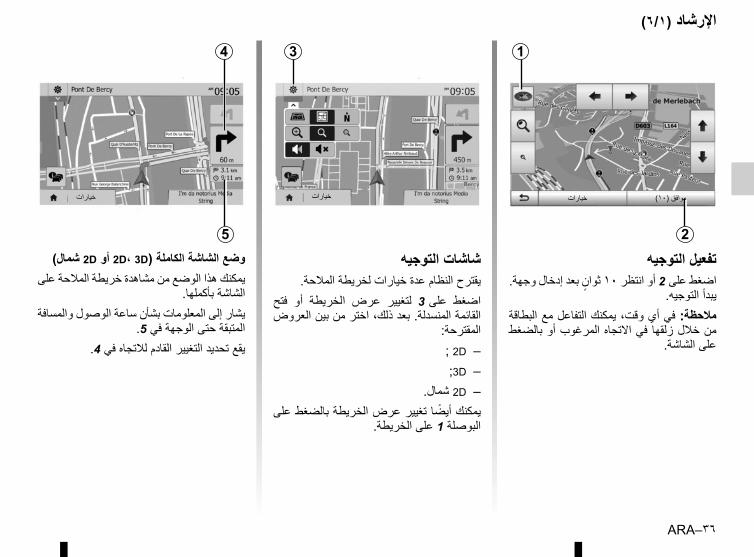
ARA–٣٦
اإلرشاد (٦/١)
تفعيل التوجيهاضغط على 2 أو انتظر ١٠ ثوان بعد إدخال وجهة.
يبدأ التوجيه.مالحظة: في أي وقت، يمكنك التفاعل مع البطاقة من خالل زلقها في االتجاه المرغوب أو بالضغط
على الشاشة.
شاشات التوجيهيقترح النظام عدة خيارات لخريطة المالحة.
فتح أو الخريطة عرض لتغيير على 3 اضغط القائمة المنسدلة. بعد ذلك، اختر من بين العروض
المقترحة:; 2D –;3D –
2D شمال. –يمكنك أيضا تغيير عرض الخريطة بالضغط على
البوصلة 1 على الخريطة.
وضع الشاشة الكاملة (2D، 3D أو 2D شمال)يمكنك هذا الوضع من مشاهدة خريطة المالحة على
الشاشة بأكملها.يشار إلى المعلومات بشأن ساعة الوصول والمسافة
المتبقة حتى الوجهة في 5.يقع تحديد التغيير القادم لالتجاه في 4.
3
خياراتخيارات
4
5 2
خيارات موافق (١٠)
1
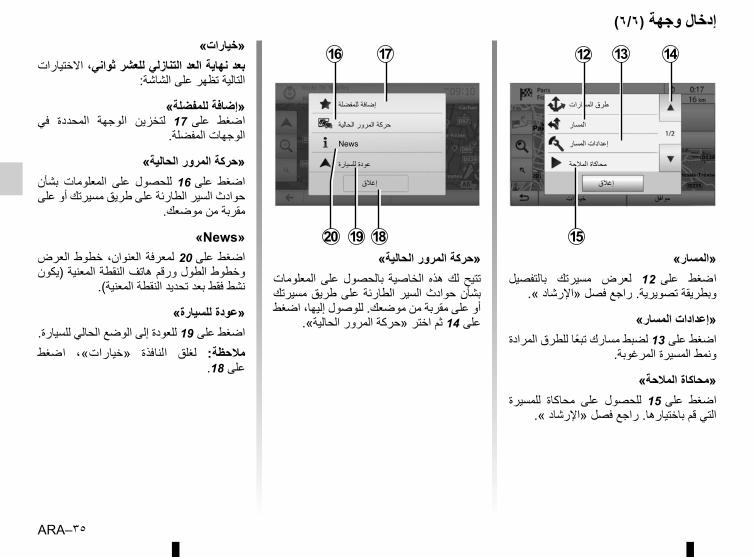
ARA–٣٥
إدخال وجهة (٦/٦)
«حركة المرور الحالية»المعلومات على بالحصول الخاصية هذه لك تتيح بشأن حوادث السير الطارئة على طريق مسيرتك أو على مقربة من موضعك. للوصول إليها، اضغط
على 14 ثم اختر «حركة المرور الحالية».
«خيارات»بعد نهاية العد التنازلي للعشر ثواني، االختيارات
التالية تظهر على الشاشة:
«إضافة للمفضلة»في المحددة الوجهة لتخزين على 17 اضغط
الوجهات المفضلة.
«حركة المرور الحالية»بشأن المعلومات على للحصول على 16 اضغط حوادث السير الطارئة على طريق مسيرتك أو على
مقربة من موضعك.
«News»اضغط على 20 لمعرفة العنوان، خطوط العرض وخطوط الطول ورقم هاتف النقطة المعنية (يكون
نشط فقط بعد تحديد النقطة المعنية).
«عودة للسيارة»اضغط على 19 للعودة إلى الوضع الحالي للسيارة.اضغط «خيارات»، النافذة لغلق مالحظة:
على 18.
«المسار»بالتفصيل مسيرتك لعرض على 12 اضغط
وبطريقة تصويرية. راجع فصل «اإلرشاد ».
«إعدادات المسار»اضغط على 13 لضبط مسارك تبعا للطرق المرادة
ونمط المسيرة المرغوبة.
«محاكاة المالحة»للمسيرة محاكاة على للحصول على 15 اضغط
التي قم باختيارها. راجع فصل «اإلرشاد ».
17
19
16
حركة المرور الحالية
إغالق
إضافة للمفضلة
عودة للسيارة
News
20 18
المسار
إغالق
طرق المسارات
محاكاة المالحة
إعدادات المسار
خيارات موافق
12 13
15
14

ARA–٣٤
إدخال وجهة (٦/٥)
التأكيد على الوجهةعدة اختيارات متاحة على الشاشة قبل التأكيد على
الوجهة:«موافق» ; –«خيارات». –
بأي تقم لم إذا ثواني. ١٠ من التنازلي العد يبدأ فعل خالل هذا الوقت، سوف يبدأ التوجيه بصورة
تلقائية.
«موافق»في حالة عدم وجود مسار نشط (لم يتم تحديد أي –مسار)، اضغط على 10 لتأكيد الوجهة كمسار
جديد.
ترتيب القائمةيمكن فرز نتائج البحث عن وجهة باستخدام نقطة عند والمسافة. باالسم التاريخ أو المفضلة هامة، للمسار وفقا النتائج فرز يتم نشط، مسار وجود
البديل. اضغط على 9 لعرضها على الخريطة.
إيجاد وجهة عن طريق اسمهاالتاريخ هامة، نقطة طريق عن وجهة حددت إذا في الوجهة عن البحث تستطيع أوالمفضلة، الخريطة من خالل اسمها. اضغط على بحث وقم
بإدخال االسم من خالل لوحة المفاتيح.
10
خيارات موافق
تحديد تستطيع نشط، مسار وجود حالة في –اضغط جديدة. مرحلة أو جديد كمسار الوجهة «نقطة أو جديد» «مسار على ثم على 10
عبور».
«خيارات»في نهاية العد التنازلي للعشر ثواني، االختيارات
التالية تظهر على الشاشة:
«طرق المسارات»اضغط على 11 لتغيير أو تعديل المسيرة.
خيارات
مواضع االهتمام التي تم العثور عليها
9
المسار
إغالق
طرق المسارات
محاكاة المالحة
إعدادات المسار
خيارات موافق
11
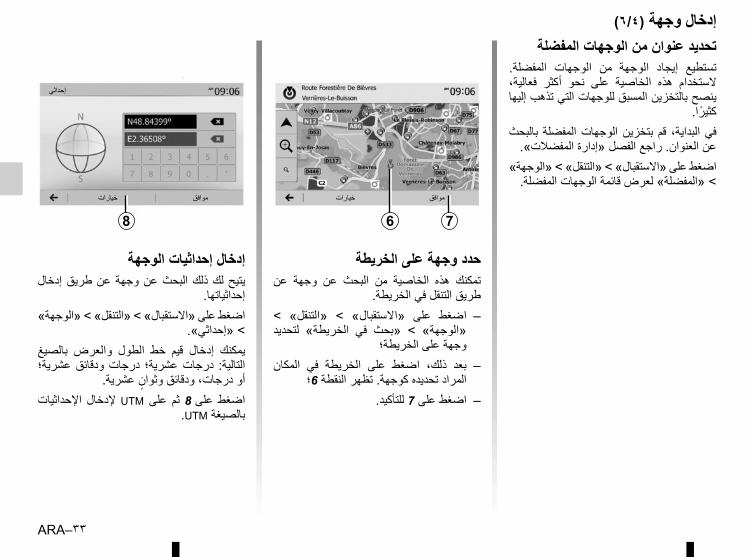
ARA–٣٣
إدخال وجهة (٦/٤)تحديد عنوان من الوجهات المفضلة
المفضلة. الوجهات من الوجهة إيجاد تستطيع فعالية، أكثر نحو على الخاصية هذه الستخدام ينصح بالتخزين المسبق للوجهات التي تذهب إليها
كثيرا.بالبحث المفضلة الوجهات بتخزين قم البداية، في
عن العنوان. راجع الفصل «إدارة المفضالت».اضغط على «االستقبال» > «التنقل» > «الوجهة»
> «المفضلة» لعرض قائمة الوجهات المفضلة.
حدد وجهة على الخريطةعن وجهة عن البحث من الخاصية هذه تمكنك
طريق التنقل في الخريطة. < «التنقل» < «االستقبال» على اضغط –لتحديد الخريطة» في «بحث < «الوجهة»
وجهة على الخريطة؛المكان في الخريطة على اضغط ذلك، بعد –
المراد تحديده كوجهة. تظهر النقطة 6؛اضغط على 7 للتأكيد. –
إدخال إحداثيات الوجهةإدخال طريق عن وجهة عن البحث ذلك لك يتيح
إحداثياتها.اضغط على «االستقبال» > «التنقل» > «الوجهة»
> «إحداثي».بالصيغ والعرض الطول خط قيم إدخال يمكنك عشرية؛ ودقائق درجات عشرية؛ درجات التالية:
أو درجات، ودقائق وثوان عشرية.اإلحداثيات إلدخال UTM على ثم على 8 اضغط
.UTM بالصيغة
6 7
خيارات موافق
8
خيارات موافق
إحداثي
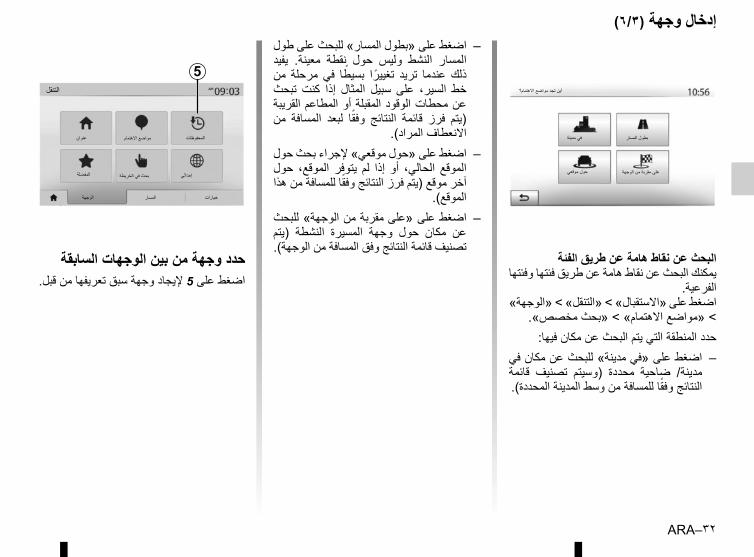
ARA–٣٢
إدخال وجهة (٦/٣)
البحث عن نقاط هامة عن طريق الفئةيمكنك البحث عن نقاط هامة عن طريق فئتها وفئتها
الفرعية.اضغط على «االستقبال» > «التنقل» > «الوجهة»
> «مواضع االهتمام» > «بحث مخصص». حدد المنطقة التي يتم البحث عن مكان فيها:
اضغط على «في مدينة» للبحث عن مكان في –قائمة تصنيف (وسيتم محددة ضاحية مدينة/ النتائج وفقا للمسافة من وسط المدينة المحددة).
أين تجد مواضع االهتمام؟
في مدينة
حول موقعي على مقربة من الوجهة
بطول المسار
اضغط على «بطول المسار» للبحث على طول –يفيد معينة. نقطة حول وليس النشط المسار من مرحلة في بسيطا تغييرا تريد عندما ذلك تبحث كنت إذا المثال سبيل على السير، خط عن محطات الوقود المقبلة أو المطاعم القريبة من المسافة لبعد وفقا النتائج قائمة فرز (يتم
االنعطاف المراد).اضغط على «حول موقعي» إلجراء بحث حول –حول الموقع، يتوفر لم إذا أو الحالي، الموقع آخر موقع (يتم فرز النتائج وفقا للمسافة من هذا
الموقع).اضغط على «على مقربة من الوجهة» للبحث –(يتم النشطة المسيرة وجهة حول مكان عن تصنيف قائمة النتائج وفق المسافة من الوجهة).
حدد وجهة من بين الوجهات السابقةاضغط على 5 إليجاد وجهة سبق تعريفها من قبل.
5التنقل
عنوان مواضع االهتمامالمحفوظات
بحث في الخريطةإحداثي
الوجهة المسار
المفضلة
خيارات
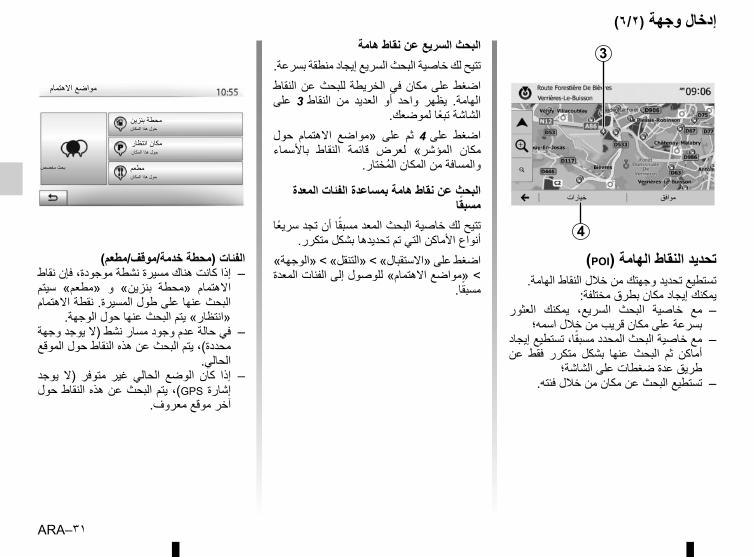
ARA–٣١
إدخال وجهة (٦/٢)البحث السريع عن نقاط هامة
تتيح لك خاصية البحث السريع إيجاد منطقة بسرعة.اضغط على مكان في الخريطة للبحث عن النقاط على النقاط 3 من العديد أو واحد يظهر الهامة.
الشاشة تبعا لموضعك. حول االهتمام «مواضع على ثم على 4 اضغط باألسماء النقاط قائمة لعرض المؤشر» مكان
والمسافة من المكان المختار.
البحث عن نقاط هامة بمساعدة الفئات المعدة مسبقا
تتيح لك خاصية البحث المعد مسبقا أن تجد سريعا أنواع األماكن التي تم تحديدها بشكل متكرر.
اضغط على «االستقبال» > «التنقل» > «الوجهة» > «مواضع االهتمام» للوصول إلى الفئات المعدة
مسبقا.
(POI) تحديد النقاط الهامةتستطيع تحديد وجهتك من خالل النقاط الهامة.
يمكنك إيجاد مكان بطرق مختلفة:العثور يمكنك السريع، البحث خاصية مع –
بسرعة على مكان قريب من خالل اسمه؛مع خاصية البحث المحدد مسبقا، تستطيع إيجاد –عن فقط متكرر بشكل عنها البحث ثم أماكن
طريق عدة ضغطات على الشاشة؛تستطيع البحث عن مكان من خالل فئته. –
الفئات (محطة خدمة/موقف/مطعم) إذا كانت هناك مسيرة نشطة موجودة، فإن نقاط –سيتم «مطعم» و بنزين» «محطة االهتمام البحث عنها على طول المسيرة. نقطة االهتمام
«انتظار» يتم البحث عنها حول الوجهة.في حالة عدم وجود مسار نشط (ال يوجد وجهة –محددة)، يتم البحث عن هذه النقاط حول الموقع
الحالي.يوجد (ال متوفر غير الحالي الوضع كان إذا –إشارة GPS)، يتم البحث عن هذه النقاط حول
آخر موقع معروف.
مواضع االهتمام
بحث مخصص
محطة بنزين
مكان انتظار
مطعم
حول هذا المكان
حول هذا المكان
حول هذا المكان
3
خيارات موافق
4
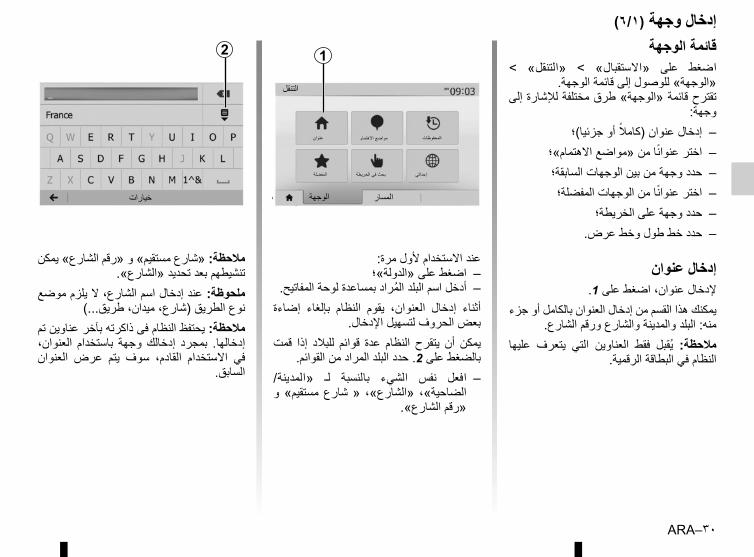
ARA–٣٠
إدخال وجهة (٦/١)قائمة الوجهة
< «التنقل» < «االستقبال» على اضغط «الوجهة» للوصول إلى قائمة الوجهة.
تقترح قائمة «الوجهة» طرق مختلفة لإلشارة إلى وجهة:
إدخال عنوان (كامال أو جزئيا)؛ –اختر عنوانا من «مواضع االهتمام»؛ –حدد وجهة من بين الوجهات السابقة؛ –اختر عنوانا من الوجهات المفضلة؛ –
حدد وجهة على الخريطة؛ –حدد خط طول وخط عرض. –
إدخال عنوانإلدخال عنوان، اضغط على 1.
يمكنك هذا القسم من إدخال العنوان بالكامل أو جزء منه: البلد والمدينة والشارع ورقم الشارع.
عليها يتعرف التي العناوين فقط يقبل مالحظة: النظام في البطاقة الرقمية.
عند االستخدام ألول مرة:اضغط على «الدولة»؛ –
أدخل اسم البلد المراد بمساعدة لوحة المفاتيح. –إضاءة بإلغاء النظام يقوم العنوان، إدخال أثناء
بعض الحروف لتسهيل اإلدخال.قمت إذا للبالد قوائم عدة النظام يتقرح أن يمكن
بالضغط على 2. حدد البلد المراد من القوائم.«المدينة/ لـ بالنسبة الشيء نفس افعل –و مستقيم» شارع الضاحية»، «الشارع»، «
«رقم الشارع».
مالحظة: «شارع مستقيم» و «رقم الشارع» يمكن تنشيطهم بعد تحديد «الشارع».
ملحوظة: عند إدخال اسم الشارع، ال يلزم موضع نوع الطريق (شارع، ميدان، طريق...)
مالحظة: يحتفظ النظام فى ذاكرته بآخر عناوين تم العنوان، باستخدام وجهة إدخالك بمجرد إدخالها. العنوان عرض يتم سوف القادم، االستخدام في
السابق.
2
خيارات خيارات
التنقل
عنوان مواضع االهتمامالمحفوظات
بحث في الخريطةإحداثي
الوجهة المسار
المفضلة
1
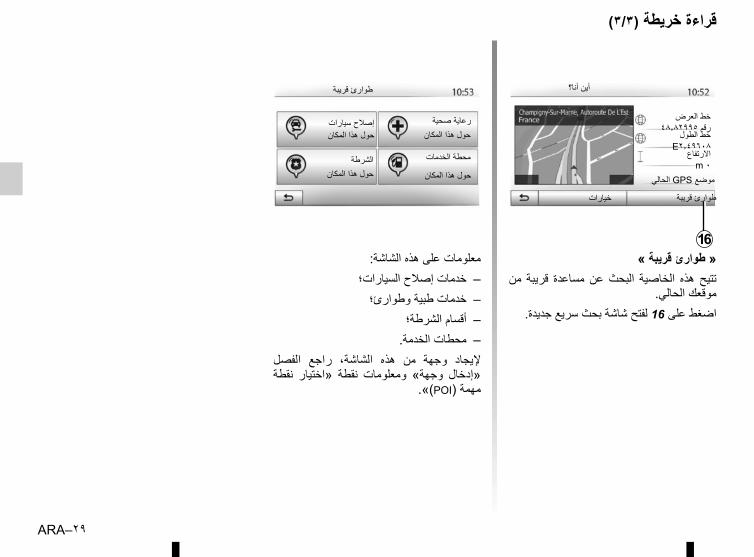
ARA–٢٩
« طوارئ قريبة »من قريبة مساعدة عن البحث الخاصية هذه تتيح
موقعك الحالي.اضغط على 16 لفتح شاشة بحث سريع جديدة.
قراءة خريطة (٣/٣)
معلومات على هذه الشاشة:خدمات إصالح السيارات؛ –خدمات طبية وطوارئ؛ –
أقسام الشرطة؛ –محطات الخدمة. –
الفصل راجع الشاشة، هذه من وجهة إليجاد نقطة «اختيار نقطة ومعلومات وجهة» «إدخال
.«(POI) مهمة
طوارئ قريبة
إصالح سياراتحول هذا المكان
حول هذا المكان
حول هذا المكان
حول هذا المكان
الشرطة
رعاية صحية
محطة الخدمات
16
خيارات طوارئ قريبة
أين أنا؟
خط العرض
خط الطول
االرتفاع
موضع GPS الحاليm ٠
E٢٫٤٩٦٠٨
رقم ٤٨٫٨٢٩٩٥
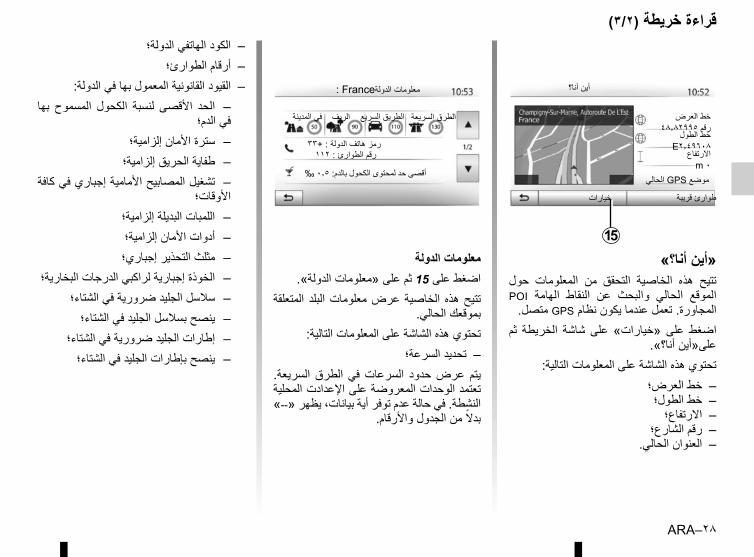
ARA–٢٨
«أين أنا؟»حول المعلومات من التحقق الخاصية هذه تتيح POI الهامة النقاط عن والبحث الحالي الموقع
المجاورة. تعمل عندما يكون نظام GPS متصل.ثم الخريطة شاشة على على «خيارات» اضغط
على«أين أنا؟».تحتوي هذه الشاشة على المعلومات التالية:
خط العرض؛ –خط الطول؛ –االرتفاع؛ –
رقم الشارع؛ –العنوان الحالي. –
قراءة خريطة (٣/٢)
معلومات الدولةاضغط على 15 ثم على «معلومات الدولة».
المتعلقة البلد معلومات عرض الخاصية هذه تتيح بموقعك الحالي.
تحتوي هذه الشاشة على المعلومات التالية:تحديد السرعة؛ –
السريعة. الطرق في السرعات حدود عرض يتم تعتمد الوحدات المعروضة على اإلعدادت المحلية النشطة. في حالة عدم توفر أية بيانات، يظهر «--»
بدال من الجدول واألرقام.
الكود الهاتفي الدولة؛ –أرقام الطوارئ؛ –
القيود القانونية المعمول بها في الدولة: –بها المسموح الكحول لنسبة األقصى الحد –
في الدم؛سترة األمان إلزامية؛ –طفاية الحريق إلزامية؛ –
تشغيل المصابيح األمامية إجباري في كافة –األوقات؛
اللمبات البديلة إلزامية؛ –أدوات األمان إلزامية؛ –مثلث التحذير إجباري؛ –
الخوذة إجبارية لراكبي الدرجات البخارية؛ –سالسل الجليد ضرورية في الشتاء؛ –ينصح بسالسل الجليد في الشتاء؛ –
إطارات الجليد ضرورية في الشتاء؛ –ينصح بإطارات الجليد في الشتاء؛ –
: Franceمعلومات الدولة
أقصى حد لمحتوى الكحول بالدم: ٠٫٥ ‰
في المدينة الريف الطريق السريع الطرق السريعة
رمز هاتف الدولة : +٣٣رقم الطوارئ : ١١٢
15
خيارات طوارئ قريبة
أين أنا؟
خط العرض
خط الطول
االرتفاع
موضع GPS الحاليm ٠
E٢٫٤٩٦٠٨
رقم ٤٨٫٨٢٩٩٥
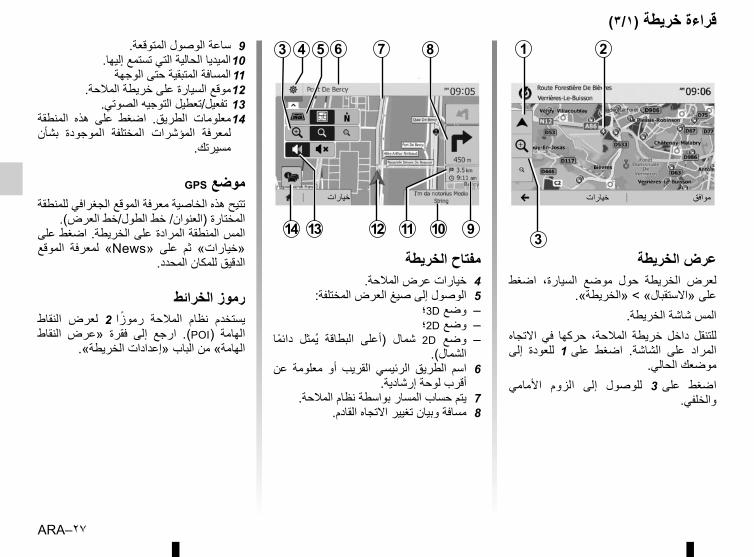
ARA–٢٧
قراءة خريطة (٣/١)
عرض الخريطةاضغط السيارة، موضع حول الخريطة لعرض
على «االستقبال» > «الخريطة».المس شاشة الخريطة.
االتجاه في حركها المالحة، خريطة داخل للتنقل إلى للعودة على 1 اضغط الشاشة. على المراد
موضعك الحالي.األمامي الزوم إلى للوصول على 3 اضغط
والخلفي.
مفتاح الخريطةخيارات عرض المالحة. 4
الوصول إلى صيغ العرض المختلفة: 5وضع 3D؛ –وضع 2D؛ –
دائما يمثل البطاقة (أعلى شمال 2D وضع –الشمال).
عن معلومة أو القريب الرئيسي الطريق اسم 6أقرب لوحة إرشادية.
يتم حساب المسار بواسطة نظام المالحة. 7مسافة وبيان تغيير االتجاه القادم. 8
ساعة الوصول المتوقعة. 910 الميديا الحالية التي تستمع إليها.المسافة المتبقية حتى الوجهة 11
12 موقع السيارة على خريطة المالحة.13 تفعيل/تعطيل التوجيه الصوتي.
المنطقة هذه على اضغط الطريق. 14 معلومات بشأن الموجودة المختلفة المؤشرات لمعرفة
مسيرتك.
GPS موضعتتيح هذه الخاصية معرفة الموقع الجغرافي للمنطقة
المختارة (العنوان/ خط الطول/خط العرض). المس المنطقة المرادة على الخريطة. اضغط على الموقع لمعرفة «News» على ثم «خيارات»
الدقيق للمكان المحدد.
رموز الخرائطالنقاط لعرض رموزا 2 المالحة نظام يستخدم النقاط «عرض فقرة إلى ارجع .(POI) الهامة
الهامة» من الباب «إعدادات الخريطة».
2
3
1
خيارات موافق
6 8
9111214
4 7
10
3 5
خيارات
13
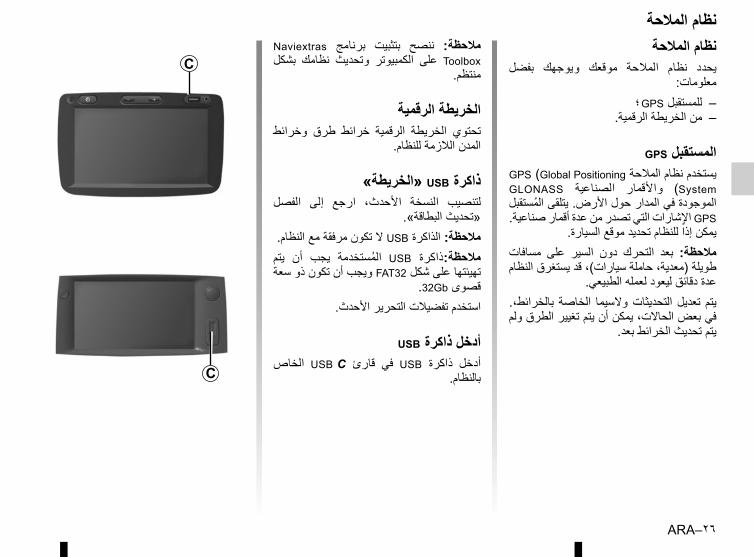
ARA–٢٦
نظام المالحةنظام المالحة
بفضل ويوجهك موقعك المالحة نظام يحدد معلومات:
للمستقبل GPS ؛ –من الخريطة الرقمية. –
GPS المستقبل GPS (Global Positioning يستخدم نظام المالحة GLONASS الصناعية واألقمار (Systemالموجودة في المدار حول األرض. يتلقى المستقبل GPS اإلشارات التي تصدر من عدة أقمار صناعية.
يمكن إذا للنظام تحديد موقع السيارة.مسافات على السير دون التحرك بعد مالحظة: طويلة (معدية، حاملة سيارات)، قد يستغرق النظام
عدة دقائق ليعود لعمله الطبيعي.بالخرائط،. الخاصة والسيما التحديثات تعديل يتم في بعض الحاالت، يمكن أن يتم تغيير الطرق ولم
يتم تحديث الخرائط بعد.
Naviextras برنامج بتثبيت ننصح مالحظة: بشكل نظامك وتحديث الكمبيوتر على Toolbox
منتظم.
الخريطة الرقميةوخرائط طرق خرائط الرقمية الخريطة تحتوي
المدن الالزمة للنظام.
ذاكرة USB «الخريطة»الفصل إلى ارجع األحدث، النسخة لتنصيب
«تحديث البطاقة».مالحظة: الذاكرة USB ال تكون مرفقة مع النظام.
يتم أن يجب المستخدمة USB مالحظة:ذاكرة تهيئتها على شكل FAT32 ويجب أن تكون ذو سعة
.32Gb قصوىاستخدم تفضيالت التحرير األحدث.
USB أدخل ذاكرةالخاص USB C قارئ في USB ذاكرة أدخل
بالنظام.
C
C
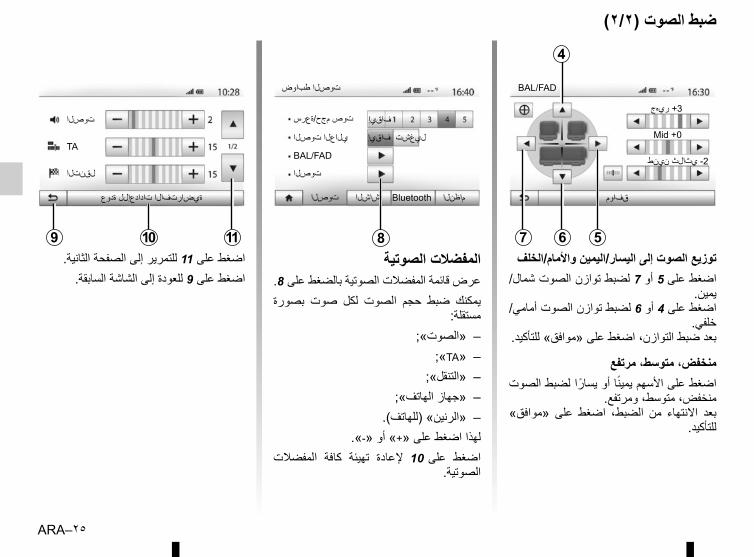
ARA–٢٥
ضبط الصوت (٢/٢)
4
7 6 5
BAL/FAD
قفاوم
3+ ريهج
Mid +0
2- يثالث نينط
توزيع الصوت إلى اليسار/اليمين واألمام/الخلفاضغط على 5 أو 7 لضبط توازن الصوت شمال/
يمين.اضغط على 4 أو 6 لضبط توازن الصوت أمامي/
خلفي.بعد ضبط التوازن، اضغط على «موافق» للتأكيد.
منخفض، متوسط، مرتفعاضغط على األسهم يمينا أو يسارا لضبط الصوت
منخفض، متوسط، ومرتفع.«موافق» على اضغط الضبط، من االنتهاء بعد
للتأكيد.
المفضالت الصوتيةعرض قائمة المفضالت الصوتية بالضغط على 8.بصورة صوت لكل الصوت حجم ضبط يمكنك
مستقلة:«الصوت»; –
;«TA» –«التنقل»; –
«جهاز الهاتف»; –«الرنين» (للهاتف). –
لهذا اضغط على «+» أو «-».المفضالت كافة تهيئة إلعادة على 10 اضغط
الصوتية.
اضغط على 11 للتمرير إلى الصفحة الثانية.اضغط على 9 للعودة إلى الشاشة السابقة.
توصلا ةشاشلا Bluetoothماظنلا
يلاعلا توصلا
توصلا
فاقيإ
فاقيإ
ليغشت
توصلا طباوض
توص مجح/ةعرس
BAL/FAD
89 1110
توصلا
TA
لقنتلا
ةيضارتفالا تادادعإلل ةدوع
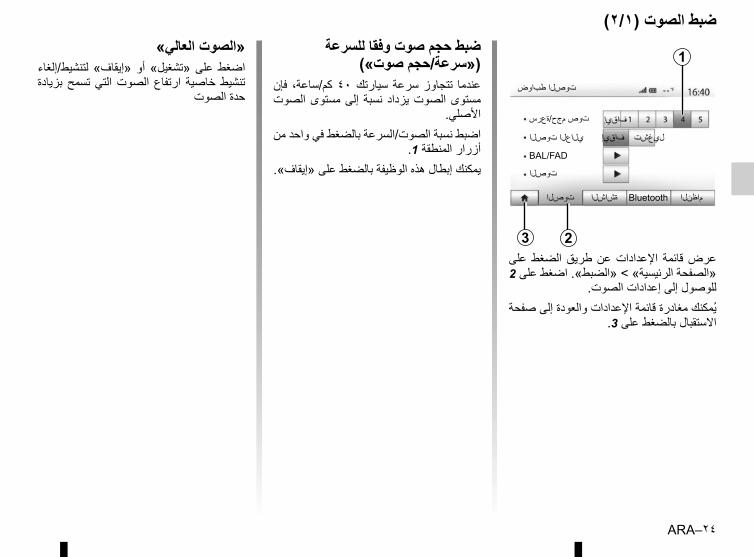
ARA–٢٤
ضبط الصوت (٢/١)
على الضغط طريق عن اإلعدادات قائمة عرض «الصفحة الرئيسية» > «الضبط». اضغط على 2
للوصول إلى إعدادات الصوت.يمكنك مغادرة قائمة اإلعدادات والعودة إلى صفحة
االستقبال بالضغط على 3.
ضبط حجم صوت وفقا للسرعة («سرعة/حجم صوت»)
فإن كم/ساعة، ٤٠ سيارتك سرعة تتجاوز عندما الصوت مستوى إلى نسبة يزداد الصوت مستوى
األصلي.اضبط نسبة الصوت/السرعة بالضغط في واحد من
أزرار المنطقة 1.يمكنك إبطال هذه الوظيفة بالضغط على «إيقاف».
1
3 2
توصلا ةشاشلا Bluetoothماظنلا
يلاعلا توصلا
توصلا
فاقيإ
فاقيإ
ليغشت
توصلا طباوض
توص مجح/ةعرس
BAL/FAD
«الصوت العالي»لتنشيط/إلغاء أو «إيقاف» على «تشغيل» اضغط بزيادة تسمح التي الصوت ارتفاع خاصية تنشيط
حدة الصوت
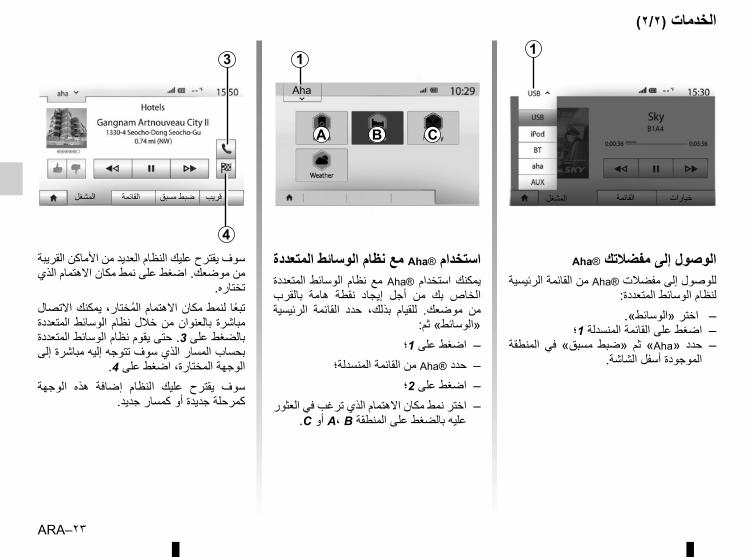
ARA–٢٣
الخدمات (٢/٢)
استخدام ®Aha مع نظام الوسائط المتعددةالمتعددة الوسائط نظام مع Aha® استخدام يمكنك بالقرب هامة نقطة إيجاد أجل من بك الخاص الرئيسية القائمة حدد بذلك، للقيام موضعك. من
«الوسائط» ثم:اضغط على 1؛ –
حدد ®Aha من القائمة المنسدلة؛ –اضغط على 2؛ –
اختر نمط مكان االهتمام الذي ترغب في العثور –.C أو A، B عليه بالضغط على المنطقة
Aha
1
A B C
سوف يقترح عليك النظام العديد من األماكن القريبة من موضعك. اضغط على نمط مكان االهتمام الذي
تختاره.تبعا لنمط مكان االهتمام المختار، يمكنك االتصال مباشرة بالعنوان من خالل نظام الوسائط المتعددة بالضغط على 3. حتى يقوم نظام الوسائط المتعددة بحساب المسار الذي سوف تتوجه إليه مباشرة إلى
الوجهة المختارة، اضغط على 4. الوجهة هذه إضافة النظام عليك يقترح سوف
كمرحلة جديدة أو كمسار جديد.
المشغل القائمة ضبط مسبق قريب
3
4
Aha® الوصول إلى مفضالتكللوصول إلى مفضالت ®Aha من القائمة الرئيسية
لنظام الوسائط المتعددة:– اختر «الوسائط».
اضغط على القائمة المنسدلة 1؛ –المنطقة في مسبق» ثم «ضبط «Aha» حدد –
الموجودة أسفل الشاشة.
المشغل القائمة ضبط مسبق
قريب
2
1
المشغل القائمة خيارات
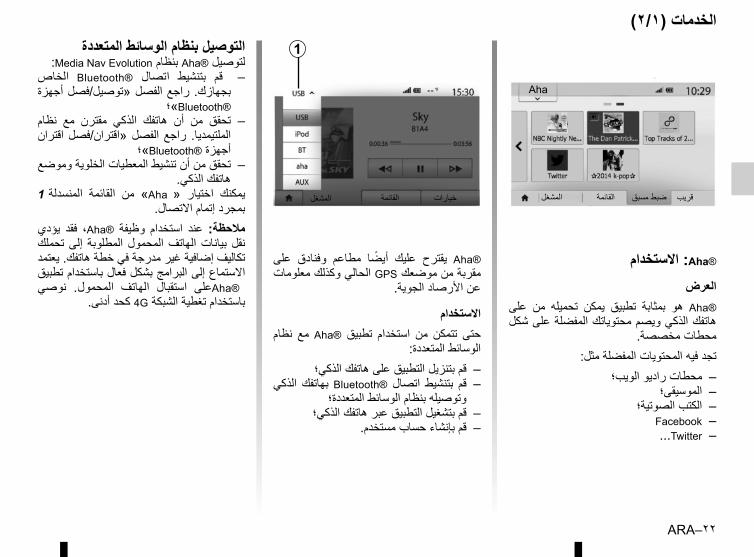
ARA–٢٢
الخدمات (٢/١)
®Aha: االستخدام
العرضعلى من تحميله يمكن تطبيق بمثابة هو Aha®هاتفك الذكي ويصم محتوياتك المفضلة على شكل
محطات مخصصة.تجد فيه المحتويات المفضلة مثل:
محطات راديو الويب؛ –الموسيقى؛ –
الكتب الصوتية؛ –Facebook –...Twitter –
على وفنادق مطاعم أيضا عليك يقترح Aha®مقربة من موضعك GPS الحالي وكذلك معلومات
عن األرصاد الجوية.
االستخدامنظام مع Aha® تطبيق استخدام من تتمكن حتى
الوسائط المتعددة:قم بتنزيل التطبيق على هاتفك الذكي؛ –
الذكي بهاتفك Bluetooth® اتصال بتنشيط قم –وتوصيله بنظام الوسائط المتعددة؛
قم بتشغيل التطبيق عبر هاتفك الذكي؛ –قم بإنشاء حساب مستخدم. –
1
المشغل القائمة خيارات المشغل القائمة ضبط مسبق قريب
Aha
التوصيل بنظام الوسائط المتعددة:Media Nav Evolution بنظام Aha® لتوصيل
الخاص Bluetooth® اتصال بتنشيط قم –بجهازك. راجع الفصل «توصيل/فصل أجهزة
®Bluetooth»؛نظام مع مقترن الذكي هاتفك أن من تحقق –اقتران الفصل «اقتران/فصل راجع الملتيمديا.
أجهزة ®Bluetooth»؛تحقق من أن تنشيط المعطيات الخلوية وموضع –
هاتفك الذكي.المنسدلة 1 القائمة من «Aha » اختيار يمكنك
بمجرد إتمام االتصال.يؤدي فقد ،Aha® وظيفة استخدام عند مالحظة: تحملك إلى المطلوبة المحمول الهاتف بيانات نقل تكاليف إضافية غير مدرجة في خطة هاتفك. يعتمد االستماع إلى البرامج بشكل فعال باستخدام تطبيق نوصي المحمول. الهاتف استقبال ®Ahaعلى
باستخدام تغطية الشبكة 4G كحد أدنى.

ARA–٢١
Bluetooth® :التوصيلأجهزة فصل «توصيل/ لفصل ا راجع
.«Bluetooth®.«BT» تظهر القائمة Bluetooth® بمجرد توصيل
االستخداماضغط ثم المنسدلة 4، القائمة من «BT» اختر على قائمة القراءة أو القائمة الصوتية المرغوبة في
شاشة نظام الملتيميديا. Bluetooth® بـ الخاصة الصوتية الملفات جميع شاشة على من مباشرة بصورة اختيارها يمكن
نظام الملتيميديا.مالحظة: بمجرد توصيله، ليس لديك إمكانية إدخال األوامر مباشرة إلى مشغل الصوت الرقمي. يجب
استخدام مفاتيح واجهة النظام.
Aha® :التوصيلللحصول على مزيد من المعلومات، يرجى الرجوع
إلى قسم «الخدمات».اختيار يمكنك ،Aha® بالتطبيق االتصال بمجرد
«Aha» من القائمة المنسدلة 4.
مصادر الصوت اإلضافية (٣/٣)Jack مدخل إضافي: مقبس
التوصيلوصل قابس Jack لمشغل الصوت بمقبس مدخل
.Jack
االستخدامحدد ثم المنسدلة 4، القائمة في «AUX» اختر بك. الخاص الصوت مشغل من المرغوب الملف أو الفنان السم ذكر أي النظام شاشة تعرض ال
للمقطوعة الموسيقية.مالحظة: ال يمكن اختيار مسار مباشرة عبر نظام
الوسائط الخاص بك.الختيار ملف، يجب تشغيل جهاز االستماع الصوتي
مباشرة، وتكون المركبة متوقفة. اختيار مسارعلى اضغط مجلد، في الصوتي الملف الختيار
«القائمة» الختيار الملف A من هذه القائمة.للعودة إلى مستوى سابق في تفرع المجلد، اضغط
على 5.الترتيب بحسب األلبومات تنظيم يتم ، افتراضيا
األبجدي.تركز أن تستطيع الرقمي، المشغل لنوع تبعا
اختيارك عن طريق المجلدات والملفات.تسهل USB المفضلة التوصيلة استخدام مالحظة:
عليك البحث في الموسيقى الخاصة بك.
المماثل المدخل من الصادر الصوت جودة جودة من أقل طبيعية بصورة تكون (AUX).(USB, Bluetooth®) صوت المداخل الرقمية
4
رئيسية القائمة خيارات
A
5
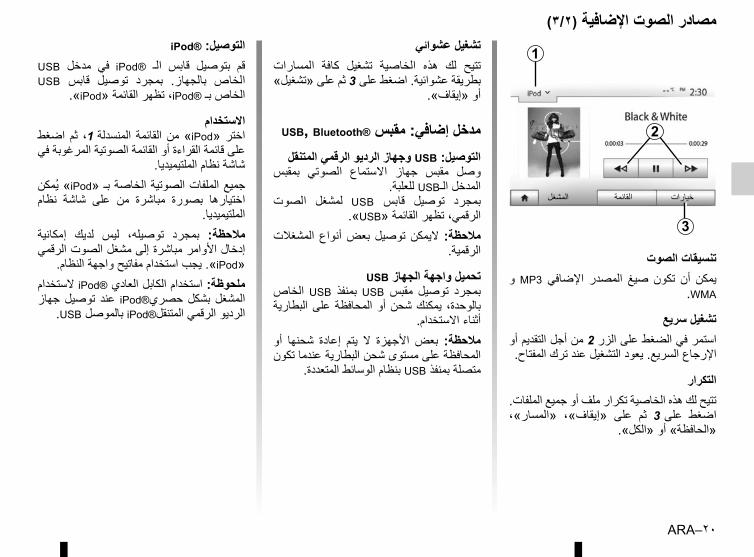
ARA–٢٠
مصادر الصوت اإلضافية (٣/٢)تشغيل عشوائي
المسارات كافة تشغيل الخاصية هذه لك تتيح بطريقة عشوائية. اضغط على 3 ثم على «تشغيل»
أو «إيقاف».
USB, Bluetooth® مدخل إضافي: مقبسالتوصيل: USB وجهاز الرديو الرقمي المتنقل
بمقبس الصوتي االستماع جهاز مقبس وصل المدخل الـUSB للعلبة.
الصوت لمشغل USB قابس توصيل بمجرد .«USB» الرقمي، تظهر القائمة
المشغالت أنواع بعض توصيل اليمكن مالحظة: الرقمية.
USB تحميل واجهة الجهازالخاص USB بمنفذ USB مقبس توصيل بمجرد البطارية على المحافظة أو شحن يمكنك بالوحدة،
أثناء االستخدام.أو شحنها إعادة يتم ال األجهزة بعض مالحظة: المحافظة على مستوى شحن البطارية عندما تكون
متصلة بمنفذ USB بنظام الوسائط المتعددة.
iPod® :التوصيل USB مدخل في iPod® الـ قابس بتوصيل قم USB قابس توصيل بمجرد بالجهاز. الخاص
.«iPod» تظهر القائمة ،iPod® الخاص بـ
االستخداماضغط ثم المنسدلة 1، القائمة من «iPod» اخترعلى قائمة القراءة أو القائمة الصوتية المرغوبة في
شاشة نظام الملتيميديا.جميع الملفات الصوتية الخاصة بـ «iPod» يمكن نظام شاشة على من مباشرة بصورة اختيارها
الملتيميديا.إمكانية لديك ليس توصيله، بمجرد مالحظة: إدخال األوامر مباشرة إلى مشغل الصوت الرقمي
«iPod». يجب استخدام مفاتيح واجهة النظام.ملحوظة: استخدام الكابل العادي ®iPod الستخدام جهاز توصيل عند iPod®حصري بشكل المشغل
.USB بالموصل iPod®الرديو الرقمي المتنقل
تنسيقات الصوتو MP3 اإلضافي المصدر صيغ تكون أن يمكن
.WMA
تشغيل سريعاستمر في الضغط على الزر 2 من أجل التقديم أو
اإلرجاع السريع. يعود التشغيل عند ترك المفتاح.
التكرارتتيح لك هذه الخاصية تكرار ملف أو جميع الملفات. «المسار»، «إيقاف»، على ثم على 3 اضغط
«الحافظة» أو «الكل».
1
3
المشغل القائمة خيارات
2
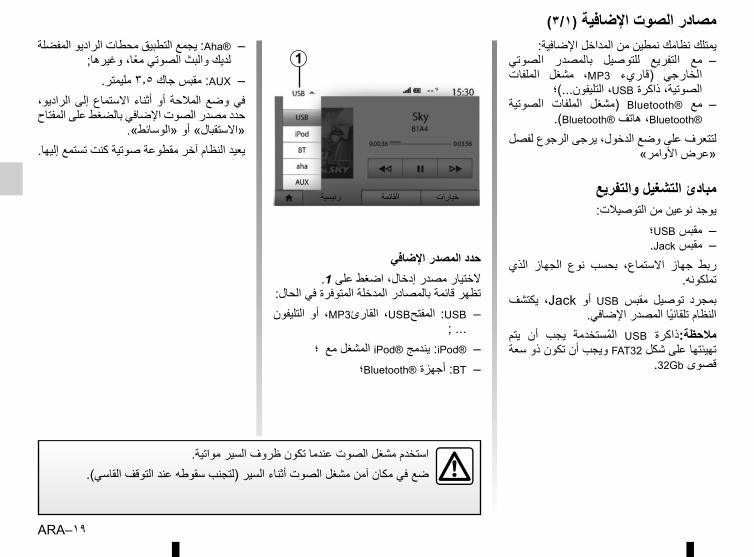
ARA–١٩
مصادر الصوت اإلضافية (٣/١)يمتلك نظامك نمطين من المداخل اإلضافية:
الصوتي بالمصدر للتوصيل التفريع مع –الملفات مشغل ،MP3 (قاريء الخارجي
الصوتية، ذاكرة USB، التليفون...)؛الصوتية الملفات (مشغل Bluetooth® مع –
.(Bluetooth® هاتف ،Bluetooth®
لتتعرف على وضع الدخول، يرجى الرجوع لفصل «عرض األوامر»
مبادئ التشغيل والتفريعيوجد نوعين من التوصيالت:
مقبس USB؛ –.Jack مقبس –
الذي الجهاز نوع بحسب االستماع، جهاز ربط تملكونه.
يكتشف ،Jack أو USB مقبس توصيل بمجرد النظام تلقائيا المصدر اإلضافي.
يتم أن يجب المستخدمة USB مالحظة:ذاكرة تهيئتها على شكل FAT32 ويجب أن تكون ذو سعة
.32Gb قصوى
حدد المصدر اإلضافيالختيار مصدر إدخال، اضغط على 1.
تظهر قائمة بالمصادر المدخلة المتوفرة في الحال:التليفون أو ،MP3القارئ ،USBالمفتح :USB –
; ...®iPod: يندمج ®iPod المشغل مع ؛ –
BT: أجهزة ®Bluetooth؛ –
®Aha: يجمع التطبيق محطات الراديو المفضلة –لديك والبث الصوتي معا، وغيرها;
AUX: مقبس جاك ٣٫٥ مليمتر. –الراديو، إلى االستماع أثناء أو المالحة وضع في حدد مصدر الصوت اإلضافي بالضغط على المفتاح
«االستقبال» أو «الوسائط».يعيد النظام آخر مقطوعة صوتية كنت تستمع إليها.
استخدم مشغل الصوت عندما تكون ظروف السير مواتية.ضع في مكان آمن مشغل الصوت أثناء السير (لتجنب سقوطه عند التوقف القاسي).
رئيسية القائمة خيارات
1
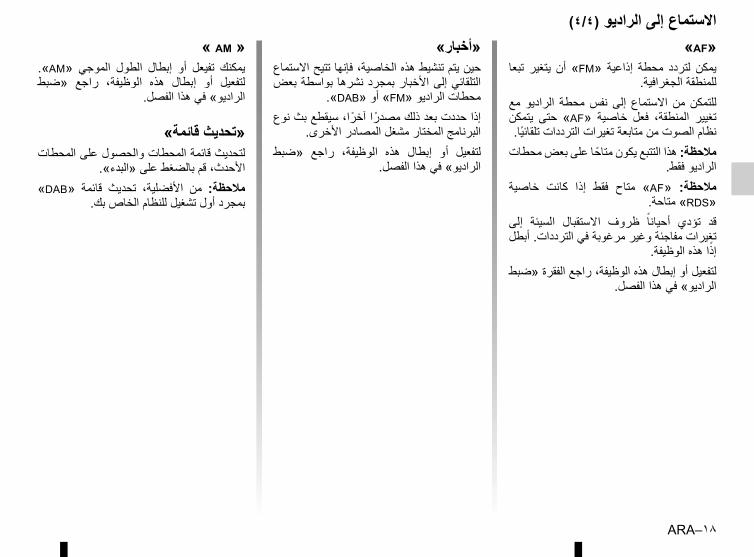
ARA–١٨
االستماع إلى الراديو (٤/٤)«أخبار»
حين يتم تنشيط هذه الخاصية، فإنها تتيح االستماع التلقائي إلى األخبار بمجرد نشرها بواسطة بعض
.«DAB» أو «FM» محطات الراديوإذا حددت بعد ذلك مصدرا آخرا، سيقطع بث نوع
البرنامج المختار مشغل المصادر األخرى.«ضبط راجع الوظيفة، هذه إبطال أو لتفعيل
الراديو» في هذا الفصل.
«AF»تبعا يتغير أن «FM» إذاعية محطة لتردد يمكن
للمنطقة الجغرافية.مع الراديو محطة نفس إلى االستماع من للتمكن يتمكن حتى «AF» خاصية فعل المنطقة، تغيير
نظام الصوت من متابعة تغيرات الترددات تلقائيا.مالحظة: هذا التتبع يكون متاحا على بعض محطات
الراديو فقط.خاصية كانت إذا فقط متاح «AF» مالحظة:
«RDS» متاحة.إلى السيئة االستقبال ظروف أحيانا تؤدي قد تغيرات مفاجئة وغير مرغوبة في الترددات. أبطل
إذا هذه الوظيفة.لتفعيل أو إبطال هذه الوظيفة، راجع الفقرة «ضبط
الراديو» في هذا الفصل.
« AM » .«AM» الموجي الطول إبطال أو تفيعل يمكنك «ضبط راجع الوظيفة، هذه إبطال أو لتفعيل
الراديو» في هذا الفصل.
«تحديث قائمة»لتحديث قائمة المحطات والحصول على المحطات
األحدث، قم بالضغط على «البدء». «DAB» قائمة تحديث األفضلية، من مالحظة:
بمجرد أول تشغيل للنظام الخاص بك.
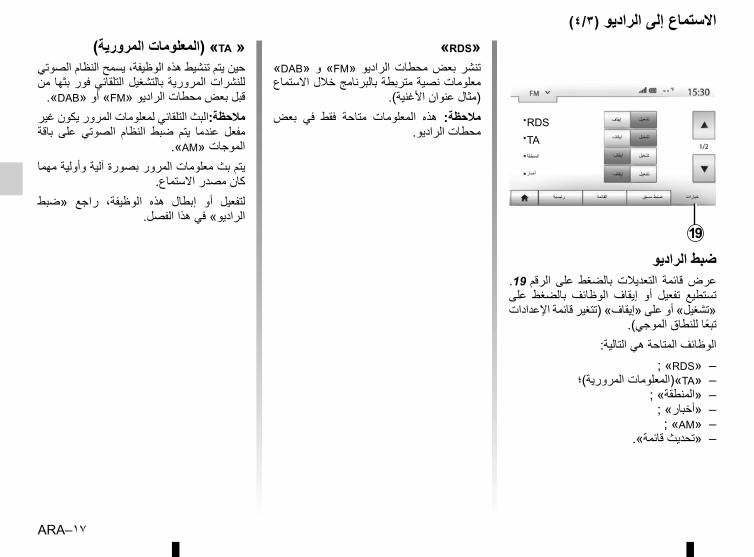
ARA–١٧
االستماع إلى الراديو (٤/٣)«RDS»
«DAB» و «FM» الراديو محطات بعض تنشر معلومات نصية متربطة بالبرنامج خالل االستماع
(مثال عنوان األغنية).بعض في فقط متاحة المعلومات هذه مالحظة:
محطات الراديو.
« TA» (المعلومات المرورية)حين يتم تنشيط هذه الوظيفة، يسمح النظام الصوتي للنشرات المرورية بالتشغيل التلقائي فور بثها من
.«DAB» أو «FM» قبل بعض محطات الراديومالحظة:البث التلقائي لمعلومات المرور يكون غير باقة على الصوتي النظام ضبط يتم عندما مفعل
.«AM» الموجاتيتم بث معلومات المرور بصورة آلية وأولية مهما
كان مصدر االستماع.«ضبط راجع الوظيفة، هذه إبطال أو لتفعيل
الراديو» في هذا الفصل.19
رئيسية القائمة ضبط مسبق خيارات
RDSTAالمنطقة
أخبار
إيقاف
إيقاف
إيقاف
إيقاف
تشغيل
تشغيل
تشغيل
تشغيل
ضبط الراديوالرقم 19. على بالضغط التعديالت قائمة عرض على بالضغط الوظائف إيقاف أو تفعيل تستطيع «تشغيل» أو على «إيقاف» (تتغير قائمة اإلعدادات
تبعا للنطاق الموجي).الوظائف المتاحة هي التالية:
; «RDS» –«TA»(المعلومات المرورية)؛ –
«المنطقة» ; –«أخبار» ; –; «AM» –
«تحديث قائمة». –
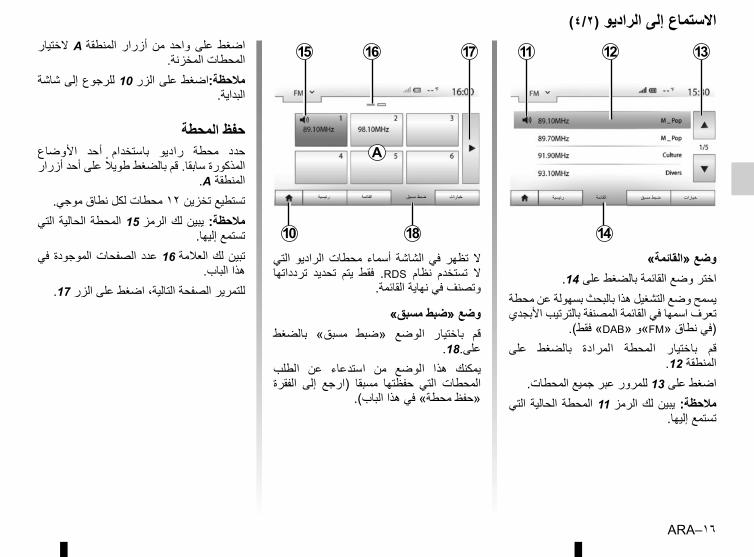
ARA–١٦
االستماع إلى الراديو (٤/٢)الختيار A المنطقة أزرار من واحد على اضغط
المحطات المخزنة.مالحظة:اضغط على الزر 10 للرجوع إلى شاشة
البداية.
حفظ المحطةاألوضاع أحد باستخدام راديو محطة حدد المذكورة سابقا. قم بالضغط طويال على أحد أزرار
.A المنطقةتستطيع تخزين ١٢ محطات لكل نطاق موجي.
التي الحالية يبين لك الرمز 15 المحطة مالحظة: تستمع إليها.
في الموجودة الصفحات عدد العالمة 16 لك تبين هذا الباب.
للتمرير الصفحة التالية، اضغط على الزر 17.
التي الراديو محطات أسماء الشاشة في تظهر ال تردداتها تحديد يتم فقط .RDS نظام تستخدم ال
وتصنف في نهاية القائمة.
وضع «ضبط مسبق»بالضغط مسبق» «ضبط الوضع باختيار قم
على.18.الطلب عن استدعاء من الوضع هذا يمكنك الفقرة إلى (ارجع مسبقا حفظتها التي المحطات
«حفظ محطة» في هذا الباب).
وضع «القائمة»اختر وضع القائمة بالضغط على 14.
يسمح وضع التشغيل هذا بالبحث بسهولة عن محطة تعرف اسمها في القائمة المصنفة بالترتيب األبجدي
(في نطاق «FM»و «DAB» فقط).على بالضغط المرادة المحطة باختيار قم
المنطقة 12.اضغط على 13 للمرور عبر جميع المحطات.
التي الحالية المحطة الرمز 11 لك يبين مالحظة: تستمع إليها.
12 1311
رئيسية القائمة ضبط مسبق خيارات
14
A
رئيسية القائمة ضبط مسبق خيارات
15
1810
16 17
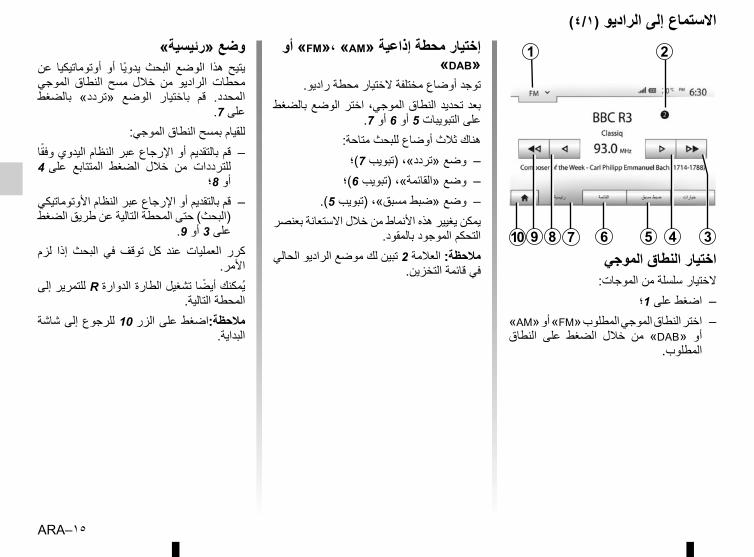
ARA–١٥
االستماع إلى الراديو (٤/١)
اختيار النطاق الموجيالختيار سلسلة من الموجات:
اضغط على 1؛ – «AM» أو «FM» اختر النطاق الموجي المطلوب –النطاق على الضغط خالل من «DAB» أو
المطلوب.
وضع «رئيسية»عن أوتوماتيكيا أو يدويا البحث الوضع هذا يتيح الموجي النطاق مسح خالل من الراديو محطات بالضغط «تردد» الوضع باختيار قم المحدد.
على 7.للقيام بمسح النطاق الموجي:
قم بالتقديم أو اإلرجاع عبر النظام اليدوي وفقا –على 4 المتتابع الضغط خالل من للترددات
أو 8؛ قم بالتقديم أو اإلرجاع عبر النظام األوتوماتيكي –(البحث) حتى المحطة التالية عن طريق الضغط
على 3 أو 9.لزم إذا البحث في توقف كل عند العمليات كرر
األمر.يمكنك أيضا تشغيل الطارة الدوارة R للتمرير إلى
المحطة التالية.مالحظة:اضغط على الزر 10 للرجوع إلى شاشة
البداية.
إختيار محطة إذاعية «FM»، «AM» أو «DAB»
توجد أوضاع مختلفة الختيار محطة راديو.بعد تحديد النطاق الموجي، اختر الوضع بالضغط
على التبويبات 5 أو 6 أو 7.هناك ثالث أوضاع للبحث متاحة:وضع «تردد»، (تبويب 7)؛ –وضع «القائمة»، (تبويب 6)؛ –
وضع «ضبط مسبق»، (تبويب 5). –يمكن يغيير هذه األنماط من خالل االستعانة بعنصر
التحكم الموجود بالمقود.مالحظة: العالمة 2 تبين لك موضع الراديو الحالي
في قائمة التخزين.
1
رئيسية القائمة ضبط مسبق خيارات
69 8 4 35
2
710
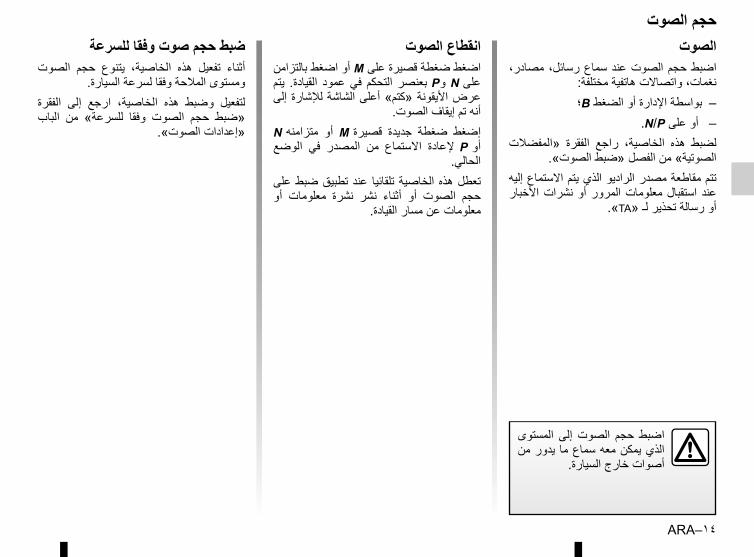
ARA–١٤
الصوتمصادر، رسائل، سماع عند الصوت اضبط حجم
نغمات، واتصاالت هاتفية مختلفة:بواسطة اإلدارة أو الضغط B؛ –
.N/P أو على –«المفضالت الفقرة راجع الخاصية، هذه لضبط
الصوتية» من الفصل «ضبط الصوت».تتم مقاطعة مصدر الراديو الذي يتم االستماع إليه األخبار نشرات أو المرور معلومات استقبال عند
.«TA» أو رسالة تحذير لـ
انقطاع الصوتاضغط ضغطة قصيرة على M أو اضغط بالتزامن يتم القيادة. عمود في التحكم بعنصر Pو N علىعرض األيقونة «كتم» أعلى الشاشة لإلشارة إلى
أنه تم إيقاف الصوت. N متزامنه أو M قصيرة جديدة ضغطة إضغط الوضع في المصدر من االستماع إلعادة P أو
الحالي.تعطل هذه الخاصية تلقائيا عند تطبيق ضبط على أو معلومات نشرة نشر أثناء أو الصوت حجم
معلومات عن مسار القيادة.
ضبط حجم صوت وفقا للسرعةالصوت حجم يتنوع الخاصية، هذه تفعيل أثناء
ومستوى المالحة وفقا لسرعة السيارة.الفقرة إلى ارجع الخاصية، هذه وضبط لتفعيل الباب من للسرعة» وفقا الصوت حجم «ضبط
«إعدادات الصوت».
حجم الصوت
المستوى إلى الصوت حجم اضبط الذي يمكن معه سماع ما يدور من
أصوات خارج السيارة.
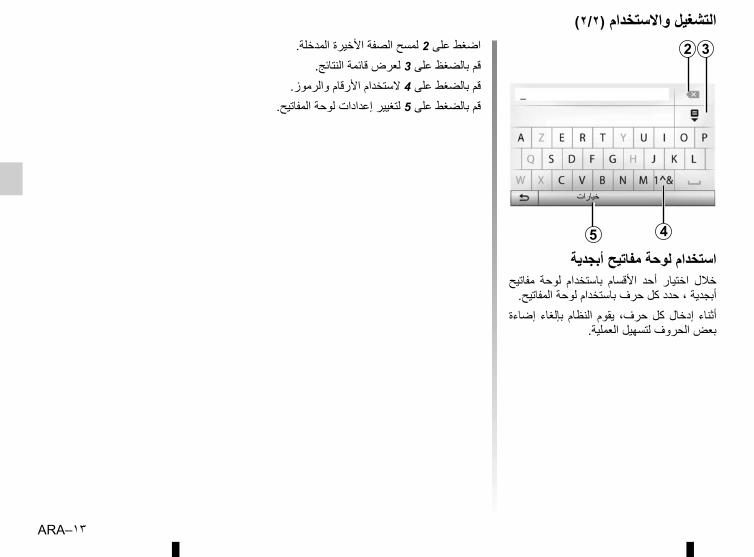
ARA–١٣
التشغيل واالستخدام (٢/٢)
استخدام لوحة مفاتيح أبجديةمفاتيح لوحة باستخدام األقسام أحد اختيار خالل
أبجدية ، حدد كل حرف باستخدام لوحة المفاتيح.إضاءة بإلغاء النظام يقوم حرف، كل إدخال أثناء
بعض الحروف لتسهيل العملية.
اضغط على 2 لمسح الصفة األخيرة المدخلة.قم بالضغظ على 3 لعرض قائمة النتائج.
قم بالضغط على 4 الستخدام األرقام والرموز.قم بالضغط على 5 لتغيير إعدادات لوحة المفاتيح.
2
45
خيارات
3
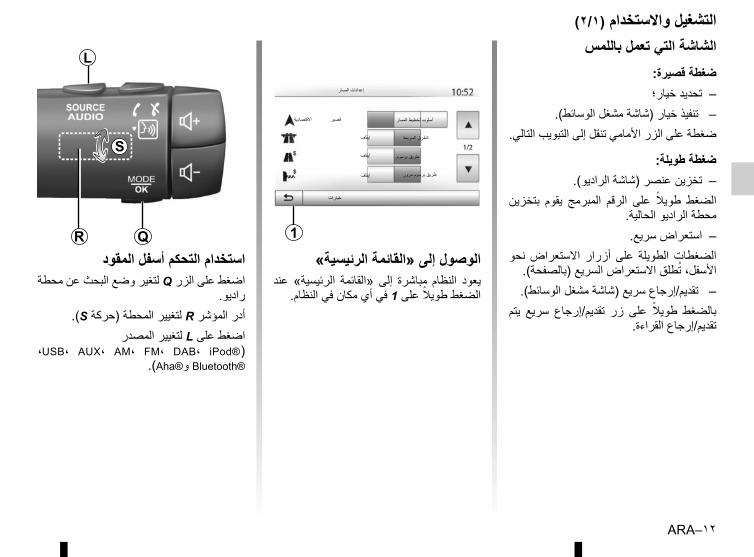
ARA–١٢
التشغيل واالستخدام (٢/١)
استخدام التحكم أسفل المقوداضغط على الزر Q لتغير وضع البحث عن محطة
راديو..(S حركة) لتغيير المحطة R أدر المؤشر
اضغط على L لتغيير المصدر ،USB، AUX، AM ، FM ، DAB ، iPod® )
.(Aha®و Bluetooth®
الشاشة التي تعمل باللمسضغطة قصيرة:تحديد خيار؛ –
– تنفيذ خيار (شاشة مشغل الوسائط).ضغطة على الزر األمامي تنقل إلى التبويب التالي.
ضغطة طويلة:تخزين عنصر (شاشة الراديو). –
بتخزين يقوم المبرمج الرقم على طويال الضغط محطة الراديو الحالية.استعراض سريع. –
نحو االستعراض أزرار على الطويلة الضغطات األسفل، تطلق االستعراض السريع (بالصفحة).– تقديم/إرجاع سريع (شاشة مشغل الوسائط).
يتم سريع تقديم/إرجاع زر على طويال بالضغط تقديم/إرجاع القراءة.
الوصول إلى «القائمة الرئيسية»عند الرئيسية» إلى «القائمة مباشرة النظام يعود
الضغط طويال على 1 في أي مكان في النظام.
QR
S
L
1
خيارات
إيقاف
إيقاف
إيقاف
تشغيل
تشغيل
تشغيل
االقتصاديةقصيرسريع أسلوب تخطيط المسار
الطرق السريعة
طريق برسوم مرور
طريق برسوم
إعدادات المسار
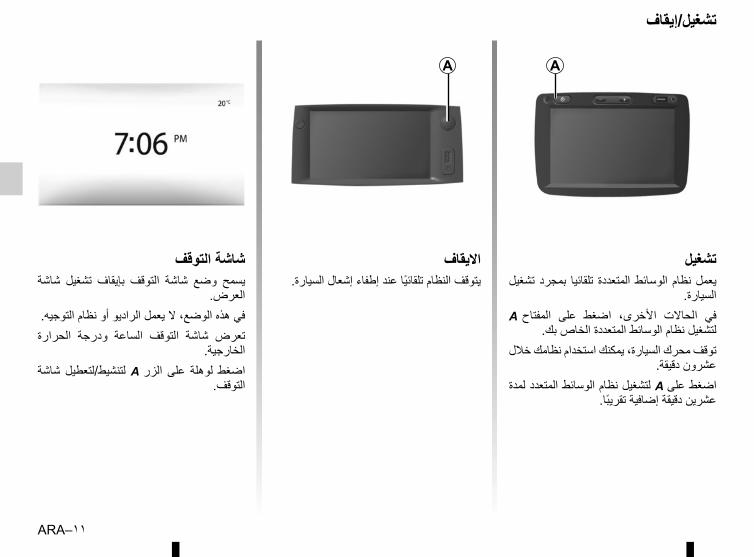
ARA–١١
تشغيل/إيقاف
تشغيلتشغيل بمجرد تلقائيا المتعددة الوسائط نظام يعمل
السيارة. A المفتاح على اضغط األخرى، الحاالت في
لتشغيل نظام الوسائط المتعددة الخاص بك.توقف محرك السيارة، يمكنك استخدام نظامك خالل
عشرون دقيقة.اضغط على A لتشغيل نظام الوسائط المتعدد لمدة
عشرين دقيقة إضافية تقريبا.
شاشة التوقفشاشة تشغيل بإيقاف التوقف شاشة وضع يسمح
العرض.في هذه الوضع، ال يعمل الراديو أو نظام التوجيه.
الحرارة ودرجة الساعة التوقف شاشة تعرض الخارجية.
شاشة لتنشيط/لتعطيل A الزر على لوهلة اضغط التوقف.
A A
االيقافيتوقف النظام تلقائيا عند إطفاء إشعال السيارة.
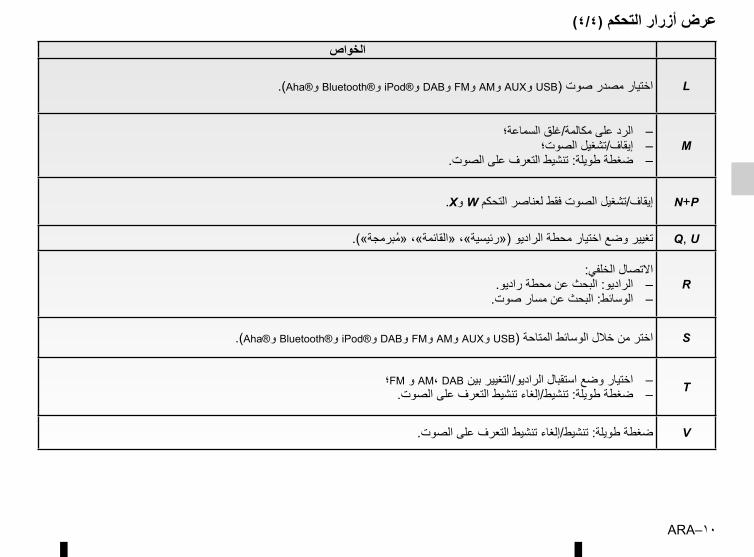
ARA–١٠
الخواص
L.(Aha®و Bluetooth®و iPod®و DABو FMو AMو AUXو USB) اختيار مصدر صوت
Mالرد على مكالمة/غلق السماعة؛ –
إيقاف/تشغيل الصوت؛ –ضغطة طويلة: تنشيط التعرف على الصوت. –
N+P.Xو W إيقاف/تشغيل الصوت فقط لعناصر التحكم
Q, U.(«رئيسية»، «القائمة»، «مبرمجة») تغيير وضع اختيار محطة الراديو
Rاالتصال الخلفي:
الراديو: البحث عن محطة راديو. –الوسائط: البحث عن مسار صوت. –
S.(Aha®و Bluetooth®و iPod®و DABو FMو AMو AUXو USB) اختر من خالل الوسائط المتاحة
T؛FM و AM، DAB اختيار وضع استقبال الراديو/التغيير بين –ضغطة طويلة: تنشيط/إلغاء تنشيط التعرف على الصوت. –
V.ضغطة طويلة: تنشيط/إلغاء تنشيط التعرف على الصوت
عرض أزرار التحكم (٤/٤)
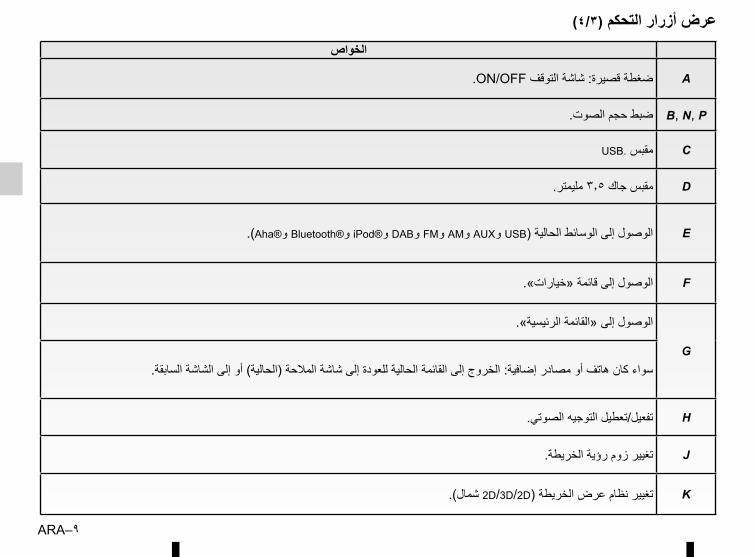
ARA–٩
الخواص
A.ON/OFF ضغطة قصيرة: شاشة التوقف
B, N, P.ضبط حجم الصوت
CUSB. مقبس
D.مقبس جاك ٣٫٥ مليمتر
E.(Aha®و Bluetooth®و iPod®و DABو FMو AMو AUXو USB) الوصول إلى الوسائط الحالية
F.«الوصول إلى قائمة «خيارات
G
الوصول إلى «القائمة الرئيسية».
سواء كان هاتف أو مصادر إضافية: الخروج إلى القائمة الحالية للعودة إلى شاشة المالحة (الحالية) أو إلى الشاشة السابقة.
H.تفعيل/تعطيل التوجيه الصوتي
J.تغيير زوم رؤية الخريطة
K.(2 شمالD/3D/2D) تغيير نظام عرض الخريطة
عرض أزرار التحكم (٤/٣)
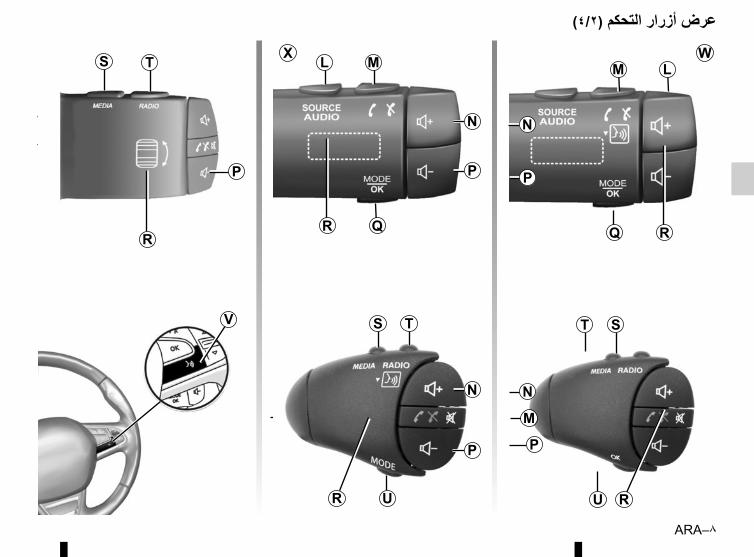
ARA–٨
Q R
LM
U
M
S
R
T
V T
M
W
عرض أزرار التحكم (٤/٢)
N N
P
X
QR
L M
N
P
P
N
U
S
R
T
N
P
M
S T
P
R
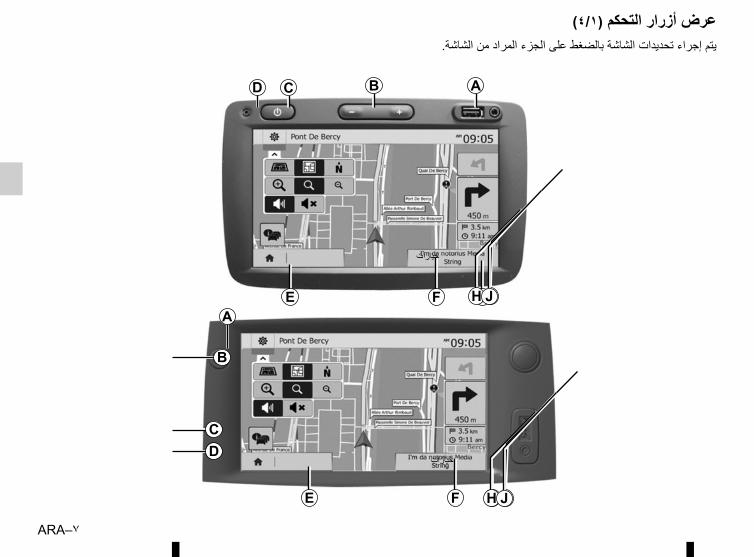
ARA–٧
يتم إجراء تحديدات الشاشة بالضغط على الجزء المراد من الشاشة.
عرض أزرار التحكم (٤/١)
BCD A
GFE H K
B
CD
GFE
A
خيارات
J
خيارات
H KJ
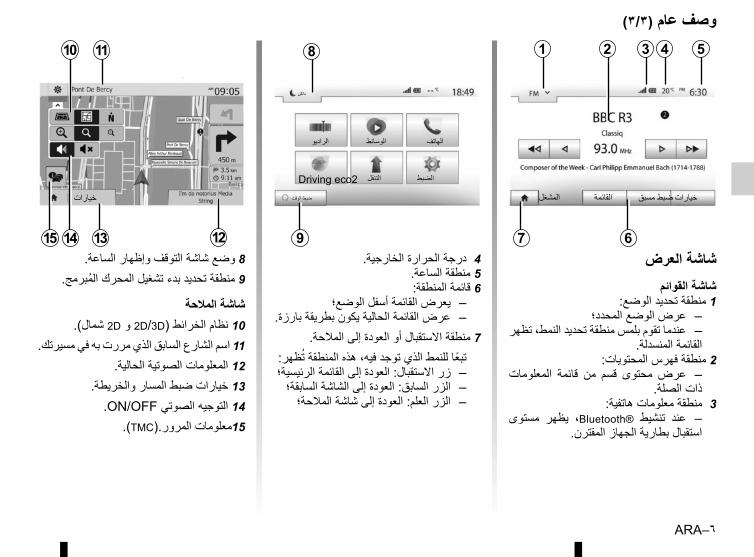
ARA–٦
شاشة العرضشاشة القوائم
1 منطقة تحديد الوضع:عرض الوضع المحدد؛ –
عندما تقوم بلمس منطقة تحديد النمط، تظهر – القائمة المنسدلة.
2 منطقة فهرس المحتويات:المعلومات قائمة من قسم محتوى عرض –
ذات الصلة.منطقة معلومات هاتفية: 3
مستوى يظهر ،Bluetooth® تنشيط عند – استقبال بطارية الجهاز المقترن.
درجة الحرارة الخارجية. 45 منطقة الساعة.6 قائمة المنطقة:
يعرض القائمة أسفل الوضع؛ – عرض القائمة الحالية يكون بطريقة بارزة. –
7 منطقة االستقبال أو العودة إلى المالحة.تبعا للنمط الذي توجد فيه، هذه المنطقة تظهر: زر االستقبال: العودة إلى القائمة الرئيسية؛ – الزر السابق: العودة إلى الشاشة السابقة؛ – الزر العلم: العودة إلى شاشة المالحة؛ –
8 وضع شاشة التوقف وإظهار الساعة.9 منطقة تحديد بدء تشغيل المحرك المبرمج.
شاشة المالحة10 نظام الخرائط (2D/3D و 2D شمال).
11 اسم الشارع السابق الذي مررت به في مسيرتك.12 المعلومات الصوتية الحالية.
13 خيارات ضبط المسار والخريطة..ON/OFF 14 التوجيه الصوتي
.(TMC).15معلومات المرور
وصف عام (٣/٣)8
الراديو الوسائط الهاتف
Driving eco2 التنقل الضبط
داكن
9
ضبط الوقت
67
321
المشغل القائمة خيارات
4 5
ضبط مسبق
10 11
121314
خيارات
15
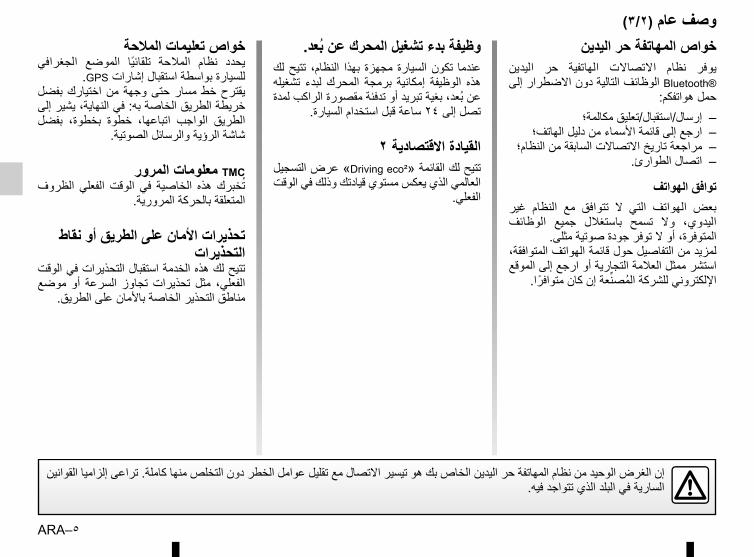
ARA–٥
وصف عام (٣/٢)خواص المهاتفة حر اليدين
اليدين حر الهاتفية االتصاالت نظام يوفر ®Bluetooth الوظائف التالية دون االضطرار إلى
حمل هواتفكم:إرسال/استقبال/تعليق مكالمة؛ –
ارجع إلى قائمة األسماء من دليل الهاتف؛ –مراجعة تاريخ االتصاالت السابقة من النظام؛ –
اتصال الطوارئ . –
توافق الهواتفغير النظام مع تتوافق ال التي الهواتف بعض الوظائف جميع باستغالل تسمح وال اليدوي،
المتوفرة، أو ال توفر جودة صوتية مثلى.لمزيد من التفاصيل حول قائمة الهواتف المتوافقة، استشر ممثل العالمة التجارية أو ارجع إلى الموقع
اإللكتروني للشركة المصنعة إن كان متوافرا.
خواص تعليمات المالحةالجغرافي الموضع تلقائيا المالحة نظام يحدد
.GPS للسيارة بواسطة استقبال إشاراتبفضل اختيارك من وجهة حتى مسار خط يقترح خريطة الطريق الخاصة به: في النهاية، يشير إلى بفضل بخطوة، خطوة اتباعها، الواجب الطريق
شاشة الرؤية والرسائل الصوتية.
TMC معلومات المرورالظروف الفعلي الوقت في الخاصية هذه تخبرك
المتعلقة بالحركة المرورية.
تحذيرات األمان على الطريق أو نقاط التحذيرات
تتيح لك هذه الخدمة استقبال التحذيرات في الوقت موضع أو السرعة تجاوز تحذيرات مثل الفعلي،
مناطق التحذير الخاصة باألمان على الطريق.
وظيفة بدء تشغيل المحرك عن بعد.لك تتيح النظام، بهذا مجهزة السيارة تكون عندما تشغيله لبدء المحرك برمجة إمكانية الوظيفة هذه عن بعد، بغية تبريد أو تدفئة مقصورة الراكب لمدة
تصل إلى ٢٤ ساعة قبل استخدام السيارة.
القيادة االقتصادية ٢تتيح لك القائمة «Driving eco²» عرض التسجيل العالمي الذي يعكس مستوي قيادتك وذلك في الوقت
الفعلي.
إن الغرض الوحيد من نظام المهاتفة حر اليدين الخاص بك هو تيسير االتصال مع تقليل عوامل الخطر دون التخلص منها كاملة. تراعى إلزاميا القوانين السارية في البلد الذي تتواجد فيه.

ARA–٤
وصف عام (٣/١)المقدمة
يوفر النظام متعدد الوسائط في سياراتك الوظائف التالية:
– راديو RDS؛– راديو DAB؛
إدارة مصادر الصوت اإلضافية؛ –تطبيق باستخدام اإلنترنت مفضالت إدارة –
®Aha؛
هاتف حر اليدين؛ –التعرف الصوتي؛ –تعليمات المالحة؛ –
الطرقات على المرور حركة عن معلومات –(TMC)؛
معلومات عن مناطق االنتباه؛ –مساعدة التوقف (كاميرا الرجوع للخلف)؛ –
برمجة بدء تشغيل المحرك عن بعد؛ –من القيادة ونصائح القيادة نمط عن معلومات –
أجل تحسين استهالكك للوقود.
Fonctions radioنظام الوسائط المتعددة يتيح االستماع إلى محطات (اإلرسال DAB التردد) (تعديل FM الراديو
الصوتي الرقمي) و AM (تعديل السعة).جودة أفضل على الحصول DAB نظام يوفر صوتية والوصول إلى المعلومات النصية المسجلة (إنتليتكس) من خالل تمرير النص، وذلك لعرض:
التحديثات الجديدة؛ –النتائج الرياضية،... –
المحطات بعض اسم بعرض RDS نظام يسمح :FM ومعلومات تنقلها محطات راديو
الطريق لمسار العامة الحالة حول معلومات –(TA)؛
رسالة (رسائل) الطوارئ. –
Aha® الوظيفةالمفضالت إلى الوصول Aha® التطبيق يتيح
الخاصة بك (بودكاستس، ويب راديو...). Aha® تطبيق وظائف كافة الستخدام مالحظة: إلى ستحتاج بك، الخاص المتعددة الوسائط بنظام تنزيل التطبيق بهاتفك الذكي وتنشيط خاصية تتبع
الموقع بهاتفك وتوصيله بالنظام الصوتي.
وظيفة إضافية للراديوبكم الخاص االستماع جهاز إلى االستماع يمكنكم لديك السيارة. في الصوت مكبر على مباشرة عدة خيارات لتتمكن من ربط المشغل الخاص بك،
ويتوقف خيارك على نوع الجهاز الخاص بك:مقبس جاك ٣٫٥ مليمتر؛ –
USB أوديو؛ –.Bluetooth® رابط –
لمزيد من التفاصيل حول قائمة الهواتف المتوافقة، استشر ممثل العالمة التجارية أو ارجع إلى الموقع
اإللكتروني للشركة المصنعة إن كان متوافرا.

ARA–٣
احتياطات االستخدام
الوظائف مجموعة على الكتيب يحتوي هذا الكتيب. هذا إعداد وقت توفرت التي التقنية الخصائص إلى استنادا الكتيب هذا في المذكورة الموديالت شرح تم الموجودة للموديالت المشار إليها. ويرتبط وجودها بموديل التجهيزات، والخيارات، والبلد المستورد. كما أن عددا من الوظائف التي ستضاف خالل العام قد
يرد شرحها في هذا الكتيب.يرجى استشارة موزع معتمد، للحصول على مزيد من التفاصيل.
االحتياطات الالزمة المتعلقة بالتالعب بالنظام– اضغط على أزرار التحكم (بلوحة التحكم أو بالمقود) واتبع التعليمات الموجودة على الشاشة عندما تسمح ظروف السير بذلك.
اضبط شدة الصوت إلى مستوى معتدل يمكنك من سماع ما يدور من أصوات خارج السيارة. –تدابير احترازية خاصة بالمالحة
إن استخدام نظام المالحة ال يحل بأي حال من األحوال محل مسئولية قائد السيارة أو يقظته أثناء قيادة السيارة. –وفقا للمنطقة الجغرافية، قد ال تحتوي الخريطة على أحدث المعلومات حول الطرق الجديدة. كن منتبها. في جميع األحوال، تكون األولوية لكود الطريق ولوحات –
اإلشارات عند مؤشرات نظام المالحة.التدابير االحترازية الخاصة باألجهزة
ال تجري أي خلع ألحد المكونات أو تعديل بالنظام لتجنب خطر أي تلف مادي أو حروق. –في حالة حدوث أي عطل وللقيام بأي تفكيك يرجى االتصال بأحد ممثلي الصانع. –
ال تقم بإدخال أي جسم غريب داخل المشغل. –ال تستخدم المنتجات التي تحتوي على الكحول و/أو سوائل الرش األخرى على المنطقة. –
تدابير احترازية خاصة بالهاتفتنظم بعض القوانين استخدام الهاتف في السيارة. فهي ال تسمح باستخدام أنظمة الهاتف حرة اليدين في كل أوقات القيادة: يجب أن يظل قائد السيارة هو المتحكم –
في القيادة؛تعد المهاتفة أثناء القيادة أحد عوامل التشتت والمخاطر الكبيرة، وذلك أثناء جميع مراحل االستخدام (كتابة الرقم، االستصال، البحث عن اسم في الدليل...). –
من الضروري اتباع االحتياطات المذكورة أدناه أثناء استخدام النظام وذلك لدواعي السالمة أو لتجنب مخاطر تلف األجهزة. تراعى إلزاميا القوانين السارية في البلد الذي تتواجد فيه.
ARA–٢
٦٦.ARA . . . . . . . . . . . . . . . . . . . . . . . . . . . . . . . . . . . . . . . . . . . . . . . . . . . . . . . . . . . . . . . . ضبط النظام٦٩.ARA . . . . . . . . . . . . . . . . . . . . . . . . . . . . . . . . . . . . . . . . . . . . . . . . . . . . . . . . . . . . . . . تحديث النظام٧٣.ARA . . . . . . . . . . . . . . . . . . . . . . . . . . . . . . . . . . . . . . . . . . . . . . . . . . . . . . . . . . . . . خلل في التشغيل

ARA–١
٣.ARA . . . . . . . . . . . . . . . . . . . . . . . . . . . . . . . . . . . . . . . . . . . . . . . . . . . . . . . . . . . احتياطات االستخدام٤.ARA . . . . . . . . . . . . . . . . . . . . . . . . . . . . . . . . . . . . . . . . . . . . . . . . . . . . . . . . . . . . . . . خواص عامة٤.ARA وصف عام . . . . . . . . . . . . . . . . . . . . . . . . . . . . . . . . . . . . . . . . . . . . . . . . . . . . . . . . . . . ٧.ARA . . . . . . . . . . . . . . . . . . . . . . . . . . . . . . . . . . . . . . . . . . . . . . . . . . . . . . . . . عرض األوامر١١.ARA . . . . . . . . . . . . . . . . . . . . . . . . . . . . . . . . . . . . . . . . . . . . . . . . . . . . . . . . . . تشغيل/إيقاف١٢.ARA . . . . . . . . . . . . . . . . . . . . . . . . . . . . . . . . . . . . . . . . . . . . . . . . . . . . . . .التشغيل واالستخدام١٤.ARA . . . . . . . . . . . . . . . . . . . . . . . . . . . . . . . . . . . . . . . . . . . . . . . . . . . . . . . . . . شدة الصوت١٥.ARA . . . . . . . . . . . . . . . . . . . . . . . . . . . . . . . . . . . . . . . . . . . . . . . . . . . . . . . . . . . . . . .AUX/الراديو١٥.ARA . . . . . . . . . . . . . . . . . . . . . . . . . . . . . . . . . . . . . . . . . . . . . . . . . . . . . . االستماع إلى الراديو١٩.ARA . . . . . . . . . . . . . . . . . . . . . . . . . . . . . . . . . . . . . . . . . . . . . . . . . . . مصادر الصوت اإلضافية٢٢.ARA . . . . . . . . . . . . . . . . . . . . . . . . . . . . . . . . . . . . . . . . . . . . . . . . . . . . . . . . . . . . .الخدمات٢٤.ARA . . . . . . . . . . . . . . . . . . . . . . . . . . . . . . . . . . . . . . . . . . . . . . . . . . . . . . . . . ضبط الصوت٢٦.ARA . . . . . . . . . . . . . . . . . . . . . . . . . . . . . . . . . . . . . . . . . . . . . . . . . . . . . . . . . . . . . . . . . . المالحة٢٦.ARA . . . . . . . . . . . . . . . . . . . . . . . . . . . . . . . . . . . . . . . . . . . . . . . . . . . . . . . . . . نظام المالحة٢٧.ARA . . . . . . . . . . . . . . . . . . . . . . . . . . . . . . . . . . . . . . . . . . . . . . . . . . . . . . . . . . قراءة خريطة٣٠.ARA . . . . . . . . . . . . . . . . . . . . . . . . . . . . . . . . . . . . . . . . . . . . . . . . . . . . . . . . . . إدخال وجهة٣٦.ARA . . . . . . . . . . . . . . . . . . . . . . . . . . . . . . . . . . . . . . . . . . . . . . . . . . . . . . . . . . . . . التوجيه٤٢.ARA . . . . . . . . . . . . . . . . . . . . . . . . . . . . . . . . . . . . . . . . . . . . . . . . . . . . . . . إعدادات الخريطة٤٣.ARA . . . . . . . . . . . . . . . . . . . . . . . . . . . . . . . . . . . . . . . . . . . . . . . . . . . . Gérer les favoris٤٥.ARA . . . . . . . . . . . . . . . . . . . . . . . . . . . . . . . . . . . . . . . . . . . . . . . . . . . . . . .ضبط نظام المالحة٤٩.ARA . . . . . . . . . . . . . . . . . . . . . . . . . . . . . . . . . . . . . . . . . . . . . . . . . . . . . . . . . . . . ²القيادة االقتصادية٥٠.ARA . . . . . . . . . . . . . . . . . . . . . . . . . . . . . . . . . . . . . . . . . . . . . . . . . . . . . . . . . . ®Bluetooth جهاز٥٠.ARA . . . . . . . . . . . . . . . . . . . . . . . . . . . . . . . . . . . . . . . . . . Bluetooth® إقران/إلغاء إقران أجهزة٥٣.ARA . . . . . . . . . . . . . . . . . . . . . . . . . . . . . . . . . . . . . . . Bluetooth® االتصال/قطع االتصال بأجهزة٥٥.ARA . . . . . . . . . . . . . . . . . . . . . . . . . . . . . . . . . . . . . . . . . . . . استخدام خاصية التعرف على الصوت٥٨.ARA . . . . . . . . . . . . . . . . . . . . . . . . . . . . . . . . . . . . . . . . . . . . . . . . . . . . . . . . . . .دليل الهاتف٥٩.ARA . . . . . . . . . . . . . . . . . . . . . . . . . . . . . . . . . . . . . . . . . . . . . . . . . . . . . . إجراء وتلقي مكالمة٦٢.ARA . . . . . . . . . . . . . . . . . . . . . . . . . . . . . . . . . . . . . . . . . . . . . . . . . . . . . . . بدء تشغيل المحرك عن بعد٦٥.ARA . . . . . . . . . . . . . . . . . . . . . . . . . . . . . . . . . . . . . . . . . . . . . . . . . . . . . . . .كاميرا الرجوع إلى الخلف

A passion for performance
ELF, partner of
RENAULT recommends ELFPartners in cutting-edge automotive technology, Elf and Renault combine their expertise on both the racetrack and the city streets. This enduring partnership gives drivers a range of lubricants perfectly suited to Renault cars. Lasting protection and optimum performance for your engine – guaranteed. Whether changing the oil or simply topping up, to find the approved ELF lubricant best suited to your vehicle, ask your Renault dealer for a recommendation or consult your vehi-cle maintenance handbook.
www.lubricants.elf.com
A brand from

RENAULT S.A.S SOcIéTé pAR AcTIONS SIMpLIfIéE AU cApITAL DE 533 941 113 € / 13-15, qUAI LE GALLO92100 BOULOGNE-BILLANcOURT R.c.S. NANTERRE 780 129 987 - SIRET 780 129 987 03591 / TéL. : 0810 40 50 60NX 1196-4 - 259105193R - 08/2016 - Edition ENG
Ñ259105193R]Ó2 5 9 1 0 5 1 9 3 R
36