mellanox – ibm sriov enablement guidedelivery04.dhe.ibm.com/sar/cma/xsa/mellanox_sr-iov... ·...
TRANSCRIPT
Mellanox – IBM SRIOV enablement guide
IBM
Mellanox – IBM SRIOV enablement guide
Version 0.0.17For IBM System-X/Mellanox OFED 2.0 drivers
Latest Version Date: 11 February 2014Origination Date: 20 November 2013
Version 0.0.17 Latest Version Date: 2014-02-11 page 1 of 30

Mellanox – IBM SRIOV enablement guide
Table of ContentsIntroduction................................................................................................................................................3RHEL 6.4 preparation:...............................................................................................................................4
OS install...............................................................................................................................................4Enable iommu:......................................................................................................................................4
SLES 11 SP3 preparation:..........................................................................................................................7OS install...............................................................................................................................................7Enable iommu:......................................................................................................................................8
Installing Mellanox Drivers/Firmware.....................................................................................................11SRIOV Customization.............................................................................................................................15
Confirming Mellanox adapter(s) are virtualizied................................................................................15 Associating physical NIC ports to virtual PCI functions...................................................................15(Optional) Assigning MAC addresses to virtual functions.................................................................16(Optional) Assignment of CPU NUMA to virtual function................................................................17(Optional) Assignment of Transparent vLAN to a virtual function....................................................20(Optional) Assignment of QOS rate limits to a virtual function.........................................................21Checking virtual function/ports configurations...................................................................................24(Optional) Hypervisor performance tuning.........................................................................................25
Creating SR-IOV enabled Virtual Machines............................................................................................27RHEL OS load on virtualized Guest...................................................................................................29SLES OS load on virtualized Guest....................................................................................................30
Version 0.0.17 Latest Version Date: 2014-02-11 page 2 of 30
Mellanox – IBM SRIOV enablement guide
IntroductionThis document outlines the supported procedure to enable and configure SR-IOV using:
• Mellanox Connect-X3 adapters on • Supported Linux Distribution (
◦ Red Hat Enterprise Linux Server version 6 quarterly update 4 or higher◦ SLES 11 Service Pack 2 or higher
• IBM System-X:◦ M4, M5 or X6 class servers (ie: servers with either Sandy Bridge or Ivy Bridge
Processor Families)
Version 0.0.17 Latest Version Date: 2014-02-11 page 3 of 30
Mellanox – IBM SRIOV enablement guide
RHEL 6.4 preparation:
OS install
Recommend changing disk partitioning to maximize the size of root partition
Recommend installing groups/packages:
Software Development Workstation Group with following customizations:Base System: Compatibility LibrariesBase System: Legacy UNIX compatibilityServers: System administration toolsVirtualization: Virtualization Tools
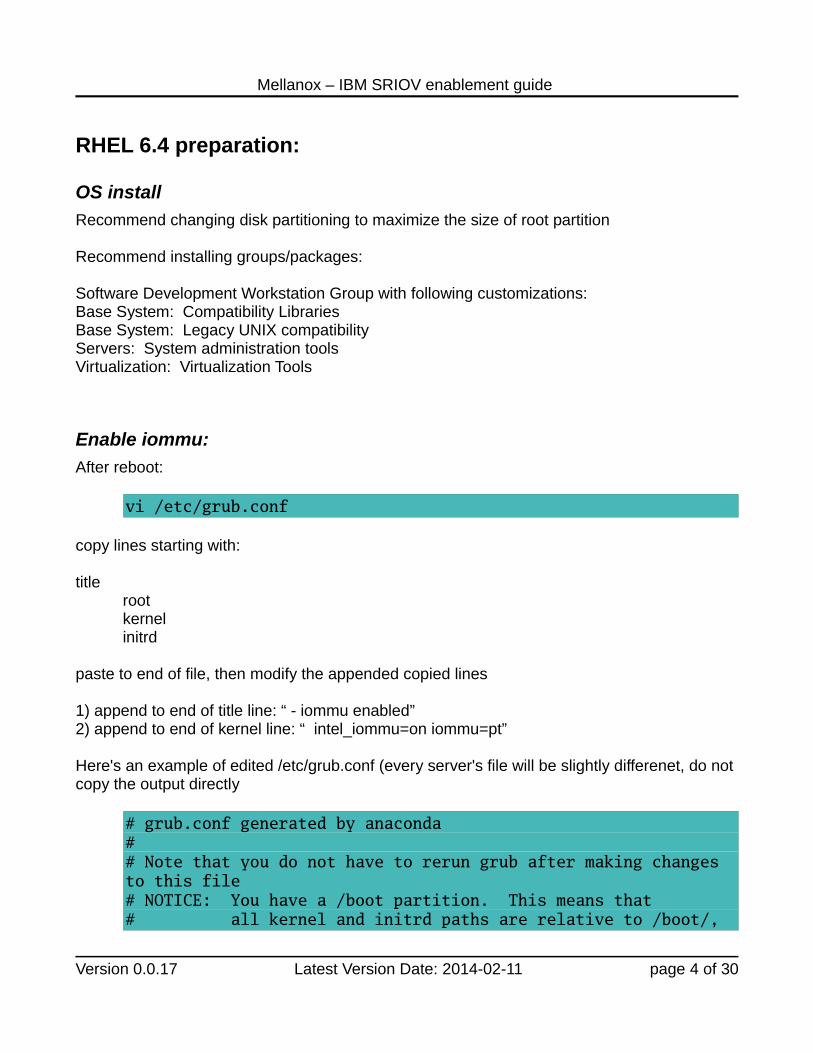
Enable iommu:
After reboot:
vi /etc/grub.conf
copy lines starting with:
titlerootkernelinitrd
paste to end of file, then modify the appended copied lines
1) append to end of title line: “ - iommu enabled”2) append to end of kernel line: “ intel_iommu=on iommu=pt”
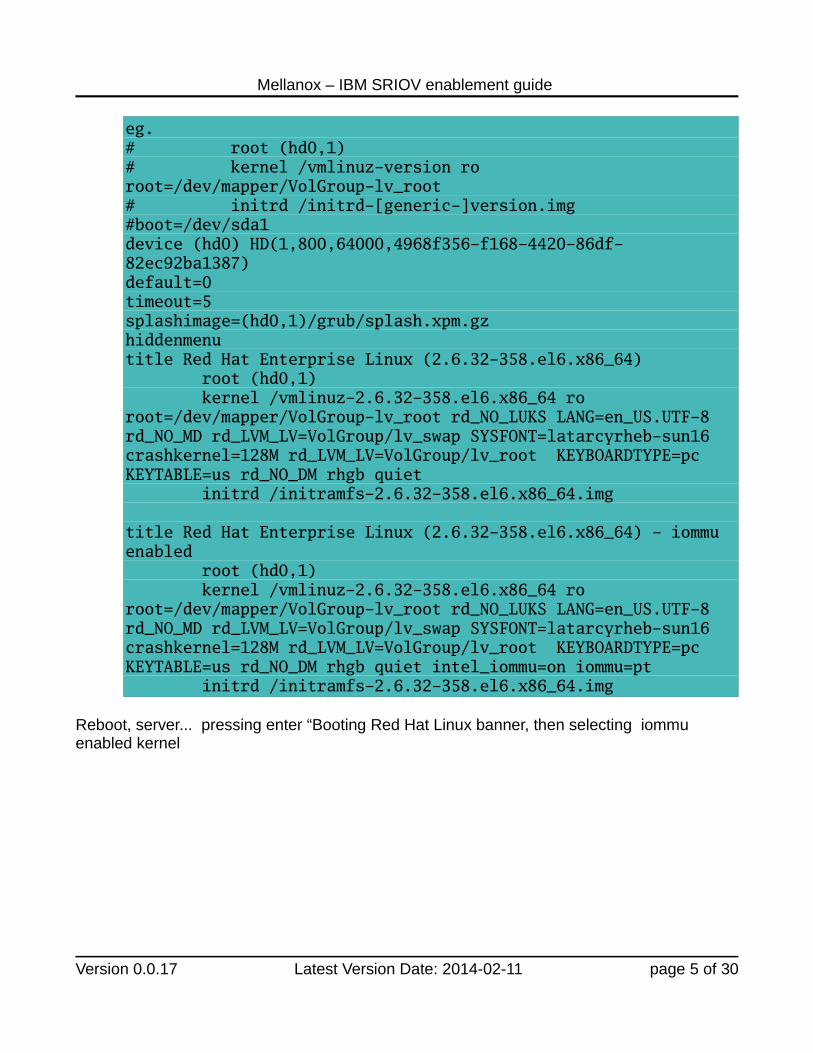
Here's an example of edited /etc/grub.conf (every server's file will be slightly differenet, do notcopy the output directly
# grub.conf generated by anaconda # # Note that you do not have to rerun grub after making changes to this file # NOTICE: You have a /boot partition. This means that # all kernel and initrd paths are relative to /boot/,
Version 0.0.17 Latest Version Date: 2014-02-11 page 4 of 30
Mellanox – IBM SRIOV enablement guide
eg. # root (hd0,1) # kernel /vmlinuz-version ro root=/dev/mapper/VolGroup-lv_root # initrd /initrd-[generic-]version.img #boot=/dev/sda1 device (hd0) HD(1,800,64000,4968f356-f168-4420-86df-82ec92ba1387) default=0 timeout=5 splashimage=(hd0,1)/grub/splash.xpm.gz hiddenmenu title Red Hat Enterprise Linux (2.6.32-358.el6.x86_64) root (hd0,1) kernel /vmlinuz-2.6.32-358.el6.x86_64 ro root=/dev/mapper/VolGroup-lv_root rd_NO_LUKS LANG=en_US.UTF-8 rd_NO_MD rd_LVM_LV=VolGroup/lv_swap SYSFONT=latarcyrheb-sun16 crashkernel=128M rd_LVM_LV=VolGroup/lv_root KEYBOARDTYPE=pc KEYTABLE=us rd_NO_DM rhgb quiet initrd /initramfs-2.6.32-358.el6.x86_64.img
title Red Hat Enterprise Linux (2.6.32-358.el6.x86_64) - iommu enabled root (hd0,1) kernel /vmlinuz-2.6.32-358.el6.x86_64 ro root=/dev/mapper/VolGroup-lv_root rd_NO_LUKS LANG=en_US.UTF-8 rd_NO_MD rd_LVM_LV=VolGroup/lv_swap SYSFONT=latarcyrheb-sun16 crashkernel=128M rd_LVM_LV=VolGroup/lv_root KEYBOARDTYPE=pc KEYTABLE=us rd_NO_DM rhgb quiet intel_iommu=on iommu=pt initrd /initramfs-2.6.32-358.el6.x86_64.img
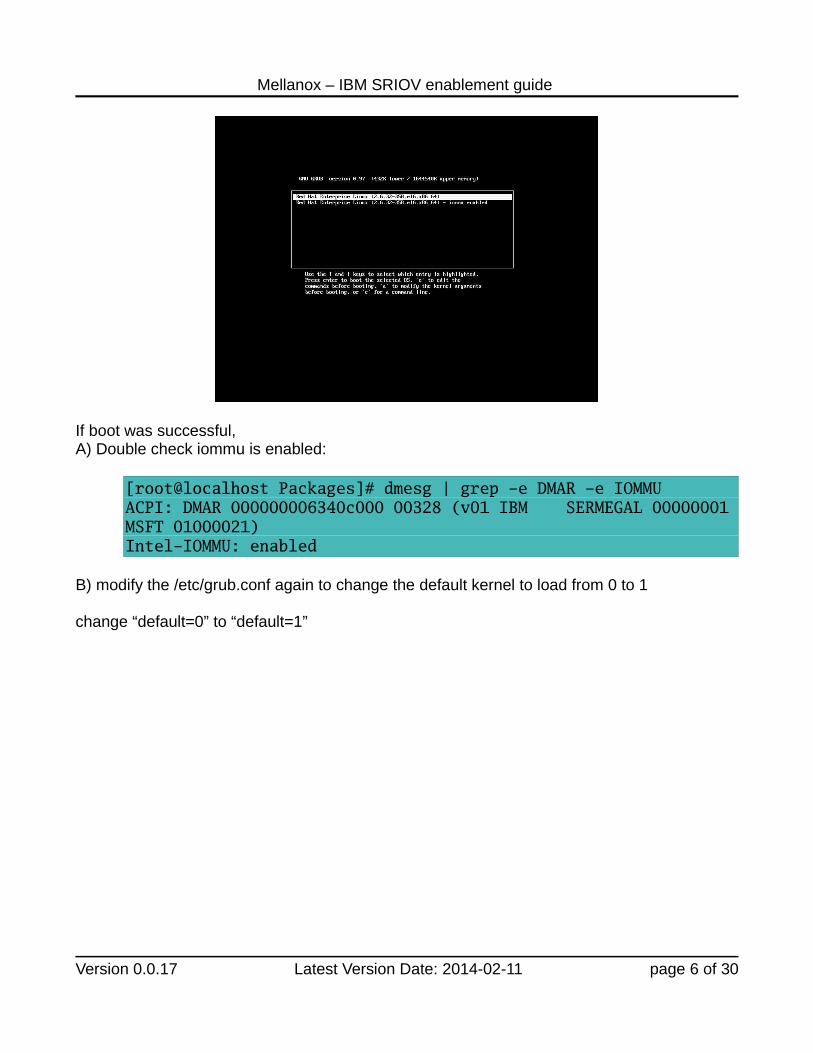
Reboot, server... pressing enter “Booting Red Hat Linux banner, then selecting iommu enabled kernel
Version 0.0.17 Latest Version Date: 2014-02-11 page 5 of 30
Mellanox – IBM SRIOV enablement guide
If boot was successful, A) Double check iommu is enabled:
[root@localhost Packages]# dmesg | grep -e DMAR -e IOMMU ACPI: DMAR 000000006340c000 00328 (v01 IBM SERMEGAL 00000001MSFT 01000021) Intel-IOMMU: enabled
B) modify the /etc/grub.conf again to change the default kernel to load from 0 to 1
change “default=0” to “default=1”
Version 0.0.17 Latest Version Date: 2014-02-11 page 6 of 30
Mellanox – IBM SRIOV enablement guide
SLES 11 SP3 preparation:
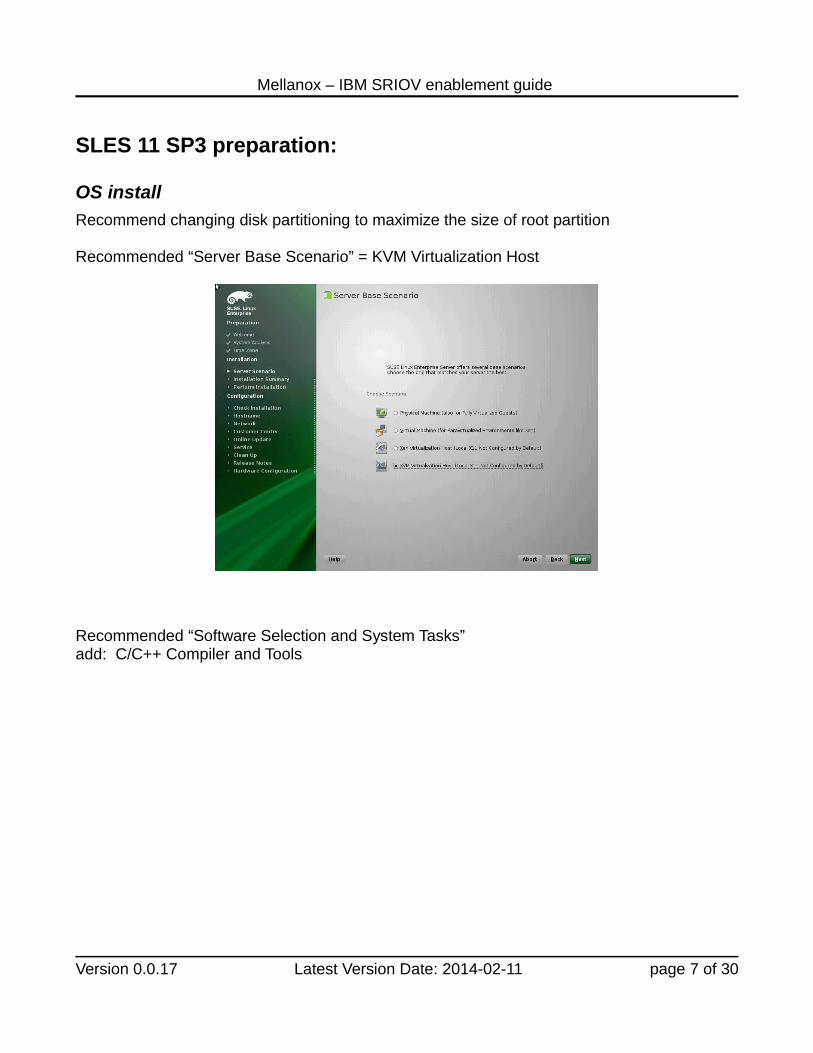
OS install
Recommend changing disk partitioning to maximize the size of root partition
Recommended “Server Base Scenario” = KVM Virtualization Host
Recommended “Software Selection and System Tasks”add: C/C++ Compiler and Tools
Version 0.0.17 Latest Version Date: 2014-02-11 page 7 of 30

Mellanox – IBM SRIOV enablement guide
Enable iommu:
After reboot:
linux-3f2i:~ # vi /boot/efi/efi/SuSE/elilo.conf
copy lines starting with:
imagelabelappenddescriptioninitrdroot
paste to end of file, then modify the appended copied lines
1) append to end of label line: “ - iommu enabled”2) append to end of append line: “ intel_iommu=on iommu=pt”
Here's an example of edited /boot/efi/efi/SuSE/elilo.conf (every server's file will be slightly different, do not copy the output directly
# This file has been transformed by /sbin/elilo. # Please do NOT edit here -- edit /etc/elilo.conf instead!
Version 0.0.17 Latest Version Date: 2014-02-11 page 8 of 30

Mellanox – IBM SRIOV enablement guide
# Otherwise your changes will be lost e.g. during kernel-update. # # Modified by YaST2. Last modification on Mon Jan 6 12:52:45 EST 2014 timeout = 80 ##YaST - boot_efilabel = "SUSE Linux Enterprise Server 11 SP3" default = linux prompt
image = vmlinuz-3.0.76-0.11-default ###Don't change this comment - YaST2 identifier: Original name:linux### label = linux append = "resume=/dev/disk/by-id/scsi-350000393d848b10c-part2 splash=silent crashkernel=256M-:128M showopts " description = "Linux (3.0.76-0.11-default)" initrd = initrd-3.0.76-0.11-default root = /dev/disk/by-id/scsi-350000393d848b10c-part3
image = vmlinuz-3.0.76-0.11-default ###Don't change this comment - YaST2 identifier: Original name:linux### label = linux-iommu append = "resume=/dev/disk/by-id/scsi-350000393d848b10c-part2 splash=silent crashkernel=256M-:128M showopts intel_iommu=on iommu=pt " description = "Linux (3.0.76-0.11-default)" initrd = initrd-3.0.76-0.11-default root = /dev/disk/by-id/scsi-350000393d848b10c-part3 image = vmlinuz-3.0.76-0.11-default ###Don't change this comment - YaST2 identifier: Original name:failsafe### label = failsafe append = "showopts ide=nodma apm=off noresume edd=off powersaved=off nohz=off highres=off processor.max_cstate=1 nomodeset x11failsafe " description = "Failsafe (3.0.76-0.11-default)" initrd = initrd-3.0.76-0.11-default root = /dev/disk/by-id/scsi-350000393d848b10c-part3
Version 0.0.17 Latest Version Date: 2014-02-11 page 9 of 30
Mellanox – IBM SRIOV enablement guide
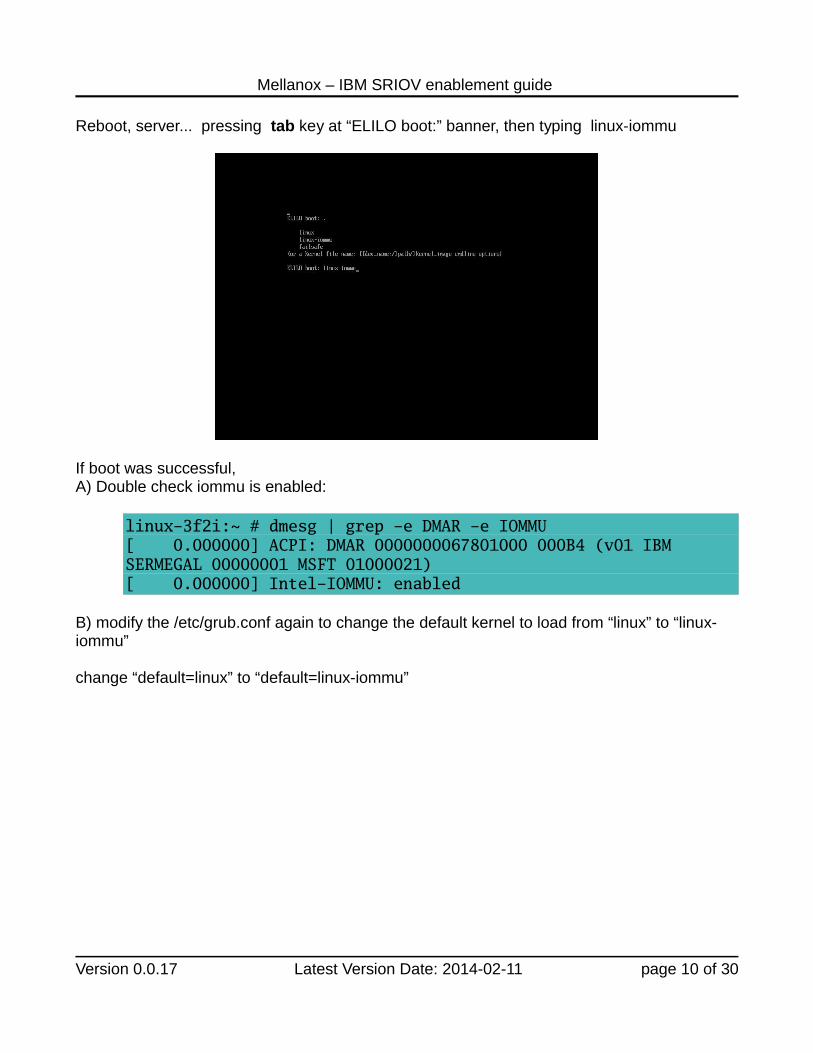
Reboot, server... pressing tab key at “ELILO boot:” banner, then typing linux-iommu
If boot was successful, A) Double check iommu is enabled:
linux-3f2i:~ # dmesg | grep -e DMAR -e IOMMU [ 0.000000] ACPI: DMAR 0000000067801000 000B4 (v01 IBM SERMEGAL 00000001 MSFT 01000021) [ 0.000000] Intel-IOMMU: enabled
B) modify the /etc/grub.conf again to change the default kernel to load from “linux” to “linux-iommu”
change “default=linux” to “default=linux-iommu”
Version 0.0.17 Latest Version Date: 2014-02-11 page 10 of 30
Mellanox – IBM SRIOV enablement guide
Installing Mellanox Drivers/FirmwareProcedure for RHEL6 and SLES 11 KVM servers are identical. Just ensure the correct driver/firmware/tool file being used matches Linux distro!
A) Using IBM standalone update express image.
Executing update payload by itself (easiest method, if other system updates not required). In this example, the server is running Red Hat 6 and the maximum number of virtual functions tobe created by the operating system is 16.
./mlnx_fw_nic_2.0.3.0.0.4_rhel6_x86-64.bin -s --enable-sriov --total-vfs 16
B) Using IBM's Update Express Tool
If desired, the Mellanox SR-IOV enabled driver install/adapter firmware can be a element of a general update express server update. A small modification of the payload's .xml is required to execute the Mellanox update properly. Download all the update express payloads, .xml files and uxspi tool into a single directory. Modify the Mellanox .xml file with the following two commands. In this example, the server is running Red Hat 6 and the maximum number of virtual functions to be created by the operating system is 16.
[root@localhost ~]# sed -i -e 's/.bin -s/.bin -s --enable-sriov --total-vfs 16/' mlnx_fw_nic_2.0.3.0.0.4_rhel6_x86-64.xml[root@localhost ~]# sed -i -e 's/x86_64/x86_64 with SR-IOV enablement/' mlnx_fw_nic_2.0.3.0.0.4_rhel6_x86-64.xml
Assuming the IBM uxspi executable, Mellanox payload and .xml files are in the current directory
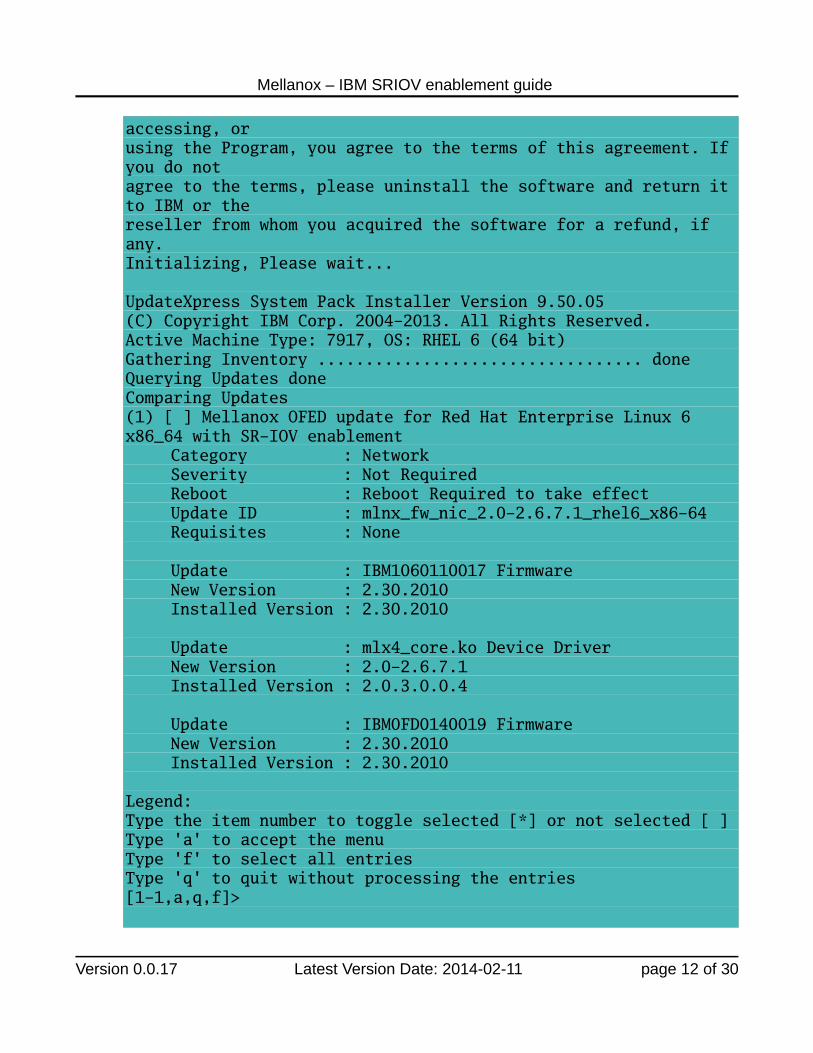
[root@localhost ~]# ./ibm_utl_uxspi_9.50_rhel6_32-64.bin up -L Extracting... Executing...
This Program is licensed under the terms of the agreement available by invoking this utility with the --license option. By extracting, copying,
Version 0.0.17 Latest Version Date: 2014-02-11 page 11 of 30
Mellanox – IBM SRIOV enablement guide
accessing, or using the Program, you agree to the terms of this agreement. Ifyou do not agree to the terms, please uninstall the software and return itto IBM or the reseller from whom you acquired the software for a refund, if any. Initializing, Please wait...
UpdateXpress System Pack Installer Version 9.50.05 (C) Copyright IBM Corp. 2004-2013. All Rights Reserved. Active Machine Type: 7917, OS: RHEL 6 (64 bit) Gathering Inventory .................................. done Querying Updates done Comparing Updates (1) [ ] Mellanox OFED update for Red Hat Enterprise Linux 6 x86_64 with SR-IOV enablement
Category : Network Severity : Not Required Reboot : Reboot Required to take effect Update ID : mlnx_fw_nic_2.0-2.6.7.1_rhel6_x86-64 Requisites : None
Update : IBM1060110017 Firmware New Version : 2.30.2010 Installed Version : 2.30.2010
Update : mlx4_core.ko Device Driver New Version : 2.0-2.6.7.1 Installed Version : 2.0.3.0.0.4
Update : IBM0FD0140019 Firmware New Version : 2.30.2010 Installed Version : 2.30.2010
Legend: Type the item number to toggle selected [*] or not selected [ ]Type 'a' to accept the menu Type 'f' to select all entries Type 'q' to quit without processing the entries [1-1,a,q,f]>
Version 0.0.17 Latest Version Date: 2014-02-11 page 12 of 30
Mellanox – IBM SRIOV enablement guide
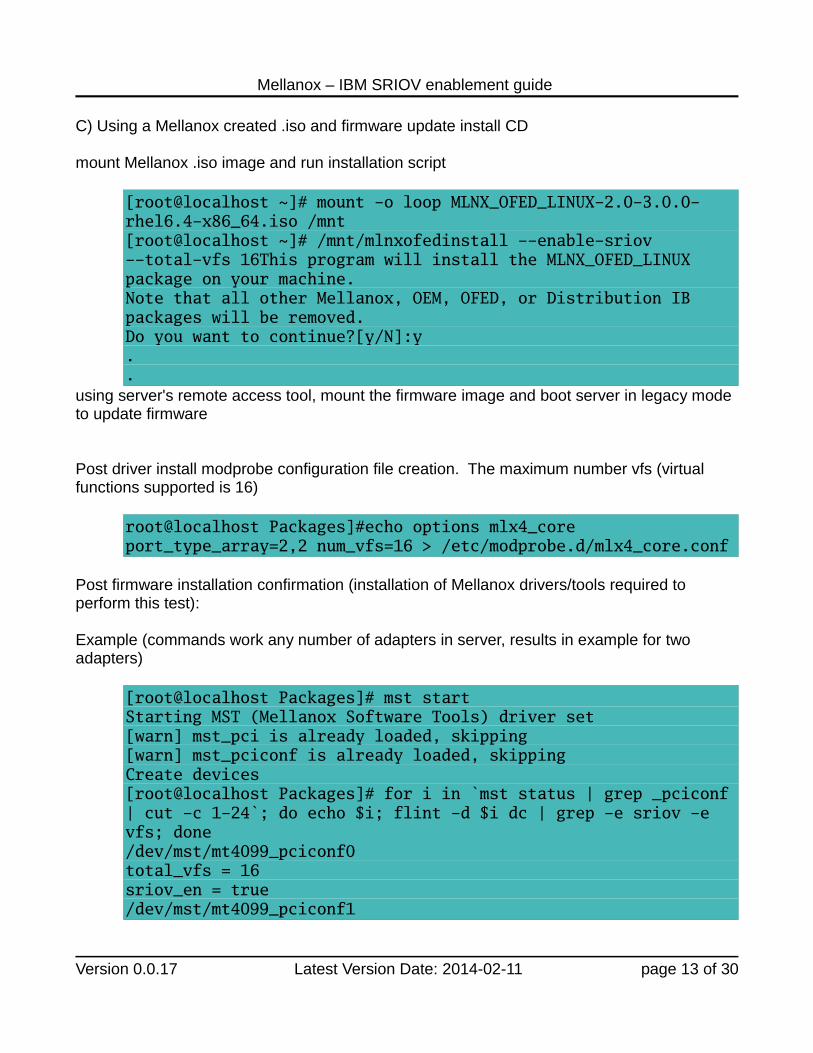
C) Using a Mellanox created .iso and firmware update install CD
mount Mellanox .iso image and run installation script
[root@localhost ~]# mount -o loop MLNX_OFED_LINUX-2.0-3.0.0-rhel6.4-x86_64.iso /mnt [root@localhost ~]# /mnt/mlnxofedinstall --enable-sriov --total-vfs 16This program will install the MLNX_OFED_LINUX package on your machine. Note that all other Mellanox, OEM, OFED, or Distribution IB packages will be removed. Do you want to continue?[y/N]:y..
using server's remote access tool, mount the firmware image and boot server in legacy mode to update firmware
Post driver install modprobe configuration file creation. The maximum number vfs (virtual functions supported is 16)
root@localhost Packages]#echo options mlx4_core port_type_array=2,2 num_vfs=16 > /etc/modprobe.d/mlx4_core.conf
Post firmware installation confirmation (installation of Mellanox drivers/tools required to perform this test):
Example (commands work any number of adapters in server, results in example for two adapters)
[root@localhost Packages]# mst start Starting MST (Mellanox Software Tools) driver set [warn] mst_pci is already loaded, skipping [warn] mst_pciconf is already loaded, skipping Create devices [root@localhost Packages]# for i in `mst status | grep _pciconf| cut -c 1-24`; do echo $i; flint -d $i dc | grep -e sriov -e vfs; done /dev/mst/mt4099_pciconf0 total_vfs = 16 sriov_en = true /dev/mst/mt4099_pciconf1
Version 0.0.17 Latest Version Date: 2014-02-11 page 13 of 30

Mellanox – IBM SRIOV enablement guide
total_vfs = 16 sriov_en = true [root@localhost Packages]#
Reboot server
Version 0.0.17 Latest Version Date: 2014-02-11 page 14 of 30
Mellanox – IBM SRIOV enablement guide
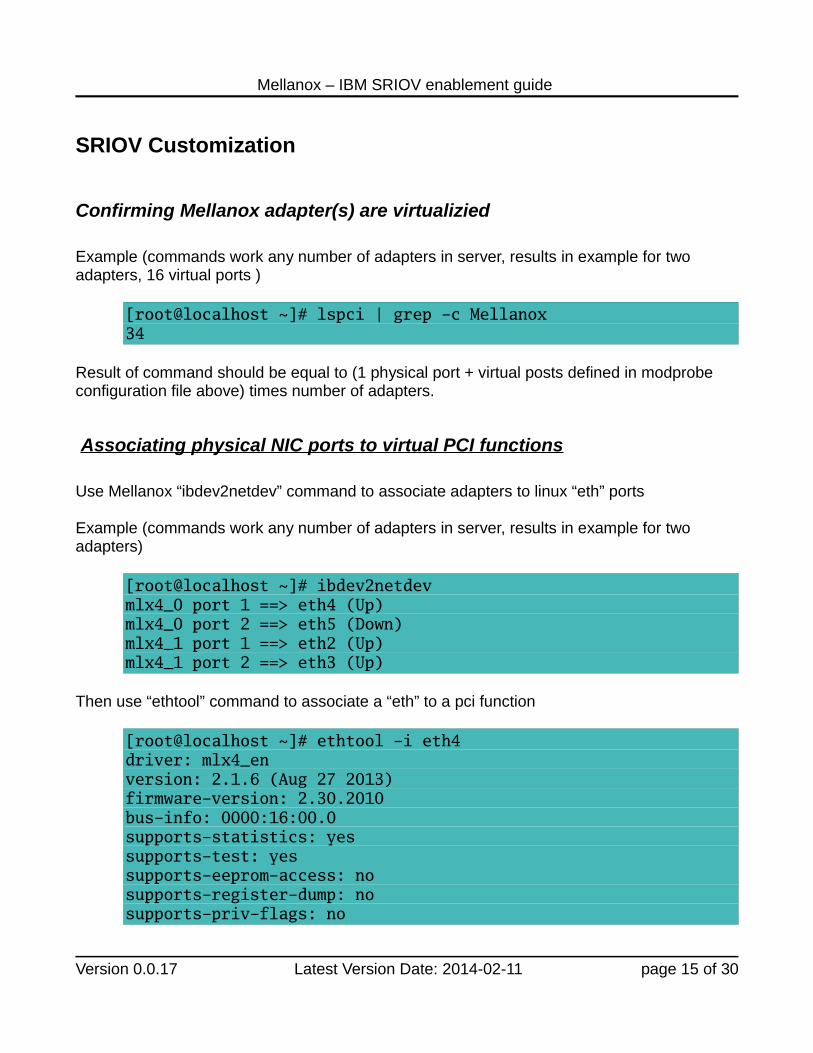
SRIOV Customization
Confirming Mellanox adapter(s) are virtualizied
Example (commands work any number of adapters in server, results in example for two adapters, 16 virtual ports )
[root@localhost ~]# lspci | grep -c Mellanox 34
Result of command should be equal to (1 physical port + virtual posts defined in modprobe configuration file above) times number of adapters.
Associating physical NIC ports to virtual PCI functions
Use Mellanox “ibdev2netdev” command to associate adapters to linux “eth” ports
Example (commands work any number of adapters in server, results in example for two adapters)
[root@localhost ~]# ibdev2netdev mlx4_0 port 1 ==> eth4 (Up) mlx4_0 port 2 ==> eth5 (Down) mlx4_1 port 1 ==> eth2 (Up) mlx4_1 port 2 ==> eth3 (Up)
Then use “ethtool” command to associate a “eth” to a pci function
[root@localhost ~]# ethtool -i eth4 driver: mlx4_en version: 2.1.6 (Aug 27 2013) firmware-version: 2.30.2010 bus-info: 0000:16:00.0 supports-statistics: yes supports-test: yes supports-eeprom-access: no supports-register-dump: no supports-priv-flags: no
Version 0.0.17 Latest Version Date: 2014-02-11 page 15 of 30
Mellanox – IBM SRIOV enablement guide
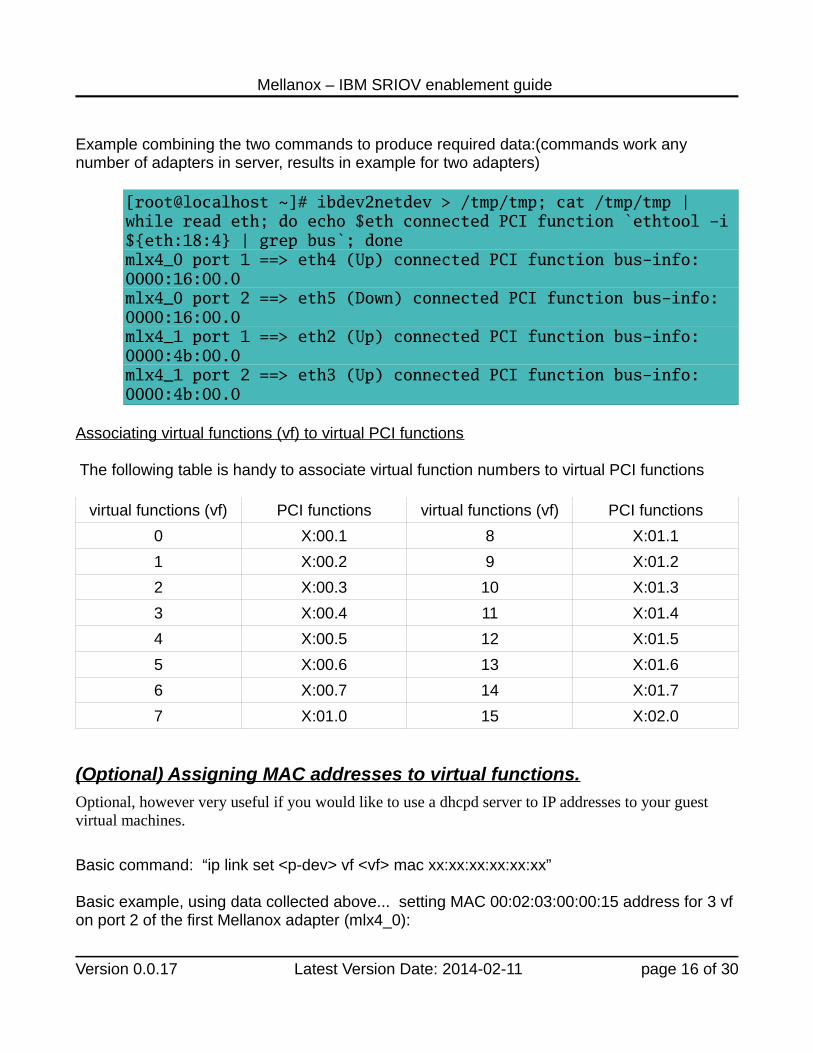
Example combining the two commands to produce required data:(commands work any number of adapters in server, results in example for two adapters)
[root@localhost ~]# ibdev2netdev > /tmp/tmp; cat /tmp/tmp | while read eth; do echo $eth connected PCI function `ethtool -i${eth:18:4} | grep bus`; done mlx4_0 port 1 ==> eth4 (Up) connected PCI function bus-info: 0000:16:00.0 mlx4_0 port 2 ==> eth5 (Down) connected PCI function bus-info: 0000:16:00.0 mlx4_1 port 1 ==> eth2 (Up) connected PCI function bus-info: 0000:4b:00.0 mlx4_1 port 2 ==> eth3 (Up) connected PCI function bus-info: 0000:4b:00.0
Associating virtual functions (vf) to virtual PCI functions The following table is handy to associate virtual function numbers to virtual PCI functions
virtual functions (vf) PCI functions virtual functions (vf) PCI functions
0 X:00.1 8 X:01.1
1 X:00.2 9 X:01.2
2 X:00.3 10 X:01.3
3 X:00.4 11 X:01.4
4 X:00.5 12 X:01.5
5 X:00.6 13 X:01.6
6 X:00.7 14 X:01.7
7 X:01.0 15 X:02.0
(Optional) Assigning MAC addresses to virtual functions.
Optional, however very useful if you would like to use a dhcpd server to IP addresses to your guest virtual machines.
Basic command: “ip link set <p-dev> vf <vf> mac xx:xx:xx:xx:xx:xx”
Basic example, using data collected above... setting MAC 00:02:03:00:00:15 address for 3 vf on port 2 of the first Mellanox adapter (mlx4_0):
Version 0.0.17 Latest Version Date: 2014-02-11 page 16 of 30
Mellanox – IBM SRIOV enablement guide
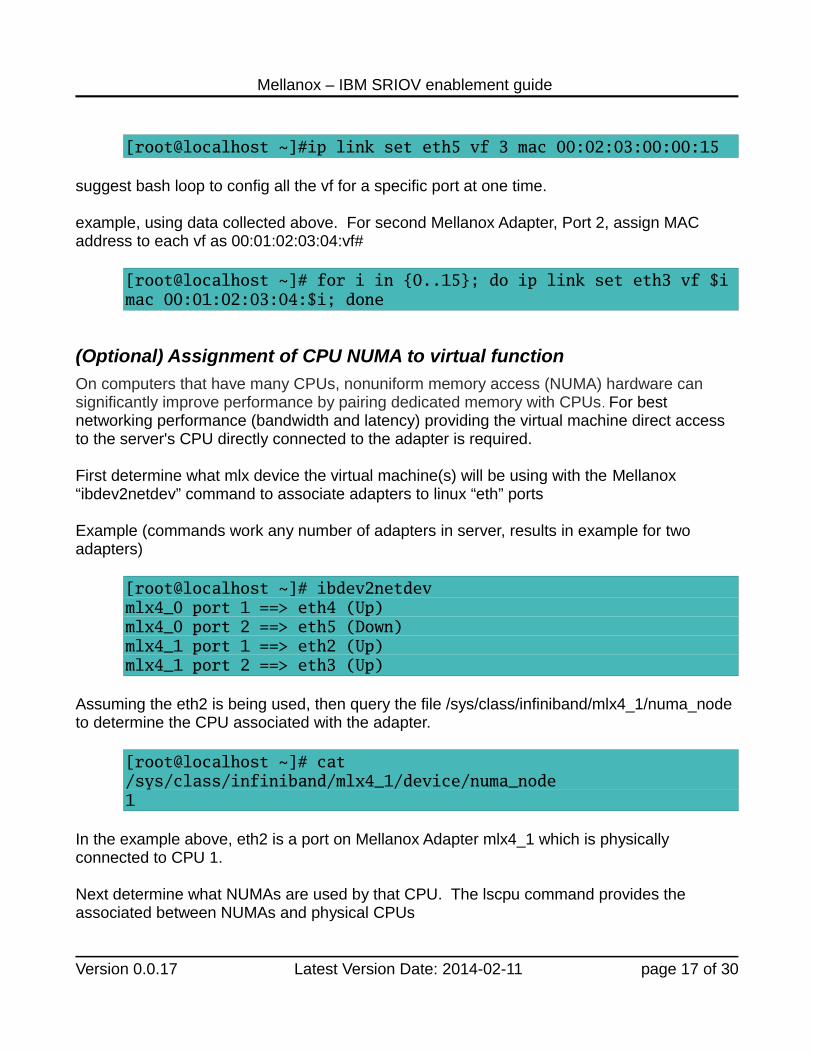
[root@localhost ~]#ip link set eth5 vf 3 mac 00:02:03:00:00:15
suggest bash loop to config all the vf for a specific port at one time.
example, using data collected above. For second Mellanox Adapter, Port 2, assign MAC address to each vf as 00:01:02:03:04:vf#
[root@localhost ~]# for i in {0..15}; do ip link set eth3 vf $imac 00:01:02:03:04:$i; done
(Optional) Assignment of CPU NUMA to virtual function
On computers that have many CPUs, nonuniform memory access (NUMA) hardware can significantly improve performance by pairing dedicated memory with CPUs. For best networking performance (bandwidth and latency) providing the virtual machine direct access to the server's CPU directly connected to the adapter is required.
First determine what mlx device the virtual machine(s) will be using with the Mellanox “ibdev2netdev” command to associate adapters to linux “eth” ports
Example (commands work any number of adapters in server, results in example for two adapters)
[root@localhost ~]# ibdev2netdev mlx4_0 port 1 ==> eth4 (Up) mlx4_0 port 2 ==> eth5 (Down) mlx4_1 port 1 ==> eth2 (Up) mlx4_1 port 2 ==> eth3 (Up)
Assuming the eth2 is being used, then query the file /sys/class/infiniband/mlx4_1/numa_node to determine the CPU associated with the adapter.
[root@localhost ~]# cat /sys/class/infiniband/mlx4_1/device/numa_node 1
In the example above, eth2 is a port on Mellanox Adapter mlx4_1 which is physically connected to CPU 1.
Next determine what NUMAs are used by that CPU. The lscpu command provides the associated between NUMAs and physical CPUs
Version 0.0.17 Latest Version Date: 2014-02-11 page 17 of 30

Mellanox – IBM SRIOV enablement guide
[root@localhost ~]# lscpu Architecture: x86_64 CPU op-mode(s): 32-bit, 64-bit Byte Order: Little Endian CPU(s): 48 On-line CPU(s) list: 0-47 Thread(s) per core: 2 Core(s) per socket: 6 Socket(s): 4 NUMA node(s): 4 Vendor ID: GenuineIntel CPU family: 6 Model: 62 Stepping: 2 CPU MHz: 2100.000 BogoMIPS: 4199.45 Virtualization: VT-x L1d cache: 32K L1i cache: 32K L2 cache: 256K L3 cache: 15360K NUMA node0 CPU(s): 0-5,24-29 NUMA node1 CPU(s): 6-11,30-35 NUMA node2 CPU(s): 12-17,36-41 NUMA node3 CPU(s): 18-23,42-47
Going back to the example where eth2 is associated with mlx4_1 which is physically connected to CPU 1. The NUMAs of interest are 6-11 and 30-35. The number of NUMAs for each CPU should equal the number of CPU cores available (in this example 12 cores = 12 NUMAs)
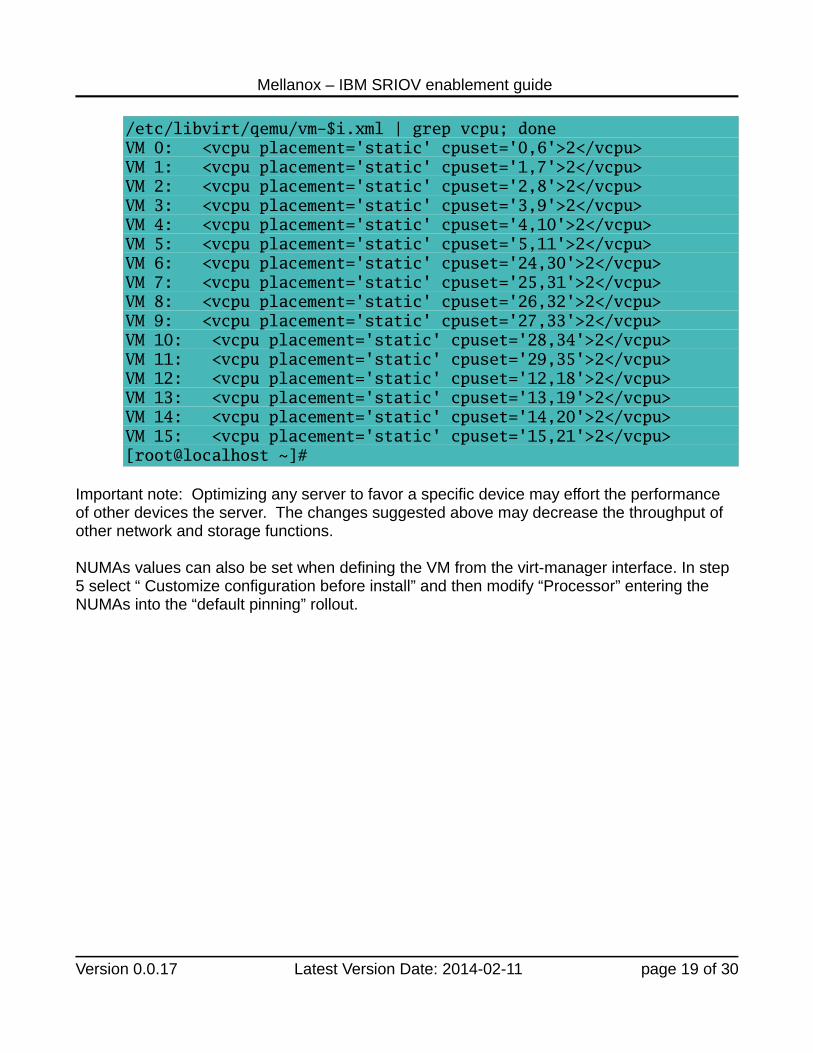
For best performance one and only one of the NUMAs associated with the CPU attached to the adapter should be used by a single virtual machine. The virtual machine's xml file defineswhat NUMAs are used by the virtual machine. Specifically the cpuset element of the vcpu tagdefines what NUMAs are used. The example below lists out the vcpu tage for 16 virtual machines defined on a server. Notice that VM 0 to VM 11 each are defined to be using 1 single NUMA from the set associated with CPU 1 (6-11, 30-35). VM 12 to VM 15 do not have NUMAs that are part of CPU 1. Performance of these Vms will be significantly LOWER than VM 0 to VM11
[root@localhost ~]# for i in {0..15}; do echo -n "VM $i: ";cat
Version 0.0.17 Latest Version Date: 2014-02-11 page 18 of 30
Mellanox – IBM SRIOV enablement guide
/etc/libvirt/qemu/vm-$i.xml | grep vcpu; done VM 0: <vcpu placement='static' cpuset='0,6'>2</vcpu> VM 1: <vcpu placement='static' cpuset='1,7'>2</vcpu> VM 2: <vcpu placement='static' cpuset='2,8'>2</vcpu> VM 3: <vcpu placement='static' cpuset='3,9'>2</vcpu> VM 4: <vcpu placement='static' cpuset='4,10'>2</vcpu> VM 5: <vcpu placement='static' cpuset='5,11'>2</vcpu> VM 6: <vcpu placement='static' cpuset='24,30'>2</vcpu> VM 7: <vcpu placement='static' cpuset='25,31'>2</vcpu> VM 8: <vcpu placement='static' cpuset='26,32'>2</vcpu> VM 9: <vcpu placement='static' cpuset='27,33'>2</vcpu> VM 10: <vcpu placement='static' cpuset='28,34'>2</vcpu> VM 11: <vcpu placement='static' cpuset='29,35'>2</vcpu> VM 12: <vcpu placement='static' cpuset='12,18'>2</vcpu> VM 13: <vcpu placement='static' cpuset='13,19'>2</vcpu> VM 14: <vcpu placement='static' cpuset='14,20'>2</vcpu> VM 15: <vcpu placement='static' cpuset='15,21'>2</vcpu> [root@localhost ~]#
Important note: Optimizing any server to favor a specific device may effort the performance of other devices the server. The changes suggested above may decrease the throughput of other network and storage functions.
NUMAs values can also be set when defining the VM from the virt-manager interface. In step 5 select “ Customize configuration before install” and then modify “Processor” entering the NUMAs into the “default pinning” rollout.
Version 0.0.17 Latest Version Date: 2014-02-11 page 19 of 30

Mellanox – IBM SRIOV enablement guide
(Optional) Assignment of Transparent vLAN to a virtual function.
To add a transparent (to the guest OS) vLAN tag all packets on a virtualized interface, use thefollowing command:
ip link set <p-dev> vf <vf> vlan <vlan-num>
example, using data collected above:
Setting a transparent vLAN on the First Port on the First adapter (eth4), virtual function 0 to 101
[root@localhost ~]# ip link set eth4 vf 0 vlan 101 The transparent vLAN will automatically apply a vLAN of 101 on every packet leaving the virtual function adapter port. Any vLAN applied by the VM's OS will be stripped away. All packets sent to the VM on this virtual interface must have the vLAN of 101 applied or it will bediscard. The vLAN tag of 101 is removed from the packet before it's sent to the VM.
Applying a vLAN of 0, will allow remove this VLAN feature.
Version 0.0.17 Latest Version Date: 2014-02-11 page 20 of 30
Mellanox – IBM SRIOV enablement guide
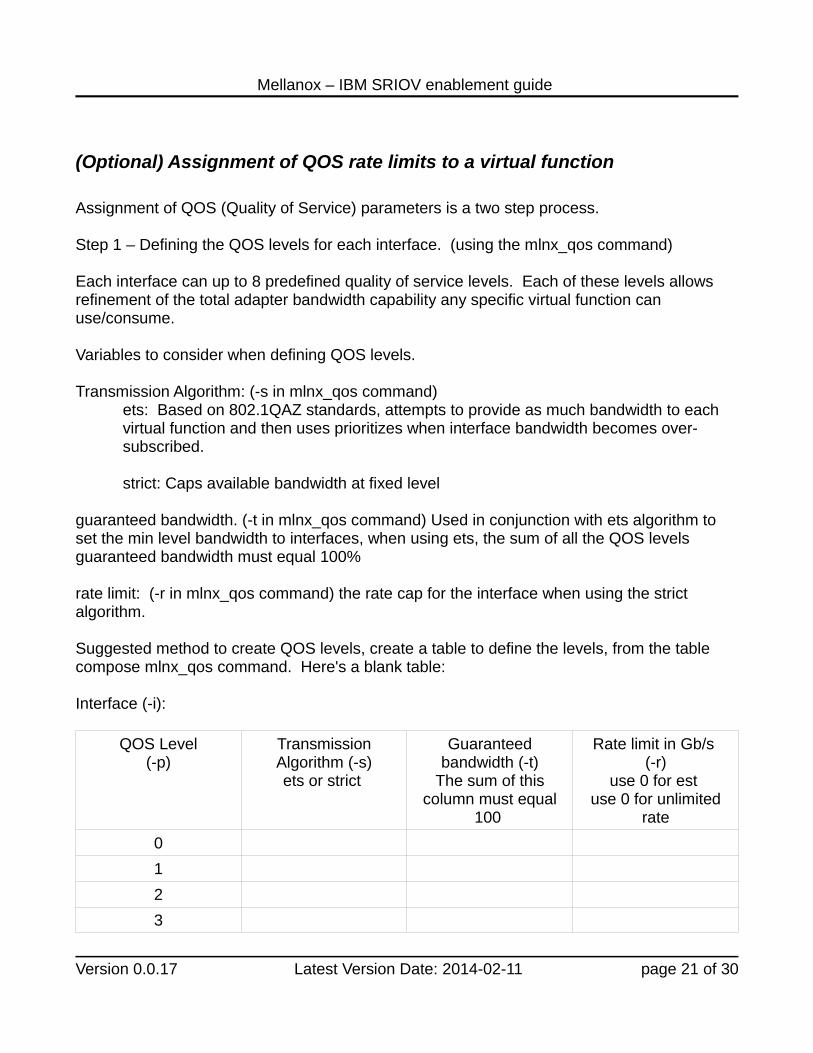
(Optional) Assignment of QOS rate limits to a virtual function
Assignment of QOS (Quality of Service) parameters is a two step process.
Step 1 – Defining the QOS levels for each interface. (using the mlnx_qos command)
Each interface can up to 8 predefined quality of service levels. Each of these levels allows refinement of the total adapter bandwidth capability any specific virtual function can use/consume.
Variables to consider when defining QOS levels.
Transmission Algorithm: (-s in mlnx_qos command)ets: Based on 802.1QAZ standards, attempts to provide as much bandwidth to each virtual function and then uses prioritizes when interface bandwidth becomes over-subscribed.
strict: Caps available bandwidth at fixed level
guaranteed bandwidth. (-t in mlnx_qos command) Used in conjunction with ets algorithm to set the min level bandwidth to interfaces, when using ets, the sum of all the QOS levels guaranteed bandwidth must equal 100%
rate limit: (-r in mlnx_qos command) the rate cap for the interface when using the strict algorithm.
Suggested method to create QOS levels, create a table to define the levels, from the table compose mlnx_qos command. Here's a blank table:
Interface (-i):
QOS Level(-p)
TransmissionAlgorithm (-s)ets or strict
Guaranteedbandwidth (-t)
The sum of thiscolumn must equal
100
Rate limit in Gb/s (-r)
use 0 for est use 0 for unlimited
rate
0
1
2
3
Version 0.0.17 Latest Version Date: 2014-02-11 page 21 of 30
Mellanox – IBM SRIOV enablement guide
4
5
6
7
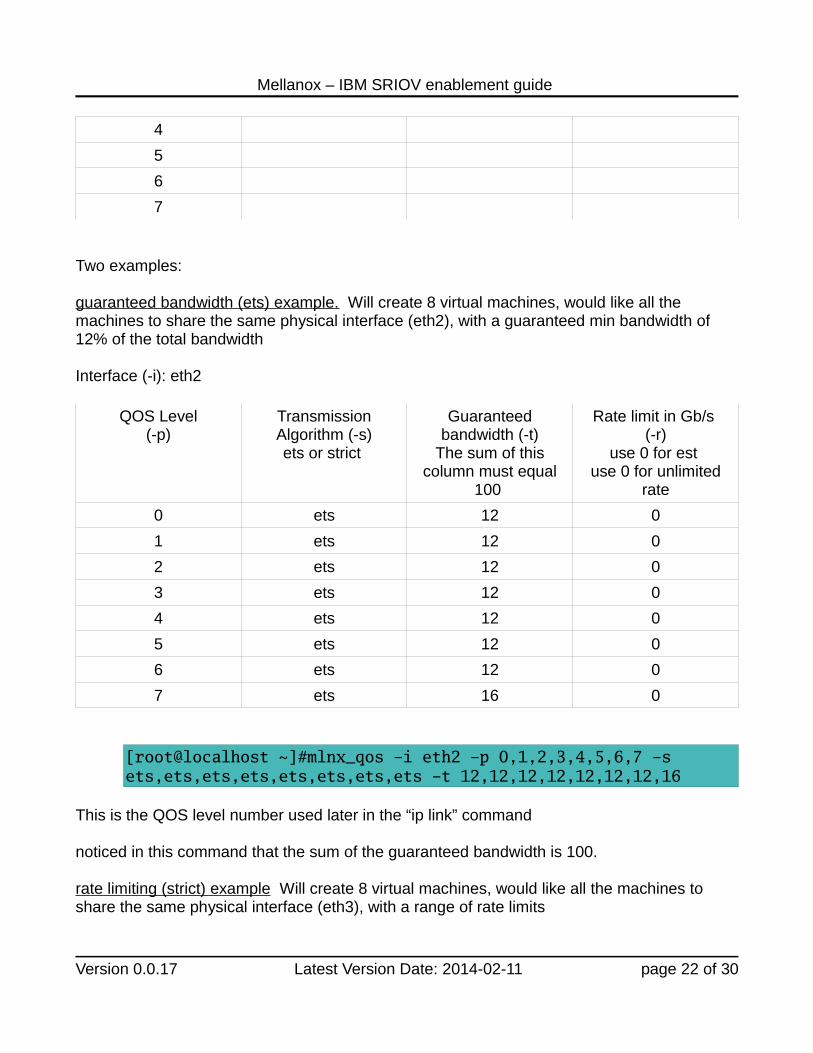
Two examples:
guaranteed bandwidth (ets) example. Will create 8 virtual machines, would like all the machines to share the same physical interface (eth2), with a guaranteed min bandwidth of 12% of the total bandwidth
Interface (-i): eth2
QOS Level(-p)
TransmissionAlgorithm (-s)ets or strict
Guaranteedbandwidth (-t)
The sum of thiscolumn must equal
100
Rate limit in Gb/s (-r)
use 0 for est use 0 for unlimited
rate
0 ets 12 0
1 ets 12 0
2 ets 12 0
3 ets 12 0
4 ets 12 0
5 ets 12 0
6 ets 12 0
7 ets 16 0
[root@localhost ~]#mlnx_qos -i eth2 -p 0,1,2,3,4,5,6,7 -s ets,ets,ets,ets,ets,ets,ets,ets -t 12,12,12,12,12,12,12,16
This is the QOS level number used later in the “ip link” command
noticed in this command that the sum of the guaranteed bandwidth is 100.
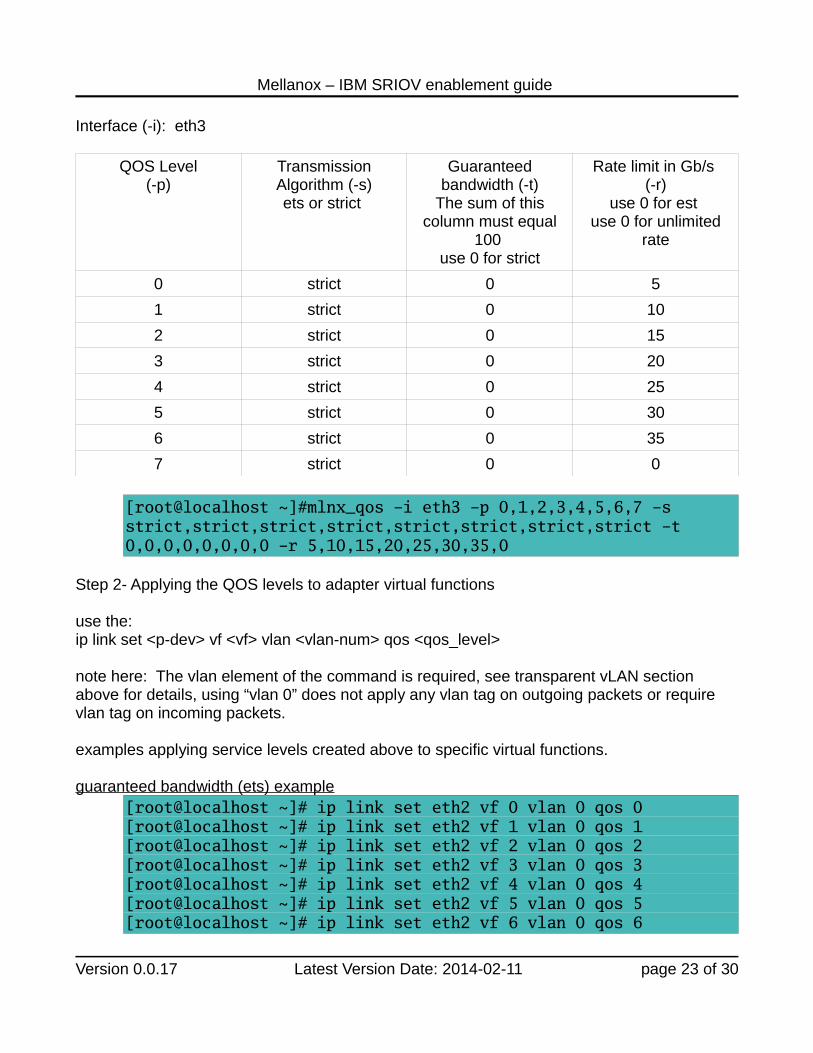
rate limiting (strict) example Will create 8 virtual machines, would like all the machines to share the same physical interface (eth3), with a range of rate limits
Version 0.0.17 Latest Version Date: 2014-02-11 page 22 of 30
Mellanox – IBM SRIOV enablement guide
Interface (-i): eth3
QOS Level(-p)
TransmissionAlgorithm (-s)ets or strict
Guaranteedbandwidth (-t)
The sum of thiscolumn must equal
100 use 0 for strict
Rate limit in Gb/s (-r)
use 0 for est use 0 for unlimited
rate
0 strict 0 5
1 strict 0 10
2 strict 0 15
3 strict 0 20
4 strict 0 25
5 strict 0 30
6 strict 0 35
7 strict 0 0
[root@localhost ~]#mlnx_qos -i eth3 -p 0,1,2,3,4,5,6,7 -s strict,strict,strict,strict,strict,strict,strict,strict -t 0,0,0,0,0,0,0,0 -r 5,10,15,20,25,30,35,0
Step 2- Applying the QOS levels to adapter virtual functions
use the:ip link set <p-dev> vf <vf> vlan <vlan-num> qos <qos_level>
note here: The vlan element of the command is required, see transparent vLAN section above for details, using “vlan 0” does not apply any vlan tag on outgoing packets or require vlan tag on incoming packets.
examples applying service levels created above to specific virtual functions.
guaranteed bandwidth (ets) example[root@localhost ~]# ip link set eth2 vf 0 vlan 0 qos 0[root@localhost ~]# ip link set eth2 vf 1 vlan 0 qos 1[root@localhost ~]# ip link set eth2 vf 2 vlan 0 qos 2[root@localhost ~]# ip link set eth2 vf 3 vlan 0 qos 3[root@localhost ~]# ip link set eth2 vf 4 vlan 0 qos 4[root@localhost ~]# ip link set eth2 vf 5 vlan 0 qos 5[root@localhost ~]# ip link set eth2 vf 6 vlan 0 qos 6
Version 0.0.17 Latest Version Date: 2014-02-11 page 23 of 30
Mellanox – IBM SRIOV enablement guide
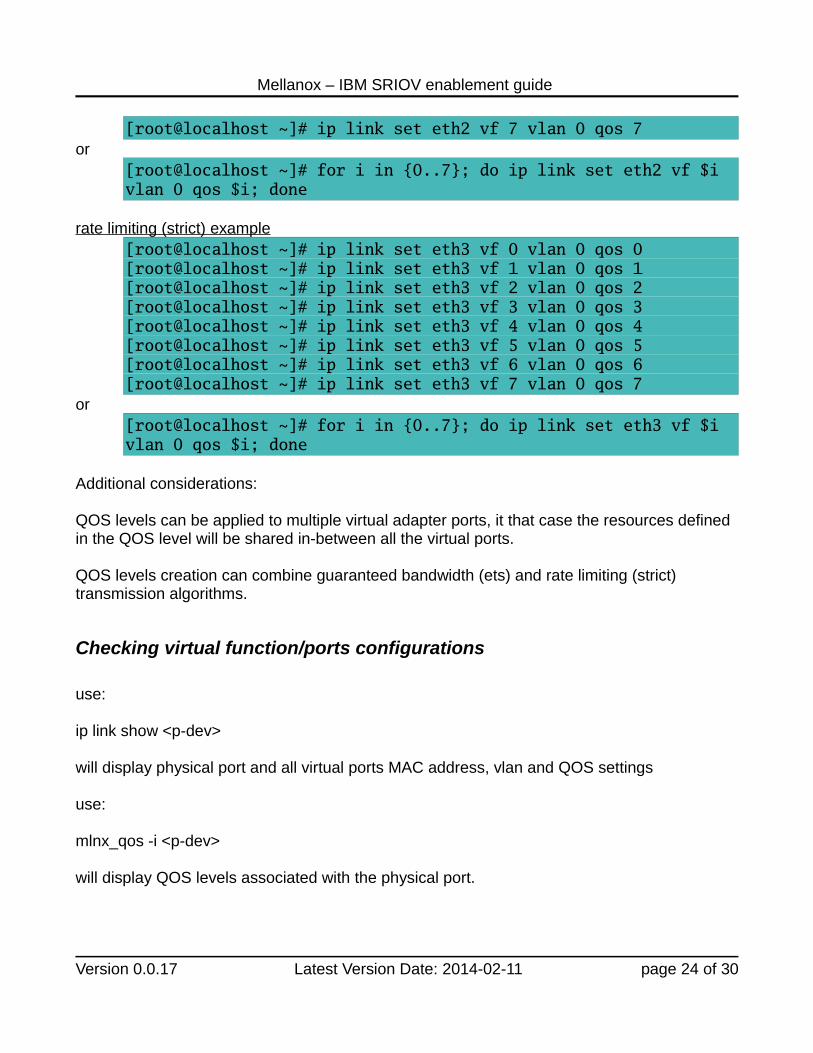
[root@localhost ~]# ip link set eth2 vf 7 vlan 0 qos 7or
[root@localhost ~]# for i in {0..7}; do ip link set eth2 vf $i vlan 0 qos $i; done
rate limiting (strict) example [root@localhost ~]# ip link set eth3 vf 0 vlan 0 qos 0[root@localhost ~]# ip link set eth3 vf 1 vlan 0 qos 1[root@localhost ~]# ip link set eth3 vf 2 vlan 0 qos 2[root@localhost ~]# ip link set eth3 vf 3 vlan 0 qos 3[root@localhost ~]# ip link set eth3 vf 4 vlan 0 qos 4[root@localhost ~]# ip link set eth3 vf 5 vlan 0 qos 5[root@localhost ~]# ip link set eth3 vf 6 vlan 0 qos 6[root@localhost ~]# ip link set eth3 vf 7 vlan 0 qos 7
or[root@localhost ~]# for i in {0..7}; do ip link set eth3 vf $i vlan 0 qos $i; done
Additional considerations:
QOS levels can be applied to multiple virtual adapter ports, it that case the resources defined in the QOS level will be shared in-between all the virtual ports.
QOS levels creation can combine guaranteed bandwidth (ets) and rate limiting (strict) transmission algorithms.
Checking virtual function/ports configurations
use:
ip link show <p-dev>
will display physical port and all virtual ports MAC address, vlan and QOS settings
use:
mlnx_qos -i <p-dev>
will display QOS levels associated with the physical port.
Version 0.0.17 Latest Version Date: 2014-02-11 page 24 of 30
Mellanox – IBM SRIOV enablement guide
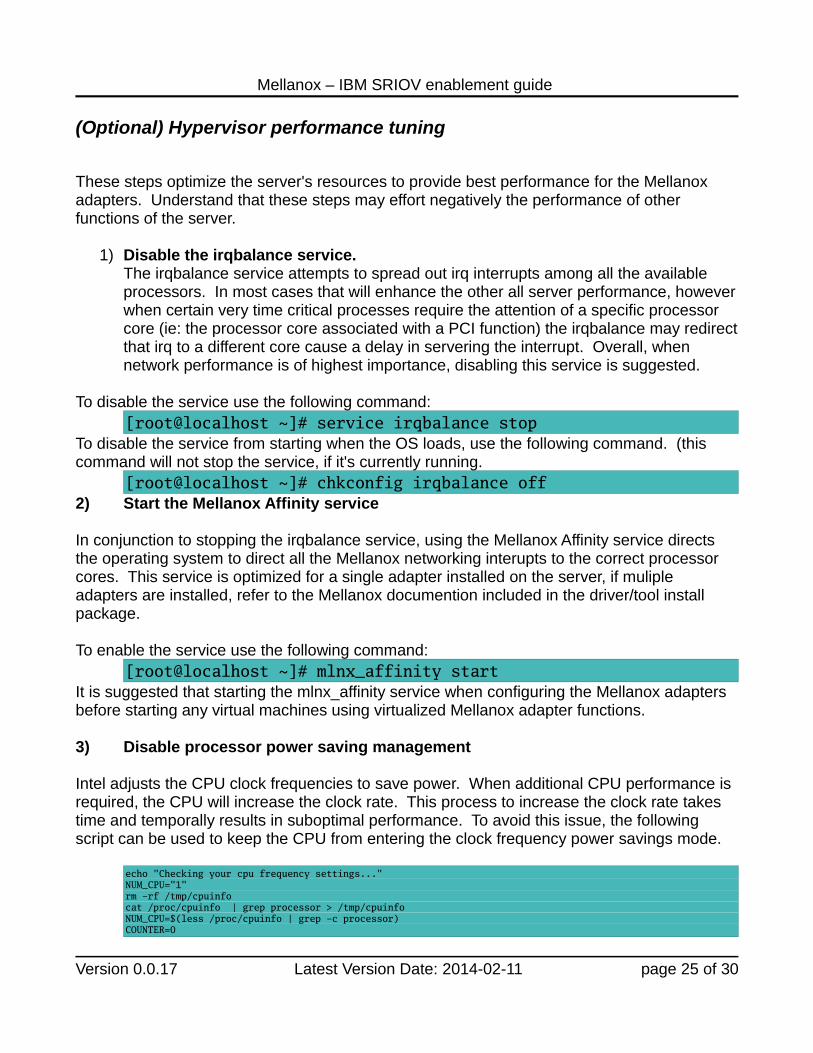
(Optional) Hypervisor performance tuning
These steps optimize the server's resources to provide best performance for the Mellanox adapters. Understand that these steps may effort negatively the performance of other functions of the server.
1) Disable the irqbalance service.The irqbalance service attempts to spread out irq interrupts among all the available processors. In most cases that will enhance the other all server performance, howeverwhen certain very time critical processes require the attention of a specific processor core (ie: the processor core associated with a PCI function) the irqbalance may redirectthat irq to a different core cause a delay in servering the interrupt. Overall, when network performance is of highest importance, disabling this service is suggested.
To disable the service use the following command:[root@localhost ~]# service irqbalance stop
To disable the service from starting when the OS loads, use the following command. (this command will not stop the service, if it's currently running.
[root@localhost ~]# chkconfig irqbalance off2) Start the Mellanox Affinity service
In conjunction to stopping the irqbalance service, using the Mellanox Affinity service directs the operating system to direct all the Mellanox networking interupts to the correct processor cores. This service is optimized for a single adapter installed on the server, if muliple adapters are installed, refer to the Mellanox documention included in the driver/tool install package.
To enable the service use the following command:[root@localhost ~]# mlnx_affinity start
It is suggested that starting the mlnx_affinity service when configuring the Mellanox adapters before starting any virtual machines using virtualized Mellanox adapter functions.
3) Disable processor power saving management
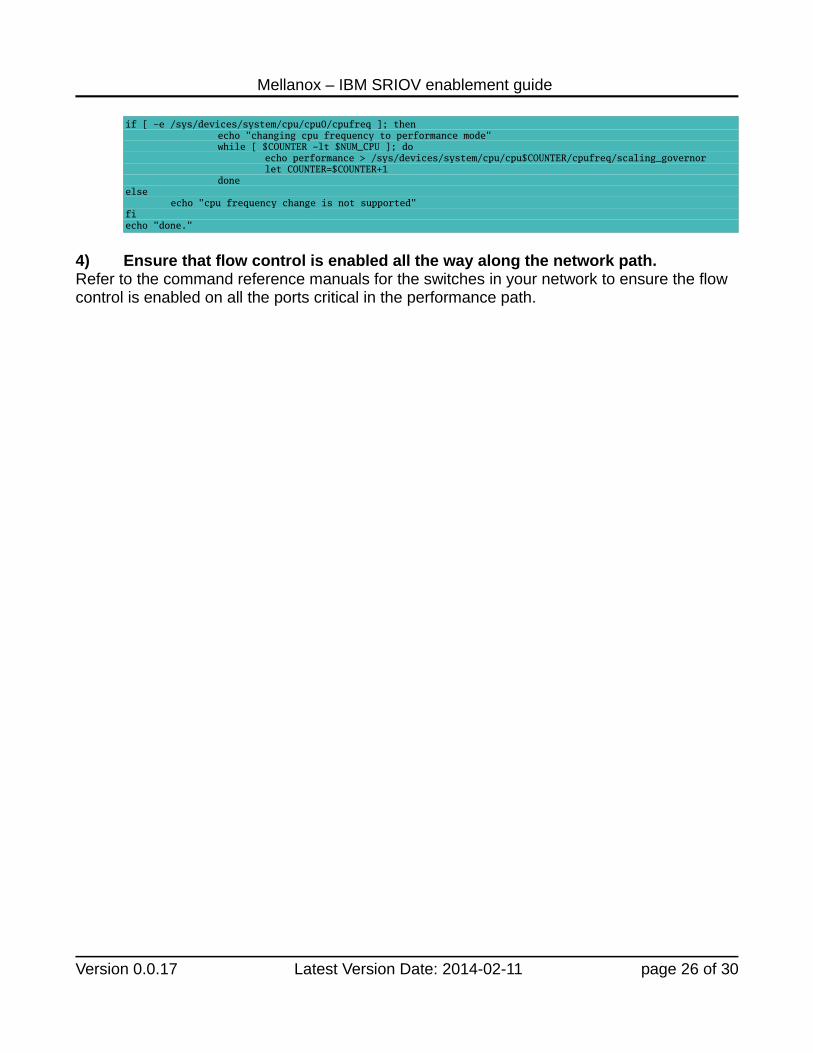
Intel adjusts the CPU clock frequencies to save power. When additional CPU performance is required, the CPU will increase the clock rate. This process to increase the clock rate takes time and temporally results in suboptimal performance. To avoid this issue, the following script can be used to keep the CPU from entering the clock frequency power savings mode.
echo "Checking your cpu frequency settings..." NUM_CPU="1" rm -rf /tmp/cpuinfo cat /proc/cpuinfo | grep processor > /tmp/cpuinfo NUM_CPU=$(less /proc/cpuinfo | grep -c processor) COUNTER=0
Version 0.0.17 Latest Version Date: 2014-02-11 page 25 of 30
Mellanox – IBM SRIOV enablement guide
if [ -e /sys/devices/system/cpu/cpu0/cpufreq ]; then echo "changing cpu frequency to performance mode" while [ $COUNTER -lt $NUM_CPU ]; do
echo performance > /sys/devices/system/cpu/cpu$COUNTER/cpufreq/scaling_governor let COUNTER=$COUNTER+1
done else
echo "cpu frequency change is not supported" fi echo "done."
4) Ensure that flow control is enabled all the way along the network path.Refer to the command reference manuals for the switches in your network to ensure the flow control is enabled on all the ports critical in the performance path.
Version 0.0.17 Latest Version Date: 2014-02-11 page 26 of 30

Mellanox – IBM SRIOV enablement guide
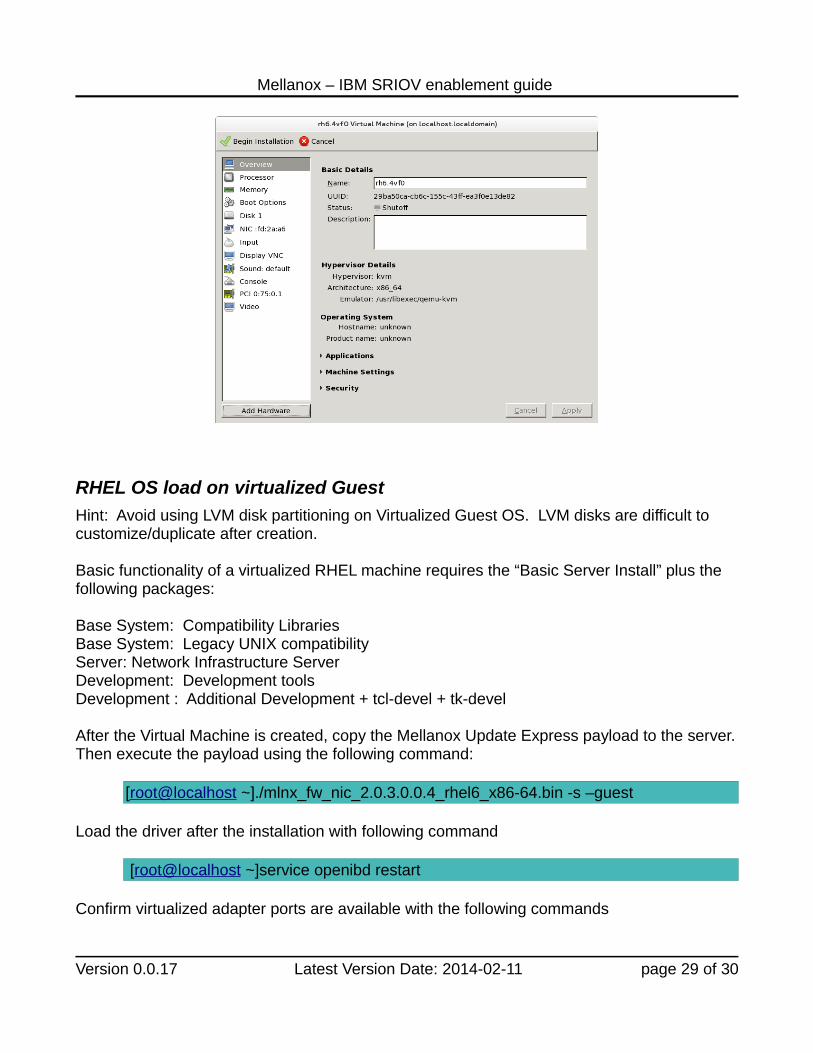
Creating SR-IOV enabled Virtual Machines
Important: Only RHEL 6 and SLES 11 based virtual machines support SR-IOV enabled Virtual Functions.
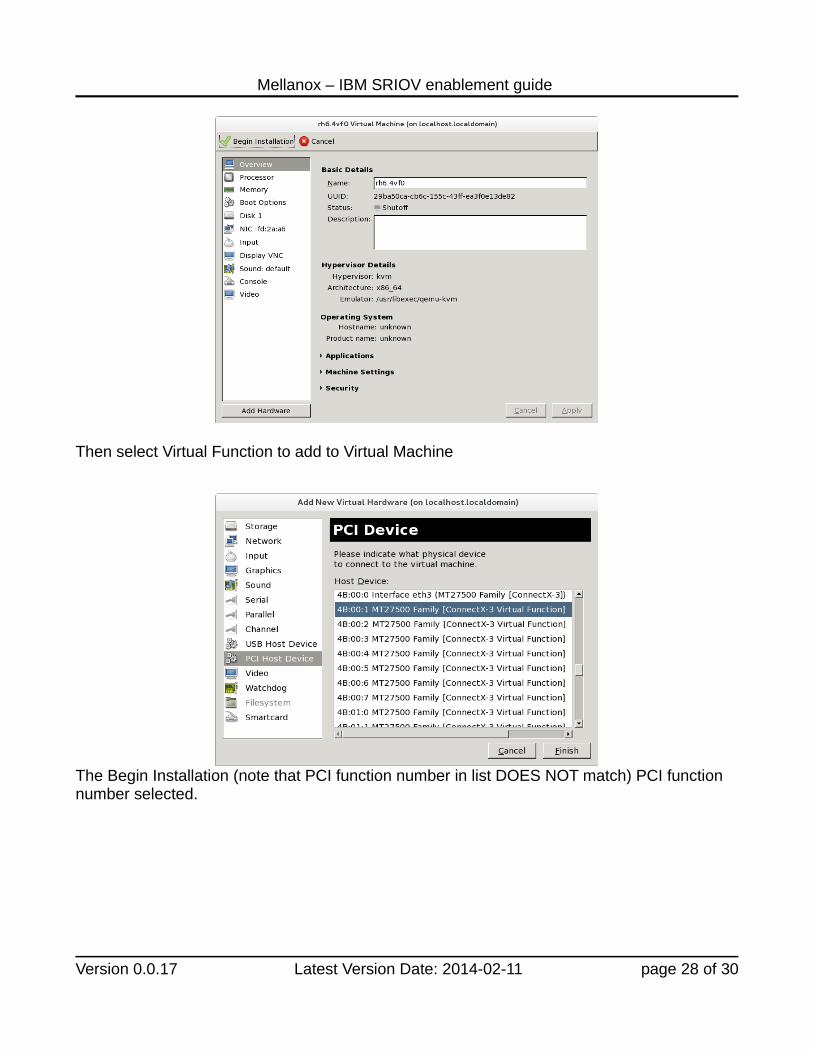
A) From virt-manager GUI. Create new virtual machine as normal, in “Step 5 of 5”, select “Customize configuration before install”
Then Select “Add Hardware Button”
Version 0.0.17 Latest Version Date: 2014-02-11 page 27 of 30
Mellanox – IBM SRIOV enablement guide
Then select Virtual Function to add to Virtual Machine
The Begin Installation (note that PCI function number in list DOES NOT match) PCI function number selected.
Version 0.0.17 Latest Version Date: 2014-02-11 page 28 of 30
Mellanox – IBM SRIOV enablement guide
RHEL OS load on virtualized Guest
Hint: Avoid using LVM disk partitioning on Virtualized Guest OS. LVM disks are difficult to customize/duplicate after creation.
Basic functionality of a virtualized RHEL machine requires the “Basic Server Install” plus the following packages:
Base System: Compatibility LibrariesBase System: Legacy UNIX compatibilityServer: Network Infrastructure ServerDevelopment: Development toolsDevelopment : Additional Development + tcl-devel + tk-devel
After the Virtual Machine is created, copy the Mellanox Update Express payload to the server.Then execute the payload using the following command:
[root@localhost ~]./mlnx_fw_nic_2.0.3.0.0.4_rhel6_x86-64.bin -s –guest
Load the driver after the installation with following command
[root@localhost ~]service openibd restart
Confirm virtualized adapter ports are available with the following commands
Version 0.0.17 Latest Version Date: 2014-02-11 page 29 of 30

Mellanox – IBM SRIOV enablement guide
[root@localhost ~]ibdev2netdev
and
[root@localhost ~]ip address show
SLES OS load on virtualized Guest
Hint: Avoid using LVM disk partitioning on Virtualized Guest OS. LVM disks are difficult to customize/duplicate after creation.
Basic functionality of a virtualized SLES machine requires the “Basic Server Install” plus the following options/packages:
Physical Machine C/C++ Development Tools
After the Virtual Machine is created, copy the Mellanox Update Express payload to the server.Then execute the payload using the following command:
[root@localhost ~]./mlnx_fw_nic_2.0.3.0.0.4_sles11_x86-64.bin -s –guest
Load the driver after the installation with following command
[root@localhost ~]service openibd restart
Confirm virtualized adapter ports are available with the following commands
[root@localhost ~]ibdev2netdev
and
[root@localhost ~]ip address show
Version 0.0.17 Latest Version Date: 2014-02-11 page 30 of 30