mental imaging in endodontics - · pdf filewe work though a case―is the most fundamental...
TRANSCRIPT
Dental Education Laboratories January 2018
Mental Imaging in EndodonticsLiving in a place you’ll never see
by Dr. L. Stephen Buchanan, DDS, FICD, FACD
To see a world in a grain of sandAnd a heaven in a wild fl ower,Hold infi nity in the palm of your handAnd eternity in an hour.
“Auguries of Innocence” by William Blake
I never expected to become an endodontist, but after my fi rst experience at it I thought, “Wow! How cool is this root canal thing? You can’t even see what you’re doing!” That experience and the remarkable crew of endo instructors at University of the Pacifi c changed my career path irrevocably. One of those gifted young endodontists, Dr. Alan Gluskin, explained to me that mental imaging―the ability to “see” root canal morphology in our heads as we work though a case―is the most fundamental skill in endodontics. He was so right.
If you cannot accurately visualize the root canal space you are working in, endo will be deadly boring 80% of the time, as you wait patiently for fi le stops to meet reference points, and 20% of the time it will be terrifying when bad things happen and you have no clue why or what to do about it.
This article will describe the concepts, procedures, and instruments that allow us to see these microscopic, hidden spaces in our minds eye. It requires imagination to get this small, but when visually naive dentists train up for a better head game, they get to trade frustration for fascination during endo procedures, inevitably increasing their success rates.
Building Mental ImagesEvery human creates and “sees” images in their heads―otherwise we would still be fooled by the peek-a-boo game that fl ipped us out as infants. The rollicking laughter elicited when the blanket pulls back is testament to the fact that most infants are not born with mental imaging skills―it is a tremendous surprise when Mom or Dad’s face suddenly appears―so it’s not a stretch of the imagination to conclude that the intensity of this experience represents the huge Aha! we get as the world in our heads is divided into Things we can see, and Things we can’t see.
The fact that even slightly older children are incapable of having that much fun―that cheaply―anymore, is
testament to the fact that we naturally learn to “see” things that cannot be seen directly. Our brains naturally fi ll in the blanks of things we know are physically present, or might be, but cannot be seen directly. We have been genetically programmed to create virtual constructs of the environment around us to better understand it and defend ourselves―genetic programming at its best.
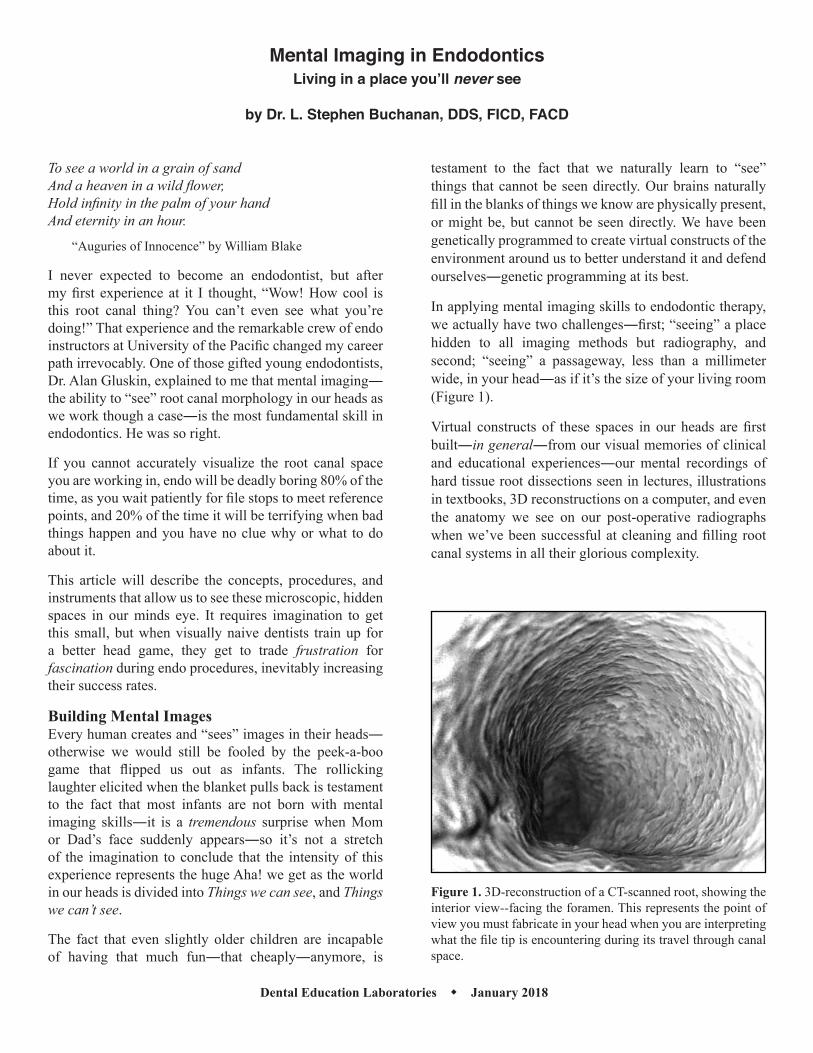
In applying mental imaging skills to endodontic therapy, we actually have two challenges―fi rst; “seeing” a place hidden to all imaging methods but radiography, and second; “seeing” a passageway, less than a millimeter wide, in your head―as if it’s the size of your living room (Figure 1).
Virtual constructs of these spaces in our heads are fi rst built―in general―from our visual memories of clinical and educational experiences―our mental recordings of hard tissue root dissections seen in lectures, illustrations in textbooks, 3D reconstructions on a computer, and even the anatomy we see on our post-operative radiographs when we’ve been successful at cleaning and fi lling root canal systems in all their glorious complexity.
Figure 1. 3D-reconstruction of a CT-scanned root, showing the interior view--facing the foramen. This represents the point of view you must fabricate in your head when you are interpreting what the fi le tip is encountering during its travel through canal space.

Dental Education Laboratories January 2018
This visual catalog we develop informs us about anatomic commonalities; what we can expect to fi nd in any given tooth. A great example is looking at root cross-sections (Figure 2) and noticing how centered canals are inside external root surfaces―this was fi rst described to me as “The Law of Centrality” by my grad school mentor, Dr. Paul Krasner.
After you get The Law of Centrality, the next time a calcifi ed pulp chamber or canal eludes your search, simply identify all external CEJ contours and drill in the center of that dentin (Figures 3A-C), or when looking for a elusive MB2 canal, simply cut a trough directly along the MB isthmus (Figure 4), knowing you are relatively centered in
root structure and unlikely to perforate, but also knowing that you are likely to fi nd what you are looking for.
This anatomic encyclopedia in our heads also informs us about anatomic differences we might encounter; anomalies to be on the lookout for, such as the sporadic occurrence of apically bifurcating accessory canals. When we understand this general possibility, we have a better chance of correctly interpreting the “click” sometimes felt as a fi le is retrieved from the terminus of a shaped canal. Armed with the knowledge that canals may bifurcate near their endpoints, the “click” immediately suggests an accessory canal (Figures 5A-B), and we move in again to explore (see case at DELendo.com/?).
Figure 3A. #9 rubber dam clamp carefully placed at the CEJ level on a severely-tipped mandibular molar. The tapered diamond bur is aimed directly at the mesial edge of the clamp jaw in search of the mesial canal system.
Figure 3B. After 12mm of drilling, the margin is reached and this radiograph shows the bur tip within 0.5mm of the ML canal.
Figure 3C. Radiograph of mesial canal system obturated.
Figure 2. Axial CT slice through the mid-root region of an upper fi rst molar. Note the centeredness of the root canals within the external root surfaces (courtesy of Dr. Markus Haapasalo).

Dental Education Laboratories January 2018
teeth and showing bone around all root ends―and at least one well-angled view. Anteriors and premolars are best shot from mesial angles and molars are best shot from distal angles to visualize their mesial root widths.
The Law of Centrality informs us that when we see a fi le centered in a root on an off-angle radiograph, it most likely is a single-canal root. When we see the fi le off-center, we know there is a second canal. If the fi le is off-centered in the coronal region but is centered apically, we know there are two canals and two canal orifi ces to be found in the pulp chamber, but likely they merge mid-root and become a single primary canal in the apical region. Off-centeredness in apical regions means there are at least
Virtual constructs of these spaces are built initially with pre-operative radiographic and CT imaging, then during access procedures by capturing image data directly through microscopes, and fi nally by paying close attention to the data that can be read from the sensations returned by instruments as they traverse these tortuous spaces.
RadiographyYou don’t need a CT machine to discover how many canals are in a given root if you shooting horizontally-angulated (level with the occlusal plane) PA radiographs from several angles in that plane. All teeth being treated endodontically must have at least one ideal straight-on pre-operative radiograph―splitting the contacts between
Figure 4. Microscope view of an MB2 trough, cut into the axial-pulpal line angle of an upper molar with a BUC-1 ultrasonic tip in an effort to locate the MB2 canal. Note the dust-fi lled isthmus line, arcing from the MB1 canal orifi ce toward the palatal. An isthmus between canals in a given root is approximately centered in that root structure, acting as both an indicator of where the MB2 will be found (at the palatal extent of this isthmus) as well as a sign post of where clinicians may safely cut past the pulp chamber fl oor in an MB2 hunt.
Figure 5A. Close-up view of the apical region of a TrueTooth®
procedural training replica, showing a #10 K-fi le taken beyond the terminus of the primary canal.
Figure 5B. As the pre-bent fi le is retrieved from the terminus, its tip clicks past the orifi ce of the accessory canal, suggesting the fi le be moved apically to see if it will get “stuck” (exhibit tug-back)― in another canal path.

Dental Education Laboratories January 2018
two apical primary canals (Figures 6A, 6B).
Having a cone beam CT machine makes this all much easier, as all of these anatomic questions can be answered pre-operatively and in a much more defi nitive manner than with conventional radiographic means. Heading into an upper molar knowing, before starting the procedure that it only has three canals is a bonus for any dentist, but for an endodontist treating the most diffi cult cases, it is a Godsend.
When RCT cases are begun at a separate appointment from the consultation, dentists will have an easier time during treatment if they closely review all radiographic
Figure 6B. Distal-angle radiograph of the same upper molar with a #15 K-fi le in each of the MB canals. Notice how the instruments, viewed together, are centered between the buccal and lingual extents of that root form.
Figure 7A. CT image showing mesial view of the MB2 canal bifurcating mid-root off the MB2 canal. Note the small lucency adjacent to the MB2 exit point.
Figure 7B. Downpack radiograph showing fi ll of branching MB2.
imaging immediately before beginning the access cavity preparation. My practice ritual is to spend 5 or 10 minutes scanning through the patient’s reconstructed CT imaging before starting the case, in fact, I visualize this as swimming through transparent volumes of the anatomic structures―and of course when encountering diffi culties during treatment, I pull up the volumetric data and take another swim (Figures 7A-C).
One of the hardest lessons I had to learn using CBCT imaging in my practice was realizing that it’s not just for challenging cases and teeth. It took me 11 months of knowing everything pre-operatively about my diffi cult
Figure 6A. Distal-angle radiograph of the MB root of a maxillary fi rst molar with a #15 K-fi le in the MB1 canal. Note the off-centeredness of the fi le within the buccal and lingual root edges (white arrows)--indicating a second canal (black arrow) in that root.

Dental Education Laboratories January 2018
Figure 8A. Second CT capture of an upper molar with an MB2 canal that has eluded me for an hour. This buccal slice shows that my troughing is right on track, mesial-to-distal.
Figure 8C. Distally-angled radiograph showing negotiating fi les in MB1 and MB2 canals. I was into the MB2 within two minutes after seeing the CT imaging.
Maybe the second hardest lesson I had to learn about using CBCT imaging in endodontic practice was that sometimes, just sometimes, it’s a great idea to capture another CBCT volume, intra-treatment, when frustrated by an illusive canal or root (Figures 8A-C).
Direct VisionThis discussion about mental imaging is not intended to denigrate direct vision in RCT. Doing RCT in molars without ideal light and adequate magnifi cation is a fool’s errand, limiting our read of the map (pulp chamber fl oor anatomy) that can best help us fi nd recalcitrant canal space. When the pulp chamber fl oor is obscured by attached pulp
cases and relatively little about the “normal” cases I deemed not worthy of CT imaging. After nearly a year of seeing things I never expected in my diffi cult cases―massive external resorption hidden on PA radiographs, MB3 canals―even lateral canals―I fi nally twigged to the fact that I was being unfair to my patients who brought less-than-awful clinical challenges. Since that time I have captured a CT volume on every one of my patients―usually charged out as a Panorex if it’s to make my life easier and charged as a typical CT fee ($250) when it’s required to diagnose, treatment plan, or treat RCT failures, for example.
Figure 7C. Post-operative radiograph showing at least four portals of exit fi lled in the MB root apex.
Figure 8B. This mesial CT slice shows; A) The cut that got me into the MB1 canal, B) The cut I’ve made searching for the MB2 canal, C) The MB2 canal―located just 1/2mm beyond the trough that has been cut―in the scariest direction of all―mesio-palatal.

Dental Education Laboratories January 2018
two things; the file flutes are packed with debris, or the file has met a canal curvature that it is too stiff to easily translate around. Upon retrieving file, examine the flutes carefully; if they are packed with debris―simply clean the instrument and put it back in the canal to do more work, if there is little or no debris packed in the flute spaces―drop to a narrower taper of rotary file and see if it doesn’t immediately cut deeper into the canal.
Getting this one is critical to avoidance of file separation. Once a file is packed with cut debris, pushing on it tightens it and radically increases the torsional forces acting against the instrument’s integrity. When a rotary file stops cutting apically because it has met a canal curve too great for it to traverse―every second it is left rotating in the canal it is being circumferentially flexed five times per second at 300 RPM―a rate of cyclic fatigue accumulation that will separate any instrument in a remarkably short period of time.
Negotiating Tortuous CanalsSuccess at negotiating tortuous canals is impossible without the clinician mentally mapping the paths of negotiating instruments, the best example being the S-curved canal. This canal presents immediately as an impediment case when loose resistance to file placement is encountered not just once, but twice―once at each of the two abrupt turns in the canal (Figure 9).
stones, cut them off the floor with a BUC-2 ultrasonic tip. This pulp chamber floor sander will deliver a smooth, flat surface that will―when washed, dried, and hydrated with a half-drop of liquid―reveal the path to unfound orifices.
The Tactile Feedback LoopAfter access procedures are completed and all orifices located, RCT is all a head game driven by pre-op mental imaging and the tactile information received by fingertips as instruments are used in canals. The instrument is activated, there is a particular sensation felt (binding, easy advancement, etc.), it is interpreted to describe some reality between canal and instrument (things are dicey in there or not), a next-action decision is made (to withdraw or continue to use the device in question), that decision is executed, there is a particular sensation felt,...and so on. Another way of describing this is “listening” to your instruments as they work in canals.
To better understand this, try this thought experiment: Be the file.
Imagine that you are the negotiating file moving into a canal. You have a subtle curve along your whole length and because you are being used in a watch-winding motion you’re tip is waving back and forth “scouting” loosely through the canal… and just as estimated length nears…“dink, dink”—loose resistance to apical advancement is felt.
With mental imaging and the knowledge that loose resistance to apical advancement indicates the instrument tip is meeting an obstruction or impediment in the canal, we instinctively retrieve the instrument, curve its very tip, and re-enter the canal with every chance of finding a passive path around the impediment. Without adequate mental imaging and correct interpretation of tactile data, it’s tempting to give the instrument a bit of a push.
The “rubber band” sensation is what I call that soft, leathery sensation felt right before pulp remnants are compacted into an irreversible blockage. Dentists must train themselves to instinctively fear this sensation because getting it a little late often means the case may already be munged and require surgery to save.
When encountering the rubber band sensation, immediately remove the instrument in use, syringe lubricant solution into the access cavity, and attempt to get a pre-bent #08 or #10 KF to, and carefully through, the terminus to insure against the often-irreversible blockage made of compacted pulp tissue remnants. Apex locators are invaluable in this effort.
Sensations of binding, during rotary file use, mean one of
Figure 9. CT reconstruction of maxillary first molar with an MB2 canal (left to right): 1. First unbent negotiating file meets an impediment halfway up the MB2 canal, 2. The bent file is directed toward the MB1 canal (buccal) to traverse the first impediment, but then immediately meets a second, 3. The “S”-curve of this tortuous canal requires the re-bent file be redirected in nearly the opposite path in order to skate around the second impediment and head for patency.

Dental Education Laboratories January 2018
As usual, when the impediment sensation is felt, the file is retrieved, bent right at its tip with the marker on the rubber stop aligned to the bend, and after trying a couple of different possible directions, the file drops deeper into the canal but immediately meets another impediment! Not to worry.
Simply note, by the marker on the stop, the direction to which the bent file was in when it dropped past the first bend―let’s say, for instance, the bent file was in a disto-lingual direction when it dropped. Although you may be dismayed by the second impediment encountered, remember that the first curve is no longer a problem as it has been mapped in your head―the only remaining thing to be done is to find the second direction of curvature. If you are lucky, redirecting that same file tip will allow your exit to patency. If you are less fortunate, it will require several attempts of re-bending and redirecting the negotiating instrument to make it around the last bend.
Finding MB2 CanalsAs noted above, the most important data point when MB2 hunting, is the isthmus line typically seen when a smooth trough has been cut from the MB1 orifice toward the palatal. Maxillary molar’s MB roots have an isthmus between all MB1 and MB2 canals―at some level in the root―and seeing that little line is a welcome map to the MB2 and a sweet security blanket when deep digging is needed to intersect the canal. Clinicians who have looked for and never seen an MB isthmus in an upper molar, have invariably been looking in a strictly apical direction―an invitation to perforation.
MB2 canals are best found by troughing in a very mesio-apical direction (Figure 10). If we reverse-image the MB2 in our mind’s eye, we see it curve down from the apex in a distal direction as it enters the pulp chamber―sometimes curving as much as 90°―we see the fallacy of looking for it in a strictly apical direction. The only thing we’ll find cutting in that direction is the furcation.
Visual GaugingVisual gauging is simply paying close attention to the tip flutes of shaping files after a new tip size has been cut to length―primarily to see if debris is present, or not, in the spaces between those flutes. When the tip flutes are packed with debris, we conclude that the file must have cut at its tip, likely we have a complete taper to the end of the root canal, therefore shaping is done. Conversely, when we cut the first file with a bigger tip diameter to length and see little or no debris in the tip flutes, we can assume the tapered shape is incomplete and it will require yet a larger terminal preparation (Figure 11). Understanding this can save the time wasted when tactile gauging is done
prematurely―before the apical prep is done or near-done.
DiagnosisThis one may not be obvious, but until you visualize what is going on inside root canals during pulp testing, you’re going to have less than definitive diagnoses and you will make mistakes in treatment planning. It is by visualizing what the pulp looks like inside the canal, that we understand why a partially necrotic pulp would give a delayed, but normal reaction to cold testing―the ice pencil chilled the tooth far enough apically to tickle the
Figure 11. Tapered shaping file cut to the end of a canal that has a larger apical diameter than the file’s tip diameter. In these cases, the retrieved file will have no cut debris in it tip flute spaces, indicating the need for a larger file tip size to carry the taper to the terminus--apical continuity of taper.
Figure 10. Saggital section of an MB root showing the MB2 canal as it enters the pulp chamber at its typically significant angle. Beware of troughing in a strictly apical direction once the pulp chamber floor has been reached--you will meet the furcation sooner than you might expect.

Dental Education Laboratories January 2018
apically degenerating pulp remnant. And we understand why the patient’s referred pain was not reproduced―the cold test actually reduced the intra-pulpal pressure causing the patient’s pain.
With this mental image data, we know to test for partial necrosis by using an electric heat source, such as a System-B, with a bit of gutta percha on its end, to see if increasing intra-pulpal pressures will stimulate the offending pulp to stand up and salute. We heat the tooth, the intra-pulpal pressure increases, lighting off a degenerating, but still vital, pulp at the end of the canal. Easy-peasy diagnosis.
Mental imaging skill is very important when assessing risk before retreating teeth with failing RCT. Visualization of the boney attachment apparatus around (or not around) the neck of the tooth informs us of about the possible loss of structural integrity in the root structure, such as fracture―the primary reason to replace rather than retreat such a tooth.
ConclusionAt the end of the day, mental imaging not only informs us, it entertains us, and makes every invasion of another root canal system an exciting event. When we “know” the canal from this exercise, the placement of cutting instruments to their ideal positions can be accomplished with confidence, intent, and consistently ideal outcomes.
With effective mental imaging, every endo case becomes a detective game where the result is ultimately determined by the accuracy of the mental pictures directing our hands (Figure 12). Without it, we are truly lost in space―root canal space.
References1. LS Buchanan, Chapter 7: Cleaning and Shaping Root
Canal Systems, Pathways of the Pulp, 5th Ed., Cohen and Burns, ed. Mosby-Yearbook, St. Louis, 199?.
Figure 12. Post-operative radiograph showing successful management of difficult anatomy―an impossibility without accurate mental imaging.
BioThe author is a Diplomate of the American Board of Endodontics and is part-time faculty at UCLA and USC’s graduate endo programs. He is the founder of Dental Education Laboratories, a hands-on teaching center in Santa Barbara where he also maintains a practice limited to conventional/microsurgical endodontic therapy and implant replacement.