mental ray contour (wireframe) render tutorial -- updated for 2015
DESCRIPTION
Basic tutorial for creating wireframe renders with Mental Ray in Maya.TRANSCRIPT

Mental Ray Contour (Wireframe) Render Tutorial By Lauren Kimball Wichowski 1. Step One: Create a New Render Layer featuring your mesh.
Make sure you have your mesh selected before clicking the “Create New Layer and Assign Selected Objects,” button. 2. Step Two: Assign Surface Shader. A Surface Shader is basically unaffected by light or shadow and can be useful for creating a flat, vector-‐esk surface to your model. There are many ways to apply a Surface Shader, but for this example I will use the Render Layer’s Material Override option.
The benefit of using a layer over-‐ride is that it will apply the new Shader to everything in the scene as oppose to a single object.

3. Step Three: Change Surface Shader’s outcolor from Black to White in the Attribute Editor.
It’s important for the Surface Shader to be white to implement the layer’s blending mode in later steps. 4. Step Four: Access the Surface Shader’s Shading Group Node to Enable Contour
Rendering. Rendering with Mental Ray often involves a conversation between the Render Settings and the individual Shader’s Mental Ray Settings. Before we delve into the Mental Ray settings, you need to make sure that Contour Rendering has been enabled on the Surface Shader itself. In order to access the “Enable Contour Rendering” option, you must first select the Shader’s Shading Group Node. To access the node, you’ll need to select the Surface Shader Material inside the Hypershade editor and Display it’s Output Connections:

After selecting the Surface Shader’s Shading Group Node, access the Attribute Editor and activate the Contours under the Mental Ray Tab.
Remember to change the Color setting from white to black and to reduce the Width settings for a thinner contour line.
5. Step Five: Activate Mental Ray in the Render Settings. In order to increase it’s efficiency, there are a number of plugins inside Maya that deactivated by default. In order to proceed, you will need to activate the Mental Ray Plugin. If you need a refresher, go to Window à Settings/Preferences à Plug-‐in Manager. The Mental Ray Plugin is called, “Mayatomr.bundle”; Load it and Close.
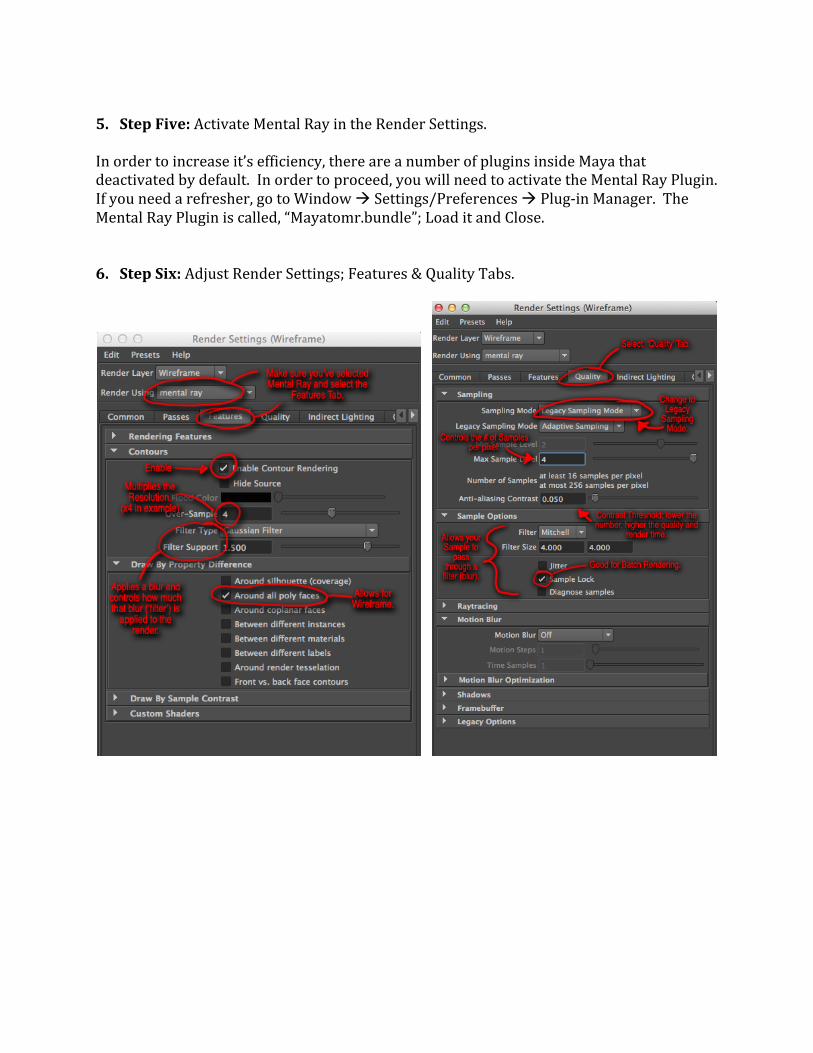
6. Step Six: Adjust Render Settings; Features & Quality Tabs.

7. Step Seven: Render & Adjust Settings to satisfaction.
Note: If you want the background white as opposed to black, select your render camera and access it’s Shape Node to adjust the Background Color found under the Environment tab.
8. Step Eight: Adjust the Render Layer Settings. To test your Wireframe by overlaying it on your Ambient Occlusion render, select the Wireframe Layer and click on the drop down menu labeled, “Normal” at the top of the Render Layer Editor (under the Channel Box) and change, “Normal” to, “Multiply”.
Make sure you activate both your AO and your Wireframe layers for rendering and select “Render All Layers” in the Options menu. When you’re ready to batch render, the layers will be organized into two separate folders for your convenience. 9. Step Nine: Test it, it should show the wireframe blended over the ambient occlusion
render below it. When you’re done, batch-‐render your turn table/animation/whatever you’re applying the wireframe to. Not only does this method shorten the span of time the total render takes, it allows you control on how you overlay the wireframe (maybe you want it on the AO pass, maybe you want it on the beauty pass, maybe you decide you don’t want it after all…the important thing is you have full control to composite the wireframe however you please in a software package like Premiere Pro or Aftereffects.

***UPDATE for Maya 2015*** If you utilize the Mental Ray Contour method to batch render the wireframe view of your model, be aware of some changes made as of Maya 2015. For those of you who’ve already attempted a batch render, you’ve likely discovered a strange occurrence where the first frame renders seamlessly followed by frame after frame of empty, blank space. In Maya 2015, a new series of contour render nodes has been introduced. In order to get the Mental Ray Contour method to work for a batch render, you need to plug-‐in a Mental Ray Contour Node into the Shape Node of the Contour Shader Group in order for it to batch render properly. Here’s how: 1. First, access your Surface Shader’s group node in the Hypershade:

2. Unspool the, “Custom Shaders” attribute in the Attribute Editor:
3. Create a, “Contour_Shader_Simple” node in the Hypershade Editor.

4. Connect the, “Contour_Shader_Simple” node to the Contour Shader input connection slot inside the Surface Shader’s Group Node:
This will disable the contour options previously accessible under the group’s shader node. To customize the line width or color, you will have to select the contour_shader_simple node to adjust the values.