meridian 568 digital surround processor · 2 introduction the 568 digital surround processor...
TRANSCRIPT

Meridian 568 Digital Surround Processoru
se
r
gu
id
e

i
Pre
fac
e
Meridian 568 DigitalSurround ProcessorUser Guide

Pre
fac
e
ii
Sales and service in the UK
Meridian Audio Ltd
Stonehill
Stukeley Meadows
Cambs
PE18 6ED
England
Tel (01480) 52144
Fax (01480) 459934
World Wide Web
http://www.meridian-audio.com
Part no: 568
Sales and service in the USA
Meridian America Inc
3800 Camp Creek Parkway
Building 2400
Suite 122
Atlanta
GA 30331
Tel (404) 344 7111
Fax (404) 346 7111
Designed andmanufactured in the UK by
Digital Gramophone and Wireless Ltd
Stonehill
Stukeley Meadows
Cambs
PE18 6ED
England
Copyright © 1995–1999 Digital Gramophone andWireless Ltd.
Manufactured under license from DolbyLaboratories Licensing Corporation (Canadianpatent 1,037,877), Lucasfilm Ltd. (US patents5,043,970; 5,189,703; 5,222,059), TrifieldProductions Ltd, and Nimbus Records Ltd.
Dolby, Pro Logic, AC-3, and the double-D symbolare trademarks of Dolby Laboratories LicensingCorporation. Lucasfilm, THX, and THX Cinema are
registered trademarks of Lucasfilm Ltd. DTS is aregistered trademark of Digital Theatre Systems Inc.MPEG is a registered trademark of the MPEGorganisation. Ambisonic is a registered trademarkof Nimbus Records Ltd. Trifield is a trademark ofTrifield Productions Ltd. LaserDisc is a trademark ofPioneer Electric Corp. Boothroyd|Stuart Meridian,Meridian, Meridian Digital Theatre, MeridianLossless Packing, and MLP are registeredtrademarks of Meridian Audio Ltd.
MHR: This product incorporates copyrightprotection technology covered by certain patentapplications and intellectual property of MeridianAudio Ltd. This technology is provided for theexpress purpose of securely containing copyrightaudio within the Meridian System only. Reverseengineering or circumvention of this protection isstrictly prohibited.
This guide was produced by Human-ComputerInterface Ltd, http://www.interface.co.uk

iii
Pre
fac
e
Contents
Introduction 1
Introduces the digital surround processor,
and gives guidelines and suggested
layouts to help you plan your surround
system.
The 568 Digital Surround Processor ...... 2
Sample configurations ........................... 4
Specification and accessories ............... 6
DSP presets ........................................... 9
Using the digitalsurround processor 13
Provides step-by-step instructions for
operating the digital surround processor,
using either the front panel or the Meridian
System Remote.
Front panel ............................................. 14
Meridian System Remote ...................... 15
Quick guide to operating the 568
with the remote ...................................... 16
Selecting a source ................................. 17
Adjusting the volume ............................. 19
Changing the DSP preset ...................... 20
Changing the display ............................. 21
Defining your ownpresets 23
Describes how to change the built-in DSP
presets, and create your own presets.
Locking and unlocking the menus ......... 24
Changing the DSP parameters .............. 25
Standard parameters ............................. 26
Changing treble, bass, or phase ............ 27
Changing the listening position ............. 28
Changing the integration of the centre .. 30
Changing the spaciousness of the
sound ..................................................... 31
Changing the lip sync and on-screen
display .................................................... 32
Changing the DSP preset for a source .. 33

Pre
fac
e
iv
Configuring the digitalsurround processorwithout a computer 63
Describes how to perform a basic
configuration of the digital surround
processor without requiring a computer.
Choosing a standard setting .................. 64
Standard source settings ....................... 66
Calibrating the system ........................... 67
Calibration tests ..................................... 70
Setting up subwoofers ........................... 74
Setting up the digitalsurround processor 49
Describes how to unpack and install the
digital surround processor, and gives
details of the video and audio
connections.
Unpacking .............................................. 50
Positioning the digital surround
processor ............................................... 51
Connecting the digital surround
processor ............................................... 52
Connecting video ................................... 55
Connecting speakers ............................. 56
Connecting sources ............................... 59
Connecting to other Meridian
equipment .............................................. 62
DSP presets 37
Gives technical information about each of
the DSP presets, with details of the special
parameters available for each one.
Logic DSP presets ................................. 38
Music DSP presets ................................ 41
5.1 Movie DSP presets .......................... 46

v
Pre
fac
e
Configuring the digitalsurround processorusing a computer 77
Describes how to configure the digital
surround processor using the Meridian
Configuration program.
The Meridian Configuration program ..... 78
Installing the Meridian Configuration
program ................................................. 79
Creating a new settings file .................... 82
Setting up speakers ............................... 85
Setting up sources ................................. 90
Configuring presets ............................... 93
Changing the setup options ................... 96
Calibrating the settings with your
system................................................. 98
Creating a User Type .......................... 100
Completing the configuration ............. 103
Troubleshooting 105
Provides suggested solutions to typical
problems.
General operating problems ............... 106
Audio problems ................................... 108
Video problems ................................... 111
Meridian Configuration program
problems ............................................. 112
Service and guarantee ........................ 113
Glossary 115
Index ................................................... 119

Pre
fac
e
vi

Intro
du
ctio
n
1
Introduction
The Meridian 568 Digital Surround Processor combines a completely digital
surround-sound processor with a high-performance digital preamplifier in a
single integrated unit. It takes advantage of the latest techniques in high-
precision analogue electronics and digital signal processing, and the result
is an impressively realistic and exciting reproduction of music and cinema
sound.
The 568 Digital Surround Processor accepts both analogue and digital
sources, and supports all the current two-channel and multi-channel audio
formats including PCM, Dolby Digital (AC-3), DTS, and MPEG. It also
includes several proprietary processing modes, including the MLP
(Meridian Lossless Packing) format.
For instructions on setting up the unit turn to Setting up the digital
surround processor, page 49. Once the digital surround processor has
been set up refer to Using the digital surround processor, page 13, for
information about getting the best results from all your music and film
recordings.

2
Intr
od
uc
tio
n
The 568 Digital Surround Processor incorporates the result of
several years of research and development into several
innovative technologies.
Digital Signal Processing
Digital Signal Processing, or DSP, is a technique pioneered by
Meridian in hi-fi products for achieving extremely accurate
reproduction of audio signals using high-precision mathematical
processing.
DSP allows sophisticated processing to be performed without
any of the cumulative noise or degradation that inevitably
occurs, even with high-quality analogue circuitry. In addition,
several of the surround-sound decoding techniques and signal
improvement techniques available in the 568 would be virtually
impossible to implement in analogue circuitry.
The 568 takes advantage of DSP for several different functions:
To remove timing variations from the incoming digital signals
(de-jittering).
To expand the precision of the signal to use the full available
range.
To resample the signal to take advantage of the highest rate
available (upsampling).
To perform filtering or adjustment of the frequency response;
eg treble or bass.
To decode digitally-encoded signals from Dolby Digital (AC-3),
DTS, or MPEG Audio.
To process the audio into a multi-channel signal, and match
the source channels to the configuration of main loudspeakers
and subwoofers in the system.
The 568 converts analogue input signals to digital format, using
high-quality analogue-to-digital converters (ADCs). Digital
signals, from CD, DVD, LaserDisc or digital broadcasting, are
already in digital format and do not need to be converted.
The signals are then retained in digital form throughout the 568
until they are converted back to analogue form at the analogue
outputs, to drive power amplifiers. If you are using the 568 with
Meridian DSP Loudspeakers, the signals remain in digital form
until the last possible stage.
The 568 Digital Surround Processor

Intro
du
ctio
n
3
Meridian High Resolution (MHR)
The 568 Digital Surround Processor supports Meridian High
Resolution (MHR), to allow you to connect to other MHR-
compliant Meridian products to take advantage of high-rate
audio sources, and provide the additional benefits of lower jitter
and improved sound quality on all sources.
MHR is a proprietary secure encoding format that uses
encryption and anti-copy methods to provide a secure copyright
protection environment, and allow the secure transfer of audio
streams within a Meridian-only system for playback only.
500 Series communications
The 568 Digital Surround Processor is part of the Meridian 500
Series of advanced digital, analogue, and video components,
and these incorporate a sophisticated communications link, to
allow you to control any combination of units using a single
remote, and ensure that they will work together as a fully
integrated system.
The communications system also allows you to extend your hi-fi
system into two or three rooms, with the ability to control the
sources in one room from the controller in another room.
The following pages show two recommended configurations
based on the 568 Digital Surround Processor to illustrate the
flexibility of the Meridian 500 Series.

4
Intr
od
uc
tio
n
Meridian Compact Theatre™
The Meridian 568 Digital Surround Processor is ideal for use with
the M33 Active Analogue Loudspeaker and M1500 Active
Subwoofer. The M33 provides an unusually good response for
such a compact case, and can be mounted either horizontally or
vertically for total flexibility.
The 568 Digital Surround Processor can connect directly to up
to eight Meridian active loudspeakers, allowing you to create a
5.1 or 7.1 analogue theatre ideal for superb music and cinema
sound in the home.
Sample configurations
Meridian DVD Player
M33
568
M33M33M1500
M33 rear M33 rear

Intro
du
ctio
n
5
Meridian DVD Player
DSP5000C
504
D33 sideD33 side
568
D33 rear D33 rear
DSP6000 DSP6000
Meridian Digital Theatre™
The 568 Digital Surround Processor can be used with two
Meridian DSP6000 Digital Loudspeakers, and a DSP5000C
Digital Centre Loudspeaker, to provide audiophile-quality sound.
A further two or four D33 Active Digital Loudspeakers can be
added as side or rear loudspeakers to give extremely convincing
multi-channel reproduction from music and film sources. The
Meridian DVD Player is an ideal source for use with the 568. It
allows you to play both audio CDs and DVD video discs, taking
full advantage of the 568’s control and digital signal processing
capabilities.

6
Intr
od
uc
tio
n
Specification
Digital inputs 4 x cable, 75Ω, IEC958 and data
compatible, up to 24 bits.
1 x optical, Toslink (EIAJ), IEC958 and
data compatible, up to 24 bits.
Analogue inputs 2 x unbalanced, 20kΩ input
impedance.
1 x stereo 24-bit Delta-Sigma ADC.
Processing 2 x Motorola 56002 running at 66MHz.
1 x Motorola 56303 running at 72MHz.
1 x Motorola 56007 running at 82MHz.
Internal precision maintained using 24-
and 48-bit arithmetic.
Analogue outputs 4 x stereo 24-bit Delta-Sigma DAC.
8 x unbalanced outputs for centre, sub,
rears, mains, and sides or subs.
3 x balanced outputs for mains and
centre.
Outputs variable between 0 and
3.5Vrms, output impedance 47Ω.
Distortion <0.01%.
Noise and hum <-95dB CCIR.
Digital outputs 4 x stereo SPDIF on cable, 75Ω, up to
24-bit precision.
Video circuit 1 x composite video loop with
on-screen display: phono, 75Ω,
1.5V p-p, PAL/NTSC/SECAM.
1 x S-video loop with on-screen
display: Y/C on minidin, 75Ω,
1.5V p-p, PAL/NTSC/SECAM.
Tape outputs 1 x digital bypass.
Specification and accessories

Intro
du
ctio
n
7
Control 2 x Meridian Comms.
9-pin D connector for RS232 PC setup
and control.
Dimensions 321mm x 88mm x 332mm
(12.7" x 3.5" x 13.1") (W x H x D).
Weight 5kg (10lb).
Meridian Audio reserves the right to amend product
specifications at any time.
Available accessories
The following accessories are available from your dealer.
Meridian 511 S-patch Box
The Meridian 511 S-patch box provides a convenient way to
interconnect the S leads between up to eight Meridian DSP
digital loudspeakers. It is required if your 568 system includes
more than two DSP loudspeakers.
Meridian 519 Demodulator
To take advantage of Dolby Digital on LaserDisc you need the
Meridian 519 Demodulator, which converts the LaserDisc
RF output to a bitstream which can be fed to the 568. The
519 Demodulator automatically senses the presence of a Dolby
Digital signal, and can select the LaserDisc PCM or DTS digital
audio output when no Dolby Digital signal is available.

8
Intr
od
uc
tio
n
Fan kit
A Fan kit is available for the 568 to provide additional ventilation
if the unit is installed in an enclosed space.
The fan can be programmed using the Meridian Configuration
program so that it either runs when the 568 is out of standby, or
when the temperature rises above the recommended level.
Rack mount kit
The Meridian 500 Shelf is a tray produced by Middle Atlantic
Products which will allow the 568, or any other 500 Series unit,
to be fitted in a standard 19" rack. For more information please
contact Middle Atlantic Products, Inc., Riverdale, NJ 07457,
USA, (001) 973-839-1011, or their local distributor.

Intro
du
ctio
n
9
The digital surround processor provides an extremely
comprehensive range of digital signal processing options for
decoding both analogue and digital audio signals and
processing them for multi-channel reproduction. These are
referred to as DSP presets, and are designed to provide the best
results with a range of different types of music and film material.
In addition to selecting built-in DSP presets, the digital surround
processor allows you to create your own presets based on the
standard ones. For example, you may want to add more delay to
the rear speakers to create a more spacious sound. You can
store your modified preset with a name of your choice, and
recall it for use at a later date.
This section gives information about each of the built-in DSP
presets, and gives recommendations for the best preset to
choose for different types of material.
Multi-channel digital sources
Several alternative multi-channel digital formats are currently
available which encode up to eight different channels onto a
digital signal. Four alternatives are currently in use: Dolby Digital,
DTS, MPEG Surround, and MLP. However, the 568 has been
designed so that it can be upgraded by downloading a software
update, to cater for new formats as they are introduced.
Dolby Digital
Dolby Digital, previously called AC-3, is the preferred sound
format for DVD video, and is widely used on LaserDisc
soundtracks. It is also the audio standard for US digital
television.
DTS
DTS uses an audio compression technique to encode five
channels of audio onto a digital signal. The DTS format is used
to encode multi-channel film soundtracks on LaserDiscs and
DVD video discs.
DSP presets

10
Intr
od
uc
tio
n
In addition, a high data-rate version of DTS can be used to
compress five channels of CD-quality audio into the same space
as two channels of unencoded sound, allowing a DTS music CD
to provide over an hour of five-channel music, at a quality
indistinguishable from conventional CD.
MPEG Surround
MPEG Surround is the preferred audio format for DVD in PAL
territories, and along with Dolby Digital is a contender as the
standard for music and performance videos on DVD worldwide.
THX
THX versions of Dolby Digital, MPEG Surround, and DTS are
provided to give a better match between the original soundtrack
and typical domestic listening conditions.
MLP
MLP (Meridian Lossless Packing) is an audio format that allows
multiple audio channels, of up to 192kHz 24-bit quality, to be
stored on a DVD without losing any information. It can also be
used to store four-channel audio on a standard CD without any
loss of quality.
Multi-channel sources encoded ontotwo channels
Several systems have been developed for encoding multi-
channel sources onto a standard two-channel analogue signal
so that they can be reproduced by a conventional stereo
system, or decoded with special equipment for multi-channel
reproduction. The 568 Digital Surround Processor provides
decoding of the two most important of these, Ambisonic and
Dolby Surround. Although the channel separation cannot be as
good as with the digital multi-channel formats, the 568 produces
excellent results with these formats.
Pro Logic
The Pro Logic preset is recommended for decoding Dolby
Surround encoded video and LaserDisc soundtracks, and films
on television. Such materials are usually identified by a Dolby
Surround symbol on the packaging, or displayed on the film
before the programme.

Intro
du
ctio
n
11
TV Logic
TV Logic provides user-adjustable steering, and is
recommended for use with TV broadcasts that are not surround
encoded, where Pro Logic may give reduced intelligibility.
THX Cinema
THX Cinema enhances Pro Logic to replicate the sound of a
dubbing stage or theatre, whether or not the other equipment in
your system is THX approved.
Ambisonic
Ambisonic decodes material specifically encoded for surround
sound reproduction, using a two-channel stereo-compatible
encoding. Recordings encoded in Ambisonic format are
available on CD from several sources including Nimbus Records
and York Ambisonic. Some radio broadcasts are also broadcast
in Ambisonic format.
Conventional stereo sources
The digital surround processor can also accept a conventional
two-channel source, such as music on compact disc or a video
soundtrack, and by analysing the information in the signal
separate the two-channel recording into multiple channels to
give better reproduction and a more stable spatial image.
Four alternative DSP presets are provided for reproducing
material originally designed for a conventional stereo pair of
speakers, and which preset you choose largely depends on your
own personal preferences.
All four presets use similar procedures to extract the surround
component of the original recording, which is delivered to the
rear surround speakers, and side surround speakers if present.
Music
Music uses a special technique developed by Meridian to divide
the sound between the left, right, and centre speakers and give
a wide, spacious sound. We recommend this option for large-
scale music, such as orchestral and choral music.

12
Intr
od
uc
tio
n
Trifield
Trifield uses a different processing technique to give a stable,
three-dimensional image, with the ability to adjust the width of
the image. Because of its precision we recommend this option
for solo, chamber, or vocal music.
Super Stereo
Super Stereo provides a form of Ambisonic decoding suitable
for material that is not specially encoded. We recommend this
option for multi-miked or multi-tracked music, such as rock
music.
Music Logic
Music Logic provides user-adjustable steering to give an
exciting sound with many types of music. We recommend this
option for studio-produced music, ie material not produced
using natural soundfield recording.
Special DSP presets
The digital surround processor also includes the following
special DSP presets, for specific applications:
Mono
The Mono preset is designed for reproducing mono materials
through a centre speaker, so that any high-frequency hiss or
clicks are centrally localised. It is intended for mono recordings,
and multi-language LaserDiscs and video soundtracks.
The Mono preset includes an Academy option, designed to
correct for a high-frequency balance in some old black and
white films, and a Party option, which plays the mono signal
through all loudspeakers.
Stereo and Direct
Stereo and Direct are provided for comparison with the other
DSP presets. Direct uses just the main left and right speakers
for traditional two-speaker stereo reproduction. Stereo, in
addition, uses any subwoofers in the layout to enhance the bass
or to protect small speakers.

Usin
g th
e d
igita
l su
rrou
nd
pro
ce
sso
r
13
Using the digitalsurround processor
This chapter provides a summary of the functions of the digital surround
processor to identify the controls which you use to operate the unit.
It also provides step-by-step instructions for operating the digital surround
processor, using either the front panel or the Meridian System Remote.
Usin
g t
he
dig
ita
l su
rro
un
d p
roc
esso
r
14
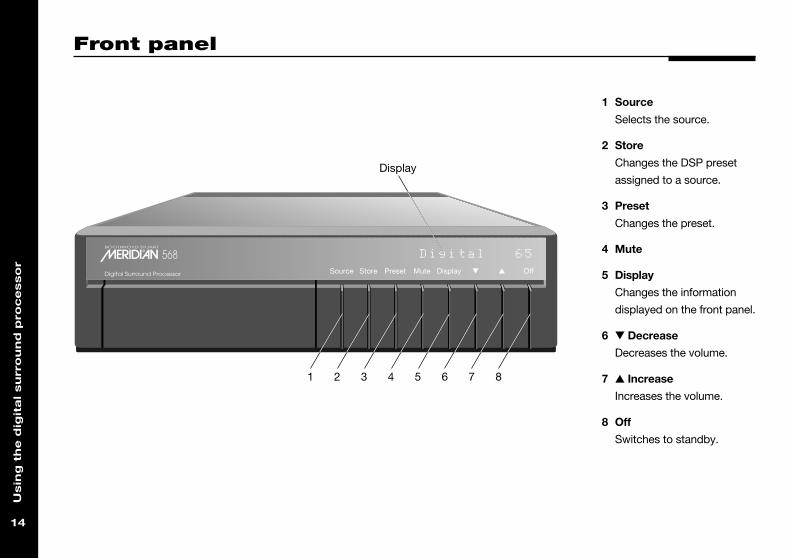
Front panel
1 Source
Selects the source.
2 Store
Changes the DSP preset
assigned to a source.
3 Preset
Changes the preset.
4 Mute
5 Display
Changes the information
displayed on the front panel.
6 V Decrease
Decreases the volume.
7 A Increase
Increases the volume.
8 Off
Switches to standby.
StoreSource VPreset Mute A Off
Digital 65BOOTHROYD STUART
568Digital Surround Processor Display
2 3 4 5 6 7 8
Display
1

Usin
g th
e d
igita
l su
rrou
nd
pro
ce
sso
r
15
1 Source keys
Select a source.
2 Control keys
Control the source functions.
3 Off
Switches to standby.
4 Function
Acesses additional functions.
5 Number keys
For entering track numbers
and radio presets.
6 Title/Chapter
For controlling a DVD Player.
7 Menu keys
For customising the 568.
8 Preset
Changes the DSP preset.
9 Display
Changes the front-panel
display.
10 Volume keys/Mute
Change the volume.
Meridian System Remote
Subtitle
Off
EnterReturn
Function 0 Title
Chapter
Record
Slow
OSD
T
Angle Audio A-B Phase
Setup
Band
7 8 9
4 5 6
1 2 3
Menu Volume
Display MutePreset
Clear
Store
Repeat
CD RADIO LP TV TAPE 1 TAPE 2 CDR CABLE DVD VCR 1 VCR 2 LD
4
1 2 3
5 6 7 8 9 10

Usin
g t
he
dig
ita
l su
rro
un
d p
roc
esso
r
16
Quick guide to operating the 568 with the remote
Action 568 as controller DSP speaker as controller
Source selection CD, RADIO etc. CD, RADIO etc.
Go to standby Off Off
Volume Volume A V Volume A V
Mute Mute Mute
Change display Display Not available
Change DSP preset Preset Preset
Move to next or previous menu Menu < > Function + Menu < >
Change the value of this menu Menu A V Function + Menu A V
Store settings as a new DSP preset Store Function + Store
or over an existing one
Associate the current DSP preset Function + Store Function + Mute
with the current source
Delete an unwanted user preset Clear (held down) Function + Clear (held down)

Usin
g th
e d
igita
l su
rrou
nd
pro
ce
sso
r
17
When not playing, the digital surround processor should be left
in the standby state. This uses a negligible amount of electricity,
but ensures that the components of the digital surround
processor operate at maximum efficiency from the moment you
start.
If you are not going to use the digital surround processor for
several days you should switch the unit completely off at the
back panel, and disconnect it from the AC power supply.
To switch on from standby
Press Source (front panel), or select a source by pressing the
appropriate source key on the remote; eg DVD.
If the digital surround processor is part of a Meridian system it
will automatically switch on any other unit in the system, such as
the CD player and Meridian DSP loudspeakers.
To select a source
Press Source (front panel) until the display shows the source
you require.
For example: DVD
Alternatively press the appropriate source key on the remote;
eg DVD.
After a short delay the display shows the currently selected DSP
preset and volume setting.
For example:Digital 56
The digital surround processor mutes the sound while you
change source.
By default the following 12 sources are available: CD, Radio, LP,
TV, Tape 1, Tape 2, CDR, Cable, DVD, VCR1, VCR2, and LDisc.
The audio input and DSP preset associated with each source
can be configured using the Meridian Configuration program; for
more information refer to Configuring the digital surround
processor using a computer, page 77.
Selecting a source

Usin
g t
he
dig
ita
l su
rro
un
d p
roc
esso
r
18
To switch to standby
Press Off on the front panel or the remote.
The display will show: .
If you have other Meridian 500 Series equipment or Meridian
DSP loudspeakers connected to the digital surround processor
these units will also switch to standby.

Usin
g th
e d
igita
l su
rrou
nd
pro
ce
sso
r
19
To mute the sound
Press Mute.
The display will show:Mute
To restore the sound
Press Mute again.
Alternatively, the sound will be restored if you adjust the volume.
The digital surround processor adjusts the volume in precise
steps of 1dB, where 9dB is equivalent to doubling the loudness.
The current volume setting is displayed in dB on the front panel
display, and can be varied in the range 1 to 99dB.
When you first connect power to the digital surround processor
the volume is set to 65, which is similar to the midway position
of the rotary volume control on a conventional preamplifier.
A setting of 87 corresponds to THX reference gain, the level at
which film soundtracks are mixed. For normal to high-level
listening you should expect to use volume levels in the range 60
to 90.
To change the volume
Press A or V (front panel), or the red A or V keys on the
remote.
As you adjust the volume setting the display will show the
current volume level.
For example:Music 70
Adjusting the volume

Usin
g t
he
dig
ita
l su
rro
un
d p
roc
esso
r
20
Each source has a set of DSP presets associated with it, one for
each of the alternative audio formats: two-channel (PCM), Dolby
Digital, DTS, MPEG, and MLP.
When you choose a source an appropriate DSP preset is
selected for the incoming audio format.
For example, if you have selected the CD source and are playing
a conventional CD, the Trifield DSP preset will initially be
selected. You may then wish to choose a different DSP preset,
such as Music or Ambisonic.
You can also change the default DSP preset associated with the
source; see Changing the DSP preset for a source, page 33.
To change the DSP preset
Press Preset (front panel or remote) to step between the
different DSP presets.
The display shows the current preset;
for example:Music
You will be able to choose any of the predefined DSP presets, or
any user-defined presets you have stored.
Changing the DSP preset
The following table gives the sequence of DSP presets for each
audio format, followed where appropriate by the abbreviated
name used on the display:
Audio format Presets
Two-channel (PCM) Direct, Music, Trifield, Ambisonic
(Ambsonic), Super Stereo (Super),
Stereo, Music Logic (MuLogic),
Pro Logic (ProLogic), THX Cinema
(THX), Mono, TV Logic
Dolby Digital Dolby Digital (Digital),
Dolby Digital THX (Dig THX)
DTS DTS, DTS THX, DTS Music (DTS Mus)
MPEG MPEG, MPEG THX,
MPEG Music (MPEG Mus)
MLP MLP
In each case these will be followed by any user-defined presets
you have stored for the appropriate audio format.

Usin
g th
e d
igita
l su
rrou
nd
pro
ce
sso
r
21
Changing the display
The digital surround processor displays information about the
current settings on the 12-character front panel display. In
addition, it can display the same information superimposed on a
video image. For more information about setting up the
on-screen display refer to Connecting video, page 55.
To change the display
Press Display.
Each time you press Display the display will step between the
options shown in the table opposite.
In addition, the following symbols on the front panel display
indicate which of the DSP processing modes are operating:
Symbol What it means
THX processing is operating.
Dolby processing is operating.
Input is DTS.
MPEG Input is MPEG.
Display option Example
DSP preset and volumeMusic 65
DSP preset and THX gainMusic -22
Source and volumeRadio 65
Audio streamAC3 5.1 44k
Blank
The audio stream display option shows the following three
pieces of information about the audio stream:
AC3 5.1 44k
Sample rate:96k 96kHz88k 88kHz48k 48kHz44k 44kHzNL Not locked
Format:PCM 2-channel PCMAC3 Dolby DigitalDTS DTS encodingMPG MPEG encodingMLP MLP encoding
Input channels:Main.LFE

Usin
g t
he
dig
ita
l su
rro
un
d p
roc
esso
r
22

De
finin
g y
ou
r ow
n p
rese
ts
23
Defining your ownpresets
In addition to being able to change the source, volume, and DSP preset,
the digital surround processor provides a sophisticated range of more
advanced adjustments for each DSP preset, to allow you to change the
characteristics of the sound to the settings you want.
This chapter explains how to change these advanced parameters, and
how to store them permanently so they are available whenever you want
to use them.
For information about the parameters specific to individual presets see
DSP presets, page 37.

De
fin
ing
yo
ur
ow
n p
rese
ts
24
Locking and unlocking the menus
To simplify the normal operation of the digital surround
processor, and to protect the settings from accidental changes,
you can lock the menus so that the parameters cannot be
accessed.
To display or change the DSP presets, or to define your own
presets, you first need to unlock the digital surround processor
menus.
To lock the menus
Press Off to put the 568 in standby.
The display shows: .
Press and hold down Preset for a
few seconds until the display shows:Locked
To unlock the menus
Repeat the above sequence so
that the display shows:Unlocked

De
finin
g y
ou
r ow
n p
rese
ts
25
Changing the DSP parameters
Each DSP preset provides a series of parameters that you can
vary to customise its behaviour to your specific requirements.
For example, most presets provide Balance and Depth
parameters which alter the characteristics of the sound.
For each of the built-in DSP presets these parameters are set to
standard values, designed to give the best sound in typical
listening conditions and with most source materials. Each time
you select a different DSP preset the parameters are reset to
these standard values, even if you have previously altered them.
You can save the changes you have made to one or more DSP
parameters in place of the original DSP preset. Alternatively you
can create a new user-defined DSP preset, with a name of your
choice. User-defined presets appear in the list of DSP presets
after the built-in ones. See Defining your own presets, page 34.
Standard parameters
All DSP presets (except Mono and Direct) provide the standard
parameters shown on the next page.
Individual DSP presets provide additional parameters, to allow
you to adjust specific features provided by that preset. For full
details refer to DSP presets, page 37.
To change a DSP parameter
Make sure the menus are unlocked; see To unlock the menus
opposite.
Press > or < (remote) until the display shows the name of the
parameter you want to change.
For example:Treble +1.5
Press A or V (remote) to change the value of the parameter.
As you change the value you will be able to hear the effect on
the sound, and the display will show the current value.
After a short delay the display will revert to the normal display of
DSP preset and volume.
Using a Meridian DSP loudspeaker
If you are using a Meridian DSP loudspeaker as the controller for
your system, select the parameter you want to change by
pressing Function > or Function < on the remote, and change
the parameter by pressing Function A or Function V on the
remote.

De
fin
ing
yo
ur
ow
n p
rese
ts
26
Parameter Range Default What it changes
Treble * † -10dB to +10dB +0dB The slope of the frequency response.
Bass * † -5dB to +5dB +0dB The bass response.
Phase * † + or - + The phase of all loudspeakers.
Balance <10 to 10> <0> The L-R balance.
Centre -3.0dB to +3.0dB +0.0dB The level of the centre.
Depth -2.5ms to +5.0ms +0.0 The delay of the centre.
Rear -30dB to +10dB +0dB The level of the rears.
Sides -30dB to +10dB +0dB The level of the sides.
R Delay ‡ 0ms to 30ms 15.0ms The delay of the rears.
S Delay ‡ 0ms to 30ms 15.0ms The delay of the sides.
LipSync 0ms to 30ms 0ms The sync. delay.
OSD * Off, Low, Med, High Low The position of the on-screen display.
* These parameters apply to all DSP presets.
† These parameters appear on the speakers if you are using DSP loudspeakers.
‡ These parameters have a range of 0ms to 15ms for 5.1 Movie presets and a range of 15ms to 30ms for Logic presets.
Standard parameters

De
finin
g y
ou
r ow
n p
rese
ts
27
The digital surround processor provides sophisticated treble and
bass controls, to allow you to adjust the broad balance of the
system to correct for the acoustics of your listening room, or for
a misbalanced recording.
The controls are more subtle than conventional tone controls,
and take advantage of digital signal processing techniques to
provide a more natural adjustment of the frequency response.
You can also change the absolute phase of the signal, to
compensate for recordings which are out of phase.
In each case all the outputs of the digital surround processor are
given the same adjustment, to ensure a correct surround effect.
If you have a Meridian DSP loudspeaker these menus appear on
the speaker. For more information see the speaker user guide.
To change the treble
Press > or < (remote) until the
display shows the current treble.
For example:Treble +1.5
Press A or V (remote) to change the treble.
The treble control tilts the frequency of the response over the
entire frequency range to make the sound brighter or dimmer. It
can be adjusted between ±10dB in 0.5dB steps. Normally
settings between +1.0 and -2.0 will give the most natural results.
To change the bass
Press > or < (remote) until the display shows the current bass
setting.
For example:Bass +0.5
The bass control allows you to adjust the bass response in the
room by ±5dB in 0.5dB steps. Normally settings between +3.0
and -2.0 will give the most natural results.
Press A or V (remote) to change the bass.
To change the absolute phase
Press > or < (remote) until the display
shows the phase; for example:Phase +
Press A or V (remote) to change the phase.
Changing treble, bass, or phase

De
fin
ing
yo
ur
ow
n p
rese
ts
28
To move the listening position to theleft or right
Press > or < (remote) until the display shows the current
balance.
For example:Balance <0>
Press A or V (remote) to move the listening position.
The display shows the direction and position of the listening
position.
For example:Balance <8
The arrow indicates the direction, and the number indicates the
position where 0 is central, 8 is in line with the corresponding
main speaker, and 10 is fully to one side.
Note that this adjustment is not available for the Mono preset.
A conventional stereo system provides a single balance control,
which changes the relative loudness of the two speakers. The
568 Digital Surround Processor provides a more sophisticated
adjustment which corresponds to moving the listening position
to the left or right.
You can also change the level of the rear or side loudspeakers
relative to the main speakers.
Changing the listening position
De
finin
g y
ou
r ow
n p
rese
ts
29
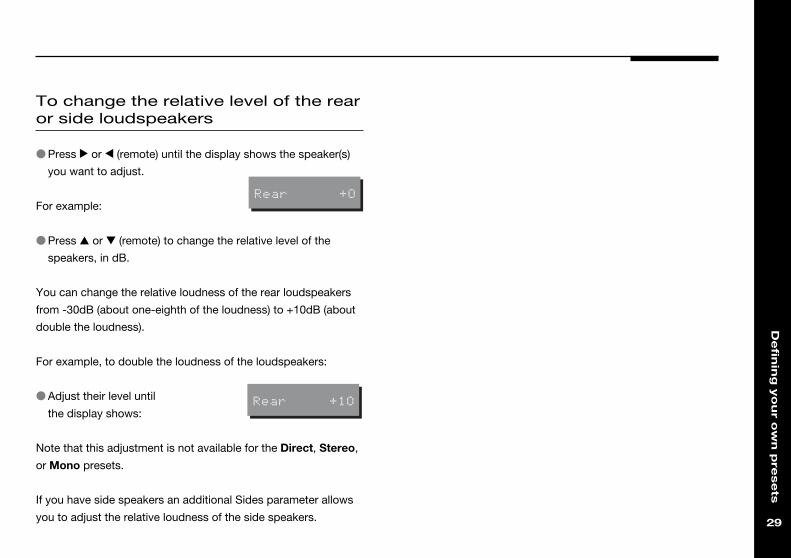
To change the relative level of the rearor side loudspeakers
Press > or < (remote) until the display shows the speaker(s)
you want to adjust.
For example:Rear +0
Press A or V (remote) to change the relative level of the
speakers, in dB.
You can change the relative loudness of the rear loudspeakers
from -30dB (about one-eighth of the loudness) to +10dB (about
double the loudness).
For example, to double the loudness of the loudspeakers:
Adjust their level until
the display shows:Rear +10
Note that this adjustment is not available for the Direct, Stereo,
or Mono presets.
If you have side speakers an additional Sides parameter allows
you to adjust the relative loudness of the side speakers.

De
fin
ing
yo
ur
ow
n p
rese
ts
30
Changing the integration of the centre
To change the relative delay of thecentre speaker
Press > or < (remote) until the display shows the current
centre depth.
For example:Depth +0.0
Press A or V (remote) to change the relative depth of the
centre speaker.
You can change the depth between -2.5ms, which corresponds
to moving the centre speaker 2 Qw feet nearer to the listening
position, and +5ms, which corresponds to moving it 5 feet
further away from the listening position.
If you have a centre loudspeaker you can adjust its relative
loudness, to provide the best integration of the centre with the
main left and right speakers.
You can also adjust the relative delay of the centre speaker to
give the best perspective between the three front speakers.
Note that these adjustments are not available for the Direct,
Stereo, or Mono presets.
To change the relative level of thecentre speaker
Press > or < (remote) until the display shows the current
centre level.
For example:Centre+0.0dB
Press A or V (remote) to change the relative level of the
centre speaker.
You can change the relative level by ±3dB in 0.5dB steps.

De
finin
g y
ou
r ow
n p
rese
ts
31
Changing the spaciousness of the sound
If you have side speakers an additional S Delay option allows
you to adjust the delay on the side speakers between 15ms and
30ms. Note that for best results you should never set the
S Delay to be less than the R Delay.
You can adjust the spaciousness of the sound by altering the
delay on the rear and side channels.
Note that these adjustments are not available for the Direct,
Stereo, or Mono presets.
To change the relative delay of therear or side speakers
Press > or < (remote) until the display shows the speaker(s)
you want to adjust.
For example:R Delay 15.0
Press A or V (remote) to change the relative delay of the
speakers.
The range of possible values depends on the preset. With the
music presets (Music, Trifield, and Ambisonic) you can change
the rear delay between 0ms and 30ms, which is equivalent to
moving the rear speakers 30 feet away.
The 5.1 Movie presets allow you to vary the delay between 0ms
and 15ms, and the Logic presets allow you to vary it between
15ms and 30ms.

De
fin
ing
yo
ur
ow
n p
rese
ts
32
To adjust the lip sync
The LipSync parameter is a unique feature of the digital
surround processor which allows you to adjust the delay
between the sound and the video image by up to one video
frame.
Most movies are mixed for a viewing distance of 30 feet, and
when viewed from 12 feet or less the sound arrives too early,
giving a disconcerting effect. Using the LipSync parameter you
can add an overall delay to the sound to accommodate your
closer home viewing distance.
Many TV broadcasts delay the picture by half a frame, and can
benefit from a LipSync setting of 12ms.
Press > or < (remote)
until the display shows:LipSync 0
Press A or V (remote) to change the delay in milliseconds.
You can adjust the delay between 0 and 30ms, where 30ms
corresponds to sitting 30 feet further away from the screen.
To change the position of theon-screen display
For each DSP preset you can specify the position of the
on-screen display (OSD), or blank the on-screen display
altogether.
For example, you may prefer to have the on-screen display at
the top of the screen when watching videos, but at the bottom
of the screen when listening to music.
Press > or < (remote) until the display shows the current OSD
position.
For example:OSD Low
Press A or V (remote) to change the position.
You can choose between Off, Low, Med, or High.
Changing the lip sync and on-screen display

De
finin
g y
ou
r ow
n p
rese
ts
33
Each source has an appropriate DSP preset associated with it
for each music format. For example, for a standard stereo (PCM)
signal the CD source uses Trifield and the TV source uses
TV Logic.
This section explains how to change the DSP preset associated
with any source.
To change the DSP preset for asource
Make sure the menus are unlocked; see To unlock the menus,
page 24.
Select the source you want to change, by pressing the
Source key on the front panel or the appropriate source key
on the remote; eg CD.
If necessary, select a signal in the appropriate format. For
example, to change the DSP preset used for DTS compact
discs, play a DTS CD.
Press Preset (front panel or remote) to select the DSP preset
you want to associate with the source.
For example: Trifield
Press Store (front panel) to save the new association.
The display shows the source and
preset you have stored; for example:CD=Trifield
After a short delay the display will revert to the normal display of
DSP preset and volume.
Changing the DSP preset for a source

De
fin
ing
yo
ur
ow
n p
rese
ts
34
The 568 Digital Surround Processor allows you to modify one of
the built-in presets, and save it for future use.
You can either save the changes to the built-in preset, or you
can create up to 12 presets of your own, with names of your
choice, so you can use them alongside the built-in presets.
To save the preset settings
Make sure the menus are unlocked; see To unlock the menus,
page 24.
If necessary, select a signal in the appropriate format. For
example, to change the DSP preset used for DTS compact
discs, play a DTS CD.
Press Preset (front panel or remote) to select the DSP preset
you want to modify and then associate with the source.
For example: Trifield
Change the preset parameters to the values you want to
store; see To change a DSP parameter, page 25.
Hold down Store (front panel), or press Store (remote) until
the display shows the next available user-defined preset.
For example:Sto.User 2
If you want to overwrite an existing user-defined preset
Press A or V (front panel or remote) to select the preset you
want to overwrite.
For example:Sto.User 1
Alternatively if you started with a built-in preset you can choose
that and overwrite it.
For example:Sto.Trifield
Press Store (front panel or remote).
The settings have been stored in the new or existing preset you
selected.
Defining your own presets

De
finin
g y
ou
r ow
n p
rese
ts
35
If you are defining a user preset you can now edit the name of
the preset if you wish.
A flashing cursor shows the letter you
are editing:Sto.•ser 1
If you have an on-screen display it shows:
Use Source (front panel) or > and < (remote) to select the
character position you want to edit.
Press A or V (front panel or remote) to change the character.
Each press steps through the sequence A to Z, a to z, 0 to 9, full
stop, and blank. You can also select a blank directly by pressing
Mute (front panel) or Clear (remote).
If you are using a Meridian DSP loudspeaker you select a blank
by pressing Function Clear.
For example, you could change the
name to:Sto.La Scala
Alternatively, you can cancel editing the name by pressing
Display (front panel).
When you have entered the name you want to use press
Store (front panel or remote).
The display shows the source and the new preset you have
defined.
For example:CD=La Scala

De
fin
ing
yo
ur
ow
n p
rese
ts
36
To clear a user-defined preset
Make sure the menus are unlocked; see To unlock the menus,
page 24.
Press Preset (front panel or remote) to select the DSP preset
you want to clear.
For example: User 2
Press and hold down Clear (remote) for several seconds.
The display shows:Preset Clear
If you clear a preset that was saved over a built-in preset, the
original settings for that preset are restored.

DS
P p
rese
ts
37
DSP presets
This chapter gives technical information about each of the DSP presets
built in to the digital surround processor.
It explains the processing performed by each DSP preset, and gives
details of the types of material you should use with each preset.
It also gives details of the special DSP parameters available for each
preset.
The DSP presets are divided into three categories: Logic, Music, and 5.1
Movie. You can set up the 568 Digital Surround Processor to use a
different subwoofer configuration for each category of DSP preset.

DS
P p
rese
ts
38
Logic DSP presets
The digital surround processor provides four DSP presets
specifically designed for reproducing stereo film soundtracks.
Three of these presets, Pro Logic, THX Cinema, and TV Logic,
are designed for Dolby Surround encoded material. Most films,
and many TV programmes and series, are encoded using Dolby
Surround, and it is increasingly being used to encode music.
The 568 Digital Surround Processor follows the Meridian
philosophy of performing all the signal processing digitally, and
the Dolby Surround decoding operates purely in a digital mode.
This gives it a far higher performance and a better subjective
sound than other analogue-based decoders.
The remaining Logic preset, Mono, is designed for films with
mono soundtracks.
Pro Logic
Dolby Surround is an encoding system based on a phase-
amplitude matrix whose output can be decoded by a very
simple passive matrix. Such a decoder gives quite a poor
separation.
The Pro Logic system uses psychoacoustically optimised
directional enhancement to increase the separation in both
left–right and front–back directions. It does this by continuously
calculating the position and degree of the currently dominant
sound. This sound is then steered to a greater or lesser extent to
that position in the arriving sound. This technique is very
successful for cinema and other dramatic programmes.
Further refinements in the Pro Logic decoder include the filtering
and delay of the rear surround signal to reduce any tendency for
the surround signals to divert attention or become dominant.
The Pro Logic decoder also uses a modified digital Dolby noise-
reduction process in the surround signal. Since Dolby Surround
material is encoded with this in mind the noise-reduction is
permanently operating in this mode.

DS
P p
rese
ts
39
THX Cinema
The THX Cinema DSP preset provides Pro Logic decoding,
followed by additional signal processing refinements developed
by Lucasfilm Ltd.
The THX extensions to Pro Logic decoding are designed to
provide a better match between the sound of the movie theatre
and a home cinema in the following ways:
The front channels are re-equalised to correct for the higher
treble often found in film soundtracks.
The surround channels are frequency-corrected using a
timbre-matching process so that sounds moving front–back
are more convincing.
The surround channels are decorrelated to break up any
artificial localisation of the rear signals due to the speakers
being nearby. In the 568 Digital Surround Processor this
decorrelation is optimised to give spacious surround sound
that has no artefacts disturbing to music or other sensitive
sounds in the mix.
The time synchronisation between loudspeakers is adjusted to
compensate for the fact that the speakers in a home system
tend to be a lot closer to the listener than in a movie theatre.
THX can also be used with the 5.1 Movie DSP presets; see
Dolby Digital THX, DTS THX, and MPEG THX, page 46.
Pro Logic and THX Cinema DSPpreset parameters
Parameter Options What it changes
Mono Rear Steered Rear, Which of the surround
Steered Side, channels are generated
Steered All, by steering. Mono gives
Mono All, conventional Pro Logic
Mono Rear, surrounds. Steered
Mono Side gives stereo surrounds.
TV Logic
TV Logic is a logic preset, with user-adjustable steering, that
can give higher intelligibility and a more appropriate spatial
presentation for studio-based TV material.

DS
P p
rese
ts
40
TV Logic DSP preset parameters
Parameter Options What it changes
Roll Off, Low, Med, High The degree of
left–right steering.
Yaw Off, Low, Med, High The degree of
front–rear steering.
Mono Rear Steered Rear, Steered Which of the surround
Side, Steered All, channels are
Mono All, Mono generated by steering.
Rear, Mono Side
Mono
In the Mono DSP preset you can choose to listen to:
Only one of two input channels, for use when different
languages or material are carried on each channel.
A combined version of the two input channels, for use if the
material was originally mono and has been conveyed on a
two-channel carrier.
If Party? is set to No, the combined or selected signal is played
only through the centre speaker, or the left and right speakers if
there is no centre, to centrally localise high-frequency hiss and
clicks.
Note that if Party? is set to Yes, full range bass is played through
any speakers that are not supplemented by a subwoofer, and
this may damage small speakers at high volume levels.
Mono DSP preset parameters
Parameter Options What it changes
Input Auto L+R, Input L, The channel selected.
Input R, Input L+R
Academy Off or On Select On to include an
equalisation (recommended
by Lucasfilm Ltd) to correct
for a high-frequency
balance in some old mono
films. Ignored if Party? is
set to Yes.
Party? No or Yes Select Yes to play the mono
signal through all speakers,
including subs.

DS
P p
rese
ts
41
Music DSP presets
Music
The Music DSP preset extracts the mono and surround
components of the original recording. These components
provide an alternative representation of the original sound, and
this representation is sometimes used for recording systems or
in broadcasts such as FM radio.
The mono element is equalised using a proprietary Meridian
technique to match the tone colour of the centre speaker, and to
compensate for the fact that the frequency response of human
hearing changes with direction.
The Music DSP preset is recommended for recordings made
with spaced omnidirectional microphones, or using a mono-
surround technique.
Trifield
As for the Music DSP preset, the Trifield preset extracts the
mono and surround components of the original recording. It then
calculates the signals for the front left, centre, and right
speakers, using the phase and amplitude differences between
the three front channels, to redistribute the sounds on a
frequency-dependent basis.
The digital surround processor provides seven alternative music
DSP presets designed for the reproduction of well-recorded
material, originally intended for replay over a traditional stereo
pair of loudspeakers.
In addition, it provides DSP presets for reproducing music in the
digitally encoded DTS, MPEG, and MLP formats.
Audio format Presets
Two-channel (PCM) Direct, Music, Trifield,
Ambisonic, Super Stereo,
Stereo, Music Logic
DTS DTS Music
MPEG MPEG Music
MLP (Meridian Lossless Packing) MLP

DS
P p
rese
ts
42
This gives a significant improvement over traditional stereo,
which converts the differences between the microphone signals
into amplitude differences in the speaker signals. This version of
the Trifield algorithm is virtually impossible to implement without
digital signal processing.
Trifield is recommended for well-made recordings and stereo
television broadcasts that are not Dolby Surround encoded. An
advantage over the Music DSP preset is that the front stereo
image is more focused, and the width of the image can be
adjusted.
Music and Trifield DSP presetparameters
Parameter Options What it changes
HS Out? * Y or N High-rate audio.
Centre Flat, EQ1 to 3 The timbre of the
centre loudspeaker.
Width † 0 to 1.5 The width of the image.
Surr. Rear Surr. Rear, Switches the surround
Surr. Side, Surr. All signal between the
side and rear speakers.
R Filter Off, 1kHz, 3kHz, The cutoff of high
7kHz frequencies from the
rear surrounds.
S Filter Off, 1kHz, 3kHz, The cutoff of high
7kHz frequencies from the
side surrounds.
* Y gives high-rate audio to the front speakers (left, right, centre,
and subwoofer) upsampled if necessary. N gives standard-rate
audio using all speakers, downsampled if necessary.
† Trifield only.

DS
P p
rese
ts
43
Ambisonic
The Ambisonic DSP preset is designed for replaying material
encoded in UHJ format, the two-channel stereo-compatible
encoding found on Ambisonically recorded discs and
broadcasts. This material is specifically encoded for surround
reproduction and can give breathtakingly realistic sound when
replayed using the digital surround processor.
Ambisonic surround sound is quite unlike conventional stereo. A
special microphone technique picks up the sound of the original
performance in all three dimensions, allowing an archive to be
made which describes the sound field exactly at that position.
The microphone signals are then encoded using a phase-
amplitude matrix to allow the effect to be conveyed on two-
channel carriers (like FM radio, LP, or CD).
The digital surround processor uses accurately matched,
frequency-dependent, phase-amplitude matrices to decode the
signal and construct the signals for each speaker feed.
The fundamental difference between Ambisonic surround sound
and conventional stereo is that the signals from all the speakers
combine to produce a coherent sound field at the listening
position, giving the illusion that you are sitting inside the
recording space whether you are at the exact central seat or well
off to one side.
Of all the signal-processing options, Ambisonic is the one that
requires the greatest attention to speaker choice and
positioning.
Super Stereo
Super Stereo synthesises a signal from a conventional stereo
recording or broadcast so that it can be decoded using the
Ambisonic decoder. The result is especially effective for two
particular types of recordings:
Those using true coincident microphone techniques.
Multi-tracked or multi-miked recordings.

DS
P p
rese
ts
44
Ambisonic and Super Stereo DSPpreset parameters
Parameter Options What it changes
Width * 0 to 1 The width of the image.
Position † A, C, E, G, I, K, M The seating position; the
letters are like rows in a
hall.
5 Channels 7, 6, 5, 4 The number of speakers.
R Filter Off, 3kHz, 7kHz, The cutoff of high
9kHz frequencies from the rear
surrounds.
S Filter Off, 3kHz, 7kHz, The cutoff of high
9kHz frequencies from the side
surrounds.
* Super Stereo only.
† Ambisonic only.
Music Logic
Music Logic is a music DSP preset with user-adjustable
steering, designed to provide an exciting experience with many
types of studio-produced music.
Music Logic DSP preset parameters
Parameter Options What it changes
Roll Off, Low, Med, High The degree of left-right
steering.
Yaw Off, Low, Med, High The degree of front-rear
steering.
Mono Rear Steered Rear, Which of the surround
Steered Side, channels are generated
Steered All, by steering.
Mono All, Mono
Rear, Mono Side

DS
P p
rese
ts
45
Stereo and Direct
The Stereo preset passes the left and right input signals directly
to the left and right main speakers. Any mono or front left and
right subwoofers continue to be used.
With the Direct preset only the left and right main speakers are
used.
Stereo and Direct DSP presetparameters
Parameter Options What it changes
HS Out? * Y or N High-rate audio.
* Y gives high-rate audio to the front speakers (left, right, centre,
and subwoofer) upsampled if necessary. N gives standard-rate
audio using all speakers, downsampled if necessary.
DTS Music
DTS Music is a special version of the DTS preset designed with
a lower LFE level of -10dB to match the bass levels applied to
DTS music CDs.
MPEG Music
MPEG Music is a special version of the MPEG preset designed
for listening to MPEG encoded music CDs.
MLP
MLP (Meridian Lossless Packing) is an audio format that
increases the amount of information that can be recorded on a
CD or DVD, without any loss of quality.
For details of the DTS Music, MPEG Music, and MLP DSP
preset parameters see 5.1 Movie DSP preset parameters,
page 47.

DS
P p
rese
ts
46
The discrete digital formats can encode up to eight separate
channels, which can be decoded to provide separate signals to
the eight speakers in a surround configuration.
Dolby Digital
Dolby Digital is a totally digital format capable of encoding five
full frequency-range channels, together with one restricted
frequency-range channel used for extreme bass.
The digital surround processor’s Dolby Digital preset is capable
of decoding the range of different options provided by Dolby
Digital. In addition, it provides bass power management to
protect systems from the potentially high bass levels that Dolby
Digital can produce.
DTS
DTS is unusual among the compressed surround formats in that
it can deliver high quality music at high bit rates.
CDs and LaserDiscs are currently available which provide a DTS
signal in place of the normal digital audio. DVDs may also
feature DTS soundtracks.
MPEG
MPEG surround is the preferred audio format for DVD in PAL
territories.
Dolby Digital THX, DTS THX, andMPEG THX
As with the standard THX Cinema DSP preset, Dolby Digital
THX, DTS THX, and MPEG THX re-equalise the signals to suit
domestic listening conditions, and applies frequency-response
correction and decorrelation to the surround channels to make
the surround sound more realistic, and can be used whether or
not your other equipment is THX approved.
5.1 Movie DSP presets

DS
P p
rese
ts
47
5.1 Movie DSP preset parameters
Parameter Options What it changes
Surr. Rear Surr. Rear, Surr. Side, Switches the surround
Surr. All signal between the side
and rear speakers.
LFE 0 to -30dB The relative level of the
LFE bass channel.
Max SPL * 105 to 120dB SPL The peak-level limit for an
LFE subwoofer.
Limit * -15 to -5dBFS The peak-level limit of the
total bass signal added
to the main speakers.
Compress † Off, Low, Med, The dynamic range
Top, Max, Mix control; see opposite.
* See Using peak-level limiting, page 48.
† Dolby Digital and Dolby Digital THX only.
Using dynamic range control
Because Dolby Digital is a digital format it allows dynamic range
control without the distortion involved in analogue methods. The
Compress parameter can be set to one of the following options:
Option Description
Off No compression.
Low Provides moderate bottom-up compression. This
raises quiet sounds above the background noise,
which is ideal for demonstration and quiet listening.
Med Provides moderate amounts of both bottom-up and
top-down compression.
Top Provides a moderate amount of top-down
compression. This reduces loud sounds.
Max Provides full bottom-up and top-down compression.
Quiet sounds are raised to be audible and loud
passages are minimised to avoid disturbance, which
is useful for late-night listening.
Mix Bypasses dialogue normalisation and references the
sound pressure level in the studio where the material
was mixed.

DS
P p
rese
ts
48
Using peak-level limiting
The Max SPL or Limit parameters allow you to set up peak-level
limiting for bass signals, and the setting applies to all the
discrete digital DSP presets.
If your loudspeaker layout includes one or more subwoofers the
parameter is named Max SPL, and it sets the peak-level limit for
the LFE channel.
If your loudspeaker layout contains no subwoofer the parameter
is named Limit, and it sets the peak-level limit of the bass signal
added to the main loudspeakers. For loudspeaker layouts using
Meridian DSP loudspeakers as the main left and right, or centre
speakers, the Limit value is fixed at -11dBFS and the parameter
does not appear in the menu.

Se
tting
up
the
dig
ital s
urro
un
d p
roc
esso
r
49
Setting up the digitalsurround processor
This chapter explains how to install the digital surround processor. It
describes what you should find when you unpack the unit, how you should
connect it to your other audio equipment and speakers, and the siting
constraints.
Before you begin installation you should ensure that your digital surround
processor is the correct voltage for your local AC supply. If it is not, do not
try to install the unit, and contact your dealer.
You should not make any connections to the digital surround processor,
or to any other component in your system, while the AC power supply is
connected and switched on.

50
Se
ttin
g u
p t
he
dig
ita
l su
rro
un
d p
roc
esso
r
Unpacking
The digital surround processor comes in a box containing the
following components:
Meridian 568 Digital Surround Processor.
Meridian System Remote.
Power cord.
500 Series communications lead.
RS232 computer serial lead.
This manual.
If any of these items are missing please contact your dealer. We
suggest that you retain the packing in case you need to
transport the unit.
Radio interference
FCC Warning: This equipment generates and can radiate radio
frequency energy and if not installed and used correctly in
accordance with our instructions may cause interference to
radio communications or radio and television reception. It has
been type-tested and complies with the limits set out in Subpart
J, Part 15 of FCC rules for a Class B computing device. These
limits are intended to provide reasonable protection against
such interference in home installations.
EEC: This product has been designed and type-tested to
comply with the limits set out in EN55013 and EN55020.

Se
tting
up
the
dig
ital s
urro
un
d p
roc
esso
r
51
Safety warnings
Do not expose the unit to dripping or splashing.
Do not place any object filled with liquid, such as a vase, on
the unit.
Do not place naked flame sources, such as lighted candles,
on the unit.
To avoid overheating
Do not position the digital surround processor:
In direct sunlight.
Near heat sources, such as a radiator.
Directly on top of heat producing equipment, such as a power
amplifier.
Ensure that air can flow through the cooling slots on the base
and top cover. Alternatively, an optional Fan kit can be fitted to
ensure adequate ventilation when the 568 is installed in an
enclosed space.
To avoid interference
Do not position the digital surround processor:
Near strong magnetic radiation, such as near a power
amplifier.
Near to a television, or where connecting cables may be
subject to or cause interference.
Positioning the digital surround processor

52
Se
ttin
g u
p t
he
dig
ita
l su
rro
un
d p
roc
esso
r
Use this connection To connect to this
COMPOSITE/S IN The video output from the 581
Video Controller, or a video
recorder, TV tuner, or cable
television.
COMPOSITE/S OUT The video input of a television or
monitor.
Video connections
To take advantage of the on-screen display you should loop
either composite or S-video through the 568; do not connect
both inputs.
Both video loop inputs include DC rejection.
OFF
MERIDIAN COMMSRS232
ON
LD/O1
SUB MAIN-R A2 A1
CENTRE MAIN-L
MAIN COMPOSITE S
ANALOGUEINPUT
BYPASSREARS SIDES/SUB
5–67–8 3–4 1–2
DIGITAL OUTPUT VIDEOCENTRE/SUB
EX
PAN
SIO
N
REAR-R SIDE-R/SUB
REAR-L SIDE-L/SUB
DIGITAL INPUTTAPE2/D4 DVD/D2
CDR/D3 CD/D1
RADIO TV
BALANCED OUTPUTRIGHT CENTRE LEFT
OUT
IN
L
R
13
24
57
68
Comms Digitalspeakers
Analogueinputs
Expansionconnector
Digitaloutput
VideoconnectionsPC
Analoguespeakers
Balanced analogueoutputs
Analoguespeakers
Opticalinput
Digitalinputs
Power inputand fuse
Connecting the digital surround processor
Rear panel

Se
tting
up
the
dig
ital s
urro
un
d p
roc
esso
r
53
Digital audio inputs
The following table gives details of the digital audio inputs:
Use this input To connect to this
CD/D1, DVD/D2, A digital source, such as a CD player,
CDR/D3, TAPE2/D4 DVD player, digital tape recorder, or
digital television tuner.
LD/01 A digital-optical source, such as a
LaserDisc player, the 519
Demodulator, or a CD player with no
digital-cable output.
The digital connections should be made with high-quality 75Ωscreened cable. Suitable cables are available from Meridian. We
do not recommend using audio cables, which do not have
adequate shielding or the correct impedance, or cables intended
for UHF applications, as these do not provide adequate
shielding in the 1–30MHz region.
Optical connections should be made using a suitable optical
fibre supplied by your dealer.
Analogue audio inputs
The following table gives details of the analogue audio inputs:
Use this input To connect to this
TV/A1, RADIO/A2 An analogue source such as a
radio tuner, tape recorder, TV
tuner, or cable television.
The analogue connections should be made using high-quality
screened cable, taking care to connect the left and right
channels correctly.

54
Se
ttin
g u
p t
he
dig
ita
l su
rro
un
d p
roc
esso
r
Audio outputs
The following table gives details of the analogue and digital
outputs:
Use this output To connect to this
MAIN 1-2 Main left and right speakers.
CENTRE/SUB 3-4 Centre speaker and centre or mono
subwoofer.
SIDES/SUB 5-6 Left and right subwoofers, or side left
and side right surround speakers.
REARS 7-8 Left and right rear surround speakers.
To use a Meridian DSP loudspeaker in a particular position
connect it to the appropriate digital output.
To use a Meridian active loudspeaker, or an analogue speaker in
conjunction with a suitable power amplifier, connect the input of
the power amplifier to the appropriate analogue output.
Communications connections
The following table gives details of the communications
connections:
Use this connection To connect to this
COMMS Other Meridian 500 Series
equipment, and the master digital
speaker.
RS232 The serial port of a PC, to
configure the 568. See Configuring
the digital surround processor
using a computer, page 77.
Other connections
The following table gives details of the other connections:
Use this connection To connect to this
BYPASS A digital tape recorder, or second
digital surround processor.
EXPANSION Depends on the expansion card
fitted; consult your Meridian dealer.

Se
tting
up
the
dig
ital s
urro
un
d p
roc
esso
r
55
On-screen display
Video lead
568 Digital Surround Processor
VIDEO OUT
VIDEO
IN
Video Source(eg 562V, 581, or DVD Player)
MONITORIN
Television/Monitor
OUT
If your surround system includes video the 568 can add a text
overlay to the video signal, to provide additional information
about its operation in the form of a textual on-screen display
(OSD). In normal operation this repeats the information provided
on the 568 front panel display. During calibration the on-screen
display provides additional guidelines to help you perform the
calibration sequence.
Connect either the composite or S-video output from the
video source to the appropriate VIDEO IN socket on the 568
Digital Surround Processor.
Connect the corresponding VIDEO OUT socket from the 568
to the television or monitor.
The on-screen display automatically locks to an NTSC, PAL, or
SECAM signal, and requires an input signal to operate. The
video circuits in the 568 are of broadcast quality, and passing
the video signal through the digital surround processor will not
affect its quality.
Connecting video

56
Se
ttin
g u
p t
he
dig
ita
l su
rro
un
d p
roc
esso
r
To connect to Meridian DSPloudspeakers
DSP5000CCentre (master)
DIGITAL OUTPUTSCOMMS
COMMSOUTPUT INPUT
DIGITALOUTPUT
DIGITAL INPUTS2 1
COMMSOUTPUT INPUT
DIGITALOUTPUT
DIGITAL INPUTS2 1
COMMS
OUTPUT
INPUT
DIGITALOUTPUT
DIGITALINPUTS
1
2
S5 lead
S5 lead
M5 lead
S5 lead (digital unused)
DSP5000 – Main R DSP5000 – Main L
568 Digital Surround Processor
511 S-patch box
Use the comms part of an M5 lead to connect one of the
COMMS sockets on the 568 to the digital speaker you have
chosen as the master (typically the centre speaker).
Use the audio part of the M5 lead to connect the digital
speaker to the appropriate digital output socket.
If your system includes more than two Meridian DSP
loudspeakers you will need a 511 S-patch box (available
separately) to link together the S5 leads from each speaker.
Connect the COMMS output from the master digital speaker
to one socket on the 511 using an S5 lead.
Link all the other digital speakers together using S5 leads, as
shown in the illustration. The other sockets on the 511 can be
used to distribute the comms to each slave speaker.
Use the duplicate sockets on each digital speaker to link the
speakers together in pairs, corresponding to the pairs of
channels on the digital outputs.
Connecting speakers

Se
tting
up
the
dig
ital s
urro
un
d p
roc
esso
r
57
To connect to active loudspeakers(eg Meridian M33s)
568 Digital Surround Processor
M33 ActiveLoudspeaker
Audio leads
INPUTINPUT
M33 ActiveLoudspeaker
21
MAIN–L
MAIN–R
Connect the appropriate analogue output socket from the
digital surround processor to the speaker inputs, using
screened audio cable.
To connect to a stereo poweramplifier (eg Meridian 556 or 557)
556 Stereo Power Amplifier
INPUTINPUT
2
568 Digital Surround Processor
1
Audio leads
MAIN–L
MAIN–R
Connect the appropriate analogue output sockets from the
digital surround processor to the stereo power amplifier line
inputs, using screened audio cable.
Connect the speaker outputs from the stereo power amplifier
to suitable speakers.
The Meridian 557 Stereo Power Amplifier provides balanced
inputs, so you have the option of connecting to it using the
balanced outputs of the 568 Digital Surround Processor.

58
Se
ttin
g u
p t
he
dig
ita
l su
rro
un
d p
roc
esso
r
To connect an active subwoofer(eg Meridian M1500 or M2500)
SUB
568 Digital Surround Processor Subwoofer
Audio lead
DIRECTINPUT
CROSSOVERINPUT
4
Connect the SUB analogue output socket from the 568 Digital
Surround Processor to the subwoofer’s line level input.
The digital surround processor provides very high-quality
crossovers for the subwoofer, and for best results you should
use these instead of the subwoofer’s crossover. To do this set
the subwoofer filtering to Narrow, and remove any crossover in
the subwoofer or set it to its highest setting (eg 200Hz). If you
cannot do this set the subwoofer filtering to wide to switch off
the digital surround processor’s crossover and use Sine/Sub
mode to match the subwoofer’s crossover frequency. For more
information see Subwoofers, page 87.
If you are using an M1500 or M2500 use the L+ input and
configure it for Bypass; refer to the subwoofer’s user guide for
more information.

Se
tting
up
the
dig
ital s
urro
un
d p
roc
esso
r
59
To connect to a digital source(eg Meridian 508.24 24-Bit CD Player)
508.24 24-Bit CD Player
Digital lead
DIGITAL INPUTCD/D1
568 Digital Surround Processor
DIGITALOUTPUT
You can connect up to five digital sources to the 568 Digital
Surround Processor.
Connect the digital source to one of the digital input sockets
of the 568, using a high-quality digital phono lead.
To connect to an analogue source(eg Meridian 504 FM Tuner)
ANALOGUE INPUTRADIO/A2
504 FM Tuner
OUTPUT
568 Digital Surround Processor
Audio lead
You can connect up to two analogue sources to the 568 Digital
Surround Processor.
Connect the analogue source to one of the analogue input
sockets of the 568, using a standard phono lead.
Connecting sources

60
Se
ttin
g u
p t
he
dig
ita
l su
rro
un
d p
roc
esso
r
To connect to a DVD player(eg Meridian DVD Player)
S-video lead
568 Digital Surround Processor
VIDEO INS
Meridian DVD Player
DIGITAL INPUTDVD/D2
DIGITALOUT
S-videooutput
Digital lead
Connect the S-video output from the DVD player to the
S VIDEO IN socket of the 568, using an S-video lead.
Connect the digital output from the DVD player to the DVD/D2
digital input of the 568, using a digital lead.
To connect to a LaserDisc player
OPTICALOUTPUT
LaserDisc player
Meridian 519Demodulator
OPTICALOUTPUT
OPTICALINPUT
RFINPUT
RFOUTPUT
Optical lead
RFlead
Opticallead
DIGITAL INPUTSLD/O1
VIDEOOUT
S-video lead
VIDEOIN S
568 Digital Surround Processor
Connect the S-video output from the LaserDisc player to the
S VIDEO IN socket of the 568, using an S-video lead.
Connect the RF output from the LaserDisc player to the 519
RF input.
Connect the optical output from the LaserDisc player to the
519 optical input, and the 519 optical output to the LD/O1
digital input socket on the 568, using optical leads.

Se
tting
up
the
dig
ital s
urro
un
d p
roc
esso
r
61
To connect to a 562 or 562VMultimedia Controller
562V Multimedia Controller
Digital lead
568 Digital Surround Processor
DIGITAL OUTPUTMAIN
DIGITAL INPUTCD/D1
ANALOGUE INPUTTV/A1
MAINANALOGUE
Audio lead
Connect the MAIN digital output of the 562 or 562V to the CD/
D1 digital input socket of the 568, using high-quality 75Ωscreened cable.
Connect the MAIN analogue output of the 562 or 562V to the
TV/A1 analogue input socket of the 568, using screened audio
cable.
This takes advantage of the high-quality 24-bit analogue-to-
digital converter in the 568 to perform the conversion of
analogue sources.
If you are using a 562V to switch the video signals, route the
video through the 568 to take advantage of the on-screen
display; see On-screen display, page 55.
Connect up to eight analogue, five digital, and two optical
sources to the appropriate inputs of the 562 or 562V.
Configure the 562 to Type 1.
Configure each 562 or 562V source as required; refer to the
562/562V User Guide for more information.
Configure the 568 to a 562 Type option; see Choosing a
standard setting, page 64.

62
Se
ttin
g u
p t
he
dig
ita
l su
rro
un
d p
roc
esso
r
To connect to other Meridian 500Series equipment
Connect one of the COMMS sockets on the back panel of the
568 Digital Surround Processor to one of the COMMS sockets
on another 500 Series unit, using the 500 comms lead
provided with the digital surround processor.
The sequence in which you connect the units is not important.
568 Digital Surround Processor 500 Series unit
COMMS COMMS
Then configure the units with the following automatic setup
procedure:
Switch all the units to standby.
Press Clear (remote).
Each unit will display:Auto Setup
One unit will then be designated
as the controller, and display:Controller
This is the unit that will respond to the remote.
All the other units will be configured
as non-controllers, and display:Not Con.
Your system is now set up and ready for use.
If for any reason the automatic setup does not give the
configuration you want, restore the default operation by
selecting one of the standard types; see Choosing a standard
setting, page 64.
Note: Do not, under any circumstances, connect any equipment
other than Meridian 500, 600, or 200 Series to the socket
marked COMMS on the back of the digital surround processor.
Connecting to other Meridian equipment

Co
nfig
urin
g th
e d
igita
l su
rrou
nd
pro
ce
sso
r with
ou
t a c
om
pu
ter
63
Configuring the digitalsurround processorwithout a computer
The 568 Digital Surround Processor can be set up for most standard
configurations of loudspeakers and sources using just the front-panel
controls and Meridian System Remote.
This chapter explains how to configure the digital surround processor
without using a computer, and then how to calibrate the loudspeakers and
sources for your particular system.
Alternatively, for complete control over all aspects of the digital surround
processor’s configuration you can set up the unit from a computer using
the Meridian Configuration program. For full information refer to the next
chapter.

Co
nfi
gu
rin
g t
he
dig
ita
l su
rro
un
d p
roc
esso
r w
ith
ou
t a
co
mp
ute
r
64
Choosing a standard setting
The digital surround processor provides several alternative
standard settings, called Types, which configure all aspects of
the 568 into the most commonly needed configurations. In
addition, any User Types you create using the Meridian
Configuration program are also available.
Choosing one of the Types overrides any other configuration you
may have performed, and so can be used to reset the
configuration of the unit.
If your digital surround processor is connected to a television or
monitor, the on-screen display also provides additional text
explaining what to do. For information about setting up the on-
screen display refer to Connecting video, page 55.
The Type you choose depends on the following aspects of your
system:
The number of speakers in your system.
Whether your system includes a subwoofer.
Whether the speakers are analogue or digital.
The following diagram shows the meaning of the standard Type
codes:
Type 5.S DAA
Main/centre/surroundspeaker types:D DigitalA Analogue
Number of main speakers:2 Main only3 Main & centre4 Main & rear5 Main, centre, & rear7 Main, centre, side, & rear
Subwoofer:0 No sub1 Mono/THX subS Special sub
The Special sub option gives no subwoofer for Music DSP
presets, a centre subwoofer for Logic presets, and an LFE
subwoofer for 5.1 Movie presets.

Co
nfig
urin
g th
e d
igita
l su
rrou
nd
pro
ce
sso
r with
ou
t a c
om
pu
ter
65
To select a Type
Put the digital surround processor into standby by pressing
Off (front panel or remote).
Hold down the A key on the front
panel until the display shows:Type in... 3
Hold down the A key for three
more seconds until the display shows:Type,wait...
It will then show the current Type
setting; for example:Type 5.1 AAA
Press or on the front panel to select the Type.
For example, if you have two analogue
speakers select the display:Type 2.0 A__
Wait for a few seconds, while the
display shows:Typing, wait
Press the Off key on the front panel.
The display shows:Exiting Type
To set up the 568 for use with a 562or 562V Multimedia Controller
Select 562 Mode as follows:
Press the Source key on the front
panel; the display shows:562 Mode on
Press the Source key again to turn off 562 Mode. While 562
Mode is on the Dolby indicator is illuminated.
In 562 Mode all the digital and analogue sources use CD/D1 and
TV/A1 respectively:
Source Input
CD, Tape 2, CDR, Cable, DVD, and LD CD/D1
Radio, LP, TV, Tape 1, VCR 1, and VCR 2 TV/A1
For information about connecting up the 568 see To connect to
a 562 or 562V Digital Control Unit, page 61.
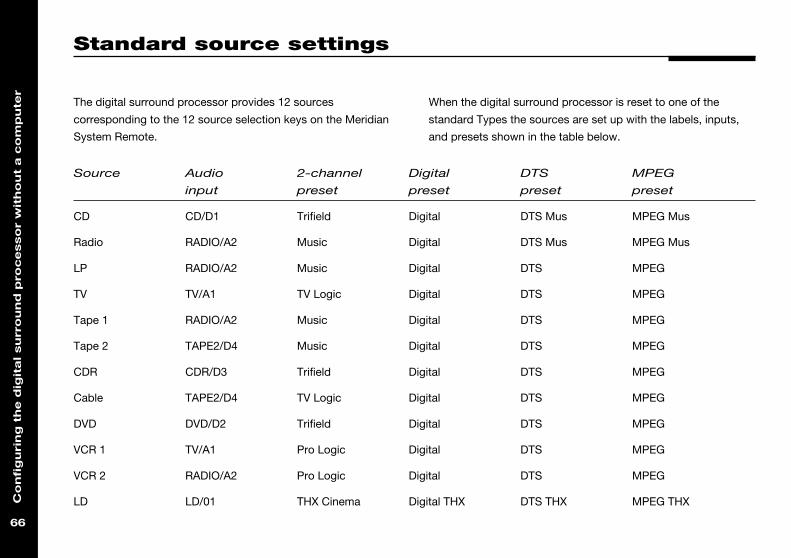
Co
nfi
gu
rin
g t
he
dig
ita
l su
rro
un
d p
roc
esso
r w
ith
ou
t a
co
mp
ute
r
66
The digital surround processor provides 12 sources
corresponding to the 12 source selection keys on the Meridian
System Remote.
When the digital surround processor is reset to one of the
standard Types the sources are set up with the labels, inputs,
and presets shown in the table below.
Standard source settings
Source Audio 2-channel Digital DTS MPEG
input preset preset preset preset
CD CD/D1 Trifield Digital DTS Mus MPEG Mus
Radio RADIO/A2 Music Digital DTS Mus MPEG Mus
LP RADIO/A2 Music Digital DTS MPEG
TV TV/A1 TV Logic Digital DTS MPEG
Tape 1 RADIO/A2 Music Digital DTS MPEG
Tape 2 TAPE2/D4 Music Digital DTS MPEG
CDR CDR/D3 Trifield Digital DTS MPEG
Cable TAPE2/D4 TV Logic Digital DTS MPEG
DVD DVD/D2 Trifield Digital DTS MPEG
VCR 1 TV/A1 Pro Logic Digital DTS MPEG
VCR 2 RADIO/A2 Pro Logic Digital DTS MPEG
LD LD/01 THX Cinema Digital THX DTS THX MPEG THX

Co
nfig
urin
g th
e d
igita
l su
rrou
nd
pro
ce
sso
r with
ou
t a c
om
pu
ter
67
Calibrating the system
To help you to set up your installation to give the best possible
sound with any particular combination of associated equipment,
the 568 Digital Surround Processor includes a built-in calibration
procedure.
This calibration procedure uses test signals to present a series
of sounds, which you use to adjust certain aspects of the
system to their optimum settings.
You should work through the calibration procedure the first time
you set up your surround sound system, and whenever you want
to check the calibration, such as after changing the layout of
your room.
Using the calibration procedure
We recommend that you perform the calibration procedure
using the Meridian System Remote and from the listening
position.
As you run the calibration procedure the name of each
calibration test is shown on the front-panel display, followed by
the parameters adjusted in the test.
If your digital surround processor is connected to a television or
monitor, the on-screen display also provides additional text
explaining what to do. For information about setting up the on-
screen display refer to Connecting video, page 55.
Each calibration test uses a test signal designed to give the best
results.
Using a Sound Pressure Level meter
Although you can perform the calibration procedure by ear, it is
recommended that you perform the tests using a Sound
Pressure Level meter. These are available fairly cheaply from
Tandy/Radio Shack, or your Meridian dealer may be able to lend
you one.
Set the Sound Pressure Level meter to C weighted, and Slow.
Take readings with the meter at the listening position, pointing
vertically. You should hold the meter with an outstretched arm to
minimise reflections from your body.

Co
nfi
gu
rin
g t
he
dig
ita
l su
rro
un
d p
roc
esso
r w
ith
ou
t a
co
mp
ute
r
68
To choose the distance units
You can choose to display and enter distances in either feet and
inches, or metres.
To change the distance units:
Put the digital surround processor into standby by pressing
Off (front panel or remote).
Press and hold the V key on the front panel for at least five
seconds.
The display shows the distance
units:Metric
or:Imperial
To start the calibration procedure
Put the digital surround processor into standby by pressing
Off (front panel or remote).
Press and hold the Off key on the front panel for at least five
seconds.
The display shows:Calibration
If you have an on-screen display it shows:
After a few seconds the display
shows:Left +0.0
For more detailed information about this and the other
calibration tests see the following sections.

Co
nfig
urin
g th
e d
igita
l su
rrou
nd
pro
ce
sso
r with
ou
t a c
om
pu
ter
69
To move between the calibration tests
Press > (remote) or Source (front panel) to move to the next
test.
Press < (remote) to move back to an earlier test.
Press Store (front panel or remote) to jump to the next set of
tests.
The calibration tests are described in the following sections.
To exit from the calibration procedure
You can exit from the calibration procedure at any time, and any
parameters you have set will be retained.
Press Off (front panel or remote).

Co
nfi
gu
rin
g t
he
dig
ita
l su
rro
un
d p
roc
esso
r w
ith
ou
t a
co
mp
ute
r
70
Levels
These tests allow you to adjust the output level to each speaker
individually, and it follows the general guidelines from Dolby
Laboratories and Lucasfilm. A Sound Pressure Level (SPL) meter
can be useful at this stage; ask your dealer for more information.
In each test the display shows the speaker being tested, and the
current relative level.
For example:Left +0.0
If you have an on-screen display it shows:
Use the > and < keys to move between each of the speakers
in the layout in the sequence: Left, Centre, Right, Side R, Rear
R, Rear L, Side L, and subwoofers.
Use A and V to adjust the level of the speaker. Ignore any
tonal difference.
For correct THX reproduction you should adjust each speaker to
75dB SPL using an SPL meter. Even if your speakers are not
THX approved this setting is recommended.
If you have Meridian DSP loudspeakers they cannot be set
above +0db.
Note that you cannot set the level of a subwoofer by ear,
because low-frequency noises sound quieter. To set the
subwoofer correctly either use an SPL meter, or set it by ear and
then reduce the subwoofer gain by 15dB to correct for human
hearing.
When you have completed the Levels section press > or
Store to proceed to the next test.
Calibration tests

Co
nfig
urin
g th
e d
igita
l su
rrou
nd
pro
ce
sso
r with
ou
t a c
om
pu
ter
71
Distance
These tests allow you to adjust the delay of each of the speakers
in the layout to time-align the system so that sounds are
coincident when they arrive at the listening position.
Before setting up the speaker outputs you need to measure the
distance to each speaker from the listening position:
CentreSubLeft Right
LeftSide
RightSide
Left Rear Right RearSurround Sub
Measure from the ear height at the listening position to the
tweeter on each speaker (where applicable), in the distance units
you have chosen; see To choose the distance units, page 68.
Use the > and < keys to move between each of the speakers
in the layout.
The display shows the speaker being
tested, and the distance:Left 18'0
If you have an on-screen display it shows:
Use A and V to change the distance.
Repeat this for each of the speakers in your layout.
Press > or Store to proceed to the next calibration stage.

Co
nfi
gu
rin
g t
he
dig
ita
l su
rro
un
d p
roc
esso
r w
ith
ou
t a
co
mp
ute
r
72
Fine tuning
These tests allow you to fine-tune the phase and delay of each
speaker when used in conjunction with other speakers on the
layout.
Use the > and < keys to move between each of the speakers
in the layout.
The first display allows you to adjust the phase.
For example:Left +
If you have an on-screen display it shows:
The next display shows the distance (or delay) for the same
speaker.
For example:Left 18'0
If you have an on-screen display it shows:
Choose the correct setting as follows:
Setting What it sounds like
Correct The sound between the speakers is
very even, and does not change
radically as you move your head.
Incorrect The sound appears diffused, and
changes in timbre and apparent
location as you move your head.

Co
nfig
urin
g th
e d
igita
l su
rrou
nd
pro
ce
sso
r with
ou
t a c
om
pu
ter
73
Pay particular attention to the centre channel, as this can have a
dramatic effect on the overall sound.
As you increase the delay the speaker will appear to move away
from you.
You have now completed the calibration of your system.
Press Off (front panel or remote) to exit from the calibration
procedure.

Co
nfi
gu
rin
g t
he
dig
ita
l su
rro
un
d p
roc
esso
r w
ith
ou
t a
co
mp
ute
r
74
This section explains how to use Sine/Sub mode to adjust the
subwoofer crossover frequency to suit the subwoofers in your
system, and use a sinewave test signal to check for room
resonances.
To turn on Sine/Sub mode
Put the digital surround processor into standby by pressing
Off (front panel or remote).
Press and hold the Mute key on the front panel for at least
five seconds.
The display shows:Sine/Sub On
The 568 will then return to standby with Sine/Sub mode turned
on.
Sine/Sub mode adds two extra options to the DSP parameter
menus: Sine and Xover.
To turn off Sine/Sub mode
Repeat the above procedure until
the display shows:Sine/Sub Off
To adjust the subwoofer crossoverfrequency
The 568 allows the crossover frequency for any subwoofers
which you have to be adjusted between 30 and 120Hz. The
crossover can be set independently for Music, Logic, and 5.1
Movie presets. The default is the THX standard of 80Hz.
Turn on Sine/Sub mode, as described above.
Press < or > (remote) until the display shows the current
crossover frequency.
For example:Xover 80Hz
Press A or V (remote) to set the crossover frequency.
For THX loudspeaker systems you should not adjust these
settings – they should be left at 80Hz. 80Hz is also the
recommended setting for all movie listening. You may prefer,
however, to lower the crossover frequency for music if your main
speakers have good bass handling down to, say, 50Hz.
Setting up subwoofers

Co
nfig
urin
g th
e d
igita
l su
rrou
nd
pro
ce
sso
r with
ou
t a c
om
pu
ter
75
To use the sinewave sweep test
Sine/Sub mode includes a sinewave signal test, to help you set
the subwoofer crossover frequencies, or check for room
resonances.
Turn on Sine/Sub mode, as described above.
Press < or > (remote) until the
display shows:Sine Off
Press A to turn on the sinewave signal.
The display shows:Pause 80Hz
An 80Hz sinewave will be played through all channels.
You can change the test signal using the menu keys, as
described in the following sections.
To change the sweep rate
Press < or > (remote) until the
display shows:Pause 80Hz
Press [ or ] (remote) to change the frequency in steps of
1Hz.
Press A or V to change the sweep rate and direction, as
follows:
Display Description
Fast sweep up.Sine >> 88Hz
Slow sweep up.Sine > 82Hz
Paused.Pause 80Hz
Slow sweep down.Sine < 78Hz
Fast sweep down.Sine << 65Hz

Co
nfi
gu
rin
g t
he
dig
ita
l su
rro
un
d p
roc
esso
r w
ith
ou
t a
co
mp
ute
r
76
To change the volume
Use the volume keys in the usual way.
Warning: Very loud low-frequency signals may damage
speakers.
To select the channel
Press < or > (remote) until the display shows the current
channels.
For example:All Channels
Press A or V to select a specific channel, or All Channels.
To select other test signals
Press < or > (remote) until the display shows the current
signal.
For example:Signal Sine
Press A or V to choose between the following test signals:
Display Description
A sinewave.Signal Sine
SilenceSignal Off
Pink noise (band pass 500Hz toSignal Noise 2kHz for main channels).

Co
nfig
urin
g th
e d
igita
l su
rrou
nd
pro
ce
sso
r usin
g a
co
mp
ute
r
77
Configuring the digitalsurround processorusing a computer
The 568 Digital Surround Processor provides a flexible range of
customisation options which you can change to suit your own preferences
and the other equipment in your system. To configure the 568 you use the
Meridian Configuration program, an intelligent Windows-based application
that is supplied with the 568. This allows you to create one or more custom
configurations, and download them to the 568 so that they are available
alongside the built-in types.
This chapter explains how to install the Meridian Configuration program,
and then how to use it to create your own configurations of the 568.

78
Co
nfi
gu
rin
g t
he
dig
ita
l su
rro
un
d p
roc
esso
r u
sin
g a
co
mp
ute
r The Meridian Configuration program is a stand-alone Windows-
based application that lets you design your own configuration of
the 568 Digital Surround Processor to suit your own personal
preferences and the particular configuration of equipment in
your system.
The Meridian Configuration program provides the following
sections to allow you to control the corresponding aspects of
the digital surround processor’s operation:
Setup
Lets you specify general features of the digital
surround processor’s operation, including the
position of the on-screen display, the information
provided on the front panel displays, the startup
volume, and settings affecting its operation in multi-
room systems.
Speakers
Lets you configure the digital surround processor to
suit the layout of the loudspeakers in your system,
and the type of each speaker, to ensure that you
get perfect surround sound performance.
The Meridian Configuration program
Sources
Lets you customise the operation of each of the
sources, including the presets used by each source
for each of the audio formats, the digital, analogue,
and/or video inputs used for that source, and
additional information about the type of each
source.
Presets
Lets you customise the settings of the built-in DSP
presets, and create additional presets of your own
based on the built-in presets.

Co
nfig
urin
g th
e d
igita
l su
rrou
nd
pro
ce
sso
r usin
g a
co
mp
ute
r
79
Requirements
To use the Meridian Configuration program you need:
A computer running Windows 95 or Windows NT 4.00.
A 100MHz or faster Pentium-class processor.
At least 16 Mbytes of RAM.
5 Mbytes of free disk space.
A vacant 9-pin serial port assigned to one of COM1 to 4.
The software requires a mouse or similar pointing device – it
cannot be operated solely from the keyboard.
To install the Meridian Configurationprogram
Insert the first Meridian Configuration program installation
disk.
Choose Run... from the Start menu.
Type A: setup and press R.
Follow the on-screen instructions, inserting the second
installation disk when prompted.
Planning the configuration
Before creating a configuration for your 568 Digital Surround
Processor it is a good idea to plan the following aspects of your
setup:
How you are going to set up the different speakers in your
layout.
Whether the bass is going to be handled by the main
speakers, or by one or more subwoofers.
Which analogue or digital inputs you are going to use for each
of your sources.
Which DSP preset you want as the default preset for each
source and audio format.
Installing the Meridian Configuration program

80
Co
nfi
gu
rin
g t
he
dig
ita
l su
rro
un
d p
roc
esso
r u
sin
g a
co
mp
ute
r Button Option Function
New Creates a new settings file.
Open Opens an existing settings file.
Save Saves the current settings file to
disk.
Fetch Fetches the current configuration
of the attached product(s).
Store Stores the current settings and
User Types to attached products.
Disconnect Disconnects the program from
attached products.
Add product Adds a product to the current
settings.
Copy Copies text or settings onto the
clipboard.
Paste Pastes text or settings from the
clipboard.
About Displays program information.
To run the Meridian Configurationprogram
Click Start, point at Programs, then click Meridian
Configuration.
The Meridian window will be displayed:
The toolbar provides a convenient way of accessing the most
important menu options:
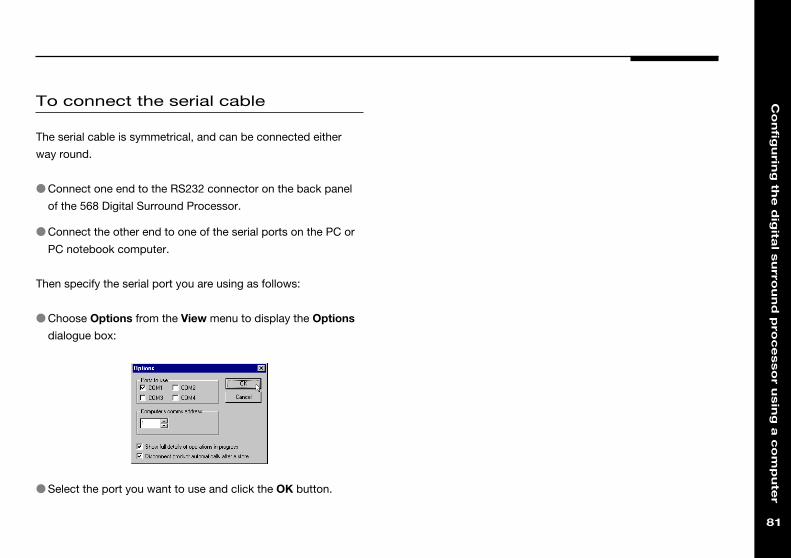
Co
nfig
urin
g th
e d
igita
l su
rrou
nd
pro
ce
sso
r usin
g a
co
mp
ute
r
81
To connect the serial cable
The serial cable is symmetrical, and can be connected either
way round.
Connect one end to the RS232 connector on the back panel
of the 568 Digital Surround Processor.
Connect the other end to one of the serial ports on the PC or
PC notebook computer.
Then specify the serial port you are using as follows:
Choose Options from the View menu to display the Options
dialogue box:
Select the port you want to use and click the OK button.

82
Co
nfi
gu
rin
g t
he
dig
ita
l su
rro
un
d p
roc
esso
r u
sin
g a
co
mp
ute
r
Creating a new settings file
A new settings file will be created for you, with the initial name
MSF1, and the Meridian window will show a Surround
processor icon to identify the product you are configuring.
Choose Save As from the File menu, enter an appropriate
name for the file, such as your name, and click the Save
button.
The section explains how to create a new settings file, using the
Meridian Configuration program, and how to enter personal
information to identify the settings in your product.
The first step is to fetch the initial settings from the digital
surround processor, to use as a starting point for your
configuration.
Click the Fetch button in the toolbar.
The Progress dialogue box will show you the progress as the
settings are fetched:

Co
nfig
urin
g th
e d
igita
l su
rrou
nd
pro
ce
sso
r usin
g a
co
mp
ute
r
83
To enter your personal details
Click the Owner icon in the left-hand panel.
Enter any text you like in the Dealer, Owner, and Description
fields.
You can enter up to 12 characters in each field, the size of the
568 front-panel display.
The Owner text will be displayed when you turn the 568 on. The
Dealer and Description text are displayed after the product
version and serial numbers if you press the front-panel Display
key in standby.
To display the settings
Double-click the Surround processor icon, to open it and
display the settings it contains.
The left-hand panel of the Meridian window will change to show
the following three icons:
Owner lets you enter personal information, for future reference,
and choose the message displayed when you first switch the
unit on, and Settings is the initial configuration in the settings
file.
Double-clicking Return to top level takes you back to the
previous level.

84
Co
nfi
gu
rin
g t
he
dig
ita
l su
rro
un
d p
roc
esso
r u
sin
g a
co
mp
ute
r The options on the Advanced tab are for use by dealers in
setting up multi-room systems, and to upload a new version of
the software to the product, and it is recommended that you do
not change these settings.
To display or edit the settings
Double-click the Settings icon.
The Meridian window will change to show the four categories of
settings contained in the settings file: Setup, Speakers,
Sources, and Presets.
The options available in each case are explained in the following
sections.
At this stage you may find it useful to maximise the Meridian
Configuration program window so you can see all the options on
each screen.

Co
nfig
urin
g th
e d
igita
l su
rrou
nd
pro
ce
sso
r usin
g a
co
mp
ute
r
85
This section describes how to use the Meridian Configuration
program to configure the 568 Digital Surround Processor for the
configuration of loudspeakers in your system, and specify
information about the type of each speaker, for optimum
performance.
The first stage in setting up the speakers is to specify the
number of speakers in the layout, and the type and size of each
speaker.
The 568 Digital Surround Processor can support up to eight
analogue or digital loudspeakers.
To specify the speaker layout
Click Speakers in the left-hand panel of the Meridian
window.
If necessary click the Layout tab to display the Layout page
of speaker settings:
Specify the type of each speaker by selecting the appropriate
option from each of the drop-down menus.
Setting up speakers

86
Co
nfi
gu
rin
g t
he
dig
ita
l su
rro
un
d p
roc
esso
r u
sin
g a
co
mp
ute
r As you change the options the layout illustration will change to
show the resulting layout.
If you select a combination of options that is not supported, the
other options will be adjusted accordingly to ensure that the
whole configuration is valid.
For example, if you specify Two rears and two sides, and then
select two subwoofers, the side speakers will be removed to
allow you to have the subwoofers.
If you specify 96.24 DSP for the left, right, and centre speakers,
an additional Meridian High Resolution setup option allows you
to specify when to use Meridian High Resolution; see Changing
the setup options, page 96.
The options available for the Mains, Centre, Surrounds, and
Subwoofers drop-down menus are explained in the following
sections.
Mains
Use the Mains drop-down menu to specify the size and type of
the main Speakers.
Choose Large if your main left and right speakers are large,
with good bass performance, and you want to use them for
full range reproduction.
Choose Small if your main left and right speakers do not have
a good bass response and you want to use one or more
subwoofers to handle the bass for the system.
Choose analogue DSP or 96.24 DSP according to the type of
each speaker.
The following table gives recommended settings for Meridian
loudspeakers:
Loudspeaker Recommended setting
DSP5000, DSP5500, Large DSP or Large 96.24 DSP *
DSP6000, or DSP6000C
DSP5000C Small DSP or Small 96.24 DSP *
M60 Large analogue
M60C, M33, or A500 Small analogue
DSP33 Small 96.24 DSP
* 96.24 versions.

Co
nfig
urin
g th
e d
igita
l su
rrou
nd
pro
ce
sso
r usin
g a
co
mp
ute
r
87
Centre
Use the Centre drop-down menus to specify which presets use
the centre speaker, and its size and type.
From the first drop-down menu choose one of the following
options:
Option Description
None If you do not have a centre speaker.
Movies only If you want to use the centre speaker for
Logic and 5.1 Movie DSP presets only.
Movies and music If you want to use the centre speaker for
all presets.
From the second drop-down menu specify the type of the
centre speaker; the options are as for the main speakers.
Surrounds
Use the Surrounds drop-down menus to specify the number
and type of the surround speakers.
From the first drop-down menu specify the number of rear
speakers and side speakers you have in your surround system.
Use the Sides and Rears drop-down menus to specify the
type of the rear and side speakers.
Subwoofers
Use the Subwoofers drop-down menus to specify the
number of subwoofers, and the DSP presets that use them.
If your main left and right speakers are small you will need to use
one or more subwoofers to handle the bass. You can choose
between appropriate combinations of mono (front), centre, left
and right, or surround.
If your main left and right speakers are large you can use one or
more subwoofers to augment the bass from the centre channel.
With 5.1 sources an additional option is to use the subwoofer
only for the LFE channel.
You can specify a different subwoofer configuration for Music,
Logic, and 5.1 Movie DSP presets.
The Advanced checkbox is for dealer use only, and it is
recommended that you leave this unchecked unless you have
special requirements.

88
Co
nfi
gu
rin
g t
he
dig
ita
l su
rro
un
d p
roc
esso
r u
sin
g a
co
mp
ute
r Speaker protection
Because of the high bass levels that 5.1 materials are capable of
reproducing, the digital surround processor allows you to set up
automatic protection of each full-range speaker or subwoofer.
A setting of Max corresponds to no protection, and 0
corresponds to full protection. By default any Meridian DSP
loudspeakers in your system are set to Max, as these include
built-in protection.
You can use SizeCalc to help you calculate the correct value for
your speakers:
Click the Size calculator button to display the SizeCalc
window:
Specify the number of bass units in each speaker (woofers),
the size of each unit, and the design of the speaker.
To specify the speaker sizes
Once you have specified the speaker layout for you system,
click the Sizes tab to display the Sizes page of speaker
settings:
This allows you to set up speaker protection for the 5.1 sources,
the type of each subwoofer, and peak level limiting.

Co
nfig
urin
g th
e d
igita
l su
rrou
nd
pro
ce
sso
r usin
g a
co
mp
ute
r
89
Peak-level limiting
The Max SPL or Bass limit parameter allows you to set up
peak-level limiting for bass signals, and the setting applies to all
the discrete digital DSP presets.
If your loudspeaker layout includes one or more subwoofers the
parameter is named Max SPL, and it sets the peak-level limit for
the LFE channel.
If your loudspeaker layout contains no subwoofer the parameter
is named Bass limit, and it sets the peak-level limit of the bass
signal added to the main loudspeakers. For loudspeaker layouts
using Meridian DSP loudspeakers as the main left and right, or
centre speakers, the Bass limit value is fixed at -11dBFS and
you cannot adjust it.
To complete the speaker setup
You have now completed the first stage of setting up the 568,
and you should save the changes you have made by choosing
Save from the File menu. You can ignore the Distances,
Crossovers, Precision, Phase/Gain, and Connections pages
of settings for the moment; these will allow you to check the
values you have set up when you calibrate the digital surround
processor.
The size value is displayed in the SizeCalc display.
Type the size into the appropriate field.
If you prefer you can copy and paste the size directly.
Subwoofer filtering and type
For each subwoofer in the system you can specify the
subwoofer filtering, and its type.
Specify the filtering from the following options:
Option Description
Narrow The digital surround processor
provides a low-pass cut off; the
subwoofer’s crossover should be
bypassed. This is the recommended
option.
Wide The subwoofer includes a crossover.
Specify the type of subwoofer as Analogue or DSP.

90
Co
nfi
gu
rin
g t
he
dig
ita
l su
rro
un
d p
roc
esso
r u
sin
g a
co
mp
ute
r To configure the source options
Select the source in the list of sources.
Click the Options tab.
Select Source exists if you want to use this source.
This section describes how to use the Meridian Configuration
program to configure the sources provided by the digital
surround processor.
To set up sources
Click the Sources icon in the left-hand panel of the Meridian
window.
The right-hand panel shows a list of the 12 sources that are
available. For each source you can display two pages of settings
by clicking on the Options or Advanced tabs.
Setting up sources

Co
nfig
urin
g th
e d
igita
l su
rrou
nd
pro
ce
sso
r usin
g a
co
mp
ute
r
91
Disabling this options prevents the source from appearing when
you press the Source key, or the corresponding source key on
the Meridian System Remote.
If you want, you can change the name displayed when the
source is selected by editing the Name field.
The name can consist of up to five letters, digits, or the
characters space, full-stop, and minus. The name you specify is
shown in the list of sources followed by the Meridian System
Remote key used to select the source in brackets.
In the Presets section specify the DSP preset you want to use
for each of the five alternative audio formats: PCM, Dolby
Digital, MPEG, DTS, or MLP.
Each drop-down menu gives the built-in and user-defined DSP
presets appropriate for that audio format.
From the Audio input drop-down menu specify the digital or
analogue audio input you want to use for the source.
The Audio input option can be set to Last valid to leave the
input unchanged when you select the source. This allows you to
create a source that changes some other aspect of the current
source, such as its DSP preset, without changing the selected
input.
If you have specified a digital input for the main audio input:
Specify the precision for the source by choosing an option
from the Precision drop-down menu.
All CDs and LaserDiscs are currently 16-bits. The 518 and 800
DVD/CD Player provide 24 bits. If in doubt choose 24-bit.
For analogue inputs the precision is automatically set to 24-bit.

92
Co
nfi
gu
rin
g t
he
dig
ita
l su
rro
un
d p
roc
esso
r u
sin
g a
co
mp
ute
r If you have two Meridian source units of the same type you
can configure them to have different Comms addresses. You
can then select the appropriate source by specifying its
Comms address in the Comms address field.
The following additional options are available. You should only
change these with advice from your dealer:
Option Description
30ms delay for audio Avoids the noise caused by
sources to avoid DTS noise switching to a DTS audio
(DTS delay) source.
Only ever play DTS for this Creates a video DTS source
source that will avoid any DTS noise
when switching audio formats.
Number of frames of delay Adds a delay required by
to apply to audio certain video systems.
Poor digital audio source – Select this if you have difficulty
frequency out of range locking to the source.
Source uses validity flag May reduce switching noise
properly on certain sources where this
is a problem.
To set the advanced source options
Click the Advanced tab to show the Advanced page of
settings.
If the source is connected to another Meridian unit, set
Comms type to 1C for a Meridian CD player, 2C for a
Meridian FM tuner, and 3C for a Meridian DVD player.
Otherwise set it to none.

Co
nfig
urin
g th
e d
igita
l su
rrou
nd
pro
ce
sso
r usin
g a
co
mp
ute
r
93
Configuring presets
The 568 Digital Surround Processor provides 20 built-in presets
and the Meridian Configuration program lets you configure the
DSP parameters of any of the built-in presets to suit your own
preferences.
You can also create up to 12 additional user-defined presets.
Each user-defined preset is based on one of the built-in presets,
and can have any name of your choice.
To set up presets
Click the Presets icon in the left-hand panel of the Meridian
window.
The right-hand panel shows a list of the 20 built-in presets, and
the 12 unused user-defined presets.
To modify a built-in preset
Select the preset in the list of presets.
The default DSP parameters will be displayed:
Adjust the parameters as required.

94
Co
nfi
gu
rin
g t
he
dig
ita
l su
rro
un
d p
roc
esso
r u
sin
g a
co
mp
ute
r The new preset is created in the first available space after the
built-in presets.
Select the new preset you have created.
Edit the preset name to identify the preset.
Initially the name is set to be the same as the built-in DSP preset it
was based on, but you can chose any name of up to 8 letters,
digits, or the characters space, full-stop, or minus; eg Football.
Note that the treble and bass settings will not be available if your
system includes DSP loudspeakers, because in this case the
DSP speakers handle the treble and bass adjustments.
For more information about the DSP parameters available for
each DSP preset see DSP presets, page 37.
If you have modified the DSP parameters from their defaults,
(modified) is displayed after the preset name in the list of
presets.
To restore the DSP parameters totheir defaults
Select the preset in the list of presets.
Click the Reset to default button.
To create a user-defined preset
Select the preset you want to use as the basis for the user-
defined preset.
Click the Copy as new preset button.

Co
nfig
urin
g th
e d
igita
l su
rrou
nd
pro
ce
sso
r usin
g a
co
mp
ute
r
95
To delete a user-defined preset
Select the preset in the list of presets.
Click the Delete this preset button.
To copy a preset to a specific positionin the list of user-defined presets
Highlight the preset you want to copy.
Choose Copy from the Edit menu, or click the
Copy button in the toolbar:
Highlight the user-defined preset or empty position you want
to replace.
Choose Paste from the Edit menu, or click
the Paste button in the toolbar:

96
Co
nfi
gu
rin
g t
he
dig
ita
l su
rro
un
d p
roc
esso
r u
sin
g a
co
mp
ute
r The final stage in editing the settings is to configure the general
Setup options.
To change the setup options
Click the Setup icon in the left-hand panel of the Meridian
window.
The Setup options will be displayed:
The options are described in the following table:
Option What it means
Lock settings on Locks the DSP preset parameters.
product
On-screen display Specifies the default position of the
position on-screen display.
Multi-room displays Includes displays of information from
Meridian sources; eg CD track number or
FM tuner frequency.
Diagnostic displays Includes diagnostic displays in the
display options.
Fan Sets the fan operation, if fitted.
Volume on startup Specifies the volume selected on
switching on at the back panel.
Comms controller Specifies whether the 568 is controller,
status not controller, or set automatically.
System and Copy For multi-room setups.
address
Changing the setup options

Co
nfig
urin
g th
e d
igita
l su
rrou
nd
pro
ce
sso
r usin
g a
co
mp
ute
r
97
Option What it means
Meridian 800 present If selected, the menu keys on the
Meridian System Remote operate the
DVD/CD Player menus rather than the
Digital Surround Controller menus.
Meridian High Specifies whether the digital output
Resolution uses Meridian High Resolution for all
sources, or only when necessary. This
option is only available if the left, right,
and centre speakers are 96.24 DSP
types; see To specify the speaker
layout, page 85.

98
Co
nfi
gu
rin
g t
he
dig
ita
l su
rro
un
d p
roc
esso
r u
sin
g a
co
mp
ute
r Once you have edited the settings to suit the configuration of
your system, the next step is to store the settings to the 568 and
use the calibration listening tests built into the 568 to calibrate it
for correct performance.
To save the settings
First save the settings to your PC hard disk.
Choose Save from the File menu, or click the
Save button in the toolbar:
To print a summary of settings
At this stage it is useful to print a summary of the speaker and
source settings, so that you can check that they correspond to
your system configuration.
Check that there is a printer connected to your PC.
Click the Settings icon in the left-hand panel of the Meridian
window.
Click the Print sources and output summary button.
To store the settings to the digitalsurround processor
Switch on the 568 Digital Surround Processor, and check that
the serial cable is connected between the 568 and the PC.
Click the Store button in the toolbar.
The 568 will display:Receiving...
The following Progress dialogue box shows how the operation
is progressing.
If there is a problem click the Details>> button to see more
information about the problem.
Calibrating the settings with your system

Co
nfig
urin
g th
e d
igita
l su
rrou
nd
pro
ce
sso
r usin
g a
co
mp
ute
r
99
When the download is complete the 568 will automatically reset
itself to use the new settings, and show the owner name you
defined:
For example:Zachary Ford
To calibrate the loudspeakers
Now proceed through the calibration procedure to set the
correct relative level, delay, and phase for each of the
loudspeakers in the system. See Calibrating the system,
page 67.
To fetch the calibrated settings
Finally fetch the calibrated settings back from the digital
surround processor as follows:
Make sure your settings file is loaded into the Meridian
Configuration program.
Click the Fetch button in the toolbar.
The Progress dialogue box will show you the progress as the
settings are fetched:
You can verify that the calibrations you made are now included
in the settings by checking the Distances and Phase/Gain
pages of the Speakers settings option.

100
Co
nfi
gu
rin
g t
he
dig
ita
l su
rro
un
d p
roc
esso
r u
sin
g a
co
mp
ute
r Once you have fetched the calibrated settings from the digital
surround processor, the final step is to store them permanently
to the 568 as a User Type, so that you can reset the unit to them
whenever you need to.
When you store one or more User Types to the 568 they
become available in the list of Types, alongside the built-in
Types. For more information about selecting one of the Types
see Choosing a standard setting, page 64.
To name the User Type
Click the Settings icon in the left-hand panel of the Meridian
window:
Enter a suitable name in the Type name field to identify your
User Type, such as Standard.
The name can have up to 12 characters.
Creating a User Type

Co
nfig
urin
g th
e d
igita
l su
rrou
nd
pro
ce
sso
r usin
g a
co
mp
ute
r
101
To create additional User Types
If you wish you can create several User Types, and store them
all to the digital surround processor. You can then reset the
digital surround processor to any of the User Types by selecting
the appropriate Type name.
To create a new User Type:
Select the User Type you want to base it on in the left-hand
panel of the Meridian Setup window; eg Standard.
Click the Copy as new user type button.
The new User Type will be specified as In use, as
identified by the circle icon in the left-hand panel
of the Meridian window:
Initially the new type will be created with the same settings as
the type you based it on, and with the name New type:
You can then change the name of the new Type, and configure
its settings, in exactly the same way as for the original Type.
A suggested naming convention is to name User Types with the
date they were created: for example, 06/05/98.

102
Co
nfi
gu
rin
g t
he
dig
ita
l su
rro
un
d p
roc
esso
r u
sin
g a
co
mp
ute
r To copy settings between User Types
Highlight the User Type you want to copy the settings from.
Choose Copy from the Edit menu, or click
the Copy button in the toolbar:
Highlight the User Type you want to copy the settings to.
Choose Paste from the Edit menu, or click the
Paste button in the toolbar:
You can also copy and paste source and preset settings from
one section of a user type to the same section of another user
type as follows:
Highlight the icon corresponding to the section of settings you
want to copy: Sources or Presets.
Choose Copy from the Edit menu, or click the
Copy button in the toolbar:
Highlight the same icon in the User Type you want to copy to.
Choose Paste from the Edit menu, or click the
Paste button in the toolbar:

Co
nfig
urin
g th
e d
igita
l su
rrou
nd
pro
ce
sso
r usin
g a
co
mp
ute
r
103
Completing the configuration
The final stage in creating a settings file is to save it, and then
store it to the digital surround processor.
To save the current settings
Choose Save from the File menu or click the Save toolbar
button, to save the changes you have made to the
settings file to your PC hard disk.
To store the settings to the 568 DigitalSurround Processor
Click the Store button.
The settings will then be downloaded
to the 568. The 568 will display:Receiving...
As the download proceeds the following dialogue box shows its
progress:
If the download was successful the 568 will briefly display the
owner name you have defined.
For example:Zachary Ford
It will then switch itself to standby.
The User Type you have created will now be available in addition
to the built-in Types, and will be selected by default if you need
to reset the configuration of the digital surround processor; see
Choosing a standard setting, page 64.

104
Co
nfi
gu
rin
g t
he
dig
ita
l su
rro
un
d p
roc
esso
r u
sin
g a
co
mp
ute
r

Tro
ub
lesh
oo
ting
105
Troubleshooting
This chapter provides suggested solutions to typical problems that may
occur when setting up the digital surround processor.
If you are still not able to resolve a difficulty with the help of this guide and
the suggestions in the following pages, please contact your Meridian
dealer or Meridian Audio Ltd.

106
Tro
ub
lesh
oo
tin
g
Standby point not lit
Check the following:
There is AC power connected to the socket on the rear of the
568.
The power switch on the rear panel of the 568 is turned on.
If the 568 will still not illuminate, check any fuses in your power
supply and the fuse in the inlet of the 568. If these are all intact,
contact your dealer.
Erratic or unexpected systembehaviour
Redo the Auto Configure process as follows:
Put the whole system into standby.
Press Clear on the Meridian System Remote.
Observe all units responding correctly.
If this fails, the memory of the 568 may have been corrupted. If
this is suspected perform a full reset; see Choosing a standard
setting, page 64.
Remote not working
Check the following:
The battery in the Meridian System Remote.
Remove the 500 Comms connections from the 568, does it
respond now? If so, replace the connections and perform an
Auto Configure procedure as described opposite.
See if the 568 has been set up as not controller in the
Meridian Configuration program; see Changing the setup
options, page 96. Note that this may be deliberate by your
dealer.
General operating problems

Tro
ub
lesh
oo
ting
107
When playing a Dolby Digital DVD, the568 selects the Pro Logic preset
DVDs include a two-channel Dolby Digital soundtrack, which will
use the default two-channel preset.
Select a six-channel soundtrack, if it is available.
Unit is overheating
If there is not adequate ventilation around the unit, or you are
operating it in an enclosed space, you will need to fit the
optional Fan kit.

108
Tro
ub
lesh
oo
tin
g
Hum on analogue input
There is no reason for the 568 to produce hum on the analogue
input.
Check the source equipment. Disconnect each source in turn.
If the hum originates from a ground loop, an antenna or cable
supply may be the cause. In this case an antenna-lead isolator
should be fitted.
If the 568 seems to be the cause of hum consult your dealer.
There is radio interference
The 568 is a digital audio and computing device which has been
designed to very high standards of electromagnetic
compatibility.
If this equipment does cause or suffer from interference to/from
radio or television reception then the following measures should
be tried:
Reorient the receiving aerial (or antenna) or route the antenna
cable of the receiver as far as possible from the 568 and its
cabling.
Ensure that the receiver uses well-screened antenna cable.
Relocate the receiver with respect to the 568.
Connect the receiver and this product to different AC outlets.
If the problem persists contact your dealer.
Audio problems

Tro
ub
lesh
oo
ting
109
Audible hiss at high volume settings
The input dynamic range of most current recordings is at
maximum 16 bit. The reason for this is that currently CD, DVD,
and LaserDisc use a 16-bit standard although DVD can support
up to 24-bits. The analogue sources you have cannot achieve
this kind of range. For comparison, analogue sources are likely
to be of the order of:
VCR, 12 bits.
FM radio, 13 bits.
Reel to reel tape, 13 bits.
Cassette tape, 12 bits.
LP, 11 bits.
Note that there may be a difference between the dynamic range
of the source channel when it is operating, and the noise you
hear in standby. For example, LP normally has lower noise when
the stylus is not in the groove; similarly tape will be quieter when
it is stopped. CD may also be quieter when it is stopped,
producing so called ‘digital silence’.
The 568 has a 24-bit capability on its internal analogue-to-digital
converter, which is used for analogue sources. When the volume
is turned up high you may hear its dither as a hiss when the
sources are stopped. This hiss is lower than the background
noise of your recordings and should be of no consequence.
The 568 has 24-bit output precision on the analogue outputs.
Other sources of hiss may be tracked down using the Mute
option. When muted the outputs are reduced to the dither at the
selected precision.
Crackling on optical inputs
Some optical sources, in particular some LaserDisc players,
provide poor drive waveforms that do not meet the EIAJ
standard. This is because the light modulates but never goes
quite ‘black’ between pulses. If you experience crackling on the
optical input or an occasional reluctance to lock, ie provide a
sound, investigate as follows.
Try other fibres.
Pull the fibre part-way out and see if the problem clears up.
Try another player or CD player on the optical input.
Contact Meridian for up-to-date advice on this point.

110
Tro
ub
lesh
oo
tin
g
Sound not clear
If speech sounds muffled in a system with a centre speaker,
check that sound is coming from the centre as there may be a
connection problem. In a digital or Meridian feed to the centre
you may have set it up to be right instead of left so that it is
playing a subwoofer signal.
If speech sounds muffled in a system with no centre speaker,
you may have selected a layout that expects one. See To
specify the speaker layout, page 85.
Centre not working
There may be a connection problem.
In a digital or Meridian feed to the centre, you may have set it
up to be right instead of left, and therefore it may be playing a
subwoofer signal.
There is a hiss when starting DTSLaserDiscs
The DTS audio stream is indistinguishable from a PCM audio
stream; the 568 takes 30ms to identify the encoding, during
which a hiss is heard.
With non-video DTS sources you can add a 30ms delay to
avoid this.
With video sources you can create a DTS-only source to avoid
any hiss.

Tro
ub
lesh
oo
ting
111
Poor picture quality
Picture quality may suffer if you do not attend to the following:
Are you using suitable quality cables with good connectors?
Is there a ground loop created between any of the
components connected to the 568?
Remember that reception of broadcast or cable signals can be
significantly deteriorated by cross-modulation in the RF domain.
It is unwise to attempt to cascade and mix several video
sources, eg LaserDisc, VCR, etc, to an antenna system.
Video problems

112
Tro
ub
lesh
oo
tin
g
Meridian Configuration program problems
Preset options do not appear or arenot available
The options available when you are editing the DSP preset
parameters depend on the speaker layout you have defined in
Speakers.
If you have any DSP speakers in the layout, treble and bass
are not available.
The Speakers options for Centre, Sides, and Rears can only
be edited if your layout includes the corresponding speakers.
Meridian Configuration programrepeatedly fails to talk to the product
Check that you have selected a COM port.
Check that no other program currently running is using the
COM port.
Check that it is connected correctly.
Turn off the 568 for a few seconds and turn back on, then
retry.
Quit from all other programs and retry.
Reboot the computer and retry.
Ensure you are using the serial lead supplied with the product,
or a null modem cable.
If you are using a laptop try turning off the screensaver or
power management software.

Tro
ub
lesh
oo
ting
113
Service
The Meridian 500 Series of hi-fi components have been carefully
designed to give years of untroubled service. There are no user-
serviceable parts inside the case, nor do the units require any
form of maintenance.
In the unlikely event that your 568 fails to function correctly, it
should be returned, in its original packaging, to your Meridian
dealer.
In case of difficulty within the UK or USA please contact the
appropriate sales and service address shown on page ii.
In case of difficulty outside the UK or USA, contact the importing
agent for the territory. A list of Meridian agents abroad is
available from Meridian Audio.
No responsibility can be accepted for the 568 whilst in transit to
the factory or an agent, and customers are therefore advised to
insure the unit. When seeking service under guarantee, proof of
the date of purchase will be required.
Service and guarantee
Guarantee
The 568 Digital Surround Processor is guaranteed against
defects in material and workmanship for two years from the date
of purchase.
The guarantee is void if the 568 Digital Surround Processor has
been subject to misuse, accident, or negligence, or has been
tampered with or modified in any way without the written
authorisation of Meridian Audio Limited. Note that connecting
anything other than the correct network lead to the COMMS
sockets may cause damage to the 568 Digital Surround
Processor which will not be covered by this guarantee.
Attempted servicing by unauthorised people may also invalidate
this guarantee. Labour and carriage charges are not covered
unless by local agreement.
Outside the UK, local warranty liability is restricted to equipment
purchased within the territory. Our agents abroad are only under
contractual obligation to service under guarantee equipment
sold through them. They are entitled to make a non-refundable
charge for any service carried out on other equipment.
This guarantee does not limit your statutory rights within the
United Kingdom.

114
Tro
ub
lesh
oo
tin
g

115
Glo
ssa
ry
Glossary
Absolute phase
A control which changes the phase of the
signals to all the speakers.
AC-3
An alternative name for the Dolby Digital
format.
Ambisonic
A music encoding and decoding system
designed to recreate the original
soundfield using an array of loudspeakers.
Aspect ratio
The overall shape of the speaker layout.
Compress
A DSP parameter providing dynamic range
control for Dolby Digital sources.
Controller
The product in a Meridian system that
uses the infra-red signals from the remote
to control the system. The controller is
normally chosen automatically, but the
installer can override this.
Dolby Digital
A digital surround-sound which provides
five full-frequency range channels (left,
centre, right, left surround, and right
surround) and an additional Low
Frequency Effects (LFE) channel which is
band limited to 120Hz.
Dolby Surround
The encoding system used for the majority
of movies on video and many TV
broadcasts. Dolby Surround encoded
material can be replayed with a surround
decoder connected to an array of
loudspeakers which normally include at
least left, centre, right, and rear surround.
DTS
Digital Theatre Systems originally
produced digital audio tracks for motion
pictures. A version of this format adapted
for consumer video and audio products is
referred to as DTS Entertainment. Like
Dolby Digital it provides five full-frequency
range channels (left, centre, right, left
surround, and right surround) and an
additional Low Frequency Effects (LFE)
channel.

Glo
ssa
ry
116
DVD
Digital Video Disc or Digital Versatile Disc,
a CD-sized disc with nearly 30 times the
storage capacity of CD. It is capable of
storing digital video, high-quality multi-
channel audio, or computer data.
Layout
Refers to a particular arrangement of
speakers and subwoofers. You can select
different layouts for the cinema, music,
and 5.1 DSP presets.
LFE
The Low Frequency Effects (LFE) channel
which enhances movie soundtracks with
sound effects and ambient sounds. It is
band limited to 120Hz in a Dolby Digital
system.
LFE sub
A subwoofer which plays the full 120Hz
bandwidth LFE signal in Dolby Digital,
DTS, and MPEG presets.
Limit
A DSP parameter that sets the peak-level
limit of the bass signal added to the main
loudspeakers.
Max SPL
A DSP parameter that sets the peak-level
limit for the LFE channel.
Menus
The flexible system for choosing options
and configuring settings in Meridian
products. On the 568 the menus are
controlled by the <, >, A, and V keys on
the MSR.
MHR
Meridian High Resolution is a proprietary
secure encoding format using encryption
and anti-copy methods that allows secure
transfer of audio streams between
elements of a Meridian-only system for the
purpose of playback only. It provides a
secure copyright protection environment
and has the very important benefit of
lowering jitter and improving sound quality
on all material.
MLP
MLP (Meridian Lossless Packing) is an
audio format that increases the amount of
information that can be recorded on a CD
or DVD, without any loss of quality.
Mono sub
A subwoofer which handles all the bass for
the system. A THX standard subwoofer
has a crossover at 80Hz.
117
Glo
ssa
ry
Mono surrounds
Surrounds which have a common signal
steered to them. This may then be
decorrelated by the THX process to give
more spaciousness.
MPEG
MPEG Surround is a digital encoding
system developed by the Motion Picture
Expert Group. Like Dolby Digital it
provides five full-frequency range
channels and an additional Low Frequency
Effects (LFE) channel.
MSF
Meridian Settings File, a file containing
settings and User Types for one or more
Meridian products.
MSR
The Meridian System Remote, or handset.
OSD
On-Screen Display, which the 568 can
superimpose on a composite video signal
to give information about the state of the
system, and to help during configuration.
PCM
Pulse Code Modulation, the method used
to encode music digitally, as used on
audio CDs.
Preset
A DSP decoding option in the 568. You
can create user-defined presets based on
the built-in presets, and with specific
parameter values; see Defining your own
presets, page 34.
Source
An input to the system, such as CD or TV.
The Meridian 500 and 800 Series provide
12 named sources, corresponding to the
names of the 12 source keys on the MSR.
In the 568 you can choose the logo
displayed for each source, and the input
used for it.
SPL
Sound Pressure Level, a physical
measurement of the level of sound at a
particular location which can be obtained
using an SPL meter.
Steered surrounds
Surrounds which have individual signals
steered to them by the digital surround
processor’s steering matrix.

Glo
ssa
ry
118
Surround
A sound reproducing system with more
than two loudspeakers, and usually with
speakers behind or to the side of the
listener.
THX
Additional processing that follows Dolby
Pro Logic Surround decoding to give a
more faithful reproduction of cinema
sound in the home.
Trifield
A music decoding system designed to
extract centre and surround signals from a
conventional two-channel stereo source.
Type
A standard configuration of the digital
surround processor. Selecting a Type
resets any configuration and calibration
changes.

119
Ind
ex
Index
Audio stream display 21
Automatic setup 62
B Balance (DSP
parameter) 25, 26, 28
Balanced outputs 54
Bass (DSP parameter) 26, 27
Bass, changing 27
built-in presets, changing 34
C Calibrating the system 67
Calibration procedure
exiting from 69
starting 68
Calibration tests 70
Distance 71
Fine tuning 72
Levels 70
moving between 69
Centre (DSP
parameter) 26, 30, 42
Centre speaker
changing the relative delay 30
changing the relative level 30
not working 110
Clearing a DSP preset 36
Communications connections 54
Components 50
Compress (DSP parameter) 47
Compression 47
Computer, configuring using 77
Configuring the digital surround
controller
using a computer 77
without a computer 63
Controller, setting 62
Copying settings between user
types 102
Crackling on optical inputs 109
Crossover frequency, adjusting 74
D Defining your own presets 23, 34
Depth (DSP parameter) 25, 26, 30
Digital audio inputs 53
Digital DSP preset 9, 46
Digital source, connecting 59
Direct DSP preset 12, 45
Display
changing 21
options 21
A AC-3 encoding 9
Academy (DSP parameter) 12, 40
Accessories 7
Fan kit 8, 51
Meridian 511 S-patch Box 7
Meridian 519 Demodulator 7
Rack mount kit 8
Active loudspeakers,
connecting 57
Active subwoofer, connecting 58
Ambisonic DSP preset 11, 43
Ambisonic encoding 11
Analogue audio inputs 53
Analogue sources, connecting 59
Audio formats 20, 41
Dolby Digital 9, 20
DTS 9, 20
MLP 10, 20
MPEG 10, 20
two-channel (PCM) 10, 20
Audio inputs
analogue 53
digital 53
Audio outputs 54
Audio problems 108

Ind
ex
120
Distance calibration test 71
Distance units, changing 68
Dolby Digital DSP preset 9, 46
dynamic range control 47
Dolby Digital encoding 9
Dolby Digital THX DSP
preset 10, 46
Dolby Surround encoding 10
DSP loudspeakers. See Meridian
DSP loudspeakers
DSP parameters
Academy 12, 40
Balance 25, 26, 28
Bass 26, 27
Centre 26, 30, 42
changing 25
Compress 47
Depth 25, 26, 30
HS Out? 42, 45
LFE 47
Limit 47, 48
LipSync 26, 32
Max SPL 47, 48
Mono Rear 39, 40, 44
OSD 26, 32
DSP parameters (continued)
Party? 40
Phase 26, 27
Position 44
R Delay 26
R Filter 44
Rear 26, 29
Roll 40, 44
S Delay 26
S Filter 44
saving 34
Sides 26, 29
Surr. Rear 47
Treble 26, 27
Width 42, 44
Yaw 40, 44
DSP preset, assigning to a
source 33
DSP presets 9, 37
Ambisonic 11, 43
changing 20
clearing 36
configuring using a PC 93
defining 23, 34
Direct 12, 45
DSP presets (continued)
Dolby Digital 9, 46
Dolby Digital THX 10, 46
DTS 9, 46
DTS Music 10, 45
DTS THX 10, 46
editing name 35
MLP 10, 45
modifying a built-in preset using a
PC 93
Mono 12, 40
MPEG 10, 46
MPEG Music 10, 45
MPEG THX 10, 46
Music 11, 41
Music Logic 12, 44
Pro Logic 10, 38, 39
Stereo 12, 45
Super Stereo 12, 43
THX Cinema 11
Trifield 12, 41
TV Logic 11, 39
DTS DSP preset 9, 46
DTS encoding 9, 10
DTS Music DSP preset 10, 45

121
Ind
ex
DTS THX DSP preset 10, 46
DVD player, connecting 60
Dynamic range control 47
F Fan kit 8, 51
Fetching calibrated settings 99
Fine tuning calibration test 72
5.1 Movie DSP presets 46
Front panel
controls 14
display symbols 21
G Glossary 115
H Hiss
at high volume settings 109
starting DTS LaserDiscs 110
HS Out? (DSP parameter) 42, 45
Hum on analogue input 108
I Input (DSP parameter) 40
Inputs, audio 53
Installing the Meridian
Configuration program 79
Integration of the centre,
changing 30
Introduction 1
L LaserDisc player, connecting 60
Levels calibration test 70
LFE (DSP parameter) 47
Limit (DSP parameter) 47, 48
Lip sync, changing 32
LipSync (DSP parameter) 26, 32
Listening position, moving to the
left or right 28
Locking the menus 24
Logic DSP presets 38
Loudspeakers
connecting 56
setting up using a PC 85
specifying layout using a PC 85
specifying the sizes using a PC 88
M Max SPL (DSP parameter) 47, 48
Menus, locking and unlocking 24
Meridian 500 Series 2
communications 3
D33 Active Digital Loudspeaker 5
Meridian 500 Series (continued)
DSP6000 Digital Loudspeakers 5
M1500 Active Subwoofer 4
M33 Active Analogue
Loudspeaker 4
Meridian 504 FM Tuner,
connecting 59
Meridian 508.24 24-Bit CD Player,
connecting 59
Meridian 511 S-patch Box 7
Meridian 519 Demodulator 7
Meridian 562V Multimedia
Controller
connecting 61
setting up with 65
Meridian Analogue Theatre 4
Meridian comms 54, 62
Meridian Configuration
program 78
installation 79
problems 112
requirements 79
running 80
toolbar buttons 80
Meridian Digital Theatre 5

Ind
ex
122
Meridian DSP loudspeakers
connecting 54, 56
using with remote
control 16, 25, 35
Meridian DVD Player,
connecting 60
Meridian High Resolution
(MHR) 3, 97
Meridian Lossless Packing
(MLP) 10, 45
Meridian M1500 or M2500,
connecting 58
Meridian M33s, connecting 57
Meridian System Remote
front panel controls 15
quick guide 16
MLP DSP preset 10, 45
Mono DSP preset 12, 40
Mono Rear (DSP
parameter) 39, 40, 44
MPEG DSP preset 10, 46
MPEG Music DSP preset 10, 45
MPEG Surround encoding 10
MPEG THX DSP preset 10, 46
Music DSP preset 11, 41
Music Logic DSP preset 12, 44
Muting the sound 19
O On-screen display (OSD) 21
changing position 32
Optical input 53
Options (View menu) 81
Options dialogue box 81
OSD (DSP parameter) 26, 32
Outputs, audio 54
Overheating problems 107
Owner icon 83
P Party? (DSP parameter) 40
PC, using to configure the 568 77
Peak-level limiting 48, 89
Personal details, entering using a
PC 83
Phase (DSP parameter) 26, 27
Phase, changing 27
Poor picture quality 111
Position (DSP parameter) 44
Presets icon 78, 93
Pro Logic DSP preset 10, 38, 39
Pro Logic encoding 10
R R Delay (DSP parameter) 26
R Filter (DSP parameter) 42, 44
Rack mount kit 8
Radio interference 50, 108
Rear (DSP parameter) 26
Rear loudspeakers
changing the relative delay 31
changing the relative level 29
Rear panel 52
Remote 15
quick guide 16
troubleshooting 106
Restoring the sound 19
Return to top level icon 83
Roll (DSP parameter) 40, 44
Room resonances, checking
for 75
S S Delay (DSP parameter) 26
S Filter (DSP parameter) 42, 44
S-patch Box 7
Safety warnings 51
Sample configurations
Meridian Analogue Theatre 4
Meridian Digital Theatre 5

123
Ind
ex
Save As (File menu) 82
Selecting a source 17
Serial cable, connecting 81
Serial port, specifying 81
Settings file, creating 82
Settings icon 83, 84
Setup icon 78, 96
Setup options, using a PC 96
Side loudspeakers
changing the relative delay 31
changing the relative level 29
Sides (DSP parameter) 26, 29
Sine/Sub mode 74
Sinewave sweep test 75
SizeCalc 88
Sound not clear 110
Sound Pressure Level meter 67
Sources 17
assigning DSP preset 33
changing DSP preset 34
configuring options using a PC 90
connecting 59
selecting 17
setting advanced options using a
PC 92
Sources (continued)
setting up 74
setting up using a PC 90
standard settings 66
Sources icon 78, 90
Spaciousness of the sound,
changing 31
Speakers
connecting 56
setting up using a PC 85
specifying layout using a PC 85
Speakers icon 78
Special sub option 64
Specification 6
Standard settings 64
choosing 65
sources 66
Standby
switching on from 17
switching to 18
Stereo DSP preset 12, 45
Stereo power amplifier,
connecting 57
Storing settings 98
Subwoofers
crossover 58
setting crossover frequency 74, 75
Super Stereo DSP preset 12, 43
Super Stereo encoding 12
Surr. Rear (DSP parameter) 42, 47
Switching on from standby 17
Switching to standby 18
T THX Cinema DSP preset 11
THX encoding 11
THX reference gain 19
Toolbar buttons 80
Treble (DSP parameter) 26, 27
Treble, changing 27
Trifield DSP preset 12, 41
Troubleshooting 105
audio 108
general operation 106
Meridian Configuration program 112
video 111
TV Logic DSP preset 11, 39
Types 64
choosing 65
standard 66

Ind
ex
124
U UHJ format 43
Unlocking the menus 24
Unpacking 50
User Types
copying settings between 102
creating 100
naming 100
User-defined presets
clearing 36
creating 94
deleting 95
editing name 35
V Ventilation 51
Video
connecting 55
connections 52
problems 111
Volume
adjusting 19
muting 19
W Width (DSP parameter) 42, 44
Y Yaw (DSP parameter) 40, 44