merry little christmas - rjrfabrics.comlittle+christmas+after... · merry little christmas ... lay...
TRANSCRIPT

Merry Little Christmas Page 1
Fin
ish
ed S
ize
44
” x
62
”
Designed By Jennifer Fulton, The Inquiring Quilter
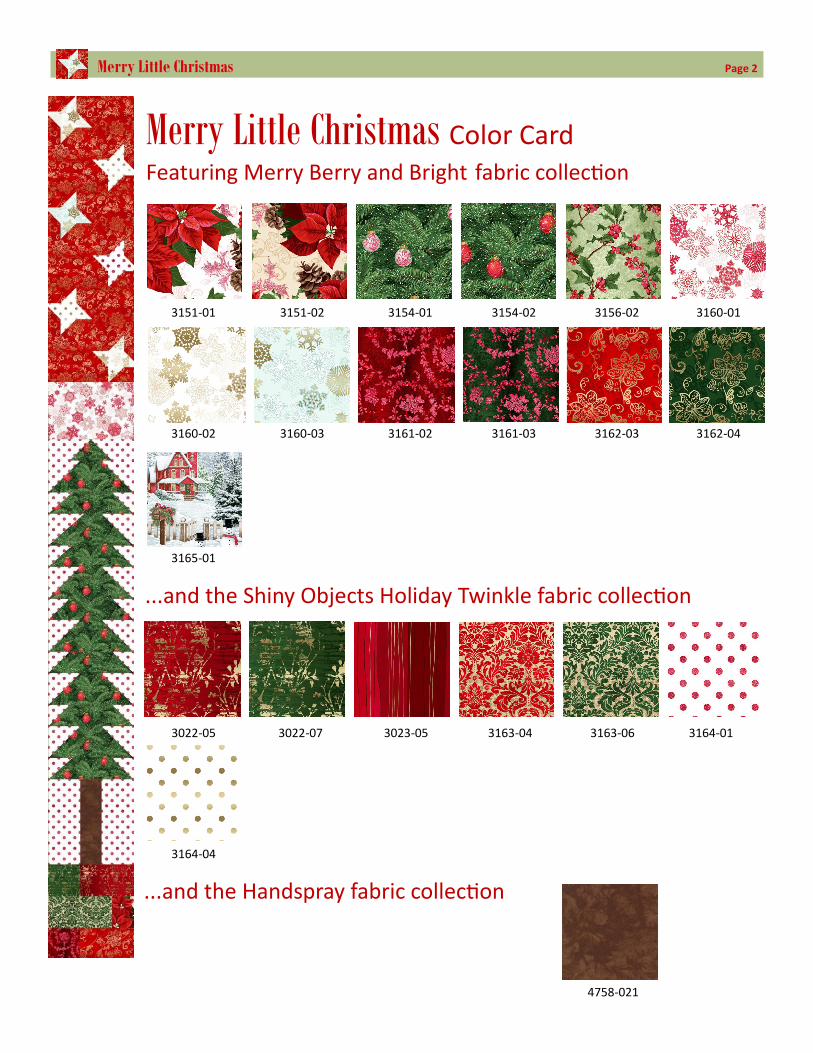
Featuring Merry Berry and Bright and Shiny Objects Holiday Twinkle by RJR Studio
Merry Little Christmas Page 2
...and the Shiny Objects Holiday Twinkle fabric collection
3151-01 3151-02 3154-01 3154-02 3156-02 3160-01
3160-02 3160-03 3161-02 3161-03 3162-03 3162-04
3165-01
3022-05 3022-07 3023-05 3163-04 3163-06 3164-01
3164-04
Merry Little Christmas Color Card Featuring Merry Berry and Bright fabric collection
...and the Handspray fabric collection
4758-021

Merry Little Christmas Page 3
Fabric Requirements Color SKU Needed
A Noel 3151-01 1/4 yard
B Vanilla 3151-02 1/4 yard
C Evergreen 3154-01 1/4 yard
D Pine 3154-02 1/3 yard
E Sage 3156-02 1/4 yard
F Radiant Cherry 3160-01 1/3 yard
G Snow 3160-02 1/4 yard
H Crystal 3160-03 1/4 yard
J Radiant Crimson 3161-02 1/4 yard
K Radiant Pine 3161-03 1/4 yard
L Scarlet 3162-03 1 yard
M Tannenbaum 3162-04 7/8 yard*
N Snow Day December 3165-01 (1) 24” panel
P Red Velvet 3022-05 1/4 yard
Q Tannenbaum 3022-07 1/4 yard
R Scarlet 3023-05 1/4 yard
S Scarlet 3163-04 1/4 yard
T Tannenbaum 3163-06 1/4 yard
U Radiant Cherry 3164-01 3/4 yard
V Snow 3164-04 1/4 yard
W Brown 4758-021 1/8 yard
Backing 3163-06 3 yards
* Includes binding
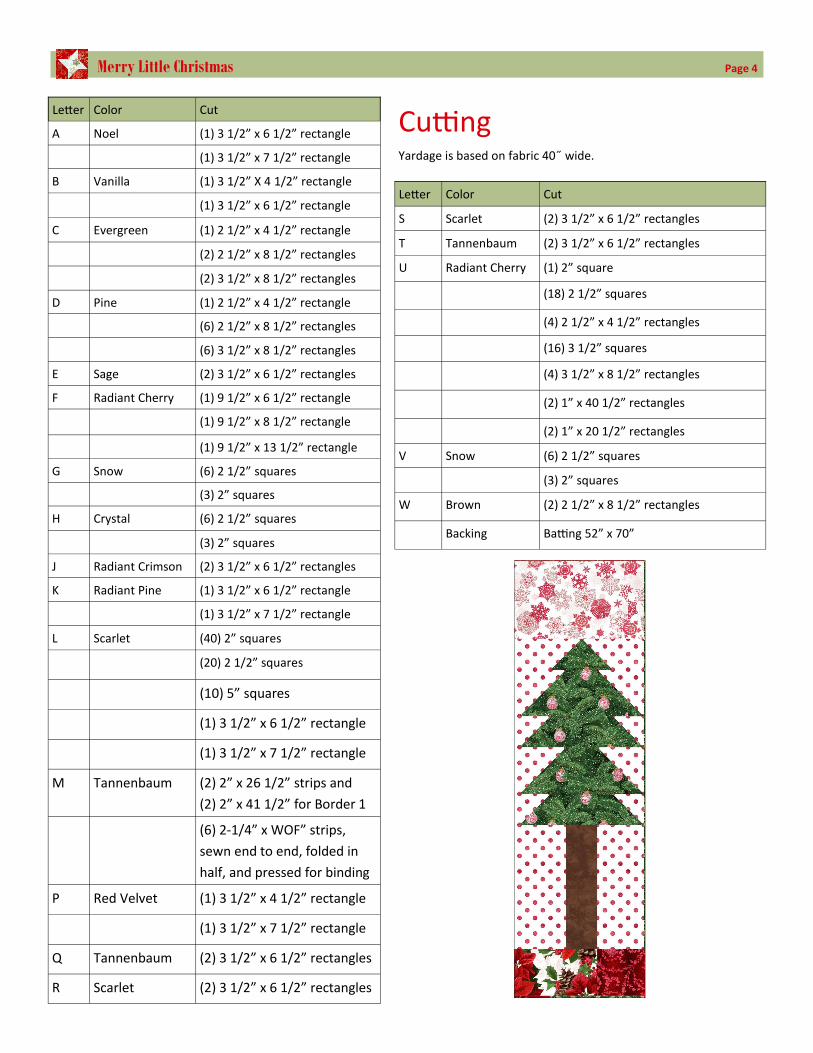
Merry Little Christmas Page 4
Cutting Yardage is based on fabric 40˝ wide.
Letter Color Cut
A Noel (1) 3 1/2” x 6 1/2” rectangle
(1) 3 1/2” x 7 1/2” rectangle
B Vanilla (1) 3 1/2” X 4 1/2” rectangle
(1) 3 1/2” x 6 1/2” rectangle
C Evergreen (1) 2 1/2” x 4 1/2” rectangle
(2) 2 1/2” x 8 1/2” rectangles
(2) 3 1/2” x 8 1/2” rectangles
D Pine (1) 2 1/2” x 4 1/2” rectangle
(6) 2 1/2” x 8 1/2” rectangles
(6) 3 1/2” x 8 1/2” rectangles
E Sage (2) 3 1/2” x 6 1/2” rectangles
F Radiant Cherry (1) 9 1/2” x 6 1/2” rectangle
(1) 9 1/2” x 8 1/2” rectangle
(1) 9 1/2” x 13 1/2” rectangle
G Snow (6) 2 1/2” squares
(3) 2” squares
H Crystal (6) 2 1/2” squares
(3) 2” squares
J Radiant Crimson (2) 3 1/2” x 6 1/2” rectangles
K Radiant Pine (1) 3 1/2” x 6 1/2” rectangle
(1) 3 1/2” x 7 1/2” rectangle
L Scarlet (40) 2” squares
(20) 2 1/2” squares
(10) 5” squares
(1) 3 1/2” x 6 1/2” rectangle
(1) 3 1/2” x 7 1/2” rectangle
M Tannenbaum (2) 2” x 26 1/2” strips and
(2) 2” x 41 1/2” for Border 1
(6) 2-1/4” x WOF” strips,
sewn end to end, folded in
half, and pressed for binding
P Red Velvet (1) 3 1/2” x 4 1/2” rectangle
(1) 3 1/2” x 7 1/2” rectangle
Q Tannenbaum (2) 3 1/2” x 6 1/2” rectangles
R Scarlet (2) 3 1/2” x 6 1/2” rectangles
Letter Color Cut
S Scarlet (2) 3 1/2” x 6 1/2” rectangles
T Tannenbaum (2) 3 1/2” x 6 1/2” rectangles
U Radiant Cherry (1) 2” square
(18) 2 1/2” squares
(4) 2 1/2” x 4 1/2” rectangles
(16) 3 1/2” squares
(4) 3 1/2” x 8 1/2” rectangles
(2) 1” x 40 1/2” rectangles
(2) 1” x 20 1/2” rectangles
V Snow (6) 2 1/2” squares
(3) 2” squares
W Brown (2) 2 1/2” x 8 1/2” rectangles
Backing Batting 52” x 70”

Merry Little Christmas Page 5
Block Assembly Creating the Friendship Star Blocks Finished block size 9”
1. Draw a diagonal line from corner to corner on the back of
(1) G 2 1/2” square.
2. Place the G square on top of (1) L 2 1/2” square, RST.
3. Sew 1/4” from both sides of the drawn line. Cut on the drawn
line. You now have (2) HST Units.
4. Press each HST Unit toward the darker triangle. Square to 2”.
5. Repeat Steps 1-4 to make (12) GL HSTs, (12) HL HSTs,
(12) VL HSTs, and (4) UL HSTs.
6. Lay out (4) GL HSTs, (1) G 2” square, and (4) L 2” squares as
shown. Sew each row, and press away from the HSTs. Sew the
rows together pressing the seams open to make (1) GL Friend-
ship Star Unit. Repeat to make (3) GL Friendship Star Units.
Square to 5”.
7. Repeat Step 6 to make (3) HL Friendship Star Units, (3) VL
Friendship Star Units, and (1) UL Friendship Star Unit.
8. Lay out (1) GL Friendship Star Unit, (1) VL Friendship Star Unit,
and (2) L 5” squares as shown. Sew each row, pressing away
from the Friendship Star Units. Sew the rows together,
pressing seams open to make (1) GV Friendship Star Block.
Square to 9 1/2”.
HST HST
5”
5”
9 1/2”
9 1
/2”
VL HST
Make 12
HL HST
Make 12
UL HST
Make 4
2”
2”
GL HST
Make 12
VL Units
Make 3
UL Units
Make 3
HL Units
Make 3
GL Units
Make 3

Merry Little Christmas Page 6
9. Repeat Step 8 to make (2) GV Friendship Star Blocks, (1) HG Friendship Star Block, (1) VH Friendship Star Block, and
(1) HU Friendship Star Block.
Creating the Tree Blocks Finished block size 9” x 20” and 9” x 40”
1. Place (1) U 2 1/2” x 4 1/2” rectangle on top of (1) C 2 1/2” x 4 1/2” rectangle as
shown, RST.
2. Sew from corner to corner.
3. Press back, and trim excess.
4. Repeat Steps 1-3, placing (1) U 2 1/2” x 4 1/2” rectangle on top of the unit on the other
corner.
5. Sew diagonally from corner to corner as shown to make (1) UC Unit 1. Press and trim.
Trim to 2 1/2” x 8 1/2”.
6. Repeat Steps 1 to 5 to make (1) UD Unit 1.
7. Repeat Steps 1 to 5 with (2) U 2 1/2” squares and (1) C 2 1/2” x 8 1/2” rectangle to
make (1) UC Unit 2. Trim to 2 1/2” x 8 1/2”.
8. Repeat Step 7 to make (2) UC Unit 2s and (6) UD Unit 2s.
Make 2 Make 1 Make 1 Make 1
UD Unit 1 - Make 1
8 1/2”
2 1
/2”
UC Unit 1 - Make 1
8 1/2”
2 1
/2”
UC Unit 2 - Make 2
UD Unit 2 - Make 6

Merry Little Christmas Page 7
9. Repeat Steps 1 to 5 with (2) U 3 1/2”
squares and (1) C 3 1/2” x 8 1/2” rectangle
to make (1) UC Unit 3. Trim to 2 1/2” x
8 1/2”.
10. Repeat Step 8 to make (2) UC Unit 3s and
(6) UD Unit 3s.
11. Sew (1) U 3 1/2” x 8 1/2” rectangle to the left side of (1)
W 2 1/2” x 8 1/2” rectangle. Press towards the U
rectangle. Sew (1) U 3 1/2” x 8 1/2” rectangle to the right
side of the unit. Press again towards the U rectangle to
make (1) Unit 4. Square to 8 1/2”.
12. Repeat Step 11 to make (2) Unit 4s.
13. Lay out (1) UC Unit 1, (2) UC Unit 2s, (2) UC Unit 3s,
(1) Unit 4, and (2) U 1” x 20 1/2” rectangles as shown.
Sew units together, pressing seams down to make
(1) Left Tree Block. Trim to 9 1/2” x 20 1/2”.
14. Lay out (1) UD Unit 1, (6) UD Unit 2s, (6) UD Unit 3s,
(1) Unit 4, and (2) U 1” x 40 1/2” rectangles as shown.
Sew units together, pressing seams down to make
(1) Right Tree Block. Trim to 9 1/2” x 40 1/2”.
8 1/2”
3 1
/2”
UC Unit 3 - Make 2 UD Unit 3 - Make 6
Unit 4 - Make 2
8 1
/2”
8 1/2”
Left Tree Block - Make 1
9 1/2”
20
1/2
”
9 1/2”
40
1/2
”

Merry Little Christmas Page 8
Creating the Bottom Border 1. Lay out fabrics as shown. Place the 7 1/2” wide fabrics at either end of Rows 1 and 3; place the 4 1/2” wide fabrics at either
end of Row 2. Place the 6 1/2” wide fabrics in the middle of all three rows.
2. Sew each row together, pressing the seams in Row 1 and Row 3 to the left. Press seams in Row 2 to the right.
3. Sew rows together, pressing seams down. Trim border to 9 1/2” x 44 1/2”.
Assembling the Quilt Center 1. Trim (1) N Snowy Day December panel to 23 1/2” x
41 1/2”.
2. Sew (1) M 2” x 41 1/2” rectangle to either side of
the trimmed panel. Press away from the panel.
3. Sew (1) M 2” x 26 1/2” rectangle to the top and
bottom of the panel. Press away from the panel.
Trim to 26 1/2” x 44 1/2”.
Quilt Assembly
1. Sew (1) HG Friendship Star Block, (1) VH Friendship
Star Block, and (1) F 8 1/2” x 9 1/2” rectangle
together. Trim to 26 1/2” x 9 1/2”. Sew to the top of
the Quilt Center. (See Quilt Assembly Diagram.)
2. Sew (2) GV Friendship Star Blocks, (1) HU Friendship
Star Block, (1) F 6 1/2” x 9 1/2” rectangle, and (1)
Left Tree Block together. Sew to the left side of Quilt
Center.
3. Sew (1) F 9 1/2” x 13 1/2” rectangle and (1) Right
Tree Block together. Trim to 9 1/2” x 53 1/2”. Sew
to the right side of the Quilt Center.
4. Sew the Bottom Border to the Quilt Center. Quilt
should now measure 44 1/2” x 62 1/2”.
5. Layer backing, batting, and the quilt top.
6. Baste, then quilt as desired. Bind with M 2 1/4”
strips.
44 1/2”
9 1
/2”
Quilt Assembly Diagram