meteor software user’s guide - rbjorgan.comrbjorgan.com/portfolio/meteor_user_guide.pdf · meteor...
TRANSCRIPT

Complemar Print, Buffalo Division1319 Military Rd Kenmore, NY 14217Call: 716.875.7238
Complemar West200 Vista #105Sparks, NV 89434-6697Call: 775.355.6800
Company Information© 2013 Complemar Partners500 Lee Road | Rochester, NY 14606Call: 800.388.7254email: [email protected]
METEOR Software User’s Guide
version 1.0 for admins

Complemar Print, Buffalo Division1319 Military Rd Kenmore, NY 14217Call: 716.875.7238
Complemar West200 Vista #105Sparks, NV 89434-6697Call: 775.355.6800
Company Information© 2013 Complemar Partners500 Lee Road | Rochester, NY 14606Call: 800.388.7254email: [email protected]
TrademarksComplemar® and Complemar Partners® are trademarks or registered trademarks of Complemar PartnersInc. All other trademarks are the property of their respective owners.
Limited LicenseSubject to the Complemar’s terms and conditions that govern your use of Complemar’s products. Complemar grants you a nonexclusive, non-transferable, non-sublicensable license to use this Complemar product only in accordance with this manual and written instructions provided by Complemar. You understand and agree that, except as expressly set forth in the Complemar terms and conditions, no right or license to any patent or other intellectual property owned or licensable by Complemar is conveyed or implied by this Complemar product. In particular, no right or license is conveyed or implied to use this Complemar product in combination with a product not provided, licensed, or specifically recommended by Complemar for such use.
Copyright© 2013 Complemar Partners. All rights reserved.

METEOR User’s Guide for Admins i
Contents
Admin Functions . . . . . . . . . . . . . . . . . . . . . . . . . . . . . . . . . . . . . . . . . . . . . . . . . . . . . . . . . . . . 3Configuring Your Store Front . . . . . . . . . . . . . . . . . . . . . . . . . . . . . . . . . . . . . . . . . . . . . . . . 4
Log Into Admin Site . . . . . . . . . . . . . . . . . . . . . . . . . . . . . . . . . . . . . . . . . . . . . . . . . . . . . . . . . . . . . . . . . . . . . . . . . 4
Using the Site Configuration Wizard . . . . . . . . . . . . . . . . . . . . . . . . . . . . . . . . . . . . . . . . . . . . . . . . . . . . . . . . . . 4
Configure Alternative Payment Methods . . . . . . . . . . . . . . . . . . . . . . . . . . . . . . . . . . . . . . . . . . . . . . . . . . . . . 7
Configure Credit Cards & Other Payment Methods . . . . . . . . . . . . . . . . . . . . . . . . . . . . . . . . . . . . . . . . . . . . 8
Payment Methods . . . . . . . . . . . . . . . . . . . . . . . . . . . . . . . . . . . . . . . . . . . . . . . . . . . . . . . . . . . . . . . . . . . . . . . . . . . . . . 8
The Payment Gateway . . . . . . . . . . . . . . . . . . . . . . . . . . . . . . . . . . . . . . . . . . . . . . . . . . . . . . . . . . . . . . . . . . . . . . . 9
Configure Shipping Methods . . . . . . . . . . . . . . . . . . . . . . . . . . . . . . . . . . . . . . . . . . . . . . . . . . . . . . . . . . . . . . . 11
Select Shipping Method Rates . . . . . . . . . . . . . . . . . . . . . . . . . . . . . . . . . . . . . . . . . . . . . . . . . . . . . . . . . . . . . . 13
Monthly Maintenance . . . . . . . . . . . . . . . . . . . . . . . . . . . . . . . . . . . . . . . . . . . . . . . . . . . . . . 15
Managing Orders . . . . . . . . . . . . . . . . . . . . . . . . . . . . . . . . . . . . . . . . . . . . . . . . . . . . . . . . . . 18View Product Reports . . . . . . . . . . . . . . . . . . . . . . . . . . . . . . . . . . . . . . . . . . . . . . . . . . . . . . . . . . . . . . . . . . . . . . 18
Reports . . . . . . . . . . . . . . . . . . . . . . . . . . . . . . . . . . . . . . . . . . . . . . . . . . . . . . . . . . . . . . . . . . . . . . . . . . . . . . . . . . . . 20
Editing Orders . . . . . . . . . . . . . . . . . . . . . . . . . . . . . . . . . . . . . . . . . . . . . . . . . . . . . . . . . . . . . . . . . . . . . . . . . . . . . 20
Processing Orders . . . . . . . . . . . . . . . . . . . . . . . . . . . . . . . . . . . . . . . . . . . . . . . . . . . . . . . . . . . . . . . . . . . . . . . . . . 21
Collecting Payment . . . . . . . . . . . . . . . . . . . . . . . . . . . . . . . . . . . . . . . . . . . . . . . . . . . . . . . . . . . . . . . . . . . . . . . . . . . . 21Automated Payment Methods . . . . . . . . . . . . . . . . . . . . . . . . . . . . . . . . . . . . . . . . . . . . . . . . . . . . . . . . . . . . . . . . . 21Check or Purchase Order . . . . . . . . . . . . . . . . . . . . . . . . . . . . . . . . . . . . . . . . . . . . . . . . . . . . . . . . . . . . . . . . . . . . . . . 21Ad-hoc Transactions . . . . . . . . . . . . . . . . . . . . . . . . . . . . . . . . . . . . . . . . . . . . . . . . . . . . . . . . . . . . . . . . . . . . . . . . . . . 21Shipping Processing . . . . . . . . . . . . . . . . . . . . . . . . . . . . . . . . . . . . . . . . . . . . . . . . . . . . . . . . . . . . . . . . . . . . . . . . . . . 22Void/Refunds . . . . . . . . . . . . . . . . . . . . . . . . . . . . . . . . . . . . . . . . . . . . . . . . . . . . . . . . . . . . . . . . . . . . . . . . . . . . . . . . . . 23
Managing Products . . . . . . . . . . . . . . . . . . . . . . . . . . . . . . . . . . . . . . . . . . . . . . . . . . . . . . . . 24Modifying or Adding a Product . . . . . . . . . . . . . . . . . . . . . . . . . . . . . . . . . . . . . . . . . . . . . . . . . . . . . . . . . . . . . 24
The Main Tab . . . . . . . . . . . . . . . . . . . . . . . . . . . . . . . . . . . . . . . . . . . . . . . . . . . . . . . . . . . . . . . . . . . . . . . . . . . . . . 25
The Images Tab . . . . . . . . . . . . . . . . . . . . . . . . . . . . . . . . . . . . . . . . . . . . . . . . . . . . . . . . . . . . . . . . . . . . . . . . . . . . 28
\How METEOR Handles Images . . . . . . . . . . . . . . . . . . . . . . . . . . . . . . . . . . . . . . . . . . . . . . . . . . . . . . . . . . . . . . . . . 28Image Filename Override . . . . . . . . . . . . . . . . . . . . . . . . . . . . . . . . . . . . . . . . . . . . . . . . . . . . . . . . . . . . . . . . . . . . . . 29
The Description Tab . . . . . . . . . . . . . . . . . . . . . . . . . . . . . . . . . . . . . . . . . . . . . . . . . . . . . . . . . . . . . . . . . . . . . . . . 31
The Mappings Tab . . . . . . . . . . . . . . . . . . . . . . . . . . . . . . . . . . . . . . . . . . . . . . . . . . . . . . . . . . . . . . . . . . . . . . . . . 32
Add Your Product to a Product Category . . . . . . . . . . . . . . . . . . . . . . . . . . . . . . . . . . . . . . . . . . . . . . . . . . . . . . . 33

METEOR User’s Guide for Admins ii
The Variant Tab . . . . . . . . . . . . . . . . . . . . . . . . . . . . . . . . . . . . . . . . . . . . . . . . . . . . . . . . . . . . . . . . . . . . . . . . . . . . 34
Optional Tabs . . . . . . . . . . . . . . . . . . . . . . . . . . . . . . . . . . . . . . . . . . . . . . . . . . . . . . . . . . . . . . . . . . . . . . . . . . . . . . 36
The Summary Tab . . . . . . . . . . . . . . . . . . . . . . . . . . . . . . . . . . . . . . . . . . . . . . . . . . . . . . . . . . . . . . . . . . . . . . . . . . . . . 36The Search Engine Tab . . . . . . . . . . . . . . . . . . . . . . . . . . . . . . . . . . . . . . . . . . . . . . . . . . . . . . . . . . . . . . . . . . . . . . . . . 36The Product Feeds Tab . . . . . . . . . . . . . . . . . . . . . . . . . . . . . . . . . . . . . . . . . . . . . . . . . . . . . . . . . . . . . . . . . . . . . . . . . 36The Options Tab . . . . . . . . . . . . . . . . . . . . . . . . . . . . . . . . . . . . . . . . . . . . . . . . . . . . . . . . . . . . . . . . . . . . . . . . . . . . . . . 36The Extension Data Tab . . . . . . . . . . . . . . . . . . . . . . . . . . . . . . . . . . . . . . . . . . . . . . . . . . . . . . . . . . . . . . . . . . . . . . . . 36
Managing Customers . . . . . . . . . . . . . . . . . . . . . . . . . . . . . . . . . . . . . . . . . . . . . . . . . . . . . . 37Adding Customer and Address Information . . . . . . . . . . . . . . . . . . . . . . . . . . . . . . . . . . . . . . . . . . . . . . . . . 37
Enter Billing and Shipping Addresses . . . . . . . . . . . . . . . . . . . . . . . . . . . . . . . . . . . . . . . . . . . . . . . . . . . . . . . . 38
Adding an Admin . . . . . . . . . . . . . . . . . . . . . . . . . . . . . . . . . . . . . . . . . . . . . . . . . . . . . . . . . . . . . . . . . . . . . . . . . . 39
Removing an Admin . . . . . . . . . . . . . . . . . . . . . . . . . . . . . . . . . . . . . . . . . . . . . . . . . . . . . . . . . . . . . . . . . . . . . . . . 39
Managing Customer Levels . . . . . . . . . . . . . . . . . . . . . . . . . . . . . . . . . . . . . . . . . . . . . . . . . . . . . . . . . . . . . . . . . 40
Defining Customer Levels . . . . . . . . . . . . . . . . . . . . . . . . . . . . . . . . . . . . . . . . . . . . . . . . . . . . . . . . . . . . . . . . . . . . . . 40Managing Customer Level Membership . . . . . . . . . . . . . . . . . . . . . . . . . . . . . . . . . . . . . . . . . . . . . . . . . . . . . . . . 42
Managing AppConfigs . . . . . . . . . . . . . . . . . . . . . . . . . . . . . . . . . . . . . . . . . . . . . . . . . . . . . 43An AppConfig Example . . . . . . . . . . . . . . . . . . . . . . . . . . . . . . . . . . . . . . . . . . . . . . . . . . . . . . . . . . . . . . . . . . . . . 43
Searching for AppConfigs . . . . . . . . . . . . . . . . . . . . . . . . . . . . . . . . . . . . . . . . . . . . . . . . . . . . . . . . . . . . . . . . . . . . . . 44

METEOR User’s Guide for Admins 3
Admin FunctionsThis booklet contains information about sections of the admin site that you'll use frequently while maintaining your store. These sections include:
• Run Configuration Wizard (configure your store front)
• View/Manage Customers (add/remove, upgrade/downgrade, assign levels)
• View/Manage Products (add/remove, change variants, add images)
• View/Manage Orders (search for and view orders, generate order reports)
• View/Edit AppConfigs (change the store front look and feel and functionality)
• Run Monthly Maintenance (keep the store front working smoothly)
When you log in to your website, these links will appear as common links on the left side of your home page.
For instructional videos, see http://manual.aspdotnetstorefront.com/t-videotutorials.aspx#Getting%20Started.

METEOR User’s Guide for Admins 4
Configuring Your Store FrontThis section provides instructions for setting up your store with the most commonly used parameters such as the store name, address, credit card types, payment gateway, shipping methods, etc. This wizard lets you define your store’s primary eCommerce identity.
Log Into Admin Site1. In your web browser, enter your company’s unique sign in (shop.yourcompany.com/admin/signin.aspx).
2. Log in [email protected] and your company password.
3. Press Enter.
• The Storefront Admin toolbar opens.
Using the Site Configuration Wizard1. On the toolbar, click Configuration → Site Configuration Wizard.
• The Site Configuration Wizard window opens.

METEOR User’s Guide for Admins 5
1. Enter the following (see next page) configuration variables in their respective fields.
2. Click the Submit button to update your store’s configuration.
Setting Description
Store Name This is the name of your store. This will appear on browser page titles, receipts, etc., so format it exactly as you want your name to look in these places.
Live Server Domain This is your web store's URL without the 'www'.
Store Origin Zip Code This will be used as the “origin” zip code when calculating shipping costs if your site uses real time shipping rates. See “Real Time Methods” on page 14.
Store Currency This is the master currency your store will use (in ISO 4217 Standard Code format).
Store Currency Numeric Code This should be the ISO 4217 Standard Code for the currency your store will use (from above).
Use Live Transactions This setting determines whether your store will try to call the live version of your payment gateway if your store has gone live or the test version if your store is still in test.
Use SSL This controls whether your site will switch to secure mode (https) on some pages throughout the site, e.g., shopping cart, signing pages, etc.

METEOR User’s Guide for Admins 6
Set Static Machine Key Sets a random, static machine key in the web.config file (which controls several very important elements of your site). This will allow the site to function properly on server farms and can also resolve issues with users being logged out and/or losing their shopping cart after an application reset.
NOTE: The {root} folder where the web.config file is located requires Read/Write/Modify permissions for the .NET user account in order to make this change.
Encrypt the Web.config This setting determines whether or not the web.config file is encrypted or not. METEOR developers generally do not encrypt this file until development and testing of a site is complete and about to go live.
NOTE: The {root} folder where the web.config file is located requires Read/Write/Modify permissions for the .NET user account in order to make this change.
Email Click the “Configure Email” link to set up the outgoing mail settings for your site.
SEO Click the 'Configure SEO' link to set up the store-wide meta tags for your store.
buySAFE buySAFE is a 3rd party service that builds customer confidence.
MaxMind MaxMind provides additional anti-fraud protection beyond what your payment gateway provides.
Setting Description

METEOR User’s Guide for Admins 7
Configure Alternative Payment MethodsYou can add the functions of non-credit card transactions.
1. Click on configure to set up account.
2. Next to each alternative payment methods, click configure for more details.
Google Checkout is a popular, secure off-site payment method.

METEOR User’s Guide for Admins 8
Configure Credit Cards & Other Payment MethodsYou can select how a customer pays for their product: by PayPal, Credit Card, PO’s etc.
Payment Methods• These check boxes allow you to select the payment method(s) you will accept on your site. You can select
multiple options.
• The more complicated payment methods require some extra setup to enable. Clicking the configure link at the right of the individual options allows you to set those methods without leaving the page.
• If you choose the Credit Card option, you'll also need to configure a payment gateway to accept payment. See the next section for more information.
1. Select the box next to the payment method.
2. Next to each payment method, click configure for more details and to set up the account.

METEOR User’s Guide for Admins 9
The Payment GatewayThis section describes the most popular methods to configure payment processing solutions. You can select the payment gateway for handling the credit card, PayPal, etc. transactions.
Not all payment gateways are available. Those that are not available, the option buttons are grayed out. If you require a gateway that is currently unavailable, contact Complemar to arrange permission to use it.
Note: You can only choose one payment gateway.
1. Select the option button next to your described payment gateway.
2. Next to each gateway, click configure link to set up the account
3. Click the Submit button to save the change.
METEOR User’s Guide for Admins 10
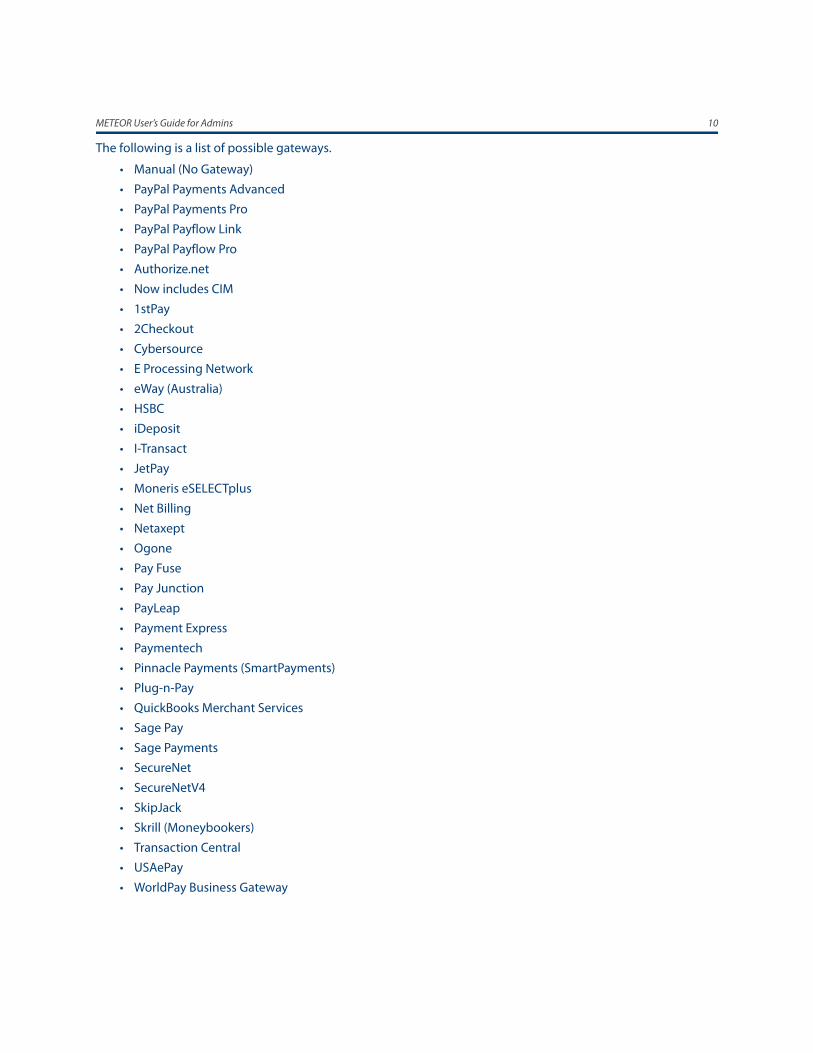
The following is a list of possible gateways.
• Manual (No Gateway)
• PayPal Payments Advanced
• PayPal Payments Pro
• PayPal Payflow Link
• PayPal Payflow Pro
• Authorize.net
• Now includes CIM
• 1stPay
• 2Checkout
• Cybersource
• E Processing Network
• eWay (Australia)
• HSBC
• iDeposit
• I-Transact
• JetPay
• Moneris eSELECTplus
• Net Billing
• Netaxept
• Ogone
• Pay Fuse
• Pay Junction
• PayLeap
• Payment Express
• Paymentech
• Pinnacle Payments (SmartPayments)
• Plug-n-Pay
• QuickBooks Merchant Services
• Sage Pay
• Sage Payments
• SecureNet
• SecureNetV4
• SkipJack
• Skrill (Moneybookers)
• Transaction Central
• USAePay
• WorldPay Business Gateway

METEOR User’s Guide for Admins 11
Configure Shipping MethodsSelect and set up your shipping methods including carriers, rates and shipping parameters (e.g., set up different rates for different items or for different total purchase amounts, etc.). You can set up different shipping methods for different customers levels.
NOTE: Real time rates and the fixed rates cannot be mixed - your store can offer live rates from one or more of the major shipping carriers, or the custom rates you set up, but not both.
After you create a shipping methods, you can set the following shipping restrictions.
Set Allowed States
• Check the states that you want to allow using this shipping method.
Set Allowed Countries
• Check the countries that you want to allow using this shipping method.
Set Allowed Zones
• Check the zones that you want to allow using this shipping method.
Use these settings if you want to restrict shipping to certain areas. If you do this, confirm that every method has at least one valid state/country combination or zone or it will not be visible to your customers. For example, a shipping method that allows Florida but not United States will not appear. Confirm that you have shipping methods for all the regions from where you want to accept orders. If you have not configured a method to ship to the address of a customer, that customer will be unable to complete checkout.
1. On the toolbar, click the Configuration tab, select Shipping → Shipping Methods.
• The Shipping Methods window opens.

METEOR User’s Guide for Admins 12
2. Click the Add New Shipping Method button . The Add New Shipping window opens.
3. Enter a name e.g., Basic Shipping.
Note: The name given to shipping method is just a label that's presented to your customers. It does not have to be a valid carrier shipping method name. “U.S. Ground Shipping,” “Local Pickup,” “Super Saver Shipping,” etc. are all just as acceptable as “UPS Ground” and “2nd Day Air.”
4. Click the Add New button. The Shipping Method window appears again.
5. Click the Configure rates link .

METEOR User’s Guide for Admins 13
• The Configure rates window opens.
Select Shipping Method Rates1. Click on one of the option buttons to select the shipping method rate. You can select from the following
rates.
• Calculate Shipping By Weight
• Calculate Shipping By Total (i.e., monetary amount of the total order)
• Use Fixed Prices
• All Orders Have Free Shipping
• Use Fixed Percentage Of Total (i.e., monetary amount of the total order)
• Use Individual Item Shipping Costs
• Use Real Time Rates
• Calculate Shipping By Weight & Zone
• Calculate Shipping By Total & Zone
• Calculate Shipping By Total & Percent
2. After you have selected your shipping method rate, click the Set As Active Shipping Calculation Method button to set your shipping rate parameters.
• The ACTIVE RATE TABLE window opens at the bottom.

METEOR User’s Guide for Admins 14
The Active Rate Table will appear with a specific set of parameters that differ from the other shipping methods rates. The table shown above is an example only for the Order Total shipping method rate. Tables and parameters will differ for each shipping method rate calculation.
3. Edit your shipping rate parameters such as different rates depending on items purchased, total charge, total items.
4. If you want to add more parameters, click the Add New Row button.
Real Time Methods
If your store is configured to offer real time rates, you will see an expanded shipping method window on the Shipping Methods page. This is a list of all of the services that each particular shipping carrier has returned for various customers in the past. The shipping carrier offers these additional rate deals for your use. There should never be any reason to delete these methods. These methods might include the following:
• UPS Ground
• UPS 3-Day Select
• UPS 2nd Day Air
• UPS Next Day Air Saver
• UPS Next Day Air Early AM
• UPS Next Day Air

METEOR User’s Guide for Admins 15
Monthly Maintenance1. On the toolbar, click Configuration and Maintenance → Monthly Maintenance.
• The Monthly Maintenance window opens.
From this page, you can run periodic maintenance which is necessary for keeping the store running smoothly and quickly. For the first five tasks, you can choose whether to do a specific maintenance on all records, no records, or only on records older than 30/60/90/120/150/180 days. You can perform multiple actions simultaneously.
Note: Perform this maintenance during off-peak hours, since the software may temporarily block various parts of the database during the maintenance operation. This will prevent customers from using the site or some parts of the site.

METEOR User’s Guide for Admins 16
NOTE: These tasks take time to complete. Once you click Go and the process begins, do not interact with the admin site until the software displays the completed message. During the maintenance operations, the software will log out all currently logged-in admin users.
Option Name Description
Clear all Shopping Carts If you plan to change prices on products or discontinue products, this option will clear the contents of any saved customer shopping carts older than the age selected. The contents of the shopping carts are products that customers added to the shopping cart before the product/price change. If you have changed prices of products or discontinued items, perform this operation to ensure that customers do not attempt to purchase discontinued products or products with updated prices.
Clear all Wish Lists If you plan to change prices on products or discontinue products, this option will clear the contents of any saved customer wish lists older than the age selected. The contents of the wish list are products that customers added to the wish list before the product/price change. If you have changed prices of products or discontinued items, perform this operation to ensure that customers do not attempt to purchase discontinued products or products with updated prices.
Clear all Gift Registries This will clear the contents of any saved customer gift registries older than the age selected. If you plan to change prices on products or discontinue products, this option will clear the contents of any saved customer gift registries The contents of the gift registries are products that customers added to the gift registries before the product/price change. If you have changed prices of products or discontinued items, perform this operation to ensure that customers do not attempt to purchase discontinued products or products with updated prices.
Erase Credit Cards/eCheck from Order Records
Credit card information is generally not required after the initial purchase, and storing it presents an unnecessary risk. This option will remove the (encrypted) credit card information from order records older than the date selected.
Erase SQL Log If SQL logging is enabled, this option will clear the contents of the SQLLog table to prevent it from getting too large. These records are not necessary for the operation of the store. They merely provide an audit record if necessary.
Clear Profiles Older Than This option clears the customer Profile which stores the cookie data and site settings for customers. Although it is generally safe to delete all Profile data, it is best to retain the last 30 days of data.
Clear Product Views Older Than This option clears the customer product views, which are saved for uses such as dynamic related products.
Invalidate All User Logins When you run this option, METEOR will force all admins and customers to log into the site on their next visit, even if they had set it to keep them logged in.
Purge Anon Customers This will clear the records of anonymous customers, i.e., customers who performed an action on your site that caused METEOR to create a temporary record for them (added to the cart, chose a locale, etc.) but who never registered or checked out. These records are not necessary and clearing them will not affect the operation of the store.

METEOR User’s Guide for Admins 17
Erase Credit Card/eCheck info from Address records
If your site is storing credit card numbers, customers who have allowed their information to be stored will have their credit card information in their Address records. This information is completely separate from any orders they've placed. This option will clear that information out of your database.
Purge all records that are marked as Deleted
Many of the Delete buttons in the store admin site do not permanently remove the selected objects (products, customers, etc.). Those records are just marked as “deleted” in the database and no longer appear in the admin site. This allows the you to recover these records if necessary. If you want to remove those records permanently, select this option.
Tune Indexes This option performs basic maintenance on your database to increase site performance.
Save Settings To save the maintenance selections that you have made on this page, select this option. This enables you to perform the same tasks the next time without selecting the option buttons.
Option Name Description

METEOR User’s Guide for Admins 18
Managing OrdersThis is where you perform the majority of order processing. You can view new/old orders, capture payment, handle shipping and examine other customer records.
View Product Reports
1. On the toolbar, click Orders →View/Manage Orders.
The Manage/View Orders window appears.
The DateRange window on the left displays order reports. The window displays all new orders for the last week by default.
The search window (OrderQualfiers window) at the top right of the page allows you to refine the list of visible orders based on parameters.
DateRange window OrderQualifiers window

METEOR User’s Guide for Admins 19
METEOR stores detailed information on various parts of the order in seven tabs.
Tab Definition
General This tab contains the basic customer and order information for the order being reviewed. It also displays information about the shipping status of the order, and allows you to enter shipping information and send “shipped” e-mails.
Billing This tab contains the full payment information for the order in question. If METEOR stores credit card information, this is the only place that the full credit card number will show.
Shipping The shipping tab shows the full details of shipping for the current order.
Customer This tab shows the you all of the customer's information. If there is a problem with a customer’s e-mail address, you can specify a different e-mail address to use for receipts other than what is entered on the original order record.
Notes This tab allows admins to make notes about the order and/or customer. Some of these notes are visible to the customer and some are not, each box is labeled to indicate which is which.

METEOR User’s Guide for Admins 20
ReportsWhen you select your orders in the OrderQualfiers window, you can format the results as a report in the DateRange window. You can generate three types of order reports for each of the dates and ranges you select.
Regular Report
This report lists all new orders in a column on the left, with a tabbed detail window on the right.
1. For Report Type, select Regular.
2. Click the Submit button.
Bulk Printing
The bulk printing report displays all new orders in a condensed grid. This is often used to generate “pick lists,” and also allows the bulk printing of receipts.
1. For Report Type, select Bulk Printing.
2. Click the Submit button.
Summary
The summary report shows almost all details of all new orders in a table.
1. For Report Type, select Summary.
2. Click the Submit button.
Editing OrdersThis is an advanced function. The store owner can enable admins to edit completed orders. Only experienced admins with the permission of the store owner should edit orders.
By default, once a customer places an order, you cannot edit it. If you must make changes, you must first make an ad-hoc charge/refund to adjust the order total. See “Ad-hoc Transactions” on page 21.
NOTE: Different industries and gateways have different rules on editing completed orders. Check with a professional advisor for the requirements for your site.
To qualify for editing, orders must:
• Not contain gift cards
• Not contain gift registry items
• Not be captured
• Have a single shipping address
Receipt This tab shows the receipt that METEOR sent to the customer when the order was placed. Admins can also open the receipt in a separate window for printing.
XML This tab contains the XML document sheet that METEOR generated for the order - pricing, shipping, taxes, etc. This information is rarely necessary for admins, but can be useful in troubleshooting issues that arise with specific orders.
Tab Definition

METEOR User’s Guide for Admins 21
• Not have recurring items
• Not have been previously edited
• Not have had the download e-mail sent (if a digital product)
• Not been marked as shipped
• Not have had the distributor e-mail sent
• Not be a PayPal or PayPal Express order
• Not have been placed by the same admin account that is trying to edit the order
• Not be C.O.D., Purchase Order, Check by Mail, or Request For Quote
Processing Orders
Collecting PaymentDepending on the payment methods you accept and your transaction mode, it may be necessary to take manual steps to collect payment on new orders.
Automated Payment Methods If you are using one of the supported payment gateways, PayPal, or Google Checkout, collecting payment is as simple as clicking the 'Capture' button on a new order. The software will call the gateway and instruct it to transfer the authorized amount from the customer's account.
Check or Purchase Order For orders where the customer paid by check or purchase order, you must handle the order processing outside the METEOR software. METEOR will send customers an e-mailed receipt with their order total; however, you may be required to contact the customer, inform them of where to send payment, etc. METEOR does not handle that kind of transaction. You should do it manually or through your accounting software package. Once you have received payment click the Capture button on the order to indicate receipt of payment.
Ad-hoc TransactionsAd-hoc transactions allow you to make partial refunds, or add to the cost of an order. The option is only available
if the order's Transaction State is “Captured,” and the button appears at the top of

METEOR User’s Guide for Admins 22
order.
To perform an ad-hoc transaction:
1. Click the button, and then fill in the required fields on the window that opens (your screen may look slightly different depending on your gateway and the type of transaction).
2. Click Create New Order button or the Cancel button.
Shipping ProcessingIf you do not handle most shipping in bulk by FedEx Shipping or UPS or other supported label software, then each order requires you to have the shipping information added manually. You perform this function here.
Once you enter the carrier, tracking number, and shipping date, click the Mark As Shipped button. METEOR sends the customer an e-mail with the product’s shipping information. This also removes the 'IsNew' flag from the order. It will no longer show up in the list of orders on this page unless you search for it.

METEOR User’s Guide for Admins 23
NOTE: If the order is set for “No Shipping Required” such as for an e-mail type gift card item, you will need to clear the IsNew flag once the payment has cleared. Click the New! icon at the top of the order to clear it.
Void/RefundsThere are four options for canceling an order.
• Void - You can void only orders that have not been captured. If the payment method went through a payment gateway, METEOR will notify the gateway to cancel the transaction and will remove the “IsNew” flag from the order.
• Force Void - This allows you to void pending orders. The force void button ignores the payment method of the order and does not contact the payment gateway.
METEOR marks the order as voided within the software only.
Once you force void an order, METEOR clears the "New" flag on the order and marks the Transaction State as “Force Voided.” METEOR will also enter a Voided On date. METEOR hides the Void, Force Void, Refund and Force Refund buttons. It unwinds the transaction at the same time restores the inventory.
• Refund - You can use the Refund function on orders that have been captured. METEOR notifies the payment gateway to reverse the charges (if applicable) and remove the “IsNew” flag from the order.
• Force Refund - Use this button only if neither the Void nor Refund options work. The force refund button ignores the payment method of the order and does not contact the payment gateway.
METEOR marks the order as refunded within the software only.
If you used another payment method or other accounting package, you still must handle the refund separately using these separate methods. You generally use the Force Refund option for paper payment methods such as checks and purchase orders.

METEOR User’s Guide for Admins 24
Managing ProductsWhen you add a product or change a product’s configuration (specifications, images, dimensions, etc.), you will use primarily the Main, Images, Description, Mappings and Variants tabs. All products on your website share the same basic attributes that these tabs control. These attributes are broken up into tabs, which are explained below.
Modifying or Adding a Product1. On the toolbar, click Products → Manage Products.
• The Manage Product window opens.
2. To modify a product, click on the product. To add a new product, click the green plus sign .
• The Main tab window opens.
3. Configure your product. See the next section.

METEOR User’s Guide for Admins 25
The Main TabThis is the most important tab. Here you will add all the essential information about your product.
1. Fill out the following fields, an asterisk (*) before the field indicates that METEOR requires an entry. See the table below for entry definitions.
2. Click the Add New button to add the product.
3. Click the Save and Close button or click the Cancel button to cancel.
Setting Definition
Name The product's name. This is visible to all customers
Product Type General type of product (generic, gift card, kit, etc)
Manufacturer Manufacturer. Use the predefined “Generic Mgf” if you do not have a custom manufacturer.
Distributor Provider/Drop-shipper to which the product is assigned

METEOR User’s Guide for Admins 26
SKU SKU number
Manufacturer Part # If populated (optional), this value will be sent in e-mails to distributors.
Published Determines whether or not the product appears on the front end of your site.
Google Checkout Allowed Determines whether customers can use the Google checkout button on the cart page (if configured) or must go through standard checkout.
Display Format XML Package The XML package chosen here determines how the software displays your product detail page on your website.
Page Size This determines how many variants the software will display on your web page if multiple product variants exist.
Column Width If multiple variants exist and the software displays them using one of the grid XML packages, this value determines how METEOR will arrange the variants into a number of separate columns .
Tax Class Which tax class to use to look up/apply tax rates to this product during checkout
Quantity Discount Table If you select this discount table, customers will get a discount based on the number of this item they purchase.
Start Date The first date you wish the product to appear to customers. Defaults to today's date.
Stop Date The last day you wish customers to be able to view that product. Generally left blank.
Show Buy Button If you set this to No, the software hides the Add to Cart/Wishlist/Gift Registry buttons.
Requires Registration to View Hides the product from anonymous customers.
Is Call to Order If you set to Yes, the software displays the “Call to Order” prompt to customers and hides “buy” buttons.
Hide Price Until Cart This prevents the item price from showing up on the product detail page.
Exclude From Product Feeds Prevents the software from exporting this product's info when feeds (PriceGrabber, Google, etc) execute.
Is a Kit Sets this as a kit product.
Track Inventory by Size and Color Allows you to specify individual inventory levels for every size/color combination on a product variant. Using this method will not work with Kits tied to the variant.
Color Option Prompt Text to display to customers for attributes they may choose instead of “Color:”
Size Option Prompt Text to display to customers for attributes they may choose instead of “Size:”
Requires Text Field If Yes, the software will display a text field on the product detail page, for customers to enter personalization/custom information.
Setting Definition

METEOR User’s Guide for Admins 27
Field Prompt How to label the text box if “Requires Text Field” above is true.
Max Length Max number of characters allowed in the text field.
Setting Definition

METEOR User’s Guide for Admins 28
The Images TabThis tab allows you to upload pictures of your product.
\How METEOR Handles ImagesMETEOR keeps track of your images by the product ID not the image name (see Image Filename Override below to change this).
• Icon - a small icon of your image
• Medium - a medium-sized photo of your item
• Large - a large-sized photo of your item
• Color Swatch - This is for advanced admins or your website developer. This term has little to do with colors. It refers to a graphic that contains multiple images of your product. See the section, Swatch Images, below.
• Swatch Image Map - This is for advanced users or your website developer. This term refers to the HTML code used to define the swatch images. METEOR can generate this automatically or you can use this to create an image map manually.
• For more detail, see the aspdotstorefront manual and the section, Swatch Images, in http://manual.aspdotnetstorefront.com/p-963-swatch-images.aspx

METEOR User’s Guide for Admins 29
Uploading Your Product Images
1. To add quickly all three of the same images (icon, medium, large) to your website, perform the following steps. (For information regarding AppConfigs, see “Managing AppConfigs” on page 32.)
1. Confirm that the AppConfig, LargeCreatesOthers, value is set to True.
2. In the Large Choose File button, browse for your large image file and select it.
3. Click the Add New button if you want to stay on the page or the Save and Close button to save and close.
• METEOR will adjust the size of the icon and medium images to conform to the icon and medium dimensions.
2. To add three different images (icon, medium, large) to your website, perform the following steps. You can also perform this function using the Image Filename Override function (see below).
1. The AppConfig, LargeCreatesOthers, value is set either to True of False.
2. In the Icon, Medium and Large Choose File buttons, browse for your three image files.
3. Click the Add New button if you want to stay on the page or the Save and Close button to save and close.
Image Filename OverrideThis function provides a handy way of uploading images that have more detailed or specific product identification than just the product ID. This is very useful in search engine optimization (SEO). This also provides a means of quickly changing your images, or adding three different images for icon, medium and large. METEOR will ignore the stored images in the back end and default to the image override images.
However, using image filename override requires a little more work on your part since you must manually resize each of your three images using an image editing program (such as PhotoShop or Paint Shop Pro). You must also upload these three images manually to your images folders on your website’s root directory. Finally, you can only upload the simplest images (one view, one color) to each of the icon, medium and large folders.
Using Image Filename Override
1. You should have three folders in your root\images\products\directory (e.g., root\images\products\icon, root\images\products\medium, root\images\products\large.
2. Create three images and give them all the same name (e.g., mytshirt.jpg)
3. Place each of the three images in its respective folder.
4. In the Images Tab, enter the filename (e.g., mytshirt.jpg) in the Image Filename Override box.
5. Click the Add New button if you want to stay on the page or the Save and Close button to save and close.
6. To revert to the former METEOR image product ID handling, delete the filename (e.g., mytshirt.jpg).
7. Click the Add New button if you want to stay on the page or the Save and Close button to save and close.
A Note on Color Swatch and Swatch Image Maps
Product detail pages can have multiple images. This allows customers to get a better idea of what they're buying or view alternate versions of the product (for example, sizes or colors).
The swatch image function is one way to allow customers to select and change among multiple images. A swatch image is made up of multiple regions, with each region representing a different alternate image for the product.
The swatch image map links each small image in the swatch image to the large product images.
A swatch image map is overlaid on the swatch image, so when customers click a region of the swatch, the

METEOR User’s Guide for Admins 30
software displays the appropriate alternate image. For example, a product page has the following 3 images, and only the red image is visible.
A swatch image would look like this:
The red image is the default main image for the product detail page, but if a customer clicks the green section of the smaller swatch image, the main image will change to the green image.
METEOR can set up the swatch images and swatch image maps automatically, but the website manager with knowledge of HTML should manage these functions in order to set up correctly the images and swatches.

METEOR User’s Guide for Admins 31
The Description TabWrite a brief description of the product that describes what makes it special.
1. Write the description in the text processing box.
2. Click the Add New button to associate it with the product.
3. Click the Save and Close button or click the Cancel button to cancel.

METEOR User’s Guide for Admins 32
The Mappings TabYour product must belong to some kind of category. In other words, each product will have an associated category. You configure this information in the Mappings Tab. Although it depends on the design of the web page, METEOR usually displays the categories on the left hand side of the web page. For example, in the figure below, the following categories are for body-building supplements. In addition, you can associate each category/product with a customer level. In this case, you can associate customers with free shipping at levels using BB.com purchasing or purchase order purchasing or just those customers that you want to send samples.
The following figure shows an example of a product category display and reflects the same categories listed in the Mappings Tab. The categories are listed on the left (WEIGHT LOSS, ENERGY, PRE-WORKOUT, HORMONE

METEOR User’s Guide for Admins 33
SUPPORT, STACKES, BUNDLES).
Add Your Product to a Product Category1. Select a box or boxes to associate your product with a category.
2. Select a box to associate your product with a your customer level that you defined earlier. This means that this product will receive a particular consideration at that particular customer level.

METEOR User’s Guide for Admins 34
The Variant TabA variant is a similar product with minor differences. Every product will have an associated variant, even if there is only one variant (i.e., the product itself). Every product has at least one variant so that METEOR can manage all of the specific product information. Products do not have to have multiple variants. Each product is a combination of parent product and the variant information.
In other words, all products listed on your METEOR website are variants, even if there is only one variant. A variant is simply a version of the parent product. The variant inherits much of its information from the parent. For example, if you sell movies that come in DVD and VHS format, the parent product is the movie and different formats could be set up as DVD and VHS variants. Parent product information might include movie name, manufacturer, etc., while some details (price, weight, etc.) are associated with the variant.
It is the variant that you sell not the parent product.
1. Enter the following product information.
• Price• Sale Price• WeightWeight is our product's weight, which defaults to pounds. Enter as a decimal (example: 12.5). You can change the default weight unit using the Localization.WeightUnits AppConfig. If a weight is set on a product variant, it will override this setting.
• Dimensions• Current Inventory• ColorsIf your product has a selection of colors, enter them here as a comma separated list (such as Red,Green,Blue). If certain colors cost more than others, you can add a price modifier as well using square brackets.
For example, if Red costs $3.00 more than blue, you can enter the colors as Red[3.00], Blue. If a customer selects red, $3.00 will be added to the price. DO NOT ENTER SPECIAL CHARACTERS SUCH AS AMPERSANDS OR SLASHES INTO COLOR NAMES.

METEOR User’s Guide for Admins 35
• Color SKU ModifiersIf your product has colors, and the SKU varies by color, enter a comma separated list of the sku modifiers here. These will be added to the end of the SKU when a customer purchases this item/color combination.
For example, if you sell Red, Green, and Blue shirts, enter r,g,b here, and when you order this item in red, the sku will be 12345r (where “r” is the sku modifier that you specified for red).
• SizesIf your product has a selection of sizes, enter them as a comma separated list (such as Small,Medium,Large,XLarge). If certain sizes cost more than others, you can add a price modifier as well using square brackets.
For example, if XLarge costs $3.00 more than other sizes, you can enter the sizes as Small,Medium,Large,XLarge[3.00]. If a customer selects XLarge, $3.00 will be added to the price. DO NOT ENTER SPECIAL CHARACTERS SUCH AS AMPERSANDS OR SLASHES INTO SIZES.
• Size SKU ModifiersIf your product has sizes and the SKU varies by size, enter a comma separated list of the sku modifiers here. These will be added to the end of the SKU when a customer purchases this item/size combination.
For example, if you sell Small, Medium, and Large shirts, you could enter s,m,l here, and when this item is ordered in medium, the sku would be 12345m (where “m” is the sku modifier that you specified for medium).
2. Click the Add New button to associate it with the product.
3. Click the Save and Close button or click the Cancel button to cancel.

METEOR User’s Guide for Admins 36
Optional TabsThese tabs are used to provide additional information. Only advanced admins and website managers should use these tabs.
The Summary TabWrite a blurb about the product.
The Search Engine TabAdd metadata for the browser search engines for text to search.
The Product Feeds TabProduct Feeds are frequently updated works—such as blog entries, news headlines, audio, and video.
The Options TabAdd additional options for your product.
The Extension Data TabAdd your own data and miscellaneous text as an XML document.

METEOR User’s Guide for Admins 37
Managing Customers
Adding Customer and Address Information
1. On the toolbar, click Customers →Add New Customer.
• The Customer Detail window opens.

METEOR User’s Guide for Admins 38
2. Enter required fields. Although there is more information that you can add, METEOR requires the following values.
• First Name
• Last Name
• Phone
3. Set a password either by clicking the Reset to Random Password button or enter a password manually and click Manually Set Password button.
4. Click the Update Customer button.
Enter Billing and Shipping Addresses
1. At the bottom of the Customer Detail window, click the View/Edit Addresses button .
• The Customer Address window opens.
2. Add the following required information.
• First Name
• Last Name
• Address
• City
• State/Province
• Country

METEOR User’s Guide for Admins 39
• Residence Type: Unknown or Residential or Commercial.
3. Click the Add or Cancel button.
4. Click either the Make Primary Billing Address button or Make Primary Shipping Address button
5. If yon want to return to the Customer Detail window, click on the Edit Customer button.
Adding an AdminAdding an admin is the same as adding a new customer except that you upgrade them to admin or super admin. A superadmin has permissions to change all AppConfigs. An admin has more limited access to certain AppConfigs (i.e, the admin has no access to the storing of credit card numbers AppConfigs). Both an admin and super admin must create a strong password to enter the Admin Console.
1. On the toolbar, click Customers → View/Edit customers.
• The Customers window opens.
2. Find your customer by entering one or more of the following types of customer information in the search box.
• First Name
• Last Name
• Phone
3. Click the Set Admin button to upgrade him to admin or click Set Super Admin button to upgrade him to super admin.
Removing an AdminYou can “demote” an admin account back to a regular customer account,.
1. On the toolbar, click Customer → View/Edit customers.
2. Find your customer by entering one or more of the following types of customer information in the search box.

METEOR User’s Guide for Admins 40
• First Name
• Last Name
• Phone
3. Click the Clear Admin button to downgrade the account to customer, or click Clear Super Admin button to downgrade the account to customer.
Managing Customer LevelsThe customer level feature allows you to put your customers into groups, which can receive discounts, special prices, be tax exempt, etc. You can also use customer levels to determine which visitors on your site see which products. You can create new levels, edit or delete the existing ones, or view a list of which customers are in each level.
Defining Customer LevelsHow to add a customer level.
1. On the toolbar, click Customers →Manage Customer Levels
• The Customer Level Management window opens.
2. Click the Add New Customer Level button at the bottom .

METEOR User’s Guide for Admins 41
• The Adding New Customer Level window opens.
3. Enter the required information in the following fields.
Field Name Description
Name This is the customer level name (e.g., BB.com, GNC). This will be visible to customers who belong to this level.
Level Discount Percent If you want this customer level to get a certain percentage off all products' base prices (NOTE: Customer levels ignore sale prices entirely), put the percentage here.
Level Discount Amount If you want this customer level to get a certain amount off all products' base prices (NOTE: Customer levels ignore sale prices entirely), put that amount here.
Level Includes Free Shipping If this is set to Yes, customers in this level will get free shipping on all orders, regardless of what they purchase. If set to No, normal shipping prices are added.
Level Allows Quantity Discounts If this is set to Yes, customers in this level can take advantage of whatever quantity discount tables are assigned to the products they purchase. If it's set to No, these customers will not get quantity discounts.
Level Allows Purchase Orders If this is set to Yes, and purchase orders are set up as an allowed payment method, customers in this level will be allowed to use POs to pay. If set to No, they will not be able to even if other customers can.
Level has no Tax on Orders If this is set to Yes, customers in this level do not pay taxes on orders. If set to No, tax is charged normally.

METEOR User’s Guide for Admins 42
Managing Customer Level MembershipYou can view the list of customers that belong to a certain customer level. You can view customers by clicking on one of the letters to view them alphabetically or search for a specific e-mail address.
1. In the Customer Level Management window, click the Show Customers button.
• The Show Customer Level window opens.
2. To add a customer, enter the customer ID or e-mail address in the text field.
3. Click the Add Customer to This Level button.
4. To remove a customer, click the Clear Level button.
Level Allows Coupons on Orders If this is set to Yes, customers in this level can use coupons normally. If it is set to No, the coupon pane will not even appear for them on the shopping cart page.
Level Discounts Also Apply to Extended Prices
If this is set to Yes, and you have set up extended prices, customers will receive the discount percentage/amount off of those extended prices. If this is set to No, they will get whatever extended prices were set up with no further discount.
Field Name Description

METEOR User’s Guide for Admins 43
Managing AppConfigsAppConfig Parameters are settings that control how the METEOR software functions. You use these tools to change the look and feel of the website. You can also change how it handles images, products, orders, etc. You use AppConfigs to manage many of the carts settings. You can change the values of an AppConfig to change everything from shipping methods to product defaults. For example, you can change the display of your products either in a list or in a grid. You an change the name of your store on your home page. This section will give you an overview of modifying AppConfigs values.
METEOR lists AppConfigs by store, Id, name, description, current value and the group name under which the AppConfig is stored.
Note: You can set the values for an AppConfig, but you should not edit, add or delete an AppConfig itself. This is an advanced feature that will not be used by the majority of admins Please contact Complemar for information and support before adding or changing an AppConfig.
An AppConfig ExampleUsing the AppConfig, StoreName, as an example, to change the breadcrumbs on your website home page.
1. On the tool bar, click Configuration→Advanced→AppConfig Parameters.
• The AppConfig Parameters window opens and displays the available AppConfigs.

METEOR User’s Guide for Admins 44
2. Search for the AppConfig, StoreName, by entering StoreName in the search box and clicking search. The search box is the easiest way to find an AppConfig.
• The StoreName AppConfig appears and displays a description of it’s function. In this case, it is the name of your store.
3. When StoreName appears, double click on Value or Edit.
4. Change the Name value, e.g., Mel’s Diner.
5. Click the Update button. The name of your store in breadcrumbs has changed to Mel’s Diner on your home page.
If you click the Update button and nothing happens, clear the cache (see instructions below).
6. Go back to home page and see your new name in the breadcrumbs.
Searching for AppConfigs1. Type the name into the box.
2. Click Search.
• If you're not sure of the name, METEOR tries to make the AppConfig names as relevant to their function as possible. For instance, if you want to change settings for how product ratings work, a simple search for “ratings” will return the applicable settings.
• You can also click any of the letters going down the left hand side of the METEOR web page, and only AppConfigs beginning with that letter will be displayed.
3. Finally, METEOR divides the AppConfigs into groups of settings that affect similar functions - ADMIN, GATEWAY, etc. Choosing a config group from the dropdown list will narrow the list of settings presented. This can help focus your search.

METEOR User’s Guide for Admins 45
Note: if update does nothing, reset the cache, if you had it turned on.The Reset Cache button is located on the right hand side of the toolbar.
Cache is now off.
Click TURN CASHING ON or Click TURN CASHING OFF.

METEOR User’s Guide for Admins 46
Index
AActive Rate Table 14
Adding a Product 24
Adding an Admin 39
Adding Customer and Address Information 37
Adminadding 39functions 3removing 39site 4toolbar 4
Alternative Payment Methods 7
AppConfigs 43
BBilling and Shipping Addresses 38
Bulk Printing Report 20
CColor SKU Modifiers 35
Color Swatch 28
Configuration Wizard 4Configuring Your Store Front 4
Credit Cards 8Customer Levels
adding customers 42adding levels 40defining 40managing 40membership 42
Customersadding address information 37adding billing and shipping addresses 38adding customer 37managing 37
DDateRange Window 18, 20
Defining Customer Levels 40
Description Tab 31

METEOR User’s Guide for Admins 47
EExtension Data Tab 36
FForce Refund 23
Force Void 23
IImage Filename Override 29
Imagescolor swatch 29swatch image maps 29
Images Tab 28
LLevels
allows purchase orders 41allows quantity discounts 41defining customer levels 40discount amount 41discount percent 41has no tax on orders 41includes free shipping 41
MMain Tab 25
Maintenance 15
Managing AppConfigs 43
Managing Customer Level Membership 42
Managing Customer Levels 40
Managing Customers 24
Managing Orders 18
Managing Products 43
Mappings Tab 32
Monthly Maintenance 44
OOders
check or purchase order 21
Optional Tabs 36
Options Tab 36
OrderQualfiers Window 18
Ordersad-hoc transactions 21automated payment methods 21

METEOR User’s Guide for Admins 48
bulk printing 20check or purchase order 21collecting payment 21DateRange 18editing 20managing 18OrderQualfiers 18processing 21regular report 20shipping processing 22summary 20view product reports 18void/refunds 23
PPayment Gateway 9Payment Methods 7Product Feeds Tab 36
Products 24
RReal Time Methods 14
Refund 23
Regular Report 20
Removing an Admin 39
Reportbulk printing 20product 18regular 20summary 20
SSearch Engine Tab 36
Set As Active Shipping Calculation Method 13
Shipping Methods 11
Shipping Rates 12
Size SKU Modifiers 35
Store Front 4
Summary Report 20
Summary Tab 36
Swatch Image Map 28
Swatch Images 29
TTabs
description 31

METEOR User’s Guide for Admins 49
extension data 36images 28main 25mappings 32options 36product feeds 36search engine 36summary 36variant 34
VVariant
color SKU modifiers 35colors 34current inventory 34dimensions 34Price 34Sale Price 34size SKU modifiers 35sizes 35weight 34
Variant Tab 34
Void 23