microscope in middle schools project - university of...
TRANSCRIPT
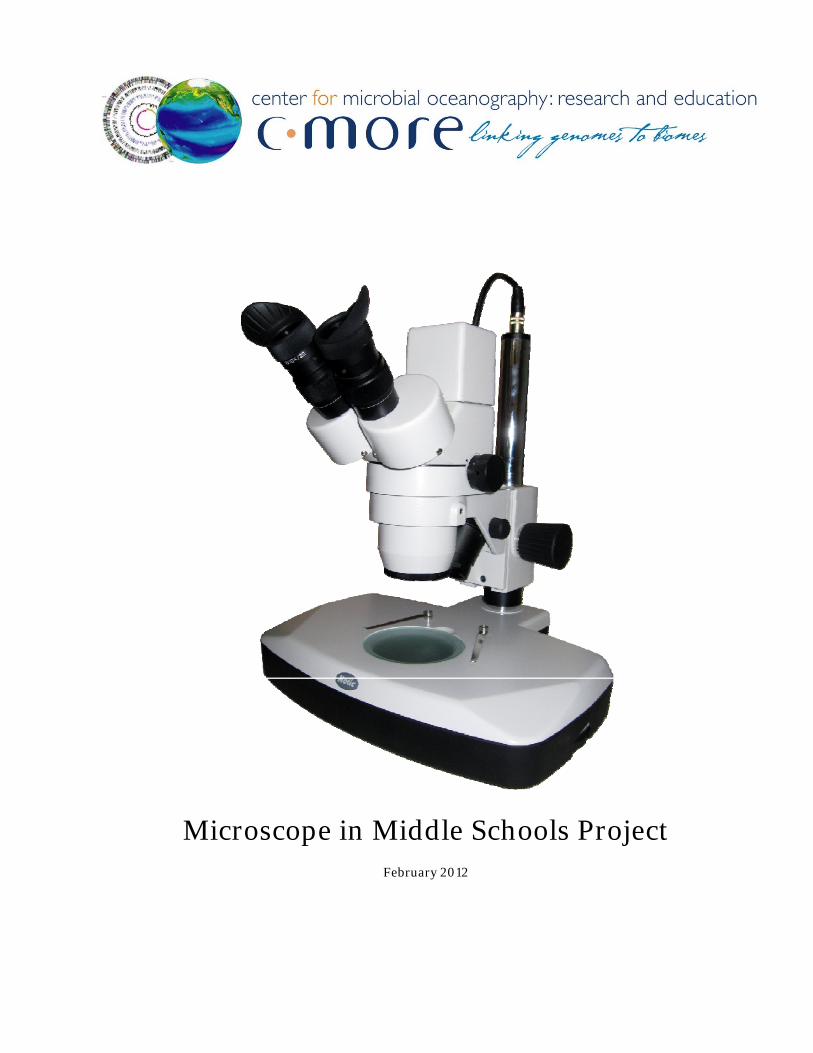
Microscope in Middle Schools Project February 2012
1
Microscope to Middle Schools
TABLE OF CONTENTS
Introduction ........................................................................................................................................................ 3
Lesson Overview and Materials List ................................................................................................................... 5
Hawai‘i Content & Performance Standards (HCPS III):....................................................................................... 7
Background Information about Microbial Oceanography ............................................................................... 11
MICROSCOPE GUIDE ......................................................................................................................................... 21
Using Motic Images Plus Version 2.0 ML on a PC .................................................................................. 24
Using Motic Images Plus Version 2.0 ML on a Mac ............................................................................... 27
Microscope Care .................................................................................................................................... 31
Lesson 1: Introduction to Plankton ................................................................................................................. 33
TEACHER GUIDE ..................................................................................................................................... 33
PLANKTON SURVEY – VERSION 1 ........................................................................................................... 35
TEACHER ANSWER KEY ................................................................................................................ 37
PLANKTON SURVEY – VERSION 2 ........................................................................................................... 39
TEACHER ANSWER KEY ................................................................................................................ 41
POWERPOINT SCRIPT ............................................................................................................................. 43
STUDENT WORKSHEET – POWERPOINT ................................................................................................ 45
TEACHER ANSWER KEY ................................................................................................................ 47
Lesson 1: Phytoplankton Microscopy Lab............................................................................................. 49
STUDENT WORKSHEET ................................................................................................................. 49
SLIDES ........................................................................................................................................... 51
Answer Key for Slides ................................................................................................................... 65
PHYTOPLANKTON ID GUIDE ......................................................................................................... 79
Lesson 2: Design Your Own Phytoplankton ...................................................................................................... 81
GRADING SHEETS ................................................................................................................................... 83
Lesson 3: Zooplankton Microscopy Lab .......................................................................................................... 85
STUDENT WORKSHEET ........................................................................................................................... 89
ZOOPLANKTON ID GUIDE ....................................................................................................................... 91
Extension: Build a Plankton Net ...................................................................................................................... 99
Extension Activity: Microscopes in History ................................................................................................... 105
GLOSSARY ....................................................................................................................................................... 107

2
3
Introduction Established in 2006, the Center for Microbial Oceanography: Research and Education (C‐MORE) is a Science
and Technology Center sponsored by the National Science Foundation. Our headquarters are located at
the University of Hawaii at Manoa in Honolulu. C‐MORE has three education goals:
Produce leaders in the next generation of microbial oceanographers.
Increase literacy in microbial oceanography
Broaden participation in the earth and ocean sciences among underrepresented groups.
To achieve these goals, C‐MORE's "K through gray" education programs serve a range of audiences,
including K‐12 students and teachers, undergraduate and graduate students, post‐doctoral researchers,
and the general public. Teacher professional development is an integral part of C‐MORE education.
In 2011, C‐MORE launched the Microscope in Middle Schools project. First, we purchased digital stereo
microscopes and related supplies for Hawaii Department of Education (HDOE) middle schools statewide.
Second, we are offering training workshops, where Hawaii’s middle school teachers will learn how to use
and care for the microscope. During these workshops, teachers will also learn about plankton and their
important roles in ocean ecosystems, climate regulation and our daily lives. Through a newly established
Memorandum of Understanding between C‐MORE and the HDOE, teachers who attend the workshop will
receive 3 HOUSSE points, which count toward Highly Qualified Teacher status.
This project was made possible by a subaward from the Hawaii Innovation Initiative, which was funded by
the State of Hawaii and the American Reinvestment and Recovery Act. Additional funding was provided by
the National Science Foundation (Grant #EF‐0424599)
Best Regards and Aloha,
Jim Foley Barbara Bruno
C‐MORE Marine Science Educator C‐MORE Education Director
& Microscope in Middle Schools Project lead Email: [email protected]
Email: [email protected] Phone: (808) 956‐0901
Phone: (808) 956‐7739

4
Education Office University of Hawaii 1000 Pope Road
Honolulu, HI 96734 http://cmore.soest.hawaii.edu/education.htm
©Center for Microbial Oceanography: Research and Education (C‐MORE). Materials may be duplicated and distributed for educational, non‐commercial purposes only.
5
INTRODUCTION TO PLANKTON
Lesson Overview and Materials List
Grade Level: Lessons are appropriate for students in grades 3–12.
Standards: Lessons are aligned with state science and art content standards for Hawai‘i.
Overview: Plankton are tiny plants (phytoplankton) and animals (zooplankton) that are incapable of swimming against major currents in the ocean. In Lesson 1, students learn about plankton through a narrated PowerPoint presentation and they investigate and identify various phytoplankton. In Lesson 2, students design their own phytoplankton. In Lesson 3, students investigate zooplankton with a microscope. Pre‐ and post‐ surveys are included.
Suggestions for Curriculum Placement: These lessons can be successfully integrated into a biology, environmental science, or marine science unit. Three key concepts are addressed: 1) the global significance of plankton in the marine food web; 2) adaptations of plankton; and 3) the identification of these mysterious critters under a microscope.
Materials: Paper materials included in this packet are shown in BOLD CAPS, Additional materials recommended are shown in lower case.
Lesson 1: Introduction to Plankton We suggest projecting slides or printing enough slides for 4–6 students per group.
1. TEACHER GUIDE – Lesson 1: Introduction to Plankton 2. PLANKTON SURVEY – Version 1 (geared towards elementary school standards) 3. TEACHER ANSWER KEY to PLANKTON SURVEY – Version 1 4. PLANKTON SURVEY – Version 2 (geared towards middle school standards) 5. TEACHER ANSWER KEY to PLANKTON SURVEY – Version 2 6. POWERPOINT SCRIPT 7. STUDENT WORKSHEET – POWERPOINT – Lesson 1: Introduction to Plankton 8. TEACHER ANSWER KEY to STUDENT WORKSHEET – POWERPOINT – Lesson 1: Introduction to
Plankton 9. STUDENT WORKSHEET – Lesson 1: Phytoplankton Microscopy Lab 10. SLIDES – Lesson 1: Phytoplankton Microscopy Lab 11. ANSWER KEY – Lesson 1: Phytoplankton Microscopy Lab 12. PHYTOPLANKTON ID GUIDE – Lesson 1: Phytoplankton Microscopy Lab
Lesson 2: Design Your Own Phytoplankton
13. TEACHER GUIDE – Lesson 2: Design Your Own Phytoplankton 14. GRADING SHEETS – Lesson 2: Design Your Own Phytoplankton 15. Black construction paper 16. Oil pastels (wax oil crayons)
6
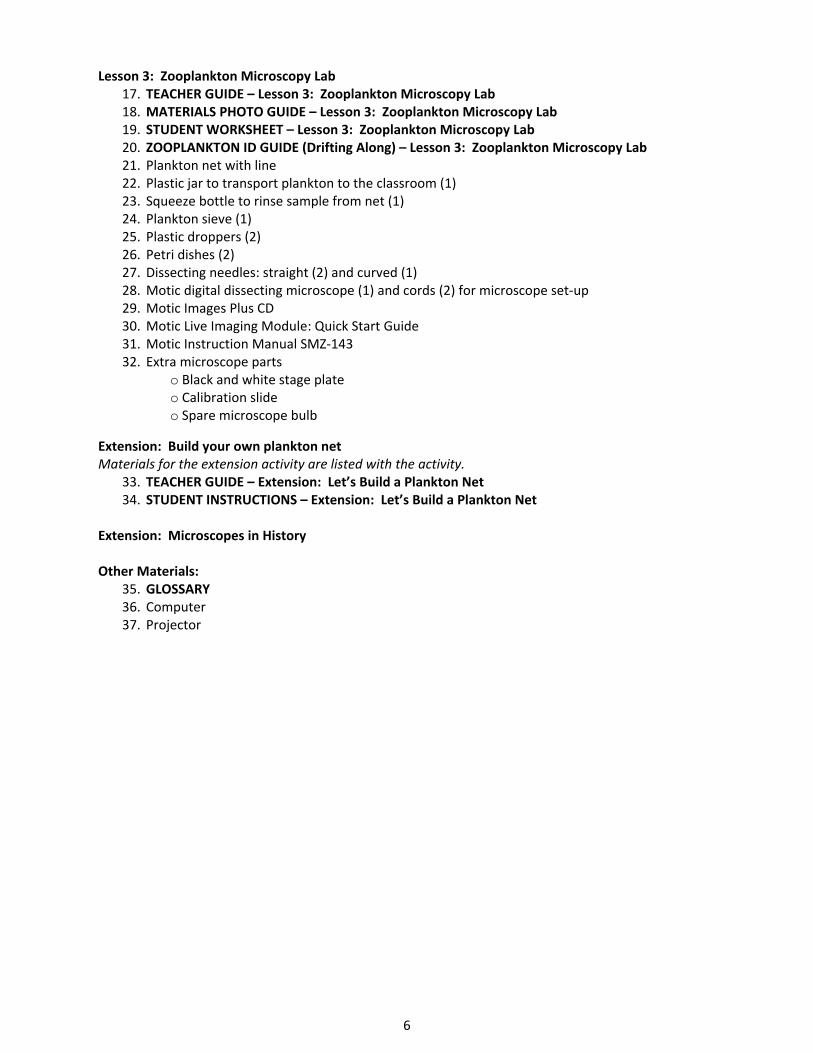
Lesson 3: Zooplankton Microscopy Lab 17. TEACHER GUIDE – Lesson 3: Zooplankton Microscopy Lab 18. MATERIALS PHOTO GUIDE – Lesson 3: Zooplankton Microscopy Lab 19. STUDENT WORKSHEET – Lesson 3: Zooplankton Microscopy Lab 20. ZOOPLANKTON ID GUIDE (Drifting Along) – Lesson 3: Zooplankton Microscopy Lab 21. Plankton net with line 22. Plastic jar to transport plankton to the classroom (1) 23. Squeeze bottle to rinse sample from net (1) 24. Plankton sieve (1) 25. Plastic droppers (2) 26. Petri dishes (2) 27. Dissecting needles: straight (2) and curved (1) 28. Motic digital dissecting microscope (1) and cords (2) for microscope set‐up 29. Motic Images Plus CD 30. Motic Live Imaging Module: Quick Start Guide 31. Motic Instruction Manual SMZ‐143 32. Extra microscope parts
o Black and white stage plate o Calibration slide o Spare microscope bulb
Extension: Build your own plankton net Materials for the extension activity are listed with the activity.
33. TEACHER GUIDE – Extension: Let’s Build a Plankton Net 34. STUDENT INSTRUCTIONS – Extension: Let’s Build a Plankton Net
Extension: Microscopes in History
Other Materials:
35. GLOSSARY 36. Computer 37. Projector
7
Hawai‘i Content & Performance Standards (HCPS III): The following science and art standards and benchmarks can be addressed through these C‐MORE lessons:
6th GRADE Benchmark SC.6.1.1 Formulate a testable hypothesis that can be answered through a controlled experiment Benchmark SC.6.1.2 Use appropriate tools, equipment, and techniques safely to collect, display, and analyze data Discuss how to conduct experiments with the plankton net. Discuss data collection methods and questions that students could answer using the equipment. Example: Use the net and microscope to answer the question “Are the plankton found at [location] the same during morning, noon and night?
Benchmark SC.6.2.1 Explain how technology has an impact on society and science Benchmark SC.6.2.2 Explain how the needs of society have influenced the development and use of technologies Discuss how microscope technology has developed and examine some microscopic discoveries that have changed the world.
Benchmark SC.6.3.1 Describe how matter and energy are transferred within and among living systems and their physical environment Discuss the role of plankton in biogeochemical cycling in the ocean.
7th GRADE Benchmark SC.7.1.1 Design and safely conduct a scientific investigation to answer a question or test a hypothesis Benchmark SC.7.1.2 Explain the importance of replicable trials Benchmark SC.7.1.3 Explain the need to revise conclusions and explanations based on new scientific evidence Discuss how to conduct experiments with the plankton net and hypotheses that students could test using the equipment. Example: Does the plankton community at [location] change as a result of a heavy rain?
Benchmark SC.7.3.1 Explain how energy moves through food webs, including the roles of photosynthesis and cellular respiration Benchmark SC.7.3.2 Explain the interaction and dependence of organisms on one another Benchmark SC.7.3.3 Explain how biotic and abiotic factors affect the carrying capacity and sustainability of an ecosystem Discuss the role of plankton in biogeochemical cycling in the ocean.
Benchmark SC.7.4.1 Describe the cell theory Benchmark SC.7.4.2 Describe the basic structure and function of various types of cells Benchmark SC.7.4.3 Describe the levels of organization in organisms Benchmark SC.7.4.4 Classify organisms according to their degree of relatedness Benchmark SC.7.5.4 Analyze how organisms' body structures contribute to their ability to survive and reproduce Benchmark SC.7.5.5 Explain how fossils provide evidence that life and environmental conditions have changed over time Discuss how different plankton (including viruses, single cell organisms and multi‐celled organisms) are adapted to survive in the marine environment. Discuss the natural history of microbes on Earth.
8
8th GRADE Benchmark SC.8.1.1 Determine the link(s) between evidence and the conclusion(s) of an investigation Benchmark SC.8.1.2 Communicate the significant components of the experimental design and results of a scientific investigation Discuss how to conduct experiments with the plankton net using various experimental designs and data collection methods. We will also discuss hypotheses that students could test using the equipment. Example: How does the plankton community at [location] relate to available nutrients?
Benchmark SC.8.2.1 Describe significant relationships among society, science, and technology and how one impacts the other Benchmark SC.8.2.2 Describe how scale and mathematical models can be used to support and explain scientific data Discuss the impact of the microscope on society. Possible assignment: Use the measurement feature on the microscope to create a scale model of a zooplankter.
Benchmark SC.8.5.1 Describe how changes in the physical environment affect the survival of organisms Discuss how changes in the ocean's physical environment cause plankton blooms.
Fine Arts Standard 1: VISUAL ARTS: Understand and apply art materials, techniques, and processes in the creation of works of art and understand how the visual arts communicate a variety of ideas, feelings, and experiences.
Grades 3–8 Benchmarks for Visual Arts: FA.3.1.3 Use observational skills in creating an original work of art. FA.4.1.4 Use properties, personal response, and research to make informed judgments about artwork. FA.5.1.1 Use the principles of art and design, including unity and harmony, in works of art. FA.5.1.4 Explain how an original artwork demonstrates a concept or idea from another discipline. FA.6–8.1.2 Apply selected elements and principles of art and design to communicate a particular message or opinion in an original work of art.
Ocean Literacy Principles. The following ocean literacy principles can be addressed through these lessons:
Ocean Literacy Principle 1: The Earth has one big ocean with many features. c. Throughout the ocean there is one interconnected circulation system powered by wind, tides, the
force of the Earth’s rotation (Coriolis effect), the Sun, and water density differences. The shape of ocean basins and adjacent land masses influence the path of circulation.
Ocean Literacy Principle 3: The ocean is a major influence on weather and climate. e. The ocean dominates the Earth’s carbon cycle. Half the primary productivity on Earth takes place in
the sunlit layers of the ocean and the ocean absorbs roughly half of all carbon dioxide added to the atmosphere.
Ocean Literacy Principle 5: The ocean supports a great diversity of life and ecosystems. a. Ocean life ranges in size from the smallest virus to the largest animal that has lived on Earth, the blue
whale. b. Most life in the ocean exists as microbes. Microbes are the most important primary producers in the
ocean. Not only are they the most abundant life form in the ocean, they have extremely fast growth rates and life cycles.
d. Ocean biology provides many unique examples of life cycles, adaptations and important relationships among organisms (symbiosis, predator‐prey dynamics and energy transfer) that do not occur on land.
f. Ocean habitats are defined by environmental factors. Due to interactions of abiotic factors such as salinity, temperature, oxygen, pH, light, nutrients, pressure, substrate and circulation, ocean life is not

9
evenly distributed temporally or spatially, i.e., it is “patchy”. Some regions of the ocean support more diverse and abundant life than anywhere on Earth, while much of the ocean is considered a desert.
References: Phytoplankton Monitoring Network (PMN) http://www.chbr.noaa.gov/pmn/ Sheean T. Haley and Sonya T. Dyhrman (2009) The Artistic Oceanographer Program—Enhancing ocean
science literacy through multidisciplinary learning. Science and Children, 46: 31–35 South West [Ohio] Local School District, “Microscope Home Page” Information retrieved November 2011,
http://www.southwestschools.org/juniorschool/jsfaculty/Microscopes/index.html Credits: Lesson 2 is based on the Artistic Oceanographer Program created by Sheean Haley and Sonya Dyhrman of Woods Hole Oceanographic Institution http://www.whoi.edu/sbl/liteSite.do?litesiteid=6692&articleId=10031 We are grateful to the feedback received from teachers nationwide, which resulted in significant improvements to the Science Kit these lessons are based on. In particular, Scott LaChance of Kapolei Middle School, Hawai‘i helped revise the plankton survey and developed the PowerPoint worksheet.

10
11
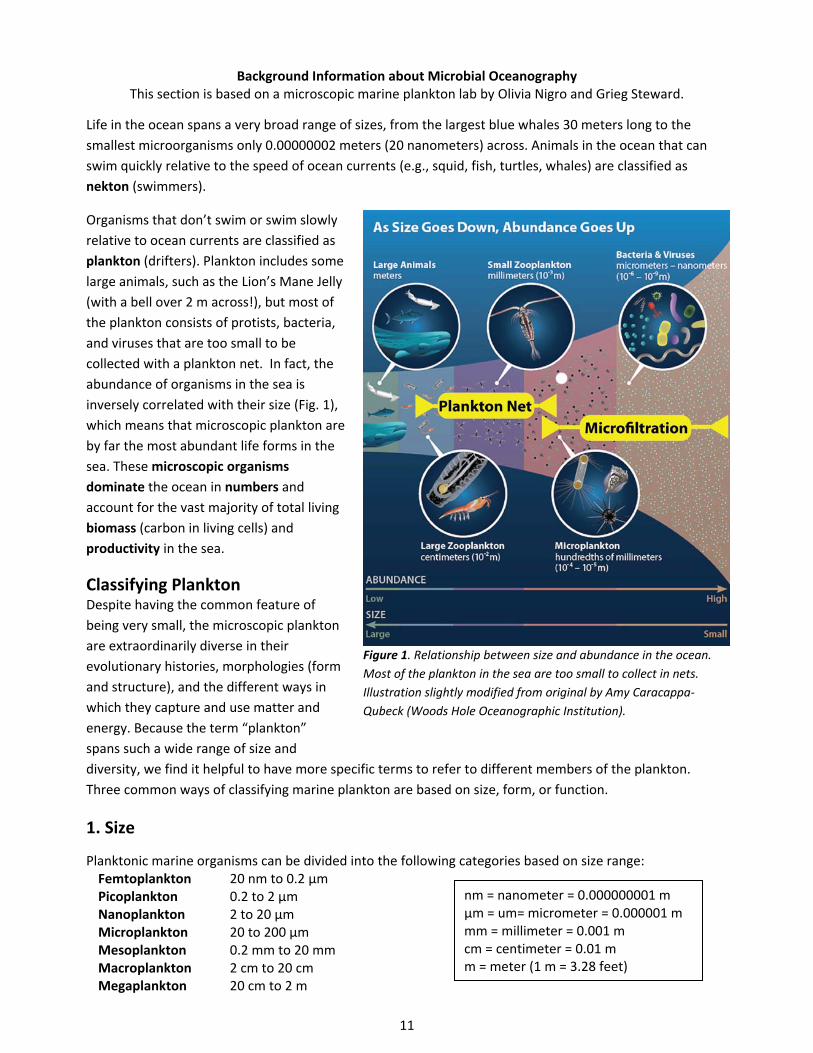
Background Information about Microbial Oceanography This section is based on a microscopic marine plankton lab by Olivia Nigro and Grieg Steward.
Life in the ocean spans a very broad range of sizes, from the largest blue whales 30 meters long to the
smallest microorganisms only 0.00000002 meters (20 nanometers) across. Animals in the ocean that can
swim quickly relative to the speed of ocean currents (e.g., squid, fish, turtles, whales) are classified as
nekton (swimmers).
Organisms that don’t swim or swim slowly
relative to ocean currents are classified as
plankton (drifters). Plankton includes some
large animals, such as the Lion’s Mane Jelly
(with a bell over 2 m across!), but most of
the plankton consists of protists, bacteria,
and viruses that are too small to be
collected with a plankton net. In fact, the
abundance of organisms in the sea is
inversely correlated with their size (Fig. 1),
which means that microscopic plankton are
by far the most abundant life forms in the
sea. These microscopic organisms
dominate the ocean in numbers and
account for the vast majority of total living
biomass (carbon in living cells) and
productivity in the sea.
Classifying Plankton Despite having the common feature of
being very small, the microscopic plankton
are extraordinarily diverse in their
evolutionary histories, morphologies (form
and structure), and the different ways in
which they capture and use matter and
energy. Because the term “plankton”
spans such a wide range of size and
diversity, we find it helpful to have more specific terms to refer to different members of the plankton.
Three common ways of classifying marine plankton are based on size, form, or function.
1. Size
Planktonic marine organisms can be divided into the following categories based on size range: Femtoplankton 20 nm to 0.2 µm Picoplankton 0.2 to 2 µm Nanoplankton 2 to 20 µm Microplankton 20 to 200 µm Mesoplankton 0.2 mm to 20 mm Macroplankton 2 cm to 20 cm Megaplankton 20 cm to 2 m
Figure 1. Relationship between size and abundance in the ocean.
Most of the plankton in the sea are too small to collect in nets.
Illustration slightly modified from original by Amy Caracappa‐
Qubeck (Woods Hole Oceanographic Institution).
nm = nanometer = 0.000000001 m µm = um= micrometer = 0.000001 m mm = millimeter = 0.001 m cm = centimeter = 0.01 m m = meter (1 m = 3.28 feet)
12
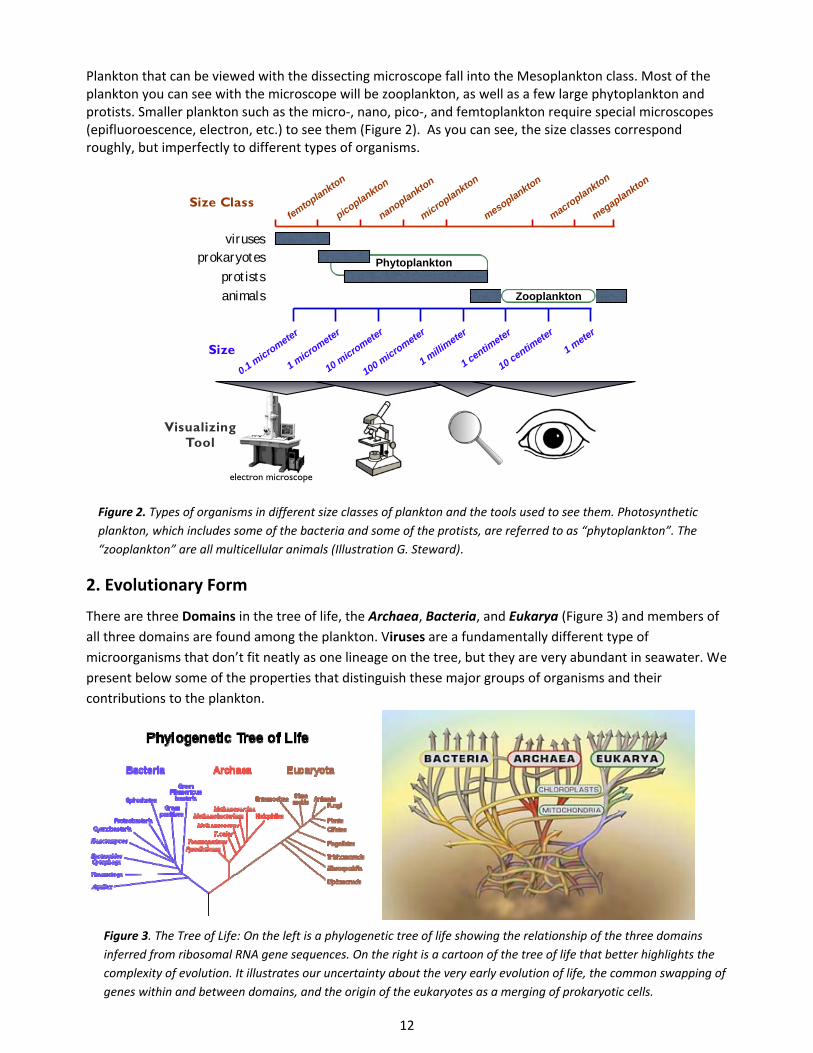
Plankton that can be viewed with the dissecting microscope fall into the Mesoplankton class. Most of the plankton you can see with the microscope will be zooplankton, as well as a few large phytoplankton and protists. Smaller plankton such as the micro‐, nano, pico‐, and femtoplankton require special microscopes (epifluoroescence, electron, etc.) to see them (Figure 2). As you can see, the size classes correspond roughly, but imperfectly to different types of organisms.
virusesprokaryotes
prot ists
femtoplankton
picoplankton
nanoplankton
mesoplankton
macroplankton
megaplankton
1 micro
meter
0.1 micro
meter
10 micro
meter
1 milli
meter
100 micro
meter
1 centimeter
10 centimeter
1 meter
microplankton
animals
Size
Size Class
VisualizingTool
electron microscope
Phytoplankton
Zooplankton
Figure 2. Types of organisms in different size classes of plankton and the tools used to see them. Photosynthetic
plankton, which includes some of the bacteria and some of the protists, are referred to as “phytoplankton”. The
“zooplankton” are all multicellular animals (Illustration G. Steward).
2. Evolutionary Form
There are three Domains in the tree of life, the Archaea, Bacteria, and Eukarya (Figure 3) and members of
all three domains are found among the plankton. Viruses are a fundamentally different type of
microorganisms that don’t fit neatly as one lineage on the tree, but they are very abundant in seawater. We
present below some of the properties that distinguish these major groups of organisms and their
contributions to the plankton.
Figure 3. The Tree of Life: On the left is a phylogenetic tree of life showing the relationship of the three domains
inferred from ribosomal RNA gene sequences. On the right is a cartoon of the tree of life that better highlights the
complexity of evolution. It illustrates our uncertainty about the very early evolution of life, the common swapping of
genes within and between domains, and the origin of the eukaryotes as a merging of prokaryotic cells.
13
Prokaryotes
Because they lack a nucleus, Bacteria and Archaea are often lumped together under the name
“prokaryotes” (loosely translated as “before a nucleus”). Archaea and Bacteria are simpler cell types that
appeared on earth before the Eukarya. They are similar in that they have no organelles or membrane‐
bound compartments inside of them and can be difficult to distinguish from one another morphologically.
While they are often lumped together under the name prokaryote, these two groups are only distantly
related and each group performs very different functions.
Prokaryotes are very abundant with around 1 billion cells per liter of surface seawater. Prokaryotes can
acquire energy to grow from a very wide variety of chemical reactions or by photosynthesis.
Photosynthetic bacteria, known as cyanobacteria, are the most abundant phytoplankton in the ocean.
Prokaryotic cells range in size from about 0.2 to 10.0 um.
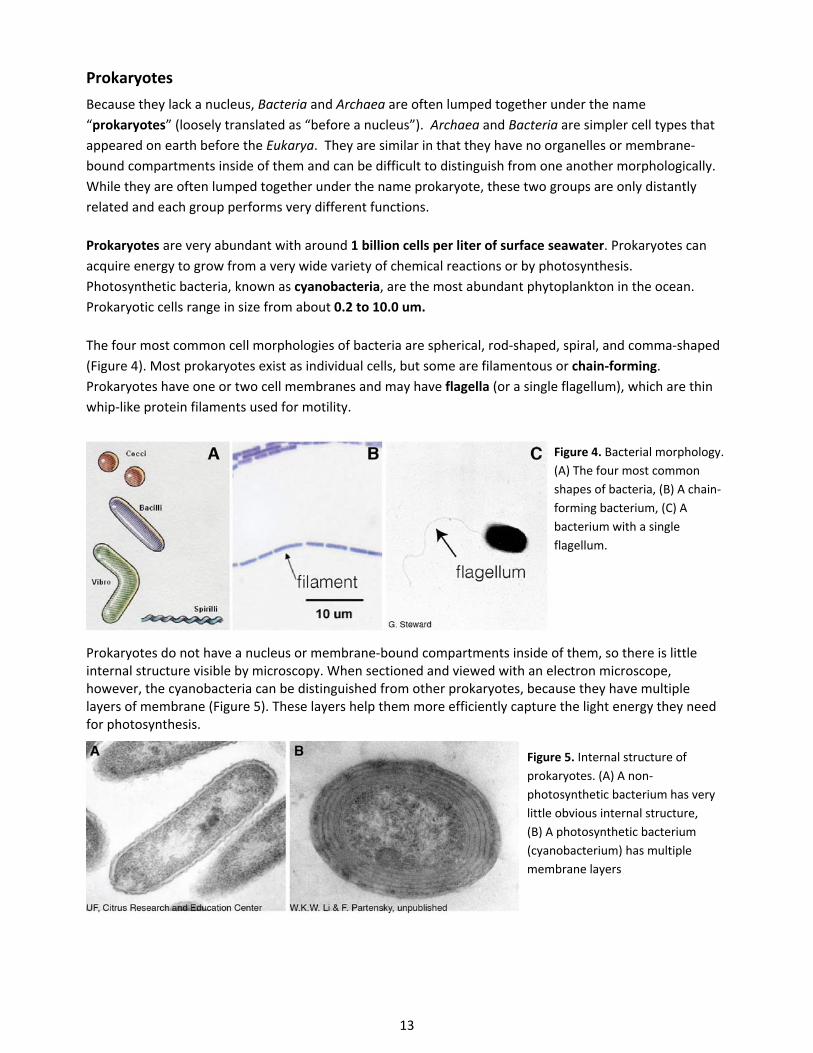
The four most common cell morphologies of bacteria are spherical, rod‐shaped, spiral, and comma‐shaped
(Figure 4). Most prokaryotes exist as individual cells, but some are filamentous or chain‐forming.
Prokaryotes have one or two cell membranes and may have flagella (or a single flagellum), which are thin
whip‐like protein filaments used for motility.
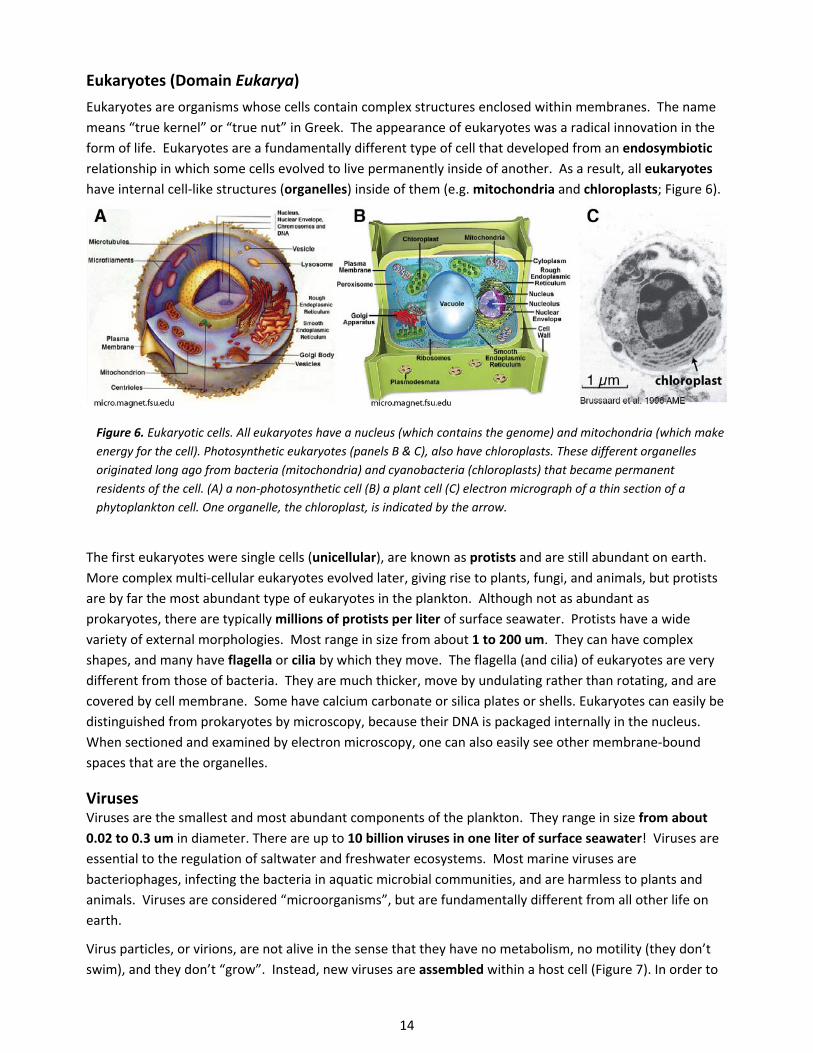
Prokaryotes do not have a nucleus or membrane‐bound compartments inside of them, so there is little internal structure visible by microscopy. When sectioned and viewed with an electron microscope, however, the cyanobacteria can be distinguished from other prokaryotes, because they have multiple layers of membrane (Figure 5). These layers help them more efficiently capture the light energy they need for photosynthesis.
Figure 4. Bacterial morphology.
(A) The four most common
shapes of bacteria, (B) A chain‐
forming bacterium, (C) A
bacterium with a single
flagellum.
Figure 5. Internal structure of
prokaryotes. (A) A non‐
photosynthetic bacterium has very
little obvious internal structure,
(B) A photosynthetic bacterium
(cyanobacterium) has multiple
membrane layers
14
Eukaryotes (Domain Eukarya)
Eukaryotes are organisms whose cells contain complex structures enclosed within membranes. The name
means “true kernel” or “true nut” in Greek. The appearance of eukaryotes was a radical innovation in the
form of life. Eukaryotes are a fundamentally different type of cell that developed from an endosymbiotic
relationship in which some cells evolved to live permanently inside of another. As a result, all eukaryotes
have internal cell‐like structures (organelles) inside of them (e.g. mitochondria and chloroplasts; Figure 6).
The first eukaryotes were single cells (unicellular), are known as protists and are still abundant on earth.
More complex multi‐cellular eukaryotes evolved later, giving rise to plants, fungi, and animals, but protists
are by far the most abundant type of eukaryotes in the plankton. Although not as abundant as
prokaryotes, there are typically millions of protists per liter of surface seawater. Protists have a wide
variety of external morphologies. Most range in size from about 1 to 200 um. They can have complex
shapes, and many have flagella or cilia by which they move. The flagella (and cilia) of eukaryotes are very
different from those of bacteria. They are much thicker, move by undulating rather than rotating, and are
covered by cell membrane. Some have calcium carbonate or silica plates or shells. Eukaryotes can easily be
distinguished from prokaryotes by microscopy, because their DNA is packaged internally in the nucleus.
When sectioned and examined by electron microscopy, one can also easily see other membrane‐bound
spaces that are the organelles.
Viruses Viruses are the smallest and most abundant components of the plankton. They range in size from about
0.02 to 0.3 um in diameter. There are up to 10 billion viruses in one liter of surface seawater! Viruses are
essential to the regulation of saltwater and freshwater ecosystems. Most marine viruses are
bacteriophages, infecting the bacteria in aquatic microbial communities, and are harmless to plants and
animals. Viruses are considered “microorganisms”, but are fundamentally different from all other life on
earth.
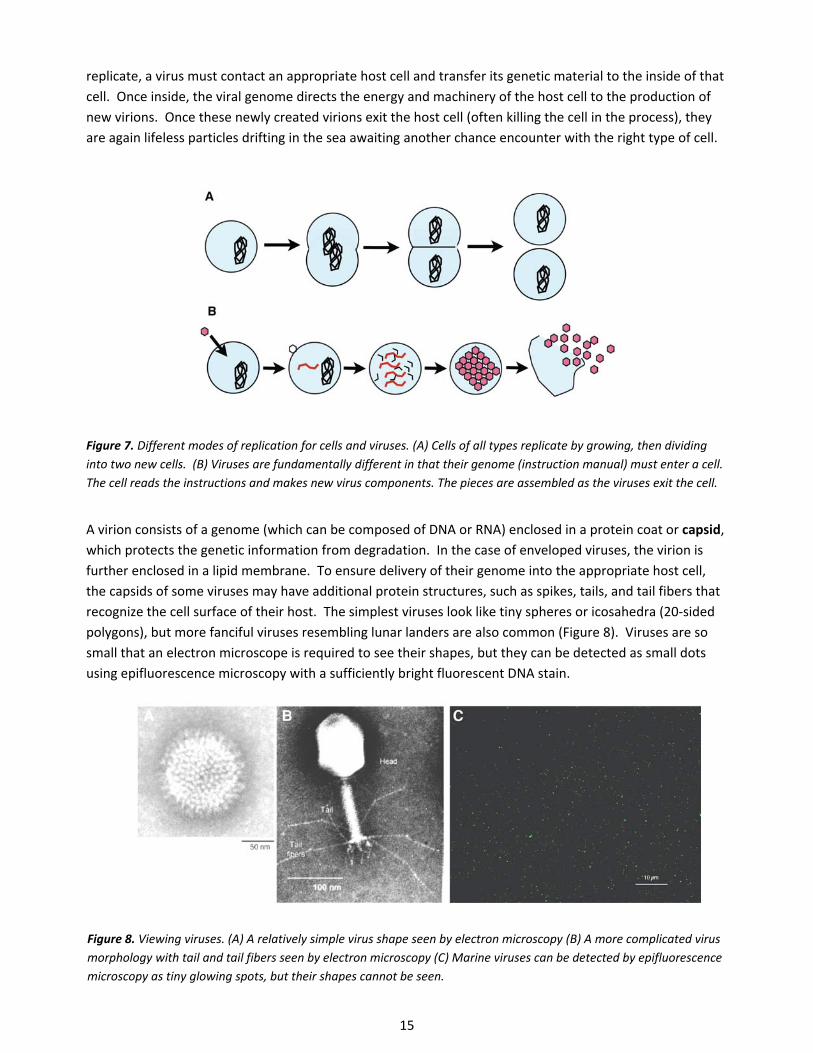
Virus particles, or virions, are not alive in the sense that they have no metabolism, no motility (they don’t
swim), and they don’t “grow”. Instead, new viruses are assembled within a host cell (Figure 7). In order to
Figure 6. Eukaryotic cells. All eukaryotes have a nucleus (which contains the genome) and mitochondria (which make
energy for the cell). Photosynthetic eukaryotes (panels B & C), also have chloroplasts. These different organelles
originated long ago from bacteria (mitochondria) and cyanobacteria (chloroplasts) that became permanent
residents of the cell. (A) a non‐photosynthetic cell (B) a plant cell (C) electron micrograph of a thin section of a
phytoplankton cell. One organelle, the chloroplast, is indicated by the arrow.
15
replicate, a virus must contact an appropriate host cell and transfer its genetic material to the inside of that
cell. Once inside, the viral genome directs the energy and machinery of the host cell to the production of
new virions. Once these newly created virions exit the host cell (often killing the cell in the process), they
are again lifeless particles drifting in the sea awaiting another chance encounter with the right type of cell.
A virion consists of a genome (which can be composed of DNA or RNA) enclosed in a protein coat or capsid,
which protects the genetic information from degradation. In the case of enveloped viruses, the virion is
further enclosed in a lipid membrane. To ensure delivery of their genome into the appropriate host cell,
the capsids of some viruses may have additional protein structures, such as spikes, tails, and tail fibers that
recognize the cell surface of their host. The simplest viruses look like tiny spheres or icosahedra (20‐sided
polygons), but more fanciful viruses resembling lunar landers are also common (Figure 8). Viruses are so
small that an electron microscope is required to see their shapes, but they can be detected as small dots
using epifluorescence microscopy with a sufficiently bright fluorescent DNA stain.
Figure 7. Different modes of replication for cells and viruses. (A) Cells of all types replicate by growing, then dividing
into two new cells. (B) Viruses are fundamentally different in that their genome (instruction manual) must enter a cell.
The cell reads the instructions and makes new virus components. The pieces are assembled as the viruses exit the cell.
Figure 8. Viewing viruses. (A) A relatively simple virus shape seen by electron microscopy (B) A more complicated virus
morphology with tail and tail fibers seen by electron microscopy (C) Marine viruses can be detected by epifluorescence
microscopy as tiny glowing spots, but their shapes cannot be seen.
16
3. Function A third way to classify organisms is based on their function, that is, how they make a living. Perhaps the
most fundamental functional distinction that can be made is based on how organisms get the organic
carbon they need for energy and growth.
Autotrophs
Organisms that are capable of making their own food by “fixing” carbon dioxide (which means they make
organic carbon from carbon dioxide) are called autotrophs (self‐feeding). Photoautotrophs (plants) fix
carbon using energy from the sun. Chemoautotrophs use chemical energy. On land, most photosynthesis is
done by multicellular life (the plants), but in the ocean, nearly all of the photosynthesis is done by single‐
celled organisms. In fact, the most abundant photosynthetic organism on earth is a prokaryote: the marine
cyanobacterium, Prochlorococcus marinus. The next most abundant cyanobacteria are the unicellular
Synechococcus species. There are also many important photosynthetic single‐celled eukaryotes (protists) in
the plankton. Some of the most abundant are very small cells, no bigger than a cyanobacterium. Others
are much larger and have distinctive shapes and features, including hard shells or plates made of cellulose
(e.g., dinoflagellates), silica (e.g., the diatoms), or calcium carbonate (e.g., coccolithophores). Although
photosynthetic protists are usually much less abundant than cyanobacteria, they sometimes form massive
blooms, which can be seen in the ocean from space.
Heterotrophs
Organisms that cannot make their own food and therefore must consume food made by autotrophs, are
called heterotrophs (different feeding). Heterotrophs are also known as consumers. In the marine
environment, planktonic heterotrophs are responsible for recycling nutrients in the euphotic zone of the
ocean. Heterotrophic prokaryotes cannot ingest particles, so they must degrade their food outside of the
cell using enzymes. They are the primary consumers of dissolved organic matter (DOM) in the ocean.
Heterotrophic protists (flagellates and ciliates) are able to ingest small cells and particles and digest them
inside a compartment within their own single cell.
When heterotrophic microbes feed, they recycle organic carbon back to carbon dioxide and release
nutrients. The carbon dioxide and nutrients are used again by the autotrophs to complete the cycle of the
food web. In the grazing food chain, phytoplankton are eaten by small zooplankton, which are in turn
eaten by larger organisms. However, the marine food web is messy and much of the carbon in the ocean
becomes dissolved. Bacteria are usually growing rapidly on this Dissolved Organic Matter (DOM) and are in
turn consumed by heterotrophic protists, which are then eaten by zooplankton. This other feeding
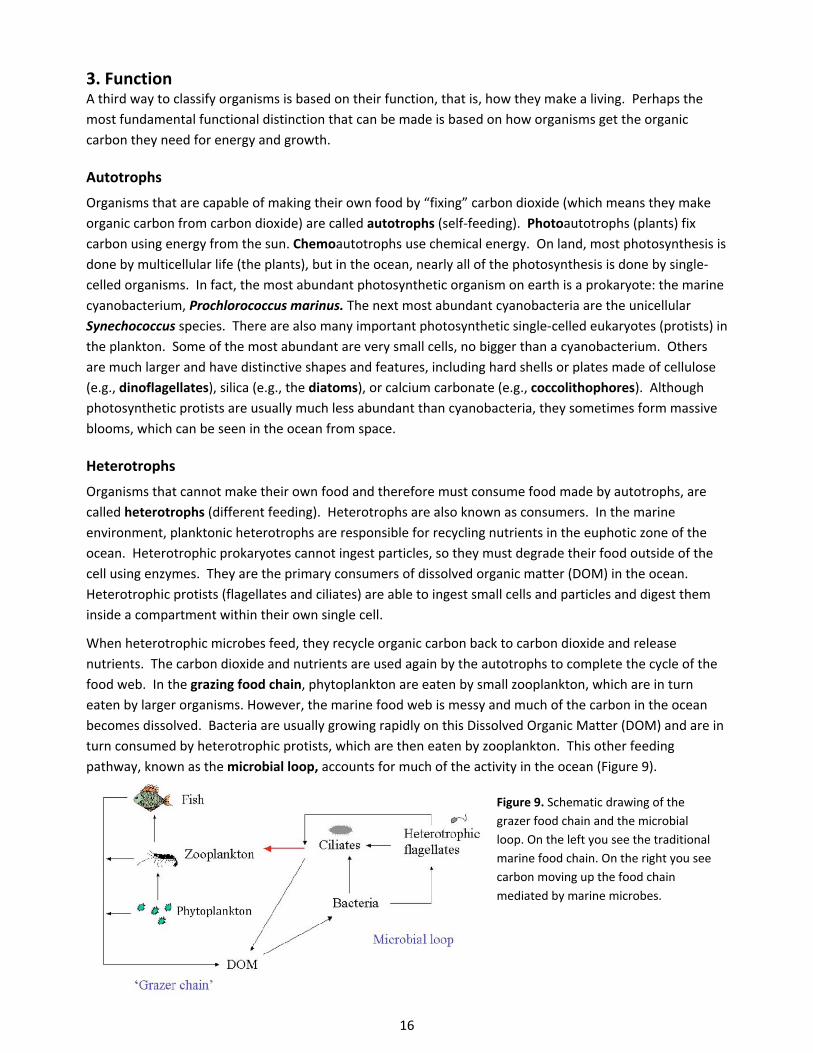
pathway, known as the microbial loop, accounts for much of the activity in the ocean (Figure 9).
Figure 9. Schematic drawing of the
grazer food chain and the microbial
loop. On the left you see the traditional
marine food chain. On the right you see
carbon moving up the food chain
mediated by marine microbes.
17
Counting and Identifying Plankton
Now that we know some of the major types of marine microplankton, let’s discuss how scientists count and
identify marine microbes. The smallest marine plankton (microplankton, nanoplankton, picoplankton, and
femtoplankton) are the most abundant organisms in the ocean, but because they are so small they can be
challenging to study. There are many ways to learn about the microscopic plankton in seawater. Three
that we are going to discuss here are: 1) cultivation, 2) microscopy, and 3) DNA sequencing.
1. Cultivation
Cultivation is when an organism is grown in the laboratory, usually after isolating it from other organisms.
To do this one must find just the right conditions and provide all the nutrients that the organism needs to
replicate itself. The mixture of nutrients and water used to grow an organism is called a medium.
Photoautotrophic plankton (or phytoplankton) need nutrients, water, and, most important, LIGHT.
Heterotrophs must be provided with some form of organic carbon to grow. Some organisms are highly
adaptable and can be grown very easily in the lab. Others are
much more challenging. Marine microbiologists have been
growing bacteria from seawater for over one hundred years,
so it is remarkable that the most abundant bacteria in the
ocean, in the genus Pelagibacter, were completely unknown
until just recently, because marine microbiologists were using
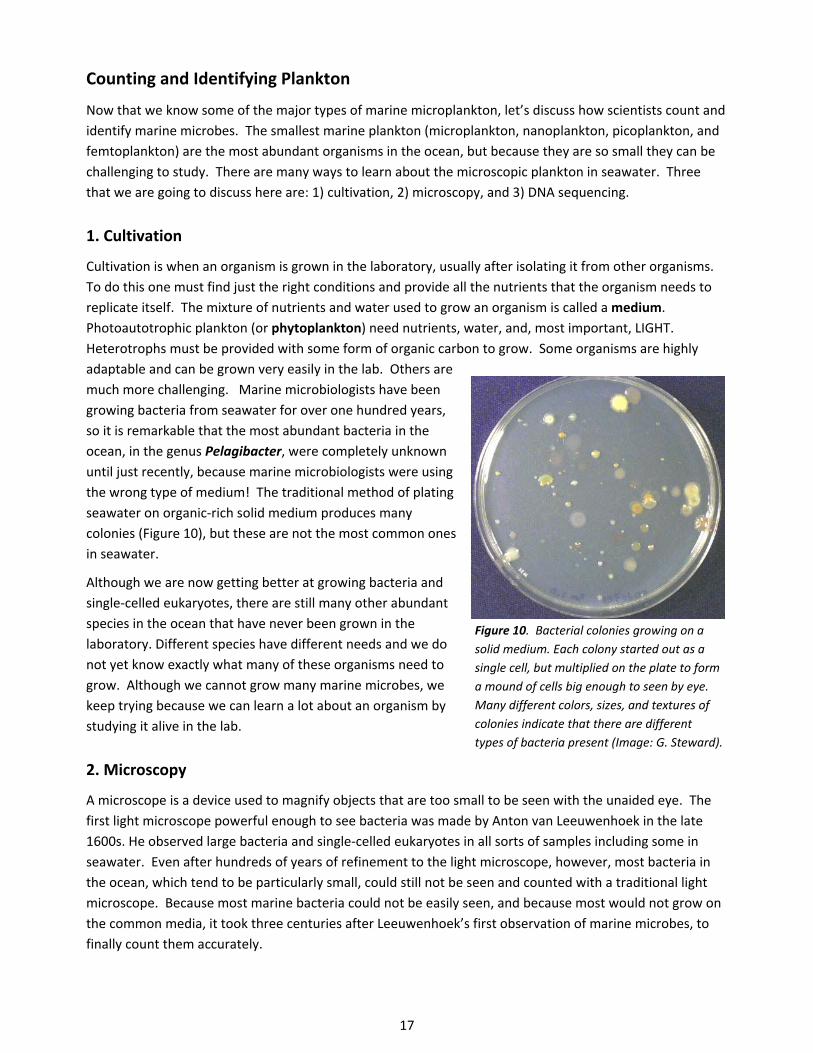
the wrong type of medium! The traditional method of plating
seawater on organic‐rich solid medium produces many
colonies (Figure 10), but these are not the most common ones
in seawater.
Although we are now getting better at growing bacteria and
single‐celled eukaryotes, there are still many other abundant
species in the ocean that have never been grown in the
laboratory. Different species have different needs and we do
not yet know exactly what many of these organisms need to
grow. Although we cannot grow many marine microbes, we
keep trying because we can learn a lot about an organism by
studying it alive in the lab.
2. Microscopy
A microscope is a device used to magnify objects that are too small to be seen with the unaided eye. The
first light microscope powerful enough to see bacteria was made by Anton van Leeuwenhoek in the late
1600s. He observed large bacteria and single‐celled eukaryotes in all sorts of samples including some in
seawater. Even after hundreds of years of refinement to the light microscope, however, most bacteria in
the ocean, which tend to be particularly small, could still not be seen and counted with a traditional light
microscope. Because most marine bacteria could not be easily seen, and because most would not grow on
the common media, it took three centuries after Leeuwenhoek’s first observation of marine microbes, to
finally count them accurately.
Figure 10. Bacterial colonies growing on a
solid medium. Each colony started out as a
single cell, but multiplied on the plate to form
a mound of cells big enough to seen by eye.
Many different colors, sizes, and textures of
colonies indicate that there are different
types of bacteria present (Image: G. Steward).
18
Light microscopy using a light microscope is probably the most well known and well used research methods
in biology. A light microscope is so called because it uses visible light to detect small objects. There are
several different types of light microscopes but the two most commonly found in the classroom are the
compound and stereo microscopes. A stereo microscope or dissecting scope is useful for viewing larger
plankton and zooplankton. Specimens are viewed in a Petri dish and can be easily moved with a dissecting
probe. A compound microscope is composed of two lens systems, an eyepiece (ocular) and an objective.
Compound microscopes use glass slides to mount specimens for viewing. Compound microscopes usually
have greater magnification (max 1000X).
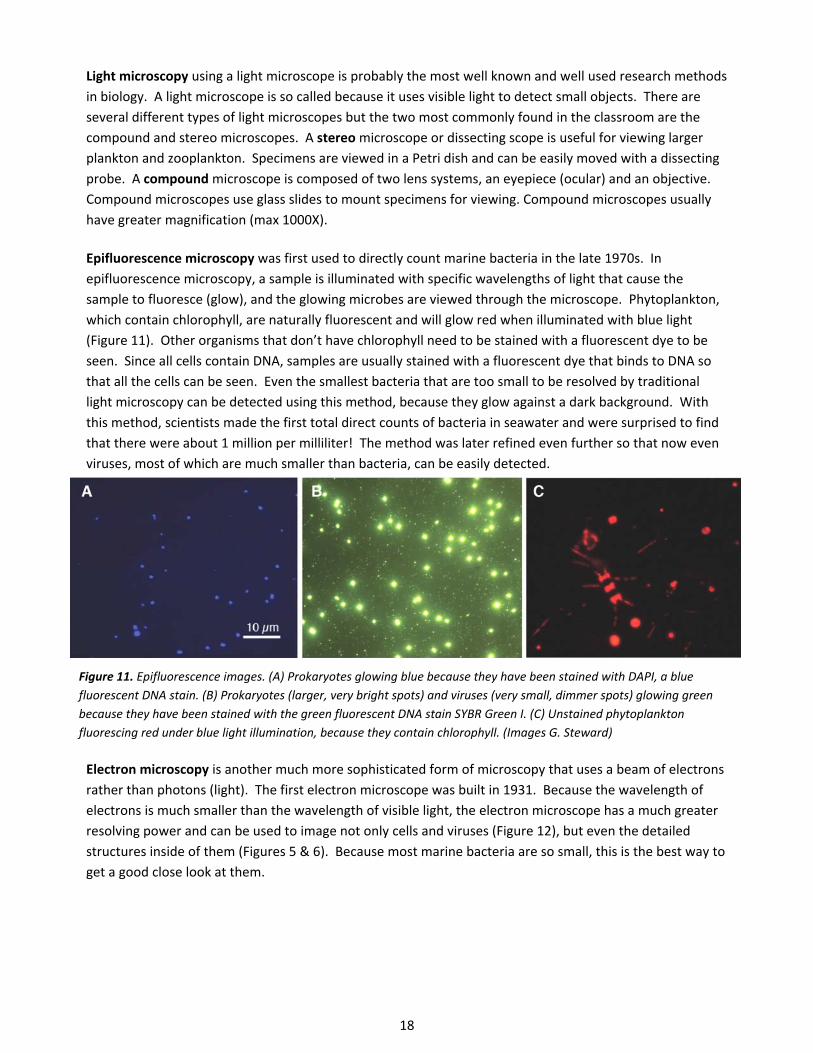
Epifluorescence microscopy was first used to directly count marine bacteria in the late 1970s. In
epifluorescence microscopy, a sample is illuminated with specific wavelengths of light that cause the
sample to fluoresce (glow), and the glowing microbes are viewed through the microscope. Phytoplankton,
which contain chlorophyll, are naturally fluorescent and will glow red when illuminated with blue light
(Figure 11). Other organisms that don’t have chlorophyll need to be stained with a fluorescent dye to be
seen. Since all cells contain DNA, samples are usually stained with a fluorescent dye that binds to DNA so
that all the cells can be seen. Even the smallest bacteria that are too small to be resolved by traditional
light microscopy can be detected using this method, because they glow against a dark background. With
this method, scientists made the first total direct counts of bacteria in seawater and were surprised to find
that there were about 1 million per milliliter! The method was later refined even further so that now even
viruses, most of which are much smaller than bacteria, can be easily detected.
Electron microscopy is another much more sophisticated form of microscopy that uses a beam of electrons
rather than photons (light). The first electron microscope was built in 1931. Because the wavelength of
electrons is much smaller than the wavelength of visible light, the electron microscope has a much greater
resolving power and can be used to image not only cells and viruses (Figure 12), but even the detailed
structures inside of them (Figures 5 & 6). Because most marine bacteria are so small, this is the best way to
get a good close look at them.
Figure 11. Epifluorescence images. (A) Prokaryotes glowing blue because they have been stained with DAPI, a blue
fluorescent DNA stain. (B) Prokaryotes (larger, very bright spots) and viruses (very small, dimmer spots) glowing green
because they have been stained with the green fluorescent DNA stain SYBR Green I. (C) Unstained phytoplankton
fluorescing red under blue light illumination, because they contain chlorophyll. (Images G. Steward)
19
Microscopy is a great way to see and count marine microbes, but we cannot always tell different organisms
apart based only on what they look like. Molecular methods, like DNA sequencing, have been very helpful
in revealing the diversity of microscopic plankton.
3. DNA Sequencing
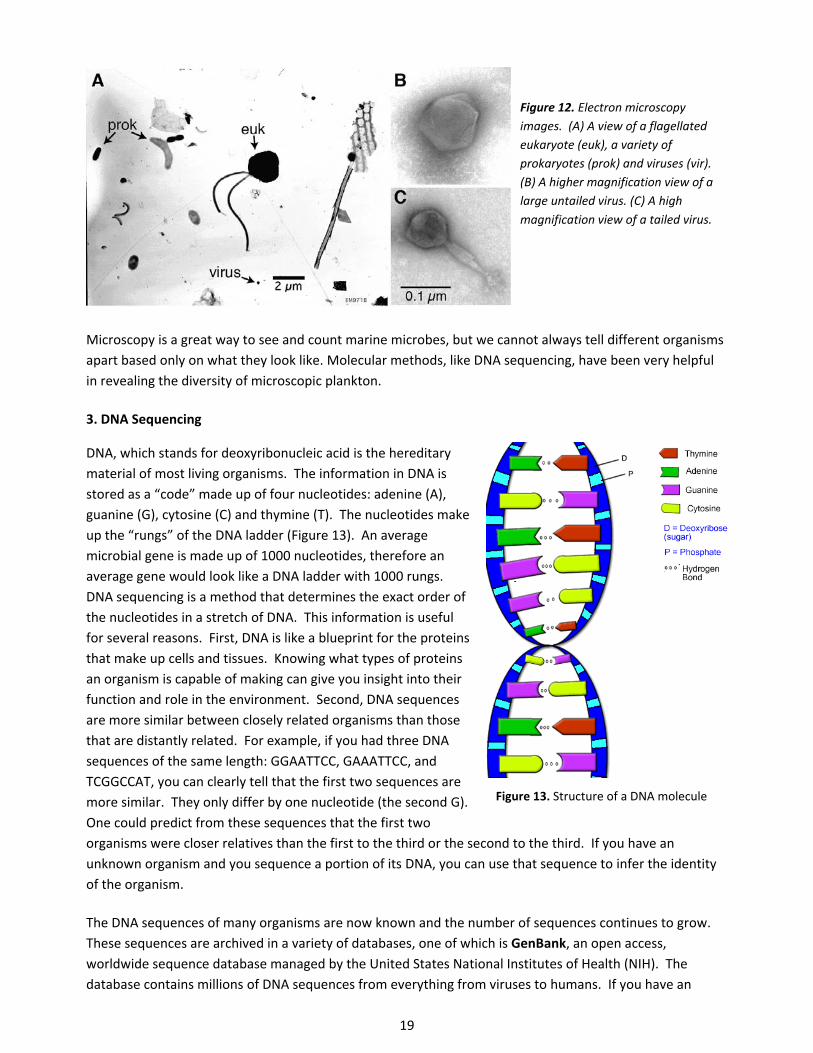
DNA, which stands for deoxyribonucleic acid is the hereditary
material of most living organisms. The information in DNA is
stored as a “code” made up of four nucleotides: adenine (A),
guanine (G), cytosine (C) and thymine (T). The nucleotides make
up the “rungs” of the DNA ladder (Figure 13). An average
microbial gene is made up of 1000 nucleotides, therefore an
average gene would look like a DNA ladder with 1000 rungs.
DNA sequencing is a method that determines the exact order of
the nucleotides in a stretch of DNA. This information is useful
for several reasons. First, DNA is like a blueprint for the proteins
that make up cells and tissues. Knowing what types of proteins
an organism is capable of making can give you insight into their
function and role in the environment. Second, DNA sequences
are more similar between closely related organisms than those
that are distantly related. For example, if you had three DNA
sequences of the same length: GGAATTCC, GAAATTCC, and
TCGGCCAT, you can clearly tell that the first two sequences are
more similar. They only differ by one nucleotide (the second G).
One could predict from these sequences that the first two
organisms were closer relatives than the first to the third or the second to the third. If you have an
unknown organism and you sequence a portion of its DNA, you can use that sequence to infer the identity
of the organism.
The DNA sequences of many organisms are now known and the number of sequences continues to grow.
These sequences are archived in a variety of databases, one of which is GenBank, an open access,
worldwide sequence database managed by the United States National Institutes of Health (NIH). The
database contains millions of DNA sequences from everything from viruses to humans. If you have an
Figure 12. Electron microscopy
images. (A) A view of a flagellated
eukaryote (euk), a variety of
prokaryotes (prok) and viruses (vir).
(B) A higher magnification view of a
large untailed virus. (C) A high
magnification view of a tailed virus.
Figure 13. Structure of a DNA molecule
20
unknown sequence and would like to determine from what type of organism it came or what its function
might be, you can compare it to all of the sequences already in GenBank to see if there other sequences
similar to yours. This comparison is easily accomplished using an online submission form and an algorithm
called the Basic Local Alignment Search Tool, or BLAST. If matches are found, they are presented as
interactive text and a graphic report. Your sequence can also be displayed on a phylogenetic tree, which is
a branching diagram showing the inferred evolutionary relationships among sequences based upon
similarities and differences in their genetic characteristics. In Figure 3 we saw a phylogenetic tree that was
made using the rRNA gene. This gene is particularly useful because all organisms have one, and it contains
information about the evolutionary relationship of organisms.
21
MICROSCOPE GUIDE
Overview of the Motic DM‐143C Digital Stereo Zoom Microscope The Motic DM‐143C Digital Stereo Microscope provides clear, unreversed 3‐ dimensional images sharply focused over the entire 10x‐40x magnification range. The large, stable base and post stand features incident (from above) and transmitted (from below) halogen illumination. Additionally, the microscope incorporates a fully integrated 3.0 megapixel (2048 x 1536) CMOS Digital Camera and comes with the Motic Images Plus software for documenting, measuring and archiving data.
a) The microscope has widefield 10X/20 eyepieces with 10X magnification. Coupled with 1.0X to
4.0X zoom lenses, the microscope offers a total magnification of 10X to 40X.
b) The microscope has a main power switch as well as a power switch for the incident (upper) and
transmitted (lower) light source. All three switches are located on the back wall of the base. The
intensity of the incident lamp can be adjusted with the lamp dimmer on the right side of the base.
c) There is a built‐in camera with a USB cable that connects the microscope to a computer. You can
also use the Motic Images software to capture, annotate, and store images in .jpg, .bmp, .stc, or
.tiff graphical format. To share the display with your entire class, connect the computer to a
projector.
22
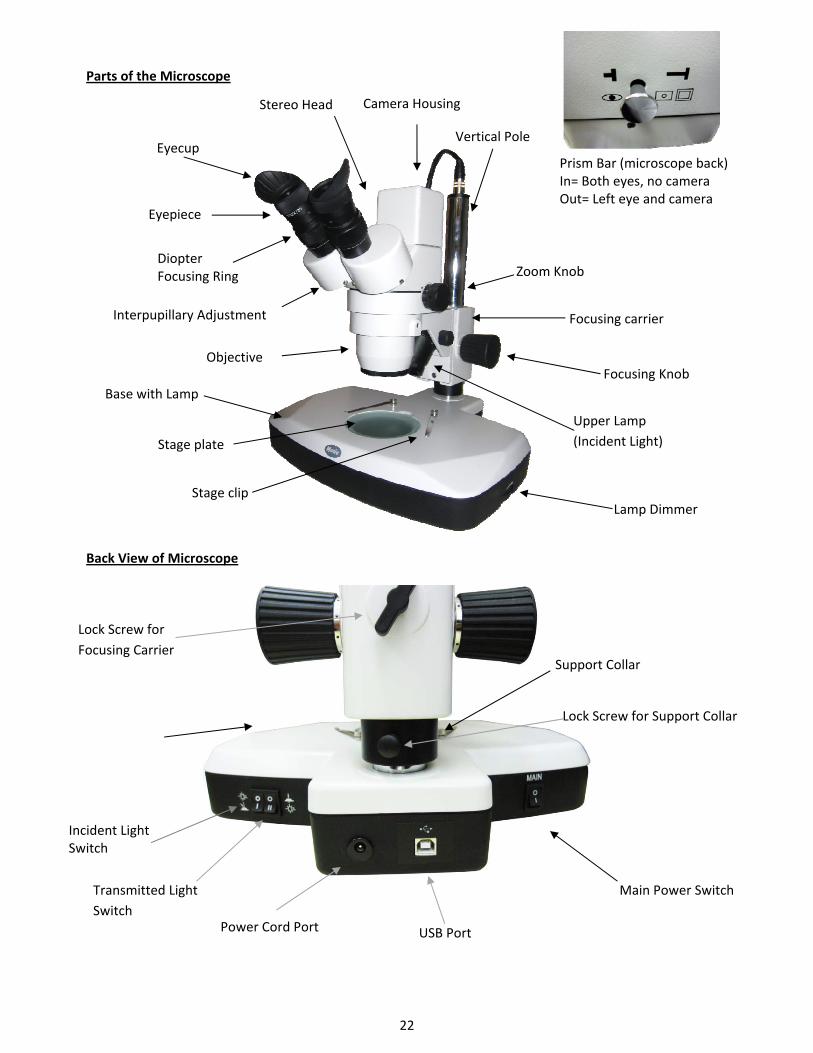
Parts of the Microscope Back View of Microscope
Eyecup Vertical Pole
Stereo Head
Zoom Knob Diopter Focusing Ring
Upper Lamp
(Incident Light)
Interpupillary Adjustment
Focusing Knob
Lock Screw for
Focusing Carrier
Lock Screw for Support Collar
Base with Lamp
Lamp Dimmer
Eyepiece
Camera Housing
USB Port
Main Power Switch
Incident Light Switch
Transmitted Light
Switch
Prism Bar (microscope back) In= Both eyes, no camera Out= Left eye and camera
Power Cord Port
Objective
Stage plate
Stage clip
Focusing carrier
Support Collar
23
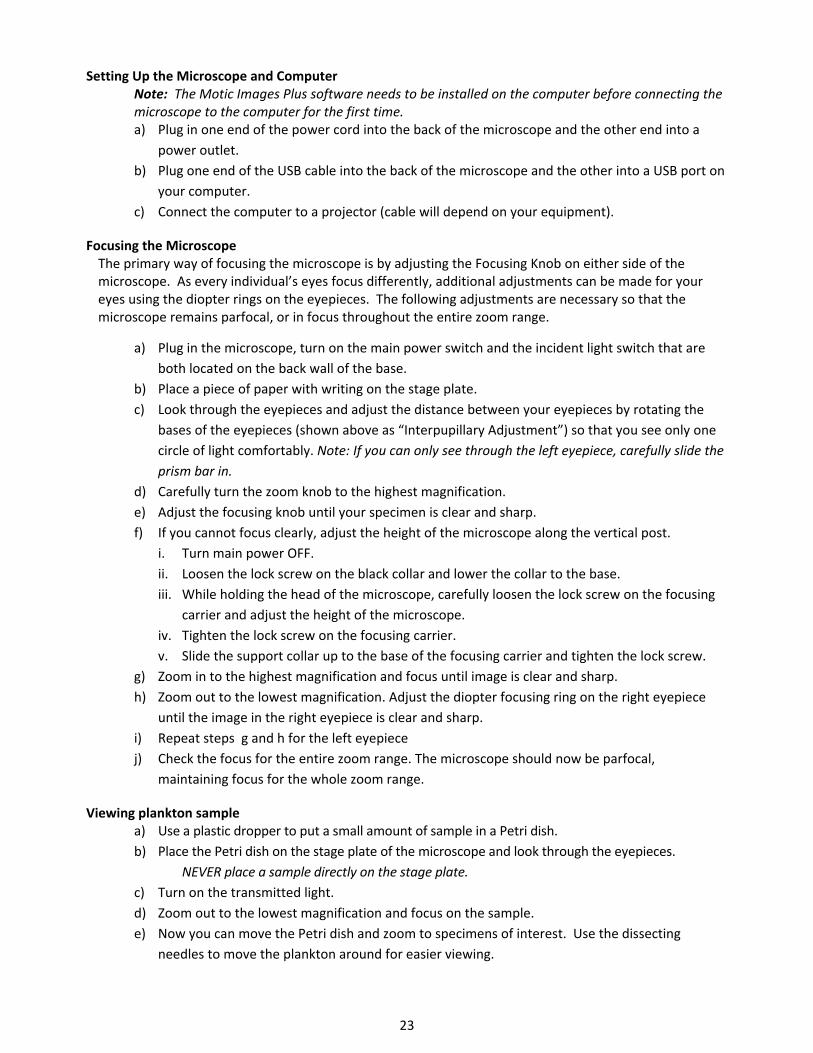
Setting Up the Microscope and Computer Note: The Motic Images Plus software needs to be installed on the computer before connecting the microscope to the computer for the first time. a) Plug in one end of the power cord into the back of the microscope and the other end into a
power outlet.
b) Plug one end of the USB cable into the back of the microscope and the other into a USB port on
your computer.
c) Connect the computer to a projector (cable will depend on your equipment).
Focusing the Microscope The primary way of focusing the microscope is by adjusting the Focusing Knob on either side of the microscope. As every individual’s eyes focus differently, additional adjustments can be made for your eyes using the diopter rings on the eyepieces. The following adjustments are necessary so that the microscope remains parfocal, or in focus throughout the entire zoom range.
a) Plug in the microscope, turn on the main power switch and the incident light switch that are
both located on the back wall of the base.
b) Place a piece of paper with writing on the stage plate.
c) Look through the eyepieces and adjust the distance between your eyepieces by rotating the
bases of the eyepieces (shown above as “Interpupillary Adjustment”) so that you see only one
circle of light comfortably. Note: If you can only see through the left eyepiece, carefully slide the
prism bar in.
d) Carefully turn the zoom knob to the highest magnification.
e) Adjust the focusing knob until your specimen is clear and sharp.
f) If you cannot focus clearly, adjust the height of the microscope along the vertical post.
i. Turn main power OFF.
ii. Loosen the lock screw on the black collar and lower the collar to the base.
iii. While holding the head of the microscope, carefully loosen the lock screw on the focusing
carrier and adjust the height of the microscope.
iv. Tighten the lock screw on the focusing carrier.
v. Slide the support collar up to the base of the focusing carrier and tighten the lock screw.
g) Zoom in to the highest magnification and focus until image is clear and sharp.
h) Zoom out to the lowest magnification. Adjust the diopter focusing ring on the right eyepiece
until the image in the right eyepiece is clear and sharp.
i) Repeat steps g and h for the left eyepiece
j) Check the focus for the entire zoom range. The microscope should now be parfocal,
maintaining focus for the whole zoom range.
Viewing plankton sample a) Use a plastic dropper to put a small amount of sample in a Petri dish.
b) Place the Petri dish on the stage plate of the microscope and look through the eyepieces.
NEVER place a sample directly on the stage plate.
c) Turn on the transmitted light.
d) Zoom out to the lowest magnification and focus on the sample.
e) Now you can move the Petri dish and zoom to specimens of interest. Use the dissecting
needles to move the plankton around for easier viewing.
24
Tip: More water in the Petri dish means that the plankton will move around more and you
may be able to observe them swimming. Less water in the dish makes for easier viewing as
the plankton will not move around as much. You can use the sieve to help remove some of
the water, but may need to gently rub the bottom of the sieve to get the water to drain
through.
f) You may need to switch between incident and transmitted light to get the best view.
Additionally, the microscope comes with two different stages. The frosted stage tends to be
most effective for observing transparent specimens like plankton. Use the black and white
stage plate for macroscopic objects that require light from the top. Note: If you change out the
stage plate, make sure to retighten the stage plate thumb screw so the plate does not fall out
during transport.
Using Motic Images Plus Version 2.0 ML on a PC The following instructions are to help you get started using the Motic Images Plus Software. For more in‐depth instructions, see the Motic Quick Start Guide and Motic Live Imaging Module included as pdf documents on the Motic Images Plus CD.
Installing the Motic Software a) To install the software, insert the Microscopes to Middle Schools for PC CD into your computer.
Open the the Motic_Plus_PC folder, then open the Plus2.0ForPC folder. Double click on the Setup application and follow installation instructions.
b) Copy the Motic manuals from the CD to your computer. In the Microscopes to Middle Schools CD, navigate to the Motic_Plus_PC folder. Copy the MIDevice and MIPlus20 files.
c) Navigate to Computer, “C:” drive, Program Files, Motic, Motic Images Plus, Help folder and paste the MIDevice and MIPlus20 files.
d) Restart the computer e) Turn on the microscope then plug the USB from the microscope into the computer. f) Wait while the computer installs the driver for the microscope. This should happen
automatically, if not, try a different USB port or refer to the Motic Manual. g) Now you can open the Motic software by using the desktop shortcut or finding the program in
the computer’s Start menu. Viewing plankton on the computer
a) Open the Motic Images Plus program. b) Observe your sample in the microscope and adjust the light and focus to get the best image. c) Click on “Capture” to start the camera. d) Pull the prism bar on the back of the microscope out to direct light to the camera. e) The image in the microscope should now appear on the right side of the computer with an
image adjustment panel on the left side of the screen. To get the best image, some of the settings need to be adjusted. NOTE: Please be patient when working with the video camera. There is a time delay between any adjustments made with the microscope and the image displayed on the screen.
i. Remove the Petri dish with your sample from the microscope stage without changing the light and focus.
ii. In the left hand panel of the Motic Live Imaging Module, check the “Auto” box next to “Exposure” for auto exposure. You can also manually adjust the exposure by un‐checking “Auto” and moving the slider bar under the exposure box.
iii. Click on “Background Balance” to reduce the effects of uneven illumination. iv. Click on “White Balance” to obtain the best color similar to what you see through
microscope.
25
v. Place the Petri dish with your sample back on the stage for viewing. vi. For the best image, you may need to repeat steps iii‐iv when you change light intensity
or magnification. vii. Additional adjustments can be made using the Motic Images Plus program. See the
Motic Live Imaging Module: Quick Start Guide for details. This guide can be found on a computer with Motic software installed [go to Start, All Programs, Motic].
Capturing and saving an image
a) At the far left of the Motic Live Imaging Module, click on the camera icon. b) Click the “Capture” button. You may also capture a video by selecting the “Record” button. c) Your captured image will appear on the side panel of the Motic Image Plus 2.0 ML window and
can be adjusted and measured within the program. See the Motic Live Imaging Module: Quick Start Guide for details. This guide can be found on a computer with the software installed [go to Start, All Programs, Motic].
d) Captured images will be saved to the “Capture Folder” folder under the Motic program. You can access this folder while in the program by selecting the “File” dropdown menu, then “Open”, and scrolling until you find the “Capture Folder”.
Calibrating the Microscope This step is important if you want to use the measurement feature of the microscope. Calibrating the microscope allows Motic Images Plus to take accurate measurements of images of objects that have been captured in the microscope. This is done by taking known measurements using a calibration slide. After calibrating the microscope with known measurement, Motic Images Plus uses the saved value of the calibration to determine the size of unknown objects.
Note: You must calibrate the microscope for every zoom (1X‐4X) and use the calibration that corresponds to the zoom when making measurements.
a) Make sure the microscope is connected to the computer with the beige USB cable.
b) Take out the Calibration slide that came with the microscope. The slide has a small, 2000 µm
diameter circle in the center of the slide and 4 lines radiating out around the circle.
c) Center the Calibration slide on to the microscope’s stage plate and secure the slide with the
stage clips.
d) Set the microscope zoom to 1x, center the calibration circle and focus so the image is clear.
e) Open Motic Image software and select “Capture” with the camera as an icon, and pull the
prism bar out to direct light to the microscope.
f) The Motic Live Imaging Module window will open displaying the calibration slide image.
g) Set the resolution to 1600x1200
h) Make sure that the whole circle is visible and can be easily contrasted from the rest of the slide.
i. Adjust the contrast by selecting the “Basic Adjustment “tab on the side of the screen and
adjust the exposure.
Note: For the best calibration, try to make the circle on the calibration slide as clear, sharp,
and contrasted from the background as you can.
i) Save a picture of the image by selecting the camera icon tab located on the side of the screen
and then clicking the “capture” button.
j) Either close or minimize the capture window. The image will be automatically saved and
displayed on the original Motic Images Plus window.
k) Open the image by double clicking on the image at right. Rename the image by clicking “save
as”. Note the date and zoom as the file name (e.g. Calibration_2011_12_03_Zoom_4x)

26
l) Select “Measure” in the Motic Images Plus window.
m) Select “Calibration Wizard” and a new window will appear.
n) Select the “Calibrate with Calibration Circle Slide” tab.
o) Select “Load Image” and select the file for the image you just saved.
p) From the “Objective Multiplication” menu, select the multiplication that corresponds to the
zoom when the image was taken (1X, 2X, 3X or 4X).
q) Select the diameter of the calibration slide (2000 µm).
r) Click on the “calibration” button.
s) In the new window, name your calibration by typing a name next to “Sign name”. The
objective number should correspond to the zoom you used and the µm/Pixel should be filled in
automatically. Click “Save”.
t) In the calibration wizard window you should now see a black circle on a white background (you
might need to move the slider bars to see it). If the image is something other than a circle, start
over at step “h”.
u) Test the calibration by measuring the dark circle in the image you used to calibrate.
a. Open the file used to calibrate then switch to the measurement tab.
b. Click on “Calibration table”
c. Select the Sign name of the calibration you just created , then click “OK”
d. Select the “circle” measurement tool
i. Click on the center of the dark circle, then drag out to draw a circle around the
circle in the image. When you release the mouse button, a window will appear
and give you the radius, area and perimeter of the circle you drew.
ii. Move the circle by moving the cursor to the edge of the circle you drew until
the + turns into a + with arrows on the ends. Now you can click and drag the
circle you created.
iii. To resize the circle, look for a small red dot on the circle and move the cursor
over it until it turns to a finger. Now you can click and drag to resize the circle.
iv. The radius of the circle should be about 1000 µm. If your calibration is way off
(> 100 µm), close the program and start again. To increase the precision of the
calibration, adjust the camera settings and try to take a different image.
v) Repeat steps d‐u in order to calibrate for each zoom stop (1X, 2X, 3X, 4X) on the microscope.
Measurements with the Microscope The Motic Images Plus software can be used to measure items in captured images as long as you know the zoom stop where the image was taken and use the corresponding calibration. Calibrate the microscope for all zoom stops prior to beginning a measurement project. a) Capture an image and note the zoom stop on the microscope. b) Open the image file, then click on “Measure” in the Motic Images Plus window. c) Click on “Calibration Table” and select the Sign name that corresponds to the correct calibration for
your zoom stop. d) Select the measurement tool you wish to use and measure the object of interest. e) Measurement will appear in a pop up window that can be moved by clicking and dragging. f) A shape can be moved by moving the cursor over the shape until the cursor turns into a + with
arrows, then click and drag the shape. g) The size of the shape can be changed by clicking and dragging a red dot in the measurement shape. h) A measurement shape can be deleted by right clicking in the pop up box and selecting delete. i) Measurement will be saved with the image if you save the file.
27
Using Motic Images Plus Version 2.0 ML on a Mac The following instructions are to help you get started using the Motic Images Plus Software. For more in‐depth instructions, see the Motic Images Plus Help Manual included as a pdf document on the Microscope to Middle Schools for Mac CD.
Installing the Motic Software a) To install the software, insert the Microscopes to Middle Schools for Mac CD into your
computer. Open the the Motic_Plus_Mac folder on the CD. Double click on the Motic Images Plus.dmg file to open the Motic Images Plus installation window.
b) Drag the Motic Images Plus icon to the Application Folder on your hard drive. c) Double click on “Install Camera Driver.mpkg” to install the camera driver. d) Restart the computer. e) Turn on the microscope, then plug in the USB from the microscope into the computer. f) Now you can open the Motic software by finding the program in the application menu.
Viewing plankton on the computer
a) Observe your sample in the microscope and adjust the light and focus to get the best image. b) Open the Motic Images Plus program. c) If the main image window (Motic 3.0 MP) does not open automatically, click on “File”, “Capture
New” to start the camera. d) In the new box, select “Live Video”. Then click “Ok”. e) Pull the prism bar on the back of the microscope out to direct light to the camera. f) The image in the microscope should now appear in a new window. To get the best image,
some of the settings need to be adjusted. NOTE: Please be patient when working with the video camera. There is a time delay between any adjustments made with the microscope and the image displayed on the screen.
i. Open the “Motic Camera Settings” box by clicking on “File”, “Video Settings”. Move the “Motic Camera Settings” box to so that you can easily see both the image and the settings windows.
ii. In the “Motic Camera Settings” box, adjust the size of the imaged displayed to best fit your use by selecting the size from the drop down menu. A 2048 x 1536 is a large image that may extend beyond the screen, but will give the highest quality when saving images. 1024 x 765 fills the screen and is good for general viewing. 512 x 384 is a small image, but may be the best way to visualize fast moving objects in the field of view.
iii. In the “Motic Camera Settings” box, click on “Auto Exposure” to have the program automatically adjust the camera settings. You can also check “Full Auto” to have the computer automatically adjust the camera settings.
iv. If the image is too bright or dark after changing the light source, you may need to manually adjust the Exposure slide bar to get a balanced image before clicking “Auto Exposure”.
v. Click on “White Balance” to remove any funny color casts so that parts of the image that should appear white, look white.
vi. The items in the image can stand out more by checking “Enhance”. vii. The camera setting can also be manually adjusted by un‐checking “Full Auto” and
moving the slider bars for specific setting. To return the camera to the factory settings click “Default”.
viii. Additional image adjustments can be made by selecting one of the options under the “Image” menu.
g) The live video can be frozen by pressing the pause button in the upper left of the Motic 3.0 MP window. Press the play button to return to live video. The pause or play button may be hidden. To display the pause or play button, click on “View” and select “Show Toolbar”.
28
Capturing and saving an image a) If the objects you are viewing are very active, freeze the image by clicking “pause” before
saving. b) Click on “File”, then select “Save As” c) Type the name of your new file in the Save As box. It is recommended to put the date, what the
image is of and magnification in the file name (e.g. 20120126_Copepod_4x). d) Choose the file type by typing in one of the following file extensions after the file name
.mix Motic Images Plus file; use this file type if you plan to use some of the enhanced features of the Motic Program (measurements, image adjustments, etc.)
.jpg Most common file type for storing digital photos; use this file type if you ` want the file to act like a digital picture.
.png Portable network graphics; this file is useful for posting to the web and can be used by most programs
.bmp The bitmap file; common image file for image processing programs. Bmp files tend to be larger so use this format if you are familiar with bmp files.
.tif Tagged Image File; used for storing images of many colors e) Choose a location to save the file in the “Where” box. f) Click “Save”
Calibrating the Microscope This step is important if you want to use the measurement feature of the microscope. Calibrating the microscope allows Motic Images Plus to take accurate measurements of images of objects that have been captured in the microscope. This is done by taking known measurements using a calibration slide. After calibrating the microscope with known measurements, Motic Images Plus uses the saved value of the calibration to determine the size of unknown objects.
Note: You must calibrate the microscope for every zoom (1X‐4X) and use the calibration that corresponds to the zoom when making measurements.
a) Make sure the microscope is connected to the computer with the beige USB cable.
b) Take out the Calibration slide that came with the microscope. The slide has a small, 2000 µm‐
diameter circle in the center of the slide and 4 lines radiating out around the circle.
c) Place a blank piece of paper on the stage, center the Calibration slide on to the microscope’s
stage plate, and secure the slide with the stage clips.
d) Set the microscope zoom to 1x, center the calibration circle and focus so the image is clear.
e) Open Motic Image software and pull the prism bar out to direct light to the microscope.
f) The Motic Live Imaging Module window will open displaying the calibration slide image.
g) Make sure that the whole circle is visible and can be easily contrasted from the rest of the slide.
i. Try different combinations of the light source (Incident only, transmitted only, both and
neither) to see which combination gives you an image with minimal shadow.
ii. Adjust the white balance, exposure and enhancement features to get the best image.
Note: For the best calibration, try to make the circle on the calibration slide as clear, sharp,
and contrasted from the background as you can.
h) Click “Measure” then select “Calibration Wizard”. A small Calibration window will open with
the calibration circle covered with an opaque square. If the opaque square is not centered over
the calibration circle, close the window and repeat steps g and h.
29
i) On the right side of the calibration window, select 1X in the ‘Objective Lens’ tab and set the
size in the ‘Circle Diameter’ tab to match the size of the circle on the calibration slide (2000µm
= 2.00 mm).
j) Click on calibrate.
k) Test the calibration by measuring the dark circle in the image you used to calibrate.
a. Close the Calibration wizard window
b. Click on “Measure”, hover over “Calibrations” and select the 1X calibration. If 1X is
already checked, it is the calibration in use.
c. Click on “Measure” and select “Circle”
i. Click on the center of the dark circle, then drag out to draw a circle around the
circle in the image. When you release the mouse button, a window will appear
and give you the radius, area and perimeter of the circle you drew.
ii. Move the circle by moving the cursor to the edge of the circle you drew until
the arrow turns into a hand. Now you can click and drag the circle you created.
iii. To resize the circle, look for a small dot on the circle and move the cursor over
it until it turns to a +. Now you can click and drag to resize the circle.
iv. Move and resize the circle you drew so that it covers the calibration circle.
v. The radius of the circle should be about 1000 µm. IF you calibration is way off
(> 100 µm), close the program and start again. To increase the precision of the
calibration, adjust the camera settings and try to take a different image.
vi. You can get rid of the measurement by clicking command (apple key or ⌘)+ Z.
l) Repeat steps h‐j in order to calibrate for each zoom stop (1X, 2X, 3X, 4X) on the microscope. Be
sure to type in the objective that corresponds to the zoom you are using. For the 2‐4X
calibration you can just click calibrate, zoom to the next magnification stop, enter the correct
objective information and calibrate. However, if the calibration circle drifts out of the center so
that it is cropped, you will need to move the slide and readjust camera settings before
calibrating.
m) Test the calibration at each magnification. The calibration selected under “Measure”,
“Calibrations” must match the zoom on the microscope for accurate measurements.
Measurements with the Microscope The Motic Images Plus software can be used to measure live video, frozen, or saved images as long as you know the zoom stop (1X, 2X, 3X, 4X) of the image and use the corresponding calibration. Calibrate the microscope for all zoom stops prior to beginning a measurement project. a) To make a measurement, click on “Measure”, then hover over calibrations and select the
calibration that corresponds to the zoom on the microscope. b) Select the measurement tool you wish to use under the “measurement” menu. c) Move the mouse to where you want to start measuring, click and drag until the end of the spot
where you want to measure and release the mouse. d) Measurement will appear in a pop up window that can be moved by clicking and dragging. e) A shape can be moved by moving the cursor over the shape until the cursor turns into a hand, then
click and drag the shape. f) The size of the shape can be changed by clicking and dragging the dot in the measurement shape. g) To delete a measurement, select the measurement you want to delete, then go to edit, delete. h) Measurement will be saved with the image if you save the file.

30
31
Microscope Care With proper care and maintenance, the microscope should give you years of use.
a) Turn off the light switches and main power switch when not in use.
b) Cover the microscope with the dustcover when not in use.
c) Keep the microscope dry.
d) Cleaning the lenses
i. It is very important that the microscope is protected from dust and water in order to
protect the microscope from fungus which would permanently damage the lenses.
ii. Avoid using the microscope in the place with high relative humidity or places with heavy
piping and sinks. Optical lenses are recommended to be kept in dry places when not in use.
iii. DO NOT WIPE THE LENSES SURFACE WITH DRY COTTON SWAB; USE CLOTH OR LENS PAPER.
iv. Breathe lightly on the glass surface and wipe with a clean, lint free cloth or lens paper.
v. Dip a lint free cloth or lens paper with a few drops of ethanol and carefully clean the lens
surface. No other solvents should be used.
e) Changing the light bulb (if necessary)
i. For incident light: a) unscrew the black collar and silver lens. b) Carefully remove the old
bulb, and plug in the new light bulb. c) Reattach the silver lens and black collar.
ii. For transmitted light: a) make sure that the lock screw for the focusing carrier is tight, then
turn the microscope 90 degrees on its side so that you can access the bottom plate. a)
Remove the small plastic section of the bottom plate by using your finger to push the
plastic compartments away from you. b) Carefully remove the old bulb, and plug in the new
light bulb. c) Reattach the missing plastic section to the bottom plate.

32
33
Lesson 1: Introduction to Plankton TEACHER GUIDE
Time Required: 40 minutes. Advance preparation requires an additional 15 minutes.
Structure: In this lesson, students are first introduced to plankton through a short PowerPoint presentation (10 minutes). Students then investigate and identify various phytoplankton using images taken with a compound microscope (25 minutes). We recommend students work in small groups. A combined pre‐ and post‐ survey for Lessons 1, 2, and 3 is included. The pre‐survey is given at the beginning of Lesson 1 (5 minutes) and the post‐survey is given at the end of Lesson 3.
Material Included: (Paper materials contained in packet are shown in BOLD CAPS) 1. PLANKTON SURVEY – Version 1 (geared towards elementary school standards) 2. TEACHER ANSWER KEY to PLANKTON SURVEY – Version 1 3. PLANKTON SURVEY – Version 2 (geared towards middle school standards) 4. TEACHER ANSWER KEY to PLANKTON SURVEY – Version 2 5. POWERPOINT SCRIPT 6. STUDENT WORKSHEET – POWERPOINT – Lesson 1: Introduction to Plankton 7. TEACHER ANSWER KEY to STUDENT WORKSHEET – POWERPOINT – Lesson 1: Introduction to
Plankton 8. STUDENT WORKSHEET – Lesson 1: Phytoplankton Microscopy Lab 9. SLIDES – Lesson 1: Phytoplankton Microscopy Lab 10. ANSWER KEY – Lesson 1: Phytoplankton Microscopy Lab 11. PHYTOPLANKTON ID GUIDE – Lesson 1: Phytoplankton Microscopy Lab 12. GLOSSARY
Materials Not Included and Needed for Lesson 1: 13. Computer 14. Projector 15. Speakers
Advance Preparation: 1. A short (10 minute), narrated PowerPoint entitled Introduction to Plankton can be found on the CD
included. Load the PowerPoint presentation by dragging the file from the CD onto the computer desktop.
2. If you prefer to present the information yourself, load the non‐narrated version of the PowerPoint presentation. A POWERPOINT SCRIPT is included as a guide.
3. Photocopy or print the PLANKTON SURVEY – Lessons 1, 2, and 3 version that is appropriate for your students (one per student). You can give this as a pre‐survey at the beginning of this lesson. It can also be given as a post‐survey or quiz at the end of Lesson 3.
4. Photocopy or print STUDENT WORKSHEET – Lesson 1: Phytoplankton Microscopy Lab one per student.
5. Students will work in groups for this lesson. Photocopy or print a class set of SLIDES – Lesson 1: Phytoplankton Microscopy Lab (one per group) and PHYTOPLANKTON ID GUIDE – Lesson 1: Phytoplankton Microscopy Lab (two per group). These materials are also used in lesson 2.
6. Photocopy or print the GLOSSARY (one per student) if desired.
34
Instructional Procedures: 1. Have the students take the PLANKTON SURVEY – Lessons 1, 2, and 3 (one per student). A
TEACHER ANSWER KEY is provided for your convenience.
2. Distribute a STUDENT WORKSHEET – PowerPoint – Lesson 1: Introduction to Plankton to each student. Play the narrated PowerPoint presentation to familiarize your students with marine plankton or give the presentation yourself.
3. Review the main topics of the PowerPoint presentation with your students: phytoplankton are
plant‐like and have certain adaptations for survival; zooplankton are animal‐like and can exist as meroplankton or holoplankton; and plankton form the basis of the marine food web. Go over the answers to the student worksheet.
4. Distribute a STUDENT WORKSHEET – Lesson 1: Phytoplankton Microscopy Lab to each student.
5. Divide the students into groups. Distribute one copy of SLIDES – Lesson 1: Phytoplankton
Microscopy Lab and two copies of PHYTOPLANKTON ID GUIDE – Lesson 1: Phytoplankton Microscopy Lab to each group.
6. Tell your students that they will be completing a phytoplankton microscopy lab. Explain that the
SLIDES – Lesson 1: Phytoplankton Microscopy Lab are phytoplankton images that were taken with a compound microscope. Compound microscopes have very high magnification, which is essential to view these tiny phytoplankton. In Lesson 3, dissecting microscopes (which have lower magnification) suffice to study the larger zooplankton. After a quick introduction to the phytoplankton lab, students should be able to work independently in their groups.
7. Have students use the PHYTOPLANKTON ID GUIDE – Lesson 1: Phytoplankton Microscopy Lab to
identify the marine phytoplankton that are found on the various photomicrographs (microscope images) in the SLIDES – Lesson 1: Phytoplankton Microscopy Lab.
8. Have the students draw the phytoplankton on their STUDENT WORKSHEET – Lesson 1:
Phytoplankton Microscopy Lab.
9. When students are finished, have them check their answers using the ANSWER KEY – Lesson 1: Phytoplankton Microscopy Lab. (Note: For each slide, only one of each type of phytoplankton is identified on the answer key.)
35
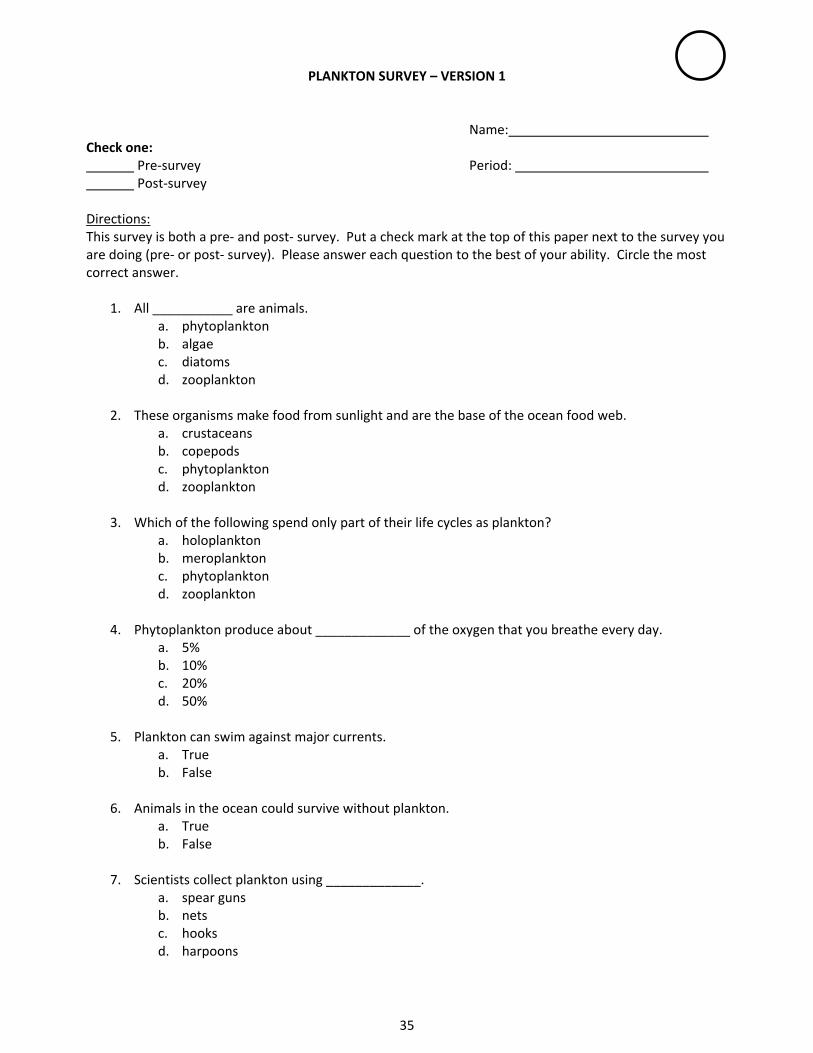
PLANKTON SURVEY – VERSION 1
Name: Check one: Pre‐survey Period: Post‐survey Directions: This survey is both a pre‐ and post‐ survey. Put a check mark at the top of this paper next to the survey you are doing (pre‐ or post‐ survey). Please answer each question to the best of your ability. Circle the most correct answer.
1. All ___________ are animals. a. phytoplankton b. algae c. diatoms d. zooplankton
2. These organisms make food from sunlight and are the base of the ocean food web.
a. crustaceans b. copepods c. phytoplankton d. zooplankton
3. Which of the following spend only part of their life cycles as plankton?
a. holoplankton b. meroplankton c. phytoplankton d. zooplankton
4. Phytoplankton produce about _____________ of the oxygen that you breathe every day.
a. 5% b. 10% c. 20% d. 50%
5. Plankton can swim against major currents.
a. True b. False
6. Animals in the ocean could survive without plankton.
a. True b. False
7. Scientists collect plankton using _____________.
a. spear guns b. nets c. hooks d. harpoons
36
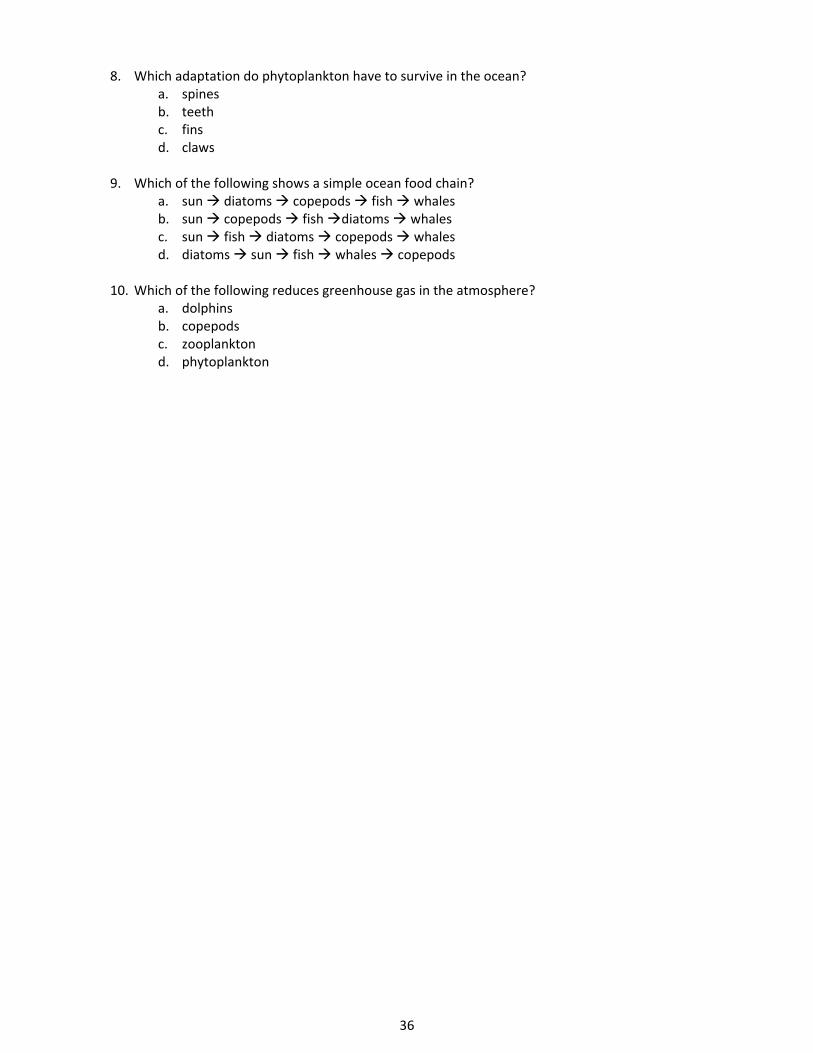
8. Which adaptation do phytoplankton have to survive in the ocean? a. spines b. teeth c. fins d. claws
9. Which of the following shows a simple ocean food chain?
a. sun diatoms copepods fish whales b. sun copepods fish diatoms whales c. sun fish diatoms copepods whales d. diatoms sun fish whales copepods
10. Which of the following reduces greenhouse gas in the atmosphere?
a. dolphins b. copepods c. zooplankton d. phytoplankton
37
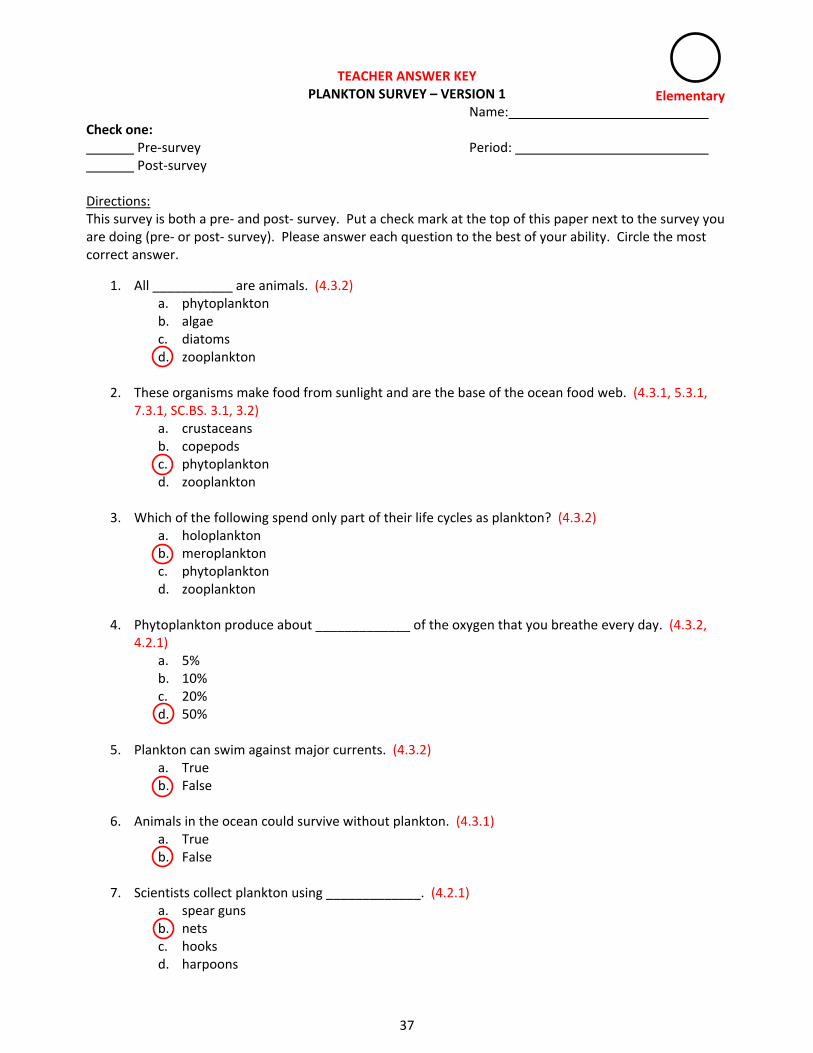
TEACHER ANSWER KEY PLANKTON SURVEY – VERSION 1
Name: Check one: Pre‐survey Period: Post‐survey Directions: This survey is both a pre‐ and post‐ survey. Put a check mark at the top of this paper next to the survey you are doing (pre‐ or post‐ survey). Please answer each question to the best of your ability. Circle the most correct answer.
1. All ___________ are animals. (4.3.2) a. phytoplankton b. algae c. diatoms d. zooplankton
2. These organisms make food from sunlight and are the base of the ocean food web. (4.3.1, 5.3.1,
7.3.1, SC.BS. 3.1, 3.2) a. crustaceans b. copepods c. phytoplankton d. zooplankton
3. Which of the following spend only part of their life cycles as plankton? (4.3.2)
a. holoplankton b. meroplankton c. phytoplankton d. zooplankton
4. Phytoplankton produce about _____________ of the oxygen that you breathe every day. (4.3.2,
4.2.1) a. 5% b. 10% c. 20% d. 50%
5. Plankton can swim against major currents. (4.3.2)
a. True b. False
6. Animals in the ocean could survive without plankton. (4.3.1)
a. True b. False
7. Scientists collect plankton using _____________. (4.2.1)
a. spear guns b. nets c. hooks d. harpoons
Elementary
38
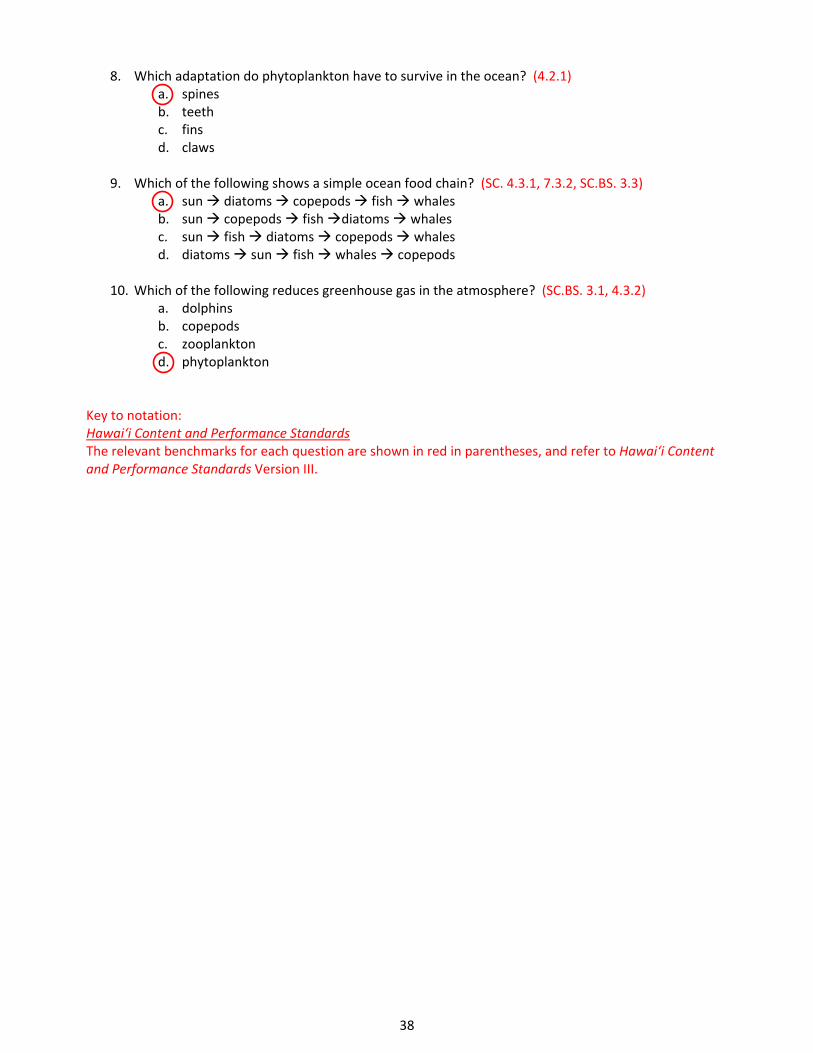
8. Which adaptation do phytoplankton have to survive in the ocean? (4.2.1) a. spines b. teeth c. fins d. claws
9. Which of the following shows a simple ocean food chain? (SC. 4.3.1, 7.3.2, SC.BS. 3.3)
a. sun diatoms copepods fish whales b. sun copepods fish diatoms whales c. sun fish diatoms copepods whales d. diatoms sun fish whales copepods
10. Which of the following reduces greenhouse gas in the atmosphere? (SC.BS. 3.1, 4.3.2)
a. dolphins b. copepods c. zooplankton d. phytoplankton
Key to notation: Hawai‘i Content and Performance Standards The relevant benchmarks for each question are shown in red in parentheses, and refer to Hawai‘i Content and Performance Standards Version III.
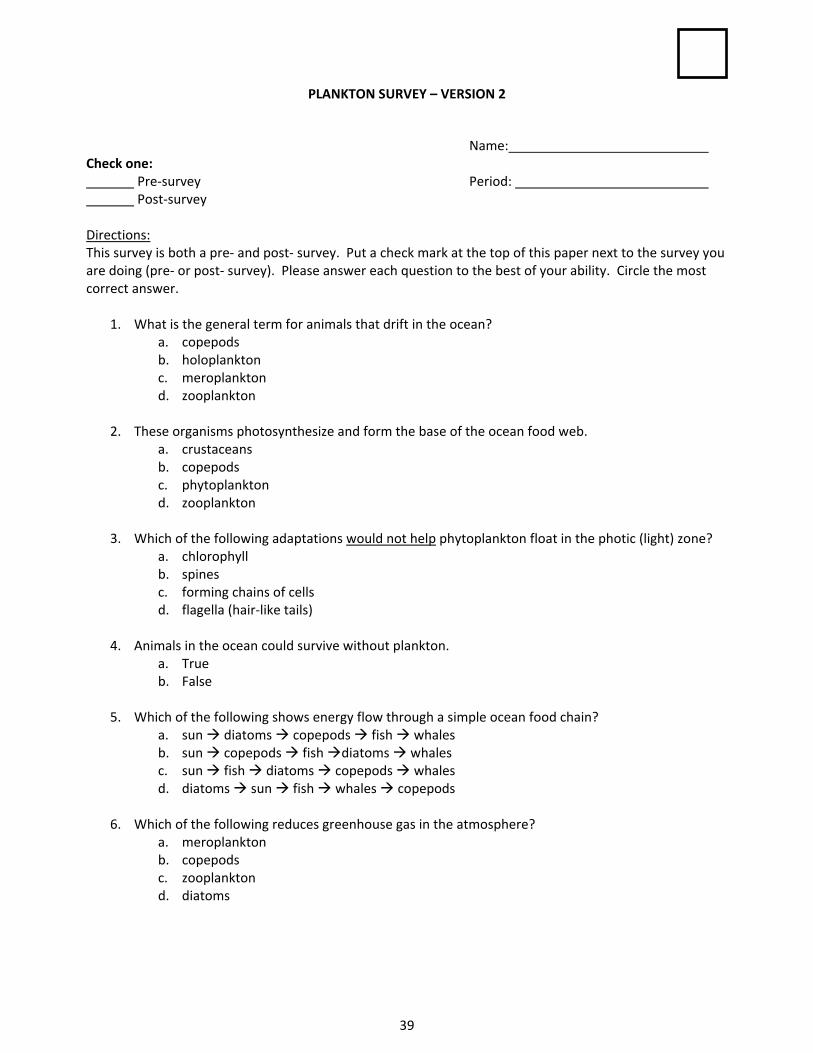
39
PLANKTON SURVEY – VERSION 2
Name: Check one: Pre‐survey Period: Post‐survey Directions: This survey is both a pre‐ and post‐ survey. Put a check mark at the top of this paper next to the survey you are doing (pre‐ or post‐ survey). Please answer each question to the best of your ability. Circle the most correct answer.
1. What is the general term for animals that drift in the ocean? a. copepods b. holoplankton c. meroplankton d. zooplankton
2. These organisms photosynthesize and form the base of the ocean food web.
a. crustaceans b. copepods c. phytoplankton d. zooplankton
3. Which of the following adaptations would not help phytoplankton float in the photic (light) zone?
a. chlorophyll b. spines c. forming chains of cells d. flagella (hair‐like tails)
4. Animals in the ocean could survive without plankton.
a. True b. False
5. Which of the following shows energy flow through a simple ocean food chain?
a. sun diatoms copepods fish whales b. sun copepods fish diatoms whales c. sun fish diatoms copepods whales d. diatoms sun fish whales copepods
6. Which of the following reduces greenhouse gas in the atmosphere?
a. meroplankton b. copepods c. zooplankton d. diatoms
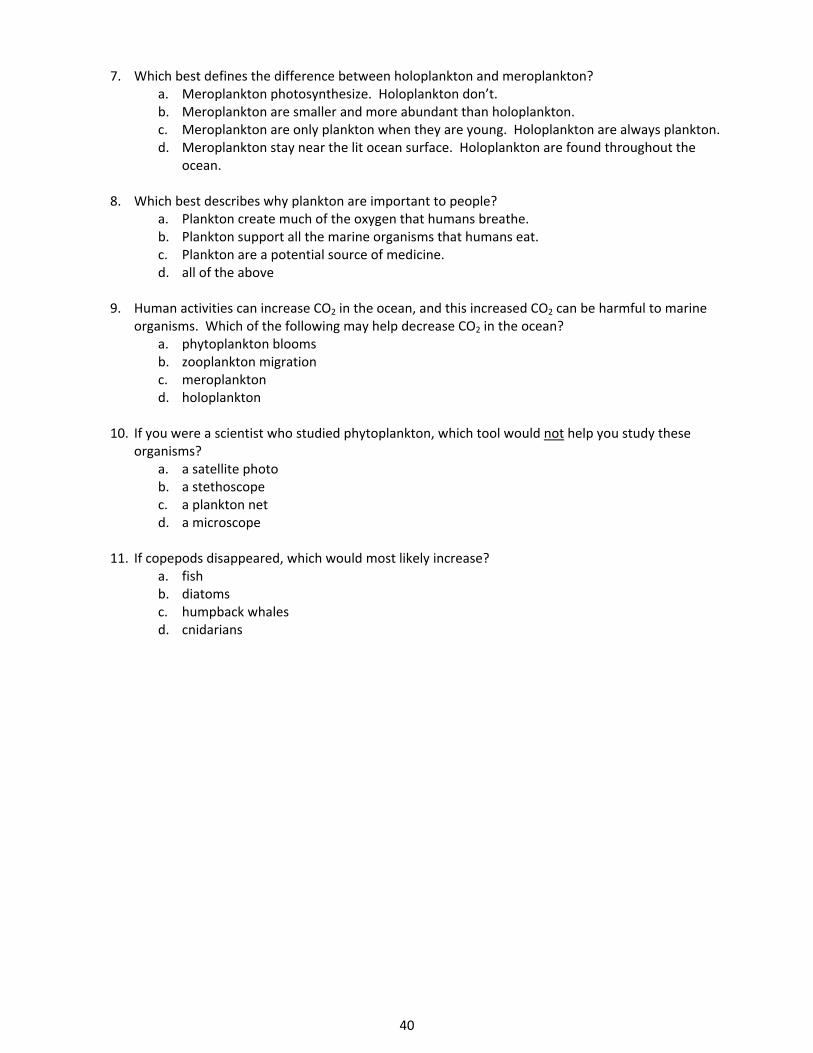
40
7. Which best defines the difference between holoplankton and meroplankton? a. Meroplankton photosynthesize. Holoplankton don’t. b. Meroplankton are smaller and more abundant than holoplankton. c. Meroplankton are only plankton when they are young. Holoplankton are always plankton. d. Meroplankton stay near the lit ocean surface. Holoplankton are found throughout the
ocean.
8. Which best describes why plankton are important to people? a. Plankton create much of the oxygen that humans breathe. b. Plankton support all the marine organisms that humans eat. c. Plankton are a potential source of medicine. d. all of the above
9. Human activities can increase CO2 in the ocean, and this increased CO2 can be harmful to marine
organisms. Which of the following may help decrease CO2 in the ocean? a. phytoplankton blooms b. zooplankton migration c. meroplankton d. holoplankton
10. If you were a scientist who studied phytoplankton, which tool would not help you study these
organisms? a. a satellite photo b. a stethoscope c. a plankton net d. a microscope
11. If copepods disappeared, which would most likely increase?
a. fish b. diatoms c. humpback whales d. cnidarians
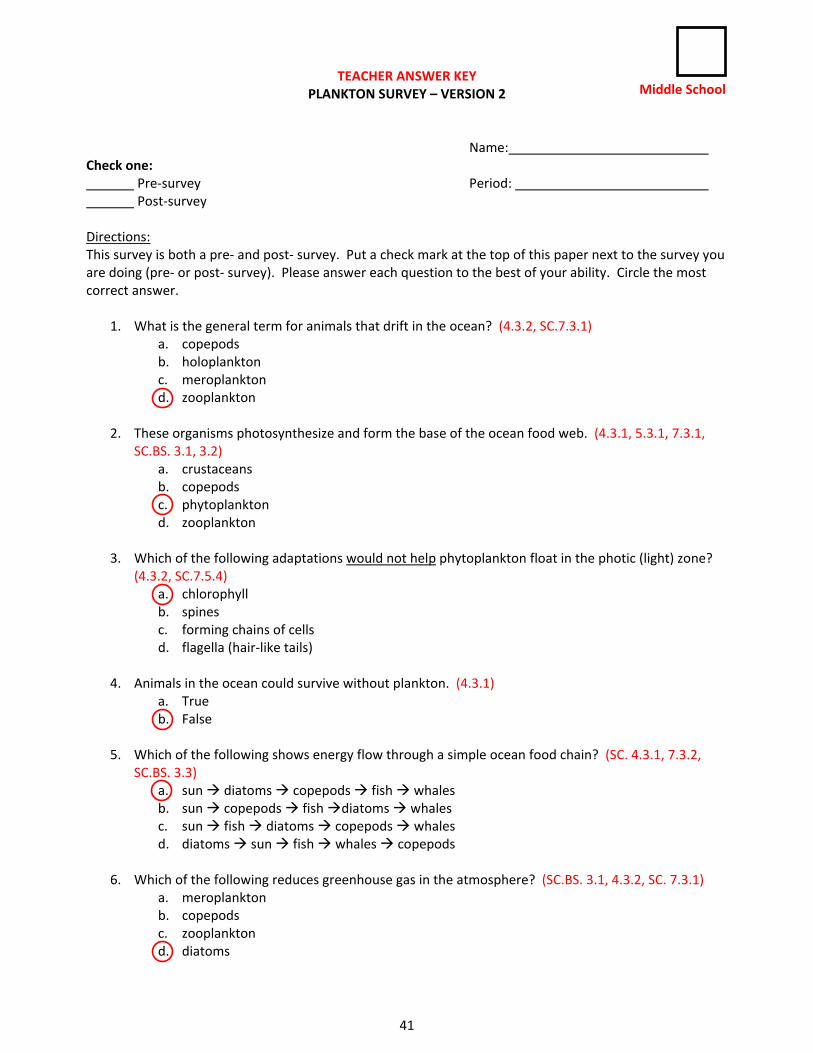
41
TEACHER ANSWER KEY PLANKTON SURVEY – VERSION 2
Name: Check one: Pre‐survey Period: Post‐survey Directions: This survey is both a pre‐ and post‐ survey. Put a check mark at the top of this paper next to the survey you are doing (pre‐ or post‐ survey). Please answer each question to the best of your ability. Circle the most correct answer.
1. What is the general term for animals that drift in the ocean? (4.3.2, SC.7.3.1) a. copepods b. holoplankton c. meroplankton d. zooplankton
2. These organisms photosynthesize and form the base of the ocean food web. (4.3.1, 5.3.1, 7.3.1,
SC.BS. 3.1, 3.2) a. crustaceans b. copepods c. phytoplankton d. zooplankton
3. Which of the following adaptations would not help phytoplankton float in the photic (light) zone?
(4.3.2, SC.7.5.4) a. chlorophyll b. spines c. forming chains of cells d. flagella (hair‐like tails)
4. Animals in the ocean could survive without plankton. (4.3.1)
a. True b. False
5. Which of the following shows energy flow through a simple ocean food chain? (SC. 4.3.1, 7.3.2,
SC.BS. 3.3) a. sun diatoms copepods fish whales b. sun copepods fish diatoms whales c. sun fish diatoms copepods whales d. diatoms sun fish whales copepods
6. Which of the following reduces greenhouse gas in the atmosphere? (SC.BS. 3.1, 4.3.2, SC. 7.3.1)
a. meroplankton b. copepods c. zooplankton d. diatoms
Middle School
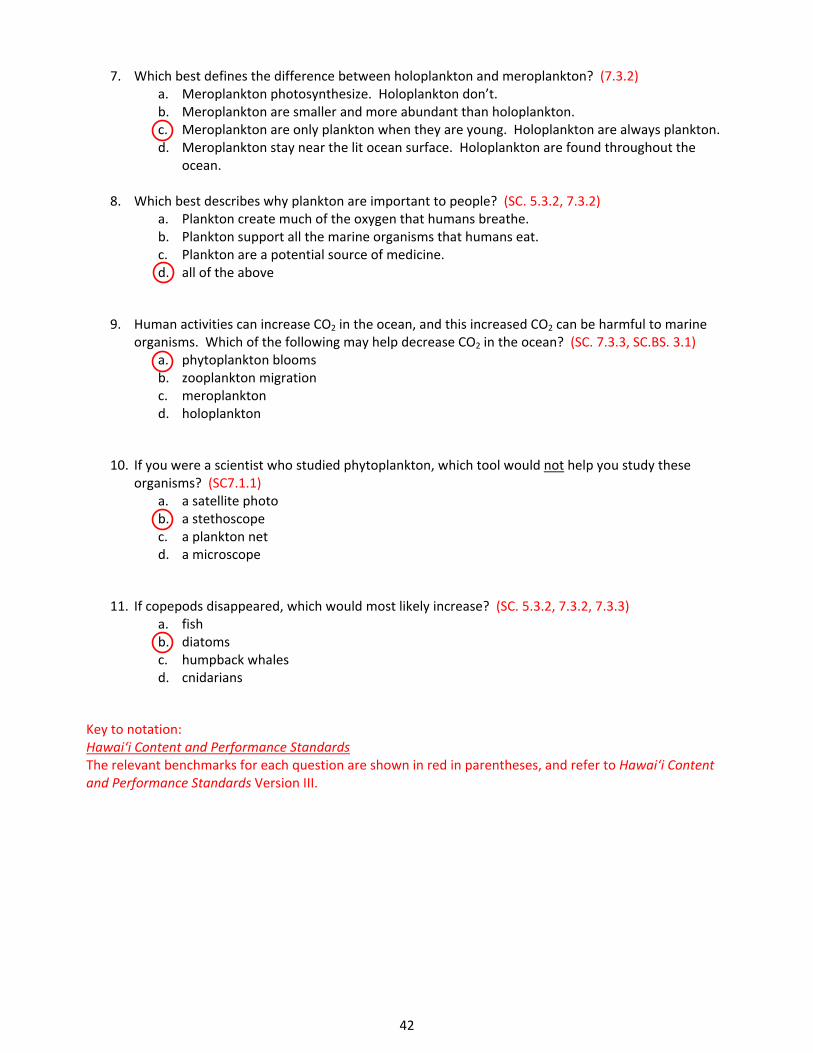
42
7. Which best defines the difference between holoplankton and meroplankton? (7.3.2) a. Meroplankton photosynthesize. Holoplankton don’t. b. Meroplankton are smaller and more abundant than holoplankton. c. Meroplankton are only plankton when they are young. Holoplankton are always plankton. d. Meroplankton stay near the lit ocean surface. Holoplankton are found throughout the
ocean.
8. Which best describes why plankton are important to people? (SC. 5.3.2, 7.3.2) a. Plankton create much of the oxygen that humans breathe. b. Plankton support all the marine organisms that humans eat. c. Plankton are a potential source of medicine. d. all of the above
9. Human activities can increase CO2 in the ocean, and this increased CO2 can be harmful to marine organisms. Which of the following may help decrease CO2 in the ocean? (SC. 7.3.3, SC.BS. 3.1)
a. phytoplankton blooms b. zooplankton migration c. meroplankton d. holoplankton
10. If you were a scientist who studied phytoplankton, which tool would not help you study these organisms? (SC7.1.1)
a. a satellite photo b. a stethoscope c. a plankton net d. a microscope
11. If copepods disappeared, which would most likely increase? (SC. 5.3.2, 7.3.2, 7.3.3) a. fish b. diatoms c. humpback whales d. cnidarians
Key to notation: Hawai‘i Content and Performance Standards The relevant benchmarks for each question are shown in red in parentheses, and refer to Hawai‘i Content and Performance Standards Version III.
43
POWERPOINT SCRIPT
Slide 1 (Title slide): Welcome to the amazing world of marine plankton. (click)
Slide 2: So what exactly are plankton? The term plankton comes from the Greek word “Planktos” meaning wanderer or drifter. (click) Plankton are organisms that live in the water and cannot swim against major currents. Plankton can be classified into two main groups: plants (click) and animals (click). (click)
Slide 3: The plant‐like plankton are called phytoplankton. You can remember that phytoplankton are like plants because plants and phyto both begin with the letter p. Each phytoplankton is a single cell or a chain of cells (click). Phytoplankton are microscopic: that means they are incredibly small. The picture shown here (click) was taken through a microscope. The phytoplankton in this image has been magnified hundreds of times. As you can see, it doesn’t look anything like plants that grow on land. Phytoplankton don’t have roots, stems, or leaves. But like land plants, they are able to capture sunlight and convert it into food. This process, called photosynthesis, also makes the oxygen that we need to breathe. In fact, phytoplankton produce about 50% of the oxygen that you breathe every day! That’s not an easy task, but fortunately there are plenty of phytoplankton to get the job done. (click) In a teaspoon of sea water, you can find over a million phytoplankton! (click) When conditions are just right, phytoplankton can grow in such large numbers that they are able to generate a bloom that can be seen from space. (click)
Slide 4: The animal‐like organisms that drift in the ocean are called zooplankton. You can remember that zooplankton are like animals because animals live in a zoo. These creatures are larger than phytoplankton, but most are still quite small. (click) You can view most zooplankton by using a magnifying glass. One notable exception (click) are jellyfish, which can be seen without a magnifying glass. Some jellyfish species can grow to over several meters in length – which of course requires no magnification at all. (click)
Slide 5: Phytoplankton live near the surface of the ocean close to the sun because they need sunlight to make food. The shape of the phytoplankton keeps them from sinking too far below the surface of the ocean. Phytoplankton that are balled up will sink (click) just like you do when you jump into the pool as a cannonball. Phytoplankton that are long and spread out will float (click) just like when you float on your back with your arms and legs spread out. These (click) are some examples of long, spread out shapes that help phytoplankton stay near the surface. Some phytoplankton (click) even link together to form chains to stay afloat. (click)
Slide 6: Two common types of phytoplankton that you will learn about today are dinoflagellates (click) and diatoms (click).
Slide 7: Phytoplankton have special adaptations, or modifications, for survival in the ocean. Most dinoflagellates have two flagella (click) that help them move through the water, and a hard shell (click) for protection. Dinoflagellates have pigments of various colors and, when there are a lot of them in one area, the ocean water appears to change color. This is called a bloom (click). Toxins are sometimes released into the surrounding waters during a bloom. Scientists believe that these toxins may protect dinoflagellates from predators. (click)
44
Diatoms are another type of plant‐like plankton. They come in varying shapes that include zigzags, ribbons, and fans. They have a protective cell wall (click) made of glass, and their spines (click) help prevent them from sinking. Diatoms also form chains (click) which help keep them near the surface. (click)
Slide 8: There are two types of zooplankton: temporary and permanent. The temporary zooplankton called meroplankton (click) only spend part of their life cycle as plankton. The permanent zooplankton called holoplankton (click) spend their whole life as plankton. You can remember that holoplankton spend their whole life as plankton because holo and whole sound similar. (click)
Slide 9: Certain animals, such as crabs and fish, are plankton only when they are young larva. When they grow up, they transform into completely different forms. As a crab grows up (click), it sinks to the ocean floor which is the natural habitat for an adult crab. A fish larva (click) grows up to be a fish with excellent swimming capabilities. In both cases, they are plankton only when they are young. (click)
Slide 10: The other type of zooplankton (called holoplankton) spends its whole life drifting around the ocean. Here are some examples of holoplankton. Copepods (click) are the most abundant animals in the ocean, and perhaps anywhere on Earth. (click)
Slide 11: Plankton are really important because they form the base of the marine food web. Phytoplankton (click) obtain their energy from the sun through photosynthesis. Phytoplankton are eaten by zooplankton (click), which are then eaten by small fish (click). Small fish get eaten by medium fish (click), which are in turn eaten by large fish (click), such as tuna. Sharks (click) are at the top of the food web. Without plankton (click), none of the larger fish or animals in the ocean could survive. The entire marine food web would collapse. (click)
Slide 12: So how do scientists study plankton? First, they conduct a plankton tow to collect the tiny organisms. Plankton are very common in the ocean, but they are often very spread out. Scientists tow plankton nets (click) slowly behind a boat to concentrate the plankton. These nets have small holes, which are large enough to allow water to pass through but small enough to trap the plankton inside. The phytoplankton and zooplankton get forced into a bucket (click) at the narrow end of the net. Scientists collect the plankton from the bucket, and investigate them with a magnifying glass or microscope. These pictures (click) show high school students collecting plankton with a net (click), and examining their findings under a microscope. (click)
Slide 13: In summary, the plant‐like plankton are called phytoplankton. Phytoplankton (click) cannot swim against major currents. All phytoplankton (click) spend their whole life as plankton. Phytoplankton (click) are important because they produce half of the oxygen that we breathe each day! Phytoplankton (click) have spines, chains, and hard shells. These adaptations protect them from predators and help them stay close to the surface where sunlight is most abundant. (click)
Slide 14: Animal‐like plankton are called zooplankton. (click) Like phytoplankton, zooplankton cannot swim against major ocean currents. Some zooplankton are plankton only when they are young. (click) They are called meroplankton or temporary plankton. For example, this zooplankton (click) becomes a crab when it grows up. Other zooplankton (click) called holoplankton spend their whole lives as plankton. Both zooplankton and phytoplankton (click) make up the base of the marine food web: without these tiny organisms, no fish could survive.
45
Name: Period:
STUDENT WORKSHEET – POWERPOINT Lesson 1: Introduction to Plankton
1. Plankton are organisms that live in the _______________ and cannot _______________ against major
currents.
2. Plant‐like plankton are called phytoplankton and are so small that a _________________is needed to
see them.
3. The animal‐like organisms that drift in the ocean are called _____________________.
4. Phytoplankton make _________________ using sunlight and carbon dioxide (CO2), so they need to live
near the ______________of the ocean.
5. Two kinds of phytoplankton are _________________________ and _________________________.
Each type has special adaptations to survive.
6. Dinoflagellates have ____________________ to help them move through the water and
_________________for protection. Dinoflagellates may increase in numbers during a
________________, which colors the water and can be seen from space.
7. Diatoms are another type of plant‐like phytoplankton that have a protective cell wall made of
__________________. They may form __________________ and have ____________________to help
them float.
8. There are two types of zooplankton: ____________________ and _______________________. The
temporary zooplankton, called _____________________, only spend part of their life cycle as plankton.
The permanent zooplankton, called _____________________, spend their whole life as plankton.
9. Meroplankton such as _____________________ and _____________________ are only plankton when
they are young larvae. Copepods are examples of ____________________________, living their entire
life as plankton.
10. ___________________are the base the marine food web. Phytoplankton get their energy from
______________________ through photosynthesis. Zooplankton eat the phytoplankton. Without
___________________, none of the larger fish or animals could survive.

46

47
Name: Period:
TEACHER ANSWER KEY to STUDENT WORKSHEET – POWERPOINT Lesson 1: Introduction to Plankton
1. Plankton are organisms that live in the __water/ocean__ and cannot ____swim_______ against major
currents.
2. Plant‐like plankton are called phytoplankton and are so small that a ___microscope____is needed to see
them.
3. The animal‐like organisms that drift in the ocean are called ___zooplankton_______.
4. Phytoplankton make ___food/sugars____ using sunlight and carbon dioxide (CO2), so they need to live
near the __surface_____of the ocean.
5. Two kinds of phytoplankton are ______dinoflagellates________ and ________diatoms________. Each
type has special adaptations to survive.
6. Dinoflagellates have ______flagella_______ to help them move through the water and
____shells_______for protection. Dinoflagellates may increase in numbers during a ____bloom_______,
which colors the water and can be seen from space.
7. Diatoms are another type of plant‐like phytoplankton that have a protective cell wall made of
____silica or glass___. They may form ____chains_____ and have ______spines_____to help them float.
8. There are two types of zooplankton: ____temporary_______ and _____permanent_________. The
temporary zooplankton, called ___meroplankton______, only spend part of their life cycle as plankton.
The permanent zooplankton, called ____holoplankton____, spend their whole life as plankton.
9. Meroplankton such as ______crabs_________ and _______fish__________ are only plankton when they
are young larvae. Copepods are examples of ________holoplankton________, living their entire life as
plankton.
10. ____Plankton_______are the base the marine food web. Phytoplankton get their energy from
________the sun_______through photosynthesis. Zooplankton eat the phytoplankton. Without
_____plankton______, none of the larger fish or animals could survive.

48
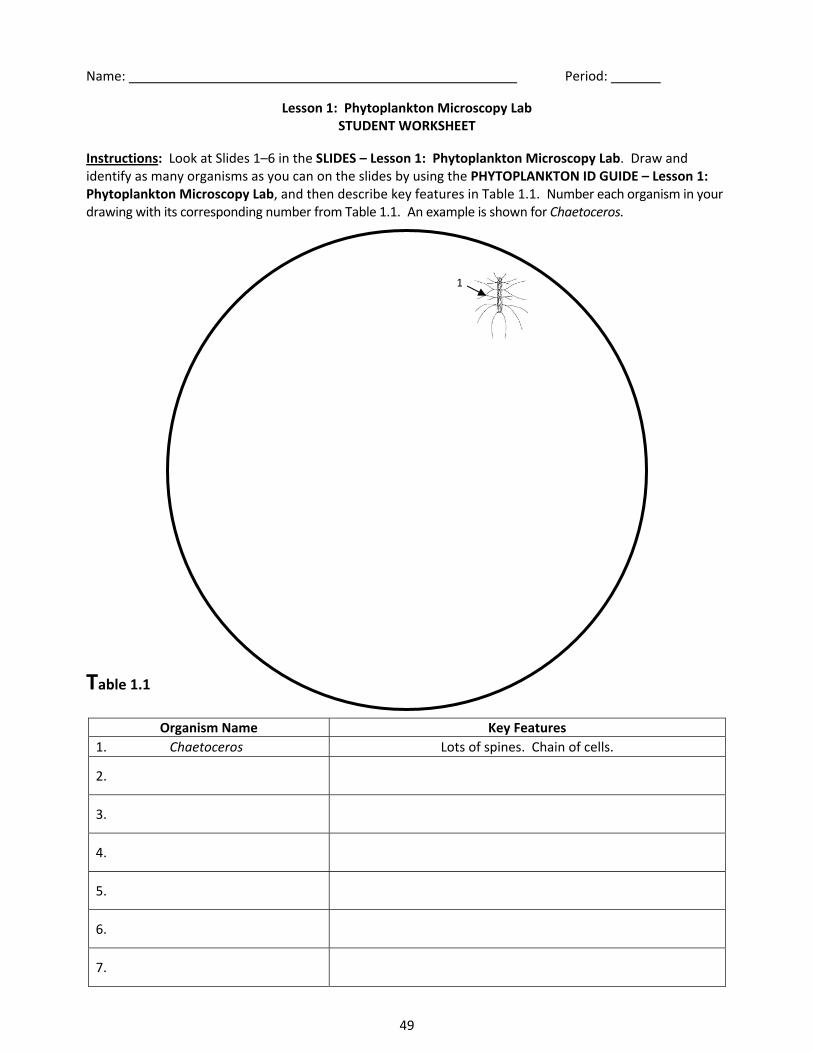
49
Name: Period:
Lesson 1: Phytoplankton Microscopy Lab STUDENT WORKSHEET
Instructions: Look at Slides 1–6 in the SLIDES – Lesson 1: Phytoplankton Microscopy Lab. Draw and identify as many organisms as you can on the slides by using the PHYTOPLANKTON ID GUIDE – Lesson 1: Phytoplankton Microscopy Lab, and then describe key features in Table 1.1. Number each organism in your drawing with its corresponding number from Table 1.1. An example is shown for Chaetoceros.
Table 1.1
Organism Name Key Features
1. Chaetoceros Lots of spines. Chain of cells.
2.
3.
4.
5.
6.
7.
1

50
51
51
SLIDES Lesson 1: Phytoplankton Microscopy Lab

52

53

54
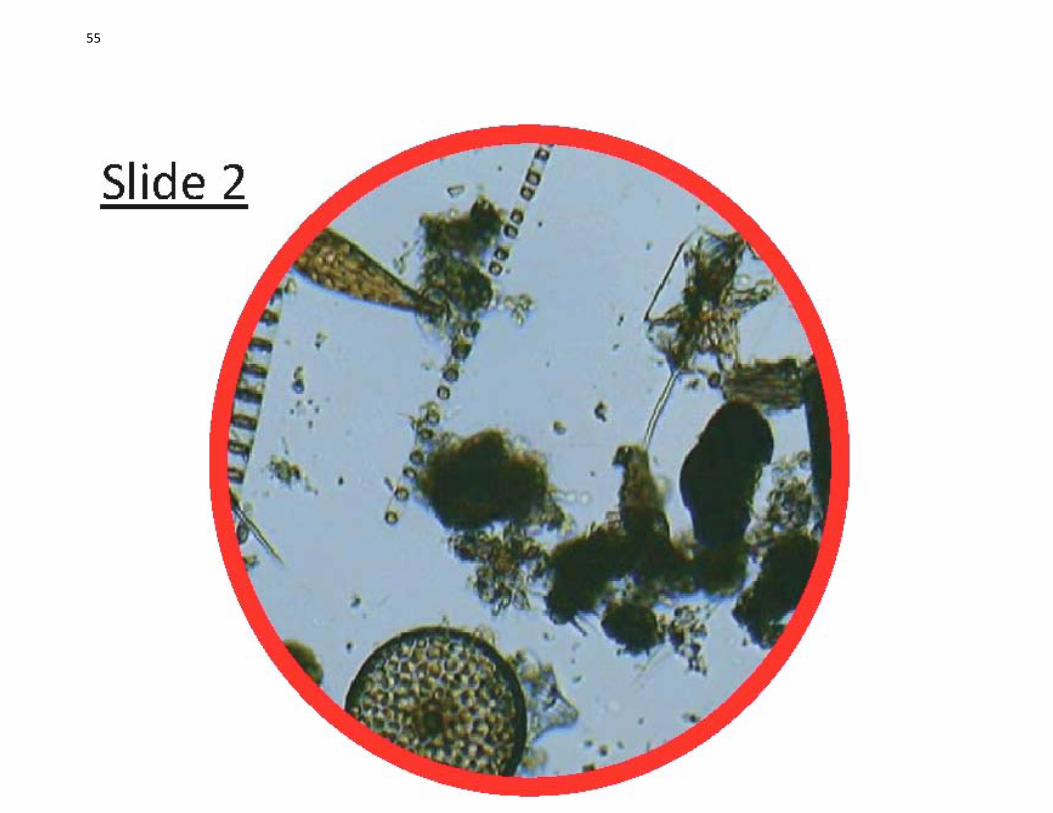
55

56
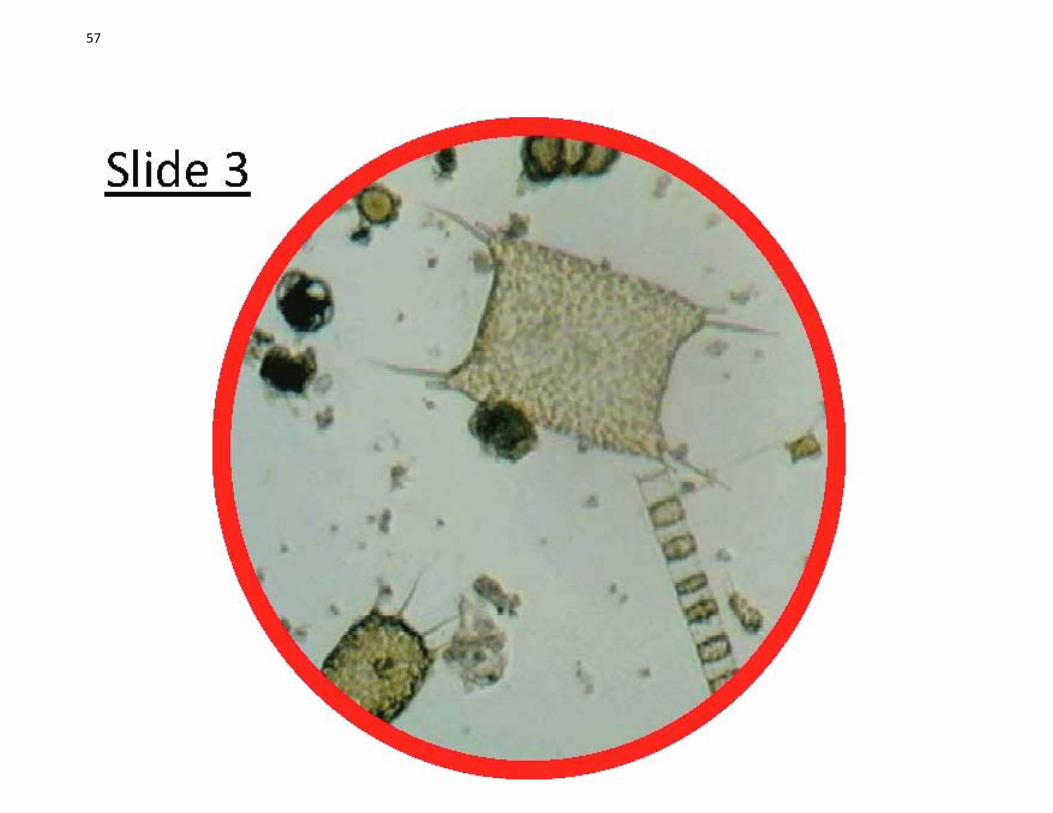
57

58
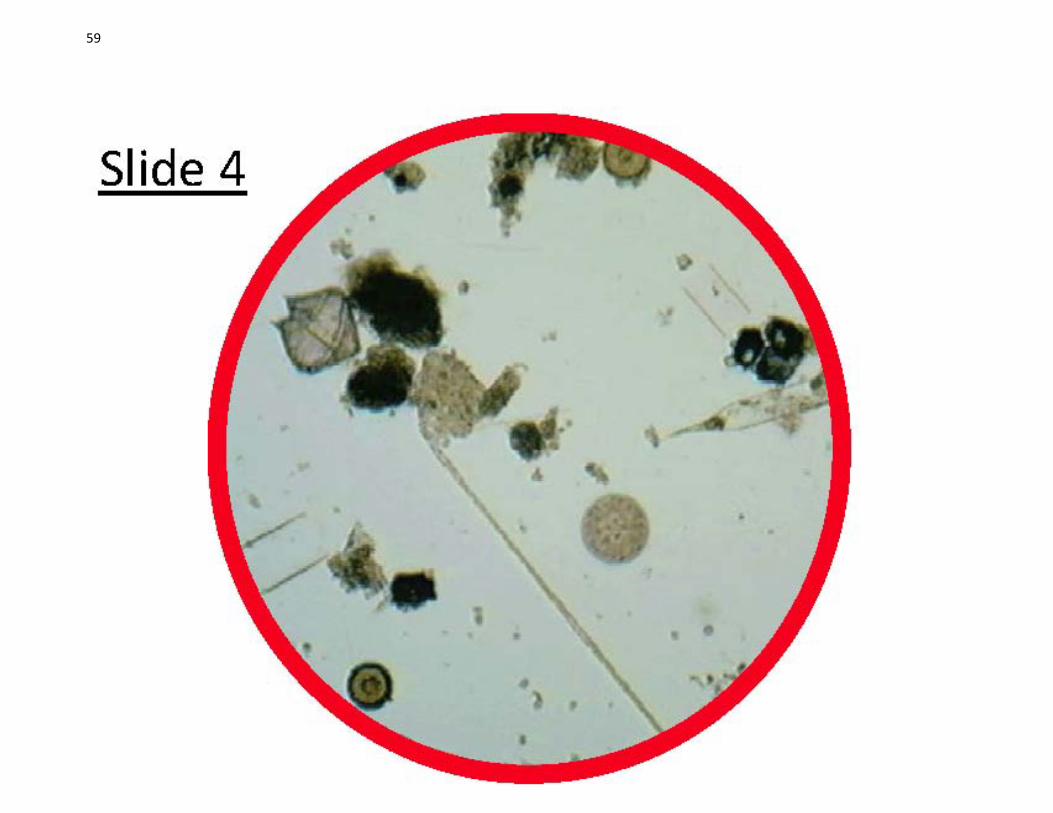
59

60
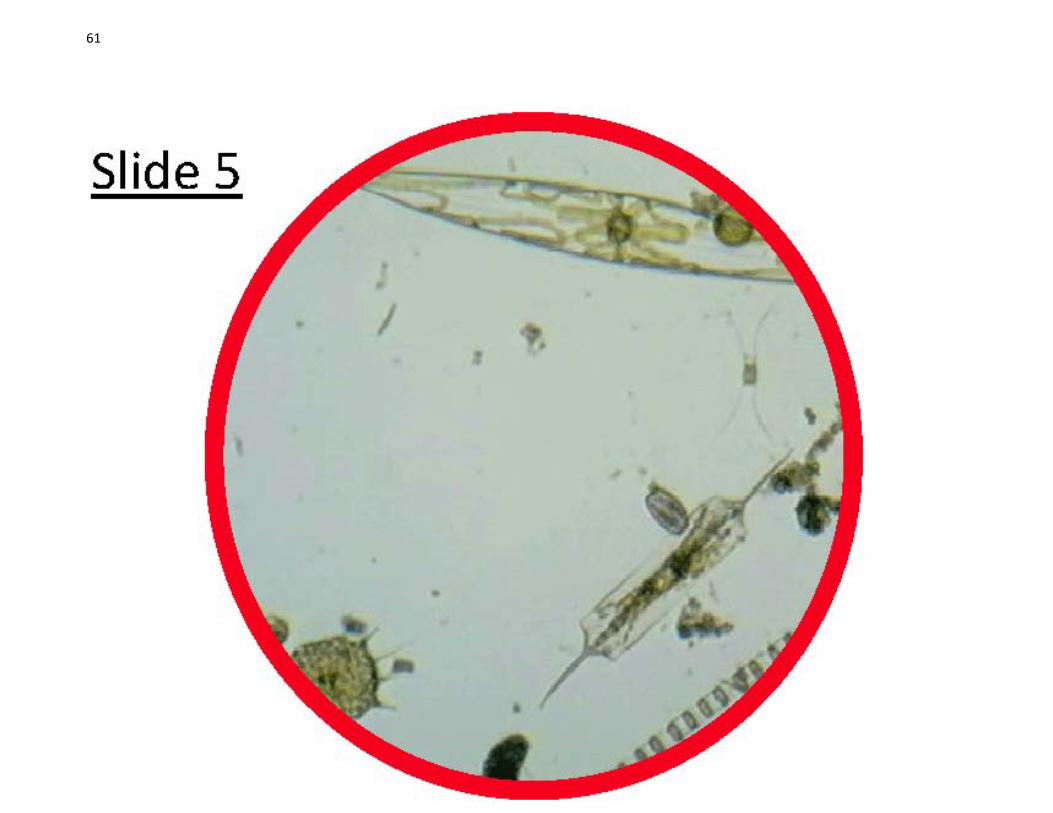
61

62
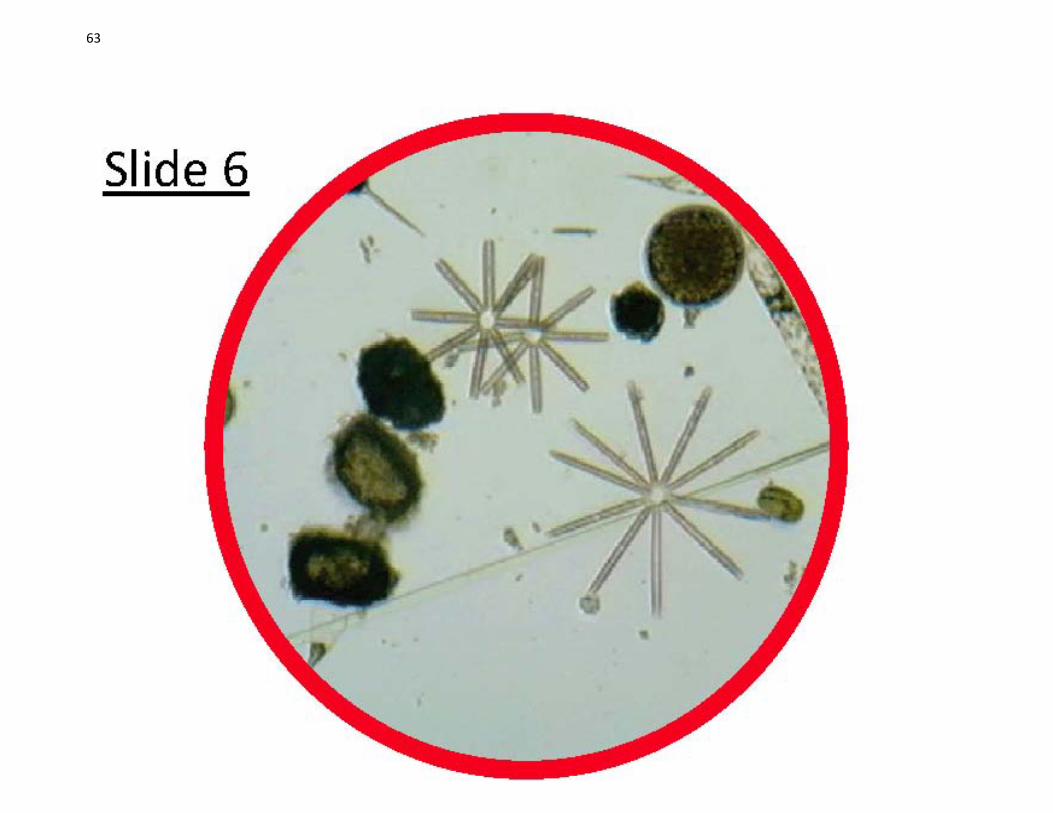
63

64
65
SLIDES Lesson 1: Phytoplankton Microscopy Lab
Answer Key for Slides

66
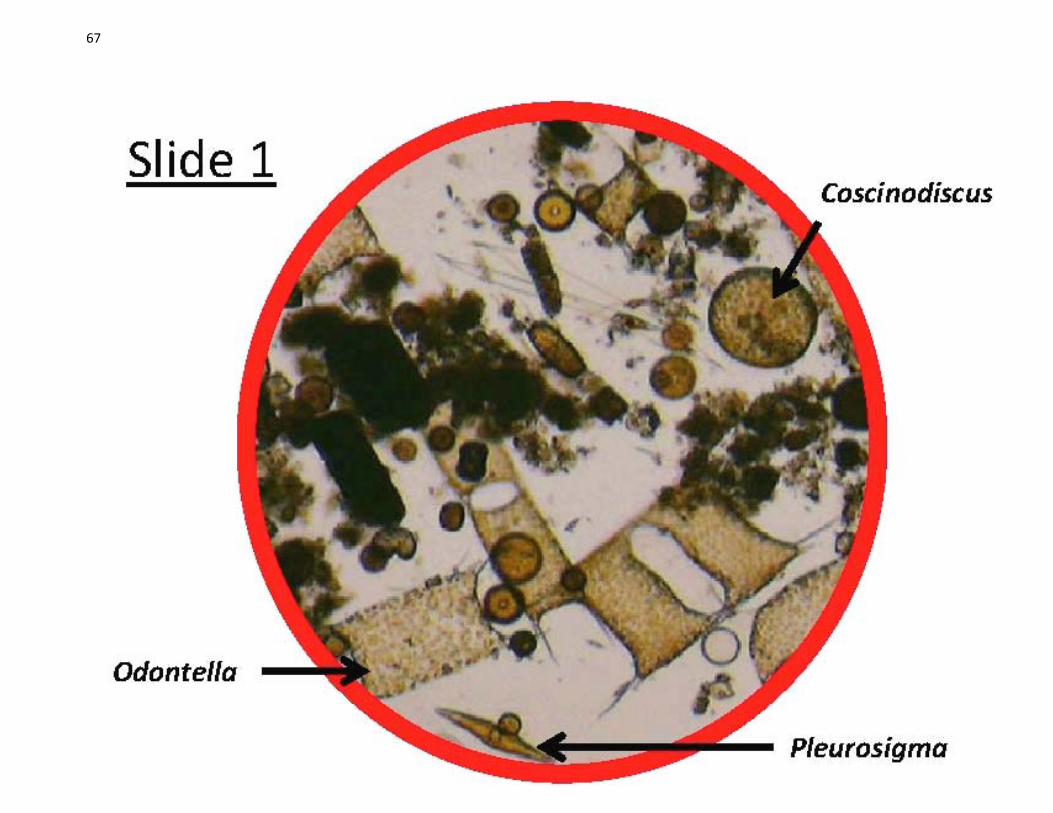
67

68
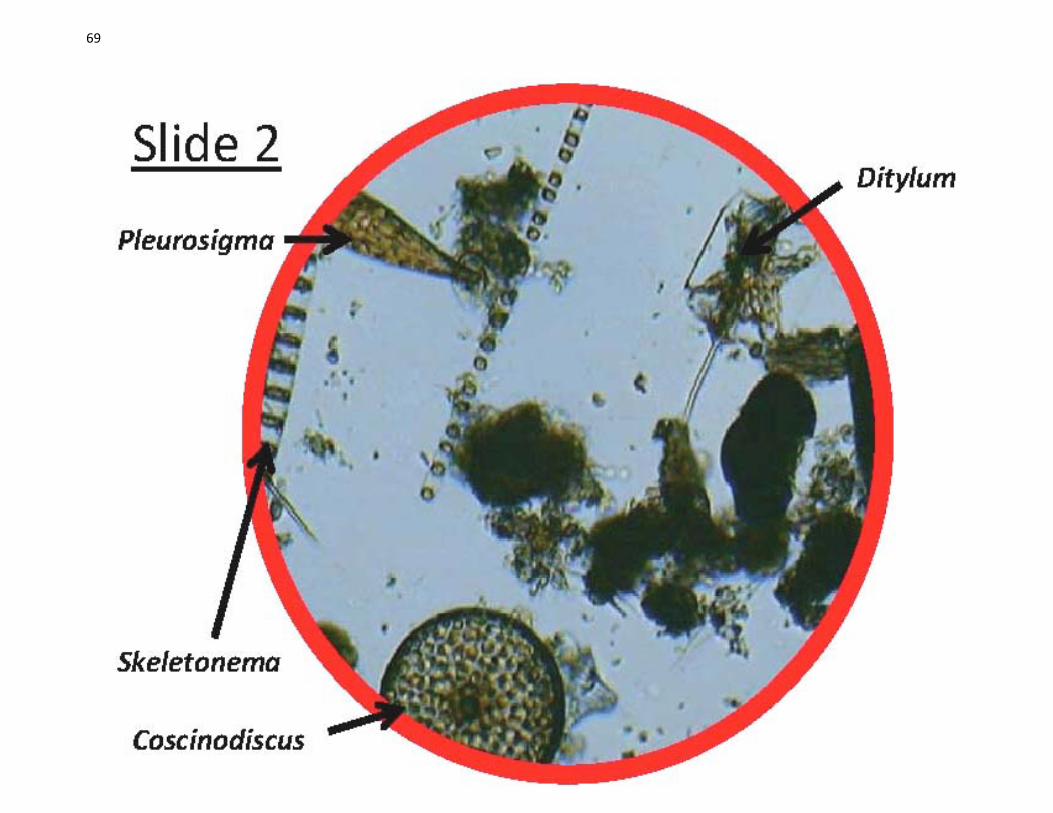
69

70
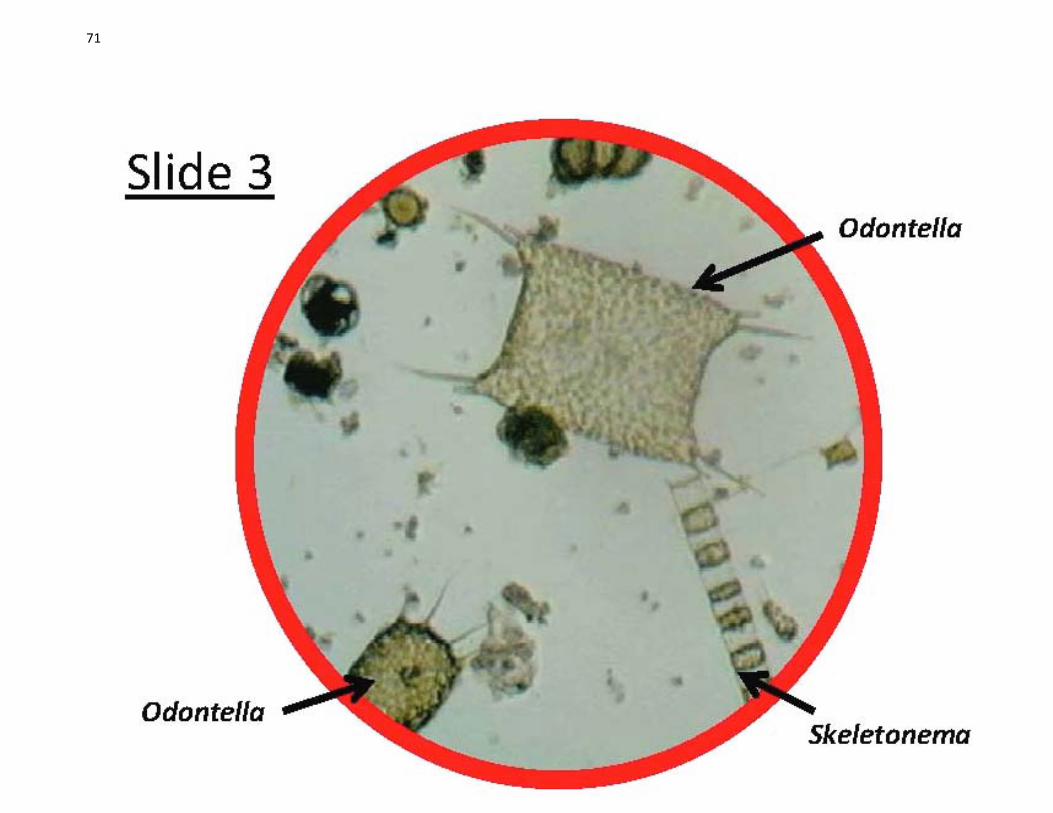
71

72
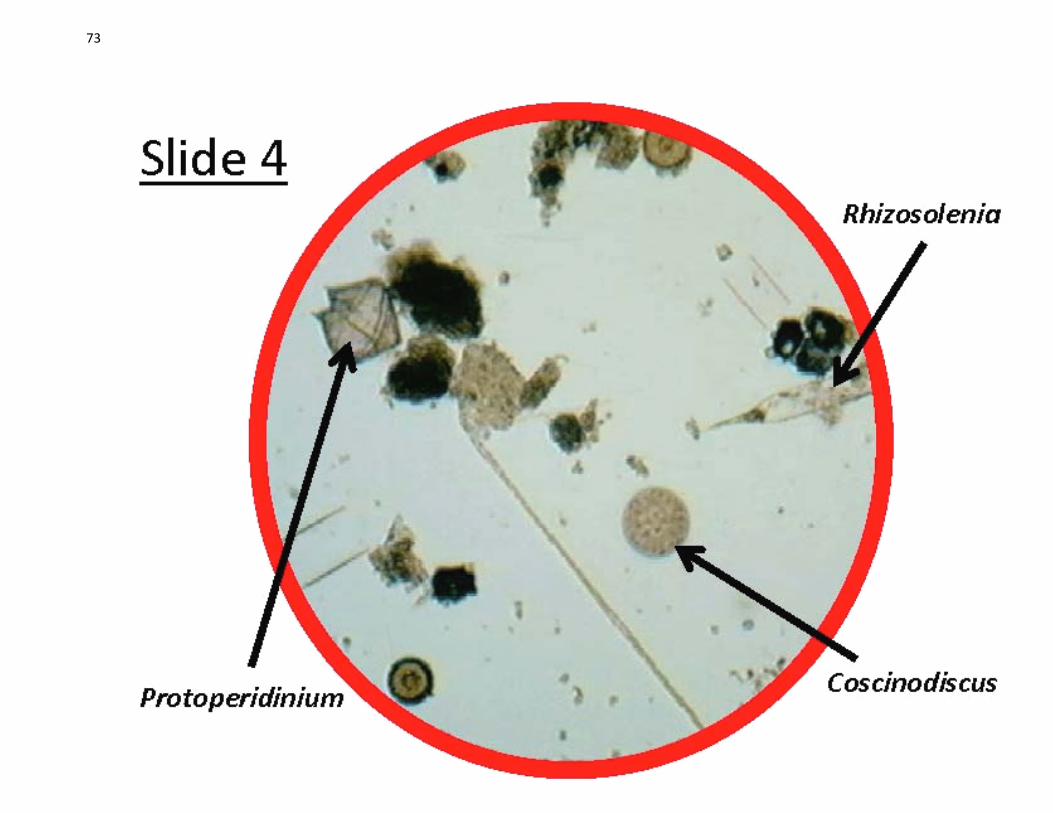
73

74
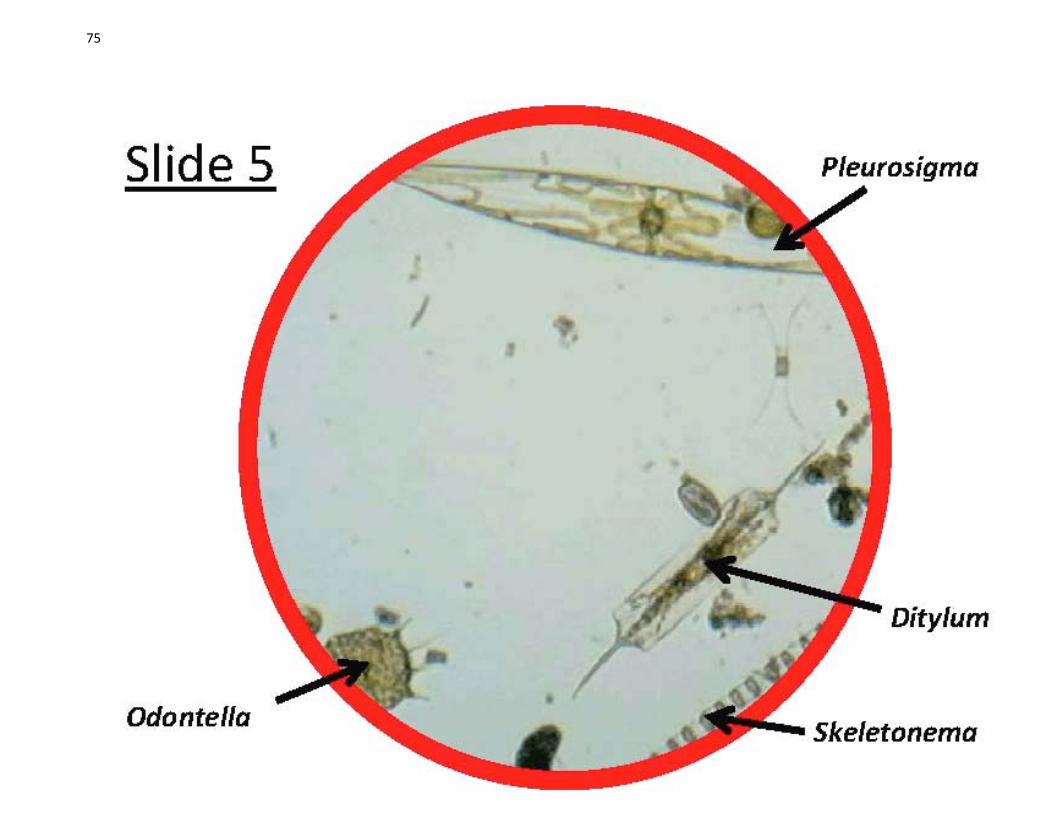
75

76
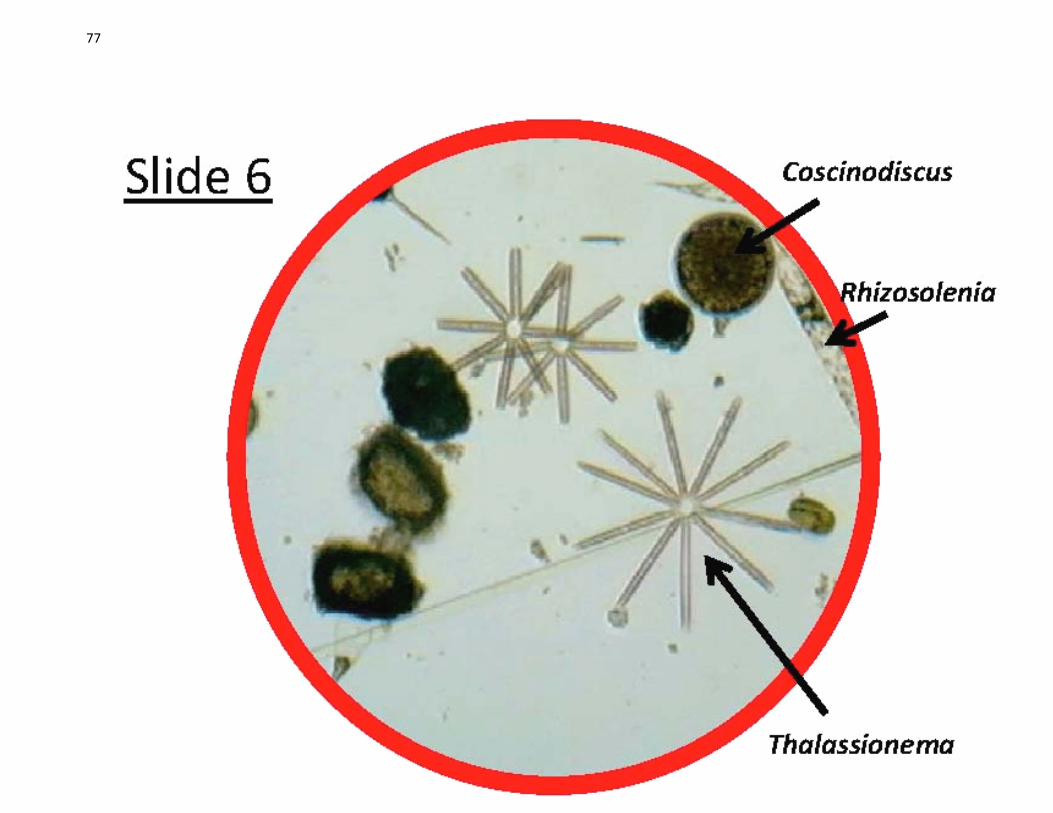
77

78
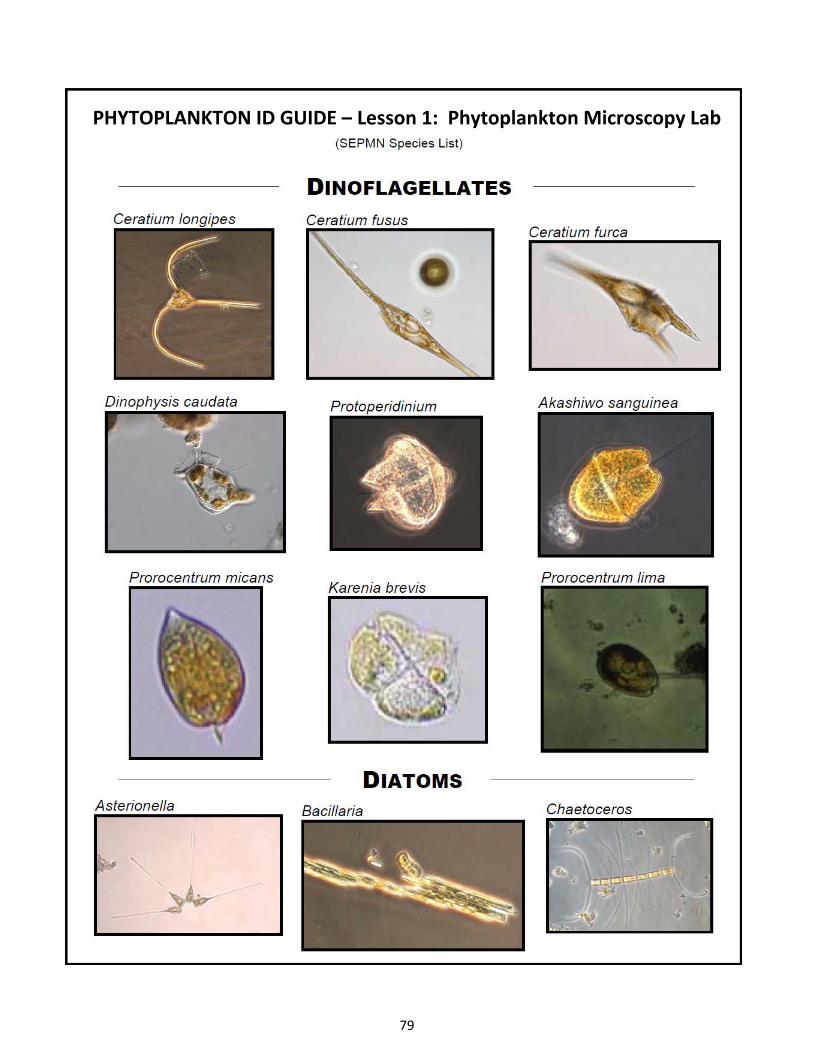
79
PHYTOPLANKTON ID GUIDE – Lesson 1: Phytoplankton Microscopy Lab

80
81
TEACHER GUIDE Lesson 2: Design Your Own Phytoplankton
Time Required: 45 minutes. Structure: This lesson enables students to creatively synthesize and reinforce the information learned during Lesson 1. Students design their own phytoplankton from direct observations and imagination (25 minutes). Students will then present their artwork to the class and receive feedback from other students (20 minutes). This lesson is designed to engage students with different learning styles. Handouts in this packet:
1. PHYTOPLANKTON ID GUIDE – Lesson 1: Phytoplankton Microscopy Lab 2. GRADING SHEETS – Lesson 2: Design Your Own Phytoplankton (optional)
Materials Needed:
3. Black construction paper 4. Oil pastels (wax oil crayons)
Advance Preparation:
1. Make sure that you have enough black construction paper and oil pastels for your classes.
2. Photocopy or print enough copies of PHYTOPLANKTON ID GUIDE – Lesson 1: Phytoplankton Microscopy Lab so that each group of students has 2 guides.
3. If you would like to grade your students on this lesson, photocopy or print the GRADING SHEETS – Lesson 2: Design Your Own Phytoplankton (one per 4 students). Cut copies into individual grading sheets.
Instructional Procedures: 1. Divide the students into five groups. Distribute one piece of construction paper to each student.
Distribute two copies of the PHYTOPLANKTON ID GUIDE – Lesson 1: Phytoplankton Microscopy Lab and one pack of oil pastels to each group.
2. Tell the students that they will have 15–20 minutes to design/invent their own phytoplankton. Review the PHYTOPLANKTON ID GUIDE – Lesson 1: Phytoplankton Microscopy Lab with the class. First review that phytoplankton tend to stay near the surface of the water and close to their food source: the sun. To accomplish this task, phytoplankton have developed adaptations such as differences in size, shape, and the formation of chains. Also discuss that phytoplankton protect themselves with spines, bristles, and hard shells. After discussing these real‐life adaptations, ask the students to use their imaginations to come up with new adaptations that would help phytoplankton survive. Examples of creative, fantastic adaptations include water wings, bubbles, inner tubes, and solar panels. Students can merge real‐life adaptations with imaginary ones to create new species of phytoplankton adapted for survival in the ocean. As students share their ideas for the different adaptations, draw them and show how they can be combined into a unique phytoplankton creation.
3. The students can work in groups to discuss ideas and adaptations, but each student should produce his or her own phytoplankton creature. Instruct the students to press heavily with the pastels and fill in their work or the drawings will be difficult to see. Also, instruct the students to make large images that fill the entire paper.
82
4. Instruct the students to name their phytoplankton. The name should consist of an imaginative element and a scientific component derived from the PHYTOPLANKTON ID GUIDE, e.g., Thalassiosira tubey. In scientific nomenclature the genus name is capitalized in italics or underlined (i.e., Thalassiosira or Thalassiosira) and the species name is lowercase and in italics or underlined (i.e., tubey or tubey).
5. Table 2.1 below lists some ideas on the artistic process that students may wish to apply. Table 2.1
Artistic Skill Teaching Tool
Size Objects in proportion to one another
Color Use of multiple colors on color wheel
Complementary colors Use of opposite pairs of colors on color wheel
Harmony Use of adjacent colors on color wheel, use of similar shapes
Unity Visually appealing linkage of elements
2D object to 3D Use of shading
6. During the last ~20 minutes of class, students will briefly present their drawings and describe why
the selected adaptations are useful to the phytoplankton’s survival. The students should also explain the name they chose for their phytoplankton. Encourage students to give positive and constructive feedback on each other’s creations. Use the GRADING SHEETS – Lesson 2: Design Your Own Phytoplankton to score the students' work.
83
GRADING SHEETS Lesson 2: Design Your Own Phytoplankton
Design your own phytoplankton!
Phytoplankton name with imaginary part and scientific part ____/ 2
At least two new adaptations for survival ____/ 2
Easy to see, image fills whole page ____/ 2
Presentation (appropriate, clear, etc.) ____/ 4
Total ____/ 10
Design your own phytoplankton!
Phytoplankton name with imaginary part and scientific part ____/ 2
At least two new adaptations for survival ____/ 2
Easy to see, image fills whole page ____/ 2
Presentation (appropriate, clear, etc.) ____/ 4
Total ____/ 10
Design your own phytoplankton!
Phytoplankton name with imaginary part and scientific part ____/ 2
At least two new adaptations for survival ____/ 2
Easy to see, image fills whole page ____/ 2
Presentation (appropriate, clear, etc.) ____/ 4
Total ____/ 10
Design your own phytoplankton!
Phytoplankton name with imaginary part and scientific part ____/ 2
At least two new adaptations for survival ____/ 2
Easy to see, image fills whole page ____/ 2
Presentation (appropriate, clear, etc.) ____/ 4
Total ____/ 10

84
85
Included in Lesson 1 }
TEACHER GUIDE Lesson 3: Zooplankton Microscopy Lab
Time Required: 50 minutes. Advance preparation requires another 1 to 2 hours.
Structure: Students will investigate and identify marine zooplankton using the digital dissecting microscope (45 minutes). We recommend students divide into small groups of 4–6 students. Finally, they will complete a post‐survey (5 minutes); the pre‐survey was given at the beginning of Lesson 1. Materials: Paper materials included in this packet are shown in BOLD CAPS. Additional materials recommended are shown in lower case. 1. MATERIALS PHOTO GUIDE – Lesson 3: Zooplankton Microscopy Lab 2. STUDENT WORKSHEET – Lesson 3: Zooplankton Microscopy Lab 3. ZOOPLANKTON ID guide (Drifting Along) – Lesson 3: Zooplankton Microscopy Lab 4. PLANKTON SURVEY – Version 1 or 2 5. TEACHER ANSWER KEY to PLANKTON SURVEY – Version 1 or 2 6. GLOSSARY 7. Plankton net with line attached 8. Plastic jar to transport plankton to the classroom (1) 9. Squeeze bottle to rinse sample from net (1) 10. Plankton sieve (1) 11. Plastic droppers (2) 12. Petri dishes (2) 13. Dissecting needles: straight (2) and curved (1) 14. Motic digital dissecting microscope (1) and cords (2) for microscope set‐up 15. Motic Images Plus CD 16. Motic Live Imaging Module: Quick Start Guide 17. Motic Instruction Manual SMZ‐143 18. Extra microscope parts 19. Computer 20. Projector
Advance Preparation:
1. Photocopy or print the STUDENT WORKSHEET – Lesson 3: Zooplankton Microscopy Lab (one per student).
2. Photocopy or print the appropriate version of the PLANKTON SURVEY – Lessons 1, 2, and 3 (one per student; provided in Lesson 1) and the GLOSSARY (one per student).
3. Familiarize yourself with the operation of the microscope by reviewing the microscope section in
this packet.
4. Conduct a plankton tow to collect a zooplankton sample. a) You can either collect the sample on your own, or make this a class field trip. Take the
plankton net, line, plastic jar, and squeeze bottle, and head down to the ocean. The plankton net has very small holes (80 µm), which are large enough to allow water to pass through but small enough to trap the zooplankton inside the collection cup (or cod end) at the end of the net.
b) Fill the squeeze bottle with seawater.
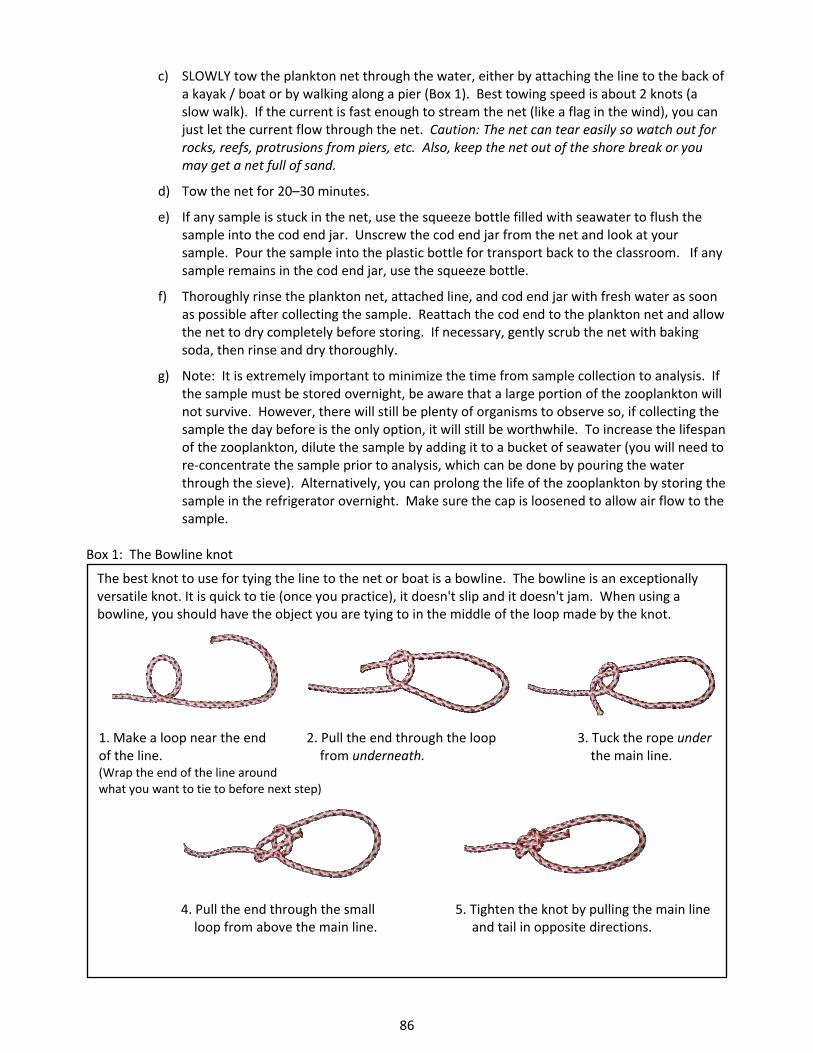
86
c) SLOWLY tow the plankton net through the water, either by attaching the line to the back of a kayak / boat or by walking along a pier (Box 1). Best towing speed is about 2 knots (a slow walk). If the current is fast enough to stream the net (like a flag in the wind), you can just let the current flow through the net. Caution: The net can tear easily so watch out for rocks, reefs, protrusions from piers, etc. Also, keep the net out of the shore break or you may get a net full of sand.
d) Tow the net for 20–30 minutes.
e) If any sample is stuck in the net, use the squeeze bottle filled with seawater to flush the sample into the cod end jar. Unscrew the cod end jar from the net and look at your sample. Pour the sample into the plastic bottle for transport back to the classroom. If any sample remains in the cod end jar, use the squeeze bottle.
f) Thoroughly rinse the plankton net, attached line, and cod end jar with fresh water as soon as possible after collecting the sample. Reattach the cod end to the plankton net and allow the net to dry completely before storing. If necessary, gently scrub the net with baking soda, then rinse and dry thoroughly.
g) Note: It is extremely important to minimize the time from sample collection to analysis. If the sample must be stored overnight, be aware that a large portion of the zooplankton will not survive. However, there will still be plenty of organisms to observe so, if collecting the sample the day before is the only option, it will still be worthwhile. To increase the lifespan of the zooplankton, dilute the sample by adding it to a bucket of seawater (you will need to re‐concentrate the sample prior to analysis, which can be done by pouring the water through the sieve). Alternatively, you can prolong the life of the zooplankton by storing the sample in the refrigerator overnight. Make sure the cap is loosened to allow air flow to the sample.
Box 1: The Bowline knot
The best knot to use for tying the line to the net or boat is a bowline. The bowline is an exceptionally versatile knot. It is quick to tie (once you practice), it doesn't slip and it doesn't jam. When using a bowline, you should have the object you are tying to in the middle of the loop made by the knot.
1. Make a loop near the end 2. Pull the end through the loop 3. Tuck the rope under of the line. from underneath. the main line. (Wrap the end of the line around what you want to tie to before next step)
4. Pull the end through the small 5. Tighten the knot by pulling the main line loop from above the main line. and tail in opposite directions.
87
Instructional Procedures: 1. Explain to your students that they will be completing a zooplankton lab. You will work with the
students to handle the microscope and take pictures of organisms.
2. Split the students into five groups, and distribute a ZOOPLANKTON ID GUIDE (Drifting Along) – Lesson 3: Zooplankton Microscopy Lab to each group.
3. Distribute a STUDENT WORKSHEET – Lesson 3: Zooplankton Microscopy Lab to each student.
4. Stir the sample and pour a small amount into 5 plastic beakers. Give one beaker to each group of students and instruct the students to view the zooplankton without the aid of a microscope. Ask them what they observe (e.g., cloudy water with small organisms).
5. Now the class will prepare samples for viewing under the dissecting microscope. Have one student from each group bring their beaker to the front of the room. Give each of these five students a Petri dish and a plastic dropper. Instruct these students to stir their samples with the plastic dropper, and immediately place one dropper full of sample onto the Petri dish. Have the students return to their seats and leave the beakers, droppers, and Petri dishes at the front of the room.
6. Turn on the microscope and the projector so the class can view the sample. You may need to fine‐tune the microscope focus to project the sharpest image. One at a time, place each Petri dish on the stage and move the dish around to show the various fields of view. Select (or ask the students to select) a Petri dish and field of view which shows many diverse zooplankton. Note: Unless you properly train your students on how to use the microscope and software, please do not allow students to handle the equipment. If you have additional microscopes at your school, allow your students to observe the plankton in smaller groups.
7. Review the ZOOPLANKTON ID GUIDE (Drifting Along) – Lesson 3: Zooplankton Microscopy Lab with the students. Explain that the guide has two parts: A. Meroplankton (temporary zooplankton) and B. Holoplankton (permanent zooplankton). Review that meroplankton are only plankton when they are young, and assume very different forms as adults. Both larval and adult forms for meroplankton are shown in the guide. Holoplankton look similar throughout their life cycle; therefore only one image of each holoplankton is shown.
8. Review the STUDENT WORKSHEET – Lesson 3: Zooplankton Microscopy Lab. Part 1 asks students to identify and draw the marine zooplankton that are projected on the screen. Part 2 asks students to select a meroplankton from part A. of the ZOOPLANKTON ID GUIDE (Drifting Along) – Lesson 3: Zooplankton Microscopy Lab that was not viewed under the microscope and draw both of its life stages.
9. As you continue to explore the zooplankton sample, you may want to save (or print) some images using the Motic software.
Assessment & Clean‐up:
1. Pass out PLANKTON SURVEY – Lessons 1, 2, and 3 (one per student). Have students check the post‐survey box and answer the questions (allow 5 minutes). A TEACHER ANSWER KEY is provided in Lesson 1.
2. Thoroughly rinse all of the zooplankton lab supplies with fresh water. These include the plankton net and line, plastic bottle, plastic beakers, plastic droppers, and Petri dishes. Please allow these items to dry completely prior to storing.
3. Switch off the individual bulbs and main power switch on the microscope, unplug, and store.
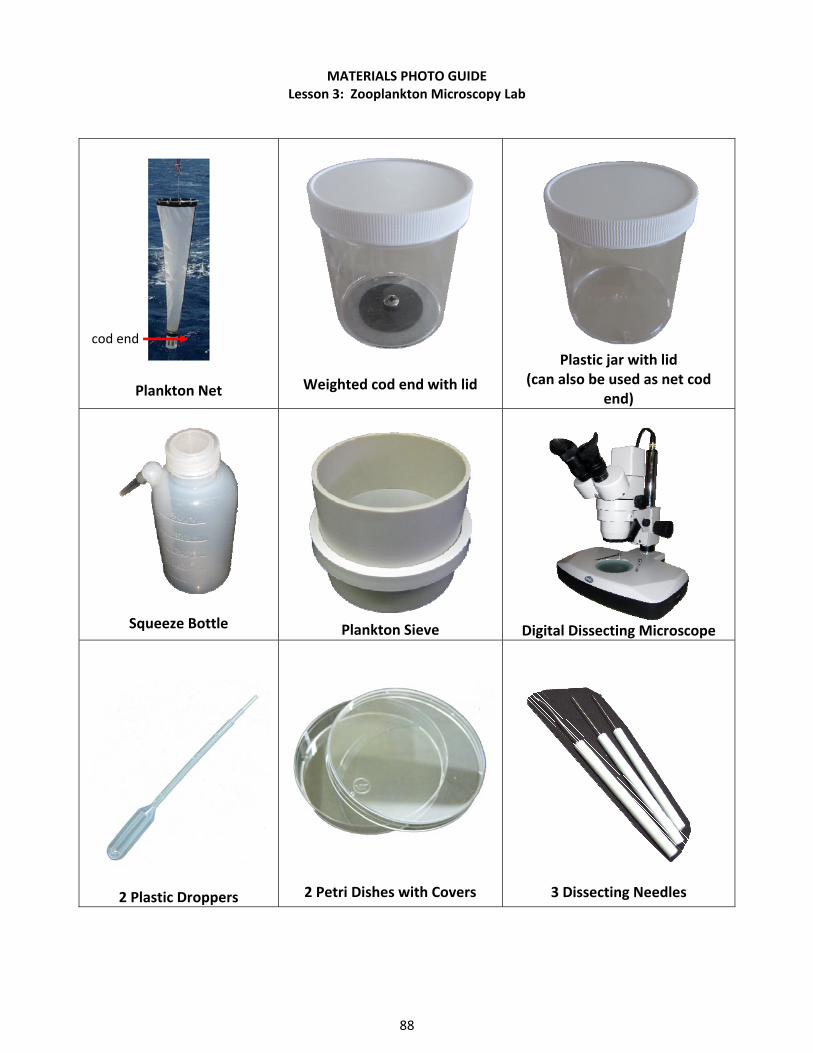
88
MATERIALS PHOTO GUIDE Lesson 3: Zooplankton Microscopy Lab
Plankton Net
Weighted cod end with lid
Plastic jar with lid
(can also be used as net cod end)
Squeeze Bottle
Plankton Sieve
Digital Dissecting Microscope
2 Plastic Droppers
2 Petri Dishes with Covers
3 Dissecting Needles
cod end
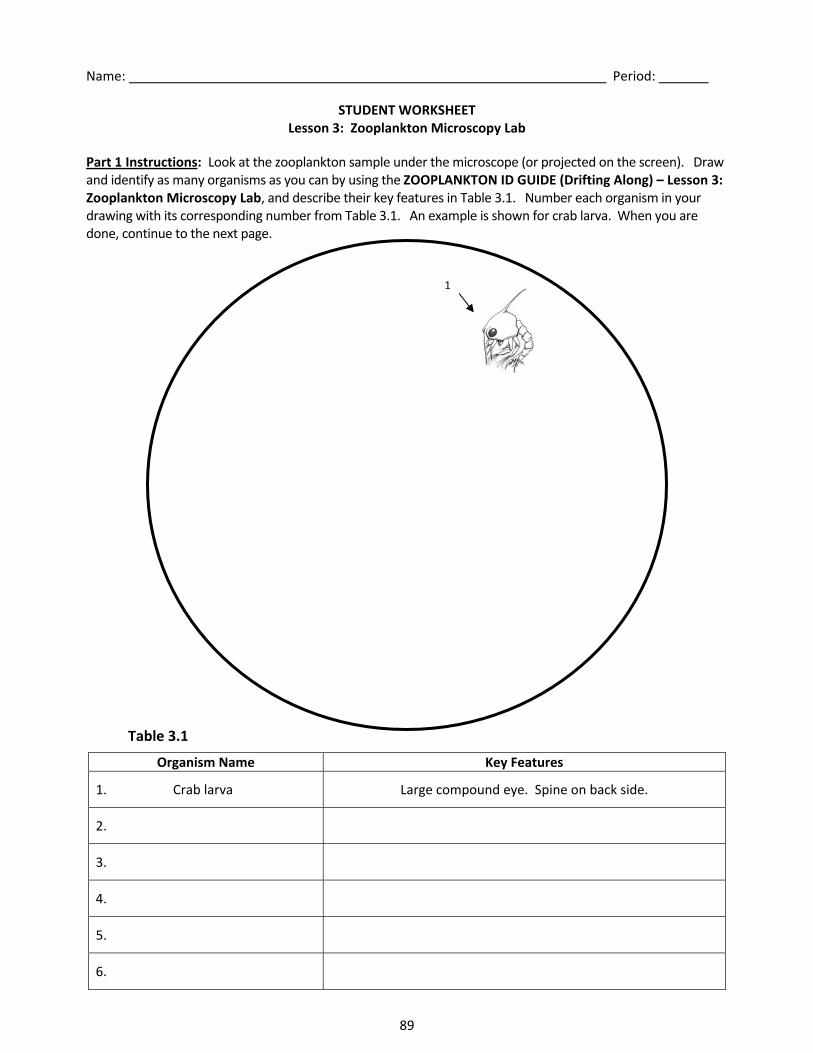
89
Name: Period:
STUDENT WORKSHEET Lesson 3: Zooplankton Microscopy Lab
Part 1 Instructions: Look at the zooplankton sample under the microscope (or projected on the screen). Draw and identify as many organisms as you can by using the ZOOPLANKTON ID GUIDE (Drifting Along) – Lesson 3: Zooplankton Microscopy Lab, and describe their key features in Table 3.1. Number each organism in your drawing with its corresponding number from Table 3.1. An example is shown for crab larva. When you are done, continue to the next page.
Table 3.1
Organism Name Key Features
1. Crab larva Large compound eye. Spine on back side.
2.
3.
4.
5.
6.
1
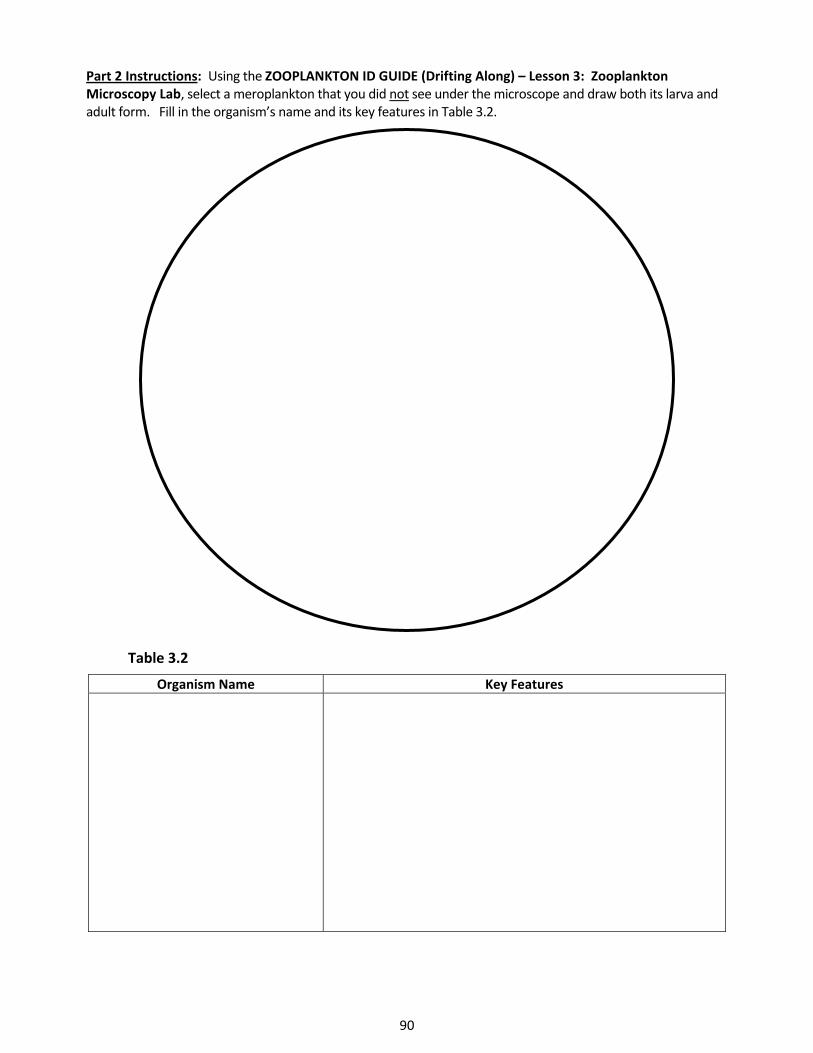
90
Part 2 Instructions: Using the ZOOPLANKTON ID GUIDE (Drifting Along) – Lesson 3: Zooplankton Microscopy Lab, select a meroplankton that you did not see under the microscope and draw both its larva and adult form. Fill in the organism’s name and its key features in Table 3.2.
Table 3.2
Organism Name Key Features
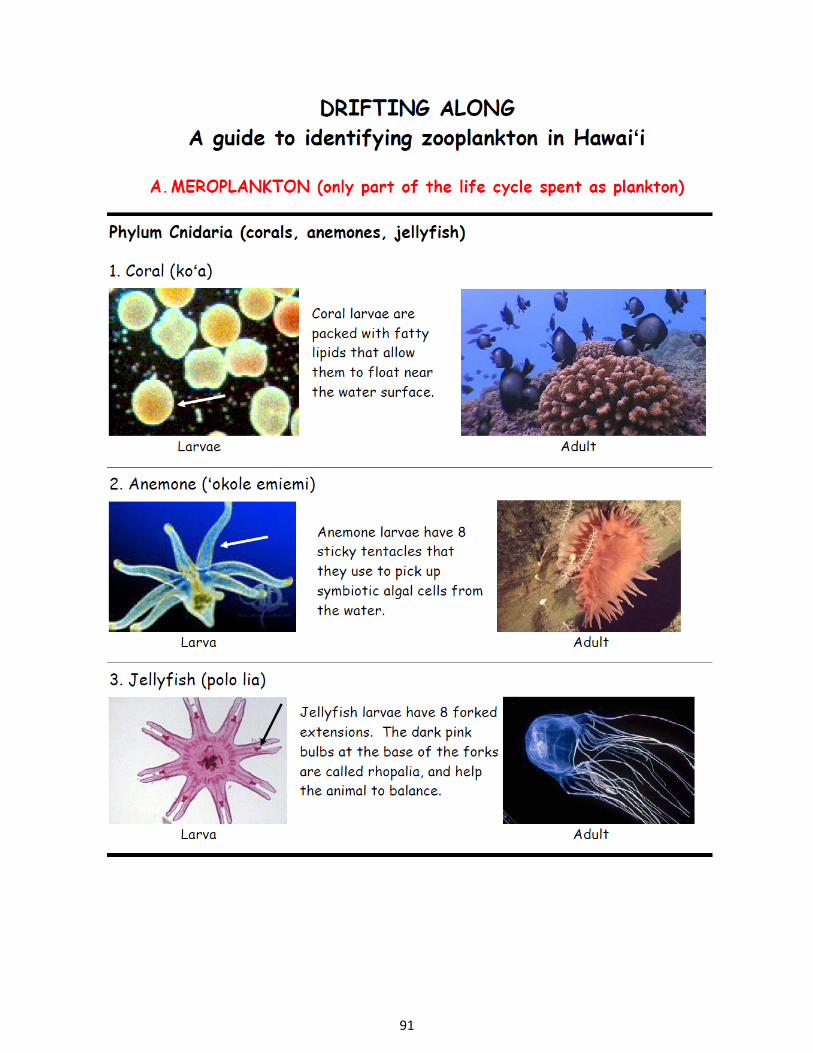
91
ZOOPLANKTON ID GUIDE (Drifting Along) Lesson 3: Zooplankton Microscopy Lab
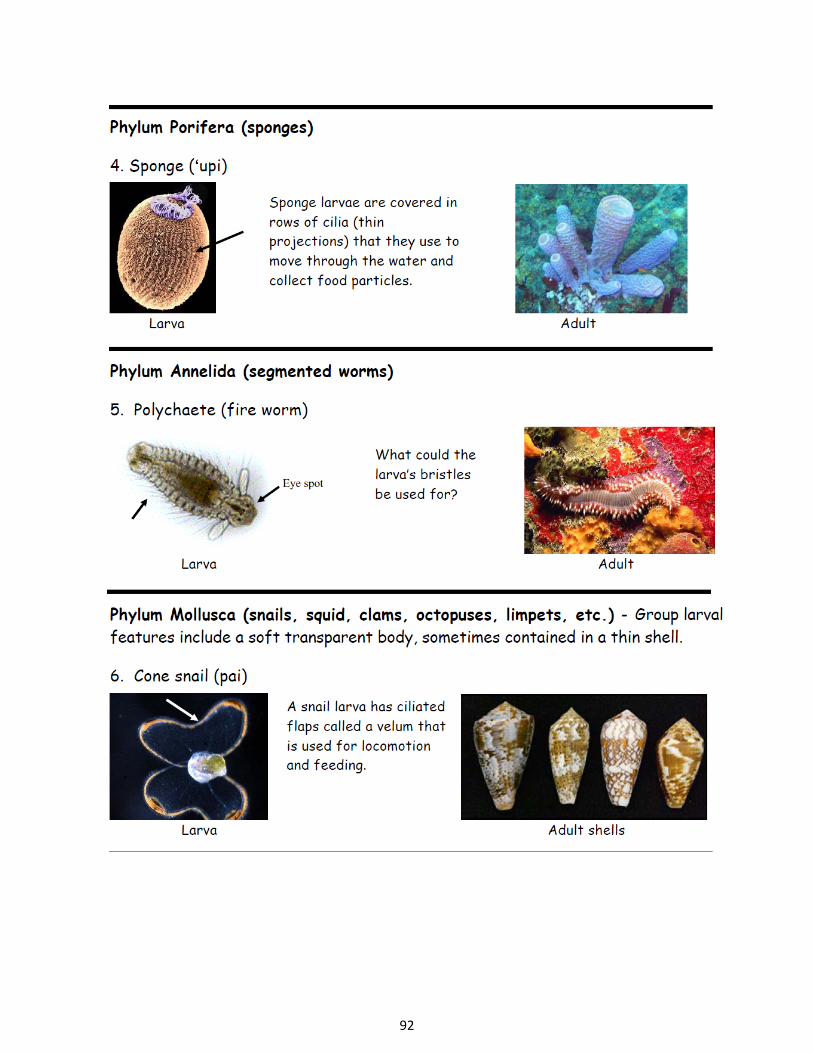
92
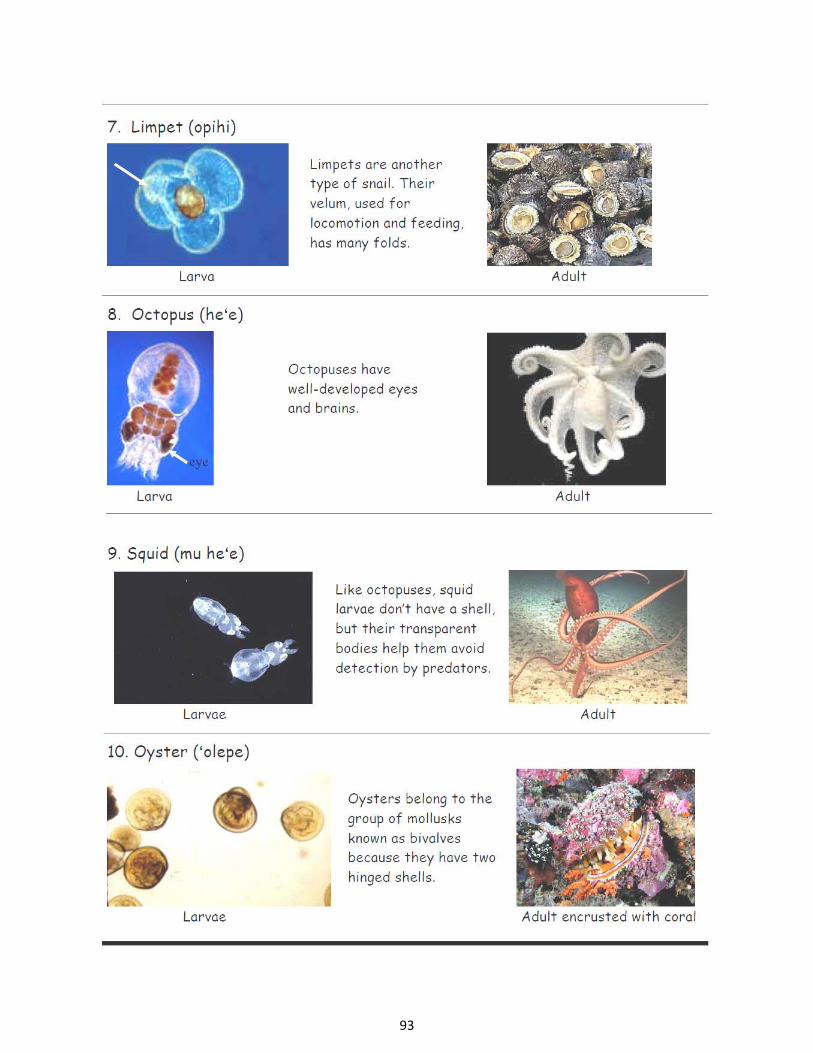
93
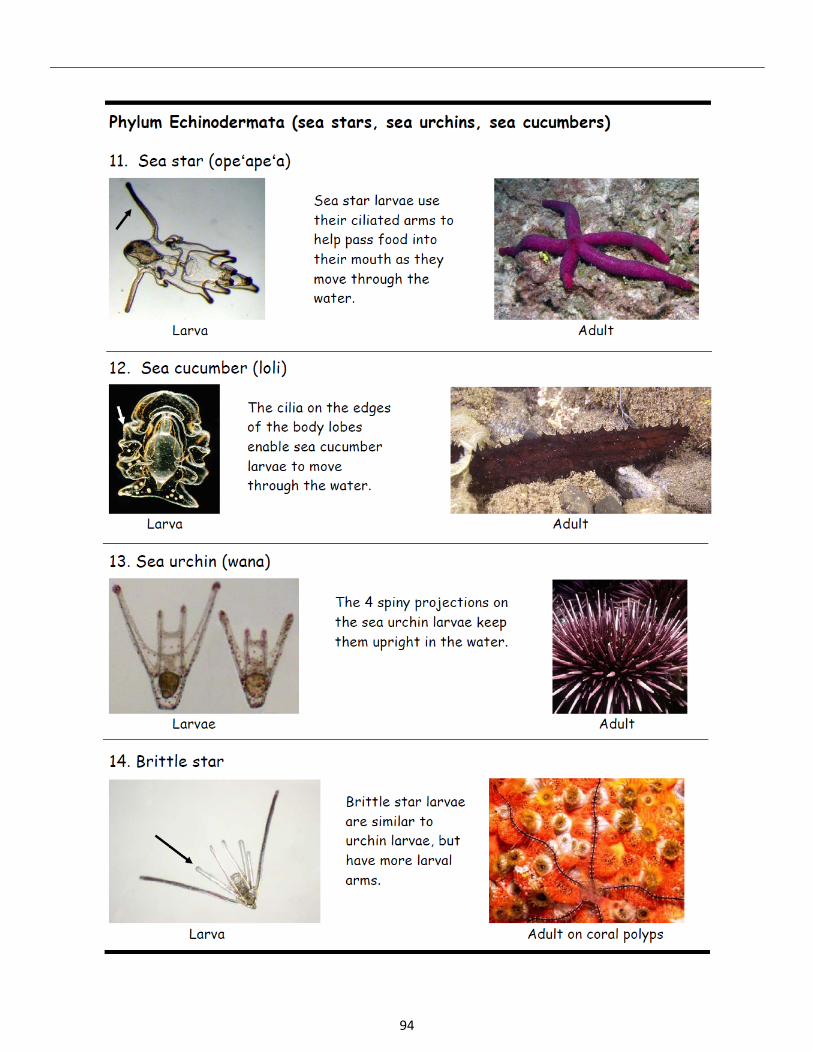
94
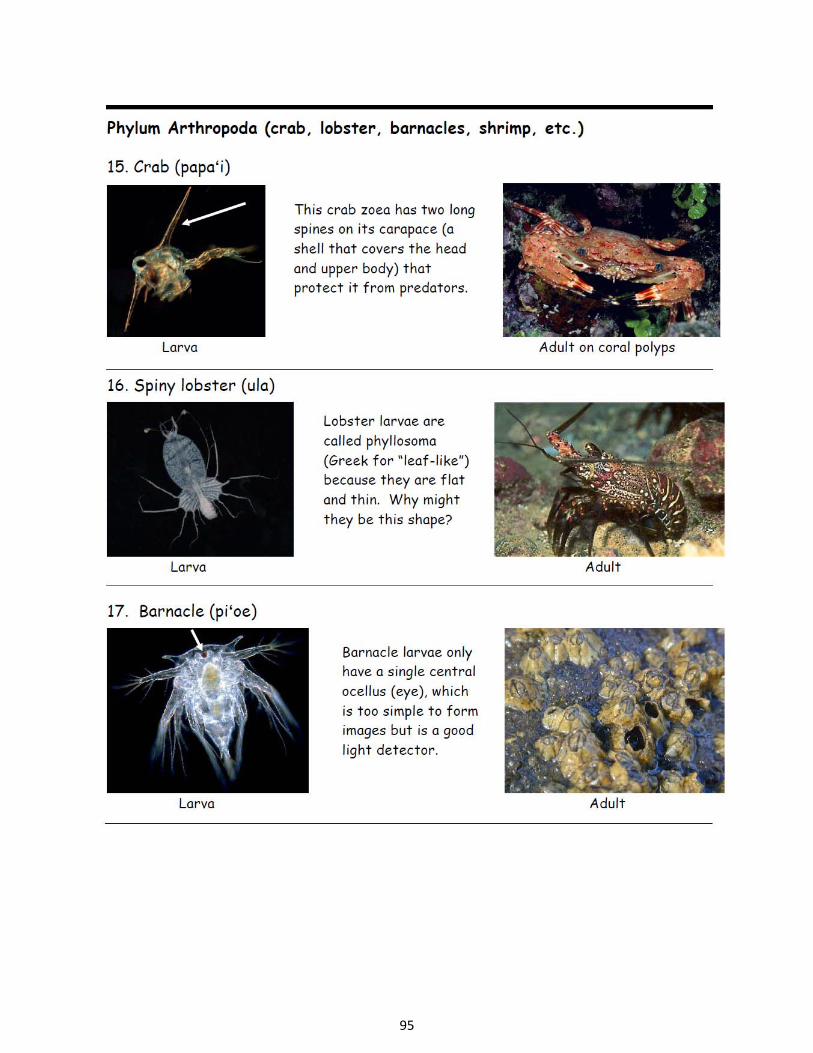
95
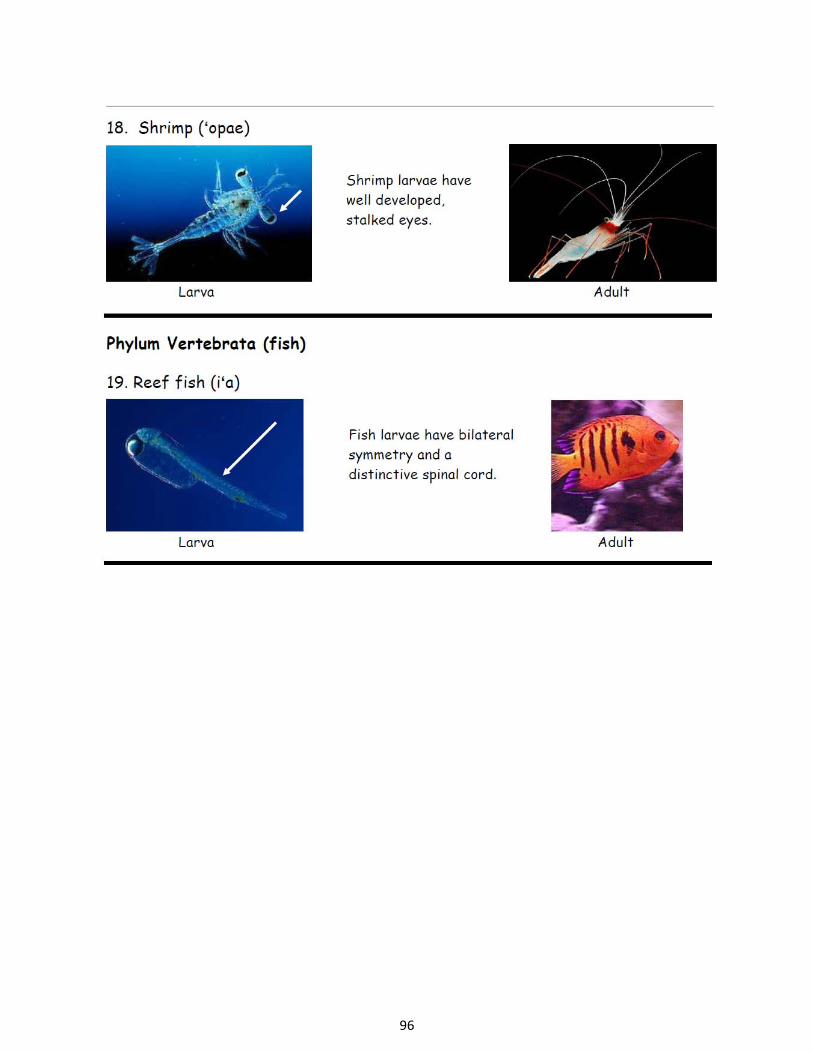
96
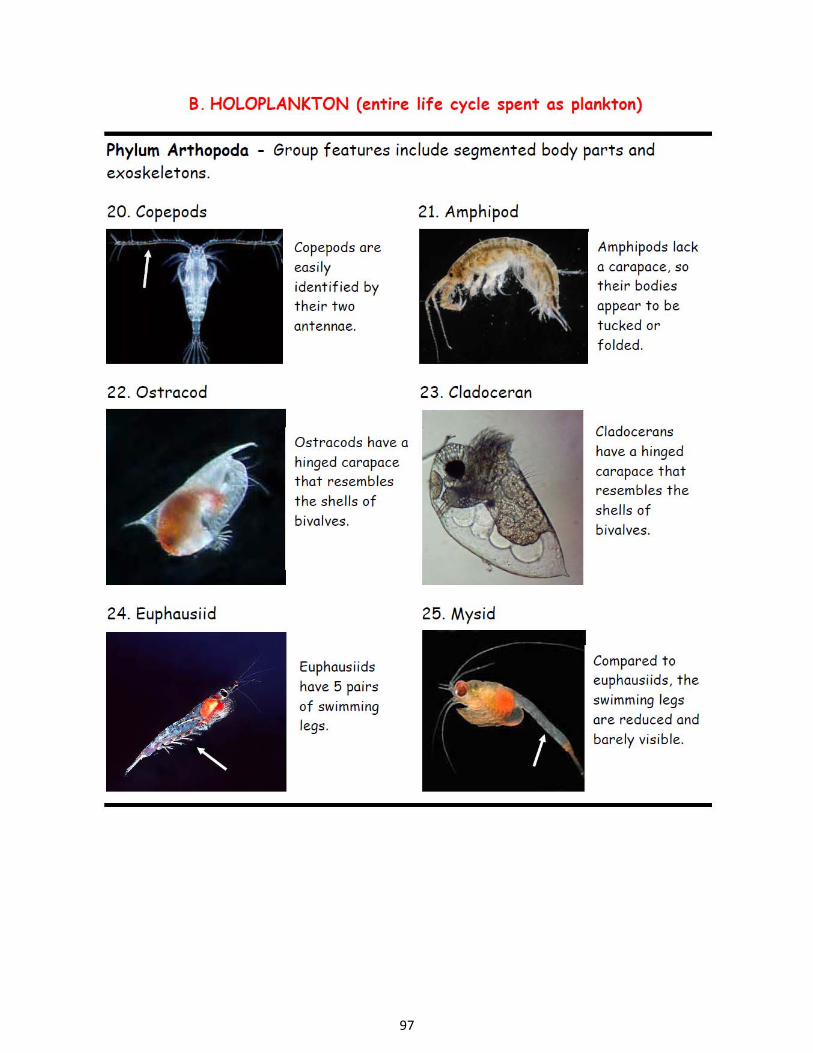
97
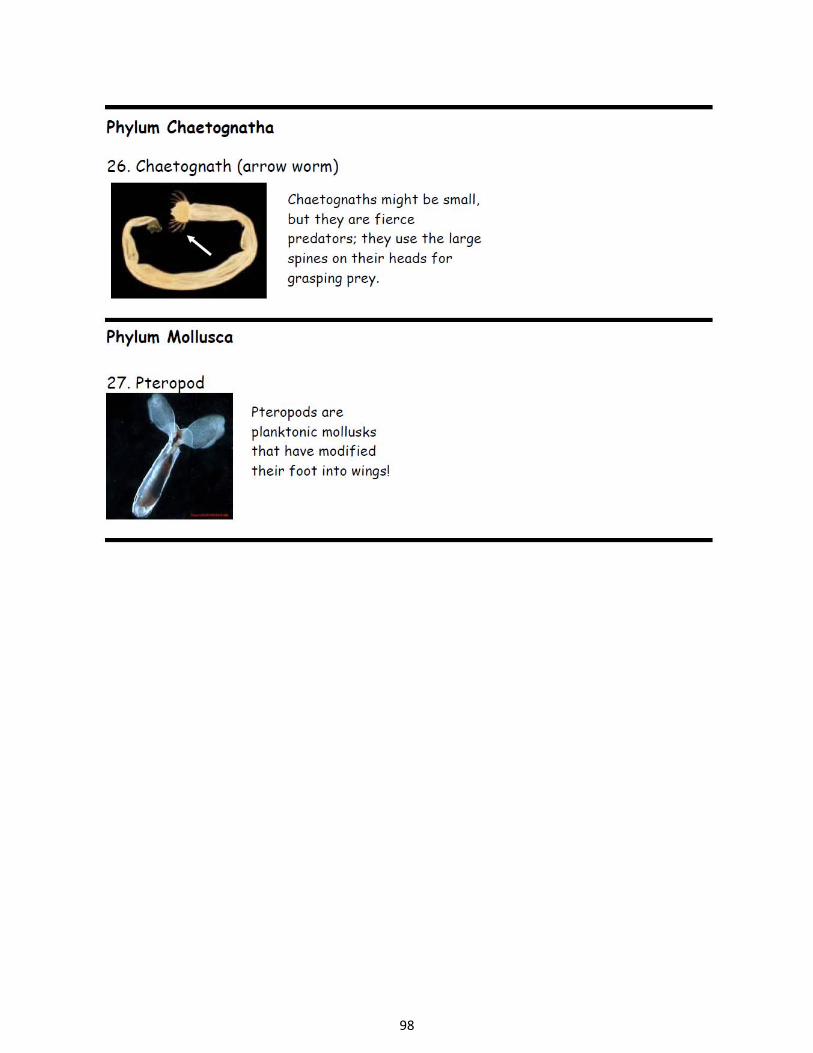
98
99
TEACHER GUIDE Extension: Build a Plankton Net
Time Required: 30 minutes. Additional time is required to obtain materials.
Structure: This extension activity enables students to construct their own plankton nets using common household materials. This can be completed as a classroom activity or for students to complete at home.
Materials Included: 1. STUDENT INSTRUCTIONS – Extension: Let’s Build a Plankton Net
Materials Needed for Extension Activity: Common supplies (per group of ~4 students):
2. Duct tape 3. Stapler 4. Scissors 5. Hole punch 6. Measuring tape or ruler
Student supplies (per student):
7. Metal wire or clothes hanger about 15 inches 8. Key ring 9. 2 short pieces of rope (1/8” wide x 16” long) 10. 1 long piece of rope (1/8” wide x 24” long) 11. Rubber band 12. Baby food jar (or small vial) 13. Nylon knee high stocking 14. Small weight (or sinker for fishing line)
Advance Preparation: 1. Obtain (or have students provide) the above materials.
2. Photocopy the STUDENT INSTRUCTIONS – Extension: Let’s Build a Plankton Net (one per student or one per pair of students).
Instructional Procedures: 1. Divide the students into groups. Deliver one set of common supplies to each group and one set of
student supplies to each student.
2. Have students build a plankton net by following the STUDENT INSTRUCTIONS – Extension: Let’s Build a Plankton Net.
3. Have students use their nets to collect data on their own and bring in to school to observe. Have them describe their collection methods including location sampled, how long they sampled, observations during the sampling and initial description of sample. Have students identify and draw the plankton they collect.
Additional Lesson Ideas: 1. Engineering design project idea: How did the homemade plankton net work? Are there aspects
that worked well? Are there aspects that did not work so well? Based on your experience, design a better net.
2. Target the new net design. Base the net redesign on a particular study location or question. For example, does the plankton collected change based on the size of the net? Or are the plankton in calm areas different than plankton in big surf? Design a net that will work and survive big surf. EXAMPLE QUESTION ONLY, DO NOT SAMPLE IN BIG SURF.

100
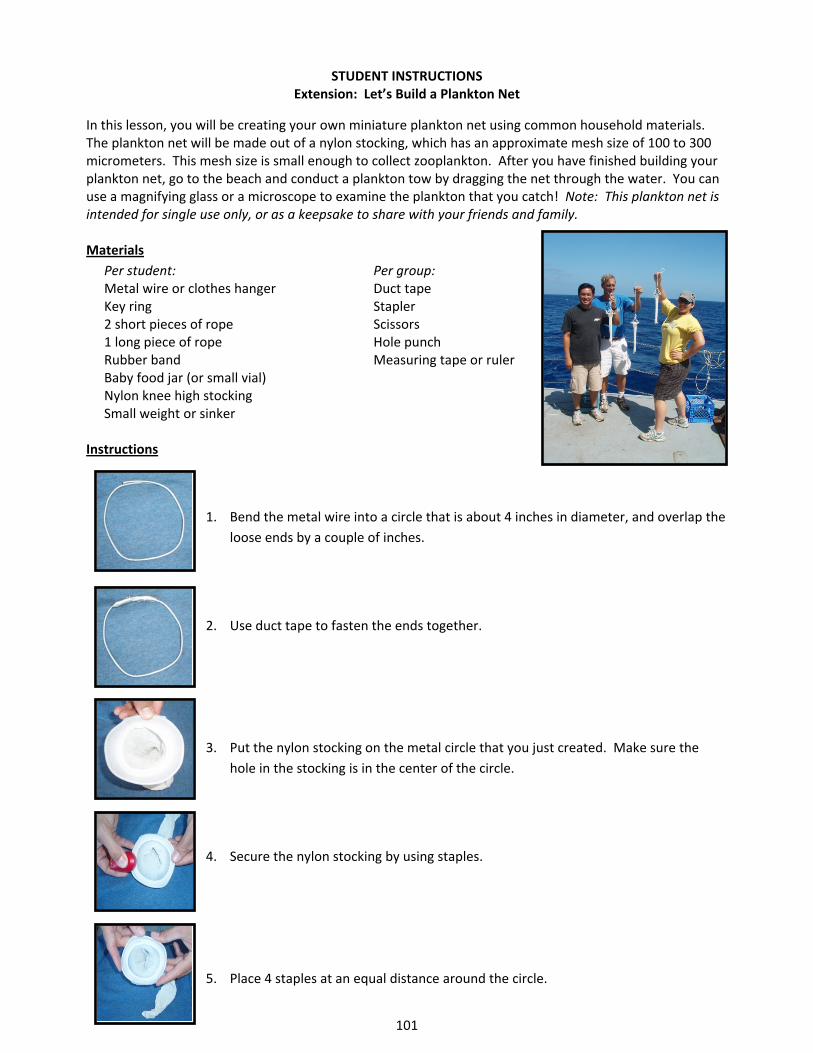
101
STUDENT INSTRUCTIONS Extension: Let’s Build a Plankton Net
In this lesson, you will be creating your own miniature plankton net using common household materials. The plankton net will be made out of a nylon stocking, which has an approximate mesh size of 100 to 300 micrometers. This mesh size is small enough to collect zooplankton. After you have finished building your plankton net, go to the beach and conduct a plankton tow by dragging the net through the water. You can use a magnifying glass or a microscope to examine the plankton that you catch! Note: This plankton net is intended for single use only, or as a keepsake to share with your friends and family. Materials
Per student: Per group: Metal wire or clothes hanger Duct tape Key ring Stapler 2 short pieces of rope Scissors 1 long piece of rope Hole punch Rubber band Measuring tape or ruler Baby food jar (or small vial) Nylon knee high stocking Small weight or sinker
Instructions
1. Bend the metal wire into a circle that is about 4 inches in diameter, and overlap the
loose ends by a couple of inches.
2. Use duct tape to fasten the ends together.
3. Put the nylon stocking on the metal circle that you just created. Make sure the
hole in the stocking is in the center of the circle.
4. Secure the nylon stocking by using staples.
5. Place 4 staples at an equal distance around the circle.
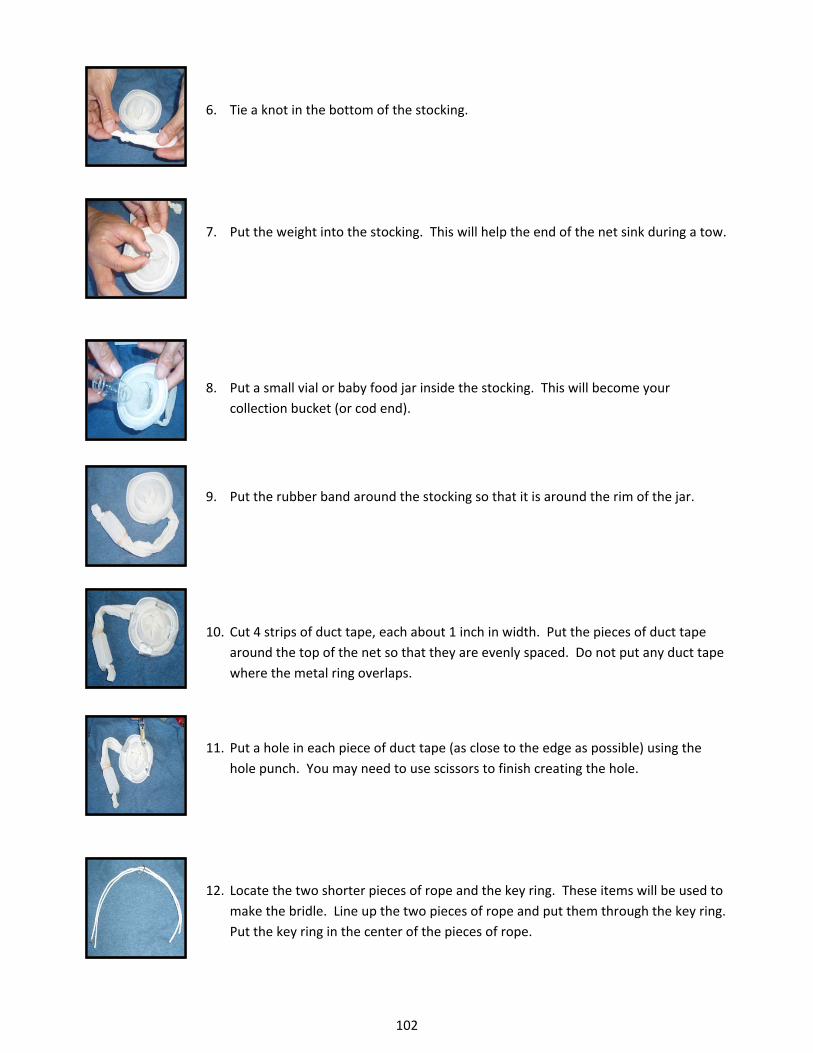
102
6. Tie a knot in the bottom of the stocking.
7. Put the weight into the stocking. This will help the end of the net sink during a tow.
8. Put a small vial or baby food jar inside the stocking. This will become your
collection bucket (or cod end).
9. Put the rubber band around the stocking so that it is around the rim of the jar.
10. Cut 4 strips of duct tape, each about 1 inch in width. Put the pieces of duct tape
around the top of the net so that they are evenly spaced. Do not put any duct tape
where the metal ring overlaps.
11. Put a hole in each piece of duct tape (as close to the edge as possible) using the
hole punch. You may need to use scissors to finish creating the hole.
12. Locate the two shorter pieces of rope and the key ring. These items will be used to
make the bridle. Line up the two pieces of rope and put them through the key ring.
Put the key ring in the center of the pieces of rope.
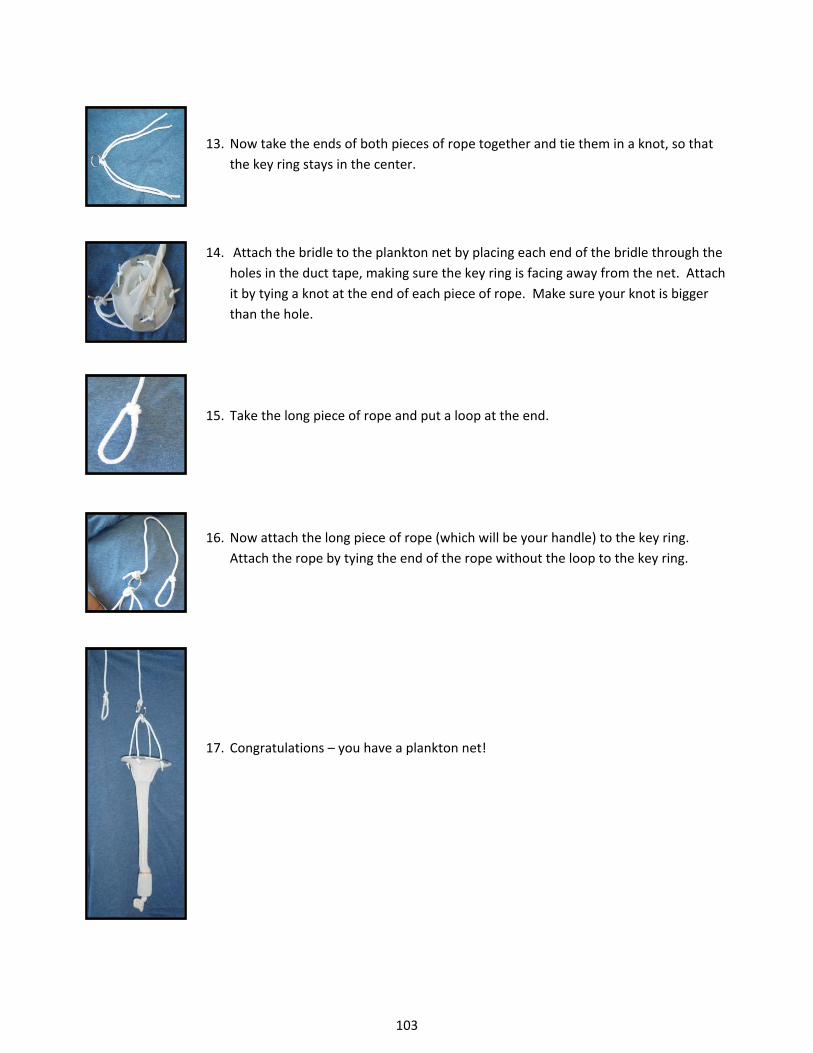
103
13. Now take the ends of both pieces of rope together and tie them in a knot, so that
the key ring stays in the center.
14. Attach the bridle to the plankton net by placing each end of the bridle through the
holes in the duct tape, making sure the key ring is facing away from the net. Attach
it by tying a knot at the end of each piece of rope. Make sure your knot is bigger
than the hole.
15. Take the long piece of rope and put a loop at the end.
16. Now attach the long piece of rope (which will be your handle) to the key ring.
Attach the rope by tying the end of the rope without the loop to the key ring.
17. Congratulations – you have a plankton net!

104
105
TEACHER GUIDE Extension Activity: Microscopes in History
Time Required: One class period.
Reference: This extension activity is based on the evolution of the microscope lesson posted online from the Southwest [Ohio] Local School District (http://www.southwestschools.org) and retrieved 30 November 2011. Structure: This lesson idea is a writing assignment that combines science and history. Students research the evolution of the microscope and use their imagination to write about the importance of the microscope in relation to the time period they choose. Materials Needed for Extension Activity:
1. Computers with internet access Advance Preparation:
1. Go to (http://www.southwestschools.org/juniorschool/jsfaculty/Microscopes/index.html) and review the History of Microscopes section. Look over other sections for additional lesson ideas. Note: some of the links from this site to external sites may no longer be operational.
2. Discuss the lesson idea with history or social studies teachers at your school to coordinate this lesson with current topics they are studying.
Instructional Procedures:
1. Tell the students that they are going to pretend to be scientific time travelers and will be going back in time to sometime between 1670 and 1975. As time travelers, they are going to document their experience by writing about it. Explain to the students the guidelines you have for writing.
2. As time travelers, their job is to go back in time and describe a microscope that was used during that time. They are to give a name to the model of microscope they choose and describe all of the distinguishable features that they can observe. Also, they should describe how the microscope would have operated, the type of objects that could be viewed, and the important historical discoveries that could be made using this scope. Alternatively, the students could describe how the microscope could be used to advance the technology of the day.
3. The time machine can be found online at (http://www.arsmachina.com/micro_1.htm). By clicking on a microscope of interest, they will be transported back to the time period where the microscope was used.
4. Allow students time to conduct additional research about the time period if necessary.
5. Give students time to write; collect at the end of class or allow them to finish as homework.
6. You may also want to have your student share their reports with the class and discuss ideas.

106
107
GLOSSARY algae (al–jee); Plant‐like organisms in the ocean. Example: seaweed. bilateral symmetry (bye‐lat‐er‐ill sim‐ah‐tree); The arrangement of a body which can be divided
into two halves that are mirror images of one another. carapace (kah‐rup‐ess); A shell that covers the head and upper body. cilia (sill‐ee‐ah); Fine hair‐like projections extending from the animal’s body.
(Ciliated is the adjective.) cod end The narrow end of a plankton net where the collection bucket is found.
diatom (dye‐uh‐tom); A type of phytoplankton. Diatoms are single‐celled algae whose
cell walls contain silica, which is the main component of most types of glass. dinoflagellate (dye‐noh‐flaj‐uh‐lit); A type of phytoplankton found in the upper ocean.
Dinoflagellates can move short distances using their two tail‐like projections. food web The predator‐prey relationships within an ecosystem or habitat. holoplankton (hole‐oh‐plank‐ton); A type of zooplankton (animal‐like) that spend their entire
lives as plankton. Holoplankton are permanent zooplankton. larva The early, free‐living immature form of an animal. (Larvae is the plural form of
larva. Larval is the adjective.) marine Relating to the ocean or sea. meroplankton (mer‐oh‐plank‐ton); A type of zooplankton that only spend part of their lives as
plankton. Meroplankton are temporary zooplankton. organism A living thing. photosynthesis (foe‐toe‐sinth‐uh‐sis); The way that plants make food. Photosynthesis requires
sunlight, carbon dioxide and water, and produces sugar and oxygen. phytoplankton (fight‐o‐plank‐ton); Microscopic plant‐like organisms that live in the ocean. phytoplankton bloom A fast increase in the numbers of one or more kinds of phytoplankton. plankton Organisms that drift in water and cannot swim against major currents.
Plankton are found in both marine and fresh water environments. Zooplankton and phytoplankton are both plankton.
plankton net A cone‐shaped nylon net with small holes that are large enough to allow water
to pass through but small enough to trap plankton.
plankton tow The process of towing or pulling a plankton net through the water behind a boat or ship in order to catch and concentrate plankton.
108
symbiotic (sim–by–ah–tick); A type of relationship between two or more species that live closely together, for example, anemone and algae. The algae provide food for the anemone and the anemone provide a habitat for algae.
velum A part of the body covered with cilia.
zoea (zoh‐a); Free‐swimming crab larva.
zooplankton (zoh‐plank‐ton); Animal‐like organisms that drift in water and cannot swim against major currents.