microsoft powerpoint 2003 - home | stockton university of contents chapter one: the fundamentals 5...
TRANSCRIPT

The Richard Stockton College of New Jersey
Microsoft®
PPoowweerrPPooiinntt 22000033 Student Edition
CustomGuideComputer Courseware

© 2003 by CustomGuide, Inc. 1502 Nicollet Avenue South, Suite 1; Minneapolis, MN 55403
This material is copyrighted and all rights are reserved by CustomGuide, Inc. No part of this publication may be reproduced, transmitted, transcribed, stored in a retrieval system, or translated into any language or computer language, in any form or by any means, electronic, mechanical, magnetic, optical, chemical, manual, or otherwise, without the prior written permission of CustomGuide, Inc.
We make a sincere effort to ensure the accuracy of the material described herein; however, CustomGuide makes no warranty, expressed or implied, with respect to the quality, correctness, reliability, accuracy, or freedom from error of this document or the products it describes. Data used in examples and sample data files are intended to be fictional. Any resemblance to real persons or companies is entirely coincidental.
The names of software products referred to in this manual are claimed as trademarks of their respective companies. CustomGuide is a registered trademark of CustomGuide, Inc.
CustomGuide.com granted to Computer and Telecommunication Services a license agreement to print an unlimited number of copies of the CustomGuide Courseware materials within Stockton College of New Jersey for training staff, faculty and students. End users who receive this handout may not reproduce or distribute these materials without permission. Please refer to the copyright notice below for more information.

Table of Contents Chapter One: The Fundamentals....................................................................................... 5
Lesson 1-1: Starting PowerPoint ...........................................................................................6 Lesson 1-2: What’s New in PowerPoint 2003? .....................................................................8 Lesson 1-3: Understanding the PowerPoint Program Screen ..............................................10 Lesson 1-4: Using Menus ....................................................................................................12 Lesson 1-5: Using Toolbars and Creating a New Presentation............................................14 Lesson 1-6: Filling Out Dialog Boxes .................................................................................16 Lesson 1-7: Keystroke and Right Mouse Button Shortcuts .................................................18 Lesson 1-8: Opening a Presentation ....................................................................................20 Lesson 1-9: Saving and Closing a Presentation and Exiting PowerPoint ............................22 Lesson 1-10: Creating a New Presentation with the AutoContent Wizard ..........................24 Lesson 1-11: Creating a Blank Presentation and Creating a Presentation from a Template 26 Lesson 1-12: Moving Around in Your Presentations ...........................................................28 Lesson 1-13: Viewing Your Presentation.............................................................................30 Lesson 1-14: Printing Your Presentation .............................................................................32 Chapter One Review............................................................................................................34
Chapter Two: Editing a Presentation ............................................................................. 39 Lesson 2-1: Inserting Slides and Text..................................................................................40 Lesson 2-2: Using the Outline Pane ....................................................................................42 Lesson 2-3: Editing Text......................................................................................................44 Lesson 2-4: Selecting, Replacing, and Deleting Text ..........................................................46 Lesson 2-5: Cutting, Copying, and Pasting Text .................................................................48 Lesson 2-6: Using Undo, Redo, and Repeat ........................................................................50 Lesson 2-7: Checking Your Spelling ...................................................................................52 Lesson 2-8: Finding and Replacing Information .................................................................54 Lesson 2-9: Viewing a Presentation’s Outline .....................................................................56 Lesson 2-10: Rearranging a Presentation’s Outline.............................................................58 Lesson 2-11: Inserting Symbols and Special Characters .....................................................60 Lesson 2-12: Working in Slide Sorter View ........................................................................62 Lesson 2-13: Adding Notes to Your Slides ..........................................................................64 Lesson 2-14: Working with Multiple Windows...................................................................66 Lesson 2-15: Collecting and Pasting Multiple Items ...........................................................68 Lesson 2-16: File Management ...........................................................................................70 Lesson 2-17: Understanding Smart Tags .............................................................................72 Lesson 2-18: Recovering Your Presentations ......................................................................74 Chapter Two Review ...........................................................................................................76
Chapter Three: Formatting Your Presentation ........................................................... 83 Lesson 3-1: Formatting Fonts with the Formatting Toolbar ................................................84 Lesson 3-2: Advanced Font Formatting with Font Dialog Box...........................................86 Lesson 3-3: Using the Format Painter .................................................................................88

4 Microsoft PowerPoint 2003
© 2003 CustomGuide, Inc.
Lesson 3-4: Applying a Template’s Formatting ...................................................................90 Lesson 3-5: Using the Slide Master .....................................................................................92 Lesson 3-6: Choosing a Color Scheme ................................................................................94 Lesson 3-7: Changing the Background of Your Slides ........................................................96 Lesson 3-8: Working with Bulleted and Numbered Lists ....................................................98 Lesson 3-9: Changing Paragraph Alignment and Line Spacing.........................................100 Lesson 3-10: Adding Headers and Footers ........................................................................102 Lesson 3-11: Working with Tabs and Indents ....................................................................104 Lesson 3-12: Changing the Page Setup..............................................................................106 Chapter Three Review .......................................................................................................108
Chapter Four: Drawing and Working with Graphics...................................................113 Lesson 4-1: Drawing on Your Slides .................................................................................114 Lesson 4-2: Adding, Arranging, and Formatting Text Boxes.............................................116 Lesson 4-3: Selecting, Resizing, Moving, and Deleting Objects .......................................118 Lesson 4-4: Formatting Objects .........................................................................................120 Lesson 4-5: Inserting Clipart..............................................................................................122 Lesson 4-6: Inserting and Formatting Pictures ..................................................................124 Lesson 4-7: Aligning and Grouping Objects......................................................................126 Lesson 4-8: Drawing AutoShapes......................................................................................128 Lesson 4-9: Flipping and Rotating Objects........................................................................130 Lesson 4-10: Layering Objects ..........................................................................................132 Lesson 4-11: Applying Shadows and 3-D Effects..............................................................134 Chapter Four Review .........................................................................................................136
Chapter Five: Delivering Your Presentation ............................................................... 143 Lesson 5-1: Delivering a Presentation on a Computer.......................................................144 Lesson 5-2: Using Slide Transitions ..................................................................................146 Lesson 5-3: Using an Animation Scheme ..........................................................................148 Lesson 5-4: Using Custom Animations..............................................................................150 Lesson 5-5: Rehearsing Slide Show Timings.....................................................................152 Lesson 5-6: Creating a Presentation that Runs by Itself ....................................................154 Lesson 5-7: Creating a Custom Show................................................................................156 Lesson 5-8: Packaging and Copying a Presentation to CD................................................158 Lesson 5-9: Viewing a Packaged Presentation...................................................................160 Chapter Five Review..........................................................................................................162
Index ................................................................................................................................... 168
Chapter One: The Fundamentals
Chapter Objectives: • Starting Microsoft PowerPoint
• Understand the PowerPoint Program Screen
• Using Menus and Toolbars
• Using and Filling Out Dialog Boxes
• Using Keystroke Shortcuts and Right Mouse Button Menus
• Opening and Saving Presentations
• Creating a New Presentation
• Viewing and Printing a Presentation
• Moving around a Presentation
• Getting Help
Chapter Task: Create a simple presentation
Welcome to your first lesson of Microsoft PowerPoint 2003. PowerPoint is a desktop presentation program that turns your ideas into professional, convincing presentations. If you’ve ever used an overhead projector, flip chart, or even a black board, you’re going to love PowerPoint! PowerPoint lets you create slides that include text, graphics, charts, and even digital movies. Once you have created a presentation, you can display it as an electronic slide show on any computer. Or, you can print your slides so that you can display them as transparencies or 35mm slides.
This chapter will introduce you to the PowerPoint ‘basics’—what you need to know to create, print, and save a presentation. If you’ve already seen the Microsoft PowerPoint program screen before, you know that it’s filled with cryptic-looking buttons, menus, and icons. By the time you’ve finished this chapter, you will know what most of those buttons, menus, and icons are used for.
Prerequisites • A computer with
Windows 2000 or later, and PowerPoint 2003 installed.
• An understanding of basic computer functions (how to use the mouse and keyboard).
6 Microsoft PowerPoint 2003
© 2004 CustomGuide, Inc.
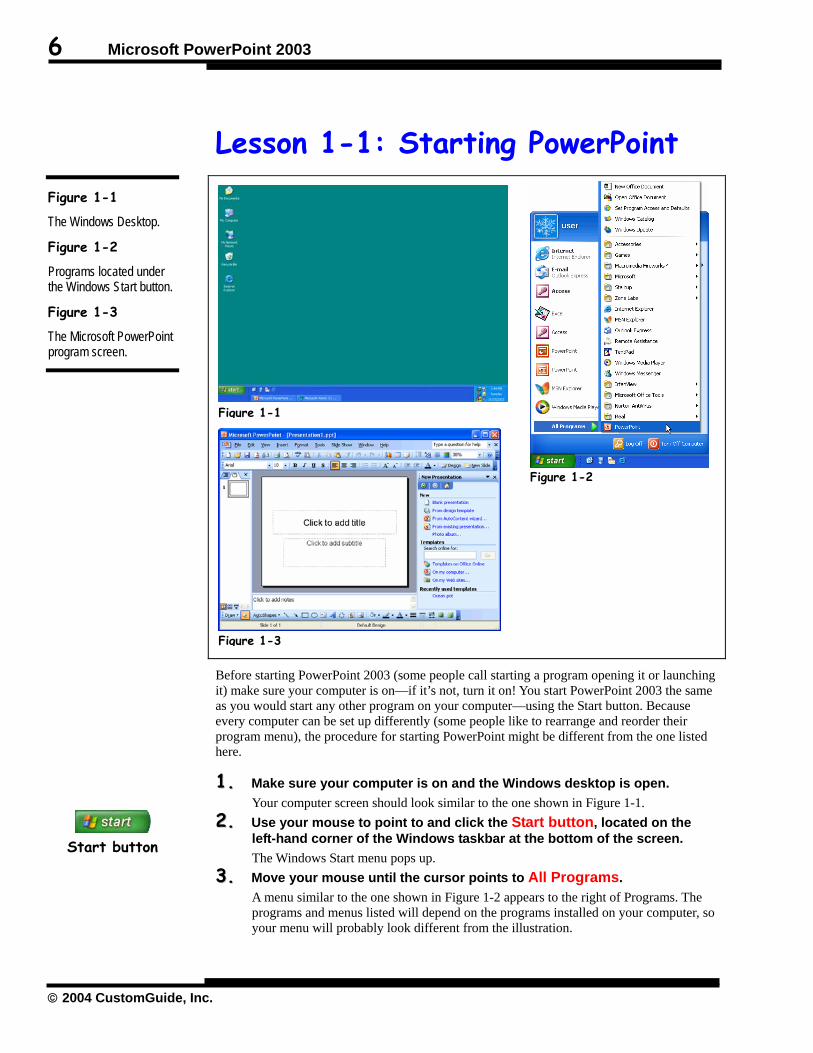
Lesson 1-1: Starting PowerPoint
Before starting PowerPoint 2003 (some people call starting a program opening it or launching it) make sure your computer is on—if it’s not, turn it on! You start PowerPoint 2003 the same as you would start any other program on your computer—using the Start button. Because every computer can be set up differently (some people like to rearrange and reorder their program menu), the procedure for starting PowerPoint might be different from the one listed here.
11.. Make sure your computer is on and the Windows desktop is open. Your computer screen should look similar to the one shown in Figure 1-1.
22.. Use your mouse to point to and click the Start button, located on the left-hand corner of the Windows taskbar at the bottom of the screen. The Windows Start menu pops up.
33.. Move your mouse until the cursor points to All Programs. A menu similar to the one shown in Figure 1-2 appears to the right of Programs. The programs and menus listed will depend on the programs installed on your computer, so your menu will probably look different from the illustration.
Figure 1-1
The Windows Desktop.
Figure 1-2
Programs located under the Windows Start button.
Figure 1-3
The Microsoft PowerPoint program screen.
Start button
Figure 1-1
Figure 1-2
Figure 1-3
Chapter One: The Fundamentals 7
The Richard Stockton College of New Jersey
Quick Reference To Start Microsoft PowerPoint: 1. Click the Windows Start
button. 2. Select All Programs →
Microsoft Office PowerPoint 2003.
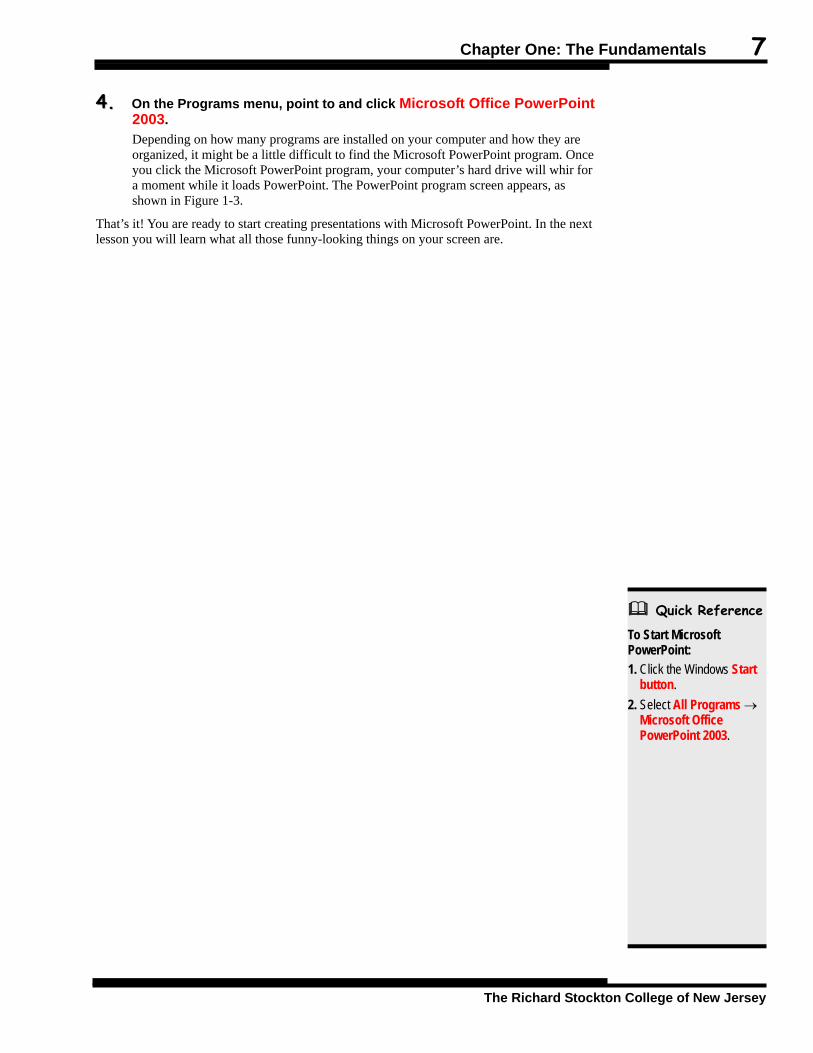
44.. On the Programs menu, point to and click Microsoft Office PowerPoint 2003. Depending on how many programs are installed on your computer and how they are organized, it might be a little difficult to find the Microsoft PowerPoint program. Once you click the Microsoft PowerPoint program, your computer’s hard drive will whir for a moment while it loads PowerPoint. The PowerPoint program screen appears, as shown in Figure 1-3.
That’s it! You are ready to start creating presentations with Microsoft PowerPoint. In the next lesson you will learn what all those funny-looking things on your screen are.

8 Microsoft PowerPoint 2003
© 2004 CustomGuide, Inc.
Lesson 1-2: What’s New in PowerPoint 2003?
If you’re upgrading from a previous version of PowerPoint to PowerPoint 2003, you’re in luck—in most respects, PowerPoint 2003 looks and works almost the same as previous versions. In fact, the upgrade from PowerPoint 2002 to PowerPoint 2003 probably saw the fewest changes from version to version. Here’s what’s new in PowerPoint 2003 (and a review of some features from PowerPoint 2002):
Table 1-1: What’s New Feature Description Getting Started Task Pane
New in 2003
A more advanced Getting Started task pane puts Microsoft Office Online right at your fingertips in PowerPoint 2003. Having such on-demand accessibility to the Internet is like having your very own genie-in-a-bottle, there to aid your every whim. Have a question about a new feature? No problem! Simply enter your question, and voila! Instant access to Microsoft’s Online Help database.
Package for CD feature
New in 2003
Allows you to package your presentation to a CD that will automatically begin playing your Slide Show when inserted into the disk drive. The PowerPoint Viewer is included by default, which enables you to play your presentation on a computer that does not have PowerPoint installed.
Highlighter Tool New in 2003
This brand-new tool makes it possible for you to highlight important text on your slides, just as if you were using a real highlighter.
Research Task Pane
New in 2003
Enables you to conduct searches on a topic without leaving your presentation. Choose from a variety of different resources including online encyclopedias, an online dictionary and an online translator.
Figure 1-4
Now you can share your presentation with others by saving it on a CD.
Figure 1-4

Chapter One: The Fundamentals 9
The Richard Stockton College of New Jersey
Feature Description Streamlined User Interface
New in 2002
Office 2003 has a new look and feel that improves the user’s Office experience. This includes removing visually competing elements, visually prioritizing items on a page, increasing letter spacing and word spacing for better readability, and defining foreground and background color to bring the most important elements to the front.
Smart Tags New in 2002
One of the bigger features in PowerPoint 2003, context-sensitive smart tags are a set of buttons that provide speedy access to relevant information by alerting you to important actions—such as formatting options for pasted information and more.
Task Panes New in 2002
The Task Pane appears on the right side of the screen and lets you quickly perform searches, open or start a new presentation, apply slide formatting, and add animation effects.
Thumbnails of slides in Normal view
New in 2002
You can use the new thumbnail representations of each slide to quickly find the slide you want to work on, or drag a thumbnail to move a slide to a new position in your presentation.
Multiple design templates per presentation
New in 2002
PowerPoint 2003 supports having more than one design template in your presentation. This is great when you want to combine several presentations into one file, but have each section maintain its distinct look.
Automatic layout for inserted objects
New in 2002
As you work, PowerPoint adjusts the slide layout automatically to accommodate pictures, diagrams, charts, and other items you add. When you choose a new slide layout, PowerPoint can automatically rearrange the existing items on the slide to fit the new layout.
Animation Effects New in 2002
PowerPoint has new animation effects, including entry and exit animations, more timing control, and motion paths — pre-drawn paths that items in an animation sequence can follow — so you can synchronize multiple text and object animations.
Animation Schemes
New in 2002
Animation schemes let you apply a pre-designed set of animation and transition effects to your entire presentation at once.
Better Organization Charts and New Diagram Types
New in 2002
Organization charts now use the drawing tools in PowerPoint, resulting in smaller file sizes and easier editing. Also, PowerPoint includes a new gallery of common conceptual diagrams. Choose from diagrams such as Pyramid for showing the building blocks of a relationship, Radial for showing items in relation to a core element, and more.
Document Recovery
New in 2002
Document Recovery gives you the option to automatically save your current document, spreadsheet, or presentation at the time an application stops responding, so you don’t lose a moment’s work. In the event of an error, Office 2003 keeps a backup of your work, giving you the chance to save and recover it so you don't lose valuable time or data.

10 Microsoft PowerPoint 2003
© 2004 CustomGuide, Inc.
Lesson 1-3: Understanding the PowerPoint Program Screen
You might find the PowerPoint 2003 program screen a bit confusing and overwhelming the first time you see it. What are all of those buttons, icons, menus, and arrows for? This lesson will help you become familiar with the PowerPoint program screen. There are no step-by-step instructions for this lesson—all you have to do is look at Figure 1-5 then refer to Table 1-2: The PowerPoint Program Screen to see what everything you’re looking at means. And most of all, relax! This lesson is only meant to help you get acquainted with the PowerPoint screen; you don’t have to memorize anything.
NOTE: PowerPoint 97 users should pay careful attention to how the PowerPoint screen is broken up into three different panes: Outline, Slide, and Notes. Since monitors and resolution sizes have gotten larger in recent years, Microsoft decided to let you view more information about your presentations at once without having to switch between windows.
Don’t worry if you find some of these elements of the PowerPoint program screen confusing at first—they will make sense after you’ve actually used them, and you will get a chance to use them in the next lesson.
Figure 1-5
Elements of the PowerPoint program screen.
Title bar Menu bar Standard toolbar Formatting toolbar
Status bar Drawing toolbar
Figure 1-5
View buttons Slide pane Notes pane
Outline tab Slides tab
Task pane

Chapter One: The Fundamentals 11
The Richard Stockton College of New Jersey
Quick Reference To Open a Menu: • Click the menu name with
the mouse. Or… • Press <Alt> and then the
underlined letter in menu. To Display a Menu’s Hidden Commands: • Click the downward-
pointing arrow ( ) at the bottom of the menu.
Or… • Open the menu and wait
a few seconds.
To Change How Menus Work: 1. Select View → Toolbars → Customize from the menu and click the Options tab.
2. Check or clear either the Always show full menusand/or Show full menus after a short delay options, then click Close.
Table 1-2: The PowerPoint Program Screen Element What it’s Used For Outline Tab Focuses on the content of your presentation instead of its appearance.
Use the Outline tab when you want to develop your presentation and add large amounts of text. You can also use Outline tab to navigate through a presentation by clicking the slide that you want to view.
Slides Tab The Slides tab displays thumbnail representations of each slide in a presentation. You can use Slides tab to navigate through a slide by clicking the slide that you want to view. You can also drag a thumbnail to move a slide to a new position in your presentation.
Title Bar Displays the name of the program you are currently using (Microsoft PowerPoint, of course) and the name of the presentation you are working on. The title bar appears at the top of all Windows programs.
Menu Bar Displays a list of menus that you use to give commands to PowerPoint. Clicking a menu name displays a list of commands—for example, clicking the Format menu name would display different formatting commands.
Standard Toolbar Toolbars are shortcuts—they contain buttons for the most commonly used commands (instead of wading through several menus). The standard toolbar contains buttons for the PowerPoint commands you will use the most, such as saving, opening, and printing presentations.
Formatting Toolbar Contains buttons for the most commonly used formatting commands, such as making text bold or italic.
Drawing Toolbar Contains buttons and menus that you can use to draw lines and shapes, or manipulate existing objects.
View Buttons Allows you to quickly switch between PowerPoint views, which change how your presentation is displayed on the screen.
Slide Pane Displays the slides one at a time, as they will appear when they are printed or displayed in a presentation.
Notes Pane Use Notes View to add notes to each slide that you can use during your presentation so you can remember what to say.
Status Bar Displays messages and feedback.
Task Pane The task pane lists commands that are relevant to whatever you’re doing in PowerPoint. You can easily hide the task pane if you want to have more room to view a document: Simply click the Close button in the upper-right corner of the task pane.

12 Microsoft PowerPoint 2003
© 2004 CustomGuide, Inc.
Lesson 1-4: Using Menus
This lesson explains one of the most common ways to give commands to PowerPoint—by using the menus. Menus for all Windows programs can be found at the top of a window, just beneath the program’s title bar.
PowerPoint’s new personalized menus have some unique characteristics not featured in other Windows programs and previous versions of PowerPoint. Microsoft PowerPoint 2003 displays its menu commands on the screen in three different ways: • By displaying every command possible, like most Windows programs, including earlier
versions of PowerPoint. • By hiding the commands you don’t use as frequently (the more advanced commands)
from view. • By displaying the hidden commands by clicking the downward-pointing arrows ( ) at
the bottom of the menu or after waiting a couple of seconds.
This lesson explains how to use PowerPoint 2003’s new personalized menus.
11.. Click the word File on the menu bar. A menu drops down from the word File, as shown in Figure 1-6. The File menu contains a list of file-related commands, such as New, which creates a new file, Open, which opens or loads a saved file, Save, which saves the currently opened file, and Close, which closes the currently opened file. Move on to the next step to try selecting a command from the File menu.
22.. Click the word Close in the File menu. The presentation window disappears—you have just closed the current presentation. Notice each of the words in the menu has an underlined letter somewhere in them. For example, the F in the File menu is underlined. Holding down the <Alt> key and pressing the underlined letter in a menu produces the same effect as clicking on it. For example, pressing the <Alt> key and then the <F> key would also open the File menu. Move on to the next step and try it for yourself.
33.. Press the <Alt> key then press the <F> key. The File menu appears. Once you open a menu you can navigate through the different menus, using either the mouse or the <Alt> key and the letter that is underlined in the menu name.
Figure 1-6
The File menu.
Figure 1-7
The Customize dialog box.
Open a menu by clicking on it or by pressing the <Alt> key and the underlined letter in the menu.
Tools menu with every command displayed.
The Tools menu with less frequently used commands hidden.
Figure 1-6
Figure 1-7
Check to always show every option on a menu.

Chapter One: The Fundamentals 13
The Richard Stockton College of New Jersey
Quick Reference To Open a Menu: • Click the menu name with
the mouse. Or… • Press <Alt> and then the
underlined letter in menu. To Display a Menu’s Hidden Commands: vClick the downward-
pointing arrow ( ) at the bottom of the menu.
Or… • Open the menu and wait
a few seconds.
To Change How Menus Work: 1. Select View → Toolbars → Customize from the menu.
2. Check or clear either the Always show full menusand/or Show full menus after a short delay options, then click Close.
44.. Press the Right Arrow Key <→ >. The next menu to the right, the Edit menu appears. If you open a menu and then change your mind, it is easy to close it without selecting any commands. Click anywhere outside the menu or press the <Esc> key.
55.. Click anywhere outside the menu to close the menu without issuing any commands.
NOTE: The procedure for using menus and the general order/layout of the menu is the same for most Windows programs. So once you master PowerPoint’s menus, you can handle just about any Windows-based program!
66.. Click the word Tools in the menu. The most common menu commands appear in the Tools menu. Some people feel intimidated by so many menu options, so the menus don’t display the more advanced commands at first. To display a menu’s advanced commands either click on the downward pointing arrows ( ) at the bottom of the menu or keep the menu open for a few seconds.
77.. Click the downward-pointing arrow ( ) at the bottom of the Tools menu. The more advanced commands appear shaded on the Tools menu. If you’re accustomed to working with earlier versions of Microsoft Office you may find that hiding the more advanced commands is disconcerting. If so, you can easily change how PowerPoint’s menus work. Here’s how:
88.. Select View → Toolbars → Customize from the menu. The Customize dialog box appears, as shown in Figure 1-7. This is where you can change how PowerPoint’s menus work. There are two check boxes here that are important: • Always show full menus: Check this box if you want to show all the
commands on the menus, instead of hiding the advanced commands. • Show full menus after a short delay: If checked, PowerPoint will wait a
few seconds before displaying the more advanced commands on a menu. 99.. Click Close.
Table 1-3: Menus found in Microsoft PowerPoint File Description File File-related commands to open, save, close, print, and create new files.
Edit Commands to copy, cut, paste, find, and replace text in a presentation.
View Commands to change how the presentation is displayed on the screen.
Insert Lists items that you can insert into a presentation, such as graphics and more.
Format Commands to format text, objects, and more.
Tools You can change PowerPoint’s options here.
Slide Show Slide show related commands.
Window Commands to display and arrange multiple windows (if you have more than one presentation open).
Help Get help on using Microsoft PowerPoint.
The Tools menu will display less frequently used commands displayed after clicking the downward-pointing arrow ( ) at the bottom of the menu.
14 Microsoft PowerPoint 2003
© 2004 CustomGuide, Inc.
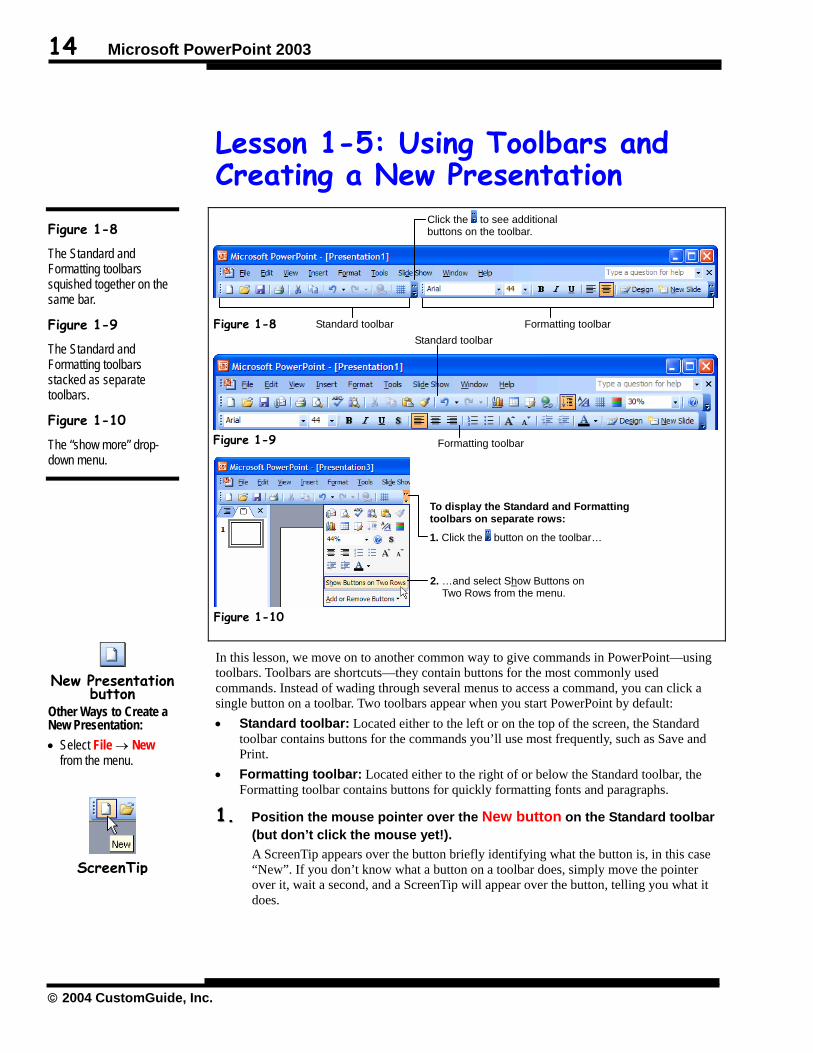
Lesson 1-5: Using Toolbars and Creating a New Presentation
In this lesson, we move on to another common way to give commands in PowerPoint—using toolbars. Toolbars are shortcuts—they contain buttons for the most commonly used commands. Instead of wading through several menus to access a command, you can click a single button on a toolbar. Two toolbars appear when you start PowerPoint by default: • Standard toolbar: Located either to the left or on the top of the screen, the Standard
toolbar contains buttons for the commands you’ll use most frequently, such as Save and Print.
• Formatting toolbar: Located either to the right of or below the Standard toolbar, the Formatting toolbar contains buttons for quickly formatting fonts and paragraphs.
11.. Position the mouse pointer over the New button on the Standard toolbar (but don’t click the mouse yet!). A ScreenTip appears over the button briefly identifying what the button is, in this case “New”. If you don’t know what a button on a toolbar does, simply move the pointer over it, wait a second, and a ScreenTip will appear over the button, telling you what it does.
Figure 1-8
The Standard and Formatting toolbars squished together on the same bar.
Figure 1-9
The Standard and Formatting toolbars stacked as separate toolbars.
Figure 1-10
The “show more” drop-down menu.
New Presentation
button Other Ways to Create a New Presentation: • Select File → New
from the menu.
ScreenTip
Figure 1-9
Figure 1-10
To display the Standard and Formatting toolbars on separate rows:
1. Click the button on the toolbar…
2. …and select Show Buttons on Two Rows from the menu.
Standard toolbar
Formatting toolbar
Click the to see additional buttons on the toolbar.
Standard toolbar Formatting toolbar Figure 1-8

Chapter One: The Fundamentals 15
The Richard Stockton College of New Jersey
Quick Reference To Use a Toolbar Button: • Click the button you want
to use.
To Display a Toolbar Button’s Description: • Position the pointer over
the toolbar button and wait a second. A ScreenTip will appear above the button.
To Create a New Presentation: • Click the New button
on the Standard toolbar. Or… • Select File → New from
the menu.
To Stack the Standard and Formatting toolbars in Two Separate Rows:
• Click the button on either toolbar and select Show Buttons on Two Rows from the list.
22.. Click the New button on the Standard toolbar. A new, blank presentation appears—not only have you learned how to use Microsoft PowerPoint’s toolbars, but you’ve also learned how to create a new, blank presentation.
PowerPoint’s toolbars also have “show more” arrows, just like menus do. When you
click a button, it displays a drop-down menu or a list of the remaining buttons on the toolbar, as well as several toolbar-related options.
33.. Click the button on the far right side of the Standard toolbar. A list of the remaining buttons on the Standard toolbar appears, as shown in Figure 1-10. Just like personalized menus, PowerPoint remembers which toolbar buttons you use most often, and displays them in a more prominent position on the toolbar.
44.. Click anywhere outside the toolbar list to close the list without selecting any of its options. Today, many computers have larger monitors, so Microsoft decided to save space on the screen by squishing both the Standard and Formatting toolbars together on the same bar, as shown in Figure 1-8. While squishing two toolbars together on the same bar gives you more space on the screen, it also makes the two toolbars look confusing—especially if you’re used to working with a previous version of Microsoft Office. If you find both toolbars sharing the same bar confusing, you can “un-squish” the Standard and Formatting toolbars and stack them on top of each other, as illustrated in Figure 1-9. Here’s how…
55.. Click the button on either the Standard or Formatting toolbar. A list of more buttons and options appear, as shown in Figure 1-10. To stack the Standard and Formatting toolbars on top of one another select the Show Buttons on Two Rows option.
66.. Select Show Buttons on Two Rows from the list. Microsoft PowerPoint displays the Standard and Formatting toolbars on two separate rows. You can display the Standard and Formatting toolbars on the same row using the same procedure.
77.. Click the button on either the Standard or Formatting toolbar and select Show Buttons on One Row from the list. PowerPoint once again displays the Standard and Formatting toolbars on the same row.
Should you display the Standard and Formatting toolbars on the same row or should you give each toolbar its own row? That’s a question that depends on the size and resolution of your computer’s display and your own personal preference. If you have a large 17-inch monitor, you might want to display both toolbars on the same row. On the other hand, if you have a
smaller monitor or are constantly clicking the buttons to access hidden toolbar buttons, you may want to consider displaying the Standard and Formatting toolbars on separate rows.
Click the button to see and/or add additional toolbar buttons.

16 Microsoft PowerPoint 2003
© 2004 CustomGuide, Inc.
Lesson 1-6: Filling Out Dialog Boxes
Some commands are more complicated than others are. Saving a file is a simple process—you only need to select File → Save from the menu or click the Save button on the Standard toolbar. Other commands are more complex—for example, suppose you want to change the top margin of the current slide to a half-inch. Whenever you want to do something relatively complicated, you must fill out a dialog box. Filling out a dialog box is usually very easy—if you’ve worked at all with Windows, you’ve undoubtedly filled out hundreds of dialog boxes. Dialog boxes usually contain several types of controls, including: • Text boxes • List boxes • Check boxes • Drop-down menus (also called combo boxes)
It is important that you know the names of these controls, because this book will refer to them in just about every lesson. This lesson gives you a tour of a dialog box, and will explain each of these controls to you so that when you run across them you will know what they are and how to use them.
11.. Select Format from the menu. The Format menu appears. Notice the items listed in the Format menu are followed by ellipses (…). The ellipses indicate that there is a dialog box attached to the menu item.
22.. Select Font from the Format menu. The Font dialog box appears, as shown in Figure 1-11. The Font dialog box is actually one of the more complex dialog boxes in Microsoft PowerPoint, and contains several different types of components. First, let’s learn about text boxes. Text boxes are the most common component of a dialog box and are nothing more than simple fill-in-the-blank areas. To use a text box, first select the text box by clicking it, or by pressing the <Tab> key until the insertion point appears inside it, then simply type the text you want into the text box.
Figure 1-11
The Font dialog box.
Figure 1-12
Using a Scroll Bar.
Text Box
List Box
Text box
List box
Drop-down list
Check box
Figure 1-11
Scroll Up Button Click here to scroll up.
Scroll Box Indicates your current position in the list (you can also click and drag the scroll box to scroll up or down).
Scroll Down ButtonClick here to scroll down.
Figure 1-12
Chapter One: The Fundamentals 17
The Richard Stockton College of New Jersey
Quick Reference To Select a Dialog Box Option: • Click the option (such as
Font or Color) with the mouse.
Or… • Press <Tab> to move to
the next option in the dialog box or <Shift> + <Tab> to move to the previous option until you arrive at the desired option.
To View a Dialog Box Tab: • Click the tab you want to
view. To Save Your Changes and Close a Dialog Box: • Click the OK button or
press <Enter>. To Close a Dialog Box without Saving Your Changes: • Click the Cancel button or
press <Esc>.
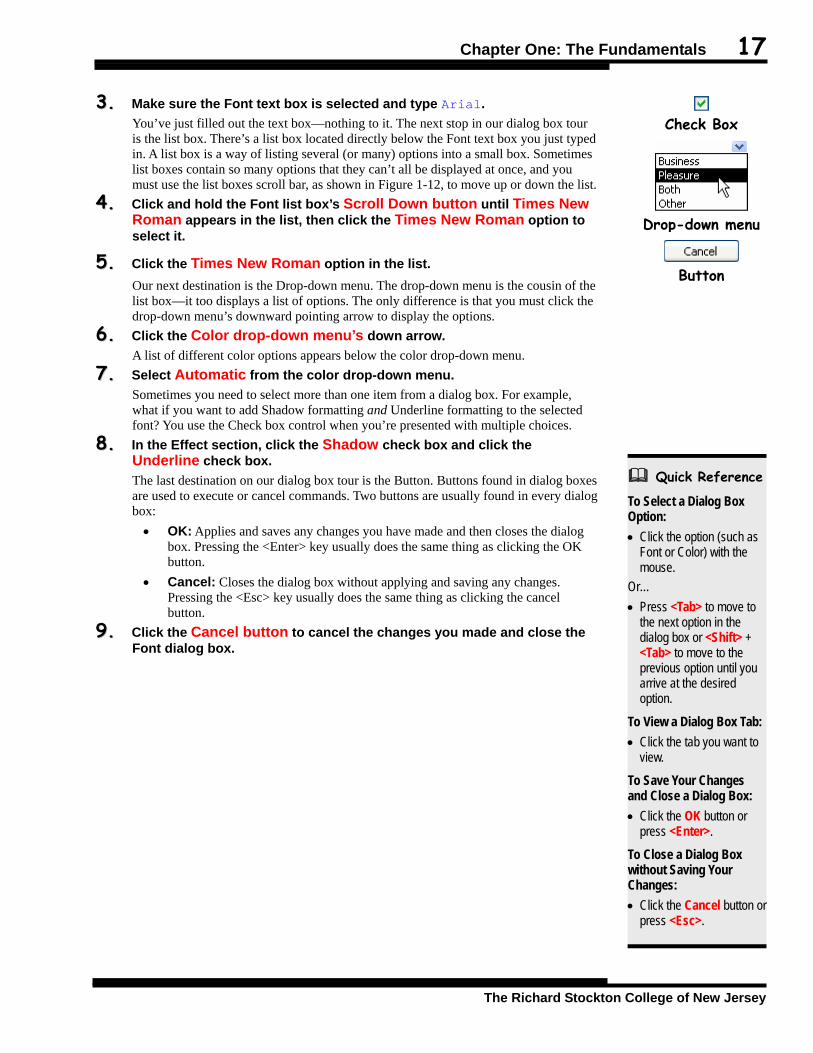
33.. Make sure the Font text box is selected and type Arial. You’ve just filled out the text box—nothing to it. The next stop in our dialog box tour is the list box. There’s a list box located directly below the Font text box you just typed in. A list box is a way of listing several (or many) options into a small box. Sometimes list boxes contain so many options that they can’t all be displayed at once, and you must use the list boxes scroll bar, as shown in Figure 1-12, to move up or down the list.
44.. Click and hold the Font list box’s Scroll Down button until Times New Roman appears in the list, then click the Times New Roman option to select it.
55.. Click the Times New Roman option in the list. Our next destination is the Drop-down menu. The drop-down menu is the cousin of the list box—it too displays a list of options. The only difference is that you must click the drop-down menu’s downward pointing arrow to display the options.
66.. Click the Color drop-down menu’s down arrow. A list of different color options appears below the color drop-down menu.
77.. Select Automatic from the color drop-down menu. Sometimes you need to select more than one item from a dialog box. For example, what if you want to add Shadow formatting and Underline formatting to the selected font? You use the Check box control when you’re presented with multiple choices.
88.. In the Effect section, click the Shadow check box and click the Underline check box. The last destination on our dialog box tour is the Button. Buttons found in dialog boxes are used to execute or cancel commands. Two buttons are usually found in every dialog box: • OK: Applies and saves any changes you have made and then closes the dialog
box. Pressing the <Enter> key usually does the same thing as clicking the OK button.
• Cancel: Closes the dialog box without applying and saving any changes. Pressing the <Esc> key usually does the same thing as clicking the cancel button.
99.. Click the Cancel button to cancel the changes you made and close the Font dialog box.
Check Box
Drop-down menu
Button

18 Microsoft PowerPoint 2003
© 2004 CustomGuide, Inc.
Lesson 1-7: Keystroke and Right Mouse Button Shortcuts
You are probably starting to realize that there are several methods to do the same thing in PowerPoint. For example, to save a file you can use the menu (select File → Save) or the toolbar (click the Save button). This lesson introduces you to two more methods of executing commands: Right mouse button shortcut menus and keystroke shortcuts.
You know that the left mouse button is the primary mouse button, used for clicking and double-clicking, and it’s the mouse button you will use over 95 percent of the time when you work with PowerPoint. So what’s the right mouse button for? Whenever you right-click something, it brings up a shortcut menu that lists everything you can do to the object. Whenever you’re unsure or curious about what you can do with an object, click it with the right mouse button. A shortcut menu will appear with a list of commands related to the object or area you right-clicked.
Right mouse button shortcut menus are a great way to give commands to PowerPoint, because you don’t have to wade through several levels of unfamiliar menus when you want to do something.
11.. Click the right mouse button while the cursor is anywhere inside the presentation window. A shortcut menu will appear where you clicked the mouse. Notice one of the items on the shortcut menu is Copy. This is the same Copy command you can select from the menu (Edit → Copy). Using the right mouse button shortcut method is slightly faster and almost always easier to remember than using PowerPoint’s menus.
22.. Move the mouse button anywhere outside the menu and click the left mouse button to close the shortcut menu. Remember that the options listed in the shortcut menu will be different, depending on what you’ve selected.
Figure 1-13
Hold down the Ctrl key and press another key to execute a keystroke shortcut.
Figure 1-14
Opening a shortcut menu for toolbars.
Shortcut menu
Figure 1-13
Figure 1-14
Esc F1 F2 F3 F4 F5 F6 F7 F8 F9 F10 F11 F12
~ `
! 1 @
2 $4
% 5
^ 6
& 7
* 8 (
9 )0
+=
# 3
Q W E R T Y A S D F G H
Z X C V B U I O P
J K L
N M {[
}]
:; "
'< ,
>.
?/
Tab Shift
Ctrl Alt
Caps Lock
Alt Ctrl
Shift
Enter
Backspace Insert Home PageUp
Delete End PageDown
|\
7 8 9
4 5 6
1 2 3
0 .
NumLock
Home PgUp
End PgDn
Ins Delete
Enter
/ *
+
PrintScreen
ScrollLock Pause
ScrollLock
CapsLock
NumLock

Chapter One: The Fundamentals 19
The Richard Stockton College of New Jersey
Quick Reference To Open a Context-Sensitive Shortcut Menu: • Right-click the object.
To Use a Keystroke Shortcut: • Press <Ctrl> + the letter
of the keystroke shortcut you want to execute.
33.. Position the pointer over either the Standard or Formatting toolbar and click the right mouse button. A shortcut menu appears that lists all the toolbars you can view, as shown in Figure 1-14.
44.. Move the mouse button anywhere outside the menu in the presentation window and click the left mouse button to close the shortcut menu. On to keystroke shortcuts. Without a doubt, keystroke shortcuts are the fastest way to give commands to PowerPoint, even if they are a little hard to remember. They’re great time-savers for issuing common commands that you do all the time. To issue a keystroke-shortcut press and hold the <Ctrl> key, press the shortcut key, and release both buttons.
55.. Press <Ctrl> + <O> (the Ctrl and O keys at the same time.) The Open dialog box appears.
66.. Click Cancel to close the open dialog box.
NOTE: Although we won’t discuss it in this lesson, PowerPoint’s default keystroke shortcuts can be changed or remapped to execute other commands.
77.. Click the File menu, and then click the word Close in the File menu.
Table 1-4: Common Keystroke Shortcuts lists the shortcut keystrokes you’re likely to use the most in PowerPoint.
Table 1-4: Common Keystroke Shortcuts Keystroke Description <Ctrl> + <B> Toggles bold font formatting
<Ctrl> + <I> Toggles italics font formatting
<Ctrl> + <U> Toggles underline font formatting
<Ctrl> + <Spacebar> Returns the font formatting to the default setting
<Ctrl> + <O> Opens a presentation
<Ctrl> + <S> Saves the current presentation
<Ctrl> + <P> Prints the current presentation to the default printer
<Ctrl> + <C> Copies the selected text or object to the Windows clipboard
<Ctrl> + <X> Cuts the selected text or object from its current location to the Windows clipboard
<Ctrl> + <V> Pastes any copied or cut text or object in the Windows clipboard to the current location
<Ctrl> + <Home> Moves the insertion point to the beginning of the presentation
<Ctrl> + <End> Moves the insertion point to the end of the presentation
20 Microsoft PowerPoint 2003
© 2004 CustomGuide, Inc.
Lesson 1-8: Opening a Presentation
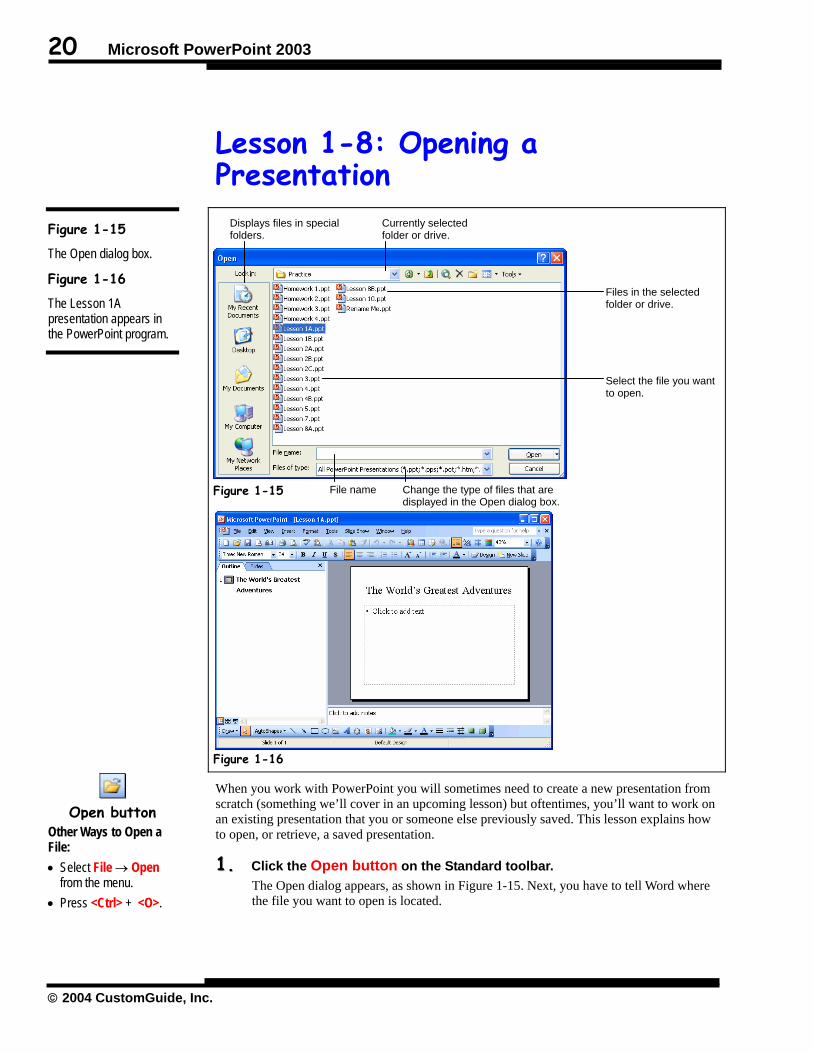
When you work with PowerPoint you will sometimes need to create a new presentation from scratch (something we’ll cover in an upcoming lesson) but oftentimes, you’ll want to work on an existing presentation that you or someone else previously saved. This lesson explains how to open, or retrieve, a saved presentation.
11.. Click the Open button on the Standard toolbar. The Open dialog appears, as shown in Figure 1-15. Next, you have to tell Word where the file you want to open is located.
Figure 1-15
The Open dialog box.
Figure 1-16
The Lesson 1A presentation appears in the PowerPoint program.
Open button
Other Ways to Open a File: • Select File → Open
from the menu. • Press <Ctrl> + <O>.
Figure 1-15
Figure 1-16
Files in the selected folder or drive.
File name
Currently selected folder or drive.
Select the file you want to open.
Change the type of files that are displayed in the Open dialog box.
Displays files in special folders.

Chapter One: The Fundamentals 21
The Richard Stockton College of New Jersey
Quick Reference To Open a Presentation: • Click the Open
button on the Standard toolbar.
Or… • Select File → Open from
the menu. Or… • Press <Ctrl> + <O>.
22.. Navigate to and open your practice folder or floppy disk. Your computer stores information in files and folders, just like you store information in a filing cabinet. To open a file, you must first find and open the folder where it’s saved. Normally new files are saved in a folder named “My Documents” but sometimes you will want to save or open files in another folder. The Open and Save dialog boxes both have their own toolbars that make it easy to browse through your computer’s drives and folders. Two controls on this toolbar are particularly helpful:
• Look In List: Click to list the drives on your computer and the current folder, then select the drive and/or folder whose contents you want to display.
• Up One Level button: Click to move up one folder. If necessary, follow your instructor’s directions to select the appropriate drive and folder where your practice files are located.
33.. Click the presentation named Lesson 1A in the file list box and click Open. PowerPoint opens the Lesson 1A presentation and displays it in the window, as shown in Figure 1-16.
Table 1-5: Special Folders in the Open and Save As Dialog Boxes Folder Description
History
Displays a list of files that you’ve recently worked on.
My Documents
Displays all the files in the My Documents folder—the default location where Microsoft Office programs save their files.
Desktop
Displays all the files and folders saved on your desktop.
My Computer
Gives access to, and information about, the disk drives and other hardware connected to your computer.
My Network Places
Lets you browse through the computers in your workgroup and the computers on the network.
Look in list

22 Microsoft PowerPoint 2003
© 2004 CustomGuide, Inc.
Lesson 1-9: Saving and Closing a Presentation and Exiting PowerPoint
After you’ve created a presentation, you need to save it if you intend on using it ever again. Saving a presentation stores it in a file on your computer’s hard disk—similar to putting a file away in a filing cabinet so you can later retrieve it. Once you have saved a presentation for the first time, it’s a good idea to save it again from time to time as you work on it. You don’t want to lose all your work if the power suddenly went out or if your computer crashed! In this lesson, you will learn how to save an existing presentation with a different name without changing the original presentation. It’s often easier and more efficient to create a presentation by modifying one that already exists instead of having to retype a lot of information.
You want to use the information in the Lesson 1A presentation we opened in the previous lesson to create a new presentation. Since you don’t want to modify the original presentation, Lesson 1A, save it as a new presentation named “Great Adventures.”
11.. Select File → Save As from the menu. The Save As dialog box appears. Here is where you can save the presentation with a new, different name. If you only want to save any changes you’ve made to a presentation—instead of saving them in a new file—click the Save button on the Standard toolbar, or select File → Save from the menu, or press <Ctrl> + <S>.
Figure 1-17
The Save As dialog box.
Figure 1-18
The Program and Presentation close buttons.
Save button
Other Ways to Save: • Select File → Save
from the menu. • Press <Ctrl> + <S>.
Click to Add Text
box
Figure 1-17
Closes the current presentation.
Closes the Microsoft PowerPoint Program.
Figure 1-18
Enter a file name.
You can save PowerPoint presentations in different file formats by selecting the format you want to save in here.
Specify where you want to save the presentation (in which drive and folder).

Chapter One: The Fundamentals 23
The Richard Stockton College of New Jersey
Quick Reference To Save a Presentation: • Click the Save button
on the Standard toolbar. Or… • Select File → Save from
the menu. Or… Press <Ctrl> + <S>.
To Save a Presentation in a New File with a Different Name: 1. Select File → Save As
from the menu. 2. Type a new name for the
presentation and click Save.
To Close a Presentation: • Click the presentation
window close button or select File → Close from the menu.
To Exit PowerPoint: • Click the PowerPoint
program’s close button or select File → Exit from the menu.
22.. In the File name text box, type Great Adventures. You also have to tell PowerPoint where to save your presentation. The Save As dialog box has its own toolbar that makes it easy to browse through your computer’s drives and folders. Two controls on this toolbar are particularly helpful:
• Look In List: Click to list the drives on your computer and the current folder, then select the drive and/or folder whose contents you want to display.
• Up One Level button: Click to move up one folder. If necessary, follow your instructor’s directions to select the appropriate drive and folder where your practice files are located.
33.. If necessary, navigate to your Practice folder or disk. The presentation is saved with the new name, “Great Adventures,” and the original presentation, Lesson 1A, closes. Now you can work on your new presentation, “Great Adventures,” without changing the original presentation, Lesson 1A. When you make changes to your presentation, you simply save your changes in the same file. Go ahead and try it.
44.. Click the Click to add text box and type Eating three Dairy Queen Blizzards. Now save your changes.
55.. Click the Save button on the Standard toolbar. PowerPoint saves the changes you’ve made to the presentation. Congratulations! You’ve just saved your first PowerPoint presentation. Make sure you’ve saved any changes you’ve made before you close a presentation. Since we’ve already saved our work in the previous step, we can move on and close the current presentation.
66.. Click the presentation Close button. (Make sure you click the presentation Close button, not the PowerPoint program Close button.) You will see two close buttons on your screen, as shown in Figure 1-18. Make sure you click the lower close button, because clicking the upper close button would close the PowerPoint program entirely. The current presentation closes but not the PowerPoint program. This is what you want to do if you’re finished working on a presentation but still want to remain in the PowerPoint program—perhaps to open and work on another presentation. You have now finished this lesson so you want to exit, or close the PowerPoint program.
77.. Click the Close button on the Microsoft PowerPoint Title Bar. This time click the Close button in the very far upper-right hand corner of the screen to close PowerPoint. The PowerPoint program window closes and you return back to the Windows desktop.
Presentation Close button
Other Ways to Close a Presentation: • Select File → Close
from the menu.
Program Close
button Other Ways to Exit PowerPoint: • Select File → Exit from
the menu.

24 Microsoft PowerPoint 2003
© 2004 CustomGuide, Inc.
Lesson 1-10: Creating a New Presentation with the AutoContent Wizard
If you are new to PowerPoint, the easiest way to create a presentation is to use the AutoContent wizard. The AutoContent wizard helps you create a new presentation by asking you about the content, purpose, style, and output of your presentation and makes suggestions about the presentation’s content and design. The new presentation contains sample text that you can replace with your own.
11.. Start Microsoft PowerPoint. The PowerPoint program starts with a new, blank presentation.
Figure 1-19
The PowerPoint dialog box asks how you want to create a new presentation or if you want to open an existing presentation.
Figure 1-20
The first page of the AutoContent Wizard.
Figure 1-21
Select a presentation category in the second page of the AutoContent Wizard.
The AutoContent Wizard is the easiest way for a beginner to create a new presentation.
Figure 1-19
Figure 1-20
Displays your progress in the AutoContent Wizard (and how much you have left to do).
Create a new presentation by selecting and using one of these options:
• Blank Presentation: Creates a new, blank presentation using the default settings for text and colors.
• From DesignTemplate: Creates a new presentation based on one of the PowerPoint design templates.
• From AutoContent Wizard: Creates a new presentation by prompting you for information about content, purpose, style, handouts, and output. The new presentation contains sample text that you can replace with your own information.
Select a category for the type of presentation you want to create.
Select the presentation that best fits your needs.
Figure 1-21

Chapter One: The Fundamentals 25
The Richard Stockton College of New Jersey
Quick Reference To Create a New Presentation with the AutoContent Wizard: 1. Start PowerPoint and
select From AutoContent Wizard in the task pane.
Or… If you’re already in
PowerPoint select File → New from the menu and select From AutoContent Wizard in the task pane.
2. Click Next and select the Category button that best fits the presentation you want to create.
3. Select a presentation from the presentation list on the right side of the dialog box and click Next.
4. Enter the information that the Presentation Wizard prompts you for, and follow any on-screen instructions.
5. Click Finish when you’re done.
6. Replace the presentation’s sample textwith your own text.
There are actually several different ways that you can create a new presentation. You can create a new presentation by using: • A Blank Presentation • A Design Template • The AutoContent Wizard
Figure 1-19 describes each of these methods in a little more detail. If you’re new to PowerPoint the simplest way to create a new presentation is with the AutoContent Wizard.
22.. Select From AutoContent Wizard in the task pane under New. The first dialog box of AutoContent Wizard appears, as shown in Figure 1-20. This dialog box walks you through the steps of creating a presentation. The flow chart in the left side of the dialog box shows where you are in the AutoContent Wizard process.
33.. Click Next. The second dialog box of the AutoContent Wizard presents you with several different types of presentations to choose from, as shown in Figure 1-21.
44.. Click the different category buttons to see which types of presentations are available. Wow! The AutoContent Wizard gives you a lot of presentation types to choose from, doesn’t it? Now that you’re a little more familiar with the presentation categories and types that are available in the AutoContent Wizard, let’s select one.
55.. Click the Corporate button, make sure the Company meeting presentation in the list is selected and click Next. The next step of the AutoContent Wizard asks you to specify what type of output you want to use for your presentation.
66.. Verify that the On-screen Presentation option is selected and click Next. The fifth step of the AutoContent Wizard appears. Here you are asked to enter the title of your presentation and any additional information.
77.. Type the following information in the specified fields. Press <Tab> after each entry.
Presentation title Our Bold Plan For Tomorrow
Footer North Shore Travel, Inc.
88.. Click Finish. You have completed the AutoContent Wizard. PowerPoint creates a new presentation based on your choices, which you can now use as a blueprint to create your own presentation. The new presentation contains sample text that you can replace with your own information.
99.. Close the new presentation without saving your changes.
If you are already in PowerPoint, you can start the AutoContent Wizard by selecting File → New from the menu and clicking From AutoContent Wizard in the task pane.

26 Microsoft PowerPoint 2003
© 2004 CustomGuide, Inc.
Lesson 1-11: Creating a Blank Presentation and Creating a Presentation from a Template
In the previous lesson you learned how to create a PowerPoint presentation using the AutoContent Wizard—and it’s a great way to create a presentation if you’re new to PowerPoint. Once you’ve become more familiar with PowerPoint, however, walking through all of the AutoContent Wizard’s steps each time you want to create a new presentation may be unnecessary. This lesson explains the two other methods of creating a presentation: creating a blank presentation and creating a presentation from a template.
First off, let’s take a look at how to create a new, blank presentation from scratch:
11.. Click the New button on the Standard toolbar. PowerPoint creates a new, blank presentation and inserts a blank title slide to your presentation. Now all you have to do is add some text to the title slide in the provided text placeholders. We’ll cover adding text to slides in more depth in another lesson—for now just give your new presentation a title.
22.. Click the Click to add title placeholder and type How we managed to misplace 15 million dollars. Since we don’t need to use this presentation, we can close it without saving our changes.
Figure 1-22
Select a Design Template from the Slide Design task pane.
New button
Other Ways to Create a New Presentation: • Select File → New
from the menu.
Click to add title
placeholder
Select the template you want to use in the presentation. Click the template arrow and select one of the following: • Apply to All Slides
Applies the selected template to every slide in the presentation.
• Apply to Selected Slides Applies the selected template to only the selected slide(s) in the presentation.
• Show Large Previews Displays a larger preview of the available templates.
Figure 1-22

Chapter One: The Fundamentals 27
The Richard Stockton College of New Jersey
Quick Reference To Create a Blank Presentation: • Click the New button
on the Standard toolbar.
Or… 1. Select File → New from
the menu. 2. Select Blank
Presentation and click OK.
To Create a Presentation from a Template: 1. Select File → New from
the menu. 2. Click From Design
Template in the task pane.
3. Double-click the template you want to use (you might have to select it from one of the tabbed categories).
To Display Large Template Previews: • Move the pointer over any
template in the task pane, click the arrow, and select Show Large Previews from the menu.
33.. Click the presentation’s Close button to close the presentation. Click No to the save changes dialog box. You can also create a new presentation using one of the professionally designed templates that come with PowerPoint. A template already includes a format and color scheme—all you have to do is add your own text. Here’s how to create a new presentation from a template:
44.. Select File → New from the menu and click From Design Template in the task pane. The New Presentation task pane appears, as shown in Figure 1-22. Now all you have to do is select the template you want to use to create your new presentation. You can see the name of any template by simply pointing the mouse at a template for a few seconds.
55.. Move the mouse pointer over the available templates until you find the Beam template (you may have to scroll down the task pane before you find it). The template previews in the task pane are quite small and difficult to see. You can switch a larger preview of the available templates to get a better look at them. Here’s how:
66.. Move the pointer over the Beam template in the task pane and click the arrow, as shown in Figure 1-22. Select Show Large Previews from the
menu. PowerPoint displays a larger preview of the available templates in the task pane. Let’s turn the Show Large Previews option off for now.
77.. Move the pointer over the Beam template in the task pane, click the arrow and select Show Large Previews from the menu.
Okay, let’s apply the Beam template to the presentation. 88.. Double-click the Beam template.
PowerPoint applies the Beam template to the new presentation. 99.. Click the presentation’s Close button to close the new presentation.
Click No to the save changes dialog box. We don’t need to display the task pane anymore so…
1100.. Click the task pane’s Close button.
Give yourself a pat on the back—in just two short lessons you’ve learned how to create a new presentation in three different ways—from scratch, using the AutoContent Wizard, and using a template.
Point the mouse at a template for a few seconds to see its name.

28 Microsoft PowerPoint 2003
© 2004 CustomGuide, Inc.
Lesson 1-12: Moving Around in Your Presentations
This lesson explains how to move from slide to slide in your presentation. Getting around in PowerPoint is very easy, so this lesson should be a breeze for you.
One way to get around in a presentation is by using PowerPoint’s scroll bars. The vertical scroll bar is located along the right side of the window and is used to move up and down in a presentation. The horizontal scroll bar is located along the bottom of the window and is used to move from left to right when a presentation doesn’t fit entirely on the screen—most likely you will rarely, if ever, have to use the horizontal scroll bar.
The procedures for getting around in a PowerPoint presentation can differ slightly, depending on which view you’re using, so this lesson will show you how to get around in a presentation no matter which view you’re using.
11.. Open the Lesson 1B presentation. One way to get around a presentation is by using the scroll bar to move up or down.
22.. Click the Scroll Down button on the Slide pane scroll bar (the one to the far right of the screen.) PowerPoint moves to the next slide when you click the slide pane’s scroll bar.
33.. Click the Next Slide button on the Slide pane scroll bar. You jump to the next slide in the presentation. PowerPoint’s scroll bars let you see more of a slide’s content and are no different than the scroll bars in just about every other Windows program. Scrolling works a bit differently in the Outline pane, however.
Figure 1-23
Along with the keyboard, the horizontal scroll bar is one of the main ways to move around in your presentations.
Scroll down arrow
Next Slide button Other Ways to Move to the Next Slide: • Press the
<Page Down> key.
Scroll Up Button Click to scroll up.
Scroll Box Indicates your current position in the presentation (you can also click and drag the scroll box to scroll up or down).
Scroll Down Button Click here to scroll down.
Previous Slide Move up to the previous slide.
Next Slide Move down to the next slide. Figure 1-23
The Status bar displays your current position in the presentation.
Click the slide you want to view on either the Outline tab or Slides tab.
Chapter One: The Fundamentals 29
The Richard Stockton College of New Jersey
Quick Reference To Move Up or Down One Screen or Slide: • Press <Page Up> to
move up one screen or slide.
• Press <Page Down> to move down one screen or slide.
To Move to the Beginning or End of a Presentation: • Press <Ctrl> + <Home>
to move to the beginning of the presentation.
• Press <Ctrl> + <End> to move to the end of the presentation.
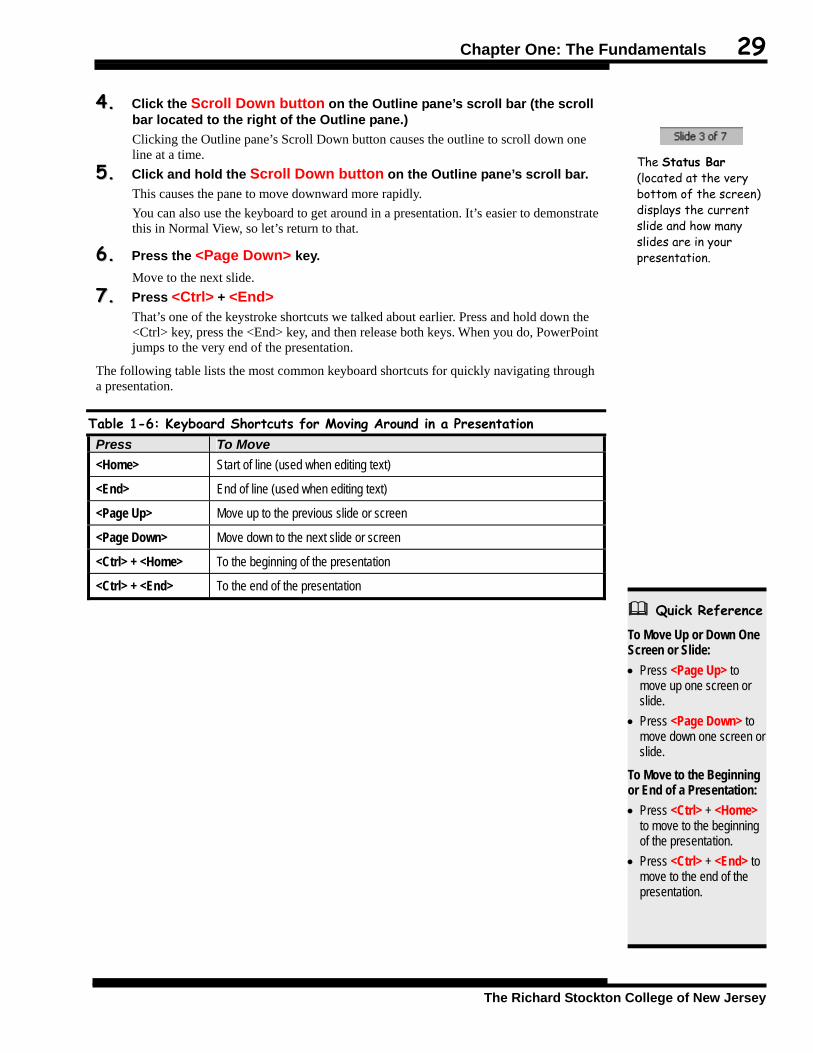
44.. Click the Scroll Down button on the Outline pane’s scroll bar (the scroll bar located to the right of the Outline pane.) Clicking the Outline pane’s Scroll Down button causes the outline to scroll down one line at a time.
55.. Click and hold the Scroll Down button on the Outline pane’s scroll bar. This causes the pane to move downward more rapidly. You can also use the keyboard to get around in a presentation. It’s easier to demonstrate this in Normal View, so let’s return to that.
66.. Press the <Page Down> key. Move to the next slide.
77.. Press <Ctrl> + <End> That’s one of the keystroke shortcuts we talked about earlier. Press and hold down the <Ctrl> key, press the <End> key, and then release both keys. When you do, PowerPoint jumps to the very end of the presentation.
The following table lists the most common keyboard shortcuts for quickly navigating through a presentation.
Table 1-6: Keyboard Shortcuts for Moving Around in a Presentation Press To Move <Home> Start of line (used when editing text)
<End> End of line (used when editing text)
<Page Up> Move up to the previous slide or screen
<Page Down> Move down to the next slide or screen
<Ctrl> + <Home> To the beginning of the presentation
<Ctrl> + <End> To the end of the presentation
The Status Bar (located at the very bottom of the screen) displays the current slide and how many slides are in your presentation.
30 Microsoft PowerPoint 2003
© 2004 CustomGuide, Inc.
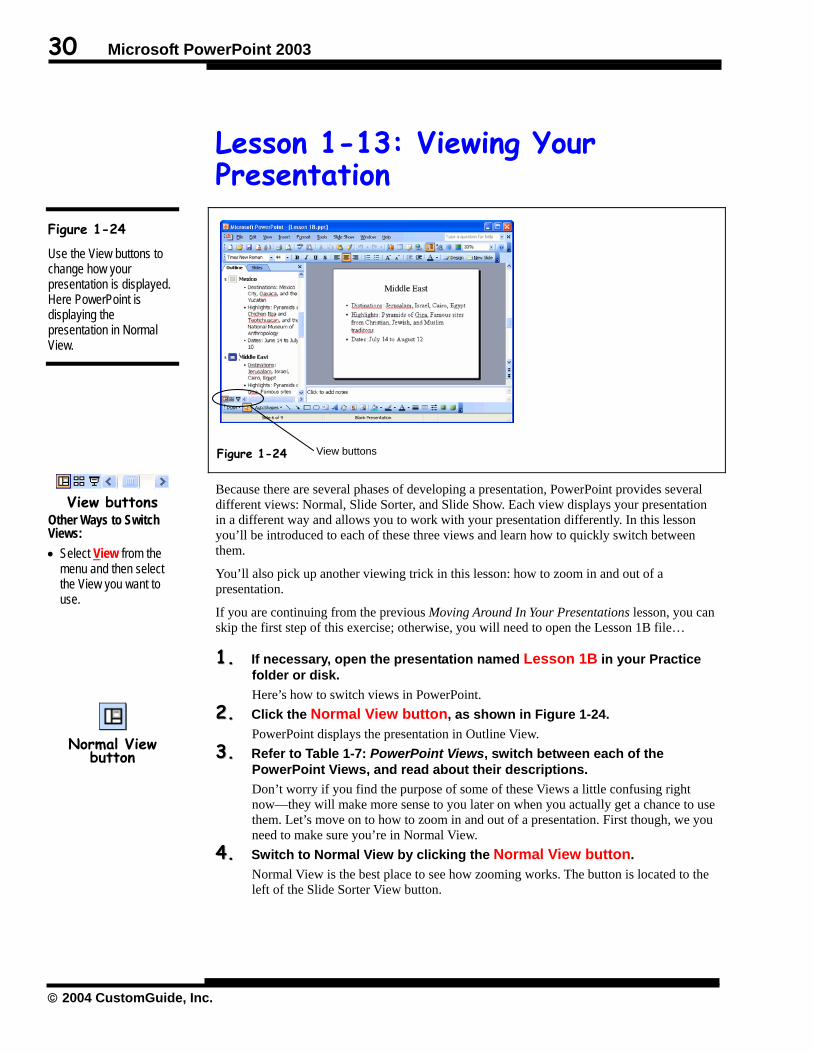
Lesson 1-13: Viewing Your Presentation
Because there are several phases of developing a presentation, PowerPoint provides several different views: Normal, Slide Sorter, and Slide Show. Each view displays your presentation in a different way and allows you to work with your presentation differently. In this lesson you’ll be introduced to each of these three views and learn how to quickly switch between them.
You’ll also pick up another viewing trick in this lesson: how to zoom in and out of a presentation.
If you are continuing from the previous Moving Around In Your Presentations lesson, you can skip the first step of this exercise; otherwise, you will need to open the Lesson 1B file…
11.. If necessary, open the presentation named Lesson 1B in your Practice folder or disk. Here’s how to switch views in PowerPoint.
22.. Click the Normal View button, as shown in Figure 1-24. PowerPoint displays the presentation in Outline View.
33.. Refer to Table 1-7: PowerPoint Views, switch between each of the PowerPoint Views, and read about their descriptions. Don’t worry if you find the purpose of some of these Views a little confusing right now—they will make more sense to you later on when you actually get a chance to use them. Let’s move on to how to zoom in and out of a presentation. First though, we you need to make sure you’re in Normal View.
44.. Switch to Normal View by clicking the Normal View button. Normal View is the best place to see how zooming works. The button is located to the left of the Slide Sorter View button.
Figure 1-24
Use the View buttons to change how your presentation is displayed. Here PowerPoint is displaying the presentation in Normal View.
View buttons
Other Ways to Switch Views: • Select View from the
menu and then select the View you want to use.
Normal View
button
View buttons Figure 1-24
Chapter One: The Fundamentals 31
The Richard Stockton College of New Jersey
Quick Reference To Switch between NormalView, Slide Sorter View, and Slide Show Views: • Click the View button on
the horizontal scroll bar for the view you want.
Or… • Select View from the
menu and select the view you want.
To Change the Zoom Levelof a Presentation: • Select the zoom level
from the Zoom list on the Standard toolbar.
Or… • Select View → Zoom
from the menu, select the zoom level you want, and click OK.
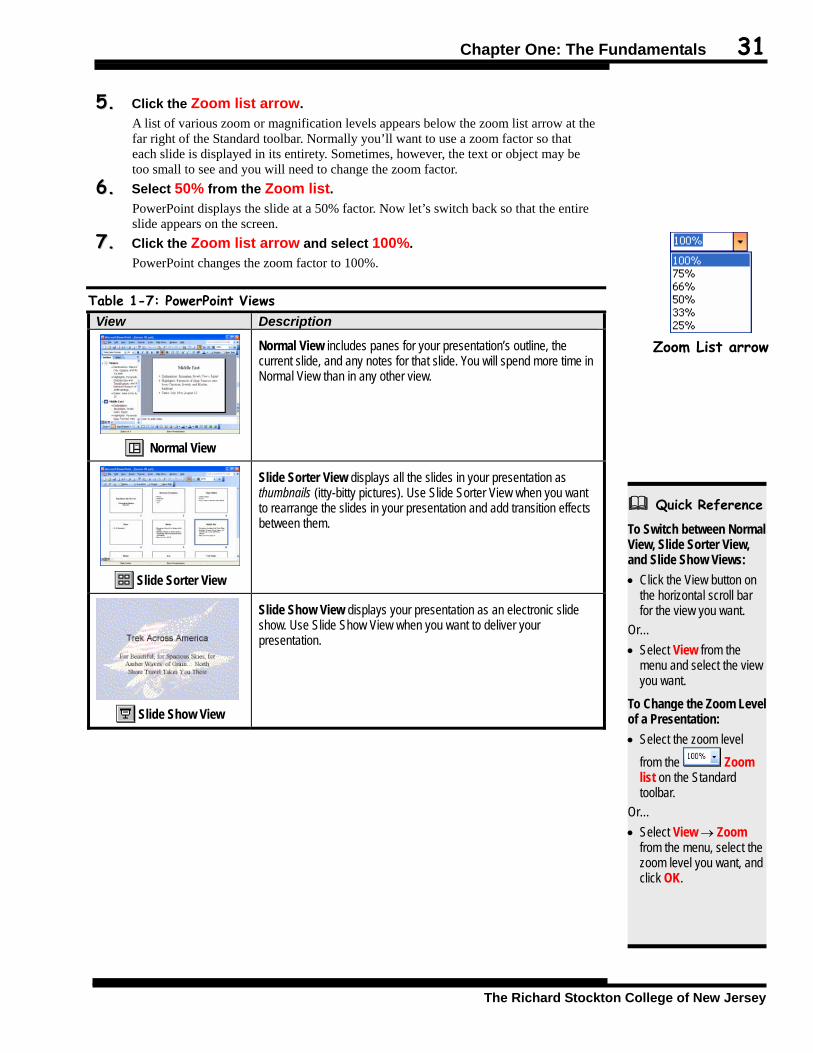
55.. Click the Zoom list arrow. A list of various zoom or magnification levels appears below the zoom list arrow at the far right of the Standard toolbar. Normally you’ll want to use a zoom factor so that each slide is displayed in its entirety. Sometimes, however, the text or object may be too small to see and you will need to change the zoom factor.
66.. Select 50% from the Zoom list. PowerPoint displays the slide at a 50% factor. Now let’s switch back so that the entire slide appears on the screen.
77.. Click the Zoom list arrow and select 100%. PowerPoint changes the zoom factor to 100%.
Table 1-7: PowerPoint Views View Description
Normal View
Normal View includes panes for your presentation’s outline, the current slide, and any notes for that slide. You will spend more time in Normal View than in any other view.
Slide Sorter View
Slide Sorter View displays all the slides in your presentation as thumbnails (itty-bitty pictures). Use Slide Sorter View when you want to rearrange the slides in your presentation and add transition effects between them.
Slide Show View
Slide Show View displays your presentation as an electronic slide show. Use Slide Show View when you want to deliver your presentation.
Zoom List arrow

32 Microsoft PowerPoint 2003
© 2004 CustomGuide, Inc.
Lesson 1-14: Printing Your Presentation
After you finish your presentation you’re probably going to want to print it. This lesson will show you how to send your presentation to the printer. Printing is another very, very easy task.
Before you print a presentation it is usually a good idea to preview it on screen before sending it to the printer—just in case you find something that needs to be changed.
11.. Switch to Normal View (if you’re not already there). Normal View displays how your presentation will appear when printed.
NOTE: If you’ve worked with other Microsoft Office programs, such as Word or Excel, you might be wondering: “Hey! Where’s my Print Preview command?!” PowerPoint doesn’t have a Print Preview command because Normal View is already an exact representation of your presentation.
22.. Select File → Print from the menu. The Print dialog box appears, as shown in Figure 1-25. The print dialog box contains various print options such as how many copies you wish to make, which printer you wish to use, and which slides you wish to print. See Table 1-8: Print Dialog Box Options for a description of what print options are available.
NOTE: If you don’t want to specify any printing options, you can print your presentation a lot faster by simply clicking the Print button ( ) on the Standard toolbar or by pressing <Ctrl> + <P>.
33.. In the Number of copies box, type 2. This will print two copies of your presentation. It’s up to you if you actually want to print out your presentation.
Figure 1-25
The Print dialog box. See Table 1-8: Print Dialog Box Options for definitions of what everything means.
Other Ways to Print: • Click the Print
button on the Standard toolbar.
• Press <Ctrl> + <P>.
Figure 1-25

Chapter One: The Fundamentals 33
The Richard Stockton College of New Jersey
Quick Reference To Print a Presentation: • Click the Print button
on the Standard toolbar. Or… • Select File → Print from
the menu. Or… • Press <Ctrl> + <P>.
For Advanced Printing Options: 1. Select File → Print from
the menu. 2. Refer to Table 1-8: Print
Dialog Box Options for information on various printing options.
44.. If you actually want to print your presentation, click OK; otherwise, click Cancel to close the Print dialog box without printing anything.
55.. Close the presentation without saving any of your changes.
Table 1-8: Print Dialog Box Options explains some of the other print options you can use when printing a presentation—how to print a specific page or a range of pages, for example.
Table 1-8: Print Dialog Box Options Print option Description Name Used to select which printer to send your presentation to when it prints (if you
are connected to more than one printer). The currently selected printer is displayed.
Properties Displays a dialog box with options available for your specific printer such as what paper size you’re using, if your presentation should be printed in color or black and white, etc.
Print to file Prints the presentation to a file instead of sending it to the printer.
Page range Allows you to specify what pages you want printed. There are several options here:
All: Prints the entire presentation.
Current slide: Prints only the page of the slide you’re currently on.
Selection: Prints a custom slide show (a presentation within a presentation) that you click in the Custom Show list.
Slides: Prints only the slides you specify. Select a range of slides with a hyphen (like 2-5) and separate single pages with a comma (like 3,7).
Number of copies Specify the number of copies you want to print.
Print what Select the component of your presentation that you want to print—slides, handouts, notes pages, or the presentation’s outline. Several check boxes appear in this section. Here’s what each of them does:
Black and white: Optimizes the look of color slides for printing on a black and white printer
Pure black and white: Prints the entire presentation in only black and white. Changes all shades of gray to either black or white.
Scale to fit paper: Reduces or enlarges slide images so that they fill the printed page. This only affects how the presentation is printed; it doesn’t change the dimension of slides in your presentation.
Frame slides: Adds a thin frame around the border of printed slides, handouts, and notes pages.
Options Lets you specify other printing options, such as printing a presentation in reverse order (from the last page to the first).
34 Microsoft PowerPoint 2003
© 2004 CustomGuide, Inc.
Chapter One Review
Lesson Summary
Starting PowerPoint • Start PowerPoint by clicking the Start button, selecting Programs, and selecting Microsoft
PowerPoint.
Understanding the PowerPoint Screen • Be able to identify the main components of the PowerPoint program screen.
Using Menus • To Use a Menu: Either click the menu name with the mouse pointer or press the <Alt> key and the
letter that is underlined in the menu name.
• PowerPoint 2003’s new personalized menus hide more advanced commands from view. To display a menu’s hidden commands click the downward-pointing arrow ( ) at the bottom of the menu, or open the menu and wait a few seconds.
• To Change How Menus Work: Select View → Toolbars → Customize from the menu, select the Options tab, check or clear either the Always Show Full Menus and/or Show Full Menus After a Short Delay options, then click Close.
Using Toolbars • To See a Description of a Toolbar Button: Leave the pointer over the button to display a
ScreenTip of what the button does.
• To Stack the Standard and Formatting toolbars in Two Separate Rows: Click the button on either toolbar and select Show Buttons on Two Rows from the list.
Filling Out Dialog Boxes • Be able to identify and use text boxes, list boxes, drop-down menus, check boxes, and sheet tabs.
• Click the control you want to use or press <Tab> to move to the next control in the dialog box and <Shift> + <Tab> to move back to the previous control.
• To Save Your Changes and Close a Dialog Box: Click the OK button or press <Enter>.
• To Close a Dialog Box without Saving Your Changes: Click the Cancel button or press <Esc>.
Keystroke and Right Mouse Button Shortcuts • Keystroke shortcuts: Press <Ctrl> and the letter that corresponds to the shortcut command at the
same time.

Chapter One: The Fundamentals 35
The Richard Stockton College of New Jersey
• Right mouse Button shortcut menus: Whenever you’re unsure or curious about what you can do with an object, click it with the right mouse button to display a list of commands related to the object.
Opening a Presentation
• To Open a Presentation: Click the Open button on the Standard toolbar, or select File → Open from the menu, or press <Ctrl> + <O>.
Saving and Closing a Presentation and Exiting PowerPoint • To Save a Presentation: Click the Save button on the Standard toolbar, or select File →
Save from the menu, or press <Ctrl> + <S>.
• To Save a Presentation in a New File with a Different Name: Select File → Save As from the menu and enter a different name for the presentation.
• To Close a Presentation: Click the presentation window close button or select File → Close from the menu.
• To Exit PowerPoint: Click the PowerPoint program’s close button or select File → Exit from the menu.
Creating a New Presentation with the AutoContent Wizard • To Create a New Presentation with the AutoContent Wizard: Start PowerPoint and select From
AutoContent Wizard in the task pane, or if you’re already in PowerPoint select File → New from the menu, and select From AutoContent Wizard in the task pane. Click Next and select the Category button that best fits the presentation you want to create. Select a presentation from the presentation list on the right side of the dialog box and click Next. Enter the information that the Presentation Wizard prompts you for and follow any on-screen instructions. Click Finish when you’re done.
Creating a Blank Presentation and Creating a Presentation from a Template
• To Create a Blank Presentation: Click the New button on the Standard toolbar or select File → New from the menu, select Blank Presentation and click OK.
• To Create a Presentation from a Template: Select File → New from the menu, click From Design Template in the task pane, then find and double-click the template you want to use (you may have to select it from one of the tabbed categories).
• To Display Large Template Previews: Move the pointer over any template in the task pane, click the arrow, and select Show Large Previews from the menu.
Moving Around in Your Presentations • <Page Up> moves up one screen, <Page Down> moves down one screen.
• <Ctrl> + <Home> moves to the beginning of a presentation.
• <Ctrl> + <End> moves to the end of a presentation.
36 Microsoft PowerPoint 2003
© 2004 CustomGuide, Inc.
Viewing Your Presentation • You can view a presentation in Normal, Slide Sorter, and Slide Show Views. Change views by
clicking on the View buttons located on the horizontal scroll bar, or by selecting them from the View menu.
• Normal View displays the slides one at a time, as they will appear when they are printed or displayed in a presentation.
• Slide Sorter View displays all the slides in your presentation as small pictures or thumbnails. Use Slide Sorter View when you want to rearrange the slides in your presentation and add transition effects between them.
• Slide Show View displays your presentation as an electronic slide show.
• Change the zoom level by using the Zoom box on the Standard toolbar.
Printing Your Presentation
• To Print a Presentation: Click the Print button on the Standard toolbar, or select File → Print from the menu, or press <Ctrl> + <P>.
• To Specify Additional Printing Options: Select File → Print from the menu. You can specify the number of copies and which pages to print.
Quiz 1. Microsoft PowerPoint is a:
A. Word processing program B. Database program C. Spreadsheet program D. Presentation program
2. Right-clicking something in PowerPoint: A. Deletes the object B. Opens a shortcut menu listing everything you can do to the object C. Selects the object D. Nothing—the right mouse button is there for left-handed people
3. Which of the following is NOT a way to create a new Presentation?
A. From scratch (create a blank presentation) B. Using a template C. Using the Scan-In Slides feature D. Using the AutoContent Wizard
4. Which of the following is NOT one of PowerPoint’s Views?
A. Normal View B. Presentation View C. Slide Show View D. Slide Sorter View

Chapter One: The Fundamentals 37
The Richard Stockton College of New Jersey
5. A keystroke combination is:
A. Pressing two or more keys at the same time, for example pressing the <Shift> and <Tab> keys at the same time.
B. A way to lock your computer to prevent unauthorized access. To unlock the computer, simply retype your keystroke combination.
C. Using the keyboard in conjunction with the mouse. D. A type of mixed drink.
6. PowerPoint automatically creates a blank presentation when you first start the program (True or False?)
7. Which of the following is NOT a technique for moving around in a presentation? A. Press <Ctrl> + <Home> to move to the first slide in a presentation. B. Press <Page Down> to move to the next slide in a presentation. C. Select Edit → Move from the menu and specify the slide you want to go to. D. Use the vertical scroll bar to move forward or backward through the slides in your
presentation.
8. To save a presentation you: (Select all that apply.)
A. Press <Ctrl> +<F5>. B. Select File → Save from the menu. C. Click the Save button on the Standard toolbar. D. Click Save on the Windows Start button.
9. The Print dialog box, which can be found by selecting File → Print from the menu, lets you print multiple copies of a presentation and print specific slides. (True or False?)
Homework 1. Start Microsoft PowerPoint by clicking the Windows Start button, pointing to
Programs and clicking Microsoft PowerPoint.
2. Click the Open button on the Standard toolbar and navigate to your Practice folder or disk. Find and click the Homework 1 file and click Open.
3. Press the <Page Down> key to move to the second slide in the presentation.
4. Switch to Outline view by clicking the Outline tab on left side of the screen.
5. Switch back to Slide View by clicking the Slides View tab on left side of the screen.
6. Select 100% from the Zoom List on the Standard toolbar. Readjust the zoom level again by selecting Fit from the Zoom List.
7. Save the presentation as “Flea Circus”: Select File → Save As from the menu, navigate to your Practice folder or disk, type “Flea Circus” in the File name box and then click Save.
8. Open the Print dialog box by selecting File → Print from the menu. Do you know how to print only the first slide of the presentation? How would you print more than one copy of the presentation? Click Cancel to close the dialog box without printing anything.

38 Microsoft PowerPoint 2003
© 2004 CustomGuide, Inc.
Extra Credit: Use the AutoContent Wizard to create a sample presentation on whatever topic you want.
Quiz Answers 1. D. PowerPoint is a Presentation program. Hopefully you got this question right!
2. B. Right-clicking an object displays a shortcut menu for the object.
3. C. There isn’t a Scan-In Slides feature anywhere in PowerPoint!
4. B. PowerPoint doesn’t have a Presentation View.
5. A. A keystroke combination is when you press two or more keys at the same time, for example <Ctrl> + <Home>.
6. False. When you first start the PowerPoint program, a dialog box where you can create a new presentation or open an existing presentation greets you.
7. C. There isn’t an Edit → Move command on the menu. All the others are valid navigation techniques.
8. B and C.
9. True. Selecting File → Print from the menu opens the Print dialog box where you can specify exactly what you want to print.

Chapter Two: Editing a Presentation
Chapter Objectives: • Inserting New Slides and Entering Text
• Working in Outline View—Promoting and Demoting Slides
• Editing, Selecting, Replacing, and Deleting Text
• Cutting, Copying, and Pasting Text
• Finding and Replacing Text
• Using Undo, Redo, and Repeat
• Checking the Spelling in a Presentation
• Reorganizing a Presentation in Outline View
• Copying, Moving, and Deleting Slides in Slide Sorter View
• Adding Notes to Your Slides
• Working with More than One Presentation and Window
• Managing Your Files
• Understanding Smart Tags
• Recovering Your Presentations
Chapter Task: Revise and Edit a Simple Presentation
Now that you’re familiar with the PowerPoint basics, you’re ready to move on to editing your slides. This chapter focuses on adding slides and text to your presentation. Most presentations take a lot of time and thought to put together and are often edited and revised several times before they’re finished. Toward that end, this chapter covers just about every trick you will need to know about editing—how to add, edit, cut, copy and paste text, how to check for spelling errors, and how to undo any mistakes you might make.
Prerequisites • How to start Microsoft
PowerPoint. • How to use menus,
toolbars, dialog boxes, and shortcut keystrokes.
• Move the mouse pointer and navigate between the slides in a presentation.
• Open and save a presentation.

40 Microsoft PowerPoint 2003
© 2004 CustomGuide, Inc.
Lesson 2-1: Inserting Slides and Text
Slides are the most basic components of a presentation. Without slides, PowerPoint would just sit there like a broken projector and do nothing. To make it easy to add slides to your presentation, PowerPoint 2003 comes with 27 preset layouts. Layouts help you choose what you want your slide to look like. There are layouts with titles, bulleted lists, clip art, charts, and even video clips. The two types of layouts that you will probably use the most are: • Title slides • Bulleted slides
Every slide has one or more areas where you can type called placeholders. These placeholders are hard to miss, since they’re labeled “Click to add title” or “Click to add text.” This lesson will walk you through adding a couple of new slides to an existing presentation.
11.. Start Microsoft PowerPoint.
22.. Open Lesson 2A and save it as Expeditions. This presentation is for a travel agency’s launch of a new series of international history tours—but it’s currently far from complete. First, the presentation needs a bulleted list slide—here’s how to add one:
Figure 2-1
Select the layout you want for your new slide from the task pane.
Figure 2-2
A blank Bulleted List layout has placeholders for the slide’s title and text.
Figure 2-3
The completed slide.
Figure 2-3
Click to add title
Figure 2-2
• Click to add text
Figure 2-1
2. Select the layout you want to use for your new slide.
1. Click the New Slide button on the Formatting toolbar.
Historical Destinations
• Latin and South America • Israel • Europe • Asia
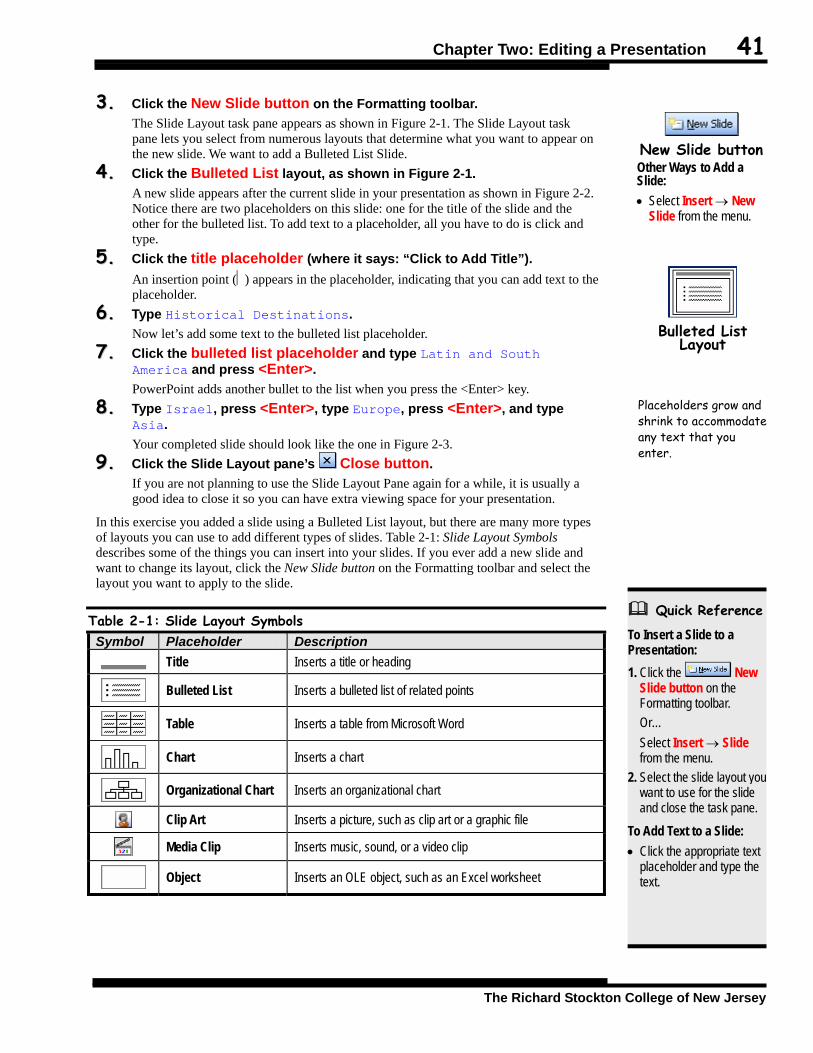
Chapter Two: Editing a Presentation 41
The Richard Stockton College of New Jersey
Quick Reference To Insert a Slide to a Presentation: 1. Click the New
Slide button on the Formatting toolbar.
Or… Select Insert → Slide
from the menu. 2. Select the slide layout you
want to use for the slide and close the task pane.
To Add Text to a Slide: • Click the appropriate text
placeholder and type the text.
33.. Click the New Slide button on the Formatting toolbar. The Slide Layout task pane appears as shown in Figure 2-1. The Slide Layout task pane lets you select from numerous layouts that determine what you want to appear on the new slide. We want to add a Bulleted List Slide.
44.. Click the Bulleted List layout, as shown in Figure 2-1. A new slide appears after the current slide in your presentation as shown in Figure 2-2. Notice there are two placeholders on this slide: one for the title of the slide and the other for the bulleted list. To add text to a placeholder, all you have to do is click and type.
55.. Click the title placeholder (where it says: “Click to Add Title”). An insertion point (⏐) appears in the placeholder, indicating that you can add text to the placeholder.
66.. Type Historical Destinations. Now let’s add some text to the bulleted list placeholder.
77.. Click the bulleted list placeholder and type Latin and South America and press <Enter>. PowerPoint adds another bullet to the list when you press the <Enter> key.
88.. Type Israel, press <Enter>, type Europe, press <Enter>, and type Asia. Your completed slide should look like the one in Figure 2-3.
99.. Click the Slide Layout pane’s Close button. If you are not planning to use the Slide Layout Pane again for a while, it is usually a good idea to close it so you can have extra viewing space for your presentation.
In this exercise you added a slide using a Bulleted List layout, but there are many more types of layouts you can use to add different types of slides. Table 2-1: Slide Layout Symbols describes some of the things you can insert into your slides. If you ever add a new slide and want to change its layout, click the New Slide button on the Formatting toolbar and select the layout you want to apply to the slide.
Table 2-1: Slide Layout Symbols Symbol Placeholder Description
Title Inserts a title or heading
Bulleted List Inserts a bulleted list of related points
Table Inserts a table from Microsoft Word
Chart Inserts a chart
Organizational Chart Inserts an organizational chart
Clip Art Inserts a picture, such as clip art or a graphic file
Media Clip Inserts music, sound, or a video clip
Object Inserts an OLE object, such as an Excel worksheet
New Slide button Other Ways to Add a Slide: • Select Insert → New
Slide from the menu.
Bulleted List
Layout
Placeholders grow and shrink to accommodate any text that you enter.

42 Microsoft PowerPoint 2003
© 2004 CustomGuide, Inc.
Lesson 2-2: Using the Outline Pane
You’ve probably already noticed that most of the slides in PowerPoint contain nothing more than headings and bulleted lists. This might seem simple—perhaps a bit boring—but it’s an extremely effective method for getting your point across. Since most presentations are highly structured, containing many points and sub-points, it makes sense to work with them as outlines—and that’s the purpose of PowerPoint’s Outline pane.
The Outline pane displays the title and text of each slide. This lesson will introduce you to the Outline pane.
Here are a few more notes about the Outline pane before we start: • A numbered heading represents each slide in the outline. Notice each slide also has a
symbol next to it indicating that it’s a slide. • Each slide’s body text appears as an indented heading under the slide’s main title
heading.
11.. Click the Outline tab to ensure that it is visible. The Outline pane replaces the Slides tab, as shown in Figure 2-4. Now you can easily view the content of the entire presentation. If you’re going to be working with a presentation’s outline for any length of time you should probably resize the Outline pane so that you can see more of the outline at once. Here’s how to resize the outline pane:
22.. Click and drag the Outline pane’s right border to the middle of the PowerPoint screen, as shown in Figure 2-4. Now you have enough room to view and work with your presentation’s outline.
Figure 2-4
You can resize the Outline pane so that you can see more of a presentation’s outline at once.
Figure 2-4
You can resize the Outline pane by dragging its border to the right or left.

Chapter Two: Editing a Presentation 43
The Richard Stockton College of New Jersey
Quick Reference To Demote a Paragraph: • Select the paragraph(s)
and press the <Tab> key or click the Demote button on the Outlining toolbar.
To Promote a Paragraph: • Select the paragraph(s)
and press <Shift> + <Tab> or click the
Promote button on the Outlining toolbar.
To Add a New Slide in the Outline Tab: • Press <Ctrl> + <Enter>
or promote a selected paragraph to the highest level on the outline.
33.. Click anywhere in the Outline pane and press <Ctrl> + <End> to move to the very end of the presentation. This is where we want to add another slide.
44.. Press <Ctrl> + <Enter> to add a new slide to the presentation. A brand new slide appears on the page—notice its slide icon ( ). By default, any new slides you add in Outline view after the title slide will be Bulleted List slides, like the one you created in the previous lesson.
55.. Type Target Market. This will be the title of your new slide.
66.. Press <Enter>. Whenever you press the <Enter> key in Outline view, it adds a new line just like the one before it. Because the preceding line is a slide, pressing <Enter> adds a new slide. Since we don’t want to add a new slide, we can demote the current line to a bullet by pressing the <Tab> key.
77.. Press <Tab>. You’ve just demoted the current line and moved it down one level in the outline. The current paragraph now appears as a subpoint under the “Target Market” heading. You demote paragraphs by selecting them and pressing the <Tab> key, or if you’re a toolbar fanatic, you can also click the Demote button on the Outlining toolbar. Let’s add the subpoints to the “Target Market” slide.
88.. Type College Students. This will be the first bulleted item on the slide.
99.. Press <Enter>. PowerPoint adds another subpoint paragraph.
1100.. Type Retirees and press <Enter>. We want to add several subpoints under the “Retirees” point.
1111.. Press <Tab> to demote the new paragraph, type Archaeologists, press <Enter>, and type Professors. To promote a paragraph means to move it up one level in the outline. You promote paragraphs by selecting them and pressing the <Shift> + <Tab> keys or by clicking the Promote button on the Outlining toolbar.
1122.. Press <Enter> to add a new paragraph and press <Shift> + <Tab> twice to promote the paragraph to level one of the outlines, making it a title for a new slide. Let’s finish this lesson by adding the text for the new slide.
1133.. Type Dates, press <Enter> to add a new paragraph, press <Tab> to demote the paragraph, and type To be determined.
Because the Outline pane focuses on the content of a presentation rather than on appearance or layout, new slides added in Outline view are always the basic Bulleted List layout. You can always change the layout of a new slide by clicking the New Slide button on the Formatting toolbar.
Other Ways to Demote a Paragraph: • Click the Demote
button on the Outlining toolbar.
• Click the point you want to demote and drag the mouse to the right.
Other Ways to Promote a Paragraph: • Click the Promote
button on the Outlining toolbar.
• Click the point you want to promote and drag the mouse to the left.

44 Microsoft PowerPoint 2003
© 2004 CustomGuide, Inc.
Lesson 2-3: Editing Text
Often, after typing a presentation, you will discover that you need to make some changes to your text—perhaps you want to rephrase or even delete a sentence. Or maybe you inherited your boss’s feeble attempt at creating a PowerPoint presentation and have to make a lot of changes. Editing a presentation by inserting and deleting text is very simple. To insert text, you move the insertion point (the blinking bar) to where you want to insert the text. You move the insertion point using the arrow keys on the keyboard or by using the mouse to click where you want to move the insertion point, as shown in Figure 2-5. Once the insertion point is where you want, just start typing.
There are a couple ways to delete text. One way to delete text is to place the insertion point to the right of the text you want to delete and press the <Backspace> key. Another way to delete text is to place the insertion point to the left of the text you want to delete and press the <Delete> key.
If you have already used a word processing program, you undoubtedly already know how to edit text, and since this lesson will be kid stuff to a pro like you, you’ll probably want to skip it. If not, this lesson will give you some practice inserting and deleting text.
11.. Press <Ctrl> + <Home> to move to the beginning of the presentation. You jump to the very beginning of the presentation. Notice the insertion point—the blinking ⏐ that appears before the word “Expeditions.” Anything you type appears wherever the insertion point is located—just move the insertion point, using the mouse or keyboard, to where you want to enter some text, and then type the text.
22.. Press the Down Arrow Key <↓> button. The insertion point moves down one line. If the cursor is not at the beginning of the current line, move it there now.
33.. Press and hold the Right Arrow Key <→> button until the insertion point is located immediately after the word Education.
Figure 2-5
Use the keyboard or the mouse to move the insertion point in a presentation.
Placing the
Insertion Point
Figure 2-5
Move the insertion point with the arrow keys on your computer’s keyboard…
…or use the mouse to click where you want to place the insertion point with the pointer.

Chapter Two: Editing a Presentation 45
The Richard Stockton College of New Jersey
Quick Reference To Move the Insertion Point: • Use the arrow keys. Or… • Click where you want to
place the insertion point with the pointer.
To Insert Text (Into an Existing Text Box): • Click in the text box,
move the insertion point where you want to insert the text, and then type thetext you want to insert.
To Delete Text: • The <Backspace> key
deletes text before, or to the left of the insertion point.
• The <Delete> key deletes text after, or to the right of the insertion point.
44.. Type al. The text is inserted at the insertion point, so that the word “Education” now says “Educational.” You’ve just learned how to insert text into a slide—pretty easy, huh?
55.. Move the insertion point to the very beginning of the Latin and South America line. Here you need to delete some text—the word “Latin.”
66.. Press the <Delete> key several times, until the word Latin is deleted. The Delete key deletes once space to the right, or after the insertion point.
77.. Type Central. You’ve just deleted the word “Latin” and inserted the word “Central” to take its place. You can also use the mouse to move the insertion point instead of the arrow keys. Simply move the mouse until the pointer is placed where you want it to be and then click the left mouse button.
88.. Click immediately after the word Israel in the fifth line of the presentation with the pointer. The insertion point appears immediately after the word Israel—right where you clicked the mouse button. You can also use the Backspace key to delete text. Like the Delete key, the Backspace key also deletes text, but in a slightly different way. The Backspace key deletes text before, or to the left of the insertion point, while the Delete key deletes text after, or to the right of the insertion point.
99.. Press the <Backspace> key. The Backspace key deletes text before, or to the left of the insertion point.
1100.. Press and hold the <Backspace> key until you have deleted the rest of Israel. Don’t delete too far—we still need an empty line here! Great! You’ve learned how to delete text using the Backspace key.
1111.. Type Middle East. Now that you’ve revised the presentation you need to save your changes.
1122.. Save your changes and close the current presentation.
The <Delete> key deletes one space to the right, or after, the insertion point.
The <Backspace> key deletes one space to the left, or before, the insertion point.

46 Microsoft PowerPoint 2003
© 2004 CustomGuide, Inc.
Lesson 2-4: Selecting, Replacing, and Deleting Text
This lesson explains how to select text. Whenever you want to edit more than one character at a time, you must select it first. A lot of editing techniques, such as formatting, cutting, copying, and pasting text, require that you select the text you want to modify. There are probably hundreds of reasons to select text in PowerPoint, so it pays off if you’re an expert at doing it.
11.. Open Lesson 2B and save it as Historical Tours. Move on to the next step and resize the Outline pane.
22.. Click and drag the Outline pane’s right border to the middle of the PowerPoint screen. Now you have more room to view and edit the presentation’s outline.
Figure 2-6
Selecting and replacing text.
Figure 2-7
The updated presentation.
Other Ways to Select Text: • Move to the beginning
or end of the text that you want to select, press and hold down the <Shift> key while using the arrow keys to select the text.
Figure 2-6
Figure 2-7
1. Position the insertion point before or after the text that you want to select.
2. Click and hold down the left mouse button, drag the mouse across the text you want to select, then release the mouse button.
3. If you want to replace the selected text, simply type in the new text – it will overwrite the selected text.

Chapter Two: Editing a Presentation 47
The Richard Stockton College of New Jersey
Quick Reference To Select a String of Text: 1. Move the insertion point
to the beginning or end of the text you want to select.
2. Click and hold the left mouse button and drag the insertion point across the text, then release the mouse button once the text is selected.
Or… Press and hold down the
<Shift> key while using the arrow keys to select the text you want.
To Select a Single Word: • Double-click the word you
want to select. To Replace Text: • Replace text by first
selecting it, then typing the new text you want.
To Deselect Text: • Click anywhere on the
computer screen.
To Delete Selected Text: 1. Select the text. 2. Press the <Delete> key.
33.. Press <Ctrl> + <End> to move to the very end of the presentation and make sure that the insertion point appears at the end of the line Sandra Wu – Asia. Actually, you can place the insertion point before or after the text you want to select.
44.. Click and hold down the mouse button and drag the mouse to the left across the entire line Sandra Wu – Asia (the words should be highlighted). Release the mouse button when you’re finished. The words Sandra Wu – Asia should be highlighted in black. Selecting text with the mouse can be a little tricky at first, especially if you’re still a novice at using it. Once you have selected a block of text, you can delete it by pressing either the <Delete> key or the <Backspace> key.
55.. Press <Delete> to delete the selected text. As you’ve probably guessed, you can delete anything you select—a word, a sentence, a slide, even the entire presentation! Let’s try something else…
66.. Select the words Ricardo Perez on the last slide. When you select text, anything you type while the text is selected will replace the selected text.
77.. Type Luis Gonzales. The name “Luis Gonzales” replaces the selected text “Ricardo Perez.” A quick way to select a single word is to double-click the word you want to select.
88.. Double-click the word Montenegro.
99.. Type Peterson. The word “Peterson” replaces the word “Montenegro”. You can also use the keyboard to select text if you don’t like using the mouse. To select text using the keyboard, move the insertion point before or after the text you want to select, press and hold down the <Shift> key while you use the arrow keys to select the text.
1100.. Move the insertion point to the very end of the line Dates: July 20 to August 28 in Slide 8. Try selecting text with the keyboard in the next step.
1111.. Press and hold down the <Shift> key and press and hold down the left arrow key <←> until you have selected the text July 20 to August 28. It’s easy to deselect text if you change your mind—just click anywhere on the screen.
1122.. Click anywhere in the Outline pane to deselect the text. The dates are no longer selected.
Table 2-2: Shortcuts for Selecting Text To Select This Do This A word Double-click the word.
A line Click next to the line in the left margin.
A sentence Press and hold <Ctrl> and double-click the sentence.
A slide (In Outline View) Click next to the slide icon ( ) in the left margin.
The entire presentation Select Edit → Select All from the menu or press <Ctrl> + <A>.
To replace text, select the text you want to replace and then type the new text you want to replace it with.
Double-click a word to select it.

48 Microsoft PowerPoint 2003
© 2004 CustomGuide, Inc.
Lesson 2-5: Cutting, Copying, and Pasting Text
By now, you should already know how to select text in a presentation. Once text is selected, you can move it to another place in the presentation by cutting or copying it and then pasting it elsewhere. Cutting, copying and pasting text is one of the more common tasks you will do in PowerPoint. Anything you cut is placed in a temporary storage area called the Windows Clipboard. The Clipboard is available to any Windows program, so you can cut and paste text between different programs.
Figure 2-8
The steps involved in cutting and pasting text.
Cut button
Other Ways to Cut: • Select Edit → Cut from
the menu. • Press <Ctrl> + <X>.
Paste button
Other Ways to Paste: • Select Edit → Paste
from the menu. • Press <Ctrl> + <V>.
1. Select the text or object you want to cut and click the Cut button. The text or object is removed or “cut” from its original location.
2. Move the insertion point to where you want to place the cut text or object.
3. Click the Paste button to paste the cut text or object.
Figure 2-8

Chapter Two: Editing a Presentation 49
The Richard Stockton College of New Jersey
Quick Reference To Cut Something: 1. Select the text or object
you want to cut. 2. Click the Cut button
on the Standard toolbar. Or… Select Edit → Cut from
the menu. Or… Press <Ctrl> + <X>.
To Copy Something: 1. Select the text or object
you want to copy. 2. Click the Copy
button on the Standard toolbar.
Or… Select Edit → Copy from
the menu. Or… Press <Ctrl> + <C>.
To Paste Cut or Copied Text or Objects: 1. Place the insertion point
where you want to paste the text or object.
2. Click the Paste button on the Standard toolbar.
Or… Select Edit → Paste
from the menu. Or… Press <Ctrl> + <V>.
11.. Go to Slide 8 and select the entire last line—Dates: July 20 to August 28. Remember how to select a line in PowerPoint? Just click next to the line in the left margin. Someone accidentally put the date on the wrong slide—you need to cut the selected text to the Windows clipboard and paste it elsewhere in the presentation.
22.. Click the Cut button on the Standard toolbar. The selected text disappears and is placed in the Windows Clipboard, ready to be moved to a new location.
33.. Move the insertion point to the end of the Highlights: line on Slide 7 (the Europe slide) and press <Enter> to add a new line. This is where you want to paste the dates that you cut.
44.. Click the Paste button on the Standard toolbar. Press the <Backspace> key twice if a blank line appears after the dates to delete it. Poof! The cut text, the dates, appears at the insertion point. Copying information is very similar to cutting information. Both commands put your selected information in the Clipboard where you can then paste it to a new location. The only difference between the two commands is that the Cut command deletes selected information when it copies it to the clipboard, while the Copy command copies the selected information to the clipboard without deleting it.
55.. Select the text Too many to list on a single slide! on Slide 8 (the Asia slide). Now you can copy the selected text to the clipboard.
66.. Click the Copy button on the Standard toolbar. Nothing appears to happen, but the selected text has been copied to the clipboard.
77.. Place the insertion point after Highlights: in the Europe slide. First you need to add a space here.
88.. Press the <Spacebar> button to add a space. You’re ready to paste the copied text.
99.. Click the Paste button on the Standard toolbar. The copied text is pasted at the insertion point.
1100.. Save your work.
You can also copy, cut, and paste text between two different Windows programs—for example, you could copy a word from a Word document and then paste it in a PowerPoint presentation. The cut, copy, and paste commands (the toolbar buttons, menus, and/or keyboard shortcuts) you learned in PowerPoint will work with most Windows applications.
Copy button
Other Ways to Copy: • Select Edit → Copy
from the menu. • Press <Ctrl> + <C>.

50 Microsoft PowerPoint 2003
© 2004 CustomGuide, Inc.
Lesson 2-6: Using Undo, Redo, and Repeat
You may not want to admit this, but you’re going to make mistakes when you use PowerPoint. You might accidentally delete a paragraph or slide you didn’t mean to delete, or paste something you didn’t mean to paste. Fortunately, PowerPoint has a wonderful feature called undo that does just that—undoes your mistakes and actions, making them as though they never happened. This lesson explains how you can undo both single and multiple mistakes, and how to redo your actions in case you change your mind.
11.. Select Slide 9 (the Tour Guides slide) by clicking to the left of the symbol and then delete the selected slide by pressing the <Delete> key. The selected slide disappears. Whoops! You didn’t really want to delete that! Watch how you can undo your “mistake.”
Figure 2-9
Undoing a slide deletion.
Undo button
Other Ways to Undo: • Select Edit → Undo
from the menu. • Press <Ctrl> + <Z>.
Figure 2-9
You just deleted a slide…
…the undo command brings the slide back, undoing your deletion.

Chapter Two: Editing a Presentation 51
The Richard Stockton College of New Jersey
Quick Reference To Undo: • Click the Undo
button on the Standard toolbar.
Or… • Select Edit → Undo from
the menu. Or… • Press <Ctrl> + <Z>.
To Redo: • Click the Redo
button on the Standard toolbar.
Or… • Select Edit → Redo from
the menu. Or… • Press <Ctrl> + <Y>.
To Repeat an Action: • Select Edit → Repeat
from the menu. Or… • Press <Ctrl> + <Y>.
22.. Click the Undo button. Poof! The deleted “Tour Guides” slide is back again. Hmmm… maybe you did want to delete the slide after all. Anything that can be undone can be redone if you change your mind or want to “undo an undo.” Here’s how you can redo the previous delete command.
33.. Click the Redo button. The “Tour Guides” slide disappears again. Often you will probably make not one, but several, mistakes, and it may be a minute or two before you’ve even realized you’ve made them. Fortunately, the programmers at Microsoft thought of this when they developed PowerPoint, because the undo feature is multileveled—meaning you can undo more than one mistake or action. The next few steps will show you how you can undo multiple errors.
44.. On Slide 8 (the Asia slide) click to the left of the Highlights: Too many to list on a single slide! line to select it and press the <Delete> key. The selected line is deleted—your second mistake (the first was deleting the “Tour Guides” slide).
55.. Press <Ctrl> + <End> to move to the end of the presentation. Let’s add another paragraph here—another “mistake.”
66.. Press <Ctrl> + <Enter> to add a new paragraph and type This slide needs a lot of work!
You’ve made enough mistakes now to see how multilevel undo works. Here’s how to undo all of your mistakes.
77.. Click the downward pointing arrow to the right of the undo button. A list of your recent actions appears beneath the Undo button. Notice that there are more actions listed than just your three most recent “mistakes.” If you wanted, you could undo any of the commands and actions you’ve made since you opened the current presentation. You don’t want to undo everything—just the last three mistakes.
88.. Select the second word Clear from the undo list (it should be the third item on the list). The last three changes you made to the presentation—deleting a slide, a line, and adding a new paragraph are all undone. The opposite of the Undo command is the Repeat command, which repeats your last command or action, if possible. Here’s how to use it.
99.. Select Slide 8 (the Asia slide) by clicking to the left of the symbol and then delete the selected slide by pressing the <Delete> key. You’ve just deleted the Asia slide. Now let’s see how you can repeat your last command…
1100.. Select Side 7 (the Europe slide) by clicking to the left of the symbol and press <Ctrl> + <Y>. PowerPoint repeats your last command and deletes the current slide.
1111.. Click the Undo button on the Standard toolbar twice to undo your deletions, and then save your work.
Redo button
Other Ways to Redo: • Select Edit → Redo
from the menu. • Press <Ctrl> + <Y>.
Multilevel Undo

52 Microsoft PowerPoint 2003
© 2004 CustomGuide, Inc.
Lesson 2-7: Checking Your Spelling
Spell checking used to be a feature only available in word processing programs—but no more! You can use PowerPoint’s spell checker to find and correct any spelling errors that you might have made in your presentations. PowerPoint’s spell checker is shared and used by the other programs in the Microsoft Office suite. Any words you add to the custom spelling dictionary in one Microsoft Office program will be available in all the other programs. What’s more, PowerPoint checks for spelling errors as you type, highlighting them with a squiggly, red underline. Of course, you could fix spelling errors the hard way and manually retype them, but if you’re not a spelling bee champion, it’s much easier to right-click a spelling error and select one of PowerPoint’s suggested spelling corrections.
This lesson will show you how you can correct the spelling in your slides and how to tell PowerPoint to ignore words that it thinks are misspelled.
11.. Right-click the red-underlined word Distinations on Slide 6. Remember that a right-click is when you click something with the right mouse button. A shortcut menu appears with suggestions for the correct spelling and several other options, as shown in Figure 2-10. Luckily, the correct spelling, “destinations” is one of the corrections listed.
NOTE: The correct spelling for a word usually appears in the list of corrections. If it doesn’t, that either means spell checker doesn’t have the word in its dictionary (names can sometimes cause this to happen) or else you’ve butchered the spelling of the word so badly that the spell checker doesn’t recognize it.
22.. Click Destinations on the shortcut menu with the left mouse button. PowerPoint makes the spelling correction. The next spelling error in the presentation is the very next word: “Jerusalam”.
Figure 2-10
PowerPoint identifies spelling errors by underlining them in red. Right-click an underlined word to correct it, ignore it, or add it to the spelling dictionary.
If you don’t like on-the-fly spell checking, you can correct your spelling by clicking the Spelling button on the Standard toolbar or by selecting Tools → Spelling from the menu.
Suggestion shortcut menu
Spelling errors
Figure 2-10

Chapter Two: Editing a Presentation 53
The Richard Stockton College of New Jersey
Quick Reference To Correct a Spelling Error: • Right-click the spelling or
grammar error and select the correction from the shortcut menu.
Or… • Correct the spelling error
by retyping it.
To Ignore a Spelling or Error: • Right-click the spelling or
grammar error and select Ignore All from the shortcut menu.
To Add a Word to the Spelling Dictionary: • Right-click the word you
want to add and select Add from the shortcut menu.
33.. Right-click the red-underlined word Jerusalam. Another shortcut menu appears, this time displaying any possible spelling corrections for the word “Jerusalam.” There’s only one suggested spelling correction listed here—and it’s the one we’re looking for.
44.. Select Jerusalem from the shortcut menu. The next spelling error in the presentation is on the next line—the word “Giza”. Wait a second, “Giza” IS spelled correctly. Whenever the spell checker sees a word that it doesn’t recognize, even if it is spelled correctly, it marks it as a spelling error. Names of people, places, and products are often flagged as spelling errors. There are two things you can do when the spell checker doesn’t recognize a correctly spelled word: • Ignore All: Leaves the spelling as it is, and ignores it throughout the rest of
your presentation. • Add: Adds the word to the spelling dictionary so that PowerPoint won’t nag you
about it during future spell checks. Use this option for non-standard words you use often.
55.. Right-click the red-underlined word Giza, then select Ignore All from the shortcut menu. The spell checker ignores the word “Giza” and its annoying, red underline disappears. There’s still one more spelling error nearby.
66.. Right-click the red-underlined word traditons located on the next line.
77.. Select traditions from the shortcut menu. PowerPoint makes the correction.
No doubt about it, the spell checker is a great tool to assist you in creating accurate slides. It’s important to note, however, that PowerPoint will not catch all of your spelling errors. For example, if you mistyped the word “had” as “hat” PowerPoint won’t catch it because “hat” is a correctly spelled word.
You can add your own words to the spelling dictionary so PowerPoint won’t recognize them as spelling errors in the future. Right-click the red-underlined word that PowerPoint can’t find in its dictionary and select Add.

54 Microsoft PowerPoint 2003
© 2004 CustomGuide, Inc.
Lesson 2-8: Finding and Replacing Information
For reasons known only to him, Kolia Richter has legally changed his name to “The Master.” Great—now you’ll have to go back to your presentation and find and replace every occurrence of “Kolia Richter” with “The Master.” You don’t even remember where his name was used—it could take you forever to go through all those slides. Or it could take you less than a minute if you use PowerPoint’s Find and Replace function.
This lesson explains how to find specific words, phrases, and values in your presentation and how you can automatically replace those words, phrases, and values.
11.. If you have been skipping around lessons, find and open the Lesson 2C presentation and save it as Historical Tours. If you don’t know where your practice files are located, ask your instructor for help.
22.. Press <Ctrl> + <Home> to move to the beginning of the presentation. You don’t have to move to the beginning of a presentation to find or replace something—but this will put us on the same page for this exercise.
33.. Select Edit → Find from the menu. The Find dialog box appears, as shown in Figure 2-11.
44.. In the Find what box type Europe. You want to find every occurrence of the word “Europe” in the presentation.
55.. Click the Find Next button. PowerPoint jumps to the first occurrence of the word “Europe” it finds in the presentation—on Slide 2.
66.. Click the Find Next button. PowerPoint jumps to the next occurrence of the word “Europe” in the presentation, found on Slide 7.
Figure 2-11
The Find dialog box.
Figure 2-12
The Replace dialog box.
Other Ways to Find Information: • Press <Ctrl> + <F>.
Other Ways to Find and Replace Information: • Press <Ctrl> + <H>.
Figure 2-11
Enter the word or phrase you want to find.
Find the next occurrence of the word or phrase.
Figure 2-12
Enter the word or phrase you want to find and replace.
Enter the replacement.
Find the next occurrence of the word or phrase.
Replace the selection.
Replace every occurrence of the word or phrase in the presentation.

Chapter Two: Editing a Presentation 55
The Richard Stockton College of New Jersey
Quick Reference To Find Information in a Presentation: 1. Select Edit → Find from
the menu. Or… Press <Ctrl> + <F>. 2. Enter the text you want to
search for in the Find what box.
3. Click the Find next button.
4. Repeat Step 3 until you find the specific text that you are looking for.
To Find and Replace Information: 1. Select Edit → Replace
from the menu. Or… Press <Ctrl> + <H>. 2. Enter the text you want to
search for in the Find what box.
3. Enter the text you want to replace it with in the Replace with box.
4. Click the Find next button.
5. Click the Replace button to replace the text.
6. Repeat Steps 4 and 5 if there is more than one occurrence that you want to replace.
Or… Click Replace All to
replace every occurrence of text in the presentation.
77.. Click Close to close the Find dialog box. The Find dialog box closes. You can also replace information in a presentation, such as changing every occurrence of “Kolia Richter” in the presentation to “The Master.”
88.. Select Edit → Replace from the menu. The Replace dialog box appears, as shown in Figure 2-12.
99.. In the Find what text box type Kolia Richter. You want to replace every occurrence of the phrase “Kolia Richter” with the phrase “The Master.”
1100.. Select the Replace with box by clicking it or by pressing the <Tab> key and type The Master.
1111.. Click Replace All. PowerPoint finds all the occurrences of the phrase “Kolia Richter” in the presentation and replaces them with “The Master.”
NOTE: Think before you use the Replace All button—you might not want it to replace every instance of a word or phrase! You can find and replace each individual occurrence of a label or value by clicking Find Next and then Replace.
1122.. Click Close. The Replace dialog box disappears and you’re back to your presentation. Notice how all the occurrences of the word “Kolia Richter” (there’s only one on Slide 9) have been replaced with “The Master.”
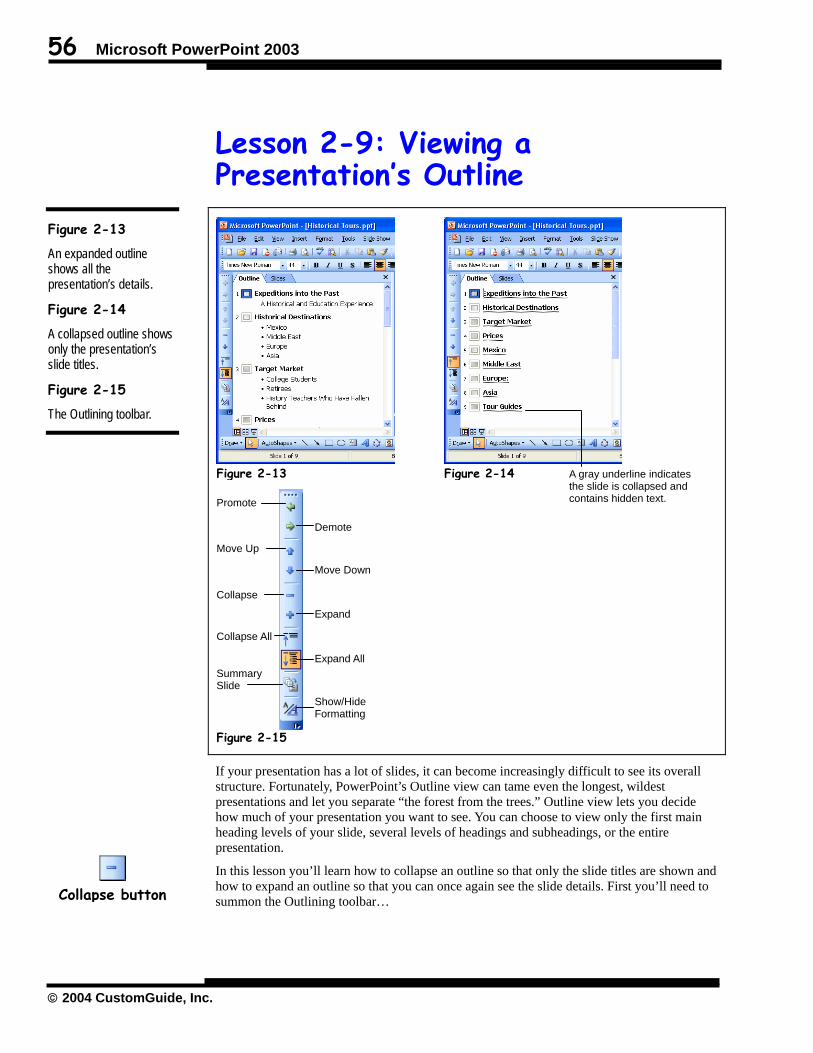
56 Microsoft PowerPoint 2003
© 2004 CustomGuide, Inc.
Lesson 2-9: Viewing a Presentation’s Outline
If your presentation has a lot of slides, it can become increasingly difficult to see its overall structure. Fortunately, PowerPoint’s Outline view can tame even the longest, wildest presentations and let you separate “the forest from the trees.” Outline view lets you decide how much of your presentation you want to see. You can choose to view only the first main heading levels of your slide, several levels of headings and subheadings, or the entire presentation.
In this lesson you’ll learn how to collapse an outline so that only the slide titles are shown and how to expand an outline so that you can once again see the slide details. First you’ll need to summon the Outlining toolbar…
Figure 2-13
An expanded outline shows all the presentation’s details.
Figure 2-14
A collapsed outline shows only the presentation’s slide titles.
Figure 2-15
The Outlining toolbar.
Collapse button
A gray underline indicates the slide is collapsed and contains hidden text.
Figure 2-13 Figure 2-14
Demote
Move Down
Expand
Expand All
Show/Hide Formatting
Promote
Move Up
Collapse
Collapse All
Summary Slide
Figure 2-15
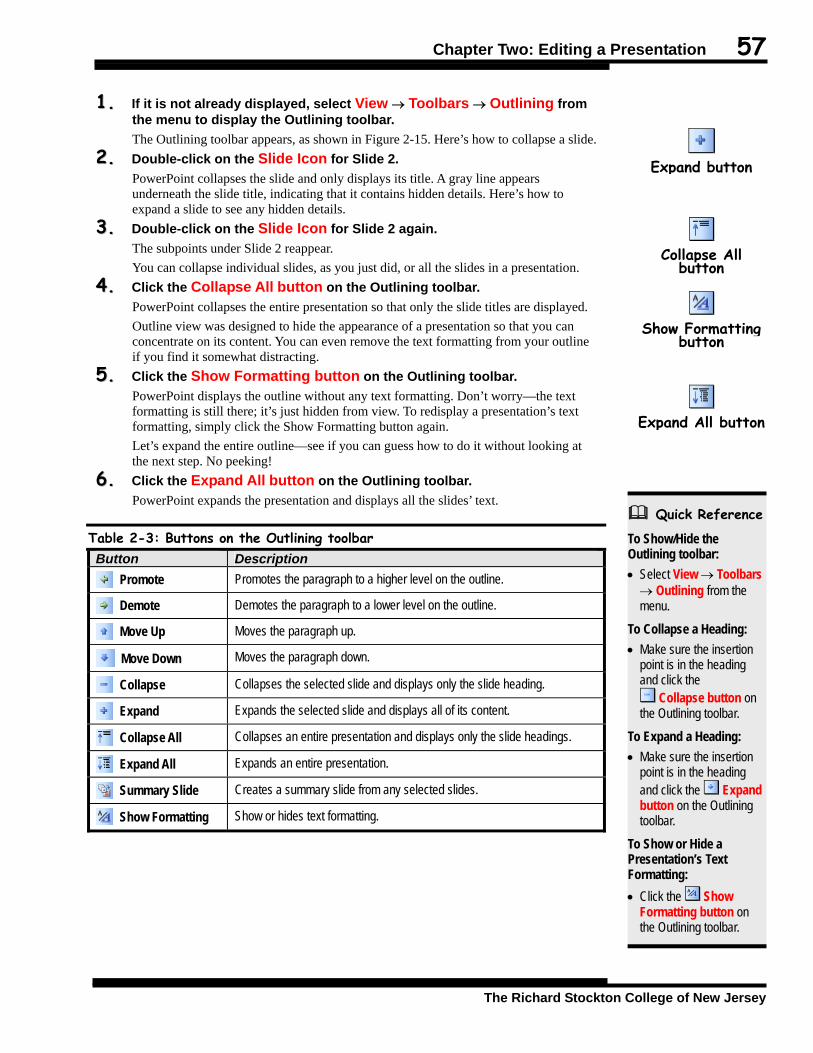
Chapter Two: Editing a Presentation 57
The Richard Stockton College of New Jersey
Quick Reference To Show/Hide the Outlining toolbar: • Select View → Toolbars → Outlining from the menu.
To Collapse a Heading: • Make sure the insertion
point is in the heading and click the
Collapse button on the Outlining toolbar.
To Expand a Heading: • Make sure the insertion
point is in the heading and click the Expand button on the Outlining toolbar.
To Show or Hide a Presentation’s Text Formatting: • Click the Show
Formatting button on the Outlining toolbar.
11.. If it is not already displayed, select View → Toolbars → Outlining from the menu to display the Outlining toolbar. The Outlining toolbar appears, as shown in Figure 2-15. Here’s how to collapse a slide.
22.. Double-click on the Slide Icon for Slide 2. PowerPoint collapses the slide and only displays its title. A gray line appears underneath the slide title, indicating that it contains hidden details. Here’s how to expand a slide to see any hidden details.
33.. Double-click on the Slide Icon for Slide 2 again. The subpoints under Slide 2 reappear. You can collapse individual slides, as you just did, or all the slides in a presentation.
44.. Click the Collapse All button on the Outlining toolbar. PowerPoint collapses the entire presentation so that only the slide titles are displayed. Outline view was designed to hide the appearance of a presentation so that you can concentrate on its content. You can even remove the text formatting from your outline if you find it somewhat distracting.
55.. Click the Show Formatting button on the Outlining toolbar. PowerPoint displays the outline without any text formatting. Don’t worry—the text formatting is still there; it’s just hidden from view. To redisplay a presentation’s text formatting, simply click the Show Formatting button again. Let’s expand the entire outline—see if you can guess how to do it without looking at the next step. No peeking!
66.. Click the Expand All button on the Outlining toolbar. PowerPoint expands the presentation and displays all the slides’ text.
Table 2-3: Buttons on the Outlining toolbar Button Description
Promote Promotes the paragraph to a higher level on the outline.
Demote Demotes the paragraph to a lower level on the outline.
Move Up Moves the paragraph up.
Move Down Moves the paragraph down.
Collapse Collapses the selected slide and displays only the slide heading.
Expand Expands the selected slide and displays all of its content.
Collapse All Collapses an entire presentation and displays only the slide headings.
Expand All Expands an entire presentation.
Summary Slide Creates a summary slide from any selected slides.
Show Formatting Show or hides text formatting.
Expand button
Collapse All
button
Show Formatting
button
Expand All button

58 Microsoft PowerPoint 2003
© 2004 CustomGuide, Inc.
Lesson 2-10: Rearranging a Presentation’s Outline
Another benefit of working in Outline view is how easy it is to modify your presentation’s content. You can change the order of points on a slide or you can even rearrange the order of the slides themselves. This lesson will give you some practice rearranging the order of points and slides in your presentation’s outline.
11.. If the Outlining toolbar isn’t displayed, summon it by selecting View → Toolbars → Outlining from the menu. Now let’s try rearranging the order of slides in the presentation.
Figure 2-16
Moving a slide with the drag and drop method.
Other Ways to Move a Paragraph: • Click and drag the
headings to a new location.
1. Select the slide you want to move by clicking to the left of the
symbol.
2. Click and hold the mouse button and drag the slide to a chosen position in the outline. The horizontal line shows the current position of the slide.
3. The slide now appears in the selected location.
Figure 2-16

Chapter Two: Editing a Presentation 59
The Richard Stockton College of New Jersey
Quick Reference To Rearrange an Outline: • Select the slide(s) or
paragraph(s) you want to move and click either the
Move Up button or Move Down button
on the Outlining toolbar. Or… • Select the slide(s) or
paragraph(s) you want to move and drag them to a new location in the outline.
22.. Select Slide 9 (the Tour Guides slide) by clicking the symbol. Make sure you’ve selected the entire slide and not just the “Tour Guides” heading. We want to move the entire slide, not just the slide heading.
NOTE: When you want to move a slide in Outline view make sure you select the entire slide, by clicking to the left of the symbol, and not just the slide heading or you will move only the slide heading instead of the entire slide.
33.. Click the Move Up button on the Outlining toolbar. The selected “Tour Guides” slide moves up the outline, appearing beneath the “Dates: To Be Determined . . . ” subheading.
44.. Click the Move Up button on the Outlining toolbar four more times, until it appears above the Asia slide. The “Tour Guides” slide moves up the outline, one line at a time, and appears below the “Dates: July 20 to August 28” paragraph of the “Europe” slide. Although it’s easy, using the Move Up and Move down buttons to move a slide or paragraph can be slow, especially if the destination is on the other side of a long presentation. Fortunately, as with so many other procedures, there is more than one way to move paragraphs and slides in PowerPoint—the Drag and Drop method.
55.. Move the pointer to the symbol of the Tour Guide slide, until the pointer changes to a . To move a slide, click and hold the mouse button and drag the slide up or down, to the desired position in the outline.
66.. Click and hold the mouse button and drag the slide up above the Mexico slide, then release the mouse button to drop the slide. A horizontal line appears as you drag the slide, indicating where the slide will be moved. You can now hide the Outlining toolbar since we’re finished using it.
77.. Select View → Toolbars → Outlining from the menu to hide the Outlining toolbar.
Using the drag and drop technique can be a little tricky if you’re still a novice with the mouse. If you make a mistake and don’t like where you moved a slide, you can always undo it by clicking the Undo button on the Standard toolbar, or by pressing <Ctrl> + <Z>.
Move Up button

60 Microsoft PowerPoint 2003
© 2004 CustomGuide, Inc.
Lesson 2-11: Inserting Symbols and Special Characters
Believe it or not, you can enter many more characters and symbols in a slide that cannot be found on the keyboard. For example, you can insert the copyright symbol (©), accented and foreign characters (Æ), silly characters (☺), and many, many more. In this lesson you will learn how to insert several of these special symbols into a slide.
11.. If necessary, find and open the Lesson 2D presentation and save it as Historical Tours. If you don’t know where your practice files are located, ask your instructor for help.
22.. Move to the Mexico slide and move the insertion point immediately after the word Itza in Chichén Itza. You were watching a special about Mexico last night on PBS and realized, to your horror, that the ‘a’ in Itza is accented (á). After a sleepless night you rush to the office to fix the problem. First you’ll have to erase the incorrect, non-accented “a.”
33.. Delete the a from the word Itza. Now that the offending character has been deleted we can add a properly accented “á” in its place.
44.. Select Insert → Symbol from the menu. The Insert Symbol dialog box appears, as shown in Figure 2-17.
55.. Verify that [Normal Text] appears in the Font list box. If it doesn’t, click the font list box and select [Normal Text]. Let’s see if we can find the “á” character.
66.. Find and click the letter á symbol. You’ll probably spend a few minutes looking for the tiny “á” symbol before you find it. Figure 2-17 will give you a better idea on where it is. Find it? There is a list of the most recently used symbols on the bottom of the dialog box to make it easier if you have to return and insert the same symbol later.
Figure 2-17
The Symbol dialog box.
The symbols that appear depend on which fonts are installed on your computer.
Figure 2-17
Select the symbol or character you want to insert.
Select a symbol or character from a different font.
Insert the selected symbol.
Most recently used symbols.

Chapter Two: Editing a Presentation 61
The Richard Stockton College of New Jersey
Quick Reference To Insert a Symbol or Special Character: 1. Place the insertion point
where you want to insert the character.
2. Select Insert → Symbol from the menu.
3. Select the symbol you want and click Insert.
77.. Click Insert. The “á” symbol is inserted, completing the proper spelling of Chichén Itzá. Whew! Now you will be able to sleep tonight!
88.. Click Close to close the Symbol dialog box. The Symbol dialog box closes.

62 Microsoft PowerPoint 2003
© 2004 CustomGuide, Inc.
Lesson 2-12: Working in Slide Sorter View
Normal view and Outline view are the views you’ll use the most when you create a PowerPoint presentation, but both of these views have a serious limitation: they don’t let you view all the slides in your presentation at the same time. That’s where Slide Sorter view comes in.
When you put pictures into a photo album, you probably lay all the pictures out on a table or floor so that you can look at all of them and decide in which order they should go. Slide Sorter view works on the same principle—it allows you to see thumbnails of all the slides in your presentation so that you can: • Sort your slides into an order that works best for your presentation. • Delete any slides. • Hide slides that you don’t want to include in a presentation or show any hidden slides
(more on this in another lesson). • Add animation and control how the slides appear and disappear (known as slide
transitions—more on this in another lesson). • Determine how long a slide should be displayed on the screen if you’re creating an
automated, stand-alone show (more on this in another lesson).
Figure 2-18
Rearranging the slide order by dropping and dragging in Slide Sorter view.
Figure 2-19
The Slide Sorter View toolbar.
Figure 2-18
Hide the selected slide
Select a slide transition effect
Rehearse timings
Create a summary slide
Inserts a new slide
Figure 2-19
Displays the speaker’s notes
Displays the Slide Display task pane

Chapter Two: Editing a Presentation 63
The Richard Stockton College of New Jersey
Quick Reference To Switch to Slide Sorter View: • Click the Slide Sorter
View button on the horizontal scroll bar.
Or… • Select View → Slide
Sorter from the menu.
To Move a Slide (in Slide Sorter View): 1. Click the slide that you
want to move. To select and move multiple slides hold down the <Shift> key as you click each slide you want select.
2. Drag the slide(s) between two other slides in slide sorter view and release the mouse button.
To Delete a Slide (in Slide Sorter View): • Click the slide and press
the <Delete> key.
To Duplicate a Slide (in Slide Sorter View): • Click the slide and press
<Ctrl> + <D>.
As you can see, a lot of the power behind Slide Sorter view has to do with delivering your presentation—and that’s the topic of a later chapter. In this lesson, you’ll learn how to use Slide Sorter view to rearrange your slides, duplicate an entire slide, and delete a slide.
11.. Switch to Slide Sorter view by clicking the Slide Sorter View button on the horizontal scroll bar. PowerPoint displays the presentation in Slide Sorter view, as shown in Figure 2-18. To move a slide in Slide Sorter view, click and drag it to new location. Move to the next step to give it a try.
22.. Click Slide 4 (the Prices slide), hold down the mouse button, and then drag the slide immediately after Slide 2 (the Historical Destinations slide) and then release the mouse button, as shown in Figure 2-18. You’ve just changed the order of your presentation, so that the Price slide will appear as the third slide in the presentation instead of the fourth slide. Since Slide Sorter view lets you view all the slides in your presentation at once, there are several other slide-related chores that are easier to perform here than in Outline View or Normal View, such as duplicating a slide. Duplicating a slide copies everything on the slide—text, formatting, you name it. Duplicating is useful when you need to churn out several slides that have the same title, images, and formatting.
33.. Select Slide 1 (the title slide) and select Edit → Duplicate from the menu. PowerPoint creates an exact duplicate of the selected title slide. In case you’re wondering, duplicating a slide is really a one-step process for selecting, copying, and pasting a slide. We don’t really need the duplicated slide in our presentation, so this is a good place to learn how to delete a slide in Slide Sorter view.
44.. Select the duplicate title slide and press the <Delete> key. Wow! That was easy! You can delete slides in Normal View and Outline view as well, but there you have to use a more cumbersome command: select Edit → Delete Slide from the menu. Let’s delete another slide while we’re at it:
55.. Select the Asia slide and delete it by pressing the <Delete> key.
Deleting slides in Slide Sorter view is easy—almost too easy. If you accidentally delete a slide you didn’t really want to delete, you can always undo your acting with the trusty Undo command: by clicking the Undo button on the Standard toolbar or by pressing <Ctrl> + <Z>.
Slide Sorter View
button Other Ways to Switch to Slide Sorter View: • Select View → Slide
Sorter from the menu.
Other Ways to Duplicate a Slide: • Select the slide you
want to duplicate and press <Ctrl> + <D>.
• Copy and paste the slide using standard copy and paste procedures.

64 Microsoft PowerPoint 2003
© 2004 CustomGuide, Inc.
Lesson 2-13: Adding Notes to Your Slides
Unless you have a perfect memory, you’re going to need notes to help you remember what to say about each slide when you deliver a presentation. PowerPoint’s notes are like the cue cards you use during a speech, reminding you to tell a joke, make eye contact, and about any key points you want to make. Notes don’t appear on the slide show presentation itself, but they can be printed so that you can use them when you deliver your presentation.
11.. If necessary, find and open the Lesson 2E presentation and save it as Historical Tours. If you do not know where your practice files are located, ask your instructor for help.
22.. Return to Outline view by clicking the Normal View button and the Outline tab and then select Slide 2. PowerPoint returns to Outline view. To add speaker notes to a slide, all you have to do is click the Notes pane as shown in Figure 2-20 and begin typing.
Figure 2-20
Enter notes for each slide in the Notes pane.
Figure 2-20
Select the slide for which you want to add notes…
…enter speaker notes for the slide in the Notes pane.

Chapter Two: Editing a Presentation 65
The Richard Stockton College of New Jersey
Quick Reference To Add Notes to a Slide: • Make sure you’re in
Normal view and begin typing your notes in the Notes pane.
33.. Click in the Notes Pane and type the following paragraph: North Shore Travel will kick off the new “Expeditions into the Past” tour packages by offering historical tours to four exciting international destinations: Mexico, Israel and Egypt, Western Europe, and Asia. Each tour will explore the region’s most important and interesting historical sites. For example, those who enroll in the Middle East tour will be visiting Jerusalem, Cairo, the Egyptian pyramids at Giza, and many famous sites from Christian, Jewish, and Muslim traditions. Let’s take a closer look at each of the new “Expeditions into the Past” tour packages. (I should really try to tell some witty joke here to keep my audience awake!)
Compare your slide to the one shown in Figure 2-20 then… 44.. Save your work.
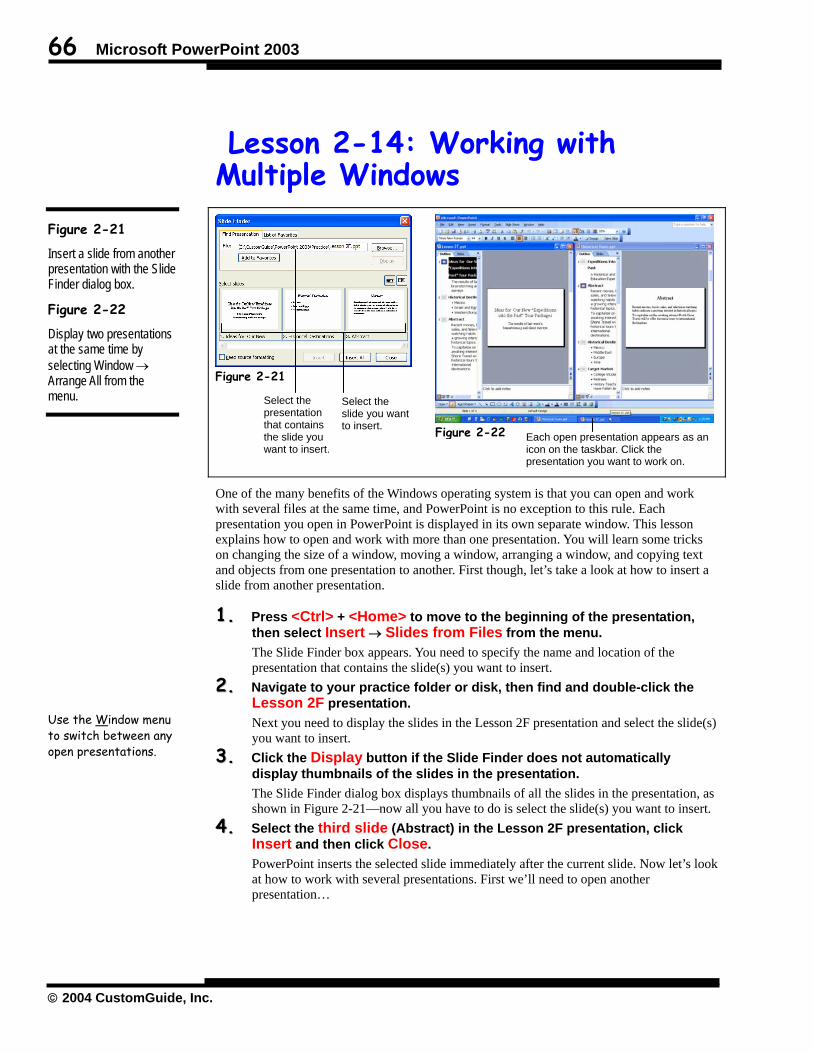
66 Microsoft PowerPoint 2003
© 2004 CustomGuide, Inc.
Lesson 2-14: Working with Multiple Windows
One of the many benefits of the Windows operating system is that you can open and work with several files at the same time, and PowerPoint is no exception to this rule. Each presentation you open in PowerPoint is displayed in its own separate window. This lesson explains how to open and work with more than one presentation. You will learn some tricks on changing the size of a window, moving a window, arranging a window, and copying text and objects from one presentation to another. First though, let’s take a look at how to insert a slide from another presentation.
11.. Press <Ctrl> + <Home> to move to the beginning of the presentation, then select Insert → Slides from Files from the menu. The Slide Finder box appears. You need to specify the name and location of the presentation that contains the slide(s) you want to insert.
22.. Navigate to your practice folder or disk, then find and double-click the Lesson 2F presentation. Next you need to display the slides in the Lesson 2F presentation and select the slide(s) you want to insert.
33.. Click the Display button if the Slide Finder does not automatically display thumbnails of the slides in the presentation. The Slide Finder dialog box displays thumbnails of all the slides in the presentation, as shown in Figure 2-21—now all you have to do is select the slide(s) you want to insert.
44.. Select the third slide (Abstract) in the Lesson 2F presentation, click Insert and then click Close. PowerPoint inserts the selected slide immediately after the current slide. Now let’s look at how to work with several presentations. First we’ll need to open another presentation…
Figure 2-21
Insert a slide from another presentation with the Slide Finder dialog box.
Figure 2-22
Display two presentations at the same time by selecting Window → Arrange All from the menu.
Use the Window menu to switch between any open presentations.
Figure 2-22
Figure 2-21
Select the presentation that contains the slide you want to insert.
Select the slide you want to insert.
Each open presentation appears as an icon on the taskbar. Click the presentation you want to work on.

Chapter Two: Editing a Presentation 67
The Richard Stockton College of New Jersey
Quick Reference To Switch between Multiple Open Presentations: • Click the presentation on
the Windows taskbar. Or… • Select Window and
select the name of the presentation you want to view.
To View Multiple Windows at the Same Time: • Select Window →
Arrange All. To Maximize a Window: • Click the window’s
Maximize button.
To Restore a Window: • Click the window’s
Restore button.
To Manually Resize a Window: 1. Position the mouse
pointer over the edge of the window.
2. Hold down the mouse button and drag the mouse to resize the window.
3. Release the mouse button.
To Move a Window: • Drag the window’s title
bar to the location where you want to position the window.
55.. Without closing the current Historical Tours presentation, open the Lesson 2F presentation. There’s the Lesson 2F presentation, but where did our Historical Tours presentation go? Don’t worry, it’s still there in a window behind the Lesson 2F presentation.
66.. Select Window from the menu. The Window menu displays all the presentations that are currently open. Simply select the presentation you want to work on.
77.. Select Historical Tours from the Window menu. The Historical Tours presentation appears. Instead of selecting an open presentation from the Windows menu, you can also select an open presentation by clicking its icon on the Windows taskbar. The Lesson 2F presentation is still open, but you can’t see it because it’s located behind the Historical Tours presentation window.
88.. Select Window → Arrange All from the menu. Both presentations—the Lesson 2F and Historical Tours—appear in the PowerPoint window, as shown in Figure 2-22. Sometimes it’s useful to look at more than one presentation at a time—especially if you want to copy text or objects from one presentation to the other.
99.. Maximize the Historical Tours window by clicking its Maximize button. The Historical Tours presentation once again fills the entire PowerPoint screen. See Table 2-4: The Three Window Sizes for more information on maximizing and minimizing windows.
1100.. Save your work.
Table 2-4: The Three Window Sizes Window State Description
Maximized Window
A presentation window in a Maximized state fills up the entire PowerPoint screen, allowing you to see as much of a presentation as possible. PowerPoint normally opens presentations in Maximized windows.
Restored Window
A presentation window in a Restored state does not fill the entire PowerPoint screen, allowing you display and work with more than one presentation or program at the same time.
Minimized Window
A Minimized presentation window appears only as a tiny icon near the bottom of the PowerPoint screen. Minimize a presentation when you need to put it away for the time being and work on something else. You can restore a minimized window by selecting the presentation from the Window menu or by clicking its icon at the bottom of the PowerPoint screen.
The Window menu

68 Microsoft PowerPoint 2003
© 2004 CustomGuide, Inc.
Lesson 2-15: Collecting and Pasting Multiple Items
If you do a lot of cutting, copying, and pasting, you will probably appreciate PowerPoint 2003’s new and improved Office 2003 clipboard, which holds not one—but twenty-four cut or copied objects.
You can use the Office Clipboard to collect and paste multiple items. For example, you can copy text in a Microsoft Word document, switch to Excel and copy a drawing object, switch to PowerPoint and copy a bulleted list, switch to Access and copy a datasheet and then switch back to Word and paste the collection of copied items.
11.. Switch to the Lesson 2F presentation. This presentation contains several items that need to be copied and pasted into the “Historical Destinations” presentation. Instead of switching between the two presentations to copy and paste the items, you can use the Office 2003 Clipboard to copy and/or cut several items and then paste them all at once. In order to “collect and paste” multiple items you need to display the Clipboard task pane.
Figure 2-23
The Clipboard task pane displays the cut or copied objects you’ve collected.
Figure 2-24
The Office 2003 Clipboard task pane.
Figure 2-23
Figure 2-24
To display the Clipboard: Select Edit → Office Clipboard from the menu.
Click the item you want to paste from the Clipboard task pane.
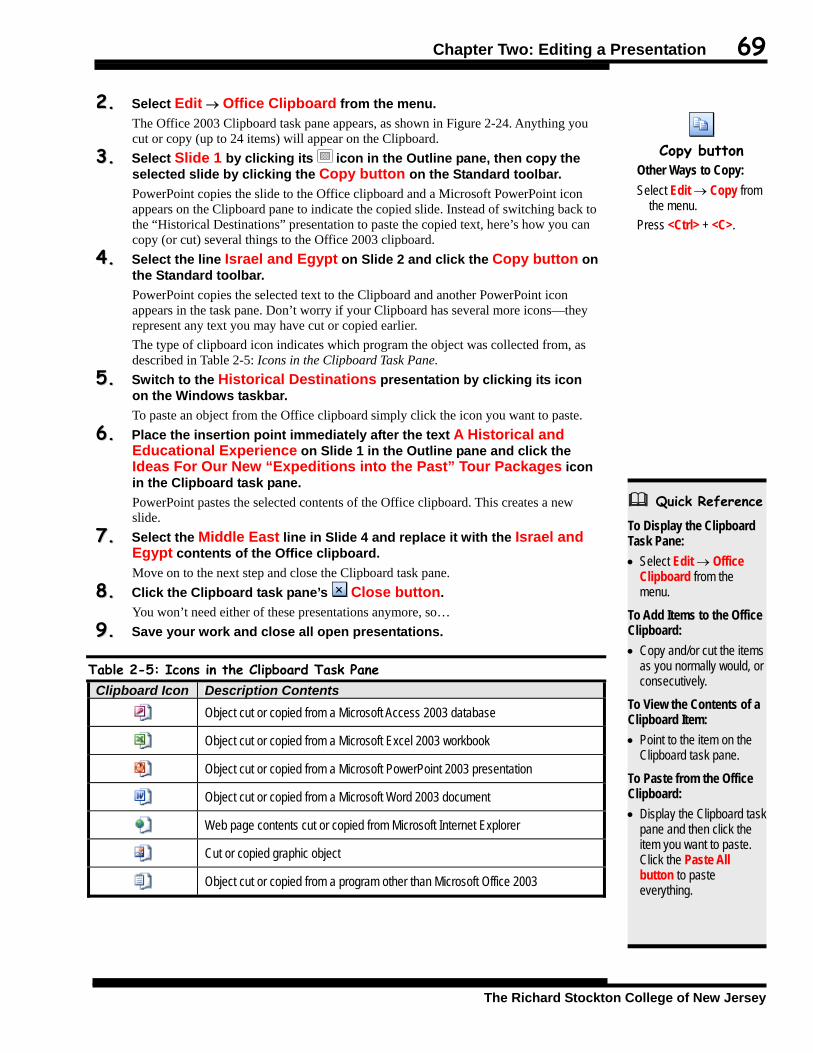
Chapter Two: Editing a Presentation 69
The Richard Stockton College of New Jersey
Quick Reference To Display the Clipboard Task Pane: • Select Edit → Office
Clipboard from the menu.
To Add Items to the Office Clipboard: • Copy and/or cut the items
as you normally would, or consecutively.
To View the Contents of a Clipboard Item: • Point to the item on the
Clipboard task pane.
To Paste from the Office Clipboard: • Display the Clipboard task
pane and then click the item you want to paste. Click the Paste All button to paste everything.
22.. Select Edit → Office Clipboard from the menu. The Office 2003 Clipboard task pane appears, as shown in Figure 2-24. Anything you cut or copy (up to 24 items) will appear on the Clipboard.
33.. Select Slide 1 by clicking its icon in the Outline pane, then copy the selected slide by clicking the Copy button on the Standard toolbar. PowerPoint copies the slide to the Office clipboard and a Microsoft PowerPoint icon appears on the Clipboard pane to indicate the copied slide. Instead of switching back to the “Historical Destinations” presentation to paste the copied text, here’s how you can copy (or cut) several things to the Office 2003 clipboard.
44.. Select the line Israel and Egypt on Slide 2 and click the Copy button on the Standard toolbar. PowerPoint copies the selected text to the Clipboard and another PowerPoint icon appears in the task pane. Don’t worry if your Clipboard has several more icons—they represent any text you may have cut or copied earlier. The type of clipboard icon indicates which program the object was collected from, as described in Table 2-5: Icons in the Clipboard Task Pane.
55.. Switch to the Historical Destinations presentation by clicking its icon on the Windows taskbar. To paste an object from the Office clipboard simply click the icon you want to paste.
66.. Place the insertion point immediately after the text A Historical and Educational Experience on Slide 1 in the Outline pane and click the Ideas For Our New “Expeditions into the Past” Tour Packages icon in the Clipboard task pane. PowerPoint pastes the selected contents of the Office clipboard. This creates a new slide.
77.. Select the Middle East line in Slide 4 and replace it with the Israel and Egypt contents of the Office clipboard. Move on to the next step and close the Clipboard task pane.
88.. Click the Clipboard task pane’s Close button. You won’t need either of these presentations anymore, so…
99.. Save your work and close all open presentations.
Table 2-5: Icons in the Clipboard Task Pane Clipboard Icon Description Contents
Object cut or copied from a Microsoft Access 2003 database
Object cut or copied from a Microsoft Excel 2003 workbook
Object cut or copied from a Microsoft PowerPoint 2003 presentation
Object cut or copied from a Microsoft Word 2003 document
Web page contents cut or copied from Microsoft Internet Explorer
Cut or copied graphic object
Object cut or copied from a program other than Microsoft Office 2003
Copy button
Other Ways to Copy: Select Edit → Copy from
the menu. Press <Ctrl> + <C>.
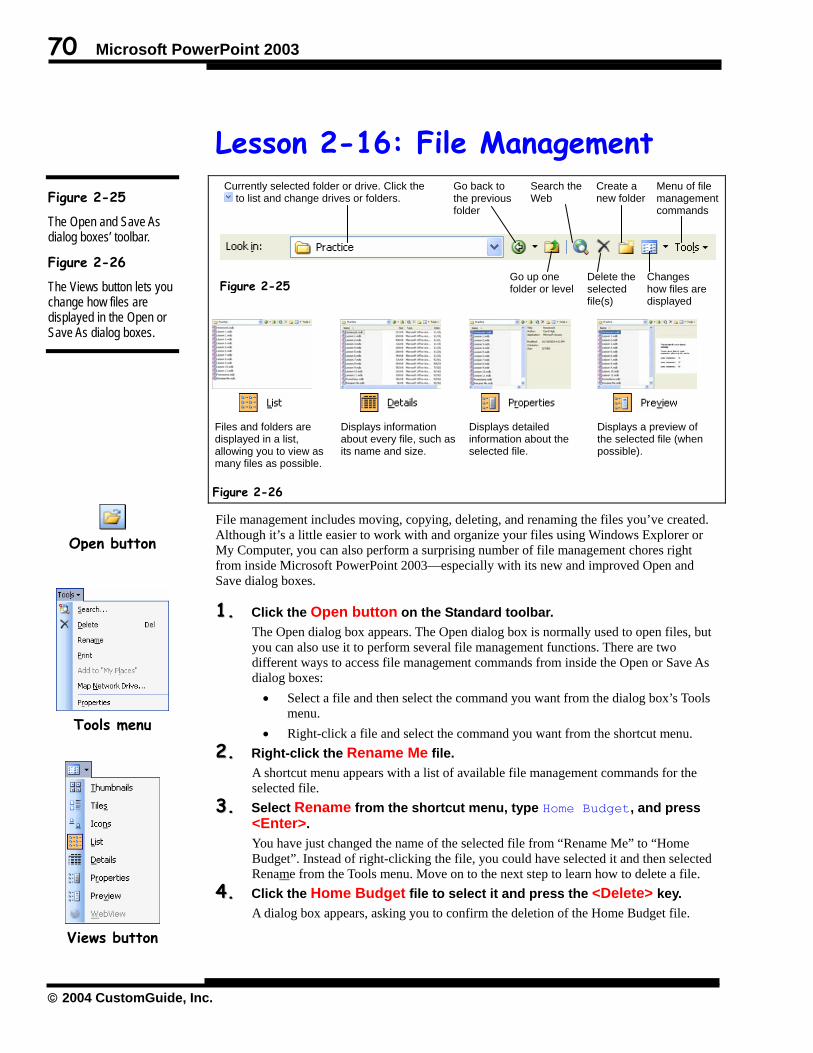
70 Microsoft PowerPoint 2003
© 2004 CustomGuide, Inc.
Lesson 2-16: File Management
File management includes moving, copying, deleting, and renaming the files you’ve created. Although it’s a little easier to work with and organize your files using Windows Explorer or My Computer, you can also perform a surprising number of file management chores right from inside Microsoft PowerPoint 2003—especially with its new and improved Open and Save dialog boxes.
11.. Click the Open button on the Standard toolbar. The Open dialog box appears. The Open dialog box is normally used to open files, but you can also use it to perform several file management functions. There are two different ways to access file management commands from inside the Open or Save As dialog boxes: • Select a file and then select the command you want from the dialog box’s Tools
menu. • Right-click a file and select the command you want from the shortcut menu.
22.. Right-click the Rename Me file. A shortcut menu appears with a list of available file management commands for the selected file.
33.. Select Rename from the shortcut menu, type Home Budget, and press <Enter>. You have just changed the name of the selected file from “Rename Me” to “Home Budget”. Instead of right-clicking the file, you could have selected it and then selected Rename from the Tools menu. Move on to the next step to learn how to delete a file.
44.. Click the Home Budget file to select it and press the <Delete> key. A dialog box appears, asking you to confirm the deletion of the Home Budget file.
Figure 2-25
The Open and Save As dialog boxes’ toolbar.
Figure 2-26
The Views button lets you change how files are displayed in the Open or Save As dialog boxes.
Open button
Tools menu
Views button
Currently selected folder or drive. Click the to list and change drives or folders.
Files and folders are displayed in a list, allowing you to view as many files as possible.
Figure 2-26
Go up one folder or level
Go back to the previous folder
Search the Web
Delete the selected file(s)
Create a new folder
Changes how files are displayed
Menu of file management commands
Displays information about every file, such as its name and size.
Displays detailed information about the selected file.
Displays a preview of the selected file (when possible).
Figure 2-25

Chapter Two: Editing a Presentation 71
The Richard Stockton College of New Jersey
Quick Reference Basic File Management in the Open Dialog box: 1. Open the Open or Save
As dialog boxes by selecting Open or Save As from the File menu.
2. Right-click the file and refer to Table 2-6: File Shortcut Menu Commands for a list of things you can do to the selected file or select the file and select a commandfrom the Tools menu.
To Change How Files are Displayed: • Click the View button
arrow and select a view.
55.. Click Yes. The Home Budget file is deleted. If you work with and create numerous files, you may find it difficult to remember what you named a file. In order to find the file(s) you’re looking for, it can help to preview your files without opening them.
66.. Click the Views button arrow and select Preview. The Open dialog box changes the display of PowerPoint files in the Practice folder or disk from List View to Preview View. To see the contents of a file, select it in the file list on the left side of the dialog box and it will appear in the Preview area on the right side of the dialog box. Try previewing the contents of a file without opening it now.
77.. Click the Lesson 2A file. The Lesson 2A file is selected and a preview of its contents appears in the Preview section. Change back to List mode to display as many files in the window as possible.
88.. Click the Views button arrow, select List to display the files in list view, then close the dialog box by clicking Cancel.
Table 2-6: File Shortcut Menu Commands Command Description Open Opens the selected file.
Open With . . . Opens the presentation using the program of your choice.
Scan with Norton Antivirus
Choose this option when you are receiving a presentation via email to make sure it does not contain a virus.
Select Selects the file you have highlighted. Works the same as double-clicking.
New Creates a new slide.
Print Sends the selected file to the default printer.
Show Displays the slide show.
Send To Depending on how your computer is set up, it lets you send the selected file to the desktop, a printer, to an email recipient, to a fax, or to a floppy drive.
Cut Used in conjunction with the Paste command to move files. Cuts or removes the selected file from its current folder or location.
Copy Used in conjunction with the Paste command to copy files. Copies the selected file.
Make Available Offline
Makes the presentation available offline.
Create Shortcut Creates a shortcut—a quick way to a file or folder without having to go to its permanent location—to the file.
Delete Deletes the selected file or files.
Rename Renames the selected file.
Properties Displays the properties of the selected file, such as when the file was created or last modified, or how large the file is.
File Shortcut
menu

72 Microsoft PowerPoint 2003
© 2004 CustomGuide, Inc.
Lesson 2-17: Understanding Smart Tags
Smart tags are one of the biggest additions to Microsoft Office 2003—and they make working with PowerPoint a lot easier. Smart tags are similar to right-mouse button shortcuts—you click smart tags to perform actions on various items. Smart tags appear when you perform certain actions, such as when you paste information or format text. PowerPoint marks these items with and indicators. Clicking a smart tag indicator displays a list of things that you can do to the smart tag, such as paste information in a different format.
In this lesson you will learn what smart tags look like and how to use them.
11.. Open the Lesson 2C presentation, save it as Smart Tags, and place the insertion point after the word “Asia” in slide 2.
22.. Add a blank slide to the current presentation by clicking the New Slide button on the Formatting toolbar and select the Blank Slide layout from the task pane. PowerPoint adds a blank slide to your presentation. For this exercise we will cut and paste information from a Microsoft Excel workbook into this slide, so we will have to start the Microsoft Excel program.
Figure 2-27
Smart tags appear when you perform a particular task or when PowerPoint recognizes certain types of information.
Figure 2-28
An example of Smart Tags with the Paste function.
New Slide button
Blank Slide layout
Click the Paste Options button arrow to display a list of actions that you can take.
Click the Paste Options smart tag to specify how information should be pasted in the document.
Smart tags appear when you can choose from more than one option regarding a task, for example, how information is pasted.
Figure 2-27
Figure 2-28
Chapter Two: Editing a Presentation 73
The Richard Stockton College of New Jersey
Quick Reference Understanding Smart Tags: • As you enter information
in a presentation, smart tag buttons will appear. Click these buttons to do something to the specified information.
To Use a Smart Tag: • Click the Smart Tag
arrow and select the desired action or option.
33.. Click the Start button and select Programs → Microsoft Excel. You probably already know that the procedure for opening a file in Microsoft Excel is no different from opening a file in Microsoft PowerPoint.
44.. Click the Open button on the Standard toolbar, browse to your practice folder or disk, then find and open the Trade Show Chart file. Next you need to select and copy the information in this workbook.
55.. Click the Sheet1 tab. Select the cell range A1:F8 by clicking cell A1, holding down the mouse button and dragging to cell F8. Now you can copy the selected cells to the Clipboard.
66.. Click the Copy button on the Standard toolbar. The information is copied to the Clipboard.
77.. Close Microsoft Excel. You should be back in Microsoft PowerPoint, looking at the blank slide we added. Let’s paste the copied information.
88.. Click anywhere on the blank slide, then click the Clipboard task pane and click the Expense text. PowerPoint pastes the copied information into the presentation. Notice the button appears next to the pasted worksheet. Click this button to specify how information is pasted.
99.. Position the pointer over the Paste Options button. A drop-down arrow appears on the Paste Options button. Click this arrow to display a list of various options for how information is pasted into your presentation.
1100.. Click the Paste Options button arrow and select Excel Table (entire workbook) from the list. PowerPoint pastes the Excel information into the slide as an entire embedded workbook.
Table 2-7: Smart Tags and Buttons Smart Tag Button Description
Paste Options The Paste Options button appears after you paste something. Click the Paste Options button to specify how information is pasted into your presentation. The available options depend on the type of content you are pasting, the program you are pasting from, and the format of the text where you are pasting.
AutoCorrect Options The AutoCorrect Options button appears after AutoCorrect identifies what could be a formatting error. You can click the AutoCorrect Options button to have PowerPoint automatically resize text to fit in its placeholder.
A B C 1 A1 B1 C1 2 A2 B2 C2 3 A3 B3 C4
Each cell in an Excel worksheet is given its own unique address, made from combining its column letter and row number, such as cell A1, A2, B1, B2,
Copy button
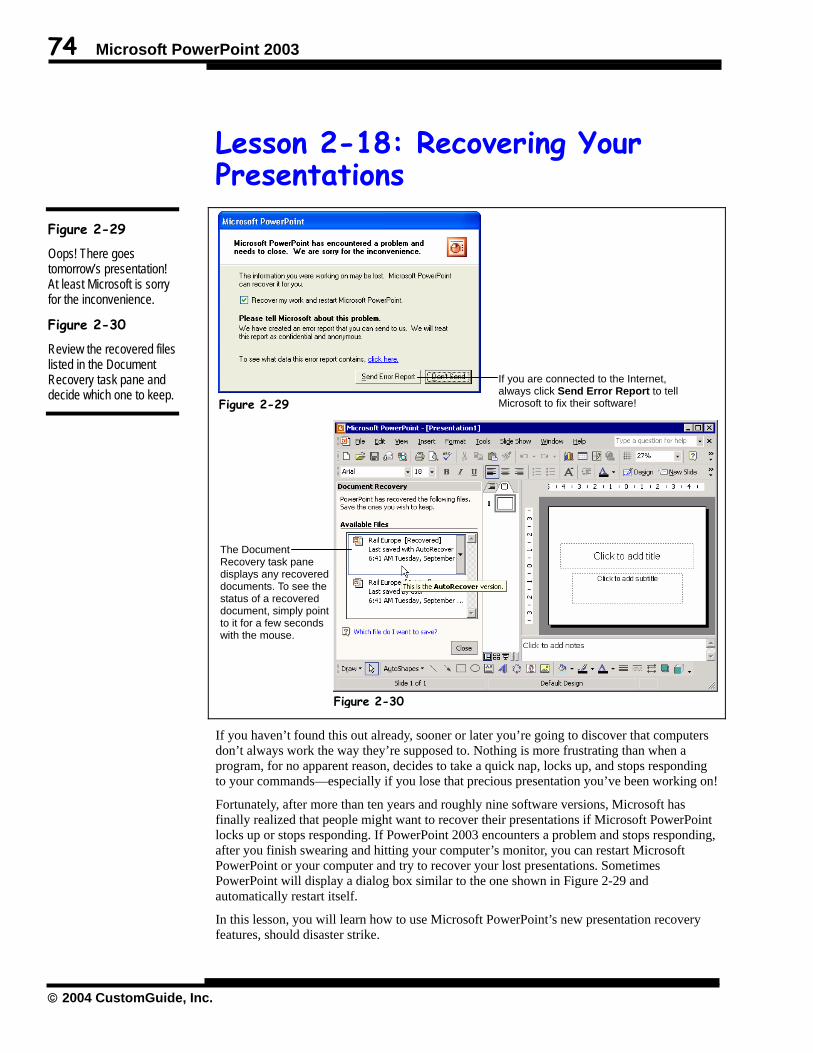
74 Microsoft PowerPoint 2003
© 2004 CustomGuide, Inc.
Lesson 2-18: Recovering Your Presentations
If you haven’t found this out already, sooner or later you’re going to discover that computers don’t always work the way they’re supposed to. Nothing is more frustrating than when a program, for no apparent reason, decides to take a quick nap, locks up, and stops responding to your commands—especially if you lose that precious presentation you’ve been working on!
Fortunately, after more than ten years and roughly nine software versions, Microsoft has finally realized that people might want to recover their presentations if Microsoft PowerPoint locks up or stops responding. If PowerPoint 2003 encounters a problem and stops responding, after you finish swearing and hitting your computer’s monitor, you can restart Microsoft PowerPoint or your computer and try to recover your lost presentations. Sometimes PowerPoint will display a dialog box similar to the one shown in Figure 2-29 and automatically restart itself.
In this lesson, you will learn how to use Microsoft PowerPoint’s new presentation recovery features, should disaster strike.
Figure 2-29
Oops! There goes tomorrow’s presentation! At least Microsoft is sorry for the inconvenience.
Figure 2-30
Review the recovered files listed in the Document Recovery task pane and decide which one to keep.
Figure 2-29
If you are connected to the Internet, always click Send Error Report to tell Microsoft to fix their software!
Figure 2-30
The Document Recovery task pane displays any recovered documents. To see the status of a recovered document, simply point to it for a few seconds with the mouse.

Chapter Two: Editing a Presentation 75
The Richard Stockton College of New Jersey
Quick Reference To Recover a Presentation: 1. Restart Microsoft
PowerPoint (if it doesn’t restart by itself).
2. Find and then click the best-recovered presentation in the Document Recovery task pane.
3. Save the presentation by selecting File → Save Asfrom the menu.
To Change the AutoRecovery Settings: 1. Select Tools → Options
from the menu and click the Save tab.
2. Ensure that the Save AutoRecovery info box is checked and specify the desired interval, in minutes, in the minutes box. Click OK when you’re finished.
11.. If necessary, restart your computer and/or Microsoft PowerPoint.
NOTE: You may not need to restart your computer or PowerPoint at all—often PowerPoint will display the dialog box shown in Figure 2-29 and automatically restart itself when it encounters a problem.
When you have restarted Microsoft PowerPoint hopefully the Document Recovery pane will appear, as shown in Figure 2-30. If the Document Recovery pane doesn’t appear, unfortunately, you’re out of luck—PowerPoint did not recover any of your presentations. Hope you made a backup! Sometimes PowerPoint will display several recovered presentations in the Document Recovery task pane (see Table 2-8: Status Indicators in the Document Recovery Task Pane), such as the original presentation that was based on the last manual save and a recovered presentation that was automatically saved during an AutoRecover save process. You can see the status of any recovered presentation simply by pointing at the recovered presentation for a second or two.
22.. To view details about any recovered presentation, simply point at the presentation in the Document Recovery task pane for a few seconds. Hopefully you will find a version of your presentation—either original or recovered—that isn’t missing too much of your work. Here’s how to select and save a recovered presentation…
33.. Click the desired recovered presentation from the task pane. The presentation appears in PowerPoint’s slide window.
44.. Select File → Save As from the menu and save the presentation. You can further protect your work by using the AutoRecover feature to periodically save a temporary copy of the presentation you're working on. To recover work after a power failure or similar problem, you must have turned on the AutoRecover feature before the problem occurred. You can set the AutoRecover save interval to occur more frequently than every 10 minutes (its default setting). For example, if you set it to save every 5 minutes, you'll recover more information than if you set it to save every 10 minutes. Here’s how to change the AutoRecover save interval…
55.. Select Tools → Options from the menu and click the Save tab. The Save tab of the Options dialog box appears.
66.. Ensure that the Save AutoRecovery info box is checked and specify the desired interval, in minutes, in the minutes box. Click OK when you’re finished.
Even with Microsoft Office 2003’s new document recovery features, the best way to ensure that you don’t lose much information if your computer freezes is to save your work regularly.
Table 2-8: Status Indicators in the Document Recovery Task Pane Status Indicator Description Original Original file based on last manual save.
Recovered File recovered during recovery process or file saved during an AutoRecover save process.
Repaired PowerPoint encountered problems while recovering the presentation and has attempted to repair them. Make sure that you double-check your presentation to make sure that there isn’t any corruption.

76 Microsoft PowerPoint 2003
© 2004 CustomGuide, Inc.
Chapter Two Review
Lesson Summary
Inserting Slides and Text in Normal View
• To Insert a Slide: Click the New Slide button on the Formatting toolbar or select Insert → Slide from the menu. Select the slide layout you want to use for the slide and close the task pane.
• To Add Text to a Slide: Click the appropriate text placeholder and type the text.
Using the Outline Pane • Outline View lets you work on the overall content of a presentation without being distracted by
formatting or graphical objects. It’s also easy to reorganize your presentation using Outline view.
• To Demote a Paragraph: Select the paragraph(s) and press the <Tab> key or click the Demote button on the Formatting or Outlining toolbar.
• To Promote a Paragraph: Select the paragraph(s) and press <Shift> + <Tab> or click the Promote button on the Formatting or Outlining toolbar.
• To Add a New Slide in the Outline Tab: Press <Ctrl> + <Enter> or promote a selected paragraph to the highest level on the outline.
Editing Text • Move the insertion point by pressing the appropriate arrow key or by clicking where you want to
place the insertion point with the pointer.
• To Insert Text (Into an Existing Text Box): Click in the text box, move the insertion point where you want to insert the text and then type the text you want to insert.
• To Delete Text: Press the <Backspace> key to delete text before, or to the left of, the insertion point. Press the <Delete> key to delete text after, or to the right of, the insertion point.
Selecting, Replacing, and Deleting Text • To Select a String of Text (Using the Mouse): Move the insertion point to the beginning or end of
the text you want to select, click and hold the left mouse button and drag the insertion point across the text then release the mouse button once the text is selected.
• To Select a String of Text (Using the Keyboard): Move the insertion point to the beginning or end of the text you want to select, then press and hold down the <Shift> key while using the arrow keys to select the text you want.
• To Select a Single Word: Double-click the word you want to select.
• To Replace Text: Select the text and then type the new text.
• To Deselect Text: Click anywhere on the computer screen.

Chapter Two: Editing a Presentation 77
The Richard Stockton College of New Jersey
• To Delete Selected Text: Select the text and press the <Delete> key.
Cutting, Copying, and Pasting Text • To Cut Something: Select the text or object you want to cut and do any of the following:
- Click the Cut button on the Standard toolbar. - Select Edit → Cut from the menu. - Press <Ctrl> + <X>.
• To Copy Something: Select the text or object you want to copy and do any of the following: - Click the Copy button on the Standard toolbar. - Select Edit → Copy from the menu. - Press <Ctrl> + <C>.
• To Paste a Cut or Copied Object: Place the insertion point where you want to paste the text or object and do any of the following: - Click the Paste button on the Standard toolbar. - Select Edit → Paste from the menu. - Press <Ctrl> + <V>.
Using Undo, Redo, and Repeat • To Undo a Mistake or Action: Do any of the following:
- Click the Undo button on the Standard toolbar. - Select Edit → Undo from the menu. - Press <Ctrl> + <Z>.
• To Redo an Undo: Do any of the following: - Click the Redo button on the Standard toolbar. - Select Edit → Redo from the menu. - Press <Ctrl> + <Y>.
• To Repeat an Action: Do any of the following: - Press <Ctrl> + <Y>. - Select Edit → Repeat from the menu.
Checking Your Spelling • PowerPoint flags any spelling errors with red squiggly underlines.
• To Correct a Spelling Error: Right-click the spelling error and select the correction from the shortcut menu or simply retype the misspelled word.
• To Ignore a Spelling Error: Right-click the spelling or grammar error and select Ignore All from the shortcut menu.
• To Add a Word to the Spelling Dictionary: Right-click the word you want to add and select Add from the shortcut menu.
Finding and Replacing Information • To Find Information in a Presentation: Select Edit → Find from the menu or press <Ctrl> +
<F>. Enter the text you want to search for in the Find what box and click the Find next button. Keep clicking the Find next button until you find the text that you are looking for.
78 Microsoft PowerPoint 2003
© 2004 CustomGuide, Inc.
• To Find and Replace Information: Select Edit → Replace from the menu or press <Ctrl> + <H>. Enter the text you want to search for in the Find what box and the text you want to replace it with in the Replace with box. Click the Find next button to find each occurrence of the text and click the Replace button as needed to replace the text. Click Replace All to replace every occurrence of text in the presentation.
Viewing a Presentation’s Outline • To Show/Hide the Outlining toolbar: Select View → Toolbars → Outlining from the menu.
• You can hide or display your presentation’s subtopics by expanding and collapsing your presentation’s headings.
• To Collapse a Heading: Make sure the insertion point is in the heading and click the Collapse button on the Outlining toolbar.
• To Expand a Heading: Make sure the insertion point is in the heading and click the Expand button on the Outlining toolbar.
• To Show or Hide a Presentation’s Text Formatting: Click the Show Formatting button on the Outlining toolbar.
Rearranging a Presentation’s Outline • To Rearrange an Outline (Using the Outlining toolbar): Select the slide(s) or paragraph(s) you
want to move and click either the Move Up button or Move Down button on the Outlining toolbar.
• To Rearrange an Outline (Using Drop and Drag): Select the slide(s) or paragraph(s) you want to move and drag them to a new location in the outline.
Inserting Symbols and Special Characters • To Insert a Symbol or Special Character: Place the insertion point where you want to insert the
character, select Insert → Symbol from the menu, select the symbol you want and click Insert.
Working in Slide Sorter View • Slide Sorter View displays all the slides in your presentation as small pictures, or thumbnails. Use
Slide Sorter View when you want to rearrange the slides in your presentation and add transition effects between them.
• To Switch to Slide Sorter View: Click the Slide Sorter View button on the horizontal scroll bar or select View → Slide Sorter from the menu.
• To Move a Slide (in Slide Sorter View): Click the slide that you want to move. To select and move multiple slides hold down the <Shift> key as you click each slide you want to select. Drag the slide(s) between two other slides in slide sorter view and release the mouse button.
• To Delete a Slide (in Slide Sorter View): Click the slide you want to delete and press the <Delete> key.
• To Duplicate a Slide (in Slide Sorter View): Click the slide you want to copy and press <Ctrl> + <D>.
Chapter Two: Editing a Presentation 79
The Richard Stockton College of New Jersey
Adding Notes to Your Slides • To Add Notes to a Slide: Make sure you’re in Normal view and begin typing in your notes in the
Notes pane.
Working with Multiple Windows • To Switch between Multiple Open Presentations: Click the presentation icon on the Windows
taskbar or select Window and select the name of the presentation you want to view.
• To View Multiple Windows at the Same Time: Select Window → Arrange All.
• To Maximize a Window: Click the window’s Maximize button.
• To Restore a Window: Click the Window’s Restore button.
• To Manually Resize a Window: Position the mouse pointer over the edge of the window, hold down the mouse button and drag the mouse to resize the window. Release the mouse button when the window reaches the desired size.
• To Move a Window: Drag the window’s title bar to the location where you want to position the window.
Collecting and Pasting Multiple Items • To Display the Clipboard Task Pane: Select Edit → Office Clipboard from the menu.
• To Add Items to the Office Clipboard: Copy and/or cut the items as you would normally.
• To Paste from the Office Clipboard: If necessary, display the Clipboard task pane, then click the item you want to paste. Click the Paste All button to paste all collected items.
File Management • You can perform most file management functions, such as delete, rename, and copy, from the
Open File dialog box. Open the Open File dialog box by clicking the Open button on the Standard toolbar or selecting File → Open.
• Right-click a file and select a file command from the shortcut menu.
Understanding Smart Tags • As you enter information in a presentation, smart tag buttons will appear. Click these buttons to
do something to the specified information.
• To Use a Smart Tag: Click the Smart Tag arrow and select the desired action or option.
Recovering Your Presentations • To Recover a Presentation: Restart Microsoft PowerPoint (if it doesn’t restart by itself after a
crash). Find and then click the best-recovered presentation in the Document Recovery task pane. Save the presentation by doing a File → Save As from the menu.
• To Change the AutoRecovery Settings: Select Tools → Options from the menu and click the Save tab. Ensure that the Save AutoRecovery info box is checked and specify the desired interval, in minutes, in the minutes box. Click OK when you’re finished.

80 Microsoft PowerPoint 2003
© 2004 CustomGuide, Inc.
Quiz 1. Which is the best view for organizing your thoughts on a presentation’s
content?
A. Normal View B. Slide Sorter view C. Outline view D. Notes view
2. Which of the following statements is NOT true?
A. Pressing the <Tab> key in Outline view demotes the selected paragraph. B. Pressing <Ctrl> + <Enter> in Outline view adds a new slide to the paragraph. C. Pressing the <Shift> + <Tab> key in Outline view promotes the selected paragraph. D. Outline view is the best view for adding and working with graphics on your slides.
3. Which key deletes text before, or to the left, of the insertion point?
A. <Page Up> B. <Page Down> C. <Delete> D. <Backspace>
4. Which of the following is not a way to cut text? A. Select the text and press <Ctrl>+<X>. B. Select the text and click the cut button on the toolbar. C. Select the text and press the delete button. D. Select the text and select Edit → Cut from the menu.
5. Once a block of text is selected, you can replace the selected text with new text by:
A. Simply typing the new text. B. Selecting File, then Insert New Text from the menu. C. You can’t replace selected text with new text. D. Clicking the Replace Text button on the Standard toolbar.
6. To view a list of suggestions for a misspelled word:
A. Select the misspelled word and select Tools → Suggestions from the menu. B. Press <Ctrl> + <S>. C. Select the misspelled word and click the Spelling Suggestion button on the Standard
toolbar. D. Right-click the misspelled word.
7. Notes view displays a notes page for the selected slide, where you can create speaker notes for the slide (True or False?)
Homework 1. Open the Homework 2 presentation, located in your Practice folder or disk, and save
it as “Fleas.”
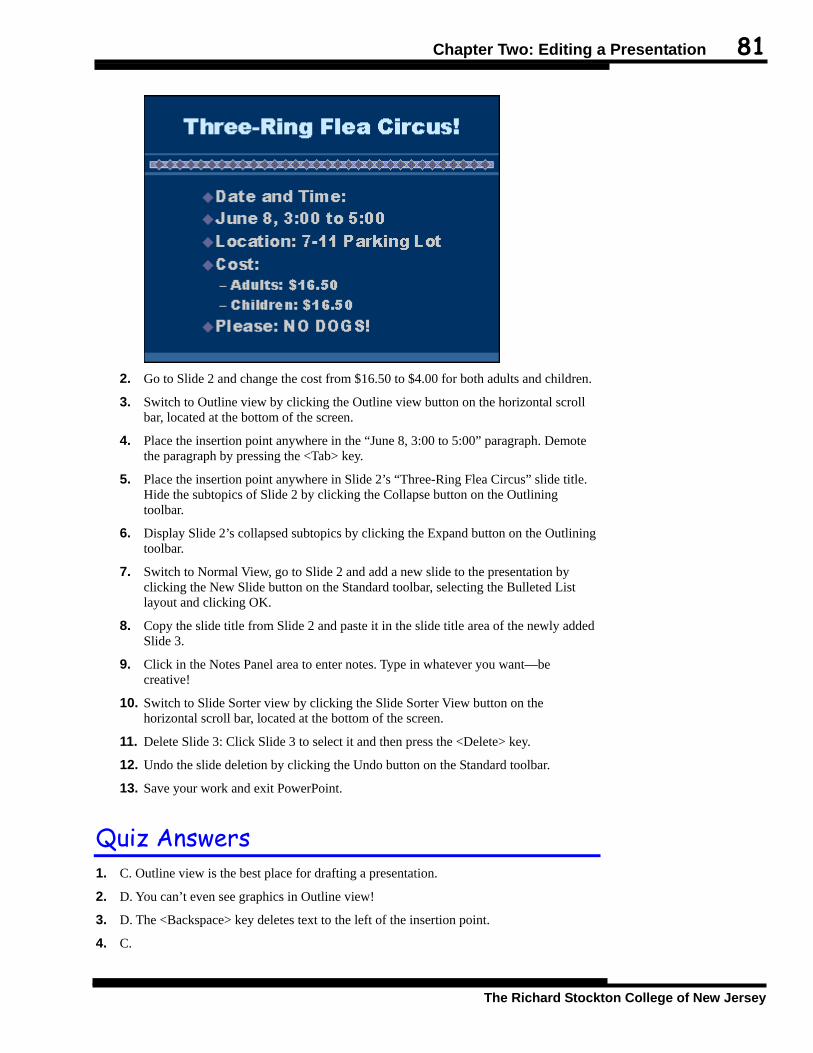
Chapter Two: Editing a Presentation 81
The Richard Stockton College of New Jersey
2. Go to Slide 2 and change the cost from $16.50 to $4.00 for both adults and children.
3. Switch to Outline view by clicking the Outline view button on the horizontal scroll bar, located at the bottom of the screen.
4. Place the insertion point anywhere in the “June 8, 3:00 to 5:00” paragraph. Demote the paragraph by pressing the <Tab> key.
5. Place the insertion point anywhere in Slide 2’s “Three-Ring Flea Circus” slide title. Hide the subtopics of Slide 2 by clicking the Collapse button on the Outlining toolbar.
6. Display Slide 2’s collapsed subtopics by clicking the Expand button on the Outlining toolbar.
7. Switch to Normal View, go to Slide 2 and add a new slide to the presentation by clicking the New Slide button on the Standard toolbar, selecting the Bulleted List layout and clicking OK.
8. Copy the slide title from Slide 2 and paste it in the slide title area of the newly added Slide 3.
9. Click in the Notes Panel area to enter notes. Type in whatever you want—be creative!
10. Switch to Slide Sorter view by clicking the Slide Sorter View button on the horizontal scroll bar, located at the bottom of the screen.
11. Delete Slide 3: Click Slide 3 to select it and then press the <Delete> key.
12. Undo the slide deletion by clicking the Undo button on the Standard toolbar.
13. Save your work and exit PowerPoint.
Quiz Answers 1. C. Outline view is the best place for drafting a presentation.
2. D. You can’t even see graphics in Outline view!
3. D. The <Backspace> key deletes text to the left of the insertion point.
4. C.
82 Microsoft PowerPoint 2003
© 2004 CustomGuide, Inc.
5. A. Typing replaces any selected text.
6. D. Right-click a misspelled word to display a list of suggestions.
7. True.
Chapter Three: Formatting Your
Presentation Chapter Objectives:
• Formatting Fonts
• Using the Format Painter to Copy and Apply Formatting
• Applying a Template’s Design to a Presentation
• Using Slide Masters
• Working with Color Schemes
• Changing the Slide Background
• Creating and Formatting Bulleted Lists
• Changing Paragraph Alignment and Line Spacing
• Adding Headers and Footers
• Working Tabs and Indents and Changing the Page Setup
Chapter Task: Format an Existing Presentation
A presentation is always more effective when it’s attractively designed and formatted. Think about it: people would rather buy expensive name-brand cereals in flashy boxes than much more affordable cereals in plain, generic boxes—even though they are really the same cereal!
This chapter explains how to format your presentations to give them more impact and make them more visually appealing. You will learn how to change the appearance, size, and color of the text in your presentations and how to change your color scheme and background. You will also learn the ins and outs of aligning text to the left, right, and center of a text box, using tabs, and indenting paragraphs. This chapter also describes how to add headers and footers to your presentations.
Prerequisites • Windows basics: How
to use menus, toolbars, dialog boxes, and shortcut keystrokes.
• Move the mouse pointer and navigate between the slides in a presentation.
• Open and save a presentation.
• Select text and objects.

84 Microsoft PowerPoint 2003
© 2004 CustomGuide, Inc.
Lesson 3-1: Formatting Fonts with the Formatting Toolbar
You can emphasize text in a presentation by making the text darker and heavier (bold), slanted (italics), larger, or in a different typeface (or font). One of the easiest methods of applying character formatting is to use the Formatting toolbar. The Formatting toolbar includes buttons for applying the most common character and paragraph formatting options.
11.. Start Microsoft PowerPoint.
22.. Open the presentation named Lesson 3 and save it as History of Mexico. First, let’s make the title of the presentation “Mexican History” stand out by making it bold. Still remember how to select text? Good, because you have to select text to format it.
Figure 3-1
The Formatting toolbar.
Figure 3-2
The steps in changing font size.
Bold button
Other Ways to Bold: • Select Format → Font
from the menu, select Bold from the Font Style box, then click OK.
• Press <Ctrl> + <B>.
Figure 3-2
2. Click the Size List arrow
( ) and select the font size.
Click here to scroll down the list.
1. Select the text you want to format.
Figure 3-1
Font list Font size list Bold
Italics
Underline
Align left
Center
Align right
Font list arrow
Font size list arrow
Numbering
Increase Font Size
Slide Design
Decrease Font Size
Increase Indent
Decrease Indent
Bullets
Shadow
Font Color
New Slide
The size of the fonts for the selected text is changed.

Chapter Three: Formatting Your Presentation 85
The Richard Stockton College of New Jersey
Quick Reference To Boldface Text: • Click the Bold button
on the Formatting toolbar or press <Ctrl> + <B>.
To Italicize Text: • Click the Italics
button on the Formatting toolbar or press <Ctrl> + <I>.
To Underline Text: • Click the Underline
button on the Formatting toolbar or press <Ctrl> + <U>.
To Change Font Size: • Select the pt. size from
the Font Size list on the Formatting toolbar.
To Change Font Type: • Select the font from the
Font list on the Formatting toolbar.
33.. Select the Mexican History text in the Slide pane and click the Bold button on the Formatting toolbar.
The selected text “Mexican History” appears in boldface (although it may not appear to change very much, since you’re using such a large font). Hmm… since applying bold didn’t really do much for the presentation’s title, let’s try changing the type and style of the font.
44.. Keeping the title selected, click the Font list arrow on the Formatting toolbar. A list appears with all the fonts that are available on your computer, listed in alphabetical order. Since there isn’t enough room to display all the font types at once, you may have to scroll up or down the list until you find the one you want.
55.. Scroll up the Font list until you see the Arial font, then click the Arial font. The title is formatted using Arial font. You can also change the font size, making text appear larger or smaller.
66.. Keeping the title selected, click the Font Size list arrow on the Formatting toolbar and then click 60. The selected text “Mexican History” appears in a larger font size (60 point type instead of the previous 44 point type). Wow! That really makes the heading stand out from the rest of the slide, doesn’t it? Font sizes are measured in points (pt.) that are 1/72 of an inch. The larger the number of points, the larger the font. Next let’s change the font formatting for the “North Shore Travel Presents” heading.
77.. Select the text North Shore Travel Presents and click the Italics button on the Formatting toolbar. The selected text appears in Italics. Move on to the next step and reduce the size of the selected text.
88.. Keeping the same text selected, click the Font Size list arrow on the Formatting toolbar and then click 36. The selected text “North Shore Travel Presents” appears in a smaller font size.
99.. Save your work by clicking the Save button on the Standard toolbar.
Table 3-1: Examples of Common Font Types and Sizes Common Font Types Common Font Sizes Arial Arial 8 point
Comic Sans MS Arial 10 point
Courier New Arial 12 point Times New Roman Arial 14 point
Font List
Font Size List
Italics button
Other Ways to Italics: • Select Format → Font
from the menu, select Italic from the Font Style box then click OK.
• Press <Ctrl> + <I>.
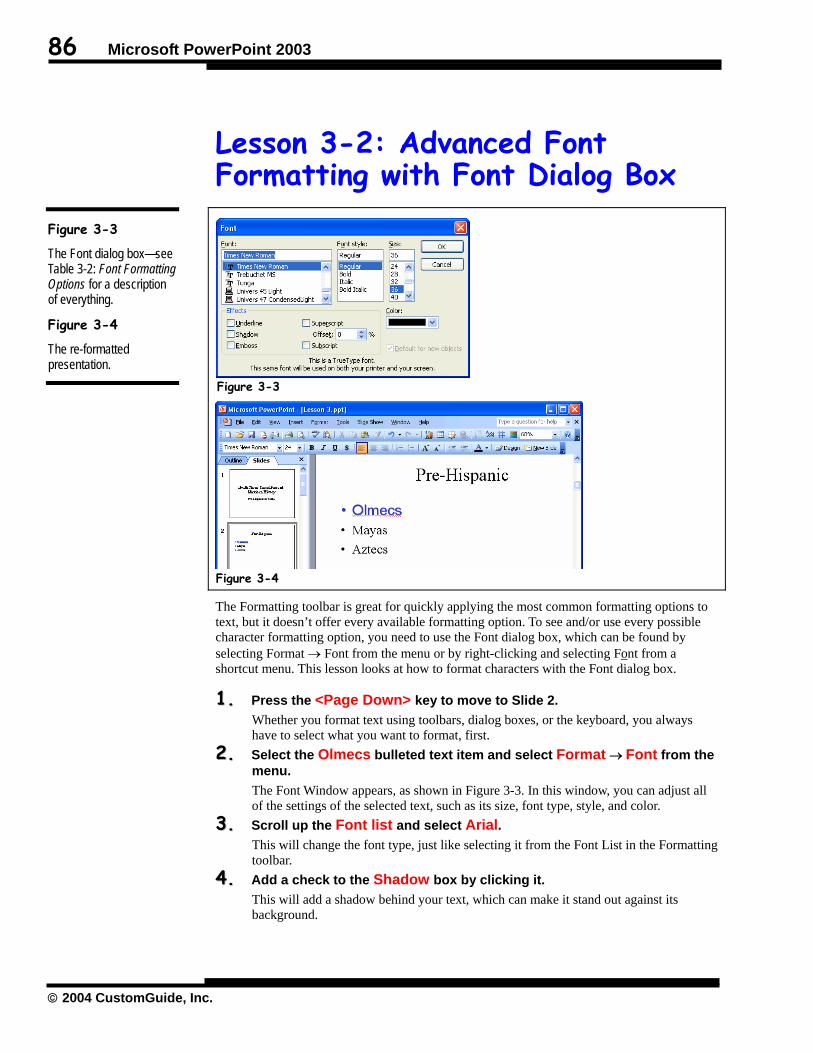
86 Microsoft PowerPoint 2003
© 2004 CustomGuide, Inc.
Lesson 3-2: Advanced Font Formatting with Font Dialog Box
The Formatting toolbar is great for quickly applying the most common formatting options to text, but it doesn’t offer every available formatting option. To see and/or use every possible character formatting option, you need to use the Font dialog box, which can be found by selecting Format → Font from the menu or by right-clicking and selecting Font from a shortcut menu. This lesson looks at how to format characters with the Font dialog box.
11.. Press the <Page Down> key to move to Slide 2. Whether you format text using toolbars, dialog boxes, or the keyboard, you always have to select what you want to format, first.
22.. Select the Olmecs bulleted text item and select Format → Font from the menu. The Font Window appears, as shown in Figure 3-3. In this window, you can adjust all of the settings of the selected text, such as its size, font type, style, and color.
33.. Scroll up the Font list and select Arial. This will change the font type, just like selecting it from the Font List in the Formatting toolbar.
44.. Add a check to the Shadow box by clicking it. This will add a shadow behind your text, which can make it stand out against its background.
Figure 3-3
The Font dialog box—see Table 3-2: Font Formatting Options for a description of everything.
Figure 3-4
The re-formatted presentation.
Figure 3-4
Figure 3-3

Chapter Three: Formatting Your Presentation 87
The Richard Stockton College of New Jersey
Quick Reference To Open the Font Dialog Box: • Select Format → Font
from the menu. To Change a Font’s Color: • Click the Font Color
Button arrow on the Drawing toolbar and select the color.
55.. Click the Color list arrow. A list of colors you can apply to the selected text appears.
NOTE: Unlike Microsoft Word or Excel, in PowerPoint the Font Color list initially displays only eight colors. These eight colors are determined by the color scheme that you are currently using. A color scheme determines the background, text, lines, shadows, and fill colors in your presentation. Instead of having to choose from more than 16 million colors, you can use a coordinated color scheme that was carefully put together by design professionals. We’ll talk more about color schemes later on in the chapter.
NOTE: If you’re looking for the Font Color list button on the Formatting toolbar, as is the case in Microsoft Word and Excel, you might not find it there. If this is the case, the Font Color list button can be found on the Drawing toolbar, which is usually located at the bottom of the screen.
66.. Select the blue color. The Colors dialog box closes and we return to the Font dialog box. Just one more font formatting change to make before we move on…
77.. Select 36 from the Size list. This will change the size of the selected text to 36 point.
88.. Click OK and deselect the text to see the changes. The Font dialog box closes and the formatting options you have chosen are applied to the selected text.
99.. Save your work.
Table 3-2: Font Formatting Options Option Description Font Displays all fonts installed on your computer and allows you to change the font
that you are currently using.
Font style Formats the style of the font: Regular (no emphasis), Bold, Italic, and Bold Italic
Size Displays and allows you to increase or decrease the size of the font.
Color Displays and allows you to change the font color.
Effects Allows you to add special effects to fonts as follows:
Underline SShhaaddooww EEEmmmbbbooossssss
Superscript Subscript
Default for new objects
Makes the current font formatting the default font formatting (be very careful about using this option!).
Font Color button
Font Color List

88 Microsoft PowerPoint 2003
© 2004 CustomGuide, Inc.
Lesson 3-3: Using the Format Painter .
Remember how we used the Font dialog box to format text in the previous lesson? It wasn’t exactly grueling mental work, but it did require a number of steps to change the font type, size, color, and style. Now you want to format all of your bulleted text like the text you formatted on Slide 2. This could take a while—even if you are able to remember the exact format and color options. When you want to copy formatting from text or objects and apply it elsewhere in your presentation, the Format Painter is the tool you need. The Format Painter tool copies how text or objects are formatted and then pastes or applies that formatting to other text or objects. The Format Painter makes it easy to keep your slides looking consistent.
The Format Painter tool is a feature that is easier to demonstrate than explain, so let’s get started!
Figure 3-5
Use the Format Painter to copy formatting to other text and objects.
1. Select the text or object with the formatting you want to copy and click or double-click the Format Painter button.
2. Select the text or object where you want to apply the copied formatting.
Figure 3-5
3. The copied formatting is applied to the selected text or object.
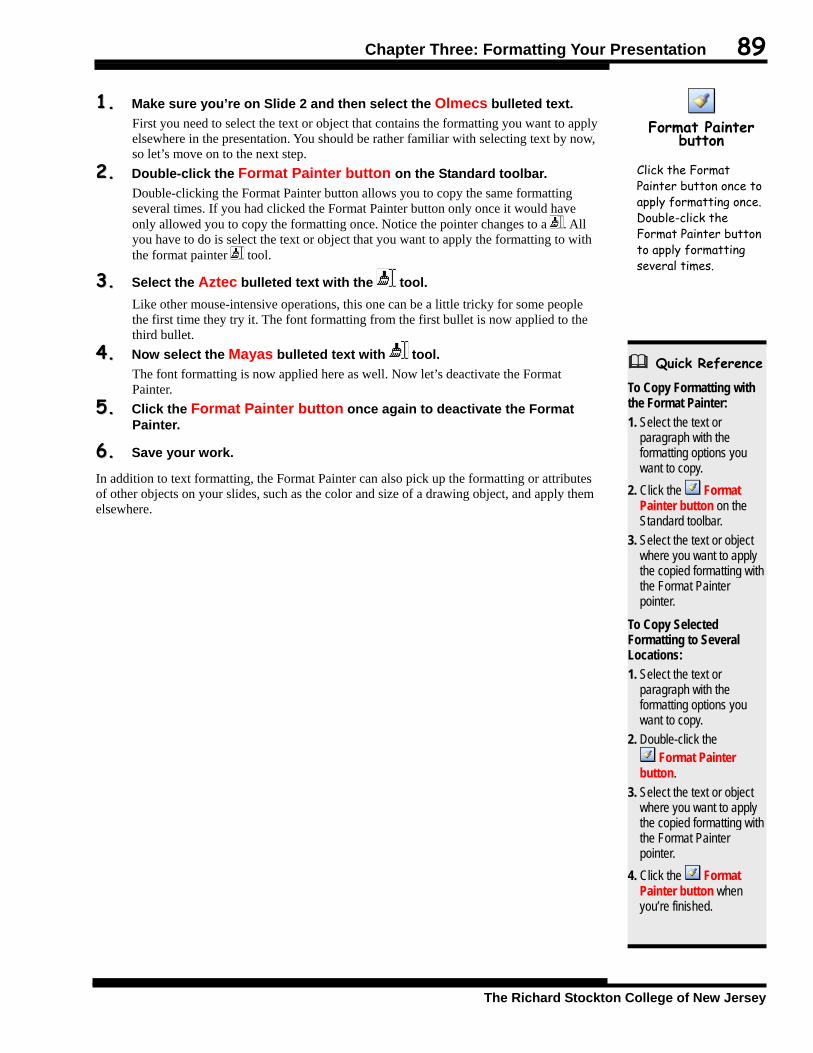
Chapter Three: Formatting Your Presentation 89
The Richard Stockton College of New Jersey
Quick Reference To Copy Formatting with the Format Painter: 1. Select the text or
paragraph with the formatting options you want to copy.
2. Click the Format Painter button on the Standard toolbar.
3. Select the text or object where you want to apply the copied formatting with the Format Painter pointer.
To Copy Selected Formatting to Several Locations: 1. Select the text or
paragraph with the formatting options you want to copy.
2. Double-click the Format Painter
button. 3. Select the text or object
where you want to apply the copied formatting with the Format Painter pointer.
4. Click the Format Painter button when you’re finished.
11.. Make sure you’re on Slide 2 and then select the Olmecs bulleted text. First you need to select the text or object that contains the formatting you want to apply elsewhere in the presentation. You should be rather familiar with selecting text by now, so let’s move on to the next step.
22.. Double-click the Format Painter button on the Standard toolbar. Double-clicking the Format Painter button allows you to copy the same formatting several times. If you had clicked the Format Painter button only once it would have only allowed you to copy the formatting once. Notice the pointer changes to a . All you have to do is select the text or object that you want to apply the formatting to with the format painter tool.
33.. Select the Aztec bulleted text with the tool. Like other mouse-intensive operations, this one can be a little tricky for some people the first time they try it. The font formatting from the first bullet is now applied to the third bullet.
44.. Now select the Mayas bulleted text with tool. The font formatting is now applied here as well. Now let’s deactivate the Format Painter.
55.. Click the Format Painter button once again to deactivate the Format Painter.
66.. Save your work.
In addition to text formatting, the Format Painter can also pick up the formatting or attributes of other objects on your slides, such as the color and size of a drawing object, and apply them elsewhere.
Format Painter
button
Click the Format Painter button once to apply formatting once. Double-click the Format Painter button to apply formatting several times.

90 Microsoft PowerPoint 2003
© 2004 CustomGuide, Inc.
Lesson 3-4: Applying a Template’s Formatting
If you’re halfway through creating a presentation and you suddenly realize that you hate how it looks, don’t worry, you can always assign a new design template to a presentation at any time. This lesson explains how.
11.. If necessary, find and open the Lesson 3B presentation and save it as History of Mexico. If you don’t know where your practice files are located, ask your instructor for help.
22.. Press <Ctrl> + <Home> to move to the Title slide in the presentation. You can apply a design template anywhere in a presentation, but for this exercise we are going to start at the beginning.
33.. Click the Design button on the Formatting toolbar. The Slide Design task pane appears as shown in Figure 3-6. The task pane can only display a few templates at a time, so you will probably have to scroll down until you find the template you want to apply. Once you have found a suitable template, simply click it to apply the template to all the slides in your presentation. You can view more template options by moving the pointer over the template in the task pane and clicking the arrow.
Figure 3-6
The Slide Design task pane.
Figure 3-7
Slide 1, once the Globe template has been applied.
Figure 3-8
Slide 3, once the Ocean template has been applied.
Design button
Other Ways to Apply a Design Template: • Double-click the name
of the template on the status bar, located at the bottom of the PowerPoint screen.
Select a template design to apply to your presentation.
For more options, move the pointer over a template and click the arrow.
Figure 3-6
Figure 3-7 Figure 3-8

Chapter Three: Formatting Your Presentation 91
The Richard Stockton College of New Jersey
Quick Reference To Apply a Template Design to a Presentation: 1. Click the Design
button on the Formatting toolbar.
2. Click the template you want to apply to the presentation.
To Apply a Template Design to a Single Slide: 1. Click the Design
button on the Formatting toolbar.
2. Move the pointer over the template in the task pane, click the arrow, and select Apply to Selected Slides from the menu.
44.. Take some time to scroll down the task pane and look at the various templates. Move on to the next step when you’ve seen enough of PowerPoint’s available templates.
55.. Click the Globe template in the task pane. The Globe template is applied to all the slides in your presentation. Notice how the colors of the text and background have changed in order to appropriately match the new design.
66.. Press <Page Down> to move to Slide 2. PowerPoint has cleverly changed the text to a color that matches the new design.
77.. Press <Page Down> to move to Slide 3. PowerPoint 2003 supports having more than one design template in your presentation—a major improvement over previous versions of PowerPoint, which supported only one design template. Using more than one template is great when you want to combine several presentations into one file, and want each section to maintain its distinct look.
88.. Scroll down the task pane until you find the Ocean template. Here’s how to apply a template to a single slide…
99.. Move the pointer over the Ocean template in the task pane and click the arrow. Select Apply to Selected Slides from the menu.
PowerPoint applies the Ocean template to the selected slide. Let’s make sure the other slides in the presentation haven’t been affected…
1100.. Press <Page Up> until you are back at Slide 1. The remaining slides in the presentation still use the Globe template, while Slide 3 uses the Ocean template. You can close the task pane since we’re finished using it.
1111.. Click the task pane’s Close button.
Move the Pointer over a Template, Click the Arrow and select One of the Following: • Apply to All Slides:
Applies the selected template to every slide in the presentation.
• Apply to Selected Slides: Applies the selected template to only the selected slide(s) in the presentation.
• Show Large Previews: Displays a larger preview of the available templates.

92 Microsoft PowerPoint 2003
© 2004 CustomGuide, Inc.
Lesson 3-5: Using the Slide Master
Do you want something to appear on every slide in your presentation (except the title slide), such as your company’s name and logo? Do you want to change how the text on all your slides is formatted? Using the Slide Master is the fastest and easiest way to set up the appearance of all slides in a presentation. The Slide Master controls all aspects of a slide’s appearance, including its background color, font style, and any reoccurring text or pictures. Changing the Master changes every slide in your presentation—adding a candy-striped background to the Master adds a candy-striped background to every single one of your slides.
Each presentation has two types of Masters: • Slide Master: Governs the appearance of your slides. • Title Master: Governs the appearance of your presentation’s title slide.
This lesson introduces you to Masters and how to use them to fine-tune the look of your presentation.
11.. Go to Slide 2 and select View → Master → Slide Master from the menu. The Slide Master appears, as shown in Figure 3-9. Notice the Slide Master includes placeholders for the slide title and body. Also, notice that the Slide Master has three additional placeholders at the bottom of the slide for the Date, Footer, and Slide Number. These areas are used by the Header and Footer command, which we’ll talk about later on in this chapter.
Figure 3-9
Slide Master View.
Figure 3-10
The Slide Master View toolbar.
Date area Number area Footer area
Title area
Text or object area
Figure 3-9
Any text or object you add to the slide master will appear on every slide in the presentation.
Insert New Slide Master
Insert New Title Master
Delete Master
Preserve Master
Rename Master
Master Layout
Close Master View
Figure 3-10
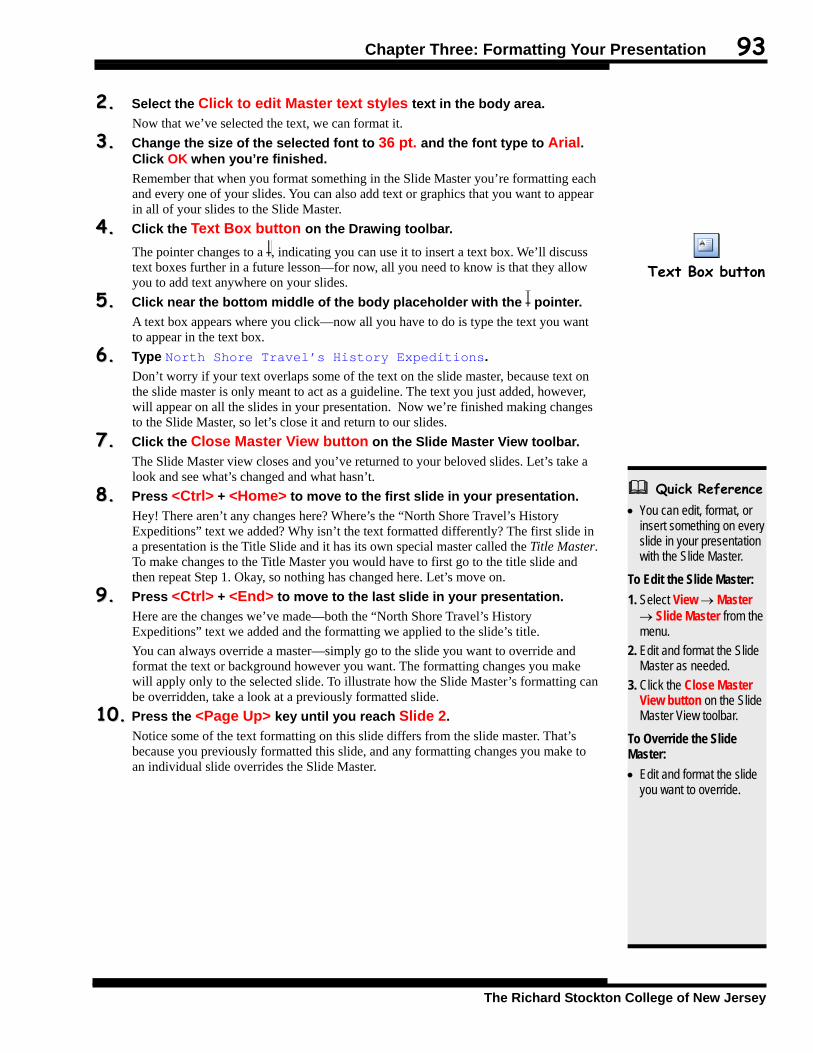
Chapter Three: Formatting Your Presentation 93
The Richard Stockton College of New Jersey
Quick Reference • You can edit, format, or
insert something on every slide in your presentation with the Slide Master.
To Edit the Slide Master: 1. Select View → Master → Slide Master from the menu.
2. Edit and format the Slide Master as needed.
3. Click the Close Master View button on the Slide Master View toolbar.
To Override the Slide Master: • Edit and format the slide
you want to override.
22.. Select the Click to edit Master text styles text in the body area. Now that we’ve selected the text, we can format it.
33.. Change the size of the selected font to 36 pt. and the font type to Arial. Click OK when you’re finished. Remember that when you format something in the Slide Master you’re formatting each and every one of your slides. You can also add text or graphics that you want to appear in all of your slides to the Slide Master.
44.. Click the Text Box button on the Drawing toolbar. The pointer changes to a , indicating you can use it to insert a text box. We’ll discuss text boxes further in a future lesson—for now, all you need to know is that they allow you to add text anywhere on your slides.
55.. Click near the bottom middle of the body placeholder with the pointer. A text box appears where you click—now all you have to do is type the text you want to appear in the text box.
66.. Type North Shore Travel’s History Expeditions. Don’t worry if your text overlaps some of the text on the slide master, because text on the slide master is only meant to act as a guideline. The text you just added, however, will appear on all the slides in your presentation. Now we’re finished making changes to the Slide Master, so let’s close it and return to our slides.
77.. Click the Close Master View button on the Slide Master View toolbar. The Slide Master view closes and you’ve returned to your beloved slides. Let’s take a look and see what’s changed and what hasn’t.
88.. Press <Ctrl> + <Home> to move to the first slide in your presentation. Hey! There aren’t any changes here? Where’s the “North Shore Travel’s History Expeditions” text we added? Why isn’t the text formatted differently? The first slide in a presentation is the Title Slide and it has its own special master called the Title Master. To make changes to the Title Master you would have to first go to the title slide and then repeat Step 1. Okay, so nothing has changed here. Let’s move on.
99.. Press <Ctrl> + <End> to move to the last slide in your presentation. Here are the changes we’ve made—both the “North Shore Travel’s History Expeditions” text we added and the formatting we applied to the slide’s title. You can always override a master—simply go to the slide you want to override and format the text or background however you want. The formatting changes you make will apply only to the selected slide. To illustrate how the Slide Master’s formatting can be overridden, take a look at a previously formatted slide.
1100.. Press the <Page Up> key until you reach Slide 2. Notice some of the text formatting on this slide differs from the slide master. That’s because you previously formatted this slide, and any formatting changes you make to an individual slide overrides the Slide Master.
Text Box button
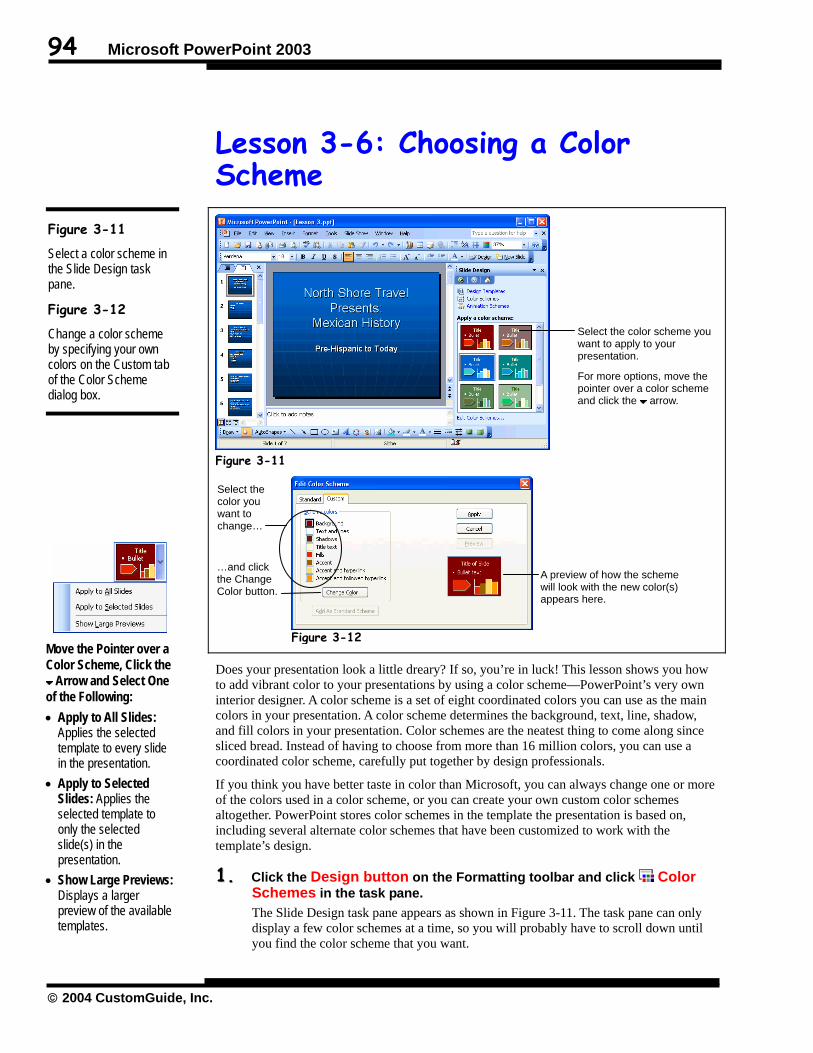
94 Microsoft PowerPoint 2003
© 2004 CustomGuide, Inc.
Lesson 3-6: Choosing a Color Scheme
Does your presentation look a little dreary? If so, you’re in luck! This lesson shows you how to add vibrant color to your presentations by using a color scheme—PowerPoint’s very own interior designer. A color scheme is a set of eight coordinated colors you can use as the main colors in your presentation. A color scheme determines the background, text, line, shadow, and fill colors in your presentation. Color schemes are the neatest thing to come along since sliced bread. Instead of having to choose from more than 16 million colors, you can use a coordinated color scheme, carefully put together by design professionals.
If you think you have better taste in color than Microsoft, you can always change one or more of the colors used in a color scheme, or you can create your own custom color schemes altogether. PowerPoint stores color schemes in the template the presentation is based on, including several alternate color schemes that have been customized to work with the template’s design.
11.. Click the Design button on the Formatting toolbar and click Color Schemes in the task pane. The Slide Design task pane appears as shown in Figure 3-11. The task pane can only display a few color schemes at a time, so you will probably have to scroll down until you find the color scheme that you want.
Figure 3-11
Select a color scheme in the Slide Design task pane.
Figure 3-12
Change a color scheme by specifying your own colors on the Custom tab of the Color Scheme dialog box.
Select the color you want to change…
…and click the Change Color button.
A preview of how the scheme will look with the new color(s) appears here.
Figure 3-12
Select the color scheme you want to apply to your presentation.
For more options, move the pointer over a color scheme and click the arrow.
Figure 3-11
Move the Pointer over a Color Scheme, Click the
Arrow and Select One of the Following: • Apply to All Slides:
Applies the selected template to every slide in the presentation.
• Apply to Selected Slides: Applies the selected template to only the selected slide(s) in the presentation.
• Show Large Previews: Displays a larger preview of the available templates.

Chapter Three: Formatting Your Presentation 95
The Richard Stockton College of New Jersey
Quick Reference • A color scheme is a set of
eight coordinated colors you use as the main colors in your presentation.
To Change the Slide Color Scheme: 1. Click the Design
button on the Formatting toolbar and click
Color Schemes in the task pane.
2. Select a color scheme from the task pane.
Or… Move the pointer over the
template in the task pane, click the arrow, and select a color scheme option from the list.
To Change a Color in a Color Scheme: 1. Click the Design
button on the Formatting toolbar.
2. Click Edit Color Schemes in the task pane.
3. Select the color you want to change, click the Change Color button, select the color you want to use and click OK.
4. Click Apply.
22.. Click the rust colored color scheme in the task pane. PowerPoint applies the color scheme to all the slides in the presentation. So what happens if you like most of the colors in a color scheme, but one particular color really bothers you? Not a problem—you can easily change one or more of the colors in a color scheme with your own colors.
33.. Click Edit Color Schemes at the bottom of the task pane. The Color Scheme dialog box appears, as shown in Figure 3-12.
44.. Select the Title text color and click the Change Color button. The Color dialog box appears—all you have to do here is select a new color.
55.. Select a yellow color and click OK. The Title text color will now be changed to the brighter yellow color you selected.
66.. Click Apply to close the dialog box and return to Normal View. The Color Scheme dialog box closes and all slides are updated with the color scheme changes.
77.. Click on any of the slides’ text and then click the Font Color list arrow on the Drawing toolbar. The eight colors displayed in the Font Color list are the coordinating colors used in the current color scheme. Changing color schemes is like a painter changing paint palettes—you have eight different colors to work with each time.
88.. Click anywhere outside the Font Color list to close the list without selecting any colors.
Table 3-3: The Eight Colors of a Color Scheme Color Description Background The color of your slide’s background. It’s usually a good idea to use a dark color
for overhead slides and a light color for handouts.
Text and lines The color applied to bulleted text, text blocks, and to any lines drawn onto the slide. Use a Text and Line color that is the opposite of the background so that it shows up well.
Shadows The color of shadow effects used in text and drawing formatting. You will usually want to use a dark color for shadows.
Title text The color applied to your slide’s title. Use a color that really stands out.
Fills Any shapes you draw with the Drawing toolbar will be filled in by this color.
Accent The color applied to odds and ends in your slides, such as charts.
Accent and hyperlink
The color of hyperlinks on your slides. Hyperlinks are usually blue.
Accent and followed hyperlink
The color of hyperlinks after they have been clicked on or followed. Followed hyperlinks are usually purple.
Color Scheme

96 Microsoft PowerPoint 2003
© 2004 CustomGuide, Inc.
Lesson 3-7: Changing the Background of Your Slides
Now that we know how to format color schemes, it’s time to move on to something a little more complicated: changing the slide’s background. Choosing an appropriate background for your slides is like picking out wrapping paper—it’s the first thing people notice about your presentation, therefore you want it to be visually appealing and tasteful. This lesson will explain background fill patterns and how they can be used in your slides to produce dramatic, eye-catching effects.
11.. If necessary, find and open the Lesson 3C presentation and save it as History of Mexico. If you don’t know where your practice files are located, ask your instructor for help.
22.. Press the <Page Up> key until you get to the Title Slide, then select Format → Background from the menu. The Background dialog box appears, as shown in Figure 3-13.
Figure 3-13
The Background dialog box.
Figure 3-14
The Gradient tab of the Fill Effects dialog box.
Figure 3-15
The presentation with a preset Nightfall gradient background.
Figure 3-15
Figure 3-13
Select the background color for your slide(s).
Check if you don’t want to keep the Master’s graphics.
Figure 3-14

Chapter Three: Formatting Your Presentation 97
The Richard Stockton College of New Jersey
Quick Reference To Change the Slide Background: 1. Select Format →
Background from the menu.
2. Select a color from the drop-down color list. If you want to use a more vibrant background follow the next steps, otherwise click Apply or Apply to All.
To Use Fill Effects for the Background: 1. Follow the steps above to
open the Background dialog box.
2. Select the Fill Effects option from the drop-down color list.
3. Click the Fill Effects tab (Gradient, Texture, Pattern, or Picture) and specify how you want the fill effect to appear.
33.. Click the background fill list arrow. Now you have to specify how you want to change the background. Here are your choices: • Color palette: Fills the background with one of the eight colors from the
slides’ current color scheme. • More colors: Fills the background with one of the hundreds of rainbow colors
from the Color dialog box. • Fill Effects: Fills the background with more dramatic-looking effects. There
are four types of fill effects: gradient, texture, pattern, and picture. Table 3-4: Types of Fill describes each of them.
44.. Select Fill Effects from the background fill list. The Fill Effects dialog box opens with the Gradient tab in front, as shown in Figure 3-14.
55.. Ensure the Gradient tab is in front and then click the Preset option in the Colors section. This indicates that you want to fill the background using a Preset Color. PowerPoint comes with numerous professionally designed background gradients.
66.. Click the Preset Color list arrow and select Nightfall from the list. A preview of the Nightfall color scheme appears in the Sample window, found in the bottom right of the dialog box. Compare your Fill Effects dialog box with the one in Figure 3-14.
77.. Click OK to close the Fill Effects dialog box. We’re back at the Background dialog box. When you’re changing a slide’s background, you have to decide whether or not you want to keep the Slide Master’s graphics and text. Check the ‘Omit background graphics from master’ box if you don’t want to keep the Master’s graphics.
88.. Click the Preview button. PowerPoint temporarily applies the background to your presentation so you can see how it will look.
99.. Click Apply to All. The slides are formatted with the gradient you selected.
Believe it or not, by learning how to use fill patterns, you’ve learned a formatting trick that probably less than five percent of all PowerPoint users know. You should feel proud of yourself!
Table 3-4: Types of Fill Effects Fill Pattern Tab Example Description
Gradient Fills the background or objects with a gradient that gradually changes from one color to another color.
Texture Fills the background or objects with a texture.
Pattern Fills the background or objects with a pattern.
Picture Fills the background or objects with a graphic or picture file.
Background Fill
List

98 Microsoft PowerPoint 2003
© 2004 CustomGuide, Inc.
Lesson 3-8: Working with Bulleted and Numbered Lists
You’ve probably already noticed that most presentations include several bulleted lists—a list of items accented by a special character known as a bullet. By default, PowerPoint uses a no-nonsense • character as a bullet, but you can use any character you want as a bullet, such as , , or even *.
This lesson explains how to add bullets to several paragraphs and how to change the character used as the bullet.
11.. Go to Slide 4 (the Colonial Epic slide). This slide contains a series of paragraphs that need to be bulleted. Here’s how to add bullets to a paragraph or series of paragraphs:
22.. Highlight the paragraph beginning with Spaniards and ending with Indians, as shown in Figure 3-16. Now that you’ve selected the paragraphs, you can add bullets to them.
Figure 3-16
Adding bullets to a series of paragraphs.
Figure 3-17
The Bullets and Numbering dialog box.
Figure 3-18
The Picture Bullet dialog box.
Click to select a picture for the bullets.
Click to select a character or symbol for the bullets.
Figure 3-17
Figure 3-16 1. Select the paragraphs you want to bullet.
2. Click the Bullets button on the Formatting toolbar.
PowerPoint applies bullets to each of the items.
Select the type of bullets you want.
Select the bullet color.
Figure 3-18

Chapter Three: Formatting Your Presentation 99
The Richard Stockton College of New Jersey
Quick Reference To Add Bullets to Several Paragraphs: 1. Select the paragraph that
you want to bullet. 2. Click the Bullet
button on the Formatting toolbar.
To Change or Format the Bullet Symbol: 1. Select Format → Bullets
and Numbering from the menu.
2. Click Character to use a symbol as the bullet(s) or Picture to use a picture or graphic as the bullet(s).
3. If you select Customize select the symbol you want to use and click OK. If you select Picture select the picture you want to use, click the picture and then click OK.
33.. Click the Bullets button on the Formatting toolbar. PowerPoint adds a bullet to each of the selected paragraphs. The Bullets button is really a toggle switch—clicking it once adds bullets, clicking it again removes them. Therefore, to remove bullets from a bulleted list, simply select the list and click the Bullets button. If you think the bullets PowerPoint uses are rather dull, you can choose a different bullet character. Here’s how:
44.. With the bulleted list still selected, select Format → Bullets and Numbering from the menu. The Bullets and Numbering dialog box appears, as shown in Figure 3-17. Here you can specify which character to use for your bullet, the color of the bullet, or the size of the bullet compared to the paragraph, if you like any of the characters displayed.
55.. Click the Customize button. The Bullet dialog box is updated to display all the characters in the Wingding font set. Symbol, Wingdings, and Webdings are three fonts that contain many interesting characters suitable for bullets. We don’t want to use any of these for our bullet at this time, so…
66.. Click Cancel. A new feature in PowerPoint 2003 is the ability to use any picture or graphical object as a bullet.
77.. Click the Picture button. In this window, as shown in Figure 3-18, you can see a variety of pictures that you can use as a bullet. Let’s find one appropriate for our slide.
88.. Scroll down until you find the picture of a small brown (hint: it’s in the first column). Click the picture and then click OK. The Bullet dialog box closes and the selected bullet replaces the existing ones.
Bullets button

100 Microsoft PowerPoint 2003
© 2004 CustomGuide, Inc.
Lesson 3-9: Changing Paragraph Alignment and Line Spacing
This lesson explains how to align the paragraphs in your slides to the left, center, or right. Figure 3-19 gives a better idea of what the various paragraph alignments look like. Actually, paragraphs in PowerPoint are aligned inside the text boxes that contain the text, so if you center a paragraph, it will appear centered inside its text box, not necessarily centered exactly on the slide.
Do you need more room before or after a paragraph? Would you like to tighten up the amount of space that appears between the lines of text on your slides? This lesson also explains how you can adjust the amount of space that appears before and after a paragraph, and how much space appears between the lines of text in a paragraph—for example, if you want to double-space a paragraph. Look at Figure 3-20 for a visual reference of the different areas where you can adjust a paragraph’s line spacing.
11.. Press the <Page Up> key until you’re back to Slide 1. Place the insertion point anywhere in the subtitle “Pre-Hispanic to Today” and click the Left Align button on the Formatting toolbar. PowerPoint left aligns the text.
22.. With the insertion point still in the subtitle click the Center button on the Formatting toolbar. The slide title is once again centered inside the text box. There’s nothing to this paragraph alignment stuff, is there? Now let’s move on to line spacing.
Figure 3-19
Examples of left aligned, centered, and right aligned text.
Figure 3-20
Examples of line spacing and spacing before and after a paragraph.
Figure 3-21
The Line Spacing dialog box.
Left Align button
Center button
Enter the amount of space youwant to leave before the first line of each selected paragraph.
Enter the amount of space you want to leave after each selected paragraph.
Left Aligned
Centered
Right Aligned
Figure 3-19
Enter the amount of space you want between lines of selectedtext.
Select the unit of measurement you want to use: lines or points.
Spanish Conquest Type some text here. Type some text
here. Type some text here. Type some
text here. Type some text here. Type
some text here. Type some text here.
Type some text here. Type some text here. Type some text here. Type some text here. Type some text here.
Line spacing
Before paragraph
After paragraph
Figure 3-21
Figure 3-20

Chapter Three: Formatting Your Presentation 101
The Richard Stockton College of New Jersey
Quick Reference To Change Line Spacing: 1. Switch to Normal View. 2. Select the paragraphs
whose line spacing you want to change.
3. Select Format → Line Spacing from the menu, adjust the line spacing settings in the dialog box and click OK.
Since PowerPoint is presentation software, you probably won’t need to adjust how much space appears before, after or inside a paragraph as much as you might need to in a word processing program. Still, if your paragraphs feel too cramped or too far apart, here’s how to adjust paragraph line spacing:
33.. Go to slide 4 and select the four bulleted subtopics, beginning with “Spaniards” and ending with “Indians”. We’ll adjust the line spacing for these paragraphs.
44.. Select Format → Line Spacing from the menu. The Line Spacing dialog box appears, as shown in Figure 3-21. There are three boxes where you can specify how much space appears between the lines in a paragraph, how much space appears above a paragraph, and how much space appears below a paragraph. Notice the combo boxes to the right of each of these boxes—they allow you to select between two different units of measurement: lines and points.
55.. Type 1.5 in the Line spacing box and click OK. The Line Spacing dialog box closes and PowerPoint adjusts the line spacing for the selected text to one and a half lines.
66.. Save your work.

102 Microsoft PowerPoint 2003
© 2004 CustomGuide, Inc.
Lesson 3-10: Adding Headers and Footers
Presentations that are several pages long often have information such as the page number, the slide’s title, or the date located at the top or bottom of every page. Text that appears at the top of every page is called a header, while text appearing at the bottom of each page is called footer. In this lesson, you will learn how to add headers and footers to your slides and handouts.
11.. If necessary, find and open the Lesson 3D presentation and save it as History of Mexico. If you don’t know where your practice files are located, ask your instructor for help.
22.. Select View → Header and Footer from the menu. The Header and Footer dialog box appears, as shown in Figure 3-22. This is where you can add a footer that appears at the bottom of all the slides in your presentation. Notice the Header and Footer dialog box has two tabs: a Slide tab and a Notes and Handouts tabs. Because PowerPoint produces two types of output (slides and handouts), each gets its own separate set of headers and footers.
Figure 3-22
The Slide tab of the Header and Footer dialog box.
Figure 3-23
The Notes and Handouts tab of the Header and Footer dialog box.
Apply to All Adds the headers and footers to your entire presentation, including the Master. Apply Adds the headers and footers only to the selected slide(s).
Adds the date to the footer of your slides.
Adds the slide number to the slide footer.
Adds the text you type in the Footer box to the bottom of the slide.
Displays the footer on all but the title slide.
Adds the text you type in the Header box to the topof the slide.
Adds the text you type inthe Footer box to the bottom of the slide.
Shows how your presentation will look with the selected footers.
Shows how your presentation will look with the selected headers and footers.
Figure 3-23
Figure 3-22

Chapter Three: Formatting Your Presentation 103
The Richard Stockton College of New Jersey
Quick Reference To Insert a Header or Footer: 1. Select View → Header
and Footer from the menu.
2. Fill in any of these boxes: Date: Displays the date and time. Number: Displays the slide number. Footer: Displays text that appears on each and every one of your slides.
3. Click Apply (to apply the header and/or footer to the current slide) or Apply to All (to apply the header and/or footer to the entire presentation).
33.. Make sure the Date and Time box is checked. Checking the Date and Time box adds the date in the bottom left corner of your slides. There are two different ways to add the date: • Update Automatically: Displays and automatically updates the current date.
For example, if you create a presentation on Saturday and then deliver it on a Wednesday, Wednesday would appear on the footer.
• Fixed: You type the date and time you want to appear in the Fixed box. The date is not updated.
44.. Select the Fixed option and type today’s date in the Fixed box. This will add the date you enter to your slide footer. You can also add your own text to the footer.
55.. Make sure the Footer box is checked and then type History of Mexico in the Footer box. Now that we’re finished specifying what we want to appear on our slides’ footer, let’s take a look at the header and footer for our presentation’s notes and handouts.
66.. Click the Notes and Handouts tab. The Notes and Handouts tab of the Header and Footer dialog box appears, as shown in Figure 3-23. At first, the Notes and Handouts tab looks identical to the Slides tab, but look closely—there’s also a place to add a header to your presentation’s notes and handouts. Move on to the next step and let’s add a header to our presentation’s notes and handouts.
77.. Make sure the Header box is checked and then type North Shore Travel in the Header box. The text “North Shore Travel” will appear in the header of your presentation’s notes and handouts. Let’s add the date to the notes and handouts header.
88.. Make sure the Date and Time box is checked, select the Fixed option and type today’s date in the Fixed box. Last, but not least, we need to add the presentation’s title to the footer.
99.. Make sure the Footer box is checked and then type History of Mexico in the Footer box. Like so many other formatting options, you can apply the header and footer to only the current slide or to all the slides in your presentation.
1100.. Click Apply to all to add the header and footer to all the slides in your presentation. The Header and Footer dialog box closes and you can see the headers and footers on your screen.
1111.. Save your work.
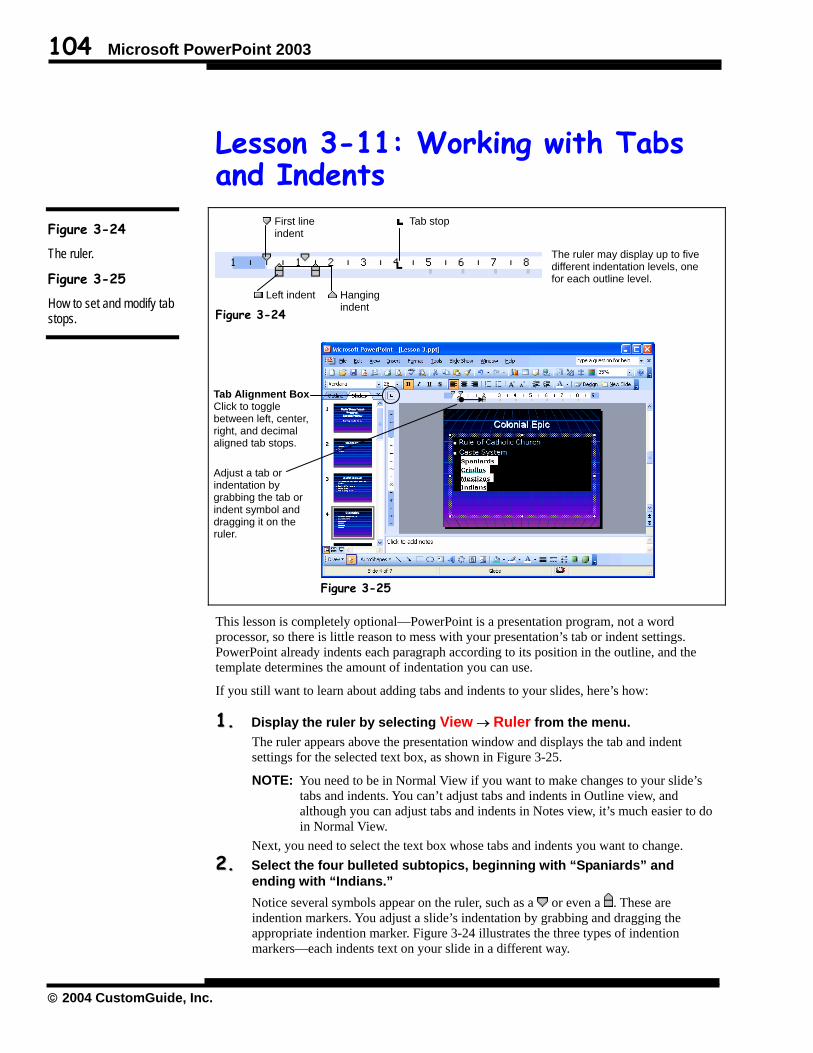
104 Microsoft PowerPoint 2003
© 2004 CustomGuide, Inc.
Lesson 3-11: Working with Tabs and Indents
This lesson is completely optional—PowerPoint is a presentation program, not a word processor, so there is little reason to mess with your presentation’s tab or indent settings. PowerPoint already indents each paragraph according to its position in the outline, and the template determines the amount of indentation you can use.
If you still want to learn about adding tabs and indents to your slides, here’s how:
11.. Display the ruler by selecting View → Ruler from the menu. The ruler appears above the presentation window and displays the tab and indent settings for the selected text box, as shown in Figure 3-25.
NOTE: You need to be in Normal View if you want to make changes to your slide’s tabs and indents. You can’t adjust tabs and indents in Outline view, and although you can adjust tabs and indents in Notes view, it’s much easier to do in Normal View.
Next, you need to select the text box whose tabs and indents you want to change. 22.. Select the four bulleted subtopics, beginning with “Spaniards” and
ending with “Indians.” Notice several symbols appear on the ruler, such as a or even a . These are indention markers. You adjust a slide’s indentation by grabbing and dragging the appropriate indention marker. Figure 3-24 illustrates the three types of indention markers—each indents text on your slide in a different way.
Figure 3-24
The ruler.
Figure 3-25
How to set and modify tab stops.
Tab Alignment Box Click to toggle between left, center, right, and decimal aligned tab stops.
Adjust a tab or indentation by grabbing the tab or indent symbol and dragging it on the ruler.
First line indent
Left indent Hanging indent
Tab stop
The ruler may display up to five different indentation levels, one for each outline level.
Figure 3-24
Figure 3-25

Chapter Three: Formatting Your Presentation 105
The Richard Stockton College of New Jersey
Quick Reference To Set a Tab Stop using the Ruler: 1. Click the Tab selector
box on the ruler until you see the type of tab you want to use (left, center, right, and decimal).
2. Click on the ruler where you want to set the tab stop.
NOTE: The ruler may display up to five different indentation levels—one for each outline level on the current slide. The illustration in Figure 3-24 has two indention levels.
Ready to try indenting the text in the text box? Then move on to the next step. 33.. Click and drag the second First Line Indent marker on the ruler to
the right, to the 2-inch mark. The sub-topics move further away from their bullets. If you’re curious, you can try dragging the other indent markers on the ruler to see how each one indents text. Once the ruler is visible, it is incredibly easy to add tab stops to your slides—simply click the ruler where you want to add a tab stop.
44.. Click the 5-inch mark on the ruler. You’ve just added a left tab stop ( ) at the five-inch mark. Let’s see how it works.
55.. Place the insertion point after Spaniards, press the <Ctrl> + <Tab> key and type Highest Caste. Sure enough, the tab stops right at the five-inch tab stop you added.
NOTE: If you don’t add any tab stops to a slide, PowerPoint uses default tab stops, which are located at each inch on the ruler.
Adjusting and removing tab stops is almost as easy as adding them. To adjust a tab stop, simply grab it and drag it to a new position on the ruler, just like you did with the indent markers. To remove a tab stop, simply drag it off the ruler.
66.. Remove the tab stop you added in Step 4 by dragging it off the ruler. Since we’re done using the ruler, let’s hide it so that we have move room to view and work with our slides.
77.. Delete the “Highest Caste” text and then select View → Ruler from the menu. The ruler disappears and we’re back in Normal View.
By clicking the Tab Alignment box (see Figure 3-25) you can toggle which type of tab stop is added when you click the ruler. Table 3-5: Types of Tabs describes the four different types of tabs you can add.
Table 3-5: Types of Tabs Alignment Mark Example Description
Left 100.00 Aligns the left side of text with the tab stop.
Center 100.00 Aligns the text so that it is centered over the tab stop.
Right 100.00 Aligns the right side of text with the tab stop.
Decimal 100.00 Aligns text at the decimal point. Text and numbers before the decimal point appear to the left, text and numbers after the decimal point appear to the right.
Left Indent
marker

106 Microsoft PowerPoint 2003
© 2004 CustomGuide, Inc.
Lesson 3-12: Changing the Page Setup
Most people deliver their PowerPoint presentations on their computer screen or on an overhead projection unit connected to a computer, so changing the page setup—the height, width, and orientation of the page—is not nearly as important as it is in other programs, such as Microsoft Word or Microsoft Excel. However, if you want to deliver your presentation on printed paper, transparencies, or 35mm slides, you need to specify the types of slides you want to make in the Page Setup dialog box.
This lesson also explains how to change the page orientation. Everything you print uses one of two different types of paper orientations: Portrait and Landscape. In Portrait orientation, the paper is taller than it is wide—like a painting of a person’s portrait. In Landscape orientation, the paper is wider than it is tall—like a painting of a landscape. Landscape orientation is the default setting for your PowerPoint slides, and Portrait orientation is the default setting for your notes, handouts, and outline.
Here, then, is how to change your presentation’s page setup:
11.. Select File → Page Setup from the menu. The Page Setup dialog box appears, as shown in Figure 3-26.
22.. Click the Slides sized for list. As you can see in the Slides sized for list, there are several types of slides you can make: • On-screen Show (the default setting)
Figure 3-26
The Page Setup dialog box is where you can change the size and orientation of your slides, notes, handouts, and outlines.
Figure 3-27
Comparison of portrait and landscape page orientations.
Portrait Landscape
Specify the types of slides you want to make.
If you select a custom size, use these boxes to determine the size of your slides.
Enter the starting numberfor the first slide to start numbering your slides from a number other than “1”.
Specify the orientation of your slides (Landscape is the default setting).
Specify the orientation of your notes, handouts, and outline (Portrait is the default setting). Figure 3-26
Figure 3-27

Chapter Three: Formatting Your Presentation 107
The Richard Stockton College of New Jersey
Quick Reference To Change a Slide’s Orientation: 1. Select File → Page
Setup from the menu. 2. In the Orientation section,
select either the Portrait or Landscape option.
To Change the Paper Size: 1. Select File → Page
Setup from the menu. 2. Click the Slide Sized for
list to select from a list of common page sizes.
• Letter Paper • Ledger Paper • A3 Paper • A4 Paper • B4 (ISO) Paper • B5 (ISO) Paper • 35mm Slides • Overhead (transparencies) • Banner • Custom (use the Width and Height boxes to specify the size of the page)
For this exercise, we’ll be creating 35mm slides. 33.. Select the 35mm slides option from the Slides sized for list.
Specifying a different slide size will usually be the only change you’ll need to make in the Page Setup dialog box, and it’s the only one we’ll be making in this exercise.
44.. Click OK to close the Page Setup dialog box. Guess what? You’ve just put another PowerPoint chapter under your belt. Move on to the next step and then take a look at the chapter review to see how much you’ve learned.
55.. Exit Microsoft PowerPoint without saving any of your changes.

108 Microsoft PowerPoint 2003
© 2004 CustomGuide, Inc.
Chapter Three Review
Lesson Summary
Formatting Fonts with the Formatting Toolbar • The quickest and easiest way to format the text in your slides is by using the Formatting toolbar.
• To Boldface Text: Click the Bold button on the Formatting toolbar or press <Ctrl> + <B>.
• To Italicize Text: Click the Italics button on the Formatting toolbar or press <Ctrl> + <I>.
• To Underline Text: Click the Underline button on the Formatting toolbar or press <Ctrl> + <U>.
• To Change Font Size: Select the point size from the Font Size list on the Formatting toolbar.
• To Change Font Type: Select the desired font from the Font list on the Formatting toolbar.
Advanced Font Formatting with the Font Dialog Box • To Open the Font Dialog Box: Select Format → Font from the menu
Using the Format Painter • The Format Painter lets you copy the formatting of text or an object and apply or paste the
formatting to another text or object.
• To Use the Format Painter: Select the text or object with the formatting options you want to copy, click the Format Painter button on the Standard toolbar, and select the text or object where you want to apply the copied formatting.
• Double-click the Format Painter button on the Standard toolbar to apply formatting to several locations. Click the Format Painter button again when you’re finished.
Applying a Template’s Formatting
• To Apply a Template Design to a Presentation: Click the Design button on the Formatting toolbar and click the template you want to apply to the presentation from the task pane.
• To Apply a Template Design to a Single Slide: Click the Design button on the Formatting toolbar, move the pointer over the template in the task pane, click the arrow, and select Apply to Selected Slides from the menu.
Using Masters • You can edit, format, or insert something on every slide in your presentation with the Slide Master.

Chapter Three: Formatting Your Presentation 109
The Richard Stockton College of New Jersey
• To Edit the Slide Master: Select View → Masters → Slide Master from the menu. Edit and format the Slide Master as needed. Any text, graphics, or formatting you add to the Slide Master will appear on every slide in your presentation. Click the Close Master View button on the Slide Master View toolbar when you’re finished.
• To Override the Slide Master: Edit and format the slide you want to override.
Choosing a Color Scheme • A Color scheme is a set of eight coordinated colors you can use as the main colors in your
presentation.
• To Change the Slide Color Scheme: Click the Design button on the Formatting toolbar and click Color Schemes in the task pane. Select a color scheme from the task pane or move the pointer over the template in the task pane, click the arrow, and select a color scheme option from the list.
• To Change a Color in a Color Scheme: Click the Design button on the Formatting toolbar and click Edit Color Schemes in the task pane. Select the color you want to change, click the Change Color button, select the color you want to use and click OK. Click Apply when you’ve finished making changes to the color scheme.
Changing the Background of Your Slides • To Change the Slide Background: Select Format → Background from the menu and select a
color from the drop-down color list. If you want to use a more vibrant background, follow the next steps; otherwise click Apply or Apply to All.
• To Use Fill Effects for the Background: Follow the steps above to open the Background dialog box. Select the Fill Effects option from the drop-down color list, click the Fill Effects tab (Gradient, Texture, Pattern, or Picture) and specify how you want the fill effect to appear.
Working with Bulleted Lists • To Add Bullets to Several Paragraphs: Select the paragraph that you want to bullet and click the
Bullet button on the Formatting toolbar.
• To Change or Format the Bullet Symbol: Select Format → Bullets and Numbering from the menu, click Customize to use a symbol as the bullet(s) or Picture to use a picture or graphic as the bullet(s). If you select Customize, select the symbol you want to use and click OK. If you select Picture, select the picture you want to use and click the OK.
Changing Paragraph Alignment and Line Spacing • To Change Line Spacing: Switch to Normal View and select the paragraphs whose line spacing
you want to change. Change the line spacing using one of these methods: - Select Format → Line Spacing from the menu, adjust the line spacing settings in the dialog box and click OK. - Click the Increase Paragraph Spacing button or Decreasing Paragraph Spacing button on the Formatting toolbar.

110 Microsoft PowerPoint 2003
© 2004 CustomGuide, Inc.
Adding Headers and Footers • To Insert a Header or Footer: Select View → Header and Footer from the menu. Fill in any of
these boxes: - Date: Displays the date and time. - Number: Displays the slide number. - Footer: Displays text that appears on each and every one of your slides. Click Apply (to apply the header and/or footer to the current slide) or Apply to All (to apply the header and/or footer to the entire presentation.
Working with Tabs and Indents • To Set a Tab Stop using the Ruler: Click the Tab selector box on the ruler until you see the
type of tab you want to use (left, center, right, and decimal). Click on the ruler where you want to set the tab stop.
Changing the Page Setup • To Change a Slide’s Orientation: Select File → Page Setup from the menu. In the Orientation
section select either the Portrait or Landscape option.
• To Change the Paper Size: Click the Slide Sized for list to select from a list of common page sizes.
Quiz 1. Which of the following can you format using buttons on the formatting
toolbar? (Select all that apply.)
A. Font Size B. Font Color C. Underlining D. Your hard drive
2. What is the purpose of the Format Painter?
A. To paint pretty pictures on your slides B. To highlight important text C. To copy formatting from one object or piece of text and then apply it elsewhere D. To change the background color of your slides.
3. Which of the following Fill Effects can you use for the slide background? (Select all that apply.)
A. Gradient B. Brightness C. Picture D. Texture

Chapter Three: Formatting Your Presentation 111
The Richard Stockton College of New Jersey
4. Although you can format text with any color, you should try to stick with the color scheme’s eight coordinated colors to give your slides a professional, consistent appearance. (True or False?)
5. How can you easily add text or a picture that will appear on each and every one of your slides?
A. Open the Slide Master by selecting View → Master → Slide Master and add the text or picture.
B. There is no quick and easy way to add something to every slide in a presentation. You have to go to each slide and add the text or picture.
C. Click the Add to All Slides button on the Standard toolbar and add the text or picture. D. Use the Format All Slides Wizard to add text to a picture.
6. Once you change the appearance of your slides with the Slide Master, you can’t change the formatting of specific slides. (True or False?)
Homework 1. Open the Homework 3 presentation, located in your Practice folder or disk, and save
it as “Three’s Company.”
2. Go to Slide 2 and select all of the bulleted items on this slide.
3. Click the Font Size list arrow on the Formatting toolbar and select 28, then click the Font list arrow on the Formatting toolbar and select Arial.
4. With the same text still selected, click the Format Painter button on the Standard toolbar. Go to Slide 3 and apply the copied formatting by selecting all the bulleted items on the slide.
5. Click the Design button on the Formatting toolbar and then click Design Templates. Select the Edge template and click Apply.

112 Microsoft PowerPoint 2003
© 2004 CustomGuide, Inc.
6. Add bold and italics formatting to the title font on every slide in the presentation using the Slide Master: select View → Masters → Slide Master from the menu, select the slide title and click the Bold button and the Italics button on the Formatting toolbar. Click the Normal or Normal View button to leave the Master Normal View.
7. Change the presentation’s Color scheme. Select Format → Color Schemes from the Slide Design menu and select a Color scheme you like. Click Apply to All to apply the Color scheme to all the slides in the presentation.
8. Add a header to all your slides that includes the current date and a footer that says “Three’s Company.” Select View → Header and Footer from the menu to open the Header and Footer dialog box. Make sure the Date and Time box is checked as well as the “Update Automatically” button, check the Footer check box and type “Three’s Company” in the Footer text box. Click Apply to All when you’re finished.
9. Change the background for the slides. Select Format → Background from the menu and select a color from the background fill list. Click Apply to All to apply the background to all the slides in the presentation.
Extra Credit: Add a two color gradient background to all the slides in your presentation. Hint: Select Format → Background from the menu, select Fill Effects from the background fill list, click the Gradient tab and create the background.
Quiz Answers 1. A, B, and C.
2. C. The Format Painter tool copies formatting from one object or piece of text so that you can apply or paste it elsewhere.
3. A, C, and D. Brightness is not one of the four Fill Effects. The correct answer would be Pattern.
4. True. You can format the text on your slides with any color you want, but it’s usually best to stick with the eight coordinated colors of the presentation’s color scheme.
5. A. The Slide Master is where you want to go if you want to change the appearance of every slide in your presentation.
6. False. Formatting an individual slide overrides the Slide Master for that slide.

Chapter Four: Drawing and Working
with Graphics Chapter Objectives:
• Drawing on your slides
• Adding, arranging, and formatting text boxes
• Selecting, resizing, formatting, and deleting objects
• Inserting clip art and pictures
• Aligning and grouping objects
• Drawing AutoShapes
• Flipping and rotating objects
• Layering objects
• Applying shadows and 3-D effects
Chapter Task: Add Drawing and Pictures to an Existing Slide
Get ready to get in touch with your artistic side! Slide shows with pictures, graphics, and visuals are much more compelling and effective at conveying messages than slide shows that contain only boring text. Even if you don’t have any artistic ability, PowerPoint makes it easy to add pictures and drawings to your slides, making them look as though you hired a professional graphic design company to create them.
This chapter explains how to use PowerPoint’s unique drawing tools to add lines, shapes, and text boxes to your slides, as well as how to format them. You will also learn how to add pictures to your slides from the Microsoft Clip Art Gallery (which includes more than 4,000 clipart pictures!) or from an external file. This chapter will also teach you how to move, resize, align and group, and flip and rotate graphic objects. Let’s get started!
Prerequisites • Windows basics: How
to use menus, toolbars, dialog boxes, and shortcut keystrokes.
• How to select objects. • Be proficient with the
mouse—especially dragging and dropping.

114 Microsoft PowerPoint 2003
© 2004 CustomGuide, Inc.
Lesson 4-1: Drawing on Your Slides
Most of PowerPoint’s drawing tools can be found on the Drawing toolbar, located at the bottom of the screen. The Drawing toolbar contains tools for drawing lines, shapes, and arrows, and for formatting graphic objects with different coloring, shadow, and 3-D effects.
11.. Start PowerPoint.
22.. Open the presentation named Lesson 4A and save it as American History. First, we have to move to the slide where we want to add our drawings.
33.. Press <Page Down> or use the vertical scroll bar to go to Slide 2. This slide is supposed to show the destinations of a tour package, but if you look closely, you’ll notice that several things are missing from it. Several of the lines connecting text labels to points on the map have disappeared. Go to the next step and we’ll learn how to fix this problem.
44.. Click the Line button on the Drawing toolbar. The pointer changes to a , indicating that you can draw the selected shape.
Figure 4-1
The Drawing toolbar.
Figure 4-2
The procedure for drawing a line or shape on a slide.
Figure 4-3
The updated slide with lines added from the text labels to their destinations on the map.
Line button
1. Click the line or shape you want to draw on the Drawing toolbar.
2. Move the pointer to the starting point of the line or shape and click and hold the mouse button.
3. Drag the pointer to the ending point of the shape or line and release the mouse button.
Our Destinations
Black Hills, S.D.
Philadelphia
New Orleans
Figure 4-2
Figure 4-3
Drawing Insert AutoShape
Select Object Tool
Draw Line
Draw Rectangle
Fill Object Color
Font Color
Dash Style
Shadow
Draw Oval
Insert WordArt
Line Style
ArrowStyle
3-D Effects
Figure 4-1
Draw Arrow
Line Color
Insert Text Box Insert Diagram or Organizational Chart
Insert Clip Art
Pacific Coast
Insert Picture

Chapter Four: Drawing and Working with Graphics 115
The Richard Stockton College of New Jersey
Quick Reference To Draw an Object: 1. Click the object you want
to draw on the drawing toolbar (such as a line or circle).
2. Draw your shape by clicking on the slide and dragging until the shape reaches the desired size.
To Draw a Perfect Square, Circle or Line: • Hold down the <Shift>
key as you draw a selected object.
55.. Place the pointer below the Black Hills, S.D. text label. Click and drag the pointer to the South Dakota marker on the map and release the mouse button, as shown in Figure 4-2. That’s all there is to drawing a line. Try drawing another one.
66.. Following the same procedure as Step 4, draw a line between the Philadelphia text label and the Philadelphia marker on the map. If you can draw a line, you can draw an arrow to point to an item of interest. That’s because an arrow is really nothing more than a line with a tiny triangle at one end. Actually, you can format any line and change it into an arrow or vice versa—but we’ll cover how to format drawing objects in another lesson. Move on to the next step and let’s try drawing an arrow.
77.. Click the Arrow button on the Drawing toolbar. The pointer again changes to a indicating you can draw an arrow.
88.. Using the procedure you just learned, draw a line between the New Orleans text label and the New Orleans marker on the map. Congratulations! You’ve just drawn an arrow on your slide.
NOTE: Arrows point at whatever you drag the destination line to—not where you first click. Remembering where to click and where to drag can be a bit confusing, and some people never master it. If your arrow points in the wrong direction, you can always change the format. For more information, see the lesson “Formatting Objects.”
Now let’s try drawing an oval. 99.. Click the Oval button on the Drawing toolbar.
The pointer changes to a . Drawing shapes is similar to drawing lines—you click on the document where you want to draw the shape and then drag until the shape reaches the desired size.
1100.. Click just above and to the left of the northwest corner of California with the pointer and drag down and to the right until an oval covers the state of California. To draw a perfect circle, rectangle, straight line, or other shape, hold down the <Shift> key as you drag.
1111.. Click the Rectangle button on the Drawing toolbar and hold down the <Shift> key as you drag a square in the bottom-left corner of the slide, as shown in Figure 4-3. Compare your slide with the one shown in Figure 4-3.
1122.. Delete the oval and save your work.
You can create perfect circles, squares, and straight lines by holding down the <Shift> key while you drag with a drawing tool.
Arrow button

116 Microsoft PowerPoint 2003
© 2004 CustomGuide, Inc.
Lesson 4-2: Adding, Arranging, and Formatting Text Boxes
Text boxes are the most important objects that you can add to your slides. Almost every slide you add to your presentation comes with at least one or two text boxes where you can add text. You can also add your own text boxes to your slides by clicking the Text Box button on the Drawing toolbar, clicking where you want the text to appear with the pointer, and typing your text.
Here are a few more pointers about text boxes: • Thin dashed lines surround text boxes. You can type in a text box by clicking inside its
boundaries. • You can add or delete text boxes to and from your slides as needed. • As with any other slide object, you can change the size of a text box by clicking it and
dragging its sizing handles. • You can move text boxes by clicking and dragging them.
11.. Click the Text Box button on the Drawing toolbar. The pointer changes to a , indicating you can click and add text to your slide. First we need to add a “Washington D.C.” text label to the slide.
22.. Click at the end of the line pointing to Washington D.C., located below the Philadelphia label, with the pointer. Before we enter the text for the “Washington D.C.” text label, we need to change the font formatting so that it matches the other text labels on the slide.
Figure 4-4
Changing the size and proportions of a text box.
Figure 4-5
The updated slide with text boxes added.
Text Box button
1. Select the text box you want to resize.
2. Click and drag any sizing handle until the text box reaches the desired size and proportion, then release the mouse button.
Our Destinations
Black Hills, S.D.
Philadelphia
New Orleans
Figure 4-5
Destinations are indicated by blue squares
Washington D.C.
Figure 4-4
Pacific Coast
The text box is resized according to your specifications.

Chapter Four: Drawing and Working with Graphics 117
The Richard Stockton College of New Jersey
Quick Reference To Add a Text Box to a Slide: • Click the Text Box
button on the Drawing toolbar, click where you want to insert the text withthe insertion point, and then type the text.
To Resize a Text Box: 1. Click the text box to select
it. 2. Drag the text box’s sizing
handles to resize it.
33.. Select Arial from the Font List on the Formatting toolbar. Any text we type now will appear in the Arial font type. We still need to change the font size.
44.. Select 18 from the Font Size List on the Formatting toolbar. OK, we’re ready to enter text in our text box.
55.. Type Washington D.C. and click anywhere outside the text box when you have finished typing. That’s all there is to adding a text box to a slide. We changed the font formatting in the text box before we entered any text, but you can also change the font formatting in a text box after text has been typed. Simply select the text and then format it. Let’s add another text box to the current slide—this one will be a legend for the map.
66.. Click the box you added in the previous lesson to select it. Select Edit Text Object from the menu. Move on to the next step to format the text box’s text.
77.. Repeat Steps 3 and 4 to change the text box’s font formatting. Now enter the text.
88.. Type Destinations are indicated by blue squares. Yikes! The text we typed is spilling out of the box! Don’t worry—you can easily change the size and proportions of any text box. Here’s how:
99.. Make sure the box is still selected, and select Format AutoShape from the menu. Select the Text Box tab and check the Word wrap text in Autoshape option and click OK. Your box should look like the third image in Figure 4-4. The text wraps to fit inside the AutoShape object.
1100.. Compare your slide to the one in Figure 4-5 and then save your work.
NOTE: If your box doesn’t look like Figure 4-5, check your text alignment (should be left aligned) and the size of your rectangle.
Font List
Font Size List

118 Microsoft PowerPoint 2003
© 2004 CustomGuide, Inc.
Lesson 4-3: Selecting, Resizing, Moving, and Deleting Objects
Selecting, resizing, moving, and deleting objects—we’ve got a lot of ground to cover in this lesson! But before you can edit, format, resize, move, or delete anything on a slide, you have to select the object. Before you select anything, make sure that the pointer is a selection pointer ( ). Ninety-nine percent of the time it will be, but if it isn’t, click the Select Objects button ( ) on the drawing toolbar.
11.. Go to Slide 3. Click the Mt. Rushmore picture to select it. When you select an object, sizing handles appear around the edge of the object, as shown in Figure 4-6. You can use these sizing handles to change the size and proportions of the selected object. Move on to the next step to see how we can increase the size of the selected Mt. Rushmore picture.
22.. Position the pointer over the bottom right sizing handle until it changes to a . Click and hold down the mouse button and drag down and to the right until the picture is the same width as the double-arrowed line below, then release the mouse button. As you drag an object’s sizing handle, a dotted outline appears to help you resize it. You already know that you can select an object by clicking it with the pointer. What you probably don’t know is that you can also select slide objects by pressing the <Tab> key. Press <Tab> once to select the first object on the slide, press <Tab> again to select the next object, and so on.
Figure 4-6
Sizing handles appear around the edges of any selected objects.
Figure 4-7
The updated slide.
Resize an object by clicking it to select it and then grabbing one of its sizing handles, dragging, and then releasing the mouse button when the object reaches the desired size.
• Mount Rushmore
• Badlands
• Needles Highway
• Custer State Park
Black Hills, South Dakota The American West
Sizing Handles Click and drag to change the size of an object.
Figure 4-6
Figure 4-7
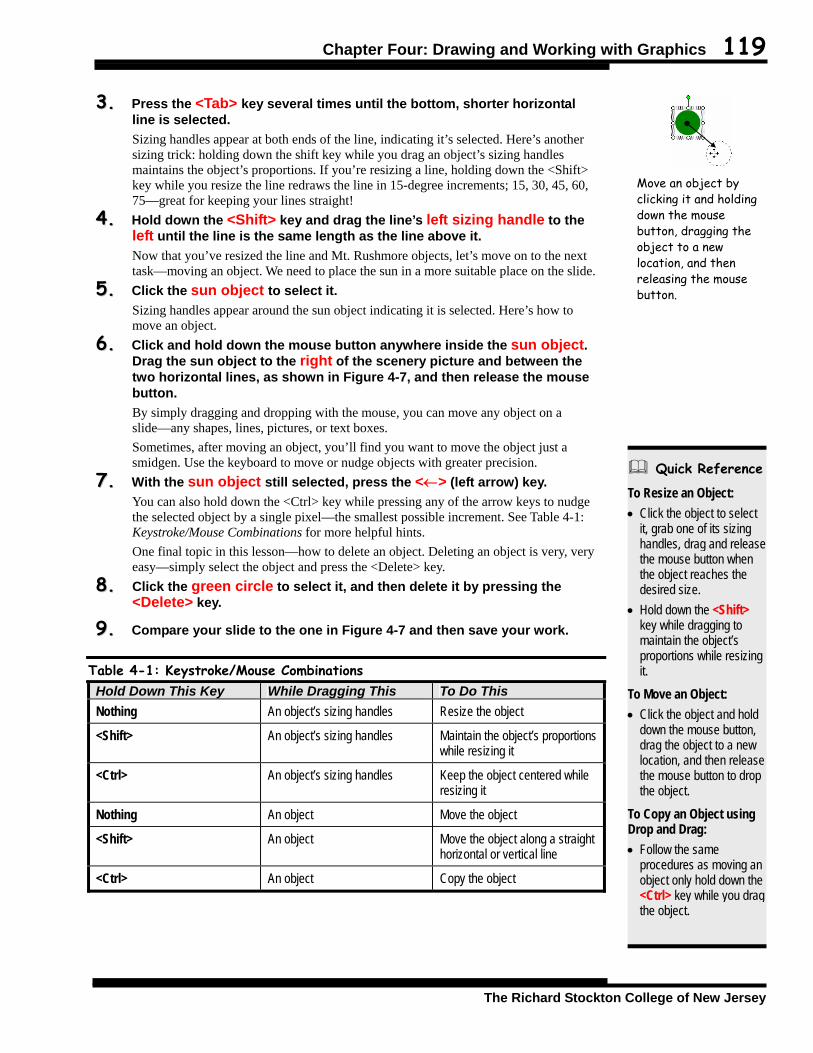
Chapter Four: Drawing and Working with Graphics 119
The Richard Stockton College of New Jersey
Quick Reference To Resize an Object: • Click the object to select
it, grab one of its sizing handles, drag and releasethe mouse button when the object reaches the desired size.
• Hold down the <Shift> key while dragging to maintain the object’s proportions while resizing it.
To Move an Object: • Click the object and hold
down the mouse button, drag the object to a new location, and then release the mouse button to drop the object.
To Copy an Object using Drop and Drag: • Follow the same
procedures as moving an object only hold down the <Ctrl> key while you drag the object.
33.. Press the <Tab> key several times until the bottom, shorter horizontal line is selected. Sizing handles appear at both ends of the line, indicating it’s selected. Here’s another sizing trick: holding down the shift key while you drag an object’s sizing handles maintains the object’s proportions. If you’re resizing a line, holding down the <Shift> key while you resize the line redraws the line in 15-degree increments; 15, 30, 45, 60, 75—great for keeping your lines straight!
44.. Hold down the <Shift> key and drag the line’s left sizing handle to the left until the line is the same length as the line above it. Now that you’ve resized the line and Mt. Rushmore objects, let’s move on to the next task—moving an object. We need to place the sun in a more suitable place on the slide.
55.. Click the sun object to select it. Sizing handles appear around the sun object indicating it is selected. Here’s how to move an object.
66.. Click and hold down the mouse button anywhere inside the sun object. Drag the sun object to the right of the scenery picture and between the two horizontal lines, as shown in Figure 4-7, and then release the mouse button. By simply dragging and dropping with the mouse, you can move any object on a slide—any shapes, lines, pictures, or text boxes. Sometimes, after moving an object, you’ll find you want to move the object just a smidgen. Use the keyboard to move or nudge objects with greater precision.
77.. With the sun object still selected, press the <←> (left arrow) key. You can also hold down the <Ctrl> key while pressing any of the arrow keys to nudge the selected object by a single pixel—the smallest possible increment. See Table 4-1: Keystroke/Mouse Combinations for more helpful hints. One final topic in this lesson—how to delete an object. Deleting an object is very, very easy—simply select the object and press the <Delete> key.
88.. Click the green circle to select it, and then delete it by pressing the <Delete> key.
99.. Compare your slide to the one in Figure 4-7 and then save your work.
Table 4-1: Keystroke/Mouse Combinations Hold Down This Key While Dragging This To Do This Nothing An object’s sizing handles Resize the object
<Shift> An object’s sizing handles Maintain the object’s proportions while resizing it
<Ctrl> An object’s sizing handles Keep the object centered while resizing it
Nothing An object Move the object
<Shift> An object Move the object along a straight horizontal or vertical line
<Ctrl> An object Copy the object
Move an object by clicking it and holding down the mouse button, dragging the object to a new location, and then releasing the mouse button.

120 Microsoft PowerPoint 2003
© 2004 CustomGuide, Inc.
Lesson 4-4: Formatting Objects
In this lesson, you’ll learn how to format slide objects. Although there are many different types of shapes in PowerPoint, the procedure for formatting each one is pretty much the same. Here it is:
11.. If necessary, find and open the Lesson 4B presentation and save it as American History. If you don’t know where your practice files are located, ask your instructor for help.
22.. Click the sun object to select it. Here’s how to change the fill color (the color used to fill the inside) of an object.
33.. Click the Fill Color button arrow on the Drawing toolbar. You can fill an object using: • Color palette color: Fills the background with one of the eight colors from
the slide’s current color scheme. • More colors: Fills the background with one of the hundreds of rainbow colors
from the Color dialog box. • Fill Effects: Fills the background with more dramatic looking effects. There are
four types of fill effects: gradient, texture, pattern, and picture. We want the sun to appear yellow, but since yellow isn’t one of the eight colors in the current color scheme, we’ll have to select it from the More colors option.
Figure 4-8
The Colors and Lines tab of the Format AutoShape dialog box.
Figure 4-9
The Size tab of the Format AutoShape dialog box.
Figure 4-10
The updated slide with the formatted objects.
Fill Color button
Other Ways to Change Fill Colors: • Select Format →
AutoShape from the menu.
You can also format any object by right-clicking the object and selecting the Format AutoShape option from the shortcut menu.
• Mount Rushmore
• Badlands
• Needles Highway
• Custer State Park
Black Hills, South Dakota The American West
Figure 4-8
Figure 4-9 Figure 4-10
Change the fill color of the object.
Change the line color of the object. Select a dash style for the object’s line.
Select a line style for the object’s line.
Specify the width of an object’s line.
Add or remove different arrowheads to a selected line.
Check to make an object transparent.
Make these settings the default for all new objects.

Chapter Four: Drawing and Working with Graphics 121
The Richard Stockton College of New Jersey
Quick Reference To Fill a Shape with a Color: • Select the shape, then
click the Fill Color button arrow on the Drawing toolbar and select the color you want.
To Change Line Color or Remove a Line: • Select the shape, then
click the Line Color button arrow on the Drawing toolbar and select the color you want.
To Change the Line Style: • Select the line, then click
the Line Style button on the Drawing toolbar and select the line style you want.
To Change the Dash Style: • Select the line, then click
the Dash Style button on the Drawing toolbar and select the dash you want.
To Add or Remove Arrow Heads: • Select the line, then click
the Arrow Style button on the Drawing toolbar and select the arrow style you want.
To Use the Format Object Dialog Box: • Select the object and
select Format → AutoShape from the menu.
44.. Select More Fill colors from the fill list.
NOTE: Although we’re assigning an individual color to the sun object, the point of the color scheme is to keep you from doing just that. Try to stick to the color scheme whenever possible. The reason for this is if you change the color scheme later on, the fill colors will also reflect the color change, unless you’ve assigned them individual colors.
55.. Select a yellow color and click OK. The sun object is filled with the selected yellow color. You can also change an object’s line color—or remove the line that surrounds the object altogether.
66.. Click the Line Color button arrow on the Drawing toolbar and select No Line to remove the line. The black line surrounding the sun disappears. Now let’s remove the arrowheads from the top line on the slide.
77.. Click the upper double-arrowhead line to select it, then click the Arrow Style button on the Drawing toolbar and select the Arrow Style 1 option (the line without any arrowheads). Next let’s change the color of the selected line.
88.. With the top line still selected, click the Line Color button arrow on the Drawing toolbar and select the blue color. We have one more change to make to the selected line—the line style.
99.. With the top line still selected, click the Line Style button on the Drawing toolbar and select the 3 pt double line. So far, we’ve been using the mouse and the Drawing toolbar to change the size and format of our slide objects. You can also use the Format AutoShape dialog box to resize and/or format a selected object. The Format AutoShape dialog box isn’t quite as quick and convenient as the Drawing toolbar, but it contains more formatting options that you can choose from. Some people actually prefer formatting objects with the Format AutoShape dialog box because it allows them to format and resize objects with a greater degree of precision. We’ll use the Format AutoShape dialog box to format the bottom line on the slide—then you can decide for yourself which method you like better.
1100.. Click the bottom line to select it and select Format → AutoShape from the menu. The AutoShape dialog box appears with the Colors and Lines tab selected, as shown in Figure 4-8. You can also open the Format AutoShape dialog box by right-clicking any object and selecting Format AutoShape from the menu.
1111.. Click the Line Color list arrow and select the blue color, then click the Line Style list arrow and select the 3 pt. double line. We’ve finished formatting the bottom line, but let’s take a look at one more thing before we close the Format AutoShape dialog box.
1122.. Click the Size tab. The Size tab of the Format AutoShape dialog box appears, as shown in Figure 4-9. Here you can resize an object with greater precision than the mouse. You can enter an exact height and width for the selected object or you can adjust its size specifying a percentage of the original size. If the Lock aspect ratio check box is selected, the Height and Width settings change in relation to one another.
1133.. Click OK to close the dialog box and compare your slide to the one in Figure 4-10.
Line Color button
Other Ways to Change an Object’s Line Color: • Select Format →
AutoShape from the menu.
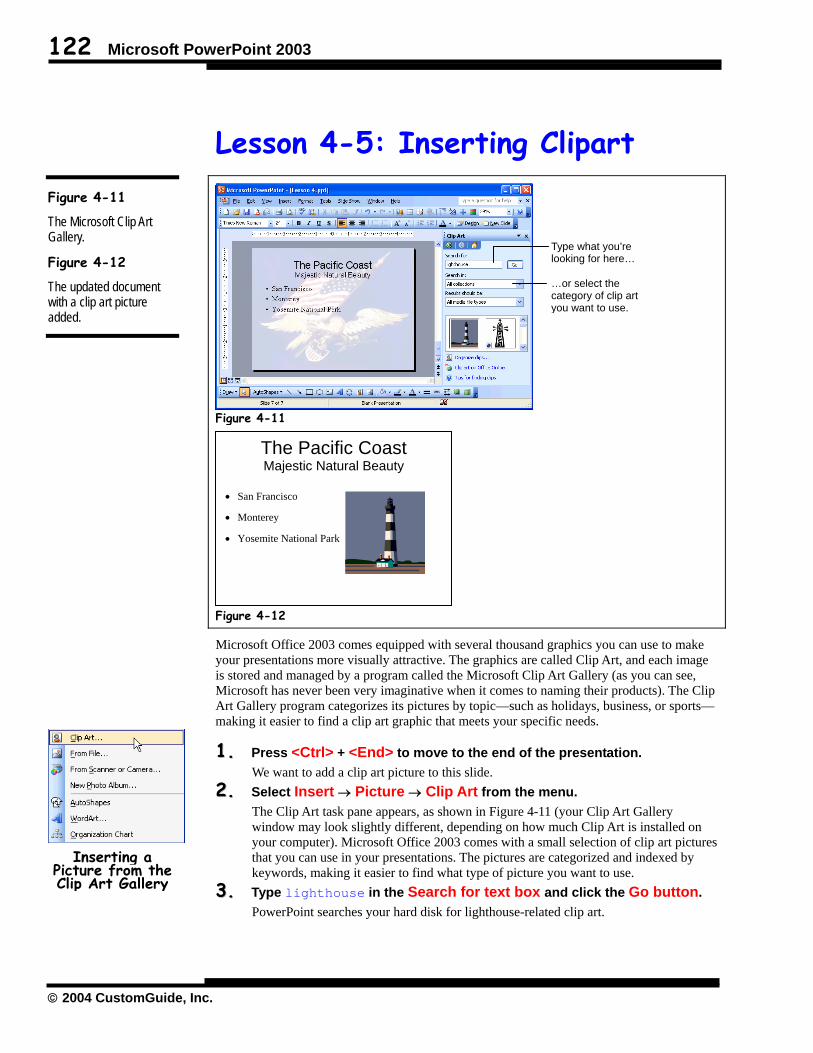
122 Microsoft PowerPoint 2003
© 2004 CustomGuide, Inc.
Lesson 4-5: Inserting Clipart
Microsoft Office 2003 comes equipped with several thousand graphics you can use to make your presentations more visually attractive. The graphics are called Clip Art, and each image is stored and managed by a program called the Microsoft Clip Art Gallery (as you can see, Microsoft has never been very imaginative when it comes to naming their products). The Clip Art Gallery program categorizes its pictures by topic—such as holidays, business, or sports—making it easier to find a clip art graphic that meets your specific needs.
11.. Press <Ctrl> + <End> to move to the end of the presentation. We want to add a clip art picture to this slide.
22.. Select Insert → Picture → Clip Art from the menu. The Clip Art task pane appears, as shown in Figure 4-11 (your Clip Art Gallery window may look slightly different, depending on how much Clip Art is installed on your computer). Microsoft Office 2003 comes with a small selection of clip art pictures that you can use in your presentations. The pictures are categorized and indexed by keywords, making it easier to find what type of picture you want to use.
33.. Type lighthouse in the Search for text box and click the Go button. PowerPoint searches your hard disk for lighthouse-related clip art.
Figure 4-11
The Microsoft Clip Art Gallery.
Figure 4-12
The updated document with a clip art picture added.
Inserting a
Picture from the Clip Art Gallery
Figure 4-12
Figure 4-11
The Pacific Coast Majestic Natural Beauty
• San Francisco
• Monterey
• Yosemite National Park
Type what you’re looking for here…
…or select the category of clip art you want to use.

Chapter Four: Drawing and Working with Graphics 123
The Richard Stockton College of New Jersey
Quick Reference To Insert a Clip Art Graphic: 1. Select Insert → Picture → Clip Art from the menu.
2. Type the name of what you’re looking for in the Search for box and press <Enter> or Go.
Or… Click a clip art category. 3. Scroll through the clip art
pictures as needed until you find an appropriate graphic.
4. Click the graphic you want to insert.
5. Close the task pane.
44.. Browse through the clip art pictures until you find a picture of a lighthouse similar to the one shown in Figure 4-12. Depending on your computer’s setup, there may be several pictures of lighthouses or only one. Now that you have found an appropriate graphic you will need to insert it into the slide. Here’s how:
55.. Click the lighthouse picture shown in Figure 4-12.
The selected graphic is inserted into the slide.
NOTE: Depending on how PowerPoint is installed and configured on your computer system, you may get a “The file is not available…” error message. This means PowerPoint cannot locate the Clip Art pictures. If you are in a classroom environment, ask your instructor for assistance. If you are using PowerPoint by yourself, you may need to insert either the Office 2003 or PowerPoint 2003 CD-ROM into your computer.
66.. Close the task pane. Often the pictures you insert will be either too large or too small. When this happens you will have to resize the picture to a more suitable dimension. You resize a picture just like any other object: by selecting it and dragging it by its sizing handles. You can also adjust the object’s size on the Size tab of the Format Picture dialog box.
77.. Click the image to select it. Position the pointer over the lower-left sizing handle, until the pointer changes to a , then click and hold the left mouse button. Drag the mouse diagonally down and to the left until the picture is roughly 50% larger, and then release the mouse button.
You probably noticed there were several other options listed in the Insert → Picture menu. Here’s what they are and what they do:
Table 4-2: The Insert Picture Menu Insert Description
Clip Art Opens the Clip Gallery where you can select a clip art image to insert.
From File Inserts a graphic file created in another program.
From Scanner Scans an image and inserts it at the insertion point.
Organization Chart Inserts a Microsoft Organization Chart object.
New Photo Album Inserts photographs from a file, disk, scanner or camera.
AutoShapes Inserts a ready-made shape, such as a circle, rectangle, star, arrow, etc.
WordArt Creates spectacular text effects, such as .
Resize a picture by clicking it to select it, then grab one of its sizing handles and drag. Release the mouse button when the object reaches the desired size.

124 Microsoft PowerPoint 2003
© 2004 CustomGuide, Inc.
Lesson 4-6: Inserting and Formatting Pictures
If the Microsoft Clip Gallery doesn’t have the graphic you’re looking for you can insert graphics created with other programs. There are many other clip art collections available that are much larger than the Microsoft Clip Gallery. Additionally, you can use graphics and pictures created with graphics programs such as Microsoft Paint (which comes with Windows) or Corel Draw. In this lesson, you will learn how to insert a picture into a slide.
11.. Go to Slide 4 and select Insert → Picture → From File from the menu. The Insert Picture dialog box appears, as shown in Figure 4-13. Here you need to specify the name and location of the graphic file to be inserted into your slide.
Figure 4-13
The Insert Picture dialog box.
Figure 4-14
The Picture toolbar.
Figure 4-15
The updated document with an external picture file inserted.
Figure 4-16
How to crop a picture.
Inserting a
Picture from a File
Figure 4-13
Insert Picture
Color Less Contrast
More Contrast
More Brightness
Less Brightness
Crop
Rotate
Line Style
Compress Pictures
RecolorPicture
Select the graphic file you want to insert.
Figure 4-14
Figure 4-15
Click the crop button on the Picture toolbar and then drag picture’s sizing handles to crop a picture.
Figure 4-16
Format Object
Set Transparent Color
Reset Picture
• Independence National Historic Park
• Independence Hall
• Franklin Court
• Liberty Bell
Philadelphia The City of Brotherly Love

Chapter Four: Drawing and Working with Graphics 125
The Richard Stockton College of New Jersey
Quick Reference To Insert a Graphic Created in Another Program: 1. Select Insert → Picture → From File from the menu.
2. Select the file location and name and click OK.
To Change a Picture’s Color Options: Select the picture, click the
Color button on the Picture toolbar, and select a coloring option.
To Crop a Picture: 1. Select the picture and
click the Crop button on the Picture toolbar.
2. Click and drag the edge of the picture until you have trimmed appropriately.
22.. If necessary, navigate to your Practice folder or disk. All the graphic files located in your Practice folder or disk appear in the file window.
33.. Select the Philadelphia file. PowerPoint displays a preview of the graphic in the right side panel of the Insert Picture dialog box.
44.. Click the Insert button to insert the Philadelphia picture. PowerPoint inserts the Philadelphia picture into the current slide. Sometimes an inserted picture may need some “tweaking”—perhaps it is too dark, too light, or is using the wrong colors. Here is where the Picture toolbar comes in. The Picture toolbar is like your very own photo studio and contains a variety of tools for adjusting and formatting any pictures you insert. The Picture toolbar should appear whenever you select a picture—if it doesn’t, move on to the next step, otherwise skip ahead to Step 6.
55.. If the Picture toolbar does not appear, summon it by selecting View → Toolbars → Picture from the menu. First let’s change the colors in the Philadelphia picture.
66.. With the Philadelphia picture still selected, click the Color button on the Picture toolbar and select Grayscale. PowerPoint changes the color of the Philadelphia picture to grayscale.
NOTE: The Picture toolbar should appear whenever a picture is selected. If the Picture toolbar doesn’t appear when you select a picture, you can still display it by selecting View → Toolbars → Picture from the menu.
Another useful tool on the Picture toolbar is the Crop button. When you crop a picture you trim its horizontal and vertical sides. Cropping is useful if you only want to include a specific portion of a picture, or when a picture contains something you want cut out, like an ex-boyfriend.
77.. Click the Crop button on the Picture toolbar. The pointer changes to a indicating you can crop pictures.
88.. Position the pointer over the right-middle sizing handle then click and hold the left mouse button and drag the mouse to the left about a half-inch, as shown in Figure 4-16. The area you cropped no longer appears in the picture.
99.. Click the Crop button on the Picture toolbar to exit cropping mode, then click the Undo button on the Standard toolbar twice to undo the cropping and grayscale formatting you applied to the picture.
Table 4-3: Common Graphic File Formats Format File Size Description BMP Large Known as a bitmap, this is a graphic format used by many programs.
CGM Small Clip art pictures often come in Computer Graphics Metafile format.
GIF Small Picture file format commonly used on the Internet.
JPG Small Digital photographs are usually saved as JPEG files. Because of its small size, JPEG files are also commonly used on the Internet.
WMF Small Another file format used for clip art pictures.
TIF Large A file format used by scanners, fax programs, and some drawing programs.
Crop button
Color button

126 Microsoft PowerPoint 2003
© 2004 CustomGuide, Inc.
Lesson 4-7: Aligning and Grouping Objects
Slides that have objects scattered randomly about them look terrible. The Align command, located under the Draw button on the Drawing toolbar, aligns objects relative to one another. You can align objects so that they are lined up with one another or spaced equally apart from one another. This lesson will give you some practice aligning objects with PowerPoint’s alignment commands.
This lesson also explains how to group and ungroup objects. It’s often easier to move and work with a single object than it is to work with several smaller objects. A group is a collection of objects that PowerPoint treats as though it were a single object. By grouping several objects together you can move or resize the entire group instead of moving and resizing each object one by one.
11.. If necessary, find and open the Lesson 4C presentation and save it as American History. Go to Slide 5. Someone sure was sloppy when they created this slide—the pictures and text are all over the place! You could manually move the objects and align the objects with one another by using the mouse—but that would require a lot of time, and unless you have eyes like a hawk, it would be difficult to align the objects perfectly. Instead we’ll align the objects using PowerPoint’s alignment commands.
Figure 4-17
The steps for aligning objects with one another.
Figure 4-18
The steps for grouping objects.
Select more than one object by holding down the <Shift> key as you click each object…
…or by using the pointer to draw a box around the objects you want to select.
1. Select the objects you want to align by holding down the <Shift> key as you click each object.
2. Select Draw → Align or Distribute from the Drawing toolbar, then select the alignment you want to use.
The objects are aligned with one another accordingly.
1. Select the objects you want to group by holding down the <Shift> key as you click each object.
2. Select Draw → Group from the Drawing toolbar.
The objects are grouped together as a single object. Figure 4-17
Figure 4-18
Aligning Objects Grouping Objects

Chapter Four: Drawing and Working with Graphics 127
The Richard Stockton College of New Jersey
Quick Reference To Select Multiple Objects:• Press and hold down the
<Shift> key as you click each object that you want to select.
Or… • Use the arrow pointer ( )
to draw a box around the objects that you want to select.
To Align Objects with Each Other: 1. Follow the above steps to
select the objects you want to align.
2. Click the Draw button on the Drawing toolbar, select Align or Distribute and select howyou want to align or distribute the selected objects.
To Group Several Objects: 1. Select the objects you
want to group together. 2. Click the Draw
button on the Drawing toolbar and select Group.
To Ungroup a Grouped Object: • Select the grouped object,
click the Draw button on the Drawing toolbar and select Ungroup.
First you need to select the objects you want to align with one another. There are two ways you can select more than one object:
• Press and hold down the <Shift> key as you click each object that you want to select. • Use the arrow pointer ( ) to draw a box around the objects that you want to select.
Point to a location above and to the left of the objects that you want to select, and click and drag the mouse down and to the right until the box surrounds all the objects. When you release the mouse button, all the objects in the box will be selected. The disadvantage of this method is it’s not as selective as using the <Shift> + click method.
22.. Hold down the <Shift> key as you select the Executive, Legislative, and Judicial pictures as shown in Figure 4-17. Now you can align the selected objects with one another. Here’s how:
33.. Click the Draw button on the Drawing toolbar and select Align or Distribute → Align Bottom. The selected objects are aligned with the bottom-most object, the Executive branch picture. Next we need to center align the Judicial text box with the Judicial branch picture.
44.. Click the Judicial branch picture to select it (and deselect any other objects) then hold down the <Shift> key and click the Judicial text box. Now let’s center align the two selected objects.
55.. Click the Draw button on the Drawing toolbar and select Align or Distribute → Align Center. PowerPoint centers the picture and text label. The procedure for grouping several objects into a single object is very similar to aligning several objects—first you select the objects you want to group, then you select the Group command from the Draw button on the Drawing toolbar.
66.. Press <Esc> to deselect the objects and then click the Legislative branch picture to select it. Then hold down the <Shift> key and click the Legislative text box. Since these two objects should always remain together, it makes sense to group them together and work with a single object instead of two.
77.. Click the Draw button on the Drawing toolbar and select Group. PowerPoint groups the selected picture and text box into a single object. You can break a group back into its original components at any time by selecting the grouped object, clicking the Draw button and selecting Ungroup.
88.. Following the procedure you learned in Steps 6 and 7, group the Judicial branch picture and the Judicial text box together and then do the same to the Executive branch picture and the Executive text box. You can also use the Align and Distribute command to distribute selected objects so there is equal horizontal or vertical distance between all the objects. Move on to the next step to try distributing the selected objects horizontally.
99.. Select the Executive, Legislative, and Judicial objects, click the Drawing button on the Drawing toolbar and select Align or Distribute → Distribute Horizontally. PowerPoint evenly distributes the selected objects.
Give yourself a pat on the back when you have finished this lesson—probably less than ten percent of all PowerPoint users know how to align and group the objects on their slides.
Draw button
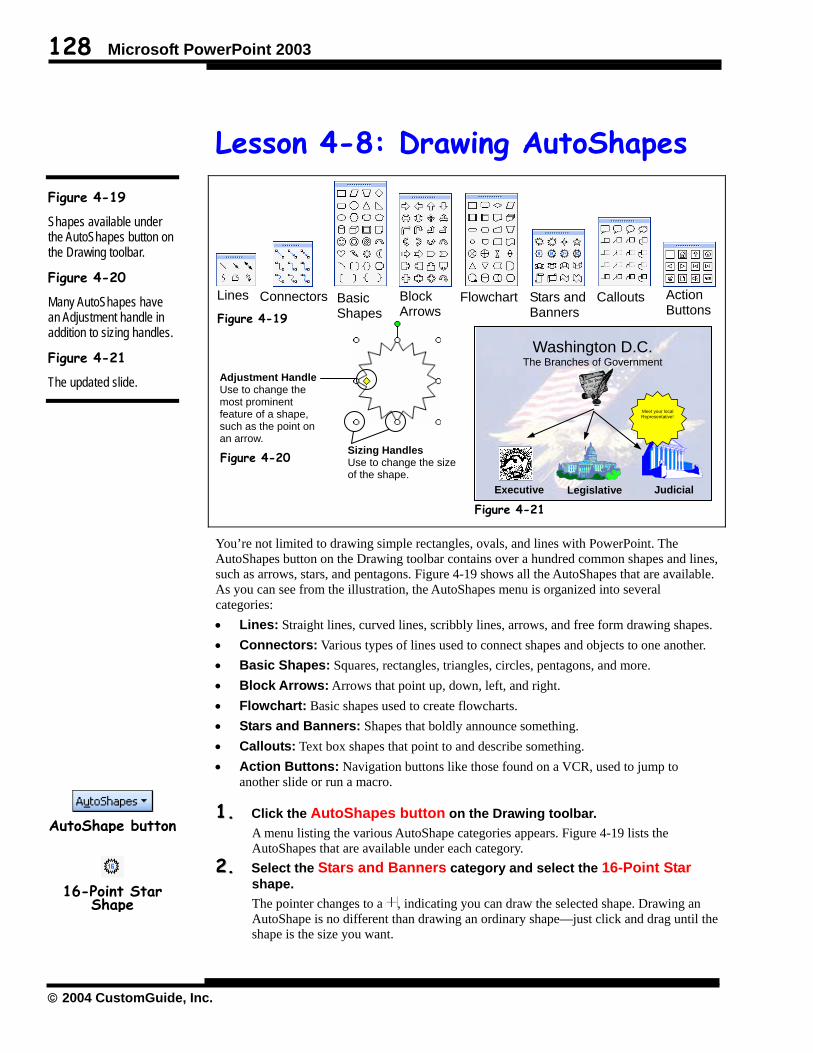
128 Microsoft PowerPoint 2003
© 2004 CustomGuide, Inc.
Lesson 4-8: Drawing AutoShapes
You’re not limited to drawing simple rectangles, ovals, and lines with PowerPoint. The AutoShapes button on the Drawing toolbar contains over a hundred common shapes and lines, such as arrows, stars, and pentagons. Figure 4-19 shows all the AutoShapes that are available. As you can see from the illustration, the AutoShapes menu is organized into several categories: • Lines: Straight lines, curved lines, scribbly lines, arrows, and free form drawing shapes. • Connectors: Various types of lines used to connect shapes and objects to one another. • Basic Shapes: Squares, rectangles, triangles, circles, pentagons, and more. • Block Arrows: Arrows that point up, down, left, and right. • Flowchart: Basic shapes used to create flowcharts. • Stars and Banners: Shapes that boldly announce something. • Callouts: Text box shapes that point to and describe something. • Action Buttons: Navigation buttons like those found on a VCR, used to jump to
another slide or run a macro.
11.. Click the AutoShapes button on the Drawing toolbar. A menu listing the various AutoShape categories appears. Figure 4-19 lists the AutoShapes that are available under each category.
22.. Select the Stars and Banners category and select the 16-Point Star shape. The pointer changes to a , indicating you can draw the selected shape. Drawing an AutoShape is no different than drawing an ordinary shape—just click and drag until the shape is the size you want.
Figure 4-19
Shapes available under the AutoShapes button on the Drawing toolbar.
Figure 4-20
Many AutoShapes have an Adjustment handle in addition to sizing handles.
Figure 4-21
The updated slide.
AutoShape button
16-Point Star
Shape
Figure 4-19
Sizing Handles Use to change the size of the shape.
Figure 4-20
Washington D.C. The Branches of Government
Meet your localRepresentative!
Figure 4-21 Executive Legislative Judicial
Lines Connectors Block Arrows
Flowchart Stars and Banners
Callouts Action Buttons
Basic Shapes
Adjustment Handle Use to change the most prominent feature of a shape, such as the point on an arrow.

Chapter Four: Drawing and Working with Graphics 129
The Richard Stockton College of New Jersey
Quick Reference To Insert an AutoShape: 1. Click the
AutoShapes button on the Drawing toolbar and select the category and AutoShape that you want to insert.
2. Drag the crosshair pointer to draw the AutoShape.
To Resize an AutoShape: Select the AutoShape and
drag its sizing handles toresize it.
To Adjust an AutoShape: • Select the AutoShape and
drag its adjustment handles ( ) to adjust the most prominent feature of the shape.
To Add Text to a Shape: • Right-click the shape,
select Add Text from the shortcut menu and type the text.
33.. Place the pointer just above the judicial building. Click and drag the pointer down and to the right until the right edge of the shape is about 1 inch from the right edge of the slide, then release the mouse button. Compare the size and position of your AutoShape with the one in Figure 4-21. If your AutoShape is still selected, you’ll notice a yellow diamond on the left side. This is an adjustment handle—some AutoShapes sneak them in along with the object’s sizing handles. By grabbing and dragging an adjustment handle, you can adjust the most prominent feature of an AutoShape, such as the point on an arrow or the spikes on a star. Adjustment handles are not used to resize an object—you still need to click and drag one of the object’s sizing handles to do that.
44.. Click and drag the 16-Point Star’s yellow adjustment handle ( ) to the left just a bit. By dragging the star’s adjustment handle you’ve changed the size of star’s spikes. You can move, resize, and format an AutoShape just like any other shape. Go to the next step and we’ll change the color of our star shape.
55.. With the 16-Point Star still selected, click the Fill Color button arrow on the Drawing toolbar, select More Fill Colors, and select a yellow color. Here’s another shape trick: you can add text to any shape by right-clicking the shape, selecting Add Text from the shortcut menu, and typing the text.
66.. Right-click the 16-Point Star and select Add Text from the shortcut menu. A blinking insertion point (⏐) appears in the star, indicating that the shape is ready to accept any text that you type. First, we have to change the font size and type so that it will fit in the AutoShape.
77.. Select Arial from the Font List and 14 from the Font Size List on the Formatting toolbar. Any text we type now will appear in Arial 14-point font type. OK, we’re ready to enter text in our text box.
88.. Type Meet your local press <Enter> to add a new line and type Representative!
Let’s try adding some more AutoShapes to the current slide. The Connectors AutoShape contains lines that connect objects on your slide. Connector lines are great if you want to create a flowchart—and that’s what we’ll do in the next step.
99.. Click the AutoShapes button on the Drawing toolbar, select Connectors and select the Straight Arrow Connector. Next you need to select the two objects you want to connect.
1100.. Position the pointer over the Constitution picture’s bottom middle sizing handle until the pointer changes to a . Click the bottom sizing handle and then click the Executive branch object’s top middle sizing handle with the pointer. You’ve just connected the Constitution object and the Executive branch object. Complete the next step and you’ve finished the lesson!
1111.. Following the procedure you learned in Steps 9 and 10, connect the Constitution with the Legislative and Judicial objects. Compare your slide with the one in Figure 4-21 when you’ve finished.
Font List
Font Size List
Straight Arrow
Connector
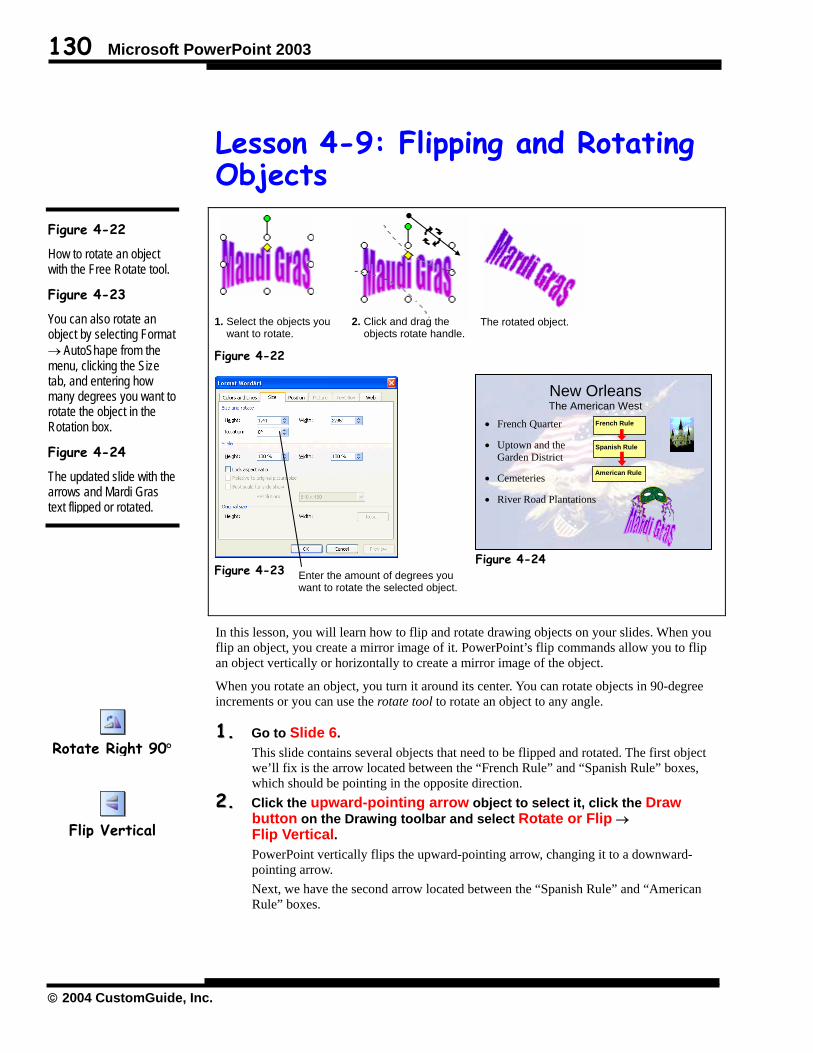
130 Microsoft PowerPoint 2003
© 2004 CustomGuide, Inc.
Lesson 4-9: Flipping and Rotating Objects
In this lesson, you will learn how to flip and rotate drawing objects on your slides. When you flip an object, you create a mirror image of it. PowerPoint’s flip commands allow you to flip an object vertically or horizontally to create a mirror image of the object.
When you rotate an object, you turn it around its center. You can rotate objects in 90-degree increments or you can use the rotate tool to rotate an object to any angle.
11.. Go to Slide 6. This slide contains several objects that need to be flipped and rotated. The first object we’ll fix is the arrow located between the “French Rule” and “Spanish Rule” boxes, which should be pointing in the opposite direction.
22.. Click the upward-pointing arrow object to select it, click the Draw button on the Drawing toolbar and select Rotate or Flip → Flip Vertical. PowerPoint vertically flips the upward-pointing arrow, changing it to a downward-pointing arrow. Next, we have the second arrow located between the “Spanish Rule” and “American Rule” boxes.
Figure 4-22
How to rotate an object with the Free Rotate tool.
Figure 4-23
You can also rotate an object by selecting Format → AutoShape from the menu, clicking the Size tab, and entering how many degrees you want to rotate the object in the Rotation box.
Figure 4-24
The updated slide with the arrows and Mardi Gras text flipped or rotated.
Rotate Right 90°
Flip Vertical
Figure 4-22
Figure 4-23 Enter the amount of degrees you want to rotate the selected object.
1. Select the objects you want to rotate.
2. Click and drag the objects rotate handle.
The rotated object.
• French Quarter
• Uptown and the Garden District
• Cemeteries
• River Road Plantations
New Orleans The American West
French Rule
Spanish Rule
American Rule
Figure 4-24
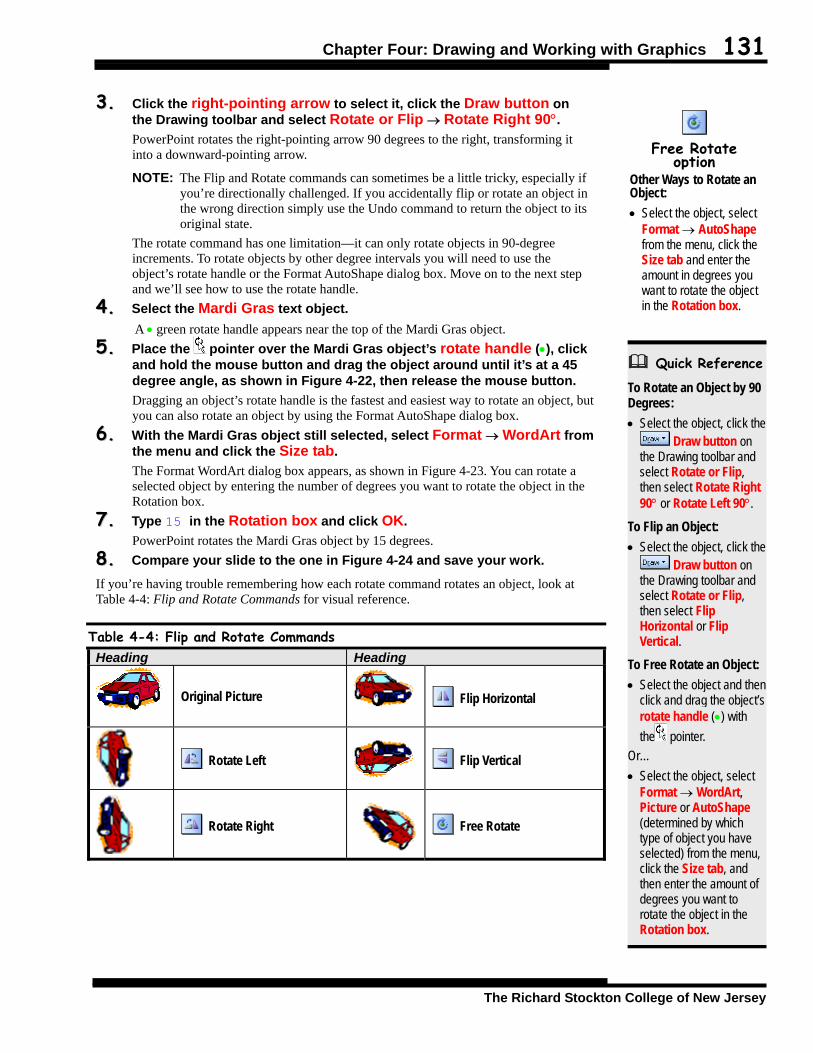
Chapter Four: Drawing and Working with Graphics 131
The Richard Stockton College of New Jersey
Quick Reference To Rotate an Object by 90 Degrees: • Select the object, click the
Draw button on the Drawing toolbar and select Rotate or Flip, then select Rotate Right 90° or Rotate Left 90°.
To Flip an Object: • Select the object, click the
Draw button on the Drawing toolbar and select Rotate or Flip, then select Flip Horizontal or Flip Vertical.
To Free Rotate an Object: • Select the object and then
click and drag the object’s rotate handle (•) with the pointer.
Or… • Select the object, select
Format → WordArt, Picture or AutoShape (determined by which type of object you have selected) from the menu, click the Size tab, and then enter the amount of degrees you want to rotate the object in the Rotation box.
33.. Click the right-pointing arrow to select it, click the Draw button on the Drawing toolbar and select Rotate or Flip → Rotate Right 90°. PowerPoint rotates the right-pointing arrow 90 degrees to the right, transforming it into a downward-pointing arrow.
NOTE: The Flip and Rotate commands can sometimes be a little tricky, especially if you’re directionally challenged. If you accidentally flip or rotate an object in the wrong direction simply use the Undo command to return the object to its original state.
The rotate command has one limitation—it can only rotate objects in 90-degree increments. To rotate objects by other degree intervals you will need to use the object’s rotate handle or the Format AutoShape dialog box. Move on to the next step and we’ll see how to use the rotate handle.
44.. Select the Mardi Gras text object. A • green rotate handle appears near the top of the Mardi Gras object.
55.. Place the pointer over the Mardi Gras object’s rotate handle (•), click and hold the mouse button and drag the object around until it’s at a 45 degree angle, as shown in Figure 4-22, then release the mouse button. Dragging an object’s rotate handle is the fastest and easiest way to rotate an object, but you can also rotate an object by using the Format AutoShape dialog box.
66.. With the Mardi Gras object still selected, select Format → WordArt from the menu and click the Size tab. The Format WordArt dialog box appears, as shown in Figure 4-23. You can rotate a selected object by entering the number of degrees you want to rotate the object in the Rotation box.
77.. Type 15 in the Rotation box and click OK. PowerPoint rotates the Mardi Gras object by 15 degrees.
88.. Compare your slide to the one in Figure 4-24 and save your work.
If you’re having trouble remembering how each rotate command rotates an object, look at Table 4-4: Flip and Rotate Commands for visual reference.
Table 4-4: Flip and Rotate Commands Heading Heading
Original Picture
Flip Horizontal
Rotate Left Flip Vertical
Rotate Right Free Rotate
Free Rotate
option Other Ways to Rotate an Object: • Select the object, select
Format → AutoShape from the menu, click the Size tab and enter the amount in degrees you want to rotate the object in the Rotation box.

132 Microsoft PowerPoint 2003
© 2004 CustomGuide, Inc.
Lesson 4-10: Layering Objects
Whenever you have more than one object on a slide, it’s possible for one or more objects to overlap one another. This presents you with a problem: how can you make sure one object appears in front of, or in back of, another object? PowerPoint (and most other drawing programs) solves this problem by layering objects, like a stack of papers. The first object you draw is on the bottom layer and the last object you draw is on the top layer. Of course, you can change the order in which objects appear in front or back, and that’s the topic of this lesson.
There are four layering commands: • Bring to Front: Places the selected object on the very top layer of the slide. All other
objects will appear behind the selected object. • Send to Back: Places the selected object on the very bottom layer of the slide. All other
objects will appear in front of the selected object. • Bring Forward: Brings the selected object one layer up on the slide. • Send Backward: Sends the selected object one layer down on the slide.
Ready to get some layering practice? Let’s get started…
11.. If necessary, find and open the Lesson 4D presentation and save it as American History. If you don’t know where your practice files are located, ask your instructor for help.
22.. Click the Mardi Gras text object to select it. We want to send the Mardi Gras object to the back layer of the slide so that it appears behind the mask.
Figure 4-25
Here the Mardi Gras text object appears before the mask.
Figure 4-26
By clicking the Draw button on the Drawing toolbar and selecting Order → Send Backward, the Mardi Gras text object is sent behind the mask.
Figure 4-27
The order in which you select and send objects to the front or back is very important, as shown here.
Figure 4-28
The updated slide with the objects properly layered.
• French Quarter
• Uptown and the Garden District
• Cemeteries
• River Road Plantations
New Orleans The American West
Figure 4-28
French Rule
Spanish Rule
American Rule
American Rule
Spanish Rule
French Rule
1. Bring to Front
2. Bring to Front
3. Bring to Front
4. Bring to Front
Figure 4-25
Figure 4-26
Figure 4-27
Layer 2
Layer 1 (Top)
Layer 3
Layer 4
Layer 5 (Bottom)
Chapter Four: Drawing and Working with Graphics 133
The Richard Stockton College of New Jersey
Quick Reference To Change the Order in Which Objects Appear on a Slide: 1. Select the object. 2. Click the Draw
button on the Drawing toolbar, select Order and select one of the following layering commands:
Bring to Front: Places the selected object on the very top layer of the slide. All other objects will appear behind the selected object.
Send to Back: Places theselected object on the very bottom layer of the slide. All other objects will appear in front of the selected object.
Bring Forward: Brings the selected object one layer up on the slide.
Send Backward: Sends the selected object one layer down on the slide.
• The order in which you select and layer objects will determine the order in which they appear on the slide. For example, the last object you bring to the front will always appear on the top layer.
33.. Click the Draw button on the Drawing toolbar and select Order → Send Backward. The selected Mardi Gras text object is sent one layer backward so that it appears behind the mask graphic. When you want to layer several objects in a particular sequence, the order in which you select the object and then send it to the front or back is very important. For example, if you bring object A to the front (or on top) and then bring object B to the front (or on top), object A moves down one layer so that it would appear behind object B. Confused? Let’s try layering the objects in the slide’s flowchart so you’ll better understand why the order in which you select and layer objects is so important.
44.. Select the arrow between Spanish Rule and American Rule, click the Draw button on the Drawing toolbar and select Order → Bring to Front. PowerPoint brings the selected arrow to the front layer, in front of both the Spanish Rule and American Rule boxes. We want the arrow to appear in front of the American Rule box, but not in front of the Spanish Rule box. Move on to the next step to bring the Spanish Rule box in front.
55.. Select the Spanish Rule object, click the Draw button on the Drawing toolbar and select Order → Bring to Front. PowerPoint brings the Spanish Rule object to the front layer, in front of the arrow that had previously been on the top layer. Notice that the bottom arrow still appears on top of the American Rule box, however. Go to the next step and finish layering the object in the flowchart.
66.. Follow the sequence shown in Figure 4-27 (you’re on Step 3) and layer the remaining arrow and French Rule box. When you’re finished, your slide should look like the one in Figure 4-28. Had you selected the objects and brought them to the front in any other sequence, the objects wouldn’t appear in the correct order.

134 Microsoft PowerPoint 2003
© 2004 CustomGuide, Inc.
Lesson 4-11: Applying Shadows and 3-D Effects
Breathe new life into the flat and boring objects on your slides! Adding shadows and 3-D effects to slide objects make them stand out and look exciting. In this lesson we’ll learn how to apply both shadows and 3-D effects to slide objects.
Adding a shadow to an object gives it a sense of depth by making it appear as if the object were casting a shadow. Not only can you add a shadow to an object, but you can also change the length of the shadow and where it falls.
The 3-D button on the drawing toolbar turns a lifeless object into a dramatic three-dimensional object—without your having to put on a pair of 3-D glasses. As with shadowing, you can change the perspective and depth of any 3-D object.
Figure 4-29
A photograph with and without a shadow effect.
Figure 4-30
Graphic objects with and without 3-D effects.
Figure 4-31
The Shadow Settings toolbar.
Figure 4-32
The 3-D Settings toolbar.
Figure 4-33
The updated slide with shadow and 3-D effect added to its objects.
Effects under the Shadow Button
Figure 4-31 Figure 4-32
Turns the shadow on or off
Nudge shadow up
Nudge shadow down
Nudge shadow left
Nudge shadow
right
Change the shadow color
Turns the 3-D effect on or off
Tilt down
Tilt up
Tilt left
Tilt right
Depth
Direction
Lighting
Surface
Change the 3-D color
Spanish Rule
French Rule
Spanish Rule
French Rule
Normal With Shadow Added
Normal With 3-D Effect Added
• French Quarter
• Uptown and the Garden District
• Cemeteries
• River Road Plantations
New Orleans The American West
Figure 4-33
American Rule
Spanish Rule
French Rule
Figure 4-29 Figure 4-30
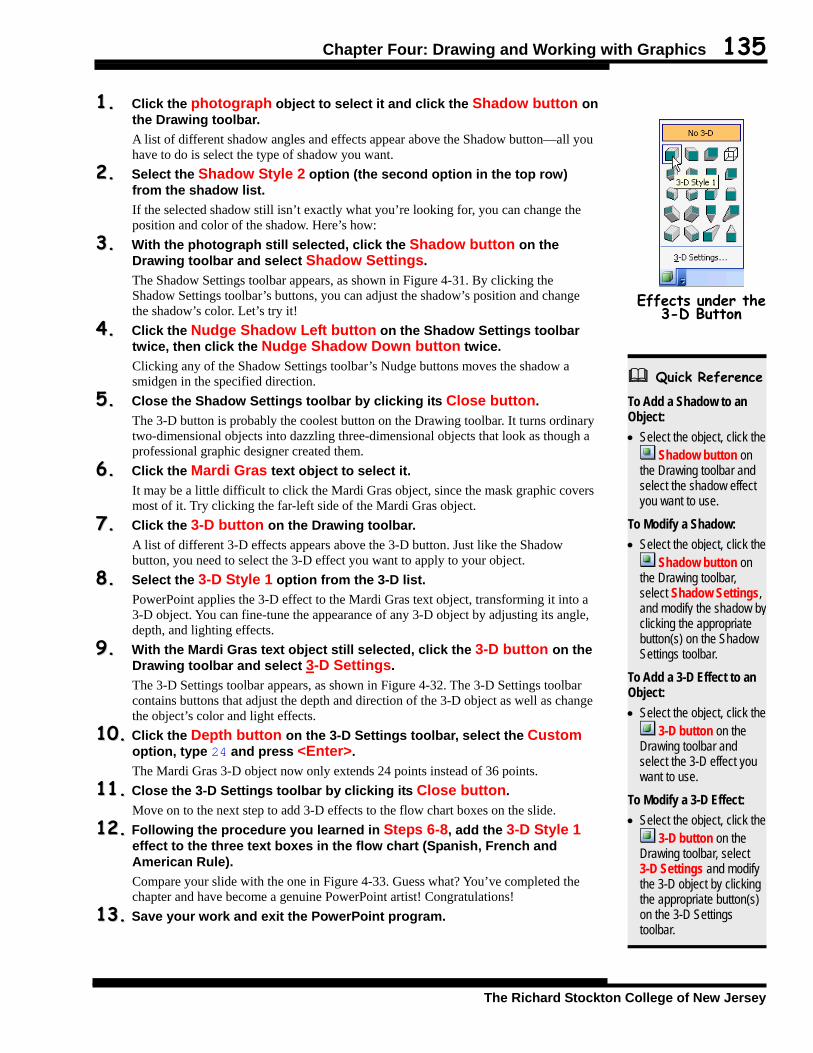
Chapter Four: Drawing and Working with Graphics 135
The Richard Stockton College of New Jersey
Quick Reference To Add a Shadow to an Object: • Select the object, click the
Shadow button on the Drawing toolbar and select the shadow effect you want to use.
To Modify a Shadow: • Select the object, click the
Shadow button on the Drawing toolbar, select Shadow Settings, and modify the shadow byclicking the appropriate button(s) on the Shadow Settings toolbar.
To Add a 3-D Effect to an Object: • Select the object, click the
3-D button on the Drawing toolbar and select the 3-D effect you want to use.
To Modify a 3-D Effect: • Select the object, click the
3-D button on the Drawing toolbar, select 3-D Settings and modify the 3-D object by clicking the appropriate button(s) on the 3-D Settings toolbar.
11.. Click the photograph object to select it and click the Shadow button on the Drawing toolbar. A list of different shadow angles and effects appear above the Shadow button—all you have to do is select the type of shadow you want.
22.. Select the Shadow Style 2 option (the second option in the top row) from the shadow list. If the selected shadow still isn’t exactly what you’re looking for, you can change the position and color of the shadow. Here’s how:
33.. With the photograph still selected, click the Shadow button on the Drawing toolbar and select Shadow Settings. The Shadow Settings toolbar appears, as shown in Figure 4-31. By clicking the Shadow Settings toolbar’s buttons, you can adjust the shadow’s position and change the shadow’s color. Let’s try it!
44.. Click the Nudge Shadow Left button on the Shadow Settings toolbar twice, then click the Nudge Shadow Down button twice. Clicking any of the Shadow Settings toolbar’s Nudge buttons moves the shadow a smidgen in the specified direction.
55.. Close the Shadow Settings toolbar by clicking its Close button. The 3-D button is probably the coolest button on the Drawing toolbar. It turns ordinary two-dimensional objects into dazzling three-dimensional objects that look as though a professional graphic designer created them.
66.. Click the Mardi Gras text object to select it. It may be a little difficult to click the Mardi Gras object, since the mask graphic covers most of it. Try clicking the far-left side of the Mardi Gras object.
77.. Click the 3-D button on the Drawing toolbar. A list of different 3-D effects appears above the 3-D button. Just like the Shadow button, you need to select the 3-D effect you want to apply to your object.
88.. Select the 3-D Style 1 option from the 3-D list. PowerPoint applies the 3-D effect to the Mardi Gras text object, transforming it into a 3-D object. You can fine-tune the appearance of any 3-D object by adjusting its angle, depth, and lighting effects.
99.. With the Mardi Gras text object still selected, click the 3-D button on the Drawing toolbar and select 3-D Settings. The 3-D Settings toolbar appears, as shown in Figure 4-32. The 3-D Settings toolbar contains buttons that adjust the depth and direction of the 3-D object as well as change the object’s color and light effects.
1100.. Click the Depth button on the 3-D Settings toolbar, select the Custom option, type 24 and press <Enter>. The Mardi Gras 3-D object now only extends 24 points instead of 36 points.
1111.. Close the 3-D Settings toolbar by clicking its Close button. Move on to the next step to add 3-D effects to the flow chart boxes on the slide.
1122.. Following the procedure you learned in Steps 6-8, add the 3-D Style 1 effect to the three text boxes in the flow chart (Spanish, French and American Rule). Compare your slide with the one in Figure 4-33. Guess what? You’ve completed the chapter and have become a genuine PowerPoint artist! Congratulations!
1133.. Save your work and exit the PowerPoint program.
Effects under the
3-D Button

136 Microsoft PowerPoint 2003
© 2004 CustomGuide, Inc.
Chapter Four Review
Lesson Summary
Drawing on Your Slides • To Draw an Object: Click the object you want to draw on the drawing toolbar (such as a line or
circle) and draw your shape by clicking on the slide with the pointer and dragging until the shape reaches the desired size.
• To Draw a Perfect Square, Circle or Line: Hold down the <Shift> key as you draw a selected object.
Adding, Arranging, and Formatting Text Boxes • To Add a Text Box to a Slide: Click the Text Box button on the Drawing toolbar, click where
you want to insert the text box with the insertion point, and then type the text.
• To Resize a Text Box: Click the text box to select it, drag the object’s sizing handles until the box reaches the desired size, and then release the mouse button.
Selecting, Resizing, Moving, and Deleting Objects • To Resize an Object: Click the object to select it, drag the object’s sizing handles until the shape
reaches the desired size, then release the mouse button.
• To Resize an Object Proportionally: Follow the above procedures, only hold down the <Shift> key while dragging in order to maintain the object’s proportions while resizing it.
• To Move an Object: Click the object and hold down the mouse button, drag the object to a new location, and then release the mouse button to drop the object.
• To Copy an Object using Drop and Drag: Follow the above procedure, only hold down the <Ctrl> key while dragging to copy the object.
Formatting Objects • To Fill a Shape with a Color: Select the shape, then click the Fill Color button arrow on the
Drawing toolbar and select the color you want.
• To Change Line Color or Remove a Line: Select the shape, then click the Line Color button arrow on the Drawing toolbar and select the color you want.
• To Change the Line Style: Select the line, then click the Line Style button on the Drawing toolbar and select the line style you want.
• To Change the Dash Style: Select the line, then click the Dash Style button on the Drawing toolbar and select the dash you want.
• To Add or Remove Arrow Heads: Select the line, then click the Arrow Style button on the Drawing toolbar and select the arrow style you want.
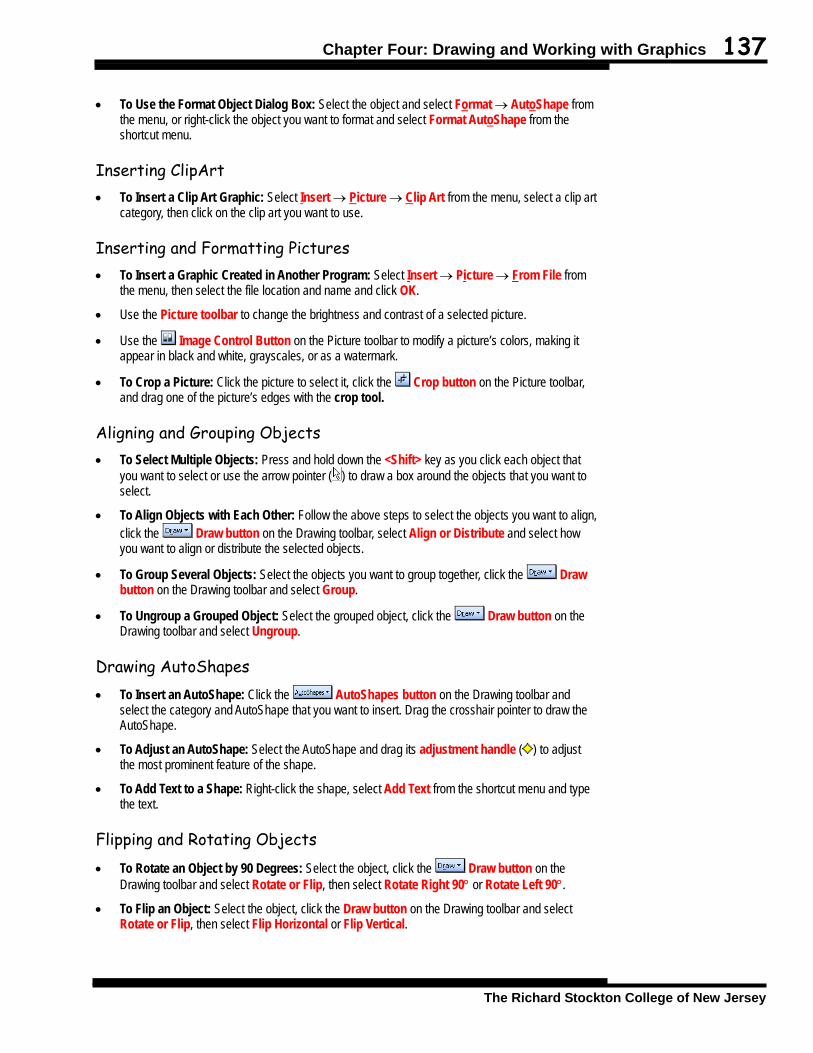
Chapter Four: Drawing and Working with Graphics 137
The Richard Stockton College of New Jersey
• To Use the Format Object Dialog Box: Select the object and select Format → AutoShape from the menu, or right-click the object you want to format and select Format AutoShape from the shortcut menu.
Inserting ClipArt • To Insert a Clip Art Graphic: Select Insert → Picture → Clip Art from the menu, select a clip art
category, then click on the clip art you want to use.
Inserting and Formatting Pictures • To Insert a Graphic Created in Another Program: Select Insert → Picture → From File from
the menu, then select the file location and name and click OK.
• Use the Picture toolbar to change the brightness and contrast of a selected picture.
• Use the Image Control Button on the Picture toolbar to modify a picture’s colors, making it appear in black and white, grayscales, or as a watermark.
• To Crop a Picture: Click the picture to select it, click the Crop button on the Picture toolbar, and drag one of the picture’s edges with the crop tool.
Aligning and Grouping Objects • To Select Multiple Objects: Press and hold down the <Shift> key as you click each object that
you want to select or use the arrow pointer ( ) to draw a box around the objects that you want to select.
• To Align Objects with Each Other: Follow the above steps to select the objects you want to align, click the Draw button on the Drawing toolbar, select Align or Distribute and select how you want to align or distribute the selected objects.
• To Group Several Objects: Select the objects you want to group together, click the Draw button on the Drawing toolbar and select Group.
• To Ungroup a Grouped Object: Select the grouped object, click the Draw button on the Drawing toolbar and select Ungroup.
Drawing AutoShapes • To Insert an AutoShape: Click the AutoShapes button on the Drawing toolbar and
select the category and AutoShape that you want to insert. Drag the crosshair pointer to draw the AutoShape.
• To Adjust an AutoShape: Select the AutoShape and drag its adjustment handle ( ) to adjust the most prominent feature of the shape.
• To Add Text to a Shape: Right-click the shape, select Add Text from the shortcut menu and type the text.
Flipping and Rotating Objects • To Rotate an Object by 90 Degrees: Select the object, click the Draw button on the
Drawing toolbar and select Rotate or Flip, then select Rotate Right 90° or Rotate Left 90°.
• To Flip an Object: Select the object, click the Draw button on the Drawing toolbar and select Rotate or Flip, then select Flip Horizontal or Flip Vertical.

138 Microsoft PowerPoint 2003
© 2004 CustomGuide, Inc.
• To Free Rotate an Object: Select the object and click and drag the object’s rotate handle (•) with the pointer. You can also rotate an object by selecting the object, selecting Format → AutoShape from the menu, clicking the Size tab, and entering the amount in degrees you want to rotate the object in the Rotation box.
Layering Objects • To Change the Order in Which Object Appear on a Slide: Select the object, click the
Draw button on the Drawing toolbar, select Order, and select one of the following layering commands: Bring to Front: Places the selected object on the very top layer of the slide. All other objects will appear behind the selected object. Send to Back: Places the selected object on the very bottom layer of the slide. All other objects will appear in front of the selected object. Bring Forward: Brings the selected object one layer up on the slide. Send Backward: Sends the selected object one layer down on the slide.
• The order in which you select and layer objects will determine the order in which they appear on the slide. For example, the last object you bring to the front will always appear on the top layer.
Applying Shadows and 3-D Effects • To Add a Shadow to an Object: Select the object, click the Shadow button on the Drawing
toolbar and select the shadow effect you want to use.
• To Modify a Shadow: Select the object, click the Shadow button on the Drawing toolbar, select Shadow Settings and modify the shadow by clicking the appropriate button(s) on the Shadow Settings toolbar.
• To Add a 3-D Effect to an Object: Select the object, click the 3-D button on the Drawing toolbar and select the 3-D effect you want to use.
• To Modify a 3-D Effect: Select the object, click the 3-D button on the Drawing toolbar, select 3-D Settings and modify the 3-D object by clicking the appropriate button(s) on the 3-D Settings toolbar.
Quiz 1. Which of the following statements is NOT true?
A. Holding down the <Shift> key while you draw an object creates perfect squares, circles and straight lines.
B. The Drawing toolbar contains tools for drawing shapes, lines, arrows and more. C. The text in a text box can’t be formatted. D. You can change the size of a text box by selecting it and dragging its sizing handles.
Chapter Four: Drawing and Working with Graphics 139
The Richard Stockton College of New Jersey
2. Which of the following are methods to select multiple objects on a slide? (Select all that apply.) A. Click the Select Object button on the Standard toolbar, click the objects you want to
select, and press <Enter> when you’re finished. B. Hold down the <Shift> key as you select each object. C. You can only select one object at a time in PowerPoint. D. Click the Arrow button on the Drawing toolbar and drag a rectangle around the
objects you want to select.
3. You can format drawing objects by: (Select all that apply.)
A. Selecting the object and formatting it with the Drawing toolbar. B. Selecting the object and selecting Format → AutoShape from the menu and
specifying your formatting options from the Format AutoShape dialog box. C. Right-clicking the object and selecting Format AutoShape from the shortcut menu
and specifying your formatting options from the Format AutoShape dialog box. D. Selecting the object, pressing <Ctrl> + <F> and specifying your formatting options
from the Format AutoShape dialog box.
4. You can change the brightness, contrast, and crop a picture using the buttons on the Drawing toolbar. (True or False?)
5. Block Arrows, Stars and Banners, and Callouts are all examples of:
A. Different types of children’s building blocks. B. Clip art categories located in the Microsoft Clip Gallery. C. AutoShape categories. D. More technical terms that I don’t understand.
6. You need to wear special glasses in order to see and appreciate 3-D effects created by the 3-D Effects button on the Drawing toolbar. (True or False?)
7. You are creating a slide about the life of Harvester ants and have inserted several dozen ant pictures into your slide. Now you’re having problems moving and keeping track of all of all those pictures. What can you do to make working with these pictures easier? A. Delete the ants, insert a picture of an anteater and write a note to your audience
explaining what happened. B. Group the ants together—select all the ants by holding down the <Shift> key as you
click each ant or by drawing a box around them with the pointer. Once you have selected all the ants, group them together by clicking the Draw button on the Drawing toolbar and selecting Group.
C. Select Edit → Select Ants from the menu whenever you want to move or work with all the ants at once.
D. Do a project on something else.
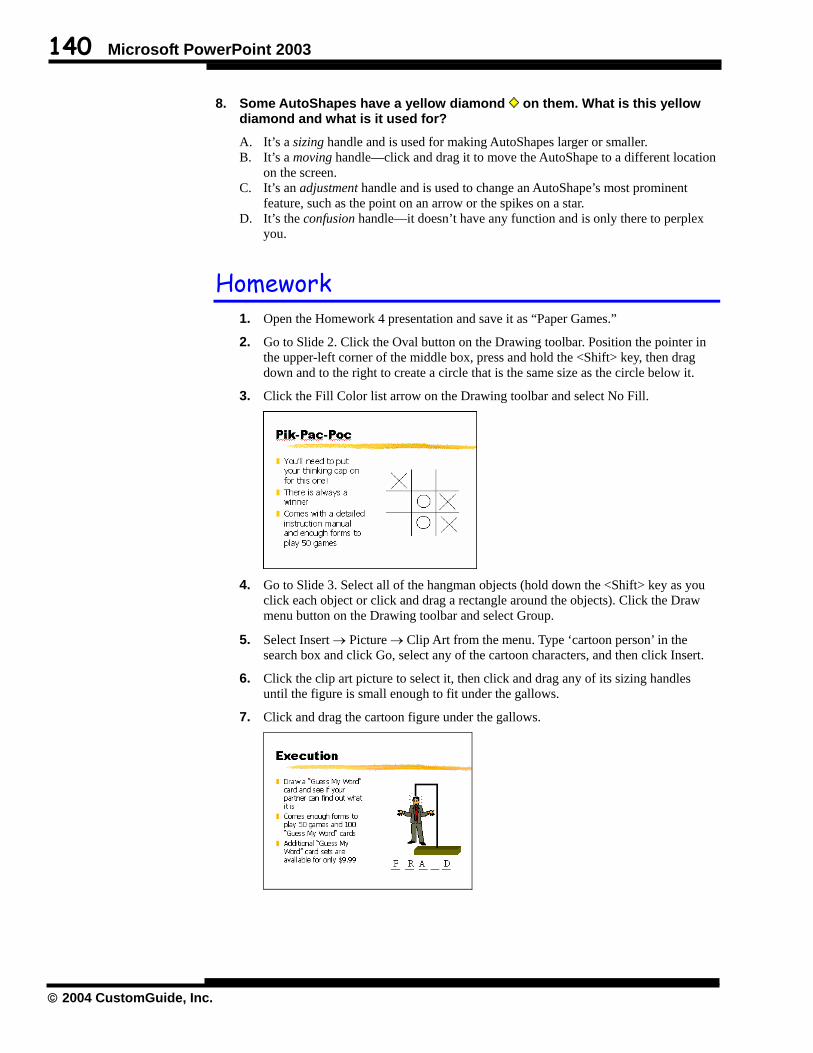
140 Microsoft PowerPoint 2003
© 2004 CustomGuide, Inc.
8. Some AutoShapes have a yellow diamond on them. What is this yellow diamond and what is it used for? A. It’s a sizing handle and is used for making AutoShapes larger or smaller. B. It’s a moving handle—click and drag it to move the AutoShape to a different location
on the screen. C. It’s an adjustment handle and is used to change an AutoShape’s most prominent
feature, such as the point on an arrow or the spikes on a star. D. It’s the confusion handle—it doesn’t have any function and is only there to perplex
you.
Homework 1. Open the Homework 4 presentation and save it as “Paper Games.”
2. Go to Slide 2. Click the Oval button on the Drawing toolbar. Position the pointer in the upper-left corner of the middle box, press and hold the <Shift> key, then drag down and to the right to create a circle that is the same size as the circle below it.
3. Click the Fill Color list arrow on the Drawing toolbar and select No Fill.
4. Go to Slide 3. Select all of the hangman objects (hold down the <Shift> key as you
click each object or click and drag a rectangle around the objects). Click the Draw menu button on the Drawing toolbar and select Group.
5. Select Insert → Picture → Clip Art from the menu. Type ‘cartoon person’ in the search box and click Go, select any of the cartoon characters, and then click Insert.
6. Click the clip art picture to select it, then click and drag any of its sizing handles until the figure is small enough to fit under the gallows.
7. Click and drag the cartoon figure under the gallows.

Chapter Four: Drawing and Working with Graphics 141
The Richard Stockton College of New Jersey
Quiz Answers 1. C. Of course you can format a text box’s text!
2. B and D. Either of these methods will select multiple objects.
3. A, B, and C. You can format drawing objects using any of these methods.
4. False. You will have to summon the Picture toolbar to accomplish these tasks.
5. C. AutoShape categories.
6. False. Of course not! What a silly question!
7. B. Grouping all those ants will make them easier to work with.
8. C. That yellow diamond is the adjustment handle and is used to change an AutoShape’s most prominent feature or angle.


Chapter Five: Delivering Your Presentation
Chapter Objectives: • Delivering a Presentation on a Computer
• Using Slide Transitions
• Animating Text and Objects
• Rehearsing Slide Show Timings
• Creating a Presentation that Runs by Itself
• Creating a Custom Show
• Using the Package for CD feature to Play a Presentation on another Computer
Chapter Task: Deliver a Slide Show and Make it More Interesting with Transitions and Animation
It’s show time! This chapter explains what PowerPoint is all about: giving an interesting presentation.
If you plan to run a slide show on your computer, you will learn how to add exciting transition effects to your slides, changing how PowerPoint advances from one slide to the next. You will also learn how to animate the text and objects on your slides. For example, you may want to make each paragraph in your slides appear one at a time.
If you plan to run a slide show on another computer, you will also learn how to use the Package for CD feature to take your presentation on the road.
Prerequisites • How to use menus,
toolbars, dialog boxes, and shortcut keystrokes.
• Move the mouse pointer and navigate between the slides in a presentation.

144 Microsoft PowerPoint 2003
© 2004 CustomGuide, Inc.
Lesson 5-1: Delivering a Presentation on a Computer
You can deliver a PowerPoint presentation in several ways: by giving everyone paper handouts of your presentation, by creating overheads or 35mm slides and then displaying them with an overhead projector, or by running the presentation on a computer. Running a presentation on a computer is the preferred method because it gives you the most control over the presentation and allows you to use multimedia, animation, and other nifty effects. You can even use a mouse pen to doodle on your slides just like sports announcers do when they illustrate football plays.
Even if you’ve already figured out how to display a presentation as an onscreen slide show, you’ll still want to review this lesson to learn some cool tricks and keyboard/mouse shortcuts that you probably didn’t know before.
11.. Start Microsoft PowerPoint, open the Lesson 7A presentation and save it as 2003 Tours. Once you’ve started PowerPoint and saved the “Lesson 7A” presentation file as “2003 Tours,” move on to the next step to display the slide show on your computer.
22.. Start the onscreen slide show by clicking the Slide Show button on the horizontal scroll bar. The first slide in the presentation fills the entire screen, as shown in Figure 5-1. In Slide Show View, you display your presentation as an electronic slide show. Advancing through the slides in your presentation is so easy that you probably don’t even need any instructions. See Table 5-1: Slide Show Keystrokes.
33.. Advance to the next slide using any of the methods listed in Table 5-1: Slide Show Keystrokes. One neat feature in Slide Show View is an electronic pen that lets you doodle on your slides, just like the kind sports announcers use to diagram football plays. Here’s how to use the pen:
Figure 5-1
In Slide Show View, each slide fills the entire screen.
Figure 5-2
The pen tool lets you draw notes, doodles, and diagrams on the current slide.
Slide Show
button Other Ways to Switch to Slide Show View: • Select View → Slide
Show from the menu.
Click the pen tool menu button to display a list of pen tool options.
Tours Around the World
Egypt China
Germany
Japan Peru
Figure 5-2 Figure 5-1

Chapter Five: Delivering Your Presentation 145
The Richard Stockton College of New Jersey
Quick Reference To Display a Slide Show: • Click the Slide Show
button on the horizontal scroll bar near the bottom of the screen.
Or… • Select View → Slide
Show from the menu.
To Advance to the Next Slide: Click the left mouse button
or press the <Enter>, <Spacebar>, <→>, <↓>, or <Page Down> keys.
To Stop a Slide Show: • Press <Esc>.
To Doodle on the Current Slide with the Pen: • Press <Ctrl> + <P> and
draw on the screen with the pen tool. Press <Ctrl> + <A> to switch back to the arrow pointer.
To Erase Your Doodles: • Press <E>.
To Display a List of Slide Show Commands: • Right-click anywhere on
the slide or click the Slide Show Menu button.
44.. Press <Ctrl> + <P> to activate the pen tool. The mouse pointer changes to a ( ), which you can use to add notes, doodles, or diagrams to your slides. There is also a new Highlighter tool in PowerPoint 2003.
55.. Use the tool to draw some doodles on the current slide. If you want to erase your doodles, press <E>.
NOTE: Notes are not permanent and are deleted the moment you stop your slide show. If you want to add permanent notes to a slide, switch to Notes Page View and add the notes.
66.. Press the <E> key to erase your doodles. Finished drawing? To change the pen back into the familiar arrow ( ), simply press <Ctrl> + <A> or <Esc>.
77.. Press <Ctrl> + <A> to switch the pen pointer back into an arrow ( ). If you move the mouse pointer during a slide show presentation, several small, unobtrusive boxes appear in the lower left corner of the screen. That’s the Slide Show toolbar. Click the Slide Show menu button to display a list of commands.
88.. Click the Slide Show menu button, located in the lower left corner of the screen. A list of slide show commands appears. You can also right-click anywhere on a slide during an on-screen presentation to display the same menu.
99.. Press <Esc> to close the slide show menu without selecting any commands. That’s all there really is to running a slide show on your computer. Let’s go to the next step and finish the show.
1100.. Use any of the methods shown in Table 5-1: Slide Show Keystrokes to advance through the slides, one at a time, until you’re finished with the slide show.
That sure was easy, wasn’t it? Should you want to quit a presentation prematurely, simply press the <Esc> key to exit Slide Show View and return to the previous view. The following table lists the most common shortcuts you can use during a slide show.
Table 5-1: Slide Show Keystrokes To do this… …do this. Advance to the next slide Press <Enter>, press <Spacebar>, press
<→>, press <↓>, press <Page Down>, or click the left mouse button
Go back to the previous slide Press <↑>, <←>, or <Page Up>
Go to slide <number> Enter the slide number and press <Enter>
Toggle between the presentation and a black screen Press <B>
Toggle between the presentation and a white screen Press <W>
Show/hide pointer Press <A> or <=>
Change arrow to an annotation pen Press <Ctrl> + <P>
Change annotation pen to an arrow Press <Ctrl> + <A> or <Esc>
Erase on-screen annotations Press <E>
End slide show Press <Esc>
Click the Slide Show menu button to display a list of slide show commands.

146 Microsoft PowerPoint 2003
© 2004 CustomGuide, Inc.
Lesson 5-2: Using Slide Transitions
A transition is how PowerPoint advances from one slide to the next during an on-screen slide show. PowerPoint transitions from slide to slide by having the new slide instantly replace the old, just like an older 35mm slide projector. PowerPoint’s slide transition feature lets you make transitions more interesting by providing you with more than 40 different special effects you can use to move between slides. For example, you can have one slide slowly dissolve and be replaced by the next slide.
You set up slide transitions in Slide Sorter View, so let’s start this lesson there.
11.. Switch to Slide Sorter View by clicking the Slide Sorter View button on the horizontal scroll bar or by selecting View → Slide Sorter from the menu. Once you’re in Slide Sorter View, you can add transition effects to your slides. First, you need to select the slide(s) you want to transition to.
22.. Click Slide 2 to select it. Let’s add a transition effect to the selected slide.
Figure 5-3
The Slide Sorter toolbar.
Figure 5-4
A transition is how PowerPoint gets from one slide to the next during an on-screen slide show.
Figure 5-5
The Slide Transition task pane.
Slide Sorter View
button
Rehearse Timings
Hide Slide
Summary Slide
Speaker Notes
Slide Transition
Slide Design
New Slide
Figure 5-3
Figure 5-4 Figure 5-5
Select a slide transition. Each time you click an option, you can preview the slide transition.
Select a sound that you want to accompany the slide transition effect.
Select the speed at which the slide transition occurs.
Apply the transition to all the slides in the presentation.

Chapter Five: Delivering Your Presentation 147
The Richard Stockton College of New Jersey
Quick Reference To Add a Slide Transition: 1. Switch to Slide Sorter
View. 2. Click the slide where you
want to add a transition. To select multiple slides, hold down the <Shift> key as you click each slide.
3. Click the Slide Transition button on the Slide Sorter toolbar.
4. Select a transition from the Transition list in the Slide Transition task pane.
5. (Optional) Select a transition speed, sound, and how you want to advance the slide.
33.. Click the Slide Transition button on the Slide Sorter toolbar. The Slide Transition task pane appears, as shown in Figure 5-5. The Slide Transition task pane gives you choices for your slide transition effects. For example, you can select the speed of the slide transition and add optional sound effects.
44.. Select the Box In effect from the Slide Transition task pane. A lightning-quick preview of the slide transition appears when you select it from the list, giving you an idea of what the transition looks like. Notice the small icon that appears at the bottom of Slide 2, indicating that the slide has a transition effect. You can add transition effects to several slides at once by selecting each slide that you want to add the effect to. To select several slides, hold down the <Ctrl> or <Shift> key while you click each slide.
55.. Hold down the <Shift> key as you click Slides 3 through 6. Now we want to apply the same slide transition effect to the recently selected slides.
66.. Select the Box In option from Slide Transition task pane. You can also change the speed of the slide transition, although Fast is almost always the best choice (unless you’re trying to kill time). Next, let’s select a sound to accompany the transition. PowerPoint has several common sounds to choose from.
77.. Select Camera from the Sound list. Voila! We’re finished adding transition effects to the selected slide. Now let’s see how our presentation looks when it’s delivered on-screen.
88.. Click on Slide 1 to select it and then click the Slide Show View button on the horizontal scroll bar. The first slide appears on your screen in Slide Show View.
99.. Step through several of the slides in the presentation by clicking the mouse button. Press <Esc> to exit the on-screen presentation when you're finished.
Transition effects are cool, but try not to use too many different types of effects in the same presentation, or they may distract your viewers rather than intrigue them.
Slide Transition
button Other Ways to Add Slide Transitions: • Select Slide Show →
Slide Transition from the menu.

148 Microsoft PowerPoint 2003
© 2004 CustomGuide, Inc.
Lesson 5-3: Using an Animation Scheme
Another way you can make your presentations more interesting is by using one of PowerPoint 2003’s new animation schemes. An animation scheme adds a preset visual effect to the text on a slide. Ranging from subtle to exciting, each scheme usually includes an effect for the slide title and an effect that is applied to the bullets or paragraphs in a slide.
In this lesson you’ll get some practice adding animation to the text and objects on your slides. Normal View is the best place to work with animation, so we’ll start by going there.
11.. If you’re still in Slide Sorter View, select Slide 1 and then click the Normal View button on the horizontal scroll bar. Here’s how to add an animation scheme to a selected slide…
Figure 5-6
An animation scheme adds a preset visual effect to the text on a slide.
Figure 5-7
Select an animation scheme from the PowerPoint 2003 task pane.
Normal View
button
Tours for the New Mil
Egypt China
Germany
Japan Peru
eln
ni
Figure 5-6
Figure 5-7
Select an animation scheme. Each time you click an option, you can preview the scheme.
Apply the animation scheme to all the slides in the presentation.

Chapter Five: Delivering Your Presentation 149
The Richard Stockton College of New Jersey
Quick Reference To Add an Animation Scheme: 1. Switch to Normal
View and go to the slide where you want to add the animation scheme.
2. Select Slide Show → Animation Scheme from the menu.
3. Select the desired animation scheme from the task pane.
22.. Select Slide Show → Animation Schemes from the menu. The Animation Scheme task pane appears. The Animation Scheme task pane contains several categories of preset animation effects that you can use. For example, the Bounce scheme, listed in the Exciting category, makes the selected slide fly in from the left side of the screen, and the title bounce in shortly thereafter.
33.. Scroll down and select the Elegant effect, listed in the Moderate category of the Animation Scheme task pane. PowerPoint applies the Elegant animation scheme to the current slide and displays a quick preview of the selected scheme.
44.. Go to Slide 2 and apply the animation effect of your choice to the slide. That’s enough animation schemes for this presentation. Let’s see how they look.
55.. Switch to Slide Show View and step through the presentation by clicking the mouse button. Press <Esc> once you’ve seen all the animation schemes you added.
Animation schemes are definitely one of the coolest features in PowerPoint, and it can be tempting to add a bunch of different schemes to the same presentation. Remember that animations are supposed to call attention to the main points of your slide, not distract the viewers’ attention.

150 Microsoft PowerPoint 2003
© 2004 CustomGuide, Inc.
Lesson 5-4: Using Custom Animations
In the previous lesson, you learned how to add animation effects to your slides’ text and objects the fast and easy way—with animation schemes. In this lesson you’ll learn how to add animation effects the hard way, with the Custom Animation dialog box. While the Custom Animation dialog box isn’t as simple to use as the Animation Effects toolbar, it lets you select from over sixty animation effects and gives you much greater flexibility and control when applying them. In fact, once you learn how to animate the text and objects on your slides with the Custom Animation dialog box, you may never want to use the Animation Effects toolbar ever again.
11.. If you have been skipping around lessons, find and open the Lesson 7B presentation and save it as 2003 Tours. Now that our slide has been cleared of previously applied effects, we’ll start by adding animation to the bullets on this slide.
Figure 5-8
The Custom Animation task pane.
Figure 5-9
The animated slide.
Other Ways to Add Custom Animation: • Right-click the object
and select Custom Animation from the shortcut menu.
• Cruise the Nile
• Explore the Pyramids
• Visit the Sphinx
Expedition to Egypt
Figure 5-9
To apply a new animation effect, click the object you want to animate, and then click Add Effect.
When an animation effect that is applied to a selected item will start.
Remove the animation.
Figure 5-8
Sets the path of your animation effect such as the direction of a fly in.
Lists the animation effects you have applied to this slide.

Chapter Five: Delivering Your Presentation 151
The Richard Stockton College of New Jersey
Quick Reference To Add Custom Animation to an Existing Slide Object: 1. Switch to Normal
View and go to the slide where you want to add the animation.
2. Select the object you want to animate.
3. Select Slide Show → Custom Animation from the menu.
Or… Right-click the object and
select Custom Animation from the shortcut menu.
4. Click the Add Effect button in the task pane and select the desired animation.
5. (Optional) Specify the speed and parameters of the animation.
22.. Make sure you’re in Normal View, then go to Slide 2 and select No Animation from the Animation Schemes task pane. Now that our slide has been cleared of previously applied effects, we’ll start by adding animation to the bullets on this slide.
33.. Place the insertion point anywhere in the bulleted list text box and select Slide Show → Custom Animation from the menu. The Custom Animation task pane appears, as shown in Figure 5-8.
44.. Click the Add Effect button in the task pane and select Entrance → Blinds. PowerPoint applies the Blinds effect to the bulleted list and displays a preview of how the bullets will appear on the slide. Notice that the numbers , , and and so on have appeared on the slide. These numbers indicate the order in which each element on the slide will appear. Let’s add something fun to this slide—a camel cartoon. First we need to insert the camel graphic file into the current slide…
55.. Select Insert → Picture → From File from the menu. The Insert Picture dialog box appears. Here you need to specify the name and location of the graphic file to be inserted into your slide.
66.. If necessary, navigate to your Practice folder or disk. All the graphic files in the disk or folder appear in the file window.
77.. Select the Camel file and click the Insert button. PowerPoint inserts the camel graphic into the current slide. We don’t need to resize the camel graphic since it’s already the correct size, but we do have to move the camel to a better location on the slide.
88.. Drag the camel to the bottom right of the Sphinx picture, as shown in Figure 5-8. Now let’s animate the camel object. We want to animate the camel so that it appears to be walking in from the right of the slide. Here’s how to do it:
99.. With the Camel picture still selected, click the Add Effect button in the task pane and select Motion Paths → Left from the menu. Let’s see how our new animations look.
1100.. Switch to Slide Show View and step through the presentation by clicking the mouse button to activate the animation. Press <Esc> once you’ve seen all the animation schemes you added.
NOTE: Because you must click to view the animation and PowerPoint goes through each bullet point first, the camel will not move until your fourth click. You can adjust when a piece of animation starts using the Custom Animation task pane and clicking on the Start box arrow button.
Move on to the next step … 1111.. Close the PowerPoint 2003 task pane.
Add Effect
button
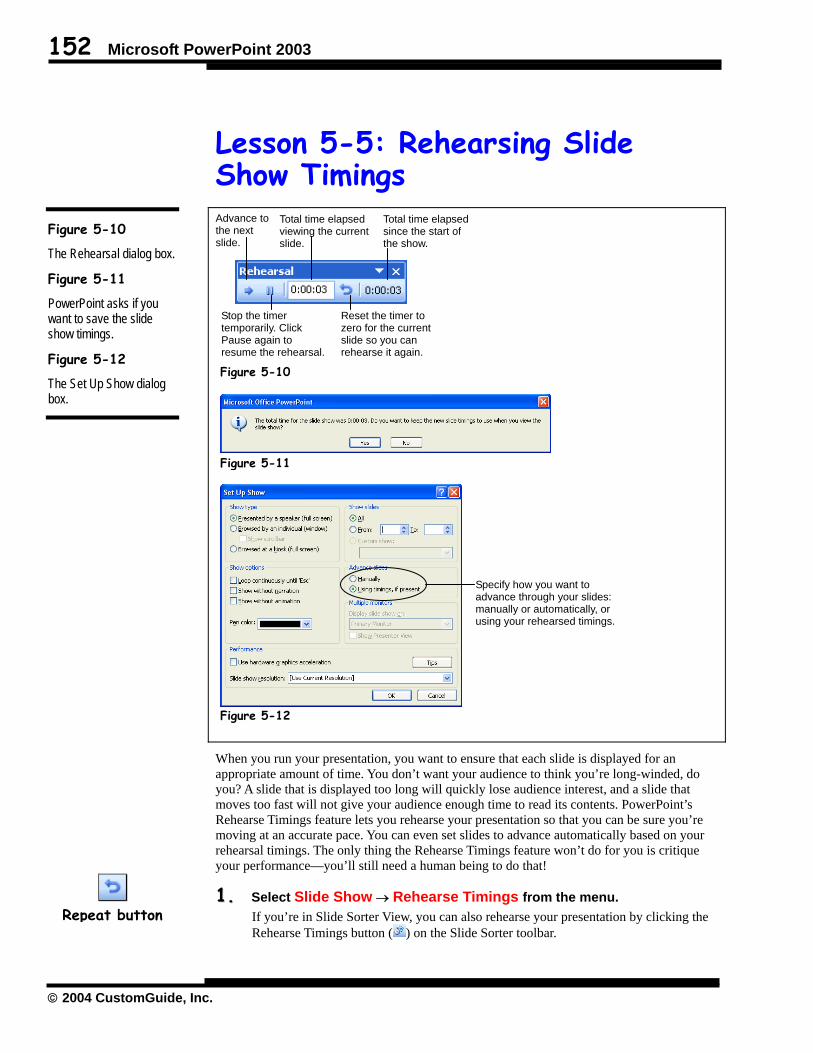
152 Microsoft PowerPoint 2003
© 2004 CustomGuide, Inc.
Lesson 5-5: Rehearsing Slide Show Timings
When you run your presentation, you want to ensure that each slide is displayed for an appropriate amount of time. You don’t want your audience to think you’re long-winded, do you? A slide that is displayed too long will quickly lose audience interest, and a slide that moves too fast will not give your audience enough time to read its contents. PowerPoint’s Rehearse Timings feature lets you rehearse your presentation so that you can be sure you’re moving at an accurate pace. You can even set slides to advance automatically based on your rehearsal timings. The only thing the Rehearse Timings feature won’t do for you is critique your performance—you’ll still need a human being to do that!
11.. Select Slide Show → Rehearse Timings from the menu. If you’re in Slide Sorter View, you can also rehearse your presentation by clicking the Rehearse Timings button ( ) on the Slide Sorter toolbar.
Figure 5-10
The Rehearsal dialog box.
Figure 5-11
PowerPoint asks if you want to save the slide show timings.
Figure 5-12
The Set Up Show dialog box.
Repeat button
Total time elapsed since the start of the show.
Reset the timer to zero for the current slide so you can rehearse it again.
Figure 5-10
Specify how you want to advance through your slides: manually or automatically, or using your rehearsed timings.
Total time elapsed viewing the current slide.
Stop the timer temporarily. Click Pause again to resume the rehearsal.
Advance to the next slide.
Figure 5-11
Figure 5-12

Chapter Five: Delivering Your Presentation 153
The Richard Stockton College of New Jersey
Quick Reference To Add/Rehearse Slide Timings: 1. Select Slide Show →
Rehearse Timings from the menu.
2. Display each slide for whatever duration you want. Then advance to the next slide. PowerPointwill record how long each slide is presented.
• If you make a mistake on the timing, click the Repeat button and try again.
3. When you’ve finished the last slide, click Yes to accept your timings.
• To run your slide show manually instead of using the timings, select Slide Show → Set Up Show from the menu, select Manually, and click OK.
You immediately go to Slide Show view, and the Rehearsal dialog box appears in the upper left corner of the screen, as shown in Figure 5-10. You can see the seconds in the Rehearsal dialog box ticking away. No slide transitions or object animations will occur without our command. As you’re reading this, look at the timers in the Rehearsal dialog box. Unless you’re a speed-reader, it’s likely that too much time has already passed and been recorded in the slide timings! Don’t worry—we can easily reset the time on the current slide to zero.
22.. Click the Repeat button on the Rehearsal dialog box. The text animation effect on the first slide begins and prints the title onto the screen. If you ever feel that you have made a mistake on the timings for a specific slide, click the Repeat button.
33.. Advance through the slide’s animations, allowing about 1 or 2 seconds between each animation effect. When you’ve finished displaying all the animation effects, wait another 3 seconds and then advance to the next slide in the presentation. The second slide in the presentation appears. Notice how the elapsed time in the left side of the rehearsal dialog box resets to zero while the elapsed time in the right side of the rehearsal dialog box keeps on ticking. The timer on the right side of the dialog box records the elapsed time for the entire presentation, while the timer on the left side of the dialog box records the elapsed time for only the current slide.
44.. Following the same procedure as in Step 3, continue through the rest of the slides in the presentation, being careful to display each slide for at least 5 seconds. When you finish the presentation, a dialog box appears, asking if you want to save the slide timings, as shown in Figure 5-11. If you save the timings, the next time you run the slide show, the slides will appear automatically at the intervals you specified.
55.. Click Yes to save the timings. The presentation appears in Slide Sorter view. Notice that the slide timings appear in the lower left corner of each slide. The next time you run the slide show, PowerPoint will automatically advance the slides and animations at the timings you specified during rehearsal. If you find all of this automation too restrictive, you can always manually step through your presentation’s animations and slides. Here’s how:
66.. Select Slide Show → Set Up Show from the menu. The Set Up Show dialog box appears, as shown in Figure 5-12. To rehearse how long it takes you to present information compared to the rehearsal timings you set, click on the slide you want to rehearse with and press the Play button at the bottom of the Custom Animation menu. The menu plays one slide at a time for the amount of time you specified in your rehearsal.
77.. Select the Manually option under Advance Slides and click OK. The dialog box closes. You will now have to manually advance through the animations and slides in your slide show.
88.. Advance through the animations and slides in your presentation.
Slide timings appear in the lower-left corner of each slide in Slide Sorter view.

154 Microsoft PowerPoint 2003
© 2004 CustomGuide, Inc.
Lesson 5-6: Creating a Presentation that Runs by Itself
This lesson explains how to create a self-running presentation that communicates information without your having to be there to operate it. For example, you might want to set up a presentation to run unattended in a booth at a trade show or on a community access cable channel. Except for using the mouse to click certain items, you can make most controls unavailable so users can't make changes to the presentation. A self-running presentation restarts when it's finished and also when it's been idle on a manually advanced slide for longer than five minutes.
When you design a self-running presentation, you’ll want to keep the setting and purpose of the presentation in mind. For example, will your self-running presentation be in a booth or in a display window? Do you want viewers to interact with your presentation (if it contains hyperlinks), or do you want to prevent them from tampering with it? Is your presentation self-explanatory, or do you need to add voice narration to it?
Several options you will want to consider when creating a self-running slide show include: • Automatic or manual timings: You can set a slide show to run by itself with
automatic timings, or you can set it so users can move through the show at their own pace by using the mouse to click the appropriate buttons. Mouse clicks are ignored unless they’re on objects you've created hyperlinks to. See Lesson 7-5: Rehearsing Slide Show Timings for more information.
• Hyperlinks: You can set up hyperlinks to move through the slide show or to jump to other slides and programs. See Chapter Nine: Working with Other Programs and the Internet for more information.
• Voice narration: You can add recorded narration that plays with your slide show. See Chapter Eight: Working with Multimedia for more information.
Figure 5-13
Set up a presentation to run automatically in the Slide Transition task pane.
Figure 5-14
Select the Browsed at a kiosk option in the Set Up Show dialog box to create a self-running show.
Other Ways to Select all the Slides in a Presentation: • Select Edit → Select
All from the menu.
Check to have PowerPoint automatically advance to the next slide…
…after this many seconds have elapsed.
Select to run the slide show as a self-running show. PowerPoint will automatically check the Loop continuously box when you select this option.
Figure 5-13
Figure 5-14
Chapter Five: Delivering Your Presentation 155
The Richard Stockton College of New Jersey
Quick Reference To Create a Presentation that Runs by Itself: 1. Switch to Slide Sorter
View. 2. Select all the slides in the
presentation by pressing <Ctrl> + <A> or by selecting Edit → Select All from the menu.
3. Click the Slide Transition button on the Slide Sorter toolbar or select Slide Show → Slide Transition from the menu.
4. Check the Automatically after box, specify how long you want to display each slide in the secondsbox, and click Apply to All Slides.
5. Select Slide Show → Set Up Show from the menu.
6. Select the Browsed at a kiosk option, make sure the Using timings, if present button is selected and click OK.
7. Switch to Slide Show View to start the automated slide show.
Setting up a presentation to run by itself is incredibly easy. Here’s how to do it:
11.. Switch to Slide Sorter View if you’re not already there. You can switch to Slide Sorter View by clicking the Slide Sorter View button on the horizontal scroll bar or by selecting View → Slide Sorter from the menu.
22.. Press <Ctrl> + <A> to select all the slides in the presentation. Now that all the slides in the presentation are selected, you need to tell PowerPoint to automatically advance the slides.
33.. Click the Slide Transition button on the Slide Sorter toolbar. The Slide Transition task pane appears, as shown in Figure 5-13. This is where you tell PowerPoint to automatically advance to the next slide(s) after a specified number of seconds have passed.
44.. Ensure that the Automatically after box in the task pane is checked, then click the seconds box and type 5. PowerPoint will now automatically advance through the selected slides in your presentation in 5-second intervals.
55.. Click Apply to All Slides. PowerPoint applies the settings to all the slides in the presentaion.
66.. Select Slide Show → Set Up Show from the menu. The Set Up Show dialog box appears, as shown in Figure 5-14. The Show type section is what’s important here. There are three options you can choose from: • Presented by a speaker: This is the typical full-screen slide show. You can
advance the slides and animations manually, or you can set automatic timings using the Rehearse Timings command.
• Browsed by an individual: Runs the slide show in a standard window, with custom menus and commands that make it easy for an individual reader to browse your presentation.
• Browsed at a kiosk: Runs the slide show full-screen as a self-running show that restarts after 5 minutes of inactivity. The audience can advance the slides or click hyperlinks and action buttons but cannot modify the presentation. Pressing the <Esc> key will stop any of these slide shows. Make sure the ‘Using timings, if present’ button is selected under Advance slides.
77.. Select both the Browsed at a kiosk and the Using Timings, if present options from the dialog box. Click OK. Let’s try our presentation with the new automatic slide transitions.
88.. Switch to Slide Show View by clicking the Slide Show button on the horizontal toolbar, or by selecting View → Slide Show from the menu. Sit back and watch as PowerPoint automatically advances through the slides in the presentation. Move on to the next step when you’ve seen enough.
99.. Press <Esc> to cancel the presentation and return to the previous view. Select the ‘On mouse click’ check box, and clear the ‘Automatically after’ check box in the task pane if you want the next slide to appear only when you click the mouse.
1100.. Close the Slide Transition task pane and save your work.
Slide Transition
button Other Ways to Add Slide Transitions: Select Slide Show →
Slide Transition from the menu.

156 Microsoft PowerPoint 2003
© 2004 CustomGuide, Inc.
Lesson 5-7: Creating a Custom Show
When you create a presentation, you may need to customize it for a different audience. For example, if you were the owner of a children’s summer camp, you could create a slide show for the kids containing only slides about how fun the camp is, and another slide show for the parents containing additional slides that explain the benefits of two weeks without children. Instead of having to create and work with several presentation files, PowerPoint 2003 has a Custom Shows feature that lets you create several similar slide shows and store them in the same presentation file.
11.. Select Slide Show → Custom Shows from the menu. The Custom Shows dialog box appears, as shown in Figure 5-15.
22.. Click the New button. The Define Custom Show dialog box appears, as shown in Figure 5-16. First, you need to give your custom show a name.
33.. Type No Peru in the Slide show name box. Next, add the slides you want to appear in the custom slide show.
44.. Click the Expedition to Egypt slide from the Slides in presentation box and click Add. The Expedition to Egypt slide appears in the Slides in custom show list to the right.
Figure 5-15
The Custom Shows dialog box.
Figure 5-16
The Define Custom Show dialog box.
Figure 5-15
Figure 5-16
Select the slides you want to appear in the custom show…
…and click Add.
These slides will appear in the custom show.
Reorder slides by selecting them and clicking the Up or Down arrows.

Chapter Five: Delivering Your Presentation 157
The Richard Stockton College of New Jersey
Quick Reference To Create a Custom Show:1. Select Slide Show →
Custom Shows from the menu.
2. Click the New button and enter a name for the custom show in the Slide Show name box.
3. Select the slide you want to add to the custom show from the Slides in presentation box and click Add. Repeat until you’ve selected all the slides that you want to include.
4. Click OK then Close when you’re finished.
To Show a Custom Show: • Select Slide Show →
Custom Shows from the menu, select the custom show and click Show.
To Edit a Custom Show: • Select Slide Show →
Custom Shows from the menu, select the custom show, click Edit, and then add, remove, or reorder the slides in the custom show.
To Delete a Custom Show: • Select Slide Show →
Custom Shows from the menu, select the custom show and click Remove.
55.. Following the procedure described in Step 4, add the Expedition to China, Expedition to Germany, and Expedition to Japan slides to the custom show. If you add a slide to a custom show by mistake, you can remove it by clicking the slide in the Slides in custom show list and then clicking the Remove button. You’ve finished creating your custom show so you can move on to the next step and close the Define Custom Show dialog box.
66.. Click OK. The Custom Shows dialog box reappears.
77.. Select the No Peru show in the Custom Show box and click Show. PowerPoint displays the selected custom show in Slide Show View. By now you’re probably getting tired of seeing the same slides again and again, so you can quit the slide show as soon as you want.
88.. Press <Esc> to cancel the slide show and save your work.
You can add or delete slides from a custom show after it has been created by selecting Slide Show → Custom Shows from the menu, selecting the custom show you want to edit and clicking the Edit button. Then go ahead and add and/or remove the slides from the custom show.
You can also delete a custom show entirely by selecting Slide Show → Custom Shows from the menu, selecting it, and then clicking the Remove button.

158 Microsoft PowerPoint 2003
© 2004 CustomGuide, Inc.
Lesson 5-8: Packaging and Copying a Presentation to CD
Obviously, your computer has Microsoft PowerPoint installed on it, but what if you want to run a presentation on a computer that doesn’t have PowerPoint installed? The problem is easily solved with PowerPoint’s Package for CD feature. The Package for CD feature packs together all the files and fonts used in a presentation, as well as the PowerPoint Viewer so that those without the PowerPoint program can still view your presentation. If you have CD burning hardware, the Package for CD feature can copy presentations to a blank recordable CD (CD-R) or a blank rewritable (CD-RW). You can also use the Package for CD feature to copy the presentation to a folder on your computer, a network location, or, if you do not include the viewer, a floppy disk instead of directly to CD. This lesson explains how you can use PowerPoint’s Package for CD feature to take your show on the road.
11.. If necessary, find and open the Lesson 7C presentation and save it as 2003 Tours. Or open the presentation you want to copy to a CD or folder. Once the presentation is open you can run the Package for CD feature.
22.. Select File → Package for CD from the menu. The Package for CD dialog box appears, as shown in Figure 5-17.
33.. Type 2003 Tours in the Name the CD box. Choose a name that you can easily recognize so that you don’t confuse yourself.
44.. To check out your presentation’s default settings, click Options. The Options dialog box appears, as shown in Figure 5-18.
Figure 5-17
The Package for CD dialog box.
Figure 5-18
Change your default settings in the Options dialog box.
Figure 5-19
The Copy to Folder dialog box.
Including the Microsoft Viewer makes it possible for other PC’s without PowerPoint to view your presentation.
Figure 5-18
Figure 5-19
Figure 5-17 Click here to specify how your presentation will be displayed.
Click here to include TrueType fonts.
Click here to create a password for your presentation.
Chapter Five: Delivering Your Presentation 159
The Richard Stockton College of New Jersey
Quick Reference To Package a Presentationto a Folder in your Hard drive: 1. Open the presentation
you want to copy. 2. Select File → Package
for CD from the menu. 3. Click the Copy to Folder
button and specify where to save the presentation.
To Package a Presentationto CD: 1. Open the presentation
you want to copy. 2. Select File → Package
for CD from the menu. 3. Click the Copy to CD
button and insert a blank CD when prompted.
55.. Make sure that the PowerPoint Viewer, Linked files, and Embedded TrueType fonts boxes are checked and click OK. The Options dialog box closes and you’re back to the Package for CD dialog box.
NOTE: You don’t have to include the PowerPoint Viewer if the recipient of your packaged presentation already has PowerPoint or the PowerPoint Viewer program installed. Adding the Viewer to your packaged presentation takes up a lot of file space, so don’t include it if you don’t have to.
NOTE: The Microsoft PowerPoint Viewer program must be installed on your computer in order to use it with the Package for CD feature. If PowerPoint can’t find the Viewer when it tries to package your presentation, you’ll have to install it from the Microsoft Office CD-ROM, or download it from Microsoft Office Online.
66.. Click the Copy to Folder button, type C:\ in the text box and click OK. This will package and save the presentation to a folder in your C: hard drive named “2003 Tours.”
77.. Click the Close button in the Package for CD dialog box. The Package for CD dialog box closes, and you’re ready to take your presentation on the road! Since we’ll be using the PowerPoint Viewer program instead of the actual PowerPoint program in the next lesson, you can move on to the next step and exit Microsoft PowerPoint.
88.. Exit Microsoft PowerPoint.
Now that you know how to use the Package for CD feature to copy a PowerPoint slide show to a folder, turn the page and we’ll learn how to run the packaged slide show using the PowerPoint Viewer program.

160 Microsoft PowerPoint 2003
© 2004 CustomGuide, Inc.
Lesson 5-9: Viewing a Packaged Presentation
Once you’ve copied your presentation to a folder or CD, you can run it using the PowerPoint Viewer program. Loading and running a packed presentation on another computer can be a little tricky the first time you try it, so we’ll walk through the entire process in this lesson. Viewer is free to distribute, so you don’t need to worry about purchasing another license.
First, we need to find the packaged presentation. There are several ways to find and run a packaged PowerPoint presentation: • Find the presentation’s drive and folder using My Computer or Windows Explorer. When
you’ve opened the appropriate drive and/or folder, simply double-click the pptview icon and select the presentation.
• Click the Windows Start button and select Run. Type the drive name and folder name of the program you want to run, “2003 Tours.” For example, if you had saved a presentation to the C: hard drive, you would type “c:\2003 Tours.”
Although both methods work equally well, we’ll be using the first method in this lesson.
11.. Make sure you can see the Windows desktop and double-click the My Computer icon in the upper-left corner of the screen. The My Computer window appears, displaying the contents of your computer.
Figure 5-20
The Package for CD feature copies several files when it packages a presentation.
Figure 5-21
Select the presentation you want to run in the Microsoft PowerPoint Viewer.
My Computer
Double-click the pptview icon to open the PowerPoint Viewer…
Figure 5-20
Figure 5-21
…then select the presentation you want to run.
Chapter Five: Delivering Your Presentation 161
The Richard Stockton College of New Jersey
Quick Reference To Run a Packed Presentation: 1. Browse to the disk drive
and/or folder where the packed presentation is saved using My Computeror Windows Explorer.
Or… Click the Windows Start
button, select Run, click the Browse button and browse to the disk drive and/or folder where the packed presentation is saved.
2. Find and double-click the file folder.
To Use the Microsoft PowerPoint Viewer: 1. Browse to the drive and
folder where you installed the presentation and find and double-click the pptview program file.
2. Select the presentation you want to view and clickOpen.
To Run a Packed Presentation Copied to CD: • Simply insert the CD into
the disc drive.
22.. Double-click the (C:) hard drive icon. If you copied your packaged presentation to CD, you would double-click the CD-RW (D:) drive icon instead.
33.. Find and double-click the 2003 Tours folder. Several files will appear in the folder or diskette where you saved your presentation, as shown in Figure 5-20. One of these files is the PowerPoint Viewer program.
44.. Find and double-click the pptview program file. The Microsoft PowerPoint Viewer program window appears, as shown in Figure 5-21. You’re ready to run the packed presentation—all you have to do now is select the presentation you want to view.
55.. Select the Lesson 7B file and click Open to run the selected presentation in the Microsoft PowerPoint Viewer program. Voila! The presentation appears in all its glory, even though you’re not actually using PowerPoint to display it.
66.. Step through the presentation. Press <Esc> when you’ve seen enough, then exit the Microsoft PowerPoint Viewer program.
Congratulations! You’ve just learned how to unpack a presentation and run it using the Microsoft PowerPoint Viewer program. Of course, if the computer you want to run a presentation on has the full PowerPoint program, there’s no sense in using the PowerPoint Viewer program.
pptview

162 Microsoft PowerPoint 2003
© 2004 CustomGuide, Inc.
Chapter Five Review
Lesson Summary
Delivering a Presentation on a Computer • To Display a Slide Show on a Computer: Click the Slide Show button on the horizontal scroll
bar or select View → Slide Show from the menu.
• To Advance to the Next Slide: Click the left mouse button or press the <Enter>, <Spacebar>, <→>, <↓>, or <Page Down> keys.
• To Stop a Slide Show: Press <Esc>.
• To Doodle on the Current Slide with the Pen: Press <Ctrl> + <P> and draw on the screen with the pen tool. Press <Ctrl> + <A> to switch back to the arrow pointer.
• To Erase Your Doodles: Press <E>.
• To Display a List of Slide Show Commands: Right-click anywhere on the slide or click the Slide Show Menu button.
Using Slide Transitions • A transition is how PowerPoint advances from one slide to the next during an on-screen slide show.
You can choose from over 40 different special effects to move between slides.
• To Add Slide Transitions using the Slide Sorter Toolbar: Switch to Slide Sorter View. Click the slide where you want to add a transition. To select multiple slides hold down the <Shift> key as you click each slide. Click the Slide Transition button on the Slide Sorter toolbar and select a transition from the Transition list in the Slide Transition task pane. (Optional) Select a transition speed, sound, and how you want to advance the slide.
Using an Animation Scheme • An animation scheme adds a preset visual effect to the text on a slide. Ranging from subtle to
exciting, each scheme usually includes an effect for the slide title and an effect that is applied to the bullets or paragraphs.
• To Add an Animation Scheme: Switch to Normal View and go to the slide where you want to add the animation scheme. Select Slide Show → Animation Scheme from the menu and then select the desired animation scheme from the task pane.
Using Custom Animations
• To Add Custom Animation to an Existing Slide Object: Switch to Normal View and go to the slide where you want to add the animation. Select the object you want to animate and select Slide Show → Custom Animation from the menu or right-click the object and select Custom Animation from the shortcut menu. Click the Add Effect button in the task pane and select the desired animation. (Optional) Specify the speed and parameters of the animation.

Chapter Five: Delivering Your Presentation 163
The Richard Stockton College of New Jersey
Rehearsing Slide Show Timings • Slide Show Timings let you practice how long each slide is displayed on-screen during a
presentation. These timings can be saved and used later to create an automated slide show.
• To Add/Rehearse Slide Timings: Select Slide Show → Rehearse Timings from the menu. Display each slide for whatever duration you want, then advance to the next slide. PowerPoint will record how long each slide is presented. If you make a mistake on the timing, click the Repeat button and try again. When you’ve finished the last slide, click Yes to accept your timings.
• To run your slide show manually instead of using the timings, select Slide Show → Set Up Show from the menu, select Manually and click OK.
Creating a Presentation that Runs by Itself • To Create a Presentation that Runs by Itself: Switch to Slide Sorter View and select all the
slides in the presentation by pressing <Ctrl> + <A> or by selecting Edit → Select All from the menu. Click the Slide Transition button on the Slide Sorter toolbar or select Slide Show → Slide Transition from the menu, check the Automatically after box, specify how long you want to display each slide in the seconds box, and then click Apply to All Slides. Select Slide Show → Set Up Show from the menu, select the Browsed at a kiosk option, make sure the Using timings, if present button is selected under Advance slides and click OK.
• Switch to Slide Show View to play the automated slide show. Press <Esc> to stop playing the presentation.
Creating a Custom Show • PowerPoint’s Custom Show feature allows you to save several different slide shows within a single
presentation file.
• To Create a Custom Show: Select Slide Show → Custom Shows from the menu, click the New button, and enter a name for the custom show in the Slide Show name box. Select the slide you want to add to the custom show from the Slides in presentation box, and click Add. Repeat until you’ve selected all the slides that you want to include. Click OK and then Close when you’re finished.
• To Run a Custom Show: Select Slide Show → Custom Shows from the menu, select the custom show and click Show.
• To Edit a Custom Show: Select Slide Show → Custom Shows from the menu, select the custom show, click Edit, and then add, remove, or reorder the slides in the custom show.
• To Delete a Custom Show: Select Slide Show → Custom Shows from the menu, select the custom show, and click Remove.
Using the Package for CD feature • The Package for CD feature packages a presentation to a folder or CD so that you can run the
presentation on other computers—even if they don’t have PowerPoint installed!
• To Package a Presentation to a Folder in your Hard Drive: Open the presentation you want to copy and select File → Package for CD from the menu. Click the Copy to Folder button and specify where to save the presentation.
• To Package a Presentation to CD: Open the presentation you want to copy and select File → Package for CD from the menu. Click the Copy to CD button and insert a blank CD when prompted.

164 Microsoft PowerPoint 2003
© 2004 CustomGuide, Inc.
Viewing a Packaged Presentation • To Run a Packed Presentation: Use either of these methods:
- Browse to the disk drive and/or folder where the packed presentation is saved using My Computer or Windows Explorer. - Click the Windows Start button, select Run, click the Browse button, and browse to the disk drive and/or folder where the packed presentation is saved. After using either method, double-click the file folder.
• To Use the Microsoft PowerPoint Viewer: Browse to the drive and folder where you installed the presentation and find and double-click the pptview program file, select the presentation you want to view, and click Open.
Quiz 1. For six monthly payments of just $49, you can purchase additional software
for PowerPoint that enables you to doodle on your slides during a presentation. (True or False?)
2. Slide Show view displays your presentation as an electronic slide show on your computer. (True or False?)
3. Which PowerPoint view works best for adding slide transitions?
A. Normal View B. Slide Show view C. Slide Sorter view D. Notes view
4. Which of the following statements most accurately describes animation as it is used in PowerPoint presentations?
A. You can animate and program the Office Assistant to give your presentation for you. B. You can add several animated characters to your slides that will amuse everyone with
their clowning around. C. You can animate text and objects so that they appear on your slides by using one of
more than 50 different special effects. D. You can animate a slide show so that it can run by itself.
5. Which of the following statements about rehearsing slide timings is NOT true?
A. Rehearsing slide timings helps you ensure that each slide is displayed for an appropriate amount of time.
B. You can record slide timings in Slide Show view. Simply advance to the next slide after each slide has been displayed for the desired duration.
C. You can manually change slide timings by selecting Slide Show → Timings from the menu and editing the timings in the Slide Timings dialog box.
D. After you’ve added slide timings, you can save them and later use them to automate the slideshow.
6. You have a presentation that needs to be shown to two different audiences. One audience will see all the slides in the presentation; the other audience
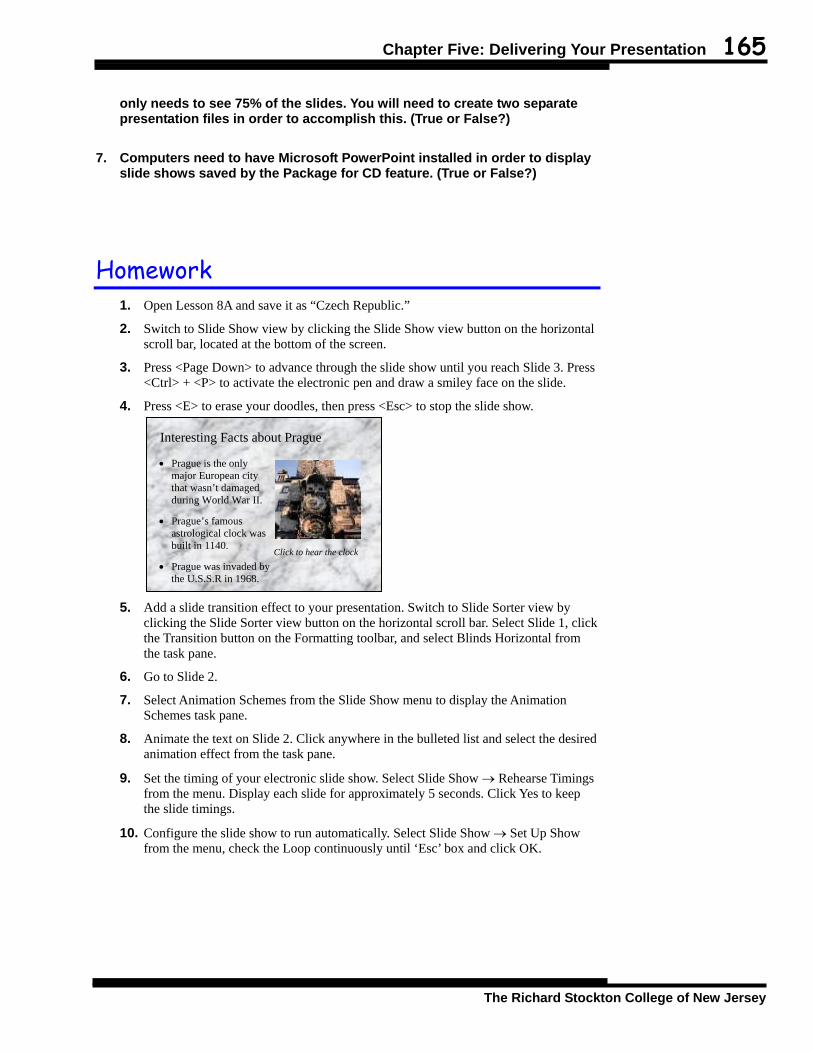
Chapter Five: Delivering Your Presentation 165
The Richard Stockton College of New Jersey
only needs to see 75% of the slides. You will need to create two separate presentation files in order to accomplish this. (True or False?)
7. Computers need to have Microsoft PowerPoint installed in order to display slide shows saved by the Package for CD feature. (True or False?)
Homework 1. Open Lesson 8A and save it as “Czech Republic.”
2. Switch to Slide Show view by clicking the Slide Show view button on the horizontal scroll bar, located at the bottom of the screen.
3. Press <Page Down> to advance through the slide show until you reach Slide 3. Press <Ctrl> + <P> to activate the electronic pen and draw a smiley face on the slide.
4. Press <E> to erase your doodles, then press <Esc> to stop the slide show.
5. Add a slide transition effect to your presentation. Switch to Slide Sorter view by clicking the Slide Sorter view button on the horizontal scroll bar. Select Slide 1, click the Transition button on the Formatting toolbar, and select Blinds Horizontal from the task pane.
6. Go to Slide 2.
7. Select Animation Schemes from the Slide Show menu to display the Animation Schemes task pane.
8. Animate the text on Slide 2. Click anywhere in the bulleted list and select the desired animation effect from the task pane.
9. Set the timing of your electronic slide show. Select Slide Show → Rehearse Timings from the menu. Display each slide for approximately 5 seconds. Click Yes to keep the slide timings.
10. Configure the slide show to run automatically. Select Slide Show → Set Up Show from the menu, check the Loop continuously until ‘Esc’ box and click OK.
• Prague is the only major European city that wasn’t damaged during World War II.
• Prague’s famous astrological clock was built in 1140.
• Prague was invaded by the U.S.S.R in 1968.
Interesting Facts about Prague
Click to hear the clock

166 Microsoft PowerPoint 2003
© 2004 CustomGuide, Inc.
Quiz Answers 1. False. PowerPoint already has the ability to doodle on your slides—just press <Ctrl> +
<P>.
2. True.
3. C. Slide Sorter view is the easiest place to add and work with slide transitions.
4. C.
5. C.
6. False. You can create two custom slide shows—one that includes every slide in the presentation for one audience and another custom show that excludes some of the slides for the other audience.
7. False. The Package for CD feature gives you the option of including the PowerPoint Viewer program, which can display your presentations on computers that don’t have PowerPoint installed.


168 Index
© 2001 CustomGuide, Inc.
Index
A adjustment handle ............................... 128 aligning
objects ............................................. 126 paragraphs....................................... 100
Animation Effects button .................... 148 animations
custom............................................. 150 described ......................................... 148 effects.......................................148, 150 of objects......................................... 148 of text .............................................. 148 order................................................ 150 preset............................................... 148 timing.............................................. 150
arrows drawing ............................................114
AutoLayouts for slides.......................... 40 AutoShape button ............................... 128 AutoShapes ......................................... 128
B background color .................................. 96 Backspace key..................................44, 45 BMP graphics file format.................... 125 Bold button ........................................... 84 Bring Forward command .................... 132 Bring to Front command..................... 132 bullet, changing..................................... 98 Bullets button........................................ 98
C cells
copying ............................................. 30 cutting ............................................... 30 moving .............................................. 30 pasting............................................... 30
CGM graphics file format ................... 125 Clip Art Gallery .................................. 122
clip art, inserting ..................................122 clipboard ..........................................30, 49 Collapse All button ................................57 Collapse button ......................................56 color
color scheme ......................................94 for drawn objects .............................120 line ...................................................120 slide background................................96
connecting shapes ................................128 Copy button ...........................................48 Copy command......................................48 copying ..................................................48 Crop button ..........................................124 cropping ...............................................124 Ctrl key ..................................................18 custom presentation .............................156 Cut button ..............................................48 Cut command.........................................48 cutting ....................................................48
D Decrease Paragraph Spacing button.....101 Delete key ........................................44, 45 deleting
slide objects .....................................118 text .....................................................44
Demote button .......................................43 demoting paragraphs..............................43 desktop.....................................................6 Dialog boxes ..........................................16 Draw button
Flip command ..................................130 Order command ...............................132 Rotate command ..............................130
drawing 3-D effects, adding...........................134 aligning objects................................126 arrows ..............................................114 AutoShapes ......................................128 color .................................................120
Index 169
The Richard Stockton College of New Jersey
cropping...........................................124 during a slide show..........................144 flipping objects ................................130 grouping objects ..............................126 inserting clipart ................................122 inserting pictures..............................124 layering objects................................132 lines .................................................114 moving objects.................................118 resizing objects ................................118 rotating objects ................................130 selecting objects...............................118 shadow effects, adding.....................134 shapes ...................................... 114, 128 text boxes.........................................116
Drawing toolbar...................................114
E editing text .............................................44 Expand All button..................................57 Expand button........................................56
F File management ...................................70 files
deleting ..............................................70 renaming ............................................70
Fill Color button ..................................120 Fill Effects
described............................................97 gradient ..............................................97 pattern ................................................97 picture ................................................97 texture ................................................97
Find command .......................................54 flipping objects ....................................130 flowchart..............................................128 fonts
colors .................................................86 selecting.............................................84 shadows .............................................86 size...............................................84, 87
footers ..................................................102 foreign characters ..................................60 Format Painter button ............................88 formatting
copying ..............................................88 described............................................83 drawing objects................................120
Formatting toolbar .................................11
G GIF graphics file format ......................125
graphics, inserting ....................... 122, 124 grouping, objects .................................126
H headers and footers
adding ..............................................102 described..........................................102
hiding slides..................................................65
highlighting text ....................................46
I Image Control button...........................124 Increase Paragraph Spacing button......101 indenting text.......................................104 inserting
clipart...............................................122 graphics ...........................................124 picture..............................................124 slide, new...........................................40
insertion point........................................44 Italics button ..........................................84
J JPG graphics file format ......................125
K Keyboard ...............................................18 Keystroke shortcuts ...............................18
L landscape orientation ...........................106 layering objects....................................132 layouts for slides....................................40 Line button .......................................... 114 line spacing..........................................100 lines
arrowheads, adding..........................120 color, changing ................................120 drawing............................................ 114 style .................................................120 thickness ..........................................120
lists, bulleted..........................................98
M Menu Bar............................................... 11 Menus
shortcut menus........ See shortcut menus Move Down button................................59 Move Up button.....................................58 moving
slide objects ..................................... 118

170 Index
© 2001 CustomGuide, Inc.
N New Slide button .................................. 40 notes
pages ................................................. 64 Notes Page View
adding notes pages ............................ 64
O Order command .................................. 132 orientation ........................................... 106 Outline View
changing order of slides .................... 58 displaying presentation in ................. 56 printing from..................................... 56 working in ......................................... 42
Outlining toolbar................................... 42
P Package for CD feature
packaging a presentation................. 158 unpacking on another computer ...... 160
Page Setup command.......................... 106 paragraph
alignment ........................................ 100 spacing ............................................ 100
Paste button........................................... 48 Paste command ..................................... 48 pasting................................................... 48 Pen tool, for writing on slides ............. 144 Picture toolbar..................................... 124 pictures, inserting.........................122, 124 portrait orientation .............................. 106 PowerPoint Viewer program............... 160 presentation
automated........................................ 154 custom............................................. 156 deliverying ...................................... 144 multiple, working with...................... 66 rehearsing timings........................... 152
Promote button...................................... 43 promoting paragraphs ........................... 43
R Redo button........................................... 50 Redo command ..................................... 50 Repeat command................................... 50 Replace command................................. 54 replacing text......................................... 46 resizing.................................................118 Right-click ............................................ 18 Rotate button....................................... 130 rotating objects.................................... 130
S Select Objects button ...........................118 selecting
multiple slide objects .......................118 text .....................................................46
Send to Back command .......................132 Shadow button .....................................134 shadows
described..........................................134 images..............................................134 shapes...............................................134
shapes...................................................114 drawing ....................................114, 128
Shortcut menus ......................................18 Show Formatting button ........................57 sizing handles ......................................118 Slide Layout button................................41 Slide Show button........................144, 145 slide shows
automated.........................................154 custom..............................................156 delivering .........................................144 described..........................................143 rehearsing timings............................152
Slide Transition button.........................147 slides
adding new.........................................40 changing order of .........................58, 62 copying ..............................................62 duplicating .........................................62 hiding .................................................65 moving ...............................................62 size, changing ..................................106 transitioning between.......................146
speaker notes..........................................64 spell-checking........................................52 Spelling button.......................................52 Standard toolbar.....................................11 Start button...............................................6 Status bar ...............................................11 symbols, inserting ..................................60
T tabs.......................................................104 templates
applying design from .........................90 text
editing ................................................44 finding................................................54 replacing ............................................46 selecting .............................................46
Text Box button ...................................116 text boxes
adding ..............................................116
Index 171
The Richard Stockton College of New Jersey
formatting text in .............................116 resizing ............................................116
three-dimensional effects.....................134 TIF graphics file format.......................125 timing
automatic .........................................154 manual .............................................154 slide .................................................152
Title bar..................................................11 toolbars
Drawing ...........................................114 Outlining............................................42 Picture..............................................124
transitions, slide description of ...................................146
U Underline button....................................84 Undo button...........................................50 Undo command .....................................50
V views
Master................................................92 Slide Show.......................................144
W windows
multiple, working with ......................66 resizing ..............................................66
WMF graphics file format ...................125