microsoft system center 2012 service manager cookbook · pdf filemicrosoft system center 2012...
TRANSCRIPT

Microsoft System Center 2012 Service Manager Cookbook
Samuel Erskine (MCT) Anders Asp (MVP) Andreas Baumgarten (MVP) Steve Beaumont Dieter Gasser
Chapter No. 4 "Building the Configuration Management
Database (CMDB)"
In this package, you will find: A Biography of the authors of the book
A preview chapter from the book, Chapter NO.4 "Building the Configuration Management Database (CMDB)"
A synopsis of the book’s content
Information on where to buy this book
About the Authors Samuel Erskine (MCT) has over 15 years' experience in a wide range of technologies and industries (public and private) including working for fortune 500 organizations. In 2009 he founded a consultancy practice organization in the United Kingdom focused on implementing Microsoft System Center systems management and IT Service management products. He merged the United Kingdom organization with Syliance IT Services in 2012 and became the third member of the Syliance global management team. He is a Computer Engineering graduate and holds various technology vendor/industry certifications. He is an active participant in the System Center community with a blog at www.frameworktorealwork.com.
Thanks to Jungfraubahnen Management AG (http://www.jungfrau.ch/) for the Photo of "Top of Europe".
For More Information: www.packtpub.com/microsoft-system-center-service-manager-2012-
cookbook/book
Anders Asp (MVP) started his IT career working with storage and backup solutions, but discovered Service Manager back in 2009 and has been working full time with the product ever since. He is currently working at a Swedish company named Lumagate as a Service Manager Specialist and Product Manager. He also teaches the official Service Manager course at the two largest training centers in Sweden and has presented at several large events.
He is very active on the official Service Manager forums at TechNet and regularly blogs about the product on his own blog at www.scsm.se. In April 2012, he was awarded with the Microsoft Most Valuable Professional (MVP) title in the "System Center Cloud and Datacenter Management" area.
Andreas Baumgarten (MVP), IT Architect with the German IT service provider H&D International Group, has worked as an IT pro for more than 20 years. Microsoft technologies have always accompanied him and he can also look back on 14 years of experience as a Microsoft Certified Trainer.
Since 2008, he has been responsible for the field of System Center technology consulting and ever since he took part in SCSM 2010 and 2012 and System Center Orchestrator 2012 Technology Adoption Program with H&D.
With his deep inside technology know-how and his broad experience across the System Center product family and IT management, he now designs and develops Private Cloud solutions for customers all over Germany.
In October 2012, he was awarded with the Microsoft Most Valuable Professional (MVP) title for "System Center Cloud and Datacenter Management".
For More Information: www.packtpub.com/microsoft-system-center-service-manager-2012-
cookbook/book
Steve Beaumont has been working in IT since 1998, working his way through the ranks starting with low-end system building and support through to managing a crack team of enterprise class support specialists, and to now provide consultancy and designs for System Center 2012 and Private Cloud solutions.
With the release of Service Manager 2010, he ventured into the dark side of customization and released some solutions to the community via the TechNet Gallery helping to show how to extend the usage of the product.
He also runs his own blog (http://systemscentre.blogspot.com) covering the full range of System Center components and areas related to desktop design, deployment, and optimization.
Dieter Gasser is an IT Consultant and co-founder of the company Syliance IT Services, headquartered in Switzerland, and specializes in Service Manager delivery and customization.
He has been working in IT for more than 13 years and has had a strong focus on Microsoft technologies. He started his career as an application and database developer, and was later appointed IT Manager for an international manufacturing company.
In 2010 he entered the systems management and automation market. With his technical and managerial background, he has been focusing on Service Manager ever since. Together with his colleagues, he delivers datacenter management and automation solutions based on Microsoft System Center to customers all over Switzerland.
For More Information: www.packtpub.com/microsoft-system-center-service-manager-2012-
cookbook/book
Microsoft System Center 2012 Service Manager Cookbook System Center 2012 Service Manager builds on its predecessor System Center Service Manager 2010, by extending the ITIL© process features to include Service Request fulfillment, Release Management, and automated orchestration with significant enhancements in its reporting capabilities. The full set of additions and improvements can be found at the official Microsoft website for the product.
System Center 2012 Service Manager (SCSM) is a modular product made up of a series of submodular components. Installing the product is simple using the official product documentation and online community resources.
The post-installation phase requires you to plan and configure the product in a methodical sequence. The aim of the book is to address the challenges faced by many first-time users of SCSM post-installation, and also to share valuable insight from real-world implementations.
The book is written in the Packt style, which provides the reader with independent task-oriented steps to achieve specific SCSM objectives. The authors recommend that you read the first two chapters as a background for subsequent chapters, if you are new to SCSM and process-oriented software products. The book may be read in the order of interest, but where relevant, the authors refer to dependent recipes in other chapters.
What This Book Covers Chapter 1, ITSM Frameworks and Processes, aims to provide a background to ITSM frameworks with a particular focus on the Information Technology Infrastructure Library (ITIL©) and Microsoft Operations Framework (MOF). The objective is to explain the relevant key areas of these frameworks and how they relate to Service Manager as a solution.
Chapter 2, Personalizing SCSM 2012 Administration, covers the initial process dependent critical settings and tasks a Service Manager administrator would need to configure after successfully installing the product.
Chapter 3, Configuring Service Level Agreements (SLAs), delves into the Service Level Agreement areas of Service Manager 2012 and provides you with recipes, which simplify the implementation of this complex topic.
Chapter 4, Building the Configuration Management Database (CMDB), shows Service Manager Administrators how to build the SCSM 2012 Configuration Management Database (CMDB). The recipes in this chapter include various options, from a
For More Information: www.packtpub.com/microsoft-system-center-service-manager-2012-
cookbook/book

manual approach, right through to automating the importing of information from external systems.
Chapter 5, Deploying Service Request Fulfillment, focuses on Service Requests in Service Manager 2012. These recipes will show the reader how to set up the underlying components and all the steps required to present Service Requests to end users as catalog items in the Self-Service Portal.
Chapter 6, Working with Incident and Problem Management, takes two core features of Service Manager, Incident and Problem Management, and provides recipes that will accelerate the reader's knowledge and implementation of these vital ITSM processes.
Chapter 7, Designing Change and Release Management, provides recipes for Change and Release Management in SCSM. A modular approach is provided to aid the readers understanding of the mechanics of this complex organization specific processes.
Chapter 8, Implementing Security Roles, simplifies one of the least understood areas of System Center 2012 Service Manager, the role-based security module.
Chapter 9, Reporting, provides the recipes required to expose the wealth of information stored within Service Manager using the supported reporting interfaces to the product.
Chapter 10, Extending SCSM with Advanced Personalization, contains the recipes to take a standard SCSM deployment to an organization-specific personal implementation, using supported Authoring and Development Tools. SCSM is an extendible product but requires expert knowledge of the product's internal mechanisms.
Chapter 11, Automating Service Manager 2012, takes Service Manager to the next level by providing you with recipes that introduce automation of the ITSM processes in scope of the product.
Appendix A, Community Extensions and Third-party Commercial SCSM Solutions, presents a brief summary of some of the most requested and useful extensions to SCSM as solutions from trusted Microsoft Partners. SCSM, similar to most Microsoft products, has an extended solutions partner community.
Appendix B, Useful Websites and Community Resources, is the SCSM administrator's directory of online resources.
For More Information: www.packtpub.com/microsoft-system-center-service-manager-2012-
cookbook/book

4Building the
Confi guration Management
Database (CMDB)
In this chapter we will have recipes for confi guring the Service Manager with information about your environment. We will specifi cally cover the area of setting up the Confi guration Management Database (CMDB) within Service Manager, with the following tasks:
Adding confi guration items manually
Importing active directory confi guration items
Importing confi guration manager confi guration items
Importing operations manager confi guration items
Importing virtual machine manager confi guration items
Importing orchestrator runbooks
Using a CSV fi le to import items into the CMDB
Creating a business Service
Personalizing and organizing confi guration item views
Creating a confi guration item group
For More Information: www.packtpub.com/microsoft-system-center-service-manager-2012-
cookbook/book
Building the Confi guration Management Database (CMDB)
106
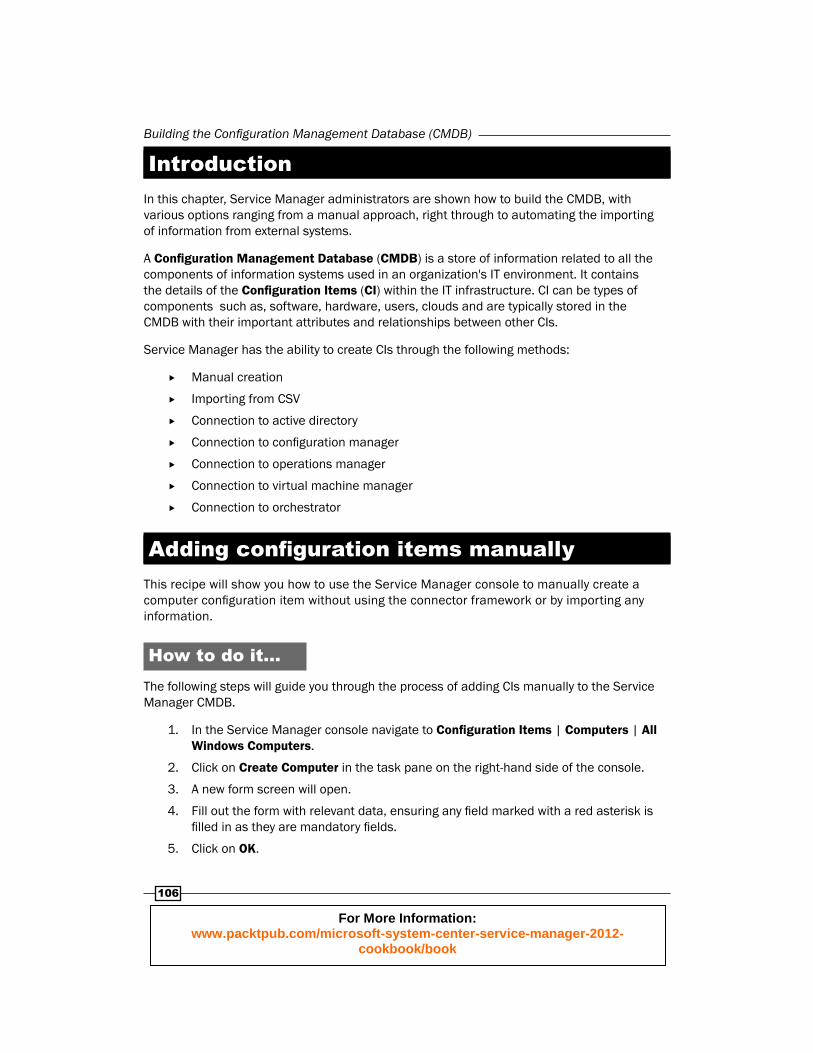
IntroductionIn this chapter, Service Manager administrators are shown how to build the CMDB, with various options ranging from a manual approach, right through to automating the importing of information from external systems.
A Confi guration Management Database (CMDB) is a store of information related to all the components of information systems used in an organization's IT environment. It contains the details of the Confi guration Items (CI) within the IT infrastructure. CI can be types of components such as, software, hardware, users, clouds and are typically stored in the CMDB with their important attributes and relationships between other CIs.
Service Manager has the ability to create CIs through the following methods:
Manual creation
Importing from CSV
Connection to active directory
Connection to confi guration manager
Connection to operations manager
Connection to virtual machine manager
Connection to orchestrator
Adding confi guration items manuallyThis recipe will show you how to use the Service Manager console to manually create a computer confi guration item without using the connector framework or by importing any information.
How to do it...The following steps will guide you through the process of adding CIs manually to the Service Manager CMDB.
1. In the Service Manager console navigate to Confi guration Items | Computers | All Windows Computers.
2. Click on Create Computer in the task pane on the right-hand side of the console.
3. A new form screen will open.
4. Fill out the form with relevant data, ensuring any fi eld marked with a red asterisk is fi lled in as they are mandatory fi elds.
5. Click on OK.
For More Information: www.packtpub.com/microsoft-system-center-service-manager-2012-
cookbook/book

Chapter 4
107
How it works...Filling in the form submits the data to the database, creating the CI and a unique GUID identifi er within the database.
There's more...This method can be repeated for any confi guration item within Service Manager. For a basic installation, this includes CIs such as the following:
Computers/servers
Software
Users
Business services
Environments
Importing active directory confi guration items
This recipe will show you how to set up the active directory connector, which will allow you to import users, groups, and printers from your active directory forest as CIs within Service Manager.
Getting readyBefore you set up the connector you will need an account within your active directory forest that has Read permissions to the organizational units containing the items you would like to import.
How to do it...The following steps will guide you through the process of importing data from Active Directory into the Service Manager CMDB.
1. In the Service Manager console, navigate to Administration | Connectors.
2. In the task pane on the right-hand side click on Create Connector and select Active Directory Connector.
3. Review the information on the Before You Begin screen and click on Next.
For More Information: www.packtpub.com/microsoft-system-center-service-manager-2012-
cookbook/book

Building the Confi guration Management Database (CMDB)
108
4. Enter a name and description for the connector. In this example I've called it demo.local Active Directory Connector.
5. Ensure the Enable this connector box is checked and then click on Next.
6. Choose to either synchronize the entire domain or a specifi c OU.
In this example I've chosen to synchronize the entire domain.
For More Information: www.packtpub.com/microsoft-system-center-service-manager-2012-
cookbook/book
Chapter 4
109
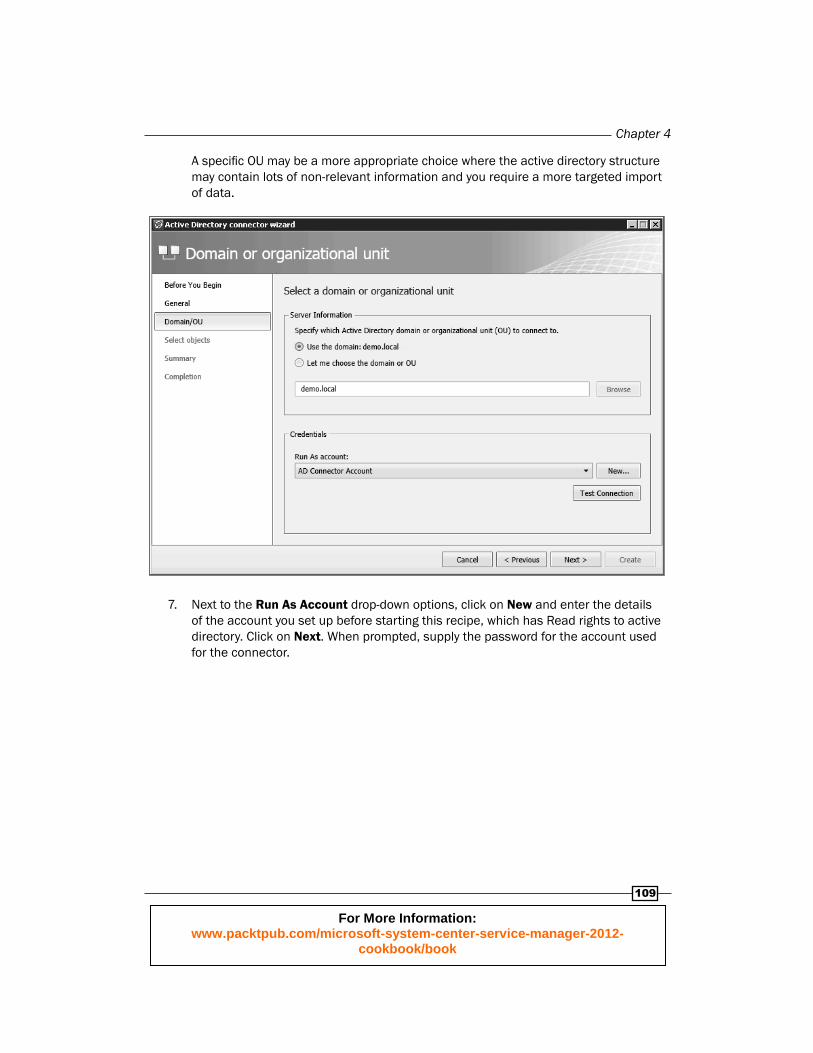
A specifi c OU may be a more appropriate choice where the active directory structure may contain lots of non-relevant information and you require a more targeted import of data.
7. Next to the Run As Account drop-down options, click on New and enter the details of the account you set up before starting this recipe, which has Read rights to active directory. Click on Next. When prompted, supply the password for the account used for the connector.
For More Information: www.packtpub.com/microsoft-system-center-service-manager-2012-
cookbook/book

Building the Confi guration Management Database (CMDB)
110
8. The Select objects screen allows you to drill down and choose either specifi c objects to synchronize with this connector or provide an LDAP query to select the objects based on a custom criteria. As shown in this example, just select All computers, printers, users and user groups.
9. Ensure that both options at the bottom of the screen are selected and click on Next.
10. Review the summary and then, click on Create.
11. When the completion screen shows that the connector was successfully created, click on Close.
How it works...By default the active directory connector polls active directory every 24 hours for new objects. If new objects are present, they are inserted into Service Manager as new confi guration items, otherwise the connector becomes dormant until the next 24 hour interval.
By default the AD connector schedule is not confi gurable via the GUI console but can be changed via PowerShell.
For More Information: www.packtpub.com/microsoft-system-center-service-manager-2012-
cookbook/book

Chapter 4
111
There's more...The active directory connector can be accessed via the Connectors folder under the Administration Workspace of the Service Manager console. Select the connector and click on Properties from the tasks pane on the right-hand side of the console.
Mapping active directory domain attributes to Service Manager propertiesThe following link is to the Service Manager TechNet library documentation and shows the active directory attribute and the corresponding Service Manager property that it maps to.
http://technet.microsoft.com/en-us/library/hh524307
Changing the active directory connector schedule via PowerShellUnfortunately, changing the schedule of a connector isn't an easy PowerShell cmdlet and requires the use of the SDK via PowerShell.
Anton Gritsenko has a good blog post here that explains how to achieve this:
http://blog.scsmsolutions.com/2012/03/update-ad-and-sccm-connector-scheduler-with-powershell/
Importing Confi guration Manager confi guration items
This recipe will show you how to set up the Confi guration Manager connector, which will allow you to import information such as hardware and software information from your confi guration manager system as CIs within Service Manager.
Getting readyBefore you set up the connector you will need an account within your active directory forest for the connector that has the following permissions:
Confi guration Manager SQL Database—smsdbrole_extract&db_datareader roles
Service Manager—advanced operator
For More Information: www.packtpub.com/microsoft-system-center-service-manager-2012-
cookbook/book

Building the Confi guration Management Database (CMDB)
112
How to do it...The following steps will guide you through the process of importing data from System Center Confi guration Manager into the Service Manager CMDB.
1. In the Service Manager console, navigate to Administration | Connectors.
2. In the task pane on the right-hand side, click on Create Connector and select Confi guration Manager Connector.
3. Review the Before You Begin screen and then click on Next.
4. On the General screen, enter a name and a description for the connector. In this example, shown as follows), I've called it demo.local Confi guration Manager Connector.
5. Ensure the Enable is ticked so that this connector box is enabled and then click on Next.
For More Information: www.packtpub.com/microsoft-system-center-service-manager-2012-
cookbook/book

Chapter 4
113
6. On the Select Management Pack screen, use the drop-down list under Management Pack to select the appropriate version of Confi guration Manager that you wish to connect to, and then click on Next.
7. On the Connect to System Center Confi guration Manager Database screen, supply the name of the server hosting the SQL site database (including any instance information if applicable). Then supply the name of the database. In this example, I've used SCCM01 as the name of the server holding the site database and SMS_DL1 as the database name.
8. Next to the Run As Account drop-down selection, click on New and enter the details of the account you had set up before starting this recipe, which is a member of smsdbrole_extract and the db_datareader groups for the site database.
9. Click on Test Connection and enter the password for the account, when prompted.
10. Click on Next.
For More Information: www.packtpub.com/microsoft-system-center-service-manager-2012-
cookbook/book
Building the Confi guration Management Database (CMDB)
114
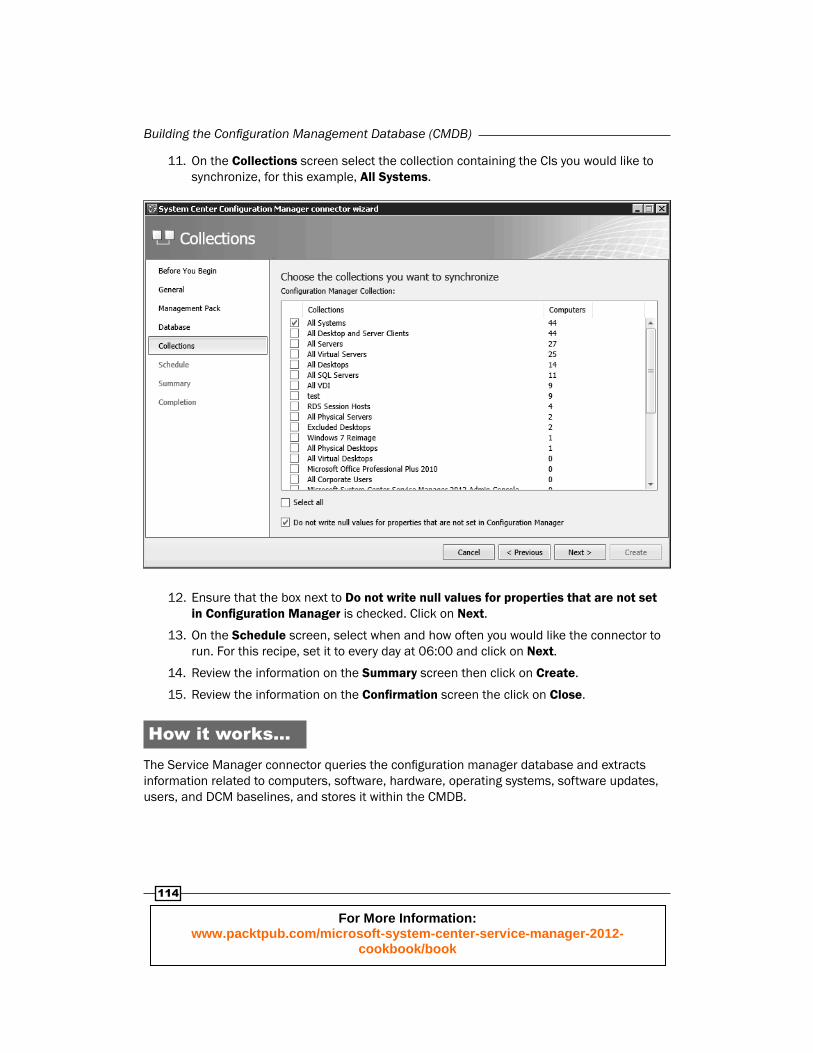
11. On the Collections screen select the collection containing the CIs you would like to synchronize, for this example, All Systems.
12. Ensure that the box next to Do not write null values for properties that are not set in Confi guration Manager is checked. Click on Next.
13. On the Schedule screen, select when and how often you would like the connector to run. For this recipe, set it to every day at 06:00 and click on Next.
14. Review the information on the Summary screen then click on Create.
15. Review the information on the Confi rmation screen the click on Close.
How it works...The Service Manager connector queries the confi guration manager database and extracts information related to computers, software, hardware, operating systems, software updates, users, and DCM baselines, and stores it within the CMDB.
For More Information: www.packtpub.com/microsoft-system-center-service-manager-2012-
cookbook/book
Chapter 4
115
There's more...The Confi guration Manager connector can be accessed via the Connectors folder under the Administration Workspace of the Service Manager console. Select the connector and click on Properties from the task pane on the right-hand side of the console.
Mapping Confi guration Manager attributes to Service Manager propertiesThe following link is to the Service Manager TechNet library documentation and shows the Confi guration Manager attribute and the corresponding Service Manager property that it maps to.
http://technet.microsoft.com/en-us/library/hh519741
Importing Operations Manager confi guration items
This recipe will show you how to set up the Operations Manager connector, which will allow you to import information such as server IP addresses, SQL databases, and distributed application information from your operations manager system as CIs within Service Manager.
Getting readyBefore you set up the connector you will need an account within your Active Directory forest for the connector that has the following permissions:
Operations Manager—operator privileges
Service Manager—advanced operator
For the Operations Manager connector to know what to synchronize with Service Manager, it is required that the management packs containing the classes that defi ne the information are imported into Service Manager.
The Service Manager installation directory contains the base management packs required to get started with the Operations Manager connector.
For More Information: www.packtpub.com/microsoft-system-center-service-manager-2012-
cookbook/book

Building the Confi guration Management Database (CMDB)
116
For Operations Manager 2007:
1. Open a PowerShell window.
2. Type the following commands:
Set-ExecutionPolicy Unrestricted
Set-Location \"Program Files\Microsoft System Center 2012\Service Manager\Operations Manager Management Packs"
.\installOMMPs.ps1
3. Close the PowerShell window.
4. This will import the Operations Manager 2007 Management Packs required for a basic connector.
For Operations Manager 2012:
1. In the Service Manager console navigate to the Administration | Management Packs.
2. In the tasks pane on the right-hand side under Management Packs click on Import.
3. On the Select Management Packs to Import screen, click on Add and navigate to the drive where Service Manager is installed:
Program Files\Microsoft System Center 2012\Service Manager\Operations Manager 2012 Management Packs.
4. Click on the Change the File Type drop-down menu to select MP Files (*.mp).
5. Select all the management packs displayed and click on Open.
6. On the Import Management Packs screen, click on Import.
7. When the import process is complete, click on OK.
How to do it...The following steps will guide you through the process of importing data from System Center Operations Manager into the Service Manager CMDB.
1. In the Service Manager console navigate to Administration | Connectors.
2. In the task pane on the right-hand side, click on Create Connector then select Operations Manager CI Connector.
3. Review the Before You Begin screen then click on Next.
For More Information: www.packtpub.com/microsoft-system-center-service-manager-2012-
cookbook/book

Chapter 4
117
4. On the General screen, enter a name and a description for the connector. In this example I've called it demo.local Operations Manager Connector.
5. Ensure the Enable box is checked and then click on Next.
6. On the Server Details screen in the Server Name box, supply the name of the server that the Operations Manager Management Server is installed on.
7. Next to the Run As Account drop-down menu, click on New and enter the details of the account you had set up before starting.
8. Click the test connection and enter the password for the account, when prompted.
9. Click on Next.
For More Information: www.packtpub.com/microsoft-system-center-service-manager-2012-
cookbook/book

Building the Confi guration Management Database (CMDB)
118
10. On the MP Selection screen, check the Select all box and ensure that the Do not write null values for properties that are not set in Operations Manager box is checked. Click on Next.
11. On the Schedule screen, select when and how often you would like the connector to run. For this recipe, set this to every day at 05:00 and click on Next.
12. Review the information on the Summary screen then click on Create.
13. Review the information on the Confi rmation screen the click on Close.
How it works...The Service Manager connector queries the Operations Manager Management Server and extracts information related to servers and related items and stores it within the CMDB according to the schedule specifi ed.
For More Information: www.packtpub.com/microsoft-system-center-service-manager-2012-
cookbook/book
Chapter 4
119
There's more...The Operations Manager connector can be accessed via the Connectors folder under the Administration Workspace of the Service Manager console. Select the connector and click on Properties from the task pane on the right-hand side of the console.
Adding new Operations Manager CIsEvery so often you will import new management packs into Operations Manager to extend its monitoring capabilities and/or update its management packs with newer versions. These will require importing into Service Manager to either allow these new classes of data to be brought across as CIs or to ensure that any changes to the classes within the management packs are mirrored across both systems.
First use the same method described in the Getting ready section of this recipe to import and browse for the updated/new management packs.
Next you must edit the Operations Manager CI connector, as follows:
1. In the Service Manager console, navigate to the Service Manager console to Administration | Connectors.
2. Select the Operations Manager CI Connector, named demo.local Operations Manager Connector in this recipe.
3. In the task pane on the right-hand side, click on Properties.
4. In the Edit screen on the left-hand side, click on Management Packs and then click on Refresh.
5. Enter the password for the account used by the Operations Manager CI Connector and click on OK.
6. In the Management Packs list, select the new management packs that you have just imported or check the Select All box, and click on OK.
Importing Virtual Machine Manager confi guration items
This recipe will show you how to set up the Virtual Machine Manager connector, which will allow you to import information about your virtualization CIs and your private cloud environment.
For More Information: www.packtpub.com/microsoft-system-center-service-manager-2012-
cookbook/book
Building the Confi guration Management Database (CMDB)
120
Getting readyBefore you set up the connector you will need an account within your Active Directory forest for the connector that has the following permissions:
Virtual Machine Manager—SCVMM Administrator Role and Local Administration Rights on the Virtual Machine Manager server
Service Manager—Advanced Operator
You must also ensure that an Operations Manager CI connector has been created fi rst and that the following management packs are imported:
IIS 2003
IIS 7
IIS Library
SQL Server Core Library
After these are imported, import the Virtual Machine Manager Management Pack (Microsoft.SystemCenter.VirtualMachineManager.2012.Discovery) into Service Manager and all the management packs are synchronized with the Operations Manager CI Connector.
See the Operations Manager CI Connector recipe for information on importing management packs, setting up the Operations Manager CI connector, and synchronizing management packs with the connector.
How to do it...The following steps will guide you through the process of importing data from System Center Virtual Machine Manager into the Service Manager CMDB:
1. In the Service Manager console, navigate to Administration | Connectors.
2. In the task pane on the right-hand side, click on Create Connector. Then select Virtual Machine Manager Connector.
For More Information: www.packtpub.com/microsoft-system-center-service-manager-2012-
cookbook/book

Chapter 4
121
3. Review the Before You Begin screen then click on Next.
4. On the General screen enter a name for the connector and a description. In this recipe I've called it demo.local SCVMM Connector.
5. Ensure that the Enable this connector box is checked, and then click on Next.
For More Information: www.packtpub.com/microsoft-system-center-service-manager-2012-
cookbook/book

Building the Confi guration Management Database (CMDB)
122
6. On the Connection screen in the Server Information box, supply the name of the server that the Virtual Machine Manager is installed on. In this recipe I've used SCVMM01 as the name of the Virtual Machine Manager Server.
7. Next to the Run As Account drop-down menu click on New and enter the details of the account that you had set up before starting.
8. Click Test Connection and enter the password for the account when prompted.
9. Click on Next.
10. Review the information on the Summary screen and then click on Create.
11. Review the information on the Confi rmation screen and then click on Close.
How it works...Most of the CI information related to virtualization is actually brought across by the Operations Manager CI connector, which is why it is a prerequisite to have that connector set up before creating the Virtual Machine Connector. The Virtual Machine Connector syncs information relating to the Virtual Machine Manager Library to complete the CMDB information.
For More Information: www.packtpub.com/microsoft-system-center-service-manager-2012-
cookbook/book

Chapter 4
123
The items the connector syncs are as follows:
Service templates
VM templates
Storage classifi cations
Logical networks
Load balancers
Load balancer VIP templates
This extra information allows you to create items such as Service Requests that might allow a user to provision a Virtual Machine by referencing a VM Template.
There's more...The Virtual Machine Manager connector can be accessed via the Connectors folder under the Administration Workspace of the Service Manager Console. Select the connector and click on Properties from the task pane on the right-hand side of the console.
Need to use an account that isn't a local Administrator?If you have a policy that prohibits the use of local administrator accounts, you need to manually adjust a few permissions to allow for remote PowerShell usage by the account used for the Virtual Machine Manager connector.
1. Log on to the server hosting Virtual Machine Manager as a user with administrative rights.
2. Open a PowerShell window (ensure it's elevated with administrative rights).
3. Type the following and press Enter:Set-PSsessionConfigurationMicrosoft.Powershell –ShowSecurityDescriptorUI
4. When prompted whether "you are sure you want to perform this action", type Y and press Enter.
5. Add the account being used for the connector and grant it Execute (Invoke) permission by checking the Allow box.
6. Click on OK.
7. If prompted to confi rm whether "WinRM can be restarted", type Y and press Enter.
For More Information: www.packtpub.com/microsoft-system-center-service-manager-2012-
cookbook/book
Building the Confi guration Management Database (CMDB)
124
Setting up a Virtual Machine Manager and Operations Manager integrationBecause most of the information about your virtualization CIs comes through the Operations Manager CI Connector it is also advisable to set up the integration feature between Virtual Machine Manager and Operations Manager via the Virtual Machine Manager console.
1. Within Operations Manager ensure that the following management packs are imported:
IIS 2003
IIS 7
IIS Library SQL
Server Core Library
2. In the Virtual Machine Manager console, navigate to Settings workspace.
3. Click on System Center settings and Operations Manager Server.
4. If no connection exists, a wizard will start.
5. Follow the wizard through and the connection will be made.
Importing Orchestrator runbooksThis recipe will show you how to setup the Orchestrator connector, which will allow you to import information about your runbooks to allow them to be used within automation activities in Service Request processes.
Getting readyBefore you set up the connector you will need an account within your Active Directory forest for the connector that has the following permissions:
Read Properties
List Contents
Publish permissions to the root Runbook folder and all child objects
These permissions are granted via the Runbook Designer console.
For More Information: www.packtpub.com/microsoft-system-center-service-manager-2012-
cookbook/book

Chapter 4
125
How to do it...The following steps will guide you through the process of importing runbook information from System Center Orchestrator into the Service Manager CMDB to allow runbooks to be used as automation activities during Service Requests.
1. In the Service Manager console navigate to Administration | Connectors.
2. In the task pane on the right-hand side click on Create Connector then select Orchestrator Connector.
3. Review the Before You Begin screen then click on Next.
4. On the General screen enter a name for the connector and a description. In this recipe I've called it demo.local Orchestrator Connector.
5. Ensure that the Enable this connector box is checked, and then click on Next.
For More Information: www.packtpub.com/microsoft-system-center-service-manager-2012-
cookbook/book

Building the Confi guration Management Database (CMDB)
126
6. On the Connection screen in the Server Information box, supply the URL of the Orchestrator Web Service. This is in the form of http://<Server>:81/Orchestrator2012/Orchestrator.svc. In this example I've used http://SCORCH01:81/Orchestrator2012/Orchestrator.svc as the URL of the Orchestrator Web Service.
7. Next to the Run As Account drop-down menu, click on New and enter the details of the account you set up before starting.
8. Click Test Connection and enter the password for the account when prompted.
9. Click on Next.
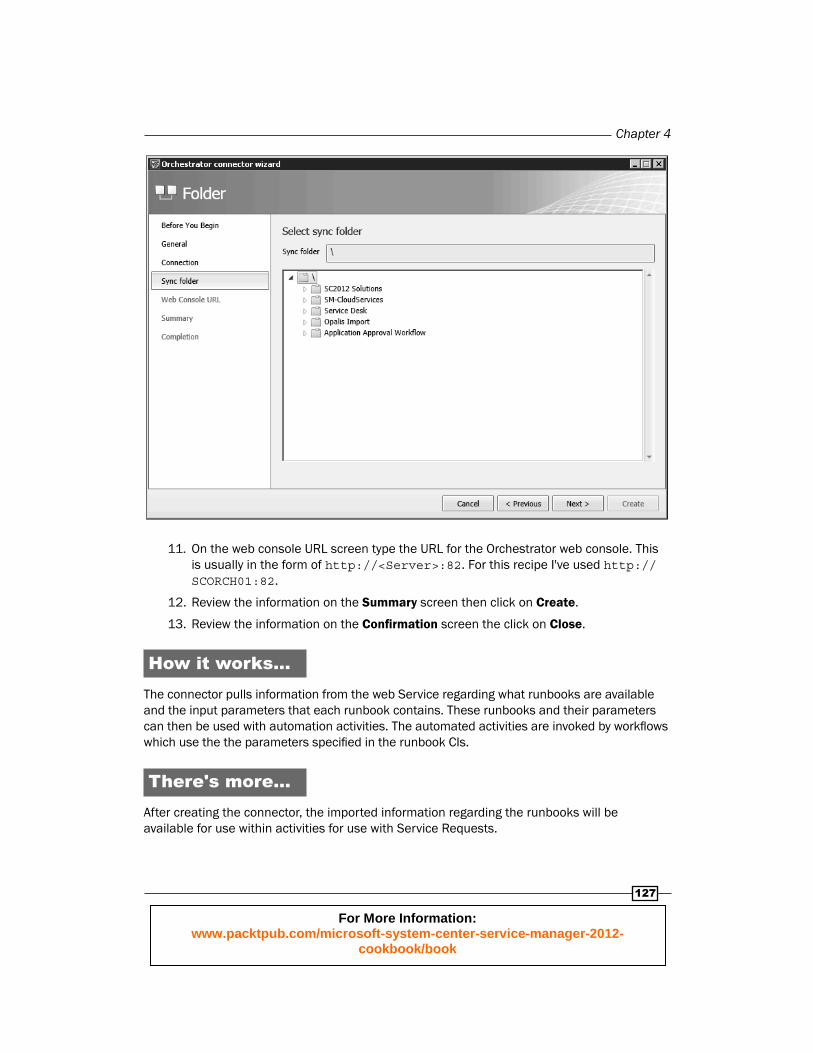
10. On the Folder screen select the folder containing the runbooks you require to synchronize to Service Manager. For this recipe select the root folder (shown as a \ ) to synchronize all runbooks.
For More Information: www.packtpub.com/microsoft-system-center-service-manager-2012-
cookbook/book
Chapter 4
127
11. On the web console URL screen type the URL for the Orchestrator web console. This is usually in the form of http://<Server>:82. For this recipe I've used http://SCORCH01:82.
12. Review the information on the Summary screen then click on Create.
13. Review the information on the Confi rmation screen the click on Close.
How it works...The connector pulls information from the web Service regarding what runbooks are available and the input parameters that each runbook contains. These runbooks and their parameters can then be used with automation activities. The automated activities are invoked by workfl ows which use the the parameters specifi ed in the runbook CIs.
There's more...After creating the connector, the imported information regarding the runbooks will be available for use within activities for use with Service Requests.
For More Information: www.packtpub.com/microsoft-system-center-service-manager-2012-
cookbook/book
Building the Confi guration Management Database (CMDB)
128
Where are my runbooks?After you set up the Orchestrator connector, you will fi nd the imported runbooks under the Library section of the Service Manager console.
Using a CSV fi le to import items into the CMDB
Sometimes you may want to bulk import confi guration items into the CMDB. One way to do this is to import them using a Comma-Separated Value (CSV) fi le containing the CIs that relate to any class type or projection type already existing within Service Manager.
Getting readyTo import data using this method, two fi les are required, as follows:
A fi le containing the CIs to be imported; structured in a comma-delimited method and saved with a .csv extension.
A fi le that defi nes the class types or projection types used by all items in the CSV fi le. Also, this fi le defi nes the order in which the data appears as columns. The fi le must end with an .xml extension, and the authors recommend that the you match the fi rst part of the XML fi le name to the fi rst part of the CSV fi le name.
How to do it...First we need to create the data fi le. In this recipe we will create a CSV fi le that will allow us to import some computer/server confi guration items into Service Manager.
1. Open Microsoft Excel or similar spreadsheet application.
On the fi rst row create the following headers:
Computer Name
Number of Physical Processors
Number of Logical Processors
IP Address
2. Then provide data, like the following table:
For More Information: www.packtpub.com/microsoft-system-center-service-manager-2012-
cookbook/book

Chapter 4
129
Computer Name Number of Physical Processors
Number of Logical Processors
IP Address
WKST01 1 2 172.16.1.50
WKST02 1 4 172.16.1.52
WKST03 1 2 172.16.1.57
WKST04 1 2 172.16.1.60
WKST05 1 6 172.16.1.68
Server01 2 4 172.16.1.200
Server02 2 8 172.16.1.201
Server03 4 16 172.16.1.202
Server04 4 24 172.16.1.203
Server05 1 1 172.16.1.204
3. Remove the fi rst row with the column headings and then save the data as a CSV fi le called ComputerCIs.csv.
4. The resulting CSV fi le contents should look like the following:
WKST01,1,2,172.16.1.50
WKST02,1,4,172.16.1.52
WKST03,1,2,172.16.1.57
WKST04,1,2,172.16.1.60
WKST05,1,6,172.16.1.68
Server01,2,4,172.16.1.200
Server02,2,8,172.16.1.201
Server03,4,16,172.16.1.202
Server04,4,24,172.16.1.203
Server05,1,1,172.16.1.204
Next we need to create the XML fi le that defi nes the format and structure.
1. The information stored in the data fi le is aimed at creating/updating CIs of the class Windows Computer, which is defi ned within Service Manager as a class Microsoft.Windows.Computer.
2. We also have four columns of data that need mapping to the appropriate properties of the Microsoft.Windows.Computer class. You can either use the Authoring tool to locate the class and view the properties or you can use PowerShell.
For More Information: www.packtpub.com/microsoft-system-center-service-manager-2012-
cookbook/book

Building the Confi guration Management Database (CMDB)
130
3. Use an XML editor to create the required XML fi le (for example Notepad.exe). The following table shows the appropriate properties for our data that we need to map the columns to:
Property Property name
Computer Name PrincipalName
Number of Physical Processors PhysicalProcessors
Number of Logical Processors LogicalProcessors
IP Address IPAddress
4. Every XML defi nition fi le for CSV import starts with the following line:
<CSVImportFormat> and ends with a similar closing line: </CSVImportFormat>
5. The next line defi nes the class type to be imported. For this recipe that needs to be the Microsoft.Windows.Computer class.
<Class Type="Microsoft.Windows.Computer">
This again requires a closing tag after the properties:
</Class>
6. For each column of data within the data fi le, we need to specify the property of the class it requires mapping to and in the order in which they are listed within the CSV fi le.
<Property ID="PrincipalName" /><Property ID="PhysicalProcessors" /><Property ID="LogicalProcessors" /><Property ID="IPAddress" />
7. This will give a completed XML defi nition fi le that looks like this:
<CSVImportFormat><Class Type="Microsoft.Windows.Computer"><Property ID="PrincipalName" /><Property ID="PhysicalProcessors" /><Property ID="LogicalProcessors" /><Property ID="IPAddress" /></Class></CSVImportFormat>
8. Save this XML fi le as ComputerCIs.xml.
For More Information: www.packtpub.com/microsoft-system-center-service-manager-2012-
cookbook/book
Chapter 4
131
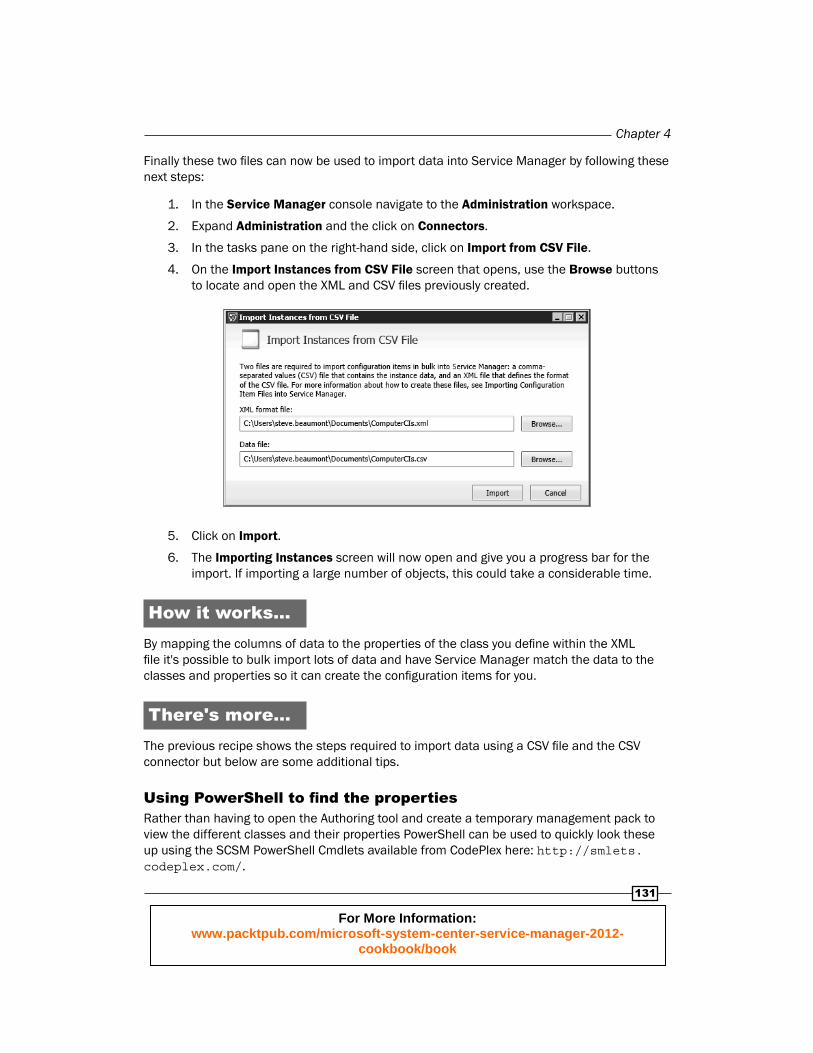
Finally these two fi les can now be used to import data into Service Manager by following these next steps:
1. In the Service Manager console navigate to the Administration workspace.
2. Expand Administration and the click on Connectors.
3. In the tasks pane on the right-hand side, click on Import from CSV File.
4. On the Import Instances from CSV File screen that opens, use the Browse buttons to locate and open the XML and CSV fi les previously created.
5. Click on Import.
6. The Importing Instances screen will now open and give you a progress bar for the import. If importing a large number of objects, this could take a considerable time.
How it works...By mapping the columns of data to the properties of the class you defi ne within the XML fi le it's possible to bulk import lots of data and have Service Manager match the data to the classes and properties so it can create the confi guration items for you.
There's more...The previous recipe shows the steps required to import data using a CSV fi le and the CSV connector but below are some additional tips.
Using PowerShell to fi nd the propertiesRather than having to open the Authoring tool and create a temporary management pack to view the different classes and their properties PowerShell can be used to quickly look these up using the SCSM PowerShell Cmdlets available from CodePlex here: http://smlets.codeplex.com/.
For More Information: www.packtpub.com/microsoft-system-center-service-manager-2012-
cookbook/book

Building the Confi guration Management Database (CMDB)
132
For this recipe we needed the properties for the Windows Computer class.
Open a PowerShell session and type the following:
Import-Module SMLets
$CI = Get-SCSMClass –Name Microsoft.Windows.Computer$
$CI.PropertyCollection
This will list all the properties directly used by the class (but not relationships).
Is CSV import just for confi guration items?No, CSV import is not just for confi guration items. The CSV import method can also be used to create work items such as incidents by targeting the data at the System.WorkItem.Incident class by using the XML defi nition fi le and defi ning the properties for the data such as Title, Description, Impact, and Urgency.
This can be very useful especially for scenarios such as migrating Service Desk tools.
Complex CI importingSometimes you will want to import data that isn't held by just a single class but maybe spans multiple classes and in particular class relationships.
For example, you may want to import a new computer CI, but specify the Asset Custodian for that device.
This can be achieved through the use of Type Projection and defi ning these in the XML defi nition fi le rather than just a single class type.
Apart from using the previous recipe and creating a new computer CI based on the information such as Computer Name, Number of Physical Processors, Number of Logical Processors, and IP Address, we also now need to specify the user details for the custodian.
The original XML defi nition fi le started with the following code:
<CSVImportFormat><Class Type="Microsoft.Windows.Computer">
This time the Type Projection needs to be specifi ed fi rst:
<CSVImportFo rmat><Projection Type="Microsoft.Windows.Computer.ProjectionType"><Seed><Class Type="Microsoft.Windows.Computer">
Specify the properties as before, close the class section with the </Class> tag and then ensure the seed section is also closed with a </Seed> tag.
For More Information: www.packtpub.com/microsoft-system-center-service-manager-2012-
cookbook/book

Chapter 4
133
Next, the additional class information for the Custodian can be added by starting a new section with a <Component Alias> tag:
<Component Alias="Custodian"><Seed><Class Type="System.Domain.User"><Property ID="Domain"/><Property ID="UserName"/></Class></Seed></Component>
This allows the data to be added to the data fi le in the format of the Domain Name in the column after IP Address and then the username of the custodian that should be assigned.
Finally the </Projection> tag must be placed towards the bottom to close the Type Projection defi nition.
The fi nal XML would look like the following:
<CSVImportFormat><Projection Type="Microsoft.Windows.Computer.ProjectionType"><Seed><Class Type="Microsoft.Windows.Computer"><Property ID="PrincipalName"/><Property ID="PhysicalProcessors"/><Property ID="LogicalProcessors"/><Property ID="IPAddress"/></Class></Seed><Component Alias="Custodian"><Seed><Class Type="System.Domain.User"><Property ID="Domain"/><Property ID="UserName"/></Class></Seed></Component></Projection></CSVImportFormat>
See alsoThere are third-party tools that make CSV import and data mapping easier. See the Appendix for information about Provance and their Data Management Pack.
For More Information: www.packtpub.com/microsoft-system-center-service-manager-2012-
cookbook/book

Building the Confi guration Management Database (CMDB)
134
Creating a business serviceThis recipe shows how to create a business service within Service Manager. A business service is a collection of information relating to an IT service such as an e-mail system, a payroll system, or other line of business service. The information about the service consists of information such as the components that make up the service (servers, databases, websites) and properties such as availability of the service, affected users, and owner information for example.
Getting readyYou can either manually create a business service in which case review the manually creating CIs recipe or you can have them synchronized with information relating to distributed applications from within Operations Manager, in which case review and set up the Operations Manager CI Connector as shown in the recipe within this chapter.
This recipe will show how to create a business service based on a distributed application. Before attempting this recipe you will need a distributed application and save it to management pack.
You will also need all the management packs that contain items that your distributed application references, such as SQL and IIS.
How to do it...The following steps will guide you through the process of creating a business service within Service Manager:
1. Within Operations Manager export the management pack containing the distributed application you want to create as a business service.
2. Within the Service Manager console navigate to Administration | Management Packs.
3. On the task pane on the right-hand side of the console click on Import.
4. On the Select Management Packs to Import screen, navigate to the management pack you exported earlier, select it, click on Open, and then click on Import.
5. If the import fails, review the error details and mostly likely it will reference a management pack that the one you are trying to import relies on. If so, repeat the import process but navigate to the required management pack and import that fi rst before the one containing your distributed application.
6. Once you have the management pack imported navigate in the Service Manager console | Administration | Connectors.
For More Information: www.packtpub.com/microsoft-system-center-service-manager-2012-
cookbook/book
Chapter 4
135
7. Select the Operations Manager CI Connector and in the task pane click on Properties.
8. In the Edit screen, in the left-hand side, click on Management Packs, and then click on Refresh.
9. Enter the password for the account used by the Operations Manager CI Connector and click on OK.
10. In the Management Packs list, select the new management packs you imported and click on OK.
11. With the Operations Manager CI connector selected click on Synchronize Now in the task pane.
12. Navigate in the Service Manager console | Confi guration Items | All Business Services.
13. Your distributed application should now be displayed under All Business Services.
14. Select your business service and click on Edit on the task pane on the right-hand side.
15. From the form screen that opens you can add additional information such as availability, operational status, owner and affected users, as well as view the components that make up the business service as defi ned within Operations Manager as your distributed application.
How it works...Service Manager uses the information in the exported management pack, from operations manager to create the business service CI. The business service defi nition in Service Manager matches the distributed application in Operations Manager due to the use of this shared management pack.
There's more...The business services are great for storing information related to a service so they're available when creating work items, but they can also be used to automatically raise incidents.
Raising related incidentsBy default, Service Manager will not connect related incidents raised from Operations Manager to Business Services. For example an alert about a database being offl ine that is part of a business service will not add the business service as a related item to the incident.
This can be enabled, but requires the alert to be generated with the same name as the business service. This requires some planning and the use of rollup monitors in the related Operations Manager instance.
For More Information: www.packtpub.com/microsoft-system-center-service-manager-2012-
cookbook/book

Building the Confi guration Management Database (CMDB)
136
Personalizing and organizing confi guration item views
This recipe is designed to show you how to personalize and organize your confi guration item views.
How to do it...The following steps will guide you through the how to organize CI information into personal views within Service Manager.
1. Navigate in the Service Manager console to Confi guration Items workspace, expand Confi guration Items, and click on Computers.
2. Click on Create View on the task pane on the right-hand side.
3. Specify a name and description for the view. For this recipe give the view a name of All Virtual Servers.
For More Information: www.packtpub.com/microsoft-system-center-service-manager-2012-
cookbook/book

Chapter 4
137
4. Click on Criteria on the left-hand side of the Create View screen.
5. Next to the Search for objects of a specifi c class click on the Browse button.
6. On the Select a Class screen use the drop-down list to select Combination classes and use the fi lter box to fi nd the Computer (typical) type projection, select it, and click on OK.
For More Information: www.packtpub.com/microsoft-system-center-service-manager-2012-
cookbook/book

Building the Confi guration Management Database (CMDB)
138
7. Under Available properties select the relevant property to fi lter the information shown in the view. For this recipe choose Virtual Machine and click on Add. Ensure that the criteria for Virtual Machine is set to equals to True.
8. Click on Display on the left-hand side of the Create View screen.
9. Use this section to select the columns to display in the view. For this recipe select only the following:
NetBIOS Computer Name
- Expand Hosts Windows Operating System
Operating System Version Display Name
Physical Memory (MB)
Service Pack Version
10. Click on OK.
For More Information: www.packtpub.com/microsoft-system-center-service-manager-2012-
cookbook/book
Chapter 4
139
How it works...This recipe walked you through the process of creating a view to display information related to the virtual servers contained within your CMDB. This recipe can be repeated to create new views based on any class or combinations of classes you select and the visible columns of data you choose to display by choosing different classes and columns in steps 6,7, and 9.
Creating a confi guration item groupYou can use groups within Service Manager to logically group and manage confi guration items (CIs). Groups can contain either CIs of the same class or mixed classes and can be either a static group by manually adding certain CIs or a dynamic group by specifying the rules.
How to do it...The following steps will guide you through the process of creating a CI group.
1. In the Service Manager console navigate to the Library workspace, expand Library and click on Groups.
2. In the task pane on the right-hand side click on Create Group.
3. Review the information on the Create Group Wizard screen then click on Next.
4. On the General screen provide a name for the group and a description. For this recipe name the group VIP Users and provide a description of All VIP IT Service Users.
5. Under Management pack, drop the list down and select your custom management pack to store this group in, and then click on Next.
6. If you wish to manually specify any specifi c objects, on the Included Members screen, click on Add. For this recipe, simply click on Next on the screen to skip.
7. On the Dynamic Members screen click the … button next to the box under the text Specify the class and add criteria to build your query.
8. On the Select a class screen that opens fi lter the list by typing in the box and select the User class. Click on OK.
For More Information: www.packtpub.com/microsoft-system-center-service-manager-2012-
cookbook/book

Building the Confi guration Management Database (CMDB)
140
9. Use the fi lter box under Available properties to fi nd Department, select it, and click on Add. Then alter the Criteria to contains and type Management.
This will create a group containing all users that have management as part of their department description which is either pulled from Active Directory or manually specifi ed.
10. Click on Next.
11. On the Subgroups page you can specify other groups that already exist to combine them into one group. For example if you had two separate groups, one for the senior managers and one for the line managers, you could create an all managers group and use this to simply add both the groups without having to use the dynamic members section. For this recipe, just click on Next to skip the screen.
12. On the Excluded Members screen you can choose objects to specifi cally exclude from the list that might get picked up by any dynamic rules or other groups that you don't want in this list. For this recipe just click on Next to skip the screen.
13. Review the information on the Summary screen then click on Create.
14. Once the Completion screen shows that the group has been created successfully, click on Close.
For More Information: www.packtpub.com/microsoft-system-center-service-manager-2012-
cookbook/book
Chapter 4
141
How it works...A group is a logical grouping of confi guration items stored within the CMDB. Once you have created a group, you can use it within security roles to restrict access, as criteria for notifi cation subscriptions or even as criteria for reports.
There's more...This recipe showed how to create a group containing users but you can create groups for other CIs too.
Creating other groups containing other CI typesYou can use this recipe and change the object type to select anything stored within the CMDB to build groups containing other CIs such as a group to hold all the virtual servers by varying steps 8 and 9. Also, you can manually assign items by adding them in step 6 and skipping steps 7, 8, and 9 instead.
For More Information: www.packtpub.com/microsoft-system-center-service-manager-2012-
cookbook/book

Where to buy this book You can buy Microsoft System Center 2012 Service Manager Cookbook from the Packt Publishing website: http://www.packtpub.com/microsoft-system-center-service-manager-2012-cookbook/book. Free shipping to the US, UK, Europe and selected Asian countries. For more information, please read our shipping policy.
Alternatively, you can buy the book from Amazon, BN.com, Computer Manuals and most internet book retailers.
www.PacktPub.com
For More Information: www.packtpub.com/microsoft-system-center-service-manager-2012-
cookbook/book