microsoft word 2013 an intermediate guide word 2013 an intermediate guide (level 2) contents...
TRANSCRIPT

Microsoft Word 2013™ An Intermediate Guide (Level 2)
Contents
Introduction .............................................................................................................. 1
Starting up Microsoft Word ................................................................ 1
Creating a Title.......................................................................................................... 1
Using Styles ............................................................................................... 1
Modifying a Style ..................................................................................... 2
The Body (Normal) Text ........................................................................................ 2
Creating a Style ........................................................................................ 3
The Styles Pane......................................................................................... 5
The Ruler ..................................................................................................................... 5
Using the Tab Key .................................................................................... 6
Setting Tabs ............................................................................................... 7
Tables ....................................................................................................................... 8
Inserting/Deleting Rows and Columns ........................................... 9
Table Properties ....................................................................................... 9
The Layout and Design Tabs............................................................. 10
Captions ................................................................................................... 11
Inserting Things ..................................................................................................... 12
Footnotes (and Endnotes) ................................................................ 12
Special Characters ............................................................................... 13
Page Breaks ............................................................................................. 14
Page Numbers ....................................................................................... 14
Headers and Footers ........................................................................... 15
References and a Bibliography ........................................................ 15
Graphics, Pictures and Shapes ........................................................ 16
Equations ................................................................................................. 17
Adding Comments and Tracking Changes .................................................. 17
Printing and Page Setup ..................................................................................... 18
Finishing Off ............................................................................................................ 18
IT Training

1
Introduction The aim of this document is to teach you how to get the most out of Microsoft Word for everyday tasks. In particular, it shows you the best way to write something like an essay. It should bring undergraduates up to a level sufficient for their studies.
This document assumes that you are familiar with the layout of Word 2013 and can use the Ribbon and its buttons, which are covered in the document Microsoft Word: An Essential Guide. It also assumes you know about saving and printing your work.
Starting up Microsoft Word To start Microsoft Word:
1. Load up Word 2013 as usual or press <Ctrl n> for a new document if Word is already open
WARNING: Avoid opening files directly from a USB pen or similar media - first copy them to Documents and then open them from there. Copy back to your media after editing.
Tip: You can create a shortcut to any file by right clicking on it and then choosing Send to followed by Desktop (create shortcut). To load the file in future, simply double click on the desktop icon. When you’ve finished working on it, <Delete> the shortcut – the file to which it refers is NOT deleted.
2. Press <Ctrl s> to save your file (or click on the [Save] button on the Quick Access Toolbar or use
Save on the FILE tab)
3. Give your file a name (eg type testdoc) then press <Enter> for [Save]
Note that your file has the file extension of .docx. Documents used to have the extension .doc, which was for the old Word 97-2003 format and you can save in this format if you need to by using Save As on the FILE tab.
Creating a Title When starting a new document, the first thing you usually do is to type in a title. Titles need to stand out from the rest of the text. To achieve this, most people turn on bold and select a larger font size (and then reset them after typing the title) but Word provides a facility to do this automatically.
Using Styles
Styles -
Turning on bold/italic/underline and changing fonts or font size explicitly is not the best way to create a title. In Microsoft Word you have different heading styles already set up for you:
1. Click on the [Heading 1] button in the Styles group on the HOME tab of the Ribbon to create a
title – you may find that a Navigation Pane appears on the left of the screen
2. Type the title of your work - eg My Main Title
The text automatically appears in bold and in larger letters (the font is set to Calibri Light, the colour to blue and the size to 16 point).
Note: Word also has a Title style – here the font size is much larger (28 point). Heading styles have other advantages, however, so stick to these.
2
3. Press <Enter> and the style automatically reverts back to Normal (Calibri font size 11pt)
Styles are simply different types of formatted text. It is better to use them rather than setting up a particular format manually for several reasons:
You don't have to keep clicking on the toolbar buttons to activate and de-activate the settings
You don't have to remember how different heading and sub-heading levels have been set up
If you alter a style, text defined in that style changes throughout the whole document
You can create your own styles
Most importantly, heading styles are used to generate a Table of Contents automatically – this is
very important when you have to write a thesis or dissertation
Note: In Word 2013 there is a new DESIGN tab which allows you to select a different style set, so that you can change more than one style at a time. One of these style sets is for numbered headings.
Modifying a Style You may not like the way the Heading 1 style has been set up. There are several ways to change this, the easiest being as follows:
1. Click three times on your heading (My Main Title) to select it
2. Make the desired changes to the font – eg click on the drop-down arrow attached to the [Font
Color] button and choose Automatic (ie black)
3. Make any changes to the paragraph layout – eg click on the [Center] button
4. Finally, right click on the [Heading 1] button on the HOME tab and choose Update Heading 1 to
Match Selection
Whenever you use the Heading 1 style again in this document, the new settings will be used. Note that this change only applies to this document – if you start up a new document the old Heading 1 settings are used. You’ll see later how to change the default settings for all your documents.
The Body (Normal) Text You next need to decide how you want the rest of your text to appear. It's easiest to set this up at the very start of your text. You can then modify the Normal style setting, as you did with Heading 1.
1. Move down to the end of your document (press <down arrow> or <Ctrl End>)
2. Set up the required font – its size, colour and the font itself (eg change the size to 12 point)
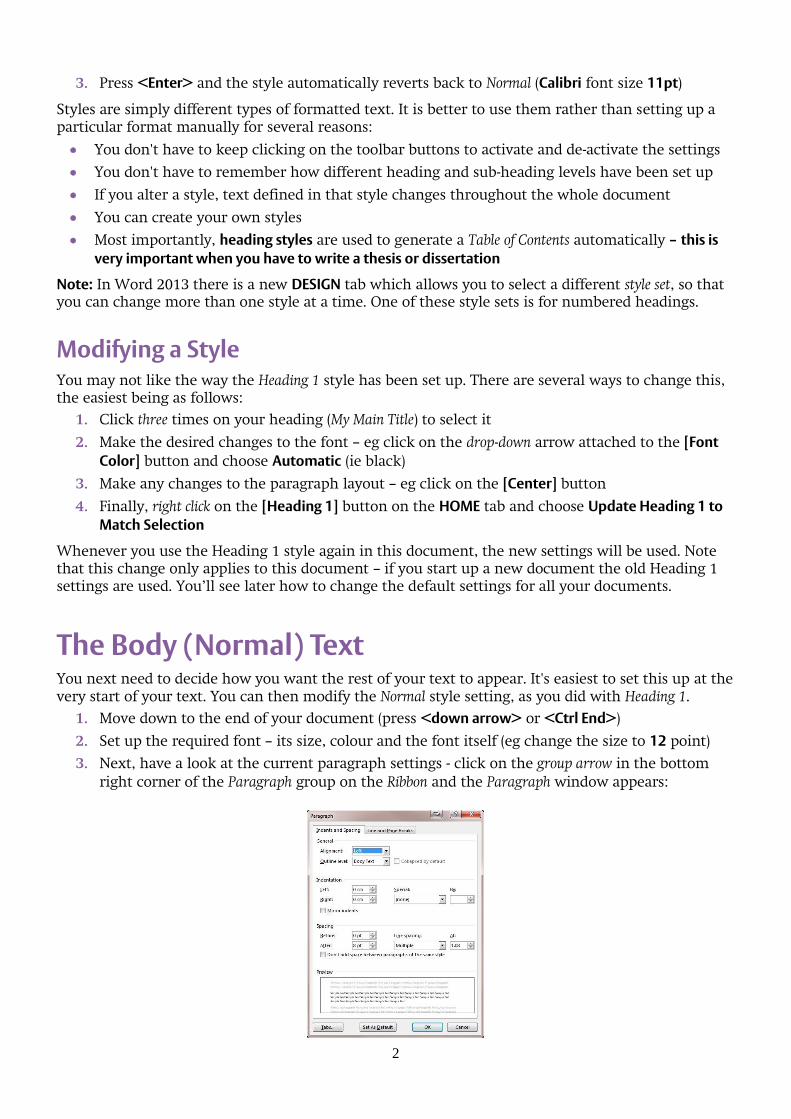
3. Next, have a look at the current paragraph settings - click on the group arrow in the bottom
right corner of the Paragraph group on the Ribbon and the Paragraph window appears:

3
The default setting for a Normal style paragraph in Word 2013 has the line spacing slightly greater than single (1.08), with extra space separating one paragraph from the next (8pt after). This saves you having to press <Enter> twice at the end of each paragraph. To change the spacing:
4. Click on the list arrow under Line Spacing: and choose 1.5 lines (or Double for double spacing)
Tip: Note the option Exactly. This is useful if something doesn't quite fit neatly on a page. Instead of Double, you could set a line spacing of exactly 1.9, for example, just for the paragraphs on that page.
While the Paragraph window is still open, have a look at the options on the Line and Page Breaks tab:
5. Click on the Line and Page Breaks tab
Currently, Widow/Orphan control is set on. This ensures you don't have a single line of a paragraph isolated from the rest when printing (at least two lines will be shown on the top/bottom of the page). Note also Keep with next, which keeps two paragraphs together. This is automatically turned on when you use a heading style. The Asian Typography tab isn’t relevant for most users (and may not even be shown).
6. Press <Enter> for [OK] to close the Paragraph window
7. Type some text to check that the settings are what you require
8. Finally, right click on the [Normal] button on the HOME tab and choose Update Normal to Match
Selection
It’s important to change the style in this way and not just the layout for this particular paragraph. Note that you could have changed the line spacing and other paragraph settings using the buttons on the Ribbon; the group arrow was used just to show you all the options which can be changed.
9. [Save] your work – it’s a good idea to save your work regularly (eg every 10 minutes or so)
Tip: Remember, the easiest way to do this is to press <Ctrl s> periodically.
Creating a Style You may want to create your own styles for particular pieces of work (for a quotation, for example):
1. Press <Enter> for a new paragraph then type in a quotation (or a couple of lines of rubbish text)
2. Make the required changes to the layout of the paragraph – click on the Paragraph group arrow
and change the Line spacing: to Single and the Left: and Right: Indentation to 1.0 cm (then click
on [OK])
3. Make any required changes to the font – click three times within the paragraph to select it then
(for example) press <Ctrl i> or click on [Italic] to make the text italic

4
4. After selecting the text, a Quick Format box should appear with the last button being for
Styles
5. Click on the above [Styles] button and choose Create a Style
6. Type in a new name for your style - call this one quotation and press <Enter> for [OK]
Now, every time you want to type in a quotation, simply select this style from the available styles. In fact the style isn’t quite correct yet as you’ll discover if you try moving to a new paragraph:
7. Press <End> (or <right arrow>) to move the typing position to the end of the quotation
8. Press <Enter> for a new paragraph – the style stays as quotation (with a heading it reverted to normal)
9. Press <Backspace> or <Ctrl z> twice to remove the extra paragraph
To correct your quotation style:
10. Right click on the new [quotation] button in the Styles group on the Ribbon and choose Modify...
The Modify Style dialog box appears:
11. Click on the list arrow attached to Style for following paragraph: and choose Normal
Note the options at the foot of the Modify Style window. The style modifications are currently set to Only in this document. If, however, you select the option New documents based on this template, your style will be available in all your new documents. If you want this then turn this option on.
12. Press <Enter> for [OK] to close the Modify Style dialog box
13. Press <Enter> again and you should find the style now reverts to Normal

5
You can modify the other style settings (Normal and Headings) in the same way via the Ribbon, adding them to the template if you wish to change the defaults.
Finally, test your style on another paragraph:
14. Click once on your normal paragraph - there is no need to select the paragraph
15. Move the mouse over the [quotation] button and your paragraph will appear single spaced,
italicised and indented (there’s no need to make it so)
16. If you did accidentally apply the style, press <Ctrl z> or click on [Undo] to remove the style change
17. Press <Ctrl End> to move back to the end of your text
The Styles Pane You may have noticed that the new quotation style has displaced another potentially useful style from the Ribbon. What happens if you want a style that’s disappeared? You can get to more styles either
by using the scroll bar in the Styles group or by clicking on [More] (the button at the bottom of the styles scroll bar). However, if you are using styles a lot then it’s easier to display the Style Pane permanently.
1. Try using the styles scroll bar then view all the styles by clicking on the [More] button
2. Choose Heading 2 and type in a second heading – this style has also been set up in the
CalibriLight font again with the colour blue and the size 13 point
3. Modify the current settings, if you want, using either of the methods described earlier (either
by right clicking on the [Heading 2] button and choosing Modify… or by changing the look of
the typed text, right clicking on the [Heading 2] button and choosing Update Heading 2 to
Match Selection)
Next, display the Style Pane:
4. Click on the group arrow in the bottom right corner of the Styles group – the Styles pane
appears on the far right
5. Click back on your quotation paragraph and then on the Normal style in the pane - the
current paragraph changes back to normal
For more information on styles see the Microsoft Word: Styles advanced notes.
Note: In Word 2013, when you move to the left of a heading, you may notice a small arrow like so:
Clicking on the arrow will hide what appears under this heading. Clicking on the arrow again (it looks slightly different) will show the content under the heading.
The Ruler The Ruler was an integral part of Microsoft Word right up to Word 2007. In the later versions of the software it isn’t displayed by default but it can easily be turned back on. In fact, it shows you several important paragraph settings and can be used to set tab positions.

6
To display the Ruler:
1. Click on the VIEW tab on the Ribbon and then the [Ruler] button in the Show group (there
should now be a tick in the box next to Ruler)
The Ruler, which is marked up in centimetres, is used to set the layout of the text across the page, including margins, tab positions and indents. First line, hanging, left and right indents are shown by symbols at each end of the white part of the ruler. Tabs are shown by various symbols depending on their type; the default tabs are set at 1.27cm (half inch) intervals.
2. Type in a new paragraph (for simplicity, just hold down the m key) but do not press <Enter>
yet
3. Click on the HOME tab on the Ribbon then on the [Increase Indent] button - your text will move in one tab stop (the left indent markers on the Ruler alter to reflect the new settings)
4. Click on [Increase Indent] again and your text will move in by another tab stop
5. To move the left margin back to a 1.27cm indent, click once on the [Decrease Indent] button
(to the left of the [Increase Indent] button)
Note that only the left indent changes. To move the right indent you have to drag the small triangle on the right hand side of the ruler. Take care not to click on the Ruler or you will set a tab (as you’ll see later).
6. Drag the right indent marker back to the 15cm mark
Tip: You may have noticed that the marker jumps along the ruler rather than moves smoothly. If you need to set the indent precisely using this method, hold down <Alt> as you move the marker - the actual size of the margin is displayed. You can, of course, also set the indents in the Paragraph dialog box, as you saw earlier.
7. Return the right indent to its original position (it’s easiest to use the [Undo] button as, believe it
or not, you can’t drag the marker to the exact place at 15.92cm unless you hold down the
<Alt> key)
8. Next, try changing the Hanging Indent by positioning the mouse cursor over the lower triangle
on the left and dragging it to the 2cm mark – references often appear like this in journals
9. Repeat step 8 but this time drag the indent to the left margin (at 0.0cm) – you now have the
first line still indented but the rest of your paragraph set to normal typing
10. Finally, reset your paragraph to its default settings – simply click on the [Normal] style button
Note: You shouldn’t use the indent markers to change the page margins – set these in Page Layout.
Tip: It can sometimes be useful to move the right indent a fraction into the margin if your text doesn’t fit nicely on the page. Just a slight movement may result in a paragraph taking up one less line. If your text is justified (straight at the left and right) then you would need to do this for all the paragraphs on that page.
Using the Tab Key Tabs are special characters used for lining up text. They should always be used rather than spaces when this is required - as, for example, in a table or vertical list. Spaces may appear to line things up, however, when the document is printed the carefully-spaced text rarely lines up properly.
Explore how the <Tab> key (on the left immediately above <Caps Lock>) works:
1. Press <Enter> for a new paragraph at the end of your text

7
2. Press <Tab> a few times (the cursor moves across the screen in jumps of 1.27cm or half an
inch) then use <Backspace> to remove them and return the typing position to the left
3. Type Name: then press <Tab> twice and type in your_own_name (press <Enter>)
4. Type Address: press <Tab> once then type in the first line of your_address (press <Shift
Enter>)
5. Continue with your address, pressing <Tab> twice to line up each line of text and <Shift
Enter>at the end of each line (press <Enter> at the end of the last line)
Note: <Shift Enter> gives you a new line but not a new paragraph. As the default paragraph (normal) style has extra space between the paragraphs (to save pressing <Enter> twice) the lines would be very widely spaced if they were all paragraphs. You should also use <Shift Enter> when you want two or more paragraphs to appear under the same number or bullet point when typing a list.
Setting Tabs You can set up your own tabs at different positions and you can also create tabs which line up text on the right, centrally or on a particular character (eg a decimal point). To set a tab position, simply click once on the Ruler. The default tab is a Left Tab but this next exercise also shows you how to set different types:
1. On a new line, press the <Tab> key once and type in a single short word (don’t press <Enter>
yet)
2. Next, click on the Ruler at the 3cm mark – an L-symbol appears on the Ruler denoting a left tab
and your text jumps across to start at this position
3. Point to the tab symbol and drag it along the Ruler to a different position
4. Release the mouse button and the text moves along to its new position
5. Next, drag the tab down off the Ruler – the text returns to the default first tab (at 1.27cm)
Now try setting several tabs, of different types:
6. Repeat step 2 to set a Left Tab at 3cm
7. Next, click once on the [Tab Select] button on the far left of the Ruler – you now have a Center Tab
8. Click once on the Ruler at the 8cm mark – a different symbol appears, indicating the centre tab
9. Press the <Tab> key once and type in a single short word – it appears centred on 8cm
10. Repeat steps 7 to 9 to create a Right Tab at the 12cm mark and type a number
11. Finally, repeat step 10 for a Decimal Tab at the 15cm mark – include a decimal point in the number
12. Test out your tabs - press <Shift Enter> and type in another line of text/numbers
13. Reset the default tab type to Left Tab by clicking four more times on the [Tab Select] button
Note: You can also set up tabs without using the Ruler by opening the Paragraph dialog box (through
the group arrow next to Paragraph on the HOME ribbon) and clicking on the [Tabs…] button at the bottom left. This also allows you to set tab leaders, a series of dots or dashes linking text to page numbers (as in a Table of Contents, for example). This happens automatically if you have been using Heading styles throughout your work, as you’ll see next.
1. Press <Enter> for a new line then reset the style to [Normal] to remove your tab settings
2. Click on the REFERENCES tab on the Ruler, then on the [Table of Contents] button on the far left
3. From the list that appears, choose the first option of Automatic Table 1 – a Table of Contents
appears, with tab leaders between the text on the left and page numbers on the right
4. Click on [Undo] to remove the Table of Contents as it isn’t needed here

8
5. End by hiding the Ruler (unless you want to keep it displayed) – click on the [Ruler] button on
the VIEW tab
An essay (which this guide is aimed at) doesn’t usually have a Table of Contents but a thesis or dissertation does. See the Microsoft Word: Starting a Thesis notes for further information about this, including how to automatically number your headings (1.1, 1.2, 1.2.1 etc.).
Tables An alternative (and simpler) way to line up text is to use a table. You can justify the text in each column (or even each cell) using the standard justification buttons ([Left], [Center] and [Right]) or the more complex alignment settings you will be looking at in a minute. Note, however, that you can’t line up numbers on a decimal point without using the special Decimal Tab.
Tip: You can set up tabs within cells in a table using the Ruler. To jump between these tabs, you can’t simply press the <Tab> key, instead you use what is termed a hard tab by pressing <Ctrl Tab>.
1. Move to the INSERT tab on the Ribbon then click on the [Table] button in the Tables group
2. A drop-down grid appears: drag through this to set up the size of the required table (here,
select three columns in the top row – if you make a mistake, click on the [Undo] button)
Two extra tabs appear on the Ribbon – TABLE TOOLS DESIGN and LAYOUT.
3. In the first cell in the table, type Name then press <Tab> to move to the second column
4. Type Address then press <Tab> to move to the third column
5. Type Notes - press <Tab> again and you will find a second row automatically appears
6. Fill in your own personal details again in this row, noting the instructions below
When typing the address, press <Enter> at the end of each line - the cell automatically expands downwards. At the end of the address press <Tab> to avoid having a blank line.
7. In the column headed Notes, type in a few lines of rubbish text
You will find that the words wrap from one line to the next automatically - again, the cell expands downwards if necessary as you type. If you want to include further rows in your table press <Tab> when you reach the last cell.
By default, the columns in a table are all made the same width. To adjust this:
8. Move the mouse cursor over the column border between columns 1 and 2 (it will change to a
double-headed arrow)
9. Hold the mouse button down and drag the border to the left or right then release the mouse
button

9
To resize the columns to exactly fit the data:
10. Double click on the column borders (do this on both the internal vertical borders)
11. To widen the last column to fill the page, double click on the right-hand border
12. Finally, to improve the look of the table, first select the top row (position the mouse cursor to
the left of the top row and click once)
13. Press <Ctrl 0> (don’t use the zero on the numeric keypad) to add some space above the text
14. Next, press <Ctrl b> then <Ctrl e> to both embolden and centre the top row headings (or right
click then click on the [Bold] and [Center] buttons in the Format Text box which appears)
Inserting/Deleting Rows and Columns If you used a right click when you carried out the last instruction, you may or may not have noticed that you can also use this method to insert or delete a row or column in a table. There are also buttons for these commands on the TABLE TOOLS DESIGN tab on the Ribbon (but it’s easier to right click).
1. Right click in the top row of the table and choose Insert then Insert Rows Below – a new row
appears
2. Right click on the cell in the second column of the new row and choose Insert then Insert
Columns to the Left – three columns are added because you had three cells selected (you need to watch out for this)
3. Press <Ctrl z> for [Undo] to remove the unwanted columns then repeat step 2 in the second column of the top (or third) row – a single column appears between Name and Address
4. Right click on any cell in the new selected column and this time choose Delete Columns
5. Finally, right click on any of the empty cells in row 2 and choose Delete Cells... – a dialog box appears:
6. Press <Enter> for [OK] – just that cell disappears, not the entire row
7. Repeat step 5 but in the Delete Cells dialog box, choose Delete entire row before pressing
<Enter>
8. Adjust the column widths, if necessary, so that the table again stretches across the page
Table Properties There are some important table properties of which you should be aware. These allow you, for example, to set a heading row for a table (which will be repeated if the table splits over two pages); prevent a row from splitting across a page or set a row to a fixed height.

10
1. Right click on any cell in the top row of the table and choose Table Properties… – a dialog box
appears:
The Table Properties dialog box has five tabs (Table, Row, Column, Cell, Alt Text), each with different settings. The settings on the Table tab (currently shown) will be dealt with later.
2. Click on the Row tab
3. Turn on Specify height: and set this to 2cm
Note the other options here. Ideally, cells in a table shouldn’t split across pages and the top row should be a header row:
4. Turn ON the Repeat as header row at the top of each page option
5. Turn OFF the Allow row to break across pages option then click on the [Next Row] button
6. Repeat step 5 for this and any other rows in the table
7. Click on the Column and Cell tabs to see the settings there (but don’t change anything)
8. Press <Enter> for [OK] to enforce the changes you have made to the properties
9. Move the typing position before Name in the first cell and press <Enter> a few times – you’ll
find it expands further as you add the blank lines – then use <Ctrl z> to remove them
Tip: To prevent a cell expanding like this, when setting the row height turn on the Row height is: Exactly option (this is currently set to At least). This should always be used for forms which are to be printed.
The Layout and Design Tabs Many of the commands covered in the previous three sections can also be found on the TABLE TOOLS LAYOUT tab:
1. Move to the LAYOUT tab on the Ribbon
In the Table group on the left, the [Select] button can be used to select part or the whole of the table – the whole table can also be selected by clicking on the boxed four-headed arrow on the left above the table.
2. Click on [Select] then choose Select Row to select the top row (or click to the left of the row if you prefer using the mouse; click immediately above a column to select a column)
3. The Rows & Columns group has buttons for inserting or deleting cells/rows/columns

11
4. In the Merge group, you can merge two or more cells together and can split cells or the whole
table
5. The Cell Size group lets you set the column width and row height (or distribute them evenly)
6. In the Alignment group, you can set the cell justification, both horizontally and vertically – try
out the various buttons (end with the central button – [Align Center])
7. The Data group includes [Repeat Header Rows] and [Sort]
The TABLE TOOLS DESIGN tab is dominated by Table Styles which work in a similar way to heading styles etc. These allow you to completely change the look of a table at the click of a button. Again, you can define your own styles if you so wish. Of more interest to the average user are the borders and shading settings:
1. Click on the DESIGN tab on the Ribbon
2. The Table Style Options group on the left is used to define the various parts of the table to be
used with styles (i.e. the [Header Row] button is nothing to do with [Repeat Header Rows] )
3. In the Table Styles group, move the mouse over some of the styles provided to see their effect
(don’t click on any of them)
4. Using the [Shading] button (click on the arrow underneath), colour the selected top row a light
grey
5. In the Borders group, use the arrow underneath [Borders] to remove/add borders to selected cells
The Borders group lets you set up the line style, width and colour. You can then use the mouse to redraw lines or you can use the [Borders] button to apply the change to the cell (or pre-selected range)
6. Click on the [Line Style] button (to the left of [Borders]) and choose a double line – the [Border
Painter] button is turned on and the cursor changes to a paintbrush
7. Point the brush cursor to a line and click the mouse button – it changes to a double line
8. Click on the LAYOUT tab at the top, and try out the [Eraser] button in the Draw group on the
left of the ribbon – click with the rubber cursor to remove a border
9. The Eraser merges cells if the line is internal – click on [Undo] to reverse this then turn off
[Eraser]
Note that you can add a border to any piece of text (from a word to a whole page) - for example, a
line above and below a heading. The buttons for these borders are in the Paragraph group on the HOME tab and the Page Background group on the DESIGN tab. Borders are another feature which can be set in a style.
Tip: If you want to have some text next to a diagram, simply create a table with one row and two columns. Place the diagram in one cell and the text in the other then remove the borders. Use the [View Gridlines] button on the far left of the LAYOUT tab if you want to see where the table is – these do not print.
To learn more about tables, borders and shading, see the Microsoft Word: Tables advanced notes.
Captions In the same way that Heading styles should be used for your main headings, Captions should be used for your figures and tables. These can then automatically generate a Table of Figures and a Table of Tables and allow you to cross-reference them in your text.
1. Click anywhere inside the table

12
2. Move to the REFERENCES tab and choose [Insert Caption] in the Captions group
3. The default Position: is Above selected item but this can be changed – press <Enter> for [OK]
4. Complete your caption by typing in some text
Note: You can redefine the Caption style if you don’t like the way it looks, as you did earlier with Headings.
To cross-reference your table:
5. Move to a new line at the end of your work (press <Ctrl End> then <Enter>) then click on
[Cross-reference] in the Captions group
6. Change Reference type: to Table (scroll down) and Insert reference to: to Only label and number
7. Press <Enter> for [Insert] then <Esc> to [Close] the Caption dialog box
8. Type in some text about the table to complete the sentence
You can use captions and cross-referencing for figures, equations, footnotes and your own captions (eg photographs, maps) in exactly the same way. End by generating a Table of Tables:
9. Press <Enter> for a new paragraph then click on [Insert Table of Figures] in the Captions group
10. Check the Caption label: is set correctly to Table then press <Enter> for [OK]
11. Press <Ctrl z> for [Undo] to remove the Table of Tables as it isn’t needed here
To learn more about captions, see the Microsoft Word: Starting a Thesis notes.
Inserting Things
Footnotes (and Endnotes) To insert a footnote:
1. Move the typing position to where the footnote indicator should appear
2. On the REFERENCES tab, click on the [Insert Footnote] button in the Footnotes group
3. Type in your footnote (anything will do here) then click back on the main text (or press <up
arrow>)
Note that there is also an [Insert Endnote] button. Endnotes appear below the end of your text; footnotes at the bottom of each page. Try inserting an endnote, if you like, and then use [Undo] to remove it.
To change a note:
4. Click on the text of the note at the bottom to move the typing position and edit as usual, then
click back on the main text

13
To delete a note:
5. Drag through the note indicator in the main text to select it then press <Delete>
Special Characters As well as the characters found on the keyboard, you might want to include special mathematical symbols, fractions and accented characters. To insert a special character:
1. Move to the INSERT tab and click on [Symbol] (far right) then More Symbols… - a dialog box
appears:
2. If necessary, click on the list arrow attached to the Font: box and choose (normal text) at the top
of the Font: list
3. Use the scroll bar on the right to move up and down the symbols – the Subset: box helps you
move directly to sets of symbols (e.g. Greek Extended or Mathematical Operators)
4. Double click on a character to insert it - note that it's also added to the Recently used symbols:
For characters in a different font:
5. Click on the list arrow attached to the Font: box and choose Wingdings – near the bottom of the
list
You can now select all sorts of characters from smiley faces to arrows and everyday objects like telephones!
6. Add a few more characters then choose (normal text) at the top of the Font: list to return to
normal
7. Next, click on the Special Characters tab for yet more symbols (eg a non-breaking space, used
where two words must not be separated)
8. Press <Esc> or click on [Close] to close the Symbol window
You may have noticed that for many characters a Shortcut key has been set up. Some of these involve using the <Alt> key plus the numeric key pad, others the <Ctrl> key plus normal keys. A degree sign, for example, can either be obtained (make sure the numeric key pad has been activated by <Num Lock>) by holding down <Alt> and typing 0176 or <Ctrl @> (i.e. <Ctrl Shift ‘>) followed by pressing the <spacebar> key (note that this may not work).
That particular key combination isn’t very intuitive and Word allows you to set up your own shortcut keys. The key combinations for foreign accents are easier to remember, however. Essentially, you type the accent using the <Ctrl> key, and then follow that with the letter you require:
9. Hold down <Ctrl> and type a comma, then release <Ctrl> and type c

14
You should have typed ç. Some other accents you might want include <Ctrl '> for an acute accent, <Ctrl `> for a grave, <Ctrl ^> (i.e. <Ctrl Shift 6>) for a circumflex, and <Ctrl Shift ;> for an umlaut. Just follow these with the appropriate vowel. Other foreign-language characters include <Ctrl /> followed by <o> for ø, <Ctrl @> (i.e. <Ctrl Shift ‘>) followed by <a> for å and <Ctrl ~> (i.e. <Ctrl Shift #>) followed by <n> for ñ.
To learn more, see the Microsoft Word: Symbols, Foreign Characters and Keyboards advanced notes.
Page Breaks Sometimes you may wish to start a new page, for example for a new section or to put a table or diagram on a separate page. The temptation is to add blank lines by pressing <Enter> but, as you change your text, these breaks move up and down the paper. Instead, you should fix the position by inserting a hard page break. These can be added from the [Page Break] button at the start of the INSERT ribbon or, more simply:
1. Click where you would like the new page to appear
2. Hold down <Ctrl> and press <Enter> - a new page will appear
3. If you want a blank (numbered) page in a document, press <Ctrl Enter> a second time (or click
on the [Blank Page] button above [Page Break] on the INSERT ribbon)
To remove a break, move to the top of the following page and press the <Backspace> key twice (or move to the foot of the previous page and press <Delete> once).
Page Numbers To add page numbers to your document:
1. On the INSERT tab click on [Page Number] in the Header & Footer group
2. Choose Top of Page or Bottom of Page then the layout you prefer (usually the first three
layouts put the page number to the left, centre or right respectively)
It’s generally a good idea to keep the layout simple but scroll down to see more complex layouts.
3. Select the layout you prefer – the HEADER & FOOTER TOOLS DESIGN tab appears
4. Click on the [Page Number] button in the new Header & Footer group on the left
5. Choose Format Page Numbers… - the Page Number Format dialog box appears:
6. Here, you can set the Number format: (e.g. i or - 1 -) and can Start at: a number other than 1
7. Make any required changes then press <Enter> or click on [OK]

15
Tip: If you want to have different page numbering in different parts of your document (eg Roman numerals for the introductory pages of a thesis) then you need to divide your document into sections. A section break can be added using the [Breaks] button on the PAGE LAYOUT tab. Once you have the sections, each can have its own settings – page numbering, header, footer (see below) etc.
Headers and Footers While the Header & Footer Tools Design tab is open, have a look at the other settings:
1. In the Header & Footer group, you can select from built-in [Header] or [Footer] layouts
2. In the Insert group, you can insert a date & time field (which can be fixed or which updates
automatically)
3. In the Navigation group you can move between the header and footer (the <up/down arrow> keys also work)
4. In the Options group you can set a [Different First Page] – e.g. if you don’t want this page
numbered
5. Click on the [Close Header and Footer] button on the far right to move back to your text
Tip: You can also double click away from the header/footer (double clicking on a header/footer reactivates it) to move back to your text.
References and a Bibliography When writing an essay or dissertation, you may want to include a bibliography. In Word 2013 you can have your own library of references, from which you can add selected references to your document.
1. Position yourself in the text and then move to the REFERENCES tab on the Ribbon
2. Click on [Insert Citation] in the Citations & Bibliography group and choose Add New Source…
3. In the Create Source dialog box, type in a reference (again, anything will do but fill out all the
fields)
4. Press <Enter> for [OK] and your reference (author, year) appears in your text
5. Repeat steps 2 to 4 for a second reference
6. Type in some more text then insert one of the references again – click on [Insert Citation] and choose one of the references from the list at the top
7. Now click on the [Bibliography] button in the same group and choose Insert Bibliography or a
Built-In one– your references appear in full at the end of your document
8. To change the referencing style (eg to Harvard), choose the required style from the [Style:]
button
9. Use <Ctrl z> to [Undo] any style changes and remove your bibliography

16
The [Manage Sources] button lets you pick up references from your library in other documents. For further information see the Microsoft Word: References and Bibliography advanced notes.
Graphics, Pictures and Shapes You might want to insert a picture into your text. Microsoft has its own selection of pictures that you can use or you can insert your own objects (eg Excel charts, scanned photographs or pictures you have drawn saved as JPEG, GIF or PNG files). For example, to insert a picture from the Online Pictures Clip Art Gallery:
1. Position the insertion point where you want to insert the picture
2. Move to the INSERT tab and click on [Online Pictures] in the Illustrations group (use [Pictures]
for your own picture, [SmartArt] for a more advanced graphic like an organisation chart,
[Chart] for a new chart, and [Object] in the Text group for an Excel chart)
An Insert Pictures window appears. Here you can search for a specific picture clip (on your PC or the WWW) from Office.com Clip Art (or use the Bing Image search engine).
3. Click in the search box next to Office.com Clip Art, type something (e.g. sport) and then press
<Enter> for [Go]
4. Click on a picture and then [Insert]
The picture should already be selected - handles (small squares) show at the corners and edges of the picture. A PICTURE TOOLS FORMAT ribbon appears at the top.
A Layout Options icon will show to the right of the picture. This can be used to change the way that text wraps around the picture. The default Text Wrapping setting is for the picture to be In Line with Text. This means that it can be moved around as if it were a word. There are several other settings but these should be avoided unless you know what you are doing. To find out more information see the Microsoft Word: Graphics advanced notes.
5. Drag the handles to change the image's size/shape or use the buttons provided in the Size group
on the far right of the PICTURE TOOLS FORMAT tab
Tip: Resizing from a corner circle handle will ensure that the proportions of the image stay the same – if you use a handle at the side it will distort your image.
6. Use the circular arrow above the central handle on the top border to rotate the shape
7. Click on the [Crop] button in the Size group on the right and drag one of the black lines (in
place of the resizing handles) inwards to hide part of the picture. Click again on the [Crop]
button to accept this change
8. Press the key combination of <Ctrl e> to centre your picture horizontally on the page
Finally, add a caption:
9. Click on the picture (to activate it) then move to the REFERENCES tab and click on [Insert
Caption] in the Captions group (about halfway along the ribbon)
10. Check that the Label: is set to Figure and select the required Position: (usually below for a figure)
then click on [OK]
11. Complete the caption then press <Enter> for a new paragraph
To insert a shape:
1. Move back to the INSERT tab on the Ribbon and click on the [Shapes] button
2. Select a shape then position the mouse cursor (a cross or plus sign) where you want the shape to appear, hold down the mouse button and drag out the shape
3. Release the mouse button to fix the shape’s size – the DRAWING TOOLS FORMAT tab appears

17
Handles are provided, as with a picture. Some shapes (eg a smiley face) also have yellow spots, which allow you to modify the shape. See the document Microsoft Office: The Drawing Tools for further information.
4. Click away from the shape to close the Drawing Tools Format tab
Another feature in Word allows you to insert a screenshot from a different window/application:
1. Place the current typing position where you want the screenshot to appear
2. On the INSERT tab, click on the [Screenshot] button (last in the Illustrations group)
3. If you want a whole window then choose it from those available
4. If not, choose Screen Clipping. Using the mouse cursor (shows as a cross or plus sign), drag over the area of the window required then release the mouse button – the area selected will
be inserted into your text as a picture
Equations To insert an equation:
1. Move to a new line at the end of your document (press <Ctrl End> and <Enter> if necessary)
2. On the INSERT tab, click on the [Equation] list arrow in the Symbols group on the far right
3. Select one of the Built-in equations (e.g. Area of Circle) – the EQUATION TOOLS DESIGN tab shows
4. Move along the equation using the <arrow keys> adding or replacing existing text/values as you go
5. Click away from the equation once you have finished making changes
Note: Equations can be numbered in the same way as tables/figures (using a Caption) and cross-referenced. See the Microsoft Word: Equations advanced notes for further details.
Adding Comments and Tracking Changes The facility to show what changes/corrections have been made to a document since it was last saved is a useful, if sometimes annoying, one. You can also add comments in balloons:
1. Move to the REVIEW tab on the Ribbon and click on the icon above [Track Changes] in the
Tracking group to turn tracking on (the status bar at the bottom of the window may now show
that Track Changes are turned on)
2. Now type in some new text – a red vertical line will appear in the left margin marking this line
as new
3. Select some text from earlier in your document and <Delete> it – the text is deleted and another red vertical line appears on the left
4. Select a word and make it bold (press <Crtl b> or click on [Bold]) – the text turns bold and another red vertical line appears
5. Click on the box with a down arrow displaying Simple Markup and change it to All Markup – the
red lines go grey, the deleted text appears in red with a line through it and the bold formatting is highlighted by a balloon on the right
6. Click the [Show Markup] button in the Tracking group (just underneath the All Markup box)
choose Balloons then select Show all Revisions Inline
Note that any formatting changes (here, the bold command at step 5) are not shown in balloons.
To get the balloons back:
7. Repeat step 6 but select Show Revisions in Balloons – all changes, apart from new added text,
will be highlighted in balloons on the right of your document

18
8. Select some different text and click on the [New Comment] button in the Comments group
9. A comment balloon appears (note that your username or name will probably show to indicate
who’s writing the comment) – type in some text as a comment
To delete a comment:
10. Click on the comment then use the [Delete] button in the Comments group
To delete all comments:
11. Click on any comment then on the arrow attached to the [Delete] button and choose Delete
All Comments in Document
To accept or reject changes to your document:
12. Click on the change then use the [Accept] or [Reject] button in the Changes group
To accept all the changes and turn off tracking:
13. Click on the list arrow below [Accept] and choose Accept All Changes and Stop Tracking
14. [Save] the final version of your document – press <Ctrl s>
See the Microsoft Word: Tracking Changes advanced notes for further details.
Printing and Page Setup Instructions on how to print your document were covered in the Microsoft Word: An Essential Guide course notes; here you will look at how you can change the layout on the printed page.
1. Move to the PAGE LAYOUT tab and look at the Page Setup group
2. The [Margins] button lets you set up the margins (the white space surrounding your text)
3. The [Orientation] button lets you choose Landscape to turn the paper sideways
4. The paper [Size] should normally be set to A4
5. The [Hyphenation] button lets you turn on automatic hyphenation (so that long words at the
end of a line are split onto two lines)
Tip: To see all the Page Setup settings in a single dialog box, click on the Page Setup group arrow.
Finishing Off You have now completed the Intermediate training, but there’s a lot more to learn about Microsoft Word. Various guides to Microsoft Word: Advanced Topics are available on the WWW and there are special notes to help you when using Microsoft Word for a Thesis (starting and finishing). Don't forget that Word has a comprehensive on-line help facility via the [Help] button ( in the top right corner) or press the <F1> function key, usually on the top row of your keyboard.
To leave Microsoft Word:
1. Press <Alt F4> or click on the cross in the top right-hand corner of the Word window
2. Press <Enter> for [Save] if you want to save the changes to your document (or press n for
[Don’t Save] if you don't)
™ Trademark owned by Microsoft Corporation. © Screen shot(s) reprinted by permission from Microsoft Corporation. Copyright © 2014: The University of Reading Last Revised: October 2014