microsoft word - princeton...
TRANSCRIPT

Microsoft Word©
Mail Merge

Princeton University Office of Information Technology Word Mail Merge
Page 2 ©2003 EZ-REF Courseware
COPYRIGHT Copyright ©2003 by EZ-REF Courseware, Laguna Beach, CA http://www.ezref.com/ All rights reserved. This publication, including the student manual, instructor's guide and exercise files, or any part thereof, may not be reproduced or transmitted in any form or by any means, electronic or mechanical, without prior written permission of EZ-REF Courseware. TRADEMARKS EZ-REF is a trademark of EZ-REF Courseware. All other products or brand names mentioned are trademarks or registered trademarks of their respective holders. DISCLAIMER While EZ-REF Courseware has taken care to ensure the accuracy and quality of these materials, all material is provided without any warranty whatsoever, including, but not limited to, the implied warranties of merchantability or fitness for a particular purpose. Any persons or businesses mentioned in the text of this manual are strictly fictitious. Any resemblances to existing or deceased persons, or existing or defunct businesses, is entirely coincidental.

Princeton University Word Mail Merge Office of Information Technology
©2003 EZ-REF Courseware Page 3
TABLE OF CONTENTS MAIL MERGE................................................................................................................................................. 4
THE DATA SOURCE............................................................................................................................................4 THE MAIL MERGE WIZARD................................................................................................................................6 FILTERING AND SORTING THE MERGE ........................................................................................................12 BUILDING THE MERGE LETTER......................................................................................................................13 FORMATTING A FIELD......................................................................................................................................15 PREVIEWING AND MAKING CHANGES..........................................................................................................15 COMPLETING THE MERGE..............................................................................................................................16 WORKING WITH THE MAIL MERGE TOOLBAR..............................................................................................17
USING MAIL MERGE TO CREATE LABELS.............................................................................................. 20 CREATING LABELS FROM A DATA FILE ........................................................................................................21

Princeton University Office of Information Technology Word Mail Merge
Page 4 ©2003 EZ-REF Courseware
MAIL MERGE USAGE: Mail merge is used for those people who have a specific letter or
form that needs to be sent to several different people. Instead of typing the letter over and over, you can create the letter once in something Word refers to as a Main document and then create a Data Source file with the names and addresses of people who should receive the letter. Once these two files have been created, you simply merge them together, creating an original letter for each address in the data file. You can also use the merge feature to create envelopes, labels, e-mail messages and directories.
THE DATA SOURCE
The data source acts as a rolodex file. In the rolodex file, each card is like a record, it contains the information for one person/contact. On that card you have various pieces of information such as a first and last name, company, street address, city and so on. These pieces of data will make up the fields of a data source file. Note that you can create a data file from within Word, but you can also use a list that you have stored in an Excel worksheet, a table or query from Access, or you can use your Contacts address book from Outlook if you have one.

Princeton University Word Mail Merge Office of Information Technology
As mentioned, the data source file contains the list of names and addresses that are to be used to create the form letters. Each name and address is divided into what are called fields. A single field will contain one piece of information, such as a first name.
Each field must have its own unique name (title) so you can use that name in the main file to indicate where it should be printed.
All the information for one person is stored in one complete record. A record consists of a row of information. The first row within the Data Source File is referred to as the Header Row. This row consists of the fields making up the file. Each record in a data file (address list) represents one person.
©2003 EZ-REF Courseware Page 5
NOTE: Each record of a data source file must have the same
number of fields. If you don't have any data for that field, simply leave the field blank.

Princeton University Office of Information Technology Word Mail Merge
Page 6 ©2003 EZ-REF Courseware
THE MAIL MERGE WIZARD
To create a mail merge, follow the steps outlined below:
Starting in a blank document, access the following menu: MENU:
Tools
Letters and Mailings
Select Mail Merge Wizard... from the sub-menu.
The task pane (located along the right side of the screen) will change to display the Mail Merge wizard, as shown below:

Princeton University Word Mail Merge Office of Information Technology
From within the first step of the Mail Merge task pane, select the type of mail merge document you want to create. You can create a mail merge for letters, e-mail messages, envelopes, labels or an address directory.
Once you have made your selection, click on
to move to the second step.
The next step of the Mail Merge wizard allows you to specify whether you wish to use the current file as the starting document or if you would rather use one of the built-in templates or your own existing document.
After making your selection, click on to move to the third Mail Merge step.
©2003 EZ-REF Courseware Page 7

Princeton University Office of Information Technology Word Mail Merge
Page 8 ©2003 EZ-REF Courseware
The next step of the Mail Merge wizard is used to select recipients from an existing list, from your Microsoft Outlook contacts or by typing the list yourself.
If you have chosen to type a new list, click on to begin adding the necessary information for each letter (e.g., each contact’s name, address, city, state and zip code).
NOTE: If you had chosen to use an existing list, your next step would include a dialog box where you would be asked to select the document you wish to use as your data source. An Excel worksheet is a commonly used way to store information for mail merge. Note that you can also use your Outlook Contacts list.
In MS Word, choose Tools, General tab, enable Confirm conversion at Open. Begin the Mail Merge. When the Confirm Data Source window appears, choose MS Excel Worksheets via DDE (*.xls) and click OK. This will cause the mail merge to use a DDE connection (Office XP version) instead of an OLEDB (Office 2003 version). This is a known problem with Office 2003 and mail merging with Excel.

Princeton University Word Mail Merge Office of Information Technology
When creating a new Address List, the following screen appears:
The first thing you should probably do within this dialog box is to remove any unwanted fields or add any that may be missing. To
do so, click on .
©2003 EZ-REF Courseware Page 9

Princeton University Office of Information Technology Word Mail Merge
Page 10 ©2003 EZ-REF Courseware
From within the “Customize Address List” box, highlight any field
you wish to remove and click on . You will be asked to confirm the deletion.
To add a new field, click on and enter a name for the field you wish to add to the list.
To rename an existing field, select the field from the list and then
click on the button. You will be asked to enter a new name for the existing field.
You can rearrange the order of the fields by selecting the field you
wish to move and then clicking on either the or
button.
Once you have customized the fields to your liking, click on
to return to the original dialog box.
You may now begin adding the information for the first contact you wish to send the mail merge letter to.
To move from field to field, simply press Tab or Enter.
If you make a mistake, press Shift+Tab to move back a field or simply click in the box you wish to edit.
Once you have completed a record, click on to move to the next blank record. If you prefer using the keyboard, you can press Enter twice.
To view existing entries, use the bottom portion of the “New Address List” box. Notice you can quickly move to the first, previous, next and last record in your list or you can click in the box provided and enter the record number you wish to view.
To remove an unwanted record, move to it and then click on the
button while viewing it. You will be asked to confirm the removal of the record.

Princeton University Word Mail Merge Office of Information Technology
If you have a long list of addresses, you can quickly locate a record
by clicking on and then entering part of the field’s contents. Word will search through your list and locate any records containing the text you have entered.
To filter or sort your list of addresses, click on . You will be taken to a new dialog box with two tabs across the top. The first tab (labeled “Filter Records”) is used to enter criteria by which to filter the list of records being displayed. The second tab (labeled “Sort Records”) is used to sort the list based on one of your fields. For example, you might want to sort your list by last name.
Once you are finished entering the list of addresses you wish to use
as your data source, click on .
The next step is to save the list, as shown below:
Notice that Word automatically assigns the extension .mdb to the document. This indicates that the list you just created is being saved as a Microsoft Access database.
Enter a name for your list and click .
©2003 EZ-REF Courseware Page 11

Princeton University Office of Information Technology Word Mail Merge
Page 12 ©2003 EZ-REF Courseware
The “Mail Merge Recipients” list is displayed on your screen:
FILTERING AND SORTING THE MERGE To quickly sort the list by any column (field), simply click on the field name. To sort a field in descending order, click on the same column heading a second time.
To filter the records so that only certain ones are displayed in the list, click on the down arrow beside the column (field) you wish to use to set the criteria for filtering. A pull-down list of options will appear - allowing you to create a filter for that column. For example, you may wish to display only those clients in California. To do so, you would click on the down arrow beside the column containing the state and choose “CA” from the list.
To remove an existing filter, click on the down arrow a second time and choose (All) from the list.
The bottom of the list contains a series of buttons. You can either select all records in the list, clear all selections within the list, reload the data source to reflect any changes you may have made to the list, find a particular record, edit a record, or validate the recipients’ addresses. This last option is only available if you have installed address validation software on your system.
Click on to close the “Mail Merge Recipients” list and return to the wizard.

Princeton University Word Mail Merge Office of Information Technology
Click on to move to the next step within the Mail Merge wizard.
BUILDING THE MERGE LETTER
If you started off in a blank document, you are now ready to write the actual letter that will be sent to the recipients in the list you have just created.
Simply begin typing in the letter as you normally would.
To insert the information from the data file into your letter, place your cursor at the location where the information should be inserted and then select one of the following options from the task pane:
Select this option to format and insert the
complete address block at the current cursor location.
Choose this option to select the format for the
greeting and to insert it at the current cursor location.
©2003 EZ-REF Courseware Page 13
If you have electronic postage software installed on your system and have chosen to

Princeton University Office of Information Technology Word Mail Merge
Page 14 ©2003 EZ-REF Courseware
create envelopes as your document, you can use this option to add electronic postage to your envelopes.
If you are creating envelopes or address labels
as your document, you may want to include a postal bar code as part of the address.
You can use this option to insert any other field from
your data file into the main document.
The following diagram shows how the codes look in your letter:
<< <<AddressBlock>> >> << <<GreetingLine>> >> Congratulations! You may have won a million dollars! All you need to do is order yet another magazine from us and we may be contacting you. We know you already have subscribed to 83 of our magazines in the hopes of winning but keep trying. The next one may be the winner. Remember, <<First_Name>>, if you do not continue to subscribe to new magazines, we will have to take your name off the list and give your ten million dollars to someone else. You wouldn't want that to happen to you, would you? So, get out that checkbook and order another new one. Sincerely, Ed McMahon

Princeton University Word Mail Merge Office of Information Technology
FORMATTING A FIELD
If you would like a field to appear in a particular format (bold, italics, different font, etc.), simply highlight the field(s) and apply the formatting as you normally would with regular text. The data that replaces the field during the merge will be printed using the formats that were applied to the field variable.
Click on to move to the next step within
the Mail Merge wizard.
PREVIEWING AND MAKING CHANGES The document window will contain one of the letters while the task pane allows you to quickly flip through each address within your list to preview the letters for accuracy.
©2003 EZ-REF Courseware Page 15

Princeton University Office of Information Technology Word Mail Merge
Page 16 ©2003 EZ-REF Courseware
If you see a mistake that needs to be corrected from within the Address List, click on to make changes.
If you decide for some reason that one of the recipients should not receive this particular letter, display the letter addressed to the
recipient you wish to exclude and then click on .
Click on to move to the final step within the Mail Merge wizard.
COMPLETING THE MERGE You can either click on to go ahead and begin printing the merged documents or click on to create a new document containing each of the merged letters so that you can then edit the letters individually.

Princeton University Word Mail Merge Office of Information Technology
WORKING WITH THE MAIL MERGE TOOLBAR While working with the mail merge feature, you should notice a new tool bar is added to the screen. Once you are finished working with the Mail Merge wizard, you can use these tools to quickly access any of the options associated with the mail merge documents.
Below is a list and short description for each of the tools:
Select this tool to specify what type of document (such as letter, labels or envelopes) you wish to create.
This tool is used to open the data source file.
Use this tool to access the list of recipients.
Click on this tool to insert the address block at the current cursor location.
Use this tool to format and insert the greeting line at the current cursor location.
Select this tool to insert one of the merge fields.
Use this button to insert advanced merge field options into the document. Such options include the ability to ask the user during the merge process for additional information or to insert specific fields based on conditions.
Click on this tool to "preview" the merged data to make sure that the information will be placed correctly.
©2003 EZ-REF Courseware Page 17

Princeton University Office of Information Technology Word Mail Merge
Page 18 ©2003 EZ-REF Courseware
Select this tool to highlight the merge fields in your letter so that you can quickly differentiate them from the rest of the document text.
This tool is used to match fields from a data file to Word’s built-in fields. You might want to use this feature if Word does not automatically recognize your fields when using the address block or greeting line. For example, you would match up the first name field from your data file to the first name field within Word.
When creating labels, use this tool to copy the field codes from the first label to the rest of the labels.
Use these buttons to view the first/last records.
These buttons display the next/previous records.
Use the record number box to display a specific record. To print only the letter you are currently viewing, you will need to access the File Print menu.
This tool is used to open a dialog box where you can quickly locate a record based on text stored within one of the fields.
Click on this to check the file for merge errors. You can have Word check the document for any errors that may have occurred. You should see a button at the top (along with the other merge icons on the screen) with a checkmark.
Click on this button to merge the letter with the data and create a new document. The resulting form letters will be placed in a new document that can then be printed after your review. Do not save this newly created file - you will be wasting space. If you need these letters again, simply perform the merge once more.
Princeton University Word Mail Merge Office of Information Technology
Use this tool to perform the merge and immediately print the letters as they are created. You should make sure the form letter is correct before you send hundreds of merged forms to the printer!
Click on this tool to create e-mail messages from the merged data instead of documents. Before using this option, be sure that you have included an e-mail address as one of your fields. You will be asked to select the field to be used for the e-mail address, the subject line, and in what format (such as HTML or plain text) the e-mail should be sent.
If you have a fax card installed on your computer system, you can select this tool to send the merged data to each recipient by fax.
Once you have completed the merge process, you may want to close the task pane. To do so, click on the close button (which is located in the upper right corner of the task pane).
©2003 EZ-REF Courseware Page 19

Princeton University Office of Information Technology Word Mail Merge
Page 20 ©2003 EZ-REF Courseware
USING MAIL MERGE TO CREATE LABELS
A special note: If you are going to use an Excel worksheet for a mail merge data file, you must change a conversion setting in Word to avoid potential formatting problems with the data. You should do this you begin your first mail merge. Note that you only need to do this once.
1. Choose Tools, General tab,
2. Enable Confirm conversion at Open.
Now each time you begin a mail merge, the Confirm Data Source window will appear.
3. Choose MS Excel Worksheets via DDE (*.xls) and click OK. This will cause the mail merge to use a DDE connection (Office XP version) instead of an OLEDB (Office 2003 version) and will avoid formatting problems with the Excel data when the mail merge is created.
Princeton University Word Mail Merge Office of Information Technology
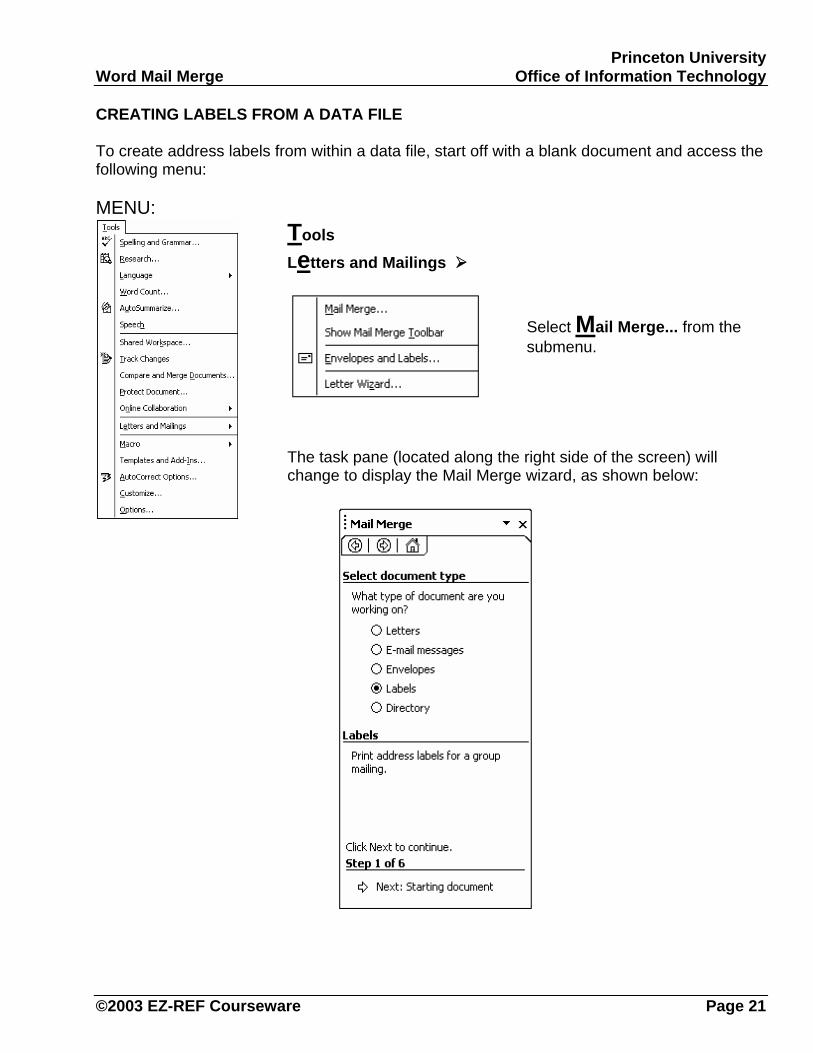
CREATING LABELS FROM A DATA FILE To create address labels from within a data file, start off with a blank document and access the following menu: MENU:
Tools
Letters and Mailings
Select Mail Merge... from the submenu.
The task pane (located along the right side of the screen) will change to display the Mail Merge wizard, as shown below:
©2003 EZ-REF Courseware Page 21

Princeton University Office of Information Technology Word Mail Merge
Page 22 ©2003 EZ-REF Courseware
From within the first step, select Labels as the type of mail merge document you want to create.
Once you have made your selection, click on to move to the second step.
The next step is used to specify whether to use the current file as the starting document or if you would rather use one of the built-in templates or your own existing document.
Since you started off in a blank document, you will need to select Label options... to define the layout for the document.

Princeton University Word Mail Merge Office of Information Technology
The following dialog box will be displayed, prompting you to select the type of labels you want to create:
Select the type of labels you want to use and click on .
The blank document will now be formatted for the type of labels you selected.
Click on (from the bottom of the task pane along the right side of the screen) to move to the next step.
©2003 EZ-REF Courseware Page 23

Princeton University Office of Information Technology Word Mail Merge
Page 24 ©2003 EZ-REF Courseware
The task pane will display options for selecting recipients:
The first option labeled Use an existing list allows you to select a data document that contains the list of addressees to be used for the labels. For example, an Excel worksheet is commonly used to store names and addresses for labels.
The second option labeled Select from Outlook contacts is used to obtain the list from your Contacts folder within Outlook.
The third option labeled Type a new list allows you to create your own list of addressees from the Word Mail Merge Wizard.
To use an existing list, select that option from the options and then click on

Princeton University Word Mail Merge Office of Information Technology
The following dialog box will be displayed:
Browse to the file you want to use as the data file and click on
.
Once open, you can sort the list by any of the field columns or use the checkboxes along the left to choose which addresses to use:
When done, click on .
©2003 EZ-REF Courseware Page 25

Princeton University Office of Information Technology Word Mail Merge
Page 26 ©2003 EZ-REF Courseware
Click on (from the bottom of the task pane along the right side of your screen) to move to the next step:
Click on to define how the address block will be displayed on the labels.
Princeton University Word Mail Merge Office of Information Technology
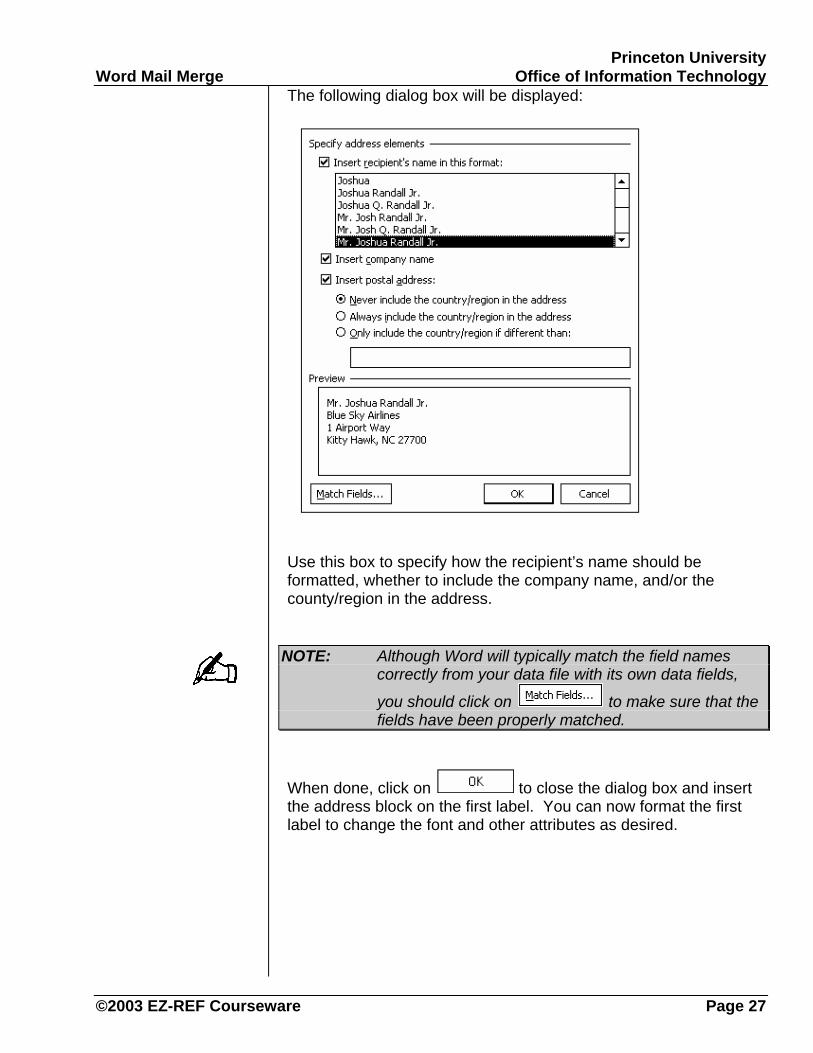
The following dialog box will be displayed:
Use this box to specify how the recipient’s name should be formatted, whether to include the company name, and/or the county/region in the address.
NOTE: Although Word will typically match the field names correctly from your data file with its own data fields,
you should click on to make sure that the fields have been properly matched.
When done, click on to close the dialog box and insert the address block on the first label. You can now format the first label to change the font and other attributes as desired.
©2003 EZ-REF Courseware Page 27

Princeton University Office of Information Technology Word Mail Merge
Page 28 ©2003 EZ-REF Courseware
To copy the address block from the first label to the rest of the
labels, click on .
Next, click on
The task pane will change to display the following:
If you see a problem and would like to fix it, click on to access your data file.
If everything looks fine, click on to access the final merge step.

Princeton University Word Mail Merge Office of Information Technology
The following task pane will be displayed:
If you are sure everything is correct and want to immediately print the labels, click on
If you want to double-check the labels or change the format before printing them out, click on
Regardless of which option you selected, you’ll be asked which records should be merged. Typically, you’ll want to choose All.
If you chose to edit the individual labels, a new document will be created containing the merged labels. You can edit them as you would any other document and when all changes have been made, you can then print the labels.
If the address list will not change, you may want to save the finished label document for future printing instead of going through the mail merge process again. However, if the list of addressees changes on a regular basis, you should close without saving the merged file. Instead, save the label layout document so that you can reuse the layout for future labels.
©2003 EZ-REF Courseware Page 29