migrating cases to postgresql - amazon web servicesad-pdf.s3.amazonaws.com/ftk/migrating_cases_to...
TRANSCRIPT

AccessDataForensic Toolkit
Migrating Cases from Oracle to PostgreSQL
Version: 3.4.1
| 1

©2011 AccessData Group, LLC All rights reserved. No part of this publication may be reproduced, photocopied, stored on a retrieval system, or transmitted without the express written consent of the publisher.
AccessData Group, LLC makes no representations or warranties with respect to the contents or use of this documentation, and specifically disclaims any express or implied warranties of merchantability or fitness for any particular purpose. Further, AccessData Group, LLC reserves the right to revise this publication and to make changes to its content, at any time, without obligation to notify any person or entity of such revisions or changes.
Further, AccessData Group, LLC makes no representations or warranties with respect to any software, and specifically disclaims any express or implied warranties of merchantability or fitness for any particular purpose. Further, AccessData Group, LLC reserves the right to make changes to any and all parts of AccessData software, at any time, without any obligation to notify any person or entity of such changes.
You may not export or re-export this product in violation of any applicable laws or regulations including, without limitation, U.S. export regulations or the laws of the country in which you reside.
AccessData Group, LLC.384 South 400 WestSuite 200Lindon, Utah 84042U.S.A.
www.accessdata.com
AccessData Trademarks and Copyright InformationAccessData® is a registered trademark of AccessData Group, LLC.
Distributed Network Attack® is a registered trademark of AccessData Group, LLC.
DNA® is a registered trademark of AccessData Group, LLC.
Forensic Toolkit® is a registered trademark of AccessData Group, LLC.
FTK® is a registered trademark of AccessData Group, LLC.
Password Recovery Toolkit® is a registered trademark of AccessData Group, LLC.
PRTK® is a registered trademark of AccessData Group, LLC.
Registry Viewer® is a registered trademark of AccessData Group, LLC.
A trademark symbol (®, ™, etc.) denotes an AccessData Group, LLC. trademark. With few exceptions, and unless otherwise notated, all third-party product names are spelled and capitalized the same way the owner spells and capitalizes its product name. Third-party trademarks and copyrights are the property of the trademark and copyright holders. AccessData claims no responsibility for the function or performance of third-party products.
Third party acknowledgements:
FreeBSD ® Copyright 1992-2011. The FreeBSD Project .
AFF® and AFFLIB® Copyright® 2005, 2006, 2007, 2008 Simson L. Garfinkel and Basis Technology Corp. All rights reserved.
Copyright © 2005 - 2009 Ayende Rahien
Legal Information | 2

PostgreSQL
Migrating FTK Databases Overview
How you upgrade your cases depends on the following situations:
You can upgrade your active 3.x Oracle-based cases to 3.4 using PostreSQL.
See “Upgrading Cases from 3.x to 3.4.1” on page 6.
If you create Oracle-based cases in 3.4 and then want to change them to use PostreSQL, you can do that by backing up and restoring the cases.
See “Migrating Cases Between Database Types” on page 3.
See “Backing Up a Case” on page 4.
See “Restoring a Case” on page 5.
Migrating Cases Between Database TypesIf you have decided to migrate your FTK Oracle cases to FTK PostgreSQL, the migration paths vary depending on your starting point.
Upgrading 3.x Cases From Oracle to 3.4.1 PostgreSQLCases created by FTK (version 3.0 or newer) with an Oracle database can be upgraded (and converted) for use in FTK 3.4 with PostgreSQL database support by using the case copy function. For help, see Upgrading Cases from 3.x to 3.4.1.
Note: FTK does not support migrating from a PostgreSQL database to Oracle.
Moving FTK 3.4.1 Cases from Oracle to PostgreSQLFTK 3.4 cases can be moved from Oracle to PostgreSQL. In order to do so, you must do the following:
Backup each case that you want moved using the “Database Independent Format.”
Restore each case to the new database.
To migrate cases from Oracle to PostgrSQL
1. Open the Case Management interface in FTK.
2. Back up ALL cases that need to be migrated using the database independent format. For help on this step, see “Backing Up a Case.”
Migrating FTK Databases Overview | 3
connected to a database previously, you will need to follow these steps to switch default databases:
3a. After all cases have been backed up successfully, close FTK completely.
3b. Shut down the database service(s). (In Windows, you can use the services.msc managment snap-in to stop the database services.)
3c. Ensure the new database is up and accepting connection requests.
3d. Launch FTK (you should receive a message stating that FTK was unable to connect to the database).
3e. Connect FTK to the new database and complete the initialization process. For help, see “Initializing the FTK Database.”
4. Open the Case Management interface in FTK (connected to the new database).
5. Restore your cases to the new database. For help, see “Restoring a Case.”
Backing Up a Case
Performing a Backup and Restore on a Two-Box InstallationIf you have installed FTK and the database on separate boxes, there are special considerations you must take into account. For instructions on how to back up and restore in this environment, see “Configuring FTK for a Two-box Back-up and Restore.”
Performing a Backup of a caseAt certain milestones of an FTK investigation, it is recommended that you back up your case to mitigate the risk of an irreversible processing mistake or perhaps case corruption. It is important to understand that a case backup must be restored to the same version of the database from which it was created. Case backup can also be used when migrating case data from one database type to another. For example, if you have created cases in FTK 3.4 running an Oracle database and you want to move the case(s) to the same version of FTK that is running a PostgreSQL database.
When you back up a case, FTK copies case information and database files (but not evidence) to the selected destination folder. AccessData recommends that you store copies of your drive images and other evidence separate from the backed-up case.
Important: Case Administrators back up cases and must maintain and protect the library of backups against unauthorized restoration, because the user who restores an archive becomes that case’s administrator.
Note: FTK does not compress the backup file. A backed-up case requires the same amount of space as that case’s database tablespace and the case folder together.
To back up a case
1. In the Case Manager window, select the case to back up.
2. Do one of the following:
Click Case > Back up.
Migrating FTK Databases Overview | 4
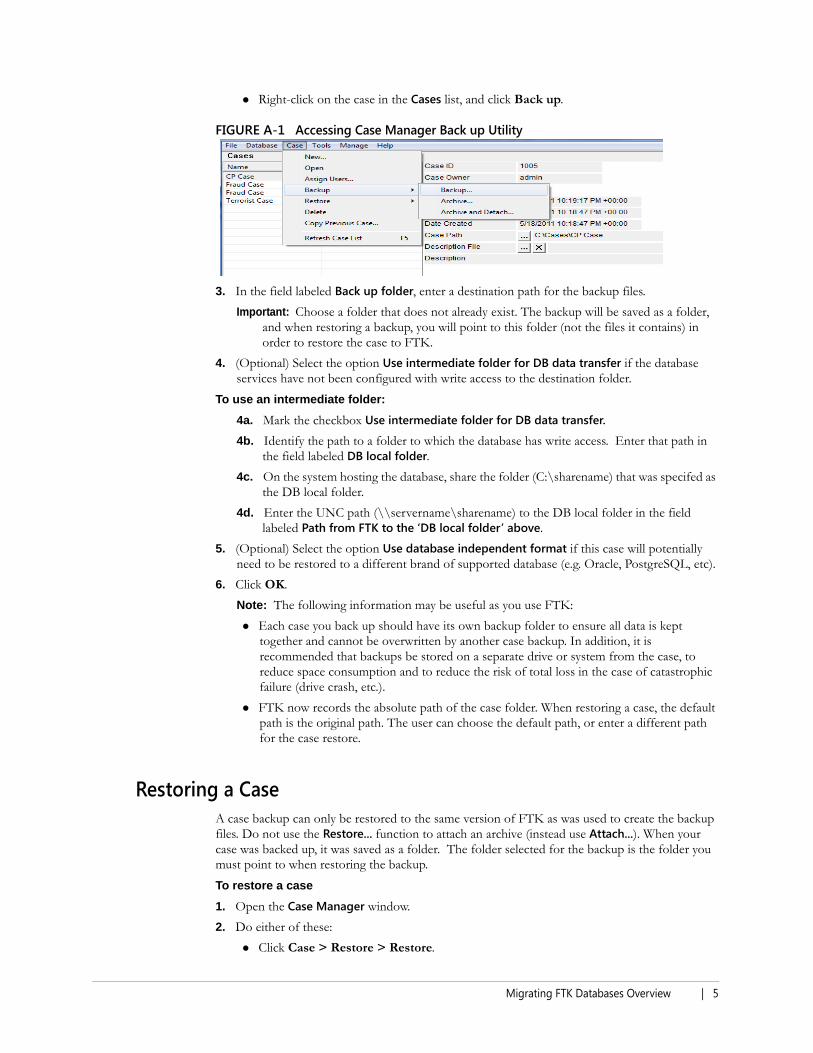
FIGURE A-1 Accessing Case Manager Back up Utility
3. In the field labeled Back up folder, enter a destination path for the backup files.
Important: Choose a folder that does not already exist. The backup will be saved as a folder, and when restoring a backup, you will point to this folder (not the files it contains) in order to restore the case to FTK.
4. (Optional) Select the option Use intermediate folder for DB data transfer if the database services have not been configured with write access to the destination folder.
To use an intermediate folder:
4a. Mark the checkbox Use intermediate folder for DB data transfer.
4b. Identify the path to a folder to which the database has write access. Enter that path in the field labeled DB local folder.
4c. On the system hosting the database, share the folder (C:\sharename) that was specifed as the DB local folder.
4d. Enter the UNC path (\\servername\sharename) to the DB local folder in the field labeled Path from FTK to the ‘DB local folder’ above.
5. (Optional) Select the option Use database independent format if this case will potentially need to be restored to a different brand of supported database (e.g. Oracle, PostgreSQL, etc).
6. Click OK.
Note: The following information may be useful as you use FTK:
Each case you back up should have its own backup folder to ensure all data is kept together and cannot be overwritten by another case backup. In addition, it is recommended that backups be stored on a separate drive or system from the case, to reduce space consumption and to reduce the risk of total loss in the case of catastrophic failure (drive crash, etc.).
FTK now records the absolute path of the case folder. When restoring a case, the default path is the original path. The user can choose the default path, or enter a different path for the case restore.
Restoring a CaseA case backup can only be restored to the same version of FTK as was used to create the backup files. Do not use the Restore... function to attach an archive (instead use Attach...). When your case was backed up, it was saved as a folder. The folder selected for the backup is the folder you must point to when restoring the backup.
To restore a case
1. Open the Case Manager window.
2. Do either of these:
Click Case > Restore > Restore.
Migrating FTK Databases Overview | 5

3. Browse to and select the backup folder to be restored.
4. A prompt asks if you want to use an intermediate folder. The processing status dialog appears, showing the progress of the archive. When the archive completes, close the dialog.
Initializing the FTK DatabaseBefore you can get started with case management, you must initialize the FTK database.
To initialize the FTK Database
1. Start FTK.
2. If FTK does not detect an existing database connection for that version of FTK, you will be prompted to Add Database.
3. In the RDBMS drop-down menu, select the brand of database to which you are connecting to FTK.
4. Enter the IP address or DNS hostname of the server hosting the database in the Host field.
5. (Optional) Give the database connection a nickname in the Display name field.
6. Do not change the values in the Oracle SID, Postgres dbname, or Port number fields unless you have a custom database configuration.
7. Click OK.
8. If the connection attempt to the database was successful, the database will be initialized.
9. Upon completion of the initialization process, you will be prompted to create the Application Administrator account for that version of the database schema. Enter the desired credentials for the account and click OK.
10. Log into the database using the Application Administrator account credentials via the Please Authenticate dialog.
FIGURE A-2 Please Authenticate
11. A successful login enables you to use the Case Manager window. From here, you can create other user accounts and perform other administrative tasks as discussed in the following sections.
Upgrading Cases from 3.x to 3.4.1If you have cases that were created in FTK 3.0 or newer, you can convert them to open in the current release of FTK. These steps can also be used when upgrading cases from a 3.x Oracle database to a 3.4.1 PostgreSQL for example.
Note: Some features supported by newer versions of FTK may not be available when reviewing a case that has been upgraded. Depending on the feature, you may need to reprocess some or all of the evidence in the case to be able to use a particular feature.
Initializing the FTK Database | 6

upgrade to 3.4.1, you must first upgrade the cases to 3.0 or newer.
To upgrade a case
1. Open the Case Manager interface (using the latest version of FTK).
2. Click Case > Copy Previous Case...
3. On the Copy Case(s) dialog, select the version of the database (from which you would like to copy your case) via the Select Database drop-down menu.
Note: If prompted to authenticate, enter the system administrator (sys) credentials for the Oracle database and then click OK.
FIGURE A-3 The Copy Case Dialog Box
4. Highlight the case(s) which you would like to upgrade into the new database. Use Shift+Click or Ctrl+Click to select more than one case at a time.
Important: The selected case(s) must not be in use at the time of upgrade.
5. Once you have selected the case(s) to be upgraded, click OK to proceed.
6. On the Copy Previous Case(s) dialog, use the Case: drop-down menu to switch between the list of users associated to each case.
Initializing the FTK Database | 7

exists in the previous database (Old User Name) to a user name(s) that exist in the new database (New User Name).
FIGURE A-4 Copy Previous Case(s)
8. Do the following to associate users:
8a. Highlight the old user name(s) to which you would like to associate to a username in the new database. Use SHIFT+Click or CTRL+Click to select more than one username at a time.
8b. Click Associate to...
8c. Select the user name from the new database to which you would like to associate the old user names.
This step assumes you have already created user accounts in the new database.
9. Ensure that the folder path in the Temporary Storage field points to a location that contains storage space sufficient to copy the entire contents of the case (which includes the case folder, index, and case data but not evidence).
10. Click OK.
11. The selected user associations are mapped and the case is copied into the new database.
Note: FTK will write the copied case to the same main case folder as the source case. The upgraded case name will be appended with a number to make it unique. For example, Terrorist Case (1).
Configuring FTK for a Two-box Back up and RestoreBy default, a two-box installation of FTK (also known as a distributed installation, where FTK and its associated database have been installed on separate systems) is not configured to allow the user to back up and restore case information. Some configuration changes must be performed manually by the system administrator to properly configure a two-box installation. Please note that the steps required to complete this configuration differ slightly for domain systems than for workgroup systems.
Initializing the FTK Database | 8

The following steps are required before you can perform two-box case back ups and restoration.
Create a service account common to all systems involved. See “Create a Service Account” on page 9.
Share the case folder and assign appropriate permissions. See “Share the FTK Case Folder” on page 9.
Configure the database services to run under service account. See “Configure Database Services” on page 10.
Share back up destination folder with appropriate permissions. See “Share the Backup Destination Folder” on page 12.
Note: When prompted by FTK to select the backup destination folder, always use the UNC path of that shared folder, even when the backup destination folder is local to the FTK system.
Each of these items is explained in detail later in this chapter.
Create a Service AccountTo function in a distributed configuration, all reading and writing of case data should be performed under the authority of a single Windows user account. Throughout the rest of this appendix, this account will be referred to as the “service account.” If all the systems involved are members of the same domain, choosing a domain user account is the recommended choice. If not, all systems are members of the same domain, then you can configure “Mirrored Local Accounts” (see Microsoft KB 998297) as detailed in the following steps:
To set up Mirrored Local Accounts
1. On the FTK host system, create (or identify) a local user account.
2. Ensure that the chosen account is a member of the Local Administrators group.
3. On the database host system, create a user that has the exact same username and password as that on the FTK host system.
4. Ensure that this account is also a member of the Local Administrators group on the database host system.
Instructions for Domain User AccountsChoose (or create) a domain user account that will function as the service account. Verify that the chosen domain user has local administrator privilege on both the FTK host system and the database host system.
To verify the domain user account privileges
1. Open the “Local Users and Groups” snap-in.
2. View the members of the Administrators group.
3. Ensure that the account selected earlier is a member of this group (either explicitly or by effective permissions).
4. Perform this verification for both the FTK and the database host systems.
Share the FTK Case FolderOn the system hosting FTK, create a network share to make the main FTK case folder available to other users on the network. The case folder is no longer assigned by default. The user creating the case creates the case folder. It is that folder that needs to be shared.
Initializing the FTK Database | 9

C:\FTK-Cases.
To share the case folder
1. Before you can effectively share a folder in Windows you must make sure that network file sharing is enabled. Windows XP users should disable Simple File Sharing before proceeding. Windows Vista/7 users will find the option in the Sharing and Discovery section of the Network and Sharing Center. If you encounter any issues while enabling file sharing, please contact your IT administrator.
2. Open the Properties dialog for the case folder.
3. Click the Sharing tab to share the folder.
4. Edit the permissions on both the Sharing and Security tabs to allow the one authoritative user Full Control permissions.
5. Test connectivity to this share from the database system:
5a. Open a Windows Explorer window on the system hosting the database.
5b. Type \\servername\sharename in the address bar, where “servername” = the hostname of the FTK host system, and “sharename” = the name of the share assigned in Step 1.
FIGURE A-5 FTK Cases Properties: Share this folder
For example: If the name of the system hosting FTK is ForensicTower1 and you named the share “FTK-Cases” in Step #1 above, the UNC path would be \\forensictower1\FTK-Cases.
5c. Click OK. Check to see if the contents of the share can be viewed, and test the ability to create files and folders there as well.
Configure Database ServicesTo ensure access to all the necessary resources, the services upon which the database relies must be configured to log on as a user with sufficient permissions to access those resources.
Initializing the FTK Database | 10

1. On the database server system, open the Windows Services Management console:
1a. Click Start > Run.
1b. Type services.msc. 1c. Press Enter.
FIGURE A-6 Oracle ftk2TNSListener Properties
2. Locate the following services:
Oracle
Oracle TNS Listener service listed as OracleFTK2TNSListener or OracleAccessDataDBTNSListener (Found on Oracle System)
OracleServiceFTK2 (Found on Oracle System)
PostgreSQL
postgresql-x64-9.0
or
postgresql-x86-9.0
3. Open the properties of the service and click the Log On tab.
4. Choose This account.
5. Click Browse to locate the service account username on the local system or domain. Ensure that “From this location” displays the appropriate setting for the user to be selected. Note that
Initializing the FTK Database | 11

FIGURE A-7 Select User Dialog
6. In the object name box, type in the first few letters of the username and click Check Names. Highlight the desired username. Click OK when finished.
7. Enter the current password for this account and then enter it again in the Confirm Password box. Click Apply and then OK.
8. Repeat Steps #3-8 for each database service.
9. Restart database service(s) when finished.
Share the Backup Destination FolderUsing the same steps as when sharing the main FTK case folder, share the backup destination folder. Use the UNC path to this share when performing backups.
Test the New ConfigurationTo test the new configuration
1. Launch FTK and log in normally.
2. Select (highlight) the name of the case you want to back up.
2a. Click Case > Back up.
2b. Select a back up destination folder.
Note: The path to the backup location must be formatted as a UNC path.
The Data Processing window opens, and when the progress bar turns green, the backup is complete. If the Data Processing window results in a red progress bar (sometimes accompanied by “Error 120”), the most likely cause is that the database service does not have permission to write to the backup location. Please double check all the steps listed in this document.
Initializing the FTK Database | 12

Initializing the FTK Database | 13

Initializing the FTK Database | 14