migrating to ipad - head · pdf fileipad: the popover. it’s another one of my own...
TRANSCRIPT

this is a new chapter 315
I need a device that’s more like a book. Does Apple have one of those?
migrating to iPad7
We need more room
iPhones are great, but a bigger screen can be better. When the iPad first launched, some panned it by saying that it was “just a big iPhone” (but
uh, without the phone). In many ways it is, but that screen opens up many opportunities
for better user interaction. More screen real estate means that reading is comfortable,
web pages are easily viewed, and the device can act more like a book. Or a calendar. Or
many other things that you already know how to use, like a menu...

316 Chapter 7
DrinkMixer on the iPadIt happens all the time: a new device comes out and now your clients want to use it. iPad and iPhone apps have lots of overlap. iOS runs both devices, which are touch screen–based, and only one app is allowed to be visible at a time to users.
The big difference? The screen size!
The iPad screen resolution is 768 x 1024.
The iPad screen is 9.7” diagonally.
The iPhone 4 (with Retina display) has a resolution of 640 x 960.
The iPhone screen is only 3.5” diagonally.
iPhones have data access most of the time.
Lots of iPads are Wi-Fi only.
iPad is meant to be used in any orientation, portrait or landscap
e.
People tend to use the iPhone most in portrait mode, like this.
drinking big

you are here 4 317
migrating to iPad
Let’s just run DrinkMixer on the iPad. iPhone apps are supposed to work too, right?
Do this! Open up DrinkMixer in Xcode and run it in the iPad simulator. Then you can see what we’re dealing with.
Build and run...
Yes, they do.Every iPhone app on the App Store will run on iPads right out of the box, but there’s a catch.
To see what will happen on the iPad, you just need to
switch the simulator for Xcode.
Click here and select iPad Simulator.

318 Chapter 7
The iPad simulatorThe simulator will launch the iPad with the DrinkMixer iPhone app, as is. You didn’t have to change a line of code, and it does work. Of course, the simulator is enough to show you that just running the iPhone app on the iPad isn’t ideal.
First off, it’s the size of an iPhone app, but on an iPad. Ugh. You can change the size of the view to fill the entire screen by “doubling” the pixels, but that doesn’t change the resolution of the view, so the graphics don’t look as good. Play with it in the simulator, too, and we’ll bet it doesn’t really feel right, either...
Wow. I don’t know how you fix it, but that is not what I was thinking an iPad version of DrinkMixer would look like...
Click here to double the pixels.
When using pixel doubling, the app looks not only pixelated, but wrong! It looks totally out of proportion.
big, but ugly

you are here 4 319
migrating to iPad
The HIG covers iPads, tooSince the device has changed, let’s go back to the HIG. If you work your way through the iOS Human Interface Guidelines, you’ll find a section called “For iPad: Restrain Your Information Hierarchy.” For DrinkMixer, that means we need to use the extra real estate that comes from the big screen to reduce the number of screen transitions. For example, you can easily display a detail view next to a list view using a Split View Controller.
What are some apps that you’ve used for both iPad and iPhone? Are there any elements that are iPad-specific?
The view shows two levels of data, called a Split View Controller.
This is the segmented control. It’s another way to consolidate information into a single view rather than introduce a hierarchy.
This is a pop-over. It’s used in portrait mode.

320 Chapter 7
Head First: Hi, iPad! It really exciting to be interviewing a famous device like you.
iPad: Thank you! I’m happy to be here. There are lots of other tablets out there, but once you know me, you know the best.
Head First: That’s a great lead-in for me. How do you answer the critics that say you’re just a big iPhone?
iPad: Would that really be such a bad thing? People who say that just don’t understand us. We do have some things in common, like the touch screen, iOS, accelerometers, and awesome apps, but the apps are usually different.
Head First: Well, your apps are bigger, right?
iPad: Yes, but you’re missing the point. My screen is bigger, but because of that, you interact with me very differently.
Head First: How so? People still use the same gestures?
iPad: When you pick me up, I’m more like a book than iPhone. iPhone is more about getting things done quickly and moving on. Me, you want to sit down and spend some time with. I might even write my own book: iPhones Are From Mars, iPads Are From Venus. Don’t you agree?
Head First: Ummm, that’s probably true. I’ve noticed that you move around more, too.
iPad: My Apps need to support all four orientations, so no matter how you pick me up, it just works. And there should be less bouncing around.
Head First: What?
iPad: When you’re using iPhone, the screen is really small (but pretty, I wish I had that awesome display). Anyway, because the screen is small, you’re going between screens a lot on iPhone. With me, designers
usually put a lot on one screen. They call that “restraining the hierarchy.”
Head First: Interesting. Do you have any special views?
iPad: I do. To reduce the number of views, there is a Split View Controller just for my apps. In landscape, it shows a table view on the left side of the screen and the detail view on the other side. So as soon as you pick something, you can see the details without hiding the list.
Head First: Is that what you use for mail?
iPad: Yup, it’s perfect for that. And if you shift that Split View Controller to portrait, it just shows the detail view, until you click on a navigation button and see the popover.
Head First: The what?
iPad: The popover. It’s another one of my own special controls. It’s like a dialog box that appears on the screen without covering the whole thing up.
Head First: Like a speech bubble?
iPad: Exactly. Great for little bits of information, color settings, stuff like that.
Head First: What don’t you have?
iPad: I’m like an iPod Touch. Limited GPS, sometimes no camera. Those are the biggies.
Head First: Anything you’d like to add?
iPad: Well, people should really take advantage of my size. Use visual clues from the real world to help people use your app. You have lots of space to work with and room for lots of fingers touching things. Think about how real books, calendars, switches, dials, and real physical controls look and feel. Take advantage of that.
Head First: Thanks, iPad. Can’t wait to get started!
iPad ExposedThis week’s interview:What makes you different?�
interview with iPad

you are here 4 321
migrating to iPad
Sketch up the UI for the new DrinkMixer iPad app. You’ve got more room, so be sure to use it well! Consult the HIG and make sure you know what information is going in which element of the view.
Remember, we want to convert this whole app into an iPad app, with the right iPad controls.

Detail view
here
This is the popover that comes with the Split View Controller.
Drinks List
Navigation control
322 Chapter 7
Now we have an idea of the UI for the new iPad app. Having this all put together first is going to help keep everything going in the right place as you code.
We’ll use the iPad-
specific Split View
Controller. Then we
can have the drink
list on the left and
the ingredients on the
right.
Detail view
hereDrinks List
The Split View Controller is a pretty powerful control. It handles restraining the hierarchy and it looks good too, even in portrait mode with a popover!
Navigation control
exercise solution

you are here 4 323
migrating to iPad
Q: Is building an app for iPad really that different than building for iPhone?
A: From a coding and development perspective, no, they’re nearly identical. But from a design and UI perspective, yes, they’re very different. It’s important to spend time with an iPad to make sure you “get it.” When designing iPad apps, there will be a point where an app will just start to feel like an iPad app. It’s lots of little design elements like the use of space, textures on controls and UI components, interaction patterns, etc. iPhone apps are much more about ease of use with your thumb, quick access to data, etc. iPad apps are “bigger” than that. People sit on couches and really soak in iPad apps. Give them that kind of depth.
Q: Does “restraining the hierarchy” just mean using a split-view control?
A: No. That’s one way to help get there, but it’s definitely not the only way. We’ll
use a split view control for DrinkMixer, but there are lots of other things to consider. For example, let’s say you have summary information about chapters in a book. In an iPhone app, you might have a table view listing the chapters, and tapping on a chapter will show that summary information. In an iPad app, you might want to have a fancy table of contents only showing three or four summaries at a time but indicate to the user that they can turn the page to see the next set. Hook that up with a swipe gesture and a nice page curl animation and you have a much more natural way of flipping through the same material without needing to slide views in and out as the user moves through data.
Q: Are we going to have the same hardware issues with iPad as we did with iPhone? Specifically different capabilities and features?
A: Absolutely. You already had that to some extent with just the first iPad—there are 3G iPads with a GPS while the
Wi-Fi–only ones obviously don’t have 3G connectivity or a true GPS. The iPad 2 has two cameras while the original iPad doesn’t have any. iPad 2’s graphics and processing capabilities are substantially better, too. The good news is that you should handle it just like iPhone and iPod Touch differences—simply check for device capabilities and code around not having them.
Q: Does the iPad run a different version of iOS or anything?
A: No; well, no more so than iPod Touch vs. iPhone. There are some controls that are only available on the iPad (and you need to check for them if you build a universal app—more on that later), but the basic OS is the same and you can have a single build that runs on all iOS devices. Speaking of running on lots of devices...
Now that you’re ready to build this thing, what exactly is it called? When Apple designed the iPad and iPhone to share one OS, Apple introduced the concept of a Universal app, an app that is built for both devices. That still means different views for iPhone and iPad, but only one code base that gets submitted to the App Store. Users get both a native iPhone app and native iPad app when they buy your application instead of needing to purchase two separate apps.
It’s a big factor in distribution, actually...
Building a project for iPhone
+ iPad = Universal App
Behind the Scenes Creating an App for iPhone and iPad

324 Chapter 7
Tonight’s talk: Universal App Distribution or not?
Universal:
Ha! Two apps. That’s really inefficient. It really just makes more sense to support iPhones and iPads everywhere, like I do.
True, but if I’m written right, most of my code is shared between the devices. It’s really not that hard to just use the right view controllers on the right device and everything else goes from there.
I’d be happy to trade worrying about a couple more devices for better sales and reviews.
The reviews I see have a lot of people complaining about needing to purchase the same app again just to use it on another device. I’m usually a little more expensive, but users love getting more value for their money.
Two Apps:
You do support everyone, that’s true, but that makes you kinda hefty, right? You have to check for like, everything!
See, my apps don’t have that much to worry about. If it’s iPhone, that’s it. Well, except for touches...but I don’t need to deal with everything in one..
Wait a sec. I’m really the moneymaker. If you build two apps, then you can sell twice per user. Every person out there with an iPhone and an iPad has to pay twice to get all of me.
Hmm. I don’t buy it. I cost less but only work on a specific kind of device.
fireside chat

you are here 4 325
migrating to iPad
Universal:
Let’s talk maintenance. I think we both agree that you don’t want two completely separate code bases, right?
Totally agree. So I guess really we’re arguing about a packaging issue. Do the users want to pay a little more and get iPhone and iPad support, or do they want to pay a little less when they only want support for one device, but end up paying more if they want both?
Two Apps:
Oh, absolutely. Even if you are going to make two different apps, you should be sharing a code base. You definitely don’t want to be in a situation where you’re fixing the same bug in multiple projects or trying to keep them in sync.
You know, I bet there isn’t a simple answer to that. There are lots of users who have lots of different opinions. It probably depends on the app and how the developer wants to interact with the users. I guess there’s room for both of us...
Sam doesn’t want to deal with multiple applications. He wants the iPad version of DrinkMixer to be tied in with the original iPhone app. What kind of app distribution are we going to have to use?

326 Chapter 7
Use Xcode to build your Universal appSince we’re looking to support Sam and keep things easier, it makes more sense to build a universal app that creates one software bundle. This isn’t too hard to implement, because when the code is cleanly separated in the MVC pattern, we just need to talk to another view.
Upgrade your appHighlight the project in the Navigator window and you’ll see the basic project settings. Make sure that Targets is highlighted.
Under devices, the drop-down box will let you select iPhone, iPad, or Universal. Select Universal.
Do this!
Xcode can convert
your app for iPad.
Click Yes!
Xcode generated a new view for the app.
Select the project in your Navigation window.
building universal

you are here 4 327
migrating to iPad
Wait—what’s a target? What does it have to do with iPads?
Targets are used in the build process.Xcode completes the build process based on the targets that you identify. A target keeps track of which files and the instructions of what to do with them for a build. We upgraded our target to be a universal build, so now it has everything it needs to build an app that runs on iPhones, iPod Touches, and iPads.
As part of the upgrade process, Xcode introduced the new .xib for us and added it to the target.
Geek Bits
Since Xcode is used for Mac development too, there are lots of reasons to create several targets, such as frameworks or libraries. Targets are frequently used to build unit tests or application tests as well. The test code is only included in the test targets and won’t be in the release builds. Xcode only builds the active target, so you can build just one piece at a time. We only have one target for DrinkMixer, so it’s always active.

328 Chapter 7
Test DriveMake sure that the iPad simulator is still selected for the build and build and run the app. It should look much more iPad-specific now...
Because we did such a great
job writing clean code, the
app can port easily to the
iPad and the actions all
work.
We got rid of the pixel-doubling badness, but it still feels like an overgrown iPhone app...
test drive

you are here 4 329
migrating to iPad
The detail view looks really bad, and it’s just a regular table view—we never told it to use the Split View Controller.
Detail view
hereDrinks List
You’re right.Since we’re working with iPhone and a new view, Xcode just ported what we had over to the iPad—in this case, a table view. To put the new Split View Controller into play, we need to fix that.
Split-view MagnetsAdding the split view isn’t really that hard if you think about it a bit. Use these magnets to order the steps we need to work through.
Open up MainWindow-iPad.xib in Xcode
Add a Split Vi
ew Controller
from the libra
ry
Wire up the Split View Controller reference
Delete the Navigation Controller
Add in the DrinkMixer Detail View
Navigation control
Add a Navigation Controller to the Detail View
Declare and add the
UISplitViewController instance
variable and its IBOutlet to the
DrinkMixerAppDelegate files
Change the Table View to the Root View
We’ll walk you through the coding, you just get them in order!

330 Chapter 7
Open up MainWindow-iPad.xib in Xcode
Add a Split View Controller from the library
Delete the Navigation Controller
Split-view Magnets SolutionAdding the split view isn’t really that hard if you think about it a bit. Use these magnets to order the steps we need to work through.
This is the initial file listing that was created by Xcode when the new target was created.
This Navigation Controller is going to be replaced with a Split View Controller. So, delete this now.
magnets solution

you are here 4 331
migrating to iPad
Add a Navigation Controller
to the Detail View
For the Split View Controller to work, you need to have two children. By default, they are a Navigation Controller with an embedded Table View and a standard view controller. We want a Navigation Control on top of the View Controller for the right-hand pane. Using a real navigation controller for the detail view gets us access to a navigation bar and the usual edit buttons, like we had for the iPhone version of the app.
Child no. 1, table view with Navigation Controller
This view is child no. 2.
We want a Navigation Controller here.
This is what it’ll look like when you’re done...
The easiest way to swap out the right view controller is to drag and drop a Navigation Controller into the right pane. Interface Builder will update the right view controller to be a Navigation Controller for us and drop the navigation bar right where we want it.
Drop a Navigation
Controller right into the right V
iew
Controller. It should
change to look like this...

332 Chapter 7
@interface DrinkMixerAppDelegate : NSObject <UIApplicationDelegate> {
UIWindow *window;
UINavigationController *navigationController;
UISplitViewController *splitViewController_;}
@property (nonatomic, retain) IBOutlet UISplitViewController *splitViewController;
Add in the DrinkMixer Detail View
Declare and add the UISplitViewControl
ler instance variable
and its IBOutlet to the DrinkMixerAppD
elegate files
This view controller is the
detail view on the landscape
view of the Split View Controller. It needs to
be
our detail view.
DrinkMixerAppDelegate.h
more magnet solution
Split-view Magnets Solution (cont.)
To change this, highlight the View Controller, and change the view controller class to “DrinkDetailViewController” from the drop-down list in the inspector.

you are here 4 333
migrating to iPad
Wire up the Split View controller reference
@synthesize splitViewController=splitViewController_;
DrinkMixerAppDelegate.m
Change the table view to the root view
- (void)dealloc {
[splitViewController_ release]; [navigationController release];
[window release];
[super dealloc];
}
@end
Just like we did with the detail view, change the class type for the table view controller to “Root View Controller.”
But the App Delegate is for the iPhone and the iPad, right? Don’t we need to tell it which
view to use?
Right-click on the App Delegate and connect the splitViewController outlet to the Split View Controller.

334 Chapter 7
Check your devicesThis is where the code paths for the iPhone and the iPad are going to intersect—in the App Delegate. Because we’re migrating an existing iPhone application, we already have an AppDelegate and it’s set up to add our RootViewController to the window when the application launches.
Now that we’ve added iPad-specific views, we need to update our AppDelegate to add the correct one to the window depending on the device. iOS makes it easy to determine which device you’re on through a macro named UI_USER_INTERFACE_IDIOM(). This returns a constant that tells you the type of device your application is running on; we can use this to figure out which view controller to show in the window.
- (BOOL)application:(UIApplication *)application didFinishLaunchingWithOptions:(NSDictionary *)launchOptions {
// Override point for customization after application launch.
// Add the navigation controller’s view to the window and display.
if (UI_USER_INTERFACE_IDIOM() == UIUserInterfaceIdiomPad) {
[self.window addSubview:self.splitViewController.view];
}
else {
[self.window addSubview:navigationController.view];
} [self.window makeKeyAndVisible];
return YES;
}
DrinkMixerAppDelegate.m
Now it’s ready to run…
Here we check the UI_USER_INTERFACE_IDIOM() and if it’s an iPad, we add the splitViewController’s view to the window. Otherwise, we add the navigationController’s view.
who are you?

you are here 4 335
migrating to iPad
Test Drive
To see the split view, go up to the Hardware→Rotate Right menu option.
We don’t have the popovers
working yet, so there’s no way
to show the full drink list.
This is the view that we
should see in portrait. Just
the detail view.
Save everything and then build and run. You may need to switch Xcode back to the iPad setting for the Simulator...
336 Chapter 7
Test Drive
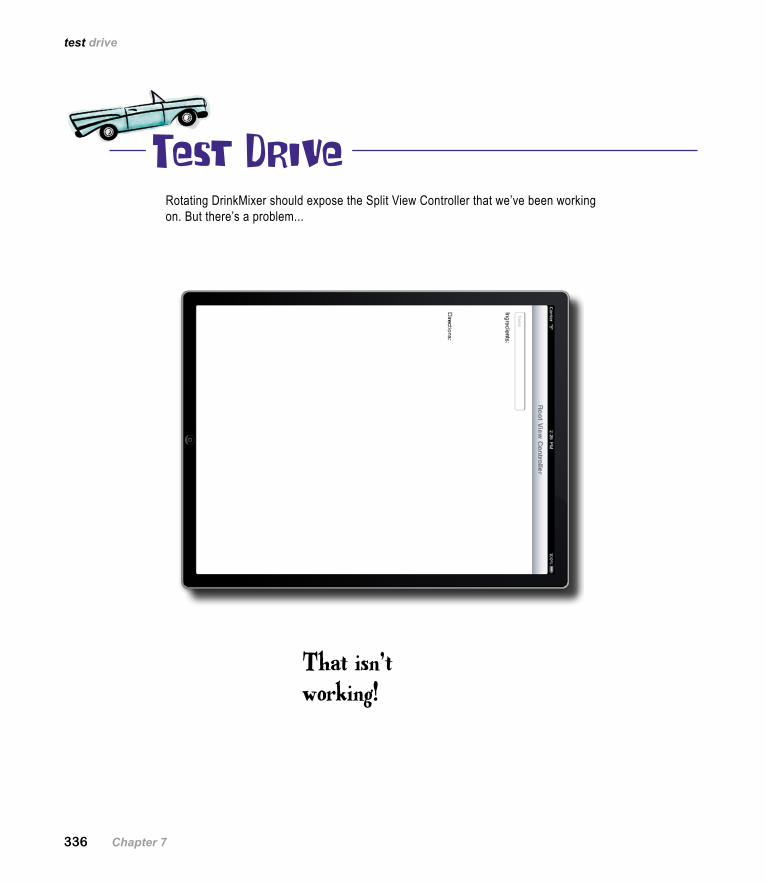
That isn’t working!
Rotating DrinkMixer should expose the Split View Controller that we’ve been working on. But there’s a problem...
test drive

you are here 4 337
migrating to iPad
Rotation is key with iPadAn important part of coding for the iPad is that is has to support all orientations, since Apple is big on there being no wrong way to use an iPad. Users will expect to be able to pick up their iPad any way and have it work. To start supporting all orientations, we need each of our controllers to know that we want to do that.
/*
// Override to allow orientations other than the default portrait orientation.
- (BOOL)shouldAutorotateToInterfaceOrientation:(UIInterfaceOrientation)interfaceOrientation {
// Return YES for supported orientations.
return (interfaceOrientation == UIInterfaceOrientationPortrait);
return YES;}
*/
RootViewController.m DrinkDetailViewController.m
This method is in all your view implementation files, just commented out.
Remove this line and replace it with YES to support all orientations.

338 Chapter 7
Test Drive
Now, push the home key and launch it again.
Now you’re supporting all the orientations, everything is linked, and devices are checked. The split view should be working now...
test drive

you are here 4 339
migrating to iPad
Wait. The app looked OK once it got started, but something weird happened at startup.
We’re not fully supporting rotations yet.The code is all set up to handle a rotation when you’re in the app.
At startup, iPad apps should show a launch image first, while they’re loading, like a splash screen. Apple’s HIG recommends that the image should be your actual initial user interface (minus specific data). Depending on the application, though, some people use actual splash screens.
Once the images are set up, iOS will pick the image that goes with the current orientation and avoid that awkward rotation of the interface that you saw without appropriate launch images.
We have two images you can use for launch images, you just need to download them and drop them in your project.
Go to http://www.headfirstlabs.com/books/hfiphonedev and download the launch images for this chapter.
Select the project in Xcode and scroll down to iPad Deployment Info. Enable all four support device orientations.
Drop the portrait launch image into the Portrait Launch image box and the landscape image into the Landscape Launch Image box. Let Xcode copy both into your project.

340 Chapter 7
We’re just about ready to fully support the launch in any orientation. Here’s what your final resources directory should look like.
In the iPad Deployment Info, you should have all launch orientations selected and the images dropped into Launch Images.
Xcode will have added the images to your project, but notice that it changed the names to Default-<orientation>~ipad.png. This ~ipad notation is standard in iOS and can be used to provide device specific resources.
sharpen solution

you are here 4 341
migrating to iPad
Test DriveNow we’re supporting all the different orientations, right from the beginning. Try stopping it and relaunching in the simulator from landscape. Everything works!

342 Chapter 7
Test DriveWhat if you tap on one of those rows in the horizontal split-view orientation?
Continued...
That’s not right!
test drive

you are here 4 343
migrating to iPad
Your job is to play Detail View Controller and figure out why you’re not displaying the right thing. Look at the code below and see if you
can figure out what’s going wrong...
BE the Detail View Controller
- (void)viewWillAppear:(BOOL)animated {
[super viewWillAppear:animated];
// Setup our UI with the provided drink
self.nameTextField.text = [self.drink objectForKey:NAME_KEY];
self.ingredientsTextView.text = [self.drink objectForKey:INGREDIENTS_KEY];
self.directionsTextView.text = [self.drink objectForKey:DIRECTIONS_KEY];
}
DrinkDetailViewController.m
When does this code actually get called?
When should it get called? What classes are you going to need to update?
What’s the difference here between the iPad and the iPhone?

344 Chapter 7
BE the Detail View ControllerYour job is to play Detail View Controller and figure out why you’re not displaying the right thing. Look at the code below
and see if you can figure out what’s going wrong...
viewWillAppear gets called only when the view gets presented to the user. Not as the user interacts with the view.
The detail view needs to be updated each time the user selects a row.
DrinkDetailViewController, RootViewController
- (void)viewWillAppear:(BOOL)animated {
[super viewWillAppear:animated];
// Setup our UI with the provided drink
self.nameTextField.text = [self.drink objectForKey:NAME_KEY];
self.ingredientsTextView.text = [self.drink objectForKey:INGREDIENTS_KEY];
self.directionsTextView.text = [self.drink objectForKey:DIRECTIONS_KEY];
}
DrinkDetailViewController.m
When does this actually get called?
When should it get called? What classes are you going to need to update?
What’s the difference here between the iPad and the iPhone? That restrained hierarchy thing. The iPhone has to show two different views for the detail view and the root view. Since the views are together for the Split View Controller on the iPad, the view isn’t being presented, but it still has to change.
be the solution

you are here 4 345
migrating to iPad
A persistent view problemWe built things for the iPhone to populate the detail view when it’s about to be displayed. The problem is that with the iPad version, it’s always displayed. What worked well on the iPhone (repopulating the data as the view was presented) doesn’t work well on the iPad, since it will only get one viewWillAppear message—right after the app launches. So what should we do?
The wrong solution would be to duplicate our viewWillAppear code. We’re better developers than that, so we’re going to refactor the code into a new method in the DrinkDetailViewController called refreshView that will repopulate the view when the drink changes (via a drinkChanged method).
Add this!
- (void)viewWillAppear:(BOOL)animated {
[super viewWillAppear:animated];
[self refreshView];
}
- (void)refreshView { // Setup our UI with the provided drink
self.nameTextField.text = [self.drink objectForKey:NAME_KEY];
self.ingredientsTextView.text = [self.drink objectForKey:INGREDIENTS_KEY];
self.directionsTextView.text = [self.drink objectForKey:DIRECTIONS_KEY];
}
- (void)drinkChanged:(NSDictionary *)newDrink {
self.drink = newDrink;
[self refreshView];
}
DrinkDetailViewController.m
This is code that has been pulled from viewWillAppear
-(void) refreshView;
-(void) drinkChanged:(NSDictionary *)newDrink;
@end
DrinkDetailViewController.h
Yeah, we said it. Duplicating
that code would be bad. Not
“maybe not a good idea” or
“for now we can...blah blah”.
It would be BAD. Your code
needs its dignity, too.
Make sure you add a call to
our new refreshView method
in viewWillAppear.
Here’s our new drinkChanged method,
which updates the drink we’re showing,
then delegates to our new method to
update the view.

346 Chapter 7
Don’t forget the tableviewInstead of swapping out the table view when a row is selected, the detail view needs to change and the table view should stay the same—but only for the iPad, not the iPhone.
To fix that problem, we need to split the code, just like we did in our AppDelegate.
What’s the difference here between the iPad and
the iPhone?
That restrained hierarchy thing. The iPhone has
to show two different views for the detail view
and the root view. Since the views are together
for the split view controller on the iPad, the view
isn’t being presented, but it still has to cha
nge.
@class DrinkDetailViewController;@interface RootViewController : UITableViewController {
NSMutableArray *drinks_;
UIBarButtonItem *addButton_;
DrinkDetailViewController *splitViewDetailView_;
}
@property (nonatomic, retain) IBOutlet DrinkDetailViewController *splitViewDetailView;
RootViewController.h
@synthesize drinks=drinks_, addButton=addButton_, splitViewDetailView=splitViewDetailView_;
- (void)dealloc {
[splitViewDetailView_ release];
[drinks_ release];
[addButton_ release];
[super dealloc];
}
RootViewController.h
Add this!
tableview fixing

you are here 4 347
migrating to iPad
Test DriveBefore you build and run, go into Interface Builder and link up the detail view in the split pane to our new split ViewDetailView property on the RootViewController. Now you’re pushing the detail view onto the right-hand side of the pane, while the left-hand side is still showing the table view.
- (void)tableView:(UITableView *)tableView didSelectRowAtIndexPath:(NSIndexPath *)indexPath {
if (!self.editing) {
if (UI_USER_INTERFACE_IDIOM() == UIUserInterfaceIdiomPad) {
[self.splitViewDetailView drinkChanged:[self.drinks objectAtIndex:indexPath.row]];
}
else { DrinkDetailViewController *detailViewController = [[DrinkDetailViewController alloc] initWithNibName:@”DrinkDetailViewController” bundle:nil];
detailViewController.drink = [self.drinks objectAtIndex:indexPath.row];
[self.navigationController pushViewController:detailViewController animated:YES];
[detailViewController release];
} }
else {
AddDrinkViewController *editingDrinkVC = [[AddDrinkViewController
RootViewController.h
We need to check to see if we’re on an iPad, and if so, use the new
drinkChanged method on our detailViewController. If we’re not on an
iPad, just create and push a new detail view controller like before.

348 Chapter 7
Test DriveBuild and run the application. Now you’re pushing the detail view onto the right-hand side of the pane, while the left-hand side is still showing the table view.
Everything’s working! In landscape at least…
test drive
you are here 4 349
migrating to iPad
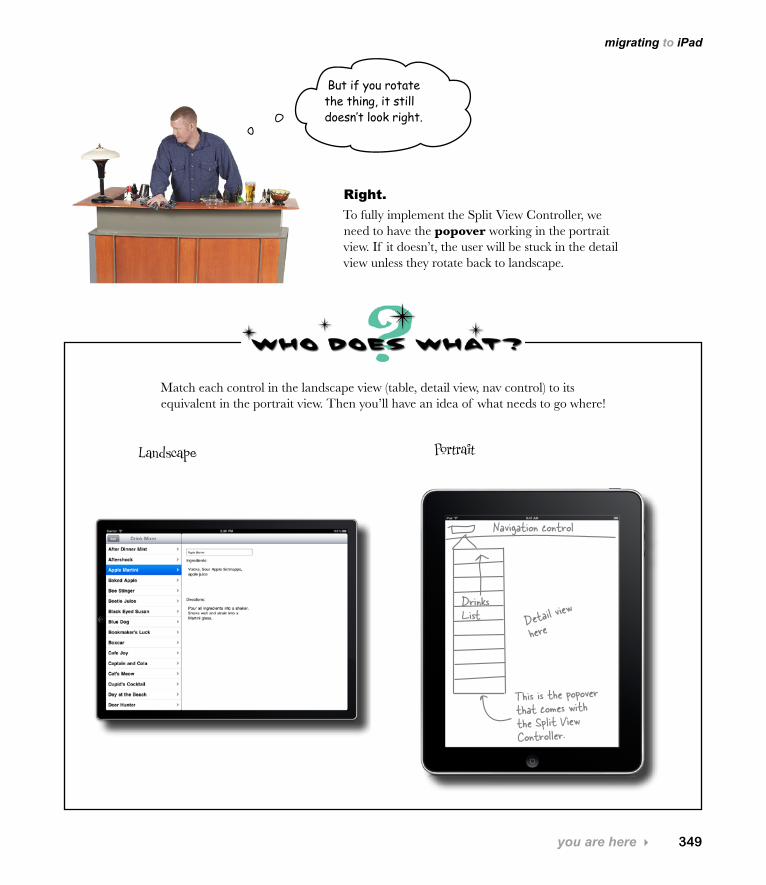
But if you rotate the thing, it still doesn’t look right.
Right.To fully implement the Split View Controller, we need to have the popover working in the portrait view. If it doesn’t, the user will be stuck in the detail view unless they rotate back to landscape.
Detail view
here
This is the popover that comes with the Split View Controller.
Drinks List
Navigation control
PortraitLandscape
Match each control in the landscape view (table, detail view, nav control) to its equivalent in the portrait view. Then you’ll have an idea of what needs to go where!

350 Chapter 7
Present the popover!The UISplitViewController, while awesome, doesn’t do anything except manage the two views inside it. When the iPad is rotated to portrait, the views that we’re working with are the same, just like you saw in the exercise. While DrinkMixer supports the detail view in portrait, we need to enable the other hidden view, the table view. We’ll do this with the popover.
The popover is an iPad exclusive control that is used to present a table view temporarily, just to allow the user to select another detail view and keep working with the data. To manage moving the views around, we need to conform to the UISplitViewController delegate protocol and present the popover. We also need to set up a button to allow the user to access the popover view in the navigation control of the detail view in portrait.
Detail view
here
Drinks List
Navigation control
This button needs to be created, since it doesn’t map to anything specific in landscape. It will present the popover.
Landscape
SOlUTion
who does what solution
Match each control in the landscape view (table, detail view, nav control) to its equivalent in the portrait view. Then you’ll have an idea of what needs to go where!
Portrait

you are here 4 351
migrating to iPad
Add the UIPopoverController to DrinkDetailViewController.h.Create an instance variable named popOver_ and a corresponding property that’s an IBOutlet.
1
Synthesize and dealloc popOver_ in DrinkDetailViewController.m.2
Implement UISplitViewDelegate methods in DrinkDetailViewController.m.Get started based on what you can find in the documentation. We’re going to implement the button in code. If you get stuck, it’s on the next page.
3
Use Xcode to edit the view so that the SplitViewController delegate outlet is connected to our DrinkDetailViewController.You’ll have to open up the iPad main window and expand the Split View Controller to make the connection.
4
Go dive into the documentation and find out about the UISplitViewController delegate protocol. Use that to figure out how to implement the items below.
Note that it’s the DrinkDetailViewController acting as
the Split View Controller’s delegate. That’s the view that’s
visible when we go to portrait, so that’s the view that has
to handle the popover.

352 Chapter 7
Once you’re finished implementing the Split View Controller delegate, it can handle all the information properly in landscape and portrait.
Add the UIPopoverController to DrinkDetailViewController.h.Create an instance variable named popOver_ and a corresponding property that’s an IBOutlet.
1
Synthesize and dealloc popOver_ in DrinkDetailViewController.m.
2
@interface DrinkDetailViewController : UIViewController <UISplitViewControllerDelegate> {
@private
UITextField *nameTextField_;
UITextView *ingredientsTextView_;
UITextView *directionsTextView_;
UIScrollView *scrollView_;
NSDictionary *drink_;
UIPopoverController *popOver_;
}
@property (nonatomic, retain) UIPopoverController *popOver;
DrinkDetailViewController.h
@synthesize drink=drink_, nameTextField=nameTextField_, ingredientsTextView=ingredientsTextView_, directionsTextView=directionsTextView_, scrollView=scrollView_, popOver=popOver_;
- (void)dealloc {
[nameTextField_ release];
[ingredientsTextView_ release];
[directionsTextView_ release];
[scrollView_ release];
[drink_ release];
[popOver_ release]; [super dealloc];
}DrinkDetailViewController.m
long exercise solution

you are here 4 353
migrating to iPad
Implement UISplitViewDelegate methods in DrinkDetailViewController.m.Get started based on what you can find in the documentation. We’re going to implement the button in code. If you get stuck, it’s on the next page.
3
#pragma mark - UISplitViewDelegate methods
- (void)splitViewController:(UISplitViewController *)svc willHideViewController:(UIViewController *)aViewController withBarButtonItem:(UIBarButtonItem *)barButtonItem forPopoverController:(UIPopoverController *)pc {
barButtonItem.title = @”Drinks”;
[self.navigationItem setLeftBarButtonItem:barButtonItem animated:YES];
self.popOver = pc;
}
- (void) splitViewController:(UISplitViewController *)svc willShowViewController:(UIViewController *)aViewController invalidatingBarButtonItem:(UIBarButtonItem *)barButtonItem {
[self.navigationItem setLeftBarButtonItem:nil animated:YES];
self.popOver = nil;
}
DrinkDetailViewController.m
This method will be called by the splitViewController when it has to hide the left-hand view controller. This method gives us a popover controller and button that we can use to show that hidden view when necessary.
This method gets called when the splitViewController can put the left-hand view controller back. We just ditch the button.

354 Chapter 7
Use Xcode to edit the view so that the SplitViewController delegate outlet is talking to the DrinkDetailViewController.You’ll have to open up the iPad main window and expand the Split View Controller to make the connection.
4
Do this!
One last thing—the drinkChanged method needs a quick update.
- (void)drinkChanged:(NSDictionary *)newDrink {
self.drink = newDrink;
[self refreshView];
if (popOver_ != nil) {
[popOver_ dismissPopoverAnimated:YES];
}}
DrinkDetailViewController.mHere we make sure to dismiss our popover if the user selects a new drink.
long exercise solution
you are here 4 355
migrating to iPad
Test Drive
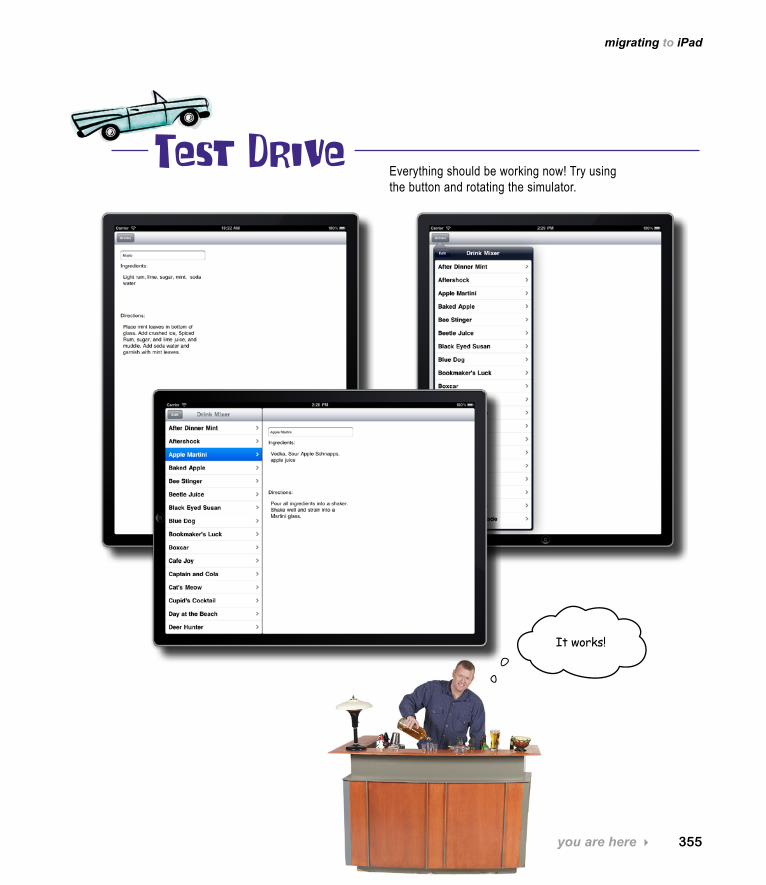
It works!
Everything should be working now! Try using the button and rotating the simulator.

356 Chapter 7
Q: The detail view still doesn’t look all that great. Shouldn’t we fix that?
A: If we were going up on the App Store, yes. In our next iPad app, later in the book, we’re going to focus a lot more on look and feel. For now, we wanted you to get the controls figured out.
Q: When we enabled various launch orientations in Xcode, what did that actually do?
A: If you take a look at your Info.plist in your project, you’ll see that Xcode quietly added an array of enumerations that list the launch orientations you support. The GUI option we used is just a convenience (and new in Xcode 4) for setting those values. iOS looks at your app’s Info.plist to figure out what launch orientations it can use.
Q: You mentioned the ~ipad thing was standard. Standard for what?
A: Before the iPad, launch screens were simply named Default.png, then Default-Portrait.png and Default-Landscape.png. Once the iPad entered the scene, Apple added the concept of ~<device> to filenames. iOS will pick the most appropriate file based on device type. It does something similar with the @2x notation for high-resolution (iPhone 4 Retina display).
Q: Are popovers only used with Split View Controllers?
A: Most definitely not! Popovers are used pretty often in iPad applications. They’re very straightforward to use—they simply wrap a view and you can tell them which control they should appear next to. See the documentation for UIPopoverController for more information.
Q: We really didn’t do much to support the various screen orientations. Is that normal?
A: It really depends on your application. When you edit the size information of a control in Xcode, you can set its Autoresizing properties. With those properties, you can anchor a control to the top, bottom, or sides and control whether it stretches when the view changes size (which is typically due to a rotation). If you’re using roughly the same layout for both landscape and portrait (which we are, minus the table view), you can use Autosizing to get you what you want. For more complicated views, you might hide or show entire controls or resize and re-layout controls depending on the orientation. There are a number of view controller callbacks that will get called while the view is rotating to its new orientation, and in there you can update the size, position, and visibility of your controls if necessary.
Typically, you’ll use view animations here to make sure things transition smoothly.
Q: What happens if I try to use a popover on the iPhone?
A: Very, very bad things. There are controls and features that only exist on a particular device (and within a particular iOS version). When the iPad first came out, you couldn’t even rely on there being a class name UIPopoverController on the iPhone. Now that’s gotten a little simpler, but you must always check that you’re on a particular device or that the device has the feature you are about to use before trying to do it. Depending on what versions of iOS you support, you will also need to check to make sure certain classes exist before doing anything with them. For example, older code will often have the popover reference we added in the detail view controller declared as type “id” since you couldn’t assume the UIPopoverController was a valid type on iPhones. If you support old versions of iOS, you’ll need to do the same. Apple has excellent documentation on writing backward compatible code that you should look into if you’re going to support older versions of iOS.
no dumb questions

you are here 4 357
migrating to iPad
iPad CrossLet’s get the right brain working. Here are some vocab words from your first iPad chapter. Untitled Puzzle
Header Info 1Header Info 2
etc...
1
2
3
4
5 6
7 8
9
10
Across3. ___________ is what you're doing when you implement
code that differs by device7. This control is iPad specific and controls other views.9. These are not just big iphones
10. iPads need to support all ________.
Down1. This control is used only on iPad2. Apps compiled for both iPhone and iPad are4. The Split View Controller keeps track of ________ views5. To implement the popover, you need to add a ________ to
the portrait view.6. This covers UI for iPhone and iPad8. The images display when the app is starting up

358 Chapter 7
iPad Cross SolutionLet’s get the right brain working. Here are some vocab words from your first iPad chapter. Untitled Puzzle
Header Info 1Header Info 2
etc...
P1
U2 OD3 E V I C E C H E C K I N G P
I C4 OV H V
B5 H6 E I EU S7 P L8 I T V I E W C O N T R O L L E RT A G S DT U I9 P A D SO10 R I E N T A T I O N S LN C
H
Across3. ___________ is what you're doing when you implement
code that differs by device [DEVICECHECKING] 7. This control is iPad specific and controls other views.
[SPLITVIEWCONTROLLER] 9. These are not just big iphones [IPADS]
10. iPads need to support all ________. [ORIENTATIONS]
Down1. This control is used only on iPad [POPOVER] 2. Apps compiled for both iPhone and iPad are [UNIVERSAL] 4. The Split View Controller keeps track of ________ views
[CHILD] 5. To implement the popover, you need to add a ________ to
the portrait view. [BUTTON] 6. This covers UI for iPhone and iPad [HIG] 8. The images display when the app is starting up [LAUNCH]
iPad cross solution

you are here 4 359
migrating to iPad
Your iOS Development ToolboxYou’ve got Chapter 7 under your belt and now you’ve added a bunch of iPad
controls to your toolbox.
iPad HIGThere are iPad-specific controls, and some rules differ between iPhone and iPad.The Split View Controller and popovers are iPad-specific controls.
Universal AppsDepending on how you want to distribute your app, you can build two apps or a Universal app. Universal apps are only sold once, but they contain code for both the iPhone and iPad, which makes maintenance easier and the customers happy!
Device CheckingOnce you build a Universal app, you’ll need to check for different devices so your app can behave differently as needed.
Split View ControllerThis controller’s job is to keep track of two child views that are displayed differently in portrait and landscape. Once you set it up properly, you can have a small number of views that display lots of different ways.
CHAP
TER
7