migration guide - pimagroup.com data migration guide.pdf · powerexchange to v8.1.0. document...
TRANSCRIPT

Migration Guide
Informatica PowerExchange®
(Version 8.1.1)
Informatica PowerExchange Migration GuideVersion 8.1.1March 2007
Copyright (c) 2006 Informatica Corporation.All rights reserved. Printed in the USA.
This software and documentation contain proprietary information of Informatica Corporation, they are provided under a license agreement containing restrictions on use and disclosure and is also protected by copyright law. Reverse engineering of the software is prohibited. No part of this document may be reproduced or transmitted in any form, by any means (electronic, photocopying, recording or otherwise) without prior consent of Informatica Corporation.
Use, duplication, or disclosure of the Software by the U.S. Government is subject to the restrictions set forth in the applicable software license agreement as provided in DFARS 227.7202-1(a) and 227.7702-3(a) (1995), DFARS 252.227-7013(c)(1)(ii) (OCT 1988), FAR 12.212(a) (1995), FAR 52.227-19, or FAR 52.227-14 (ALT III), as applicable.
The information in this document is subject to change without notice. If you find any problems in the documentation, please report them to us in writing. Informatica Corporation does not warrant that this documentation is error free.
Informatica, PowerMart, PowerCenter, PowerChannel, PowerConnect, PowerExchange and PowerPlug are trademarks or registered trademarks of Informatica Corporation in the United States and in jurisdictions throughout the world. All other company and product names may be trade names or trademarks of their respective owners.
This product includes software developed by the Apache Software Foundation (http://www.apache.org/). The Apache Software is Copyright © 1999-2004 The Apache Software Foundation. All rights reserved.
DISCLAIMER: Informatica Corporation provides this documentation "as is" without warranty of any kind, either express or implied, including, but not limited to, the implied warranties of non-infringement, merchantability, or use for a particular purpose. The information provided in this documentation may include technical inaccuracies or typographical errors. Informatica could make improvements and/or changes in the products described in this documentation at any time without notice.
Part Number: F-MIG-811-0008
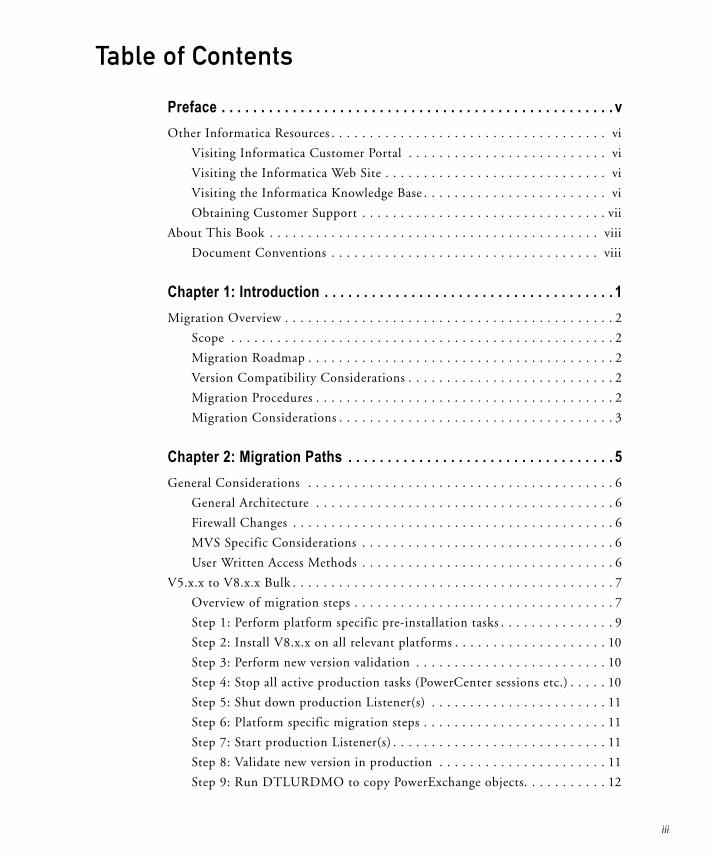
Table of Contents
Preface . . . . . . . . . . . . . . . . . . . . . . . . . . . . . . . . . . . . . . . . . . . . . . . . . . vOther Informatica Resources . . . . . . . . . . . . . . . . . . . . . . . . . . . . . . . . . . . . vi
Visiting Informatica Customer Portal . . . . . . . . . . . . . . . . . . . . . . . . . . vi
Visiting the Informatica Web Site . . . . . . . . . . . . . . . . . . . . . . . . . . . . . vi
Visiting the Informatica Knowledge Base . . . . . . . . . . . . . . . . . . . . . . . . vi
Obtaining Customer Support . . . . . . . . . . . . . . . . . . . . . . . . . . . . . . . . vii
About This Book . . . . . . . . . . . . . . . . . . . . . . . . . . . . . . . . . . . . . . . . . . . viii
Document Conventions . . . . . . . . . . . . . . . . . . . . . . . . . . . . . . . . . . . viii
Chapter 1: Introduction . . . . . . . . . . . . . . . . . . . . . . . . . . . . . . . . . . . . . 1Migration Overview . . . . . . . . . . . . . . . . . . . . . . . . . . . . . . . . . . . . . . . . . . . 2
Scope . . . . . . . . . . . . . . . . . . . . . . . . . . . . . . . . . . . . . . . . . . . . . . . . . . 2
Migration Roadmap . . . . . . . . . . . . . . . . . . . . . . . . . . . . . . . . . . . . . . . . 2
Version Compatibility Considerations . . . . . . . . . . . . . . . . . . . . . . . . . . . 2
Migration Procedures . . . . . . . . . . . . . . . . . . . . . . . . . . . . . . . . . . . . . . . 2
Migration Considerations . . . . . . . . . . . . . . . . . . . . . . . . . . . . . . . . . . . . 3
Chapter 2: Migration Paths . . . . . . . . . . . . . . . . . . . . . . . . . . . . . . . . . . 5General Considerations . . . . . . . . . . . . . . . . . . . . . . . . . . . . . . . . . . . . . . . . 6
General Architecture . . . . . . . . . . . . . . . . . . . . . . . . . . . . . . . . . . . . . . . 6
Firewall Changes . . . . . . . . . . . . . . . . . . . . . . . . . . . . . . . . . . . . . . . . . . 6
MVS Specific Considerations . . . . . . . . . . . . . . . . . . . . . . . . . . . . . . . . . 6
User Written Access Methods . . . . . . . . . . . . . . . . . . . . . . . . . . . . . . . . . 6
V5.x.x to V8.x.x Bulk . . . . . . . . . . . . . . . . . . . . . . . . . . . . . . . . . . . . . . . . . . 7
Overview of migration steps . . . . . . . . . . . . . . . . . . . . . . . . . . . . . . . . . . 7
Step 1: Perform platform specific pre-installation tasks . . . . . . . . . . . . . . . 9
Step 2: Install V8.x.x on all relevant platforms . . . . . . . . . . . . . . . . . . . . 10
Step 3: Perform new version validation . . . . . . . . . . . . . . . . . . . . . . . . . 10
Step 4: Stop all active production tasks (PowerCenter sessions etc.) . . . . . 10
Step 5: Shut down production Listener(s) . . . . . . . . . . . . . . . . . . . . . . . 11
Step 6: Platform specific migration steps . . . . . . . . . . . . . . . . . . . . . . . . 11
Step 7: Start production Listener(s) . . . . . . . . . . . . . . . . . . . . . . . . . . . . 11
Step 8: Validate new version in production . . . . . . . . . . . . . . . . . . . . . . 11
Step 9: Run DTLURDMO to copy PowerExchange objects. . . . . . . . . . . 12
iii
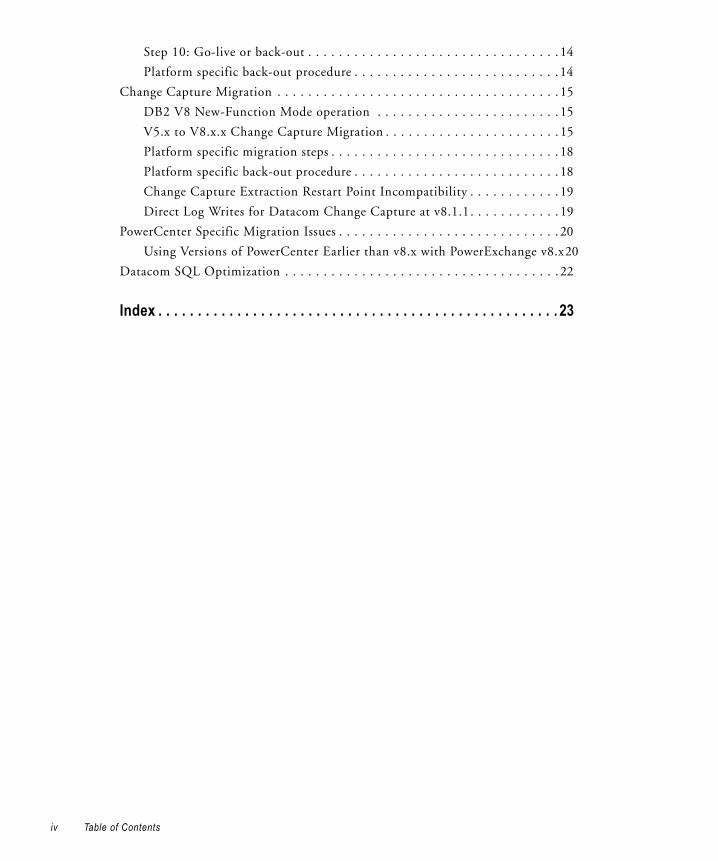
Step 10: Go-live or back-out . . . . . . . . . . . . . . . . . . . . . . . . . . . . . . . . . 14
Platform specific back-out procedure . . . . . . . . . . . . . . . . . . . . . . . . . . . 14
Change Capture Migration . . . . . . . . . . . . . . . . . . . . . . . . . . . . . . . . . . . . . 15
DB2 V8 New-Function Mode operation . . . . . . . . . . . . . . . . . . . . . . . . 15
V5.x to V8.x.x Change Capture Migration . . . . . . . . . . . . . . . . . . . . . . . 15
Platform specific migration steps . . . . . . . . . . . . . . . . . . . . . . . . . . . . . . 18
Platform specific back-out procedure . . . . . . . . . . . . . . . . . . . . . . . . . . . 18
Change Capture Extraction Restart Point Incompatibility . . . . . . . . . . . . 19
Direct Log Writes for Datacom Change Capture at v8.1.1. . . . . . . . . . . . 19
PowerCenter Specific Migration Issues . . . . . . . . . . . . . . . . . . . . . . . . . . . . . 20
Using Versions of PowerCenter Earlier than v8.x with PowerExchange v8.x20
Datacom SQL Optimization . . . . . . . . . . . . . . . . . . . . . . . . . . . . . . . . . . . . 22
Index . . . . . . . . . . . . . . . . . . . . . . . . . . . . . . . . . . . . . . . . . . . . . . . . . . . 23
iv Table of Contents

Preface
PowerExchange Batch provides the extract and apply capability needed to support data
warehouse and migration initiatives. PowerExchange has become the standard in this area, demonstrating excellent performance, scalability, productivity and ease-of-use.
PowerExchange Change provides the ability to capture changes from transactional databases and make them available at pre-determined intervals. This is particularly useful in applications such as Data Warehousing. Rather than providing updates into the data warehouse on a weekly or monthly basis, it is now practical to update on an hourly or daily basis, without overloading the IT infrastructure. PowerExchange Change supports capture of changed data on a wide variety of platforms and databases and does not require a separate set of database tables as a staging area. Changes are available at separate intervals, to different targets, greatly enhancing flexibility and performance. Changes can be presented in condensed form, providing just the net change over the specified interval.
PowerExchange Real-time provides real-time access to changes streamed from transactional databases. PowerExchange Real-time requires no additional programming to complete the integration picture.
Change data captured by PowerExchange Change and PowerExchange Real-time is available to PowerCenter . Changes can be sourced in relational format and can be distributed to message queues or applied to targets via PowerCenter.
v
Other Informatica Resources
In addition to the product manuals, Informatica provides these other resources:
♦ Informatica Customer Portal
♦ Informatica web site
♦ Informatica Knowledge Base
♦ Informatica Global Customer Support
Visiting Informatica Customer PortalAs an Informatica customer, you can access the Informatica Customer Portal site at http://my.informatica.com. The site contains product information, user group information, newsletters, access to the Informatica customer support case management system (ATLAS), the Informatica Knowledge Base, and access to the Informatica user community.
Visiting the Informatica Web SiteYou can access the Informatica corporate web site at http://www.informatica.com. The site contains information about Informatica, its background, upcoming events, and sales offices. You will also find product and partner information. The services area of the site includes important information about technical support, training and education, and implementation services.
Visiting the Informatica Knowledge BaseAs an Informatica customer, you can access the Informatica Knowledge Base at http://my.informatica.com. Use the Knowledge Base to search for documented solutions to known technical issues about Informatica products. You can also find answers to frequently asked questions, technical white papers, and technical tips.
vi Preface
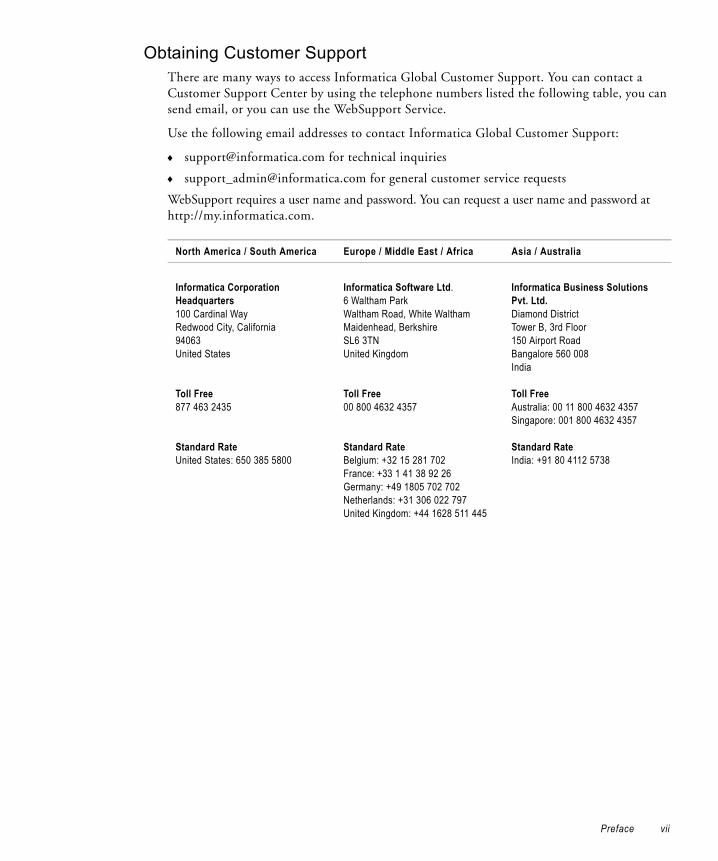
Obtaining Customer SupportThere are many ways to access Informatica Global Customer Support. You can contact a Customer Support Center by using the telephone numbers listed the following table, you can send email, or you can use the WebSupport Service.
Use the following email addresses to contact Informatica Global Customer Support:
♦ [email protected] for technical inquiries
♦ [email protected] for general customer service requests
WebSupport requires a user name and password. You can request a user name and password at http://my.informatica.com.
North America / South America Europe / Middle East / Africa Asia / Australia
Informatica CorporationHeadquarters100 Cardinal WayRedwood City, California 94063United States
Toll Free 877 463 2435
Standard RateUnited States: 650 385 5800
Informatica Software Ltd.6 Waltham ParkWaltham Road, White WalthamMaidenhead, BerkshireSL6 3TNUnited Kingdom
Toll Free 00 800 4632 4357
Standard RateBelgium: +32 15 281 702France: +33 1 41 38 92 26Germany: +49 1805 702 702Netherlands: +31 306 022 797United Kingdom: +44 1628 511 445
Informatica Business SolutionsPvt. Ltd.Diamond DistrictTower B, 3rd Floor150 Airport RoadBangalore 560 008India
Toll Free Australia: 00 11 800 4632 4357Singapore: 001 800 4632 4357
Standard RateIndia: +91 80 4112 5738
Preface vii
About This Book
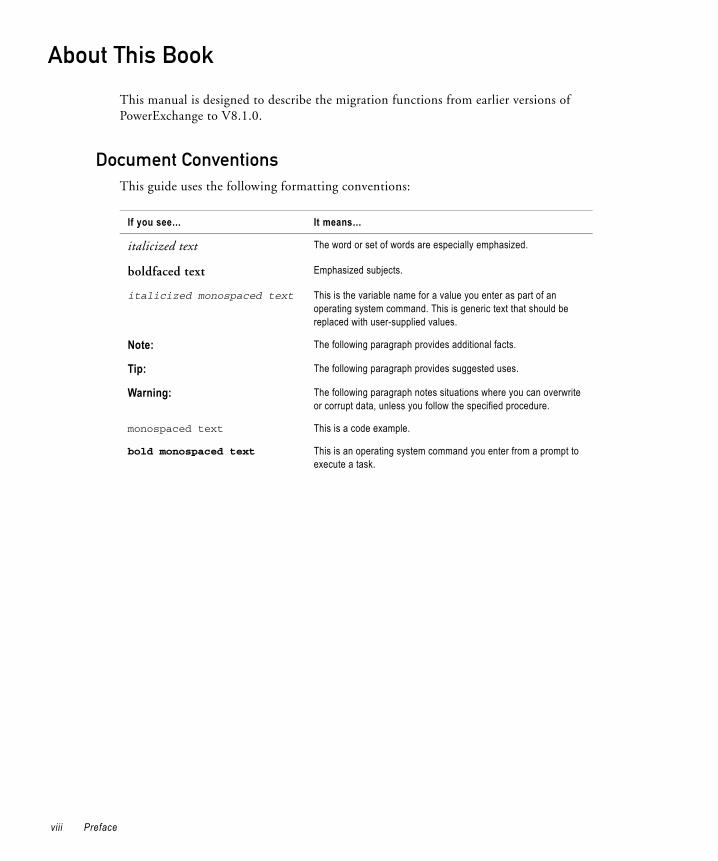
This manual is designed to describe the migration functions from earlier versions of PowerExchange to V8.1.0.
Document ConventionsThis guide uses the following formatting conventions:
If you see… It means…
italicized text The word or set of words are especially emphasized.
boldfaced text Emphasized subjects.
italicized monospaced text This is the variable name for a value you enter as part of an operating system command. This is generic text that should be replaced with user-supplied values.
Note: The following paragraph provides additional facts.
Tip: The following paragraph provides suggested uses.
Warning: The following paragraph notes situations where you can overwrite or corrupt data, unless you follow the specified procedure.
monospaced text This is a code example.
bold monospaced text This is an operating system command you enter from a prompt to execute a task.
viii Preface
C h a p t e r 1
Introduction
This chapter covers the following topics:
♦ Migration Overview, 2
1
Migration Overview
The purpose of this document is to outline recommended procedures for existing PowerExchange customers when migrating to newer releases. In addition to describing the process the document will reference sample jobs and scripts.
ScopeOnly recently supported versions of the product are covered. They are as follows:
♦ PowerExchange V5.2.x
♦ PowerExchange V8.x.x
The above product versions have been packaged as PowerConnect for Mainframe, PowerConnect for Complex Flat Files and PowerConnect for AS/400 when shipped to Informatica customers. Version, 5.2.x and above, have been fully re-branded and shipped as Informatica PowerExchange.
Migration RoadmapThis section lists the migration paths that are supported by the current release of PowerExchange:
♦ PowerExchange V5.2.x Bulk to PowerExchange V8.x.x Bulk
♦ PowerExchange V5.2.x Bulk to PowerExchange V8.x.x Change Capture
Version Compatibility ConsiderationsPowerExchange components are only compatible with other components of the same version and release. One cannot, for example, upgrade PowerExchange client software and expect it to communicate successfully with a PowerExchange Listener running at a previous version.
However it is possible to run several versions of PowerExchange in parallel as long as all communicating components are at the same version.
Migration ProceduresFor migration to Version 8.x the migration process will use the PowerExchange utility DTLURDMO. The traditional upgrade process has been to manually copy files, allowing PowerExchange to update the formats of those files as they are used. When using DTLURDMO any record format changes will be undertaken by the copy utility. In this manual basic copy commands for DTLURDMO will be documented, sufficient to migrate the full environment to the new version. Full functionality of the utility, to only migrate particular data maps or registrations for example, is documented in the PowerExchange Utilities Guide.
2 Chapter 1: Introduction
Migration ConsiderationsAlthough the upgrade process for PowerExchange Bulk is very straightforward, customer policy may dictate that existing test environments are used or new ones prepared for new software versions. Moreover it is Informatica's recommendation that installation and configuration of a new version of PowerExchange is carried out so as not to affect files in an existing PowerExchange production system. The use of brand new target files is strongly advised, especially in a capture environment where logs, archive logs and condense datasets would complicate the procedure greatly. When migration coincides with the adoption of new functionality, for example an additional adapter type or change data capture, it is even more appropriate to use a parallel test environment. However these recommendations should be taken in the context of your own defined software upgrade procedures.
The test environment may be a different library path on the same server or a separate physical server. Ensure that you have license keys authorizing the IP addresses of all servers in the test environment prior to installation of the new version of PowerExchange. Informatica support can provide these keys on a temporary basis or for a longer term at a reduced license fee.
Informatica recommends you identify the current release of the software within the path name or file names of the production install base, whether on the same or separate server to the previous version.
When upgrading PowerExchange Capture environments, complete the Upgrade process it is recommended that the PowerExchange utility DTLURDMO is used to copy the PowerExchange objects.
Note: For users migrating VSAM registrations: If you are upgrading from an earlier release of PowerExchange it must be understood that the format of the registration tags, generated by the registration process, has changed across releases. If a brand new registration is created (rather than copied from a previous registration), then the new format registration tag name will be used rendering any data captured under the old tag name inaccessible. This restriction is for dataset names longer than 27 characters, but the recommendation is to copy registrations from one version to the next rather than recreate.
Migration Overview 3

4 Chapter 1: Introduction
C h a p t e r 2
Migration Paths
This chapter covers the following topics:
♦ General Considerations, 6
♦ V5.x.x to V8.x.x Bulk, 7
♦ Change Capture Migration, 15
♦ PowerCenter Specific Migration Issues, 20
♦ Datacom SQL Optimization, 22
5
General Considerations
General ArchitectureThe first stage of the migration should be to build a structure diagram of the installation to help understand the best way of upgrading the site. This must include an assessment of how the use of PowerExchange has developed, and how in-house written scripts, REXX execs or automation affect the running of the software. It is vital to identify non-standard scripts which, if missed, may run an old version of software.
If there are a number of listeners running you should identify any jobs which may invoke listener to listener conversations. If these are part of the architecture then it will not be possible to upgrade those to different versions at different times. Listeners running at one version will not talk to listeners running at another version.
Identify all PCs upon which PowerExchange Navigator software is installed. Each copy of the Navigator will need to be upgraded. A Navigator can only link to a Listener running at the same version.
Firewall ChangesThe following procedures will discuss the use of different ports for testing. The use of new ports will almost certainly require firewall changes and these should be arranged in advance of the upgrade.
MVS Specific ConsiderationsThe use of aliases may aid the upgrade process. It is recommended that the new version of PowerExchange is installed to new libraries, possibly with the version number of the software in the name to help identification of the version. If aliases are used these can be switched to the new datasets when the new version goes live.
If using new datasets, even with aliases, these will require APF authorisation. In addition security rules should be reviewed for the new installation (RACF, ACF2 etc.). Security rules for PowerExchange are documented in the Product Security chapter of the PowerExchange Reference Manual.
User Written Access MethodsIf upgrading from V510 or earlier versions, any USER access methods which customers have coded themselves must be rebuilt.
If the access methods are written in C, the header dtlamlgi.h must be replaced with dlgif.h to reflect the new interface structure.
6 Chapter 2: Migration Paths
V5.x.x to V8.x.x Bulk
Changes to consider when undertaking this migration are as follows:
♦ The format of the datamap objects has changed. While it is possible to read old datamap objects created using PowerExchange V5.2, any changes to old maps or the creation of new ones will result in the object being written in V8.x.x format. These cannot be read by a V5.x system.
♦ The ODBC interface has changed and the old ODBC driver will need to be removed and the new one added. This process is covered in the PowerExchange Installation Guide.
♦ There are differences in z/OS JCL generated by the V8.x.x version of the z/OS Installation Assistant compared with the old. To simplify future migration and for faster implementation of new features, Informatica recommends use of the new style JCL in the supplied RUNLIB, which should be edited accordingly.
♦ The Navigator "Browser Profile" resources from v5.0 though compatible with V8.x.x are listed as "Personal Metadata". From V5.1.0 onwards the old Browser Profiles will be named Personal Metadata and are compatible.
♦ Command sets are handled differently from V5.1 onwards. Please read the section on the Repository and the section on PowerCenter Mover Command Syntax in the PowerExchange Apply Reference Manual, for Command Set use if these were used in V5.x.
All other changes are new functionality and features documented in the Release Notes for each subsequent version of PowerExchange and, though they may require changes to configuration files to be activated, do allow the product to run with an existing configuration. Refer to the PowerExchange Installation Guide and relevant Adapter Guides for information on implementing new features.
Below is an overview of the steps required to migrate between these versions on all platforms. The time taken for validation of the new version (step 3) may vary significantly depending on the complexity of the PowerExchange configuration.
Overview of migration steps1. Platform specific pre-installation tasks (see section “Step 1: Perform platform specific
pre-installation tasks” on page 9)
2. Install V8.x.x on all relevant platforms (refer to the PowerExchange Installation Guide)
3. Perform new version validation in test
4. Stop all active production tasks (PowerCenter sessions etc.)
5. Shut down production Listener(s)
6. Start V8.x.x listener(s)
7. Perform platform specific migration steps (see section “Step 6: Platform specific migration steps” on page 11)
V5.x.x to V8.x.x Bulk 7
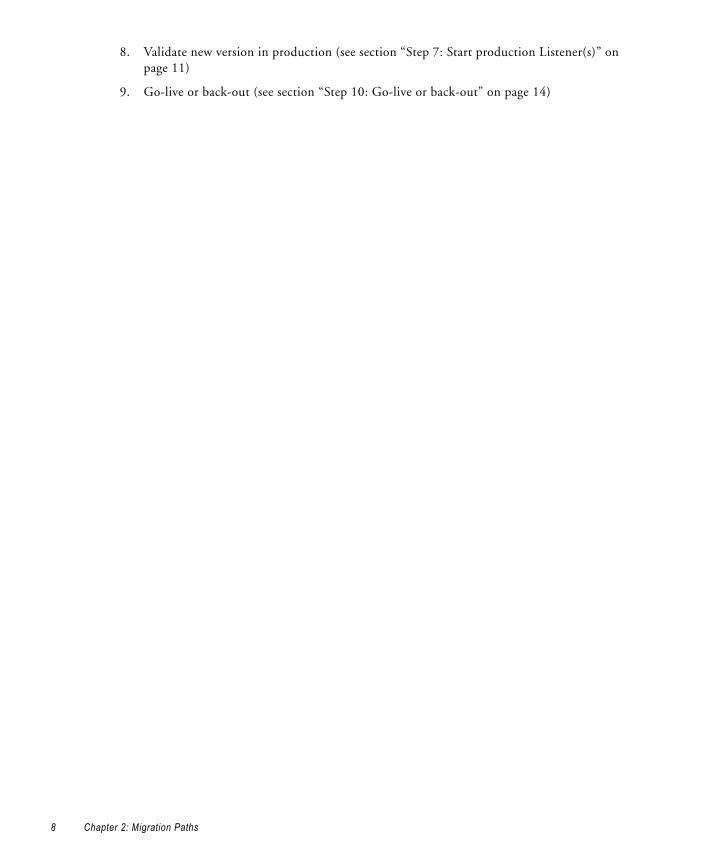
8. Validate new version in production (see section “Step 7: Start production Listener(s)” on page 11)
9. Go-live or back-out (see section “Step 10: Go-live or back-out” on page 14)
8 Chapter 2: Migration Paths
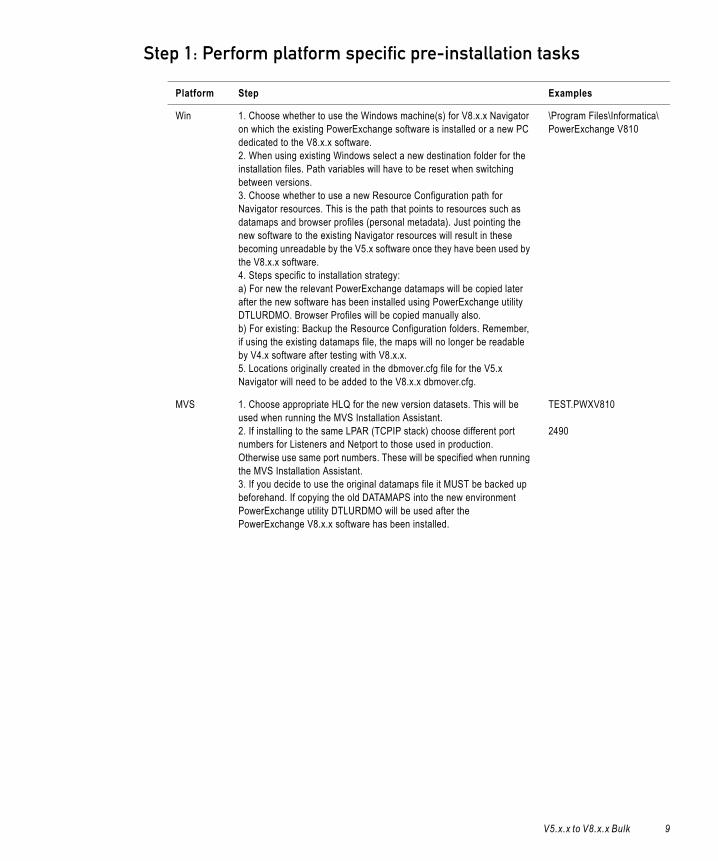
Step 1: Perform platform specific pre-installation tasks
Platform Step Examples
Win 1. Choose whether to use the Windows machine(s) for V8.x.x Navigator on which the existing PowerExchange software is installed or a new PC dedicated to the V8.x.x software.2. When using existing Windows select a new destination folder for the installation files. Path variables will have to be reset when switching between versions.3. Choose whether to use a new Resource Configuration path for Navigator resources. This is the path that points to resources such as datamaps and browser profiles (personal metadata). Just pointing the new software to the existing Navigator resources will result in these becoming unreadable by the V5.x software once they have been used by the V8.x.x software. 4. Steps specific to installation strategy:a) For new the relevant PowerExchange datamaps will be copied later after the new software has been installed using PowerExchange utility DTLURDMO. Browser Profiles will be copied manually also.b) For existing: Backup the Resource Configuration folders. Remember, if using the existing datamaps file, the maps will no longer be readable by V4.x software after testing with V8.x.x.5. Locations originally created in the dbmover.cfg file for the V5.x Navigator will need to be added to the V8.x.x dbmover.cfg.
\Program Files\Informatica\PowerExchange V810
MVS 1. Choose appropriate HLQ for the new version datasets. This will be used when running the MVS Installation Assistant.2. If installing to the same LPAR (TCPIP stack) choose different port numbers for Listeners and Netport to those used in production. Otherwise use same port numbers. These will be specified when running the MVS Installation Assistant.3. If you decide to use the original datamaps file it MUST be backed up beforehand. If copying the old DATAMAPS into the new environment PowerExchange utility DTLURDMO will be used after the PowerExchange V8.x.x software has been installed.
TEST.PWXV810
2490
V5.x.x to V8.x.x Bulk 9
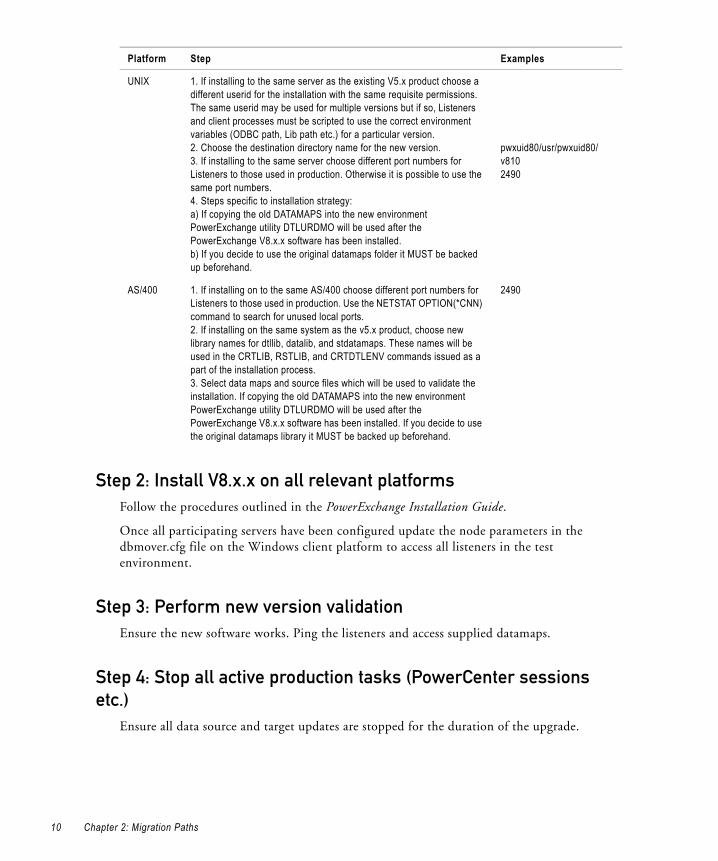
Step 2: Install V8.x.x on all relevant platformsFollow the procedures outlined in the PowerExchange Installation Guide.
Once all participating servers have been configured update the node parameters in the dbmover.cfg file on the Windows client platform to access all listeners in the test environment.
Step 3: Perform new version validationEnsure the new software works. Ping the listeners and access supplied datamaps.
Step 4: Stop all active production tasks (PowerCenter sessions etc.)
Ensure all data source and target updates are stopped for the duration of the upgrade.
UNIX 1. If installing to the same server as the existing V5.x product choose a different userid for the installation with the same requisite permissions. The same userid may be used for multiple versions but if so, Listeners and client processes must be scripted to use the correct environment variables (ODBC path, Lib path etc.) for a particular version.2. Choose the destination directory name for the new version. 3. If installing to the same server choose different port numbers for Listeners to those used in production. Otherwise it is possible to use the same port numbers.4. Steps specific to installation strategy:a) If copying the old DATAMAPS into the new environment PowerExchange utility DTLURDMO will be used after the PowerExchange V8.x.x software has been installed.b) If you decide to use the original datamaps folder it MUST be backed up beforehand.
pwxuid80/usr/pwxuid80/v8102490
AS/400 1. If installing on to the same AS/400 choose different port numbers for Listeners to those used in production. Use the NETSTAT OPTION(*CNN) command to search for unused local ports.2. If installing on the same system as the v5.x product, choose new library names for dtllib, datalib, and stdatamaps. These names will be used in the CRTLIB, RSTLIB, and CRTDTLENV commands issued as a part of the installation process.3. Select data maps and source files which will be used to validate the installation. If copying the old DATAMAPS into the new environment PowerExchange utility DTLURDMO will be used after the PowerExchange V8.x.x software has been installed. If you decide to use the original datamaps library it MUST be backed up beforehand.
2490
Platform Step Examples
10 Chapter 2: Migration Paths
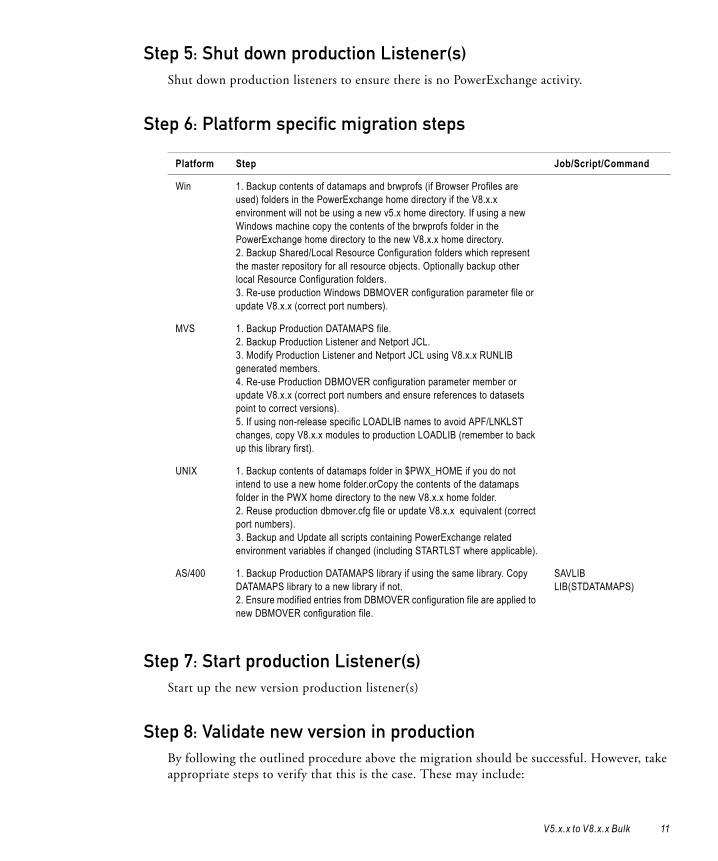
Step 5: Shut down production Listener(s)Shut down production listeners to ensure there is no PowerExchange activity.
Step 6: Platform specific migration steps
Step 7: Start production Listener(s)Start up the new version production listener(s)
Step 8: Validate new version in production By following the outlined procedure above the migration should be successful. However, take appropriate steps to verify that this is the case. These may include:
Platform Step Job/Script/Command
Win 1. Backup contents of datamaps and brwprofs (if Browser Profiles are used) folders in the PowerExchange home directory if the V8.x.x environment will not be using a new v5.x home directory. If using a new Windows machine copy the contents of the brwprofs folder in the PowerExchange home directory to the new V8.x.x home directory.2. Backup Shared/Local Resource Configuration folders which represent the master repository for all resource objects. Optionally backup other local Resource Configuration folders.3. Re-use production Windows DBMOVER configuration parameter file or update V8.x.x (correct port numbers).
MVS 1. Backup Production DATAMAPS file.2. Backup Production Listener and Netport JCL.3. Modify Production Listener and Netport JCL using V8.x.x RUNLIB generated members. 4. Re-use Production DBMOVER configuration parameter member or update V8.x.x (correct port numbers and ensure references to datasets point to correct versions).5. If using non-release specific LOADLIB names to avoid APF/LNKLST changes, copy V8.x.x modules to production LOADLIB (remember to back up this library first).
UNIX 1. Backup contents of datamaps folder in $PWX_HOME if you do not intend to use a new home folder.orCopy the contents of the datamaps folder in the PWX home directory to the new V8.x.x home folder.2. Reuse production dbmover.cfg file or update V8.x.x equivalent (correct port numbers).3. Backup and Update all scripts containing PowerExchange related environment variables if changed (including STARTLST where applicable).
AS/400 1. Backup Production DATAMAPS library if using the same library. Copy DATAMAPS library to a new library if not.2. Ensure modified entries from DBMOVER configuration file are applied to new DBMOVER configuration file.
SAVLIB LIB(STDATAMAPS)
V5.x.x to V8.x.x Bulk 11
♦ Testing communication between clients and all listeners in the production environment with:
dtlrexe prog=ping loc=<nodename>.
♦ Running selected jobs to exercise data access through PowerExchange data maps.
Step 9: Run DTLURDMO to copy PowerExchange objects.At this stage, if PowerExchange is to run against new versions of the PowerExchange objects rather than existing libraries, the datamaps should be copied. To do this use the PowerExchange Copy Utility DTLURDMO. The following section will assume the entire datamap set will be copied. DTLURDMO does have the ability to copy selectively, however, and the full functionality of the utility is documented in the PowerExchange Utilities Guide.
The types of definitions that can be managed with this utility are:
♦ PowerExchange data maps
♦ PowerExchange capture registrations
♦ PowerExchange capture extraction data maps
On MVS the input statements for this utility will be taken from SYSIN.
On non-MVS platforms the input argument will point to a file containing the input definition. If no input argument is provided it will look for a file dtlurdmo.ini in the current path.
The utility runs on all capture platforms.
Windows and Unix Command Line
Syntax
DTLURDMO <dtlurdmo definition file>
For example
DTLURDMO e:\powerexchange\bin\dtlurdmo.ini
DTLURDMO Definition file specification
This file is used to specify how the DTLURDMO utility will operate. If no definition file is specified it will look for a file dtlurdmo.ini in the current path.
MVS DTLURDMO job utilityYou run the utility by submitting the DTLURDMO job which can be found in the RUNLIB library.
DTLURDMO Definition File specification
This file is used to specify how the DTLURDMO utility will operate and will be read from the SYSIN card.
12 Chapter 2: Migration Paths
AS/400 utility
Syntax
CALL PGM(<location and name of DTLURDMO executable file>)
For example
CALL PGM(dtllib/DTLURDMO)
DTLURDMO Definition file specification
This file is used to specify how the DTLURDMO utility will operate. By default the definition is in the member CFG/DTLURDMO in the current datalib library.
If you wish to create a separate DTLURDMO definition file rather than use the default location you must give the library and filename of the definition file as a parameter. For example:
CALL PGM(dtllib/DTLURDMO) parm ('datalib/deffile(dtlurdmo)')
Running DTLURDMOThe utility should be run extracting information from the files locally, then writing out the datamaps through the new PowerExchange V8.x.x Listener. This will cause the datamaps to be written out in the format required for the upgraded PowerExchange. DTLURDMO must be run once for the datamaps, then again for the registrations and then the extract maps if this is a capture environment. Commands for mixed datamaps, registrations and extract maps cannot be run together.
If only a subset of the PowerExchange datamaps, registrations and extract maps are required then selective copies can be carried out. Details of performing selective copies are documented fully in the PowerExchange Utilities Guide. This document assumes that everything will be migrated from the existing environment to the new V8.x.x format.
Definition File Example
The following example shows a definition file to copy all datamaps from the existing local datamaps (the local datamaps are defined in the DATAMAP DD card in the MVS JCL or by the path on Windows or Unix) to the V8.x.x listener (defined by the TARGET location node1):
USER DTLUSR;
EPWD A3156A3623298FDC;
SOURCE LOCAL;
TARGET NODE1;
DETAIL;
REPLACE;
DM_COPY;
SELECT schema=*;
V5.x.x to V8.x.x Bulk 13
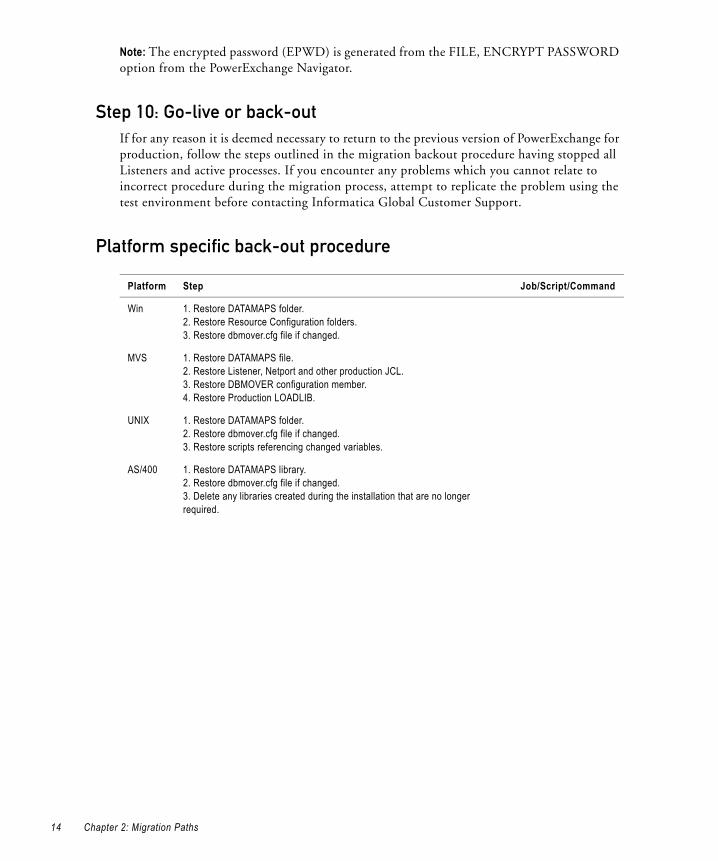
Note: The encrypted password (EPWD) is generated from the FILE, ENCRYPT PASSWORD option from the PowerExchange Navigator.
Step 10: Go-live or back-out If for any reason it is deemed necessary to return to the previous version of PowerExchange for production, follow the steps outlined in the migration backout procedure having stopped all Listeners and active processes. If you encounter any problems which you cannot relate to incorrect procedure during the migration process, attempt to replicate the problem using the test environment before contacting Informatica Global Customer Support.
Platform specific back-out procedure
Platform Step Job/Script/Command
Win 1. Restore DATAMAPS folder.2. Restore Resource Configuration folders.3. Restore dbmover.cfg file if changed.
MVS 1. Restore DATAMAPS file.2. Restore Listener, Netport and other production JCL.3. Restore DBMOVER configuration member.4. Restore Production LOADLIB.
UNIX 1. Restore DATAMAPS folder.2. Restore dbmover.cfg file if changed.3. Restore scripts referencing changed variables.
AS/400 1. Restore DATAMAPS library.2. Restore dbmover.cfg file if changed.3. Delete any libraries created during the installation that are no longer required.
14 Chapter 2: Migration Paths
Change Capture Migration
This step describes the actions required to migrate the change capture environment to a new version of PowerExchange. Before moving to this step it is essential that the relevant migration steps for your PowerExchange bulk environment, documented previously in this chapter, have been completed successfully.
Note: If upgrading an IMS Synchronous capture environment and utilising existing BMC software libraries, check the V8.x.x IMS Adapter Guide for software compatibility versions.
DB2 V8 New-Function Mode operationIn order to properly support DB2 V8 New-Function Mode operation, the DB2 ECCR now includes long table and creator names in the changed data logged to the Logger. This creates a potential compatibility issue during fallback to PowerExchange V5.x releases. Customers running the following PowerExchange versions have the necessary code that will tolerate reading logged change records containing long table and creator names:
♦ PowerExchange V522 Patch 02 with Hot Fix 02
♦ PowerExchange V522 Patch 04
All other V5.x releases of PowerExchange do not contain the toleration code. As such, you MUST NOT capture data for tables with long table or creator name until you no longer plan to fallback from V8.x to a non-tolerating V5.x release.
You can capture data from DB2 V8 running in New-Function Mode without impairing the ability to fallback to any V5.x release of PowerExchange provided the table name and creator name of the tables being captured are no longer than are supported in DB2 V7 (18 characters and 8 characters, respectively).
V5.x to V8.x.x Change Capture MigrationThe recommended migration path, as previously mentioned for PowerExchange Bulk, is to migrate to new libraries. Using the existing logs and condense datasets will complicate any back out procedures greatly and should be avoided if at all possible.
Procedure for migrating to new libraries:
1. Ensure all data captured under the old version of PowerExchange has been processed correctly before proceeding.
2. Prevent further updates to any data requiring capture.
3. Note the name of the existing Registration Groups as displayed in the Navigator.
4. Ensure the V8.x.x PowerExchange Listener is running.
5. Run DTLURDMO to copy capture registrations to the new environment. Procedures for running DTLURDMO to copy datamaps have been covered “Step 9: Run DTLURDMO
Change Capture Migration 15
to copy PowerExchange objects.” on page 12. Sample DTURDMO definition file statements are as follows:
USER DTLUSR;
EPWD A3156A3623298FDC;
SOURCE LOCAL;
TARGET NODE1;
DETAIL;
REPLACE;
REG_COPY;
SELECT dbtype=*;
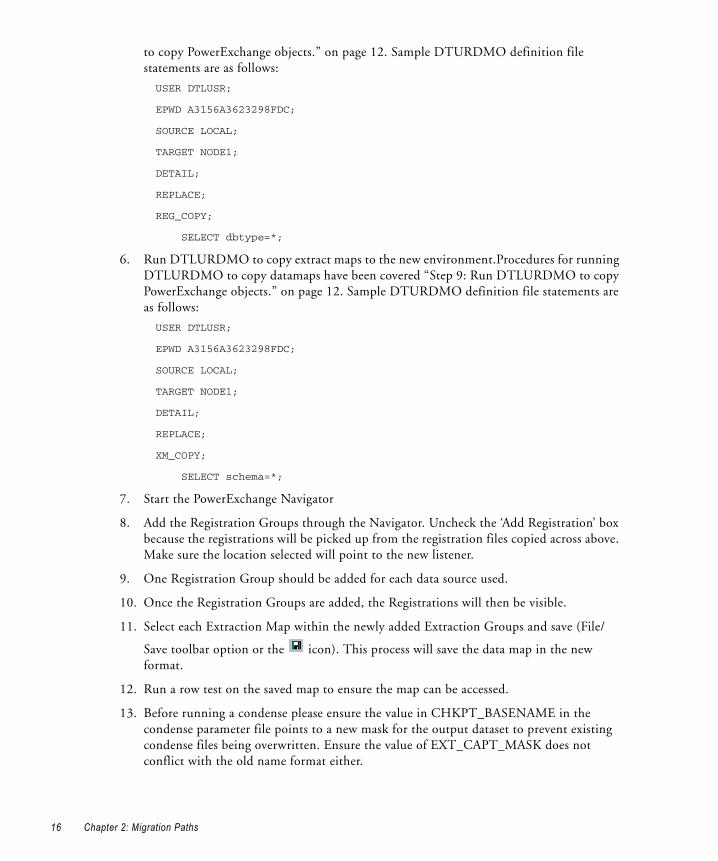
6. Run DTLURDMO to copy extract maps to the new environment.Procedures for running DTLURDMO to copy datamaps have been covered “Step 9: Run DTLURDMO to copy PowerExchange objects.” on page 12. Sample DTURDMO definition file statements are as follows:
USER DTLUSR;
EPWD A3156A3623298FDC;
SOURCE LOCAL;
TARGET NODE1;
DETAIL;
REPLACE;
XM_COPY;
SELECT schema=*;
7. Start the PowerExchange Navigator
8. Add the Registration Groups through the Navigator. Uncheck the ‘Add Registration’ box because the registrations will be picked up from the registration files copied across above. Make sure the location selected will point to the new listener.
9. One Registration Group should be added for each data source used.
10. Once the Registration Groups are added, the Registrations will then be visible.
11. Select each Extraction Map within the newly added Extraction Groups and save (File/
Save toolbar option or the icon). This process will save the data map in the new format.
12. Run a row test on the saved map to ensure the map can be accessed.
13. Before running a condense please ensure the value in CHKPT_BASENAME in the condense parameter file points to a new mask for the output dataset to prevent existing condense files being overwritten. Ensure the value of EXT_CAPT_MASK does not conflict with the old name format either.
16 Chapter 2: Migration Paths
Procedure if using existing libraries:
1. Ensure all data captured under the old version of PowerExchange has been processed correctly before proceeding.
2. Prevent further updates to any data requiring capture.
3. Back up all the existing PowerExchange libraries.
4. Ensure the new listener points to the existing libraries/files.
5. Ensure the Resource Configuration in the new Navigator is directed to the old location for the data maps.
6. Access each Registration Group, saving the individual extraction maps (File/Save toolbar
option or the icon). Remember, once these extraction maps have been saved under PowerExchange V8.x.x they cannot be read by the old PowerExchange software. If it is required to fall-back to the old version of the software these maps will need to be restored.
7. Run a row test on the saved map to ensure the map can be accessed.
Change Capture Migration 17
Platform specific migration steps
Platform specific back-out procedureIf testing has been carried out entirely against new software and new files which have been populated with copied data then fallback be reinstating the old software. If testing was carried
Platform Step Job/Script/Command
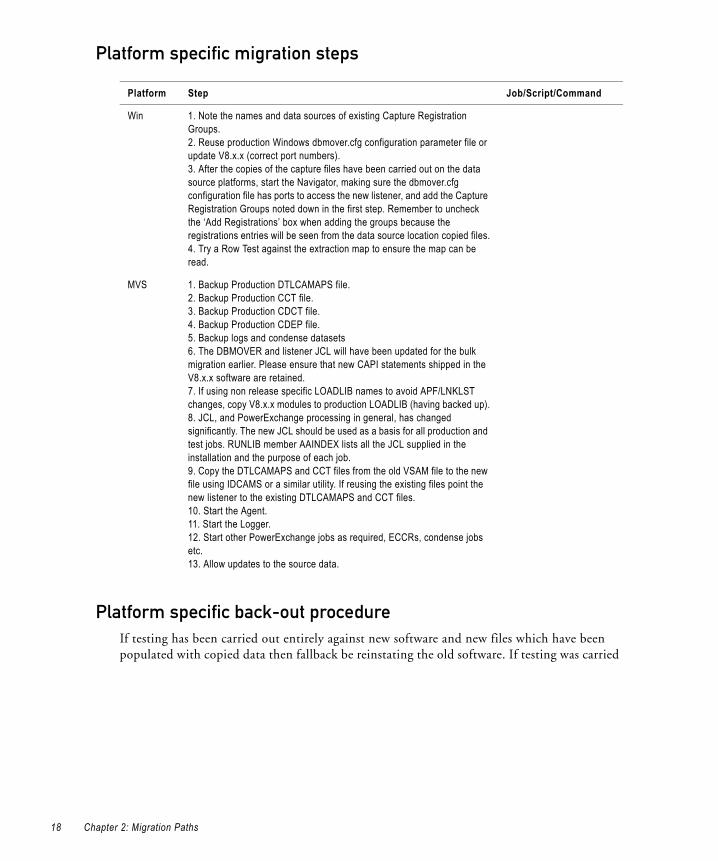
Win 1. Note the names and data sources of existing Capture Registration Groups.2. Reuse production Windows dbmover.cfg configuration parameter file or update V8.x.x (correct port numbers).3. After the copies of the capture files have been carried out on the data source platforms, start the Navigator, making sure the dbmover.cfg configuration file has ports to access the new listener, and add the Capture Registration Groups noted down in the first step. Remember to uncheck the ‘Add Registrations’ box when adding the groups because the registrations entries will be seen from the data source location copied files.4. Try a Row Test against the extraction map to ensure the map can be read.
MVS 1. Backup Production DTLCAMAPS file.2. Backup Production CCT file.3. Backup Production CDCT file.4. Backup Production CDEP file.5. Backup logs and condense datasets6. The DBMOVER and listener JCL will have been updated for the bulk migration earlier. Please ensure that new CAPI statements shipped in the V8.x.x software are retained.7. If using non release specific LOADLIB names to avoid APF/LNKLST changes, copy V8.x.x modules to production LOADLIB (having backed up).8. JCL, and PowerExchange processing in general, has changed significantly. The new JCL should be used as a basis for all production and test jobs. RUNLIB member AAINDEX lists all the JCL supplied in the installation and the purpose of each job.9. Copy the DTLCAMAPS and CCT files from the old VSAM file to the new file using IDCAMS or a similar utility. If reusing the existing files point the new listener to the existing DTLCAMAPS and CCT files.10. Start the Agent.11. Start the Logger.12. Start other PowerExchange jobs as required, ECCRs, condense jobs etc.13. Allow updates to the source data.
18 Chapter 2: Migration Paths
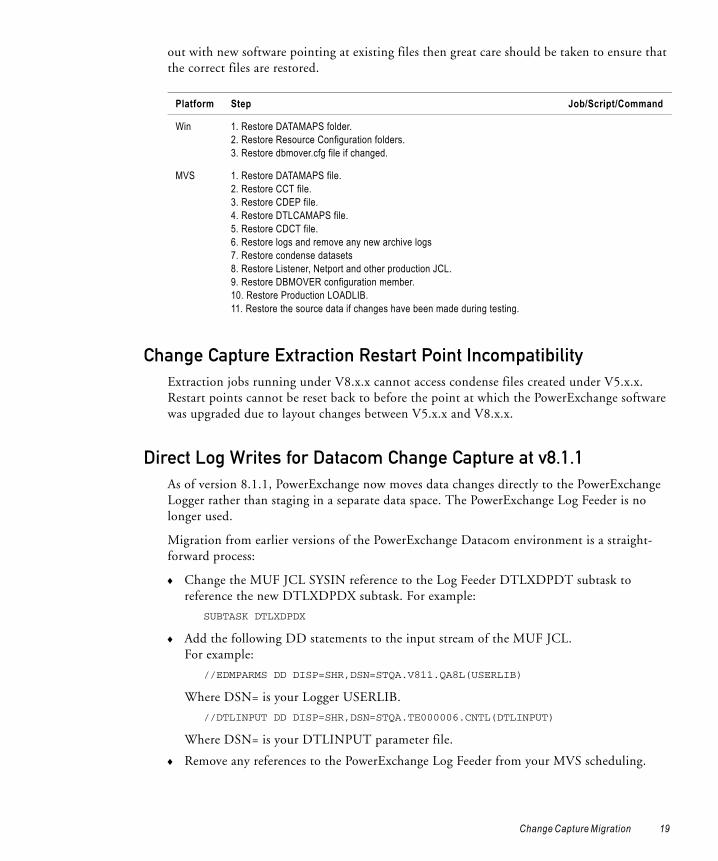
out with new software pointing at existing files then great care should be taken to ensure that the correct files are restored.
Change Capture Extraction Restart Point IncompatibilityExtraction jobs running under V8.x.x cannot access condense files created under V5.x.x. Restart points cannot be reset back to before the point at which the PowerExchange software was upgraded due to layout changes between V5.x.x and V8.x.x.
Direct Log Writes for Datacom Change Capture at v8.1.1As of version 8.1.1, PowerExchange now moves data changes directly to the PowerExchange Logger rather than staging in a separate data space. The PowerExchange Log Feeder is no longer used.
Migration from earlier versions of the PowerExchange Datacom environment is a straight-forward process:
♦ Change the MUF JCL SYSIN reference to the Log Feeder DTLXDPDT subtask to reference the new DTLXDPDX subtask. For example:
SUBTASK DTLXDPDX
♦ Add the following DD statements to the input stream of the MUF JCL.For example:
//EDMPARMS DD DISP=SHR,DSN=STQA.V811.QA8L(USERLIB)
Where DSN= is your Logger USERLIB.
//DTLINPUT DD DISP=SHR,DSN=STQA.TE000006.CNTL(DTLINPUT)
Where DSN= is your DTLINPUT parameter file.
♦ Remove any references to the PowerExchange Log Feeder from your MVS scheduling.
Platform Step Job/Script/Command
Win 1. Restore DATAMAPS folder.2. Restore Resource Configuration folders.3. Restore dbmover.cfg file if changed.
MVS 1. Restore DATAMAPS file.2. Restore CCT file.3. Restore CDEP file.4. Restore DTLCAMAPS file.5. Restore CDCT file.6. Restore logs and remove any new archive logs7. Restore condense datasets8. Restore Listener, Netport and other production JCL.9. Restore DBMOVER configuration member.10. Restore Production LOADLIB.11. Restore the source data if changes have been made during testing.
Change Capture Migration 19
PowerCenter Specific Migration Issues
Users of Informatica PowerCenter must make a configuration change to their POWERMART.INI file when migrating to PowerExchange V8.x.x and greater. Existing implementations will include the following line:
DETAIL=PMODBC.DLL
The following line should be included that can co-exist with the DETAIL= line:
PWX=PMODBC.DLL
A change to the PowerExchange metadata will mean that if the application accesses any PowerExchange metadata, such as DTL__CAPXRESTART1, DTL__CAPXRESTART2, etc., the metadata will need to be imported again.
Using Versions of PowerCenter Earlier than v8.x with PowerExchange v8.x
Running the same version and release of PowerExchange and PowerCenter is the preferred configuration as this provides complete access to all new functionality. However, it is not necessary to upgrade both PowerCenter and PowerExchange to V8.x at the same time. PowerExchange V8.x tolerates versions of PowerCenter earlier thanV8.x as a migration path. There are some restrictions when operating in this toleration environment:
1. ODBC access to PowerExchange from PowerCenter is only guaranteed with supported releases of PowerCenter.
2. PowerExchange Client for PowerCenter (PWXPC) access to PowerExchange from PowerCenter is only guaranteed with PowerCenter V7.1.3 and above.
Note: PowerCenter Server running on HP/UX (32-bit or 64-bit) with PowerExchange V8.1.0 requires a PowerExchange hot fix in order to function correctly. Contact Informatica Support for assistance.
3. The PowerCenter Server bin directory must be before the PowerExchange directory in any path and library path environment variables on the PowerCenter Server platform.
4. The PowerCenter Server bin directory must not be in any path and library path variables used by the PowerExchange Listener.
5. You cannot use location “local” when accessing any PowerExchange source or target through PowerCenter. Instead, you must use access them through a PowerExchange Listener.
PowerExchange and PowerExchange Client for PowerCenter (PWXPC) CoexistenceDifferent versions of PowerExchange and PWXPC can coexist provided that the version and release levels of PowerExchange are equal to or higher than those of PWXPC (PowerCenter).
20 Chapter 2: Migration Paths
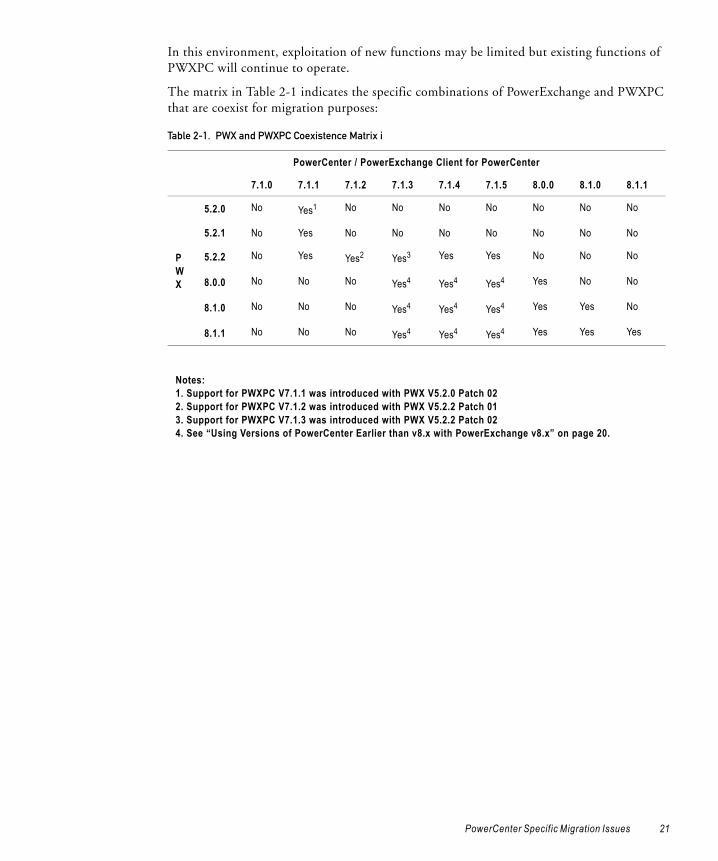
In this environment, exploitation of new functions may be limited but existing functions of PWXPC will continue to operate.
The matrix in Table 2-1 indicates the specific combinations of PowerExchange and PWXPC that are coexist for migration purposes:
Table 2-1. PWX and PWXPC Coexistence Matrix i
PowerCenter / PowerExchange Client for PowerCenter
7.1.0 7.1.1 7.1.2 7.1.3 7.1.4 7.1.5 8.0.0 8.1.0 8.1.1
PWX
5.2.0 No Yes1 No No No No No No No
5.2.1 No Yes No No No No No No No
5.2.2 No Yes Yes2 Yes3 Yes Yes No No No
8.0.0 No No No Yes4 Yes4 Yes4 Yes No No
8.1.0 No No No Yes4 Yes4 Yes4 Yes Yes No
8.1.1 No No No Yes4 Yes4 Yes4 Yes Yes Yes
Notes:1. Support for PWXPC V7.1.1 was introduced with PWX V5.2.0 Patch 022. Support for PWXPC V7.1.2 was introduced with PWX V5.2.2 Patch 013. Support for PWXPC V7.1.3 was introduced with PWX V5.2.2 Patch 024. See “Using Versions of PowerCenter Earlier than v8.x with PowerExchange v8.x” on page 20.
PowerCenter Specific Migration Issues 21
Datacom SQL Optimization
PowerExchange optimizes SQL queries against Datacom data maps by using key indexing. This is applicable to those SQL queries that contain WHERE clauses.
The PowerExchange data map holds the index key information that is used to optimize the SQL query processing.
If you are going to use WHERE clauses in your SQL queries then you must re-generate your existing data maps. You need to go through the data map creation process that you used originally; the extra metadata that is needed to enable indexing optimization will be imported seamlessly.
22 Chapter 2: Migration Paths
I n d e x
AAbout this Book v
Bback-out 14Browser Profile 7
Ddocumentation
conventions viiidtlrexe 12DTLURDMO Definition file 12, 13
IInstall V8.x.x 7, 10
MMigration Considerations 3Migration Overview 2Migration Paths 5
OOverview of migration steps 7
PPersonal Metadata 7ping 12Platform specific migration step 11, 18pre-installation tasks 9
SSyntax
AS/400 13Windows and UNIX 12
VV4.x to V5.1.0 Bulk 6V4.x to V5.2.x Bulk 6V4.x to V8.x.x Bulk 7V5.0.0 to V5.1.0 Bulk 7Validate new version 11
23

Zz/OS JCL 7
24 Index