mike's pacman/ms pacman upright cabinet 60-in-1 upgrade ...4. install the jamma pcb to...
TRANSCRIPT

Your one stop classic coin-op arcade shop
P. O. Box 130, 60 W. Main St, Circleville, UT 84723 Ph: (435) 577-2258
Visit us on the Web at http://www.mikesarcade.com
Email: [email protected]
Mike's Pacman/Ms Pacman Upright
Cabinet 60-in-1 Upgrade Complete Kit
Congratulations on your purchase of our easy to install kit to upgrade your
original Pacman or Ms Pacman upright cabinet to a new Chinese 60-in-1
multigame machine! No need to rewire your cabinet or change out any
parts. Everything needed in this one simple to install kit!
This kit includes everything required to upgrade your Pac / Ms Pac cabinet
to a 60-in-1 machine.
1. New Chinese 60-in-1 iCade JAMMA PCB w/4 PCB Mounting feet
2. New JAMMA PCB to Pacman/Ms Pacman Cabinet Adapter
3. New Switching Power Supply
4. New DC Power supply harness
5. AC power tap cable to tap into monitor power. (Plug and Done)
Tools Required: Philips Screwdriver
Your one stop classic coin-op arcade shop
P. O. Box 130, 60 W. Main St, Circleville, UT 84723 Ph: (435) 577-2258
Visit us on the Web at http://www.mikesarcade.com
Email: [email protected]
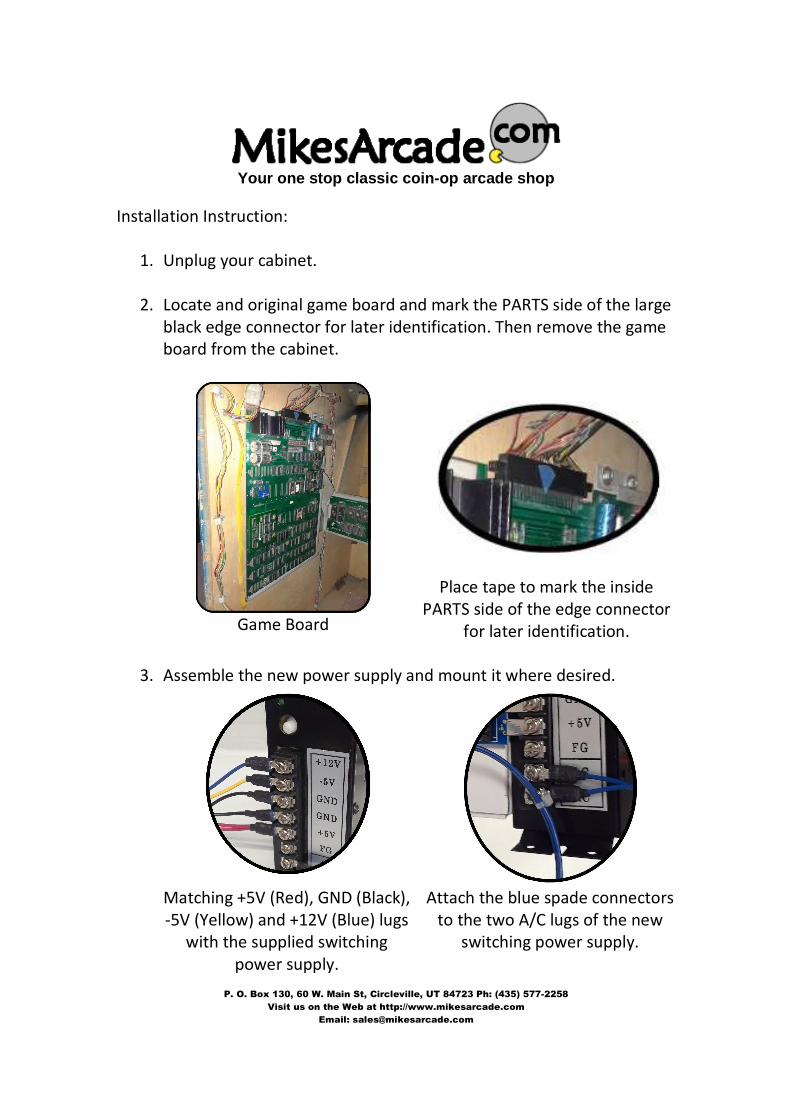
Installation Instruction:
1. Unplug your cabinet.
2. Locate and original game board and mark the PARTS side of the large
black edge connector for later identification. Then remove the game
board from the cabinet.
Game Board
Place tape to mark the inside
PARTS side of the edge connector
for later identification.
3. Assemble the new power supply and mount it where desired.
Matching +5V (Red), GND (Black),
-5V (Yellow) and +12V (Blue) lugs
with the supplied switching
power supply.
Attach the blue spade connectors
to the two A/C lugs of the new
switching power supply.

Your one stop classic coin-op arcade shop
P. O. Box 130, 60 W. Main St, Circleville, UT 84723 Ph: (435) 577-2258
Visit us on the Web at http://www.mikesarcade.com
Email: [email protected]
4. Install the JAMMA PCB to Pacman/Ms Pacman Cabinet Adapter into
the cabinet connector, with the PARTS side facing the inside of the
cabinet.
5. Add the PCB Feet to the 60-in-1 iCade JAMMA PCB, the plug it into
the open end of the adapter.
6. Plug the 6-Pin power connector into the Cabinet adapter.
7. Mount the assembly to the wall of the cabinet using the holes in the
mounting feet.
8. Mount your power supply on the wall anywhere the cables will allow
near the 60-in-1 iCade PCB.
Assembled boards with
6-pin Power connector installed
Full assembly with
power supply mounted

Your one stop classic coin-op arcade shop
P. O. Box 130, 60 W. Main St, Circleville, UT 84723 Ph: (435) 577-2258
Visit us on the Web at http://www.mikesarcade.com
Email: [email protected]
9. Connect A/C power tap between monitor power and supply from the
cabinet.
A/C Monitor Power Connector Power-tap installed
10. Double check your work, and verify all connections.
11. Plug in your Pac cabinet into your power source/wall outlet and play!
12. Done!
Everything will power as normal with no need to turn
on/off multiple power sources.
DISCLAMER: This upgrade has been designed to be used as stated above; however
installing this kit incorrectly can cause serious damage to the installer and the game.
Poor or incorrect wiring can damage your game and or game boards. Use this product at
your own risk. Liability is limited to repair or replacement of the Kit only.