milady's standard cosmetology textbook 2012, 1st...
TRANSCRIPT

Chap
ter
Pedicuring26©
Tom
ek_P
a, 2
010;
use
d un
der l
icen
se fr
om S
hutte
rsto
ck.c
om.
Why Study Pedicuring?
Pedicure Tools
About Pedicures
Disinfection
Procedures
Chapter Outline
Copyright 2011 Cengage Learning. All Rights Reserved. May not be copied, scanned, or duplicated, in whole or in part. Due to electronic rights, some third party content may be suppressed from the eBook and/or eChapter(s).
Editorial review has deemed that any suppressed content does not materially affect the overall learning experience. Cengage Learning reserves the right to remove additional content at any time if subsequent rights restrictions require it.

callus softeners pg. 851
curette pg. 848
exfoliating scrubs pg. 850
foot file (paddle) pg. 849
foot soaks pg. 850
nail rasp pg. 848
pedicure pg. 844
reflexology pg. 858
toe separators pg. 849
toenail clippers pg. 847
Key termsPage number indicates where in the chapter the term is used.
Learning ObjectivesAfter completing this chapter, you will be able to:
LO1 Identify and explain the equipment used when performing pedicures.
LO2Identify and explain three materials used when performing pedicures.
LO3Describe a callus softener and how it is best used.
LO4Explain the differences between a basic and a spa pedicure.
LO5Describe reflexology and its use in pedicuring.
LO6Know why consistent cleaning and disinfection of pedicure baths must be performed.
LO7Know and describe the steps involved in the proper cleaning and disinfecting of whirlpool foot spas and air-jet basins.
LO8Demonstrate the proper procedures for a basic pedicure.
LO9Demonstrate a foot and leg massage.
26Copyright 2011 Cengage Learning. All Rights Reserved. May not be copied, scanned, or duplicated, in whole or in part. Due to electronic rights, some third party content may be suppressed from the eBook and/or eChapter(s).
Editorial review has deemed that any suppressed content does not materially affect the overall learning experience. Cengage Learning reserves the right to remove additional content at any time if subsequent rights restrictions require it.

A pedicure is a cosmetic service performed on the feet by a licensed cosmetologist or nail technician. Pedicures can include exfoliating the skin, reducing calluses and
trimming, shaping, and polishing the toenails. Often pedicures include a foot massage as well. Though pedicures have been performed as foot care since ancient times and in the beauty industry for decades, they were relatively rare even as recently as the late 1980s.
In the 1990s, with the development of the spa industry and new pampering equipment, techniques, and products, pedicures exploded onto service menus and became the fastest-growing service in the industry. Currently pedicures are a regular ritual in many clients’ personal-care regimen. Pedicures are now considered a standard service performed in salons by cosmetologists.
The information in this chapter will provide you with the skills you need to perform beautification and routine care on your clients’ feet, toes, and toenails. Pedicures are now a basic part of good foot care and hygiene and are particularly important for clients who are joggers, dancers, and cosmetologists—or for anyone who spends a lot of time standing on his or her feet.
Pedicures are not merely manicures on the feet. While they are a similar basic service, they require additional precautions, a specific skill set, and more knowledge of chronic illnesses, disorders, and diseases. Pedicures can cause more damage to clients than manicures. For all of these reasons, experts recommend that you become proficient in performing manicures before learning how to perform pedicures.
Pedicures create client loyalty, produce considerable income, and can be important preventive health services for many clients. In short, pedicure services offer something for everyone. Once your clients experience the comfort, relaxation, and value of a great pedicure they will return for more. For these reasons, you would be wise to perfect your pedicure skills while in school.
WHY STUDY PEDICURING?Cosmetologists should study and have a thorough understanding of pedicuring because:
■■ It will enable you to add this very desirable service to your service offerings.
■■ It is important to differentiate between the various pedicure tools and to know how they are properly used.
■■ It will allow you to perform a pedicure safely and correctly.
© K
irill
Zdor
ov, 2
010;
use
d un
der l
icen
se fr
om iS
tock
phot
o.co
m.
26 844 Chapter 26 Pedicur ing Part 5: Nail CareCopyright 2011 Cengage Learning. All Rights Reserved. May not be copied, scanned, or duplicated, in whole or in part. Due to electronic rights, some third party content may be suppressed from the eBook and/or eChapter(s).
Editorial review has deemed that any suppressed content does not materially affect the overall learning experience. Cengage Learning reserves the right to remove additional content at any time if subsequent rights restrictions require it.

Pedicure ToolsIn order to perform pedicures safely, you must learn to work with the tools required for this service and to incorporate all safety, cleaning, and disinfection procedures as written in your state’s regulations. Pedicures include the standard manicure tools plus a few that are specific to the pedicure service. As with manicures, the four types of nail technology tools that you will incorporate into your services include:
• Equipment • Implements
• Materials • Pedicure products
EquipmentEquipment includes all permanent tools, excluding implements, that are used to perform nail services. Some permanent equipment for performing pedicures is different from that used for manicures.
Pedicure Station Pedicure stations include a comfortable chair with an armrest and footrest for the client and an ergonomic chair for the cosmetologist. Designs vary according to several factors, such as the amount of available space, the availability of water in the salon, and cost (Figure 26–1, Figure 26–2, and Figure 26–3).
Pedicure Stool and Footrest Compared with manicures, pedicures make maintaining healthy posture more challenging for the service provider. The cosmetologist’s pedicuring stool is usually low to make it more comfortable and ergonomically correct for the pedicurist to work on the client’s feet. Some stools come with a built-in footrest for the client, making it easier for the stylist to reach the client’s feet. Alternately, a separate footrest can be used. Your chair must be comfortable and allow ergonomically correct positioning (Figure 26–4 and Figure 26–5).
Figure 26–1Comfortable chair and pedicure chair.
Figure 26–2Sturdy pedicure center with removable foot bath and adjustable footrest.
Figure 26–3Fully plumbed station comes with many options.
Figure 26–4Low pedicure chair with back support.
Figure 26–5Pedicure chair with drawers and back support.
© M
ilady
, a p
art o
f Cen
gage
Lea
rnin
g. P
hoto
grap
hy b
y D
ino
Pet
roce
lli.
Cou
rtesy
of E
urop
ean
Touc
h.
Cou
rtesy
of E
urop
ean
Touc
h.
Cou
rtesy
of E
urop
ean
Touc
h.
Cou
rtesy
of E
urop
ean
Touc
h.
26Chapter 26 Pedicur ing 845Part 5: Nail CareCopyright 2011 Cengage Learning. All Rights Reserved. May not be copied, scanned, or duplicated, in whole or in part. Due to electronic rights, some third party content may be suppressed from the eBook and/or eChapter(s).
Editorial review has deemed that any suppressed content does not materially affect the overall learning experience. Cengage Learning reserves the right to remove additional content at any time if subsequent rights restrictions require it.

Pedicure Foot Bath Pedicure foot baths vary in design from the basic stainless steel basin to an automatic whirlpool that warms and massages the client’s feet. The soak bath is filled with comfortably warm water and a product to soak the client’s feet. The bath must be large enough to completely immerse both of the client’s feet comfortably.
Basin soak baths can be large stainless steel bowls or beautiful ceramic ones. Small transportable baths can be purchased from retail stores, beauty supply stores, or industry manufacturers. They must be manually filled and emptied for each client’s service (Figure 26–6).
A step above the portable water baths is the more customized pedicure unit, which has a removable foot bath and the technician’s stool built in. Ergonomically, these units are better for the cosmetologist than sitting on the floor to perform the service. A portable pedicure unit includes a place for the foot bath and a storage area for supplies.
The next step up in cost and ease of use is the portable foot basin with built-in whirlpool-action (Figure 26–7). These baths add an extra touch to the service by gently massaging the feet with the action of the whirlpool. The bath is filled from the sink through attachable hoses. After the service, the bath is drained by pumping the water back into the sink through the attached hoses. They have built-in footrests, and the surrounding cabinet has areas for storage of pedicure supplies.
The ultimate pedicure foot bath is the fully plumbed pedicure chair, sometimes referred to as a throne-design chair. These units
are not portable. They are permanently plumbed to both hot and cold water, as well as to a drain. Most units have a built-in massage feature in the chair and a warmer which adds to the relaxation of the client. Recently, many throne-type chairs with a self-cleaning and disinfection cycle have become available.
Pedicure CartsPedicure carts are designed to keep supplies organized. There are many different designs available that include a hard surface for placement of your implements and in-service supplies, as well as drawers and shelves for storage of implements, supplies, and pedicure products. Some units include a space for storage of the foot bath. Most take up very little space, and they make it much easier to keep the pedicure area organized (Figure 26–8).
Electric Foot Mitts (Optional)These heated mitts, shaped for the feet but similar to electric manicure mitts, are designed to add a special touch to a more-than-basic pedicure. Pedicures that include the use of heated mitts are a higher-cost service, or their use can be an add-on to a lower-cost service. After a foot
Figure 26–6Self-contained foot bath with hose.
Figure 26–7Typical portable foot bath, usually with a whirlpool fan.
Figure 26–8Pedicure cart with drawers.
© C
ourte
sy o
f Eur
opea
n To
uch.
©
Mila
dy, a
par
t of C
enga
ge L
earn
ing.
Pho
togr
aphy
by
Din
o P
etro
celli
.©
Cou
rtesy
of E
urop
ean
Touc
h.
26 846 Chapter 26 Pedicur ing Part 5: Nail CareCopyright 2011 Cengage Learning. All Rights Reserved. May not be copied, scanned, or duplicated, in whole or in part. Due to electronic rights, some third party content may be suppressed from the eBook and/or eChapter(s).
Editorial review has deemed that any suppressed content does not materially affect the overall learning experience. Cengage Learning reserves the right to remove additional content at any time if subsequent rights restrictions require it.

massage, a conditioning lotion or a mask is applied to the feet, and then they are placed in a plastic wrap or cover. Last, the feet are placed inside the warm electric foot mitts.
The warmth provided by the mitts helps the conditioning agents of the mask penetrate more effectively, adds to the comfort of the service, and provides ultimate client relaxation.
Terry Cloth Mitts (Optional) These washable mitts (available for both hands and feet) are placed on a client’s feet after a penetrating conditioning product and a cover have been applied. Terry cloth mitts are routinely used over paraffin and a cover because they hold in the heat provided by the warmed paraffin to encourage the product’s conditioning of the feet or hands.
Paraffin Bath (Optional)As discussed in Chapter 25, Manicuring, paraffin is an especially wonderful treatment in a pedicure (Figure 26–9).
Although many clients, salon and spa owners, and cosmetologists prefer other paraffin application methods, the traditional method is to dip and re-dip the hands and feet three to four times into the larger paraffin bath. The paraffin coating covers the skin, sealing the surface of the skin which promotes deeper penetration of previously applied lotions and masks, creating optimum benefits and results from the products. The paraffin bath also stimulates circulation, and the deep heat helps to reduce inflammation and promote circulation to affected joints. Some unique health precautions must be considered for pedicure clients who are chronically ill. Do not provide the paraffin wax treatment to clients with lesions or abrasions, impaired foot or leg circulation, loss of feeling in their feet or legs, or other diabetes-related problems. The skin of elderly clients may be thinner and more sensitive to heat, so a pre-service wax-patch test must be performed to ensure the client will be comfortable having the treatment. LO1
ImplementsThe implements mentioned in Chapter 25, Manicuring, are used in pedicures also. There are, however, implements that are specific for use in pedicures. Following is a list of these pedicure-specific implements.
Toenail ClippersToenail clippers are larger than fingernail clippers, with curved or straight jaws specifically designed for cutting toenails. When performing a pedicure, use only professional toenail clippers. The best clippers for toenails have jaws that are straight and come to a point. Those with blunt points are difficult to use in the small corners of highly curved nail plates. For your client’s safety, only use high-quality implements made specifically for performing professional pedicures. They will last longer and make cutting toenails easier for you and safer for your clients.
Figure 26–9Paraffin foot bath.
© M
ilady
, a p
art o
f Cen
gage
Lea
rnin
g.
Pho
togr
aphy
by
Yani
k C
hauv
in.
© P
eter
Zijl
stra
, 201
0; u
sed
unde
r lic
ense
from
Shu
tters
tock
.com
.
26Chapter 26 Pedicur ing 847Part 5: Nail CareCopyright 2011 Cengage Learning. All Rights Reserved. May not be copied, scanned, or duplicated, in whole or in part. Due to electronic rights, some third party content may be suppressed from the eBook and/or eChapter(s).
Editorial review has deemed that any suppressed content does not materially affect the overall learning experience. Cengage Learning reserves the right to remove additional content at any time if subsequent rights restrictions require it.

CuretteA curette is a small, scoop-shaped implement used for more efficient removal of debris from the nail folds, eponychium, and hyponychium areas. Curettes are ideal for use around the edges of the big toe nail (Figure 26–10). A double-ended curette, which has a 0.06 inch (1.5 mm) diameter on one end and a 0.1 inch (2.5 mm) diameter on the other, is recommended. Some are made with a small hole, making the curette easier to clean after it has been used.
Curettes require gentle and careful maneuvers to prevent damage to the skin in the nail folds. Never use curettes to cut out tissue or debris that is adhering to living tissues. Cosmetologists must never use curettes with sharp edges because doing so can result in serious injury. Only those with dull or rounded edges are safe and appropriate for use by cosmetologists.
Nail Rasp A nail rasp is a metal implement with a grooved edge used for filing and smoothing the edges of the nail plate. Ask your instructor to demonstrate its use for you, since it is designed to file in one direction. This implement has a filing surface of about ⅛-inch (3.2 mm) wide and about ¾-inch (19 mm) long attached to a straight or angled metal handle (Figure 26–11). The angled file is recommended because it is easier to control under the free edge of the nail.
The file is placed under the nail, angling from the center of the nail out past the side free edge, and then gently pulled toward the center to file free edges that might grow into the tissues, potentially causing an ingrown nail. The filing process may be repeated to make sure there are no rough edges remaining along the free edge. As you become proficient in the use of a nail rasp you will find it to be an invaluable and time-saving implement. Properly used, the nail rasp will add the professional finishing touch required in the care of the toenails. Take special care with this tool and never use it on the top of the nail or past the hyponychium area of the side of the free edge because it can damage the skin and cause infections. Never use it on nails that are already ingrown; refer clients with ingrown toenails to a podiatrist.
Pedicure Nail File For toenails, a medium grit file will work best for shaping, and a fine grit file will work best for finishing and sealing the edges. Some cosmetologists use a metal file on toenails (Figure 26–12). Check with your instructor to find out whether a metal file is legal in your state. Metal files must be either cleaned and then disinfected, or cleaned and then sterilized after each use and before reuse.
Figure 26–10Double-ended curette.
Figure 26–11Nail rasp.
Figure 26–12Metal abrasive file.
© M
ilady
, a p
art o
f Cen
gage
Lea
rnin
g. P
hoto
grap
hy b
y M
icha
el D
zam
an.
26 848 Chapter 26 Pedicur ing Part 5: Nail CareCopyright 2011 Cengage Learning. All Rights Reserved. May not be copied, scanned, or duplicated, in whole or in part. Due to electronic rights, some third party content may be suppressed from the eBook and/or eChapter(s).
Editorial review has deemed that any suppressed content does not materially affect the overall learning experience. Cengage Learning reserves the right to remove additional content at any time if subsequent rights restrictions require it.

Foot File A foot file, also known as paddle, is a large, abrasive file used to smooth and reduce thicker areas of callus (Figure 26–13). Foot files come in many different grits and shapes. They must be properly cleaned and disinfected between each use or disposed of after a single use if they cannot be disinfected.
In general, if an abrasive file cannot survive proper cleaning and disinfection procedures without being rendered unusable, it must be considered single-use and be thrown away or given to the client for home use.
Many reasonably priced foot paddles are available for purchase in bulk for single use in pedicures. Foot paddles with disposable and replaceable abrasive surfaces are also available. The handles of these files must be cleaned and disinfected before reuse. Check with your instructor to find out whether these are legal for use in your state.
Nipper A nipper is an implement used in manicures and pedicures to trim tags of dead skin. Because of the many precautions in performing pedicures, cosmetologists must take great care to avoid cutting, tearing, or ripping living tissue with this implement. Do not use nippers on the feet of clients who have diabetes because the risk of infection, amputation, and even death from accidental injury is great. Also, avoid using nippers on clients with psoriasis since injury to the toenail unit can create new psoriasis lesions where the damage occurs.
MaterialsAll materials mentioned in Chapter 25, Manicuring, are also used in pedicuring. In addition, a few unique materials are used in this service.
Toe Separators Toe separators are made of foam rubber or cotton and are used to keep toes apart while polishing the nails. Toe separators are important for performing a quality pedicure (Figure 26–14). Since toe separators cannotbe cleaned and disinfected, a new set must be used on each client and then thrown away or given to the client for at-home use.
Figure 26–14Toe separators.
CauTioNIt is illegal for cosmetologists to cut or dramatically reduce calluses on clients unless the cosmetologist is working as an assistant under the direct supervision of a physician or podiatrist. Cutting falls under the category of medical treatment and is not a cosmetic service. For cosmetologists in most states, cutting is considered outside the scope of practice and will be determined so in lawsuits. The service technician may have to explain this truth to some clients who are accustomed to these illegal activities in other salons. Simply say, “I’m sorry, but cutting is a medical treatment and we are not allowed to use blades for that reason. We have excellent products and procedures to reduce calluses without dangerously cutting your skin.”
CauTioNIt is especially dangerous to cut into and damage the skin on the feet of immuno-suppressed clients because the healing of their wounds is a slow, sometimes impossible, process. Do not trim cuticles, use metal pushers, or use sharp implements on clients who have any chronic illness. Even a break in the skin that is so tiny it cannot be seen can cause infection, amputation, and even death.
Figure 26–13Foot files for reducing calluses.
© M
ilady
, a p
art o
f Cen
gage
Lea
rnin
g. P
hoto
grap
hy b
y M
icha
el D
zam
an.
26Chapter 26 Pedicur ing 849Part 5: Nail CareCopyright 2011 Cengage Learning. All Rights Reserved. May not be copied, scanned, or duplicated, in whole or in part. Due to electronic rights, some third party content may be suppressed from the eBook and/or eChapter(s).
Editorial review has deemed that any suppressed content does not materially affect the overall learning experience. Cengage Learning reserves the right to remove additional content at any time if subsequent rights restrictions require it.

CauTioNPedicure Slippers Single-use paper or foam slippers are provided for those clients who have not worn open-toed shoes and want to avoid smudging their newly applied toenail polish. They are specially designed not to touch the nails while being worn.
Gloves Cosmetologists must wear gloves while performing pedicures because repeated exposure to pedicure water can cause extreme dryness and cracking on the hands. Gloves also protect cosmetologists from exposure to pathogens that may be present on the feet or in the water. A new set of gloves is worn for each pedicure and then thrown away. If the client or cosmetologist is allergic to latex, nitrile gloves should be worn. (See Chapter 25, Manicuring, for more information.) LO2
Professional Pedicure ProductsProducts for pedicure services include the products discussed in Chapter 25, Manicuring, plus others that are unique to pedicuring. These new product types are:
• Soaks • Scrubs • Masks
• Pedicure lotions and creams • Callus softeners
Foot Soaks Foot soaks are products containing gentle soaps, moisturizers, and other additives that are used in the pedicure bath to cleanse and soften the skin. A good foot soak product is gentle but effective and thoroughly cleans and deodorizes the feet. It is better to use professionally formulated products because they are designed to properly cleanse without being overly harsh to the skin. Other ingredients may include moisturizing oils with aromatherapy qualities. The soak sets the stage for the rest of the pedicure, so be sure to use a high-quality product to start your pedicure service on a good note.
Exfoliating Scrubs These gritty lotions are massaged on the foot and leg to remove dry, flaky skin and reduce calluses. They leave the skin feeling smoother and moisturized. Exfoliating scrubs are usually water-based lotions that contain an abrasive as the exfoliating agent. Sea sand, ground apricot kernels, pumice, quartz crystals, jojoba beads, and polypropylene beads are all exfoliating agents that may be found in pedicure scrubs. Scrubs also contain moisturizers which help to condition the skin. Cosmetologists must wear gloves when using these products as repeated use will irritate the skin on the hands.
No additive that is added to the water during a pedicure soak kills pathogens and replaces your obligation to clean and disinfect the equipment and implements after the pedicure. Any chemical that is strong enough to adequately kill pathogens is not safe for contact with skin. Disinfectants must never be placed in the foot bath with your client’s feet. They can be harmful to the skin.
did you know?Avoid excessively abrasive scrubs since they may leave tiny, invisible scratches on clients’ skin that can be portals of entry for pathogenic microorganisms. Portals of entry are openings in the skin caused by damage during a professional service.
26 850 Chapter 26 Pedicur ing Part 5: Nail CareCopyright 2011 Cengage Learning. All Rights Reserved. May not be copied, scanned, or duplicated, in whole or in part. Due to electronic rights, some third party content may be suppressed from the eBook and/or eChapter(s).
Editorial review has deemed that any suppressed content does not materially affect the overall learning experience. Cengage Learning reserves the right to remove additional content at any time if subsequent rights restrictions require it.

Masks Masks are concentrated treatment products often composed of mineral clays, moisturizing agents, skin softeners, aromatherapy oils, extracts, and other beneficial ingredients to cleanse, exfoliate, tighten, tone, hydrate, and nourish the skin. They are highly valued by clients. Masks are applied to the skin and left in place for five to ten minutes to allow penetration of beneficial ingredients. Menthol, mint, cucumber, and other ingredients are very popular in foot-care masks.
Foot Lotions or Creams Lotions and creams are important to condition and moisturize the skin of the legs and feet, to soften calluses, and to provide slip for massage. They are also formulated as home-care products for maintenance of the service and improvement of the skin. Cosmetologists who work in a podiatry or medical office will be introduced to treatment-level lotions and creams that are associated with the improvement of medical conditions of the feet. Whether you work in a salon, spa, or medical office, get to know your product line well in order to recommend products to aid the client in maintaining the pedicure benefits.
Callus Softeners Professional strength callus softeners are products designed to soften and smooth thickened tissue (calluses). They are applied directly to the client’s heels and over pressure-point calluses. They are left on for a short period of time, according to the manufacturer’s directions. After the product softens the callus, it is more easily reduced and smoothed with files or paddles. LO3
About PedicuresPedicures have become a part of the American lifestyle to the extent that many people get pedicures more often than they have their hair cut. These clients are as choosy about their pedicure as they are about other salon services. As with most beauty procedures, a pedicure is a service that must be practiced and perfected. You must continually search for education and new ideas to keep up with the changes.
See page 86326-1prOCedure The Basic
Pedicure
Choosing Pedicure ProductsMany pedicure products are available, but the most synergistic ones (those designed to work well together) are developed systems or lines.
CauTioNCuticle removers and callus softeners are potentially hazardous to the eyes. For that reason, safety glasses should be worn whenever using or pouring them. Be sure to wear gloves during their use. Used improperly, these products may cause severe irritation to the cosmetologist’s eyes, hands, and skin. Used correctly, they are safe and effective.
© n
ewph
otos
ervi
ce, 2
010;
use
d un
der l
icen
se fr
om S
hutte
rsto
ck.c
om.
26Chapter 26 Pedicur ing 851Part 5: Nail CareCopyright 2011 Cengage Learning. All Rights Reserved. May not be copied, scanned, or duplicated, in whole or in part. Due to electronic rights, some third party content may be suppressed from the eBook and/or eChapter(s).
Editorial review has deemed that any suppressed content does not materially affect the overall learning experience. Cengage Learning reserves the right to remove additional content at any time if subsequent rights restrictions require it.

These products provide the fastest and easiest way to develop an optimal pedicure service. They are available from many manufacturers of professional nail and foot products. Before choosing any one line, check out a variety of product lines, compare them, and then decide for yourself which line is best for your clients.
Always check the quality of the company’s educational support and its commitment to the cosmetologists using its products. Find other cosmetologists who use the products and discuss the quality of the company’s customer service and its shipping competence, and listen closely to their experiences. Look at your research and make the decision based on which company best meets your and your clients’ needs.
When using a manufacturer’s product line, follow its recommendations and suggested procedures, because these methods have been tested and found to enhance the effectiveness of the product line.
Service MenuTailor your foot-care menu of services to meet the lifestyle and requests of your clientele. For example, younger clients will probably love nail art, while the older clients are more likely to enjoy paraffin wax treatments.
Shorter services are great menu expanders. Not all clients will want or need a full pedicure. Some clients may only want or need a professional nail trimming. Others may want a pampering massage appointment between their full pedicure services to relieve tension and stress. Some may only want a polish change. List these additional services on your menu with your full pedicures to provide options for your clients.
Interaction During the ServiceDuring the procedure, discuss with your client the products that are needed to maintain the pedicure between salon visits. However, only talk to clients who wish to have a discussion. Clients who want to drift off should be allowed the peace and tranquility they are seeking. If this is the case, discuss your product recommendations during polishing or when closing the service. Remember to keep your conversations professional; never discuss personal issues.
Pedicure clients are often in the salon to relax and be pampered. Offer them refreshment and suggest they sit back and relax. Then smile and start the service. There should be no distractions, such as phone calls, others talking with the service provider, and so on, for you or the client during the pedicure. In addition to the foot care provided during a pedicure, clients purchase this service because of the relaxation it provides. Distractions prevent this from happening.
To grow your clientele, you must encourage your clients to schedule regular, monthly pedicures. The accepted time between pedicure
did you know?Podiatrists and physicians know that at-risk patients are having, or are interested in having, pedicures. Knowing that these patients are extremely susceptible to infection and that they have poor healing capabilities, many doctors are hiring or referring patients to specially trained pedicure professionals.
These licensed professionals have taken advanced education to learn to perform safe pedicures on at-risk patients. If you are interested in a specialty in nail technology, you might consider becoming an Advanced Nail Technician (ANT). An ANT is a salon-based nail technician who has completed advanced training in how to work safely on at-risk patients. Podiatrists and physicians refer their patients to ANTs for pedicures, feeling confident that the patients will be safe from harm and infection.
Another specialty, the Medical Nail Technician (MNT), may be available for cosmetologists who wish to work in medical offices and who have taken extensive training. These new specialties take nail care to a whole new level and expand professional possibilities for cosmetologists interested in specializing in nail care.
After licensing is achieved, certification courses are usually considered continuing education. They are not licenses.
26 852 Chapter 26 Pedicur ing Part 5: Nail CareCopyright 2011 Cengage Learning. All Rights Reserved. May not be copied, scanned, or duplicated, in whole or in part. Due to electronic rights, some third party content may be suppressed from the eBook and/or eChapter(s).
Editorial review has deemed that any suppressed content does not materially affect the overall learning experience. Cengage Learning reserves the right to remove additional content at any time if subsequent rights restrictions require it.

appointments is generally four weeks because of the slow growth of the toenails. Mention that their feet are in constant use and need routine maintenance. Remind them that proper foot care, through pedicuring, improves both personal appearance and basic foot comfort.
SchedulingWhen scheduling a client for a pedicure over the telephone, warn female clients not to shave their legs within the forty-eight hours before the pedicure. Why? Shaving the legs increases the presence of tiny microscopic abrasions, and shaving within forty-eight hours before a pedicure may allow portals of entry for pathogenic microbes, increasing the risk of stinging, irritation, or infection. This is an important infection control policy.
To help uphold the policy, post a tasteful sign with the same message in the pedicure area, and place it on your service menu and Web site where your pedicures are listed. Then, before you place your client’s feet in the pedicure soak, ask her when she last shaved her legs—if it was within the last forty-eight hours, reschedule the appointment. It is the responsible thing to do. Additionally, when clients are scheduling a pedicure appointment, suggest they wear open-toed shoes or sandals so that polish will not be ruined following the service. Many spas provide single-use pedicure slippers for those who forget to wear open-toed sandals, but a reminder during scheduling is usually appreciated. After all, the appearance of their polish is a priority to most pedicure clients.
It is important to schedule appointments for the proper length of time, and it is important for the technicians to stay on time. Clients dislike waiting, so you should learn the time that it takes to perform individual steps (toenail shortening, cuticle removal, massage, callus reduction) as assigned on the service menu. Then, practice to meet those times. Knowing where you should be in a service at a specific time also helps you start your next client on time. For example, you must be polishing forty-five to fifty minutes after beginning a one-hour pedicure in order to be on time.
The basic pedicure in most salons does not include a leg massage; a spa pedicure usually does. Pedicures that include leg massages are longer, more upscale and more expensive services. Therefore, they require and deserve additional time. The basic pedicure may be forty-five-minutes, but the spa pedicure, with an added mask and leg massage—perhaps even a paraffin wax service—will be much longer, possibly even half an
When you are performing a pedicure, the foot should be grasped between the thumb and fingers at the mid-tarsal area. The thumb is on the bottom of the foot, while the fingers are wrapped around the dorsal side of the foot. This positioning accomplishes two things:
• It locks the foot into place, allowing the cosmetologist control of its movements.
• A gentle though firm grip has a calming effect on the client and overcomes apprehension in those who dislike their feet being touched.
Never hold the foot lightly or loosely as it can cause a ticklish sensation in many people. Most clients will accept and tolerate a firm, comfortable grip on the foot even if they are ticklish.
© G
ubci
o, 2
010;
use
d un
der l
icen
se fr
om iS
tock
phot
o.co
m.
26Chapter 26 Pedicur ing 853Part 5: Nail CareCopyright 2011 Cengage Learning. All Rights Reserved. May not be copied, scanned, or duplicated, in whole or in part. Due to electronic rights, some third party content may be suppressed from the eBook and/or eChapter(s).
Editorial review has deemed that any suppressed content does not materially affect the overall learning experience. Cengage Learning reserves the right to remove additional content at any time if subsequent rights restrictions require it.
hour longer, depending upon the additional services and how luxurious they might be. Do not cram too much into a pedicure or the experience will not be relaxing for your client or enjoyable for you as a service provider. Rushing through a pedicure may even cause you backaches.
If you time your services appropriately, clients will believe they are receiving better services. As a result, they will be willing to pay what you deserve to receive.
Sometimes when a client books a standard pedicure, his or her feet will be in bad condition requiring more time than was scheduled. When you are completing the client consultation and evaluating the client’s feet, you will know quite quickly if this is the case. You must tell this client that you will do the best you can in the time allotted, but he or she must schedule another pedicure very soon in order to get the feet into a condition the client will enjoy. Since clients generally know when they have problem feet, they probably will not be surprised at the need for another appointment and further work. Do not work beyond your scheduled time.
By sticking to the appointment time allotted, you will not only be preserving your schedule, you will also be protecting the client. If the client’s feet are in bad shape and you work as long as is necessary to get them in optimal condition in only one service, they may become irritated or painful. The best option is to sell the client home-care products to improve the condition of the feet and schedule another service within one or two weeks.
Series PedicuresSome improvements in the feet require more than one appointment, this is referred to as a series. A situation that may require a series of appointments is callus reduction. When a client comes in with heavy
calluses never use a blade. Not only are blades dangerous and a potential cause of infection, but their use is against the law in most states. Using a blade also stimulates heavier growth of calluses as the skin attempts to grow back quickly to protect the damaged skin.
To reduce calluses during a pedicure and to maintain their reduction, perform a safe
amount of exfoliation with a scrub. Apply the new, more effective callus reduction products
on them and use the foot paddle to remove a safe amount of callus. Explain to the client the negatives
regarding rushed removal of calluses. Explain that weekly callus reduction appointments for four to six weeks will
lower the calluses and that after that series, the client can receive maintenance pedicures less frequently, about once a month.
© A
rtbox
, 201
0; u
sed
unde
r lic
ense
from
Shu
tters
tock
.com
.
26 854 Chapter 26 Pedicur ing Part 5: Nail CareCopyright 2011 Cengage Learning. All Rights Reserved. May not be copied, scanned, or duplicated, in whole or in part. Due to electronic rights, some third party content may be suppressed from the eBook and/or eChapter(s).
Editorial review has deemed that any suppressed content does not materially affect the overall learning experience. Cengage Learning reserves the right to remove additional content at any time if subsequent rights restrictions require it.

During the series appointments, a full pedicure is not performed between the monthly pedicures; the callus reduction appointment is merely a weekly soak, application of the reduction product for a set time (usually five minutes), reasonable callus reduction, and application of a lotion. It takes about half an hour and should be a less expensive service than an entire pedicure.
At the four-week appointment, a full pedicure is performed with treatments following again. Some clients will require more than the six weeks for a callus reduction series, and this should be explained when the series is suggested. The client can also be sold a glycolic or lactic acid hand and body lotion to use on the feet every other day, and daily use of a lotion containing DMU (Dimethyl urea hardners) should be recommended to soften and prevent the scaly condition from returning. A foot paddle can also be sold to the client for use after showers between treatment appointments. Gloves must be worn during these services.
Another condition that can require weekly treatment is scaly feet. First, however, the client must be sent to a podiatrist to define whether the scaly condition is caused by a fungus. If no fungus is present, the client can return weekly for three to six weeks for a foot exfoliation treatment that includes scrubs and a callus reduction treatment, such as a mask. Remember that masks should be applied all over the feet for one to three minutes, but no longer. These treatments are designed so that the client will have beautiful feet when the series is finished. Home-care products must be recommended to maintain the improved condition.
Spa PedicureThe pedicure described in Procedure 26–1, The Basic Pedicure, is the basis for all other pedicure services. For example, in the basic pedicure, the massage is performed on the foot only, while in the upgrade to a spa pedicure, the massage is performed on the foot and the lower leg (to the knee).
Another spa pedicure upgrade is the use of a mask on the foot and/or leg. The mask is applied, covered, and allowed to set while the client relaxes and the mask’s effectiveness increases. A further upgrade would
did you know?Most salons will have a protocol to follow when finishing services. Follow them closely for two reasons. First, a routine keeps things moving in the salon, and second, clients get used to the closing protocol and know what to expect. If your salon does not have a post-service protocol, or if you work alone, establish one. Clients are more comfortable with a familiar routine.
© M
agda
lena
Buj
ak, 2
010;
use
d un
der l
icen
se fr
om S
hutte
rsto
ck.c
om.
26Chapter 26 Pedicur ing 855Part 5: Nail CareCopyright 2011 Cengage Learning. All Rights Reserved. May not be copied, scanned, or duplicated, in whole or in part. Due to electronic rights, some third party content may be suppressed from the eBook and/or eChapter(s).
Editorial review has deemed that any suppressed content does not materially affect the overall learning experience. Cengage Learning reserves the right to remove additional content at any time if subsequent rights restrictions require it.

be the incorporation of special products such as aromatherapy lotions, oils, paraffin, and other specialty products. LO4
Elderly Clients Older people need regular, year-round foot care even more than younger people. Many elderly people cannot reach their feet, cannot see them, or cannot squeeze the nail clippers to trim their own nails. They need continual help in their foot-care maintenance, especially since it can become a health issue. The cosmetologist who offers pedicure services for this segment of the population will be doing these individuals a great service and will find plenty of willing clients in need of their services.
Many of these clients have health issues that require exceptionally gentle care. Never cut their tissues or push back the eponychium as even a microscopic opening, or microtrauma, can be fatal for these clients. Discuss health issues with them; do not perform pedicures on diabetics or on people with circulatory diseases without their physician’s permission. Seek training in how to work with these clients, so you will know how to work safely on them.
Pedicure PricingMost salons and spas will probably have a price list for services before you join the staff, but you may at some time find yourself in a position to price your own services. In this case, determine the price of your basic pedicure first, and then set your prices for more upscale and luxurious pedicures by increasing the base price of the pedicure according to the value of the added treatments, products, and extra time.
Another great way to upgrade your pedicure service and price is through nail art. Many clients enjoy adding a little something special to their normal pedicure polish, especially if their work prohibits them from wearing polish or art on their hands. It is easy to get your clients
addicted to toenail art by giving the first example at no cost. Once they have it and their friends compliment them, they will want it every time, and you will quickly see an increase in revenue with your existing clientele (Figure 26–15). Toenail art is especially popular in sandal season and for formal occasions when women often wear open footwear.
Many salons and spas have found that manicure and pedicure packages are well received by their clients and work well for the staff. Manicures and pedicures together are like salt and pepper—although they are different, they go well together.
■Figure 26–15Gel toe art.
You should charge extra for add-on services such as paraffin wax treatments and nail art. Services have dollar value—especially when you consider the time, product expense, skill level, and equipment used. Always be up front about additional service costs, and if a client decides to indulge in one, charge for it.
Business Tip
© C
ourte
sy o
f Nob
le N
ails
by
Loui
se C
alla
way
.
26 856 Chapter 26 Pedicur ing Part 5: Nail CareCopyright 2011 Cengage Learning. All Rights Reserved. May not be copied, scanned, or duplicated, in whole or in part. Due to electronic rights, some third party content may be suppressed from the eBook and/or eChapter(s).
Editorial review has deemed that any suppressed content does not materially affect the overall learning experience. Cengage Learning reserves the right to remove additional content at any time if subsequent rights restrictions require it.

One great way to sell these packages is to develop theme services for holidays and special events, such as Christmas, Valentine’s Day, Mother’s Day, prom, weddings, and birthday packages; market them, and you will see your clientele grow.
Pedicure MassageAccording to post-visit client salon surveys, massage is the most enjoyed aspect of any nail service. Because this is especially true for pedicures, you should spend time developing a technique that you will enjoy giving and that your clients will enjoy receiving.
The definition of massage, according to the Merriam-Webster Dictionary, is “a method of manipulation of the body by rubbing, pinching, kneading, tapping.” General body massage sometimes has a therapeutic purpose and sometimes focuses on relaxation. However, massage given during manicures and pedicures definitely focuses on relaxation.
The art of massage has a rich and long history. There are many types of massage, and individuals usually develop their own special styles and techniques. No matter what techniques you use, perfect them so foot and leg massage becomes second nature to you. During this part of the pedicure, be keenly aware of your client’s health, meet any precautionary requirements, and offer a massage that relaxes the client but is not harmful to him or her.
The foot and leg massage is similar to the hand and arm massage that follows a manicure. The massage technique that is used most is effleurage. This technique is even more important for pedicures than manicures because many clients have circulatory issues that may prevent you from using other massage techniques. During consultation, you must ask clients questions concerning their health. If clients have a circulatory disease, high blood pressure, or other chronic diseases that affect their legs or feet, you must get permission from their physician before providing a full spa pedicure massage.
Most of us enjoy being touched, and the art of massage takes a pedicure to a higher level. Many people think foot massage is more special than
© V
ladG
avril
off,
2010
; use
d un
der l
icen
se fr
om S
hutte
rsto
ck.c
om.
26Chapter 26 Pedicur ing 857Part 5: Nail CareCopyright 2011 Cengage Learning. All Rights Reserved. May not be copied, scanned, or duplicated, in whole or in part. Due to electronic rights, some third party content may be suppressed from the eBook and/or eChapter(s).
Editorial review has deemed that any suppressed content does not materially affect the overall learning experience. Cengage Learning reserves the right to remove additional content at any time if subsequent rights restrictions require it.

massage on any other part of the body. Foot massage induces a high degree of relaxation and stimulates blood flow. Be aware of the areas of the feet and legs where the client most enjoys massage, and put a greater emphasis in these areas.
Every cosmetologist has his or her own massage style and technique. No matter what you define as yours, perfect it so that it becomes second nature to you.
See page 86726-2prOCedure Foot and Leg
Massage
ReflexologyReflexology is a unique method of applying pressure with thumb and index fingers to the hands and feet, and it has demonstrated health benefits. This specialty massage often employs many of the principles of acupressure and acupuncture, and it is considered a science by many technicians.
Reflexology is based on the principle that areas (reflexes) in the feet and hands correspond to all the organs, glands, and parts of the body. Reflexology practitioners believe that stimulating (pressing) these reflexes or points can transmit positive energy and increase blood flow to the specified areas.
Professional, hands-on training is essential in reflexology for two reasons:
• The specific touch used in reflexology can be learned only through hands-on training. Clients who have received a reflexology treatment from a certified expert recognize the appropriate touch and respond negatively to people who attempt reflexology but cannot deliver the same treatment because of minimal or no training.
• An untrained cosmetologist may not be able to produce results for the client, so the client will not be happy about the extra cost and time taken by the service.
If a salon wishes to offer reflexology services, the staff who will perform the services must receive authentic training and certification in the art of reflexology. LO5
ErgonomicsPedicures can pose a threat to the health and well-being of cosmetologists who perform them. If technicians are careless about protecting themselves through proper ergonomics, they can develop serious and painful back conditions.
Pay attention to your body’s positioning and make sure you are working ergonomically. Always sit in a comfortable position, relaxed and unstrained, to reduce the risk of injury to your back, shoulders, arms, wrists, and hands. For example, avoid leaning forward or stretching to
© S
mar
t-fot
o, 2
010;
use
d un
der l
icen
se fr
om S
hutte
rsto
ck.c
om.
26 858 Chapter 26 Pedicur ing Part 5: Nail CareCopyright 2011 Cengage Learning. All Rights Reserved. May not be copied, scanned, or duplicated, in whole or in part. Due to electronic rights, some third party content may be suppressed from the eBook and/or eChapter(s).
Editorial review has deemed that any suppressed content does not materially affect the overall learning experience. Cengage Learning reserves the right to remove additional content at any time if subsequent rights restrictions require it.

reach your client’s feet. Take a minute to stretch before and after each pedicure to keep your body limber, in-line, and more resistant to injury.
Although it is important to give your client the best possible service, it is also important to keep yourself healthy during the process and to avoid injuries caused by strain or repeated motion.
Disinfection Disinfection of the pedicure bath has been discussed and sensationalized in the media—and for good reason. There are specific criteria and steps that must be followed exactly to ensure proper disinfection and infection control. Improper, rushed, or careless cleaning of the pedicure bath may lead to health and safety concerns for salon clients. The salon and the individual technician bear the responsibility for ensuring that proper disinfection occurs and that proper procedures are followed.
The following cleaning and disinfecting procedures are recommended for all types of pedicure equipment by the Nail Manufacturer’s Council (NMC), a group of nail-care company representatives, and the International Nail Technicians Association (INTO), a group of professional nail technicians:
• whirlpool units • air-jet basins
• pipe-less and all non-whirlpool basins • sinks
• bowls • tubs
In addition, salons must always use an EPA-registered hospital disinfectant that the label claims is a broad spectrum bactericide, virucide, and fungicide. For accountability purposes, most states require salons to record the time and date of each disinfecting procedure in a pedicure or a disinfection log.
Salon teams should incorporate the disinfection procedures discussed in Chapter 5, Infection Control: Principles and Practices, as well as those on the following pages, into their regular cleaning and disinfecting schedules. These procedures should be displayed in employee areas. Always check your state regulations concerning the required disinfection protocol. LO6
Disinfection of Whirlpool Foot Spas and Air-Jet Basins
After Every Client:1. Drain all water from the basin.
2. Scrub all visible residue from the inside walls of the basin with a brush and liquid soap and water. Use a clean and disinfected brush with a handle. Brushes must be cleaned and disinfected after each use.
3. Rinse the basin with clean water.
For more information concerning disinfection and other important topics pertaining to nails, go to http://www.probeauty.org /research. this site contains many informational brochures, relevant to manicuring and pedicuring. the brochures which are published in several languages, including Vietnamese and Spanish, are written by the leading scientists and technical experts in the industry, and are reviewed by other industry leaders before being published.
26Chapter 26 Pedicur ing 859Part 5: Nail CareCopyright 2011 Cengage Learning. All Rights Reserved. May not be copied, scanned, or duplicated, in whole or in part. Due to electronic rights, some third party content may be suppressed from the eBook and/or eChapter(s).
Editorial review has deemed that any suppressed content does not materially affect the overall learning experience. Cengage Learning reserves the right to remove additional content at any time if subsequent rights restrictions require it.

4. Refill the basin with clean water and circulate the correct amount (according to the mixing instructions on the label) of the EPA-registered hospital disinfectant through the basin for ten minutes.
5. Drain, rinse, and wipe the basin dry with a clean paper towel.
At the End of Every Day: 1. Remove the screen and any other removable parts. (A screwdriver
may be necessary.)
2. Clean the screen and other removable parts and the area behind these with a brush and liquid soap and water to remove all visible residues. Replace the properly cleaned screen and other removable parts.
3. Fill the basin with warm water and chelating detergent (a detergent designed for use in hard water), and circulate the chelating detergent through the system for five to ten minutes (following the manufacturer’s instructions). If excessive foaming occurs, discontinue circulation and let soak for the remainder of the time, as instructed.
4. Drain the soapy solution and rinse the basin.
5. Refill the basin with clean water and circulate the correct amount (according to the mixing instructions on the label) of the EPA-registered hospital disinfectant through the basin for ten minutes.
6. Drain, rinse, and wipe the basin dry with a clean paper towel.
7. Allow the basin to dry completely.
At Least Once Each Week: 1. Drain all water from the basin.
2. Remove the screen and any other removable parts. (A screwdriver may be necessary.)
3. Clean the screen and other removable parts and the area behind these with a brush and liquid soap and water to remove all visible residues. Replace the properly cleaned screen and other removable parts.
4. Scrub all visible residue from the inside walls of the basin with a brush and liquid soap and water. Use a clean and disinfected brush with a handle. Brushes must be cleaned and disinfected after each use.
5. Fill the basin with clean water and circulate the correct amount (according to the mixing instructions on the label) of the EPA-registered hospital disinfectant through the basin. ©
Gre
gory
Ger
ber,
2010
; use
d un
der l
icen
se fr
om S
hutte
rsto
ck.c
om.
26 860 Chapter 26 Pedicur ing Part 5: Nail CareCopyright 2011 Cengage Learning. All Rights Reserved. May not be copied, scanned, or duplicated, in whole or in part. Due to electronic rights, some third party content may be suppressed from the eBook and/or eChapter(s).
Editorial review has deemed that any suppressed content does not materially affect the overall learning experience. Cengage Learning reserves the right to remove additional content at any time if subsequent rights restrictions require it.

Here’s a Tip
6. Do not drain the disinfectant solution. Instead, turn the unit off and leave the disinfecting solution in the unit overnight.
7. In the morning, drain and rinse.
8. Refill the basin with clean water and flush the system. LO7
Disinfection of Pipe-less Foot SpasThis process is for units with footplates, impellers, impeller assemblies, and propellers.
After Every Client: 1. Drain all water from the basin.
2. Remove impeller, footplate, and any other removable components according to the manufacturer’s instructions.
3. Thoroughly scrub impeller, footplate, and/or other components and the areas behind each with a liquid soap and a clean, disinfected brush to remove all visible residues. Then reinsert impeller, footplate, and/or other components.
4. Refill the basin with water and circulate the correct amount (according to the mixing instructions on the label) of the EPA-registered hospital disinfectant through the basin for ten minutes.
5. Drain, rinse, and wipe the basin dry with a clean paper towel.
At the End of Every Day:1. Fill the basin with warm water and chelating detergent, and circulate the
chelating detergent through the system for five to ten minutes (following manufacturer’s instructions). If excessive foaming occurs, discontinue circulation and let soak for the remainder of the ten minutes.
2. Drain the soapy solution and rinse the basin.
3. Refill the basin with clean water and circulate the correct amount (according to the mixing instructions on the label) of the EPA-registered hospital disinfectant through the basin for ten minutes.
4. Drain, rinse, and wipe the basin dry with a clean paper towel.
At Least Once Each Week: 1. Drain all water from the basin.
2. Remove impeller, footplate, and any other removable components according to the manufacturer’s instructions.
3. Thoroughly scrub impeller, footplate, and/or other components and the areas behind each with a liquid soap and a clean, disinfected brush to remove all visible residues, and then reinsert impeller, footplate, and/or other components.
Think that you don’t have ten minutes between pedicures to disinfect? Try this: before reaching for the massage lotion, clean the basin or foot spa and fill with water and disinfectant solution. Or, if the client is receiving a foot mask, use the mask time to clean the tub, refill it with water, and put in the disinfectant. The disinfectant can remain in the basin while you complete the pedicure, meeting the time requirement for disinfection. This minimizes the procedure time, keeps you on schedule, and allows the client to see you disinfect the tub, which will give them confidence that you consistently provide safe services.
26Chapter 26 Pedicur ing 861Part 5: Nail CareCopyright 2011 Cengage Learning. All Rights Reserved. May not be copied, scanned, or duplicated, in whole or in part. Due to electronic rights, some third party content may be suppressed from the eBook and/or eChapter(s).
Editorial review has deemed that any suppressed content does not materially affect the overall learning experience. Cengage Learning reserves the right to remove additional content at any time if subsequent rights restrictions require it.

4. Refill the basin with water and circulate the correct amount (according to the mixing instructions on the label) of the EPA-registered hospital disinfectant through the basin for ten minutes.
5. Do not drain the disinfectant solution. Instead, turn the unit off and leave the disinfecting solution in the unit overnight.
6. In the morning, drain and rinse.
7. Refill the basin with clean water and flush the system.
Disinfection of Non-Whirlpool Foot Basins or TubsThis includes basins, tubs, foot baths, sinks, and bowls—all nonelectrical equipment that holds water for a client’s feet during a pedicure service.
After Every Client:1. Drain all water from the foot basin or tub.
2. Clean all inside surfaces of the foot basin or tub with a clean, disinfected brush and liquid soap and water to remove all visible residues.
3. Rinse the basin or tub with clean water.
4. Refill the basin with clean water and the correct amount (according to the mixing instructions on the label) of the EPA-registered hospital disinfectant. Leave this disinfecting solution in the basin for ten minutes.
5. Drain, rinse, and wipe the basin dry with a clean paper towel.
At the End of Every Day: 1. Drain all water from the foot basin or tub.
2. Clean all inside surfaces of the foot basin or tub with a brush and liquid soap and water to remove all visible residues.
3. Fill the basin or tub with water and the correct amount (according to the mixing instructions on the
label) of the EPA-registered hospital disinfectant. Leave this disinfecting solution in the basin for
ten minutes.
4. Drain, rinse, and wipe the basin dry with a clean paper towel.
© A
l Rub
linet
sky,
201
0; u
sed
unde
r lic
ense
from
Shu
tters
tock
.com
.
26 862 Chapter 26 Pedicur ing Part 5: Nail CareCopyright 2011 Cengage Learning. All Rights Reserved. May not be copied, scanned, or duplicated, in whole or in part. Due to electronic rights, some third party content may be suppressed from the eBook and/or eChapter(s).
Editorial review has deemed that any suppressed content does not materially affect the overall learning experience. Cengage Learning reserves the right to remove additional content at any time if subsequent rights restrictions require it.

1
2
3Service Tip
26-1prOC
edur
e
The Basic PedicureImplements and Materialsin addition to the basic materials on your manicuring table, you will need the following supplies for the basic pedicure:
• Callus softeners
• Curettes
• Electric foot mitts (optional)
• Exfoliant
• Foot lotions or creams
• Foot paddle
• Foot soak
• Gloves
• Nail rasp
• Nippers
• Paraffin bath (optional)
• Pedicure basin or foot bath
• Pedicure nail files
• Pedicure slippers
• Terry cloth mitts (optional)
• Toe separators
• Toenail clippers
Preparation
• perform See page 81725-1prOCedure Pre-Service
Procedure
Procedure1 put on a pair of clean gloves
and check the temperature of the pedicure bath for safety. place the client’s feet in the bath, and make sure she is comfortable with the water temperature. allow the feet to soak for five minutes to soften and clean the feet before beginning the pedicure.
2 Lift one of the client’s feet from the bath. Wrap the first towel around the foot and dry it thoroughly. Make sure you dry between the toes. place the foot on the footrest or on a towel you have placed on your lap.
3 First, remove polish from the little toe and move across the foot toward the big toe. Complete polish removal is important to a quality pedicure finish.
© M
ilady
, a p
art o
f Cen
gage
Lea
rnin
g. P
hoto
grap
hy b
y D
ino
Pet
roce
lli.
Work on the foot on the client’s nondominant side first. (The dominant side of the body is determined by the side of the client’s writing hand.) The foot on the client’s dominant side usually needs more soaking and attention. It needs to soak those few extra minutes while you are working on the other foot.
26Chapter 26 Pedicur ing 863Part 5: Nail CareCopyright 2011 Cengage Learning. All Rights Reserved. May not be copied, scanned, or duplicated, in whole or in part. Due to electronic rights, some third party content may be suppressed from the eBook and/or eChapter(s).
Editorial review has deemed that any suppressed content does not materially affect the overall learning experience. Cengage Learning reserves the right to remove additional content at any time if subsequent rights restrictions require it.

CauTioN
Service Tip
4
6
8
11
4 Carefully clip the toenails of the first foot straight across and even with the end of the toes. the big toenail is usually the most challenging to trim. do not leave any rough edges or “hooks” that might create an opportunity for infections.
7 apply callus remover to the calluses, wrap the foot in a towel, and lay it aside. remove the other foot from the water and perform steps 2 through 7 on that foot.
6 Carefully file the nails of the first foot with an appropriate single-use and prepped abrasive file. File them straight across, rounding them slightly at the corners. Smooth rough edges with the fine side of an abrasive file.
Take care not to clip the nails too short and not to break the seal of the hyponychium, an important protection of the toenail unit from infection.
8 remove the first foot from the towel wrap; use a wooden pusher to gently remove any lose, dead tissue. Next, exfoliate the foot with a scrub to remove the dry or scaly skin. use extra pressure on the heels and other areas where more calluses and dry skin build up. Next, use a foot file to smooth and reduce the thicker areas of calluses.
26-1The Basic Pedicure continuedProc
edur
e
9 place the first foot in the foot bath and rinse off the cuticle softener and callus remover completely. then, lift the foot to above the water and brush the nails with a nail brush. remove the foot and dry thoroughly.
11 use the single-use cotton-tipped wooden pusher or product dispenser to apply cuticle remover to the second foot. Begin with the little toe and work toward the big toe.
Toe separators can be used to hold the toes apart while filing or applying cuticle remover. Always use new separators for every client.
© M
ilady
, a p
art o
f Cen
gage
Lea
rnin
g. P
hoto
grap
hy b
y D
ino
Pet
roce
lli.
5 Carefully use the foot rasp, if needed. the rasp is narrow and will only file the nail in one direction. It can be used to remove, smooth, and round off any sharp points on the free edges that might eventually cause infection. do not probe with the rasp or point the tip toward the hyponychium. Gently draw it along the side free edge that you have just trimmed. Small, short strokes with the file will accomplish the task.
10 repeat steps 8 and 9 on the other foot.
26 864 Chapter 26 Pedicur ing Part 5: Nail CareCopyright 2011 Cengage Learning. All Rights Reserved. May not be copied, scanned, or duplicated, in whole or in part. Due to electronic rights, some third party content may be suppressed from the eBook and/or eChapter(s).
Editorial review has deemed that any suppressed content does not materially affect the overall learning experience. Cengage Learning reserves the right to remove additional content at any time if subsequent rights restrictions require it.

CauTioN12
13
CauTioN
15
12 Carefully remove the cuticle tissue from the nail plate using a wooden or metal pusher, staying away from the eponychium and taking care not to break the seal between the nail plate and eponychium. use a nipper to carefully remove any loose tags of dead skin, but don’t cut, rip, or tear living skin, since this may lead to serious infections.
13 Next, if necessary, the curette is used on the first foot to gently push the soft tissue folds away from the walls of the lateral nail plate. this allows you to visually inspect the nail plate and the surrounding tissue. If there is extra buildup of debris between the nail plate and surrounding tissue, it should be gently removed with the curette. to use this implement, place the rounded side of the spoon toward the sidewall of living skin. a gentle scooping motion is then used along the nail plate to remove any loose debris. take care not to overdo it. do not use this implement to dig into the soft tissues along the nail fold as injury may occur. If the tissue is inflamed (i.e., ingrown toenail), the client must be referred to a qualified medical doctor or podiatrist.
Remember that calluses protect the underlying skin from irritation and are there for a purpose. For example, joggers, waitresses, cosmetologists, nurses, teachers, and others are on their feet many hours a day. Calluses protect their feet in stress areas. Remove only enough to make the client comfortable. Calluses should be softened and smoothed, not excessively thinned or removed. Never use a blade on calluses as it is illegal and can cause debilitating infections. Educate your client about callus formation and the protective function calluses provide. Also discuss products for home use to help soften and condition callused areas between salon appointments.
© M
ilady
, a p
art o
f Cen
gage
Lea
rnin
g. P
hoto
grap
hy b
y D
ino
Pet
roce
lli.
When performing a pedicure, do not push back the eponychium with a metal pusher. Compared with the hands, feet are more susceptible to infections, and pushing back the eponychium (or cutting it) can dramatically increase the risk of serious infections on feet. This tool is designed to remove the tissue that may adhere to the surface of the nail plate, not for pushing back the eponychium. This is especially important for clients with diabetes, psoriasis, and other chronic illnesses.
14 dip your client’s first foot into the foot bath. With the foot over the foot bath, again brush it with the nail brush to remove bits of debris. dry the foot thoroughly. Wrap it in a towel and perform steps 11 to 13 on the other foot. When finished, wrap that foot in the foot towel and set it aside while performing the coming steps on the first foot.
15 apply lotion, cream, or oil to the first foot for skin conditioning and massage. use a firm touch to avoid tickling your client’s feet.
26Chapter 26 Pedicur ing 865Part 5: Nail CareCopyright 2011 Cengage Learning. All Rights Reserved. May not be copied, scanned, or duplicated, in whole or in part. Due to electronic rights, some third party content may be suppressed from the eBook and/or eChapter(s).
Editorial review has deemed that any suppressed content does not materially affect the overall learning experience. Cengage Learning reserves the right to remove additional content at any time if subsequent rights restrictions require it.

20
26-1The Basic Pedicure continued
16 perform a foot massage on the first foot. then re-wrap the foot and place it on the towel on the floor.
See page 86726-2prOCedure Foot and Leg
Massage
17 Massage the second foot.
18 remove traces of lotion, cream, or oil from the nails of both feet with polish remover.
19 ask the client to put on the sandals he or she will wear home or provide single-use pedicure slippers. Insert the toe separators, if possible. apply base coat to the nails on both feet, then two coats of color, and finally a topcoat. apply polish drying product (optional) to prevent smudging of the polish.
Proc
edur
e
Service Tip
21 You may want to escort the client to a drying area and offer him or her refreshment. LO8
20 Finished look.
More expensive pedicures with luxury touches such as masks, paraffin, and mitts should include exfoliation and massage of the legs. The top of the knee may be included, but the underside of the knee is not included. Exfoliate the leg after the foot is exfoliated, but before the use of the foot file, and then apply a lotion to maintain the softness until the massage.
Post-Service
• Complete See page 82125-2prOCedure Post-Service
Procedure
Business TipIt is very easy to create a specialty pedicure by adding masks, paraffin treatments, or other special applications after the massage and before polishing.
© M
ilady
, a p
art o
f Cen
gage
Lea
rnin
g. P
hoto
grap
hy b
y D
ino
Pet
roce
lli.
26 866 Chapter 26 Pedicur ing Part 5: Nail CareCopyright 2011 Cengage Learning. All Rights Reserved. May not be copied, scanned, or duplicated, in whole or in part. Due to electronic rights, some third party content may be suppressed from the eBook and/or eChapter(s).
Editorial review has deemed that any suppressed content does not materially affect the overall learning experience. Cengage Learning reserves the right to remove additional content at any time if subsequent rights restrictions require it.

1 1 rest the client’s heel on a footrest or stool and suggest that your client relax. Grasp the leg gently just above the ankle and use your other hand to hold the foot just beneath the toes; rotate the entire foot in a circular motion.
26-2prOC
edur
e
Foot and Leg MassageImplements and Materialsin addition to the basic materials on your manicuring table, you will need the following for the massage:
• Massage oil or lotion
these techniques and illustrations provide instruction for massage on the feet and legs. a massage for a basic pedicure will include only the foot, while a spa pedicure will also include the leg massage, up to and including the front of the knee.
Foot Massage
2 hold the foot and move the other hand to the dorsal surface of the foot. place the base of your palm of that hand on top of the foot behind the toes. (Contact is made only with your palm; your fingers do not touch the client’s skin and should be lifted away.) Slide up to the ankle area with gentle pressure. repeat three to five times in the middle, then on the sides of the dorsal surface of the foot. ever so slightly lift the palm each time to return to the initial position of the slide after reaching the ankle.
© M
ilady
, a p
art o
f Cen
gage
Lea
rnin
g. P
hoto
grap
hy b
y D
ino
Pet
roce
lli.
26Chapter 26 Pedicur ing 867Part 5: Nail CareCopyright 2011 Cengage Learning. All Rights Reserved. May not be copied, scanned, or duplicated, in whole or in part. Due to electronic rights, some third party content may be suppressed from the eBook and/or eChapter(s).
Editorial review has deemed that any suppressed content does not materially affect the overall learning experience. Cengage Learning reserves the right to remove additional content at any time if subsequent rights restrictions require it.

3
6
Service Tip
3 Keep one hand in contact with the foot. Slide the other hand and place the thumb on the plantar surface of the foot with the fingers gently holding the dorsal side of the foot. Now, slide the other hand to the same position on the foot, opposite side. Move one thumb in a firm circular movement, moving from one side of the foot, across, above the heel, up the medial side (center side) of the foot to below the toes, across the ball of and back down the other side of the foot (distal side) to the original position. Now, move the thumb of the other hand across and up the outside of the foot, then down to its original position. the base of the thumbs through to the pad of the fingers should be in contact with the skin throughout the movement. Your nails must not touch the client’s skin.
4 alternate the movements of the thumbs in a smooth, firm motion. repeat several times. this is a very relaxing movement.
5 perform the same thumb movement on the surface of the heels, rotating your thumbs in opposite directions. repeat three to five times.
6 place your one hand on top of the foot, cupping it, and make a fist with your other hand. the hand on top of the foot will press the foot toward you while your other hand twists into the instep of the foot. this helps stimulate blood flow and provides relaxation. repeat three to five times. this is a friction movement. the bottom of the foot is the only place a friction movement is performed in pedicure services.
26-2Foot and Leg Massage continuedProc
edur
e
Always apply enough lotion or oil to the foot to allow sufficient slide and no skin drag. If there is a need to apply more lotion, stay in contact with the guest by leaving one hand on the foot or leg, while the other hand reaches for a pump of the lotion or oil bottle. Place your thumb over the pump, then press down to deposit more product onto the fingers below the pump. Distribute the lotion and return to the massage.
Business TipThe basic pedicure does not include the leg massage, only the foot massage, for two reasons: time and money. Most salons schedule less time for the basic pedicure, allowing less time for massage. Second, higher-cost specialty pedicures must be greatly enhanced to be perceived as worth the higher price. The leg massage is one special addition.
© M
ilady
, a p
art o
f Cen
gage
Lea
rnin
g. P
hoto
grap
hy b
y D
ino
Pet
roce
lli.
26 868 Chapter 26 Pedicur ing Part 5: Nail CareCopyright 2011 Cengage Learning. All Rights Reserved. May not be copied, scanned, or duplicated, in whole or in part. Due to electronic rights, some third party content may be suppressed from the eBook and/or eChapter(s).
Editorial review has deemed that any suppressed content does not materially affect the overall learning experience. Cengage Learning reserves the right to remove additional content at any time if subsequent rights restrictions require it.

10
7a 7b Service Tip
10 every massage, whether pedicure or body massage, must end. Feathering is a technique used at the end of a massage to provide a signal for experienced clients that the massage is ending, and to provide a gentle release from the client. at the end of the last movement in the pedicure massage, create a smooth transition by gently placing both of the client’s feet onto the footrest, or on another stable surface, and move your palms to the top of the feet with your fingers toward the leg. press your entire hands three times slowly onto the feet. (this should not be a hard press, just a firm push.) Maintain each press for one to two seconds. after the last press, lift your palms slightly, but maintain contact with the feet with your fingertips. Now, gently pull your hand toward the tips of the toes with a feather-light touch of your fingertips. (do not allow your fingernails to touch the skin.) pull completely off the end of the toes. perform the final feather-off movement only once, and then allow the client to relax a minute or two before moving to the next step of the pedicure.
7b hold the tip of the toe, starting with the little toe, and make a figure eight with each toe. repeat three to five times on each toe and then move to the next. after the last movement on each toe, gently squeeze the tip of each once, and then move on to the next toe. You must have sufficient lotion for this to be comfortable and relaxing.
© M
ilady
, a p
art o
f Cen
gage
Lea
rnin
g. P
hoto
grap
hy b
y D
ino
Pet
roce
lli.
7a Start with the little toe, placing the thumb on the top of the toe and arching the index finger underneath the toe. (Your palm is facing up.) push the fingers and thumb in that position back to the base of the toe, then rotate the thumb and finger in a circular, effleurage movement until the index finger is arched over the top of the toe, and the thumb is underneath. pull the toe with index finger and thumb outward, away from the foot.
8 Now, return your hands to the position described in step 4, and repeat steps 3 and 4.
9 repeat all movements on each foot as many times as you wish, adding other movements that you like to perform, and then move to the other leg/foot.
The most enjoyable massage is a rhythmic, slow slide with the fingers and palm connecting to the client as much as possible. Maintain a touch connection with the client throughout the massage, sliding the hands from one location to the next in a smooth transition.
26Chapter 26 Pedicur ing 869Part 5: Nail CareCopyright 2011 Cengage Learning. All Rights Reserved. May not be copied, scanned, or duplicated, in whole or in part. Due to electronic rights, some third party content may be suppressed from the eBook and/or eChapter(s).
Editorial review has deemed that any suppressed content does not materially affect the overall learning experience. Cengage Learning reserves the right to remove additional content at any time if subsequent rights restrictions require it.
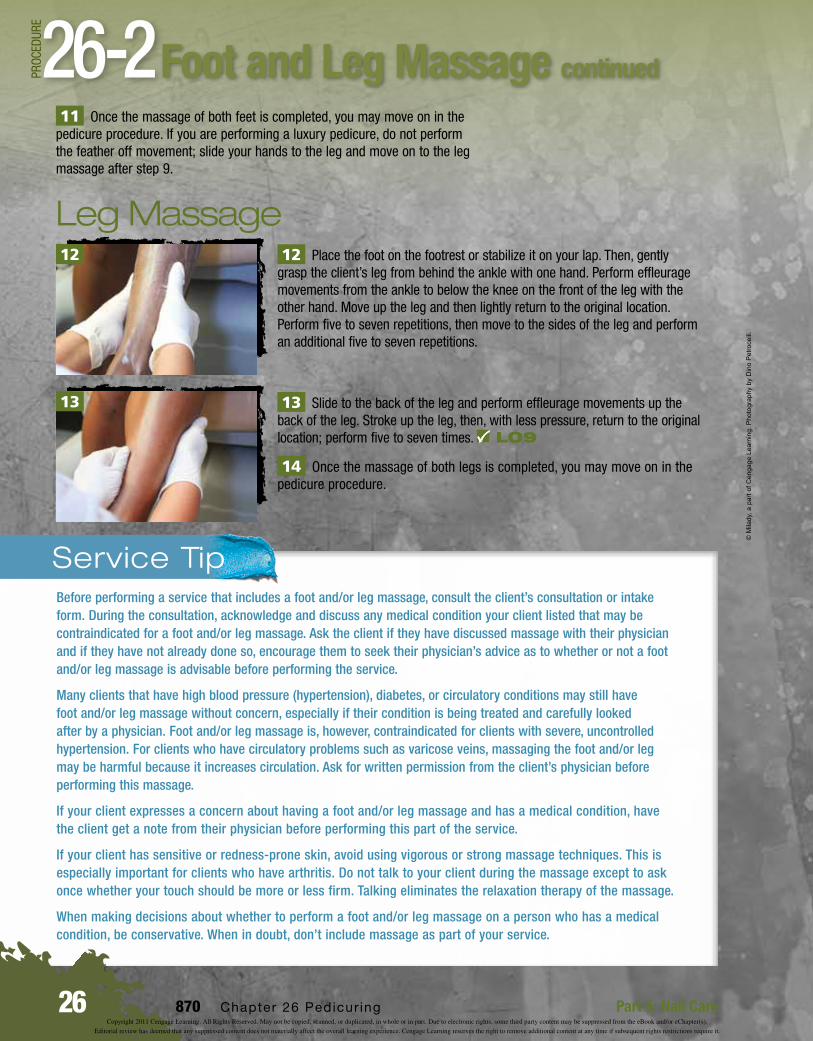
Service Tip
12
13
26-2Foot and Leg Massage continuedProc
edur
e
12 place the foot on the footrest or stabilize it on your lap. then, gently grasp the client’s leg from behind the ankle with one hand. perform effleurage movements from the ankle to below the knee on the front of the leg with the other hand. Move up the leg and then lightly return to the original location. perform five to seven repetitions, then move to the sides of the leg and perform an additional five to seven repetitions.
13 Slide to the back of the leg and perform effleurage movements up the back of the leg. Stroke up the leg, then, with less pressure, return to the original location; perform five to seven times. LO9
14 Once the massage of both legs is completed, you may move on in the pedicure procedure.
11 Once the massage of both feet is completed, you may move on in the pedicure procedure. If you are performing a luxury pedicure, do not perform the feather off movement; slide your hands to the leg and move on to the leg massage after step 9.
Leg Massage
© M
ilady
, a p
art o
f Cen
gage
Lea
rnin
g. P
hoto
grap
hy b
y D
ino
Pet
roce
lli.
Before performing a service that includes a foot and/or leg massage, consult the client’s consultation or intake form. During the consultation, acknowledge and discuss any medical condition your client listed that may be contraindicated for a foot and/or leg massage. Ask the client if they have discussed massage with their physician and if they have not already done so, encourage them to seek their physician’s advice as to whether or not a foot and/or leg massage is advisable before performing the service.
Many clients that have high blood pressure (hypertension), diabetes, or circulatory conditions may still have foot and/or leg massage without concern, especially if their condition is being treated and carefully looked after by a physician. Foot and/or leg massage is, however, contraindicated for clients with severe, uncontrolled hypertension. For clients who have circulatory problems such as varicose veins, massaging the foot and/or leg may be harmful because it increases circulation. Ask for written permission from the client’s physician before performing this massage.
If your client expresses a concern about having a foot and/or leg massage and has a medical condition, have the client get a note from their physician before performing this part of the service.
If your client has sensitive or redness-prone skin, avoid using vigorous or strong massage techniques. This is especially important for clients who have arthritis. Do not talk to your client during the massage except to ask once whether your touch should be more or less firm. Talking eliminates the relaxation therapy of the massage.
When making decisions about whether to perform a foot and/or leg massage on a person who has a medical condition, be conservative. When in doubt, don’t include massage as part of your service.
26 870 Chapter 26 Pedicur ing Part 5: Nail CareCopyright 2011 Cengage Learning. All Rights Reserved. May not be copied, scanned, or duplicated, in whole or in part. Due to electronic rights, some third party content may be suppressed from the eBook and/or eChapter(s).
Editorial review has deemed that any suppressed content does not materially affect the overall learning experience. Cengage Learning reserves the right to remove additional content at any time if subsequent rights restrictions require it.

review Questions
Chapter Glossarycallus softeners Products designed to soften and smooth thickened tissue (calluses).
curette A small, scoop-shaped implement used for more efficient removal of debris from the nail folds, eponychium, and hyponychium areas.
exfoliating scrubs Water-based lotions that contain a mild, gritty-like abrasive and moisturizers to help in removing dry, flaky skin and reduce calluses.
foot file Also known as paddle; large, abrasive file used to smooth and reduce thicker areas of callus.
foot soaks Products containing gentle soaps, moisturizers, and other additives that are used in a pedicure bath to cleanse and soften the skin.
nail rasp A metal implement with a grooved edge that is used for filing and smoothing the edges of the nail plate.
pedicure A cosmetic service performed on the feet by a licensed cosmetologist or nail technician; can include exfoliating the skin, callus reduction, as well as trimming, shaping, and polishing toenails. Often includes foot massage.
reflexology A unique method of applying pressure with thumb and index fingers to the hands and feet, and it has demonstrated health benefits.
toe separators Foam rubber or cotton disposable materials used to keep toes apart while polishing the nails. A new set must be used on each client.
toenail clippers Professional implements that are larger than fingernail clippers and have a curved or straight jaw, specifically designed for cutting toenails.
1. Name five pieces of equipment unique to pedicures. 2. Name three specialty materials used when performing pedicures. 3. What is a callus softener and how is it used? 4. What is the difference between a basic pedicure and a spa pedicure? 5. What is reflexology and how is it used in pedicuring? 6. Why is consistent cleaning and disinfection of pedicure baths so important? 7. What are the steps involved in the proper cleaning and disinfecting of whirlpool foot spas and air-jet basins
after each client? 8. List and describe the proper procedures for a basic pedicure. 9. List and explain the procedure for a foot and leg massage.
26Chapter 26 Pedicur ing 871Part 5: Nail CareCopyright 2011 Cengage Learning. All Rights Reserved. May not be copied, scanned, or duplicated, in whole or in part. Due to electronic rights, some third party content may be suppressed from the eBook and/or eChapter(s).
Editorial review has deemed that any suppressed content does not materially affect the overall learning experience. Cengage Learning reserves the right to remove additional content at any time if subsequent rights restrictions require it.