mips vs. arm assembly comparing registersece2035.ece.gatech.edu/readings/embedded/mipsvsarm.pdf ·...
TRANSCRIPT
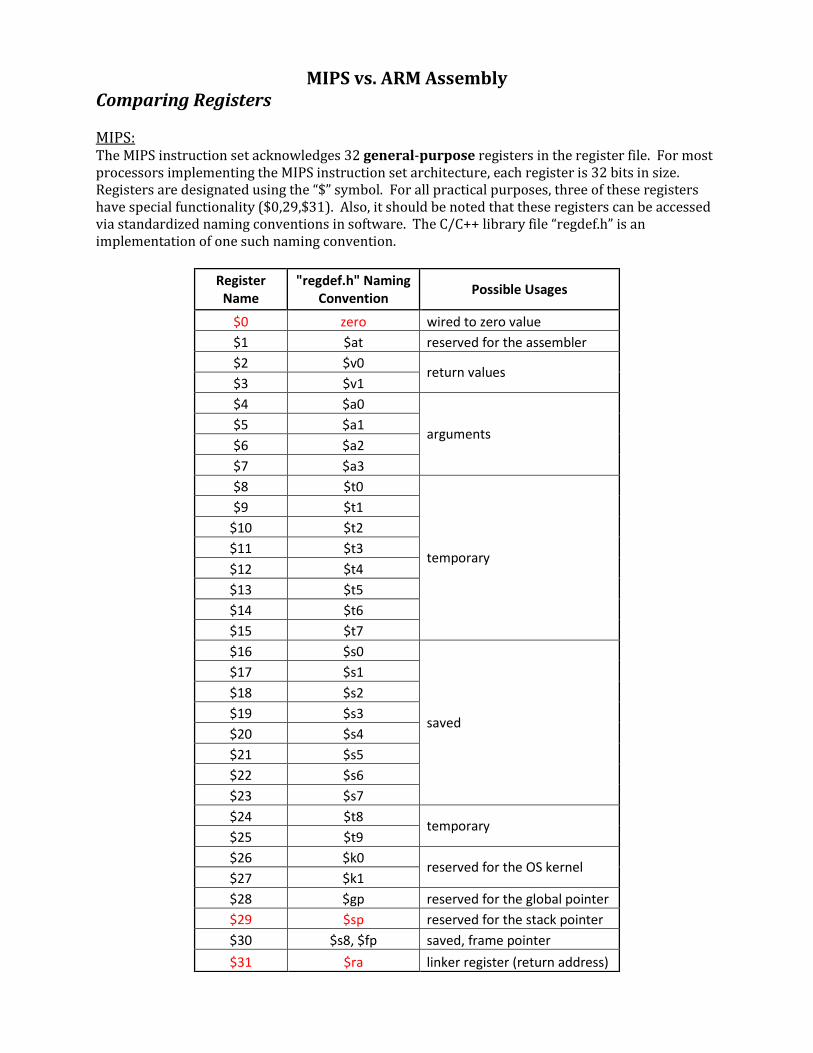
MIPS vs. ARM Assembly Comparing Registers MIPS: The MIPS instruction set acknowledges 32 general-purpose registers in the register file. For most processors implementing the MIPS instruction set architecture, each register is 32 bits in size. Registers are designated using the “$” symbol. For all practical purposes, three of these registers have special functionality ($0,29,$31). Also, it should be noted that these registers can be accessed via standardized naming conventions in software. The C/C++ library file “regdef.h” is an implementation of one such naming convention. Register
Name "regdef.h" Naming
Convention Possible Usages
$0 zero wired to zero value
$1 $at reserved for the assembler
$2 $v0 return values
$3 $v1
$4 $a0
arguments $5 $a1
$6 $a2
$7 $a3
$8 $t0
temporary
$9 $t1
$10 $t2
$11 $t3
$12 $t4
$13 $t5
$14 $t6
$15 $t7
$16 $s0
saved
$17 $s1
$18 $s2
$19 $s3
$20 $s4
$21 $s5
$22 $s6
$23 $s7
$24 $t8 temporary
$25 $t9
$26 $k0 reserved for the OS kernel
$27 $k1
$28 $gp reserved for the global pointer
$29 $sp reserved for the stack pointer
$30 $s8, $fp saved, frame pointer
$31 $ra linker register (return address)
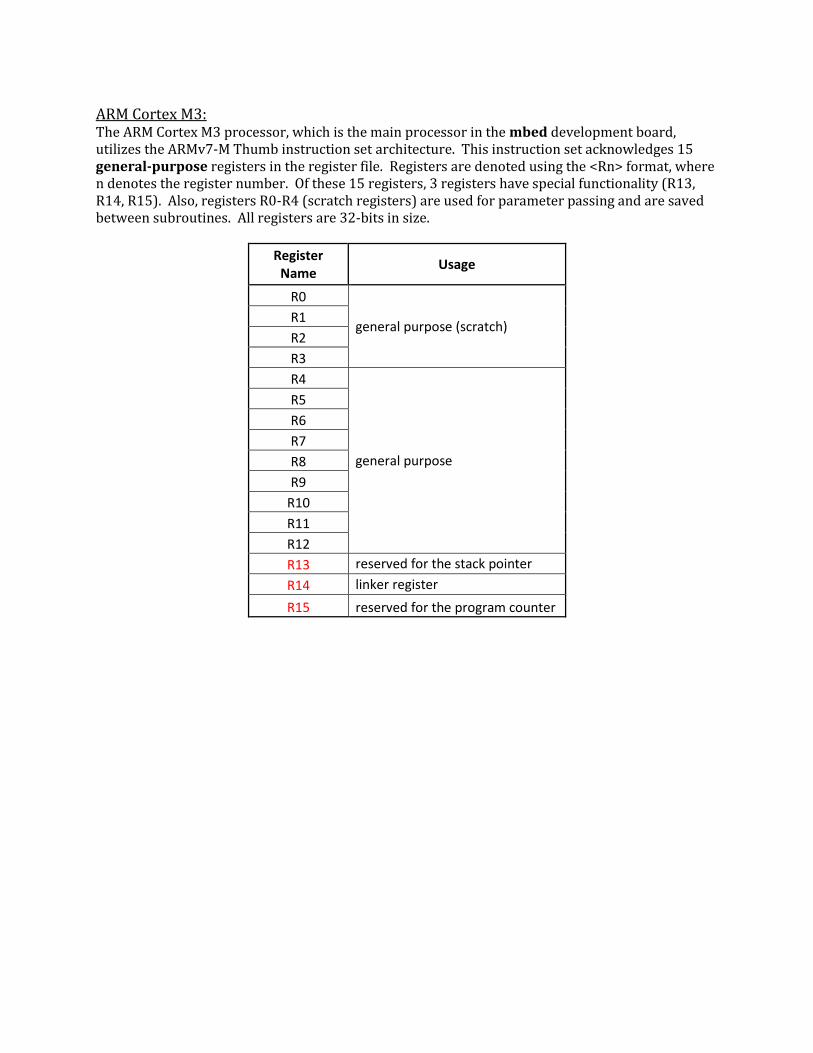
ARM Cortex M3: The ARM Cortex M3 processor, which is the main processor in the mbed development board, utilizes the ARMv7-M Thumb instruction set architecture. This instruction set acknowledges 15 general-purpose registers in the register file. Registers are denoted using the <Rn> format, where n denotes the register number. Of these 15 registers, 3 registers have special functionality (R13, R14, R15). Also, registers R0-R4 (scratch registers) are used for parameter passing and are saved between subroutines. All registers are 32-bits in size.
Register Name
Usage
R0
general purpose (scratch) R1
R2
R3
R4
general purpose
R5
R6
R7
R8
R9
R10
R11
R12
R13 reserved for the stack pointer
R14 linker register
R15 reserved for the program counter
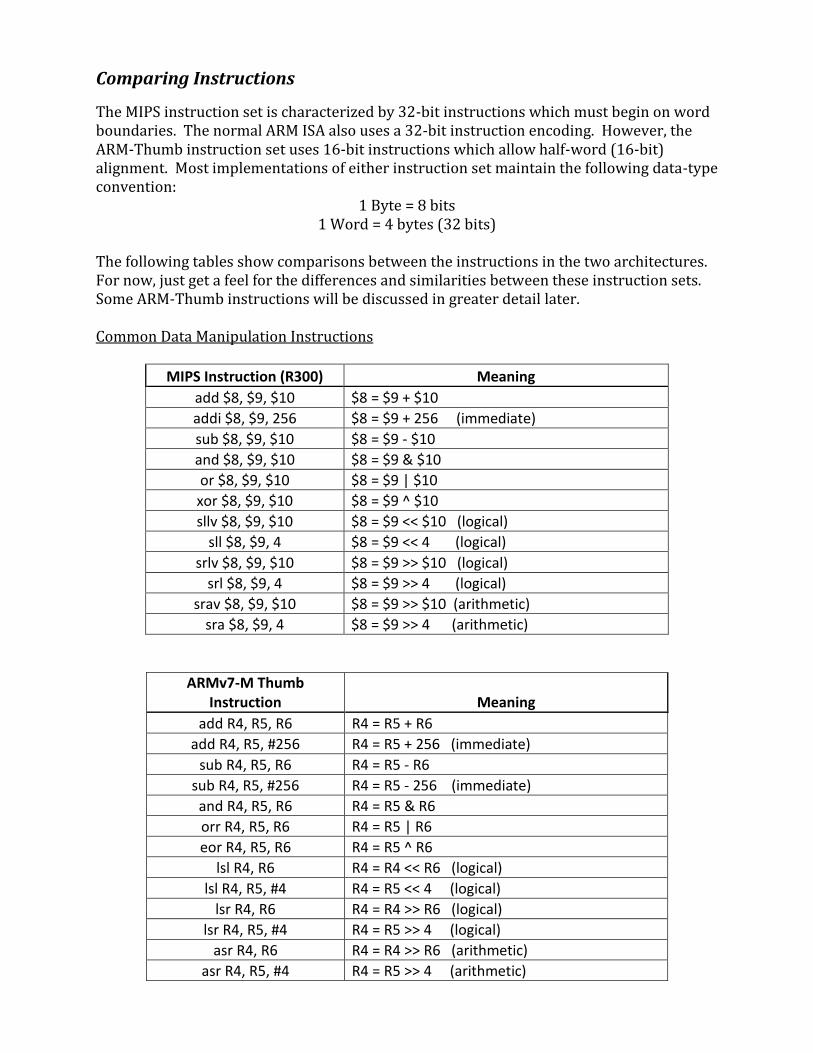
Comparing Instructions
The MIPS instruction set is characterized by 32-bit instructions which must begin on word boundaries. The normal ARM ISA also uses a 32-bit instruction encoding. However, the ARM-Thumb instruction set uses 16-bit instructions which allow half-word (16-bit) alignment. Most implementations of either instruction set maintain the following data-type convention:
1 Byte = 8 bits 1 Word = 4 bytes (32 bits)
The following tables show comparisons between the instructions in the two architectures. For now, just get a feel for the differences and similarities between these instruction sets. Some ARM-Thumb instructions will be discussed in greater detail later. Common Data Manipulation Instructions
MIPS Instruction (R300) Meaning
add $8, $9, $10 $8 = $9 + $10
addi $8, $9, 256 $8 = $9 + 256 (immediate)
sub $8, $9, $10 $8 = $9 - $10
and $8, $9, $10 $8 = $9 & $10
or $8, $9, $10 $8 = $9 | $10
xor $8, $9, $10 $8 = $9 ^ $10
sllv $8, $9, $10 $8 = $9 << $10 (logical)
sll $8, $9, 4 $8 = $9 << 4 (logical)
srlv $8, $9, $10 $8 = $9 >> $10 (logical)
srl $8, $9, 4 $8 = $9 >> 4 (logical)
srav $8, $9, $10 $8 = $9 >> $10 (arithmetic)
sra $8, $9, 4 $8 = $9 >> 4 (arithmetic)
ARMv7-M Thumb Instruction Meaning
add R4, R5, R6 R4 = R5 + R6
add R4, R5, #256 R4 = R5 + 256 (immediate)
sub R4, R5, R6 R4 = R5 - R6
sub R4, R5, #256 R4 = R5 - 256 (immediate)
and R4, R5, R6 R4 = R5 & R6
orr R4, R5, R6 R4 = R5 | R6
eor R4, R5, R6 R4 = R5 ^ R6
lsl R4, R6 R4 = R4 << R6 (logical)
lsl R4, R5, #4 R4 = R5 << 4 (logical)
lsr R4, R6 R4 = R4 >> R6 (logical)
lsr R4, R5, #4 R4 = R5 >> 4 (logical)
asr R4, R6 R4 = R4 >> R6 (arithmetic)
asr R4, R5, #4 R4 = R5 >> 4 (arithmetic)
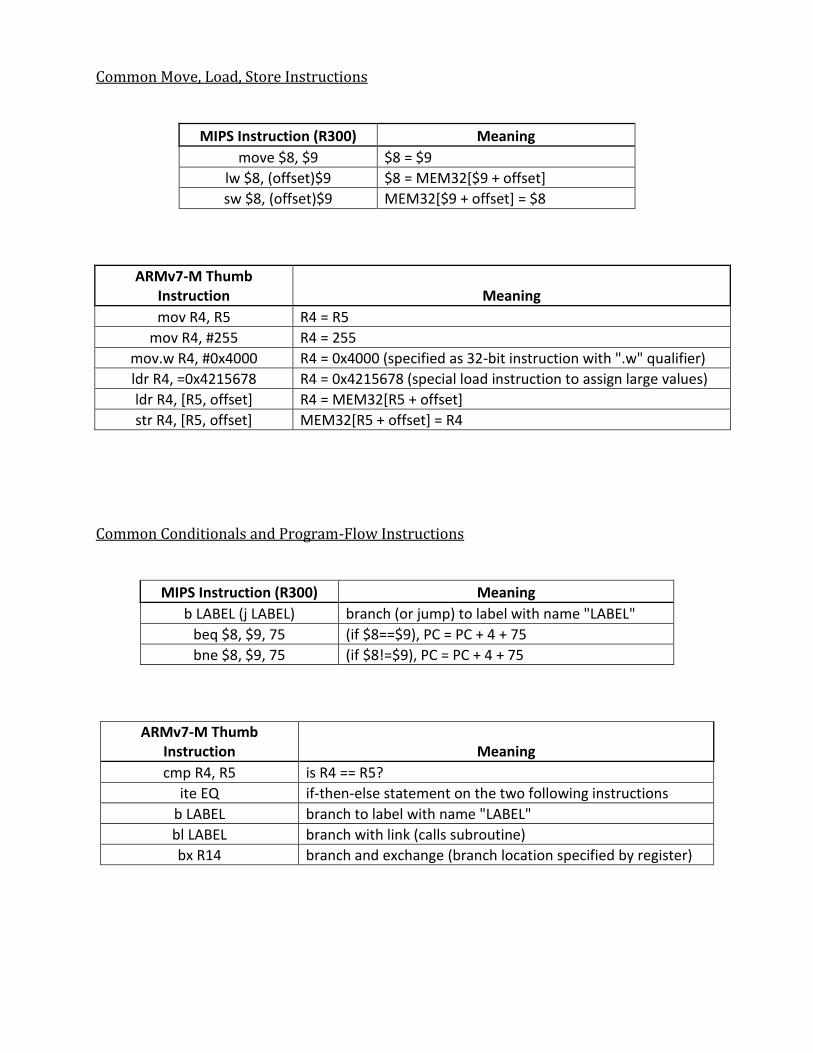
Common Move, Load, Store Instructions
MIPS Instruction (R300) Meaning
move $8, $9 $8 = $9
lw $8, (offset)$9 $8 = MEM32[$9 + offset]
sw $8, (offset)$9 MEM32[$9 + offset] = $8
ARMv7-M Thumb Instruction Meaning
mov R4, R5 R4 = R5
mov R4, #255 R4 = 255
mov.w R4, #0x4000 R4 = 0x4000 (specified as 32-bit instruction with ".w" qualifier)
ldr R4, =0x4215678 R4 = 0x4215678 (special load instruction to assign large values)
ldr R4, [R5, offset] R4 = MEM32[R5 + offset]
str R4, [R5, offset] MEM32[R5 + offset] = R4
Common Conditionals and Program-Flow Instructions
MIPS Instruction (R300) Meaning
b LABEL (j LABEL) branch (or jump) to label with name "LABEL"
beq $8, $9, 75 (if $8==$9), PC = PC + 4 + 75
bne $8, $9, 75 (if $8!=$9), PC = PC + 4 + 75
ARMv7-M Thumb Instruction Meaning
cmp R4, R5 is R4 == R5?
ite EQ if-then-else statement on the two following instructions
b LABEL branch to label with name "LABEL"
bl LABEL branch with link (calls subroutine)
bx R14 branch and exchange (branch location specified by register)
A Closer Look At ARMv7-M Thumb Loading Immediate Values and the “.W” Qualifier As stated before, ARMv7-M Thumb instructions are 16-bit by nature. Therefore, each instruction has a limited amount of bits for an immediate parameter. Let’s use the “MOV” instruction for an example. We can move the immediate value of 0xFF into register R2 using the command:
MOV R2, #255
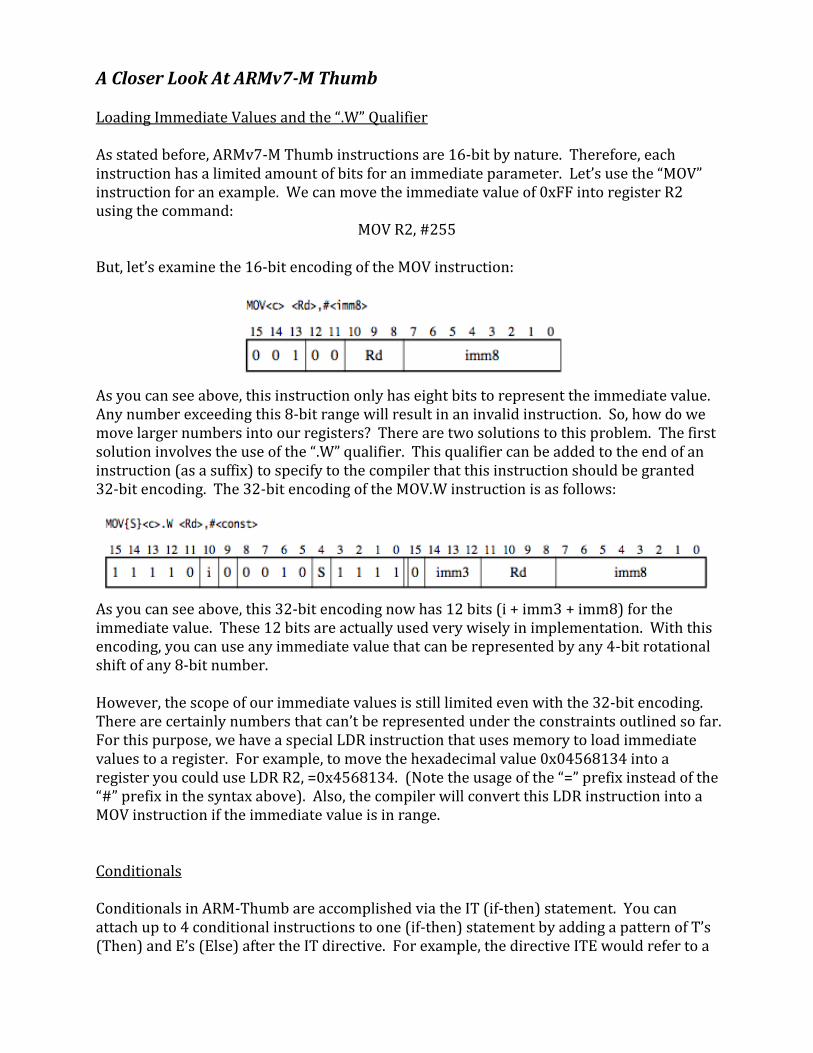
But, let’s examine the 16-bit encoding of the MOV instruction:
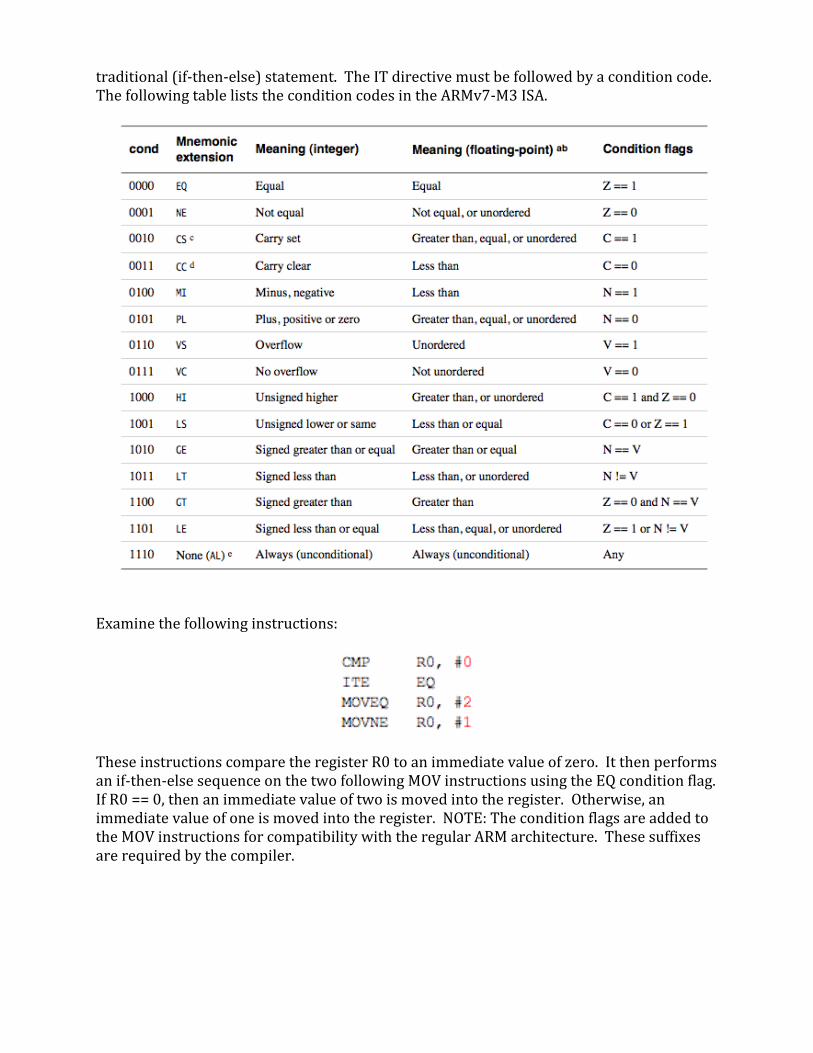
As you can see above, this instruction only has eight bits to represent the immediate value. Any number exceeding this 8-bit range will result in an invalid instruction. So, how do we move larger numbers into our registers? There are two solutions to this problem. The first solution involves the use of the “.W” qualifier. This qualifier can be added to the end of an instruction (as a suffix) to specify to the compiler that this instruction should be granted 32-bit encoding. The 32-bit encoding of the MOV.W instruction is as follows:
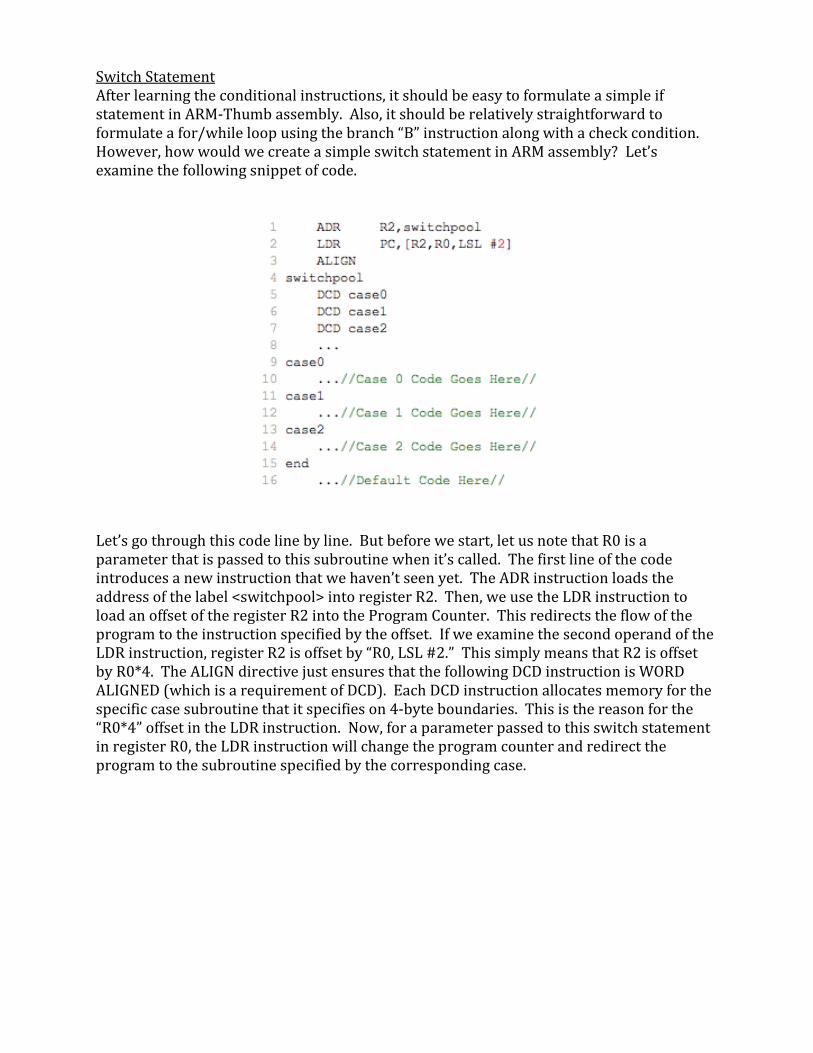
As you can see above, this 32-bit encoding now has 12 bits (i + imm3 + imm8) for the immediate value. These 12 bits are actually used very wisely in implementation. With this encoding, you can use any immediate value that can be represented by any 4-bit rotational shift of any 8-bit number. However, the scope of our immediate values is still limited even with the 32-bit encoding. There are certainly numbers that can’t be represented under the constraints outlined so far. For this purpose, we have a special LDR instruction that uses memory to load immediate values to a register. For example, to move the hexadecimal value 0x04568134 into a register you could use LDR R2, =0x4568134. (Note the usage of the “=” prefix instead of the “#” prefix in the syntax above). Also, the compiler will convert this LDR instruction into a MOV instruction if the immediate value is in range. Conditionals Conditionals in ARM-Thumb are accomplished via the IT (if-then) statement. You can attach up to 4 conditional instructions to one (if-then) statement by adding a pattern of T’s (Then) and E’s (Else) after the IT directive. For example, the directive ITE would refer to a
traditional (if-then-else) statement. The IT directive must be followed by a condition code. The following table lists the condition codes in the ARMv7-M3 ISA.
Examine the following instructions:
These instructions compare the register R0 to an immediate value of zero. It then performs an if-then-else sequence on the two following MOV instructions using the EQ condition flag. If R0 == 0, then an immediate value of two is moved into the register. Otherwise, an immediate value of one is moved into the register. NOTE: The condition flags are added to the MOV instructions for compatibility with the regular ARM architecture. These suffixes are required by the compiler.
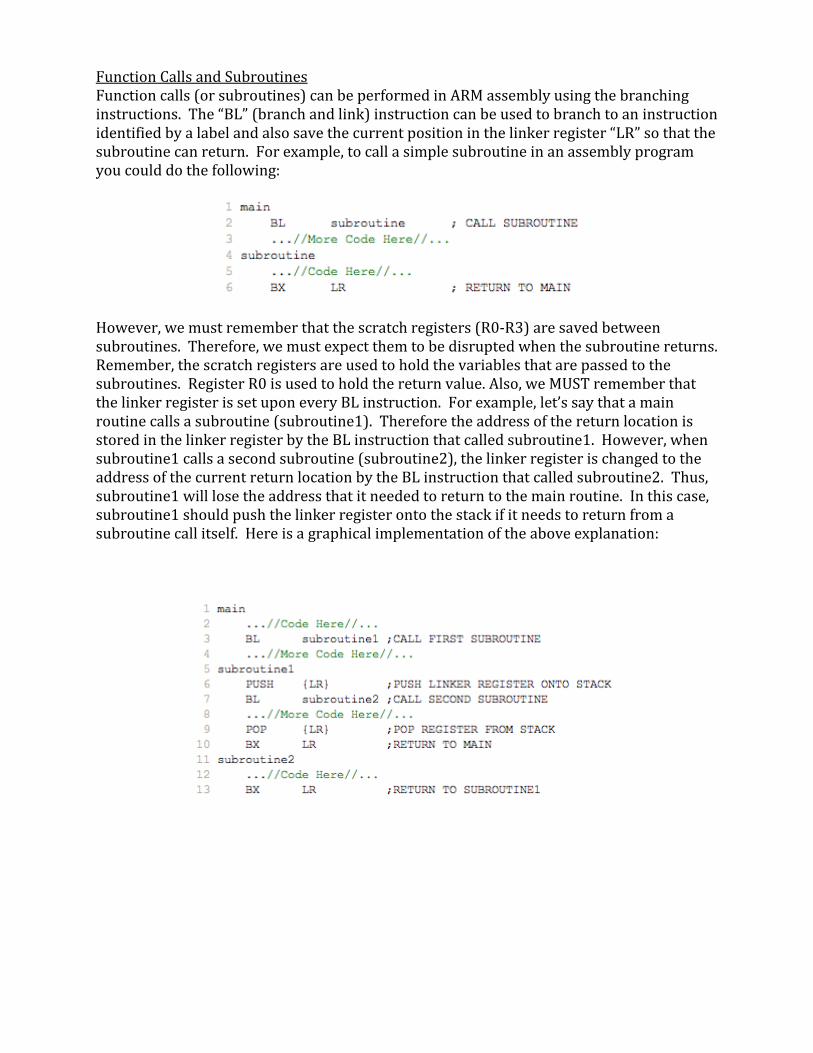
Switch Statement After learning the conditional instructions, it should be easy to formulate a simple if statement in ARM-Thumb assembly. Also, it should be relatively straightforward to formulate a for/while loop using the branch “B” instruction along with a check condition. However, how would we create a simple switch statement in ARM assembly? Let’s examine the following snippet of code.
Let’s go through this code line by line. But before we start, let us note that R0 is a parameter that is passed to this subroutine when it’s called. The first line of the code introduces a new instruction that we haven’t seen yet. The ADR instruction loads the address of the label <switchpool> into register R2. Then, we use the LDR instruction to load an offset of the register R2 into the Program Counter. This redirects the flow of the program to the instruction specified by the offset. If we examine the second operand of the LDR instruction, register R2 is offset by “R0, LSL #2.” This simply means that R2 is offset by R0*4. The ALIGN directive just ensures that the following DCD instruction is WORD ALIGNED (which is a requirement of DCD). Each DCD instruction allocates memory for the specific case subroutine that it specifies on 4-byte boundaries. This is the reason for the “R0*4” offset in the LDR instruction. Now, for a parameter passed to this switch statement in register R0, the LDR instruction will change the program counter and redirect the program to the subroutine specified by the corresponding case.
Function Calls and Subroutines Function calls (or subroutines) can be performed in ARM assembly using the branching instructions. The “BL” (branch and link) instruction can be used to branch to an instruction identified by a label and also save the current position in the linker register “LR” so that the subroutine can return. For example, to call a simple subroutine in an assembly program you could do the following:
However, we must remember that the scratch registers (R0-R3) are saved between subroutines. Therefore, we must expect them to be disrupted when the subroutine returns. Remember, the scratch registers are used to hold the variables that are passed to the subroutines. Register R0 is used to hold the return value. Also, we MUST remember that the linker register is set upon every BL instruction. For example, let’s say that a main routine calls a subroutine (subroutine1). Therefore the address of the return location is stored in the linker register by the BL instruction that called subroutine1. However, when subroutine1 calls a second subroutine (subroutine2), the linker register is changed to the address of the current return location by the BL instruction that called subroutine2. Thus, subroutine1 will lose the address that it needed to return to the main routine. In this case, subroutine1 should push the linker register onto the stack if it needs to return from a subroutine call itself. Here is a graphical implementation of the above explanation:
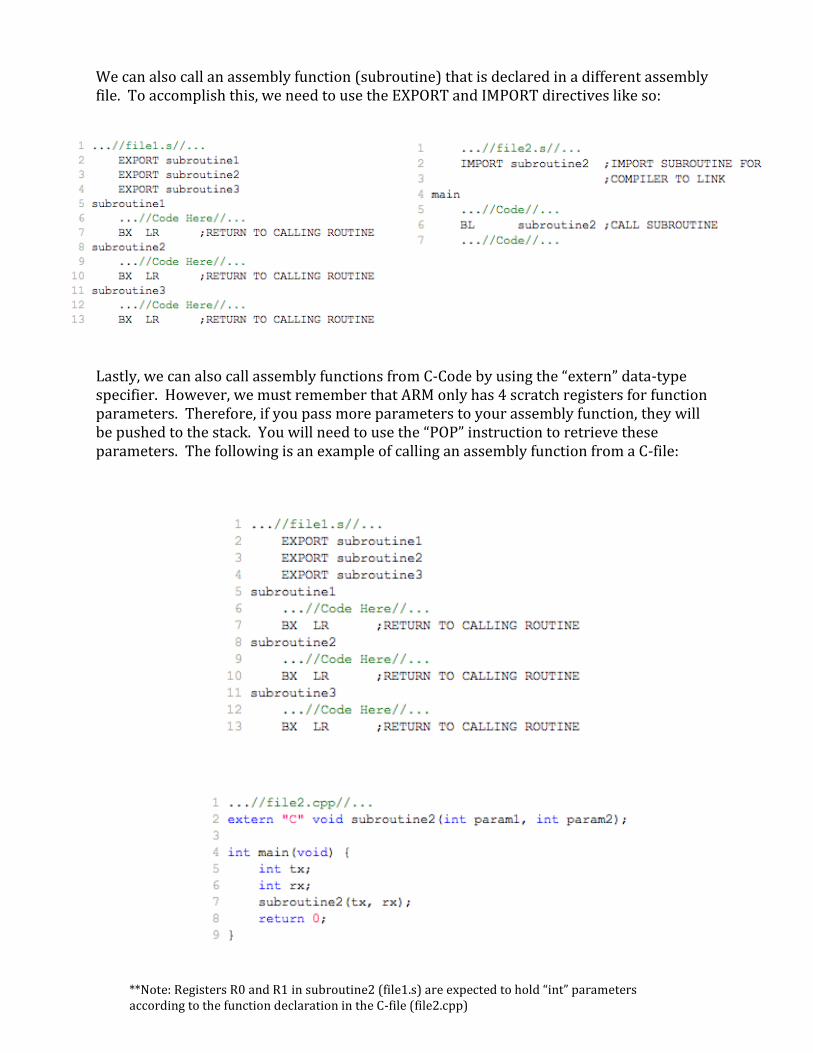
We can also call an assembly function (subroutine) that is declared in a different assembly file. To accomplish this, we need to use the EXPORT and IMPORT directives like so: Lastly, we can also call assembly functions from C-Code by using the “extern” data-type specifier. However, we must remember that ARM only has 4 scratch registers for function parameters. Therefore, if you pass more parameters to your assembly function, they will be pushed to the stack. You will need to use the “POP” instruction to retrieve these parameters. The following is an example of calling an assembly function from a C-file:
**Note: Registers R0 and R1 in subroutine2 (file1.s) are expected to hold “int” parameters according to the function declaration in the C-file (file2.cpp)
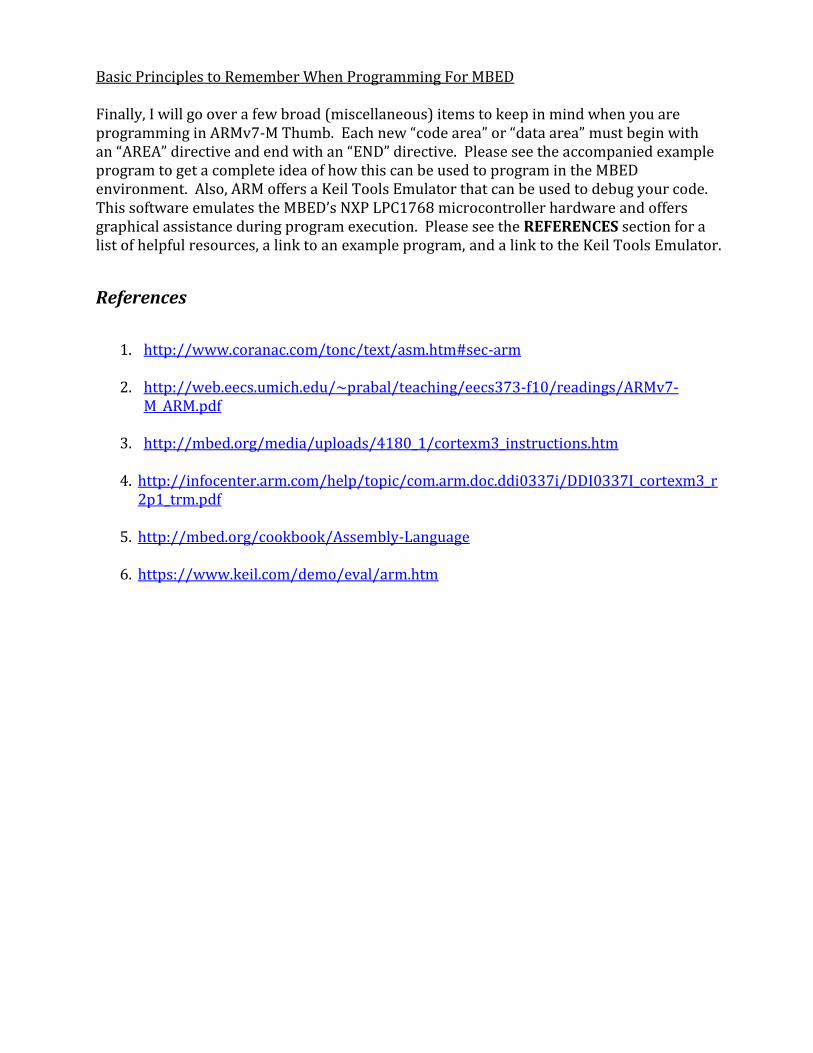
Basic Principles to Remember When Programming For MBED Finally, I will go over a few broad (miscellaneous) items to keep in mind when you are programming in ARMv7-M Thumb. Each new “code area” or “data area” must begin with an “AREA” directive and end with an “END” directive. Please see the accompanied example program to get a complete idea of how this can be used to program in the MBED environment. Also, ARM offers a Keil Tools Emulator that can be used to debug your code. This software emulates the MBED’s NXP LPC1768 microcontroller hardware and offers graphical assistance during program execution. Please see the REFERENCES section for a list of helpful resources, a link to an example program, and a link to the Keil Tools Emulator.
References
1. http://www.coranac.com/tonc/text/asm.htm#sec-arm
2. http://web.eecs.umich.edu/~prabal/teaching/eecs373-f10/readings/ARMv7-
M_ARM.pdf
3. http://mbed.org/media/uploads/4180_1/cortexm3_instructions.htm
4. http://infocenter.arm.com/help/topic/com.arm.doc.ddi0337i/DDI0337I_cortexm3_r2p1_trm.pdf
5. http://mbed.org/cookbook/Assembly-Language
6. https://www.keil.com/demo/eval/arm.htm
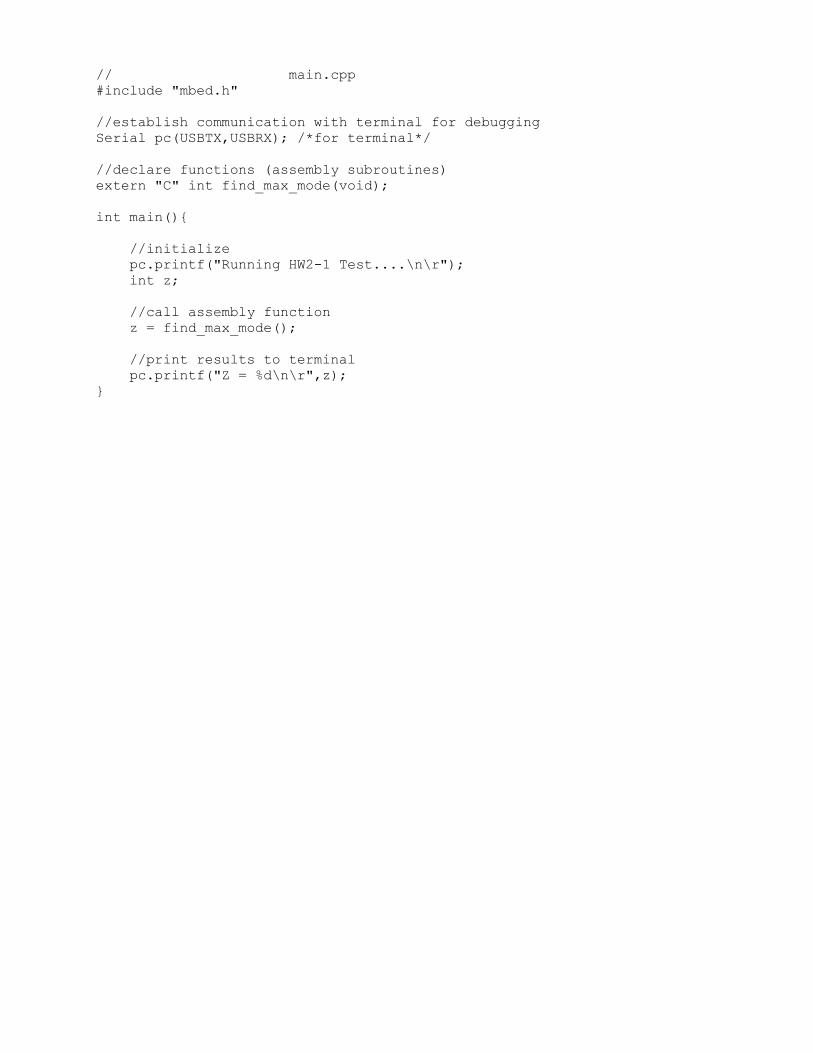
// main.cpp
#include "mbed.h"
//establish communication with terminal for debugging
Serial pc(USBTX,USBRX); /*for terminal*/
//declare functions (assembly subroutines)
extern "C" int find_max_mode(void);
int main(){
//initialize
pc.printf("Running HW2-1 Test....\n\r");
int z;
//call assembly function
z = find_max_mode();
//print results to terminal
pc.printf("Z = %d\n\r",z);
}
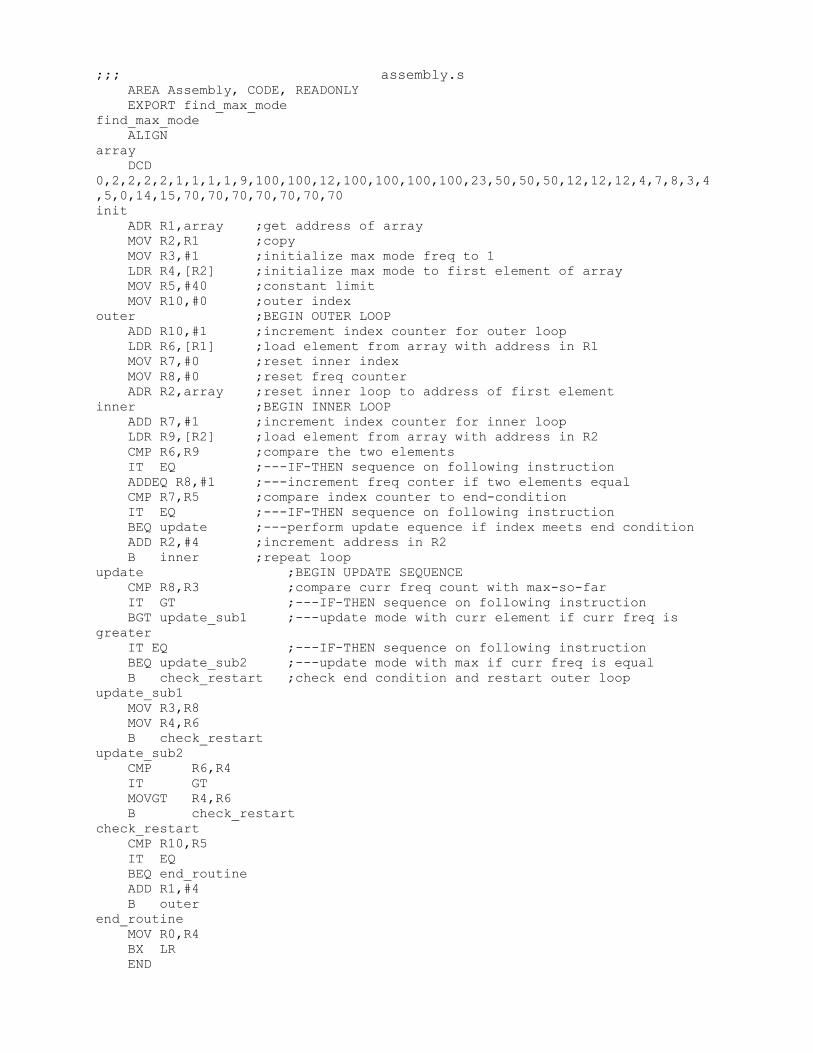
;;; assembly.s
AREA Assembly, CODE, READONLY
EXPORT find_max_mode
find_max_mode
ALIGN
array
DCD
0,2,2,2,2,1,1,1,1,9,100,100,12,100,100,100,100,23,50,50,50,12,12,12,4,7,8,3,4
,5,0,14,15,70,70,70,70,70,70,70
init
ADR R1,array ;get address of array
MOV R2,R1 ;copy
MOV R3,#1 ;initialize max mode freq to 1
LDR R4,[R2] ;initialize max mode to first element of array
MOV R5,#40 ;constant limit
MOV R10,#0 ;outer index
outer ;BEGIN OUTER LOOP
ADD R10,#1 ;increment index counter for outer loop
LDR R6,[R1] ;load element from array with address in R1
MOV R7,#0 ;reset inner index
MOV R8,#0 ;reset freq counter
ADR R2,array ;reset inner loop to address of first element
inner ;BEGIN INNER LOOP
ADD R7,#1 ;increment index counter for inner loop
LDR R9,[R2] ;load element from array with address in R2
CMP R6,R9 ;compare the two elements
IT EQ ;---IF-THEN sequence on following instruction
ADDEQ R8,#1 ;---increment freq conter if two elements equal
CMP R7,R5 ;compare index counter to end-condition
IT EQ ;---IF-THEN sequence on following instruction
BEQ update ;---perform update equence if index meets end condition
ADD R2,#4 ;increment address in R2
B inner ;repeat loop
update ;BEGIN UPDATE SEQUENCE
CMP R8,R3 ;compare curr freq count with max-so-far
IT GT ;---IF-THEN sequence on following instruction
BGT update_sub1 ;---update mode with curr element if curr freq is
greater
IT EQ ;---IF-THEN sequence on following instruction
BEQ update_sub2 ;---update mode with max if curr freq is equal
B check_restart ;check end condition and restart outer loop
update_sub1
MOV R3,R8
MOV R4,R6
B check_restart
update_sub2
CMP R6,R4
IT GT
MOVGT R4,R6
B check_restart
check_restart
CMP R10,R5
IT EQ
BEQ end_routine
ADD R1,#4
B outer
end_routine
MOV R0,R4
BX LR
END