mircury lna™ microrna array kit - · pdf file10903 hsa_negative_control-8 hsa, mmu, rno...
TRANSCRIPT

miRCURY LNA™ microRNA Array Kit
7th generation v.2 - human, mouse & rat
ExpressionAnalysis
Instruction manual v4.1for product # 208500, 208501, 208502, 208504,
208505, 208506, 208520, 208521, 208522
November 2016
2
microRNA ARRAY KIT · Instruction Manual
Table of Contents
Product Summary . . . . . . . . . . . . . . . . . . . . . . . . . . . . . . . . . . . . . . . . . . . . . . . . . . . . . . . . . . . 4
miRCURY LNA™ microRNA Array Kit content . . . . . . . . . . . . . . . . . . . . . . . . . . . . . . . . . . . . 4
Additional required material . . . . . . . . . . . . . . . . . . . . . . . . . . . . . . . . . . . . . . . . . . . . . . . . . . . 4
miRCURY LNA™ microRNA Array layout . . . . . . . . . . . . . . . . . . . . . . . . . . . . . . . . . . . . . . . . 5
Array probes specifications . . . . . . . . . . . . . . . . . . . . . . . . . . . . . . . . . . . . . . . . . . . . . . . . . . . 6
How to use the Spike-in microRNAs . . . . . . . . . . . . . . . . . . . . . . . . . . . . . . . . . . . . . . . . . . . . 8
Scanner settings and array orientation . . . . . . . . . . . . . . . . . . . . . . . . . . . . . . . . . . . . . . . . . 10
Storage . . . . . . . . . . . . . . . . . . . . . . . . . . . . . . . . . . . . . . . . . . . . . . . . . . . . . . . . . . . . . . . . . . . . 11
Protocol overview. . . . . . . . . . . . . . . . . . . . . . . . . . . . . . . . . . . . . . . . . . . . . . . . . . . . . . . . . . . 12
Single or dual color . . . . . . . . . . . . . . . . . . . . . . . . . . . . . . . . . . . . . . . . . . . . . . . . . . . . . . . . . . 13
Labeling Protocol . . . . . . . . . . . . . . . . . . . . . . . . . . . . . . . . . . . . . . . . . . . . . . . . . . . . . . . . . . 15
Protocol & Notes . . . . . . . . . . . . . . . . . . . . . . . . . . . . . . . . . . . . . . . . . . . . . . . . . . . . . . . . . 16
Hybridization Protocol. . . . . . . . . . . . . . . . . . . . . . . . . . . . . . . . . . . . . . . . . . . . . . . . . . . . . . . 18
Hybridization and washing using Tecan HS Pro™ hybridization stations . . . . . . . . . . . 18
Hybridization and washing using an Agilent hybridization
SureHyb Chamber Kit and Gasket Slide Kit . . . . . . . . . . . . . . . . . . . . . . . . . . . . . . . . . . . 21
Hybridization and washing using NimbleGen/ MAUI® 4-Bay
or 12-Bay hybridization stations. . . . . . . . . . . . . . . . . . . . . . . . . . . . . . . . . . . . . . . . . . . . . 25
Recommendations for Experimental Set-up and Data Handling. . . . . . . . . . . . . . . . . . . 30
Software and Databases . . . . . . . . . . . . . . . . . . . . . . . . . . . . . . . . . . . . . . . . . . . . . . . . . . . . . 34
ImaGene® . . . . . . . . . . . . . . . . . . . . . . . . . . . . . . . . . . . . . . . . . . . . . . . . . . . . . . . . . . . . . . . 34
Nexus Expression™. . . . . . . . . . . . . . . . . . . . . . . . . . . . . . . . . . . . . . . . . . . . . . . . . . . . . . . 34
Links to other array software. . . . . . . . . . . . . . . . . . . . . . . . . . . . . . . . . . . . . . . . . . . . . . . 35
3
microRNA ARRAY KIT · Instruction Manual
GenePix® Array List (GAL) fi les can be found at www.exiqon.com/Gal-downloads
Tips and Trouble Shooting. . . . . . . . . . . . . . . . . . . . . . . . . . . . . . . . . . . . . . . . . . . . . . . . . . . . 36
Experimental procedure . . . . . . . . . . . . . . . . . . . . . . . . . . . . . . . . . . . . . . . . . . . . . . . . . . . 36
Preparation of RNA sample . . . . . . . . . . . . . . . . . . . . . . . . . . . . . . . . . . . . . . . . . . . . . . . . 36
Working with large sample numbers . . . . . . . . . . . . . . . . . . . . . . . . . . . . . . . . . . . . . . . . 37
Concentration and purification of the labeling reaction . . . . . . . . . . . . . . . . . . . . . . . . . 37
Solid particles . . . . . . . . . . . . . . . . . . . . . . . . . . . . . . . . . . . . . . . . . . . . . . . . . . . . . . . . . . . 38
Flushing the hybridization chamber . . . . . . . . . . . . . . . . . . . . . . . . . . . . . . . . . . . . . . . . . 38
Drying slides. . . . . . . . . . . . . . . . . . . . . . . . . . . . . . . . . . . . . . . . . . . . . . . . . . . . . . . . . . . . . 38
No signals . . . . . . . . . . . . . . . . . . . . . . . . . . . . . . . . . . . . . . . . . . . . . . . . . . . . . . . . . . . . . . . 38
High signals . . . . . . . . . . . . . . . . . . . . . . . . . . . . . . . . . . . . . . . . . . . . . . . . . . . . . . . . . . . . . 39
High background . . . . . . . . . . . . . . . . . . . . . . . . . . . . . . . . . . . . . . . . . . . . . . . . . . . . . . . . . 39
Spike-in microRNA signal distribution . . . . . . . . . . . . . . . . . . . . . . . . . . . . . . . . . . . . . . . 40
Sample signal distribution for Spike-in microRNA
Kit v2 (product # 208041) . . . . . . . . . . . . . . . . . . . . . . . . . . . . . . . . . . . . . . . . . . . . . . . . . . 40
References. . . . . . . . . . . . . . . . . . . . . . . . . . . . . . . . . . . . . . . . . . . . . . . . . . . . . . . . . . . . . . . . . 41
Related Products . . . . . . . . . . . . . . . . . . . . . . . . . . . . . . . . . . . . . . . . . . . . . . . . . . . . . . . . . . . 42

4
microRNA ARRAY KIT · Instruction Manual
Product Summary
miRCURY LNA™ microRNA Array Kit content
Microarray slides
miRCURY LNA™ microRNA Arrays consist of control probes, and approximately 3100 capture
probes, complementary to most human, mouse, rat, and their related viral sequences from the
v.19.0 release of miRBase. See table on-line for coverage. The arrays also contain a number
of proprietary human miRPlus™ sequences not yet in miRBase. Layout fi les (GAL fi les) are
available for miRBase version 21.
Hybridization buffer (product # 208022)
Products with 3, 6 and 24 slides: 1 bottle x 5 mL
20x Salt buffer (product # 208023)
Products with 3 and 6 slides: 1 bottle x 125 mL
Products with 24 slides: 2 bottles x 125 mL
10% Detergent solution (product # 208024)
Products with 3 and 6 slides: 1 bottle x 15 mL
Products with 24 slides: 2 bottles x 15 mL
Spike-in microRNA Kit v2 (product# 208041)
52 synthetic 5’-phosphorylated microRNAs, dried-down, 2 x 24 reactions
Additional required material
miRCURY LNA™ microRNA Power Labeling Kit or miRCURY LNA™ microRNA Hi-Power
Labeling Kit
Fluorescent labeling of microRNAs from total RNA samples ready for hybridization on arrays
(product 208033,208034, 208035).
For manual hybridization
Microarray Hybridization Chamber - SureHyb (Agilent product# G2534A)
Hybridization Gasket Slide Kit (Agilent product# G2534-60003)
Hybridization oven with rotation. Glass staining jar/dish or equivalent.

5
microRNA ARRAY KIT · Instruction Manual
miRCURY LNA™ microRNA Array layout
The array is located on a standard-sized slide as illustrated in the drawing below (25.4 mm
by 76.2 mm or 1 in by 3 in). The array carries the following specifi cations:
• Outer dimensions: 13 mm wide, 1.1mm thick by 53 mm long
• 36 sub-arrays
• Spot size: 100 µm
• Distance between spots: 185 µm
Figure 1.
To assist in orientation of the array and positioning of the image analysis grid, Hy3™ fl uorescent
labeled “landing lights” are present in all 4 corners plus one extra in lower right corner of
the 36 sub-arrays, 180 total. The slides are compatible with all major brands of microarray
scanners, that take glass slides of the above described specifi cations (1 x 3 inches, not
Affymetrix and Illumina scanners).
The miRCURY LNA™ microRNA Array, REV (Figure 1, middle image) which is accommodating
MAUI®/NimbleGen™ mixers and hybridization stations is printed on the opposite side of the
barcode. The miRCURY LNA™ microRNA Array, 7th gen v.2 (Figure 1, bottom image) is printed
on new slide substrate and results are not directly comparable to old 7th gen arrays.
7 mm
13 mm
53 mm
6 mm
15 mm
9 mm
Products 7th generation – hsa, mmu & rno208500208501208502
7 mm
13 mm
53 mm
6 mm
15 mm
7 mm
Products 7th generation v.2 – hsa, mmu & rno208504208505208506
7 mm
Products 7th generation REV – hsa, mmu & rno208520208521208522
13 mm
53 mm
6 mm
15 mm

6
microRNA ARRAY KIT · Instruction Manual
Array probes specifi cations
Tm-normalized capture probes
The miRCURY LNA™ microRNA Array slides contain capture probes complementary to mature
microRNAs registered in miRBase. The capture probes are Locked Nucleic Acid (LNA™)
enhanced oligonucleotides. By varying the LNA™ content and length, the capture probes are
Tm-normalized to hybridize optimally under the conditions described in this protocol.
Coverage of probe set
The slides contain capture probes for most microRNAs in human, mouse, rat and their related
viruses as annotated in miRBase Release 19.0. Please go to www.exiqon.com/array to see
the coverage in respect to the latest version of miRBase. In addition, a number of capture
probes are available for detection of microRNAs not included in miRBase. These miRPlus™
probes give researchers access to information unavailable elsewhere.
Please go to our online microRNA resource at
www.exiqon.com/gal-downloads to:
• Download species-specifi c GenePix® Array Lists (GAL) fi les, consistent with the latest
updates to miRBase. Please note the product number and lot# on the array slide box and
on the slide pouch. This number is needed to identify the GAL fi le.
Control capture probes
A number of control capture probes are included in the probe set.
• Spike-in control probes to ensure optimal labeling and hybridization.
• Negative control capture probes.
• Capture probes complementary to small nuclear RNAs.
Please see table on the next page for details.

7
microRNA ARRAY KIT · Instruction Manual
List of control probes
Probe ID Positive controls Aliases Validated in these
organisms
46202 5S_rRNA - hsa
145659 RNU1 U1; HSD1; RNU1; U1A1; HU1-1;
RNU1A; RNU1A3; RNU1G4; Rnu1a1
hsa, mmu
145657 RNU5 U5a; Rnu5a hsa, mmu
11278 RNU6-1 U6; RNU6; RNU6A hsa, mmu, rno
11279 RNU6-1/RNU6-2 U6; RNU6; RNU6A / U6; RNU6B hsa, mmu, rno
19011 SNORD10 mgU6-77 hsa
145661 SNORD65 HBII-135 mmu
19005 SNORD118 U8 hsa
19606 SNORD12 HBII-99 hsa
19603 SNORD13 U13 hsa
19013 SNORD14B U14; U14B; RNU14B hsa
19607 SNORD15A U15A; RNU15A hsa
19008 SNORD2 R39B; SNR39B hsa
19007 SNORD3@ U3; U3A; U3B hsa
46204 SNORD38B U38B; RNU38B hsa
46206 SNORD44 U44; RNU44 hsa
46205 SNORD48 U48; RNU48 hsa
46203 SNORD49A U49; U49A; RNU49 hsa
19604 SNORD4A Z17A; RNU101A; mgh18S-121 hsa
19605 SNORD6 mgh28S-2412 hsa
145663 SNORD68 HBII-202 mmu
46197 SNORA66 U66 hsa
145666 SNORD110 HBII-55 mmu
Probe ID Negative controls Validated negative control in these organisms
14258 hsa_negative_control-1 hsa, mmu, rno
14259 hsa_negative_control-2 hsa
14260 hsa_negative_control-3 hsa, mmu, rno
14266 hsa_negative_control-4 hsa, mmu, rno
10901 hsa_negative_control-6 hsa, mmu, rno
10902 hsa_negative_control-7 hsa, mmu, rno
10903 hsa_negative_control-8 hsa, mmu, rno
List of control probes: The different control capture probes were compared against the genomic sequence of hsa, mmu and
rno, with the BLAST tools at www.ensembl.org. The right column show species for which the positive control probes have
a perfect sequence match. Negative probes are listed with species for which they are designed as mismatch sequences.

8
microRNA ARRAY KIT · Instruction Manual
Some capture probes have been optimized from previous versions of the miRCURY
LNA™ Array. These will appear with a new probe ID on this array compared to earlier
versions. For more details about comparisons to older versions of the arrays, please contact
Exiqon: www.exiqon.com/contact.
How to use the Spike-in microRNAs
The miRCURY LNA™ microRNA Array Spike-in Kit v2 contains 52 different synthetic unlabeled
microRNAs in different concentrations. The set can be spiked into an RNA sample prior to
labeling and the synthetic Spike-in Kit v2 will hybridize to corresponding capture probes on the
miRCURY LNA™ microRNA Array. Spike-in microRNAs added in equal amounts to the different
labeling reactions before hybridization can be used to improve the data quality, as control
for the labeling reaction or in calibrating the scanner settings as well as for assessing the
technical variability between different parts of the array:
• If the variation between replicates of each of the four spike-in controls exceed 20-25%,
it could be an indication of insuffi cient agitation of the sample, often seen as a gradient in
the signal.
• Inter- as well as intra correlations between all 52 spike-in microRNAs are normally within
0.950 and 0.999 (R2).
The Spike-in microRNA Kit v2 has been designed and tested not to cross-react with endogenous
microRNAs from human, mouse or rat, and is provided at concentrations compatible with
endogenous microRNA expression levels. The Spike-in Kit v2 is supplied with different
concentrations of synthetic spike-in microRNAs aimed at spanning the whole intensity range
of microRNAs in most tissue samples.
In the GAL-fi le, only capture probes relevant to the species in question are annotated with
a name. Probes that do not have a name could be designed for another species, internal
controls or obsolete probes no longer in use. Some of these may show signal although
they are not annotated, but they should be ignored in the analysis.
Important note

9
microRNA ARRAY KIT · Instruction Manual
Each spike-in microRNA has 4 replicates of capture probes on the array. Four of the capture
probes (ID # 27968, 28568, 28684 and 29001) are printed in two diagonals in each of the 36
subgrids (see fi gure 2). For details of the signal distribution from the spike-in capture probes,
see tip 10 on page 40.
List of capture probes for Spike-in microRNA Kit v2.
Probe ID Name
1100 spike_control_v2_1
13186 spike_control_v2_2
13367 spike_control_v2_3
13371 spike_control_v2_4
13388 spike_control_v2_5
13389 spike_control_v2_6
13393 spike_control_v2_7
13417 spike_control_v2_8
13421 spike_control_v2_9
13430 spike_control_v2_10
24127 spike_control_v2_11
24136 spike_control_v2_12
24163 spike_control_v2_13
24199 spike_control_v2_14
24217 spike_control_v2_15
24226 spike_control_v2_16
25557 spike_control_v2_17
25593 spike_control_v2_18
25611 spike_control_v2_19
25728 spike_control_v2_20
26160 spike_control_v2_21
27291 spike_control_v2_22
27318 spike_control_v2_23
27350 spike_control_v2_24
27676 spike_control_v2_25
27821 spike_control_v2_26
Probe ID Name
27833 spike_control_v2_27
27953 spike_control_v2_28
27968 spike_control_v2_29*
28038 spike_control_v2_30
28098 spike_control_v2_31
28393 spike_control_v2_32
28444 spike_control_v2_33
28488 spike_control_v2_34
28568 spike_control_v2_35*
28581 spike_control_v2_36
28684 spike_control_v2_37*
28876 spike_control_v2_38
28929 spike_control_v2_39
29001 spike_control_v2_40*
29056 spike_control_v2_41
29138 spike_control_v2_42
29146 spike_control_v2_43
29544 spike_control_v2_44
29564 spike_control_v2_45
29837 spike_control_v2_46
30147 spike_control_v2_47
30207 spike_control_v2_48
30293 spike_control_v2_49
30747 spike_control_v2_50
30756 spike_control_v2_51
32812 spike_control_v2_52
List of Spike-in microRNA Kit v2 capture probes and their probe ID’s:
* Indicates that these probes are printed in two diagonals in all subgrids. 72 + 4 replicates in total (see fi gure 2 for layout
overview). The different control and spike-in microRNA capture probes were compared against the genomic sequence of
hsa, mmu and rno, with the BLAST tools at www.ensembl.org.

10
microRNA ARRAY KIT · Instruction Manual
Scanner settings and array orientation
4 of the spike-in control probes (marked with * on page 9) are located in two diagonals, each
in a total of 72 replicas. When scanning the images, these spike-in capture probes can be
used to determine appropriate scanner settings. If the spike-in mix is added in equal amounts
to both RNA samples, the signal from the spike-in capture probes should be similar in both
channels after scanning for dual color experiments. First fi nd a laser power setting that gives
the expected signal range and then adjust PMT settings so that both channels give similar
signal in the spike-in capture probes.
The landing lights (annotated as Hy3™ in the gal-fi le, probe ID 13138) should not be used
for fi nding the proper scanner settings as these spots contain dye spotted directly on the
arrays. The intensity of these spots may vary from batch to batch of slides. These spots are
only included for gal-fi le orientation, and their corresponding data points should be removed
prior to normalization of the dataset.
Figure 2. The location of spike-in capture probes in each subgrid on miRCURY LNA™ Arrays. The green spots are the
Hy3™ landing lights. The red spots in the diagonal are probe # 29001, 28684, 28568 and 27968 counting from upper left,
targeting complementary RNAs in the Spike-in microRNA v2 Kit.
Std probes (4 replicates)
Landing light
Control probes (replicates in all 72
subgrids)

11
microRNA ARRAY KIT · Instruction Manual
Storage
miRCURY LNA™ microRNA Arrays should be stored desiccated at room temperature and
protected from light. When properly stored, the arrays will remain hybridization competent
for at least 6 months from production date. The arrays are shipped in desiccated, re-sealable
storage pouches that are ideal for this purpose. Both the storage pouches and slide storage
boxes are manufactured from materials that minimize outgassing and effectively block
exposure to foreign contaminants that can elevate background levels.
When accessing arrays, remove only the arrays you plan to immediately use and return the
remaining arrays to the pouch quickly, leaving the desiccant pack in place.
Dissolve the miRCURY LNA™ Array Spike-in microRNA Kit v2 in 30 µL/vial of RNase free water
(supplied) upon receipt. Vortex to thoroughly dissolve the lyophilized RNA, pulse briefl y in a
microfuge, and leave the suspension on ice for 30 min. to dissolve. Vortex and then spin to
collect tube contents.
Store the dissolved Spike-in microRNA at –20°C until use and avoid repeated
cycles of freeze/thawing. You may wish to aliquot the dissolved spike-in microRNAs
to avoid repeated freeze/thawing. For long-term storage, keep the vial at –80°C. If stored
properly, shelf life for the miRCURY LNA™ Array Spike-in microRNA Kit v2 is 6 months. In
solution, the shelf life for the spike-in microRNAs is 3 months.

12
microRNA ARRAY KIT · Instruction Manual
CIP treatment Mix:
RNA sample, CIP buffer, Spike-In microRNA and CIP enzyme
Labeling reaction Mix:
CIP treated RNA sample, Labeling buffer, Hy3™ or Hy5™, DMSO,
Enzyme
Mix samples Dual color mix:
Hy3™ labeled sample, Hy5™ labeled sample, Hybridization buffer
Denature sample
Single color mix:
Hy3™ labeled sample, Hybridization buffer
Denature sample
miRCURY LNA™ microRNA Array Kit
Hybridize Hybridize at 56°C for 16 hours
Stringency wash Wash 2 min. in buffer A at 56°C
Wash 2 min. in buffer B at 23°C
Wash 2 min. in buffer C at 23°C
Dry slides
Image acquisition Scan slides (recommended scan at 10µm), Download relevant GAL
fi les from www.exiqon.com/gal-downloads
Protocol overview
Workfl ow for the complete microRNA array experiment combining the sample labeling and
array hybridization protocol.
miRCURY LNA™ microRNA Hi-Power Labeling Kit
13
microRNA ARRAY KIT · Instruction Manual
Tip: For a visual presentation of the labeling procedure and a manual hybridization, please
view the instructional movie at www.exiqon.com/e-talk.
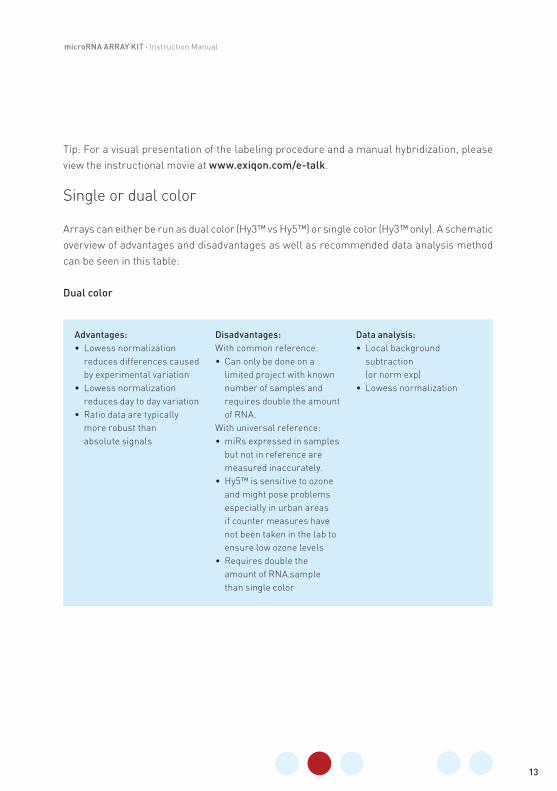
Single or dual color
Arrays can either be run as dual color (Hy3™ vs Hy5™) or single color (Hy3™ only). A schematic
overview of advantages and disadvantages as well as recommended data analysis method
can be seen in this table:
Dual color
Advantages:
• Lowess normalization
reduces differences caused
by experimental variation
• Lowess normalization
reduces day to day variation
• Ratio data are typically
more robust than
absolute signals
Disadvantages:
With common reference:
• Can only be done on a
limited project with known
number of samples and
requires double the amount
of RNA.
With universal reference:
• miRs expressed in samples
but not in reference are
measured inaccurately.
• Hy5™ is sensitive to ozone
and might pose problems
especially in urban areas
if counter measures have
not been taken in the lab to
ensure low ozone levels
• Requires double the
amount of RNA sample
than single color
Data analysis:
• Local background
subtraction
(or norm exp)
• Lowess normalization

14
microRNA ARRAY KIT · Instruction Manual
Single color
Experimental design
If running a single color experiment, each sample has to be labeled with Hy3™, and hybridized
to individual arrays. For dual color experiments, it is recommended that each sample is labeled
with Hy3™ and that the reference is labeled with Hy5™. As reference we recommend to use
either a common reference or a universal reference.
Advantages:
• Enables comparison across
experiments
• Ability to add more samples
to an experiment later
Disadvantages:
• Requires extremely high
lab standards and very
reproducible handling of
samples
• Experiments performed
over a large time span are
sensitive to minor lot to
lot variations
Data analysis:
• Local background
subtraction
(or norm exp)
• Quantile normalization
*Single color is only supported if the RNA is labeled using the miRCURY LNA™ microRNA Array Hi-Power Labeling Kit or
miRCURY LNA™ microRNA ArrayPower Labeling Kit, and Exiqon’s buffers etc.

15
microRNA ARRAY KIT · Instruction Manual
Before starting the experiment
Total RNA should be prepared using a method that preserves small RNA species. When
using commercially available kits, please verify that the total RNA preparation contains small
molecular weight RNAs. We recommend using the miRCURY™ RNA Isolation Kits for total
RNA preparations. For labeling, we recommend that you use miRCURY LNA™ microRNA
Hi-Power Labeling Kit or miRCURY LNA™ microRNA Power Labeling Kit. Please visit
www.exiqon.com to learn more about these products.
The amount of total RNA to be labeled for an array hybridization depends on the microRNA
content of the cells or tissue being analyzed. Without prior knowledge of microRNA content in
the sample, we recommend using between 250 ng and 1 μg of total RNA per labeling reaction
depending on labeling kit used.
Prior to performing the labeling, dissolve the fl uorescent dye(s) by adding 29 µL of nuclease-free
water (we recommend to use DEPC (diethylpyrocarbonate) treated water) to the tube with the
labeling dye, followed by vortexing and a brief centrifugation to collect the content of the tube.
Dissolve the spike-in microRNAs in 30 µL of RNase free water supplied upon receipt. Leave
the suspension on ice for 30 minutes to dissolve. Vortex and then spin to collect tube contents.
Store the dissolved Spike-in microRNA at –20°C until use and avoid repeated cycles of freeze/
thawing. You may wish to aliquot the dissolved spike-in microRNAs to avoid repeated freeze/
thawing. For long-term storage, keep the vial at –80°C.
Labeling Protocol (Product # 208033, 208034, 208035)
Minor lot variations of the labeling dyes may occur. For optimal performance of dual
color hybridization with Hy3™ and Hy5™ labeled RNA, it is recommended to use
matched pairs of Hy3™ and Hy5™ labels. The miRCURY LNA™ microRNA Array,
Hi-Power Labeling Kit (product # 208035) always contain matching pairs of dyes.
See Tip 1
Important note
16
microRNA ARRAY KIT · Instruction Manual
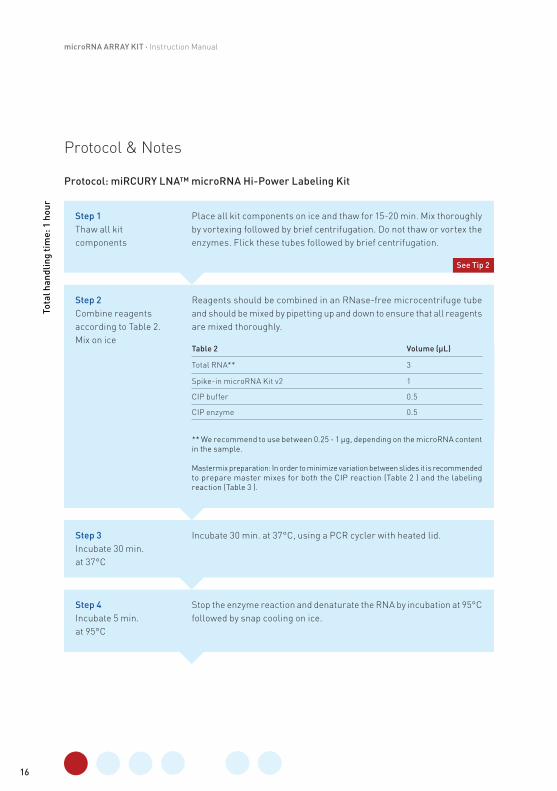
Protocol & Notes
Protocol: miRCURY LNA™ microRNA Hi-Power Labeling Kit
To
tal
ha
nd
lin
g t
ime
: 1
ho
ur
Step 1
Thaw all kit
components
Place all kit components on ice and thaw for 15-20 min. Mix thoroughly
by vortexing followed by brief centrifugation. Do not thaw or vortex the
enzymes. Flick these tubes followed by brief centrifugation.
Step 3
Incubate 30 min.
at 37°C
Incubate 30 min. at 37°C, using a PCR cycler with heated lid.
Step 4
Incubate 5 min.
at 95°C
Stop the enzyme reaction and denaturate the RNA by incubation at 95°C
followed by snap cooling on ice.
Step 2
Combine reagents
according to Table 2.
Mix on ice
Reagents should be combined in an RNase-free microcentrifuge tube
and should be mixed by pipetting up and down to ensure that all reagents
are mixed thoroughly.
** We recommend to use between 0.25 - 1 µg, depending on the microRNA content
in the sample.
Mastermix preparation: In order to minimize variation between slides it is recommended
to prepare master mixes for both the CIP reaction (Table 2 ) and the labeling
reaction (Table 3 ).
** W d t b t 0 25 1 d di th i RNA t t
Table 2 Volume (µL)
Total RNA** 3
Spike-in microRNA Kit v2 1
CIP buffer 0.5
CIP enzyme 0.5
See Tip 2

17
microRNA ARRAY KIT · Instruction Manual
Step 7
Mix and centrifuge the
reagents briefl y
Reagents should be mixed by gentle vortexing or by pipetting up and
down to ensure that all reagents are mixed thoroughly.
Step 9
Incubate for
15 min. at 65°C
After stopping the labeling procedure, briefl y spin the reaction and leave
it at 4°C. The labeled sample is now ready for hybridization on the array.
Hybridization should preferably occur within 1-2 h. Protect the labeled
samples from light as much as possible.
Step 6
Combine reagents
listed in Table 3.
Mix on ice
Add the reagents listed in Table 3 to the 5 µL CIP reaction from step 5.
Mastermix preparation: In order to minimize variation between slides it is recommended
to prepare master mixes for both the CIP reaction (Table 2) and the labeling
reaction (Table 3).
Mastermix preparation: In order to minimize variation between slides it is recommended
Table 3 Volume (µL)
CIP reaction from step 5 5
Hi-Power Labeling buffer 3
Fluorescent label (Hy3™ or Hy5™) 1.5
DMSO 2
Hi-Power Labeling enzyme 1
Step 8
Incubate 2 hours
at 16°C
Incubate for 2 hours at 16°C, using a PCR cycler with heated lid. Protect
the reaction from light.
Step 5
Incubate 2 min.
on ice
Leave on ice for at least 2 min. and up to 15 min. Briefl y spin the reaction
after incubation on ice.
18
microRNA ARRAY KIT · Instruction Manual
Hybridization Protocol
Hybridization and washing using Tecan HS Pro™ hybridization stations
Before starting the experiment
For labeling, we recommend using the miRCURY LNA™ microRNA Hi-Power Labeling Kit (see
page 15-17). Please visit www.exiqon.com to learn more about this product.
The amount of total RNA to be labeled for an array hybridization depends on the microRNA
content of the cells or tissue being analyzed. Without prior knowledge of microRNA content in
the sample, it is recommended using between 250 ng and 1 μg of total RNA per labeling reaction.
Check the hybridization buffer for any precipitate. If necessary, warm the solution at 56°C and
agitate to dissolve the precipitate completely.
Please refer to the instruction manual of your hybridization station for correct volume of
buffers required to perform the hybridization.
The volumes in Table 1 on page 19 apply to the hybridization of 4 slides in a Tecan HS400/
HS4800 hybridization station.
We recommend using Tecan hybridization chamber 57*21 mm HS4800 Pro. (Catalogue number
30019211 for a set of 12).
19
microRNA ARRAY KIT · Instruction ManualT
ota
l h
an
dli
ng
tim
e:
1 h
ou
r
Protocol
Step 1
Combine the
labeled sample(s)
If running a dual color experiment, the two samples from the Hy3™ and
Hy5™ labeling reactions are combined on ice.
If the experiment is single color, 12.5 µL RNase free water is added to
the labeled sample. Total volume should be 25 µL.
Step 4
Incubate 2 min.
on ice
Leave on ice for at least 15 min. and up to 90 min. Briefl y spin the reaction
after ice incubation.
Step 5
Preparation of Tecan
Load slides in hybridization chambers. Set the program for the hybridization
station: Prewash the slides with preheated wash buffer A. Temperature
56°C, Wash time: 30 sec., Soak time: 0 sec.
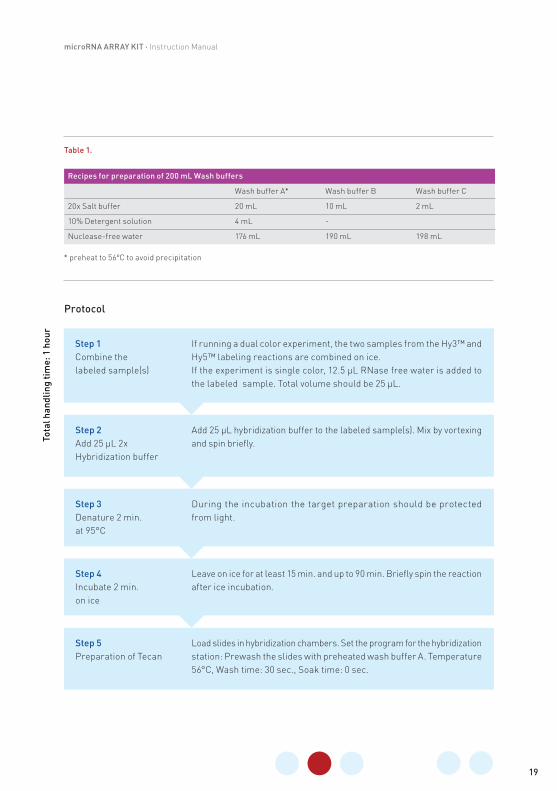
Recipes for preparation of 200 mL Wash buffers
Wash buffer A* Wash buffer B Wash buffer C
20x Salt buffer 20 mL 10 mL 2 mL
10% Detergent solution 4 mL -
Nuclease-free water 176 mL 190 mL 198 mL
Table 1.
* preheat to 56°C to avoid precipitation
Step 3
Denature 2 min.
at 95°C
During the incubation the target preparation should be protected
from light.
Step 2
Add 25 µL 2x
Hybridization buffer
Add 25 µL hybridization buffer to the labeled sample(s). Mix by vortexing
and spin briefl y.

20
microRNA ARRAY KIT · Instruction Manual
Step 9
Two runs of wash at
56°C for 1 min.
using Wash buffer A
Set the program for the hybridization station: Temperature 56°C,
Wash time: 1 min., Soak time: 1 min.
Step 10
Two runs of wash at
23°C for 1 min.
using Wash buffer B
Set the program for the hybridization station: Temperature 23°C,
Wash time: 1 min., Soak time: 1 min.
Step 11
Two runs of wash at
23°C for 1 min.
using Wash buffer C
Set the program for the hybridization station: Temperature 23°C,
Wash time: 1 min., Soak time: 1 min.
Step 12
Wash at 23°C for 30 sec.
using Wash buffer C
Set the program for the hybridization station: Temperature 23°C,
Wash time: 30 sec., Soak time: 0 sec.
Step 13
Dry slides
Set the program for the hybridization station: Slide drying for 5 min.
Step 7
Inject reaction mixture
Inject the 50 µL target preparation to the hybridization station. In order
to fl ush the injection inlet, it is recommended to inject 10µL 1x diluted
Hybridization buffer after target injection.
Step 8
Incubate 16 hours
at 56°C
Set the program for the hybridization station:
56°C and 16 hours incubation. Agitation should be set to medium, if
possible.
Step 6
Flush hyb chamber
with 1x Hybridization
buffer
The slide chamber in the hybridization station should be primed. Check
the appropriate volume of the chamber in the suppliers manual and add
1x diluted Hybridization buffer. Dilute with water. (e.g. use 100 µL for a
Tecan HS400/HS4800).
See Tip 5

21
microRNA ARRAY KIT · Instruction Manual
Hybridization and washing using an Agilent Hybridization SureHyb Chamber Kit and Gasket Slide KitFor optimal quality, it is recommended to use an automatic hybridization station, e.g. Tecan
HS Pro hybridization station (see procedure at page 19-20). If a hybridization station is not
available, manual hybridization can be carried out according to the protocol in this section
using an Agilent Hybridization SureHyb Chamber Kit and Gasket Slide Kit. Please contact
www.exiqon.com/contact for an alternative protocol using cover slip.
Additional required materials:
Hybridization Chamber Kit - SureHyb enabled, Agilent part # G2534A
Hybridization Gasket Slide Kit (5) - 1 microarray per slide format, Agilent part # G2534-60003
Hybridization oven with rotation (e.g. SciGene, # 400 or Agilent).
Ethanol 99%
Hybridization chamber user guide (G2534-90002)
Before starting the experiment, day 1
We recommend using the miRCURY LNA™ microRNA Hi-Power Labeling Kit for labeling of
your sample(s). Please visit www.exiqon.com to learn more about this product.
Check the hybridization buffer for any precipitate. If necessary, warm the solution at 56°C and
agitate to dissolve the precipitate completely.
22
microRNA ARRAY KIT · Instruction Manual
Before starting the experiment, day 2
Glass staining jar/dish and Wash buffer A should be placed at 56°C before starting the
experiments on day 2.
If one or two miRCURY LNA™ microRNA Arrays are processed together in an experiment, the
arrays could be washed in a 50 mL screw-top tube (e.g. Falcon) by gently inverting the tube. If
three or more miRCURY LNA™ microRNA Arrays are processed in an experiment, the arrays
could be placed in a slide rack and washed in a glass staining jar/dish. Use an appropriate
volume of washing buffer to cover the slides and shake gently. The volumes in Table 2 below
are required for a large glass staining dish (8 slides, Sigma-Aldrich product # S-S6016 or
similar). The following protocol is for hybridization of miRCURY LNA™ microRNA Arrays using
a Agilent Hybridization chamber - SureHyb.
An instructional video on how to perform the hybridization using SureHyb Chambers can be
found here: www.exiqon.com/e-talk
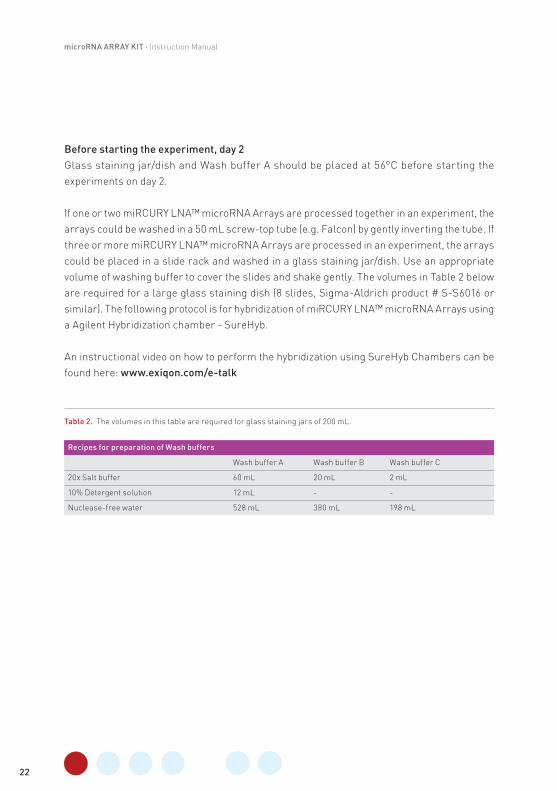
Table 2. The volumes in this table are required for glass staining jars of 200 mL.
Recipes for preparation of Wash buffers
Wash buffer A Wash buffer B Wash buffer C
20x Salt buffer 60 mL 20 mL 2 mL
10% Detergent solution 12 mL - -
Nuclease-free water 528 mL 380 mL 198 mL
23
microRNA ARRAY KIT · Instruction ManualT
ota
l h
an
dli
ng
tim
e:
1 h
ou
r
Protocol
Step 1
Prepare the labeled
sample(s)
Adjust the volumes of the labeled sample to 200 µL by adding nuclease free
water to the labeled sample(s) (kept on ice). If running a dual color experiment,
combine the two samples from the Hy3™ and Hy5 ™ labeling reactions before
adjusting the volume.
Step 2
Add 200 µL
2x hybridization buffer
If there is precipitation in the Hybridization buffer, then warm the solution
at 56°C and agitate to dissolve. Add 200 µL to the labeled sample(s). Mix
by vortexing and spin briefl y.
Step 4
Incubate 2 min. on ice
Leave on ice for at least 2 min. and up to 15 min. Briefl y spin the reaction
after ice incubation.
Step 5
Add 400 µL to reservoir
Add 400 µL of the target sample mixture to the reservoir of backing
gasket slides. Place the slide on top of the the backing gasket slides
with the array side facing the target samples.
Step 6
Incubate 16 hours
at 56°C
Clamp the array/backing slide sandwich into the SureHyb hybridization
chambers and make sure all bubbles move freely. Incubate at 56°C for
16 h. in a hybridization oven with rotation (e.g. SciGene, #400).
Step 7
Place Wash buffer A
at 56°C overnight
Pre-warm the glass staining jar/dish and Wash buffer A by placing
them at 56°C.
Step 3
Denature 2 min.
at 95°C
During the incubation the target preparation should be protected
from light.

24
microRNA ARRAY KIT · Instruction Manual
Step 11
Wash briefl y at room
temperature in
Wash buffer B
The slide is washed briefl y (one plunge) in Wash buffer B (at RT) to avoid
transfer of detergent to the next wash step.
Step 12
Wash 2 min. at room
temperature in
Wash buffer B
The slide is washed at room temperature by plunging gently for 2 min.
in a new glass staining jar/dish/Falcon tube in Wash buffer B.
Step 13
Wash 2 min. at room
temperature in
Wash buffer C
The slide is washed at room temperature by plunging gently for 2 min.
in a new glass staining jar/dish/Falcon tube in Wash buffer C. Remove
slides very slowly from the buffer in order to let the buffer run off.
Step 9
Collect slides in
Wash buffer A
Slides are placed in a submerged slide rack in a new jar with 56°C
Wash buffer A until all slides are disassembled. Make sure the slides
are kept fully submerged during washing steps, and don’t let the slides
dry in between steps.
Step 14
Wash briefl y in
99% Ethanol
Transfer the slide rack to a new staining dish with 99% Ethanol
at room temperature. Wash the slides very briefly by plunging
the rack gently up and down in the ethanol for a few seconds.
Remove slides very slowly in order for the ethanol to drain.
Step 10
Wash 2 min. at 56°C
in Wash buffer A
Immerse the slides in the prewarmed Wash buffer A and wash slides
by plunging gently for 2 min.
Step 8
Disassemble
hybridization chamber
Remove array/backing slide sandwich fromSureHyb hybridization
chamber. Submerge the sandwich into a jar containing 56°C Wash buffer
A and separate the slides from the backing slide using a plastic forceps.

25
microRNA ARRAY KIT · Instruction Manual
Hybridization and washing using NimbleGen/ MAUI® 4-Bay or 12-Bay hybridization stations
This Protocol provides information for the use of Exiqon miRCURY LNA™ Arrays with the
NimbleGen/ MAUI® Hybridization System using a NimbleGen HX1 mixer. The protocol is
designed for the arrays that are printed on the opposite side of the slide compared to the
barcode (prod. # 208520, 208521 and 208522).
The NimbleGen/ MAUI® Hybridization System is comprised of two main components, the
disposable NimbleGen Mixer hybridization chambers and NimbleGen/ MAUI® instrument that
powers the mixing bladders in the Mixer and maintains a constant incubation temperature. The
NimbleGen Mixer adheres to the microarray slide via an adhesive gasket forming a uniform,
low volume, sealed hybridization chamber. Once attached, the Mixer-slide is clamped into one
of the heated slide bays in the base unit, where hybridization takes place. For details about
using the NimbleGen/ MAUI® Hybridization System please see the User’s Guide that come
with the Hybridization System.
Step 15
Dry the slide(s)
Dry the slides by centrifugation for 5 minutes at 1000 rpm. At this stage
the fl uorophores on the slides are very susceptible to degradation by
ozone in atmospheric air. Keep ozone-induced photo bleaching to a
minimum by working in an ozone free lab or keeping the slides under a
controlled atmosphere. Scan slides immediately after drying.
See Tip 6

26
microRNA ARRAY KIT · Instruction Manual
Additional required materials:
RNA samples (labeled with miRCURY LNA™ Hi-Power Labeling Kit)
NimbleGen HX1-mixers
NimbleGen Precision mixer alignment tool (PMAT)
NimbleGen Mixer Disassembly Tool
NimbleGen Gasket brayer
Positive Displacement Pipette (optional, but highly recommended)
Wide pipette tips (see fi lling video at www.exiqon.com)
7 Rectangular Staining Dishes, 250 mL, w/slide washing racks
(e.g. Wheaton # 900200 /VWR# 25461-003).
Heating block set to 56°C.
Oven set to 56°C.
Before starting the experiment, day 1
We recommend using the miRCURY LNA™ microRNA Hi-Power Labeling Kit for labeling of
your sample(s). Please visit www.exiqon.com to learn more about this product.
Check the hybridization buffer for any precipitate. If necessary, warm the solution at 56°C
and agitate to dissolve the precipitate completely prepare the wash buffers and leave min.
500 mL Wash Buffer A in an oven at 56°C over night. Leave 2 Rectangular Staining Dishes in
the oven at 56°C as well.
Table 2. The volumes in this table are required for glass staining jars of 200 mL.
Recipes for preparation of Wash buffers
Wash buffer A Wash buffer B Wash buffer C
20x Salt buffer 60 mL 20 mL 2 mL
10% Detergent solution 12 mL - -
Nuclease-free water 528 mL 380 mL 198 mL

27
microRNA ARRAY KIT · Instruction Manual
Protocol
Step 2
Prepare the labeled
sample(s
If running a dual color experiment, the two samples from the Hy3™ and
Hy5™ labeling reactions are combined on ice. If the experiment is single
color, 12.5 µL RNase free water is added to the labeled sample. Total volume
should be 25 µL.
Step 1
Attach the NimbleGen
HX1-mixer to the
miRCURY LNA™ Array
For details on how to assemble the mixer and the array slide please
see the NimbleGen User’s Guide. Briefl y:
Remove the miRCURY LNA™ Array from the slide box.
Insert the array slide in the PMAT with the barcode facing down and
away from the hinge.
Place the HX1 mixer in the lid of the PMAT with the end of the mixer
towards the hinge and the mixer’s adhesive gasket facing outward.
Remove the protective lining from the mixer using a forceps and close
the lid of the PMAT and carefully press the mixer.
Remove the mixer-slide assembly from the PMAT and place the
assembly with the mixer side up on a heating block at 56°C for 5 min.
Use the NimbleGen Gasket brayer and moderate pressure to ensure
good mixer to slide adhesion.
Leave the mixer-slide assembly with the mixer side upon the heating
block at 56°C. The sample must be loaded onto the 56°C-heated slide
within 30 min of assembly.
Step 3
Add 25 µL
2X Hybridization buffer
Add 25 μL 2X Hybridization buffer to the labeled sample(s). Mix by
vortexing and spin briefl y. Final volume 50 μL.
See Tip 3
Step 4
Denature 2 min.
at 95°C
During the incubation the target preparation should be protected
from light.

28
microRNA ARRAY KIT · Instruction Manual
Step 5
Cool 2 min. on ice
Leave on ice for at least 2 min. and up to 15 min. Briefl y spin the reaction
after ice incubation. Heat the sample to 56°C for 2 min. prior to loading
into the slide-mixer assembly.
Step 6
Load the sample into
the pre-heated
HX1-mixer-slide
assembly
Briefl y spin the pre-heated sample prior to opening the tube. Aspirate
45 μL of sample into the pipette by pipetting up and down a few times
(avoid bubbles).
Insert the pipette tip into the fi ll port in the tab-end of the HX1-mixer and
carefully inject the sample into the chamber at a moderate speed until
sample emerges from the vent port (if sample is injected to slowly, a
bubble might form). The actual volume of the HX1-mixer varies slightly
from batch to batch, so do not be alarmed should some of the sample
bubble up from the vent port.
Keep the plunger depressed and remove the pipette tip from the fi ll
port. Any excess sample from the fi ll and vent ports are wiped clean
with a tissue.
Using forceps, place adhesive port seals directly over both ports. Use
a fi nger on each port seal and press down fi rmly on both seals
simultaneously to seal the ports.
Step 9
Prepare wash buffers
At room temperature prepare the following washing solutions, each in
a separate staining dish. Add suffi cient liquid to completely cover the
slides when they are placed in a washing rack in the staining dish: Wash
A, B and C buffer according to table 2. Ethanol, 99%.
Step 7
Incubate 16 hours
at 56°C
Place the loaded slide-mixer assembly in one of the bays of a NimbleGen
mixer, close the lid and incubate at 56°C for 16 h with mixing mode B.
Step 8
Preparation of
washing procedure
In preparation of next day’s washing procedure pre-heat min. 500 mL
Wash Buffer A at 56°C overnight. Leave 2 Rectangular Staining Dishes
in the oven at 56°C as well.
29
microRNA ARRAY KIT · Instruction Manual
Step 10
Disassemble
HX1-mixer and slide
Perform the following operations at 56°C by working in the door
opening of an oven:
A. Place the mixer/slide assembly in the Mixer Disassembly Tool
in the heated staining dish and add suffi cient pre-heated Wash
Buffer A to cover it.
B. To the other pre-heated staining dish add suffi cient Wash Buffer
A to completely cover the slides when placed in the washing rack.
C. Remove the HX1-mixer from the slide and quickly insert it into
the submerged washing rack to avoid cooling of the slide.
Step 13
Wash 2 min. at
room temperature
in Wash buffer C
Transfer the slide rack to a new staining dish with Wash Buffer C at
room temperature. Wash the slides for 2 minutes by plunging the rack
gently up and down in the buffer. Remove very slowly from the buffer in
order to let the buffer run off.
Step 12
Wash 2 min. at
room temperature
in Wash buffer B
When all slides have been collected in Wash Buffer B, wash the slides for
additional 2 minutes by plunging the rack gently up and down in the buffer
at room temperature. Make sure the slides are kept fully submerged
during washing steps, and don’t let the slides dry between steps.
Step 11
Wash 2 min. at
56°C in Wash
buffer A
D. Wash the slide for 2 min at 56°C by gentle plunging of the slide rack.
E. Transfer the slide to the rack in Wash Buffer B
F. Repeat steps C to F for each slide in the NimbleGen
Hybridization Station, collecting the slides submerged in Wash
Buffer B at room temperature.
Step 15
Dry the slide(s)
Dry the slides by centrifugation for 5 minutes at 1000 rpm. At this stage the
fl uorophores on the slides are very susceptible to degradation by ozone
in atmospheric air. Keep ozone-induced photobleaching to a minimum
by working in an ozone free lab or keeping the slides under a controlled
atmosphere. Scan slides immediately after drying.
Step 14
Wash briefl y in
99% Ethanol
Transfer the slide rack to a new staining dish with 99% Ethanol at room
temperature. Wash the slides very briefl y by plunging the rack gently up
and down in the ethanol for a few seconds. Remove slides very slowly in
order for the ethanol to drain.
See Tip 6

30
microRNA ARRAY KIT · Instruction Manual
Recommendations for Experimental Set-up and Data Handling
As mentioned earlier (page 13), it is possible to hybridize one sample (i.e. single color) or two
samples (i.e. dual color) to one array. Since microarray expression profi ling without appropriate
standards cannot be used for absolute quantifi cation, expression levels of a microRNA in a
sample can only be determined in comparison to other samples. In single color experiments,
each sample is hybridized to a separate array; the comparison must then occur between arrays.
So far there are no established or thoroughly tested control or housekeeping small ncRNAs
or microRNAs that can be used as common factors for normalization. The only options for
single-color experiments are the use of the characteristic signal distributions, assuming that
the similarity between the samples is high enough to allow normalization, or the use of synthetic
spiked-in microRNAs. A set of spiked-in control microRNAs could also be an option, but again,
it has to be considered that the number of spots used is limited and may thus introduce bias.
A way to enable optimal normalization across arrays is to use dual-color arrays with a common
reference sample or a universal reference on all arrays in the study. Once intra-slide normalization
has taken place, the log2 ratios between sample and reference for each microRNA can be
calculated allowing the immediate direct comparison of all log2 ratios from all slides. The fact
that all microRNA signals are expressed as a ratio to a reference, which should be the same on
each slide, in essence removes technical variations from the comparison.
For help on designing array experiments, an overview can be downloaded from
www.exiqon.com/ls/Documents/Scientifi c/mirna-array-profi ling-guide.pdf.
Protocol
Step 1
Scanning
We are using an Agilent G2505B Microarray Scanner System. The scanning
is normally performed with 10 µm. The sensitivity should be adjusted
to 100% PMT. To avoid ozone bleaching, we scan the microarrays in an
ozone-free environment (less than 2 ppb ozone). Before starting any
analysis, confi rm that the tiff image is in the correct orientation (two
landing lights in lower right corner). Depending on the scanner, the
image may need to be fl ipped from upper left to lower right.
31
microRNA ARRAY KIT · Instruction Manual
Step 2
Spot evaluation and
background subtraction
In general, we recommend using local background subtraction. We
subtract the local median background signal from each spot using the
Exiqon-tailored ImaGene® data analysis software (see www.exiqon.com/
mirna-array-software), When using more advanced background subtraction,
‘Normexp plus offset’ convinced us with satisfying results. We are not
using Feature Extraction software (Agilent) on a routine level. However,
we provide a short protocol for customers who like to use this software
(www.exiqon.com/array).
Step 3
Normalization
When running a dual color experiment we recommend a lowess intra-slide
normalization for the signal intensities of each channel as a minimum.
This eliminates the dye- and label-specifi c variances. In addition, it is
recommended to monitor inter-slide comparability based on the spike-
ins and or signals derived from constantly expressed RNAs. If running
single color experiments we recommend to normalize the data using
the quantile normalization method, as we have found that this generates
the most reliable data.
Both of these normalization methods are supported in the Nexus software.
For details of the Exiqon array data analysis supplied software package
see www.exiqon.com/mirna-array-software.
miRCURY LNA™ microRNA Arrays contain several control capture
probes (e.g. detecting U6 snRNA and snoRNAs) and the signal obtained
from these probes could theoretically be used in normalization after
confi rming the constant expression of these small RNAs under the given
experimental conditions. However, we believe that normalization based
on these very few probes alone is not optimal. Therefore, we recommend
using these control capture probes to monitor the analyzed samples for
uniformity and not for normalization.
In theory, it is possible to use signals from a set of spike-in synthetic
microRNAs (added to each labeling reaction and for which control
capture probes exist) to perform normalization. However, apart from
being something synthetic added to the samples, the use of spike-ins
for normalization focuses on a small number of data points, which is
a problem if the differences between the samples are very large or if
something in the samples themselves affect the synthetic microRNAs
during labeling or hybridization. Exiqon ’s spike-in Kit is supplied with
the array (spike-in microRNA Kit v2, 208041) and contains 52 synthetic
microRNAs and could in theory be used for normalization, although we
recommend using all detection probes instead.

32
microRNA ARRAY KIT · Instruction Manual
Step 4
Data analysis and
visualization
From each spot and each channel the median signal intensity obtained
after image analysis should be measured and normalized (after either local
background subtraction or normexp plus offset background subtraction).
The difference of a normalized and an unnormalized dataset can be seen
in the MA plots on the next page. For each of the normalized four replica
datasets, the ratio between the Hy3 and Hy5 channels is determined.
The way the actual comparison is performed depends on the experimental
setup. For direct comparison, the log ratios can be used directly. For
common /universal reference comparisons log2 differences between
sample are compared indirectly between the slides by using the common
reference as normalizer added up to obtain the difference between the
samples. We recommend using the special tailored Exiqon-offered
Nexus software (see www.exiqon.com/mirna-array-software), that
calculates signifi cant differentially expressed miRs across samples
and visualizes this in heatmaps/cluster diagrams.
Two color intra-slide MA-plots obtained before (left) and after (right) lowess intra-slide normalization.
Colored spots represent spike-ins of different signal intensities.
10
5
0
-5
-10
0 5 10 15
M
10
5
0
-5
-10
0 5 10 15A A

33
microRNA ARRAY KIT · Instruction Manual
Step 5
Data evaluation
We strongly advise users to evaluate the microRNA data for their cluster
and family performance. MicroRNAs which cluster in close proximity are
expected to react similarly in their expression pattern, due to common
transcriptional activity. MicroRNA families can be interesting to analyze
since they may react similarly due to their common target sequences
and help understanding how family members are tissue-specifi cally
regulated. An analysis of how the data of families or clusters correlate
can therefore provide relevant data in addition to the actual microRNA
signal of initial interest. Additionally, a further analysis of potentially
regulated mRNAs targets will be useful. A short list of useful software
and databases can be found on the following page.

34
microRNA ARRAY KIT · Instruction Manual
Software and Databases
Exiqon offers a software package tailored to suit the needs of analysis of the miRCURY LNA™
microRNA Arrays. The easy-to-use software package includes ImaGene® 9 for image analysis
and Nexus Expression™ 3 for array data analysis. Together with the Exiqon specifi c settings
fi le and the Exiqon quick manual, a successful array analysis can be obtained with a few clicks.
Brief descriptions of the two software tools are given below. Further information is available
at www.exiqon.com/mirna-array-software.
ImaGene®
The Exiqon-offered image analysis software ImaGene® 9 places a grid on top of the scanned
array image, and identifi es which probe is located in each spot. The software quantifi es the
signal intensity and the surrounding background. ImaGene® 9 can also be used for basic data
normalization. ImaGene® in our hands outperforms other software regarding precision in
spot recognition and fl agging.
Nexus Expression™
Nexus Expression™ 3 is the miRCURY LNA™ microRNA Array supportive software for statistical
analysis of array profi ling data. Nexus Expression™ 3 is fully compatible with ImaGene® but also
other common image analysis program output formats are supported. Nexus Expression™ 3
allows background subtraction, normalization and visualization of array data. It can combine
the replicated measures of each probe on the arrays into one output value per array and
make statistical calculations of the differentially expressed data obtained by comparing the
microRNA signal data of different array experiments. The active links of the probe-target
information to miRBase allows for easy retrieval of further microRNA information. Additional
information can be found on the Exiqon website at www.exiqon.com/mirna-array-software.
Several other commercial and free software packages for microarray image and data analysis
are also available. A selection of these is listed below. The list is not complete and a more
appropriate solution may be available for certain projects. For a more comprehensive overview
of software packages, it is advised to visit statweb at www.statsci.org/micrarra/index.html.

35
microRNA ARRAY KIT · Instruction Manual
Links to other array software:
Image analysis:
Bzscan - http://tagc.univ-mrs.fr/ComputationalBiology/bzscan/
ScanAlyze - http://rana.lbl.gov/EisenSoftware.htm
Spotfi nder - http://www.tm4.org/spotfi nder.html
Statistical analysis:
Carmaweb - https://carmaweb.genome.tugraz.at/
DChip - https://sites.google.com/site/dchipsoft/downloading-dchip-software
Midas - http://www.tm4.org/midas.html
R/bioconductor / limma - http://www.r-project.org/
http://www.bioconductor.org/ http://bioinf.wehi.edu.au/limma/
Links to additional array analysis software and microRNA software and databases in general
are available at www.exiqon.com/array
36
microRNA ARRAY KIT · Instruction Manual
Experimental procedure
Total RNA should be prepared using a method that retains small RNA species. When using
commercially available kits, please ensure that the total RNA preparation is guaranteed to
contain microRNAs.
We recommend using our miRCURY™ RNA Isolation Kits for total RNA puri fi cation. Procedures
that include acidic phenol chloroform extraction are generally also recognized as methods
that preserve small RNAs. However, we recommend a column purifi cation step following the
phenol:chloroform extraction to remove any trace of these chemicals, as they could potentially
inhibit the labeling reaction. Our miRCURY™ RNA Isolation Kits can be used for this procedure.
The purifi ed total RNA should be dissolved in RNase-free water or TE buffer at a concentration
of no more than 2 µg/µL. It is recommended to assess the integrity of the RNA isolated before
proceed ing with labeling. This may be performed either on the Agilent Bioanalyzer (RIN values
should be above 7) or by denaturing gel electrophoresis. Degraded RNA is generally not
suitable for labeling or for hybridization to microarrays. However, RNA extracted from FFPE
samples does give good results on miRCURY LNA™ arrays. The miRCURY LNA™ microRNA
Hi-Power Labeling Kit can be used for effi cient labeling of both microRNA enriched and total
RNA. However, microRNAs constitute only a small fraction (~0.01%) of the total RNA. Attempts
to purify this small fraction can result in loss of microRNAs or co-purifi cation of larger RNA
species. For this reason, we recommend using total RNA for labeling and hybridization.
The amount of total RNA to be labeled for an array hybridization depends on the microRNA
content of the cells or tissue being analyzed. Without prior knowledge of the microRNA content
we recommend using between 250 ng and 1 μg of total RNA per labeling reaction.
Tips and Trouble Shooting
Tip 1. Preparation of RNA sample

37
microRNA ARRAY KIT · Instruction Manual
We recommend to label all samples at one time to avoid day-to-day variations. The labeled
samples can be stored at -80°C and successive hybridizations. Labeled samples are stable
at -80°C for up to 3 months.
We recommend that you follow the standard instruction manual for the labeling reaction,
which will yield 50 µL (if running dual color). To minimize the number of handling steps
through which the concentration of microRNAs may be compromised, we recommend loading
45 µL of the sample into the NimbleGen HX1 mixer without a concentration/purifi cation
step; However if high fl uorescent background is repeatedly observed, you may purify the
labeling reactions to remove unincorporated dyes. For purifi cation and/or concentration
of the sample we recommend miRCURY™ RNA Isolation Kits, alternatively either ethanol
precipitation or the RNeasy Mini Kit.
Due to the bleaching effect of ozone on Hy5™ it is important to fi nish the concentration of
the labeling reaction in the shortest amount of time possible.
Ethanol precipitation:
The combined labeling reaction can be concentrated by either ethanol precipitation as
shown below:
• Add 1/10 vol RNase free sodium acetate (3M, PH 5.5) to the 25 μl labeling reaction + 3
vol 100% ethanol
• Incubate the sample at –20°C for 20 minutes
• Centrifuge 20 minutes at > 12000g at 4°C
• Remove supernatant and wash the pellet with 200 μl 80% precooled ethanol (-20°C)
• Centrifuge 5 minutes at > 12000g at 4°C
• Remove supernatant and let the pellet dry for 5 minutes
• Dissolve in a mixture of 20 μl: 3.2 μl DMSO, 12 μl H2O and 4.8 μl labeling buffer
miRCURY™ RNA Isolation Kits
• Please refer to the miRCURY™ RNA Isolation Kit manual for an RNA
concentration protocol.
Tip 2. Working with large sample numbers
Tip 3. Concentration and purifi cation of the labeling reaction

38
microRNA ARRAY KIT · Instruction Manual
If you are concerned about introducing microscopic solid particles onto your array, then fi lter
the sample through a Millipore 0.22 Ultrafree-MC Centrifugal Filter (product # UFC30GV0S):
Wet the fi lter with 20 µL Nuclease-free water, spin 1 min. at 12,000 rpm and remove water.
Add the target preparation and repeat the centrifugation. The fl ow-through contains the
labeled sample(s).
In order not to lose any target when using automated hybridization stations, it is recommended
that you inject a volume smaller than the total volume of the hybridization chamber. The mixing
mechanism of the hybridization station will ensure that the injected sample will be distributed
equally across the entire array. To ensure that the composition of the hybridization buffer is the
same after mixing it is recommended to fl ush the hybridization chamber with 1X hybridization
buffer immediately prior to sample injection.
If you are doing manual hybridization and have more than 2 slides in your experiment you can
dry the slides in a centrifuge by placing the slides in a slide rack on a swinging plate tray (1,000
rpm for 5 minutes). Alternatively, place your slides back to back in a screw-top tube and spin
at 1,000 rpm for 5 minutes in a centrifuge.
Check that the Hy3™ labeled “landing lights” are visible. They are located in all 4 corners plus
one extra in the lower right corner of the 36 sub-arrays, 180 total. If they are visible, please
check that signals from the spike-in controls used in the labeling can be seen. If not, the
labeling procedure probably has failed. If the spike-in controls can be seen, please check that
your total RNA sample is of good quality by gel electrophoresis and optical density analysis. If
the RNA quality is good, then try to increase the amount of RNA used in the labeling.
If signals in the Hy5™ channel are unexpectedly low, it could be due to high ozone levels in the
air. Ozone has a bleaching effect on the Hy5™. Exiqon recommends performing the labeling
reaction, slide handling and scanning in an ozone free environment.
Tip 4. Solid particles
Tip 5. Flushing the hybridization chamber
Tip 6. Drying slides
Tip 7. No signals
39
microRNA ARRAY KIT · Instruction Manual
Due to high binding affi nity of the LNA™-enriched miRCURY™ capture probes, it is of utmost
importance to use high stringency experimental settings, i.e. using the miRCURY LNA™ microRNA
Array hybridization buffer and an overnight hybridization temperature of 56°C. Furthermore,
use of 0,25-1 µg total RNA will in most cases result in optimal array signal intensities.
Using a manual hybridization procedure with cover slip may produce high background around
the margins of the coverslip. This is usually caused by evaporation of the hybridization solution.
To avoid uneven distribution of the hybridization solution, it is important to position the slide
horizontally. To increase the humidity, we recommend using a water bath.
Tip 8. High signals
Tip 9. High background

40
microRNA ARRAY KIT · Instruction Manual
Spike-in microRNA signal distribution
Figure 3 below shows the distribution of the 52 spike-in microRNAs spiked into 0.25µg universal
reference RNA (Ambion, AM6000). The concentration of the various spike-in microRNAs are
optimized such that the signal intensities of these spike-in microRNAs are in the dynamic
range of naturally expressed microRNAs in most tissues.
100000
10000
1000
100
1010 100 1000 10000 100000
Hy3
™ s
igna
l slid
e 2
Hy3™ signal slide 1
microRNAsspike-in kit v2
Figure 3. Scatter plot of two hybridizations with spike-in microRNA Kit v2 added. One μL of the Spike-in microRNA
Kit v2 was spiked into each sample of 0.25 μg total RNA from a mix of human tissues and labeled with Hy3™. Labeling
was performed using the miRCURY LNA™ microRNA Power Labeling Kit. Hybridization was performed using the Tecan
HS4800™ Pro hybridization station.
Tip 10. Sample signal distribution for Spike-in microRNA Kit v2 (product # 208041)

41
microRNA ARRAY KIT · Instruction Manual
References
• The microRNA Registry.
Griffi ths-Jones S. Nucleic Acid Research, 2004, 32, Database Issue, D109-11
• miRBase, http://www.mirbase.org
• www.exiqon.com/array
42
microRNA ARRAY KIT · Instruction Manual
Related Products
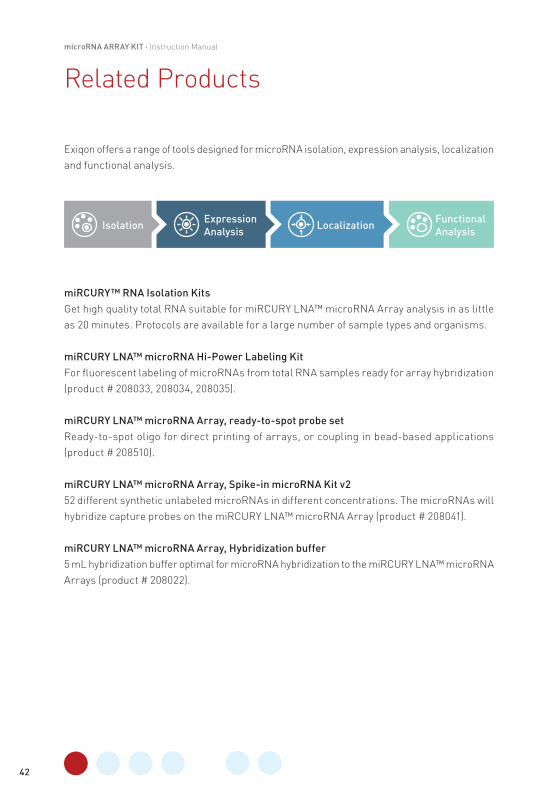
Exiqon offers a range of tools designed for microRNA isolation, expression analysis, localization
and functional analysis.
miRCURY™ RNA Isolation Kits
Get high quality total RNA suitable for miRCURY LNA™ microRNA Array analysis in as little
as 20 minutes. Protocols are available for a large number of sample types and organisms.
miRCURY LNA™ microRNA Hi-Power Labeling Kit
For fl uorescent labeling of microRNAs from total RNA samples ready for array hybridization
(product # 208033, 208034, 208035).
miRCURY LNA™ microRNA Array, ready-to-spot probe set
Ready-to-spot oligo for direct printing of arrays, or coupling in bead-based applications
(product # 208510).
miRCURY LNA™ microRNA Array, Spike-in microRNA Kit v2
52 different synthetic unlabeled microRNAs in different concentrations. The microRNAs will
hybridize capture probes on the miRCURY LNA™ microRNA Array (product # 208041).
miRCURY LNA™ microRNA Array, Hybridization buffer
5 mL hybridization buffer optimal for microRNA hybridization to the miRCURY LNA™ microRNA
Arrays (product # 208022).
Functional AnalysisLocalizationExpression
AnalysisIsolation
43
microRNA ARRAY KIT · Instruction Manual
miRCURY LNA™ microRNA Array, Wash buffer kit
125 mL salt buffer and 15 mL detergent optimal for wash of miRCURY LNA™ microRNA
Arrays. (product # 208021).
miRCURY LNA™ microRNA Detection
For in situ hybridization and northern blotting of all annotated microRNAs. miRCURY LNA™
microRNA ISH Buffer Set (FFPE).
miRCURY LNA™ microRNA ISH Optimization Kit (FFPE)
Complete kit with control probes and hybridization buffer for easy set up of microRNA in situ
hybridization.
miRCURY LNA™ microRNA Inhibitors and Power Inhibitors
Unravel the function of microRNAs by microRNA inhibition. Sophisticated LNA™ design ensures
potent inhibition of all microRNAs regardless of their GC content. Chemically modifi ed, highly
stable Power Inhibitors for unrivalled potency.
miRCURY LNA™ microRNA Inhibitor Library
For genome-wide high throughput screening of microRNA function.
miRCURY LNA™ Universal RT microRNA PCR
Exiqon’s microRNA qPCR system offers the best available combination of performance and
ease-of-use on the microRNA real-time PCR market and is ideal for the validation of your
microarray results. The combination of a Universal RT reaction and LNA™-enhanced PCR
primers results in unmatched sensitivity and specifi city. The Ready-to-use microRNA PCR
panels enable fast and easy microRNA expression profi ling. Products available include
individual assays, miRNome panels, focus panels and custom Pick-&-Mix panels.

44
microRNA ARRAY KIT · Instruction Manual
Literature citations:
Please refer to miRCURY LNA™ microRNA Array when describing a procedure for publication using this product.
Patents and Trademarks
Exiqon, LNA™, Hy3, Hy5, miRPlus and miRCURY™ are registered trademarks of Exiqon A/S, Vedbaek, Denmark. Locked
Nucleic Acids (LNA™) are covered by patents and patent applications owned by Exiqon A/S. ImaGene® and Nexus Expression™
are registered trademarks of BioDiscovery, Inc. All other trademarks are the property of their respective owners.
Disclaimer
Products are for research use only and not for diagnostic or therapeutic use. The products in their original or any
modifi ed form may be used only for the buyer’s internal research purposes and not for commercial, diagnostic,
therapeutic, or other use, including contract research. The buyer may not resell products in their original or any
modifi ed form. The purchase of products does not include or carry an implied right or license for the buyer to use
such products in the provision of services to third parties and a license must be obtained directly from Exiqon A/S
for such use. This product and its use are covered by one or more of the following patents owned by Oxford Gene
Technology Limited or Oxford Gene Technology IP Limited: US 6,054,270, US 5,700,637, EP 0,373,203; Jap. 3,393, 528 and
3,386,391 and pending patents. The purchaser is licensed to practice methods and processes covered by these patents
using this product for its own internal research purposes only but may not: transfer data derived from the use of this
product to third parties for value; use this product in the provision of services to third parties for value; use this product
to make, have made, create or contribute to the creation of stand alone expression database products for license, sale or
other transfer to a third party for value; or use this product for the identifi cation of antisense reagents or the empirical
design of probes or sets of probes for using or making nucleic acid arrays. The products are for research use only and
not for diagnostic or therapeutic use. Specifi cations in this document are subject to change without notice. The array is
guaranteed to cover a minimum of 98 % of the miRBase version that it was designed for.
© Copyright 2012 Exiqon. All rights reserved.

45
microRNA ARRAY KIT · Instruction Manual
Notes

Outside North America
Exiqon A/S · Skelstedet 16
DK-2950 Vedbaek · Denmark
Phone +45 45 660 888
Fax +45 45 661 888
North America
Exiqon Inc. · 12 Gill Street, Suite 1650
Woburn, MA 01801 · United States
Phone (781) 376 4150
Fax (781) 376 4152
exiqon.com
13
-00
72
- 9
19
97
3 -
v4
.1 -
11
/20
16